

Page 1
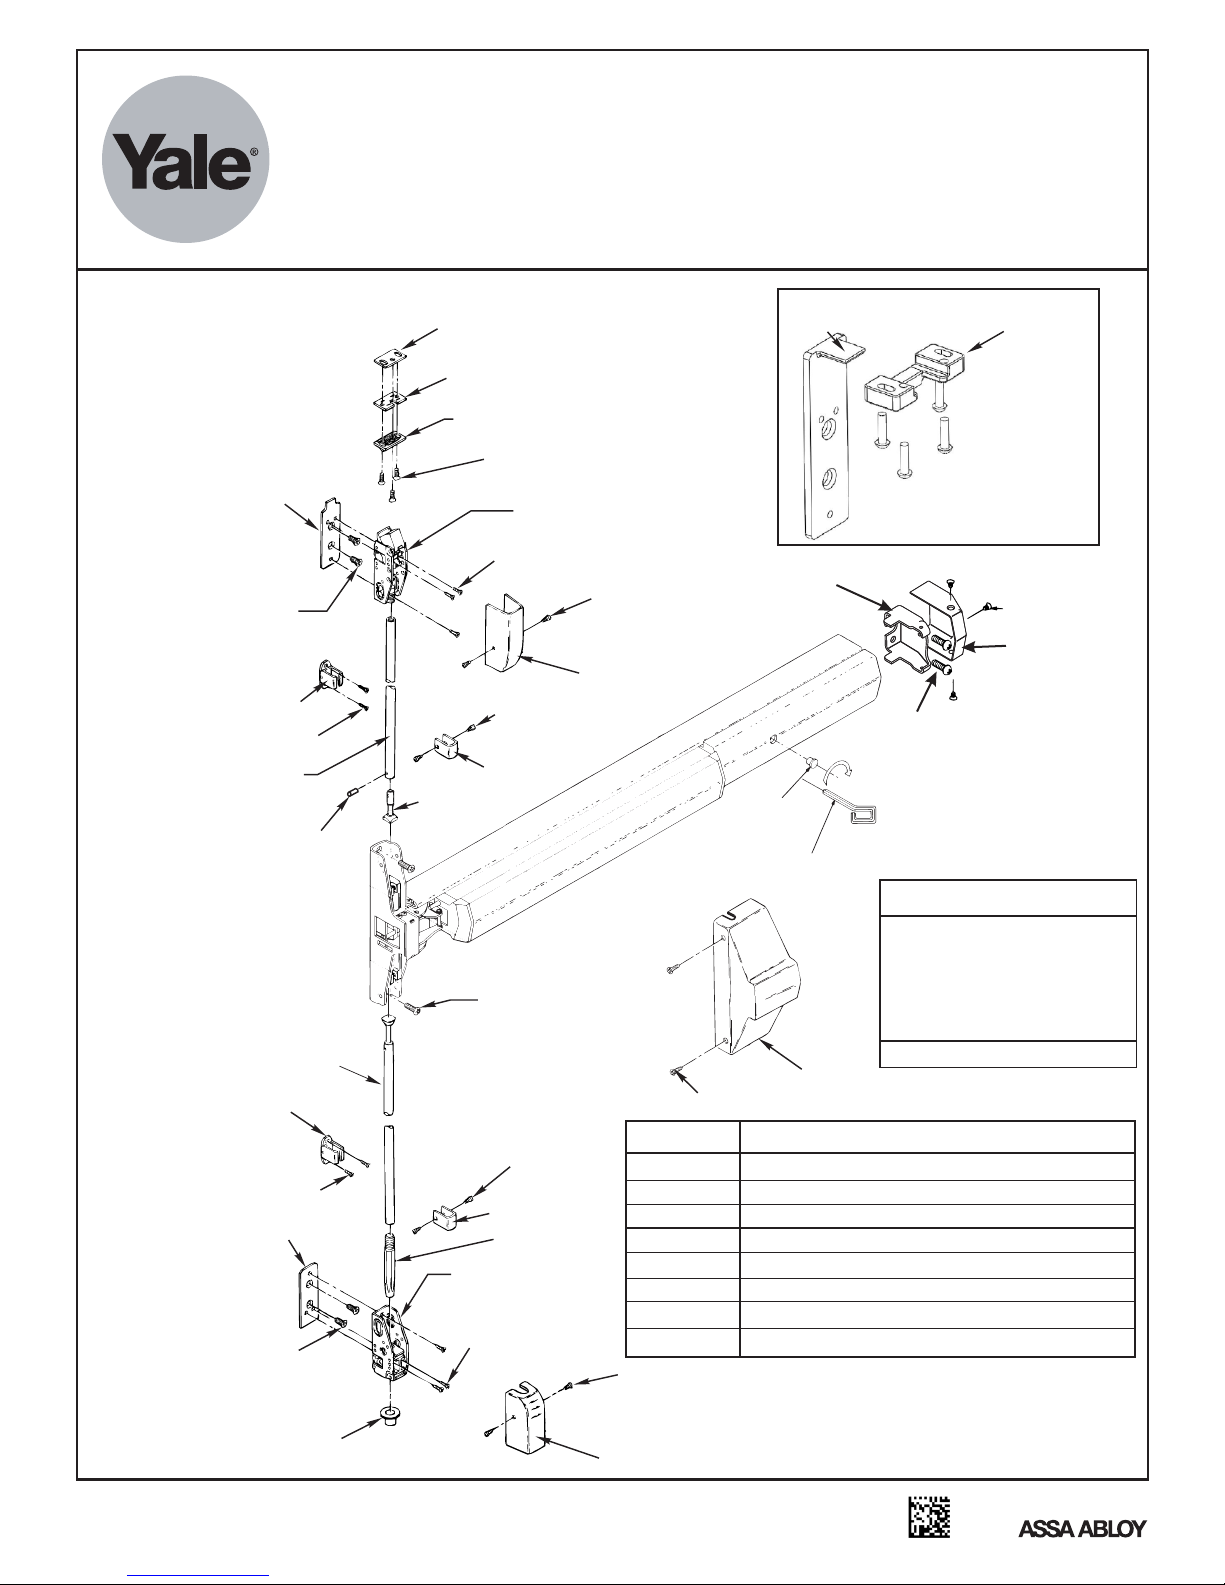
7110(F), 7170(F)(LBR)
Surface Vertical Rod Exit Device Series
Installation Instructions
Strike Angle Must
Shim (2) Supplied
Strike Plate
Engage Strike
726
Top Strike
Top Mounting Plate
(2) 1/4-20 X 3/4" PFHMS
(Metal Door)
or
(2) #14 x 1-1/2" PFH”AB”SMS
(Wood Door)
Rod Guide
(2) #8 x 1/2" (13mm) PRH”AB”SMS
Top Rod
Roll Pin
Bottom Rod Assembly
Rod Guide
(2) #8 x 1/2" (13mm) PRH”AB”SMS
Bottom Mounting Plate
(2) 1/4-20 X 3/4" PFHMS
(Metal Door)
or
(2) #14 x 1-1/2" PFH”AB”SMS
(Wood Door)
790 Strike
791 Strike
(3) 10-24 x 3/4" (19mm) PFHMS
Top Latch
(Panic & Fire Label)
(3) 10-24 x 1/4" (6mm) PPHMS
(2) 8-32 x 1/4" (6mm) PFHMS
Latch Cover
(2) #6 x 3/8" (10mm) PTH”AB”SMS
‘
Guide Cover
Top Rod Connector
(2) 1/4-20 X 1" PPHMS
(Metal Door)
or
(2) #14 x 1-1/2" PPH”AB”SMS
(Wood Door)
(2) 8-32 x 5/16" (8mm) PFHUMS
(2) #6 x 3/8" (10mm)
ABBREVIATION
PTH”AB”SMS
Guide Cover
Deadbolt
Bottom Bolt Case
Panic & Fire Label
(3) 10-24 x 1/4" (6mm)
PPHMS
(2) 8-32 x 1/4" (6mm) PFHMS
Bolt Case Cover
12-24
PRHMS
Top bracket and 726 strike
required for 7170(F)(LBR).
End Clamp
(3) 8-32 x 5/16"
PFHUMS
End Cap
(2) 1/4-20 X 1" PPHMS
(Metal Door)
(2) #14 x 1-1/2" PPH”AB”SMS
or
(Wood Door)
Hole Plug
(Fire Label Devices)
Dogging Key
Dogging
Feature to hold bolts retracted and
touchpad depressed, for push-pull door
To Dog Device
1. Insert dogging key.
2. Hold touchbar depressed.
3. Turn key 1/4 turn clockwise.
(Not a feature of fire labeled devices.)
Cover
FASTENER DESCRIPTION
PPH”AB”SMS
PFHUMS
PFHMS
PRH”AB”SMS
PTH”AB”SMS PHILLIPS TRUSS HEAD TYPE “AB” SHEET METAL SCREW
PPHMS PHILLIPS PAN HEAD MACHINE SCREW
PFH”AB”SMS
PRHMS PHILLIPS ROUND HEAD METAL SCREW
PHILLIPS PAN HEAD TYPE “AB” SHEET METAL SCREW
PHILLIPS FLAT HEAD UNDER CUT MACHINE SCREW
PHILLIPS FLAT HEAD MACHINE SCREW
PHILLIPS ROUND HEAD TYPE “AB” SHEET METAL SCREW
PHILLIPS FLAT HEAD TYPE “AB” SHEET METAL SCREW
All dimensions are in inches (mm) unless otherwise noted.
operation.
An ASSA ABLOY Group brand
80-9470-0010-000 (03-13)
Page 2
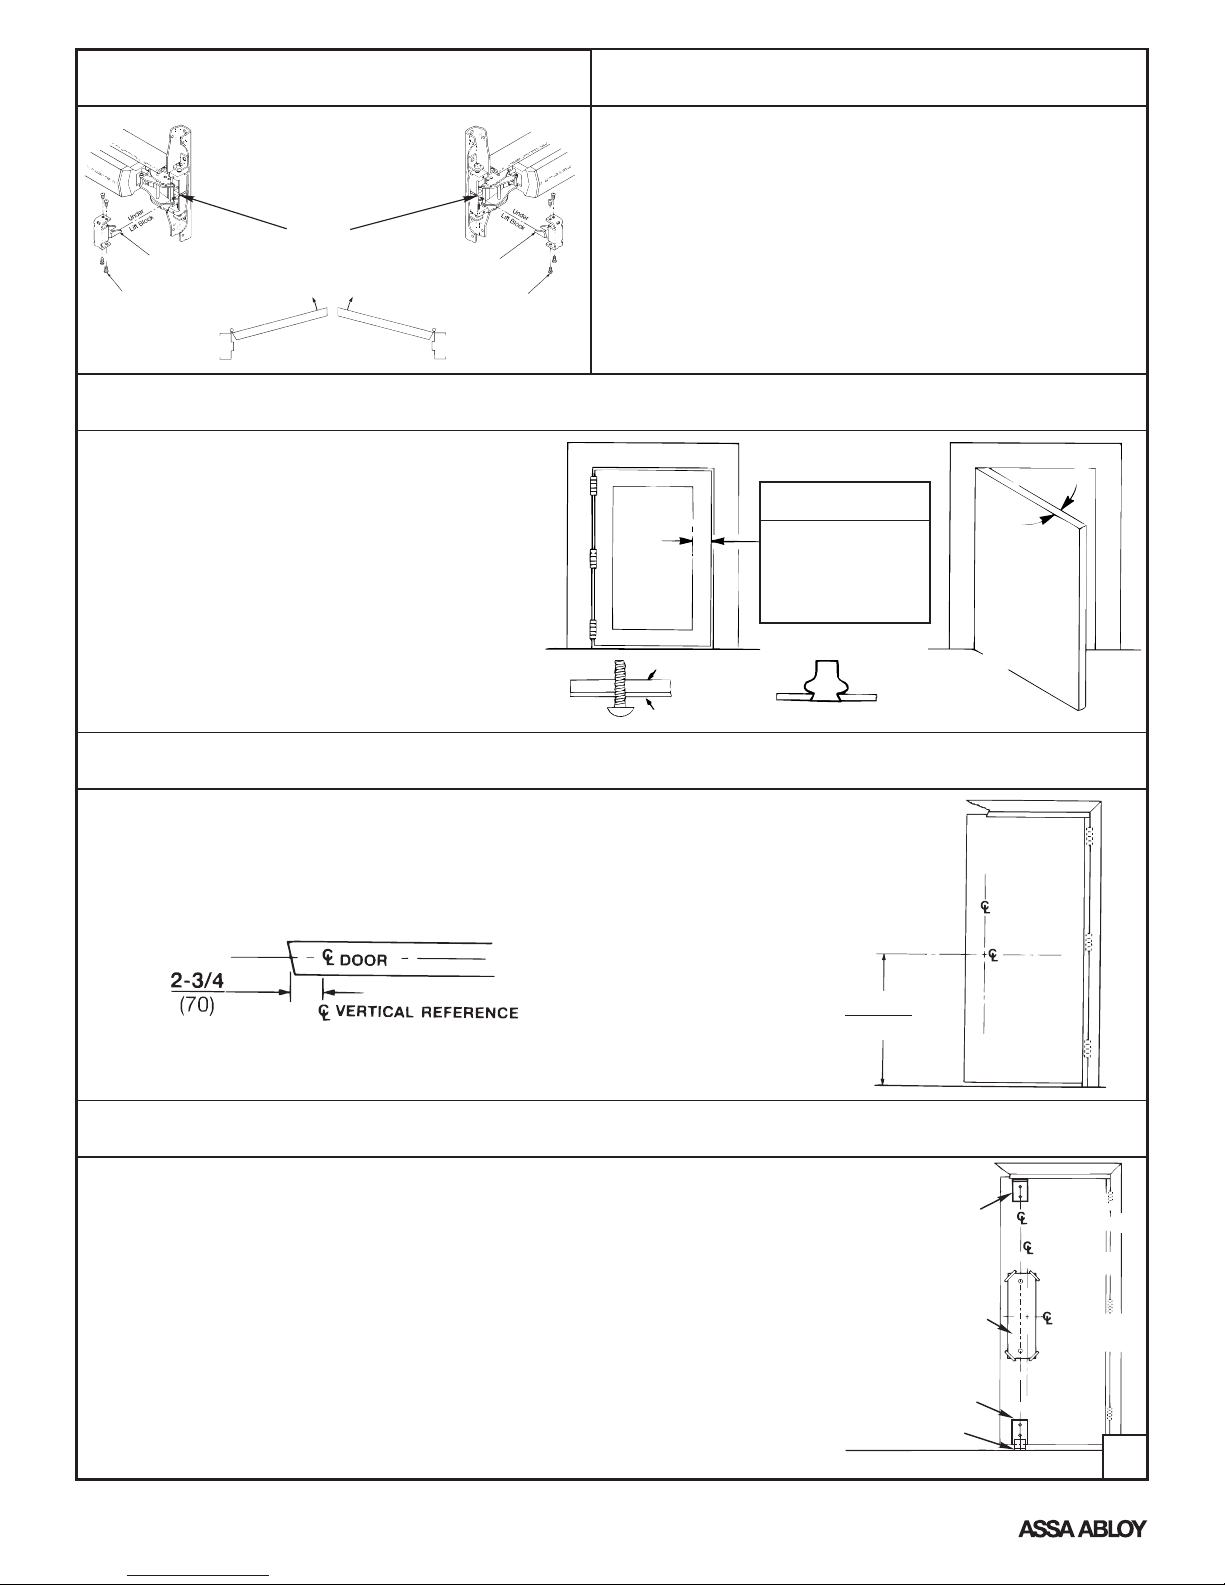
To Change Hands
Maintenance
RHR Device
Vertical Lifter Assembly
(4) 8-32 x 3/16" PPHMS
Remove (4) Screws and
Vertical Lifter Assembly.
Rotate device to opposite
hand (180 degrees). Insert
Lifter Assembly under Lift
Block and re-install screws.
Lift Block
Vertical Lifter Assembly
(4) 8-32 x 3/16" PPHMS
LHR DoorRHR Door
Check Before Starting
Unreinforced Doors or Frames
Doors and Frames with walls having a structural
thickness (metal skin plus reinforcement or solid
hardwood) to engage less than (3) full screw threads
are considered unreinforced.
Unreinforced Doors: Use SNB (sex nuts and bolts).
Unreinforced Frames: Use Blind Rivet Nuts.
Recommended fasteners for unreinforced openings
are not necessarily supplied by Yale Locks and
Hardware.
LHR Device
1. Periodically remove covers and coat mechanisms with a
silicone base lubricant. This is particularly required in corrosive
environments for proper product function.
2. Check mounting fasteners periodically. Retighten if found
loose. Apply screw locking compound (available at automotive
part stores) or change part fasteners if screws continue to back
out.
3. Periodic checks (and adjustments) of strikes are required to
compensate for changes in the opening (e.g. door sagging).
Min. Door Stile
4-1/2" (114mm)
Door and frame must
meet structural and
dimensional specifications
on exit device template(s)
for door and frame
preparation.
Reinforcement
Door Skin
Blind Rivet Nut
Door Must Swing Freely
1. Mark Door
Single Door or Pair without Mullion
Locate and Mark Horizontal and Vertical Reference Centerlines as shown.
LHR door shown, preparation is typical for both door hands.
Note: Door should be in the closed position while marking horizontal and
vertical reference lines. Paper or the Plastic Template may be used in this step.
FINISHED
FLOOR
or THRESHOLD
2. Prepare Door, Frame, & Sill
A. Locate “Device Template” aligning VERTICAL REFERENCE and HORIZONTAL
REFERENCE lines. Tape template to door face.
B. Extend centerline of Rod and Strikes from “Device Template” to door top and
bottom, on door face.
C. Locate Top Latch/Strike and Bottom Bolt Case templates in place over centerline
of Rods and Strikes on door. Tape templates in place and mark holes.
Note that the centerline of the rods and strikes used to install top and bottom bolts
is not the Vertical Reference centerline.
D. Locate and tape Trim Template to door when required (See instructions packed with Trim).
E. Mark and prepare holes per installation template (exclude 791 or 726 strike, holes
prepared in Step 7).
F. Locate 790 Bottom Strike Template. Tape in place over Rods and Strikes centerline
on door. Tape template in place and mark hole locations. Holes to be prepared in Step 7.
G. Remove templates from door.
op Latch & 791or 726
T
LHR DOOR
INSIDE FACE
VERTICAL
REFERENCE
HORIZONTAL
39-15/16
(1014)
emplate
ike T
Str
Device Template
Bottom Case
Template
Floor Strike Template
FINISHED FLOOR or THRESHOLD
REFERENCE
LHR DOOR
INSIDE FACE
Rods & Strikes
VERTICAL
REFERENCE
HORIZONTAL
REFERENCE
2
An ASSA ABLOY Group brand
80-9470-0010-000 (03-13)
Page 3
3. Size Device
Device must be field cut to size, as required
* LHR Door (Door Open)
inside face
STILE
Horizontal line
C
L
Dogging
Hole
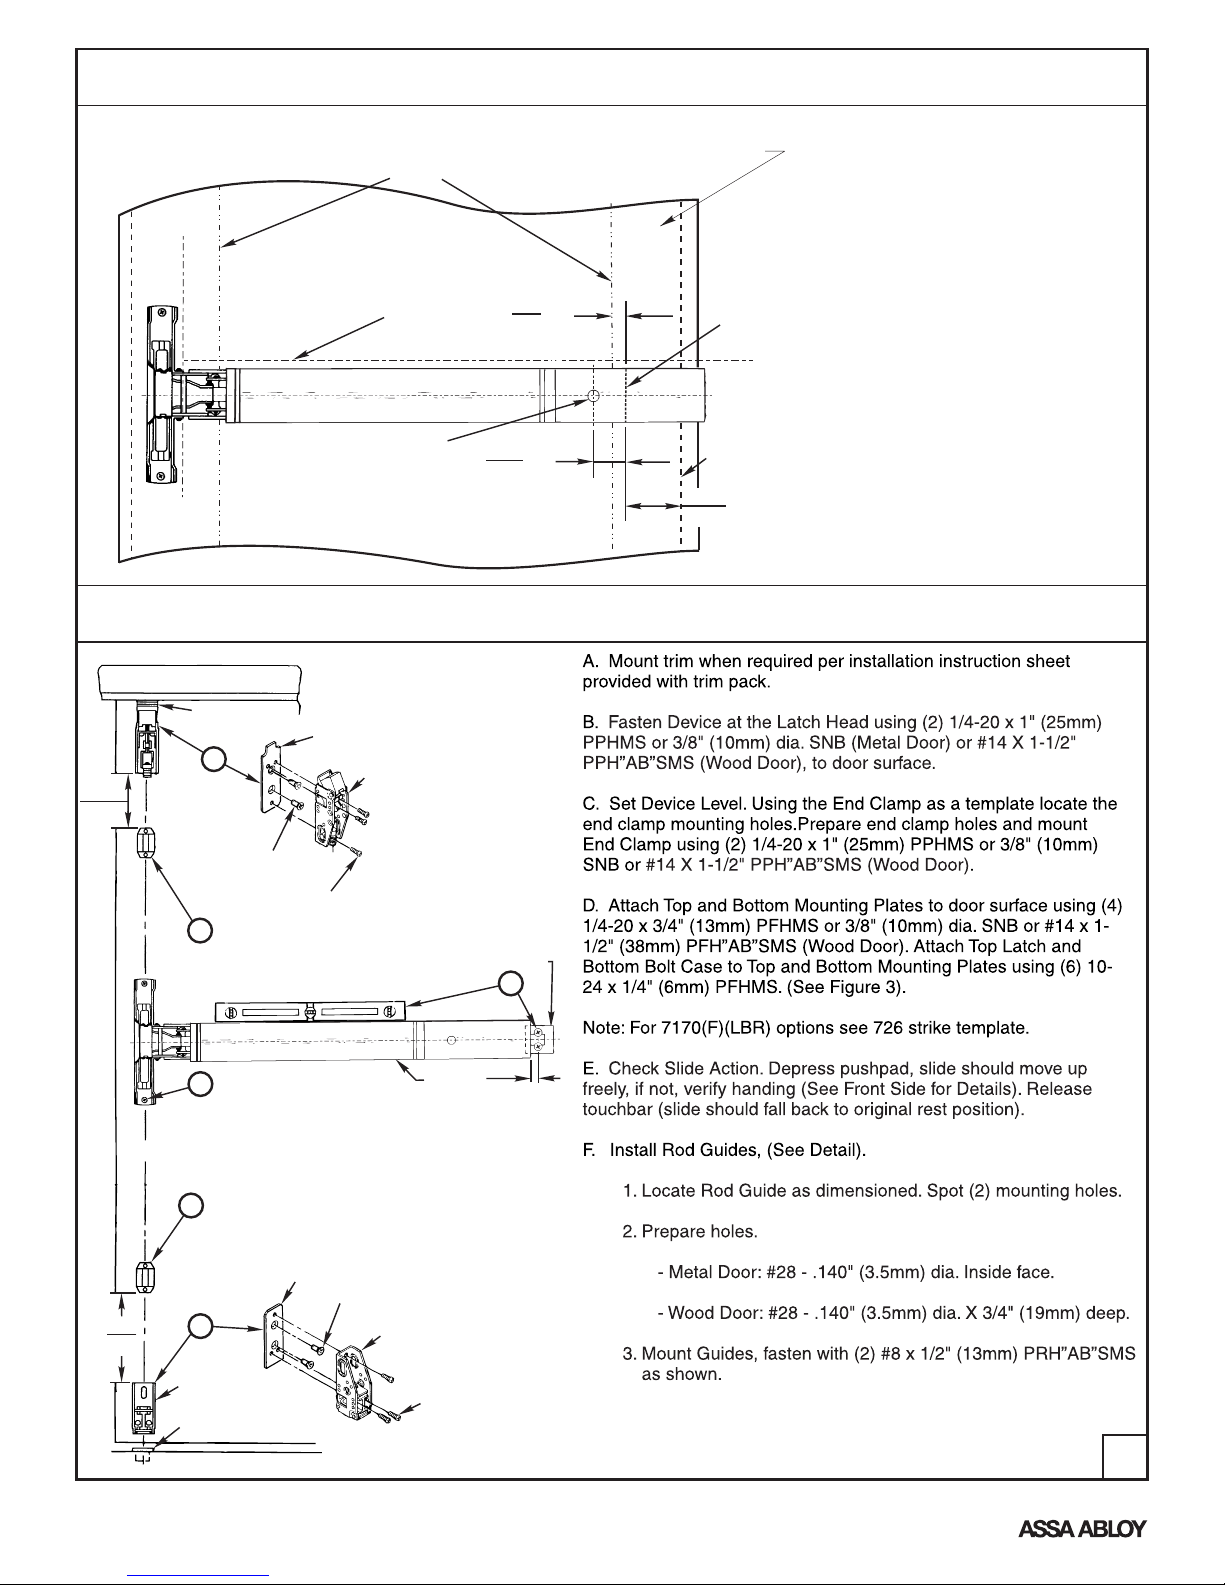
4. Mount Device & Components
Note: 726 Strike and top
bracket not shown.
Top
Mounting
Plate
Top
Latch
16-3/8
(416)
791 Strike
D
1-3/8
(35)
3/8
(10)
HINGE SIDE OF DOOR
Min.
Min.
CUT
LINE
STOP
SURFACE
2-1/4
(57)
Determine device length
1. Close door. Measure 2-1/4" (57mm)
from the Stop Surface on the hinge side of
the door, mark Horizontal Reference at
this point.
Note: This dimension must be 3/8"
(10mm) minimum from edge of the stile
on the door.
2. Open door. Align mounting holes in
device with Mounting Holes in the door.
Mark device where it crosses the mark
from Step 1. If mark is less than 1-3/8"
(35mm) min. from Dogging Hole, a shorter
device is required.
3. Before cutting, make sure the End
Cover is in place and there is no gap
between it and the Pushpad. Cut device
on mark from Step 2.
(2) 1/4-20 x 3/4" (19mm)
PFHMS
F
C
L
B
C
Device Mounting Holes,
L
Rods, & Strikes
Rod Guide
F
15
(381)
D
Bottom Bolt
Case
790 Strike
Rod Guide
Bottom
Mounting
(3) 10-24 x 1/4" (6mm)
PPHMS
Plate
(2) 1/4-20 x 3/4" (19mm)
PFHMS
Bottom Bolt
Case
End
Clamp
C
1/2
vice
De
(3) 10-24 x 1-1/4" (32mm)
PPHMS
(13)
Figure 3.
An ASSA ABLOY Group brand
3
80-9470-0010-000 (03-13)
Page 4

5. Rod Preparation & Assembly
7. Complete Installation
Note: Below listed instructions are based on a device
mounted 39-15/16" (1014mm) from finished floor
or threshold. Any deviation on device mounting
height must be accommodated to insure proper
device function.
A. Top Rod Sizing
1. For openings under 7' (2134mm), subtract the actual
opening height from 7' (2134mm).
Example: 6'8" (2032mm) opening
7'0" (2134mm) - 6'8" (2032mm)
= 4" (102mm)
Top Rod must have 4" (102mm) cut from end with
1/8” (3mm) thru hole. Use attached drill fixture to
locate and re-drill 1/8" (3mm) dia. hole thru the
top rod. Make sure rod bottoms out inside drill fixture
prior to drilling. (See Figure 5A).
2. For opening over 7' (2134mm), subtract 7' (2134mm)
from the actual opening height.
Example: 7'6" (2286mm) - 7'0" (2134mm)
= 6" (152mm).
Top Rod must have a 6" (152mm) extension added
to length (See below for available rod lengths).
60-1510-0280: 2" (51mm)
60-1510-0277: 6" (152mm)
60-1510-0278: 12" (305mm)
(Specify Device Finish)
B. Assemble Top Rod
Insert Top Rod Connector into sized Top Rod and Install
1/8" (3mm) x 1/2" (13mm) Roll Pin thru both pieces until
flush on both sides. (See Figure 5B).
1/8
(3)
3/8
(10)
Drill Fixture
Figure 5A: Drill Pin Hole
36-1/8
(918)
Top Rod
Connector
Figure 5B: Top Rod Assembly
Top Rod
1/8" (3mm)
x 1/2" (13mm)
Flush
Flat Face
(2 Sides)
6. Bottom Bolt Assembly
A. Thread Bottom Bolt into Bottom
Rod Assembly.
B. Leave 1/2" (13mm)
for adjustment.
32-1/4
(812)
3-7/8
(98)
Bottom Rod
Assembly
1/2
Adjustable
(13)
(Ref.)
Bolt
Top Strike Detail
791 Strike
A2
Roller
Bolt
Tripping
Lever
Bolt
Engagement
Note: Bottom Bolt will retract to
1/8" (3mm) above Floor Strike.
Floor covering in the door path
must be laid out accordingly.
Frame
Stop
A
Cover
Screw
Hole
A1
Rod Guide
Cover
Screw
Hole
Slide
Cover
Screw
Hole
B
Rod Guide
Cover
Screw
Hole
3/8"
(10)
(2) Supplied (Start With One)
(Ridges Face Down)
(3) 10-24 x 3/4" (19mm) PFHMS
A. Install Top Rod and 791 Strike
1. Thread Top Rod Assembly onto Top Latch.
Lift rod to fully retract Top Latchbolt.
Depress Pushpad and hold depressed.
Adjust top rod length until Rod Connector
seats into the Slide Assembly in latch case.
Note: For 7170 devices, skip section (2a)
and 2(b). See the installation instructions
for the 726 strike on page 9.
2a. Position the Top Strike Roller between
the Tripping Lever and the Bolt on the
Top Latch. Verify hole positions and
prepare holes per Installation Instruction
Template.
b. Install Top Strike and Strike Plate using
(2) #10-24 x 3/4" (19mm) PFHMS thru
outer slots. Adjust and shim strike as
needed for zero door rattle. Add third
screw (#10-24 x 3/4" (19mm) PFHMS)
after final adjustments.
3. If Top Bolt does not remain retracted when
door is opened, Top Rod is too short. Pull
rod out of the guide and the slide then
rotate rod to increase length. Upper Bolt
should retract flat.
4. If upper latch will not deadlock, Top rod
is too long. Pull rod out of the guide and
the slide and rotate to decrease length.
* If 7170 LBR, skip section B.
B. Install Lower Rod and 790 Strike
1. With door open, actuate Pushpad to
retract upper latch. Hang Lower rod
from bottom of Slide and adjust bolt so
that it clears the finished floor by 1/4".
2. Verify location of pipe strike template.
Prepare the strike hole and install the
pipe strike. Set in place with appropriate
bonding material.
3. With the door open, actuate pushpad
to retract upper latch. Adjust bolt
height by pulling the rod out of the
guide and slide and rotating until the
bolt clears the pipe strike by 1/8".
C. Test device action by Touchbar,
by Trim, by Dogging
D. Install covers
B2
Shim
Strike Plate
790 STRIKE
(Press in place)
4
An ASSA ABLOY Group brand
80-9470-0010-000 (03-13)
Page 5

TOP LATCH &
BOTTOM
791 STRIKE
(7110 only)
TAPE TO
FRAME STOP
9
"
16
14
#26 (.147" DIA) DRILL
10-24 TAP
(2 HOLES)
FOLD LINE
(STOP LINE)
ALIGN WITH
TAPE TO
DOOR STOP
9
16
14
C
RODS
L
BOLT CASE
C
"
7
"
8
22
1
"
2
4
57
TAPE TO
DOOR STOP
ALIGN WITH
5
1
"
16
33
C
RODS
L
HOLE 'A'
(SEE TABLE
FOR SIZES)
HOLE 'A'
(SEE TABLE
FOR SIZES)
A
A
3
1
"
5
1
"
16
33
8
35
BOTTOM DOOR EDGE
FOLD ON LINE &
TAPE THIS TAB TO
BOTTOM DOOR EDGE
HOLE “A”
PREPARATION
Drill: #7 (.201 dia.)
Tap: 1/4-20
3/8" (9.5mm) dia.
Thru door
Drill: #9 (.196" dia.)
CUTLINE
DOOR/FRAME
Thru Bolt
(Metal or Wood)
Wood Door
FASTENER
1/4-20 PPHMSMetal Reinforced
1/4-20 SNB
#14 x 1-1/2"
PPH”AB”SMS
An ASSA ABLOY Group brand
5
80-9470-0010-000 (03-13)
Page 6

This page left blank intentionally.
An ASSA ABLOY Group brand
6
80-9470-0010-000 (03-13)
Page 7

DEVICE TEMPLATE
790 STRIKE
11
"
16
17
TAPE TO
DOOR FACE
5
" (16) DIA. X
8
3/4 (19) DEEP
FOLD LINE
LHR DOOR
5
3
"
8
92
L
C
C
L
11
16
17
C
"
L
C
VERTICAL REFERENCE
ALIGN WITH OF RODS
C
L
CUTLINE
HORIZONTAL REFERENCE
3
5
8
92
"
11
"
16
17
L
C
CUTLINE
RODS
RHR DOOR
DEVICE TEMPLATE
7
An ASSA ABLOY Group brand
80-9470-0010-000 (03-13)
Page 8

This page left blank intentionally.
An ASSA ABLOY Group brand
8
80-9470-0010-000 (03-13)
Page 9

TAPE THIS TAB TO FRAME STOP
726 STRIKE
1/8"
(3)
1/4"
(6)
3/4"
(19)
3/4"
(19)
3/4"
(19)
1/8"
(3)
FOLD
(STOP LINE)
ALIGN WITH OF RODS
C
L
1/4"
(6)
3/4"
(19)
2-1/4"
(57)
1-5/16"
DOOR FASTNER HOLE 'A'
METAL
REINFORCED
HOLLOW
METAL &
ALUMINUM
ALUMINUM SNB THRU DOOR
SCREW 1/4-20 TAP
5/16 (8) DIA
INSIDE DOOR
OPTIONAL
SNB
FACE
3/8 (10) DIA
OUTSIDE
DOOR FACE
TAPE TO DOOR
TOP LATCH
& STRIKE
(33)
Strike Angle Must
Engage Strike
CUTLINE
Strike Angle and Top
Latch Mounting Plate
(2) Mounting Screws 1/4-20 x 3/4 PFHMS
726
Top Strike
12-24
PRHMS
Top Latch Case
9
An ASSA ABLOY Group brand
80-9470-0010-000 (03-13)
Page 10

Plastic Installation Template
7000 Exit Devices
For use in conjunction with instruction sheets packed with exit device.
Holes and slots are identified below by exit device series and trim. Prep door and frame for only those
features required for the exit device being installed.
All 7000 Exit Devices
Frame
Door Stop
Door
Template
7120(F), 7160(F)
& 7220M(F) CVR
Vertical Reference
Wide Stile
Trim Only
Against Door Surface
Against Door Stop
or Mullion
(when applicable)
7150(F)(WS), 7170(F)(WS)
7120(F), 7160(F)
& 7220M(F) CVR
All 7000 Exit Devices
757F
Strike
Location
Mortise
7130(F)
Vertical Reference
Narrow Stile
Trim Only
Wide Stile
Trim Only
Horizontal
Reference
Wide Stile
Trim Only
Product Support Tel 800.438.1951 • www.yalelocks.com
Yale Locks & Hardware is a division of Yale Security Inc., an ASSA ABLOY Group company.
Yale® is a registered trademark of Yale Security Inc., an ASSA ABLOY Group company. Other products' brand names may be trademarks or registered trademarks of their respective
An ASSA ABLOY Group brand
owners and are mentioned for reference purposes only. These materials are protected under U.S. copyright laws. All contents current at time of publication.
Yale Security Inc. reserves the right to change availability of any item in this catalog, its design, construction, and/or its materials.
All rights reserved. Reproduction in whole or in part without the express written permission of Yale Security Inc. is prohibited.
Copyright © 2002, 2013, Yale Security Inc., an ASSA ABLOY Group company.
10
80-9470-0010-000 (03-13)
 Loading...