


USER MANUAL BEDIENUNGSANLEITUNG


 X-422
X-422
2-Din Infotainer X-422

CONTENT
ABOUT THIS MANUAL
This manual contains important information and warnings about the operation of this XZENT unit. Please store it in a place where you have access later on.
REMOTE CONTROL |
4 |
X-422 FRONT PANEL HARD KEYS |
6 |
MAIN MENU |
7 |
FM TUNER MODE |
8 |
FM TUNER Operation Buttons |
8 |
FM Tuner Setup (PopUp) |
9 |
DAB TUNER MODE |
10 |
USB / IPod MODE |
12 |
EASY CONNECT |
15 |
BT MODE |
16 |
Camera MODE |
20 |
SETUP MODE |
21 |
Note 1.The descriptions and other content shown in this manual may deviate from the real device. 2.Pictures shown in this manual and some HMI screenshots may deviate from the real unit.
3.Specifications and technical design of this device model are necessarily subject to change without notice.
2

SAFTY INFORMATION
νRead the instructions entirely. Heed all warnings. Follow the instructions.
νRetain this manual. Whoever will use the unit should have access to this manual.
νThis unit is designed to be functional in vehicles with 12 V DC battery and negative ground.
νDo not operate the unit in any other way than described in this manual. Failure to follow the in- structions as provided may void your warranty.
νDo not disassemble or alter the unit in any way because this will void your warranty. Do not attempt to repair or to service the unit yourself, but contact an authorized XZENT dealer instead.
νUse only original accessories which are designed and manufactured for the unit, otherwise you will risk damage. Install the unit according to the mounting instructions by using the supplied mounting accessories. Acceleration forces during accidents can be huge. Incorrectly mounted devices pose a serious risk for the driver and passengers during an accident.
νProtect the unit from water and other liquids that could enter the housing. A short circuit or even a fire could result.
νTo prevent a short circuit, never insert any metallic object (such as coins or metal tools) into the unit.
νBefore you replace a defective fuse try to find the cause for the short circuit. Pay attention to the cables of the power supply! If the short circuit does not result from a failure of the power supply or wiring, you can replace the defective fuse with a new one (of identical value). If the shortcircuit persists, contact an authorized XZENT dealer.
νWhen connecting to any other device, read the user‘s guide for compatibility and notes on electrical connections. Do not try to connect incompatible products.
νBe careful not to drain the car battery while using the unit when the car engine is turned off. Because the unit consumes a considerable amount of energy and the battery will be charged only while the engine is running, it might happen that the battery will discharge to a point where it is not possible to start the engine anymore.
νAccording to the law in different European countries, driving with monitors showing movies in the viewing range of the driver is not allowed, because the driver might get distracted from traffic. Please respect the traffic regulations of your country or you may face legal penalties in case of accidents or even lose your insurance coverage. Pay attention to the playback volume inside your vehicle since you are required to notice exterior warning sounds like police sirens etc..
νDon‘t expose the unit to hard impacts. A mechanical or electrical malfunction of the unit could be the result.
νShould any problems or questions occur during the installation, please consult your XZENT dealer/importer.
3
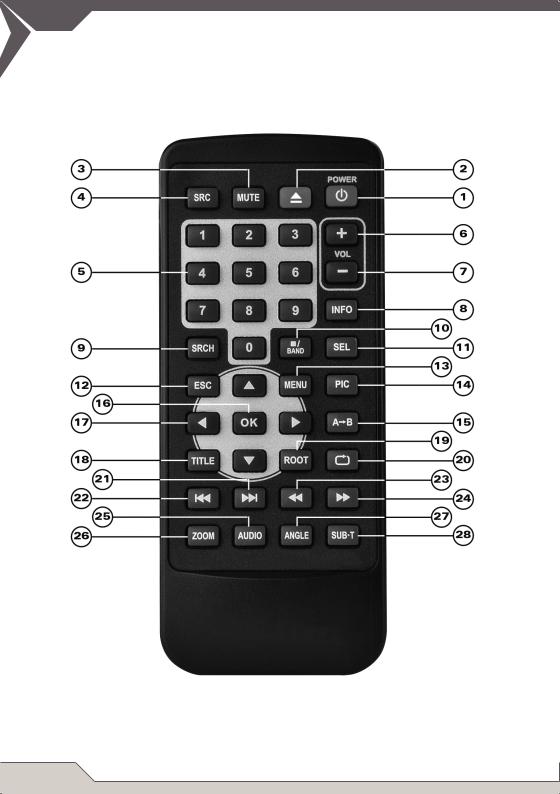
REMOTE CONTROL
4

Operation buttons |
|
|
1. |
POWER |
Device ON/OFF |
2. |
EJECT |
No function |
3. |
MUTE |
Mute/Un-mute audio output |
4. |
SRC |
Change sources |
5. |
KEYPAD |
Numeric input |
6. |
VOL+ |
Increase volume |
7. |
VOL – |
Decrease volume |
8. |
INFO |
No function |
9. |
SRCH |
No function |
10. |
STOP/BAND |
Change FM/radio band |
11. |
SEL |
Open EQ |
12. |
ESC |
No function |
13. |
MENU |
Open main menu |
14. |
PIC |
No function |
15. |
REPEAT A-B |
No function |
16. |
OK |
Play/Pause |
17. |
DIRECTION BUTTONS |
No function |
18. |
TITLE |
No function |
19. |
ROOT |
No function |
20. |
REPEAT |
No function |
21. |
SKIP NEXT |
Media player: jump to next track/Tuner: jump to next preset station |
22. |
SKIP PREVIOUS |
Media player jump to previous track/ |
|
|
Tuner: jump to previous preset station |
23. |
FAST REVERSE |
No function |
24. |
FAST FORWARD |
No function |
25. |
AUDIO |
No function |
26. |
ZOOM |
No function |
27. |
ANGLE |
No function |
28. |
SUB-T |
No function |
5
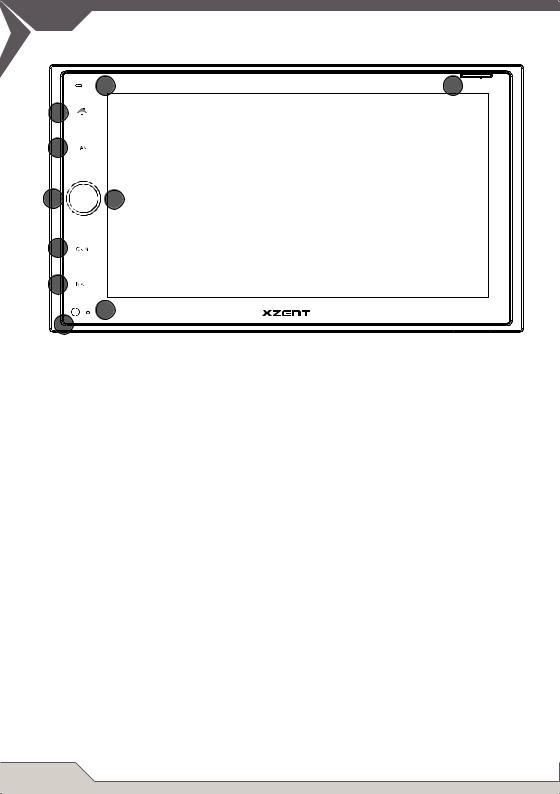
X-422 FRONT PANEL HARD KEYS
|
A |
C |
MAP |
|
|
||
2 |
|
|
|
6 |
FAV |
|
|
3 |
1 |
|
|
5 |
CAM |
|
|
4 |
NAV |
|
|
B |
7 |
|
|
|
|
|
|
Operation Buttons/ touch-area Buttons: |
|
||
1. |
Power: |
Long Press to turn OFF/ON device |
|
|
|
Short Press to Mute device |
|
2. |
Home: |
Short Press to enter MAIN MENU, Long Press to show NAV Infobar |
|
3. |
Volume: |
Rotate to change Volume |
|
4. |
NAV: |
Press to enter NAV Source |
|
5. |
CAM: |
Press to enter CAM Source |
|
|
|
Press again to switch to CAM2 (only Dual Mode) |
|
6. |
FAV: |
Press to use FAV function |
|
7. |
POWER RESET: |
Press to perform a reset |
|
Various:
A.Built-In Mic
B.Infrared sensor
C . NAV Card Micro-SD
6
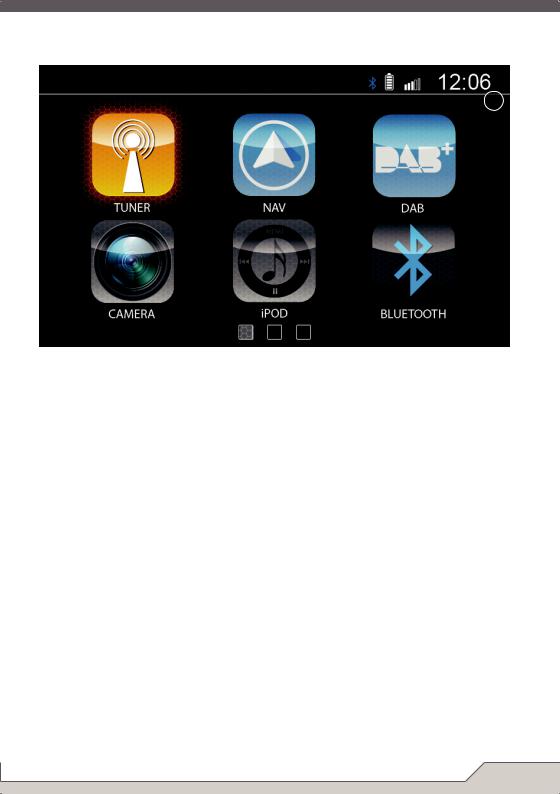
MAIN MENU
A
A |
Clock |
Long press to open time and date in full screen mode. Touch the |
|
|
screen again to leave full screen mode |
MAIN MENU
Slide on touchscreen left or right to change the displayed page
To select a source touch the corresponding icon
7
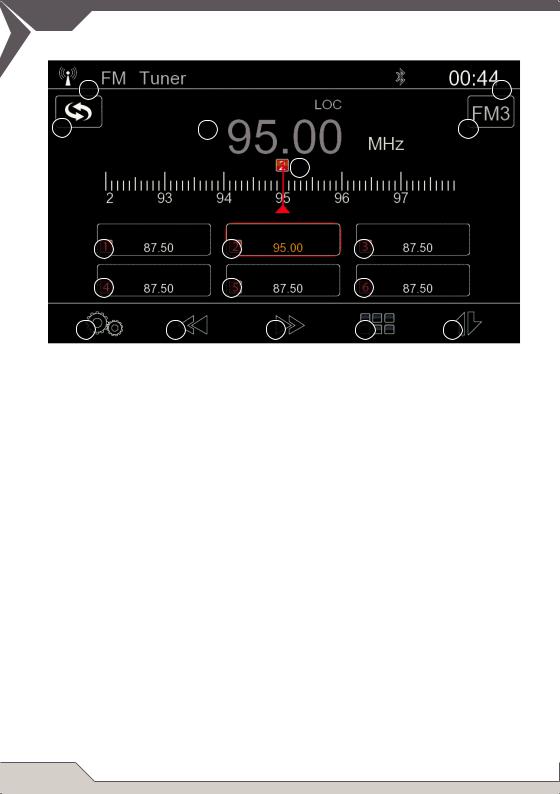
FM TUNER MODE
|
10 |
11 |
1 |
13 |
2 |
|
|
3 |
|
4 |
|
4 |
4 |
|
|
4 |
|
4 |
4 |
|
|
5 |
6 |
7 |
8 |
9 |
FM TUNER Operation buttons |
|
|
|
||
1. |
Switch DAB/FM |
|
Tap to change between FM/DAB directly |
|
|
2. |
BAND |
|
Tap to switch radio band (FM1 > FM2 > FM3) |
|
|
|
|
|
Band= Shows active Band |
|
|
3. |
Scala |
|
Slide Scala left or right to scan for next Station |
|
|
4. |
Preset |
|
Tap to select Preset |
|
|
|
|
|
Tap & hold to save current frequency as Preset |
|
|
5. |
Tuner Setup |
|
Tap to open pop up for Tuner settings |
|
|
6. |
PREV/ Adjust down |
|
Longpress to scan previous available station |
|
|
|
|
|
Tap to adjust frequency 50 kHz down |
|
|
7. |
NEXT/Adjust up |
|
Longpress to scan next available station |
|
|
|
|
|
Tap to adjust frequency 50 kHz up |
|
|
8. |
Keypad |
|
Tap to open Keypad and set Frequency directly |
|
|
9. |
RDStext |
|
Tap to open RDStext fi eld, radio text, if available |
|
|
Information fi elds |
|
|
|
|
|
10. |
Source Info |
|
Show the active source |
|
|
11. |
Clock Time |
|
Shows clock time, sync with GPS signal |
|
|
8
1
2
3
4
5
6
7
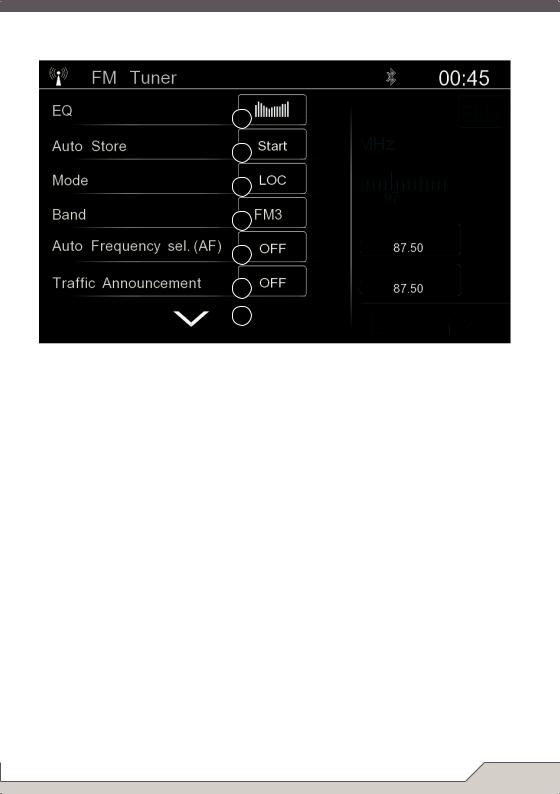
FM Tuner Setup (PopUp) |
|
|
1. |
EQ |
Tap on EQ to enter in Equalizer |
2. |
Auto Store |
Tap on Start to Auto store preset buttons |
3. |
Mode |
Tap to switch between LOC/DX |
4. |
Band |
Tap to switch radio band (FM1 > FM2 > FM3) |
5. |
AF |
Tap to turn off/on AF function |
6. |
TA |
Tap to turn on/off TA function |
7. |
close |
Tap to hide Tuner Setup |
Note:
νSelected and active items are highlighted in orange.
νThis unit features an RDS tuner. RDS is a system which transmits data on top of the FM radio signal. Availability and content of the RDS data depend on the respective broadcast station and its signal strength. RDS does, for example, transmit alternative frequencies, which allow for frequency changes without user interaction.
νYou need to have the AF function activated in order to use the RDS functionality and features.
9
DAB TUNER MODE
|
11 |
|
|
|
12 |
|
|
|
|
|
|
1 |
13 |
8 |
9 |
|
10 |
|
|
|
|||
|
2 |
|
|
15 |
2 |
|
|
|
|
||
|
2 |
|
14 |
|
2 |
|
2 |
|
|
|
2 |
|
3 |
4 |
5 |
6 |
7 |
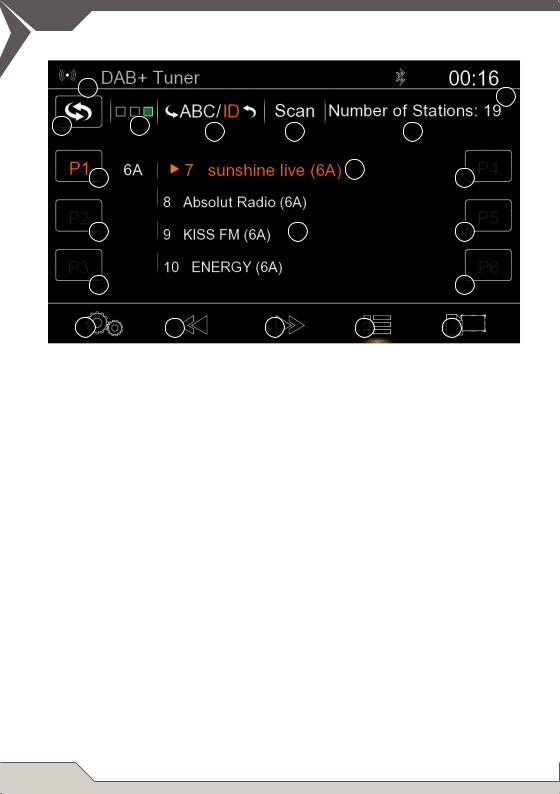
DAB TUNER Operation buttons |
|
|
|||
1. |
Switch DAB/FM |
|
Tap to change between FM/DAB directly |
|
|
2. |
Preset |
|
Tap to select Preset |
|
|
|
|
|
Tap & hold to save current station as Preset |
|
|
3. |
DAB Setup |
|
Tap to open pop up menu for DAB settings |
|
|
4. |
PREV/ Adjust down |
|
Tap to play previous Station in same Ensemble |
|
|
|
|
|
Longpress to jump to previous available Ensemble |
|
|
5. |
NEXT/Adjust up |
|
Tap to play next Station in same Ensemble |
|
|
|
|
|
Longpress to jump to next available Ensemble |
|
|
6. |
DAB-List |
|
Short press to see scan result list |
|
|
|
|
|
Long press to start comfort scan |
|
|
7. |
DLStext/slideshow |
|
Tap to open DLS-text/slideshow view |
|
|
8. |
List sorting |
|
Tap to change between alphabetical and ID sorting |
|
|
9. |
Scan |
|
Tap to start comfort scan |
|
|
|
|
|
Long press to start full scan |
|
|
Information fi elds |
|
|
|
|
|
10. |
Number of Stations |
|
Shows the amount of scanned stations |
|
|
11. |
Source Info |
|
Show the active source |
|
|
12. |
Clock Time |
|
Shows clock time, sync with GPS signal |
|
|
13. |
Signal Quality |
|
Show: Black= No Antenna/ Signal |
|
|
|
|
|
Red= bad reception> No Audio or many dropouts |
|
|
|
|
|
Orange= reception> some audio dropouts may occure |
||
|
|
|
Green= Good reception> |
|
|
14. |
Station Name |
|
Slectable stations |
|
|
15. |
Played Station |
|
Shows actual playd station |
|
|
10
|
|
|
|
|
1 |
|
|
2 |
|
|
3 |
|
|
4 |
|
|
5 |
|
|
7 |
|
|
6 |
DAB Tuner Setup (PopUp) |
|
|
1. |
EQ |
Tap on EQ to enter in Equalizer |
2. |
Full Scan EQ |
Tap on start to perform a full band scan of DAB Band |
3. |
Comfort Scan |
Tap to set Comfort Scan ON/OFF (Full band scan on fi rst enter of DAB) |
4. |
DAB-DAB following |
Tap to set Service Following ON/OFF (DAB to DAB-only if available) |
5. |
DAB Power |
Tap to set Phantompower of DAB ON/OFF (12V DC) |
6. |
Close |
Tap to hide DAB Setup |
Information fi elds |
|
|
7. |
Version |
Show Version of DAB-Firmware |
1
Full Scan (PopUp) |
|
1. Cancel |
Tap to cancel Full Scan function |
11
USB / IPOD MODE
7 |
9 |
8
10
1 |
|
|
|
|
2 |
3 |
4 |
5 |
6 |
|
|
7 |
|
9 |
|
11 |
1 |
|
|
11 |
|
|
|
|
|
|
|
2 |
3 |
4 |
5 |
6 |
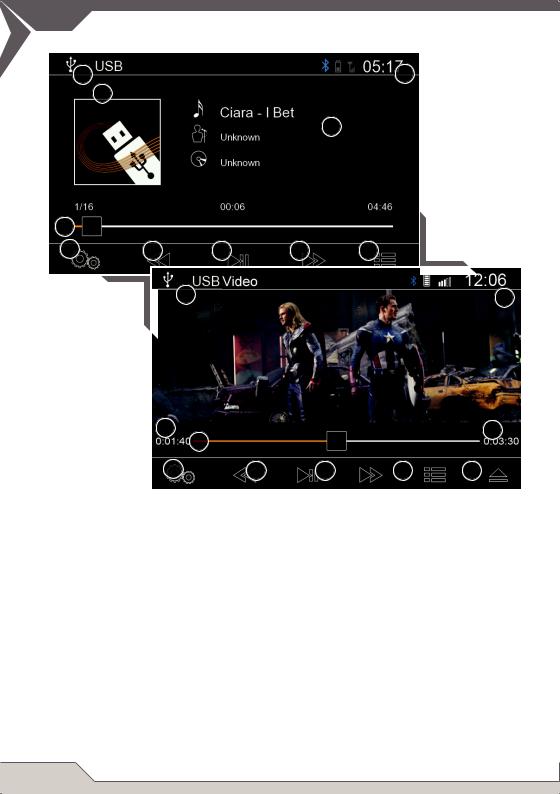
USB/ Video; iPodAudio Operation Buttons |
|
|
|
||
1. |
Progress bar |
Tap to jump to playtime (only in USB) |
|
|
|
2. |
Media Setup |
Tap to open pop up menu for Media settings |
|
||
3. |
PREV |
Tap to jump to previous track |
|
|
|
4. |
PLAY/PAUSE |
Tap to pause/continue playback |
|
|
|
5. |
NEXT |
Tap to jump to next track |
|
|
|
6. |
LIST |
Tap to show fi le list mode |
|
|
|
Information fi elds |
|
|
|
|
|
7. |
Source Info |
Show the active source |
|
|
|
8. |
Cover Art |
Shows the cover of Album from active Track if available |
|
||
9. |
Clock Time |
Shows clock time, sync with GPS signal |
|
|
|
10. |
ID3 |
Show ID3 from active Track |
|
|
|
11. |
Track info |
Show active Track time (left current playtime; Middle current |
|||
|
|
Track No.; right total playtime) |
|
|
|
12
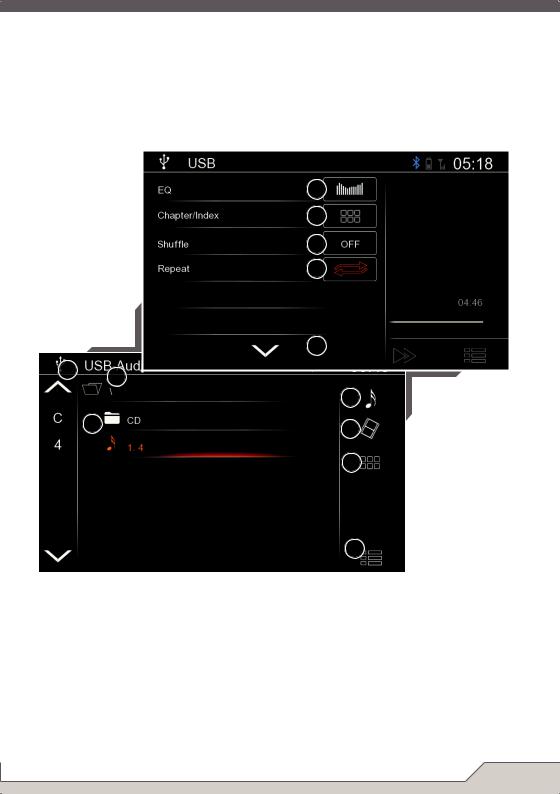
USB/ Video; iPodAudio Setup (PopUp)
1. |
EQ |
Tap on EQ to enter in Equalizer |
2. |
Keypad |
Tap to open Keypad and set Track number directly |
3. |
Shuffl e |
Tap to turn on/off shuffl e function (shuffl e folder All OFF) |
4. |
RepeatT |
Tap to toggle repeat (single > folder >All> OFF) |
5. |
Close |
Tap to hide USB Setup |
|
|
1 |
|
|
2 |
|
|
3 |
|
|
4 |
|
|
5 |
1 |
|
2 |
|
|
|
|
|
4 |
|
3 |
5 |
|
|
|
|
|
6 |
|
|
7 |
USB/-Audio/ Video List; |
|
|
1. |
Quick Select |
Scroll Numbers/ letters up or down, Press the number/ letter to jump |
|
|
directly to the fi rst Filename with the same letter. |
2. |
Folder |
Tap on Icon to jump one Folder Up at USB (jump out of active Folder; |
|
|
Level Up) |
3. |
File |
Tap line to start track (audio or video) |
|
|
Tap and scroll up/ down to scroll the list |
4. |
Audio |
Tap on Icon to open list of Audio fi les/ Mode |
5. |
Video |
Tap on Icon to open list of Video fi les/ Mode |
6. |
Keypad |
Tap to open Keypad and set Track number directly |
7. |
List |
Tap to hide list |
13
USB / IPOD MODE
1 |
|
2 |
|
|
3 |
|
4 |
|
|
|
|
|
|
|
5 |
|
|
|
6 |
|
|
|
7 |
|
|
|
8 |
|
|
|
9 |
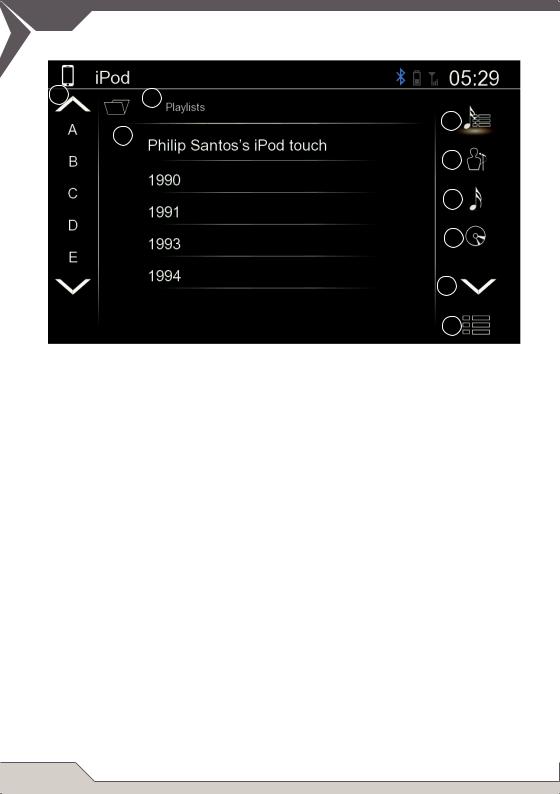
IPod-Audio List |
|
|
|
1. |
Quick Select |
Scroll Numbers/ letters up or down, Press the number/ letter to jump |
|
|
|
directly to the fi rst Filename with the same letter. |
|
2. |
Folder |
Tap on Icon to jump one Folder Up at Ipod (jump out of active Folder; |
|
|
|
Level Up) |
|
3. |
File |
Tap line to start track (audio or video) |
|
|
|
Tap and scroll up/ down to scroll the list |
|
4. |
Playlists |
Tap to |
sort list and show all Playlists |
5. |
Artists |
Tap to |
sort list and show all Artists |
6. |
Songs |
Tap to |
sort list and show all Songs |
7. |
Albums |
Tap to |
sort list and show all Albums |
8. |
Keypad |
Slide to the second page and tap to open Keypad and set Track |
|
|
|
number directly |
|
9. |
Close |
Tap to hide list |
|
14

EASY CONNECT
Connect your Android Smartphone via USB to the device. Follow the instructions on the screen to finish connection setup.
Note:
Please open your USB debugging mode on your smartphone. In case of license error your phone will automatically download a new license file from the internet. So your mobile internet must be enabled.
15

BT MODE
BT Operation Buttons |
|
|
|
|
1. |
Phone |
|
Tap to show Device-manager list of paired Phones or of Phone |
|
|
|
|
witch are connected |
|
2. |
Sync. Phonebook |
|
Tap to start synchronisation of Phonebook manually |
|
3. |
BT Setup |
|
Tap to open pop up menu for BT settings |
|
4. |
Favourite |
|
Tap to show favourite mode if not already active |
|
5. |
Phonebook/Call Log |
|
Tap to enter Phonebooklist mode |
|
6. |
Keypad |
|
Tap to open keyboard to dial a number |
|
7. |
Media Ctr. |
|
Tap to open and start A2DP playback/ Media Ctr. |
|
8. |
Delete |
|
Tap to delete Phone from pairing list |
|
Information fi elds |
|
|
|
|
9. |
Source Info |
|
Show the active source |
|
10. |
Info fi eld |
|
Shows if a mobile phone is connected and some Mobile information |
|
11. |
Clock Time |
|
Shows clock time, sync with GPS signal |
|
12. |
Active Phone Name |
|
Show the name of the active phone |
|
|
9 |
|
10 |
11 |
|
1 |
|
|
8 |
|
12 |
|
|
|
2 |
|
|
|
|
3 |
4 |
5 |
6 |
7 |
|
|
|
|
1 |
|
|
|
|
2 |
|
|
|
|
3 |
|
|
|
|
4 |
|
|
|
|
5 |
|
|
|
6 |
|
BT Setup (PopUp) |
|
|
|
|
1. |
EQ |
|
Tap open EQ mode |
|
2. |
Auto Connect |
|
Tap to set Auto Connect ON/OFF |
|
3. |
List Sorting |
|
Tap to set List Sorting |
|
4. |
MIC Gain |
|
Tap left or right arrow to set MIC Gain (MIC Gain) |
|
5. |
Pin Set |
|
Tap open Key-pad to set Pin |
|
6. |
Close |
|
Tap to hide BT Setup |
|
16
 Loading...