

XYZ Printing Nobel 1.0 Product Manual
V1.5
-1-
Nobel 1.0 3D Printer
Product Manual
ENGLISH
FEDERAL COMMUNICATIONS COMMISSION INTERFERENCE STATEMENT
This equipment has been tested and found to comply with the limits for a Class B digital device, pursuant to part 15 of the FCC Rules. These limits are designed to provide
reasonable protection against harmful interference in a residential installation. This equipment generates, uses and can radiate radio frequency energy and, if not installed
and used in accordance with the instructions, may cause harmful interference to radio communications. However, there is no guarantee that interference will not occur in a
particular installation. If this equipment does cause harmful interference to radio or television reception, which can be determined by turning the equipment off and on, the
user is encouraged to try to correct the interference by one or more of the following measures:
-Reorient or relocate the receiving antenna.
-Increase the separation between the equipment and receiver.
-Connect the equipment into an outlet on a circuit different from that to which the receiver is connected.
-Consult the dealer or an experienced radio/ TV technician for help.
CAUTION:
Any changes or modifications not expressly approved by the grantee of this device could void the user's authority to operate the equipment.
This device complies with Part 15 of the FCC Rules. Operation is subject to the following two conditions: (1) this device may not cause harmful interference, and (2) this device
must accept any interference received, including interference that may cause undesired operation.
Safety and Compliance
Read the following safety instructions and contents of this manual before use, operation, maintenance, replacement
or removal of any parts, components, or materials of the printer.
For the latest information about the Nobel 1.0 3D Printer and XYZprinting products, please visit XYZprinting
website (http://www.xyzprinting.com) or contact your sales representative.
The following has been written in order to cover all possible printing scenarios. For scenarios which occur outside
the scenarios detailed in this manual, the user will be held accountable for their own safety.
Resin Care
•Wear proper protective equipment, avoid raw material contact and vapor inhalation.
•Chemical-resistant gloves should be worn when you make contact with resin.
•Avoid exposing resin to high temperatures, localized heat sources (i.e., drum or band heaters), oxidizing
conditions, freezing conditions, direct sunlight, ultraviolet radiation, inert gas blanketing.
•Never pour the waste resin back to the bottle or down the sink, as it may pollute the remaining resin or clog the
drain.
•You may pour resin waste into plastic bag and expose it to sunlight or UV light source to cure the resin. The cured
resin can then be discarded.
•Avoid dripping resin on anything other than the platform or the resin tank, or the printer may malfunction.
Copyright
All other trade names and trademarks are properties of their respective owners.
Important Safety Information:
•Do not let children operate this device without adult supervision. Moving parts may cause serious injury.
•Electric shock hazard.
•Do not place the printer on an unleveled or unstable surface. Printer may fall or tumble causing harm and/or injury.
Also tank level detection may be inaccurate.
•Do not place any object on top of the printer. Liquid and solid objects that fall into the printer may lead to printer
damage or safety risks.
•Please keep the printer, resin, or alcohol away from fire.
•Do not disassemble or replace the printer cover with non-XYZprinting covers.
•Insert and secure the power cord firmly for proper usage and to avoid potential electricity and fire dangers.
•Do not attempt to service the printer beyond the instructions specified in this document. In the case of
irrecoverable problem, contact XYZprinting service center or your sales representative.
•Do not place the printer in humid or dusty environments such as bathrooms and high traffic areas.
•Some components of the printer move during operation. Do not attempt to touch or change anything inside
before powering off the printer.
•Please keep the lid closed during printing to avoid injury.
•This printer is a Class 1 Laser Product. A Class 3B laser module is used as a light source. Never disassemble the
product.
•For optimized printing quality, only use resin supplied by XYZprinting.
•Make sure to set the power switch to the off position and remove the power cord before transporting the device.
•Only use the grounded power adapter and power cord supplied with the printer to prevent possible electrical
shocking.
•Please place and use the printer in a well ventilated area. The process of printing will produce a small amount of
non-toxic odor. Having a well ventilated area will ensure a more comfortable environment.
V1.5
-2-
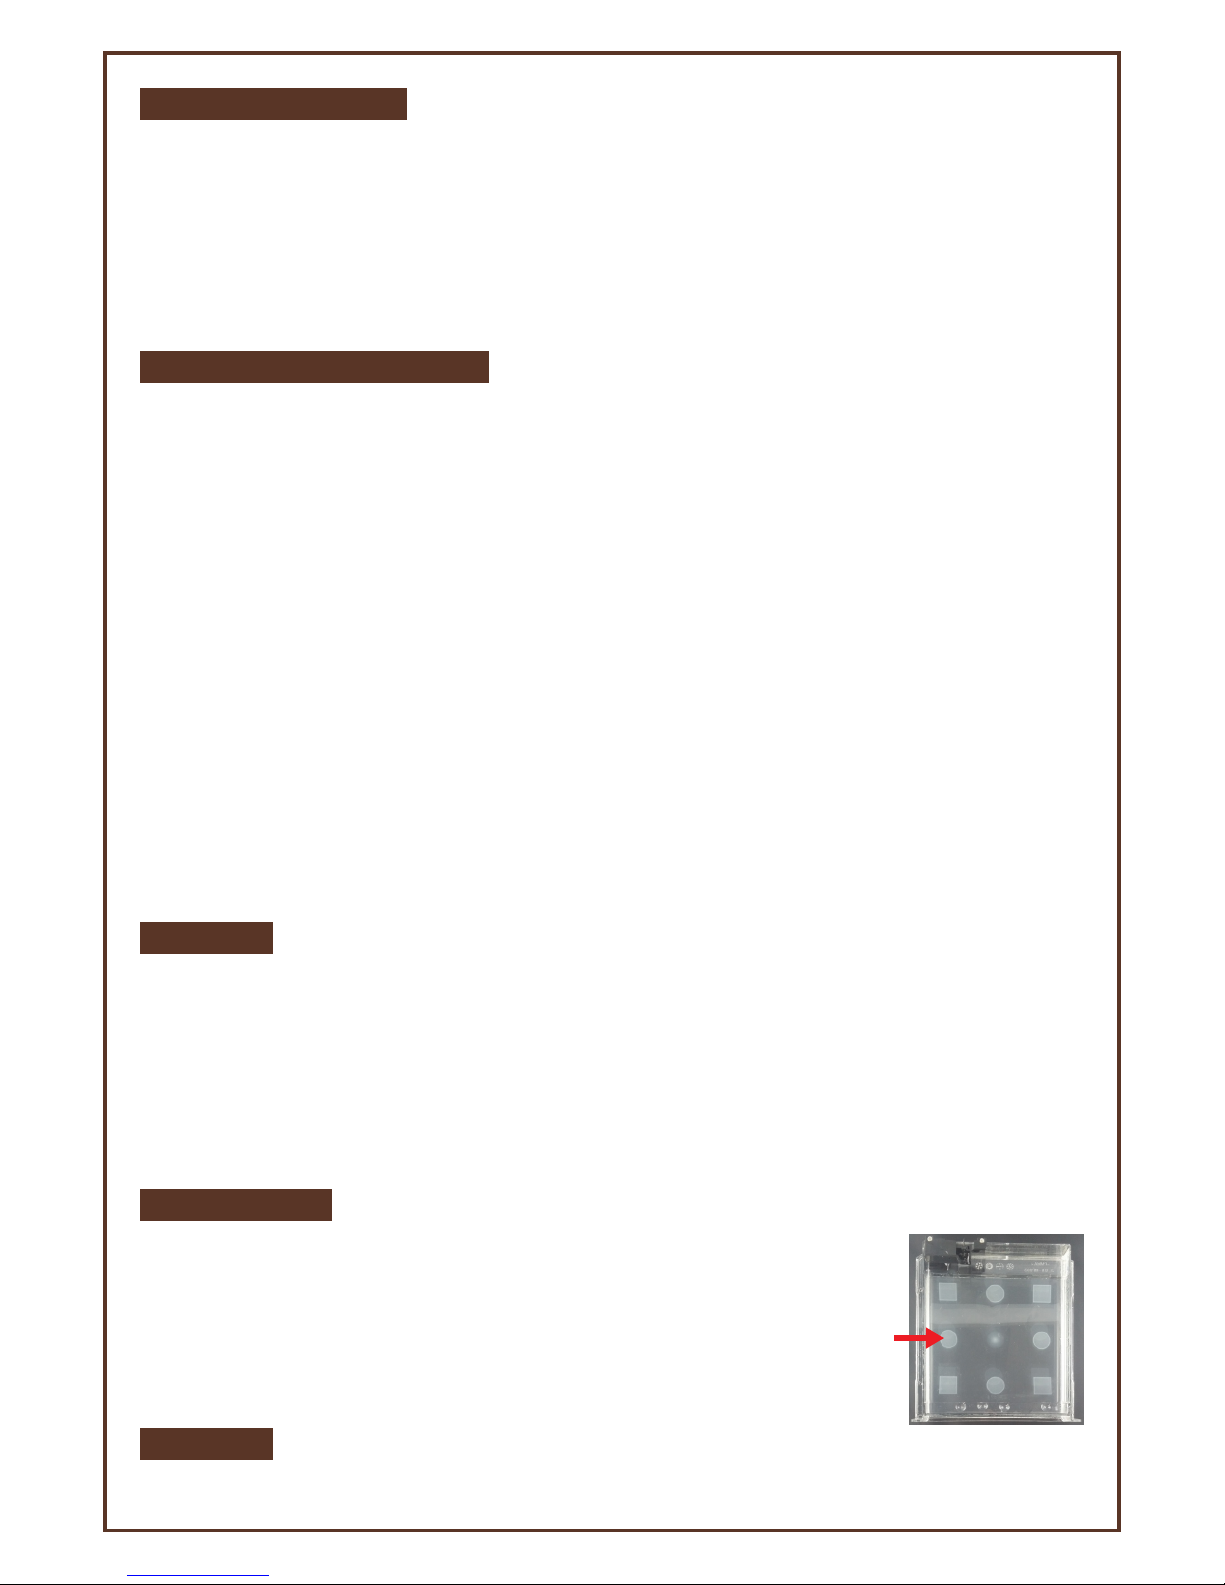
Resin Tank Care
•Due to the nature of the print technology and material, the resin tank may
develop cloudy regions overtime where the laser cures the resin frequently
and may lead to print fails. Moving the print location around the
platform can help prolong the life of the tank.
•Change to a new tank when over 2/3 of the surface gets cloudy.
•Use a separate resin tank when using resin of different colors. Mixing resin of
different color may affect printing quality.
Cloudy

V1.5
-3-
⑦Shake the resin bottle for around
10 seconds to ensure even color.
⑧Assemble the nozzle cap and the
tube (placed in the rinse basket when
shipped).
⑨Replace the bottle cap with the
assembled nozzle cap.
Unpacking & Setup
After removing all external packing
materials and tapes…
①Take off the lid and remove the
accessory tray over the platform.
②Connect power adapter, power cord
to the printer.
③Switch on the printer. Initialization
will take around 10 minutes.
④Raise the platform:
On the printer screen, select
“UTILITIES” and press ► to find
“MOVE PLATFORM”>”TO TOP”.
And press “YES” to raise the
platform.
⑤When the platform is moved to the
top, remove the protecting foam.
⑥Unpack the resin tank and insert it
into the tank slot. Push all the way
until reaching the end.
⑩Install filling tubes.
Push the tubes all the way down.
First attach the black tube to thick
nozzle, and then connect the
transparent tube to thin nozzle.
Put on the lid, and it’s ready for
printing.
nobel 1.0
►UTILITIES
SETTINGS
INFO
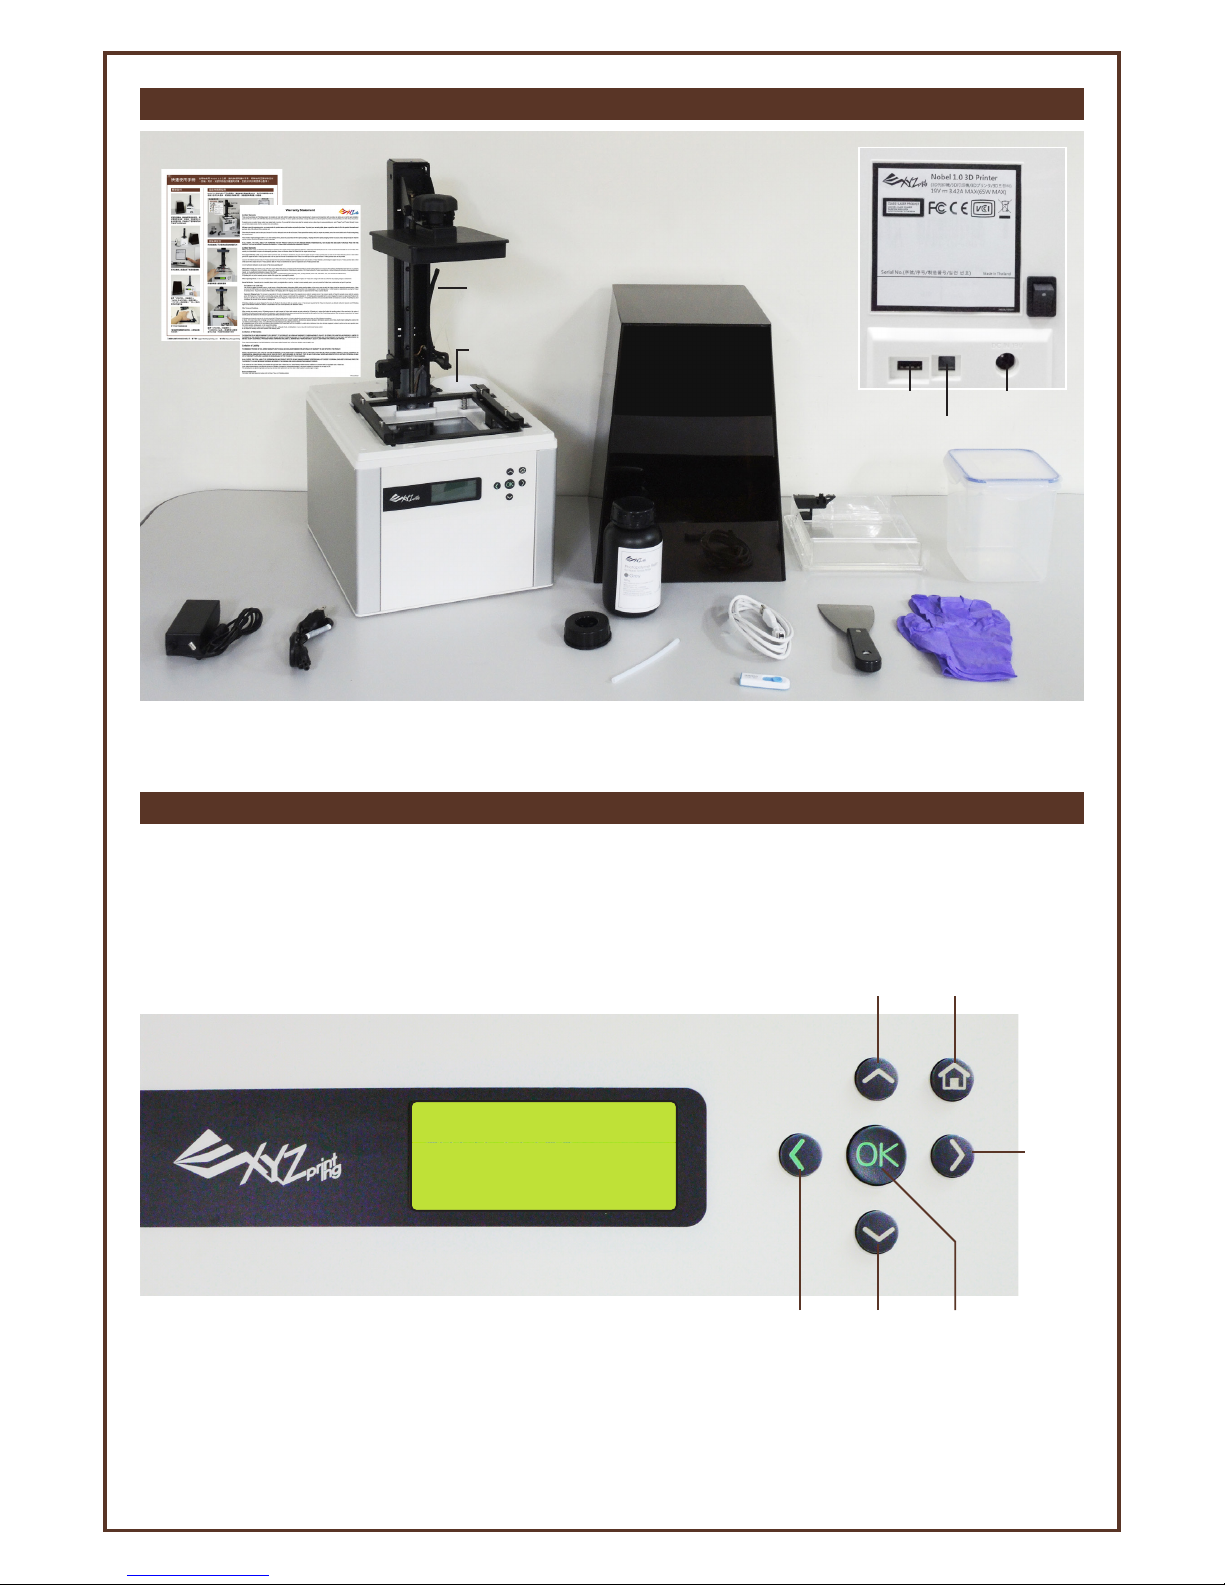
Product Overview & Accessories
Use the Display and Control Panel
V1.5
-4-
To control and maintain the printer, you will need to operate certain functions with buttons on the control panel. Here is the map
of the buttons:
Move up
Next
page
Move downBack/Cancel
Home menu
Confirm selection
and settings/Exit
Platform
Filling Tubes
Cartridge Slot
Tank Slot
Operation Panel
Lid
Resin Tank
Rinse Basket
Gloves
Scraper
USB Flash Drive
Inner Tube
Nozzle cap
Power Cable
Power Adapter
Starter Resin
USB Wire
Power Jack
USB Wire Port
USB Drive Port
(Back View)
Power
Switch
Quick Start Guide
Warranty
Card
LCM Menus
UTILITIES
INSTALL RESIN
V1.5
-5-
“Utilities” menu provides the control of the printer. You can instruct to fill the resin tank manually, and calibrate the
printer when necessary.
You can activate resin-filling function manually. Before doing so, make sure the resin bottle, resin tank and the lid are
installed correctly. (See “Unpack & Setup” for details).
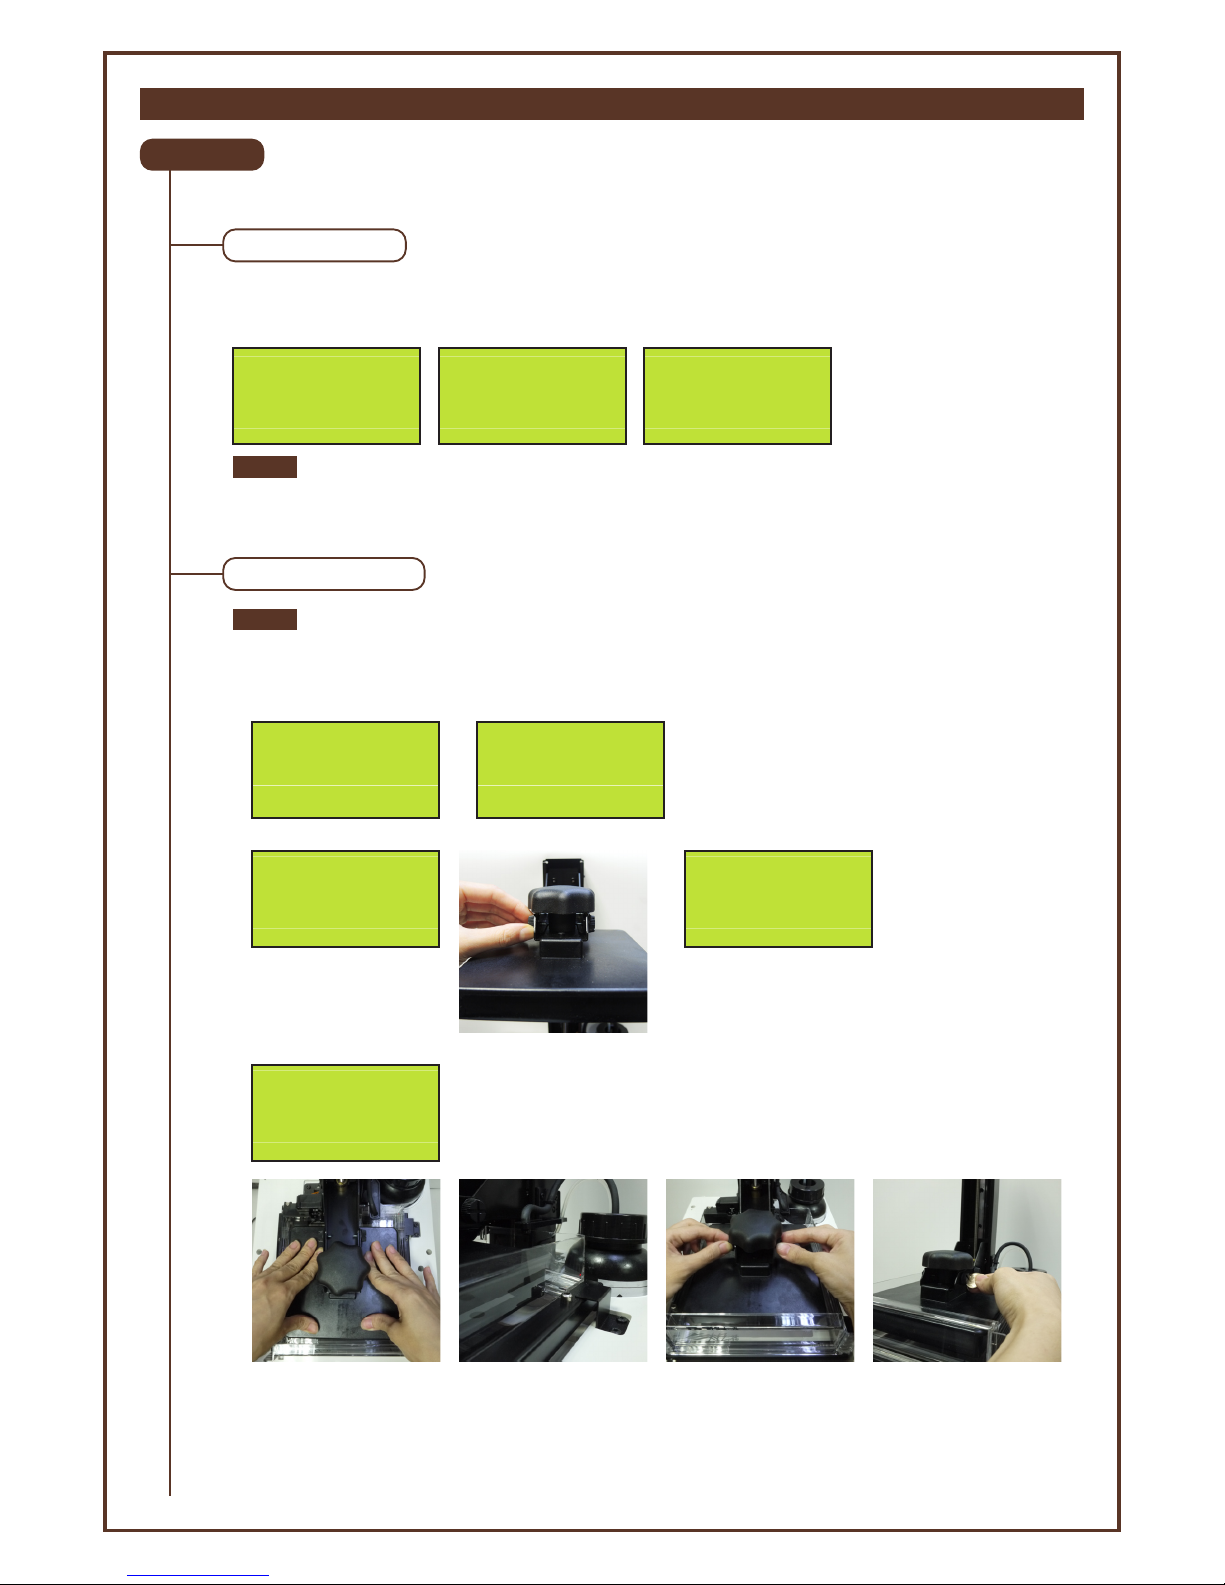
“Horizon Calibration” ensures the platform is parallel with the resin tank for more stable printing performance.
Always perform “Horizon Calibration” after changing to a new tank or a tank different the one used for last print.
Select “Yes” and press [OK] to begin:
• “Auto Fill” function is enabled by default. You may skip loading resin manually when auto-fill is enabled.
• Shaking the resin bottle well before use ensures an even color.
• The printer detects the tank level after "Install Resin" is activated. Resin will be filled only when the tank
level is low.
HORIZON CALIB
INSTALL RESIN
BOTTLE BY NOW
NO
►YES
MAKE SURE PIPES
ARE INSTALLED
CORRECTLY
[OK] FOR NEXT
RESIN TANK IS
FILLING UP NOW
PLEASE WAIT…
[OK] TO CANCEL
Select “Yes” and press [OK] to begin:
Note
To ensure the accurracy of calibration, please empty the resin tank before calibrating.
Note
①
START HORIZON
CALIBRATION NOW?
NO
►YES
②
REMOVE OBJECT
FROM PLATFORM
[OK] TO CONTINUE
③
LOOSEN 4 SMALL
SCREWS ABOVE
THE PLATFORM
[OK] TO CONTINUE
Tighten the screws with
fingers. First tighten the
front screws. Fasten screw
F1 then F2. And tighten
the screws at the back.
Fasten screw B1 then B2.
Finally tighten the screws
with a coin or other tools
(sequence from F1, B1, F2
to B2) and press [OK] to
complete calibration.
When you see the
message above, press the
platform with both hands
3 times. Make sure you
see the right side of the
tank sinks into the tank
slot slightly.
Wait for 5 seconds so the
silicon finish on the tank
can reshape. Check the
tank frame has repositioned (there's no gap
between the frame
holders).
⑤
TIGHTEN ALL 4
SCREWS ABOVE
THE PLATFORM
[OK] TO FINISH
④
Wait until the platform
descends to the bottom.
PROCESSING
PLEASE WAIT...
F1
F1
F2
F2
B1
B1
B2
B2
 Loading...