

Page 1
Important Safety Precautions 2
Product exterior 2
Specications 3
Unpacking 4
Main screen 6
WiFi setting 7
Print bed calibration (leveling) 8
Z-offset check 8
Load laments 8
Ink Installation 9
Change Ink 10
Print test page 10
Color calibration 11
Ink Calibration 11
Convert and slicing le 12
Printing 12
Problem code and handling 13
XYZprinting 3D Printer
Quick Guide
ENG
The manual is mainly intended for users to understand how to use the
da Vinci Color 3D printer (“da Vinci Color”) correctly. In this manual,
users can learn more about the operating tips, application skills and
maintenance of the da Vinci Color 3D printer.
For more information on the da Vinci Color 3D printer and the
complete XYZprinting product line, please contact your local dealer or
visit the ofcial website of XYZprinting: http://www.xyzprinting.com.
ENG : Read this user manual in the SD or USB Card before using your printer.
DEU : Lesen Sie vor der Benutzung Ihres Druckers diese Bedienungsanleitung auf der SD- oder USB-Karte.
ESP : Lea primero- La información regulatoria Lea el documento en se encuentra en la tarjeta SD o USB antes de utilizar la impresora.
FRA : Veuillez lire ce manuel d'utilisation dans la carte SD ou USB avant d'utiliser votre imprimante.
ITA : Prima di utilizzare la stampante leggere il Mauale d'uso della scheda SD o del dispositivo USB.
HD23FC1X071
Page 2
DEU
POR
FRA
JPN
KOR
THA
ITA
ZH
ENG
ESP
Puede utilizar XYZmaker para iniciar actualizaciones manuales en el firmware y software de la impresora.
Cuando utilice la impresora por primera vez, le recomendamos conectarse a Internet y realizar la actualización manual una vez para obtener los recursos más recientes.
本機での印刷の前に、お使いのPCと本機をUSB接続し、XYZmakerをインストールし、「情報」ボタンをクリック、「
ファームウェアアップグレード」をクリックして最 新 版 の ファームウェアに本 機 をアップグレ ードしてください 。
XYZmaker를 사용하여 프린터 펌웨어 및 소프트웨어의 수동 업데이트를 시작할 수 있습니다. 처음으로
프린터를 사용할 경우, 인터넷에 연결한 후 수동으로 업데이트하여 최신 리소스를 획득할 것을 권장합니다.
Você pode usar o XYZmaker para iniciar atualizações manuais para o firmware da impressora e software.
Ao utilizar a impressora pela primeira vez, recomendamos conectar à Internet e realizar atualização manual
uma vez para obter os recursos mais recentes.
Vous pouvez utiliser XYZmaker pour lancer des mises à jour manuelles du logiciel et du firmware de l'imprimante. En cas d'utilisation de l'imprimante pour la première fois, nous vous conseillons de vous connecter à
Internet et d'effectuer une mise à jour manuelle une fois pour obtenir les dernières ressources.
You may use XYZmaker to initiate manual updates to the printer firmware and software. When using the printer for the first time, we recommend connecting to the Internet and performing manual update once to obtain
the latest resources.
您可以透过XYZmaker对打印机韧体及软体进行手动更新,建议您初次使用打印机时,先利用网络连线执行几
次手动更新以获得最新资源。
Sie können mit XYZmaker manuelle Aktualisierungen der Drucker-Firmware und -Software starten. Wenn
Sie den Drucker das erste Mal benutzen, sollten Sie eine Internetverbindung herstellen und die manuelle
Aktualisierung zum Erhalt der aktuellsten Ressourcen einmal ausführen.
È possibilie utilizzare XYZmaker per avviare l'aggiornamento manuale di firmware e software della stampante. Quando si utilizza la stampante per la prima volta, si raccomanda di eseguire il collegamento ad
Internet e di eseguire una volta l'aggiornamento manuale per ottenere le risorse più aggiornate.
CHI
您可以透過XYZmaker對列印機軔體及軟體進行手動更新,建議您初次使用列印機時,先利用網路連線執行乙次
手動更新以獲得最新資源。
คุณสามารถใช้ XYZ maker เพื่อการปรับปรุงเฟิร์มแวร์และซอฟต์แวร์ของเครื่องพิมพ์
เมื่อเริ่มใช้งานเครื่องพิมพ์เป็นครั้งแรก เราขอแนะนำให้คุณเชื่อมต่ออินเทอร์เน็ต
และทำการอัปเดตด้วยตนเองเพื่อขอรับข้อมูลล่าสุด
Page 3
P2
● Do not move the machine by yourself as it is heavy.
● Do not place the printer in a dusty, humid or outdoor environment.
● Do not place the printer on a soft or tilted surface. Otherwise, the machine will fall / ip over and become damaged or
cause personal injury.
● Do not leave the product or power cord to unattended children. Otherwise, personal injury or electric shock might occur.
● Use the provided power cord. Otherwise, incorrect grounding might lead to damage.
● Do not place any liquid container on top of the product. Otherwise, overow or spill might go into the machine and pose
the risks of danger or safety concern.
● Do not wipe the printer with alcohol or ammable chemicals. Otherwise, danger might occur.
● Do not move the machine when it’s powered on.
● Do not reach into the machine with your hands during operation. Otherwise, risks of impact from moving printing parts or
burn from high temperature might occur.
● The machine becomes hot during operation and thus run in high temperature. Do not touch or replace parts when they
are not cooled down.
● After startup, the parts in the machine will heat up or move depending on the user’s instructions. During product
operation, do not touch or block the operation of the parts.
● Weak odors may be generated during the printing process. We recommend working in a well-ventilated and open area
to ensure operational comfort.
● Defect reparation must be carried out according to the contents of this instruction manual. Where the defect cannot be
repaired, please contact your printer dealer or the customer service center.
P2
Important Safety Precautions
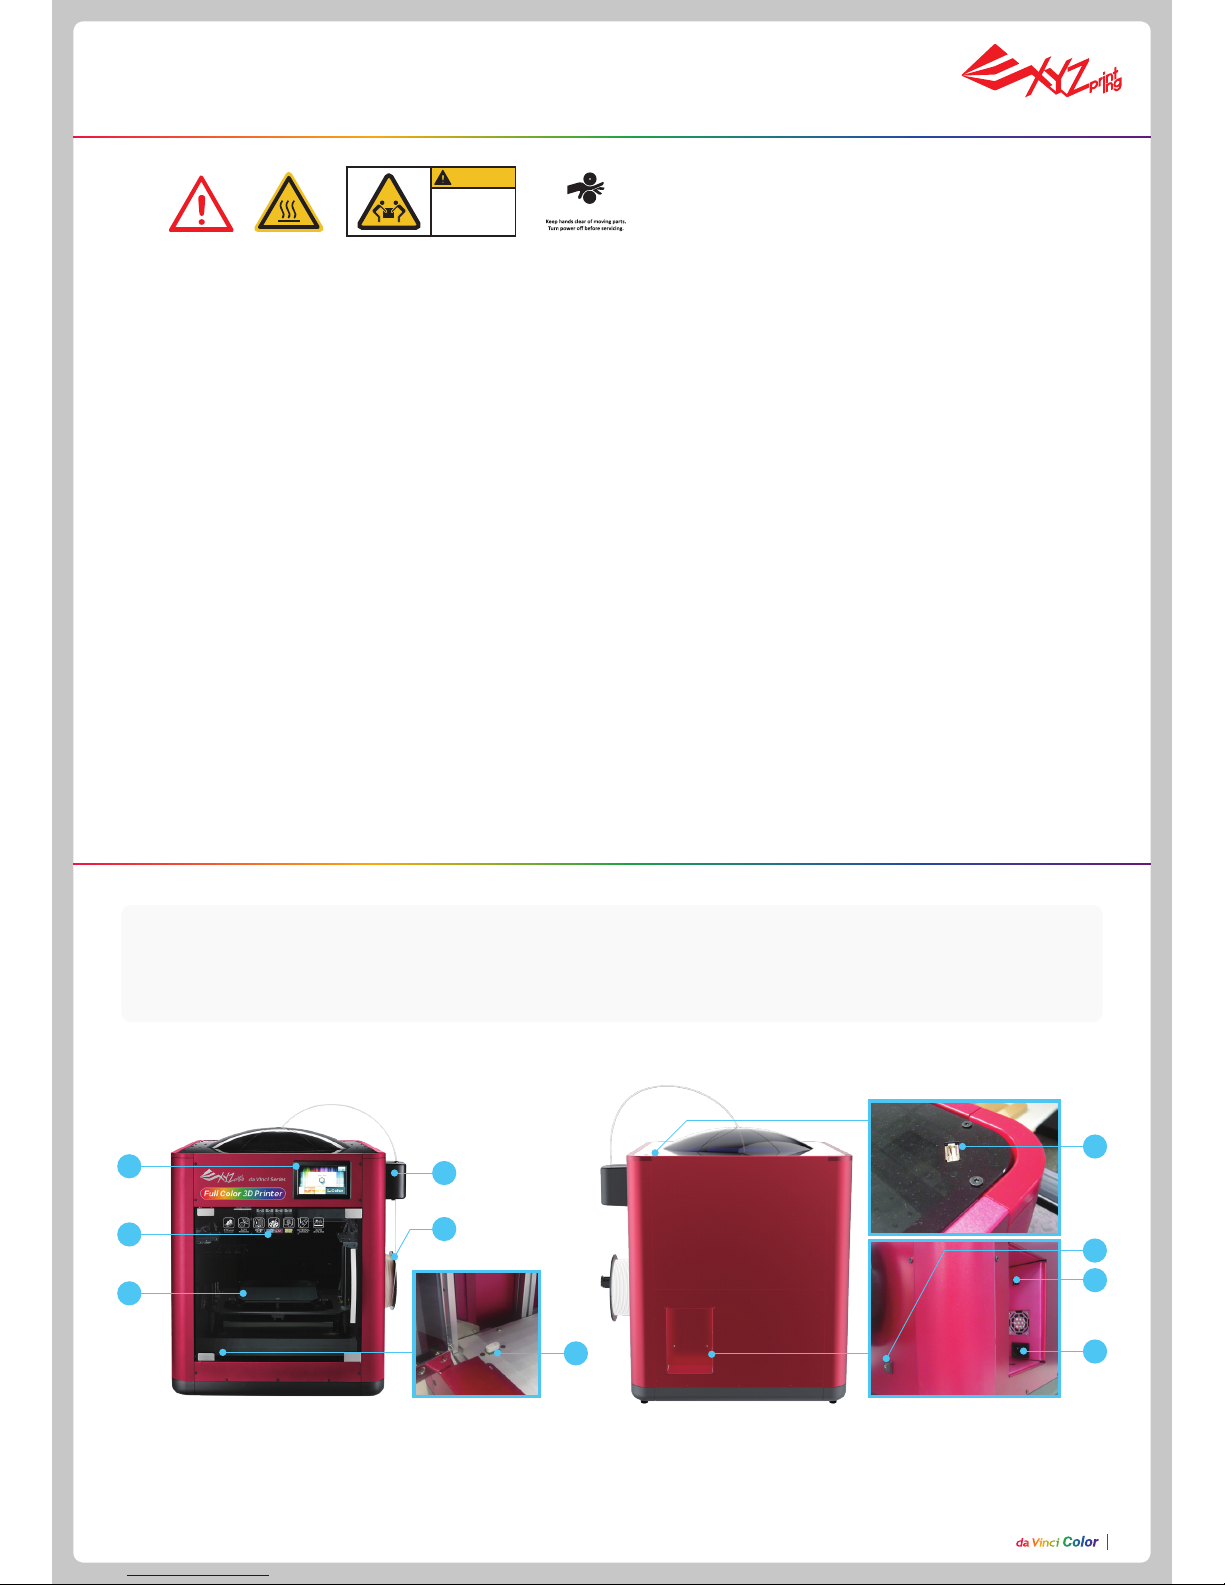
Product exterior
1. 5 inch color touch panel 2. Auto-feeding module 3. Print head 4. Print bed+EZ removable rubber magnet
5. Filament spool holder 6. USB Port 7. USB Port
(WiFi dongle)
8. Power switch
9. USB Port (To PC) 10. Power jack
CAUTION
Heavy object.
2 person lift
required
Watch Your Hands.
1
3
2
4
7
8
10
9
6
5
Page 4
P3
Specications
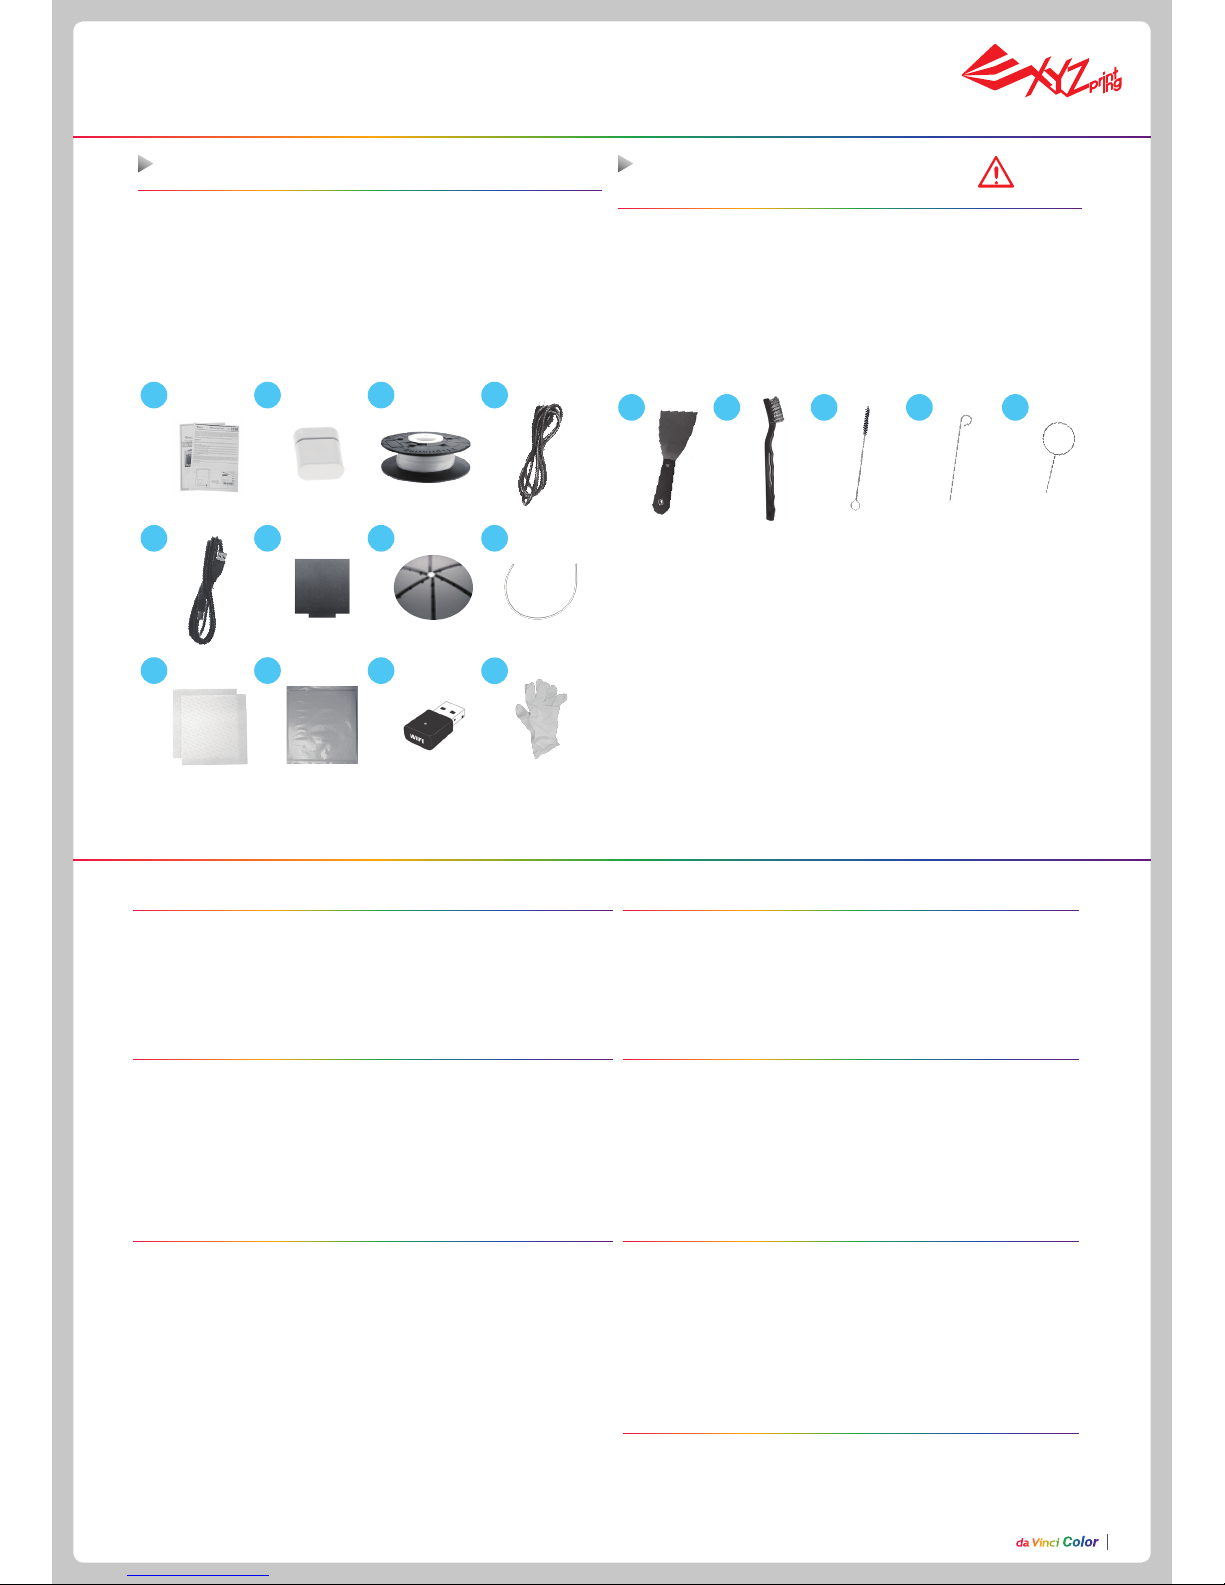
Accessory Checklist
Printing
Printing technology 2D pattern: Inkjet printing
3D structure: Fused filament fabrication
(FFF)
Dimensions and Weight
Dimensions (W*D*H) 600* 581* 640 mm
Net weight 32 Kg
Gross weight 43 Kg
Performance
Printing dimensions
Mono color printing
(without inkjet printing)
200 x 200 x 150 mm
(W*D*H)
Full color printing
185 x 185 x 150 mm
Thickness of printed layer 0.1 mm ~0.4 mm
Alignment precision X/Y : 0.0125 mm
Auto calibration Yes
Auto feeding Ye s
Ofine standalone printing Yes
Materials
3D printing materials 3D Color-inkjet PLA, PLA, Tough PLA, PETG
Filament diameter 1.75 mm
Ink type CMYK cartridge with separate colors
Hardware
Print head diameter 0.4mm
User interface 5” color touch screen
Print bed Non-heated, removable
Transmission
USB 2.0 drive / USB cable /
wireless transmission
Software
User software XYZmaker
Supported le format AMF, PLY, OBJ, STL, 3CP
Operating system Mac OS X 10.10 / 10.11 / 10.12
Windows 7 /8/10 (64-bit)
Linux 14.04
Temperature
Machine operating temperature 15-30°C
Cartridge storage temperature 15-35°C
Filament storage temperature 0-38°C
Precautions and Instructions of
Maintenance Tools
31 2 4 5
The following tools are intended for use under the guidance or guard-
ianship of an adult only. Do not allow children unfamiliar with the tools
to have access to them in case of danger.
Accessory Checklist
1 2 3 4
11
5 6
12
7 8
1. Quick Guide 7. Top Cover
2.
USB drive 8. Guide Tube
3. 3D Color-inkjet PLA 9. PC Mylar x 2
4. Power cord 10. Mask Tape
5. USB cable 11 . WiFi Dongle
6. EZ Removable Rubber Magnet 12. Pair of gloves
●
Make sure the maintenance work of the printer is carried out when
the print bed has cooled down.
●
When printing is completed and the print bed is cooled down to room
temperature, the printed object can be removed from the print bed
with the scraper.
●
Filament residues generated during the course of printing may
be stuck on the print head and gears of the printing module. The
printing quality and printer operation as well as the measurement of
the print bed may be affected. When this happens, clean the printing
module with the wire brush.
1.
Scraper
4.
Feed hole cleaning wire
2.
Wire brush
5.
Print head cleaning wire
3.
Gear cleaning brush
9 10
Page 5
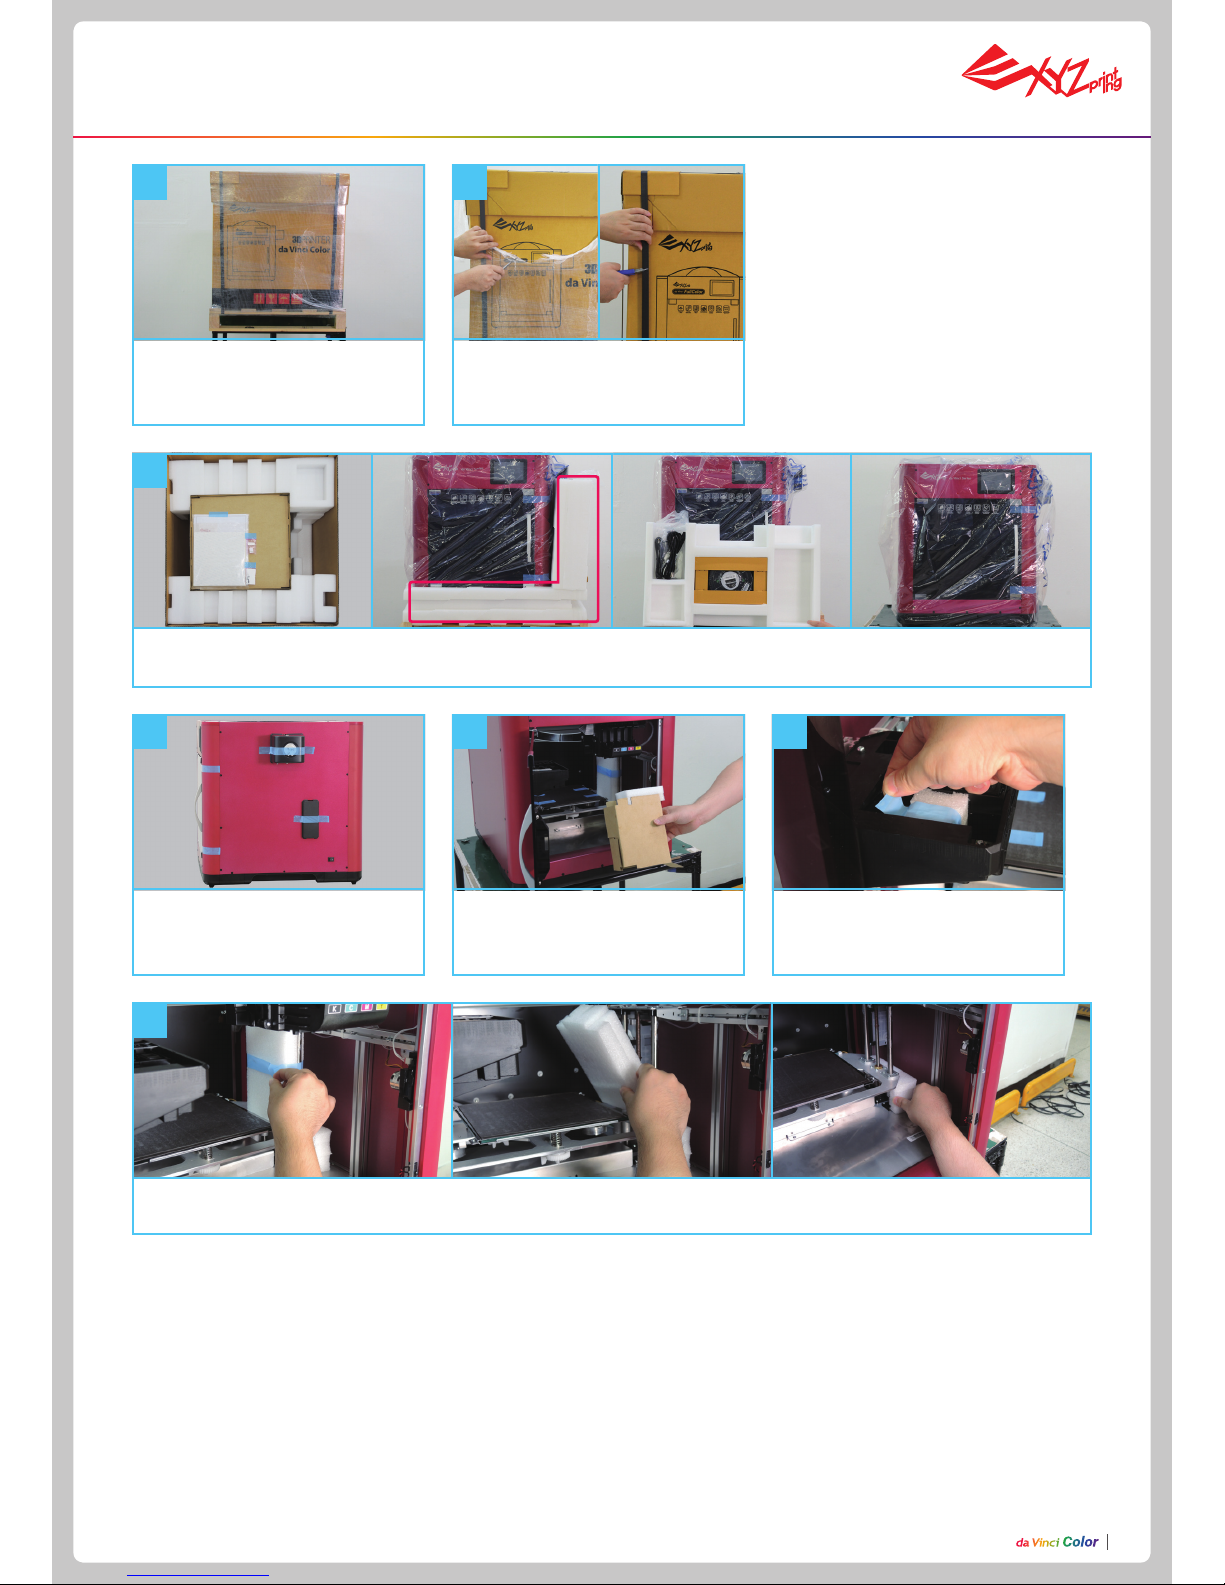
P4P4
Remove the packaging materials, top cover box, assessory box and plastic cover.
Unpacking
3
7
Remove the foam next to the guide screws on both sides, and then remove the foam under the print bed.
Remove the tape on the body (4 in
total).
4
Move the printer to a table or plat-
form. (Do not move the printer by
yourself as it is heavy.)
1
Remove the plastic wrap and PP.
2
Open the front door. Remove the
tape from the supporting aterials
and print bed.
5
Remove the foam on the cartridge
holder.
6
Page 6

P5
Place the top cover down with the
guide tube going through the hole in
the top.
10
Insert the guide tube through the top
cover, and then insert one end into
the printing module.
9
Conrm the rubber magnet is well placed on the print bed.
12
Insert the other end of the guide tube into the feed module and
secure it tightly.
11
Remove the cable tie and foam in front and back of the front door.
8
Unpacking
There is a sheet of PC film to
rubber magnet with a double
sided adhesive, this PC film is
replaceable, please replace it
when it's dirty or broken.
Note
Page 7

P6P6
Main screen
This includes Filament, Ink Load
and Unload.
Filament/Ink loading
and unloading
This menu can be used to import
les (.3cp) from a USB drive to the
machine for printing without a com-
puter.
This includes the functions in Home
Page 1:
Settings of the Print-Bed, PrintHead, Filament and Ink.
Next page includes
WiFi, Sound, Statistics, Language
and Display.
The last page includes
Model, Version, Reset and Legal
Info.
Settings
USB Printing Menu
Page 8

P7
Before setting the WiFi, please insert
the WiFi dongle into USB port on the
top of printer.
1. Tap ADD and the printer will
start to search for available
access points.
4. Conrm the connection is
completed.
2. Tap the access point to be
used.
3. Enter the password for the
access point.
WiFi setting
●
Use a USB cable to connect the printer to the computer and run the XYZmaker.
●
Check if the WiFi function is activated on the computer and connect to the access point.
1. Run the XYZmaker. Click on File > Print > da Vinci
Printer.
2. Select the printer to be used.
PRINT:
Set printing parameters and quali-
ty. If only a le conversion is needed, tap
“PREPARE”.
DASHBOARD:
Monitor print head
temperature, lament used and lament
loading / unloading.
3. When the software displays ”
READY
”, the
connection is established successfully.
Now, you can click on “DASHBOARD” to
monitor the printer or “PRINT” to print a
le.
Use the XYZmaker to verify if the WiFi connection is established successfully
Page 9

P8P8
1. Place the lament on the
spool holder.
Make sure the lament rotates
clockwise when pulled.
Note
2. Tap Filament Load and
Unload in the main screen and
select Filament.
3. Tap Filament. 4. Tap Load.
5. Conrm the operation. 6. Insert the lament into the feed module, it will be automatically loaded.
7. Check if the temperature of the print head goes up to 210 °C (Color PLA from XYZprinting) after
the lament is loaded. Once the set temperature is reached, the feeding motor will feed the lament
along the guide tube into the print head.
8. Once lament has extruded
from the print head, the lament
will be successfully loaded.
Tap the screen to conrm and
continue.
1. Tap Z-offset. 3. Users can tap the icon to
higher or lower the print bed,
the higher value the bigger
distance and vice versa.
2. Move the print head to the center of the print
bed. It is recommended that the space between
the print head and the print bed just touch and
the nozzle can move smoothly on the print bed.
Print bed calibration (leveling)
1. Select Calibration. 2. Conrm the operation.
3. Wait while the sensor measures the height of the print bed at three different locations. Once the mea-
surement is complete, the printer will automatically level the print bed.
4. After the calibration is
successfully completed, tap to
conrm.
Z-offset check
Load laments
Page 10

P9
1. Prepare several paper towels and the
ink cartridge.
6. Check if the ink transferred to the
paper towel displays two straight lines.
If so, ink guidance is successfully
completed. Once ink guidance is done,
install the ink cartridge.
2. Unpack the ink cartridge.
7. If the ink did not transfer well, please
wet the paper towel with 75% Alcohol to
wipe the ink. After you clean the inkjet,
check to see if the ink transferred.
4. Press the cartridge head against the
paper towel to transfer some ink onto it.
3. Remove the cartridge cover.
5. If the ink did not transfer well, try
putting the paper towel on the table and
hold the ink pressed on the paper towel.
The da Vinci Color uses four color inks which can be replaced separately.
Ink Guidance
Ink Installation
Page 11

P10P10
3.Wait until the cartridge moves
to the center of the print bed,
and then change the ink.
1. Tap Change Ink and tap to
conrm.
4. Tap the PROCEED after you
change.
3. Fix the paper onto the print bed and then tap PROCEED,
the printer will do a test print.
2. Conrm the operation.
4. Remove the test page and
tap PROCEED.
5. Please refer to the photo
above, a successful print won't
show stripes and lack of ink.
1. Lift up the plate upwards.
2. Take out the cartridge.
3. Put in a new cartridge.
4. Check if the cartridge is placed properly.
5. Press down the plate on top.
6. Check if the order of the ink color is K(Black),
C(Cyan), M(Magenta) and Y(Yellow) from left
to right.
Cartridge Installation
1
4
2
5
3
6
We suggest you print a test page after you install the ink cartridge. Please prepare a sheet of paper.
2. Tap Test Page.1. Tap Calibration.
1
2
3
4
•
Ink cleaning
: please wet the paper
towel with 75% alcohol to wipe the ink.
After you clean the ink, please print
the test page again.
•
Drain the ink
: please refer to C and
then print the test page again.
•
Strongly swing the ink
: use paper
towel to pack the ink and then swing
the ink. If the ink comes out, please
print the test page.
Ink Troubleshooting
Condition 1&3 :
Follow the description below for ink
troubleshooting.
Condition 2&4 :
Please re-install the ink.
Change Ink
Print test page
Tap the ink, the screen will
show the status of the ink,
including "Ink Low", "No Ink",
"Invalid Ink", and "Invalid
Color"
Page 12

P11
2. Check that the print bed is
clear,
1. Tap Ink Calibration.
5. After the printing is completed,
take out the calibration card.
7. For vertical alignment, enter
each color’s corresponding
number. After entering the
number, tap PROCEED.
5. Check the printed calibration
chart using the on-screen
instructions. For each color
select the line that is the best
aligned with black (K).
6. Horizontally and vertically,
nd the box where the ink is
the most aligned, and then tap
PROCEED.
8. Horizontal direction: Enter
the number of the box you think
the lament and ink align the
most, and then tap PROCEED.
8. Conrm the numbers
entered in the boxes and tap
PROCEED.
3. The printing operation will
start once the print nozzle is
warmed up.
4. The printer will print the
calibration card automatically.
This takes approximately 15
minutes. (Make sure you have
loaded the lament.)
6. For horizontal alignment,
enter each color’s
corresponding number. After
entering the number, tap
PROCEED.
7. Vertical direction: Enter the
number of the box you think the
lament and ink align the most,
and then tap PROCEED.
9. After the calibration is
completed, tap PROCEED to
nish the ink calibration.
4. Take out the printed paper
and tap PROCEED.
3. Please x the printing paper onto the print bed.1. Tap Calibration. 2. Tap Color.
Color calibration
Ink Calibration
Page 13

P12P12
Connect the printer and computer with a USB cable and install the “XYZmaker” on the computer to transfer the les you want to print.
The “XYZmaker” is compatible with operating systems of Windows 7 or higher and Mac OS 10.8 or higher. You can install it by using the included USB drive or downloading the installer from the ofcial XYZprinting website. The user manual of the software can also be downloaded from
the ofcial website.
For details, visit the ofcial website: http://www.xyzprinting.com/
2. Click on OPEN to select the
model le to be printed from the
folder. You can adjust the object
size, printing position and angle
once the le is loaded. To print
color objects, save the le to be
printed in the obj format and load
it in the XYZmaker.
4. The Prepare function can convert a obj le to
a .3cp le. Once the le is edited and adjusted,
click on Print to output the object. The printing
operation will start after the le is sliced.
1. Connect the computer and printer and select da Vinci COLOR.
3. You can change related settings to the desired
printing result and effect.
Convert and slicing le
Printing
1. Check if the USB drive is plugged to
the machine.
2. Tap the USB Printing Menu in the
main screen.
3. Select the le you want to print.
5. The screen will show the print
percentage when printing. The Pause,
Stop, and Refill are shown below the
print percentage.
4. Check le information and tap “Print”.
By default, the front door will
be locked when printing. If you
want to change this setting, go to
Setting > Door Lock to change it.
Note
Page 14

P13
Problem code and handling
For the latest information on the functionalities and settings of da Vinci Color, refer to the user manual provided or visit XYZprinting ofcial
website: www.xyzprinting.com.
When a problem occurs with the printer, the service code will be displayed on the printer screen and / or the software interface. Please refer
to this service code description form for preliminary testing.
Service
Code
Symptom Action
OO11 Print head heated for too long
please check the Flexible flat cable and reboot
OO14 Print head heated issue -- temperature exceed
OO30 Abnormal--X axis
check the cable of the motor and the sensor, and check
the position of the sensor
OO31 Abnormal--Y axis
OO32 Abnormal--Z axis
OO50 Internal communication error -- memory error reboot the printer
OO52 Print head memory error replace the print head
OO55 inkjet head error replace the inkjet head
OO56 inkjet data error reboot the printer
You are cautioned that changes or modications not expressly approved by the part responsible for compliance could void the user’s authority
to operate the equipment.
This equipment has been tested and found to comply with the limits for a Class B digital device, pursuant to part 15 of the FCC rules. These
limits are designed to provide reasonable protection against harmful interference in a residential installation. This equipment generates, uses
and can radiate radio frequency energy and, if not installed and used in accordance with the instructions, may cause harmful interference to
radio communications. However, there is no guarantee that interference will not occur in a particular installation. If this equipment does cause
harmful interference to radio or television reception, which can be determined by turning the equipment off and on, the user is encouraged to try
to correct the interference by one or more of the following measures:
● Reorient or relocate the receiving antenna.
● Increase the separation between the equipment and receiver.
● Connect the equipment into an outlet on a circuit different from that to which the receiver is connected.
● Consult the dealer or an experienced radio/TV technician for help.
XYZprinting is not responsible for any radio or television interference caused by using other than recommended cables and connectors or by
unauthorized changes or modications to this equipment. Unauthorized changes or modications could void the user's authority to operate the
equipment.
This device complies with Part 15 of the FCC Rules. Operation is subject to the following two conditions: (1) this device may not cause harmful
interference, and (2) this device must accept any interference received, including interference that may cause undesired operation.
This device complies with FCC radiation exposure limits set forth for an uncontrolled environment and it also complies with Part 15 of the FCC
RF Rules. This equipment must be installed and operated in accordance with provided instructions and the antenna(s) used for this transmitter
must be installed to provide a separation distance of at least 20 cm from all persons and must not be co-located or operating in conjunction with
any other antenna or transmitter. End-users and installers must be provided with antenna installation instructions and consider removing the
no-collocation statement.
Federal Communications Commission (FCC) Statement
 Loading...