

Page 1

EN
da Vinci 1.0 Pro
Laser Engraving Module User Manual
Product safety
Introducing the laser engraver module
Introducing the installation / detachment of the laser engraving module
Laser engraving operations and instructions
Preferences and settings
Stopping and canceling laser engraving
Product Model:
da Vinci 1.0
Professional
Page 2
da Vinci 1.0
The purpose of this user manual is to help users understand the means of correctly operating the laser engraver module of the da Vinci 1.0 Pro. 3D printer. This manual provides relevant information on operational
knowledge, application techniques, and maintenance of the laser engraver module.
If you wish to learn more about the latest information of the da Vinci 1.0 Pro. 3D printer and the entire catalog
of products offered by XYZ, you are welcome to contact your local dealer or visit the offi cial website of XYZ-
printing: http://www.xyzprinting.com
Pro
Product Safety
●
Important Safety Information
Please read through this manual and all safety reminders carefully before using, operating, dismantling,
replacing, or removing this product. Please also comply with relevant safety reminders and instructions.
Please prevent children from coming into contact with this product on their own or play with the engraver as this may cause injuries or electric shocks.
◆
Do not move the machine when the power supply has been switched on.
◆
Do not open the front door when the machine is running to prevent interrupting the laser engraving process, as this would impact the integrity of the sculpted image.
◆
Do not look directly at the laser engraving process to prevent eye discomfort.
◆
Mild odors may be generated during the engraving process. We recommend working in a well-ventilated and open area to ensure operational comfort.
◆
Please turn off the electric power when dismantling / replacing the laser engraving module.
◆
Ensure that there are personnel around the printer during laser engraving.
◆
Defect reparation must be carried out according to the contents of this instruction manual. Where the defect cannot be repaired, please contact your printer dealer or the
◆
customer service center.
Introduction to the Laser sculpting module
●
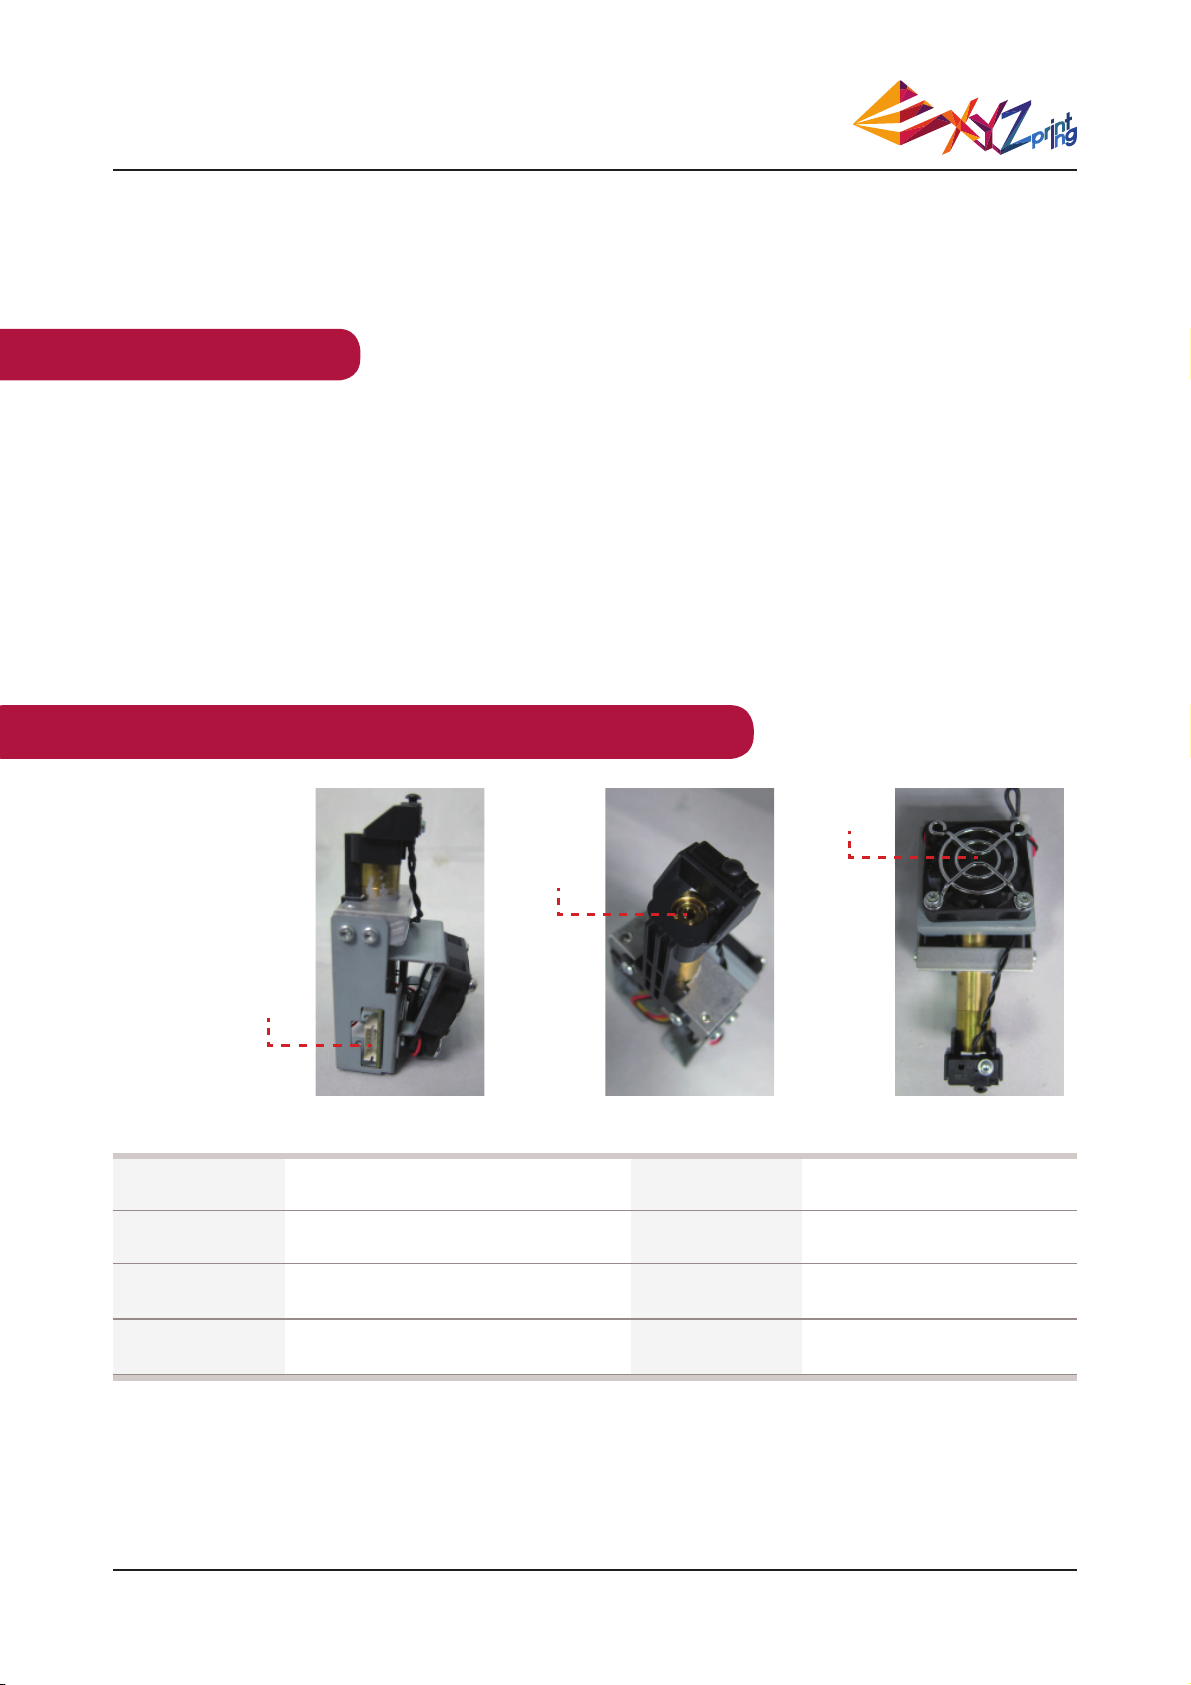
Product Overview
Engraver
head
Heating bus slot
●
Specifi cations
Laser Wavelength
Laser Power for Class 3B
Classifi cation
Engraving area
450nm+5nm/-10nm InGaN
20 x 20 cm
Laser Wavelength
Beam Diameter
File Types
≦
Fan
350mW ~500mW
1mm
JPG / PNG / GIF / BMP
Mode of Operation
●
Recommended laser engraving material:
Paper
◆
P 2 V.1
◆
Note
:
Avoid using materials that are light colored, white, or have glossy surfaces for laser engraving.
Achieve the best engraving results with gray colored or dark colored materials.
CW (Continuous Wave)
Cardboard
◆
Leather
◆
Wood
◆
Plastic
Page 3

da Vinci 1.0
Pro
Introducing the installation / detachment of the laser engraving module
●
Replace the laser engraving module:
Before replacing the extruder module with the laser engraving module, check if there are remaining fi laments in
the nozzle and remove them accordingly.
UTILITIES
CALIBRATE
BUILD SAMPLE
CHANGE NOZZLE
After removing the fi lament,
1
please select [CHANGE NOZZLE].
Unplug the heating bus at the side of the extruder module
4
●
Installing the laser engraving module:
Wait for the panel to display the
2
message that allows you to switch
off the power to replace the
printing module before switching
off the power.
TURN OFF POWER
AND THEN CHANGE
NOZZLE MODULE
5
Move the module manually to the center or
3
any other position that allows easy detachment of the module.
Pull open the quick-detachment lock to release the extruder module. Tilt the module and remove it from the slot. Provide proper
safekeeping of the extruder.
(avoid touching high temperature extruders to avoid burns)
Move the module manually to the center position.
1
Pull the quick-detachment button. Tilt the laser engraving
3
module and insert it into the installation slot.
●
Dismantling the laser engraver module
Switch off the printer power.
◆
Pull the quick-detachment button. Tilt the laser engraver mod-
◆
ule and take it out from the installation slot.
◆
Detach the connected cables.
◆
:
Install the buses, and pay special attention to the upper and lower buses.
2
Press the quick-detachment button and ensure that the
4
module is secured by the locking lever at the correct
position to complete the installation.
Complete dismantling and provide proper safekeeping of the
laser engraver module.
P 3 V.1
Page 4
da Vinci 1.0
Pro
Laser engraving operations and instructions
●
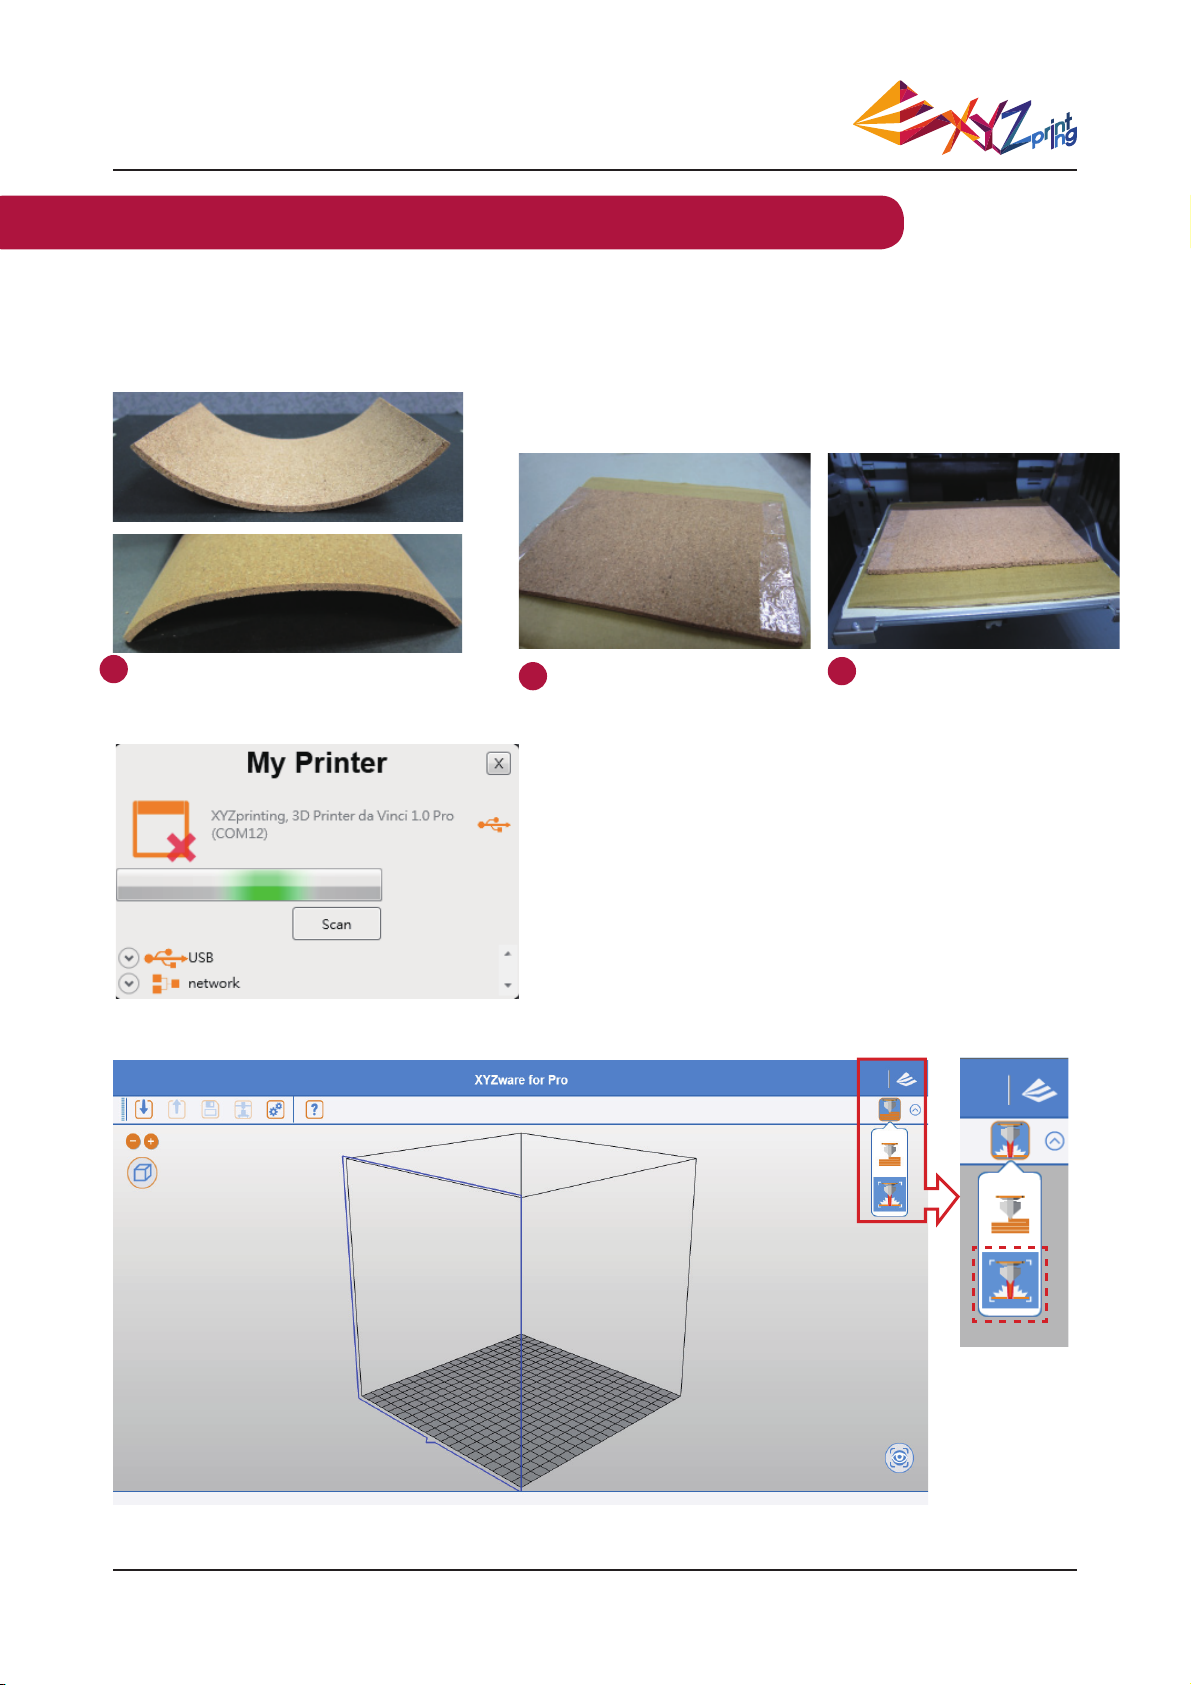
Reminders before laser engraving
The engraving module is only capable of engraving planar objects. The target should thus be placed fl atly on
the panel. Avoid engraving warped or curved objects that are not completely fl at.
The user may use tape to secure and fl atten the object on the platform or other fl at surfaces.
Avoid using engraved materials that are
1
curved or otherwise not fl at.
The user may use tape to secure
2
and fl atten the
object on the platform or other
fl at surfaces.
An example of an item placed
3
within the platform.
Connect the printer to the computer:
◆
Please check that the printer is already connected. After connecting, the “XYZware for
Pro” screen will appear. Select the Switch
to Laser Engraving function at the Tool area
at the top right hand corner of the software
interface.
P 4 V.1
Page 5

da Vinci 1.0
●
Laser engraving process
Pro
A warning screen should appear. Please ensure that the item has been
1
removed from the platform (ensuring that the platform is clear of any item).
Note:
The engraving module is only capable of engraving planar objects. The target
should thus be placed fl atly on the panel. Avoid engraving warped or curved ob-
jects that are not completely fl at.
Support file type:
Yes
Select “Yes” to return the platform to its up-
2
per position. After the platform has reached
its original location, lower it to a suitable
position to place the item to be engraved
upon the platform.
No
Select “Import” on the device to select the graphic fi le you
4
Enter the platform display screen.
3
5
Once the picture fi le has been imported, please
verify that the picture covers the center of the
screen as indicated by the red round dot.
P 5 V.1
wish to engrave.
(the red round dot on the screen will be the
center of the platform)
Page 6

da Vinci 1.0
Move the picture over the red circular dot to cover it.
6
Pro
The user may edit the picture such as by
7
enlarging, shrinking, or rotating it.
Click once to hide the imported fi le. Click on this icon
:
again to show it.
Delete the imported fi le.
:
Once basic editing has been completed, select this "Engrave" icon.
Alternatively, select this "Advanced Engraving Settings" icon to
complete advanced settings before engraving.
P 6 V.1
Page 7
da Vinci 1.0
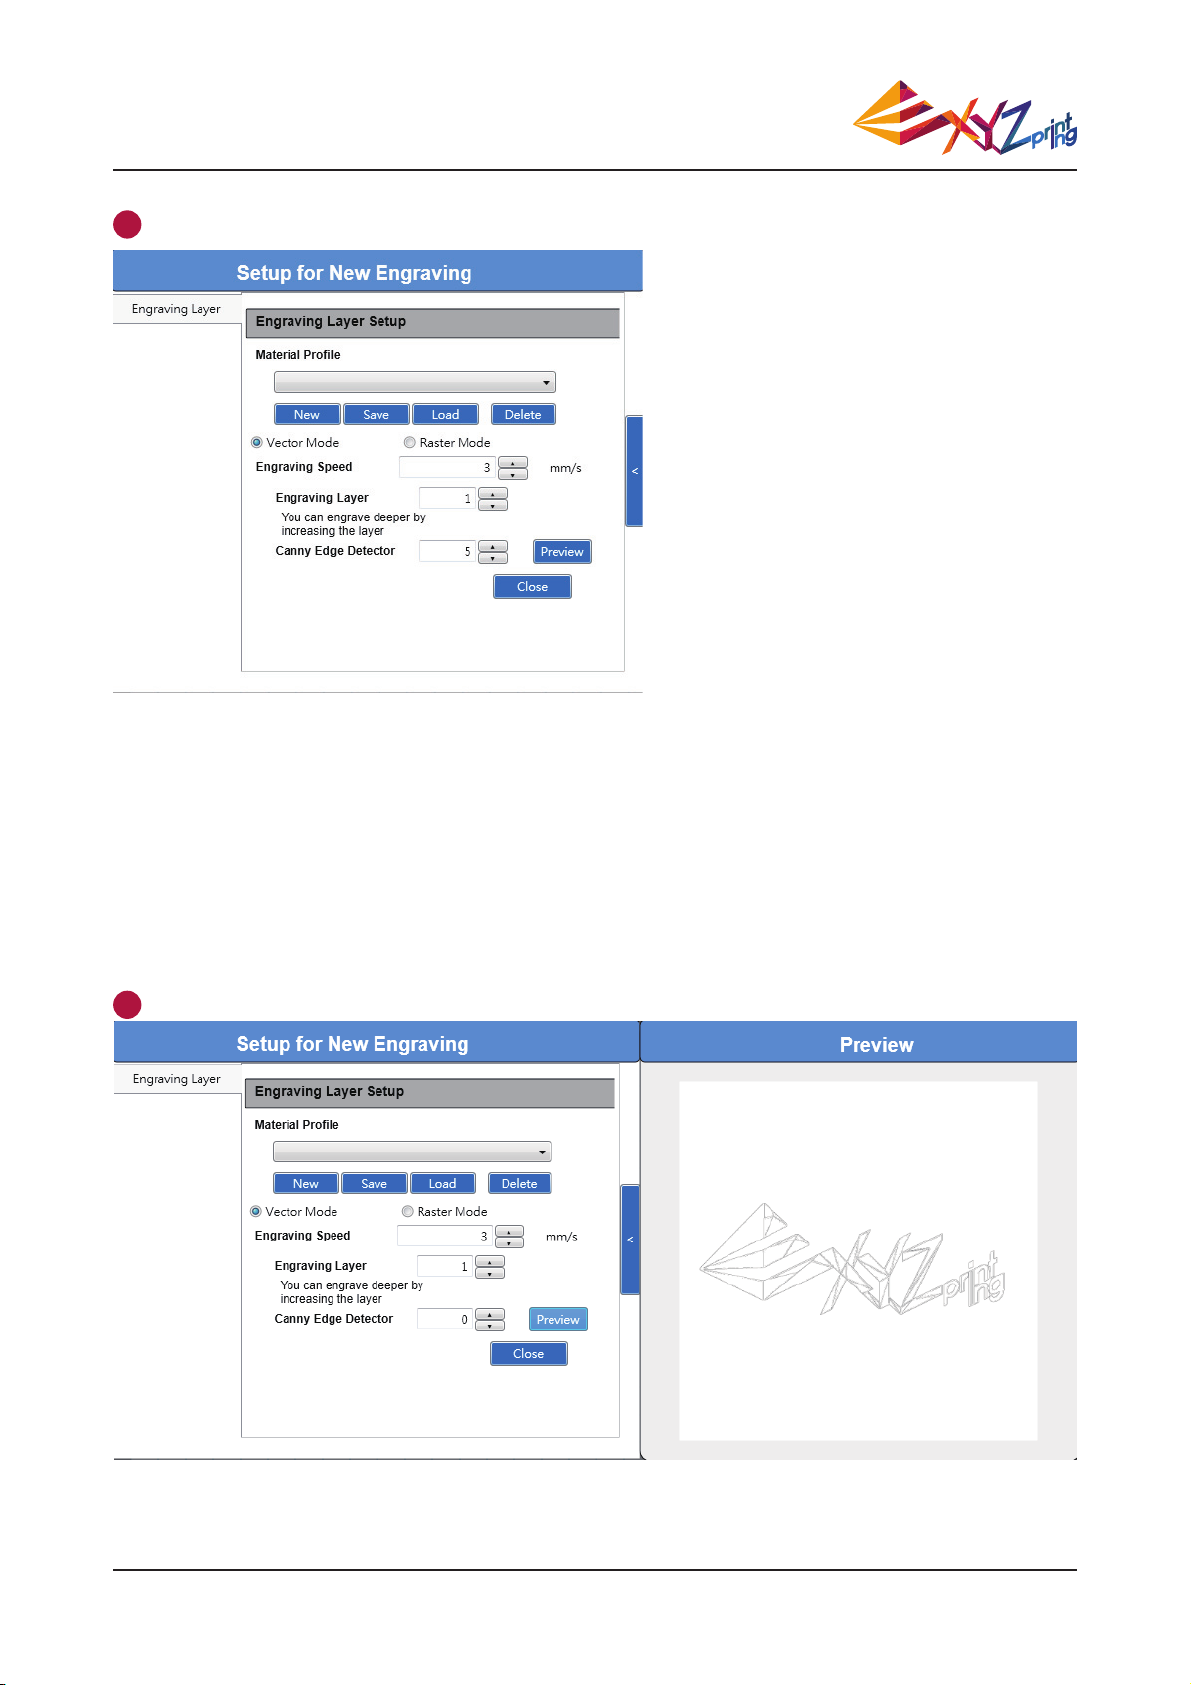
Select "Edit". The software screen shall display the laser engraver settings.
8
Pro
The user may choose between Vector / Pixel engraving modes (default software setting is Vector mode).
◆
Vector:The original form and clarity will be retained. The graphic will be depicted in hollow lines. No jagged
edges will appear.
Raster: Pixel graphics may depict the original appearance and solid lines of the graphic and provides a more
realistic fi nish.
Vector mode preview screen
Once settings have been completed, click on "Preview". A window will be opened on the right side to display the effects:
9
A preview when Canny Edge Detector (sensitivity for contour detection) has been set to 0.
※
P 7 V.1
Page 8

da Vinci 1.0
A preview when Canny Edge Detector (sensitivity for contour detection) has been set to 80.
※
Pro
Raster mode preview screen
A preview when White Color Range (sensitivity for color darkness) has been set to 0.
※
P 8 V.1
Page 9

da Vinci 1.0
g
A preview when White Color Range (sensitivity for color darkness) has been set to 80.
※
Pro
●
Laser engraving parameters and ranges
Item
Vector /
Settings
Engraving Speed
Raster
Vector /
Engraving Layer
Raster
Vector
Raster
An example of laser engraving
●
Canny Edge Detector
White Color Range
Original Vector
Contents
Numerical range
Smaller values will lead to slower engraving speed
but more in-depth engraving effects.
1~30
Set the number of engraving lines. Selecting more
lines will lead to more in-depth engraving effects.
Setting for the contour of lines detected. Smaller
values will lead to more contours detected. Higher
1~20
0~100
values will cause lines to appear clearer and
simpler.
Higher values would ignore more color grades.
Automatic fi ltering and removal of light colored
0~255
portions, retaining parts that have darker shades.
Raster
mm/s
P 9 V.1
Page 10

da Vinci 1.0
Pro
Profi le Settings
●
Save settings:
Once engraving speed and engraving layer parameters have been set, click on “Save” to save
the settings. A fi le preference settings screen will appear.
Enter the fi lename:
Use only English alphabets and number (for example,
the fi le can be named as 1). When complete, click on
“Yes” to add this as a new set of preferences. You may
use the pull-down menu in the Preferences interface to
select the saved preferences.
To select the saved preferences, select Engraving Preferences, click on the pull down menu, fi nd and select
the specifi ed fi le name, and click on “Read”. Engraving speed and layers will be based upon the parameter
values provided in the selected parameter settings.
P 10 V.1
Page 11

da Vinci 1.0
●
Removing the settings:
Pro
To delete a set of saved preferences, click on the engraving Preferences, click on the pull down menu, fi nd and select the
specifi ed fi le name, and click on “Delete”. Click on “Yes” to confi rm the deletion of the selected settings combination.
Yes
●
To restore default preferences and settings:
Click on “Add” to return to the default software settings and combinations. After setting or selecting the laser engraving
1
No
parameters, click on “Apply”. Once the item has been transferred, engraving will commence accordingly.
Once the engraving fi le has been delivered, it will be displayed on the software screen.
2
ENGRAVING
INITIALIZING
PLEASE WAIT
When the item has been transferred, the platform will
3
be raised to its upper position to measure the engraving distance. The platform will then be lowered accordingly. The machine interface will display, “Engraving
Initializing.”
ENGRAVIN 021%
TIME PASS 00h02m
ESTIMATED 00h09m
ACTIVE MENU [OK]
ENGRAVING
COMPLETE
REMOVE OBJECT
[OK] TO RETURN
During engraving, the machine interface will dis-
4
play the expected time required for the process
and the percentage progress.
The machine interface will display this
5
screen once engraving is complete.
P 11 V.1
Page 12

da Vinci 1.0
Pro
Pause and cancel the laser sculpting
●
PAUSE
●
RESUME
Pro. 1
PRINT MODE
PAUSE
CANCEL
Select “PAUSE” to pause the laser
1
PAUSE
ARE YOU SURE?
NO
YES
Select [YES].
2
engraving process.
JOB EILL BE
CANCELLED IF
PAUSED OVER
3 MINUTES
The screen will display “JOB WILL
3
BE CANCELLED IF PAUSED
Pro. 1
PRINT MODE
RESUME
CANCEL
This screen will appear after about 5 seconds. Select
4
“CANCEL” to cancel the task, or “RESUME” to continue.
OVER 3 MINUTES” (after about 5
seconds).
Pro. 1
PRINT MODE
RESUME
CANCEL
To cancel the pause and resume the printing, select “RESUME”. A screen will appear to confi rm whether to resume the
1
engraving process. Select “YES” to continue the laser engraving process.
RESUME
ARE YOU SURE?
NO
YES
●
CANCEL:
Select [YES].
2
CANCEL
ARE YOU SURE?
NO
YES
To cancel the laser engraving job, select “CANCEL”. A screen will appear to confi rm whether to cancel the engraving
1
process. Select “YES” to cancel the laser engraving process.
JOB CANCELING
PLEASE WAIT
Wait for the cancellation of the laser engraving process.
2
JOB CANCELING
COMPLETE
REMOVE OBJECT
[ OK ] TO RETURN
Successful cancellation will stop the laser engraving process.
3
The platform will then be automatically lowered.
P 12 V.1
 Loading...