

Page 1

XYZprinting 3D Food Printer
User Manual
Model : 3C10A
P 1 V1
English
Page 2

P 2 V1
XYZprinting 3D Food Printer User Manual
Contents
1. Introducing the Product ............................................................................................ 3
1-1 Product appearance ............................................................................................4
1-2 Accessories.............................................................................................................. 5
1-3 Specifications .........................................................................................................5
2. Introducing product operations ............................................................................. 6
2-1 My Recipe ................................................................................................................ 8
2-2 Printing from the USB drive ...........................................................................10
2-3 Printing from the PC .........................................................................................11
2-4 Settings ...................................................................................................................12
2-5 Cartridge loading demonstration - cookie dough ................................15
3. Reminders .....................................................................................................................16
4. Safety regulations ......................................................................................................17
Page 3

P 3 V1
XYZprinting 3D Food Printer User Manual
Technology is no longer limited to labs or factories. People of all ages, including
children, can now enjoy the fun made possible by technological developments.
XYZprinting has continued to make remarkable achievements in the field of 3D
printing. In the past 2 years, we have successfully introduced 3D printing technologies
to family settings. In 2015, XYZprinting released food printers never seen before in the
market. 3D printing technology can now be used to print different food ingredients
through an easy to use interface. XYZprinting 3D Food Printer allows users to simply
press a few buttons and create innovative work that integrates digital information
with a diverse selection of materials that may include clay or edible ingredients. XYZprinting 3D Food Printer is not only capable of creating materials in the desired shape
and form; it can also be used for post-production processing and decorations. Inbuilt
sensors allow the printer to accurately measure the item's height and print the materials directly upon the item. Users may print different materials in a variety of colors on
the object to enhance visual aesthetics.
The principle of 3D printing is to extrude materials from the cartridge in a
three-dimensional space, generating layers stacked upon each other to build the desired form. Users can download pictures from the cloud database. Alternatively, they
may also use their own 3D graphics software to create their favorite images. Since the
emergence of this technology, digital technology enthusiasts will be able to demonstrate their skills by actually creating their designs.
XYZprinting has identified market opportunities and lifestyle applications offered
by 3D printing technology, releasing a number of novel 3D printing products that
emphasize convenience and diversity. Our products extend to personal, family, and
educational settings. With the help of printing technology, everyone can become a
designer and creator. We hope that in the not too distant future, the once exclusive
space-age technology of 3D printing will become an integral part of every household.
1. Introducing the Product
Page 4

P 4 V1
XYZprinting 3D Food Printer User Manual
USB port
Touchscreen
Cartridge chamber
Printing chamber
Power switch
USB port
1-1 Product appearance
Page 5

P 5 V1
XYZprinting 3D Food Printer User Manual
Cartridge x3, Screw cap with 1
mm, 2 mm, and 4 mm
diameters (3 of each)
Material plate
(printing bed)
Tray
Transformer
Power cord
USB cable
Printing
chamber cover
1-2 Accessories
1-3 Specifications
Printer
dimension
Printing
method
Extruder
diameter
Operations
Connection
Maximum
printing
dimension
Printing
thickness
Software
System
support
File format
150 x 200 x 150 mm
0.8-3.2mm
Foodware
Win 7/Win 8
STL and XYZ format (.3wf)
471 x 480 x 610 mm
Pressure injection, multiple
cartridge model 100 cc*3
1 / 2 / 4 mm (adjustable)
5" touchscreen
USB 2.0
Page 6

P 6 V1
XYZprinting 3D Food Printer User Manual
The power switch is located at the
side of the printer near the bottom.
Please make sure that the printer is
placed on a stable platform before
plugging it into a power source and
switching it on.
This printer model is capable of
being loaded with 3 cartridges for
3 different material types. Opening
the cover of the cartridge chamber
will reveal 3 slots numbered 1, 2, and
3 from right to left. Cartridges must
be loaded in a proper sequence. You
must start loading from slot 1 before
proceeding to the slot on the left.
If the cartridges are not installed in
this particular sequence (1 to 3), the
carrier will be unable to retrieve the
cartridge (such conditions may arise
when: Only 1 cartridge is placed
in slot 2 or slot 3 while slot 1 is left
empty).
Plug in the power socket
and switch on the printer
The printing chamber cover
is provided together with the
printer. Please refer to the
picture and install the cover
securely.
Install the printing
chamber cover
Installing the cartridges
in the cartridge chamber
2. Introducing product operations
01
02
03
1
2
3
Page 7

P 7 V1
XYZprinting 3D Food Printer User Manual
When printing, place the lining paper
on the material plate. The user may also
use double-sided tape to temporarily
secure and smoothen the lining paper.
Note! Unevenness of the lining paper
will severely affect printing quality.
Placing the lining paper
on the material plate
●
Cartridges that have been detected by the printer will be colored
to provide easy identification. This
shows that the printer has already
detected the cartridge.
Please refer to the steps below to combine the material plate and tray
and load them into the printing chamber.
Loading the material plate and tray
Place the material
plate in the center
of the tray (the orienting hole must be
pointing outside).
Orient the tray so
that it becomes
horizontal and slide
it into the printing
chamber (please
make sure that the
tray can slide back
and forth smoothly
on the rolling rail)
Please slide the front
edge of the tray
diagonally so that it
makes contact with
the rolling wheel.
●
Once the cartridge has been installed, return to the Main Screen
to check if the printer has detected
the cartridge.
Check if the printer has
detected the cartridge
04
05
06
Page 8

P 8 V1
XYZprinting 3D Food Printer User Manual
Confirm the picture displayed on the
screen and press the print icon displayed at the bottom right corner.
Press the Print Icon
My Recipe
Select the option of "My Recipe" and
click on the picture of your desired
printing project. If you want to print
from a USB drive, please enter the
file name and skip to Step 14.
Print data can be derived from 3 sources:
●
My Recipe
●
USB
●
Computer connection (for printing
using computer connections, please
refer to the software manual)
Select "My Recipe"
Return to the Main Screen and
press "Make" to start your printing
project.
Select "Make" from the
touchscreen
2-1 My Recipe
07
08
01
02
Page 9

P 9 V1
XYZprinting 3D Food Printer User Manual
Before pressing the button to initiate
printing, please check that: 1. The cartridges have been installed in the slots;
2. The lining paper has been placed
upon the material plate; 3. There are no
cartridges on the moving platform.
When materials run out during the
printing process, the user may use the
Cartridge Replacement option to use
materials from "Cartridge 1 Only" or
"Cartridge 2&3".
"Cartridge 1 Only": The printer will
return the spent cartridge to the cartridge chamber. The user may take out
the spent cartridge and place a new
cartridge in slot 1. The printer will then
load a new cartridge and continue
printing.
"Cartridge 2&3": The printer will return
Cartridge 1 to its slot in the cartridge
chamber and automatically load cartridges from slot 2 and slot 3 accordingly to continue printing.
The touchscreen shall display printing
time, remaining time, and percentage
progress.
Press "Start" to confirm
printing or "X" at the top left
corner to cancel the printing.
"Cartridge Replacement"
option
Start printing
After printing is complete, wait for the cartridge to be
returned to its original location before retrieving the
finished product.
03
04
05
06
Page 10

P 10 V1
XYZprinting 3D Food Printer User Manual
Enter "My Recipe" folder
and click on the "pen and
paper" icon at the top right
corner to start editing
The "Option" screen will be
displayed. Select the "Add"
or "Remove" icons to add
or remove files respectively
from your USB.
Insert your USB drive.
"USB" will be shown in the
Main Screen
Ensure that the USB is successfully
read (an arrow will be displayed at
the bottom of the USB when successfully read)
2-2 Printing from the USB drive
01
02
03
04
Page 11

P 11 V1
XYZprinting 3D Food Printer User Manual
Selecting "Add" will open
the USB and display the
folders contained within.
Please select the picture
files you wish to add (multiple selection allowed).
Once you have verified
the files selected, select
"Done" at the top right
corner to transfer the file
to the machine.
Repeat Steps 1 to 6 of section 2-1 to print the files.
Use the USB cable to connect
the printer to the PC (for detailed
settings of printing parameters,
please refer to the software user
manual).
Please open Foodware and then
select "Import" to import the files
(in .stl format).
Importing the files
2-3 Printing from the PC
05
06
01
02
Page 12
P 12 V1
XYZprinting 3D Food Printer User Manual
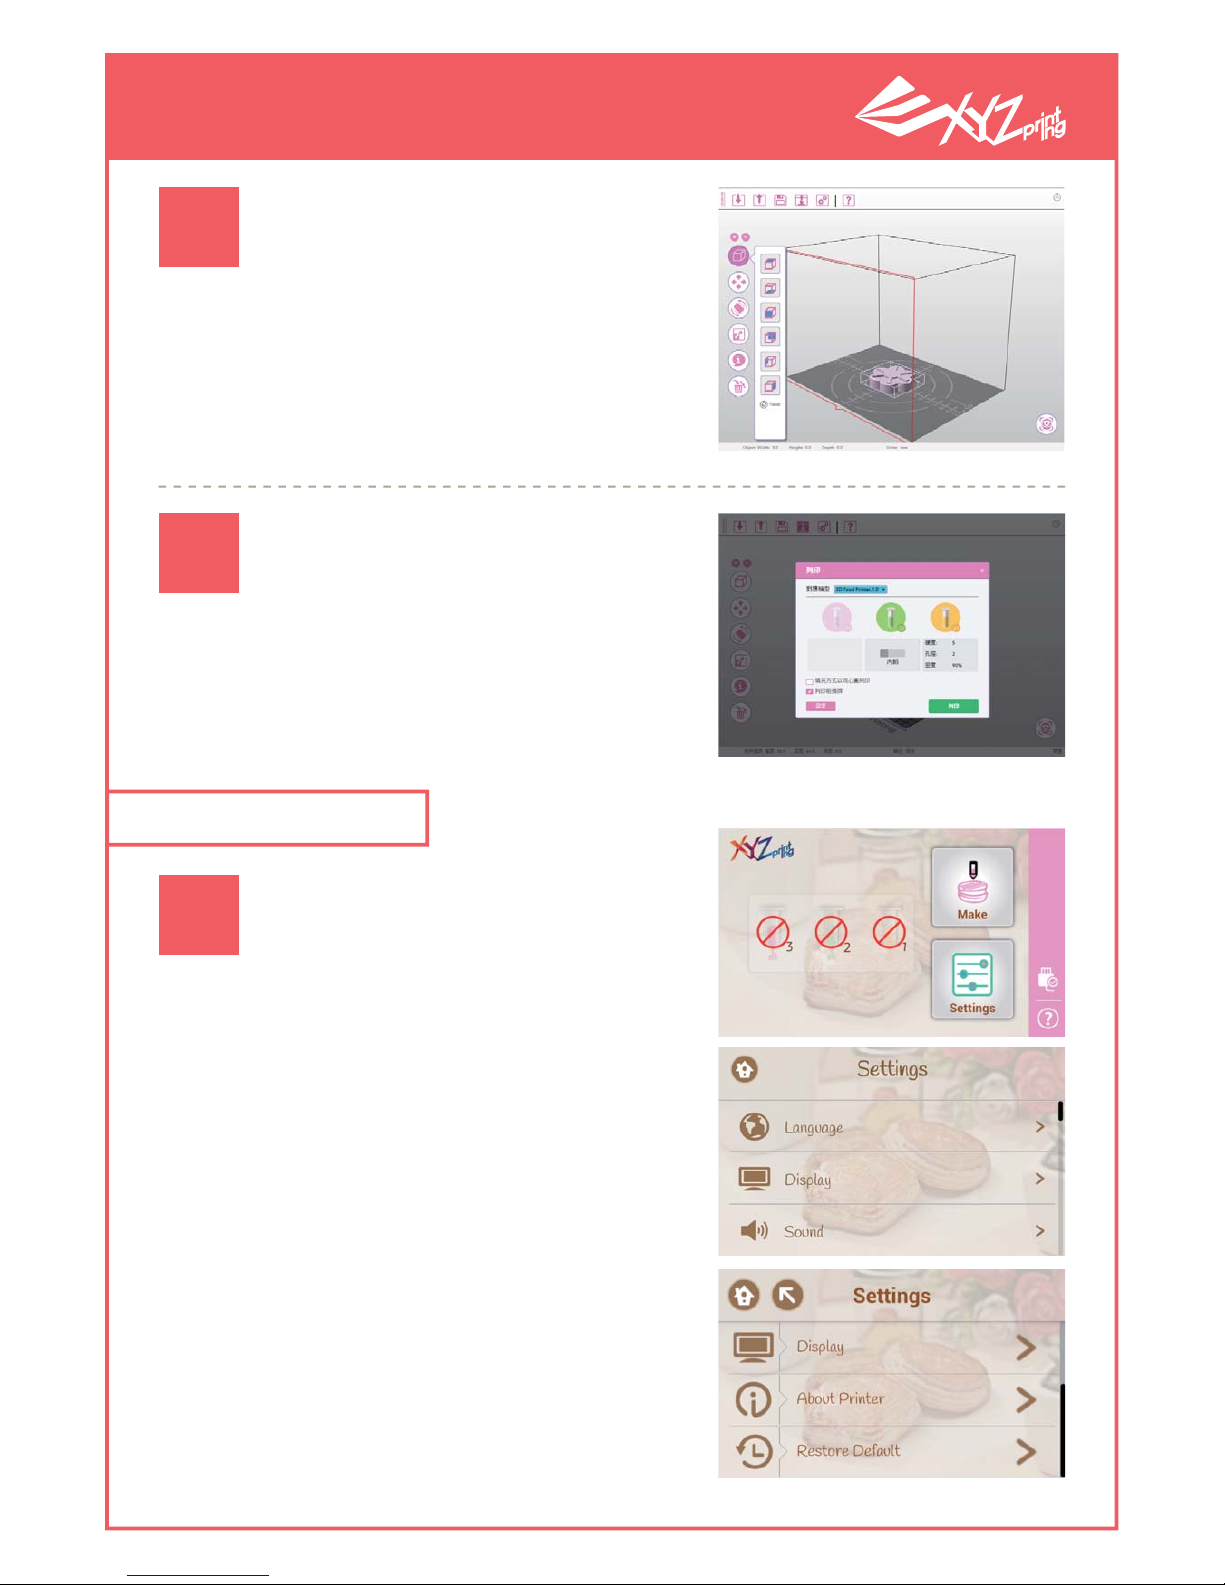
After verifying the print dimensions, select "Print" to adjust the
parameters accordingly and begin
printing.
Press the "Settings" icon on the
Main Screen to enter the printer
settings screen.
Press "Print" after adjusting
the parameters
Select "Print" to initiate printing.
Before printing, please check that
the cartridges, lining paper, and
material plate have been placed
accordingly.
Printing after verification
2-4 Settings
03
04
01
Page 13

P 13 V1
XYZprinting 3D Food Printer User Manual
Press the "Language" function in
the settings screen to bring up the
language options. The printer offers multiple languages to choose
from.
Press the "Sound" function in the
settings screen to change the
sound when pressing the button.
"0" means that no sound will be
played.
Press the "Display" function in the
settings screen to enter the "Brightness" and "Sleep" options. The user
may use these options to adjust
screen brightness as well as printer
sleep time.
"Language"
"Sound"
"Display"
02
03
04
Page 14
P 14 V1
XYZprinting 3D Food Printer User Manual
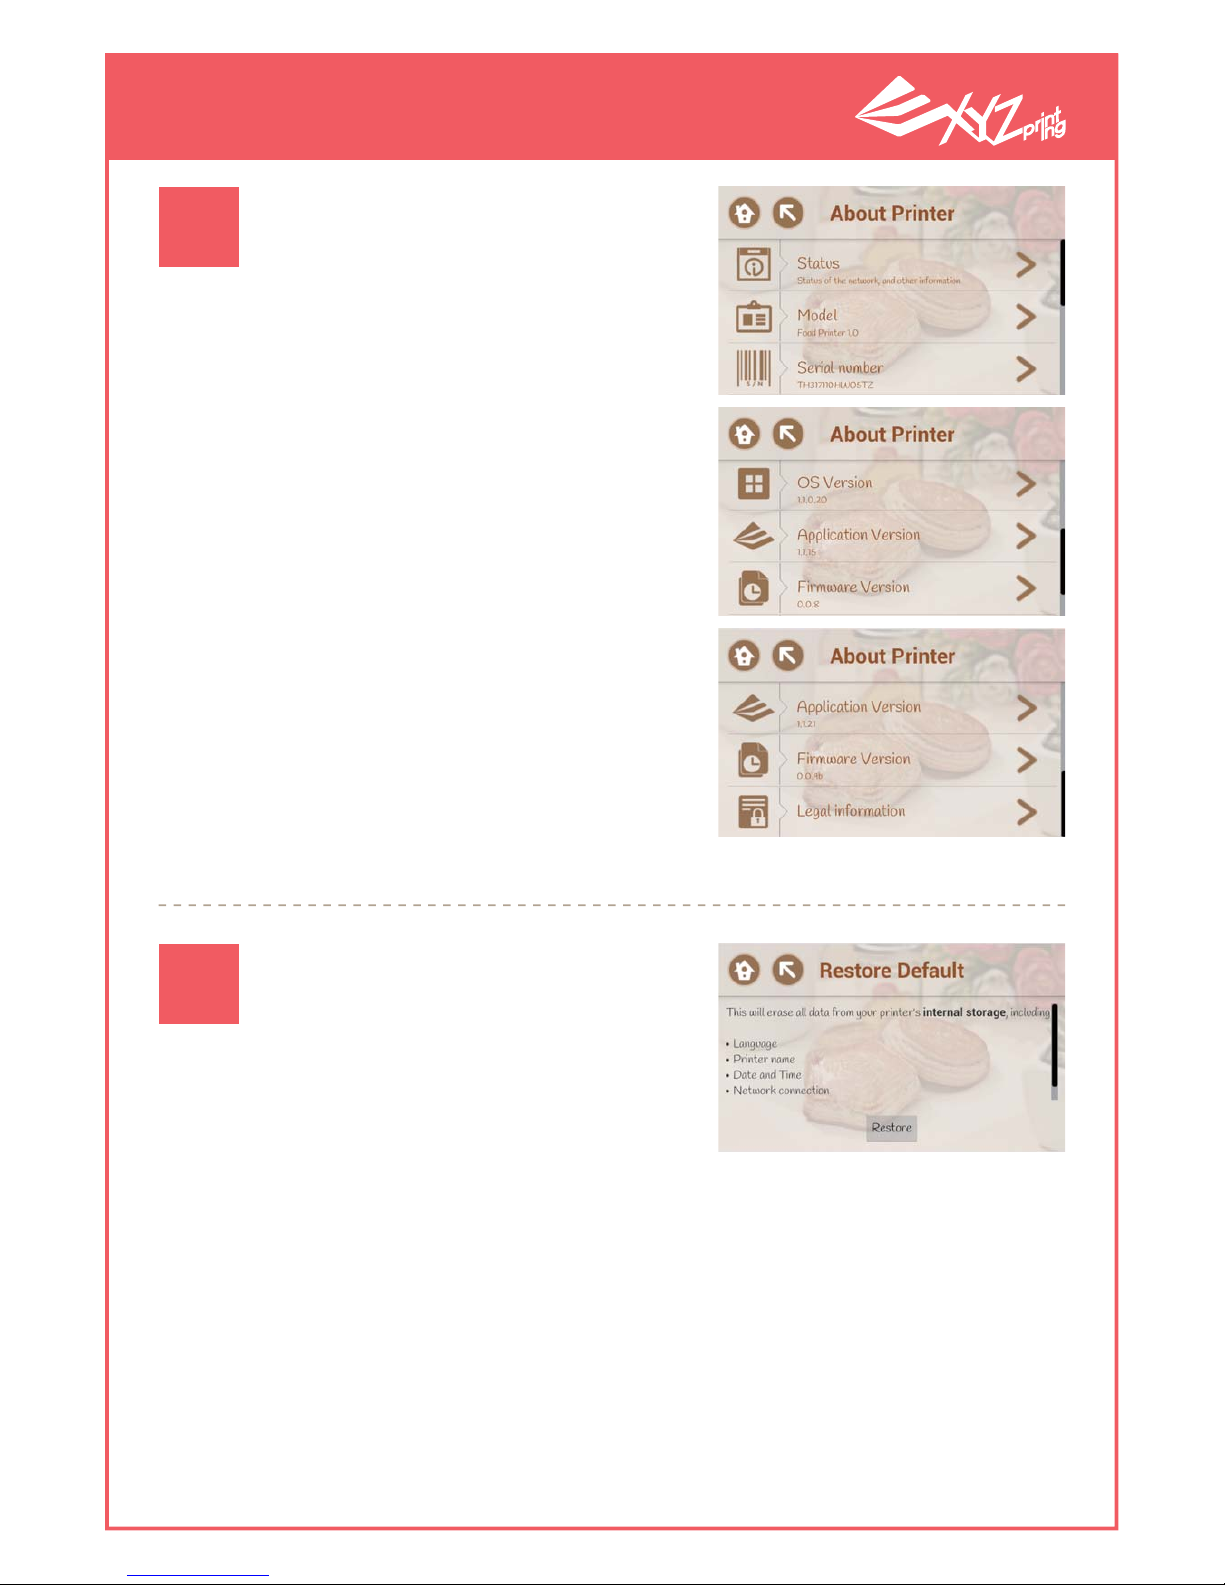
"About Printer" shows the machine's current status, including
Status, Model, Serial Number, OS
Version, Application Version, Firmware Version, and Legal Information.
Click "Restore" to let the system
clear user-stored data in the printer
and return all parameter to factory
settings.
"About Printer"
"Restore Default"
05
06
Page 15

P 15 V1
XYZprinting 3D Food Printer User Manual
Prepare the cartridge and the materials
to be loaded into the cartridge.
This 3D printer is mainly used to print paste-like materials. The picture shows the cookie dough.
The cartridge will use pressure injection to extrude the material and stack them to form the desired 3D shape. The cookie dough offers many potential applications. Users are free to use their
creativity and use different materials as needed.
Fill the material so that it is level with the
cartridge outlet, and then place the screw
cap.
Before refilling, make sure that the cartridge tube is dry, the screw cap has been
removed, and that the plunger is pushed
to the cartridge outlet end.
Use the spoon to load the material. Push the plunger forward from the inlet
end of the cartridge and make sure that
the material is extruded from the nozzle.
Refill the cartridge with the material by
using the spoon and make sure that the
material is tightly packed.
2-5 Cartridge loading demonstration - cookie dough
01 04
0502
03
Page 16

P 16 V1
XYZprinting 3D Food Printer User Manual
● Only start printing when the printer is placed on a level surface.
● Do not move the printer when it is switched on (or during printing).
● The printer is heavy. Please use both hands when carrying the printer. Please place the
printer gently and avoid bumping heavily against the printer as this may affect printer functions.
● If the printer must be transported for long periods of time (on vehicles), please secure
the printer carrier at 3 locations using cable ties (please refer to the unpacking instructions provided on the Quick Guide for these locations)
User requirements
Emergency handling
● Do not place in the printer in an overly humid area.
● Keep the cover closed before and after use.
● The maximum load of the cartridge is when the material layer is even with the cartridge extruder after closing the plunger cover. Loading excessive materials may
cause it to leak which may contaminate the printer and prevent normal functions.
● If the printer malfunctions, please immediately stop its use and unplug the power cable. Continued use may lead to printer damage.
● If the printer malfunctions, please contact the dealer or XYZprinting customer service
personnel promptly. Do not attempt to repair the machine on your own.
3. Reminders
Page 17

P 17 V1
XYZprinting 3D Food Printer User Manual
Warning Screen
Before printing
During printing
After printing
● Do not reach your hand into the printing chamber during printing.
● Do not open the cartridge chamber cover. This may prevent the carrier from loading and
replacing the cartridges properly.
● The user may manually stop the printing process during printing. If the printer jams or if
printing is stopped during the printing process, please shut down the printer, wait for several
seconds before restarting the printer and reprint your project.
● The material plate is constructed using plastics. Please avoid exposing the plate to high temperatures as this may damage the plate.
● Please check if the external cover of the cartridge chamber has been closed properly to ensure that the carrier is able to load the materials properly.
● If the user intends to print materials on an existing object, please ensure that the top part of
the object to be printed is level and even. Uneven surfaces will seriously affect print results.
4. Safety regulations
 Loading...