

Revolutionary Alarm Clock
and Room Audio System
User Manual

LUNA™ User Manual
2
LUNA™ User Manual
3
“TIME IS THE MOST
IMPORTANT:
Please read all safety instructions before proceeding. The answers to
most set up and performance questions can be found in this manual or in
the Troubleshooting Guide. If you have any further questions about the
operation or use of this product please contact our customer service team
for assistance before returning it to the place of purchase.
VALUABLE THING A MAN
CAN SPEND.”
TheophrasTus
Welcome to Luna.
Thank you for purchasing Luna, a revolutionary alarm clock + room audio
system made for your iPod. Luna lets you create the perfect sleeping and
waking environments and enjoy outstanding audio throughout the day.
With Luna’s user-friendly controls you can simply set the clock and alarm
time, or customize everything from the display brightness to the snooze
timer. Luna’s innovative menu system looks and functions much like your
iPod, and is just as easy to navigate. Keep it simple or customize it all – this
manual will show you how to do just that.
CONTENTS
Safety Information 03
Warranty Information 05
What’s Included 06
Unpacking 06
Initial Setup 06
Controls and Connections 08
Using the Remote Control 10
Basic Setup 12
Setting the Alarms 13
Alarm Operation 16
Listening to Audio 16
Setting the Sleep Mode Preferences 18
Restoring Default Settings 18
Replacing the Remote Battery 18
Troubleshooting 20
Customer Service:
Email: support@xtrememac.com
Telephone number: 1-866-392-9800 Toll free within the United States
Hours of operation: Monday through Friday, 9am – 6pm EST
Product Safety
When used in the directed manner, this unit has been designed and
manufactured to ensure your personal safety. However, improper use can
result in potential electrical shock or fire hazards. Please read all safety and
operating instructions carefully before installation and use, and keep these
instructions handy for future reference. Take special note of all warnings
listed in these instructions.
The lightning flash with arrowhead, within an equilateral
triangle, is intended to alert the user to the presence of
uninsulated “dangerous voltage” within the product’s
enclosure that may be of sufficient magnitude to
constitute a risk of electric shock to persons.
Caution: To prevent the risk of electric shock, do not
remove cover (or back). No user-serviceable parts
inside. Refer servicing to qualified service personnel.
The exclamation point within an equilateral triangle
isintended to alert the user to the presence of
important operating and maintenance (servicing)
instructions in the literature accompanying the
appliance.
CAUTION: To prevent electric shock do not use this (polarized) plug
with an extension cord, receptacle or other outlet unless the blades
can be fully inserted to prevent blade exposure.
WARNING: TO REDUCE THE RISK OF FIRE OR ELECTRIC SHOCK,
DO NOT EXPOSE THIS APPLIANCE TO RAIN OR MOISTURE.
IMPORTANT SAFETY INSTRUCTIONS
1. Read these instructions.
2. Keep these instructions.
3. Heed all warnings.
4. Follow all instructions.
5. Do not use this apparatus near water — This apparatus shall not be
exposed to dripping or splashing, and no objects filled with liquids, such
as vases, shall be placed on the apparatus.
6. Clean only with dry cloth.
7. Do not block any ventilation openings. Install in accordance with the
manufacturer’s instructions. The apparatus should not be situated on a
bed, sofa, rug or similar surface that may block the ventilation openings.
The apparatus must not be placed in a built-in installation, such as a
closed bookcase or cabinet that may impede the flow of air through the
ventilation openings. Ventilation should not be impeded by covering the
openings with items such as newspapers, tablecloths, curtains, etc.

LUNA™ User Manual
4
LUNA™ User Manual
5
8. Do not install near any heat sources such as radiators, heat registers,
stoves, or other apparatus (including amplifiers) that produce heat.
9. No naked flame sources, such as lighted candles, should be placed on
the apparatus.
10. Do not defeat the safety purpose of the polarized or grounding-type
plug. A polarized plug has two blades with one wider than the other.
A grounding type plug has two blades and a third grounding prong.
The wide blade or the third prong are provided for your safety. If the
provided plug does not fit into your outlet, consult an electrician for the
replacement of the obsolete outlet.
11. Protect the power cord from being walked on or pinched —particularly
at plugs, convenience receptacles, and the point where they exit from
the apparatus.
12. Do not install in an area which impedes the access to the power plug.
Disconnecting the power plug is the only way to completely remove
power to the product and must be readily accessible at all times.
13. Power source —Use only power supplies of the type specified in the
operating instructions or as marked on the appliance. If a separate
power supply is included with this apparatus, do not substitute with any
other power supply —use only manufacturer-provided power supplies.
14. Unplug this apparatus during lightning storms or when unused for long
periods of time.
15. Refer all servicing to qualified service personnel. Servicing is required
when the apparatus has been damaged in any way, such as powersupply cord or plug is damaged, liquid has been spilled or objects have
fallen into the apparatus, the apparatus has been exposed to rain or
moisture, does not operate normally, or has been dropped. For service,
refer to qualified service personnel, return to the dealer, or call the
XtremeMac service line for assistance.
16. For products which incorporate batteries, please refer to local
regulations for proper battery disposal.
17. Only use attachments/accessories specified by the manufacturer.
Federal Communication Commission: Verified to comply with FCC
Rules for Radiated and Conducted Emission, Part 15, Subpart B,
for Class B Equipment.
Warranty Information
What Does The Warranty Cover? XtremeMac warrants that its products
shall be free from defects in materials or workmanship, with the exceptions
stated below.
What Is The Period Of Coverage? This warranty runs for 90 days from the
date of purchase.
What Does The Warranty Not Cover? This warranty does not cover any
defect, malfunction or failure that occurs as a result of: misuse or failure
to follow the product directions; abuse; or use with improper, unintended
or faulty equipment. Also, consequential and incidental damages are not
recoverable under this warranty. Further, opening up the unit or removing
any pieces from the product will immediately render your warranty null and
void.
What Will XtremeMac Do To Correct The Problem? XtremeMac will,
at its option, repair or replace any product that proves to be defective in
material or workmanship. If your product is no longer being manufactured,
or is out of stock, at its option, XtremeMac may replace your product with a
similar or better XtremeMac product.
How To Get Warranty Service? To get a covered product repaired or
replaced, you must contact XtremeMac during the warranty period by
either calling (866) 392-9800 if you are in the U.S., or by e-mail (support@
xtrememac.com). If you email XtremeMac, you must include your name,
address, email address, telephone number, date of purchase and a
complete description of the problem you are experiencing. If the problem
appears to be related to a defect in material or workmanship, XtremeMac
will provide you a return authorization and instructions for return shipment.
Return shipments shall be at the customer’s expense, and the return
must be accompanied by the original proof of purchase and in the original
packaging. You should insure the shipment as appropriate because you are
responsible for the product until it arrives at XtremeMac.
The above limited warranties and remedies do not extend to the iPod used
with the product.
This device complies with Part 15 of the FCC Rules. Operation is subject
to the following two conditions: This device may not cause harmful
interference. This device must accept any interference received, including
interference that may cause undesired operation. Note that FCC regulations
provide that changes or modifications not expressly approved by
XtremeMac could void your authority to operate this equipment.
CE Compliance for Europe: Verified to comply with EN55013, for
RF Emissions and EN55020 for Immunity as applicable.
C-Tick Compliance for Australia: Verified to comply with
AS/NZ1053 for RF Emissions as required by the Australian
Communications Authority.
Copyright © 2006 Xtreme Accessories, LLC. XtremeMac, Luna and the
“X” logo are trademarks of Xtreme Accessories, LLC. Designed in the USA.
Made in China.For customer service and warranty information visit our
website at www.XtremeMac.com, or call toll-free in the USA: 1-866-392-
9800. iPod is a trademark of Apple Computer, Inc., registered in the U.S.
and other countries. Patent pending.
LUNA™ User Manual
6
LUNA™ User Manual
7
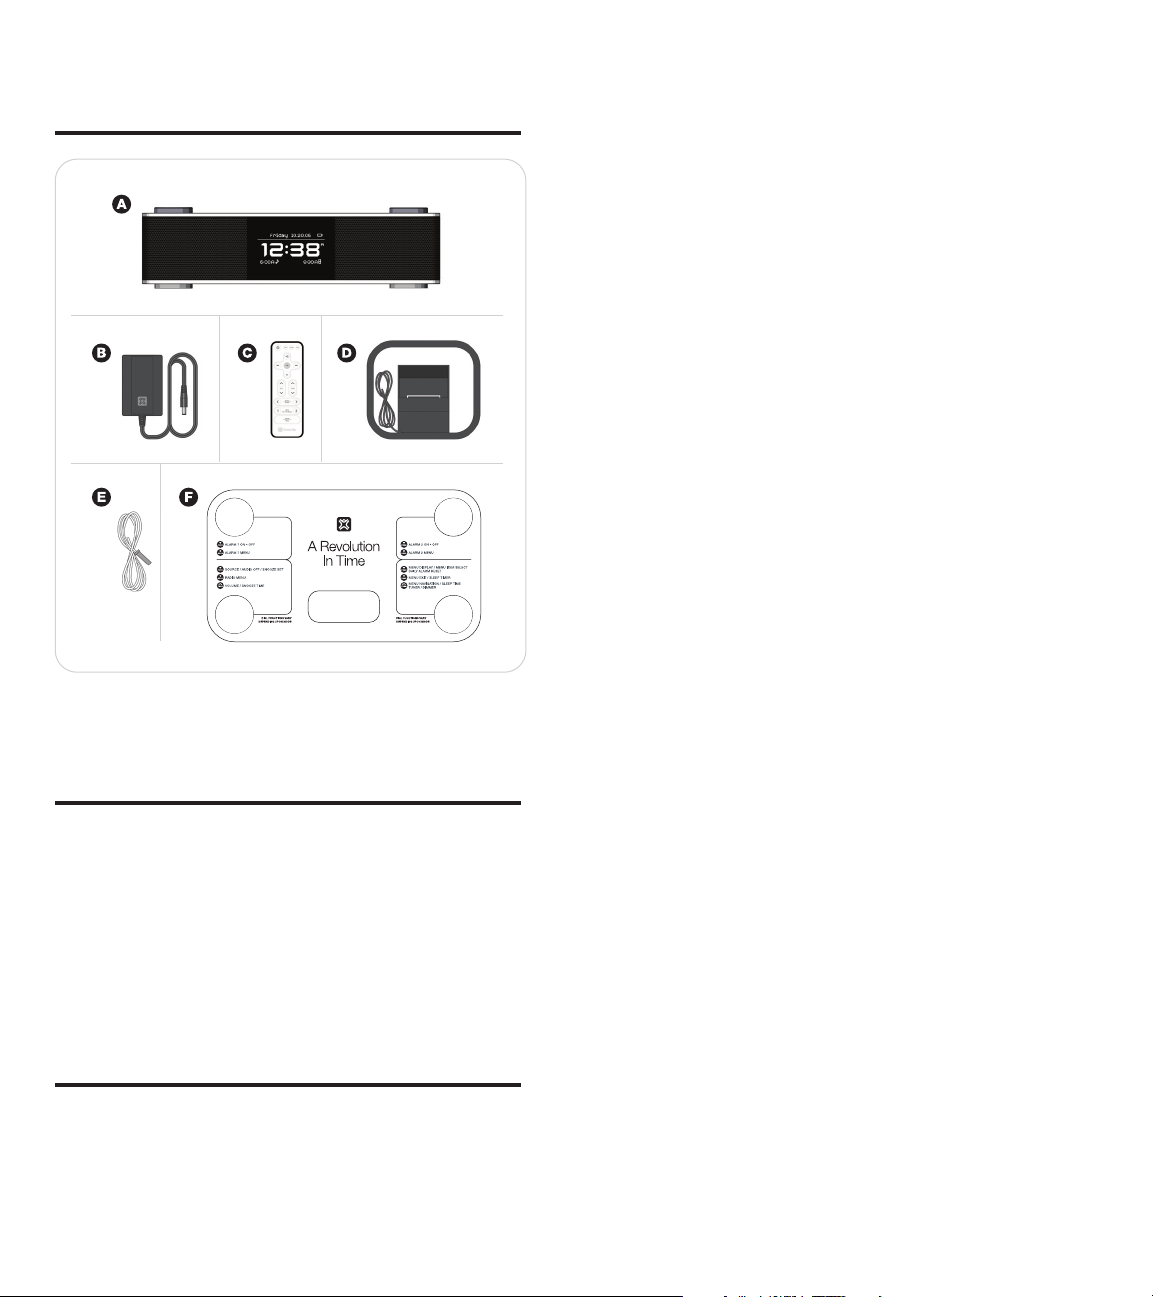
What’s included
A. Luna Main Unit, B. AC Adapter (Power Supply), C. Remote control
D. AM Loop Antenna, E. FM Antenna, F. Quick Start Guide
Unpacking
1. Remove foam from box with the manual/compliance card compartment
facing upward.
2. Remove the foam lid.
3. Remove Luna from the foam and then remove the unit from the foam
bag protecting it.
4. Place Luna on a level surface following the precautions listed in the
safety warnings.
5. Remove AC Adapter, Remote, Batteries and AM/FM Antennas from foam
and plastic bags.
6. Read and review manual and safety guide.
7. Retain the original packaging for the warranty period of 90 days.
Intial Setup
Install batteries for time and date backup:
Luna uses a backup battery system to retain the date/clock setting in the
event of a power failure. Luna also features a built-in power back up that
will save the time in the event of a short power failure for up to five minutes
– even without the backup batteries installed.
If the batteries have been installed properly and a power failure occurs or
the AC cord is accidentally disconnected for more than five minutes, the
current time and alarm settings will be maintained.
1. Open battery compartment cover located on the bottom of the unit.
2. Insert two AA batteries, checking that the polarity (+ and – ends of the
batteries) matches the image on the inside of the battery compartment.
3. Close the compartment cover.
Note: A battery symbol will flash in the upper right hand side of the main
screen when the backup batteries need to be replaced.
Battery Information:
• Do not mix old and new batteries
• Do not mix alkaline, standard (carbon-zinc) or rechargeable (nickelcadmium) batteries
Connect AM Loop Antenna
Fold the built-in foot to stand the antenna loop upright, being careful not
to pinch the cord. Next, extend the antenna so that the cord is laid out flat.
Take the braided portion of the cord and insert one of the exposed ends
into each of the two jacks on the back of Luna labeled “AM”. To do this, you
must lift up the lever and insert one wire into each jack. For best reception,
move the AM antenna away from the unit.
Connect FM Antenna
Place the gray end of the antenna into the jack on the back of Luna labeled
FM. Next, extend the antenna so that it is laid out flat and not tangled. For
best reception, the FM antenna should be positioned vertically above Luna.
The positioning of the antenna should be done while the unit is on and in
FM mode.
Connect the AC Adapter
Connect the AC adapter into the jack on the back of Luna labeled “Power”,
then plug the AC adapter into the wall outlet.
Universal Dock Well
Your iPod comes with a dock well insert from Apple. This insert will work
with Luna and all other products with a Universal dock well. Additionally,
your XtremeMac case may come with an insert that will allow you to dock
your iPod in Luna with the case still on.*
Docking your iPod:
1. Remove the plastic cover protecting the iPod connector on Luna. You
may retain this cover to protect the connector when not in use, but it is
not necessary.
2. Select the proper insert* for your iPod – use the one that came with your
iPod or the one that came your XtremeMac case.*
3. Gently press the insert into the dock .
4. Carefully place your iPod into the dock.
5. To remove/replace an insert, first remove your iPod, then grip the insert
in the back and gently pull upwards.
*Only select cases from XtremeMac have a dock insert included.

LUNA™ User Manual
8
LUNA™ User Manual
9
Controls and Connections
Please review these controls and connections as they are referred to
throughout the manual. Note that the items are labeled with the user facing
the unit.
1. Multifunction Display
Variable brightness display with time, day/date, audio source, and
alarm times shown on main screen. In menu mode, it shows all the
customizable options.
2. Universal Dock Well
Accommodates iPod models with dock connector. Before docking your
iPod, remove the plastic cover protecting the dock connector and insert
the appropriate dock well insert for your iPod.
3. Left Control Knob
To toggle through source options, turn audio off, and activate
snooze while the alarm is sounding.
To access Radio menu
To control volume when an audio source is playing or increase/
decrease snooze time when in snooze mode.
4. Alarm 1 Button
To activate/deactivate Alarm1
To navigate through the menu, increase/decrease the sleep time
when in sleep mode or increase/decrease the brightness of the
display when not in menu or sleep mode
1. AM Loop Antenna Jacks
Connect the included AM loop antenna into these jacks by placing one
wire into each jack for AM reception
2. FM Antenna Jack
Connect the included FM antenna into this jack for FM reception
3. AUX/LINE IN Jack
To listen to iPod models without a dock connector or an alternative audio
device, connect an auxiliary 3.5mm stereo audio cable to this jack and
the other end to the device.
4. Power Jack
Connect the AC adapter into this jack and then plug the AC adapter into
the wall outlet.
5. Battery Compartment
Holds two AA batteries for time and date backup in case of a power
failure.
To enter Alarm 1 menu
5. Alarm 2 Button
To activate/deactivate Alarm 2
To enter Alarm 2 menu
6. Right Control Knob
To enter the main menu, select a menu item or reset the daily alarm
when the alarm is sounding
To exit the main menu or to activate the sleep timer when an audio
source is playing.

LUNA™ User Manual
10
LUNA™ User Manual
11
Using the Remote Control
Before using the included remote, make sure to pull out the “Remove” tab
protecting the battery.
Many of Luna’s functions can be controlled from across the room with the
included remote. When using the remote, the display adjusts to show the
commands at full screen size so that they can be seen easily from across
the room.
3. Shuffle Button
Toggles through shuffle off, shuffle songs and shuffle albums in your
iPod settings.
4. Reset Button
Resets the bass and treble back to default settings.
5. Volume up/Volume down Buttons
Increases/decreases the volume while an audio source is playing.
Sleep/Snooze mode: Increases/decreases the sleep or snooze time
while the mode is displayed on the screen.
6. Play/Pause Button
Plays and pauses the iPod.
7. Previous Button
iPod mode: Press to go to previous track or hold to fast rewind through
current track.
Radio mode: Press to tune the frequency down
8. Next Button
iPod mode: Press to skip to next track or hold to fast forward through
current track.
Radio mode: Press to tune the frequency up
9. Treble up and down Buttons
Increase/decrease treble
10. Bass up and down Buttons
Increase/decrease bass
1. Power On/Off Button
Turns the audio source On/Off.
2. Source Button
Changes audio source – select from “iPod”, “FM radio”, “AM radio” or
“Aux”.
11. Playlist/Presets (Previous and Next) Buttons
iPod mode: Skip to previous/next playlist
Radio mode: Selects presets
12. Alarm 1 On/Off/Reset Button
Activates/Deactivates Alarm 1 and resets Alarm 1 for the next day
when pressed while alarm is sounding.
13. Alarm 2 On/Off/Reset Button
Activates/Deactivates Alarm 2 and resets Alarm 2 for the next day
when pressed while alarm is sounding.
14. Snooze/Sleep Button
Sleep mode: Activates sleep when pressed when and audio source is
playing
Snooze mode: Activates snooze when pressed while alarm is sounding

LUNA™ User Manual
12
LUNA™ User Manual
13
Basic Setup
Luna is controlled using the two control knobs at the front of the unit and
the two buttons at the rear of the unit. Luna’s innovative menu system looks
and functions much like your iPod, so it is easy to navigate. Please review
the CONTROLS AND CONNECTIONS section to learn about the controls.
This section will guide you through the basic setup using the menu system.
The instructions for each section are written to guide you through Luna’s
features and settings starting from the main screen where the time and date
are displayed. To get started, we recommend you access each menu item
from this main screen.
To return to the main screen from any menu, turn the Right Control Knob
until the “Exit” menu item is highlighted and push to select. Alternatively,
you can push and hold the Right Control Knob to exit the menu, or allow
the menu to timeout after 30 seconds of inactivity. Note that when making
changes to settings, Luna will not save the changes unless you have
accepted the changes by pressing the Right Control Knob.
Setting the Time:
1. Push the Right Control Knob to access the main menu. The menu will
appear on Luna’s display.
2. Turn the Right Control Knob until the “Settings” menu item is highlighted
and push to select.
3. Push the Right Control Knob again to select the “Time” menu item. The
hour will blink to indicate that it can be adjusted. Turn the Right Control
Knob to change the hour, AM or PM (indicated by an “A” or “P” next to
the time) and push to accept the correct hour and advance to adjust the
minutes.
4. The minute section will then blink to indicate that it can be adjusted. Turn
the Right Control Knob to change the minutes and push to accept and
save your changes.
Setting the Date:
1. Push the Right Control Knob to access the main menu. The menu will
appear on Luna’s display.
2. Turn the Right Control Knob until the “Settings” menu item is highlighted
and push to select.
3. Turn the Right Control Knob until the “Date” menu item is highlighted
and push to select.
4. Push the Right Control Knob again to select the year. The year will
blink to indicate that it can be adjusted. Turn the Right Control Knob to
change the year and push to accept and save your changes.
5. Turn the Right Control Knob again until the “Month” menu item is
highlighted and push to select. The month will then blink to indicate that
it can be adjusted. Turn the Right Control Knob to the change the month
and push to accept and save your changes.
6. Turn the Right Control Knob again until the “Day” menu item is
highlighted and push to select. The day will then blink to indicate that it
can be adjusted. Turn the Right Control Knob to the change the day and
push to accept and save your changes.
Note: The day of the week will be displayed automatically.
Setting the Display Options:
1. Push the Right Control Knob to access the main menu. The menu will
appear on Luna’s display.
2. Turn the Right Control Knob until the “Settings” menu item is highlighted
and push to select.
3. Turn the Right Control Knob until the “Display Options” menu item is
highlighted and push to select .
4. Turn the Right Control Knob to highlight either “Contrast” or “Dimmer”
and push to select. The level will blink to indicate that it can be adjusted.
5. Turn the Right Control Knob to increase/decrease the level for contrast
(from 0 to 60) and for the dimmer (from 0 to 20) push to accept and save
your changes. If you set the dimmer to a level lower than 5, touching
any control will automatically bring the dimmer up to a level 5 for a few
moments so that you can make adjustments to your settings.
Note: You may also invert the display colors through the “Display Options”
menu.
SHORTCUT
You may turn the Right Control Knob to increase/
decrease the brightness of the display at any time,
except when in menu or sleep mode.
Setting the Date and Time Format:
Luna’s default date format is Month, Day, Year (MM.DD.YY) and default
time format is a 12-hour clock. To select Day, month, year (DD.MM.YY)
and/or to select a 24-hour clock format, follow these instructions:
1. Push the Right Control Knob to access the main menu. The menu will
appear on Luna’s display.
2. Turn the Right Control Knob until the “Settings” menu item is highlighted
and push to select.
3. Turn the Right Control Knob until the “Format” menu item is highlighted
and push to select.
4. Turn the Right Control Knob to highlight either “Time Format” or “Date
Format” and push to select.
5. Turn the Right Control Knob to highlight your preferred format and push
to select. This will automatically turn the selected format to “ON” the
other format to “OFF”.
Setting the Daylight Savings Time Option:
1. Push the Right Control Knob to access the main menu. The menu will
appear on Luna’s display.
2. Turn the Right Control Knob until the “Settings” menu item is highlighted
and push to select.
3. Turn the Right Control Knob until the “DST” menu item is highlighted and
push to toggle between “OFF” and “ON”. Activate this feature when Day
Light Savings Time is in effect. This will advance the time one hour.
Setting the Alarms
Luna’s two alarms work independently from each other, allowing you to
customize each one to your preference. You can set the time, wake to
source, volume/volume ramping, dimmer brightness and even snooze time
for each.
Setting Alarm Time:
1. Push the Right Control Knob to access the main menu. The menu will
appear on Luna’s display.
2. Turn the Right Control Knob to highlight either “Alarm 1” or “Alarm 2”
and push to select.
3. Push the Right Control Knob again and the hour will blink to indicate it
can be adjusted. Turn the Right Control Knob to change the hour, AM or
PM (indicated by an “A” or a “P” next to the time) and push to accept the
correct hour and advance to adjust the minutes.

LUNA™ User Manual
14
LUNA™ User Manual
15
4. The minute section will then blink to indicate it can be adjusted. Turn the
Right Control Knob to change the minutes and push to accept and save
your changes.
5. Once you set the alarm time(s), you need to make sure to activate the
alarm(s). Push the Alarm 1 Button on the back left to activate Alarm 1
and/or push the Alarm 2 Button on the back right to activate Alarm 2.
The display will show each alarm time and source icon when the alarm is
activated.
SHORTCUT
You may also access Alarm 1 and Alarm 2 menus by
holding down the corresponding Alarm Button.
Setting Alarm Source:
1. Push the Right Control Knob to access the main menu. The menu will
appear on Luna’s display.
2. Turn the Right Control Knob to highlight either “Alarm 1” or “Alarm 2”
and push to select.
3. Turn the Right Control Knob until the “Wake To” menu item is highlighted
and push to select. Turn the Right Control Knob to choose between
“iPod”, “Radio”, or “Sounds”. Highlight your source choice and push to
accept.
Waking to iPod
– If “iPod” is selected as alarm source, be sure to properly dock your
iPod in the Universal dock well. If you do not dock your iPod, the
alarm source will default to the buzzer to make sure that you do
not miss your set alarm time.
– Set your iPod to shuffle or pick the song or playlist you would like
to wake to.
Note: Ensure your playlist has an adequate amount of songs to play for
the amount of time it will take you to wake.
Waking to radio
– If “Radio” is selected as alarm source, make sure the FM and AM
antennas are connected per the instructions.
– Next, you may select a preset station or tune Luna to your
preferred AM or FM station (see “Set Presets” on pages 16-17).
– To select a preset station, select radio as alarm source (see step 2
above). Push the Right Control Knob to select the “Presets” menu
item and push to select. The band and station will blink. Turn the
Right Control Knob to toggle through your preset stations. Push to
select desired preset station.
– To manually tune the radio, turn the Right Control Knob until
the “Tune” menu item is highlighted. Push to select. The AM/FM
band will blink to indicate that it can be adjusted. Turn the Right
Control Knob to the desired band and push to accept the band
and advance to tune the frequency. The frequency will then blink
to indicate it can be adjusted. Turn the Right Control Knob to tune
the desired frequency and push to accept.
Note: For best FM reception, the antenna should be extended fully and
vertically above Luna. For best AM reception, the AM loop antenna
should be positioned away from Luna.
Waking to Sounds
– If “Sounds” is selected as alarm source, you may select from
“Beeping”, “Buzzing” or “Ringing.” Turn the Right Control Knob to
the desired sound and push to select. The selected item will turn
from “OFF” to “ON” in the menu.
Setting Alarm Snooze Time:
1. Push the Right Control Knob to access the main menu. The menu will
appear on Luna’s display.
2. Turn the knob to highlight either “Alarm 1” or “Alarm 2” and push to
select.
3. Turn the Right Control Knob until the “Snooze” menu item is highlighted
and push to select. The snooze time will blink to indicate that it can be
adjusted. Turn the Right Control Knob to increase/decrease the snooze
time (from 1 to 60 minutes) and push to accept and save your changes.
Setting Alarm Volume:
Setting Volume Level
Luna allows you select a specific volume for each alarm, independent
of the last listening volume. This means you can go to sleep with
the volume barely on and still wake to a volume that is considerably
louder or vice versa.
1. Push the Right Control Knob to access the main menu. The menu
will appear on Luna’s display.
2. Turn the Right Control Knob to highlight either “Alarm 1” or “Alarm
2” and push to select.
3. Turn the Right Control Knob until the “Volume” menu item is
highlighted and push to select.
4. To select the volume level, push the Right Control Knob again. The
volume level will blink to indicate that it can be adjusted. Turn the
Right Control Knob to the desired volume level (from 5 to 20) and
push to accept and save your changes. The alarm volume cannot
be set lower than level 5 to ensure minimum waking volume.
Setting Volume Ramping
Luna volume ramping feature gradually increases the alarm volume
over a specified time period, from 0 to 60 seconds.
1. Push the Right Control Knob to access the main menu. The menu
will appear on Luna’s display.
2. Turn the Right Control Knob to highlight either “Alarm 1” or “Alarm
2” and push to select.
3. Turn the Right Control Knob until the “Volume” menu item is
highlighted and push to select.
4. Turn the Right Control Knob until the “Ramp Time” item is
highlighted and push to select. The ramp time will blink to indicate
that it can be adjusted. Turn the Right Control Knob to increase/
decrease the volume ramp time (from 0 to 60 seconds) and push
to accept and save your changes.
Setting Dimmer:
The brightness of Luna’s multifunction display can be specified for each
alarm. This means that you can fall asleep with the display dimmed and
wake to a brighter display.
1. Push the Right Control Knob to access the main menu. The menu will
appear on Luna’s display.
2. Turn the Right Control Knob to highlight either “Alarm 1” or “Alarm 2”
and push to select.
3. Turn the Right Control Knob until the “Dimmer” menu item is highlighted
and push to select. The dimmer level will blink to indicate that it can be
adjusted. Turn the knob to increase/decrease the dimmer level (from 0 to
20) and push to accept and save your changes.

LUNA™ User Manual
16
LUNA™ User Manual
17
To Preview Alarm Settings:
Luna features an alarm preview which allows you to hear and see all of your
set alarm options – audio source, volume and volume ramping, and dimmer
settings. This way you have no surprises in the morning!
1. Push the Right Control Knob to access the main menu. The menu will
appear on Luna’s display.
2. Turn the Right Control Knob to highlight either “Alarm 1” or “Alarm 2”
and push to select.
3. Turn the Right Control Knob until the “Preview” menu item is highlighted
and push to select. Luna will then let you preview all of your alarm
settings, including source, volume/ramping and dimmer.
4. Preview will last for 30 seconds and then time out. To end preview, press
the Right Control Knob.
Alarm Operation
1. Set the alarm time and options following the instructions in “SETTING
THE ALARMS”
2. Push the Alarm 1 Button on the back left to activate/deactivate Alarm 1
and/or push the Alarm 2 Button on the back right to activate/deactivate
Alarm 2. The display will show each alarm time and source icon when
activated.
3. When the alarm is sounding, the alarm time and source icon will flash.
You can snooze, reset the alarm for the next day, or turn the alarm
completely off.
4. Push the Left Control Knob to snooze. Your alarm settings allow you to
set the snooze time in advance, but the snooze time can be adjusted
when in snooze mode by turning the Left Control Knob.
5. Push the Right Control Knob to silence the alarm and reset it to come on
again the following day .
6. To stop the alarm from sounding on the following day, push the
corresponding Alarm On/Off Button. This will turn the alarm OFF. The
alarm time and source icon will not appear in the display.
7. If the alarm is not turned off after it sounds it will play for approximately
one hour and then turn off automatically. The alarm will reset for the
following day unless you turn the alarm off.
Listening to Audio
Many of the functions can be controlled by the included remote control.
Please review the “REMOTE CONTROL” section on pages 10-11 to learn
more about using the remote.
Listening to Your iPod:
1. Select the correct insert and dock your iPod (see “Universal Dock Well”
on page 7).
2. Push the Left Control Knob to toggle through source options until “iPod”
appears in the display.
3. Press play on your iPod.
4. Turn the Left Control Knob to increase/decrease the volume.
Note: If you have a iPod without a dock connector, please follow the
instructions for “Listening to an Auxiliary Source” below.
Listening to the Radio:
1. Push the Left Control Knob to toggle through source options until “FM”
or “AM” appears in the display. The frequency will blink to indicate that it
can be adjusted.
2. Turn the Right Control Knob to tune to the desired frequency and push to
select.
3. Turn the Left Control Knob to increase/decrease the volume.
4. To select a new station or a preset station, hold down the Left Control
Knob to access the Radio menu. Turn the right control knob to scroll
through the menu options – “Tune”, “Select Presets” and “Set Presets.”
5. When the desired menu item is highlighted, push the Right Control Knob
to select and follow the instructions below:
Tune
– The AM/FM band indicator will blink to indicate that it can be
adjusted. Turn the Right Control Knob to the desired band and
push to select. The frequency will then blink to indicate it can be
adjusted.
– Turn the Right Control Knob to tune the desired frequency and
push to accept.
Set Presets
– Turn the Right Control Knob until the desired preset number is
highlighted (presets 1 through 4) and push to select.
– The AM/FM band indicator will blink to indicate it can be adjusted.
Turn the Right Control Knob to the desired band and push to
select. The frequency will then blink to indicate that it can be
adjusted.
– Turn the Right Control Knob to tune the desired frequency and
push to accept.
– Repeat these steps to program remaining presets.
Select Presets
– Turn the Right Control Knob until the desired preset number is
highlighted (presets 1 through 4) and push to select.
Note: You can also access all radio functions though the main menu
under “Radio.”
Listening to an Auxiliary Source:
1. Connect the device to “AUX/LINE IN” jack on the back of Luna with an
auxiliary 3.5mm stereo audio cable (not included)
2. Push the Left Control Knob to toggle through source options until “AUX”
appears in the display.
3. Press play on the device.
4. Turn the Left Control Knob to increase/decrease the volume.
Adjusting Bass and Treble:
1. Push the Right Control Knob to access the main menu. The menu will
appear on Luna’s display.
2. Turn the Right Control Knob until the “Settings” menu item is highlighted
and push to select.
3. Turn the Right Control Knob until the “Audio” menu item is highlighted
and push to select.
4. Turn the Right Control Knob to highlight either “Bass” or “Treble” and
push to select. The level will blink to indicate that it can be adjusted.
5. Turn the Right Control Knob to increase/decrease the level (from -7 to 7)
and push to accept.
Note: It is recommended that you adjust the bass and treble while listening
to an audio source.

LUNA™ User Manual
18
LUNA™ User Manual
19
Charging your iPod:
Luna will charge dock connector iPod models (4G models and later).
Make sure that your iPod is properly docked in the system. Once properly
docked, Luna will charge your iPod.
Setting the Sleep Mode Preferences
Setting the Sleep Timer:
1. Select the desired audio source (see “Listening to Audio” on pages 16-
17).
2. Push the Right Control Knob to access the main menu. The menu will
appear on Luna’s display.
3. Turn the Right Control Knob until the “Sleep” item is highlighted and
push to select.
4. Push the Right Control Knob again to turn sleep timer on.
5. Turn the Right Control Knob until the “Duration” menu item is highlighted
and push to select. The sleep time will blink to indicate that it can be
adjusted. Turn the Right Control Knob to increase/decrease the sleep
time (from 1 to 90 minutes) and push to accept.
Setting Sleep Options
– While in the sleep menu, turn the Right Control Knob until the
“Decrease Volume” menu item is highlighted and push to select
“On” or “Off”. Activating this feature will decrease the volume
gradually over the sleep time.
– While in the sleep menu, turn the Right Control Knob until the
“Dimmer” menu item is highlighted and push to select. The
dimmer level will blink to indicate it can be adjusted. Turn the Right
Control Knob to increase/decrease the dimmer level (from 0 to 20)
and push to accept.
To Replace the Battery:
1. The battery door is located on the bottom of the remote control. To open,
hold the remote with the back facing up and squeeze the latch while
pulling out the battery door.
2. Take out current battery and replace with a “CR2025” 3-volt Lithium Cell
battery. The battery door has a “+” symbol to indicate correct placement.
Place the battery with the “+” side of the battery on the same side as this
symbol.
3. Replace the battery door with the “+” of the battery facing up.
SHORTCUT
You may also enter the sleep mode by holding the
Right Control Knob while audio is playing. The sleep
time will appear in the top line of the display.
Turn the Right Control Knob at any time to increase/
decrease the sleep time.
Restoring Default Settings
Using this operation will reset all of your programmed settings back to
factory default settings (except contrast).
1. Push the Right Control Knob to access the main menu. The menu will
appear on Luna’s display.
2. Turn the Right Control Knob until the “Settings” menu item is highlighted
and push to select.
3. Turn the Right Control Knob until the “Reset Settings” menu item is
highlighted and push to select.
4. Push the Right Control Knob again to confirm reset.
Replacing the Remote Battery
The remote control battery is already installed at the factory. Before using,
make sure to pull out the “Remove” tab that is protecting the battery. When
the remote control stops operating or its range seems reduced, it is time to
replace the battery.
Note: Please dispose of batteries properly.

LUNA™ User Manual
20
LUNA™ User Manual
21
Troubleshooting
No power
Possible Problem Solution
AC Adapter is not connected to
a wall outlet and/or the power
supply connector is not plugged
into supply jack on the back of
Luna
Wall outlet is not functioning Plug another device into the
iPod was docked BEFORE
plugging the AC adapter into the
unit and the wall
No sound from speakers
Possible Problem Solution
Audio source is not selected Push the left control knob on the
Volume is set too low Turn the left control knob to
iPod is not docked correctly Remove your iPod from the dock
Sound is distorted
Possible Problem Solution
Volume level on Luna is set too
high
Sound source is distorted If the original source (MP3) is of
Bass and Treble are set too high Reset the bass and treble
Remote Control doesn’t work
Possible Problem Solution
Low Battery Replace battery
Remote Control is not pointed
toward Luna’s IR window
Unit gets warm after extended play at high volume
Possible Problem Solution
As with other devices, this is
normal when the unit is played
at loud volumes for an extended
period of time
Connect the AC adapter into the
jack in the back of Luna labeled
“Power” and then plug the AD
adapter into the wall outlet
same outlet to confirm the outlet
is working
Make sure to plug the AC adapter
into Luna and then the wall outlet
before docking your iPod
unit to select the audio source
increase the volume
well and re-dock to make sure it
is properly connected
Use the left control knob or
remote to lower the volume
poor quality, distortion and noise
are easily noticed with highpowered speakers
settings with the reset button on
the remote
Point the remote toward the IR
window, within 15 feet of the unit
Lower the volume or turn the unit
off for a short period of time
Battery icon flashes on screen
Possible Problem Solution
Back up batteries are weak or not
installed
Replace or install new AA
batteries
Display appears blurry or faded
Possible Problem Solution
Contrast and /or dimmer settings
are set too high or low*
*Room temperatures can change the
contrast of the Display
Adjust the contrast and/or
dimmer settings in the menu
system (see “Setting the Display”
sections
No AM radio reception or too much static
Possible Problem Solution
AM antenna may not be properly
connected
AM loop antenna is not properly
positioned
Plug the AM antenna into the two
jacks on the back of Luna
Move AM Antenna away
from Luna and rotate for best
reception
No FM radio reception or too much static
Possible Problem Solution
FM antenna may not be properly
connected
FM antenna is not properly
positioned
Plug the FM antenna into the FM
jack on the back of Luna
Place the FM antenna vertically
above Luna and vary positions
while the unit is on and in FM
mode
iPod did not charge
Possible Problem Solution
iPod is not docked properly Remove your iPod from the
iPod is frozen or the iPod battery
has a problem
*Visit http://www.apple.com/support/ to download the latest software for
your iPod.
universal dock well and re-dock
to make sure it is properly
connected
Make sure your iPod is working
properly before docking into
Luna. Refer to your iPod manual
for details and make sure you
are using the latest software on
your iPod or for instructions on
resetting your iPod*

LUNA™ User Manual
22
LUNA™ User Manual
23
This page intentionally left blank. This page intentionally left blank.

Copyright © 2006 Xtreme Accessories, LLC. XtremeMac, Luna and the “X” logo are
trademarks of Xtreme Accessories, LLC. Designed in the USA. Made in China.
For customer service and warranty information visit our website at
www.XtremeMac.com, or call toll-free in the USA: 1-866-392-9800.
iPod is a trademark of Apple Computer, Inc., registered in the U.S. and other countries.
Patent pending.
 Loading...