

Page 1
User Manual
Ver.2.3.2 Frimware
Page 2
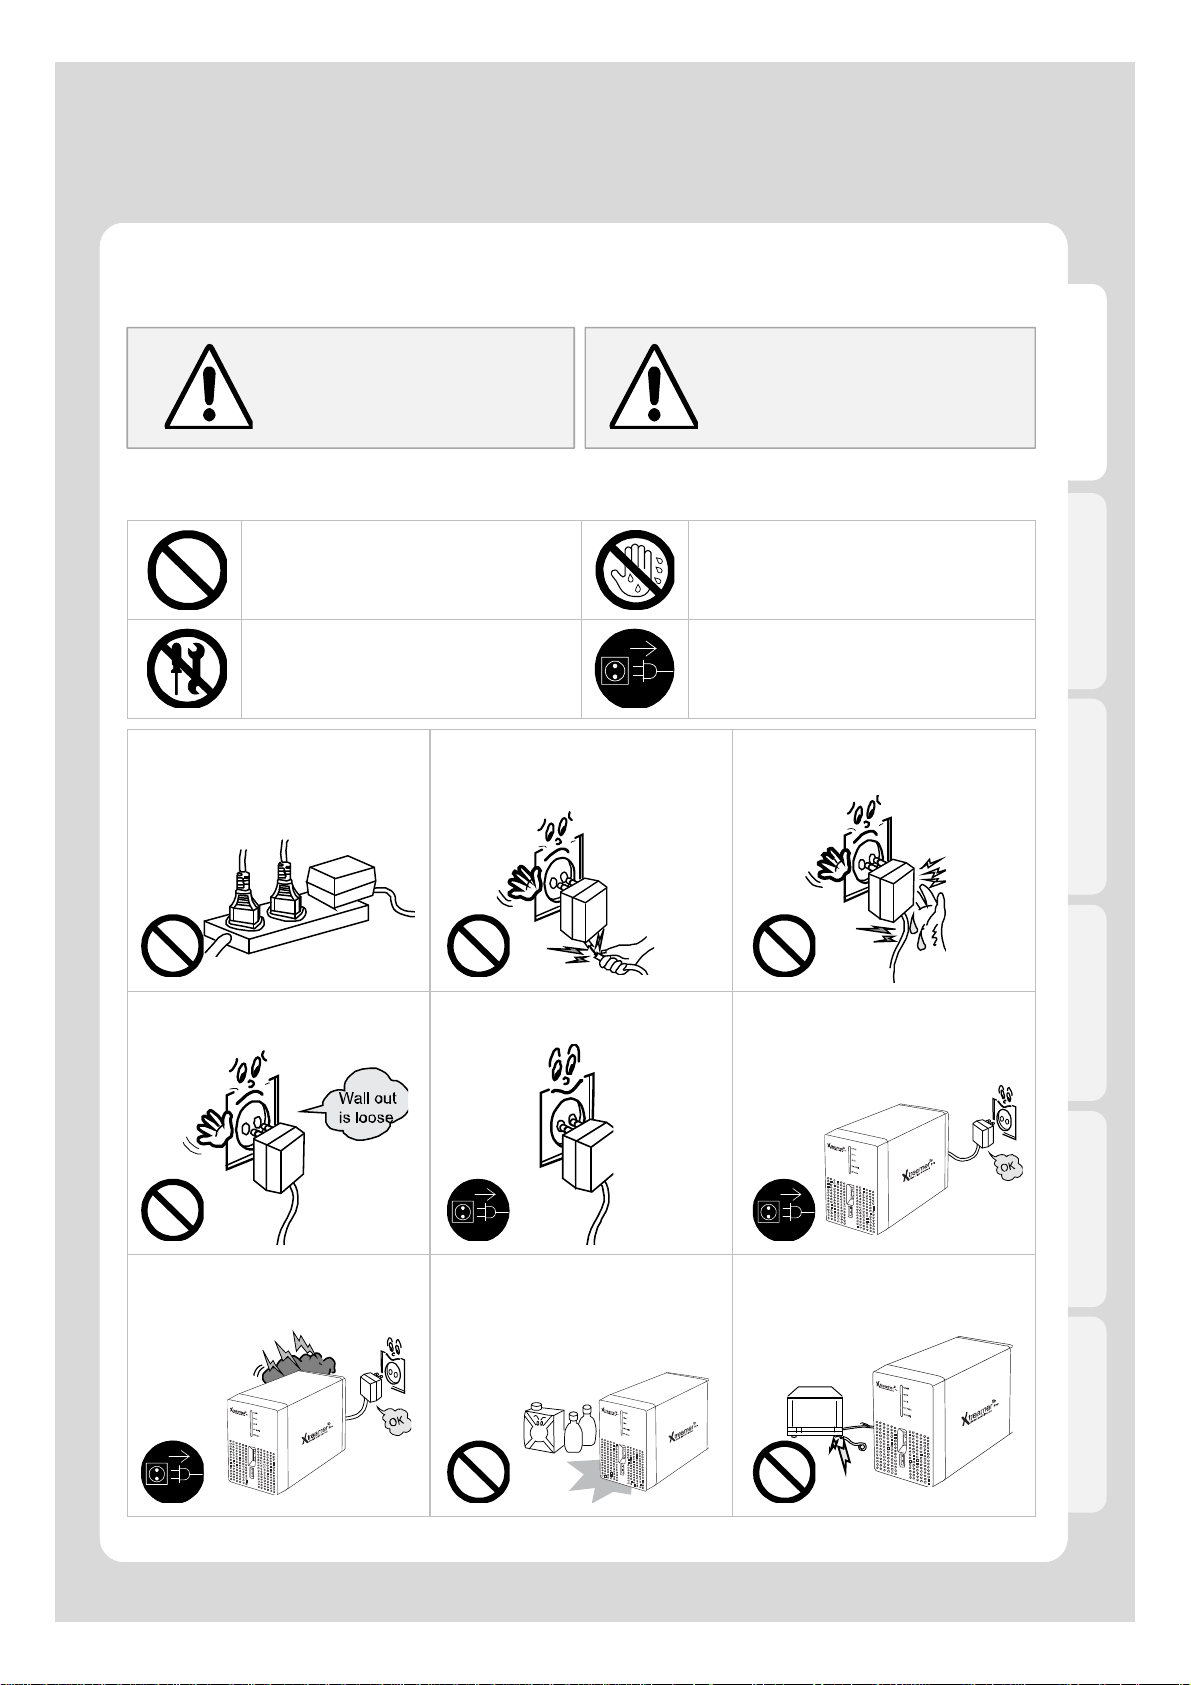
Safety Notes
The following are to protect safety of user and to prevent damages to property.
Use product properly after carefully reading the following content s.
Violating instructions
Warning Caution
Instructions
Act prohibited Contact by wet hand prohibited
may lead to serious
injury or death.
English
Violating instructions may
lead to slight injury or
damage to product.
Modification prohibited
Do not connect a number of power
plugs at the same time. (This may
generate heat or cause fire.)
Do not insert power plug if it fits loose
to power outlet. (This may cause fire
or electric shock.)
Do not forcefully pull out power cord.
(Breakage of power cord may cause
fire and electric shock.)
Make sure to turn off power switch
and pull out power plug when moving
product.
Power plug to be separated
from power outlet
Do not insert of pull out power plug
with wet hand. (This may cause
electric shock.)
Do not place plant pots, cups or
objects filled with chemical or water,
etc. on top of product. (This may
cause breakdown of product.)
Clean the outside of product by
wiping it with lightly wet or dry towel.
(Using detergent for grease removal,
thinner or heavily wet towel, etc. may
cause breakdown of product.)
Product must not be disassembled,
repaired or modified. Take caution not
to have foreign substances inserted
into products. (This may cause
breakdown of product or electric
shock.)
2
Do not forcefully bend the connected
power cord or have it pressed down
by heavy objects. (This may cause
fire or electric shock.)
Page 3
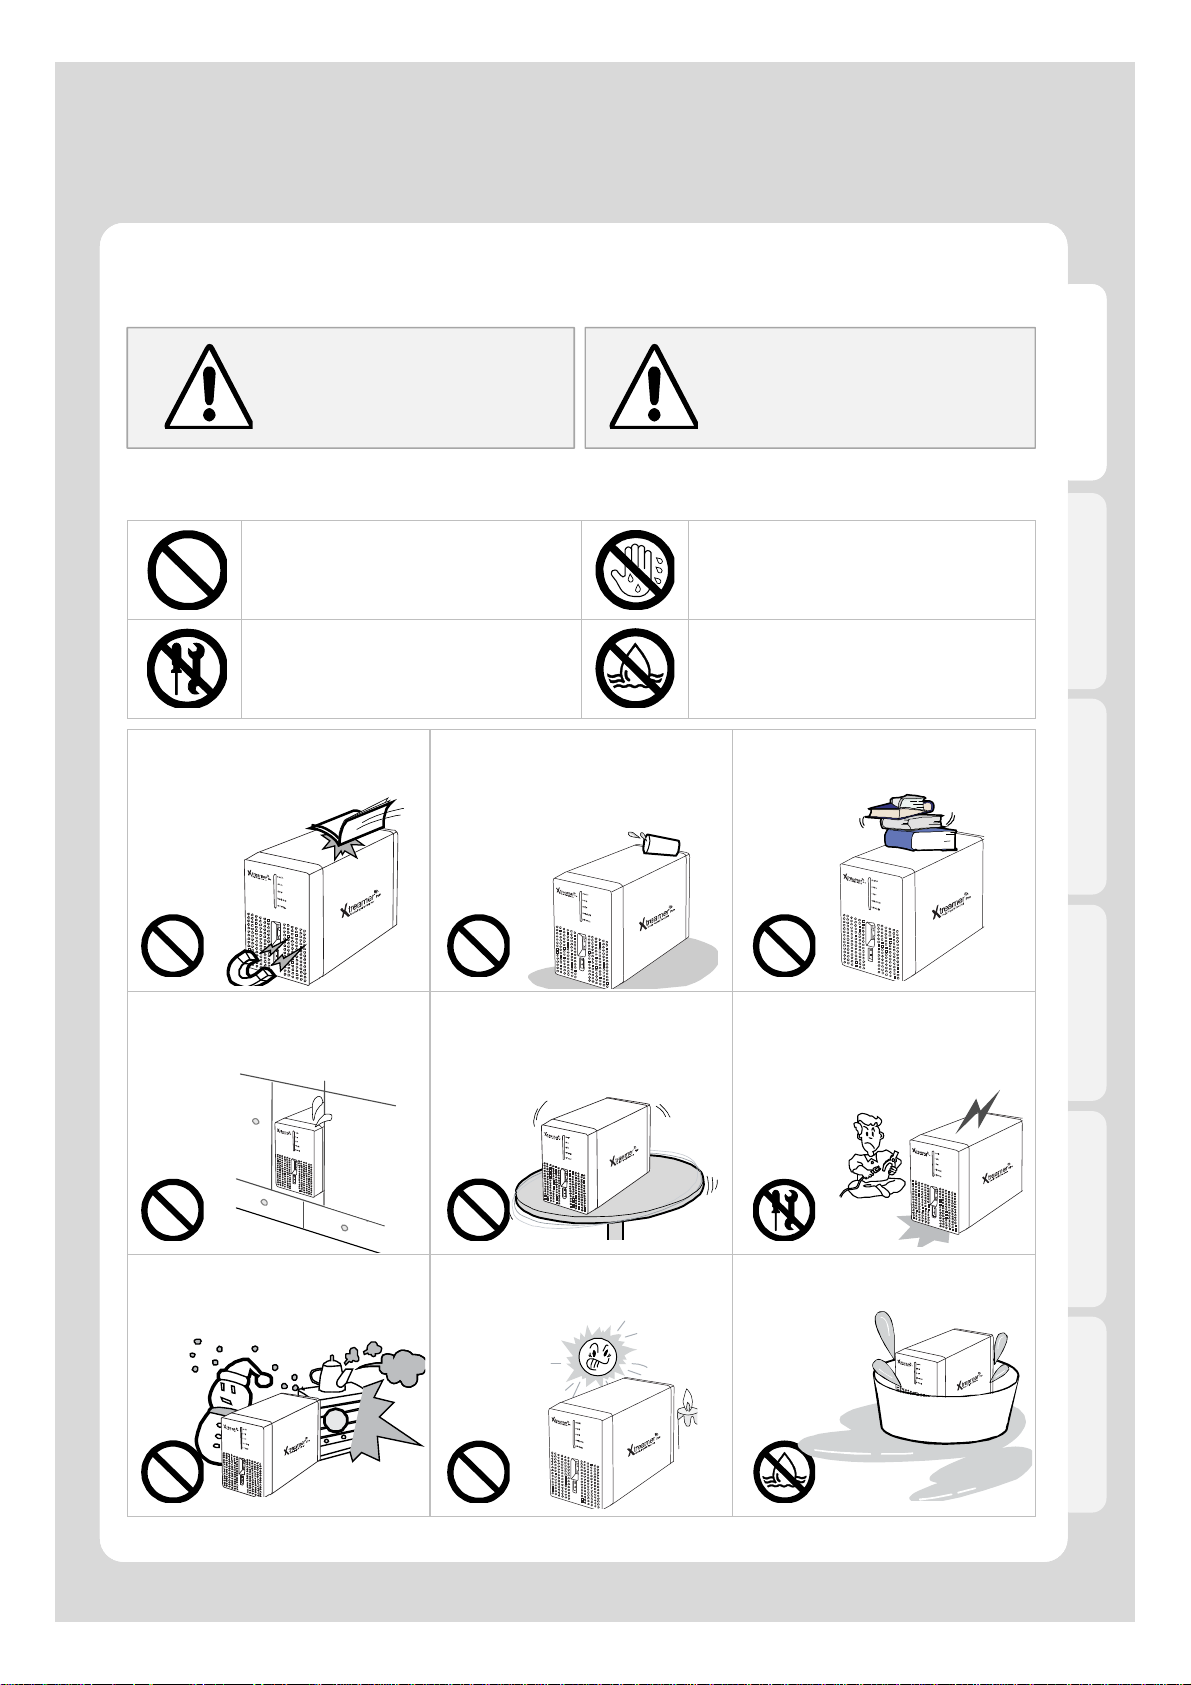
Safety Notes
The following are to protect safety of user and to prevent damages to property.
Use product properly after carefully reading the following content s.
Violating instructions
Warning Caution
Instructions
Act prohibited Contact by wet hand prohibited
Modification prohibited Soaking prohibited
may lead to serious
injury or death.
English
Violating instructions may
lead to slight injury or
damage to product.
Do not drop objects on top of product
or exert impact to product. Keep
product away from severe vibration or
magnetic objects.)
Do not cover up product or install it in
places with poor ventilation, such as a
wall closet, etc
Do not install product in places where
temperature is too high (35˚ or
higher)/ too low (5˚ or less) or
humidity is high
Do not place plant pots, cups or
containers filled with chemical or
water, etc. on top of product. (This
may cause fire/ electric shock. Falling
of the objects may also cause injury.)
Install product in level and stable
place. (Otherwise, product may not
operate normally.)
Do not install product under direct
sunlight or near objects of heat, such
as lit candle, cigarette or fire, etc.
Do not place heavy objects on top of
product. (Falling of objects may cause
injury.)
Product must not be disassembled,
repaired or modified. Take caution not
to have foreign substances inserted
into products. (This may cause
breakdown of product or electric
shock.)
Do not place product in water. (This
may cause breakdown of product or
electric shock.)
3
Page 4

Table of contents
Safety Notes
Introduction
About Product
Part names and functions
Specification
Hard-Disk Installation
Connection
1. Video & Audio output Connect
2. Connect to the Network
3. Connect to your PC
Remote Control Functions
Settings
1. HDD Format
2
6
7
9
10
11
12
12
14
15
16
19
19
English
2. System
3. Playback
4. A/V
5. Network
5-1. Wired LAN Setup
5-2. Wireless LAN Setup
6. Application
6-1. The Usage of Network Drive
Major Function
Main Menu
1. Media Library Menu
1-1. Movie Playback Function of Media Library
1-2. Photos Function of Media Library
1-3. Music Function of Media Library
2. Internet
2-1. Xtreamer Live Introduction
2-2 How to use “YouTube” function
2-3. How to use “Picasa (Google)” function
2-4. How to use “Weather” function
22
24
26
30
30
31
33
33
34
34
35
37
41
42
43
43
43
45
45
4
Page 5

Table of contents
3. File Manager
4. Internet Radio
5. How to use Movie Subtitle TTF Fonts
6. How to use “Lock System” function
7. How to use “iPhone remote” function
8. How to use “Auto run” function
9. Changing background image at the main menu
Advanced Users Guide
1. Web Server
1-1. Initial Setting for Web Server connection
1-2. How to use “Set-up menu” of Web Server
1-3 How to use “Web GUI File Manager” of Web Server
1-4 How to “File Upload & File Download”
2. Usage of NAS (Network Attached Storage)
46
47
49
50
52
55
57
60
60
60
61
62
63
64
English
3. How to set-up Folder Sharing in Windows 7
4. How to set-up Folder Sharing in Windows Vista
5. If folder accessing in window XP isn’t available.
6. How to configure Folder Sharing Permission in Windows XP
7. How to register Network PC Shortcut
8. How to connect Network when it isn’t properly working
9. How to display “Guest” account “on” for Windows
10. Firmware upgrade
11. How to use “HDD A-B Switch”
Troubleshooting
66
73
81
82
87
88
88
89
91
93
5
Page 6

Introduction
Congratulation on your purchase of the Xtreamer Media Player, a state-of-the-art con sumer
electronic device that will enhance and enrich your home multimedia experience.
The Xtreamer Media Player is a portable streamer allows you to bring your favorite movi es, music,
photos and online content to your living room from various sources such as your PC, internal
SATA hard disc, external USB storage devices and so on.
The player has been designed for high performance networkin g and quality playba ck.
Due to the rapid development of our product we cannot possibly guaranty that this Guide will
include all its features. So if you have questions please feel free to browse the Xtreamer
Knowledge base or contact our staff.
Please make sure to visit our site www.xtreamer.net for the Xtreamer news, official
announcements and firmware upgrade.
English
6
Page 7

About Product
Multimedia library
High Resolution HD-level File Play: Xtreamer supports the max. of 1920X1080 progressive
scan to provide clear and high resolution picture quality.
Supporting Diverse Movie Format Types
Xtreamer supports a variety of HD files, such as TP, TS ,TRP and M2T,M2TS.MTS files, but
also MPEG1/2/4 , Divx (3/4/5/6), Xvid, DAT, ISO, DVD (VOB, IFO) and MKV(X.264), AVC HD,
WMV9, ASF, H.264,MOV,MP4, RMVB, FLV, etc. You can conveniently enjoy watching
movies anywhere as long as you have access to a display device, such as TV, etc.
Convenient Copy
Xtreamer allows you to copy a media file to a network-connected PC.
Also, you can copy files by high-speed from PC to Xtreamer HDD or to USB storage device
connected to Xtreamer.
Supporting Diverse Music Files
Xtreamer supports a variety of music sources, such as AAC,MPEG audio MP1/2/3/ A,
WMV,WMA,FLAC,OGG, AC3 and DTS, etc. As the player supports fast rewind/
forward functions, you can quickly find the desired part you require for listening.
English
Digital Photo Album
Xtreamer supports the upgraded JPEG and BMP image files. The entire family can enjoying
watching the files through TV, etc. Also, vertically photographed filed can be rotated in screen
for viewing without requiring modification.
Network-shared File Play
Files shared on a network can be played through wired/ wireless means without having to
move them to the Xtreamer hard disk.
NAS (Network Attached Storage)
Xtreamer uses the network drive in Window at support SAMBA function
Supporting USB Host
Xtreamer supports 2 USB2.0 hosts. By connecting USB external storage devices,
you can easily add additional storage to the Xtreamer and play the files on the
external USB devices. A USB type memory card reader, etc. can also be used.
Supporting UPnP client
Xtreamer supports UPnP server functions. Xtreamer supports free DDNS so that you can
connect to the internal HDD of the Xtreamer not only from your local PC, but also from any
PC with a Internet connection. This function can be used from an external device that
supports UPnP client.
7
Page 8

About Product
Supporting High Resolution HDMI
Built in with HDMI terminal for digital signal output, Xtreamer enables you to
enjoy video content with better picture quality.
5.1CH Audio Output and Down Mix Function
Xtreamer provides 5.1CH Dolby Digital audio and DTS, etc. Also, down mix function lets
you play 2CH audio through TV, etc. without requiring an additional decoding device,
such as amplifier, etc (optical).
Supporting free DDNS
Xtreamer provides 1 DDNS(Yourname.myxtreamer.net) to connect UPNP Web Server from a
PC outside LAN environment. Network and internet conne ctio n is mandatory.
Supporting Real time Youtube and free media channel
Xtreamer provides real time searching and playing Youtubeor media files online without
downloading each files.
English
Internet
It’s in Korean but make sure there is something about “You can add your favorite Internet
feeds and enjoy custom online content”
Internet Radio
enjoy a vast variety of styles and genres with our Internet radio featu re. Easily add any
number of your favorite stations.
Easy access to your favorite files
add any file to your Favorites for easy access via the Main Menu and create playlists that can
be automatically run after startup.
IPhone and iPod control
you can control your Xtreamer via iPod or any phone capable of connecting to your home
network with a custom remote control application
Manufactured under license from Dolby Laboratories. Dolby and the double-D symbol are trademarks of Dolby Laboratories
DTS is a registered trademark & the DTS logos and Symbol are trademarks of DTS, Inc.
8
Page 9
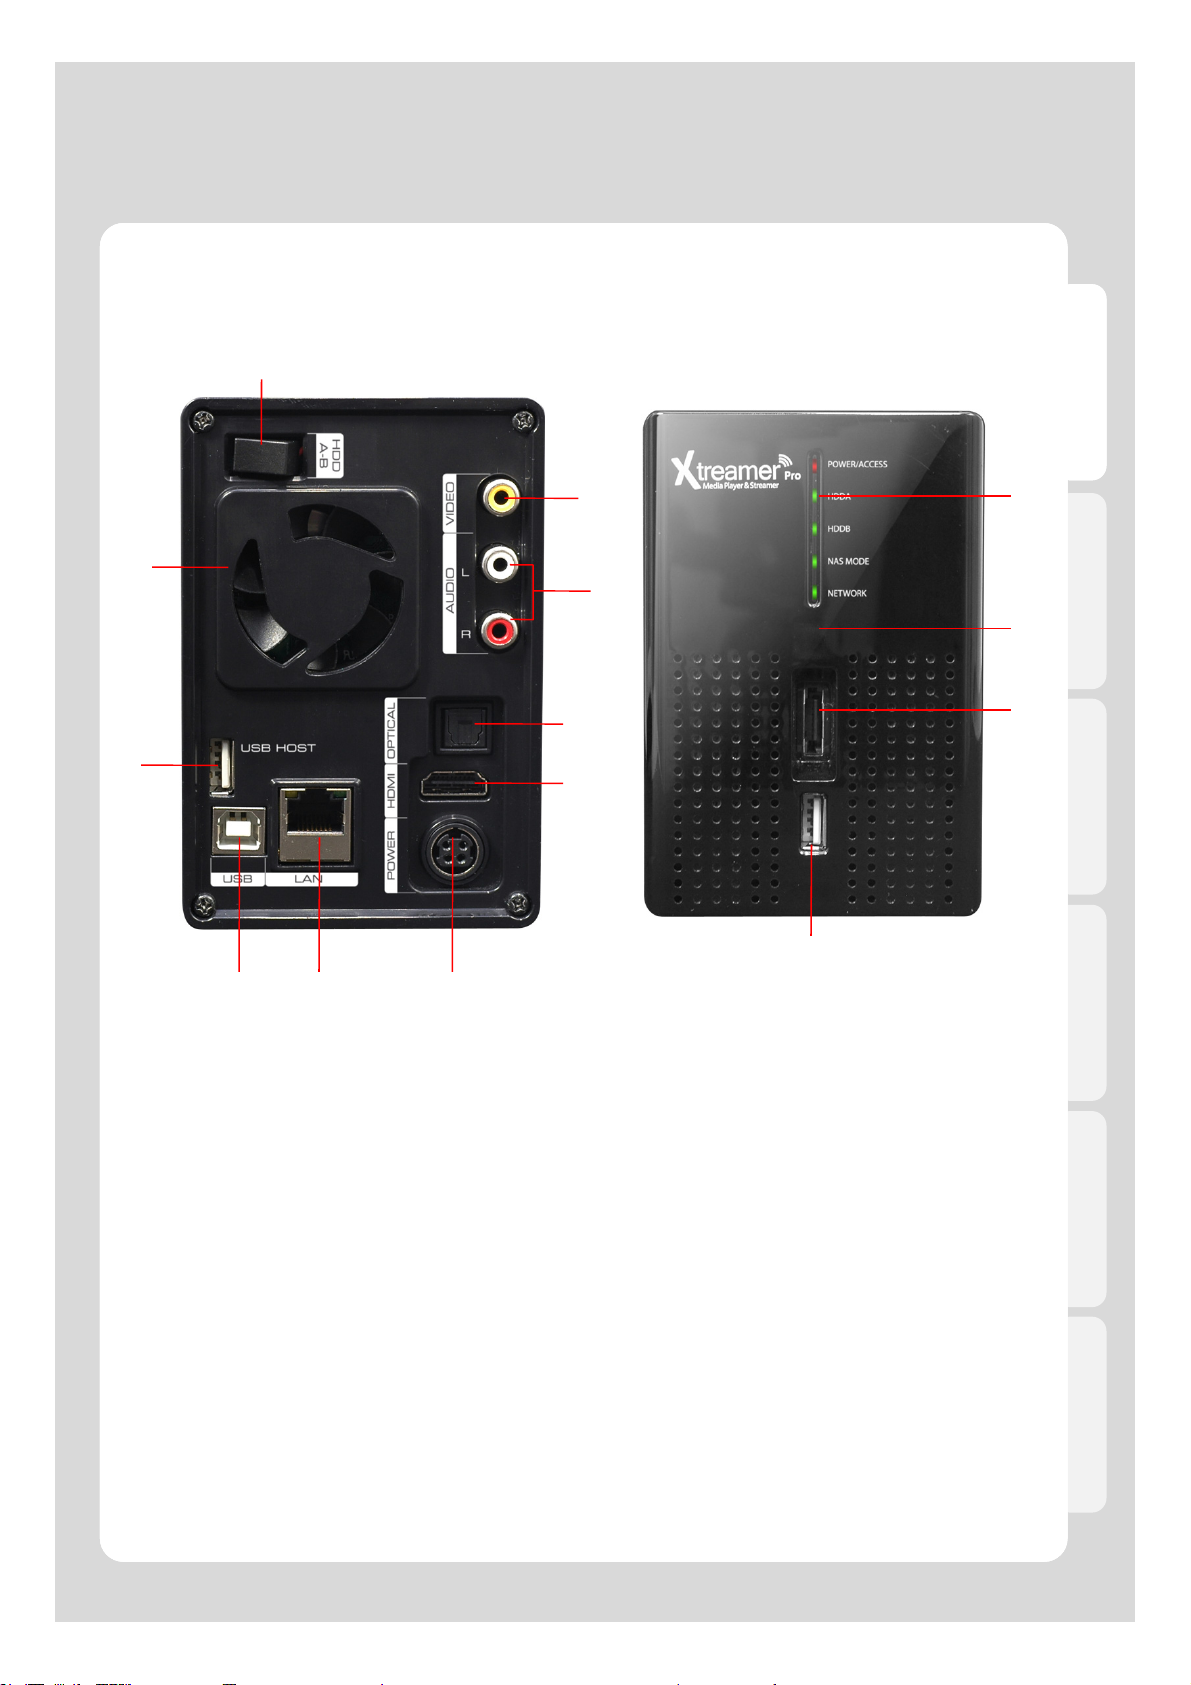
Part names and functions
①
English
④
⑦
⑧
⑨⑩
②
⑤
⑥
①
③
②
③
④
① A/B HDD switch
② Composite terminal
③ Stereo RCA terminal
④ FAN
⑤ Optical terminal
⑥ HDMI terminal
⑦ USB host
⑧ USB slave port
⑨ 10/100Mbps LAN Port
⑩ Power
Front PanelBack Panel
① LED status
② IR reception part
③ eSATAterminal
④ USB host
9
Page 10
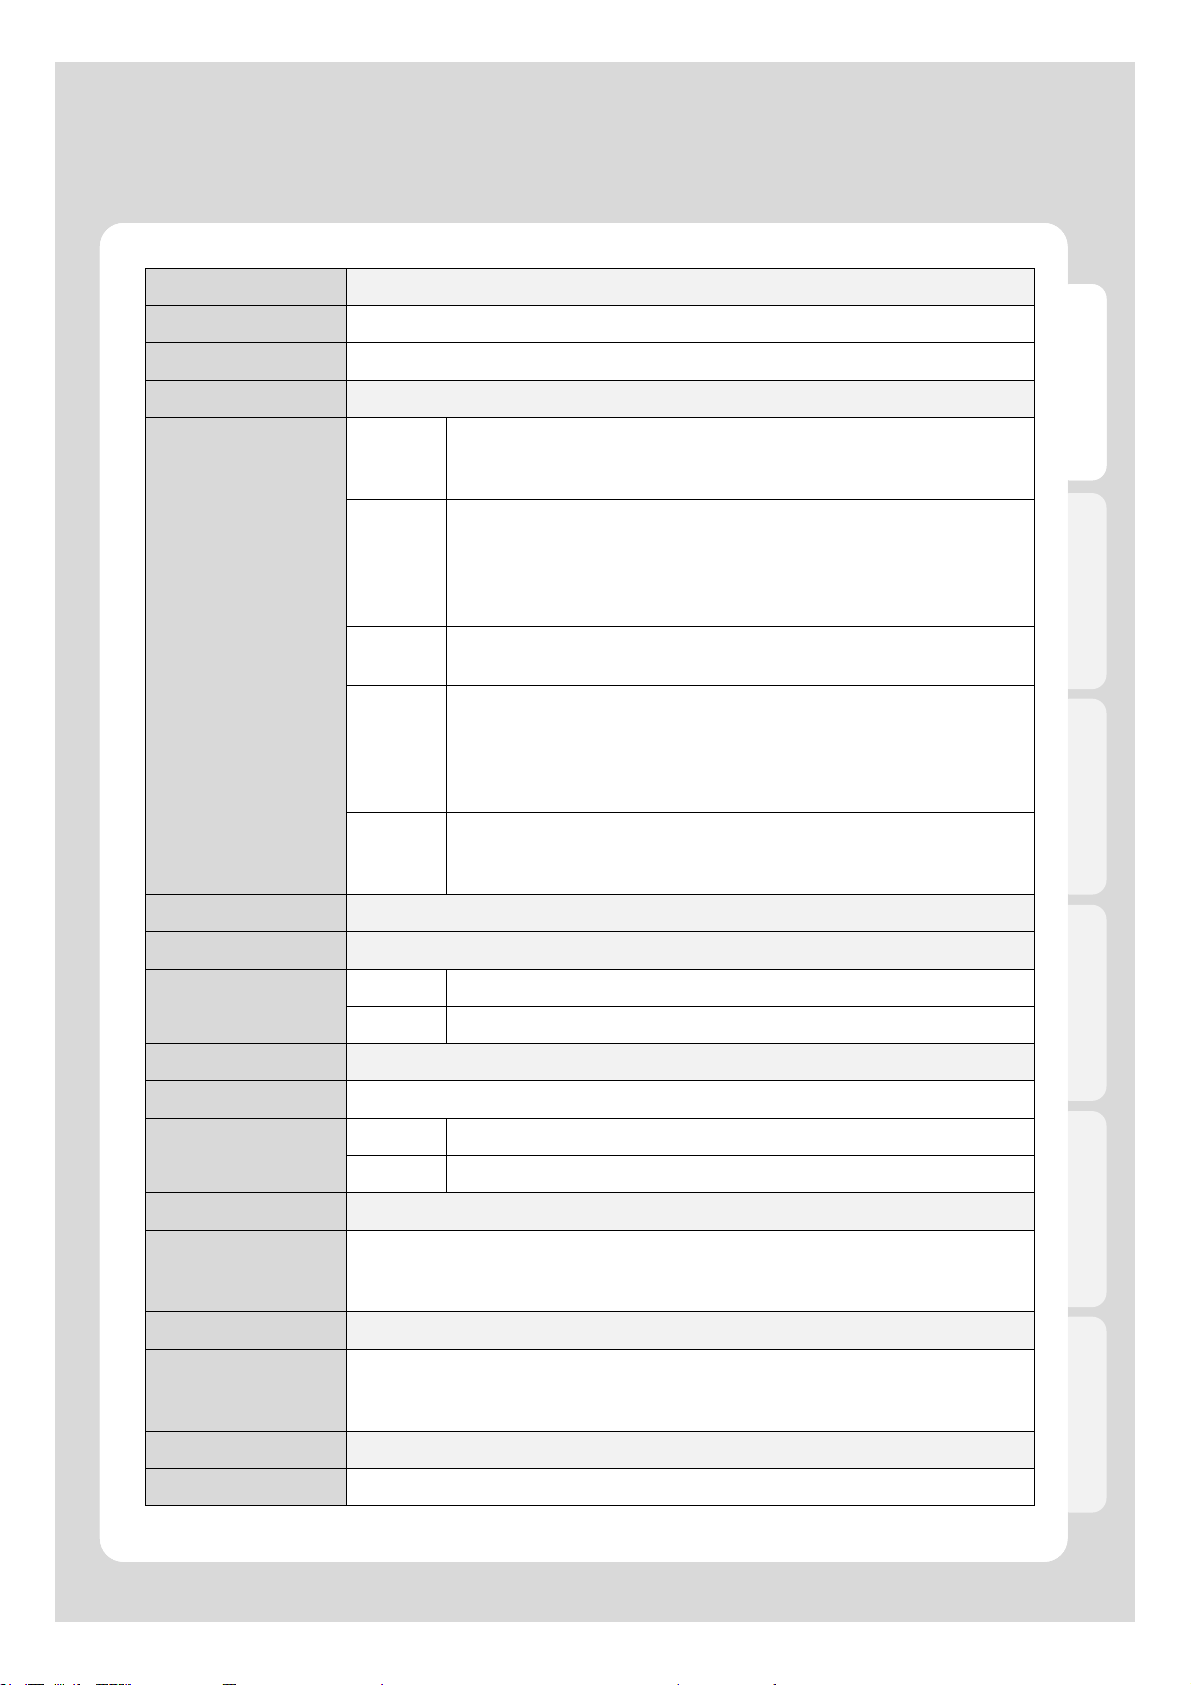
Specification
Product Name Xtreamer Pro
Processor RTD1283DD(+) 400MHz Processor
Operating System 256MB DDR2 SDRAM, 256MB Flash RAM
File System Linux
ASF / AVI / DIVX / FLV / IFO / ISO / M2P / M2TS / M2V / M4V / MKV /
MOV / MP4 / MPEG / MPG / MTS / RMVB / TP / TRP / TS / VOB /
WMV
XVID SD/HD / MPEG1, VCD 1.0/2.0, SVCD / HD MPEG2 (up to
MP@HL1080i), ISO/IFO/VOB/TS / HD MPEG4
SP/ASP(720p/1080i/1080p), Xvid / H.264 BP@L3, HP@4.1 /
WMV9/VC-1 AP@L3 / RealVideo 8/9/10, up to 720@30P /
DviX3/4/5/6/7 (Licensee Only)
AAC / AC3 / DTS / FLAC / FLC / M3U / M3U8 / M4A / MP1 / MP2 /
MP3 / MPA / OGG / PCM / RA / RM / WAV / WMA
Dolby® Digital Plus, TrueHD / DTS HD Master Audio, High
Resolution, LBR / 7.1 down-mix / WMAWMA Pro, Dolby® Digital
AC3 and DTS® (Licensee Only) / MPEG I Layer 1, 2, 3 (2-CH) and
MPEG II Layer 1, 2 (Multi-Channel) / LPCM,ADPCM, FLAC, AAC,
WAV, and OGG Vorbis / RA1/RA-cook/RA-lossless
HD JPEG/BMP/GIF/MGIF(Not Act)/PNG/TIFF/TIF /
HD JPEG with unlimited resolution(40M-pixel tested) / Full-pixel
(Progressive JPEG Not support)
Supported File
& Formats
Video
Formats
Video
Codecs
Audio
Formats
Audio
Codecs
Image
English
Subtitle SRT, SMI, SUB, SSA, SUB+IDX, ASS, PGS
Video Output Composite and HDMI1.3
Audio Output
TV System NTSC, PAL or HDMI Auto
Hi-Def Decoding HD HDMI(480P, 576P, 720P 50HZ/60HZ , 1080i 50HZ/60HZ, 1080P 50HZ/60HZ)
Networking
Network Security Wireless : WEP, WPA
Network Protocol
Hard-Disk Type 3.5” Internal SATA I/II
USB Interface
Power DC 5V/4.2A , 12V, 3A
Dimension 82mm(W) X 120mm(H) X 180mm(D)
Analog Stereo RCA
Digital Optical
Wired Ethernet (10/100) LAN via RJ-45 Port
Wireless USB host port (Optional)
Wireless : IEEE802.11N, 3dBi USB antenna(Optional)
Wired : 10/100Mbps Fast Ethernet (RJ45)
TCP/IP (DHCP client mode, Static IP mode)
USB2.0 Host x 2
USB2.0 Slave x 1
eSATA x 1
10
Specifications subject to change without prior notice
Page 11
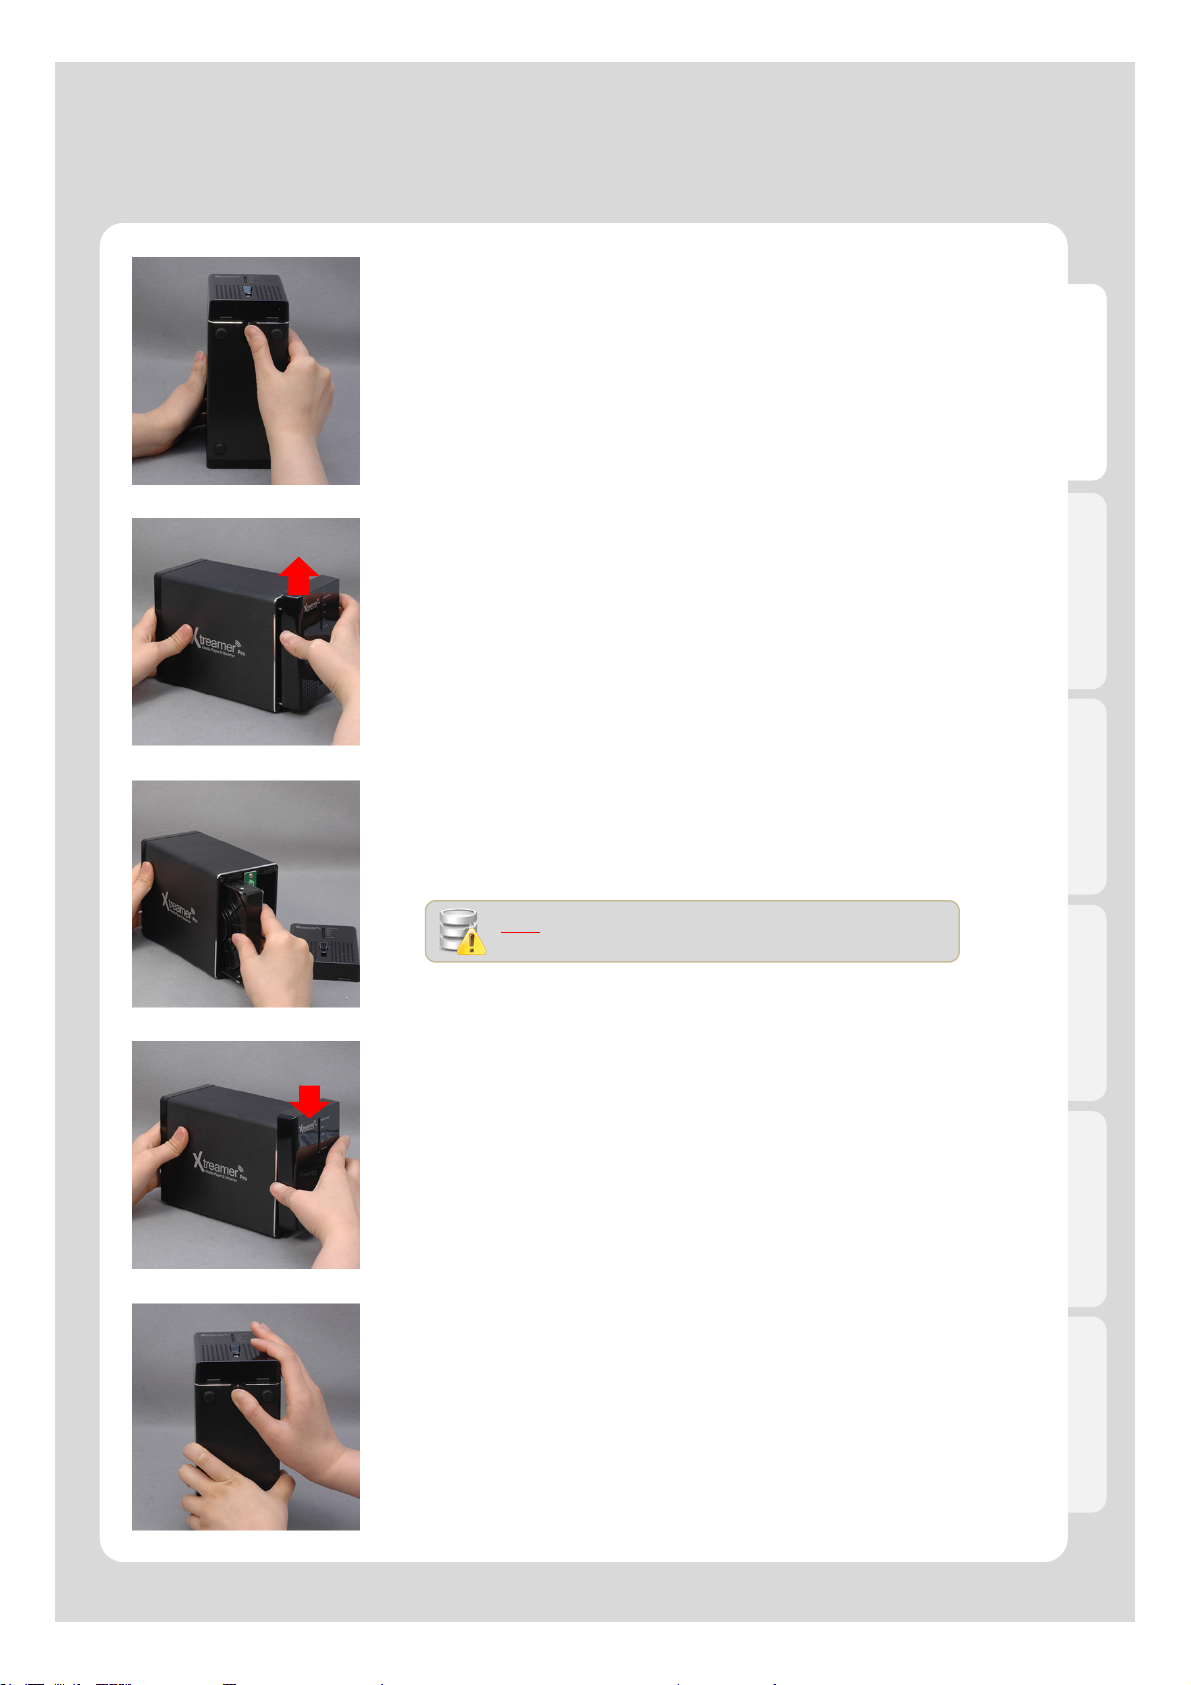
Hard-Disk Installation
01.
02.
03.
Slide the lock toward the down direction.
English
Open the front cover toward the up direction..
Push the Hard disk in Xtreamer Pro.
To insert 2.5” hard disk, please push carefully to correct location
into Xtreamer Pro
04.
05.
note
When install only one HDD, must install it into tray “A”
Close the front cover toward the down direction..
Slide and close the lock toward the down direction.
11
Page 12
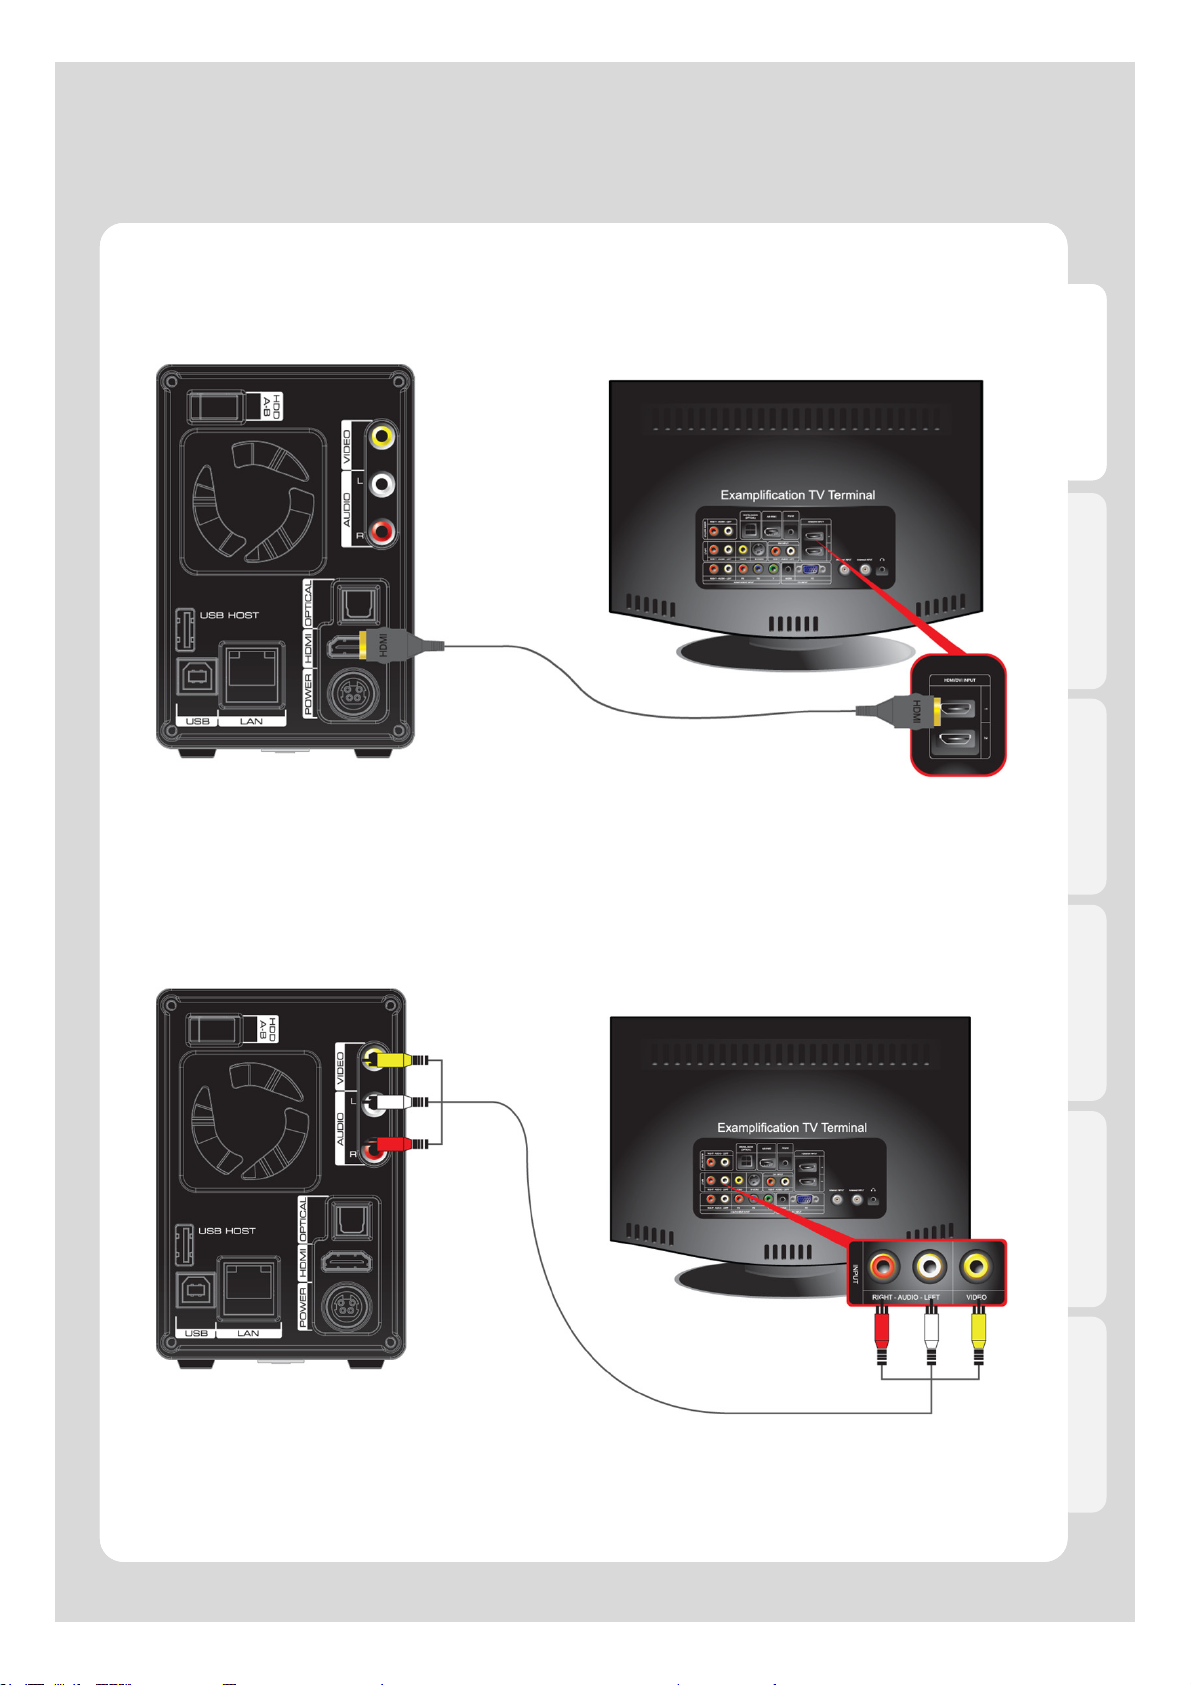
Connection
1. Video & Audio output Connect
ㆍHDMI cable connection
Connect HDMI cable to HDMI terminal at the back of product. Connect the remaining cable
terminal to HDMI terminal at the back of digital TV. Make sure to carefully distinguish
between input and output terminals.
English
ㆍComposite cable connection
Connect yellow cable for video signal to the terminal located at the back of side of TV. Then,
select external input of TV. Connect the remaining red and white terminal cables to the left/ right
and audio output terminal at the back of the device. Then, connect red and white cables to the
left/ right terminal of DTV input or component audio input located at the back of digital TV.
12
Page 13
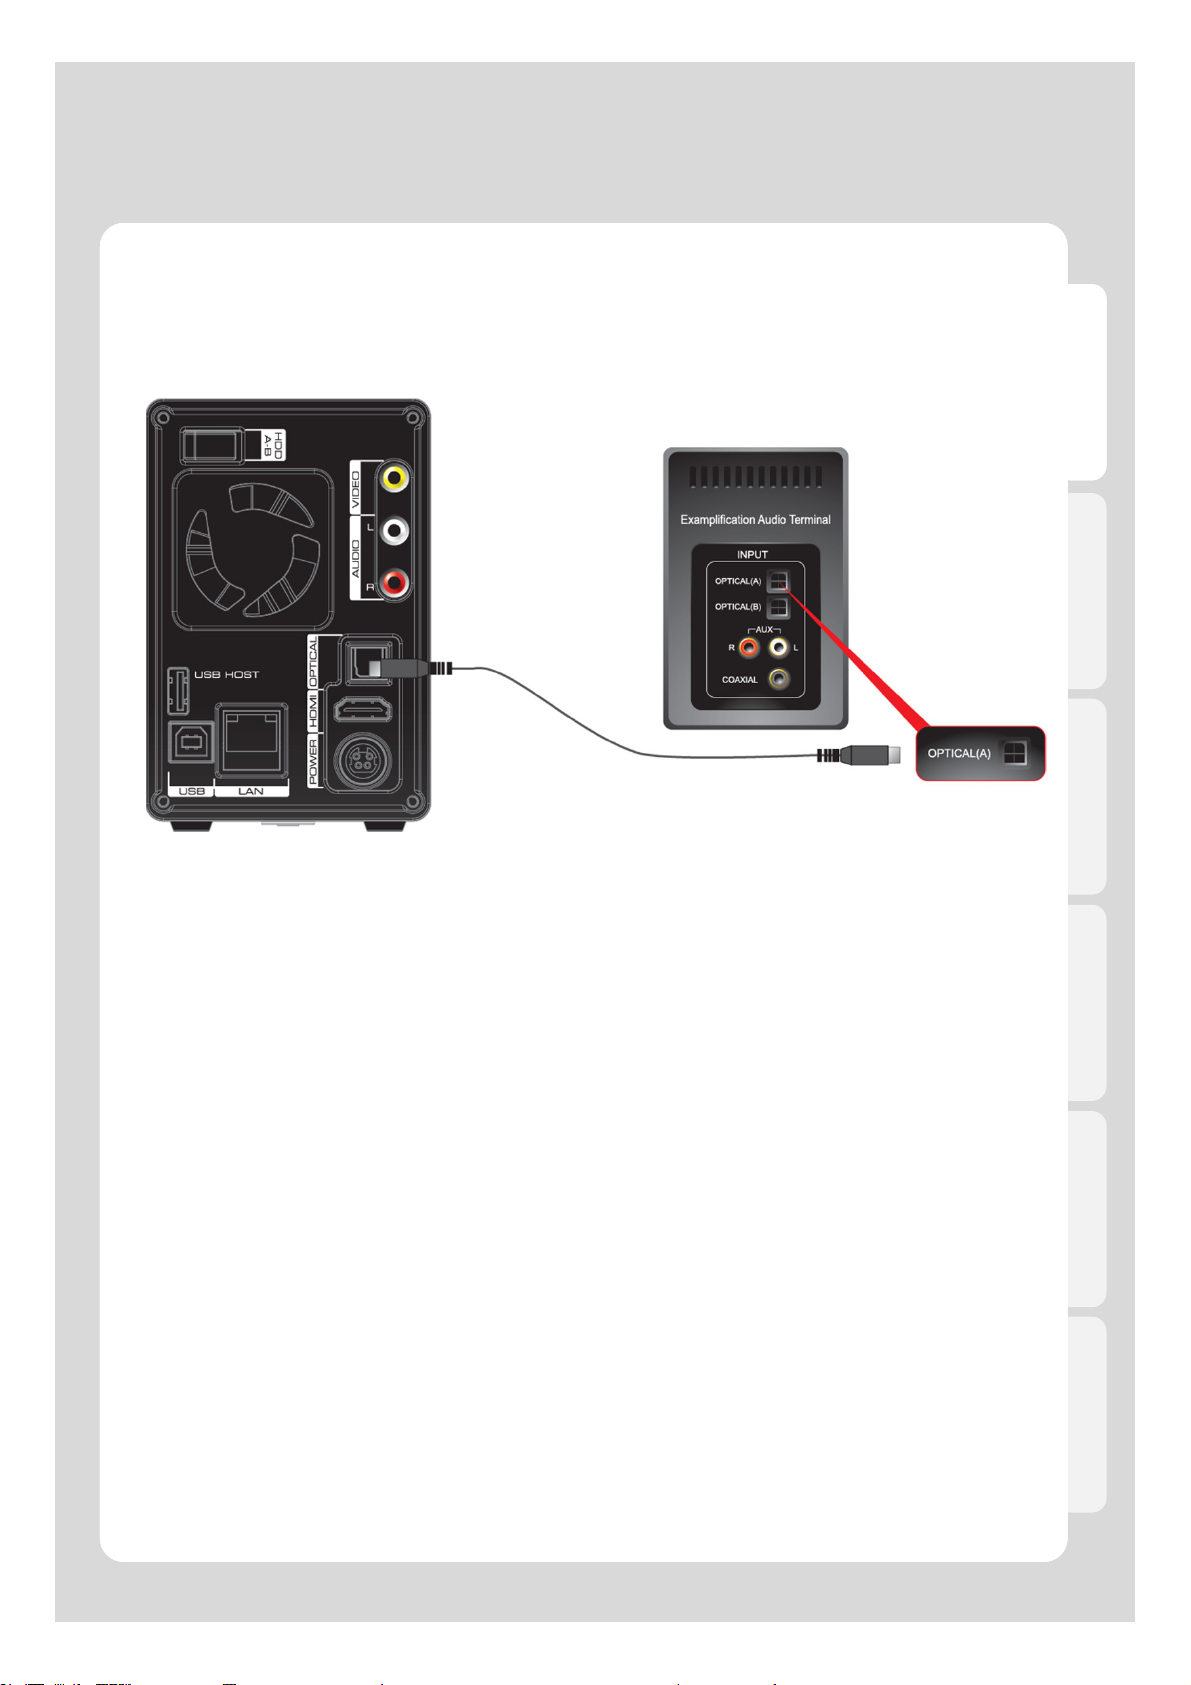
Connection
ㆍOptical cable connection
You can enjoy high-quality sound 5.1CH if the audio device is an amplifier or a receiver with
optical output cable input terminal. Connect optical cable to Optical, the optical output terminal
of Xtreamer as shown above. Then, connect amplifier or receiver to enjoy 5.1CH.
English
13
Page 14
Connection
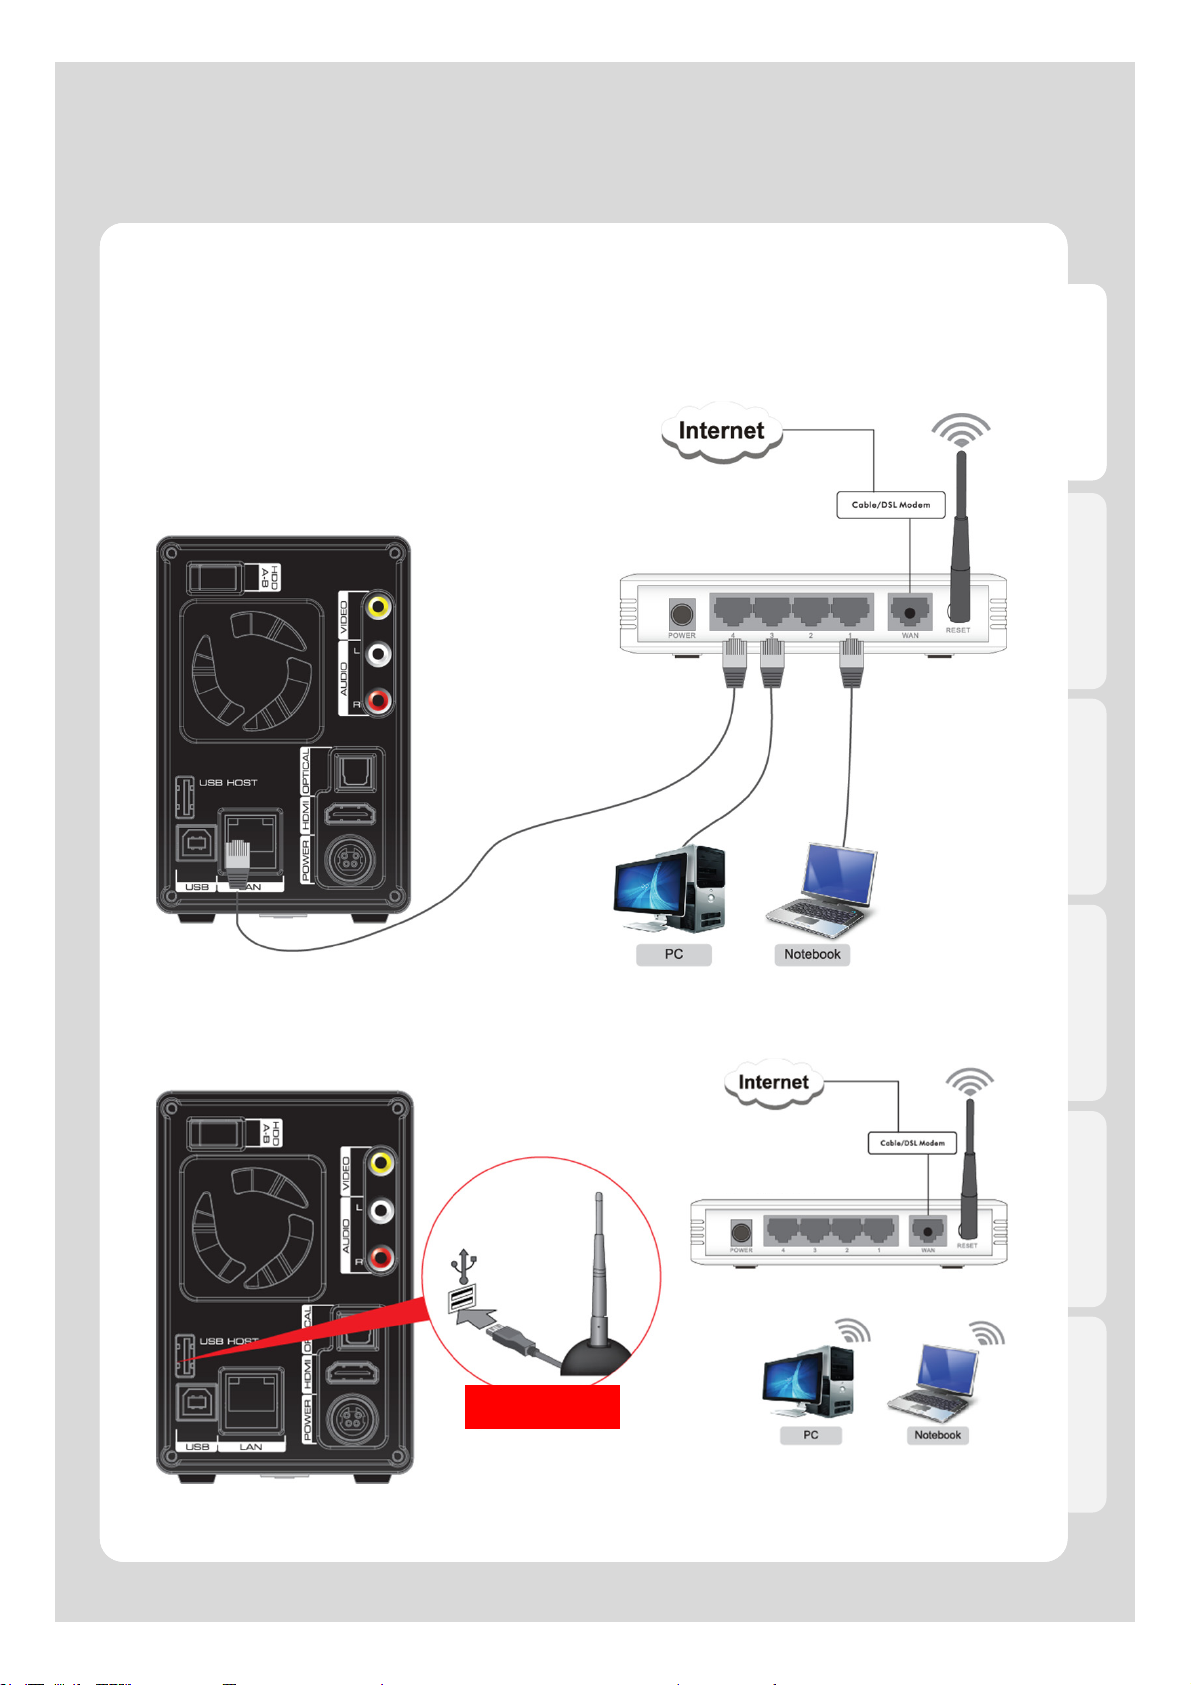
2. Connect to the Network
ㆍWired Network
Wired IP Sharing Router
English
IP Sharing Router
ㆍWireless Network
Optional
Wireless USB antenna
14
Wireless IP Sharing Router
Page 15

Connection
3. Connect to your PC
ㆍConnect the Adapter ㆍConnect the USB cable
English
PC
ㆍDisconnect the Xtreamer
(1) Click on (2) Disconnect
Click
Click
2
1
You must eject before disconnecting USB. If you don’t eject before
disconnecting, copied file will be unstably completed so that it brings its
inability to playback.
15
Page 16
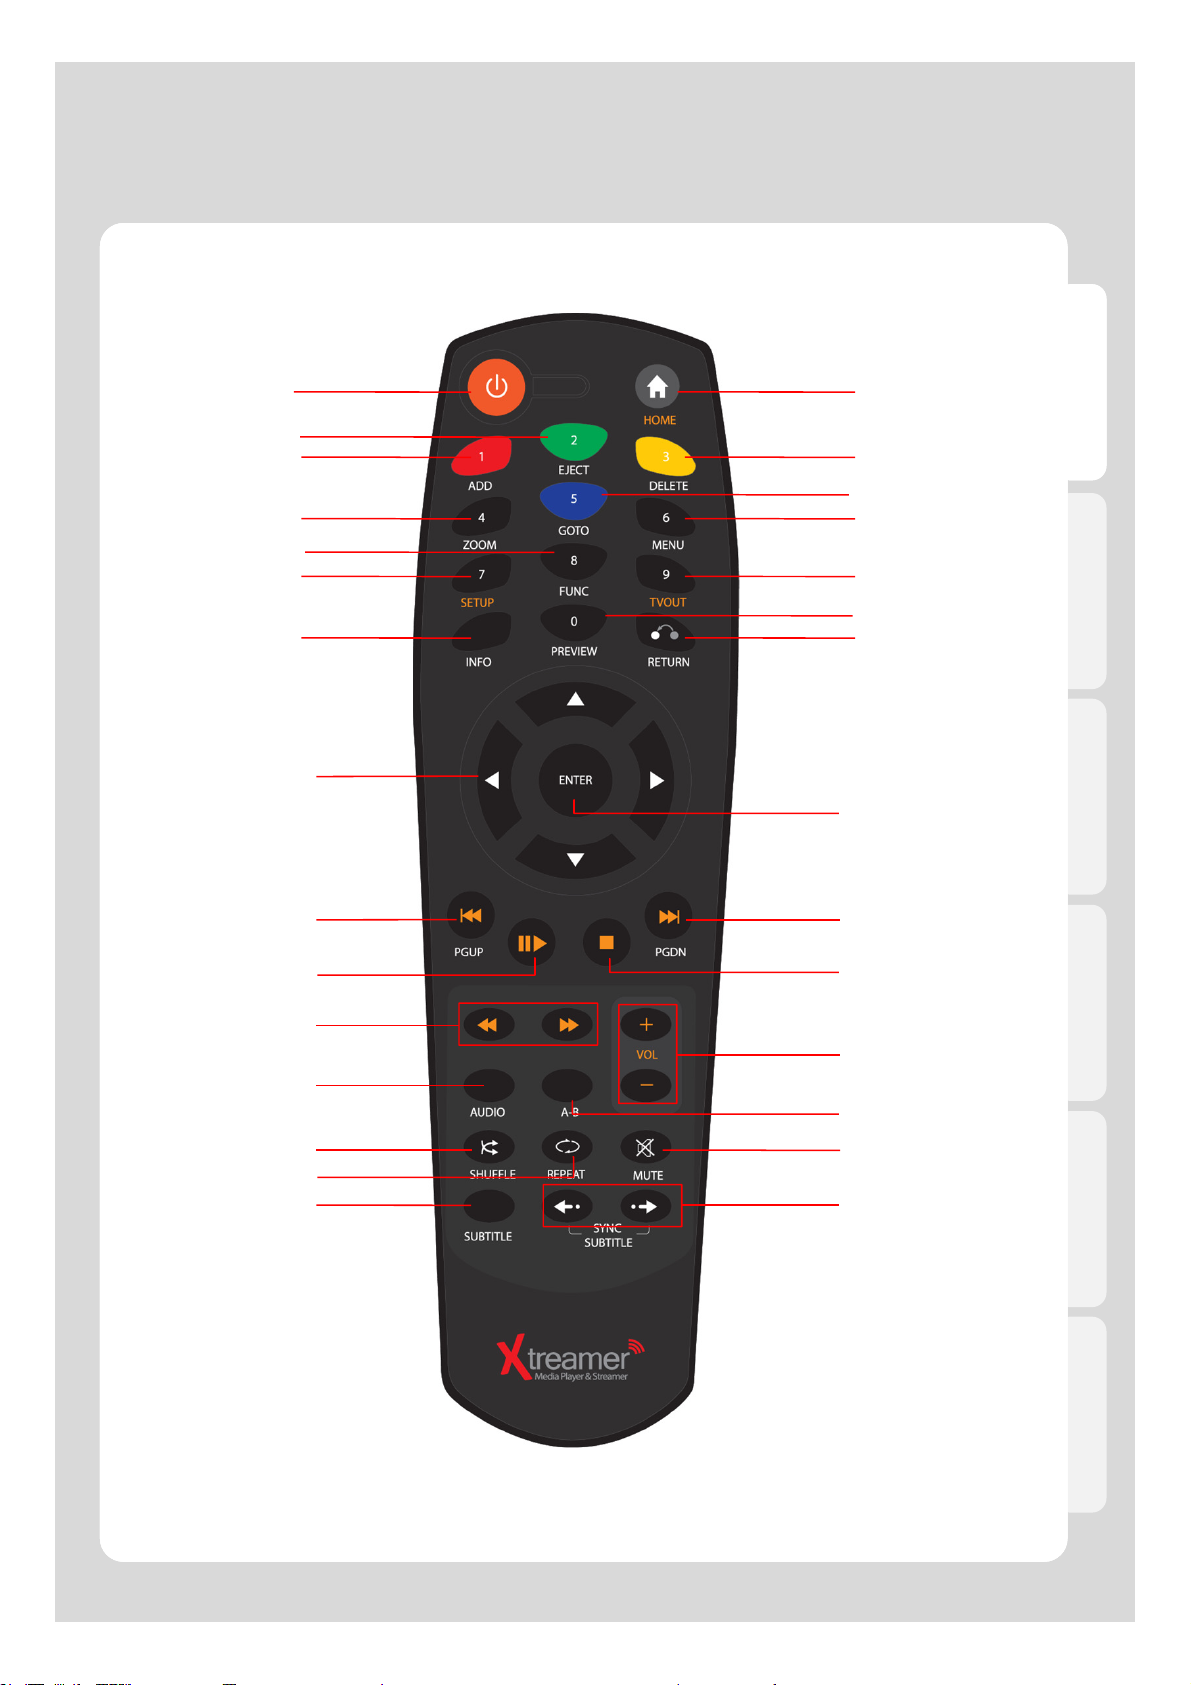
Remote Control Functions
English
12
3
4
7
9
10
13
5
6
8
11
12
14
15
17
19
21
23
26
27
28
16
18
20
22
24
25
29
16
Page 17
Remote Control Functions
- Turns the power On(or Off) / NAS Mode On(or Off)
1POWER
-Compulsory shutdown by pressing [Power] button more
than 3 sec
English
2HOME
3EJECT
4ADD
5 DELETE
6 GOTO
7 ZOOM
8MENU
9 FUNC
10 SETUP
11 TVOUT
Goes to Main Menu
- Adds the selected media file to Playlist
- Opens external tray load DVD ROM
Selects files in Playlist or File Manager
- Deletes the selected files in Media Library
- Moves to the next step in File Manager
- Tile : Selects files on Playlists
- Chapter : Moves to the next chapter or file
- Time : Sets the time you want to play from
- Use this button during playback
- Enlarges (or Reduces) screen
- Adjusts zoom percentage and Moves to position of
enlarged output by pressing arrow keys.
Menu view of DVD Jukebox
Use for sub functions to each menu
[Lock Folder / Changing names / Add to Favorite]
- Takes you to the Settings menu
- Alters and applies functions available during playback
- Toggles Video Output Modes by pressing more than
twice
- Use to cycle through the different video output modes
and resolutions (HDMI, AV)
12 PREVIEW
13 INFO
14 RETURN
15
16 ENTER
17 PGUP
DIRECTION
KEY
- Selects the preview mode
[ Preview / File Lists / Thumbnail]
Displays the current status for playing media file
[Video Codec / Audio Codec / Resolution / FPS /
Running time / Playlists / File name / Repeat / Shuffle /
WiFi wireless signal strength / Running time progress bar]
Returns (or Cancels)
- Skips chapters during playback
[LEFT - Forward 30 sec / RIGHT - Back 10 sec
UP - Forward 3 min / DOWN - Back 1 min]
-Single file playback
- Moves forward frame by frame after pressing
[PLAY/PAUSE] button to pause.
- Selects files after pressing [ADD] button
Moves to previous Chapter (or List)
/ Playing previous File
17
Page 18
Remote Control Functions
18 PGDN
19 PLAY/PAUSE
20 STOP
21 FR/FF
22 VOLUME
23 AUDIO
24 A-B
25 MUTE
26 SHUFFLE
27 REPEAT
28 SUBTITLE
29 SYNC SUBTITLE
Moves to next Chapter (or List)
/ Playing next File
Continuous file playback, Pause the playback
Stop playback
Forward function
[0.8 X/1.1 X/1.2 X/1.5 X/2 X/4 X/8 X/16 X/32 X/1X]
Adjusts volume level
Use it if your video file contain s multiple audio tracks to
switch between them
Sets repetitive section between A and B
Mutes the sound
Random playback
Plays files repeatedly
[Title playback / a Folder file playback / Repeat Off]
Adjusts [Size / Outline / Position / Color / Advanced
Color]
Adjusts subtitle sync during playback
English
18
Page 19
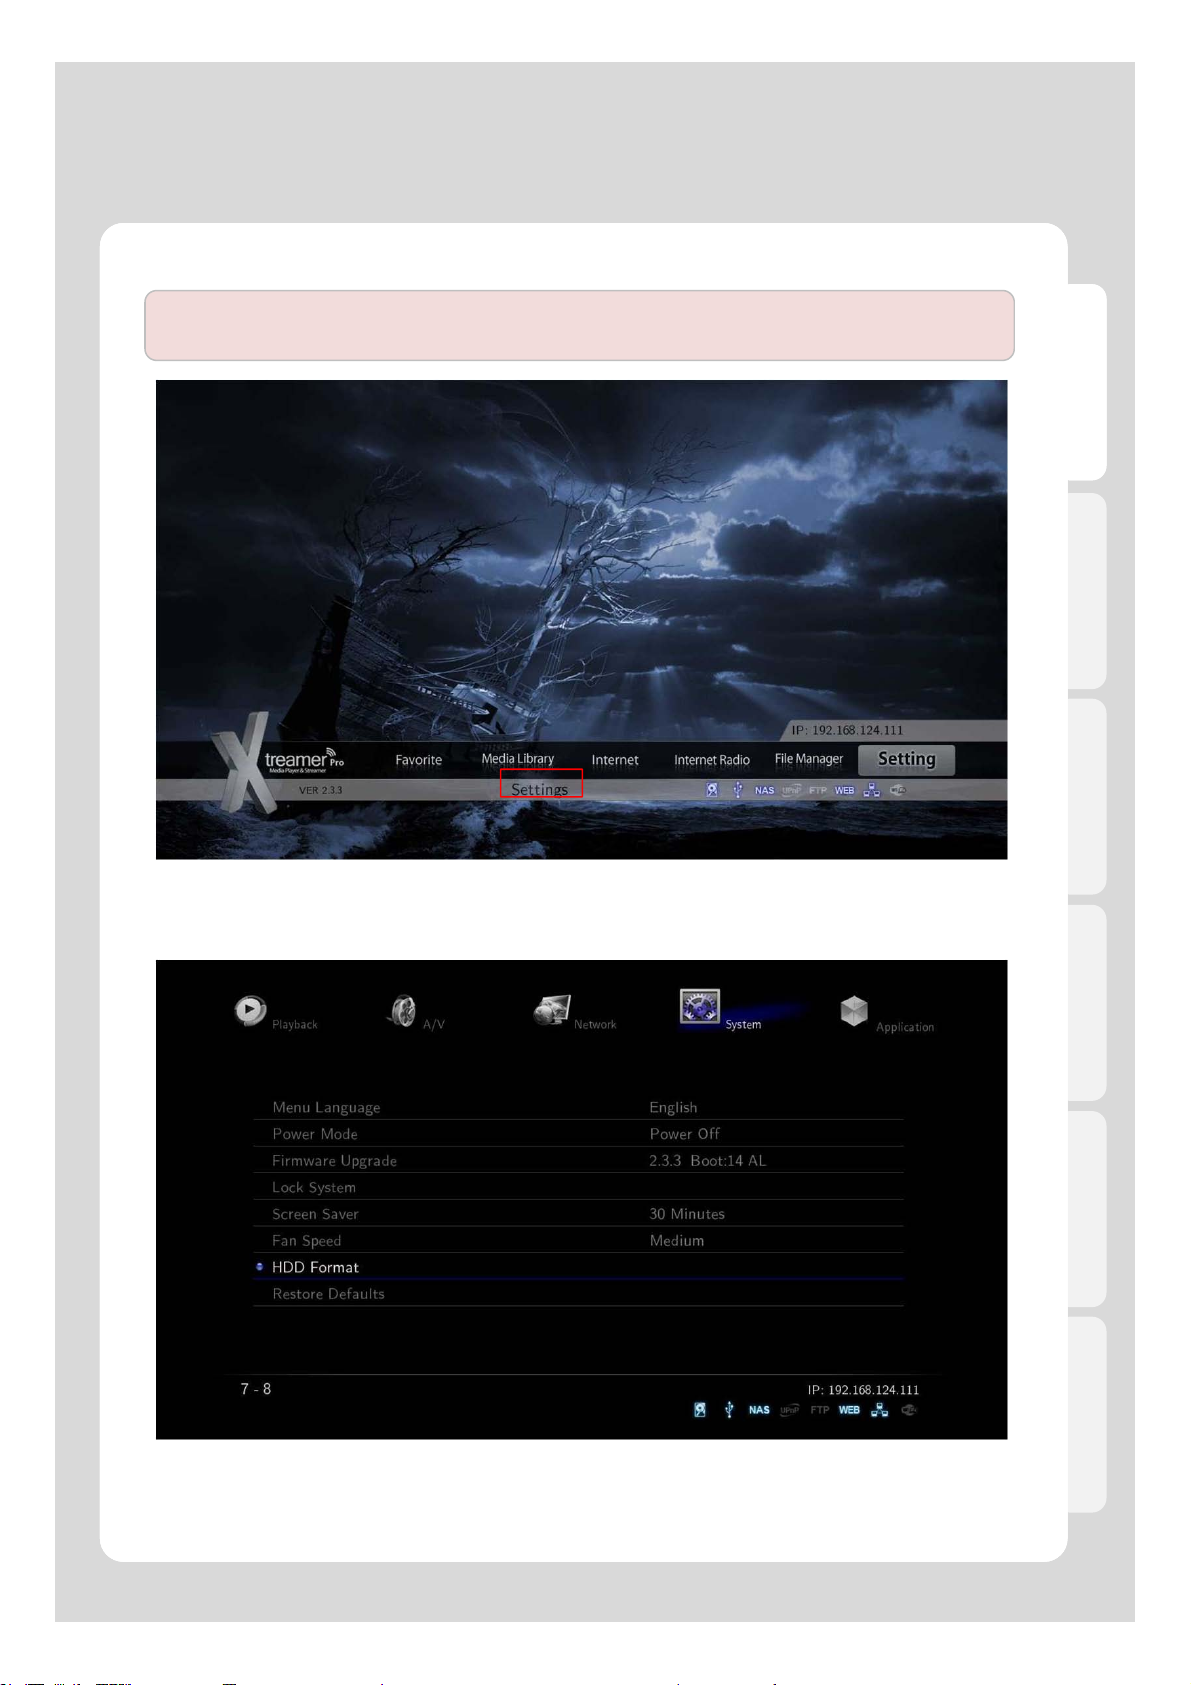
1. HDD Format
Settings
If you bought a new hard disk it’s highly advisable to format it via a Windows utility or a relevant program
before using it
How to Format Internal HDD
1. Insert HDD you want to format into Xtreamer, and then reboot.
2. Select [Settings].
English
3. Select [System] – [HDD Format].
19
Page 20
Settings
English
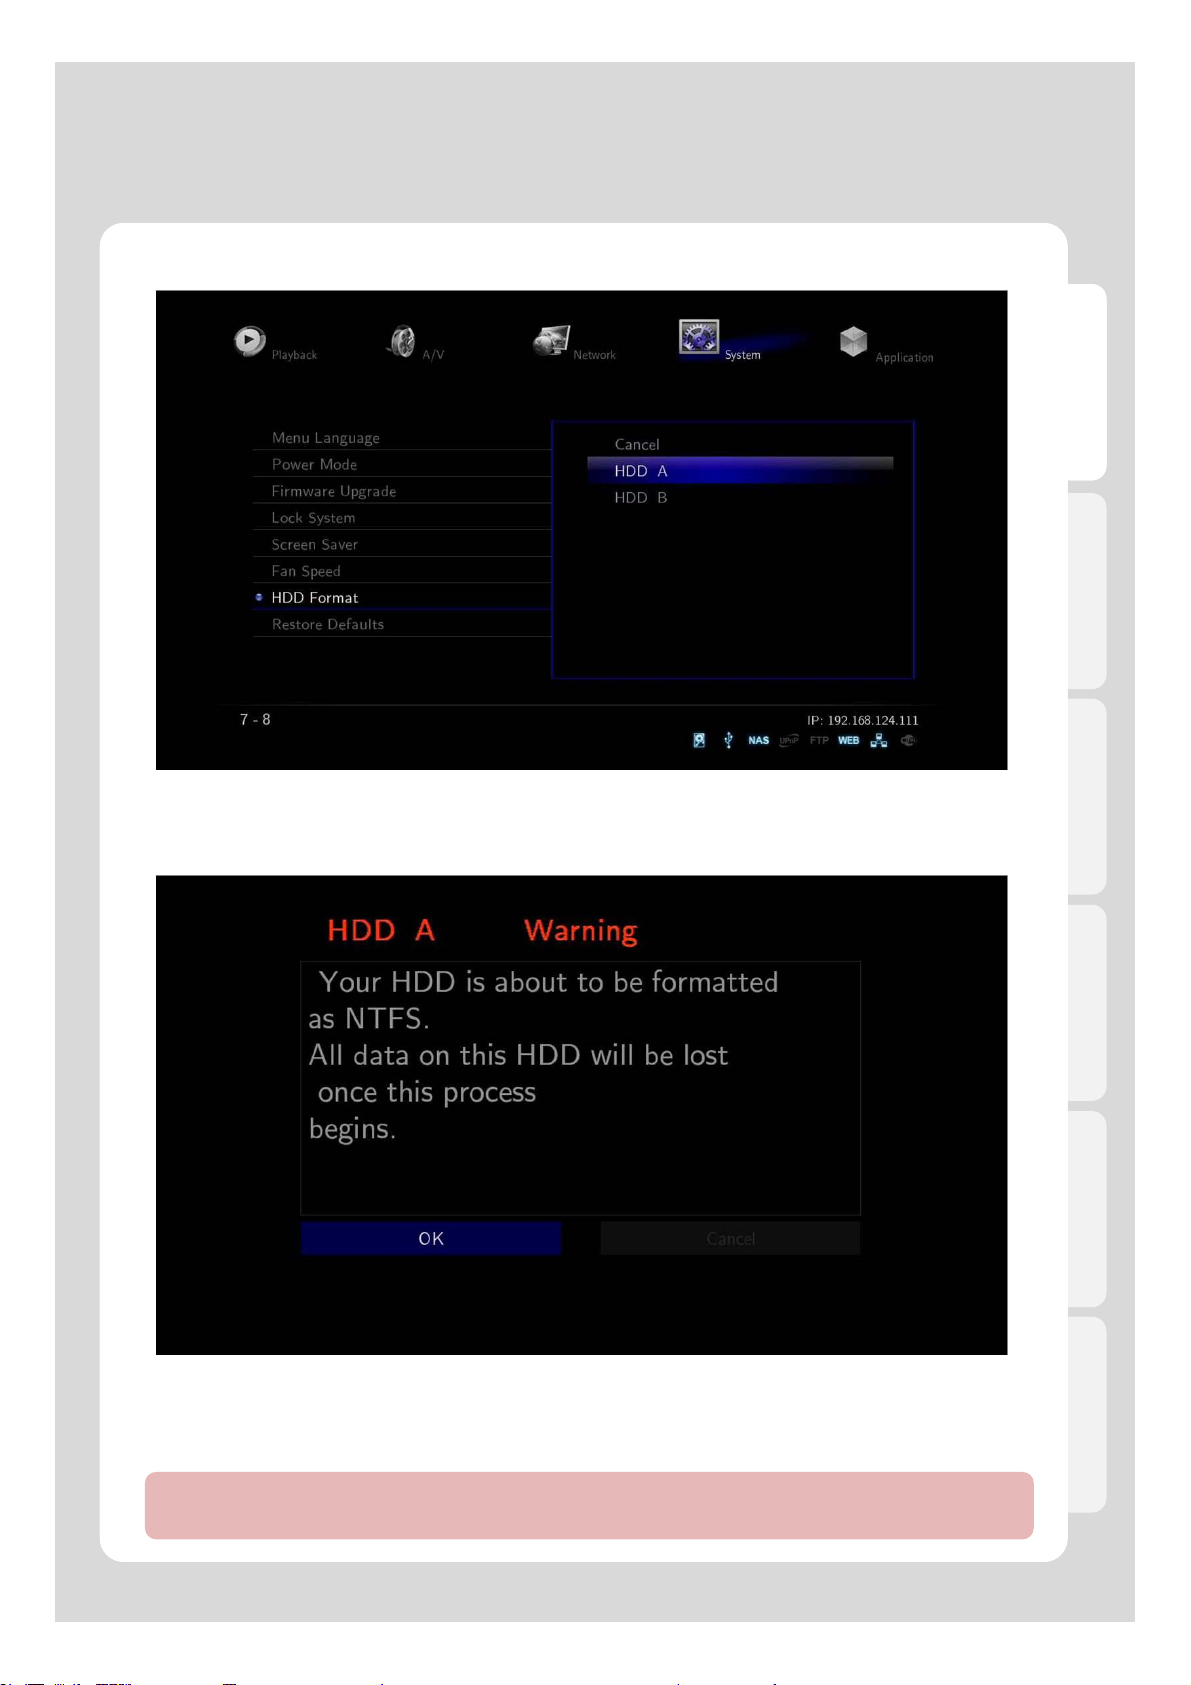
4. Select HDD you want to format.
5. Select [OK] after reading “Warning” message carefully.
If you don’t want to delete all data, do not format HDD due to all data on this HDD will be lost once this
progress.
20
Page 21
Settings
English
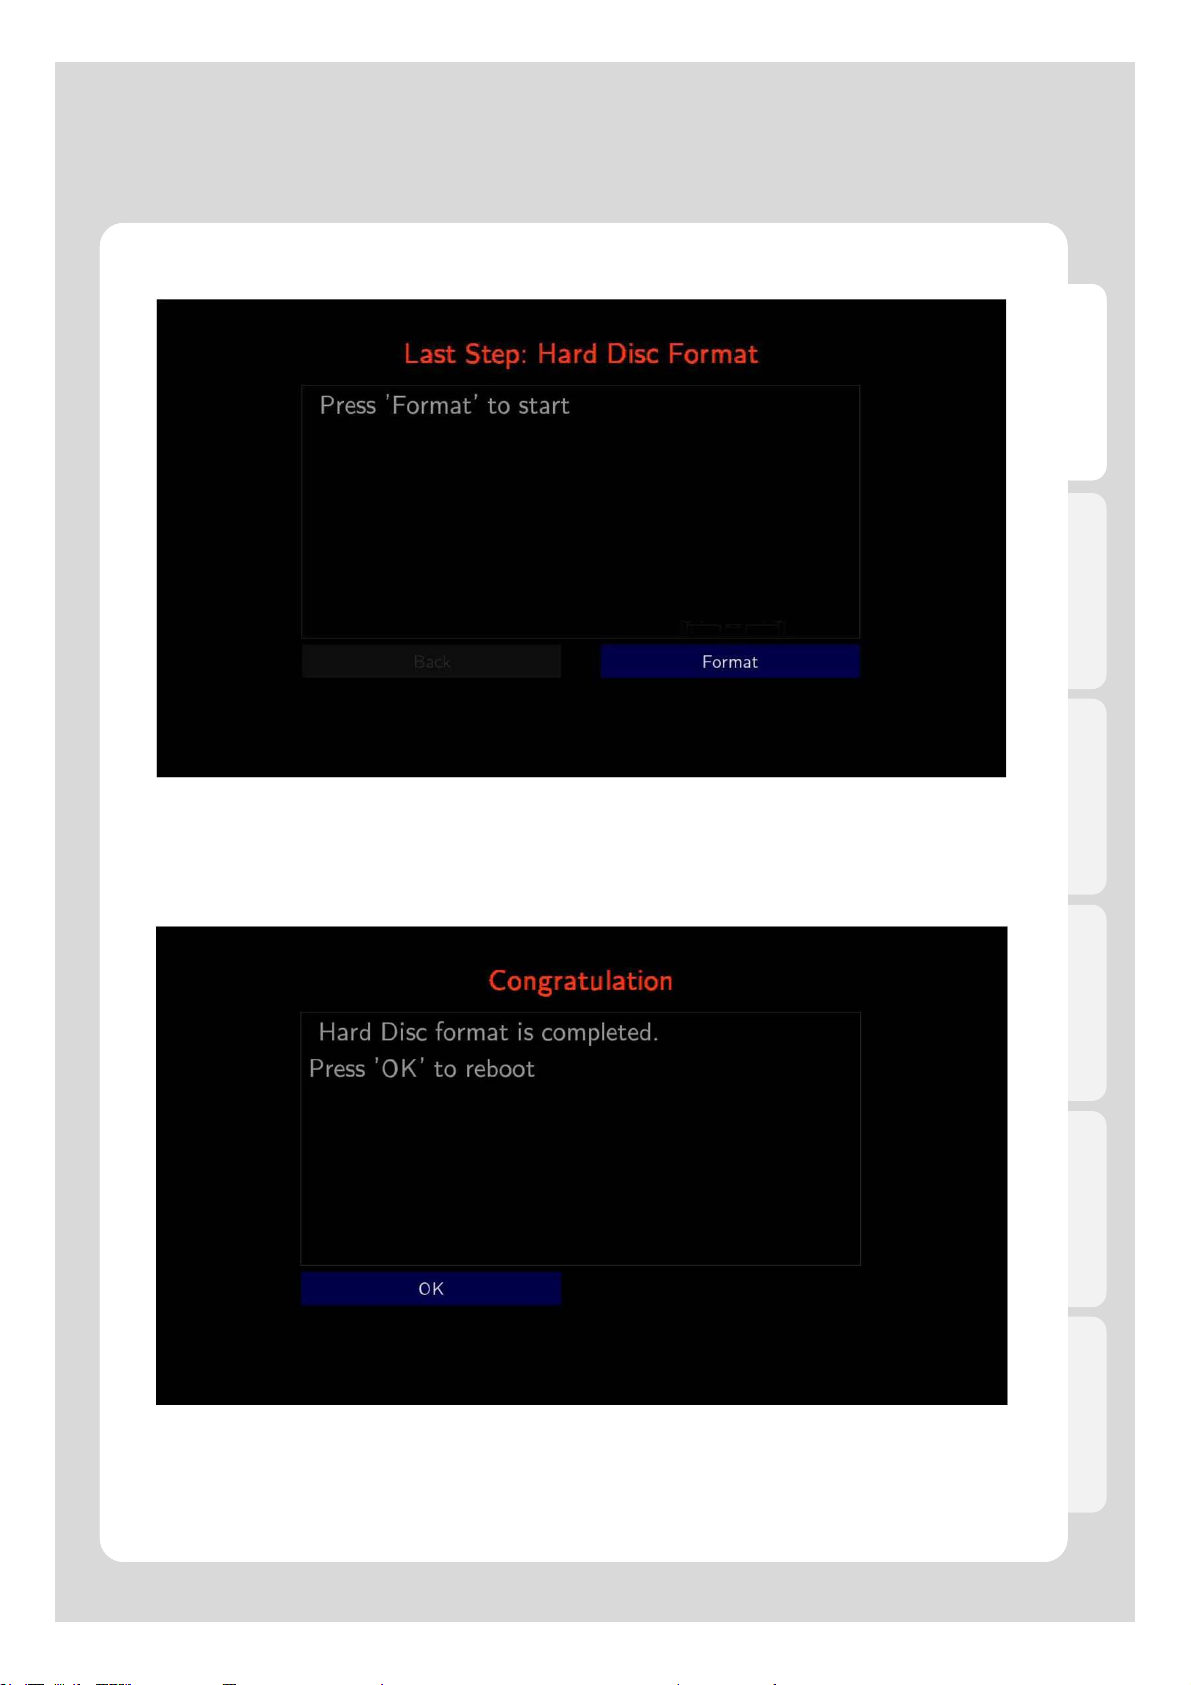
6. Press [Format] button in order to proceed with format.
7. After HDD format is completed, press [OK] to reboot.
21
Page 22
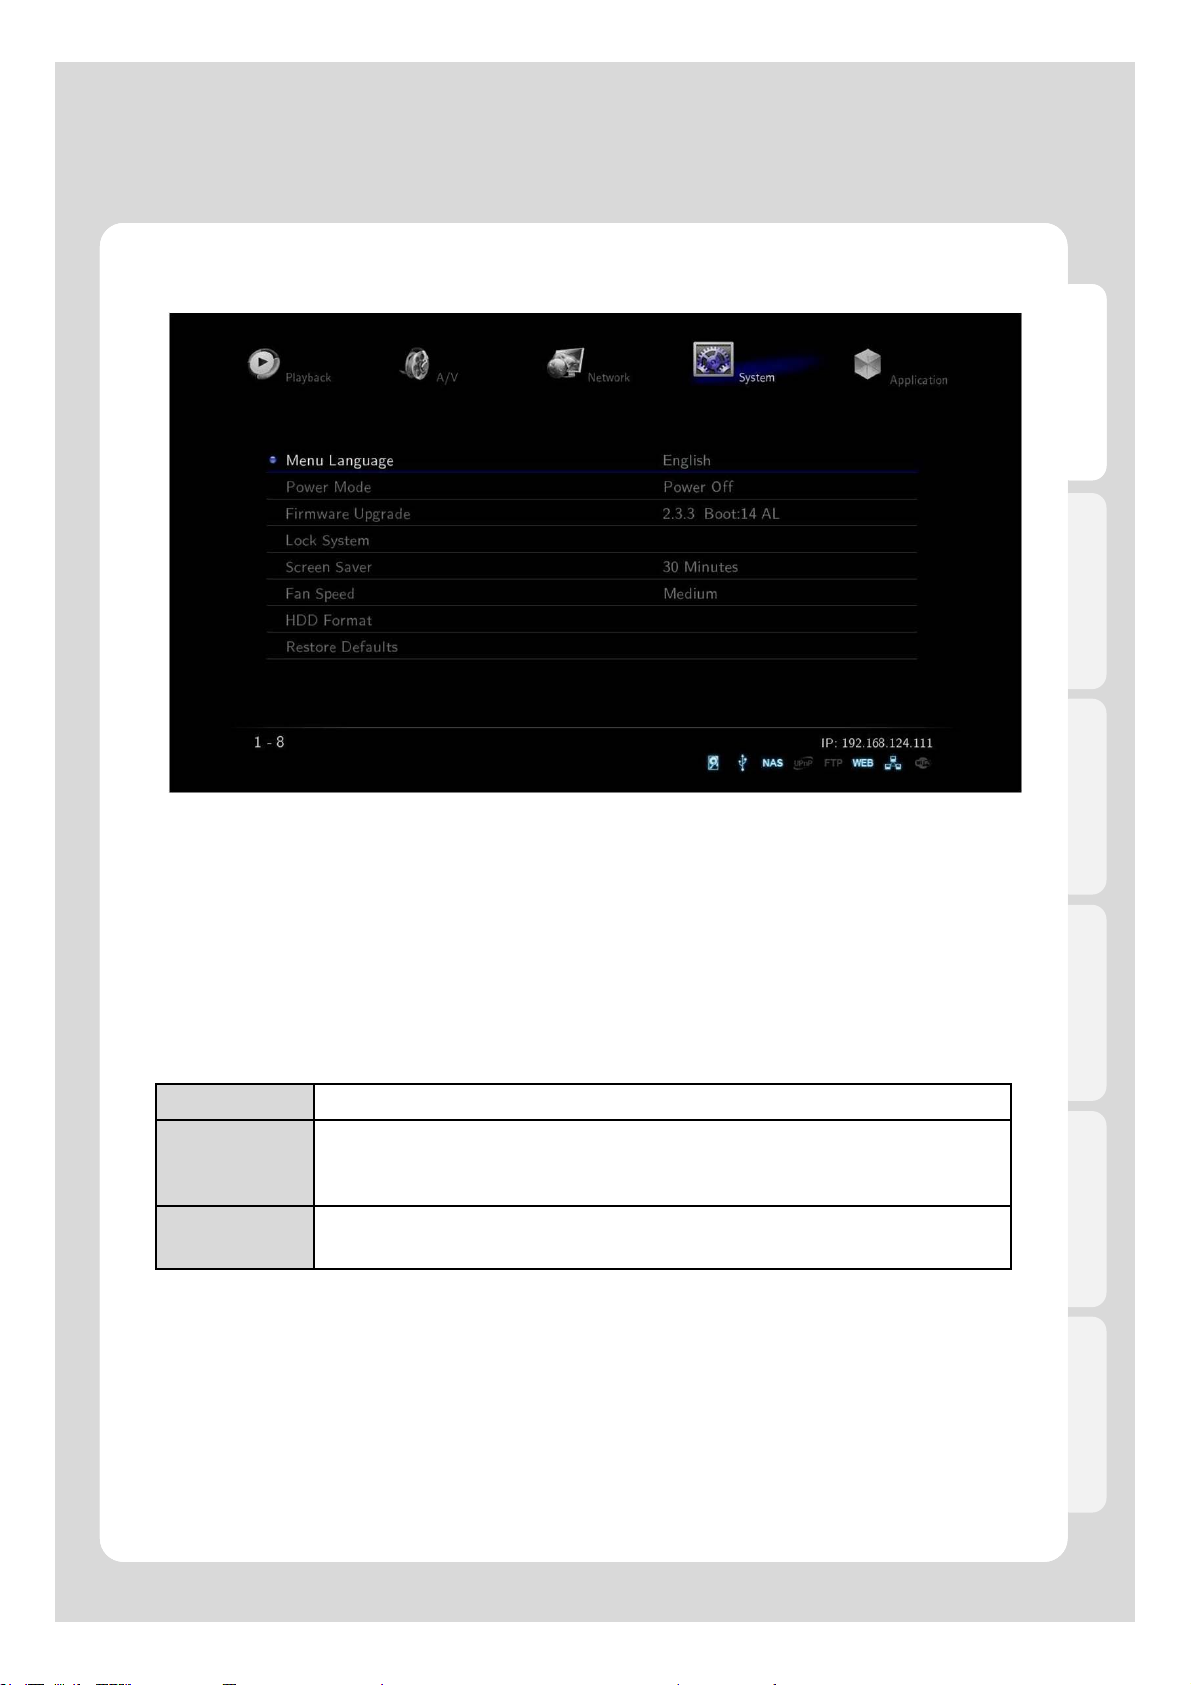
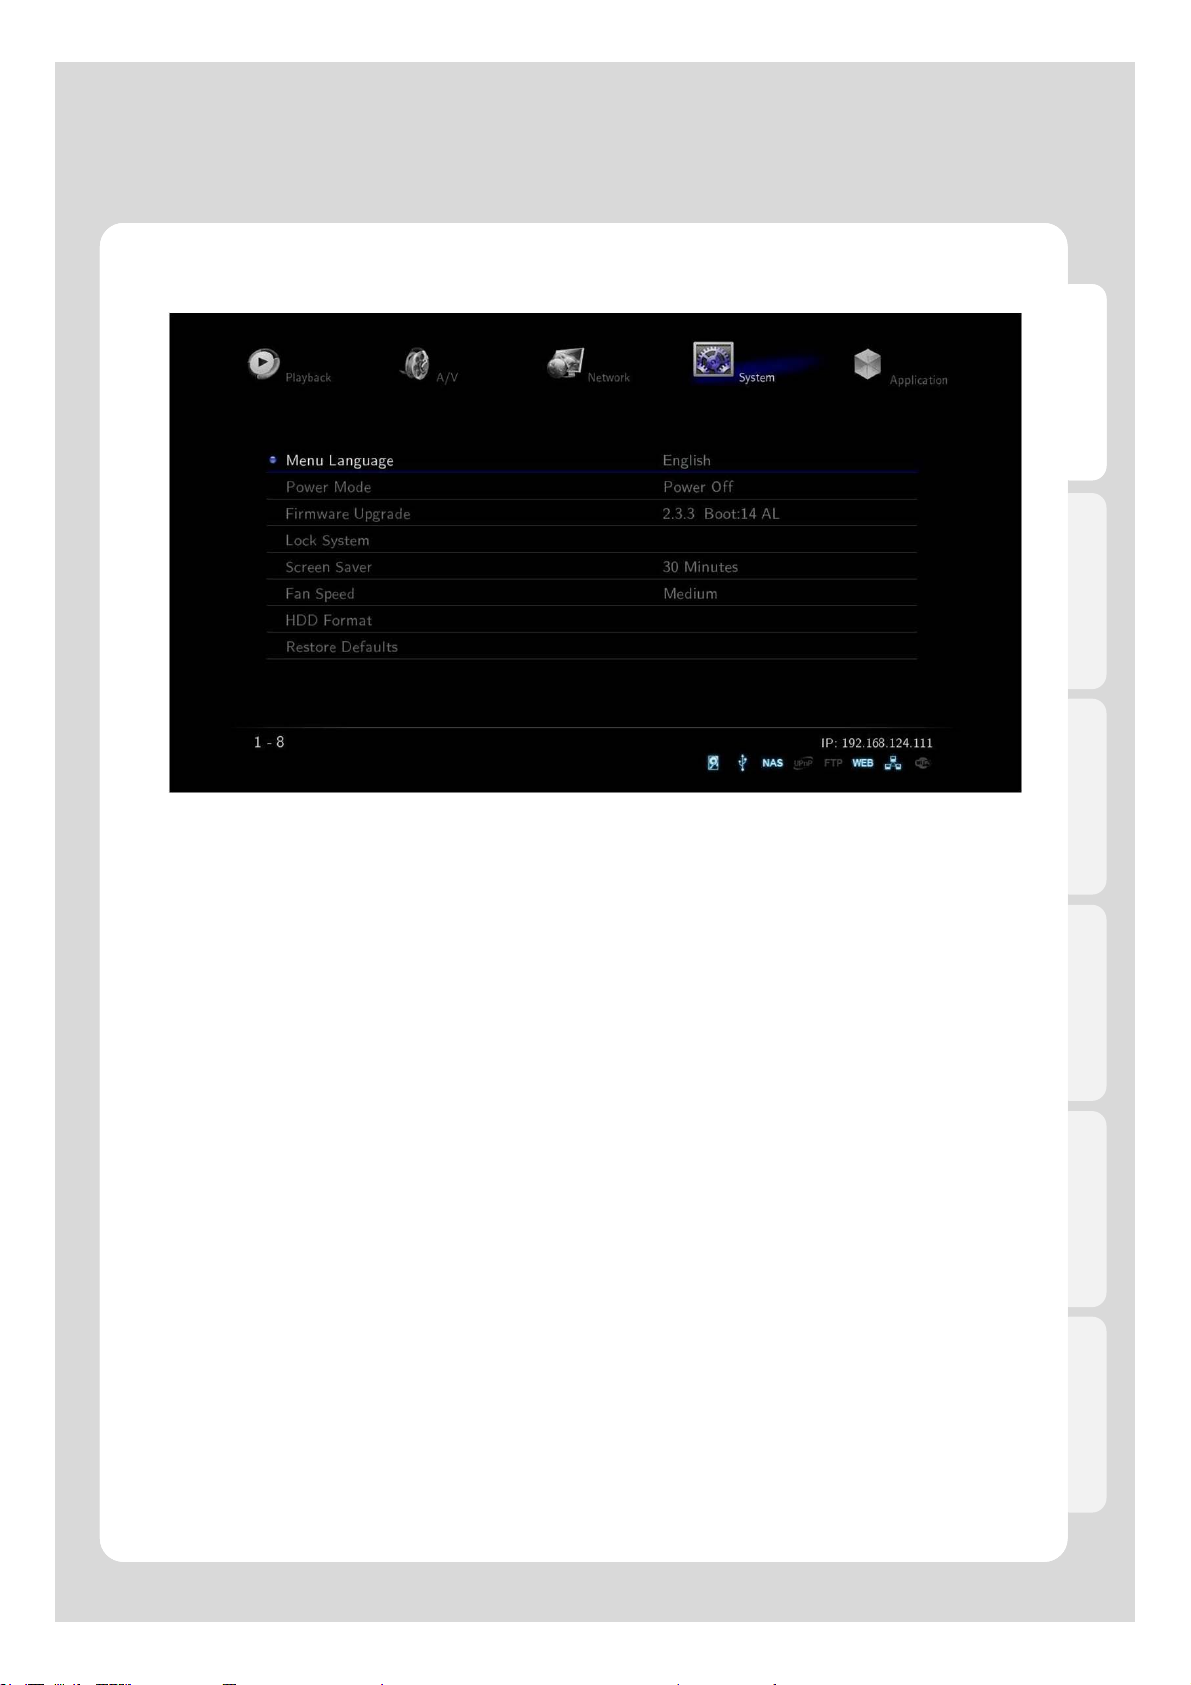
2. System
Settings
English
Menu Language
Default language is in English; OSD language menu can be changed. You will therefore be able to choose
your language, select [Setting] – [System] – [Menu Language].
Xtreamer Media Players supports the following languages:
[1]Arabic [2]Thai [3] Hebrew [4]Vietnamese [5]Chinese [6]Japanese [7]Korean [8]Spanish [9]German
[10]Italian [11]Turkish [12] Greek [13] Dutch [14] French [15]Latvian [16]Russian [17]Croatian [18]Portuguese
[19]Swedish [20]Polish [21]Romanian [22]Ukrainian [23]English [24]Magyar [25]Czech [26] Slovene
[27]Finnish [28]Danish [29] Estonian [30]Hungarian.
Power Mode
The feature supports “Power Mode” settings by pressing [POWER] button on your remote.
Power Off Select to switch off the power.
Speed and stability of stream are improved by optimizing its function of network
NAS Mode
Confirm
Window
Firmware Update
The feature displays the current firmware version. It also enables you to update firmware by selecting stored
firmware file from HDD or USB storage device. After the upgrade procedure is complete the system will reboot.
application as setting off PLAYER mode internally. The allotted memory for PLAYER
function is set to Off mode which enables the system to reserve 90 percent of the
memory for NAS Mode.
By pressing [POWER] button, Confirm Window is displayed to select between
[Power OFF] and [NAS Mode].
Lock System
This option allows you to assign a password to your system folders in order to protect your content. The
Locked folders will be accessible by password only.
22
Page 23
2. System
Settings
English
Screen Saver
This is to set the time for automatic changing images on your screen during periods of user inactivity.
Screensaver is designed to prevent phosphor burn-in on the LCD TV when the properties of the exposed
areas of phosphor-coating on the inside of the screen gradually and permanently change, eventually leading
to ghost image on the screen.
[Off / 1 Minutes / 5 Minutes / 15 Minutes / 30 Minutes / 45 Minutes]
Fan Speed
The feature is to provide adequate cooling for lowering noise.
[Low / Medium / High / Manual]
By switching to NAS Mode in which additional setting values are automatically stored.
HDD Format
This feature supports internal HDD format function. Formatted file system is divided into Linux Swap partition
and NTFS partition. By auto formatting, Linux swap partition is an independent section of hard disk used
solely for swapping. The swap space is the amount of virtual memory available.
Restore defaults
This option restores your player to the factory defaults. It will clear all the personal settings including passwords,
favorites, custom skins etc.
- Using this option will not damage the data on your HDD
- Always reset your settings after a firmware upgrade
Effect Sound
Pressing the arrow keys plays a sound effect.
23
Page 24

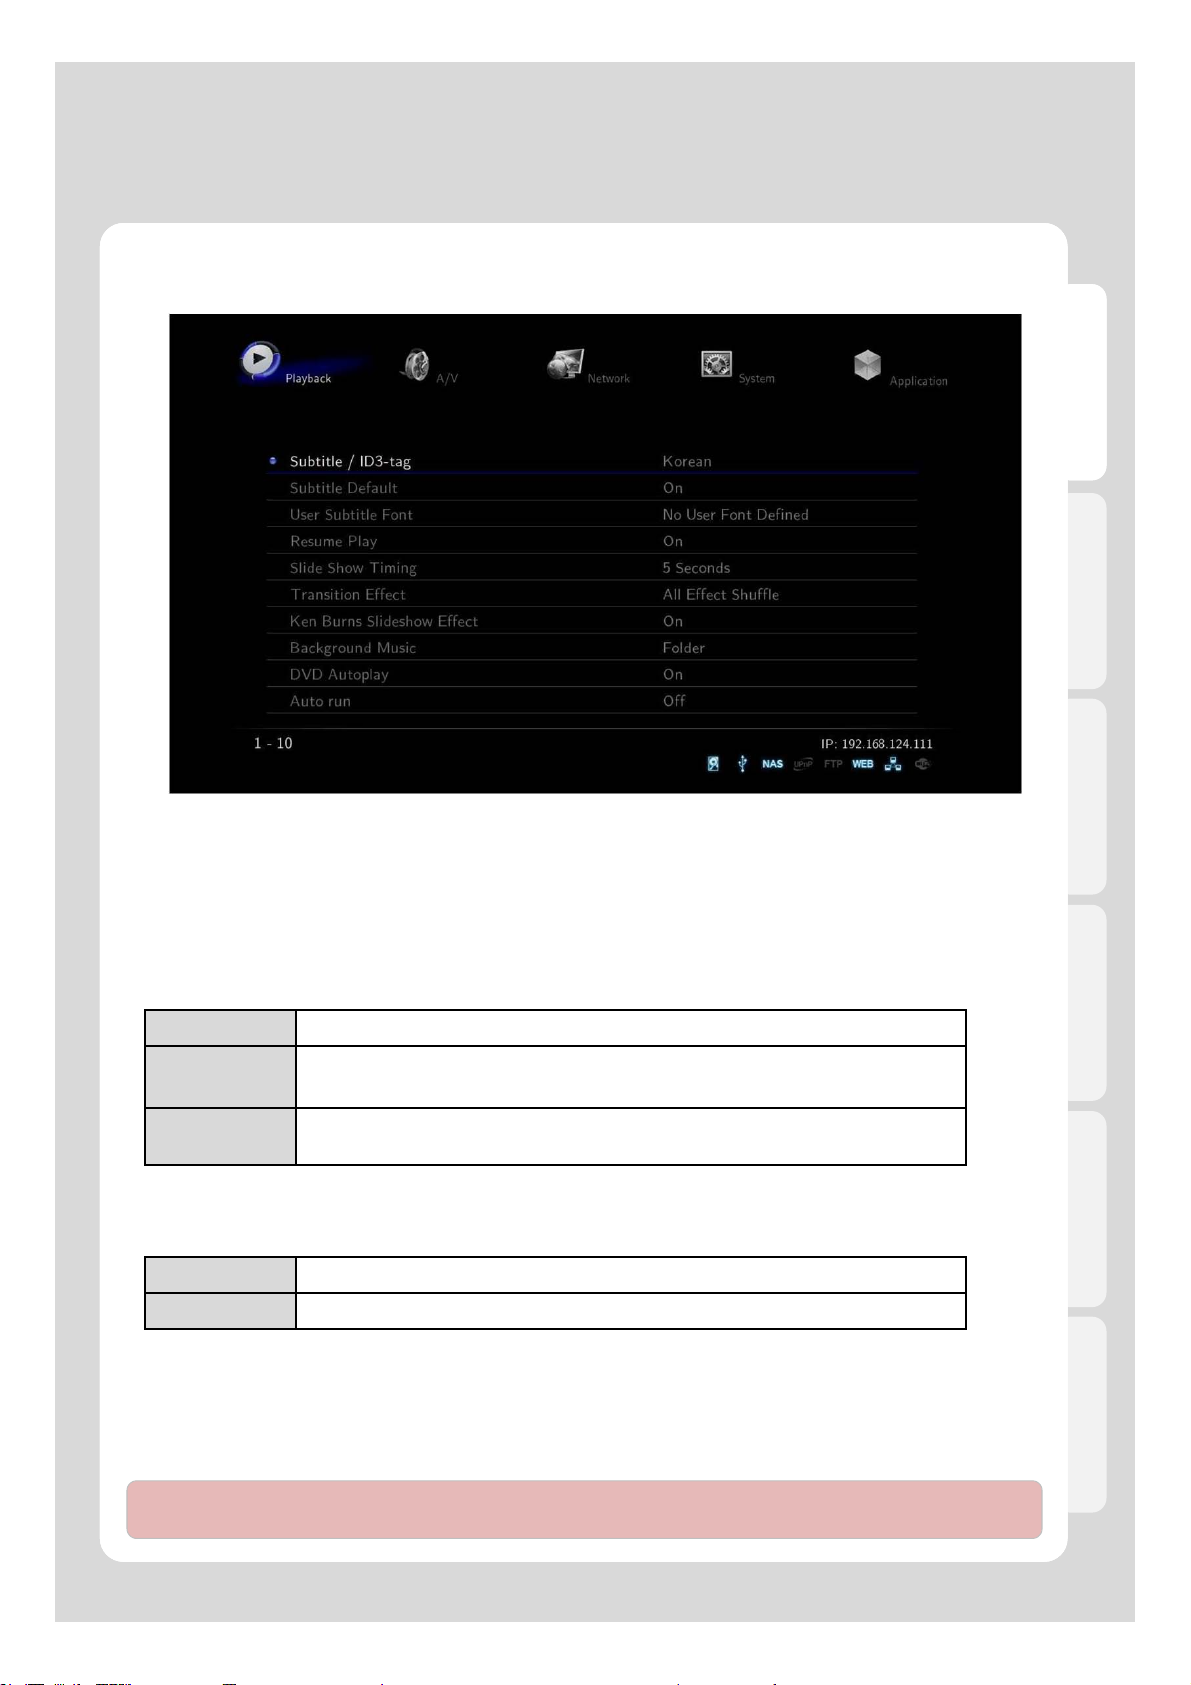
3. Playback
Settings
English
Subtitle / ID3-Tag
You can specify the language used for subtitle languages, this function you can be provided that ID3-tag is
supported for Mp3 file. Unicode [UTF-8] is a computing industry standard, and is set as a default value. NonUnicode type doesn’t translate or verify the contents of files. Select the same language as your subtitle.
Select [Setting] – [Playback] – [Subtitle/ID3-tag] – [Thai].
Subtitle Default
This feature provides selection of displaying subtitles at the bottom of the screen.
ON
OFF
User Subtitle Font
TTF font allows you to combine multiple fonts into a file used for defining characters design. To use custom
fonts you need to save them on an internal HDD or USB Storage device: “User_font” folder is automatically
created and you will be able to store several TTF font files in that folder.
Selecting and changing fonts is also supported during playback. Select [Setting] – [Playback] – [User Subtitle
Font]. ※ Depending on fonts, you may not be able to change font designs.
Resume Play
You can begin playing Xtreamer from the point where you previously stopped it. Your system saves a record
of the scene that was playing when you stopped playback so it knows where to resume playing.
ON Video is played from the beginning with “Resume Playback?” message.
Displaying subtitle by automatic carrying subtitle file.
※ The name of movie and the subtitle file must be identical.
Subtitle isn’t displayed.
OFF Video isn’t resumed to play.
Slide Show Time
The feature is to set the time, and a display of a series of chosen pictures.
You will be able to select the time transitions:
[Off / 2 Seconds / 5 Seconds / 10 Seconds / 30 Seconds / 1 Minute / 2 Minutes]
24
Page 25
3. Playback
Settings
English
Transition Effect
The feature is used to display a range of digital photos, and its application includes 7 major functions.
[All Effect Shuffle] is set as a default value.
Ken Burns Sideshow Effect
The feature enables used technique of embedding still photographs in motion pictures, and displays zooming
effects.
Background Music
Background music is played while running photo slideshow.
OFF Turning off the background music.
Folder
Playlist
DVD Autoplay
The feature allows you to select automatic DVD play mode when inserting a DVD disk into the DVD ROM
connected to your player via USB port
OFF DVD Disk isn’t automatically played.
ON DDVD Disk is automatically played.
Auto Run - need an internal HDD to use this feature
This feature allows you to automatically play a designated playlist when Xtreamer starts.
Auto-Run function detects and plays a Playlist and also enables you to organize your playlists via the Xtreamer
Web Server. [Off / Music Playlist (Sequence) / Music Playlist (Shuffle) / Photo Playlist (Sequence) / Photo Playlist
(Shuffle) / Movie Playlist (Sequence) / Movie Playlist (Shuffle)]
You will enjoy playing the entire content of music folder while your focus is on its
inside photos of the same folder.
Music files will be played, select [Media Library] – [Playlist]. There can be
several new variations on slideshow like using your captioned photos and music.
Note : Add up your file lists to Playlist by selecting [Media Library] – Tap Menu [Music/Photos/Movies] in order to
run automatically. Added Playlist from [All] mode won’t be played by Auto Run.
25
Page 26
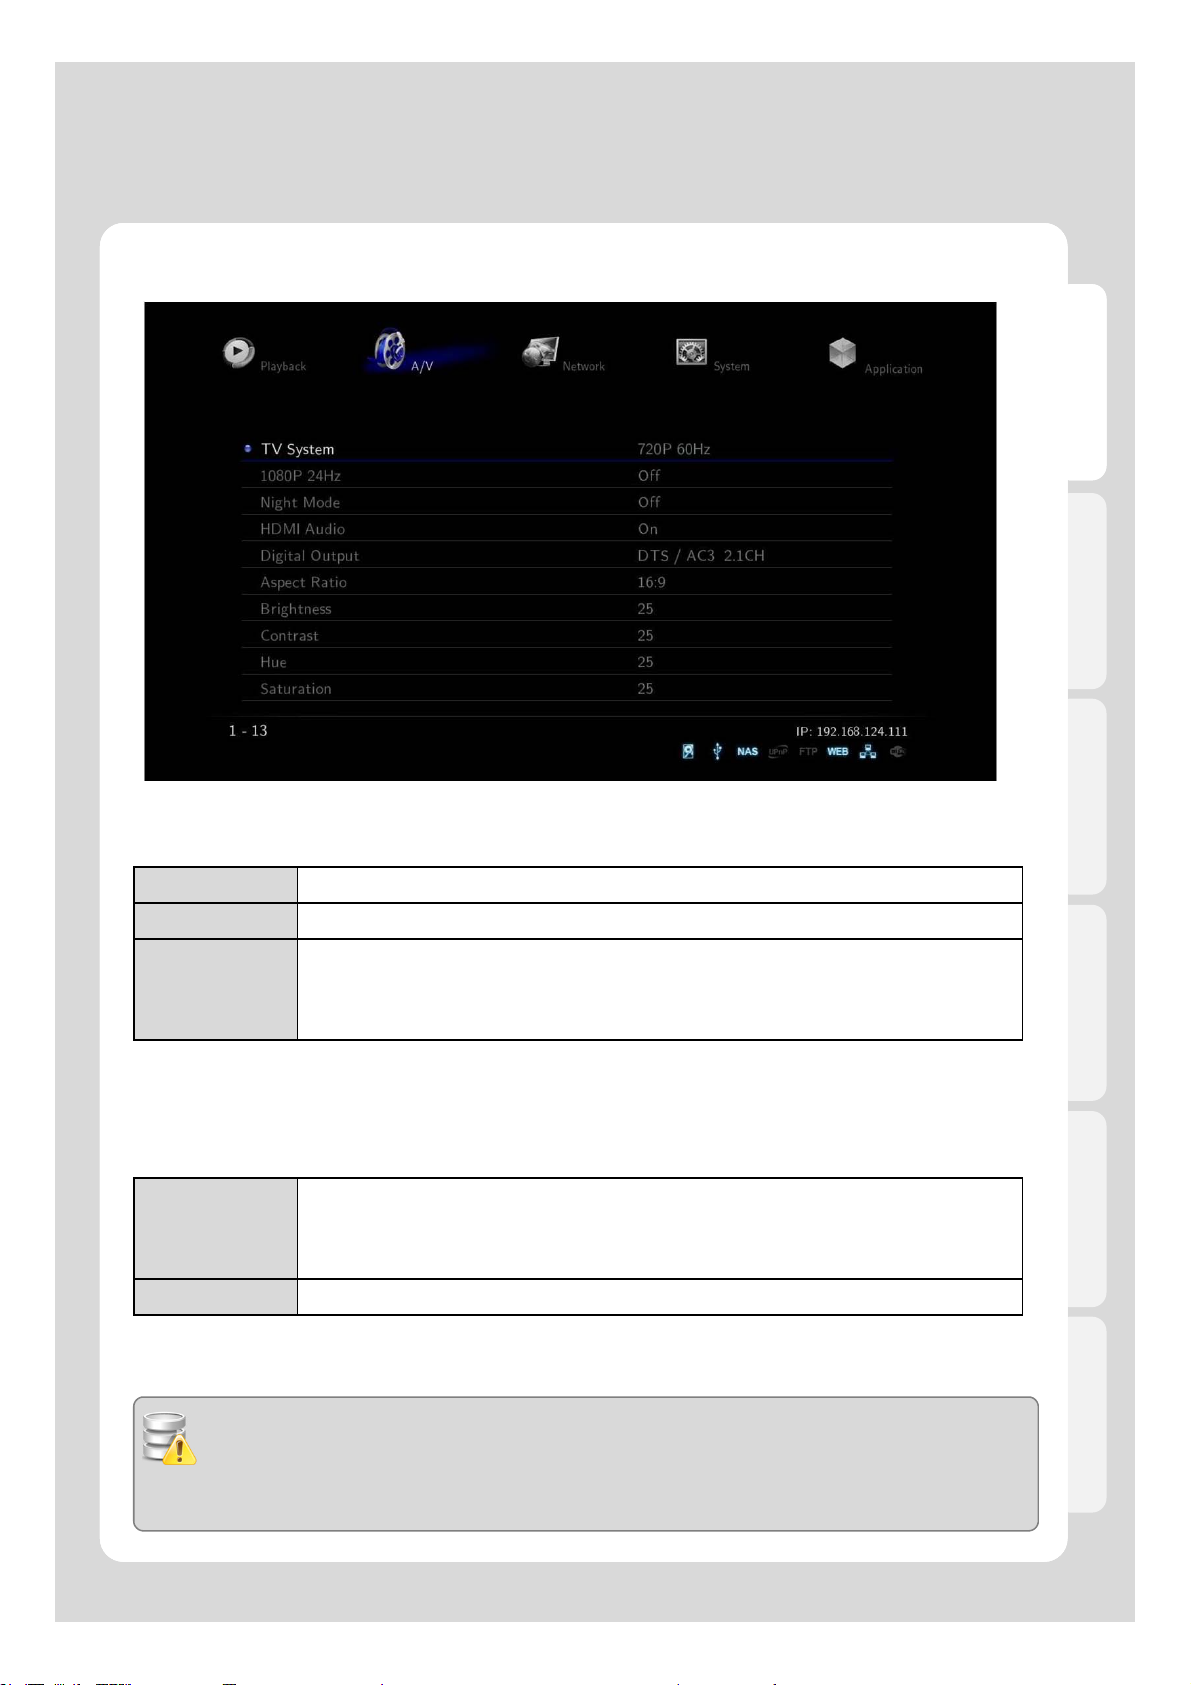
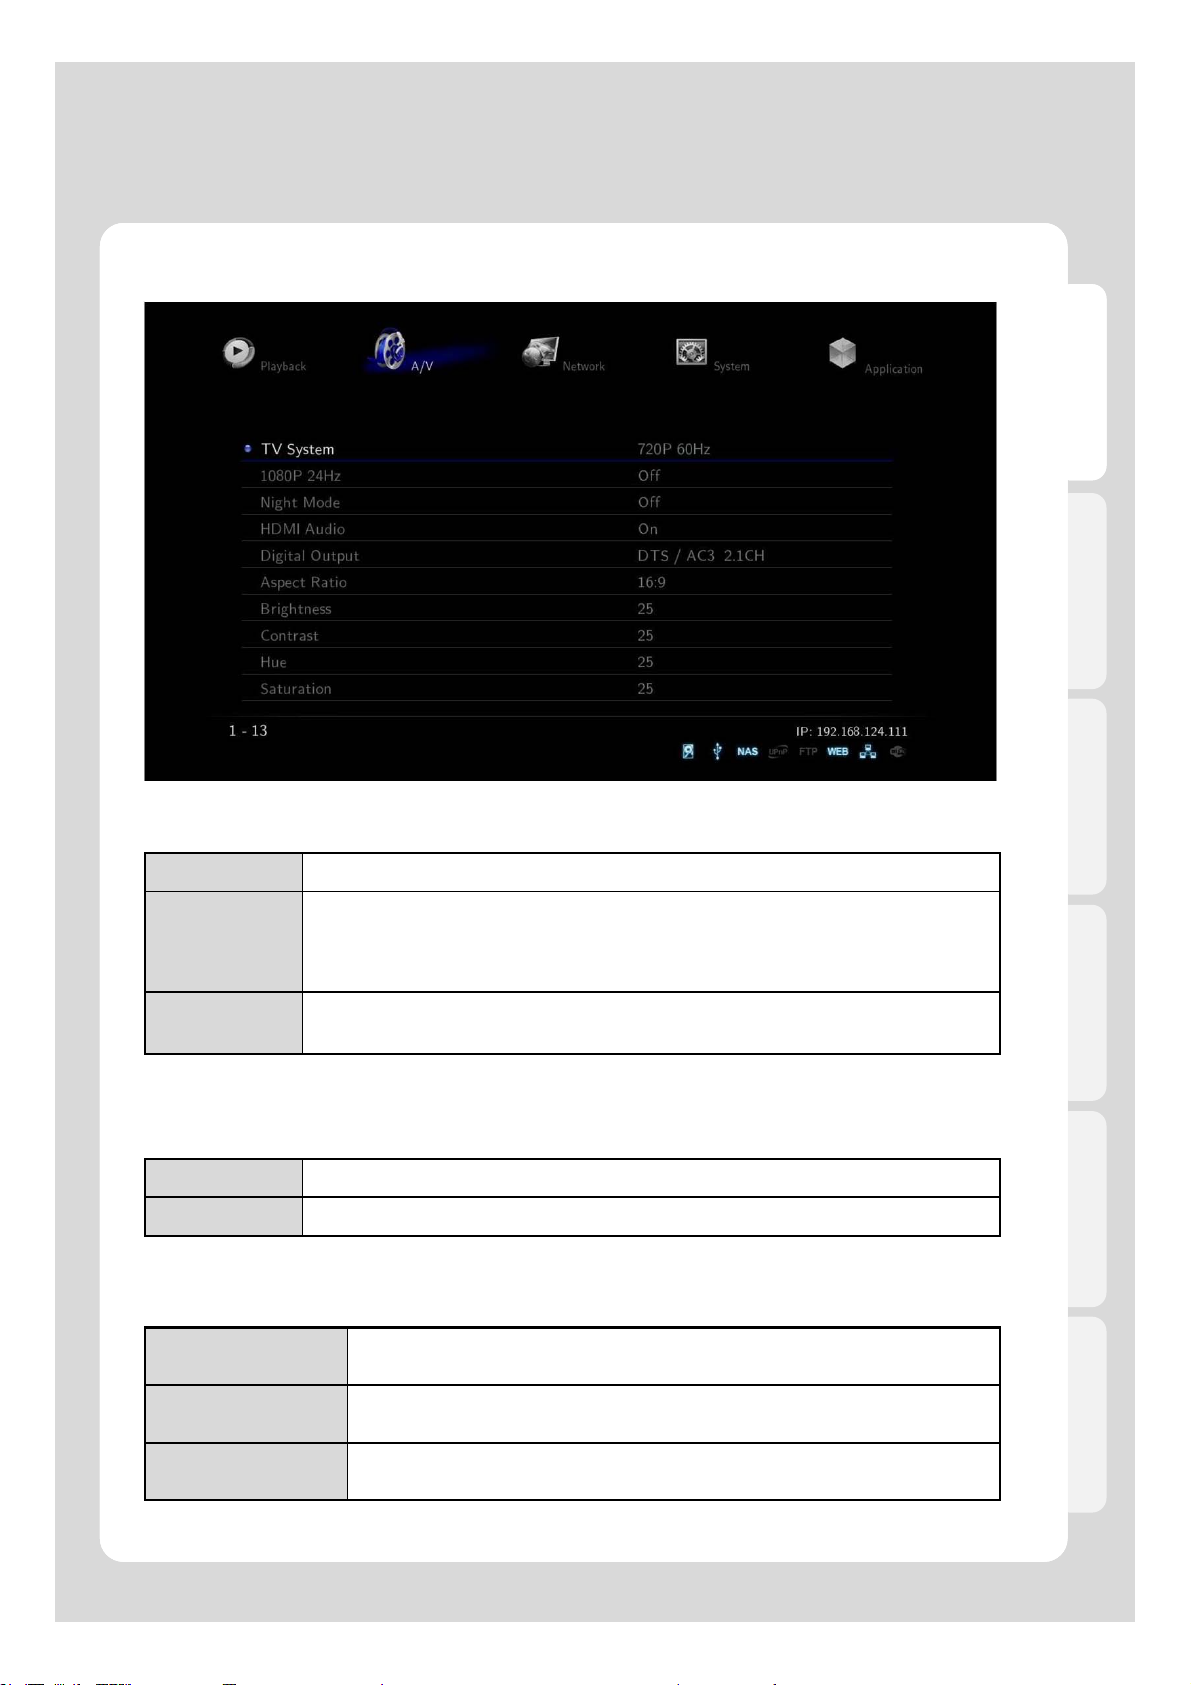
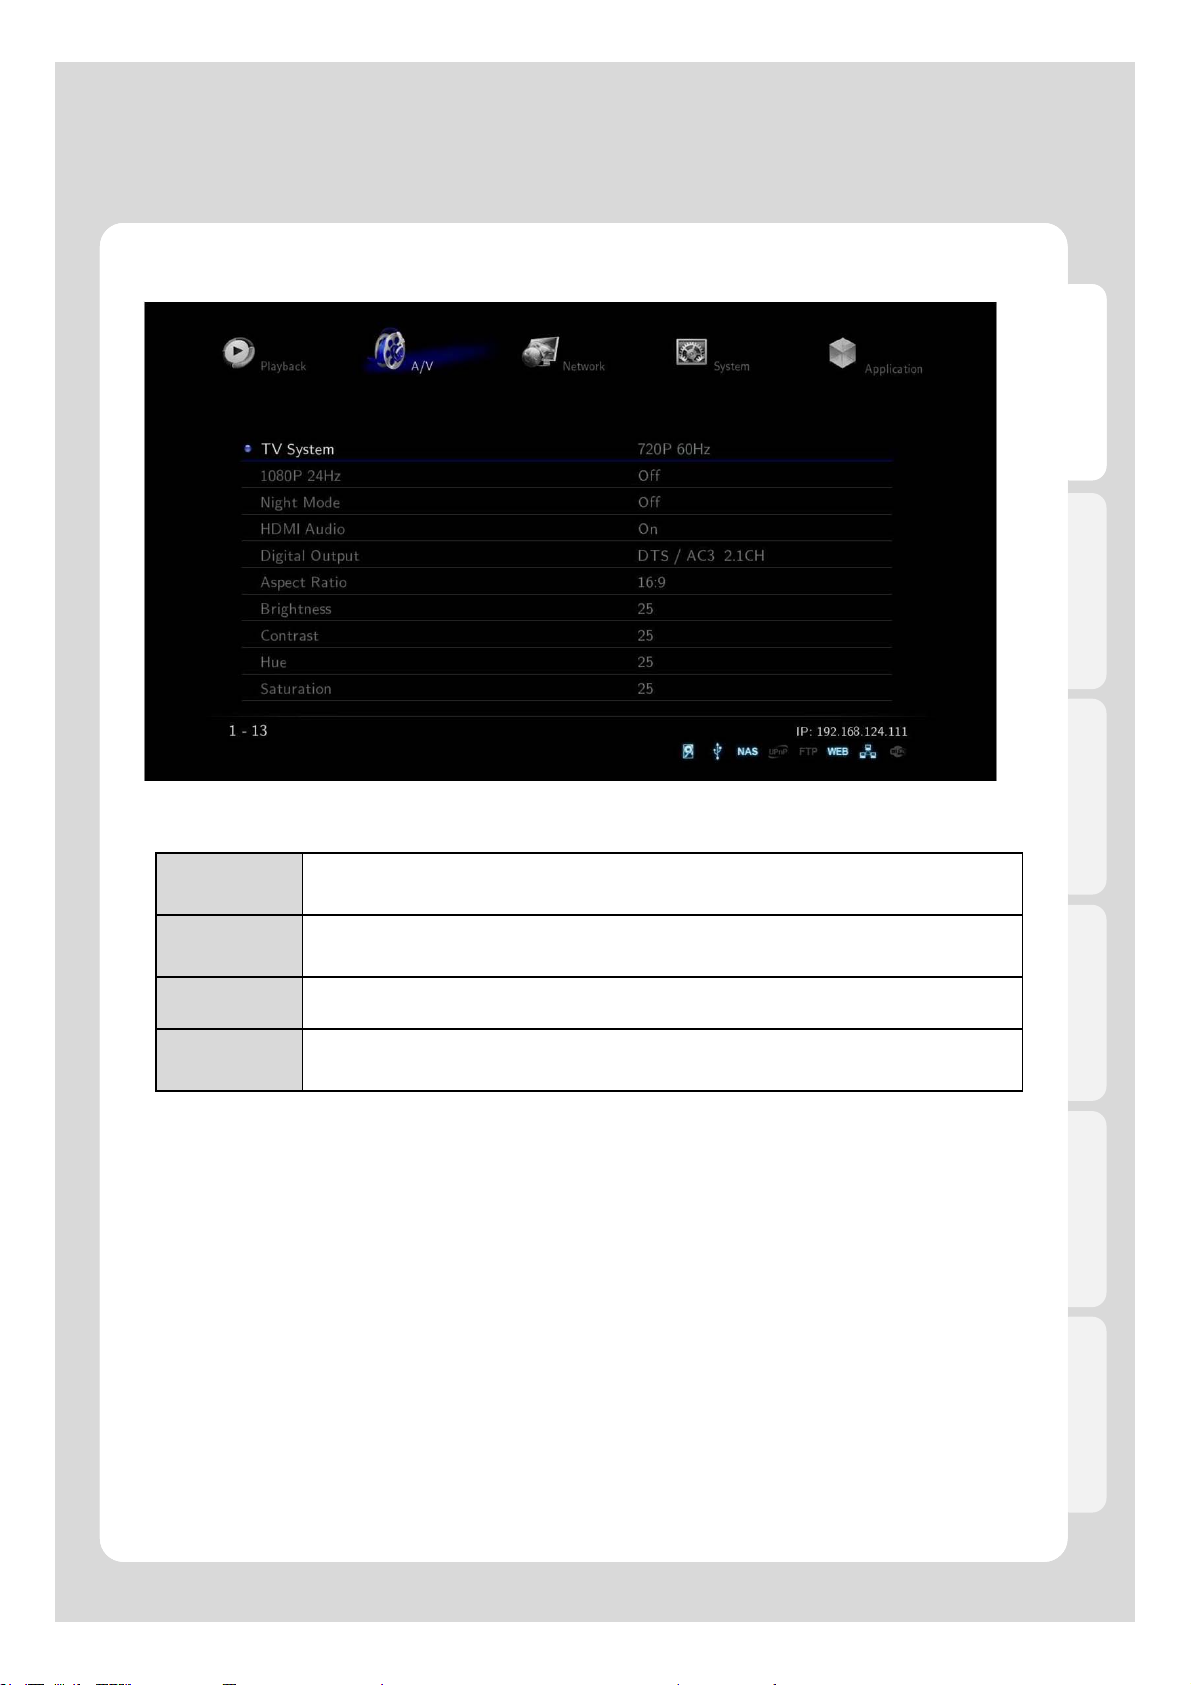
4. A/V
Settings
English
TV System
You will be able to select proper display resolution and video output type.
PAL (B) (50Hz) Europe, Greenland, South Africa, the Middle East, China, Austria, India, Indonesia.
NTSC (60Hz) Korea, the USA, Japan, Canada, Taiwan, the Philippines, Colombia.
Display
Resolution
1080P 24Hz
This feature will allow you playback of 1080P 24Hz when playing Blu-ray file (BD); however, this function is
subject to the factors that Xtreamer is connected to TV with “HDMI cable”, and depending on the screen scanning
with 24Hz frame rate.
ON
OFF 1080P 24Hz output is off
HDMI Auto / NTSC / PAL / 480P / 576P / 720P 50Hz / 720P 60Hz / 1080i 50Hz / 1080i
60Hz / 1080P 50Hz / 1080P Supported.
※ In some cases, display resolution on your TV can not be supported due to inactivity;
therefore, you should check your TV specification.
This function will be enabled when FPS of media playback file and 1080P resolution
output are the rates of 23.976 frame /s.
BD file is recorded by an original film frame rate of 24 frame /s, and then outputted
to 1080p/24Hz.
Note for 1080p 24p
- TV, AV amp and media file you use must be acceptable to 1080P 24Hz as well as your media file is
recorded by 1080P 23.976fps.
- If video isn’t properly played by selecting [ON], you will be required to select [Off].
- The initial TV screen can be flickering when you switch on “1080P 24Hz” mode
26
Page 27
4. A/V
Settings
English
Night Mode
Off
On
Comfort
Outputting raw sound.
It provides high-definition audio that is identical to, and every bit as spectacular as,
the master recording. In spite of decreasing volume, you will be able to experience
incredible surround sound that puts you right in the middle of the action without
disturbing others.
You will be able to hear every tiny sound in rich detail as well as comfortable sound
levels solely for you.
HDMI Audio
It enables you to turn on (or off) HDD Audio through HDMI connection.
Off It supports both video and audio.
On It supports sound in silence during video playback.
Digital Output
You will be able to select between Digital and Analog Output Type.
DTS / AC3 5.1CH
(Passthough)
DTS / AC3 2.1CH
(Downmix)
It enables 5.1ch surround sound with optical connection when you wish to use
multi-channel speaker.
Decoding all sounds is demanded to output 2.1ch stereo sound when TV or
2ch Speaker used.
ACC/FLAC/OGG
5.1CH PCM(HDMI)
It outputs 5.1ch surround sound created by ACC/FLAC/OGG, and supports
multi channel output with only HDMI connection.
27
Page 28
4. A/V
Settings
English
Aspect Ratio
You will be able to select Aspect Ratio type of movie screen for playback.
PanScan 4:3
LatterBox 4:3
16:9 Video is fully displayed in 16:9 DVD frame as well as 4:3 Ratio fully displayed.
16:10
Brightness
Brightness in video refers to the luminance portion of a video signal. It enables you to use Increase Brightness
and Decrease Brightness commands by pressing [SET-UP] button on your remote during playback.
Contrast
This option tells Xtreamer by how much to adjust video contrast when using Increase Contrast and Decrease
Contrast commands by pressing [SET-UP] button on your remote while playback.
Hue
This option provides how to use the Hue adjustment to enhance your colors. Along the way, you will be able to
use Increase Hue and Decrease Hue commands by pressing [SET-UP] button on your remote during playback.
16:9 Ratio converted to 4:3 Ratio is referred to as high definition TV. It will reduce
scan lines to 4:3.
16:9 Ratio converted to 4:3 Ratio is referred to as your TV. It will decompress image
to 4:3.
It enables you to add letterboxing bars above and below video screen, meanwhile,
your TV maintains its aspect ratio of 16:9, e.g. 16:9=1920x1080 / 16:10=1920x1200.
Saturation
This feature, saturation is one of three coordinates in the HSL and HSV color spaces. It enables you to use
Increase Saturation and Decrease Saturation commands by pressing [SET-UP] button on your remote while
playback.
28
Page 29
4. A/V
Settings
English
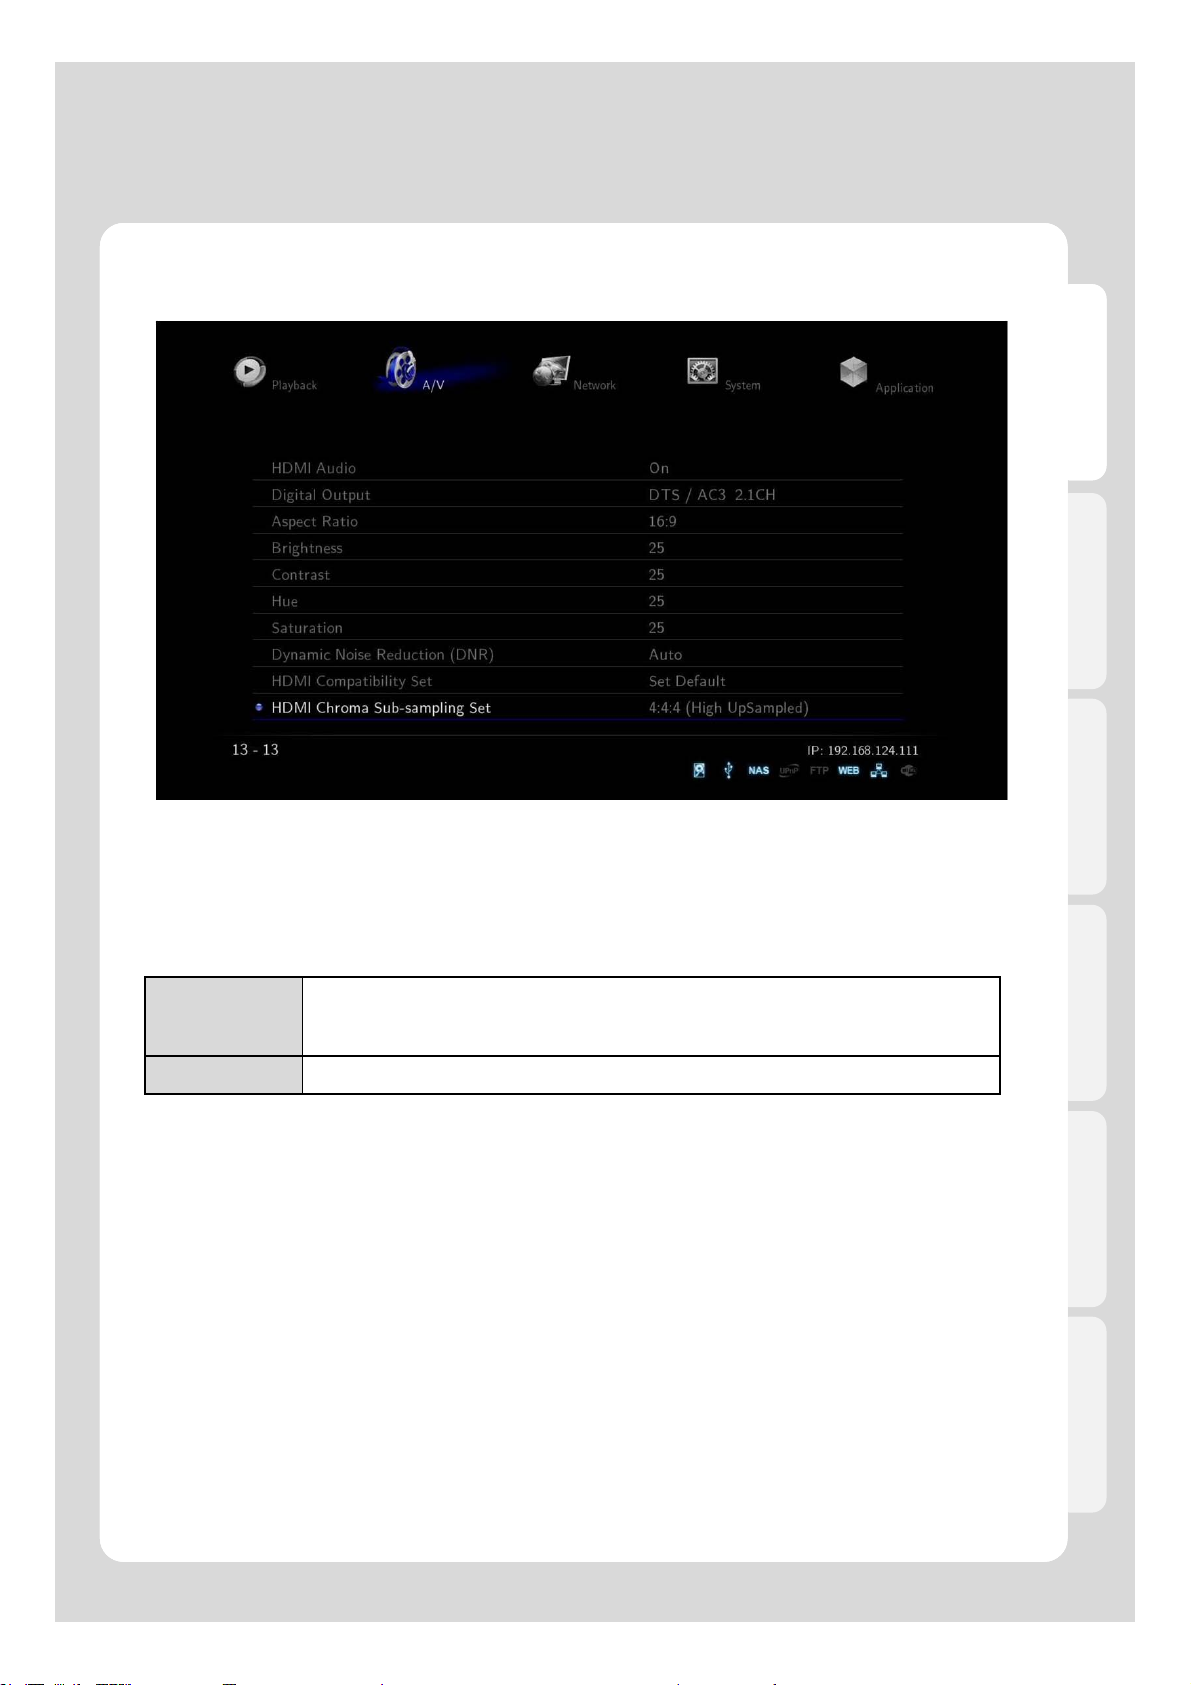
Dynamic Noise Reduction(DNR)
This is an audio noise reduction system used to automatically reduce background noise.
HDMI Chroma Sub-sampling Set
This feature encodes images and videos via HDMI
Your video will be upsampled to 4:4:4.
4:4:4
4:2:2 4:2:2: is a general format and is used before 4:4:4 type was introduced
※In a few cases, some TVs won’t be able to support 4:4:4 upsampling therefore it
can bring screen noise problem.
2929
Page 30

5. Network
Settings
5-1. Wired LAN Setup
DHCP IP (AUTO)
The Dynamic Host Configuration Protocol DHCP is a networking protocol used to automatically retrieve IP
address assignments through Wired LAN. This feature is set as a default value so that IP address is
automatically assigned by RJ45 connecting and rebooting. You need a network router in order to stream files
from your PC.
※ IP address of DHCP IP may sometimes be unstable.
English
STATIC IP (MANUAL)
Static IP is a manual way of obtaining an IP address, and is used for an assigned IP address that does not
change often that being so it will most likely receive the same IP address through Wired LAN. IP will be
allocated by users when a fixed IP address is needed or DHCP server isn’t available.
30
Page 31

5. Network
Settings
5-2. Wireless LAN Setup
In order to connect your Xtreamer to a wireless environment you need to plug “USB WiFi Antenna (Optional
Item)” to a USB2 port on the back panel of your player.The Xtreamer WiFi Antenna supports 802.11N protocol.
Note. We recommend to use LEFT USB2 port as seen from the front.
1 2
1. Insert USB WiFi Antenna
※ Xtreamer can be disturbed by other wireless network services which may result in a relative lower speed.
2. Select [Infrastructure (AP)].
English
3 4
3. Select SSID type (available wireless network), you may want to use.
4. Enter correct passkey, and then press [OK].
Note
- The “USB WiFi Antenna” can only be used with the Xtreamer line products. Any devices will not be compatible.
- Only “Web hex character codes” is supported.
- Web hex encoding supports 64-bit and 128-bit integers capable.
- If you have the problem of unstable wireless network or low speed, check you wireless channels for
optimum signal strength. Changing channel is available through your router.
31
Page 32

5. Network
Settings
5-2. Wireless LAN Setup
5 6
5. Select DHCP IP (AUTO).
6. Press [Enter] button after confirming “Setting List” and then it will try to connect to router so that you will see
“Test OK and Show Net Info”.
7
English
7. Save the information by pressing [Enter] button on your remote after setting.
32
Page 33

6. Application
Settings
6-1. The Usage of Network Drive
NAS Network Drive(SAMBA)
You will be able to set up “NAS” in order to improve optimizing its function of network application.
NAS network drive provides storing and copying files services, of which all are connected to Xtreamer via
Windows file administrator in a convenient way.
English
UPnP Media Server
You will be able to set up “UPnP Media Server” in order to improve optimizing its function of network application,
and playback function is connected to “UPnP AV Media Server” such as Tversity, PS3 Media Server and XBMC
Media Center. This feature supports UPnP Media Server and NFS client functions.
Web Server
It enables you to set up “Web Server” in order to improve optimizing its function of network application. The web
server will read files uploading and downloading from Xtreamer, if it exists, and send a response to the client's
Web browser using HTTP and the server responds with the content of that resource so that controlling Xtreamer
by web remote control is enabled.
FTP Server
You will be able to set up “FTP Server” in order to improve optimizing its function of network application.
Xtreamer has a built-in FTP service that you will be able to manage and copy files to and from it through FTP
connection.
Note
If there isn’t frequent use, setting [OFF] will be recommended, by reason of reserving the memory and
keeping security.
What’s the UPnP?
Universal Plug and Play “UPnP” is a set of networking protocols. The UPnP architecture allows peer-topeer networking of PCs, networked home appliances and wireless devices. It is a distributed, open
architecture protocol based on established standards such as TCP/IP, UDP, HTTP, XML, and SOAP.
The goals of UPnP are to allow devices to connect seamlessly and to simplify the implementation of
networks in the home. UPnP achieves this by defining and publishing UPnP device control protocols
DCP built upon open, Internet-based communication standards.
33
Page 34

◎ Main Menu
Major Function
English
Favorites This option provides a shortcut to the list of your favourite folders and files.
You can browse your files via Media Library. It allows you to search for the files on
Media Library
Internet
Internet Radio
File Manager
Setting
your internal hard disk, external storage and optical devices, network etc. There
are several options: USB, HDD, Network Shares, NET, UPnP, Playlist, DVD, and
e-TRAYz (Xtreamer NAS solution).
Xtreamer offers high-quality streaming videos through the Internet without
downloading anything.
Xtreamer supports high-quality streaming music, talk, and audio with Internet
Radio. Browse preset categories and your own favorite stations.
Xtreamer has a built in file manager that allows you to easily copy files to and from
any USB attached drive to Xtreamer internal HDD without having to use PC to
accomplish that.
You will be able to set up Playback, A/V, System, Network, and Application for
your convenience.
34
Page 35

Major Function
1. Media Library Menu
Using the Media Library
English
RC Button Description
Up/Down
Navigation Key
Left/Right
Navigation Key
Enter
ADD Selecting files
EJECT
PREVIEW
FUNC
RETURN It provides cancelling or going back to previous menu.
PLAY/PAUSE Continuous Playback (or Pause).
PGUP/PGDN Viewing next page (for quick movement).
Moving cursor Up (or Down).
Selecting among tap menus, and filtering file lists.
- single file playback
- You can use “ENTER” button as multi selected folder after pressing
[ADD] button for your convenience.
-You can add files, which are selected by [ADD] button, to Playlist by pressing [EJECT]
button.(※ Add to playlist function works only for internal HDDs.)
- You can open (or close) external tray load ODD/DVD ROM.
- You can change file view options for [All / Music / Photos / Movies / Internet Radio].
- It supports [File List / Preview / Thumbnail].
It provides variety of functions as you put cursor on files and folders
- It changes folder and file names.
(default language : English, Multi language : Keyword)
- It deletes folders and files.
- It sets folder lock and lock off.
- * Adding files to [Favorites].
* Multi selected file by pressing [ADD] button is enabled when adding to Favorite,
however, multi selected folder isn’t provided.
How to use “Folder Cover Art” Support
Folder Cover Art is automatically supported when there are movie poster files of “Cover.jpg” or “Folder.jpg” in
the folder. But if there isn’t “Cover.jpg” or “Folder.jpg”, the first file on the list will be showed.
35
Page 36

Major Function
1. Media Library Menu
Using the Media Library
RC Button Description
English
DELETE It deletes files and folders selected.
TVOUT
VOL + / - Adjusts sound volume
MUTE Mutes the sound
SETUP You to the settings menu
HOME It supports going back to the initial menu after rebooting.
Tip
How to use its specialized function of playback
Thumbnail View function; Thumbnails are reduced-size versions of pictures, used solely for “Photos”
menu by pressing [PREVIEW] button which means you will not be able to use the function in
“ALL/Movies/Music” menu. “MUSIC” mode; all the music are automatically played in order. “All” modes,
on the other hand, doesn’t support automatic playback so ID3Tag and Cover Ari Photos are not
changed. You will enjoy its specialized function of playback such as MUSIC, PHOTOS and MOVIES
mode.
Press once: You can see the current status of TVOUT.
Press more than twice: changes TVOUT type.
36
Page 37

Major Function
1-1. Movie Playback Function of Media Library
Usage of Remote Control key functions during playback
1
2
3
English
Adjusting and viewing hidden TV screen are enabled so that you can enjoy watching the movies by visibility
output.
RC Button 동작설명
It modifies Scale, position, and Reset.
1. Scale– Left (or Right) keys you enable to adjust vertical lines, and Up (or Down)
keys support adjusting horizontal lines after pressing [ENTER] button.
ZOOM
2. Position – The Arrow Keys support adjusting position of movie screen after
pressing [ENTER] button.
3. Reset – Reset to Default.
※ “Zoom- in” and “Landscape View” functions are solely supported for “Photos” mode.
37
Page 38

Major Function
1-1. Movie Playback Function of Media Library
Usage of Remote Control key functions during playback
English
RC Button Description
1. Title: It shows movie title lists and change playback file.
GOTO
MENU Shows MENU Window during playing DVD Title File.
TVOUT It changed TV output type.
1
RC Button Description
INFO
2. Chapter: It provides moving to next (or previous) Chapter.
3. Time: It provides moving to the point where you want to start from.
2
It displays file information which is being played.
1. It displays codec information and resolution for video and audio.
2. It shows frame rate FPS.
3. It displays total running and current running time.
4. It provides the figure of all file lists and present playback lists.
5. It supports current status information of “Repeat/ A-B Repeat/Shuffle/24P film”.
6. It displays the figure of WiFi wireless signal intensity.
3
4 6
5
ENTER
- It activates the item you selected.
- It moves forward frame by frame after pressing [PLAY/PAUSE] button to stop.
38
Page 39

Major Function
1-1. Movie Playback Function of Media Library
Usage of Remote Control key functions during playback
1
English
RC Button Description
It provides skip function during playback (refer to the above picture).
◀ : It goes 10 seconds backwards
Navigation
PGUP/PGDN
PLAY/PAUSE Play or pause the playback
STOP It stops playback.
FR/FF
VOLUME It adjusts sound volume.
MUTE Mutes the sound
▶ : It goes 30 seconds forwards.
▲ : It goes 3 minutes forwards.
▼ : It goes 1 minute backwards.
It views previous file (or next file) by new starting.
During DVD playback: plays previous chapter (or next chapter).
Rewind and Forward functions are enabled with “0.8X/1.1 X/1.2 X/1.5 X/2
X/4 X/8 X/16 X/32 X” speeds as well as music file is enabled with 2X
speed control.
39
Page 40

Major Function
1-1. Movie Playback Function of Media Library
Usage of Remote Control key functions during playback
English
RC Button Description
AUDIO Use it if your video file contains multiple audio tracks to switch between them.
A-B
SHUFFLE
REPEAT
SUBTITLE
SYNC SUBTITLE It provides controlling sync length (100ms).
SETUP Takes you to the settings menu
ADD It provides selecting files you want to add to “Playlist”.
EJECT It adds selected files to Playlist. (After selecting the files by pressing [ADD] button).
It supports selecting the points; Between A and B; the section is repeatedly played
between the points.
It provides selecting between “Playback in order” and “Random playback” to
change playback mode.
It provides selecting between “playing a file repeatedly” or “playing all files
repeatedly”.
1. Subtitle: Selecting subtitle file; both internal & external subtitle files are supported.
2. Searching: Selecting external subtitle files from the folder.
3. Size/Outline: Adjusting subtitle size and frame outline.
4. Position: Controlling subtitle position.
5. Color: Changing subtitle color.
6. Advanced Color: Changing subtitle outline color.
7. Subtitle /ID3-Tag: Selecting proper language.
8. Reset: Reset to Default.
40
Page 41

Major Function
1-2. Photos Function of Media Library
Usage of Remote Control functions in “Photos” mode
English
RC Button Description
ENTER It confirms and shows photo files.
PLAY It shows photo files.
INFO
STOP It stops showing “Slide Show”.
Left/Right in
navigation
PGUP/PGDN It goes to next file (or previous file).
VOLUME Adjusts background music volume
MUTE Mutes the background music
SHUFFLE It changes playback mode; Order Playback or Random Playback.
ADD
EJECT It adds selected files after selecting them by pressing [ADD] button.
If you use [PREVIEW] button on your remote, JPEG and EXIF data information will be
displayed on “Preview” Screen.
It displays EXIF information of photo file, which is being showed.
(JPEG/EXIF supported)
It rotates a photo file to the left (or right).
It provides selecting files you want to add onto “Playlist”.
- only works for an internal HDD
41
Page 42

Major Function
1-3. Music Function of Media Library
Usage of Remote Control functions in “Music” mode
English
RC Button Description
ENTER It plays the music you put the cursor on.
PLAY It plays all music.
PGUP/PGDN It plays next music file (or previous music file)..
STOP It stops playback.
Rewind & Forward function is enabled with (1.1 X/1.2 X/1.5 X/2 X/4
FB/FF
SHUFFLE It changes playback mode; Order Playback or Random Playback.
REPEAT
VOLUME It adjusts volume sound.
MUTE Mutes the sound
X/8 X/16 X/32 X) speeds as well as increasing the speed of the
music file is enabled until 4X.
It provides you select between “playing a file repeatedly” or “playing
all files repeatedly”.
42
Page 43

2. Internet
2. Internet
Major Function
2-1. Xtreamer Live Introduction
Xtreamer is FLV capable device. It allows you to watch live streaming content from hundreds web
publishers such as CNN, ESPN, various music, gaming and technology channels and more on your
TV. Xtreamer also enables you to enjoy “YouTube” FLV files right away without using your PC by
bringing them straight to your living room
You can also add your own favorite feeds and channels or enjoy a vast selection of custom internet
content collected by the Xtreamer community. For more information please visit our official forum –
forum.xtreamer.net
English
2-2 How to use “YouTube” function
You will select [YouTube] on “Internet” menu, and then choose the types among its list; Recently
Added, Recently Featured, Top Favorites and Top Rated, as well as “Search Videos” provided.
First, Select [Search Video]. Type characters you want to search for.
(Supported Languages: English / Multi-Language: Using
Key word is enabled)
43
Page 44

Major Function
2. Internet
For instance, if you type [Xtreamer] to search, there
will be lists regarding Xtreamer, and then select
whatever you’d like to watch; refer to the above image,
it has the same result between “Xtreamer” and “PC’.
HD Resolution Online Streaming View
English
Channel Links for “Internet TV” Category
Channel Links for “News (Video)” Category Channel Links for “Life Style” Category
Note.
User’s Internet Condition and environment might be able to have effect on “Online Streaming Service”
so that connection may be unstable. Changing Supported channel is subject to manufacturer’s
condition in order to improve optimizing condition.
Channel Links for “Technology & Gadgets” Category
44
Page 45

2. Internet
Major Function
2-3. How to use “Picasa (Google)” function
What’s the Picasa function?
Picasa is a software application for organizing and editing digital photos, originally owned by Google.
You will be able to look for photos searching by key words as well as using your account ID.
Click [Internet] – [Photos] – [Picasa]. Select from keyword as well as type keywords so
that you can look at photos. You can also use
account ID.
2-4. How to use “Weather” function
You will be able to check Today’s and Weekly weather forecast by country and city name.
English
Supported Remote Control Button
Zoom in
Zoom out
Changing “Measurement Unit”
Switching Screens
45
Page 46

Major Function
3. File Manager
The Usage of “File Manager” function
RC Button Description
English
Navigation Keys It provides moving cursor up, down, right, left.
ENTER It confirms if files are selected or not.
Red Button[1] It provides adding and selecting folders and files.
Green Button[2] It provides cancelling all selected files and folders.
Yellow Button[3] It provides going to next step or copying.
File Manger for practical use
Xtreamer has a built in file manager that allows you to easily copy files to and from any USB attached drive;
Digital Camera, MP3 Player, and Mobile Phone, to Xtreamer internal HDD without being necessary to use
PC to accomplish that. You will even be able to back up simply by your remote control.
46
Page 47

4. Internet Radio
Major Function
● Usage of “Internet Radio” function
● Usage of “Internet Radio” function
RC Button Description
English
Navigation It moves the cursor.
ENTER It checks and plays.
Preview It switches to “Preview” mode or “List” mode.
● How to use “Internet Radio”
If you want to listen to the radio by registering in Xtreamer, you will need to use “Http://” address type and [.plsx]
extension.
● How to create [.plsx] extension file when you already know the radio address
1. Open [Note Pad].
2. Type it (refer to the next example).
File = http://“Internet Radio Address”
Title1 = “Title”
3. Type Internet Radio Address into File1=“”, and type
title into Title1=“”.
※ “http://” type is solely supported; however, [MMS] type
isn’t currently supported.
[example 1]
Note. Members of our community constantly publish new Internet stations lists. For more information please
visit our official forum – forum.xtreamer.net
47
Page 48

4. Internet Radio
Major Function
English
5. Change a file type into “All Files [*.*]”.
6. Change the file extension into [*.PLSX].
7. Save the file.
8. Copy the stored file to “My Radio” folder
of Xtreamer, or to where you want to put.
● How to use “SHOUT cast Radio”
Refer to the method whenever you want to listen to the radio at http://www.shoutcast.com
1. Access to the web at
http://www.shoutcast.com
2. Click [TURN IN!] whatever you want to
listen to.
3. If window message is popped up to
save the file, you will change the file
extension [pls] into [plsx].
4. The file, has plsx file extension, will be
played right away via Xtreamer.
48
Tip
If you are not able to seek plsx
extension file which means it isn’t
properly changed into plsx
extension file.
Page 49

Major Function
5. How to add Movie Subtitle TTF Fonts
The Xtreamer media player give you’re an ability customize subtitle fonts for movie
playback. You are required to use an internal HDD or an external USB storage device. You
also need to prepare TTF font files before using your custom fonts.
1. Get ready “TTF file font” for being used.
2. Copy the TTF file font into the folder of [..\\user_font\],
created automatically.
English
3. Press [Setting] – [Playback] – [User Subtitle Font]
and then select font whatever you want.
You can change font setting from “SET-UP” menu
during playback.
Tip
Some font files may not be showed properly.
The following subtitle types aren’t supported for TTF Font Settings: DVD internal subtitle, Blu-Ray
internal subtitle, Image subtitle [idx+sub, PGS].
49
Page 50

Major Function
6. How to use “Lock System” function
It enables you to keep locked folder on your system away from the reach of unwanted handling by simply
designating it a password. Locked folder will therefore be accessible by password only [Default PWD: 0000].
1. First of all, change the default password.
[Setting → System → Lock System → 0000(Default) → Set Password]
English
2. Enter password whatever you want to change.
3. Move cursor to choose a folder you want to lock and then, press [FUNC] – [Folder Lock] so that it will
be locked.
50
Page 51

Major Function
6. How to use “Lock System” function
4. Enter PWD
English
5. The folder is automatically locked, and you will see the locked folder icon so that preview can’t be seen
without entering password.
6. In order to unlock the folder, you will place the cursor on the locked folder, pressing [FUNC] button, and
then type your password.
Note
Locked folder won’t be accessible by Xtreamer GUI; However, PC connection through USB Slave
will be accessible.
51
Page 52

Major Function
7. How to use “iPhone remote” function
If you have an iPhone, iPod Touch, iPhone 3G, and 3GS, you can make it Xtreamer remote through
WiFi. It is supported when Xtreamer turning on, however you won’t be able to turn on Xtreamer by
iPhone remote.
1. You should access by the identical Network AP
between iPhone and Xtreamer so that you need
“Wireless AP Router.” Check if web server is “ON” or
not in Application menu.
2. Run Safari “Web Browser” in iPhone, and then
access to the web server by typing allocated IP
address of Xtreamer on URL.
3. Click [RC] button on the bottom of the screen, then
access to the remote control.
English
Note
If IP address is 192.168.123.5, type [192.168.123.5/rc]
in the iPhone address bar. “/re” needs to be lower case
so that you will be able to use the remote function.
52
Page 53

Major Function
7. How to use “iPhone remote” function
English
Main Remote Control Sub Remote Control
If you press the screen, you will be able to look at
Xtreamer screen (refer to the above image).
Click [Refresh] button in order to renew the screen.
If you click [Now Playing], it will show
Album Arts included in MP3.
Note
Black screen will be captured if using “Screenshot” function during video playback.
53
Page 54

Major Function
7. How to use “iPhone remote” function
English
Use this function when you search for
variety of YouTube files and change file
name.
You will be able to enter multilanguages when searching for YouTube
files and altering file names.
You will be able to use web remote control as real remote control
※ Type [, /rc2] with small letters in the address bar in order to use web remote control
(Refer to the above image)
54
Page 55

Major Function
8. How to use “Auto run” function
When you turn the power on, Xtreamer detects the arrival and starts a process of examining the
device or searching the file you chose to auto play.
English
1. Select [Setting] – [Playback] – [Auto run]
(This instance is for Music Auto run).
3. Select [Media Library], and search for files
you want to auto run.
2. Each selected menu “Movie/Photos/Music” is
automatically played by classification.
4. Move to “Music” tap menu by pressing [Right]
arrow key.
As files are selected, you will be able
to see “√” mark.
5. Press Button, [1] and then select whatever you want to auto run by arrow keys.
6. You will be able to select files by [ENTER] button after press button, [1].
55
Page 56

Major Function
8. How to use “Auto run” function
7. Add up files to Playlist by pressing button, [2] after all selection once completed.
You will be able to add files to other folders in succession.
English
8. Select [Media Library] – [Playlist] in order to check
if files added up properly or not.
Tip
Files in internal HDD are solely played automatically.
9. Check all additional items, and then confirm the
[Autorun] function is working well by rebooting.
Tip. The playlist autorun function works only for internal
HDDs
56
Page 57

Major Function
9. Changing background image at the main menu
English
1. Search for a photo file you want to display, the file should be in internal HDD.Xtreamer Pro is optimized
for 1280 x 720 screen resolution
2. Place the cursor on the photo file needed to display, then press [FUNC(8)] on your remote.
3. Select [Change Wallpaper].
57
Page 58

Major Function
9. Changing background image at the main menu
English
4. Select the main menu you want to display background image at.
5. Confirm the background image weather it’s correctly applied or not.
58
Page 59

Major Function
9. Changing background image at the main menu
English
10. Background initialization
1. Press [FUNC(8)] on the photo file.
2. Select [Change Wallpaper].
3. Select [Initialization] menu, then click it.
4. In the case of initializing, all main background images are set by default.
59
Page 60

Advanced Users Guide
1. Web Server
1-1. Initial Setting for Web Server connection
In order to use “Web Server” for Xtreamer, establishing Network and PC is essential.
1. Firstly, check if IP address is correctly accessed or not in Network.
2. Confirm the allocated IP and then setup [System] - [UPnP Media Server] - [On].
3. Enter the allocated IP address of Xtreamer in URL address bar. The PC and Xtreamer need to be the
same local network.
English
- We’d recommend you to connect to wired network to use Web Server.
- The latest version of browser is highly recommended.
- MS IE6 many cause not proper working like PNG file supporting etc.
60
Page 61

Advanced Users Guide
1. Web Server
1-2. How to use “Set-up menu” of Web Server
English
Menu Description
Login It sets ID and PWD to access to web-server.
DDNS
HTTP
FTP It changes FTP connection port number (Default value : 21).
Live
Backup/Restore It saves or restores UPnP setting value.
Language It changes language for UPnP media server.
NAS Mode
NFS Client
Workgroup/Hostname
TV Skin It changes or restores GUI skin.
-It allows you to access your Xtreamer over the Internet from everywhere in the
world. Simply type ***.myxtreamer.net in your browser.
- The Xtreamer DDNS service is free
- It changes HTTP Port (Default Value: 80).
- It changes HTTP Port if 80 Port isn’t supported, e.g. 8080.
- For instance, the case of Korea, if you access from external, you need to change
80 port due to it is blocked by Korea communication service. (Please make sure to
open\forward a relevant port on your router).
- It provides adding user specified RSS address when you use Xtreamer Live.
- Web port default value must be 80.
- Live keyword: This button enables you to connect “make” button on Xtreamer key
board input screen.
- If you use keyword function, you can enter and search in multi-languages.
It blocks TV output from Xtreamer so that more stable network environment can be
provided.
It mounts NFS File System. Generally, it enables you to use the file system only for
NAS Server product by mounting.
It changes Network Group, and hostname of Xtreamer in Network.
(Default Value : myxtreamer)
61
Page 62

Advanced Users Guide
1. Web Server
1-3 How to use “Web GUI File Manager” of Web Server
English
Menu Description
Video It shows solely video files.
Audio It displays only audio files.
Photos It shows solely photos files.
All It displays all files.
Mylist It provides managing Mylist, [Media Library] – [Mylist].
Upload It uploads files. Several files you will be able to upload at a time.
File Manager It enables you to create new folder, change name, copy, move, and delete.
Note: Please note that the remote downloading via web server is solely depends on your home
network upload speed.
62
Page 63

Advanced Users Guide
1. Web Server
1-4 How to “File Upload & File Download”
English
How to Upload to Web Server
1. If you click [Upload] button, window will be popped up
(refer to the next image), and then add up files here.
2. Click [Upload] button leads to automatic uploading.
(Uploading in excess of 2GB is impossible due to
capacity limitation of web browser)
3. Disappearing Uploading lists means all uploading
completely finished.
How to file download
1. Click file you’d like to download after accessing to UPnP.
You will be required clicking [Save as] in some cases, depending on web browser program or condition.
2. We’d recommend you to use the latest version of UPnP web browser which provides connection link in
order to run GOM/VLC/WMP Player properly.
63
Page 64

Advanced Users Guide
2. Usage of NAS (Network Attached Storage)
If you want to use Network Drive, your network should be connected with the same PC.
English
1. Check if IP address is correctly allocated or not
from Router.
3. for Windows users, click [Start] - [Run] – [Example] (refer to the above image).
(Example-1)
Type [\\192.168.124.121] if you know the allocated IP address of product.
(Example-2)
Type [\\myxteamer] (refer to the below image) if you already set DHCP IP in Router which is changed each
time.
2. Press [Application] – [NAS] - [ON].
TIP
You will be able to connect network drive easily if changing [mystreamer], which is a default
value in Web Server Hostname, into simple name.
64
Page 65

Advanced Users Guide
2. Usage of NAS (Network Attached Storage)
English
4. Click on the right side of your mouse after selecting the searched folder, Xtreamer.
5. Click [Map Network Drive…] on POP-UP Menu so networks drive connection can be completed.
6. You will be easily able to manage files through added network drive in explore so you don’t have to connect it
each time.
65
Page 66

Advanced Users Guide
3. How to set-up Folder Sharing in Windows 7
This instruction is for Window 7 Ultimate.
1. Click [Start] – [Control Panel] - [View network status and tasks in Network and Internet].
English
2. Click [Change advanced sharing settings] on the right side of the screen after appearing Network and
Sharing Centre.
66
Page 67

Advanced Users Guide
3. How to set-up Folder Sharing in Windows 7
English
3. Change sharing options (refer to the above image).
The sharing option needs to be applied in your home or company (Current Profile).
67
Page 68

Advanced Users Guide
3. How to set-up Folder Sharing in Windows 7
English
4. Select a folder you want to share, and click on the right side of mouse, then click [Properties] on pop-up
menu.
Click
5. Click [Sharing] on tap menu, and then click [Advanced Sharing…].
68
Page 69

Advanced Users Guide
3. How to set-up Folder Sharing in Windows 7
Click
Click
English
6. Check on [Share this folder], then click [Permissions].
Click
Click
7. Click [Add] if there is no “Guest” account due to “Everyone” and “Guest” account needed in order to
Network sharing.
69
Page 70

Advanced Users Guide
3. How to set-up Folder Sharing in Windows 7
Click
8. Click [OK] after entering [Guest] (refer to the above image).
English
9. Click [OK] - [Apply] – [OK] in order to confirm if “Guest” account is added or not.
(Both Guest and Everyone account must be placed).
70
Page 71

Advanced Users Guide
3. How to set-up Folder Sharing in Windows 7
Click
English
10. Plus, add [Guest] account on Security tap menu, then click [Edit…] (refer to the above image).
Click
11. Click [Add…] (refer to the above image).
71
Page 72

Advanced Users Guide
3. How to set-up Folder Sharing in Windows 7
12. Click [OK] after typing [Guest] account.
English
13. Complete setup as confirming “Guest” account added by selecting [OK] – [Apply] – [OK]
(Both Guest and Account must be placed). If there is no “Everyone”, you should add it.
72
Page 73

Advanced Users Guide
4. How to set-up Folder Sharing in Windows Vista
This instruction is for Window Visa Ultimate.
English
1. Click [Start] - [Network] – [Properties].
Click
Click
2. Click [Network discovery] - [Turn on network discovery] and then, click [Apply].
73
Page 74

Advanced Users Guide
4. How to set-up Folder Sharing in Windows Vista
Click
Click
English
3. Click [File sharing] – [Turn on file sharing], and then click [Apply].
Click
Click
4. (Important)
Click [Password protected sharing] – [Turn off password protected sharing], and then click
[Apply]. Once completed, close the window.
74
Page 75

Advanced Users Guide
4. How to set-up Folder Sharing in Windows Vista
English
Click
5. Move cursor to which folder you want to share and then go to the [Properties] on pop-up menu as clicking
on the right side of mouse.
Click
6. Click [Sharing] – [Advanced sharing…].
75
Page 76

Advanced Users Guide
4. How to set-up Folder Sharing in Windows Vista
Click
Click
English
7. Check on [Share this folder], then click [Permissions].
Click
8. Click [Add…] button in order to add “Guest” account.
76
Page 77

Advanced Users Guide
4. How to set-up Folder Sharing in Windows Vista
Click
9. Type [Guest], and then click [OK].
English
Click
Click
10. Once completed, check if there is “Guest” account or not, then [OK] – [Apply] – [OK].
77
Click
Page 78

Advanced Users Guide
4. How to set-up Folder Sharing in Windows Vista
English
11. Click [Apply] – [OK] so you will complete adding “Guest” account on sharing tap menu.
Click
12. Confirm if there are both “Guest” and “Everyone” accounts or not on “Security” tap menu.
If there is no “Guest” account, click [Edit…] (Both accounts should be placed).
78
Page 79

Advanced Users Guide
4. How to set-up Folder Sharing in Windows Vista
Click
English
13. Click [Add] if there is no “Guest” account.
14. Type [Guest] (refer to the above image), then click [OK].
Click
79
Page 80

Advanced Users Guide
4. How to set-up Folder Sharing in Windows Vista
English
15. Check if “Guest” account is correctly added or not, then click [Apply] – [OK].
16. Click [Close] to set completed.
80
Page 81

Advanced Users Guide
5. If folder accessing in window XP isn’t available.
The instruction is subject to there isn’t any problem in IP, Network Workgroup, Computer’s name,
and so on. You, therefore, need to check Security set up part.
Note:
This instruction will be able to have effect on changing value, registry key correction in system, hence,
you must not change other set value, incorrect setting value will be able to cause serious damage to
your system].
1. Click [Start] – [Control Panel] - [Administrative Tools] [Local Security Policy] – [User Rights Assignment].
1-1. Everyone, Users and Guest must be included in “Access this computer from network”.
1-2. Add Everyone, Users and Guest if there is missing one in there.
1-3. If there are Everyone, Users and Guest in “Deny Access to this computer form the network”, delete 3 of
these accounts.
1-4. Users and Guest must be included in “Log on locally”.
1-5. Users and Guest must not be included in “Deny log on locally”.
1-6. everyone and Users must be included in “By pass traverse checking”.
2. Click [Start] – [Control Panel] –[Administrative Tools] – [Local Security Policy] – [Security Option].
2-1. Network Security: [Send LM & NTCM responses] in “Authentication Level”.
2-2. Network Access : [Disabled] in “Don’t allow anonymous enumeration of SAM accounts and shares”.
3. Click [Start] – [Control Panel] – [Firewall].
3-1. Check on [File and Printer Sharing] in “Exception” tap menu.
4. Click [Start] – [Control Panel] – [Administrative Tools] – [Services].
4-1. Computer Browser: [Started in Status ] - [Automatic in Startup type].
4-2. Server: [Started in Status ] – [Automatic in Startup type].
4-3. Workstation: [Status Started] – [Startup type Automatic].
English
5. Click [Start] – [Run] and type [regedit] then click [OK].
5-1 [HKEY_LOCAL_MACHINE] – [SYSTEM] – [Current Control Set] – [Control] –[Lsarestrictanonymous]
“Lsarestrictanonymous” Value must be [0]. If there is no item, which means the value is the same as “0”.
6. Once completed, you should reboot your computer so that setting value can be applied.
81
Page 82

Advanced Users Guide
6. How to configure Folder Sharing Permission in Windows XP
This instruction is for Windows XP Professional Users.
Click
1. Click [My Computer] – [Tools] – [Folder Options…].
English
Click
2. Click [Folder Options…] – [View] – [Use Simple File Sharing (Recommended)] in “Advanced settings” – [OK].
※ Use Simple File Sharing (Recommended) must not be selected.
82
Page 83

Advanced Users Guide
6. How to configure Folder Sharing Permission in Windows XP
Click
English
3. Select a folder you want to share in Network, then click [Properties] – [Sharing].
Click
4. Click [Share this folder] – [Permission].
If there is no “Guest” account, click [Add…] button.
83
Page 84

Advanced Users Guide
6. How to configure Folder Sharing Permission in Windows XP
Click
5. Type [Guest], and then click [OK].
English
6. As you check “Guest” account added, the setting will be completed by clicking [OK] – [Apply] – [OK].
84
Page 85

Advanced Users Guide
6. How to configure Folder Sharing Permission in Windows XP
Click
English
7. Click [Share permissions] – [Add].
8. Type [Guest] and then, click [OK].
Click
85
Page 86

Advanced Users Guide
6. How to configure Folder Sharing Permission in Windows XP
English
9. As you check “Guest” account added in Security tap, setting will be completed by [Apply] – [OK].
Tip
You will be able to use this method in order to allow (or block) the access by someone.
86
Page 87

Advanced Users Guide
7. How to register Network PC Shortcut
This instruction will be useful if you want to create shortcut or you can’t search for PC
through Network.
English
1. Access to menu by selecting [Media Library] – [NET] – [My_Shorcuts].
Press [FUNC] button on your remote in “My_Shortcuts”
screen, then if window appears, press [Add] button.
As starting Windows, enter ID and PWD into pop-up
window for Network User’s. If you don’t use PWD, enter
[guest] in the ID Section, leave the PWD section blank.
Once entered, save ID and PWD by pressing [OK].
87
Page 88

Advanced Users Guide
8. How to connect Network when it isn’t properly working
There would be several reasons; Xtreamer fundamentally uses “Guest” accoun t for its Network
Connection. If “Guest” account is “off” in Windows operating system, you will not be able to
approach to shared folder.
9. How to display “Guest” account “on” for Windows
For Windows XP,
(1) Select [Start] – [Control Panel] - [User accounts]
(2) Change from [Guest accounts is off] to [Guest accounts is on]
For Windows Vista,
(1) Select [Start] – [Control Panel] – [User accounts] – [Manage another account]
(2) Click [Guest]
(3) Change from [Guest accounts is off] to [Turn on]
Reboot PC and Xtreamer, then you will be able to connect Network.
English
88
Page 89

Advanced Users Guide
10. Firmware upgrade
English
※ To update Firmware, you will need USB memory or internal HDD.
※ If you want to download the latest firmware version, access to Xtreamer website to get it.
www.xtreamer.net www.enicorn.co.kr
1. Download new firmware to your HDD or USB.
Select [Setting] – [System] – [Firmware Upgrade], and then look for saved firmware file then, select it.
89
Page 90

Advanced Users Guide
10. Firmware upgrade
English
2. After window message appears, Xtreamer will be rebooted, and then Firmware update will start.
3. You will be able to see the progress of firmware upgrade; it normally takes approximately 5 minutes
to be completed
- Depending on firmware, screen setting will be able to be initial set value.
- If you can’t see the screen, try it after reconnecting composite.
Note: Please make sure to use a USB stick\disk-on-key no bigger than 2GB. Format the stick to FAT32.
After the process is finished, you must perform a RESTORE DEFAULT via the SETTINGS menu
This will remove all your saved pre-sets.
90
Page 91

Advanced Users Guide
11. How to use “HDD A-B Switch”
A/B
Switch
USB Slave
English
11-1 How to back up and copy/move data through “USB Slave”
1. Check whether there is 1 or 2 HDD in Xtreamer Pro.
2. Divert the “A-B switch” button pertaining to the same HDD side.
From switch standpoint
Switch
3. . Connect USB Slave cable to the power terminal in order to connect to the PC.
4. After turning the power on automatically, the selected HDD will be connected; and it will take
about 1 minute to reboot.
Note
If the “A-B switch” button isn’t properly diverted pertaining to the same HDD side, hard drive in
My Computer won’t be recognized. Therefore you must place “A-B switch” button pertaining to the
same side. (refer to the above image)
5. In the case of connecting to the other side of HDD tray, use the “Safely remove hardware”
option, and then divert the “A-B switch” button to the other HDD tray side so that HDD-recognition
will be smoothly performed.
Switch
91
Page 92

Advanced Users Guide
11. How to use “HDD A-B Switch”
eSATA Slave
English
11-1 How to back up and copy/move data through “eSATA Slave”
1. Check whether there is 1 or 2 HDD in Xtreamer Pro.
2. Divert the “A-B switch” button pertaining to the same HDD side.
From switch standpoint
Switch
3. . Connect eSATA Slave cable to the power terminal in order to connect to the PC.
4. After turning the power on automatically, the selected HDD will be connected. It will take about 1
minute to reboot due to Xtreamer starts booting to stored equipment mode in order to conne ct to
the PC.
Note
If the “A-B switch” button isn’t properly diverted pertaining to the same HDD side, hard drive in My
Computer won’t be recognized. Therefore you must place “A-B switch” button pertaining to the same
side. Especially for eSATA, if you are not able to search for it, reboot or start “New hardware
devices” in the device manager.
Switch
5. In the case of connecting to the other side of HDD tray, use the “Safely remove hardware” option,
and then divert the “A-B switch” button to the other HDD tray side so that HDD-recognition will be
smoothly performed.
6. If HDD-recognition isn’t performed, start “New hardware devices” in the device manager.
92
Page 93

Troubleshooting
Emergency firmware procedure:
In case your player would crash and stops responding to your remote’s commands and you need to
remove the power cord to restart, it could have problems with restarting or will not start at all. You
could also face other issues that can only be solved by installing the emergency firmware.
The installation procedure is as follows: (1) Download and Un-zip/Extract the Emergency "install.img" file
(2) Copy the “install.img” file to the root of the USB2 pen-drive or to HDD inside the Xtreamer (ie: not
inside a folder).
(3) Disconnect the Xtreamer's power supply. Wait a minute. Reconnect the power supply.
(4) Using the Remote control, press "Home" and release, press "3" and release, press "Power" and
release.
(5) After the process is finished, you must perform a RESTORE DEFAULT via the SETTINGS menu This will remove all your saved pre-sets.
The emergency upgrade process should be visible on your screen if performed correctly.
English
My Xtreamer doesn't start – no red LED on the player.
Please check that the power cord is plugged in.
Orange LED is blinking – Xtreamer stuck on the splash screen
Unplug the player for a few minutes and then try again.
It might be necessary to run the emergency firmware installation.
Can't see anything on the TV screen
Check all the connections and cycle through various TVOUT options on your remote. You should also
check if your TV has different input options.
Can't upgrade the firmware – after a reboot Xtreamer is stuck on the splash screen
Connect your player to a TV via RCA cables and try the procedure again.
Resetting Xtreamer to factory defaults
Please make sure to reset your player to factory defaults via [SETTING] – [SYSTEM] menu. That will
help you to avoid many possible issues.
Xtreamer looses wireless connection, playback over wireless is less than perfect.
To improve your wireless connectivity and performance you can:
* Use router channels 1 or 11.
* Setup 20 MHz channel width.
* Switch router wireless Band to 2.4 GHz
Using a short USB extension cable is a great way to improve the signal strength.
93
Page 94

Troubleshooting
Xtreamer cannot play a video file
Not all video files are encoded to work with the Xtreamer. That depends on the encoding of the media
or can happen due to a corrupted download. Being able to play a file on your PC does not necessarily
mean that the Xtreamer media player will be able to play back the same file flawlessly.
In case of a problem please contact the Xtreamer support stuff.
I can't find information I'm looking for in this guide
Media player development is a very dynamic field and every firmware update brings new features and
improvements. If you cannot find a desired information in this guide please visit our Knowledge base.
Xtreamer official forum is a large and vibrant community where people from all over the world come
together to discuss various Xtreamer products. It's full of friendly and helpful people and is a great
place for an Xtreamer enthusiast. Please register and join the community.
You can also contact the Xtreamer stuff via the Shop site or e-mail.
English
94
 Loading...