

Page 1

Easy Guide
to Xtreamer Elvira
Page 2
Introduction
Dear friend and customer.
Congratulation on the purchase of the Xtreamer Elvira digital media player.
The Xtreamer Elvira with it's fan-less compact design offers a great and affordable solution to
users who want a solid, yet capable, compact Media Player which is suitable for travel and
playback from an external USB Hard Drive.
It supports the very latest media files and codecs and it's intuitive User Interface allows you to
enjoy most of the popular media formats you have come to expect from Xtreamer's more
expensive media player models.
In this guide we present all the relevant functions and options that will allow you to enjoy our
player.
Should you have any questions, please do not hesitate to contact our Technical Support staff.
Xtreamer company also maintains a fully searchable Knowledge Base and the Official Xtreamer
Forum.
Page 3
3
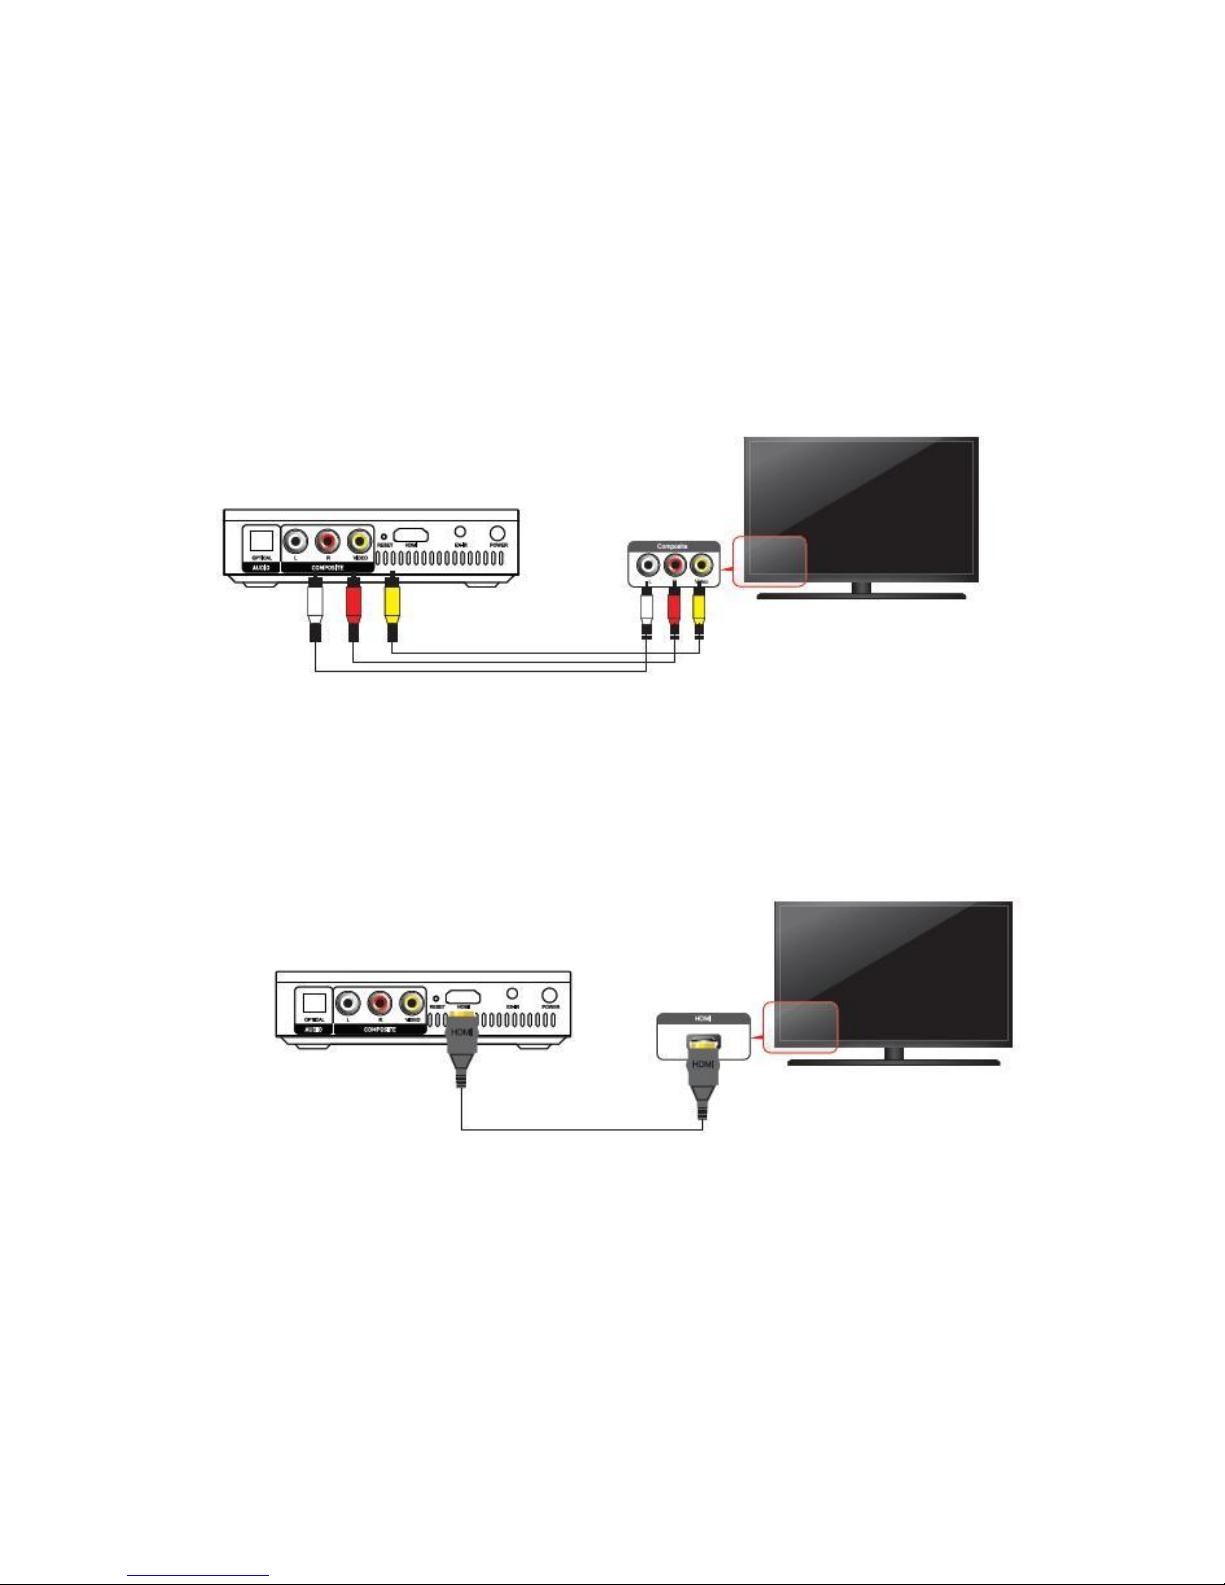
Basically, all you need is a TV. Simply take your Xtreamer Elvira,
connect it to power and use an appropriate cable depending on your television.
Xtreamer Elvira media player supports both SD television with RCA (Yellow, red, white) connection
What do you need to connect your Xtreamer Elvira?
And high definition TV's with HDMI connection
Please note: for best performance use HDMI.
Note: you can also connect your Elvira via an amplifier or a receiver. In these cases in
addition to the Xtreamer Elvira settings you might have to adjust the settings on your
receiver.
Page 4
4
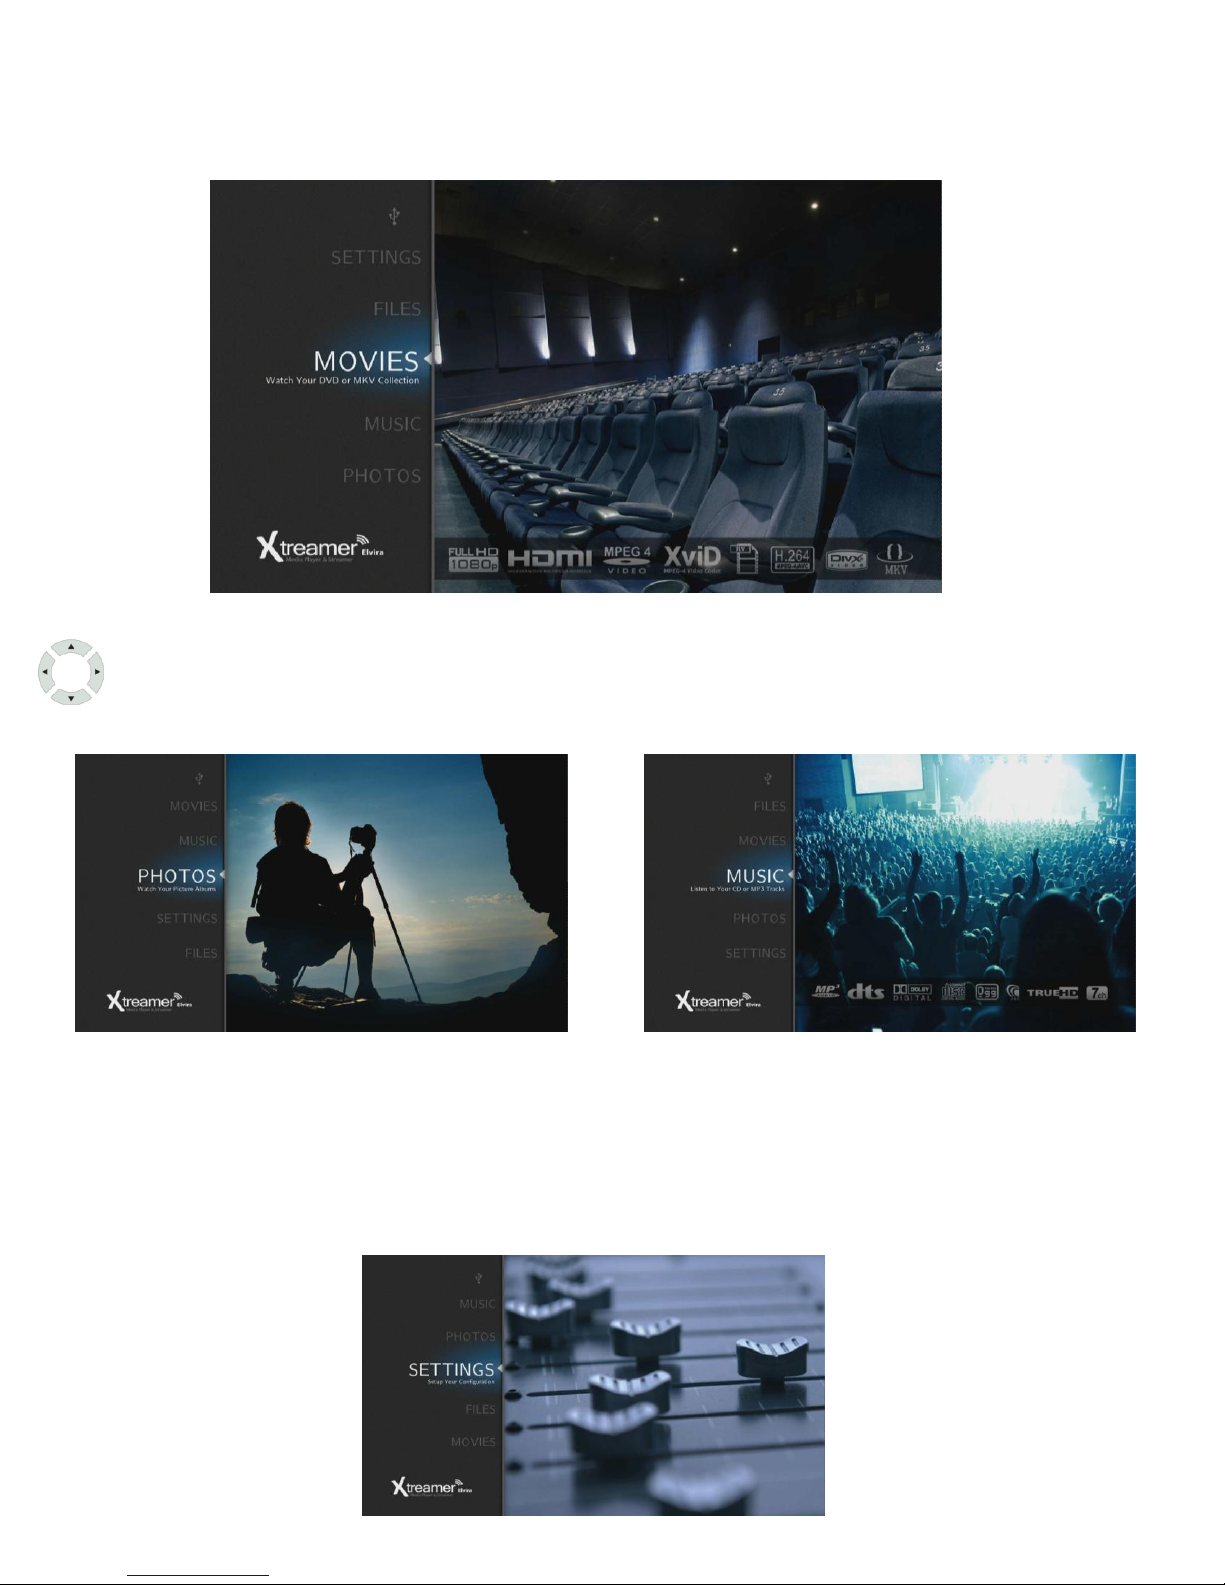
Once your player is connected and switched on, you will be taken to Elvira's main screen.
Quick introduction to Xtreamer Elvira
By pressing UP and DOWN cursor buttons on the remote control you will be able to
navigate the main menu and enter its sections.
Movies, Music and Images sections are self-explanatory. Once you connect an external
storage device to your Elvira, the player will automatically scan it, filling the sections with
relevant content.
The Files section allows you to browse the connected storage devices.
The Settings section is for adjusting your player's performance to better suit your needs.
Page 5
5
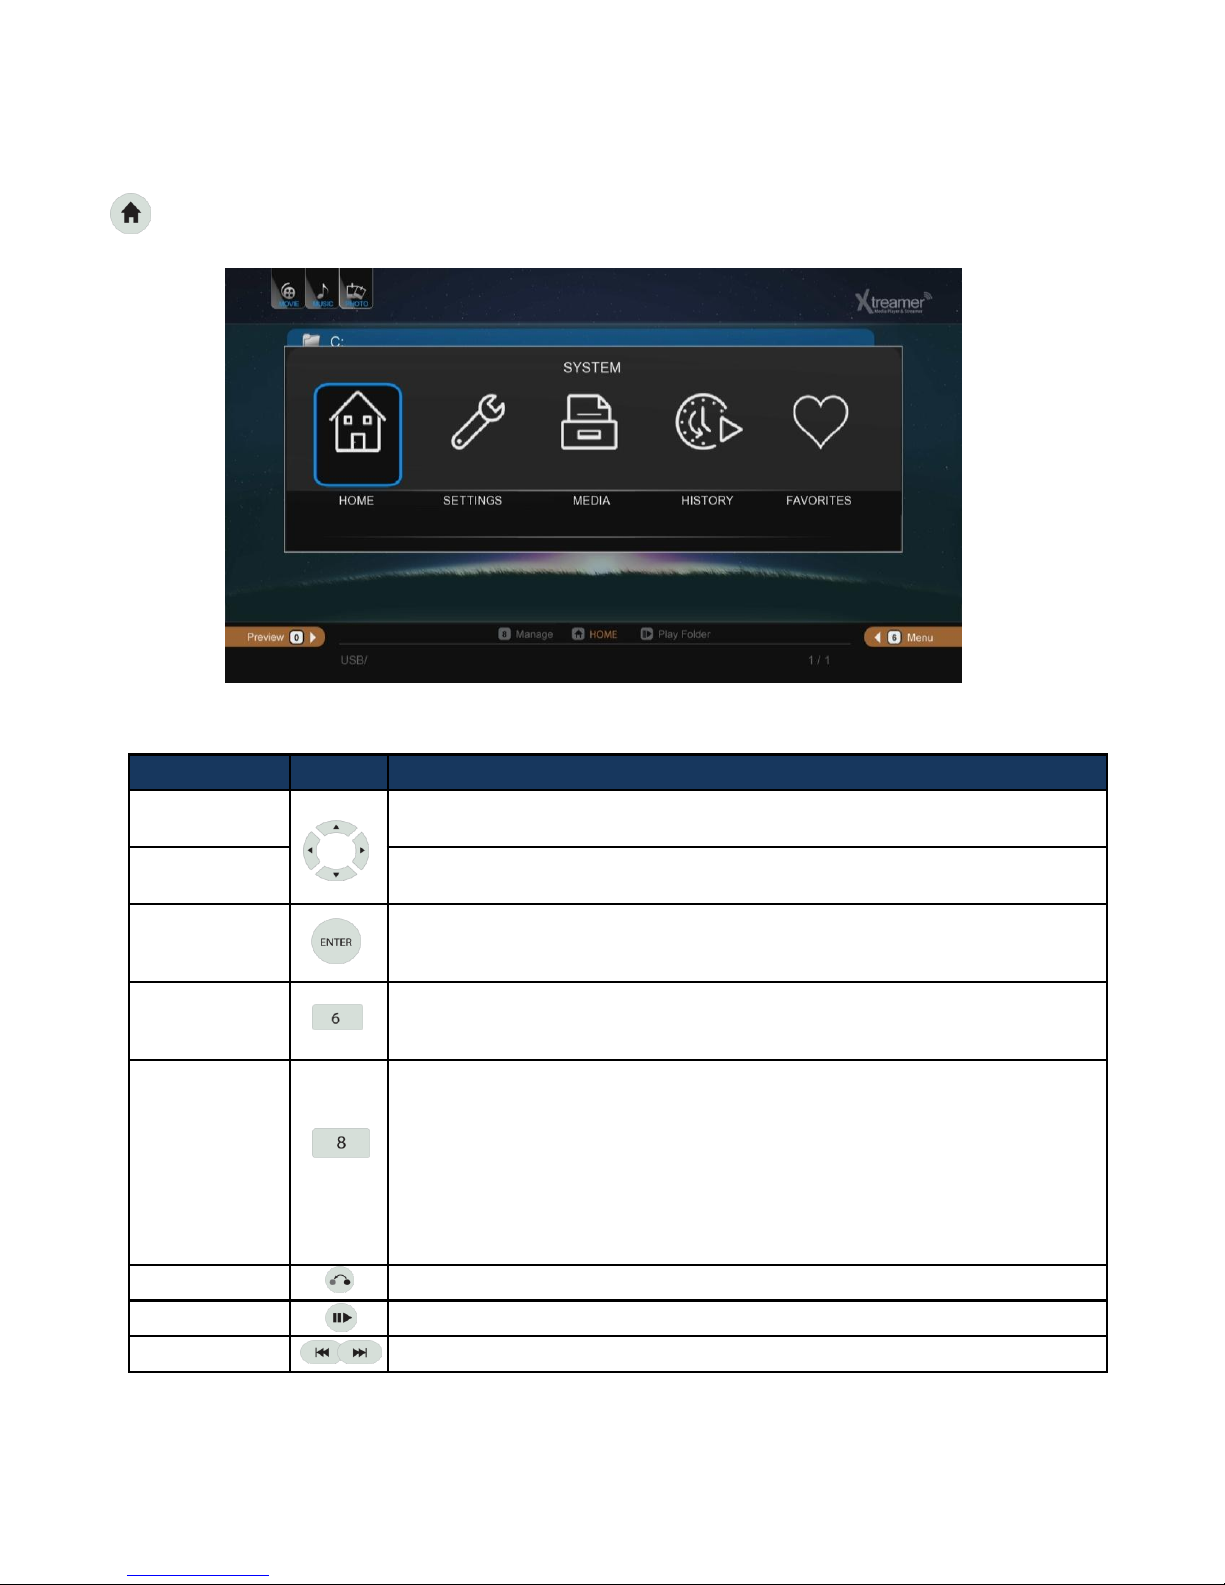
RC Button Description
Up/Down
Navigation Key
Moving cursor Up (or Down).
Left/Right
Navigation Key
Selecting among tap menus, and filtering file lists.
Enter
- Entering
- You can use “ENTER” button as multi selected folder after pressing
[ADD] button for your convenience.
MENU
- Toggles various viewing modes and options [Files List / Preview / Thumbnail}
- Change content view [Music / Photos / Movies / All]
- Various options depending on content.
FUNC
It provides variety of functions as you put cursor on files and folders
- It changes folder and file names.
- Allows you to copy and move files.
- It deletes folders and files.
- It sets folder lock and lock off.
- * Adding files to [Favorites].
•Multi selected file by pressing [ADD] button is enabled when adding to Favorite, however,
multi selected folder isn’t provided.
RETURN It provides cancelling or going back to previous menu.
PLAY/PAUSE Continuous Playback (or Pause).
PGUP/PGDN Viewing next page (for quick movement).
Important remote functions
Press Home button to enter the Quick Navigation Panel
Note: We will cover more remote functions in this guide later.
You can also use the Quick Installation Guide (included in the box) for the full list of all the
available remote button functions.
Page 6
1. Automatically adjust the TV output mode when connected via HDMI cable.
Cycle through available resolutions.
Remote Control Key: TVOUT // Press 2 times consecutively
2. . Connect RCA cable
Please note that video might suffer when connected via analogue.
Remote Control Key: TVOUT // Press 2 times consecutively
Different regions use different output standards:
-- PAL(B) : HDMI Auto, 576P 50Hz, 720P 50Hz, 1080i 50Hz, 1080P 50Hz
Europe, South Africa, Middle East, China, Austria, India
-- NTSC : HDMI Auto, 480P 60Hz, 720P 60Hz, 1080i 60Hz, 1080P 60Hz
Korea, Japan, US, Canada, Taiwan, Philippines, Colombia
6
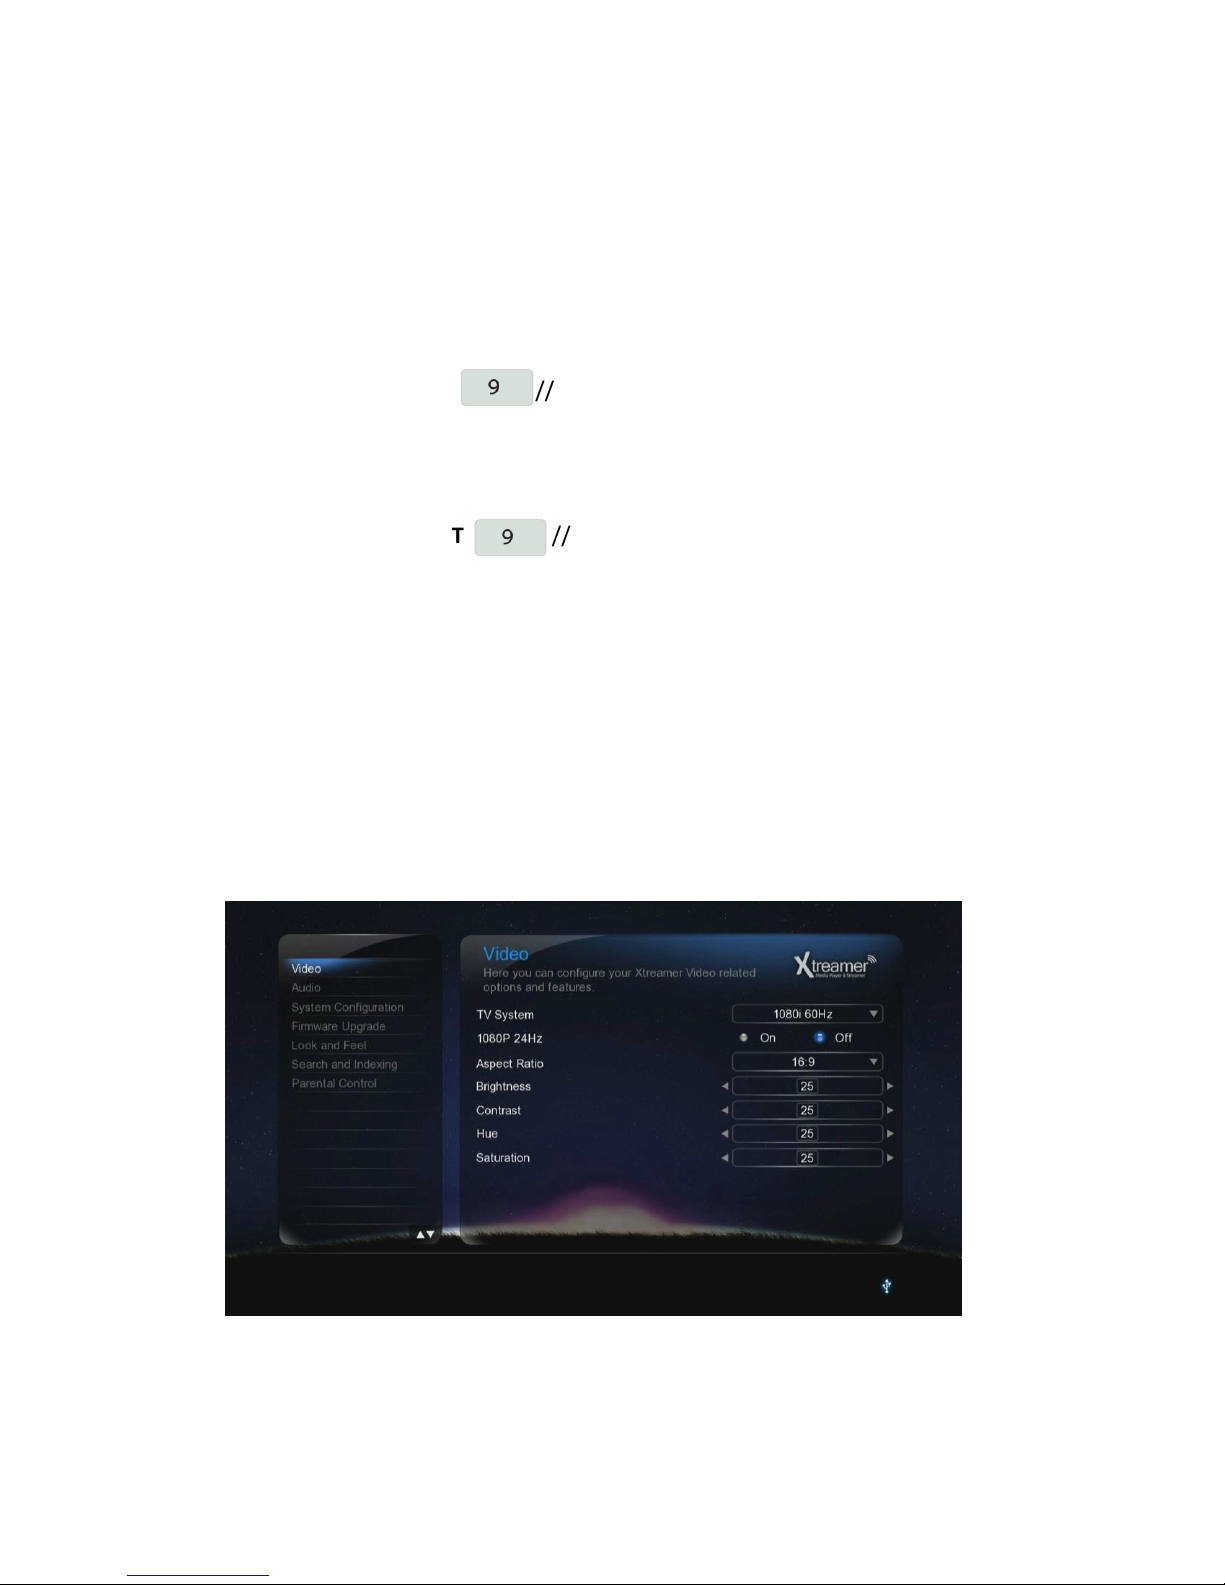
1. Adjusting output mode with TV output and Video output
Basic Setup
You don't need to know every setting of your Xtreamer Elvira but some are necessary
TV SYSTEM – set the resolution depending on your TV’s capabilities.
Page 7
7
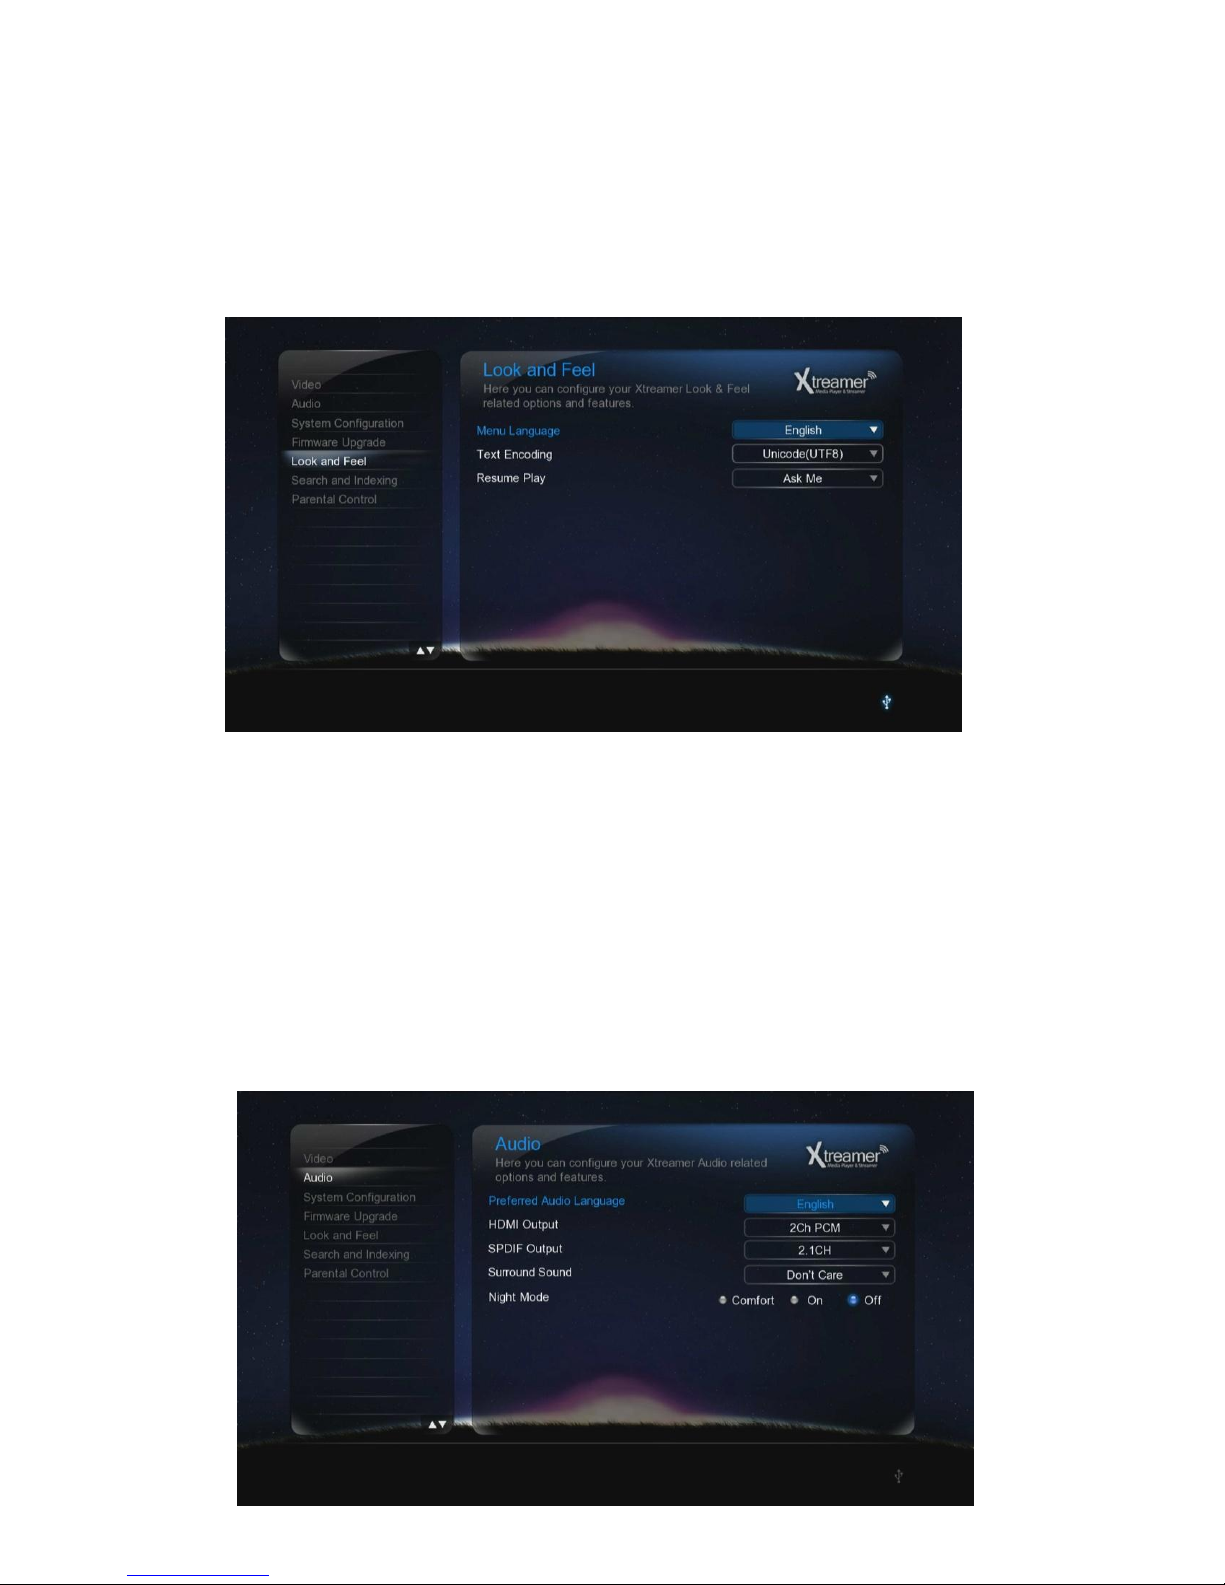
2. Select Language (default : English)
To Select the System language.
Setting Look and Feel Menu Language Select
3. Select Subtitle\ID3-Tag encoding(default : Unicode(UTF8) )
Select the subtitle code.
Setting Look and Feel Text Encoding Select.
4. Select Preferred Audio Language (default: English)
To set the default language for DVD movies.
Setting Audio Preferred Audio Language Select.
Basic Setup
Page 8

Select the audio setting according to your audio system.
HDMI Outut
Setting Audio HDMI Output Select
SPDIF Output
Setting Audio SPDIF Output Select
8
5. Audio Setup
Basic Setup
Page 9

Enter the Movies section.
If you have Auto Scan enabled in your Settings (Search and Indexing) the device will
automatically scan the connected storage and provide you with a list of available movies.
9
Playing Movies
Page 10

10
Media Playback Remote functions
RC Button Description
Navigation
It provides skip function during playback (refer to the above picture).
◀ : It goes 10 seconds backwards
▶ : It goes 30 seconds forwards.
▲ : It goes 3 minutes forwards.
▼ : It goes 1 minute backwards.
PGUP/PGDN
It views previous file (or next file) by new starting.
During DVD playback: plays previous chapter (or next chapter).
PLAY/PAUSE Play or pause the playback
STOP It stops playback.
FR/FF
Rewind and Forward functions are enabled with “0.8X/1.1 X/1.2 X/1.5 X/2 X/4 X/8
X/16 X/32 X” speeds as well as music file is enabled with 2X speed control.
VOLUME It adjusts sound volume.
MUTE Mutes the sound
Playing Movies
Page 11

11
RC Button Description
AUDIO Use it to switch between multiple audio tracks .
A-B
It supports selecting the points; Between A and B; the section is repeatedly played between the
points.
SHUFFLE
It provides selecting between “Playback in order” and “Random playback” to change playback
mode.
REPEAT It provides selecting between “playing a file repeatedly” or “playing all files repeatedly”.
SUBTITLE
1. Subtitle: Selecting subtitle file; both internal & external subtitle files are supported.
2. Searching: Selecting external subtitle files from the folder.
3. Size/Outline: Adjusting subtitle size and frame outline.
4. Position: Controlling subtitle position.
5. Color: Changing subtitle color.
6. Advanced Color: Changing subtitle outline color.
7. Subtitle /ID3-Tag: Selecting proper language.
8. Reset: Reset to Default.
SYNC SUBTITLE Allows you to synch your subtitle file to a movie(100ms).
SETUP Takes you to the settings menu
ADD It provides selecting files you want to add to “Playlist”.
EJECT It adds selected files to Playlist. (After selecting the files by pressing [ADD] button).
Movie Playback Function of Media Library
Usage of Remote Control key functions during playback
Playing Movies
Page 12

12
1 2
3
5 4
Playing Movies
RC Button Description
INFO
It displays file information which is being played.
1. It displays codec information and resolution for video and frame rate FPS.
2. It shows audio information.
3. It displays total running and current running time.
4. It provides the figure of all file lists and present playback lists.
5. It supports current status information of “Repeat/ A-B Repeat/Shuffle/24P film”.
ENTER
- It activates the item you selected.
- It moves forward frame by frame after pressing [PLAY/PAUSE] button to stop.
RC Button Description
GOTO
1. Title: It shows movie title lists and change playback file.
2. Chapter: It provides moving to next (or previous) Chapter.
3. Time: It provides moving to the point where you want to start from.
MENU List of playback options
TVOUT It changes TV output type.
Page 13

13
Playing Movies
RC Button Description
ZOOM
It modifies Scale, position, and Reset.
1. Scale– Left (or Right) keys you enable to adjust vertical lines, and Up (or Down)
keys support adjusting horizontal lines after pressing [ENTER] button.
2. Position – The Arrow Keys support adjusting position of movie screen after
pressing [ENTER] button.
3. Reset – Reset to Default.
※ “Zoom- in” and “Landscape View” functions are solely supported for “Photos” mode.
Press SUBTITLE button to enable\load subtitles and adjust the subtitle text properties
Page 14

Enter the Music section.
14
Playing Music
Page 15

15
Media Playback Remote functions
Music Function of Media Library
RC Button Description
ENTER It plays the music file you put the cursor on.
PLAY It plays all music. Can also be used to play all subfolders.
PGUP/PGDN It plays next music file (or previous music file)..
STOP It stops playback.
FB/FF
Rewind & Forward function is enabled with (1.1 X/1.2 X/1.5 X/2 X/4 X/8 X/16
X/32 X) speeds as well as increasing the speed of the music file is enabled
until 4X.
SHUFFLE It changes playback mode; Order Playback or Random Playback.
REPEAT
It provides you select between “playing a file repeatedly” or “playing all files
repeatedly”.
VOLUME It adjusts volume sound.
MUTE Mutes the sound
MENU List of available options
Playing Music
Page 16

Enter the Photos section.
If you have Auto Scan enabled in your Settings (Search and Indexing) the device will
automatically scan the connected storage and provide you with a list of available audio files.
16
Viewing Images
Page 17

17
RC Button Description
ENTER It confirms and shows photo files.
PLAY Press to start a Slide Show
INFO
It displays EXIF information of photo file, which is being showed.
(JPEG/EXIF supported)
STOP It stops a Slide Show.
Left/Right in
navigation
It rotates a photo file to the left (or right).
PGUP/PGDN Go to next file (or previous file).
VOLUME Adjusts background music volume
MUTE Mutes the background music
SHUFFLE It changes playback mode; Order Playback or Random Playback.
ADD
It provides selecting files you want to add onto “Playlist”.
- only works for an internal HDD
EJECT It adds selected files after selecting them by pressing [ADD] button.
Viewing Photos
Page 18

While running a Slide Show, press to enter the Options menu.
You will be able to set the time each slide is shown on your TV, transition effects, adjust video
settings and add the background music.
18
Playing Music
Page 19

Enter the Files section.
Files section allows you to browse all available storage. While Elvira does not support internal
hard drive and, as a result, you need to connect your storage devices to a computer or a NAS in
order to move\copy files, there are cases when you still need a File Manager.
This function allows you to copy, move, delete and rename files as well as create playlists and
photo albums and add files and folders to Favorites.
19
File Manager
Page 20

20
RC Button Description
Up/Down
Navigation Key
Moving cursor Up (or Down).
Left/Right
Navigation Key
Selecting among tap menus, and filtering file lists.
Enter
- Entering
- You can use “ENTER” button as multi selected folder after pressing
[ADD] button for your convenience.
MENU
- Toggles various viewing modes and options [Files List / Preview / Thumnail}
- Change content view [Music / Photos / Movies / All]
- Various options depending on content.
FUNC
It provides variety of functions as you put cursor on files and folders
- It changes folder and file names.
- Allows you to copy and move files.
- It deletes folders and files.
- It sets folder lock and lock off.
- * Adding files to [Favorites].
•Multi selected file by pressing [ADD] button is enabled when adding to Favorite, however,
multi selected folder isn’t provided.
File Manager
Page 21

Press and choose Multiple Select
This feature allows you to copy, move, delete and so on using multiple files.
It also allows you to create Photo albums and playlists.
21
File Manager
Page 22

You can also use the FUNC option to add files, folders, playlists or photo albums to Favorites for
easy access.
To access favorites press HOME button.
22
File Manager
Page 23

It is advisable to check Xtreamer Main Site for new firmware updates. New releases include
new features, enhancements and fixes for your Elvira.
How to install the firmware
* Download a firmware file and un-RAR it. Find install.img and copy it into the root of a USB
stick (we recommend a smaller stick, freshly formatted FAT32)
* Unplug your Xtreamer Elvira from electricity.
* Put the USB stick with the install.img file into a USB port on Xtreamer Elvira
* Plug the device into power while pressing the POWER button on Elvira at the same time. Keep
the button pressed for 5 to 10 seconds then release.
* The procedure will start and will be visible on your TV screen. Please be patient.
Once the procedure is finished the device will reboot.
It is very important to reset the device's settings to factory defaults after every upgrade.
23
Upgrading Firmware
 Loading...