

Page 1

User Manual
Ver.2.5.4. Firmware
Page 2

English
2
Safety Notes
Introduction
About the Product
Part-names and functions
Specification
Hard-Disk Installation
Connection
1. Video & Audio output Connections
2. Connect to the Network
3. Connect to the USB Storage
Remote Control Functions
Settings
Initial settings
Playback
A/V
Network
1. Wired LAN Setup
2. Wireless LAN Setup
System
Application
Major Function
Favorites menu
Media Library menu
Recently Watched
Preview mode
Folder playback
Changing Main-menu background image
Sleep Timer
Viewing JukeBox information in Media Library
Folder Lock
Hide Locked Folders
Table of Contents
Page 3

English
3
Using the Media Library
1. Movie Playback Function of Media Library
2. Photos Function of Media Library
3. Music Function of Media Library
How to use Music Jukebox in Photos slide-show?
Using Music Jukebox during slide-show
Using external subtitle files
Internet Radio
How to use the “Auto run” function
How to add Movie Subtitle TTF Fonts
Return to the Media Library
Accepting a call while playing an audio file on Xtreamer DVD
Using Audio and Photos simultaneously
Xtreamering
Internet
Using Xtreamering
Installation and Menu description
xJukeBox setup
Using xJukeBox
Using xVOD
File-manager menu
Using the File-manager
Advanced Users Guide
Web Server
Web Server media-server
Usage of NAS (Network Attached Storage)
Web server Jukebox Application
Jukebox Web Server Application
How to set-up Folder Sharing in Windows 7
How to set-up Folder Sharing in Windows Vista
If folder accessing in window XP isn’t available.
How to configure Folder Sharing Permission in Windows XP
How to register Network PC Shortcut
You can't access a share on your network
How to display “Guest” account “on” for Windows
Firmware upgrade
Online firmware upgrade
Table of Contents
Page 4

English
4
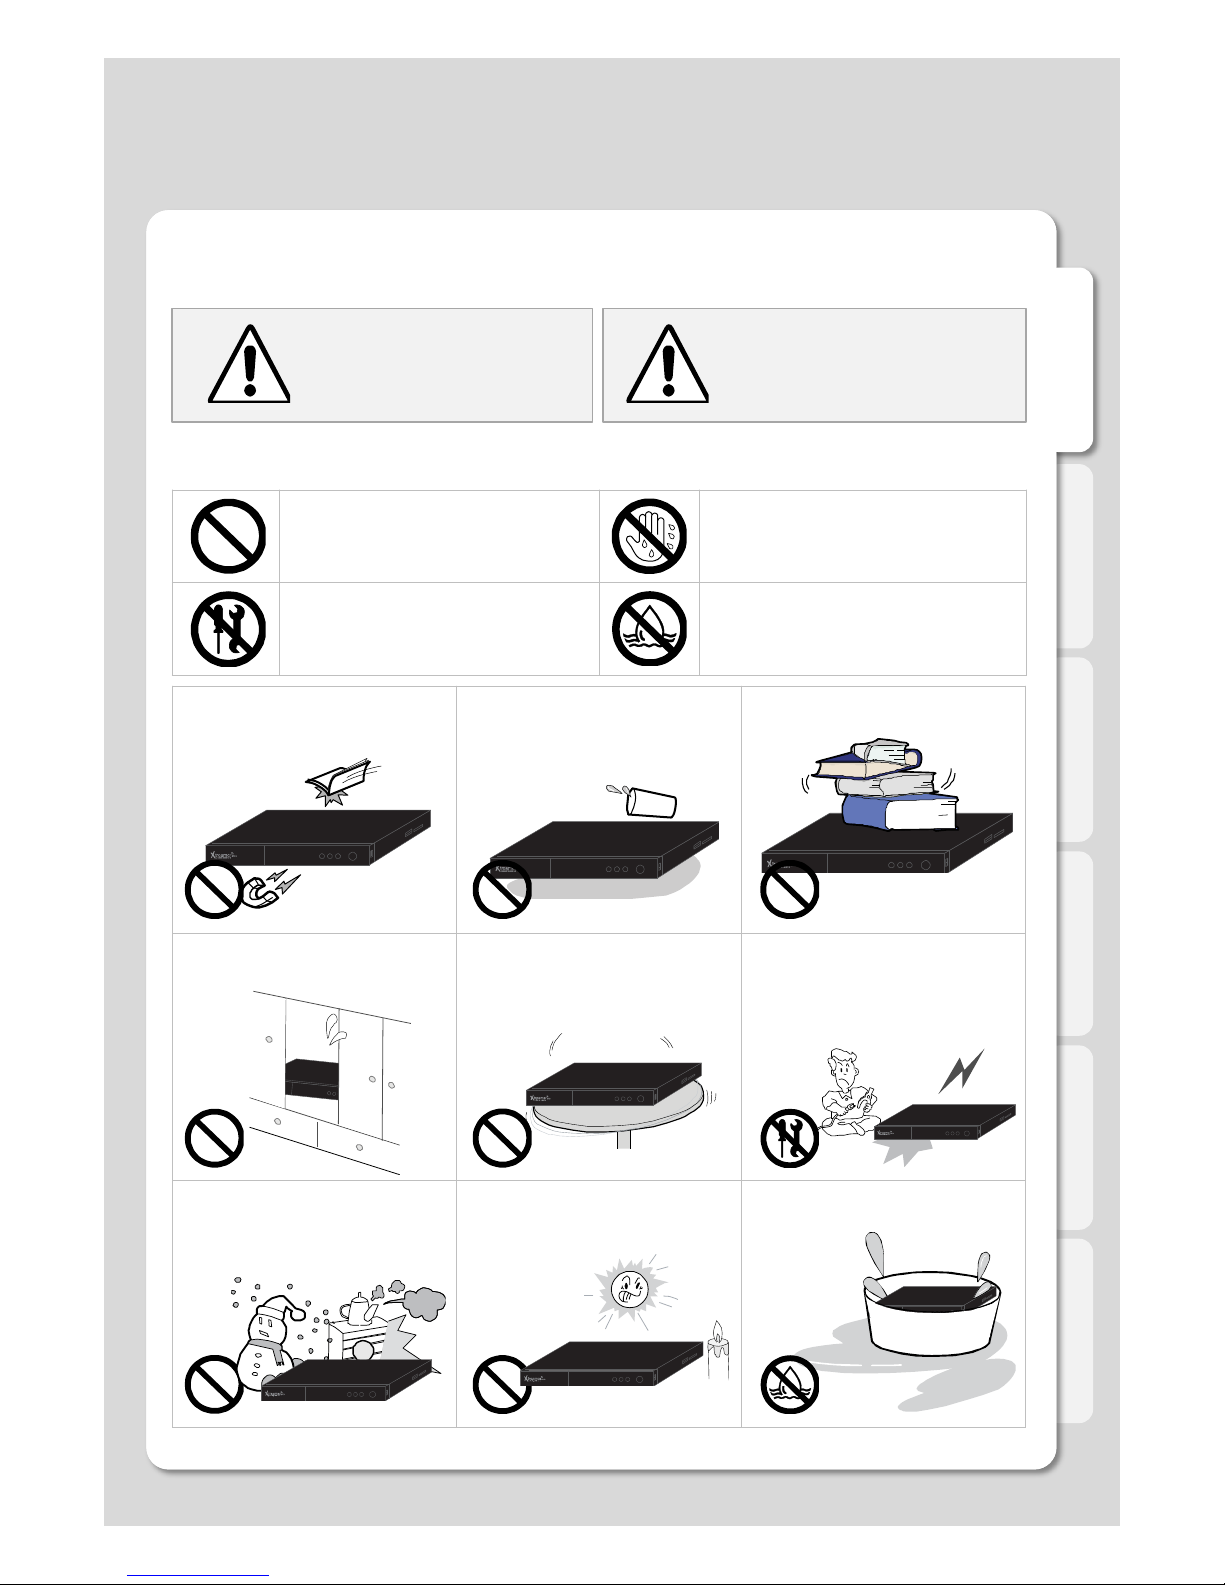
Safety Notes
Warning ! Caution!
Act prohibited! Contact by wet hand prohibited!
Modification prohibited!
Power plug must be removed fr
om power outlet!
The following instructions are here to protect your safety and to prevent damage to your unit.
Please read them before using out product.!
Do not connect a number of power plu
gs at the same time. (This may genera
te heat or cause fire.)!
Do not forcefully pull out power cord. (
Breakage of power cord may cause fir
e and electric shock.)!
Do not insert or pull out power plug wit
h wet hand. (This may cause electric s
hock.)!
Do not insert power plug if it fits loose
to power outlet. (This may cause fire o
r electric shock.)!
Make sure to turn off power switch an
d pull out power plug when moving pro
duct.!
Do not place plant pots, cups or object
s filled with chemical or water, etc. on t
op of product. (This may cause breakd
own of product.)!
Clean the outside of product by wiping
it with lightly wet or dry towel. (Using
detergent for grease removal, thinner
or heavily wet towel, etc. may cause b
reakdown of product.)!
Product must not be disassembled, re
paired or modified. Take caution not to
have foreign substances inserted into
products. (This may cause breakdown
of product or electric shock.)!
Do not forcefully bend the connected p
ower cord or have it pressed down by
heavy objects. (This may cause fire or
electric shock.)!
Violating these
instructions
may lead to serious
injury or death.!
Violating these instructions
may lead to injury or damage
to the product.!
Instructions !
Page 5
English
5
Safety Notes
Warning ! Caution!
Act prohibited! Contact by wet hand prohibited!
Modification prohibited! Soaking prohibited!
The following instructions are here to protect your safety and to prevent damage to your unit.
Please read them before using out product.!
Do not drop objects on top of product
or exert impact to product. Keep produ
ct away from severe vibration or magn
etic objects.)
Do not place plant pots, cups or contai
ners filled with chemical or water, etc.
on top of product. (This may cause fire
/ electric shock. Falling of the objects
may also cause injury.)
Do not place heavy objects on top of p
roduct. (Falling of objects may cause i
njury.)
Do not cover up product or install it in
places with poor ventilation, such as a
wall closet, etc!
Install product in level and stable plac
e. (Otherwise, product may not operat
e normally.)
Product must not be disassembled, re
paired or modified. Take caution not to
have foreign substances inserted into
products. (This may cause breakdown
of product or electric shock.)
Do not install product in places where
temperature is too high (35˚ or higher)/
too low (5˚ or less) or humidity is high!
Do not install product under direct sunl
ight or near objects of heat, such as lit
candle, cigarette or fire, etc.
Do not place product in water. (This m
ay cause breakdown of product or ele
ctric shock.)
Violating these
instructions
may lead to serious
injury or death.!
Violating these instructions
may lead to injury or damage
to product.!
Instructions !
Page 6

English
6
Introduction
Congratulations on your purchase of the Xtreamer DVD Media Player, a state-of-the-art consumer e
lectronic device that will enhance and enrich your home multimedia experience.
The Xtreamer DVD hybrid media player is based on the same successful platform as the models w
e
introduced in 2010 which allow you to stream HD (MKV H.264) movies or user-generated videos,
listen to high-quality digital music and show high-resolution slideshows of your family photos on you
r TV. The Xtreamer DVD is equipped with 1 normal size 3.5" HDD capacity of up to 3TB storage, do
uble
memory and iPhone\iPad dock that will allow you to enjoy your iTunes collection on TV.
With the Xtreamer DVD we are opening a new dimension to Media Players by connecting them to t
he wonderful world of Apple devices.
Due to the rapid development of our product we cannot possibly guarantee that this Guide will inclu
de all its features. So if you have questions please feel free to browse the Xtreamer Knowledge bas
e or contact our staff.
Please make sure to visit our site www.xtreamer.net for the Xtreamer news, official announcements
and firmware upgrade.
Page 7

English
7
About the Product
Multimedia library
High Resolution HD-level File Play: Xtreamer DVD supports the maximum of 1920X1080 pro
gressive scan to provide clear and high resolution picture quality.
Supporting Diverse Movie Format Types
Xtreamer DVD supports a variety of HD files, such as TP, TS ,TRP and M2T,M2TS.MTS files,
but also MPEG1/2/4 , Divx (3/4/5/6), Xvid, DAT, ISO, DVD (VOB, IFO) and MKV(X.264), AVC
HD, WMV9, ASF, H.264,MOV,MP4, RMVB, FLV, etc. You can conveniently enjoy watching m
ovies anywhere as long as you have access to a display device, such as TV, etc.
Convenient Copy
Xtreamer DVD allows you to copy a media file from and to a network-connected computer.
Also, you can copy files by high-speed USB from a PC to Xtreamer DVD HDD or to a USB st
orage device connected to Xtreamer DVD.
Supporting Diverse Music Files
Xtreamer DVD supports a variety of music sources, such as AAC,MPEG audio MP1/2/3/A,
WMV,WMA,FLAC,OGG, AC3 and DTS, etc. The player’s fast forward and rewind functions a
llow you quickly navigate through your files.
Digital Photo Album
Xtreamer DVD supports the upgraded JPEG and BMP image files. The entire family can enjo
ying watching the files on your TV screen. Vertically photographed files can be rotated withou
t requiring any modification.
Network-shared File Play
Files shared on your home network can be played through wired or wireless connection witho
ut having to move them to the Xtreamer DVD hard disk.
NAS (Network Attached Storage)
Xtreamer DVD can be used as a the network drive in Window with full SAMBA support
Supporting USB Host
Xtreamer DVD supports 2 USB2.0 hosts. By connecting USB external storage devices,
you can easily add additional storage to the Xtreamer DVD and play the files on the
external USB devices. A USB type memory card reader can also be used.
Supporting UPnP client
Xtreamer DVD supports UPnP server functions. Xtreamer DVD supports free DDNS so that y
ou can connect to the storage of the Xtreamer not only from your local PC, but also from any
PC with a Internet connection. This function can also be used from an external device that su
pports UPnP client.
Page 8

English
8
Manufactured under license from Dolby Laboratories. Dolby and the double-D symbol are trademarks of Dolby Laboratories
DTS is a registered trademark & the DTS logos and Symbol are trademarks of DTS, Inc.
About the Product
Supporting High Resolution HDMI
Built-in HDMI terminal for digital signal output enables you to enjoy video content with better
picture quality.
5.1CH Audio Output and Down Mix Function
Xtreamer DVD provides 5.1CH Dolby Digital audio and DTS, etc. It can also downmix audio s
treams to 2 channels to play on a TV without requiring an additional decoding device,
such as an amplifier (optical).
Supporting free DDNS
Xtreamer DVD provides 1 DDNS (Yourname.myxtreamer.net) to connect UPNP free Web Ser
ver that allows you to connect to your player from all over the world.
Supporting real-time YouTube access
With Xtreamer DVD you can search and play videos from YouTube without downloading the
m, find your favorite YouTube channels, playlists etc.
Internet
Access Xtreamering section on the Main Menu to get access to hundreds of Internet streams
and online channels as well as many Xtreamer community projects bringing you a variety of a
mazing online content and unique applications.
Internet Radio
Enjoy a vast variety of styles and genres with our Internet-radio feature. Easily add any numb
er of your favorite stations.
Easy access to your favorite files
Add any file or folder to your Favorites for easy access via the Main-menu and create playlist
s that can be automatically run after startup.
Page 9
English
9
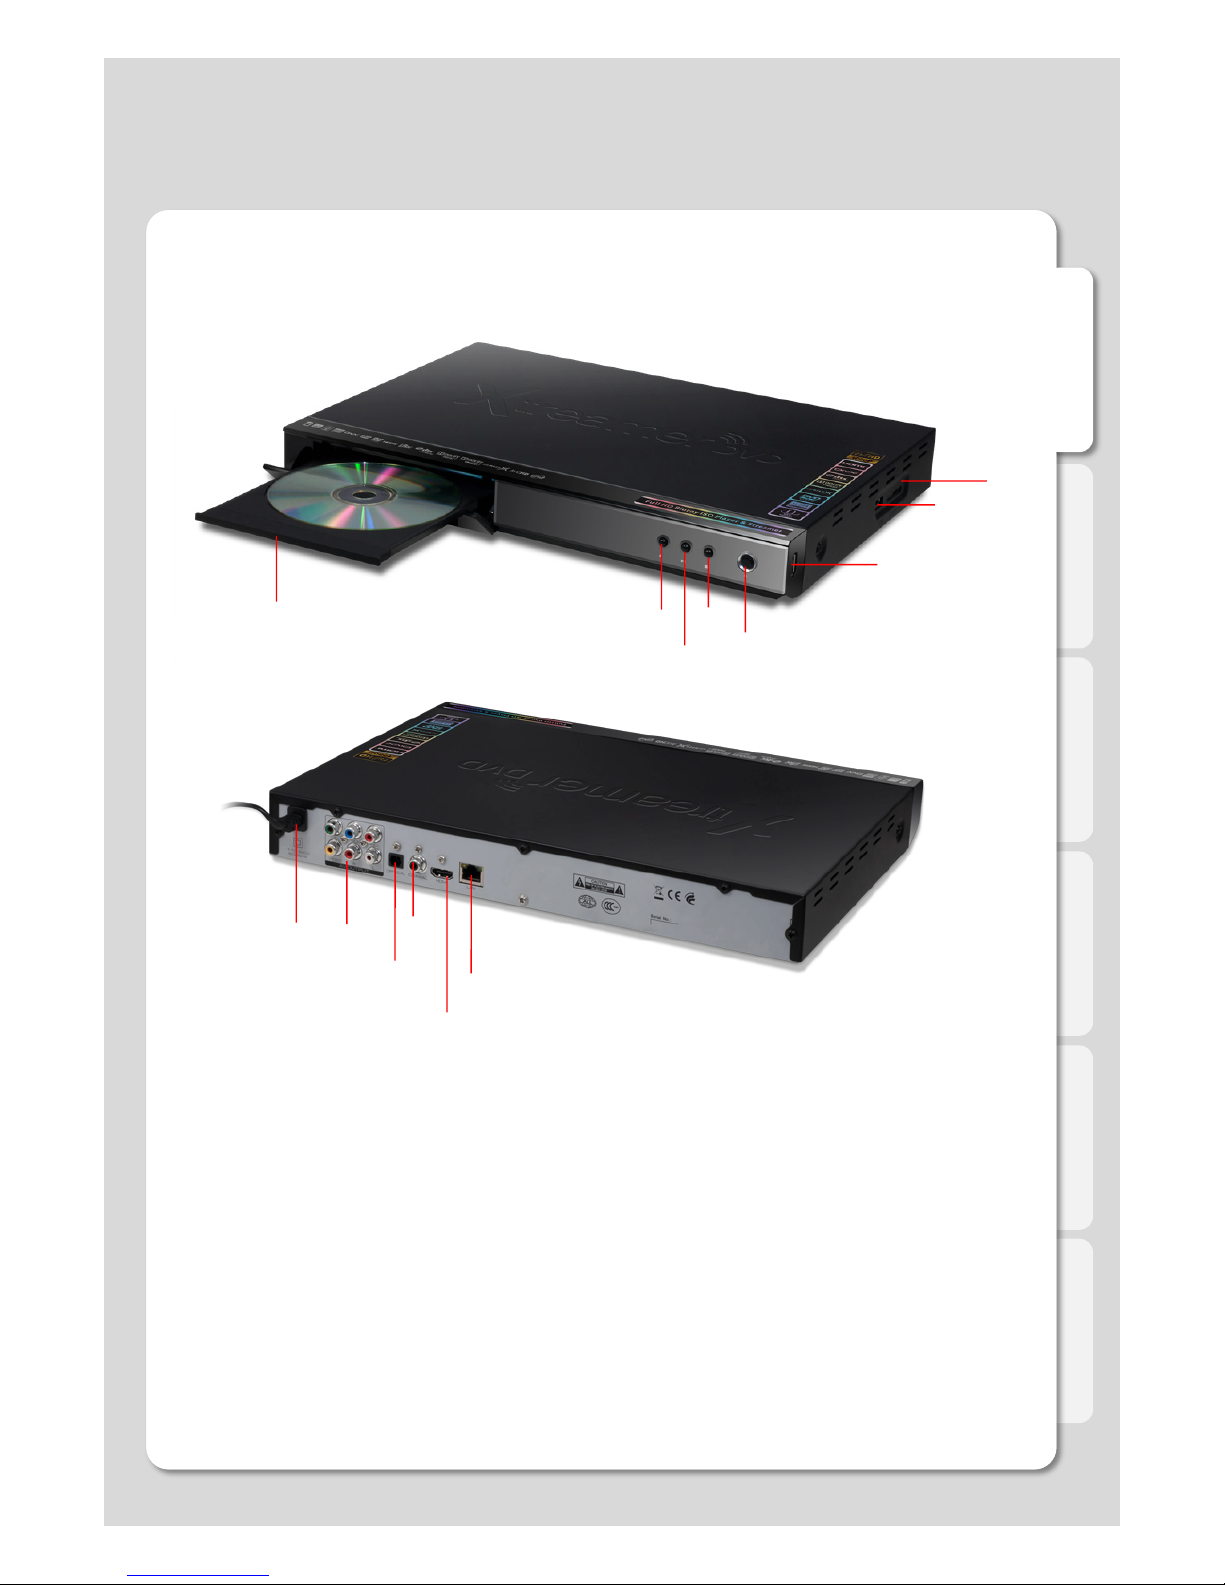
Front Panel
Back Panel
① Composite / Component terminal
② Optical terminal
③ Coaxial terminal
④ HDMI terminal
⑤ 10/100Mbps LAN Port / USB host
⑥ Power code
① DVD ROM
② Eject
③ Play/Pause
④ Stop
⑤ Power
⑥ USB host
⑦ USB host
⑧ SD/MMC/MS card reader
Part-names and functions
②
⑤
④
①
③
①
②
③
④
⑥
⑦
⑧
⑤
⑥
Page 10
English
10
Specifications
Specifications subject to change without prior notice
Product Name Xtreamer DVD
Processor RTD1283DD(+) 400MHz Processor / 256MB DDR2 RAM, 256MB Flash RAM
Operating System Linux
File System FAT16/32 / NTFS / UDF / EXT2 / EXT3 / NFS / HFS / JFFS2
Supported File
& Formats
Video For
mats
ASF / AVI / DIVX / FLV / IFO / ISO / M2P / M2TS / M2V / M4V / MK
V / MOV / MP4 / MPEG / MPG / MTS / RMVB / TP / TRP / TS / VO
B / WMV / BDMV
Video Cod
ec’s
XVID SD/HD / MPEG1 / MPEG-2 (up to MP@HL1080i)
MPEG-4 (ASP@L5, 720p 1-point GMC)
H.264 (High@L5.1 16RefFrame)
FLV (H.263) / FLV with VP6 (H.264)
WMV9 (MP@HL) / VC-1 (MP@HL, AP@L3) / RTSP
RealVideo 8/9/10, up to 720@30P / DVIX 3/ 4/ 5/ 6/ 7
Audio
Formats
AAC / AC3 / DTS / FLAC / FLC / M3U / M3U8 / M4A / MP1 / MP2 /
MP3 / MPA / OGG / PCM / RA / RM / WAV / WMA / PLSX
Audio
Codec’s
Dolby® Digital TrueHD / Dolby® Digital Plus / DTS HD MA
/ 7.1 down-mix / WMA Pro / MPEG I Layer 1, 2, 3 (Multi-Channel)
LPCM, ADPCM, FLAC, AAC, WAV, and OGG Vorbis
DownMix DTS / DTS-HD MA / DTS-HD HR / Dolby D / Dolby TrueHD
Pass
through
DTS / DTS 96/24 / DTS ES / DTS-HD MA
Dolby D / Dolby D EX / Dolby Pro Logic IIx / Dolby D+ / TrueHD
Image HD JPEG / BMP / GIF / PNG / TIFF / TIF / Progressive JPEG
Subtitle SRT, SMI(SMIL), SUB, SSA, ASS, SUB+IDX, PGS(Blu-Ray) , MKV(Embedded)
Video Output HDMI 1.3a / Component / Composite
Audio Output
Analog Stereo RCA
Digital Optical (5.1ch) / Coaxial (5.1ch) / HDMI (7.1ch)
TV System NTSC , PAL , HDMI Auto / FULL HD (1920x1080P) 50Hz, 60Hz, 24Hz
Networking
Wired Ethernet (10/100) LAN via RJ-45 Port
Wireless USB host port(optional)
Network Security Wireless : WEP(Open mode, Share Mode) , WPAPSK, WPA2PSK, WPS
Network Protocol UPnP Server/ Client(AV), Web Server, NFS , FTP, SAMBA Server/ Client
Hard-Disk Type 3.5” HDD Internal SATA I/II (up to 3TB)
Interface USB 2.0 Host x 2, SD/MMC/MS card reader
Power AC110-240V,50/60Hz
Dimension / FAN 360X252X43mm
Page 11

English
11
Video & Audio Output Connections
ㆍHDMI cable connection
Connections
ㆍComposite cable connection
Connect HDMI cable to HDMI terminal at the back of product. Connect the remaining cable
terminal to HDMI terminal at the back of a digital TV. Make sure to carefully distinguish
between input and output terminals.
Connect yellow cable for video signal to the terminal located at the back of side of TV. Then,
select external input of TV. Connect the remaining red and white terminal cables to the left/ right
and audio output terminal at the back of the device. Then, connect red and white cables to the
left/ right terminal of DTV input or component audio input located at the back of a digital TV.
Page 12
English
12
Connection
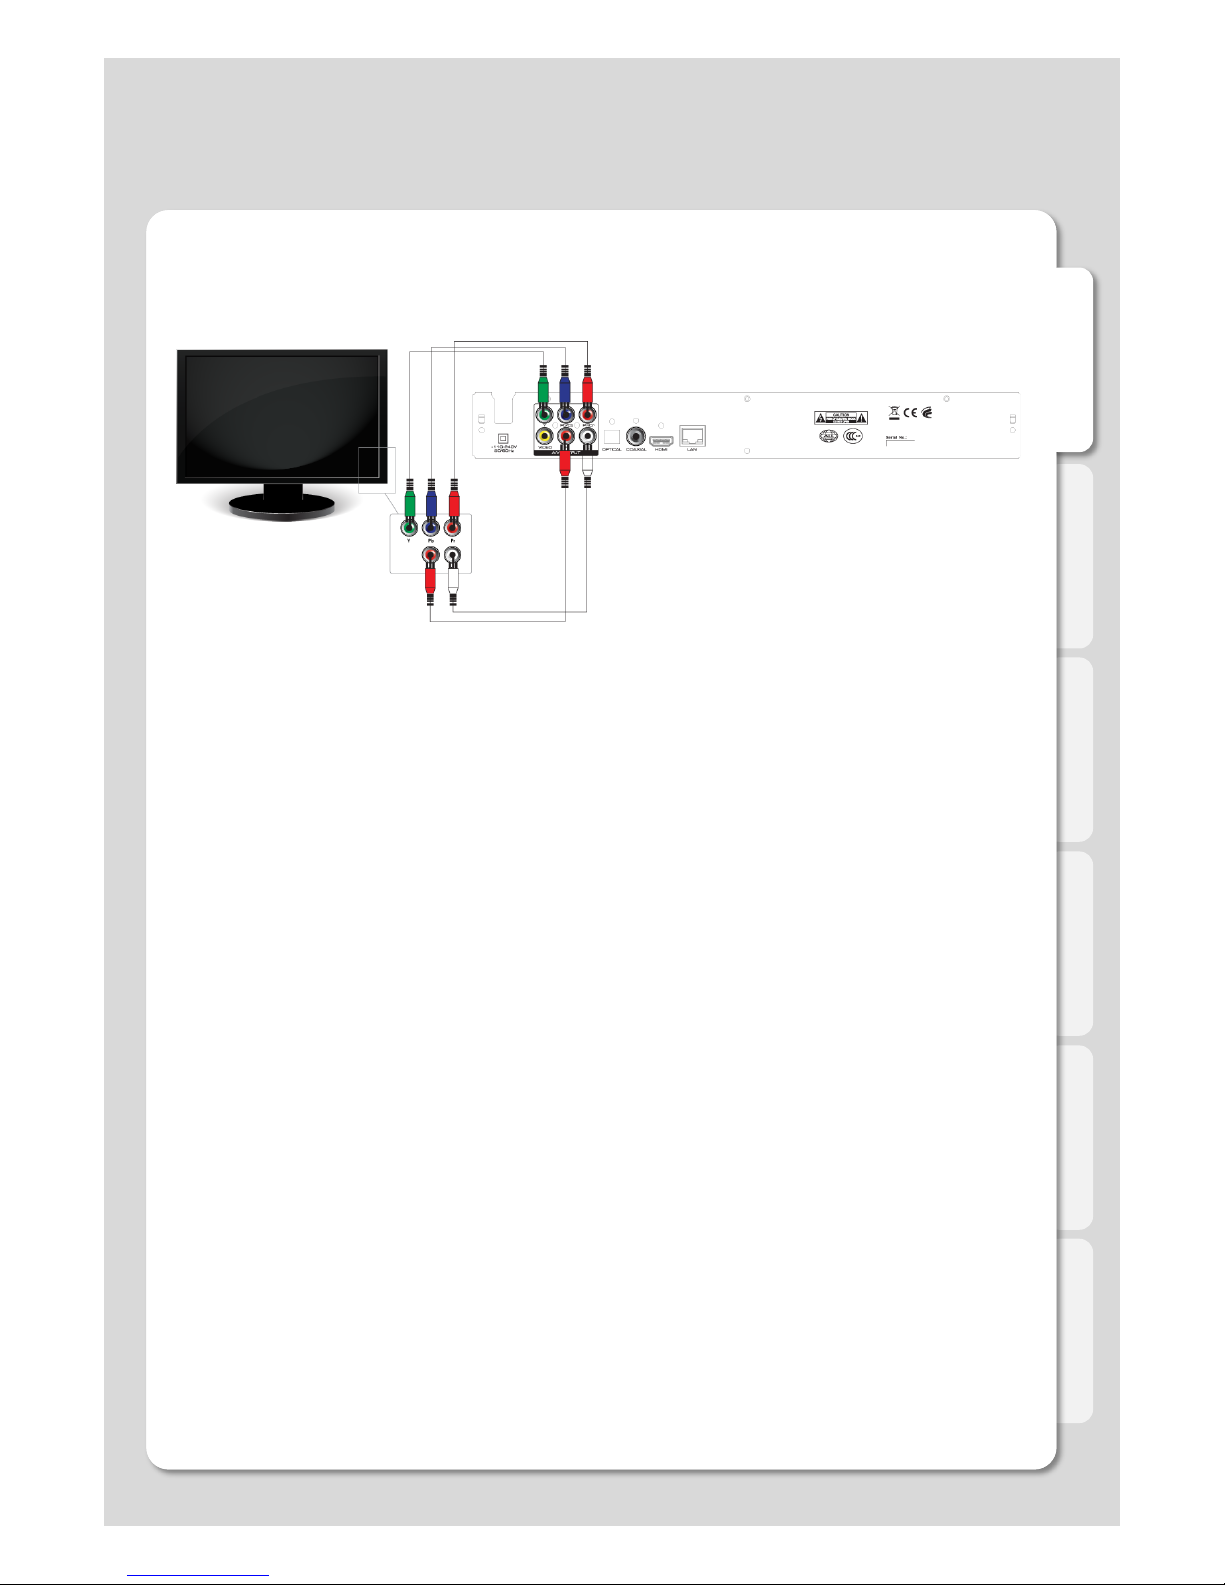
ㆍComponent cable connection
Connect the green, blue and red terminal cables to the Xtreamer DVD and TV in accordanc
e with the color scheme; connect white AV cable to L terminal, and red AV cable to R termin
al. (Component cable is an optional item)
Page 13
English
13
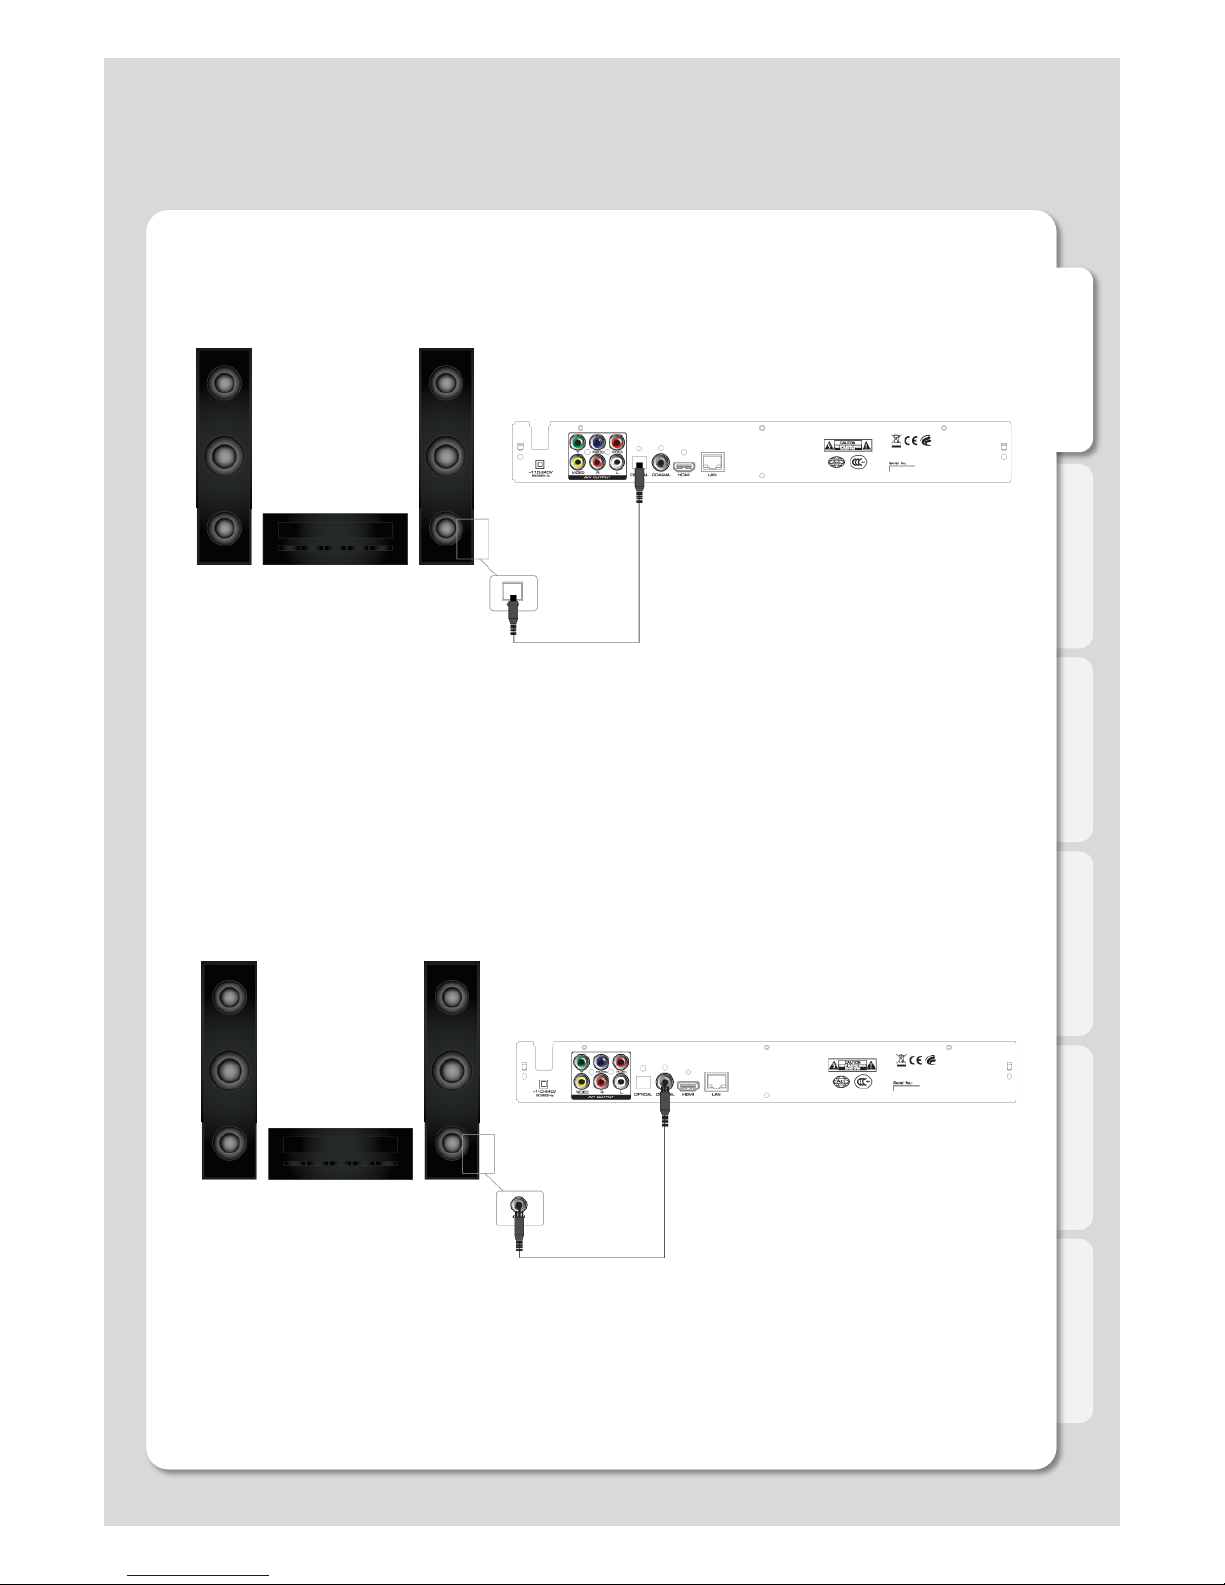
ㆍOptical cable connection
Connection
You can enjoy high-quality 5.1CH sound when connected to an amplifier or a receiver with
optical cable. Connect optical cable to Optical port on Xtreamer DVD as shown above. Then, c
onnect to an amplifier or a receiver. ( Optical cable is optional )
ㆍCoaxial cable connection
You can enjoy high-quality 5.1CH sound when connected to an amplifier or a receiver with
coaxial output cable. Connect coaxial cable to coaxial port on Xtreamer DVD as shown above.
Then, connect to an amplifier or a receiver. ( Coaxial cable is optional )
Page 14
English
14
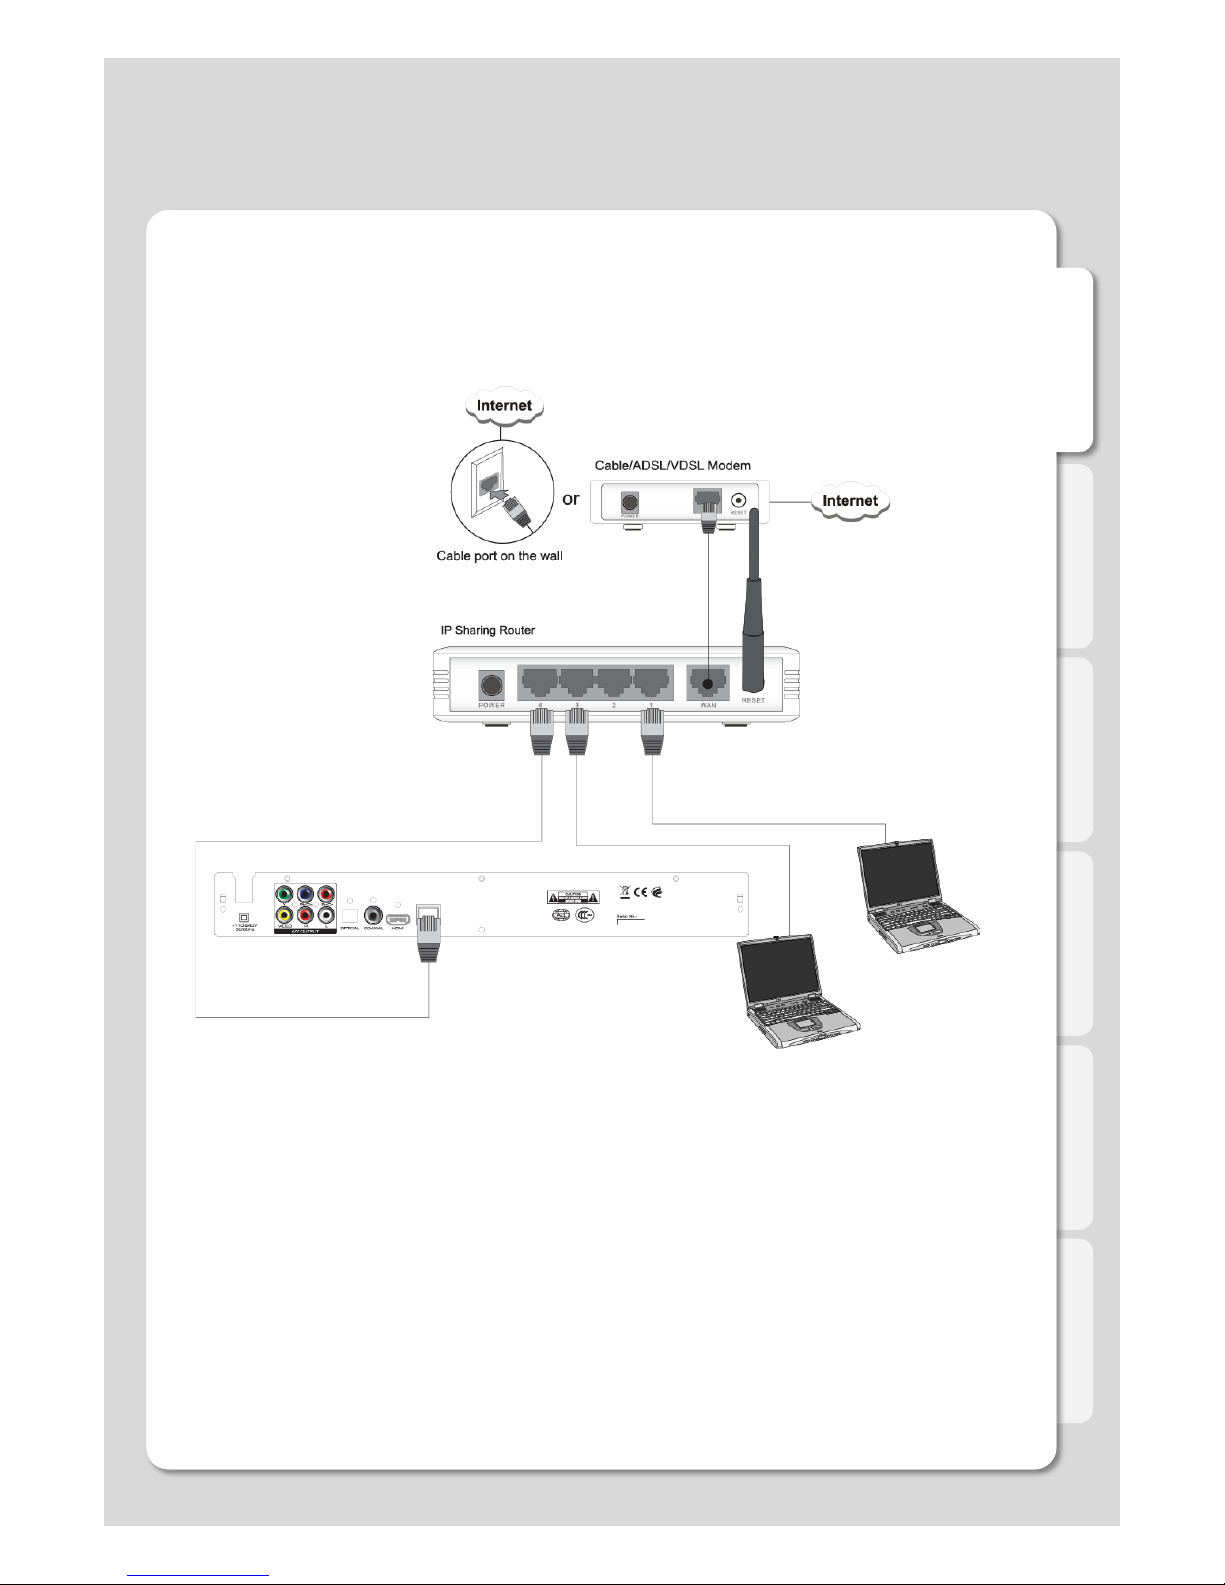
Connect to the Network
ㆍWired Network
Connection
Page 15

English
15
ㆍWireless Network
Connect to the Network
Connection
Page 16
English
16
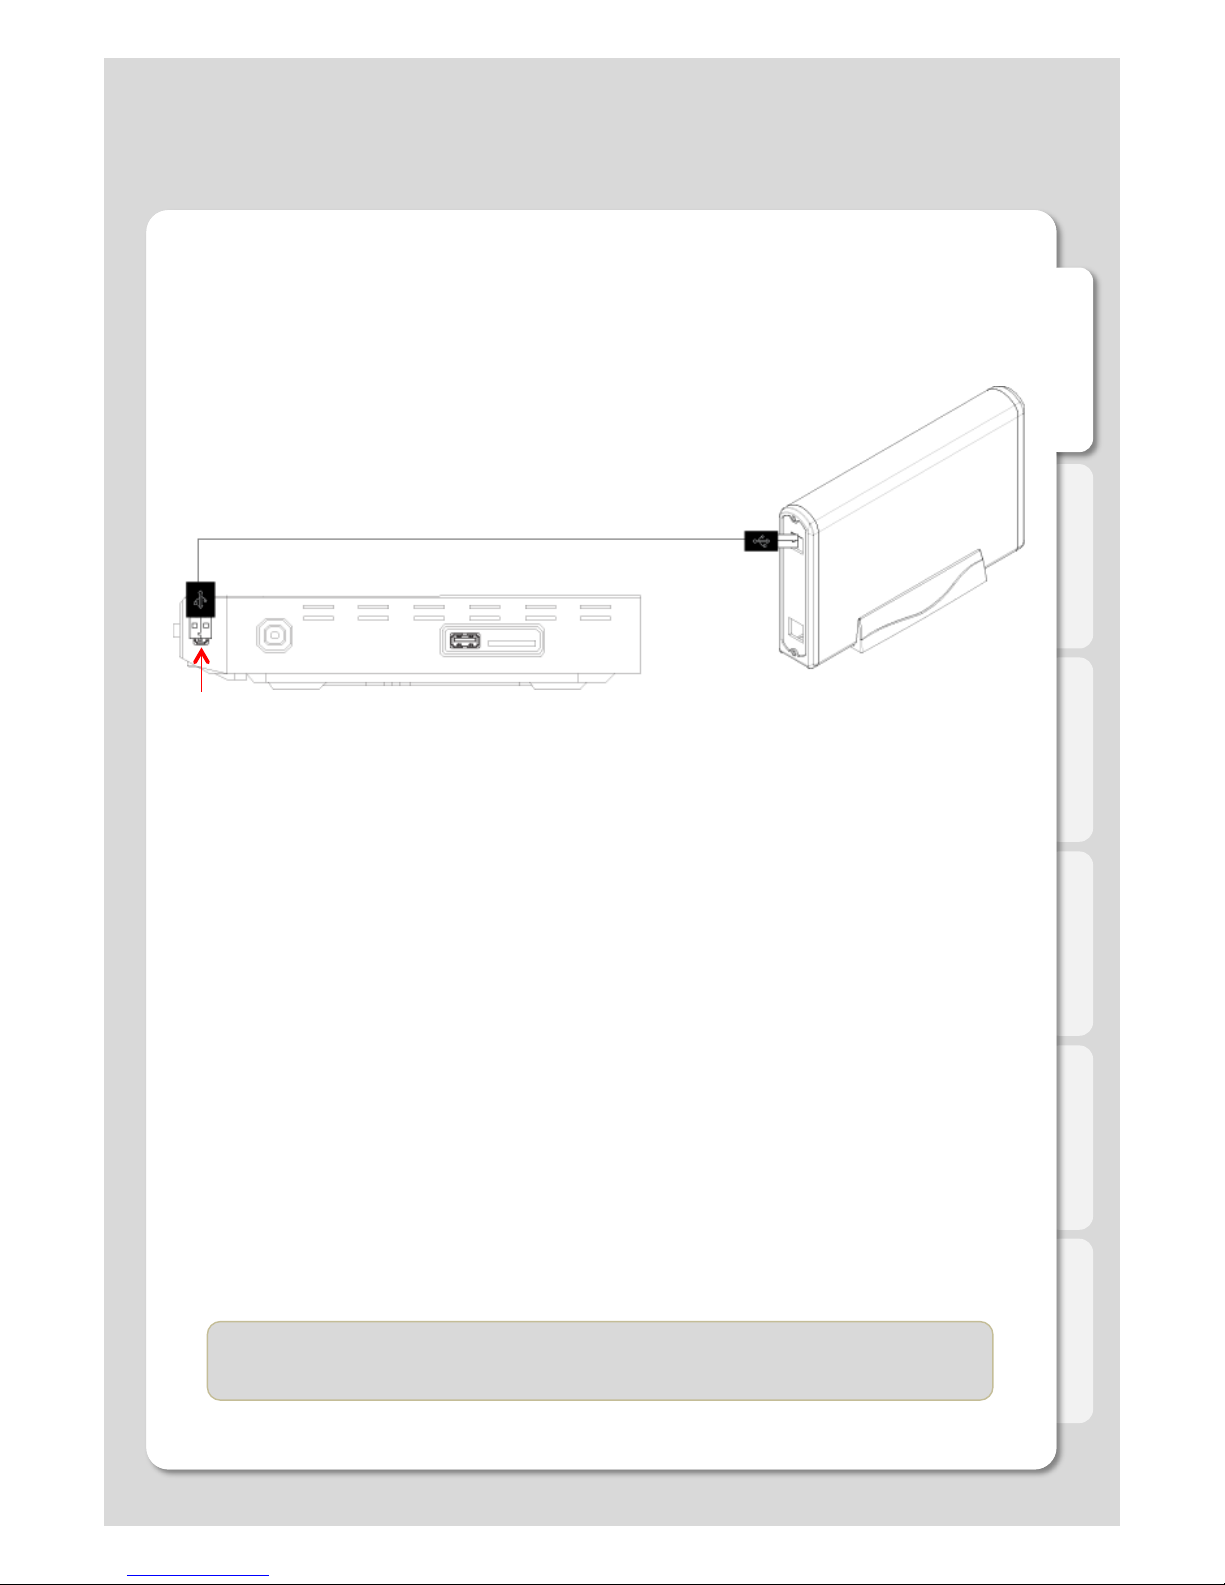
External USB storage Connect the external USB storage to frontward USB.
본 설명에 포함된 USB 저장장치는 별도 구매 제품입니다.
USB 저장장치가 없을 경우 일부 기능 사용이 제한됩니다.
설치형 기능 : Xtreamering / 저장형 기능 : 자막폰트 TTF 설정
Connection
Connect to the USB Storage
Connect USB cable to USB host terminal at the back of product for external storage
Power on DVD after completed connection, found USB storage after completed booting.
Should connect to the USB Host frontward for using the Xtreamering menu.
If doesn’t connect to the USB host frontward, can’t use Xtreamering menu.
Page 17
English
17
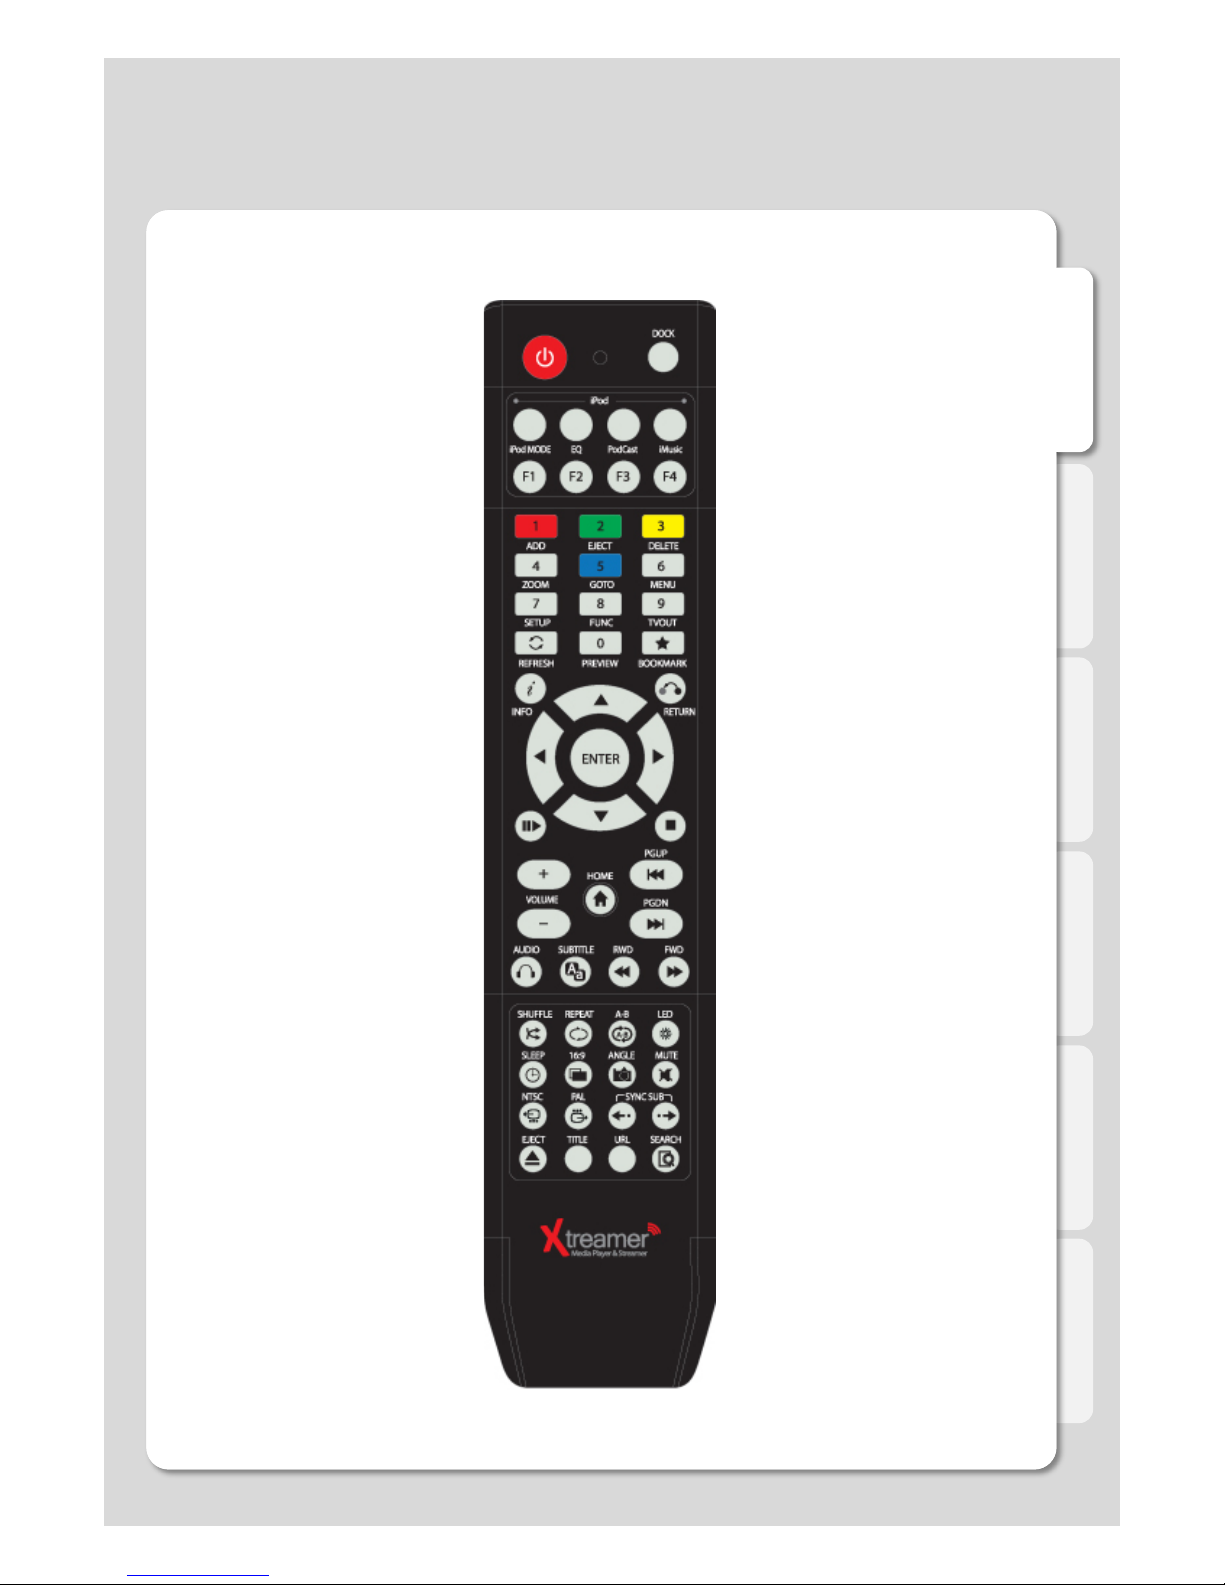
Remote Control Functions
Page 18
English
18
Remote Control Functions
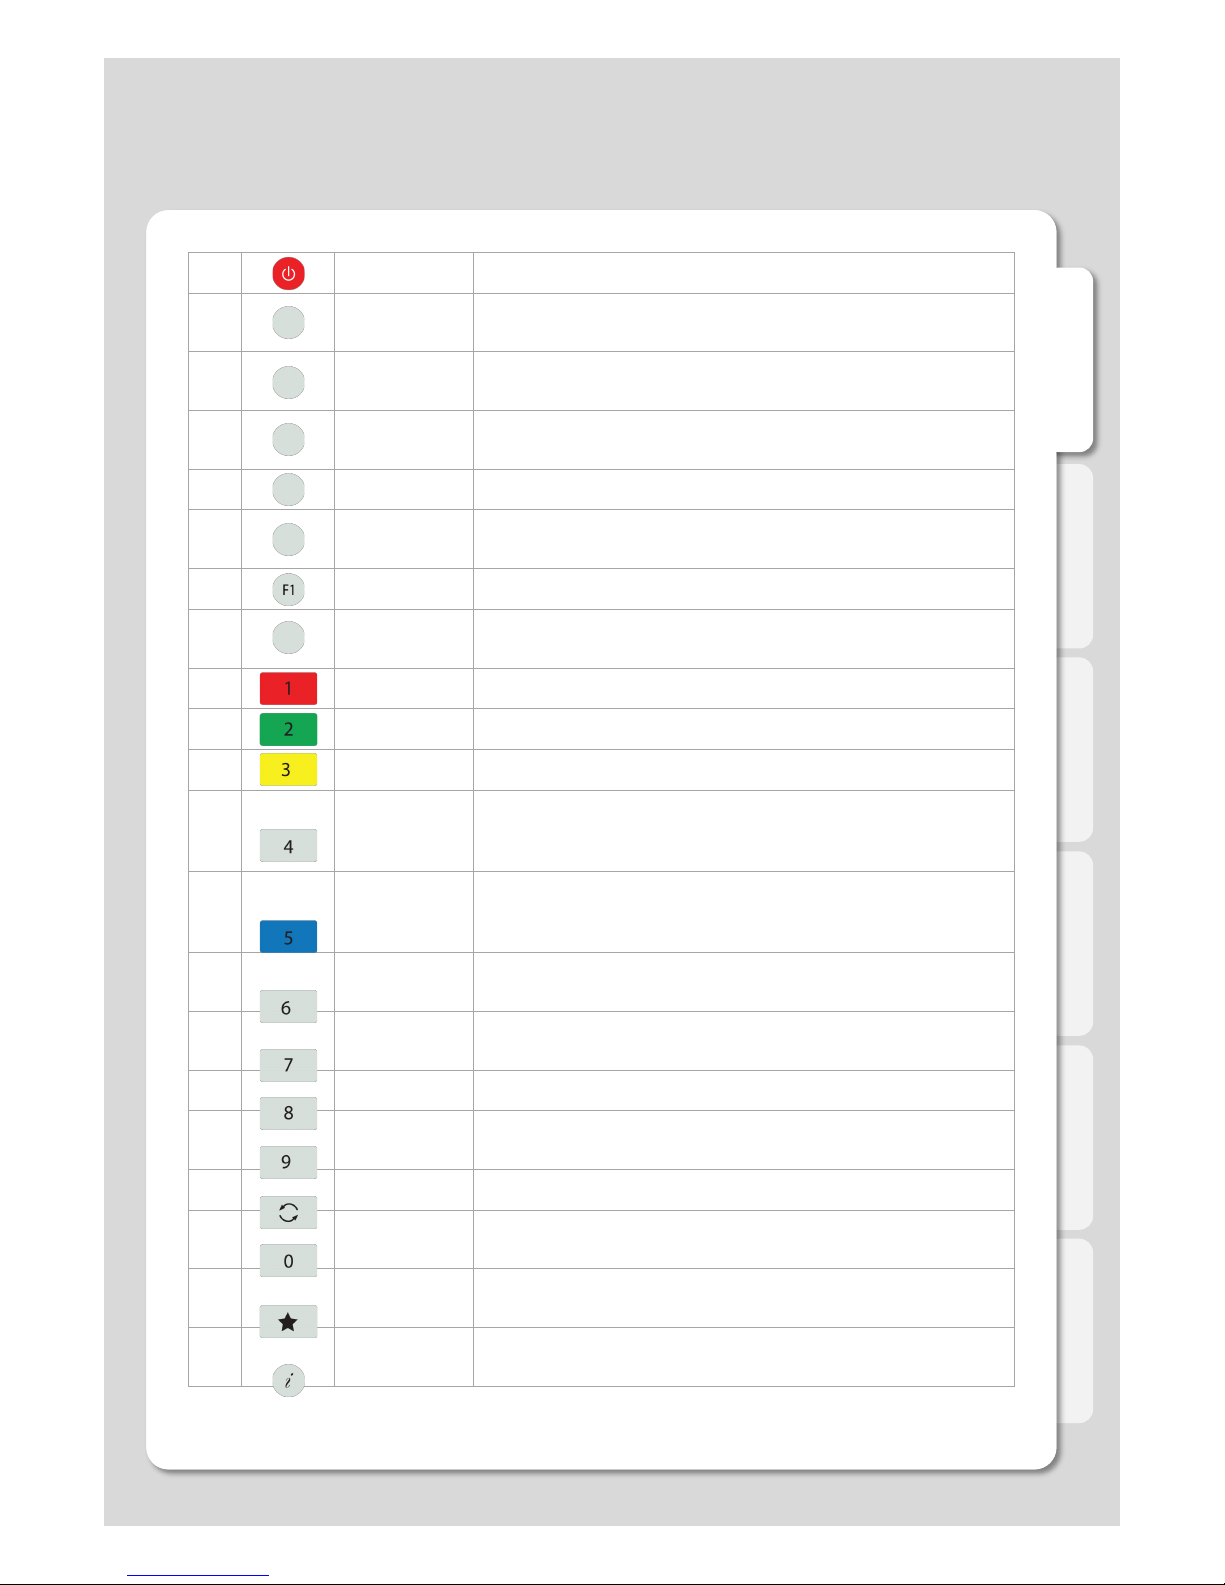
1 POWER
Power on / off
2 DOCK
Changes to iPod (iPad) control mode, one more click switche
s to Xtreamer DVD control mode.
3 iPod MODE
Shifts iPod mode (Currently, this function is supported for iPo
d touch and iPhone running iOS 4.0 or above)
4 iMusic
Shifts into iMusic mode (This function will be supported in the
future)
5 EQ
Changes IPod sound output mode
6 Podcast
Shifts into Podcast mode (This function will be supported in th
e future)
7 F1
Adjust brightness of iPod movie
8 F2~F4
In the future updates these buttons will be used for additional
iPod functions.
9 ADD
Add
10 EJECT
To add a selected media file to list / Eject for DVD
11 DELETE
Delete
12 ZOOM
To enlarge and reduce screen/ repeatedly pressing for adjusti
ng zooming percentage/moving to position of enlarged output
by using direction keys./ Setup the X,Y position on screen
13 GOTO
To select file in the same title or to execute shortcut to the alr
eady designated chapter position/shortcut to the desired time
position
14 MENU
To change or set DVD file menus by moving to MENU screen
during DVD(VOB) file play
15 SETUP
Function available when playing media file or using menu’s in
VIDEO IN screen to display various setup screens
16 FUNC
Opens a list of available functions
17 TVOUT
Toggle Video Output Modes and resolution (HDMI, AV) - doub
le press
18 REFRESH
Refreshes the lists
19 PREVIEW
To turn on/ off preview screen automatically displayed in medi
a play file search mode
20 BOOKMARK
Supports adding a file to bookmark and to show bookmark list
s
21 INFO
To display the current status function available while playback
/ Open information of the movie playing
Page 19
English
19
Remote Control Functions
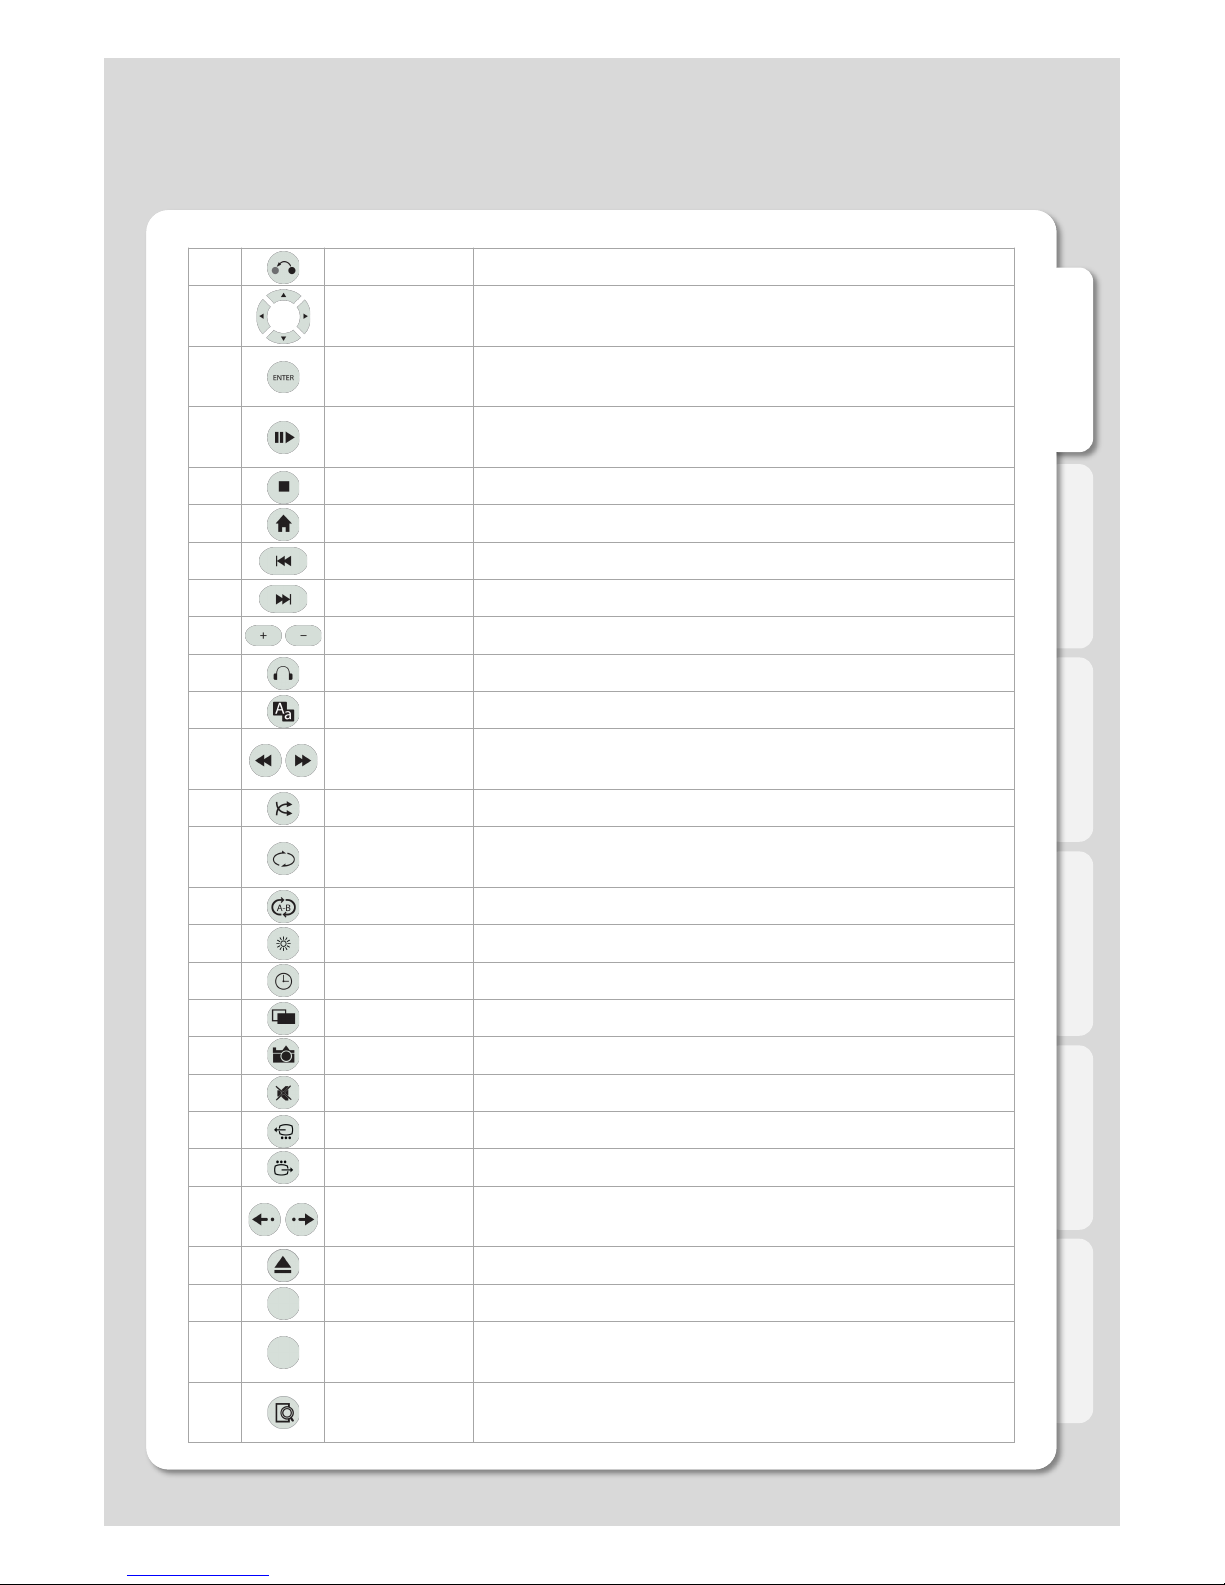
22 RETURN
Return to previous screen
23
NAVIGATION
KEYS
To move the cursor and select files
24 ENTER
To confirm selection / play. When used to play a file toggles si
ngle-file playback.
25 PLAY/PAUSE
To play and pause a selected file. When used toggles consec
utive (file-by-file) playback.
26 STOP
To stop playback
27 HOME
To return to the Main Menu.
28 PGUP
To move to previous chapter or file (list)
29 PGDN
To move to next chapter or file (list)
30 VOLUME
Volume adjustment
31 AUDIO
Option to change or select multiple audio tracks
32 SUBTITLE
Opens Subtitle browser
33 RWD/FWD
1.5x/2x/4x/8x/16x/32x speed, function available in movie files,
mp3 as well sound output available in 2x speed
34 SHUFFLE
To change play sequence to shuffle
35 REPEAT
To repeat file in play or to repeat all media files in the corresp
onding folder
36 A-B
To set zone repetition
37 LED
Turns On/Off LED part of Xtreamer DVD
38 SLEEP
Can be used to set the timer to turn off the player
39 16:9
Screen shifts into 16:9/16:10/4:3 ratio during playback
40 ANGLE
Used if Angle is supported in a DVD file.
41 MUTE
Mutes the sound
42 NTSC
Change output to NTSC
43 PAL
Change output to PAL
44
SYNC SUBTI
TLE
Adjust subtitle files to synch with a movie file(100ms/ 0.1sec)
45 EJECT
Eject disc
46 TITLE
Go to title menu (DVD-Video)
47 URL
This function will be supported in the future.
48 SEARCH
This function will be supported in the future.
Page 20

English
1. Automatically adjust the TV output mode when connected via HDMI cable.
Cycle through available resolutions.
Remote Control Key: TVOUT // Press 2 times consecutively
2. . Connect Component / Composite cable
Please note that video might suffer when connected via analogue.
Remote Control Key: TVOUT // Press 2 times consecutively
Different regions use different output standards:
-- PAL(B) : HDMI Auto, 576P 50Hz, 720P 50Hz, 1080i 50Hz, 1080P 50Hz
Europe, South Africa, Middle East, China, Austria, India
-- NTSC : HDMI Auto, 480P 60Hz, 720P 60Hz, 1080i 60Hz, 1080P 60Hz
Korea, Japan, US, Canada, Taiwan, Philippines, Colombia
20
1. Adjusting output mode with TV output and Video output
2. Select OSD language menu (default : English)
Select the OSD language.
Setting ! System ! Menu Language ! Select
3. Select subtitle\ID3-Tag encoding(default : Unicode(UTF8) )
Select the subtitle code.
Setting ! Playback ! Subtitle / ID3-tag ! Select.
4. Select Audio Output. (default : DTS / Dolby D 2.1CH)
Select the audio setting as your audio system.
Use Only TV (Downmixing)
Setting ! A/V ! Digital Output ! DTS / Dolby D 2.1CH)
Using amplifiers (Pass Through)
Setting ! A/V ! Digital Output ! DTS / Dolby TrueHD/Dolby D+
Settings
Initial setting
Page 21
English
21
Playback
Settings
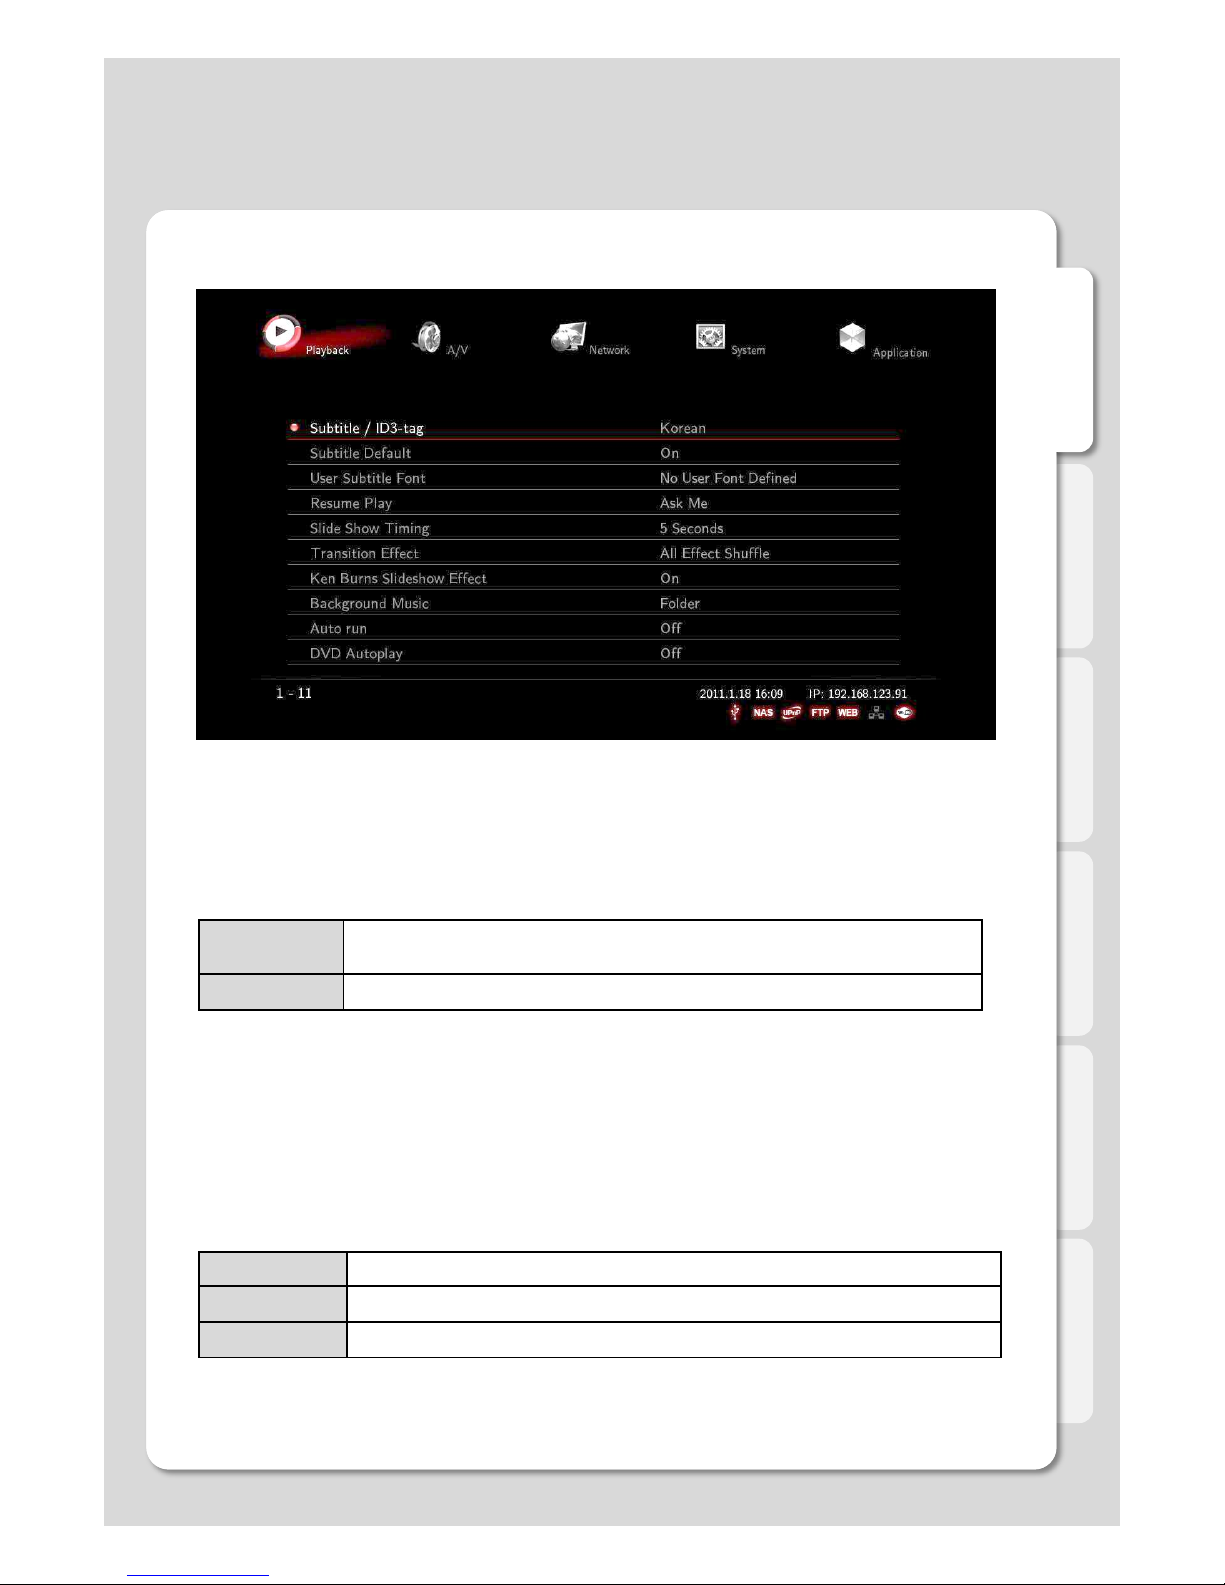
Subtitle Default
Subtitle / ID3-Tag
You can specify the language used in subtitle files and ID3-tag in Mp3 files. Unicode [UTF-8] is an industry s
tandard, and is set as default . If you are not using Unicode encoded files, select your preferred language.
Example: [Setting] – [Playback] – [Subtitle/ID3-tag] – [Thai].
User Subtitle Font
TTF font allows you to combine multiple fonts into a file used for defining characters design. To use custom fon
ts you need to save them on an USB Storage device: “User font” folder is automatically created and you will b
e able to store several TTF font files in that folder.
Selecting and changing fonts is also supported during playback. Select [Setting] – [Playback] – [User Subtitle
Font]. ※ Depending on fonts, you may not be able to change font designs.
Resume Play
You can begin playing Xtreamer from the point where you previously stopped it. Your system saves a record
of the scene that was playing when you stopped playback so it knows where to resume playing.
Slide Show Time
This feature is used to set the time intervals for changing images during a slideshow.
You will be able to select the time transitions:
[Off / 2 Seconds / 5 Seconds / 10 Seconds / 30 Seconds / 1 Minute / 2 Minutes]
ON
If the name of video file and subtitle file are identical subtitles will be displayed a
utomatically.
OFF
Subtitles are not displayed.
NEVER Do not resume playback. (Do not use Recently watched list)
ASK ME Pop up the message of asked resume playback.
ALWAYS Start the resume playback.
Page 22
English
22
Playback
Settings
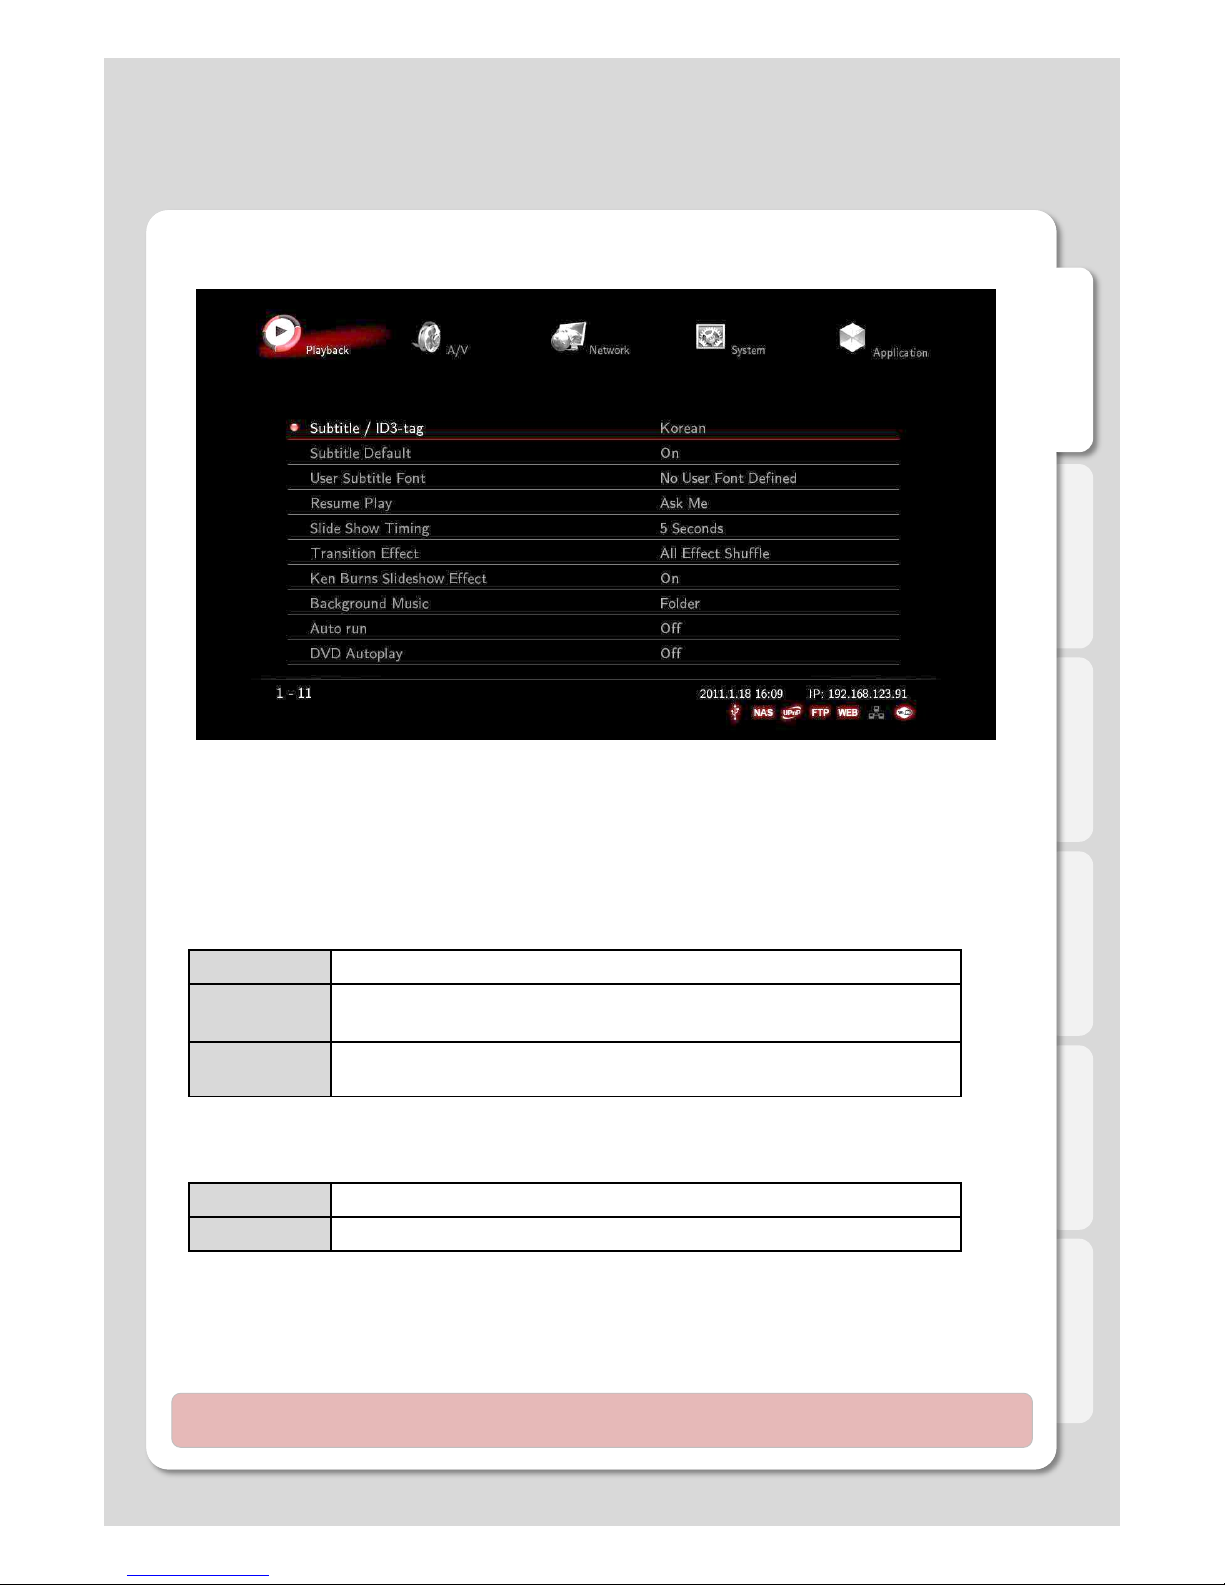
DVD Autoplay
The feature allows you to select automatic DVD play mode when inserting a DVD disk into the DVD ROM connect
ed to your player via USB port
Background Music
Background music is played while running photo slideshow.
Transition Effect
The feature is used to display a range of digital photos, and its application includes 7 major functions.
[All Effect Shuffle] is set as a default value.
Ken Burns Sideshow Effect
The feature enables used technique of embedding still photographs in motion pictures, and displays zooming e
ffects.
Auto Run - need an external HDD to use this feature
This feature allows you to automatically play a designated playlist when Xtreamer starts.
Auto-Run function detects and plays a Playlist and also enables you to organize your playlists via the Xtreamer W
eb Server. [Off / Music Playlist (Sequence) / Music Playlist (Shuffle) / Photo Playlist (Sequence) / Photo Playlist (
Shuffle) / Movie Playlist (Sequence) / Movie Playlist (Shuffle)]
Note : Add your file lists to Playlist by selecting [Media Library] – Type [Music/Photos/Movies] in order to
use this feature. Added Playlist from [All] mode won’t be played by the Auto Run feature.
OFF Turning off the background music.
Folder
You will enjoy playing the entire content of music folder while your focus is on its
inside photos of the same folder.
Playlist
Music files will be played, select [Media Library] – [Playlist]. There can be
several new variations on slideshow like using your captioned photos and music.
OFF DVD Disk isn’t automatically played.
ON DVD Disk is automatically played.
Page 23
English
23
A/V
Settings
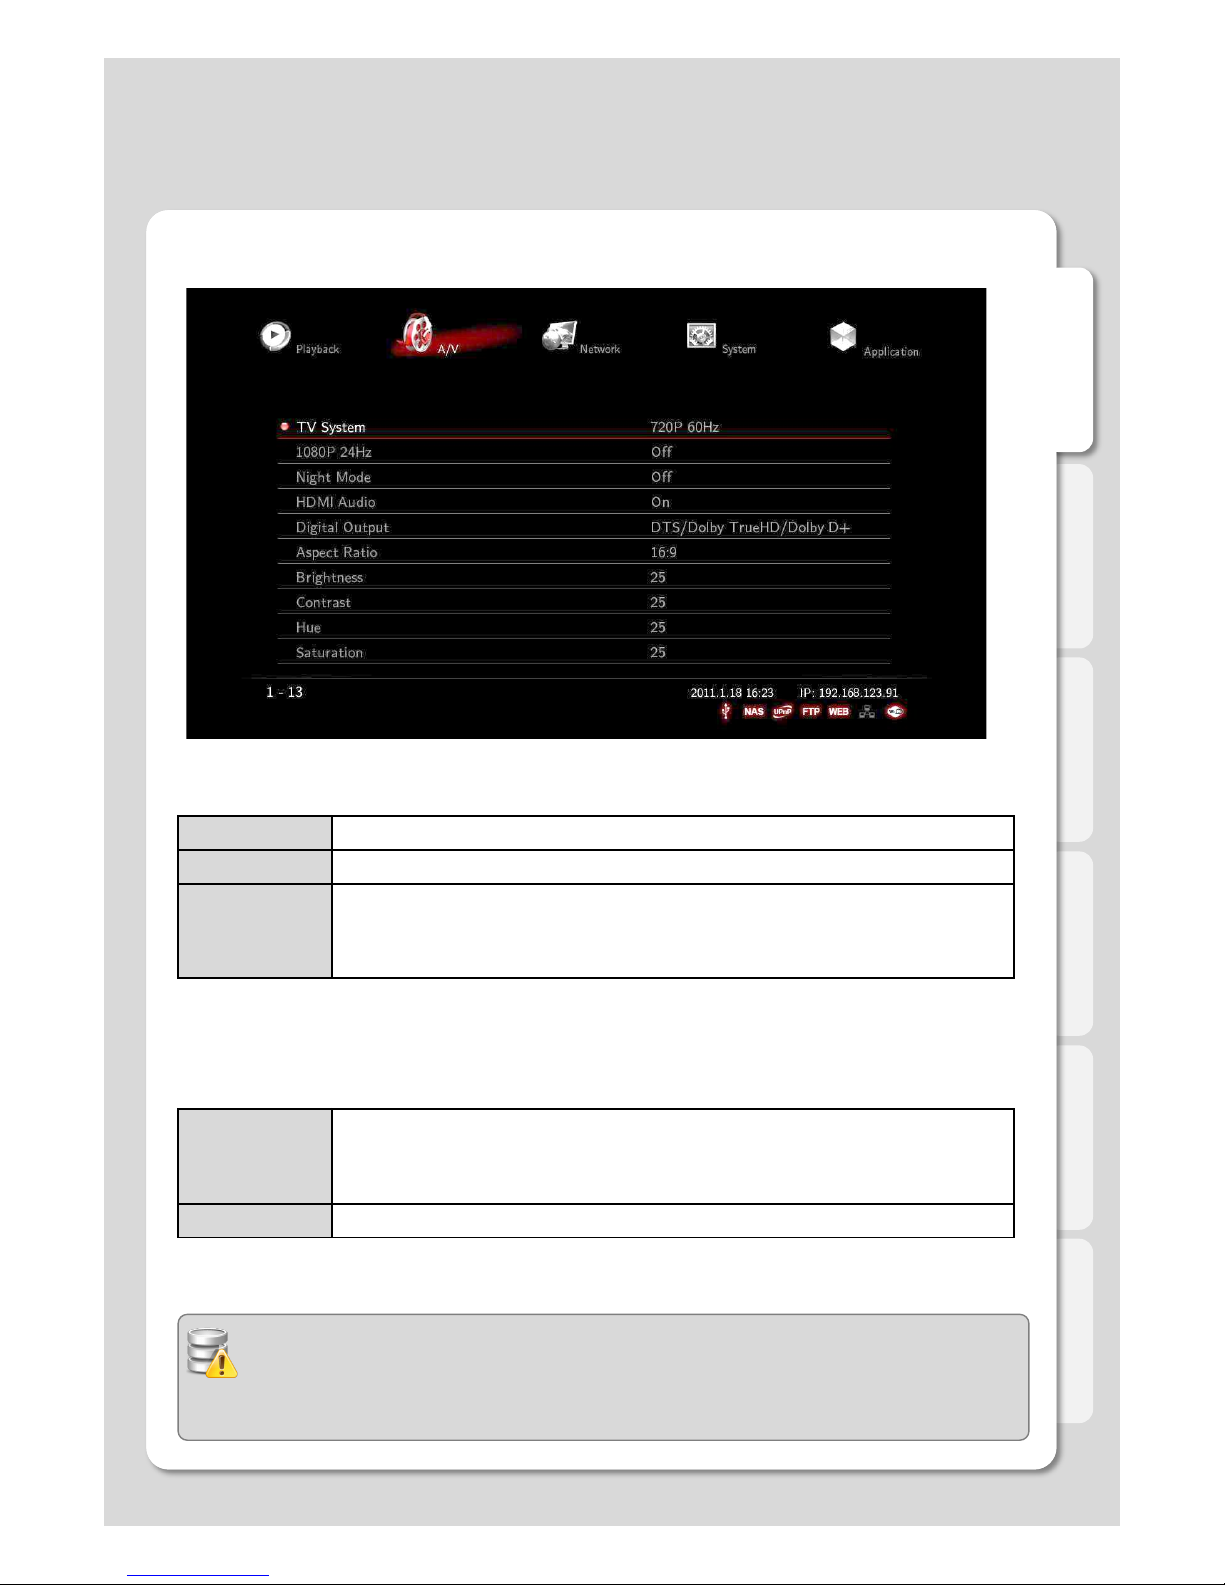
TV System
You will be able to select proper display resolution and video output type.
1080P 24Hz
This feature allows you 1080P 24Hz output when playing Blu-ray files (BD); however, this function is
only available when Xtreamer DVD is connected using a HDMI cable to a TV that supports 24Hz frame rate.
PAL (B) (50Hz) Europe, Greenland, South Africa, the Middle East, China, Austria, India, Indonesia.
NTSC (60Hz) Korea, the USA, Japan, Canada, Taiwan, the Philippines, Colombia.
Display Resolut
ion
HDMI Auto / NTSC / PAL / 480P / 576P / 720P 50Hz / 720P 60Hz / 1080i 50Hz / 1080i
60Hz / 1080P 50Hz / 1080P Supported.
※ In some cases, display resolution on your TV can not be supported due to inactivity; t
herefore, you should check your TV specification.
ON
This function will be enabled when FPS of media playback file and 1080P resolution ou
tput are the rates of 23.976 frame /s.
BD file is recorded by an original film frame rate of 24 frame /s, and then outputted to 1
080p/24Hz.
OFF 1080P 24Hz output is off
Note for 1080p 24p
- TV, AV amp and media file you use must support 1080P 24Hz and your media file should be
encoded 1080P 23.976fps.
- If video isn’t properly played by selecting [ON], you will be required to select [Off].
- The initial TV screen can be flickering when you switch on “1080P 24Hz” mode
Page 24
English
24
A/V
Settings
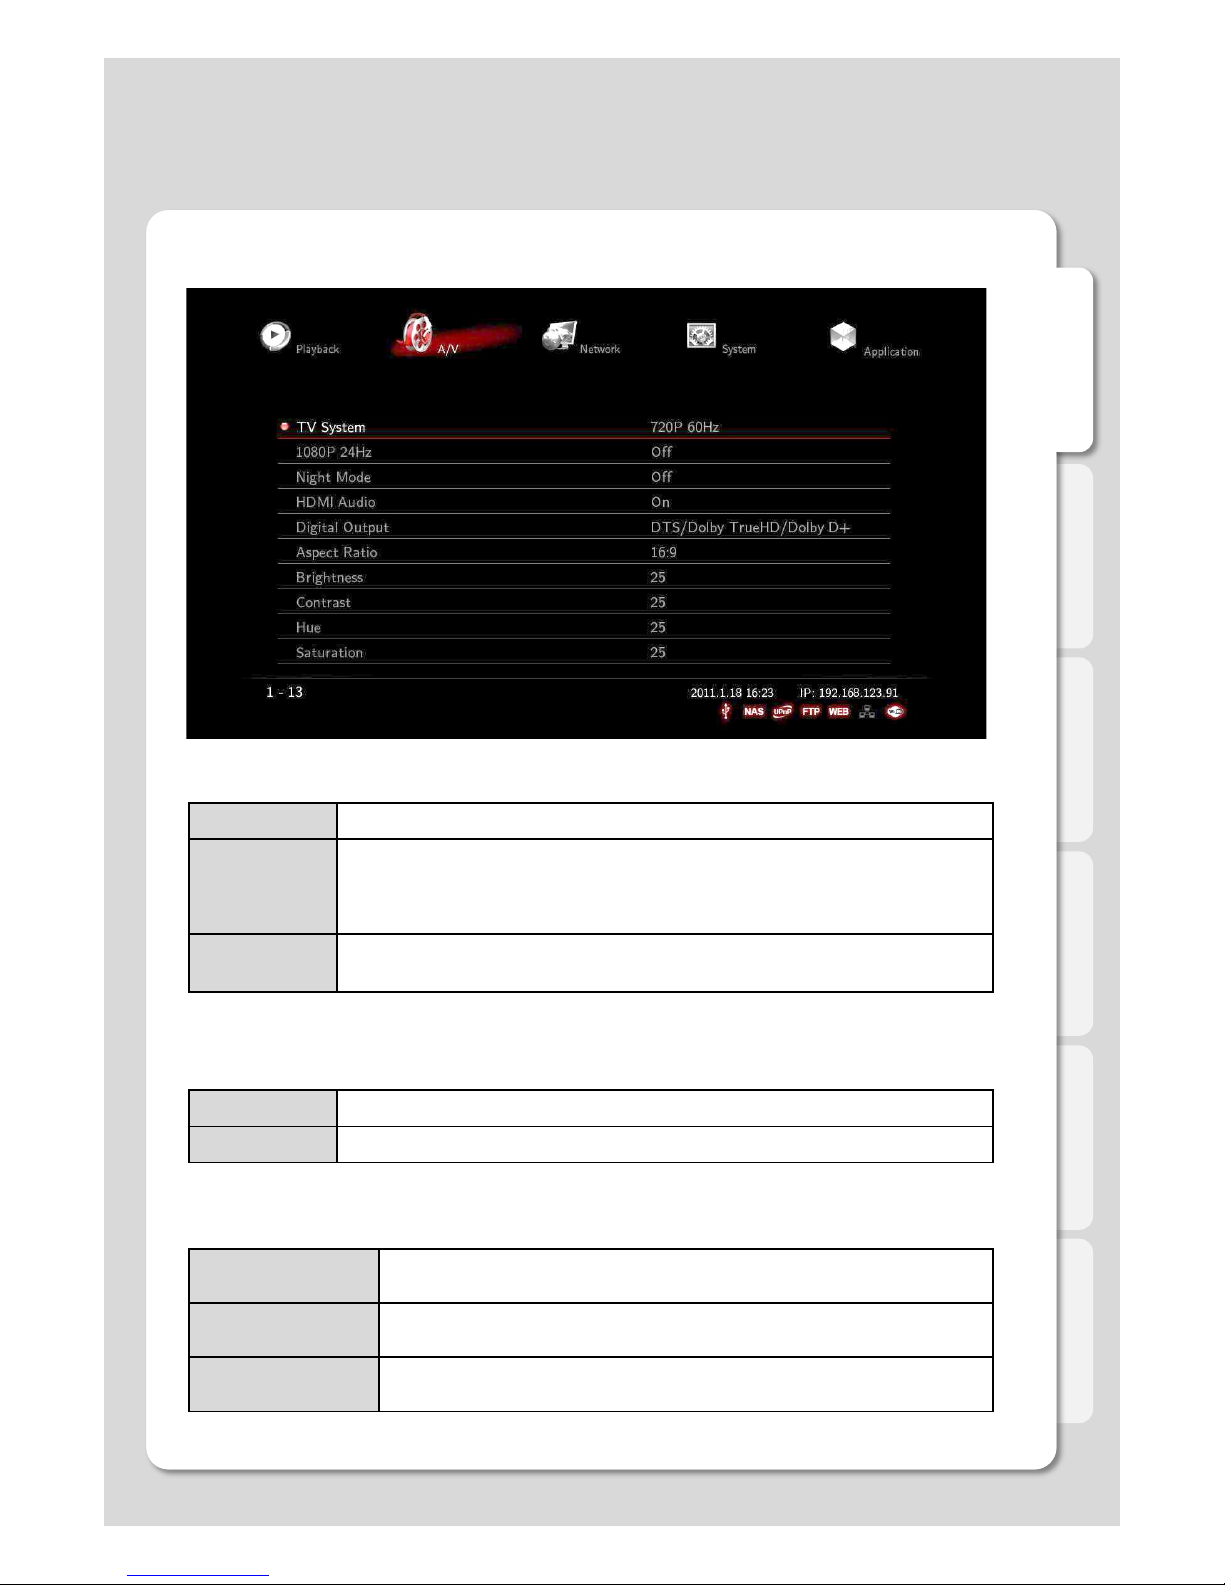
Night Mode
Off
Outputting raw sound.
On
It provides high-definition audio that is identical to, and every bit as spectacular as, t
he master recording. In spite of decreasing volume, you will be able to experience in
credible surround sound that puts you right in the middle of the action without distur
bing others.
Comfort
You will be able to hear every tiny sound in rich detail as well as comfortable sound
levels solely for you.
HDMI Audio
It enables you to turn on (or off) HD Audio through HDMI connection.
Off Both video and audio is outputted via HDMI.
On No audio is outputted via HDMI connection
Digital Output
Select between Digital and Analog Output Type.
DTS / AC3 5.1CH
(Passthough)
Enables 5.1ch surround sound with optical connection when you wish to use
multi-channel speaker.
DTS / AC3 2.1CH
(Downmix)
All audio is downmixed to output 2.1ch stereo sound when TV or 2ch Speaker
used.
ACC/FLAC/OGG 5.1
CH PCM(HDMI)
It outputs 5.1ch surround sound created by ACC/FLAC/OGG, and supports m
ulti channel output with only HDMI connection.
Page 25

English
25
A/V
Settings
PanScan 4:3
16:9 Ratio converted to 4:3 Ratio is referred to as high definition TV. It will reduce
scan lines to 4:3.
LetterBox 4:3
16:9 Ratio converted to 4:3 Ratio is referred to as your TV. It will decompress image
to 4:3.
16:9 Video is fully displayed in 16:9 DVD frame as well as 4:3 Ratio fully displayed.
16:10
It enables you to add letterboxing bars above and below video screen, meanwhile,
your TV maintains its aspect ratio of 16:9, e.g. 16:9=1920x1080 / 16:10=1920x1200.
Brightness
Brightness in video refers to the luminance portion of a video signal. It enables you to use Increase Brightness
and Decrease Brightness commands by pressing [SET-UP] button on your remote during playback.
Contrast
Allow you to adjust video contrast when using Increase Contrast and Decrease Contrast commands by pressing
[SET-UP] button on your remote during playback.
Hue
This option provides how to use the Hue adjustment to enhance your colors. Along the way, you will be able to
use Increase Hue and Decrease Hue commands by pressing [SET-UP] button on your remote during playback.
Saturation
This feature, saturation is one of three coordinates in the HSL and HSV color spaces. It enables you to use
Increase Saturation and Decrease Saturation commands by pressing [SET-UP] button on your remote while
playback.
Aspect Ratio
You will be able to select Aspect Ratio type of movie screen for playback.
Page 26
English
26 26
A/V
Settings
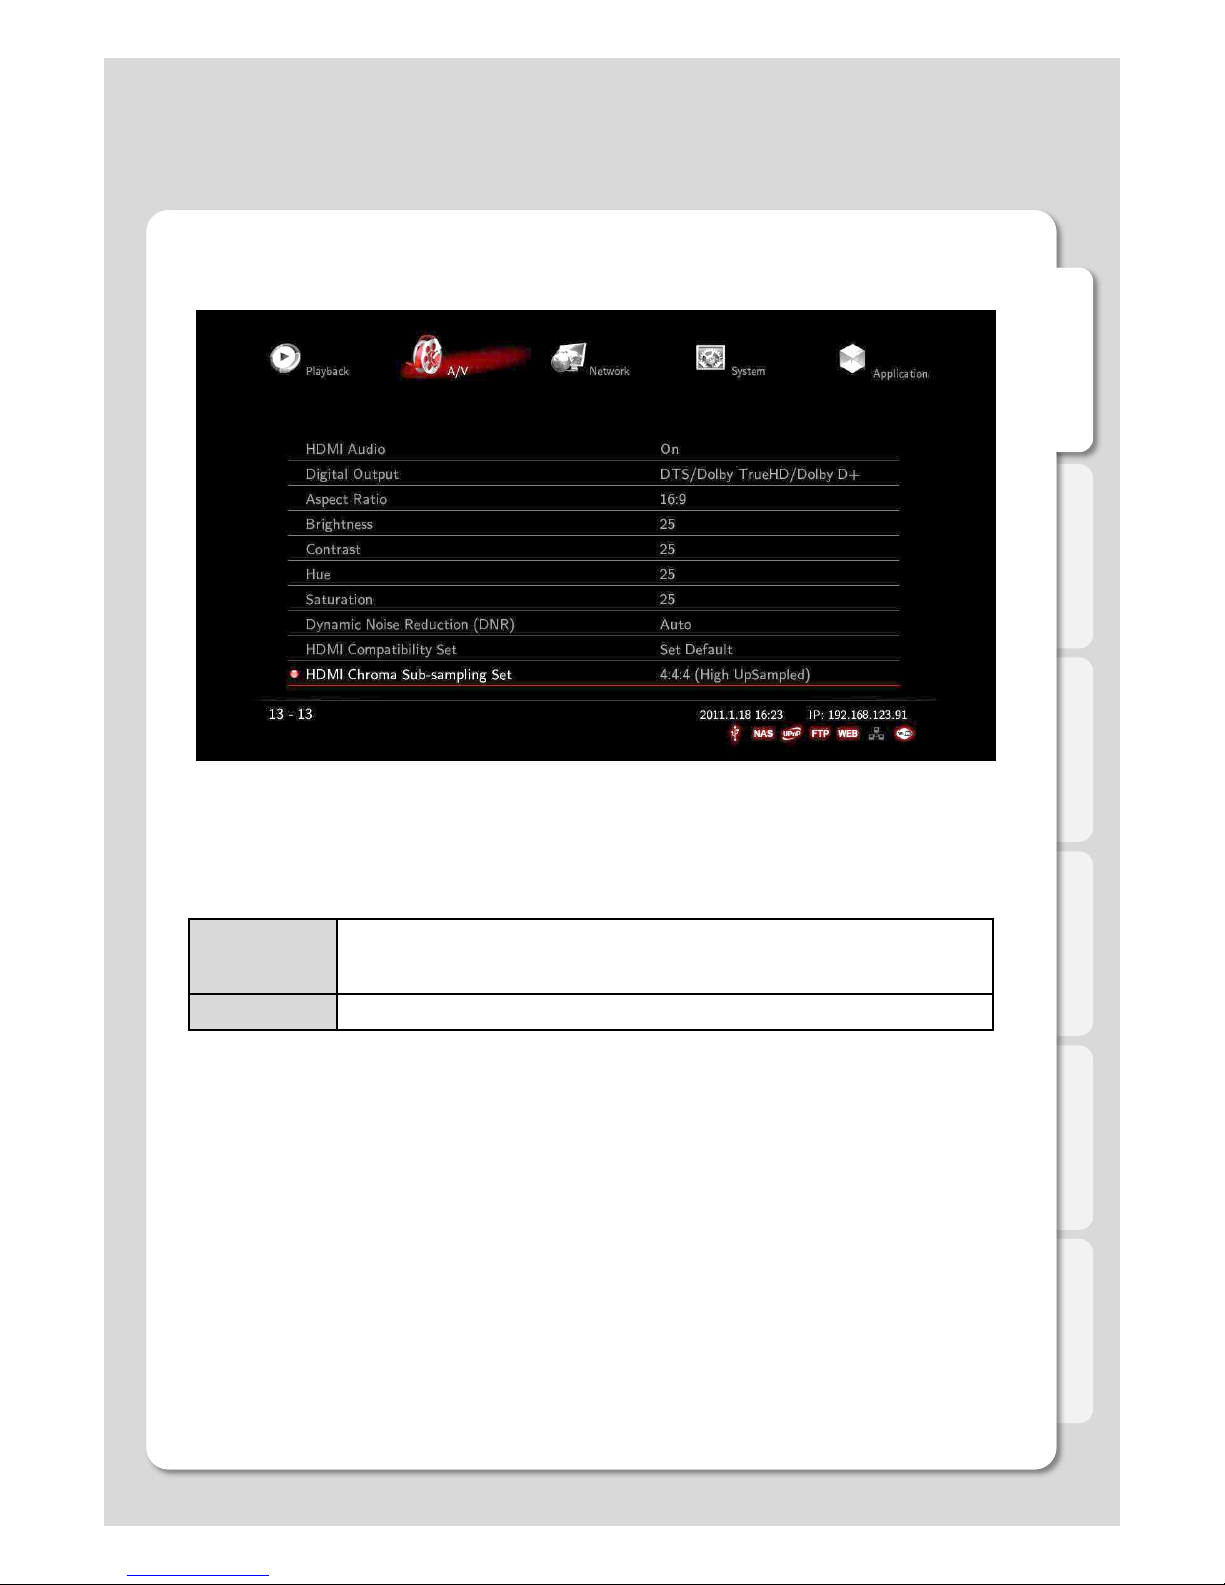
Dynamic Noise Reduction(DNR)
This is an audio noise reduction system used to automatically reduce background noise.
HDMI Chroma Sub-sampling Set
This feature encodes images and videos via HDMI
4:4:4
Your video will be upsampled to 4:4:4.
※In a few cases, some TVs won’t be able to support 4:4:4 upsampling therefore it c
an bring screen noise problem.
4:2:2 4:2:2: is a general format and is used before 4:4:4 type was introduced
Page 27
English
27
Network
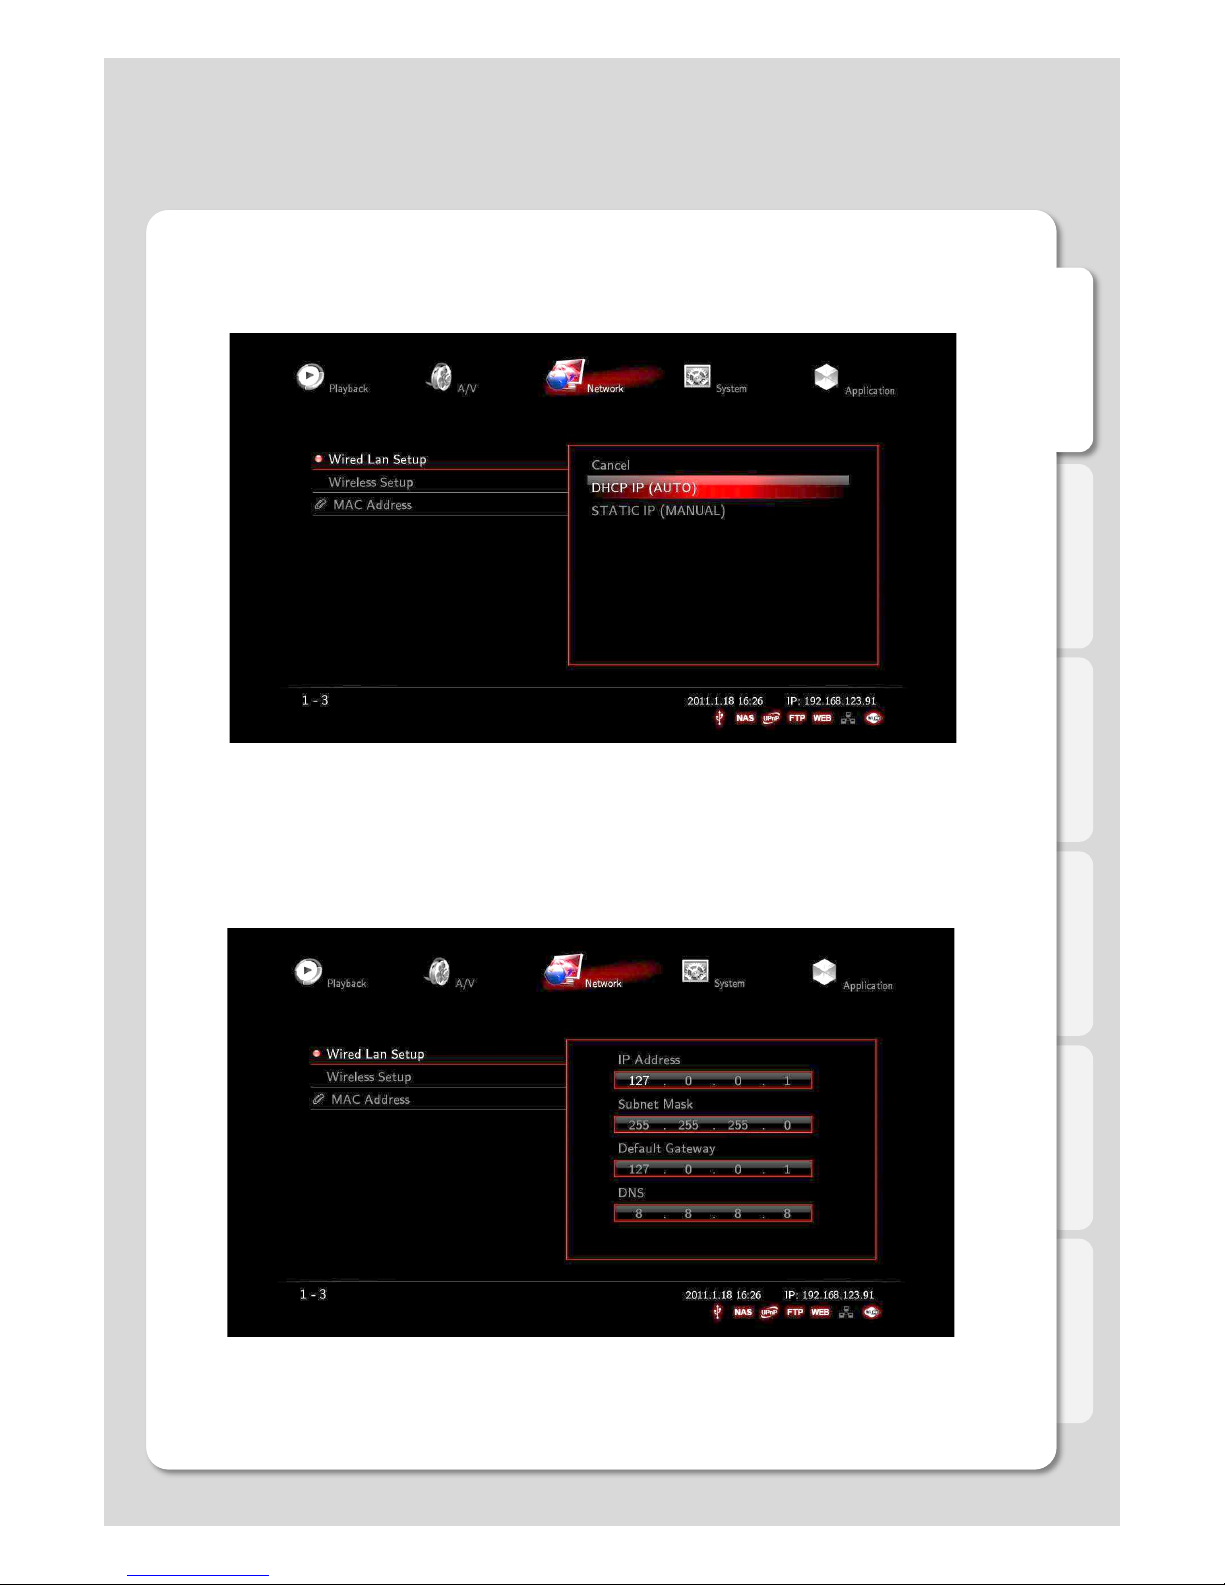
1. Wired LAN Setup
Settings
DHCP IP (AUTO)
The Dynamic Host Configuration Protocol DHCP is a networking protocol used to automatically retrieve IP addre
ss assignments through Wired LAN. This feature is set as a default value so that IP address is automatically ass
igned by RJ45 connecting and rebooting. You need a network router in order to stream files from your PC.
※ IP address of DHCP IP may sometimes be unstable.
STATIC IP (MANUAL)
Static IP is a manual way of obtaining an IP address, and is used for an assigned IP address that does not chan
ge often that being so it will most likely receive the same IP address through Wired LAN. IP will be allocated by
users when a fixed IP address is needed or DHCP server isn’t available.
Page 28

English
28
1 2
3 4
Network
Settings
In order to connect your Xtreamer DVD to a wireless environment you need to plug “USB WiFi Antenna (Optiona
l Item)” to a USB2 port on the back panel of your player. The Xtreamer WiFi Antenna supports 802.11N protocol.
2. Wireless LAN Setup
1. Insert USB WiFi Antenna
※ Xtreamer DVD wireless connection can be disturbed by other wireless network services which may result i
n a relative lower speed.
2. Select [Infrastructure (AP)].
3. Select SSID type (available wireless network), you want to use.
4. Enter correct passkey, and then press [OK].
Note
- The “USB WiFi Antenna” can only be used with the Xtreamer products. Other devices will not be compatible.
- Only “Web hex character codes” is supported.
- Web hex encoding supports 64-bit and 128-bit integers capable.
- If you have the problem of unstable wireless network or low speed, check your wireless channels for
optimum signal strength. Changing channel is available through your router.
Page 29
English
29
5 6
7
Network
Settings
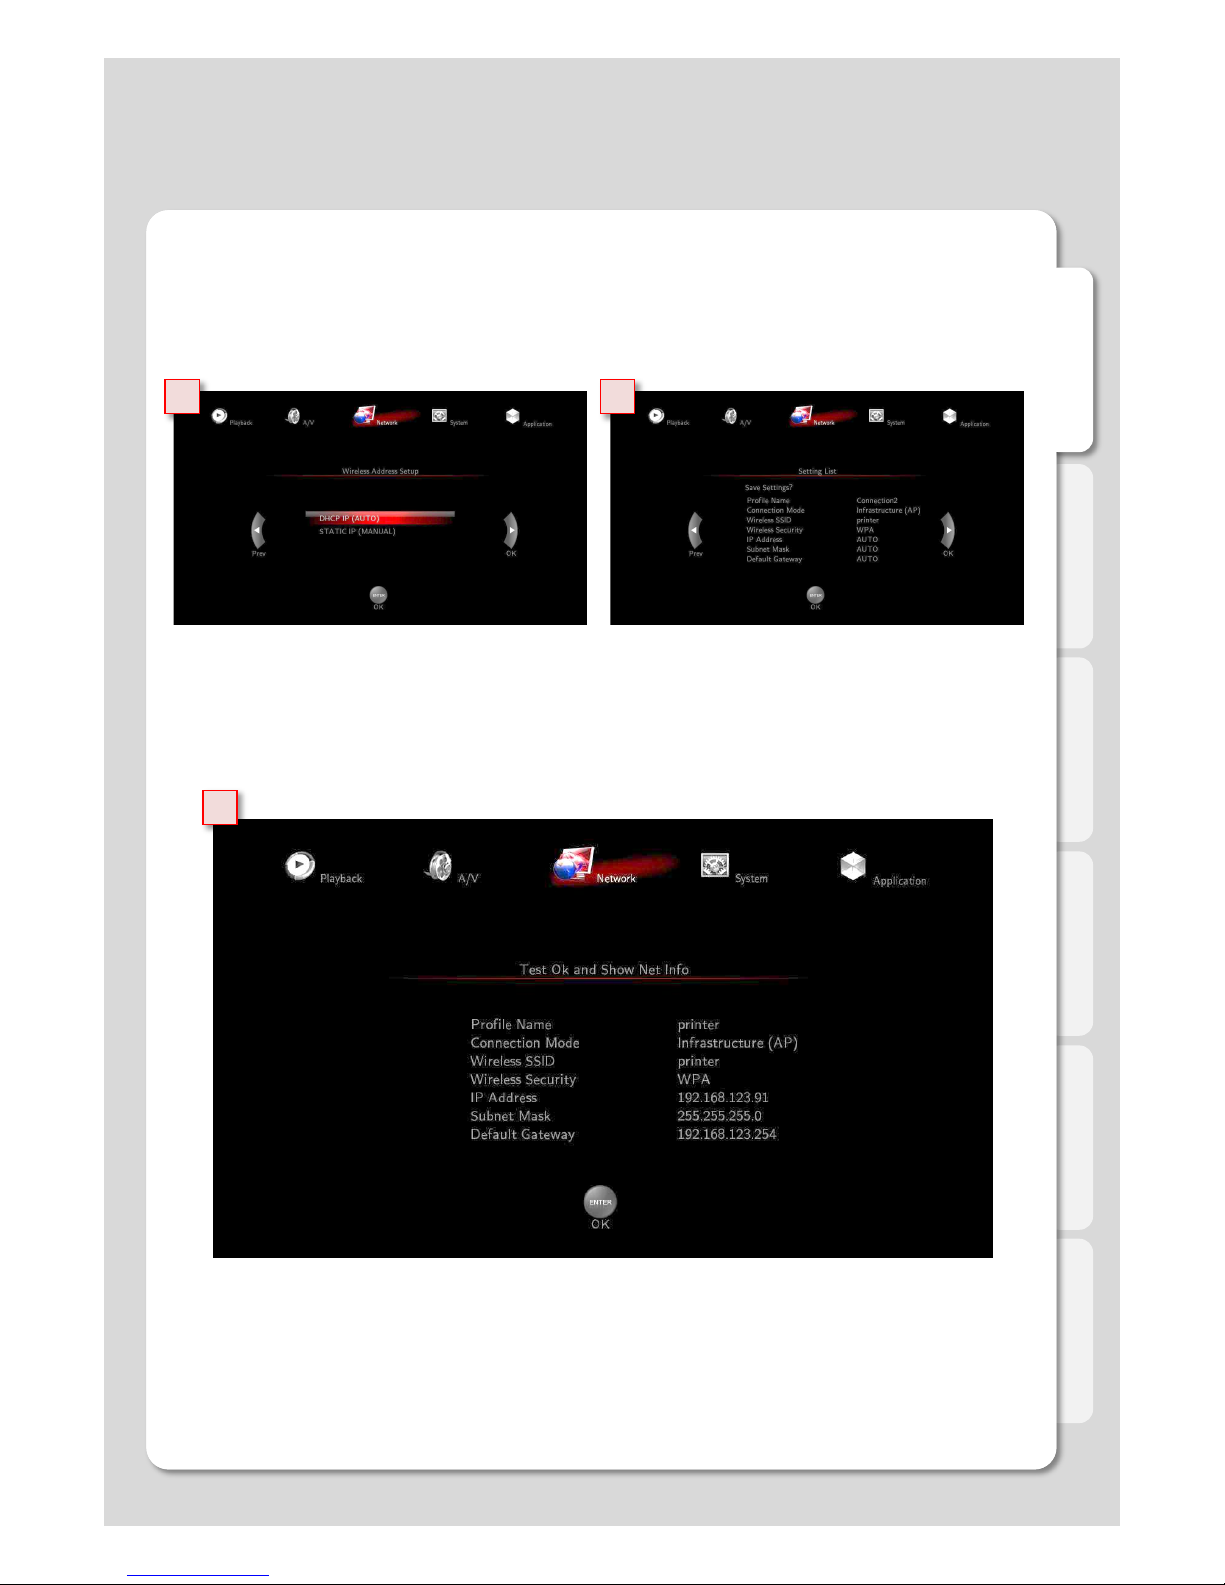
5. Select DHCP IP (AUTO) or choose Static IP and enter your network details.
6. Press [Enter] button after confirming “Setting List” and then it will try to connect to router so that you will see
“Test OK and Show Net Info”.
7. Save the information by pressing [Enter] button on your remote after setting.
2. Wireless LAN Setup
Page 30
English
30
System
Settings
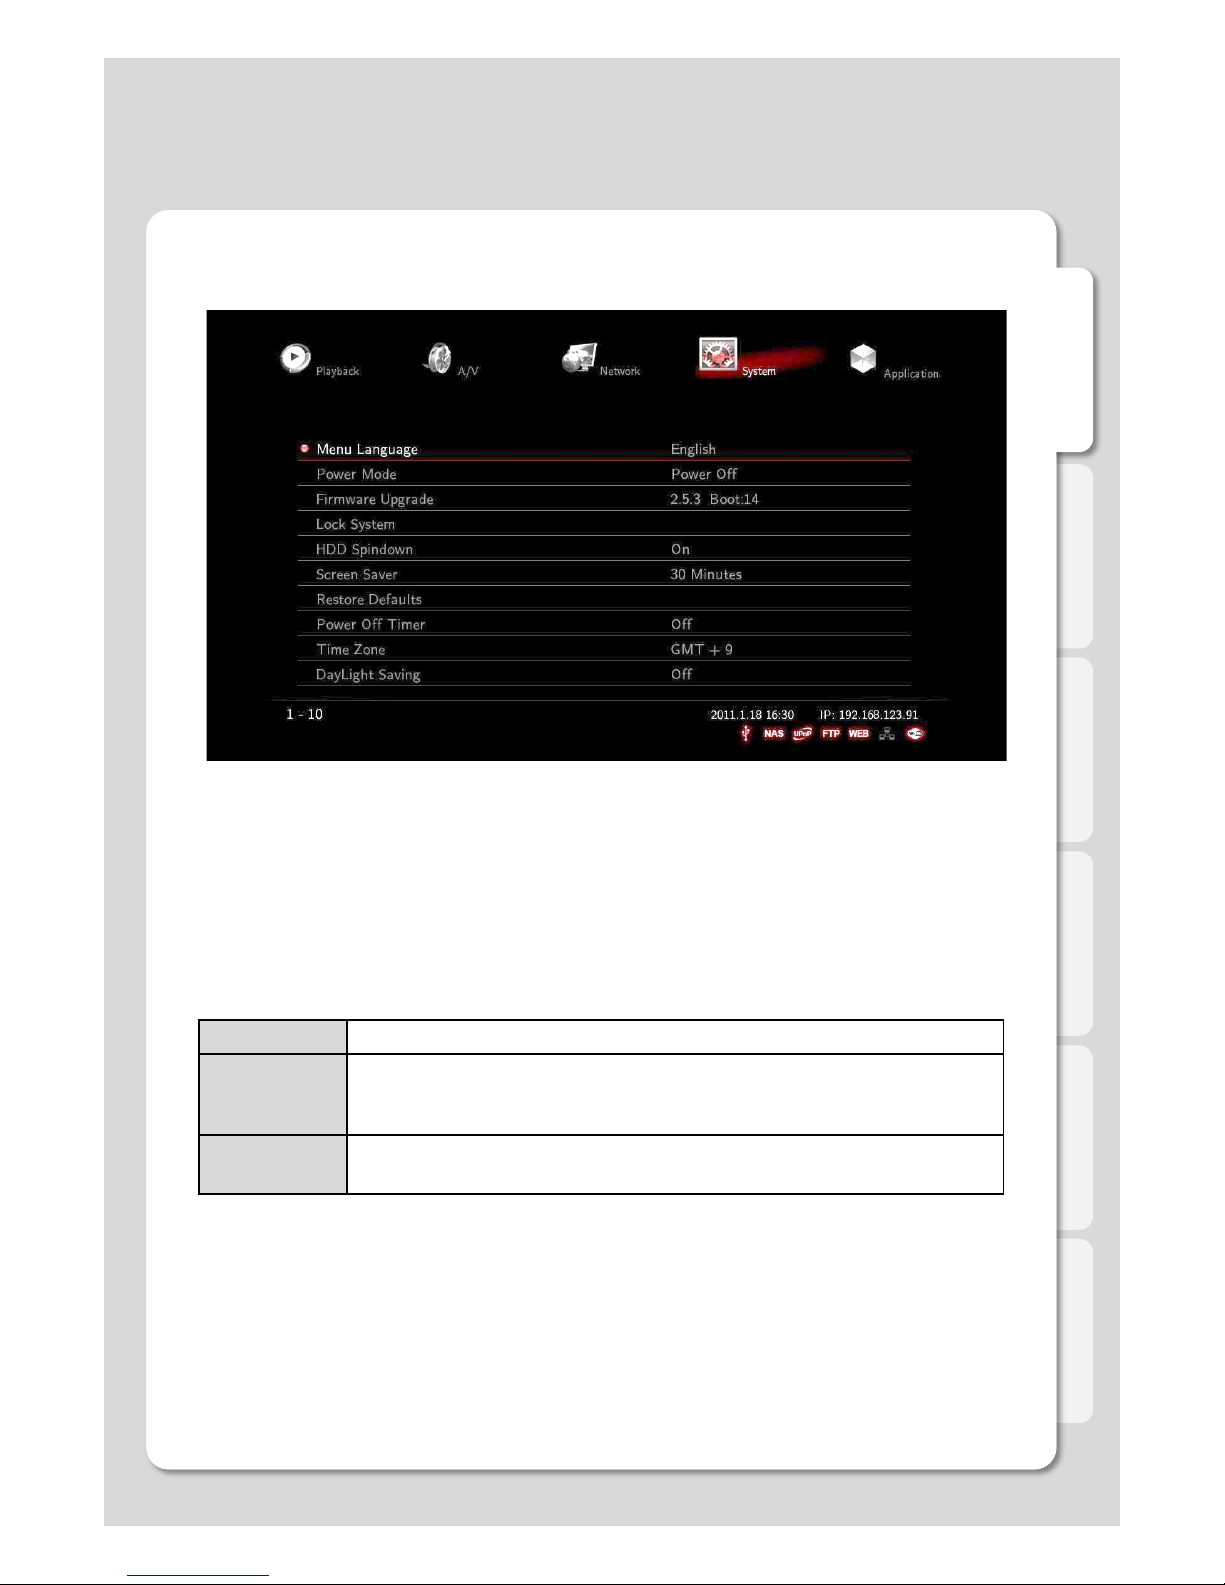
Menu Language
Default language is in English but the OSD menu language can be changed to your preferred language: sele
ct [Setting] – [System] – [Menu Language].
Xtreamer Media Players supports the following languages:
[1]Arabic [2]Thai [3] Hebrew [4]Vietnamese [5]Chinese [6]Japanese [7]Korean [8]Spanish [9]German [10]Itali
an [11]Turkish [12] Greek [13] Dutch [14] French [15]Latvian [16]Russian [17]Croatian [18]Portuguese [19]Sw
edish [20]Polish [21]Romanian [22]Ukrainian [23]English [24]Magyar [25]Czech [26] Slovene [27]Finnish [28]
Danish [29] Estonian [30]Hungarian.
Firmware Update
The feature displays the current firmware version. It also enables you to update firmware by selecting stored
firmware file from HDD or USB storage device. After the upgrade procedure is complete the system will reboot.
Power Mode
The feature supports “Power Mode” settings by pressing [POWER] button on your remote.
Lock System
This option allows you to assign a password to your system folders in order to protect your content. The Loc
ked folders will be accessible by password only.
Power Off Select to switch off the power.
NAS Mode
Speed and stability of stream are improved by optimizing its function of network appli
cation as setting off PLAYER mode internally. The allotted memory for PLAYER funct
ion is set to Off mode which enables the system to reserve 90 percent of the memory
for NAS Mode.
Confirm Window By pressing [POWER] button, Confirm Window is displayed to select between [Powe
r OFF] and [NAS Mode].
Page 31

English
31
System
Settings
Restore defaults
This option restores your player to the factory defaults. It will clear all the personal settings including passwords,
favorites, custom skins etc.
- Using this option will not damage the data on your HDD
- Always reset your settings after a firmware upgrade
Screen Saver
This is to set the time for automatic changing images on your screen during periods of user inactivity. Screen
saver is designed to prevent phosphor burn-in on the LCD TV when the properties of the exposed areas of ph
osphor-coating on the inside of the screen gradually and permanently change, eventually leading to ghost im
age on the screen.
[Off / 1 Minutes / 5 Minutes / 15 Minutes / 30 Minutes / 45 Minutes]
Power Off Timer
An automatic mechanism for activating a device at a preset time of power off
Time Zone
Time zone selected time zone of Xtreamer DVD. Select your country on NTP
Day Light Saving
Enable Day Light Saving option to synch the internal Xtreamer DVD clock to your country.
HDD Spindown
Stop the HDD spin automatically when doesn't use HDD.
Shift to HDD spindown when stop the HDD spin for more then 10minute.
Page 32

English
32
Application
The Usage of Network Drive
Settings
NAS Network Drive(SAMBA)
Allows you to use your player as a NAS device on your network.
NAS network drive provides storing and copying files services.
UPnP Media Server
You will be able to set up “UPnP Media Server” in order to improve optimizing its function of network application,
and playback function is connected to “UPnP AV Media Server” such as Tversity, PS3 Media Server and XBMC
Media Center. This feature supports UPnP Media Server and NFS client functions.
Web Server
It enables you to set up “Web Server” in order to optimize the player's network applications. The web server allo
ws uploading and downloading files from Xtreamer DVD and gives you an ability to control your player via virtual
(Web) remote control application.
FTP Server
You will be able to set up “FTP Server” in order to improve optimizing its function of network application. Xtream
er has a built-in FTP service that you will be able to manage and copy files to and from it through FTP connectio
n.
Note
If an option is not frequently used we recommend disabling it to reserve the memory and for security
reasons.
What’s the UPnP?
Universal Plug and Play “UPnP” is a set of networking protocols. The UPnP architecture allows peer-to-p
eer networking of PCs, networked home appliances and wireless devices. It is a distributed, open archite
cture protocol based on established standards such as TCP/IP, UDP, HTTP, XML, and SOAP.
The goals of UPnP are to allow devices to connect seamlessly and to simplify the implementation of netw
orks in the home. UPnP achieves this by defining and publishing UPnP device control protocols DCP buil
t upon open, Internet-based communication standards.
Page 33

English
33
Favorites menu
Use this option to easily access your favorite files and folders.
- Can add folders.
- Can add files.
- Can be used for internal hard disk and external storage.
- Can add shared network folders
- Only the contents of Favorites can be used in Xtreamering / Jukebox applica
tion
Major Function
Page 34

English
34
4. Select the file you want to add and press the
8(FUNC) button
2. Open a folder you want to add - select HD
D or USB
1. Select Media Library
3. Select partition.
Favorites menu
Major Function
Page 35

English
35
8. The file\folder is now available for easy access.
6. When successful the command will be di
splayed.
5. Select Add to Favorites.
7. Move to Main Menu and check the
Favorites for verification.
Favorites menu
Major Function
Page 36

English
36
Media Library Menu
- Enjoy your movies, music and image files.
- Play media files shared on your network.
- Search files on HDD and USB storage devices.
- Listen to internet radio stations.
- Setup Playlists and play them automatically when the player starts
- Access your iPod\iPad Dock
Major Function
Page 37

English
37
※ Note
DVD Auto play setting can change to Settings ! Playback ! DVD Autoplay ! ON/OFF
Playback DVD DISK
You can play DVD / DATA DVD / DATA CD / Audio CD
2. Insert DISK into DVD ROM and select Media Library.
DVD Disk is automatically played when inserting a DVD disk into DVD ROM.
1. Insert DVD disk into DVD ROM.
You can open and close , press EJECT button on remote control.
Major Function
Page 38

English
38
주요 기능 설명
3. Select DVD menu.
4. Pop up the Play Disc / Browse Disc window when DVD Autoplay ! OFF.
Play Disc Play the Disk
Browse Disc Browse files.
Playback DVD DISK
Page 39

English
39
주요 기능 설명
5. Star the DVD play.
6. Move to the CD Play mode when insert audio CD into DVD ROM.
Playback DVD DISK
Page 40

English
40
※ Note
1. Works with video files only.
2. Allows you to resume playback.
3. Only the unfinished video files are shown on the list.
4. DVD/ISO folders are not listed.
Recently Watched
1. Press 1(ADD) button on your Remote Control to main scre
en
2. Select a movie file from the Recently Watched popup wind
ow and play it.
Major Function
Page 41

English
41
Preview mode
Navigate to a file in Media Library.
1. Press the PREVIEW button on the remote.
2. See the preview.
Major Function
※ Note
Preview mode options are saved separately for each media type all/music/photo/movie
Page 42

English
42
Major Function
2. Press PLAY to play the entire folder.
3. If the folder contain subfolders they will be played automatically.
4. When the movie ends or is stopped, you will return to the file list.
Folder playback
1.Navigate to a folder you want to play.
Page 43

English
43
Sleep Timer
1. Press SLEEP button while watching a movie.
2. Select Sleep Timer button and press it repeatedly.
Major Function
※ Note
1. After setting the timer press SLEEP again to start the timer.
2. Available options are: 30/60/90/120/180/240/300/turn-off.
3. The option won't work if NTP is restarted after applying SLEEP function.
Page 44

English
44
Major Function
Press 8 and to see folder cover-art in preview mode
Press INFO button.
Viewing JukeBox information in Media Library
This function can be used after setting up a movie in the JukeBox application.
Or press INFO when accessing a folder.
Page 45

English
45
Major Function
This option allows you to view JukeBox movie info and art faster and more conveniently.
Jukebox mode is faster in media library.
Press ENTER or PLAY to play the file when INFO screen appears.
Viewing JukeBox information in Media Library
Page 46

English
46
Folder Lock
2. Enter the new password.
3. Move cursor to choose a folder you want to lock and then, press [FUNC] – [Folder Lock] to lock a folder
.
1. First of all, change the default password.
[Setting → System → Lock System → 0000(Default) → Set Password]
This option allows you to provide password only access to designated files on your network.
Locked folder will be accessible only by a password [Default PWD: 0000].
Major Function
Page 47

English
47
2. Enter the password (Default : 0 0 0 0)
3. Turn on the Hide Locked Folders.
4. Locked folders will not be seen in
Media Library.
If you want to see the folder,
refresh screen or reboot.
Note
1. Locked folders will be invisible.
2. To see a hidden folder, adjust the settings.
3. Movies in locked folders are not listed in Recently Watched.
4. Locked folders are not visible in File Manager.
5. Firmware upgrades do not reset this option.
Hide Locked Folders
1. Select Setting ! System ! Lock System
Major Function
Page 48

English
48
Using the Media Library
Major Function
RC Button Description
Up/Down Navig
ation Key
Moving cursor Up (or Down).
Left/Right Navig
ation Key
Selecting among tap menus, and filtering file lists.
Enter
- Single file playback
- You can use “ENTER” button as multi selected folder after pressing
[ADD] button for your convenience.
ADD Selecting files
EJECT
- You can add files, which are selected by [ADD] button, to Playlist by pressing [EJECT]
button.(※ Add to playlist function works only for external HDDs.)
- You can open (or close) external tray load ODD/DVD ROM.
PREVIEW
- You can change file view options for [All / Music / Photos / Movies / Internet Radio].
- It supports [File List / Preview / Thumbnail].
FUNC
It provides variety of functions as you put cursor on files and folders
- It changes folder and file names.
(default language : English, Multi language : Keyword)
- It deletes folders and files.
- It sets folder lock and lock off.
- * Adding files to [Favorites].
* Multi selected file by pressing [ADD] button is enabled when adding to Favorite, howev
er, multi selected folder isn’t provided.
RETURN It provides cancelling or going back to previous menu.
PLAY/PAUSE Continuous Playback (or Pause).
PGUP/PGDN Viewing next page (for quick movement).
How to use “Folder Cover Art” Support
Folder Cover Art is automatically supported when there are movie poster files of “Cover.jpg” or “Folder.jpg” in
the folder. But if there isn’t “Cover.jpg” or “Folder.jpg”, the first file on the list will be showed.
Page 49

English
49
Major Function
Tip
How to use its specialized function of playback
Thumbnail View function; Thumbnails are reduced-size versions of pictures, used solely for “Photos”
menu by pressing [PREVIEW] button which means you will not be able to use the function in “ALL/Mo
vies/Music” menu. “MUSIC” mode; all the music are automatically played in order. “All” modes, on the
other hand, doesn’t support automatic playback so ID3Tag and Cover-art Photos are not changed. You
will enjoy its specialized function of playback such as MUSIC, PHOTOS and MOVIES mode.
RC Button Description
DELETE It deletes files and folders selected.
TVOUT
Press once: You can see the current status of TVOUT.
Press more than twice: changes TVOUT type.
VOL + / - Adjusts sound volume
MUTE Mutes the sound
SETUP You to the settings menu
HOME It supports going back to the initial menu after rebooting.
Using the Media Library
Page 50

English
50
1
2
3
Major Function
RC Button Description
ZOOM
It modifies Scale, position, and Reset.
1. Scale– Left (or Right) keys you enable to adjust vertical lines, and Up (or Down)
keys support adjusting horizontal lines after pressing [ENTER] button.
2. Position – The Arrow Keys support adjusting position of movie screen after
pressing [ENTER] button.
3. Reset – Reset to Default.
※ “Zoom- in” and “Landscape View” functions are solely supported for “Photos” mode.
1. Movie Playback Function of Media Library
Usage of Remote Control key functions during playback
Adjusting and viewing hidden TV screen are enabled so that you can enjoy watching the movies by visibility ou
tput.
Page 51

English
51
1
2
3
5
4 6
Major Function
RC Button Description
INFO
It displays file information which is being played.
1. It displays codec information and resolution for video and audio.
2. It shows frame rate FPS.
3. It displays total running and current running time.
4. It provides the figure of all file lists and present playback lists.
5. It supports current status information of “Repeat/ A-B Repeat/Shuffle/24P film”.
6. It displays the figure of WiFi wireless signal intensity.
ENTER
- It activates the item you selected.
- It moves forward frame by frame after pressing [PLAY/PAUSE] button to stop.
RC Button Description
GOTO
1. Title: It shows movie title lists and change playback file.
2. Chapter: It provides moving to next (or previous) Chapter.
3. Time: It provides moving to the point where you want to start from.
MENU Shows MENU Window during playing DVD Title File.
TVOUT It changes TV output type.
1. Movie Playback Function of Media Library
Usage of Remote Control key functions during playback
Page 52

English
52
1
Major Function
RC Button Description
Navigation
It provides skip function during playback (refer to the above picture).
◀ : It goes 10 seconds backwards
▶ : It goes 30 seconds forwards.
▲ : It goes 3 minutes forwards.
▼ : It goes 1 minute backwards.
PGUP/PGDN
It views previous file (or next file) by new starting.
During DVD playback: plays previous chapter (or next chapter).
PLAY/PAUSE Play or pause the playback
STOP It stops playback.
FR/FF
Rewind and Forward functions are enabled with “0.8X/1.1 X/1.2 X/1.5 X/2
X/4 X/8 X/16 X/32 X” speeds as well as music file is enabled with 2X spee
d control.
VOLUME It adjusts sound volume.
MUTE Mutes the sound
1. Movie Playback Function of Media Library
Usage of Remote Control key functions during playback
Page 53

English
53
Major Function
RC Button Description
AUDIO Use it to switch between multiple audio tracks .
A-B
It supports selecting the points; Between A and B; the section is repeatedly played b
etween the points.
SHUFFLE
It provides selecting between “Playback in order” and “Random playback” to change
playback mode.
REPEAT
It provides selecting between “playing a file repeatedly” or “playing all files repeatedl
y”.
SUBTITLE
1. Subtitle: Selecting subtitle file; both internal & external subtitle files are supported.
2. Searching: Selecting external subtitle files from the folder.
3. Size/Outline: Adjusting subtitle size and frame outline.
4. Position: Controlling subtitle position.
5. Color: Changing subtitle color.
6. Advanced Color: Changing subtitle outline color.
7. Subtitle /ID3-Tag: Selecting proper language.
8. Reset: Reset to Default.
SYNC SUBTITLE Allows you to synch your subtitle file to a movie(100ms).
SETUP Takes you to the settings menu
ADD It provides selecting files you want to add to “Playlist”.
EJECT It adds selected files to Playlist. (After selecting the files by pressing [ADD] button).
1. Movie Playback Function of Media Library
Usage of Remote Control key functions during playback
Page 54

English
54
Major Function
2. Photos Function of Media Library
Usage of Remote Control functions in “Photos” mode
RC Button Description
ENTER It confirms and shows photo files.
PLAY It shows photo files.
INFO
It displays EXIF information of photo file, which is being showed.
(JPEG/EXIF supported)
STOP It stops a “Slide Show”.
Left/Right in n
avigation
It rotates a photo file to the left (or right).
PGUP/PGDN Go to next file (or previous file).
VOLUME Adjusts background music volume
MUTE Mutes the background music
SHUFFLE It changes playback mode; Order Playback or Random Playback.
ADD
It provides selecting files you want to add onto “Playlist”.
- only works for an external HDD
EJECT It adds selected files after selecting them by pressing [ADD] button.
If you use [PREVIEW] button on your remote, JPEG and EXIF data information will b
e displayed on “Preview” Screen.
Page 55

English
55
Major Function
3. Music Function of Media Library
Usage of Remote Control functions in “Music” mode
RC Button Description
ENTER It plays the music you put the cursor on.
PLAY It plays all music. Can also be used to play all subfolders.
PGUP/PGDN It plays next music file (or previous music file)..
STOP It stops playback.
FB/FF
Rewind & Forward function is enabled with (1.1 X/1.2 X/1.5 X/2 X/4
X/8 X/16 X/32 X) speeds as well as increasing the speed of the musi
c file is enabled until 4X.
SHUFFLE It changes playback mode; Order Playback or Random Playback.
REPEAT
It provides you select between “playing a file repeatedly” or “playing
all files repeatedly”.
VOLUME It adjusts volume sound.
MUTE Mutes the sound
Page 56

English
56
Press the 8(FUNC) button on remote control and then pop up jukebox.
How to use Music Jukebox in photos slide-show?
Start the Slideshow. (ENTER : play only one image file, PLAY : sequential play)
Major Function
Press ENTER to locate audio files.
Page 57

English
57
Press 8 to return to the Music Jukebox.
Using Music Jukebox during slide-show
Choose a file you want to play.
Jukebox screen disappears when you press RETURN.
Major Function
Page 58

English
58
Using external subtitle files
1. Press the Subtitle button on the remote control while playing a movie.
Major Function
2. Locate a subtitle file.
< Press Subtitles on remote control while playing a movie>
Page 59

English
59
Major Function
Using external subtitle files
Move to the top.
Move to the bottom.
Move up a folder.
Select and Play.
Use to choose another storage device or network
Page 60

English
60
●
Major Function
RC Button Description
Navigation It moves the cursor.
ENTER It checks and plays.
Preview It switches to “Preview” mode or “List” mode.
Internet Radio
● Using Internet Radio
● How to use “Internet Radio”
If you want to add a radio station to the list you will need to use “Http://” address type and [.plsx] extension.
● How to create [.plsx] extension file when you already know the radio address
1. Open [Note Pad].
2. Type it (refer to the next example).
File = http://“Internet Radio Address”
Title1 = “Title”
3. Type Internet Radio Address into File1=“”, and type titl
e into Title1=“”.
※ “http://” type is solely supported; however, [MMS] type i
sn’t currently supported.
[example 1]
Note. Members of our community constantly publish new Internet stations lists. For more information please
visit our official forum – http://forum.xtreamer.net
Page 61

English
61
5. Change a file type into “All Files [*.*]”.
6. Change the file extension into [*.PLSX].
7. Save the file.
8. Copy the stored file to “MyRadio” folder
on the internal Xtreamer DVD hard drive fo
r easy access from the Internet Radio secti
on.
● How to use “SHOUT cast Radio”
Refer to the method whenever you want to listen to the radio at http://www.shoutcast.com
1. Access to the web at
http://www.shoutcast.com
2. Click [TURN IN!] whatever you want to
listen to.
3. If window message is popped up to
save the file, you will change the file
extension [pls] into [plsx].
4. The file, with plsx file extension, will be
played right away via Xtreamer.
Tip
If you are not able to seek plsx
extension file which means it isn’t
properly changed into plsx
extension file.
Major Function
Internet Radio
Page 62

English
62
How to use “Auto run” function
This function allows you to automatically play a pre-arranged playlist when the Xtreamer DVD is switc
hed on.
1. Select [Setting] – [Playback] – [Auto run]
(This instance is for Music Auto run).
2. Each selected menu “Movie/Photos/Music” is
automatically played by classification.
3. Select [Media Library], and search for files
you want to auto run.
4. Move to “Music” type menu by pressing [Rig
ht]
arrow key.
5. Press Button, [1] and then select whatever you want to auto run by arrow keys.
6. You will be able to select files by [ENTER] button after press button, [1].
As files are selected, you will be able
to see “√” mark.
Major Function
Page 63

English
63
7. Add files to Playlist by pressing button, [2] after all selection once completed.
You will be able to add files to other folders in succession.
8. Select [Media Library] – [Playlist] in order to check
if files added up properly or not.
9. Check all additional items, and then confirm the
[Autorun] function is working well by rebooting.
Important:
This function only works with an storage.
Major Function
How to use “Auto run” function
Page 64

English
64
Major Function
How to add Movie Subtitle TTF Fonts
The Xtreamer DVD media player offers you the ability to customize subtitle fonts for movie
playback. You are required to use an external USB storage device. You also need to prepa
re TTF font files before using your custom fonts.
1. Get ready “TTF file font” for being used.
2. Copy the TTF file font into the folder of [..\\user_font\],
created automatically.
3. Press [Setting] – [Playback] – [User Subtitle Font]
and then select font whatever you want.
You can change font setting from “SET-UP” menu
during playback.
Tip
Some font files may not be showed properly.
The following subtitle types aren’t supported for TTF Font Settings: DVD internal subtitle, Blu-Ray
internal subtitle, Image subtitle [idx+sub, PGS].
Page 65

English
65
Xtreamering
- Official news and internet feeds.
- Best of community projects bringing you amazing online content and unique application
s.
- Enhance your movie experience with the community Jukebox.
- Access video streaming services via xVOD.
- A wide variety of internet feeds and channels on Xtreamer Live.
- HD quality YouTube access.
- IP TV, News, RSS based Games, Weather and much more.
- Online upgrade feature.
- Internet connection is required.
- Internal hard drive should be installed.
If no hard drive installed
You will be automatically navigated to XtreamerLive. Please note that some features may n
ot work.
When a hard drive installed
You will be navigated to the Xtreamering installation menu.
You can install and upgrade various Xtreamering features as you see fit.
Please note: some projects are still on the beta stage and will be updated.
Major Function
Page 66

English
66
Internet
Major Function
1. Xtreamer Live Introduction
Xtreamer is a FLV capable device. It allows you to watch live streaming content from hundreds web pu
blishers such as CNN, ESPN, various music, gaming and technology channels and more on your TV.
Xtreamer also enables you to enjoy “YouTube” FLV files right away without using your PC by bringing t
hem straight to your living room
You can also add your own favorite feeds and channels or enjoy a vast selection of custom internet co
ntent collected by the Xtreamer community. For more information please visit our official forum at:
http://forum.xtreamer.net
2. How to use “YouTube” function
You will select [YouTube] on “Internet” menu, and then choose the types among its list; Recently Ad
ded, Recently Featured, Top Favorites and Top Rated, as well as “Search Videos” provided.
First, Select [Search Video]. Type characters you want to search for.
(Supported Languages: English / Multi-Language: Using Key
word is enabled)
If no hard disk installed
Page 67

English
67
For instance, if you type [Xtreamer] to search, there wi
ll be lists regarding Xtreamer, and then select whateve
r you’d like to watch; refer to the above image, it has t
he same result between “Xtreamer” and “PC’.
Channel Links for “Internet TV” Category
HD Resolution Online Streaming View
Channel Links for “Technology & Gadgets” Category
Channel Links for “News (Video)” Category Channel Links for “Life Style” Category
Note.
The connection and playback quality depends on your internet speed and network setup. Changing Su
pported channel is subject to manufacturer’s condition in order to improve optimizing condition.
Internet
Major Function
Page 68

English
Supported Remote Control Button
Zoom in
Zoom out
Changing “Measurement Unit”
Switching Screens
68
3. How to use “Picasa (Google)” function
Click [Internet] – [Photos] – [Picasa]. Select from keyword as well as type keywords so t
hat you can look at photos. You can also use accou
nt ID.
What’s the Picasa function?
Picasa is a software application for organizing and editing digital photos, originally owned by Google.
You will be able to look for photos searching by key words as well as using your account ID.
2-4. How to use “Weather” function
You will be able to check Today’s and Weekly weather forecast by country and city name.
Internet
Major Function
Page 69

English
69
Please note: Internal hard drive is required to access all the features.
Using Xtreamering
Select Xtreamering menu.
Disclaimer agreement window will pop up .
Press 1 on the remote control to accept and start the download.
Major Function
Page 70

English
70
Major Function
Using Xtreamering
Check for the latest version.
Press OK to proceed
Installation and Menu description.
Page 71

English
71
Major Function
Using Xtreamering
Download starts.
It may take a minute or more depending on your internet speed.
Press Ok to install\upgrade
After the process is complete you will be returned to the Main Menu
Installation and Menu description
Page 72

English
72
Major Function
Using Xtreamering
Enter the Xtreamering Menu
You can now download any desired service or application
Installation and Menu description
Page 73

English
73
Major Function
Using Xtreamering
Installation and Menu description
Download or upgrade your favorite Xtreamering projects
Page 74

English
74
Check on our forum for more projects and mods - http://forum.xtreamer.net/
Major Function
Using Xtreamering
Installation and Menu description
Page 75

English
75
Major Function
Using Xtreamering
All the Xtreamering content can be found in the ''SCRIPTS'' folder on your external HDD.
You can manually download, transfer and edit files in the SCRIPTS sub-folders.
Installation and Menu description
Page 76

English
76
Xtreamer Movie Jukebox enables you to view movie poster images, fan-art, and movie synopsis.
Major Function
xJukeBox setup
Press OK on the JukeBox in Xtreamering menu.
The disclaimer agreement window will appear.
Press 1 on the remote control to agree and download the application.
Using Xtreamering
Page 77

English
77
Major Function
Click OK to download or upgrade
Please remember that if your download is taking too long you can always download the program
from our forum or the Knowledge base and install it manually.
Using Xtreamering
xJukeBox setup
Page 78

English
78
Major Function
After the download is finished press OK to proceed with the installation.
It might take up to 10minutes.
After the installation you will be returned to the Main Menu.
Before using the application please add some movie files to Favorites
Using Xtreamering
xJukeBox setup
Page 79

English
79
Major Function
Navigate to Jukebox
.
Using Xtreamering
xJukeBox setup
Page 80

English
80
Major Function
Using xJukeBox
※ Note
Only the files and folders added to Favorites can be used with the JukeBox
You can choose from several viewing modes: WALL VIEW, MULTIPLEX VIEW
Using Xtreamering
Page 81

English
81
- 4 types of modes are supported for “Movie JukeBox”
MULTIPLEX VIEW
WALL VIEW 2X7
WALL VIEW 3X9
LIST VIEW
Press key on your remote so as to play your favoruite movie.
Press [INFO] key on your remote that shows “FAN ART” and “detail information”.
< MULTIPLEX VIEW 2X7 Mode >
< INFO Mode >
Major Function
Using xJukeBox
Using Xtreamering
Page 82

English
82
[LIST VIEW Mode] is used to quick move and search.
Press [INFO] key on your remote that shows “FAN ART” and “detail information”.
< LIST VIEW Mode >
< INFO Mode >
Major Function
Using xJukeBox
Using Xtreamering
Page 83

English
83
< WALL VIEW 2X7 Mode >
< WALL VIEW 3X9 Mode >
Major Function
Using xJukeBox
Using Xtreamering
Page 84

English
84
Major Function
Navigate to Settings
Select scraper plug-in suitable to your language and press enter.
Use Xtreamering menu
Using xJukeBox
Page 85

English
85
Major Function
Select the method of your scraper plug-in between online and offline, and then press enter.
Choose Offline Scraping if you have Folder.Jpg, panart.jpg, NFO and XML files available.
Select the method of scanning your media library and press enter.
Search ''IN FILES'' to search file name.
Search ''IN FOLDER'' to search folder name.
Using Xtreamering
Using xJukeBox
Page 86

English
86
Major Function
Press button 5 on the remote control to start scanning the movie information via online.
Scanning might take some time depending on the number of movies in your collection and network
conditions.
After scan finished, press [1] FUNC key on the remote control to return to the Main-menu.
Use Xtreamering menu
Using xJukeBox
Page 87

English
87
Major Function
Please verify that the file name (Movie name) is correct.
How does the scanning work.
Once you found the right movie the Jukebox will access the information.
Using Xtreamering
Please make sure to prepare for the scan and amend the file names to match the names of the
movies in order to get better results.
Using xJukeBox
Page 88

English
88
Major Function
The best way is to create a folder for each movie and change the folder name to match the movie
on the scraper site and then search using the IN FOLDER scanning option,
Use the screenshot above as an example.
Using Xtreamering
Using xJukeBox
Page 89

English
89
Major Function
Using xVOD
Basic setup process is same as with all the Xtreamering projects.
After the installation enter xVOD.
Using Xtreamering
To use xVOD you need to have a premium account on MegaVideo site.
Page 90

English
90
Major Function
First, go to CONFIGURE menu to enter MediaVideo premium account credentials.
WEBSITES : Select available sites.
BOOKMARKS : Your favorite videos
CONFIGURE : Enter your premium account settings.
ABOUT… : xVOD instructions.
Using Xtreamering
Using xVOD
Page 91

English
91
Major Function
Incert your MegaVideo password.
You credentials will be saved so you won't have to do that every time you access the service.
Choose Modify User name MU to enter your MegaVideo user name
Using Xtreamering
Using xVOD
Page 92

English
92
Major Function
Choose a category.
Choose WACHNEWFILMS (EN : English)% to browse files
Following window appears when you access the Website menu.
Using Xtreamering
Using xVOD
Page 93

English
93
Major Function
Now you can watch a movie without downloading it.
Press Enter to view the information about a movie.
▶ You can press the Play button for playback or press 1 to add to bookmarks.
Select a genre from the catalogue.
Using Xtreamering
Using xVOD
Page 94

English
94
Major Function
※ Note
While playing over wireless network, media streaming may experience lag, jitters or even disconnects.
Such problems may occur due to insufficient bandwidth available via VOD service as well as network
environment.
When using Movie Porter
If there are several files on the right side you can cycle through them to find a better performance.
All the bookmarked movies are available in the BOOKMARKS menu
You can remove bookmarked movies by pressing button 2 on your remote control.
Using Xtreamering
Using xVOD
Page 95

English
95
Major Function
- Streaming a MegaVideo clip on xVOD
Select MegaVideo.com
Select WEBSITES on xVOD
Using Xtreamering
Using xVOD
Page 96

English
96
Major Function
Enter video ID
You can find MegaVideo file IDs on www.MegaVideo.com
Xtreamering
- Streaming a MegaVideo clip on xVOD
Using xVOD
Page 97

English
97
Major Function
Click on Show URL of Video button.
Access MegaVideo.com via your browser. Find a movie you want to watch.
Using Xtreamering
◆ How to find a MegaVideo ID
- Streaming a MegaVideo clip on xVOD
Using xVOD
Page 98

English
98
Major Function
Access the Web server of your Xtreamer DVD Setup → Live → Live Keyword → Make
Copy the 8digit ID code
Using Xtreamering
◆ How to create Keyword for xVOD
- Streaming a MegaVideo clip on xVOD
Using xVOD
Page 99

English
99
Select the “Insert MegaVideo ID to Play” and OK button on remote control. Select Keyword button
on the virtual keyboard button and then choose the keyword from the list.
Press OK.
Major Function
Paste the copied ID codes and click Save
Using Xtreamering
Using xVOD
Page 100

English
100
Major Function
When the search-result appears you can play ENTER to play the video file.
Insert MegaVideo ID and play
Save MegaVideo ID and play the file.
Using Xtreamering
Using xVOD
 Loading...