

Page 1

NuApps-SwitchPerform
User’s Manual
USM Ver 1.8
Page 2

Foreword
Copyright
Copyright © 2010 Xtramus T e chnologies, all rights reserved. The information contained in this document is the property of Xtramus
Technologies. No part of this publication shall be reproduced, stored in a retrieval system, or transmitted, in any form or by any
means, without the prior written permission of Xtramus Technologies.
Disclaimer
The information contained in this document is subject to change without notice and does not represent a commitment on the part of
Xtramus Technologies. The information in this document is believed to be accurate and reliable. However, Xtramus Technologies
assumes no responsibility or liability for any errors or inaccuracies that may appear in the docume nt.
Trademarks
NuApps-SwitchPerform and NuApps-SwitchPerform-Client are trademarks or registered trademarks of Xtramus Technologies. All
other trademarks and registered trademarks are the property of their respective owners.
Warranty
Xtramus Technologies warrants for the hardware provided along wit h this d ocument under proper usage and conditions in normal
environment; any improper operation or in irregular environment may possibly cause this product NOT function well. For detailed
terms, please contact your local dealer.
Contact Information
Xtramus Technologies
E-mail: sales@xtramus.com
Website: www.xtramus.com
Tel: +886-2-8227-6611
Fax: +886-2-8227-6622
XTRAMUS TECHNOLOGIES®
2
E-mail: sales@xtramus.com
Website: www.Xtramus.com
Page 3

Revision History
Date
Manual
Version
Software
Version
2010/10/15 1.0 First draft version
1. Change the packet generation mode to “Fix Loading” and
“Burst” in 4.5.3. General Configuration and add contents
for the scroll-down menu.
2010/11/02 1.1
2. Change the overview figure for Chart window in page 33,
and add more descriptions for Main Display Screen.
3. Add descriptions/figure for “Setting” button in 4.7.1. Control
Buttons.
4. Change the figures in 4.7.4. Main Display Screen.
2010/11/09 1.2
1. Add descriptions regarding to “Report Folder” in Counter
Report and Chart.
1. Change overall figure for Port Remapping window on
page 16.
2010/11/12 1.3
2. Add notes for MAC Learning Setting and VLAN Setting on
page 29.
3. Change Tx/Rx Statistics figure on page 47.
2010/11/15 1.4 1. Remove “Draft” watermark.
1. Change figures for Counter/Chart on page 22 and 23.
2. Change figure for General Configure on page 28.
3. Add descriptions of “Transfer User Defined Packet” on
page 29.
2010/11/16 1.5
4. Change figure for Chart Window on page 33.
5. Change figure for Chart Control Buttons, change figures
for Vertical Axis Scale Setting and change related
descriptions on page 34.
6. Change NuApps-SwitchPerform-Client overview figure on
page 45.
1. Change Chart Window figures on page 22 and 23.
2. Change Chart Window overview figure and related
2010/11/23 1.6
descriptions on page 33.
3. Change Throughput figure and related descriptions on
page 37.
1. Change General Configuration figure on page 28.
2. Add descriptions and figure of Communication Mode in
2010/11/27 1.7 v1.0b018
Packet Generation Mode field on page 28.
3. Add figures and descriptions of File Select field on page
29. Change descriptions on Load Percentage on page 29
accordingly as well.
1. Change Revision History format: add Software Version
2010/12/01 1.8 v1.0b019
2. Change Chart Window figures on page 22 and 23.
3. Change Chart Window figures on page 34.
4. Change Chart Display Options figures on page 36.
History
XTRAMUS TECHNOLOGIES®
3
E-mail: sales@xtramus.com
Website: www.Xtramus.com
Page 4

Table of Contents
Foreword..........................................................................................................................................2
Revision History..............................................................................................................................3
1. NuApps-SwitchPerform..............................................................................................................5
2. Installing/Uninstalling NuApps-SwitchPerform........................................................................6
3. NuApps-SwitchPerform Function Overview...........................................................................12
3.1. Starting NuApps-SwitchPerform.....................................................................................12
3.2. NuApps-SwitchPerform/NuServer Function Overview.................................................17
4. NuApps-SwitchPerform Functions..........................................................................................19
4.1. Menu Bar...........................................................................................................................19
4.1.1. File ................................................................................................................................19
4.1.2. View ..............................................................................................................................21
4.1.3. Config...........................................................................................................................21
4.1.4. Report...........................................................................................................................22
4.1.5. Help...............................................................................................................................22
4.2. Quick Launch Buttons .....................................................................................................23
4.3. System Status Overview..................................................................................................24
4.4. Control Buttons/Test Running Status Icon ....................................................................24
4.5. Test Configuration............................................................................................................25
4.5.1. Port Select....................................................................................................................26
4.5.2. Media Type ...................................................................................................................27
4.5.3. General Configuration.................................................................................................28
4.5.4. DUT Information ..........................................................................................................30
4.6. Counter Report .................................................................................................................31
4.6.1. Control Buttons ...........................................................................................................32
4.6.2. Main Display Screen....................................................................................................32
4.7. Chart..................................................................................................................................33
4.7.1. Control Buttons ...........................................................................................................34
4.7.2. Test Information...........................................................................................................35
A. Test Information –Burst Mode .....................................................................................35
B. Test Information – Fix Loading....................................................................................35
4.7.3. Chart Display Options.................................................................................................36
4.7.5. Throughput/Utilization ................................................................................................37
5. NuApps-SwitchPerform-Client.................................................................................................38
5.1. Installing/Uninstalling NuApps-SwitchPerform-Client..................................................38
5.2. Starting NuApps-SwitchPerform-Client..........................................................................44
5.3. NuApps-SwitchPerform-Client Functions......................................................................45
5.3.1. Menu Bar ......................................................................................................................46
5.3.2. NIC Status.....................................................................................................................47
5.3.3. Connected By ..............................................................................................................47
5.3.4. Tx/Rx Statistics............................................................................................................47
5.3.5. Control Buttons ...........................................................................................................47
XTRAMUS TECHNOLOGIES®
4
E-mail: sales@xtramus.com
Website: www.Xtramus.com
Page 5
1. NuApps-SwitchPerform
NuApps-SwitchPerform is a utility software that designed for analyzing Ethernet switch,
PC/Notebook, and network video player. NuApps-SwitchPerform’s load-generating
capabilities provide an effective way to evaluate DUT’s (Device Under Test) Utilization,
Throughput, Packet Loss, CRC Error, and Latency with NuApps-SwitchPerform’s three
different modes: Network Switch, PC/Notebook, and Others (Network Video Player). Test
results/statistics can be viewed with NuApps-SwitchPerform’s intuitive real-time chart and counter report.
NuApps-SwitchPerform is designed for Xtramus Technologies XM-RM series module cards listed in the
table down below:
Module Cards Support NuApps-SwitchPerform
XM-RM731
*Note: NuStreams-2000i and NuStreams-600i are required as well.
Also, please make sure that your PC meets the requirements listed in the table down below before
installing NuApps-SwitchPerform.
OS
CPU
RAM
HDD
*Note: The HDD requirement listed here are the minimum available Hard-Disk space for installing both
NuApps-SwitchPerform and WinPcap. However, large amount of data will be generated while running
NuApps-SwitchPerform. It is recommended to preserve enough available Hard-Disk space to store
these data.
Windows XP Windows Vista
800MHz CPU 1.6 GHz, 32 bits (x86) CPU
256MB RAM 1GB RAM
20MB available space 20MB available space
XTRAMUS TECHNOLOGIES®
5
E-mail: sales@xtramus.com
Website: www.Xtramus.com
Page 6
2. Installing/Uninstalling NuApps-SwitchPerform
Please follow the steps down below to install NuApps-SwitchPerform.
Installing NuApps-SwitchPerform
1. Double-click NuApps-SwitchPerform installation
program and start the installation process.
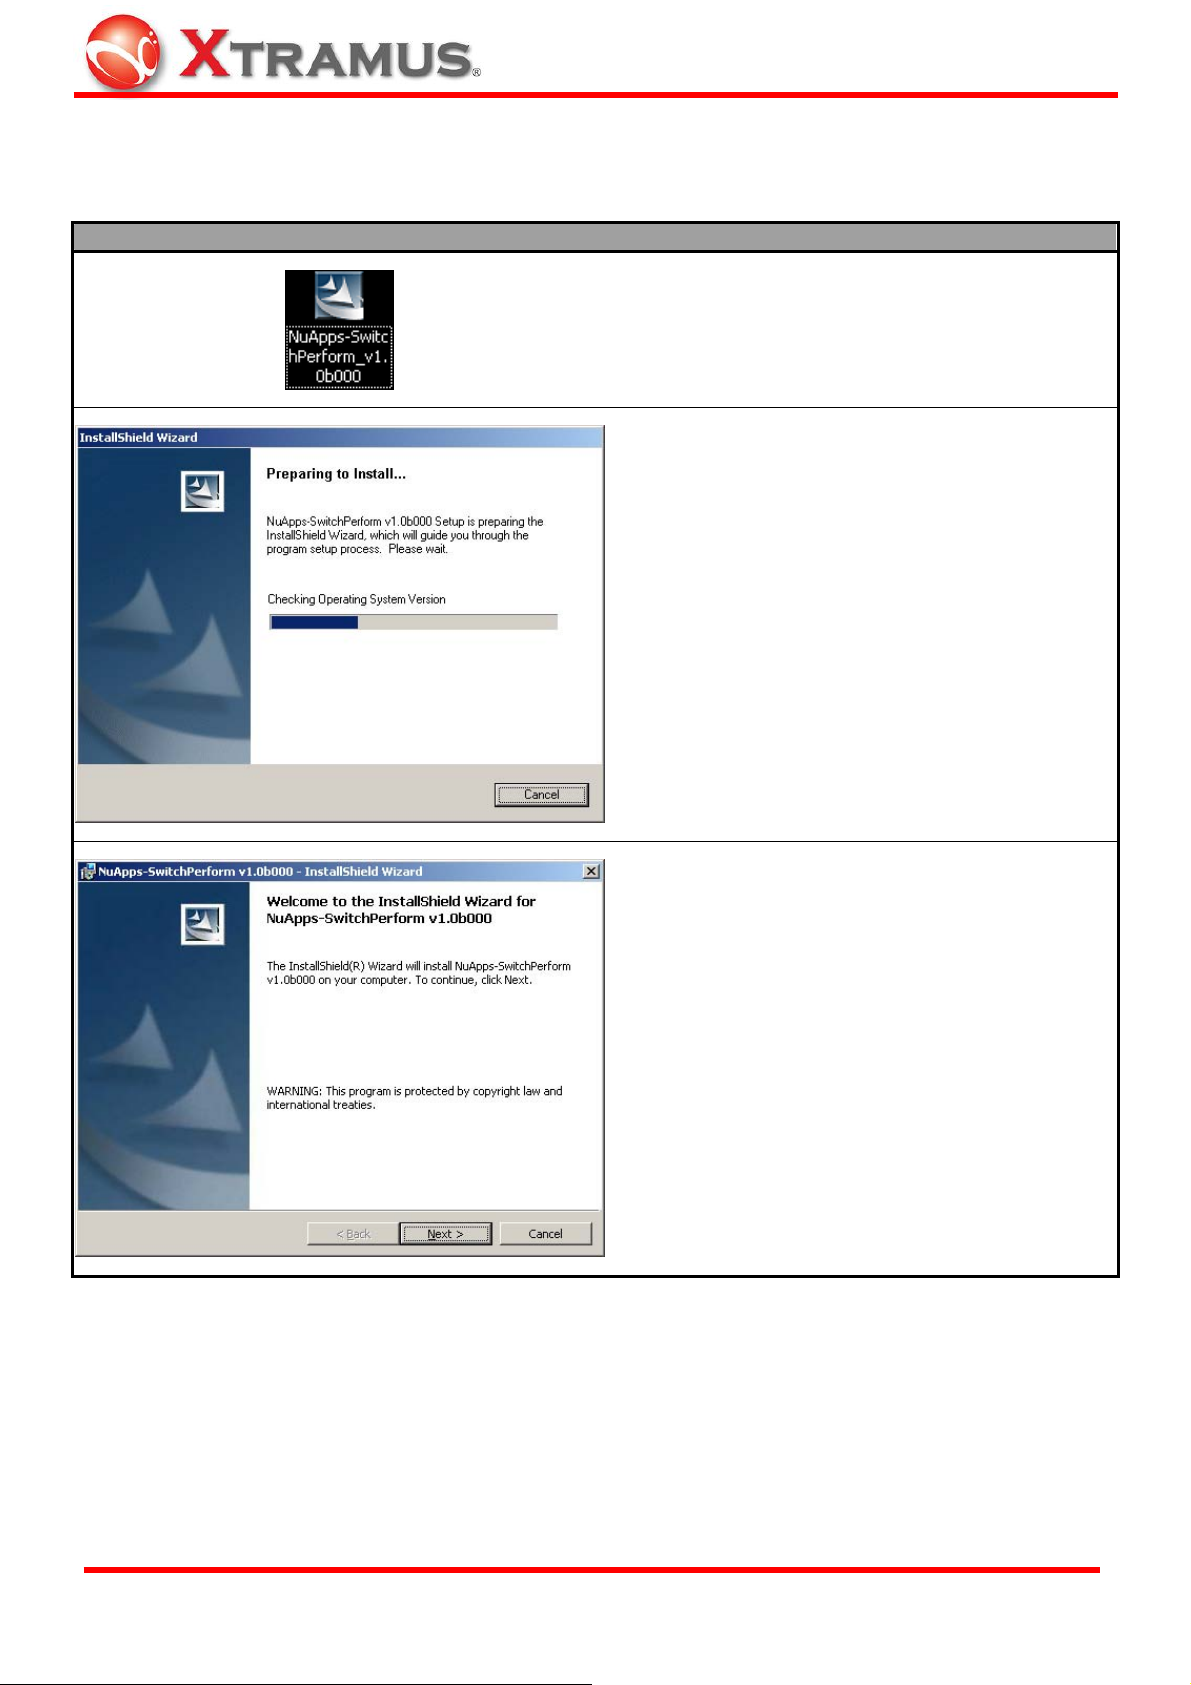
2. InstallShield Wizard is starting to install
NuApps-SwitchPerform. If you would like to cancel
installation, click “Cancel”.
XTRAMUS TECHNOLOGIES®
3. Click “Next” to continue installation.
6
E-mail: sales@xtramus.com
Website: www.Xtramus.com
Page 7
Installing NuApps-SwitchPerform
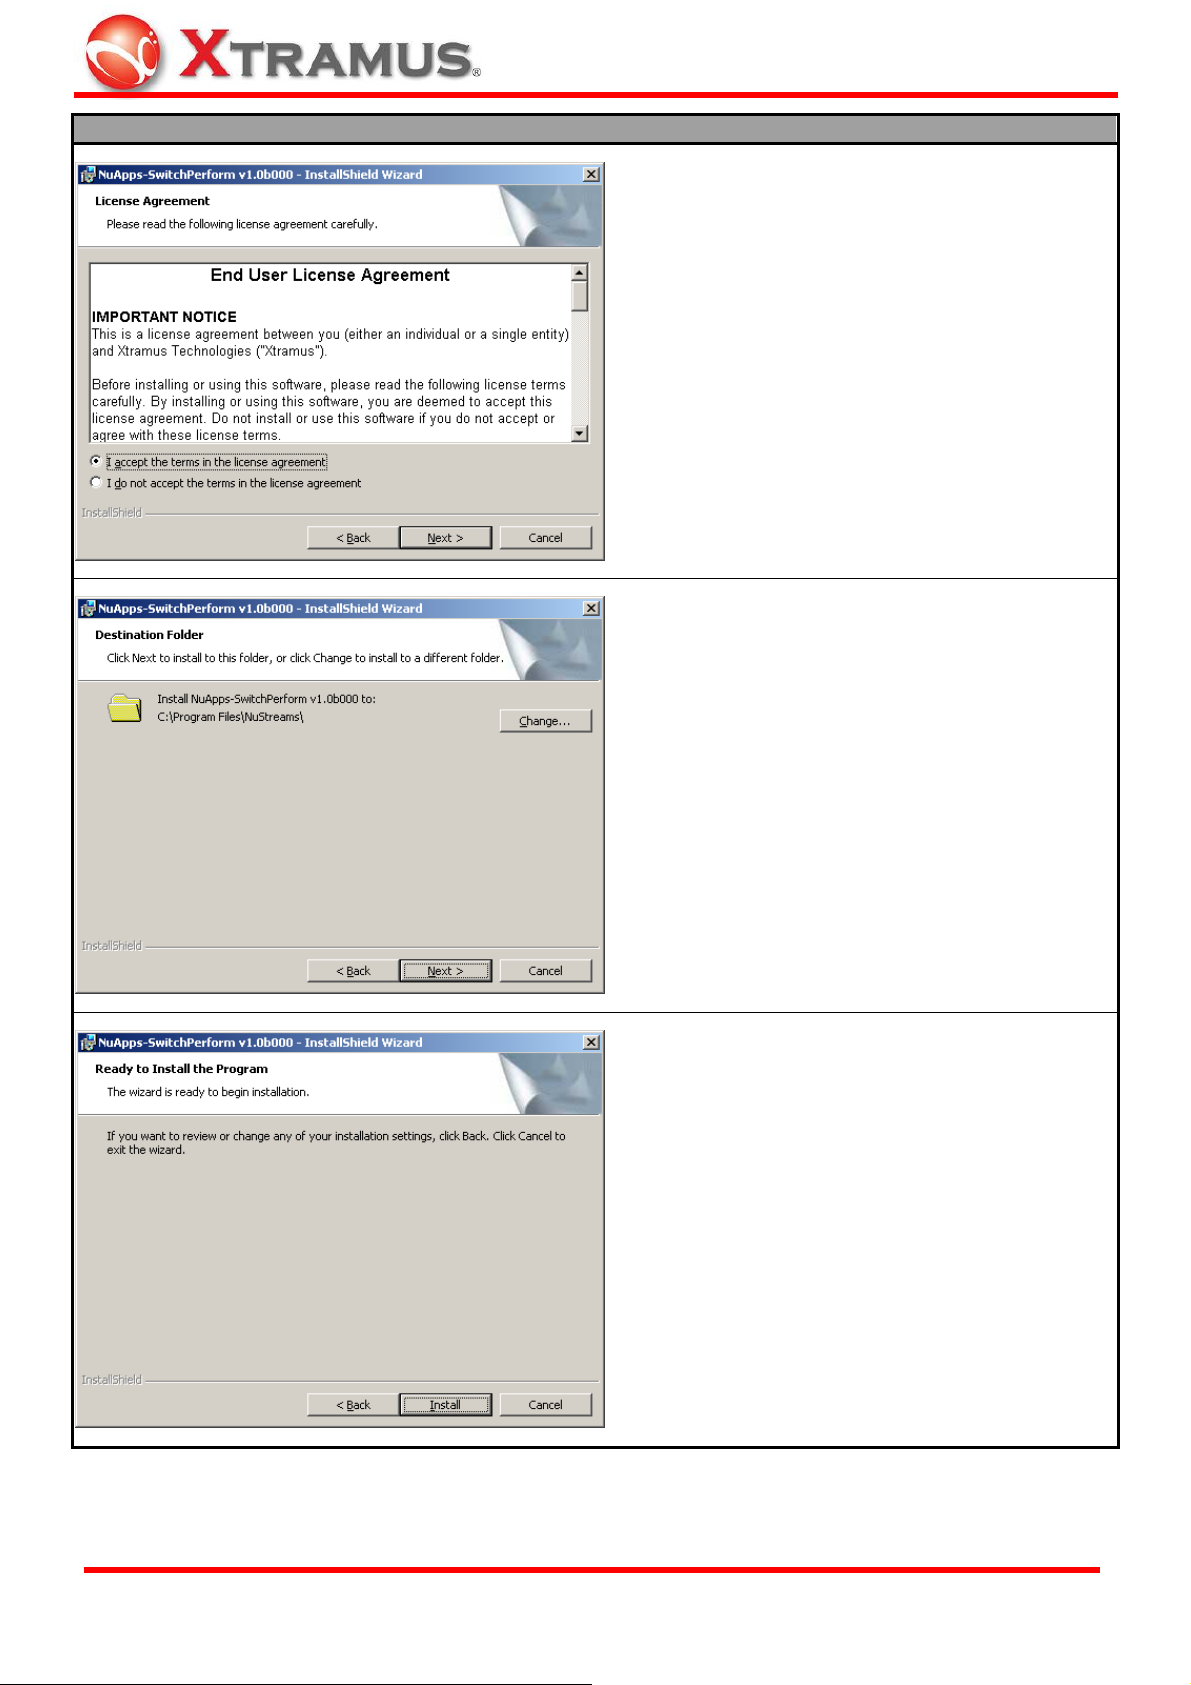
4. Click “I accept the terms in the license
agreement”, and click “Next” to continue.
5. Click the Change… button to install the program
to another folder, or click
Next button to install the
program into the default destination folder, and then
continue next step. Click
the previous step to modify.
Back button to go back to
6. NuApps-SwitchPerform InstallShield Wizard will
start installing momentarily. Click
Install button to
start installation.
XTRAMUS TECHNOLOGIES®
7
E-mail: sales@xtramus.com
Website: www.Xtramus.com
Page 8
Installing NuApps-SwitchPerform
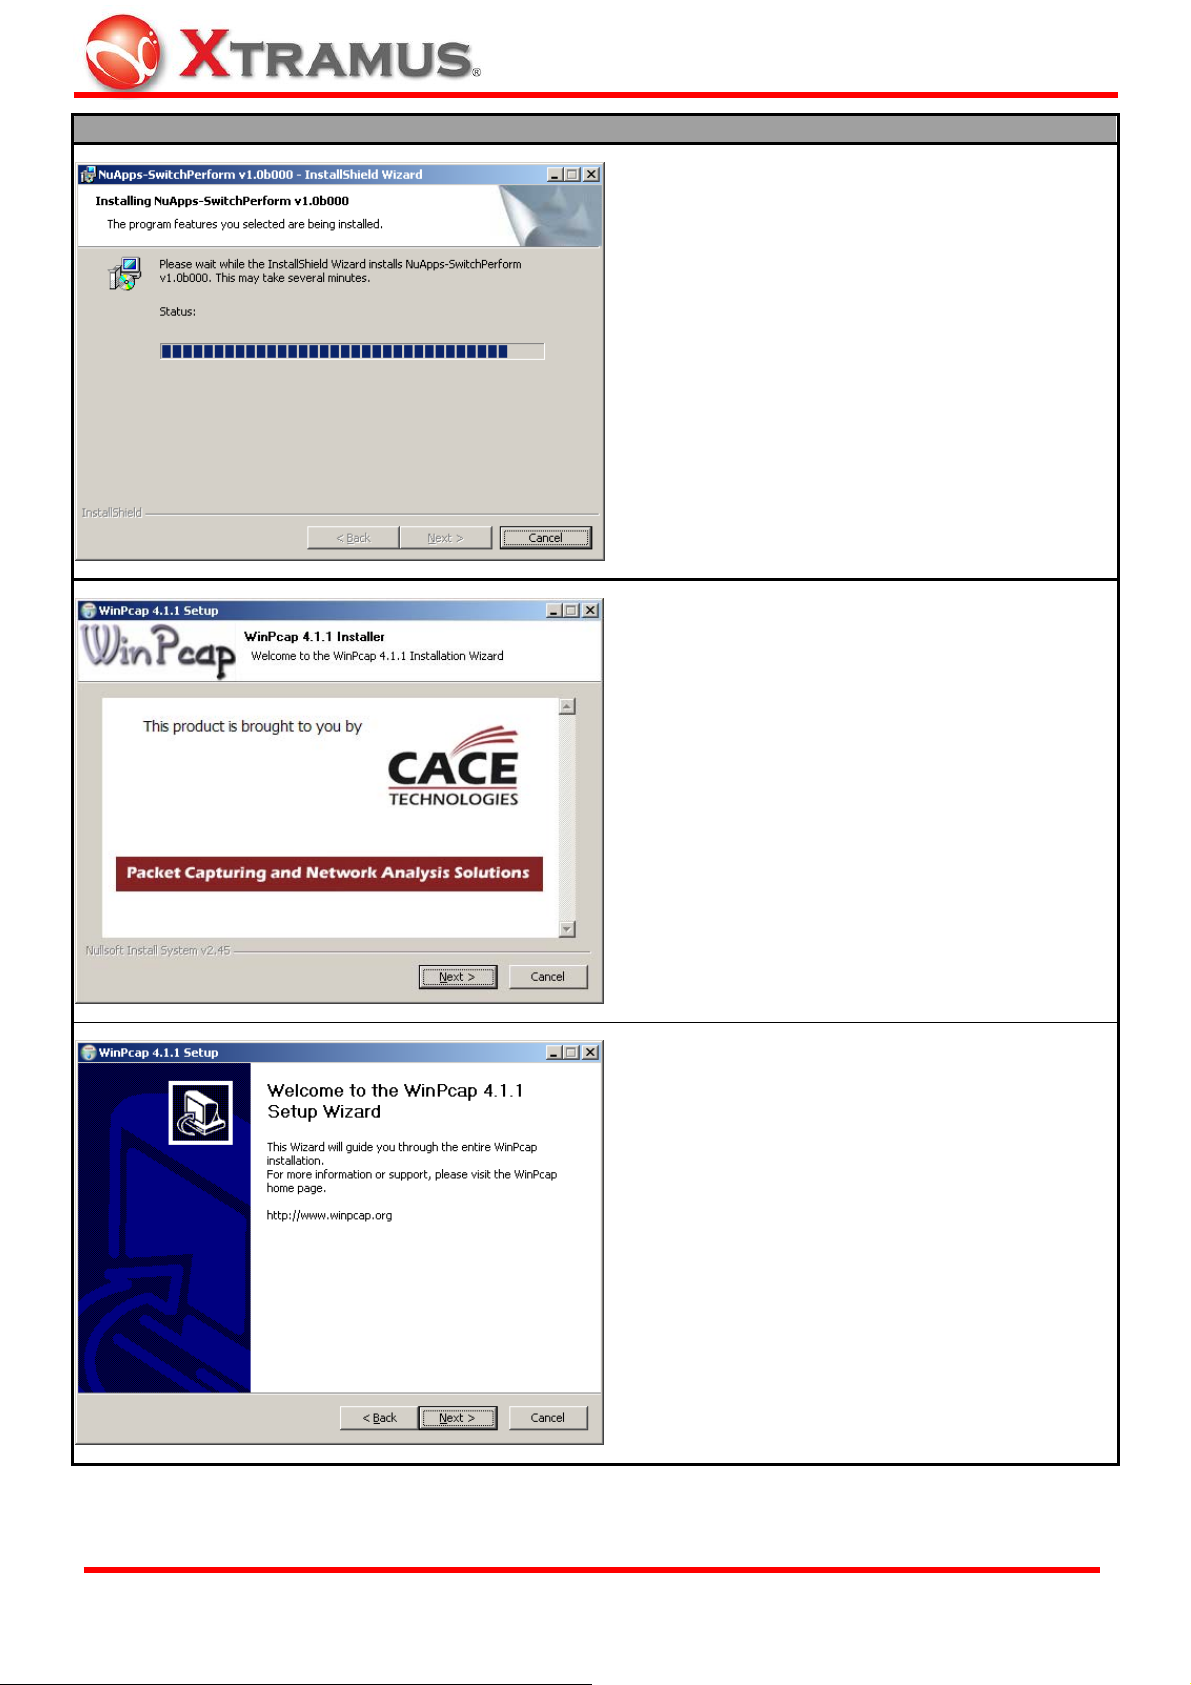
7. InstallShield Wizard is installing
NuApps-SwitchPerform.
8. If your PC does not have WinPcap installed, a
WinPcap Installer window will popup. Click Next
button to get ready to install, or click
Cancel button
to stop. For more detail information regarding to
WinPcap, please visit their webpage at:
www.winpcap.org.
9. WinPcap is preparing to install, or click Cancel
button to stop at any time.
XTRAMUS TECHNOLOGIES®
8
E-mail: sales@xtramus.com
Website: www.Xtramus.com
Page 9
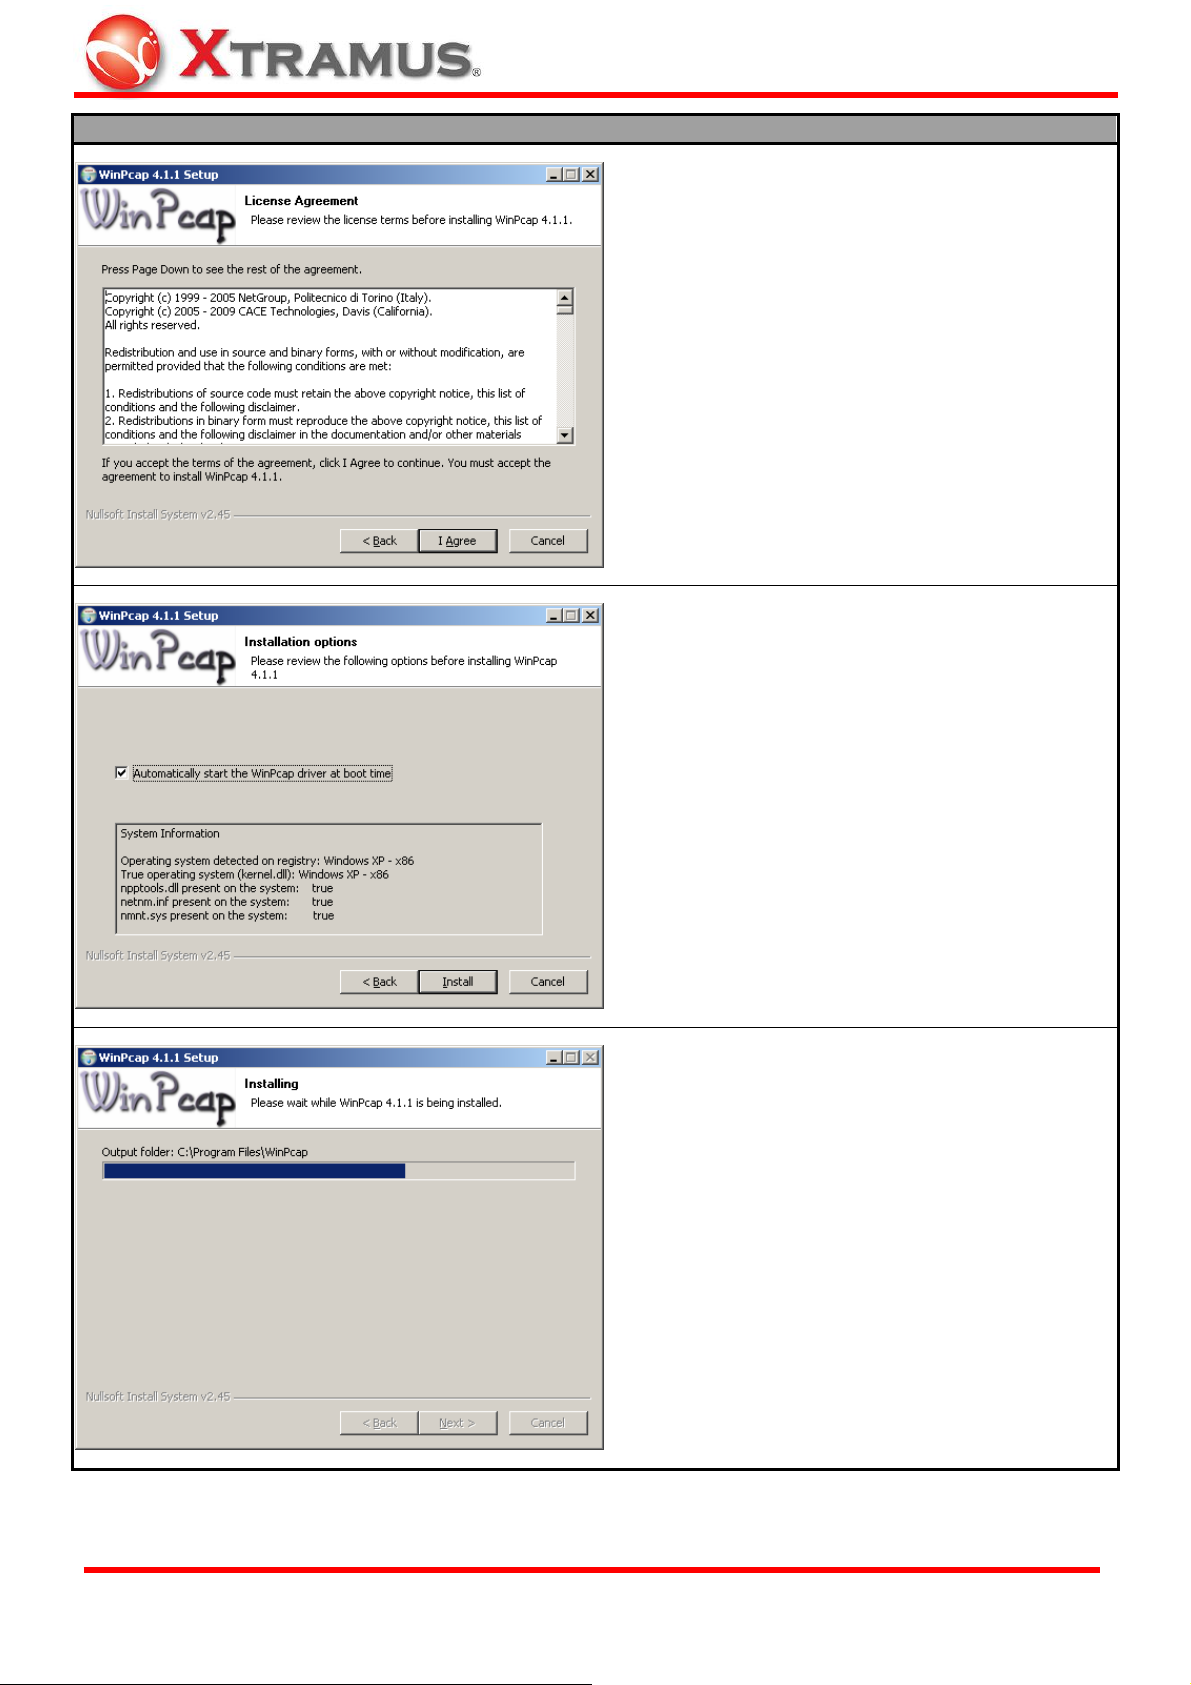
Installing NuApps-SwitchPerform
10. Review the license agreement before installing.
I Agree button to continue. It is necessary to
Click
accept the agreement to install WinPcap.
11. You can set if you would like to start WinPcap
driver when booting PC by clicking the check box.
Click “Install” to continue.
12. WinPcap is installing.
XTRAMUS TECHNOLOGIES®
9
E-mail: sales@xtramus.com
Website: www.Xtramus.com
Page 10
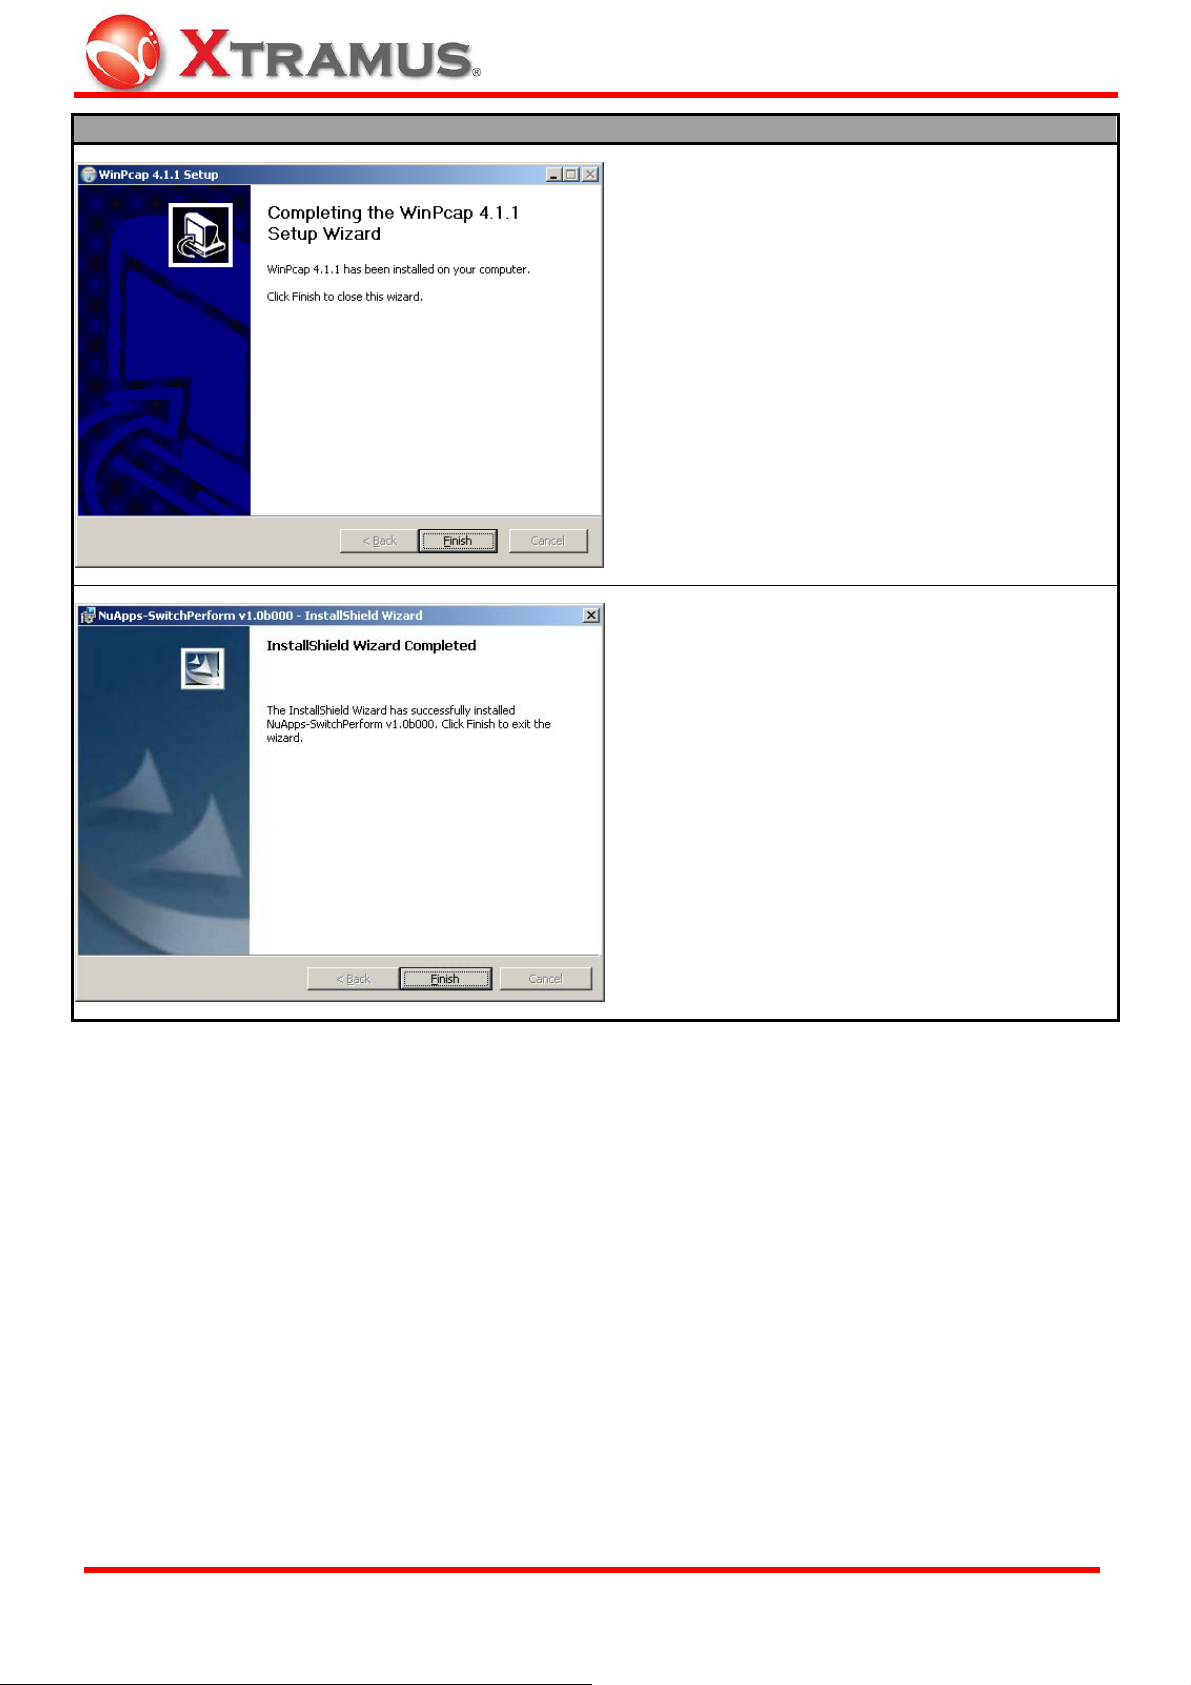
Installing NuApps-SwitchPerform
13. WinPcap installation completes. Click Finish
button to close the wizard.
14. NuApps-SwitchPerform installation completes.
Click
Finish button to exit.
XTRAMUS TECHNOLOGIES®
10
E-mail: sales@xtramus.com
Website: www.Xtramus.com
Page 11
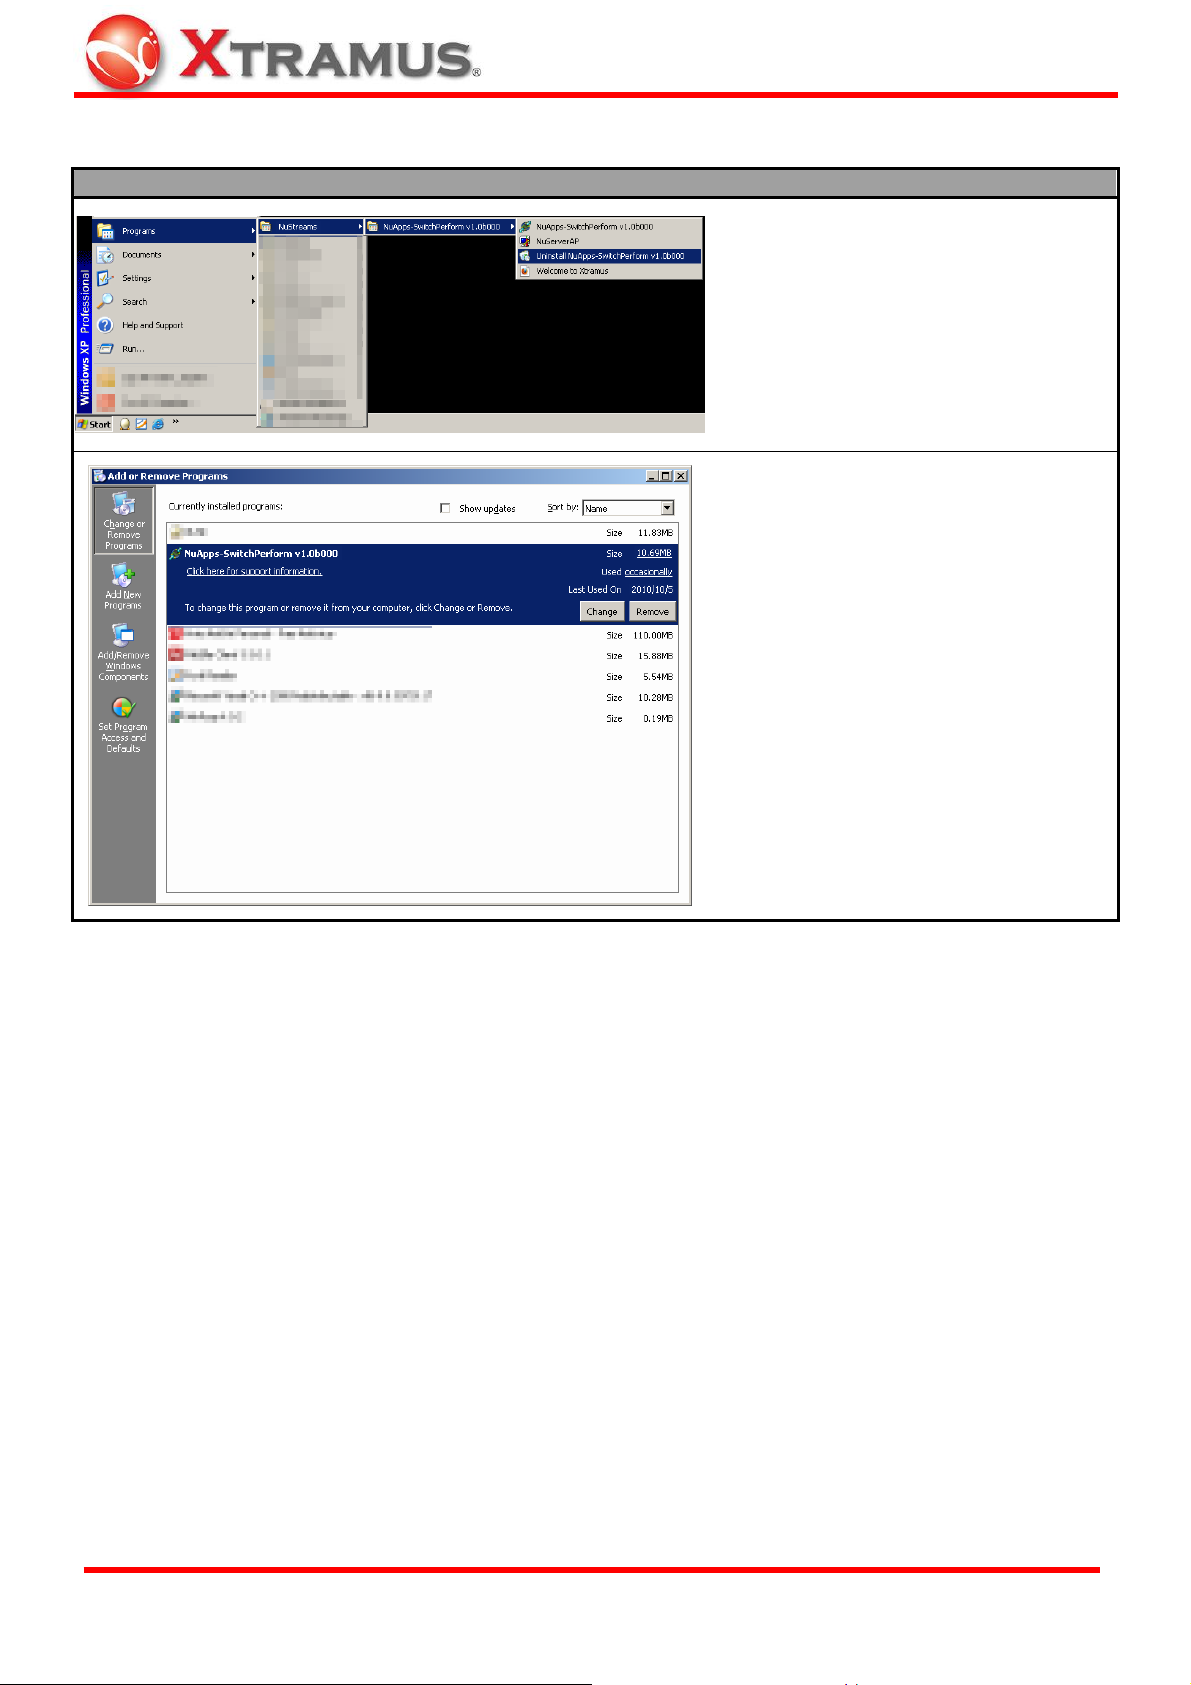
You can uninstall NuApps-SwitchPerform by:
Uninstalling NuApps-SwitchPerform
• Click Start Æ Programs Æ
NuStreams Æ
NuApps-SwitchPerform Æ Uninstall
NuApps-SwitchPerform.
• Go to the Control Panel, choose
NuApps-SwitchPerform from
installed program list, and click
“Remove” to uninstall.
XTRAMUS TECHNOLOGIES®
11
E-mail: sales@xtramus.com
Website: www.Xtramus.com
Page 12
3. NuApps-SwitchPerform Function Overview
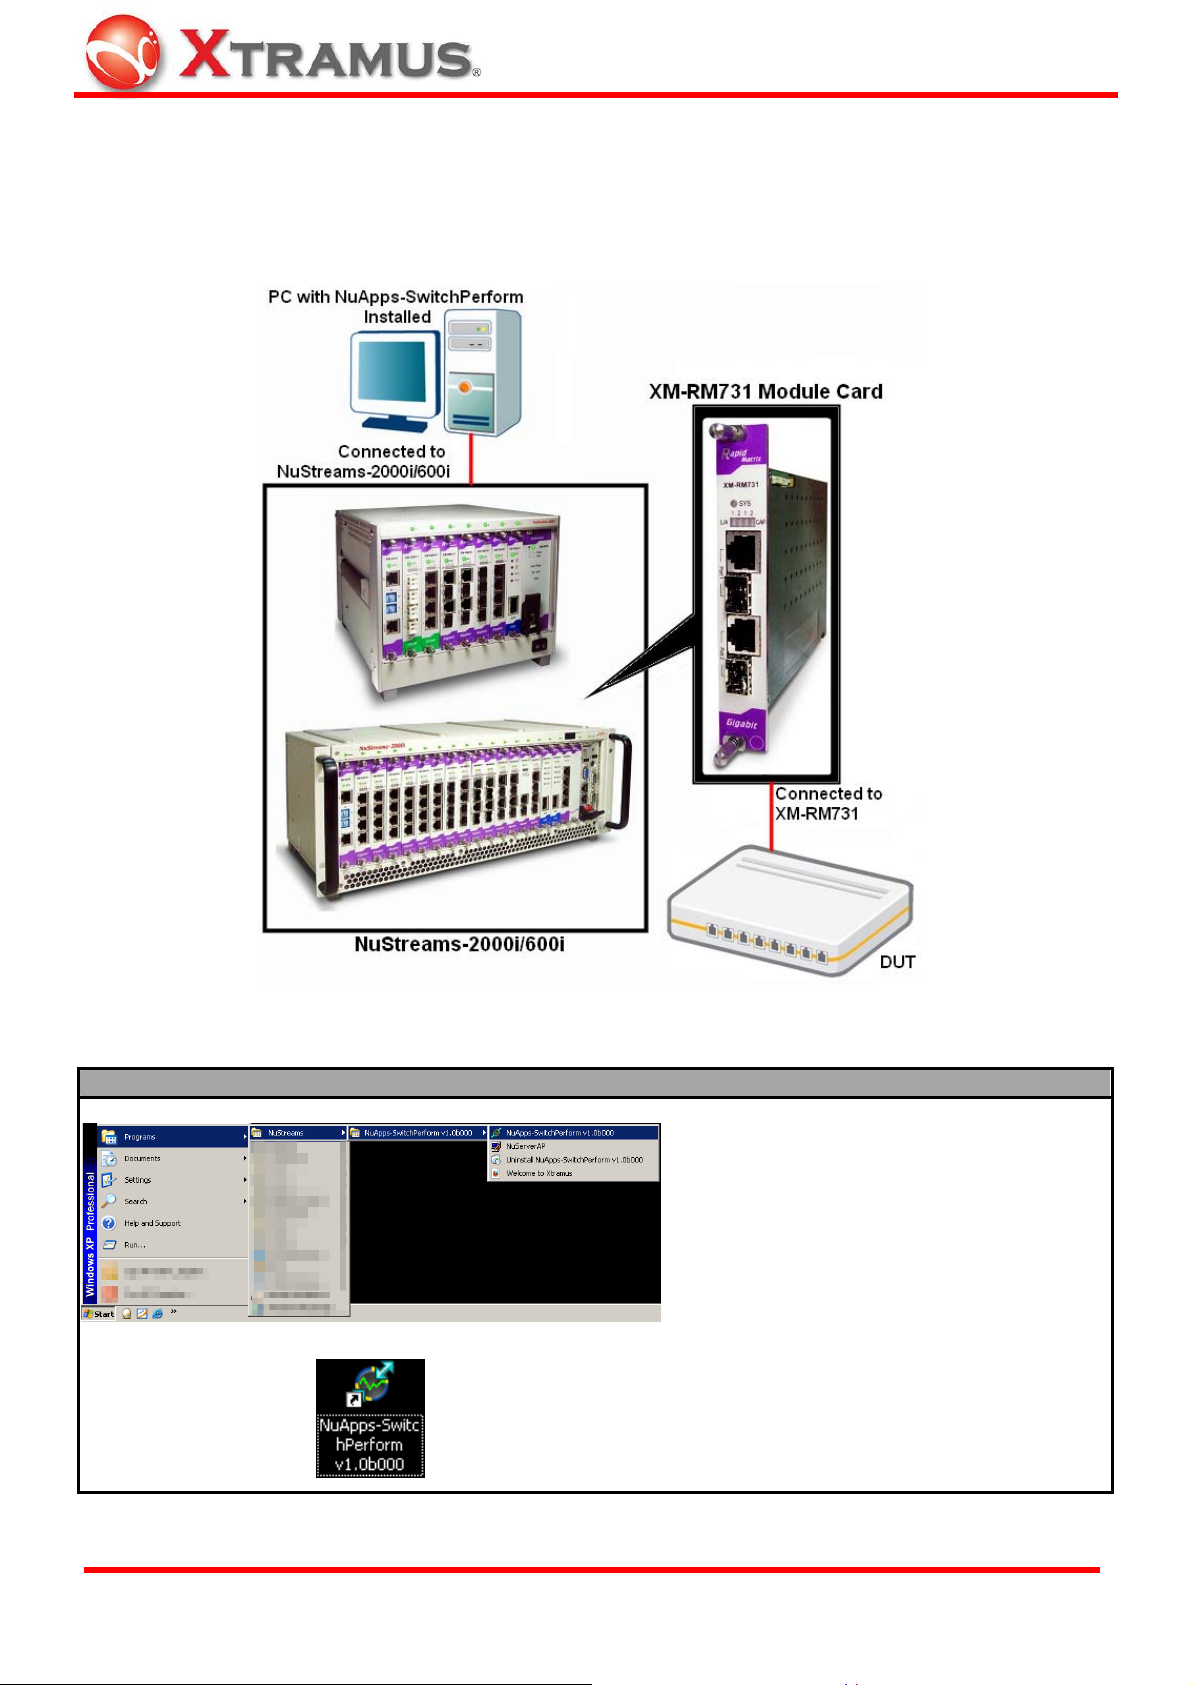
3.1. Starting NuApps-SwitchPerform
Before starting NuApps-SwitchPerform, the DUT, your PC, and NuStreams-2000i/600i shall be connected
as shown in the figure down below:
There are two ways to start NuApps-SwitchPerform:
Starting NuApps-SwitchPerform
XTRAMUS TECHNOLOGIES®
12
• Click Start Æ Programs Æ NuStreams Æ
NuApps-SwitchPerform.
• Double-click NuApps-SwitchPerform icon
located on your PC’s desktop.
E-mail: sales@xtramus.com
Website: www.Xtramus.com
Page 13
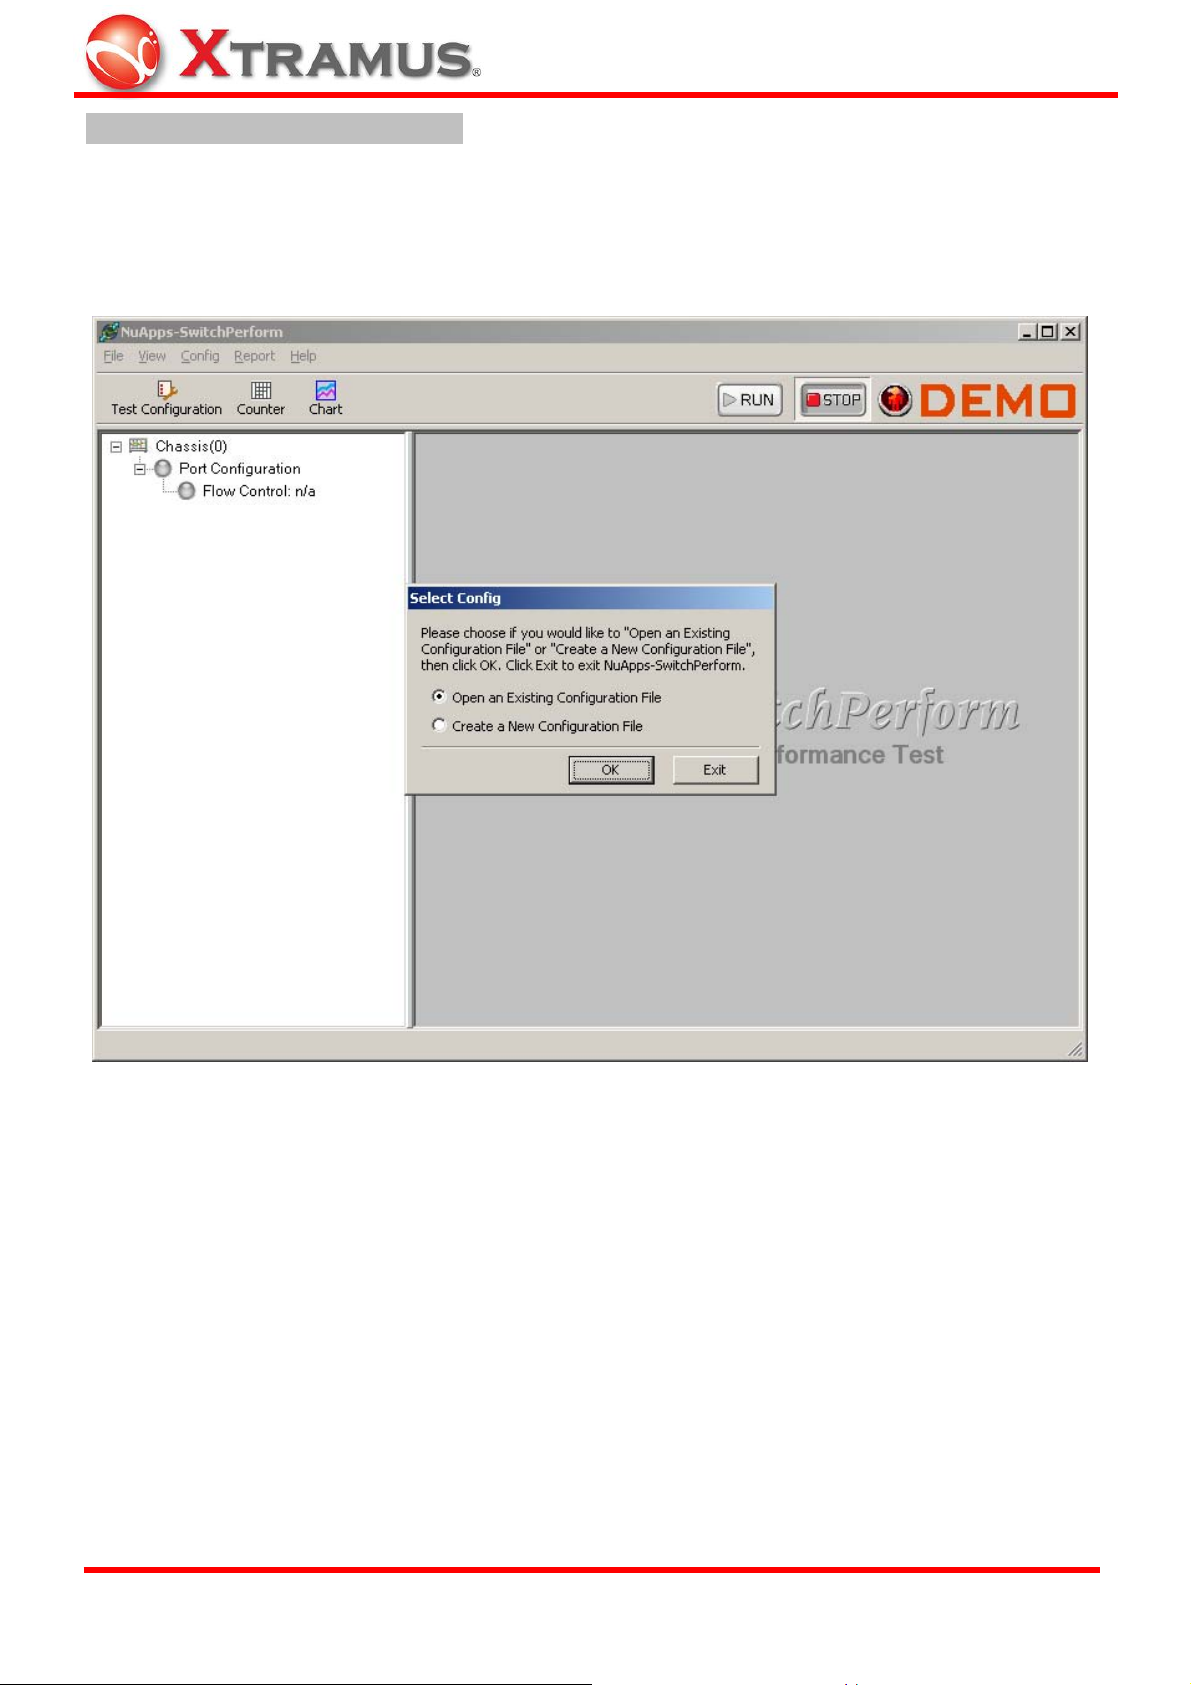
NuApps-SwitchPerform Demo Mode
If your PC is not connected with NuStreams-2000i/600i, you can still run NuApps-SwitchPerform under
Demo Mode. Almost all NuApps-SwitchPerform’s functions are available under Demo Mode. However,
please note that Demo Mode is for system demo purposes only, and does not serve any testing
purposes at all.
XTRAMUS TECHNOLOGIES®
13
E-mail: sales@xtramus.com
Website: www.Xtramus.com
Page 14
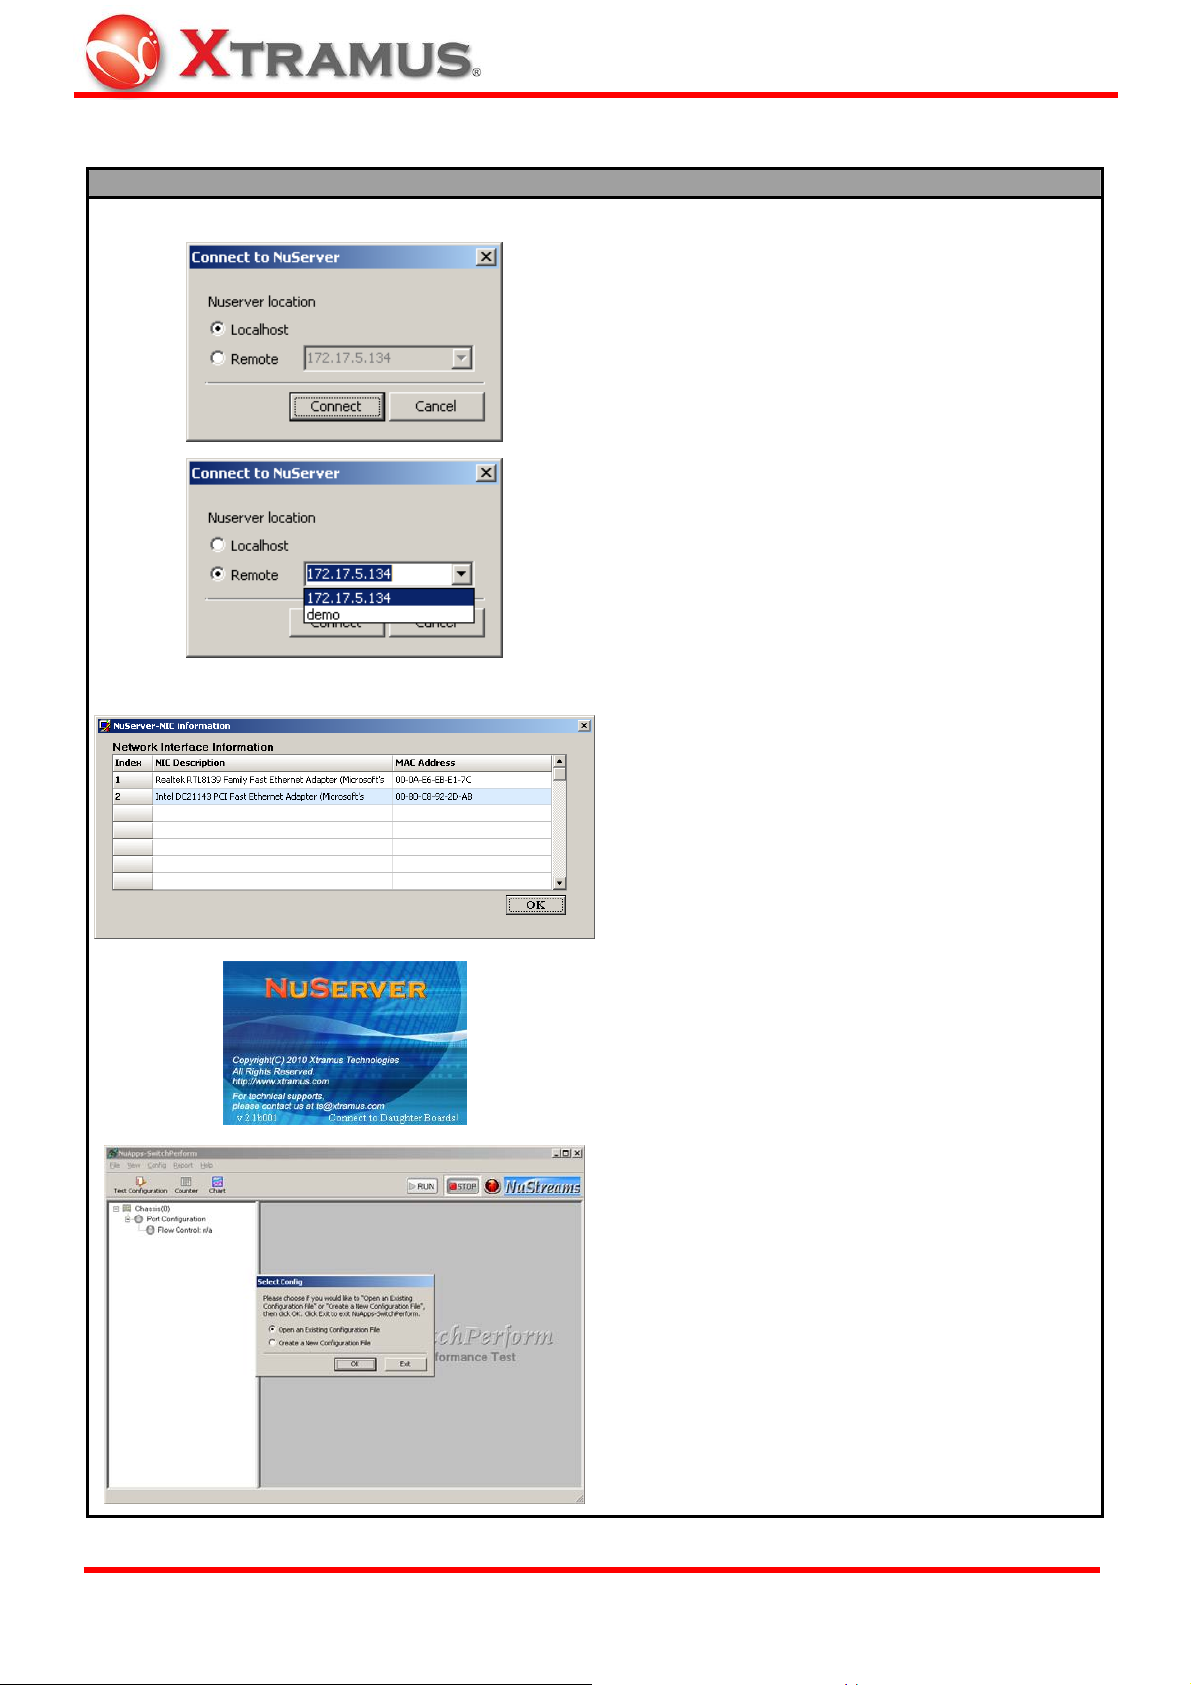
Please follow the steps down below to start NuApps-SwitchPerform and NuServer properly.
Starting NuServer
When starting NuApps-SwitchPerform, a “Connect
to NuServer” window will pop up and asked how
you are going to connect to NuServer.
• Local Host: Choose this option when you’re
running NuApps-SwitchPerform from
NuStreams-2000i IPC module or a PC that’s
connected to NuStreams-2000i/600i via an
RJ45 cable.
• Remote: Choose this option when you’re
running NuApps-SwitchPerform from other PC
located on the network. Choose the IP address
which is assigned to NuStreams-2000i/600i from
the scroll-down menu, or choose demo to enter
NuApps-SwitchPerform’s Demo Mode.
• Connect/Cancel: Click the Connect/Cancel
button to connect to NuStreams-2000i/600i or
cancel starting NuApps-SwitchPerform.
A “NuServe r-NIC Information” window will pop
up. Please select the NIC (Network Interface Card)
which is connected to NuStreams -2000i/ 600i’s
from the Network Interface Information table,
and click OK. If you’re using NuStreams-2000i’s
IPC module, please choose “Realtek RTL8139
Family Fast Ethernet”.
NuServer will connect to the daughter boards, and
NuApps-SwitchPerform will start as well.
You now have access to NuApps-SwitchPerform’s
main display window.
XTRAMUS TECHNOLOGIES®
14
E-mail: sales@xtramus.com
Website: www.Xtramus.com
Page 15
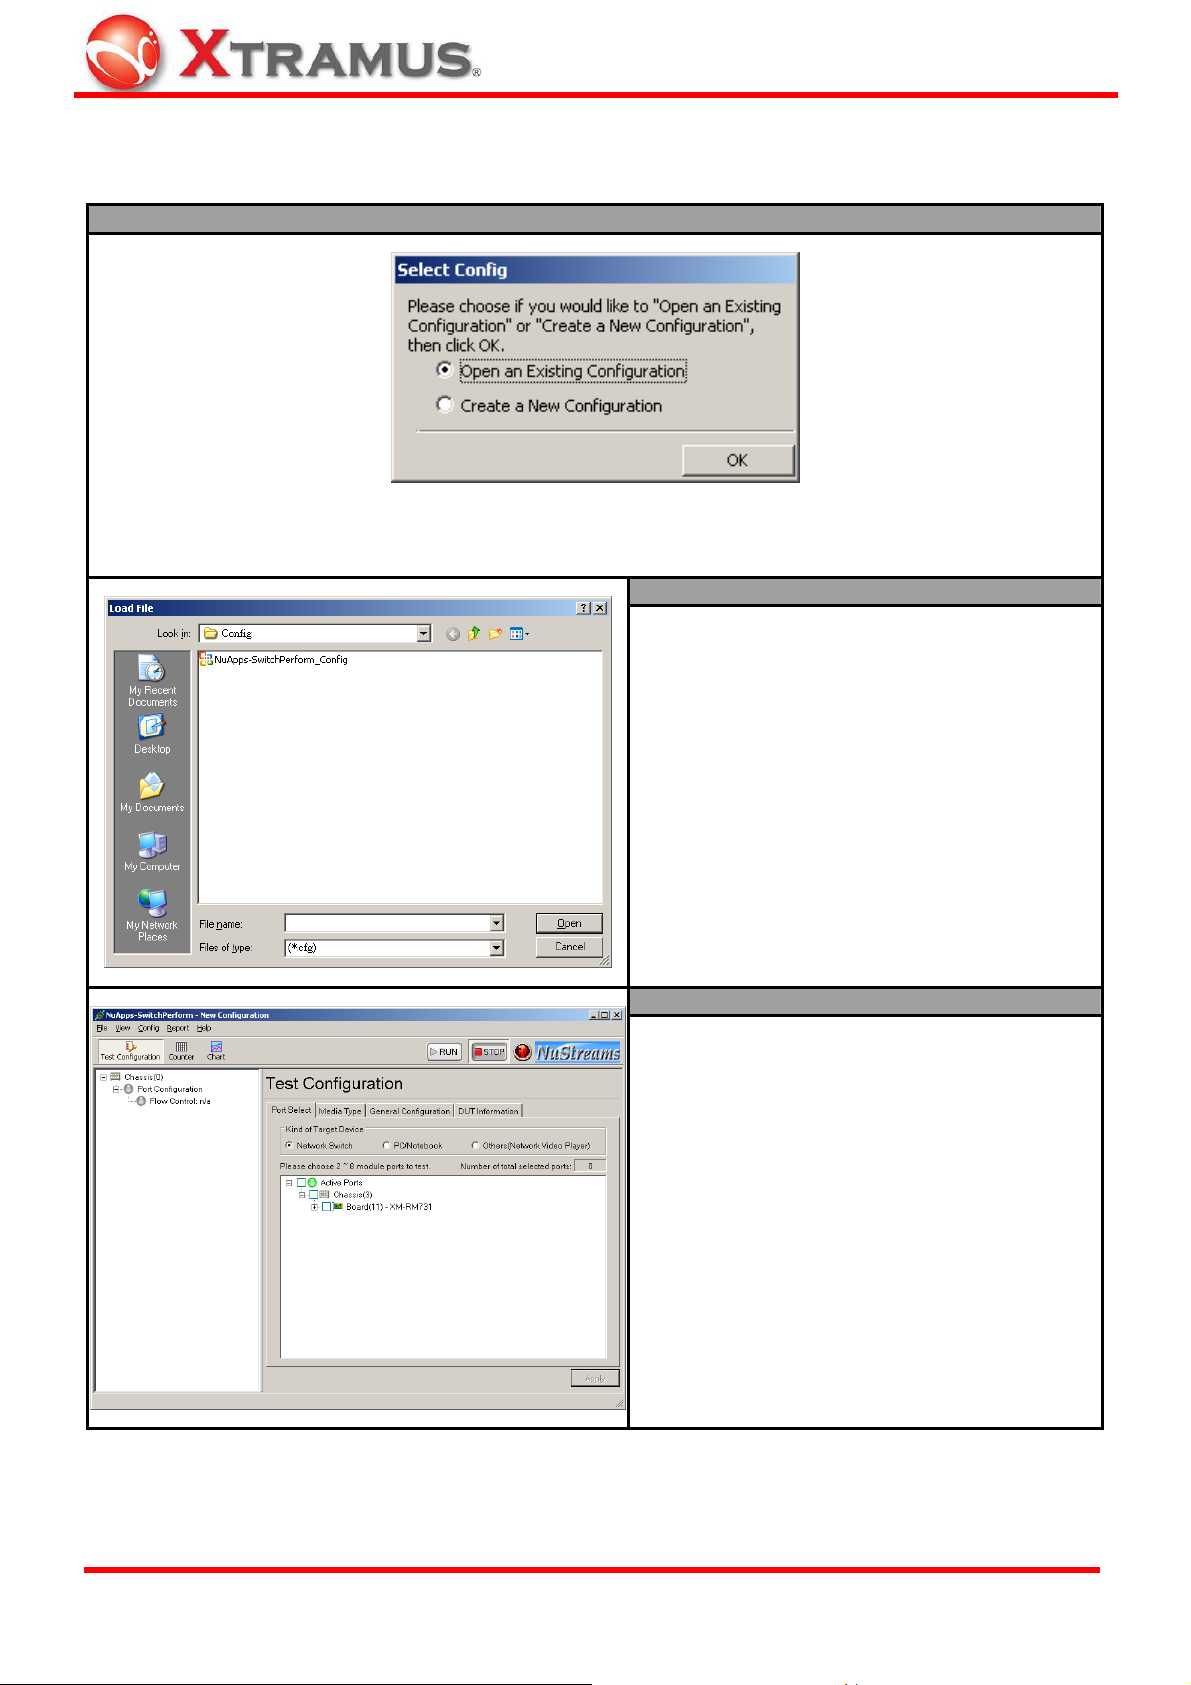
After starting NuApps-SwitchPerform, a Select Config window will pop up. You can choose if you would
like to Open an Existing Configuration or Create a New Configuration. Please press OK to continue.
Description – Select Config
As mentioned above, you have to reserve ports on module cards before performing tests with
NuApps-SwitchPerform. You can do so by either Open an Existing Configuration or by Create a New
Configuration.
Open an Existing Configuration
If you have a previously saved configuration file
stored in your PC, you can load it and apply all
the setting you’ve made by choosing “Open an
Existing Configuration” from the Select
Config pop-up window.
Configuration files are saved in the format of
“*.cfg”.
Create a New Configuration
If you are running NuApps-SwitchPerform for
the first time or you would like to create a new
configuration, please choose “Create a New
Configuration” from the Select Config pop-up
window.
For more information regarding to creating a
new configuration for NuApps-SwitchPerform,
please refer to 4.5. Test Configuration on page
25.
XTRAMUS TECHNOLOGIES®
15
E-mail: sales@xtramus.com
Website: www.Xtramus.com
Page 16

Description – Select Config
If the port mapping contained in the configuration file you’ve loaded from your PC does not match
NuStreams-2000i/600i’s current port mapping, a Port Remapping window will pop up and guides you
through port remapping process. You can perform port remapping Automatically or Manually.
¾ Automatically: NuApps-SwitchPerform will perform port remapping automatically.
¾ Manually: You will have to make the proper port remapping by yourself manually.
If you choose automatically, the port remapping
will be made automatically.
The final result of the port remapping will be shown
on the Remapping Result field. Press OK to
continue.
If you choose manually from Port Remapping
scroll-down menu, you will have to make the
proper port remapping by yourself.
¾ Remapping Port: This field shows the port
mapping you’ve loaded from file.
¾ Candidate Port: This field shows the current
port mapping.
To make port remapping manually, please choose
a port from Remapping Port (1), assign a new port
ID from Candidate Port (2), and click
to add it to the Remapping Result (3).
button
XTRAMUS TECHNOLOGIES®
The final result of the port remapping will be shown
on the Remapping Result field. Press OK to finish
the port remapping process.
16
E-mail: sales@xtramus.com
Website: www.Xtramus.com
Page 17

3.2. NuApps-SwitchPerform/NuServer Function Overview
NuApps-SwitchPerform Main Window
NuApps-SwitchPerform Functions Overview
A Menu Bar
B Quick Launch Buttons
C System Status Overview
D
Control Buttons/Test
Running Status Icon
E Main Display Screen
The Menu Bar allows you to make settings about test criteria,
load/save settings you’ve made, and change language displayed.
The Quick Launch Buttons allow you to access test configurations
and view test statistics/chart.
The System Status Overview allows you to view information
regarding to the system and test ports.
The Control Buttons allow you to start/stop tests, and the Test
Running Status Icon indicates if the test is running.
You can make detail configurations on the Main Display Screen.
XTRAMUS TECHNOLOGIES®
17
E-mail: sales@xtramus.com
Website: www.Xtramus.com
Page 18

Y
NuServer
NuServer Functions Overview
This section displays the information regarding to the model cards that are
Module Card
Information
installed on NuStreams-2000i/600i. Model Card IDs are showed as the
format of (X, Y, Z) while X is the number of the chassis (which is displayed
on NuStreams-2000i/600i),
installed, and Z is the available port number located on the model card.
NIC Information
NuServer Version
This section displays the detail information (including NIC Model name,
NIC’s MAC address) regarding to the selected NIC.
This section displays the version of your NuServer.
is the slot number where this model card is
XTRAMUS TECHNOLOGIES®
18
E-mail: sales@xtramus.com
Website: www.Xtramus.com
Page 19

4. NuApps-SwitchPerform Functions
4.1. Menu Bar
NuApps-SwitchPerform Menu Bar includes configuration options such as File, View, Config, Report,
and Help. Please refer to the sections down below for detail information regarding to each configuration
option.
4.1.1. File
Function Descriptions – File
Create New
Configuration File
Open Existing
Configuration File
If you are running
NuApps-SwitchPerform for the first
time or you would like to create a
new configuration, please choose
“Create a New Configuration”
from the Select Config pop-up
window.
For more information regarding to
creating a new configuration for
NuApps-SwitchPerform, please
refer to 4.5. Test Configuration on
page 25.
If you have a previously saved
configuration file stored in your PC,
you can load apply all the setting
you’ve made with the Open
Existing Configuration File
function on the Menu Bar. .
Configuration files are saved in the
format of “*.cfg”, and the default
file path is “C:\ Program Files\
NuStreams\NuApps-Switch
Perform\Config”.
XTRAMUS TECHNOLOGIES®
19
E-mail: sales@xtramus.com
Website: www.Xtramus.com
Page 20

Function Descriptions – File
You can save the current test
settings with the Save
Configuration function on the
Menu Bar.
Save
Configuration
&
Configuration
Save as
Save Counter to
Excel File
Configuration files are saved in the
format of “*.cfg”, and the default
file path is “C:\ Program Files\
NuStreams\NuApps-Switch
Perform\Config”.
If you would like to save the current
test settings with another file name,
please choose Configuration
Save as on the Menu Bar instead.
You can save the current test
counter reports with the Save
Counter to Excel File function on
the Menu Bar.
Counter reports are saved in the
format of “*.xls”, and can be view
with Microsoft Excel®. The default
file path is “C:\ Program Files\
NuStreams\NuApps-Switch
Perform\Report\Counter”.
Save Chart to JPG
File
Exit
You can save the current test result
chart with the Save Chart to JPG
File function on the Menu Bar.
Counter reports are saved in the
format of “*.jpg”, and the default
file path is “C:\ Program Files\
NuStreams\NuApps-Switch
Perform\Report\Chart”.
A prompt pop-up window will ask if
you are sure to exit
NuApps-SwitchPerform. Click YES
to exit NuApps-SwitchPerform, or
click NO to cancel.
XTRAMUS TECHNOLOGIES®
20
E-mail: sales@xtramus.com
Website: www.Xtramus.com
Page 21

4.1.2. View
Function Descriptions – View
Module
Information
The Module Information function on the Menu Bar allows you to view information
regarding to the module cards installed on NuStreams-2000i/600i. Please note that
the module cards listed here are module cards that were selected for testing with
NuApps-SwitchPerform. Module cards that weren’t selected won’t be shown here.
• OK: Click this button to leave Module Information pop-up window.
4.1.3. Config
Function Descriptions – Config
Test Configuration
XTRAMUS TECHNOLOGIES®
The Test Configuration function on the Menu Bar allows you to make test settings.
For more information regarding to configure NuApps-SwitchPerform’s test settings,
please refer to 4.5. Test Configuration
21
on page 25.
E-mail: sales@xtramus.com
Website: www.Xtramus.com
Page 22

4.1.4. Report
Function Descriptions – Report
The Counter function on the Menu
Bar allows you to view the counter
report of the current test.
Counter
Chart
For more information regarding to
NuApps-SwitchPerform’s counter
report, please refer to 4.6. Counter
Report on page 31.
The Chart function on the Menu Bar
allows you to view the statistics chart
of the current test.
For more information regarding to
NuApps-SwitchPerform’s chart, please
refer to 4.7. Chart on page 33.
4.1.5. Help
Function Descriptions – Help
About
Xtramus Web
XTRAMUS TECHNOLOGIES®
Open your default web browser and access Xtramus Website (www.xtramus.com).
An “About” window will pop up and show detailed
system information.
22
E-mail: sales@xtramus.com
Website: www.Xtramus.com
Page 23

4.2. Quick Launch Buttons
These Quick Launch Buttons allow you to access Test Configuration on the Main Display Screen and
view Counter Report and Chart.
Function Descriptions – Test Configuration
The Test Configuration button on the Quick
Launch Buttons allows you to make test
settings.
Function Descriptions – Counter
Function Descriptions – Chart
For more information regarding to configure
NuApps-SwitchPerform’s test settings, please
refer to 4.5. Test Configuration on page 25.
The Counter button on the Quick Launch
Buttons allows you to view the counter report
of the current test.
For more information regarding to
NuApps-SwitchPerform’s counter report,
please refer to 4.6. Counter Report on page
31.
XTRAMUS TECHNOLOGIES®
23
The Chart button on the Quick Launch
Buttons allows you to view the statistics chart
of the current test.
For more information regarding to
NuApps-SwitchPerform’s chart, please refer to
4.7. Chart on page 33.
E-mail: sales@xtramus.com
Website: www.Xtramus.com
Page 24

4.3. System Status Overview
The System Status Overview allows you to view information regarding to XM-RM7 31 module cards that
were selected with NuApps-SwitchPerform. You can unfold the list with the
the
button.
button, and fold the list with
4.4. Control Buttons/Test Running Status Icon
The Control Buttons allow you to start/stop tests, and the Test Running Status Icon indicates if there’s
a test running.
Control Buttons
Start test
Stop test
Test Running Status Icon
XTRAMUS TECHNOLOGIES®
No test is underway
Test is running
24
E-mail: sales@xtramus.com
Website: www.Xtramus.com
Page 25

4.5. Test Configuration
The Test Configuration displayed on the Main Display Screen allows you to configure test
configurations.
There are two ways to access Test Configuration:
Accessing Port Config
• Click Test Configuration located on the Menu Bar.
• Click the Test Configuration button located on Quick
Launch Buttons.
The Test Configuration contains four sets of settings: Port Select, Media Type, General Configuration,
and DUT Information, which can be accessed by clicking the menu tabs located on the upper part.
¾ Port Select: The Port Select allows you to set the type of your DUT (Network Switch,
PC/Notebook, and Network Video Player) and choose the module cards/ports for performing
tests with NuApps-SwitchPerform.
¾ Media Type: The Media Type allows you to set all ports’ transmitting rate.
¾ General Configuration: The General Configuration contains detail configuration options.
¾ DUT Information: You can input DUT information with the DUT Information.
Please see the section down below for detail information regarding to the settings of Test Configuration.
XTRAMUS TECHNOLOGIES®
25
E-mail: sales@xtramus.com
Website: www.Xtramus.com
Page 26

4.5.1. Port Select
The Port Select allows you to set the type of your DUT (Network Switch, PC/Notebook, and Network
Video Player) and choose the module cards/ports for performing tests with NuApps-SwitchPerform.
Kind of Test Device
The Kind of Test Device field allows you to choose the type of your DUT for testing.
Network Switch
Set NuApps-SwitchPerform to perform tests on network switches. You have
select 2~8 ports for Network Switch test.
Set NuApps-SwitchPerform to perform tests on PC/Notebook. Please note that
the DUT PC/Notebook DUT must have NuApps-SwitchPerform-Client
PC/Notebook
installed and running. You have to select 1~4 port for the PC/Notebook test. For
more details about NuApps-SwitchPerform-Client, please refer to 5.
NuApps-SwitchPerform-Client on page 38.
Others
(Network Video Player)
Set NuApps-SwitchPerform to perform tests on network video player. You have
to select 1 port (and 1 port only) for the Network Video Player test.
Number of total selected ports
This field displays the number of ports you’ve selected.
Port Selecting Tree Menu
You can select the port/module card/chassis to perform tests by clicking the check box of the module
card/chassis. Also, you can unfold the tree menu with the
button, and fold the tree menu with the
button.
Apply
Apply and save the changes you’ve made on this page. After making any settings on this
page, you must click the Apply button or all changes will be lost.
XTRAMUS TECHNOLOGIES®
26
E-mail: sales@xtramus.com
Website: www.Xtramus.com
Page 27

4.5.2. Media Type
The Media Type allows you to set all ports’ transmitting rate.
Media Configuration
You can set the connection rate for all selected ports with the Media Type menu tab.
¾ Auto 1000M Full Duplex: Set all ports to 1000M full-duplex with auto-negotiation.
¾ Auto 100M Full Duplex: Set all ports to 100M full-duplex with auto-negotiation.
¾ Auto 100M Half Duplex: Set all ports to 100M half-duplex with auto-negotiation.
¾ Auto 10M Full Duplex: Set all ports to 10M full-duplex with auto-negotiation
¾ Auto 10M Half Duplex: Set all ports to 10M half-duplex with auto-negotiation.
Apply
Apply and save the changes you’ve made on this page. After making any settings on
this page, you must click the Apply button or all changes will be lost.
XTRAMUS TECHNOLOGIES®
27
E-mail: sales@xtramus.com
Website: www.Xtramus.com
Page 28

4.5.3. General Configuration
Packet Generation Mode
You can set the NuApps-SwitchPerform’s Packet Generation Mode here. The Packet Generation Mode
includes:
¾ Fix Loading: NuApps-SwitchPerform will generate and send packets for the set amount of time or
number of packets.
¾ Burst: NuApps-SwitchPerform will generate and send packets in a burst manner for the set amount of
time, stop, and start generating and sending packets in a burst manner for another set amount of time.
The amount of times available in the scroll-down menu include: 200 ms (millisecond), 250 ms, 500 ms,
1 second, 2 seconds, 4 seconds, and 5 seconds.
¾ Communication Mode: The Communication Mode is only available
when you choose “Others (Network Video Player)” in Port Select setting
page’s “Kind of Test Device” field. Choosing this mode allows
NuApps-SwitchPerform to send user-defined packet streams to the DUT. When the Loop function is
enabled, NuApps-SwitchPerform will send the user-defined packets to the DUT in a loop-back manner.
The Interval field allows you to set the time interval (second) between each loop.
MAC Learning Setting*
The MAC Learning Setting function allows learning packets transmitted to the DUT before test p acket s are
transmitted.
¾ Frame Count: Repeat frame count per learning packets burst.
Port Configuration
Click the Enable Flow Control check box to enable NuApps-SwitchPerform’s flow control function. If the
flow control function is enabled, the transmitting rate will drop if traffic overflow occurs.
VLAN Setting*
Enable this function to add VLAN tag to packets.
XTRAMUS TECHNOLOGIES®
VLAN (Virtual LAN) is a group of hosts with common requirements that
communicate within the same Broadcast domain regardless of the physical
location.
By clicking the Setup button, you can configure CoS (class of service)
and VID (VLAN ID) on the pop-up VLAN Setup window by double-clicking
the CoS or VID field you would like to configure.
¾ OK: Apply the changes you made and exit VLAN Setup.
¾ Cancel: Cancel the changes you made and exit.
¾ Apply: Apply the changes you made without exiting.
28
E-mail: sales@xtramus.com
Website: www.Xtramus.com
Page 29

Packet Setting
The Packet Setting field allows you to set the time period or the number of packets that will be sent during
the test. Also, you can set the packet length and payload here as well.
¾ Transmitted by Time (Min/Sec): Packets will be sent for the set amount of time if you choose this
option. You can set the time by Min (Minutes) or Sec (Seconds).
¾ Transmitted by Packets: A set amount of packets (from 1 to 9,999,999,999) will be sent if you choose
this option.
¾ Packet Length (with CRC): You can set the packet length (with CRC) with the scroll-down menu here.
The packet lengths available here include 64 Bytes, 128 Bytes, 256 Bytes, 512 Bytes, 1024 Bytes, and
1518 Bytes.
¾ Payload: Y ou can set the p acket p ayload with the scroll-down menu here. The packet p ayloads available
here include All 0, Byte Increase, Byte Decrease, Word Increase, Word Decrease, 55AA,
5555AAAA, 8’0 8’1, 16’0 16’1, 32’0 32’1, 64’0 64’1, Random, and All 1.
¾ Insert Elongated Frame Gap: When enabling this function, a 1 bit-time of frame gap will be inserted
after a certain amount of packets are transmitted, and therefore, decrease packet loss.
Load Percentage (per port)
The Load Percentage (per port) field allows you to set the percentage for the packet traffic load. Please
note that the Load Percentage (per port) field will display differently when you choose Fix Loading and
Burst Mode in the Packet Generation Mode. Also, please note that the Load Percentage (per port) field
will be replaced by File Select if you choose Others (Network Video Player) as your DUT type and set the
packet generation mode to Communication Mode.
Burst Mode
¾ Rate: The network traffic rate (%) of the test.
Fix Loading
¾ Initial Rate: The starting network traffic rate (%) of the test.
¾ Max Rate: The maximum network traffic rate (%) of the test.
¾ Test Time Step: The
File Select
When choosing Others (Network Video Player) as your DUT type
and set the packet generation mode to Communication Mode, the
Load Percentage (per port) field will be replaced by File Select. The
File Select field allows you upload pre-defined WinPcap files
(“*.pcap”) saved on your PC.
¾ Initial File: The Initial File is a WinPcap file (“*.pcap”) needed to
initiate DUT when the test starts. Please click the Load button to
load the Initial File saved on your PC.
¾ Normal File: The Normal File is a WinPcap file (“*.pcap”) that will
be sent to the DUT for Network Video Player test after the DUT is
initiated by the Initial File. Please click the Load button to load the
Normal File saved on your PC.
Apply
Apply and save the changes you’ve made on this page. After making any settings on this
page, you must click the Apply button or all changes will be lost.
*Please note that both MAC Learning Setting and VLAN Setting are only available when performing tests
for Network Switch.
XTRAMUS TECHNOLOGIES®
29
E-mail: sales@xtramus.com
Website: www.Xtramus.com
Page 30

4.5.4. DUT Information
DUT Information
You can set the DUT information with the DUT Information. Information you input here will be
displayed on NuApps-SwitchPerform’s report.
¾ DUT Name: The model name of the DUT.
¾ Description: The brief description for the DUT.
¾ S/N: The serial number of the DUT.
¾ MAC: The MAC Address of the DUT.
Apply
Apply and save the changes you’ve made on this page. Af ter making any settings on this
page, you must click the Apply button or all changes will be lost.
XTRAMUS TECHNOLOGIES®
30
E-mail: sales@xtramus.com
Website: www.Xtramus.com
Page 31

4.6. Counter Report
You can view NuApps-SwitchPerform’s counter report here. There are two ways to access Counter
Report:
Accessing Counter Report
• Click Counter located on Report in the Menu Bar.
• Click the Counter button located on Quick Launch Buttons.
Accessing Counter Report
A Control Buttons
B Main Display Screen
XTRAMUS TECHNOLOGIES®
These buttons allow you to save the counter report, clear all
statistics, hide/show test statistics, and open the folder
where test statistics files are saved.
You can view counter statistics here in this section.
31
E-mail: sales@xtramus.com
Website: www.Xtramus.com
Page 32

4.6.1. Control Buttons
Control Buttons Descriptions
The Save button allows you to save the current counter reports to Microsoft Excel ® format
files.
The Clear All button allows you to clear all statistics displayed in the Main Display Screen.
The Hide button allows you to hide some of the TX/Rx statistics, as well as fold all tree style
tab statistics in the Main Display Screen.
The Show button allows you to show all TX/Rx statistics, as well as unfold all tree style tab
statistics in the Main Display Screen.
Click the Report Folder button to open the folder where the counter reports are saved. The
file path of the folder where the counter reports are saved is: C:\Program Files\NuStreams
\NuApps-SwitchPerform v1.0b008\Report\Counter.
4.6.2. Main Display Screen
Main Display Screen Descriptions
The Main Display Screen displays counter report statistics of all ports you’ve selected for test.
XTRAMUS TECHNOLOGIES®
32
E-mail: sales@xtramus.com
Website: www.Xtramus.com
Page 33

4.7. Chart
You can view test result charts here. There are two ways to access Chart:
Accessing Chart
• Click Chart located on Report in the Menu Bar.
• Click the Chart button located on Quick Launch Buttons.
Accessing Counter Report
A Control Buttons
B Test Information
C Chart Display Options
D Main Display Screen
E Throughput/Utilization
XTRAMUS TECHNOLOGIES®
These two buttons allow you to save the counter report,
clear all statistics, make chart display settings, and open the
folder where Chart files are saved.
Test information is displayed in this field.
The Chart Display Options allows you to adjust the chart
displayed in the Main Display Screen.
The Main Display Screen that displays the test chart. The
Elapsed Time is represented in X-Axis, while the
Utilization (%), Throughput (Mbps), Packets, and
Latency (microsecond, µs) are represented in Y-Axis.
These fields display the throughput/utilization information.
33
E-mail: sales@xtramus.com
Website: www.Xtramus.com
Page 34

4.7.1. Control Buttons
Control Buttons Descriptions
The Save button allows you to save the current chart as a “*.jpg” file.
The Clear All button allows you to clear all statistics displayed in the Main Display Screen.
The Scale Setting button allows you to adjust the Y-Axis scale of the chart displayed in the
Main Display Screen. A Vertical Axis Scale Setting window will pop up after you click this
button.
The Vertical Axis Scale Setting window allows
you to adjust the Y-Axis scale of the chart
displayed in the Main Display Screen. You can
adjust the scale of Network
Utilization Rate (%),
Network Throughput (Mbps), Number of
Packets for Packet Loss/CRC Error, and
Transmitting/Receiving Latency
(microsecond, µs) displayed here.
The display mode of Y-Axis can be set as Auto or
User Define:
¾
Auto: NuApps-SwitchPerform will adjust the
display scale of Y-Axis automatically.
¾
User Define: You can define the minimum
and the maximum values in these fields
. Only
values between the minimum and the
maximum values you set here will be
displayed on the chart.
After setting the display mode of Y-Axis, you can
click OK to save all the changes you’ve made
and exit, Cancel to cancel all the changes and
exit, or click Apply to save all the changes you’ve
made without existing Vertical Axis Scale
Setting.
Click the Report Folder button to open the folder where the charts are saved. The file path of
the folder where the charts are saved is: C:\Program Files\NuStreams
\NuApps-SwitchPerform v1.0b008\Report\Chart.
XTRAMUS TECHNOLOGIES®
34
E-mail: sales@xtramus.com
Website: www.Xtramus.com
Page 35

4.7.2. Test Information
The Test Information field displays information regarding to test settings and start/stop time of the test.
However, information displayed in the Test Information field is different when setting the Packet
Generation Mode to Burst Mode and Fix Loading.
A. Test Information –Burst Mode
Test Information Descriptions – Burst Mode
¾ Start Time: Test starting time. ¾ Stop Time: Test stopping
time
¾ DUT Name: The model name of
the DUT.
¾ Packet Length (with CRC): The
length of packets with CRC.
¾ Test Time Step: The Time
Step of the test.
¾ Rate: The network traffic
rate (%).
¾ Elapsed Time: The period of
time of the test.
¾ Packet Generation Mode: The
mode for test packet generating.
B. Test Information – Fix Loading
Test Information Descriptions – Fix Loading
¾ Start Time: Test starting time. ¾ Stop Time: Test stopping
time
¾ DUT Name: The model name of
the DUT.
¾ Packet Length (with CRC): The
length of packets with CRC.
¾ Test Time Step: The Time
Step of the test.
¾ Initial Rate: The starting
network traffic rate (%).
¾ Elapsed Time: The period of
time of the test.
¾ Packet Generation Mode: The
mode for test packet generating.
¾ Max Rate: The maximum
network traffic rate (%).
XTRAMUS TECHNOLOGIES®
35
E-mail: sales@xtramus.com
Website: www.Xtramus.com
Page 36

4.7.3. Chart Display Options
Chart Display Options Descriptions
These buttons can show/hide the lines that represent different statistics base on their
categories:
Utilization
CRC Error
These check-boxes allow you to show/hide the lines that represent each different
statistics. Also, clicking these buttons allows you to highlight the statistics displayed on
the Main Display Screen.
The Port Display can show/hide the lines that represent different statistics base on
ports.
¾ All Port: Display all statistics as chart in the Main Display Screen of all ports.
¾ Select Port: Click the scroll-down menu to choose the port and display its
statistics as chart in the Main Display Screen.
The TxRx Display can show/hide the lines that represent different statistics base on
Transmitting/Receiving.
¾ Tx + Rx: Display all Transmitted/Received Packets statistics as chart in the
Main Display Screen.
¾ Tx: Display all Transmitted Packets statistics as chart.
¾ Rx: Display all Received Packets statistics as chart.
The Time Scale and Min Scale allow you to adjust the X-Axis scale of the chart
displayed in the Main Display Screen.
Throughput Packet Loss
Latency
XTRAMUS TECHNOLOGIES®
¾ Time Scale: The Time Scale allows you to adjust the chart displaying scale. To
view the chart in a short period of time, move the cursor towards the
view the chart in a long period of time, move the cursor towards the
icon. To
icon.
¾ Min Scale: You can set the starting value of the X-Axis here. Press the Set button
to apply the changes you made in Min Scale.
36
E-mail: sales@xtramus.com
Website: www.Xtramus.com
Page 37

4.7.4. Main Display Screen
Main Display Screen Descriptions
The Main Display Screen displays the test statistics as chart. Statistics displayed here are Utilization,
Throughput, Packet Loss, CRC Error, and Latency. They are represented with lines in different
colors as shown in the table down below:
Utilization
CRC Error
Throughput Packet Loss
Latency
You can highlight specific statistics and hide/show the lines by clicking its representing button or check
box on the Chart Display Options field as shown in the figure down below.
→
Statistics Chart without Highlights
4.7.5. Throughput/Utilization
Statistics Chart with Utilization Highlighted
Throughput (Mbps)
¾ Max: Maximum throughput ¾ Min: Minimum through ¾ Current: Current throughput
Utilization (%, per Sec.)
¾ Max: Maximum utilization ¾ Min: Minimum utilization ¾ Average: Average utilization
XTRAMUS TECHNOLOGIES®
37
E-mail: sales@xtramus.com
Website: www.Xtramus.com
Page 38

5. NuApps-SwitchPerform-Client
NuApps-SwitchPerform-Client is a utility software specifically designed for PC/Notebook
when performing PC/Notebook Tests with NuApps-SwitchPerform.
PC with NuApps-SwitchPerform-Client installed can receive packets and transmit these
packets back, thus making NuApps-SwitchPerform PC/Notebook Test possible.
Please note that when performing PC/Notebook Tests with NuApps-SwitchPerform,
NuApps-SwitchPerform-Client must be installed on the PC or Notebook you would like to test.
5.1. Installing/Uninstalling NuApps-SwitchPerform-Client
Installing NuApps-SwitchPerform-Client
1. Double-click NuApps-SwitchPerform-Client
installation program and start the installation
process.
2. InstallShield Wizard is starting to install
NuApps-SwitchPerform-Client. If you would like
to cancel installation, click “Cancel”.
3. Click “Next” to continue installation.
XTRAMUS TECHNOLOGIES®
38
E-mail: sales@xtramus.com
Website: www.Xtramus.com
Page 39

Installing NuApps-SwitchPerform-Client
4. Click “I accept the terms in the license
agreement”, and click “Next” to continue.
5. Click the Change… button to install the
program to another folder, or click Next button to
install the program into the default destination
folder, and then continue next step. Click Back
button to go back to the previous step to modify.
6. NuApps-SwitchPerform-Client InstallShield
Wizard will start installing momentarily. Click
Install button to start installation.
XTRAMUS TECHNOLOGIES®
39
E-mail: sales@xtramus.com
Website: www.Xtramus.com
Page 40

Installing NuApps-SwitchPerform-Client
7. InstallShield Wizard is installing
NuApps-SwitchPerform-Client.
8. If your PC does not have WinPcap installed, a
WinPcap Installer window will popup. Click Next
button to get ready to install, or click Cancel
button to stop. For more detail information
regarding to WinPcap, please visit their webpage
at:
www.winpcap.org.
9. WinPcap is preparing to install, or click Cancel
button to stop at any time.
XTRAMUS TECHNOLOGIES®
40
E-mail: sales@xtramus.com
Website: www.Xtramus.com
Page 41

Installing NuApps-SwitchPerform-Client
10. Review the license agreement before
installing. Click I Agree button to continue. It is
necessary to accept the agreement to install
WinPcap.
11. You can set if you would like to start WinPcap
driver when booting PC by clicking the check box.
Click “Install” to continue.
12. WinPcap is installing.
XTRAMUS TECHNOLOGIES®
41
E-mail: sales@xtramus.com
Website: www.Xtramus.com
Page 42

Installing NuApps-SwitchPerform-Client
13. WinPcap installation completes. Click Finish
button to close the wizard.
14. NuApps-SwitchPerform-Client installation
completes. Click Finish button to exit.
XTRAMUS TECHNOLOGIES®
42
E-mail: sales@xtramus.com
Website: www.Xtramus.com
Page 43

You can uninstall NuApps-SwitchPerform by:
Uninstalling NuApps-SwitchPerform-Client
• Click Start Æ Programs Æ
Xtramus Æ NuApps-Switch
Perform-Client Æ Uninstall
NuApps-SwitchPerform-Client.
• Go to the Control Panel, choose
NuApps-SwitchPerform-Client
from installed program list, and click
“Remove” to uninstall.
XTRAMUS TECHNOLOGIES®
43
E-mail: sales@xtramus.com
Website: www.Xtramus.com
Page 44

5.2. Starting NuApps-SwitchPerform-Client
Before starting NuApps-SwitchPerform-Client and performing PC/Notebook Test, PCs and
NuStreams-2000i/600i shall be connected as shown in the figure down below:
There are two ways to start NuApps-SwitchPerform-Client:
Starting NuApps-Sw itchPerform-Client
XTRAMUS TECHNOLOGIES®
44
• Click Start Æ Programs Æ Xtramus Æ
NuApps-SwitchPerform-Client.
• Double-click NuApps-SwitchPerform
-Client icon located on your PC’s
desktop.
E-mail: sales@xtramus.com
Website: www.Xtramus.com
Page 45

5.3. NuApps-SwitchPerform-Client Functions
NuApps-SwitchPerform Functions Overview
A Menu Bar
B NIC Status
C Connected By
D Tx/Rx Statistics
E Control Buttons
The Menu Bar allows you to exit NuApps-SwitchPerform-Client and
set/change the NIC for PC/Notebook Test.
The NIC Status displays the NIC (Network Interface Card) status.
This field displays the software connected to NuApps-SwitchPerform-Client.
The Tx/Rx Statistics displays statistics of transmitting/receiving packets.
These Control Buttons allows you to clear statistics counters, stop/start
connecting to the software, and exit NuApps-SwitchPerform-Client.
XTRAMUS TECHNOLOGIES®
45
E-mail: sales@xtramus.com
Website: www.Xtramus.com
Page 46

5.3.1. Menu Bar
NuApps-SwitchPerform-Client’s Menu Bar allows you to exit NuApps-SwitchPerform-Client and
set/change the NIC for PC/Notebook Test.
Function Descriptions – File
A prompt pop-up window will ask if you are sure to exit
Exit
NuApps-SwitchPerform-Client. Click YES to exit, or click NO to
cancel.
Function Descriptions – Config
Test
Configuration
A Select NIC for Testing window will pop up. By clicking the check-box, you can
choose the NIC (Network Interface Card) connected to XM-RM731 listed in the table for
PC/Notebook Test. Two modes are available here:
¾ Loopback Mode: Using ONE NIC for PC/Notebook Test. NuApps-SwitchPerform
will transmit/receive test packets to/from the selected NIC to test its network
capabilities.
¾ Rotate Mode: Using at least TWO NICs for PC/Notebook Test. NuApps
-SwitchPerform will transmit/receive test packets among the selected NICs to test
their network capabilities in a rotating manner. Please note that in order to use
Forwarding Mode, the PC/Notebook for PC/Notebook Test must have at least
TWO NICs and these TWO NICs must be selected in the NIC table. Up to
FOUR NICs can be selected here.
Click OK to apply all the changes you’ve made, or click Cancel to cancel and exit.
Function Descriptions – Help
About
An “About” window will pop up and show detailed
system information.
Xtramus
Web
XTRAMUS TECHNOLOGIES®
Open your default web browser and access Xtramus Website (www.xtramus.com).
46
E-mail: sales@xtramus.com
Website: www.Xtramus.com
Page 47

5.3.2. NIC Status
Function Descriptions – NIC Status
The NIC Status displays the selected NIC’s model name and MAC address.
5.3.3. Connected By
Function Descriptions – Connected By
The Connected By displays the software that’s connected with NuApps-SwitchPerform-Client.
5.3.4. Tx/Rx Statistics
Function Descriptions – Tx/Rx Statistics
The Tx/Rx Statistics displays the number of packets and Byte of transmitting/receiving packets.
5.3.5. Control Buttons
Function Descriptions – Control Buttons
The Clear Counter button allows you to clear all statistics displayed in Tx/Rx Statistics.
Press the Stop button to stop receiving/transmitting packets for PC/Notebook Test.
Press the Start button to start receiving/transmitting packets for PC/Notebook Test.
Press the Exit button to exit NuApps-SwitchPerform-Client.
XTRAMUS TECHNOLOGIES®
47
E-mail: sales@xtramus.com
Website: www.Xtramus.com
Page 48

Note: Information and specifications contained in this document are subject to change without notice.
XTRAMUS TECHNOLOGIES®
All products and company names are trademarks of their respective corporations.
Copyright © 2010 Xtramus Technologies, all rights reserved.
Do not reproduce, redistribute or repost without written permission from Xtramus.
Doc # USM_NuApps-SwitchPerform_V1.8_ENG_20101201
48
E-mail: sales@xtramus.com
Website: www.Xtramus.com
 Loading...