

Page 1

NuApps-QoS-RM
User’s Manual
USM Ver 1.1
Page 2

Foreword
Copyright
Copyright © 2012 Xtramus Technologies, all rights reserved. The information contained in this document is the property of Xtramus
Technologies. No part of this publication shall be reproduced, stored in a retrieval system, or transmitted, in any form or by any
means, without the prior written permission of Xtramus Technologies.
Disclaimer
The information contained in this document is subject to change without notice and does not represent a commitment on the part of
Xtramus Technologies. The information in this document is believed to be accurate and reliable. However, Xtramus Technologies
assumes no responsibility or liability for any errors or inaccuracies that may appear in the document.
Trademarks
NuApps-QoS-RM is a trademark or registered trademark of Xtramus Technologies. All other trademarks and registered
trademarks are the property of their respective owners.
Warranty
Xtramus Technologies warrants for the hardware provided along with this document under proper usage and conditions in normal
environment; any improper operation or in irregular environment may possibly cause this product NOT function well. For detailed
terms, please contact your local dealer.
Contact Information
Xtramus Technologies
E-mail: [email protected]
Website: www.xtramus.com
Tel: +886-2-8227-6611
Fax: +886-2-8227-6622
XTRAMUS TECHNOLOGIES®
2
E-mail: [email protected]
Website: www.Xtramus.com
Page 3
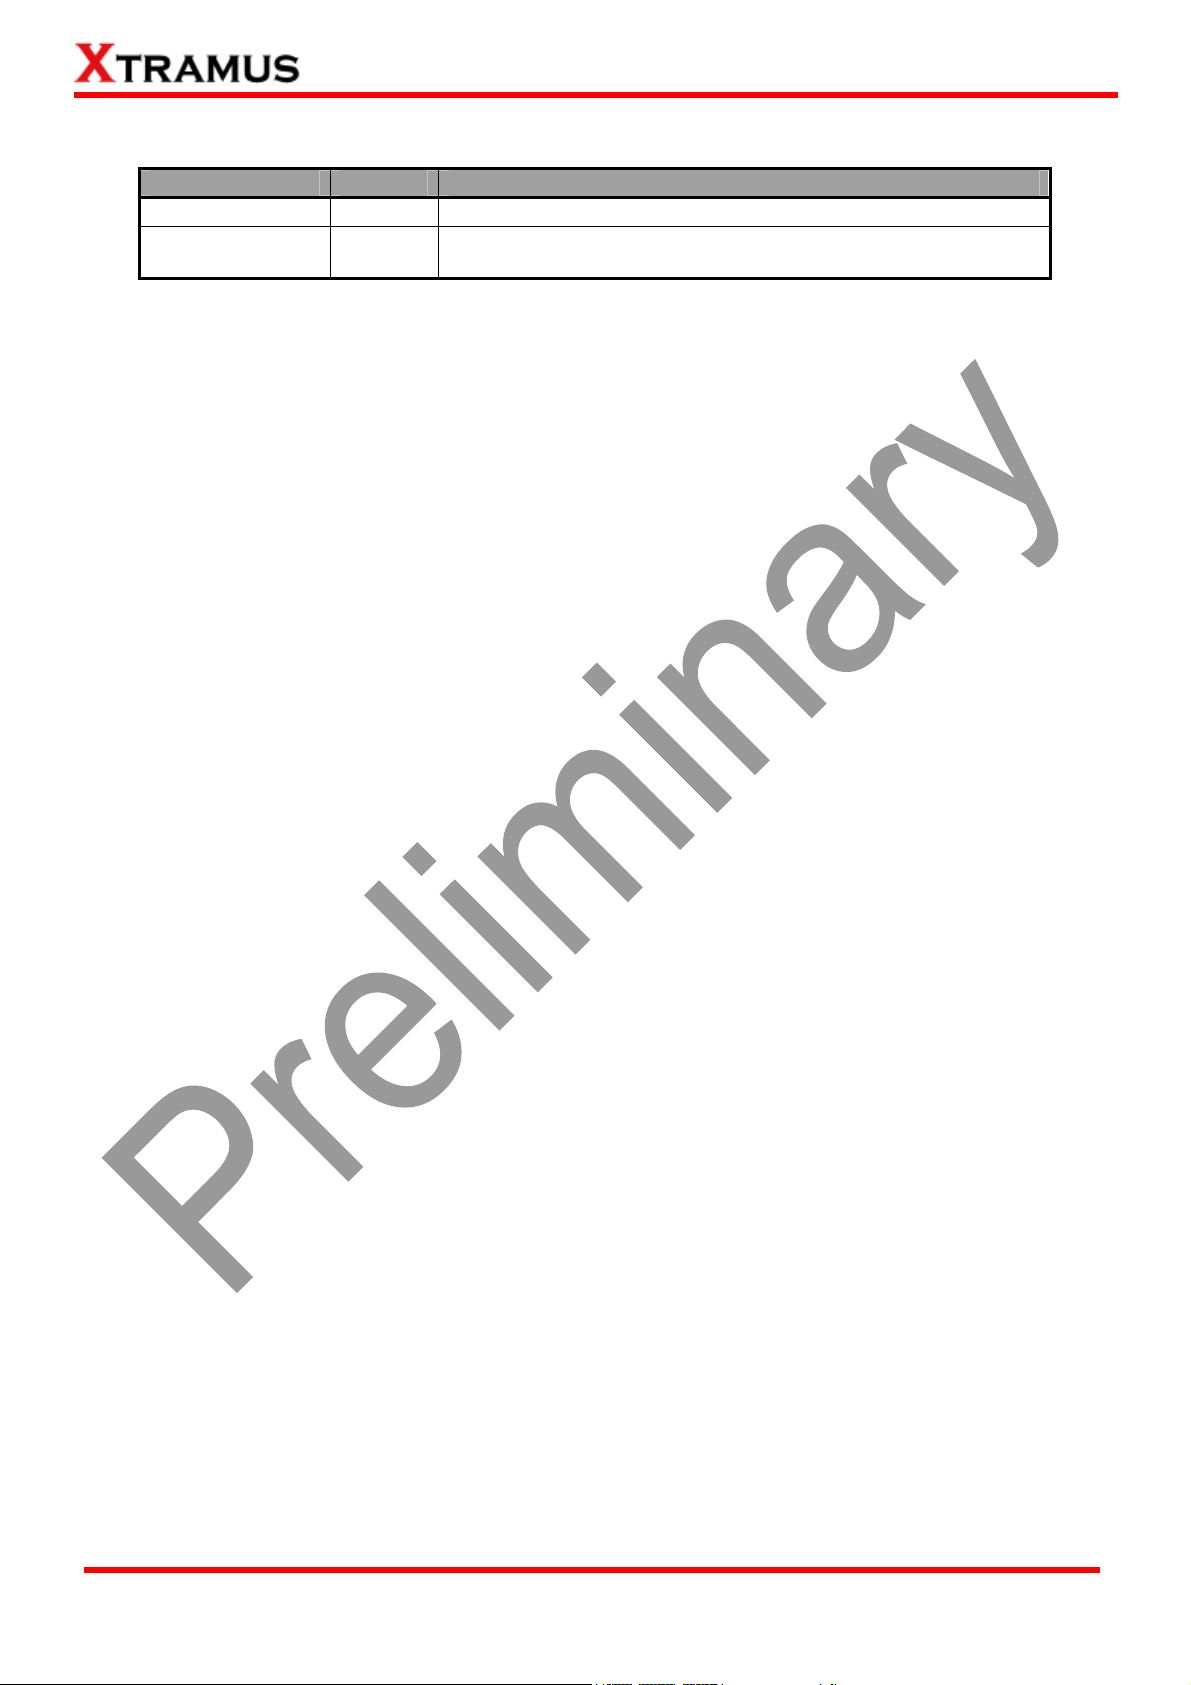
Revision History
Date Version History
2011/11/07 1.0 First draft version
2012/09/10 1.1
1. Deleting the description of NuApps-QoS-RM supports
operation system Windows 2000.(Page 5)
XTRAMUS TECHNOLOGIES®
3
E-mail: [email protected]
Website: www.Xtramus.com
Page 4

Table of Contents
Foreword ..........................................................................................................................................2
Revision History ..............................................................................................................................3
1. NuApps-QoS-RM Overview ........................................................................................................5
2. Installing/Uninstalling NuApps-QoS-RM ................................................................................... 6
2.1. Installing NuApps-QoS-RM................................................................................................ 6
2.2. Uninstalling NuApps-QoS-RM........................................................................................... 9
3. NuApps-QoS-RM Function Overview ...................................................................................... 10
3.1 Starting NuApps-QoS-RM .................................................................................................10
3.2 NuApps-QoS-RM/NuServer Overview..............................................................................16
4. NuApps-QoS-RM Functions ..................................................................................................... 18
4.1. Menu Bar ........................................................................................................................... 18
4.1.1. File ................................................................................................................................18
4.1.2. View ..............................................................................................................................19
4.1.3. Language...................................................................................................................... 19
4.1.4. Tool ...............................................................................................................................20
4.1.5. Help...............................................................................................................................21
4.2. Quick Launch Buttons ..................................................................................................... 22
4.3. System Info/Configuration List ....................................................................................... 25
4.4. Elapsed Time.....................................................................................................................26
4.5. Description........................................................................................................................ 27
4.6. Status Bar.......................................................................................................................... 28
4.8. Port Configuration............................................................................................................ 29
4.9. Test Configuration ............................................................................................................32
4.9.1. Pairing/Assigning Test Ports...................................................................................... 34
4.9.2. Test Configuration Overview ......................................................................................37
4.9.3. Throughput Test ..........................................................................................................38
4.9.4. Packet Loss Test ......................................................................................................... 40
4.9.5. Latency Test .................................................................................................................41
4.9.6. Latency Overtime Test ................................................................................................42
4.9.7. Latency Snapshot Test................................................................................................ 44
4.9.8. Jitter Test...................................................................................................................... 46
5. Report......................................................................................................................................... 47
XTRAMUS TECHNOLOGIES®
4
E-mail: [email protected]
Website: www.Xtramus.com
Page 5
1. NuApps-QoS-RM Overview
Network QoS (quality of service) is a way to classify the transmission priority of packets while the
volume of to-be-transmitted packets is beyond the Ethernet switch or router’s throughput
capability. Packets with higher priorities are processed and transmitted first. For Ethernet frame, each
packets can be tagged with a VLAN ID and CoS (class of service), and Layer 3 IP/UDP packets are
marked according to the type of service they need. For Ethernet switch or router that supports QoS,
packets higher CoS priority should be transmitted first if network traffic is congested. NuApps-QoS-RM can
limit acceptable network traffic at receiving port, analyze the traffic distribution of packets with different
priority received from router or switch, and test the performance of Layer 3 Router, Switch with QoS
function.
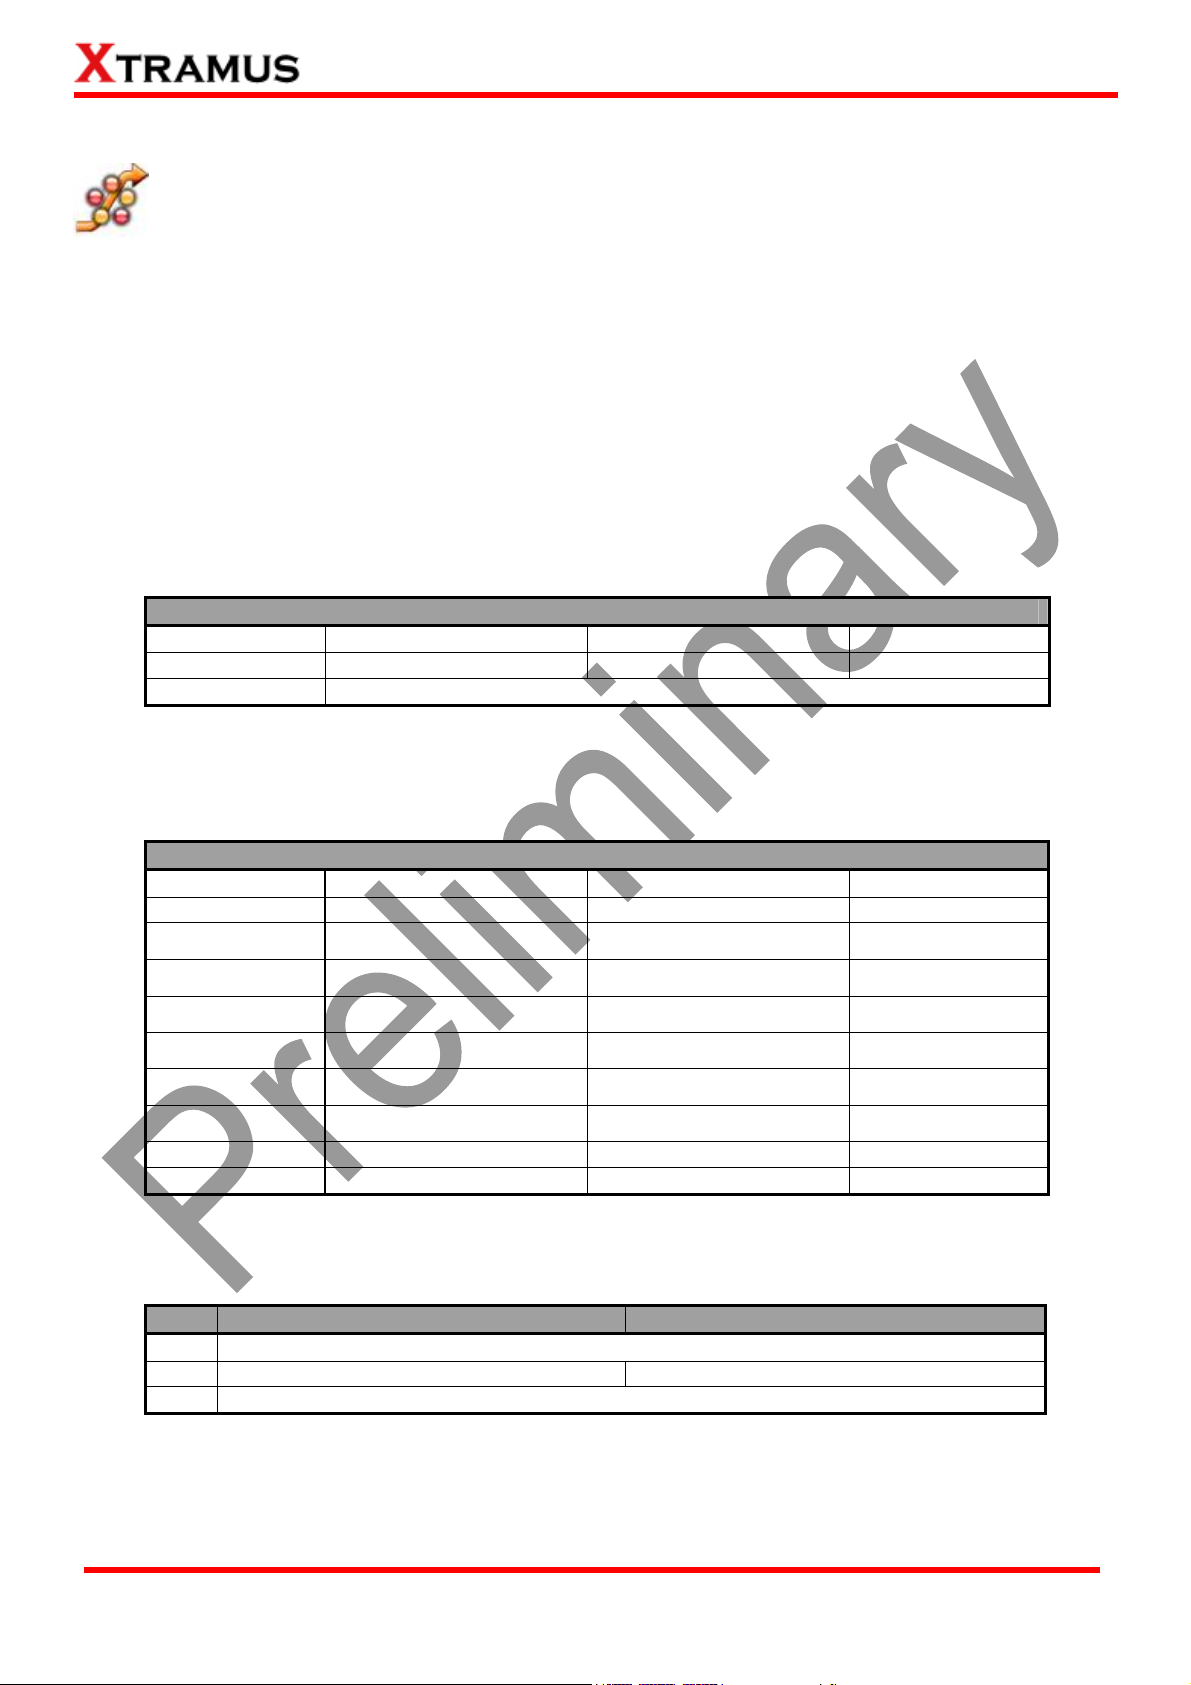
NuApps-QoS-RM is designed for Xtramus Technologies XM-RM series module cards listed in the table
down below:
Module Cards Support NuApps-QoS-RM
XM-RM661 XM-RM671 XM-RM681 XM-RM731
XM-RM751 XM-RM761 XM-RM781 XM-RM881
XM-RM891
*Note: NuStreams-2000i and NuStreams-600i are required as well
Also, the firmware FPGA/PROM version of your XM-RM module cards shall meet the requirements listed
down below:
Module Cards Requirements for NuApps-QoS-RM
Module FPGA Firmware PROM
XM-RM661
V3.0b016
V1.6b003 V1.6b002
XM-RM671 V3.0b016 V1.6b003 V1.6b002
XM-RM681 V3.0b016 V1.6b003 V1.6b002
XM-RM731
XM-RM751
XM-RM761
XM-RM781
XM-RM881
XM-RM891
V2.0b004
V3.0b016
V3.0b016
V3.0b016
V1.6b003 V1.6b002
V1.6b003 V1.6b002
V1.6b003 V1.6b002
V1.6b003
V1.6b002
V1.3b007 V0.9b005 V0.1b020
V1.3b003 V1.6b003 V1.6b002
Please make sure that your PC meets the requirements listed in the table down below before installing
NuApps-QoS-RM.
OS Windows XP Windows Vista/7
CPU
RAM
HDD
512MB RAM 1GB RAM
Pentium 1.3GHz or Higher
10GB Available Space
*Note: Large amount of data will be generated while running NuApps-QoS-RM. It is
recommended to preserve enough available Hard-Disk space to store these data.
XTRAMUS TECHNOLOGIES®
5
E-mail: [email protected]
Website: www.Xtramus.com
Page 6
2. Installing/Uninstalling NuApps-QoS-RM
2.1. Installing NuApps-QoS-RM
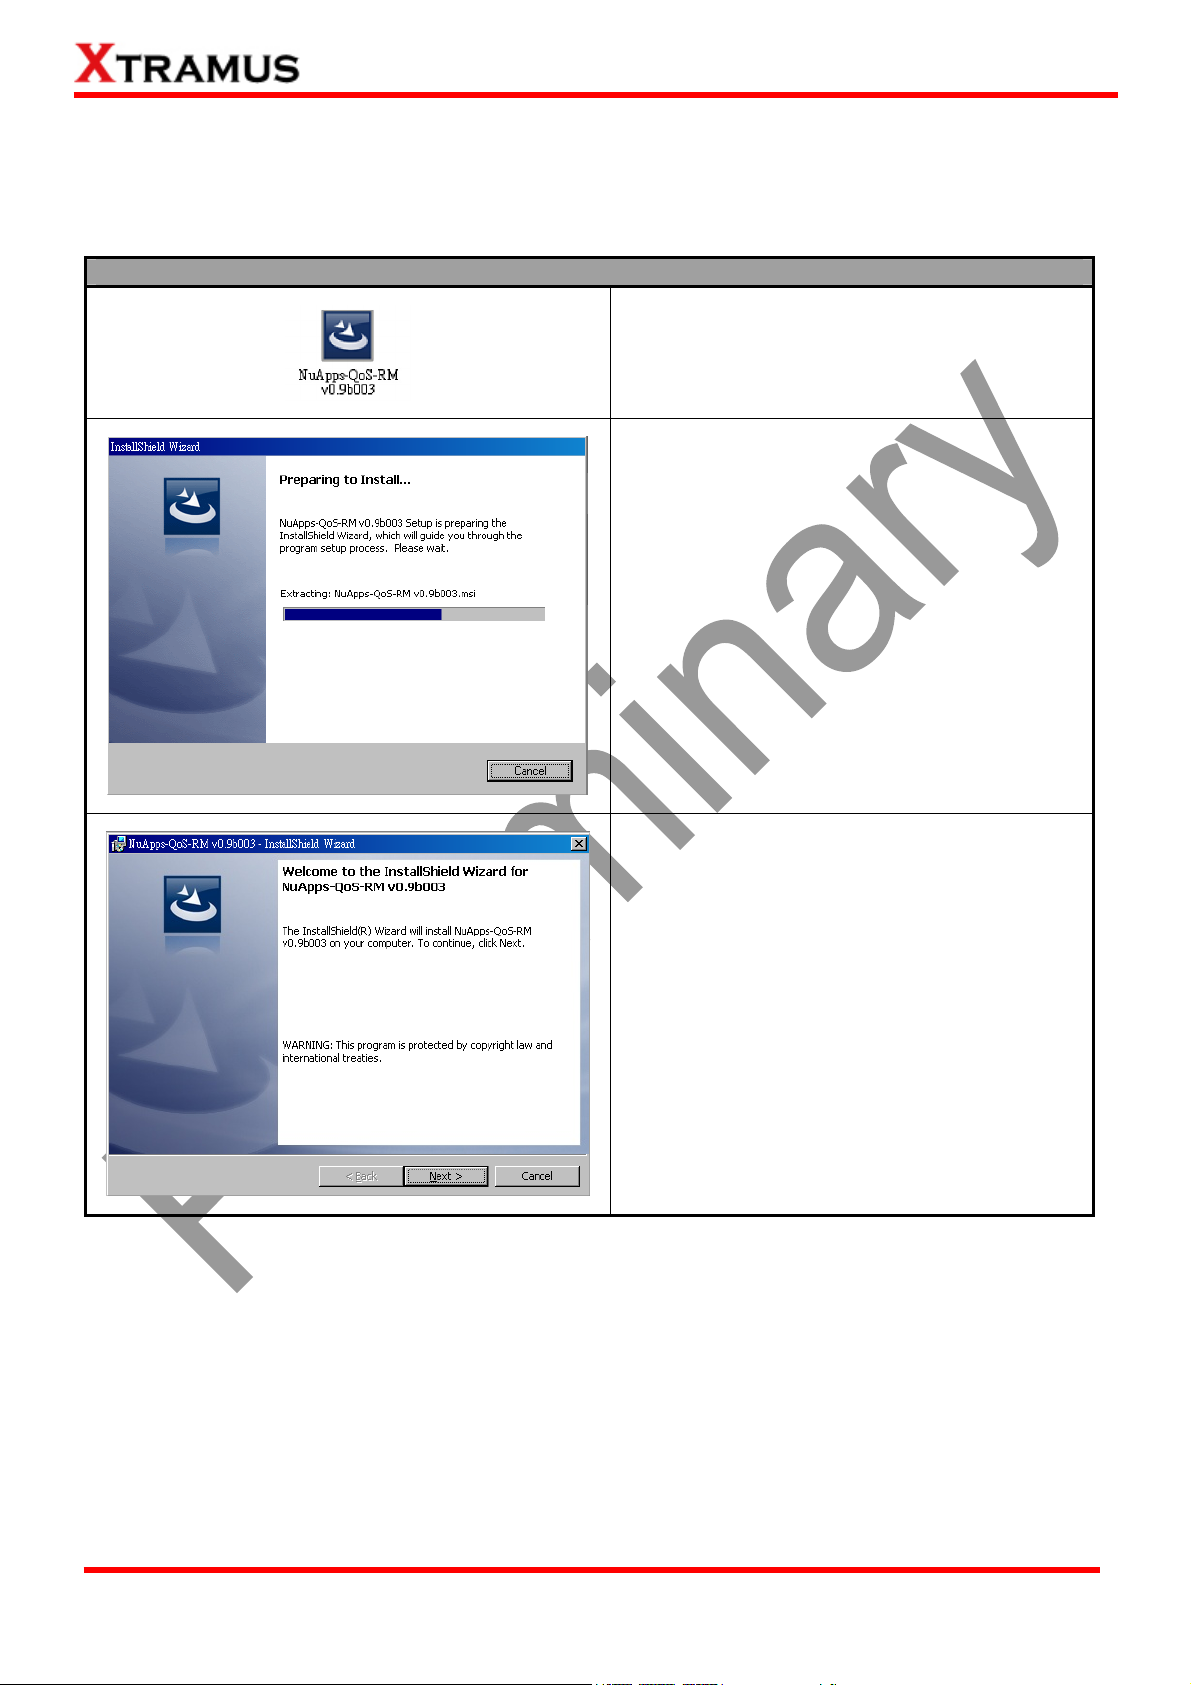
Please follow the steps down below to install NuApps-QoS-RM.
Installing NuApps-QoS-RM
1. Double-click NuApps-QoS-RM installation
program and start the installation process*.
2. InstallShield Wizard is starting to install
NuApps-QoS-RM. If you would like to cancel
installation, click “Cancel”.
3. Click “Next” to continue installation.
*Note: Due to different Operating System or system settings, warning messages might pop up when
installing NuApps-QoS-RM or driver for your device. When this occurs, please choose the options on
these pop-up warning messages that allow you to continue installing NuApps-QoS-RM or device
driver.
XTRAMUS TECHNOLOGIES®
6
E-mail: [email protected]
Website: www.Xtramus.com
Page 7
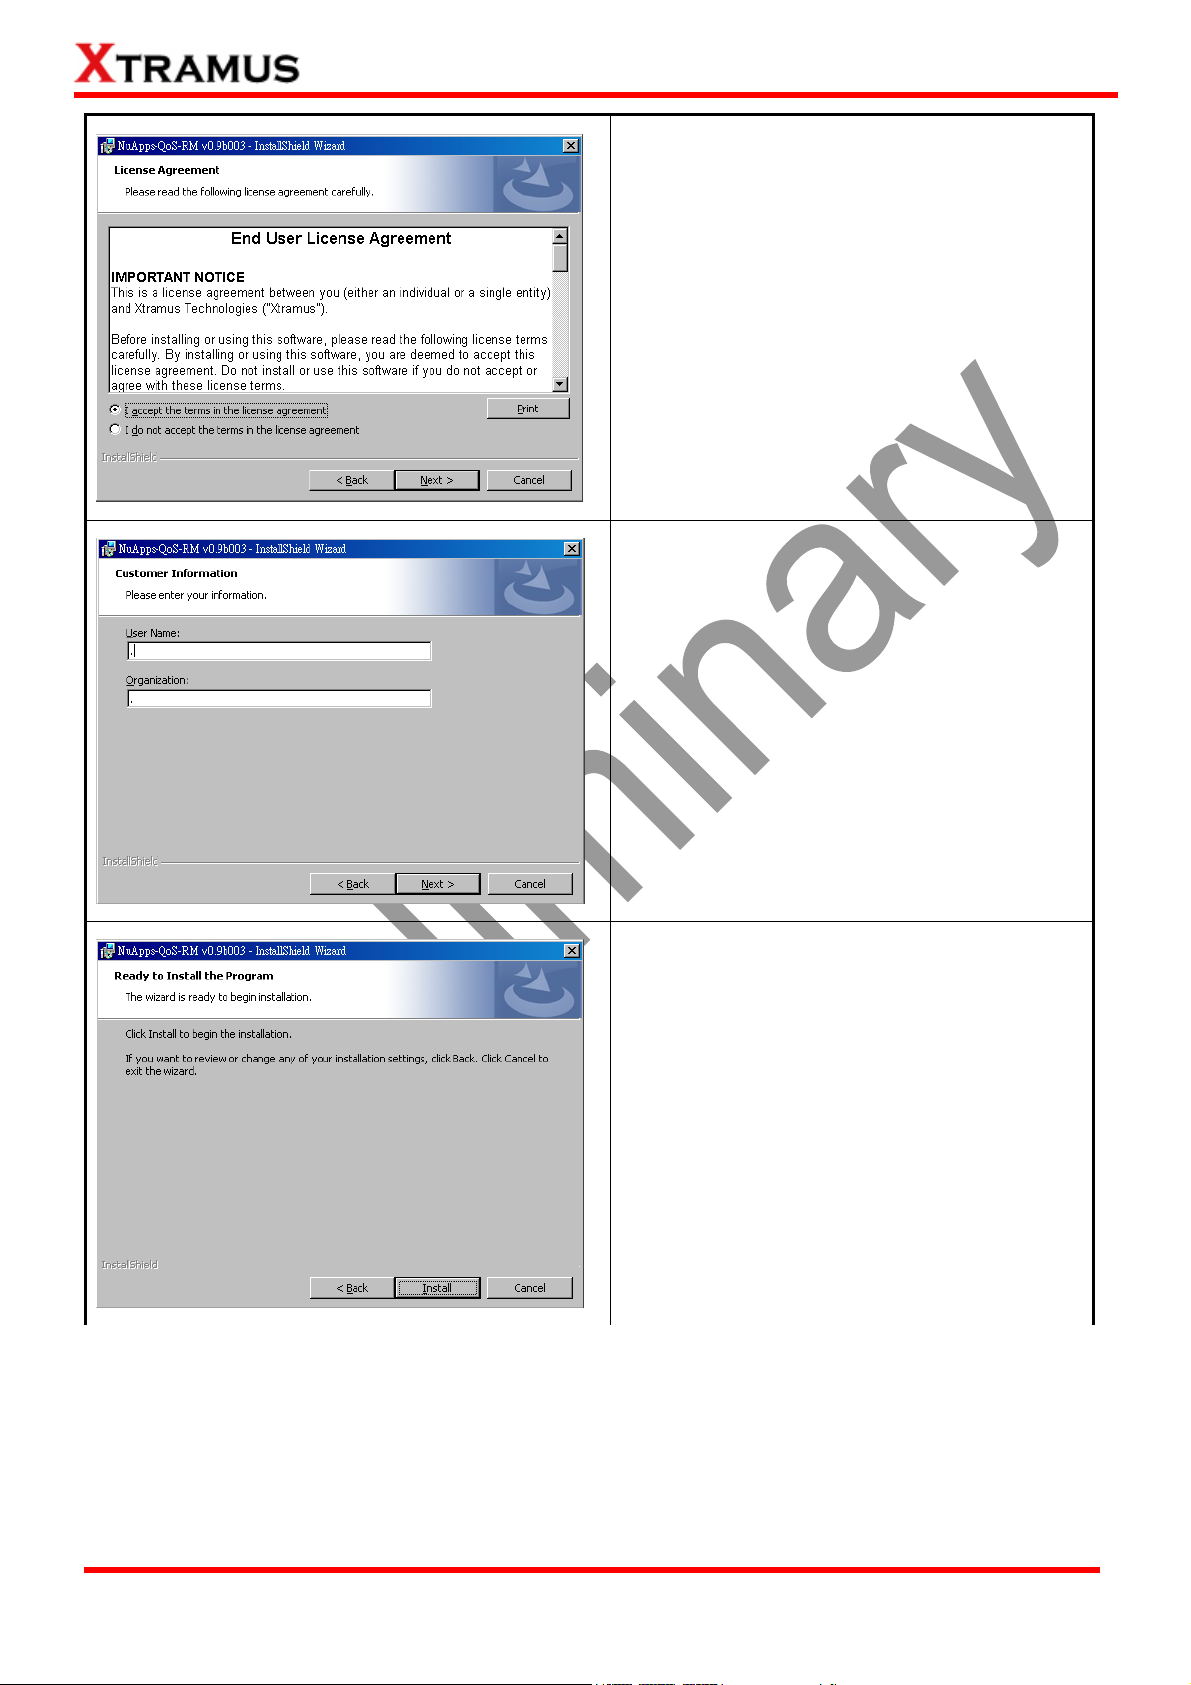
4. Click ”I accept the terms in the license
agreement”, and click “Next” to continue.
5. You can input Username and Organization
in the related fields. Click “Next” to continue.
6. NuApps-QoS-RM installShield Wizard will
start installing momentarily. Click “Install”
button to continue.
XTRAMUS TECHNOLOGIES®
7
E-mail: [email protected]
Website: www.Xtramus.com
Page 8
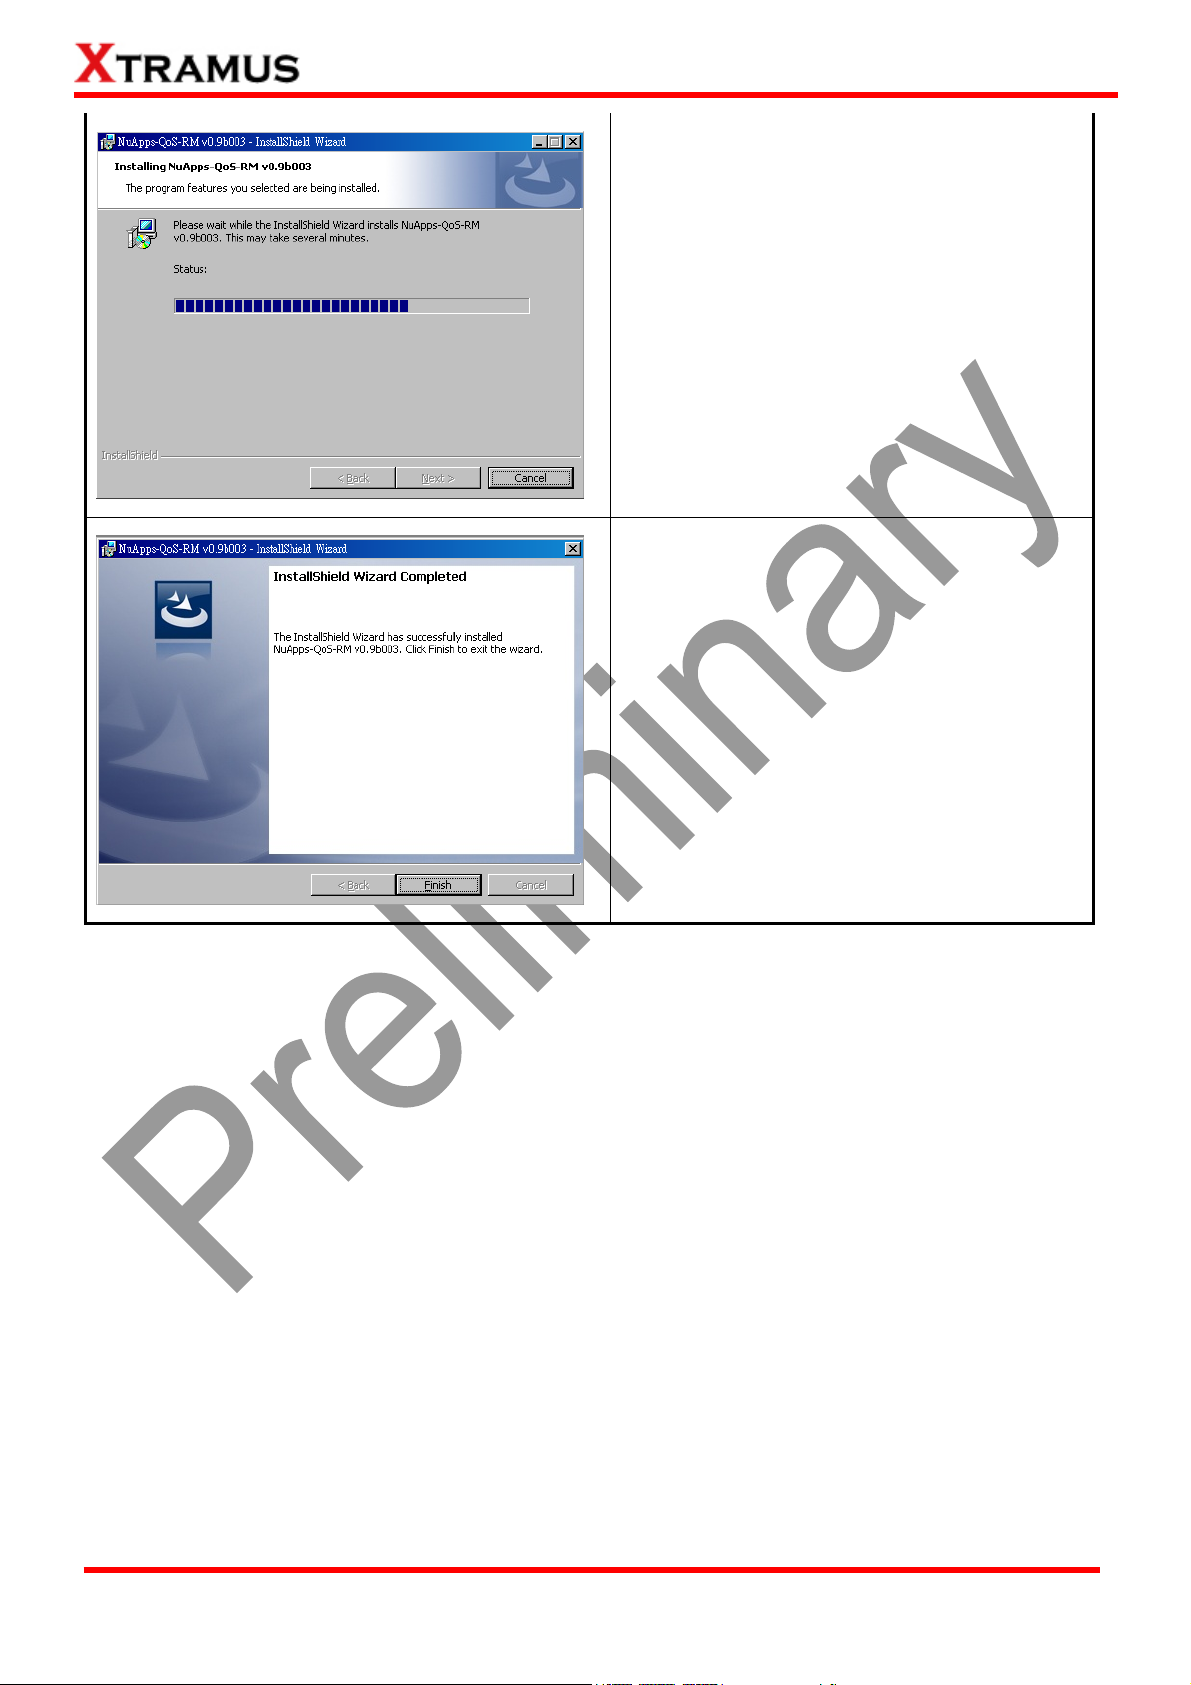
7. InstallShield Wizard is installing
NuApps-QoS-RM.
8. NuApps-QoS-RM installation completes.
Click Finish button to exit.
XTRAMUS TECHNOLOGIES®
8
E-mail: [email protected]
Website: www.Xtramus.com
Page 9
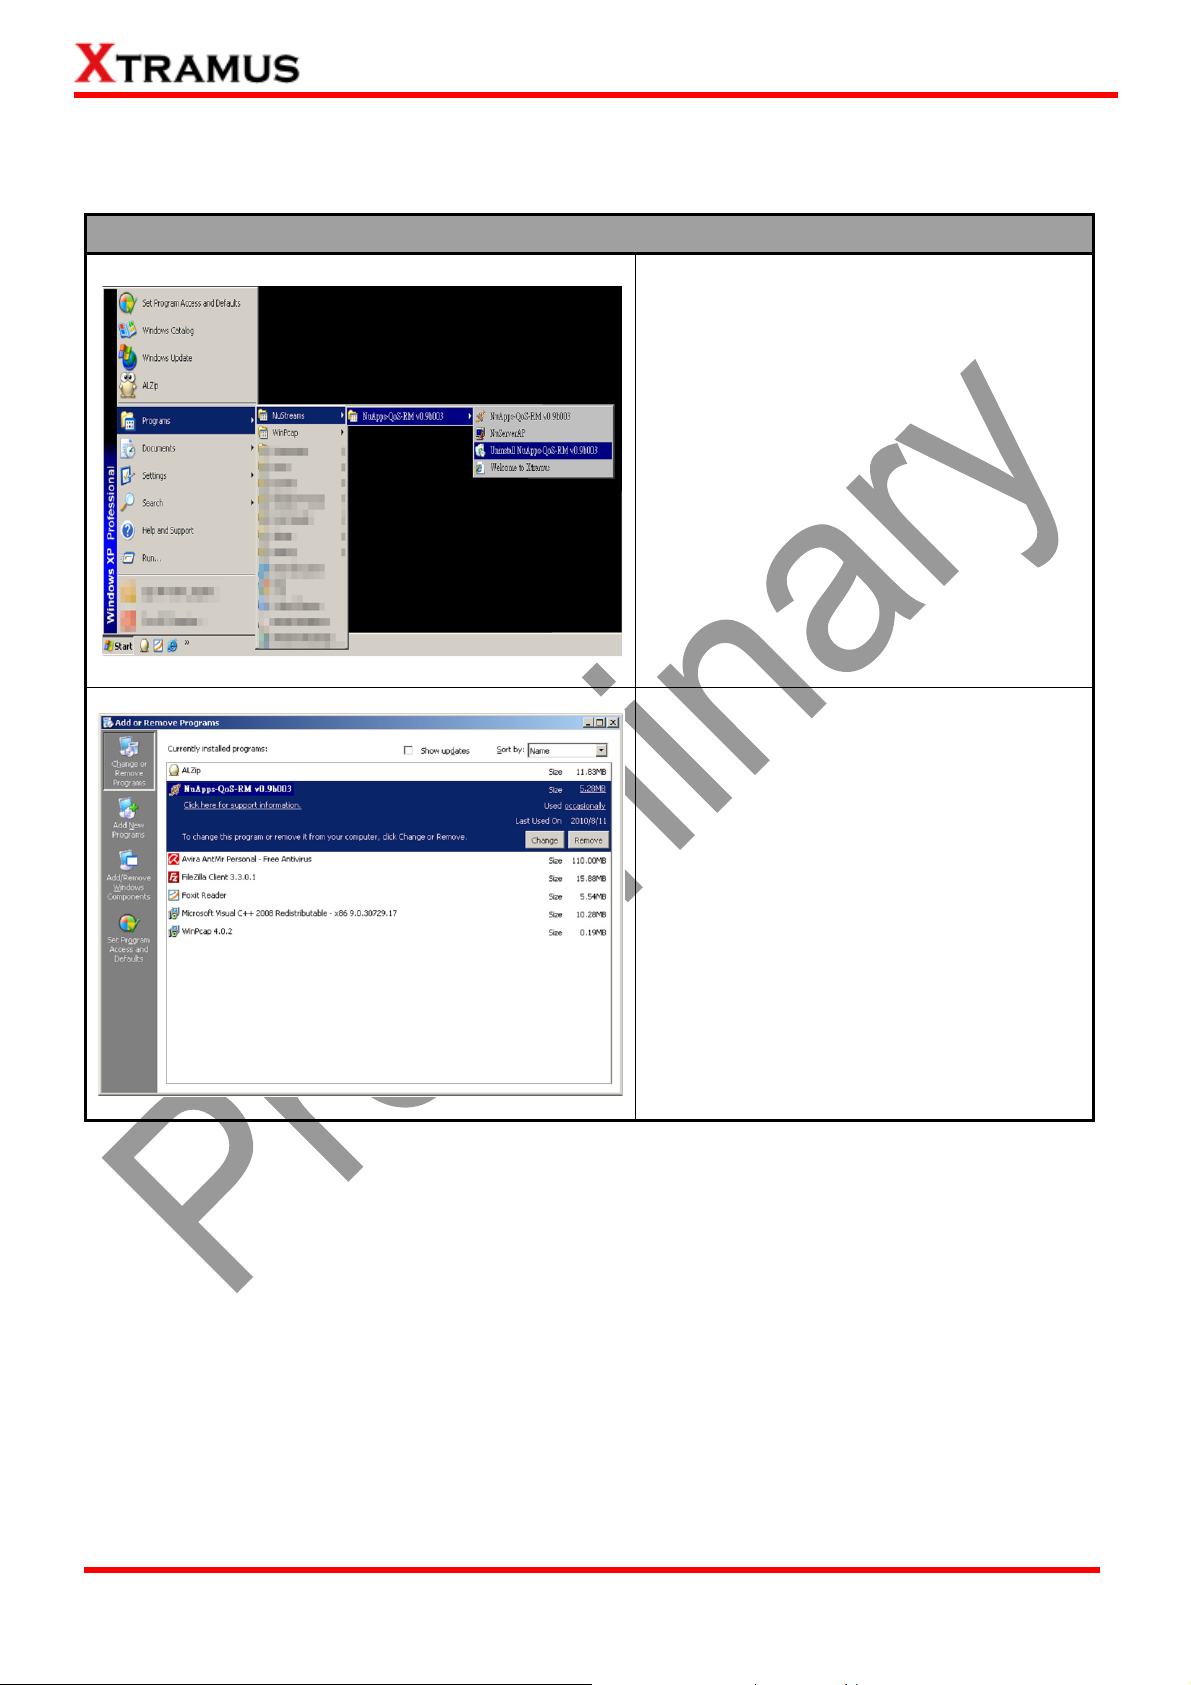
2.2. Uninstalling NuApps-QoS-RM
Please follow the steps down below to uninstall NuApps-QoS-RM.
Uninstalling NuApps-2544-RM
Click Start Æ Programs Æ NuStreams Æ
NuApps-QoS-RM Æ Uninstall
NuApps-QoS-RM.
Go to the Control Panel, choose
NuApps-QoS-RM from installed program
list, and click “Remove” to uninstall.
XTRAMUS TECHNOLOGIES®
9
E-mail: [email protected]
Website: www.Xtramus.com
Page 10
3. NuApps-QoS-RM Function Overview
3.1 Starting NuApps-QoS-RM
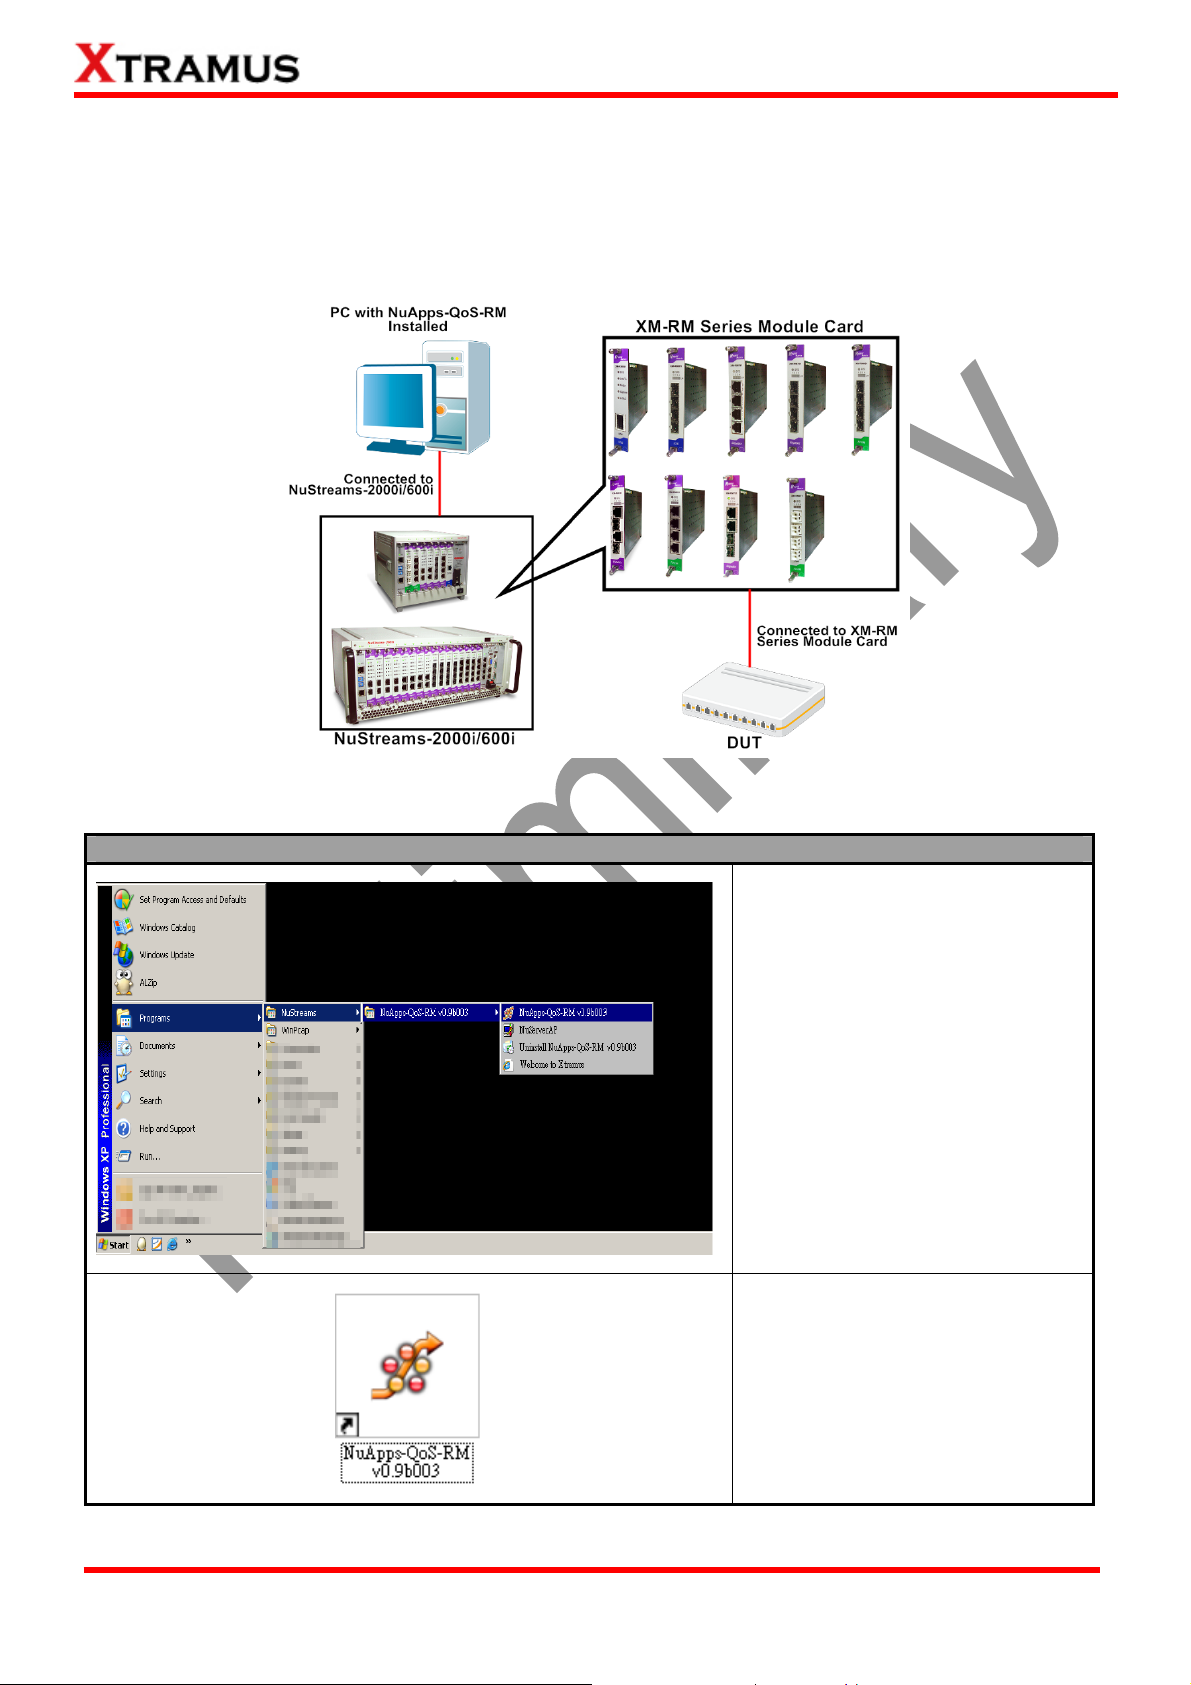
Before starting NuApps-QoS-RM, the DUT, your PC, and NuStreams-2000i/600i shall be connected
properly as show in the figure down below:
There are two ways to start NuApps-QoS-RM:
Starting NuApps-QoS-RM
Click Start Æ Programs Æ
NuStreams Æ NuApps-QoS-RM.
XTRAMUS TECHNOLOGIES®
Double-click NuApps-QoS-RM
icon located on your PC’s desktop.
10
E-mail: [email protected]
Website: www.Xtramus.com
Page 11
NuApps-QoS-RM Demo Mode
If your PC is not connected with NuStreams-2000i/600i, you can still run NuApps-QoS-RM under Demo
Mode. Almost all NuApps-QoS-RM’s functions are available under Demo Mode. However, please note
that Demo Mode is for system demo purposes only, and does not serve any testing purposes at all.
XTRAMUS TECHNOLOGIES®
11
E-mail: [email protected]
Website: www.Xtramus.com
Page 12
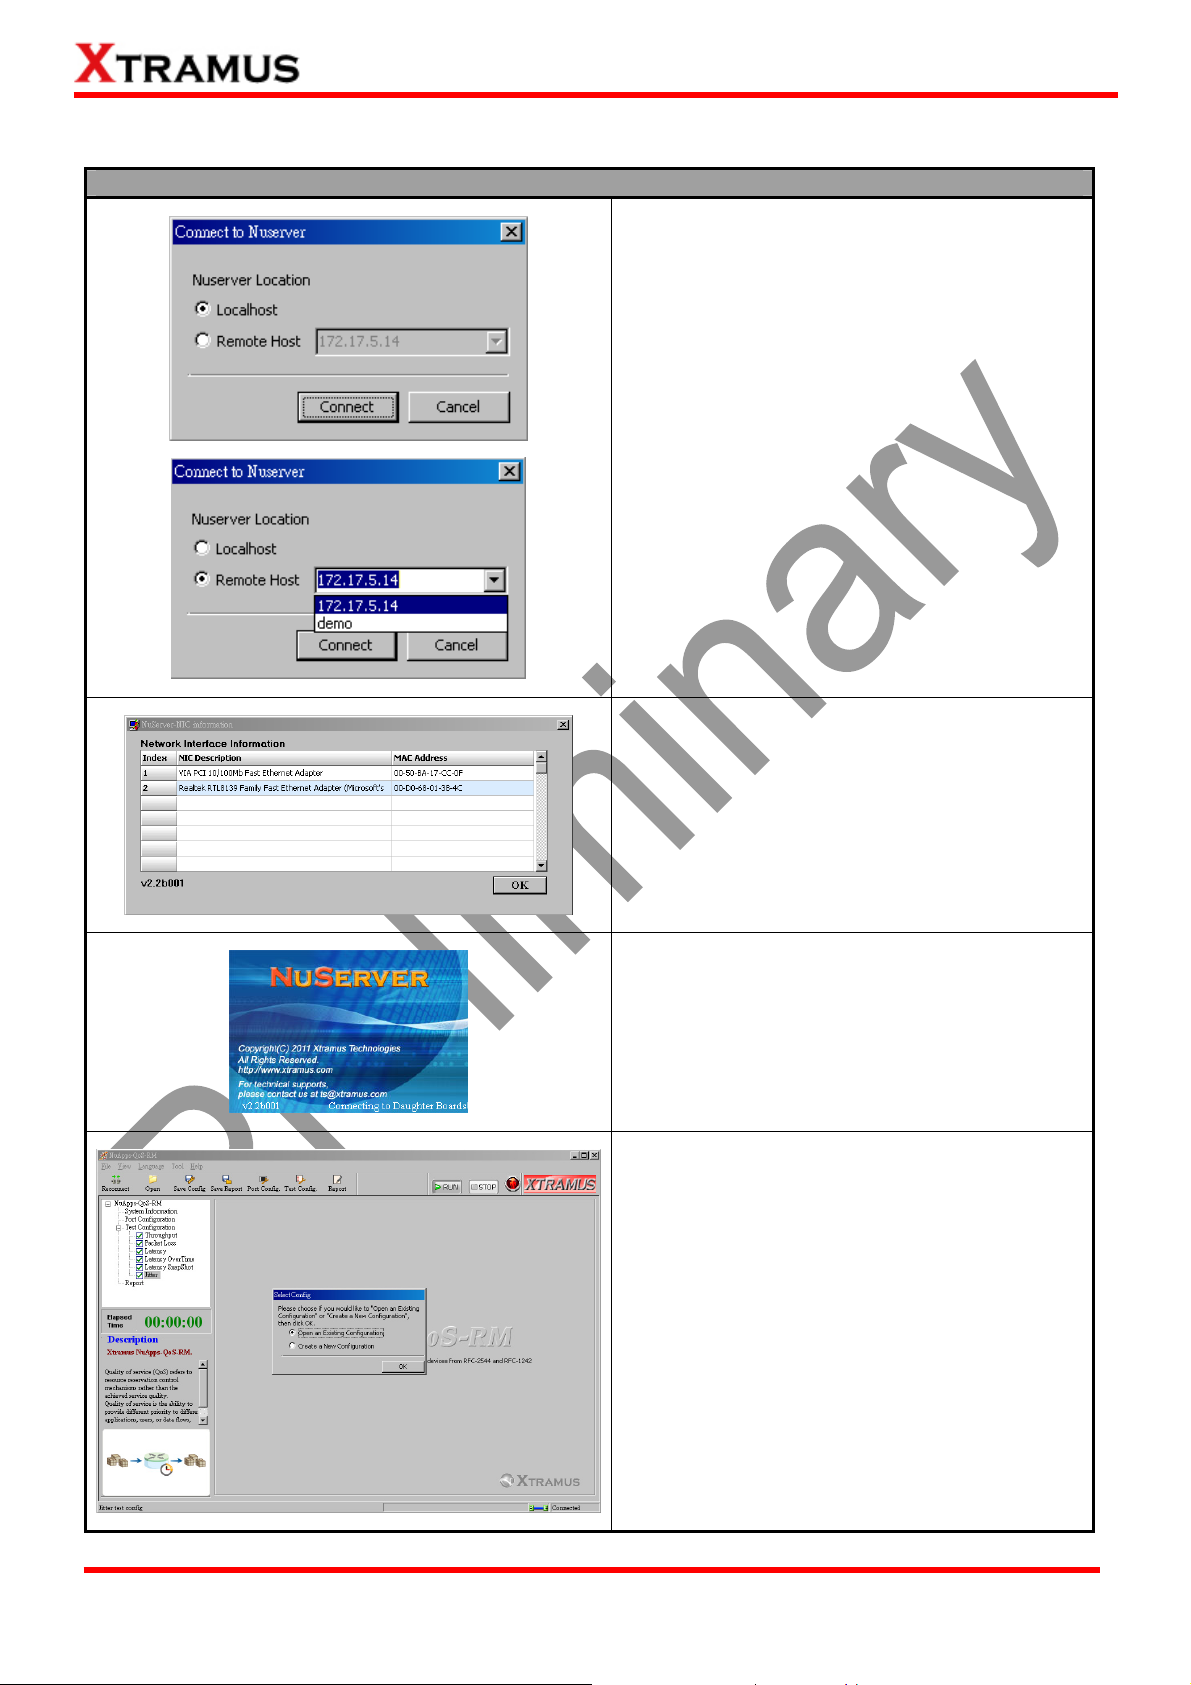
Please follow the steps down below to start NuApps-QoS-RM and NuServer properly.
Starting NuServer
When starting NuApps-QoS-RM, a “Connect
to NuServer” window will pop up and asked
how you are going to connect to NuServer.
z Local Host: Choose this option when
you-re running NuApps-QoS-RM from
NuStreams-2000i IPC module or a PC
that’s connected to NuStreams-2000i/600i
via an RJ45 cable.
z Remote Host: Choose this option when
you’re running NuApps-QoS-RM from
other PC located on the network. Choose
the IP address which is assigned from
NuStreams-2000i/600i from the
scroll-down menu, choose demo to enter
NuApps-QoS-RM’s Demo Mode.
z Connect/Cancel: Click the
Connect/Cancel button to connect to
NuStreams-2000i/600i or cancel starting
NuApps-QoS-RM.
If you choose the Local Host option, a
“NuServer-NIC Information” window will pop
up. Please select the NIC (Network Interface
Card) which is connected to
NuStreams-2000i/600i’s from the Network
Interface Information table, and click OK.
NuServer will connect to the daughter boards,
and NuApps-QoS-RM will start as well.
You now have access to NuApps-QoS-RM’s
main display window.
XTRAMUS TECHNOLOGIES®
12
E-mail: [email protected]
Website: www.Xtramus.com
Page 13
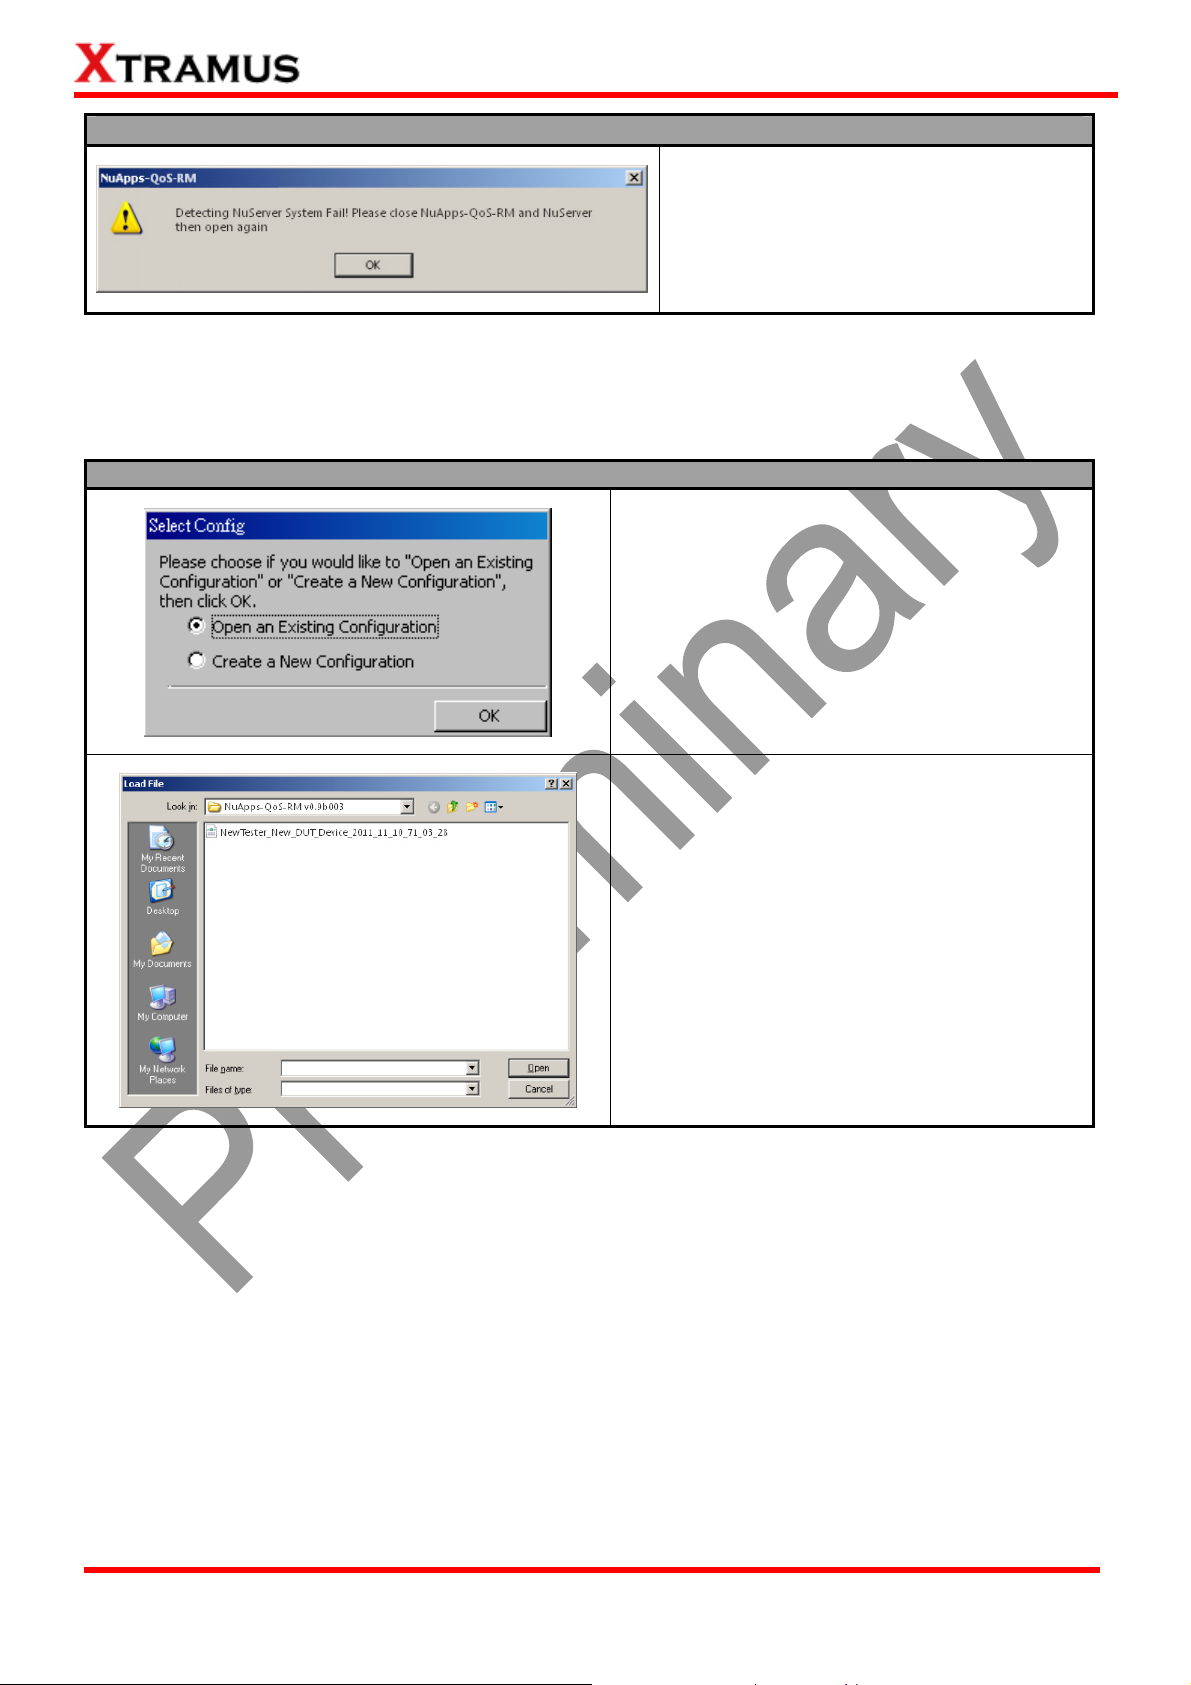
Starting NuServer
If an error message window pops up and
says “Detecting NuServer System Fail”,
please close NuApps-QoS-RM and
NuServer, and start again.
After starting NuApps-QoS-RM, a Select Config window will pop up. You have to reserve ports on module
cards before performing tests with NuApps-QoS-RM. Please follow the steps down below and make the
proper configurations for NuApps-QoS-RM.
Port Reserving
As mentioned above, you have to reserve ports
on module cards before performing tests with
NuApps-QoS-RM. You can do so by either
choosing Open an Existing Configuration or by
Create a New Configuration.
If you have a previously saved configuration file
stored in your PC, you can load it and apply all
the setting you’ve made by choosing “Open an
Existing Configuration” from the Select
Config pop-up window.
Configuration files are saved in the format of
“*.xml”, and are named with Tester Name, DUT
Name, and the date/time when the files are
created.
XTRAMUS TECHNOLOGIES®
13
E-mail: [email protected]
Website: www.Xtramus.com
Page 14
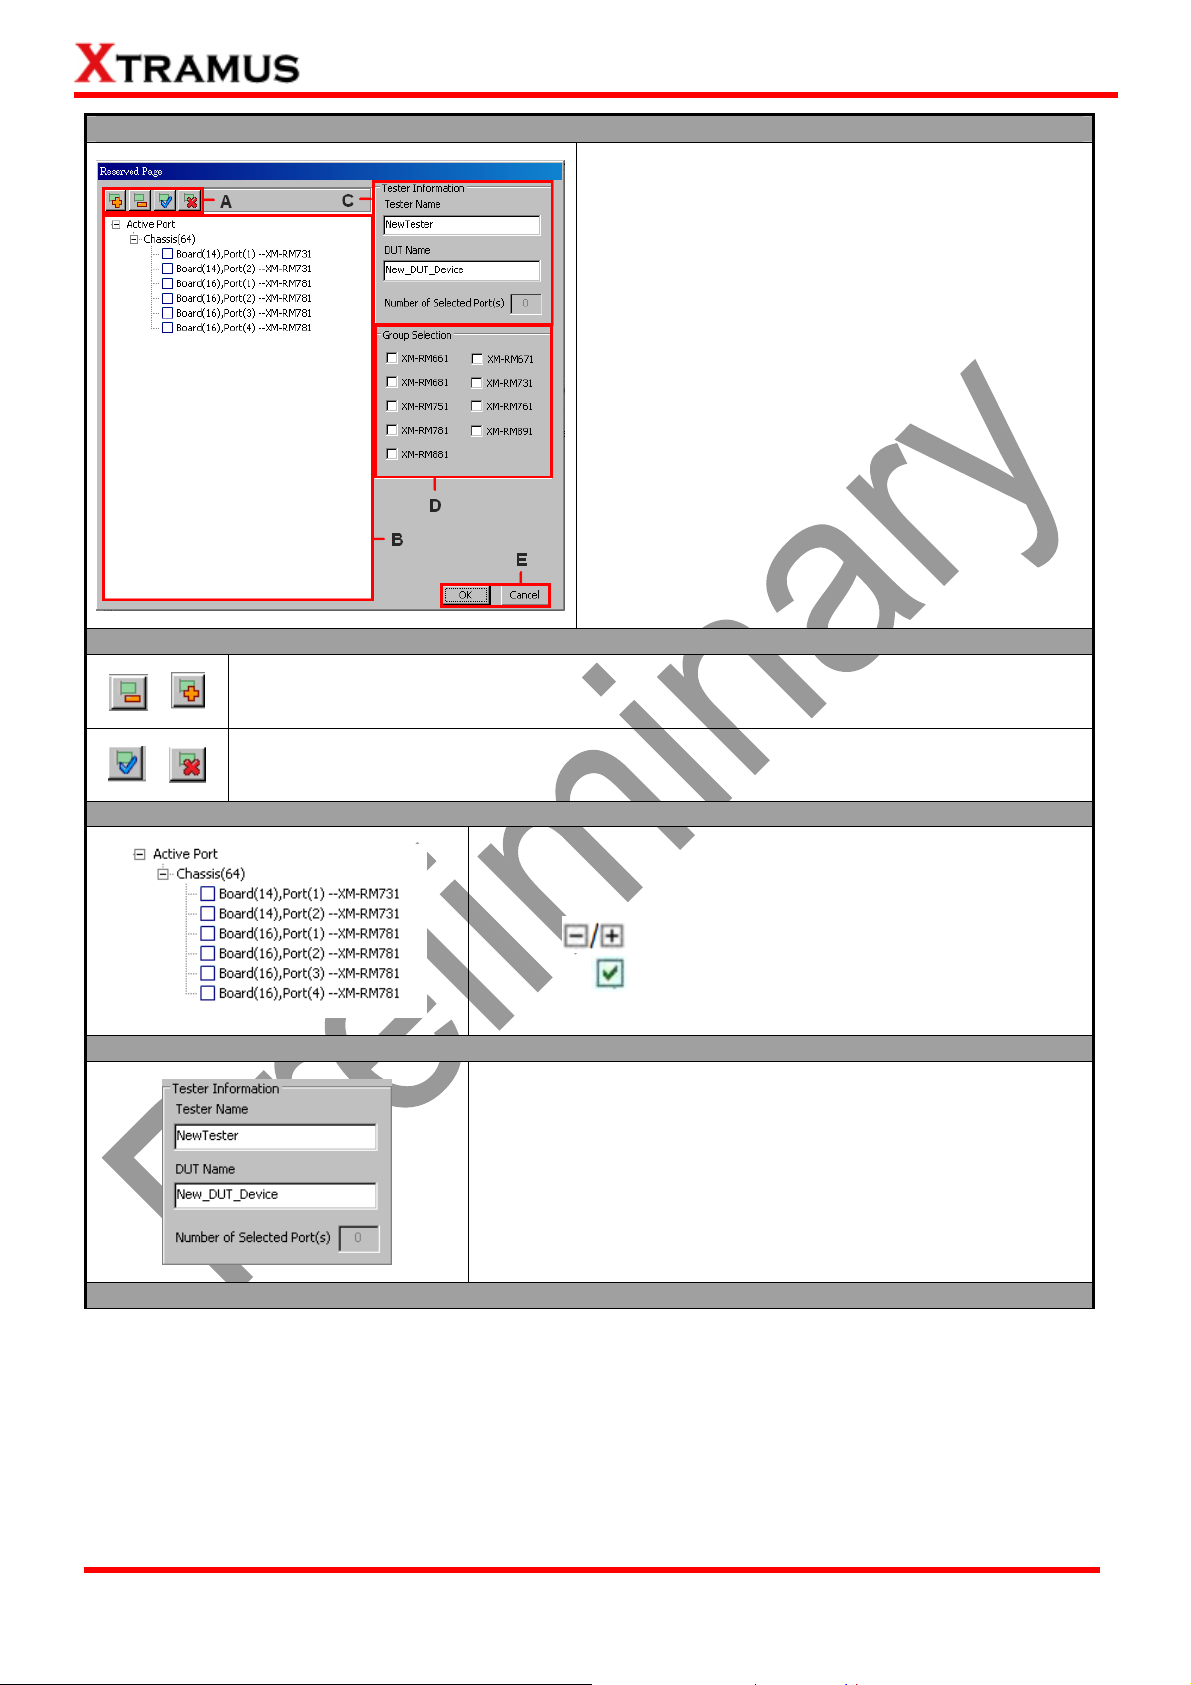
Port Reserving
A. Tree Style Tab Buttons
If you would like to make a new configuration,
please choose “Create a New Configuration”
from the Select Config pop-up window. A
Reserved Page window will pop up when you
choose to create a new configuration.
The Reserved Page pop-up window can be
divided as:
¾ A. Tree Style Tab Buttons
¾ B. Active Port Tree Style Tab
¾ C. Tester Information
¾ D. Group Selection
¾ E. OK/Cancel Buttons
After selecting the port for test performing, please
click OK button to continue.
These two buttons allow you to unfold/fold all the Active Port tree style tab displayed in
B.
These two buttons allow you to check/uncheck all the Active Port displayed in B.
B. Active Port Tree Style Tab
C. Tester Information
All the module cards along with their Active Ports are listed
here in this field. You can fold/unfold the tree style stab by
clicking
by clicking
icons. Also, you can check/uncheck the port
icon.
You can set the Tester Name and DUT Name here in the
Tester Information field. The Tester Name and DUT Name
you’ve set here will be applied when naming the configuration
files.
Also, the number of ports you’ve selected will be displayed in
Number of Selected Port(s) field.
D. Group Selection
XTRAMUS TECHNOLOGIES®
14
E-mail: [email protected]
Website: www.Xtramus.com
Page 15

Clicking the check box in front of each module card allows you
to active all the ports of the module cards.
XTRAMUS TECHNOLOGIES®
15
E-mail: [email protected]
Website: www.Xtramus.com
Page 16
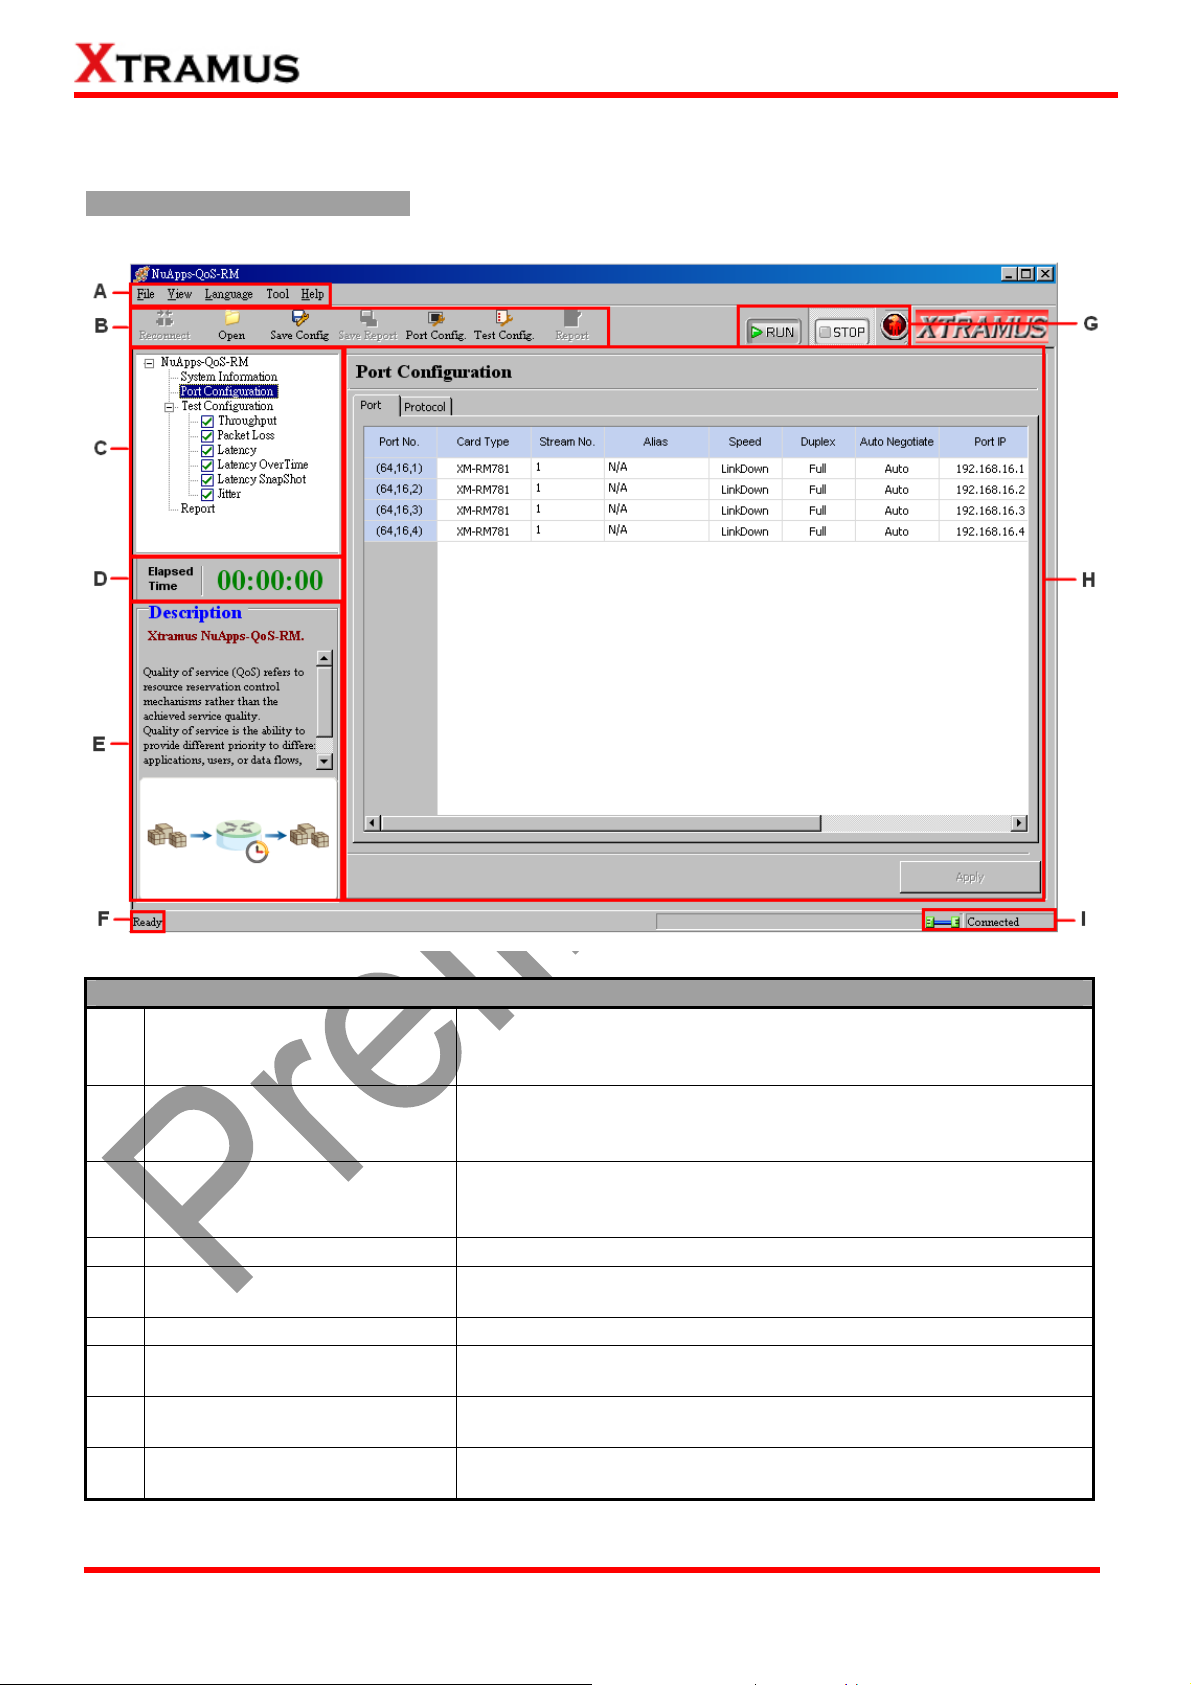
3.2 NuApps-QoS-RM/NuServer Overview
NuApps-QoS-RM Main Window
NuApps-QoS-RM Functions Overview
The Menu Bar allows you to save/load settings you made, to
A
Menu Bar
make settings about test criteria and change language
displayed.
The Quick Launch Buttons allow you to reconnect your PC to
B
Quick Launch Buttons
NuStreams-2000i/600i, open/save test settings, make test
configurations, and view or save your test reports.
System Info/Configuration
C
D
E
F
G
H
I
Control Buttons/Test
Running Status Icon
Main Display Screen
System Connection Status
List
Elapsed Time
Description
Status Bar
By clicking the System Info/Configuration List, you can view
system information, making port and test configurations, or
view test reports on Main Display Screen.
The Elapsed Time field displays the elapsed time during test.
The Description field display brief descriptions regarding to
tests.
The Status Bar shows the running status of NuApps-QoS-RM.
The Control Buttons all you to start/stop tests, and Test
Running Status Icon indicates if there’s a test running.
You can make detail configurations and view real-time testing
diagrams on the Main Display Screen.
This icon shows the connection status between your PC and
NuStreams-2000i/600i.
XTRAMUS TECHNOLOGIES®
16
E-mail: [email protected]
Website: www.Xtramus.com
Page 17

NuServer
Description
Module Card
Information
NIC Information
NuServer Version
This section displays the information regarding to the module cards that are
installed on NuStreams-2000i/600i. Model Cards IDs are showed as the format
of (X,Y,Z) while X is the number of the chassis (which is displayed on
NuStreams-2000i/600i), Y is the slot number where this module card is
installed, and Z is the available port number located on the module card.
This section displays the detail information (including NIC Model name, NIC’s
MAC address) regarding to the selected NIC.
This section displays the version of your NuServer.
XTRAMUS TECHNOLOGIES®
17
E-mail: [email protected]
Website: www.Xtramus.com
Page 18

4. NuApps-QoS-RM Functions
4.1. Menu Bar
NuApps-QoS-RM Menu Bar includes configuration options such as File, View, Language, Tool, and
Help. Please refer to the sections down below for detail information regarding to each configuration
option.
4.1.1. File
File
Load default
configuration
Save current
configuration
Set Report
Save path
to…
If you have a previously saved
configuration file stored in your
PC, you can load it and apply all
the setting you’ve made by
choosing “Open Existing
Configuration” from the Menu
Bar.
Configuration files are saved in
the format of”*.xml”, and are
named with Tester Name, DUT
Name, and the date/time when
the files are created.
The Save current configuration function on the Menu Bar allow you to save the
settings you’ve made or the test results.
To save the settings you’ve made, choose “Save current configuration” from the
Menu Bar before performing any tests, and choose the file path where you would
like to save the configuration file. Configuration files are saved in the format of “*.xml”.
To save the results, choose “Set Report Save Path to…” from the Menu Bar after
performing test, and choose the file path where you would like to save your test
results. Test results and related statics are available and can be viewed with the “*.xls”
file you saved this way. Please note that you need Microsoft Excel® to view “*xls” file.
Exit
XTRAMUS TECHNOLOGIES®
18
A prompt pop-up window will ask if
you are sure to exit
NuApps-QoS-RM. Click YES to
exit NuApps-QoS-RM, or click NO
to cancel.
E-mail: [email protected]
Website: www.Xtramus.com
Page 19
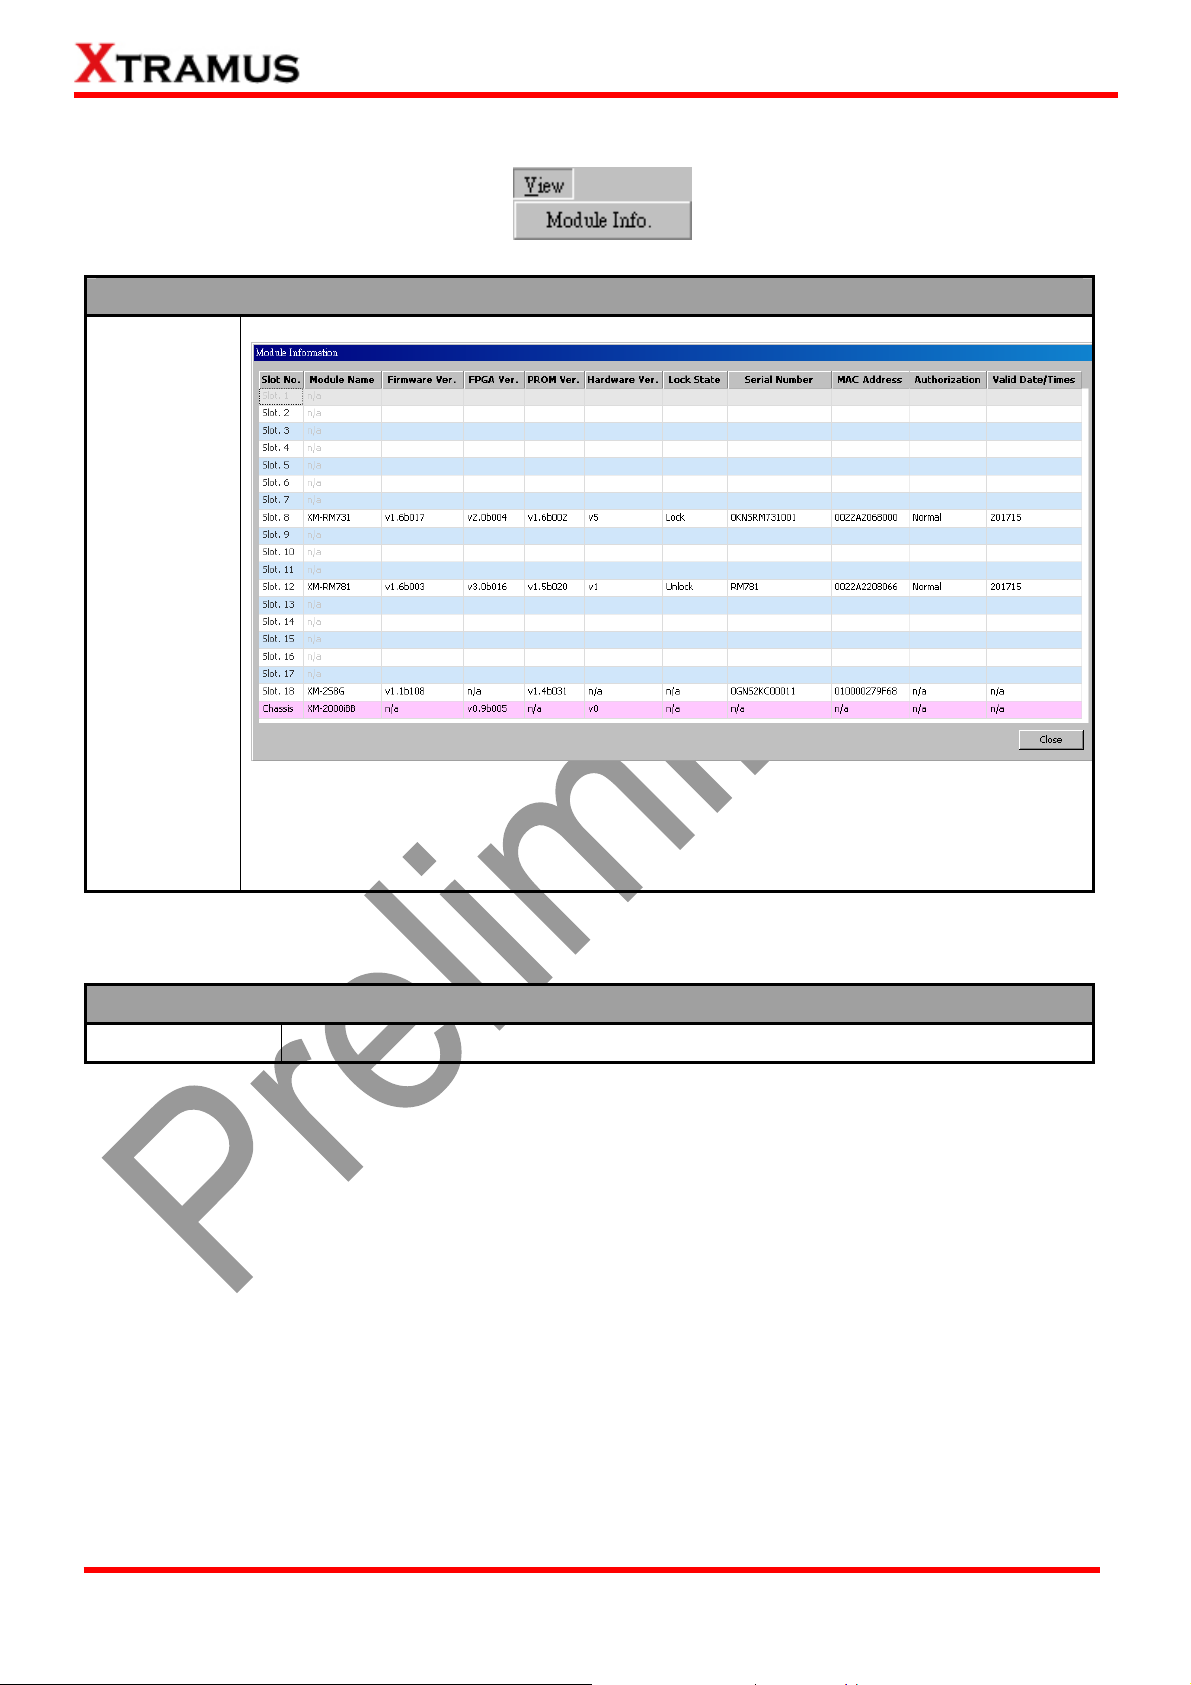
4.1.2. View
View
Module Info.
You can view all information regarding to the module cards you’ve installed on your
NuStreams-2000i/600i by View function on the Menu Bar.
Click “Close” to close the Module Information window.
4.1.3. Language
Language
English
The NuApps-QoS-RM’s UI illustration language is based on English.
XTRAMUS TECHNOLOGIES®
19
E-mail: [email protected]
Website: www.Xtramus.com
Page 20

4.1.4. Tool
Tool
Device Name
Tester Name
Auto
Negotiation
Learning
You can name your DUT in this field, the default name is New_DUT_Device.
You can name your Tester in this field, the default name is New Tester.
Min. Waiting Time The minimum waiting time (in seconds) for auto-negotiation.
If the time (in seconds) NuApps-QoS-RM spent for
MediaType Change
auto-negotiation exceeds the time you set here, the test will
Timeout
stop.
There’s 3 options for Learning Mode, choose “Never” to
Learning Mode
block learning function, choose “Once” to learn at the first
test trial, and choose “every trial” to learn at every test trial.
The value set here will be the number of learning packets
Learning Retry
that will be sent through the ports chosen to be learned for
building address table.
Delay time after
learning
You can set the period of time to delay after finishing with
learning function.
XTRAMUS TECHNOLOGIES®
20
E-mail: [email protected]
Website: www.Xtramus.com
Page 21

4.1.5. Help
Help
About
NuApps-QoS-RM
Click “About NuApps-QoS-RM…” to
pop up a window showing detailed
system information.
Click “OK” button to close this
window.
System
Requirements
Xtramus Web
A “System Requirements” window
will pop up and show the
requirements for your PC and the
FPGA/Firmware/PROM of the
module cards.
Click “OK” button to close this
window.
Open your default web browser and access Xtramus Website
(www.xtramus.com).
XTRAMUS TECHNOLOGIES®
21
E-mail: [email protected]
Website: www.Xtramus.com
Page 22

4.2. Quick Launch Buttons
In Quick Launch Buttons bar you can reconnect NuStreams-2000i/600i, open/save configuration files,
save your report, set your port/test configuration and see your report. Please refer to the section down
below for more detail descriptions regarding to Quick Launch Buttons.
Reconnect
If the connection between your PC and NuStreams-2000i/600i is down, a “Disconnected”
Open
icon
Press Reconnect button
will be shown in “System Connection Status”.
to re-establish the connection between your PC and
NuStreams-2000i/600i. If the connection has been established successfully, a message
window will pop up, and the “System Connection Status” will be shown as “Connected”
.
If you have a previously saved
configuration file stored in your PC, you
load it and apply all the setting you’ve
made by clicking Open button on the
Quick Launch Buttons.
Configuration files are saved in the
format of “*.xml”, and are named with
Tester Name, DUT Name, and the
date/time when the files are created.
Save Config
XTRAMUS TECHNOLOGIES®
22
You can save the current test settings
with the Save Config button on the
Quick Launch Buttons.
Configuration files are saved in the
format of “*.xml”, and are named with
Tester Name, DUT Name, and the
date/time when files are created.
E-mail: [email protected]
Website: www.Xtramus.com
Page 23
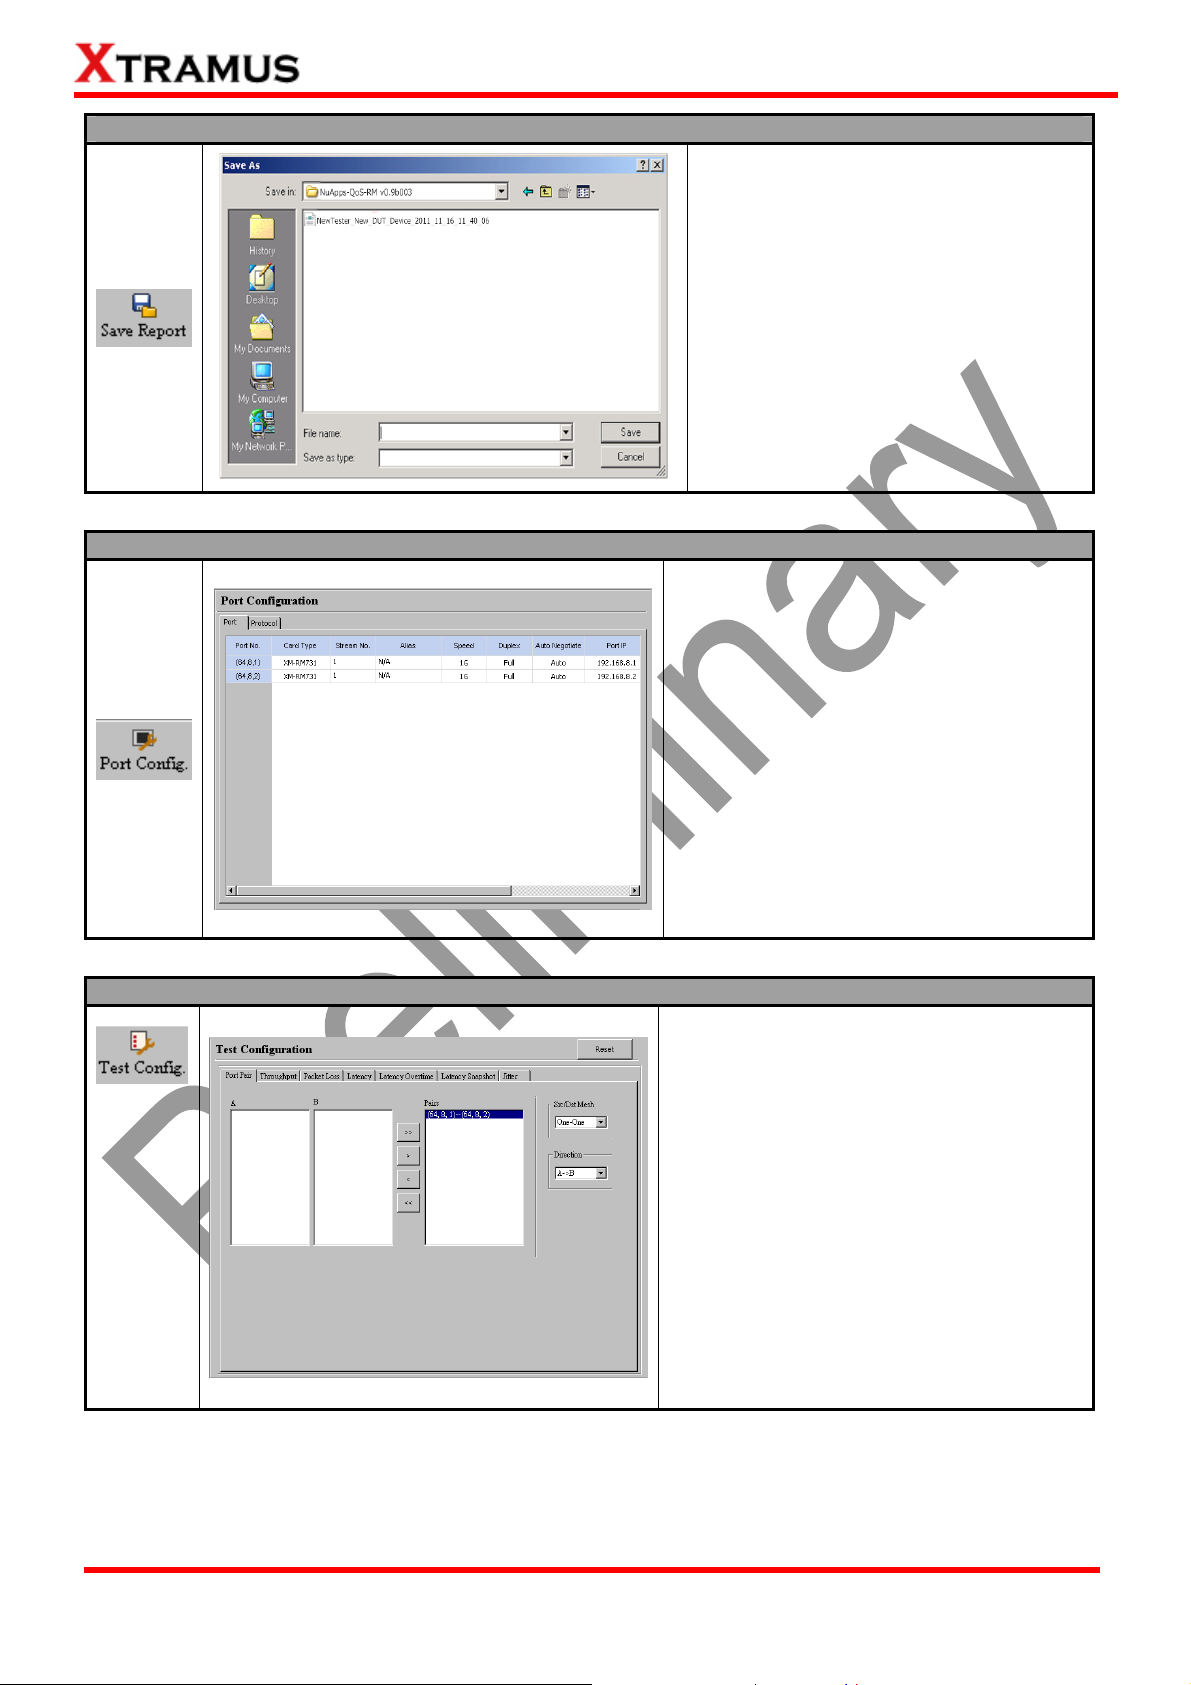
Save Report
Port Config
You can save the test report with the
Save Report button on the Quick
Launch Buttons.
Reports are saved in the format of
“*.xls”, and are named with Tester
Name, DUT Name, and the date/time
when files are created.
By clicking the Port Config button, the
Port Configuration screen will be shown
on the Main Display Screen located on
the right side of NuApps-QoS-RM’s main
window, allowing you to make settings for
the module ports.
Test Config
Settings such as port transmitting rate,
auto-negotiation, and protocol are
available and can be set here.
For more detail description about Port
Configuration, please refer to 4.8. Port
Configuration.
By clicking the Test Config button, the
Test Configuration screen will be shown
on the Main Display Screen located on
the right side of NuApps-QoS-RM’s main
window, allowing you to make test
settings.
You can set 7 different test modes here,
including set Port Pair, Throughput,
Packet Loss, Latency, Latency
Overtime, Latency Snapshot and Jitter.
For more detail description about Port
Configuration, please refer to 4.9. Port
Configuration.
XTRAMUS TECHNOLOGIES®
23
E-mail: [email protected]
Website: www.Xtramus.com
Page 24

Report
The Report button allows you to view test
results, charts, and statistics on the Main
Display Screen located on the right side
of NuApps-QoS-RM’s main window.
XTRAMUS TECHNOLOGIES®
24
E-mail: [email protected]
Website: www.Xtramus.com
Page 25

4.3. System Info/Configuration List
The System Info/Configuration List allows you to view system information, making port/test
configurations, and check test reports on the Main Display Screen.
System Information
Port Config
By clicking the System Information on the
System Info/Configuration List, the System
Information screen will be shown on the Main
Display Screen located on the right side of
NuApps-QoS-RM’s main window.
By clicking the Port Config on the System
Info/Configuration List, the Port Configuration
screen will be shown on the Main Display
Screen located on the right side of
NuApps-QoS-RM’s main window, allowing you
to make settings for the module ports.
Settings such as port transmitting rate,
auto-negotiation, gateway IP, IP mask and
protocol can be set here.
XTRAMUS TECHNOLOGIES®
For more detail description about Port
Configuration, please refer to 4.8. Port
Configuration.
25
E-mail: [email protected]
Website: www.Xtramus.com
Page 26

Test Config
Report
By clicking the Test Config on the System
Info/Configuration List, the Test Configuration
screen will be shown on the Main Display
Screen located on the right side of
NuApps-QoS-RM’s main window, allowing you
to make test settings.
You can set 7 different test modes here,
including set Port Pair, Throughput, Packet
Loss, Latency, Latency Overtime, Latency
Snapshot and Jitter.
For more detail description about Port
Configuration, please refer to 4.9. Port
Configuration.
The Report button allows you to view test
results, charts, and statistics on the Main
Display Screen located on the right side of
NuApps-QoS-RM’s main window.
4.4. Elapsed Time
The Elapsed Time allows you to know the time spent during tests.
XTRAMUS TECHNOLOGIES®
26
E-mail: [email protected]
Website: www.Xtramus.com
Page 27

4.5. Description
The Description displays brief descriptions of Quality of service (QoS), Throughput, Packet Loss, Latency,
Latency Overtime, Latency Snapshot, Jitter tests.
XTRAMUS TECHNOLOGIES®
27
E-mail: [email protected]
Website: www.Xtramus.com
Page 28

4.6. Status Bar
The Status Bar indicated by the arrow above shows the running status of NuApps-QoS-RM. The running
status includes: “Ready”, “Setting Media Type”, “Performing Learning”, ”Clear Counter” and others.
4.7. Control Buttons/Test Running Status Icon
The Control Buttons allow you to start/stop tests, and the Test Running Status Icon indicates if there’s
a test running.
Control Buttons
Start test
Stop test
Test Running Status Icon
XTRAMUS TECHNOLOGIES®
No Test is running
Test is running
28
E-mail: [email protected]
Website: www.Xtramus.com
Page 29

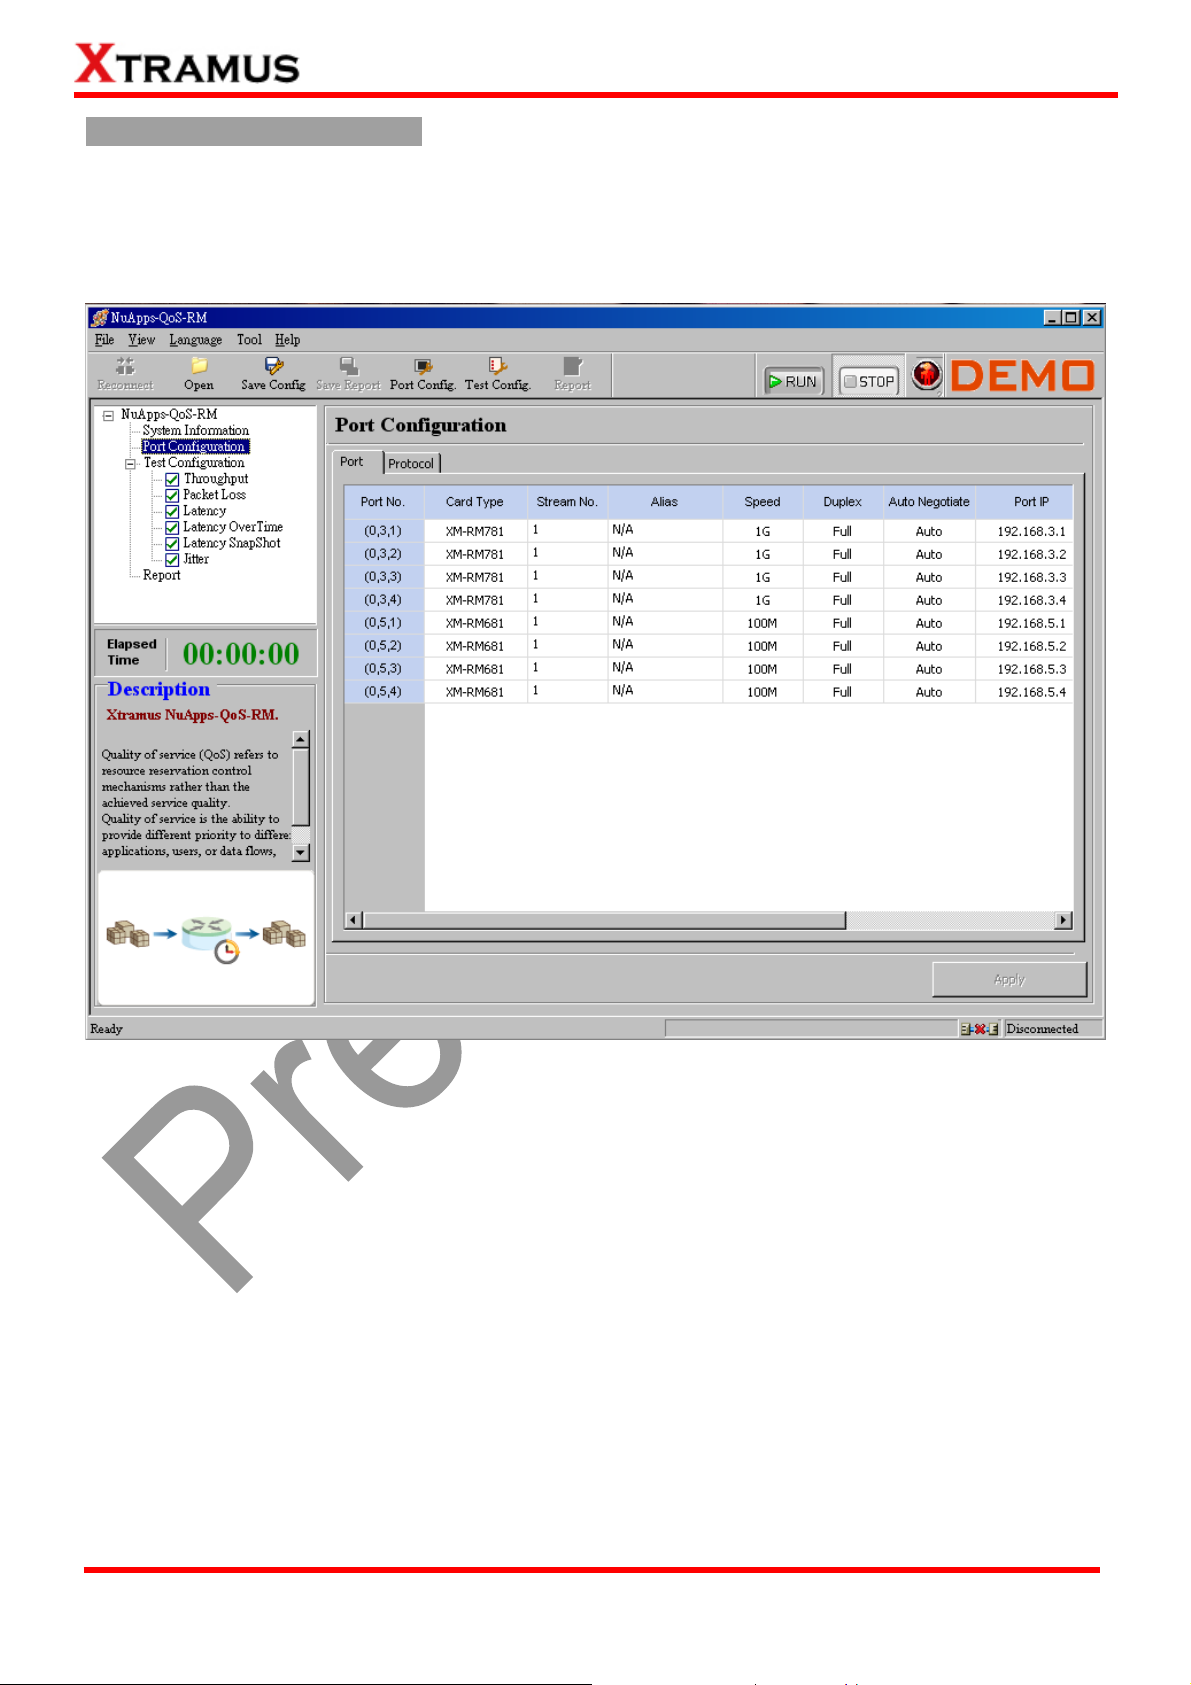
4.8. Port Configuration
Settings such as port transmitting rate, auto-negotiation, and protocol are available and can be configured
on the Port Configuration displayed on the Main Display Screen.
There are two ways to access Port Config:
Accessing Port Config
Click Port Config located on System
Info/Configuration List.
Click the Port Config button located on
Quick Launch Buttons.
The Port Configuration contains two different sets of settings: Port and Protocol, which can be
accessed by clicking the Port or Protocol menu tab.
¾ Port: Allows you to set each port’s transmitting rate, duplex, auto-negotiation and Layer 3 IP.
¾ Protocol: Allows you to set each port’s protocol Layer 2, enable/disable VLAN, VID, CFI, Priority and
others functions.
XTRAMUS TECHNOLOGIES®
29
E-mail: [email protected]
Website: www.Xtramus.com
Page 30

Port
¾ Port No. /Card Type: These two fields display each port’s Port ID and the model name of its module
card.
¾ Stream No. : The name of the different Stream.
¾ Alias: You can input alias for identifying active ports here in these fields.
¾ Speed: The Speed scroll-down menu allows you to set each port’s transmitting/receiving rate.
¾ Duplex: You can set the port as Full-Duplex or Half-Duplex with the scroll-down menu. Note that the
Duplex can only be set when the speed is 10M/100M.
¾ Auto Negotiate: By clicking the scroll-down menu, you can choose mode Auto (with
auto-negotiation) or Force (without auto-negotiation).
¾ Port IP: Set the module card’s Port IP in this field.
¾ Gateway IP: Set the module card’s Gateway IP in this field.
¾ IP Mask: Set the module card’s IP Mask in this field.
XTRAMUS TECHNOLOGIES®
30
E-mail: [email protected]
Website: www.Xtramus.com
Page 31

Protocol
¾ Port No. : This field displays each port’s Port ID.
¾ Port MAC: These fields display the MAC addresses of all ports.
¾ Enable VLAN: VLAN (Virtual LAN) is a group of hosts with common requirements that
communicate within the same Broadcast domain regardless of the physical location. By enabling
the VLAN, you can change settings of the following options:
z VID: Virtual ID, an ID number for identifying different virtual LANs on the network. You can set
the VID for each port.
z CFI: Canonical Format Indicator, a 1-bit field in frames for compatibilities of Ethernet and
Token Ring networks.
z Priority: VLAN Priority (IEEE P802.1p) indicates the priority level of frames transmitted from
each port.
¾ Precedence: You can modify this setting as 000-Routine ~111-Network Control.
¾ ToS: Type of Service, you can modify this setting as 0000-Normal~1000-Min Delay.
¾ Class Sel. : You can modify this setting as Class 0~7 to order priority.
¾ Drop Prob. : You can modify this setting as Low, Medium and High to filter the quality of packets.
¾ Protocol: You may modify protocol to Layer2 test, Layer3-ToS test, Layer3-Diff test, wherein,
choosing Layer3-ToS allows you to modify Precedence and ToS, and if choosing Layer3-Diff
allows you to modify Class Sel. and Drop Prob..
¾ Apply: Press “Apply” button to save your settings.
XTRAMUS TECHNOLOGIES®
31
E-mail: [email protected]
Website: www.Xtramus.com
Page 32

4.9. Test Configuration
7 different test modes, including Port Pair, Throughput, Packet Loss, Latency, Latency Overtime,
Latency Snapshot, Jitter, can be configured on the Test Configuration displayed on the Main Display
Screen.
There are two ways to access Test Config:
Accessing Test Config
Click Test Config located on System
Info/Configuration List.
Click the Test Config button located on
Quick Launch Buttons.
XTRAMUS TECHNOLOGIES®
32
E-mail: [email protected]
Website: www.Xtramus.com
Page 33

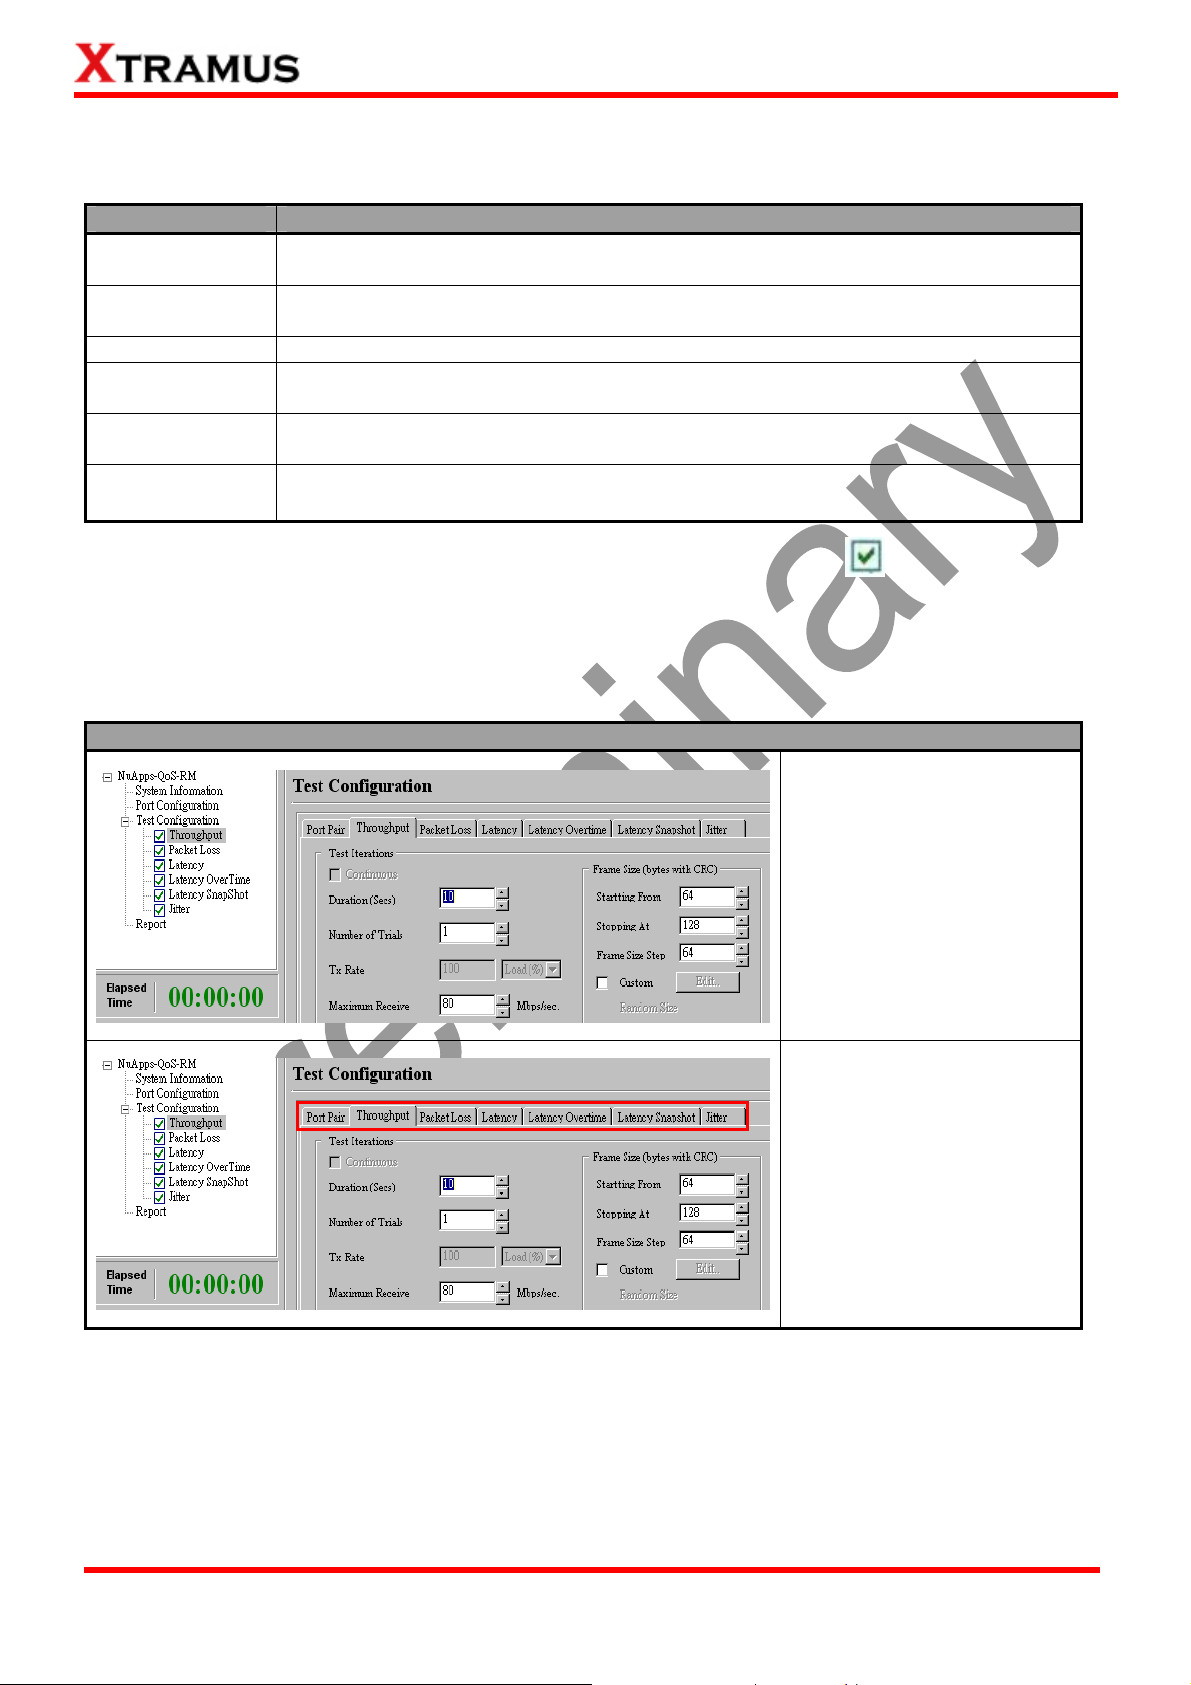
The Test Configuration contains 7 different sets of settings: Port Pair, Throughput, Packet Loss,
Latency, Latency Overtime, Latency Snapshot, Jitter, which can be accessed by clicking the test you
would like to perform on System Info/Configuration List or the tab menu located on Test Configuration
screen.
XTRAMUS TECHNOLOGIES®
33
E-mail: [email protected]
Website: www.Xtramus.com
Page 34

4.9.1. Pairing/Assigning Test Ports
Before making any test configurations on the Test Configuration screen, you have to make the proper
port pairing/assigning first. NuApps-QoS-RM has 2 different test modes available: One-One and Many-
Many.
To access these 2 test modes, please click the scroll-down menu located on the upper-right part of
NuApps-QoS-RM’s window as shown in the figure down below.
Also, set the direction of source port to destination port by clicking the scroll-down menu located
down part of the scroll where you chose the One-One and Many-Many mode.
If you want to reset all settings you’ve done for NuApps-QoS-RM’s test mode back to the default value,
please press the Reset button located next to the scroll-down menu.
Please see the sections down below for more information regarding to pair/assign ports in different test
modes.
XTRAMUS TECHNOLOGIES®
34
E-mail: [email protected]
Website: www.Xtramus.com
Page 35

One-One
In One to One test mode, packets will be sent from one source port (A) to one destination port (B) as
shown in the figure above.
Port Pairing/Assigning for One-One Mode
1. Choose a port that will serve as the source
port from the Source Ports field.
2. Choose a port that will serve as the
destination port from the Destination Ports
field.
3. Click the > button to add the port pair you
set in step1-2.
Note: If you click the >> button, the system will
automatically match all the available ports into
pair.
XTRAMUS TECHNOLOGIES®
4. The port pair will be added to the Test Port
Pair field. You can remove the selected port
pair by clicking the < button, or remove all port
pairs by clicking the << button.
35
E-mail: [email protected]
Website: www.Xtramus.com
Page 36
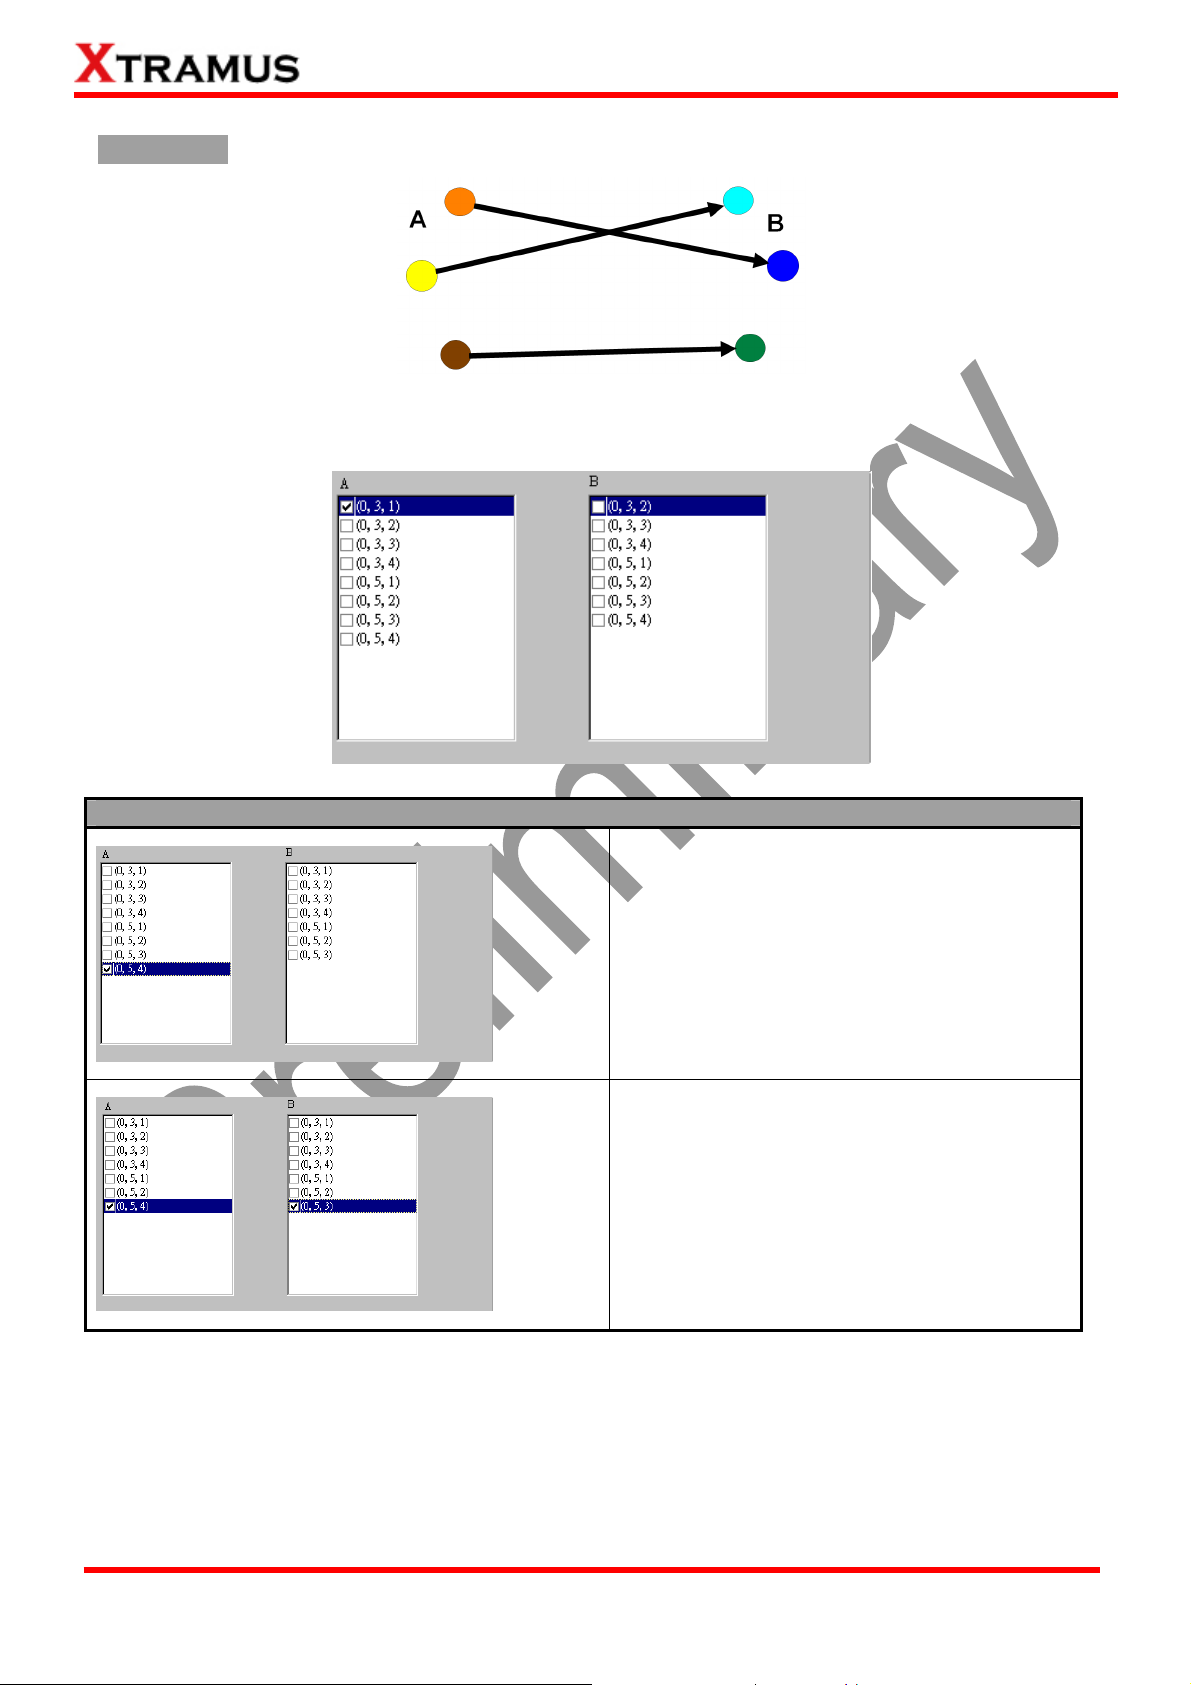
Many-Many
In Many-Many test mode, packets will be sent from each source port (A) to one of the multiple
destination port (B) as shown in the figure above.
Port Pairing/Assigning for Many-Many Mode
1. Choose a port that will serve as the source
port from A field.
2. Choose a port that will serve as the
destination port from B field.
XTRAMUS TECHNOLOGIES®
36
E-mail: [email protected]
Website: www.Xtramus.com
Page 37
4.9.2. Test Configuration Overview
NuApps-QoS-RM supports the following tests:
Test Description
Throughput
Packet Loss
Latency Measures the time it takes for the DUT to forward a packet.
Latency
Overtime
Latency
Snapshot
Jitter
To start performing tests with NuApps-QoS-RM, please check the check box in front of the test you
would like to perform first. Unchecked tests will not be performed, and cannot access their report as well
during or after the tests.
Determines the DUT’s maximum capable throughput rate without dropping any
packets.
Measures the percentage of packets that are not forwarded due to the lack of
resource.
Measures the time it takes for the DUT to forward a packet in a time interval.
Measures the packet that DUT forwards in a determined time gap.
Measures the
periodic signal.
undesired deviation from true periodicity of an assumed
You can access setting options for the tests you would like to perform by:
Accessing Test Setting Pages
Click the test you would like
to configure located on
System Info/Configuration
List.
Click the test you would like
to configure located on the
test tab menu.
For more detailed setting options regarding to Throughput, Packet Loss, Latency, Latency Overtime,
Latency Snapshot and Jitter, please refer to the sections down below.
XTRAMUS TECHNOLOGIES®
37
E-mail: [email protected]
Website: www.Xtramus.com
Page 38
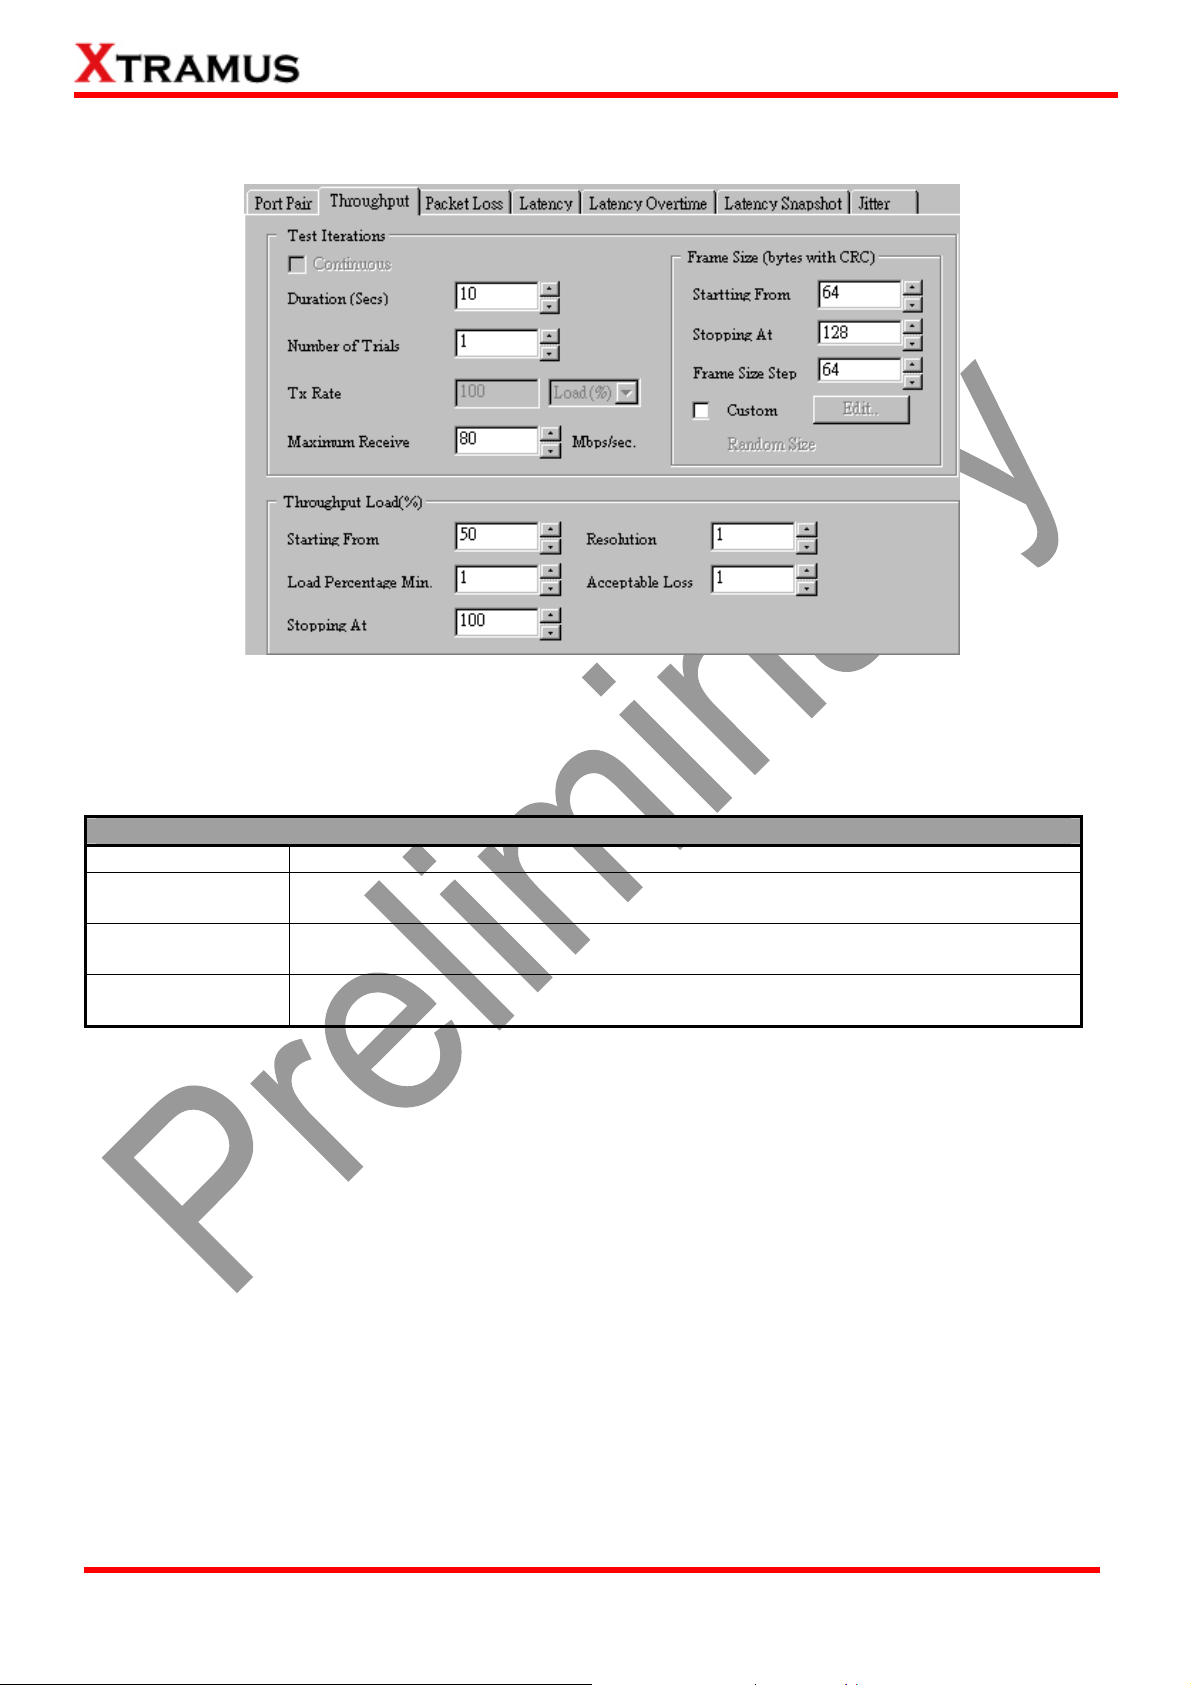
4.9.3. Throughput Test
Throughput test determines the DUT’s maximum capable throughput rate without dropping any packets.
The Throughput configuration page allows you to customize the test duration, packet length, packet
transmission rate (%) for the desired testing environment.
Test Iterations
Continuous
Duration(Secs)
Number of Trials
Maximum
Receive
Click to activate continuous testing with the same settings.
The duration of time (in seconds) for the test. The range for the testing time is
1~5000.
The number of times of the test. The range for the number of times of the test is
1~100.
The maximum limit to receive packets in Mbps/sec.
XTRAMUS TECHNOLOGIES®
38
E-mail: [email protected]
Website: www.Xtramus.com
Page 39

Frame Size (bytes with CRC)
Starting
from/Stopping at
The starting/ending size of the transmitted packet. The range of the Starting
from/Stopping at field is 60~16384.
The frame size will increase in arithmetic progression fashion, while the value
Frame Size Step
you set here will serve as its difference. The range of the Frame Size Step is
1~16384.
Custom
You can customize the size of each
transmitted packet manually by
enabling Custom function and
clicking the Edit button. A Packet Size
Customization window will pop up.
You can customize the Frame Size on
this window, or reset all custom
settings by clicking “Default” button.
Click “OK” button to save the settings
or “Cancel” to exit the window without
saving the settings.
Packet Payload
This scroll-down menu allows you to set packet contents to Random, Increase,
0x55AA, 0x00FF, All 1 or All 0.
Throughput Load (%)
Starting
from/Stopping at
Load Percentage
Min.
Resolution
Acceptable Loss
The starting/ending network traffic rate (%) of the test.
The minimum acceptable network traffic rate (%) of the test.
The test will stop when the difference between the current network traffic rate
and the last network traffic rate is smaller than the value you set here.
The acceptable rate of packet loss during the test.
XTRAMUS TECHNOLOGIES®
39
E-mail: [email protected]
Website: www.Xtramus.com
Page 40

4.9.4. Packet Loss Test
Packet Loss test measures the percentage of packets that are not forwarded (therefore, lost) due to the
lack of resource. The loading and testing time can be customized to simulate real-world scenario; thus,
giving the user a clear view of DUT’s performance limits under different loading environments.
Test Iterations
Continuous
Duration (Secs)
Number of Trials
Tx Rate
Maximum
Receive
Frame Size (bytes with CRC)
Starting
from/Stopping at
Frame Size Step
Click to activate continuous testing with the same settings.
The duration of time (in seconds) for the test. The range for the testing time is
1~5000.
The number of times of the test. The range for the number of times of the test is
1~100.
The rate of packet transfer. You can also set the load unit in percentage or
Mbps here.
The maximum limit to receive packets in Mbps/sec.
The starting/ending size of the transmitted packet. The range of the Starting
from/Stopping at field is 60~16384.
The frame size will increase in arithmetic progression fashion, while the value
you set here will serve as its difference. The range of the Frame Size Step is
1~16384.
Custom
Packet Payload
XTRAMUS TECHNOLOGIES®
You can customize the size of each
transmitted packet manually by
enabling Custom function and clicking
the Edit button. A Packet Size
Customization window will pop up.
You can customize the Frame Size on
this window, or reset all custom
settings by clicking “Default” button.
Click “OK” button to save the settings
or “Cancel” to exit the window without
saving the settings.
This scroll-down menu allows you to set packet contents to Random, Increase,
0x55AA, 0x00FF, All 1 or All 0.
40
E-mail: [email protected]
Website: www.Xtramus.com
Page 41

4.9.5. Latency Test
Latency test measures the time it takes for the DUT to forward a packet. The load generated by
NuStreams-2000i/600i can be customized with different packet lengths and for specified period of times.
Test Iterations
Continuous
Duration (Secs)
Number of Trials
Tx Rate
Maximum
Receive
Frame Size (bytes with CRC)
Starting
from/Stopping at
Frame Size Step
Click to activate continuous testing with the same settings.
The duration of time (in seconds) for the test. The range for the testing time is
1~5000.
The number of times of the test. The range for the number of times of the test is
1~100.
The rate of packet transfer. You can also set the load unit in percentage or
Mbps here.
The maximum limit to receive packets in Mbps/sec.
The starting/ending size of the transmitted packet. The range of the Starting
from/Stopping at field is 60~16384.
The frame size will increase in arithmetic progression fashion, while the value
you set here will serve as its difference. The range of the Frame Size Step is
1~16384.
Custom
Packet Payload
XTRAMUS TECHNOLOGIES®
You can customize the size of each
transmitted packet manually by
enabling Custom function and clicking
the Edit button. A Packet Size
Customization window will pop up.
You can customize the Frame Size on
this window, or reset all custom
settings by clicking “Default” button.
Click “OK” button to save the settings
or “Cancel” to exit the window without
saving the settings.
This scroll-down menu allows you to set packet contents to Random, Increase,
0x55AA, 0x00FF, All 1 or All 0.
41
E-mail: [email protected]
Website: www.Xtramus.com
Page 42

4.9.6. Latency Overtime Test
Latency Overtime test measures the time it takes for the DUT to forward a packet in a time interval. The
load generated by NuStreams-2000i/600i can be customized with different packet lengths and for
specified period of times.
Test Iterations
Continuous
Duration (Secs)
Number of Trials
Tx Rate
Maximum
Receive
Click to activate continuous testing with the same settings.
The duration of time (in seconds) for the test. The range for the testing time is
1~5000.
The number of times of the test. The range for the number of times of the test is
1~100.
The rate of packet transfer. You can also set the load unit in percentage or
Mbps here.
The maximum limit to receive packets in Mbps/sec.
XTRAMUS TECHNOLOGIES®
42
E-mail: [email protected]
Website: www.Xtramus.com
Page 43

Frame Size (bytes with CRC)
Starting
from/Stopping at
The starting/ending size of the transmitted packet. The range of the Starting
from/Stopping at field is 60~16384.
The frame size will increase in arithmetic progression fashion, while the value
Frame Size Step
you set here will serve as its difference. The range of the Frame Size Step is
1~16384.
Custom
You can customize the size of each
transmitted packet manually by
enabling Custom function and clicking
the Edit button. A Packet Size
Customization window will pop up.
You can customize the Frame Size on
this window, or reset all custom
settings by clicking “Default” button.
Click “OK” button to save the settings
or “Cancel” to exit the window without
saving the settings.
Packet Payload
Latency Overtime
Time Interval
(sec.)
This scroll-down menu allows you to set packet contents to Random, Increase,
0x55AA, 0x00FF, All 1 or All 0.
You can set the time interval in this field for measuring the Latency Overtime.
XTRAMUS TECHNOLOGIES®
43
E-mail: [email protected]
Website: www.Xtramus.com
Page 44

4.9.7. Latency Snapshot Test
Latency Snapshot test measures the latency by capturing a certain quantity of frames per stream from
a starting time point. The load generated by NuStreams-2000i/600i can be customized with different
packet lengths and for specified period of times.
Test Iterations
Continuous
Duration (Secs)
Number of Trials
Tx Rate
Maximum
Receive
Click to activate continuous testing with the same settings.
The duration of time (in seconds) for the test. The range for the testing time is
1~5000.
The number of times of the test. The range for the number of times of the test is
1~100.
The rate of packet transfer. You can also set the load unit in percentage or
Mbps here.
The maximum limit to receive packets in Mbps/sec.
XTRAMUS TECHNOLOGIES®
44
E-mail: [email protected]
Website: www.Xtramus.com
Page 45

Frame Size (bytes with CRC)
Starting
from/Stopping at
The starting/ending size of the transmitted packet. The range of the Starting
from/Stopping at field is 60~16384.
The frame size will increase in arithmetic progression fashion, while the value
Frame Size Step
you set here will serve as its difference. The range of the Frame Size Step is
1~16384.
Custom
You can customize the size of each
transmitted packet manually by
enabling Custom function and clicking
the Edit button. A Packet Size
Customization window will pop up.
You can customize the Frame Size on
this window, or reset all custom
settings by clicking “Default” button.
Click “OK” button to save the settings
or “Cancel” to exit the window without
saving the settings.
Packet Payload
Latency Snapshot
Capture frames
per streams
Capture Start
(sec.)
This scroll-down menu allows you to set packet contents to Random, Increase,
0x55AA, 0x00FF, All 1 or All 0.
Set the quantity of frames you want to capture per stream.
Set the time point you want to start to capture the frames per stream.
XTRAMUS TECHNOLOGIES®
45
E-mail: [email protected]
Website: www.Xtramus.com
Page 46

4.9.8. Jitter Test
Jitter test measures the variation of latency during the DUT’s test. If the latency doesn’t vary, than the
Jitter’s value will be positive. The load generated by NuStreams-2000i/600i can be customized with
different packet lengths and for specified period of times.
Test Iterations
Continuous
Duration (Secs)
Number of Trials
Tx Rate
Maximum
Receive
Frame Size (bytes with CRC)
Starting
from/Stopping at
Frame Size Step
Click to activate continuous testing with the same settings.
The duration of time (in seconds) for the test. The range for the testing time is
1~5000.
The number of times of the test. The range for the number of times of the test is
1~100.
The rate of packet transfer. You can also set the load unit in percentage or
Mbps here.
The maximum limit to receive packets in Mbps/sec.
The starting/ending size of the transmitted packet. The range of the Starting
from/Stopping at field is 60~16384.
The frame size will increase in arithmetic progression fashion, while the value
you set here will serve as its difference. The range of the Frame Size Step is
1~16384.
Custom
Packet Payload
XTRAMUS TECHNOLOGIES®
You can customize the size of each
transmitted packet manually by
enabling Custom function and clicking
the Edit button. A Packet Size
Customization window will pop up.
You can customize the Frame Size on
this window, or reset all custom
settings by clicking “Default” button.
Click “OK” button to save the settings
or “Cancel” to exit the window without
saving the settings.
This scroll-down menu allows you to set packet contents to Random, Increase,
0x55AA, 0x00FF, All 1 or All 0.
46
E-mail: [email protected]
Website: www.Xtramus.com
Page 47

5. Report
The results, statics and charts are displayed and can be checked on the Main Display Screen. There are
two ways to view Report:
Accessing Report
Click Report located on System
Info/Configuration List.
Click the Report button located on Quick
Launch Buttons.
During the test, charts or
statics table for results of
each test (Throughput,
Packet Loss, Latency,
Latency Overtime,
Latency Snapshop, Jitter)
will be displayed on the
Main Display Screen.
NuApps-QoS-RM will
switch testing table of each
test automatically when
finishing the current test
and starting the next test.
Please note that you can
only access the testing
table for test you’ve performed.
XTRAMUS TECHNOLOGIES®
47
E-mail: [email protected]
Website: www.Xtramus.com
Page 48

Overview of each testing table
Choose the testing table that you want to evaluate by choosing from the scroll on the Counter option
shown on the figure below down:
Throughput Test Report Packet Loss
This chart uses Frame Count per Second as
X-axis, and Frame Size as Y-axis to show DUT’s
throughput performance.
This chart uses Packet Loss Rate (%) as
X-axis, and Frame Size/Load as Y-axis to show
DUT’s packet loss ratio.
XTRAMUS TECHNOLOGIES®
48
E-mail: [email protected]
Website: www.Xtramus.com
Page 49
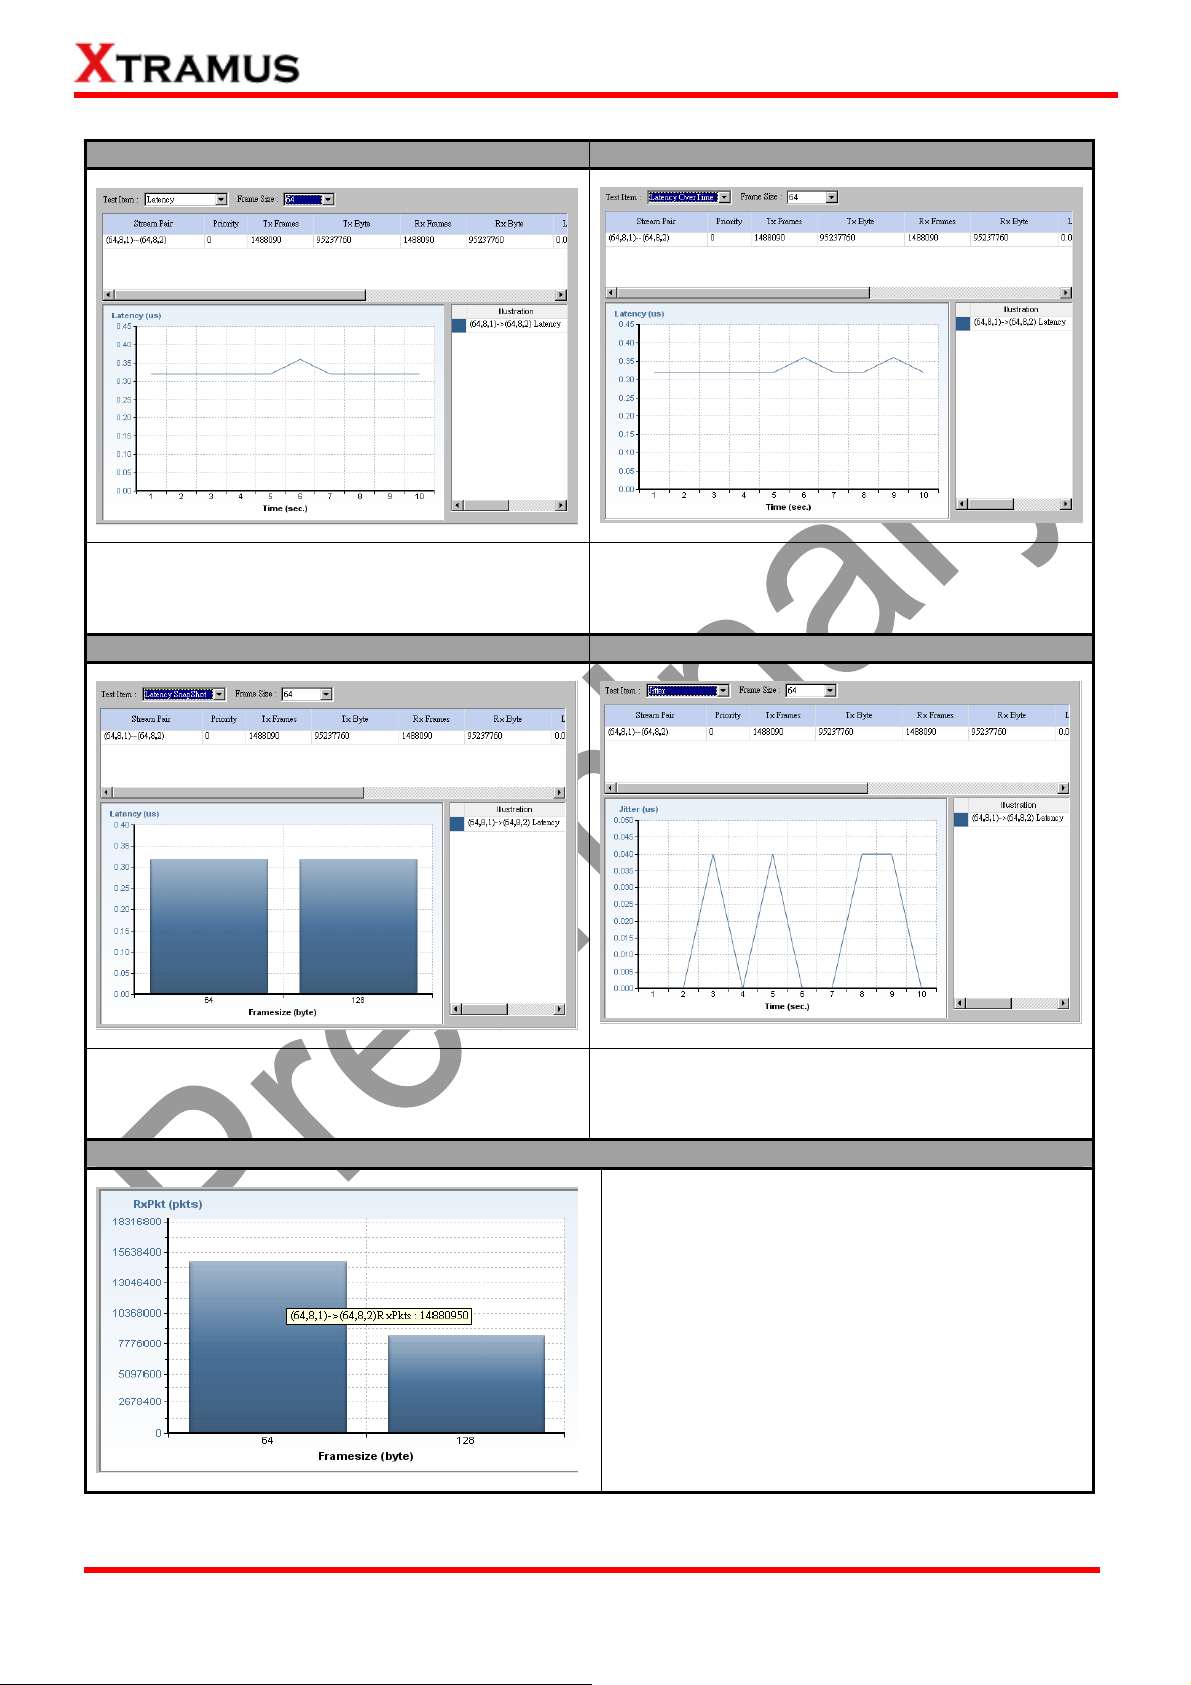
Latency Latency Overtime
This chart uses Latency in Microseconds (μs)
as Y-axis, and time in seconds as X-axis.
This chart uses Latency in Microseconds (μs)
as Y-axis, and time in seconds as X-axis.
Latency Snapshot Jitter
This chart uses Latency in Microseconds (μs)
as Y-axis, and Frame Size as X-axis.
This chart uses Jitter in Microseconds (μs) as
Y-axis, and time in seconds as X-axis.
Viewing Test Result Chart
XTRAMUS TECHNOLOGIES®
To view detail statistics on the chart, please
move the mouse cursor to the part you would
like to know more, as shown in the figure on the
left.
49
E-mail: [email protected]
Website: www.Xtramus.com
Page 50

Viewing Test Result Chart (Continued)
If you would like to view test result charts for other pairs of ports, please click the port pair you would like
to view from Report on the System Info/Configuration List.
Also, you can view test results counter by clicking the Report tab as shown on the figure down below. All
statistics will be displayed in this table in detail for test result analysis.
You can save the test results by:
Saving Test Results
Click FileÆSave Report Save
Path to… on your Menu Bar.
Click Save Report on your
Quick Launch Buttons.
Test results and related statistic are available and can be viewed with the “*.xls” file you saved this way.
You need Microsoft Excel® to view “*.xls” file.
XTRAMUS TECHNOLOGIES®
50
E-mail: [email protected]
Website: www.Xtramus.com
Page 51

Note: Information and specifications contained in this document are subject to change without notice. Note: Information and specifications contained in this document are subject to change without notice.
XTRAMUS TECHNOLOGIES®
XTRAMUS TECHNOLOGIES®
All products and company names are trademarks of their respective corporations. All products and company names are trademarks of their respective corporations.
Copyright © 2011 Xtramus Technologies, all rights reserved. Copyright © 2011 Xtramus Technologies, all rights reserved.
Do not reproduce, redistribute or repost without written permission from Xtramus. Do not reproduce, redistribute or repost without written permission from Xtramus.
Doc # USM_NuApps-QoS-RM_V1.1_ENG_Preliminary_20120910 Doc # USM_NuApps-QoS-RM_V1.1_ENG_Preliminary_20120910
E-mail: [email protected]
51
51
E-mail: [email protected]
Website: www.Xtramus.com
Website: www.Xtramus.com
 Loading...