

Page 1

NuStreams-P9M
User Manual
USM Ver 2.1
Page 2

®
Foreword
Copyright
Copyright © 2010 Xtramus Technologies, all rights reserved. The information contained in this document is the property of Xtramus
Technologies. No part of this publication shall be reproduced, stored in a retrieval system, or transmitted, in any form or by any
means, without the prior written permission of Xtramus Technologies.
Disclaimer
The information contained in this document is subject to change without notice and does not represent a commitment on the part of
Xtramus Technologies. The information in this document is believed to be accurate and reliable. However, Xtramus Technologies
assumes no responsibility or liability for any errors or inaccuracies that may appear in the document.
Trademarks
NuStreams is a trademark or registered trademark of Xtramus Technologies. All other trademarks and registered trademarks are
the property of their respective owners.
Warranty
Xtramus Technologies warrants to recipient that hardware supplied with this document will be free from significant defects for a
period of three (3) months from the date of delivery, under normal use and conditions. Defective Product under warranty shall be,
at Xtramus Technologies’ discretion, repaired or replaced. To the extent permitted by applicable law, all implied warranties,
including but not limited to imply warranties of merchantability, non-infringement and fitness for a particular purpose, are hereby
excluded, and the liability to Xtramus Technologies, if any, for damages relating to any allegedly defective product shall be limited
to the actual price paid by the purchaser for such product. In no event will Xtramus Technologies be liable for costs of procurement
of substitute products or services, lost profits, or any special, direct, indirect, consequential, or incidental damages, however
caused and on any theory of liability, arising in any way out of the sale and/or license of products or services to recipient even if
advised of the possibility of such damages and notwithstanding any failure of essential purpose of any limited remedy.
Contact Information
Xtramus Technologies
E-mail: sales@xtramus.com
Website: www.xtramus.com
Tel: +886-2-8227-6611
Fax: +886-2-8227-6622
XTRAMUS TECHNOLOGIES
2
E-mail: sales@xtramus.com
Website: www.Xtramus.com
Page 3
®
Revision History
Date USM Version History
November.
1.0
10, 2008
July,2009 1.1 Modify NuStreams-P9M Utility
July,2009 1.2 Modify NuStreams-P9M Utility and Items in LCD of
the machine
March, 2010 2.0 Apply to new manual format. Revise all concepts
base on the previous manual.
June, 2010 2.1 Add brief descriptions regarding to NuStreams-P9M
Test Types.
XTRAMUS TECHNOLOGIES
3
E-mail: sales@xtramus.com
Website: www.Xtramus.com
Page 4

®
Table of Contents
Foreword ..........................................................................................................................................2
Revision History .............................................................................................................................. 3
1. NuStreams-P9M Overview ..........................................................................................................5
1.1. General Description of NuStreams-P9M...........................................................................5
1.2. Residential Gateway & Switch ..........................................................................................6
1.3. NuStreams-P9M Panel Functions Overview ....................................................................7
1.4. NuStreams-P9M LED Status.............................................................................................. 9
2. Hardware Installation for Testing DUTs................................................................................... 10
2.1. For Residential Gateway (Router) Test...........................................................................10
2.2. For Switch Test ................................................................................................................. 11
3. NuStreams-P9M Control Buttons & LCD................................................................................. 12
3.1. NuStreams-P9M Control Buttons Overview................................................................... 12
3.2. NuStreams-P9M LCD Overview.......................................................................................13
3.3. Operating NuStreams-P9M with Control Buttons & LCD.............................................. 14
4. NuStreams-P9M Utility ..............................................................................................................18
4.1. Installing NuStreams-P9M Utility Software ....................................................................19
4.2. Uninstalling NuStreams-P9M Utility Software................................................................22
4.3. NuStreams-P9M Utility Demo Mode................................................................................ 23
4.4. Connecting NuStreams-P9M to PC................................................................................. 24
4.5. NuStreams-P9M Utility Functions................................................................................... 25
4.5.1. NuStreams-P9M Utility Main Window Overview ....................................................... 25
4.5.2. Menu Bar ......................................................................................................................26
4.5.3. Quick Launch Buttons ................................................................................................29
4.5.4. Info/Run Select List .....................................................................................................31
4.5.5. Main Display Window.................................................................................................. 33
4.6. Firmware/FPGA/NuPAD Upgrade .................................................................................... 39
5. NuPAD ........................................................................................................................................44
5.1. NuPAD Control Buttons & LCD ....................................................................................... 44
5.2. Connecting NuPAD with NuSTreams-P9M ..................................................................... 45
5.3. Starting DUT Tests with NuPAD ...................................................................................... 46
XTRAMUS TECHNOLOGIES
4
E-mail: sales@xtramus.com
Website: www.Xtramus.com
Page 5

®
1. NuStreams-P9M Overview
1.1. General Description of NuStreams-P9M
NuStreams-P9M is a stand-alone tester for testing switches
and routers (with switch ports) with 8 LAN ports and 1 WAN
port at wirespeed. NuStreams-P9M’s compact, lightweight
designs with built-in tasks make it an ideal solution for tests
on production line, DUT performance analysis and
troubleshooting at service centers or maintenance outlets as
well.
NuStreams-P9M provides pre-defined templates containing customized parameters including number of
ports tested, packet transmitting duration, DHCP test enabling/disabling, sending UDP/TCP packets, load
utilization, packet length, packet loss tolerance, and etc. Configurations for tests can be done without
utility softwares or any specific technical know-how.
Under NuStreams-P9M’s Auto Test mode, a DUT’s switch traffic ability is tested via comparing the
number of transmitted packets/received packets between one of the LAN port (or switch port) and the
WAN port.
With high reliable test results and the best cost/performance ratio, NuStreams-P9M is the best solutions
available for router and switch tests.
Key Advantages of NuStreams-P9M
• Multi-function tester for network devices such as network switches and routers
• Reliable testing capability– repeated and conclusive tests to validate the functionality and performance
of a DUT (device under test) at various speeds and load conditions
• Flexible WAN port connection for testing routers:
¾ Static IP
¾ DHCP (Dynamic Host Configuration Protocol)
• Save the expense of developing and learning complicated testing utility softwares/scripts
• High throughput during DUT tests and easy to maintain
• Automatic test procedure makes NuStreams-P9M a more productive solution than other traditional
PC-based solutions
• Compact, lightweight and portable
XTRAMUS TECHNOLOGIES
5
E-mail: sales@xtramus.com
Website: www.Xtramus.com
Page 6

®
1.2. Residential Gateway & Switch
NuStreams-P9M can perform tests on Residential Gateway (Broadband Router) and Switch. Tests for
Residential Gateway and Switch have different test subjects and parameters. Please refer to the table
down below for more information about all the parameters that can be configured before performing tests.
Residential Gateway
WAN Type DHCP / Static IP
WAN (Static IP) Default IP: 172.17.5.220
Media Type 10M Full / 100M Full
Check Vendor ID off / on
MAC Range 00-00-00
IP Type TCP / UDP
TCP Type HTTP / FTP
Session 1~8
Frame Length 64 / 128 / 256 / 512 / 768 / 1024 / 1280 / 1518 bytes
W-L Utilization 10/30/50/60/70/80/90/100 (WAN → LAN)
L-W Utilization 10/30/50/60/70/80/90/100 (LAN → WAN)
Test Time 1s-10s / 30s / 1min-3min / 5min
Loss/Excess
Tolerance
Link Wait
(Minimum&Time Out)
0 / 100 / 1000 / 3000 / 5000 / 7000 / 9000 / 9999 Pkts
2~200s
Switch
Speed 10M Half / 10M Full / 100M Half / 100M Full
Ports 01 / 012 / 0123 / 01234 / 012345 / 0123456 / 01234567
Frame Length 64 / 128 / 256 / 512 / 768 / 1024 / 1280 / 1518 / 1600 bytes
Test Time 1s-10s/30s/1min-3min/5min
Loss/Excess
Tolerance
0 / 100 / 1000 / 3000 / 5000 / 7000 / 9000 / 9999 pkts
Test Utilization 10 /30 / 50 / 60 / 70 / 80 / 90 / 100
Link Wait
(Minimum&Time Out)
2~200s
Learning Time 1~10s
Note: All test parameters can be configured with NuStreams-P9M utility software. For example,
packet loss tolerance can be set from 0 to 9999.
XTRAMUS TECHNOLOGIES
6
E-mail: sales@xtramus.com
Website: www.Xtramus.com
Page 7
®
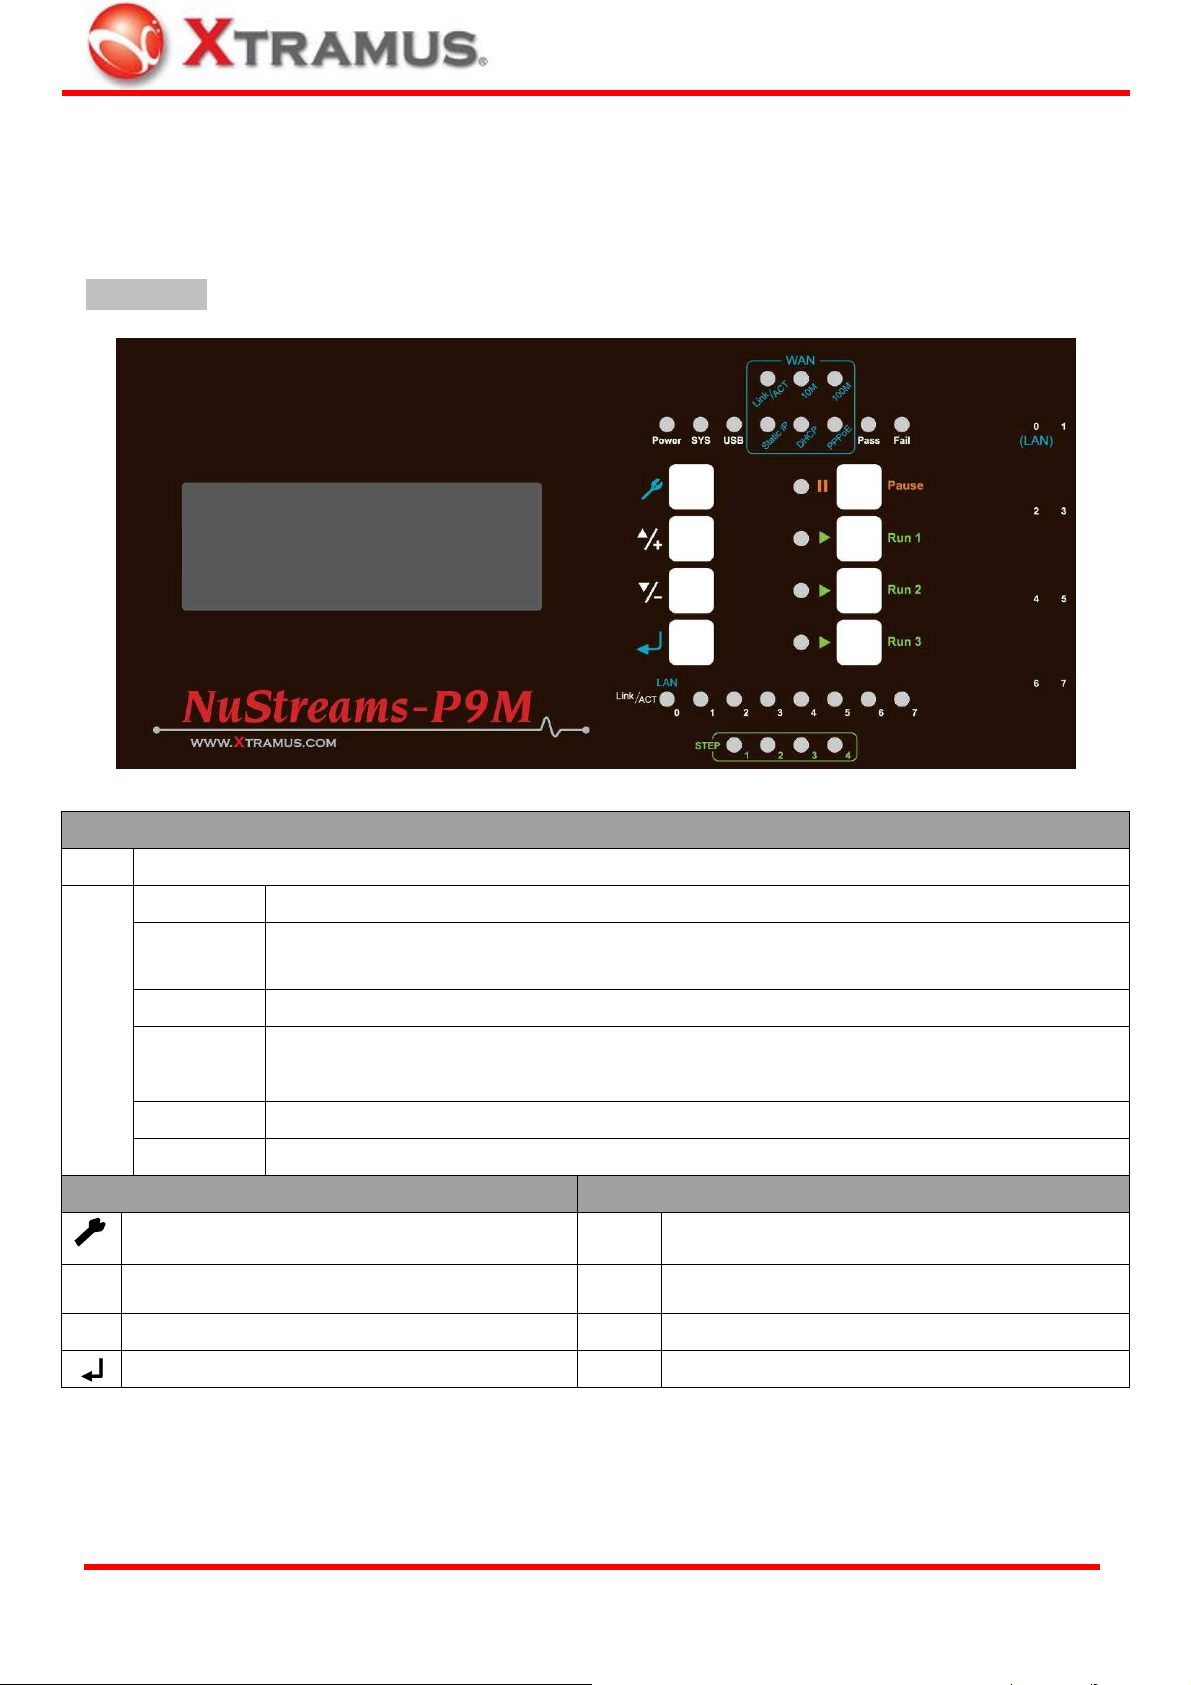
1.3. NuStreams-P9M Panel Functions Overview
NuStreams-P9M’s LEDs, buttons, and interface ports are located on its Front, Left and Right Side
Panels.
Front Panel
System Status & Testing Result Feedback Interface
LCD
System
¾ Power: Power ON ¾ SYS: System ready ¾ USB: USB connection status
¾ Link/Act: Connected with DUT WAN port ¾ 10M: 10 Mbps connection linked ¾ 100M: 100 Mbps connection linked
WAN
Test
LEDs
¾ Static IP: Using static IP as router WAN
connection
¾ Pass: DUT passes the test ¾ Fail: DUT does not pass the test
¾ || Pause: Pause current running test ¾ ► Run 2: Test Task of Run 2 is running
Hotkey
¾ ► Run 1: Test Task of Run 1 is running ¾ ► Run 3: Test Task of Run 3 is running
LAN Link/ACT
STEP
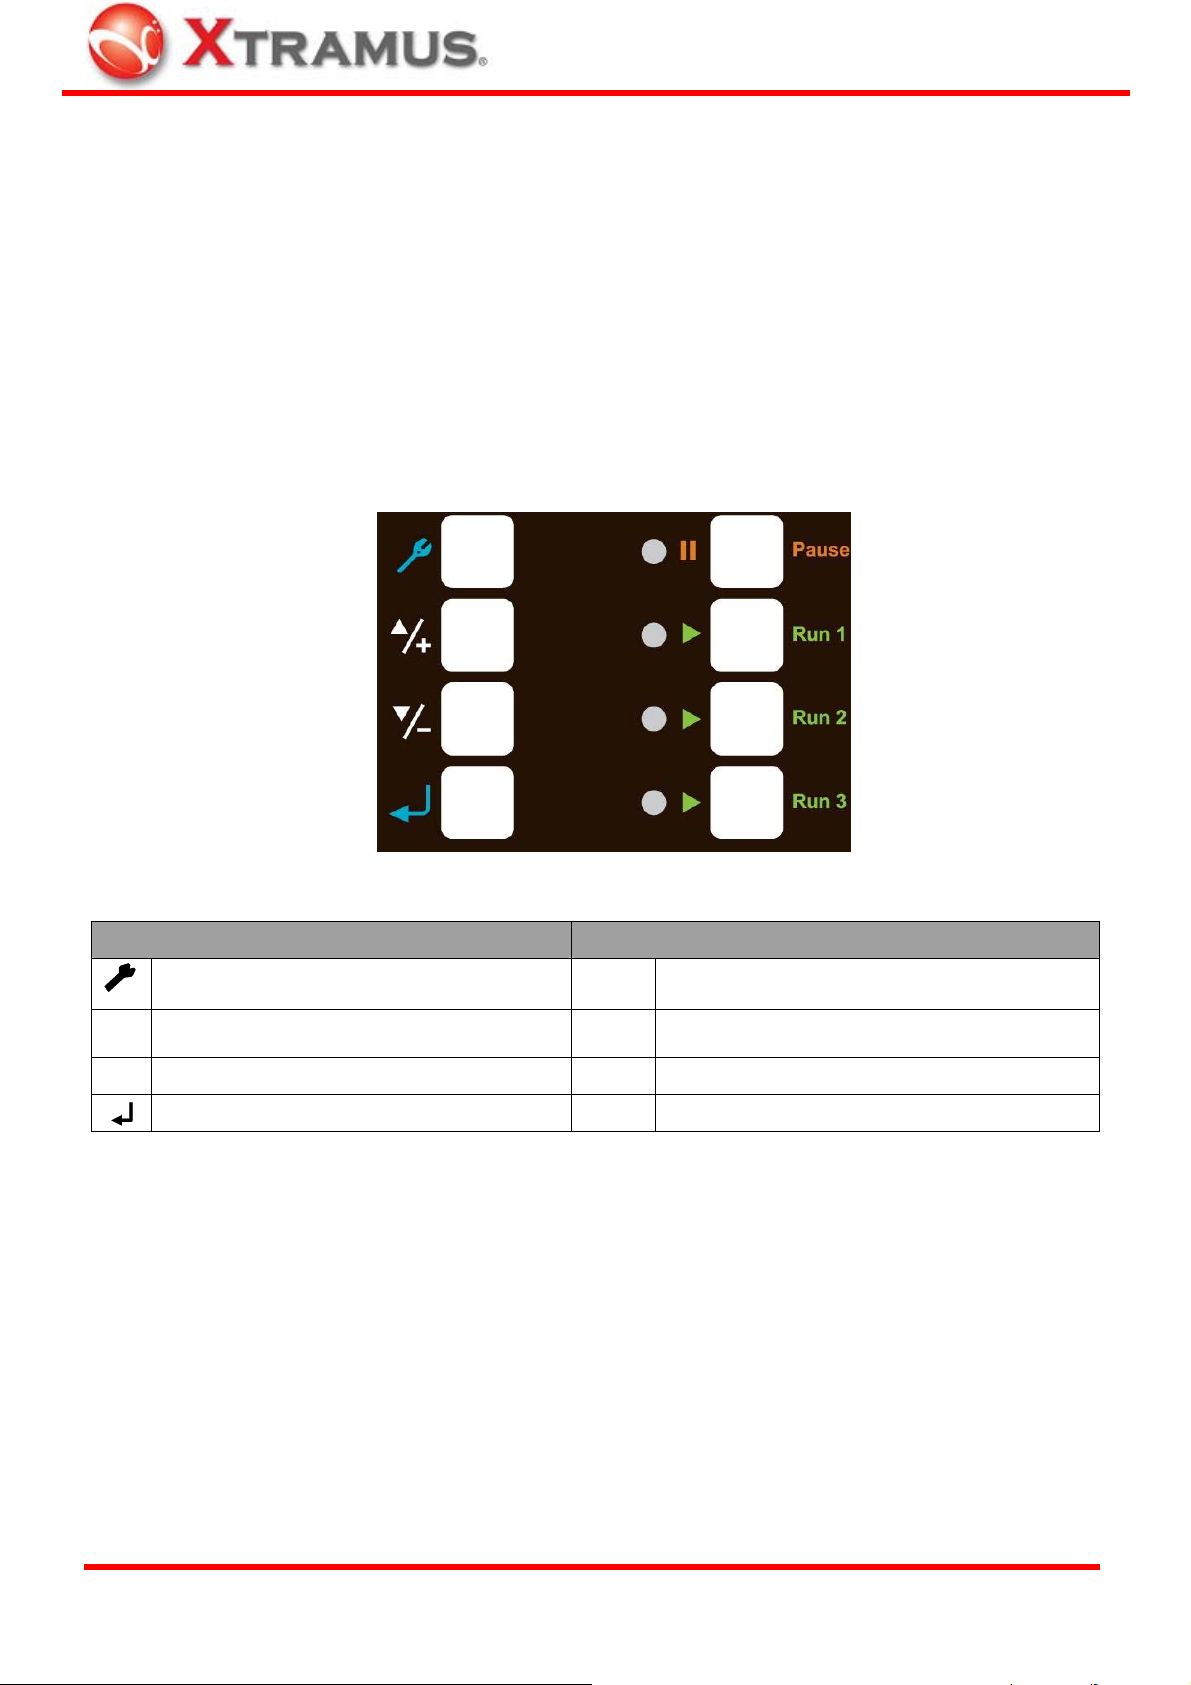
Configuration Buttons (Left Side) Operation Buttons (Right Side)
Enter main menu, return to the previous menu, or cancel the
changes you’ve made
Move selection cursor up or change test parameters
▲/+
Move selection cursor down or change test parameters
▼/-
Enter selected menu or apply the changes you made
Note: For more information regarding to NuStreams-P9M’s LED status, please refer to “1.4. NuStreams-P9M LED Status”.
NuStreams-P9M’s LAN ports are connected to DUT’s (switch or router) LAN ports. LAN LED 0~7 will be on accordingly
NuStreams-P9M’s testing process includes 4 steps. STEP LED 1~4 will show the testing process accordingly
4 x 20 characters LCD that display system information, status, and menu
¾ DHCP: Using DHCP as router
WAN connection
|| Pause Pause the test that is currently running
► Run1
► Run2 2
► Run3 3
Start Run 1 test. Up to 4 tasks can be configured in each Run
hotkey. Press this button and all tasks stored within will start
nd
hotkey as above
rd
hotkey as above
XTRAMUS TECHNOLOGIES
7
E-mail: sales@xtramus.com
Website: www.Xtramus.com
Page 8
®
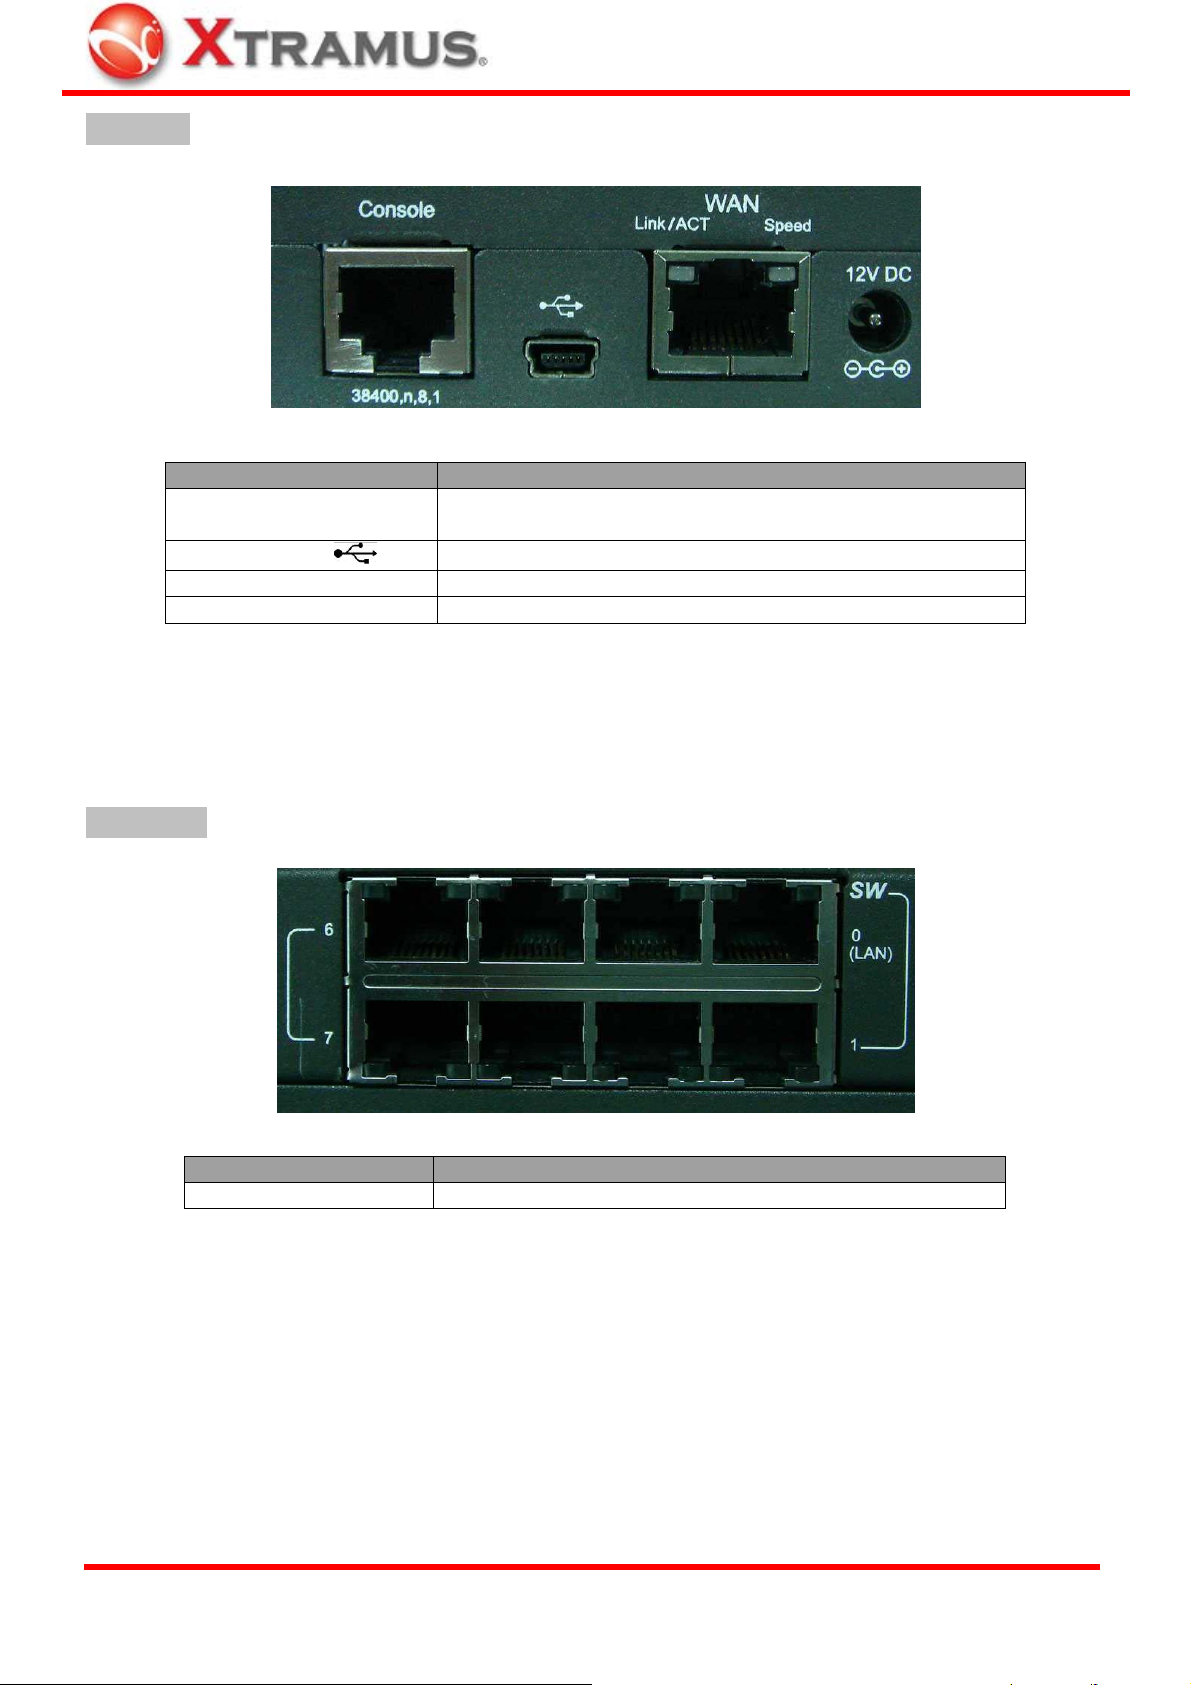
Left Panel
Port Function
Console
Mini-USB
WAN (Link/ACT Speed)
12V DC Power Jack
Connecting NuStreams-P9M with Xtramus NuPAD for test
management
Connecting NuStreams-P9M with PC for test management
Connecting NuStreams-P9M with DUT WAN port
NuStreams-P9M power jack
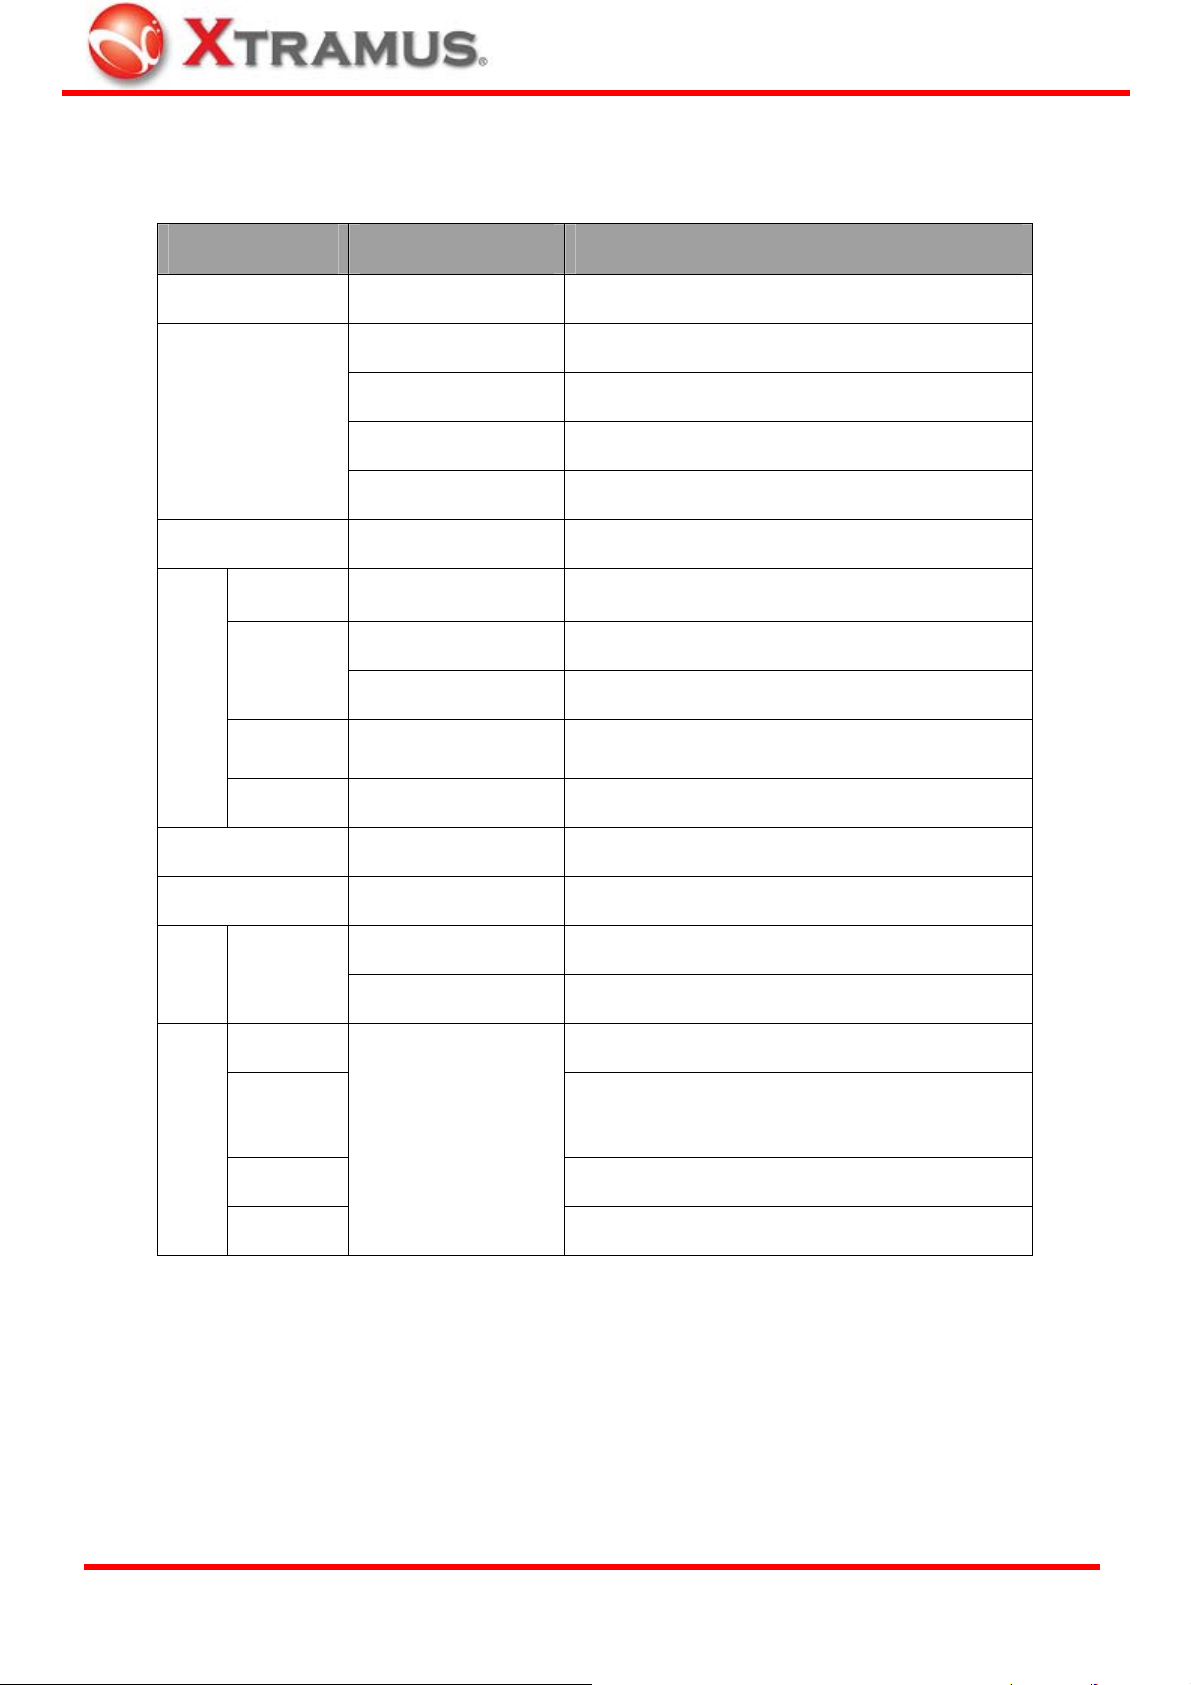
Right Panel
Port Function
Ethernet LAN Port
10/100M Ethernet LAN Ports with RJ-45 Connector × 8
XTRAMUS TECHNOLOGIES
8
E-mail: sales@xtramus.com
Website: www.Xtramus.com
Page 9
®
1.4. NuStreams-P9M LED Status
The table down below contains NuStreams-P9M’s front panel LED status and their meanings.
LED Status Description
WAN
Power
SYS
USB
10M/100M
Link/ACT
Static IP
DHCP
Pass
On NuStreams-P9M is on
Off NuStreams-P9M’s CPU system down
On NuStreams-P9M CPU system initializing
Green Light Blinking NuStreams-P9M’s CPU system active and running
Yellow Light On NuStreams-P9M is not starting properly
Green Light On NuStreams-P9M is connecting to PC via USB cable
Green Light On NuStreams-P9M’s connection with DUT is active
Green Light On WAN connection established and standing-by
Green Light Blinking Test packets sending via WAN ports
Blue Light On DUT WAN connection is set to Static-IP
Amber Light On DUT WAN connection is set to DHCP
Green Light On DUT test passed
Fail
Link/ACT
LAN
0 ~ 7
1
2
STEP
3
4
Red Light On DUT test failed
Green Light On NuStreams-P9M’s connection with DUT is active
Green Light Blinking The corresponding LAN port is performing test
Auto-Negotiation
Residential Gateway: Waiting ARP Reply
Green Light On
Switch: Sending Learning Packets
Starting DUT tests
Test complete, generating test results and report
XTRAMUS TECHNOLOGIES
9
E-mail: sales@xtramus.com
Website: www.Xtramus.com
Page 10

®
2. Hardware Installation for Testing DUTs
As we mentioned in “1.3 Residential Gateway & Switch”, NuStreams-P9M can perform tests on
Residential Gateway (general commercial router) and Switch. Installing NuStreams-P9M with different
types of DUTs requires different installation process.
Please see the installation structure mentioned down below for installing NuStreams-P9M with
Residential Gateway (router) and Switch.
2.1. For Residential Gateway (Router) Test
While performing tests on Residential Gateway (Router), both WAN and LAN ports of the DUT must
be connected to NuStreams-P9M with CAT-5 UTP cables as shown in the figure down below.
If both NuStreams-P9M and the DUT are connected with CAT-5 UTP cables correctly,
NuStreams-P9M’s LAN and WAN LEDs will be ON according to the test parameter you configured
previously.
XTRAMUS TECHNOLOGIES
10
E-mail: sales@xtramus.com
Website: www.Xtramus.com
Page 11
®
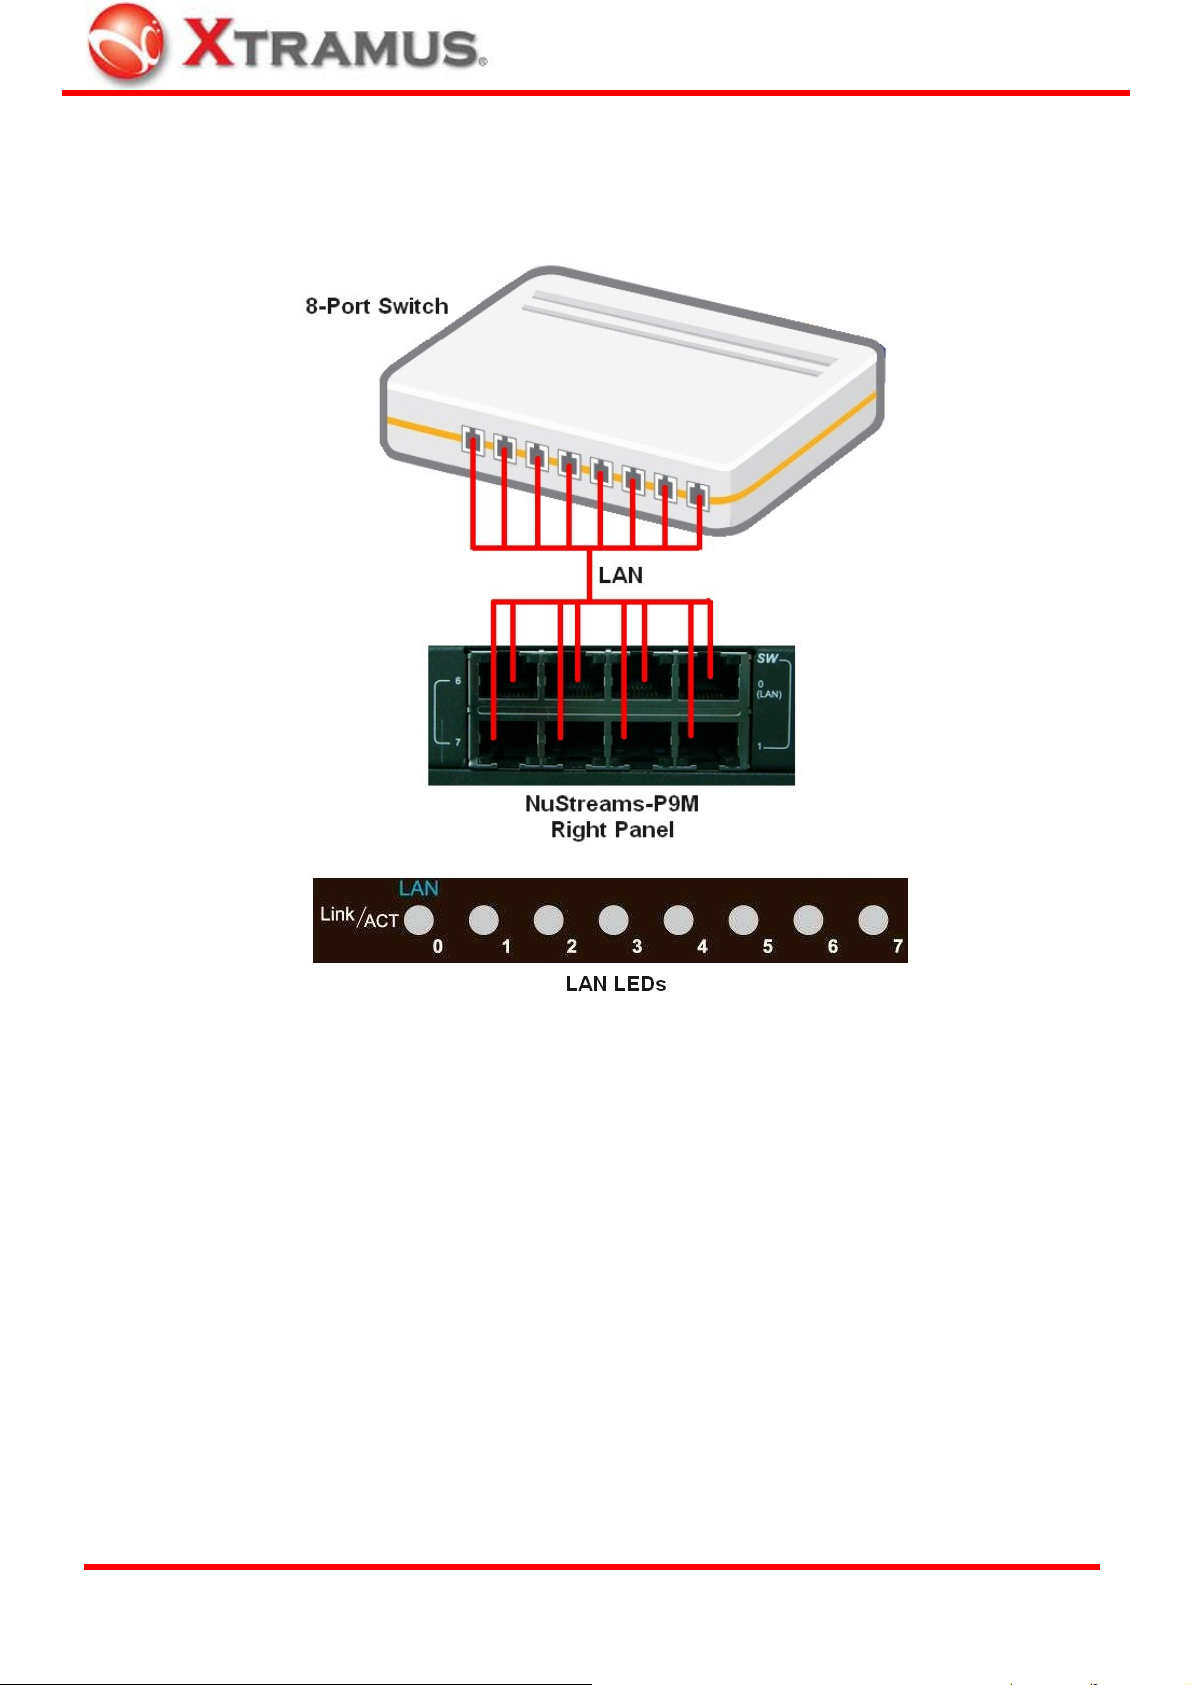
2.2. For Switch Test
While performing tests on Switch, DUT LAN ports must be connected to NuStreams-P9M with CAT-5
UTP cables as shown in the figure down below.
If both NuStreams-P9M and the DUT are connected with CAT-5 UTP cables correctly,
NuStreams-P9M’s LAN LEDs will be ON according to the test parameter you configured previously.
XTRAMUS TECHNOLOGIES
11
E-mail: sales@xtramus.com
Website: www.Xtramus.com
Page 12
®
3. NuStreams-P9M Control Buttons & LCD
All parameters for DUT tests can be configured via NuStreams-P9M’s control buttons located on its front
panel. Also, configuring, testing, and system information will be displayed and viewed on
NuStreams-P9M’s LCD screen.
Please see sections down below for more details about NuStreams-P9M’s control panel/LCD.
3.1. NuStreams-P9M Control Buttons Overview
With NuStreams-P9M’s control buttons located on its front panel, all test parameters and system
configurations can be set via these buttons.
Table down below is a list of brief descriptions for NuStreams-P9M’s control buttons.
Configuration Buttons (Left Side) Operation Buttons (Right Side)
Enter main menu, return to the previous menu, or cancel
the change you’ve made
Move selection cursor up or change test parameters
▲/+
Move selection cursor down or change test parameters
▼/-
Enter selected menu or apply the changes you made
|| Pause Pause the test that is currently running
► Run1
► Run2 2
► Run3 3
Start Run 1 test. Up to 4 tasks can be configured in each Run
hotkey. Press this button and all tasks stored within will start
nd
hotkey as above
rd
hotkey as above
XTRAMUS TECHNOLOGIES
12
E-mail: sales@xtramus.com
Website: www.Xtramus.com
Page 13
g
g
V
g
g
g
f
®
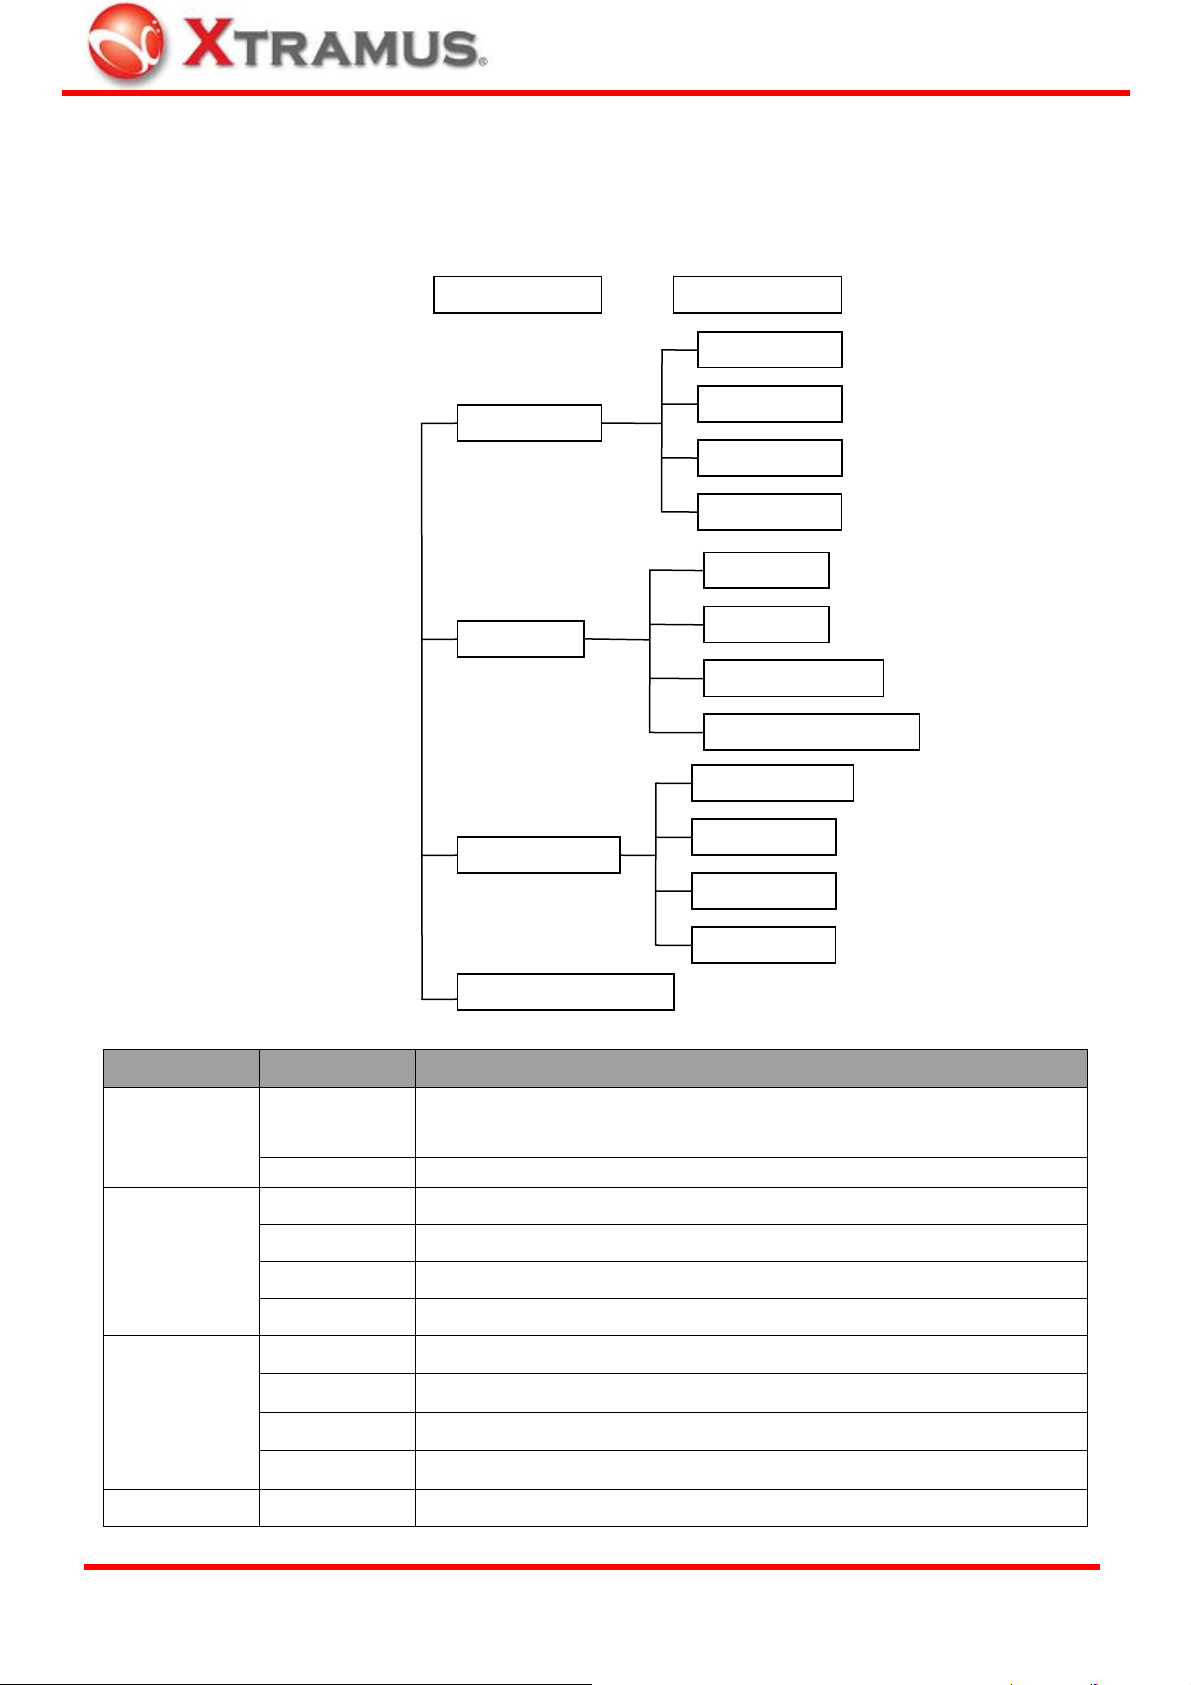
3.2. NuStreams-P9M LCD Overview
All configuration options and system information can be viewed via NuStreams-P9M’s LCD screen. All
options and their functions contained in the menu are listed down below:
Layer 1 Menu Layer 2 Menu
Modify Run 1
Test Settin
Test Lo
System Settin
Modify Run 2
Modify Run 3
Load Default
iew Lo
Delete Lo
Store Log On/Off
Full Warning On/Off
Buzzer On/Of
Password
Date/Time
Load Default
System Information
Layer 1 Menu Layer 2 Menu Brief Description
Test Setting
Test Log
System Setting
System Information
Modify Run 1
Modify Run 2
Modify Run 3
Load Default Restore all parameters stored in Run 1~3 to default value
View Log
Delete Log
Store Log Test reports will be stored automatically if this function is enable
Full Warning System will issue warnings when log storage memory is running out
Buzzer
Password
Date/Time
Load Default Restore all system settings to default value
N/A Display detailed system information
You can configure test parameters for Run 1~3 under this menu. Each Run can hold
up to 4 tasks
View test logs generated after the tests are complete
Delete all logs stored in NuStreams-P9M
If enabled, system will buzz whenever a button is pressed
You can set new password for the system under this menu
System date and time can be configured under this menu
XTRAMUS TECHNOLOGIES
13
E-mail: sales@xtramus.com
Website: www.Xtramus.com
Page 14

®
3.3. Operating NuStreams-P9M with Control Buttons & LCD
This section contains detailed instructions about setting your NuStreams-P9M via control buttons and
LCD. All NuStreams-P9M’s functions are divided into different parts and listed in the tables down
below.
Basic Functions
Function Control Button Action LCD Display
Press button.
Entering Main Menu
Moving Selection
Press ▲/+ or ▼/- buttons. Press button to
Cursors & Entering
Selected Option
Back to Previous
Menu
enter the menu option you chose.
Press button.
System Information
Function Control Button Action LCD Display
Entering System
Information Menu
Move the > cursor to “System Information”,
and press
button. You can scroll up/down
the test report by pressing ▲/+ or ▼/- buttons.
XTRAMUS TECHNOLOGIES
14
E-mail: sales@xtramus.com
Website: www.Xtramus.com
Page 15

®
Test Configuring & Performing
Function Control Button Action LCD Display
Move the > cursor to “Test Setting”, and
press
Entering Test
Setting Menu
you to input the system password. The default
password is ▲/+ ▲/+ ▲/+ ▲/+. Press
button after inputting the password to enter the
test setting menu.
Press ▲/+ or ▼/- buttons to choose which
“Run” you would like to modify. Press
button to start configuring the selected “Run”.
Choose “Modify” and press
configuring parameters for the Task you’ve
chosen.
Modifying Test
Parameters
Press ▲/+ or ▼/- buttons to choose which
parameter you would like to configure, and
press
parameter values with ▲/+ or ▼/- buttons, and
press
button. NuStreeams-P9M will prompt
to start
button to start configuring. Change
button to apply the changes.
Insert/Delete Tasks
Running/Pausing
Tests
Press
button again to save the settings
you’ve made to the Task.
You can also insert or delete Tasks.
To add a new task to the current Run, choose
“insert” from “Run List” menu, and press
button. A new task with default parameters will
be added to that Run.
To remove an existing task of the current Run,
choose “delete” from “Run List” menu, and
press
button. The existing task you chose
will be deleted.
Each “Run” can contain up to 4 Tasks, while
each Task is an independent test that can
contain different test parameters.
To perform tests, press ►Run 1~3 button. All
tasks stored in that Run will run by their orders.
Pass/Fail LED will be on according to the test
result.
To pause all tests, press || Pause button.
XTRAMUS TECHNOLOGIES
15
E-mail: sales@xtramus.com
Website: www.Xtramus.com
Page 16

®
Test Log Management
Function Control Button Action LCD Display
Entering Test Log
Menu
View Log
Delete Log
Log Auto-Save
Warning when
Memory Full
Move the > cursor to “Test Log”, and press
button.
Choose “View Log” from “Test Log” menu list,
and press
button.
Choose “Delete Log” from “Test Log” menu
list, and press
button. System will ask if you
really want to delete all logs stored in
NuStreams-P9M. Press ▲/+ to confirm, or ▼/-
to cancel.
Choose “Store Log” from “Test Log” menu list,
and press
button. The select cursor “>” will
be changed to “→” icon. Using ▲/+ or ▼/-
buttons to set Log Auto-Save function On or
Off, and press
button to apply the changes.
System will save all test logs automatically
if this function is ON.
Choose “Full Warning” from “Test Log” menu
list, and press
button. The select cursor “>”
will be changed to “→” icon. Using ▲/+ or ▼/-
buttons to set Memory Full Warning function On
or Off, and press
button to apply the
changes. System will alert you when its log
storing memory is about to full if this
function is ON.
XTRAMUS TECHNOLOGIES
16
E-mail: sales@xtramus.com
Website: www.Xtramus.com
Page 17

®
System Configuration/Information
Function Control Button Action LCD Display
Move the > cursor to “System Setting”, and
press
Entering System
Setting Menu
you to input the system password. The default
password is ▲/+ ▲/+ ▲/+ ▲/+. Press
button after inputting the password to enter the
test setting menu.
Choose “Buzzer” from “System Setting” menu
list, and press
will be changed to “→” icon. Using ▲/+ or ▼/-
Buzzer
buttons to set Buzzer function On or Off, and
press
will make a buzz sound whenever you press
a button if this function is ON.
Choose “Password” from “System Setting”
menu list, and press
button. NuStreeams-P9M will prompt
button. The select cursor “>”
button to apply the changes. System
button.
Password On/Off
Setting New
Password
System Date/Time
You can set the Password function On/Off by
selecting Password: On/Off. Using ▲/+ or ▼/-
buttons to set Password function On or Off.
Choose “Password” from “System Setting”
menu list, and press
button.
You can change system password (Default
Password: ▲/+ ▲/+ ▲/+ ▲/+) under Setting
Password menu.
Password is a set of 4-button combination
using ▲/+, ▼/-, ►Run1, ►Run2, and ►Run3
buttons.
Please input your old password under “ORG: “,
and input your new password under “New: “.
Choose “Date/Time” from “System Setting”
menu list, and press
button.
You can adjust system date and time by
pressing ▲/+ or ▼/- buttons, and button to
apply the changes you’ve made.
Choose “Load Default” from “System Setting”
button.
Load System
Default Value
menu list, and press
System will ask if you really want to set all
system settings to default. Press ▲/+ to
confirm, or ▼/- to cancel.
XTRAMUS TECHNOLOGIES
17
E-mail: sales@xtramus.com
Website: www.Xtramus.com
Page 18

®
4. NuStreams-P9M Utility
NuStreams-P9M comes with GUI (Graphic User Interface) configuration utility software that runs under
Microsoft Windows environment.
By connecting NuStreams-P9M with PC via its Management Port (located at the left panel of
NuStreams-P9M) as shown in the figure down below, users can configure test parameters, download
testing logs and upgrade firmware.
All test parameters can be configured with NuStreams-P9M utility software, including all the
configurations that can be set by buttons located on NuStreams-P9M’s panel.
However, NuStreams-P9M utility software and its hardware driver must be installed on PC first.
NuStreams-P9M’s driver will be installed automatically while installing NuStreams-P9M utility software.
XTRAMUS TECHNOLOGIES
18
E-mail: sales@xtramus.com
Website: www.Xtramus.com
Page 19

®
4.1. Installing NuStreams-P9M Utility Software
Please follow the steps down below to install NuStreams-P9M Utility Software:
1. Double click NuStreams-P9M utility software install program. Click “Next >” to start utility software
installation process. During the installation, you can click “Cancel” to cancel installing
NuStreams-P9M utility software.
2. Choose “I accept the terms in the license agreement “and click “Next ”.
XTRAMUS TECHNOLOGIES
19
E-mail: sales@xtramus.com
Website: www.Xtramus.com
Page 20
®
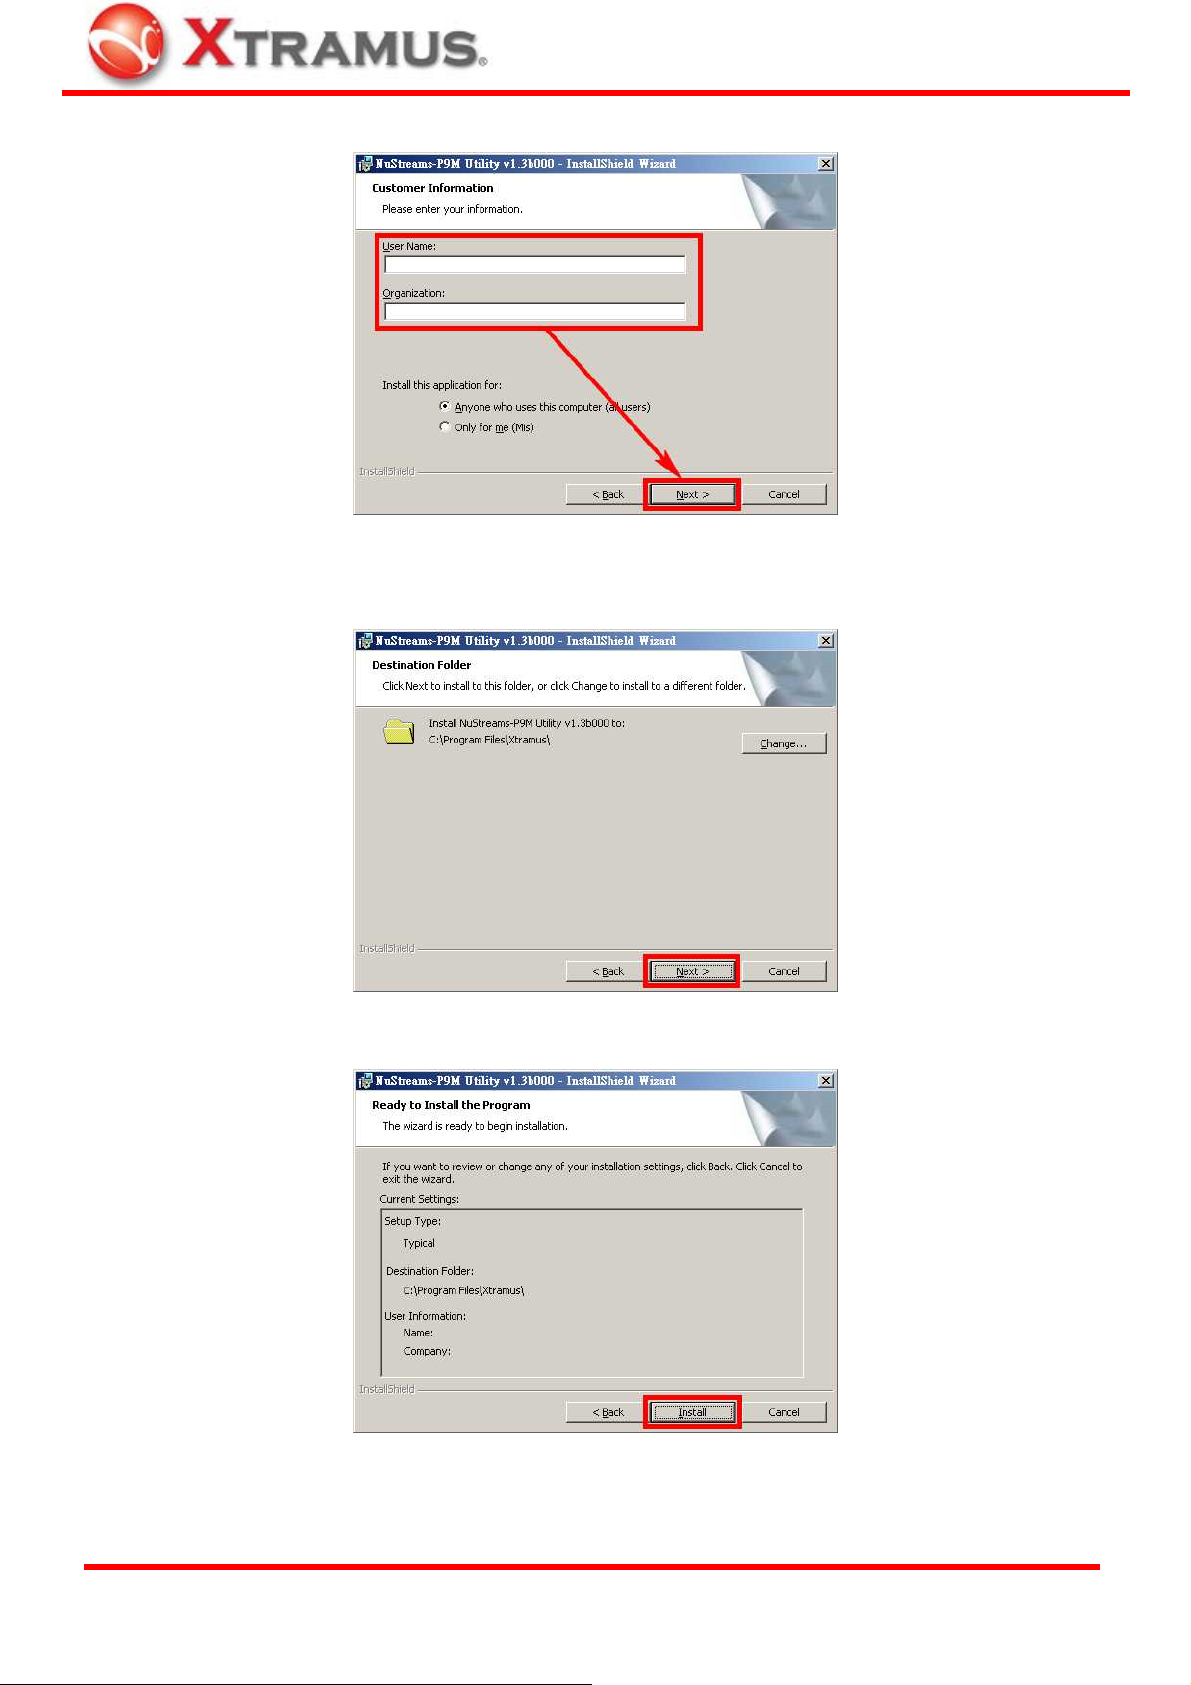
3. Input the User Name and the Organization (optional), and click “Next”
4. Choose which folder you would like to install NuStreams-P9M utility software by clicking “Change”,
and then click “Next”.
5. Click “Install” to start the installation.
XTRAMUS TECHNOLOGIES
20
E-mail: sales@xtramus.com
Website: www.Xtramus.com
Page 21

®
6. NuStreams-P9M utility software installation complete. Click “Finish” to close the InstallShield
Wizard.
XTRAMUS TECHNOLOGIES
21
E-mail: sales@xtramus.com
Website: www.Xtramus.com
Page 22

®
4.2. Uninstalling NuStreams-P9M Utility Software
To uninstall NuStreams-P9M Utility Software, please click Start → Programs → NuStreams →
APMPT-4 → Uninstall APMPT-4
You could remove NuStreams-P9M Utility Software via “Add or Remove Programs” as well.
XTRAMUS TECHNOLOGIES
22
E-mail: sales@xtramus.com
Website: www.Xtramus.com
Page 23

®
4.3. NuStreams-P9M Utility Demo Mode
After installing NuStreams-P9M utility software properly, an icon will appear on your
desktop. You can double-click this icon to run NuStreams-P9M utility software.
However, for NuStreams-P9M utility software to work properly, your PC must be connected to
NuStreams-P9M via a Mini-USB cable first.
You can still run NuStreams-P9M utility software without having NuStreams-P9M connected to your
PC under Demo Mode.
All NuStreams-P9M utility software’s functions can be viewed and demonstrated. However,
NuStreams-P9M Demo Mode is for demo purpose only and can’t be used for Broadband
Router/Switch tests.
XTRAMUS TECHNOLOGIES
23
E-mail: sales@xtramus.com
Website: www.Xtramus.com
Page 24

®
4.4. Connecting NuStreams-P9M to PC
As mentioned in the sections above, for NuStreams-P9M utility software to work properly, your PC
must be connected to NuStreams-P9M via a Mini-USB cable first. Please follow the steps down below
to make sure that your NuStreams-P9M is properly connected to your PC.
1. Before connecting NuStreams-P9M to your PC, please be sure that NuStreams-P9M is ready and
its LCD screen is shown as the picture down below.
2. Connect your PC to NuStreams-P9M’s mini-USB port located on its left panel via a Mini-USB cable
as shown in the figure down below.
3. If NuStreams-P9M and your PC are connected properly, a “Safely Remove Hardware” icon
show up in the button-right of your desktop. Also, a “USB Link” message will be shown on
NUStreams-P9M’s LCD screen as down below.
A “Get the system info” message will be shown on LCD if NuStreams-P9M utility software is
running.
will
XTRAMUS TECHNOLOGIES
24
E-mail: sales@xtramus.com
Website: www.Xtramus.com
Page 25

®
4.5. NuStreams-P9M Utility Functions
4.5.1. NuStreams-P9M Utility Main Window Overview
Function Descriptions
Menu Bar
Quick Launch Buttons
Info/Run Select List
Main Display Window
USB Connection Status
The Menu Bar allows you to access configuration files from your
PC/NuStreams-P9M, manage test logs, and perform system
maintenance.
With a simple click of these Quick Launch Buttons, you can access
configuration files from your PC/NuStreams-P9M and managing test logs.
This section contains a selectable list of NuStreams-P9M’s detailed
system information and Test List.
This section displays detailed system information or all test parameters
you can configure for each Task in Run 1~3.
This icon shows the connection status between your PC and
NuStreams-P9M.
XTRAMUS TECHNOLOGIES
25
E-mail: sales@xtramus.com
Website: www.Xtramus.com
Page 26

®
4.5.2. Menu Bar
NuStreams-P9M Menu Bar includes configuration options such as File, Task, Log, Service,
Language, and Help.
File
Load Default Config.
Profile
The system will load the default test settings for Run 1~3. All test parameters in Run
1~3 will be set to default value. However, loading test settings won’t be saved to
NuStreams-P9M until applied.
Load Config. Profile
From
Save Configuration
You can choose to load test settings either from Existing Files, or Pre-defined
Files for Network Products.
• Existing Files: NuStreams-P9M utility will load test settings which you saved
previously.
• Pre-defined Files for Network Products: NuStreams-P9M utility will load test
setting samples for network products pre-defined by Xtramus. All these test
settings are stored in “Default Config Profile” folder located under
NuStreams-P9M utility software installation folder. These test settings are
named by the format of A_B_C_D_E_F, which means:
¾ A: Name of the testing device. In here, it’s NuStreams-P9M
¾ B: Type of the DUT (Chip or Model)
¾ C: Name of the Manufacturer
¾ D: DUT Model Name
¾ E: DUT Version
¾ F: Testing WAN type.
Please note that loading test settings won’t be saved to NuStreams-P9M until
applied.
You can save all parameter changes through Run
1~3 you made to your PC. If you haven’t saved the
changes previously, a Select Run window will pop
up and ask you which test setting (Run) you would
like to save.
Save As…
Exit
The “Save As…” function is similar to the “Save Configuration”. The only
difference is that you can save test settings (Run) with different file names.
Exit NuStreams-P9M utility software.
XTRAMUS TECHNOLOGIES
26
E-mail: sales@xtramus.com
Website: www.Xtramus.com
Page 27

®
Task
Get Task
This function allows NuStreams-P9M utility software to access all test settings (Run)
from NuStreams-P9M and show those settings in both Info/Run Select List and
Main Display Window.
Add Task
As mentioned in sections above, each Run can hold up to 4 different Tasks. You can
add new Tasks to each Run with this function. To add a new Task, click the Run you
would like to add the new Task to from Info/Run Select List, then click Task →
Add Task on the Menu Bar.
Delete Task
You can delete an existing Task with this function. To delete an existing task, click
the Task you would like to delete from Info/Run Select List, then click Task →
Delete Task on the Menu Bar.
Apply All
*Please note that the connection (of mini-USB cable) between PC and NuStreams- P9M must be connected at
all time while getting/setting tasks.
Apply and save all changes you’ve made to NuStreams-P9M.
Log
Get Device Log
Accessing test logs from NuStreams-P9M
memory and save these logs to a specific folder
on your PC. After retrieving test logs from
NuStreams-P9M, the log folder will pop up. Also,
a message window contains detail information
about system log file memory buffer will pop up.
Click YES if you want to clear all logs stored in
NuStreams -P9M or click NO to cancel.
Clear Device Log
Log Saving
Settings
Show Log Folder
Set Log Folder
Clear all test logs stored in NuStreams-P9M’s memory.
Log saving settings can be configured here:
• Save Log to Device: If this function is
ON, NuStreams-P9M will save all test
logs in its log file memory buffer.
• Warning when Log storage space is
full: System will issue a warning if the
log file memory buffer is about to full.
Show the file folder where test logs are stored.
Change where you would like to save test logs retrieved from NuStreams-P9M. You can
create new folders for log-saving as well.
XTRAMUS TECHNOLOGIES
27
E-mail: sales@xtramus.com
Website: www.Xtramus.com
Page 28

®
Service
System Setting
If NuStreams- P9M’s password has been changed, you could reset it to default
(▲/+ ▲/+ ▲/+ ▲/+) by “Clear Device Password” function.
A “Clear Device Password” window
will pop up when you choose this
function from Menu Bar. Input “admin”
in the “Password” column and click
“OK”. NuStreams-P9M’s password will
be cleared and set to the default ▲/+
▲/+ ▲/+ ▲/+.
You can change utility software’s
password (default: admin) by click the
“Modify” button on “Clear Device
Password” window. A “Modify
Password” window will pop up.
Input NuStreams-P9M utility’s old
password under “Old Password”
column, and type in the new password
under both “New Password” and
“Confirm Password” columns.
System Upgrade
Languages
English
Simplified Chinese
Help
Help
If you forget NuStreams-P9M utility’s password, please uninstall NuStreamsP9M utility, and re-install it again. NuStreams-P9M utility’s password will be set
to “admin” after re-installation.
You can upgrade NuStreams-P9M’s Firmware, FPGA, and NuPAD’s Firmware with
this function. Please note that if you upgrade NuStreams-P9M’s firmware, all settings
will be reset to default, and all test logs stored in NuStreams-P9M’s memory will be
deleted as well.
NuStreams-P9M utility has 2 different languages for its UI available. You can set the
language of UI to either English or Simplified Chinese.
An “About” window will pop up and show detailed system information.
Xtramus Web
Access Xtramus Website (www.xtramus.com).
XTRAMUS TECHNOLOGIES
28
E-mail: sales@xtramus.com
Website: www.Xtramus.com
Page 29

®
4.5.3. Quick Launch Buttons
These Quick Launch Buttons allow you to reconnect NuStreams-P9M, access test setting files from
your PC or NuStreams-P9M, or managing test log files.
Reconnect
Reconnect
If the USB connection between your PC and NuStreams-P9M is down, a
“Disconnected” icon
Status”.
will be shown in “USB Connection
Load & Save
Load & Save
Press Reconnect button
the connection between your PC and
NuStreams-P9M. If the connection has been
established successfully, a message window will
pop up, and the “USB Connection Status” will be
shown as “Connected”
The Load and Save buttons allow you to load or save test settings from/to your PC,
identical to “Load Config. Profile From Existing Files” and “Save Configuration”
functions available in the Menu Bar mentioned in
To load test setting files stored in your PC, click
“Load” button, select which Run (or All 3
Runs) to apply the settings, and choose the
path which the test setting file are located.
to re-establish
.
4.5.2. Menu Bar.
To save test setting on your PC, click “Save”
button, select which Run (or All 3 Runs) to
save, and choose where you would like to save
the test settings.
Test setting files for each Run (Run 1~3) are named in the format of “*.run”, while
test setting files for all runs are named in the format of “*.all”.
XTRAMUS TECHNOLOGIES
29
E-mail: sales@xtramus.com
Website: www.Xtramus.com
Page 30

®
Get Task/Apply All
Get Task/Apply All
By clicking Get Task button, you can load test settings from NuStreams-P9M,
display all settings in Info/Run Select List and Main Display Window.
On the other hand, Apply All button allows you to apply all the changes you’ve
made to all Runs and save these settings to your NuStreams-P9M.
To load test settings from NuStreamsP9M, click “Get Task” button. Settings
will be displayed in Info/Run Select
List and Main Display Window.
To apply all the changes you’ve made
with the utility software and save these
settings to NuStreams-P9M, click
“Apply All”.
Please note that the connection (of mini-USB cable) between PC and NuStreamsP9M must be connected at all time while getting/setting tasks.
Get Log/Clear Log/Log Folder
Get Log/Clear Log
Log Folder
Get Log and Clear Log buttons allow you to obtain test logs from NuStreams-P9M
or clear all test logs stored in NuStreams-P9M, just like the “Get Device Log” and
“Clear Device Log” on the Menu Bar.
To get all test logs from NuStreams- P9M,
click “Get Log” button. A window with
NuStreams-P9M log memory space and
log folder screen will pop up. Click Yes to
clear all test logs in NuStreams-P9M, or
click No to leave these test logs be.
To clear all test logs stored in NuStreams
-P9M’s log memory, click “Clear Log”
button, and click Yes.
Click “Log Folder” button to open the
folder where all test logs are stored on
your PC. All log folders are named with
the test date, and all logs are named with
the test date and time.
XTRAMUS TECHNOLOGIES
30
E-mail: sales@xtramus.com
Website: www.Xtramus.com
Page 31

®
4.5.4. Info/Run Select List
The Info/Run Select List contains a list of selectable options. When selected, the Main Display
Window will show the corresponding information/Run setting.
System Information
To show NuStreams-P9M’s detailed system information, click “System Information” on the Info/Run Select
List. A detailed System Information will display on the Main Display Window located in the right side of the
Info/Run Select List.
XTRAMUS TECHNOLOGIES
31
E-mail: sales@xtramus.com
Website: www.Xtramus.com
Page 32

®
Test List
To access test settings stored in NuStreams-P9M, please click button located on the Quick Launch
Buttons section so the utility software can access and display all Runs stored in NuStreams-P9M.
Please note that the connection (of mini-USB cable) between PC and NuStreams- P9M must be connected
at all time while getting/setting tasks.
All test settings stored in NuStreams-P9M will be displayed under Test List. All parameters in each Task can
be viewed or changed by the detailed configuration window displayed on the Main Display Window.
By right clicking a Task on Test List, you can Add Task,
Delete Task, Apply All, Copy, or Paste Tasks.
• Add Task: Add a Task with default test setting values to
the current Run. Up to 4 Tasks can be added in one
Run.
• Delete Task: Delete the current Task.
• Apply All: Apply all test settings and save these
settings to NuStreams-P9M.
• Copy: Copy current Task.
• Paste: Paste the Task you copied to the current Run.
Also, by clicking Run 1~3 listed on Test Lis t , you can
change the title of each Run on the Main Display Window.
XTRAMUS TECHNOLOGIES
32
E-mail: sales@xtramus.com
Website: www.Xtramus.com
Page 33

®
4.5.5. Main Display Window
The Main Display Window displays NuStreams-P9M’s detailed System Information and Test List
which contains all test parameters you can configure for each Task in Run 1~3.
To d i sp l ay System Information and Test List on Main Display Window, please refer to “4.5.4.
Info/Run Select List”.
View System Information
The System Information displayed on Main Display Window shows NuStreams-P9M and NuPAD’s detail
information and status.
• Refresh: Update the latest system information and status, press this button.
XTRAMUS TECHNOLOGIES
33
E-mail: sales@xtramus.com
Website: www.Xtramus.com
Page 34

®
Modifying Run Title
Start Configuring/Viewing Tasks
You can modify titles for all Runs listed on Info/Run Select
List.
• A: Run Title. You can modify title names here.
• B: Click “Apply” to apply all the changes you’ve
made.
After acquiring all the Tasks stored in NuStreams-P9M (for more detail, please refer to 4.5.3. Quick Launch
Buttons), click the specific Task you would like to configure on the Info/Run Select List to configure/view all
parameters of that Task in Main Display Window.
Before configuring test parameters in each Task, please select the DUT Test Type first. The test parameters
listed in the Main Display Window will change according to the DU T Tes t Ty p e you chose.
NuStreams-P9M utility has 3 different test types:
• Router: Testing Broadband Router including its WAN
abilities.
• Switch: Testing Switch and its switch functions.
• Router + Switch: Testing Broadband Router as well as its
switch functions.
XTRAMUS TECHNOLOGIES
34
E-mail: sales@xtramus.com
Website: www.Xtramus.com
Page 35
®
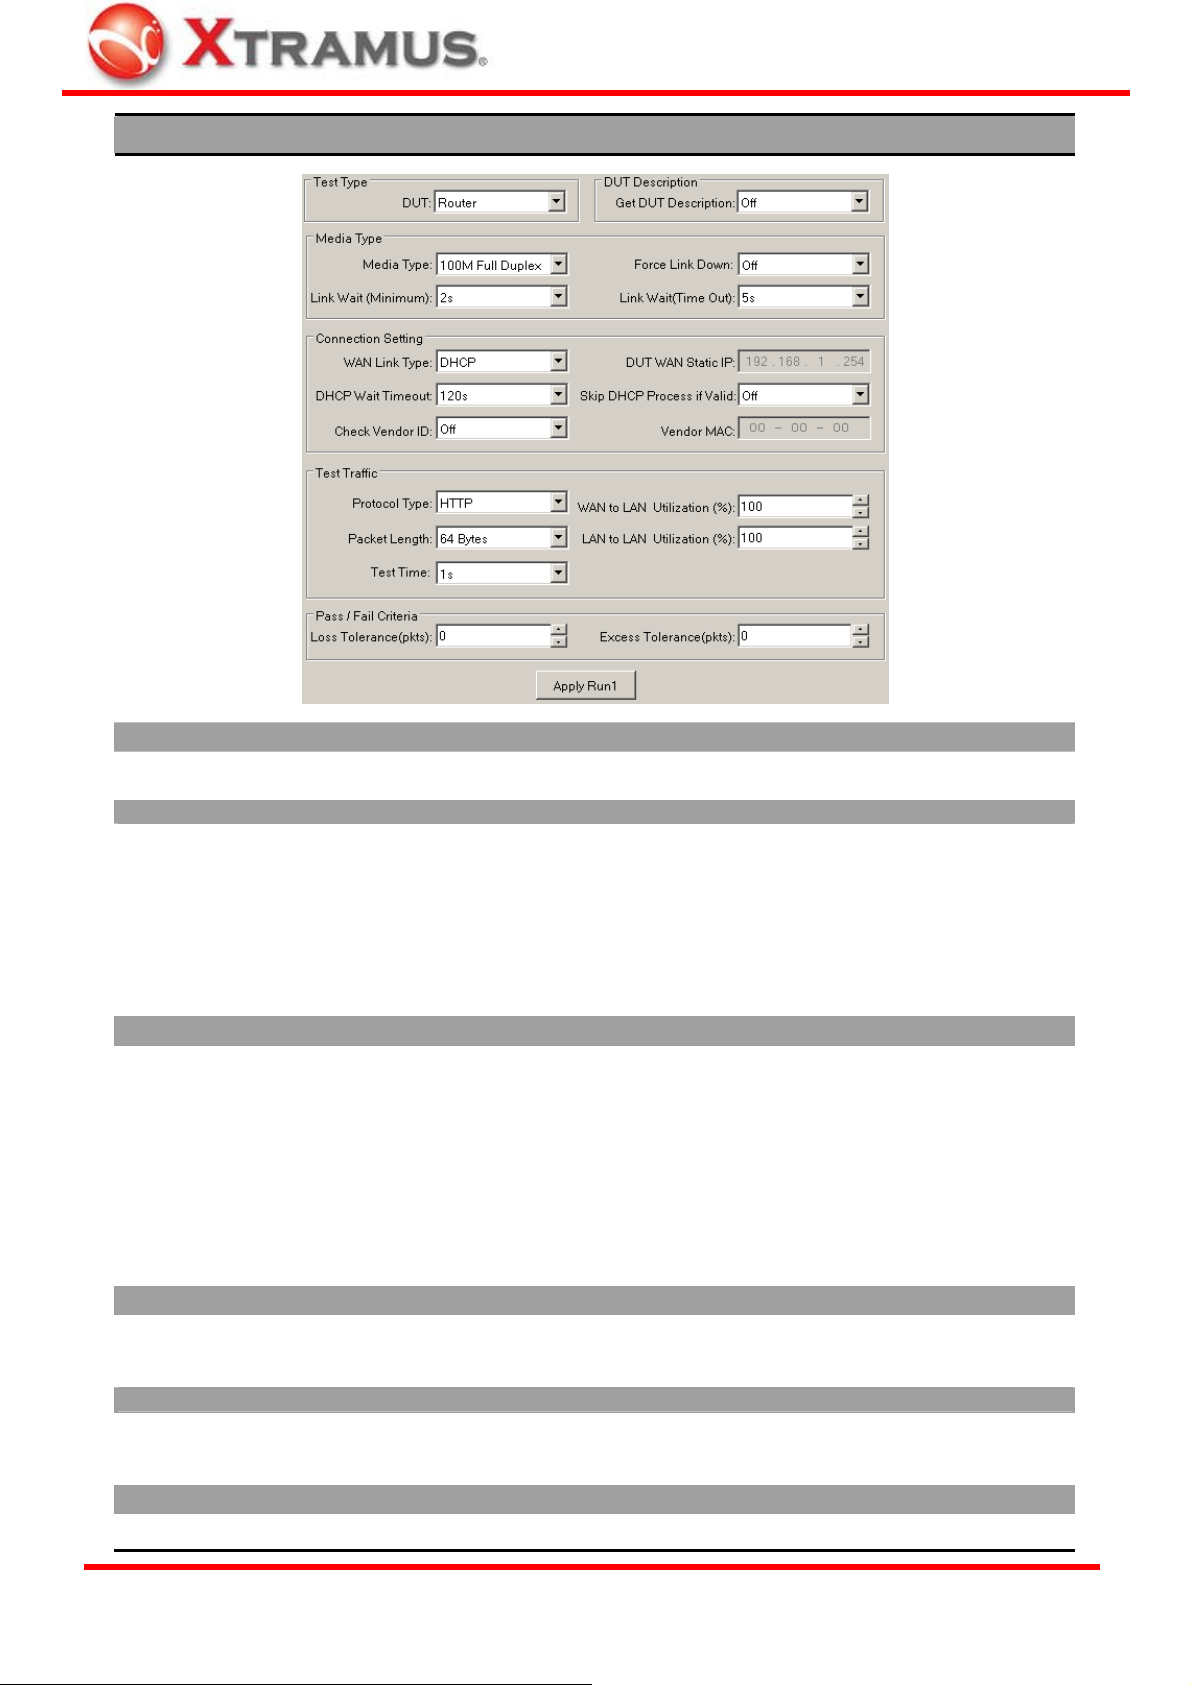
DUT: Router
Test Type/DUT Description
• DUT: Choose “Router” from this scroll-down menu to start configuring router tests.
• Get DUT Description: Enable this function to acquire DUT information during test and output it to test logs.
Media Type
Media Type: Two rates of connection speed are
•
available: 10M Full Duplex and 100M Full Duplex.
• Link Wait (Minimum): NuStreams-P9M will attempt to
establish connection with the DUT and wait for the
minimum time (seconds). NuStreams-P9M will keep
waiting until the minimum time is met even the DUT has
already responded.
• Force Link Down: The connection link between DUT
and NuStreams-P9M will be forced to terminate when
this function is enabled.
• Link Wait (Time Out): NuStreams-P9M will attempt to
establish connection with the DUT and wait for a period
of time until time out (second), and NuStreams-P9M will
not attempt to establish connection anymore.
Connection Setting
WAN Link Type: Choose the WAN connection type for
•
DUT testing. Two WAN Link Types are available: DHCP
and Static IP. The WAN Link Type set here must be the
same with the setting of the DUT.
• DHCP Wait Timeout: This menu sets the duration of
time for attempting to establish connection with DHCP
server.
• Check Vender ID: Enable this function to check DUTs’
MAC address and see if they match DUT vender’s
designated MAC address.
• DUT WAN Static IP: If the WAN Link Type is set as
Static IP, please input the static IP address you set in
the DUT here.
• Skip DHCP Process if Valid: Disable or enable DHCP
server.
• Vendor MAC: If Check Vender ID is enabled, please
input the vender’s designated MAC address here for
comparisons.
Test Traffic
•
Protocol Type: You can set the protocol used (HTTP,
UDP, or FTP) for DUT tests.
• Test Utilization (%): Utilization is the traffic flow ratio of
network, presented in percentage (1~99).
• Packet Length: Length of testing packets. • Test Time: The duration of time for DUT test.
Pass/Fail Criteria
•
Loss Tolerance (pkts): The acceptable number of lost
packets in data transmitting during tests (0~9999).
• Excess Tolerance (pkts): The acceptable number of
excess packets in data transmitting during tests
(0~9999).
Apply Run
• Click this button to apply all the settings you’ve made and save the settings to NuStreams-P9M.
XTRAMUS TECHNOLOGIES
35
E-mail: sales@xtramus.com
Website: www.Xtramus.com
Page 36

®
DUT: Switch
Test Type/DUT Description
•
DUT: Choose “Switch” from this scroll-down menu to start configuring switch tests.
Media Type
Testing LAN Ports: Up to 8 ports (LAN Port 0~7) can
•
be tested at the same time. Please connect the DUT
with NuStreams-P9M’s LAN Ports with Cat-5 cables
according to the Testing LAN Ports you set here.
• Link Wait (Minimum): NuStreams-P9M will attempt to
establish connection with the DUT and wait for the
minimum time (seconds). NuStreams-P9M will keep
waiting until the minimum time is met even the DUT has
already responded.
Test Traffic
•
Packet Length: The length of test packets (from
64~1600 Bytes) transmitting by NuStreams-P9M.
• Learning Time: NuStreams-P9M will start sending
send learning packets to the DUT. The DUT will record
the MAC addresses of these packets, and learn the
routing to NuStreams-P9M.
Pass/Fail Criteria
•
Loss Tolerance (pkts): The acceptable number of lost
packets in data transmitting during tests (0~9999).
Apply Run
• Click this button to apply all the settings you’ve made and save the settings to NuStreams-P9M.
• Media Type: Two rates of connection speed are
available: 10M/100 Full/Half Duplex.
• Link Wait (Time Out): NuStreams-P9M will attempt to
establish connection with the DUT and wait for a period
of time until time out (second), and NuStreams-P9M will
not attempt to establish connection anymore.
• Test Utilization (%): Utilization is the traffic flow ratio of
network, presented in percentage (1~99).
• Test Time: The duration of time for DUT test.
• Excess Tolerance (pkts): The acceptable number of
excess packets in data transmitting during tests
(0~9999).
XTRAMUS TECHNOLOGIES
36
E-mail: sales@xtramus.com
Website: www.Xtramus.com
Page 37

®
DUT: Router + Switch
Test Type
•
DUT: Choose “Router + Switch” from this scroll-down menu to start configuring tests for both routers and switches.
• Get DUT Description: Enable this function to acquire DUT information during test and output it to test logs.
Media Type
Media Type: Two rates of connection speed are
•
available: 10M Full Duplex and 100M Full Duplex.
• Link Wait (Minimum): NuStreams-P9M will attempt to
establish connection with the DUT and wait for the
minimum time (seconds). NuStreams-P9M will keep
waiting until the minimum time is met even the DUT has
already responded.
• Force Link Down: The connection link between DUT
and NuStreams-P9M will be forced to terminate when
this function is enabled.
• Link Wait (Time Out): NuStreams-P9M will attempt to
establish connection with the DUT and wait for a period
of time until time out (second), and NuStreams-P9M will
not attempt to establish connection anymore.
• Testing LAN Ports: Up to 8 ports (LAN Port 0~7) can be tested at the same time. Please connect the DUT with
NuStreams-P9M’s LAN Ports with Cat-5 cables according to the Testing LAN Ports you set here.
Connection Setting
WAN Link Type: Choose the WAN connection type for
•
DUT testing. Two WAN Link Types are available: DHCP
and Static IP. The WAN Link Type set here must be the
same with the setting of the DUT.
• DHCP Wait Timeout: This menu sets the duration of
time for attempting to establish connection with DHCP
server.
• Check Vender ID: Enable this function to check DUTs’
MAC address and see if they match DUT vender’s
designated MAC address.
• DUT WAN Static IP: If the WAN Link Type is set as
Static IP, please input the static IP address you set in
the DUT here.
• Skip DHCP Process if Valid: Disable or enable DHCP
server.
• Vendor MAC: If Check Vender ID is enabled, please
input the vender’s designated MAC address here for
comparisons.
XTRAMUS TECHNOLOGIES
37
E-mail: sales@xtramus.com
Website: www.Xtramus.com
Page 38

®
Test Traffic
•
Protocol Type: You can set the protocol used (HTTP,
UDP, or FTP) for DUT tests.
• Packet Length: The length of test packets (from
64~1600 Bytes) transmitting by NuStreams-P9M.
• Test Utilization (%): Utilization is the traffic flow ratio of
network, presented in percentage (1~99).
• Test Time: The duration of time for DUT test.
• Learning Time: NuStreams-P9M will start sending learning packets to the DUT. The DUT will record the MAC
addresses of these packets, and learn the routing to NuStreams-P9M.
Pass/Fail Criteria
•
Loss Tolerance (pkts): The acceptable number of lost
packets in data transmitting during tests (0~9999).
• Excess Tolerance (pkts): The acceptable number of
excess packets in data transmitting during tests
(0~9999).
Apply Run
• Click this button to apply all the settings you’ve made and save the settings to NuStreams-P9M.
XTRAMUS TECHNOLOGIES
38
E-mail: sales@xtramus.com
Website: www.Xtramus.com
Page 39

®
4.6. Firmware/FPGA/NuPAD Upgrade
As mentioned above in “4.5.2. Menu Bar”, by clicking Service → System Upgrade on the Menu
Bar, you can upgrade NuStreams-P9M’s firmware, FPGA, and NuPAD’s firmware via
NuStreams-P9M utility.
Before upgrading NuStreams-P9M firmware/FPGA, please be sure that NuStreams–P9M and your
PC are connected via mini-USB cable all the time as shown in the figure down below.
When upgrading NuPAD firmware, please be sure that NuPAD is connected with NuStreams-P9M via
RJ45 cable, and NuStreams-P9M is connected with you PC via mini-USB cable as shown in the figure
down below.
XTRAMUS TECHNOLOGIES
39
E-mail: sales@xtramus.com
Website: www.Xtramus.com
Page 40

®
Firmware/FPGA Upgrading
To start upgrading NuStreams-P9M firmware
/FPGA , click Service → System Upgrade on the
Menu Bar, and choose if you would like to upgrade
NuStreams-P9M firmware or FPGA.
If you’re upgrading NuStreams-P9M firmware, a
message window will pop up, reminding you that all
NuStreams-P9M’s settings will be reset to default
after firmware upgrading. Please click Yes to
continue.
Also, please note that all test logs stored in
NuStreams -P9M will be deleted after upgrading as
well.
Select where NuStreams-P9M’s firmware/FPGA file
(in the format of “*.bin”) is stored in your PC, then
click “Open”.
Click Yes to start upgrading firmware.
NuStreams-P9M utility will start uploading firmware
from your PC to NuStreams-P9M.
It might take several minutes uploading firmware or
FPGA. Please note that the connection between
NuStreams-P9M and your PC shall remain
connected at all time, and please be sure that the
NuStreams-P9M and your PC’s power remain ON
during the process.
XTRAMUS TECHNOLOGIES
40
E-mail: sales@xtramus.com
Website: www.Xtramus.com
Page 41

®
NuStreams-P9M’s LCD will show the firmware/FPGA upgrading process as shown in the figures down
below.
NuStreams-P9M Firmware Upgrading FPGA Upgrading
Firmware/FPGA upgrading complete! Click OK to
finish. You will have to click the Reconnect button
on NuStreams-P9M’s Quick Launch
Button in order to re-establish the connection
between your PC and NuStreams-P9M.
If you’re upgrading FPGA, please reboot
NuStreams-P9M by switching its power off, and
turning it back on.
XTRAMUS TECHNOLOGIES
41
E-mail: sales@xtramus.com
Website: www.Xtramus.com
Page 42

®
NuPAD Firmware Upgrading
Before upgrading NuPAD’s firmware, please connect NuPAD, NuStreams-P9M, and your PC
according to the figures and descriptions down below:
→
1. Connect NuPAD with NuStreams-P9M’s
Console port via a RJ45 cable.
2. Connect NuStreams-P9M’s USB port with your
PC via mini-USB cable.
After connecting NuPAD, NuStreams-P9M, and your PC according the descriptions shown above,
please start upgrading NuPAD’s firmware by the following steps:
To start upgrading NuPAD’s firmware, click Service
→ System Upgrade on the Menu Bar, and
choose NuPAD Upgrade.
Select where NuPAD’s firmware (in the format of
“*.bin”) is stored in your PC, then click “Open”.
Click Yes to start upgrading firmware.
NuStreams-P9M will start the NuPAD firmware
upgrading process. Please note that during the
upgrading process, NuPAD, NuStreams-P9M, and
your PC must be power on and connected properly
at all time.
XTRAMUS TECHNOLOGIES
42
E-mail: sales@xtramus.com
Website: www.Xtramus.com
Page 43

®
NuPAD’s LCD screen will show the firmware upgrading process as shown in the pictures down below:
Firmware upgrading completes. Please click OK to
continue.
NuPAD will try to re-connect with NuStreams-P9M
after upgrading its firmware. Please remove the
mini-USB cable between your PC and
NuStreams-P9M when NuPAD is connecting to
NuStreams-P9M.
XTRAMUS TECHNOLOGIES
43
E-mail: sales@xtramus.com
Website: www.Xtramus.com
Page 44

®
5. NuPAD
NuPAD is an assistant extension keypad, especially designed for running
tests at mass production line.
With all test parameters set and stored in NuStreams-P9M, NuPAD
allows users to perform tests without changing pre-set parameters.
5.1. NuPAD Control Buttons & LCD
A Connection Port
B LCD Screen
C Control Buttons
D/E System LEDs
Connecting NuPAD with NuStreams-P9M’s Console Port.
Displaying system information, status, and test results.
¾ || Pause: Press this button to pause the current running test. Press
this button again to resume the test.
¾ ■ Stop: Press this button to stop the current running test.
¾
► Run: Press this button to start test.
¾ Sys/Link/Alarm: Showing NuPAD running status.
¾ Power: When NuPAD is connected to NuStreams-P9M’s Console
Port, the Green Power LED will be ON.
¾ Pass/Fail: If the test passed, the Pass/Fail Green LED will be ON; if
the test failed, the Pass/Fail Amber LED will be ON.
¾ Step 1~4: Showing the progress of the test.
XTRAMUS TECHNOLOGIES
44
E-mail: sales@xtramus.com
Website: www.Xtramus.com
Page 45

®
5.2. Connecting NuPAD with NuSTreams-P9M
Before using NuPAD as NuStreams-P9M’s assistant extension keypad, you have to connect NuPAD’s
Connection Port with NuStreams-P9M’s Console Port with a Cat-5 cable first as shown in the figure
down below.
After connecting NuStreams-P9M with Cat-5 cable, NuPAD will start establishing connection with
NuStreams-P9M, and its LCD will display system status as shown down below.
1. NuPAD is powering up.
2. Showing NuPAD’s hardware and firmware version.
3. NuPAD starting connecting with NuStreams-P9M.
During this process, NuPAD’s buzzer will be beeping.
4. Connection established, and NuPAD’s buzzer stops
beeping. If NuPAD’s buzzer keeps beeping and the
connection between NuStreams-P9M and NuPAD
can’t be established, please power off both
NuStreams-P9M and NuPAD, power them on, and try
again.
XTRAMUS TECHNOLOGIES
45
E-mail: sales@xtramus.com
Website: www.Xtramus.com
Page 46

®
5.3. Starting DUT Tests with NuPAD
NuPAD has 3 buttons on its front panel: “|| Pause”, “■ Stop”, and “
► Run”. After connecting NuPAD
with NuStreams-P9M with Cat-5 cable, you can start/pause/stop DUT tests with these 3 buttons.
Please see the table down below for a detailed description about these buttons’ functions.
Function Button Description
Start Testing All Tasks
in Current Run
Switching Current Run || Pause
Pause Current Running
Test
Stop Current Running
Test
► Run Press “► Run” to start all Tasks in
the current Run. The current Run
(Run 1~3) about to be tested will
be displayed on the upper-right
part of LCD.
To change the current Run (Run 1~3), press both “|| Pause” and “■
+
■Stop
|| Pause
■Stop Press “■Stop” button once to stop the current running test.
Stop” buttons at the same time. If NuPAD is current in Run 1, pressing
both “|| Pause” and “■Stop” buttons at the same time will switch the
current Run from Run 1 to Run 2.
Press “|| Pause” button once to pause the current running test. Press “||
Pause” button again to resume the test.
XTRAMUS TECHNOLOGIES
46
E-mail: sales@xtramus.com
Website: www.Xtramus.com
 Loading...