

Page 1

NuApps-MultiUnits-RM
User’s Manual
USM Ver 1.5
Page 2

Foreword
Copyright
Copyright © 2012 Xtramus Technologies, all rights reserved. The information contained in this document is the property of Xtramus
Technologies. No part of this publication shall be reproduced, stored in a retrieval system, or transmitted, in any form or by any
means, without the prior written permission of Xtramus Technologies.
Disclaimer
The information contained in this document is subject to change without notice and does not represent a commitment on the part of
Xtramus Technologies. The information in this document is believed to be accurate and reliable. However, Xtramus Technologies
assumes no responsibility or liability for any errors or inaccuracies that may appear in the document.
Trademarks
NuApps-MultiUnits-RM is a trademark or registered trademark of Xtramus Technologies. All other trademarks and registered
trademarks are the property of their respective owners.
Warranty
Xtramus Technologies warrants for the hardware provided along with this document under proper usage and conditions in normal
environment; any improper operation or in irregular environment may possibly cause this product NOT function well. For detailed
terms, please contact your local dealer.
Contact Information
Xtramus Technologies
E-mail: sales@xtramus.com
Website: www.xtramus.com
Tel: +886-2-8227-6611
Fax: +886-2-8227-6622
XTRAMUS TECHNOLOGIES®
2
E-mail: sales@xtramus.com
Website: www.Xtramus.com
Page 3

Revision History
Date Version History
2012/04/02 1.0 First draft version
1. Added new function Tool Bar on Menu Bar_View. (Page
26)
2. Amended the correct function of LED (1, 2,…8) of each
2012/04/26 1.1
2012/08/21 1.2
window task. (Page 31_H)
3. Included the Break off as a status of window task. (Page
31_I)
4. Added new function Upload Data to MES. (Page 39)
1. Modify Main Interface’s Demo figure. (Page 20)
2. Added figure of initial option window for choosing
interfaces. (Page 21)
3. Modify new figure for main interface due to LED (1~9).
(Page 22)
4. Modify new figure for main interface due to LED (1~9).
(Page 24)
5. Added Empty the time information description on
Config. (Page 26)
6. Added Input Information on Config. (Page 26)
7. Modify the window task figure. (Page 31, 35 and 43)
8. Amended descriptions for LED. (Page 31)
9. Added Option Dialog window and description. (Page 38)
10. Added description about Reset and Reset All functions.
(Page 41)
11. Modify Select Ports interface figure. (Page 42)
12. Modified the figure of UC Task _ Test Procedure. (Page
52)
13. Added description about Broadcast/Unicast and
function Learning Connection Check description. (Page
52)
14. Added Port Select… function figure and description. (54,
60, 66, 72, 78, 84, 90, 96, 102, 108, 114, 120, 126, 132,
138, 144, 150, 156, 162, 168, 174, 180, 186, 192, 198,
204, 210, 216, 222, 228, 234 and 240)
15. Added a note describing that each selected port pair can
support up to 32 tasks test. (Page 40 and 43)
16. Added new figure for Port Map interface and description
for new function Traffic Direction mode. (Page 53, 59,
65, 71, 77, 83, 89, 95, 101, 107, 113, 119, 125, 131, 137,
143, 149, 155, 161, 167, 173, 179, 185, 191, 197, 203,
209, 215, 221, 227, 233 and 239)
17. Added new figure for Packet interface and description for
new function Enable S/N Error Check. (Page 55, 61, 67,
73, 79, 85, 91, 97, 103, 109, 115, 121, 127, 133, 139,
145, 151, 157, 163, 169, 175, 181, 187, 193, 199, 205,
211, 217, 223, 229, 235, 241)
18. Modify 1 to Many task’s Traffic Window. (Page 51)
19. Modify Config figure. (Page 26)
20. Modify 1 to Many task figure, adding Enable S/N Error
Check function description. (Page 52)
21. Amend Media Type figure for each task test.
22. Modify Test Report figure, adding date on time display.
(Page 247)
XTRAMUS TECHNOLOGIES®
3
E-mail: sales@xtramus.com
Website: www.Xtramus.com
Page 4

Date Version History
1. Update General Information’s figure for selection of
Pass/Fail/Pass rate/Start time/Duration. (Page 27)
2. Update 1 to Many_Test Procedure’s figure for Media
Type Fails to Continue function. (Page 53)
2012/09/05 1.3
3. Update Router NAT_Set’s figure. (Page 55)
4. Update each task_Port Map’s figure for the word
“Apply”.
5. Update each task_Media Type’s figure for adding Media
Type Fails to Continue function and description.
2012/09/07 1.4
1. Deleting the description of NuApps-MultiUnits-RM
supports operation system Windows 2000.(Page 11)
1. Update module cards’ FPGA/Firmware support version.
(Page 11)
2. Update Demo mode User Interface figure. (Page 21)
3. Update User Interface figure. (Page 23 and 25)
2012/11/14 1.5
4. Adding UI Style description and figure. (Page 25 and 28)
5. Adding Start All description. (Page 25)
6. Update Quick Launch Buttons. (Page 31)
7. Update Environment Setting figure. (Page 38)
8. Adding Suffix function on Environment Setting. (Page
39)
XTRAMUS TECHNOLOGIES®
4
E-mail: sales@xtramus.com
Website: www.Xtramus.com
Page 5

Table of Contents
Foreword ..........................................................................................................................................2
Revision History ..............................................................................................................................3
1. NuApps-MultiUnits-RM Overview............................................................................................. 11
1.1. General Description of NuApps-MultiUnits-RM ............................................................. 11
1.2. Function Description_ Performance Task in Layer 2 (PT2) ..........................................12
1.2.1. One to Many Unicast Test (1 to Many-UC).................................................................12
1.2.2. Unicast Test (UC) .........................................................................................................12
1.2.3. Flow Control Test (FC) ................................................................................................13
1.2.4. Broadcast Test (BC) ....................................................................................................13
1.2.5. Filter Test (FT) ..............................................................................................................14
1.2.6. CRC Error Test (CRC).................................................................................................. 14
2. Installing and Uninstalling NuApps-MultiUnits-RM ................................................................15
3. NuApps-MultiUnits-RM Function Overview ............................................................................ 20
3.1. Starting NuApps-MultiUnits-RM ......................................................................................20
3.2. NuServer Window............................................................................................................. 24
3.3. NuApps-MultiUnits-RM Main Window............................................................................. 25
3.3.1. Menu Bar ...................................................................................................................... 26
A. File…………....................................................................................................................26
B. Config……….. ................................................................................................................27
C. View…………..................................................................................................................27
D. Security………. ..............................................................................................................29
E. Language……….............................................................................................................30
F. Help…………...................................................................................................................30
3.3.2. Quick Launch Buttons ................................................................................................ 31
3.3.3. Status Window............................................................................................................. 32
3.3.4. Task Running Windows ..............................................................................................33
4. Creating Task via New Model Wizard ...................................................................................... 34
4.1. Selecting Active Ports from Installed Module Cards.....................................................35
4.2. Making Settings on Option – New Model Window.........................................................37
4.2.1. Environment Settings .................................................................................................38
4.2.2. Select Port Settings..................................................................................................... 42
4.2.3. Adding/Removing Tasks via Task List Setting.......................................................... 45
4.2.4. Configuring Tasks Listed on List of Selected Tasks................................................ 48
5. NuApps-MultiUnits-RM Detail Task Setting............................................................................. 49
5.1. 1 to Many-UC..................................................................................................................... 50
A. Port Map............................................................................................................................. 50
B. Media..................................................................................................................................52
C. Traffic. ................................................................................................................................53
D. Test Procedure .................................................................................................................. 54
5.2. Router-NAT........................................................................................................................ 55
A. Port Map............................................................................................................................. 55
B. Set…...................................................................................................................................56
C. Test Procedure .................................................................................................................. 57
5.3. Unicast Test (UC) _ PT2-UC-10H (10Mbps Half Duplex)................................................58
A. Port Map............................................................................................................................. 58
B. Media Type......................................................................................................................... 60
C. Packet ................................................................................................................................60
D. Learning............................................................................................................................. 62
E. Criteria................................................................................................................................63
F. Misc….. ...............................................................................................................................63
G. Help….................................................................................................................................63
5.4. Unicast Test (UC) _ PT2-UC-10F (10Mbps Full Duplex) ................................................64
A. Port Map............................................................................................................................. 64
B. Media Type......................................................................................................................... 66
XTRAMUS TECHNOLOGIES®
5
E-mail: sales@xtramus.com
Website: www.Xtramus.com
Page 6

C. Packet ................................................................................................................................66
D. Learning............................................................................................................................. 68
E. Criteria................................................................................................................................69
F. Misc…….............................................................................................................................. 69
G. Help….................................................................................................................................69
5.5. Unicast Test (UC) _ PT2-UC-100H (100Mbps Half Duplex)............................................70
A. Port Map............................................................................................................................. 70
B. Media Type......................................................................................................................... 72
C. Packet ................................................................................................................................72
D. Learning............................................................................................................................. 74
E. Criteria................................................................................................................................75
F. Misc….. ...............................................................................................................................75
G. Help…… ............................................................................................................................. 75
5.6. Unicast Test (UC) _ PT2-UC-100F (100Mbps Full Duplex) ............................................76
A. Port Map............................................................................................................................. 76
B. Media Type......................................................................................................................... 78
C. Packet ................................................................................................................................78
D. Learning............................................................................................................................. 80
E. Criteria................................................................................................................................81
F. Misc….. ...............................................................................................................................81
G. Help….................................................................................................................................81
5.7. Unicast Test (UC) _ PT2-UC-1G (1000Mbps Full Duplex) ..............................................82
A. Port Map............................................................................................................................. 82
B. Media Type......................................................................................................................... 84
C. Packet ................................................................................................................................84
D. Learning............................................................................................................................. 86
E. Criteria................................................................................................................................87
F. Misc…. ................................................................................................................................87
G. Help….................................................................................................................................87
5.8. Unicast Test (UC) _ PT2-UC-10G (10Gbps Full Duplex) ................................................ 88
A. Port Map............................................................................................................................. 88
B. Media Type......................................................................................................................... 90
C. Packet ................................................................................................................................90
D. Learning............................................................................................................................. 92
E. Criteria................................................................................................................................93
F. Misc….. ...............................................................................................................................93
G. Help……. ............................................................................................................................ 93
5.9. Flow Control Test (FC) _ PT2-FC-10H-100H (10Mbps Half ↔ 100Mbps Half) ..............94
A. Port Map............................................................................................................................. 94
B. Media Type......................................................................................................................... 96
C. Packet ................................................................................................................................96
D. Learning............................................................................................................................. 98
E. Criteria................................................................................................................................99
F. Misc…….............................................................................................................................. 99
G. Help……. ............................................................................................................................ 99
5.10. Flow Control Test (FC) _ PT2-FC-100H-10H (100Mbps Half ↔ 10Mbps Half) ..........100
A. Port Map........................................................................................................................... 100
B. Media Type....................................................................................................................... 102
C. Packet ..............................................................................................................................102
D. Learning........................................................................................................................... 104
E. Criteria.............................................................................................................................. 105
F. Misc….. ............................................................................................................................. 105
G. Help…............................................................................................................................... 105
5.11. Flow Control Test (FC) _ PT2-FC-10F-100F (10Mbps Full ↔ 100Mbps Full) ............106
A. Port Map........................................................................................................................... 106
B. Media Type....................................................................................................................... 108
XTRAMUS TECHNOLOGIES®
6
E-mail: sales@xtramus.com
Website: www.Xtramus.com
Page 7

C. Packet ..............................................................................................................................108
D. Learning........................................................................................................................... 110
E. Criteria.............................................................................................................................. 111
F. Misc……............................................................................................................................ 111
G. Help…… ........................................................................................................................... 111
5.12. Flow Control Test (FC) _ PT2-FC-100F-10F (100Mbps Full ↔ 10Mbps Full)............ 112
A. Port Map........................................................................................................................... 112
B. Media Type....................................................................................................................... 114
C. Packet .............................................................................................................................. 114
D. Learning........................................................................................................................... 116
E. Criteria.............................................................................................................................. 117
F. Misc……............................................................................................................................ 117
G. Help…............................................................................................................................... 117
5.13. Flow Control Test (FC) _ PT2-FC-100F-1G (100Mbps Full ↔ 1000Mbps Full) ......... 118
A. Port Map........................................................................................................................... 118
B. Media Type....................................................................................................................... 120
C. Packet ..............................................................................................................................120
D. Learning........................................................................................................................... 122
E. Criteria.............................................................................................................................. 123
F. Misc….. ............................................................................................................................. 123
G. Help…............................................................................................................................... 123
5.14. Flow Control Test (FC) _ PT2-FC-1G-100F (1000Mbps Full ↔ 100Mbps Full) .........124
A. Port Map........................................................................................................................... 124
B. Media Type....................................................................................................................... 126
C. Packet ..............................................................................................................................126
D. Learning........................................................................................................................... 128
E. Criteria.............................................................................................................................. 129
F. Misc……............................................................................................................................ 129
G. Help…… ........................................................................................................................... 129
5.15. Flow Control Test (FC) _ PT2-FC-1G-10G (1000Mbps Full ↔ 10Gbps Full)............. 130
A. Port Map........................................................................................................................... 130
B. Media Type....................................................................................................................... 132
C. Packet ..............................................................................................................................132
D. Learning........................................................................................................................... 134
E. Criteria.............................................................................................................................. 135
F. Misc……............................................................................................................................ 135
G. Help…….. ......................................................................................................................... 135
5.16. Flow Control Test (FC) _ PT2-FC-10G-1G (10G Full ↔ 1000Mbps Full) ...................136
A. Port Map........................................................................................................................... 136
B. Media Type....................................................................................................................... 138
C. Packet ..............................................................................................................................138
D. Learning........................................................................................................................... 140
E. Criteria.............................................................................................................................. 141
F. Misc……............................................................................................................................ 141
G. Help……. .......................................................................................................................... 141
5.17. Broadcast Test (BC) _ PT2-BC-10H (10Mbps, Half Duplex) ...................................... 142
A. Port Map........................................................................................................................... 142
B. Media Type....................................................................................................................... 144
C. Packet ..............................................................................................................................144
D. Learning........................................................................................................................... 146
E. Criteria.............................................................................................................................. 147
F. Misc……............................................................................................................................ 147
G. Help……. .......................................................................................................................... 147
5.18. Broadcast Test (BC) _ PT2-BC-10F (10Mbps, Full Duplex) .......................................148
A. Port Map........................................................................................................................... 148
B. Media Type....................................................................................................................... 150
XTRAMUS TECHNOLOGIES®
7
E-mail: sales@xtramus.com
Website: www.Xtramus.com
Page 8

C. Packet ..............................................................................................................................150
D. Learning........................................................................................................................... 152
E. Criteria.............................................................................................................................. 153
F. Misc……............................................................................................................................ 153
G. Help….............................................................................................................................. .153
5.19. Broadcast Test (BC) _ PT2-BC-100H (100Mbps, Half Duplex) .................................. 154
A. Port Map........................................................................................................................... 154
B. Media Type....................................................................................................................... 156
C. Packet ..............................................................................................................................156
D. Learning........................................................................................................................... 158
E. Criteria.............................................................................................................................. 159
F. Misc……............................................................................................................................ 159
G. Help…….. ......................................................................................................................... 159
5.20. Broadcast Test (BC) _ PT2-BC-100F (100Mbps, Full Duplex) ...................................160
A. Port Map........................................................................................................................... 160
B. Media Type....................................................................................................................... 162
C. Packet ..............................................................................................................................162
D. Learning........................................................................................................................... 164
E. Criteria.............................................................................................................................. 165
F. Misc……............................................................................................................................ 165
G. Help………........................................................................................................................ 165
5.21. Broadcast Test (BC) _ PT2-BC-1G (1000Mbps, Full Duplex) ....................................166
A. Port Map........................................................................................................................... 166
B. Media Type....................................................................................................................... 168
C. Packet ..............................................................................................................................168
D. Learning........................................................................................................................... 170
E. Criteria.............................................................................................................................. 171
F. Misc……............................................................................................................................ 171
G. Help…............................................................................................................................... 171
5.22. Broadcast Test (BC) _ PT2-BC-10G (10Gbps, Full Duplex).......................................172
A. Port Map........................................................................................................................... 172
B. Media Type....................................................................................................................... 174
C. Packet ..............................................................................................................................174
D. Learning........................................................................................................................... 176
E. Criteria.............................................................................................................................. 177
F. Misc….. ............................................................................................................................. 177
G. Help……. .......................................................................................................................... 177
5.23. Filter Test (FT) _ PT2-FT-10H (10Mbps, Half Duplex).................................................178
A. Port Map........................................................................................................................... 178
B. Media Type....................................................................................................................... 180
C. Packet ..............................................................................................................................180
D. Learning........................................................................................................................... 182
E. Criteria.............................................................................................................................. 183
F. Misc…. .............................................................................................................................. 183
G. Help……. .......................................................................................................................... 183
5.24. Filter Test (FT) _ PT2-FT-10F (10Mbps, Full Duplex) .................................................184
A. Port Map........................................................................................................................... 184
B. Media Type....................................................................................................................... 186
C. Packet ..............................................................................................................................186
D. Learning........................................................................................................................... 188
E. Criteria.............................................................................................................................. 189
F. Misc……............................................................................................................................ 189
G. Help…… ........................................................................................................................... 189
5.25. Filter Test (FT) _ PT2-FT-100H (100Mbps, Half Duplex).............................................190
A. Port Map........................................................................................................................... 190
B. Media Type....................................................................................................................... 192
XTRAMUS TECHNOLOGIES®
8
E-mail: sales@xtramus.com
Website: www.Xtramus.com
Page 9

C. Packet ..............................................................................................................................192
D. Learning........................................................................................................................... 194
E. Criteria.............................................................................................................................. 195
F. Misc….. ............................................................................................................................. 195
G. Help……. .......................................................................................................................... 195
5.26. Filter Test (FT) _ PT2-FT-100F (100Mbps, Full Duplex) .............................................196
A. Port Map........................................................................................................................... 196
B. Media Type....................................................................................................................... 198
C. Packet ..............................................................................................................................198
D. Learning........................................................................................................................... 200
E. Criteria.............................................................................................................................. 201
F. Misc….. ............................................................................................................................. 201
G. Help…............................................................................................................................... 201
5.27. Filter Test (FT) _ PT2-FT-1G (1000Mbps, Full Duplex)...............................................202
A. Port Map........................................................................................................................... 202
B. Media Type....................................................................................................................... 204
C. Packet ..............................................................................................................................204
D. Learning........................................................................................................................... 206
E. Criteria.............................................................................................................................. 207
F. Misc……............................................................................................................................ 207
G. Help…...............................................................................................................................207
5.28. Filter Test (FT) _ PT2-FT-10G (10Gbps, Full Duplex)................................................. 208
A. Port Map........................................................................................................................... 208
B. Media Type....................................................................................................................... 210
C. Packet ..............................................................................................................................210
D. Learning........................................................................................................................... 212
E. Criteria.............................................................................................................................. 213
F. Misc….. ............................................................................................................................. 213
G. Help……. .......................................................................................................................... 213
5.29. CRC Error Test (CRC) _ PT2-CRC-10H (10Mbps, Half Duplex)................................. 214
A. Port Map........................................................................................................................... 214
B. Media Type....................................................................................................................... 216
C. Packet ..............................................................................................................................216
D. Learning........................................................................................................................... 218
E. Criteria.............................................................................................................................. 219
F. Misc…. .............................................................................................................................. 219
G. Help…............................................................................................................................... 219
5.30. CRC Error Test (CRC) _ PT2-CRC-10F (10Mbps, Full Duplex).................................. 220
A. Port Map........................................................................................................................... 220
B. Media Type....................................................................................................................... 222
C. Packet ..............................................................................................................................222
D. Learning........................................................................................................................... 224
E. Criteria.............................................................................................................................. 225
F. Misc…... ............................................................................................................................ 225
G. Help…............................................................................................................................... 225
5.31. CRC Error Test (CRC) _ PT2-CRC-100H (100Mbps, Half Duplex)............................. 226
A. Port Map........................................................................................................................... 226
B. Media Type....................................................................................................................... 228
C. Packet ..............................................................................................................................228
D. Learning........................................................................................................................... 230
E. Criteria.............................................................................................................................. 231
F. Misc….. ............................................................................................................................. 231
G. Help…............................................................................................................................... 231
5.32. CRC Error Test (CRC) _ PT2-CRC-100F (100Mbps, Full Duplex).............................. 232
A. Port Map........................................................................................................................... 232
B. Media Type....................................................................................................................... 234
XTRAMUS TECHNOLOGIES®
9
E-mail: sales@xtramus.com
Website: www.Xtramus.com
Page 10

C. Packet ..............................................................................................................................234
D. Learning........................................................................................................................... 236
E. Criteria.............................................................................................................................. 237
F. Misc……............................................................................................................................ 237
G. Help…............................................................................................................................... 237
5.33. CRC Error Test (CRC) _ PT2-CRC-1G (1000Mbps, Full Duplex) ...............................238
A. Port Map........................................................................................................................... 238
B. Media Type....................................................................................................................... 240
C. Packet ..............................................................................................................................240
D. Learning........................................................................................................................... 242
E. Criteria.............................................................................................................................. 243
F. Misc……............................................................................................................................ 243
G. Help…............................................................................................................................... 243
5.34. CRC Error Test (CRC) _ PT2-CRC-10G (10Gbps, Full Duplex) ................................. 244
A. Port Map........................................................................................................................... 244
B. Media Type....................................................................................................................... 246
C. Packet ..............................................................................................................................246
D. Learning........................................................................................................................... 248
E. Criteria.............................................................................................................................. 249
F. Misc……............................................................................................................................ 249
G. Help…… ........................................................................................................................... 249
6. Run Test, Test Result & Report ..............................................................................................250
XTRAMUS TECHNOLOGIES®
10
E-mail: sales@xtramus.com
Website: www.Xtramus.com
Page 11
1. NuApps-MultiUnits-RM Overview
1.1. General Description of NuApps-MultiUnits-RM
NuApps-MultiUnits-RM is a utility software that displays up to 8 independent windows in 1
user interface, where each window can run different settings with an independent DUT
(Device Under Test). The NuApps-MultiUnits-RM supports all XM-RM module cards and
can reserve the XM-RM module card’s ports on each testing window, where the testing result of each
window can be showed separately on a log file.
NuApps-MultiUnits-RM is designed for Xtramus Technologies XM-RM series module cards. The table
down below contains the XM-RM module cards, FPGA/Firmware/PROM versions that are supported by
NuApps-MultiUnits-RM.
Module Cards Support NuApps-MultiUnits-RM
Module Card FPGA Version Firmware Version
XM-RM661/671/681
XM-RM751/761/781
XM-RM731
XM-RM881
XM-RM881-2
XM-RM891
*Note: NuStreams-2000i and NuStreams-600i are required as well.
V4.0b010 V1.7b032
V4.0b010 V1.7b032
V3.0b011 V1.7b032
V2.1b006 V0.9b046
V2.1b003 V0.9b046
V2.0b003 V1.7b032
Also, please make sure that your PC meets the requirements listed in the table down below before
installing NuApps-MultiUnits-RM.
OS
RAM
CPU
HDD
*Note: Large amount of data will be generated while running NuApps-MultiUnits-RM. It
is recommended to preserve enough available Hard-Disk space to store these data.
Windows XP Windows Vista/Windows 7
512MB RAM 1GB RAM
Pentium 1.3Ghz or higher
10 GB Available Space
XTRAMUS TECHNOLOGIES®
11
E-mail: sales@xtramus.com
Website: www.Xtramus.com
Page 12
1.2. Function Description_ Performance Task in Layer 2 (PT2)
Built-in tasks in NuApps-MultiUnits-RM include Unicast, Flow Control, Broadcast, Filter tasks and
CRC error.
1.2.1. One to Many Unicast Test (1 to Many-UC)
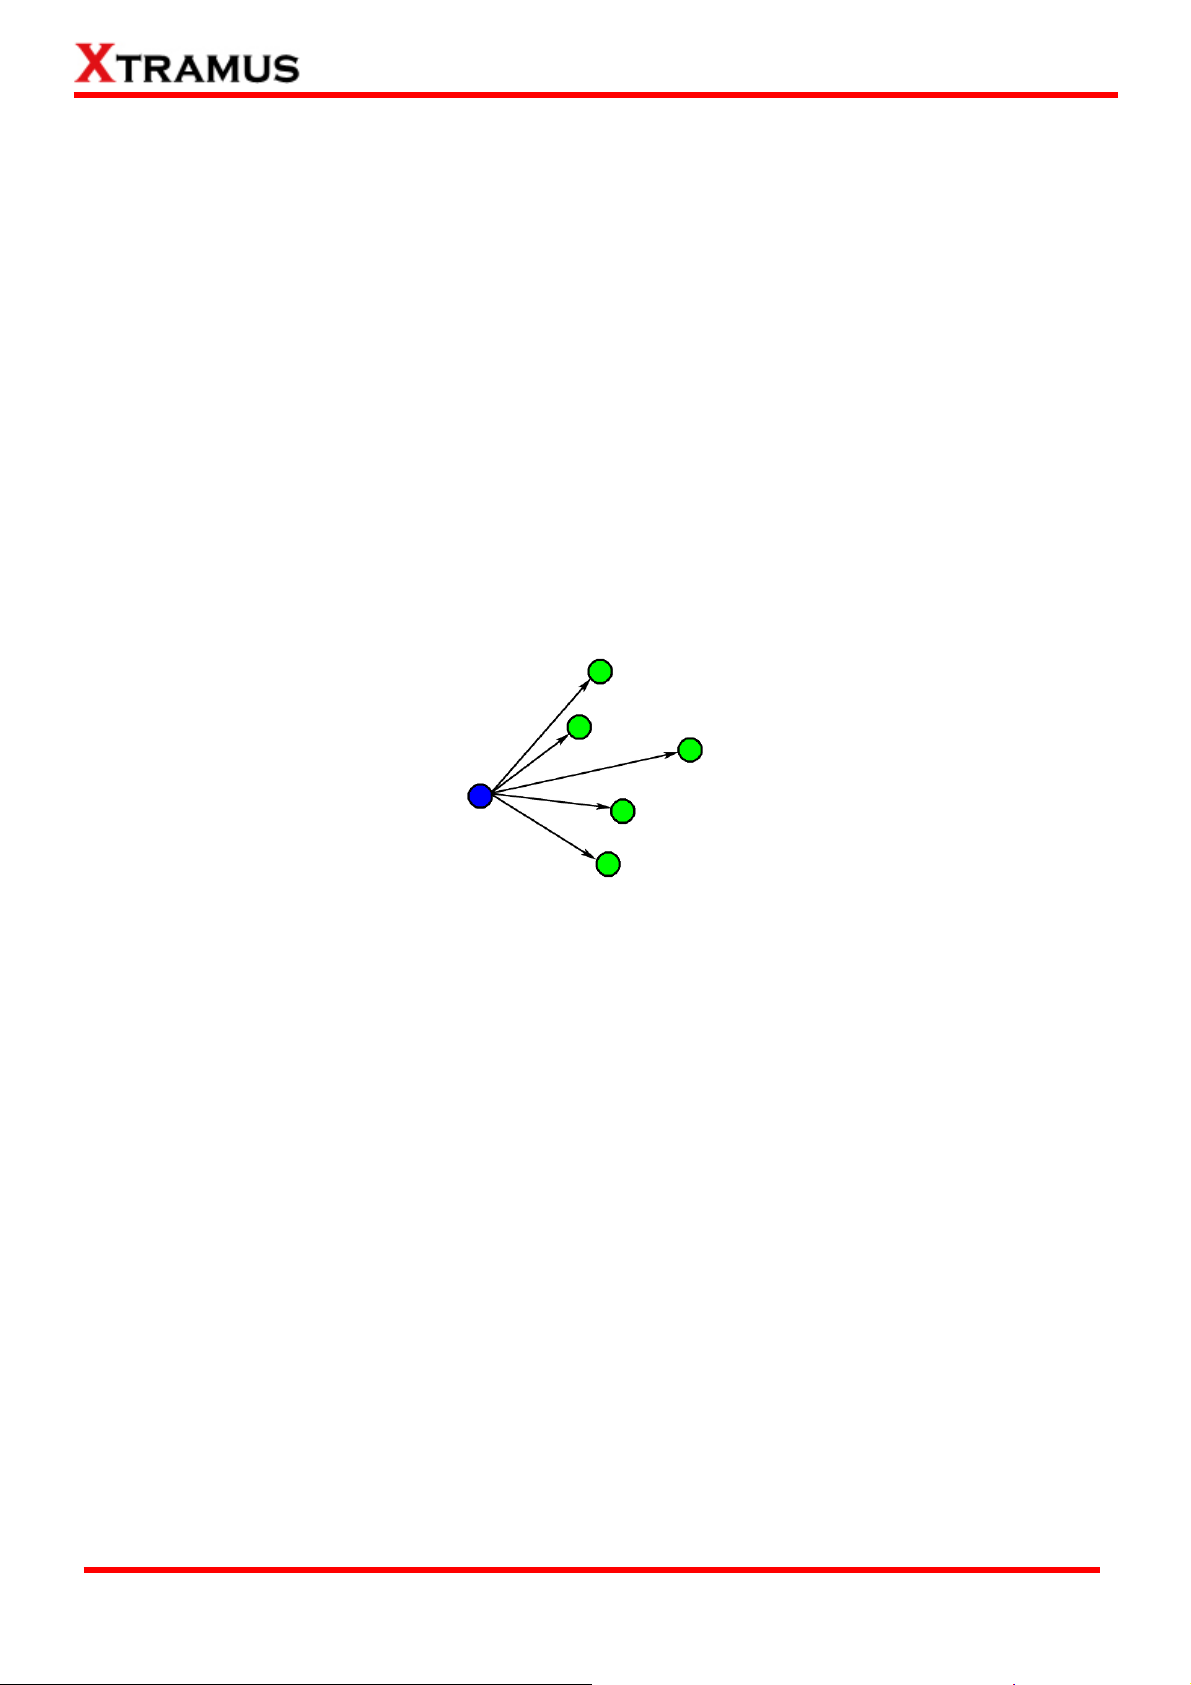
One to Many Unicast Full Performance Test, performing layer 2 MAC address Unicast performance tests
from one source to multiple ports with different media types (such as 100Mbps and 1000Mbps Full).
1.2.2. Unicast Test (UC)
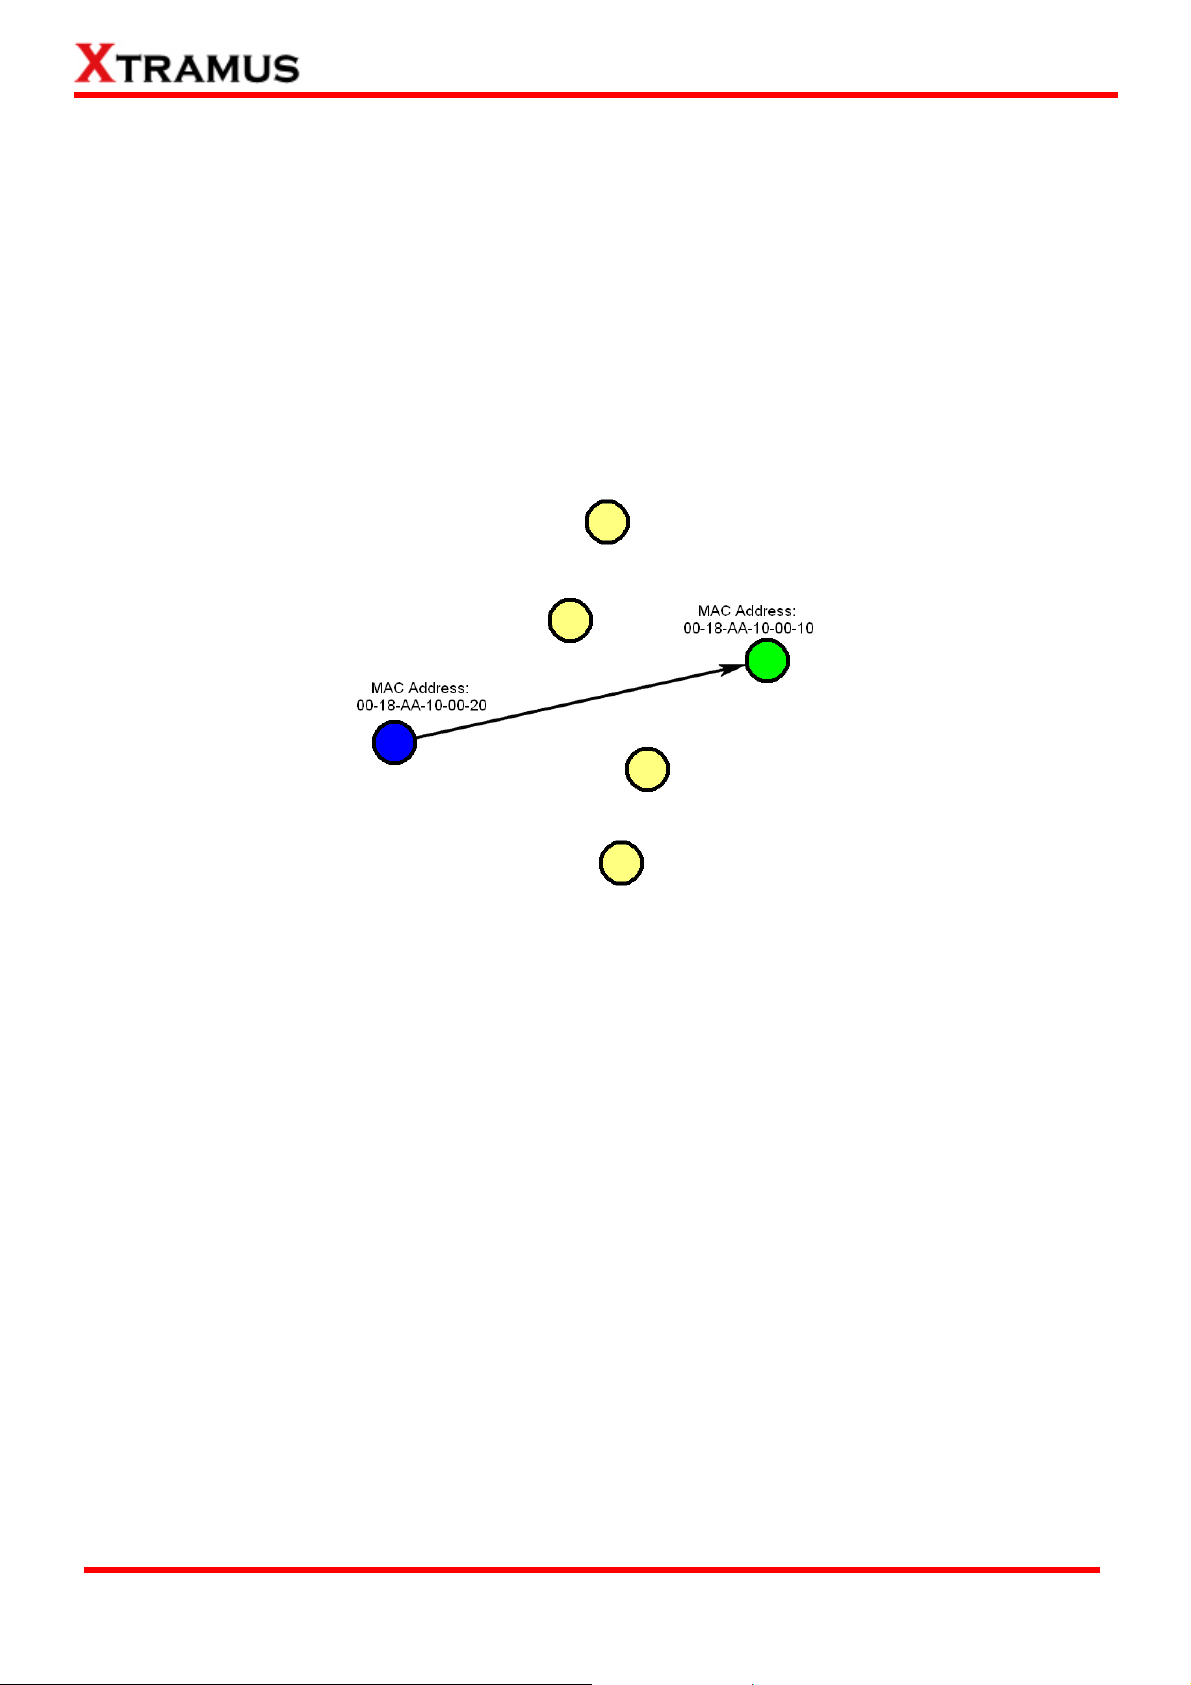
Unicast transmission is the sending of information packets to a single destination. In layer 2 test, unique
MAC address is the key of single destination as illustration below.
Perform unicast test on DUT in layer2 with different speeds, mode and various configurations.
• PT2-UC-10H (10Mbps Half Duplex)
• PT2-UC-10F (10Mbps Full Duplex)
• PT2-UC-100H (100Mbps Half Duplex)
• PT2-UC-100F (10Mbps Full Duplex)
• PT2-UC-1G (1000Mbps Full Duplex)
• PT2-UC-10G (10G Full Duplex)
XTRAMUS TECHNOLOGIES®
12
E-mail: sales@xtramus.com
Website: www.Xtramus.com
Page 13
1.2.3. Flow Control Test (FC)
Perform flow control test on DUT in layer 2 with different speeds, mode and various configurations. It
tests the performance when the DUT is connected to media with varied kinds of speed and direction.
• PT2-FC-10H-100H (10Mbps Half ↔ 100Mbps Half)
• PT2-FC-100H-10H (100Mbps Half ↔10Mbps Half)
• PT2-FC-10F-100F (10Mbps Full ↔ 100Mbps Full)
• PT2-FC-100F-10F (100Mbps Full ↔ 10Mbps Full)
• PT2-FC-100F-1G (100Mbps Full ↔ 1000Mbps Full)
• PT2-FC-1G-100F (1000Mbps Full ↔ 100Mbps Full)
• PT2-FC-1G-10G (1000Mbps Full ↔ 10G Full)
• PT2-FC-10G-1G (10G Full ↔ 1000Mbps Full)
1.2.4. Broadcast Test (BC)
Broadcasting refers to transmitting packets that will be received (conceptually) by every device on the
network.
Perform broadcast test on DUT in layer2 with different speeds, mode and various configurations. These
following tasks transmit broadcast frames (Destination Address: FF:FF:FF:FF:FF:FF).
• PT2-BC-10H, (10Mbps, Half Duplex)
• PT2-BC-10F, (10Mbps, Full Duplex)
• PT2-BC-100H, (100Mbps, Half Duplex)
• PT2-BC-100F, (100Mbps, Full Duplex)
• PT2-BC-1G, (1Gbps, Full Duplex)
• PT2-BC-10G, (10Gbps, Full Duplex)
XTRAMUS TECHNOLOGIES®
13
E-mail: sales@xtramus.com
Website: www.Xtramus.com
Page 14

1.2.5. Filter Test (FT)
This filter test should filter all packets with the same source MAC address and destination MAC Address.
For this test, test packets sent are all with the same source MAC address and destination MAC address
and the DUT should filter this kind of packet.
Perform filter test on DUT in layer2 with different speeds, mode and various configurations. The
following tasks transmit frames with same DA (destination address) and SA (source address).
• PT2-FT-10H
• PT2-FT-10F
• PT2-FT-100H
• PT2-FT-100F
• PT2-FT-1G
• PT2-FT-10G
1.2.6. CRC Error Test (CRC)
Perform CRC (Cyclic Redundancy Check) error test on DUT in layer2 with different speeds, mode and
various configurations for the last 4 bytes of CRC to be filtered. For normal DUT, frame with error CRC
should be filtered. The following tasks transmit frames with CRC errors
• PT2-CRC-10H, (10Mbps, Half Duplex)
• PT2-CRC-10F, (10Mbps, Full Duplex)
• PT2-CRC-100H, (100Mbps, Half Duplex)
• PT2-CRC-100F, (100Mbps, Full Duplex)
• PT2-CRC-1G, (1Gbps, Full Duplex)
• PT2-CRC-10G, (10Gbps, Full Duplex)
.
XTRAMUS TECHNOLOGIES®
14
E-mail: sales@xtramus.com
Website: www.Xtramus.com
Page 15
2. Installing and Uninstalling NuApps-MultiUnits-RM
Please follow the steps down below to install NuApps-MultiUnits-RM.
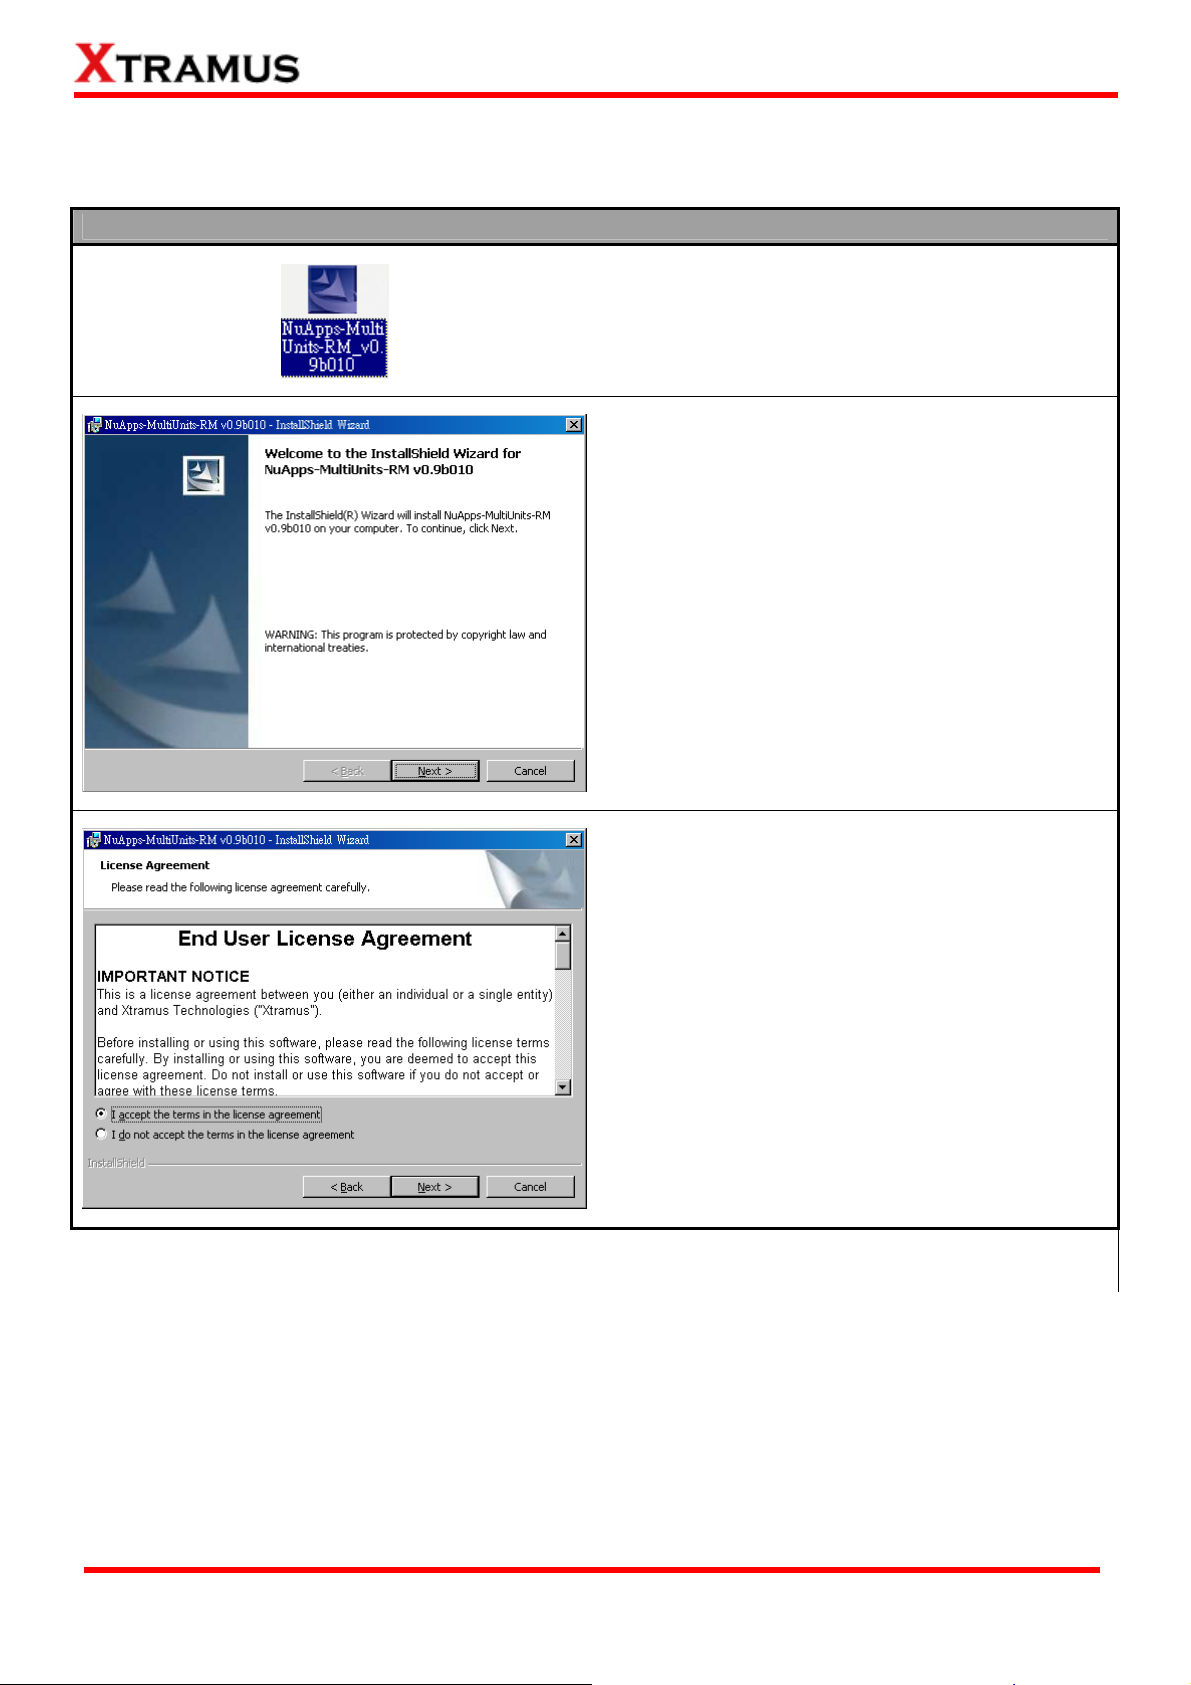
Installing NuApps-MultiUnits-RM
1. Double-click NuApps-MultiUnits-RM installation
program and start the installation process.*
2. InstallShield Wizard is starting to install
NuApps-MultiUnits-RM. If you would like to
cancel installation, click Cancel, or click Next to
continue installation.
3. After reading the End User License
Agreement, please select I accept the terms
in the license agreement, and Next to
proceed with the installation, or click Cancel to
cancel installation. You may also click Back to
return to the previous installation window.
*Note: Due to different Operating Systems or system settings, warning messages might pop up when installing
NuApps-MultiUnits-RM. When this occurs, please choose the options on these pop-up warning messages that allow you
to continue installing NuApps-MultiUnits-RM.
XTRAMUS TECHNOLOGIES®
15
E-mail: sales@xtramus.com
Website: www.Xtramus.com
Page 16

Installing NuApps-MultiUnits-RM
4. Click the Change… button to install the
program to another folder, or click Next button
to install the program into the default
destination folder, and then continue next
step. Click Back button to go back to the
previous step to modify.
5. This window will show the settings you made
so far, if anything must be amended, please
click Back button to go back to the previous
step to modify. Click Install button to continue.
6. InstallShield Wizard is installing
NuApps-MultiUnits-RM.
XTRAMUS TECHNOLOGIES®
16
E-mail: sales@xtramus.com
Website: www.Xtramus.com
Page 17
Installing NuApps-MultiUnits-RM
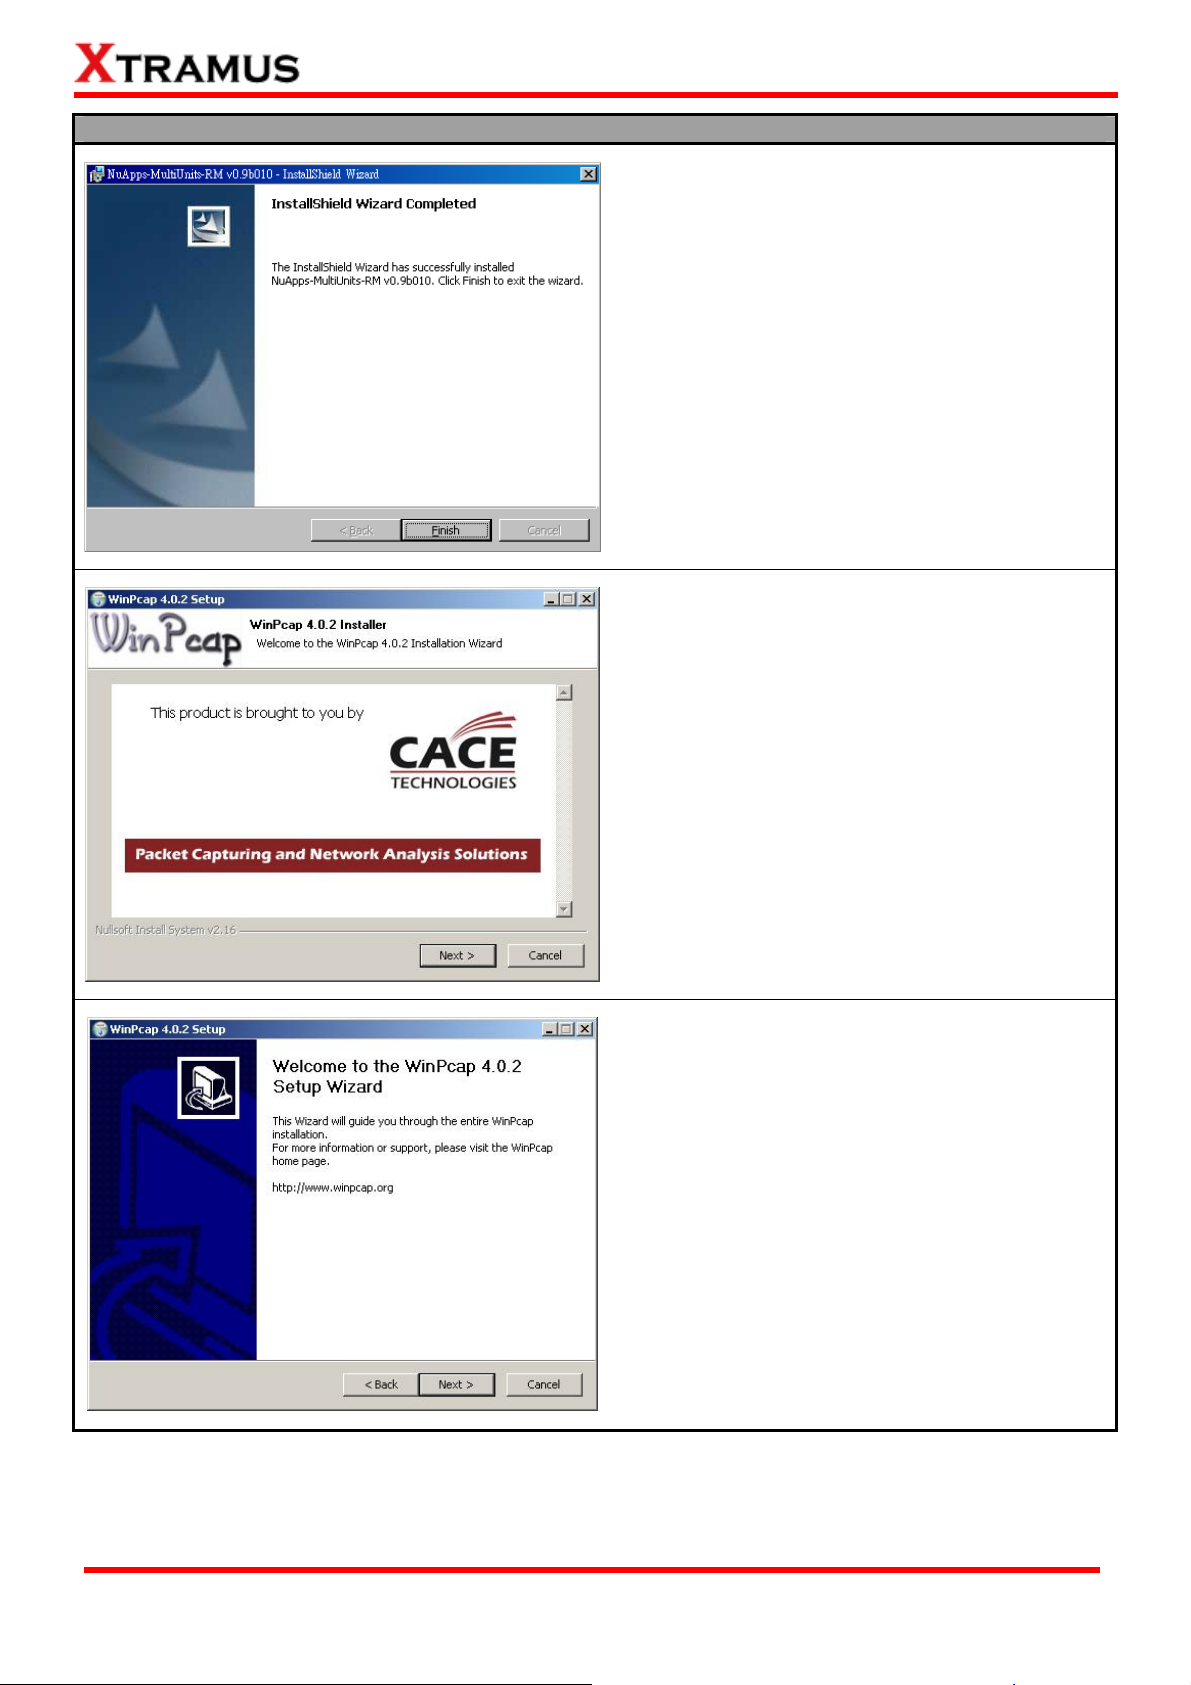
7. NuApps-MultiUnits-RM installation completes.
Click Finish button to exit.
8. If your PC does not have WinPcap installed, a
WinPcap Installer window will pop up. Click
Next button to get ready to install, or click
Cancel button to stop. For more detail
information regarding to WinPcap, please visit
their webpage at: www.winpcap.org.
9. WinPcap is preparing to install, or click
Cancel button to stop at any time.
XTRAMUS TECHNOLOGIES®
17
E-mail: sales@xtramus.com
Website: www.Xtramus.com
Page 18
Installing NuApps-MultiUnits-RM
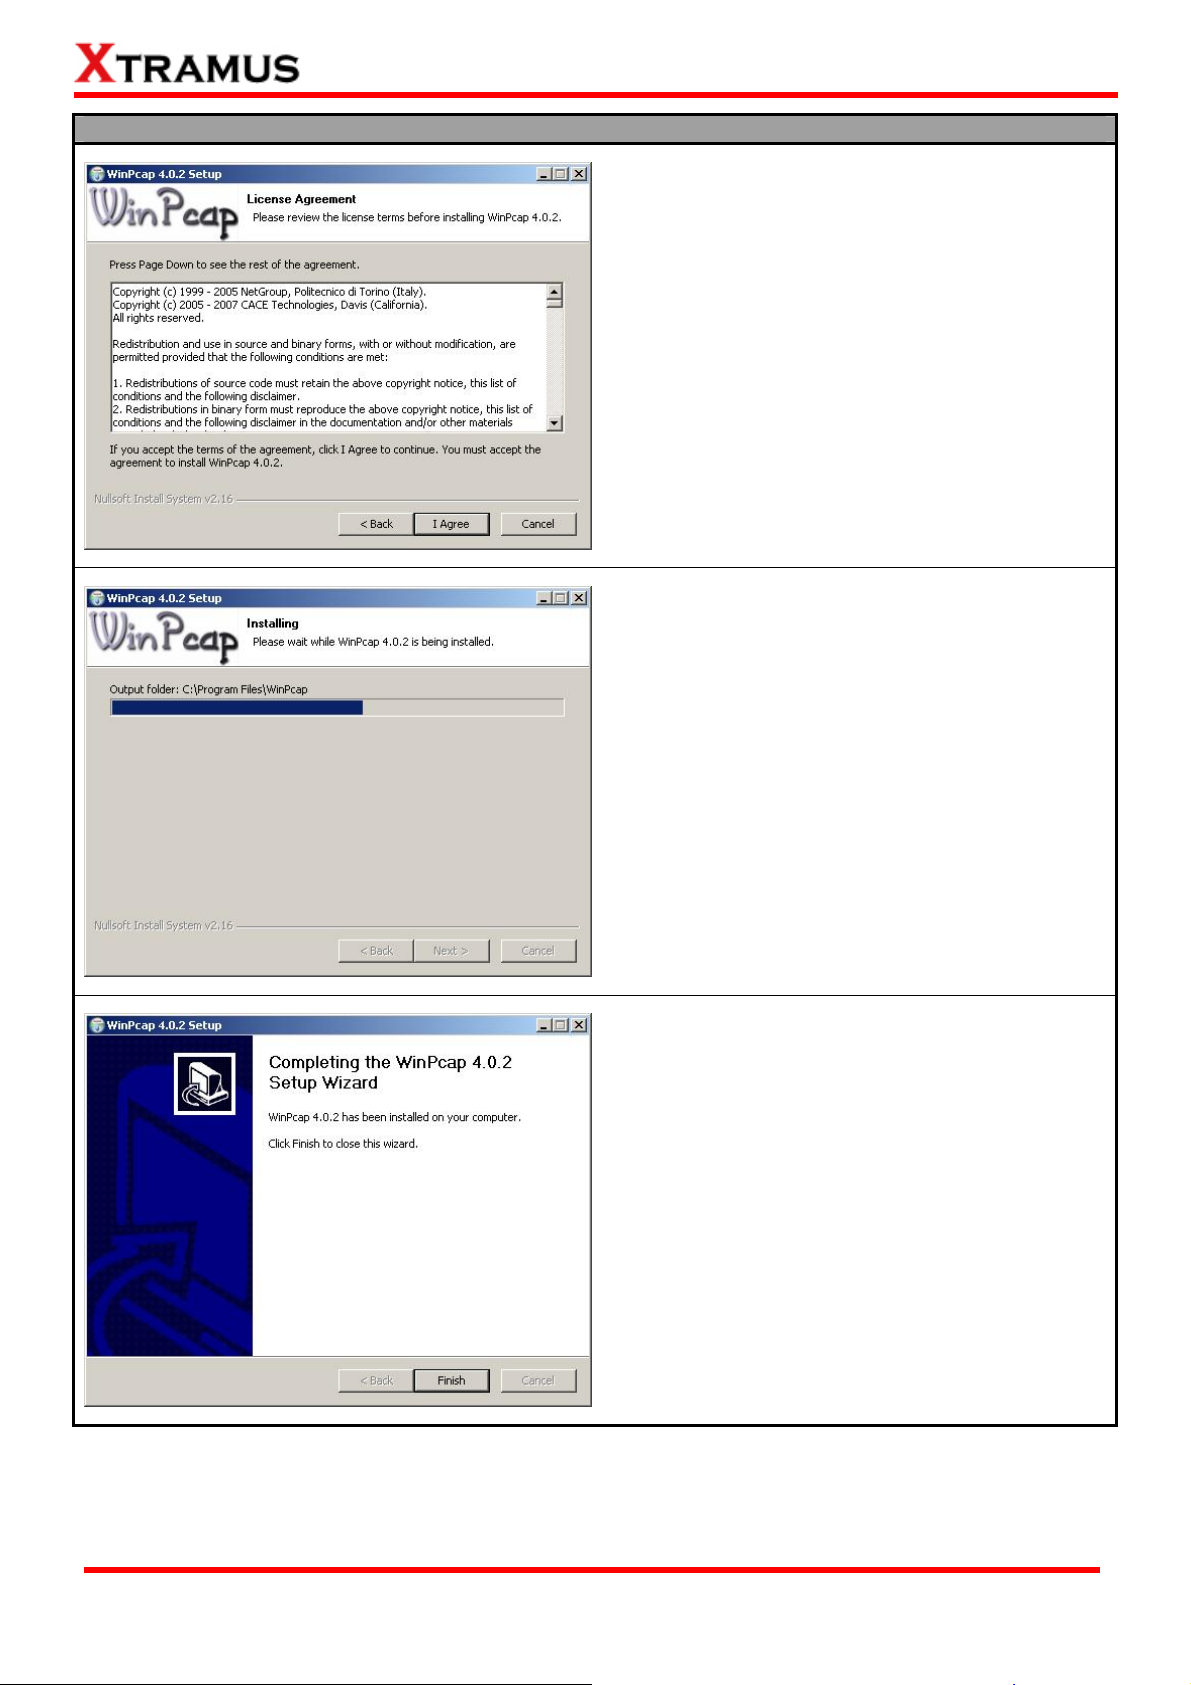
10. Review the license agreement before installing.
Click I Agree button to continue. It is necessary
to accept the agreement to install WinPcap.
11. WinPcap is installing.
12. WinPcap installation completes. Click Finish
button to close the wizard.
XTRAMUS TECHNOLOGIES®
18
E-mail: sales@xtramus.com
Website: www.Xtramus.com
Page 19
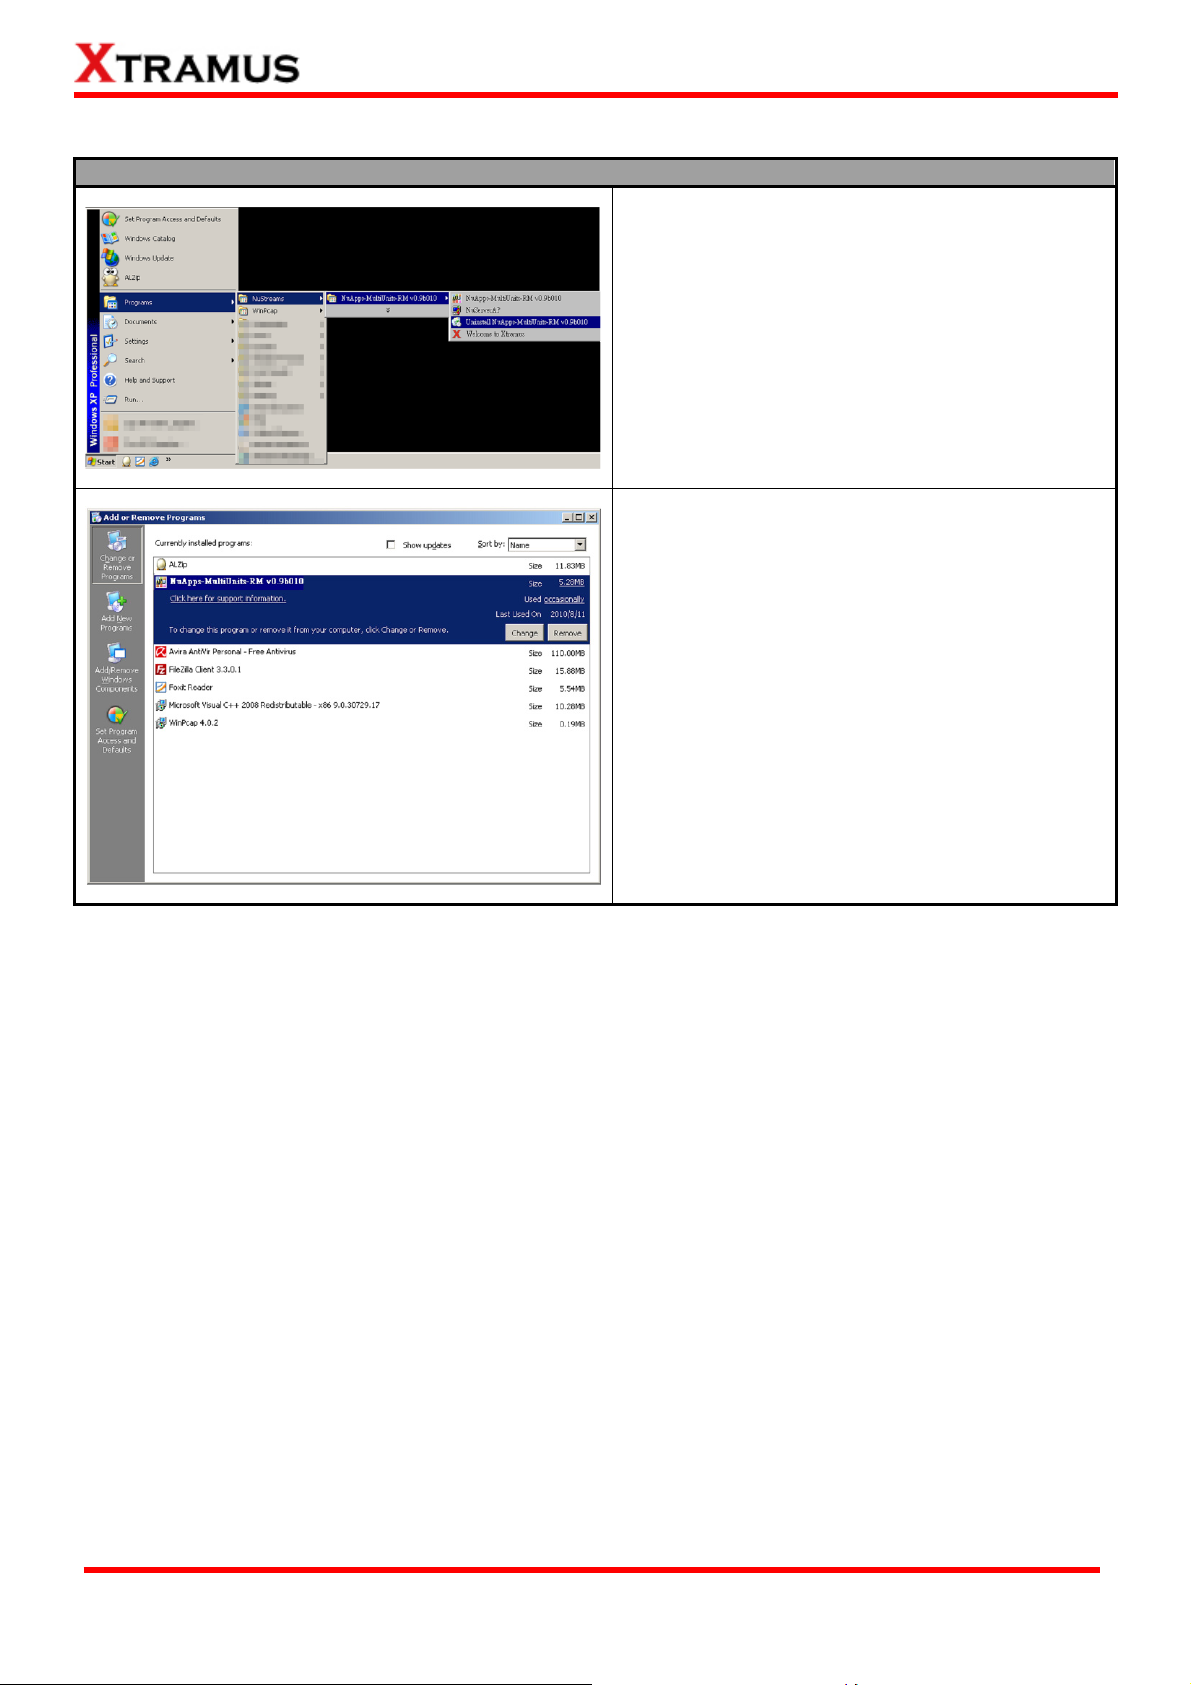
You can uninstall NuApps-MultiUnits-RM by:
Uninstalling NuApps-MultiUnits-RM
¾ Click Start Æ Programs Æ NuStreams Æ
NuApps-MultiUnits-RM Æ Uninstall
NuApps-MultiUnits-RM
¾ Go to the Control Panel, choose
NuApps-MultiUnits-RM from installed
program list, and click Remove to uninstall.
XTRAMUS TECHNOLOGIES®
19
E-mail: sales@xtramus.com
Website: www.Xtramus.com
Page 20
3. NuApps-MultiUnits-RM Function Overview
3.1. Starting NuApps-MultiUnits-RM
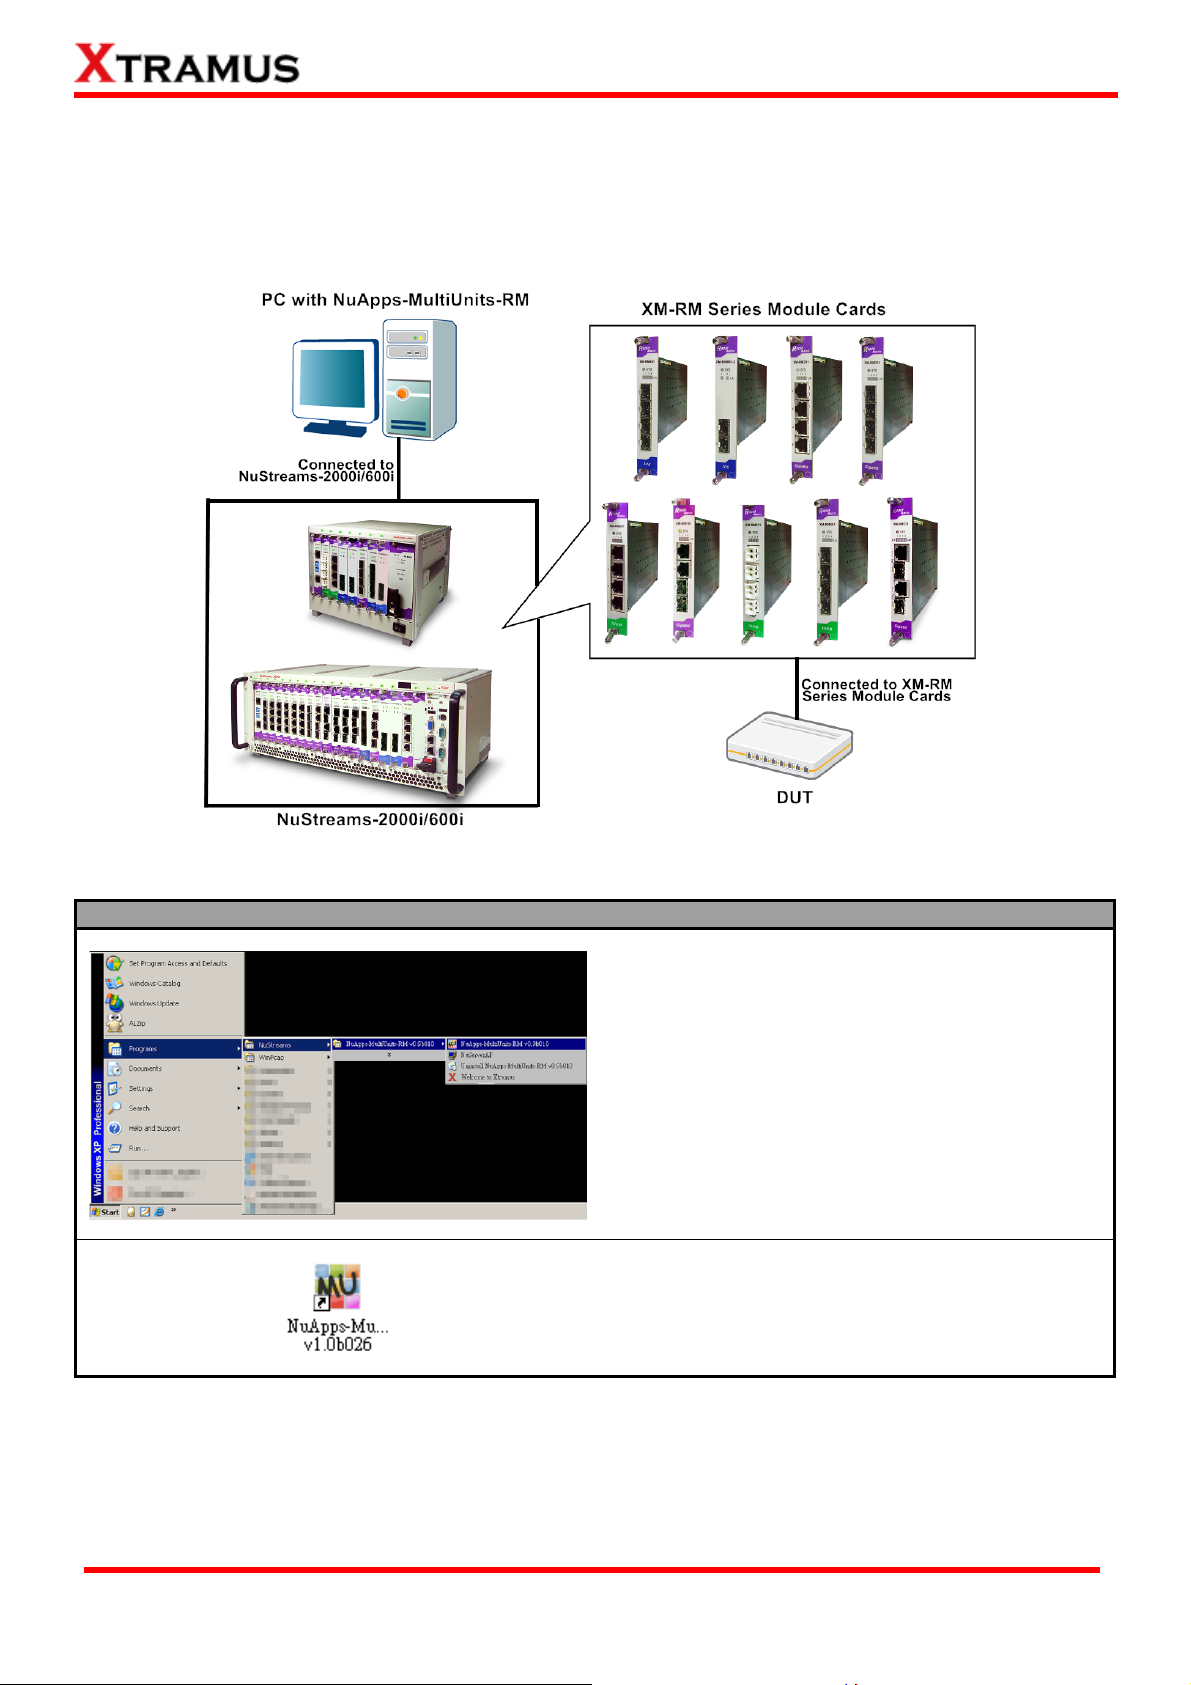
Before starting NuApps-MultiUnits-RM, the DUT, your PC, and NuStreams-2000i/600i shall be connected
properly as shown in the figure down below:
There are two ways to start NuApps-MultiUnits-RM:
Starting NuApps-MultiUnits-RM
¾ Click Start Æ Programs Æ NuStreams Æ
NuApps-MultiUnits-RM
¾ Double-click NuApps-MultiUnits-RM icon
located on your PC’s desktop.
XTRAMUS TECHNOLOGIES®
20
E-mail: sales@xtramus.com
Website: www.Xtramus.com
Page 21
If your PC is not connected with NuStreams-2000i/600i, you can still run NuApps-MultiUnits-RM under
Demo Mode. Almost all NuApps-MultiUnits-RM ‘s functions are available under Demo Mode. However,
please note that Demo Mode is for system demo purposes only, and does not serve for any testing at
all.
XTRAMUS TECHNOLOGIES®
21
E-mail: sales@xtramus.com
Website: www.Xtramus.com
Page 22

Please follow the steps down below to start NuApps-MultiUnits-RM and NuServer properly.
Starting NuServer / NuApps-MultiUnits-RM
When you activate the NuApps-MultiUnits-RM, the first step is to
choose the right version of interface. Please choose the Standard
(default) and click OK button to proceed.
Note: If you chose a wrong interface, you can go to C:\Program
Files\NuStreams\NuApps-MultiUnits-RM v1.0bXXX and double
click the config.txt notepad to modify manually the correct
interface. Please modify the current Baron to OnInputDlg=0 for
standard interface.
When starting NuApps-MultiUnits-RM, a “Connect to NuServer”
window will pop up and ask how you are going to connect to
NuServer.
¾ Local Host: Choose this option when you’re running
NuApps-MultiUnits-RM from NuStreams-2000i IPC module or a
PC that’s connected to NuStreams-2000i/600i via an RJ45
cable.
¾ Remote: Choose this option when you’re running
NuApps-MultiUnits-RM from other PC located on the network.
Choose the IP address which is assigned from
NuStreams-2000i/600i from the scroll-down menu, or choose
demo to enter NuApps-MultiUnits-RM’s Demo Mode.
¾ Connect/Cancel: Click the Connect/Cancel button to connect
to NuStreams-2000i/600i or cancel starting
NuApps-MultiUnits-RM.
If NuServer is not running while starting NuApps-MultiUnits-RM, a
window will pop up and ask if you would like to run NuServer or not.
Please click YES to continue.
A “NuServer-NIC Information” window will pop up. Please select the NIC (Network Interface Card) which
is connected to NuStreams -2000i/ 600i’s from the Network Interface Information table, and click OK. If
you’re using NuStreams-2000i’s IPC module, please choose “Realtek RTL8139 Family Fast Ethernet”.
XTRAMUS TECHNOLOGIES®
22
E-mail: sales@xtramus.com
Website: www.Xtramus.com
Page 23
NuServer will connect to the daughter boards, and NuApps-MultiUnits-RM will start as well.
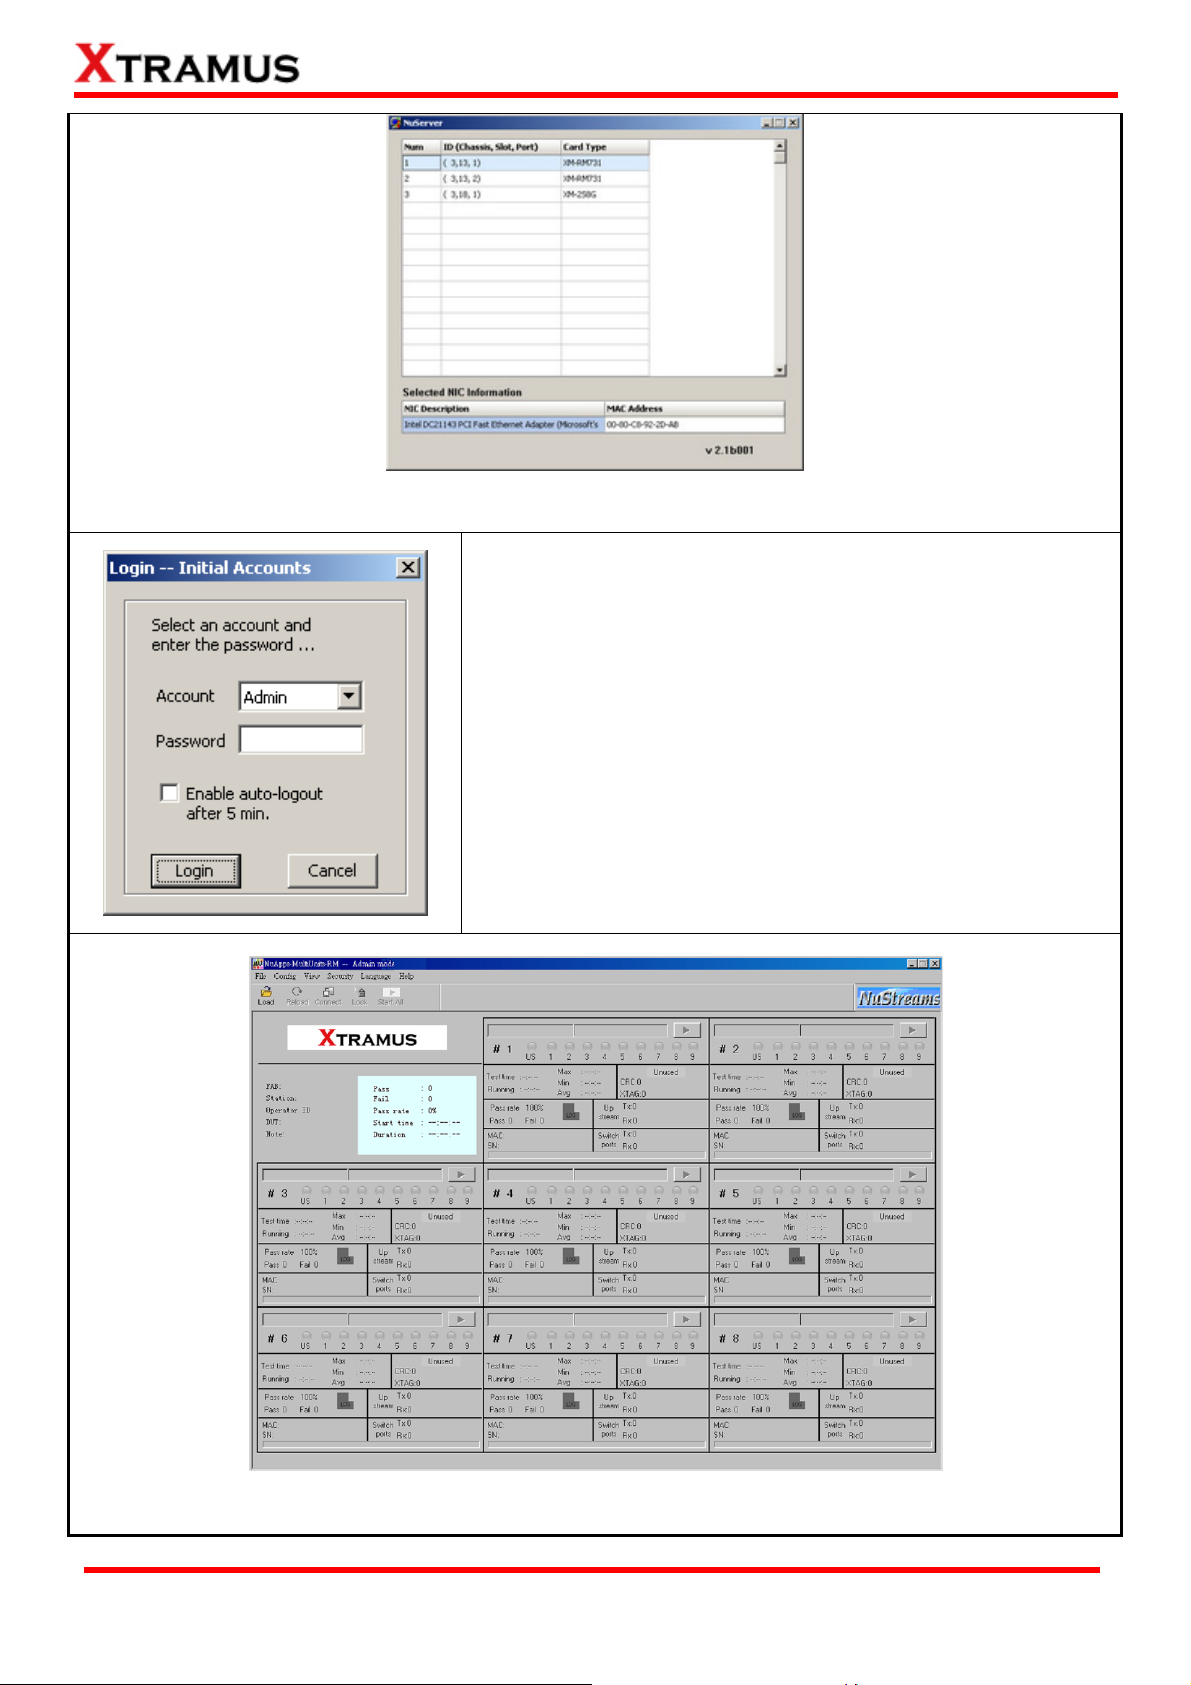
For security reasons, NuApps-MultiUnits-RM requires
Account/Password to login. The default Account/Password is:
• Account: Admin
• Password: xtramustech
Please note that the password is case-sensitive, and shall be
changed as soon as you login for the first time.
• Enable auto-logout after 5 min: Enable this function so
NuApps-MultiUnits-RM shall automatically logout after 5
minutes.
Login/Cancel: Click Login/Cancel button to login or cancel.
You now have access to NuApps-MultiUnits-RM’s main display window.
XTRAMUS TECHNOLOGIES®
23
E-mail: sales@xtramus.com
Website: www.Xtramus.com
Page 24
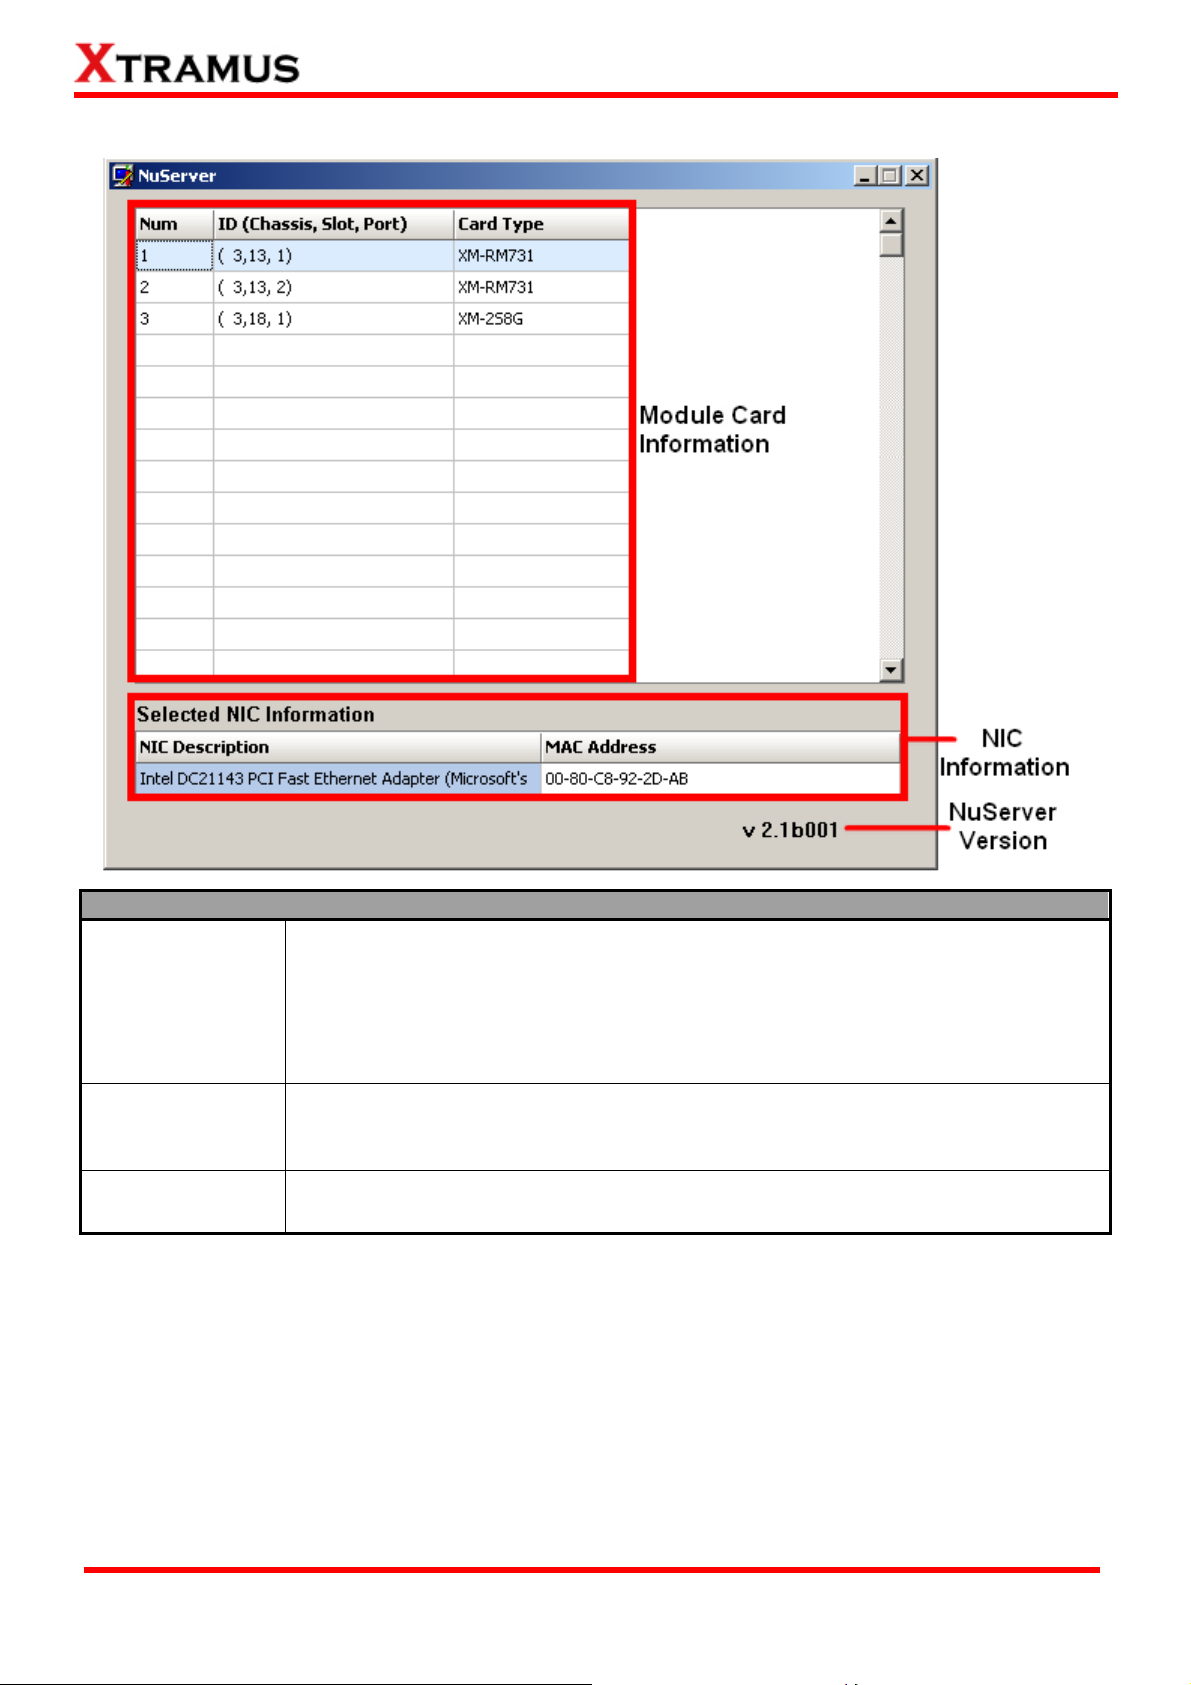
3.2. NuServer Window
Description
Module Card
Information
NIC Information
NuServer Version
This section displays the information regarding to the model cards that are installed
on NuStreams-2000i/600i. Model Card IDs are showed as the format of (X, Y, Z)
while X is the number of the chassis (which is displayed on NuStreams-2000i/600i),
Y is the slot number where this model card is installed, and Z is the available port
number located on the model card.
This section displays the detail information (including NIC Model name, NIC’s MAC
address) regarding to the selected NIC.
This section displays the version of your NuServer.
XTRAMUS TECHNOLOGIES®
24
E-mail: sales@xtramus.com
Website: www.Xtramus.com
Page 25
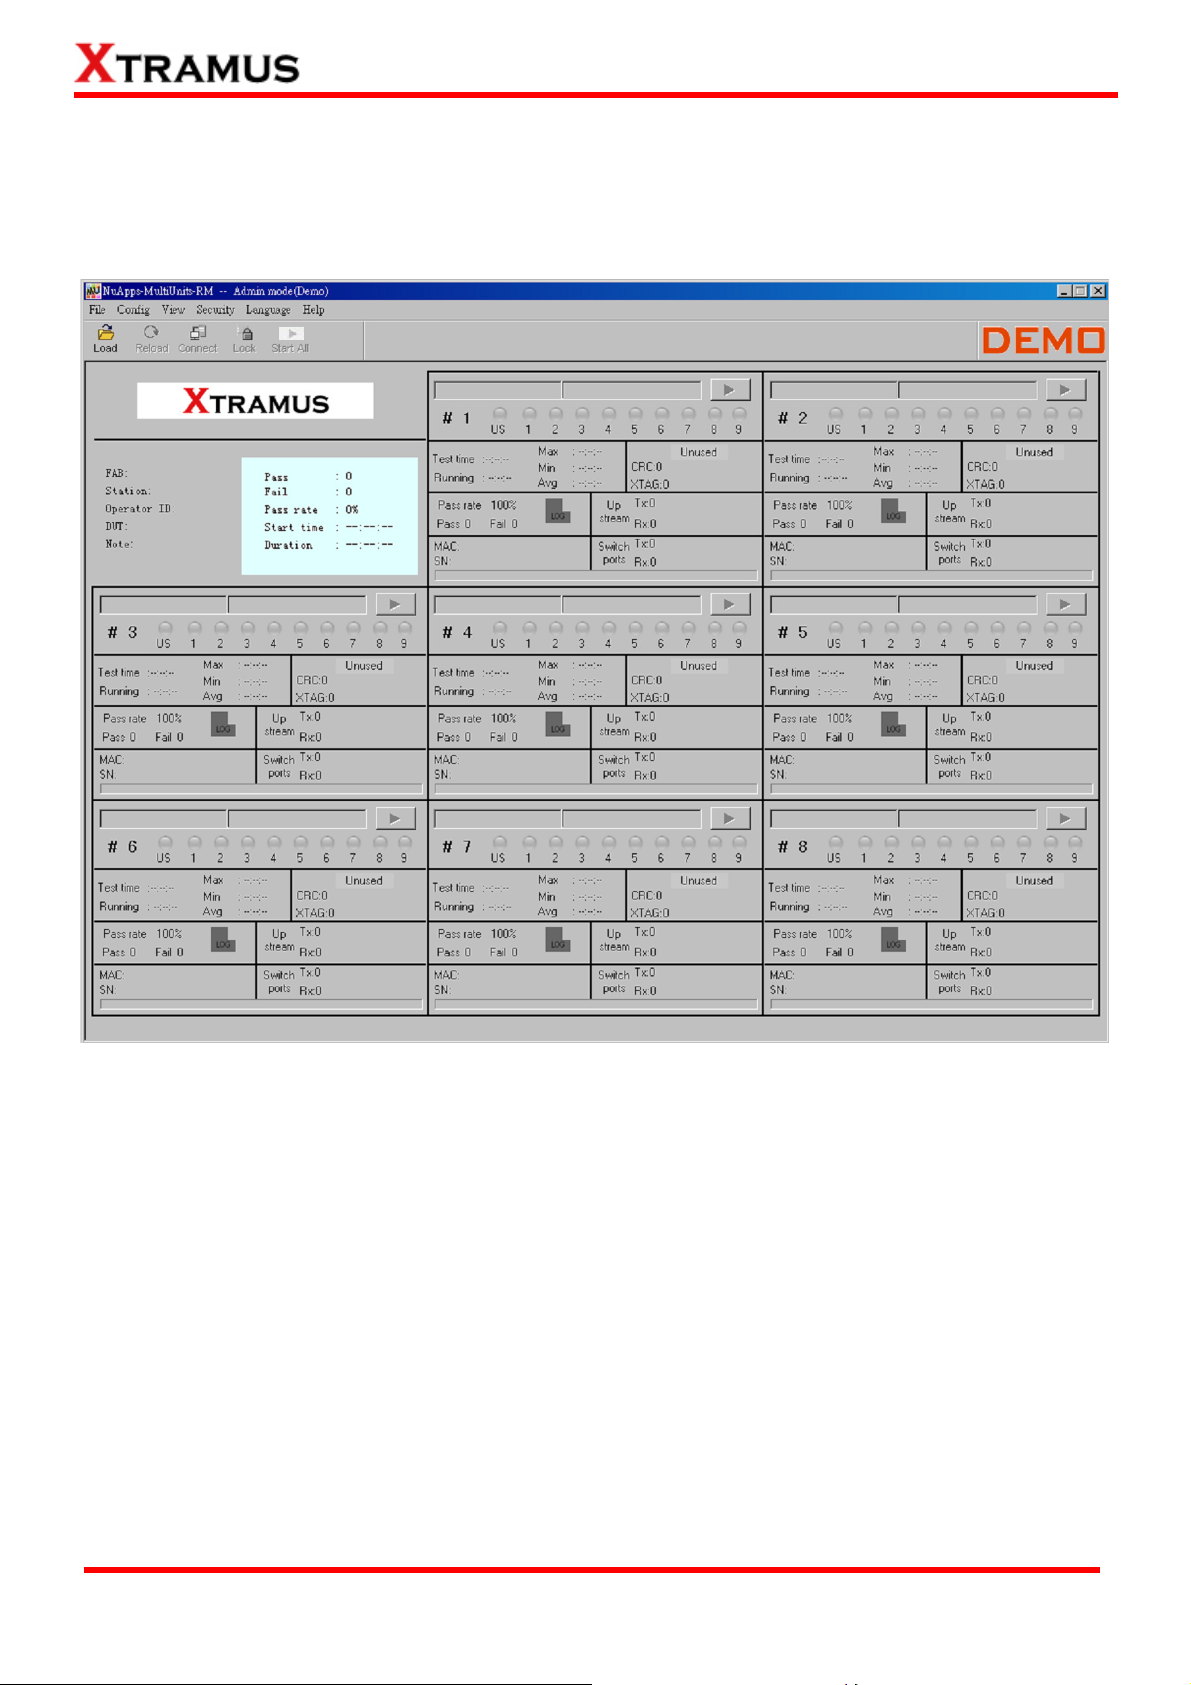
3.3. NuApps-MultiUnits-RM Main Window
Function Descriptions
A Menu Bar
B
Quick Launch
Buttons
C Status Window
D
Task Running
Windows
The Menu Bar allows you to manage test model settings, view test log/ model
information, set/reset NuApps-MultiUnits-RM password, change language
displayed, and change the User Interface style. It also shows the requirement
to run this software, the version of this software and also the link to access
our website.
The Quick Launch Buttons allow you to load/reload test model settings,
connect to the NuServer, lock test model and start all the task running.
Shows the information of Fabrication (FAB), Station, Operator ID, device
under test (DUT), any Note you set before, Pass/Fail tasks, tasks Pass rate,
NuApps-MultiUnits-RM Start time and Duration.
This section contains 8 windows, each window shows its general
information/status of the tasks that are currently running. The testing result
will be shown by clicking the LOG button of each window.
XTRAMUS TECHNOLOGIES®
25
E-mail: sales@xtramus.com
Website: www.Xtramus.com
Page 26
3.3.1. Menu Bar
NuApps-MultiUnits-RM Menu Bar includes configuration options such as File, Config, View, Security,
Language, and Help. Please refer to the sections down below for detail information regarding to each
configuration option.
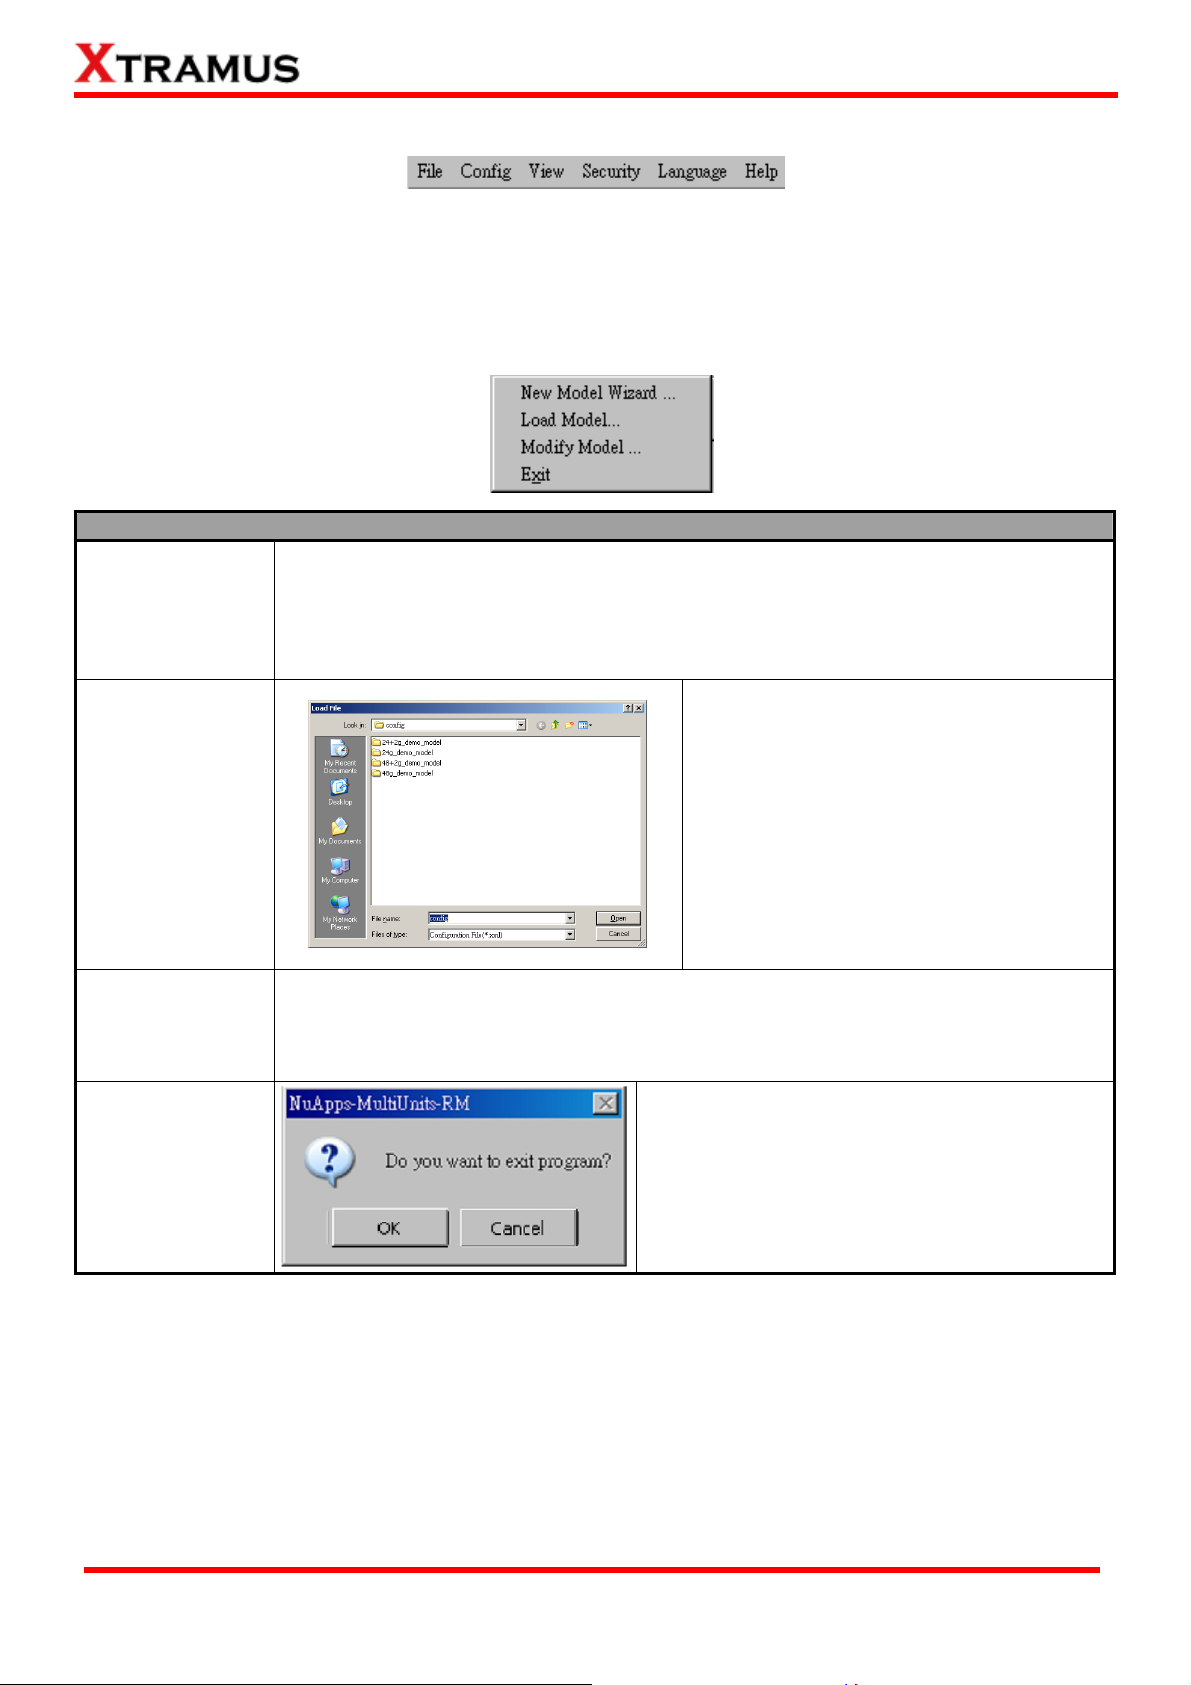
A. File
File Menu Bar Overview
Choose this option to start the New Model Wizard. The New Model Wizard allows the
New Model Wizard
users to set testing options for DUT. For detail descriptions regarding to the New
Model Wizard and its settings, please refer to”4. Creating Task via New Model
Wizard”.
Load Model
Modify Model
Exit
Load a previously-saved configuration file
and applies these settings to
NuApps-MultiUnits-RM.
All the configurations you’ve made via New
Model Wizard will be saved as a “*.xml” file,
along with several “*.cfg” files.
Please note that these “*.cfg” files contain
test settings as well. Deleting them will
cause your “*.xml” file unable to load
properly.
Choose this option to make changes to the current test settings for DUT. After clicking
this option, the previous Model Wizard will open again to allow modifying on the
settings.
A prompt pop-up window will ask if you are sure
to exit NuApps-MultiUnits-RM. Click OK to exit
NuApps-MultiUnits-RM, or click Cancel to
cancel.
XTRAMUS TECHNOLOGIES®
26
E-mail: sales@xtramus.com
Website: www.Xtramus.com
Page 27
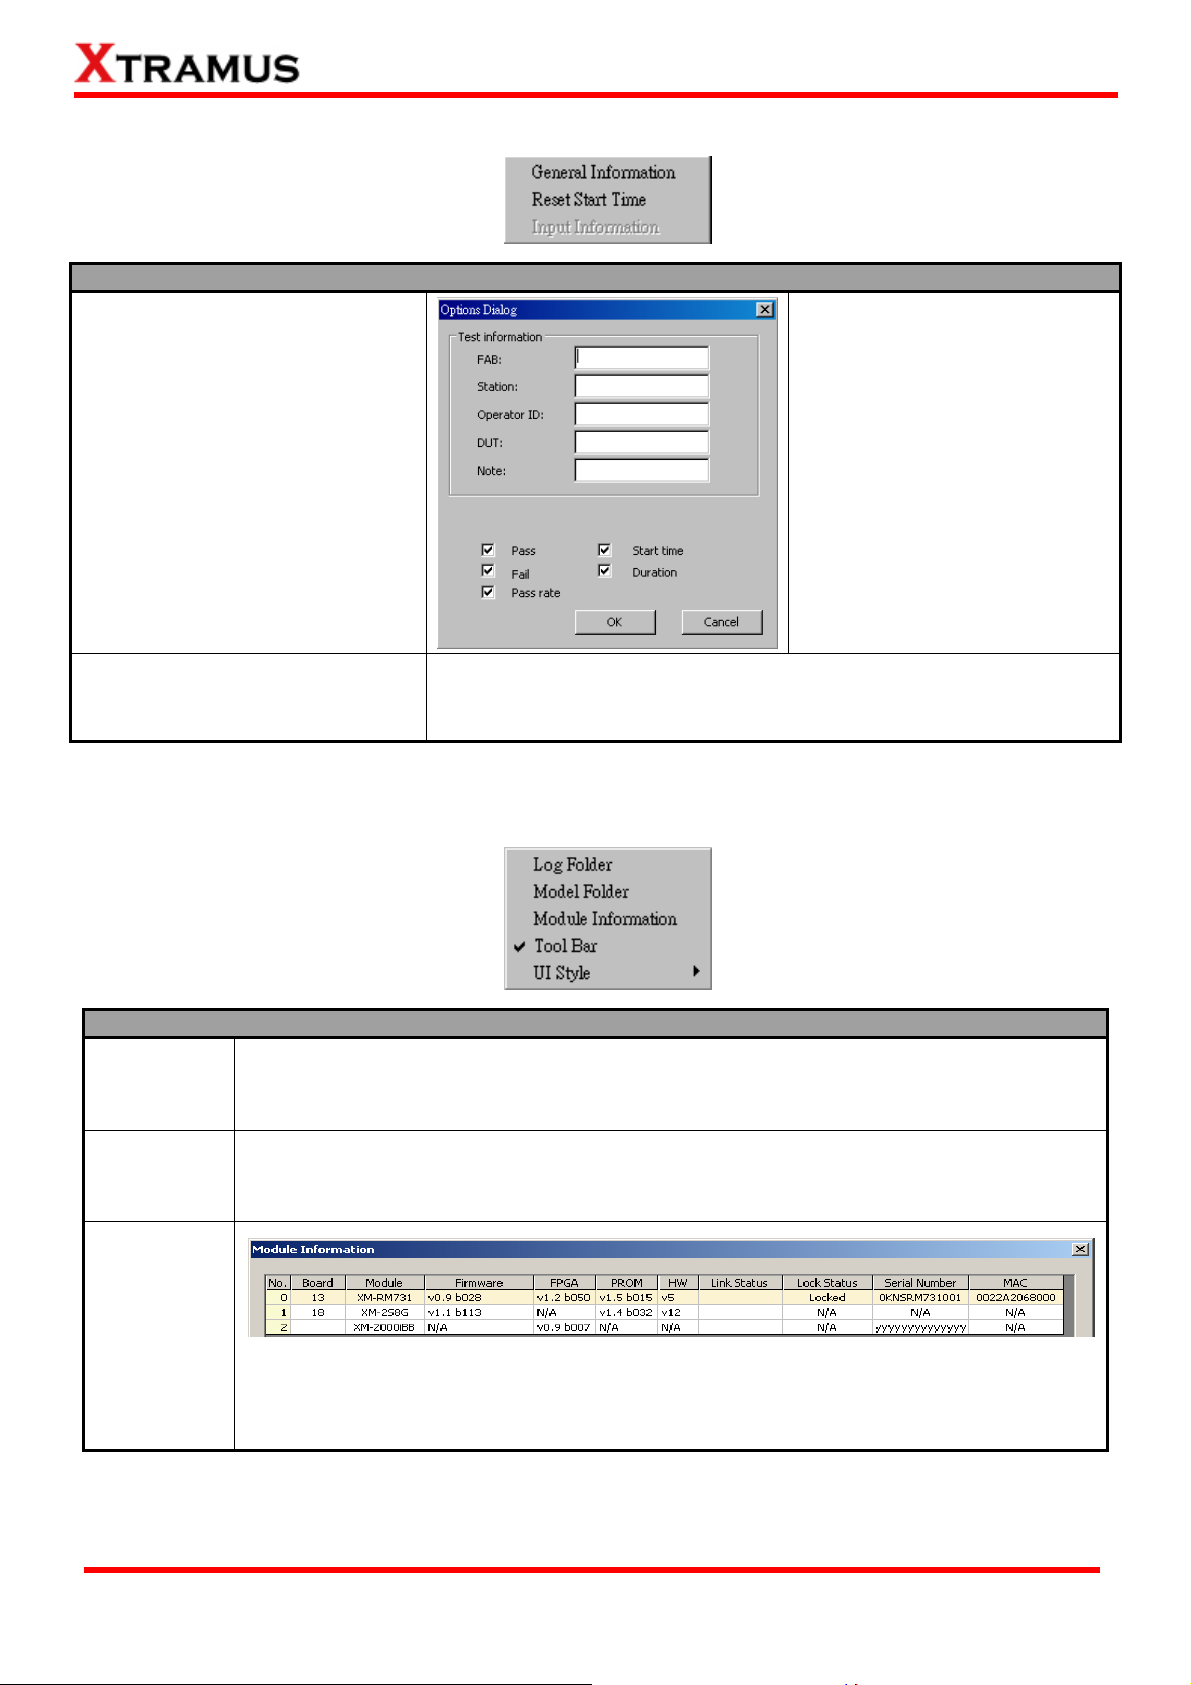
B. Config
Config Menu Bar Overview
General Information
Click the General Information
option to pop up the Operation
Dialog window. You may type
information for FAB, Station,
Operator ID, DUT and Note.
Please click OK button to save
the settings or click Cancel to
exit without saving the settings.
You can also select
Pass/Fail/Pass rate/Start time/
Duration to enable be displayed
on main interface.
Reset Start Time
*Note: the option Input Information is not available for standard interface.
Click this option to refresh the Duration timer. Please refer to the
3.3.3. Status Window for more information about Duration.
C. View
View Menu Bar Overview
Log Folder
Model
Folder
Choosing Log Folder and the folder where all the saved test logs of the current test
model will be open.
Choosing Model Folder and the folder where all the DUT model configuration files are
saved will be open.
Module
Information
The Module Information window displays all the module cards that are installed on
NuStreams-2000i/600i and their detail information. To close the Module Information
window, click OK button.
XTRAMUS TECHNOLOGIES®
27
E-mail: sales@xtramus.com
Website: www.Xtramus.com
Page 28
View Menu Bar Overview
Enable or disable this function to show or hide Quick Launch Buttons bar. For more
Tool Bar
details about the Quick Launch Buttons, please refer to the 3.3.2. Quick Launch
Buttons.
You can change the User Interface from this option. The UI Style available for selection
includes Standards 3*3(default), Standards 4*2, Simple 3*3 and Simple 4*2. For
more details about the UI Style, please see the figure down below for each User
Interface:
• Standards 3*3(default)
UI Style
• Standards 4*2
• Simple 3*3
• Simple 4*2
XTRAMUS TECHNOLOGIES®
28
E-mail: sales@xtramus.com
Website: www.Xtramus.com
Page 29

D. Security
Security Menu Bar Overview
Logout
Login/Change
Account
Change
Password
Logout from Admin Mode and switch NuApps-MultiUnits-RM to Operator Mode.
Login to the Admin Mode.
You can change the password for Admin Mode here.
For security reasons, it is recommended to change
NuApps-MultiUnits-RM’s password after your first login.
• Old Password: Enter the old password here.
• New: Enter the new password here. The new
password should be 6~12 characters and
mustn’t contain special symbols.
• Confirm: Please type your new password again
for confirming.
• OK: Apply all the changes you’ve made and
apply.
• Cancel: Cancel and abandon all the changes
you’ve made.
Reset
Password
If you forget NuApps-MultiUnits-RM’s Admin Mode password, you can reset the password
to the default password “xtramustech”.
Click YES to reset the login password (or NO to cancel), and click OK to complete.
Always login
in OP Mode
Every time when NuApps-MultiUnits-RM starts running, it will be running under Operator
Mode.
XTRAMUS TECHNOLOGIES®
29
E-mail: sales@xtramus.com
Website: www.Xtramus.com
Page 30
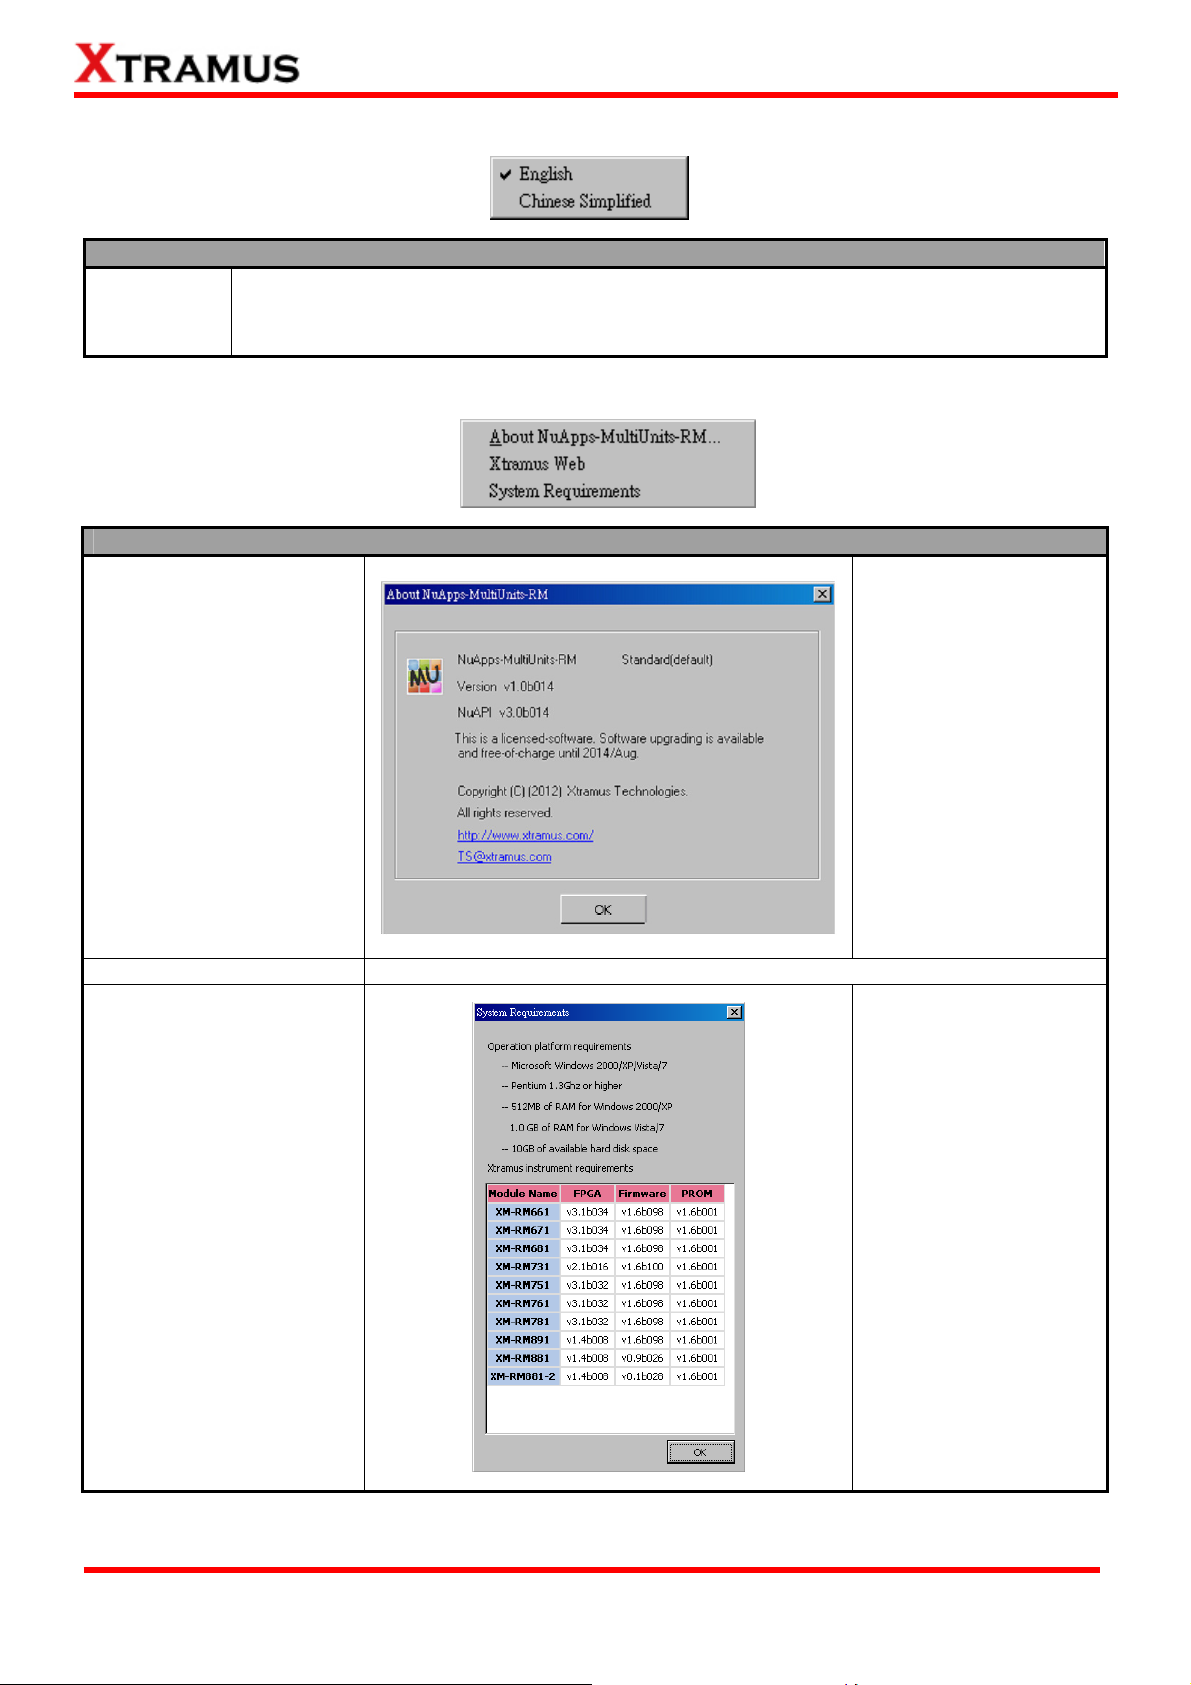
E. Language
Language Menu Bar Overview
English/
Chinese
Simplified
NuApps-MultiUnits-RM has 2 different languages for its UI available. You can set the
language of UI to either English or Simplified Chinese.
F. Help
Help Menu Bar Overview
About
NuApps-MultiUnits-RM…
Xtramus Web
System Requirements
An “About” window will
pop up and show
detailed system
information.
Click this option to access to Xtramus official website.
A “System
Requirements” window
will pop up and show
the requirements for
your PC and the
FPGA/Firmware/PROM
version limit of the
module cards. Click the
Ok button to exit the
“System
Requirements” pop up
window.
XTRAMUS TECHNOLOGIES®
30
E-mail: sales@xtramus.com
Website: www.Xtramus.com
Page 31

3.3.2. Quick Launch Buttons
The Quick Launch Buttons allow you to Load/Reload DUT Model Settings, Connect to NuServer, or Lock
a Module Card on the Chassis.
Quick Launch Buttons
The Load Quick Launch Button
serves the same function as Load
Model on the Menu Bar.
Clicking this button allows loading
a previously-saved configuration
file and applies these settings to
Load
NuApps-MultiUnits-RM.
All the configurations you’ve made
via New Model Wizard will be
saved as a “*.xml” file, along with
several “*.cfg” files.
Please note that these “*.cfg” files
contain test settings as well.
Deleting them will cause your “*.xml” file unable to load properly.
Reload
Connect
Lock
Start All
NuApps-MultiUnits-RM will reload the current opened DUT model setting and apply all
these settings.
The Connect button allows you to re-connect to the NuServer if it is not connected while
initializing NuApps-MultiUnits-RM.
Clicking the Lock button allows the user to lock a specific module card installed on a
NuStreams-600i/2000i chassis.
Clicking the Start All button will allow to start all set task running.
XTRAMUS TECHNOLOGIES®
31
E-mail: sales@xtramus.com
Website: www.Xtramus.com
Page 32

3.3.3. Status Window
Status Window
FAB
Station
Operator ID
DUT
Note
ModelName
Pass
Fail
Pass rate
Start time
Shows the fabrication note.
Shows the testing station.
Shows the user’s ID.
Shows the Device Under Test.
Shows the pre set notes.
Shows the name of the model you set for the test.
The number of the pass window task.
The number of the fail window task.
The rate results from the total pass window task.
Shows the starting operation time based on the time clock of your PC.
Duration
Shows the time spent since the Start time.
XTRAMUS TECHNOLOGIES®
32
E-mail: sales@xtramus.com
Website: www.Xtramus.com
Page 33

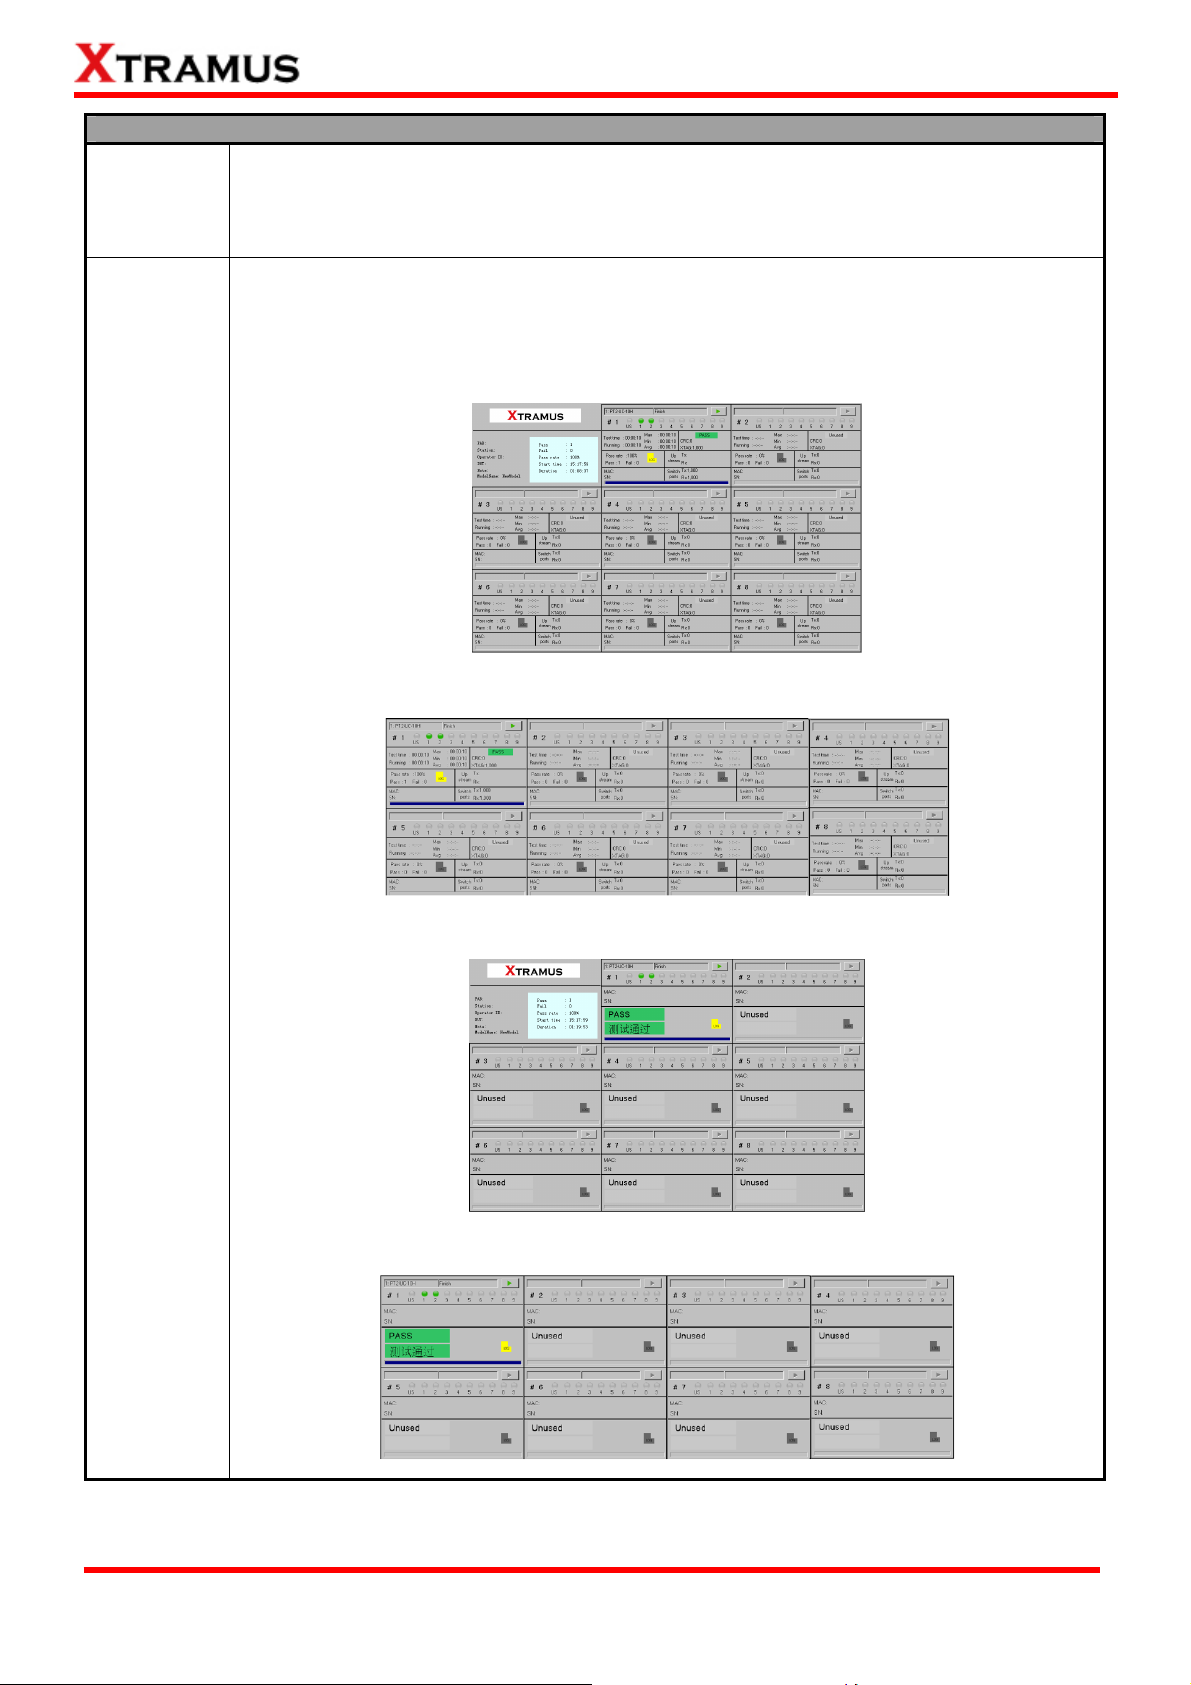
3.3.4. Task Running Windows
Task Running Windows
A
B
C
D
E
F
G
H
This field shows the current operating task.
This field shows the current status of your task.
You can Start or Pause the current task running.
The number order of your window.
Shows the Maximum/Minimum/Average/Running Test time.
Shows the total Pass/Fail task, the total Pass task rate and the Log (testing result) of the
task.
Shows the MAC and S/N of your Device Under Test (DUT).
Those LED (1,2,3,…,9) show the connection status between your NuStreams-600i/2000i with
your Device Under Test (DUT), where gray means disconnected, dark green means
10/100Mbps connection, bright green means up to 100Mbps connection and yellow LED
means test fail. The US will only light during One-to-Many test.
I
J
L
M
XTRAMUS TECHNOLOGIES®
This field shows the number of CRC errors, XTAG and also the current status of the windows
tests, which the status includes Unused, Waiting,Testing, Pass, Fail and Break off.
Shows the Up Stream’s Tx/Rx packet number.
Shows Switch ports’ Tx/Rx packet number.
Progress Bar.
33
E-mail: sales@xtramus.com
Website: www.Xtramus.com
Page 34

4. Creating Task via New Model Wizard
When performing tests on your DUT with NuApps-MultiUnits-RM for the first time, you have to create a new
set of test settings for the DUT.
Before starting to create a new task via New Model Wizard, please be sure that:
¾ All module cards (such as XM-RM751, XM-RM761, or XM-RM781) are installed on chassis (such as
NuStreams-2000i/600i) properly.
¾ The chassis (such as NuStreams-2000i/600i) is powered-on and is connected to a PC (or IPC
module installed on NuStreams-2000i) according to “3.1. Starting NuApps-MultiUnits-RM”.
To start using New Model Wizard, please click File on the Menu Bar, and choose New Model Wizard as
shown in the figure down below.
A “New Model Wizard – Active Ports for Selection!” window will pop up. All module cards that are
installed on the chassis will be displayed here.
XTRAMUS TECHNOLOGIES®
34
E-mail: sales@xtramus.com
Website: www.Xtramus.com
Page 35

4.1. Selecting Active Ports from Installed Module Cards
A. Tree Style Tab Buttons
These two buttons allow you to unfold/fold all the Active Port tree style tab displayed in B.
These two buttons allow you to check/uncheck all the Active Port displayed in B.
B. Active Port Tree Style Tab & E. Module Card List
All the module cards, along with their Active Ports are listed
here in this field. You can fold/unfold the tree style tab by
clicking
by clicking
Also, you can check which module card and its Active Ports
are activated for tests in E. Module Card List as well. Click
the check box in front the module card you would like to
activate/deactivate.
/ icons. Also, you can check/uncheck the port
icon.
XTRAMUS TECHNOLOGIES®
35
E-mail: sales@xtramus.com
Website: www.Xtramus.com
Page 36

C. DUT Model Name
D. Active Port Count
F. OK/Cancel
Click this button to apply all the changes you’ve made and move on to the Preview and
Confirm window.
Click this button to abandon all the changes you’ve made and go back to the Main
Window.
You can input DUT’s model name here in this field.
Please note that a folder named after the model name you input here
will be created under “config” folder inside NuApps-MultiUnits-RM’s
folder, and all the configuration files and test logs will be saved to that
folder.
This field display how many ports you’ve been activated for now.
After finishing the module cards/Active Ports for the tests, you can review all the ports, module cards, and
model name on Preview and Confirm window.
Click Next > to start making detail task settings or click < Back to go back to Select Active Ports window.
Also, you can click Cancel to abandon all the changes you’ve made and go back to the Main Window.
XTRAMUS TECHNOLOGIES®
36
E-mail: sales@xtramus.com
Website: www.Xtramus.com
Page 37

4.2. Making Settings on Option – New Model Window
An Option – New Model window will show up after you’ve selected module cards and Active Ports. The
Option – New Model window allows you to make detail test configurations.
NuApps-MultiUnits-RM has two different kinds of configurations: Environment Settings and Task List
Settings. All settings made in here can be saved by clicking Save as button, the settings will be saved in
XML format.
¾ Environment Settings: Configure global settings of the test environment for all tasks.
¾ Task List Settings: All test tasks are listed and categorized by groups. All tasks added to the
Selected Tasks field will be listed under this category and can be configured in detail.
For more detail information and descriptions regarding to these settings, please refer to the sections
down below.
XTRAMUS TECHNOLOGIES®
37
E-mail: sales@xtramus.com
Website: www.Xtramus.com
Page 38

4.2.1. Environment Settings
To access Environment Settings and start configuring global settings of the test environment for all
tasks, please click Environment from the Configuration Tree Style Tab located on the left side of
Option – New Model window as shown in the figure above.
Please note that all changes you’ve made here will be kept temporally and won’t be lost if you switch to
Task List Settings. However, you must click OK (located on the bottom-right part of the Option – New
Model window to apply all the changes you’ve made.
XTRAMUS TECHNOLOGIES®
38
E-mail: sales@xtramus.com
Website: www.Xtramus.com
Page 39

A. DUT – Port Number
You can view the number of active ports in this field.
B. Model Name
You can input or change DUT’s model name here in this field.
Please note that a folder named after the model name you input here will be
created under “config” folder inside NuApps-MultiUnits-RM’s folder, and all the
configuration files and test logs will be saved to that folder.
C. NuServer –IP Address
If you’re running NuApps-MultiUnits-RM from other PC located on the
network, you can set the IP address which is assigned from
NuStreams-2000i/600i from the scroll-down menu or input the IP address
manually.
D. Log – File Name Setting
Test results will be saved as log files and named automatically after tests
are completed.
NuApps-MultiUnits-RM creates test result logs and stores these logs
automatically to folders named after the testing date. You can set the
names that will be applied to these folders and test result logs here in
Log – File Name Setting.
XTRAMUS TECHNOLOGIES®
• Folder: You can set the name of the log folders as “Year, Month”, or
“Year, Month, Date”.
• Prefix: You can input the prefix word for test result log names here.
• Suffix: You can set the style of the suffix word for test result log
names here.
• Log Setting: You can choose the format of log as TXT, XML or both
at same time.
39
E-mail: sales@xtramus.com
Website: www.Xtramus.com
Page 40

E. Auto Start
F. Log Folder Path
NuApps-MultiUnits-RM will halt and wait for further
instructions after the current running task is completed. You
can click the check- box in this section so that
NuApps-MultiUnits-RM will start the next task automatically.
Also, you can set how many seconds shall
NuApps-MultiUnits-RM be waiting before starting the next
task in the field down below (Waiting Time).
As mentioned in “D. Log – File Name Setting”,
NuApps-MultiUnits-RM creates test result logs and stores
these logs automatically to designated folders.
You can set where you want to save the test logs by the
scroll-down menu.
• Default Log Folder: Test logs will be saved to the
default log folder.
• DUT’s Model Folder: Test logs will be saved to
where DUT test settings are saved.
• User Defined Folder: Test logs will be saved to the
designated file path you input in the Path field down
below.
G. Others settings
If you enable Export to PDF report function, you will be
able to save the running result report in PDF format.
By connecting a barcode reader to your PC, you can scan
pre-defined barcodes with the barcode reader. Information
such as DUT Task Settings, Operator ID and DUT MAC
Address can be read by barcode reader and input into
NuApps-MultiUnits-RM.
Besides, you can enable the Automatic Acquisition Of MAC
function for system to search for you the MAC address. And
also you can set manually the device under test’s IP from DUT
IP.
If you click the Setup button, an Options Dialog window will
pop up, which allows you to type your preference on FAB,
Station, Operator ID, DUT and Note. Besides, you can set the
number count of your DUT’s MAC address and S/N.
Please click the Ok button when you are finished with the
settings, or click Cancel to exit this window without saving.
XTRAMUS TECHNOLOGIES®
40
E-mail: sales@xtramus.com
Website: www.Xtramus.com
Page 41

G. Others settings
If you enable the Upload Data to MES function, the Database Setup button will be available. Clicking
the Database Setup button will pop up a Database Setup window for settings.
The Database Setup window allows you to set your Driver Type and allows you to define your User ID,
Password, Server Name, Database Name and Table Name.
Besides, you can also Set Number of Item (up to 20 items) to be displayed and click Apply button to
confirm. You can define a name for each Item Name’s field, and also scroll down each Source Data’s
field to indicate it as FAB, SN1, OP_ID, Time_Start, Time_End, Time_Used, Model_Name, DUT_MAC
or Final_Result.
Note: Currently, for Driver settings there is only SQL Server option available for selection.
XTRAMUS TECHNOLOGIES®
41
E-mail: sales@xtramus.com
Website: www.Xtramus.com
Page 42

4.2.2. Select Port Settings
To access Select Port Settings, please click Select Port from the Configuration Tree Style Tab located
on the left side of Option – New Model window as shown in the figure above.
Please note that all changes you’ve made here will be kept temporally and won’t be lost if you switch to
Task List Settings. However, you must click OK (located on the bottom-right part of the Option – New
Model window to apply all the changes you’ve made.
Note: Each selected port pair can support up to 32 tasks test.
XTRAMUS TECHNOLOGIES®
42
E-mail: sales@xtramus.com
Website: www.Xtramus.com
Page 43

Select Port Settings
The left field shows the ports of your XM-RM module
cards available on each slot of your
NuStreams-2000i/600i to choose. The number order (X,
Y, Z) is based on (Chassis, Board, Port).
• Port Count: Scroll down this field to set the number
of ports that you want to be included on one task
window.
• Set Window Count: Scroll down this field to set the
number of window task that you want to submit for
this time test.
• Add to Window NO.: Scroll down this field and
select the number order of your window task to
submit the Port Count settings.
You may click the Next button to skip to the next window
task settings instead of scroll down the Add to Window
NO. field.
When you select a port from the left field, you have to
click on -> button to send the selected port to the right
field for next steps settings.
You can also select the right field port and click the <-
button to withdrawn the previous selected port from the
right field.
You can also click the Resetall button to cancel all the
selected ports on the right field to be returned to the left
field for all the windows, or you can click the Reset
button to cancel only the current window settings.
XTRAMUS TECHNOLOGIES®
43
E-mail: sales@xtramus.com
Website: www.Xtramus.com
Page 44

Select Port Settings
Please refer to the right field, it is an example of selected
ports.
After the previous settings, please click
OK button to confirm the settings, or
click Cancel button to exit without
saving. If you click the Save as button,
you can save your current settings on
your PC.
XTRAMUS TECHNOLOGIES®
44
E-mail: sales@xtramus.com
Website: www.Xtramus.com
Page 45

4.2.3. Adding/Removing Tasks via Task List Setting
To start managing tasks for your DUT, please click List of Selected Tasks on the left side of the
Option – New Model.
Under Task List Settings, you can:
¾ View all NuApps-MultiUnits-RM’s available tasks according to their groups.
¾ Add/Delete task that you would like to perform.
¾ Arrange order of the tasks.
Note: Each selected port pair can support up to 32 tasks test.
XTRAMUS TECHNOLOGIES®
45
E-mail: sales@xtramus.com
Website: www.Xtramus.com
Page 46

A. Task Add/Remove Buttons
The Task Add/Remove Buttons allow you to add or remove tasks to/from Select Tasks.
• By clicking button, you can add the task you’ve selected from Built-in Tasks field
in the left-side to the Selected Tasks in the right-side.
• By clicking button, you can remove the task you’ve selected from the Selected
Tasks in the right-side.
B. Built-in Tasks
The Built-in Tasks display tasks available in NuApps-MultiUnits-RM. You
can choose which tasks you would like the system to display on Built-in
Tasks field
To add a task to Selected Tasks, please click the task you would like to
add in Built-in Tasks, and click
button.
XTRAMUS TECHNOLOGIES®
46
E-mail: sales@xtramus.com
Website: www.Xtramus.com
Page 47

C & E. Selected Tasks
All tasks you’ve selected from Built-in Tasks field will be listed in the Select
Tasks. The number of the tasks you chose will be shown here as well.
To remove a task from Selected Tasks, please click the task you would like
remove here, and click
D. Selected Tasks Managing Buttons
You can manage the testing order of tasks listed in the Selected Tasks.
To move the priority of a task listed in Selected Tasks up, click on that task, and click
button; to move the priority of a task listed in Selected Tasks down, click on that task, and
button.
click
button.
If you would like to remove all the tasks listed in Selected Tasks, click
button.
XTRAMUS TECHNOLOGIES®
47
E-mail: sales@xtramus.com
Website: www.Xtramus.com
Page 48

4.2.4. Configuring Tasks Listed on List of Selected Tasks
After choosing the tasks you would like to perform from Built-in Tasks as mentioned in “4.2.3.
Adding/Removing Tasks via Task List Setting”, you can start making detail settings with individual
tasks by clicking the task you would like to configure from List of Selected Tasks. All the configurations
for this task will be listed in the right-side section as shown in the figure down below.
Please note that the maximum number of tasks that can be selected into the List of Selected Tasks is
32.
For more detailed information regarding to task settings in NuApps-MultiUnits-RM’s task groups, please
refer to “5. NuApps-MultiUnits-RM Detail Task Setting.”
Click the OK button on the bottom-right side of Option – New Model window when all configurations are
done. A “Save As” window will pop up and prompt you to save all the configurations you made.
The default name for the configuration setting is “config” and will be saved in a folder named after the
DUT’s Model Name. All configuration setting files are saved as XML format, and changing configuration
setting’s file type may cause NuApps-MultiUnits-RM unable to load your previous saved setting file.
NuApps-MultiUnits-RM will apply all the settings you’ve made after saving.
XTRAMUS TECHNOLOGIES®
48
E-mail: sales@xtramus.com
Website: www.Xtramus.com
Page 49

5. NuApps-MultiUnits-RM Detail Task Setting
As mentioned in “4.2.4. Configuring Tasks Listed on List of Selected Tasks”, you can make detail
settings with individual tasks by clicking the task you would like to configure from List of Selected Tasks.
All the configurations for this task will be listed in the right-side section as shown in the figure down below.
All tasks available for NuApps-MultiUnits-RM can be divided into different groups Unicast, Flow Control,
Broadcast, Filter tasks and CRC error. Please refer to “1.2. Function Description_ Performance Task
in Layer 2 (PT2
)” for descriptions. Also, descriptions for each task can be viewed on
NuApps-MultiUnits-RM as well.
XTRAMUS TECHNOLOGIES®
49
E-mail: sales@xtramus.com
Website: www.Xtramus.com
Page 50

Test Tasks – Layer 2
All the Layer 2 tasks settings can be set here. For available Layer 2 tasks and their descriptions, please
refer to “1.2. Function Description_ Performance Task in Layer 2 (PT2
).”
5.1. 1 to Many-UC
1 to Many-UC is a Unicast Full Performance Test. Performing Layer 2 MAC address Unicast performance
tests from one source to multiple ports with different media types (such as 100Mbps and 1000Mbps Full).
A. Port Map
Before making any other configurations for 1 to Many-UC test, you have to assign a Root Port and its
Member Ports first.
To assign an Active Port as the Root Port,
please click the Available Port you would like to
use as a Root Port, and then click the Æ button
to add it to the Root Port field located on the
right side. To remove the Root Port you’ve
assigned, click the Å button.
XTRAMUS TECHNOLOGIES®
50
E-mail: sales@xtramus.com
Website: www.Xtramus.com
Page 51

To assign Active Ports as the Member Ports for Root, please
click the Active Ports you would like to use as Member Ports,
and then click the Æ button to add it to the member Ports field
located on the right side. To remove a Member Port you’ve
assigned, click the Member Port you would like to remove,
and then click the Å button.
• Available Ports: All available Active Ports will be
shown in this field. If you assign an Active Port as the
Root Port or one of the Member Ports, it will be
removed from this field.
• Æ/Å: You can add an selected Active Port as the Root Port or one of the Member Ports by
clicking the Æ button, or remove the Root Port or Member Ports by clicking the Å button.
• Window: You may configure each Window task settings by clicking the Window1, Window2,…,
Window8. The number of the Windows depends on the number of Set Window Count, please
refer to the 4.2.2. Select Port Settings.
• Root Port: The port set to transfer packets to the Member Ports.
• Total Down Stream Rate: The rate of total Down Stream in Mbps.
• Total Up Stream Rate: The rate of total Up Stream in Mbps.
• Member Ports: The ports set to receive packets from Root Port.
• Reset: Click this button to remove all Active Ports that has been assigned as Root Port or
Member Ports.
XTRAMUS TECHNOLOGIES®
51
E-mail: sales@xtramus.com
Website: www.Xtramus.com
Page 52

B. Media
You can set the media type for all the Active Ports that’s used for 1 to Many-UC test here. The
configuration for Root Port and Member Port are identical, and can be related.
• Root: You can set the media type (Speed, Flow Control, Auto-MDIX, MDI Select and Master
Mode) in this field. To configure Root Port, please double-click on the column that you would like
to configure, or click the scroll-down menu located on the column.
• Member: You can set the media type (Speed, Flow Control, Auto-MDIX, MDI Select and
Master Mode) in this field. To configure Member Port, please double-click on the column that you
would like to configure, or click the
scroll-down menu located on the column. You
could also click the Member Quick Setup
button. A Quick Setup window will pop up.
The settings you made here will apply to all
the Member Ports listed in the Member field.
XTRAMUS TECHNOLOGIES®
52
E-mail: sales@xtramus.com
Website: www.Xtramus.com
Page 53
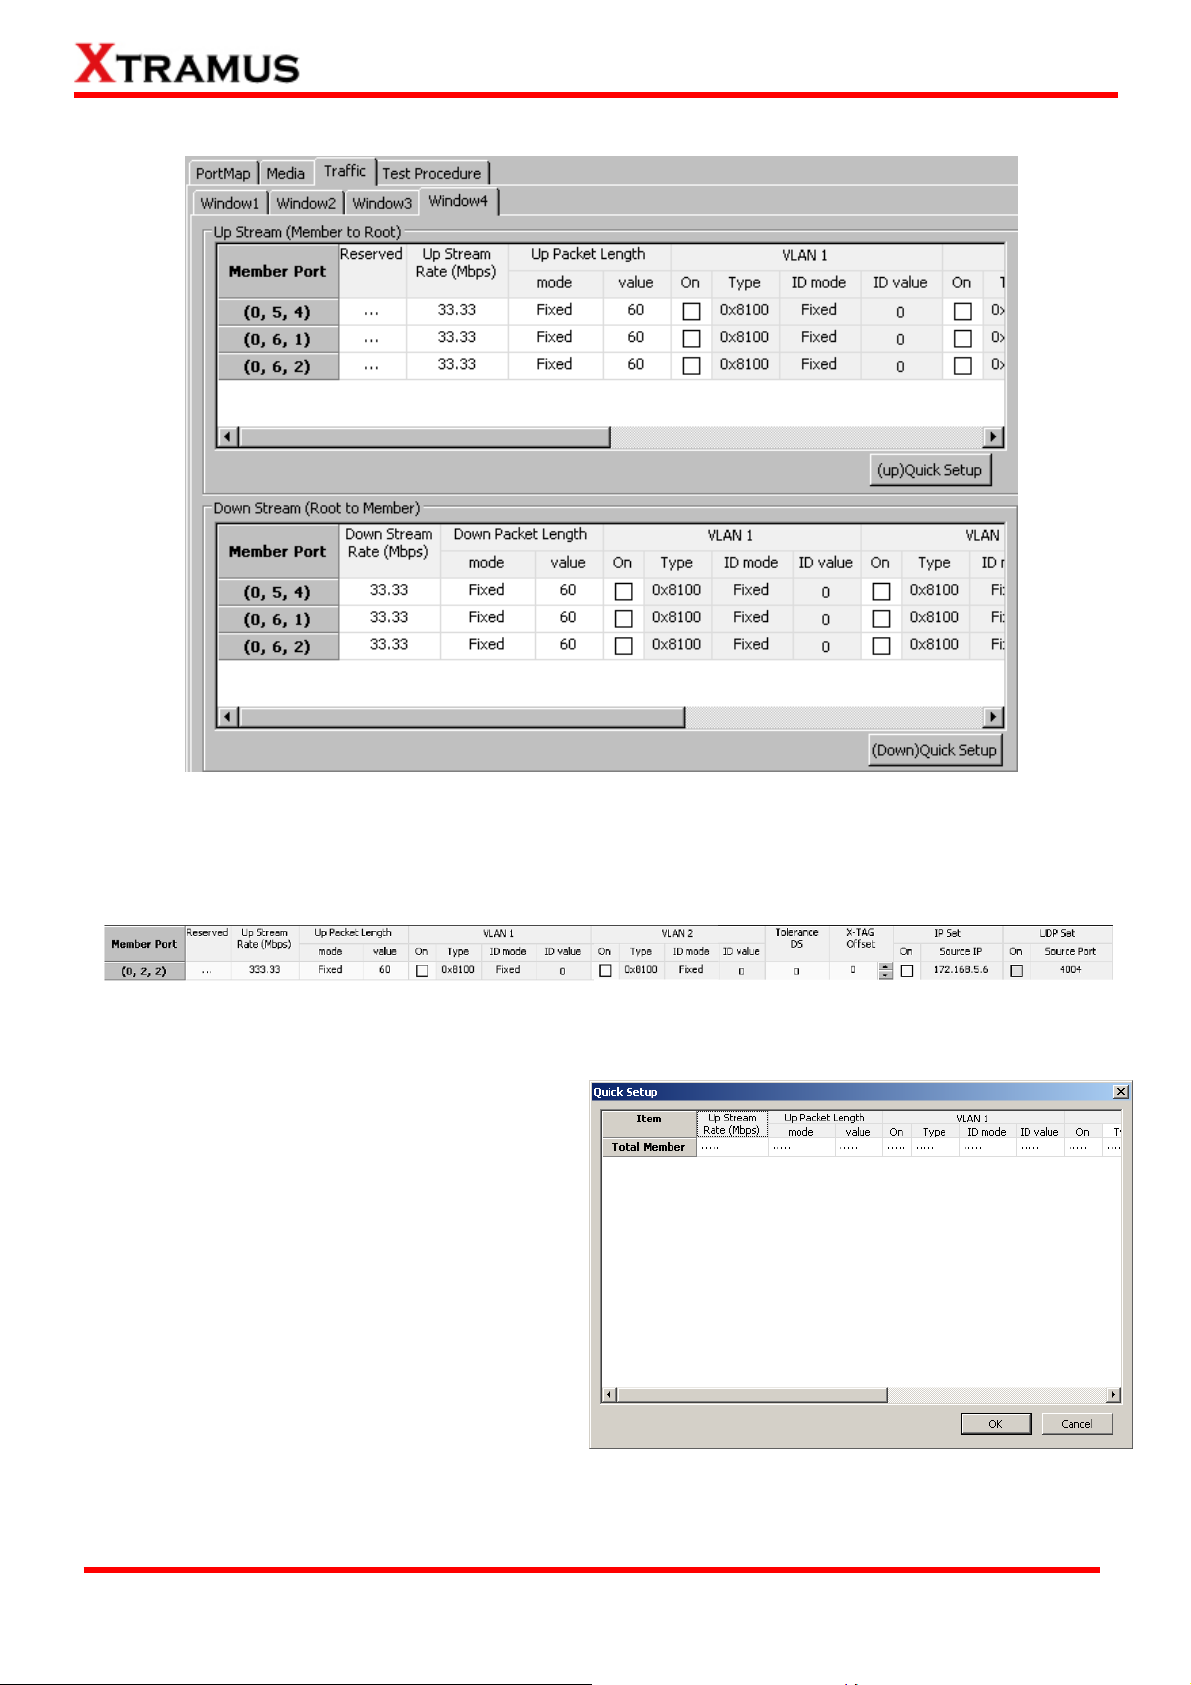
C. Traffic
You can make Up Stream and Down Stream packet transmitting settings for all the Active Ports that’s
used for 1 to Many-UC test here. The configuration for Up Stream (Member to Root) and Down
Stream (Root to Member) are identical, and can be related, as shown in the figure down below:
You can configure all the settings for each Active Port listed in Up Stream or Down Stream field in a
one-by-one manner by double-clicking the column you would like to configure.
You can also click the Quick Setup button. A
Quick Setup window will pop up. The settings
you made here will apply to all the Active Ports
listed in the Up Stream or Down Stream field.
XTRAMUS TECHNOLOGIES®
53
E-mail: sales@xtramus.com
Website: www.Xtramus.com
Page 54

D. Test Procedure
• Enable Learning: By
activating the Enable
Learning function, the
Frame Count and Tx Pkt
Timeout function will be
enabled.
• Frame Count: You can set
here the frame count when
processing the Learning
function.
• Tx Pkt Timeout: If the Tx
packets spent for
auto-negotiation exceeds
the Tx Pkt Timeout you set
here, the test will stop and the result will be fail.
• Delay Time After Learning: You can set the time interval between After Learning to the next
process.
• Broadcast/Unicast: Select the learning packet mode for Broadcast or Unicast.
• Learning Correction Check: Enable the Learning Correction Check option and set the
Minimum Waiting Time and the Timeout Time for operating this function.
• Mediatype Setting: Set the Minimum Waiting Time as the minimum media type auto
negotiation time in this field, and set the Media Type Waiting Timeout for any exceeding time will
stop the test and the result will be fail. Enabling the Mediatype Fails To Continue function to
allow the continuation of task running even after reaching the media type waiting timeout.
• Transmit by Time: The 1 to Many-UC test will be performed for the set amount of time.
• Transmit by Packet: The 1 to Many-UC test will be performed for the set amount of packet.
• Insert Elongated Frame Gap: When enabling this function, 1 bit-time of frame gap will be
inserted after a certain amount of packets are sent and decrease packet loss.
• Traffic Direction Mode: The packets traffic direction includes Root to Member only, Member to
Root only and Both.
• Tx Payload: It includes All0, All1, Byte increase, Byte decrease, Word increase, Word
decrease, 55AA, 5555AAAA, 8’0 8’1, 16’0 16’1, 32’0 32’1, 64’0 64’1, UDF or Random.
• Enable S/N Error Check: Selecting this option will enable the capturing of S/N Error.
• MAC Setup: When you click the MAC Setup button, a window will pop up enabling to set the
MAC address of each port. After finished the settings, please click the Apply button to save the
settings or Cancel button to cancel the settings.
XTRAMUS TECHNOLOGIES®
54
E-mail: sales@xtramus.com
Website: www.Xtramus.com
Page 55

5.2. Router-NAT
This task allows the testing of the router’s functions.
A. Port Map
• Member Port: Ports are
displayed in IDs in the format of
(X, Y, Z) while X is the number of
the chassis (which is displayed
on NuStreams-2000i/600i), Y is
the slot number where this
module card is installed, and Z is
the available port number located
on the module card.
• WAN/LAN: All ports set for this
task will be ordered in this field
as WAN/LAN ports. The first port will be auto set as the WAN port, and the others will be auto set
as the LAN ports. You can change the WAN port by double clicking any LAN port on this field.
• Window NO: You can view each Window number’s Member Port by scroll down this field and
select the Window No of your interest.
• Next: instead of scrolling down the Window NO field, you may click this button to change and
view the next Window’s Member Port.
• Port Select…: Clicking this option will pop up a Port Select window allowing the selection of the
ports to be used on the task.
Please click the OK button to save the settings you made on this window, or click the Cancel button to
close the window without saving the settings.
XTRAMUS TECHNOLOGIES®
55
E-mail: sales@xtramus.com
Website: www.Xtramus.com
Page 56

B. Set
• Packet Length Setting: As shown in the figure down below, in a standard Ethernet II frame, the
Frame Length can be from 64~1518 bytes. By clicking the Frame Length scroll-down menu, you
can set the frame length to random (frame length will be randomly assigned from 64~1518 bytes) or
fixed (frame length will be a fixed number). If you choose fixed as your Frame Length, you can set
the frame length in the field down below.
• Packet Setting: The system will transmit packet during the set amount of time.
• Learning: You can set the learning condition here.
¾ Frame Count: Repeat frame count per learning packets burst.
¾ Delay Time After Learning: The time gap between after learning and the next process.
• VLAN Setting: Add VLAN tag for test. VLAN (Virtual LAN) is a group of hosts with common
requirements that communicate within the same Broadcast domain regardless of the physical
location. By clicking the Setup button, you can configure CoS (class of service) and VID (VLAN ID)
on the pop-up VLAN Setup window. Click Apply and apply all the changes you’ve made here.
• Connection Setting: You can set the basic connection setting here.
¾ WAN Link Type: Scroll down to choose between DHCP or Static IP.
¾ Connection Wait Timeout: Scroll down to choose the value in seconds.
¾ DUT WAN Static IP: Set the WAN IP of your DUT (Device Under Test).
¾ WAN Gateway IP: You can set the WAN gateway IP in this field.
¾ Skip DHCP Process if Valid: enable this function to allow the system to skip DHCP process.
• Enable Flow Control: enable this option to allow the flow control function.
XTRAMUS TECHNOLOGIES®
56
E-mail: sales@xtramus.com
Website: www.Xtramus.com
Page 57

C. Test Procedure
• Minimum Waiting Time: The minimum waiting time for link up.
• Mediatype WaitingTimeout: The maximum waiting time for link up.
• Media Type Fails To Continue: enables the continuation of task running even after reaching the
media type waiting timeout.
• WAN Media Type: Scroll down to choose the media type for WAN port in auto negotiation mode.
• LAN Media Type: Scroll down to choose the media type for LAN port in auto negotiation mode.
• Switch Utilization(%): The transfer rate utilization of your module cards’ port.
• WAN to LAN Utilization(%): The transfer rate from WAN port to LAN port.
• LAN to WAN Utilization(%): The transfer rate from LAN port to WAN port.
XTRAMUS TECHNOLOGIES®
57
E-mail: sales@xtramus.com
Website: www.Xtramus.com
Page 58

5.3. Unicast Test (UC) _ PT2-UC-10H (10Mbps Half Duplex)
Layer 2 10Mbps Half Duplex Unicast Performance Test is to transmit test streams via point to point
addressing method that is based on MAC address.
A. Port Map
• Source/Destination Port: These two fields display the source/ destination port for the task. Ports
are displayed in IDs in the format of (X, Y, Z) while X is the number of the chassis (which is
displayed on NuStreams-2000i/600i), Y is the slot number where this module card is installed, and
Z is the available port number located on the module card.
• Port Map: This field shows how test streams will be transmitted from port to port.
• Æ: To assign how test streams flow from source port to the destination port, click a port from
Source Port, click a port from Destination Port, and then click Æ button to add them to the Port
Map.
• Å: To remove a port map setting from Port Map, click the setting you would like to remove, and
then click Å button to remove it from Port Map.
• Pair >: NuApps-MultiUnits-RM will match ports located on the same module card in a
back-and-forth manner, and add them to the Port Map.
• Rotate >: NuApps-MultiUnits-RM will match ports so the last port will connect to the first port, thus
forming a loop. If you have the same amount of ports on your chassis and DUT, Rotate allows you
to test all DUT’s ports simultaneously.
• Reset <: Remove all port map settings in the Port Map.
• Window NO: You can view each Window number’s Port Mapping by scroll down this field and
select the Window No of your interest.
• Next: instead of scrolling down the Window NO field, you may click this button to change and
view the next Window’s Port Mapping.
• Traffic Direction Mode: You can scroll down and choose the direction of the traffic on this field.
XTRAMUS TECHNOLOGIES®
58
E-mail: sales@xtramus.com
Website: www.Xtramus.com
Page 59

• Port Select…: Clicking this option will pop up a Port Select window allowing the selection of the
ports to be used on the task.
Please click the OK button to save the settings you made on this window, or click the Cancel button
to close the window without saving the settings.
XTRAMUS TECHNOLOGIES®
59
E-mail: sales@xtramus.com
Website: www.Xtramus.com
Page 60

B. Media Type
• Minimum Waiting Time: NuApps-MultiUnits-RM will halt at least for the Minimum Waiting Time
you input here during auto-negotiation process.
• Media Type Waiting Timeout: If the time spent for auto-negotiation exceeds the Media Type
Waiting Timeout you set here, the test will stop and the test result will be fail.
• Media Type: By clicking the scroll-down menu, you can set the transmitting mode to Auto (with
auto-negotiation), Force (without auto-negotiation), or Off (all the ports in this task are link-down).
• Media Select: Click the scroll-down menu to choose if all the connecting cables are Copper or
Fiber.
• Media Type Fails To Continue: enables the continuation of task running even after reaching the
media type waiting timeout.
C. Packet
• Frame Length Setting: As shown in the figure down below, in a standard Ethernet II frame, the
Frame Length (Without CRC) can be from 60~16300 bytes.
By clicking the Frame Length scroll-down menu, you can set the frame length to random (frame
length will be randomly assigned from 60~16300 bytes) or fixed (frame length will be a fixed
number). If you choose fixed as your Frame Length, you can set the frame length in the field
XTRAMUS TECHNOLOGIES®
60
E-mail: sales@xtramus.com
Website: www.Xtramus.com
Page 61

down below.
• Packet Setting: You can set how packets will be transmitted in this field.
¾ Transmit by time: The system will transmit packet
during the set amount of time.
¾ Transmit by packet: The system will transmit the set number of packets. If
the system fails to send the test packet within the time you set in TxPKT
Timeout field, the packet will be drop. Also, you can set the content of the
transmitting packets with the Payload scroll-down menu.
• Packet Gap Setting: You can set the gaps between packets in this field.
¾ Frame Gap: Duration time between frames. Increasing Frame Gap reduces
the fail rate, while 96 bit-time is wirespeed.
¾ Burst Gap: Duration between each burst. Set the burst gap to control the transmission rate
of packets. Increasing Frame Gap reduces the fail rate.
• VLAN Setting: Add VLAN tag for test. VLAN (Virtual LAN) is
a group of hosts with common requirements that
communicate within the same Broadcast domain regardless
of the physical location. By clicking the Setup button, you
can configure CoS (class of service) and VID (VLAN ID) on
the pop-up VLAN Setup window. Click Apply and apply all
the changes you’ve made here.
• Wait for check result: The system will halt for the time you
set here before checking test result.
• Wait for read counter: The system will halt for the set
microseconds before read the counters. This function is
useful for counters since they are stored in memory buffer
and the final counter value might take some time to read.
• Enable Flow Control: When enabling this function, the transmitting rate will drop if traffic overflow
occurs. This function must be enabled under full-duplex.
• Disable Check Result: When this mode is enabled, all test procedures will be carried out no
matter the result is Pass or Fail. This mode can only be access if you choose Transmit by Time in
the Packet Setting field.
• Enable S/N Error Check: Selecting this option will enable the capturing of S/N Error.
• Enable X-TAG offset: X-TAG is a 12-byte tag which is developed by Xtramus and embedded at
49th~60th bytes of each testing frames generated by Rapid-Matrix for multi-stream tests. X-TAG
will be added to all the testing frames generated by NuApps-MultiUnits-RM.
• Estimation of Test: System will calculate the amount of packets and the time it will take to
transmit these packets, and display these statistics in Estimated Transmission Packets (Per
Port) and Estimated Packets Transmission Time.
XTRAMUS TECHNOLOGIES®
61
E-mail: sales@xtramus.com
Website: www.Xtramus.com
Page 62

D. Learning
• Enable Learning: As shown in the figures down below, enabling this function allows learning
packets transmitted to the DUT before test packets are transmitted. If you disable this function, no
learning packets will be transmitted.
• Frame Count: Repeat frame count per learning packets burst.
• Frame Gap: Duration time between learning frames.
• Delay Time After Learning: The time gap between after learning and the next process.
• Tx Pkt Timeout: If the system fails to send the learning packet within the time you set in TxPKT
Timeout field, the packet will be drop.
XTRAMUS TECHNOLOGIES®
62
E-mail: sales@xtramus.com
Website: www.Xtramus.com
Page 63

E. Criteria
• Allowable Tolerance: You can set the allowable amount packet loss/excess here.
¾ Total Packet Loss: If packet loss (including error packets) is higher then the value you set
here, the test result of the DUT will be fail.
¾ Total Packet Excess: If packets excess (including error packets) is higher then the value you
set here, the test result of the DUT will be fail. Packet excess happens when packet
transmission is bad and packets are resend multiple times, causing the amount of received
packets is more than sent packets.
F. Misc
• Title of Task Name: You can assign a name to this task for identification.
• Apply: Apply the changes you made.
G. Help
All test variables used for this task and their definitions will be listed here for reference.
XTRAMUS TECHNOLOGIES®
63
Website: www.Xtramus.com
E-mail: sales@xtramus.com
Page 64

5.4. Unicast Test (UC) _ PT2-UC-10F (10Mbps Full Duplex)
Layer 2 10Mbps Full Duplex Unicast Performance Test is to transmit test streams via point to point
addressing method that is based on MAC address.
A. Port Map
• Source/Destination Port: These two fields display the source/ destination port for the task. Ports
are displayed in IDs in the format of (X, Y, Z) while X is the number of the chassis (which is
displayed on NuStreams-2000i/600i), Y is the slot number where this module card is installed, and
Z is the available port number located on the module card.
• Port Map: This field shows how test streams will be transmitted from port to port.
• Æ: To assign how test streams flow from source port to the destination port, click a port from
Source Port, click a port from Destination Port, and then click Æ button to add them to the Port
Map.
• Å: To remove a port map setting from Port Map, click the setting you would like to remove, and
then click Å button to remove it from Port Map.
• Pair >: NuApps-MultiUnits-RM will match ports located on the same module card in a
back-and-forth manner, and add them to the Port Map.
• Rotate >: NuApps-MultiUnits-RM will match ports so the last port will connect to the first port, thus
forming a loop. If you have the same amount of ports on your chassis and DUT, Rotate allows you
to test all DUT’s ports simultaneously.
• Reset <: Remove all port map settings in the Port Map.
• Window NO: You can view each Window number’s Port Mapping by scroll down this field and
select the Window No of your interest.
• Next: instead of scrolling down the Window NO field, you may click this button to change and
view the next Window’s Port Mapping.
• Traffic Direction Mode: You can scroll down and choose the direction of the traffic on this field.
XTRAMUS TECHNOLOGIES®
64
E-mail: sales@xtramus.com
Website: www.Xtramus.com
Page 65

• Port Select…: Clicking this option will pop up a Port Select window allowing the selection of the
ports to be used on the task.
Please click the OK button to save the settings you made on this window, or click the Cancel button
to close the window without saving the settings.
XTRAMUS TECHNOLOGIES®
65
E-mail: sales@xtramus.com
Website: www.Xtramus.com
Page 66

B. Media Type
• Minimum Waiting Time: NuApps-MultiUnits-RM will halt at least for the Minimum Waiting Time
you input here during auto-negotiation process.
• Media Type Waiting Timeout: If the time spent for auto-negotiation exceeds the Media Type
Waiting Timeout you set here, the test will stop and the test result will be fail.
• Media Type: By clicking the scroll-down menu, you can set the transmitting mode to Auto (with
auto-negotiation), Force (without auto-negotiation), or Off (all the ports in this task are link-down).
• Media Select: Click the scroll-down menu to choose if all the connecting cables are Copper or
Fiber.
• Media Type Fails To Continue: enables the continuation of task running even after reaching the
media type waiting timeout.
C. Packet
• Frame Length Setting: As shown in the figure down below, in a standard Ethernet II frame, the
Frame Length (Without CRC) can be from 60~16300 bytes.
By clicking the Frame Length scroll-down menu, you can set the frame length to random (frame
length will be randomly assigned from 60~16300 bytes) or fixed (frame length will be a fixed
number). If you choose fixed as your Frame Length, you can set the frame length in the field
XTRAMUS TECHNOLOGIES®
66
E-mail: sales@xtramus.com
Website: www.Xtramus.com
Page 67

down below.
• Packet Setting: You can set how packets will be transmitted in this field.
¾ Transmit by time: The system will transmit packet
during the set amount of time.
¾ Transmit by packet: The system will transmit the set number of packets. If
the system fails to send the test packet within the time you set in TxPKT
Timeout field, the packet will be drop. Also, you can set the content of the
transmitting packets with the Payload scroll-down menu.
• Packet Gap Setting: You can set the gaps between packets in this field.
¾ Frame Gap: Duration time between frames. Increasing Frame Gap reduces
the fail rate, while 96 bit-time is wirespeed.
¾ Burst Gap: Duration between each burst. Set the burst gap to control the transmission rate
of packets. Increasing Frame Gap reduces the fail rate.
• VLAN Setting: Add VLAN tag for test. VLAN (Virtual LAN) is
a group of hosts with common requirements that
communicate within the same Broadcast domain regardless
of the physical location. By clicking the Setup button, you
can configure CoS (class of service) and VID (VLAN ID) on
the pop-up VLAN Setup window. Click Apply and apply all
the changes you’ve made here.
• Wait for check result: The system will halt for the time you
set here before checking test result.
• Wait for read counter: The system will halt for the set
microseconds before read the counters. This function is
useful for counters since they are stored in memory buffer
and the final counter value might take some time to read.
• Enable Flow Control: When enabling this function, the transmitting rate will drop if traffic overflow
occurs. This function must be enabled under full-duplex.
• Disable Check Result: When this mode is enabled, all test procedures will be carried out no
matter the result is Pass or Fail. This mode can only be access if you choose Transmit by Time in
the Packet Setting field.
• Enable S/N Error Check: Selecting this option will enable the capturing of S/N Error.
• Enable X-TAG offset: X-TAG is a 12-byte tag which is developed by Xtramus and embedded at
49th~60th bytes of each testing frames generated by Rapid-Matrix for multi-stream tests. X-TAG
will be added to all the testing frames generated by NuApps-MultiUnits-RM.
• Estimation of Test: System will calculate the amount of packets and the time it will take to
transmit these packets, and display these statistics in Estimated Transmission Packets (Per
Port) and Estimated Packets Transmission Time.
XTRAMUS TECHNOLOGIES®
67
E-mail: sales@xtramus.com
Website: www.Xtramus.com
Page 68

D. Learning
• Enable Learning: As shown in the figures down below, enabling this function allows learning
packets transmitted to the DUT before test packets are transmitted. If you disable this function, no
learning packets will be transmitted.
• Frame Count: Repeat frame count per learning packets burst.
• Frame Gap: Duration time between learning frames.
• Delay Time After Learning: The time gap between after learning and the next process.
• Tx Pkt Timeout: If the system fails to send the learning packet within the time you set in TxPKT
Timeout field, the packet will be drop.
XTRAMUS TECHNOLOGIES®
68
E-mail: sales@xtramus.com
Website: www.Xtramus.com
Page 69

E. Criteria
• Allowable Tolerance: You can set the allowable amount packet loss/excess here.
¾ Total Packet Loss: If packet loss (including error packets) is higher then the value you set
here, the test result of the DUT will be fail.
¾ Total Packet Excess: If packets excess (including error packets) is higher then the value you
set here, the test result of the DUT will be fail. Packet excess happens when packet
transmission is bad and packets are resend multiple times, causing the amount of received
packets is more than sent packets.
F. Misc
• Title of Task Name: You can assign a name to this task for identification.
• Apply: Apply the changes you made.
G. Help
All test variables used for this task and their definitions will be listed here for reference.
XTRAMUS TECHNOLOGIES®
69
Website: www.Xtramus.com
E-mail: sales@xtramus.com
Page 70

5.5. Unicast Test (UC) _ PT2-UC-100H (100Mbps Half Duplex)
Layer 2 100Mbps Half Duplex Unicast Performance Test is to transmit test streams via point to point
addressing method that is based on MAC address.
A. Port Map
• Source/Destination Port: These two fields display the source/ destination port for the task. Ports
are displayed in IDs in the format of (X, Y, Z) while X is the number of the chassis (which is
displayed on NuStreams-2000i/600i), Y is the slot number where this module card is installed, and
Z is the available port number located on the module card.
• Port Map: This field shows how test streams will be transmitted from port to port.
• Æ: To assign how test streams flow from source port to the destination port, click a port from
Source Port, click a port from Destination Port, and then click Æ button to add them to the Port
Map.
• Å: To remove a port map setting from Port Map, click the setting you would like to remove, and
then click Å button to remove it from Port Map.
• Pair >: NuApps-MultiUnits-RM will match ports located on the same module card in a
back-and-forth manner, and add them to the Port Map.
• Rotate >: NuApps-MultiUnits-RM will match ports so the last port will connect to the first port, thus
forming a loop. If you have the same amount of ports on your chassis and DUT, Rotate allows you
to test all DUT’s ports simultaneously.
• Reset <: Remove all port map settings in the Port Map.
• Window NO: You can view each Window number’s Port Mapping by scroll down this field and
select the Window No of your interest.
• Next: instead of scrolling down the Window NO field, you may click this button to change and
view the next Window’s Port Mapping.
• Traffic Direction Mode: You can scroll down and choose the direction of the traffic on this field.
XTRAMUS TECHNOLOGIES®
70
E-mail: sales@xtramus.com
Website: www.Xtramus.com
Page 71

• Port Select…: Clicking this option will pop up a Port Select window allowing the selection of the
ports to be used on the task.
Please click the OK button to save the settings you made on this window, or click the Cancel button
to close the window without saving the settings.
XTRAMUS TECHNOLOGIES®
71
E-mail: sales@xtramus.com
Website: www.Xtramus.com
Page 72

B. Media Type
• Minimum Waiting Time: NuApps-MultiUnits-RM will halt at least for the Minimum Waiting Time
you input here during auto-negotiation process.
• Media Type Waiting Timeout: If the time spent for auto-negotiation exceeds the Media Type
Waiting Timeout you set here, the test will stop and the test result will be fail.
• Media Type: By clicking the scroll-down menu, you can set the transmitting mode to Auto (with
auto-negotiation), Force (without auto-negotiation), or Off (all the ports in this task are link-down).
• Media Select: Click the scroll-down menu to choose if all the connecting cables are Copper or
Fiber.
• Media Type Fails To Continue: enables the continuation of task running even after reaching the
media type waiting timeout
C. Packet
• Frame Length Setting: As shown in the figure down below, in a standard Ethernet II frame, the
Frame Length (Without CRC) can be from 60~16300 bytes.
By clicking the Frame Length scroll-down menu, you can set the frame length to random (frame
length will be randomly assigned from 60~16300 bytes) or fixed (frame length will be a fixed
XTRAMUS TECHNOLOGIES®
72
E-mail: sales@xtramus.com
Website: www.Xtramus.com
Page 73
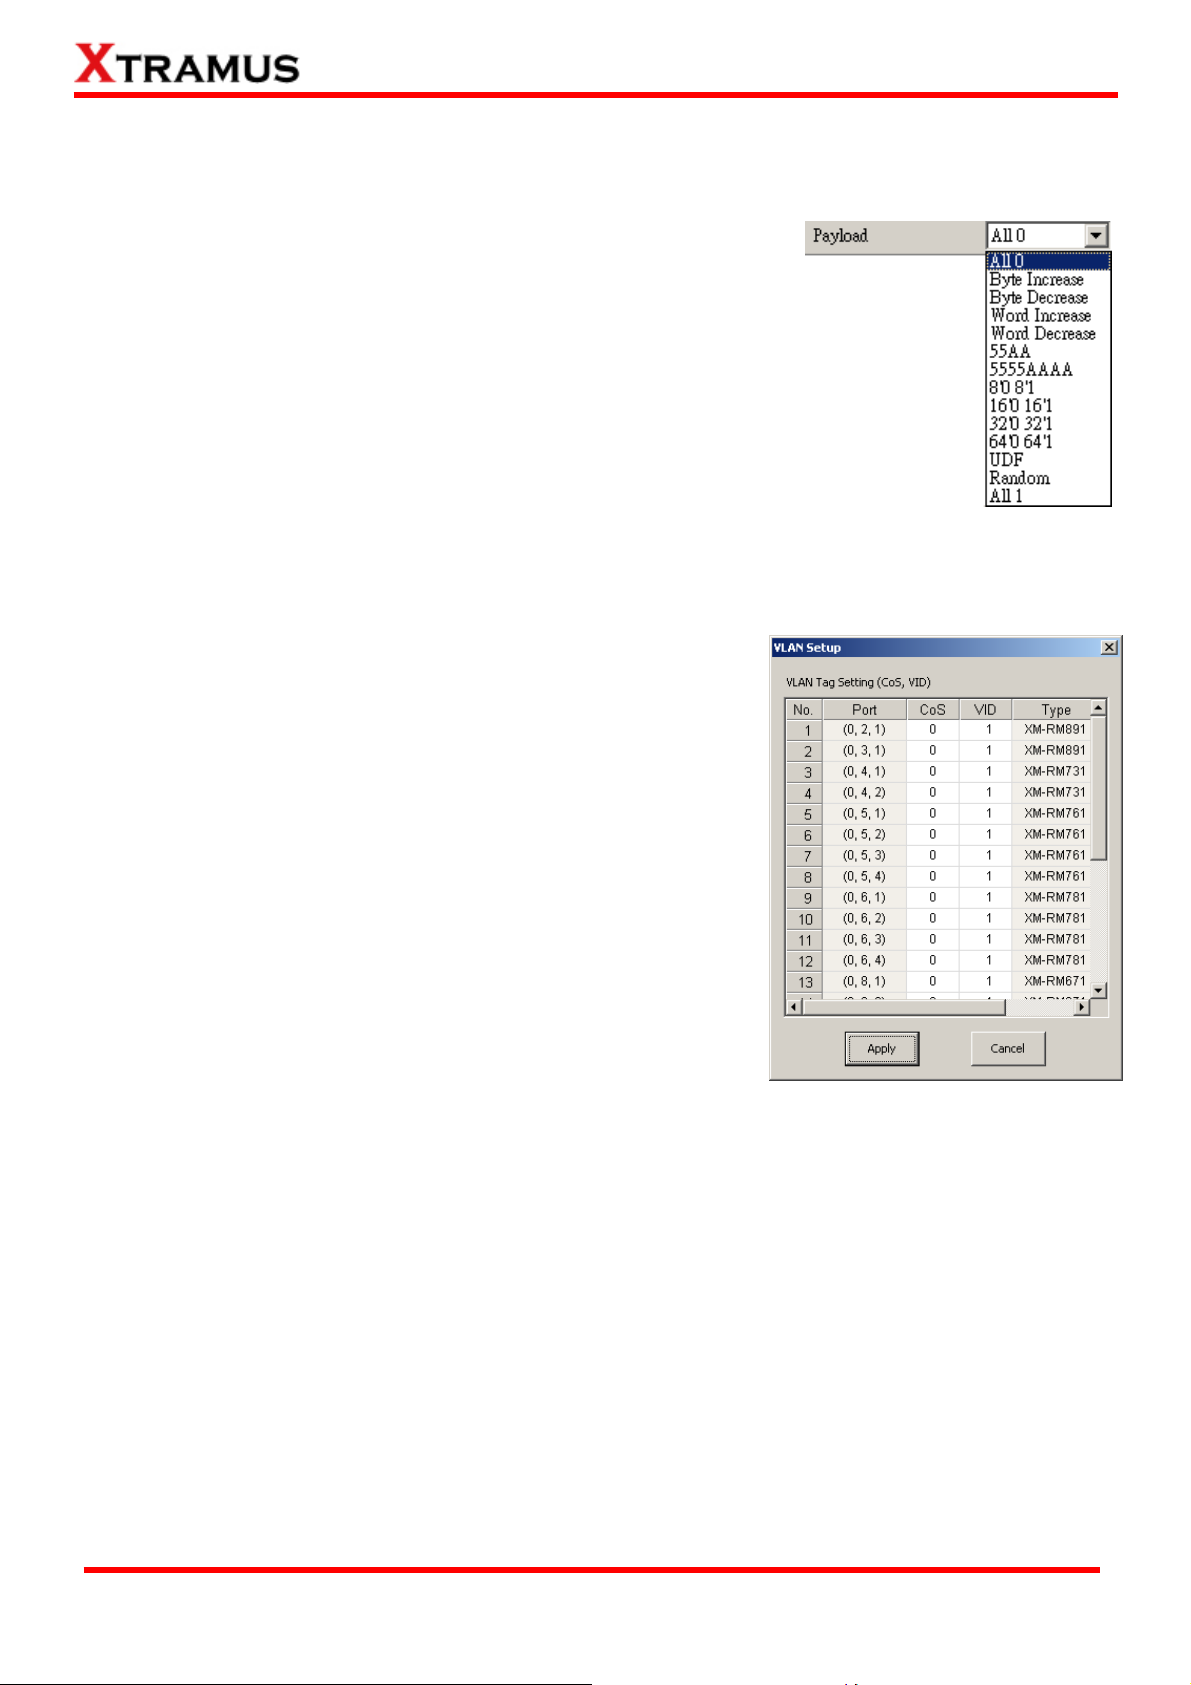
number). If you choose fixed as your Frame Length, you can set the frame length in the field
down below.
• Packet Setting: You can set how packets will be transmitted in this field.
¾ Transmit by time: The system will transmit packet
during the set amount of time.
¾ Transmit by packet: The system will transmit the set number of packets. If
the system fails to send the test packet within the time you set in TxPKT
Timeout field, the packet will be drop. Also, you can set the content of the
transmitting packets with the Payload scroll-down menu.
• Packet Gap Setting: You can set the gaps between packets in this field.
¾ Frame Gap: Duration time between frames. Increasing Frame Gap reduces
the fail rate, while 96 bit-time is wirespeed.
¾ Burst Gap: Duration between each burst. Set the burst gap to control the transmission rate
of packets. Increasing Frame Gap reduces the fail rate.
• VLAN Setting: Add VLAN tag for test. VLAN (Virtual LAN) is
a group of hosts with common requirements that
communicate within the same Broadcast domain regardless
of the physical location. By clicking the Setup button, you
can configure CoS (class of service) and VID (VLAN ID) on
the pop-up VLAN Setup window. Click Apply and apply all
the changes you’ve made here.
• Wait for check result: The system will halt for the time you
set here before checking test result.
• Wait for read counter: The system will halt for the set
microseconds before read the counters. This function is
useful for counters since they are stored in memory buffer
and the final counter value might take some time to read.
• Enable Flow Control: When enabling this function, the transmitting rate will drop if traffic overflow
occurs. This function must be enabled under full-duplex.
• Disable Check Result: When this mode is enabled, all test procedures will be carried out no
matter the result is Pass or Fail. This mode can only be access if you choose Transmit by Time in
the Packet Setting field.
• Enable S/N Error Check: Selecting this option will enable the capturing of S/N Error.
• Enable X-TAG offset: X-TAG is a 12-byte tag which is developed by Xtramus and embedded at
49th~60th bytes of each testing frames generated by Rapid-Matrix for multi-stream tests. X-TAG
will be added to all the testing frames generated by NuApps-MultiUnits-RM.
• Estimation of Test: System will calculate the amount of packets and the time it will take to
transmit these packets, and display these statistics in Estimated Transmission Packets (Per
Port) and Estimated Packets Transmission Time.
XTRAMUS TECHNOLOGIES®
73
E-mail: sales@xtramus.com
Website: www.Xtramus.com
Page 74

D. Learning
• Enable Learning: As shown in the figures down below, enabling this function allows learning
packets transmitted to the DUT before test packets are transmitted. If you disable this function, no
learning packets will be transmitted.
• Frame Count: Repeat frame count per learning packets burst.
• Frame Gap: Duration time between learning frames.
• Delay Time After Learning: The time gap between after learning and the next process.
• Tx Pkt Timeout: If the system fails to send the learning packet within the time you set in TxPKT
Timeout field, the packet will be drop.
XTRAMUS TECHNOLOGIES®
74
E-mail: sales@xtramus.com
Website: www.Xtramus.com
Page 75

E. Criteria
• Allowable Tolerance: You can set the allowable amount packet loss/excess here.
¾ Total Packet Loss: If packet loss (including error packets) is higher then the value you set
here, the test result of the DUT will be fail.
¾ Total Packet Excess: If packets excess (including error packets) is higher then the value you
set here, the test result of the DUT will be fail. Packet excess happens when packet
transmission is bad and packets are resend multiple times, causing the amount of received
packets is more than sent packets.
F. Misc
• Title of Task Name: You can assign a name to this task for identification.
• Apply: Apply the changes you made.
G. Help
All test variables used for this task and their definitions will be listed here for reference.
XTRAMUS TECHNOLOGIES®
75
Website: www.Xtramus.com
E-mail: sales@xtramus.com
Page 76

5.6. Unicast Test (UC) _ PT2-UC-100F (100Mbps Full Duplex)
Layer 2 100Mbps Full Duplex Unicast Performance Test is to transmit test streams via point to point
addressing method that is based on MAC address.
A. Port Map
• Source/Destination Port: These two fields display the source/ destination port for the task. Ports
are displayed in IDs in the format of (X, Y, Z) while X is the number of the chassis (which is
displayed on NuStreams-2000i/600i), Y is the slot number where this module card is installed, and
Z is the available port number located on the module card.
• Port Map: This field shows how test streams will be transmitted from port to port.
• Æ: To assign how test streams flow from source port to the destination port, click a port from
Source Port, click a port from Destination Port, and then click Æ button to add them to the Port
Map.
• Å: To remove a port map setting from Port Map, click the setting you would like to remove, and
then click Å button to remove it from Port Map.
• Pair >: NuApps-MultiUnits-RM will match ports located on the same module card in a
back-and-forth manner, and add them to the Port Map.
• Rotate >: NuApps-MultiUnits-RM will match ports so the last port will connect to the first port, thus
forming a loop. If you have the same amount of ports on your chassis and DUT, Rotate allows you
to test all DUT’s ports simultaneously.
• Reset <: Remove all port map settings in the Port Map.
• Window NO: You can view each Window number’s Port Mapping by scroll down this field and
select the Window No of your interest.
• Next: instead of scrolling down the Window NO field, you may click this button to change and
view the next Window’s Port Mapping.
• Traffic Direction Mode: You can scroll down and choose the direction of the traffic on this field.
XTRAMUS TECHNOLOGIES®
76
E-mail: sales@xtramus.com
Website: www.Xtramus.com
Page 77

• Port Select…: Clicking this option will pop up a Port Select window allowing the selection of the
ports to be used on the task.
Please click the OK button to save the settings you made on this window, or click the Cancel button
to close the window without saving the settings.
XTRAMUS TECHNOLOGIES®
77
E-mail: sales@xtramus.com
Website: www.Xtramus.com
Page 78

B. Media Type
• Minimum Waiting Time: NuApps-MultiUnits-RM will halt at least for the Minimum Waiting Time
you input here during auto-negotiation process.
• Media Type Waiting Timeout: If the time spent for auto-negotiation exceeds the Media Type
Waiting Timeout you set here, the test will stop and the test result will be fail.
• Media Type: By clicking the scroll-down menu, you can set the transmitting mode to Auto (with
auto-negotiation), Force (without auto-negotiation), or Off (all the ports in this task are link-down).
• Media Select: Click the scroll-down menu to choose if all the connecting cables are Copper or
Fiber.
• Media Type Fails To Continue: enables the continuation of task running even after reaching the
media type waiting timeout.
C. Packet
• Frame Length Setting: As shown in the figure down below, in a standard Ethernet II frame, the
Frame Length (Without CRC) can be from 60~16300 bytes.
By clicking the Frame Length scroll-down menu, you can set the frame length to random (frame
length will be randomly assigned from 60~16300 bytes) or fixed (frame length will be a fixed
XTRAMUS TECHNOLOGIES®
78
E-mail: sales@xtramus.com
Website: www.Xtramus.com
Page 79

number). If you choose fixed as your Frame Length, you can set the frame length in the field
down below.
• Packet Setting: You can set how packets will be transmitted in this field.
¾ Transmit by time: The system will transmit packet
during the set amount of time.
¾ Transmit by packet: The system will transmit the set number of packets. If
the system fails to send the test packet within the time you set in TxPKT
Timeout field, the packet will be drop. Also, you can set the content of the
transmitting packets with the Payload scroll-down menu.
• Packet Gap Setting: You can set the gaps between packets in this field.
¾ Frame Gap: Duration time between frames. Increasing Frame Gap reduces
the fail rate, while 96 bit-time is wirespeed.
¾ Burst Gap: Duration between each burst. Set the burst gap to control the transmission rate
of packets. Increasing Frame Gap reduces the fail rate.
• VLAN Setting: Add VLAN tag for test. VLAN (Virtual LAN) is
a group of hosts with common requirements that
communicate within the same Broadcast domain regardless
of the physical location. By clicking the Setup button, you
can configure CoS (class of service) and VID (VLAN ID) on
the pop-up VLAN Setup window. Click Apply and apply all
the changes you’ve made here.
• Wait for check result: The system will halt for the time you
set here before checking test result.
• Wait for read counter: The system will halt for the set
microseconds before read the counters. This function is
useful for counters since they are stored in memory buffer
and the final counter value might take some time to read.
• Enable Flow Control: When enabling this function, the transmitting rate will drop if traffic overflow
occurs. This function must be enabled under full-duplex.
• Disable Check Result: When this mode is enabled, all test procedures will be carried out no
matter the result is Pass or Fail. This mode can only be access if you choose Transmit by Time in
the Packet Setting field.
• Enable S/N Error Check: Selecting this option will enable the capturing of S/N Error.
• Enable X-TAG offset: X-TAG is a 12-byte tag which is developed by Xtramus and embedded at
49th~60th bytes of each testing frames generated by Rapid-Matrix for multi-stream tests. X-TAG
will be added to all the testing frames generated by NuApps-MultiUnits-RM.
• Estimation of Test: System will calculate the amount of packets and the time it will take to
transmit these packets, and display these statistics in Estimated Transmission Packets (Per
Port) and Estimated Packets Transmission Time.
XTRAMUS TECHNOLOGIES®
79
E-mail: sales@xtramus.com
Website: www.Xtramus.com
Page 80

D. Learning
• Enable Learning: As shown in the figures down below, enabling this function allows learning
packets transmitted to the DUT before test packets are transmitted. If you disable this function, no
learning packets will be transmitted.
• Frame Count: Repeat frame count per learning packets burst.
• Frame Gap: Duration time between learning frames.
• Delay Time After Learning: The time gap between after learning and the next process.
• Tx Pkt Timeout: If the system fails to send the learning packet within the time you set in TxPKT
Timeout field, the packet will be drop.
XTRAMUS TECHNOLOGIES®
80
E-mail: sales@xtramus.com
Website: www.Xtramus.com
Page 81

E. Criteria
• Allowable Tolerance: You can set the allowable amount packet loss/excess here.
¾ Total Packet Loss: If packet loss (including error packets) is higher then the value you set
here, the test result of the DUT will be fail.
¾ Total Packet Excess: If packets excess (including error packets) is higher then the value you
set here, the test result of the DUT will be fail. Packet excess happens when packet
transmission is bad and packets are resend multiple times, causing the amount of received
packets is more than sent packets.
F. Misc
• Title of Task Name: You can assign a name to this task for identification.
• Apply: Apply the changes you made.
G. Help
All test variables used for this task and their definitions will be listed here for reference.
XTRAMUS TECHNOLOGIES®
81
Website: www.Xtramus.com
E-mail: sales@xtramus.com
Page 82

5.7. Unicast Test (UC) _ PT2-UC-1G (1000Mbps Full Duplex)
Layer 2 1000Mbps Half Duplex Unicast Performance Test is to transmit test streams via point to point
addressing method that is based on MAC address.
A. Port Map
• Source/Destination Port: These two fields display the source/ destination port for the task. Ports
are displayed in IDs in the format of (X, Y, Z) while X is the number of the chassis (which is
displayed on NuStreams-2000i/600i), Y is the slot number where this module card is installed, and
Z is the available port number located on the module card.
• Port Map: This field shows how test streams will be transmitted from port to port.
• Æ: To assign how test streams flow from source port to the destination port, click a port from
Source Port, click a port from Destination Port, and then click Æ button to add them to the Port
Map.
• Å: To remove a port map setting from Port Map, click the setting you would like to remove, and
then click Å button to remove it from Port Map.
• Pair >: NuApps-MultiUnits-RM will match ports located on the same module card in a
back-and-forth manner, and add them to the Port Map.
• Rotate >: NuApps-MultiUnits-RM will match ports so the last port will connect to the first port, thus
forming a loop. If you have the same amount of ports on your chassis and DUT, Rotate allows you
to test all DUT’s ports simultaneously.
• Reset <: Remove all port map settings in the Port Map.
• Window NO: You can view each Window number’s Port Mapping by scroll down this field and
select the Window No of your interest.
• Next: instead of scrolling down the Window NO field, you may click this button to change and
view the next Window’s Port Mapping.
• Traffic Direction Mode: You can scroll down and choose the direction of the traffic on this field.
XTRAMUS TECHNOLOGIES®
82
E-mail: sales@xtramus.com
Website: www.Xtramus.com
Page 83

• Port Select…: Clicking this option will pop up a Port Select window allowing the selection of the
ports to be used on the task.
Please click the OK button to save the settings you made on this window, or click the Cancel button
to close the window without saving the settings.
XTRAMUS TECHNOLOGIES®
83
E-mail: sales@xtramus.com
Website: www.Xtramus.com
Page 84

B. Media Type
• Minimum Waiting Time: NuApps-MultiUnits-RM will halt at least for the Minimum Waiting Time
you input here during auto-negotiation process.
• Media Type Waiting Timeout: If the time spent for auto-negotiation exceeds the Media Type
Waiting Timeout you set here, the test will stop and the test result will be fail.
• Media Type: By clicking the scroll-down menu, you can set the transmitting mode to Auto (with
auto-negotiation), Force (without auto-negotiation), or Off (all the ports in this task are link-down).
• Media Select: Click the scroll-down menu to choose if all the connecting cables are Copper or
Fiber.
• Media Type Fails To Continue: enables the continuation of task running even after reaching the
media type waiting timeout.
C. Packet
• Frame Length Setting: As shown in the figure down below, in a standard Ethernet II frame, the
Frame Length (Without CRC) can be from 60~16300 bytes.
By clicking the Frame Length scroll-down menu, you can set the frame length to random (frame
length will be randomly assigned from 60~16300 bytes) or fixed (frame length will be a fixed
number). If you choose fixed as your Frame Length, you can set the frame length in the field
XTRAMUS TECHNOLOGIES®
84
E-mail: sales@xtramus.com
Website: www.Xtramus.com
Page 85

down below.
• Packet Setting: You can set how packets will be transmitted in this field.
¾ Transmit by time: The system will transmit packet
during the set amount of time.
¾ Transmit by packet: The system will transmit the set number of packets. If
the system fails to send the test packet within the time you set in TxPKT
Timeout field, the packet will be drop. Also, you can set the content of the
transmitting packets with the Payload scroll-down menu.
• Packet Gap Setting: You can set the gaps between packets in this field.
¾ Frame Gap: Duration time between frames. Increasing Frame Gap reduces
the fail rate, while 96 bit-time is wirespeed.
¾ Burst Gap: Duration between each burst. Set the burst gap to control the transmission rate
of packets. Increasing Frame Gap reduces the fail rate.
• VLAN Setting: Add VLAN tag for test. VLAN (Virtual LAN) is
a group of hosts with common requirements that
communicate within the same Broadcast domain regardless
of the physical location. By clicking the Setup button, you
can configure CoS (class of service) and VID (VLAN ID) on
the pop-up VLAN Setup window. Click Apply and apply all
the changes you’ve made here.
• Wait for check result: The system will halt for the time you
set here before checking test result.
• Wait for read counter: The system will halt for the set
microseconds before read the counters. This function is
useful for counters since they are stored in memory buffer
and the final counter value might take some time to read.
• Enable Flow Control: When enabling this function, the transmitting rate will drop if traffic overflow
occurs. This function must be enabled under full-duplex.
• Disable Check Result: When this mode is enabled, all test procedures will be carried out no
matter the result is Pass or Fail. This mode can only be access if you choose Transmit by Time in
the Packet Setting field.
• Enable S/N Error Check: Selecting this option will enable the capturing of S/N Error.
• Enable X-TAG offset: X-TAG is a 12-byte tag which is developed by Xtramus and embedded at
49th~60th bytes of each testing frames generated by Rapid-Matrix for multi-stream tests. X-TAG
will be added to all the testing frames generated by NuApps-MultiUnits-RM.
• Estimation of Test: System will calculate the amount of packets and the time it will take to
transmit these packets, and display these statistics in Estimated Transmission Packets (Per
Port) and Estimated Packets Transmission Time.
XTRAMUS TECHNOLOGIES®
85
E-mail: sales@xtramus.com
Website: www.Xtramus.com
Page 86

D. Learning
• Enable Learning: As shown in the figures down below, enabling this function allows learning
packets transmitted to the DUT before test packets are transmitted. If you disable this function, no
learning packets will be transmitted.
• Frame Count: Repeat frame count per learning packets burst.
• Frame Gap: Duration time between learning frames.
• Delay Time After Learning: The time gap between after learning and the next process.
• Tx Pkt Timeout: If the system fails to send the learning packet within the time you set in TxPKT
Timeout field, the packet will be drop.
XTRAMUS TECHNOLOGIES®
86
E-mail: sales@xtramus.com
Website: www.Xtramus.com
Page 87

E. Criteria
• Allowable Tolerance: You can set the allowable amount packet loss/excess here.
¾ Total Packet Loss: If packet loss (including error packets) is higher then the value you set
here, the test result of the DUT will be fail.
¾ Total Packet Excess: If packets excess (including error packets) is higher then the value you
set here, the test result of the DUT will be fail. Packet excess happens when packet
transmission is bad and packets are resend multiple times, causing the amount of received
packets is more than sent packets.
F. Misc
• Title of Task Name: You can assign a name to this task for identification.
• Apply: Apply the changes you made.
G. Help
All test variables used for this task and their definitions will be listed here for reference.
XTRAMUS TECHNOLOGIES®
87
Website: www.Xtramus.com
E-mail: sales@xtramus.com
Page 88

5.8. Unicast Test (UC) _ PT2-UC-10G (10Gbps Full Duplex)
Layer 2 10Gbps Full Duplex Unicast Performance Test is to transmit test streams via point to point
addressing method that is based on MAC address.
A. Port Map
• Source/Destination Port: These two fields display the source/ destination port for the task. Ports
are displayed in IDs in the format of (X, Y, Z) while X is the number of the chassis (which is
displayed on NuStreams-2000i/600i), Y is the slot number where this module card is installed, and
Z is the available port number located on the module card.
• Port Map: This field shows how test streams will be transmitted from port to port.
• Æ: To assign how test streams flow from source port to the destination port, click a port from
Source Port, click a port from Destination Port, and then click Æ button to add them to the Port
Map.
• Å: To remove a port map setting from Port Map, click the setting you would like to remove, and
then click Å button to remove it from Port Map.
• Pair >: NuApps-MultiUnits-RM will match ports located on the same module card in a
back-and-forth manner, and add them to the Port Map.
• Rotate >: NuApps-MultiUnits-RM will match ports so the last port will connect to the first port, thus
forming a loop. If you have the same amount of ports on your chassis and DUT, Rotate allows you
to test all DUT’s ports simultaneously.
• Reset <: Remove all port map settings in the Port Map.
• Window NO: You can view each Window number’s Port Mapping by scroll down this field and
select the Window No of your interest.
• Next: instead of scrolling down the Window NO field, you may click this button to change and
view the next Window’s Port Mapping.
• Traffic Direction Mode: You can scroll down and choose the direction of the traffic on this field.
XTRAMUS TECHNOLOGIES®
88
E-mail: sales@xtramus.com
Website: www.Xtramus.com
Page 89

• Port Select…: Clicking this option will pop up a Port Select window allowing the selection of the
ports to be used on the task.
Please click the OK button to save the settings you made on this window, or click the Cancel button to
close the window without saving the settings.
XTRAMUS TECHNOLOGIES®
89
E-mail: sales@xtramus.com
Website: www.Xtramus.com
Page 90

B. Media Type
• Minimum Waiting Time: NuApps-MultiUnits-RM will halt at least for the Minimum Waiting Time
you input here during auto-negotiation process.
• Media Type Waiting Timeout: If the time spent for auto-negotiation exceeds the Media Type
Waiting Timeout you set here, the test will stop and the test result will be fail.
• Media Type: By clicking the scroll-down menu, you can set the transmitting mode to Auto (with
auto-negotiation), Force (without auto-negotiation), or Off (all the ports in this task are link-down).
• Media Select: Click the scroll-down menu to choose if all the connecting cables are Copper or
Fiber.
• Media Type Fails To Continue: enables the continuation of task running even after reaching the
media type waiting timeout.
C. Packet
• Frame Length Setting: As shown in the figure down below, in a standard Ethernet II frame, the
Frame Length (Without CRC) can be from 60~16300 bytes.
By clicking the Frame Length scroll-down menu, you can set the frame length to random (frame
length will be randomly assigned from 60~16300 bytes) or fixed (frame length will be a fixed
number). If you choose fixed as your Frame Length, you can set the frame length in the field
XTRAMUS TECHNOLOGIES®
90
E-mail: sales@xtramus.com
Website: www.Xtramus.com
Page 91

down below.
• Packet Setting: You can set how packets will be transmitted in this field.
¾ Transmit by time: The system will transmit packet
during the set amount of time.
¾ Transmit by packet: The system will transmit the set number of packets. If
the system fails to send the test packet within the time you set in TxPKT
Timeout field, the packet will be drop. Also, you can set the content of the
transmitting packets with the Payload scroll-down menu.
• Packet Gap Setting: You can set the gaps between packets in this field.
¾ Frame Gap: Duration time between frames. Increasing Frame Gap reduces
the fail rate, while 96 bit-time is wirespeed.
¾ Burst Gap: Duration between each burst. Set the burst gap to control the transmission rate
of packets. Increasing Frame Gap reduces the fail rate.
• VLAN Setting: Add VLAN tag for test. VLAN (Virtual LAN) is
a group of hosts with common requirements that
communicate within the same Broadcast domain regardless
of the physical location. By clicking the Setup button, you
can configure CoS (class of service) and VID (VLAN ID) on
the pop-up VLAN Setup window. Click Apply and apply all
the changes you’ve made here.
• Wait for check result: The system will halt for the time you
set here before checking test result.
• Wait for read counter: The system will halt for the set
microseconds before read the counters. This function is
useful for counters since they are stored in memory buffer
and the final counter value might take some time to read.
• Enable Flow Control: When enabling this function, the transmitting rate will drop if traffic overflow
occurs. This function must be enabled under full-duplex.
• Disable Check Result: When this mode is enabled, all test procedures will be carried out no
matter the result is Pass or Fail. This mode can only be access if you choose Transmit by Time in
the Packet Setting field.
• Enable S/N Error Check: Selecting this option will enable the capturing of S/N Error.
• Enable X-TAG offset: X-TAG is a 12-byte tag which is developed by Xtramus and embedded at
49th~60th bytes of each testing frames generated by Rapid-Matrix for multi-stream tests. X-TAG
will be added to all the testing frames generated by NuApps-MultiUnits-RM.
• Estimation of Test: System will calculate the amount of packets and the time it will take to
transmit these packets, and display these statistics in Estimated Transmission Packets (Per
Port) and Estimated Packets Transmission Time.
XTRAMUS TECHNOLOGIES®
91
E-mail: sales@xtramus.com
Website: www.Xtramus.com
Page 92

D. Learning
• Enable Learning: As shown in the figures down below, enabling this function allows learning
packets transmitted to the DUT before test packets are transmitted. If you disable this function, no
learning packets will be transmitted.
• Frame Count: Repeat frame count per learning packets burst.
• Frame Gap: Duration time between learning frames.
• Delay Time After Learning: The time gap between after learning and the next process.
• Tx Pkt Timeout: If the system fails to send the learning packet within the time you set in TxPKT
Timeout field, the packet will be drop.
XTRAMUS TECHNOLOGIES®
92
E-mail: sales@xtramus.com
Website: www.Xtramus.com
Page 93

E. Criteria
• Allowable Tolerance: You can set the allowable amount packet loss/excess here.
¾ Total Packet Loss: If packet loss (including error packets) is higher then the value you set
here, the test result of the DUT will be fail.
¾ Total Packet Excess: If packets excess (including error packets) is higher then the value you
set here, the test result of the DUT will be fail. Packet excess happens when packet
transmission is bad and packets are resend multiple times, causing the amount of received
packets is more than sent packets.
F. Misc
• Title of Task Name: You can assign a name to this task for identification.
• Apply: Apply the changes you made.
G. Help
All test variables used for this task and their definitions will be listed here for reference.
XTRAMUS TECHNOLOGIES®
93
Website: www.Xtramus.com
E-mail: sales@xtramus.com
Page 94

5.9. Flow Control Test (FC) _ PT2-FC-10H-100H (10Mbps Half ↔ 100Mbps Half)
Layer2 10Mbps Half Duplex to 100Mbps Half Duplex Flow Control tests the performance when the DUT is
connected to media with varied kinds of speed and duplex mode.
A. Port Map
• Source/Destination Port: These two fields display the source/ destination port for the task. Ports
are displayed in IDs in the format of (X, Y, Z) while X is the number of the chassis (which is
displayed on NuStreams-2000i/600i), Y is the slot number where this module card is installed, and
Z is the available port number located on the module card.
• Port Map: This field shows how test streams will be transmitted from port to port.
• Æ: To assign how test streams flow from source port to the destination port, click a port from
Source Port, click a port from Destination Port, and then click Æ button to add them to the Port
Map.
• Å: To remove a port map setting from Port Map, click the setting you would like to remove, and
then click Å button to remove it from Port Map.
• Pair >: NuApps-MultiUnits-RM will match ports located on the same module card in a
back-and-forth manner, and add them to the Port Map.
• Rotate >: NuApps-MultiUnits-RM will match ports so the last port will connect to the first port, thus
forming a loop. If you have the same amount of ports on your chassis and DUT, Rotate allows you
to test all DUT’s ports simultaneously.
• Reset <: Remove all port map settings in the Port Map.
• Window NO: You can view each Window number’s Port Mapping by scroll down this field and
select the Window No of your interest.
• Next: instead of scrolling down the Window NO field, you may click this button to change and
view the next Window’s Port Mapping.
• Traffic Direction Mode: You can scroll down and choose the direction of the traffic on this field.
XTRAMUS TECHNOLOGIES®
94
E-mail: sales@xtramus.com
Website: www.Xtramus.com
Page 95

• Port Select…: Clicking this option will pop up a Port Select window allowing the selection of the
ports to be used on the task.
Please click the OK button to save the settings you made on this window, or click the Cancel button to
close the window without saving the settings.
XTRAMUS TECHNOLOGIES®
95
E-mail: sales@xtramus.com
Website: www.Xtramus.com
Page 96

B. Media Type
• Minimum Waiting Time: NuApps-MultiUnits-RM will halt at least for the Minimum Waiting Time
you input here during auto-negotiation process.
• Media Type Waiting Timeout: If the time spent for auto-negotiation exceeds the Media Type
Waiting Timeout you set here, the test will stop and the test result will be fail.
• Media Type: By clicking the scroll-down menu, you can set the transmitting mode to Auto (with
auto-negotiation), Force (without auto-negotiation), or Off (all the ports in this task are link-down).
• Media Select: Click the scroll-down menu to choose if all the connecting cables are Copper or
Fiber.
• Media Type Fails To Continue: enables the continuation of task running even after reaching the
media type waiting timeout.
C. Packet
• Frame Length Setting: As shown in the figure down below, in a standard Ethernet II frame, the
Frame Length (Without CRC) can be from 60~16300 bytes.
By clicking the Frame Length scroll-down menu, you can set the frame length to random (frame
length will be randomly assigned from 60~16300 bytes) or fixed (frame length will be a fixed
number). If you choose fixed as your Frame Length, you can set the frame length in the field
down below.
XTRAMUS TECHNOLOGIES®
96
E-mail: sales@xtramus.com
Website: www.Xtramus.com
Page 97

• Packet Setting: You can set how packets will be transmitted in this field.
¾ Transmit by time: The system will transmit packet
during the set amount of time.
¾ Transmit by packet: The system will transmit the set number of packets. If
the system fails to send the test packet within the time you set in TxPKT
Timeout field, the packet will be drop. Also, you can set the content of the
transmitting packets with the Payload scroll-down menu.
• Packet Gap Setting: You can set the gaps between packets in this field.
¾ Frame Gap: Duration time between frames. Increasing Frame Gap reduces
the fail rate, while 96 bit-time is wirespeed.
¾ Burst Gap: Duration between each burst. Set the burst gap to control the transmission rate
of packets. Increasing Frame Gap reduces the fail rate.
• VLAN Setting: Add VLAN tag for test. VLAN (Virtual LAN) is
a group of hosts with common requirements that
communicate within the same Broadcast domain regardless
of the physical location. By clicking the Setup button, you
can configure CoS (class of service) and VID (VLAN ID) on
the pop-up VLAN Setup window. Click Apply and apply all
the changes you’ve made here.
• Wait for check result: The system will halt for the time you
set here before checking test result.
• Wait for read counter: The system will halt for the set
microseconds before read the counters. This function is
useful for counters since they are stored in memory buffer
and the final counter value might take some time to read.
• Enable Flow Control: When enabling this function, the transmitting rate will drop if traffic overflow
occurs. This function must be enabled under full-duplex.
• Disable Check Result: When this mode is enabled, all test procedures will be carried out no
matter the result is Pass or Fail. This mode can only be access if you choose Transmit by Time in
the Packet Setting field.
• Enable S/N Error Check: Selecting this option will enable the capturing of S/N Error.
• Enable X-TAG offset: X-TAG is a 12-byte tag which is developed by Xtramus and embedded at
49th~60th bytes of each testing frames generated by Rapid-Matrix for multi-stream tests. X-TAG
will be added to all the testing frames generated by NuApps-MultiUnits-RM.
• Estimation of Test: System will calculate the amount of packets and the time it will take to
transmit these packets, and display these statistics in Estimated Transmission Packets (Per
Port) and Estimated Packets Transmission Time.
XTRAMUS TECHNOLOGIES®
97
E-mail: sales@xtramus.com
Website: www.Xtramus.com
Page 98

D. Learning
• Enable Learning: As shown in the figures down below, enabling this function allows learning
packets transmitted to the DUT before test packets are transmitted. If you disable this function, no
learning packets will be transmitted.
• Frame Count: Repeat frame count per learning packets burst.
• Frame Gap: Duration time between learning frames.
• Delay Time After Learning: The time gap between after learning and the next process.
• Tx Pkt Timeout: If the system fails to send the learning packet within the time you set in TxPKT
Timeout field, the packet will be drop.
XTRAMUS TECHNOLOGIES®
98
E-mail: sales@xtramus.com
Website: www.Xtramus.com
Page 99

E. Criteria
• Allowable Tolerance: You can set the allowable amount packet loss/excess here.
¾ Total Packet Loss: If packet loss (including error packets) is higher then the value you set
here, the test result of the DUT will be fail.
¾ Total Packet Excess: If packets excess (including error packets) is higher then the value you
set here, the test result of the DUT will be fail. Packet excess happens when packet
transmission is bad and packets are resend multiple times, causing the amount of received
packets is more than sent packets.
F. Misc
• Title of Task Name: You can assign a name to this task for identification.
• Apply: Apply the changes you made.
G. Help
All test variables used for this task and their definitions will be listed here for reference.
XTRAMUS TECHNOLOGIES®
99
Website: www.Xtramus.com
E-mail: sales@xtramus.com
Page 100

5.10. Flow Control Test (FC) _ PT2-FC-100H-10H (100Mbps Half ↔ 10Mbps Half)
Layer2 100Mbps Half Duplex to 10Mbps Half Duplex Flow Control tests the performance when the DUT is
connected to media with varied kinds of speed and duplex mode.
A. Port Map
• Source/Destination Port: These two fields display the source/ destination port for the task. Ports
are displayed in IDs in the format of (X, Y, Z) while X is the number of the chassis (which is
displayed on NuStreams-2000i/600i), Y is the slot number where this module card is installed, and
Z is the available port number located on the module card.
• Port Map: This field shows how test streams will be transmitted from port to port.
• Æ: To assign how test streams flow from source port to the destination port, click a port from
Source Port, click a port from Destination Port, and then click Æ button to add them to the Port
Map.
• Å: To remove a port map setting from Port Map, click the setting you would like to remove, and
then click Å button to remove it from Port Map.
• Pair >: NuApps-MultiUnits-RM will match ports located on the same module card in a
back-and-forth manner, and add them to the Port Map.
• Rotate >: NuApps-MultiUnits-RM will match ports so the last port will connect to the first port, thus
forming a loop. If you have the same amount of ports on your chassis and DUT, Rotate allows you
to test all DUT’s ports simultaneously.
• Reset <: Remove all port map settings in the Port Map.
• Window NO: You can view each Window number’s Port Mapping by scroll down this field and
select the Window No of your interest.
• Next: instead of scrolling down the Window NO field, you may click this button to change and
view the next Window’s Port Mapping.
• Traffic Direction Mode: You can scroll down and choose the direction of the traffic on this field.
XTRAMUS TECHNOLOGIES®
100
E-mail: sales@xtramus.com
Website: www.Xtramus.com
 Loading...