

Page 1

NuApps-IGMP-RM
User’s Manual
USM Ver 1.2
Page 2

Foreword
Copyright
Copyright © 2012 Xtramus Technologies, all rights reserved. The information contained in this document is the property of Xtramus
Technologies. No part of this publication shall be reproduced, stored in a retrieval system, or transmitted, in any form or by any
means, without the prior written permission of Xtramus Technologies.
Disclaimer
The information contained in this document is subject to change without notice and does not represent a commitment on the part of
Xtramus Technologies. The information in this document is believed to be accurate and reliable. However, Xtramus Technologies
assumes no responsibility or liability for any errors or inaccuracies that may appear in the document.
Trademarks
NuApps-IGMP-RM is a trademark or registered trademark of Xtramus Technologies. All other trademarks and registered
trademarks are the property of their respective owners.
Warranty
Xtramus Technologies warrants for the hardware provided along with this document under proper usage and conditions in normal
environment; any improper operation or in irregular environment may possibly cause this product NOT function well. For detailed
terms, please contact your local dealer.
Contact Information
Xtramus Technologies
E-mail: sales@xtramus.com
Website: www.xtramus.com
Tel: +886-2-8227-6611
Fax: +886-2-8227-6622
XTRAMUS TECHNOLOGIES®
2
E-mail: sales@xtramus.com
Website: www.Xtramus.com
Page 3

Revision History
Date Version History
2012/05/17 1.0 First draft version
2012/09/10 1.1
2012/09/17 1.2
1. Deleting the description of NuApps-IGMP-RM supports
operation system Windows 2000.(Page 5)
1. Deleting watermark Preliminary.
2. Updating FPGA and Firmware Version. (Page 5)
3. Updating figure for Demo mode. (Page 12)
4. Modifying Main user interface figure. (Page 14, 16)
5. Modifying Port Pairing Setting figure. (Page 19)
6. Modifying Test Config. Setting figure. (Page 19)
7. Updating Language figure. (Page 20)
8. Adding System Requirement figure and description.
(Page 20)
9. Adding IGMP V3 Source Filter Test on Sys Info figure.
(Page 23)
10. Modifying Port Pairing Config figure. (Page 23)
11. Updating Mixed Class Throughput task figure. (Page 24)
12. Adding IGMP V3 Source Filter Test figure and
description. (Page 25)
13. Adding IGMP V3 Source Filter Test description. (Page
26)
14. Updating Port Pairing Config description figure and
description. (Page 31-32)
15. Adding IGMP V3 Source Filter Test description. (Page
33)
16. Adding Version 3 description in each task. (Page 34, 37,
40, 43, 46, 49)
17. Adding IGMP V3 Source Filter Test figure and task
description. (Page 51-53)
18. Adding IGMP V3 Source Filter Test on Sys Info figure.
(Page 54)
19. Adding IGMP V3 Source Filter Test description. (Page
55)
20. Updating Test Report Counter figure and Clear
description. (Page 56)
21. Adding IGMP V3 Source Filter Test Report figure and
description. (Page 60)
22. Deleting the description of NuApps-IGMP-RM supports
operation system Windows 2000.(Page 20)
XTRAMUS TECHNOLOGIES®
3
E-mail: sales@xtramus.com
Website: www.Xtramus.com
Page 4

Table of Contents
Foreword ..........................................................................................................................................2
Revision History ..............................................................................................................................3
1. General Description of NuApps-IGMP-RM ................................................................................5
2. Installing and Uninstalling NuApps-IGMP-RM .......................................................................... 6
3. NuApps-IGMP-RM Function Overview .................................................................................... 11
3.1. Starting NuApps-IGMP-RM .............................................................................................. 11
3.2. NuServer Window............................................................................................................. 15
3.3. NuApps-IGMP-RM Main Window..................................................................................... 16
3.3.1. Menu Bar ...................................................................................................................... 17
A. File…………… ................................................................................................................17
B. View……………. .............................................................................................................18
C. Setting………. ................................................................................................................19
D. Language…… ................................................................................................................20
E. Help…………. .................................................................................................................20
3.3.2. Quick Launch Buttons ................................................................................................ 21
3.3.3. System Info/Configuration List .................................................................................. 23
3.3.4. Elapsed Time................................................................................................................26
3.3.5. Description................................................................................................................... 26
3.3.6. Status Bar..................................................................................................................... 26
3.3.7. Control Buttons/Test Running Status Icon ...............................................................27
4. Creating Task via Testing Configuration.................................................................................28
4.1. Selecting Active Ports from Installed Module Cards.....................................................29
4.2. Port Configuration............................................................................................................ 30
4.3. Port-pairing Config........................................................................................................... 31
5. NuApps-IGMP-RM Test Modes ................................................................................................. 33
5.1. Mixed Class Throughput.................................................................................................. 33
5.2. Aggregated Multicast Throughput.................................................................................. 36
5.3. Scaled Group Forwarding................................................................................................ 39
5.4. Latency Test ......................................................................................................................42
5.5. Group Capacity Test......................................................................................................... 45
5.6. Group Join/Leave Latency Test....................................................................................... 48
5.7. IGMP V3 Source Filter Test ..............................................................................................51
6. Run Test, Test Result & Report ................................................................................................54
6.1. Accessing the test report.................................................................................................55
6.2. Test Report_Counter ........................................................................................................ 56
6.3. Test Report _Mixed Class Throughput ...........................................................................57
6.4. Test Report _Aggregated Multicast Throughput ...........................................................57
6.5. Test Report _Scaled Group Forwarding .........................................................................58
6.6. Test Report _Latency Test ...............................................................................................58
6.7. Test Report _Group Capacity Test .................................................................................. 59
6.8. Test Report _Group Join/Leave Latency Test................................................................ 59
6.9. Test Report _IGMP V3 Source Filter Test .......................................................................60
XTRAMUS TECHNOLOGIES®
4
E-mail: sales@xtramus.com
Website: www.Xtramus.com
Page 5
1. General Description of NuApps-IGMP-RM
NuApps-IGMP-RM is the professional testing software for Internet Group Management
Protocol (IGMP), a communication protocol designed to manage the membership of
Internet Protocol multicast groups. IGMP establishes multicast group memberships by
connecting IP hosts and adjacent multicast routers. It will be an important protocol when multicast-enabled
applications such as webinars, Internet radio/TV, and video/audio conferences are now being used widely
over the Internet. From those applications used widely, how to test the equipment becomes an important
issue.
NuApps-IGMP-RM must be activated with NuStreams Chassis. NuApps-IGMP-RM is designed for Xtramus
Technologies XM-RM series module cards. The table down below contains the XM-RM module cards,
FPGA/Firmware versions that are supported by NuApps-IGMP-RM.
Module Cards Support NuApps-IGMP-RM
Module Card FPGA Version Firmware Version
XM-RM661/671/681
XM-RM751/761/781
XM-RM731
XM-RM881
XM-RM881-2
XM-RM891
*Note: NuStreams-2000i and NuStreams-600i are required as well.
V3.1b034 v1.6b106
V4.0b004 v1.6b106
V3.0b000 v1.6b161
v1.4b008 V0.9b026
v1.4b008 V0.1b028
v1.4b008 V1.6b106
Also, please make sure that your PC meets the requirements listed in the table down below before
installing NuApps-IGMP-RM.
OS
RAM
CPU
HDD
*Note: Large amount of data will be generated while running NuApps-IGMP-RM. It is
recommended to preserve enough available Hard-Disk space to store these data.
Windows XP Windows Vista/7
512MB RAM 1GB RAM
Pentium 1.3Ghz or higher
10 GB Available Space
XTRAMUS TECHNOLOGIES®
5
E-mail: sales@xtramus.com
Website: www.Xtramus.com
Page 6
2. Installing and Uninstalling NuApps-IGMP-RM
Please follow the steps down below to install NuApps-IGMP-RM.
Installing NuApps-IGMP-RM
1. Double-click NuApps-IGMP-RM installation
program and start the installation process.*
2. InstallShield Wizard is starting to install
NuApps-IGMP-RM. If you would like to cancel
installation, click Cancel, or click Next to
continue installation.
3. After reading the End User License
Agreement, please select I accept the terms
in the license agreement, and Next to proceed
with the installation, or click Cancel to cancel
installation. You may also click Back to return to
the previous installation window.
*Note: Due to different Operating Systems or system settings, warning messages might pop up when installing
NuApps-IGMP-RM. When this occurs, please choose the options on these pop-up warning messages that allow you to
continue installing NuApps-IGMP-RM.
XTRAMUS TECHNOLOGIES®
6
E-mail: sales@xtramus.com
Website: www.Xtramus.com
Page 7
Installing NuApps-IGMP-RM
4. You can change the User/Organization name
here, the default name for User/Organization
name is “.”. Click the Next button to continue
with the next step. Click Back button to go back
to the previous step to modify. And click Cancel
to exit this installation wizard.
5. This window will ask for your confirmation to
start the installation, if anything must be
amended, please click Back button to go back
to the previous step to modify. Click Install
button to continue.
6. InstallShield Wizard is installing
NuApps-IGMP-RM.
XTRAMUS TECHNOLOGIES®
7
E-mail: sales@xtramus.com
Website: www.Xtramus.com
Page 8
Installing NuApps-IGMP-RM
7. NuApps-IGMP-RM installation completes. Click
Finish button to exit.
8. If your PC does not have WinPcap installed, a
WinPcap Installer window will pop up. Click
Next button to get ready to install, or click
Cancel button to stop. For more detail
information regarding to WinPcap, please visit
their webpage at: www.winpcap.org.
9. WinPcap is preparing to install, or click Cancel
button to stop at any time.
XTRAMUS TECHNOLOGIES®
8
E-mail: sales@xtramus.com
Website: www.Xtramus.com
Page 9
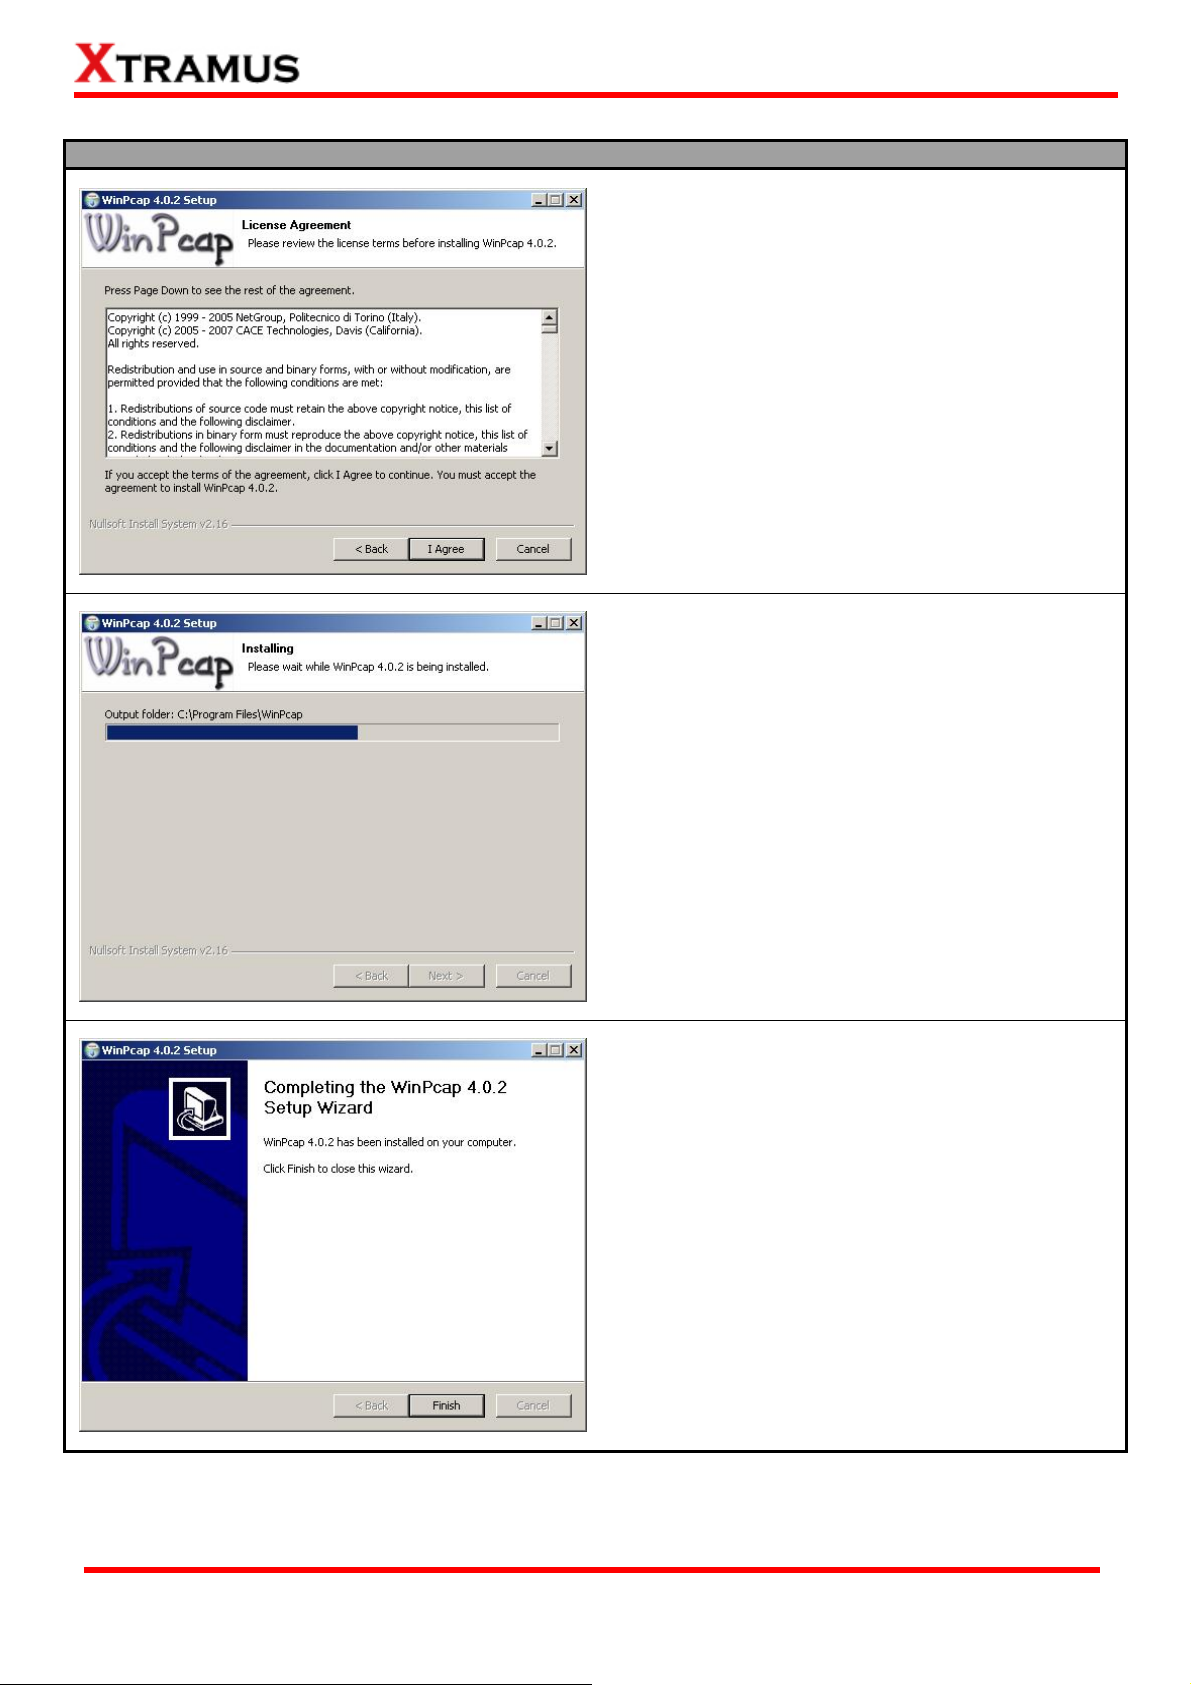
Installing NuApps-IGMP-RM
10. Review the license agreement before installing.
Click
I Agree button to continue. It is necessary
to accept the agreement to install WinPcap.
11. WinPcap is installing.
XTRAMUS TECHNOLOGIES®
12. WinPcap installation completes. Click Finish
button to close the wizard.
9
E-mail: sales@xtramus.com
Website: www.Xtramus.com
Page 10
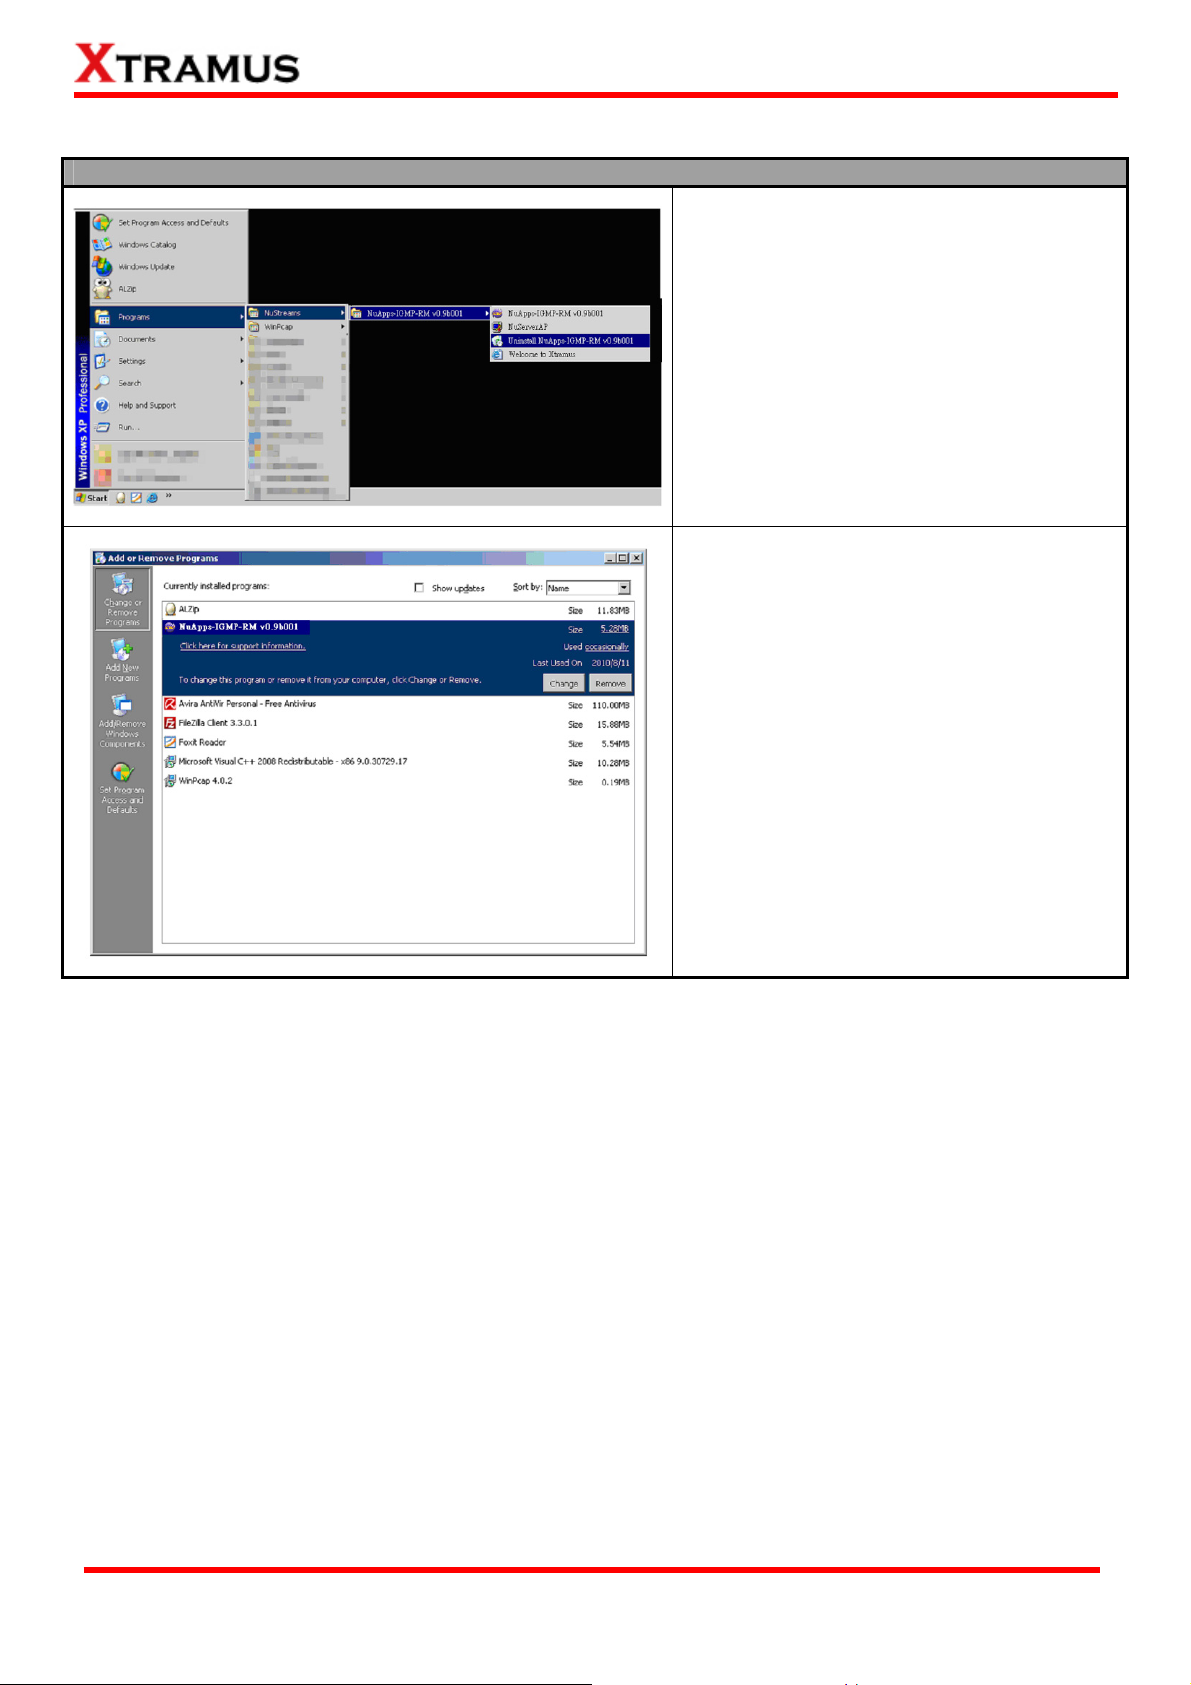
You can uninstall NuApps-IGMP-RM by:
Uninstalling NuApps-IGMP-RM
¾ Click Start Æ Programs Æ NuStreams
Æ NuApps-IGMP-RM Æ Uninstall
NuApps-IGMP-RM
¾ Go to the Control Panel, choose
NuApps-IGMP-RM from installed
program list, and click Remove to
uninstall.
XTRAMUS TECHNOLOGIES®
10
E-mail: sales@xtramus.com
Website: www.Xtramus.com
Page 11
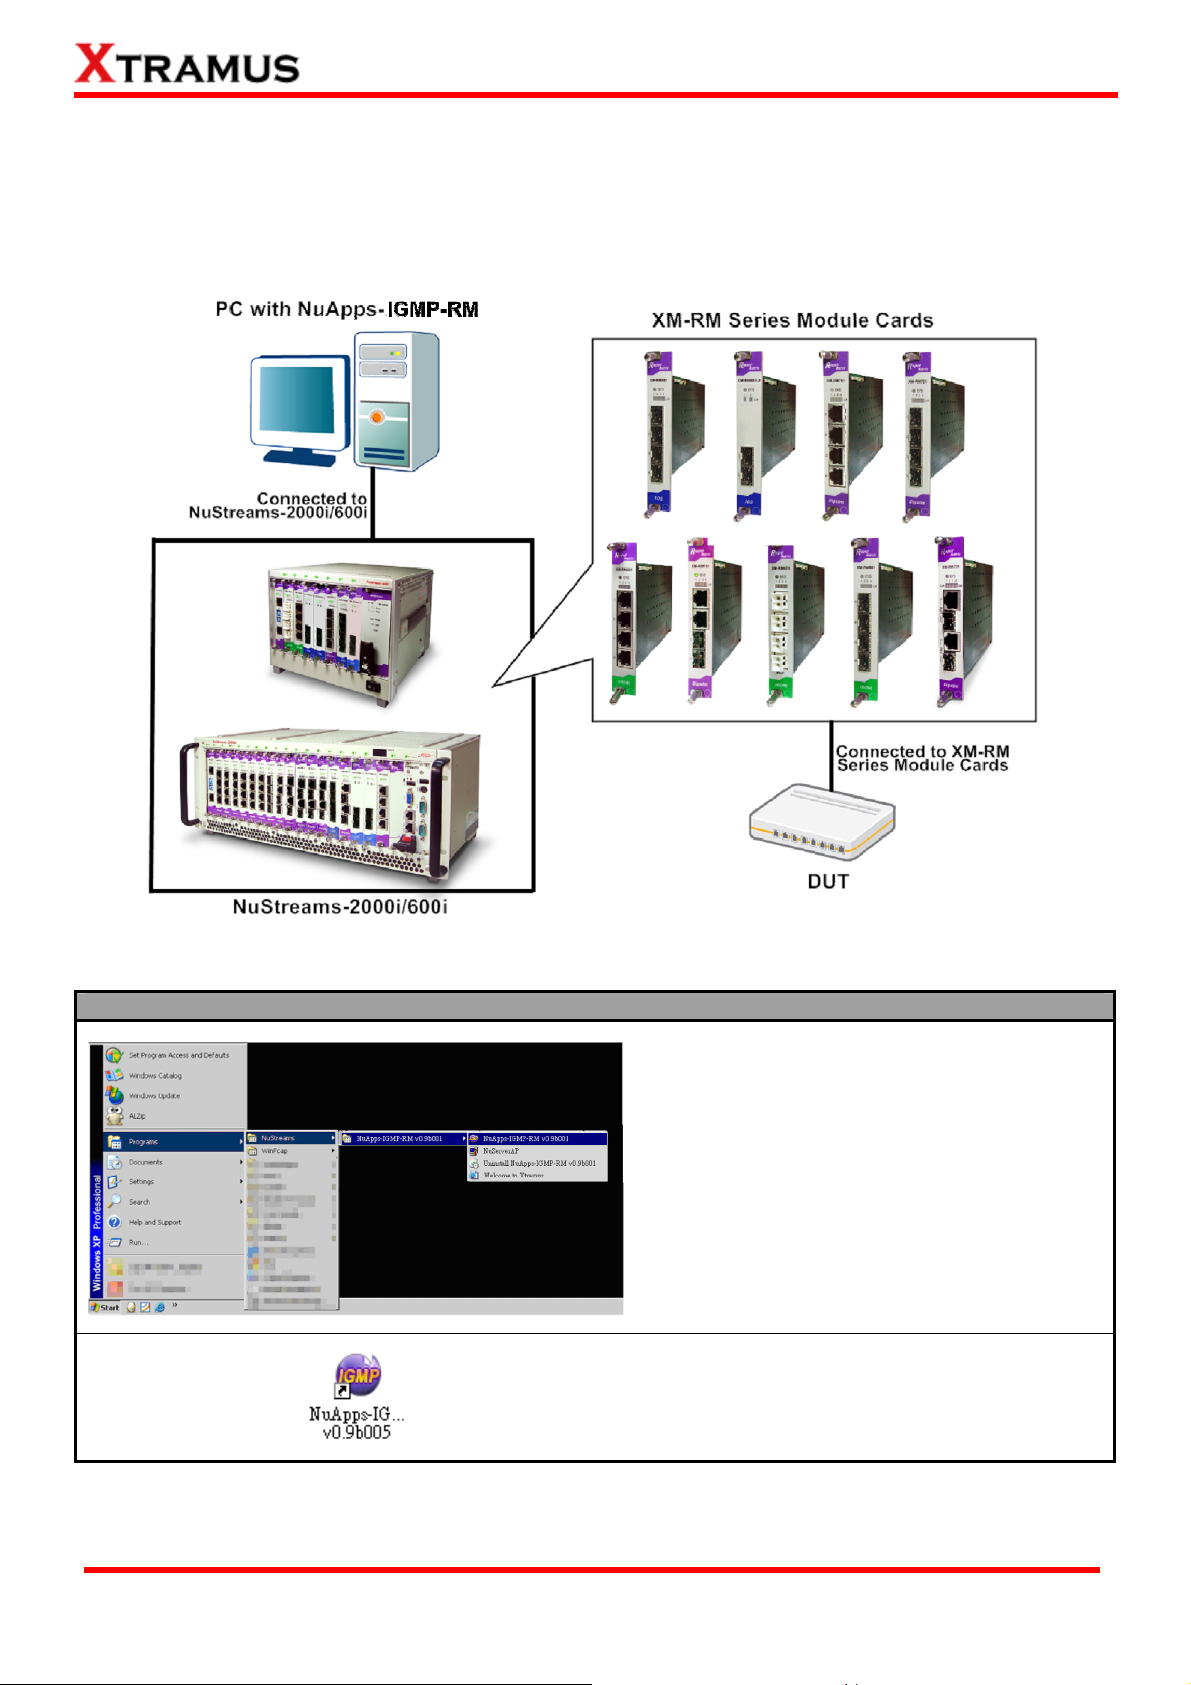
3. NuApps-IGMP-RM Function Overview
3.1. Starting NuApps-IGMP-RM
Before starting NuApps-IGMP-RM, the DUT, your PC, and NuStreams-2000i/600i shall be connected
properly as shown in the figure down below:
There are two ways to starts NuApps-IGMP-RM:
Starting NuApps-IGMP-RM
¾ Click Start Æ Programs Æ NuStreams Æ
NuApps-IGMP-RM
¾ Double-click NuApps-IGMP-RM icon
located on your PC’s desktop.
XTRAMUS TECHNOLOGIES®
11
E-mail: sales@xtramus.com
Website: www.Xtramus.com
Page 12
If your PC is not connected with NuStreams-2000i/600i, you can still run NuApps-IGMP-RM under Demo
Mode. Almost all NuApps-IGMP-RM‘s functions are available under Demo Mode. However, please note
that Demo Mode is for system demo purposes only, and does not serve any testing at all.
XTRAMUS TECHNOLOGIES®
12
E-mail: sales@xtramus.com
Website: www.Xtramus.com
Page 13

Please follow the steps down below to starts NuApps-IGMP-RM and NuServer properly.
Starting NuServer / NuApps-IGMP-RM
When starting NuApps-IGMP-RM, a “Connect to
NuServer” window will pop up and asked how you are
going to connect to NuServer.
¾ Local Host: Choose this option when you’re
running NuApps-IGMP-RM from NuStreams-2000i
IPC module or a PC that’s connected to
NuStreams-2000i/600i via an RJ45 cable.
¾ Remote: Choose this option when you’re running
NuApps-IGMP-RM from other PC located on the
network. Choose the IP address which is assigned
from NuStreams-2000i/600i from the scroll-down
menu, or choose demo to enter
NuApps-IGMP-RM’s Demo Mode.
¾ Connect/Cancel: Click the Connect/Cancel button
to connect to NuStreams-2000i/600i or cancel
starting NuApps-IGMP-RM.
A “NuServer-NIC Information” window will pop up. Please select the NIC (Network Interface Card) which
is connected to NuStreams -2000i/ 600i’s from the Network Interface Information table, and click OK. If
you’re using NuStreams-2000i’s IPC module, please choose “Realtek RTL8139 Family Fast Ethernet”.
XTRAMUS TECHNOLOGIES®
13
E-mail: sales@xtramus.com
Website: www.Xtramus.com
Page 14
Starting NuServer / NuApps-IGMP-RM
NuServer will connect to the daughter boards, and NuApps-IGMP-RM will start as well.
You now have access to NuApps-IGMP-RM’s main display window.
XTRAMUS TECHNOLOGIES®
14
E-mail: sales@xtramus.com
Website: www.Xtramus.com
Page 15
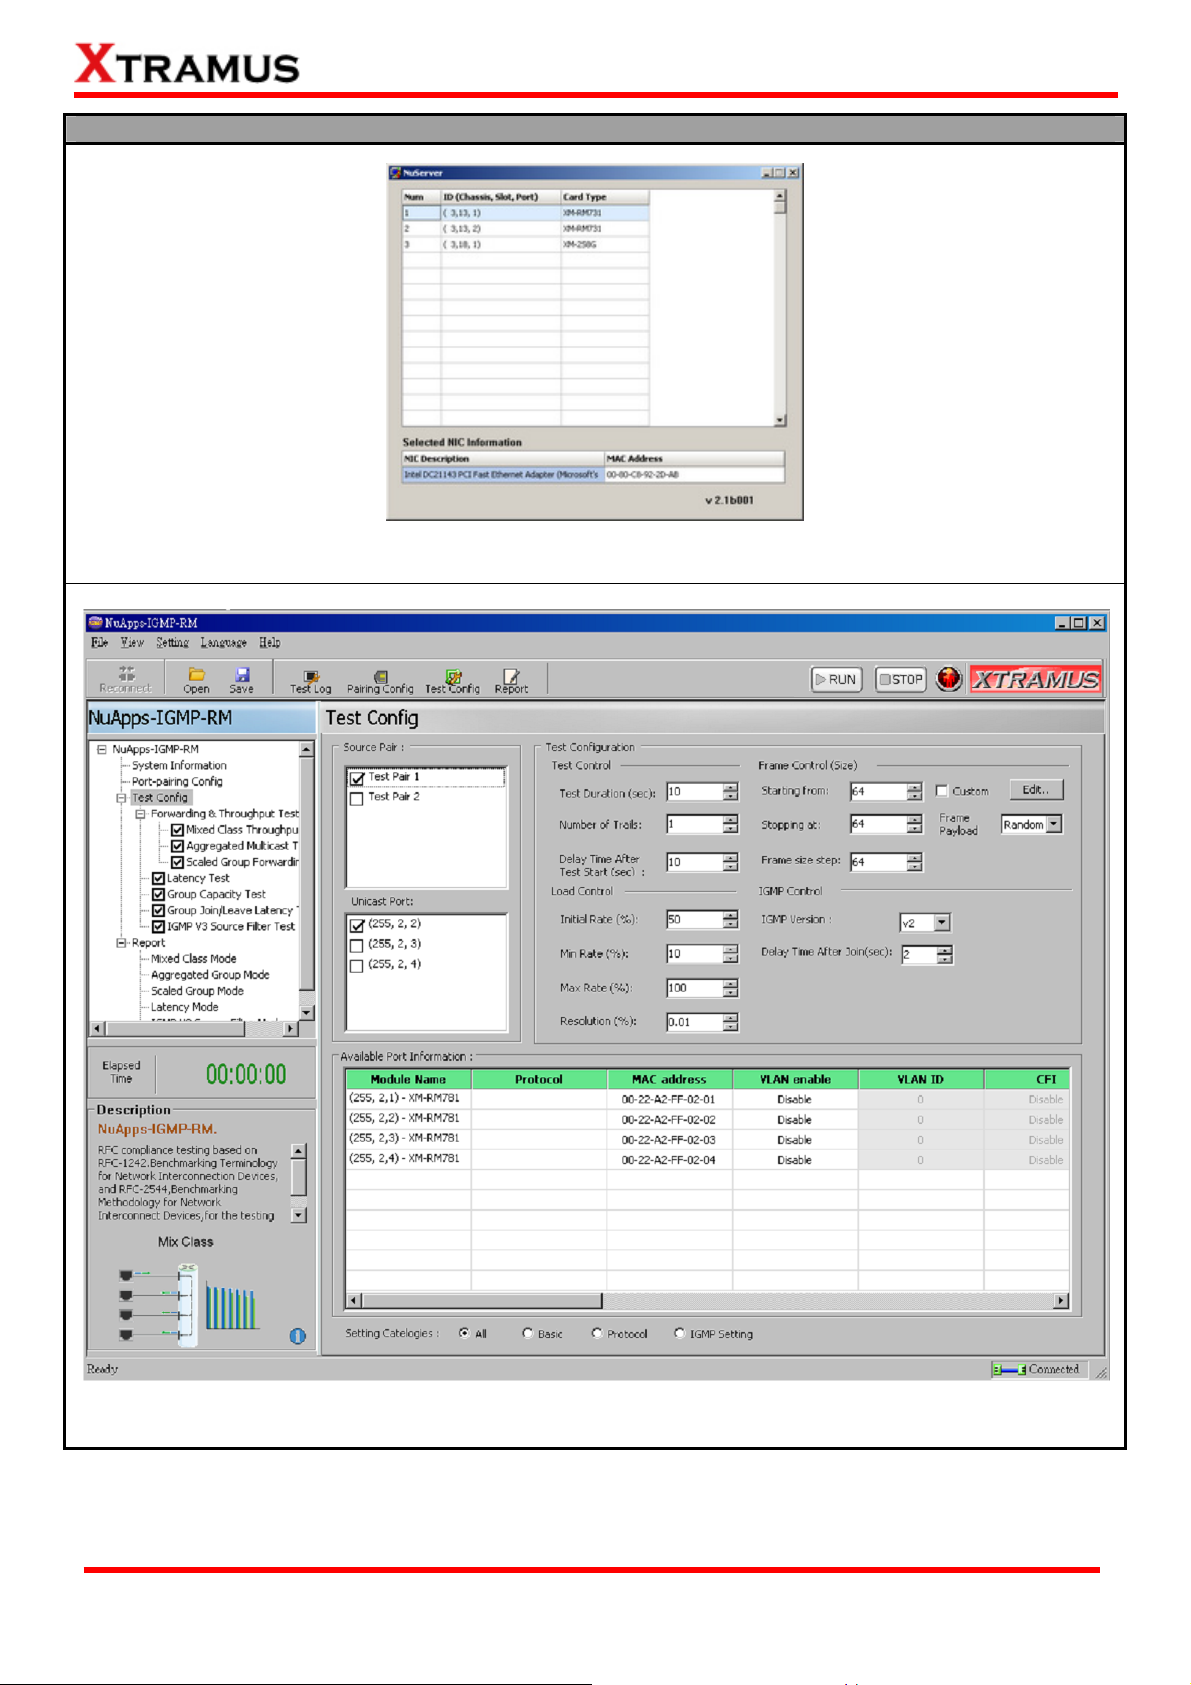
3.2. NuServer Window
Description
This section displays the information regarding to the model cards that are
installed on NuStreams-2000i/600i. Model Card IDs are showed as the
Module Card
Information
format of (X, Y, Z) while X is the number of the chassis (which is displayed
on NuStreams-2000i/600i), Y is the slot number where this model card is
installed, and Z is the available port number located on the model card.
This section displays the detail information (including NIC Model name,
NIC Information
NIC’s MAC address) regarding to the selected NIC.
NuServer Version This section displays the version of your NuServer.
XTRAMUS TECHNOLOGIES®
15
E-mail: sales@xtramus.com
Website: www.Xtramus.com
Page 16
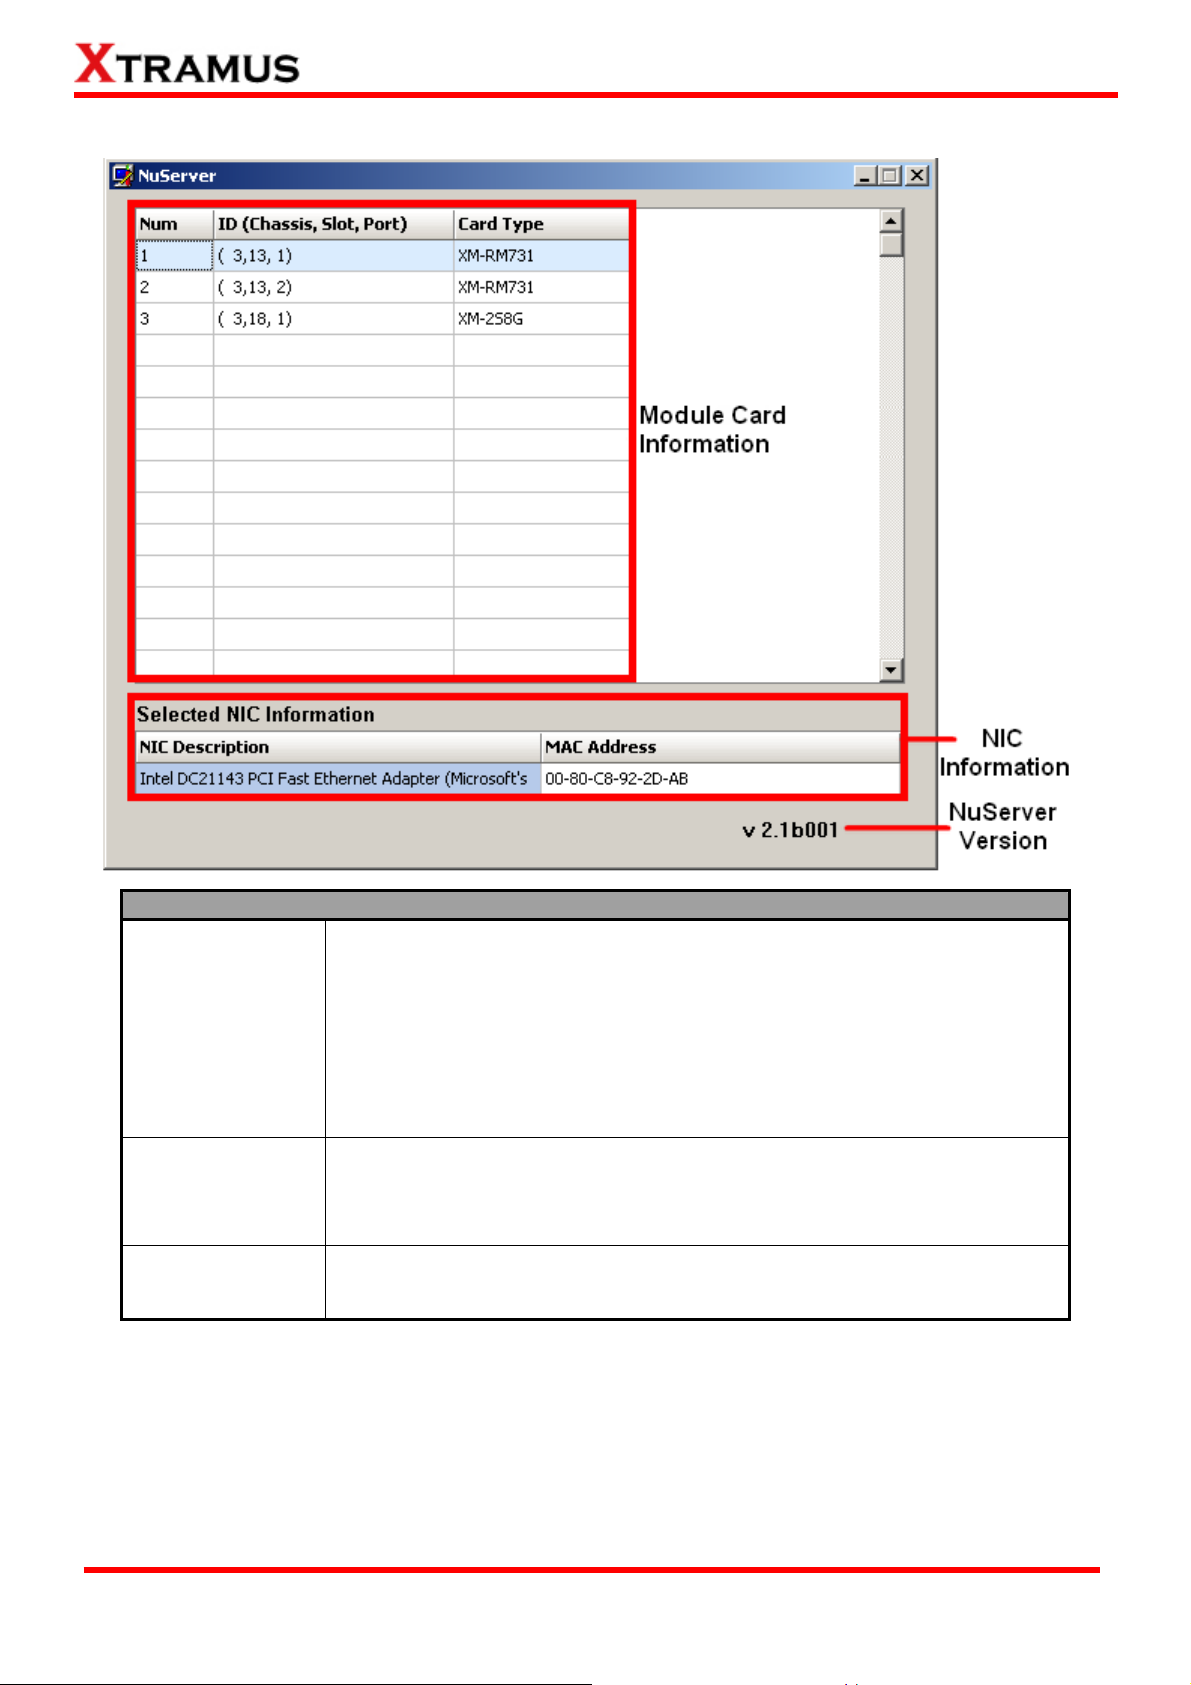
3.3. NuApps-IGMP-RM Main Window
Function Descriptions
A Menu Bar
B Tool Bar
System
C
Info/Configuration
List
D Elapsed Time
E Description
F Status Bar
Control
G
Buttons/Test
Running Status
Icon
The Menu Bar allows you to manage test model settings, view module
cards information, set the module cards’ port and test configuration,
change language displayed and access to Xtramus website.
The Tool Bar contains buttons that allow you to reconnect your PC to
NuStreams-2000i/600i, load/save test settings, make test/port
configurations, and view test log/reports.
By clicking the System Info/Configuration List, you can view system
information, making test/ports configurations, or view test reports on right
side Main Display Screen.
The Elapsed Time field displays the elapsed time during test.
The Description field display brief descriptions regarding to tests.
The Status Bar shows the running status of NuApps-IGMP-RM.
The Control Buttons allow you to start/stop tests, and the Test Running
Status Icon indicates if there’s a test running.
H
I
XTRAMUS TECHNOLOGIES®
Main Display
Screen
System
Connection Status
You can make detail configurations and view real-time testing diagrams
on the Main Display Screen.
This icon shows the connection status between your PC and
NuStreams-2000i/600i.
16
E-mail: sales@xtramus.com
Website: www.Xtramus.com
Page 17
3.3.1. Menu Bar
NuApps-IGMP-RM Menu Bar includes configuration options such as File, View, Setting, Language,
and Help. Please refer to the sections down below for detail information regarding to each configuration
option.
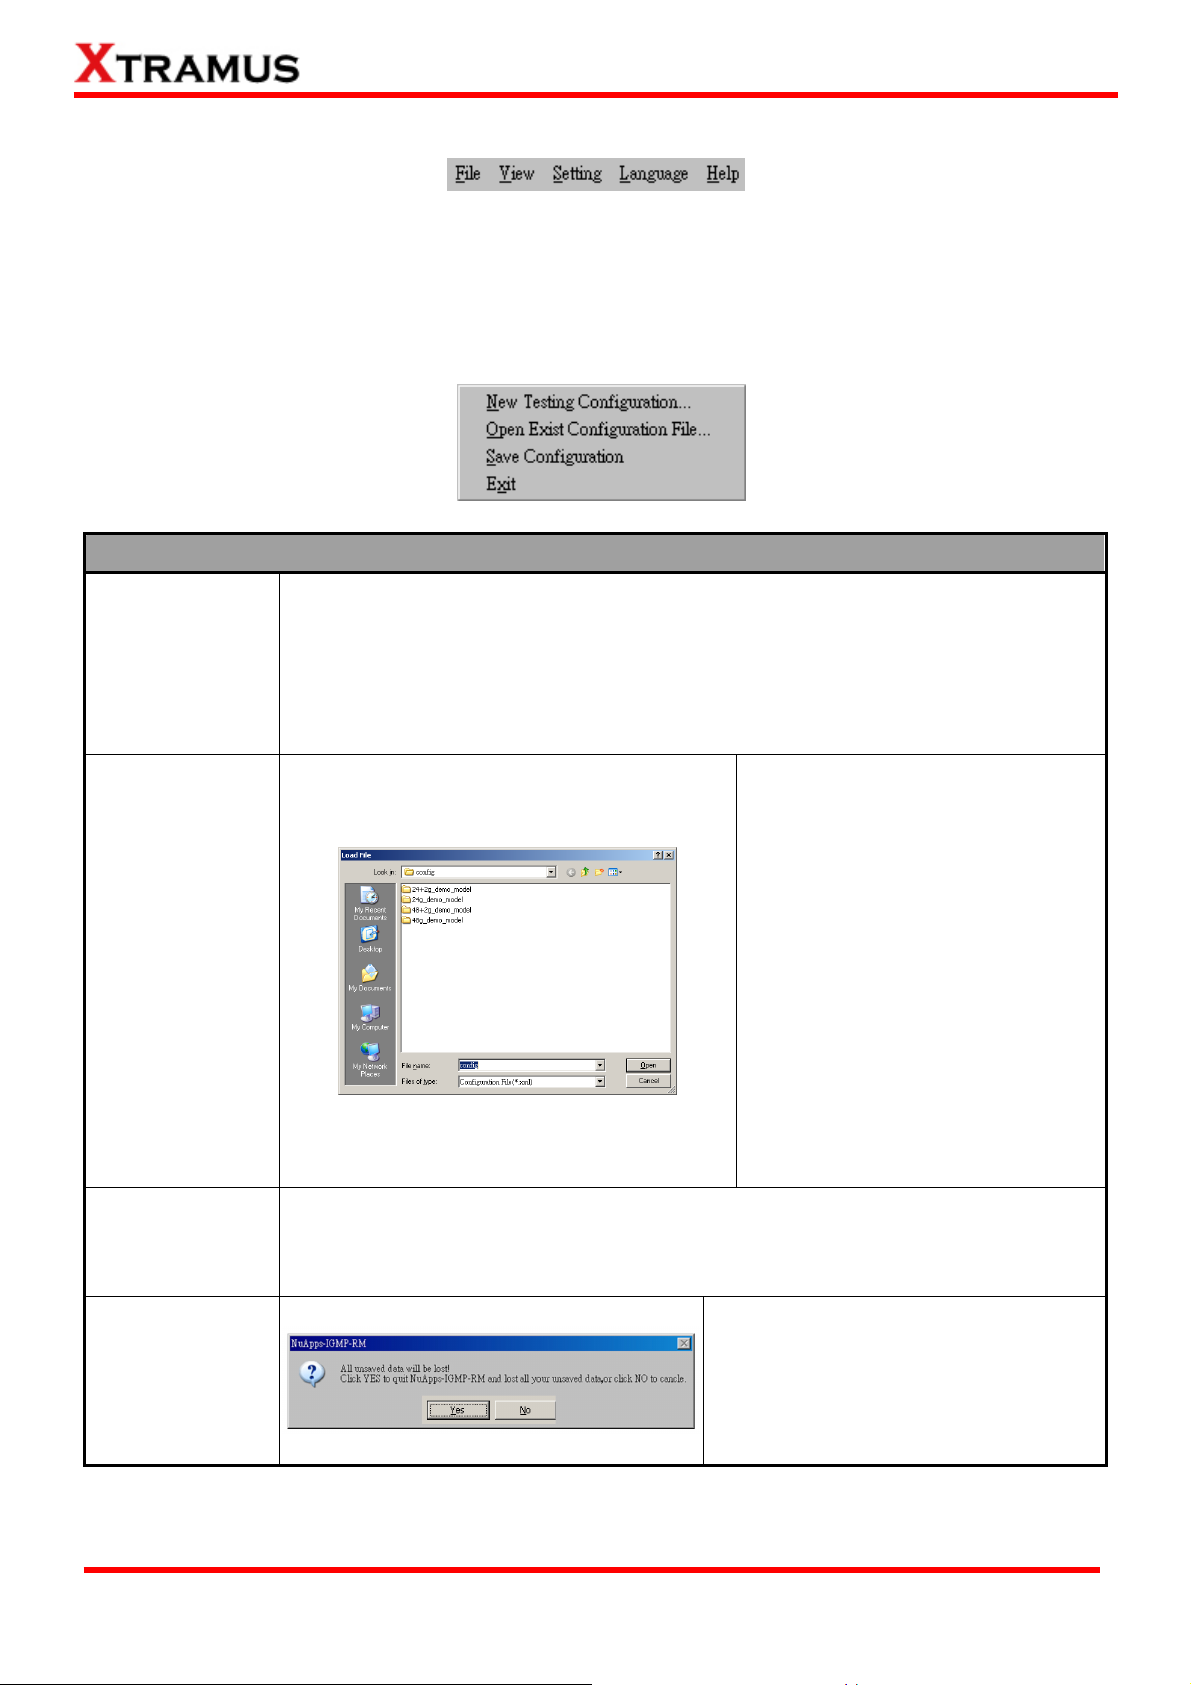
A. File
File Menu Bar Overview
The New Testing Configuration… allows the users to lock the ports of your
New Testing
Configuration…
Open Exist
Configuration
File…
Save
Configuration
NuStreams-2000i/600i’s module cards for task testing. For detail descriptions
regarding to the New Model Wizard and its settings, please refer to”4. Creating Task
via New Testing Configuration”.
Load a previously-saved
configuration file and applies these
settings to NuApps-IGMP-RM.
All the configurations you’ve made
via New Testing Configuration will be
saved as a “*.xml” file, along with
several “*.cfg” files.
Please note that these “*.cfg” files
contain test settings as well. Deleting
them will cause your “*.xml” file
unable to load properly.
Choose this option to save your configuration made on New Testing
Configuration….
Exit
XTRAMUS TECHNOLOGIES®
17
A prompt pop-up window will ask if you
are sure to exit NuApps-IGMP-RM. Click
YES to exit NuApps-IGMP-RM, or click
NO to cancel.
E-mail: sales@xtramus.com
Website: www.Xtramus.com
Page 18
B. View
View Menu Bar Overview
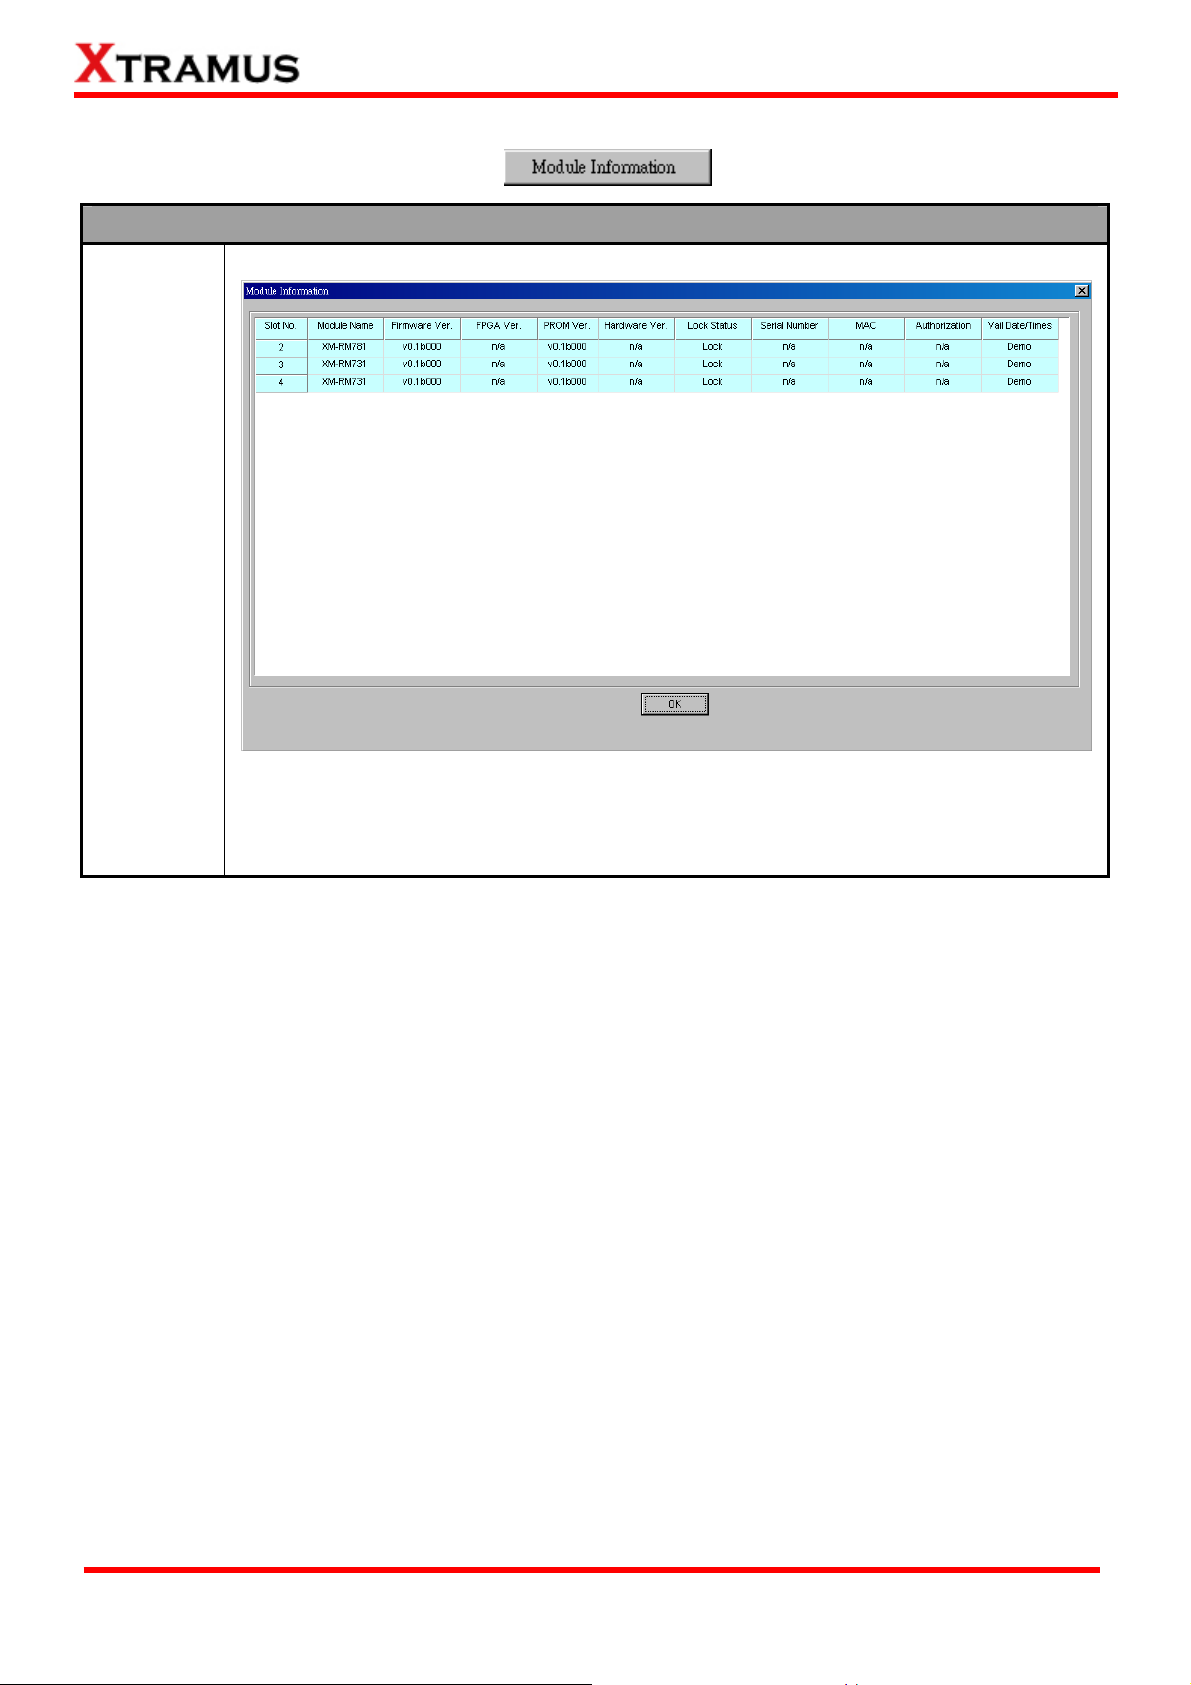
Module
Information
Choosing this option will pop up a window showing the detail information of your module
cards. Click the OK button to exit this window.
XTRAMUS TECHNOLOGIES®
18
E-mail: sales@xtramus.com
Website: www.Xtramus.com
Page 19
C. Setting
Setting Menu Bar Overview
Port-pairing
Setting
Test Setting
From this option, you can set the ports as source/host port. Also, you can set number
of groups and the Initial Group address.
XTRAMUS TECHNOLOGIES®
From this option, you can set the parameters for each available test configuration.
19
E-mail: sales@xtramus.com
Website: www.Xtramus.com
Page 20

D. Language
Language Menu Bar Overview
English/
NuApps-IGMP-RM has 2 different languages for its UI available. You can set the language
Simplified
Chinese
of UI to either English or Simplified Chinese.
E. Help
Help Menu Bar Overview
About…
An “About” window will pop up
and show detailed system
information.
System Requirements
Xtramus Web Click this option to access the Xtramus official website.
XTRAMUS TECHNOLOGIES®
20
A “System Requirements”
window will pop up and show
the requirements for your PC
and the FPGA/Firmware of the
module.
Click the OK button to exit the
“System Requirements”
pop-up window.
E-mail: sales@xtramus.com
Website: www.Xtramus.com
Page 21

3.3.2. Quick Launch Buttons
The Quick Launch Buttons allow you to reconnect your NuStreams-2000i/600i, Open/Save the current
settings, see the test log/Report, and set the ports/test configuration.
Reconnect
If the connection between your PC and NuStreams-2000i/600i is down, a “Disconnected” icon
will be shown in “System Connection Status”.
Open
Save
Press Reconnect button
NuStreams-2000i/600i. If the connection has been established successfully, a message window will
pop up, and the “System Connection Status” will be shown as “Connected”
to re-establish the connection between your PC and
If you have a previously saved
configuration setting file stored in your PC,
you can load it and apply all the setting
you’ve made by clicking the “Open” button
on the Tool Bar.
All configuration files are saved in the
format of “*.xml”.
.
XTRAMUS TECHNOLOGIES®
21
You can save the current test settings
with the Save button on the Quick
Launch Buttons.
Configuration files are saved in the
format of “*.xml”.
E-mail: sales@xtramus.com
Website: www.Xtramus.com
Page 22

Test Log
Pairing Config
Clicking this button will pop up a window showing the Log of the test result.
From this option, you can set the ports as
source/host port. Also, you can set number of
groups and the Initial Group address.
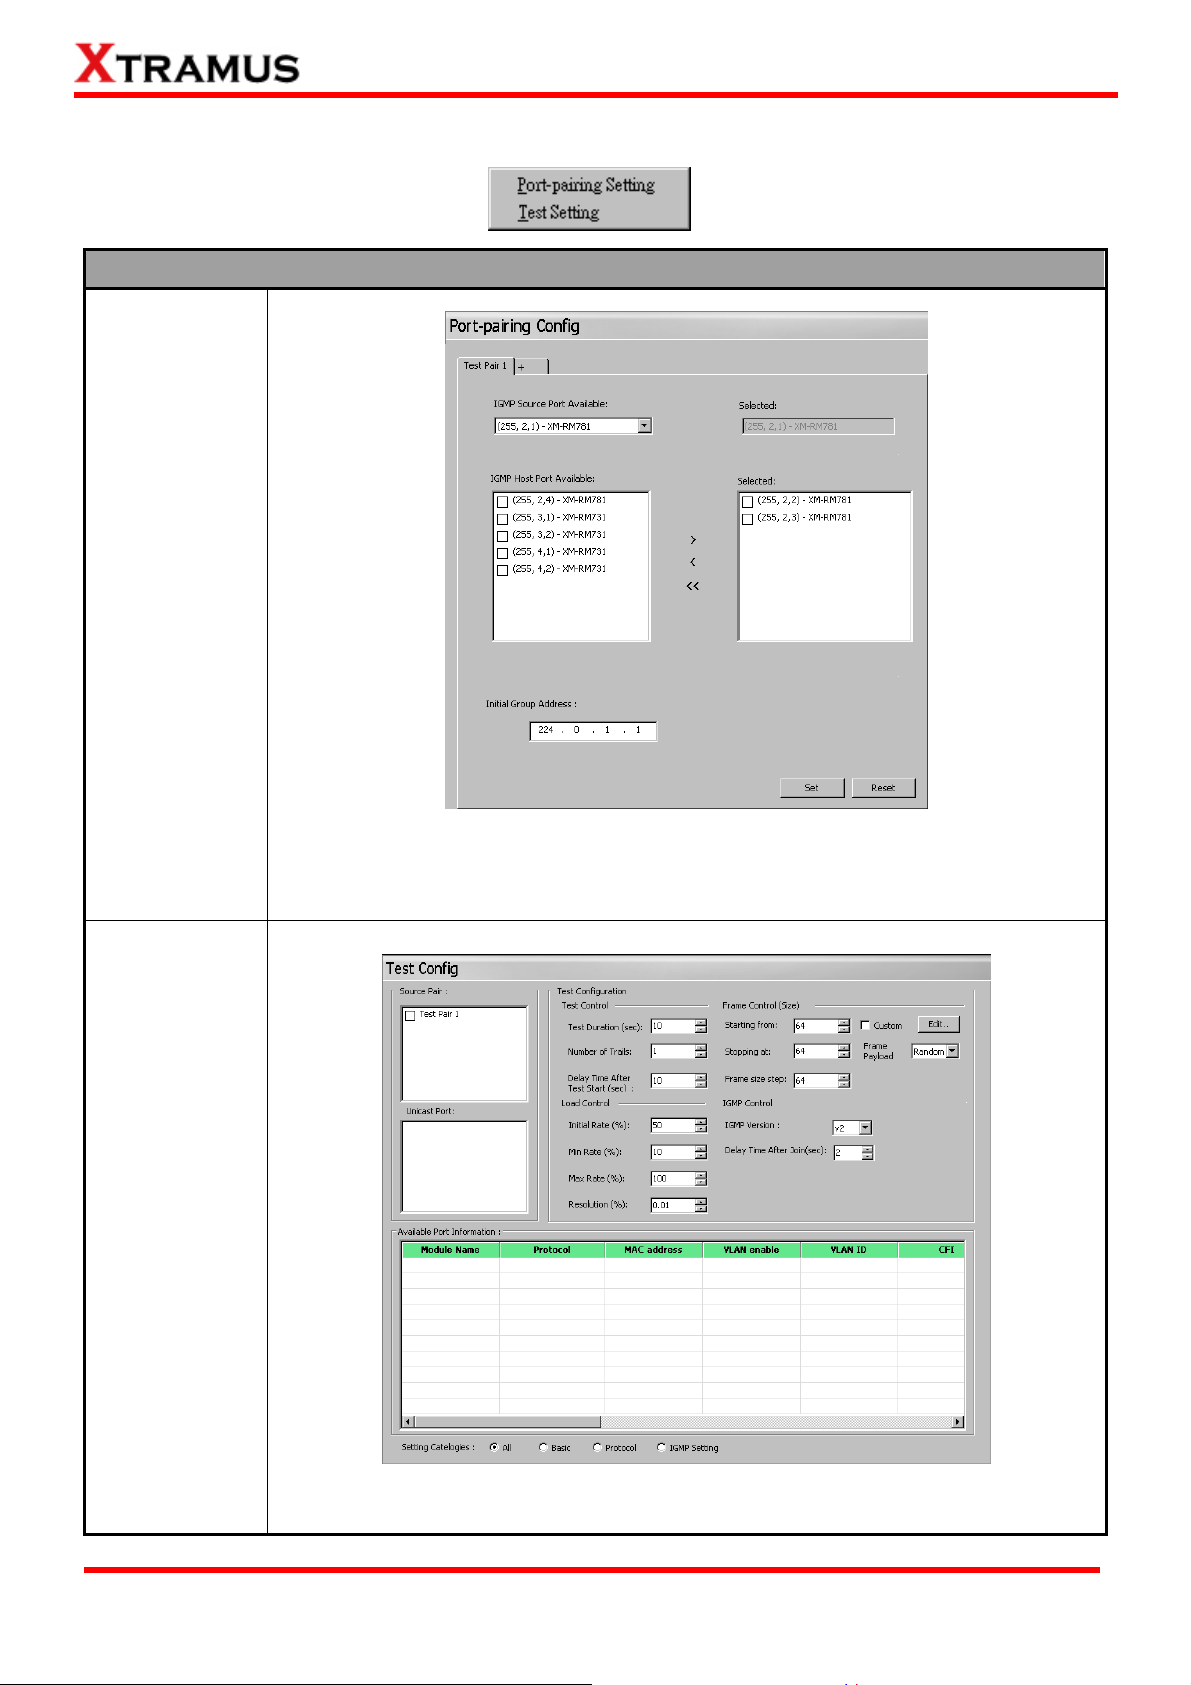
Test Config
Report
From this option, you can set the test
parameters of each task test.
Clicking this button will pop up a window showing the test result of your tasks.
XTRAMUS TECHNOLOGIES®
22
E-mail: sales@xtramus.com
Website: www.Xtramus.com
Page 23

3.3.3. System Info/Configuration List
By clicking the System Info/Configuration List, you can view system information, making test/ports
configurations, or view test reports on right side Main Display Screen.
System Information
Port-pairing Config
By clicking the System Information on the System
Info/Configuration List, the System Information
screen will be shown on the Main Display Screen
located on the right side of NuApps-IGMP-RM’s main
window.
By clicking the Port-pairing Config on the System
Info/Configuration List, the Port-pairing
Configuration screen will be shown on the Main
Display Screen located on the right side of
NuApps-IGMP-RM’s main window, allowing you to
make settings for NuStreams-2000i/600i ports.
XTRAMUS TECHNOLOGIES®
23
E-mail: sales@xtramus.com
Website: www.Xtramus.com
Page 24

Test Config
Mixed Class
Throughput
Aggregated
Multicast
Throughput
This test measures the DUT’s ability to
operate heterogeneous traffic stream,
source port will send an aggregated traffic
stream which consists of a mixture of unicast
and multicast packets to every destination
ports.
For more detail description about this test,
please refer to 5.1. Mixed Class
Throughput.
This test offer multicast traffic at an initial
offered load to all destination ports in fixed
parameter of setting. An iterative binary
search algorithm used to find the maximum
rate at which none of the offered frames are
dropped is determined while N destination.
Scaled Group
Forwarding
Latency Test
For more detail description about this test,
please refer to 5.2. Aggregated Multicast
Throughput.
This test measures the maximum non-drop
offered load in which the destination test
port(s) join an initial number of multicast
groups on the first iteration.
For more detail description about this test,
please refer to 5.3. Scaled Group
Forwarding.
This test provides the measurement of
latency from the collection methodology for
latency in RFC-2544. The destination ports
collect a set of latency measurements M
over a certain period of time, where M is
composed of maximum and minimum
latency.
XTRAMUS TECHNOLOGIES®
24
For more detail description about this test,
please refer to 5.4. Latency Test.
E-mail: sales@xtramus.com
Website: www.Xtramus.com
Page 25

Test Config
Group Capacity
Test
Group
Join/Leave
Latency Test
The objective of this test is to determine the
maximum number of multicast groups a
device or system under test can support
while maintaining the ability to forward
multicast frames to all multicast groups
registered to that device or system under
test.
For more detail description about this test,
please refer to 5.5. Group Capacity Test.
The objective of this test is to determine the
time duration it takes a device or system
under test to process a successful IGMP
group membership report (leave report).
For more detail description about this test,
please refer to 5.6. Group Join/Leave
Latency Test.
The objective of this test is to compare if the
quantity of packet received by host port is
IGMP V3
Source Filter
the same as the predicted quantity to
evaluate the operation of the DUT.
Test
For more detail description about this test,
please refer to 5.7. IGMP V3 Source Filter
Test.
Report
By clicking the Report on the System Info/Configuration List, it will pop up a window showing the test
result of your tasks.
XTRAMUS TECHNOLOGIES®
25
E-mail: sales@xtramus.com
Website: www.Xtramus.com
Page 26

3.3.4. Elapsed Time
The Elapsed Time allows you to know the time spent during tests.
3.3.5. Description
The Description displays brief descriptions of NuApps-IGMP-RM. If you click the
button, the
detailed information of the Mixed Class Throughput, Aggregated Multicast Throughput, Scaled
Group Forwarding, Latency Test, Group Capacity Test, Group Join/Leave Latency Test and
IGMP V3 Source Filter Test will be showed on the Main Display Screen to the right.
3.3.6. Status Bar
The Status Bar indicated by the arrow above shows the running status of NuApps-IGMP-RM. The
running status includes: “Testing”, “Performing testing”, “Ready” and others.
XTRAMUS TECHNOLOGIES®
26
E-mail: sales@xtramus.com
Website: www.Xtramus.com
Page 27

3.3.7. Control Buttons/Test Running Status Icon
The Control Buttons allow you to start/stop tests, and the Test Running Status Icon indicates if
there’s a test running.
Control Buttons
Start test
Stop test
Test Running Status Icon
No Test is running
Test is running
XTRAMUS TECHNOLOGIES®
27
E-mail: sales@xtramus.com
Website: www.Xtramus.com
Page 28

4. Creating Task via Testing Configuration
When performing tests with your DUT on NuApps-IGMP-RM for the first time, you have to create a new set
of test settings to run the test.
Before starting to create a new task via New Testing Configuration, please be sure that:
¾ All module cards (such as XM-RM751, XM-RM761, or XM-RM781) are installed on chassis (such as
NuStreams-2000i/600i) properly.
¾ The chassis (such as NuStreams-2000i/600i) is powered-on and is connected to a PC (or IPC
module installed on NuStreams-2000i) according to “3.1. Starting NuApps-IGMP-RM”.
To start using New Testing Configuration, please click File on the Menu Bar, and choose New Testing
Configuration… as shown in the figure down below.
A “Reserved Config” window will pop up. All module cards that are installed on the chassis will be
displayed here.
XTRAMUS TECHNOLOGIES®
28
E-mail: sales@xtramus.com
Website: www.Xtramus.com
Page 29

4.1. Selecting Active Ports from Installed Module Cards
A. Active Port Tree Style Tab
B. Tester Information
All the module cards, along with their Active Ports are listed here in this
field. You can fold/unfold the tree style tab by clicking
you can lock/unlock the port by clicking
icon.
/ icons. Also,
You can input the Tester name and DUT’s model name here in this field.
C. Lock
XTRAMUS TECHNOLOGIES®
Clicking this button will reserve the chosen module card’s port(s) for task
testing.
29
E-mail: sales@xtramus.com
Website: www.Xtramus.com
Page 30
4.2. Port Configuration
A. Port Status Overview
Port No.
Card Type
Media Speed
Duplex
Flow Control
Auto negotiate
Shows the each port by (chassis number, module card’s slot, port number).
Shows the module card type.
Depending on the current module card, you can click the field and scroll down to
select different media speed.
Shows the current duplex. Note: Half or Full option will be available soon.
Shows the status of flow control. Note: On or Off option will be available soon.
Shows the status of auto negotiation. Note: Auto or Force will be available soon.
B. Auto-Negotiation
Min Waiting Time
Mediatype
Change Timeout
You can set here the minimum waiting time for auto negotiation.
You can set here the limit for timeout during change of media type.
XTRAMUS TECHNOLOGIES®
30
E-mail: sales@xtramus.com
Website: www.Xtramus.com
Page 31

4.3. Port-pairing Config
After setting the port configuration, you have to set port-pairing configuration. You can access the
port-pairing configuration window by clicking the
button from the tool bar. Or by clicking the
Port-pairing Config option on the System Info/Configuration List to access the port pairing
configuration window as shown below:
Please refer to the Port-pairing Config window below for a better understanding on its functions:
XTRAMUS TECHNOLOGIES®
31
E-mail: sales@xtramus.com
Website: www.Xtramus.com
Page 32

Functions of port-pairing configuration window:
A. Create Test Pair: You can select each Test Pair 1 for changing theirs settings here. You can also
create new Test Pair window by clicking the + button.
B. Choose your source port: Scroll down the IGMP Source Port Available field to select the port as
source port. Please note that each port is displayed as (chassis number, module cards’ slot, port
number) – XM-RM modules type. The selected port will be displayed on the Selected field to the
right.
C. Choose your host port: Select the port to be added on the group from the left side IGMP Host Port
Available and click on the > button to move the selected port(s) to the right side Selected field. You
can return the port(s) from Selected field to IGMP Host Port Available by selecting the port and click
the < button. If you click the << button, than all the ports from the Selected field will return to the IGMP
Host Port Available field.
D. Set your group: Type your initial group address on the left side address field.
E. Apply the settings: If you are finished with the settings above, please click the Set button to apply the
settings or Reset to restart with the settings.
XTRAMUS TECHNOLOGIES®
32
E-mail: sales@xtramus.com
Website: www.Xtramus.com
Page 33

5. NuApps-IGMP-RM Test Modes
The NuApps-IGMP-RM supports 6 test modes: Mixed Class Throughput, Aggregated Multicast
Throughput, Scaled Group Forwarding, Latency Test, Group Capacity Test, Group Join/Leave
Latency Test and IGMP V3 Source Filter Test.
After selecting the module cards’ port(s), as previous described on 4. Creating Task via Testing
Configuration, please refer to the section down below for detailed description of each test modes and
theirs respectively setting options.
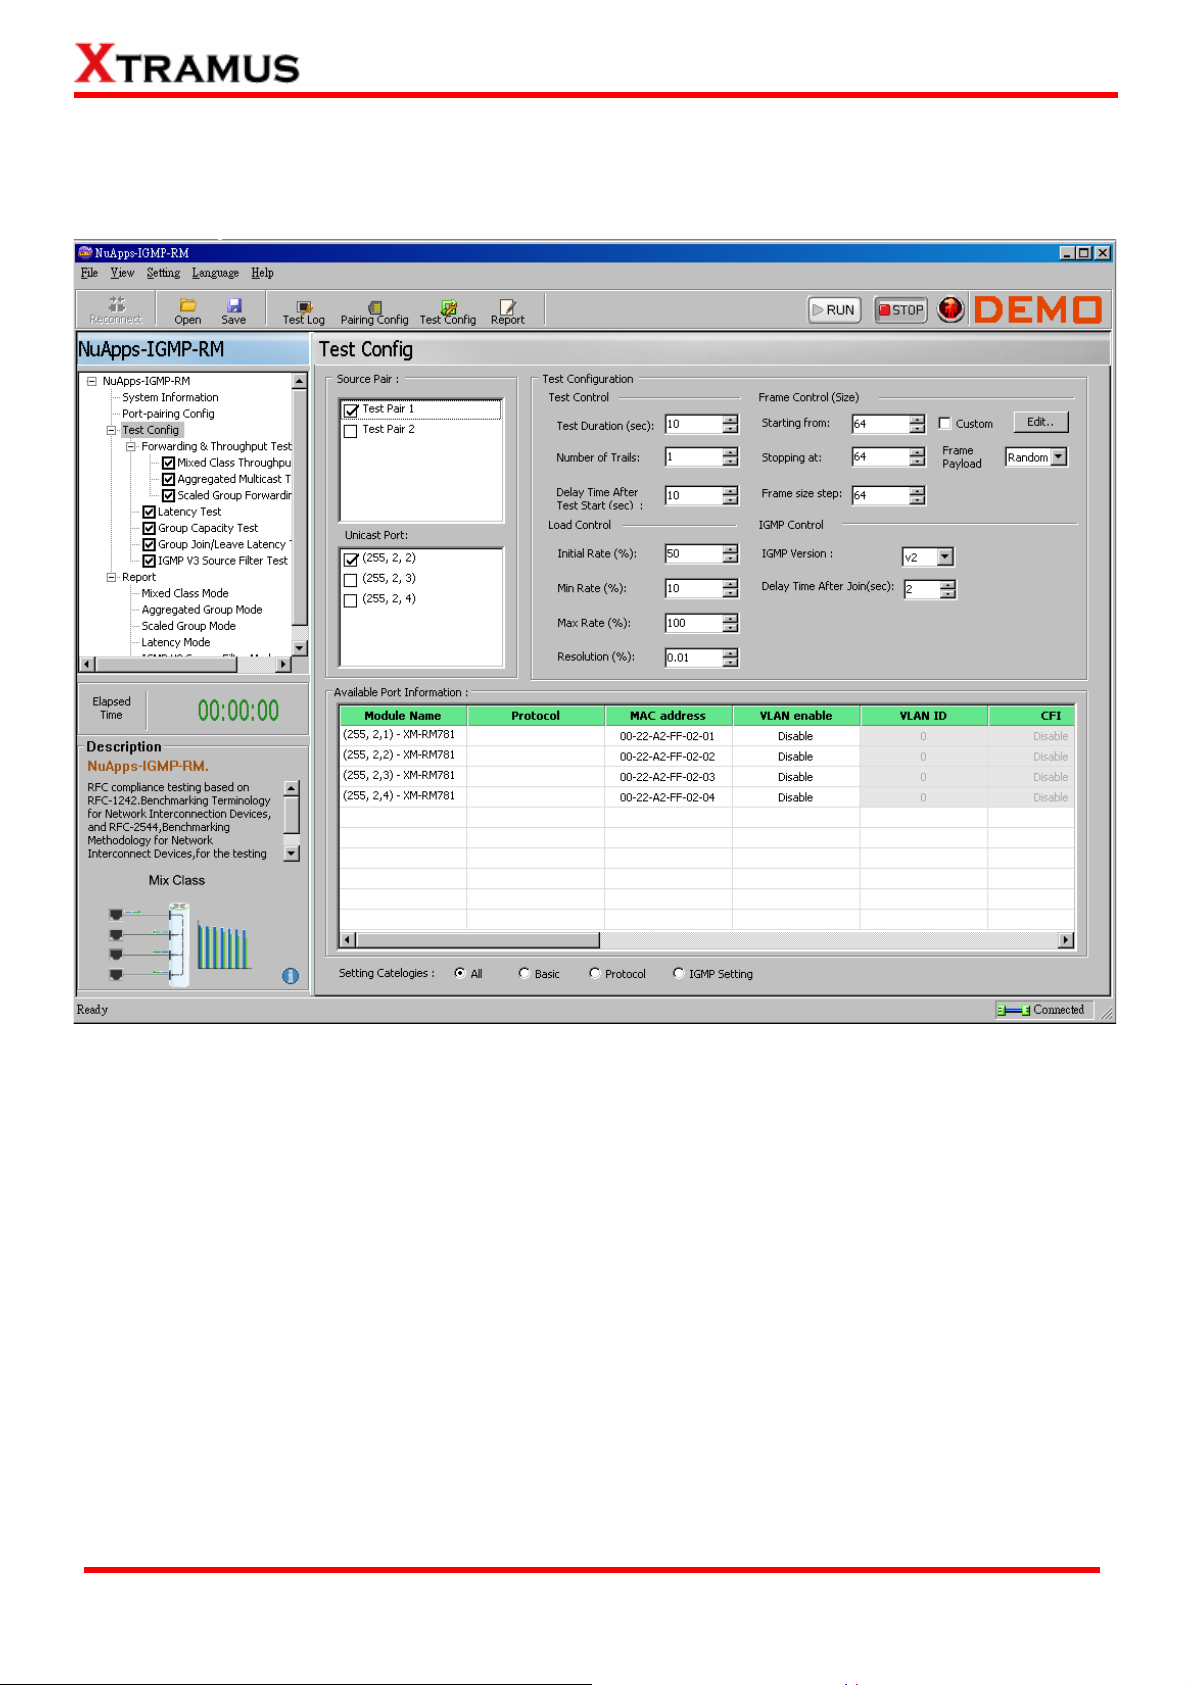
5.1. Mixed Class Throughput
The objective of this test mode is to determine the throughput of a Device or System under test (DUT or
SUT) when both unicast class frames and multicast class frames are offered simultaneously to a fixed
number of interfaces.
This test also measures the DUT’s ability to operate heterogeneous traffic stream, source port sending an
aggregated traffic stream which consists of a mixture of unicast and multicast packets to every destination
ports.
Port setting
Source Pair
Unicast Port
XTRAMUS TECHNOLOGIES®
You can choose the previous set Test Pair to be used on the Mixed Class
Throughput test.
You can select a port for unicast test.
33
E-mail: sales@xtramus.com
Website: www.Xtramus.com
Page 34

Test Configuration
Test Control
Frame Control
(size)
Test Duration (sec)
Number of Trails
Delay Time After
Test Start (sec)
Starting from
Stopping at
Frame size step
Custom/Edit…
Frame Payload
The duration of time (in seconds) for the test.
The number of times of the test.
The time interval for starting a test.
Set the initial frame size (bytes) here. The default
setting is 64 bytes.
Set the final frame size (bytes) here. The default setting
is 64 bytes.
The frame size to be added on every cycle.
Activating the Custom function will activate the settings
made on Edit…. The Edit… option includes settings for
Frame Size, Initial Rate, Min. Rate, Max. Rate and
Resolution.
The Frame Payload includes: Random, Increase,
0x55AA, 0x00FF, All 1 and All 0.
Load Control
IGMP Control
Initial Rate (%)
Min Rate (%)
Max Rate (%)
Resolution (%)
IGMP Version
Delay Time After
Join (sec)
The initial packet loading in percentage.
The minimum packet loading in percentage.
The maximum packet loading in percentage.
The deviation before reach the maximum rate.
There are version 1, version 2 and version 3 as option.
The version 1 only support membership query and
report (Join), the version 2 support both Join and Leave.
The time interval for sending the Join packets.
XTRAMUS TECHNOLOGIES®
34
E-mail: sales@xtramus.com
Website: www.Xtramus.com
Page 35

Available Port Information
Module Name
MAC address
VLAN enable
VLAN ID
CFI
VLAN Priority
IP Address
Gateway IP
Mask
Current
LinkStatus
Media Speed
Duplex
Autonegotiation
Group IP
Number of Group
The name of the current module card under this test mode. It is based on
(chassis number, module card’ slot, port number).
The MAC address of the current module card’s ports.
You can choose to Enable or Disable the VLAN function.
If you enable the VLAN function, you will be able to set the VLAN ID here.
Enable or Disable the Canonical Format Indicator (CFI) function.
If you enable the VLAN function, you will be able to set the VLAN Priority here,
in which the range is between 0-7.
Set the IP address for the current port.
Set the IP of your Gateway.
Set the Subnet Mask here.
Shows the current link status in speed/duplex/autonegotiation.
Set the media speed of your module card.
Set the Duplex for Full or Half.
Set the as Auto negotiate or Force the system to run task on the set media
speed.
Shows the IP address of the group under test.
Shows the number of group under test.
Setting Categories
All
Basic
Protocol
IGMP Setting
Shows all the available port information.
Shows only Current Link Status, Media Speed, Duplex and Autonegotiation
information.
Shows only Protocol, MAC address, VLAN enable, VLAN ID and CFI
information.
Shows only Group IP and Number of Group information.
XTRAMUS TECHNOLOGIES®
35
E-mail: sales@xtramus.com
Website: www.Xtramus.com
Page 36

5.2. Aggregated Multicast Throughput
The objective of this test mode is to determine the maximum rate at which none of the offered frames to
be forwarded through N destination interfaces of the same multicast groups are dropped.
This test also provides multicast traffic at an initial offered load to all destination ports in fixed parameter of
setting. An iterative binary search algorithm used to find the maximum rate at which none of the offered
frames are dropped is determined while N destination. All iteration will increase the destination port and to
find the maximum non-drop provided load.
Port setting
Source Pair
You can choose the previous set Test Pair to be used on the Aggregated
Multicast Throughput test.
XTRAMUS TECHNOLOGIES®
36
E-mail: sales@xtramus.com
Website: www.Xtramus.com
Page 37

Test Configuration
Test Control
Frame Control
(size)
Test Duration (sec)
Number of Trails
Delay Time After
Test Start (sec)
Starting from
Stopping at
Frame size step
Custom/Edit…
Frame Payload
The duration of time (in seconds) for the test.
The number of times of the test.
The time interval for starting a test.
Set the initial frame size (bytes) here. The default
setting is 64 bytes.
Set the final frame size (bytes) here. The default setting
is 64 bytes.
The frame size to be added on every cycle.
Activating the Custom function will activate the settings
made on Edit…. The Edit… option includes settings for
Frame Size, Initial Rate, Min. Rate, Max. Rate and
Resolution.
The Frame Payload includes: Random, Increase,
0x55AA, 0x00FF, All 1 and All 0.
Load Control
IGMP Control
Initial Rate (%)
Min Rate (%)
Max Rate (%)
Resolution (%)
IGMP Version
Delay Time After
Join (sec)
Number of initial
Client
Number of Max
Clients
The initial packet loading in percentage.
The minimum packet loading in percentage.
The maximum packet loading in percentage.
The deviation before reach the maximum rate.
There are version 1, version 2 and version 3 as option.
The version 1 only support membership query and
report (Join), the version 2 support both Join and Leave.
The time interval for sending the Join packets.
You can set the number of the clients from the start of
the test.
You can set the maximum number of the clients for this
test.
XTRAMUS TECHNOLOGIES®
37
E-mail: sales@xtramus.com
Website: www.Xtramus.com
Page 38

Available Port Information
Module Name
MAC address
VLAN enable
VLAN ID
CFI
VLAN Priority
IP Address
Gateway IP
Mask
Current
LinkStatus
Media Speed
Duplex
Autonegotiation
Group IP
Number of Group
The name of the current module card under this test mode. It is based on
(chassis number, module card’ slot, port number).
The MAC address of the current module card’s ports.
You can choose to Enable or Disable the VLAN function.
If you enable the VLAN function, you will be able to set the VLAN ID here.
Enable or Disable the Canonical Format Indicator (CFI) function.
If you enable the VLAN function, you will be able to set the VLAN Priority here,
in which the range is between 0-7.
Set the IP address for the current port.
Set the IP of your Gateway.
Set the Subnet Mask here.
Shows the current link status in speed/duplex/autonegotiation.
Set the media speed of your module card.
Set the Duplex for Full or Half.
Set the as Auto negotiate or Force the system to run task on the set media
speed.
Shows the IP address of the group under test.
Shows the number of group under test.
Setting Categories
All
Basic
Protocol
IGMP Setting
Shows all the available port information.
Shows only Current Link Status, Media Speed, Duplex and Autonegotiation
information.
Shows only Protocol, MAC address, VLAN enable, VLAN ID and CFI
information.
Shows only Group IP and Number of Group information.
XTRAMUS TECHNOLOGIES®
38
E-mail: sales@xtramus.com
Website: www.Xtramus.com
Page 39

5.3. Scaled Group Forwarding
The objective of this test mode is to determine the forwarding rate as a function of tested multicast groups
for a fixed number of tested device or system under test (DUT or SUT) ports.
The destination test port(s) join an initial number of multicast groups on the first iteration to measure the
maximum non-drop provided load. The number of multicast groups joined by each destination test port is
then scaled in following iterations and the forwarding rate is measured.
Note: the total number of multicast groups joined must not exceed the multicast group capacity of the
DUT/SUT.
Port setting
Source Pair
You can choose the previous set Test Pair to be used on the Scaled Group
Forwarding test.
XTRAMUS TECHNOLOGIES®
39
E-mail: sales@xtramus.com
Website: www.Xtramus.com
Page 40

Test Configuration
Test Control
Frame Control
(size)
Test Duration (sec)
Number of Trails
Delay Time After
Test Start (sec)
Starting from
Stopping at
Frame size step
Custom/Edit…
Frame Payload
The duration of time (in seconds) for the test.
The number of times of the test.
The time interval for starting a test.
Set the initial frame size (bytes) here. The default
setting is 64 bytes.
Set the final frame size (bytes) here. The default setting
is 64 bytes.
The frame size to be added on every cycle.
Activating the Custom function will activate the settings
made on Edit…. The Edit… option includes settings for
Frame Size, Initial Rate, Min. Rate, Max. Rate and
Resolution.
The Frame Payload includes: Random, Increase,
0x55AA, 0x00FF, All 1 and All 0.
Load Control
IGMP Control
Initial Rate (%)
Min Rate (%)
Max Rate (%)
Resolution (%)
IGMP Version
Delay Time After
Join (sec)
Number of initial
Client
Number of Max
Clients
The initial packet loading in percentage.
The minimum packet loading in percentage.
The maximum packet loading in percentage.
The deviation before reach the maximum rate.
There are version 1, version 2 and version 3 as option.
The version 1 only support membership query and
report (Join), the version 2 support both Join and Leave.
The time interval for sending the Join packets.
You can set the number of the clients from the start of
the test.
You can set the maximum number of the clients for this
test.
XTRAMUS TECHNOLOGIES®
40
E-mail: sales@xtramus.com
Website: www.Xtramus.com
Page 41

Available Port Information
Module Name
MAC address
VLAN enable
VLAN ID
CFI
VLAN Priority
IP Address
Gateway IP
Mask
Current
LinkStatus
Media Speed
Duplex
Autonegotiation
Group IP
Number of Group
The name of the current module card under this test mode. It is based on
(chassis number, module card’ slot, port number).
The MAC address of the current module card’s ports.
You can choose to Enable or Disable the VLAN function.
If you enable the VLAN function, you will be able to set the VLAN ID here.
Enable or Disable the Canonical Format Indicator (CFI) function.
If you enable the VLAN function, you will be able to set the VLAN Priority here,
in which the range is between 0-7.
Set the IP address for the current port.
Set the IP of your Gateway.
Set the Subnet Mask here.
Shows the current link status in speed/duplex/autonegotiation.
Set the media speed of your module card.
Set the Duplex for Full or Half.
Set the as Auto negotiate or Force the system to run task on the set media
speed.
Shows the IP address of the group under test.
Shows the number of group under test.
Setting Categories
All
Basic
Protocol
IGMP Setting
Shows all the available port information.
Shows only Current Link Status, Media Speed, Duplex and Autonegotiation
information.
Shows only Protocol, MAC address, VLAN enable, VLAN ID and CFI
information.
Shows only Group IP and Number of Group information.
XTRAMUS TECHNOLOGIES®
41
E-mail: sales@xtramus.com
Website: www.Xtramus.com
Page 42

5.4. Latency Test
The objective of this test mode is to produce a set multicast latency measurement from a single, multicast
ingress interface of a device or system under test (DUT or SUT) through multiple, egress multicast
interfaces of that same DUT/SUT as provided by the metric Multicast Latency.
The measurement if latency from the collection methodology for latency in RFC 2544. Destination ports
collect a set of latency measurements M over a certain period of time, where M is composed of maximum
and minimum latency.
Port setting
Source Pair
You can choose the previous set Test Pair to be used on the Latency test.
XTRAMUS TECHNOLOGIES®
42
E-mail: sales@xtramus.com
Website: www.Xtramus.com
Page 43

Test Configuration
Test Control
Frame Control
(size)
Test Duration (sec)
Number of Trails
Delay Time After
Test Start (sec)
Starting from
Stopping at
Frame size step
Custom/Edit…
Frame Payload
The duration of time (in seconds) for the test.
The number of times of the test.
The time interval for starting a test.
Set the initial frame size (bytes) here. The default
setting is 64 bytes.
Set the final frame size (bytes) here. The default setting
is 64 bytes.
The frame size to be added on every cycle.
Activating the Custom function will activate the settings
made on Edit…. The Edit… option includes settings for
Frame Size, Initial Rate, Min. Rate, Max. Rate and
Resolution.
The Frame Payload includes: Random, Increase,
0x55AA, 0x00FF, All 1 and All 0.
Load Control
IGMP Control
Initial Rate (%)
Step Rate (%)
Max Rate (%)
IGMP Version
Delay Time After
Join (sec)
The initial packet loading in percentage.
The rate percentage to be added on every cycle.
The maximum packet loading in percentage.
There are version 1, version 2 and version 3 as option.
The version 1 only support membership query and
report (Join), the version 2 support both Join and Leave.
The time interval for sending the Join packets.
XTRAMUS TECHNOLOGIES®
43
E-mail: sales@xtramus.com
Website: www.Xtramus.com
Page 44

Available Port Information
Module Name
MAC address
VLAN enable
VLAN ID
CFI
VLAN Priority
IP Address
Gateway IP
Mask
Current
LinkStatus
Media Speed
Duplex
Autonegotiation
Group IP
Number of Group
The name of the current module card under this test mode. It is based on
(chassis number, module card’ slot, port number).
The MAC address of the current module card’s ports.
You can choose to Enable or Disable the VLAN function.
If you enable the VLAN function, you will be able to set the VLAN ID here.
Enable or Disable the Canonical Format Indicator (CFI) function.
If you enable the VLAN function, you will be able to set the VLAN Priority here,
in which the range is between 0-7.
Set the IP address for the current port.
Set the IP of your Gateway.
Set the Subnet Mask here.
Shows the current link status in speed/duplex/autonegotiation.
Set the media speed of your module card.
Set the Duplex for Full or Half.
Set the as Auto negotiate or Force the system to run task on the set media
speed.
Shows the IP address of the group under test.
Shows the number of group under test.
Setting Categories
All
Basic
Protocol
IGMP Setting
Shows all the available port information.
Shows only Current Link Status, Media Speed, Duplex and Autonegotiation
information.
Shows only Protocol, MAC address, VLAN enable, VLAN ID and CFI
information.
Shows only Group IP and Number of Group information.
XTRAMUS TECHNOLOGIES®
44
E-mail: sales@xtramus.com
Website: www.Xtramus.com
Page 45

5.5. Group Capacity Test
The objective of this test mode is to determine the maximum number of multicast groups that a device or
system under test (DUT or SUT) can support while maintaining the ability to forward multicast frames to
all multicast groups registered to that DUT/SUT.
One or more destination test ports of DUT/SUT will join an initial number of multicast groups. After a
minimum delay, the source test ports must transmit to each group at a specified provided load. If at least
one frame for each multicast group is forwarded properly by the DUT/SUT on each participating egress
interface, the iteration is said to pass at he current capacity.
Port setting
Source Pair
You can choose the previous set Test Pair to be used on the Latency test.
Last Pass Group Capacity
Shows the current pass group capacity of this test.
XTRAMUS TECHNOLOGIES®
45
E-mail: sales@xtramus.com
Website: www.Xtramus.com
Page 46

Test Configuration
Test Control
Frame Size (byte)
Number of Trails
Delay Time After
Test Start (sec)
Set the size of the packet to be sent.
The number of times of the test.
The time interval for starting a test.
There are version 1, version 2 and version 3 as option.
IGMP Control
Result
Test Pair
Group Capacity
IGMP Version
The version 1 only support membership query and
report (Join), the version 2 support both Join and Leave.
Number of Init.
Set the initial number of group.
Group
Number of Max
Set the maximum number of group
Group
Group Increase
Step
Set the number of group to be added on every cycle
until reach the maximum group.
Shows the current test pair.
Shows each port capacity.
XTRAMUS TECHNOLOGIES®
46
E-mail: sales@xtramus.com
Website: www.Xtramus.com
Page 47

Available Port Information
Module Name
MAC address
VLAN enable
VLAN ID
CFI
VLAN Priority
IP Address
Gateway IP
Mask
Current
LinkStatus
Media Speed
Duplex
Autonegotiation
Group IP
Number of Group
The name of the current module card under this test mode. It is based on
(chassis number, module card’ slot, port number).
The MAC address of the current module card’s ports.
You can choose to Enable or Disable the VLAN function.
If you enable the VLAN function, you will be able to set the VLAN ID here.
Enable or Disable the Canonical Format Indicator (CFI) function.
If you enable the VLAN function, you will be able to set the VLAN Priority here,
in which the range is between 0-7.
Set the IP address for the current port.
Set the IP of your Gateway.
Set the Subnet Mask here.
Shows the current link status in speed/duplex/autonegotiation.
Set the media speed of your module card.
Set the Duplex for Full or Half.
Set the as Auto negotiate or Force the system to run task on the set media
speed.
Shows the IP address of the group under test.
Shows the number of group under test.
Setting Categories
All
Basic
Protocol
IGMP Setting
Shows all the available port information.
Shows only Current Link Status, Media Speed, Duplex and Autonegotiation
information.
Shows only Protocol, MAC address, VLAN enable, VLAN ID and CFI
information.
Shows only Group IP and Number of Group information.
XTRAMUS TECHNOLOGIES®
47
E-mail: sales@xtramus.com
Website: www.Xtramus.com
Page 48

5.6. Group Join/Leave Latency Test
The objective of this test mode is to determine the time duration that allows the device or system under
test to process a successful IGMP group membership report (leave report).
Port setting
Source Pair
You can choose the previous set Test Pair to be used on the Latency test.
Average Delay
Join Average Delay
Leave Average Delay
The average time delay for joining a group.
The average time delay foe leaving a group.
XTRAMUS TECHNOLOGIES®
48
E-mail: sales@xtramus.com
Website: www.Xtramus.com
Page 49

Test Configuration
Test Control
IGMP Control
Result
Test Pair
Join Delay
Leave Delay
Test Duration
Number of Trails
Delay Time After
Source Join
Time duration of the test.
The number of times of the test.
The time delay for preparation of the next Test Pair test.
There are version 1, version 2 and version 3 as option.
IGMP Version
The version 1 only support membership query and
report (Join), the version 2 support both Join and Leave.
Enable Measure
Join Delay
Enable Measure
Leave Delay
Selecting this option will enable the system to report the
time delay for joining a group.
Selecting this option will enable the system to report the
time delay for leaving a group.
Shows the current test pair.
The average time delay for joining a group of each group.
The average time delay for leaving a group of each group.
XTRAMUS TECHNOLOGIES®
49
E-mail: sales@xtramus.com
Website: www.Xtramus.com
Page 50

Available Port Information
Module Name
MAC address
VLAN enable
VLAN ID
CFI
VLAN Priority
IP Address
Gateway IP
Mask
Current
LinkStatus
Media Speed
Duplex
Autonegotiation
Group IP
Number of Group
The name of the current module card under this test mode. It is based on
(chassis number, module card’ slot, port number).
The MAC address of the current module card’s ports.
You can choose to Enable or Disable the VLAN function.
If you enable the VLAN function, you will be able to set the VLAN ID here.
Enable or Disable the Canonical Format Indicator (CFI) function.
If you enable the VLAN function, you will be able to set the VLAN Priority here,
in which the range is between 0-7.
Set the IP address for the current port.
Set the IP of your Gateway.
Set the Subnet Mask here.
Shows the current link status in speed/duplex/autonegotiation.
Set the media speed of your module card.
Set the Duplex for Full or Half.
Set the as Auto negotiate or Force the system to run task on the set media
speed.
Shows the IP address of the group under test.
Shows the number of group under test.
Setting Categories
All
Basic
Protocol
IGMP Setting
Shows all the available port information.
Shows only Current Link Status, Media Speed, Duplex and Autonegotiation
information.
Shows only Protocol, MAC address, VLAN enable, VLAN ID and CFI
information.
Shows only Group IP and Number of Group information.
XTRAMUS TECHNOLOGIES®
50
E-mail: sales@xtramus.com
Website: www.Xtramus.com
Page 51

5.7. IGMP V3 Source Filter Test
The objective of this test is to compare if the quantity of packet received by host port is the same as the
predicted quantity to evaluate the operation of the DUT.
Port setting
IGMP Source
Port
IGMP Host Port
You can choose the port group to be the source port on this field. Please select
the port by clicking on its □, and than click the > button to confirm the
selection.
You can choose the port group to be the host port on this field. Please select the
port by clicking on its □, and than click the > button to confirm the selection.
All the selected Source/Host port will be moved on its respectively Selected
field. If you want to cancel a selection, please select the port from the Selected
field and click < button.
Selected
If you want to cancel all the selection, please click the << button.
You can confirm a multiple selection of ports by clicking the >> button.
XTRAMUS TECHNOLOGIES®
51
E-mail: sales@xtramus.com
Website: www.Xtramus.com
Page 52

Test Configuration
Number of Trails
Delay Time After
Test Start
Test Duration
Number of Groups
Initial Group
Address
Filter Settings
The number of times of the test.
The time delay for preparation of the next Test Pair test.
Time duration of the test.
You can set the number of groups for this test.
You can modify the Group Address on this field.
On this option, you can set the group to be excluded or included on filter mode.
Please select the group as indicated by the figure above, and than click the Include/Exclude option
by scrolling down the Filter Type field, and than click Set button to confirm the settings.
XTRAMUS TECHNOLOGIES®
52
E-mail: sales@xtramus.com
Website: www.Xtramus.com
Page 53

Available Port Information
Module Name
MAC address
VLAN enable
VLAN ID
CFI
VLAN Priority
IP Address
Gateway IP
Mask
Current
LinkStatus
Media Speed
Duplex
Autonegotiation
Group IP
Number of Group
The name of the current module card under this test mode. It is based on
(chassis number, module card’ slot, port number).
The MAC address of the current module card’s ports.
You can choose to Enable or Disable the VLAN function.
If you enable the VLAN function, you will be able to set the VLAN ID here.
Enable or Disable the Canonical Format Indicator (CFI) function.
If you enable the VLAN function, you will be able to set the VLAN Priority here,
in which the range is between 0-7.
Set the IP address for the current port.
Set the IP of your Gateway.
Set the Subnet Mask here.
Shows the current link status in speed/duplex/autonegotiation.
Set the media speed of your module card.
Set the Duplex for Full or Half.
Set the as Auto negotiate or Force the system to run task on the set media
speed.
Shows the IP address of the group under test.
Shows the number of group under test.
Setting Categories
All
Basic
Protocol
IGMP Setting
Shows all the available port information.
Shows only Current Link Status, Media Speed, Duplex and Autonegotiation
information.
Shows only Protocol, MAC address, VLAN enable, VLAN ID and CFI
information.
Shows only Group IP and Number of Group information.
XTRAMUS TECHNOLOGIES®
53
E-mail: sales@xtramus.com
Website: www.Xtramus.com
Page 54

6. Run Test, Test Result & Report
Before starting to run a task, you must activate the test you want to run by clicking on the test mode of
System Info/Configuration List shown below. The unselected test mode will not run during testing.
Please also select the Port Pair that you want to run for testing. Please note that multiple selecting of Port
Pair is possible.
After finishing with the settings, you can click on the up right side
Also you can stop the test running whenever you click on the
XTRAMUS TECHNOLOGIES®
54
button to start to run all tasks.
button.
E-mail: sales@xtramus.com
Website: www.Xtramus.com
Page 55

6.1. Accessing the test report
The results, statics and charts are displayed and can be checked on the Main Display Screen. There are
two ways to view Report:
Accessing Report
Click Report located on System
Info/Configuration List.
Click the Report button located on Quick
Launch Buttons.
During the test, charts or statics table
for results of each test (Mixed Class
Throughput, Aggregated Multicast
Throughput, Scaled Group
Forwarding, Latency Test, Group
Capacity Test, Group Join/Leave
Latency Test and IGMP V3 Source
Filter Test) will be displayed on the
Main Display Screen.
NuApps-IGMP-RM will switch testing
table of each test automatically when
finishing the current test and starting
the next test. Please note that you can only access the testing table for test you’ve performed.
XTRAMUS TECHNOLOGIES®
55
E-mail: sales@xtramus.com
Website: www.Xtramus.com
Page 56

6.2. Test Report_Counter
The Counter report will show the detailed result of each test cycle.
You can save the Counter report on your PC by clicking the
button. Test results and related
statistic are available and can be viewed with the “*.xls” file you saved this way. You need Microsoft Excel®
to view “*.xls” file.
Also, you can click the
to refresh the counter and run a new task tests.
XTRAMUS TECHNOLOGIES®
56
E-mail: sales@xtramus.com
Website: www.Xtramus.com
Page 57

6.3. Test Report _Mixed Class Throughput
The test result for Mixed Class Throughput will show the table of Rx Packets versus each Rx Ports. It will
include the Unicast, Multicast and the Total Rx Packets of each port.
6.4. Test Report _Aggregated Multicast Throughput
The test result for Aggregated Multicast Throughput will show the table of Rx Packets versus each Rx
Ports. It shows the Total Rx Packets of each port.
XTRAMUS TECHNOLOGIES®
57
E-mail: sales@xtramus.com
Website: www.Xtramus.com
Page 58

6.5. Test Report _Scaled Group Forwarding
The test result for Scaled Group Forwarding will show the table of Rx Packets versus each Rx Ports. It
shows the Total Rx Packets of each port from each group.
6.6. Test Report _Latency Test
The test result for Latency Test will show the table of Rx Latency in us versus each Rx Ports. It includes the
maximum, minimum and the average latency of each port.
XTRAMUS TECHNOLOGIES®
58
E-mail: sales@xtramus.com
Website: www.Xtramus.com
Page 59

6.7. Test Report _Group Capacity Test
The test result for Group Capacity Test is shown on the Test Config window from the System
Info/Configuration List. The result of the maximum pass group capacity is shown by the red rectangle for
each test pair.
6.8. Test Report _Group Join/Leave Latency Test
The test result for Group Join/Leave Latency Test is shown on the Test Config window from the System
Info/Configuration List. You must select the Enable Measure Join Delay and Enable Measure Leave
Delay for system to display the average delay time for respectively Join and Leave group. Those result is
shown by the red rectangle for each test pair.
XTRAMUS TECHNOLOGIES®
59
E-mail: sales@xtramus.com
Website: www.Xtramus.com
Page 60

6.9. Test Report _IGMP V3 Source Filter Test
The test result for IGMP V3 Source Filter Test will show the table of Rx Packets in us versus each Rx Ports.
It includes the Total and Multicast of IGMP V3 Source Filter of each port.
XTRAMUS TECHNOLOGIES®
60
E-mail: sales@xtramus.com
Website: www.Xtramus.com
Page 61

Note: Information and specifications contained in this document are subject to change without notice.
XTRAMUS TECHNOLOGIES®
All products and company names are trademarks of their respective corporations.
Copyright © 2012 Xtramus Technologies, all rights reserved.
Do not reproduce, redistribute or repost without written permission from Xtramus.
Doc # USM_NuApps-IGMP-RM_V1.2_ENG_20120926
61
E-mail: sales@xtramus.com
Website: www.Xtramus.com
 Loading...