

Page 1

NuApps-G8261-RM
User’s Manual
USM Ver 1.0
Page 2

Foreword
Copyright
Copyright © 2011 Xtramus Technologies, all rights reserved. The information contained in this document is the property of Xtramus
Technologies. No part of this publication shall be reproduced, stored in a retrieval system, or transmitted, in any form or by any
means, without the prior written permission of Xtramus Technologi es.
Disclaimer
The information contained in this document is subject to change without notice and does not represent a commitment on the part of
Xtramus Technologies. The information in this document is believed to be accurate and reliable. However, Xtramus Technologies
assumes no responsibility or liability for any errors or inaccuracies that may appear in the document.
Trademarks
NuApps-G8261-RM is a trademark or registered trademark of Xtramus Technologies. All other trademarks and registered
trademarks are the property of their respective owners.
Warranty
Xtramus Technologies warrants for the hardware provided along with this document under proper usage and conditions in normal
environment; any improper operation or in irregular environment may possibl y cause this product NOT function well. For detailed
terms, please contact your local dealer.
Contact Information
Xtramus Technologies
E-mail: sales@xtramus.com
Website: www.xtramus.com
Tel: +886-2-8227-6611
Fax: +886-2-8227-6622
XTRAMUS TECHNOLOGIES®
2
E-mail: sales@xtram us . co m
Website: www.Xtramus.com
Page 3

Revision History
Date Ver Software History
2011/11/24 1.0 v0.9b009 First draft version
1. Change Revision History.
2. Page 5, add XM-RM881 module card, and upgrade
NuApps-G8261 installation requirements, module card
firmware/FPGA/PROM requirement.
2011/12/07 1.0 v0.9b010
3. Page 6, change installation step 1&2 figures and
descriptions.
4. Page 10, change hardware installation figure (adding
XM-RM881).
5. Page 11, change ActiveTcl download figure and related
descriptions (x86 only).
XTRAMUS TECHNOLOGIES®
3
E-mail: sales@xtram us . co m
Website: www.Xtramus.com
Page 4

Table of Contents
Foreword..........................................................................................................................................2
Revision History..............................................................................................................................3
1. NuApps-G8261-RM Overview.....................................................................................................5
2. Installing/Uninstalling NuApps-G8261-RM................................................................................6
3. NuApps-G8261-RM Function Overview...................................................................................10
3.1. Starting NuApps-G8261-RM.............................................................................................10
3.2. Downloading & Installing ActiveTcl ................................................................................11
3.3. Starting NuServer & NuApps-G8261-RM ........................................................................15
3.4. Port Reserving..................................................................................................................16
3.5. NuApps-G8261-RM/NuServer Overview.........................................................................18
4. NuApps-G8261-RM Functions..................................................................................................20
4.1. Menu Bar...........................................................................................................................20
4.1.1. File ................................................................................................................................20
4.1.2. View ..............................................................................................................................21
4.1.3. Language......................................................................................................................22
4.1.4. Export...........................................................................................................................22
4.1.5. Help...............................................................................................................................23
4.2. Quick Launch Buttons .....................................................................................................24
4.3. System Info/Configuration List .......................................................................................26
4.4. Select Task ........................................................................................................................27
4.5. Description........................................................................................................................28
4.6. Status Bar..........................................................................................................................28
4.7. Control Buttons/Test Running Status Icon ....................................................................28
4.8. Port Configuration............................................................................................................29
4.9. Test Configuration............................................................................................................34
4.9.1. G.8261 Test Case 1 ......................................................................................................37
4.9.2. G.8261 Test Case 2 ......................................................................................................39
4.9.3. G.8261 Test Case 3 ......................................................................................................41
4.9.4. G.8261 Test Case 4 ......................................................................................................43
4.9.5. G.8261 Test Case 5 ......................................................................................................45
4.9.6. G.8261 Test Case 12 ....................................................................................................47
4.9.7. G.8261 Test Case 13 ....................................................................................................49
4.9.8. G.8261 Test Case 14 ....................................................................................................51
4.9.9. G.8261 Test Case 15 ....................................................................................................53
4.9.10. G.8261 Test Case 16 ..................................................................................................55
4.10. Report..............................................................................................................................57
XTRAMUS TECHNOLOGIES®
4
E-mail: sales@xtram us . co m
Website: www.Xtramus.com
Page 5

1. NuApps-G8261-RM Overview
NuApps-G8261-RM is an application that’s designed base on ITU-T (ITU Telecommunication
Standardization Sector) Recommendation G.8261 for analyzing Ethernet switches, bridges, and
routers. The following test cases are available in NuApps-G8261-RM:
Uni-Direction
y Test Case 1: The “Static” Network disturbance load with 80%.
y Test Case 2: Sudden large and persistent changes in network load.
y Test Case 3: The slow change in network load over an extremely long timescale.
y Test Case 4: Temporary network outages and restoration for varying amounts of time.
y Test Case 5: Temporary network congestion and restoration for varying amounts of time.
Bi-Direction
y Test Case 12: The 'Static' Packet load.
y Test Case 13: Sudden large and persistent changes in network load.
y Test Case 14: The slow change in network load over an extremely long timescale.
y Test Case 15: Temporary network outages and restoration for varying amounts of time.
y Test Case 16: Temporary network congestion and restoration for varying amounts of time.
NuApps-G8261-RM is designed for Xtramus Technologies XM-RM series module cards listed in the table
down below:
Module Cards Support NuApps-G8261-RM
XM-RM661 XM-RM671 XM-RM681
XM-RM731 XM-RM751 XM-RM761
XM-RM781 XM-RM881 XM-RM891
*Note: NuStreams-2000i and NuStreams-600i are required as well.
Also, the firmware/FPGA/PROM version of your XM-RM module cards shall meet the requirements listed
down below:
Module Cards Requirements for NuApps-G8261-RM
Module Firmware FPGA PROM
XM-RM661/671/681
XM-RM751/761/781
XM-RM731
XM-RM881
XM-RM891
v1.6b019 v3.0b021 v1.6b002
v1.6b019 v3.0b020 v1.6b002
v1.6b019 v2.0b006 v1.6b002
v0.9b016 v1.3b024 v0.1b022
v1.6b020 v1.3b003 v1.6b002
Please make sure that your PC meets the requirements listed in the table down below before installing
NuApps-G8261-RM.
OS
CPU
RAM
HDD
*Note: Large amount of data will be generated while running NuApps-G8261-RM. It is recommended to
preserve enough available Hard-Disk space to store these data.
XTRAMUS TECHNOLOGIES®
Windows 2000/Windows XP Windows Vista/Windows 7
Pentium 1.3GHz or Higher
1GB RAM 2GB RAM
10 GB Available Hard Drive Space
5
E-mail: sales@xtram us . co m
Website: www.Xtramus.com
Page 6
2. Installing/Uninstalling NuApps-G8261-RM
Please follow the steps down below to install NuApps-G8261-RM.
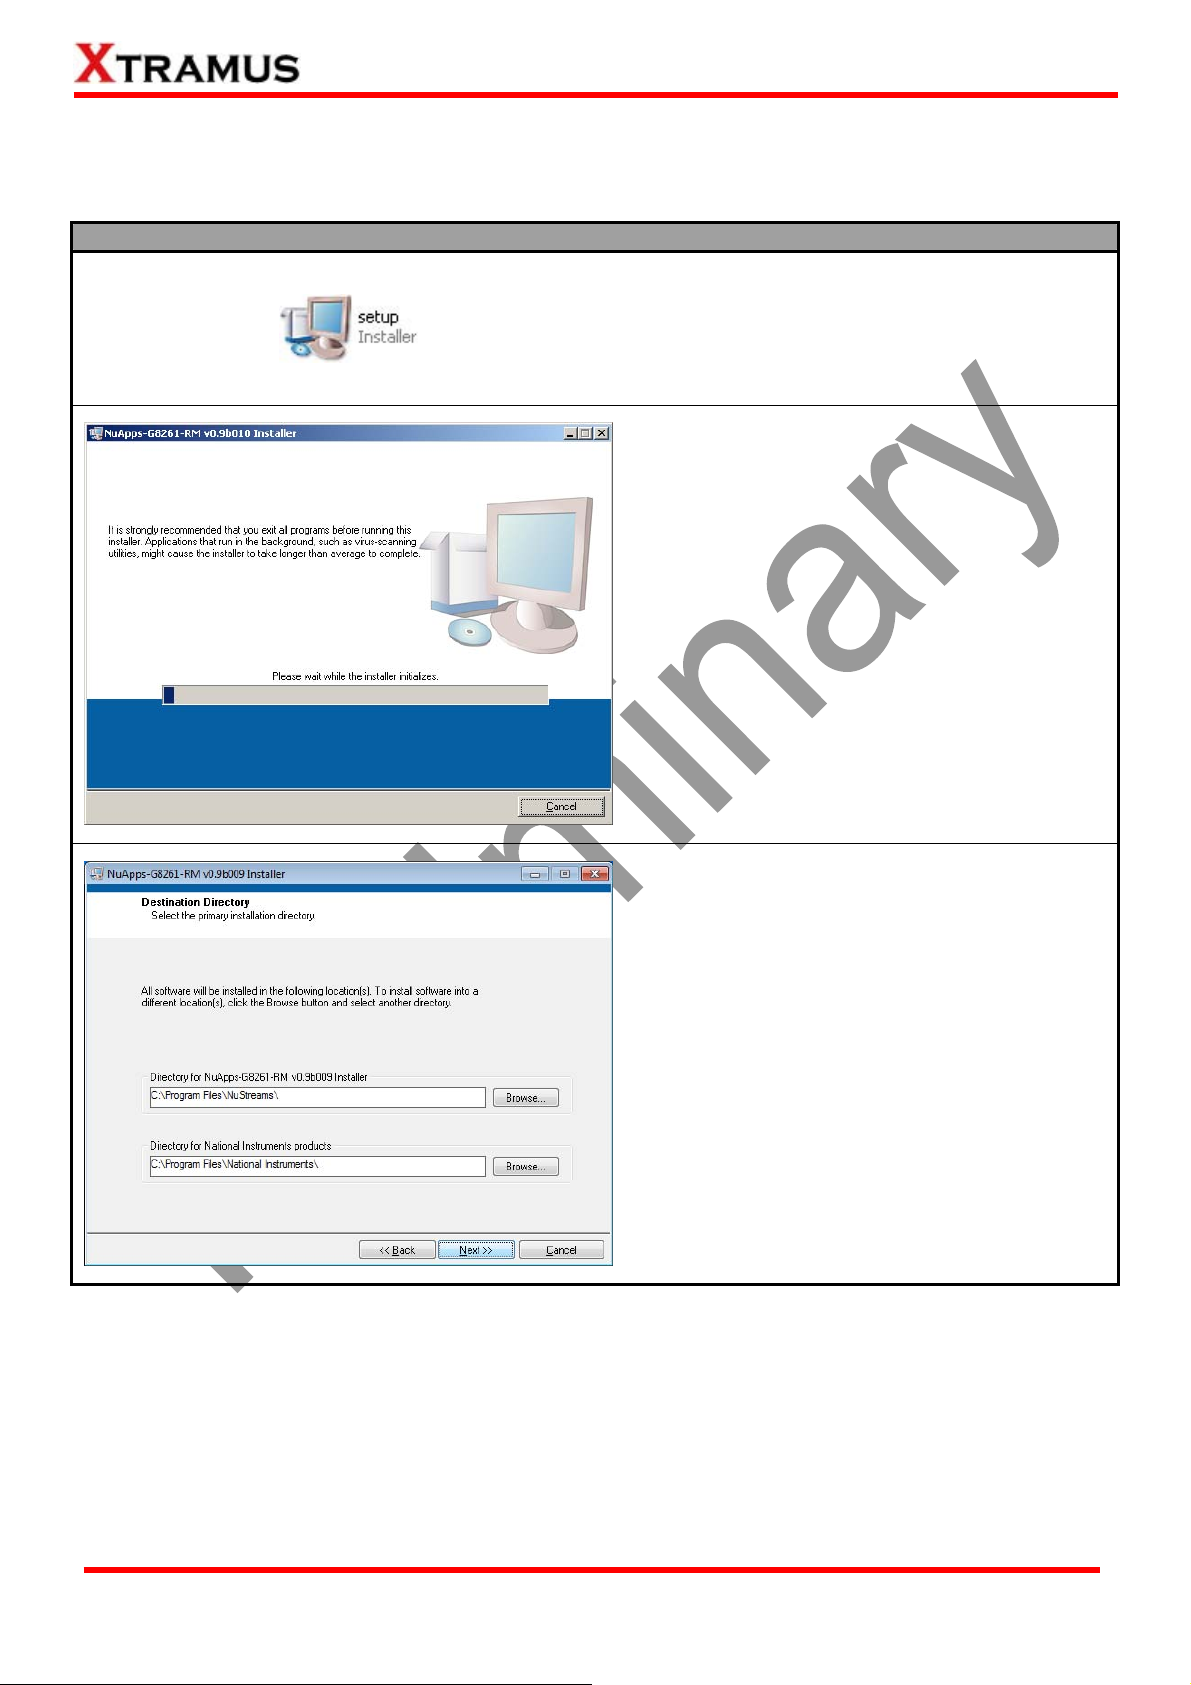
Installing NuApps-G8261-RM
1. Put NuApps-G8261 installation CD into your
PC’s CD-ROM. NuApps-G8261 Installer shall start
running automatically. If NuApps-G8261 Installer
does not run automatically , please double-click th e
Setup file contained in NuApps-G8261 installation
CD as shown in the figure on the left*.
2. The installation program will extract files
automatically. You can press “Cancel” to cancel
extracting files.
3. Click “Next” to continue installation.
*Note: Due to different Operating Systems or system settings, warning messages might pop up when
installing NuApps-G8261-RM. When this occurs, please choose the options on these pop-up warning
messages that allow you to continue installing NuApps-G8261-RM or device driver.
XTRAMUS TECHNOLOGIES®
6
E-mail: sales@xtram us . co m
Website: www.Xtramus.com
Page 7
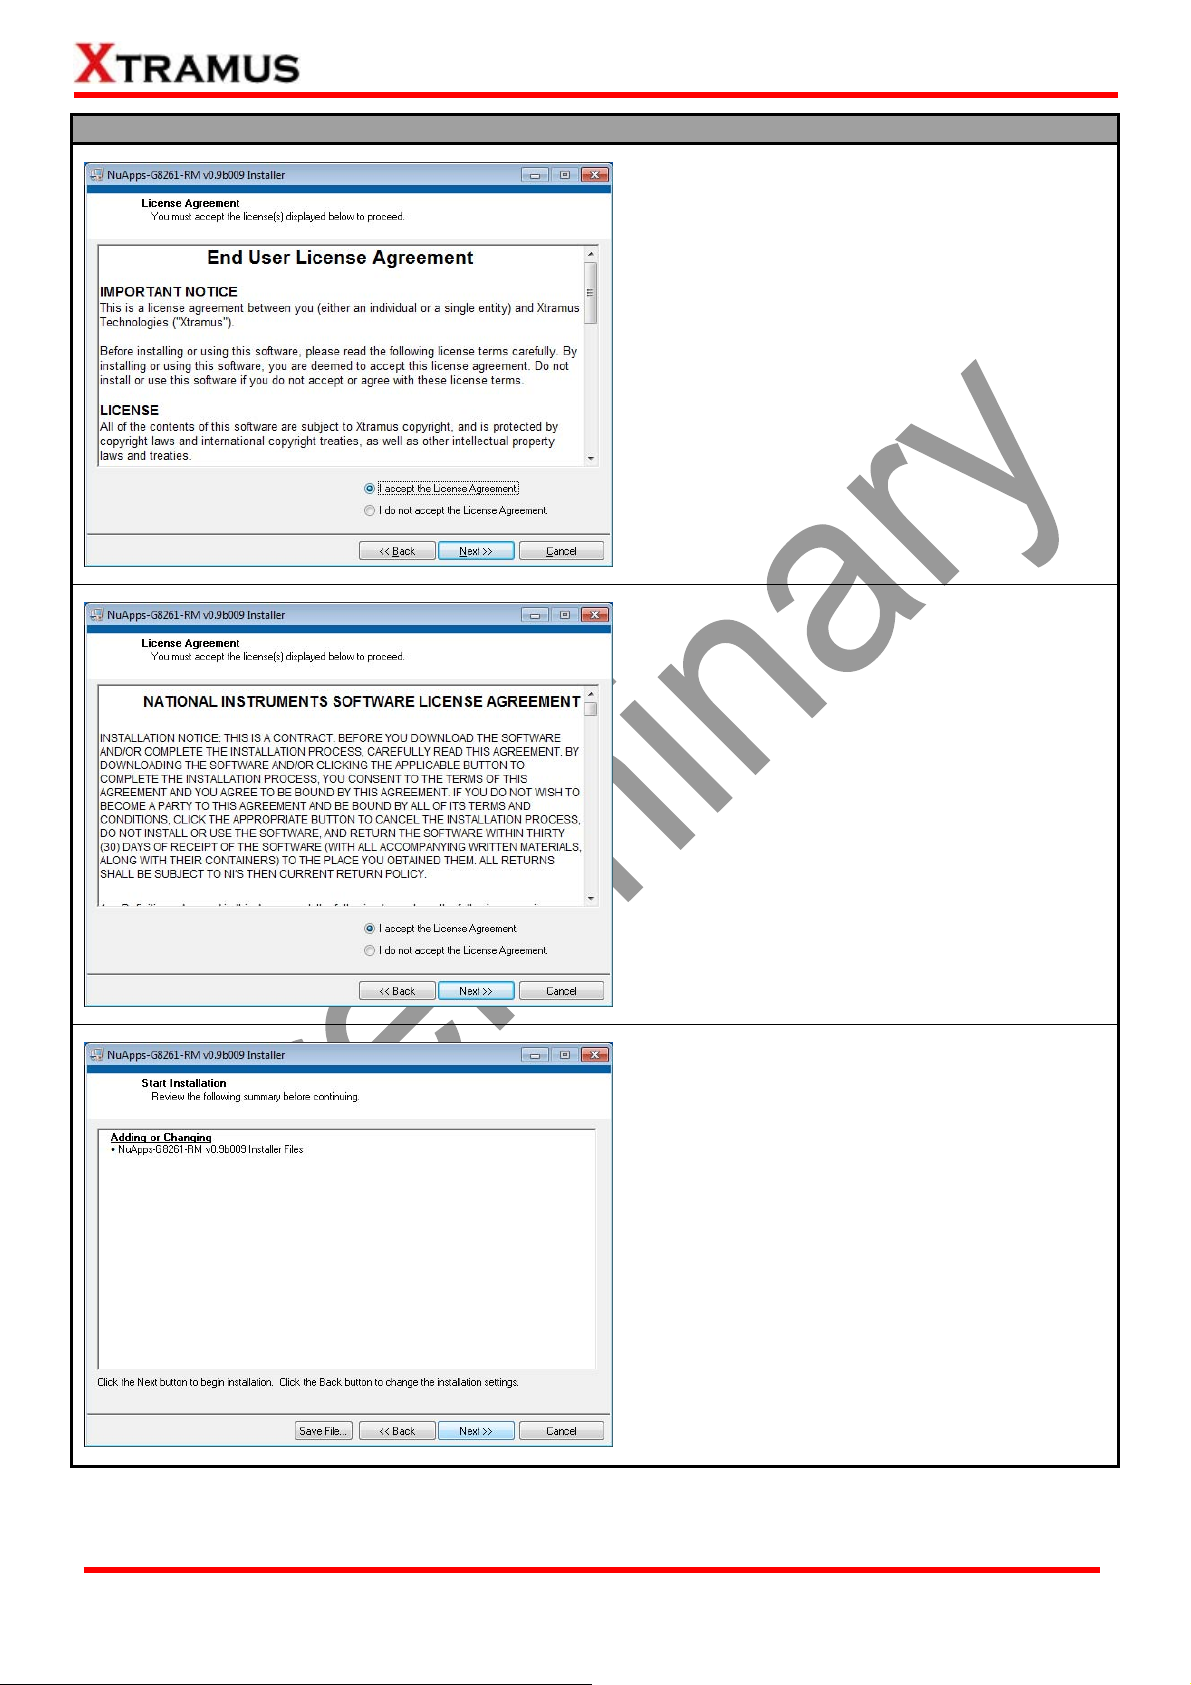
Installing NuApps-G8261-RM
4. Click “I accept the terms in the license
agreement”, and click “Next” to continue.
5. Click “I accept the terms in the license
agreement”, and click “Next” to continue.
6. NuApps-G8261-RM Installer will start installing
momentarily. Click “
Next” button to continue.
XTRAMUS TECHNOLOGIES®
7
E-mail: sales@xtram us . co m
Website: www.Xtramus.com
Page 8
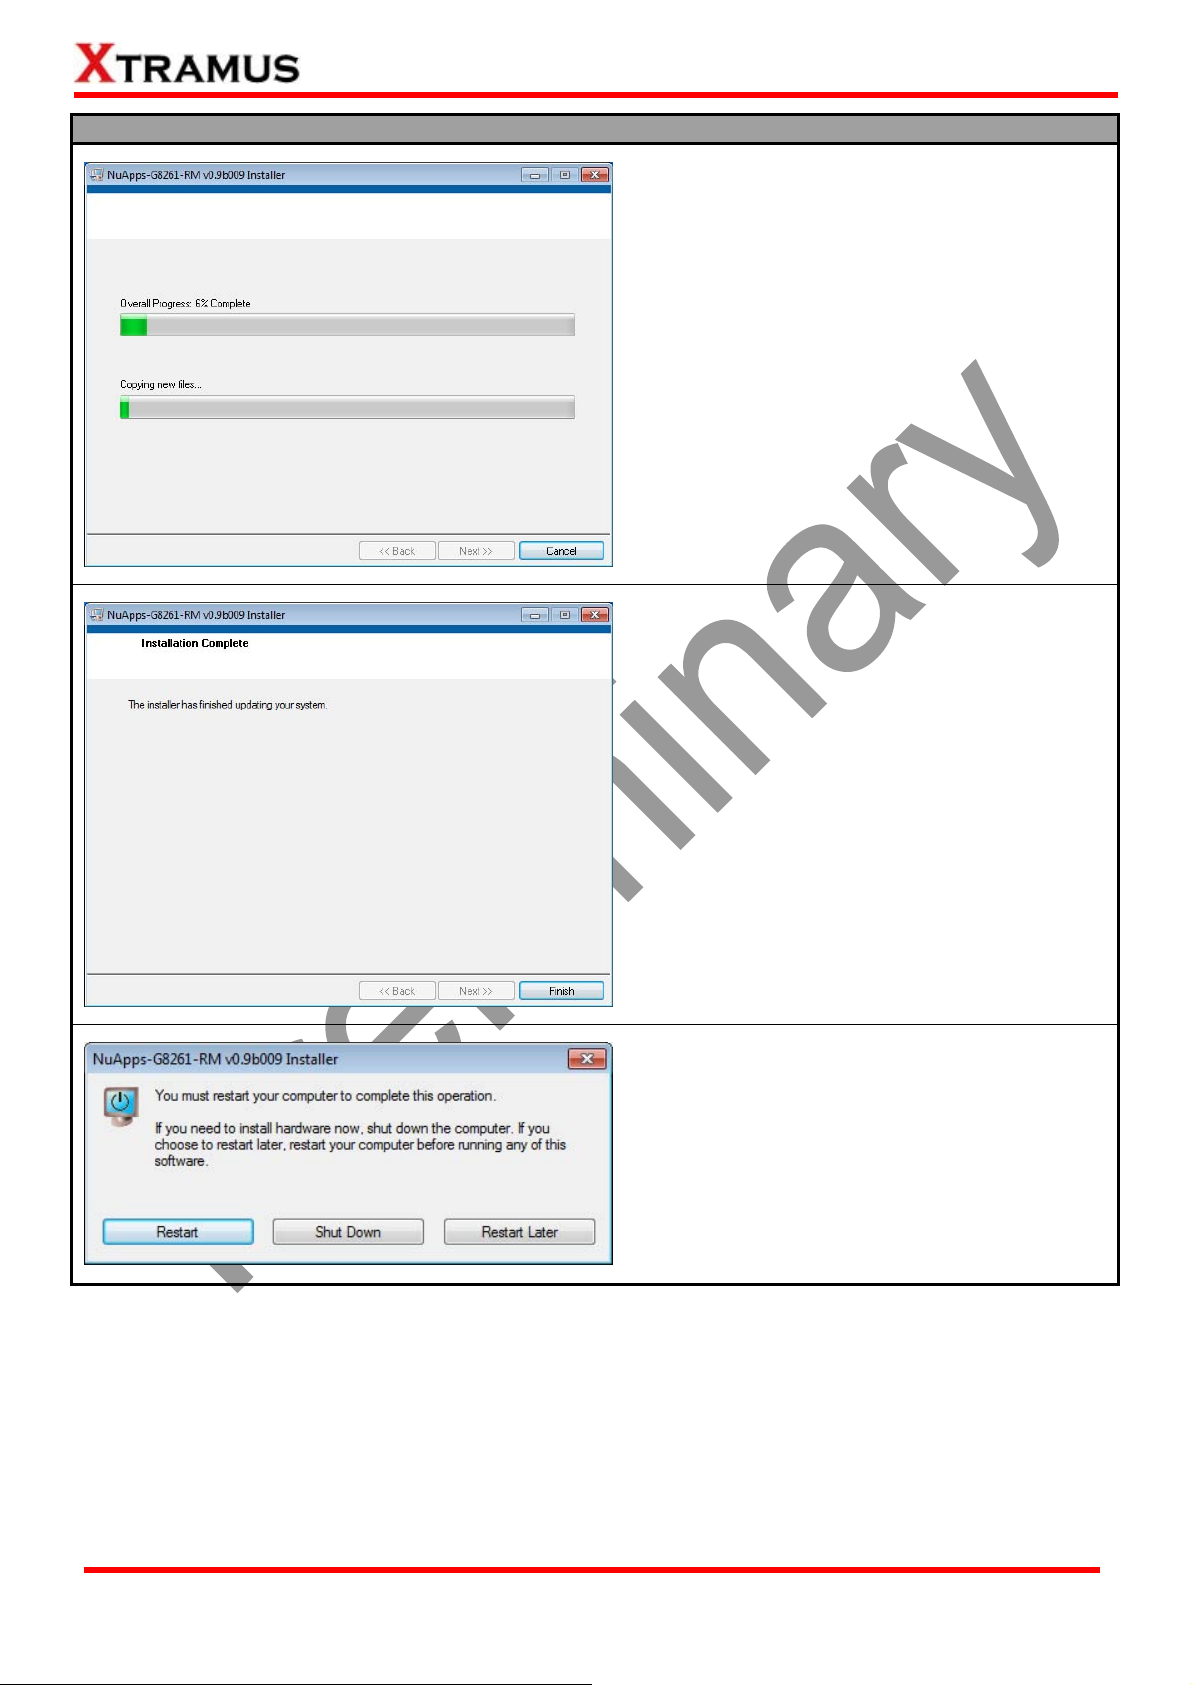
Installing NuApps-G8261-RM
7. Installer is installing NuApps-G8261-RM.
8. NuApps-G8261-RM installation completes.
Click
Finish button to exit.
9. NuAppw-G8261-RM Installer will prompt you to
restart your computer after the installation. It is
recommended to restart your computer after
installing NuApps-G8261-RM.
XTRAMUS TECHNOLOGIES®
8
E-mail: sales@xtram us . co m
Website: www.Xtramus.com
Page 9
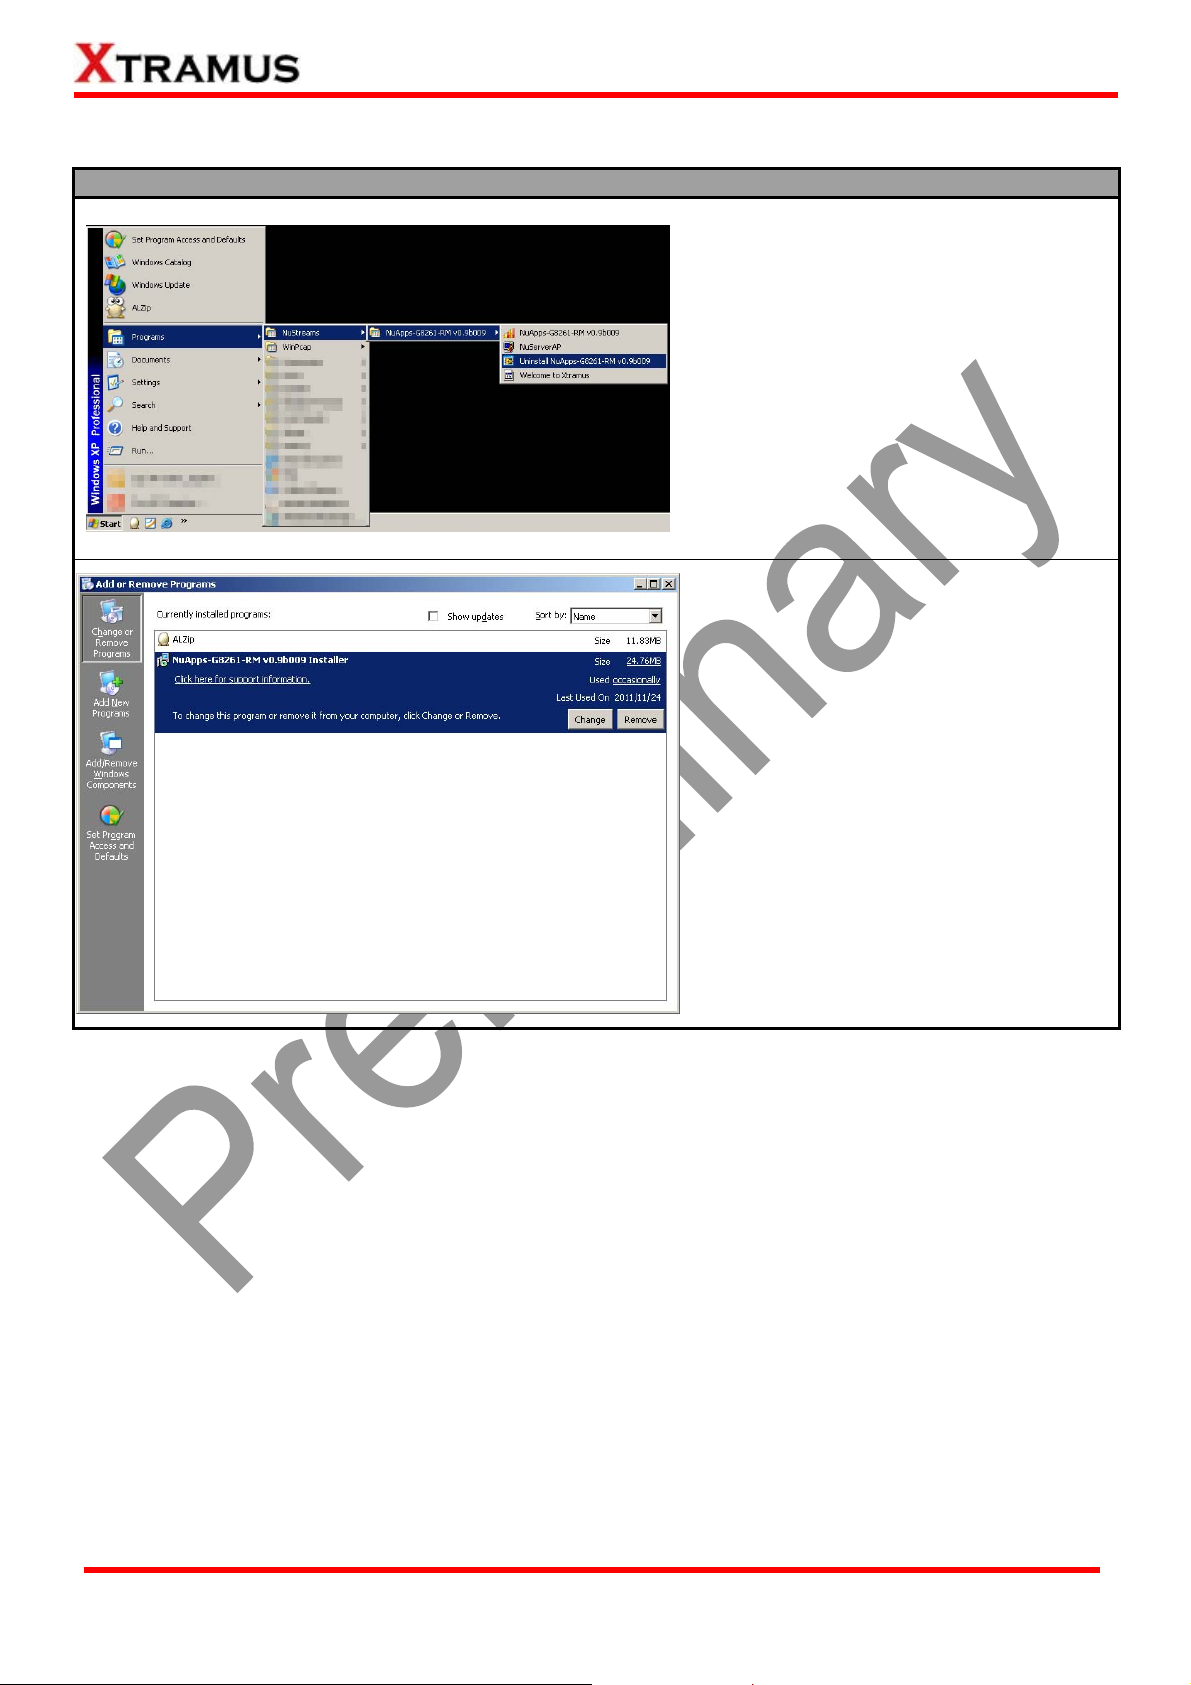
You can uninstall NuApps-G8261-RM by:
Uninstalling NuApps-G8261-RM
• Click Start Æ Programs Æ NuStreams
Æ NuApps-G8261-RM Æ Uninstall
NuApps-G8261-RM.
• Go to the Control Panel, choose
NuApps-G8261-RM from installed
program list, and click “Remove” to
uninstall.
XTRAMUS TECHNOLOGIES®
9
E-mail: sales@xtram us . co m
Website: www.Xtramus.com
Page 10
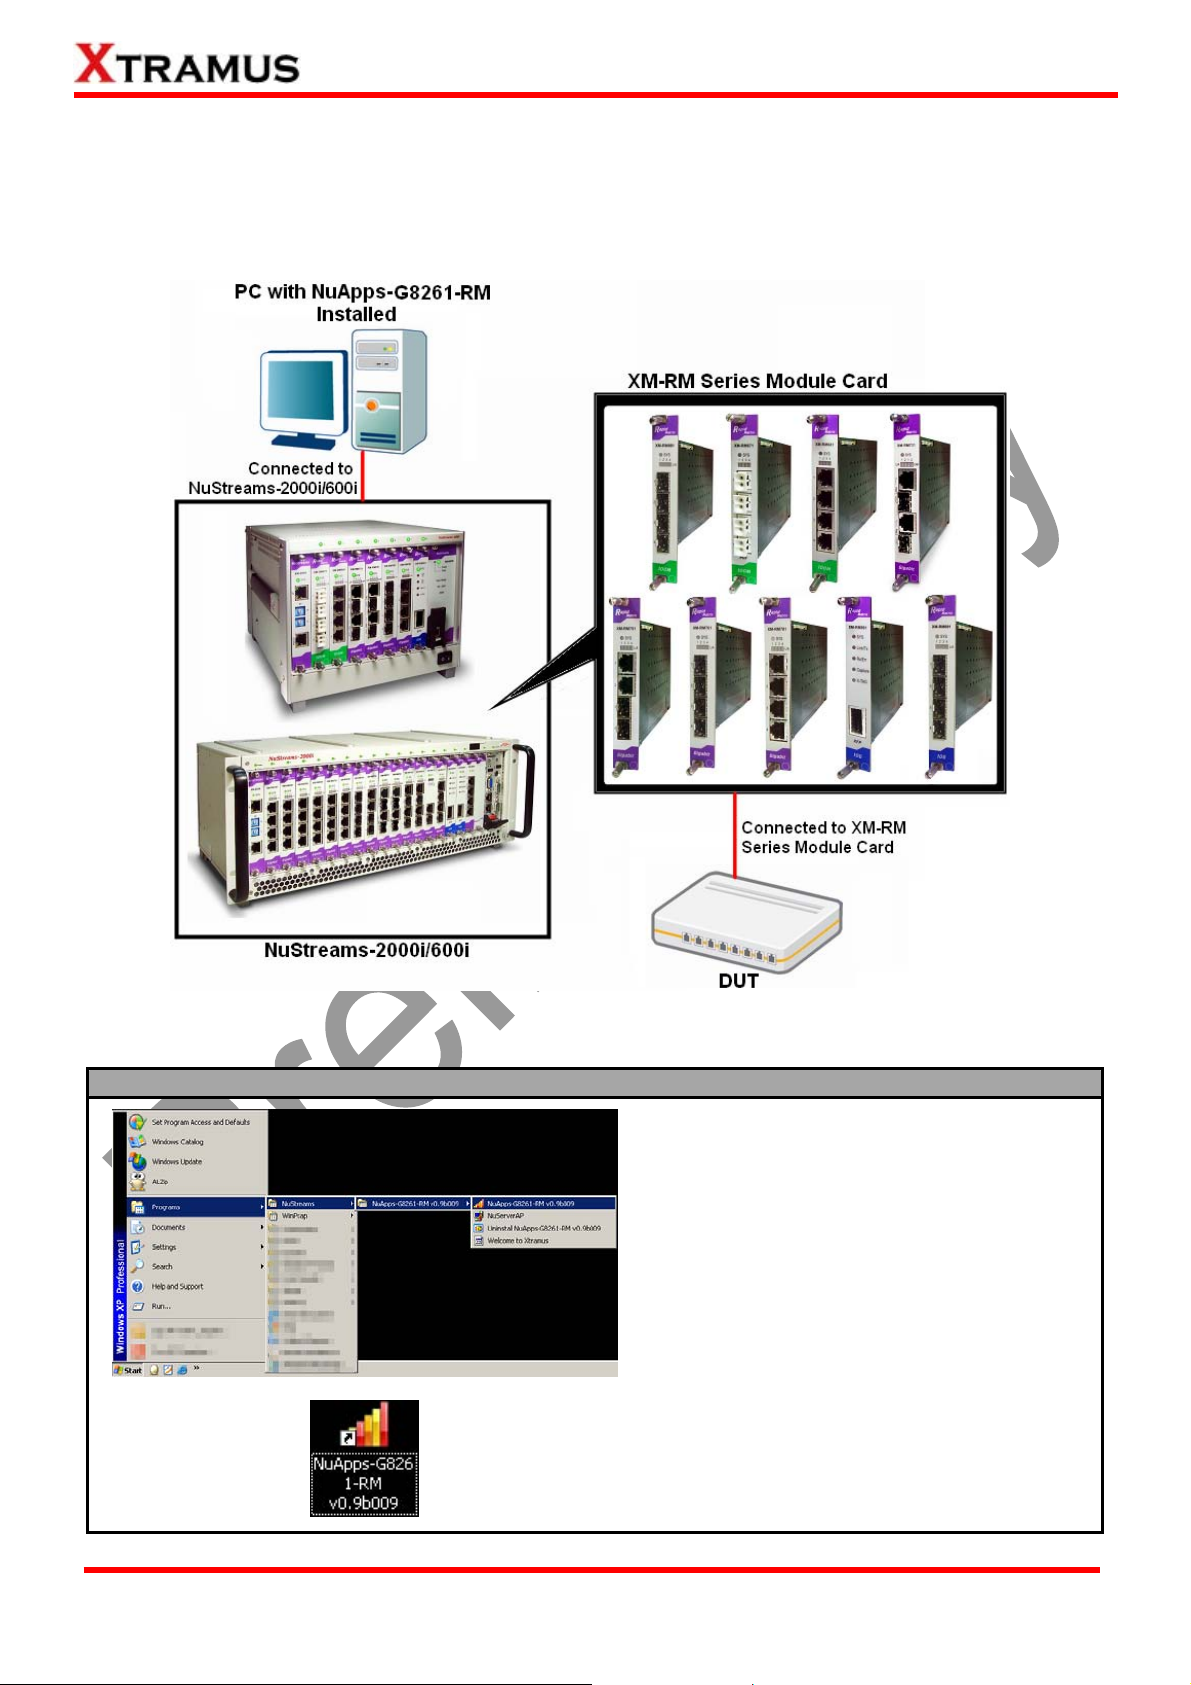
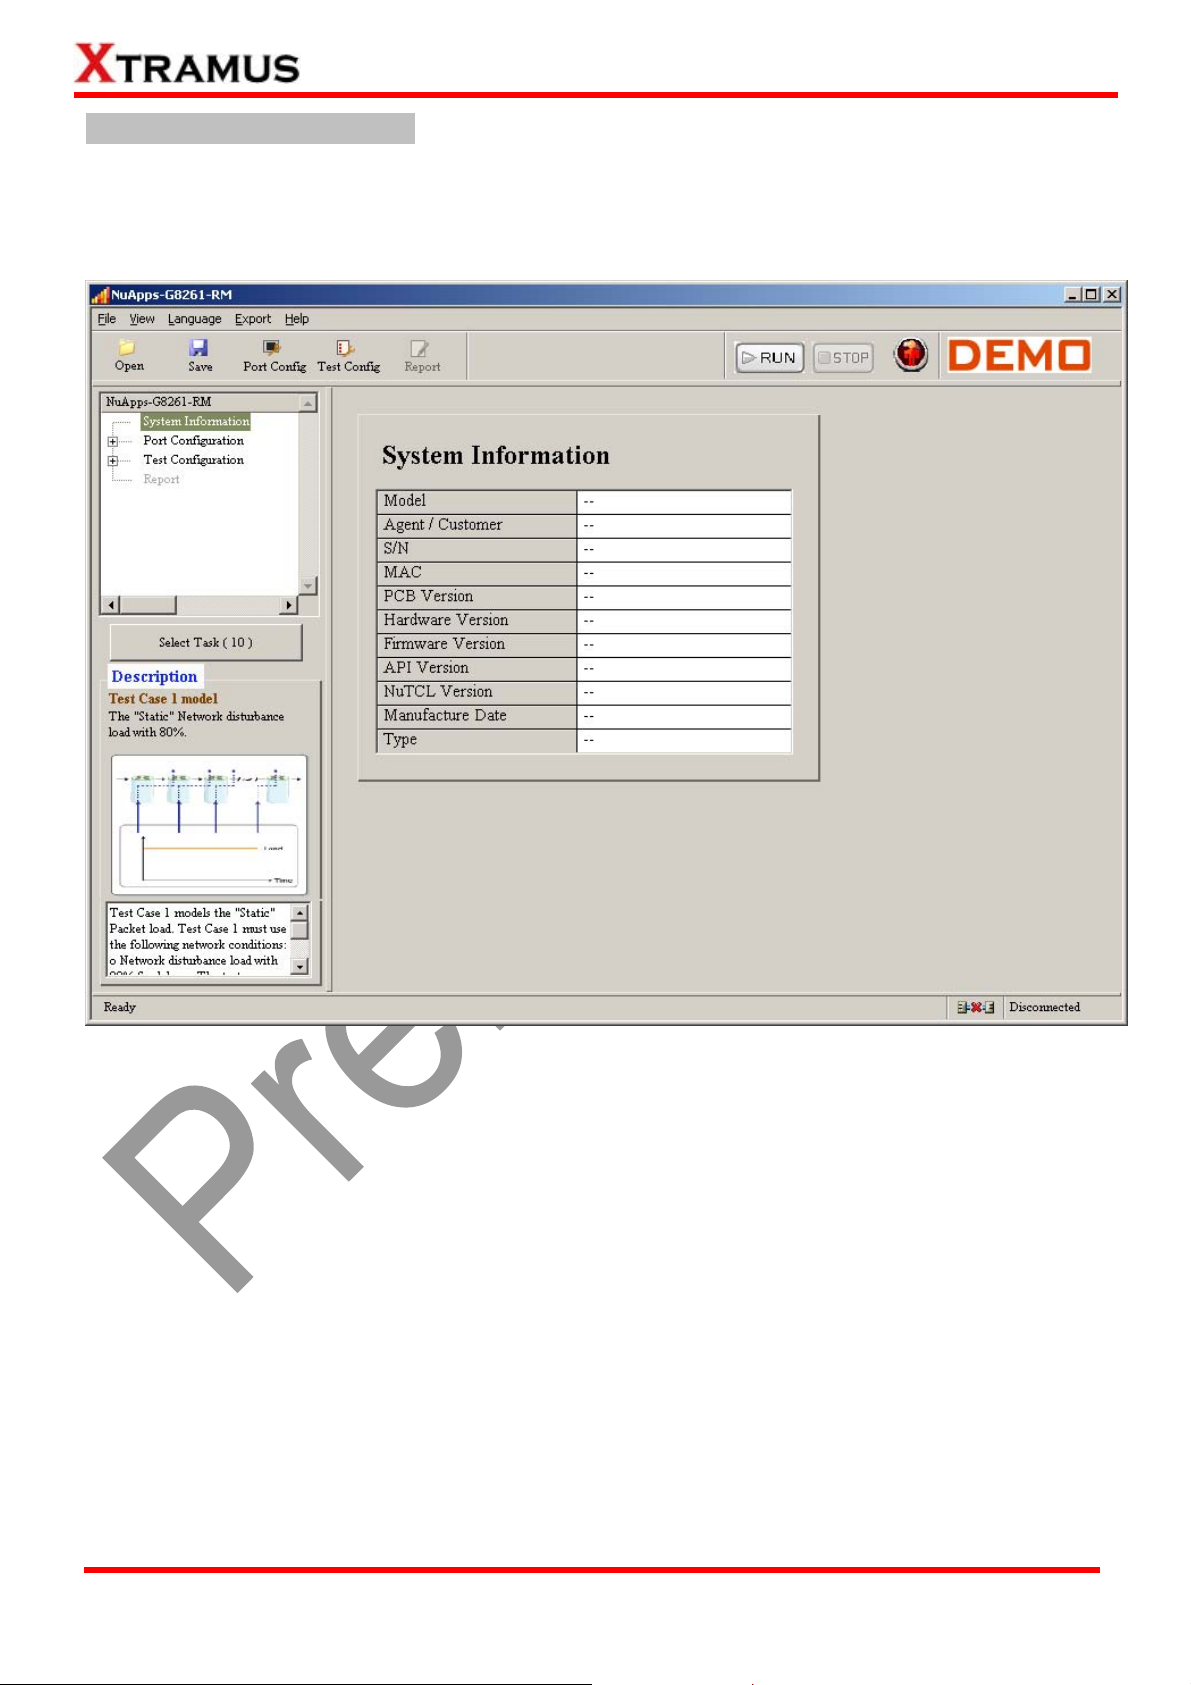
3. NuApps-G8261-RM Function Overview
3.1. Starting NuApps-G8261-RM
Before starting NuApps-G8261-RM, the DUT, your PC, and NuStreams-2000i/600i shall be connected
properly as show in the figure down below:
There are two ways to start NuApps-G8261-RM:
Starting NuApps-G8261-RM
XTRAMUS TECHNOLOGIES®
• Click Start Æ Programs Æ NuStreams Æ
NuApps-G8261-RM.
• Double-click NuApps-G8261-RM icon
located on your PC’s desktop.
10
E-mail: sales@xtram us . co m
Website: www.Xtramus.com
Page 11
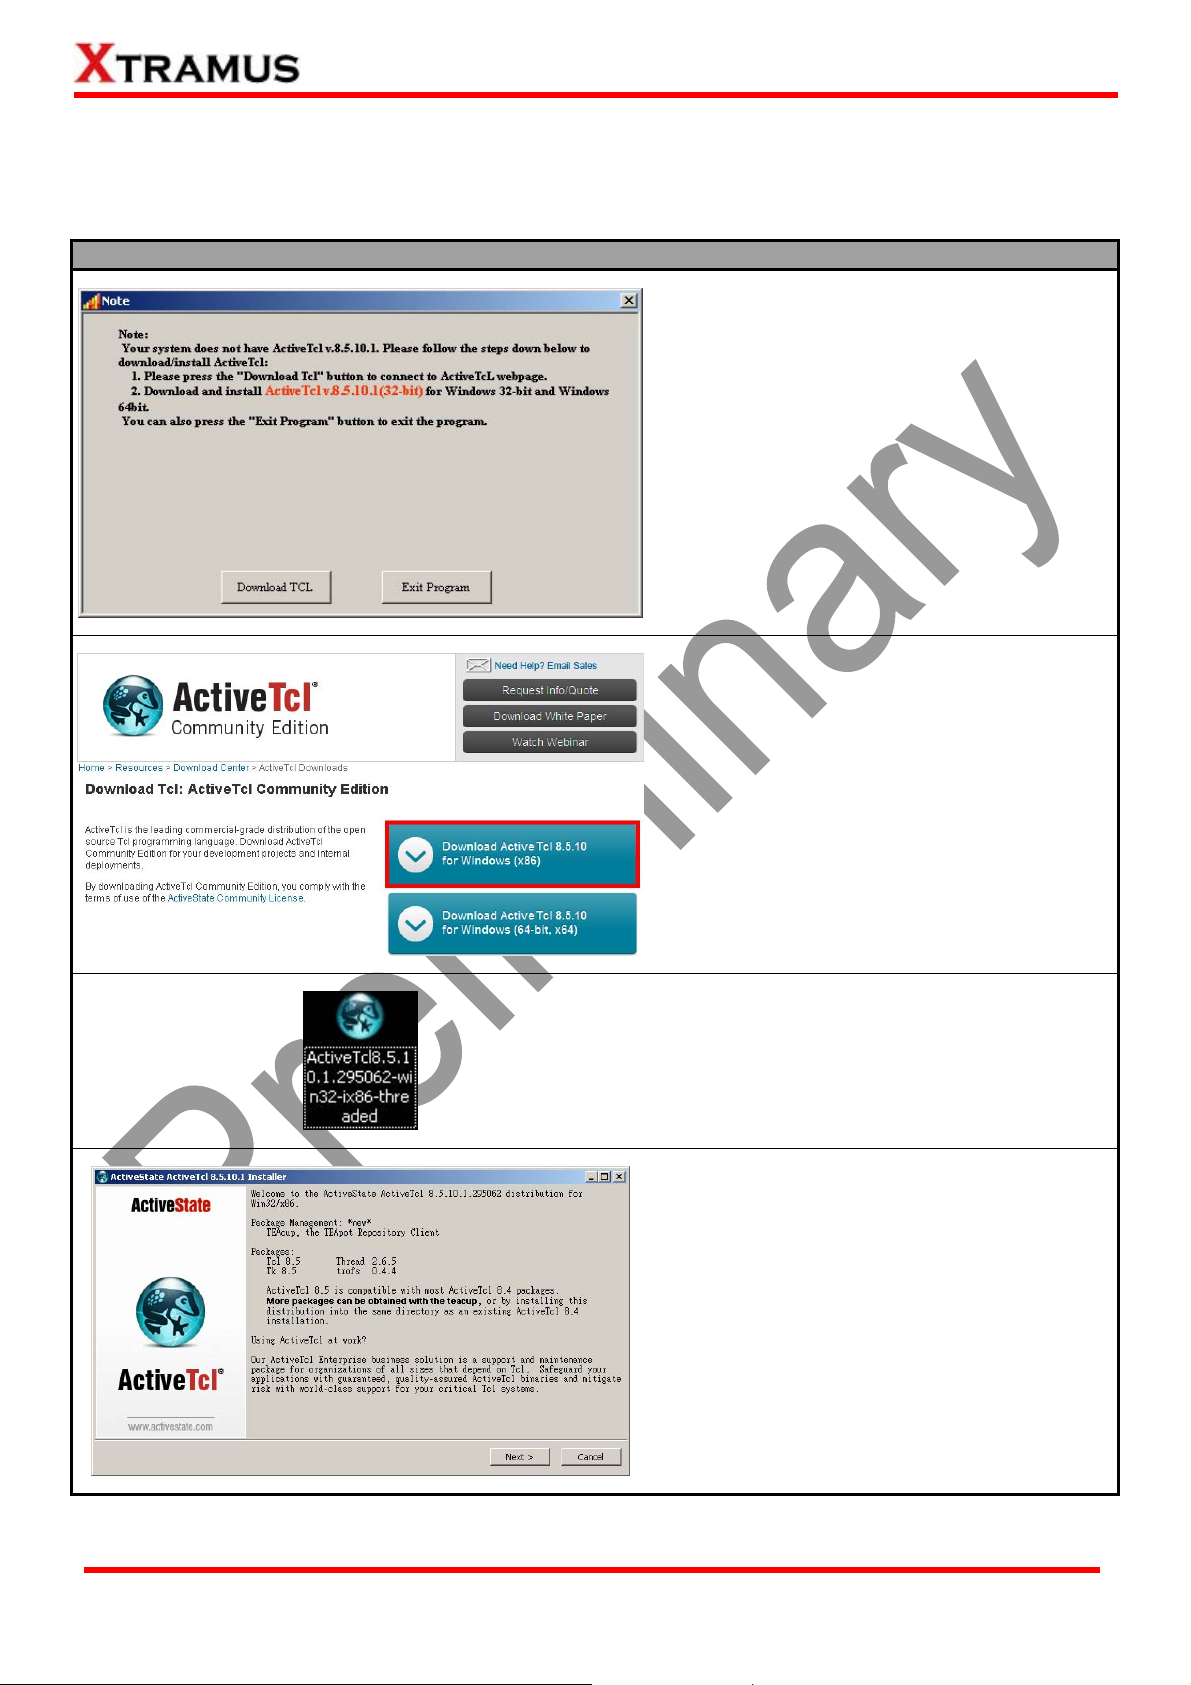
3.2. Downloading & Installing ActiveTcl
If your PC does not have ActiveTcl installed, a window will pop up, prompting you to download and install
ActiveTcl. Please follow the steps down below and install ActiveTcl properly.
Downloading & Installing ActiveTcl
1. Please press the “Download TCL” button to
start downloading ActiveTcl.
NuApps-G8261-RM will open your default
web browser and go to ActiveTcl webpage
(www.activestate.com/activetcl/downloads).
2. Press the “Download ActiveT cl (x86)”
button on the webpage to start downloading
ActiveTcl.
Please note that the ActiveTcl version you’ve
downloaded must match the ActiveTcl version
mentioned in the pop-up window.
Also, please note that NuApps-G8261 only
supports x86 ActiveT cl.
After you’ve downloaded ActiveTcl, please
3.
double-click the installation software and start
installing ActiveTcl.
XTRAMUS TECHNOLOGIES®
11
4. Press “Next” to start installing ActiveTcl.
E-mail: sales@xtram us . co m
Website: www.Xtramus.com
Page 12
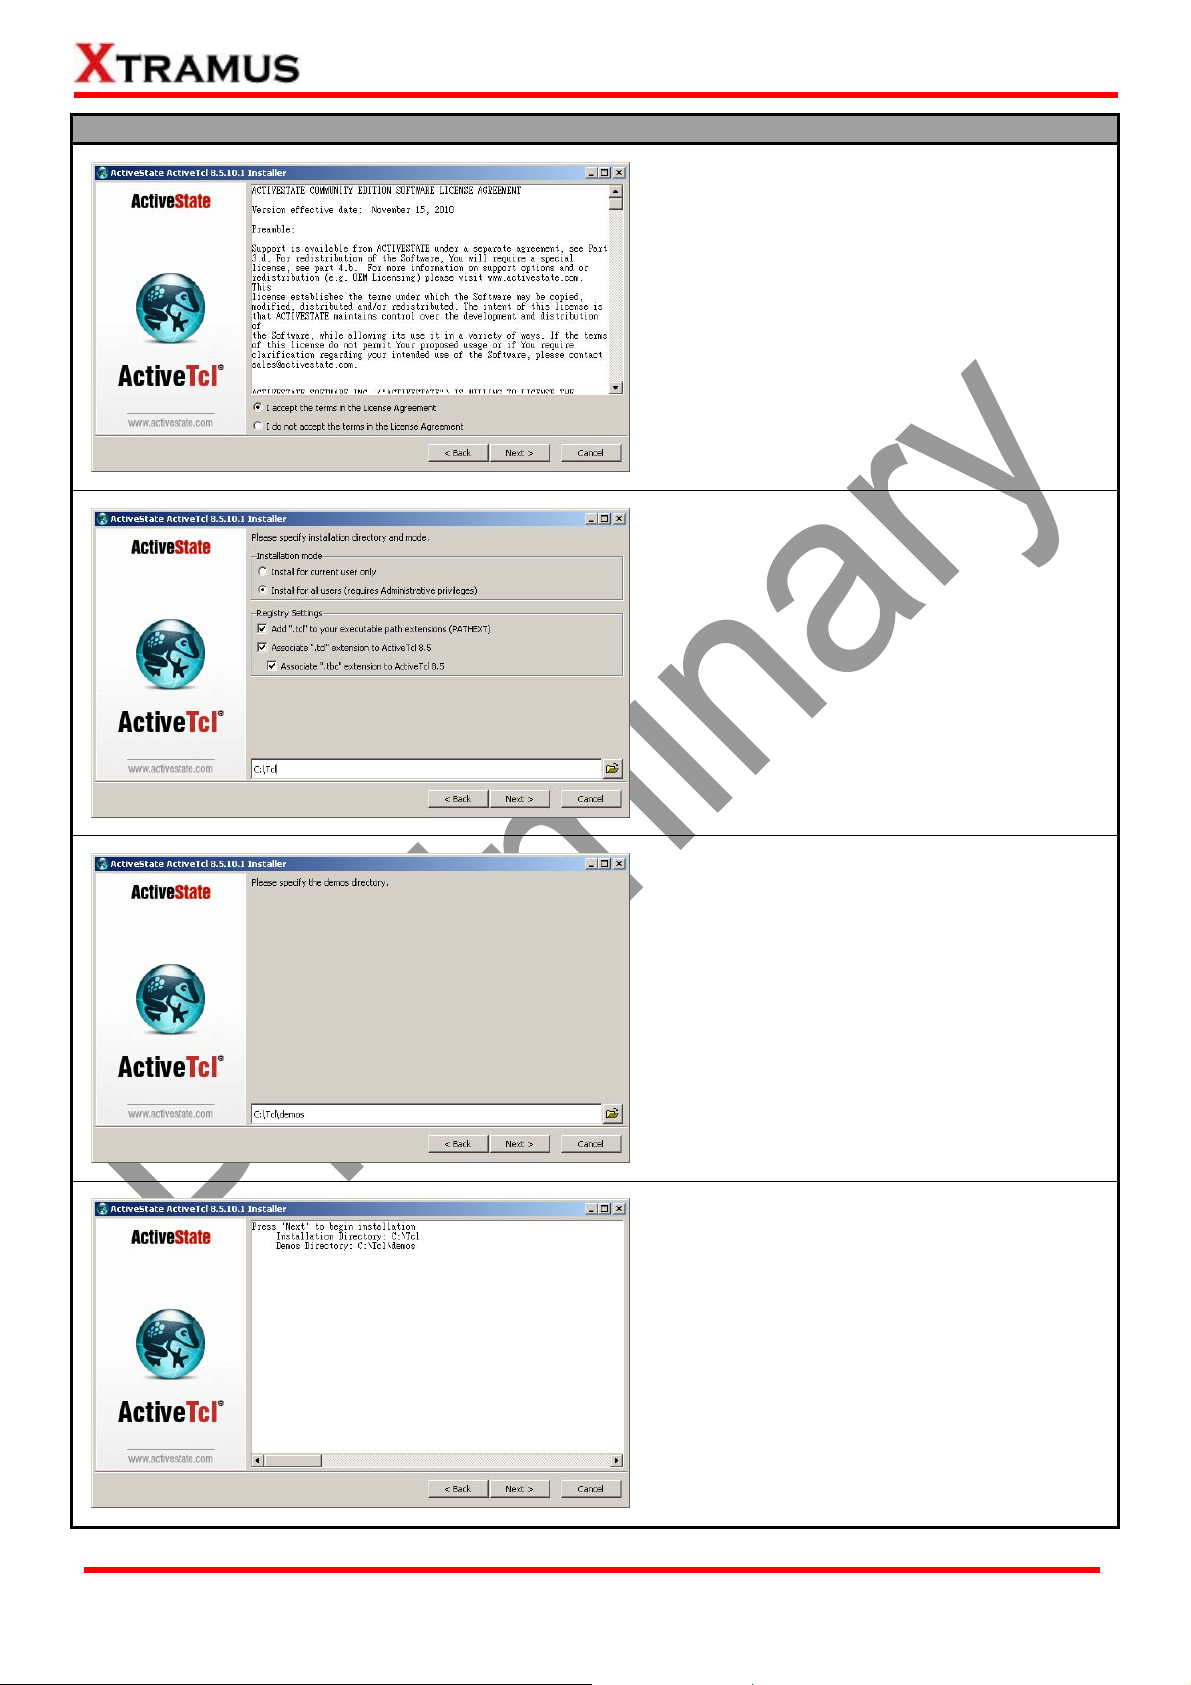
Downloading & Installing ActiveTcl
5. Choose “
“I accept the terms in the license
agreement”, and click “Next” to continue.
6. It is highly recommended to leave the
installation directory and mode as it is without
changing any of the settings you see here.
Also, please note that ActiveTcl MUST be
installed in the directory of “C:\Tcl”.
Please click “Next” to continue.
XTRAMUS TECHNOLOGIES®
12
7. Please leave the demos directory as it is
without changing (C:\Tcl\demos), and press
“Next” to continue.
8. Please press “Next” to continue.
E-mail: sales@xtram us . co m
Website: www.Xtramus.com
Page 13
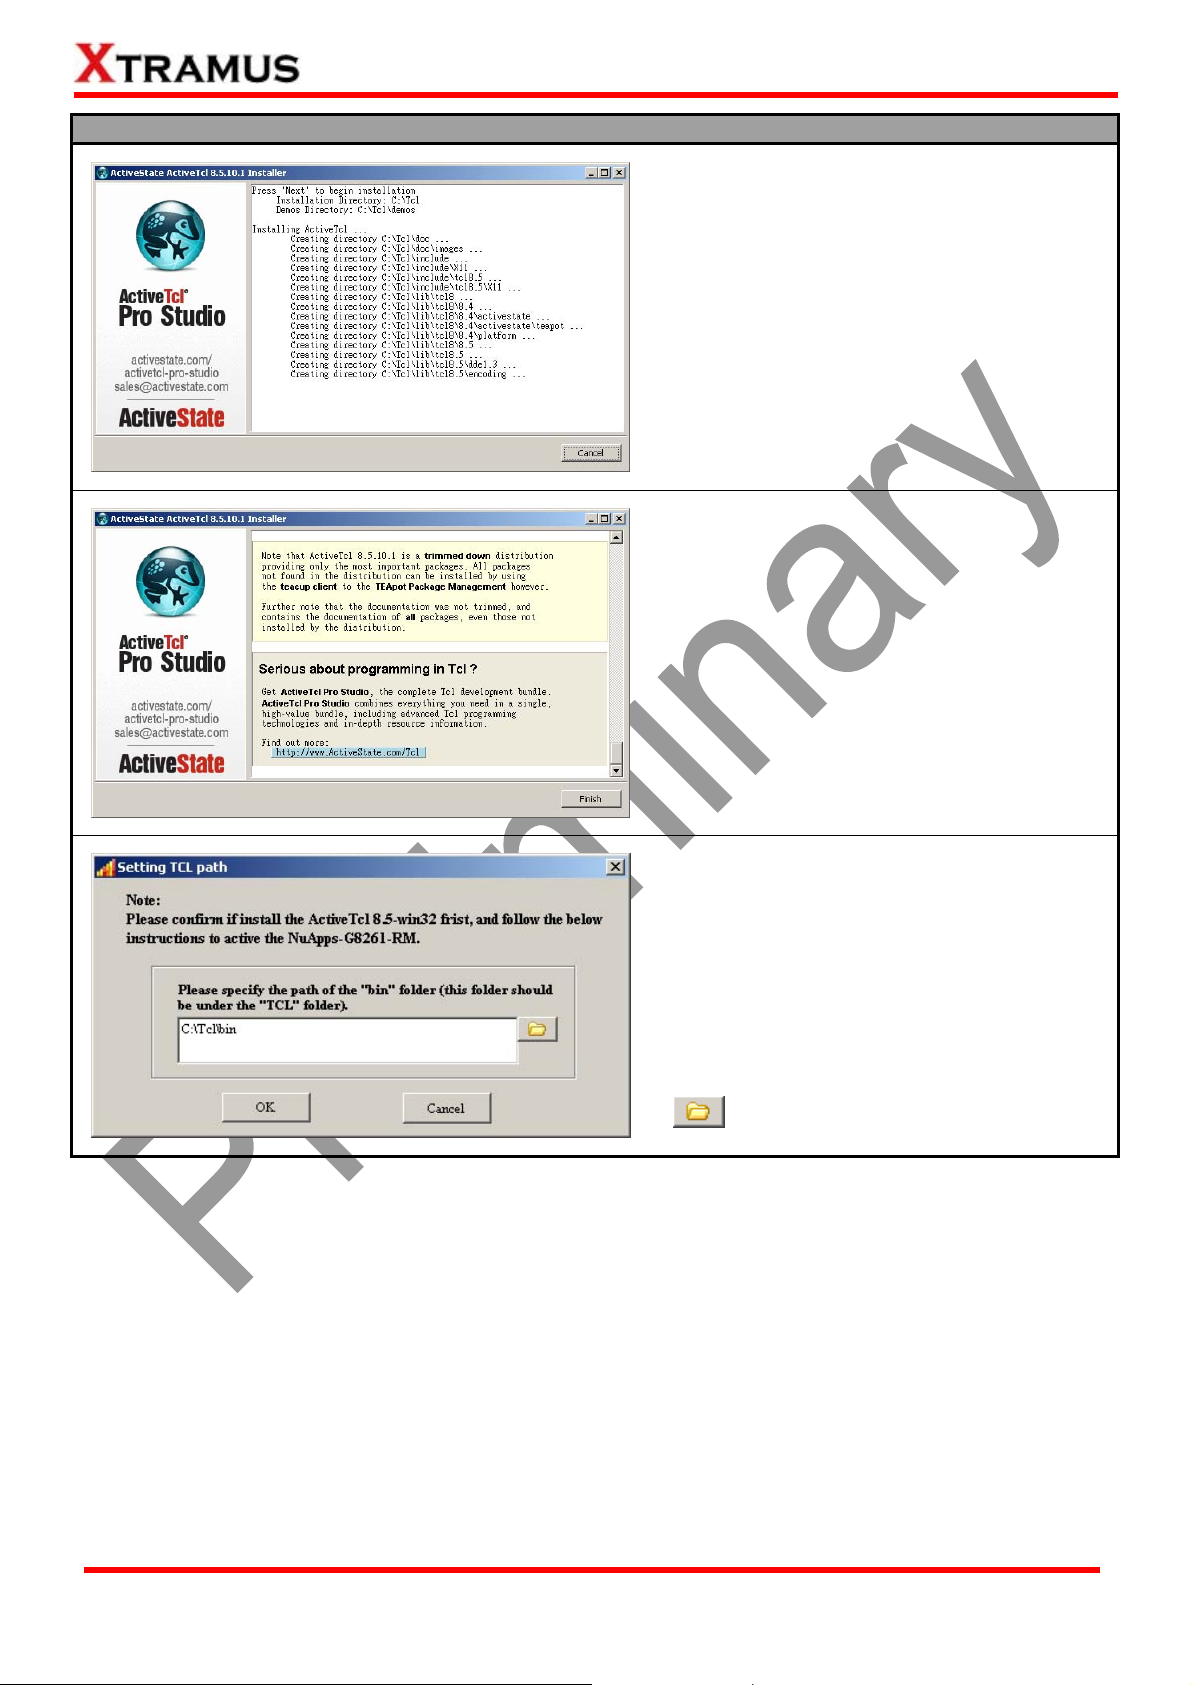
Downloading & Installing ActiveTcl
9. Installer is installing ActiveTcl.
10. Installation completes. Please press
“Finish” to finish installing ActiveTcl.
11. After you’ve successfully installed ActiveTcl,
a “Setting TCL Path” window will pop up and
prompt you to specify the path of the “bin”
folder.
If you’ve installed ActiveTcl following the
steps above, please press “OK” to continue.
If you changed ActiveTcl installation folder
while installing ActiveTcl, please press the
button to specify the “bin” folder.
XTRAMUS TECHNOLOGIES®
13
E-mail: sales@xtram us . co m
Website: www.Xtramus.com
Page 14
NuApps-G8261-RM Demo Mode
If your PC is not connected with NuStreams-2000i/600i, you can still run NuApp s-G8261-RM under Demo
Mode. Almost all NuApps -G8261-RM’s functions are available under Demo Mode. However, please note
that Demo Mode is for system demo purposes only, and does not serve any testing purposes at all.
XTRAMUS TECHNOLOGIES®
14
E-mail: sales@xtram us . co m
Website: www.Xtramus.com
Page 15
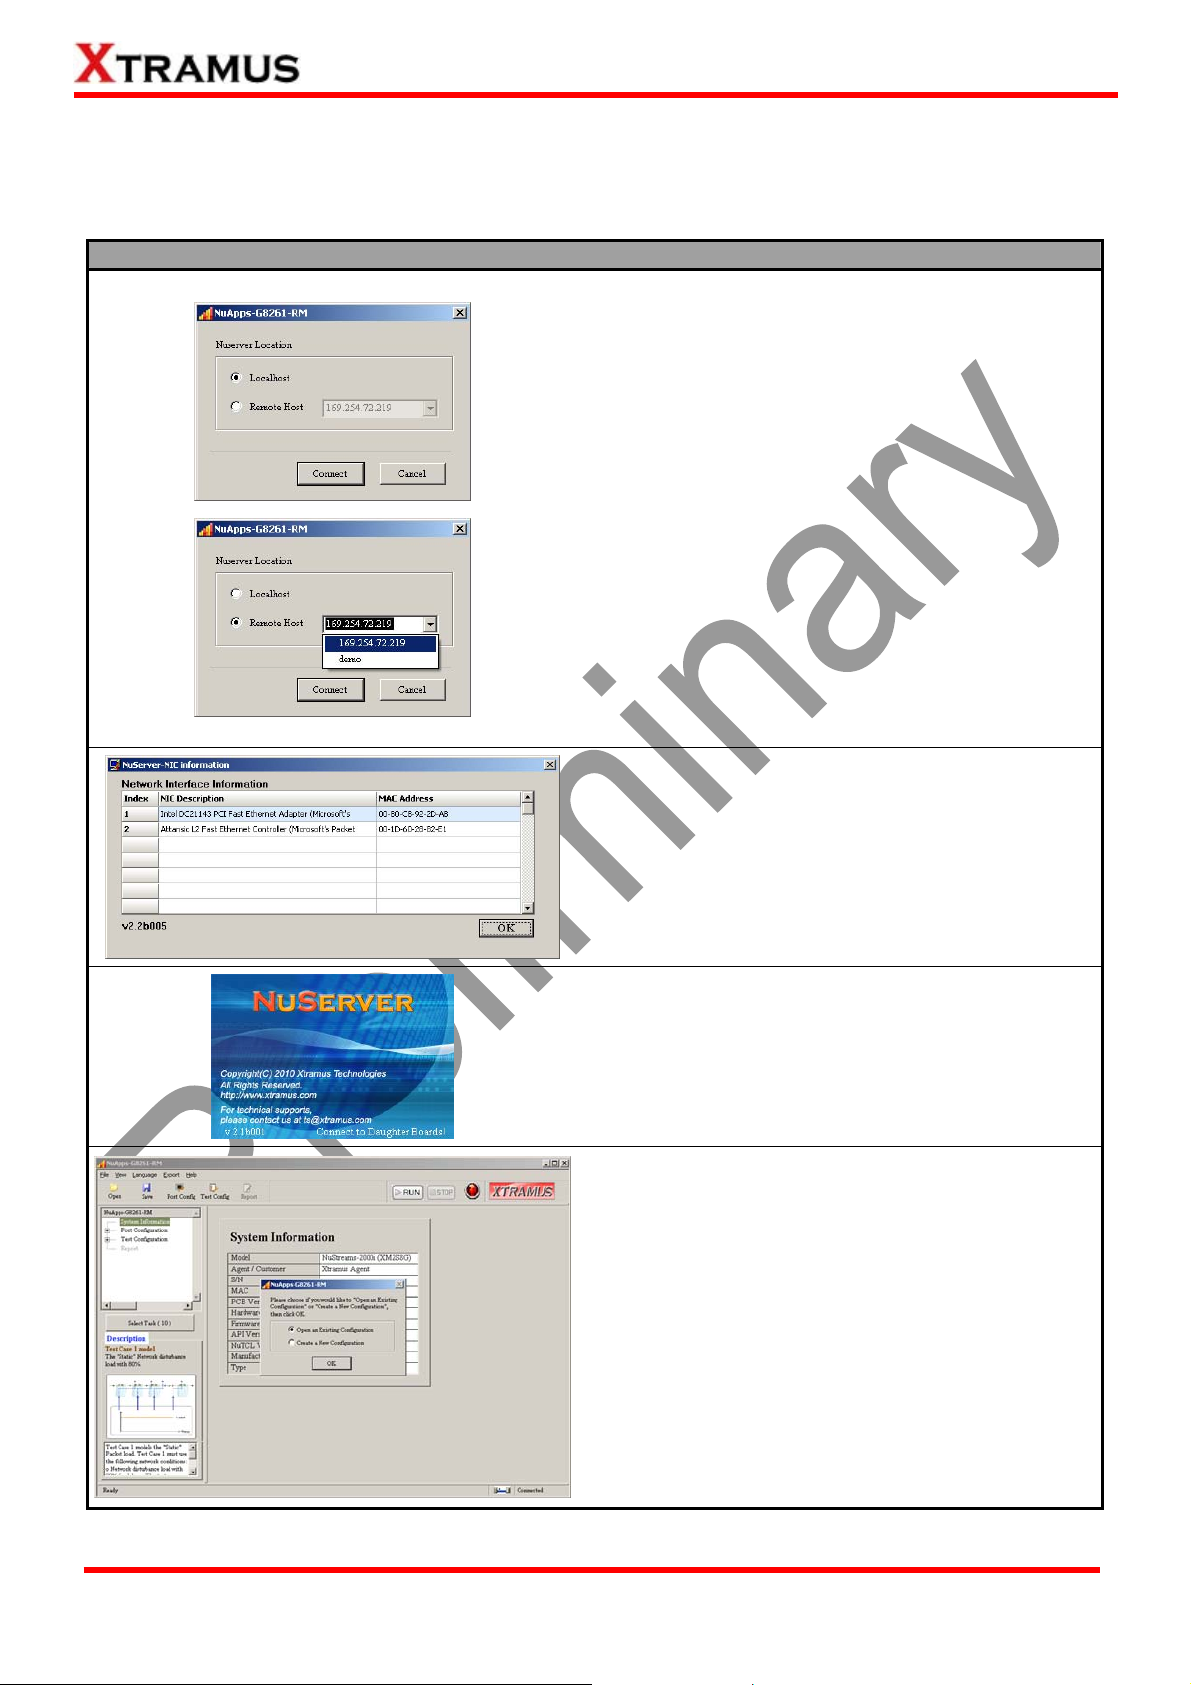
3.3. Starting NuServer & NuApps-G8261-RM
NuServer allows you to connect your PC to NuStreams-2000i/600i, and will start automatically once you
start NuApps-G8261-RM. Please follow the steps down below to st art NuApp s-G8261-RM and NuServer .
Starting NuServer
When starting NuApps-G8261-RM, a “Connect to
NuServer” window will pop up and asked how you
are going to connect to NuServer.
• Local Host: Choose this option when you’re
running NuApps-G8261-RM from
NuStreams-2000i IPC module or a PC that’s
connected to NuStreams-2000i/600i via an RJ45
cable.
• Remote: Choose this option when you’re running
NuApps-G8261-RM from other PC located on the
network. Choose the IP address which is assigned
from NuStreams-2000i/600i from the scroll-down
menu, or choose demo to enter Demo Mode.
• Connect/Cancel: Click the Connect/Cancel button
to connect to NuStreams-2000i/600i or cancel
starting NuApps-G8261-RM.
A “NuServe r-NIC Information” window will pop up.
Please select the NIC (Network Interface Card) which
is connected to NuStreams -2000i/ 600i’s from the
Network Interface Information table, and click OK.
If you’re using NuStreams-2000i’s IPC module,
please choose “Realtek RTL8139 Family Fast
Ethernet”.
NuServer will connect to the daughter boards, and
NuApps-G8261-RM will start as well.
You now have access to NuApps-G8261-RM’s main
display window.
XTRAMUS TECHNOLOGIES®
15
E-mail: sales@xtram us . co m
Website: www.Xtramus.com
Page 16
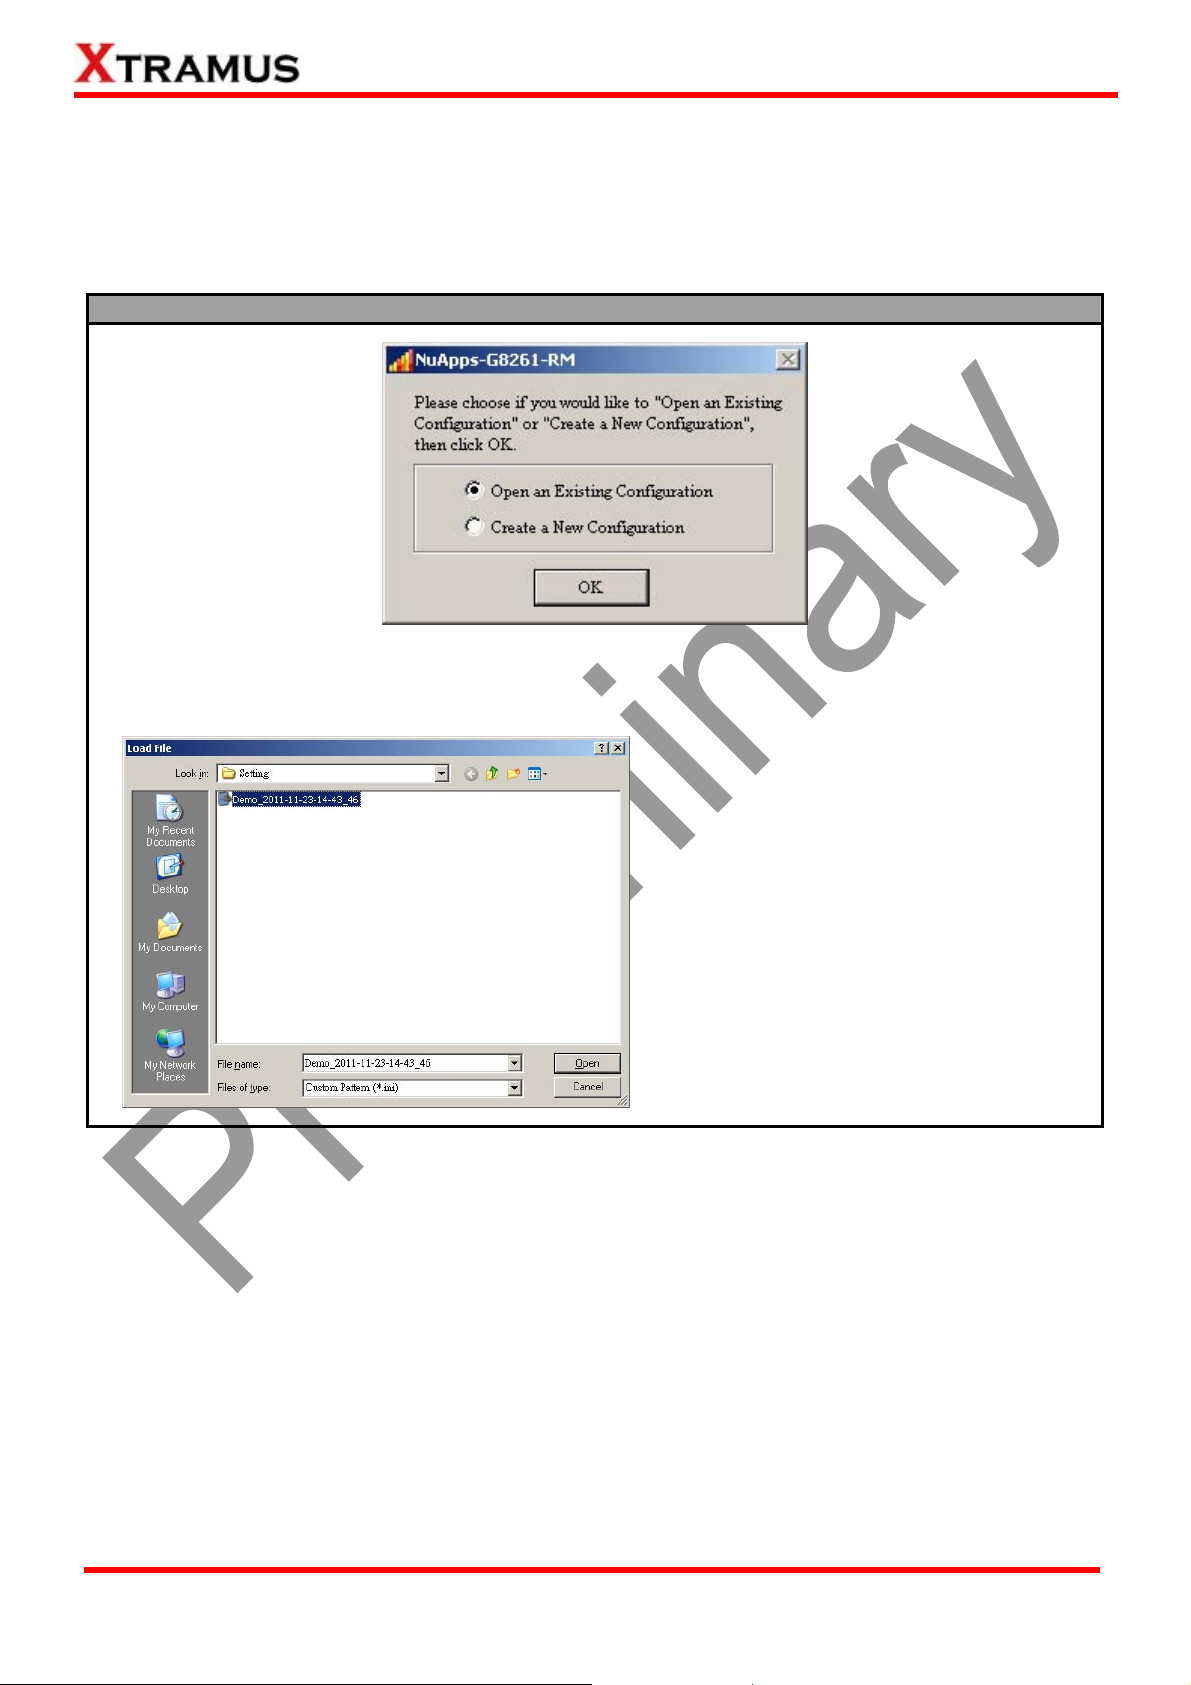
3.4. Port Reserving
After starting NuApps-G8261-RM, a window will pop up. You have to reserve ports on module cards
before performing tests with NuApps-G8261-RM. Please follow the steps down below and make the
proper configurations for NuApps-G8261-RM.
Port Reserving
As mentioned above, you have to reserve ports on module cards before performing tests with
NuApps-G8261-RM. You can do so by either Open an Existing Configuration or by Create a New
Configuration.
If you have a previously saved configuration
file stored in your PC, you can load it and
apply all the setting you’ve made by
choosing “Open an Existing
Configuration” from the Select Config
pop-up window.
Configuration files are saved in the format of
“*.ini”, and are named with the date/time
when the files are created.
Please note that the module card
information contained in the configuration
file you’ve loaded from your PC MUST
match to your NuStreams Chassis’ current
status.
XTRAMUS TECHNOLOGIES®
16
E-mail: sales@xtram us . co m
Website: www.Xtramus.com
Page 17
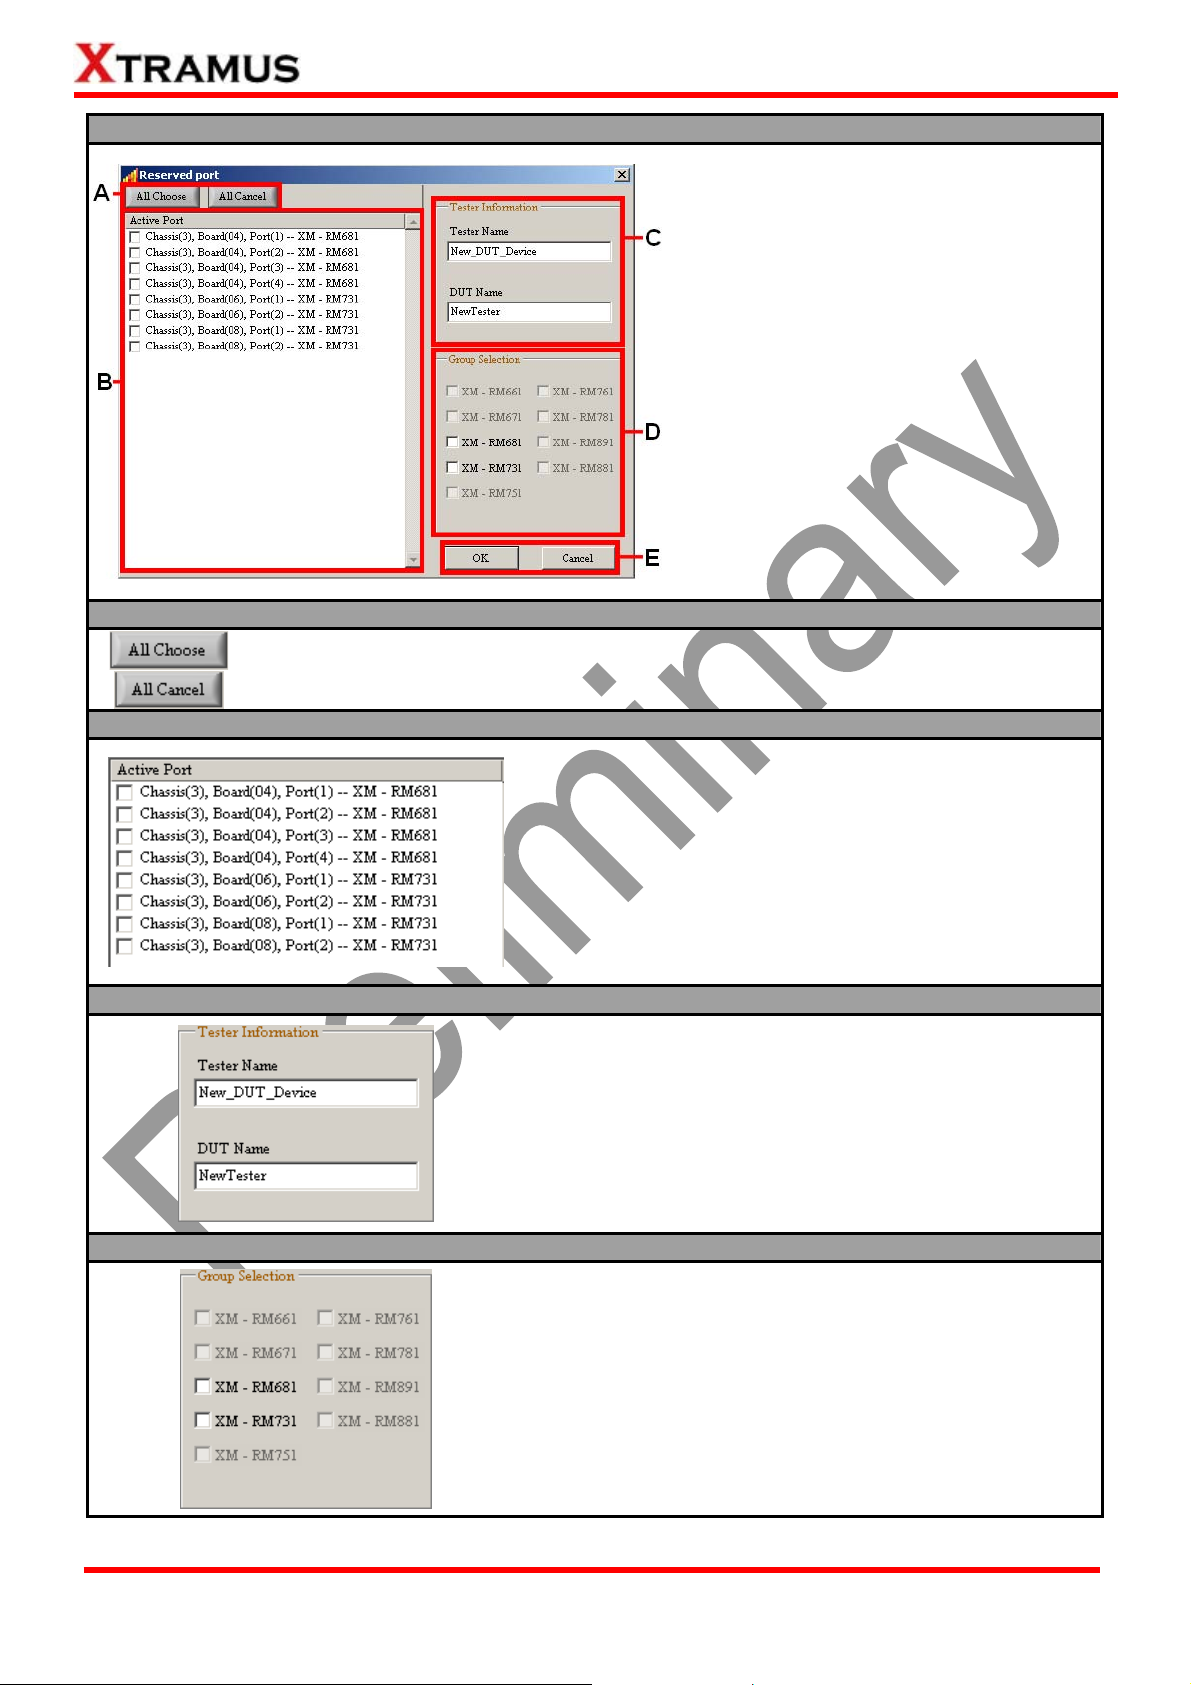
A
Port Reserving
A. All Choose/Cancel Buttons
The All Choose button allows you to select all ports listed in the Active Port List.
If you would like to make a new
configuration, please choose “Create a New
Configuration” from the Select Config
pop-up window. A Reserved Port window
will pop up when you choose to create a
new configuration.
The Reserved Page pop-up window can be
divided as:
¾ A. All Choose/Cancel Buttons
¾ B. Active Port List
¾ C. Tester Information
¾ D. Group Selection
¾ E. OK/Cancel Buttons
After selecting the port for test performing,
please click OK button to continue.
The All Cancel button allows you to select all ports listed in the Active Port List.
B. Active Port List
C. Tester Information
D. Group Selection
ll the module cards, along with their Active Ports are listed
here in this field.
Also, you can check/uncheck the port by
clicking check box in front of the module cards’ ports.
You can set the Tester Name and DUT Name here in the
Tester Information field. The Tester Name and DUT
Name you’ve set here will be applied when naming the
configuration files.
Clicking the check box in front of each module card allows
you to active all the ports of the module cards.
XTRAMUS TECHNOLOGIES®
17
E-mail: sales@xtram us . co m
Website: www.Xtramus.com
Page 18
3.5. NuApps-G8261-RM/NuServer Overview
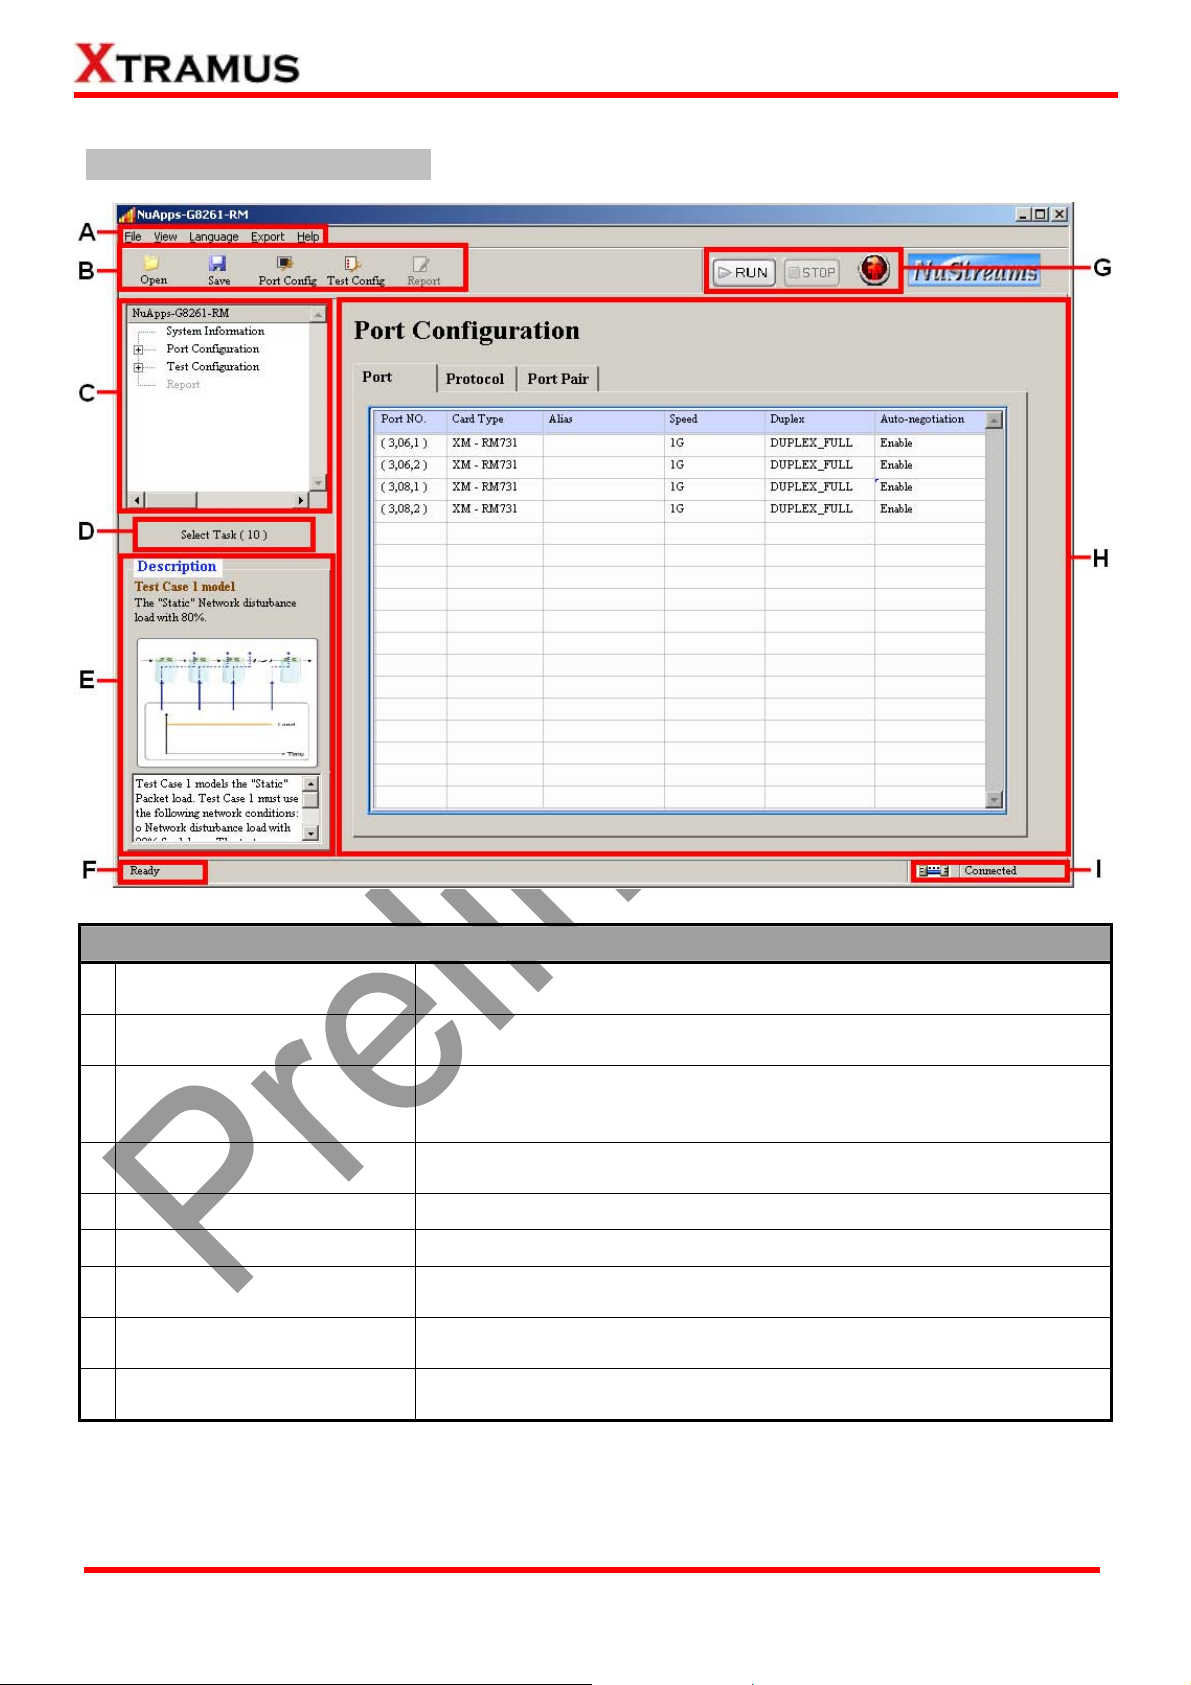
NuApps-G8261-RM Main Window
NuApps-G8261-RM Functions Overview
A Menu Bar
B Quick Launch Buttons
System Info/Configuration
C
List
D Select Task
E Description
F Status Bar
G
Control Buttons/Test
Running Status Icon
H Main Display Screen
I System Connection Status
The Menu Bar allows you to make settings about test criteria,
load/save settings you’ve made, and change language displayed.
The Quick Launch Buttons allow you to open/save test settings,
make test configurations, and view test reports.
By clicking the System Info/Configuration List, you can view system
information, making test configurations, or view test reports on H. Main
Display Screen.
Press the Select Task button to select/view G.8261 Test Cases you
would like to choose.
The Description field display brief descriptions regarding to tests.
The Status Bar shows the running status of NuApps-G8261-RM.
The Control Buttons allow you to start/stop tests, and the Test
Running Status Icon indicates if there’s a test running.
You can make detail configurations and view real-time testing diagrams
on the Main Display Screen.
This icon shows the connection status between your PC and
NuStreams-2000i/600i.
XTRAMUS TECHNOLOGIES®
18
E-mail: sales@xtram us . co m
Website: www.Xtramus.com
Page 19

NuServer
Description
Module Card
Information
NIC Information
NuServer Version
This section displays the information regarding to the model cards that are
installed on NuStreams-2000i/600i. Model Card IDs are showed as the
format of (X, Y, Z) while X is the number of the chassis (which is displayed
on NuStreams-2000i/600i), Y is the slot number where this model card is
installed, and Z is the available port number located on the model card.
This section displays the detail information (including NIC Model name,
NIC’s MAC address) regarding to the selected NIC.
This section displays the version of your NuServer.
XTRAMUS TECHNOLOGIES®
19
E-mail: sales@xtram us . co m
Website: www.Xtramus.com
Page 20

4. NuApps-G8261-RM Functions
4.1. Menu Bar
NuApps-G8261-RM Menu Bar includes configuration options such as File, View, Language, Export and
Help. Please refer to the sections down below for detail information regarding to each configuration
option.
4.1.1. File
File
If you would like to make a new
configuration or open an existing
configuration file, please choose
“Create a New Configuration” from
the Menu Bar. A pop-up window will
New Testing
Configuration
prompt and ask you if you would like to
open an existing configuration or
create a new one.
Save As
Configuration
File
For detail information about how to
open an existing configuration or
create a new configuration for your
tests, please refer to Page 16.
The Save As Configuration function
on the Menu Bar allows you to save
the settings you’ve made.
To save the settings you’ve made,
choose “Save As Configuration”
from the Menu Bar, and choose the file
path where you would like to save the
configuration file. Configuration files
are saved in the format of “*.ini”.
XTRAMUS TECHNOLOGIES®
20
E-mail: sales@xtram us . co m
Website: www.Xtramus.com
Page 21

File
If you have a previously saved
configuration file stored in your PC, you
can load it and apply all the setting
you’ve made by choosing “Open an
Existing Configuration” from the
Select Config pop-up window.
Load
Configuration
File
Exit
4.1.2. View
Configuration files are saved in the
format of “*.ini”, and are named with
the date/time when the files are
created.
Please note that the module card
information contained in the
configuration file you’ve loaded from
your PC MUST match to your
NuStreams Chassis’ current status.
A prompt pop-up window will ask if you
are sure to exit NuApps-G8261-RM.
Click YES to exit NuApps-G8261-RM,
or click NO to cancel.
View
Module Info.
You can view all information regarding to the module cards you’ve installed on your
NuStreams-2000i/600i by View function on the Menu Bar.
Please note that if your module cards’ firmware/FPGA version do not match
NuApps-G8261-RM’s requirements, a “
” icon will be displayed in that slot.
¾ Refresh: Refresh the module information displayed here.
¾ Close: Close Module Information window.
XTRAMUS TECHNOLOGIES®
21
E-mail: sales@xtram us . co m
Website: www.Xtramus.com
Page 22

4.1.3. Language
Language
English/Simplified
Chinese
4.1.4. Export
Export
NuApps-G8261-RM has 2 different languages for its UI available. You can set the UI
language to either English or Simplified Chinese. Please note that as of
2011/11/23, NuApps-G8261-RM only supports English UI.
You can save your test results as Microsoft Excel files, PDF files, and HTML files. (Note:
As of 2011/11/23, PDF file format is not supported yet.)
Log
If you choose “Configuration”, a Configuration window will pop up, allowing you to
view/set where you would like to save all your reports.
To change the folder which you would like to save test reports, please press the
button.
To view the folder where test reports are saved, please press the Browse button.
XTRAMUS TECHNOLOGIES®
22
E-mail: sales@xtram us . co m
Website: www.Xtramus.com
Page 23

4.1.5. Help
Help
Xtramus Web
Open your default web browser and access Xtramus Website (www.xtramus.com).
About
NuApps-G8261-RM
System
Requirements
An “About” window will pop up and show detailed
system information.
A “System Requirements” window will pop up
and show the requirements for your PC and the
FPGA/Firmware/PROM of the module cards.
¾ OK: Click this button to exit the “System
Requirements” pop-up window.
XTRAMUS TECHNOLOGIES®
23
E-mail: sales@xtram us . co m
Website: www.Xtramus.com
Page 24

4.2. Quick Launch Buttons
These Quick Launch Buttons allow you to open/save configuration files, module port configuration, test
configuration, and view test reports. Please refer to the section down below for more detail descriptions
regarding to Quick Launch Buttons.
Open
If you have a previously saved configuration
file stored in your PC, you can load it and
apply all the setting you’ve made by
choosing “Open an Existing Configuration”
from the Select Config pop-up window.
Configuration files are saved in the format of
“*.ini”, and are named with the date/time
when the files are created.
Save
Please note that the module card information
contained in the configuration file you’ve
loaded from your PC MUST match to your
NuStreams Chassis’ current status.
The Save As Configuration function on the
Menu Bar allows you to save the settings
you’ve made.
To save the settings you’ve made, choose
“Save As Configuration” from the Menu
Bar, and choose the file path where you
would like to save the configuration file.
Configuration files are saved in the format of
“*.ini”.
XTRAMUS TECHNOLOGIES®
24
E-mail: sales@xtram us . co m
Website: www.Xtramus.com
Page 25

Port Config
By clicking the Port Config button, the Port
Configuration screen will be shown on the
Main Display Screen located on the right side
of NuApps-G8261-RM’s main window, allowing
you to make settings for the module ports.
Test Config
Report
Settings such as port transmitting rate,
auto-negotiation, protocol, and pairing ports
are available and can be set here.
For more detail description about Port
Configuration, please refer to 4.8. Port
Configuration.
By clicking the T est Config button, all available test cases’detailed descriptions will be shown
on the Main Display Screen located on the right side of NuApps-G8261-RM’s main window,
allowing you to view contents for these settings.
For more detail description about Test Configuration, please refer to 4.9. Test
Configuration.
XTRAMUS TECHNOLOGIES®
25
The Report button allows you to view test
results, charts, and statistics on the Main
Display Screen located on the right side
of NuApps-G8261-RM’s main window.
For more detail description about Report,
please refer to 4.10. Report.
E-mail: sales@xtram us . co m
Website: www.Xtramus.com
Page 26

4.3. System Info/Configuration List
The System Info/Configuration List allows you to view system information, making port/test
configurations, and check test reports on the Main Display Screen.
System Information
Port Config
By clicking the System Information on the System
Info/Configuration List, the System Information
screen will be shown on the Main Display Screen
located on the right side of NuApps-G8261-RM’s main
window.
By clicking the Port Config button, the Port
Configuration screen will be shown on the Main
Display Screen located on the right side of
NuApps-G8261-RM’s main window, allowing you to
make settings for the module ports.
Settings such as port transmitting rate,
auto-negotiation, protocol, and pairing ports are
available and can be set here.
XTRAMUS TECHNOLOGIES®
For more detail description about Port Configuration,
please refer to 4.8. Port Configuration.
26
E-mail: sales@xtram us . co m
Website: www.Xtramus.com
Page 27

Test Config (Uni-Direction & Bi-Direction)
By clicking the Test Config button, all available test cases’ detailed descriptions will be shown on the
Main Display Screen located on the right side of NuApps-G8261-RM’s main window, allowing you to
view contents for these settings.
For more detail description about Test Configuration, please refer to 4.9. Test Configuration.
Report
The Report button allows you to view test results,
charts, and statistics on the Main Display Screen
located on the right side of NuApps-G8261-RM’s
main window.
For more detail description about Report, please
refer to 4.10. Report.
4.4. Select Task
Select Task
The Select Task allows you to view contents of
all available test cases. Also, you can select test
cases for testing DUT here as well.
To select a test case, please check the check
box before the test case.
¾ OK: Apply all the settings you’ve made
and exit.
¾ Cancel: Cancel all the settings you’ve
made and exit.
XTRAMUS TECHNOLOGIES®
27
E-mail: sales@xtram us . co m
Website: www.Xtramus.com
Page 28

4.5. Description
The Description displays brief descriptions and figures regarding to test cases supported by
NuApps-G8261-RM. Also, the Description field displays test status as well. Please refer to the table
down below:
Test Pass
Test Fail
Test is running
Test is waiting to run
4.6. Status Bar
The Status Bar shows the running status of NuApps-G8261-RM.
4.7. Control Buttons/Test Running Status Icon
The Control Buttons allow you to start/stop tests, and the Test Running Status Icon indicates if there’s
a test running.
Control Buttons
Start test
XTRAMUS TECHNOLOGIES®
Stop test
Test Running Status Icon
No test is underway
Test is running
28
E-mail: sales@xtram us . co m
Website: www.Xtramus.com
Page 29

4.8. Port Configuration
Settings such as port transmitting rate, auto-negotiation, protocol, and pairing ports are available and can
be configured on the Port Configuration displayed on the Main Display Screen.
There are two ways to access Port Config:
Accessing Port Config
• Click Port Config located on
System Info/ Configuration List
• Click the Port Config button
located on Quick Launch
Buttons.
The Port Configuration contains two different sets of settings: Port, Protocol, and Port Pair, which can
be accessed by clicking the menu tabs.
¾ Port: Allows you to set each port’s alias, transmitting rate, duplex, and auto-negotiation.
¾ Protocol: Allows you to set each port’s MAC addresses, IP addresses, Gateway IP, and IP Mask.
¾ Port Pair: Allows you to set Test Pair Ports and Load Pair Ports.
XTRAMUS TECHNOLOGIES®
29
E-mail: sales@xtram us . co m
Website: www.Xtramus.com
Page 30

Port
¾ Port No./Card T ype: These two fields display each port’ s Port ID and the model name of its module
card.
¾ Alias: You can input alias for identifying active ports here in these fields.
¾ Speed: The Speed scroll-down menu allows you to set each port’s transmitting/receiving rate.
¾ Duplex: You can set the port as Full-Duplex or Half-Duplex with the scroll-down menu.
¾ Auto Negotiate: By clicking the scroll-down menu, you can set the transmitting mode to Enable
(with auto-negotiation) or Disable (without auto-negotiation).
XTRAMUS TECHNOLOGIES®
30
E-mail: sales@xtram us . co m
Website: www.Xtramus.com
Page 31

Protocol
¾ Port No.: This field displays each port’s Port ID.
¾ Port MAC: These fields display the MAC addresses of all ports.
¾ Port IP/Gateway/IP Mask: You can input each port’s IP Address, Gateway IP Address, and
Default Mask in these fields.
¾ Reset: Press this button to set Port MAC, Port IP, Gateway, and IP Mask of all ports to the default
value.
XTRAMUS TECHNOLOGIES®
31
E-mail: sales@xtram us . co m
Website: www.Xtramus.com
Page 32

Protocol
Before performing tests with NuApps-G8261-RM, you have to assign port pairs for Test Pair (the port pair
for G.8261 Test Case testing) and Load Pair (the port pair for impairing the Test Pair Ports) first. Please
note that you can assign only ONE pair of ports for the Test Pair.
Please see the section down below for Port Pair:
Port Pairing
1. Choose a port that will serve as the source
port from the Source Ports field.
XTRAMUS TECHNOLOGIES®
32
E-mail: sales@xtram us . co m
Website: www.Xtramus.com
Page 33

Port Pairing
2. Choose a port that will serve as the
destination port from the Destination
Ports field.
3. Click the Test Pair or Load Pair button to
add the port pair you set in step 1~2.
Please note that you can assign only ONE
pair of ports for the Test Pair.
4. The port pair will be added to the Test Port
Pair or Load Port Pair field according to
your setting in step 3. You can remove the
selected port pair by clicking the Back
button, or remove all port pairs by clicking
the All Back button.
XTRAMUS TECHNOLOGIES®
33
E-mail: sales@xtram us . co m
Website: www.Xtramus.com
Page 34

4.9. Test Configuration
As mentioned in 1. NuApps-G8261-RM Overview, NuApps-G8261-RM is an application that’s designed
base on ITU-T (ITU Telecommunication Standardization Sector) Recommendation G.8261 for analyzing
Ethernet switches, bridges, and routers.
The following test cases are available in NuApps-G8261-RM. For more detailed information, please refer
to ITU website at
Diagram Description
http://www.itu.int/rec/T-REC-G.8261-200804-I/en.
Test Case 1: The “Static” Network disturbance load with 80%.
Test Case 2: Sudden large and persistent changes in network load.
XTRAMUS TECHNOLOGIES®
Test Case 3: The slow change in network load over an extremely
long timescale.
Test Case 4: Temporary network outages and restoration for varying
amounts of time.
34
E-mail: sales@xtram us . co m
Website: www.Xtramus.com
Page 35

Diagram Description
Test Case 5: Temporary network congestion and restoration for
varying amounts of time.
Test Case 12: The 'Static' Packet load.
Test Case 13: Sudden large and persistent changes in network load.
Test Case 14: The slow change in network load over an extremely
long timescale.
Test Case 15: Temporary network outages and restoration for
varying amounts of time.
XTRAMUS TECHNOLOGIES®
35
E-mail: sales@xtram us . co m
Website: www.Xtramus.com
Page 36

Diagram Description
Test Case 16: Temporary network congestion and restoration for
varying amounts of time.
To make settings for any Test Cases, please click the Test Case you would like to configure on the
System Info/Configuration List as shown in the figure down below.
Please note that base different Test Cases have different test settings available. The next section will only
introduce test settings relating to the corresponding Test Case.
XTRAMUS TECHNOLOGIES®
36
E-mail: sales@xtram us . co m
Website: www.Xtramus.com
Page 37

4.9.1. G.8261 Test Case 1
Test Setting
Duration (Secs)
Rate (%)
Frame Size (bytes)
Frame Gap (bits)
Rate (packet/sec)
The duration of time (in seconds) for the test. The range for the testing time is
3~30000.
The network traffic rate (%) for the Test Pair Port.
The size of the test packets. The range of the Starting from/at field is 60~1514.
The idle period between transmission of Ethernet frames. This field will change
according to the frame size you set.
The transmitting rate (packets transmitted per second) for the test. This field will
change according to the frame size you set.
As a network utility, Ping is widely used for testing if one specific host is
Ping Times
reachable through its IP address. You can set how many times you would like to
perform the ping command.
Packet Payload
This scroll-down menu allows you to set packet contents to Random, Increase,
0×55AA, 0×00FF, All 1 or All 0.
Criteria
Latency (µs)
Jitter (µs)
The criteria set here will be used to determine if the DUT meets the requirement.
You can set the Latency (µs) here.
The criteria set here will be used to determine if the DUT meets the requirement.
You can set the Jitter (µs) here.
Network Load Setting – Forward
Load Rate (%)
XTRAMUS TECHNOLOGIES®
The starting network traffic rate for the Load Pair Port.
37
E-mail: sales@xtram us . co m
Website: www.Xtramus.com
Page 38

Load Pair Port Transmitting Setting
Stabilization (sec)
The Load Pair Ports will hold and wait for the set amount of time (in seconds)
after Test Pair Ports starting transmitting test packets.
Network Traffic Model
Setting the Network Traffic Model to Model 1 will set packets transmitted from
Load Pair Ports as follows:
Model 1
y 80% of the packets will be 60 byte packets.
y 5% of the packets will be 572 byte packets.
y 15% of the packets will be 1514 byte packets.
Setting the Network Traffic Model to Model 1 will set packets transmitted from
Load Pair Ports as follows:
Model 2
y 30% of the packets will be 60 byte packets.
y 10% of the packets will be 572 byte packets.
y 60% of the packets will be 1514 byte packets.
Buttons
Rest Parameters for
All Test Cases
Select
Click this button to reset all settings made for all Test Cases to default.
Click this button to include this Test Case for DUT test.
XTRAMUS TECHNOLOGIES®
38
E-mail: sales@xtram us . co m
Website: www.Xtramus.com
Page 39

4.9.2. G.8261 Test Case 2
Test Setting
Duration (Secs)
Rate (%)
Frame Size (bytes)
Frame Gap (bits)
Rate (packet/sec)
The duration of time (in seconds) for the test. This field is fixed to 24 and cannot
be changed.
The network traffic rate (%) for the Test Pair Port.
The size of the test packets. The range of the Starting from/at field is 60~1514.
The idle period between transmission of Ethernet frames. This field will change
according to the frame size you set.
The transmitting rate (packets transmitted per second) for the test. This field will
change according to the frame size you set.
As a network utility, Ping is widely used for testing if one specific host is
Ping Times
reachable through its IP address. You can set how many times you would like to
perform the ping command.
Packet Payload
This scroll-down menu allows you to set packet contents to Random, Increase,
0×55AA, 0×00FF, All 1 or All 0.
Criteria
Latency (µs)
Jitter (µs)
The criteria set here will be used to determine if the DUT meets the requirement.
You can set the Latency (µs) here.
The criteria set here will be used to determine if the DUT meets the requirement.
You can set the Jitter (µs) here.
Network Load Setting – Forward
Load Rate (%)
Max Load Rate (%)
XTRAMUS TECHNOLOGIES®
The starting network traffic rate for the Load Pair Port.
The maximum network traffic rate for the Load Pair Port.
39
E-mail: sales@xtram us . co m
Website: www.Xtramus.com
Page 40

Load Pair Port Transmitting Setting
Stabilization (sec)
Periods
Duration
(Sec/Period)
The Load Pair Ports will hold and wait for the set amount of time (in seconds)
after Test Pair Ports starting transmitting test packets.
The number of times for the Load Pair Ports to run its cycle.
The time (in seconds) for each cycle.
Network Traffic Model
Setting the Network Traffic Model to Model 1 will set packets transmitted from
Load Pair Ports as follows:
Model 1
y 80% of the packets will be 60 byte packets.
y 5% of the packets will be 572 byte packets.
y 15% of the packets will be 1514 byte packets.
Setting the Network Traffic Model to Model 1 will set packets transmitted from
Load Pair Ports as follows:
Model 2
y 30% of the packets will be 60 byte packets.
y 10% of the packets will be 572 byte packets.
y 60% of the packets will be 1514 byte packets.
Buttons
Rest Parameters for
All Test Cases
Select
Click this button to reset all settings made for all Test Cases to default.
Click this button to include this Test Case for DUT test.
XTRAMUS TECHNOLOGIES®
40
E-mail: sales@xtram us . co m
Website: www.Xtramus.com
Page 41

4.9.3. G.8261 Test Case 3
Test Setting
Duration (Secs)
Rate (%)
Frame Size (bytes)
Frame Gap (bits)
Rate (packet/sec)
The duration of time (in seconds) for the test. This field is fixed to 1440 and
cannot be changed.
The network traffic rate (%) for the Test Pair Port.
The size of the test packets. The range of the Starting from/at field is 60~1514.
The idle period between transmission of Ethernet frames. This field will change
according to the frame size you set.
The transmitting rate (packets transmitted per second) for the test. This field will
change according to the frame size you set.
As a network utility, Ping is widely used for testing if one specific host is
Ping Times
reachable through its IP address. You can set how many times you would like to
perform the ping command.
Packet Payload
This scroll-down menu allows you to set packet contents to Random, Increase,
0×55AA, 0×00FF, All 1 or All 0.
Criteria
Latency (µs)
Jitter (µs)
The criteria set here will be used to determine if the DUT meets the requirement.
You can set the Latency (µs) here.
The criteria set here will be used to determine if the DUT meets the requirement.
You can set the Jitter (µs) here.
Network Load Setting – Forward
Load Rate (%)
Max Load Rate (%)
Variation (sec./%)
XTRAMUS TECHNOLOGIES®
The starting network traffic rate for the Load Pair Port.
The maximum network traffic rate for the Load Pair Port.
The Load Pair Ports will change transmitting rates after the set amount of time.
41
E-mail: sales@xtram us . co m
Website: www.Xtramus.com
Page 42

Load Pair Port Transmitting Setting
Stabilization (sec)
Periods
Duration
(Sec/Period)
The Load Pair Ports will hold and wait for the set amount of time (in seconds)
after Test Pair Ports starting transmitting test packets.
The number of times for the Load Pair Ports to run its cycle.
The time (in seconds) for each cycle. This field is fixed to 360 and cannot be
changed.
Network Traffic Model
Setting the Network Traffic Model to Model 1 will set packets transmitted from
Load Pair Ports as follows:
Model 1
y 80% of the packets will be 60 byte packets.
y 5% of the packets will be 572 byte packets.
y 15% of the packets will be 1514 byte packets.
Setting the Network Traffic Model to Model 1 will set packets transmitted from
Load Pair Ports as follows:
Model 2
y 30% of the packets will be 60 byte packets.
y 10% of the packets will be 572 byte packets.
y 60% of the packets will be 1514 byte packets.
Buttons
Rest Parameters for
All Test Cases
Select
Click this button to reset all settings made for all Test Cases to default.
Click this button to include this Test Case for DUT test.
XTRAMUS TECHNOLOGIES®
42
E-mail: sales@xtram us . co m
Website: www.Xtramus.com
Page 43

4.9.4. G.8261 Test Case 4
Test Setting
Duration (Secs)
Rate (%)
Frame Size (bytes)
Frame Gap (bits)
Rate (packet/sec)
The duration of time (in seconds) for the test. This field is fixed to 64 and cannot
be changed.
The network traffic rate (%) for the Test Pair Port.
The size of the test packets. The range of the Starting from/at field is 60~1514.
The idle period between transmission of Ethernet frames. This field will change
according to the frame size you set.
The transmitting rate (packets transmitted per second) for the test. This field will
change according to the frame size you set.
As a network utility, Ping is widely used for testing if one specific host is
Ping Times
reachable through its IP address. You can set how many times you would like to
perform the ping command.
Packet Payload
This scroll-down menu allows you to set packet contents to Random, Increase,
0×55AA, 0×00FF, All 1 or All 0.
Criteria
Latency (µs)
Jitter (µs)
The criteria set here will be used to determine if the DUT meets the requirement.
You can set the Latency (µs) here.
The criteria set here will be used to determine if the DUT meets the requirement.
You can set the Jitter (µs) here.
Network Load Setting – Forward
Load Rate (%)
XTRAMUS TECHNOLOGIES®
The starting network traffic rate for the Load Pair Port.
43
E-mail: sales@xtram us . co m
Website: www.Xtramus.com
Page 44

Load Pair Port Transmitting Setting
Stabilization (sec)
Periods
Duration
(Sec/Period)
Outage
The Load Pair Ports will hold and wait for the set amount of time (in seconds)
after Test Pair Ports starting transmitting test packets.
The number of times for the Load Pair Ports to run its cycle.
The time (in seconds) for each cycle. This field is fixed to 9 and cannot be
changed.
Load Pair Ports will be link-down for the set amount of time after finish their
cycles.
Network Traffic Model
Setting the Network Traffic Model to Model 1 will set packets transmitted from
Load Pair Ports as follows:
Model 1
y 80% of the packets will be 60 byte packets.
y 5% of the packets will be 572 byte packets.
y 15% of the packets will be 1514 byte packets.
Setting the Network Traffic Model to Model 1 will set packets transmitted from
Load Pair Ports as follows:
Model 2
y 30% of the packets will be 60 byte packets.
y 10% of the packets will be 572 byte packets.
y 60% of the packets will be 1514 byte packets.
Buttons
Rest Parameters for
All Test Cases
Select
Click this button to reset all settings made for all Test Cases to default.
Click this button to include this Test Case for DUT test.
XTRAMUS TECHNOLOGIES®
44
E-mail: sales@xtram us . co m
Website: www.Xtramus.com
Page 45

4.9.5. G.8261 Test Case 5
Test Setting
Duration (Secs)
Rate (%)
Frame Size (bytes)
Frame Gap (bits)
Rate (packet/sec)
The duration of time (in seconds) for the test. This field is fixed to 19 and cannot
be changed.
The network traffic rate (%) for the Test Pair Port.
The size of the test packets. The range of the Starting from/at field is 60~1514.
The idle period between transmission of Ethernet frames. This field will change
according to the frame size you set.
The transmitting rate (packets transmitted per second) for the test. This field will
change according to the frame size you set.
As a network utility, Ping is widely used for testing if one specific host is
Ping Times
reachable through its IP address. You can set how many times you would like to
perform the ping command.
Packet Payload
This scroll-down menu allows you to set packet contents to Random, Increase,
0×55AA, 0×00FF, All 1 or All 0.
Criteria
Latency (µs)
Jitter (µs)
The criteria set here will be used to determine if the DUT meets the requirement.
You can set the Latency (µs) here.
The criteria set here will be used to determine if the DUT meets the requirement.
You can set the Jitter (µs) here.
Network Load Setting – Forward
Load Rate (%)
Max Load Rate (%)
XTRAMUS TECHNOLOGIES®
The starting network traffic rate for the Load Pair Port.
The maximum network traffic rate for the Load Pair Port.
45
E-mail: sales@xtram us . co m
Website: www.Xtramus.com
Page 46

Load Pair Port Transmitting Setting
Stabilization (sec)
Periods
Duration
(Sec/Period)
Fill-load (sec)
The Load Pair Ports will hold and wait for the set amount of time (in seconds)
after Test Pair Ports starting transmitting test packets.
The number of times for the Load Pair Ports to run its cycle.
The time (in seconds) for each cycle. This field is fixed to 9 and cannot be
changed.
The Load Pair Ports will transmit by the Max Rate for the set amount of time.
Network Traffic Model
Setting the Network Traffic Model to Model 1 will set packets transmitted from
Load Pair Ports as follows:
Model 1
y 80% of the packets will be 60 byte packets.
y 5% of the packets will be 572 byte packets.
y 15% of the packets will be 1514 byte packets.
Setting the Network Traffic Model to Model 1 will set packets transmitted from
Load Pair Ports as follows:
Model 2
y 30% of the packets will be 60 byte packets.
y 10% of the packets will be 572 byte packets.
y 60% of the packets will be 1514 byte packets.
Buttons
Rest Parameters for
All Test Cases
Select
Click this button to reset all settings made for all Test Cases to default.
Click this button to include this Test Case for DUT test.
XTRAMUS TECHNOLOGIES®
46
E-mail: sales@xtram us . co m
Website: www.Xtramus.com
Page 47

4.9.6. G.8261 Test Case 12
Test Setting
Duration (Secs)
Rate (%)
Frame Size (bytes)
Frame Gap (bits)
Rate (packet/sec)
The duration of time (in seconds) for the test. The range for the testing time is
3~30000.
The network traffic rate (%) for the Test Pair Port.
The size of the test packets. The range of the Starting from/at field is 60~1514.
The idle period between transmission of Ethernet frames. This field will change
according to the frame size you set.
The transmitting rate (packets transmitted per second) for the test. This field will
change according to the frame size you set.
As a network utility, Ping is widely used for testing if one specific host is
Ping Times
reachable through its IP address. You can set how many times you would like to
perform the ping command.
Packet Payload
This scroll-down menu allows you to set packet contents to Random, Increase,
0×55AA, 0×00FF, All 1 or All 0.
Criteria
Latency (µs)
Jitter (µs)
The criteria set here will be used to determine if the DUT meets the requirement.
You can set the Latency (µs) here.
The criteria set here will be used to determine if the DUT meets the requirement.
You can set the Jitter (µs) here.
Network Load Setting – Forward/Reverse
Load Rate (%)
XTRAMUS TECHNOLOGIES®
The starting network traffic rate for the Load Pair Port.
47
E-mail: sales@xtram us . co m
Website: www.Xtramus.com
Page 48

Load Pair Port Transmitting Setting
Stabilization (sec)
The Load Pair Ports will hold and wait for the set amount of time (in seconds)
after Test Pair Ports starting transmitting test packets.
Network Traffic Model
Setting the Network Traffic Model to Model 1 will set packets transmitted from
Load Pair Ports as follows:
Model 1
y 80% of the packets will be 60 byte packets.
y 5% of the packets will be 572 byte packets.
y 15% of the packets will be 1514 byte packets.
Setting the Network Traffic Model to Model 1 will set packets transmitted from
Load Pair Ports as follows:
Model 2
y 30% of the packets will be 60 byte packets.
y 10% of the packets will be 572 byte packets.
y 60% of the packets will be 1514 byte packets.
Buttons
Rest Parameters for
All Test Cases
Select
Click this button to reset all settings made for all Test Cases to default.
Click this button to include this Test Case for DUT test.
XTRAMUS TECHNOLOGIES®
48
E-mail: sales@xtram us . co m
Website: www.Xtramus.com
Page 49

4.9.7. G.8261 Test Case 13
Test Setting
Duration (Secs)
Rate (%)
Frame Size (bytes)
Frame Gap (bits)
Rate (packet/sec)
The duration of time (in seconds) for the test. This field is fixed to 24 and cannot
be changed.
The network traffic rate (%) for the Test Pair Port.
The size of the test packets. The range of the Starting from/at field is 60~1514.
The idle period between transmission of Ethernet frames. This field will change
according to the frame size you set.
The transmitting rate (packets transmitted per second) for the test. This field will
change according to the frame size you set.
As a network utility, Ping is widely used for testing if one specific host is
Ping Times
reachable through its IP address. You can set how many times you would like to
perform the ping command.
Packet Payload
This scroll-down menu allows you to set packet contents to Random, Increase,
0×55AA, 0×00FF, All 1 or All 0.
Criteria
Latency (µs)
Jitter (µs)
The criteria set here will be used to determine if the DUT meets the requirement.
You can set the Latency (µs) here.
The criteria set here will be used to determine if the DUT meets the requirement.
You can set the Jitter (µs) here.
Network Load Setting – Forward/Reverse
Load Rate (%)
Max Load Rate (%)
XTRAMUS TECHNOLOGIES®
The starting network traffic rate for the Load Pair Port.
The maximum network traffic rate for the Load Pair Port.
49
E-mail: sales@xtram us . co m
Website: www.Xtramus.com
Page 50

Load Pair Port Transmitting Setting
Stabilization (sec)
Periods
Duration
(Sec/Period)
The Load Pair Ports will hold and wait for the set amount of time (in seconds)
after Test Pair Ports starting transmitting test packets.
The number of times for the Load Pair Ports to run its cycle.
The time (in seconds) for each cycle.
Network Traffic Model
Setting the Network Traffic Model to Model 1 will set packets transmitted from
Load Pair Ports as follows:
Model 1
y 80% of the packets will be 60 byte packets.
y 5% of the packets will be 572 byte packets.
y 15% of the packets will be 1514 byte packets.
Setting the Network Traffic Model to Model 1 will set packets transmitted from
Load Pair Ports as follows:
Model 2
y 30% of the packets will be 60 byte packets.
y 10% of the packets will be 572 byte packets.
y 60% of the packets will be 1514 byte packets.
Buttons
Rest Parameters for
All Test Cases
Select
Click this button to reset all settings made for all Test Cases to default.
Click this button to include this Test Case for DUT test.
XTRAMUS TECHNOLOGIES®
50
E-mail: sales@xtram us . co m
Website: www.Xtramus.com
Page 51

4.9.8. G.8261 Test Case 14
Test Setting
Duration (Secs)
Rate (%)
Frame Size (bytes)
Frame Gap (bits)
Rate (packet/sec)
The duration of time (in seconds) for the test. This field is fixed to 360 and cannot
be changed.
The network traffic rate (%) for the Test Pair Port.
The size of the test packets. The range of the Starting from/at field is 60~1514.
The idle period between transmission of Ethernet frames. This field will change
according to the frame size you set.
The transmitting rate (packets transmitted per second) for the test. This field will
change according to the frame size you set.
As a network utility, Ping is widely used for testing if one specific host is
Ping Times
reachable through its IP address. You can set how many times you would like to
perform the ping command.
Packet Payload
This scroll-down menu allows you to set packet contents to Random, Increase,
0×55AA, 0×00FF, All 1 or All 0.
Criteria
Latency (µs)
Jitter (µs)
The criteria set here will be used to determine if the DUT meets the requirement.
You can set the Latency (µs) here.
The criteria set here will be used to determine if the DUT meets the requirement.
You can set the Jitter (µs) here.
Network Load Setting – Forward/Reverse
Load Rate (%)
Max Load Rate (%)
Variation (sec./%)
XTRAMUS TECHNOLOGIES®
The starting network traffic rate for the Load Pair Port.
The maximum network traffic rate for the Load Pair Port.
The Load Pair Ports will change transmitting rates after the set amount of time.
51
E-mail: sales@xtram us . co m
Website: www.Xtramus.com
Page 52

Load Pair Port Transmitting Setting
Stabilization (sec)
Periods
Duration
(Sec/Period)
The Load Pair Ports will hold and wait for the set amount of time (in seconds)
after Test Pair Ports starting transmitting test packets.
The number of times for the Load Pair Ports to run its cycle.
The time (in seconds) for each cycle. This field is fixed to 360 and cannot be
changed.
Network Traffic Model
Setting the Network Traffic Model to Model 1 will set packets transmitted from
Load Pair Ports as follows:
Model 1
y 80% of the packets will be 60 byte packets.
y 5% of the packets will be 572 byte packets.
y 15% of the packets will be 1514 byte packets.
Setting the Network Traffic Model to Model 1 will set packets transmitted from
Load Pair Ports as follows:
Model 2
y 30% of the packets will be 60 byte packets.
y 10% of the packets will be 572 byte packets.
y 60% of the packets will be 1514 byte packets.
Buttons
Rest Parameters for
All Test Cases
Select
Click this button to reset all settings made for all Test Cases to default.
Click this button to include this Test Case for DUT test.
XTRAMUS TECHNOLOGIES®
52
E-mail: sales@xtram us . co m
Website: www.Xtramus.com
Page 53

4.9.9. G.8261 Test Case 15
Test Setting
Duration (Secs)
Rate (%)
Frame Size (bytes)
Frame Gap (bits)
Rate (packet/sec)
The duration of time (in seconds) for the test. This field is fixed to 19 and cannot
be changed.
The network traffic rate (%) for the Test Pair Port.
The size of the test packets. The range of the Starting from/at field is 60~1514.
The idle period between transmission of Ethernet frames. This field will change
according to the frame size you set.
The transmitting rate (packets transmitted per second) for the test. This field will
change according to the frame size you set.
As a network utility, Ping is widely used for testing if one specific host is
Ping Times
reachable through its IP address. You can set how many times you would like to
perform the ping command.
Packet Payload
This scroll-down menu allows you to set packet contents to Random, Increase,
0×55AA, 0×00FF, All 1 or All 0.
Criteria
Latency (µs)
Jitter (µs)
The criteria set here will be used to determine if the DUT meets the requirement.
You can set the Latency (µs) here.
The criteria set here will be used to determine if the DUT meets the requirement.
You can set the Jitter (µs) here.
Network Load Setting – Forward/Reverse
Load Rate (%)
XTRAMUS TECHNOLOGIES®
The starting network traffic rate for the Load Pair Port.
53
E-mail: sales@xtram us . co m
Website: www.Xtramus.com
Page 54

Load Pair Port Transmitting Setting
Stabilization (sec)
Periods
Outage
The Load Pair Ports will hold and wait for the set amount of time (in seconds)
after Test Pair Ports starting transmitting test packets.
The number of times for the Load Pair Ports to run its cycle.
Load Pair Ports will be link-down for the set amount of time after finish their
cycles.
Network Traffic Model
Setting the Network Traffic Model to Model 1 will set packets transmitted from
Load Pair Ports as follows:
Model 1
y 80% of the packets will be 60 byte packets.
y 5% of the packets will be 572 byte packets.
y 15% of the packets will be 1514 byte packets.
Setting the Network Traffic Model to Model 1 will set packets transmitted from
Load Pair Ports as follows:
Model 2
y 30% of the packets will be 60 byte packets.
y 10% of the packets will be 572 byte packets.
y 60% of the packets will be 1514 byte packets.
Buttons
Rest Parameters for
All Test Cases
Select
Click this button to reset all settings made for all Test Cases to default.
Click this button to include this Test Case for DUT test.
XTRAMUS TECHNOLOGIES®
54
E-mail: sales@xtram us . co m
Website: www.Xtramus.com
Page 55

4.9.10. G.8261 Test Case 16
Test Setting
Duration (Secs)
Rate (%)
Frame Size (bytes)
Frame Gap (bits)
Rate (packet/sec)
The duration of time (in seconds) for the test. This field is fixed to 19 and cannot
be changed.
The network traffic rate (%) for the Test Pair Port.
The size of the test packets. The range of the Starting from/at field is 60~1514.
The idle period between transmission of Ethernet frames. This field will change
according to the frame size you set.
The transmitting rate (packets transmitted per second) for the test. This field will
change according to the frame size you set.
As a network utility, Ping is widely used for testing if one specific host is
Ping Times
reachable through its IP address. You can set how many times you would like to
perform the ping command.
Packet Payload
This scroll-down menu allows you to set packet contents to Random, Increase,
0×55AA, 0×00FF, All 1 or All 0.
Criteria
Latency (µs)
Jitter (µs)
The criteria set here will be used to determine if the DUT meets the requirement.
You can set the Latency (µs) here.
The criteria set here will be used to determine if the DUT meets the requirement.
You can set the Jitter (µs) here.
Network Load Setting – Forward/Reverse
Load Rate (%)
Max Load Rate (%)
XTRAMUS TECHNOLOGIES®
The starting network traffic rate for the Load Pair Port.
The maximum network traffic rate for the Load Pair Port.
55
E-mail: sales@xtram us . co m
Website: www.Xtramus.com
Page 56

Load Pair Port Transmitting Setting
Stabilization (sec)
Periods
Fill-load (sec)
The Load Pair Ports will hold and wait for the set amount of time (in seconds)
after Test Pair Ports starting transmitting test packets.
The number of times for the Load Pair Ports to run its cycle.
The Load Pair Ports will transmitt by the Max Rate for the set amount of time.
Network Traffic Model
Setting the Network Traffic Model to Model 1 will set packets transmitted from
Load Pair Ports as follows:
Model 1
y 80% of the packets will be 60 byte packets.
y 5% of the packets will be 572 byte packets.
y 15% of the packets will be 1514 byte packets.
Setting the Network Traffic Model to Model 1 will set packets transmitted from
Load Pair Ports as follows:
Model 2
y 30% of the packets will be 60 byte packets.
y 10% of the packets will be 572 byte packets.
y 60% of the packets will be 1514 byte packets.
Buttons
Rest Parameters for
All Test Cases
Select
Click this button to reset all settings made for all Test Cases to default.
Click this button to include this Test Case for DUT test.
XTRAMUS TECHNOLOGIES®
56
E-mail: sales@xtram us . co m
Website: www.Xtramus.com
Page 57

4.10. Report
Test results, statistics and charts are displayed and can be checked on the Main Display Screen. There
are two ways to view Report:
Accessing Report
• Click Report located on System Info/
Configuration List.
• Click the Report button located on Quick
Launch Buttons.
During the tests, charts for the results of each Test Case will be displayed on the Main Display Screen.
Please note that charts displayed on the Main Display Screen will refresh and be cleared automatically
while performing the next Test Case.
Please see sections down below for detailed information regarding to Report.
XTRAMUS TECHNOLOGIES®
57
E-mail: sales@xtram us . co m
Website: www.Xtramus.com
Page 58

Current Run Task
Menu Tab
Chart Adjusting Buttons
The “Current Run – Task” displays the current running
Test Case.
Click the Menu Tab to view test results. Options
available here are Latency, Jitter, Test Pair – Tx, Test
Pair – Rx, Load Pair – Tx, Load Pair – Rx, and
Report.
The Chart Adjusting Buttons allow you to adjust
charts displayed here.
Press this button to set the center of the chart.
This button allows you to adjust the scope of the
chart.
This option allows you to choose a certain
range of chart with magnification.
This option allows you to choose a certain
range of chart (X-Axis) with magnification.
Test Pair Port Info
This option allows you to choose a certain
range of chart (Y-Axis) with magnification.
This option allows you to view the whole chart.
This option allows you to magnify the chart.
This option allows you to minify the chart.
This button allows you to drag the charts around.
The Test Pair Port Info field displays information
regarding to the Test Pair Ports you’ve set.
XTRAMUS TECHNOLOGIES®
58
E-mail: sales@xtram us . co m
Website: www.Xtramus.com
Page 59

Clear/Save As Buttons
You can save the test results by:
Save Test Results
The Clear/Save As Buttons allow you to clear/save the
current chart.
Charts will be saved as JPEG format. To view the charts
you’ve saved, please go to Export → Log →
Configuration on the Menu Bar, and press the
“Browse” button on the Graph Path.
To save the test result charts, please press the Save As Button.
To save the test results statistics, please go to Export → Log on the
Menu Bar, and choose the format you would like to save.
XTRAMUS TECHNOLOGIES®
59
E-mail: sales@xtram us . co m
Website: www.Xtramus.com
Page 60

Note: Information and specifications contained in this document are subject to change without notice.
XTRAMUS TECHNOLOGIES®
All products and company names are trademarks of their respective corporations.
Copyright © 2011 Xtramus Technologies, all rights reserved.
Do not reproduce, redistribute or repost without written permission from Xtramus.
Doc #USM_NuApps-G8261-RM _V1.0_ENG_Preliminary_20111207
60
E-mail: sales@xtram us . co m
Website: www.Xtramus.com
 Loading...