

Page 1

NuTEA-551
User’s Manual
USM Ver 1.1
Page 2

Foreword
Copyright
Copyright © 2011 Xtramus Technologies, all rights reserved. The information contained in this document is the property of Xtramus
Technologies. No part of this publication shall be reproduced, stored in a retrieval system, or transmitted, in any form or by any
means, without the prior written permission of Xtramus Technologies.
Disclaimer
The information contained in this document is subject to change without notice and does not represent a commitment on the part of
Xtramus Technologies. The information in this document is believed to be accurate and reliable. However, Xtramus Technologies
assumes no responsibility or liability for any errors or inaccuracies that may appear in the docume nt.
Trademarks
NuTEA-551 is a trademark or registered trademark of Xtramus Technologies. All other trademarks and registered trademarks are
the property of their respective owners.
Warranty
Xtramus Technologies warrants for the hardware provided along with this document under proper usage and conditions in normal
environment; any improper operation or in irregular environment may possibly cause this product NOT function well. For detailed
terms, please contact your local dealer.
Contact Information
Xtramus Technologies
E-mail: sales@xtramus.com
Website: www.xtramus.com
Tel: +886-2-8227-6611
Fax: +886-2-8227-6622
XTRAMUS TECHNOLOGIES®
2
E-mail: sales@xtram u s .com
Website: www.Xtramus.com
Page 3
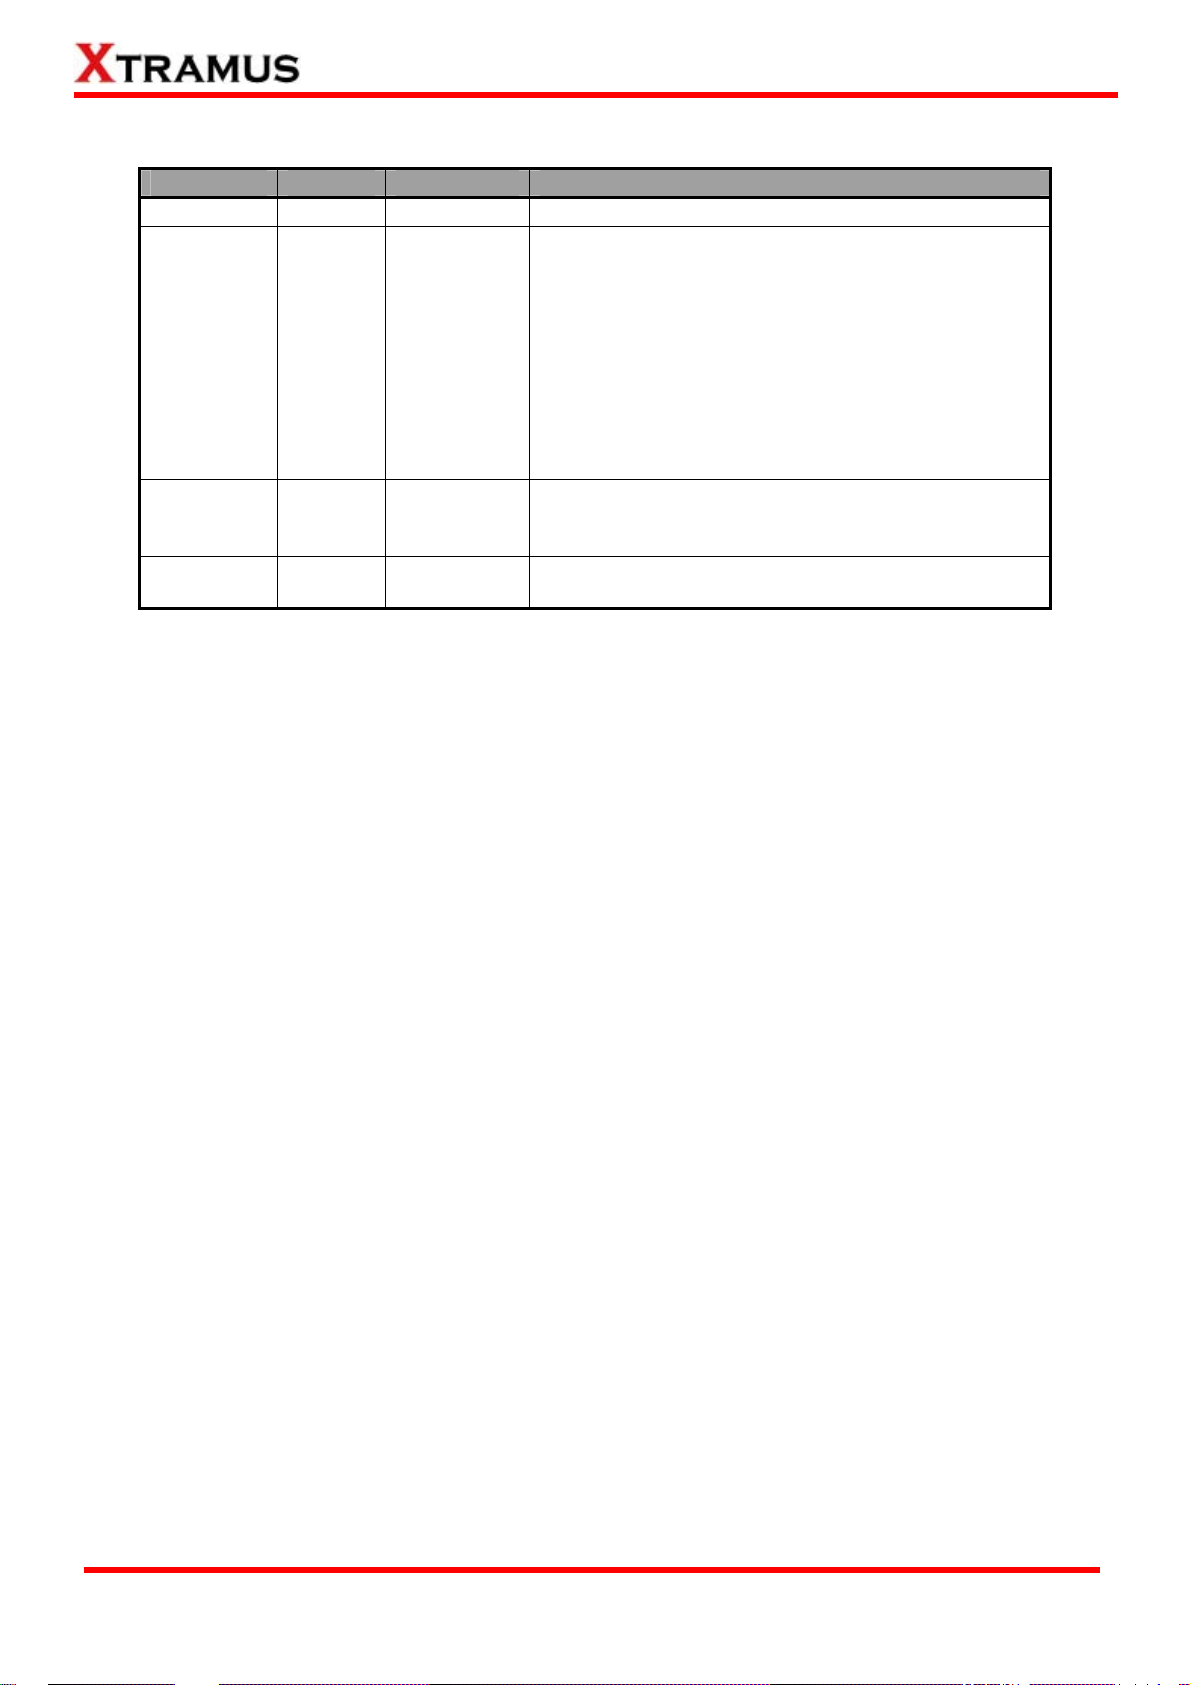
Revision History
Date Version AP Version History
2011/01/25 1.0 First version
1. Change manual template.
2. Page 3, change Revision History format.
3. Page 21, add OS warning messages.
4. Page 36, change parameter settings figure.
2011/06/22 1.1 Ver 1.3b007
2011/06/23 1.2 Ver 1.3b007
2011/9/14 1.2 Ver 1.3b007
5. Page 37, change Impairment Parameter figure.
6. Page 38, re-write Packet Jitter descriptions,
and add Sustained Cycle of Jitter descriptions.
7. Page 38, add Packet Insertion descriptions.
8. Page 43, remove SDFR descriptions and add
session filter descriptions.
1. Remove Preliminary watermark.
2. Page 38, rephrase descriptions regarding to
Sustained Cycle of Jitter.
1. Page 12, correcting figures of one way and two
way impairments.
XTRAMUS TECHNOLOGIES®
3
E-mail: sales@xtram u s .com
Website: www.Xtramus.com
Page 4

Table of Contents
Foreword..........................................................................................................................................2
Revision History..............................................................................................................................3
1. NuTEA-551 Overview ..................................................................................................................5
1.1. NuTEA-551 General Description .......................................................................................5
1.2. Key Benefits of NuTEA-551 ...............................................................................................6
1.3. Main Applications of NuTEA-551 ......................................................................................7
1.4. Impairment Overview of NuTEA-551.................................................................................8
2. NuTEA-551 Function Overview..................................................................................................9
2.1. NuTEA-551 Ports ................................................................................................................9
2.2. NuTEA-551 Front Panel – LCD & LEDs ..........................................................................10
2.3. NuTEA-551 Front Panel – Buttons..................................................................................11
3. Making Settings with NuTEA-551’s Front Panel.....................................................................12
3.1. Connecting NuTEA-551 to Your Network.......................................................................12
3.2. NuTEA-551 Setting Options Overview............................................................................14
3.3. NuTEA-551 Front Panel Functions – Basic Controls....................................................15
3.4. NuTEA-551 Front Panel Functions – Impair Parameters..............................................16
3.5. NuTEA-551 Front Panel Functions – Statistic Counters...............................................17
3.6. NuTEA-551 Front Panel Functions – Filter Setting .......................................................18
3.7. NuTEA-551 Front Panel Functions – System Setting....................................................18
3.8. NuTEA-551 Front Panel Functions – System Information............................................19
3.9. NuTEA-551 Front Panel Functions – Restore Defaults.................................................19
4. NuTEA-551 Utility ......................................................................................................................20
4.1. Installing/Uninstalling NuTEA-551 ..................................................................................21
4.2. Starting NuTEA-551 Utility Software & Demo Mode......................................................25
4.3. NuTEA-551 Utility Software Main Window Overview ....................................................26
5. NuTEA-551 Utility Software Function......................................................................................27
5.1. NuTEA-551 Utility Software Function – Menu Bar.........................................................27
5.1.1. Menu Bar – File............................................................................................................27
5.1.2. Menu Bar – Report.......................................................................................................27
5.1.3. Menu Bar – Setting......................................................................................................29
5.1.4. Menu Bar – Service (Firmware/FPGA Upgrading)....................................................30
5.1.5. Menu Bar – Languages ...............................................................................................32
5.1.6. Menu Bar – Help ..........................................................................................................32
5.2. NuTEA-551 Utility Software Function – Quick Launch Buttons...................................33
5.2.1. Quick Launch Buttons – Reconnect..........................................................................33
5.2.2. Quick Launch Buttons – Counter & Chart.................................................................33
5.2.3. Quick Launch Buttons – Port A, Port B, Port AB......................................................34
5.3 NuTEA-551 Function – Info/Setting Select List ..............................................................35
5.4. NuTEA-551 Parameter Settings.......................................................................................36
5.4.1. Impairment Parameters...............................................................................................37
5.4.2. Max Impairment Limit..................................................................................................39
5.4.3. Network Media Setting................................................................................................40
5.4.4. Filter Setting.................................................................................................................41
5.4.5. PHY OSC Clock............................................................................................................44
XTRAMUS TECHNOLOGIES®
4
E-mail: sales@xtram u s .com
Website: www.Xtramus.com
Page 5

1. NuTEA-551 Overview
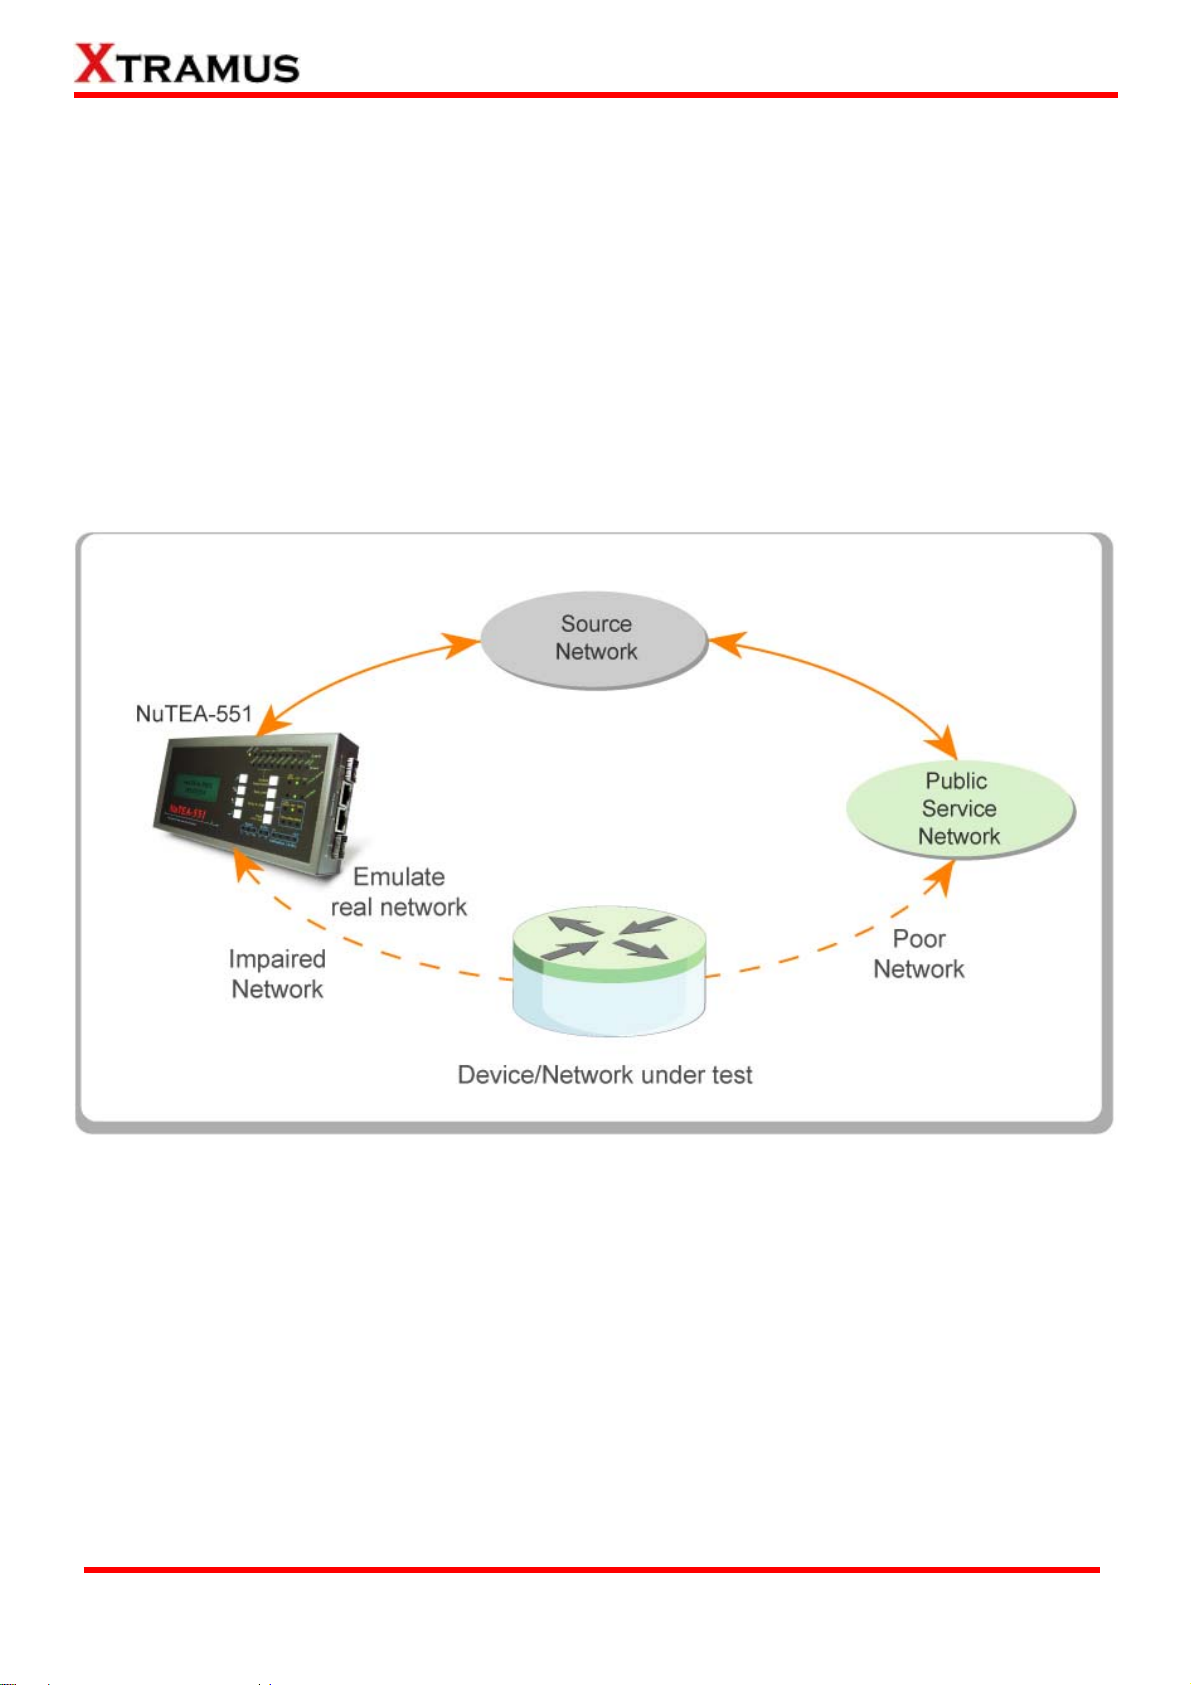
1.1. NuTEA-551 General Description
NuTEA-551 is a network impairment device that impairs
Ethernet network to emulate unstable network conditions,
especially networks with complex topology, such as Internet
in public network.
It is a compact, lightweight, and highly cost-effective device
that provides the function to simulate Ethernet traffic
impairment situation, such as CRC Error Packet, Packet
Corruption, Packet Drop, Packet Order Exchanging
(Re-order), Packet Duplicate, Delay, Jitter, and Limiting
Packet Transferring Rate. Variables regarding to these impairments can be set with accurate
high-precision and apply for all kinds of Devices under Test (DUTs).
With functions mentioned above, NuTEA-551 is capable of emulating almost any possible error that could
happen in real-world network environments. While developing network products, it is crucial to
understand how these under developing products would perform or react when network errors occur.
NuTEA-551’s impairment emulating capabilities allow manufacturers to perform tests with their products
in labs. Also, NuTEA-551 can emulate packet delay and packet jitter as well, and the packet delay/jitter
time can be set in milliseconds (ms) or microseconds (μs).
NuTEA-551 provides a controllable blemish network environment for manufacturers to test their products’
performances within lab network environments. With NuTEA-551’s capability to set and change network
impairment settings dynamically, it is easy for users to build a customized network environment for
product demo or testing product’s specific function.
Embedded with Voltage-Controlled Crystal Oscillator (VCXO), NuTEA-551 can be adjusted to match/jitter
its PHY chip’s frequency within the range of ±100 ppm via utility software.
Also, NuTEA-551 supports Maximum Impairment Limit, which allows users to set the number of times for
error emulations with NuTEA-551’s utility software.
XTRAMUS TECHNOLOGIES®
5
E-mail: sales@xtram u s .com
Website: www.Xtramus.com
Page 6

1.2. Key Benefits of NuTEA-551
• Emulate network impairment situations for testing DUTs while building small network environment for
users
• Testing DUT performance with impairment packet procession and validates packet completeness
• Reduce manufacturer’s product developing and researching cost with less debugging time
• High performance with useful tool for checking product quality during production
• Emulate real network impairment situations such as:
¾ Packet CRC Error
¾ Packet Corrupt
¾ Packet Drop
¾ Packet Order Exchanging (Re-order)
¾ Packet Duplicate
¾ Packet Delay & Jitter
¾ Data Transferring with Limited Rate
• Packet-base Impairment which uses the amount of packets as account standard
• Follow G.1050, the Network Model for Evaluating Multimedia Transmission Performance over Internet
Protocol
• Utility software with setting options that allows users to set:
¾ SDFR (Self-Discover Filtering Rules), a set of filtering rules including Destination Address,
Source Address, VLAN, Destination IP, Source IP, Destination Port, and Source Port
¾ 2 sets of Session Filter including Port A → Port B and Port B → Port A
• Embedded with Two RJ-45 & Fiber Combo Ports
• Supports RMON Counters
• Performing Configurations with Front Panel Buttons
• Utility software that runs under Windows® environment. When connecting NuTEA-551 with your PC via
a Mini USB cable, it allows users to:
¾ Setting NuTEA-551’s impairment parameters
¾ View counter reports and statistics chart
¾ Upgrading NuTEA-551’s firmware and FPGA
XTRAMUS TECHNOLOGIES®
6
E-mail: sales@xtram u s .com
Website: www.Xtramus.com
Page 7
1.3. Main Applications of NuTEA-551
• DUT Performance Testing and Analyzing
¾ Conducting DUT Performance Tests in Emulated Network Environment
¾ Various Embedded Packet Counters of NuTEA-551 for Checking DUT Counters’ Reliability
• DUT Troubleshooting. With network which emulates public network with poor bandwidth, users can
examine and see if the DUT has good network disaster recovery ability
• Validate and check if other test devices in mass production line are working properly or having the right
settings, and capable of picking up faulty DUTs
• Emulating and building a real-world network environment for demonstration purposes
• Products aiming for Telecommunication Service Provider can use NuTEA-551 for functions examining
and testing
XTRAMUS TECHNOLOGIES®
7
E-mail: sales@xtram u s .com
Website: www.Xtramus.com
Page 8

1.4. Impairment Overview of NuTEA-551
NuTEA-551 can simulate different Ethernet traffic impairment situations, including:
CRC Error Packet
At the tail of a packet, it keeps a checksum value to verify the correctness of the packet when it is
received. If the checksum value is not correct that can verify the correctness of the packet, we call it CRC
Error Packet.
Packet Corruption
For some reason intentionally or unintentionally, the content of packet is modified, owing to poor
transmission or manual interference.
Drop Packet
Ethernet is a family of frame-based computer networking technologies. Frames are transmitted via
different devices and media. Af ter the transmission via dif ferent media and devices, some of frames might
be lost. For layer 2 switching mode of OSI model, packet is the same as frame.
Packet Re-Order
All of frame/packet should be transmitted sequentially, and it is able to reunite to complete data at
destination device. If the frame/packet sent goes different routes, it might be possible that later packet
arriving destination earlier, so the sequence of packet is changed, owing to poor device or manual
interference.
Packet Duplication
Packet is transmitted one by one via network device. For some reason, the destination had received the
packet, however the sending side does not received the acknowledgement, so packet is resent and
duplicated packet is generated.
Packet Delay & Jitter
Delays may occur during packet/frame transmission in real world network environments. Also, these time
periods of data transmission delays may vary, and are usually referred as jitters.
For more information regarding how to configure these Ethernet traffic impairment situations, please refer
to 5.4. NuTEA-551 Parameter Settings.
XTRAMUS TECHNOLOGIES®
8
E-mail: sales@xtram u s .com
Website: www.Xtramus.com
Page 9

2. NuTEA-551 Function Overview
2.1. NuTEA-551 Ports
Ports Description
A Mini-USB Port
B Power Jack
C Network Port A
Network Port
D
Mini USB Port for Firmware/FPGA Upgrading
DC 12 V Power Jack
¾ RJ45 Port × 1 ¾ SFP Port × 1
Network Port B
¾ RJ45 Port × 1 ¾ SFP Port × 1
XTRAMUS TECHNOLOGIES®
9
E-mail: sales@xtram u s .com
Website: www.Xtramus.com
Page 10
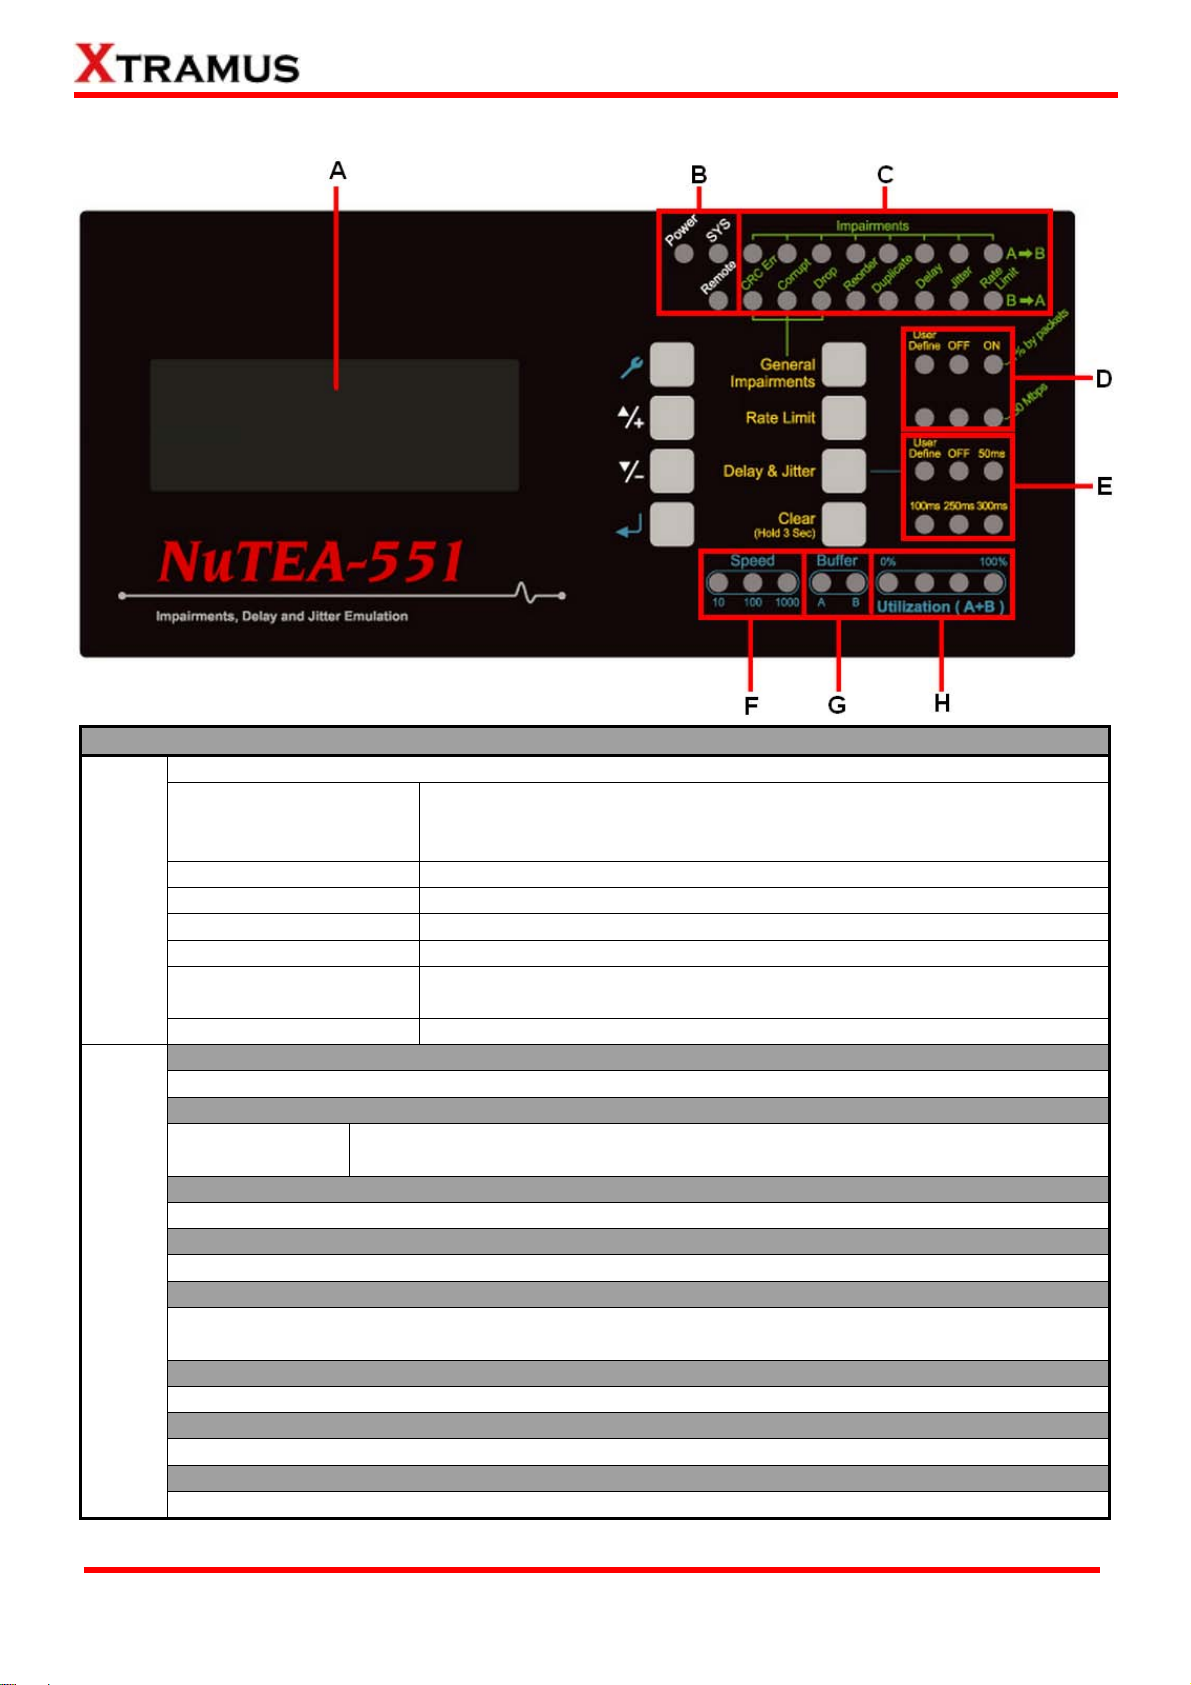
2.2. NuTEA-551 Front Panel – LCD & LEDs
LCD & LEDs Descriptions
Impair Parameters
LCD
(A)
Statistic Counters
Media Setting
Filter Setting
System Setting
System Information
Restore Defaults
General System Information (B)
¾ Power ¾ SYS ¾ Remote
Impairments (C)
A → B
B → A
1% by Packets (D)
¾ User Define ¾ Off ¾ On
50 Mbps (D)
LEDs
(B~H)
¾ User Define ¾ Off ¾ On
Delay & Jitter (E)
¾ User Define ¾ 50 ms ¾ 250 ms
¾ Off ¾ 100 ms ¾ 300 ms
Speed (F)
¾ 10 Mbps ¾ 100 Mbps ¾ 1000Mbps
Buffer (G)
¾ A ¾ B
Utilization (A+B) (H)
Utilization (A+B) is displayed via 4 LEDs, ranging from 0% to 100%
4 × 20 (Characters ) LCD Screen
¾ CRC Error ¾ Packet Duplication ¾ Packet Corruption
¾ Packet Delay ¾ Packet Drop ¾ Packet Jitter
¾ Packet Reorder ¾ Rate Limit
¾ Port A ¾ Port B ¾ Port A and B
¾ Auto All ¾ Force 100M Full ¾ Force 10M Full
¾ Port A to B ¾ Port B to A ¾ Port A to/from B
NuTEA-551 Buzzer ON/OFF
Displaying NuTEA-551’s System Information including Temperature
and Fan RPM
Restore All Settings of NuTEA-551 to Default Value
¾ CRC Error ¾ Drop ¾ Duplicate ¾ Jitter
¾ Corrupt ¾ Reorder ¾ Delay ¾ Rate Limit
XTRAMUS TECHNOLOGIES®
10
E-mail: sales@xtram u s .com
Website: www.Xtramus.com
Page 11
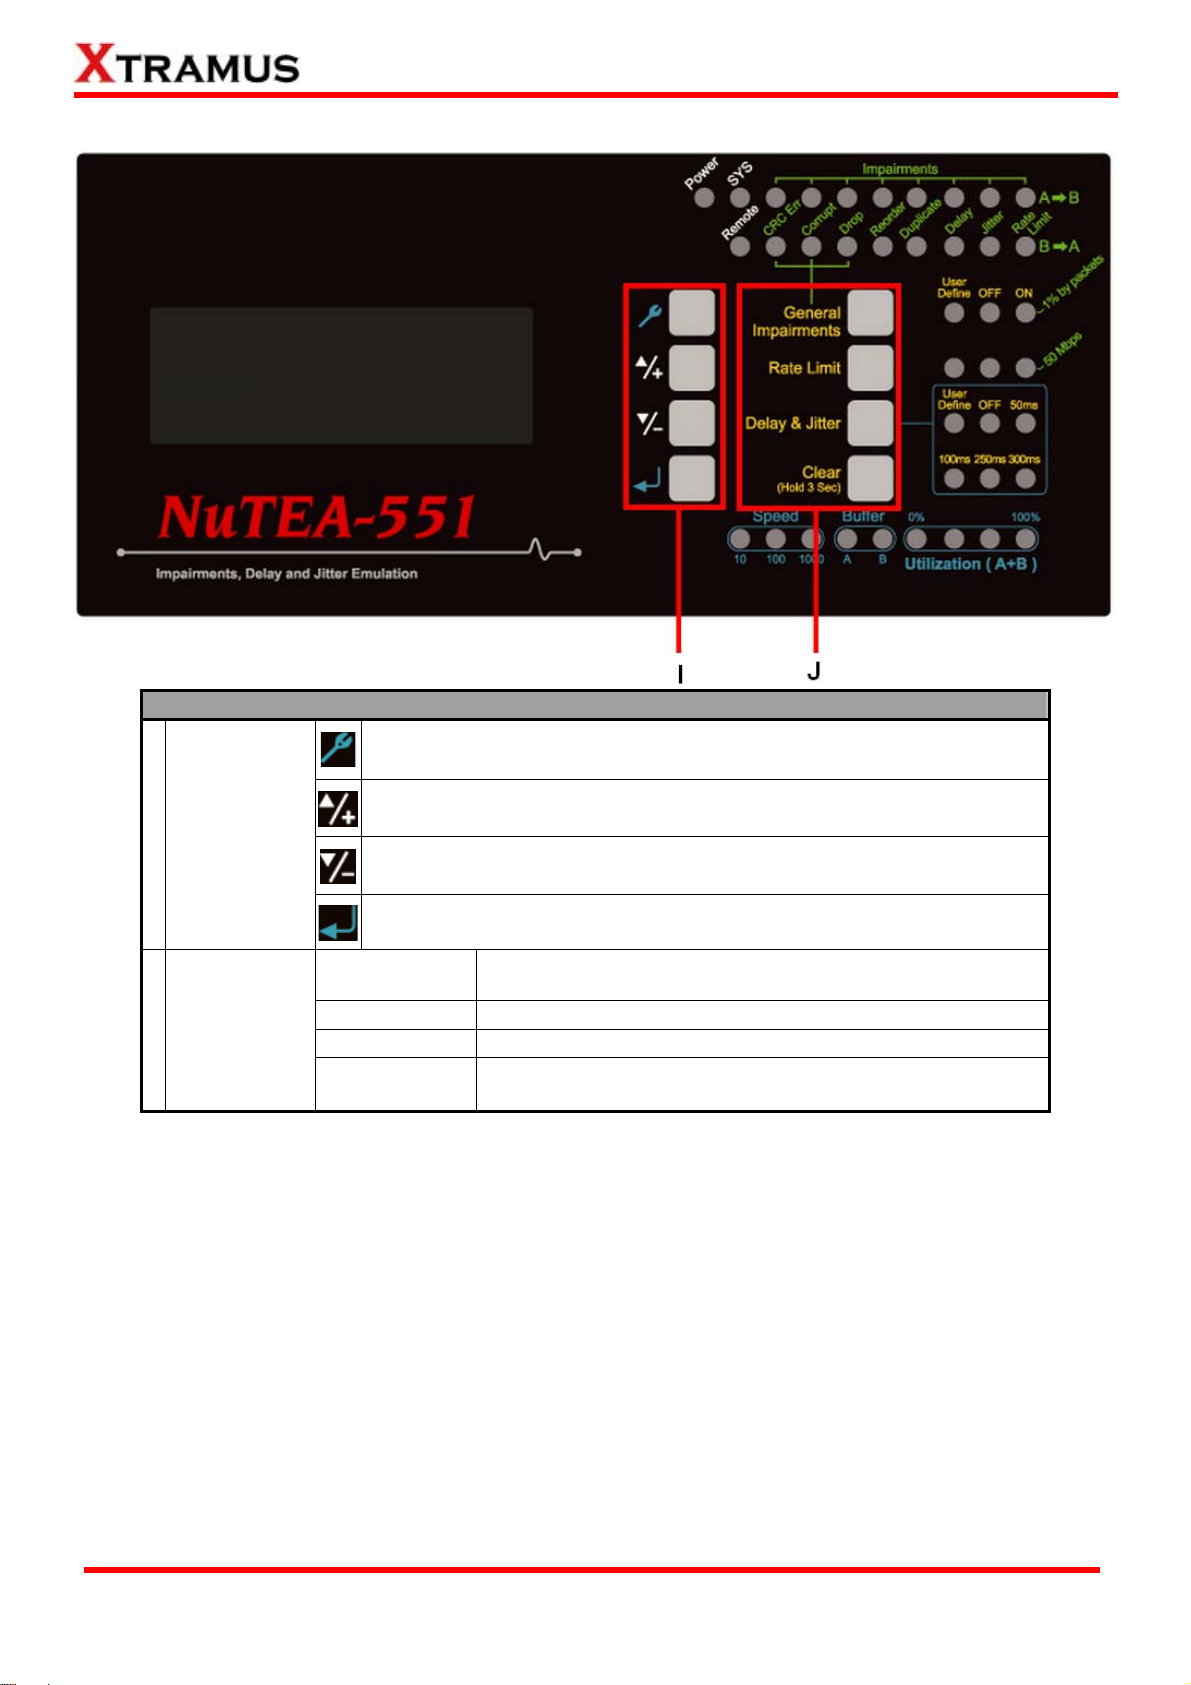
2.3. NuTEA-551 Front Panel – Buttons
Buttons Descriptions
Enter the Main Menu(*) or return to the previous Menu
Operation
I
Buttons
Move the select cursor up
Move the select cursor down
Execute the selected selection
Enable general impairments including CRC Error, Packet
Corrupt, and Packet Drop. You can apply your settings too.
Set packet transferring rate limit
Set delay and jitter time
Press this button and hold it for 3 seconds to clear all
statistic counters stored in NuTEA-551
*Menu will be displayed on the LCD screen.
Configuration
J
Buttons
General
Impairments
Rate Limit
Delay & Jitter
Clear
XTRAMUS TECHNOLOGIES®
11
E-mail: sales@xtram u s .com
Website: www.Xtramus.com
Page 12
3. Making Settings with NuTEA-551’s Front Panel
NuTEA-551’s LCD screen can display information and contain select options such as Impair Parameters,
Statistic Counters, Media Setting, Filter Setting, System Setting, System Information, and Restore
Defaults.
3.1. Connecting NuTEA-551 to Your Network
NuTEA-551 must be installed to your networks properly. The following section contains examples for
connecting NuTEA-551 to your network.
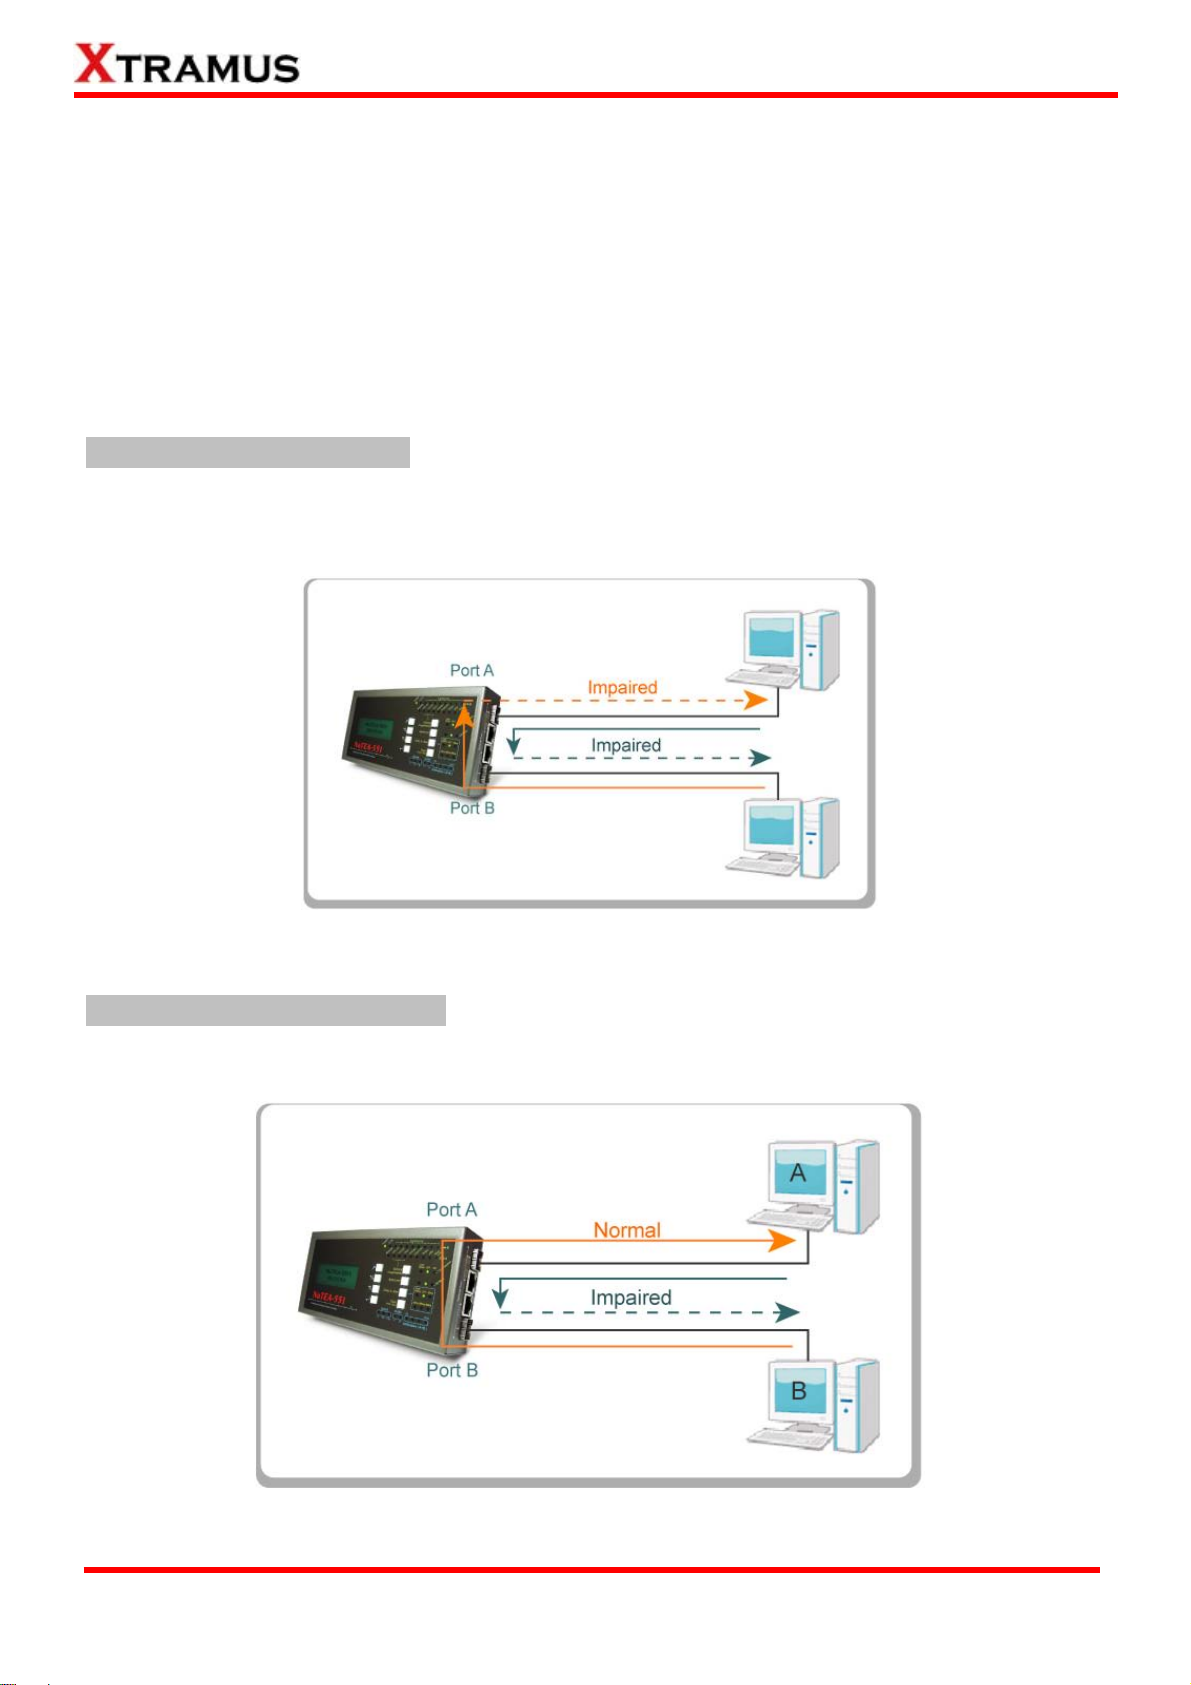
Two Ways Impairment (Default)
The illustration below shows the concept of impaired network. It is an example that normal network is
impaired.
Data streams both way that flow through this machine is impaired.
One Way Impairment (User Define)
The illustration below impairs network flow from port A to B only. There is no influence on the network
from port B to A
Users can activate impairment by button with user define selections
XTRAMUS TECHNOLOGIES®
12
E-mail: sales@xtram u s .com
Website: www.Xtramus.com
Page 13
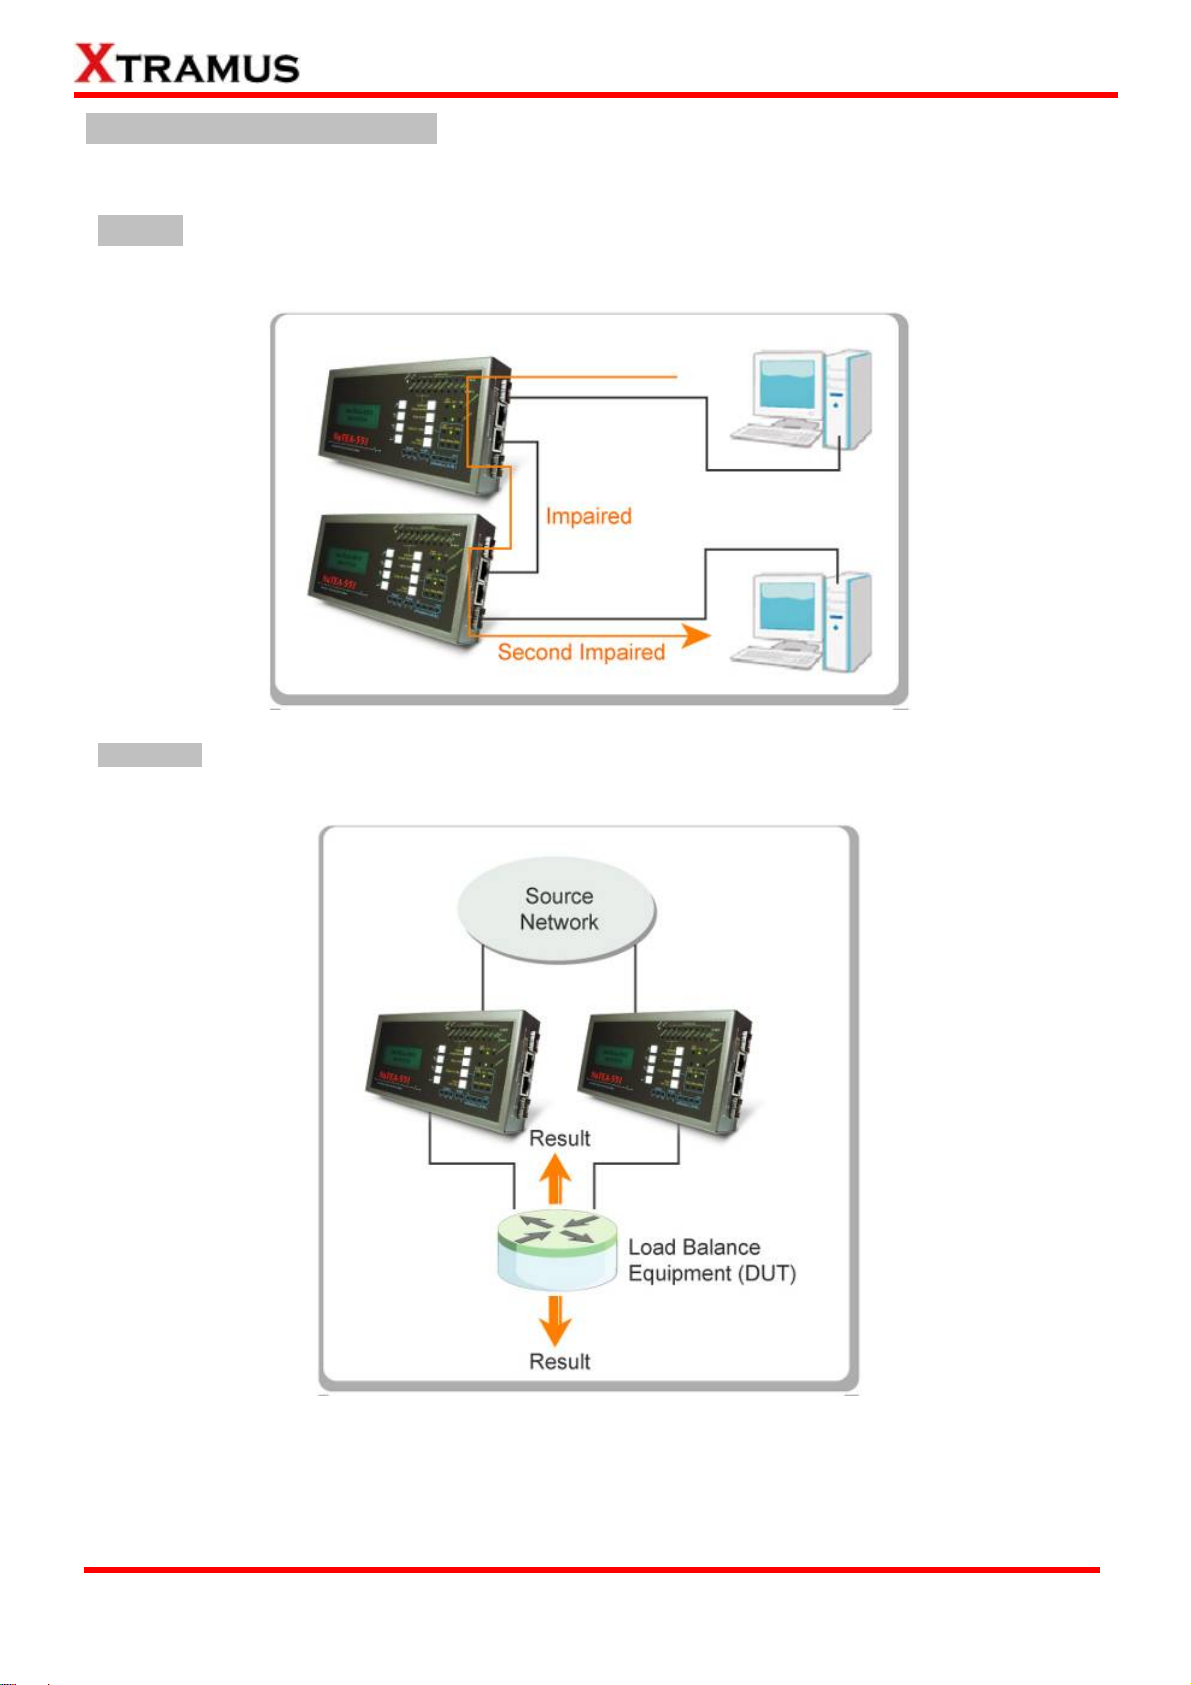
Impairment from Multiple Devices
If a single unit of this machine is not enough to generate the impairment environment required, you can
connect it in serial or in parallel to create any kinds of possible impairment structure.
In Serial
NuTEA-551 can be cascaded for multiple impairments.
In Parallel
NuTEA-551 can be connected in parallel to emulate impairment from different source network.
XTRAMUS TECHNOLOGIES®
13
E-mail: sales@xtram u s .com
Website: www.Xtramus.com
Page 14
r
p
r
A
A
f
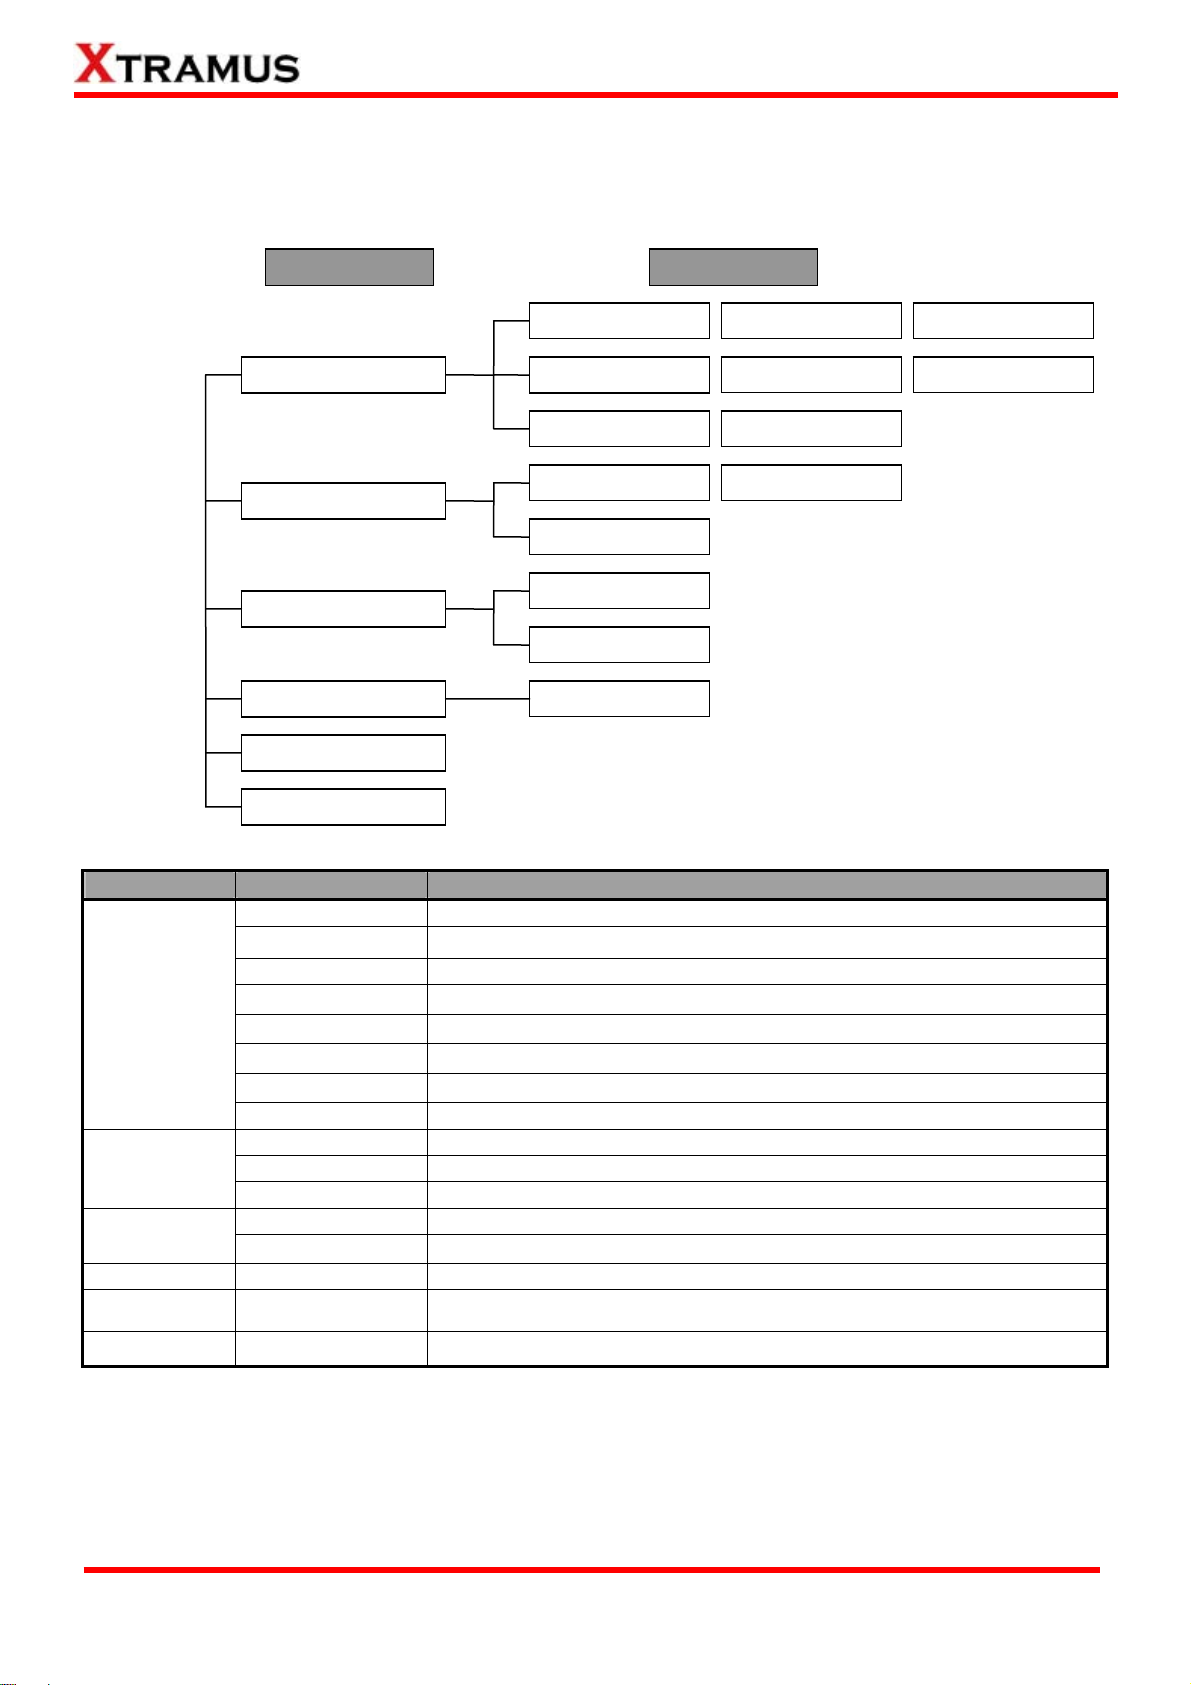
3.2. NuTEA-551 Setting Options Overview
All configuration options and system information can be viewed via NuTEA-551’s LCD screen. All options
and their functions contained in the menu are listed down below:
Layer 1 Menu Layer 2 Menu
Packet Duplication
Packet Reorder
Packet Delay
Clear Counter
Impair Parameters
Statistic Counters
Filter Settings
System Settings
System Information
Restore Defaults
CRC Erro
Packet Corruption
Packet Dro
Port
Port B
Port A to B
Port B to
Buzzer On/Of
Layer 1 Menu Layer 2 Menu Description
CRC Error View CRC Error impairment for Port A and Port B
Packet Corruption
View Packet Corruption impairment for Port A and Port B
Packet Drop View Packet Drop impairment for Port A and Port B
Impair
Parameters
Packet Reorder
Packet Duplication
Packet Delay
Packet Jitter
View Packet reorder impairment for Port A and Port B
View Packet Duplication impairment for Port A and Port B
View Packet Delay impairment for Port A and Port B
View Packet Jitter impairment for Port A and Port B
Rate Limit View Rate Limit impairment for Port A and Port B
Statistic
Counters
Filter Setting
System Setting
System
Information
Restore Defaults
Port A View packet counters and statistics for Port A
Port B View packet counters and statistics for Port B
Clear Counter Clear all counters and statistics
Port A to B View SDFR filter for packets flow from Port A to Port B
Port B to A View SDFR filter for packets flow from Port B to Port A
Buzzer On/Off If enabled, system will buzz whenever a button is pressed
N/A Display detailed system information
N/A Reset all NuTEA-551’s settings and parameters to default value
Packet Jitte
Rate Limit
XTRAMUS TECHNOLOGIES®
14
E-mail: sales@xtram u s .com
Website: www.Xtramus.com
Page 15

3.3. NuTEA-551 Front Panel Functions – Basic Controls
The following section lists some basic setting controls for making configurations with NuTEA-551’s front
panel buttons.
Basic Setting Controls
Function Control Button Action LCD Display
Entering Main
Menu
Back to
Previous
Menu
Moving
Selection
Cursor
Press
Press
Press
button to enter NuTEA-551’s main menu.
button to go back to the previous menu.
to move the selection cursor up, or press
to move the selection cursor down.
↓
↓
↓
Entering
Selected
Press
Option
XTRAMUS TECHNOLOGIES®
button to enter the menu option you chose.
15
↓
E-mail: sales@xtram u s .com
Website: www.Xtramus.com
Page 16

3.4. NuTEA-551 Front Panel Functions – Impair Parameters
Function Control Button Action LCD Display
Entering
Impair
Parameters
Menu
View
Impairment
Parameters
Press
and press
button to enter NuTEA-551’s main menu,
button to enter NuTEA-551’s Impair
Parameters menu.
Configuration options such as Impair Parameters,
Statistic Counters, Media Setting, Filter Setting,
System Setting, System Information, and Restore
Defaults are available and can be viewed here.
When you’re in NuTEA-551’s Impair Parameters
menu, press
or button to choose the
impairment you would like to view and press the
button. You can view impairment parameters for
packets from Port A to B, or packets from Port B to
A. Press
again to view the impairment
parameters.
↓
↓
↓
↓
XTRAMUS TECHNOLOGIES®
16
E-mail: sales@xtram u s .com
Website: www.Xtramus.com
Page 17

3.5. NuTEA-551 Front Panel Functions – Statistic Counters
Function Control Button Action LCD Display
Entering
Statistic
Counter Menu
View Counter
Press button to enter NuTEA-551’s main menu,
choose Statistic Counters from the main menu, and
press
button to enter NuTEA-551’s Statistic
Counters menu.
You can view statistics and counters for Port A and
Port B. Also, you can clear both Port A and Port B’s
counters here.
When you’re in NuTEA-551’s S t atisti c Counter menu,
press
would like to view and press the
or button to choose the Port you
button. You can
view counter reports for the port you’ve chose.
↓
↓
↓
Clear Counter
Choose Clear Counter from Statistic Counter
menu, and press the
button. NuTEA-551 will
prompt and ask if you’re sure to clear all counters.
Press
button to clear all counters, or press
button to cancel.
↓
XTRAMUS TECHNOLOGIES®
17
E-mail: sales@xtram u s .com
Website: www.Xtramus.com
Page 18

3.6. NuTEA-551 Front Panel Functions – Filter Setting
Function Control Button Action LCD Display
Entering Filter
Setting
Menu
View SDFR
Status
Press
choose Filter Setting from the main menu, and press
button to enter NuTEA-551’s Filter Setting menu.
You can view SDFR status for Port A and Port B here.
When you’re in NuTEA-551’s Filter Setting menu,
press
you would like to view (Port A to B or Port B to A)
and press the
display the SDFR status (On/Off).
button to enter NuTEA-551’s main menu,
or button to choose the SDFR status
button. The LCD screen will
↓
↓
↓
3.7. NuTEA-551 Front Panel Functions – System Setting
Function Control Button Action LCD Display
Entering
System
Setting
Menu
Press
choose System Setting from the main menu, and
press
Setting menu.
You can turn ON/OFF NuTEA-551’s buzzer here. To
turn ON/Off NuTEA-551’s buzzer, press
button to enter NuTEA-551’s main menu,
button to enter NuTEA-551’s System
button.
↓
↓
XTRAMUS TECHNOLOGIES®
18
E-mail: sales@xtram u s .com
Website: www.Xtramus.com
Page 19

3.8. NuTEA-551 Front Panel Functions – System Information
Function Control Button Action LCD Display
Press
button to enter NuTEA-551’s main menu,
choose System Information from the main menu,
Entering
System
and press
button to enter NuTEA-551’s System
Information menu.
Information
Menu
You can view NuTEA-551’s system information here.
Press
or button to view all NuTEA-551’s
system information.
3.9. NuTEA-551 Front Panel Functions – Restore Defaults
Function Control Button Action LCD Display
Entering
Restore
Default
Menu
Press
choose Restore Defaults from the main menu, and
press
Defaults menu.
Press
default value, or press
button to enter NuTEA-551’s main menu,
button to enter NuTEA-551’s Restore
button to reset all NuTEA-551’s setting to
button to cancel.
↓
↓
↓
↓
XTRAMUS TECHNOLOGIES®
19
E-mail: sales@xtram u s .com
Website: www.Xtramus.com
Page 20

4. NuTEA-551 Utility
NuTEA-551 comes with a utility software that runs under Microsoft Windows environment.
By connecting NuTEA-551 with PC via a USB cable as shown in the figure down below, you
can configure test parameters, download testing logs and upgrade firmware.
NuTEA-551 Utility Software System Requirement
OS
CPU
RAM
HDD
All test parameters can be configured with NuTEA-551 utility software, including all the configurations that
can be set by buttons located on NuTEA-551’s panel.
Please note that you have to install NuTEA-551 utility software and hardware driver on your PC first. After
installing NuTEA-551 utility software, NuTEA-551’s driver will be installed automatically.
Microsoft Windows 2000/XP/Vista/7
Pentium 1.3GHz or Higher
1.0GB of RAM
10GB of Available Hard Disk Space
XTRAMUS TECHNOLOGIES®
20
E-mail: sales@xtram u s .com
Website: www.Xtramus.com
Page 21

4.1. Installing/Uninstalling NuTEA-551
Please follow the steps down below to install NuTEA-551 utility software.
Installing NuTEA-551 Utility Software
1. Double-click NuTEA-551 utility software
installation program and start the
installation process*.
2. InstallShield Wizard is starting to install
NuTEA-551 utility software. If you would
like to cancel installation, click “Cancel”.
3. Click “Next” to continue installation.
*Note: Due to different Operating Systems or system settings, warning messages might pop up when
installing NuTEA-551 Utility or driver for your device. When this occurs, please choose the options on
these pop-up warning messages that allow you to continue installing NuTEA-551 Utility or device
driver.
XTRAMUS TECHNOLOGIES®
21
E-mail: sales@xtram u s .com
Website: www.Xtramus.com
Page 22

Installing NuTEA-551 Utility Software
4. Click “I accept the terms in the license
agreement”, and click “Next” to continue.
5. Click the Change… button to install the
program to another folder, or click
Next
button to install the program into the
default destination folder, and then
continue next step. Click
Back button to
go back to the previous step to modify.
6. NuTEA-551 utility software InstallShield
Wizard will start installing momentarily.
Click
Install button to start installation.
XTRAMUS TECHNOLOGIES®
22
E-mail: sales@xtram u s .com
Website: www.Xtramus.com
Page 23

Installing NuTEA-551 Utility Software
7. InstallShield Wizard is installing
NuTEA-551 utility software.
8. NuTEA-551 utility software installation
completes. Click
Finish button to exit.
XTRAMUS TECHNOLOGIES®
23
E-mail: sales@xtram u s .com
Website: www.Xtramus.com
Page 24

To uninstall NuTEA-551 utility software, you can:
Uninstalling NuTEA-551 Utility Software
Click Start Æ Programs Æ
¾
NuStreams Æ NuTEA-500 Utility Æ
Uninstall NuTEA-500 Utility.
¾ Go to the Control Panel, choose
NuTEA-500 Utility from installed
program list, and click “Remove” to
uninstall.
XTRAMUS TECHNOLOGIES®
24
E-mail: sales@xtram u s .com
Website: www.Xtramus.com
Page 25

4.2. Starting NuTEA-551 Utility Software & Demo Mode
Before starting NuTEA-551 utility software, please be sure that your NuTEA-551 is properly connected to
your PC. The figure down below is an example for connecting NuTEA-551 to PC via an USB cable.
Before connecting NuTEA-551 with your PC via a USB cable, please be
↓
sure that NuTEA-551 should be in the most outer layer of its menu, which
displays only the model name (NuTEA-551) and its cumulative running
time.
↓
When connected properly, NuTEA-551’s LCD screen will display a
message “USB Link Connected” as shown in the figures on the left hand.
You can start NuTEA-551 utility software by:
Starting NuTEA-551 Utility Software
¾ Double-click NuTEA-551 utility icon
located on your PC’s desktop
¾
Click Start Æ Programs Æ NuStreams
Æ NuTEA-500 Utility Æ
NuTEA-551
Utility.
If your PC is not connected with NuTEA-551, you can still run NuTEA-551 utility software under Demo
Mode. Almost all functions are available under Demo Mode. However, please note that Demo Mode is
for system demo purposes only, and does not serve any testing purposes at all.
XTRAMUS TECHNOLOGIES®
25
E-mail: sales@xtram u s .com
Website: www.Xtramus.com
Page 26

4.3. NuTEA-551 Utility Software Main Window Overview
Function Descriptions
The Menu Bar allows you to load/save configuration files, view
A Menu Bar
counters/charts, make impairment settings, perform system maintenance
and view system information.
Quick Launch
B
C
D
E
Buttons
Info/Setting Select
List
Main Display
Window
USB Connection
Status
With a simple click of these Quick Launch Buttons, you can reconnect your
PC with NuTEA-551, view counters/charts, and make impairment settings.
This section contains a selectable list of NuTEA-551’s detailed system
information and impairment settings.
This section displays detailed system information or all impairment
parameters you can configure.
This icon shows the connection status between your PC and NuTEA-551.
For more detail descriptions regarding to NuTEA-551 utility software, please refer to Chapter 5 down
below.
XTRAMUS TECHNOLOGIES®
26
E-mail: sales@xtram u s .com
Website: www.Xtramus.com
Page 27

5. NuTEA-551 Utility Software Function
5.1. NuTEA-551 Utility Software Function – Menu Bar
The Menu Bar includes configuration options such as File, Report, Setting, Service, Languages, and
Help. Please see the sections down below for more detailed information.
5.1.1. Menu Bar – File
File
Load Default
Config. Profile
Load Config.
Profile From
Save Config
Exit
NuTEA-551 utility software will load the default settings. All impairment
parameters will be set to default value.
You can choose to load test settings either from Existing Files.
• Existing Files: NuTEA-551 utility software will load test settings which you
saved previously.
You can save all impairment parameters you made to your PC. The files will be in
the format of “*.cfg”.
Exit NuTEA-551 utility software.
5.1.2. Menu Bar – Report
Report
When choosing Counter from the Menu Bar, a Counter Window will pop up and show
system statistics of NuTEA-551’s Port A, Port B, and both Port A/B.
You can make settings for the Counter Window via its Control Buttons located on the
upper part of the Counter Window.
Button Description
Counter
The Save button allows you to save the current counter reports to Microsoft Excel
® format files.
Click the Click button allows the Counter Window to start updating current
statistics dynamically. Click the Click button again will stop updating.
The Clear All button allows you to clear all statistics displayed in the Counter
Window.
The Hide button allows you to hide some of the statistics, as well as fold all tree
style tab statistics in the Counter Window.
The Show button allows you to show all statistics, as well as unfold all tree style
tab statistics in the Counter Window.
XTRAMUS TECHNOLOGIES®
27
E-mail: sales@xtram u s .com
Website: www.Xtramus.com
Page 28

Report
Chart
When choosing Chart from the Menu Bar, a Chart Window will pop up and display
system statistics in the form of graphic charts. Two different charts are available here: Line,
and Bar.
¾ Line: Displays statistics including Rx/Tx Utilization, Rx/Tx Line Rate, and Rx/Tx
Packet Rate.
¾ Bar: Displays statistics including Packet CRC Error, Packet Corrupt, Packet
Drop, Packet Reorder, and Packet Duplicate.
You can adjust the chart the Control Buttons located on the upper part of the Chart
Window.
Button Description
Click the Click button allows the Chart Window to start
updating the chart dynamically. Click the Click button
again will stop updating.
Click the Line button allows the Chart window to
display the chart in Line mode.
Click the Bar button allows the Chart window to
display the chart in Bar mode.
Also, you can adjust how charts are displayed in the Chart Window:
Line
You can set the information you would like to display/hide
on the Chart Window. Click the check box in front of the
information you would like to display/hide here.
As mentioned above, under Line mode, the Chart
Window displays statistics including Rx/Tx Utilization,
Rx/Tx Line Rate, and Rx/Tx Packet Rate. All of them
are represented by lines in different colors.
You can set chart’s Y-Axis (Vertical Axis) display
scale for Port A, Port B, or both Port A & B here.
Two different modes of scale can be selected here:
Auto, and User Define.
¾ Auto: The Chart Window will adjust the display range of Y-Axis automatically.
¾ User Define: You can set the display range of Y-Axis by yourself. Input the
Bar
As mentioned above, under Bar mode, the Chart Window displays statistics including
Packet CRC Error, Packet Corrupt, Packet Drop, Packet Reorder, and Packet
Duplicate. All of them are represented by bars in different colors.
You can only adjust the Time Scale under Bar mode.
XTRAMUS TECHNOLOGIES®
minimum and maximum range for the Y-Axis in the corresponding fields, and click
the Set button to apply the settings you’ve made.
The Time Scale allows you to view charts in a specific
period of time. Click the Start Time scroll-down menu to
choose the starting time, and click the End Time
scroll-down menu to choose the ending time. All st atistics
between Start Time and End Time will be displayed in
the chart.
28
E-mail: sales@xtram u s .com
Website: www.Xtramus.com
Page 29

5.1.3. Menu Bar – Setting
Setting
The Setting on the Menu Bar allows you to make configurations for NuTEA-551’s
Port A, Port B, and both Port A & B. Configuration options cont ain here in clude the
following categories:
¾ Impairment Parameters: You can set NuTEA-551’s impairment
parameters here.
¾ Max Impairment Limit: This configuration option allows you to set
impairment parameters’ limit.
¾ Network Media Setting: You can set both Port A and Port B’s media type
(Half/Full) here.
¾ Filter Setting: The Filter Setting configuration option allows you to set
SDFR and Session filters.
¾ PHY OSC Clock: NuTEA-551 is embedded with Voltage-Controlled
Crystal Oscillator (VCXO), allowing users to adjust to match/jitter its PHY
chip’s frequency within the range of ±100 ppm.
Port A
Port B
Port A and B
All the configuration options can be viewed and adjusted on NuTEA-551 utility
software’s Main Display Window, as shown in the figure down below.
XTRAMUS TECHNOLOGIES®
For more detailed information regarding to setting Port A, Port B, and Port A & B’s
configuration settings and parameters, please refer to 5.4. NuTEA-551
Parameter Settings.
29
E-mail: sales@xtram u s .com
Website: www.Xtramus.com
Page 30

5.1.4. Menu Bar – Service (Firmware/FPGA Upgrading)
Service
The System Upgrade function located on the Menu Bar allows you to upgrade
NuTEA-551’s firmware and FPGA. The following section will demonstrate how to
upgrade NuTEA-551’s firmware.
Please note NuTEA-551 must be power-on and connected to your PC all the time when
upgrading its firmware/FPGA. Please refer to 4.2. Starting NuTEA-551 Utility
Software & Demo Mode for more information regarding to connect NuTEA-551 and
your PC.
The following section will show you how to upgrade NuTEA-551’s firmware. The
processes for upgrading firmware and FPGA are quite the same and can be related.
1. Please click Service → System
Upgrade → Firmware Upgrade on
the Menu Bar. If you want to
upgrade FPGA, please choose
FPGA Upgrade.
System
Upgrade
2. A NuSet-MiniTAP window will pop
up. Please click the Browse button.
3. A Load File window will pop up.
Please choose the firmware file
saved on your PC. The
firmware/FPGA file should be in the
format of “*.bin”. Click Open after
you’ve chosen the file.
XTRAMUS TECHNOLOGIES®
30
E-mail: sales@xtram u s .com
Website: www.Xtramus.com
Page 31

Service
4. Click Upgrade button to start
upgrading NuTEA-551’s firmware.
5. Please note that the upgrading
process will set all settings to
default. Click YES to continue the
upgrading process.
System
Upgrade
(Continued)
6. NuTEA-551 utility software will start
upgrading firmware. Please note
that during this process,
NuTEA-551’s power must be
ALWAYS on.
7. Upgrade complete! NuTEA-551 will
reboot after upgrading firmware.
Also, the connection between
NuTEA-551 and your PC will be
severed. Please reconnect
NuTEA-551 with your PC by clicking
the Reconnect button on the Quick
Launch Buttons.
XTRAMUS TECHNOLOGIES®
31
E-mail: sales@xtram u s .com
Website: www.Xtramus.com
Page 32

5.1.5. Menu Bar – Languages
Languages
English
&
Simplified Chinese
NuTEA-551 utility software has 2 different languages for it s UI available. You
can set the language of UI to either English or Simplified Chinese.
5.1.6. Menu Bar – Help
Help
Xtramus Web
Access Xtramus Website (www.xtramus.com).
System
Requirements
About NuTEA-551
Utility
A System Requirements window will pop up,
showing you NuTEA-551 utility software’s
minimum system requirement. Also, this
pop-up window will show you the required
firmware/FPGA version as well.
An “About” window will pop up and show detailed system information.
XTRAMUS TECHNOLOGIES®
32
E-mail: sales@xtram u s .com
Website: www.Xtramus.com
Page 33

5.2. NuTEA-551 Utility Software Function – Quick Launch Buttons
These Quick Launch Buttons allow you to reconnect NuTEA-551, access Counter Reports and Charts, or
configure NuTEA-551’s Port A, Port B, and Port A & B.
5.2.1. Quick Launch Buttons – Reconnect
Reconnect
If the USB connection between your PC and NuTEA-551 is down, a “Disconnected”
icon
will be shown in “USB Connection Status”.
Reconnect
Press Reconnect button
connection between your PC and NuTEA-551. If the
connection has been established successfully, a
message window will pop up, and the “USB
Connection Status” will be shown as “Connected”.
5.2.2. Quick Launch Buttons – Counter & Chart
Counter & Chart
The Counter and Chart buttons located on the Quick Launch Buttons allows you
to view counter reports and statistics chart.
For more detailed information, please refer to 5.1.2. Report.
to re-establish the
XTRAMUS TECHNOLOGIES®
33
E-mail: sales@xtram u s .com
Website: www.Xtramus.com
Page 34

5.2.3. Quick Launch Buttons – Port A, Port B, Port AB
Reconnect
The Port A, Port B, and Port AB buttons on the Quick Launch Buttons allow you
to make configurations for NuTEA-551’s Port A, Port B, and both Port A & B.
Configuration options contain here include the following categories:
¾ Impairment Parameters: You can set NuTEA-551’s impairment parameters
here.
¾ Max Impairment Limit: This configuration option allows you to set
impairment parameters’ limit.
¾ Network Media Setting: You can set both Port A and Port B’s media type
(Half/Full) here.
¾ Filter Setting: The Filter Setting configuration option allows you to set
SDFR and Session filters.
¾ PHY OSC Clock: NuTEA-551 is embedded with Voltage-Controlled Crystal
Oscillator (VCXO), allowing users to adjust to match/jitter its PHY chip’s
frequency within the range of ±100 ppm.
All the configuration options can be viewed and adjusted on NuTEA-551 utility
software’s Main Display Window, as shown in the figure down below.
For more detailed information regarding to setting Port A, Port B, and Port A & B’s
configuration settings and parameters, please refer to 5.4. NuTEA-551 Parameter
Settings.
XTRAMUS TECHNOLOGIES®
34
E-mail: sales@xtram u s .com
Website: www.Xtramus.com
Page 35

5.3 NuTEA-551 Function – Info/Setting Select List
The Info/Setting Select List contains a list of selectable options. When selected, the Main Display
Window will show NuTEA-551’s system information or allow you to access NuTEA-551 system settings.
To show NuTEA-551’s detailed system information, click “System Information” on the Info/Setting
Select List. A detailed System Information will display on the Main Display Window located in the right
side of the Info/Setting Select List as shown in the figure down below.
• Refresh: Update the latest system information and status, press this button.
You can also access NuTEA-551’s parameter configuration page by clicking relating options on the
Info/Setting Select List. For more information, please refer to 5.4. NuTEA-551 Parameter Settings.
XTRAMUS TECHNOLOGIES®
35
E-mail: sales@xtram u s .com
Website: www.Xtramus.com
Page 36

5.4. NuTEA-551 Parameter Settings
You can make parameter configurations for NuTEA-551’s Port A, Port B, and both Port A & B. You can
access NuTEA-551’s Parameter Settings by:
Accessing Parameter Settings
¾
Click Setting on the Menu Bar, and
choose the port (Port A, Port B, or Port A
and B) you would like to configure.
¾
Click one of the Port A, Port B, or Port AB
buttons located on the Quick Launch
Buttons.
¾ Click Port A or Port B located on the
Info/Setting Select List
Parameter Settings displayed on the Main
Display Window contain different
configurations including Impairment
Parameters, Max Impairment Limit,
Network Media Setting, Filter Setting,
and PHY OSC Clock. Please refer to the
sections down below for more detailed
information.
XTRAMUS TECHNOLOGIES®
36
E-mail: sales@xtram u s .com
Website: www.Xtramus.com
Page 37

5.4.1. Impairment Parameters
Parameter Settings – Impairment Parameters
CRC Error
You can enable CRC Error impairment and set its parameters here.
¾ Enable: Click the Enable check box to enable NuTEA-551’s CRC Error impairment.
¾ CRC Error Percentage (%): You can set the percentage of packets with CRC Error here in this field.
The range of the CRC Error Percentage (%) is from 0.00001% to 50%.
Packet Corruption
You can enable Packet Corruption impairment and set its parameters here.
¾ Enable: Click the Enable check box to enable NuTEA-551’s Packet Corruption impairment.
¾ Corruption Percentage (%): You can set the percentage of packets with Packet Corruption here in
this field. The range of the Corruption Percentage (%) is from 0.00001% to 50%.
Packet Drop
You can enable Packet Drop impairment and set its parameters here.
¾ Enable: Click the Enable check box to enable NuTEA-551’s Packet Drop impairment.
¾ Drop Percentage (%): You can set the percentage of packets with Packet Drop here in this field. The
range of the Drop Percentage (%) is from 0.00001% to 50%.
¾ Available when Rate > X%: If enabled, Packet Drop impairment will be triggered when the line rate
reach the set percentage.
¾ Rate (%): You can set the triggering line rate here in this field. The range of the Rate ( %) is from 1% to
100%.
Packet Reorder
You can enable Packet Reorder impairment and set its parameters here.
¾ Enable: Click the Enable check box to enable NuTEA-551’s Packet Reorder impairment.
¾ Reorder Percentage (%): You can set the percentage of packets with Packet Reorder here in this
field. The range of the reorder Percentage (%) is from 0.00001% to 50%.
XTRAMUS TECHNOLOGIES®
37
E-mail: sales@xtram u s .com
Website: www.Xtramus.com
Page 38

Packet Duplication
You can enable Packet Duplication impairment and set its parameters here.
¾ Enable: Click the Enable check box to enable NuTEA-551’s Packet Duplication impairment.
¾ Reorder Percentage (%): You can set the percentage of packets with Packet Reorder here in this
field. The range of the reorder Percentage (%) is from 0.00001% to 50%.
Packet Delay
You can enable Packet Delay impairment and set its parameters here.
¾ Enable: Click the Enable check box to enable NuTEA-551’s Packet Delay impairment.
¾ Delay Time (ms, μs): You can set the Packet Delay time here in this field. The delay time can be set
as milliseconds (ms) or microseconds (μs). The range of the Packet Delay is from 0.0024ms (2.4μs) to
10,000ms (10,000,000μs).
Packet Jitter
You can enable Packet Jitter impairment and set its parameters here. Please note that you have to enable
Packet Delay first to enable this function.
¾ Enable: Click the Enable check box to enable NuTEA-551’s Packet Jitter impairment.
¾ Jitter Time (ms, μs): You can set the delay time for Packet jitter here in this field. The jitter time can be
set as milliseconds (ms) or microseconds (μs). The range of the Packet Delay is from 0.0024ms
(2.4μs) to 10,000ms (10,000,000μs). For example, if you set the Jitter Time as 2ms, the delay time of
the transmitting packets will be set to a random time between +1ms and -1ms.
¾ Sustained Cycle of Jitter (Hz): The Sustained Cycle of Jitter scroll-down menu allows you to set the
frequency of the packet jitter occurrence. The value of the jitter time is generated randomly in every
cycle, and will not change during the cycle. You can set the Sustained Cycle of Jitter (Hz) as 0.25
(Jitter Time changes 1 time in every 4 seconds), 0.5 (Jitter Time changes 1 time in every 2 seconds), 1
(Jitter Time changes 1 time in every 1 second), 4 (Jitter Time changes 4 times in 1 second) , 16 (Jitter
Time changes 16 times in 1 second) , 64 (Jitter Time changes 64 times in 1 second) , 256 (Jitter Time
changes 256 times in 1 second) , and 1024 (Jitter Time changes 1024 times in 1 second).
Packet Insertion
The Packet Insertion function allows you to insert packets with specific frame contents you set here.
¾ Enable: Click the Enable check box to enable NuTEA-551’s Packet Insertion function.
¾ Packets (pkt/s): You can set how many packets that will be inserted to the data stream per second.
The range of the Packets (pkt/s) is from 0.1pkt/s to 16 pkt/s.
¾ Packet Length (with CRC): You can set the packet length (with CRC) for packet insertion in this field.
The range of the Packet Length (with CRC) is from 64 to 1518.
¾ DA/SA: You can input the DA (Destination MAC Address) and the SA (Source MAC Address) of the
inserting packets here in these two fields.
¾ Link Layer Type: You can input the EtherType for the inserting packets here in this field. EtherType is
a two-octet field in an Ethernet frame, used to indicate which protocol is encapsulated in the PayLoad
of an Ethernet Frame. For example, EtherType 0800 indicates IPv4 protocol.
¾ VLAN Tag: Click the VLAN Tag check box to enable the VLAN Tag for the inserting packets.
¾ User Priority: Click the User Priority scroll-down menu to set the VLAN priority.
¾ CFI: CFI stands for Canonical Format Indicator, a 1-bit field of the Ethernet frame that indicates if the
packets’ MAC addresses are non-canonical format or canonical format. To set the inserting packets as
non-canonical format, please click the scroll-down menu and choose Set, and vice versa.
¾ VID: You can set the VLAN ID for the inserting packets here in this field.
Rate Control
You can enable the Rate Control function and set its parameters here.
¾ Enable: Click the Enable check box to enable Rate Control function.
¾ Rate (%): You can set the triggering line rate here in this field. The range of the Rate ( %) is from 1% to
100%.
Other Settings
¾ Disable All Impairments: Click the Disable All Impairments check box to disable all impairments.
¾ Apply: Click this button to apply all the changes you made here and save these settings to
NuTEA-551.
XTRAMUS TECHNOLOGIES®
38
E-mail: sales@xtram u s .com
Website: www.Xtramus.com
Page 39

5.4.2. Max Impairment Limit
Parameter Settings – Max Impairment Limit
CRC Error
You can enable the max limit of times for CRC Error impairments and set the number of times here.
¾ No Limit: No max limit of times will be applied for CRC Error impairments.
¾ Max CRC Error Limit (Times): You can set the max number of times for CRC Error impairments here.
The range of the Max CRC Error Limits (Times) is from 1 to 65535.
Packet Corruption
You can enable the max limit of times for Packet Corruption impairments and set the number of times
here.
¾ No Limit: No max limit of times will be applied for Packet Corruption impairments.
¾ Max Corruption Limit (Times): You can set the max number of times for Packet Corruption
impairments here. The range of the Max Packet Corruption Limits (Times) is from 1 to 65535.
Packet Drop
You can enable the max limit of times for Packet Drop impairments and set the number of times here.
¾ No Limit: No max limit of times will be applied for Packet Drop impairments.
¾ Max Drop Packet Limit (Times): You can set the max number of times for Packet Drop impairments
here. The range of the Max Packet Drop Limits (Times) is from 1 to 65535.
Packet Reorder
You can enable the max limit of times for Packet Reorder impairments and set the number of times here.
¾ No Limit: No max limit of times will be applied for Packet Reorder impairments.
¾ Max Reorder Packet Limit (Times): You can set the max number of times for Packet Reorder
impairments here. The range of the Max Packet Reorder Limits (Times) is from 1 to 65535.
XTRAMUS TECHNOLOGIES®
39
E-mail: sales@xtram u s .com
Website: www.Xtramus.com
Page 40

Packet Duplication
You can enable the max limit of times for Packet Duplication impairments and set the number of times
here.
¾ No Limit: No max limit of times will be applied for Packet Duplication impairments.
¾ Max Duplicate Packet Limit (Times): You can set the max number of times for Packet Duplication
impairments here. The range of the Max Packet Duplication Limits (Times) is from 1 to 65535.
Other Settings
¾ Disable All Limits: Click the Disable All Limit check box to disable all limits.
¾ Apply: Click this button to apply all the changes you made here and save these settings to
NuTEA-551.
5.4.3. Network Media Setting
Parameter Settings – Network Media Setting
Media Type
You can set the media type for NuTEA-551’s Port A and Port B here.
¾ Auto All: Both NuTEA-551’s Port A and Port B will be set to auto.
¾ Force 100M Full: Both NuTEA-551’s Port A and Port B will be set to force 100M Full.
¾ Force 10M Full: Both NuTEA-551’s Port A and Port B will be set to force 10M Full.
Other Settings
¾ Apply: Click this button to apply all the changes you made here and save these settings to
NuTEA-551.
XTRAMUS TECHNOLOGIES®
40
E-mail: sales@xtram u s .com
Website: www.Xtramus.com
Page 41

5.4.4. Filter Setting
Parameter Settings – Filter Setting
SDFR Overview
SDFR (Self-Discover Filtering Rules) is a technology that makes packet capturing/filtering over Ethernet
easy and convenient. Each filter is independent and can be activated in any combinations.
All SDFR you’ve set can be view in the Current Filter field. Also, you can view parameters and values for
these SDFR in the Filter Values field, as shown in the figure above.
To access SDFR settings, please choose On in the SDFR field, and click the Settings button located on
the right side as shown in the figure down below.
A SDFR Set ting window will pop up, allowing you to configure SDFR. Please refer to the section down
below for more detail information regarding to SDFR configurations.
To apply all the changes you made here and save these settings to NuTEA-551, please click the Apply
button located in the lower-right part of Filter Setting page.
XTRAMUS TECHNOLOGIES®
41
E-mail: sales@xtram u s .com
Website: www.Xtramus.com
Page 42

SDFR Setting
You can choose the criteria with the check boxes. The SDFR parameters available here includes:
¾ DA: Destination MAC Address
¾ SA: Source MAC Address
¾ VID: VLAN ID
¾ DIP: Destination IP Address
¾ SIP: Source IP Address
¾ DPort: Destination Port
¾ SPort: Source Port
As mentioned above, each parameter is independent and can be activated in any combinations. To
activate the parameter (or combinations of parameters), please click the check box.
Rule Setting
The Rule Setting field allows you to set and input the value of DA, SA, VID, DIP, SIP, DPort and SPort.
The value of SDFR parameters can be set as Single, Pair, and Range. The following descriptions will us
DA as example.
¾ Single: A single value will be used as SDFR
parameter.
¾ Pair: Two values will be used as SDFR
parameters.
¾ Range: Values within the range of the two values
set here will be used as SDFR parameters.
Current Filter/Technical Terms
The Current Filter field displays the settings you’ve made, while the Technical Terms field displays the
explanations for DA, SA, VID, DIP, SIP, DPort, and SPort.
Buttons
¾ OK: Apply all the changes you’ve made and exit SDFR Setting window.
¾ Cancel: Cancel all the changes you’ve made and exit SDFR Setting window.
¾ Apply: Apply all the changes you’ve made without existing SDFR Setting window.
XTRAMUS TECHNOLOGIES®
42
E-mail: sales@xtram u s .com
Website: www.Xtramus.com
Page 43

Session Filter Overview
Packets will be transmitted and monitored according to the Session Filter you’ve set here.
All parameters and values for these Session Filters can be viewed in the Filter Values field, as shown in
the figure above.
To access Session Filter settings, please choose On in the Session Filter field, and click the Settings
button located on the right side as shown in the figure down below.
A Session Filter Setting window will pop up, allowing you to configure Session Filter. Please refer to the
section down below for more detail information regarding to Session Filter configurations.
To apply all the changes you made here and save these settings to NuTEA-551, please click the Apply
button located in the lower-right part of Filter Setting page.
Session Filter Setting
Port A → Port B & Port B → Port A
NuTEA-551 utility software supports two Session Filters for Port A and Port B. Each Session Filter
allows you to set the packets flow from the SIP (Source IP Address) to the DIP (Destination IP Address).
The IP addresses that serve as SIP and DIP will be switched (Previous SIP → Current DIP, Previous DIP
→ Current SIP) afterward.
To set the Session Filters, please check the check box and input the SIP and DIP accordingly.
Buttons
¾ OK: Apply all the changes you’ve made and exit SDFR Setting window.
¾ Cancel: Cancel all the changes you’ve made and exit SDFR Setting window.
¾ Apply: Apply all the changes you’ve made without existing SDFR Setting window.
XTRAMUS TECHNOLOGIES®
43
E-mail: sales@xtram u s .com
Website: www.Xtramus.com
Page 44

5.4.5. PHY OSC Clock
Parameter Settings – PHY OSC Clock
Clock Source on PHYs
Embedded with Voltage-Controlled Crystal Oscillator (VCXO), NuTEA-551 can be adjusted to match/jitter
its PHY chip’s frequency within the range of ±100 ppm via NuTEA-551 utility software. NuTEA-551’s PHY
chip frequency can be set as the following:
¾ System Default: NuTEA-551 PHY OSC Clock’s frequency is set to 1 ppm.
¾ User Define (Fix): NuTEA-551 PHY OSC Clock’s frequency will be set to the frequency you’ve set
here.
¾ User Define (Dynamic): NuTEA-551 PHY OSC Clock’s frequency will jitter within the range set here.
Other Settings
¾ Apply: Click this button to apply all the changes you made here and save these settings to
NuTEA-551.
XTRAMUS TECHNOLOGIES®
44
E-mail: sales@xtram u s .com
Website: www.Xtramus.com
Page 45

Note: Information and specifications contained in this document are subject to change without notice.
XTRAMUS TECHNOLOGIES®
All products and company names are trademarks of their respective corporations.
Copyright © 2011 Xtramus Technologies, all rights reserved.
Do not reproduce, redistribute or repost without written permission from Xtramus.
Doc # USM_NuTEA-551_V1.2_ENG_20110914
45
E-mail: sales@xtram u s .com
Website: www.Xtramus.com
 Loading...