

Page 1
ROBOT VACUUM CLEANER
Робот-пылесос Xrobot
модель XR510F
c пультом дистационного управления и
___________автоматическим зарядным устройством___________
Инструкция
Благодарим Вас за покупку нашего робота
Пожалуйста, прочитайте инструкцию перед
началом использования
Model No. XR510F
With Remote Control,Auto Charging Station
USER MANUAL
Thank you for purchasing the product
Please read the manual carefully before using.
.
Page 2
Contents
Содержание
Содержание
Применение
Знакомства с функциями
Компоненты
Знакомство с устройством
Структура
Подключение аккумулятора
Панель управления
Установка зарядной станции и зарядка робота
Пульт управления
Виртуальная стена
Зарядная станция
Обслуживание робота-пылесоса
Контейнер для пыли
Фильтр
Щетки
Переднее колесо
Проблемы в работе
Технические характеристики
Меры предосторожности
Contents
Applicability
Function Introduction
Components of the Cleaner
Introduction
Structure Introduction
Battery Replacement & Installment
Function of Buttons
Charging Methods of Main Body
Remote Control
Space lsolator
Docking Station
Maintenance of the Cleaner
Dust Box
Filter
Main Brush and Floor Brush
Front Wheel
Failure Checking
Technical Specifications
Safety Precautions
01
02
02
02
03
03
04
06
07
08
10
11
12
12
13
14
14
15
16
17
Page 3
Applicability:
XR510F
Область применения:
Устройство предназначено для применения дома, в гостиничные номерах или
офисах для очистки различных короткошерстных ковров, деревянных полов,
керамической плитки и др.
Знакомство с функциями:
Робот-пылесос XR510 пылесос с аккумулятором, контролируемый передовыми
интеллектуальными программами. Робот-пылесос обладает следующими функциями:
автоматическая очистка поверхностей от пыли, уборка по таймеру, выбор скорости,
защита от падения и столкновения, автоматитическая зарядка, а также имеет пульт
дистанционного управления.
Компоненты робота-пылесоса:
1. Робот-пылесос Xrobot XR510F x1шт
2. Пульт дистанционного управления x 1 шт
3. Зарядная станция x 1 шт
4. Адаптер x 1 шт
5. Виртуальная стена×1 шт
6. Инструкция x 1 шт
7. Чистящая съемная панель 1 шт
8. Тряпка для панели x 2 шт
9. Щетка для очистки 1 шт
10.Боковая щетка x 2шт
11.Фильтр x 1шт
12.Аккумулятор x 1 шт
Робот-пылесос
Пульт дистанционного управления
Зарядная станция
Адаптер
Виртуальная стена
Инструкция
Чистящая съемная панель
Тряпка для панели
Щетка для очистки
Боковая щетка (две)
Фильтр
Аккумулятор
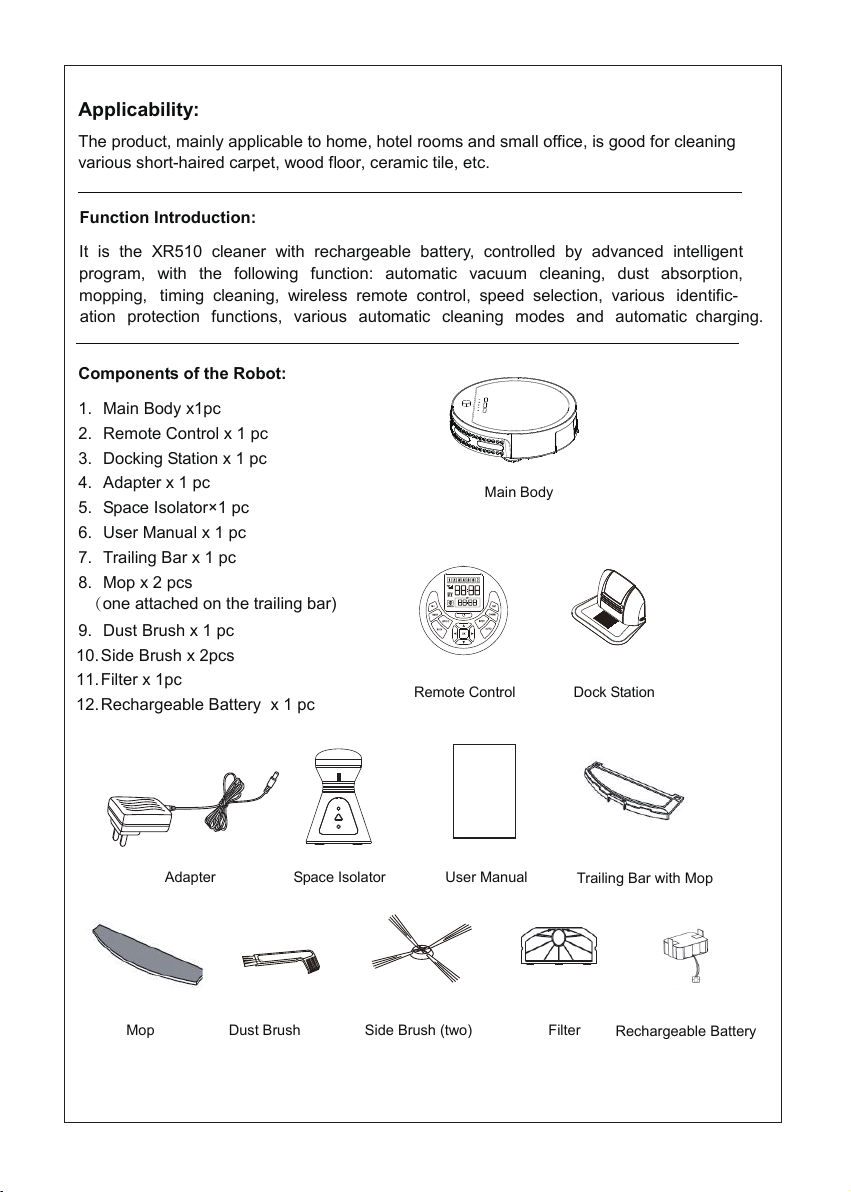
The product, mainly applicable to home, hotel rooms and small office, is good for cleaning
various short-haired carpet, wood floor, ceramic tile, etc.
Function Introduction:
It is the XR510 cleaner with rechargeable battery, controlled by advanced intelligent
program, with the following function: automatic vacuum cleaning, dust absorption,
mopping, timing cleaning, wireless remote control, speed selection, various
ation
protection functions, various automatic cleaning modes and automatic
Components of the Robot:
1. Main Body x1pc
2. Remote Control x 1 pc
3. Docking Station x 1 pc
4. Adapter x 1 pc
Main Body
5. Space Isolator×1 pc
6. User Manual x 1 pc
7. Trailing Bar x 1 pc
8. Mop x 2 pcs
(one attached on the trailing bar)
9. Dust Brush x 1 pc
10.Side Brush x 2pcs
11.Filter x 1pc
12.Rechargeable Battery
x 1 pc
Remote Control Dock Station
identific-
charging.
Adapter Space Isolator User Manual
Mop Dust Brush Side Brush (two)
-02-
Trailing Bar with Mop
Filter
Rechargeable Battery
Page 4

Introduction
Введение
Верхняя крышка
AUTO / автоматическая очистка
CHARGE / зарядка
Декоративные лампы
SPOT / очистка пятна
Приемник сигнала
Контакты для автоматической зарядки
Датчики для "виртуальной стены"
Декоративные лампы
Щетка для пола
Левое колесо
Контейнер для пыли
Основная щетка
Выключатель
питания
Разъем для
адаптера сети
Правое колесо
Датчик перепада высоты
Крышка
батарейного отсека
Переднее колесо
Боковая щетка
Датчик перепада высоты
Structure Introduction
Top cover
AUTO/automatic cleaning
CHARGE / charge
SPOT/spot cleaning
Decorative lamp
Wall datection sensors
Ground detection sensor
Battery cover
Front wheel
Side brush
Ground detection sensor
Left wheel
Decorative lamp
Signal receiver
Auto-charging electrode
Floor brush
Dust box
Main brush
Power switch
DC socket
Right wheel
Page 5
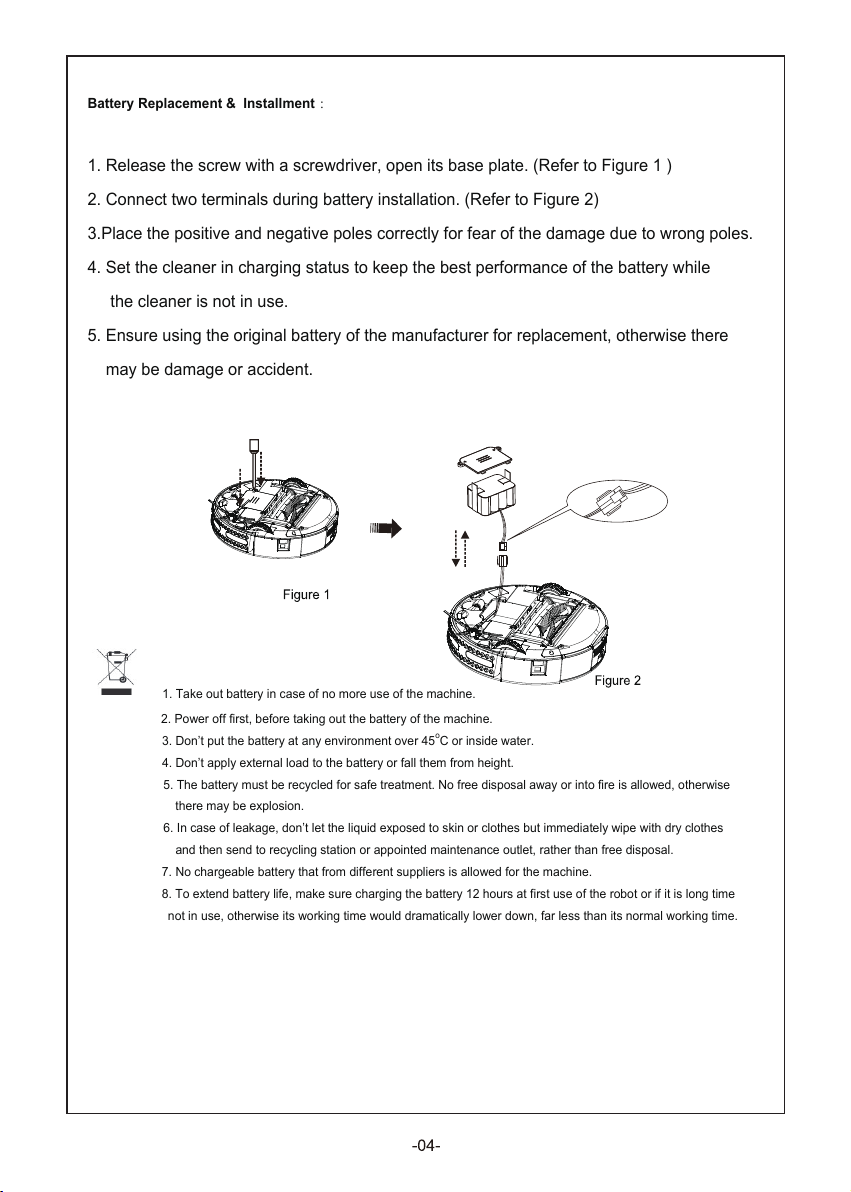
Battery Replacement & Installment :
Подключение аккумулятора:
1. Отпустите винт с помощью отвертки, открыть основание. (См. рисунок 1)
2. Соедините два терминала во время установки батареи. (См. Рисунок 2)
3. Поместите положительный и отрицательный полюса правильно во избежание
повреждения.
4. Установите пылесос в состояние зарядки, чтобы сохранить лучшие характеристики
работы аккумулятора в то время как очиститель не используется.
5. Убедитесь, что используете оригинальную батарею производителя для замены,
в противном случае может привести к повреждению
1. Вынуть батарею в случае продолжительного неиспользования машины.
2. Выключите сначала, перед извлечением батареи машины.
3. Не помещайте батарею более чем в 45C или в воду.
4. Не применять внешнюю нагрузку на батарею и не кидайте их с высоты.
5. Батарея должна быть переработана для безопасной утилизации. Нельзя ее
размещать вблизи огня, может быть взрыв.
6. В случае утечки жидкости из батареи не допускайте попадание на кожу.
7.Чтобы продлить срок службы батарей, убедитесь, что зарядка аккумулятора
длилась 12 часов при первом использовании робота или, если он долгое время
не использовался.
1. Release the screw with a screwdriver, open its base plate. (Refer to Figure 1 )
2. Connect two terminals during battery installation. (Refer to Figure 2)
3.Place the positive and negative poles correctly for fear of the damage due to wrong poles.
4. Set the cleaner in charging status to keep the best performance of the battery while
the cleaner is not in use.
5. Ensure using the original battery of the manufacturer for replacement, otherwise there
may be damage or accident.
1. Take out battery in case of no more use of the machine.
2. Power off first, before taking out the battery of the machine.
3. Don’t put the battery at any environment over 45
4. Don’t apply external load to the battery or fall them from height.
5. The battery must be recycled for safe treatment. No free disposal away or into fire is allowed, otherwise
there may be explosion.
6. In case of leakage, don’t let the liquid exposed to skin or clothes but immediately wipe w
and then send to recycling station or appointed maintenance outlet, rather than free disposal.
7. No chargeable battery that from different suppliers is allowed for the machine.
8. To extend battery life, make sure charging the battery 12 hours at first use of the robot or if it is long time
not in use, otherwise it
s working time would dramatically lower down, far less than its normal working time.
o
C or inside water.
ith dry clothes
Page 6

Battery replacement of the Space lsolator:
Замена батарей виртуальной стены:
1.Откройте крышку как на рис. 1.
2.Вставте батареи (соблюдая
полярность (+ / -)
(См. Рисунок 2/3)
3.Пожалуйста, поменяйте батарейки если
они использовались длительное время.
Замена батареи пульта дистанционного
управления:
1.Откройте крышку батарейного отсека, а
затем замените
батареи. (См. рисунок 1)
2.Пожалуйста, разместите положительный
и отрицательный полюса правильно,
опасаясь повреждения в результате
неправильного полюса! (См. Рисунок 2)
3.Пожалуйста, поменяйте батарейки если они
использовались длительное время.
1.Пожалуйста, не храните батарею при температуре выше 45 ℃ или в воде.
2.Не оказывают внешние воздействие на батарею и не бросайте их с высоких
мест.
3.Батарея должна быть переработана с безопасной утилизации. Пожалуйста,
не выбрасывайте его свободно и не бросайте в огонь, опасаясь взрыва!
Open the cover as per figure 1.
1.
Please the batteries (not inclued
2.
with correct polarity (+/-)
(Refer to Figure 2/3)
Please take out the battery if it was
3.
unused for long.
Battery replacement of the remote control:
Open the battery cover and then replace
1.
the battery. (Refer to Figure 1)
2.
Please place the positive and negative poles
correctly for fear of the damage due to
wrong poles! (Refer to Figure 2)
3.
Please take out the battery if it was unused for
long.
Please don’t place the battery in the high-temperature environment above
1.
45℃or in the water.
Please don’t exert external force to the battery or drop them from high
2.
place.
The battery should be recycled with safe disposal. Please don’t discard it
3.
freely or throw it into fire for fear of explosion!
Page 7
Function information on panel:
Функции кнопок:
Выключатель питания:
Индикатор питания и декоративные лампы загораются, когда робот-пылесос включен;
Индикатор питания мигает во время зарядки;
Когда очиститель полностью заряжена, индикатор питания перестанет мигать;
При низкой уровне зарядке аккумулятора индикатор зарядки будет мигать вместе с
декоративными лампами.
AUTO (автоматическая уборка):
Нажмите кнопку AUTO, чтобы началась автоматическая уборка. Когда батарея
находится на низком уровне, он будет автоматически искать базу;
Нажмите любую кнопку на панели машины, чтобы остановить уборку.
В случае низкого заряда батареи во время чистки, робот пылесос будет издавать
звуковой сигнал 10 раз и автоматически искать док-станцию для зарядки со светом
кнопки включения.
Перед чисткой, вы должны очистить беспорядок на полу, особенно обратить внимание на
провода.
CHARGE (заряд):
Нажмите кнопку CHARGE, робот-пылесос автоматически будет искать докстанцию. Нажмите любую кнопку на панели робота-пылесоса, чтобы
остановить.
SPOT (местная уборка):
Нажмите кнопку SPOT и робот-пылесос XR-510 автоматически вступит в область
1 квадратного метра и будет чистить по спирали в течение 2-3 минут;
Нажмите любую кнопку на панели робота, чтобы остановить очистку.
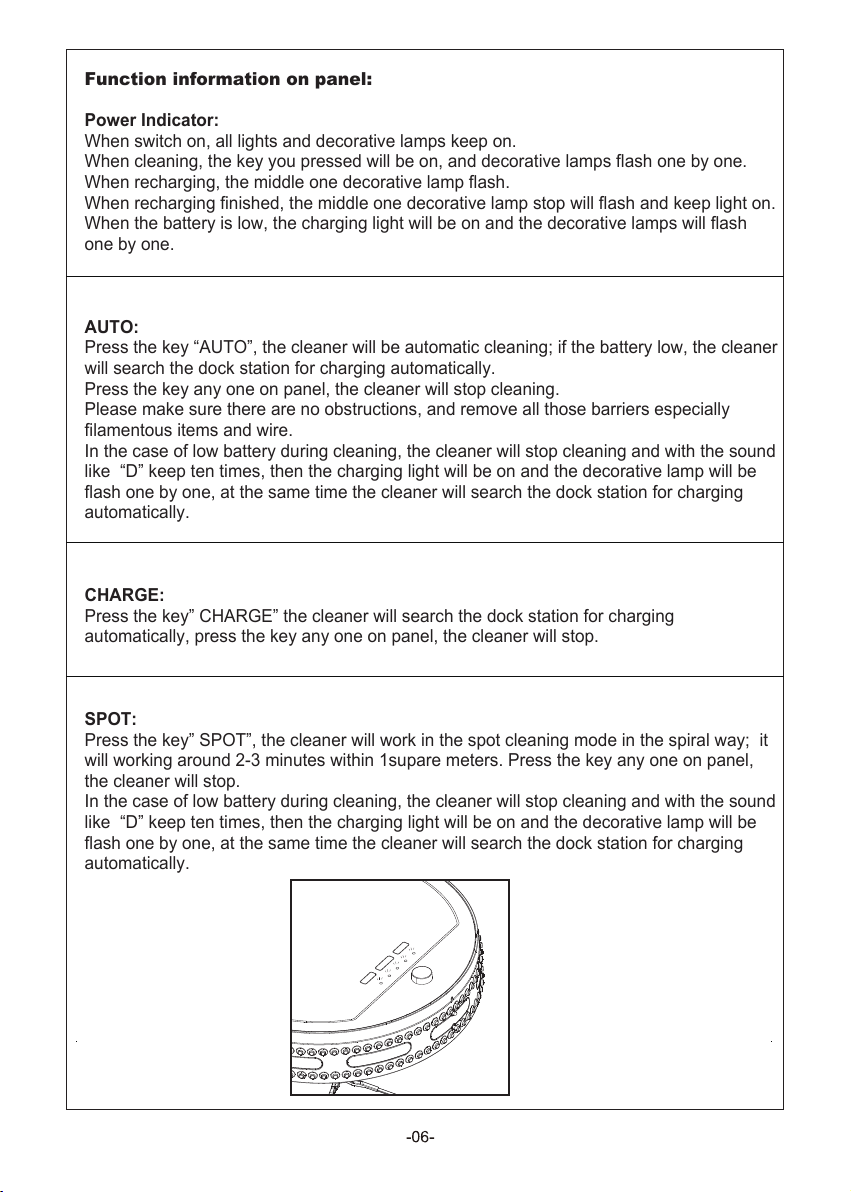
Power Indicator:
When switch on, all lights and decorative lamps keep on.
When cleaning, the key you pressed will be on, and decorative lamps flash one by one.
When recharging, the middle one decorative lamp flash.
When recharging finished, the middle one decorative lamp stop will flash and keep light on.
When the battery is low, the charging light will be on and the decorative lamps will flash
one by one.
AUTO:
Press the key “AUTO”, the cleaner will be automatic cleaning; if the battery low, the cleaner
will search the dock station for charging automatically.
Press the key any one on panel, the cleaner will stop cleaning.
Please make sure there are no obstructions, and remove all those barriers especially
filamentous items and wire.
In the case of low battery during cleaning, the cleaner will stop cleaning and with the sound
like “D” keep ten times, then the charging light will be on and the decorative lamp will be
flash one by one, at the same time the cleaner will search the dock station for charging
automatically.
CHARGE:
Press the key” CHARGE” the cleaner will search the dock station for charging
automatically, press the key any one on panel, the cleaner will stop.
SPOT:
Press the key” SPOT”, the cleaner will work in the spot cleaning mode in the spiral way; it
will working around 2-3 minutes within 1supare meters. Press the key any one on panel,
the cleaner will stop.
In the case of low battery during cleaning, the cleaner will stop cleaning and with the sound
like “D” keep ten times, then the charging light will be on and the decorative lamp will be
flash one by one, at the same time the cleaner will search the dock station for charging
automatically.
AUTO CHARGE SPOT
Page 8

Charging Method of Main Body:
Установка зарядной станции и
зарядка робота-пылесоса
Ручная зарядка:
1. Вы можете использовать
переходник или док-станцию для
зарядки робота пылесоса.
2. Соедините выход адаптера с
розеткой робота, используя адаптер
для зарядки. (См. Рисунок 1)
3. Перед зарядкой включите робот и
подключить адаптер к док-станции.
Убедитесь, что робот-пылесос
упирается в зарядную станцию(См.
рисунок 2)
4. Нажмите кнопку CHARGE на пульте
дистанционного управления или на
панели машины, и уборщик будет искать
док-станцию для зарядки. (См. Рисунок 3)
5. Когда машина ищет док-станцию , нажмите
CHARGE клавишу на панели машины или
CHARGE на пульте дистанционного управления,
чтобы остановить поиски док-станции.
6. Во время зарядки индикатор мигает. Когда он перестанет мигать, это означает,
что батарея полностью заряжена.
Автоматическая зарядка:
В случае низкого заряда батареи во время чистки робот-пылесос будет трубить 10
раз и автоматически искать док-станцию для зарядки со светом кнопка заряда.
1.Когда робот-пылесос встанет на зарядку, пожалуйста убедитесь, что индикатор
сигнализирует о начале зарядке аккумулятора.
2.Когда закончите уборку, температура аккумулятора будет немного высокой, и ее время
зарядки будет продолжительным.
Manual Charging:
1. You can use the adapter or docking
station to charge for the main body
directly.
2
.
Turn on the cleaner and connect the
output terminal of the adapter with DC
socket of the main boby while using the
adapter for charging.(Refer to Figure 1)
Before charging,turn on the cheaner and
3.
connect the adapter with docking station
make sure the cleaner abut against the
doching station,and connect the auto-
charging electrode well with that of the
docking station.(Refer to Figure 2)
P
ress the CHARGE button on the remote
4.
control or the machine panel and the cleaner
will search the docking station for charging in
a valid scope.(See Figure 3)
5. When the machine is searching for the docking
station, press the CHARGE key on the machine’s
panel or the STOP or CHARGE key on the remote
control, to stop the cleaner searching for the docking
station immediately.
High Voltage! Electrical
hazard! Please dry your
hands before using!
High Voltage! Electrical
hazard! Please dry your
hands before using!
Figure 1
Figure 2
6. During charging, the indicator blinks. When it stops blinking, it indicates the battery is
fully charged.
Automatic Charging:
In the case of low battery during cleaning, the cleaner will stop cleaning and with the
sound like “D” keeps ten times, then the charging light will be on and the decorative
lamp will be flash one by one, at the same time the cleaner will search the dock station
for charging automatically.
1: When the cleaner is charging, please sure the switch keeps on
2: When the cleaner finish cleaning, the temperature of the battery is very high, so the
charging time will be longer.
Page 9

Remote Control:
set to select all or turn
Пульт управления:
Панель управления пульта дистанционного управления:
Дни недели
Прежде чем использовать пульт дистанционного управления сделайте проверку кода
или
он не будет работать.
Шаги для проверки кода: Пожалуйста, убедитесь, что питание на пульте
дистанционного управления и робота-пылесоса достаточно, а затем в
соответствии со следующими шагами.
A: Выключите робот;
B: Нажмите и удерживайте кнопку "OK" на пульте дистанционного управления;
C: Включите робот-пылесос;
D: После этого робот просигналит 2 или 3 раза, отпустите кнопку "ОК". Набор
кода завершилась успешно.
если вы не слышите сигнал во время проверки кода, просто повторите описанный выше
процесс.
★Внимание:
если вы не слышите сигнал во время проверки кода, просто повторите описанный выше
процесс.
Прием сигнала
Подтверждать
Кнопка включения
Стоп
Скорость
Установка текущего
времени
Текущее время
Предварительно
установленное время
Предустановленные
уборки
Заряд
Автоматическая
уборка
Местная уборка
Кнопки направления
Общий выбор/Сброс
индикации всех дней
недели
Control Panel of Remote Control:
Weekdays
Emission signal
Pre-
off charging indicators
Setting of current time
Speed
Stop
Power button
Confirm
TIMER
Direction buttons
Current time
Pre-set time
Pre-set cleaning
Charge
Automatic cleaning
Spot cleaning
Tips: Code check is required before you use the remote control, or it will fail to work.
Steps for code check: Please ensure the power of the remote control & cleaner are
enough, and then according to the following steps.
A: Turn off the cleaner;
B: Press and hold the “OK” button on the remote control;
urn on the machine
C: T
After the cleaner toot twice or 3 times,release the “OK” button, then the code
D:
check set is finished successfully.
★Note:
If you fail to hear toot twice or 3 times,during the code check,just repeat the above process.
-08-
Page 10
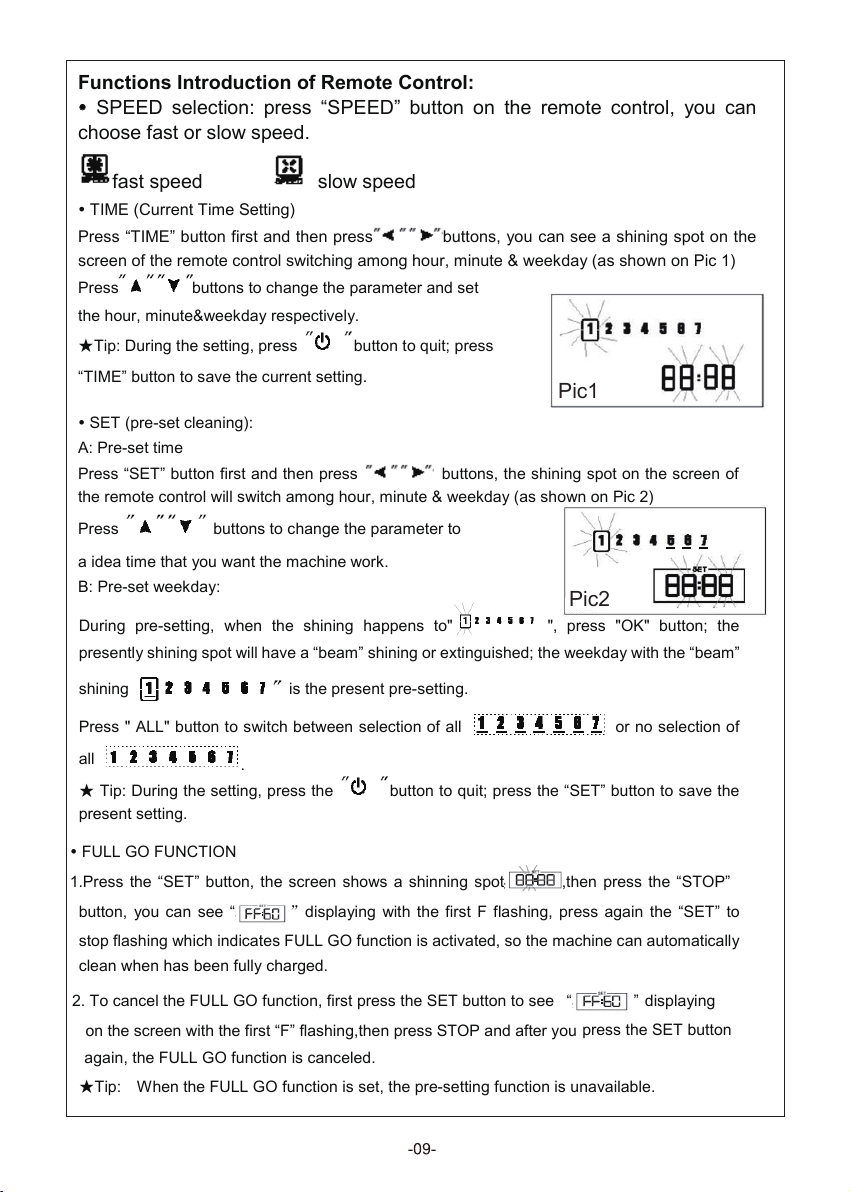
Functions Introduction of Remote Control:
Press buttons to change the parameter and set
the hour, minute&weekday respectively.
★Tip: During the setting, press button to quit; press
“TIME” button to save the current setting.
SET (pre-set cleaning):
A: Pre-set time
Press “SET” button first and then press buttons, the shining spot on the screen of
the remote control will switch among hour, minute & weekday (as shown on Pic 2)
Press buttons to change the parameter to
a idea time that you want the machine work.
B: Pre-set weekday:
During pre-setting, when the shining happens to" ", press "OK" button; the
presently shining spot will have a “beam” shining or extinguished; the weekday with the “beam”
shining is the present pre-setting.
Press " ALL" button to switch between selection of all or no selection of
all
.
★ Tip: During the setting, press the button to quit; press the “SET” button to save the
present setting.
FULL GO FUNCTION
1.Press the “SET” button, the screen shows a shinning spot ,then press the “STOP”
button, you can see “ ”displaying with the first F flashing, press again the “SET” to
stop flashing which indicates FULL GO function is activated, so the machine can automatically
clean when has been fully charged.
2. To cancel the FULL GO function, first press the SET button to see “ ”
displaying
on the screen with the first “F” flashing,then press STOP and after you
again, the FULL GO function is canceled.
press the SET button
★
: hen the FULL GO function is set, the pre
SPEED selection: press “SPEED” button on the remote control, you can
choose fast or slow speed.
fast speed slow speed
TIME (Current Time Setting)
Press “TIME” button first and then press
screen of the remote control switching among hour, minute & weekday (as shown on Pic 1)
buttons, you can see a shining spot on the
Pic1
Pic2
Tip:
W
-setting function is unavailable.
Page 11

Space Isolator:
Виртуальная стена
передатчик сигнала
индикатор питания
выключатель питания
кнопка кода проверки
Совет: Вы должны проверить код перед использованием "виртуальной стены", иначе она
не будет работать.
Шаги проверки кода:
A: Выключите робот и включите изолятор (с включенным индикатором.);
B: Удерживайте кнопку проверки кода на изоляторе; (Совет: код кнопки проверки
находится внутри отверстия, вам нужно использовать вспомогательный инструмент при
удержание кнопки)
C: Включите робот;
D: После того как робот просигналит 2 или 3 раза,
отпустите кнопку проверки кода и проверка кода успешно завершен.
Примечание: Если вы не слышите гудок дважды во время проверки кода, просто
повторите описанный выше процесс.
Совет: Поместите изолятор к стене, или он может быть легко перемещен от робота
сбоку или сзади, что приведет к тому что аппарат очищает ограниченном
пространстве.
Signal transmitting
Power switch
Code check button
Power indicator
Tip: You should check code before using the Space Isolator; otherwise it will fail to work.
Steps of code check:
A : Turn off the cleaner, and turn on the Space Isolator (with power indicator on);
B : Keep holding the code check button on the Space Isolator;(
is inside the hole, you need to use auxiliary tools when hold the button
)
the code check button
Tip:
C : Turn on the cleaner;
D: After the cleaner toots 2 or 3 times,
release the code check button, then the code
check set is finished successfully.
★ Note: If you fail to hear toot twice during the code check, just repeat the above process.
Tip
: Place the space isolator against the wall, or it might be easily moved by the cleaner from
side or back of the space isolator, which would cause the machine cleans the confined area.
2 or 3 times,
Page 12
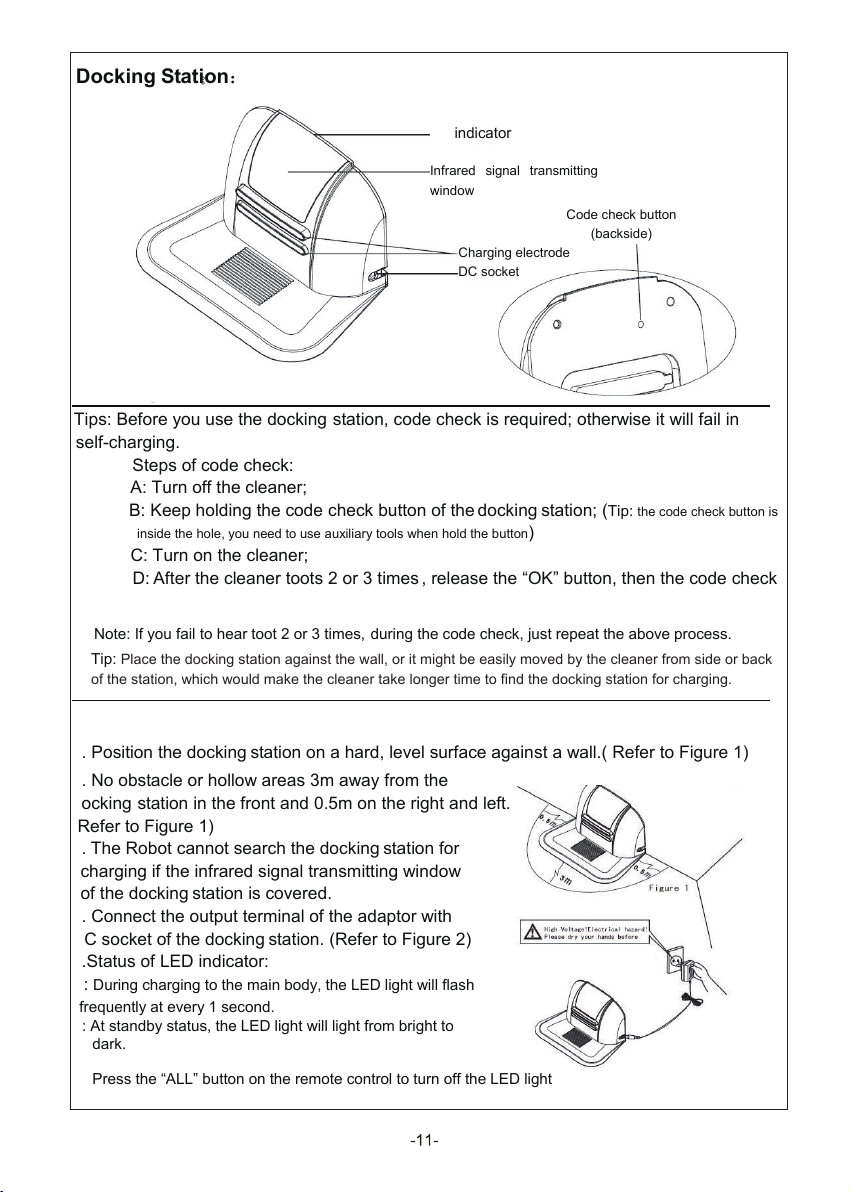
Docking Station:
window
Зарядная станция
индикатор
Окно для передачи
инфракрасного сигнала
Кнопка проверки кода
(на задней стороне)
Контакты для заряда
DC разъем
Советы: Перед использованием док-станции, код требует проверки, в противном случае она
не будет выполнять самостоятельную зарядку.
Шаги Кода проверки:
A: Выключите очиститель;
B: Удерживайте кнопку кода проверки док-станции; (Совет: кнопка кода проверки в отверстие,
необходимо использовать вспомогательные инструменты, когда удерживаете кнопку)
C: Включите очиститель;
D:после того как робот-пылесос просигналит 2 или 3 раза, отпустите кнопку "ОК" и код
проверки успешно завершен.
Примечание: Если вы не слышите гудок 2 или 3 раза, во время проверки кода, просто
повторите описанный выше процесс.
Совет: установите док-станцию к стене, или он может быть легко перемещен роботом
боковой или задней часть робота, что потребует занять больше времени, чтобы найти
док-станцию для зарядки.
Автоматическая зарядка:
1. Установите док-станцию на твердой ровной поверхности. (См. рисунок 1)
2.Нет препятствий в области 3 м от док-станция спереди
и 0,5 м справа и слева.(См. рисунок 1)
3.Робот не может найти док-станцию для
зарядки если окно передачи инфракрасного сигнала
из док-станции закрыто.
4. Подключите выходной разъем адаптера с
DC разъем док-станции. (См. Рисунок 2)
5.Статус светодиодного индикатора:
A: Во время зарядки в основном корпусе светодиод
будет мигать. Часто на каждую 1 секунду.
B: В режиме ожидания, светодиод будет гореть от яркого
до темного.
Нажмите кнопку "ALL" кнопку на пульте дистанционного
управления, чтобы выключить свет светодиодный
индикатор
LED indicator
Infrared signal transmitting
Code check button
Charging electrode
DC socket
Tips: Before you use the docking station, code check is required; otherwise it will fail in
self-charging.
Steps of code check:
A: Turn off the cleaner;
B: Keep holding the code check button of the docking station; (
inside the hole, you need to use auxiliary tools when hold the button
)
C: Turn on the cleaner;
D: A
fter the cleaner toots 2 or 3 times , release the “OK” button, then the code check
set is
finished successfully.
★ Note: If you fail to hear toot 2 or 3 times, during the code check, just repeat the above process.
Tip: Place the docking station against the wall, or it might be easily moved by the cleaner from side or back
of the station, which would make the cleaner take longer time to find the docking station for charging.
(backside)
Tip: the code check button is
Automatic Charging:
1. Position the docking station on a hard, level surface against a wall.( Refer to Figure 1)
2. No obstacle or hollow areas 3m away from the
docking
station in the front and 0.5m on the right and left.
(Refer to Figure 1)
3. The Robot cannot search the docking station for
charging if the infrared signal transmitting window
of the docking station is covered.
4. Connect the output terminal of the adaptor with
DC socket of the docking station. (Refer to Figure 2)
5.Status of LED indicator:
A:
During charging to the main body, the LED light will flash
frequently at every 1 second.
B: At standby status, the LED light will light from bright to
dark.
Press the “ALL” button on the remote control to turn off the LED light
Figure 2
Page 13
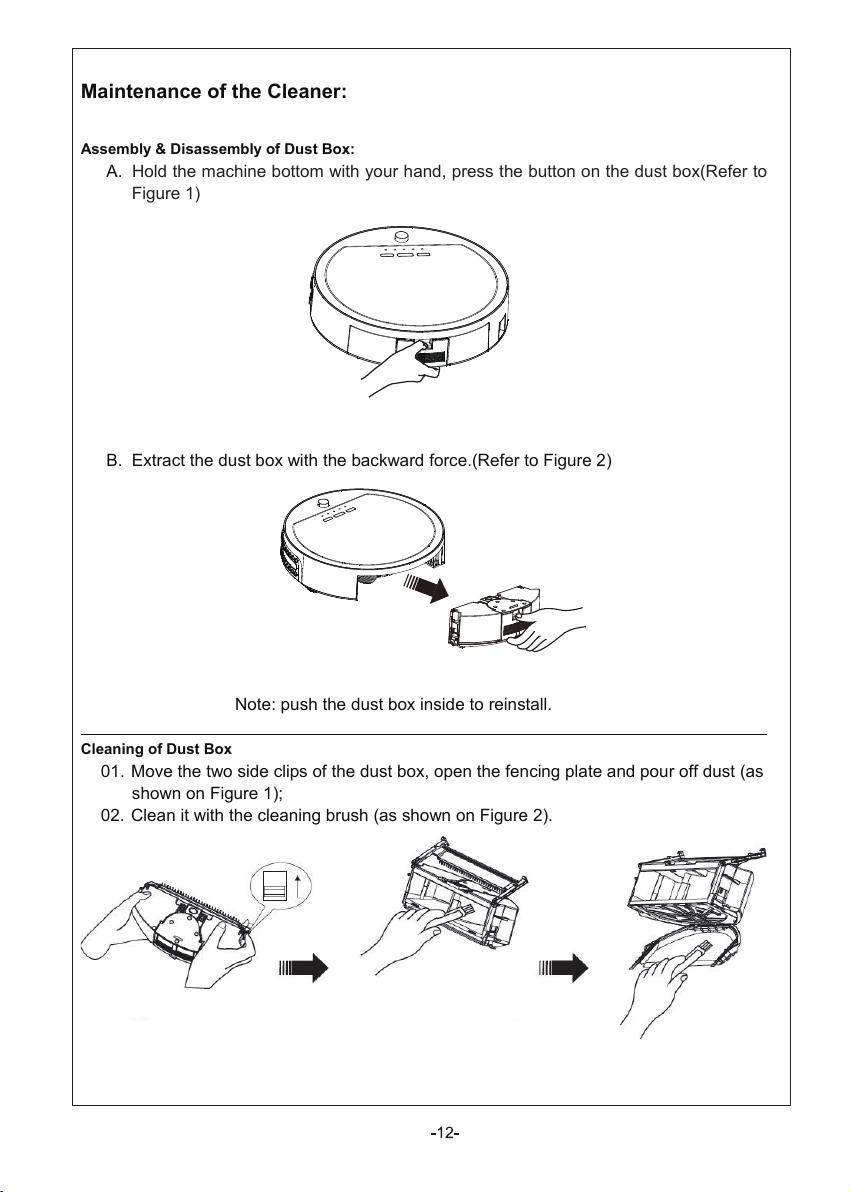
Maintenance of the Cleaner:
Монтаж & Разборка и очистка частей:
Сборка и демонтаж пылесборника:
А. держите машину нижней рукой, нажмите на кнопку пылесборника (см.Рисунок 1)
B. Извлечения пылесборника с обратной силой. (См. Рисунок 2)
Примечание: нажмите на пылесборник внутри
Очистка пылесборника
01. Отщелкните с двух сторон клипсы пылесборника, откройте ограждения и вытряхните
пыль (как показано на рисунке 1);
02. Очистите ее с помощью щеточки (как показано на рисунке 2).
Assembly & Disassembly of Dust Box:
A. Hold the machine bottom with your hand, press the button on the dust box(Refer to
Figure 1)
Figure 1
B. Extract the dust box with the backward force.(Refer to Figure 2)
Figure 2
Note: push the dust box inside to reinstall.
Cleaning of Dust Box
01. Move the two side clips of the dust box, open the fencing plate and pour off dust (as
shown on Figure 1);
02. Clean it with the cleaning brush (as shown on Figure 2).
Figure 1
Figure 2
Page 14

Filter Replacement & Cleaning:
A. Press the two side clips over the dust box to open the fencing plate, If the rubber part
which attached the fencing plate was worn out, you need to take out it for replacement.
(Refer to figue 1)
take out
Figure 1
B. Press the button on the dust box, the fan assembly will automatically pop up (Refer
to Figure 2);
Tip: water is not allowed to directly clean the fan assembly.
C. Pop up the blower, take out the filter, and then clean the dust box. (Refer to Figure 3)
Figure 2 Figure 3
D. Clean the filter by hair dryer with cold wind or using brush cleaner. (Refer to Figure 4
and Figure 5)
Figure 4
Figure 5
F. Reinstall the filter in the original position.
Page 15

Tip: The rubber cleaning head sometimes might be dropped off when you clean the
Снятие и установка боковой щетки
1.Открутите основной болт отверткой,
поменяйте/почистите/установите боковую
щетку.
2. Воткните боковую щетку на держатель и
закрепите ее при помощи болта и отвертки.
1. Надавите на крепеж вперед и
поднимите его наверх(рис.1, рис.2).
2. Вытащите щетки, надавив в бок и
наверх.
3. После очистки, вставте щетки в их
отверстие, после чего закройте
крышку фиксатор (рис.3).
Установка и снятие основной щетки и щетки пола
Внимание: резинка пылесборника может выпасть при чистки,
следуйте инструкции, чтобы установить ее.
1. Расположите резинку согласно рис.1
2. Установите один конец резинки внутрь пылесборника. Убедитесь что резинка хорошо
закреплена, рис.2
3. Чтобы завершить установку резинки, осторожно надавите на нее.
dustbin, please follow the below instruction to reinstall it..
Rubber cleaning head
Figure 1
1. Position the dustbin and rubber cleaning head as picture 1.
2. Place one end of the cleaning head into the dustbin, make sure the cleaning head is
upward and connect well with the dustbin. (Refer to picture 2).
3. Make the cleaning head completely connect with dustbin by pressing with your hand.
Assembly & Disassembly of Main Brush and Floor Brush:
1. Force the locking bar forward and raise
the cover by your right thumb, then
raise rod of the main brush by your left
hand. (Refer to Figure 1
2. Take out the main brush and floor brush.
(Refer to Figure 3)
3. Insert the main brush and floor brush
into the holes before closing the cover
in assembly.
and Figure 2)
Assembly & Disassembly of Side Brush:
Figure 2
Figure 3
1. Release the screw in the main shaft of the side
brush before you change a new one.
2. Press the side brush against the main shaft and
then fasten the screw. (Refer to the figure)
Page 16

Cleaning of Main Brush and Floor Brush:
Возможные проблемы в работе пылесоса
Код ошибки
Причина ошибки
Как решить проблему
Е001 Сенсоры определения Прочистите сенсоры в нижней передней
высоты поверхности части робота
E002 Средняя щетка Вычистите щетку от мусора и посторонних
предметов!
E003 Выключается робот Используйте адаптер, чтобы зарядить
робот и включите устройство
Е004 Левое и правое колесо Вычистите колеса от мусора
Е005 Неверно вставлен контейнер для пыли Вычистите контейнер и вставте его заново
Если ошибки сохраняются после проделанных операций,
обратитесь в сервис-центр. Не пытайтесь чинить пылесос
самостоятельно!
Снятие/установка/чистка переднего колеса
Достаньте переднее колесо, подцепив его, прочистите его при
помощи щетки.
Чистка основной щетки и щетки пола
1.Регулярно прочищайте щетки, вытащите щетки,
очистите их от всех волосков, ниток, пыли и др.отходов.
Очищайте от отходов всасывающий механизм. Делать
это необходимо припомощи щетки для очищения.
2. Особое внимание уделяйте железным частям щетки
(кончики щетки), тщательно прочищайте их от
намотанных волос и ниток. Уделяйте внимание
углублениям на данных частях щетки.
1. Clear the hair or big dust particles on the brushes
regularly to improve the cleaning performance. Clean the
dust at the air intake. Clean the paper scraps or small
particles by cleaning brush directly. Rotate the brush
carefully and cut the hair, yarn and other twisted objects
by scissors or pull them by hand.
2. The cleaning of the main brush and floor brush can be done
by reference to the assembly & disassembly.
Assembly & Disassembly and Cleaning of Front Wheel:
1. Clean the front wheel with a clean brush. (Refer to the figure below)
Failure information which may appear during using:
Failure Code
E001 Ground detection sensors
E002 Middle brush
E003 Power off
E004
E005 Dustin poor contact
If the failure still exist after the above check, please contact the after-sale
service maintenance, professional maintenance staff or the technical center
of the company, don’t disassemble and maintain it by yourself.
Failure Cause How to solve
Clean the sensors at the front bottom of the cleaner
Clean the rubbish such as hair, thread wrapped on
the brush
Use the adaptor to charge , after full charged , then
use again
Left &right wheel Check the left and right wheels , clean the rubbish
on it
Check the dustbin and re-fix the dustbin after
cleaning
Page 17

Technical Specifications:
Номинальное напряжение
Технические характеристики
Аккумулятор
Рабочее время
Номинальная мощность
Диапазон рабочих температур
Влажность при эксплуатации
Пульт ДУ
Размер
Вес
Емкость батареи
Емкость пылесборника
Номинальное напряжение
Аккумулятор
Диапазон рабочих температур
Влажность при эксплуатации
Размер
Вес
Технические характеристики Пульта дистанционного управления:
Расстояние
Пульт ДУ
Технические характеристики док-станции:
Размер
Вес
Диапазон рабочих температур
Влажность при эксплуатации
Номинальная мощность
Технические характеристики "виртуальной стены":
Номинальное напряжение
Расстояние
Диапазон рабочих температур
Влажность при эксплуатации
Беспроводная частота
Мощность сигнала
Размер
Параметры машины
Machine parameters
1 Rated Voltage DC14.4V
2 Battery Ni-MH battery (the charge time is about 3-4h)
3 Working Hours
4 Rated Power
5 Operating Temperature Range
6 Operating Humidity Range ≤90%RH
7 Wireless Remote ISM Frequency Band 2.4GHz
8 Specification
9 Weight 3.1kg
10 Battery Capacity 2200mAh
11 Dust Box Capacity 350mL
Technical Specifications of Remote Control:
Rated Voltage
1
Battery
2
Remote Distance
3
Operating Temperature Range
4
Operating Humidity Range
5
6
Wireless Remote
7
Specification
8
Weight
≥60min
24W
-10℃~45℃
320×92mm
DC 3V
2 AAA alkaline batteries
≥7M (no obstruction)
-10℃~45℃
≤90%RH
ISM Frequency Band 2.4GHz
108X28mm (including buttons) (LXT)
0.08kg
Technical Specifications of Docking station:
1 Specification
L×W×H: 218×138×125mm
2 Weight 0.23kg
3 Rated Voltage DC24V
4 Operating Temperature Range
5 Operating Humidity Range
-10℃~45℃
≤90%RH
Technical Specifications of Space lsolator:
1 Nominal voltage
DC 3V
2 Wireless frequency ISM frequency band 2.4GHZ
3 Control distance ≤3.5m
4 Emission power
5 Operating Temperature range
6 Operating Humidity range
7 Dimension
1mW(0dB)
-10℃~45℃
≤90%RH
∮86*125mm
Page 18

Safety Precautions:
Меры предосторожности
Внимание
Только специалисты нашей компании
или сервис-центра могут
обслуживать, разбирать и изменять
конфигурации устройства. Опасно
для здоровья!
Не используйте иное зарядное
устройство кроме оригинального во
избежание повреждения устройства,
получения электрического шока или
возникновения возгорания.
Кабель питания находится под
высоким напряжением. Не
дотрагивайтесь мокрыми руками.
Не перегибайте кабель питания, а
также не располагайте тяжелые
объекты на нем во избежании порчи.
Не закручивайте одежду или другие
вещи в щетки или колеса робота во
избежания причинения ущерба
здоровью.
Не приближайтесь к устройству с
сигаретами, зажигалками, спичками,
а также легковоспламеняющимися
жидкостями.
Внимание
Не забудьте отключить питание во
время транспортировки или
длительного хранения робота.
Проверьте качество соединения
вилки и розетки во избежание
потери заряда или возгорания!
Проверьте, чтобы кабель питания
был вставлен должным образом в
робот во избежания пожара.
Уберите все легко повреждаемые
объекты(объекты освещения,
стеклянные бутылки и тд.) перед
использованием робота во
избежание нанесения ущерба.
Пожалуйста, используйте робот с
осторожностью в присутствии детей,
чтобы не напугать их и не навредить
Не используйте робот-пылесос
вблизи воды, чтобы не повредить
устройство!
Чтобы продлить срок службы
батареи уборщика убедитесь,
что зарядка аккумулятора длилась
не менее 16 часов перед первым
использованием или
если он долгое время не
использовался.
Не используйте робот на открытом
воздухе. Это может
вызвать повреждения продукта.
Не вставайте на робот во
избежание повреждения устройства
или нанесения вреда здоровью.
Не используйте робот-пылесос на
малых площадях (стульях, столах и
т.п.) во избежание повреждения.
Не используйте робот на больших
торговых площадях во избежание
повреждения устройства.
Если машина долгое время не
используется, извлеките
аккумулятор из машины и
храните ее в сухом прохладном
месте, после полной
зарядки.
Не оставляйте провода, веревки и другие подобные объекты длиной более
150 мм на полу во избежание попадания их в щетку.
Caution
No one else can disassemble, maintain or
transform the product except the
maintenance technicians designated by
the company, or it may cause fire, electric
shock or personal injury.
Don’t touch high-voltage power cord of
the electric appliance with your wet hand,
or it may cause electric shock.
Don’t twist your clothes or any part of
your body (head, finger, etc.) into the
brush or wheel of the Robot, or it may
cause personal injury.
Don’t use other charger but the equipped
one of the Robot, or it may cause product
damage, electric shock or fire due to high
voltage.
Don’t bend the power cord overly or
place weight on it, or it may cause power
cord damage, fire or electric shock.
Don’t approach cigarette, lighter, match
and other heat objects or combustible
materials such as the gasoline cleaner.
Attention
Don’t forget to turn off the power while
transporting or storing the Robot for long,
or the battery may be damaged.
Check whether the charger and socket is
connected well, or it may cause charging
failure or even fire.
To extend the cleaner’s battery life; make
sure charging the battery at least 16
hours before you first use the machine or
if it is long time not in use. Its cleaning
reaches peak performance after 2 or 3
circles of using out the battery power.
Please use the Robot cautiously in the
presence of the children to avoid
frightening or harming them.
Don’t make the Robot take in water and
other liquors for fear of the product
damage.
Don’t use the Robot outdoors, or it may
cause the product damage.
No cord , wire or other objects that longer than 150mm on the floor to avoid entangling with
cleaner’s brushes.
Insert the power cord of the charger well
or it may cause electric shock, short
circuit, smoking or fire.
If the machine is long time not in use,
remove the battery from the machine and
store it in a cool dry place after being fully
charged.
Remove all easily damaged objects
(including luminous objects, fabrics, glass
bottles, etc.) before using, or it may
cause damage to these objects or affect
the using of the Robot.
Don’t stand or sit on the Robot, or it may
cause damage to the Robot or personal
injury.
Don’t use the Robot on small tables and
chairs or other small space, or the Robot
may be damaged.
Don’t use the Robot in commercial
places, or the Robot may be damaged by
excessive use.
Page 19

Роботы-пылесосы XRobot
от официального дилера
Xrobotmarket
Page 20

"CE" marking states that the product is compliant to European Directives:
2006/95/EC Low Voltage Directive
2004/108/EC EMC Directive
It is possible to request a full copy of Declaration of compliance to the Distributor:
This product comply with the rules of RoHs Directive(2002/95/CE)
This product comply with the rules of Eup Directive(2002/125/CE)
 Loading...