

Page 1
XR210E
P
D
F
-
X
C
h
a
n
g
e
E
d
i
t
o
r
w
w
w
.
t
r
a
c
k
e
r
s
o
f
a
e
.
c
P
D
F
-
X
C
h
a
n
g
e
E
d
i
t
o
r
w
w
w
.
t
r
a
c
k
e
r
s
o
f
a
e
.
c
Click to BUY NOW!
P
D
F
-
X
C
h
a
n
g
e
E
d
i
t
o
r
w
w
w
.
t
r
a
c
k
e
r
-
s
o
f
t
w
a
r
e
.
c
o
m
Click to BUY NOW!
P
D
F
-
X
C
h
a
n
g
e
E
d
i
t
o
r
w
w
w
.
t
r
a
c
k
e
r
-
s
o
f
t
w
a
r
e
.
c
o
m
Click to BUY NOW!
P
D
F
-
X
C
h
a
n
g
e
E
d
i
t
o
r
w
w
w
.
t
r
a
c
k
e
r
-
s
o
f
t
w
a
r
e
.
c
o
m
Click to BUY NOW!
P
D
F
-
X
C
h
a
n
g
e
E
d
i
t
o
r
w
w
w
.
t
r
a
c
k
e
r
-
s
o
f
t
w
a
r
e
.
c
o
m
Click to BUY NOW!
P
D
F
-
X
C
h
a
n
g
e
E
d
i
t
o
r
w
w
w
.
t
r
a
c
k
e
r
-
s
o
f
t
w
a
r
e
.
c
o
m
Click to BUY NOW!
P
D
F
-
X
C
h
a
n
g
e
E
d
i
t
o
r
w
w
w
.
t
r
a
c
k
e
r
-
s
o
f
t
w
a
r
e
.
c
o
m
Xrobot XR210Е
С функциями авто зарядки, влажной уборки, с дистанционным пультом и
ультрафиолетовой лампой
Многофункциональный
робот-пылесос
Пожалуйста, прочитайте Руководство пользователя
Спасибо за покупку нашего продукта.
перед использованием продукта.
Page 2
Attention
P
D
F
-
X
C
h
a
n
g
e
E
d
i
t
o
r
w
w
w
.
t
r
a
c
k
e
r
s
o
f
a
e
.
c
P
D
F
-
X
C
h
a
n
g
e
E
d
i
t
o
r
w
w
w
.
t
r
a
c
k
e
r
s
o
f
a
e
.
c
Click to BUY NOW!
P
D
F
-
X
C
h
a
n
g
e
E
d
i
t
o
r
w
w
w
.
t
r
a
c
k
e
r
-
s
o
f
t
w
a
r
e
.
c
o
m
Click to BUY NOW!
P
D
F
-
X
C
h
a
n
g
e
E
d
i
t
o
r
w
w
w
.
t
r
a
c
k
e
r
-
s
o
f
t
w
a
r
e
.
c
o
m
Click to BUY NOW!
P
D
F
-
X
C
h
a
n
g
e
E
d
i
t
o
r
w
w
w
.
t
r
a
c
k
e
r
-
s
o
f
t
w
a
r
e
.
c
o
m
Click to BUY NOW!
P
D
F
-
X
C
h
a
n
g
e
E
d
i
t
o
r
w
w
w
.
t
r
a
c
k
e
r
-
s
o
f
t
w
a
r
e
.
c
o
m
Click to BUY NOW!
P
D
F
-
X
C
h
a
n
g
e
E
d
i
t
o
r
w
w
w
.
t
r
a
c
k
e
r
-
s
o
f
t
w
a
r
e
.
c
o
m
Click to BUY NOW!
P
D
F
-
X
C
h
a
n
g
e
E
d
i
t
o
r
w
w
w
.
t
r
a
c
k
e
r
-
s
o
f
t
w
a
r
e
.
c
o
m
Page 3

1. Применимость...................................................................................................................
P
D
F
-
X
C
h
a
n
g
e
E
d
i
t
o
r
w
w
w
.
t
r
a
c
k
e
r
s
o
f
a
e
.
c
P
D
F
-
X
C
h
a
n
g
e
E
d
i
t
o
r
w
w
w
.
t
r
a
c
k
e
r
s
o
f
a
e
.
c
Click to BUY NOW!
P
D
F
-
X
C
h
a
n
g
e
E
d
i
t
o
r
w
w
w
.
t
r
a
c
k
e
r
-
s
o
f
t
w
a
r
e
.
c
o
m
Click to BUY NOW!
P
D
F
-
X
C
h
a
n
g
e
E
d
i
t
o
r
w
w
w
.
t
r
a
c
k
e
r
-
s
o
f
t
w
a
r
e
.
c
o
m
Click to BUY NOW!
P
D
F
-
X
C
h
a
n
g
e
E
d
i
t
o
r
w
w
w
.
t
r
a
c
k
e
r
-
s
o
f
t
w
a
r
e
.
c
o
m
Click to BUY NOW!
P
D
F
-
X
C
h
a
n
g
e
E
d
i
t
o
r
w
w
w
.
t
r
a
c
k
e
r
-
s
o
f
t
w
a
r
e
.
c
o
m
Click to BUY NOW!
P
D
F
-
X
C
h
a
n
g
e
E
d
i
t
o
r
w
w
w
.
t
r
a
c
k
e
r
-
s
o
f
t
w
a
r
e
.
c
o
m
Click to BUY NOW!
P
D
F
-
X
C
h
a
n
g
e
E
d
i
t
o
r
w
w
w
.
t
r
a
c
k
e
r
-
s
o
f
t
w
a
r
e
.
c
o
m
Содержание
3
2. Описание функций...........................................................................................................
3. Компоненты робота........................................................................................................
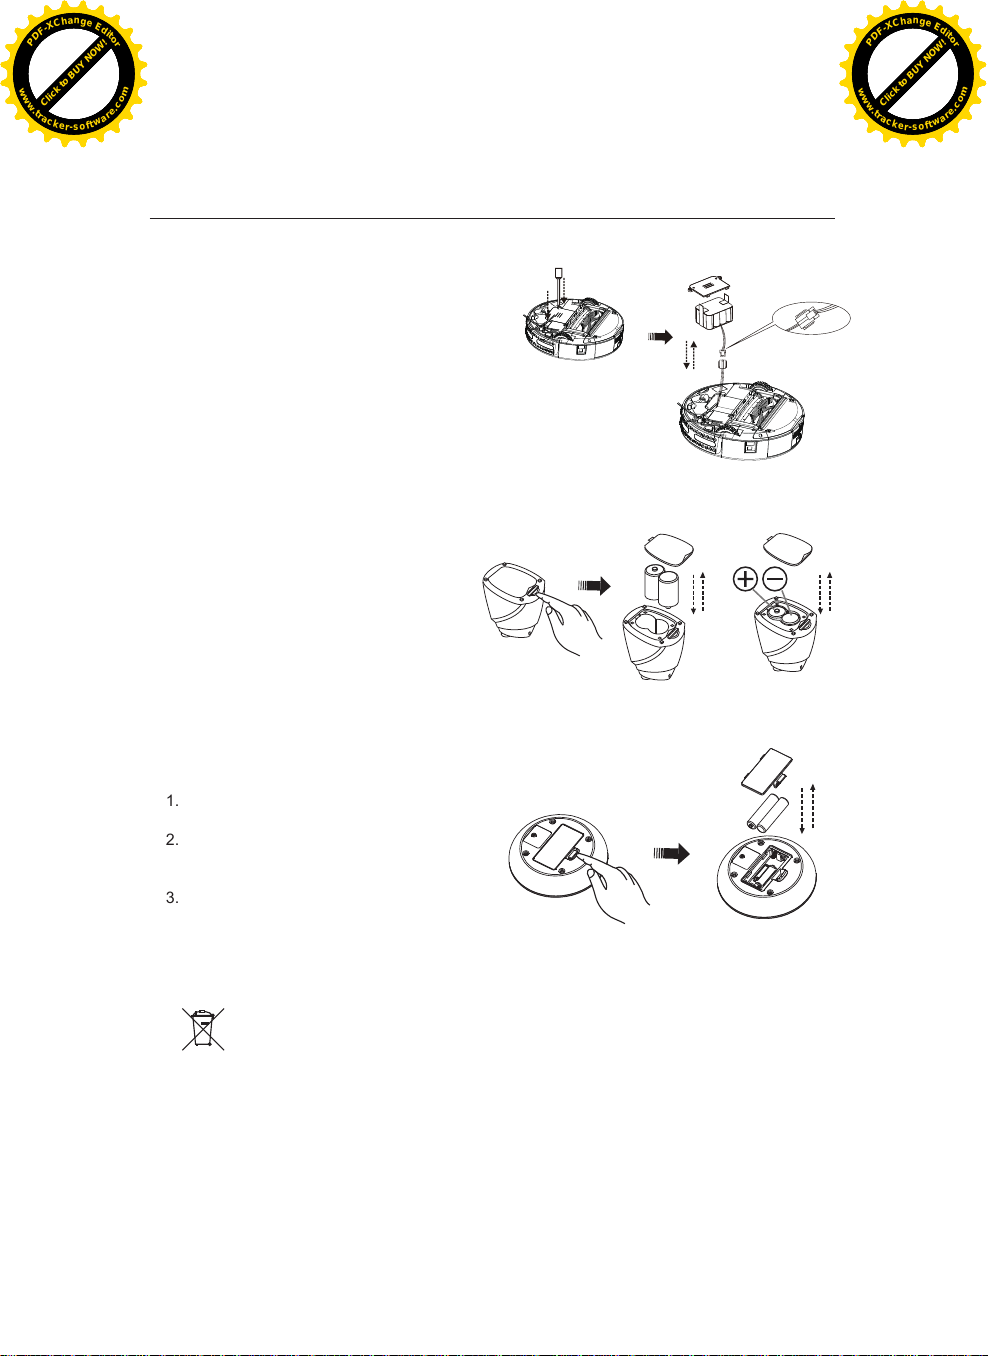
4. Установка батареи............................................................................................................
5. Введение...........................................................................................................................
6. Пульт ДУ..............................................................................................................................
7. Авто зарядная станция...................................................................................................
8. Виртуальная стена..........................................................................................................
9. Ежедневная очистка.......................................................................................................
10. Неисправности...............................................................................................................
11. Технические параметры................................................................................................
3
3
4
5
8
11
14
16
20
22
-2-
Page 4
P
D
F
-
X
C
h
a
n
g
e
E
d
i
t
o
r
w
w
w
.
t
r
a
c
k
e
r
s
o
f
a
e
.
c
P
D
F
-
X
C
h
a
n
g
e
E
d
i
t
o
r
w
w
w
.
t
r
a
c
k
e
r
s
o
f
a
e
.
c
Click to BUY NOW!
P
D
F
-
X
C
h
a
n
g
e
E
d
i
t
o
r
w
w
w
.
t
r
a
c
k
e
r
-
s
o
f
t
w
a
r
e
.
c
o
m
Click to BUY NOW!
P
D
F
-
X
C
h
a
n
g
e
E
d
i
t
o
r
w
w
w
.
t
r
a
c
k
e
r
-
s
o
f
t
w
a
r
e
.
c
o
m
Click to BUY NOW!
P
D
F
-
X
C
h
a
n
g
e
E
d
i
t
o
r
w
w
w
.
t
r
a
c
k
e
r
-
s
o
f
t
w
a
r
e
.
c
o
m
Click to BUY NOW!
P
D
F
-
X
C
h
a
n
g
e
E
d
i
t
o
r
w
w
w
.
t
r
a
c
k
e
r
-
s
o
f
t
w
a
r
e
.
c
o
m
1. Применяемость:
Click to BUY NOW!
P
D
F
-
X
C
h
a
n
g
e
E
d
i
t
o
r
w
w
w
.
t
r
a
c
k
e
r
-
s
o
f
t
w
a
r
e
.
c
o
m
Click to BUY NOW!
P
D
F
-
X
C
h
a
n
g
e
E
d
i
t
o
r
w
w
w
.
t
r
a
c
k
e
r
-
s
o
f
t
w
a
r
e
.
c
o
m
Устройство предназначено для применения в домашних условиях, в отелях или офисах для чистки
различныхковровы хпокрыт ийскороткимворсом,ата кжедеревянных,кафель ныхидругихвидо
втвердыхполов.
2. Знакомст ва с функциям и:
Робот-пылесос - это пылесос нового поколения с заряжаемой батареей, контролируемый
усовершенствованным микропроцессором.Робот-пылесособладаетследующими
функциями:автоматическаяочисткаповерхностейотпыли,мытьепола,уборкасустановкой
таймера,выборскоростиуборки,атакжеимеетбеспроводнойпультуправления.Уборкас
роботом-пылесосом проста и качественна.
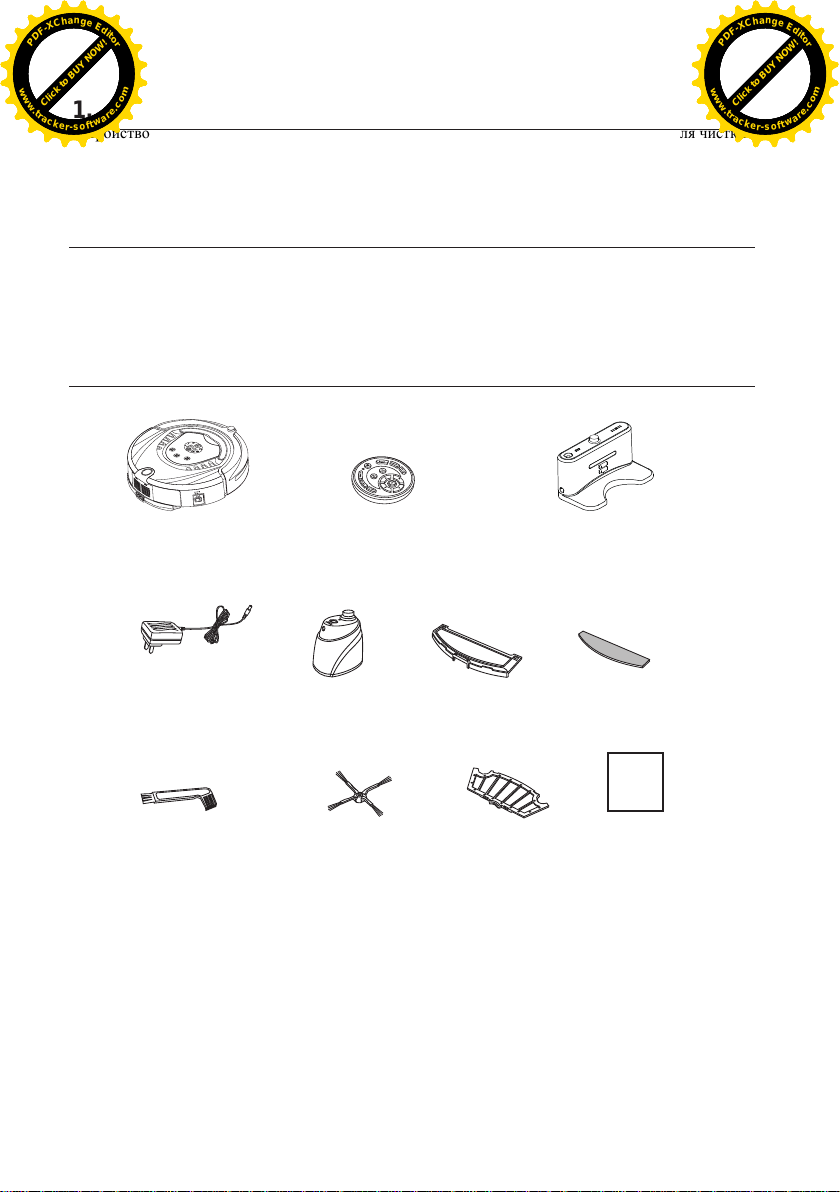
3. Компоненты робота:
Пылесос
Адаптор
Виртуальная стена
Щетка для чистки Боковая щетка Фильтр
Пульт ДУ Авто зарядная
станция
Блок для ВУ
Тряпка pad
Инструкция
-3-
Page 5
P
D
F
-
X
C
h
a
n
g
e
E
d
i
t
o
r
w
w
w
.
t
r
a
c
k
e
r
s
o
f
a
e
.
c
P
D
F
-
X
C
h
a
n
g
e
E
d
i
t
o
r
w
w
w
.
t
r
a
c
k
e
r
s
o
f
a
e
.
c
Click to BUY NOW!
P
D
F
-
X
C
h
a
n
g
e
E
d
i
t
o
r
w
w
w
.
t
r
a
c
k
e
r
-
s
o
f
t
w
a
r
e
.
c
o
m
Click to BUY NOW!
P
D
F
-
X
C
h
a
n
g
e
E
d
i
t
o
r
w
w
w
.
t
r
a
c
k
e
r
-
s
o
f
t
w
a
r
e
.
c
o
m
Click to BUY NOW!
P
D
F
-
X
C
h
a
n
g
e
E
d
i
t
o
r
w
w
w
.
t
r
a
c
k
e
r
-
s
o
f
t
w
a
r
e
.
c
o
m
Click to BUY NOW!
P
D
F
-
X
C
h
a
n
g
e
E
d
i
t
o
r
w
w
w
.
t
r
a
c
k
e
r
-
s
o
f
t
w
a
r
e
.
c
o
m
Click to BUY NOW!
P
D
F
-
X
C
h
a
n
g
e
E
d
i
t
o
r
w
w
w
.
t
r
a
c
k
e
r
-
s
o
f
t
w
a
r
e
.
c
o
m
Click to BUY NOW!
P
D
F
-
X
C
h
a
n
g
e
E
d
i
t
o
r
w
w
w
.
t
r
a
c
k
e
r
-
s
o
f
t
w
a
r
e
.
c
o
m
1.
2.
3.
Page 6
P
D
F
-
X
C
h
a
n
g
e
E
d
i
t
o
r
w
w
w
.
t
r
a
c
k
e
r
s
o
f
a
e
.
c
P
D
F
-
X
C
h
a
n
g
e
E
d
i
t
o
r
w
w
w
.
t
r
a
c
k
e
r
s
o
f
a
e
.
c
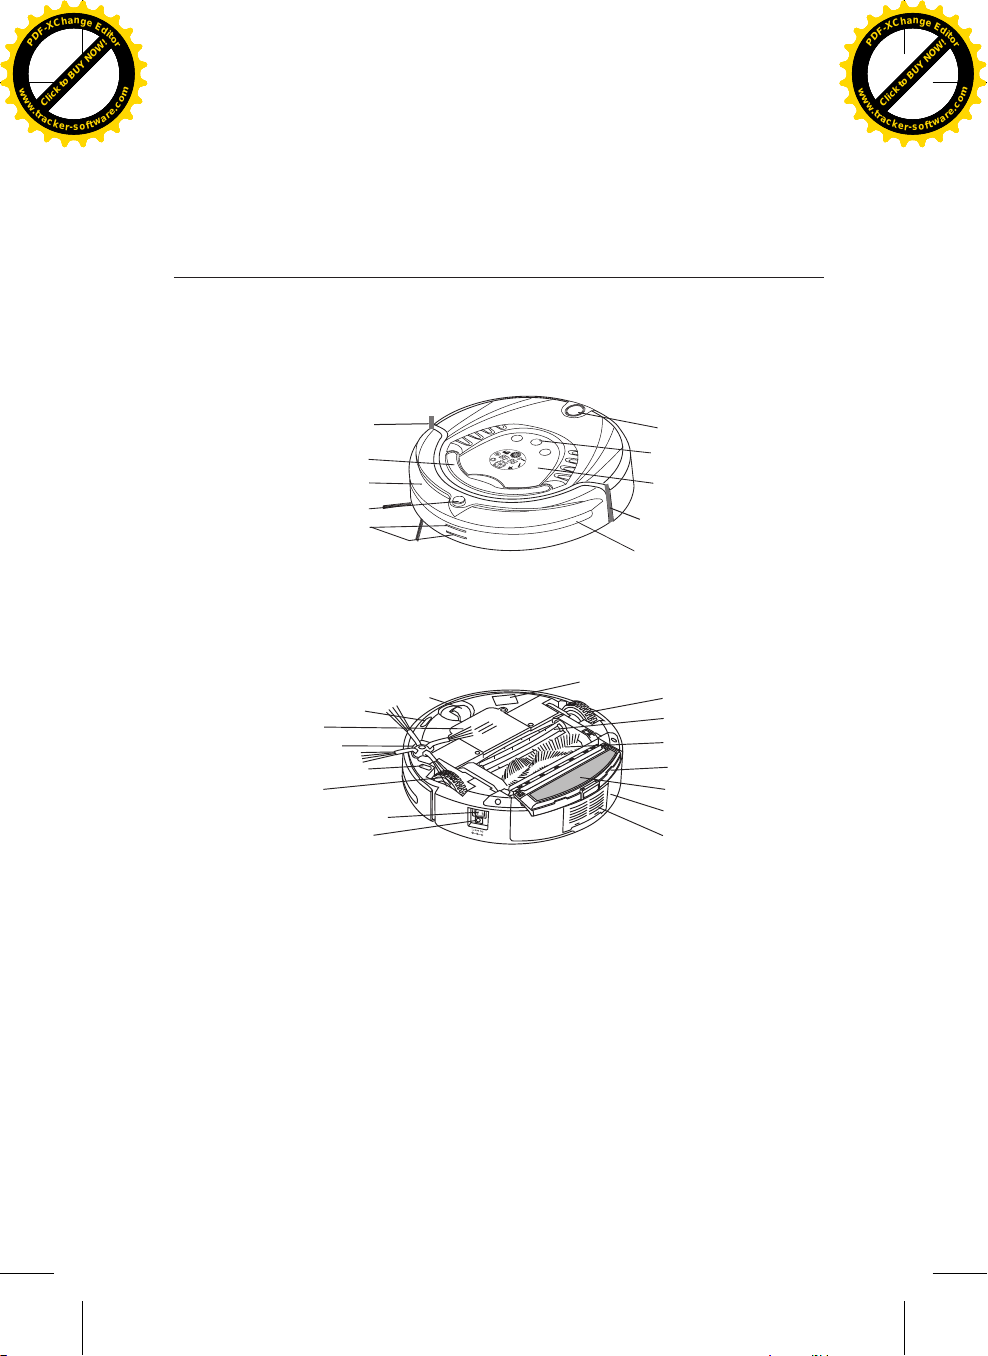
5. Введение:
Click to BUY NOW!
P
D
F
-
X
C
h
a
n
g
e
E
d
i
t
o
r
w
w
w
.
t
r
a
c
k
e
r
-
s
o
f
t
w
a
r
e
.
c
o
m
Click to BUY NOW!
P
D
F
-
X
C
h
a
n
g
e
E
d
i
t
o
r
w
w
w
.
t
r
a
c
k
e
r
-
s
o
f
t
w
a
r
e
.
c
o
m
Click to BUY NOW!
P
D
F
-
X
C
h
a
n
g
e
E
d
i
t
o
r
w
w
w
.
t
r
a
c
k
e
r
-
s
o
f
t
w
a
r
e
.
c
o
m
Click to BUY NOW!
P
D
F
-
X
C
h
a
n
g
e
E
d
i
t
o
r
w
w
w
.
t
r
a
c
k
e
r
-
s
o
f
t
w
a
r
e
.
c
o
m
Click to BUY NOW!
P
D
F
-
X
C
h
a
n
g
e
E
d
i
t
o
r
w
w
w
.
t
r
a
c
k
e
r
-
s
o
f
t
w
a
r
e
.
c
o
m
Click to BUY NOW!
P
D
F
-
X
C
h
a
n
g
e
E
d
i
t
o
r
w
w
w
.
t
r
a
c
k
e
r
-
s
o
f
t
w
a
r
e
.
c
o
m
Верхняя часть
Бампер
Ручка
Бампер
Инфракрасный порт
Контакты авто зарядки
Датчики высоты
Крышка батареи
Боковая щетка
Датчики высоты
Правое колесо
Кнопка вкл/выкл
Разъем для адаптера
Нижняя часть
Переднее колесо
Кнопка пылесборника
Фунциональные кнопки
Экран дисплея
Бампер
Окно для
датчиков
УФ лампа
Левое колесоl
Щетка для пола
Основная щетка
Блок для ВУ
Тряпка
Контейнер
Окно вентиляции
-5-
Page 7

Page 8

Уберите все
препятствия в
помещении,
которые могут
помешать работе
по прямой
линии, зиг-
загами, вдоль
стен в вашем
помещении
Page 9

6. Remote Control:
P
D
F
-
X
C
h
a
n
g
e
E
d
i
t
o
r
w
w
w
.
t
r
a
c
k
e
r
s
o
f
a
e
.
c
P
D
F
-
X
C
h
a
n
g
e
E
d
i
t
o
r
w
w
w
.
t
r
a
c
k
e
r
s
o
f
a
e
.
c
Click to BUY NOW!
P
D
F
-
X
C
h
a
n
g
e
E
d
i
t
o
r
w
w
w
.
t
r
a
c
k
e
r
-
s
o
f
t
w
a
r
e
.
c
o
m
Click to BUY NOW!
P
D
F
-
X
C
h
a
n
g
e
E
d
i
t
o
r
w
w
w
.
t
r
a
c
k
e
r
-
s
o
f
t
w
a
r
e
.
c
o
m
Click to BUY NOW!
P
D
F
-
X
C
h
a
n
g
e
E
d
i
t
o
r
w
w
w
.
t
r
a
c
k
e
r
-
s
o
f
t
w
a
r
e
.
c
o
m
Click to BUY NOW!
P
D
F
-
X
C
h
a
n
g
e
E
d
i
t
o
r
w
w
w
.
t
r
a
c
k
e
r
-
s
o
f
t
w
a
r
e
.
c
o
m
Click to BUY NOW!
P
D
F
-
X
C
h
a
n
g
e
E
d
i
t
o
r
w
w
w
.
t
r
a
c
k
e
r
-
s
o
f
t
w
a
r
e
.
c
o
m
Click to BUY NOW!
P
D
F
-
X
C
h
a
n
g
e
E
d
i
t
o
r
w
w
w
.
t
r
a
c
k
e
r
-
s
o
f
t
w
a
r
e
.
c
o
m
Control panel:
i.
Overall Appearance Key Description
1. Automatic cleaning key/Thursday
2. Spot cleaning key/Friday
3. Time set key/Tuesday
4. Timing key/Monday
5. UV sterilizing key/Wednesday
6. Automatic recharging key/Sunday
7. Speed selection key/Saturday
8. Turn off/cancel
9. It will work automatically after the
battery is full
10. Confirmation key
11. Forward key
12. Back key
13. Turn left key
14. Turn right key
14 keys in total
Using Method & Functional Status of Control Panel:
ii.
the following steps are very important, or the remote control may fail.
You should check code of the remote control or cleaner.
1.
Check the remote control and Cleaner have enough power, turn off the Cleaner, press OK
2.
on the remote control for more than 4s, and then turn on the Cleaner without releasing OK.
After the Cleaner toots twice, release OK, then the code check set is finished.
3.
If you fail to hear toot during the code check, just repeat the above process.
-8-
Page 10

Function Guide Function Information
P
D
F
-
X
C
h
a
n
g
e
E
d
i
t
o
r
w
w
w
.
t
r
a
c
k
e
r
s
o
f
a
e
.
c
P
D
F
-
X
C
h
a
n
g
e
E
d
i
t
o
r
w
w
w
.
t
r
a
c
k
e
r
s
o
f
a
e
.
c
Click to BUY NOW!
P
D
F
-
X
C
h
a
n
g
e
E
d
i
t
o
r
w
w
w
.
t
r
a
c
k
e
r
-
s
o
f
t
w
a
r
e
.
c
o
m
Click to BUY NOW!
P
D
F
-
X
C
h
a
n
g
e
E
d
i
t
o
r
w
w
w
.
t
r
a
c
k
e
r
-
s
o
f
t
w
a
r
e
.
c
o
m
Click to BUY NOW!
P
D
F
-
X
C
h
a
n
g
e
E
d
i
t
o
r
w
w
w
.
t
r
a
c
k
e
r
-
s
o
f
t
w
a
r
e
.
c
o
m
Click to BUY NOW!
P
D
F
-
X
C
h
a
n
g
e
E
d
i
t
o
r
w
w
w
.
t
r
a
c
k
e
r
-
s
o
f
t
w
a
r
e
.
c
o
m
Click to BUY NOW!
P
D
F
-
X
C
h
a
n
g
e
E
d
i
t
o
r
w
w
w
.
t
r
a
c
k
e
r
-
s
o
f
t
w
a
r
e
.
c
o
m
Click to BUY NOW!
P
D
F
-
X
C
h
a
n
g
e
E
d
i
t
o
r
w
w
w
.
t
r
a
c
k
e
r
-
s
o
f
t
w
a
r
e
.
c
o
m
Auto Cleaning
Spot Cleaning
Week & Time Setting
Timing Cleaning Setting
Full go funtion setting
Speed selection
Press the key, the Cleaner will clean in the auto cleaning mode ;Press
the key again, the Cleaner will stop running.
Press the key, the Cleaner will clean in the spot mode ;Press the key
again, the Cleaner will stop running.
1. Turn on the Cleaner.
2. Press on the remote controller, the icon in the LCD screen
of cleaner will flicker.
3. Press correct week button on the remote controller; there is display
in icon , 1 means Sunday, 2 means Monday, …accordingly, 7
means Saturday.
4. After setting correct week , then you can set time
5. Press to enter time setting, the Icon in the LCD screen of
the cleaner will flicker.
6. Press or to set the correct hour.
7. Press again will flicker
8. Press or to set the correct minute
9. After finishing Week & Time Setting, press “OK” to save it
Cleaning Week setting :
1. Turn on the Cleaner.
2. Press Timing Cleaning setting button , then the icon in
the LCD screen of the cleaner will flicker.
3. Press any week button /some week buttons or all week buttons you
want to set timing cleaning on any day or days or everyday of a we-
ek, then the selected date or dates will flicker. In , 1 means Su-
nday, 2 means Monday, accordingly, 7 means Saturday.
4. If you want to cancel any setting day or days, just press the week
button again.
5. after set the clean day of each week, it is possible to set the starting
time of cleaning.
Cleaning time setting:
1.Press to enter cleaning time setting, the Icon in the LCD
screen of the cleaner will flicker.
2.Press or to select the timing cleaning hour.
3.Press again will flicker
4.Press or to set the timing cleaning minute.
5.After finishing Week & Time Setting, press “OK” to save it.
When the cleaner is connected to the Docking Station, at the
setting time it will start cleaning automatically (when the battery is
fully charged); when the cleaning is finished or the battery is low,
the cleaner will go back to the Docking Station automatically.
Press , “D” in the icon “ ” will flicker, the cleaner will
start cleaning automatically when the battery is charged (5/6 hours
charging); this function is suitable for large house which one full
charging can not clean all the rooms.
Remark: Can not set timing cleaning and full go function at the
same time !
Press the “SAT/V” key repeatedly, you can choose fast or slow speed.
It will have automatic memory after the speed selection (fast 1, slow 2)
-9-
Page 11

Function Guide Function Information
P
D
F
-
X
C
h
a
n
g
e
E
d
i
t
o
r
w
w
w
.
t
r
a
c
k
e
r
s
o
f
a
e
.
c
P
D
F
-
X
C
h
a
n
g
e
E
d
i
t
o
r
w
w
w
.
t
r
a
c
k
e
r
s
o
f
a
e
.
c
Click to BUY NOW!
P
D
F
-
X
C
h
a
n
g
e
E
d
i
t
o
r
w
w
w
.
t
r
a
c
k
e
r
-
s
o
f
t
w
a
r
e
.
c
o
m
Click to BUY NOW!
P
D
F
-
X
C
h
a
n
g
e
E
d
i
t
o
r
w
w
w
.
t
r
a
c
k
e
r
-
s
o
f
t
w
a
r
e
.
c
o
m
Click to BUY NOW!
P
D
F
-
X
C
h
a
n
g
e
E
d
i
t
o
r
w
w
w
.
t
r
a
c
k
e
r
-
s
o
f
t
w
a
r
e
.
c
o
m
Click to BUY NOW!
P
D
F
-
X
C
h
a
n
g
e
E
d
i
t
o
r
w
w
w
.
t
r
a
c
k
e
r
-
s
o
f
t
w
a
r
e
.
c
o
m
Click to BUY NOW!
P
D
F
-
X
C
h
a
n
g
e
E
d
i
t
o
r
w
w
w
.
t
r
a
c
k
e
r
-
s
o
f
t
w
a
r
e
.
c
o
m
Click to BUY NOW!
P
D
F
-
X
C
h
a
n
g
e
E
d
i
t
o
r
w
w
w
.
t
r
a
c
k
e
r
-
s
o
f
t
w
a
r
e
.
c
o
m
1.Turn on the power switch of the cleaner, and press the key can
turn on/off the Cleaner .
Turn off/cancel/stop
2.You can stop the running mode by pressing the key .
3.You can delete and return to the original setting if you get wrong
sets or want to stop setting.
4.Press the key for more than 5s, you can delete all set and memory
and return to the initial status
OK key
UV lamp key
You must press “OK” to save any setting you did
You can turn on/off UV lamp by pressing the “UV” key while the
cleaner is in the Standby mode or running. The on/off set will be
memorized automatically.
While the Cleaner is in the Standby mode or running, the Cleaner will
Auto Docking Key
search the Docking Station for charging after you press “SUN/DOCK”
key.
Forward key
Backward key
Turn left key
Turn right key
You should use the remote control within 10m (radio signal scope), or you
1.
Press “Forward”, the Cleaner will run forward cleaning press
can stop. It will stop automatically in case of the obstacle.
Press for long, the Robot will run backward cleaning, and it will
stop after you release the key.
Press and release till the Cleaner turn left to the direction you
want. It will stop automatically in case of the obstacle.
Press and release till the Cleaner turn right to the direction you
want. It will stop automatically in case of the obstacle.
may fail to control the main body.
The Cleaner may fail to find the Docking Station due to the obstacle,
2.
complex condition or because the battery’ power used up .
-10-
Page 12

P
D
F
-
X
C
h
a
n
g
e
E
d
i
t
o
r
w
w
w
.
t
r
a
c
k
e
r
s
o
f
a
e
.
c
P
D
F
-
X
C
h
a
n
g
e
E
d
i
t
o
r
w
w
w
.
t
r
a
c
k
e
r
s
o
f
a
e
.
c
Click to BUY NOW!
P
D
F
-
X
C
h
a
n
g
e
E
d
i
t
o
r
w
w
w
.
t
r
a
c
k
e
r
-
s
o
f
t
w
a
r
e
.
c
o
m
Click to BUY NOW!
P
D
F
-
X
C
h
a
n
g
e
E
d
i
t
o
r
w
w
w
.
t
r
a
c
k
e
r
-
s
o
f
t
w
a
r
e
.
c
o
m
Click to BUY NOW!
P
D
F
-
X
C
h
a
n
g
e
E
d
i
t
o
r
w
w
w
.
t
r
a
c
k
e
r
-
s
o
f
t
w
a
r
e
.
c
o
m
Click to BUY NOW!
P
D
F
-
X
C
h
a
n
g
e
E
d
i
t
o
r
w
w
w
.
t
r
a
c
k
e
r
-
s
o
f
t
w
a
r
e
.
c
o
m
Click to BUY NOW!
P
D
F
-
X
C
h
a
n
g
e
E
d
i
t
o
r
w
w
w
.
t
r
a
c
k
e
r
-
s
o
f
t
w
a
r
e
.
c
o
m
Click to BUY NOW!
P
D
F
-
X
C
h
a
n
g
e
E
d
i
t
o
r
w
w
w
.
t
r
a
c
k
e
r
-
s
o
f
t
w
a
r
e
.
c
o
m
Page 13

Installation of Docking Station and Charging for the cleaner:
P
D
F
-
X
C
h
a
n
g
e
E
d
i
t
o
r
w
w
w
.
t
r
a
c
k
e
r
s
o
f
a
e
.
c
P
D
F
-
X
C
h
a
n
g
e
E
d
i
t
o
r
w
w
w
.
t
r
a
c
k
e
r
s
o
f
a
e
.
c
Click to BUY NOW!
P
D
F
-
X
C
h
a
n
g
e
E
d
i
t
o
r
w
w
w
.
t
r
a
c
k
e
r
-
s
o
f
t
w
a
r
e
.
c
o
m
Click to BUY NOW!
P
D
F
-
X
C
h
a
n
g
e
E
d
i
t
o
r
w
w
w
.
t
r
a
c
k
e
r
-
s
o
f
t
w
a
r
e
.
c
o
m
Click to BUY NOW!
P
D
F
-
X
C
h
a
n
g
e
E
d
i
t
o
r
w
w
w
.
t
r
a
c
k
e
r
-
s
o
f
t
w
a
r
e
.
c
o
m
Click to BUY NOW!
P
D
F
-
X
C
h
a
n
g
e
E
d
i
t
o
r
w
w
w
.
t
r
a
c
k
e
r
-
s
o
f
t
w
a
r
e
.
c
o
m
Click to BUY NOW!
P
D
F
-
X
C
h
a
n
g
e
E
d
i
t
o
r
w
w
w
.
t
r
a
c
k
e
r
-
s
o
f
t
w
a
r
e
.
c
o
m
Click to BUY NOW!
P
D
F
-
X
C
h
a
n
g
e
E
d
i
t
o
r
w
w
w
.
t
r
a
c
k
e
r
-
s
o
f
t
w
a
r
e
.
c
o
m
Automatic recharging:
Install the Docking Station on the flat ground
1.
firmly and against the vertical wall.
No obstacle or hollow areas 3m away from the
2.
Docking Station in the front and 0.5m on the
right and left. (Refer to Figure 1)
3.
The Cleaner cannot search the Docking Station
for charging if the infrared signal transmitting
window of the recharger is covered.
4.
Connect the output terminal of the adaptor with
DC socket of the Docking Station. (Refer to
Figure 2)
Page 14

Press DOCKING in the remote control if you
P
D
F
-
X
C
h
a
n
g
e
E
d
i
t
o
r
w
w
w
.
t
r
a
c
k
e
r
s
o
f
a
e
.
c
P
D
F
-
X
C
h
a
n
g
e
E
d
i
t
o
r
w
w
w
.
t
r
a
c
k
e
r
s
o
f
a
e
.
c
Click to BUY NOW!
P
D
F
-
X
C
h
a
n
g
e
E
d
i
t
o
r
w
w
w
.
t
r
a
c
k
e
r
-
s
o
f
t
w
a
r
e
.
c
o
m
Click to BUY NOW!
P
D
F
-
X
C
h
a
n
g
e
E
d
i
t
o
r
w
w
w
.
t
r
a
c
k
e
r
-
s
o
f
t
w
a
r
e
.
c
o
m
Click to BUY NOW!
P
D
F
-
X
C
h
a
n
g
e
E
d
i
t
o
r
w
w
w
.
t
r
a
c
k
e
r
-
s
o
f
t
w
a
r
e
.
c
o
m
Click to BUY NOW!
P
D
F
-
X
C
h
a
n
g
e
E
d
i
t
o
r
w
w
w
.
t
r
a
c
k
e
r
-
s
o
f
t
w
a
r
e
.
c
o
m
Click to BUY NOW!
P
D
F
-
X
C
h
a
n
g
e
E
d
i
t
o
r
w
w
w
.
t
r
a
c
k
e
r
-
s
o
f
t
w
a
r
e
.
c
o
m
Click to BUY NOW!
P
D
F
-
X
C
h
a
n
g
e
E
d
i
t
o
r
w
w
w
.
t
r
a
c
k
e
r
-
s
o
f
t
w
a
r
e
.
c
o
m
want to charge for the main body, the Cleaner
will search the Docking Station for charging
within available scope automatically. (Refer to
Figure 3)
Figure 3
Press any key in host panel or POWER OFF
and DOCKING keys in the remote control while
the Cleaner is searching for the Docking
Station, the Cleaner will then stop searching.
After the battery is used up, the first grid of the
charging icon will flicker, when the second and
then the third grid will flicker showing it is
charging, stop flickering after completing the
charging. (Refer to Figure 4 and Figure 5)
Turn on the Cleaner, full three grids show
enough power, one grid missing means the
decreased power, and it should be charged
after three grids missing. (Refer to Figure 6)
Automatic charging:
The Cleaner will search the Docking Station for charging automatically in case of low battery
during cleaning.
SPOT
AUTO
UV
The Cleaner may fail to find the Docking Station due to the obstacle,
1.
decreased battery and complex condition, so the Docking Station should
be put in wide space.
When the cleaner finish cleaning , the temperature of the battery is very
2.
high ; so charging time will be longer
Page 15

Space Isolator, an accessory of the cleaner, can block area by sending special infrared
P
D
F
-
X
C
h
a
n
g
e
E
d
i
t
o
r
w
w
w
.
t
r
a
c
k
e
r
s
o
f
a
e
.
c
P
D
F
-
X
C
h
a
n
g
e
E
d
i
t
o
r
w
w
w
.
t
r
a
c
k
e
r
s
o
f
a
e
.
c
Click to BUY NOW!
P
D
F
-
X
C
h
a
n
g
e
E
d
i
t
o
r
w
w
w
.
t
r
a
c
k
e
r
-
s
o
f
t
w
a
r
e
.
c
o
m
Click to BUY NOW!
P
D
F
-
X
C
h
a
n
g
e
E
d
i
t
o
r
w
w
w
.
t
r
a
c
k
e
r
-
s
o
f
t
w
a
r
e
.
c
o
m
Click to BUY NOW!
P
D
F
-
X
C
h
a
n
g
e
E
d
i
t
o
r
w
w
w
.
t
r
a
c
k
e
r
-
s
o
f
t
w
a
r
e
.
c
o
m
Click to BUY NOW!
P
D
F
-
X
C
h
a
n
g
e
E
d
i
t
o
r
w
w
w
.
t
r
a
c
k
e
r
-
s
o
f
t
w
a
r
e
.
c
o
m
Click to BUY NOW!
P
D
F
-
X
C
h
a
n
g
e
E
d
i
t
o
r
w
w
w
.
t
r
a
c
k
e
r
-
s
o
f
t
w
a
r
e
.
c
o
m
Click to BUY NOW!
P
D
F
-
X
C
h
a
n
g
e
E
d
i
t
o
r
w
w
w
.
t
r
a
c
k
e
r
-
s
o
f
t
w
a
r
e
.
c
o
m
signal so as to prevent the Cleaner from entering some unnecessary areas.
Page 16

P
D
F
-
X
C
h
a
n
g
e
E
d
i
t
o
r
w
w
w
.
t
r
a
c
k
e
r
s
o
f
a
e
.
c
P
D
F
-
X
C
h
a
n
g
e
E
d
i
t
o
r
w
w
w
.
t
r
a
c
k
e
r
s
o
f
a
e
.
c
Click to BUY NOW!
P
D
F
-
X
C
h
a
n
g
e
E
d
i
t
o
r
w
w
w
.
t
r
a
c
k
e
r
-
s
o
f
t
w
a
r
e
.
c
o
m
Click to BUY NOW!
P
D
F
-
X
C
h
a
n
g
e
E
d
i
t
o
r
w
w
w
.
t
r
a
c
k
e
r
-
s
o
f
t
w
a
r
e
.
c
o
m
Click to BUY NOW!
P
D
F
-
X
C
h
a
n
g
e
E
d
i
t
o
r
w
w
w
.
t
r
a
c
k
e
r
-
s
o
f
t
w
a
r
e
.
c
o
m
Click to BUY NOW!
P
D
F
-
X
C
h
a
n
g
e
E
d
i
t
o
r
w
w
w
.
t
r
a
c
k
e
r
-
s
o
f
t
w
a
r
e
.
c
o
m
Click to BUY NOW!
P
D
F
-
X
C
h
a
n
g
e
E
d
i
t
o
r
w
w
w
.
t
r
a
c
k
e
r
-
s
o
f
t
w
a
r
e
.
c
o
m
Click to BUY NOW!
P
D
F
-
X
C
h
a
n
g
e
E
d
i
t
o
r
w
w
w
.
t
r
a
c
k
e
r
-
s
o
f
t
w
a
r
e
.
c
o
m
Page 17

P
D
F
-
X
C
h
a
n
g
e
E
d
i
t
o
r
w
w
w
.
t
r
a
c
k
e
r
s
o
f
a
e
.
c
P
D
F
-
X
C
h
a
n
g
e
E
d
i
t
o
r
w
w
w
.
t
r
a
c
k
e
r
s
o
f
a
e
.
c
Click to BUY NOW!
P
D
F
-
X
C
h
a
n
g
e
E
d
i
t
o
r
w
w
w
.
t
r
a
c
k
e
r
-
s
o
f
t
w
a
r
e
.
c
o
m
Click to BUY NOW!
P
D
F
-
X
C
h
a
n
g
e
E
d
i
t
o
r
w
w
w
.
t
r
a
c
k
e
r
-
s
o
f
t
w
a
r
e
.
c
o
m
Click to BUY NOW!
P
D
F
-
X
C
h
a
n
g
e
E
d
i
t
o
r
w
w
w
.
t
r
a
c
k
e
r
-
s
o
f
t
w
a
r
e
.
c
o
m
Click to BUY NOW!
P
D
F
-
X
C
h
a
n
g
e
E
d
i
t
o
r
w
w
w
.
t
r
a
c
k
e
r
-
s
o
f
t
w
a
r
e
.
c
o
m
Click to BUY NOW!
P
D
F
-
X
C
h
a
n
g
e
E
d
i
t
o
r
w
w
w
.
t
r
a
c
k
e
r
-
s
o
f
t
w
a
r
e
.
c
o
m
Click to BUY NOW!
P
D
F
-
X
C
h
a
n
g
e
E
d
i
t
o
r
w
w
w
.
t
r
a
c
k
e
r
-
s
o
f
t
w
a
r
e
.
c
o
m
Page 18

Cleaning of Dustbin and Blower:
P
D
F
-
X
C
h
a
n
g
e
E
d
i
t
o
r
w
w
w
.
t
r
a
c
k
e
r
s
o
f
a
e
.
c
P
D
F
-
X
C
h
a
n
g
e
E
d
i
t
o
r
w
w
w
.
t
r
a
c
k
e
r
s
o
f
a
e
.
c
Click to BUY NOW!
P
D
F
-
X
C
h
a
n
g
e
E
d
i
t
o
r
w
w
w
.
t
r
a
c
k
e
r
-
s
o
f
t
w
a
r
e
.
c
o
m
Click to BUY NOW!
P
D
F
-
X
C
h
a
n
g
e
E
d
i
t
o
r
w
w
w
.
t
r
a
c
k
e
r
-
s
o
f
t
w
a
r
e
.
c
o
m
Click to BUY NOW!
P
D
F
-
X
C
h
a
n
g
e
E
d
i
t
o
r
w
w
w
.
t
r
a
c
k
e
r
-
s
o
f
t
w
a
r
e
.
c
o
m
Click to BUY NOW!
P
D
F
-
X
C
h
a
n
g
e
E
d
i
t
o
r
w
w
w
.
t
r
a
c
k
e
r
-
s
o
f
t
w
a
r
e
.
c
o
m
Click to BUY NOW!
P
D
F
-
X
C
h
a
n
g
e
E
d
i
t
o
r
w
w
w
.
t
r
a
c
k
e
r
-
s
o
f
t
w
a
r
e
.
c
o
m
Click to BUY NOW!
P
D
F
-
X
C
h
a
n
g
e
E
d
i
t
o
r
w
w
w
.
t
r
a
c
k
e
r
-
s
o
f
t
w
a
r
e
.
c
o
m
First dump the dust, and then clean
it with Dust Brush. (Refer to Figure
1)
Pop up the blower, and then clean
the air inlet/outlet with dust brush.
(Refer to Figure 2 and Figure 3)
Don’t clean the blower in water!
3.
Pop up the blower, take out the
filter, and then clean the dustbin in
water. (Refer to Figure 4)
Clean the filter by hairdryer or Dust
brush. (Refer to Figure 5 and Figure
6)
After cleaning, you can assemble it
6.
firmly as before the disassembly.
Figure 1
Page 19

P
D
F
-
X
C
h
a
n
g
e
E
d
i
t
o
r
w
w
w
.
t
r
a
c
k
e
r
s
o
f
a
e
.
c
P
D
F
-
X
C
h
a
n
g
e
E
d
i
t
o
r
w
w
w
.
t
r
a
c
k
e
r
s
o
f
a
e
.
c
Click to BUY NOW!
P
D
F
-
X
C
h
a
n
g
e
E
d
i
t
o
r
w
w
w
.
t
r
a
c
k
e
r
-
s
o
f
t
w
a
r
e
.
c
o
m
Click to BUY NOW!
P
D
F
-
X
C
h
a
n
g
e
E
d
i
t
o
r
w
w
w
.
t
r
a
c
k
e
r
-
s
o
f
t
w
a
r
e
.
c
o
m
Click to BUY NOW!
P
D
F
-
X
C
h
a
n
g
e
E
d
i
t
o
r
w
w
w
.
t
r
a
c
k
e
r
-
s
o
f
t
w
a
r
e
.
c
o
m
Click to BUY NOW!
P
D
F
-
X
C
h
a
n
g
e
E
d
i
t
o
r
w
w
w
.
t
r
a
c
k
e
r
-
s
o
f
t
w
a
r
e
.
c
o
m
Click to BUY NOW!
P
D
F
-
X
C
h
a
n
g
e
E
d
i
t
o
r
w
w
w
.
t
r
a
c
k
e
r
-
s
o
f
t
w
a
r
e
.
c
o
m
Click to BUY NOW!
P
D
F
-
X
C
h
a
n
g
e
E
d
i
t
o
r
w
w
w
.
t
r
a
c
k
e
r
-
s
o
f
t
w
a
r
e
.
c
o
m
Figure 1
-18-
Figure 2
Page 20

Assembly & Disassembly and Cleaning of Front Wheel:
P
D
F
-
X
C
h
a
n
g
e
E
d
i
t
o
r
w
w
w
.
t
r
a
c
k
e
r
s
o
f
a
e
.
c
P
D
F
-
X
C
h
a
n
g
e
E
d
i
t
o
r
w
w
w
.
t
r
a
c
k
e
r
s
o
f
a
e
.
c
Click to BUY NOW!
P
D
F
-
X
C
h
a
n
g
e
E
d
i
t
o
r
w
w
w
.
t
r
a
c
k
e
r
-
s
o
f
t
w
a
r
e
.
c
o
m
Click to BUY NOW!
P
D
F
-
X
C
h
a
n
g
e
E
d
i
t
o
r
w
w
w
.
t
r
a
c
k
e
r
-
s
o
f
t
w
a
r
e
.
c
o
m
Click to BUY NOW!
P
D
F
-
X
C
h
a
n
g
e
E
d
i
t
o
r
w
w
w
.
t
r
a
c
k
e
r
-
s
o
f
t
w
a
r
e
.
c
o
m
Click to BUY NOW!
P
D
F
-
X
C
h
a
n
g
e
E
d
i
t
o
r
w
w
w
.
t
r
a
c
k
e
r
-
s
o
f
t
w
a
r
e
.
c
o
m
Click to BUY NOW!
P
D
F
-
X
C
h
a
n
g
e
E
d
i
t
o
r
w
w
w
.
t
r
a
c
k
e
r
-
s
o
f
t
w
a
r
e
.
c
o
m
Click to BUY NOW!
P
D
F
-
X
C
h
a
n
g
e
E
d
i
t
o
r
w
w
w
.
t
r
a
c
k
e
r
-
s
o
f
t
w
a
r
e
.
c
o
m
iv.
Pull out the front wheel with your finger and tools and then clean it. (Refer to the figure)
1.
Insert and press the front wheel into the right position while assembling
2.
Cleaning of Sensor and Infrared Transparent Window:
Clean the sensor and infrared transparent window with the cotton swab or soft cloth.
1.
The wall detection sensor is in front of the Cleaner, while the ground detection sensor and
2.
infrared transparent window are at the bottom of the Cleaner. (Refer to the figure below)
3.
Please keep the transparent window clean so as to make the Robot work better.
-19-
Page 21

10. Trouble shooting :
P
D
F
-
X
C
h
a
n
g
e
E
d
i
t
o
r
w
w
w
.
t
r
a
c
k
e
r
s
o
f
a
e
.
c
P
D
F
-
X
C
h
a
n
g
e
E
d
i
t
o
r
w
w
w
.
t
r
a
c
k
e
r
s
o
f
a
e
.
c
Click to BUY NOW!
P
D
F
-
X
C
h
a
n
g
e
E
d
i
t
o
r
w
w
w
.
t
r
a
c
k
e
r
-
s
o
f
t
w
a
r
e
.
c
o
m
Click to BUY NOW!
P
D
F
-
X
C
h
a
n
g
e
E
d
i
t
o
r
w
w
w
.
t
r
a
c
k
e
r
-
s
o
f
t
w
a
r
e
.
c
o
m
Click to BUY NOW!
P
D
F
-
X
C
h
a
n
g
e
E
d
i
t
o
r
w
w
w
.
t
r
a
c
k
e
r
-
s
o
f
t
w
a
r
e
.
c
o
m
Click to BUY NOW!
P
D
F
-
X
C
h
a
n
g
e
E
d
i
t
o
r
w
w
w
.
t
r
a
c
k
e
r
-
s
o
f
t
w
a
r
e
.
c
o
m
Click to BUY NOW!
P
D
F
-
X
C
h
a
n
g
e
E
d
i
t
o
r
w
w
w
.
t
r
a
c
k
e
r
-
s
o
f
t
w
a
r
e
.
c
o
m
Click to BUY NOW!
P
D
F
-
X
C
h
a
n
g
e
E
d
i
t
o
r
w
w
w
.
t
r
a
c
k
e
r
-
s
o
f
t
w
a
r
e
.
c
o
m
The Cleaner doesn’t work or clean poorly
1. Check whether turning on the switch.
2. Check whether the dustbin, filter and intake are clean, and whether the side brush works.
3. Check whether the battery voltage declines greatly.
The remote control doesn’t work
1. Check the battery status of the remote control.
2. Check the battery status of the Robot.
3. Whether check code between the remote control and main body.
4. Check whether the remote control is within the available scope of the signal transmitting.
The Cleaner can not charge automatically
1. Check whether the adaptor is connected well with the charger and whether power LED of
the recharger lighting
2. Check whether the battery power is too low; if so, charge the Cleaner with the adaptor
directly.
3. Make sure there is no barrier in front of the Docking Station .
4. Use the remote controller to let the cleaner go back to the Docking Station
Increased noise in cleaning
1. Clean the dustbin and filter.
2. Check whether the brush or side brush is too dirty.
3. If the noise still too big , you may send back the cleaner to the after sale service
maintenance to add Lubricants..
The Cleaner stops working suddenly and rings intermittently
1. Check whether the set cleaning time is over.
2. Check whether there are failure codes on the display by reference of the followings
The cleaner back off continuously
1. Avoid use in sunlight or dark color carpet .
2. Pat the front bumper..
The cleaner dropped from the stair
The cleaner can not Auto-Charging after didn’t use in a long time
Use the adaptor to full charged first.
The cleaner stop to work , but no error code display
Don’t disassemble and maintain it by yourself, contact the after sale service maintenance
-20-
Page 22

Failure information which may appear during using:
P
D
F
-
X
C
h
a
n
g
e
E
d
i
t
o
r
w
w
w
.
t
r
a
c
k
e
r
s
o
f
a
e
.
c
P
D
F
-
X
C
h
a
n
g
e
E
d
i
t
o
r
w
w
w
.
t
r
a
c
k
e
r
s
o
f
a
e
.
c
Click to BUY NOW!
P
D
F
-
X
C
h
a
n
g
e
E
d
i
t
o
r
w
w
w
.
t
r
a
c
k
e
r
-
s
o
f
t
w
a
r
e
.
c
o
m
Click to BUY NOW!
P
D
F
-
X
C
h
a
n
g
e
E
d
i
t
o
r
w
w
w
.
t
r
a
c
k
e
r
-
s
o
f
t
w
a
r
e
.
c
o
m
Click to BUY NOW!
P
D
F
-
X
C
h
a
n
g
e
E
d
i
t
o
r
w
w
w
.
t
r
a
c
k
e
r
-
s
o
f
t
w
a
r
e
.
c
o
m
Click to BUY NOW!
P
D
F
-
X
C
h
a
n
g
e
E
d
i
t
o
r
w
w
w
.
t
r
a
c
k
e
r
-
s
o
f
t
w
a
r
e
.
c
o
m
Click to BUY NOW!
P
D
F
-
X
C
h
a
n
g
e
E
d
i
t
o
r
w
w
w
.
t
r
a
c
k
e
r
-
s
o
f
t
w
a
r
e
.
c
o
m
Click to BUY NOW!
P
D
F
-
X
C
h
a
n
g
e
E
d
i
t
o
r
w
w
w
.
t
r
a
c
k
e
r
-
s
o
f
t
w
a
r
e
.
c
o
m
Failure Code
Failure Cause How to solve
E001 Ground detection sensors
E002 Middle brush
E003 Power off
E004
Left &right wheel Check the left and right wheels , clean the rubbish
E005 Dustin poor contact
Clean the sensors at the front bottom of the cleaner
Clean the rubbish such as hair, thread wrapped on
the brush
Use the adaptor to charge , after full charged , then
use again
on it
Check the dustbin and re-fix the dustbin after
cleaning
-21-
Page 23

11. Technical Specifications:
P
D
F
-
X
C
h
a
n
g
e
E
d
i
t
o
r
w
w
w
.
t
r
a
c
k
e
r
s
o
f
a
e
.
c
P
D
F
-
X
C
h
a
n
g
e
E
d
i
t
o
r
w
w
w
.
t
r
a
c
k
e
r
s
o
f
a
e
.
c
Click to BUY NOW!
P
D
F
-
X
C
h
a
n
g
e
E
d
i
t
o
r
w
w
w
.
t
r
a
c
k
e
r
-
s
o
f
t
w
a
r
e
.
c
o
m
Click to BUY NOW!
P
D
F
-
X
C
h
a
n
g
e
E
d
i
t
o
r
w
w
w
.
t
r
a
c
k
e
r
-
s
o
f
t
w
a
r
e
.
c
o
m
Click to BUY NOW!
P
D
F
-
X
C
h
a
n
g
e
E
d
i
t
o
r
w
w
w
.
t
r
a
c
k
e
r
-
s
o
f
t
w
a
r
e
.
c
o
m
Click to BUY NOW!
P
D
F
-
X
C
h
a
n
g
e
E
d
i
t
o
r
w
w
w
.
t
r
a
c
k
e
r
-
s
o
f
t
w
a
r
e
.
c
o
m
Click to BUY NOW!
P
D
F
-
X
C
h
a
n
g
e
E
d
i
t
o
r
w
w
w
.
t
r
a
c
k
e
r
-
s
o
f
t
w
a
r
e
.
c
o
m
Click to BUY NOW!
P
D
F
-
X
C
h
a
n
g
e
E
d
i
t
o
r
w
w
w
.
t
r
a
c
k
e
r
-
s
o
f
t
w
a
r
e
.
c
o
m
1 Rated Voltage Ni-Cd 14.4V or Ni-MH 14.4V(Europe only)
2 Battery Rechargeable battery (the charge time is
3 Working Hours About60(1500mA) / 90minutes(2200mA)
4 Rated Power <24W
5 Operating Temperature Range
6 Operating Humidity Range ≤85RH
7 AC/DC adaptor AC 100/240V – 50/60Hz DC 24v 1.0A
8 Wireless Remote ISM Frequency Band 2.4GHz
9 Specification 320×87mm (including the wheel height)
10 Weight 3.2kg
11 Battery Capacity
Technical Specifications of Remote Control:
Applicable Models XR210E
Rated Voltage
Battery 2 AAA batteries(not include)
Remote Mode ISM Frequency Band 2.4GHz
Receiving & Transmitting Distance ≥ 10M
Transmitting Power 0dB
Operating Temperature Range
Operating Humidity Range
Specification 100×25mm (thickness)
Weight 0.08kg
Technical Specifications of Docking Station
No. Models
1
2
3
4
5
Specification
Weight
Rated Voltage
Operating Temperature Range
Operating Humidity Range
about 5h)
-10℃~45℃
1500mAh /1700mAh
3V
-10℃~45℃
≤85RH
Parameters
L×W×H: 200×51×102mm
0.23kg
24V
-10℃~45℃
≤85RH
2200mAh
Remark
Technical Specifications of Space Isolator:
No. Models Parameters Remark
1
2
3
4
5
6
Specification
Weight
Rated Voltage
Battery
Operating Temperature Range
Operating Humidity Range
L×W×H: 102×71×106mm
0.14kg
3V
2 Batteries “D” 3V (not included)
-10℃~45℃
≤85RH
-22-
Page 24

“CE” marking states that the product is compliant to European Directives:
P
D
F
-
X
C
h
a
n
g
e
E
d
i
t
o
r
w
w
w
.
t
r
a
c
k
e
r
s
o
f
a
e
.
c
P
D
F
-
X
C
h
a
n
g
e
E
d
i
t
o
r
w
w
w
.
t
r
a
c
k
e
r
s
o
f
a
e
.
c
Click to BUY NOW!
P
D
F
-
X
C
h
a
n
g
e
E
d
i
t
o
r
w
w
w
.
t
r
a
c
k
e
r
-
s
o
f
t
w
a
r
e
.
c
o
m
Click to BUY NOW!
P
D
F
-
X
C
h
a
n
g
e
E
d
i
t
o
r
w
w
w
.
t
r
a
c
k
e
r
-
s
o
f
t
w
a
r
e
.
c
o
m
Click to BUY NOW!
P
D
F
-
X
C
h
a
n
g
e
E
d
i
t
o
r
w
w
w
.
t
r
a
c
k
e
r
-
s
o
f
t
w
a
r
e
.
c
o
m
Click to BUY NOW!
P
D
F
-
X
C
h
a
n
g
e
E
d
i
t
o
r
w
w
w
.
t
r
a
c
k
e
r
-
s
o
f
t
w
a
r
e
.
c
o
m
Click to BUY NOW!
P
D
F
-
X
C
h
a
n
g
e
E
d
i
t
o
r
w
w
w
.
t
r
a
c
k
e
r
-
s
o
f
t
w
a
r
e
.
c
o
m
Click to BUY NOW!
P
D
F
-
X
C
h
a
n
g
e
E
d
i
t
o
r
w
w
w
.
t
r
a
c
k
e
r
-
s
o
f
t
w
a
r
e
.
c
o
m
2006/95/EC Low Voltage Directive
2004/108/EC EMC Directive
It is possible to request a full copy of Declaration of compliance to the Distributor:
This product comply with the rules of RoHS Directive (2002/95/CE)
This product comply with the rules of Eup Directive (2009/125/CE)
 Loading...