

Page 1

User Manual
G960, Q1S & Q1M
Page 2

1
℃
℃
Page 3

2
I.Product Overview
Overview
II.
Driver Installation
Windows
Mac
III.
Driver Settings UI
Windows
Mac
V.
Driver Uninstall
Windows
Mac
Contents
VI.
FAQ
Page 4

3
Thank you for purchasing the XP-Pen tablet. Our product user manual currently supports English,
Russian, Japanese, German, Korean, Chinese, Italian, Spanish, and French. We apologize if your
preferred language is not supported
{ I. Product Overview}
Overview
(1). Status indicator light
a. Blinking: Tablet connects to computer; indicator light will blink about every 3 seconds.
b. Solid: Stylus is in range.
c. No light: Stylus is out of detection range.
(2). Express keys
(3). USB cable
(4). Active work area
(5). Battery free stylus
Image 1-1: Overview
Page 5
4
{ II. Driver Installation }
Supported operating systems:
Windows 10, 8 or 7
Mac OS X 10.10 or above
NOTES:
(1). Uninstall any existing tablet software before attempting to install the G960, Q1S & Q1M’s driver. Other
tablet drivers may conflict with the G960, Q1S & Q1M’s driver or prevent installation entirely.
(2). You can download the latest driver version from the XP-Pen website (www.xp-pen.com) and be sure to
extract the “.zip” file contents before running “.exe” or “.pkg.”
Windows
(1).Connect the G960, Q1S & Q1M USB cable into your computers USB port.
(2).Please download the G960, Q1S & Q1M latest driver from the support section of our website, (www.xp-
pen.com)
(3).Extract the “.zip” file contents before running the “.exe” file.
(4).After a successful installation, the driver’s icon ( ) will appear in your system tray and on your desktop.
If the icon is not present, uninstall the driver, reboot, and repeat step 2.
Mac
(1).Connect the G960, Q1S & Q1M USB cable into your computers USB port.
(2).Please download the G960, Q1S & Q1M latest driver from the support section of our website, (www.xp-
pen.com)
(3).Extract the “.zip” file contents before running “.pkg”.
Image 2-1: Mac driver
Page 6
5
{ III. Driver Settings UI }
Windows
The G960, Q1S & Q1M’s driver settings can be opened in two ways:
Double-click the driver’s icon ( ) in system tray or your desktop.
Driver UI
Image 3-1: UI
1.1. Pen Function Settings
You may customize the functions of your tablet pen’s barrel button here. Use the “Function Key” option
to program custom keystrokes.
Image 3-2: Pen Functions Setting
Note:
Only the top side of the Q1S & Q1M stylus can support eraser function.
Page 7

6
1.2. Click Sensitivity & Current Pen Pressure
You can adjust the “Output” of the pen pressure to “Press” “Soft” or “Hard” in this section.
Current Pen Pressure shows the current pressure level being exerted on your tablet and can be used to
test pen pressure.
Image 3-3: Click Sensitivity & Current Pen Pressure
1.3. Mouse Mode
Absolute (Pen) Mode: Standard tablet mode; Each point of the tablet’s work area corresponds to an
absolute point on your computer display.
Relative (Mouse) Mode: Mouse mode; The tablet’s work area does not correspond to absolute points
on your computer display and your pen works as a standard mouse.
Note:
Only when you are in Relative Mode can you adjust the cursor’s speed.
Image 3-4: Mouse Mode
Page 8

7
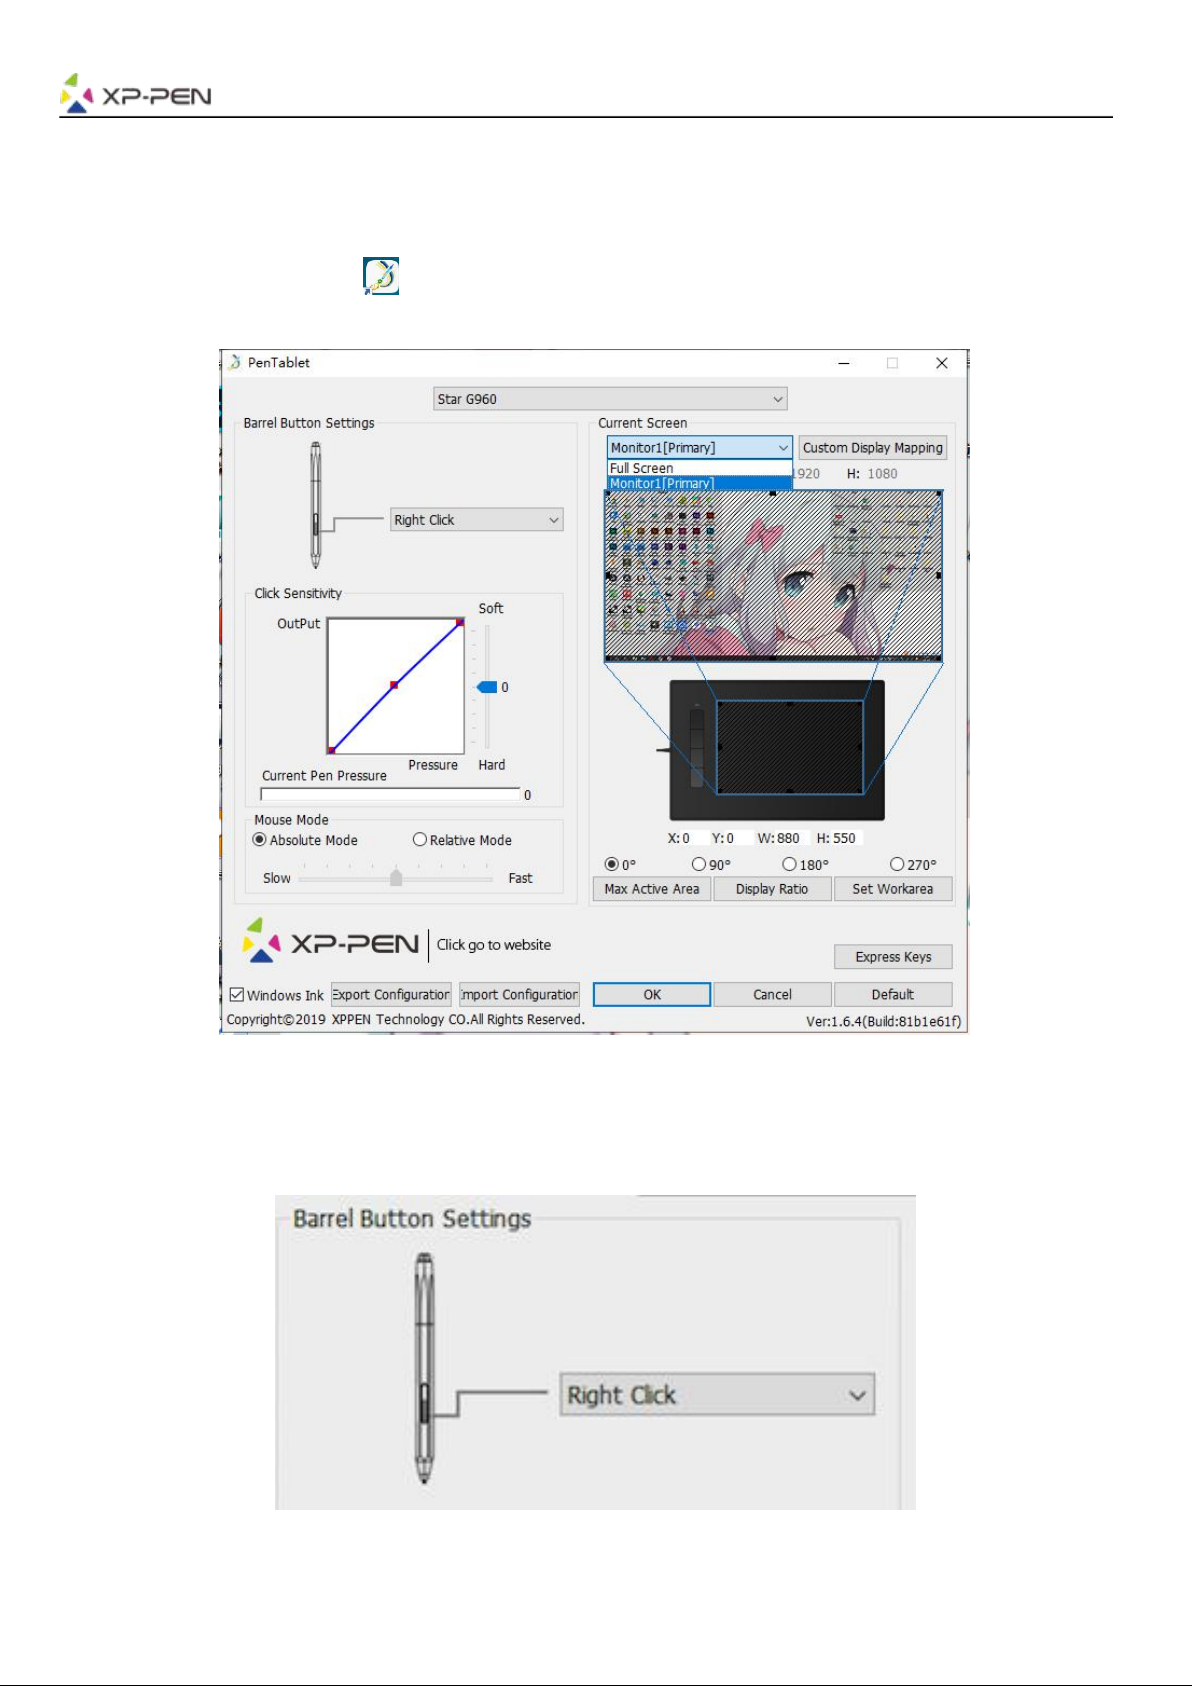
1.4. Current Screen
The G960, Q1S & Q1M may be configured for use with single or dual monitors.
If only one monitor is selected, your tablet input will be limited to that particular monitor.
Custom Display Mapping:
The dimensions of your tablet’s on-screen work area can be changed here. Please click the top-left and
bottom-right to customize.
0、90、180 & 270 angles:
The G960, Q1S & Q1M are set up for 0, 90, 180 and 270 angles and when you set it, you must also rotate
your G960, Q1S & Q1M.
Left hand is 180 angles.
You may adjust your tablet’s on-screen working area in this tab.
Set Work area:
When you click the “Set Work area” button, you can use the stylus pen to customize the G960, Q1S &
Q1M work area. Please click the top-left and bottom-right to customize.
Display Ratio:
You can set your G960, Q1S & Q1M work area adjusts the tablet’s on-screen working area to match
your monitor’s resolution.
Max Active Area:
You can set your G960, Q1S & Q1M work area to the max.
Image 3-5: Current Screen
Page 9

8
1.5. Import & Export Profiles
You can use the Import & Export Profile function to save/load your barrel buttons and shortcut key
settings.
Note:
When you finish setting up your barrel buttons and shortcut keys, click the OK button to save and exit the
tablet settings menu.
Image 3-6: Export Profile
Image 3-7: Import Profile
Page 10

9
1.6. Windows Ink
This capability can be toggled on and off here. Enabling this will allow support for Windows Ink and
applications that run using Windows Ink.
Image 3-8: Windows Ink
1.7. Express Keys Setting
Notes:
(a). The G960, Q1S & Q1M’s shortcut keys are designed to work with US English keyboards. Keys may not
function correctly with the other keyboard languages.
(b). By default, the G960, Q1S & Q1M express keys are mapped to standard Photoshop keyboard shortcuts.
Keys can be customized to function efficiently in other software.
Image 3-9. Keyboard
Disable express keys: When you enable it, all of the express keys function will be disabled.
Hide hints: When you enable it and press any express key, the message will not popup on the bottom of
your screen.
Image 3-10: Keys
Page 11

10
In this tab, you may edit the functions of the G960, Q1S & Q1M’s shortcut keys. Use the “Definition” option
to program custom keystrokes.
Image 3-11: Function Key
Note:
You can set each shortcut key for different software.
a. Click the “+” button to go to Select Program tab.
Image 3-12: Select Program
Page 12

11
b. You can choose Default or use Browse to select your choice of software.
Image 3-13: Select Program
c. Return to the shortcut key settings tab, click the tablet icon, and then customize the shortcut keys. When
you are finished, click “OK” and exit the tablet settings menu.
1.8. Default
You can click the Default button to restore default settings.
1.9. XP-PenLogo
Click our logo to visit our website.
Mac
To open the G960, Q1S & Q1M’s driver settings, open Finder > Applications > PenTabletSetting.
Driver UI
Image 3-14: Tablet Setting
Page 13

12
1. Pen
Image 3-15: Pen
1.1. In this tab, you may customize the functions of your stylus’s barrel buttons and click “Default
Button Setting” to revert to manufacturer settings.
Image 3-16: Pen
Note:
Only the top side of the Q1S & Q1M stylus can support eraser function.
Page 14

13
1.2. Configuration Setting:
Disable pen pressure: When the “Disable pen pressure” function is enabled, you can disable the pen
pressure function.
Disable Key Function: When you enable it, all of the express keys function will be disabled.
Disable Display Message: When you enable it and press any express key, the message will not popup
on the bottom of your screen.
Image 3-17: Configuration Setting
1.3. Work Area Orientation:
0, 90, 180 & 270:
The G960, Q1S & Q1M can also be configured for 0, 90, 180 & 270 angles.
Be sure to rotate the actual physical tablet as well.
Left hand is 180 angles.
Image 3-18: Work Area Orientation
1.4. Output:
You can adjust pen pressure to “Output” 、 “Press” or “Soft” 、 “Hard” sensitivity on here.
It shows the current pressure level being exerted on your tablet and can be used to test pen pressure.
Image 3-19: Output
Page 15

14
1.5. Coordinate Mode:
Absolute (Pen) Mode: Standard tablet mode; Each point of the tablet’s work area corresponds to an
absolute point on your computer display.
Relative (Mouse) Mode: Mouse mode; The tablet’s work area does not correspond to absolute points
on your computer display and works as a standard mouse.
Note:
Only when in Relative Mode can you adjust the cursor’s speed.
Image 3-20: Coordinate Mode
1.6. Import & Export Profiles
You can use the Import & Export Profile function to save/load your barrel buttons and shortcut keys
setting.
Image 3-21: Export configuration file
Page 16

15
Image 3-22: Import configuration file
1.7. Mojave Setup Navigation
If your system Mojave, please click this button to setup your tablet and reboot.
Image 3-23: Mojave Setup Navigation
2. Monitor
The “Monitor” tab allows you to configure G960, Q1S & Q1M for use with single or dual monitors. The
tablet can also be configured to use only a portion of your display.
Image 3-24: Monitor
Page 17

16
3. Tablet Area
You may adjust your tablet’s on-screen working area in this tab.
3.1. Full Area automatically selects the largest possible working area.
3.2. Screen Ratio adjusts the tablet’s on-screen working area to match your monitor’s resolution.
Image 3-25: Full Area
4. Express Keys
Notes:
(a). The G960, Q1S & Q1M’s shortcut keys are designed to work with US English keyboards. Keys may not
function correctly with the other keyboard languages.
(b). By default, the G960, Q1S & Q1M’s express keys are mapped to standard Photoshop keyboard shortcuts.
Keys can be customized to function efficiently in other software.
4.1. In the Express Keys tab, each express key has default.
Page 18

17
Image 3-26: Express keys
You may choose your preferred functions for the G960, Q1S & Q1M’s shortcut keys. Use the “Reset Customer
Defined” option to program custom keystrokes.
Image 3-27: Action Setting
Page 19

18
You can set each shortcut key for different software.
a. Click the “+” button to go to Select Program tab.
b. Your choice of software.
Image 3-28: Select Program
Page 20

19
Image 3-29: Select Program
c. Return to the shortcut key settings tab, click the tablet icon then customize the shortcut keys. When you
are finished, click the OK button and exit the tablet settings menu.
Image 3-30: Hot Key
Page 21

20
Image 3-31: Action Setting
5. About
This tab displays the current version of your driver software.
Image 3-32: About
Page 22

21
{IV. Driver Uninstall}
Windows
In the Start menu, open [Settings] → [Apps & features]. Find “Pentablet” and click “Uninstall.” Follow the onscreen instructions.
Mac
Open [Finder]→ [Application]→ [Pen Tablet], then click “Uninstall Pen Tablet” and follow the on-screen
instructions.
Image 4-1: Mac uninstall
NOTE:
When attempting to reinstall the G960, Q1S & Q1M driver, be sure to reboot your computer after the
uninstall is complete.
Page 23

22
{ VI. FAQ}
1. I can’t use the stylus to control the cursor.
Uninstall the G960, Q1S & Q1M driver. If its uninstaller will not run, run the driver’s installer again, then
allow it to uninstall the driver. Reboot, then connect the tablet to your computer and test your stylus.
If the cursor responds to your pen input, the tablet’s hardware is functional. Reinstall the G960, Q1S &
Q1M’s driver according to these steps (Windows):
Download the tablet’s latest driver from www.xp-pen.com, then extract the “.zip” contents onto the
desktop and installation.
2. How do I know that the G960, Q1S & Q1M’s driver installed successfully?
After installing the driver, the G960, Q1S & Q1M’s driver icon should be visible in your system tray on
the bottom-right of your screen (Windows OS). Pen input will control the cursor and pressure sensitivity
will be functional in the driver UI’s “Pressure Test” tab.
3. How do I determine if a Problem is software or hardware related?
Connect and install the G960, Q1S & Q1M on a different computer. If the tablet functions properly on the
new computer, you are experiencing a software issue—confirm that ALL tablet drivers (including the
G960, Q1S & Q1M) are uninstalled and removed from your computer, then reinstall the G960, Q1S & Q1M.
If you have any questions, please contact us at:
Web: www.xp-pen.com
Email: service@xp-pen.com
 Loading...