


1
Contents pages
Introduction ....................................................... 2
Description ......................................................... 5
Assembly ............................................................ 6
Alkaline or Rechargeable Batteries,
Battery Life, Battery Low Alert ......................... 8
Controls ............................................................ 10
Start I/0, Sensitivity ..................................................... 10
Iron Threshold ............................................................. 11
Ground ..................................................................... 12
Silencer ..................................................................... 13
FREQ. SHIFT. ............................................................... 14
Iron Volume. ............................................................... 15
Multi Tones Information .................................. 16
Detecting Techniques .................................... 18
Care Instructions ............................................. 19
Trouble Shooting Problems ............................. 21
Advice to Detectorists .................................... 22
Specifications .................................................. 23
XP Accessories ................................................ 24
Warranty conditions ....................................... 26

2
I N T R O D U C T I O N
CONGRATULATIONS ON PURCHASING AN XP METAL DETECTOR
AND WELCOME TO THE WORLD OF RESEARCH AND
EXPLORATION!
You have invested in a high tech detector with extreme performance, designed and
developed in France. Therefore, you are taking part in the development of the
research in the field of metal detecting undertaken by our company, we thank you
for that.
Goldmaxx Power is an exceptional detector to find small targets in
difficult type of soil (mineralized*).
Its frequency (18 kHz), makes it a very sensitive to targets that are
usually very difficult to detect, like hammered coins, gold nuggets,
minims and all other small objects.
The development of the Goldmaxx, Goldmaxx Power has led to the
inclusion of a new circuit board with specially optimised specifications.
This new powerful circuit board combining performance and choice –
two aspects which are usually very difficult to bring together.
✓ Faster target detection through the use of new, more
discriminating analogue filters. It will therefore be easier for
you to locate targets in iron infested areas.
✓ The transmitter of XP wireless headphones is integrated on
your detector's circuit board. You can therefore use your
optional XP wireless headphones.
✓ The IRON THRESHOLD potentiometer enables you to adjust the
iron level setting threshold to a low tone.
✓ The new FREQ. SHIFT switch gives you the option of choosing
between two working channels for XP wireless headphones –
channel 1 or channel 2 – and between two detection frequencies
– Freq 1 or Freq 2 – for your detector. You can then search for
targets in the same area as another XP detector without any
interference issues.
With the Goldmaxx Power you will find more than gold !
1
3
I N T R O D U C T I O N
You will find it much easier to adjust the controls to optimise your search
technique to the type of area you are searching in, thanks to the MultiTone mode with setting of the low tone (IRON LEVEL) and the rocker
threshold.
We chose instantaneous sound signalling, rather than an LCD display
because of the extraordinary ability of the human ear to analyse
compared to an LCD display.
LCD displays cannot respond in real time and do not capture weak signals
that are too brief or too close to other signals
Goldmaxx Power sound signalling provides real-time output of
the most imperceptible signal.
Goldmaxx Power is fitted with a DD 9” (22.5cm) carbon fibre search
head with a more robust coil cover.
Our high sensibility "double D" search coils, provide very good ground
penetration.
The optional elliptical 5” x 10” search coil will improve the selectivity on
iron infested areas, this is the best complementary coil for the Goldmaxx
Power.
The Goldmaxx Power search heads are not compatible
with those of other XP detectors
due to their specific frequency (18kHz).
1

4
I N T R O D U C T I O N
You will appreciate the sturdiness and manufacturing quality of our
equipment. Because a metal detector is generally used in extreme
conditions, we have given full attention to the most sensitive parts.
Goldmaxx Power has been developed and manufactured with quality
components and material, thus ensuring your XP detector a maximum
useful life.
• Connector XP : designed to resist movement failures,
moulded, completely waterproof, gold contacts (30 µ gold
plated)
• New Cable, double electromagnetic shield, very resistant,
designed to resist movement failures.
• Robust, waterproof and lightened search coil,
• Very tough polypropylene armrest,
• Telescopic stem, stored away instantly and easier handled
• Fibreglass impregnated lower stem.
• Provided with Hipmount bag/control box cover, backphone
and coil cover.
GOLDMAXX Power
Is a high performance detector specially designed
to give you greater ease of use.
Before using your detector for the first time, we
recommend that you read this instruction manual
carefully in order to make full use of its abilities.
* We use the term “mineralized” soil to refer to soil that is naturally iron infested or has
become infested due to intense human occupancy (ferrous debris or pottery). The term
does not include seawater (salt water) , which is not magnetic but is conductive.
1
5
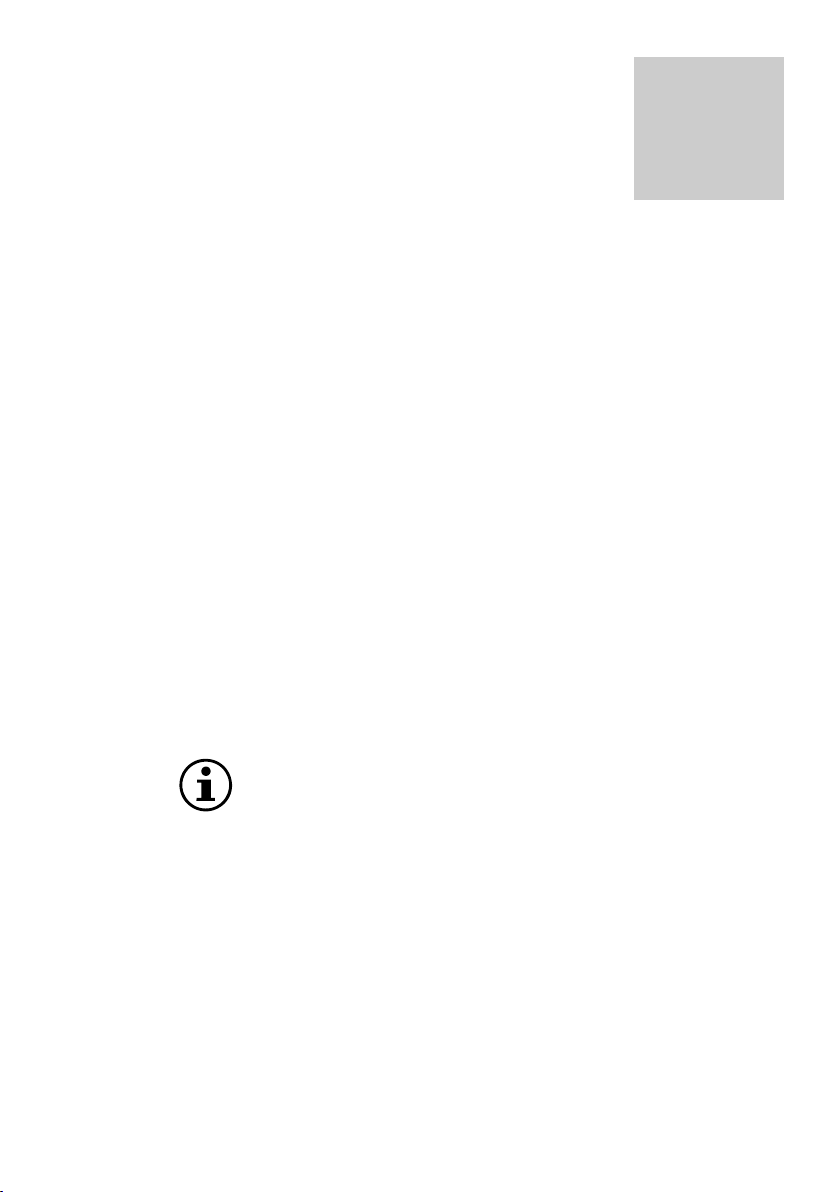
D E S C R I P T I O N
1 – Full telescopic stem, includes a fibreglass impregnated lower
stem.
2 – Robust, waterproof search coil. Diam.9” (22.5 cm), provided
with coil cover.
3 - ABS electronics box
4 – Specific XP connector, Waterproof.
5 – Protection bag
6 – Coil fixing system
7 - Headphones FX-02
2

6
A S S E M B L Y
O F D E T E C T O R
The assembly of your detector will only take
you a few seconds.
Put the shaft together as shown on the diagram.
• Put the rubber washers on the side of the
fibreglass tube (1).
• Insert the fibreglass tube on the search head (2).
• Insert the new coil fixing parts as shown on the
diagram and screw (3).
The electronic box of your detector can be positioned in 2 different ways:
Option 1 : Under the armrest
To fix it, insert the 2 wings of the armrest in the slides of the electronic control
unit, as indicated on the diagram.
Once the control
box in place
under the armrest, wind the cable
around the telescopic shaft as
indicated on the photo.
Use the 2 pieces of Velcro® (A and
B) to keep the cable in a spiral
position.
Insert now the
connector (female)
in its panel
connector (male),
screw it, the
connector is now
watertight.
3
7
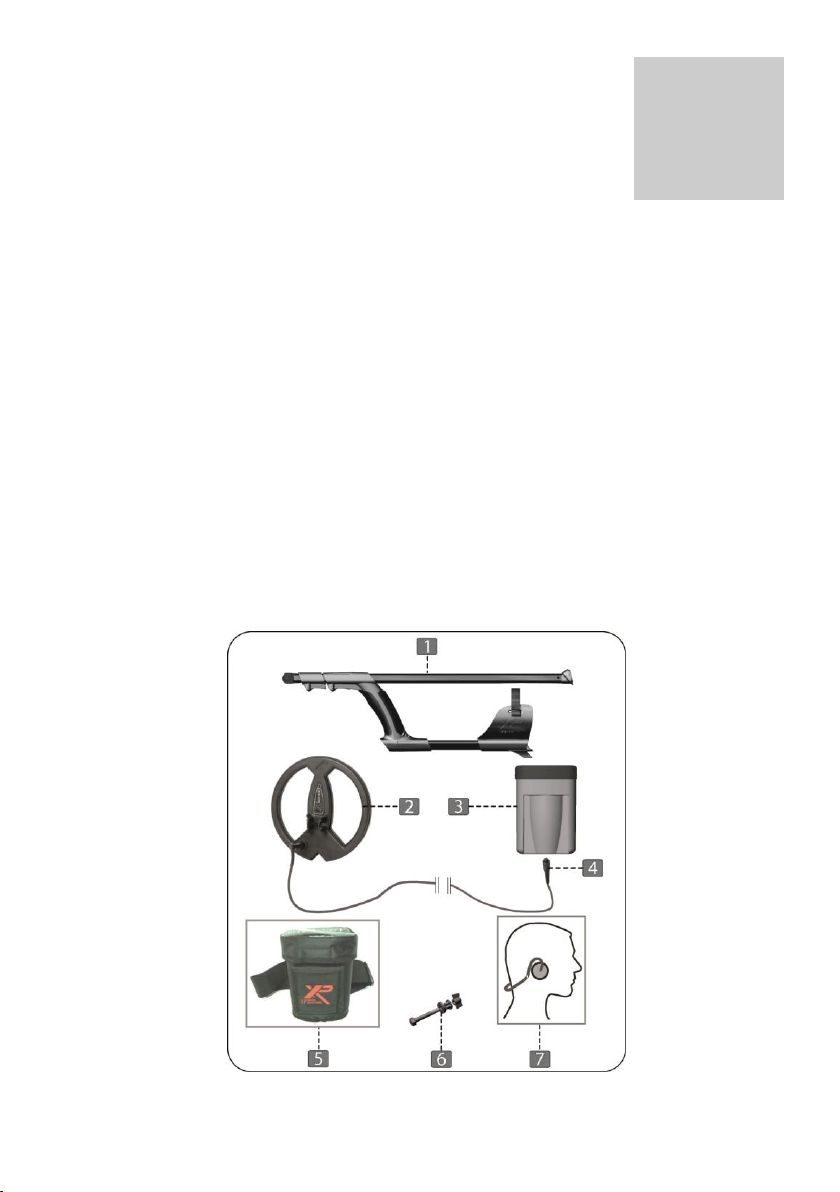
A S S E M B L Y
O F D E T E C T O R
To hold the cable along the telescopic stem you can use Velcro® strip as
shown on the photo below(C & D).
Option 2 : Electronic box hipmounted
Insert the control box into the hipmount bag.
Then insert the connector (female) in its panel
connector (male) and screw it.
Removal of control box
To remove the control box from the armrest, proceed
as indicated below.
Put your hands around the control box and press slightly
with your thumbs on the side of the armrest (1).
Whilst you keep the pressure on, slip the armrest off,
and remove completely the control box from the
armrest (2).
The hipmount bag provided with your detector can allow you to
protect your detector from rain when the electronic box is fixed on
the armrest.
3
8
A L K A L I N E O R
R E C H A R G E A B L E
B A T T E R Y , B A T T E R Y
L I F E , B A T T E R Y L O W
A L E R T
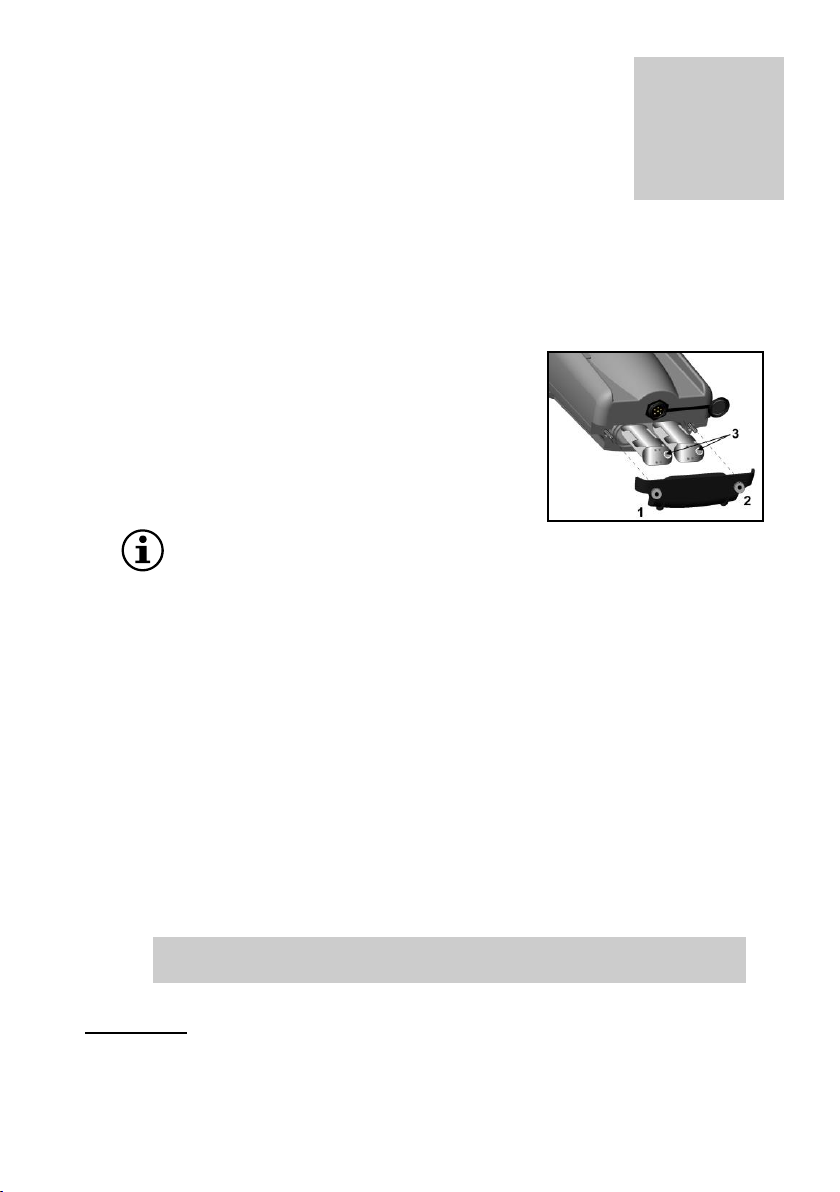
ALKALINE BATTERIES____________________________
GOLDMAXX Power powered with 12 volts from 8 AA Alkaline battery using
2 battery holders, 4 batteries in each.
Pay close attention to the battery ± polarity
before inserting the batteries holders in the
electronic box.
The metal rivets (3) of the batteries holder must
be on the right (-). Screw the nuts 1 and 2 to
close the batteries lid, not toot tight.
If you are not using the detector for more than a month,
remove the alkaline batteries from the detector.
BATTERIES
NIMH__________________________________
To power your detector you can use rechargeable battery.
The insertion of the rechargeable battery is similar to the Alkaline
batteries.
Recharging the batteries can be done in a very simple way:
Always turn off the detector before recharging batteries. Remove
the search coil connector from the control box and insert the
charger instead. 12 to 18 hours are necessary to have a full
recharge.
Avoid leaving the batteries recharging for more than 20
hours.
WARNING! Before inserting your charger, check that you are not
recharging alkaline batteries.
4

9
A L K A L I N E O R
R E C H A R G E A B L E
B A T T E R Y , B A T T E R Y
L I F E , B A T T E R Y L O W
A L E R T
BATTERY LIFE ____________________________________
Alkaline batteries about 50 hours with headphones.
Rechargeable Batteries NiMh about 40 hours with headphones.
BATTERY LOW ALERT __________________________
When the battery voltage is too low to power the detector, you will hear
a series of beeps like an alarm.
You must change the batteries soon.
4

10
C O N T R O L S
ON I/O, SENSITIVITY
_______________________________
Turn the machine on with the SENSITIVITY I/O control.
You will hear some quick "beeps" which will tell you
that the detector is correctly operating, wait for the
extra 2 beeps after 5-10 seconds.
Then you can detect.
Avoid testing your detector inside your house or in shops
because you can encounter a lot of metallic and electromagnetic
interference (reinforced concrete, pipes, cables and fluorescent
lights).
The control also enables you to adjust the sensitivity of your detector.
The sensitivity level determines the depth of detection and the stability
of your machine. It can be adjusted to suit the environment so as not to
be plagued with false signals.
Please note that this new detector has a more advanced
SENSITIVITY setting compared to previous GOLDMAXX model,
enabling you to make gradual adjustments to help alleviate false
signals.
The range of adjustments has been widened to offer more
sensitive adjustments at the top end of the range.
You should therefore not be surprised if you have to lower the
potentiometer settings on bad ground. The performance of the
machine will not diminish.
5

11
C O N T R O L S
IRON
THRESHOLD_________________________________
The Goldmaxx Power is a "multi-tone" detectors, but
users can now adjust the iron level setting by using the
IRON THRESHOLD potentiometer.
This potentiometer can be seen as a discrimination
setting with a range only covering iron. It has fine-
tuning settings ranging from 0 to 20.
At 0, all iron sounds at medium pitch. The higher the
setting, the lower the pitch for iron targets.
This, for example, enables small nails just to be picked up at a low
tone, whereas larger ones will be detected at medium tone.
As you will doubtless already know, too high a level of discrimination can
hinder the performance of a detector.
This setting was previously preset to be suited to the majority of users.
But most of the time, beginners do not want iron to register on their
machines, whereas more advanced users prefer to have this detection
option to make it easier to pinpoint coins on difficult terrain.
Use the Auto mode if you do not wish to worry you about
the setting of this potentiometer, it will allow you to have
a good rejection of ferrous targets & at the same time
coke.
By default, the Goldmaxx Power is a triple-tone
detector, but users can set it to double tone mode using
the SILENCER switch:
Switch the SILENCER from position I to position II twice within
the space of two seconds. Your machine will then be in
Double-Tone LOW / MEDIUM mode, or in MEDIUM Mono-Tone
mode if the IRON THRESHOLD potentiometer is set at
minimum, to go back to triple tone you will need to turn off
the detector & start again.
5
12
C O N T R O L S
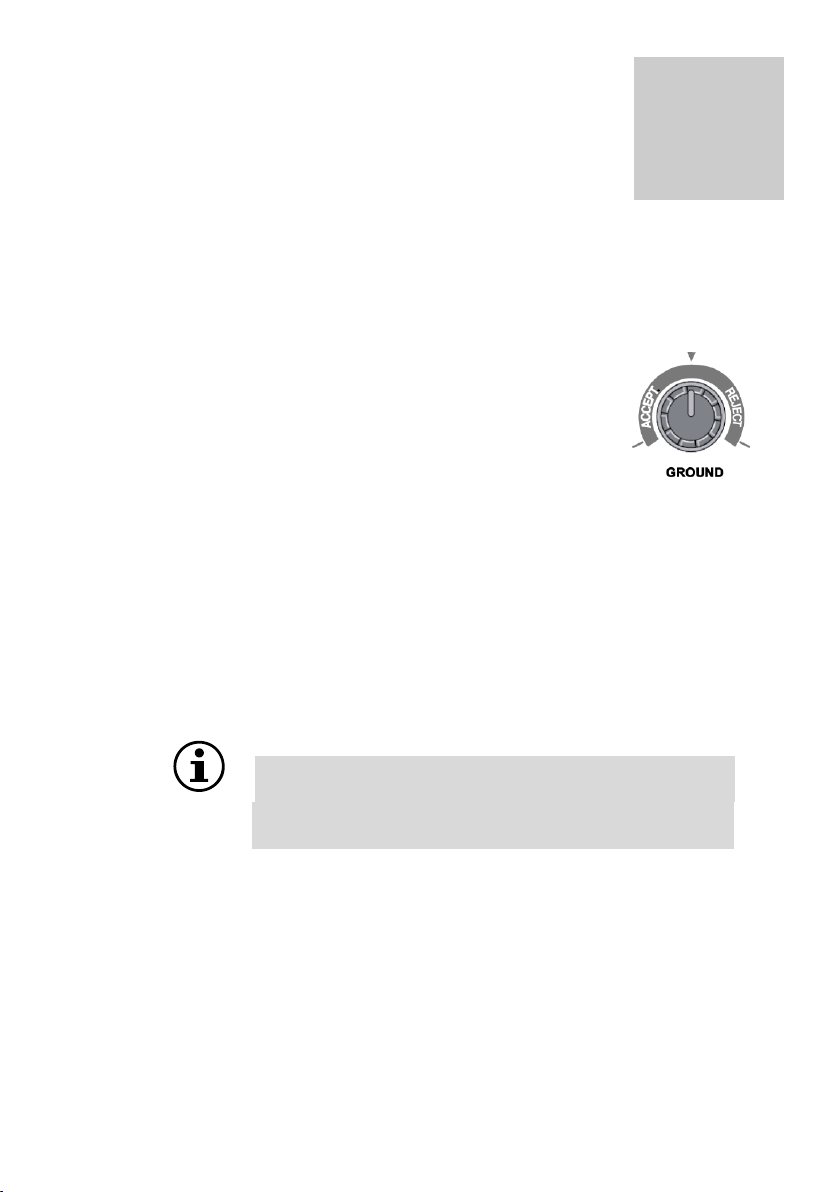
GROUND______________________________
______
With this control you can correct ground effects and
more accurately reject ferrous minerals or any pottery
containing iron oxides.
If you are detecting on grounds loaded with magnetic
stones (hot rocks), it might be a good idea to keep a
sample of these rocks on you to adjust your detector before detecting
this type of ground. You only need to move a hot rock in front of the
search coil turning slowly the GROUND control from left to right so as
to obtain a total rejection of the stone.
If the mineralization is too scattered, sweep the head on the ground
and turn the control progressively from left to right in order to get
good stable detector. On mineralised ground, these procedures will
optimise your detecting.
For maximum depth penetration, do not turn this
setting towards the right more than necessary.
The red arrow indicates a basic position suitable
for most ground.
5

13
C O N T R O L S
SILENCER________________________________
____
The silencer can limit false signals caused by iron. Use
position I or II if you desire a quieter search. Silencer in
position II will allow to get used to Goldmaxx Power faster
and will improve iron rejection.
0 : Silencer OFF
I : Silencer (advised position)
II : Silencer X 2
Silencer in position O or I will enable you to find the decent targets which
are close to ferrous targets.
Position I or II is also a very useful setting in the Multi-Tone mode, since it
increases the detector's ability in the detection of ferrous objects and
reduces its differences between low and medium pitches.
By default, the Goldmaxx Power is a triple-tone detector, but
users can set it to double tone mode using a SILENCER switch:
Switch the SILENCER from position I to position II twice within
the space of two seconds. Your machine will then be in
Double-Tone LOW / MEDIUM mode, or in MEDIUM Mono-Tone
mode if the IRON THRESHOLD potentiometer is set at
minimum, to go back to triple tone you will need to turn off
the detector & start again.
5

14
C O N T R O L S
FREQ.
SHIFT.______________________________
The FREQ. SHIFT switch eliminates interference
which would otherwise be caused between two XP
detectors used within close proximity of each
other.
It can act on two settings simultaneously:
the working frequency of your detector:
✓ Freq1 or Freq 2
the wireless headphone output channel:
✓ CH1 or CH2
How to use the FREQ. SHIFT. switch.
If you are working ALONE without your XP wireless headphones:
it is better to use FREQ. SHIFT.
✓ on the middle setting: DETECT Freq1 / WS1 OFF position
The XP wireless headphone output will be switched off and therefore not
use up power. The detector will be set on frequency 1.
If you are working ALONE with an XP wireless headphones:
you can use FREQ. SHIFT.
✓ on a low setting: DETECT Freq 1 / WS1 CH2 position
✓ on a high setting: DETECT Freq 2 / WS1 CH1 position
You should also consider adjusting the input channel of the XP wireless
headphones on the earpiece. Simultaneously hold down the ± buttons for
five seconds. See the XP wireless headphones user manual for more
information.
5

15
C O N T R O L S
If you are working WITH A PARTNER without an XP wireless headphones:
you can use FREQ. SHIFT.
✓ on the middle setting: DETECT Freq1 / WS1 OFF position on
YOUR device.
✓ on a high setting: DETECT Freq 2 / WS1 CH1 position on your
partner's device, even if they are not using an XP wireless
headset.
If you are working WITH A PARTNER, with an XP wireless headphones:
you can use FREQ. SHIFT
✓ on a low setting: DETECT Freq 1 / WS1 CH2 position for YOUR
device
✓ on a high setting: DETECT Freq 2 / WS1 CH1 position for your
partner's device.
In any event, please refer to the XP wireless headphones user
manual before use.
IRONLEVEL______________________________
____
This control allows you to adjust the audio level
of the low tone (iron signals, also coke).
• Min. = iron (low) tone is off
• Max. = you will now hear all low tones
• Intermediate levels will allow you
adjust to whatever level you prefer.
5

16
M U L T I - T O N E
I N F O R M A T I O N
In Multi-Tone mode the signal tones vary depending upon the object
found. The pitch of signal depends upon conductivity, the higher the
conductivity, the higher the pitch.
Iron has a very special signature that can be recognised easily. We have
assigned it a low-pitched sound together with a volume setting (IRON
LEVEL) so that you can make the low tone more or less conspicuous. (This
is assigned to iron and coke).
This operating mode allows for improved analysis and understanding of
the detected area, e.g. in order to find areas of former human
habitation. It also facilitates recognition of large ferrous objects (such as
old weapons). Everybody will find a use for it.
Certain types of moist ground with a low mineral content
may also trigger a low-pitched sound. The IRON LEVEL
setting may reduce or entirely eliminate that
phenomenon related to the 18 kHz detector frequency.
On certain types of ground, especially those contaminated by copper
shot gun cartridges or little pieces of aluminum foil, Goldmaxx Power
will can signal the presence of debris by means of a medium-pitched
tone, whereas as decent targets will trigger a high-pitched sound. It
is up to the user to decide whether or not to dig, depending on how
promising the area is, the type of target he or she is looking for and
the density of rubbish, since certain small "decent" targets, such as
very small coins, may also trigger a medium sound.
6

17
M U L T I - T O N E
I N F O R M A T I O N
In addition to these three basic tones, Goldmaxx Power has another
advantageous feature: it can produce several different tones
simultaneously for targets in intermediate categories. Your ear will
eventually grow accustomed to this abundance of sounds.
Certain medium-sized ferrous masses that are usually hard to identify
are signaled by a simultaneous low/medium/high pitch (except for
very large ferrous masses, of course, which generate a high pitch). It
takes a little bit of practice to accustom your ear to the various tones.
6

18
D E T E C T I N G
T E C H N I Q U E S
Goldmaxx Power is a motion detector, which means that target
detection can be carried out only when the search coil is moving.
When you detect an area, it is important to sweep with the head as
close as possible to the ground with wide movements, but not making
contact with the ground.
Keep the head parallel to the ground following the relief as much as
possible.
To pinpoint a target, use quick crossed sweeps,
with the coil over the target taking note of where the strongest audio
signal is received.
The exact location of the target is under the centre line of the search
coil from front to back and can then be determined by ‘x ing’.
7

19
C A R E
I N S T R U C T I O N S
Our detectors are designed to be as robust as possible, however, like
any electronic precision instrument, they require some care.
The XP search coil cable has been designed so as to resist long term
movement. However you should take some precautions and prolong the
life of your detector :
to remove the connector from the control box, it is important never to
pull on the cable only the connector.
It is important to leave enough slack at the bottom of the cable near
the coil to allow for adjusting the coil angle without placing strain on the
cable.
It is important not to replace the Velcro with tape as this will centre
the movement on one single part of the cable.
when the box is hipmounted, put it on your side or on your back in
order not to fold the cable of the connector when you lean forward.
(Diagram 1)
when the box is hipmounted, to prevent strain on cable and
connector, you should slide the cable through the hipmount bag belt strap.
Diagram 2
diagram 2
diagram 1
8

20
C A R E
I N S T R U C T I O N S
Not adhering to these precautions will lead to long term damage
of the cable and void the warranty due to user negligence.
If you are not using the detector for more than a
month, remove the alkaline batteries from the detector.
Do not expose your detector to high temperatures.
8

21
T R O U B L E S H O O T I N G
P R O B L E M S
PROBLEMES
CAUSES
SOLUTIONS
You hear a
series of beeps
with a regular
interval.
Low batteries.
Change the batteries .
Wrong polarity
Check if you have correctly inserted
the batteries in each pack. One
battery might be in the wrong way
around.
You can't
start your
detector.
Batteries are badly inserted or
upside down.
Check the way the batteries have
been inserted in the 2 battery
holders (refer to chapter 4)
A 6.35 plug is inserted in the
headphone plug.
Remove it.
The loudspeaker is defective.
Plug in headphones to check.
You notice
excessive
false signals
without
reasons
The sensitivity is too high.
Lower it.
The search coil connector is badly
fitted to the control box
Re fit it without forcing.
Your headphone cable is defective.
Change the headphones.
You are passing through an area
with a lot of interference (high
voltage cable, electric
transformer, electric fence).
Lower the sensitivity or get away
from this area.
You are close to other metal
detectors.
Change frequency using the FREQ.
SHIFT (refer to chap.5)
You notice
false signals
when the
search head
knocks the
ground.
GROUND control is too low.
Turn the GROUND control slightly to
the right until false signals stop.
The detector
beeps on
pottery & “hot
rocks” (not
coke)
GROUND control is too low.
Turn the GROUND control slightly to
the right until false signals stop.
If the problem persists, contact your retailer for advice.
9

22
A D V I C E T O
D E T E C T O R I S T S
Detecting is an activity, which like other leisure activities
requires some guiding principles. These few recommendations
will allow you to fully enjoy it while respecting laws,
environment and other people.
• Enquire about and abide by the laws in force of the country or
the state before searching. It is of your responsibility to know
them and to abide by them.
• Always ask the permission of the land owners where you want to
search.
• Have regard for the natural environment in which you are
searching.
• Don’t forget to backfill all holes you dig.
Avoid detecting in zones where battles took place
during the wars. Report any suspect object you might
discover to the authorities.
10

23
S P E C I F I C A T I O N S
BATTERIES
8 AA Alkaline batteries.
Rechargeable batteries NiMh 2300 mA can be used instead
of Alkaline batteries.
ELECTRONIC BOX
ABS electronic box with joint seal. It can be worn under the armrest,
or hip-mounted.
SEARCH COIL
Wide scan (Double D), Diameter: 9” (22.5 cm), provided with coil
cover. Cable length : 2.35 m
Goldmaxx Power search heads are not compatible with
those of other XP metal detectors because of their specific
frequency (18kHz).
WIRELESS TRANSMISSION
XP Wireless headphone transmitter CH1/CH2, includes.
SHAFT
Full telescopic stem, provided with fibreglass lower stem. This telescopic
stem can be stored away instantly and easier handled
LOUDSPEAKER
28 mm, 8 ohms, Weather resistant
HEADPHONES
Jack 6.35 stereo. Backphone with volume control.
FREQUENCIES
Freq 1 : 17560 HZ - Freq 2 : 17430 HZ
WEIGHT
Box ............................................................................ 340 gr
Head with cable ............................................................. 480 gr
Head + shaft + control box + hipmount bag ............................ 1550 gr
Full package ................................................................ 2400 gr
11

24
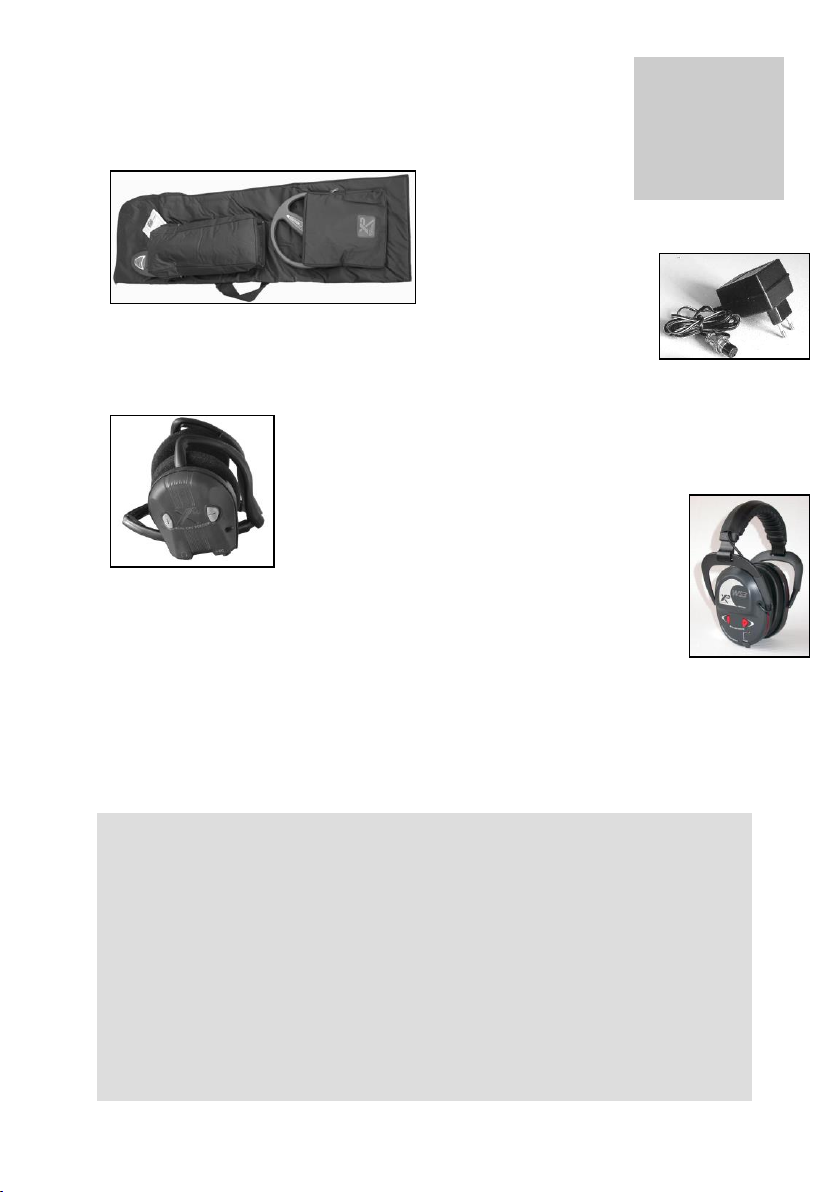
Hipmount bag. It can be used to protect
electronic box from rain.
X P A C C E S S O R I E S
Provided by all our distributors
FX-02 Headphones :
• Audio level adjust
• Impedance and sound adapted to our detectors
• 6.35 jack adaptator
• Foldable in 3 parts
• Optional protection box
12
Elliptical Search coil
5” x 10” (11/24cm)
provided with coil cover
Search coil DD High
Energy 11” (27 cm)
provided with coil cover
Standard Search coil DD 9”
(22.5 cm) provided with coil cover
Search coil DD 18”x15”-
45x38 cm
Concentric search coil 10”x8”
- 25*21 cm
provided with coil cover
Search coil DD 14”x11”-
30x36 cm
25
X P A C C E S S O R I E S
Provided by all our distributors
12
WS2 and WS3 specifications
✓ 2 selectable channels.
✓ Digital sound transmission by microprocessor
✓ The radio transmitter is directly integrated into all our detectors' circuit boards.
✓ Miniaturised electronics
✓ Headphone built in edge extra flat rechargeable Lithium battery (7g)
✓ battery life : 50 hours
✓ Fast Lithium charger: full charge in 2 hours.
✓ Charge monitoring system and full charge LED
✓ Adjustable/Memorizable volume
WS2 specifications only
✓ Removable earpiece
✓ Compact and lightweight, the headphone weighs less than 70g, battery included
Wireless Headphone WS2
2 Channels
Specially designed for XP Metal
Detectors.
Batteries charger
XP transport bag
Wireless Headphone WS3
Specially designed for XP Metal
Detectors.

26
W A R R A N T Y C O N D I T I O N S
GOLDMAXX POWER – 5 YEARS LIMITED WARRANTY
XPLORER ensures a contractual warranty from the date of purchase :
• 5 years on the electronic box, the search coil, detector shaft and its
components (armrest, twist lock…) and on the battery charger.
This warranty does not cover :
• Breakage caused by falls, impacts or accidental damage
• Damage caused by abnormal use or resulting from non-compliance
with the conditions of use stipulated in the device’s instructions
• Alteration of the electronic circuit by any unauthorized person.
• Using without coil cover, or using defective coil cover
• Corrosion of electronic circuits, due to water ingress
• Breakage of cables or wires
• The FX02 headphone
Spare parts are not cover by the 5 years warranty:
• Parts that are subject to normal wear and tear like: coil cover, coil
bolts & fittings, cases etc… (These parts must be replaced in case of
wear and tear, in such a way that no damage will be caused to the
device).
In the event of any fault or malfunction please contact your XP dealer for
advice, should any part require returning to them or the distributor it must
be accompanied by a note explaining the fault, carriage/shipping cost is the
customer’s responsibility. Proof of Purchase is required to make a claim
under this warranty. If a faulty device has been replaced by a new or
reconditioned one, the warranty will continue from the original purchase
date.
XPLORER reserves the right to change the design or specifications of
its detectors without notice.
12

27
Declaration of conformity for E.C
This declaration is made under the responsibility of the manufacturer:
XPLORER SARL - 8 rue du Développement – F-31320 CASTANET-TOLOSAN
We, XPLORER, hereby certify that this detector complies with the essential
requirements of European Directives RED 2014/53/EU which aims to harmonise
legislation in member states on the use of the radio spectrum, electromagnetic
compatibility and electrical safety.
Declaration date : 09.10.2018
Disposal of Waste Electrical and Electronic
Equipment in the European Union and Other
Countries/Regions with Separate Collection
Systems
This symbol on the product or its packaging means that this product must not be
disposed of with your household waste. Instead, it is your responsibility to hand
this over to an applicable collection point for the recycling of electrical and
electronic equipment. This separate collection and recycling will help to conserve
natural resources and prevent potential negative consequences for human health
and the environment, which inappropriate disposal could cause due to the
possible presence of hazardous substances in electrical and electronic equipment.
For more information about where to drop off your electrical and electronic
waste, please contact the shop where you purchased this product.

 Loading...