

X348NT
R
PWR
PWR
TOUCH SCREEN 1-DIN 7 TFT LCD DVD PLAYER
MADE IN CHINA

Contents
Warning and Precautions...........................................2
Electric Connection...................................................4
Receiption collection
Speaker collection
Installation................................................................5
Install the unit
Remove the unit
General Features.......................................................6
Remote Control.........................................................7
Loading and Replacing the battery
Basic operation
Play Operation...........................................................9
Open/Close
Source/Power
Mute
play/pause
Eject
RPT
TIT
TFT-LCD adjustment
Display position adjustment
Setup Operation.......................................................11
General operation
Video operation
Audio operation
Radio Operation................................................12
Band
Band tuner
AS/PS
Sound Operation...............................................14
SD/USB............................................................15
Bluetooth..........................................................16
TV .....................................................18Operation
Accessories......................................................19
AV input Operation............................................20
Troubleshooting................................................21
Familiar characters and their meanings
General problems
TFT Monitor
Radio Tuner
Mp3 playback
DVD player
Specifications...................................................26
1
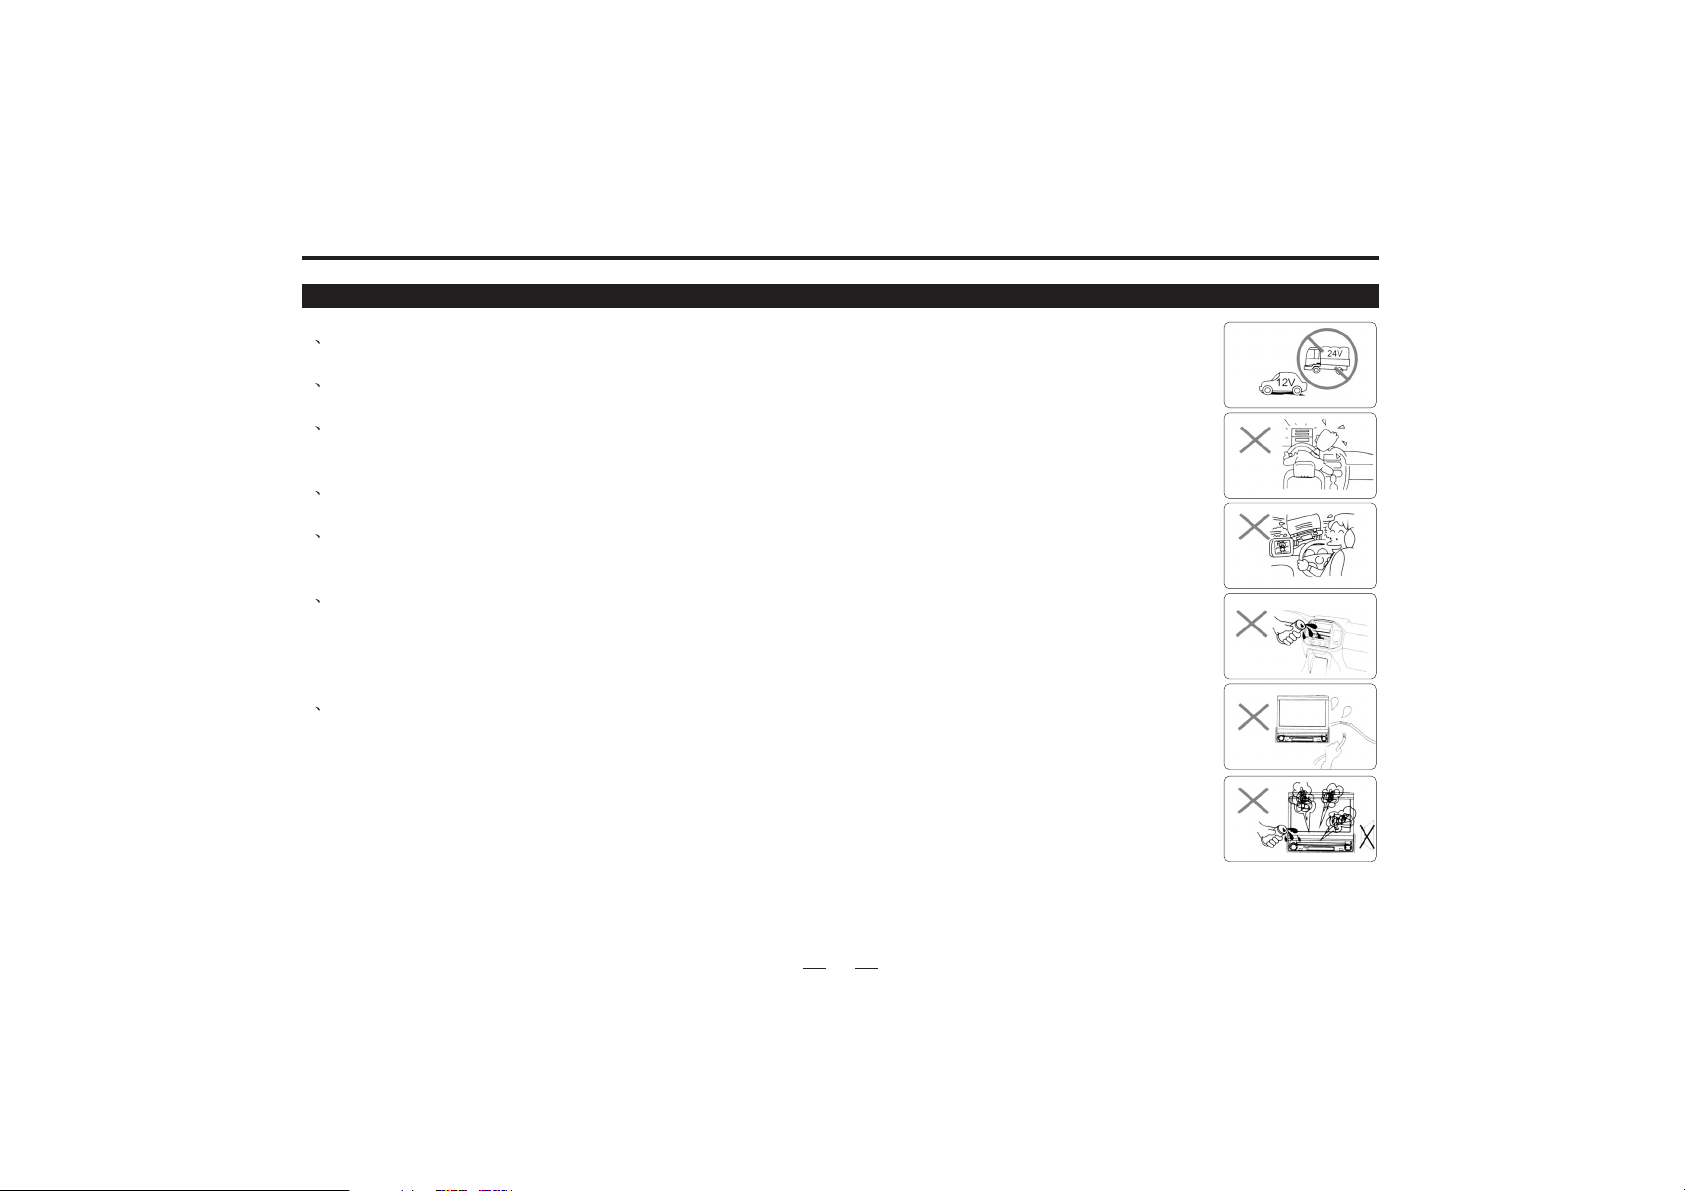
Warnings and Precautions
Warnings
1 Only connect the unit to a 12V power supply with negative grounding.
Never install the unit where the operation for safety driving is restrained.
2
Never use the video display function in the front when driving to prevent the violation of laws
3
regulations and also to reduce the risk of traffic accident except using for rear view video camera.
Never expose the unit, amplifier, speakers to moisture or water to prevent electronic sparks or fires.
4
Please don't change the fuse in the power cord without professional guidance, improper fuse may
5
cause damage to this using unit or even cause fire.
Please power off the unit at once and send it back to the after-sales service center or the dealer/
6
distributor yo purchased from if one of the following symptoms is found:
(a)NO audio output; (b)NO image output;(c)Water or other obstacle enters the unit; (d)Smoking;
(e)Peculiar smell.
To ensure safe driving, please adjust the volume to a safe and comfort level in case of emergency
7
situations.
2

Warnings and Precautions
Precautions
1
Never disassemble or adjust the unit without any professional guide. For details, please consult any professional car shop/
dealer for inquiry.
2
If the front panel or the TFT monitor is squalid, please use a clean silicone cloth and neutral detergent to wipe off the spot.
Using a rough cloth and non-neutral detergent such as alcohol for cleaning may result in scratching or decoloration to the
applicant.
3
If any abnormal behavior of the unit is found, please refer to trouble shooting guide of this manual. If no relevant information is
found , please press the [RESET] key on the front panel to resume factory default.
4
If you have parked the car in hot or cold weather for a long time, please wait until the temperature in the car becomes normal
before operating the unit.
5
Using in-car heater in low temperature environment may result in beads coagulate inside the unit, DO NOT use the unit in this
situation, eject the disc and wipe off the bead on the disc. If the unit still doesn
after-sales service center.
6
No fierce impact to the LCD monitor when it is in open position for preventing the damage to any mechanisms inside.
7
To prevent the damage to the screen, avoid touching it with sharp objects.
't work after a few hours, please contact with
8
The monitor employs auto motorizing mechanism, please do
to any mechanisms inside.
9
To provide a clear demonstration and an alternative for easy understanding to the operation of this unit, graphic illustrations
are used. However, these illustrations are some different from the actual images displayed in the unit.
10
During operation the unit," "is displayed if the particular operation is not available or illegal.
11
Operate the unit correctly according to this manual to prevent. Unnecessary problem. The guarantee won
problem is caused by inappropriate operation.
n't push, pull, or swivel the monitor manually to prevent damage
't be valid if the
3
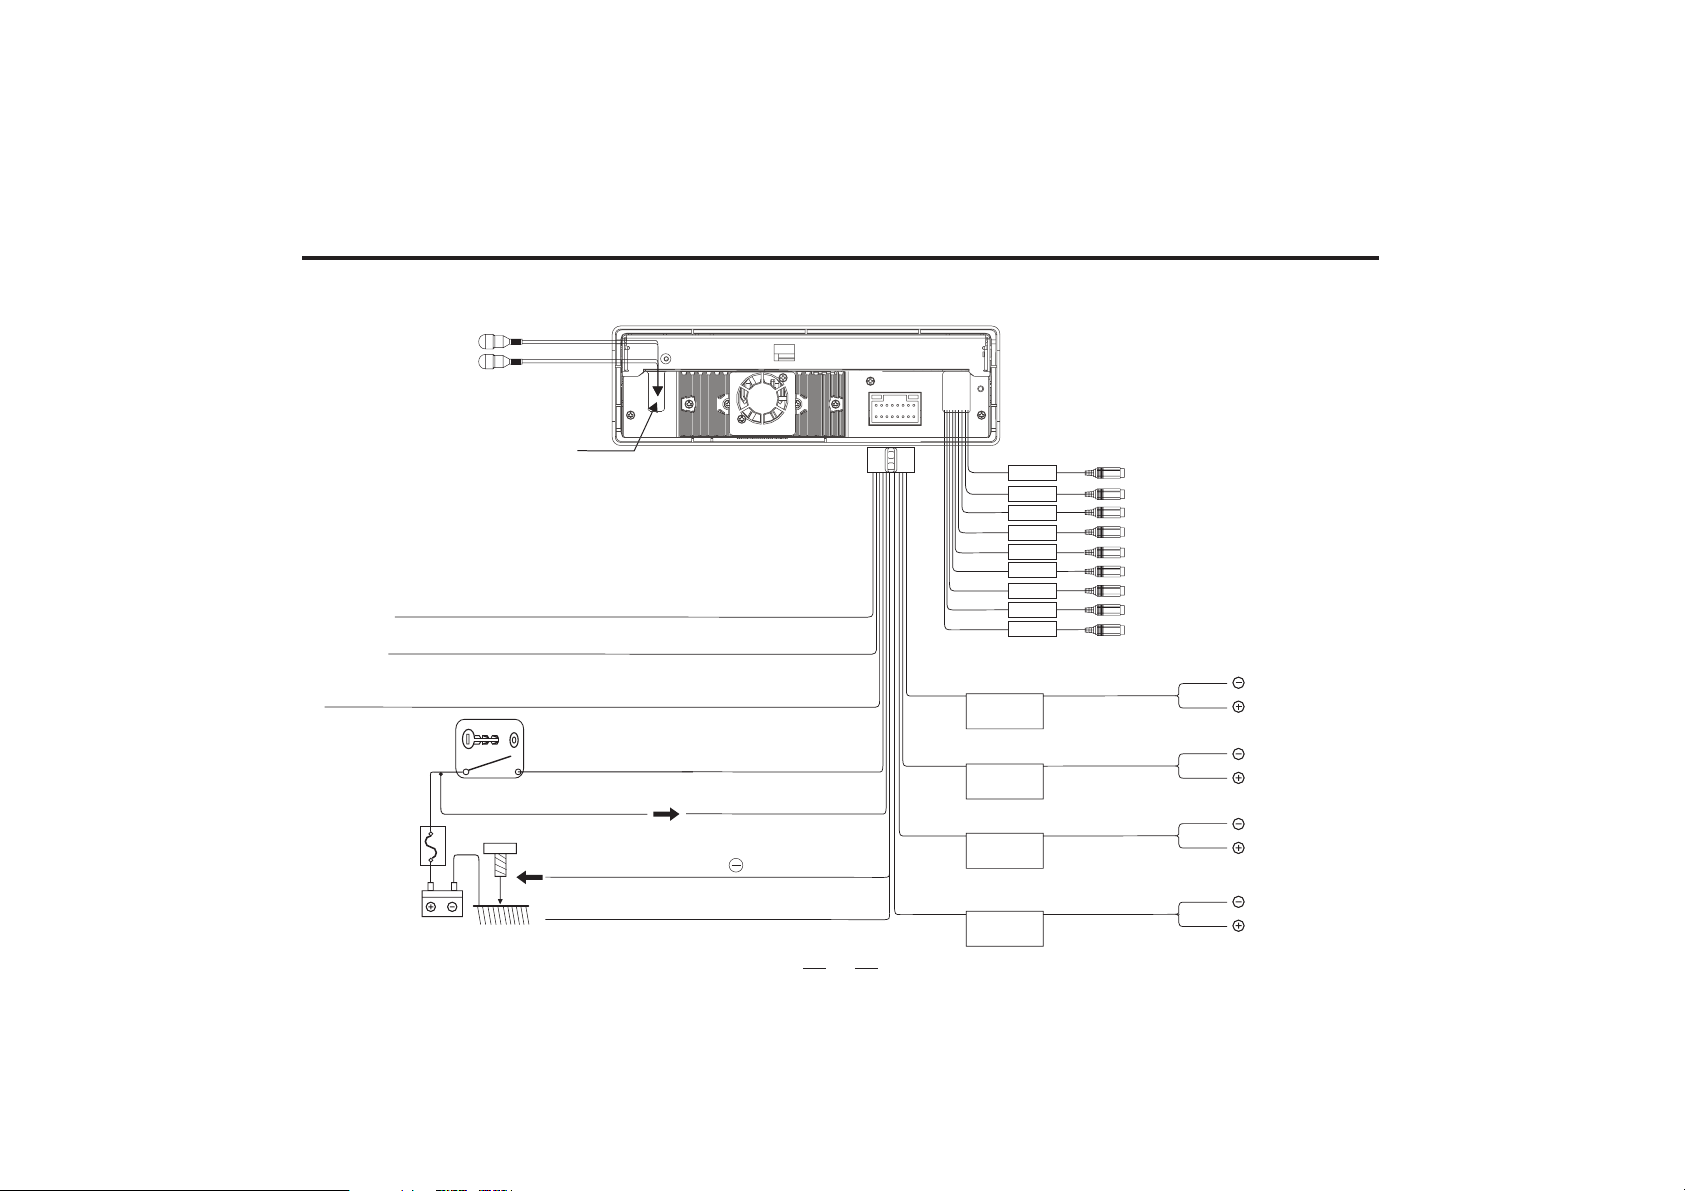
Electric Connection
TV ANTENNAPLUG
(Without TV tuner,
without this wire.)
CAR ANTENNA
Parking Brake Light (-)
Back car detecting wire
Connect control for antenna or remote control for amplifier
Ignition key
sw tchi
ACC wire
Battery wire
Car fuse box
(main fuse)
Battery
Ground wire(Black)
Light wire
(To car chassis)
(Gray)
(Brown)
(Blue)
(Red)
(Yellow)
(Orange)
GRAY
GRAY
GRAY
GRAY
GRAY
BLACK
BLACK
BLACK
BLACK
FRONT.L
FRONT.R
REAR.L
Purple/Black
REAR.R
(RED)
(WHITE)
(BLUE)
(PURPLE)
(YELLOW)
()YELLOW
(WHITE)
(RED)
(YELLOW)
White/Black
Gray/Black
Green lack/B
FRONT RIGHT RCA OUT
FRONT LEFT RCA OUT
REAR RIGHT RCA OUT
REAR LEFT RCA OUT
VIDEO OUT
BACK CAR VIDEO IN
AUXLEFTIN
AUX RIGHT IN
VIDEO IN
White
Gray
Green
Purple
To front left
speaker
To front right
speaker
To rear left
speaker
To rear right
speaker
4
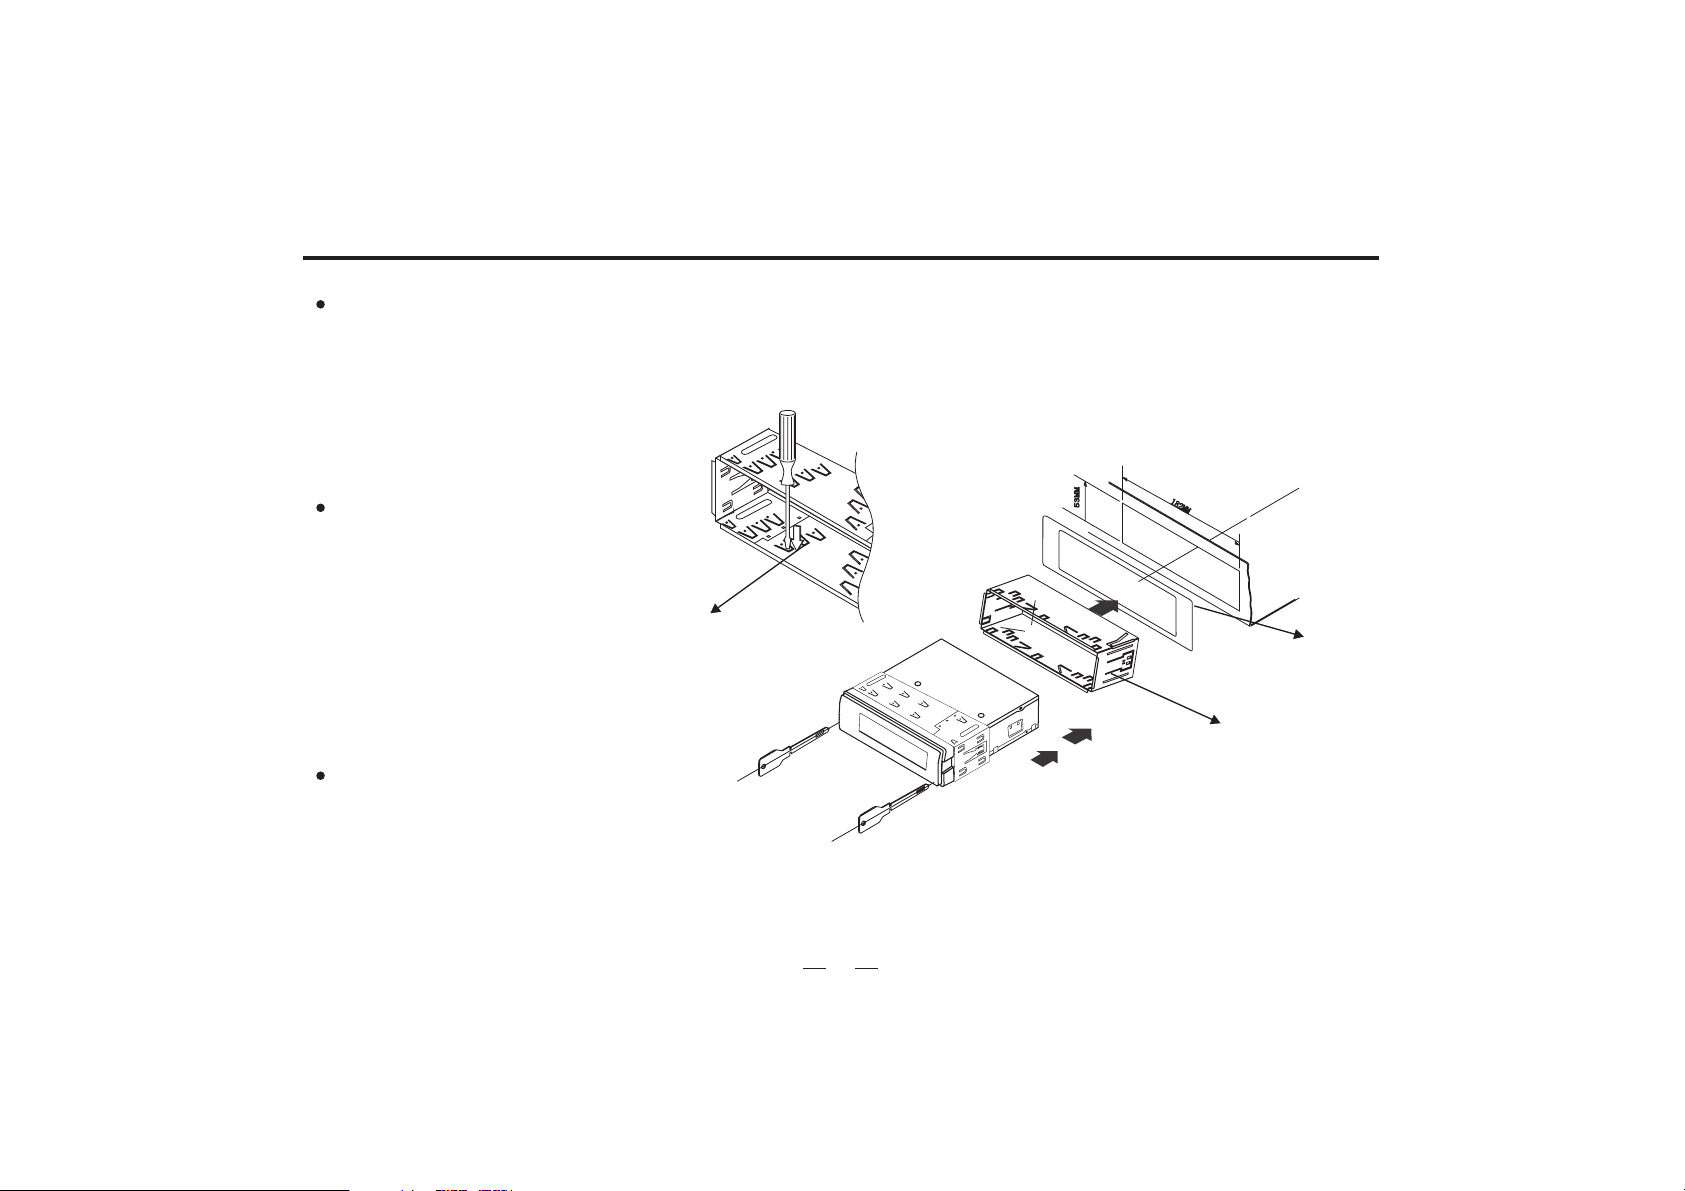
Installation
Before installing the receiver permanently, fit it in the approximate place in your car ,and connect the
equipment according to the speakers and electrical connections. When
your system is operated properly,(preferably with the
car engine running), follow the instructions
for permanent installation
of your system.
INSTALL THE UNIT
1)Install half sleeve, can be with or
without adapter. It will fit better
with adapter.
2)Bend over some tabs to secure
the half sleeve inside of dash.
3) Support strap to be strutted
under dash, secure this strip to
avoid skipping of disc.
2)Bend over tabs
of half sleeve
(supplied)
1) Adapter
(not supplied)
REMOVE THE UNIT
Insert removal wrench into the small
gap on the right side of the unit and pull
the unit slightly out on the same side,
then release the wrench. Repeat the
same action for the left side. By now,
you can remove the unit and unplug
the wires connector.
Half sleeve
(supplied)
3) Two wrenches for releasing
the unit (supplied)
5
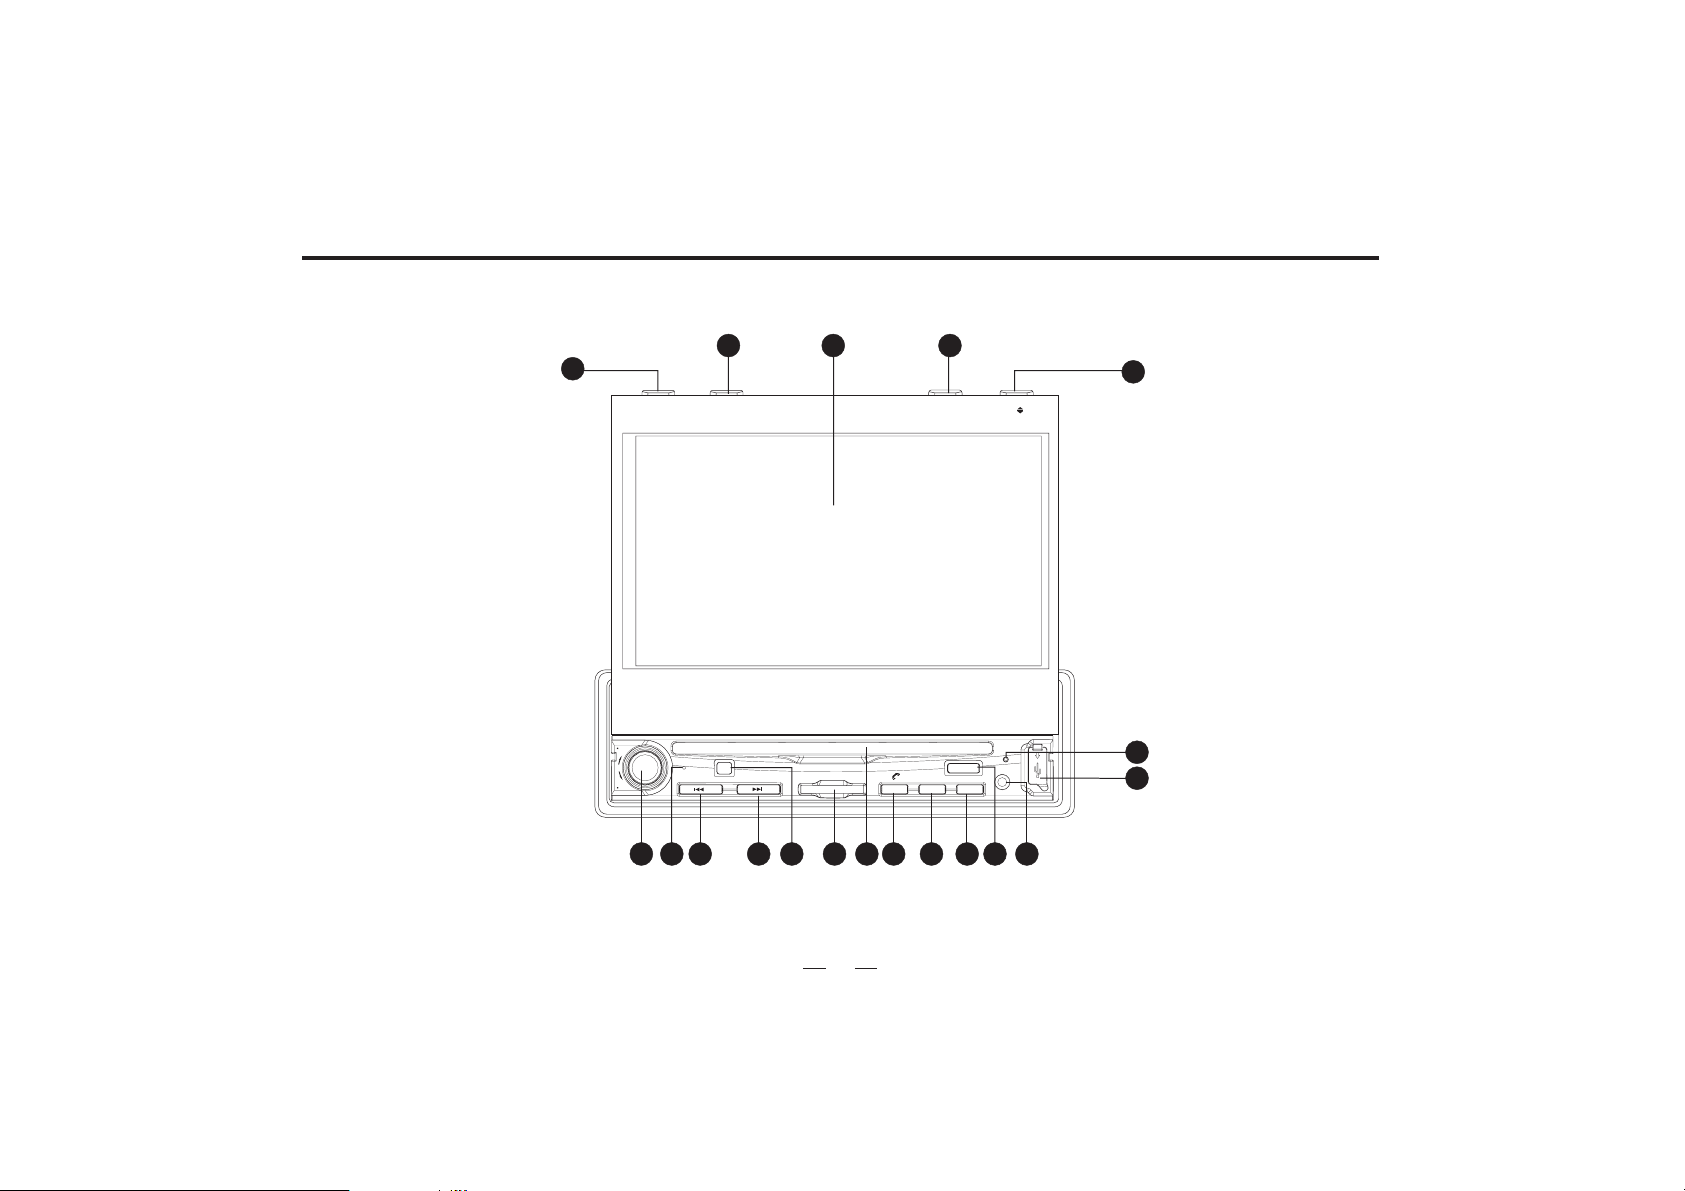
General Features
19
SRC
L
O
V
PWR
Stop/Clock
CLOCK ST
STOP
1
18
17
16
15
RPT/ST
RPT
MIC
IR
5
2
4
63
Adjust angle
ADJ
Adjust angle
RESET
EJECT
MUTE
BAND BT
97
AUX IN
108
11
12
14
13
6
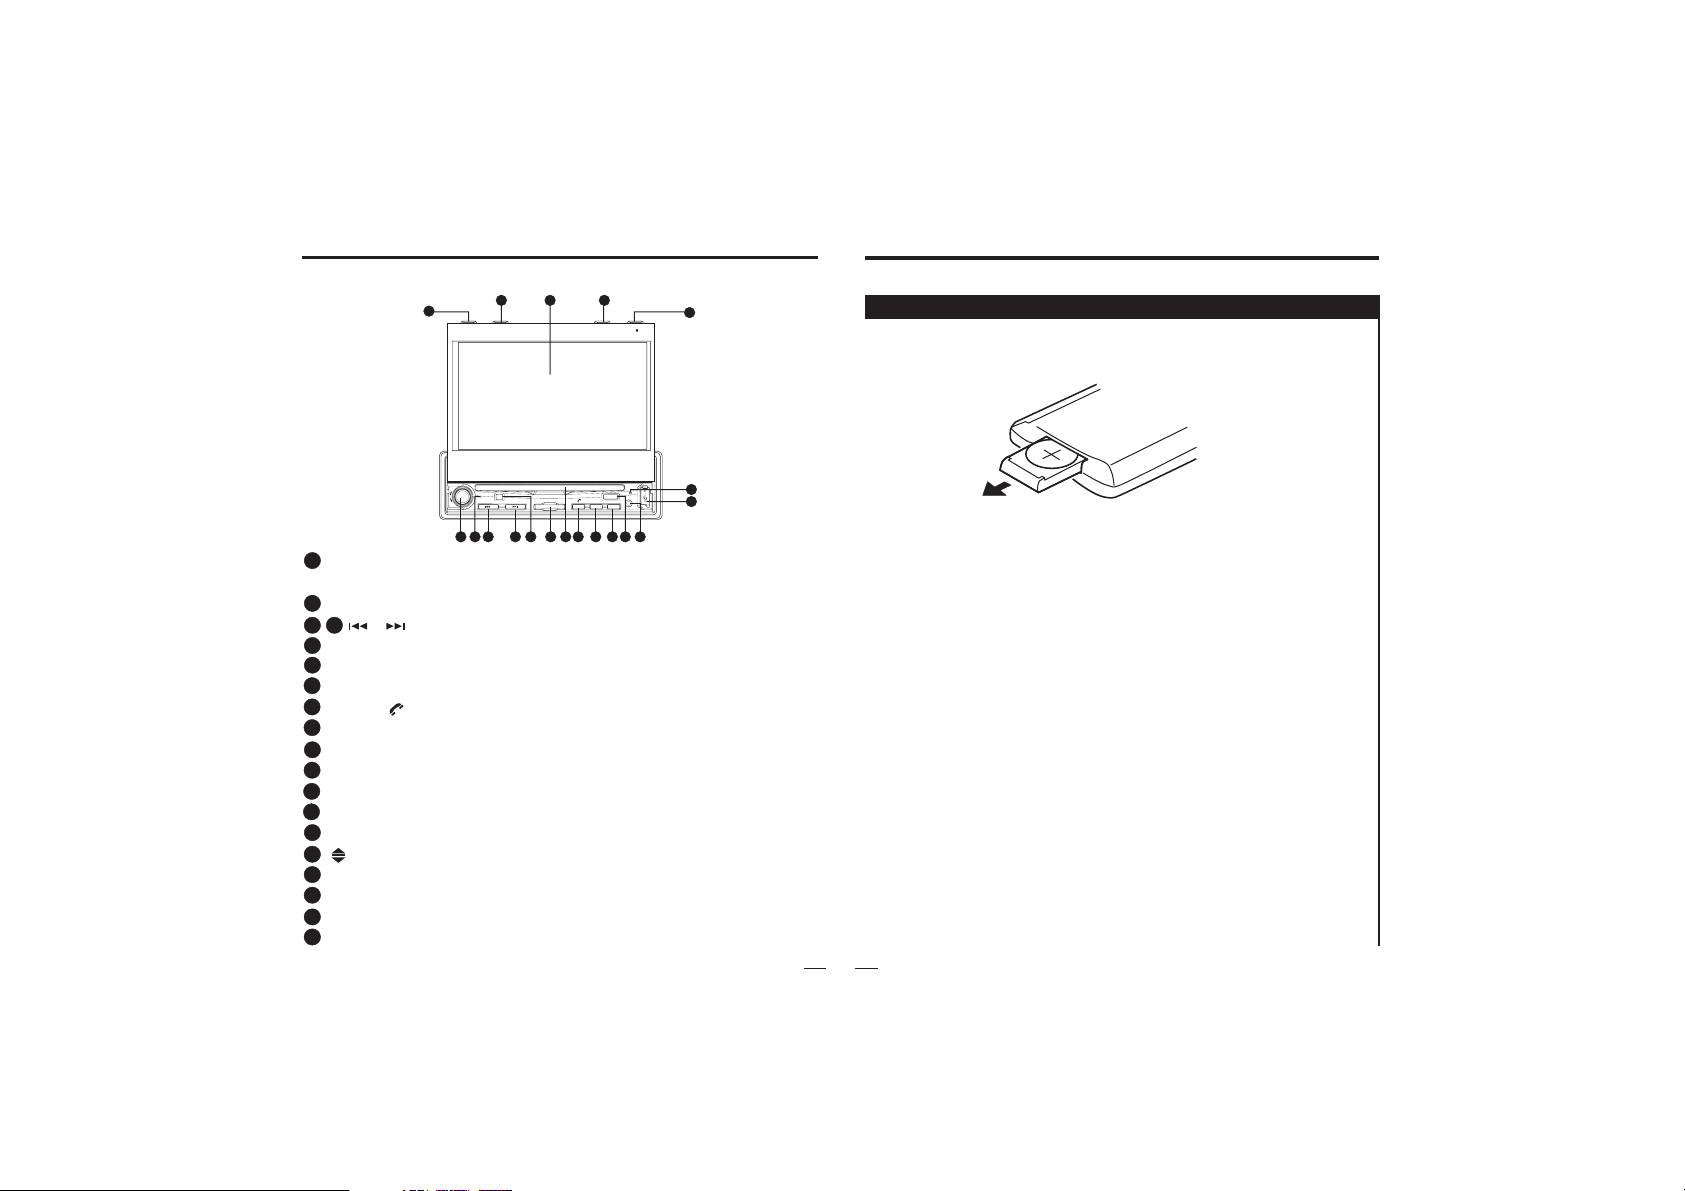
General Features
19
Stop/Clock
Remote Control
17
18
RPT/ST
Adjustangle
16
15
Loading and replacing the battery
CLOCK ST
STOP
RPT
SRC
L
O
V
MIC
IR
PWR
5
4
2
1
1
VOL/SRC/PWR Button: Rotate the VOL button to adjust the
63
ADJ
Adjustangle
RESET
EJECT
AUXIN
MUTE
BAND BT
108
97
11
14
13
12
volume; press it to make confirmation./Play source switch.
2
MIC.
4
3
/
[ ]/[ ]Button: Rewind, Last chapter/Forward,Next chapter.
5
Signal received window.
6
SD Slot.
7
To eject the DISC.
8
MUTE/[ ] Button: Mute/Answer.
9
BAND Button: Band switch/Radio mode is random play.
10
10
BT Button: Switch to BT function directly.
11
EJECT Button: To eject the DISC.
12
AUX IN
13
USB Port.
14
Reset Button.
15
[ ]Button: Display Open/Close.
16
Adjust angle Button: Display position Adjustment.
17
TFT-LCD screen.
18
ST/RPT Button: Sound track switch/Repeat.
19
CLOCK/STOP Button:Clock/Stop.
Pull out
Notes of remote control using:
Aim the remote controller at the remote sensor on the unit.
1)
Remove the battery from the remote control or insert a
2)
battery insulator if the battery has not been used for a
month or longer.
DO NOT store the remote control under direct sunlight
3)
or in high temperature environment, or it may not function
properly.
The battery can work for 6 months under normal condition.
4)
If the remote control can't work, please change the battery.
Use(button shaped) lithium battery(CR-2025)only.
5)
DO NOT recharge, disassemble, heat or expose the battery
6)
in fire.
Insert the battery in proper direction according to the
7) (+)
and(-)poles.
Store the battery in a place where children cannot reach to
8)
avoid risk of accident.
7
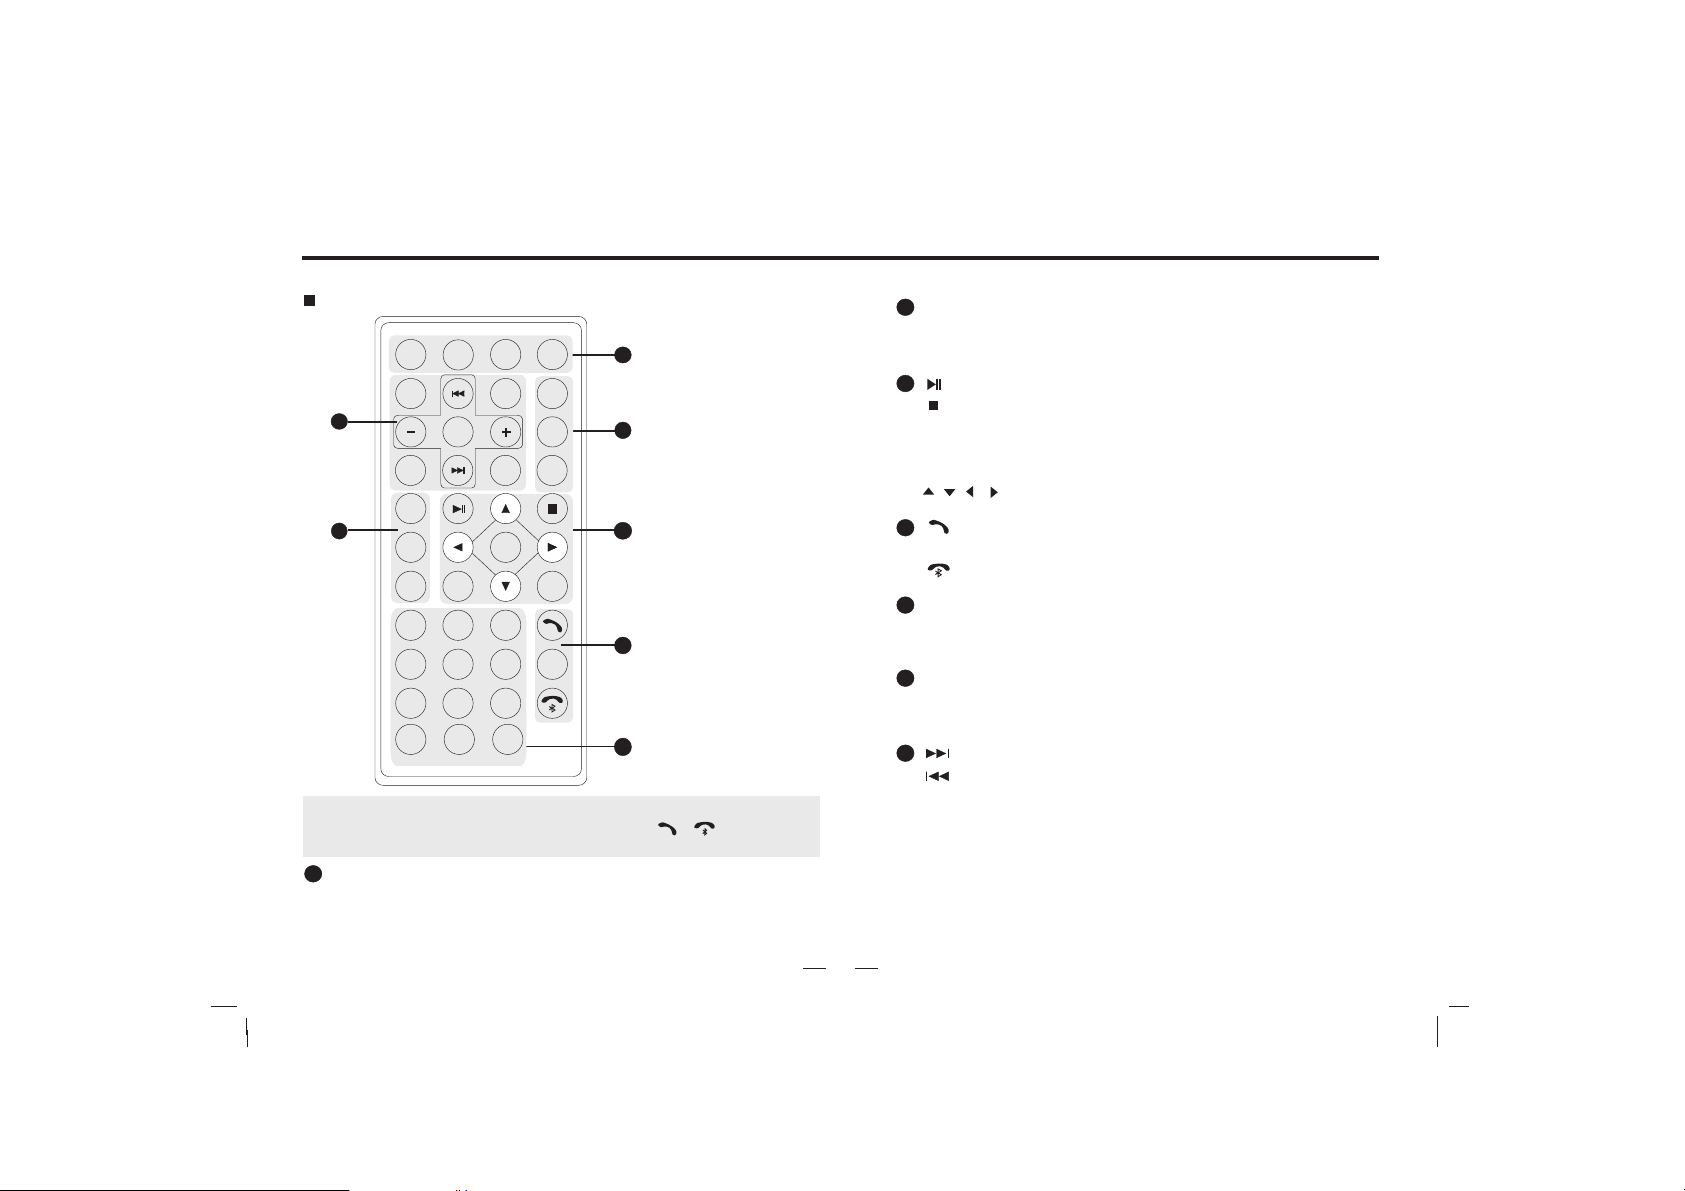
Remote Control
Button and Function
REC
Sub-T
SEL
Setup
2
ABC DEF
5 6
JKL
8 9
WXYZ
TUV
0
Mute
Angle
EQEQ
Enter
3
MNO
#
GotoRO/SN
SRC
Band
RDM
APSAPSAPS
PRG
STS T
RPT
TitleTitle
PBC
OSD
ID3I D3
1
2
3
4
5
PWR
R/L N/P
Language
7
CLK
AF
6
TA
PTY
1
4
GHI
7
PQRS
*
10+
Note: This unit doesn't have RDS function, AF/TA/PTY neither.
This unit doesn't have bluetooth function, [ ]/[ ] neither.
If the unit hasn't some functions , some buttons won't be affected.
1
[PWR] Button: Power
[REC/Sub-T]Button: Transfer recording/Language switch
[MUTE] Button: Mute
[SRC] Button: Play source switch
[BAND/RDM] Button: Band switch/Play randomly
2
[APS/PRG] Button: Scan/Program
[ST/RPT] Button: Stereo switch/Repeat
[ ]Button: Play/Pause
3
[ ]Button: Stop
[Setup] Button: Menu setting
[Title] Button: Title Menu
[ENTER] Button: Play/Confirm
[ ][ ][ ][ ]Button: Up/down/left/right button
[ ] Button: Ring on
4
[OSD/ Id3] Button: Screen Display/ Select chapter
[ ] Button: Ring off
[0~9]Button:0~9
5
[GOTO] Button: GOTO search
[RO/SN] Button: Radio scan
[AF] Button: Search stations automatically
6
[TA] Button: Traffic broadcast
[PTY] Button: Program style
[ ]Button: Forward/Next chapter
7
[ ]Button: Rewind/Last chapter
[+/-]Button: Increase/recluce volume
[SEL] Button: System setting
[CLK] Button: Clock display
[EQ] Button: Sound effect
[N.P/ANGLE] Button: Video switch/Angel Adjustment
[R.L/LANGUAGE] Button: Left/right sound track switch
dialogue language.
8

Play operation
Adjust angle
ADJ
Adjust angle
RESET
EJECT
AUX IN
MUTE
BAND BT
SRC
L
O
V
PWR
Stop/Clock
CLOCK ST
STOP
RPT/ST
RPT
MIC
IR
ON.OFF
Press [PWR] button shortly will turn the unit on. Hold [PWR]
button down will turn off the unit.
NOTE: When the power is on, the screen enters RADIO mode
automatically; press [ESC] button to go back to the main menu;
press [SRC] button shortly to switch to other modes.
Flex screen( )
Open screen:
Close screen:
Note:
If the screen stop when out press[ ] to hide the screen, then press
[ ] again the screen will out.
When power off, the screen will hide.
Press [ ] to open.
Press [ ] to close.
Eject
EJECT:
Note: About 10 seconds after the disc ejected ,if not taken out, the
Press[ ] to eject the disc.
disc will be absorbed in again.
Volume
Increasing Volume:
Rotate the VOL button in .counterclockwise direction
Decreasing Volume:
Rotate the VOL button in anticlockwise direction.
Stop/Clock
STOP:
Press [STOP] button to stop when DVD playing.
CLOCK:
Press [CLOCK] to switch between radio frequency and
clock, when radio playing.
9

Play operation
Display position Adjustment
For smooth adjustment, make sure that you return the lateral
angle to the neutral position and then adjust the tilt angle.
Avoid physical shock on the display.
Tilt angle
Press [ADJ] button ,it can adjust the
screen angle gradually.
Theunithas4grades
for adjustment ,and each time you
press the button ,it can move one
grade down along indication; it can
resume up along indication.
When you turn on the unit again, the angle
will be the same as the last angle that
you set.
ADJ ANGLE
Stop/Clock
RPT/ST
CLOCK ST
STOP
RPT
SRC
L
O
V
MIC
IR
PWR
Adjustangle
Do not place any object on
the display forcefully, or
subject it to undue force.
Do not move the display
forcibly.
The monitor's movable range
ADJ
Adjustangle
RESET
EJECT
AUXIN
MUTE
BAND BT
may be limited by the type of
car, a position where the
display is mounted, etc.
Stop/ClockStop/Clock
Stop/Clock
CLOCK ST
STOP
SRC
L
O
V
PWR
CAUTION
RPT/ST
AdjustangleAdjust angle
Adjustangle
Adjustangle
RPT/ST
Stop/Clock
RPT
MIC
IR
Adjustangle
RPT/ST
ADJ
Adjustangle
EJECT
MUTE
BAND BT
MUTE/
MUTE: Short press this button to mute the sound, short press
MUTE button again or press any other button to resume
the normal listening.
Channel seek: In BT mode, when call comeing, press this
button can answer.
RESET
AUXIN
10

Setup Operation
MENU
ENTER MENU: Press [MENU] button, then touch setting button, it
will show in screen follows:
Video mode:
BRIGHT 14
COLOR
CONTRAST
TINT
VMODE
Audio mode:
BASS 0
TREBLE
BALANCE
FADER
EQ
BASIC mode:
LOUD OFF
BEEP
CLOCK
VIDEO
AUDIO
BASIC
14
13
15
STND
-07
R06
R06
FLAT
ON
00:00
Menu operation
Touch [ ]/[ ] to choose menu.
Touch [ ]/[ ]to adjust parameter.
Touch [ ] to back main menu.
Menu operation
Touch [ ]/[ ] to choose menu.
Touch [ ]/[ ]to adjust parameter.
Touch [ ] to back main menu.
Menu operation
Touch [ ]/[ ] to choose menu.
Touch [ ]/[ ]to adjust parameter.
Touch [ ] to back main menu.
Vd osetupie
Bright Color Contrast Tint
Vmode
STAD USER
BRIG SOFT
Audio setup
Audio setup Bass Treble Balance Fader
setup between 0~14.
EQ setting
NORM
FLAT
CLAS
POP
ROCK
System setup
Loud ON and OFF
Beep ON and OFF
Time Adjust press [ ] or[ ] button to select hour/
minute then press [ ]or [ ]button to setup.
11

Radio Operation
Adjust angle
ADJ
Adjust angle
RESET
EJECT
MUTE
BAND BT
AUX IN
SRC
L
O
V
PWR
Stop/Clock
CLOCK ST
STOP
RPT/ST
AF TA PTY
RPT
MIC
IR
Note: If the unit doesn't have RDS function, the touch-screan
won't show "AF, TA and PTY".
Band
Press [BAND] button to transfer band.
FM1 FM2
FM3
AM1AM2
Select station
Press [AS/PS] button
Seek Tune:
In radio playing mode, holding down the [AS/PS] icon will
seek and store strong frequency stations automatically.
Note: FM band can store 18 stations; AM band can store 12 stations.
Browse station
Press [SCAN] button
Press [SCAN] button to scan the existing station.
Band Tune
Manually Tune
Press[ ] button: adjust to higher frequency.(such as
87.5,87.55...)
Press[ ] button: adjust to lower frequency(such as
105.5,105.0...)
Automatically Tune
Holding down the [ ] button: search higher frequency
station, and will stop when meeting one.
Holding down the [ ] button: search lower frequency
station, and will stop when meeting one.
12
Radio Operation
AF(Alternative Frequency)
Press AF and then press[ ],the machine will scan signal get
the best frequency of the local radio station. If meet a stronger
signal of the same program. letter TP will appear on LCD,
and unit will automatically choose the stronger signal sought.
Before auto scan the radio station, please turn off AF
firstly.
Only remote control ( page8)
TA(Traffic announcement)
Press TA, the unit will prior to seek the traffic information. If the
machine receives the traffic information, it will choose this
signal and quit other radio signal or CD program. If press TA
again, other program will recover and the traffic information
program will quit.
Only remote control ( page8)
PTY(Program type)
Press PTY, the unit will begin to receive program as news,
current affairs ,music, etc. The unit will seek the program
automatically and will quit CD player if it gets the right program.
If press PTY again, PTY function will quit and other program will
play as before.
Among AF, TA and PTY, TA has the absolute priority to be chosen.
Only remote control ( page8)
Note: If the unit is without RDS function, please skip this page.
13

Sound Operation
L/R
Play/pause
In play mode, press [ ] button to switch to play or pause
mode.
Select chapter or section: press [ ] to
In the DVD mode,
choose last chapter, press [ ]to choose next.
Forward: Hold [ ] button down;
Rewind: Hold [ ] button down.
RPT
RPT: In the play mode press[ RPT ]button then can transit among
the following status.
REP ONE
REP ALL
REPEAT OFF
L/R
E
Five direction button:
In play mode, you can touch[ ][ ]icon to
choose music, touch [ ] to play music.E
TIT
Title: In play mode, press [TIT] on the screen or remote control to
back to the title menu, and re-select the items needed.
L/R
R/L:
In VCD/CD/DVD mode, press [R/L]on the screen or remote
control
to switch among mono L mono R or stereo.
14

SD/USB Operation
USB/SD play operation
SRC
L
O
V
PWR
CLOCK ST
STOP
MIC
RPT
IR
MUTE
Adjust angle
EJECT
BAND BT
USB/SD mode
USB/SD mode
Inset USB/SD,the play will to the USB/SD playing mode
antomaticly.
ADJ
RESET
AUX IN
PLAY/PAUSE:
Press [ ] button to play or pause.
Select:
,
Under USB or SD play, press[ , ]can select tracks.
REPEAT
Press [ST/RPT] button first to repeat the playing track
RPT ONE
RPT DIR
RPT ALL
RPT OFF
BAND:
Press button to play the disc randomly.[BAND]
RDM OFF RDM ON
15

Bluetooth
The Bluetooth is wireless mode of transmission in short
distance. Through Bluetooth function, the DVD unit establishes
connection with Bluetooth handset. And then, these units can
realize mutually controling and file transfering.
Choose the Bluetooth Mode
Method :
A: Press the [SOURCE] button, to
return to main menu..
B:Exhales the main menu, choose
the Bluetooth to enter the
Bluetooth mode.
NO.1
Working mode of Bluetooth
Bluetooth has the following functions:
A: Paring
Make DVD Bluetooth function as handset s
facility through pairing.
B: Connecting
After connecting with the handset,
you can operate the mobile phone through DVD unit
(such as H,F, call, call record etc.)
'
Paring
Phone set pairing step as follows:
A: Turn on Bluetooth, then
touch On/Off icon to turn
on this function.
B: Turn on Bluetooth
NO.2
handsets
'
function .
C: When the mobile phone
set finds the signal, input
pairing number. Initial Pairing Code No. 0000
D: After pairing, TFT screen shows pairing succeed and
quit the pairing.
NO.1
-
-
NO.2
16
Bluetooth
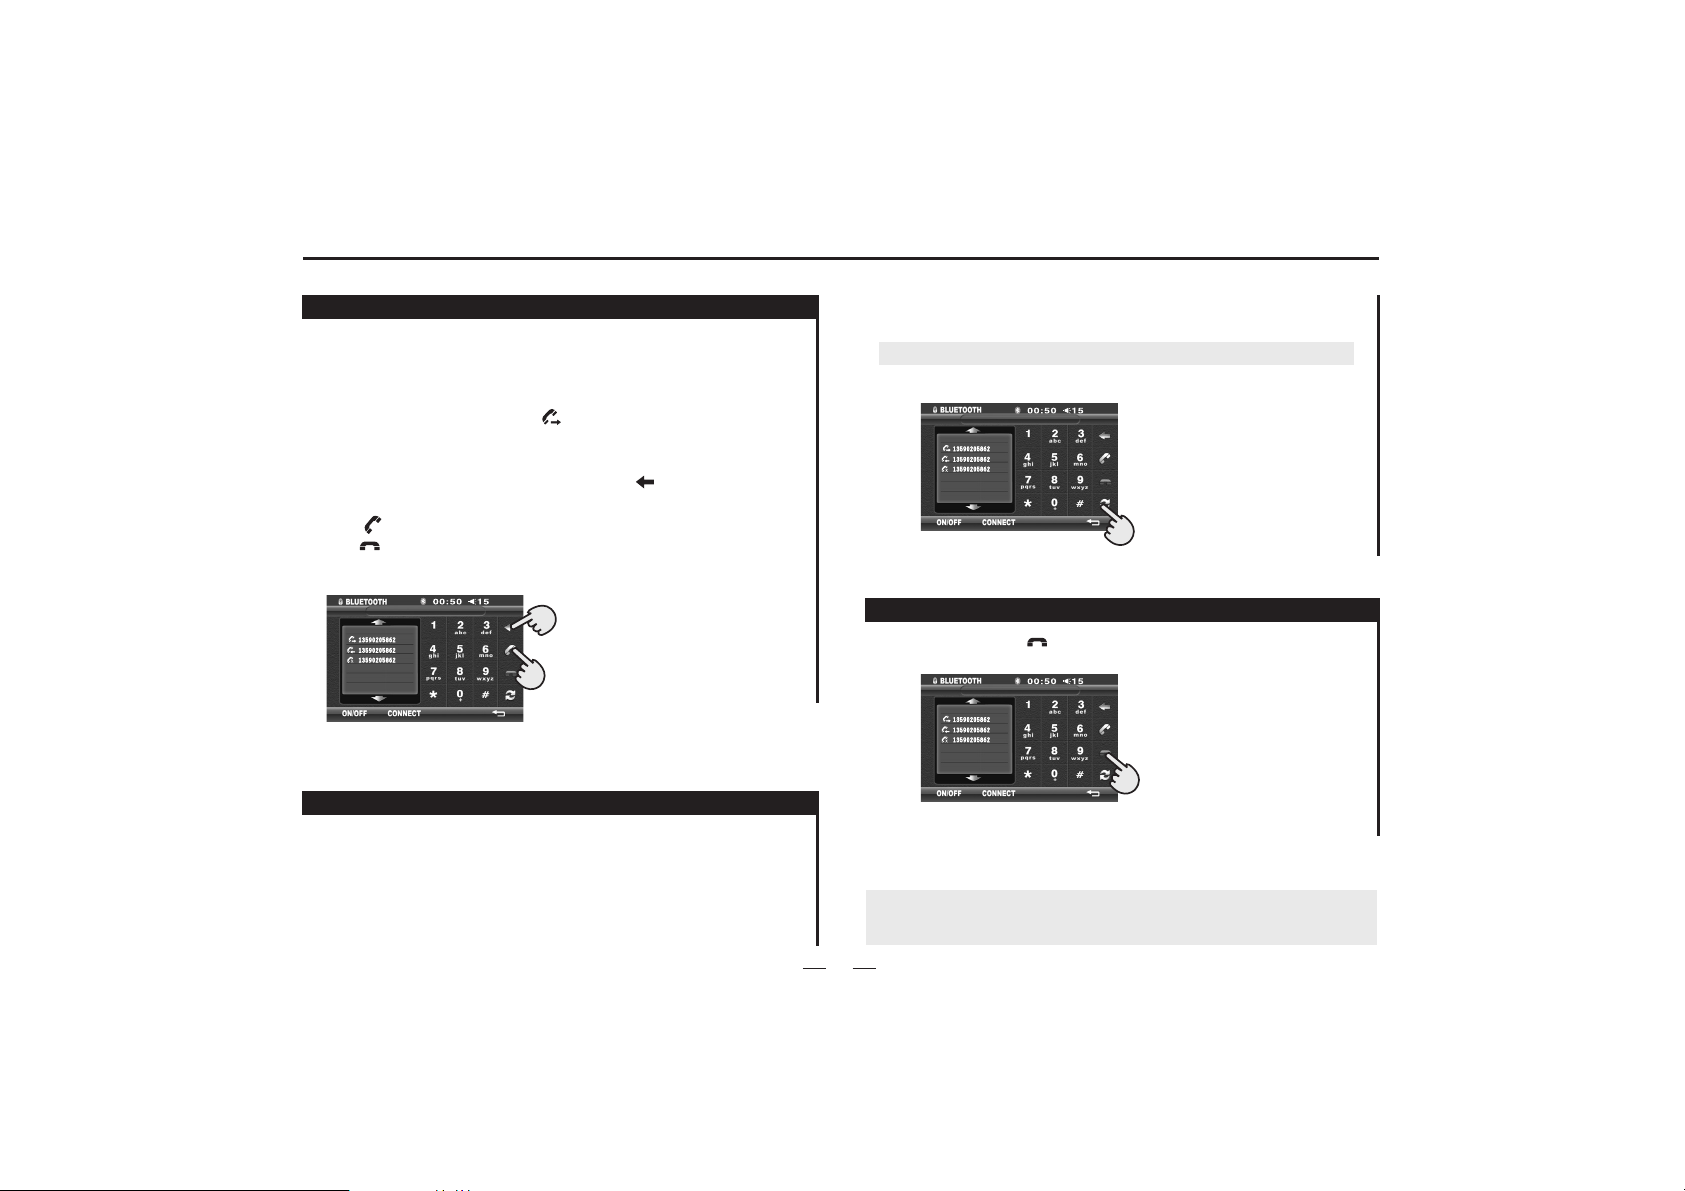
Mobile phone
After connected, you can make phone call through, touch
screen or phone record.
A: Making mobile phone call
After making phone call, the [ ]will shining.
B: Making touch screen call
Input the numbers on the screen, press [ ] icon can correct
the numbers;
Press [ ] icon to answer phone call;
Press[ ] icon to cancel or hang up.
13590205862
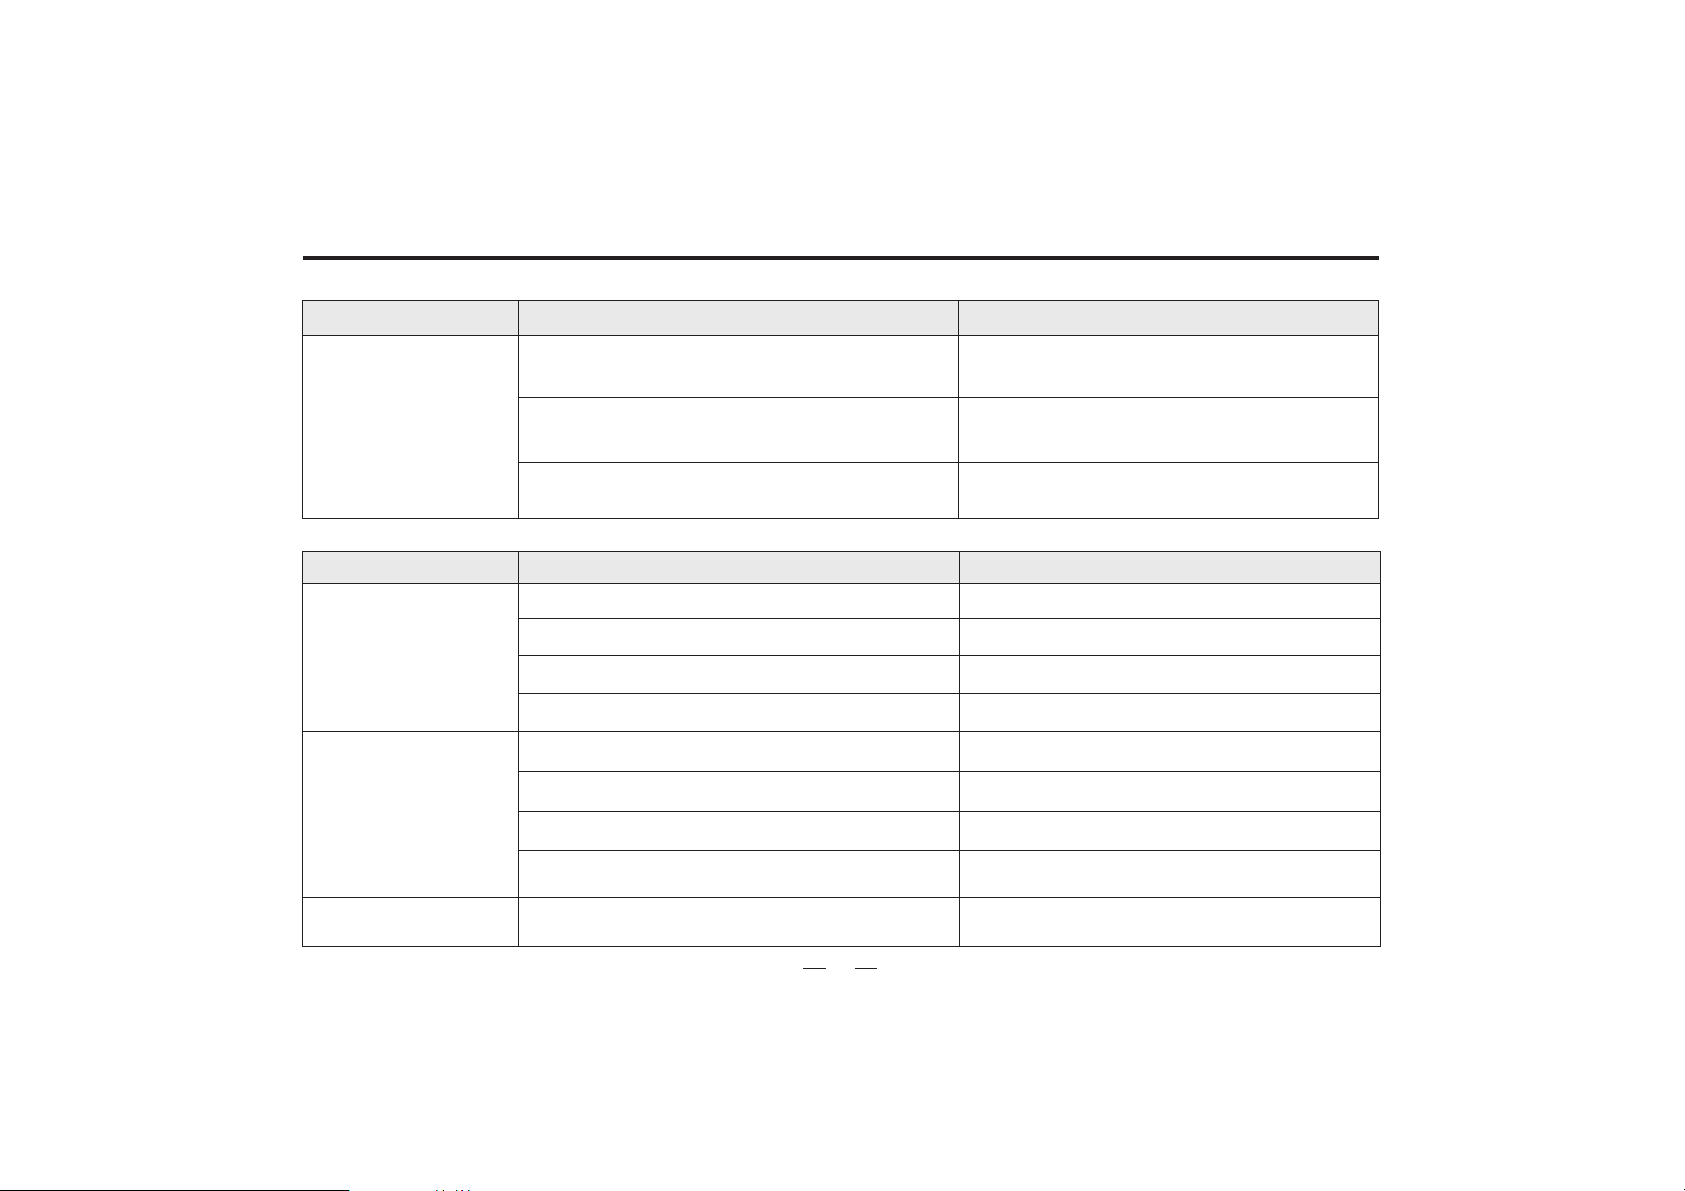
Answering
Answering functions as follows:
A: After connected, the unit can use the telephone function.
B: When there is a phone call, the Bluetooth will switch to
phone function and show the calling number automatically.
C: Touch Transfer icon can switch to phone answer mode.
Touch it again can return to Bluetooth function of the unit.
Remarks: Some mobilephone can't support this switch function.
13590205862
Hang up
You can press the [ ]button to hang up.
13590205862
Note: If the unit does not have this function, pls skip it.
Some models of mobile phones are not supported by the
Bluetooth module of this unit.
17

TV Operation
Adjust angle
EJECT
BAND BT
ADJ
RESET
AUX IN
SRC
L
O
V
PWR
CLOCK ST
STOP
MIC
RPT
IR
MUTE
TV operation
You need install TV antenna, when receive program.
TV mode:
Press [SRC] to enter main menu, then press TV icon on
TFT screen to enter.
Channel search:
Press [APS] or press [AMS] to search and store TV station
automatically.
Direct Channel Selection:
(Only for remote control)
Enter a channel number by pressing [0]to[9].
Without touch function, without these icons.
Note: If the unit does not have this function, pls skip this page.
18

Accessories
External view
........ Number of items
1
3
The use of any accessories except of those provided might
result in damage to the unit .Make sure only to use the
accessories shipped with the unit ,as shown above.
............
............2
1
External view
........ Number of items
2
............1
19

Troubleshooting
What appears to be trouble is not always serious. Please check the following points before calling a service center.
Familiar characters and their meanings
Characters
NO Disc
Bad Disc
Unkown Disc
Region Error
Disc inject dead
Causes
Disc is too dirty.
Disc is inserted upside down.
No disc in the unit.
Disc is extreme dirty.
Disc is inserted upside down.
The disc is not compatible with
the unit.
Thedisc'sregioncodeisnotthe
same as the unit's.
Disc transparence fault press disc
button long time exit.
Remedies
Clean the disc or change the disc.
Insert the disc correctly.
Insert a disc.
Clean the disc or change the disc.
Insert the disc correctly.
Clean the disc.
Clean the disc.
Then change the angle and inject
again or change another disc.
21

Troubleshooting
General problems
Symptoms
Causes
Remedies
The unit cannot be
powered on.
Remote controller does
not work.
No sound comes out or
it's hard to hear.
Poor sound quality or
sound distortion.
User preset information is
lost when ACC is off.
The fuse of the unit has been broken.
The fuse of car battery has been broken.
False operations and etc.
Battery has been exhausted.
Battery is not installed correctly.
Audio output connection is not correct.
The volume level is set to the minimum level.
The speakers have been damagedl.
The audio channel outputs are not balanced.
The speaker cord is contacted with the
bodywork.
Piraticdiscisused.
The speakers power rating does not fit into
the unit output power.
The speakers are connected incorrectly.,
The speaker cord is contacted with the
bodywork.
ACC and BATT are connected incorrectly.
Install a new fuse with correct rating.
Install a new fuse with correct rating.
Reset the unit.
Change the battery.
Install the battery correctly.
Correct the connection according to(Electrical
Connections Overall Diagram).
Adjust the volume to the optimum level.
Check the speakers.
Adjust the balance of audio channel outputs. Please
refer to (Audio control).
Use insulating cord for connection.
Use original copy disc.
Change the speakers.
Correct the connection according to(Electrical
Connections Overall Diagram).
Use insulating cord for connection.
Correct the connection according to(Electrical
Connections Overall Diagram).
22

Troubleshooting
TFT Monitor
Symptoms
No image appears on the
monitor and warning
information is shown at
all times.
Abnormal display like
as pulsatile stripes on
the image and on.
Characters are
abnormal.
Causes
Incorrect connection of Breaking wire.
The color system of DVD disc is not
suited with the monitor.
The actual color system is not the same
as the marked color system on the label
for some piratic discs.
The video cord is broken.
The video cord is not connected correctly.
False operations.
Remedies
Correct the connection according to
(Electrical Connections Overall Diagram).
Adjust the color system of the DVD disc
or the monitor.
Use original copy disc.
Change the video cord.
Connect the video cord correctly.
Turn off the power and then turn on the
power again, or change to other playing
source and then go back.
23
Troubleshooting
Radio Tuner
Symptoms
Causes
Remedies
It's hard to receive
stations.
Mp3 playback
Symptoms
Disc cannot be played
back.
Interruption occurred during
playback.
MP3's name cannot
be displayed correctly.
Auto antenna is not extended completely.
Auto antenna is not connected with the unit firmly.
LOCAL function is on.
Causes
Disc is scratched.
Disc is too dirty or wet.
The pickup is dirty.
Disc is inserted upside down.
Disc is scratched.
Disc is too dirty or wet.
Some contents are damaged.
Disc is not recorded correctly.
The name of Mp3 is not regular.
Correct the connection according to
(Electrical Connections Overall Diagram).
Correct the connection according to
(Electrical Connections Overall Diagram).
Close the LOCAL function.
Remedies
Change the disc.
Clean the disc.
Clean the pickup with cleaning disc.
Insert the disc correctly.
Change the disc.
Clean the disc.
Change the disc.
Record the disc again.
Use the regular characters.
24

Troubleshooting
DVD player
Symptoms
Disc cannot be inserted.
Disc cannot be played back.
Subtitle cannot be shown.
Audio language/subtitle
cannot be changed.
View angle cannot be
changed.
Image distortion.
PBC is invalid when playing
back VCD.
Repeat playback or GOTO search
is invalid when playing back VCD.
Causes
There is a disc in the unit already.
Disc is scratched.
Disc is too dirty or wet.
The pickup is dirty.
Disc is not compatible with the unit.
Parental lock class is too high.
Disc memory less than 120M.
Disc is inserted up side down.
The disc 's region code is not the same
as the unit 's.
There is no subtitle file in the disc.
There is only one audio language/subtitle
in the disc.
There is just one view angle in the disc.
Multi-angle view is not available for the
segment playing back now.
The disc is protected by the copyright.
The disc does not support PBC.
PBC is on. Close PBC function.
Eject the disc then insert another one.
Change the disc.
Clean the disc.
Clean the pickup with cleaning disc.
Change the disc.
Change the parental lock class.
Choose the disc of memory more than 120M.
Insert the disc correctly.
Change the disc.
Change another disc containing subtitle files.
Change another disc containing multi-language
audio or subtitle.
Change another disc containing multi-angle.
Select another segment to play back.
The unit is compatible with copy system; hence
some discs contained the informationof copying
prohibited cannot be played back.
Change another disc with PBC function.
Remedies
25
Specifications
Specifications subject to change without notice.
DISPLAY UNIT
Liquid crystal panel.........................................7 inches wide
Display weight ...........................................................1.7kg
Number of pixels............................................33,6960 pixels
Display method........................Transparent color filter format
Drive method....................................TFT (thin film transistor)
active matrix format
Light source.....................................................internal light
(built-in small fluorescent lamp)
GENERAL
Operating power...................................12 Volts DC, negative
ground
%10THD output wiring........................Designed for using four
speakers only front and rear
channels cannot be combined
in use with 2speakers.
Load impedance.................................compatible 4 to 8 ohm
speakers
Fuses............................................................ .........10 amp
Dimensions....................... 52.5cm(L)x26.0cm(W)x29.3cm(H)
Weight........................................................................2.5Kg
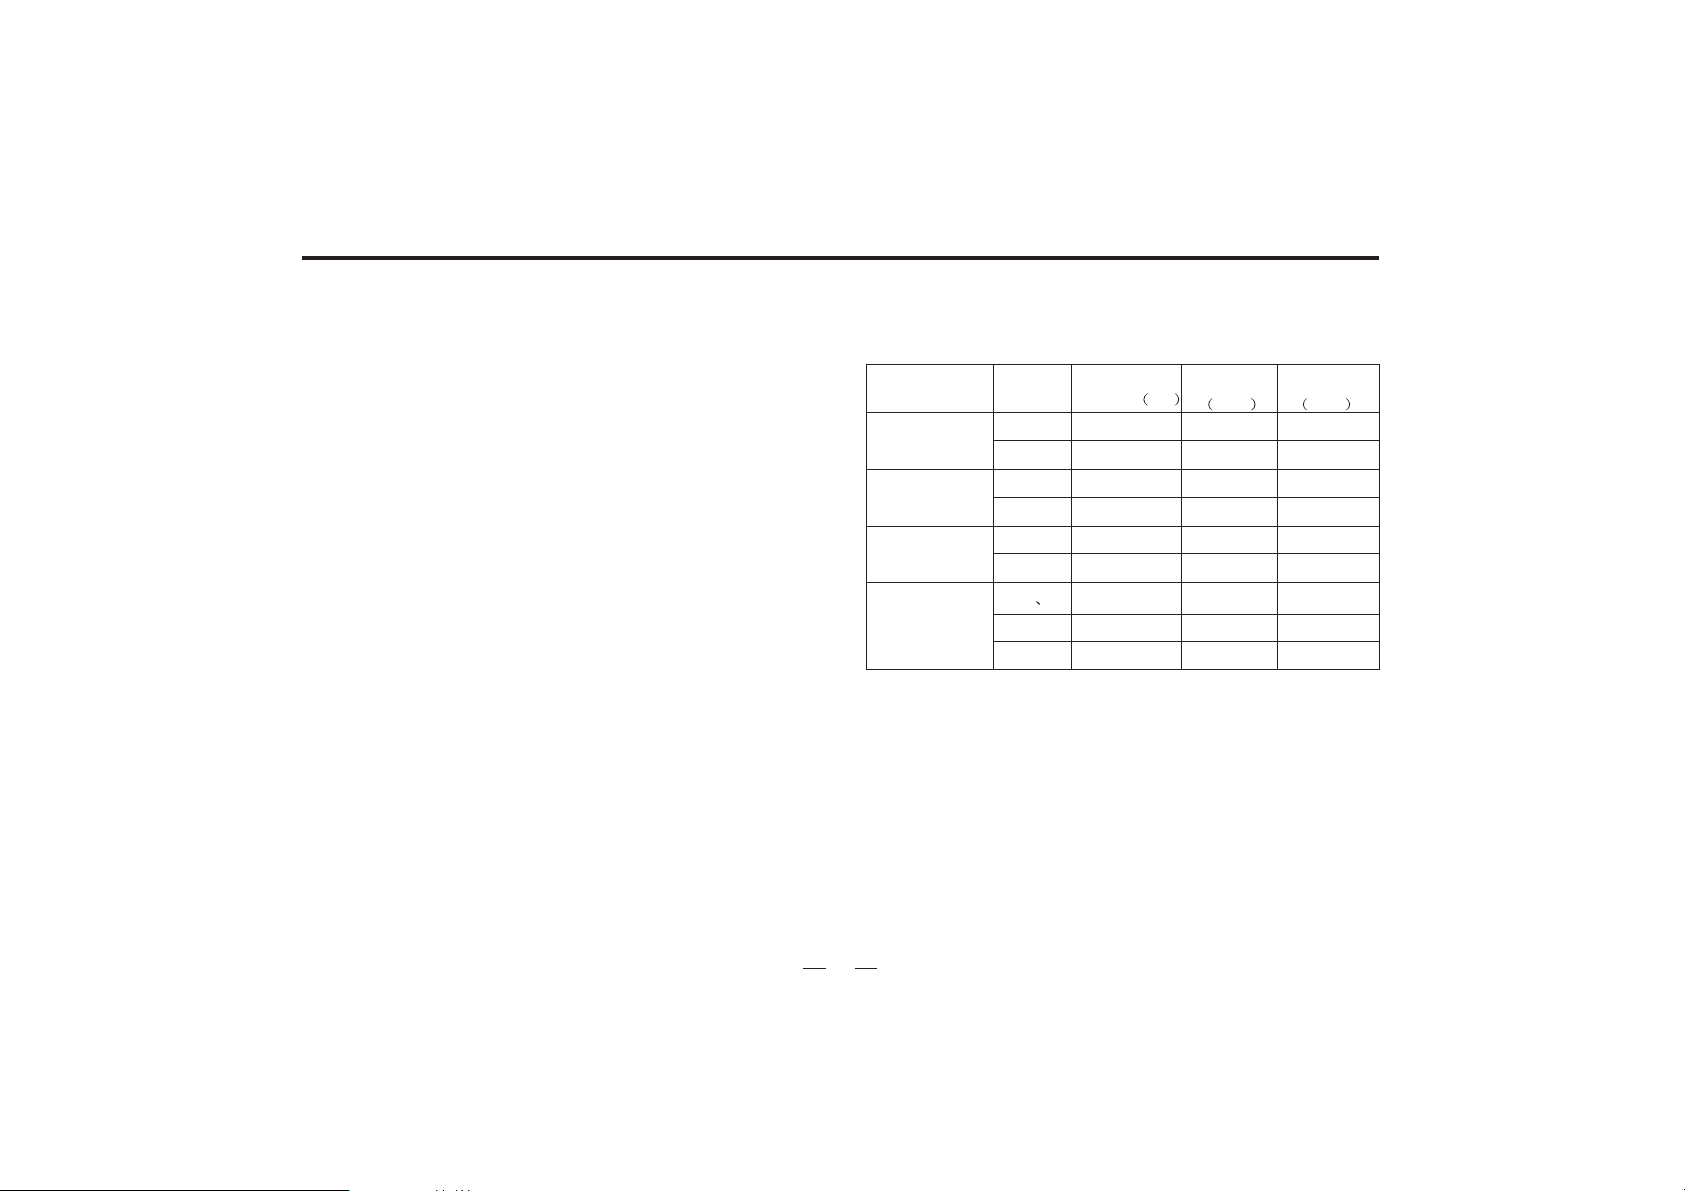
RECEVING FREQUENCY FIGURE
FM
AM
FM
AM
FM
AM
12
FM
3
AM
FREQUENCY
RANGE HZ
87.5-108.0M
522-1620K
87.5-107.9M
530-1710K
87.5-108.0M
520-1620K
87.5-108.0M
65.0-74.0M
522-1620K
AREA BAND
EUROPE
AMERICA
SOUTHA MERICA
FM
RUSSIA
Auto
Stepping
KHZ
100
9
200
10
100
10
100
30
9
Tiny
Stepping
KHZ
50
9
200
10
100
10
50
30
9
26

1 Year Limited Manufacturer Warranty -
XO Vision warrants to the original retail purchaser of this product that should this product have any defect,
under normal conditions, such defect(s) will be repaired or replaced with new or reconditioned product
(at the Company's option) without charge for parts and repair labor.
If said product is out of stock, XO Vision has the option to replace it with a similar product or issue a refund at our discretion.
This warranty only covers manufacturer defects and must be returned to company in original condition.
Proof of Purchase is required. This Warranty does not cover the costs incurred for installation, removal, product damages
(i.e. discs, tapes, etc.) or reinstallation of the product.
This warranty is void if company deems the unit to have been damaged through modification, improper installation,
negligence, misuse, or tampering with the Serial number and/or bar code of the unit. This warranty is a limited warranty
for repair/replacement of product if it falls under the above conditions. XO Vision is never responsible for more than the
purchase price of the product.
XO Vision encourages customers to contact the retailer first and only then contact XO Vision for warranty support.
Customer is responsible for shipping the product to us; we cover shipping back to the customer.
If you are having trouble with your unit, please email us at: CustomerService@XOVision.com
In your email, please include the model number, date and place of purchase and the problem. Thank you for purchasing XO Vision.
OWNER'S MANUAL
Before installation and operating the unit please read
this manual thoroughly and retain
it for future reference
 Loading...