


 XOV30S
XOV36S
XOV42S
NEED HELP?
Call our ventilation experts toll free al 800-966-8300 AVEZ-VOUS BESOIN D’AIDE ?
Contactez nos experts au numéro gratuit 800-966-8300 ¿NECESITA AYUDA?
Póngase en contacto con nuestros expertos a través del número gratis 800-966-8300
USA RANGE HOOD - User instructions
F HOTTE DE CUISINE - Notice d’utilisation
E CAMPANA EXTRACTORA - Manual de utilización

XO Hood Warranty |
Proof of original purchase date and invoice is needed to obtain |
|
|
service under warranty. |
|
What is covered |
Limited 2 Year Warranty. |
|
|
For 2 years from the original date of purchase, we will provide, |
|
|
free of charge, parts and service labor in your home to repair or |
|
|
replace any part of the hood that fails because of a manufacturing |
|
|
defect. |
|
|
The warranty is extended to the original purchaser for products |
|
|
purchased for ordinary home use in North America. |
|
|
Should you require service for your XO product call a product |
|
|
service specialist at 800.966.8300 |
|
What is not covered |
Improper Installation. |
|
|
Service trips to the home to teach you how to use the product. |
|
|
Resetting circuit breakers. |
|
|
Damage caused after delivery. |
|
|
EXPECT MORE FROM XO |
|
|
When buying any XO appliance |
|
|
you can be confident |
|
|
you have purchased a high quality, |
|
|
innovative, and stylish product, |
|
|
from a company who cares about you |
|
|
|
|
|
|
|

ENGLISH |
USA |
IMPORTANT SAFETY INSTRUCTIONS
FOR RESIDENTIAL USE ONLY
READ AND SAVE THESE INSTRUCTIONS
PLEASE READ ENTIRE INSTRUCTIONS BEFORE PROCEEDING. IMPORTANT: Save these Instructions for the Local Electrical Inspectors use. INSTALLER: Please leave these Instructions with this unit for the owner. OWNER: Please retain these instructions for future reference.
Take care when using cleaning agents or detergents.
Suitable for use in household cooking area.
WARNING - To reduce the risk of fire or electric shock, do not use this fan with any Solid-State Speed Control Device.
CAUTION - To reduce risk of fire and to properly exhaust air, be sure to duct air outside – Do not vent exhaust air into spaces within walls or ceilings or into attics, crawl spaces, or garages.
CAUTION - For general ventilating use only. Do not use to exhaust hazardous or explosive materials and vapors.
CAUTION - To avoid motor bearing damage and noisy and/or unbalanced impellers, keep drywall spray, construction dust, etc. off power unit.
CAUTION - Please read specification label on product for further information and requirements.
WARNING – TO REDUCE THE RISK OF FIRE, ELECTRIC SHOCK, OR INJURY TO PERSONS, OBSERVE THE FOLLOWING:
A.Use this unit only in the manner intended by the manufacturer. If you have questions, contact the manufacturer.
B.Before servicing or cleaning unit, switch power off at service panel and lock the service disconnecting means to prevent power from being switched on accidentally. When the service disconnecting means cannot be locked, securely fasten a prominent warning device, such as a tag, to the service panel.
WARNING - TO REDUCE THE RISK OF A RANGE TOP GREASE FIRE:
A.Never leave surface units unattended at high settings. Boilovers cause smoking and greasy spillovers that may ignite. Heat oils slowly on low or medium settings.
B.Always turn hood ON when cooking at high heat or when flambeing foods (i.e.
-3 -

Crepes Suzette, Cherries Jubilee, Peppercorn Beef Flambè).
C.Clean ventilating fans frequently. Grease should not be allowed to accumulate on fan or filter.
D.Use proper pan size. Always use cookware appropriate for the size of the surface element.
E.Keep fan, filters and grease laden surface clean.
F.Use high range setting on range only when necessary.Heat oil slowly on low to medium setting.
G.Don’ t leave range unattended when cooking.
H.Always use cookware and utensils appropriate for the type and amount off food being prepared.
WARNING – TO REDUCE THE RISK OF INJURY TO PERSONS IN THE EVENT OF A RANGE TOP GREASE FIRE, OBSERVE THE FOLLOWINGa:
A.SMOTHER FLAMES with a close-fitting lid, cookie sheet, or metal tray, then turn off the burner. BE CAREFUL TO PREVENT BURNS. If the flames do not go out immediately, EVACUATE AND CALL THE FIRE DEPARTMENT.
B.NEVER PICK UP A FLAMING PAN – You may be burned.
C.DO NOT USE WATER, including wet dishcloths or towels – a violent steam explosion will result.
D.Use an extinguisher ONLY if:
1.You know you have a Class ABC extinguisher, and you already know how to operate it.
2.The fire is small and contained in the area where it started.
3.The fire department is being called.
4.You can fight the fire with your back to an exit.
aBased on “kitchen firesafety tips” published by NFPA.
Proper maintenance of the Range Hood will assure proper performance of the unit.
INSTALLATION INSTRUCTIONS
WARNING – TO REDUCE THE RISK OF FIRE, ELECTRIC SHOCK, OR INJURY TO PERSONS, OBSERVE THE FOLLOWING:
A.Installation work and electrical wiring must be done by qualified person(s) in accordance with all applicable codes and standards, including fire-rated construction.
B.Sufficient air is needed for proper combustion and exhausting of gases through the flue (chimney) of fuel burning equipment to prevent back drafting. Follow the heating equipment manufacturer’s guideline and safety standards such as those published by the National Fire Protection Association (NFPA), and the American Society for Heating, Refrigeration and Air Conditioning Engineers (ASHRAE), and the local code authorities.
C.When cutting or drilling into wall or ceiling, do not damage electrical wiring and other hidden utilities.
-4 -

D.Ducted fans must always be vented to the outdoors.
E.This unit must be grounded.
WARNING - TO REDUCE THE RISK OF FIRE, USE ONLY METAL DUCTWORK.
WARNING - UNDER CERTAIN CIRCUMSTANCES DOMESTIC APPLIANCES MAY BE DANGEROUS.
A.Do not check filters with hood working.
B.Do not touch the lamps after a prolonged use of the appliance.
C.No food must be cooked flambè underneath the hood.
D.The use of an unprotected flame is dangerous for the filters and could cause fires.
E.Watch constantly the fried food in order to avoid the cooking oil flares up.
F.Before performing any mainteinance operation, disconnect the hood from the electrical service.
The manufacturers will not to accept any responsability for eventual damages, because of failure to observe the above instructions.
- 5 -

Installation Preparation
DUCT FITTINGS:
This Hood Must Use an 6" Round Duct. It Can Transition to 3-1/4" x
10"or3-1/4"x12"Duct.
Use this chart to compute maximum permissible lengths for duct runs to
outdoors.
NOTE: Do not exceed maximum permissible equivalent
lengths!
Maximum duct length: 100 feet for range ho-
ods.
Flexible ducting:
If flexible metal ducting is used, all the equivalent feet values in the table should be doubled. The flexible metal duct should be straight and smooth and extended as much as
possible.
DO NOT use flexible plastic ducting.
NOTE: Any home ventilation system, such as a ventilation hood, may interrupt the proper flow of combustion air and exhaust required by fireplaces, gas furnaces, gas water heaters and other naturally vented systems. To minimize the chance of interruption of such naturally vented systems, follow the heating equipment manufacturer’s guidelines and safety standards such as those published by NFPA.
Duct |
Dimensions: |
Equivalent |
Quantity |
Total |
Piece: |
Number |
Used: |
Equivalent |
|
|
Length*: |
Length: |
||
|
|
|
||
|
Round, straight |
1 ft. (per foot |
|
|
|
lenhgth) |
|
|
|
|
3-1/4" x 10" |
1 ft. (per foot |
|
|
|
straight |
lenhgth) |
|
|
|
90° elbow |
12 ft. |
|
|
|
45° elbow |
7 ft. |
|
|
|
3-1/4" x 10" |
14 ft. |
|
|
|
3-1/4" x 12" |
|
|
|
|
10 ft. |
|
|
|
|
90° elbow |
|
|
|
|
|
|
|
|
|
3-1/4" x 10" |
8 ft. |
|
|
|
3-1/4" x 12" |
|
|
|
|
6 ft. |
|
|
|
|
45° elbow |
|
|
|
|
|
|
|
|
|
3-1/4" x 10" |
33 ft. |
|
|
|
3-1/4" x 12" |
|
|
|
|
24 ft. |
|
|
|
|
90° elbow |
|
|
|
|
|
|
|
|
|
6" round to |
2 ft. |
|
|
|
rectangular |
|
|
|
|
|
|
|
|
|
Rectangular to |
2 ft. |
|
|
|
8" round |
|
|
|
|
|
|
|
|
|
3-1/4" x 10" |
|
|
|
|
3-1/4" x 12" |
|
|
|
|
6" round to |
4 ft. |
|
|
|
rectangular |
4 ft. |
|
|
|
transition 90° |
|
|
|
|
elbow |
|
|
|
|
3-1/4" x 10" |
|
|
|
|
3-1/4" x 12" |
4 ft. |
|
|
|
Rectangular to |
|
|
|
|
4 ft. |
|
|
|
|
6" transition |
|
|
|
|
|
|
|
|
|
90° elbow |
|
|
|
|
Round wall |
|
|
|
|
cap with |
24 ft. |
|
|
|
dramper |
|
|
|
|
3-1/4" x 10" |
|
|
|
|
3-1/4" x 12" |
24 ft. |
|
|
|
Rectangular |
|
|
|
|
18 ft. |
|
|
|
|
wall cap with |
|
|
|
|
|
|
|
|
|
dramper |
|
|
|
|
Round roof |
33 ft. |
|
|
|
cap |
|
|
|
|
|
|
|
*Actual length of straight duct plus duct
fitting equivalent. Equivalent length of duct Total Duct Run = pieces reflect requirements for good venting
performance with any ventilation hood.
- 6 -
WARNING FIRE HAZARD
NEVER exhaust air or terminate duct work into spaces between walls, crawl spaces, ceiling, attics or garages.
All exhaust must be ducted to the outside, unless using the recirculating option.
Use single wall rigid Metal ductwork only.
Fasten all connections with sheet metal screws and tape all joints w/ certified Silver Tape or Duct Tape.
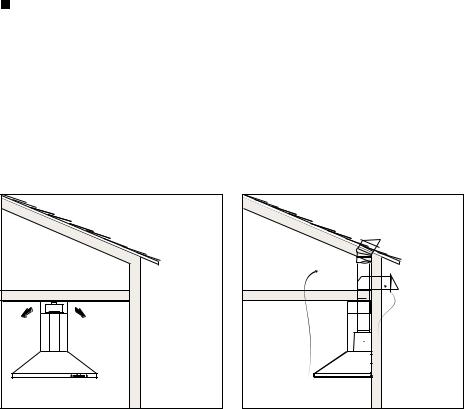
INSTALL THE DUCTWORK:
NOTE: To reduce the risk of fire, use only metal ductwork.
1.Decide where the ductwork will run between the hood and the outside.
2.A straight, short duct run will allow the hood to perform most efficiently.
3.Long duct runs, elbows, and transitions will reduce the performance of the hood. Use as few of them as possible.
4.Install a roof or wall cap. Connect 6" round metal ductwork to cap and work back towards hood location. Use duct tape to seal the joints between ductwork sections.
Installation - Ducting Options
- 7 -
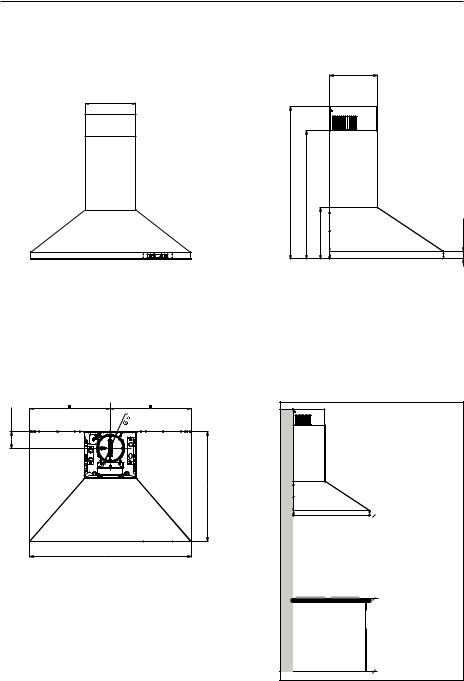
Hood Specifications
Product dimensions and clearance XOV30S - XOV36S - XOV42S:
› Front of hood |
› Side of hood |
������ |
|
› Top of hood
|
|
|
› Mounting height and clearance:
- 8 -
Installation Instructions Installation - Vented to the outside
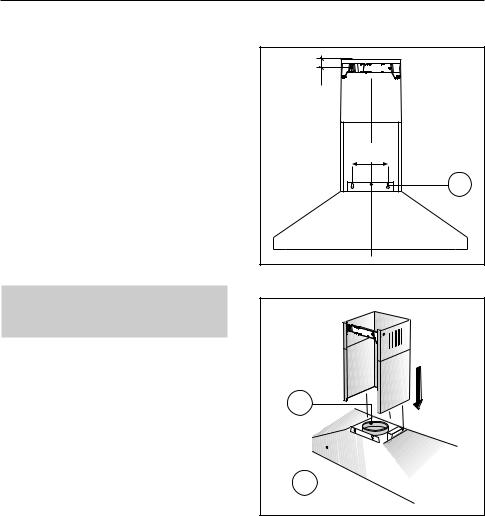
1. MOUNT TO THE WALL:
Drill the holes A respecting the distances indicated (Fig.1). Fix the appliance to the wall and align it in horizontal position to the wall units. When the appliance has been adjusted, definitely fix the hood using the screws A (Fig.2). For the various installations use screws and screw anchors suited to the type of wall (e.g. reinforced concrete, plasterboard, etc.). If the screws and screw anchors are provided with the product, check that they are suitable for the type of wall on which the hood is to be fixed.
|
|
|
Fig.1 |
IMPORTANT - The range hood must besecuredtowallstudsorusedrywall anchorscapableofsupporting75lbs.


Fig.2
- 9 -
 Loading...