

Page 1

X-Micro WLAN 11g PCI Adapter
User Manual
Page 2

Contents
1. Introduction 5
1.1 Product Feature ..........................................................................................5
1.2 System Requirement ..................................................................................5
2. Getting Start 5
2.1 LED Indicators...........................................................................................5
2.2 Install the 108Mbps Wireless Network PCI Adapter.................................6
2.2.1 Utility Installation ..........................................................................6
2.2.2 Driver Installation ..........................................................................9
3. Configuration 12
3.1 Link Information............................................................................................12
3.2 Configuration .................................................................................................13
3.3 Advance..........................................................................................................14
3.4 Site Survey.....................................................................................................17
3.5 About US........................................................................................................19
4. Glossary 19
2
Page 3

This product is in compliance with the essential
requirements and other relevant provisions of the
R&TTE directive 1999/5/EC.
Product Name: X-Micro WLAN 11g PCI Card
Mo d e l Na me : XWL-11GCAG
MAX. OUT POWER
Spain
France
France
Italy
UK
Netherlands
Germany
Austria
Belgium
Switzerland
Luxemburg
Ireland
Portugal
Norway
Denmark
COUNTRY CHANNELS
2400-2483.5 MHz 1-13 < 100 mW EIRP < 100 mW EIRP
2400-2454 MHz 1-8 < 100 mW EIRP < 100 mW EIRP
2454-2483.5 MHz 9-13 < 100 mW EIRP < 10 mW EIRP
2400-2483.5 MHz 1-13 < 100 mW EIRP < 100 mW EIRP
2400-2483.5 MHz 1-13 < 100 mW EIRP < 100 mW EIRP
2400-2483.5 MHz 1-13 < 100 mW EIRP < 100 mW EIRP
2400-2483.5 MHz 1-13 < 100 mW EIRP < 100 mW EIRP
2400-2483.5 MHz 1-13 < 100 mW EIRP < 100 mW EIRP
2400-2483.5 MHz 1-13 < 100 mW EIRP < 100 mW EIRP
2400-2483.5 MHz 1-13 < 100 mW EIRP < 100 mW EIRP
2400-2483.5 MHz 1-13 < 100 mW EIRP < 100 mW EIRP
2400-2483.5 MHz 1-13 < 100 mW EIRP < 100 mW EIRP
2400-2483.5 MHz 1-13 < 100 mW EIRP < 100 mW EIRP
2400-2483.5 MHz 1-13 < 100 mW EIRP < 100 mW EIRP
2400-2483.5 MHz 1-13 < 100 mW EIRP < 100 mW EIRP
INDOOR OUTDOOR
Finland
Iceland
Greece
Lichtenstein
Sweden
2400-2483.5 MHz 1-13 < 100 mW EIRP < 100 mW EIRP
2400-2483.5 MHz 1-13 < 100 mW EIRP < 100 mW EIRP
2400-2483.5 MHz 1-13 < 100 mW EIRP < 100 mW EIRP
2400-2483.5 MHz 1-13 < 100 mW EIRP < 100 mW EIRP
2400-2483.5 MHz 1-13 < 100 mW EIRP < 100 mW EIRP
3
Page 4

FCC INFORMATION
FCC Radiation Exposure Statement
This equipment complies with FCC radiation exposure limits set forth for an
uncontrolled environment.
This equipment should be installed and operated with minimum distance
20cm between the radiator & your body.
This transmitter must not be co-located or operating in conjunction with any
other antenna or transmitter.
The equipment has been tested and found to comply with the limits for a
Class B Digital Device, pursuant to part 15 of the FCC Rules. These limits are
designed to provide reasonable protection against harmful interference in a
residential installation.
This equipment generates, uses and can radiate radio frequency energy
and, if not installed and used in accordance with the instruction, may cause
harmful interference to radio communication. However, there is no grantee that
interference will not occur in a particular installation. If this equipment dose
cause harmful interference to radio or television reception, which can be
determined by turning the equipment off and on, the user is encouraged to try to
correct the interference by one or more of the following measures:
--Reorient or relocate the receiving antenna.
--Increase the separation between the equipment and receiver.
--Connect the equipment into an outlet on a circuit different from that to which
the receiver is connected.
--Consult the dealer or an experienced radio/TV technician for help.
Notice: The Part 15 radio device operates on a non-interference basis with
other devices operating at this frequency. Any changes or modification not
expressly approved by the party responsible could void the user’s authority to
operate the device.
REGULATORY INFORMATION
X-Micro WLAN 11g PCI Card must be installed and used in strict accordance
with the instructions. This device complies with the following radio frequency
and safety standards.
USA - Federal Communications Commission (FCC)
This device complies with Part 15 of FCC Rules. Operation is subject to the
following two conditions:
1. This device may not cause harmful interference.
2. This device must accept any interference that may cause undesired
operation.
4
Page 5

1. Introduction
1.1 Product Feature
● Compliance with IEEE 802.11g and 802.11b standards
● Highly efficient design mechanism to provide unbeatable performance
● Achieving data rate up to 54Mbps for 802.11g and 11Mps for 802.11b with wide
range coverage; high performance to deliver up to 108Mbps raw data rate for
802.11g
● Strong network security with WEP and WPA support
● Auto-switch between the two standards, IEEE 802.11b and 802.11g
● Driver/Utility support most commonly used operating systems including
Windows 98SE/ME/200/XP.
1.2 System Requirement
● Windows 98, 98SE, Millennium Edition (ME), 2000 and XP operating systems
● PC with Pentium III 600MHz system or above is recommended
● Equipped with at least one PCI slot.
● One CD-ROM drive
2. Getting Start
2.1 LED Indicators
The LED will be ON when the unit is powered up.
The LED will be Blinking indicates a WLAN connection.
5
Page 6

2.2 Install the 108Mbps Wireless Network PCI Adapter
2.2.1 Utility Installation
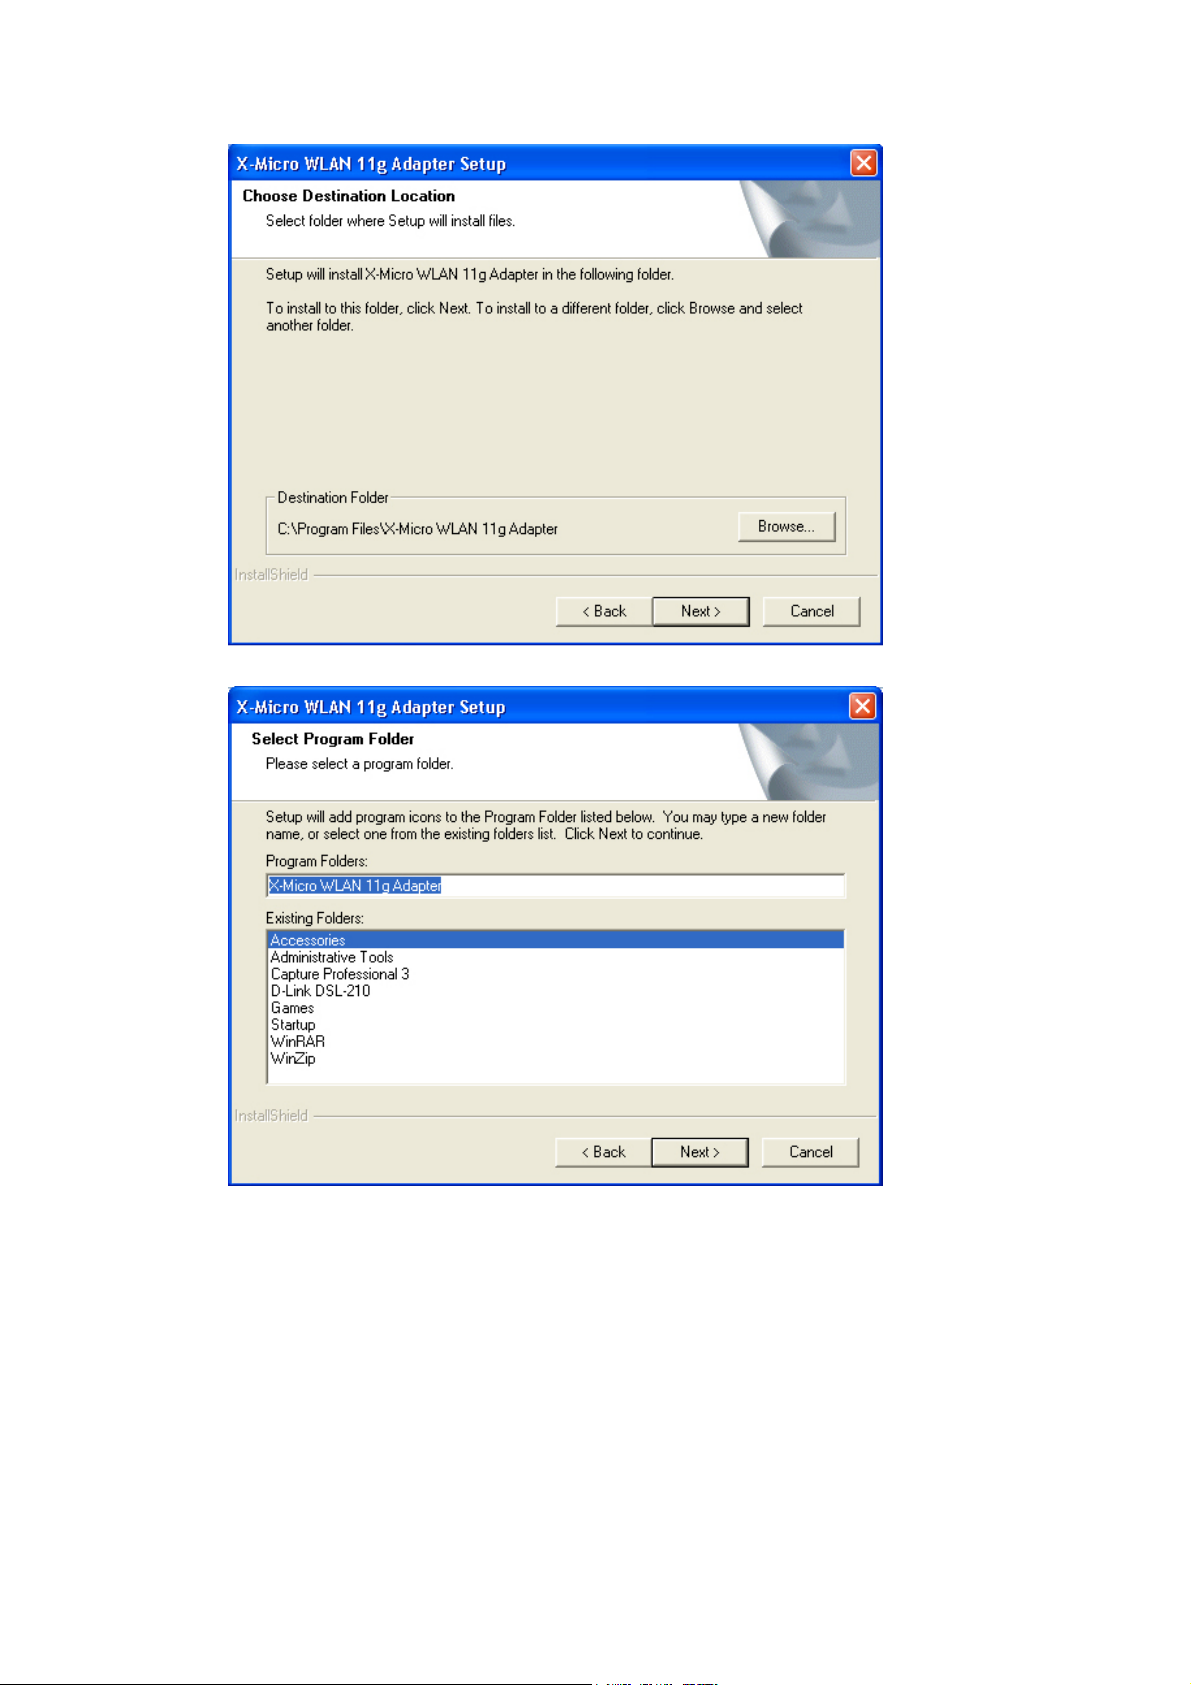
1. Before insert PCI Adapter into the PCI slot of your computer, please install the
Utility Program first. Make sure that the 108Mbps wireless Network PCI
Adapter is NOT inserted into the PCI slot.
NOTE: all the snapped images of installation mentioned in this manual are based
on Windows XP. For other windows operating system, all the procedures are
the same but the screens are not the exactly same.
2. Turn on the computer. Insert the CD into the CD-ROM Drive. Please select
“PC Card/ PCI Card” and then click the “Install”.
6
Page 7

3. InstallShield Wizard will automatically start. Please click “Next” to continue.
7
Page 8
8
Page 9

4. Please click “Finish”
5. Please make sure TURN OFF your computer and remove the power cord from
your PC. Open the computer case and then please insert the Wireless PCI
Adapter into the empty PCI slot of your computer system. Once the Wireless
PCI Adapter is installed, place the computer case back. Turn ON your
computer.
2.2.2 Driver Installation
1. Please select the second option and click “Next”.
9
Page 10

2. Please click “Continue Anyway”
10
Page 11

3. Please click “Finish”
4. To make sure if the installation is successful, you could check it through the
device management.
11
Page 12

5. Once the installation is successful, a utility program icon will show on your
desktop. To lunch the utility, just double click the icon.
3. Configuration
3.1 Link Information
The default page is as below after you launch the Utility program.
Status: Shows the BSSID associated, which can be used to identify the wireless
network.
SSID: Shows current SSID, which must be the same for the wireless client and AP in
order for communication to be established.
Frequency: Shows the current frequency used for wireless network.
Wireless Mode: Shows the current wireless mode used for wireless communication.
12
Page 13

Encryption: Shows the current encryption mode used for wireless network.
TxRate: Shows the current data rate used for transmitting.
Channel: Shows the current channel for communication.
Link Quality: Shows the link quality of the 54Mbps wireless network PCI Adapter
with the Access Point when operating under Infrastructure mode.
Signal Strength: Shows the wireless signal strength of the connection between the
54Mbps wireless network PCI Adapter with the Access Point.
Data Rate: Shows the statistics of data transfer, and the calculation is based on the
number of packets transmitted and received.
3.2 Configuration
This is the page where you can change the basic settings of the Access Point with the
minimum amount of effort to implement a secure wireless network environment.
SSID: Service Set Identifier, which is a unique name shared among all clients and
nodes in a wireless network. The SSID must be identical for each clients and nodes in
the wireless network.
Wireless Mode: There are two types available for selection
●Infrastructure – to establish wireless communication with LAN and other wireless
clients through the use the Access Points.
13
Page 14

●Ad-Hoc – to establish point-to-point wireless communication directly with other
wireless client devices such as wireless network PCI Adapter.
AdHoc Band: There are two bands available for selection- 11B and 11G
Channel: The value of channel that AP will operate in. You can select the channel
range of 1 to 11 for North America (FCC) domain and 1 to 13 for European (ETSI)
domain and 1 to 14 for Japanese domain.
Tx Rate: Select the data rate for data transmission.
Power Mode: There are 3 modes to choose.
●Continuous Access Mode (default) – the PCI Adapter is constantly operating with
full power and it consumes the most power.
●Maximum Power Save – the PCI Adapter consumes the least power and only
operates when there is wireless network activity.
●Power Save – the PCI Adapter consumes the moderate level of power.
Preamble: Select Long or Short Preamble type. Preamble is a sequence of bits
transmitted at 1Mbps that allows the PHY circuitry to reach steady-state
demodulation and synchronization of bit clock and frame start. Two different
preambles and headers are defined: the mandatory supported Long Preamble and
header, which interoperates with the 1 Mbit/s and 2 Mbit/s DSSS specification (as
described in IEEE Std 802.11), and an optional Short Preamble and header (as
described in IEEE Std 802.11b). At the receiver, the Preamble and header are
processed to aid in demodulation and delivery of the PSDU. The Short Preamble and
header may be used to minimize overhead and, thus, maximize the network data
throughput. However, the Short Preamble is supported only from the IEEE 802.11b
(High- Rate) standard and not from the original IEEE 802.11. That means that stations
using Short-Preamble cannot communicate with stations implementing the original
version of the protocol.
Click “Apply” for the changes to take effect. And then the screen will return to Link
Info. Page.
3.3 Advanced
This is the page where you configure Security settings of your 54Mbps wireless
network PCI Adapter.
14
Page 15
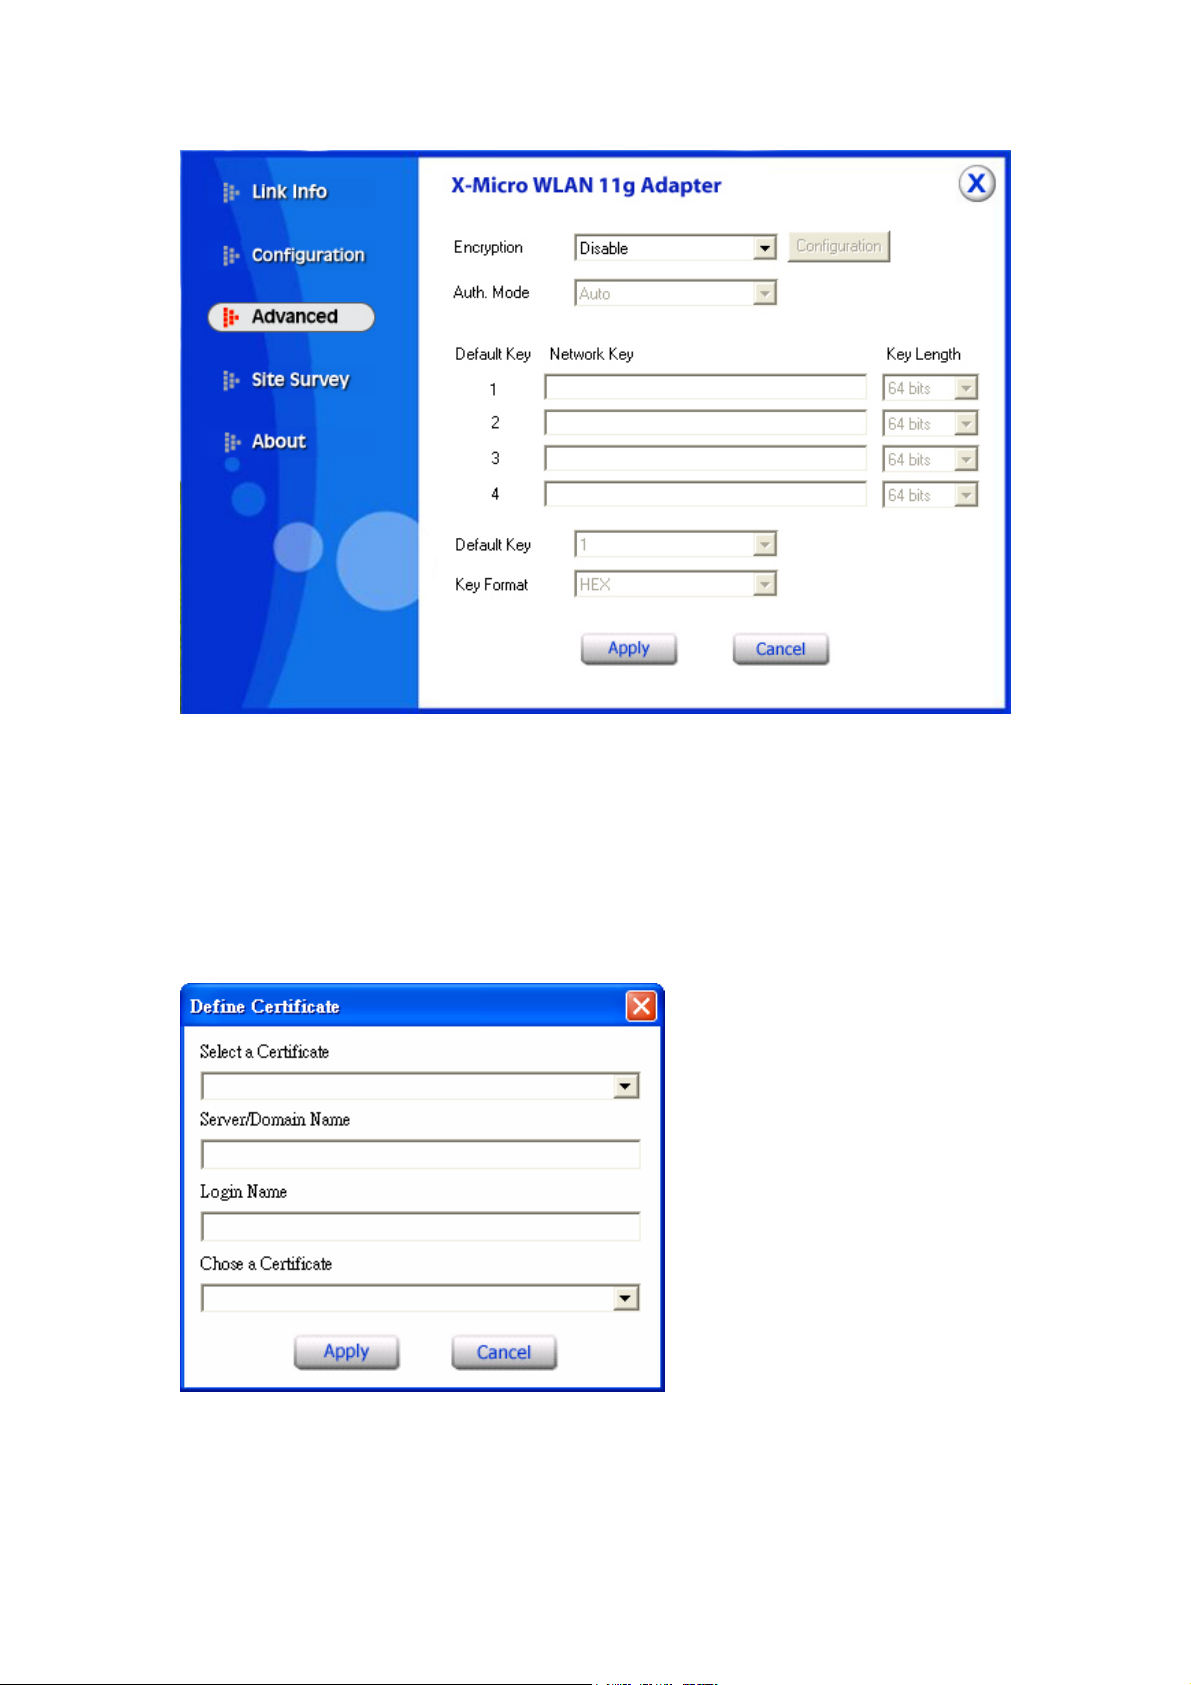
Encryption: 4 options are available: Disable, Enable, WPA and WPA-PSK.
Select Enable or Disable for WEP data encryption feature. If one of the two
options is selected, it is required to select the Authentication mode from the next
dropping list. If WPA is selected, configuration is enabled. Please click the
configuration. The below window is pop up. Then, please select the certificate that
you like to use and enter the server name and login name
If WPA-PSK is selected, click the configuration button. The popping window is as
the below. Please enter the key.
15
Page 16

Aut. Mode: There are three modes available to choose.
Open Authentication – the sender and receiver do not share secret Key for
communication. Instead, each party generates its own key-pairs and asks the other
party to accept it. The key is regenerated when the connection is established every
time.
Shared Authentication – the sender and receiver shares the common key for
data communication, and the key is used for extended length of time.
Auto – depend on the communication to establish, and automatically use the
proper authentication mode.
The following will only be activated to allow for configuration when Encryption is
enabled.
Default Key: select one of the 4 keys to use.
Network Key: enter values to these fields, either in HEX or ASCII formats. You
only have to enter the key that you will use
Key Length: select 64 or 128 bits as the length of the keys
Key Format: ASCII or HEX
16
Page 17

3.4 Site Survey
This page allows you to enable the Site Survey function to scan for the available
wireless network (wireless clients and Access Points) and establish wireless
communications with one.
Available Network – displays the wireless networks (wireless clients and Access
Points) that are in your signal range.
Select any one of them to establish communications by simply mouse double-click
or click on the “Connect” button.
Click “Refresh” button to start scanning for available network again.
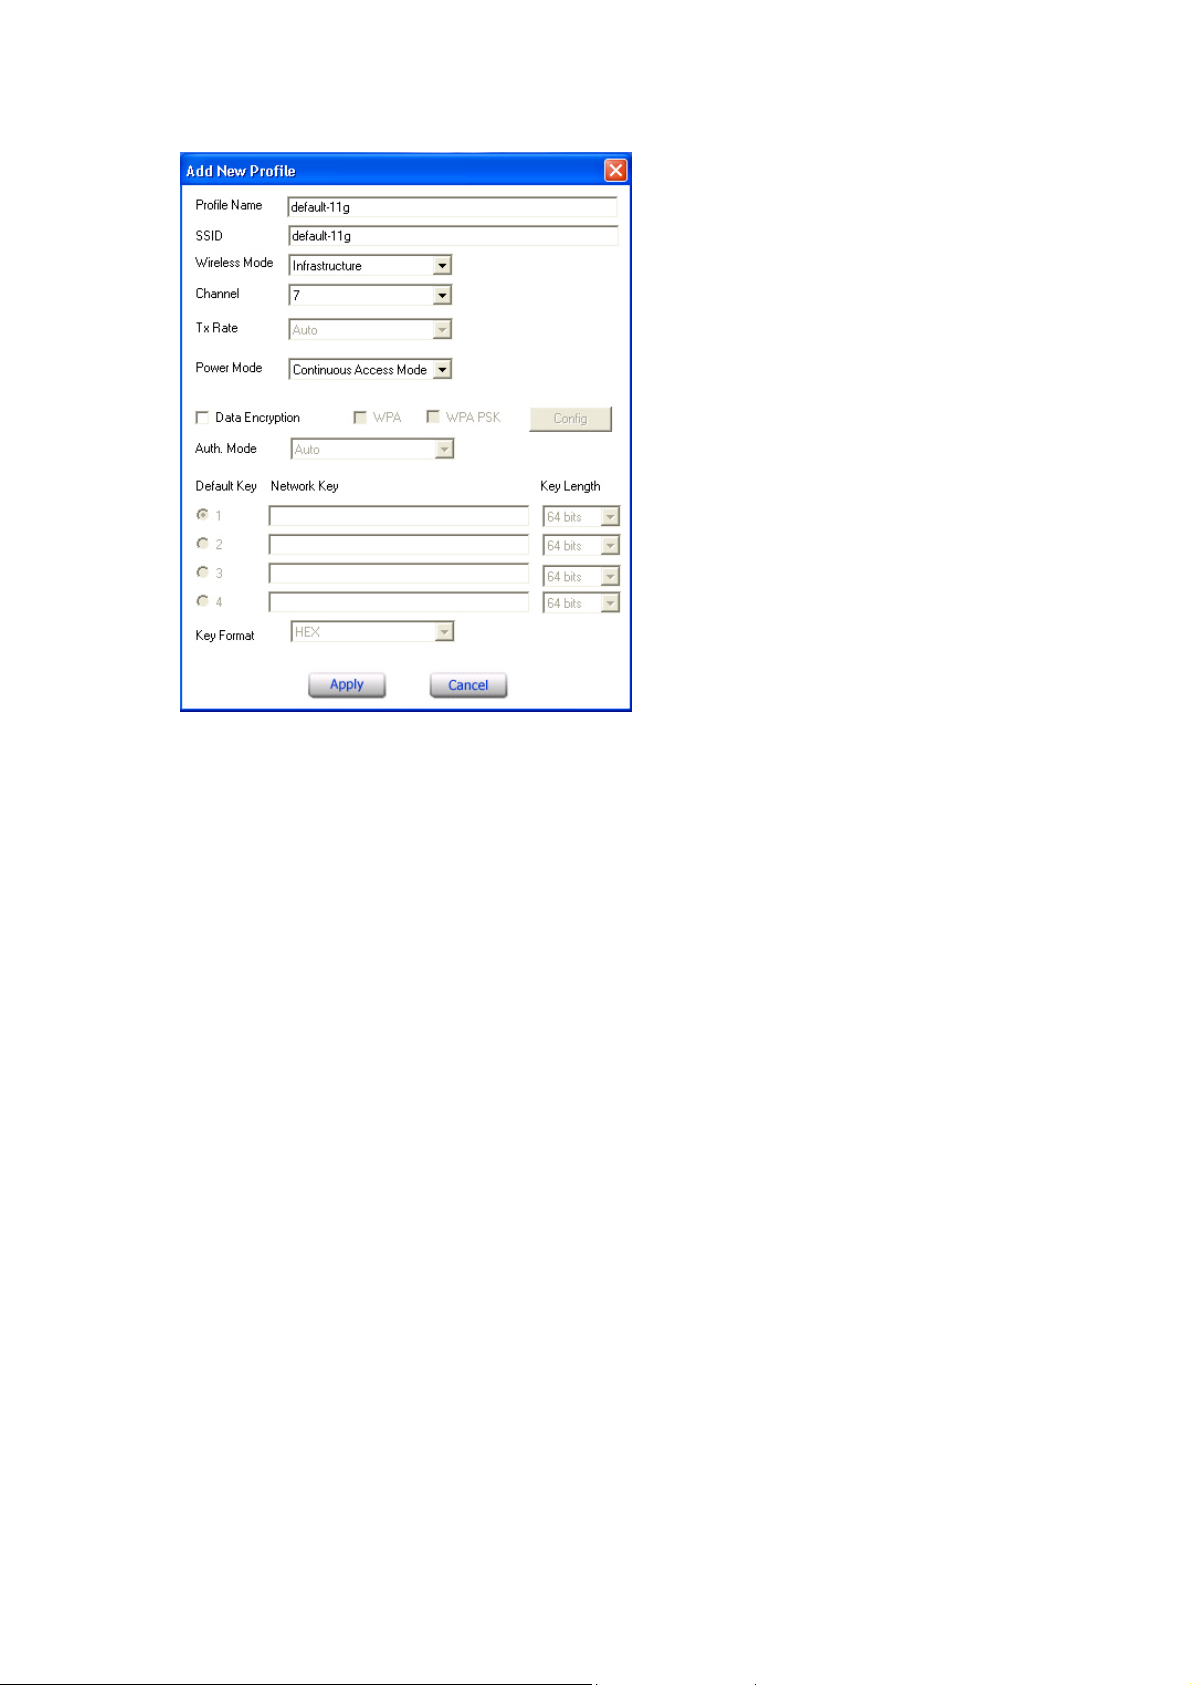
Profile – You can create and manage the created profiles for Home, offices or public
areas. By double-clicking on one of the created profile, the setting will adapt to the
configuration such as SSID, channel, and WEP settings saved by that particular
profile.
Remove: To remove the selected the profile
Properties: To view and change its settings of the profile.
Add: To add a profile. Then, the following screen would appear.
17
Page 18
18
Page 19

3.5 About US
This page displays some information about the 54Mpbs PCI Adapter utility, which
includes the version numbers for Driver, Firmware and Utility. When there is new
version of software available for upgrade, you will be able to identify by version
numbers.
4. Glossary
Access Point: An internetworking device that seamlessly connects wired and
wireless networks.
Ad-Hoc: An independent wireless LAN network formed by a group of computers,
each with a network adapter.
AP Client: One of the additional AP operating modes offered by 54Mbps Access
Point, which allows the Access Point to act as an Ethernet-to-Wireless Bridge, thus a
LAN or a single computer station can join a wireless ESS network through it.
ASCII: American Standard Code for Information Interchange, ASCII, is one of the
two formats that you can use for entering the values for WEP key. It represents
English letters as numbers from 0 to 127.
19
Page 20

Authentication Type: Indication of an authentication algorithm which can be
supported by the Access Point:
1. Open System: Open System authentication is the simplest of the available
authentication algorithms. Essentially it is a null authentication algorithm. Any station
that requests authentication with this algorithm may become authenticated if 802.11
Authentication Type at the recipient station is set to Open System authentication.
2. Shared Key: Shared Key authentication supports authentication of stations as either
a member of those who knows a shared secret key or a member of those who does
not.
Backbone: The core infrastructure of a network, which transports information from
one central location to another where the information is unloaded into a local system.
Bandwidth: The transmission capacity of a device, which is calculated by how
much data the device can transmit in a fixed amount of time expressed in bits per
second (bps).
Beacon: A beacon is a packet broadcast by the Access Point to keep the network
synchronized. Included in a beacon are information such as wireless LAN service area,
the AP address, the Broadcast destination addresses, time stamp, Delivery Traffic
Indicator Maps, and the Traffic Indicator Message (TIM).
Bit: A binary digit, which is either -0 or -1 for value, is the smallest unit for data.
Bridge: An internetworking function that incorporates the lowest 2 layers of the OSI
network protocol model.
Browser: An application program that enables one to read the content and
interact in the World Wide Web or Intranet.
BSS: BSS stands for “Basic Service Set”. It is an Access Point and all the LAN PCs
that associated with it.
Channel: The bandwidth which wireless Radio operates is divided into several
segments, which we call them “Channels”. AP and the client stations that it associated
work in one of the channels.
CSMA/CA: In local area networking, this is the CSMA technique that combines
slotted time -division multiplexing with carrier sense multiple access/collision
detection (CSMA/CD) to avoid having collisions occur a second time. This works
best if the time allocated is short compared to packet length and if the number of
situations is small.
CSMA/CD: Carrier Sense Multiple Access/Collision Detection, which is a LAN
access method used in Ethernet. When a device wants to gain access to the network, it
checks to see if the network is quiet (senses the carrier). If it is not, it waits a random
amount of time before retrying. If the network is quiet and two devices access the line
at exactly the same time, their signals collide. When the collision is detected, they
20
Page 21

both back off and wait a random amount of time before retrying.
DHCP: Dynamic Host Configuration Protocol, which is a protocol that lets network
administrators manage and allocate Internet Protocol (IP) addresses in a network.
Every computer has to have an IP address in order to communicate with each other in
a TCP/IP based infrastructure network. Without DHCP, each computer must be
entered in manually the IP address. DHCP enables the network administrators to
assign the IP from a central location and each computer receives an IP address upon
plugged with the Ethernet cable everywhere on the network.
DSSS: Direct Sequence Spread Spectrum. DSSS generates a redundant bit pattern for
each bit to be transmitted. This bit pattern is called a chip (or chipping code). The
longer the chip, the greater the probability that the original data can be recovered.
Even if one or more bits in the chip are damaged during transmission, statistical
techniques embedded in the radio can recover the original data without the need for
retransmission. To an unintended receiver, DSSS appears as low power wideband
noise and is rejected (ignored) by most narrowband receivers.
Dynamic IP Address: An IP address that is assigned automatically to a client
station in a TCP/IP network by a DHCP server.
Encryption: A security method that uses a specific algorithm to alter the data
transmitted, thus prevent others from knowing the information transmitted.
ESS: ESS stands for “Extended Service Set”. More than one BSS is configured to
become Extended Service Set. LAN mobile users can roam between different BSSs in
an ESS.
ESSID: The unique identifier that identifies the ESS. In infrastructure association, the
stations use the same ESSID as AP’s to get connected.
Ethernet: A popular local area data communications network, originally developed
by Xerox Corp., that accepts transmission from computers and terminals. Ethernet
operates on a 10/100 Mbps base transmission rate, using a shielded coaxial cable or
over shielded twisted pair telephone wire.
Fragmentation: When transmitting a packet over a network medium, sometimes the
packet is broken into several segments, if the size of packet exceeds that allowed by
the network medium.
Fragmentation Threshold: The Fragmentation Threshold defines the number of
bytes used for the fragmentation boundary for directed messages. The purpose of
"Fragmentation Threshold" is to increase the transfer reliability thru cutting a MAC
Service Data Unit (MSDU) into several MAC Protocol Data Units (MPDU) in smaller
size. The RF transmission can not allow to transmit too big frame size due to the
heavy interference caused by the big size of transmission frame. But if the frame size
is too small, it will create the overhead during the transmission.
21
Page 22

Gateway: a device that interconnects networks with different, incompatible
communication protocols.
HEX: Hexadecimal, HEX, consists of numbers from 0 – 9 and letters from A – F.
IEEE: The Institute of Electrical and Electronics Engineers, which is the largest
technical professional society that promotes the development and application of
electrotechnology and allied sciences for the benefit of humanity, the advancement of
the profession. The IEEE fosters the development of standards that often become
national and international standards.
Infrastructure: An infrastructure network is a wireless network or other small
network in which the wireless network devices are made a part of the network through
the Access Point which connects them to the rest of the network.
ISM Band: The FCC and their counterparts outside of the U.S. have set aside
bandwidth for unlicensed use in the ISM (Industrial, Scientific and Medical) band.
Spectrum in the vicinity of 2.4GHz, in particular, is being made available worldwide.
MAC Address: Media Access Control Address is a unique hex number assigned by
the manufacturer to any Ethernet networking device, such as a network adapter, that
allows the network to identify it at the hardware level.
Multicasting: Sending data to a group of nodes instead of a single destination.
Multiple Bridge – One of the additional AP operating modes offered by 54Mbps
Access Point, which allows a group of APs that consists of two or more APs to
connect two or more Ethernet networks or Ethernet enabled clients together. The way
that multiple bridge setups is based on the topology of Ad-Hoc mode.
Node: A network junction or connection point, typically a computer or workstation.
Packet: A unit of data routed between an origin and a destination in a network.
PLCP: Physical layer convergence protocol
PPDU: PLCP protocol data unit
Preamble Type: During transmission, the PSDU shall be appended to a PLCP
preamble and header to create the PPDU. Two different preambles and headers are
defined as the mandatory supported long preamble and header which interoperates
with the current 1 and 2 Mbit/s DSSS specification as described in IEEE Std
802.11-1999, and an optional short preamble and header. At the receiver, the PLCP
preamble and header are processed to aid in demodulation and delivery of the PSDU.
The optional short preamble and header is intended for application where maximum
throughput is desired and interoperability with legacy and non-short-preamble capable
equipment is not consideration. That is, it is expected to be used only in networks of
like equipment that can all handle the optional mode. (IEEE 802.11b standard)
PSDU: PLCP service data unit
Roaming: A LAN mobile user moves around an ESS and enjoys a continuous
22
Page 23

connection to an Infrastructure network.
RTS: Request To Send. An RS-232 signal sent from the transmitting station to the
receiving station requesting permission to transmit.
RTS Threshold: Transmitters contending for the medium may not be aware of each
other. RTS/CTS mechanism can solve this “Hidden Node Problem”. If the packet size
is smaller than the preset RTS Threshold size, the RTS/CTS mechanism will NOT be
enabled.
SSID: Service Set Identifier, which is a unique name shared among all clients and
nodes in a wireless network. The SSID must be identical for each clients and nodes in
the wireless network.
Subnet Mask: The method used for splitting IP networks into a series of sub-groups,
or subnets. The mask is a binary pattern that is matched up with the IP address to turn
part of the host ID address field into a field for subnets.
TCP/IP: Transmission Control Protocol/ Internet Protocol. The basic communication
language or protocol of the Internet. It can also be used as a communications protocol
in a private network, i.e. intranet or internet. When you are set up with direct access to
the Internet, your computer is provided with a copy of the TCP/IP program just as
every other computer that you may send messages to or get information from also has
a copy of TCP/IP.
Throughput: The amount of data transferred successfully from one point to another
in a given period of time.
WEP: Wired Equivalent Privacy (WEP) is an encryption scheme used to protect
wireless data communication. To enable the icon will prevent other stations without
the same WEP key from linking with the AP.
Wireless Bridge – One of the additional AP operating modes offered by 54mpbs
Access Point, which allows a pair of APs to act as the bridge that connects two
Ethernet networks or Ethernet enabled clients together.
23
 Loading...