

Page 1
Page 2

x-Lab Dot Matrix Printer XDP-321 User's Manual
Declare
About Trademark
*
is a registered trademark of xLab Global LLC in United States of America. All
other trademarks are the property of their respective owners and used for identification
purpose only.
All the Product information are subject to change without prior notice.
- i -
Page 3

x-Lab Dot Matrix Printer XDP-321 User's Manual
Warnings, Cautions, and Notes
Pay attention to the following promises when using this manual:
Warning:
Warnings must be followed carefully to avoid bodily injury.
Caution:
Cautions must be observed to avoid damage to your equipment.
Note:
Notes contain important information and useful tips on the operation of your printer.
- ii -
Page 4

x-Lab Dot Matrix Printer XDP-321 User's Manual
Important Safety Instructions
Read all of these instructions carefully and thoroughly and save them for future reference. The
unauthorized operation would lead to malfunction or accident. Manufacturers have no
responsibilities for the problems which are led by unauthorized operations from users.
1. Follow all warnings and instructions in the manual as well as marked on the product.
2. If the printer has been used recently , please do not touch the print head for overheating.
3. Do not put your fingers under the left and right tractor sprocket covers .
4. Unplug this product from the power outlet before cleaning. Do not use liquid or aerosol cleaners. Use a
damp cloth for cleaning.
5. Do not use this product near water.
6. Do not place this product on an unstable cart, stand or table. If this product fall, this may cause serious
damage to you or the product.
7. Slots and openings on the cabinet and the back or bottom are provided for air ventilation. To ensure
reliable operation of the product and to protect it from overheating, do not block or cover this area.
8. This product should never be placed near or over a radiator or heat origin, and should avoid from
direct sunshine.
9. Do not use in locations subject to high humidity or dust levels. Excessive humidity and dust may cause
equipment damage or fire.
10. Don’t remove the printer’s out-cover and never try to repair the printer by yourself . When it needed to
be repaired , please call or take it to the professional.
11. To ensure the safety of machine, please unplug this product from electric port connection if it is not
used for long time.
12. This product belongs to the impact printer, it produces noise during printing, so we suggest you to
place this printer in a relatively independent area.
13. Check the proper ventilation in room before using this printer.
14. Unplug this product from the power outlet and leave servicing to qualified service personnel under the
following conditions:
A. When the power cord or plug is damaged or frayed.
B. If liquid has been spilled into the product.
C. If the product has been exposed to rain or water.
D. If the product does not operate normally when the operating instructions are followed.
E. If the product has been dropped or the cabinet has been damaged.
F. If the product exhibits a distinct change in performance, it indicates a need for service.
Note: The contents of this manual are subject to change without notice.
* All parts of the printer can be recycled. When it is abandoned, we can call it back freely.
Please contact us when you abandon it.
- iii -
Page 5

x-Lab Dot Matrix Printer XDP-321 User's Manual
Overview
Thank you for purchasing this x-Lab printer. The printer is a 9-pin and 80-column dot matrix printer,
offering a wide range of features and multiple functions. It can be widely used in tax, mail, telecom,
police-station, hospital, insurance, finance, stock, customhouse, cabaret, aviation and transport etc.
Features:
Install Paper Easily
The design makes you load paper easily and rapidly which help to save your time.
Tear Off Function
This function helps tractor paper to be fed automatically to the tear-off position at the edge of the cutter,
for easy tear-off at the perforations after printing. This zero tear-off capability helps eliminate paper
wastage.
Facility Switch Between Cut Sheet and Tractor Paper
Tractor paper will eject automatically through LOAD/EJECT button on the control panel, pull the paper
select lever to the cut sheet position, and then load the cut sheet to print. If you want to use tractor
paper again, pull the paper select lever to the tractor paper position, then press LOAD/EJECT button,
tractor paper may be fed to the printer and print.
Eject Function
The function allows the user to eject the cut sheet or tractor paper through the facility key on the control
panel.
Select the Data Transfer Interface Automatically
The printer is configured with parallel interface, USB interface or serial interface (Please take the
specific interface as standard). Connect the printer to the computer with the correct cables. The printer
would switch to the correct interface according to the received data type automatically.
Break Pin Compensation Function
User can set the printer to print using the pin which is in good condition to compensate the break pin.
Pin Rotation Replacement Function
User can set pins to switch while printing form transverse line in order to improve print head’s life.
- iv -
Page 6

x-Lab Dot Matrix Printer XDP-321 User's Manual
Table of Contents
Declare.......................................................................................................................................................... i
Important Safety Instructions...................................................................................................................iii
Overview..................................................................................................................................................... iv
Chapter 1 Prep
aration ................................................................................................................................ 1
1.1 Unpacking & Checking........................................................................................................................1
1.2 Removing the Protective Materials......................................................................................................1
1.3 Main Parts of the Printer......................................................................................................................1
1.4 Choosing a Place for the Printer .........................................................................................................2
1.5 Installing the Printer ............................................................................................................................3
1.5.1 Installing the Paper Feed Knob ....................................................................................................3
1.5.2 Installing the Ribbon Cartridge .....................................................................................................3
1.6 Installing the Tractor............................................................................................................................ 5
1.6.1 Installing the Drive Tractor ............................................................................................................ 5
1.6.2 Installing the Draught Tractor........................................................................................................ 6
1.7 Connecting the Power Cord ................................................................................................................7
1.8 Self-test...............................................................................................................................................8
1.9 Connecting to Your Computer or Other Equipment.............................................................................9
1.9.1 Connecting to the Parallel Interface Cable .................................................................................10
1.9.2 Connecting to the USB Interface Cable
......................................................................................10
1.9.3 Connecting to the Serial Interface Cable ....................................................................................10
1.10 Installing Driver ............................................................................................................................... 11
1.10.1 Auto-installing way (Recommended) ........................................................................................ 11
1.10.2 Hand-operated installing way ................................................................................................... 11
Chapter 2 Control Panel...........................................................................................................................14
2.1 LED Indicator ....................................................................................................................................14
2.2 Key Functions ...................................................................................................................................14
2.2.1 In the Tractor Paper Mode .......................................................................................................... 14
2.2.2 In the Cut Sheet Mode................................................................................................................ 15
2.2.3 Print Speed.................................................................................................................................15
2.2.4 Micro-Adjust of Printing Home Position and Tear-off Position..................................................... 15
2.2.5 Feed Paper to the Tear-off Position ............................................................................................15
2.2.6 Other Functions of the Panel ...................................................................................................... 16
2.3 Paper Select Lever............................................................................................................................ 16
2.4 Paper Feed Knob
..............................................................................................................................16
2.5 Gap Adjust Lever...............................................................................................................................16
Chapter 3 How to Use the Printer............................................................................................................18
3.1 Installing the Print Paper ................................................................................................................... 18
3.1.1
Loading Cut Sheet......................................................................................................................18
3.1.2 Loading Tractor Paper
................................................................................................................19
3.1.3 Loading Multi-ply papers.............................................................................................................24
- v -
Page 7

x-Lab Dot Matrix Printer XDP-321 User's Manual
3.1.4 Loading Labels ........................................................................................................................... 25
3.1.5 Loading Envelopes ..................................................................................................................... 25
3.2 Changing Printer Setup
.....................................................................................................................26
3.2.1 Setting Printer Parameter Through the Control Panel ................................................................26
3.2.2 Online-aptitude Parameter Settings............................................................................................ 28
3.3 Printer Setting Descriptions............................................................................................................... 29
3.4 Restore the Factory Default Settings ................................................................................................31
Chapter 4 Problems and Solutions .........................................................................................................32
4.1 Power Supply ....................................................................................................................................32
4.2 Printing..............................................................................................................................................32
4.3 Paper Handling ................................................................................................................................. 34
4.4 Alignment Adjust Mode......................................................................................................................35
Chapter 5 Printer Maintenance and Technical Service.......................................................................... 36
5.1 Cleaning the Printer ..........................................................................................................................36
5.2 Contact the Technical Service Centre ...............................................................................................36
Appendix A Specifications....................................................................................................................... 37
A.1 General.............................................................................................................................................37
A.2 Interface Specif
ications.....................................................................................................................39
A.2.1 Parallel Interface ........................................................................................................................39
A.2.2 USB Interface.............................................................................................................................39
A.2.3 Serial Interface ........................................................................................................................... 39
Chapter B Paper Specification ................................................................................................................41
B.1 Paper
Specification and Printable Area.............................................................................................41
B.1.1 The Notice Related to Paper ...................................................................................................... 41
B.1.2 Useable Paper Types and Guarantee Area................................................................................ 42
B.1.3 Cut Sheet ...................................................................................................................................42
B.1.4 Tractor Paper..............................................................................................................................46
B.1.5 Envelope ....................................................................................................................................53
B.1.6 Delivery Note.............................................................................................................................. 58
B.1.7 Postcard .....................................................................................................................................58
B.1.8 Passbook ................................................................................................................................... 58
B.1.9 Label .......................................................................................................................................... 58
B.1.10 Recycled Paper
........................................................................................................................58
Appendix C Command Summary............................................................................................................59
- vi -
Page 8
x-Lab Dot Matrix Printer XDP-321 User's Manual
Chapter 1 Preparation
1.1 Unpacking & Checking
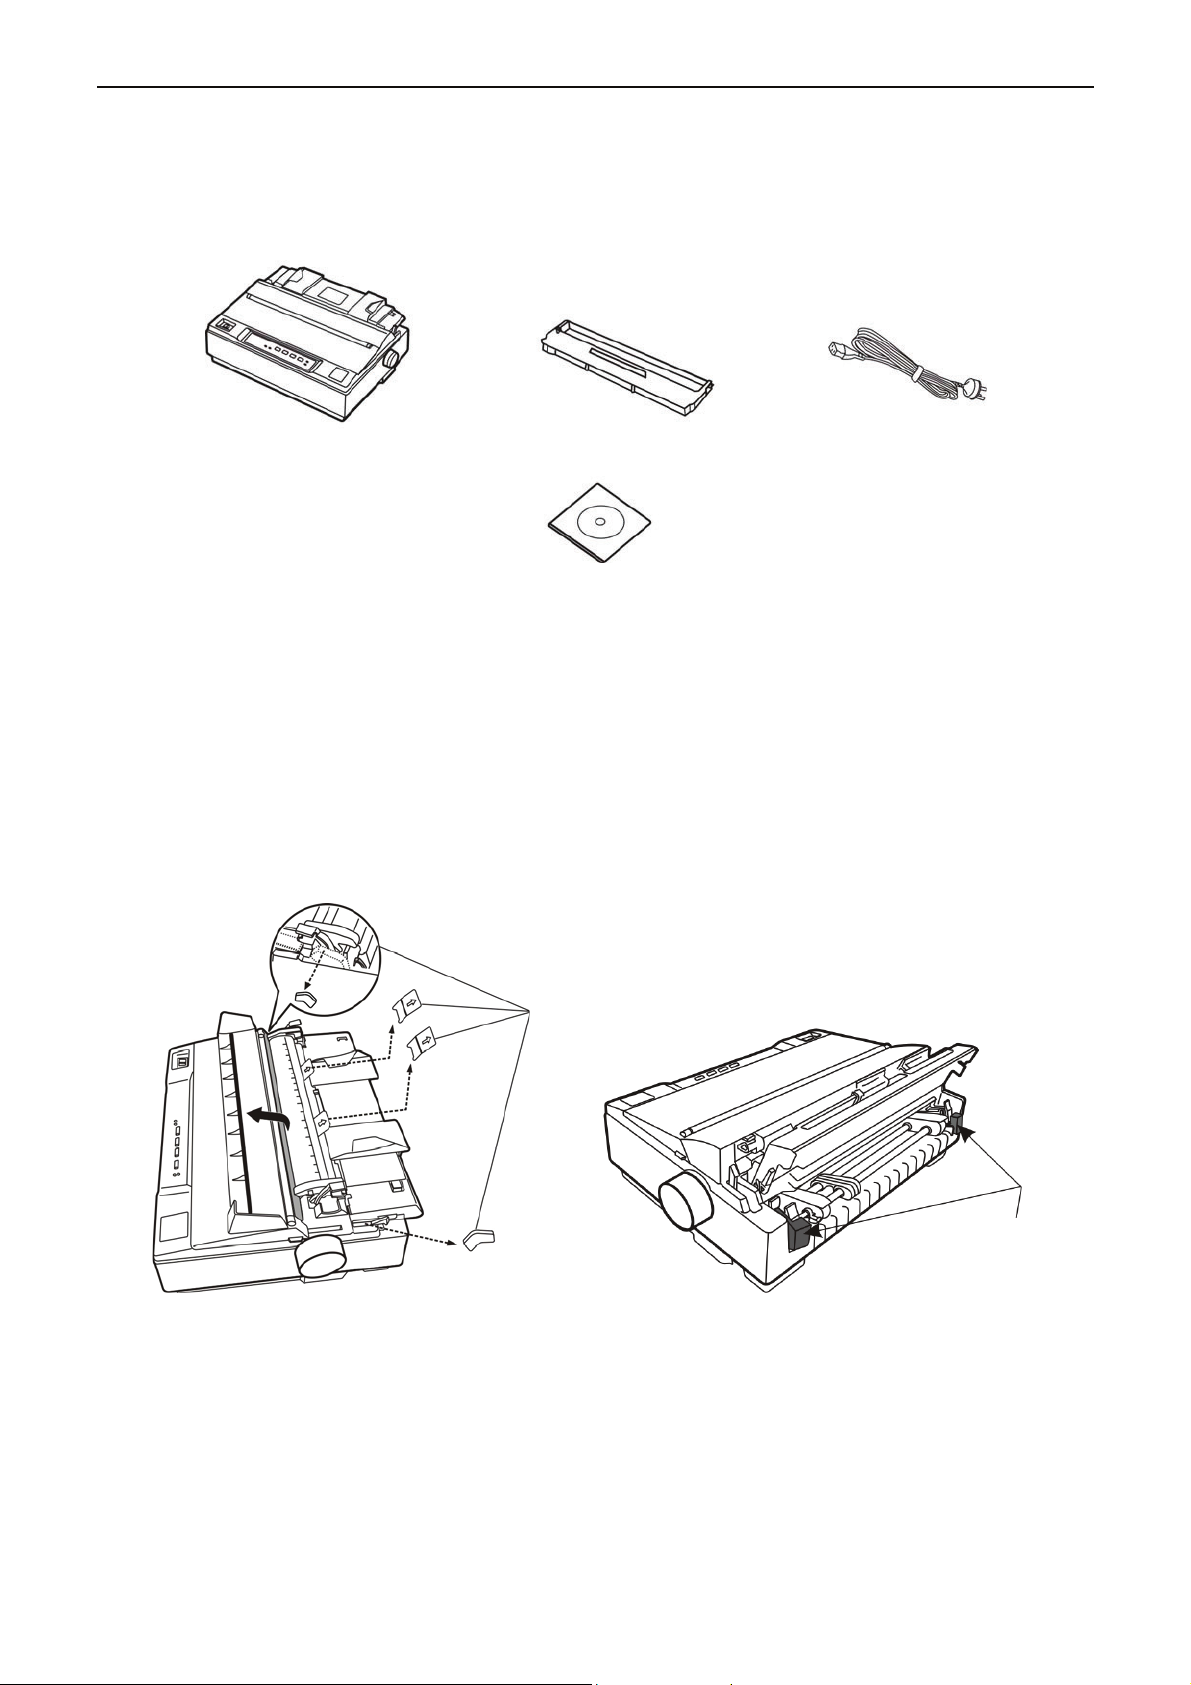
Check the following items in the package, if any of these items is missing, please contact your dealer.
Printer Ribbon cartridge
Driver CD
(Including user's manual and driver)
Figure 1.1 Packing list
1.2 Removing the Protective Materials
Power cord
1. Open the packing box, take out the printer, open the window of the printer, and remove the protective
materials as shown in Figure 1.2.
2. Save all the original packing materials so that they can be used when transporting the printer.
Figure 1.2 Remove the protective materials
Protective materials
Protective materials
1.3 Main Parts of the Printer
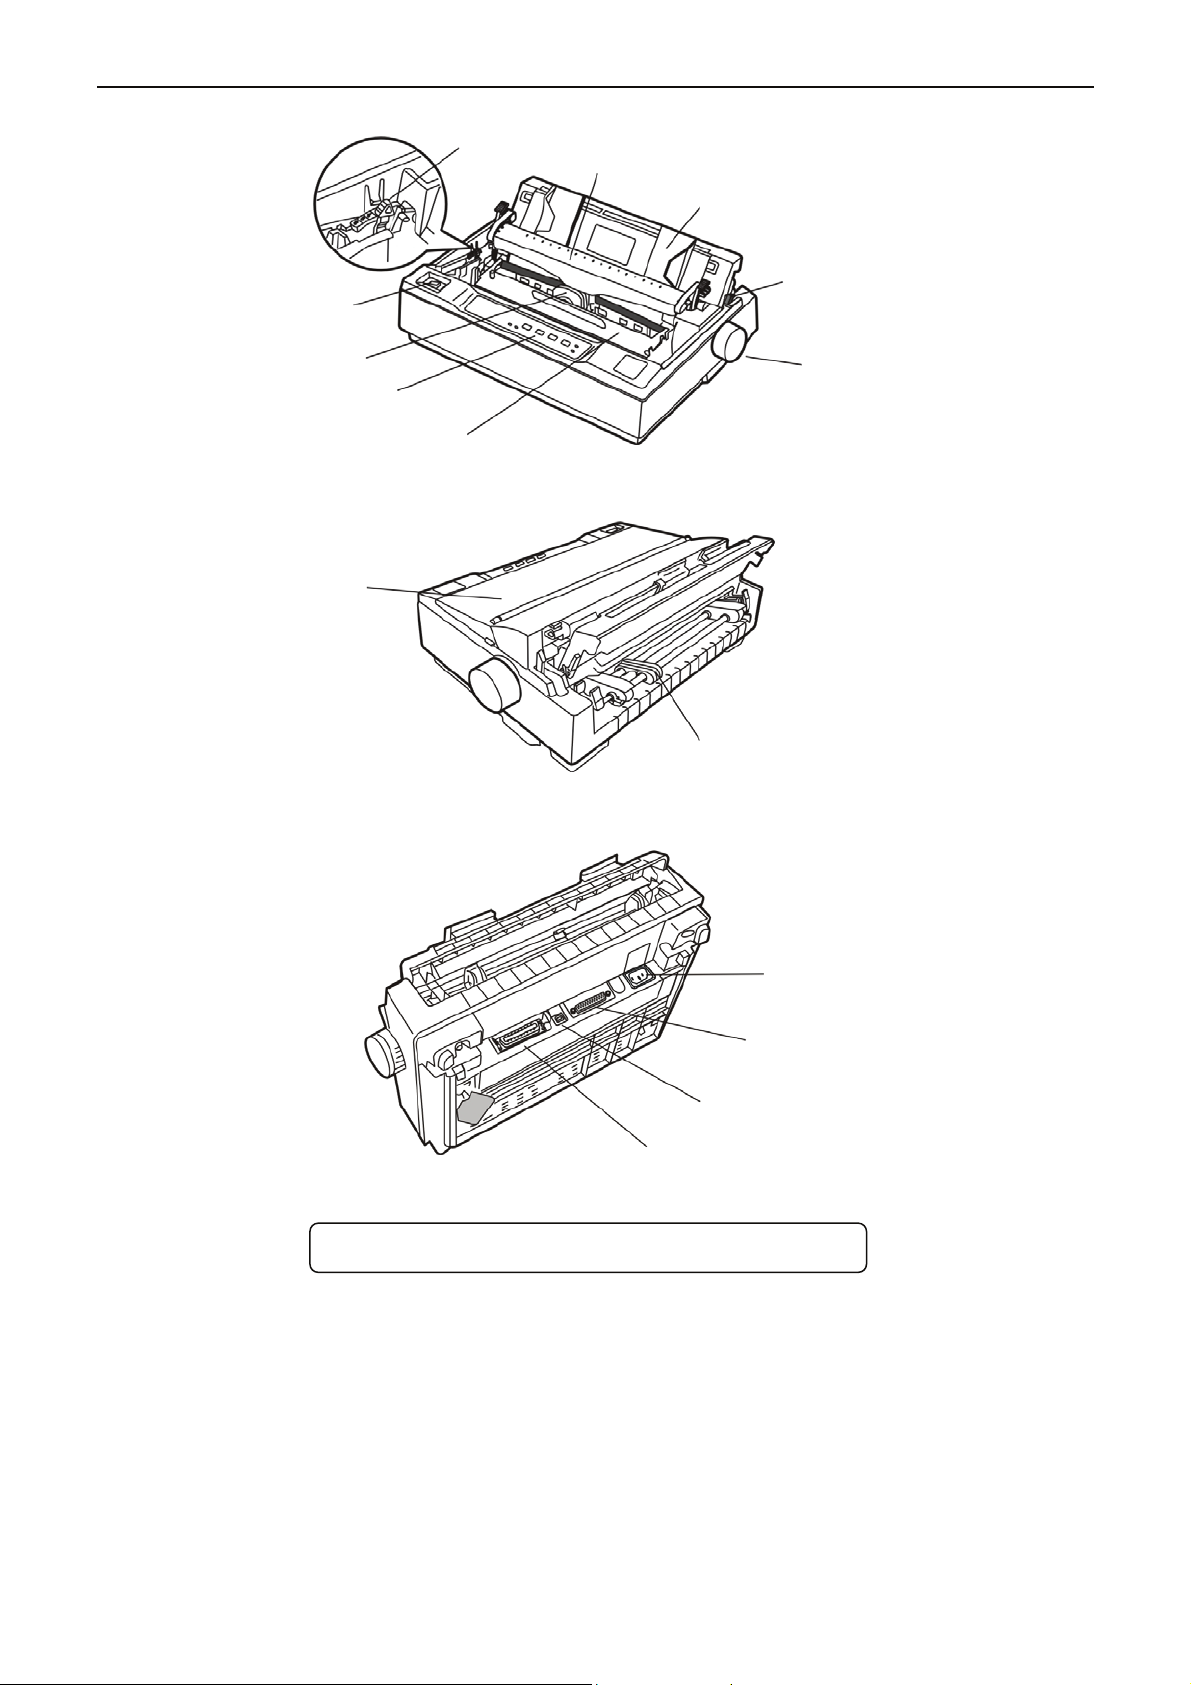
Figure1-3, Figure1-4 and Figure 1-5 show the main parts of XDP-321.
- 1 -
Page 9
x-Lab Dot Matrix Printer XDP-321 User's Manual
Gap adjust lever
Power switch
Print head
Control panel
Ribbon cartridge
Figure 1-3 Main parts of printer (Front view)
Window
Figure1-4 Main parts of printer (Side view)
Figure 1-5 Main parts of printer (Rear view)
Note: Please take the specific interface as standard.
1.4 Choosing a Place for the Printer
Tear-off position
Paper guide
Paper select lever
Paper feed knob
Tractor
Power supply inlet
Serial interface
USB interface
Parallel interface
When selecting a place to set up your printer,
choose a convenient location that provides the
following items:
1. The surface that is even and stable.
2. Adequate room around the printer to allow easy operation and maintenance. Make sure it’s close
enough to the computer for the printer cable to reach.
3. Moderate environmental conditions. Select a cool, dry area and protect your printer from direct
sunlight, excessive heat, moisture, or dust.
- 2 -
Page 10
x-Lab Dot Matrix Printer XDP-321 User's Manual
4. Appropriate power source. Make sure you use a grounded outlet; do not use an adapter plug. Avoid
electrical outlets controlled by timers or wall switches; an interruption in power can wipe out the
information in your computer or printer memory.
If you place the printer on a stand, follow these guidelines:
1. Use a stand that supports at least 9 kg (19 lb).
2. Never use a stand that tilts the printer. Always keep it level.
3. Provide enough clearance below the stand and between the printer rack and the legs of the rack so
the tractor paper flows smoothly.
4. Place cables to avoid interfere with paper feeding; secure them to a leg of the stand if possible.
1.5 Installing the Printer
Follow the steps in this section to install your printer.
1.5.1 Installing the Paper Feed Knob
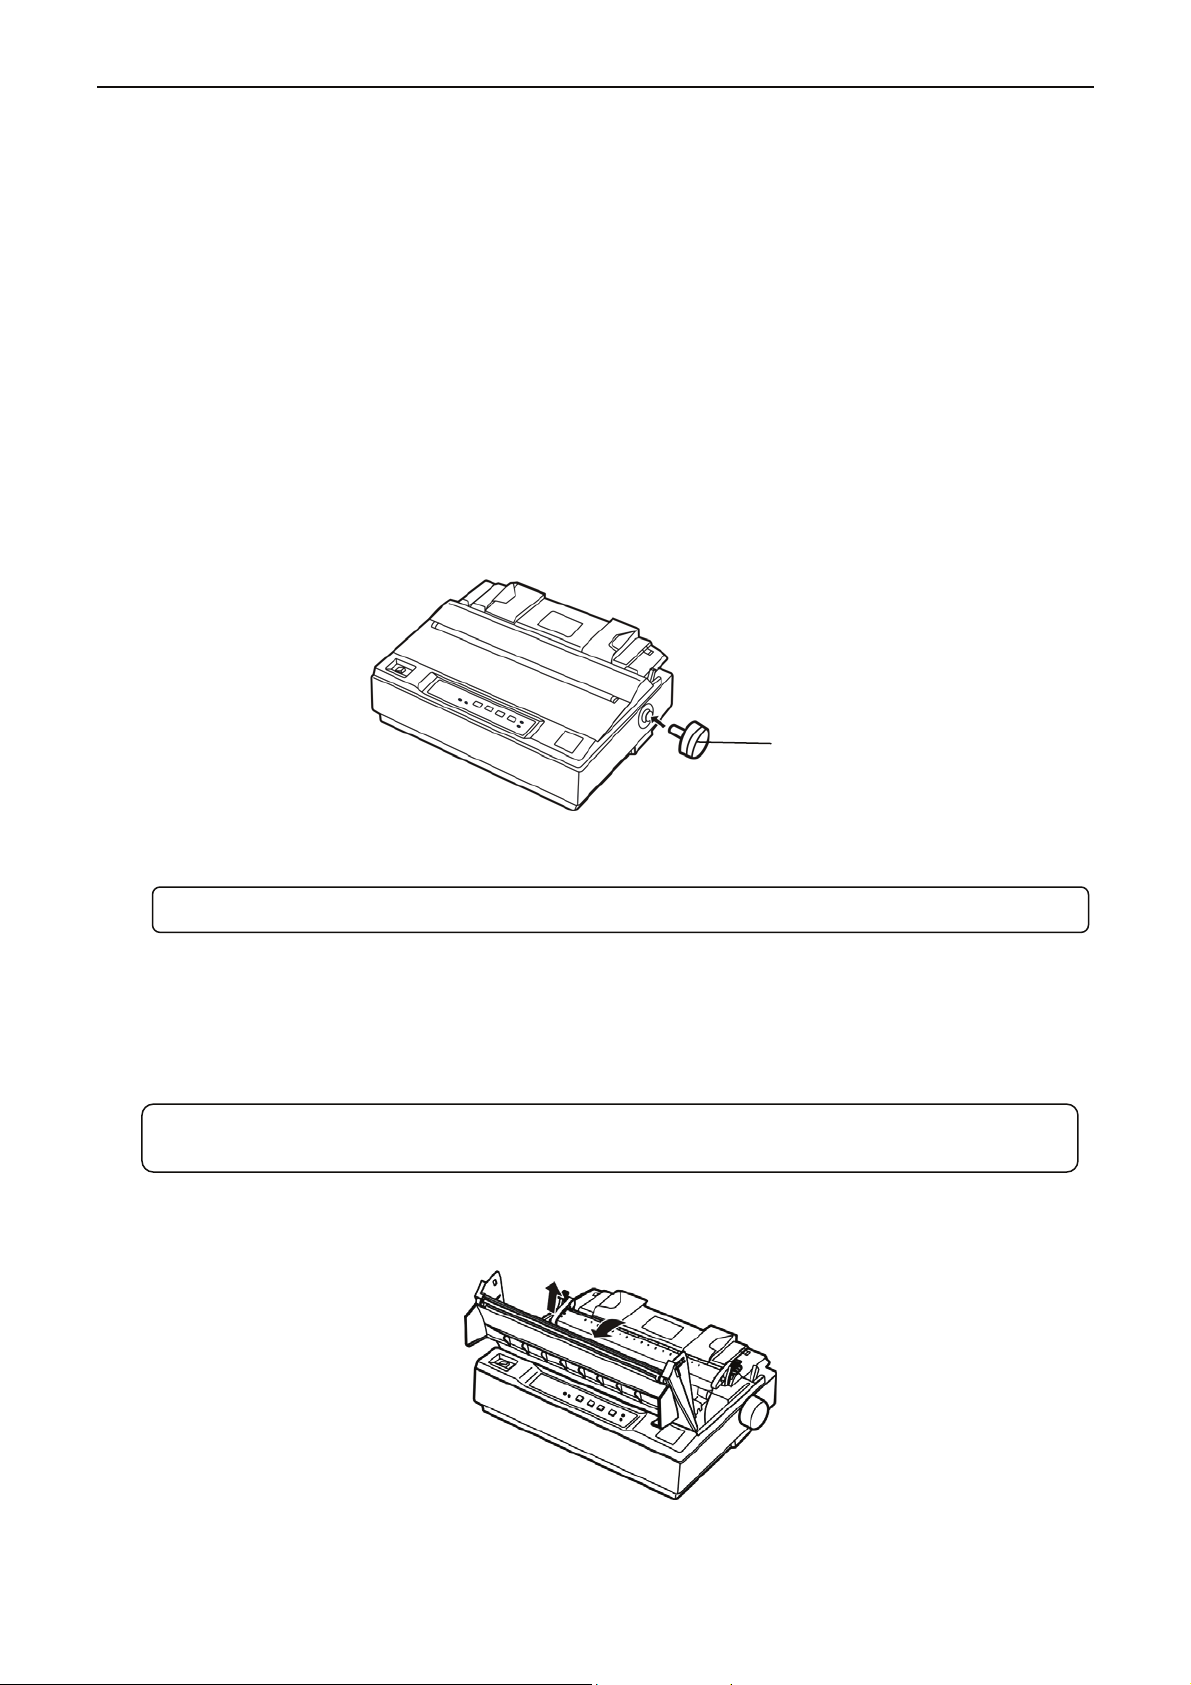
1. Insert the paper feed knob into the hole on the right side of the printer. (As shown below)
Note: The D shape of the knob should be aim at the D shape shaft inside the printer case.
2. Press firmly on the knob until it fits against the printer case.
Figure 1.5.1 Install the paper feed knob
1.5.2 Installing the Ribbon Cartridge
Paper feed knob
1. Before installing the ribbon cartridge, make sure the printer is turned off.
Caution: Must not replace the ribbon cartridge when the printer is on. The printer may start
2. Remove the window: As shown below, turn the window backwards and then lift it up.
to work suddenly and you may get hurt.
Figure 1.5.2-2 Remove the window
- 3 -
Page 11
x-Lab Dot Matrix Printer XDP-321 User's Manual
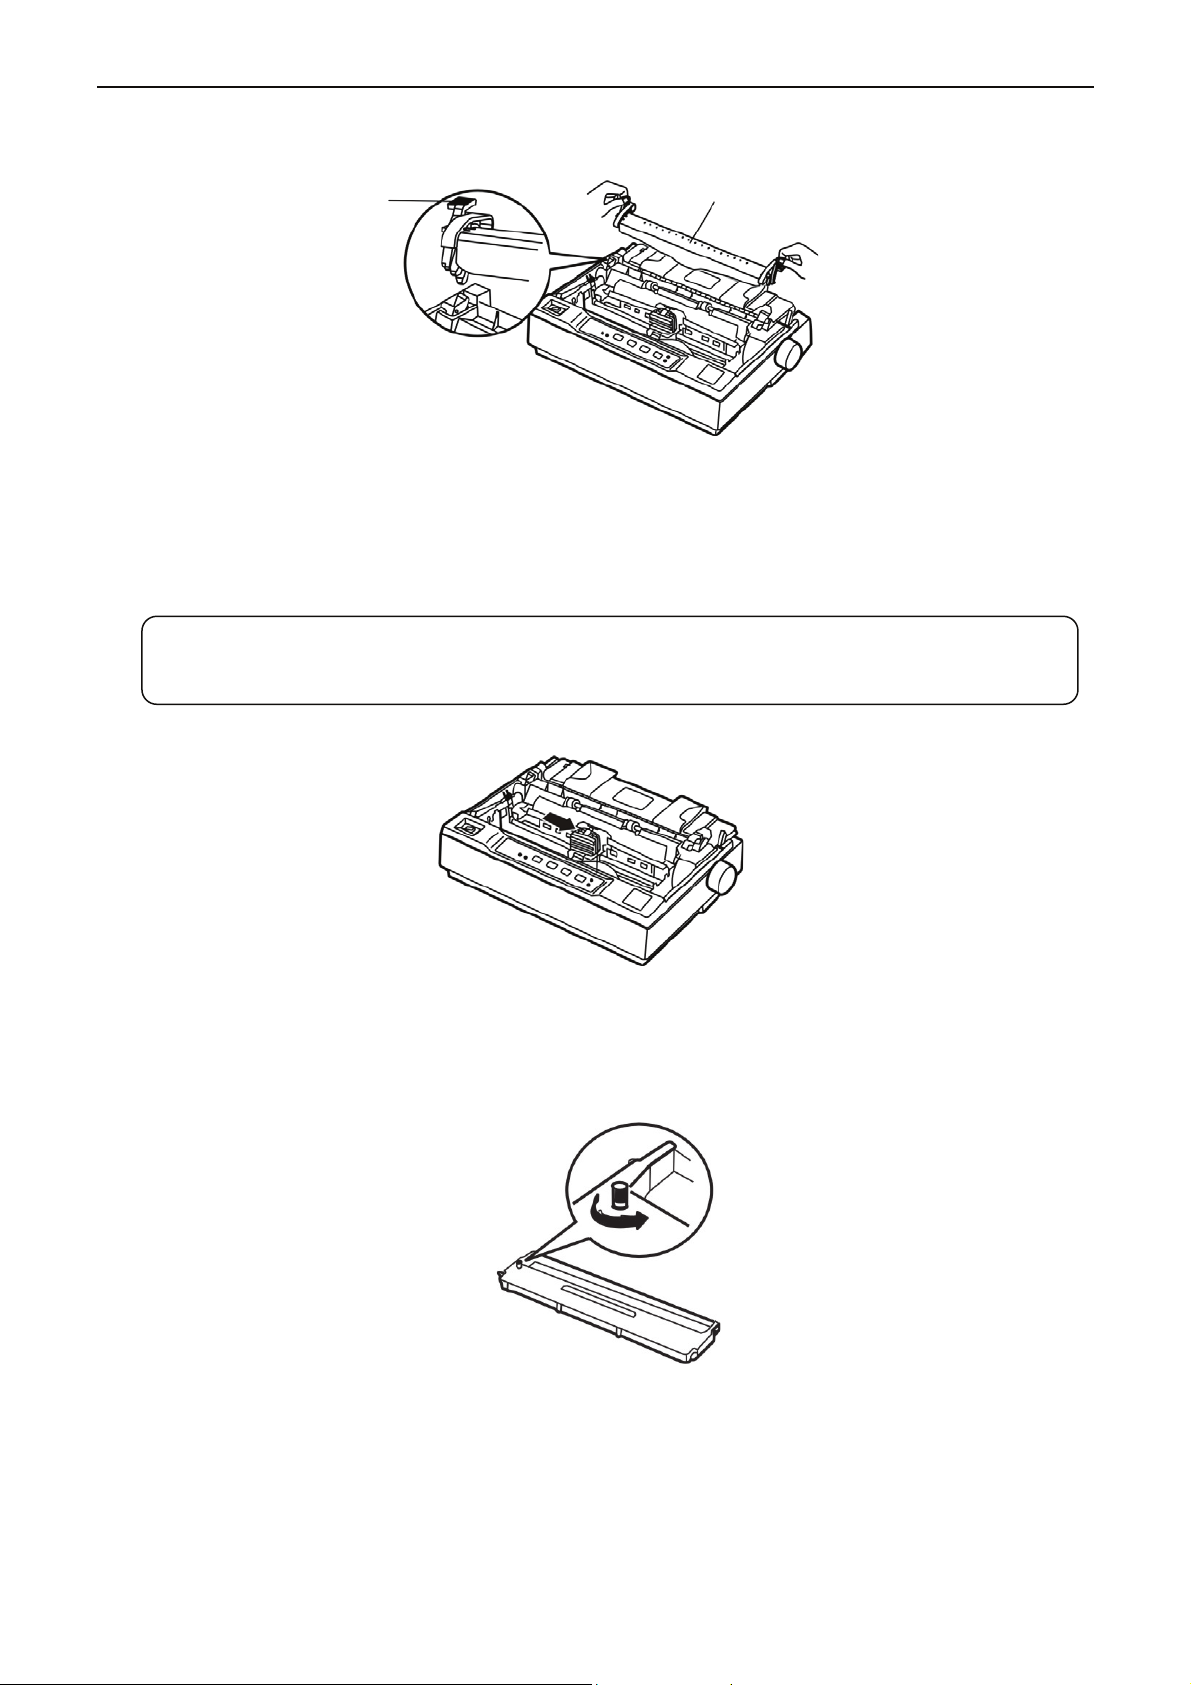
3. Remove the tear-off position: Press the lock sheets on both sides of the tear-off position, and then lift
the tear-off position upwards as shown below.
Lock sheet
Tear-off position
Figure 1.5.2-3 Remove the tear-off position
4. Pull the gap adjust lever to the highest position.
5. Slide the print head to the middle of the printer.
Caution: Never move the print head when the printer is on, or else the printer may get
damaged. Besides, do not touch the print head if the printer has just been used as
the print head may be hot.
Figure 1.5.2-5 Slide the print head to the middle of the printer
6. Hold the ribbon cartridge with the ribbon knob facing upwards. Turn the ribbon knob in the direction
of the arrow to remove any slack from the ribbon, so that it is easier to install.
Figure 1.5.2-6 Tighten the ribbon
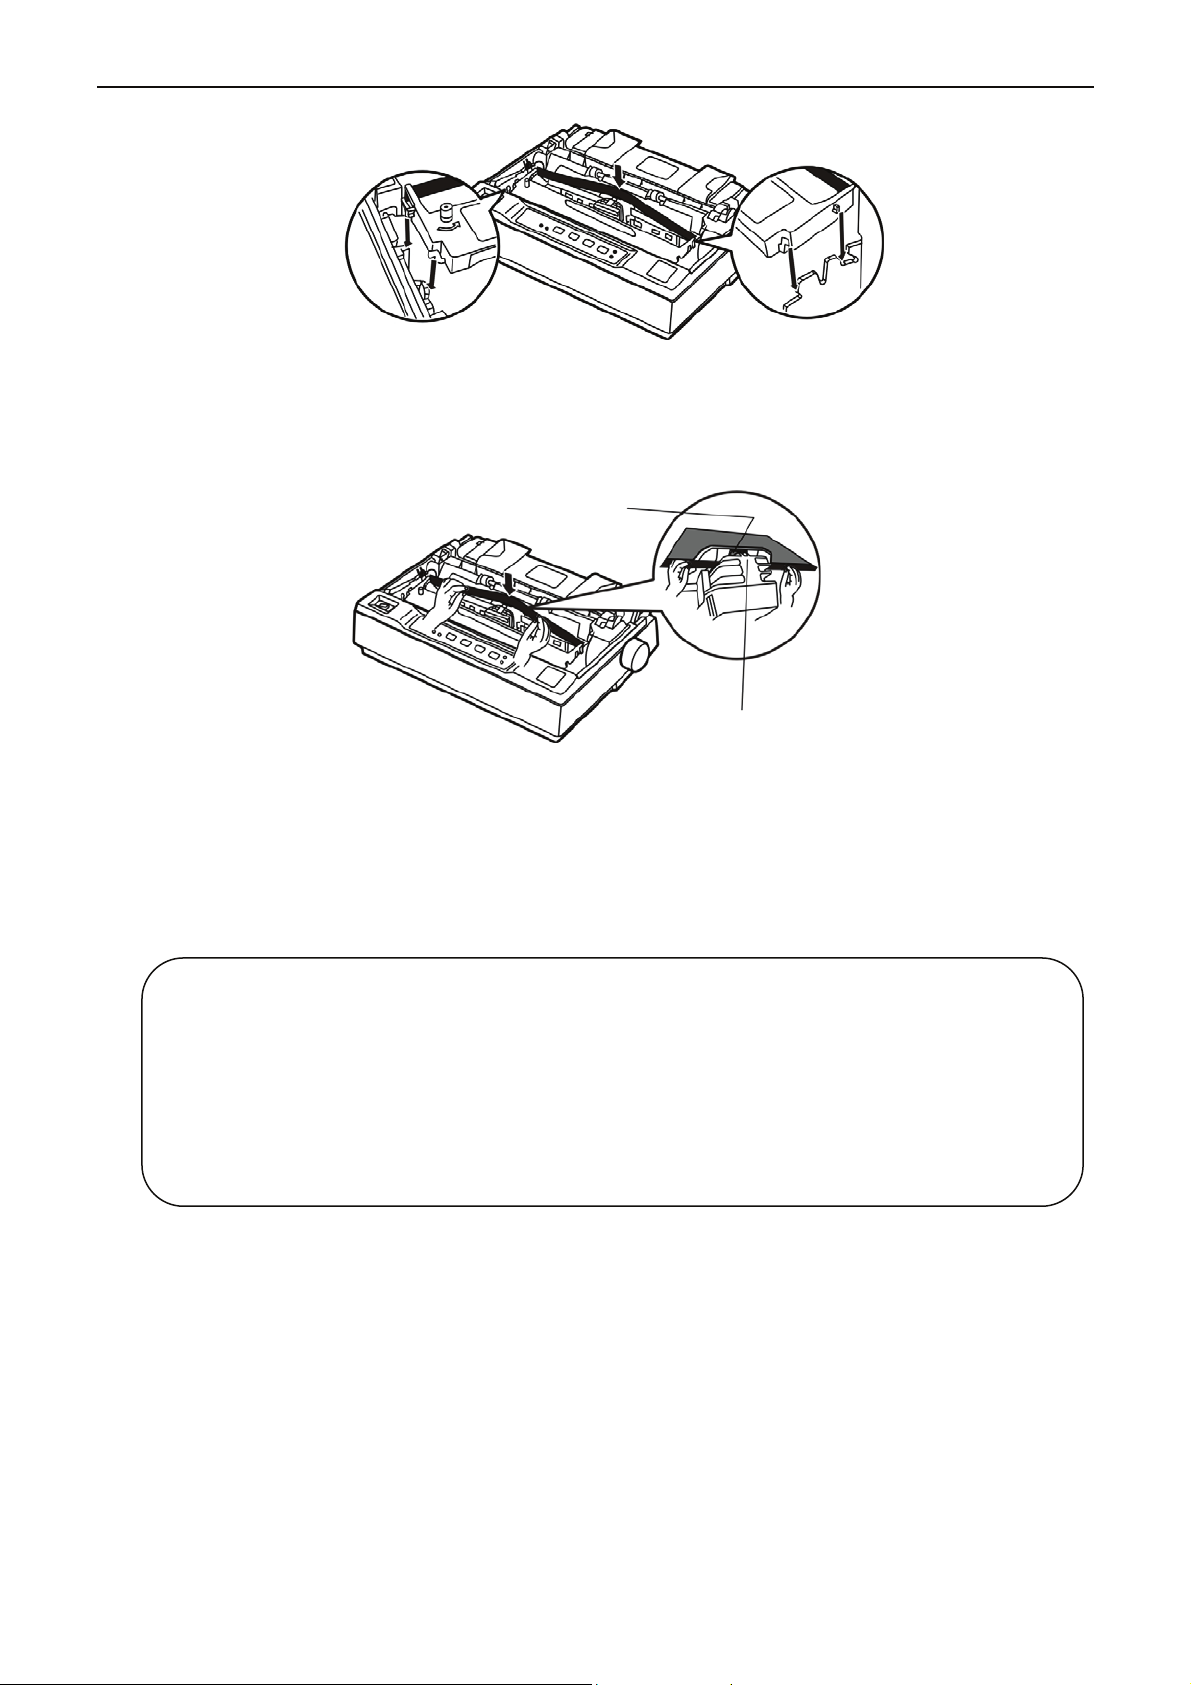
7. Insert the ribbon cartridge into the printer as the following figure shown; then hold both sides of the
cartridge, aim the buckles at the mounting slots on both sides of the printer, press them down until
they locked into place.
- 4 -
Page 12
x-Lab Dot Matrix Printer XDP-321 User's Manual
8. Use hands or other auxiliaries; guide the ribbon cord between the print head and metal guide slice.
Turn the ribbon knob to feed the ribbon into place, it should not be twisted or creased.
9. Slide the print head from side to side several times to make sure the ribbon is in the right place.
Figure 1.5.2-8 Guide the ribbon between the print head and metal guide slice
Figure 1.5.2-7 Install ribbon cartridge
Metal guide slice
Print head
10. Pull the gap adjust lever back to the original position. Reinstall the tear-off position and close the
window.
Note: 1. When your printing becomes faint, you need to replace the ribbon cartridge.
Otherwise, the print quality will be affected and the print head may be damaged.
2. To remove the old ribbon cartridge, first make sure the power is turned off, move
the print head to the center of the printer. Then hold both sides of the ribbon
cartridge and lift it out of the printer. Install a new one as the above steps.
3. Please use the original ribbon cartridge only. Manufacturer will not honor
warranty when using unauthorized ribbon cartridge.
4. Please turn the ribbon knob as the direction shown.
1.6 Installing the Tractor
There are two positions for the tractor to be installed, one is push installation position (rear side of
printer), and the other is pull installation position (top of printer). The tractor that installed in the back of
printer is called drive tractor, and the one installed in the top of printer is called draught tractor.
Generally, you can use drive tractor when using standard tractor paper. Only in this way, can the
printer tear paper normally. If the print position requires high precision, such as printing on the paper
with forms, you are suggested using draught tractor.
1.6.1 Installing the Drive Tractor
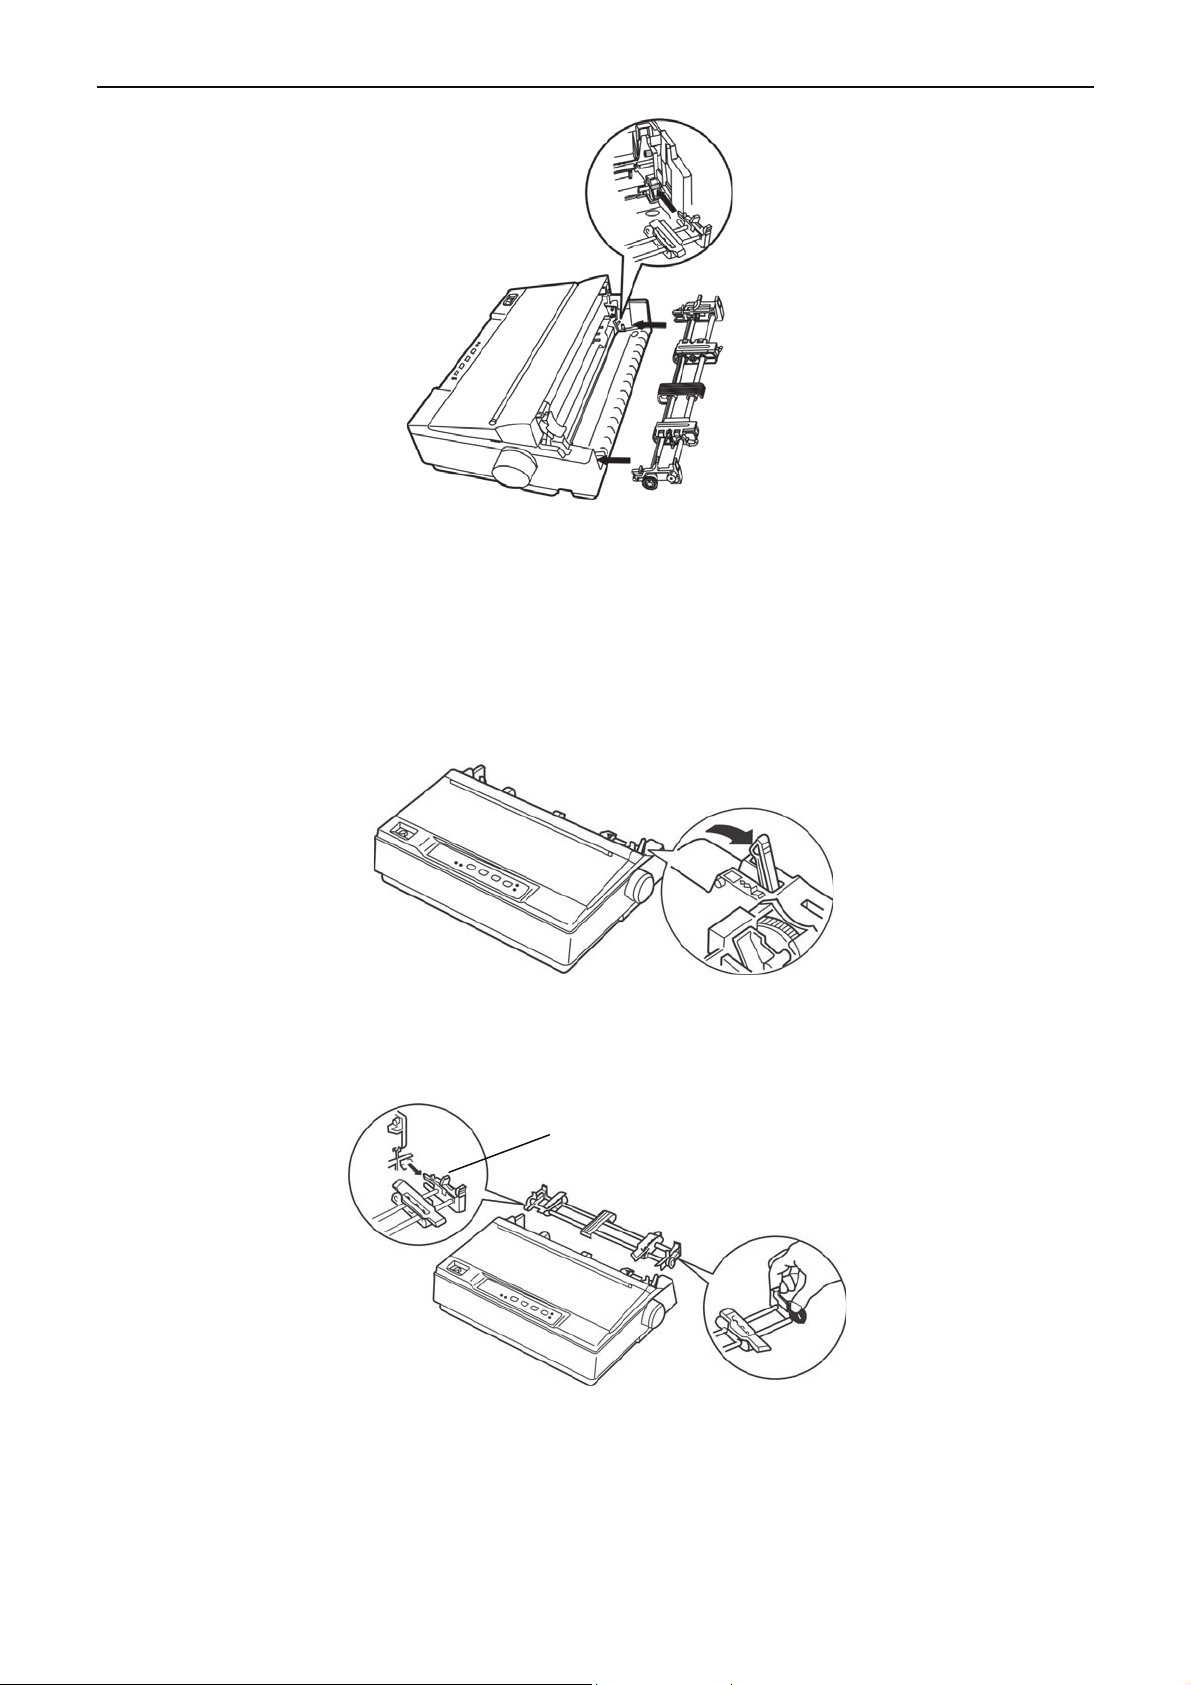
Aim the mounting slots on both sides of tractor at the alignment pins which are at the rear of printer,
press forward till it locks in place. (Shown as Figure 1-13)
- 5 -
Page 13
x-Lab Dot Matrix Printer XDP-321 User's Manual
Figure 1.6.1 Install the drive tractor
1.6.2 Installing the Draught Tractor
If the tractor has been installed in the push position (rear side of printer), take out the tractor, remove
the tear-off position, and install the tractor in the pull position. The concrete steps are as follows.
1. Make sure the printer is turned off, take out the paper guide, and then pull the paper select lever to
the tractor paper position according to the following figure.
Figure 1.6.2-1 Set paper select lever
2. Take out the drive tractor as the following steps: Press the lock sheets of the tractor tightly (As shown
in Figure 1-15), and pull out the tractor from the printer, and then remove the window.
Lock sheet
Figure 1.6.2-2 Take out the drive tractor
3. Press the lock sheet of the tear-off position tightly (shown as Figure 1-16), and then lift it upwards.
- 6 -
Page 14
x-Lab Dot Matrix Printer XDP-321 User's Manual
Lock sheet
Tear-off position
Figure 1.6.2-3 Take out the tear-off position
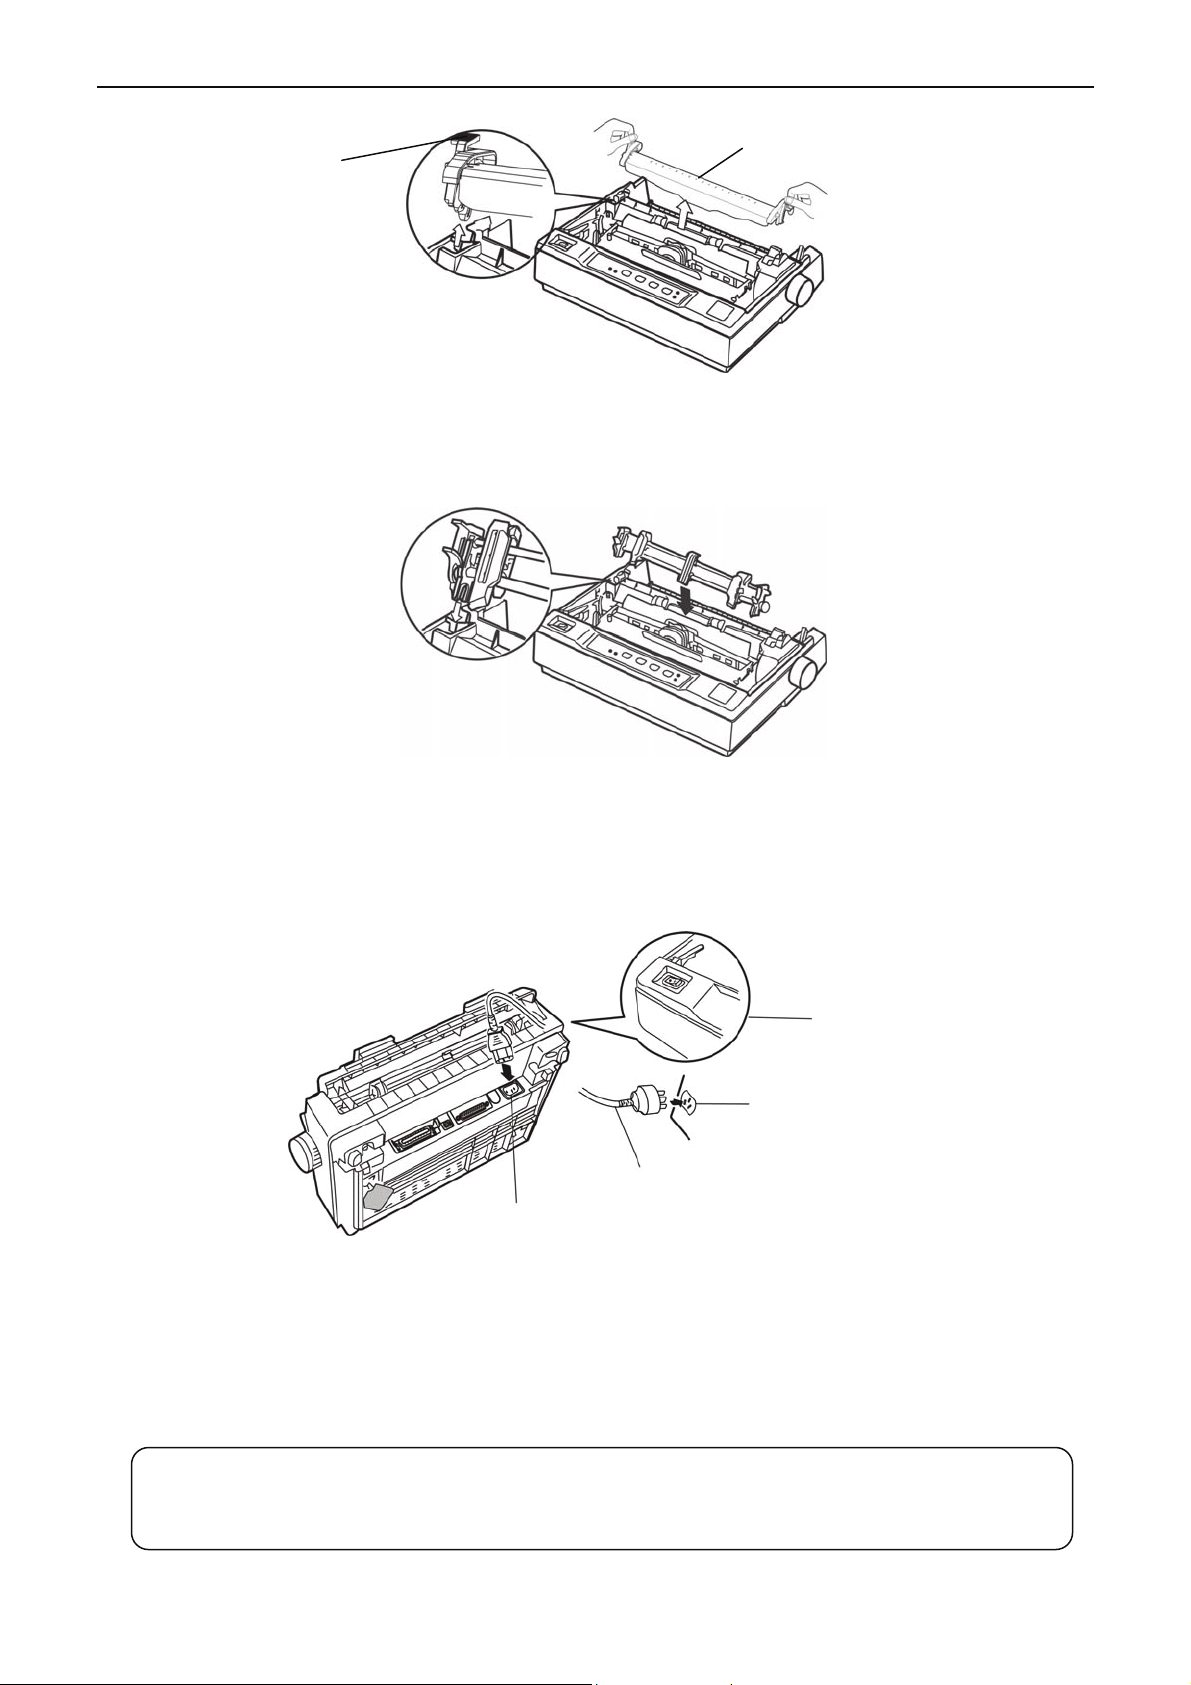
4. Take the tractor, aiming at the mounting slots on the top of printer (the mounting slot of the tear-off
position), press the tractor until it locks into place according to Figure 1-17.
Figure 1.6.2-4 Install the draught tractor
1.7 Connecting the Power Cord
1. Make sure the printer is turned off. (The pressed down side on the power switch with “O” mark denotes
the printer is off.)
Power switch
Electrical outlet
Power supply inlet
Power cord
Figure 1.7-1 Turn off the printer
2. Make sure the voltage required by the printer matches that of your electrical outlet.
3. Plug one end of power cord into the printer power supply inlet.
4. Plug the other end of power cord into a properly grounded electrical outlet.
Note: 1. If the rated voltage does not match your outlet voltage, contact your dealer for
assistance. Do not plug in the power cord.
2. Use the electrical outlet connecting the ground properly.
- 7 -
Page 15
x-Lab Dot Matrix Printer XDP-321 User's Manual
Y
1.8 Self-test
The built-in self-test function demonstrates that the printer is working properly. You can run the test
with either tractor paper or cut sheet; this section describes the easier way of ASCII self-test with cut
sheet.
Note:
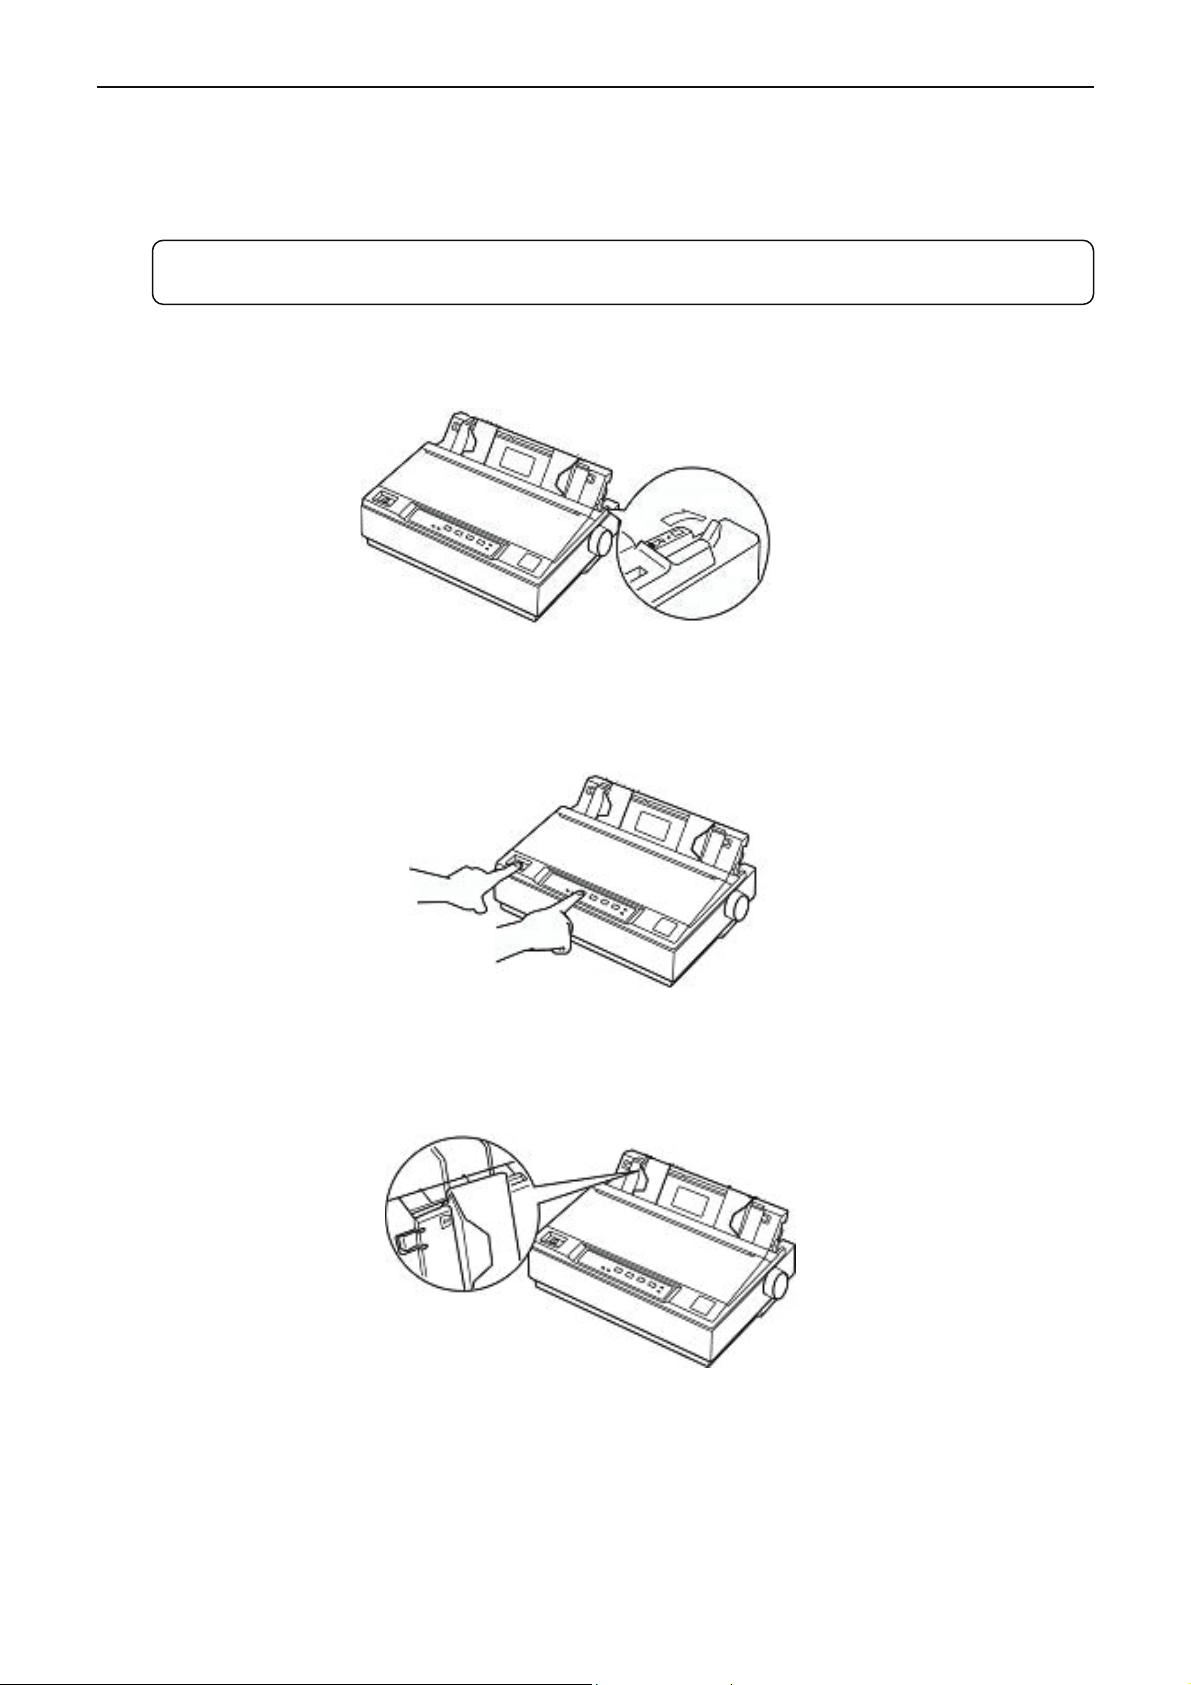
1. Make sure the printer is turned off and the paper select lever is at the cut sheet position. Raise the
paper guide.
2. While holding down the TEAR button, turn on the printer. At that time, the POWER LED blinks and
the ONLINE LED is off, which indicates the printer is out of paper.
ou should use paper at least 210 mm wide to run the self-test; otherwise, the print
head will print directly on the platen.
Figure 1.8-1 Set paper select lever
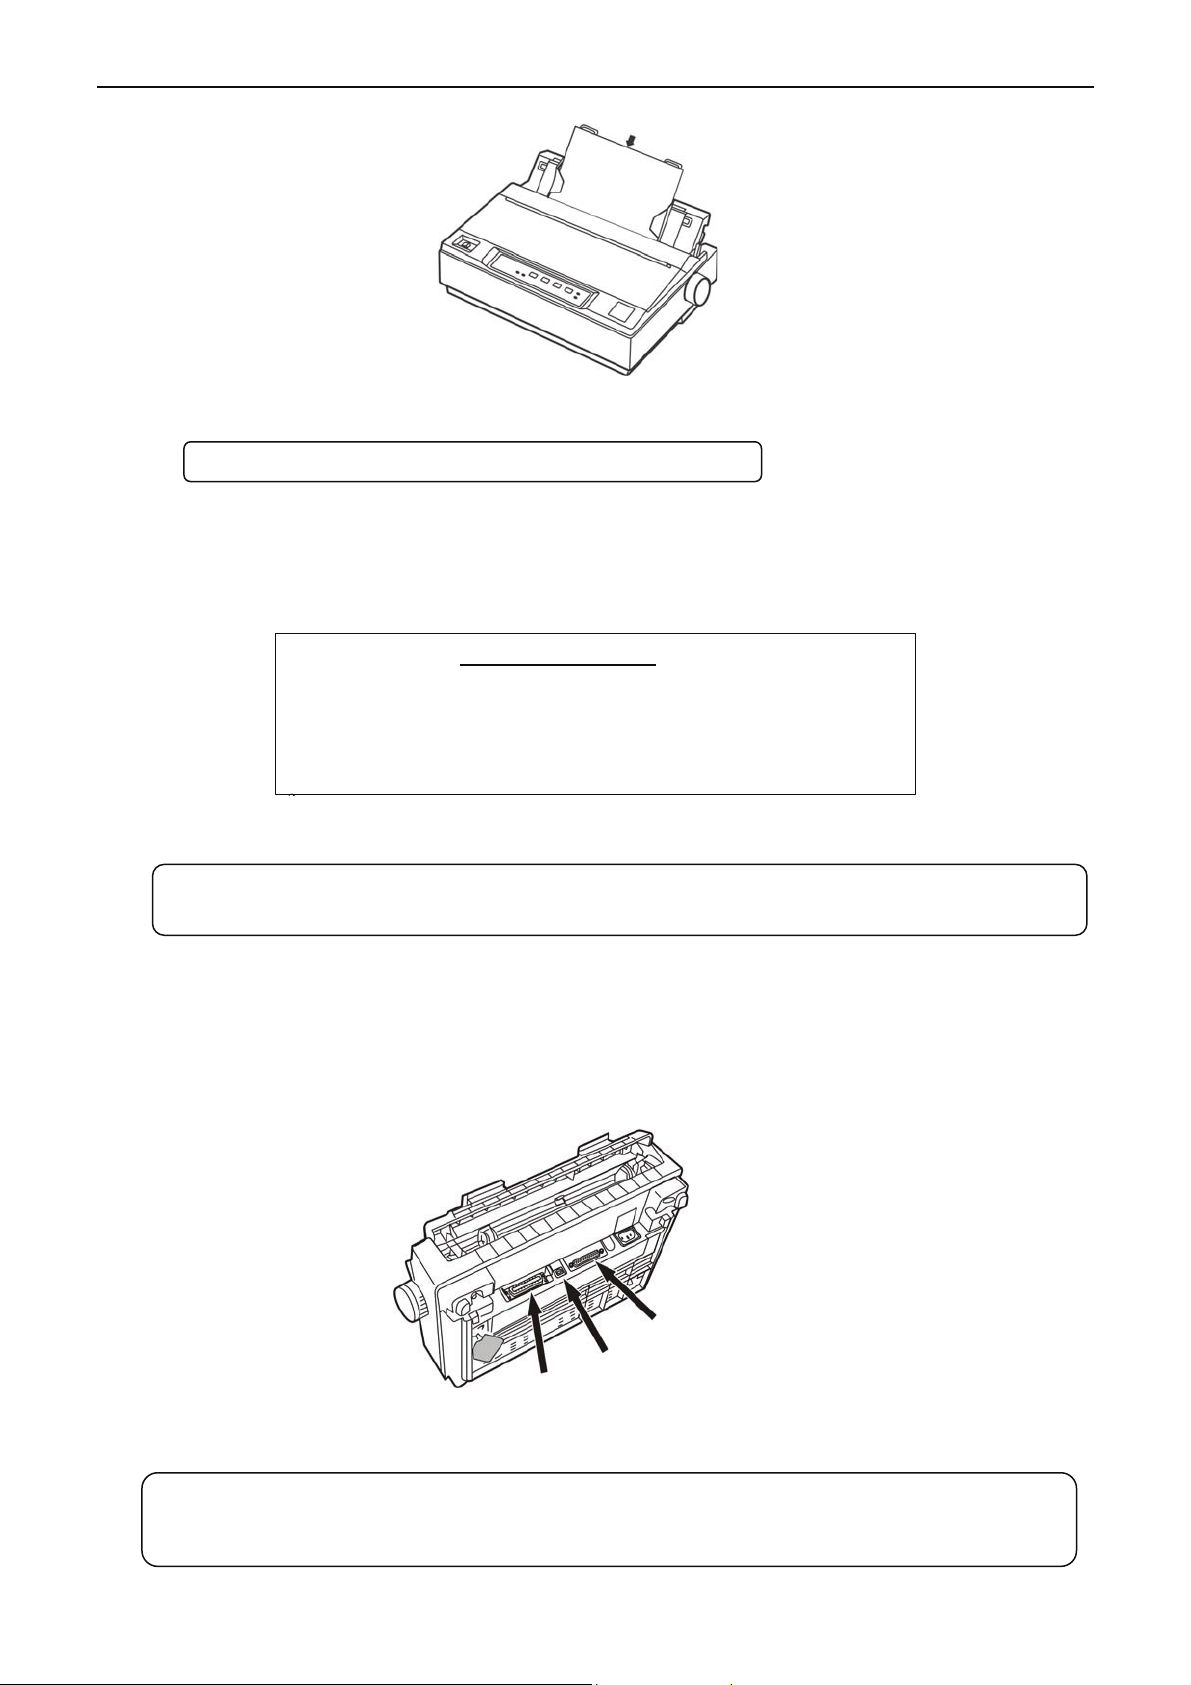
3. Slide the left guide track until it reaches at the triangular guide mark. Then adjust the right guide
track to match the width of your paper.
4. Slide a sheet of paper down between the two guide tracks until it meets resistance. The printer
loads the sheet automatically and begins printing when pressing the ONLINE button.
Figure 1.8-3 Adjust the position of right and left guide tracks
Figure 1.8-2 Startup self test
- 8 -
Page 16
x-Lab Dot Matrix Printer XDP-321 User's Manual
Figure 1.8-4 Load cut sheet
Warning: The window must be closed while printing.
5. Press the ONLINE button to pause the printing.
6. After the printer finishes printing, press LF/FF button or LOAD/EJECT button to eject cut sheet,
and then turn off the printer to exit self test mode.
!"#$%&'( )*+-./0123456789:;<=>?@ABCDEFGHIJKLMNOPQRSTUVWXYZ[\]^_`abcd
"#$%&'( )*+-./0123456789:;<=>?@ABCDEFGHIJKLMNOPQRSTUVWXYZ[\]^_`abcde
x-Lab XDP-321 VX.X 20XX/XX/XX
!"#$%&’( )*+-./0123456789:;<=>?@ABCDEFGHIJKLMNOPQRSTUVWXYZ[\]^_`ab
ASCII Self-test mode
Figure 1.8-6 ASCII self-test mode
Note: If you do not satisfied with the print result, see Chapter 4. If it prints correctly, go on
to the next section.
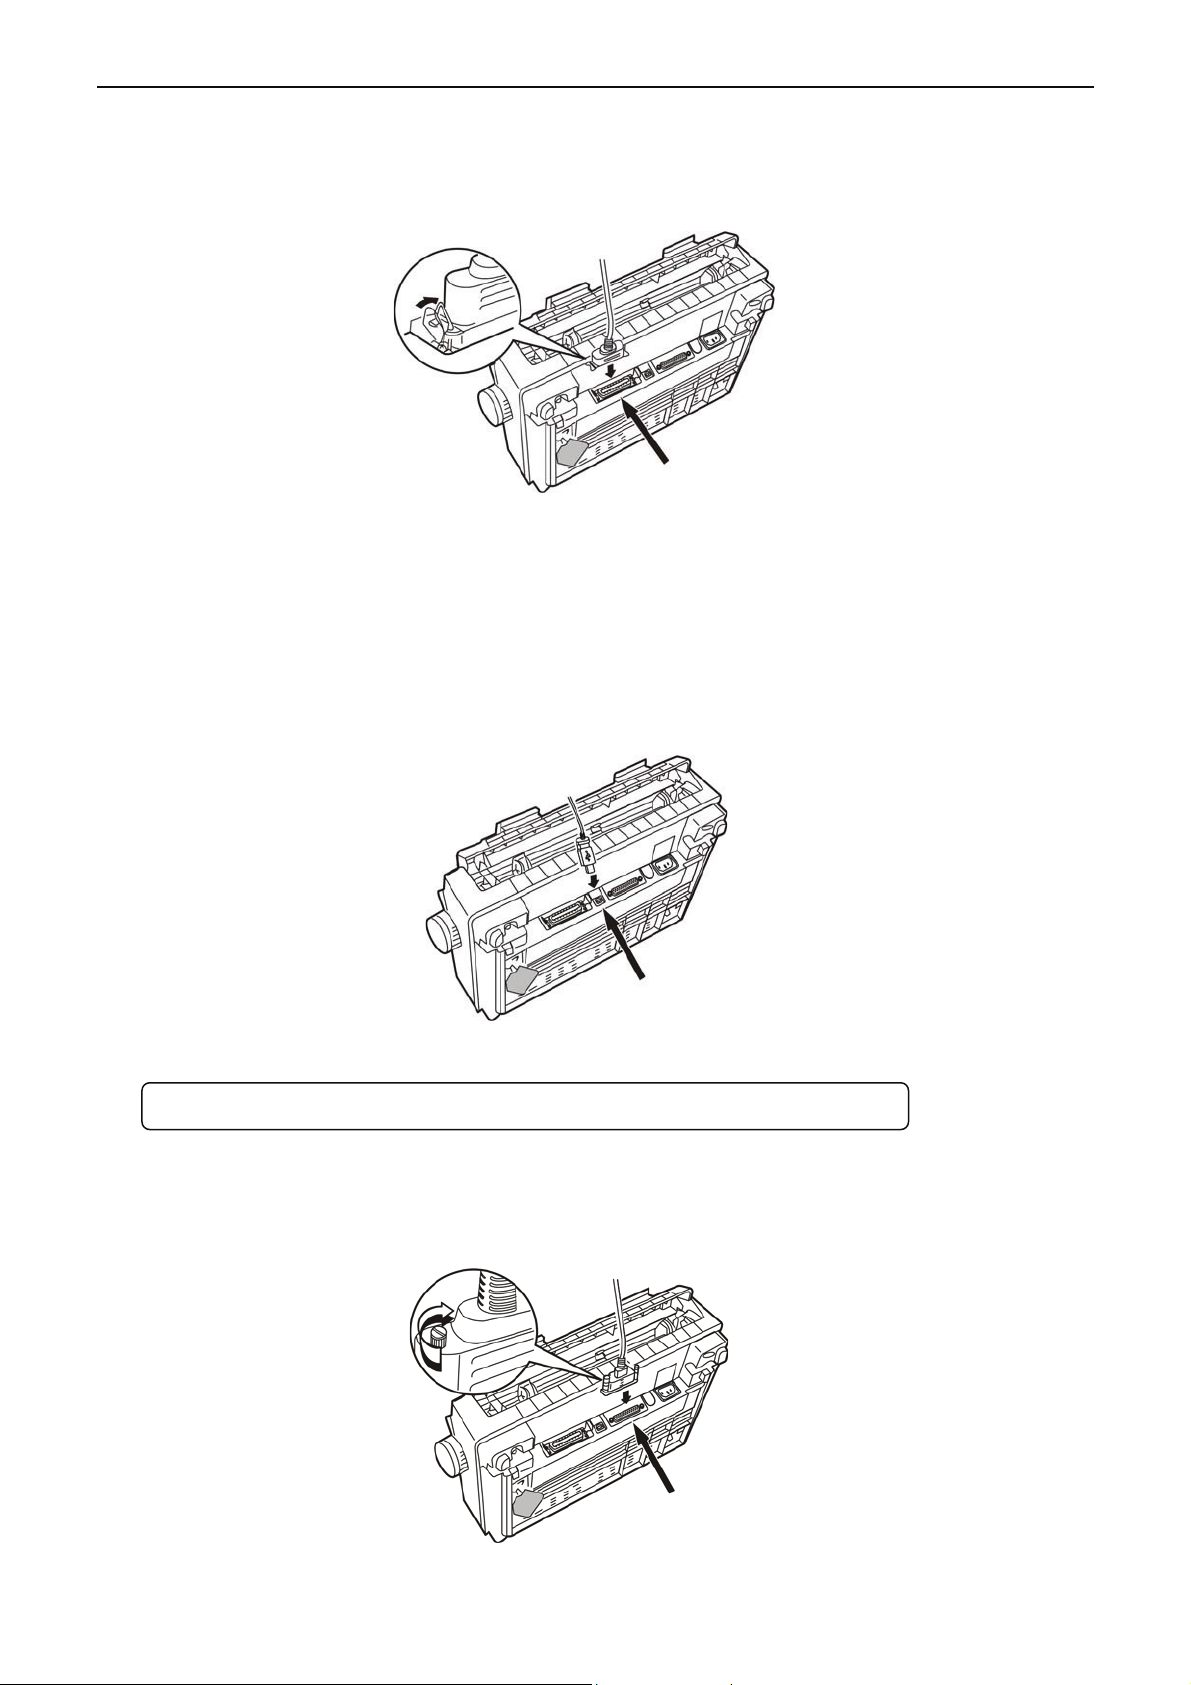
1.9 Connecting to Your Computer or Other Equipment
The printer can be configured with parallel interface, USB interface or serial interface (Please take the
specific interface as standard). Connect the printer to the computer with the correct cables. Before you
begin, place the printer upright, as shown below.
Parallel interface
Figure 1.9 Lay the rear side of printer upwards
Serial interface
USB interface
Note: Before connecting the parallel interface cable or the serial interface cable, please
make sure the power of the printer is shut down. Only after tightening the cable may
you turn on the power, or it will damage the printer.
- 9 -
Page 17
x-Lab Dot Matrix Printer XDP-321 User's Manual
1.9.1 Connecting to the Parallel Interface Cable
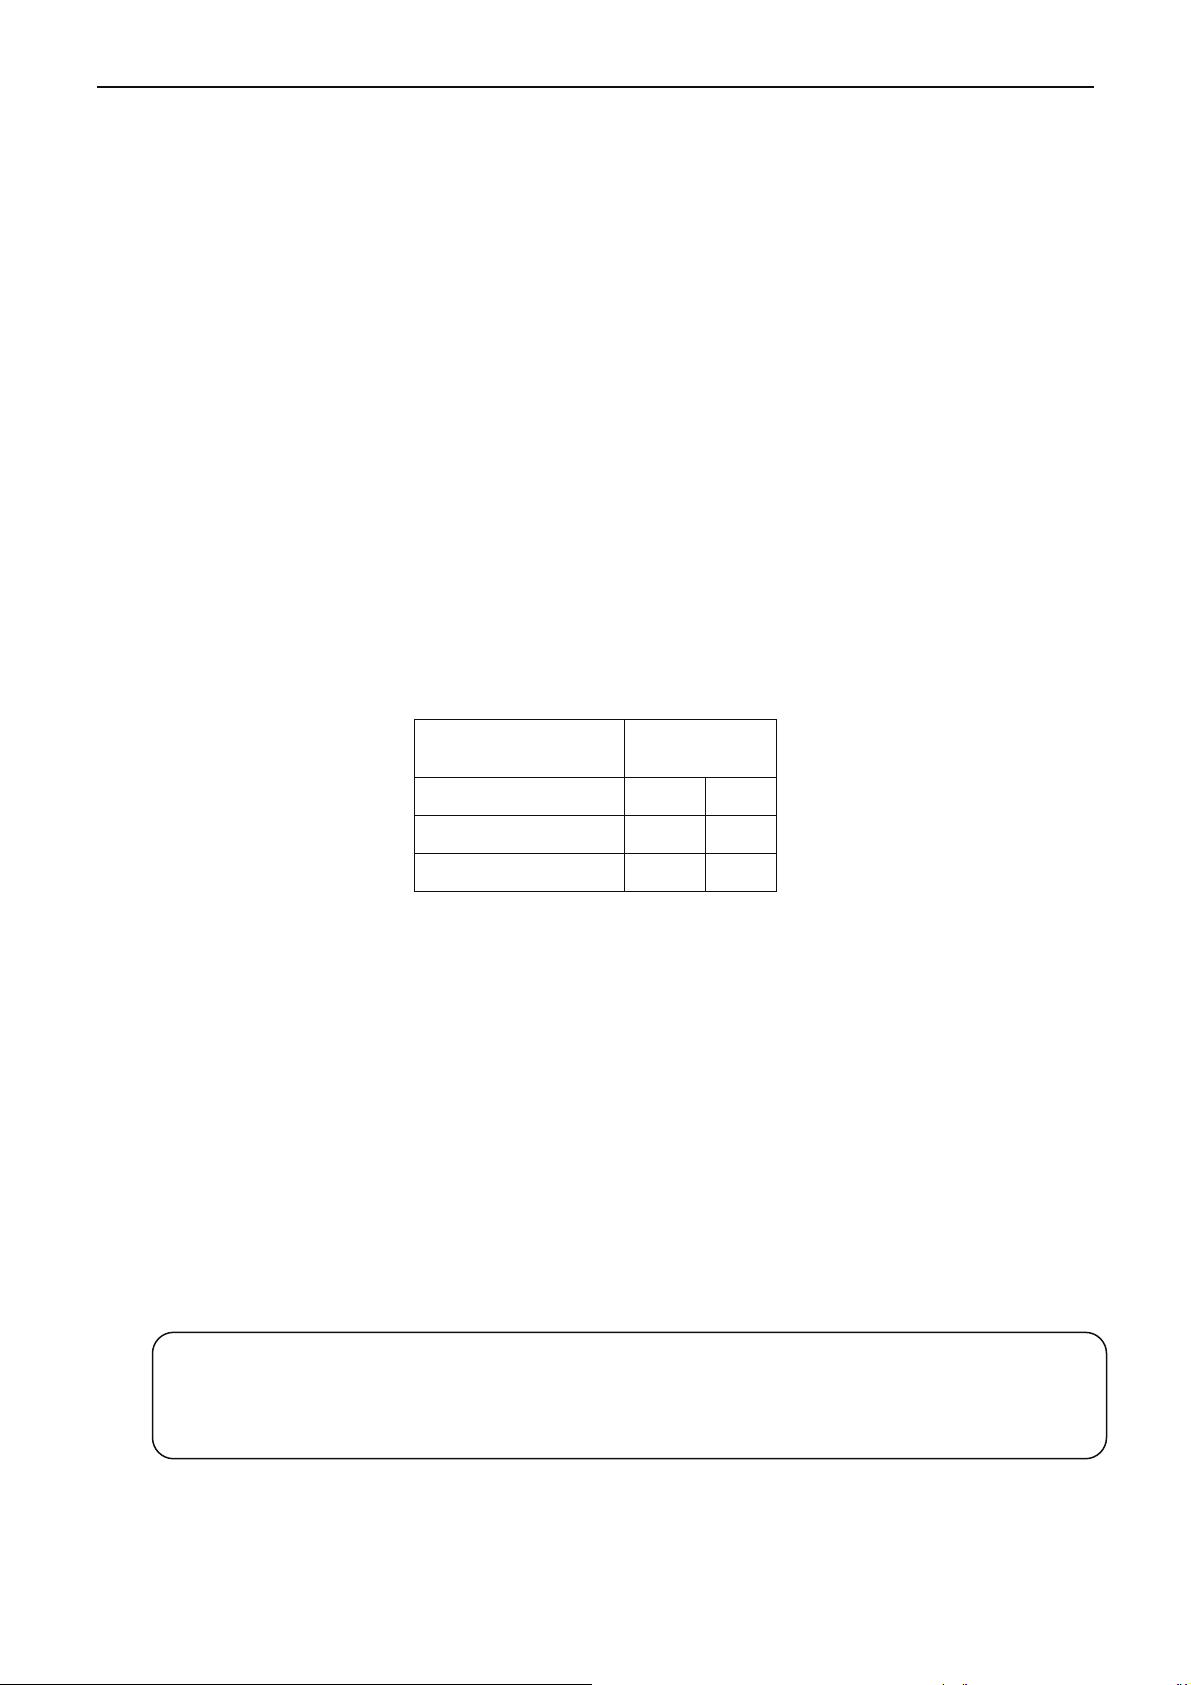
1. Turn off both the computer and the printer. Plug one end of the parallel interface cable into the
printer’s parallel interface. Squeeze the wire clips on both sides of the connector and make the cable
fixed. (As shown in Figure 1-25)
Figure 1.9.1 Connect to the parallel interface cable
2. Plug the other end of the cable into the computer’s parallel interface. And then tighten the screws
on both sides.
1.9.2 Connecting to the USB Interface Cable
Parallel interface
1. Plug the A end of the USB interface cable (flat shape) into the computer's USB interface.
2. Plug the B end of the USB interface cable (square shape) into the printer's USB interface. (As
Figure1-26 shown)
USB interface
Figure 1.9.2 Connect to the USB interface cable
Note: Don't impact the plug after connecting to the USB interface cable.
1.9.3 Connecting to the Serial Interface Cable
1. Turn off both the computer and the printer. Plug one end of the serial interface cable into the printer’s
serial interface. T
ighten the screws on both sides and make the cable fixed. (As shown in Figure1-27)
Serial interface
Figure 1.9.3 Connect to serial interface cable
- 10 -
Page 18

x-Lab Dot Matrix Printer XDP-321 User's Manual
2. Plug the other end of the cable into the computer’s serial interface and make the cable fixed.
1.10 Installing Driver
Please use the cable to connect computer with printer, then turn on the computer and the printer, put
the drive CD into the CD-ROM. Install driver by the following ways:
1.10.1 Auto-installing way (Recommended)
Double click the file “Setup.exe” in the driver disc, install driver by the following direct.
Note: Auto-installing way needs
operation systems of Windows98/ME and below are not supported.
the operation systems of Windows 2000 and above and the
1.10.2 Hand-operated installing way
Note: The hand-operated installing ways of serial interface and parallel interface are the
same.
1.10.2.1 The operating systems of Windows 2000/XP/Vista/Win7
(1) The hand-operated installing steps of parallel interface cable or serial interface cable:
The following steps are used Windows XP as an example. There are slight differences among
different operating systems. The installing way with other operating systems depends on the practical
installing process.
1 Click “Start” → “Settings” → “Select Printers”.
2. Click “Add Printer”, then a window of “Add Printer Wizard” pops up, click “Next”, then please read
the select
then click “Next”.
3. A window of “Select a Printer Port” pops up, according to your requirement, select “LPT1:
(Recommended Printer Port)”, “COM1: (serial interface)” or other interface, click “Next”.
4. A window of “Install Printer Software" pops up, click “Have Disk...”.
guide carefully, such as, select “Local printer” in the “Local or Network Printer” window,
5. A window of “Install From Disk” pops up. Please according to the operating system environment,
you should select the path as follow: CD-ROM → “Drivers” → “WIN2000 (XP-Vista-Win7)”, click
“Open”, then click “OK” to return to the window of “Install Printer Software”, click “Next”.
6. Follow the guide and click “Next” gradually till the installation is finished.
(2) The hand-operated installing steps of USB interface cable:
The following steps are used Windows XP as an example. There are slight differences among
different operating systems. The installing way with other operating systems depends on the practical
installing process.
1.
Connect with the USB cable and turn on both the computer and the printer. After the computer finds
out new hardware, and a window of “Found New Hardware” pops up — “Welcome to the new
hardware wizard”.
2. Select the “Set from the list or specific position”, then click “Next”
3. A window of “Please choose your search and installation options” pops up, choose “Don't search, I
will choose the driver to install”, click “Next”.
4. A window of “Add Printer Wizard” pops up, click “Have Disk...”.
5. A window of “Install From Disk” pops up. Please according to the operating system environment,
you should select the path as follow: CD-ROM → “Drivers” → “WIN2000 (XP-Vista-Win7)”, click
“Open”, then click “OK” to return to the window of “Add Printer Wizard", click “Next”.
6. Follow the guide and click “Next” gradually till the installation is finished.
- 11 -
Page 19

x-Lab Dot Matrix Printer XDP-321 User's Manual
1.10.2.2 The operating system of Windows 8/Windows 10
The hand-operated installing steps of parallel interface, serial interface or USB interface cable:
1. Enter “Control Panel” → “Device and Printers”.
2. Click “Add Printer”, then a window of “Add Printer Wizard” pops up, select “Add Local printer
Manually” in the “Local or Network Printer” window.
3. A window of “Select a Printer Port” pops up, according to your requirement, click “Use the Current
Port”, select “LPT1: (Printer Port)”, “COM1: (serial interface)”, USB interface or other interface click
“Next”.
4. A window of “Install Printer Driver” pops up, click “Have Disk...”.
5. A window of “Install From Disk” pops up. Please according to the operating system environment,
you should select the path as follow: CD-ROM → “Drivers” → “WIN 8(WIN 10)”, click “Open”, then
click “OK” to return to the window of “Install Printer Driver”, click “Next”.
6. Follow
the guide and click “Next” gradually till the installation is finished.
1.10.2.3 The operating system of Windows 98
(1) The installing steps with a parallel cable or a serial cable:
1. Click “Start” → “Settings” → “Printers”.
2. Click “Add Printer”, then a window of “Add Printer Wizard” pops up, click “Next”, then please read
the select guide carefully, such as, select “Local printer” in the “Local or Network Printer” window,
then click “Next”.
3. A window of “Click the manufacturer and model of your printer” pops up, click “Have Disk...”,
please click “Browse”, select the path as follow: CD-ROM → “Driver” → “WIN98 (WINME)”, then
click “OK”.
4. A window of “Install From Disk” pops up, click "OK, return to a window of “Add Printer”, select the
respective model, and then click "Next".
5. A window of “Printer port” pops up, select “Available ports”, such as, select “LPT1: Printer Port”,
click “Next”, and then show the printer’s name. If the system is not installed by other printer driver
process, the
printer is treated as default printer by the application process of Window98
environment, click “Next”. Otherwise according to prompt, choose the printer is default: “Yes”, click
“Next”, choose “Yes-(recommended)”, click “Finish”. A window of “Printer test page completed”
pops up, click “Yes”.
6. The printer driver process is installed successfully.
(2) The installing steps with an USB cable:
Note: 1. As the system of Windows 98/ME doesn’t have integrated USB driver control, please
install USB driver before using USB interface printing. Then install USB printer
driver.
2. If it has installed the USB driver, please install the USB printer driver directly as the
following steps.
USB driver installing steps:
1. Connect an USB cable and turn on the printer.
2. After the computer find out new hardware and finish searching, a window of “Add New Hardware
Wizard” pops up, click “Next”.
3. A window of “Add New Hardware Wizard” — “Windows operation” pops up, choose “Search the
best driver for the device (recommended)”, and click “Next”.
4. A window of “Search for new drivers” pops up, check “Specify a location”, click “Browse”, select
the path as follows: CD → ROM →
“Driver”-“[WIN98 (WINME) \ USBdriver]”, then click “OK”.
5. Return to a window of “Search for new drivers”, click “Next”; a window of “Windows driver file
- 12 -
Page 20

x-Lab Dot Matrix Printer XDP-321 User's Manual
search for the device” pops up, click “Next”.
6. After the system finishing installing the file automatically, a window of “USB Print Supported” pops
up, click "Finish".
7. The printer USB driver process is installed successfully.
USB printer driver installing steps:
1. Click “Start” → “Settings” → “Printers”.
2. Click “Add Printer”, then a window of “Add Printer Wizard” pops up, click “Next”.
3. A window of “Click the manufacturer and model of your printer” pops up, click “Have Disk...”,
please click “Browse”, select the path as follow: CD-ROM → “Driver” → “WIN98 (WINME)”, and
then click “OK”.
4. A window of “Install From Disk” pops up, click “OK”, return to a window of “Add Printer”, then click
"Next".
5. A window of “Printer port” pops up, select “Available ports”, select “JMUSB”, click "Next", and then
show the printer’s name. If the system is not installed by other printer driver process, the printer is
treated as default printer by the application process of Window98 environment, click “Next”.
Otherwise according to prompt, choose the printer is default: "Yes",
click "Next" choose
“Yes-(recommended)”, click “Finish”. A window of “Printer test page completed” pops up, click
“Yes”.
6. The printer driver process is installed successfully.
- 13 -
Page 21

x-Lab Dot Matrix Printer XDP-321 User's Manual
Chapter 2 Control Panel
You can use the four buttons on the control panel to operate your printer, such as line feed, load paper,
eject paper or set print speed. The LED indicators on the control panel display the currently selected
print speed.
2.1 LED Indicator
Figure 2-1 Control panel
LED
ONLINE (Green) Offline Online Micro-Adjust
POWER (Red) Turn off Turn on Paper out or malfunction occurs
Print Speed 1, 2 Indicate the currently set print speed
OFF ON BLINK
2.2 Key Functions
2.2.1 In the Tractor Paper Mode
TEAR
1. In the offline mode, if the paper is at the print position, press TEAR button and the printer feeds paper to
the tear off position.
2. In the offline mode, if the paper is at the tear off position, press TEAR button and the printer ejects paper
to the next page or to the printing home position of the current page.
LF/FF
In the offline mode, if the paper is at the print position, press the LF/FF button (for less than 0.5 second), the
printer will feed the paper one line based on current line
the printer will load tractor paper one page continuously.
LOAD/EJECT
spacing. Alternatively, hold the LF/FF button down,
1. When the paper is at the ready position, press LOAD/EJECT button, the paper will be fed to the printing
home position automatically.
2. When the paper is at the print position, press LOAD/EJECT button in the offline mode, printer will eject
one page when the eject-able length is longer than one page. If the paper eject-able length is less than
one page, the paper will go back to the ready position.
3. When the paper is at the tear-off position, press LOAD/EJECT button, printer will eject one page
automatically.
ONLINE
1. If the printer is in the offline mode with paper, press this button to enter ONLINE mode, the ONLINE LED
is on and the printer is available to print now. Press this button in the online mode, the printer is offline,
ONLINE LED is off and the printer is unavailable to print.
2. If the paper is at the tear off position in the offline mode, press ONLINE button, the printer will go back to
the printing home position of the current page or the next page.
- 14 -
Page 22
x-Lab Dot Matrix Printer XDP-321 User's Manual
2.2.2 In the Cut Sheet Mode
LF/FF
If the paper is at the print position in the offline mode, press the LF/FF button (for less than 0.5 second), the
printer will feed the paper one line based on currently set line spacing. Alternatively, hold the LF/FF button
down, the printer will load paper continuously until the cut sheet is entirely ejected.
LOAD/EJECT
If the paper is at the print position, press the LOAD/EJECT button in the offline mode, the paper will be
entirely ejected from the printer.
ONLINE
If printer is in the offline mode with paper, press ONLINE button to enter ONLINE mode, the ONLINE LED
is on and the printer is available to print. Press this button in the online mode, the printer is offline, ONLINE
LED is off and the printer is unavailable to print.
2.2.3 Print Speed
1. When printer is in the offline mode, hold the ONLINE button down for about 3 seconds, the ONLINE LED
blinks with a
2. The printer is in the alternate mode. Press the PRINT SPEED button to change the print mode among
Normal Speed mode, High Speed mode and Super High Speed mode. The combination ON (●) and
OFF (●) of the LED indicators shows the currently selected print speed.
3. Press the ONLINE button to save the value and exit the mode.
beep.
Print speed
Normal speed
High speed
Super high speed
LED
1 2
● ●
● ●
● ●
2.2.4 Micro-Adjust of Printing Home Position and Tear-off Position
1. After turning on the printer, install tractor paper properly using drive tractor and feed paper to the
printing home position (or tear-off position).
2. Hold the ONLINE button down for over 3 seconds in the offline mode till the ONLINE LED blinks
with a beep.
3. Press 〖↑〗or〖↓〗 button to feed paper upwards or eject paper downwards.
4. Press the ONLINE button again to save the setting and exit the mode after finish adjusting. Before
adjusting again, the printing home position or the tear off position will be valid all the time. After the
tear off position is adjusted, press ONLINE button and send commands to print. Only after the
printing home position is adjusted, all paper ejects and paper is feed again, does it print.
The printing home position adjusting methods of cut sheet and tractor paper are the same.
Note: 1. The adjustable range of printing home position is from -18/60 inch to +60/60 inch
(based on the default position set by the factory).
2. The adjustable range of tear off position is from -15/60 inch to +15/60 inch (based on
the default position set by the factory).
2.2.5 Feed Paper to the Tear-off Position
1. Turn on the printer, and then hold the ONLINE button down for about 3 seconds in the offline mode
- 15 -
Page 23
x-Lab Dot Matrix Printer XDP-321 User's Manual
till the ONLINE LED blinks with a beep.
2. Hold the TEAR button down for about 3 seconds to switch the function of automatically feeding
paper to the tear off position ON or OFF.
2.2.6 Other Functions of the Panel
noitcnuF nottuB
Enter printer setting mode to change the printer default setting. Long
ONLINE + POWER
LOAD/EJECT + POWER Chinese self-test mode
LF/FF + POWER Print pin test mode
TEAR + POWER English self-test mode
TEAR + LF/FF + POWER Hex dump mode
press on the LOAD/EJECT button in online mode, printer enters
menu setup mode.
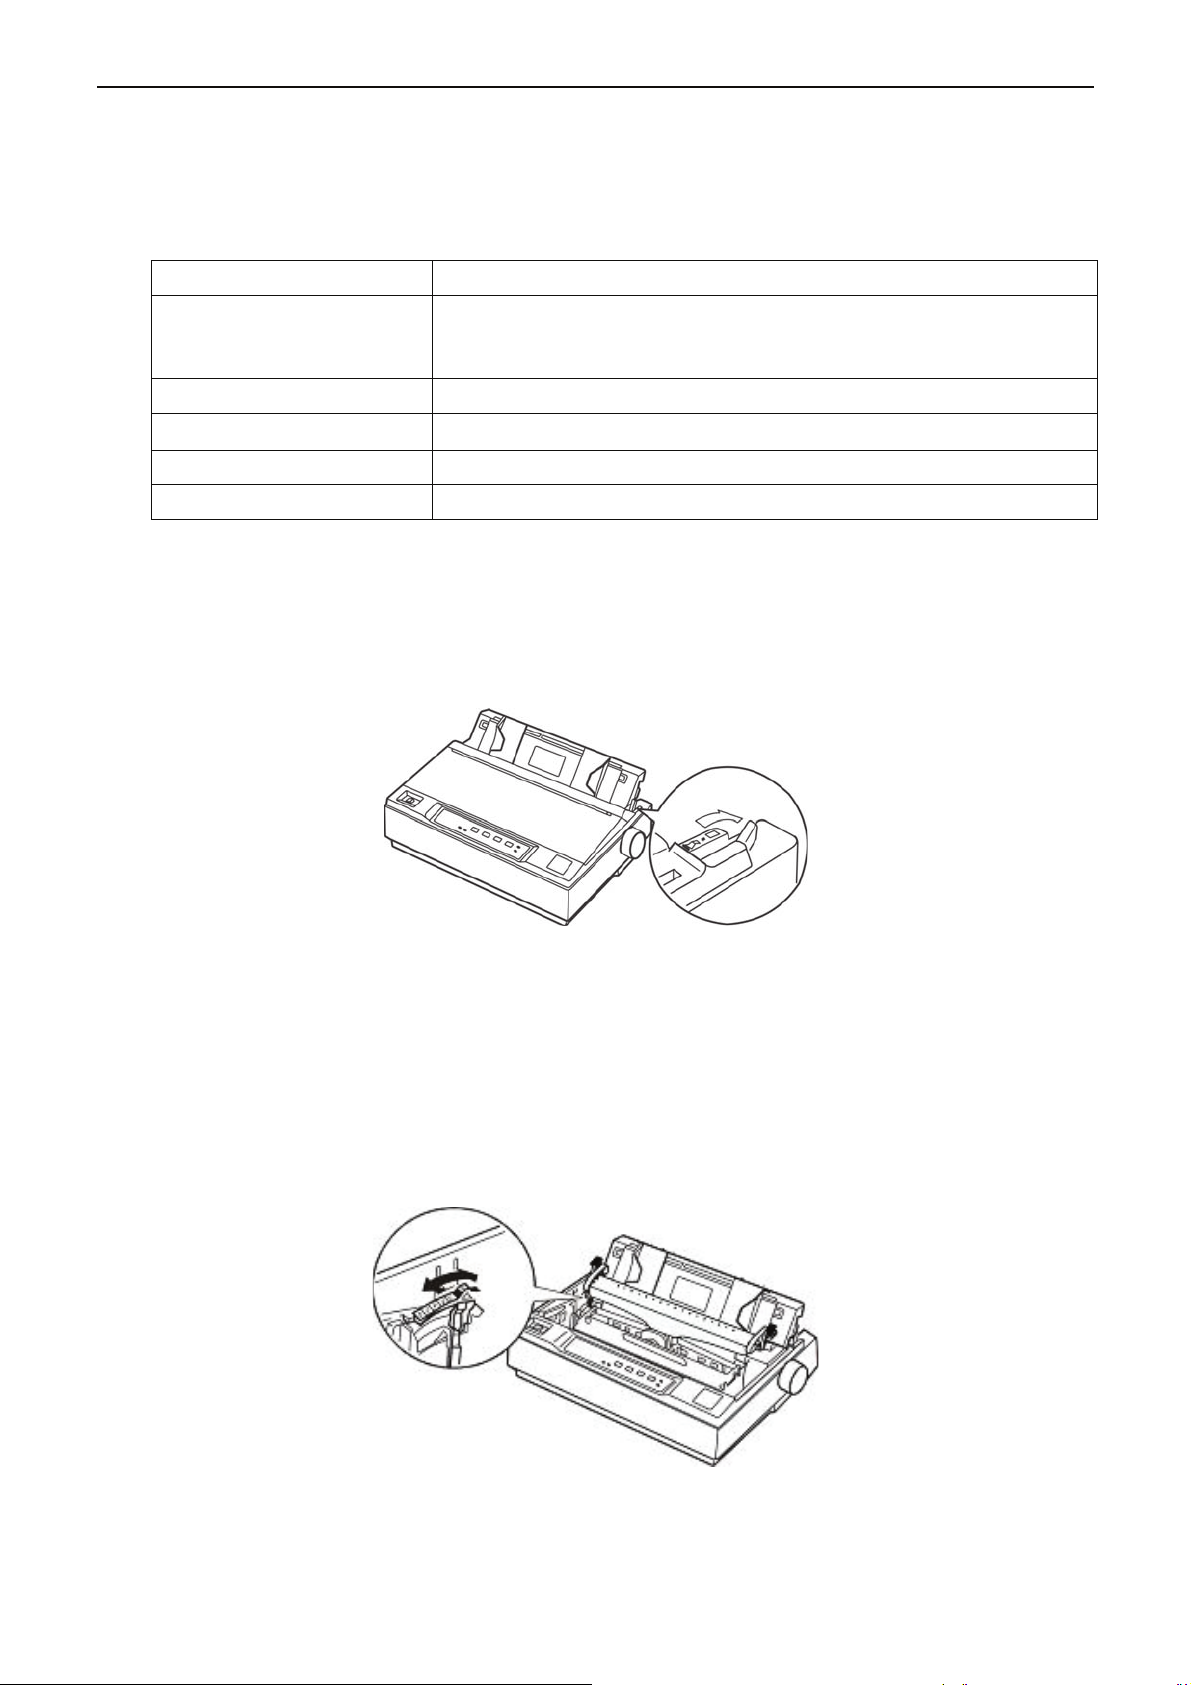
2.3 Paper Select Lever
Use the paper select lever to specify the printing mode of cut sheet or tractor paper. If you use cut
sheet to print, please pull the paper select lever to the cut sheet position; if you use tractor paper to
print, pull the paper select lever to the tractor paper position.
Figure 2.3 Paper select lever
2.4 Paper Feed Knob
The paper feed knob is used to load or eject paper manually. In general, it’s better not to use it.
2.5 Gap Adjust Lever
Set the gap adjust lever to proper position according to the thickness of your printing materials. The
default setting is for standard office paper.
Figure 2.5 Gap adjust lever
- 16 -
Page 24

x-Lab Dot Matrix Printer XDP-321 User's Manual
Use the table below to select the appropriate paper thickness.
Copies (including original) Lever position
Standard paper (cut sheet or tractor paper) 0
2-ply 1
1- )devreseR(
Multi-ply paper
Envelopes
3-ply 2
4-ply 3
20-pound 4
24-pound 5
6 )devreseR(
- 17 -
Page 25
x-Lab Dot Matrix Printer XDP-321 User's Manual
Chapter 3 How to Use the Printer
Here are the steps of using printer:
1. Assemble the printer as chapter 1, connect the printer to your computer and install the driver
correctly.
2. Load the correct type of paper.
3. Set the printer if necessary.
4. Send the print command to the printer to print.
3.1 Installing the Print Paper
In addition to printing with cut sheet and tractor paper, it can also print with a variety types of paper,
including multi-part forms, labels, and envelopes.
Caution: When printing with multi-ply paper, as it is thicker than ordinary paper, it needs the
stronger print force, so printing past or at the edge of these papers may damage
the print head.
Please make sure the printing contents are all within the printable area while printing. The correlative
printable area, please refer to Appendix A.
3.1.1 Loading Cut Sheet
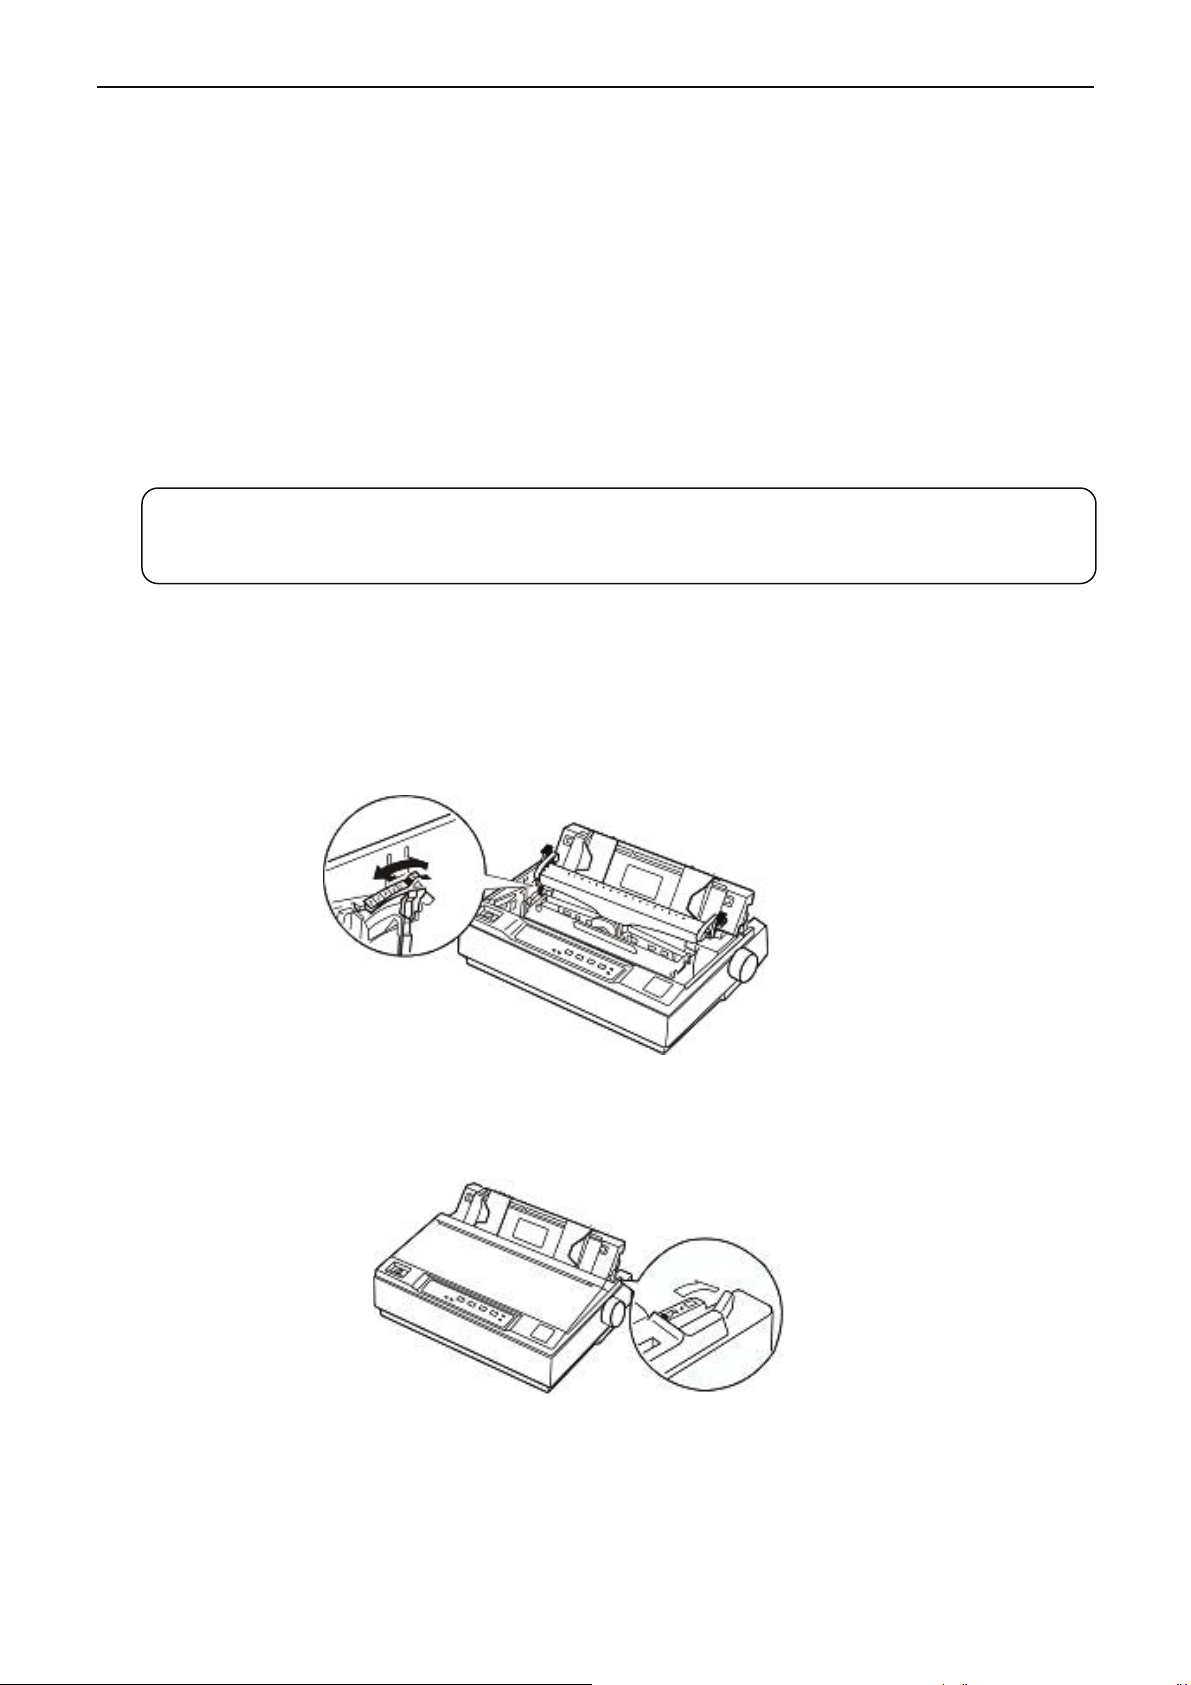
1. Make sure the printer is powered off, and open the window of the printer, refers to Gap adjust lever of
this manual according to the paper type.
2. Close the window, and set paper select lever to the cut sheet position.
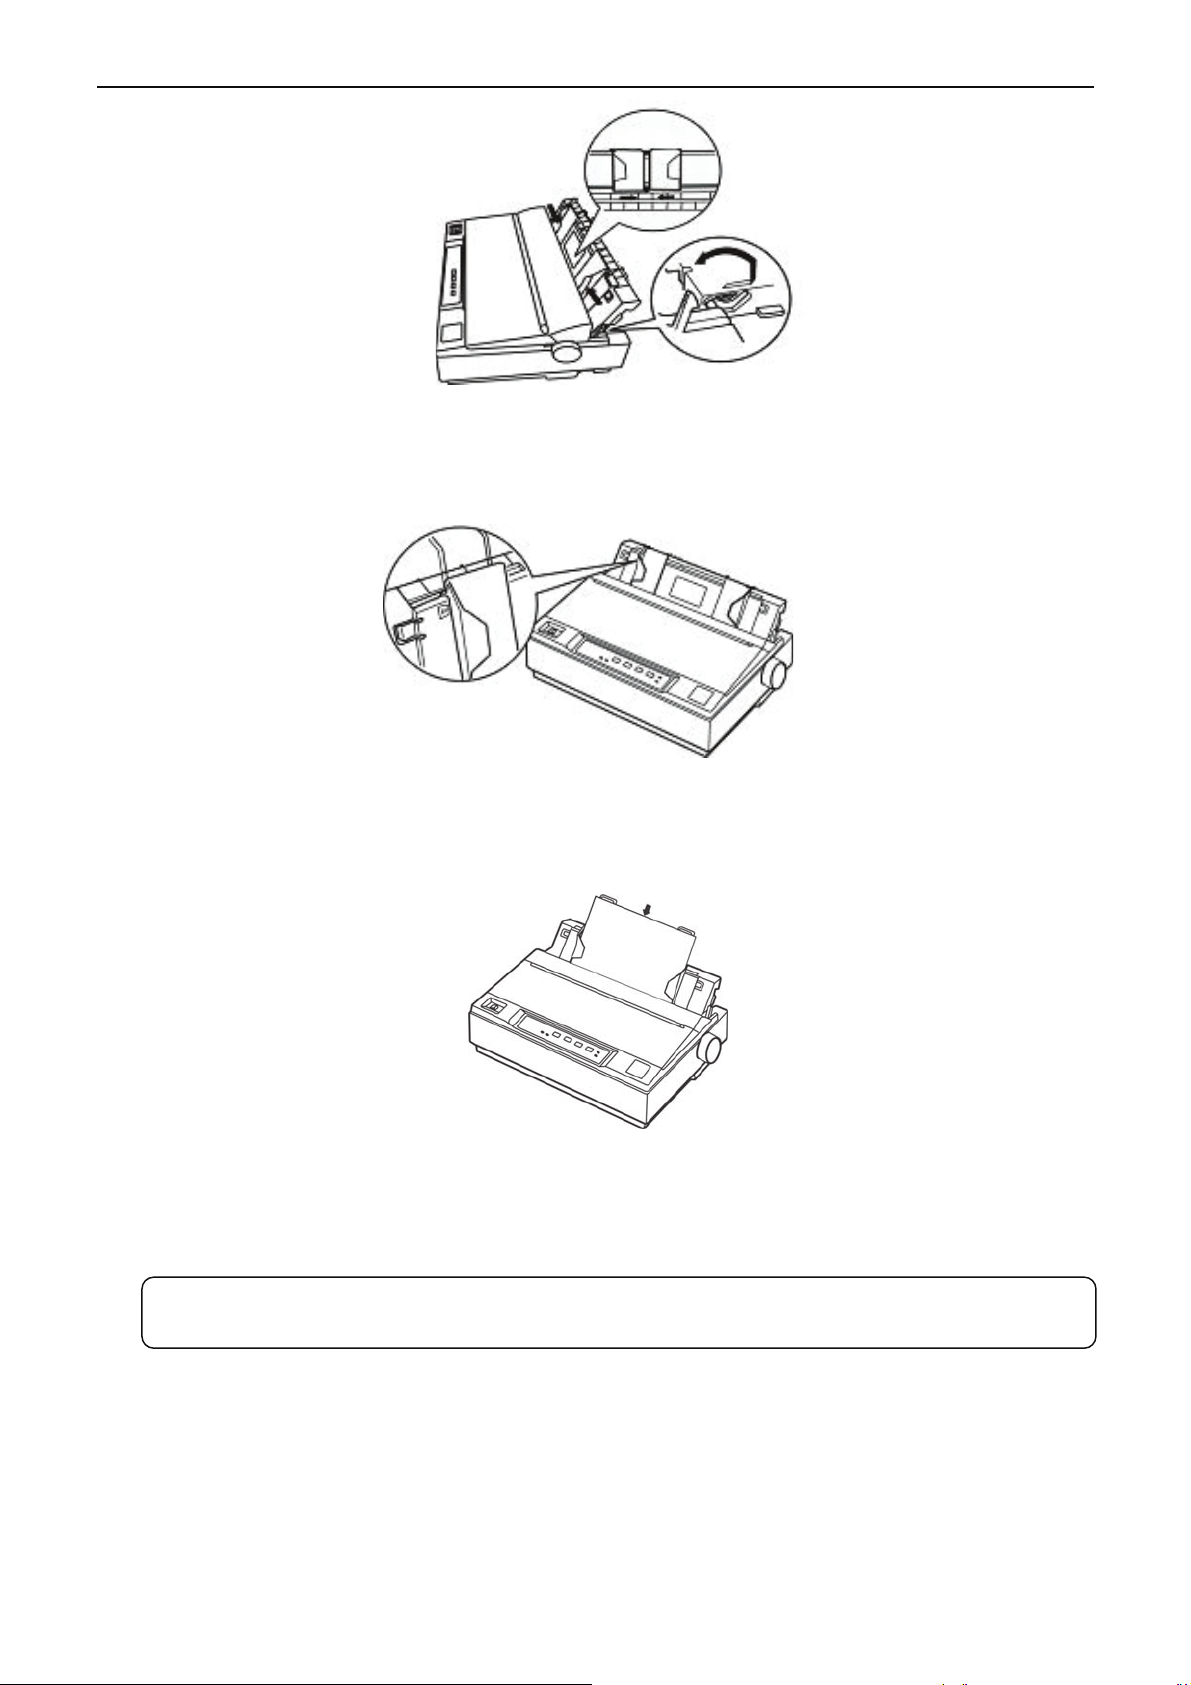
3. Raise the paper guide upright, and then turn on the printer.
Figure 3.1.1-1 Adjust gap adjust lever
Figure 3.1.1-2 Adjust paper select lever
- 18 -
Page 26
x-Lab Dot Matrix Printer XDP-321 User's Manual
Figure 3.1.1-3 Raise the paper guide upright
4. Slide the left guide track until it reaches the triangular guide mark. Next, adjust the right guide track to
match the width of your paper. (As shown in Figure 3-4)
Figure 3.1.1-4 Adjust the guide tracks
5. Slide a sheet of paper down firmly between the guide tracks until it meets resistance. The printer
loads the sheet automatically. (As shown below)
Figure 3.1.1-5 Insert cut sheet
6. Adjust the printing home position according to the steps in Micro-Adjust of Printing Home Position and
Tear-off Position if necessary.
Note: Don’t feed paper with Paper feed knob, or it will influence the precise paper feeding
position.
3.1.2 Loading Tractor Paper
If you use the tractor paper, you must decide which tractor to be installed. Then you install the tractor in
the corresponding way.
For convenience to switch between printing on cut sheet and tractor paper, or for convenience to tear
off the tractor paper, you should use
the tractor in push position. The printer leaves the factory with the
tractor installed in this position as the default setting.
- 19 -
Page 27
x-Lab Dot Matrix Printer XDP-321 User's Manual
If you want to print labels, you should use the tractor as a draught tractor.
You can use a drive tractor and a draught tractor (optional) at the same time to strengthen the function
of dealing with the tractor papers, which is fit for the printing requiring high precision in the print position,
such as tractor paper with printed tables, multi-ply paper and labels.
Here’s how to load tractor paper:
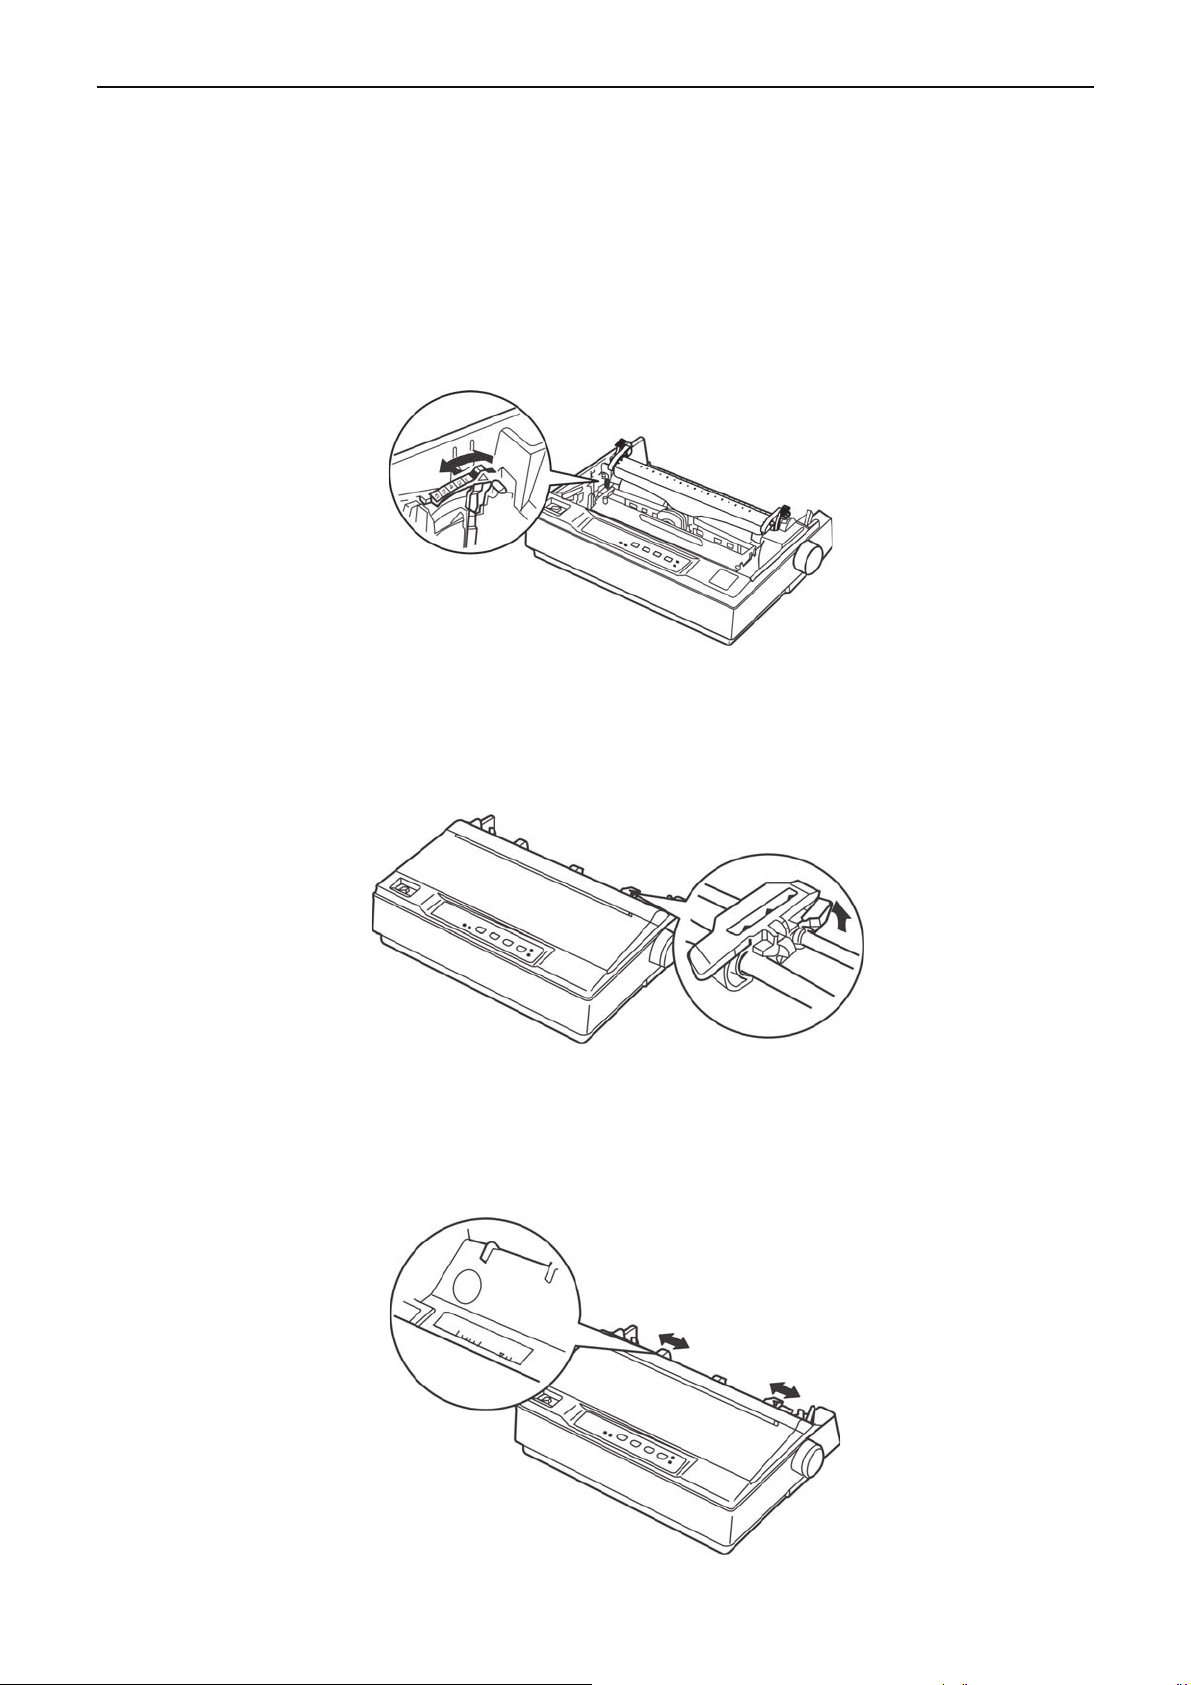
1 Using drive tractor:
1. Make sure the printer is turned off. Remove the paper guide and place the paper select lever in
the tractor paper position. Open the printer window, and then adjust the gap adjust lever
according to paper type.
2. Make sure the tractor is installed correctly (refer to chapter 1).
3. Pull the sprocket lock lever of the drive tractor upwards to release the sprocket. (As shown
4. Slide the left sprocket referring to the scale on the printer. The printer prints to the right of the
scale 0. Push the left sprocket lock lever to lock the left sprocket in place. Then slide the right
sprocket to match the width of your paper, but do not lock it. Move the paper support to the
midway which is between the sprockets. (As shown below)
Figure 3.1.2-1:1 Adjust the gap adjust lever
Figure 3.1.2-1:3 Release the sprocket
Figure 3.1.2-1:4 Adjust the position of the sprockets
below)
- 20 -
Page 28
x-Lab Dot Matrix Printer XDP-321 User's Manual
g
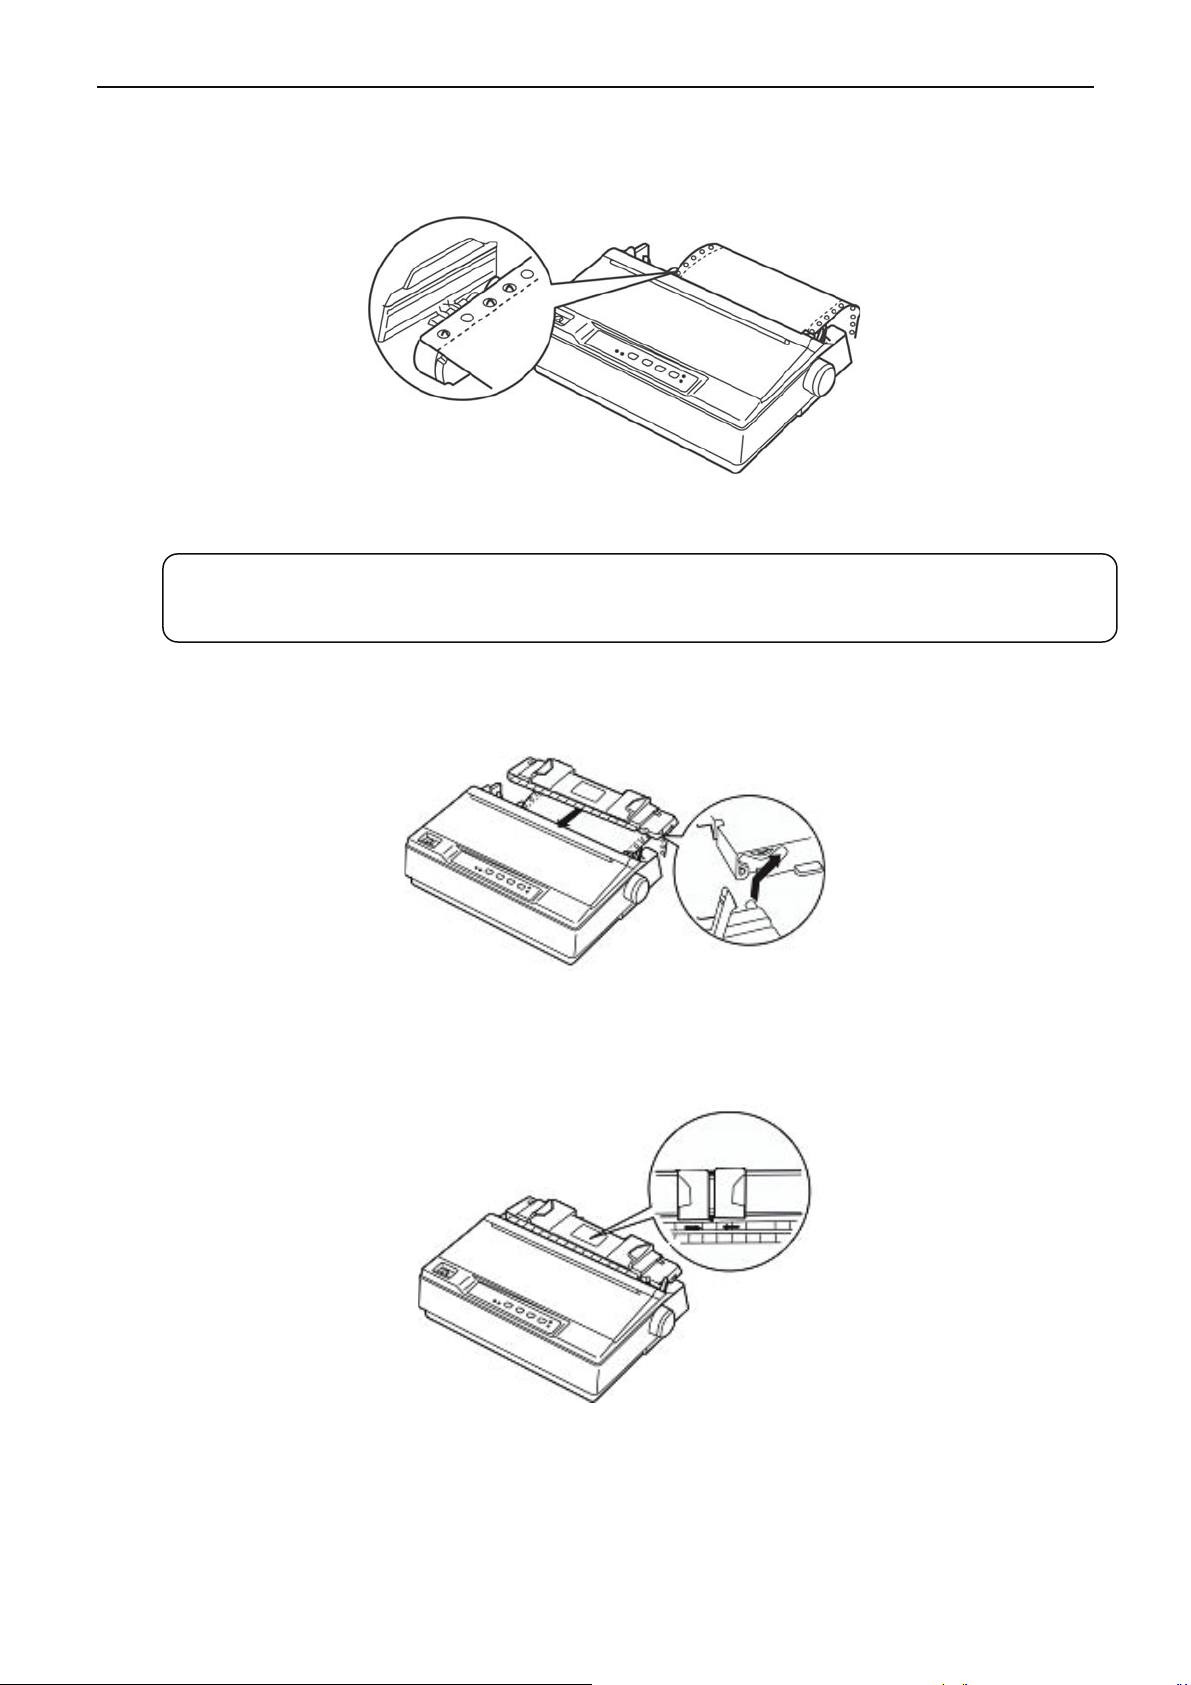
5. Make sure the paper edge is clean and straight. Open the sprocket covers, fit the first holes of the
paper to the sprocket pins and then close the sprocket covers. Slide the right sprocket to remove
any slack from the paper and lock it in place (As shown below). Now the paper is in the ready
position.
Figure 3.1.2-1:5 Load the tractor paper in the tractor
Note: Only when removing the jammed paper at the time the printer is turned off, can you
use the paper feed knob on the right side of the printer. Otherwise, the printer may be
dama
ed or the printing homeposition may be changed.
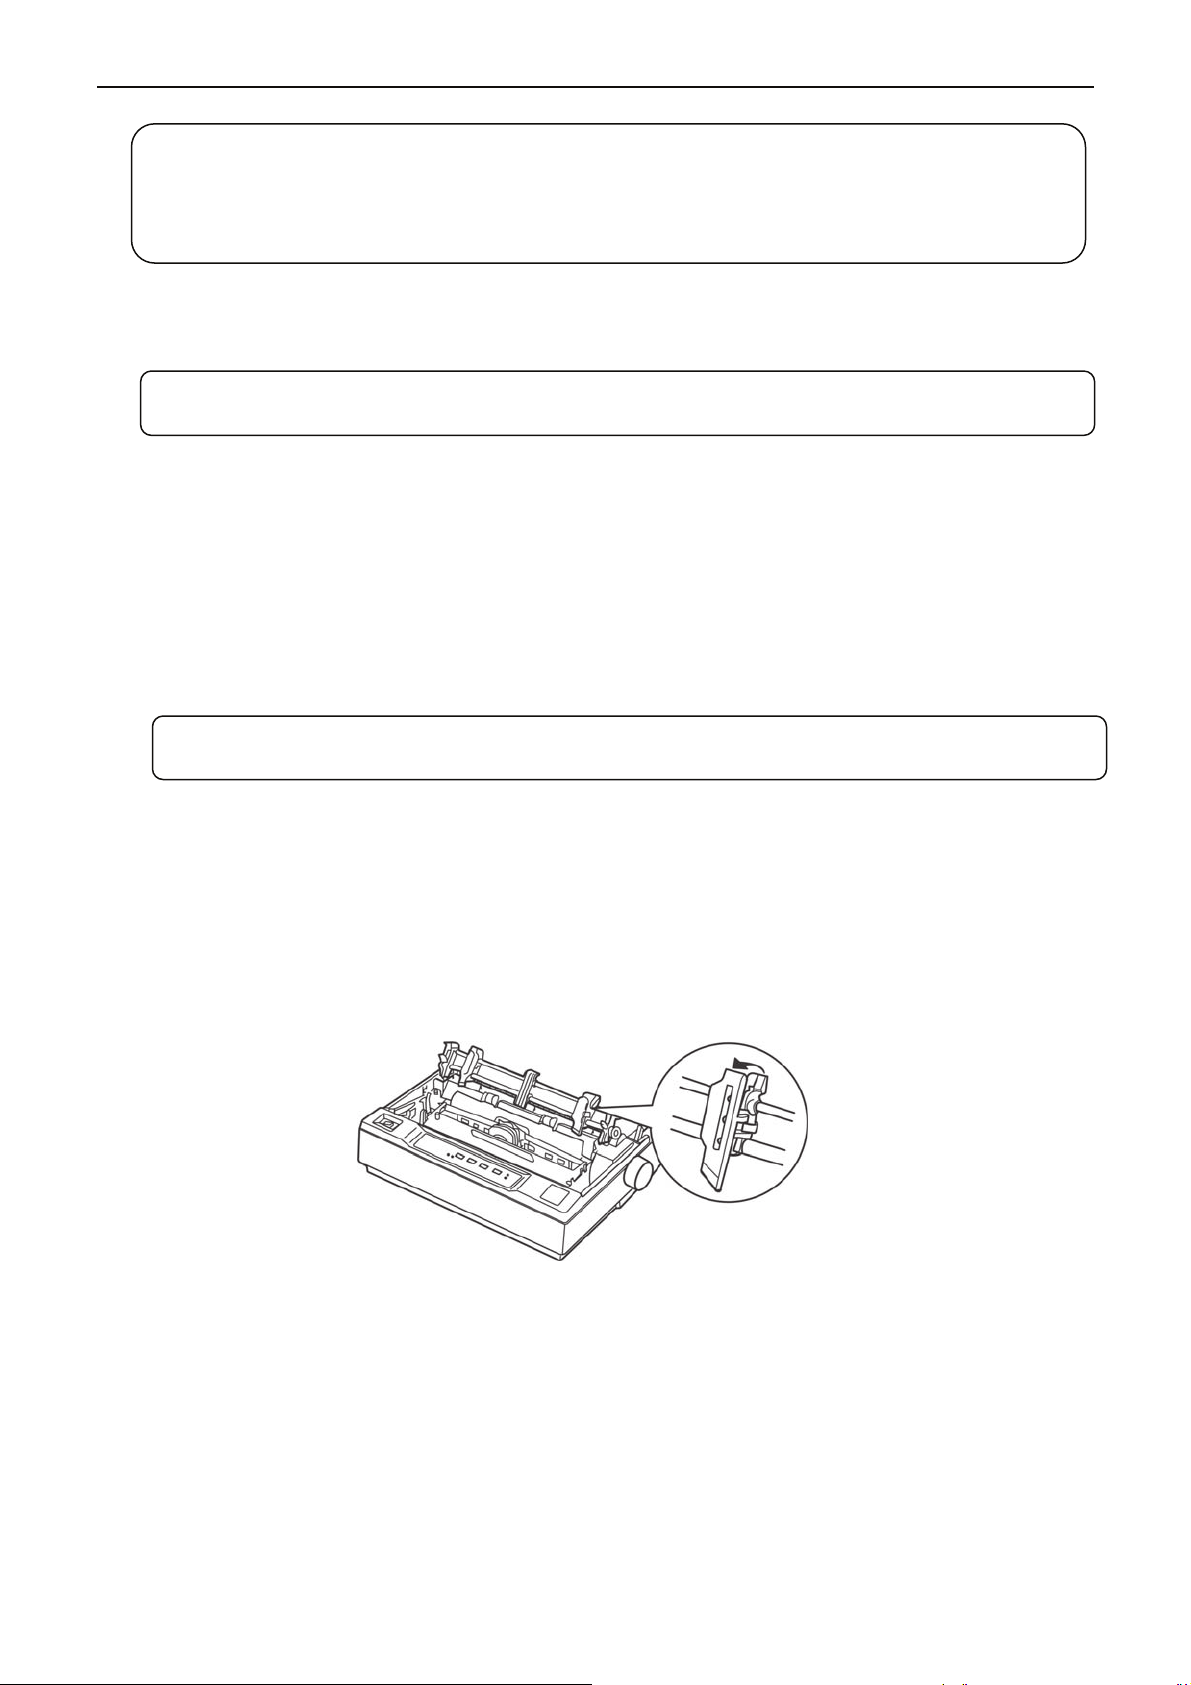
6. Hold the paper guide horizontally and install it according to the following figure, then lock it in the
direction shown by the arrow.
Figure 3.1.2-1:6 Install paper guide
7. Slide the right and left guide tracks of the paper guide to make them stop at the triangular mark on
the paper guide. (As shown below)
Figure 3.1.2-1:7 Adjust the position of guide tracks
8. Make sure the window is closed. Turn on the printer, and Press LOAD/EJECT button to feed
paper. You can adjust the printing home position according to Micro-Adjust of Printing Ho
me
Position and Tear-off Position if necessary. When the printer receives command, it begins printing
automatically.
- 21 -
Page 29
x-Lab Dot Matrix Printer XDP-321 User's Manual
g
Note: Do not use the knob to adjust the printing home position due to the micro-range is
How to switch tractor paper to cut sheet
Firstly, tear the printed tractor paper, then hold LOAD/EJECT button to eject the paper in the offline
mode. Pull the paper select lever to the cut sheet position, and load the cut sheet according to
Loading Cut Sheet in this manual.
limited. When the adjustment exceeds the up-limit or down-limit, the beeper beeps and
the position can not be adjusted for a further time. The position is in effect before next
adjustment. (The margin set in the software can cover this adjustment, so you had
better adjust the printing home position with the software.)
9. When you finish printing (the printer receives no data for several seconds), the printer feeds the
paper to the tear-off position so that the printed paper can be torn off
Note: Set the function of feeding paper to tear off position in the Print Setting mode on.
Otherwise, the printer does not feed the perforation to the ed
10. If the perforation and the edge of the window do not match, you should adjust the tear off
position following the steps in Micro-Adjust of Printing Home Position and Tear-off Position until
they are matched, and then tear the printed paper. The paper will return to the printing home
position and start printing when printer receives print command
Note: Make sure the printed tractor paper is torn off before ejecting the paper, as too many
pages to be ejected may cause paper jammed.
e of the window.
2 Using draught tractor:
1. Turn the printer off; then remove the paper guide. Pull the paper select lever to the tractor paper
position and remove the window and the tear-off position. Adjust the gap adjust lever according to
the paper type.
2. Make sure the tractor is installed correctly (refer to chapter 1).
3. Pull the sprocket lock lever of the drive tractor upwards to release the sprocket. (As shown below)
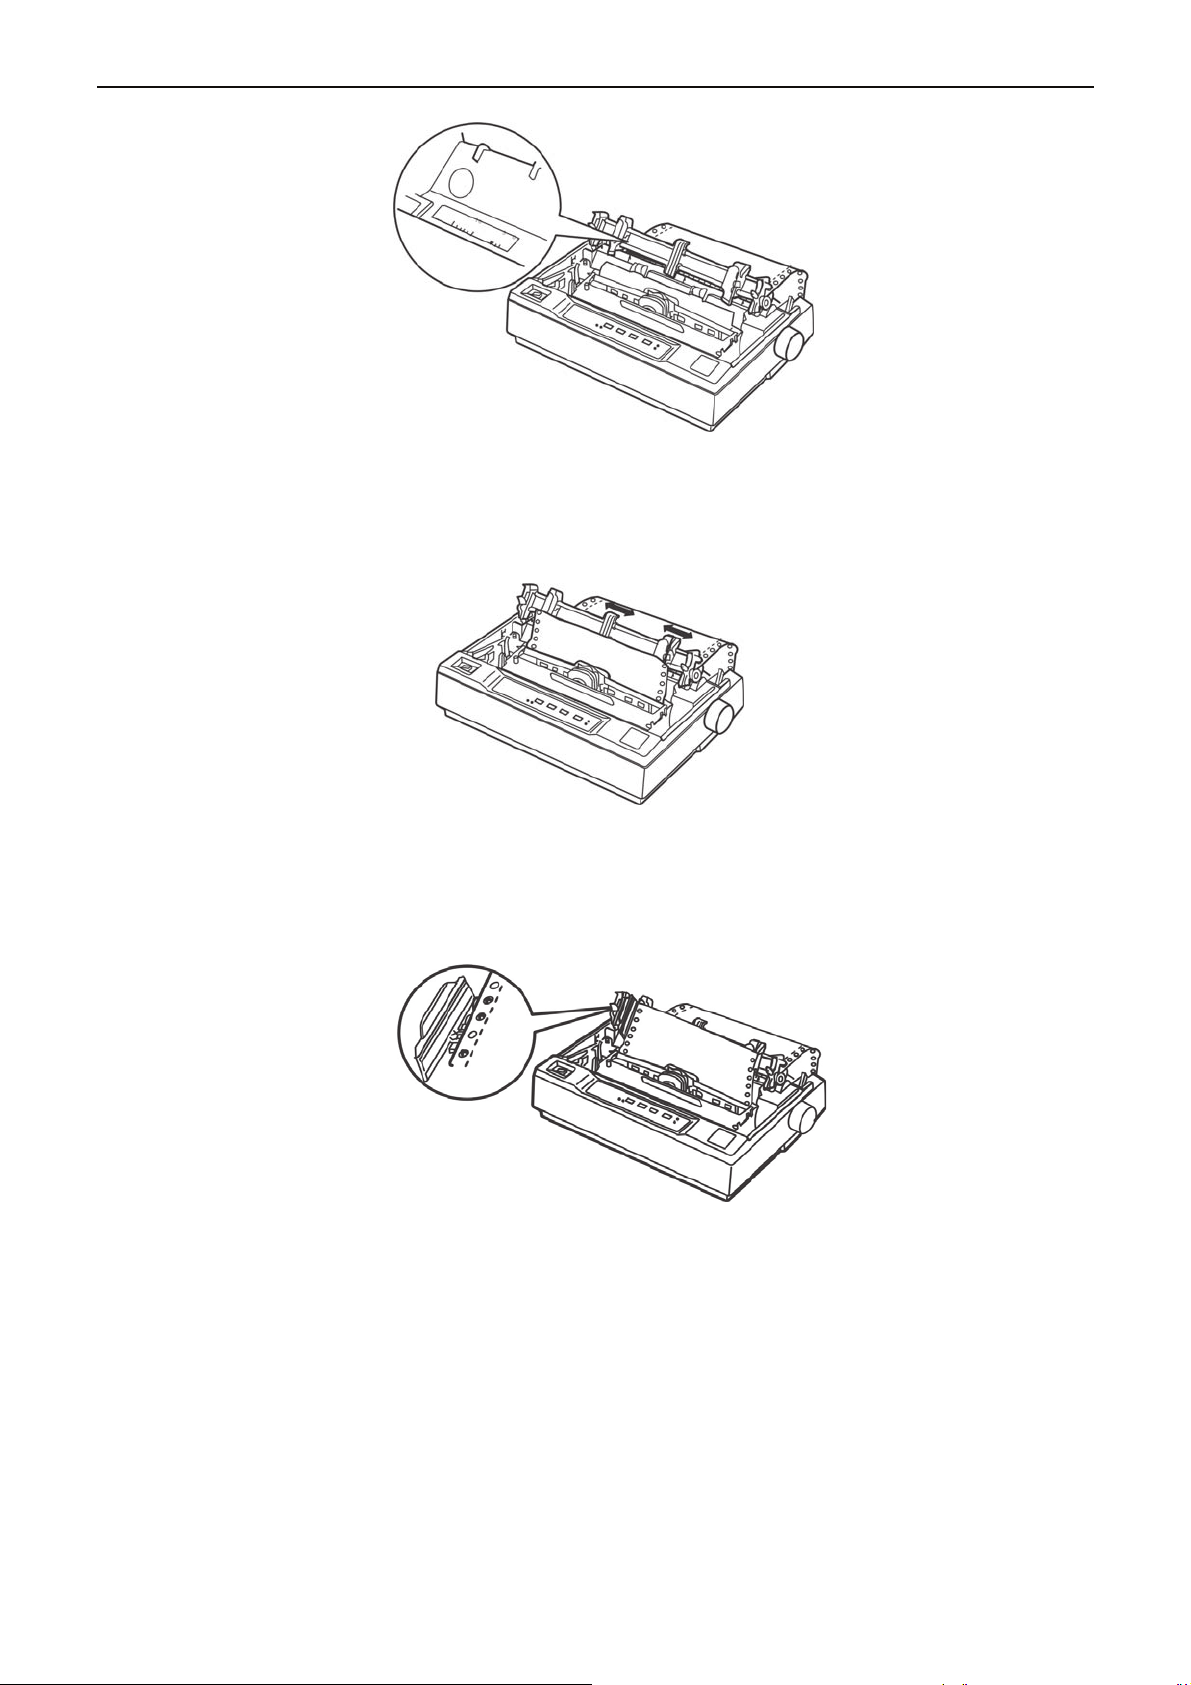
4. Insert the paper into the paper slot as shown below (printing side is faced down), then pull it out
from the position between the print head and the platen. Adjust horizontal position of the paper
using the scale on the printer as a guide. The printer can print to the right of the position marked
with 0.
Figure 3.1.2-2:3 Release the sprocket lock levers
- 22 -
Page 30
x-Lab Dot Matrix Printer XDP-321 User's Manual
Figure 3.1.2-2:4 Insert the tractor paper into the paper slot
5. Slide the left sprocket until it matches the position of the holes in the paper and lock it in place.
Then slide the right sprocket to match the width of the paper, but do not lock it. Move the paper
support to the midway which is between the two sprockets. (As shown below)
Figure 3.1.2-2:5 Adjust the position of the sprocket
6. Make sure the paper edge is clean and straight. Open the sprocket covers. Fit the first hole of the
paper to the sprocket pins and then close the sprocket covers. Slide the right sprocket to remove
any slack from the paper and lock it in place.
Figure 3.1.2-2:6 Load paper in the draught tractor
7. To separate the paper from loading and ejecting, it is necessary to install the paper guide. Hold it
horizontally and aim it at the printer’s mounting slots. Then slide the paper guide toward the rear
side of the printer until
it locks in place.
8. Slide the left and right guide tracks to the center until it stops at the triangular mark on the paper
guide.
9. Make sure the window is closed and then turn on the printer. When the printer receives data, it
begins printing automatically.
- 23 -
Page 31
x-Lab Dot Matrix Printer XDP-321 User's Manual
3 Using drive tractor and draught tractor at the same time:
1. Turn off the printer; then remove the paper guide. Pull the paper select lever to the tractor paper
position. Remove the window and adjust the gap adjust lever according to the paper type.
2. Make sure the tractor is installed correctly (refer to chapter 1).
3. Load the tractor paper on the sprocket of the drive tractor referring to Using Drive Tractor.
4. Turn on the printer, press LOAD/EJECT button to load paper automatically and the print head is at
the printing home position of the first page. Refer to Micro-Adjust of Printing Home Position and
Tear-off Position to adjust the printing home position if necessary. Hold LF/FF button down, the
printer feeds one page automatically.
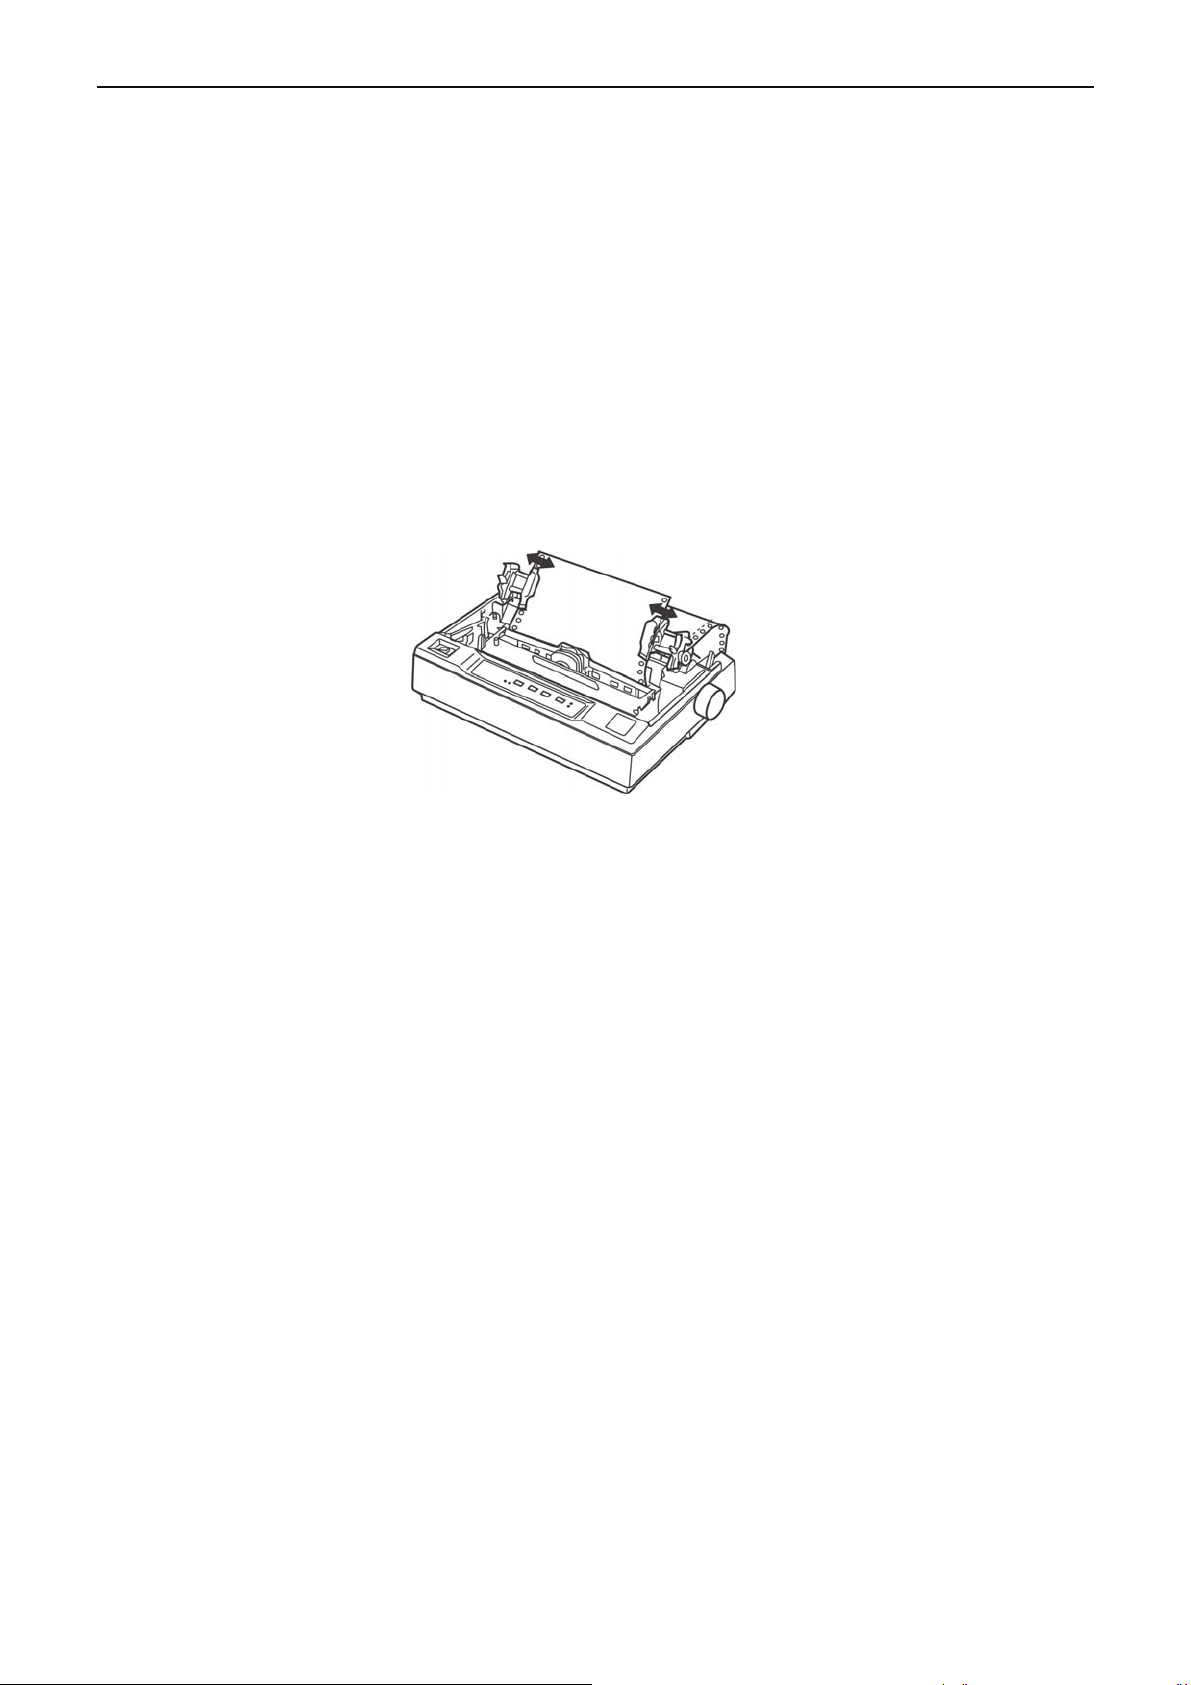
5. Release the sprocket lock lever of the draught tractor and open the sprocket cover. Pull straight
the paper upwards, and then adjus
paper. Then fit the tractor holes of the paper into the sprockets of the draught tractor, lock the
sprockets at last. The paper should not be twisted.
6. If the tractor holes of the paper do not match the sprocket of the draught tractor when tightening
the paper lengthways, then you can do as follows:
Figure 3.1.2-3:5 Adjust the position of the draught tractor
t the left and right sprockets until they match the width of the
1) Pull the paper select lever to the cut sheet position.
2) Turn the paper feed knob until the paper is tightened lengthways.
3) Pull the paper select lever forward to the tractor paper position.
7. Install the paper guide and printer window again.
8. The printer begins printing automatically when receives print commands
3.1.3 Loading Multi-ply papers
The installing ways of multi-ply papers (four plies at most) and tractor paper are the same. Just pay
attention to the following tips when installing:
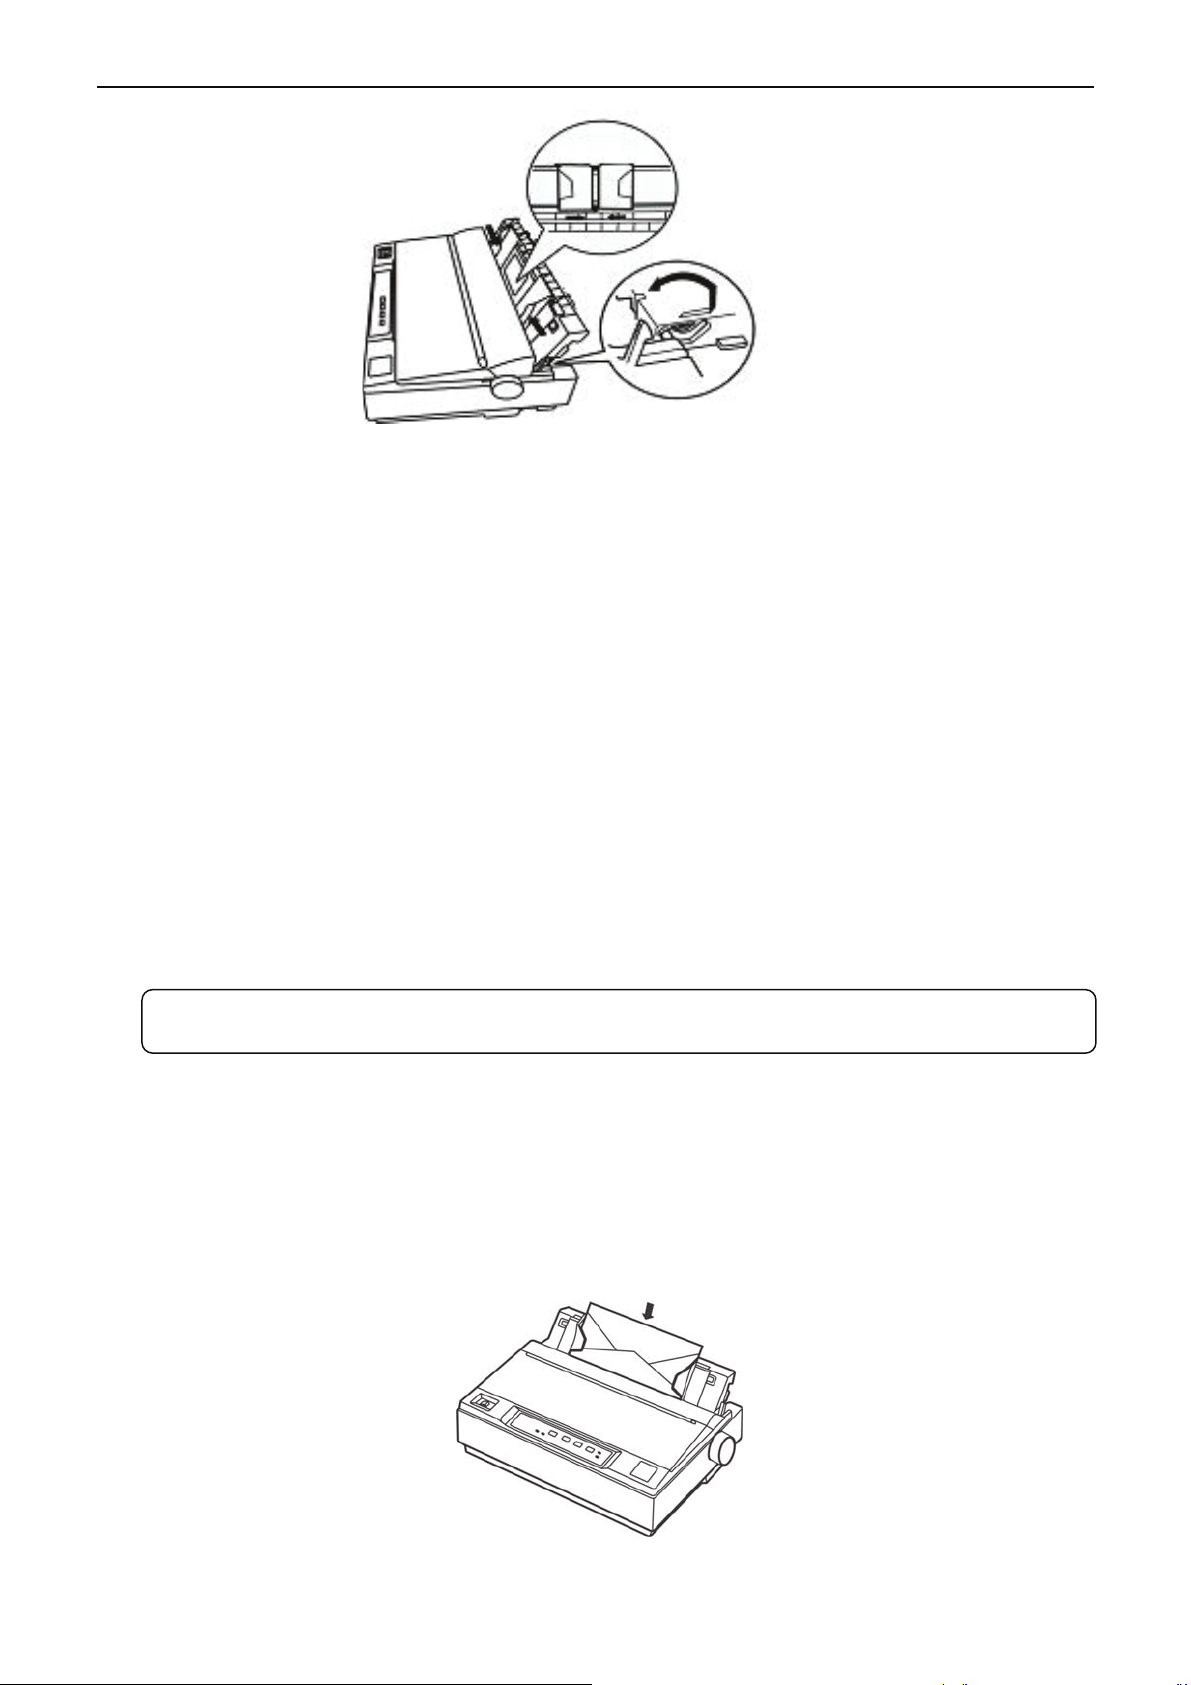
1. Must refer to the figure below to lift up the paper guide, otherwise, it may cause paper jam during
printing.
- 24 -
Page 32
x-Lab Dot Matrix Printer XDP-321 User's Manual
2. Never load multi-ply papers joined by metal staples or tape.
3. Avoid printing beyond the printable area with multi-ply papers, or the print head may be damaged.
(See Appendix for details).
Figure 3.1.3-1 Lift up paper guide
3.1.4 Loading Labels
You must use the tractor as a draught tractor to print labels (You can use draught tractor and drive
tractor at the same time). The installing ways of labels and tractor paper are the same. Keep these
tips in mind:
1. Set the gap adjust lever to position “1”.
2. Make sure the printing stays entirely within the printable area. (See Appendix for details.)
3. Because labels are sensitive to temperature and humidity, so please use them only under normal
operating conditions.
4. Do not leave labels in the printer while doing other jobs, or they would stick on the platen a
paper jam when it resumes printing.
5. Remove the labels from the printer, firstly tear off the fresh supply at the rear of the printer, and then
press LF/FF button to eject the remaining labels from the printer.
Caution: Never feed paper back and forth in the printer as they can easily peel off the mount
and jam the printer. If a label sticks on the printer, please contact your dealer.
nd cause
3.1.5 Loading Envelopes
The method of loading envelopes is generally the same with that of the cut sheet. Just pay attention
to the following tips:
1. Before loading an envelope, set the gap adjust lever to position 4 or 5.
2. Insert the envelope into the printer paper guide (as shown below), push it down gently until it feeds
into the printer.
Figure 3.1.5-2 Insert the envelop into the paper guide
- 25 -
Page 33

x-Lab Dot Matrix Printer XDP-321 User's Manual
3. Make sure the printout stays entirely within the printable area or the print head may be damaged.
(See Appendix for details.) It’s a good idea to print a test sample using a piece of cut sheet before
you print on the envelopes.
4. Use envelopes only under normal temperature and humidity conditions.
3.2 Changing Printer Setup
3.2.1 Setting Printer Parameter Through the Control Panel
1. Press the ONLINE button on the control panel while turning on the printer. The print head returns to
the home position with the printer beeping once. The ONLINE LED is off and the Power LED blinks
which denotes that paper out occurs.
2. Set the paper select lever to the proper position. (If in cut sheet mode, the paper select lever should
be in the cut sheet position, otherwise, it should be in the tractor paper position.)
3. After loading paper, in cut sheet mode, the printer would print out the current setting report
facility operation guide of control panel. In tractor paper mode, after installing the paper to the drive
tractor, once you press LOAD/EJECT button, the printer would load paper to the printing home
position and then print out the current setting report and the facility operation guide of control panel.
and
- 26 -
Page 34
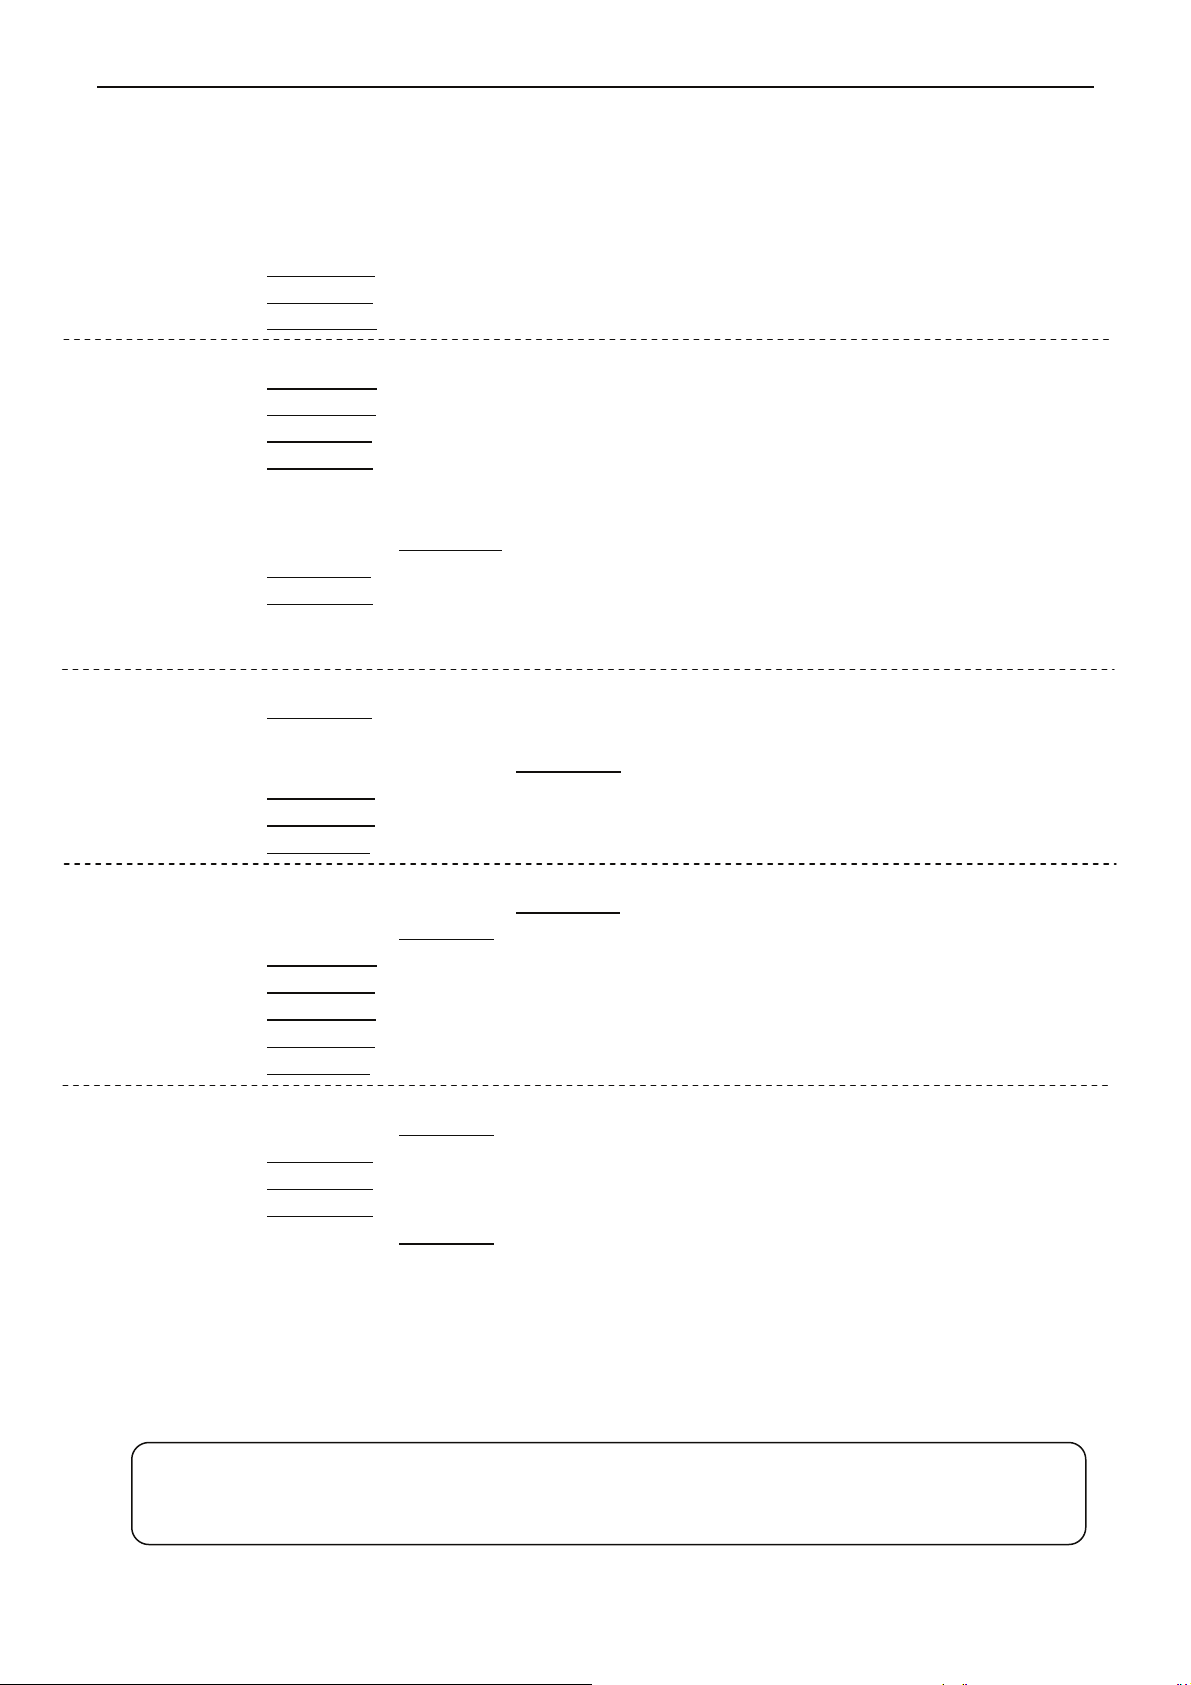
x-Lab Dot Matrix Printer XDP-321 User's Manual
x-Lab XDP-321
Current Setting Report
SYSTEM SETUP
EMULATION x-Lab IBM
LANGUAGE ENGLISH CHINESE
CHAR. MODE ASCII CHINA
CHARACTER
FONT ROMAN SANS SER
ENG PITCH 10 CPI
CHI PITCH 6.7 CPI
INTL CHAR SET U. S. A.
CHARACTER SET ITALICS GRAPHICS
IBM CHAR TBL SET 1 SET 2
CODE PAGE U.S.A. MULTI PORTUGAL CANADA NORWAY ICELAND BRASCII
PAGE LAYOUT
LINE SPACING 6 LPI 8 LPI
FORM LENGTH 3 INCH 3.5 INCH 11/3 INCH 4 INCH 5 INCH 5.5 INCH 6 INCH
FORM LOCK OFF
PAGE SKIP OFF ON
COMPRESS PRINT NORMAL 75% 50%
PRINT SETUP
PRINT DIR BI-DIR UNI-DIR AUTO
PRT-SPEED NOR-SPEED HI-SPEED SUP-SPEED
AUTO LF OFF ON
TEAR OFF OFF ON
TEAR POS TEARER HEAD TOP
PIN SWITCH OFF ON
IMPACT MODE NORMAL COPY 1 COPY 2
SERIAL 1/F
BAUD RATE 19200 BPS 9600 BPS 4800 BPS 2400 BPS 1200 BPS
PARITY NONE ODD EVEN
DATA BIT 8 BIT 7 BIT
STOP BIT 1 BIT 2 BIT
PROTOCOL XON/XOFF DTR
12 CPI 15 CPI 17.1 CPI PROPORTIONAL
7.5 CPI
FRANCE GERMANY U.K. DENMARK1 SWEDEN ITALY
SPAIN 1 JAPAN NORWAY DENMARK2 SPAIN 2 LATIN AM KOREA
LEGAL HOLAND TURKEY
ABICOMP ROMAN 8 ISO LTN1 PC858 ISO LTN9 ARAB NLS WIN 1256
TURKEY WIN LAT1 CYRILLIC RUSSIAN THAI VIETNAM
A4 12 INCH
RETTEL HCNI 5.8 HCNI 7
ON
Figure 3-19 Print out the current menu setup
Please press the ONLINE button, ensure the online LED is on, then hold down the LOAD/EJECT button
for about 3 seconds to enter Menu Setup Mode.
Note: It’s suggested using the paper which is not smaller than 8*11inch (width*length).
Note: 1. The underlined items are the current settings.
2. When you select compress printing in the setup menu, high speed printing is
invalid.
- 27 -
Page 35
x-Lab Dot Matrix Printer XDP-321 User's Manual
1. Make sure the printer is in online mode (ONLINE LED is on), hold the LOAD/EJECT button down
for about 3 seconds.
The POWER LED and ONLINE LED blink twice simultaneously which indicates that the printer
enters the menu setup mode.
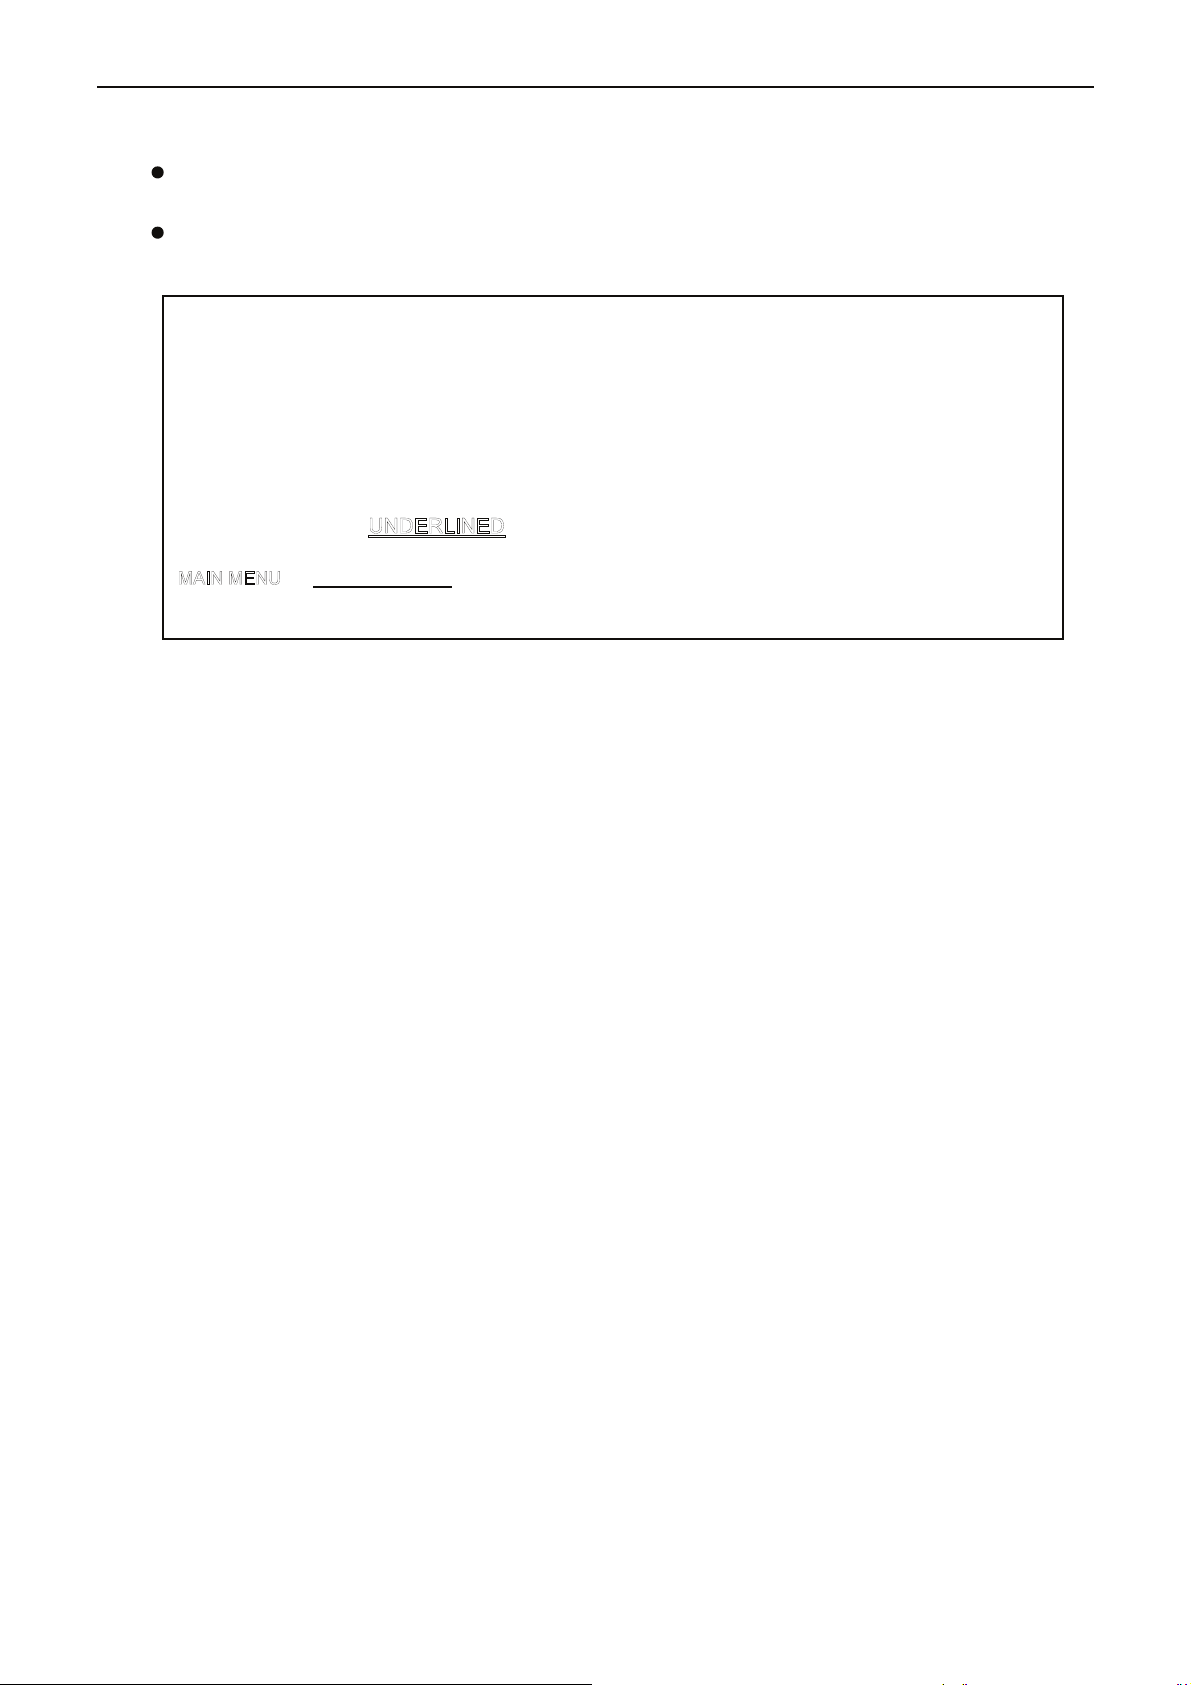
The title and main menu are printed out firstly (as the following figure shown), the underlined
items are the default settings. Print head stays under the current default item.
Use the LOAD/EJECT button to select the suitable menu items.
Use t h e LF/FF button to c onfirm the cu r rent setting .
Use the ONLINE button to return to the previous menu (Press and hold the ONLINE button to
return to the main menu).
Press and hold the TEAR button to save settings and exit.
Current settings are
x-Lab XDP-321
SETUP MENU SYSTEM
New settings will be boldfaced.
SYSTEM SETUP CHARACTER PAGE LAYOUT PRINT SETUP SERIAL I/F
HEAD PIN
Figure 3-20 Setup menu mode
2. Using the following keys to modify the menu setting:
LOAD/EJECT Select the menu option or menu setting value.
LF/FF Enter the submenu or confirm menu setting value.
Note: Newly setting option would be shown in FILLED.
ONLINE Return to upper menu (Hold on pressing ONLINE button would return to main
menu directly).
TEAR Save and exit the menu setup mode.
3. Giving up the settings modified, just turn off the printer directly. If you need to save the new setting,
long press TEAR button to save and exit the menu setup mode.
4. Turn off and restart the printer, new settings are in operation.
3.2.2 Online-aptitude Parameter Settings
XDP-321 supports the function of online-aptitude parameter settings, which can be set in the PC with
the driver installed in.
The concrete setting steps are shown as follows:
1. Make sure that the host and the printer are connected with a cable and both the host and the printer
are turned on, the printer should be in normal working condition as well.
2. Under the operating system of WIN 2000/WIN XP/VISTA/WIN 7, click “Start” → “Settings” →
“Printers”, and open the window of “Printers”.
Under the operating system of Windows 8/ Windows 10, click “Desktop” in the main panel firstly, and
then double click “Control panel” after entering the window of “Desktop”, click “Hardware and Sound”
to find “Devices and printers”, at last, open the window of “Devices and printers”.
3. Right click “x-Lab XDP-321” in the “Printers”, select “Properties”.
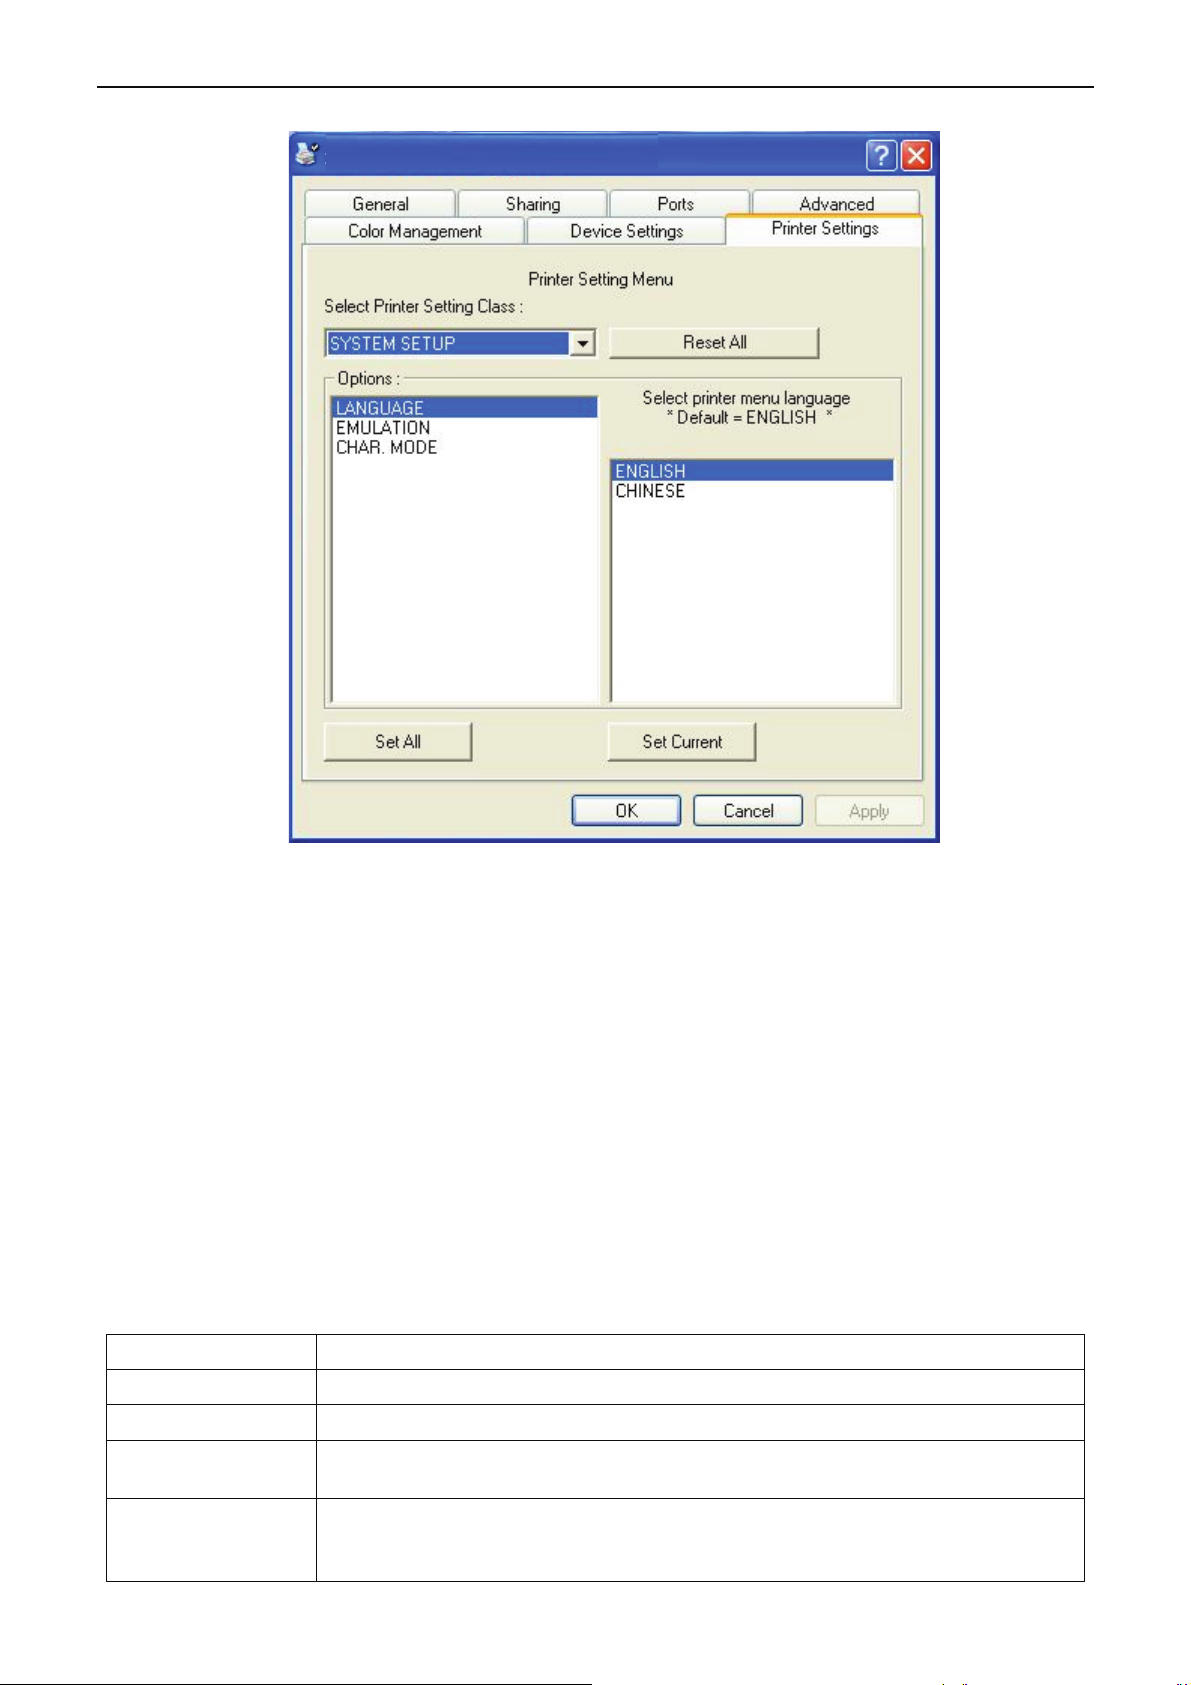
4. Click “Printer Settings” in the
Properties page.
- 28 -
Page 36
x-Lab Dot Matrix Printer XDP-321 User's Manual
5. The setting way is corresponding with that of printer menu system. In the “Printer Settings” layout,
select the first class menu in the combobox of “Select Printer Setting Class”, select the second
menu in the “Options” and set the item in the current parameters list.
6. Click the “Reset All” button to reset all the parameters to be the driver’s default, but do not change
the printer’s settings.
7. When setting the parameters: you can click “Set Current” to save the current settings after setting
each item, or you can also click “Set All” after setting all parameters. After clicking “Set All” or “Set
Current”, the parameter’s instruction will be sent to the printer.
8. The printer’s parameter settings will be changed at once after receiving the instruction and it is not
necessary to restart the printer.
9. After finishing settings, click “OK”, exit the “Properties” window
x-Lab XDP-321 Properties
.
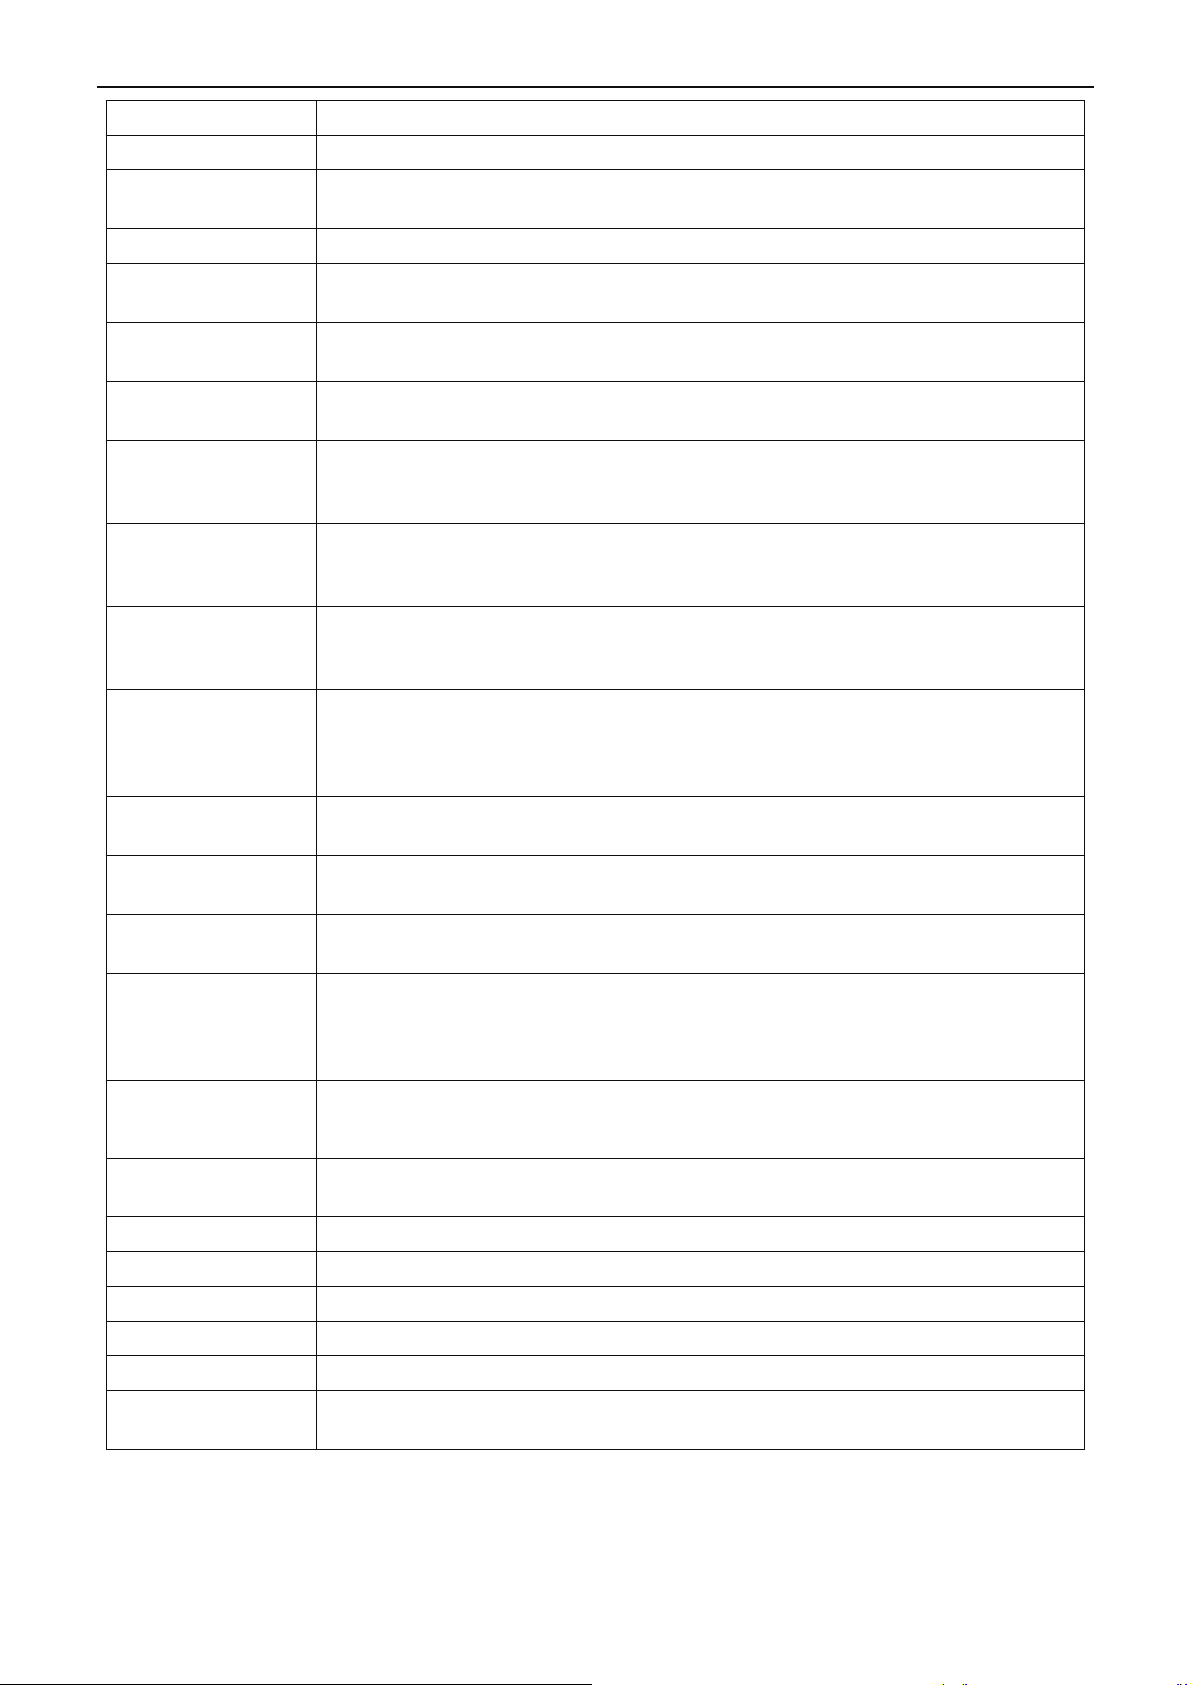
3.3 Printer Setting Descriptions
This section describes all the settings available in the Menu Setup Mode.
noitpircseD snoitpO
EMULATION Specify printer's control commands.
LANGUAGE Specify the printer menu language as English or Chinese.
CHAR. MODE
FONT
Select ASCII or Chinese character mode to print when printer receives character
printing task.
Specify a kind of ASCII fonts to print when printer receives character printing
task. If the print data with font instruction, printer gives priority to print data
instruction. (Only valid when CHARACTER MODE is choosing ASCII)
- 29 -
Page 37
x-Lab Dot Matrix Printer XDP-321 User's Manual
ENG PITCH Specify the ASCII character spacing in characters per inch (cpi).
CHI PITCH Specify the Chinese character spacing in characters per inch (cpi).
INTL CHAR SET
Specify the printer internal character set according to different using
circumstances of international characters.
CHARACTER SET Specify character set as Italic Character or Graphic Character.
IBM CHAR TBL
Select IBM character table 1, which the position from 80H to 90H of character
table are control codes.
CODE PAGE Select the code page according to different national characters use
circumstances.
LINE SPACING
Specify the line spacing in lines per inch (lpi). If the print data with vertical pitch
instruction, printer would give priority to print data instruction.
Specify the page length of the form, for both cut sheet and continuous paper.
FORM LENGTH
Printer feeds to next page according to the specified page length. If the print data
with page length instruction, printer would give priority to print data instruction.
After selecting this function on, printer would lock the page length setting. Printer
FORM LOCK
feeds to next page according to the current setting parameter and would not
affected by the page length instruction of the print data.
After selecting this function on, printer would leave one inch (25.4mm) margin at
PAGE SKIP
the perforation of the tractor paper automatically. If the print data with page
margin instruction, printer would give priority to print data instruction.
After selecting this function on, printer would print out transverse compressed
COMPRESS
PRINT
content according to the specified percentage in normal speed. When
auto-compress mode is selected, printer would detect paper width automatically
and choose the proper percentage to print.
PRINT DIR
PRT-SPEED
AUTO LF
Select the printing direction of the print head: unidirectional, bidirectional or
selected via software.
Specify the print speed of printer. Printing resolution is lower while print speed is
higher.
If this function is on, printer would advance the paper one line automatically after
receiving every carriage return instruction.
Select the function of feeding the paper to tear off position ON or OFF in tractor
TEAR OFF
paper mode. After selecting this function on, if the printer receives FF command
for a period of time, but receives no printing data, printer would feed the page
bottom to tear off position automatically.
After selecting this function on, when the printer has finished printing, paper
TEAR POS
would be fed to the set tear off position automatically, and you should tear off the
paper manually.
PIN SWITCH
After selecting this function on, printer would switch different pins to print table
line automatically.
IMPACT MODE According to customer's printing requirement, select the printing capability.
BAUD RATE Specify the printer serial data transfer rate.
PARITY Specify the parity bit for serial data transfer.
DATA BIT Specify the serial data bits.
STOP BIT Specify the serial data transfer stop bit.
PROTOCOL
Specify the protocol of printer serial data transfer as software control
(XON/XOFF) or hardware control (DTR).
- 30 -
Page 38

x-Lab Dot Matrix Printer XDP-321 User's Manual
3.4 Restore the Factory Default Settings
1. Hold on TEAR, LOAD/EJECT and LF/FF buttons on the control panel at the same time while turning
on the printer. The POWER and ONLINE LED indicators on the control panel blink 3 times
simultaneously with two beeps to confirm that printer’s factory settings have been restored.
2. Release the buttons and switch the printer off and on again.
3. After these steps, the printer’s factory settings work.
- 31 -
Page 39

x-Lab Dot Matrix Printer XDP-321 User's Manual
Chapter 4 Problems and Solutions
You may encounter many problems while operating your printer. Please refer to this chapter for
solution.
You can check the operation of your printer using the self test. Refer to chapter “Self-test”. If the self
test works properly, the problem probably lies in the computer, the software, or the interface cable. If
the self test does not work, contact your dealer or qualified service person for assistance.
Note: Press LOAD/EJECT button while turning on the printer, the printer enters the Chinese
self test mode.
Press the TEAR button while turning on the printer, the printer enters the ASCII self
test mode.
If you are an experienced user or a programmer, you can print a hexadecimal dump to isolate
communication problems between the printer and computer. To print a hex dump:
1. Install paper and turn off the printer. Next, hold down the LF/FF and TEAR buttons at the
same time while you turning on the printer.
2. Then send data from your computer. The printer prints all t
hexadecimal format.
he codes it received in
4.1 Power Supply
Power is not being supplied normally.
Phenomenon 1: The LEDs on the control panel are off, and the printer has no action.
Solutions:
1. Check that the power cord is properly plugged into the electrical outlet.
2. If the electrical outlet is controlled by an outside switch or automatic timer, use another outlet.
3. Plug another electrical device, such as a lamp, into the outlet to determine whether the outlet
operates properly.
Phenomenon 2: The LEDs blink temporarily and then go off. The LEDs stay off even when the
power is turned on again.
Solutions: Check whether the printer’s rating voltage matches with the power cord. If not, unplug the
power cord immediately and contact your dealer or a specified x-Lab service center for
advice. Do not plug the power cord to the electrical outlet again.
4.2 Printing
The printer does not print.
Phenomenon 1: The Online LED is on but nothing is printed.
Solutions:
1. Check that the Driver is installed properly for your printer, as described on chapter “Installing the
Printer Driver”. Check the driver’s printer settings.
2. Check both ends of the interface cable. Make sure the cable meets both the printer and computer
specifications.
Phenomenon 2: The Online LED is off and the ONLINE LED blinks, the printer beeps once.
Solutions: The printer may be out of paper. Load paper in the printer.
Phenomenon 3: The printer sounds like it is printing, but nothing is printed.
- 32 -
Page 40

x-Lab Dot Matrix Printer XDP-321 User's Manual
Solutions:
1. The ribbon cartridge may not be installed properly. See chapter “Installing the Ribbon Cartridge”.
2. The ribbon may be worn out. Replace the ribbon.
3. The gap adjust lever may be too high. If so, please set the gap adjust lever to the corresponding
position according to the paper thickness.
Phenomenon 4: The printer makes strange noise while printing.
Solutions:
Turn off the printer and check for a paper jam, a ribbon jam, or other problems.
Phenomenon 5: The beeper beeps several times and the ONLINE LED is off.
Solutions:
1. Switch off the printer and power on again.
2. If the ONLINE LED stays off, check for a paper jam or ribbon jam. If it does, turn the printer off and
clear the jam.
3. If an error occurs when you switch between cut sheet and tractor paper, make sure the paper
select lever is in the correct position.
4. If the printer still does not work correctly, turn off the printer and contact your dealer or a specified
x-Lab service center.
The print is faint or uneven.
Phenomenon 1: Printed characters have parts missing at the top or bottom.
Solutions: The ribbon cartridge may not be installed properly. See chapter “Installing the Ribbon
Cartridge”.
Phenomenon 2: The printout is faint.
Solutions: The ribbon may be worn out. Replace the ribbon as described on chapter “Installing the
Ribbon Cartridge”.
The ribbon can not move smoothly.
Solutions: The ribbon may be worn out. Replace the ribbon as described on chapter “Installing the
Ribbon Cartridge”.
Dots are missing in printed characters or graphics.
Phenomenon 1: A line of dots are missing in the printout.
Solutions: The print head may be damaged. Stop printing and contact your dealer or a specified x-Lab
service center to have the print head replaced.
Phenomenon 2: Dots are missing in random positions.
Solutions: The ribbon may be damaged. Replace a new one.
Printed characters are not what you expected
Phenomenon 1: The fonts or characters you sent with your software can not be printed out.
Solutions: Check whether the driver is correctly configured for your printer. For instructions, see
chapter “Installing the Printer Driver”.
Phenomenon 2: The font selected on the control panel can not be printed.
Solutions: Your software may override your control panel setting. Use the font setting in your software
program.
- 33 -
Page 41

x-Lab Dot Matrix Printer XDP-321 User's Manual
The print position is not what you expected.
Phenomenon 1: The printing home position is not correct or the bottom part of one page is
printed at the top of the next page.
Solutions:
1. See chapter Micro Adjust of Printing Home Position and Tear Position to adjust the printing home
position.
2. Check the page length set by your software and adjust it in the software or in the printer to match the
paper length.
Phenomenon 2: Regular gaps occur in the printout.
Solutions: Page skip function may be on. Set page skip function to off in the Menu setup mode.
4.3 Paper Handling
Cut sheet do not feed properly
Phenomenon 1: Paper does not feed.
Solutions:
1. Tractor paper may be left in the printer. Remove the tractor paper. Set the paper select lever to the
cut sheet position. Insert a new sheet.
2. If there is no tractor paper in the printer and the paper select lever is in the proper position, maybe
the sensor can not detect paper. Try to move the paper a little leftwards to make sure it touches the
paper sensor.
Phenomenon 2: Paper feeding is crooked or paper jam occurs.
Solutions: Turn off the printer and remove the jammed paper. Reinsert a piece of cut sheet straightly
into the paper guide, and adjust the paper guide to match with paper width. Make sure
that the window is closed, and power on again.
Phenomenon 3: Paper does not eject completely.
Solutions:
1. Use the LOAD/EJECT button to
2. Make sure the window is closed.
3. The paper may be too long. Check whether the paper used meets the specifications specified in
the Appendix, and the Using paper must be within the specified range.
eject the paper.
Tractor paper does not feed properly
Phenomenon 1: The tractor does not feed the paper.
Solutions:
1. Check that the paper select lever is pulled forward to the tractor paper position. If not, move the
lever to the correct position.
2. If this problem still can not be solved, the paper may peel off the tractor. Reinstall the paper to the
tractor.
Phenomenon 2: Paper feeding is crooked or paper jam occurs.
Solutions:
1. Make sure the paper guide is in the upright position.
2. Make sure the position of your paper supply can not prevent it from feeding vertically.
3. Make sure your paper supply is positioned within 1 meter (3 feet) off the printer.
4. Make sure the window is closed.
- 34 -
Page 42

x-Lab Dot Matrix Printer XDP-321 User's Manual
5. Make sure the edge guide positions are correct. Position the edge guides at the triangular guide
marks.
6. Check that the holes on both sides of the paper are aligned with each other. Also, make sure the
sprocket units are locked and their covers are closed.
7. Check whether the paper specifications meet the standard request according to the Appendix A.
Phenomenon 3: The paper does not eject completely.
Solutions:
1. May be the page length is too long. When using the draught tractor, tear off the paper having
entered the printer, then press the LF/FF button to feed the paper forward. When using the drive
tractor, tear off the last paper printed out, then press the LOAD/EJECT button to feed the paper
backward.
2. Please make sure the paper length is within prescribed range. (Refer to the paper specifications in
Appendix A
Phenomenon 4: When you switch between cut sheet and tractor paper, the beeper sounds
Solutions: There is paper left in the paper in channel while you change the paper select lever position.
)
several times and the online indicator is off.
Return the paper select lever to the previous position and eject the paper. Then change the
paper select lever position again.
4.4 Alignment Adjust Mode
Enter the alignment adjust mode to improve the print quality when the printer has been used for a long
time.
Note: When the gap adjust lever is in the position of 2 or above, the printer is in copy mode
automatically. Users can
sheet or tractor paper), then adjust the alignment as the steps below.
1. Turn on the printer, load paper and then turn off the printer.
2. Entering method of alignment adjust mode:
In the online mode, press and hold on the LF/FF key and TEAR key until the Power and ONLINE
indicators blink simultaneously, the printer enters LQ and DP alignment adjust mode (DP
adjust and LQ alignment adjust mode are adjusted respectively), then the printer would print out the
LQ alignment state.
3. After entering the alignment adjust mode, press the following keys to adjust the degree of make
columns:
EJECT/LOAD Each press on this button, the even line would move left with one step (the
maximal movable steps are 30)
LF/FF Each press on this button, the even line would move right with one step (the
maximal movable steps are 30)
TEAR Switch to the next DPI adjust state
set the gap adjust lever according to specific paper type (cut
alignment
ONLINE Store current setting to the printer (Power and ONLINE indicators blink
simultaneously several times)
4. Restart the printer and exit the alignment adjust mode.
Note: Alignment adjust mode would affect the printing quality, think it over before adjust it
and be strict to the instructions while adjusting.
- 35 -
Page 43
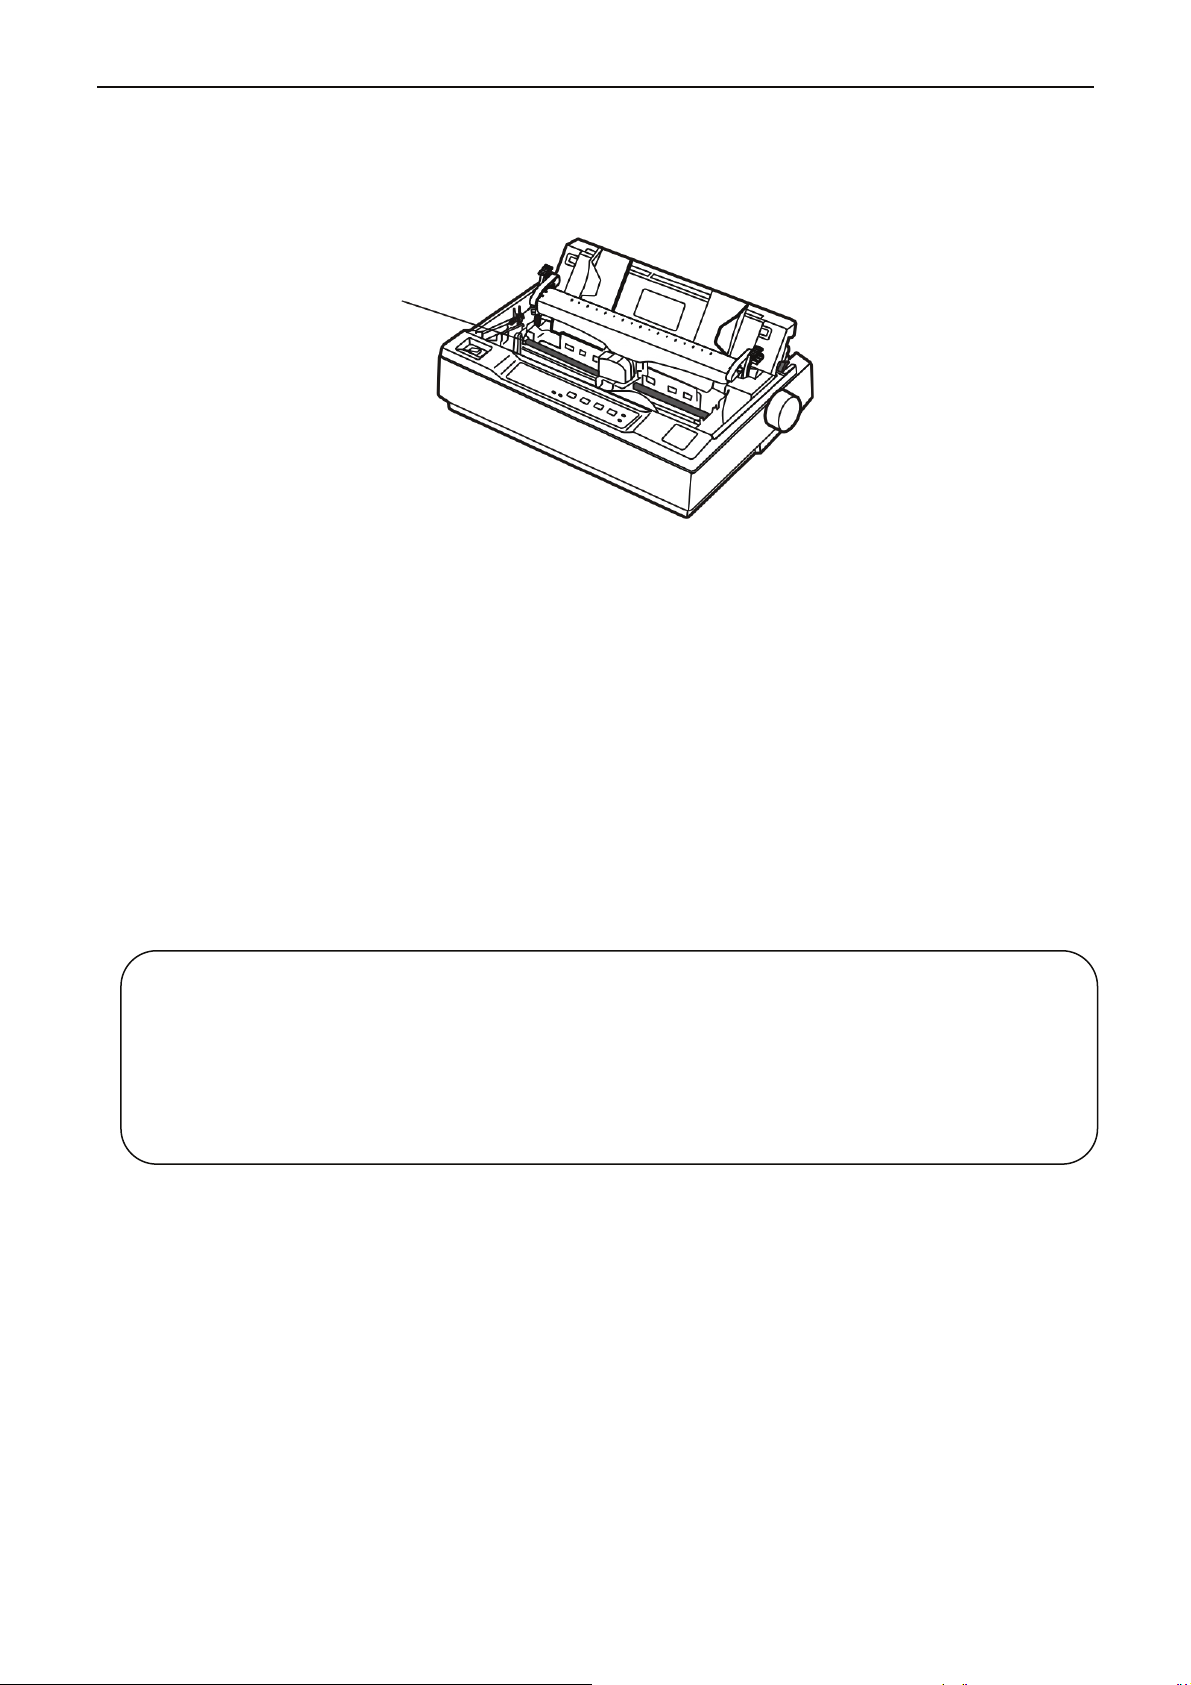
x-Lab Dot Matrix Printer XDP-321 User's Manual
Chapter 5 Printer Maintenance and Technical Service
5.1 Cleaning the Printer
Periodical cleaning and cleaning tool
Periodical cleaning: Every 3 months or 300 working hours
Carriage shaft
Figure 5-1 Cleaning the printer
Cleaning tool: Dry cloth (Use soft cloth while cleaning metal parts)
Cleaning carriage shaft
There is a layer of oil covered on the carriage shaft which guarantees the carriage runs smoothly. But the
oil is easy to absorb dust, please clean the dust with soft cloth first, and then add proper lube (NYE180
lube of NYE Company is recommended), move print head back and forth to make lube scattered.
Cleaning the paper feed path
Wipe off wasted paper, clean dirt and dust.
Note: 1. Turn off printer and pull out the power cord before cleaning.
2. Being used under dust circumstance, the carriage shaft may stack much dust and
affect the print quality. Please shorten the cleaning period.
3. Print head and the surrounding part may be high temperature after using. Please avoid
cleaning it at the moment.
4. Please use a soft cloth for cleaning, do not use combustible solvent.
5.2 Contact the Technical Service Centre
If malfunction occurs and can not be solved through the operation shown in 4.2, the components of the
printer are damaged during using or you nee
technical service centre.
d to buy some consumables, please contact the nearest
- 36 -
Page 44
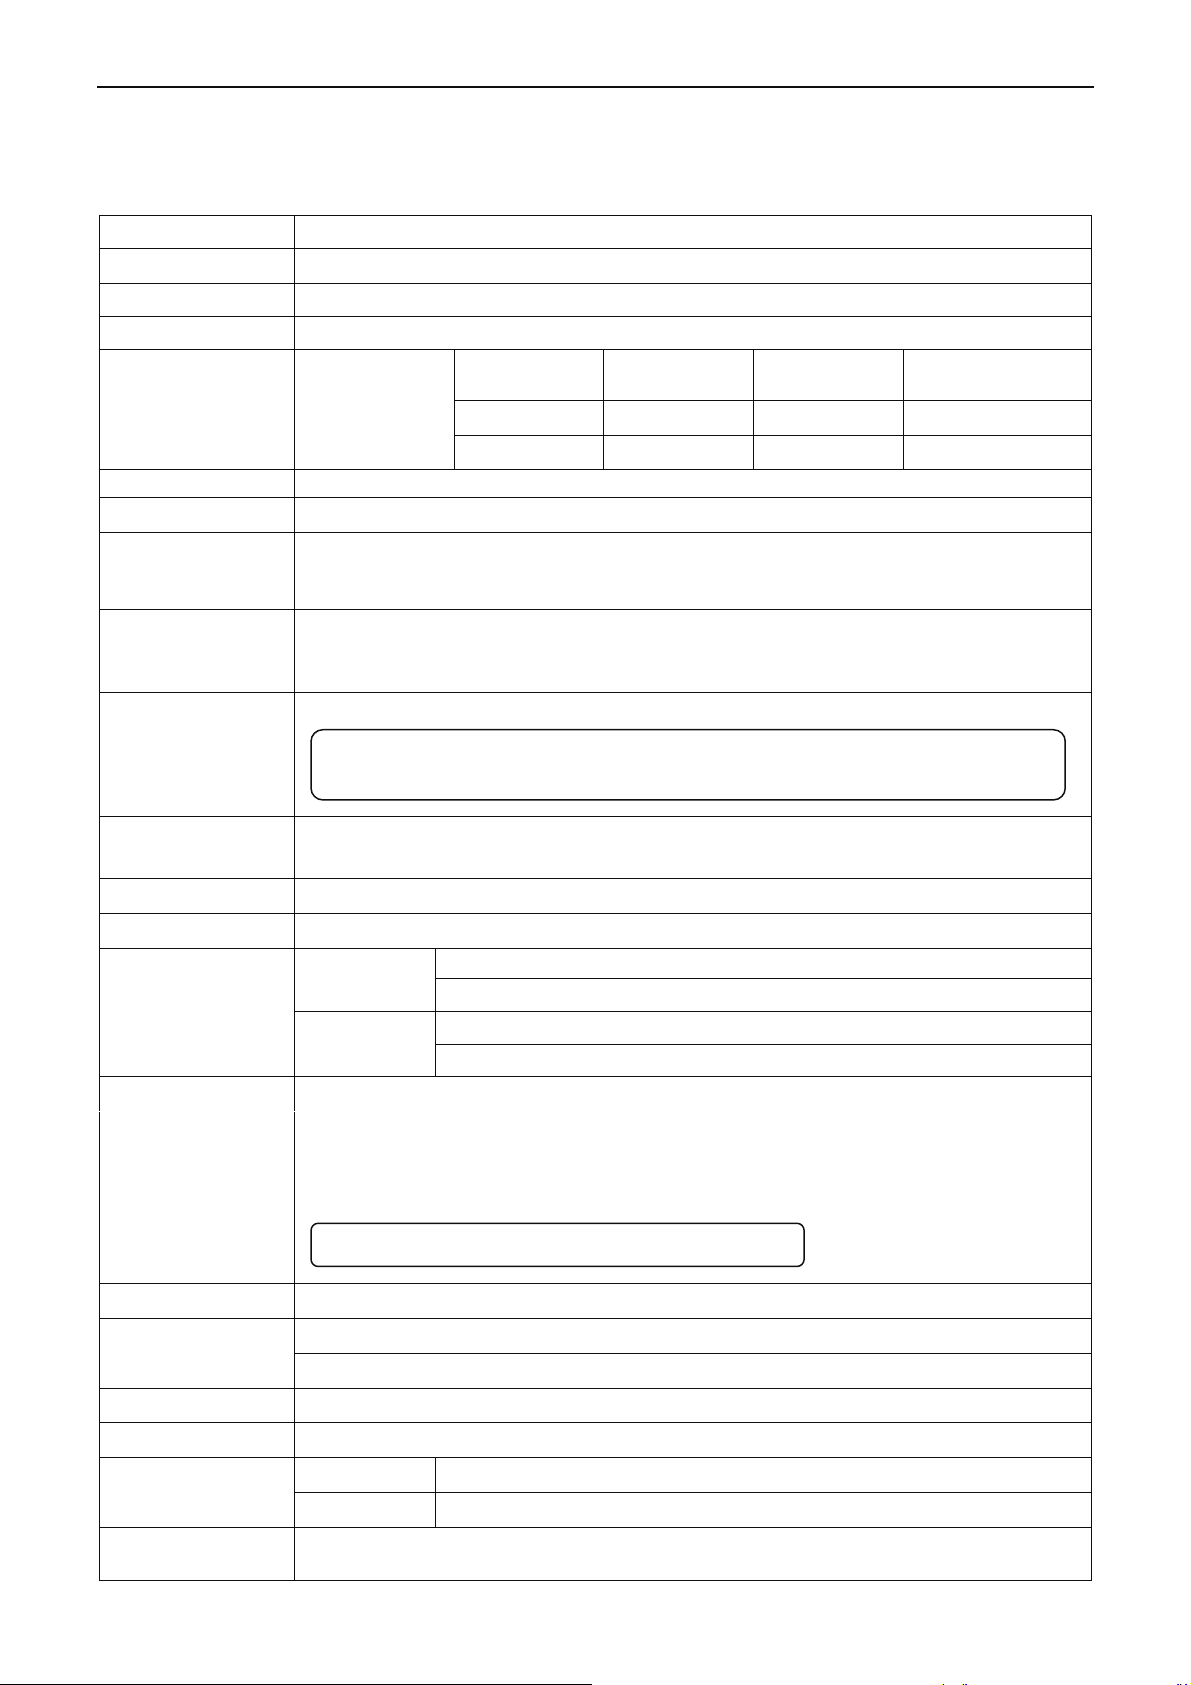
x-Lab Dot Matrix Printer XDP-321 User's Manual
Appendix A Specifications
A.1 General
Item Description
Printing method 9 Pin Dot Matrix Impact Printer
Printing direction Uni-directional or bidirectional logic seeking
Printing width 80 columns (10 CPI)/ 203.2 mm
Normal speed
Print speed ASCII
Print head Diameter of wire: 0.3 mm
Resolution 240 x 144 dpi (Max.)
ASCII: 17 international character sets (U.S.A, FRANCE, GERMANY, U.K., DENMARK1,
Character set
Code page
SWEDEN, ITALY, SPAIN 1, JAPAN, NORWAY, DENMARK2, SPAIN 2, LATIN AM, KOREA,
LEGAL, HOLAND, TURKEY)
U.S.A, MULTI, PORTUGAL, CANADA, NORWAY, ICELAND, BRASCII, ABICOMP, ROMAN 8,
ISO LTN 1, PC858, ISO LTN9, ARAB NLS, WIN 1256, TURKEY, WIN LAT1, CYRILLIC,
RUSSIAN, THAI, VIETNAM
ASCII: ROMAN, SANS SER
10 CPI 56 CPS
12 CPI 67 CPS
(NLQ)
High speed
(DRAFT)
225 CPS
270 CPS
Super high speed
(SUPER-DRAFT)
300 CPS
337 CPS
Fonts
Bar code
Character pitch ASCII: 10 CPI, 12 CPI, 15 CPI, 17.1 CPI, proportional
Line spacing 1/6 inch, programmable in 1/432 inch increments
Paper feed Speed
Interface
Input Buffer 132 KB
Ribbon
Note: In high speed mode or super high mode, printer would automatically change
the ASCII font to Draft when printing ASCII characters.
EAN-13, EAN-8, Interleaved 2 of 5, Matrix 2 of 5, Industrial 2 of 5, Code 39, Code 128 B, Code
128 C, NW-7
Normal mode
Copy mode
This printer can be equipped with the following interfaces:
Parallel interface: Centronics (IEEE1284 NIBBLE Mode)
USB interface: USB 2.0 Full-Speed
Serial interface: RS-232C
Note: Please take the specific interface as standard.
Model: JMR108
Life: 3 million characters (draft mode)
3 inches per second (Continuous feed)
63 ms advance one line (1/6 inch)
3 inches per second (Continuous feed)
63 ms advance one line (1/6 inch)
Noise
Control panel Four buttons and four LED indicators.
Paper feed type
paper thickness
adjustment
<53 dB (A) (ISO7779 standard)
Cut sheet Feed and eject from top
Tractor paper Feed from rear and eject from top
Set through gap adjust lever
- 37 -
Page 45
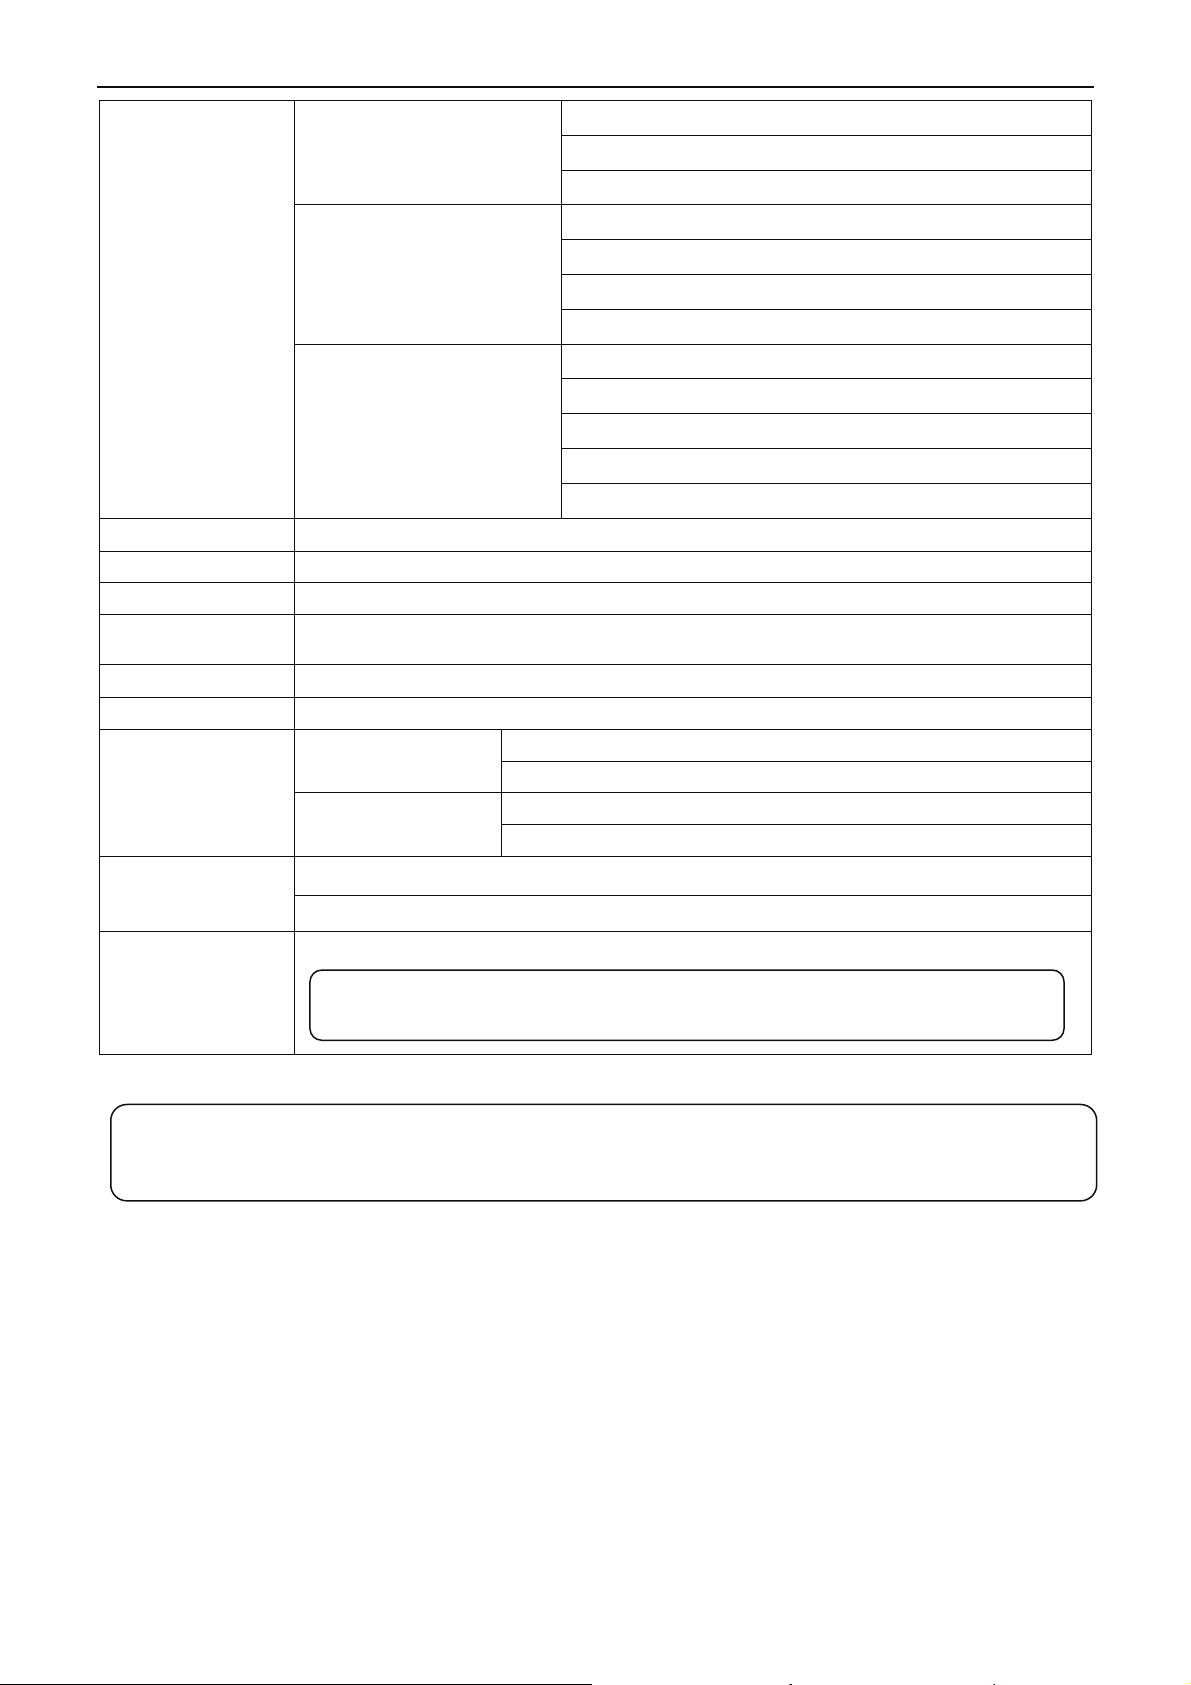
x-Lab Dot Matrix Printer XDP-321 User's Manual
Width: 148 ~ 257 mm
Cut sheet
Tractor paper
Paper specification
Adhesive label
Max. paper thickness 0.39 mm
Copy Original + 3 copies
Compression Support graph and character compression printing.
Especial functions
Physical dimensions 366 (Width) × 275 (Depth) × 156 (Height) mm
Weight Approx. 4.3 Kg
Environmental
conditions
Pin Break Compensation, Pin Rotation Replacement, Automatic Emulation Match, Online
Parameter Setting
Operating environment
Storage environment
Temperature: 5 ~ 35℃
Humidity: 25 ~ 80 %RH (No condensation)
Temperature: -40 ~ 55℃
Humidity: ≤93 (40℃, No condensation)
Thickness: 0.065 ~ 0.14 mm
Weight: 52 ~ 90 g/m
Width: 101.6 ~ 254 mm
Total Thickness: 0.065 ~ 0.39 mm
Weight (Single ply): 52 ~ 82 g/m2
Multiple paper (Every page): 40 ~ 64 g/m
Width (Mount): 101.6 ~ 254 mm
Smallest label: 63.5 × 23.8 mm
Thickness (Mount): 0.07 ~ 0.09 mm
Total thickness: 0.16 ~ 0.19 mm
2
Weight: 68 g/m
2
2
Power requirements
Power consumption
Rated voltage: 220V(AC)
Rated frequency range: 50Hz
Operating: 47 W; Standby: Approximately 3.6 W
Note: Only when the product is unconnected with outer power supply, it can achieve
zero energy consumption state.
Note: All the technical instructions in this user's manual are the laboratorial measurements
which achieved under national standard store and work environment (room temperature),
the measuring paper accords with the specification in this user's manual.
- 38 -
Page 46
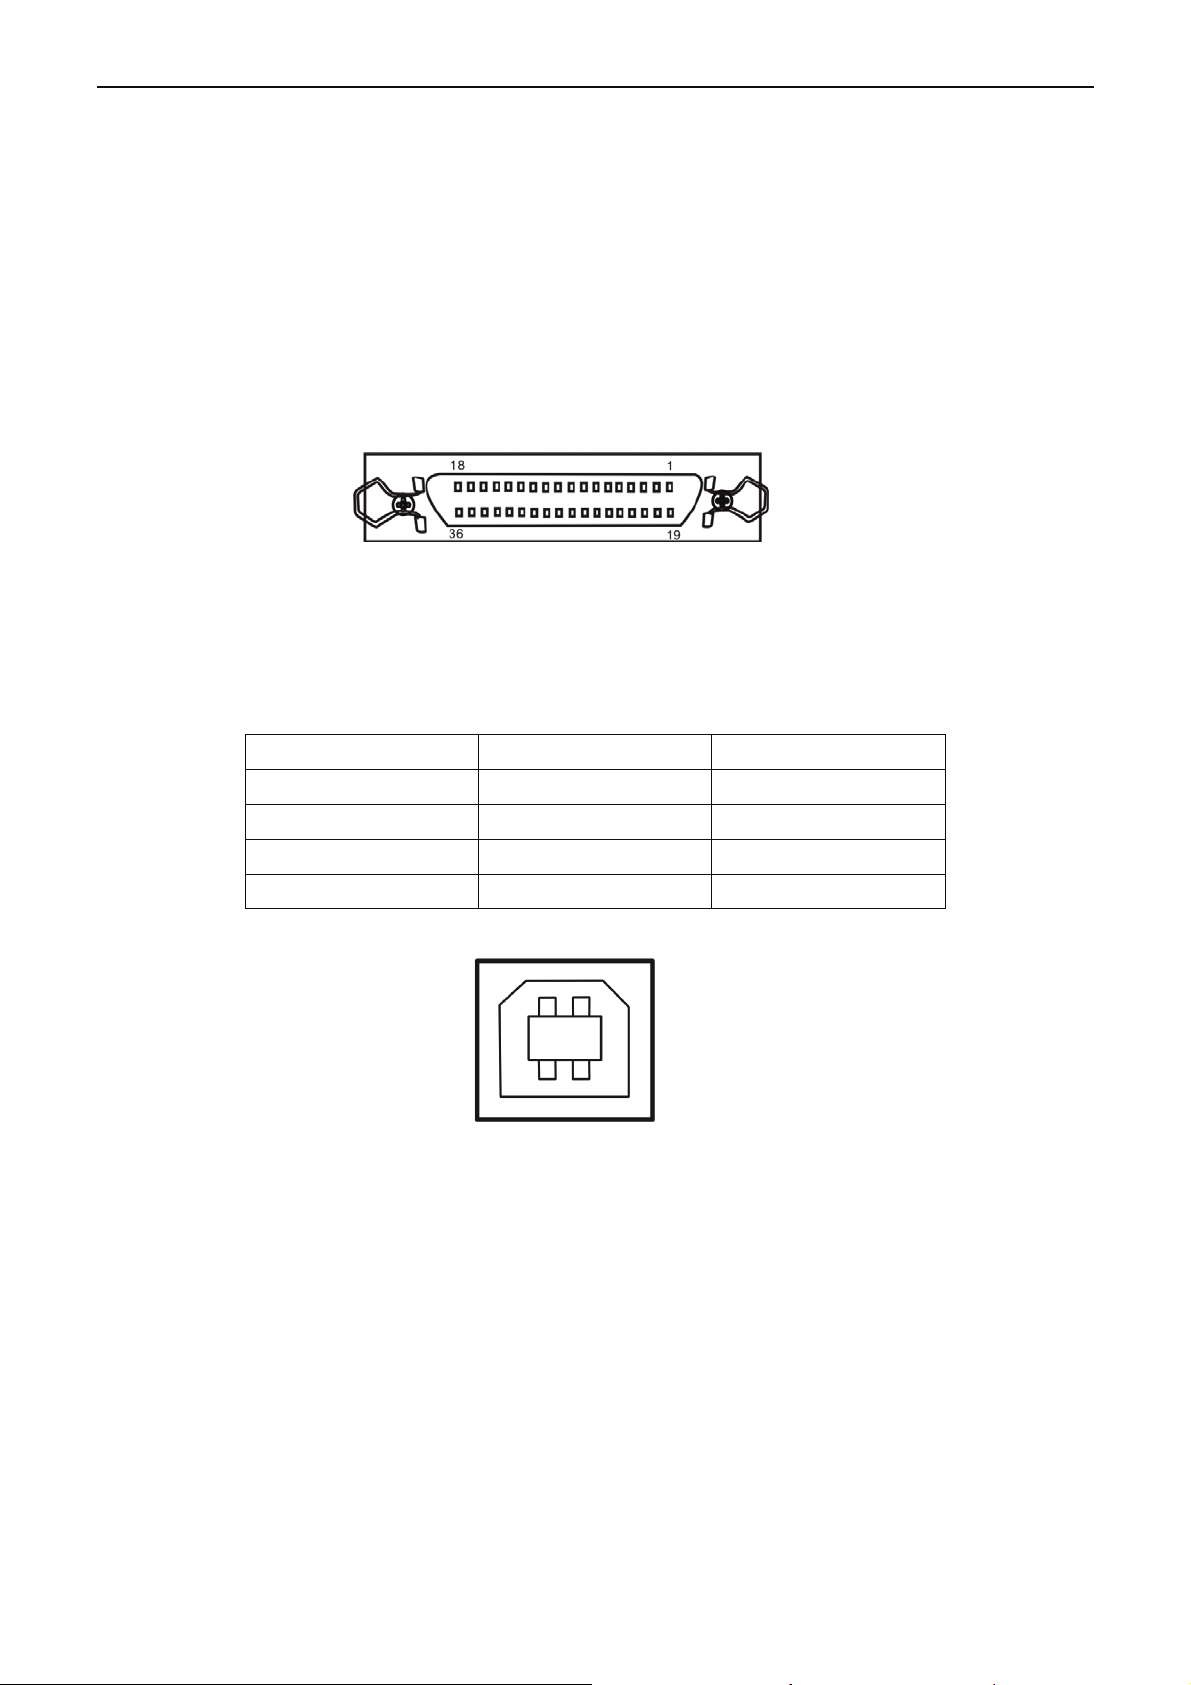
x-Lab Dot Matrix Printer XDP-321 User's Manual
A.2 Interface Specifications
Your printer can be equipped with a parallel interface, a USB interface or a serial interface. The printer
switches automatically to the appropriate interface when it receives data.
A.2.1 Parallel Interface
The parallel interface has the following characteristics.
Data format: 8-bit
Synchronization: /STROBE pulse
Handshaking: BUSY and /ACKNLG signals
Signal level: TTL compatible
A.2.2 USB Interface
Figure A-2.1 Parallel interface connector pin numbers
The following table provides the standardized contact terminating assignments by number and color
for Series “A” and Series “B” connectors of Full-speed USB 2.0.
Contact Number Signal Name Color
A.2.3 Serial Interface
1 VBUS
-D 2
+D 3
4 GND
2 1
3 4
Figure A-2.2 USB-B type connector
Red
White
Green
Black
The serial interface has the following characteristics.
Baudrate (bps): 1200 bps, 2400 bps, 4800 bps, 9600 bps, 19200 bps (selectable)
Data length: 7 or 8-bit (selectable)
Start bit: 1 bit
Parity bit: Odd, even, or none (selectable)
St
op bit: 1 bit
Handshaking: DTR protocol, XON/XOFF protocol (selectable)
- 39 -
Page 47
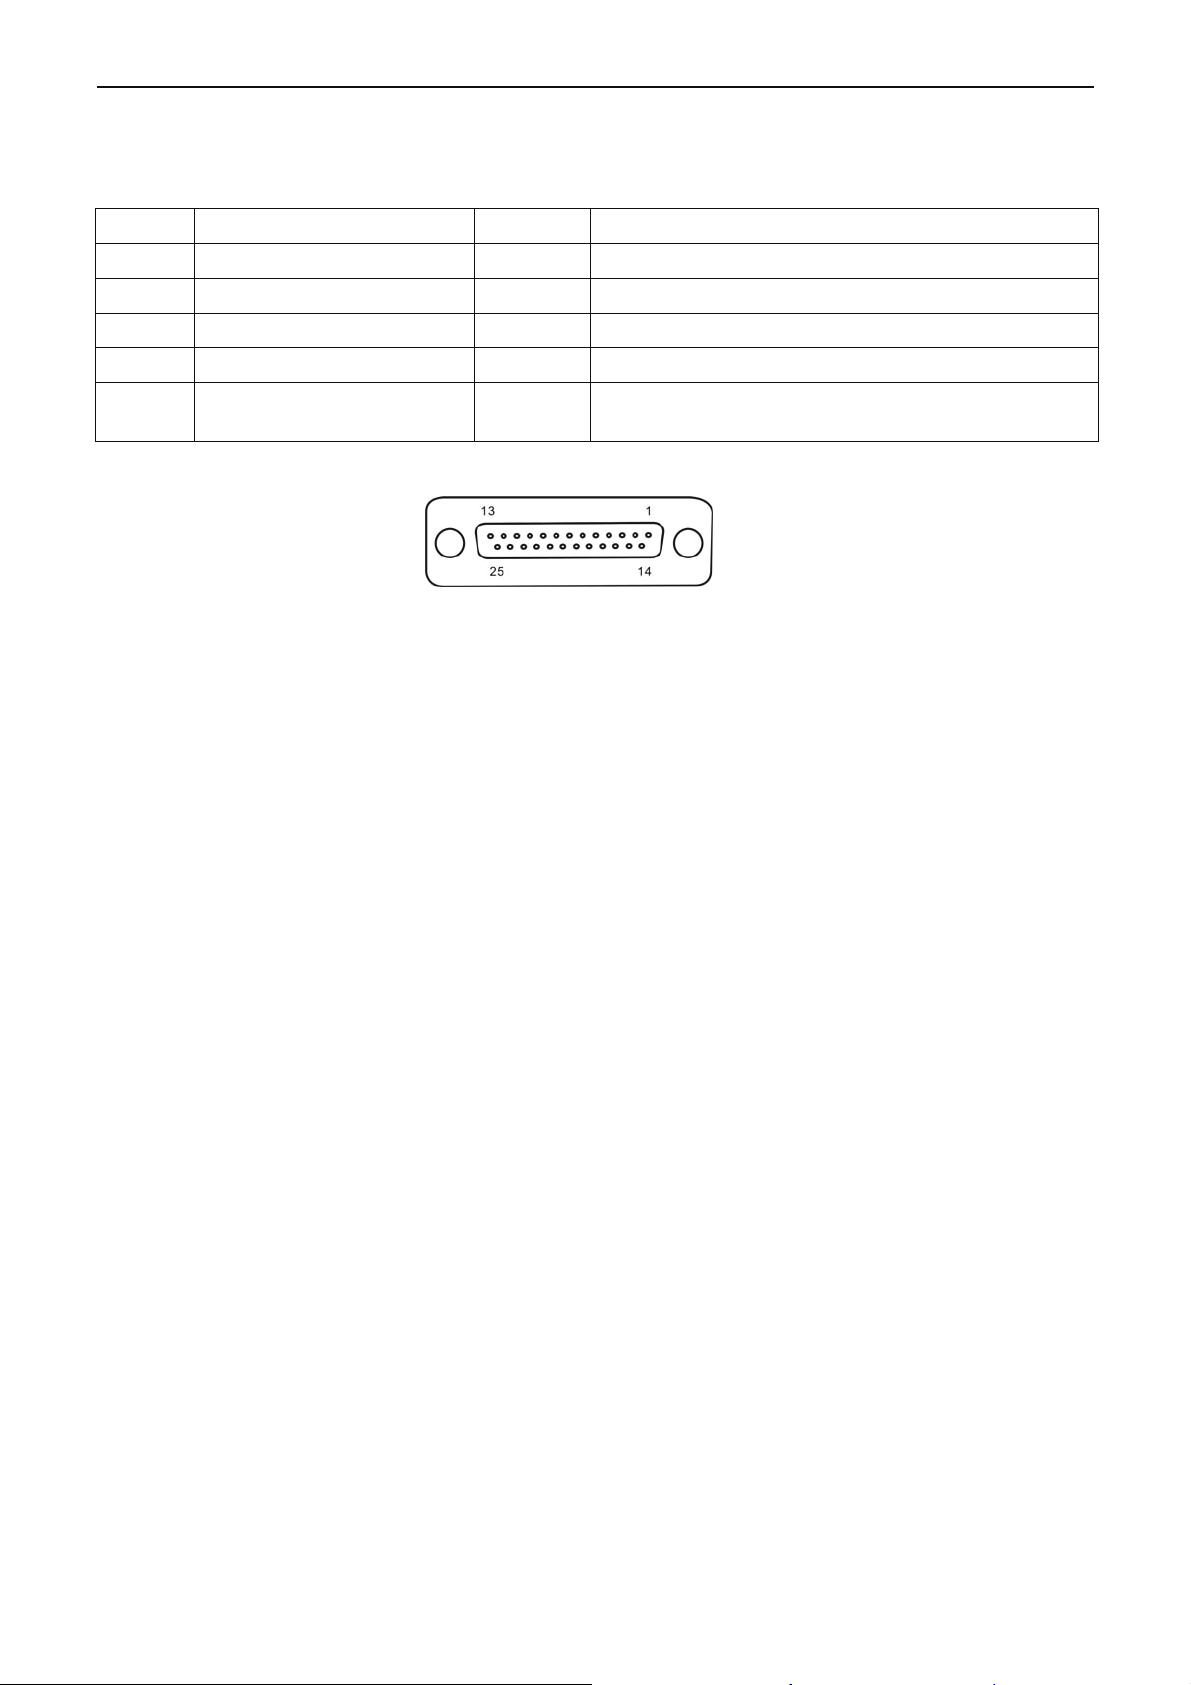
x-Lab Dot Matrix Printer XDP-321 User's Manual
Serial pin assignments
The following table lists the serial connector pin assignments and describes their respective interface
signals.
Pin No. Signal Direction Description
1 Protective Ground (FG) — Printer’s chassis ground
2 Transmitted Data (TXD/SD) Out Printer has transmitted serial data
3 Received Data (RXD/RD) In Printer has received serial data
7 Signal Ground (SG) — Return path for data control signals
20 Data Terminal Ready (DTR) Out
Figure A.2.3 Serial interface connector pin numbers
Positive when the printer is ready to receive data,
and negative when the printer is not ready
- 40 -
Page 48
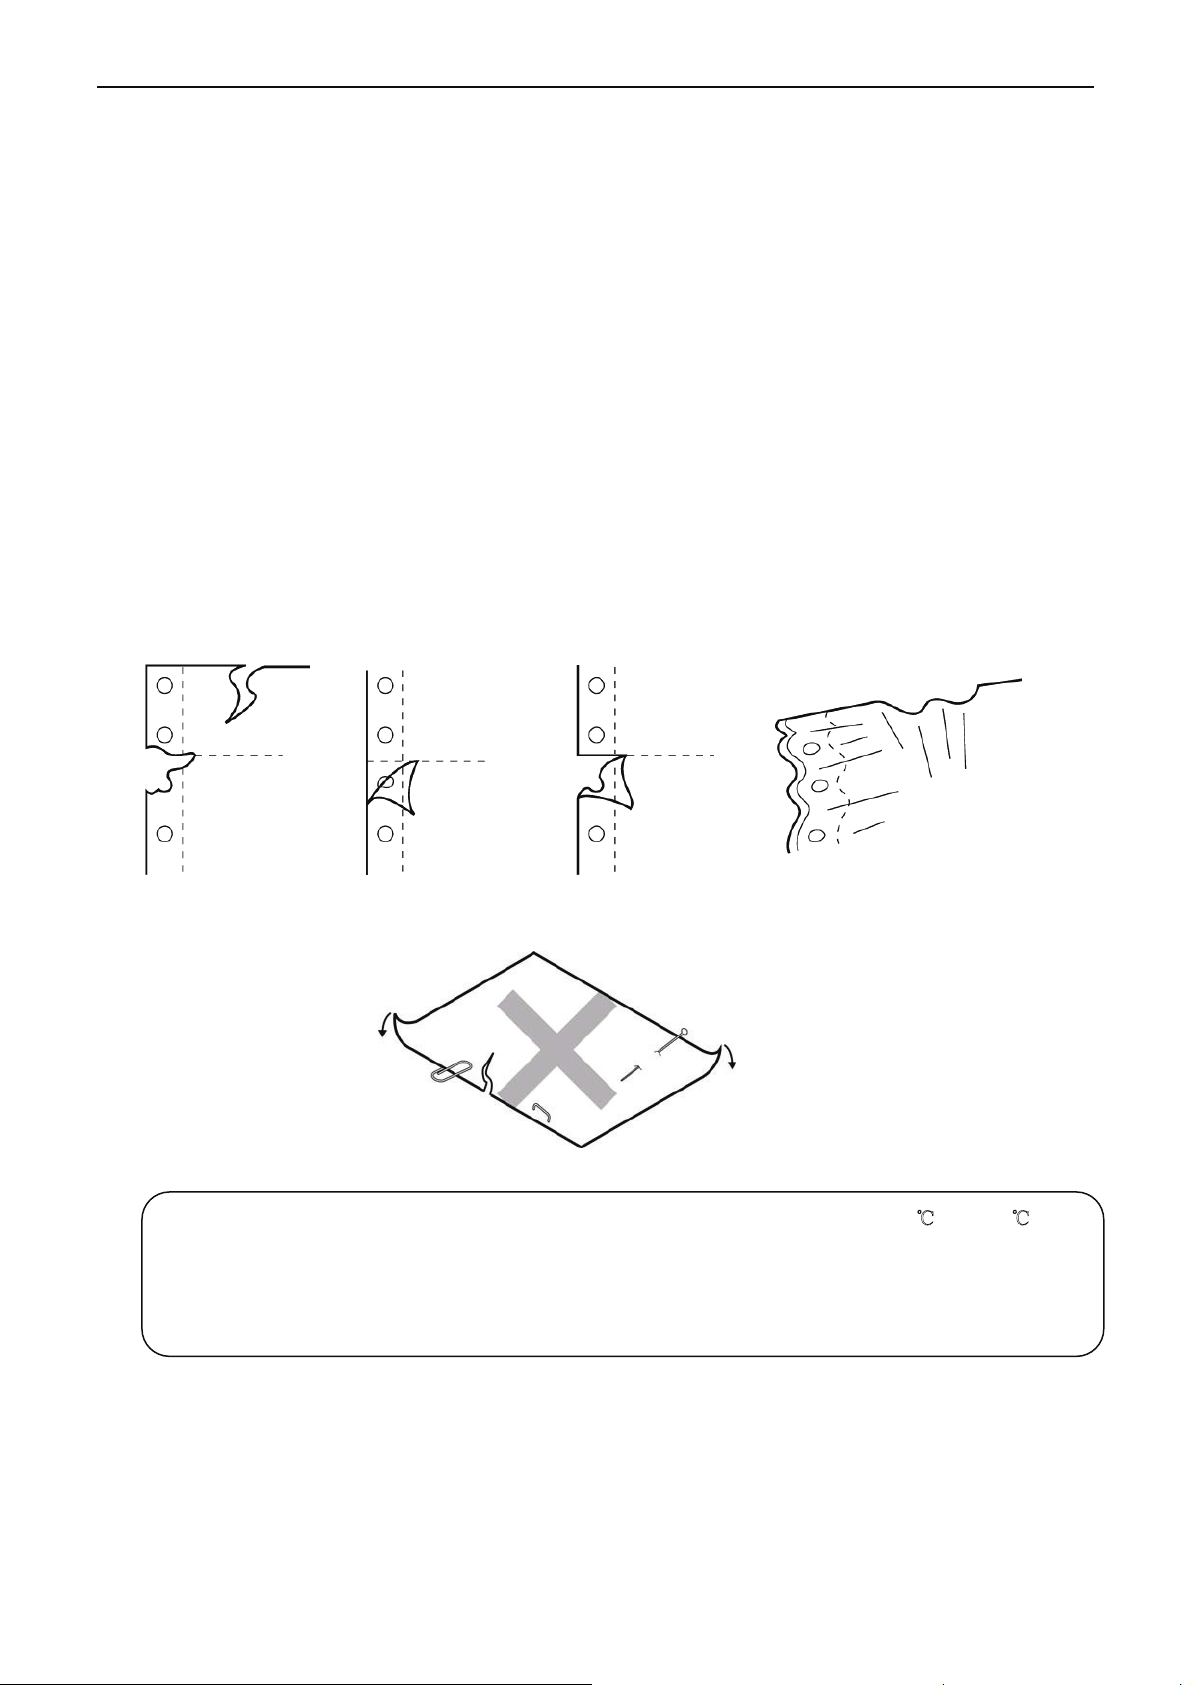
x-Lab Dot Matrix Printer XDP-321 User's Manual
Chapter B Paper Specification
B.1 Paper Specification and Printable Area
B.1.1 The Notice Related to Paper
Using the following paper will cause unstable paper feeding, paper jam or paper crease, even leads
to break pin. So it is forbidden using.
• Too thin or too thick, or the thickness of which are uneven. (The paper which doesn’t accord with
paper specification)
• Too small or too large. (The paper which doesn’t accord with paper specification)
• Paper being cut out or has hole.
• Paper with metal such as pins, clips and staples.
• Paper with paste outside, or which is uneven or flake off.
• Rough paper
• Tractor paper has crease besides the cross-perforation.
• Paper corner breaks or is creased.
• Postcard or envelope is stuck with stamp or seal.
Break Flake off Tear Crease
.
Note: 1. The storage of the paper should be in the temperature between 10℃ and 30℃ and
the relative humidity between 30% and 70%.
2. When there is difference between operating environment and storage environment,
please put the sealed paper in the operating environment for a period of time. Use it
after the paper is adapted to the operating environment.
Clip
Tear
Staple
Pin
- 41 -
Page 49
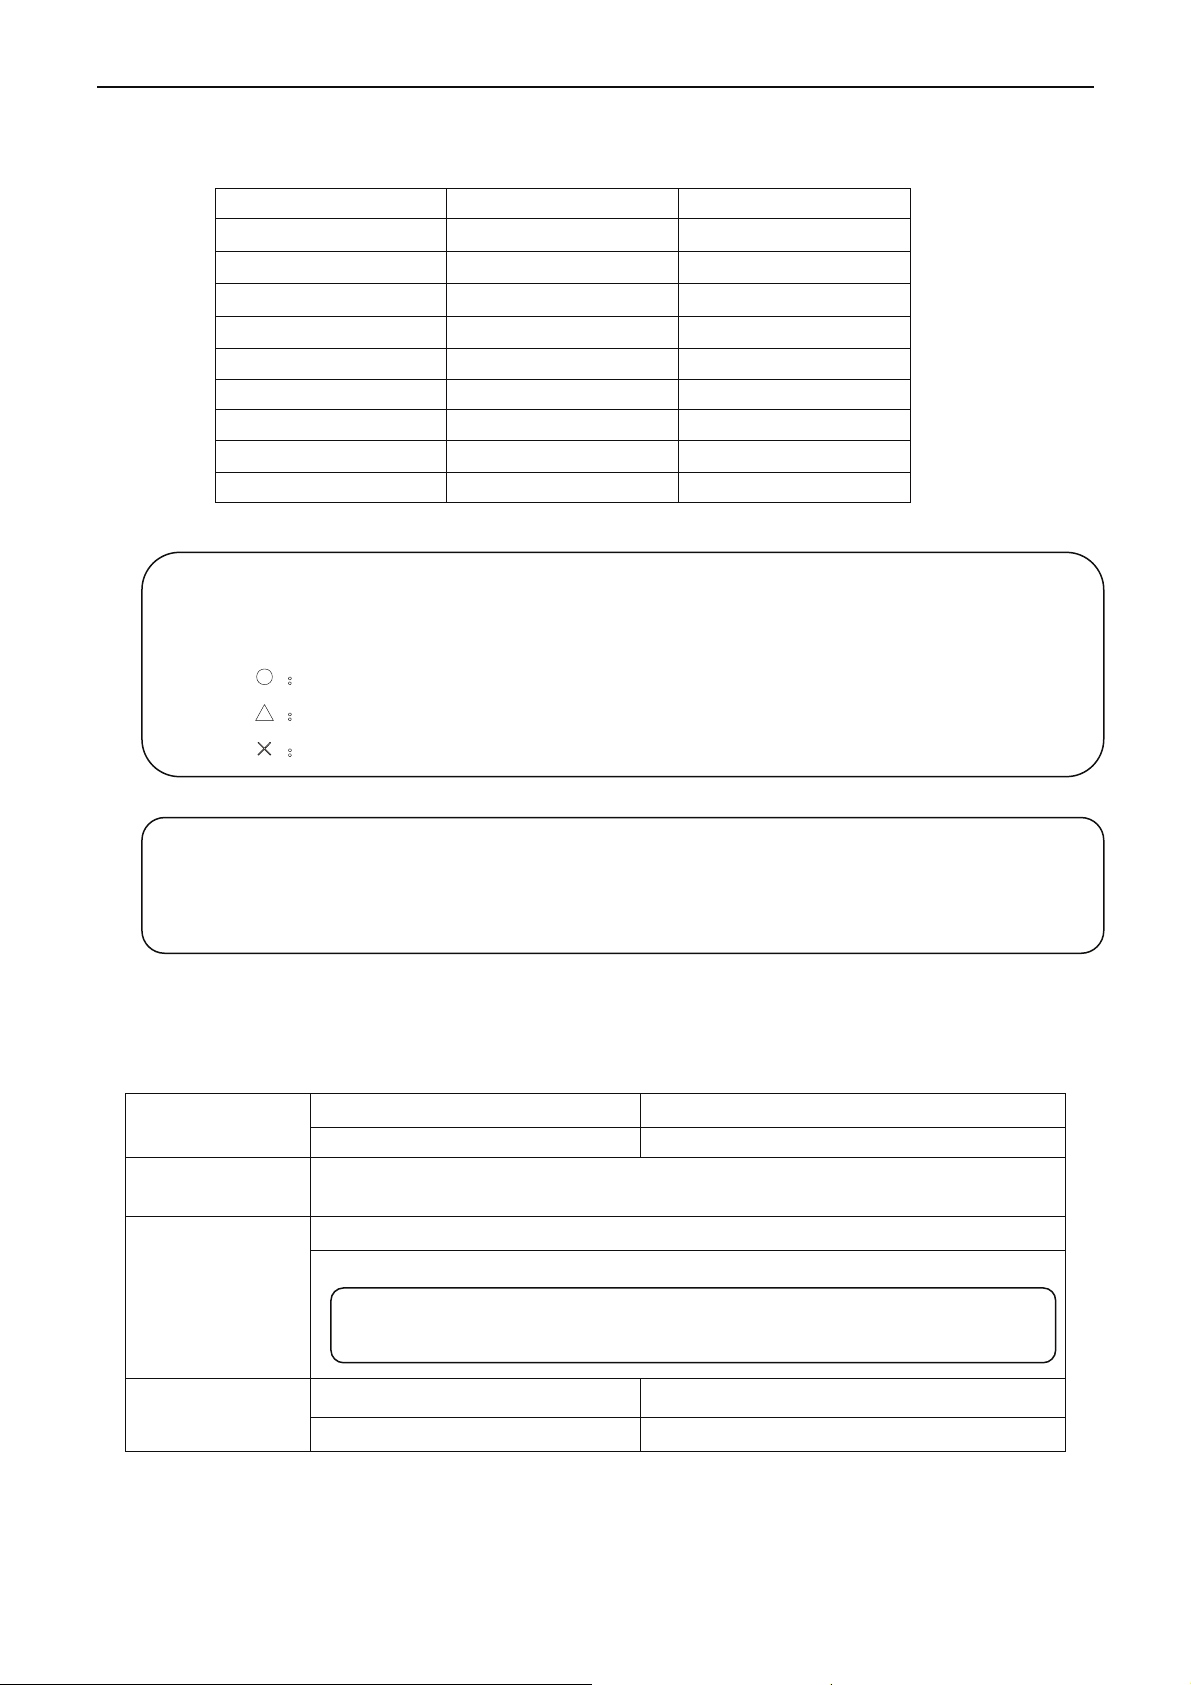
x-Lab Dot Matrix Printer XDP-321 User's Manual
B.1.2 Useable Paper Types and Guarantee Area
Useable papers are shown in the following table:
Paper type Guarantee grade Other conditions
Cut sheet ●
Continuous paper ●
Card ×
Envelope ▲
Delivery note ▲
Postcard ×
Passbook ×
Label ×
Recycled paper ●
Caution: “Guarantee” here means the specifications which accord with print specification,
noise specification and paper feed performance, etc.
The meanings of symbol in Guarantee grade column are shown as follows:
●
▲ :Can use in some conditions, not guarantee.
×
Caution: 1. To guarantee the print quality, please ensure the contents are all within printable
2. If the print contents are out of the printable area, it may cause the print head to
B.1.3 Cut Sheet
The detailed specification of cut sheet is shown in the following table.
Paper
Copy capability
(Max.)
Weight
Total thickness
:Guarantee
:Forbid using.
area.
break pins.
Single-ply paper White paper, Copy paper
Multi-ply paper NCR paper
4 copies (Original + 3 copies), paper weight based on the standard of 40 g/m
Single-ply paper: 52 ~ 90 g/m2
Multi-ply paper (each sheet): 40 ~
64 g/m
2
Note: See details in the multi-ply paper (NCR paper) requirement
table.
Single-ply paper
≤0.39 mm (Note 1)
Multi-ply paper ≤0.26 mm (Note 2)
2
.
- 42 -
Page 50
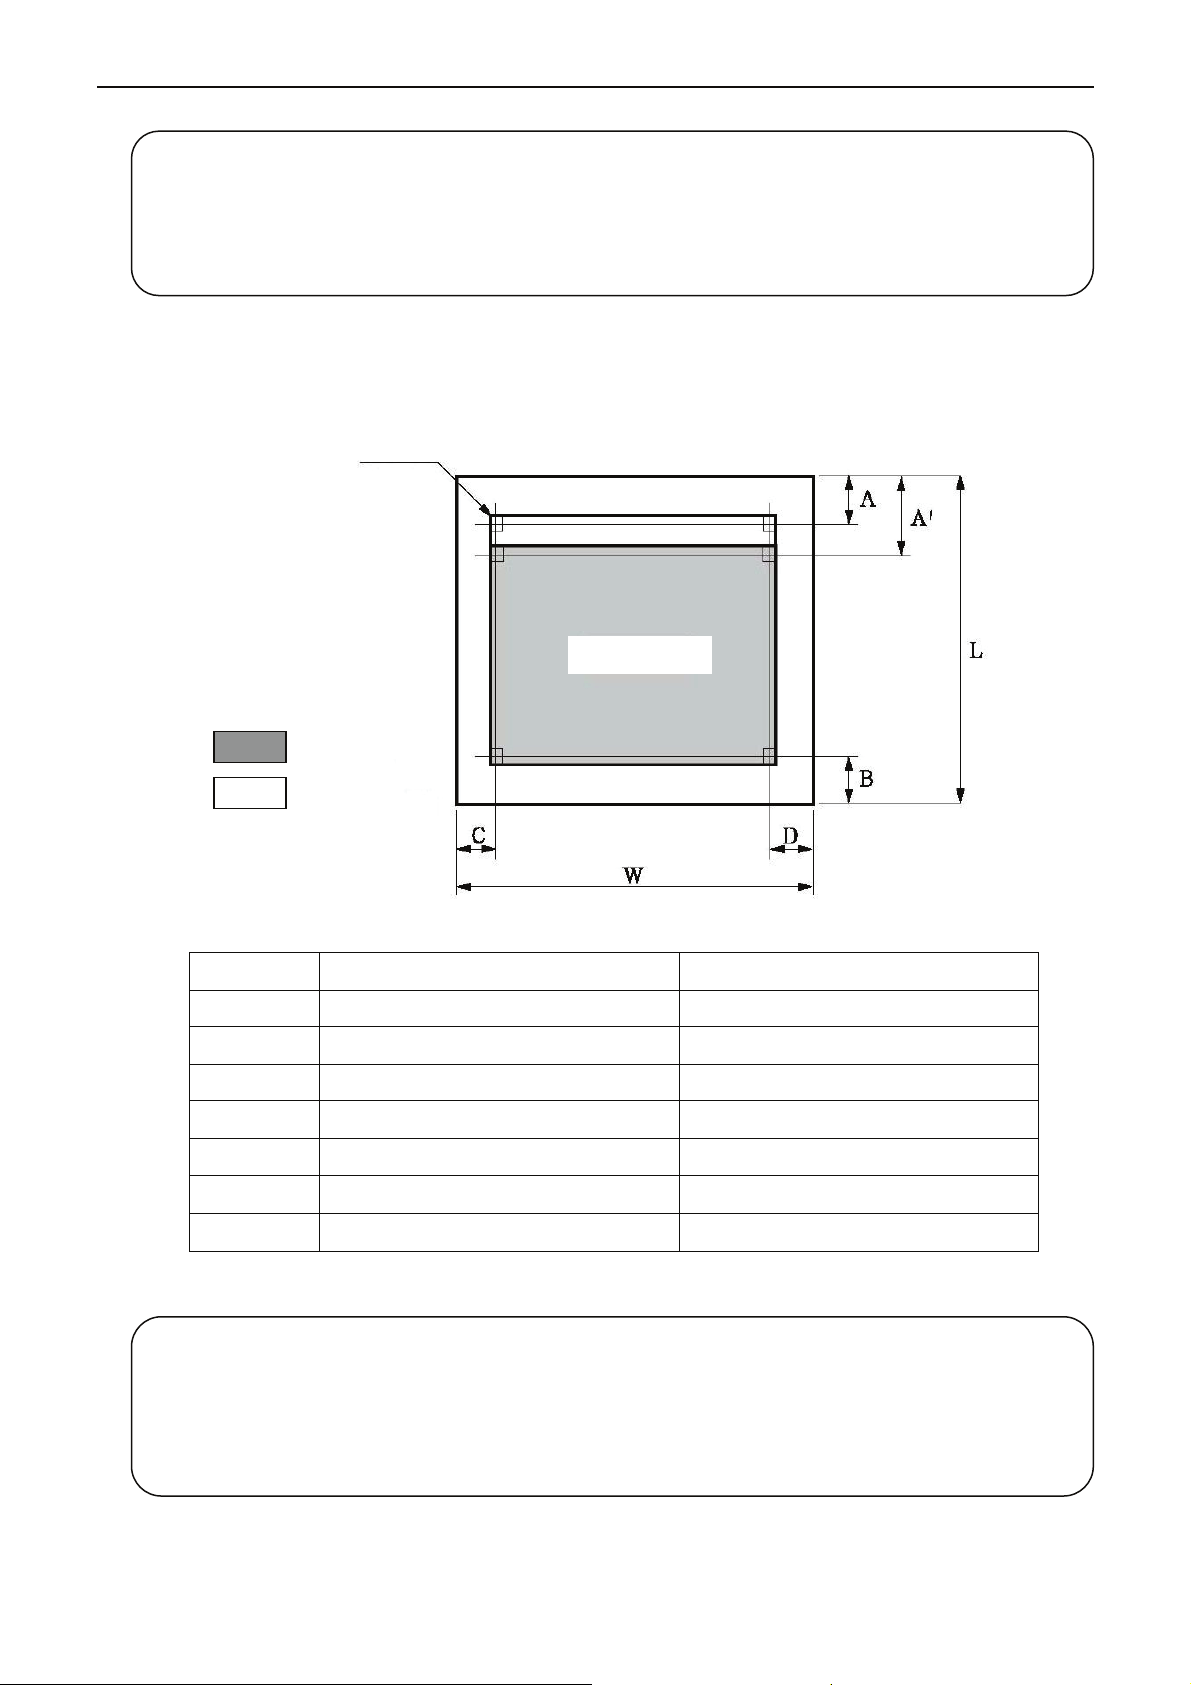
x-Lab Dot Matrix Printer XDP-321 User's Manual
Note: 1. This thickness is added by multi single-ply papers, and it is only achieved when
just printing on the upper paper. (No need to copy)
2. Refer to the requirement of the multi-ply paper (NCR paper), the mount paper can
be thicker than other plies, but we can’t guarantee the printing effect as it is
influenced by paper difference.
◆ Cut Sheet Dimension and Printable area
○ Single-ply paper
First character
(10 CPI)
Printable area
: Printable area
: Print area
Print area is not included
in print specification.
Name Specification value
Mark
W Paper width 148 ~ 257 mm
L Paper length ≥90 mm (Caution 1)
A Home position ≥2 mm
A’
Top printing unguaranteed area
≥8 mm
B Bottom printing unguaranteed area ≥9 mm
C Left printing unguaranteed area ≥3 mm
D Right printing unguaranteed area ≥3 mm
Caution: 1. Paper less than 45 kg (52 kg/m2) is worse in rigidity, so it is not in the guarantee
list.
2. Please use the paper with no crease or bend.
3. Do not print beyond the printable area, or it may cause print head break pins and
affect print head’s life.
- 43 -
Page 51
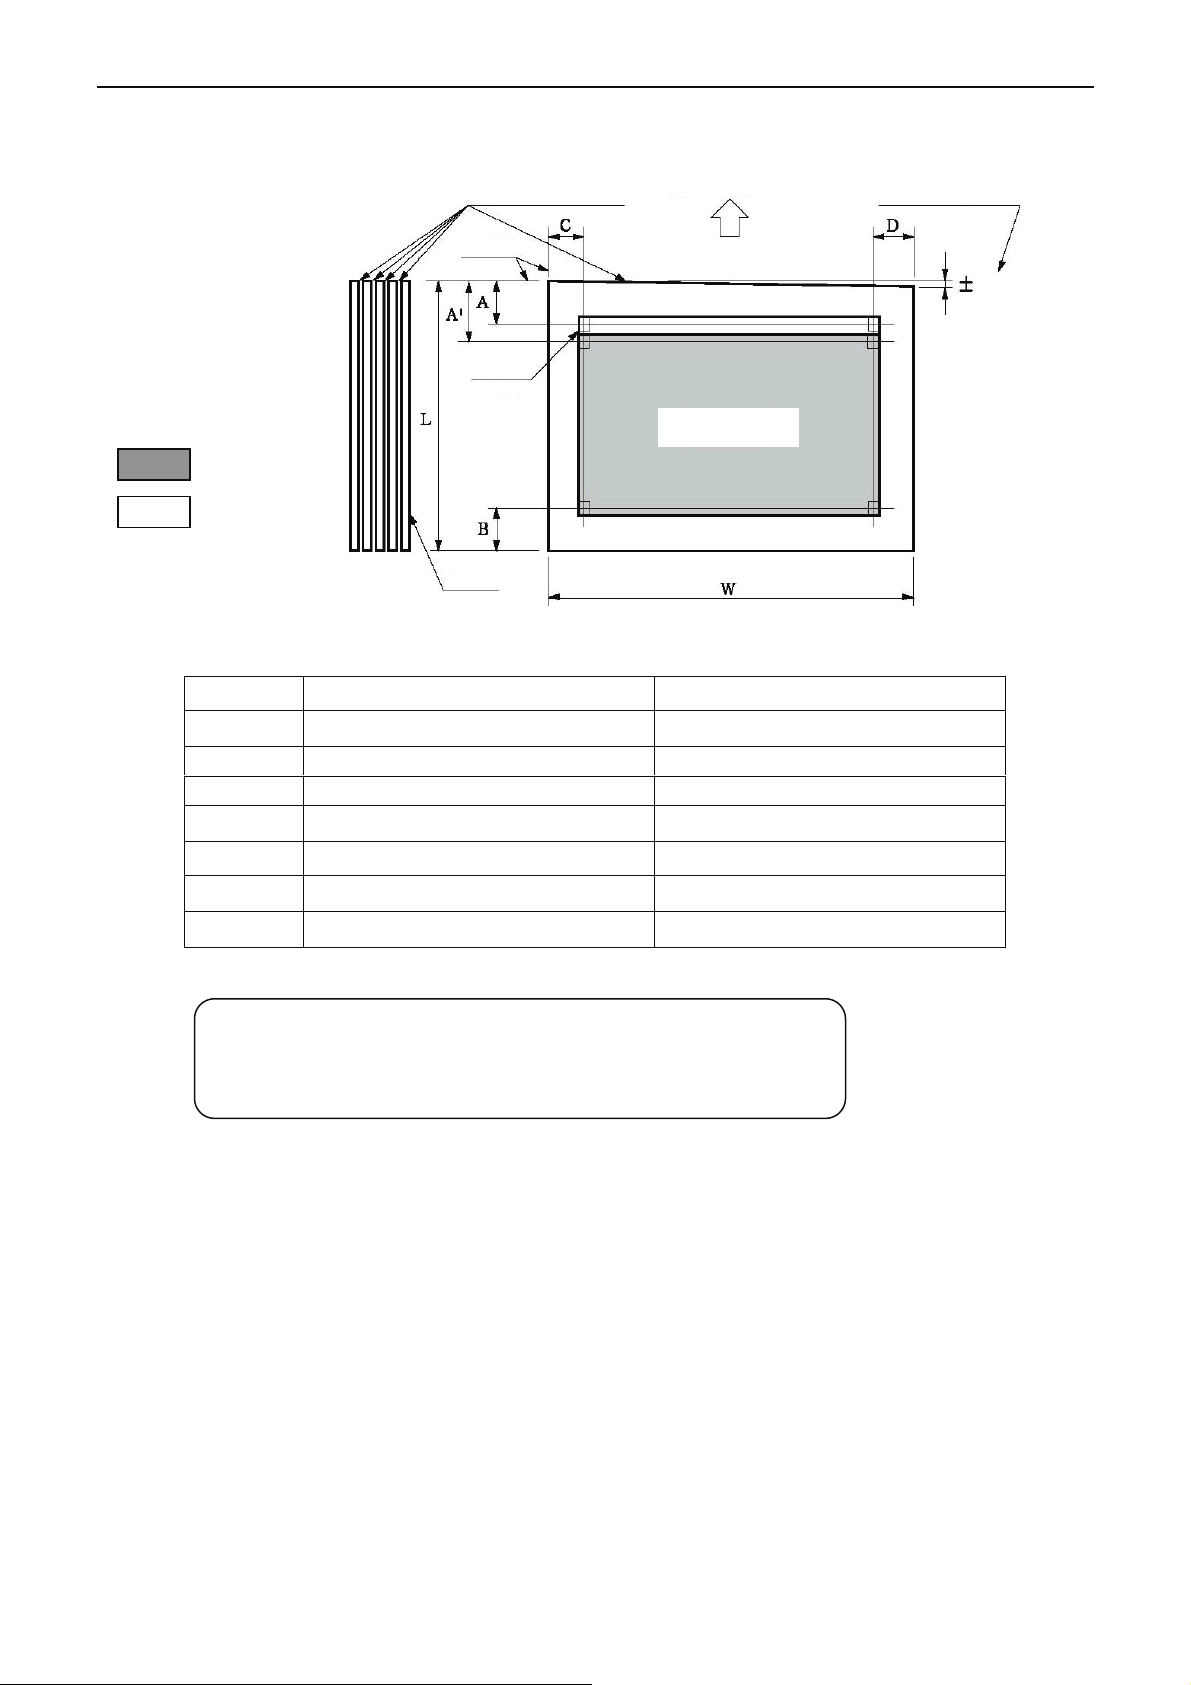
x-Lab Dot Matrix Printer XDP-321 User's Manual
○ Multi-ply paper (NCR paper)
Datum line (1 mm)
Datum line
First character
(10 CPI)
Print area is not included
in print specification.
: Printable area
: Print area
Print side
W Paper width 148 ~ 257 mm
L Paper length ≥90 mm (Caution 1)
A Home position ≥2 mm
A’ Top printing unguaranteed area ≥8 mm
B Bottom printing unguaranteed area ≥9 mm
C Left printing unguaranteed area ≥3 mm
D Right printing unguaranteed area ≥3 mm
Caution: 1. Please use paper with no crease or bend.
2. Please sizing the top at the paper feed direction.
3. Do not use the paper with binding holes.
◆ The fixing requirements of multi-ply paper (NCR paper)
Paper inserted direction
Printable area
Plumb at datum line
Less than 0.2
Unit: mm
noitacificepS emaN kraM value
○ Fixing method:
• The fixation method of fanfold paper is to sizing on the 1 mm line which is in the front of paper
inserted direction.
• Sizing with strong mucilage and press it tightly to avoid cocking.
• Please do not make the glue come out from paper edge.
• Sizing place can not have obvious creases or burr.
- 44 -
Page 52
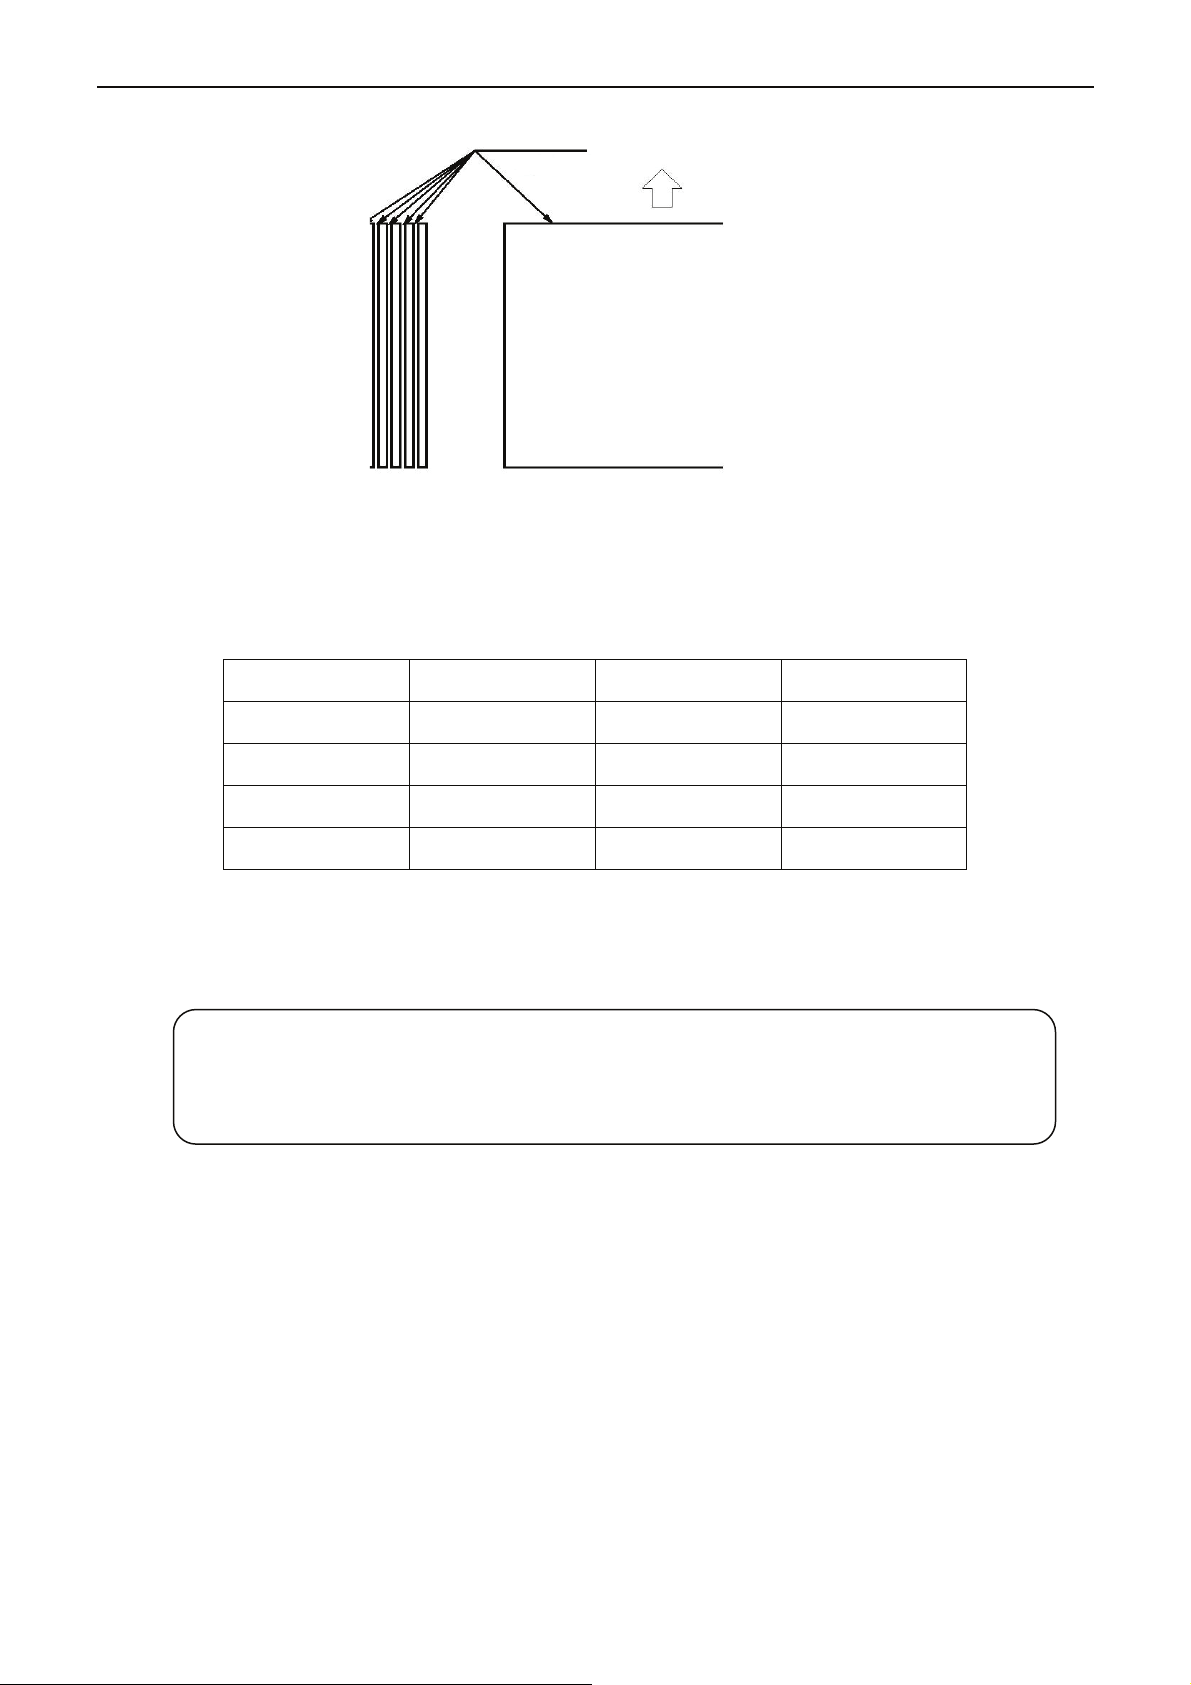
x-Lab Dot Matrix Printer XDP-321 User's Manual
Strong mucilage
(1mm width)
Paper inserted direction
◆ The combination requirements of multi-ply paper (NCR paper)
We recommend using the NCR paper which the quality is in the first class or above. The low quality
NCR paper will affect the copy effect and the printing life.
The papers which accord with the specification are shown as follows.
Pages 2 plies 3 plies 4 plies
Page 1 40 ~ 64 g/m2 40 ~ 50 g/m2 40 g/m2
Page 2 40 ~ 80 g/m2 40 ~ 50 g/m2 40 g/m2
Page 3 ---- 40 ~ 80 g/m2 40 g/m2
Page 4 ---- ---- 40g/m2
◆ Binding hole and clipped corner
It doesn’t support the paper with binding holes and clipped corners.
Note: 1. Do not use the paper with binding holes and clipped corners which are not
included in the guarantee list.
2. When using this kind of paper, the device and capability can not be
guaranteed.
◆ The relative regulations of fold, bend and curliness
According to different storage conditions, paper would easily become fold, bend or curliness
through manually disposal, transport and deposit. Therefore, they would affect paper feeding when
using these papers. Thus, please use them after amending according to the following regulations.
The papers which failed to come up to specifications would affect paper feeding seriously, please
do not use them.
○ Fold (cut sheet, continuous paper)
• Paper with the whole page folded can not be used.
(As the paper strength has been changed even after amending.)
• Please amend the fold of the corner to less than 2 mm.
- 45 -
Page 53
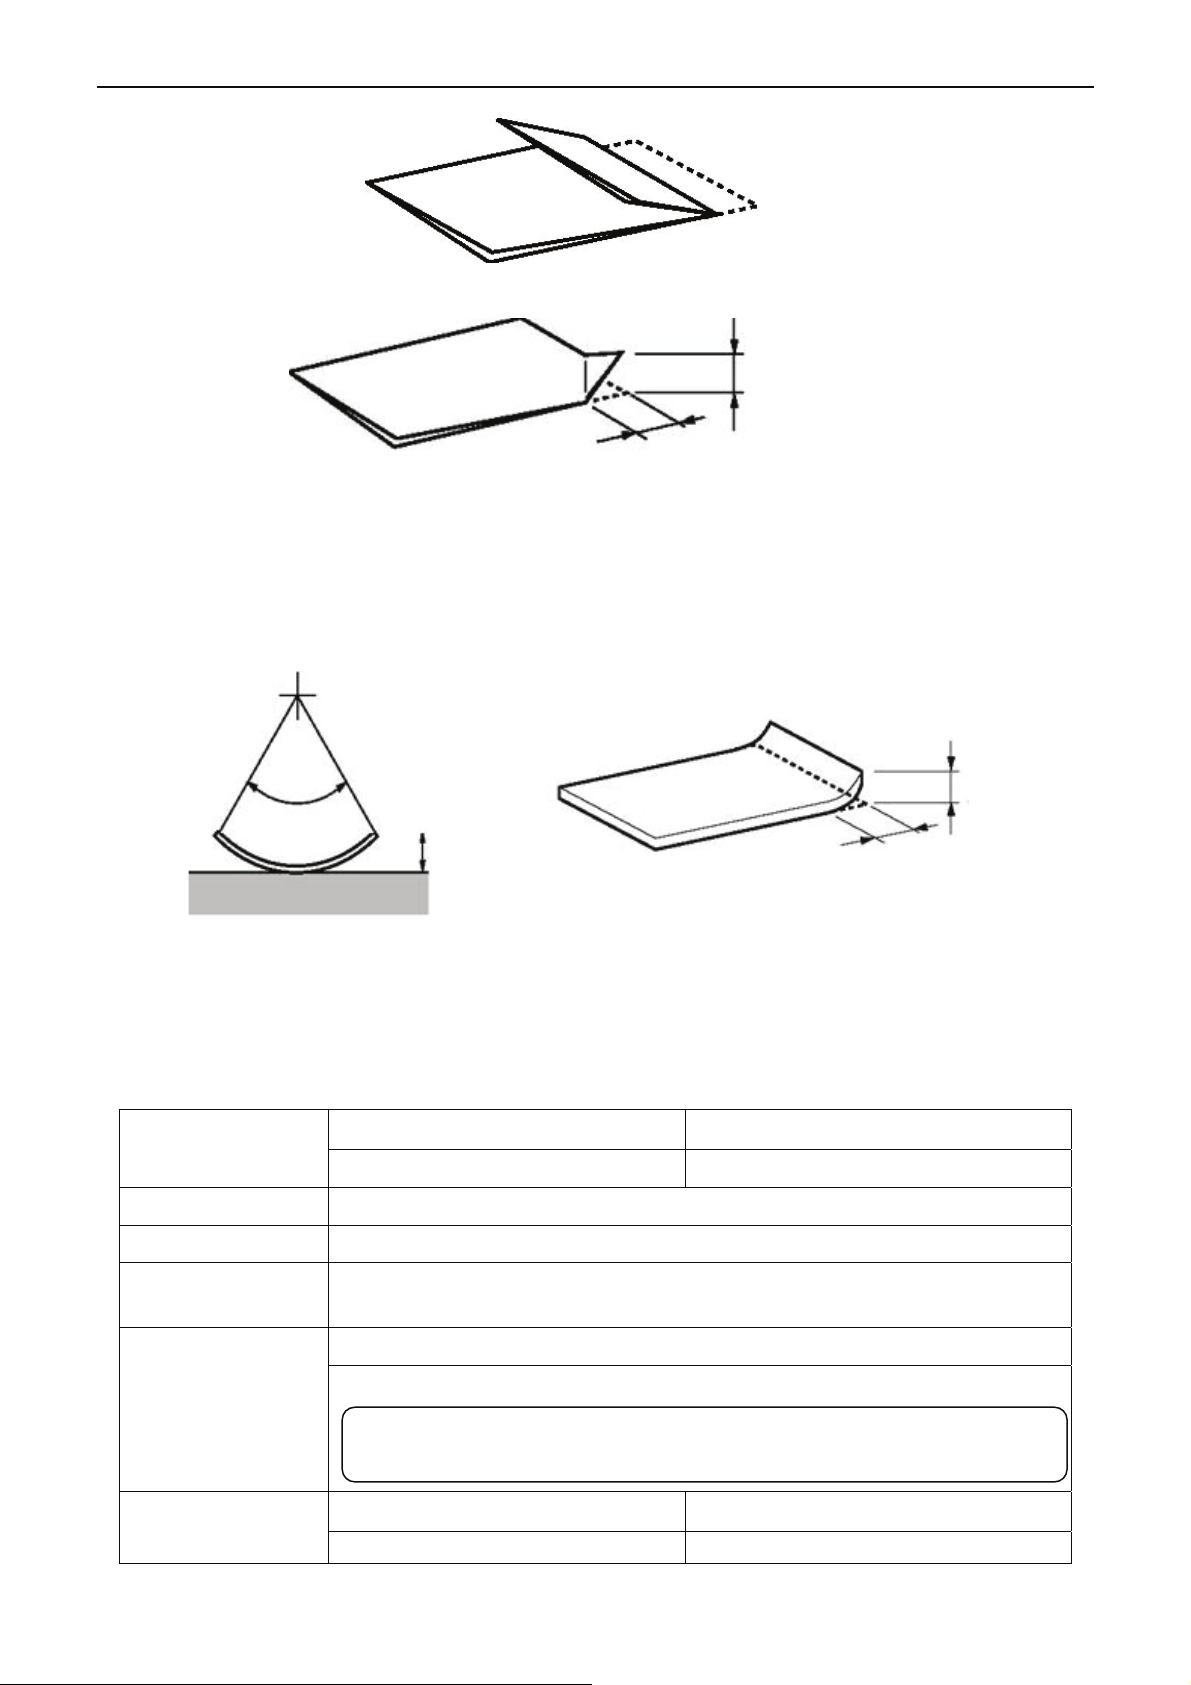
○ Bend and curliness (cut sheet, tractor paper)
• The paper can be used when the bend of the whole page is less than 2 mm.
• The bend length starts from the bend point should be within 15mm. But when the bend height
is over 2 mm, paper can not be used.
Whole page bend
Arc
B.1.4 Tractor Paper
x-Lab Dot Matrix Printer XDP-321 User's Manual
Paper with the whole page folded can not be used.
Amend it to less than 2mm
More than 15 mm
The fold of corner
Less than 2 mm
Bend
Amend it
to less
than 2
mm
Less than 15 mm
Tractor paper is the continuous paper which has gear holes and the traverse perforations lines.
Refer to the following table for the requirement of tractor paper.
Paper
Width 101.6 ~ 254 mm
Length ≥ 145 mm
Copy capability
(Max.)
Weight
Total thickness
Single-ply paper White paper
repap RCN repap ylp-itluM
4 copies (Original + 3 copies), paper weight based on the standard of 40g/ m
Single-ply paper: 52 ~ 82 g/m2
Multi-ply paper (each sheet): 40
~ 64 g/m
2
Note: See details in the multi-ply paper (NCR paper) requirement
table.
Single-ply paper ≤0.39 mm (Note 1)
Multi-ply paper ≤0.26 mm (Note 2)
2
.
- 46 -
Page 54
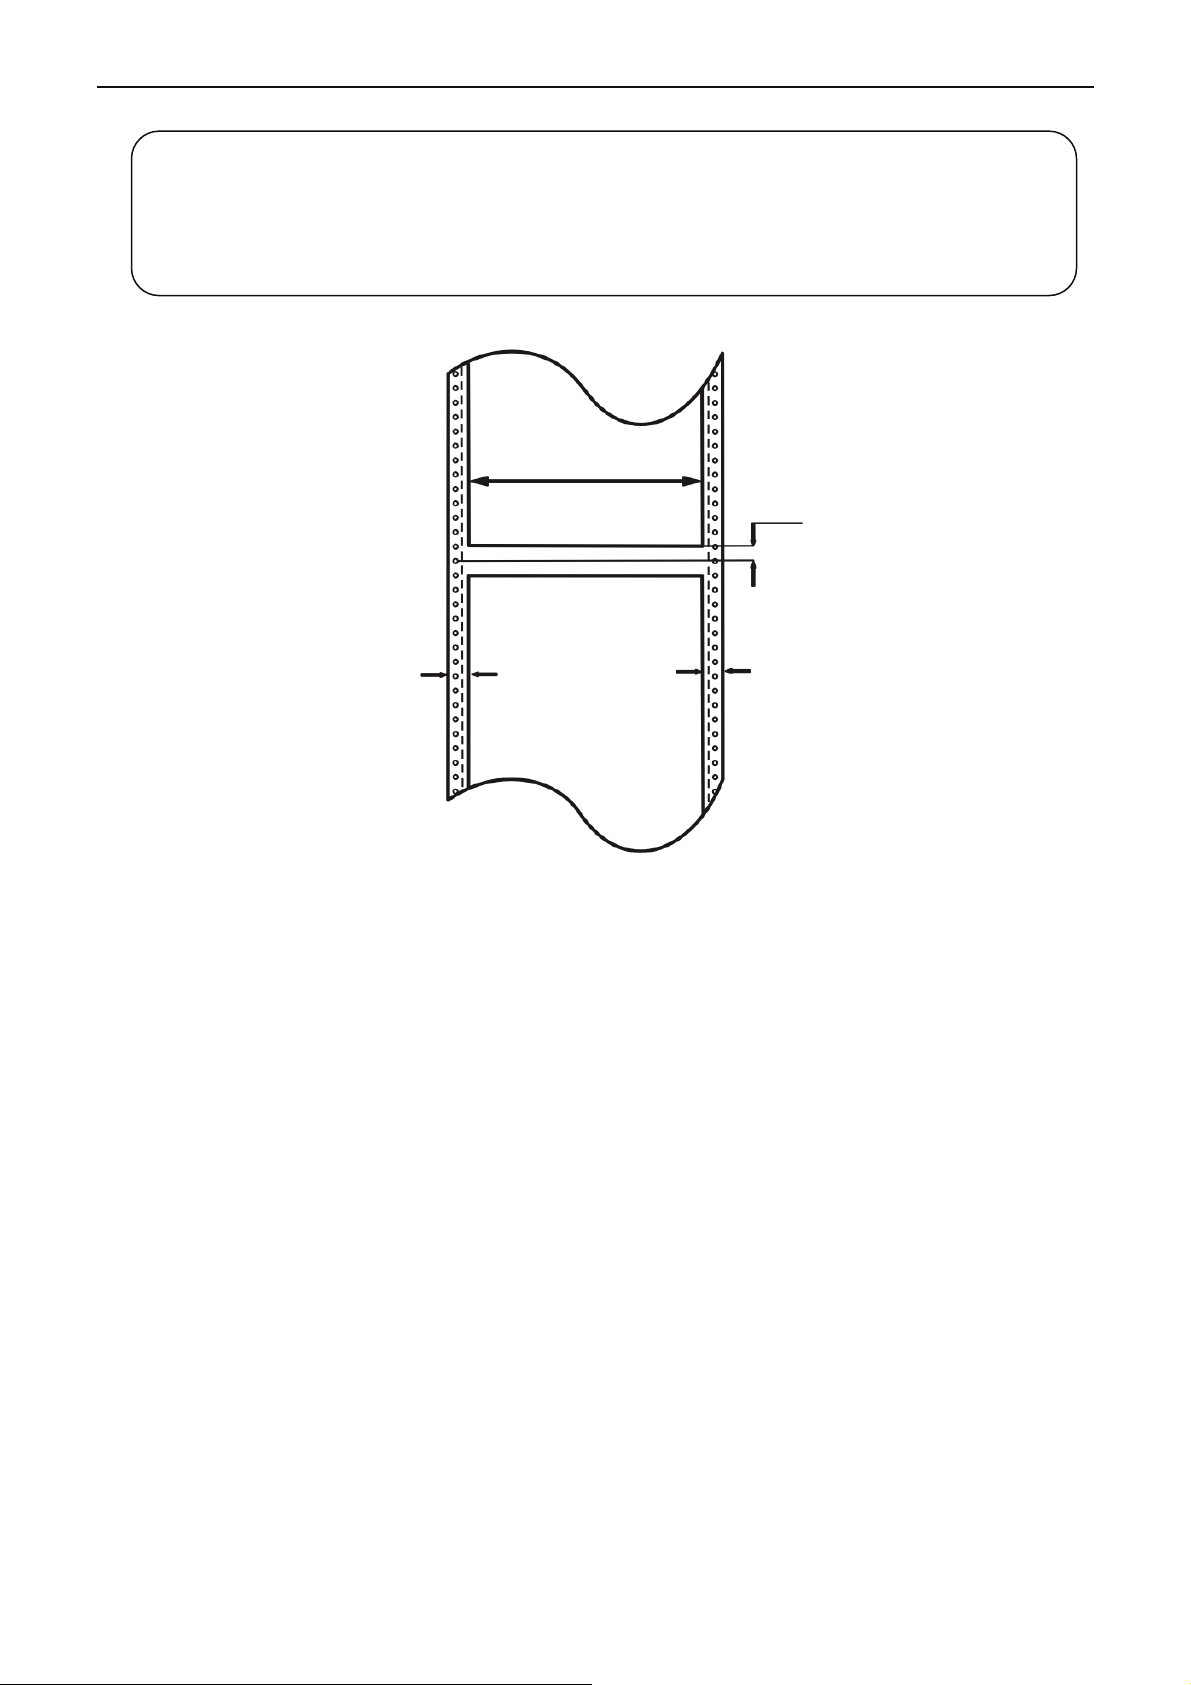
x-Lab Dot Matrix Printer XDP-321 User's Manual
Note: 1. This thickness is added by multi single-ply papers, and it is only achieved when
just printing on the upper paper. (No need to copy)
2. Refer to the requirement of the multi-ply paper (NCR paper), the mount paper can
be thicker than other plies, but we can’t guarantee the printing effect as it is
influenced by paper difference.
Max 203.2 mm
Printable Area
≥8 mm
≥13 mm
≥13 mm
◆The position and size of gear hole
The gear hole of tractor paper should accord with the specification.
The positions and sizes of gear hole are shown below. The central line here refers to the line
between any two gear holes center which is in the distance of 254mm in either side of the paper.
- 47 -
Page 55
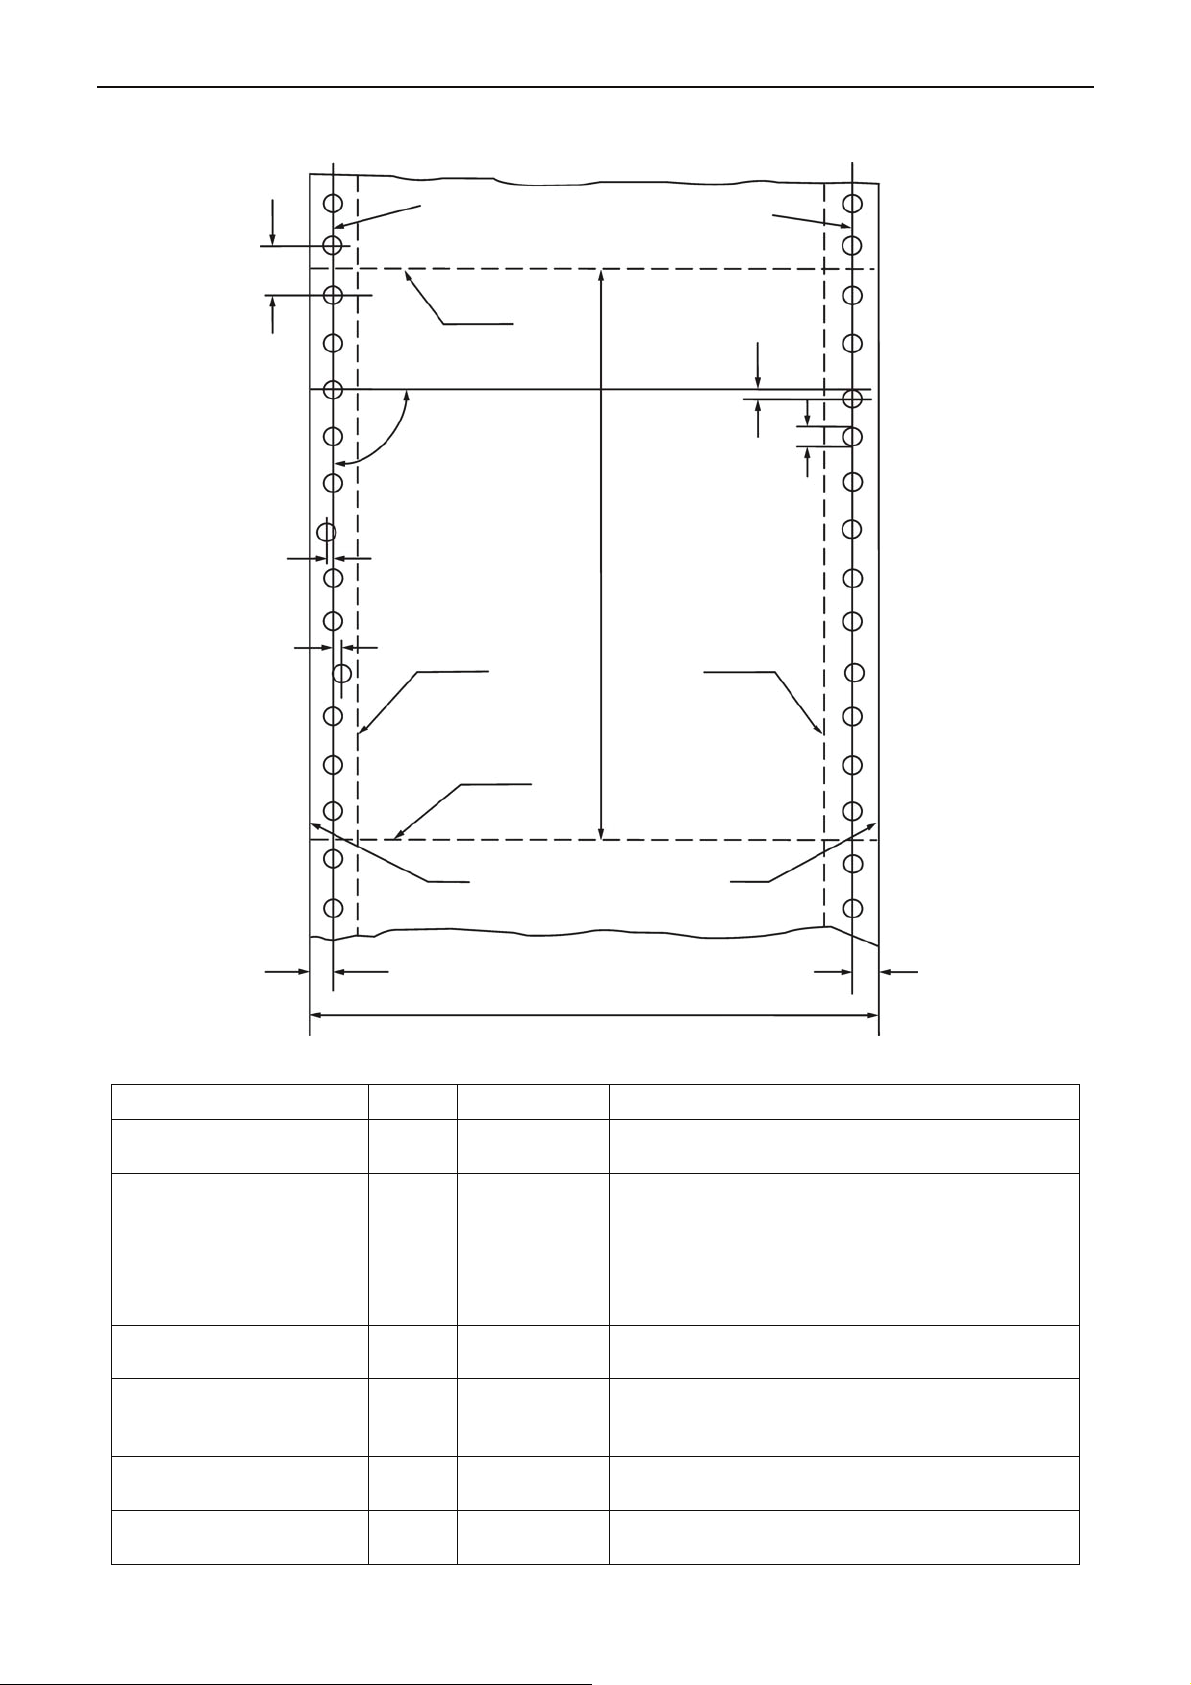
x-Lab Dot Matrix Printer XDP-321 User's Manual
Figure of tractor paper specification and gear hole
Central line
B
Transverse perforation
90°
C
C
Vertical perforation Vertical perforation
Transverse perforation
A
Item Mark Size noitcnuF )mm(
Position of Central line A 6.0 ± 0.7
Diameter of gear hole D 4.0 ± 0.1
Distance between gear
holes center
B 12.70 ± 0.05
Accumulative error of
distance between gear
– Below ± 0.3
holes center
Warp of gear hole center C Below 0.1
Central warp of right and
left gear holes.
E Below 0.15
Central line
E
D
egdE egdE
A
The distance from central line to the nearer
edge. The standard distance is 6.35mm.
It is the hole with gear edge, its minimal
diameter is the D value and its maximal
diameter is 4.5mm.
When using the multi-ply paper with gear holes,
it is allowed that the diameter of the gear hole is
bigger than 4.1mm.
Distance between nearby gear holes center in
the same side.
The accumulative error along the central line of
any two gear holes which are 254mm apart.
The maximal warp of the gear holes center in
the same side.
The warp value of the beeline which
perpendiculars to central line through any gear
- 48 -
Page 56
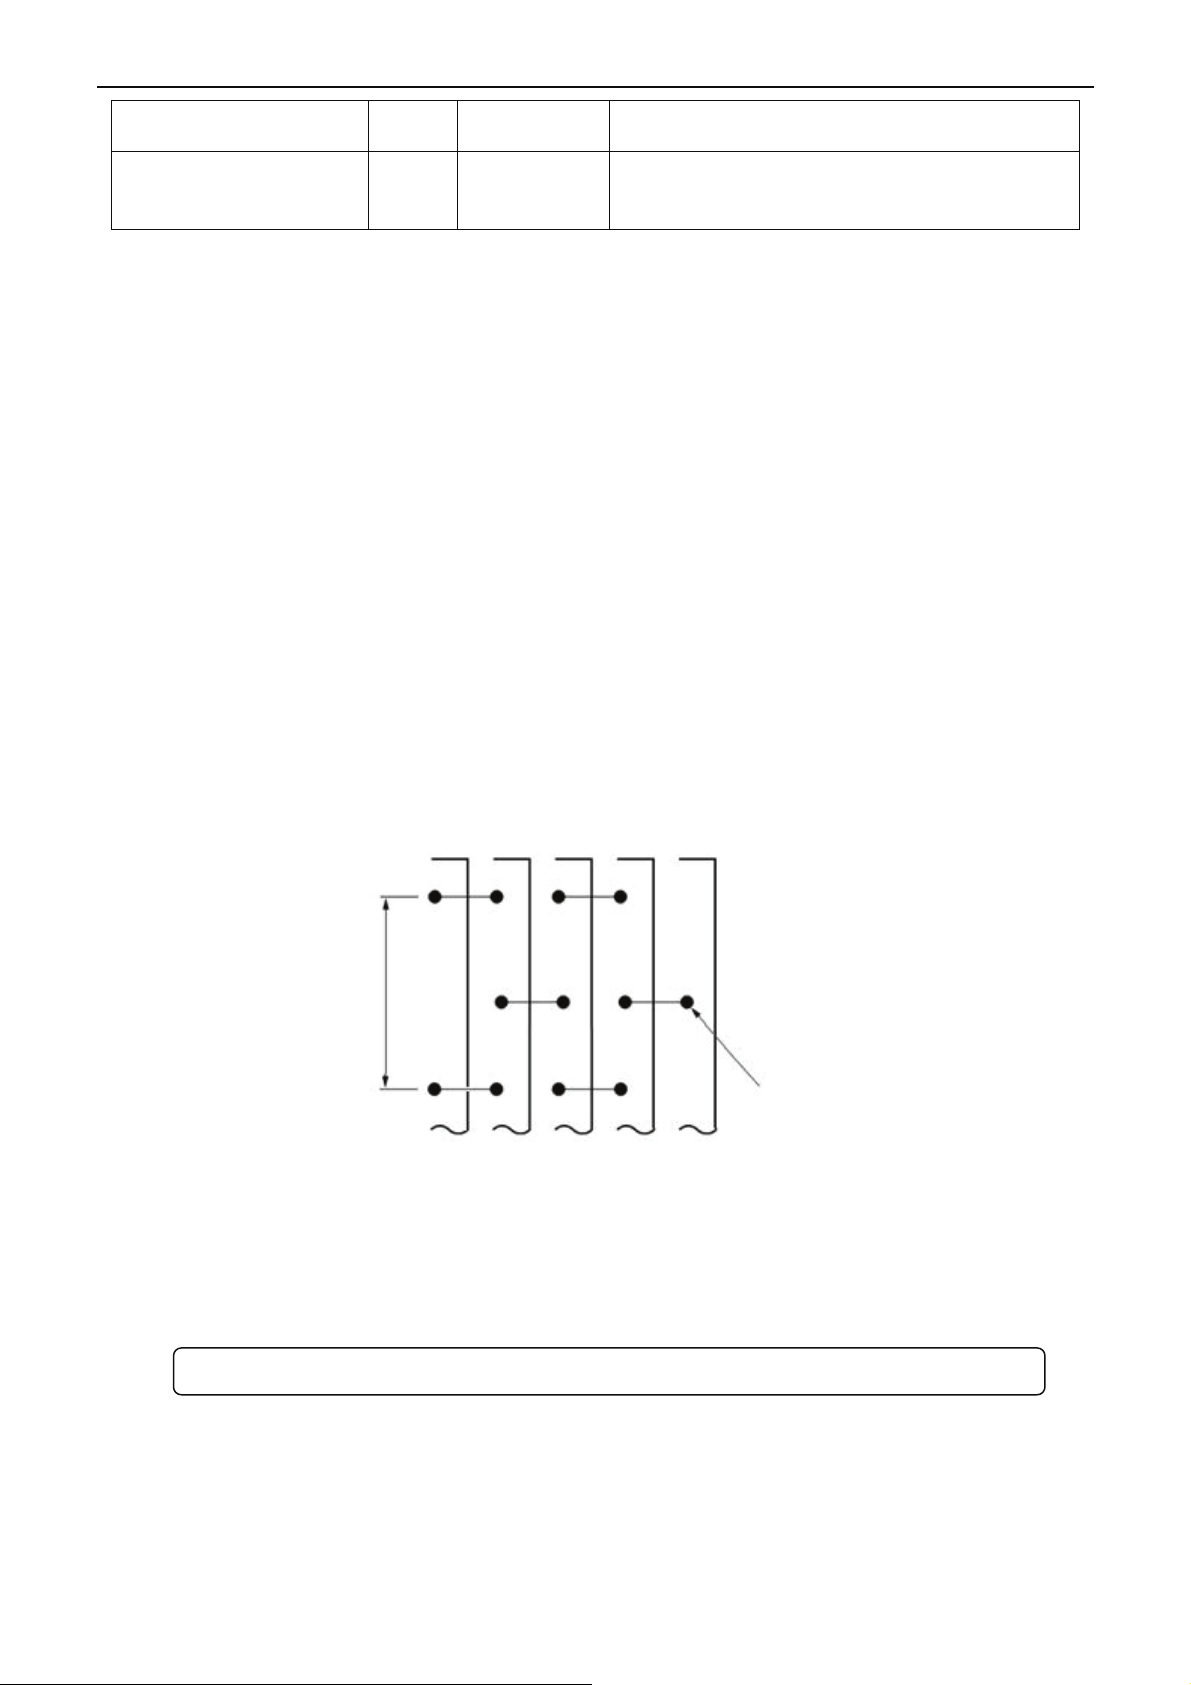
x-Lab Dot Matrix Printer XDP-321 User's Manual
Lean of right and left
central line
– Below 0.15
◆ Requirement of transverse perforation
The transverse perforation should not across the gear hole, but it should be at the center of two
adjacent gear holes, as well as, the wrap should not be over 0.1mm.
The edge of the transverse perforation should be straight, it should not be broken, and the crease
should superpose with the transverse perforation.
◆ Requirement of Multi-ply paper
This printer support the multi-ply paper which the fixed method is using point pulp, line pulp or
paper binding. It is strictly prohibited to use the multi-ply paper which is fixed through metal staple.
○ Point Pulp
• Point pulp should be in both ends, it is not allow pointing pulp only in one end.
• The point pulp position should be the same. and the size is Φ3~Φ5mm.
• The position of point pulp should be pressed down tightly to avoid warping.
• There should not be any obvious crease on the point pulp position.
• Each page of the point pulp paper is interleaving. (Interleaving between each ply)
• The position of point pulp is shown as below.
○ Line Pulp
• The line pulp position should be the same, and the width is 1 ~ 2mm.
• The position of line pulp should be pressed down tightly to avoid warping.
• Line pulp fixing should not use the paper which is obviously creased.
• Please don’t bare the pulp at the edge of paper.
Note: If the place with pulp is hard, as a result, the paper will not be fed precisely.
First
page
Second
page
Third
page
hole in the left and the center of
corresponding gear hole in the right.
The distance to other end when the parallel
moved right and left central lines superposes
with one end.
Forth
page
Fifth
page
Point pulp
- 49 -
Page 57
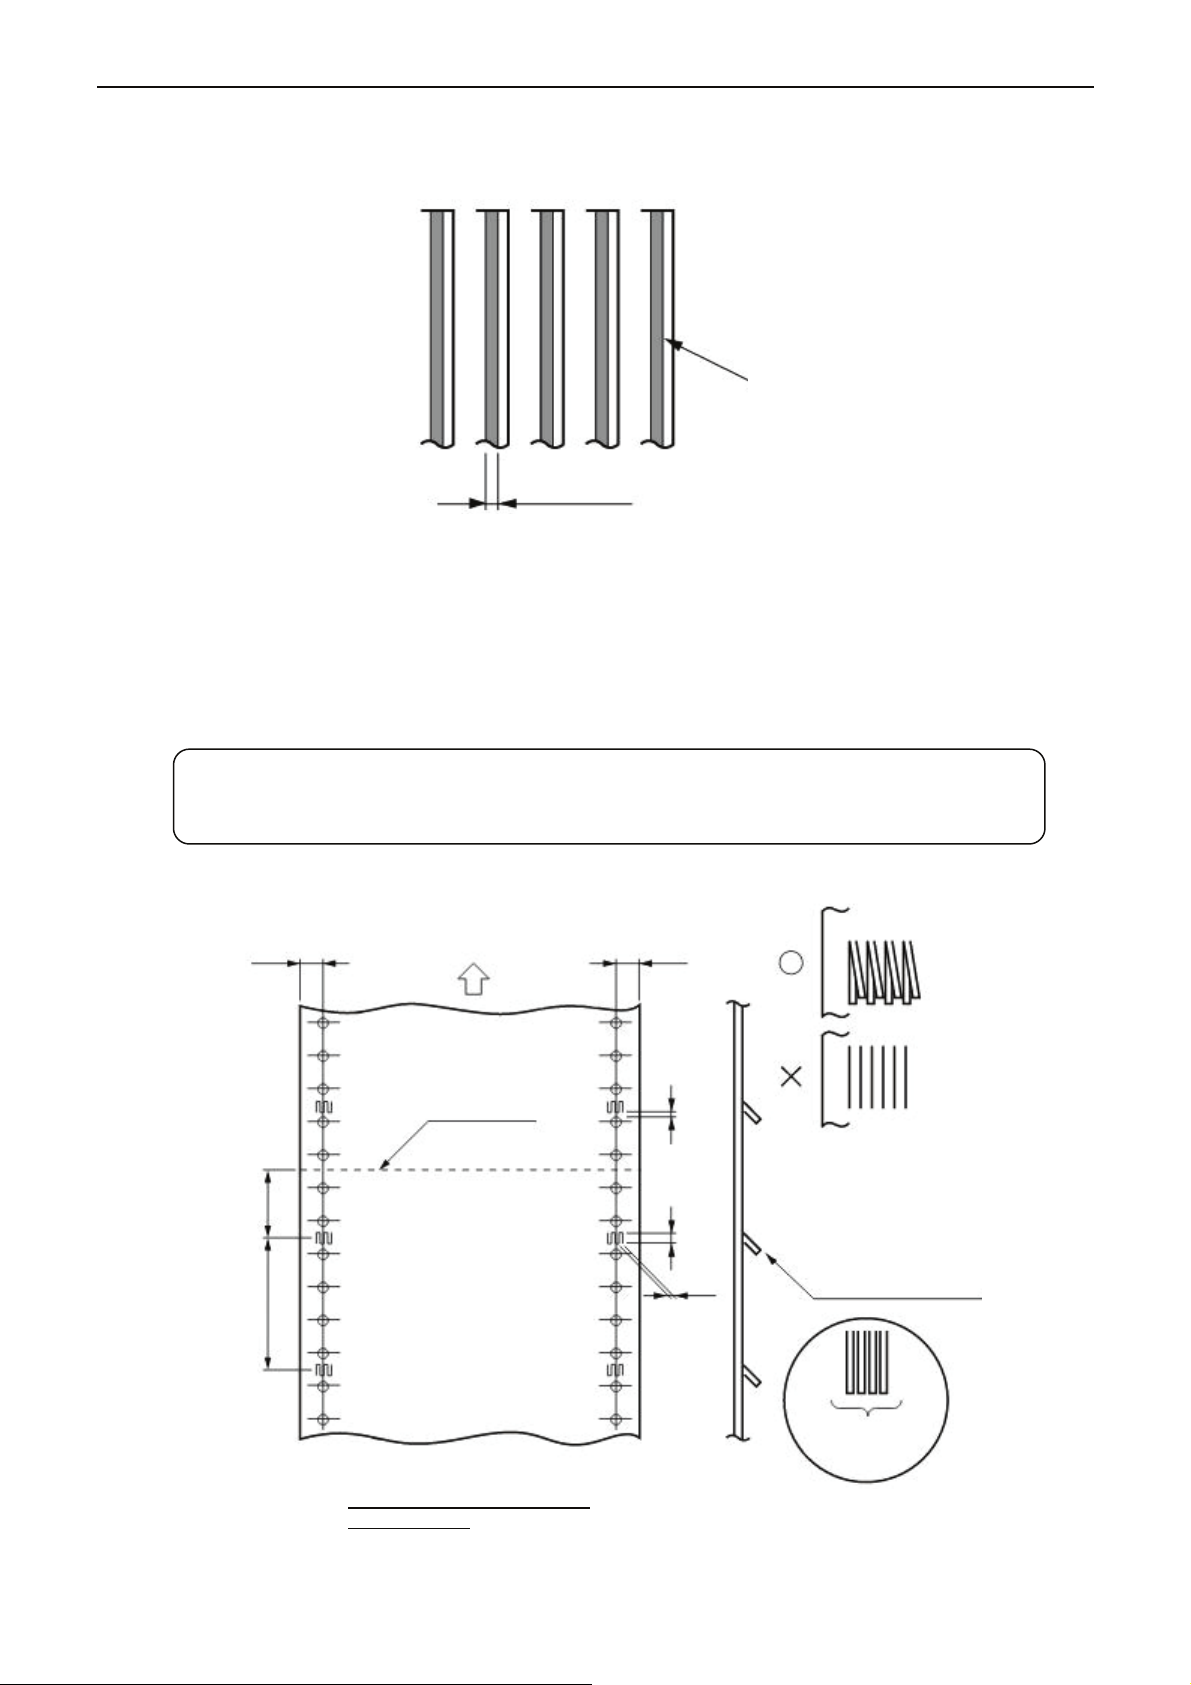
x-Lab Dot Matrix Printer XDP-321 User's Manual
page
Third
Forth
page
page
1 ~ 2 mm
Fifth
page
Line pulp
First
page
Second
○ Paper Binding
• Paper binding should be in both ends, it is not allow paper binding only in one end.
• Paper binding should be in the paper side and the surface should be even.
• Please operate double-ply paper binding along the paper feeding direction.
• Make sure paper binding part is fixed tightly and does not warp.
• Please press it down tightly after paper binding to avoid warping.
Note: Use the paper which is not in accordance with the paper binding requirement
and the specification shown below, paper feeding precision may be affected
and the printing performance can not be guaranteed.
Unit: mm
6.35 Loading direction
Transverse perforation
25.4
50.8 Space
The size and position of paper
binding (single)
6.35
Above 2
3~4
About 1
Paper binding space is
over 50.8mm (2inches)
Press down to
avoid warping
If bind the four
places together
Expanding figure of
the binding part
Fixed tightly
Not fixed tightly
- 50 -
Page 58
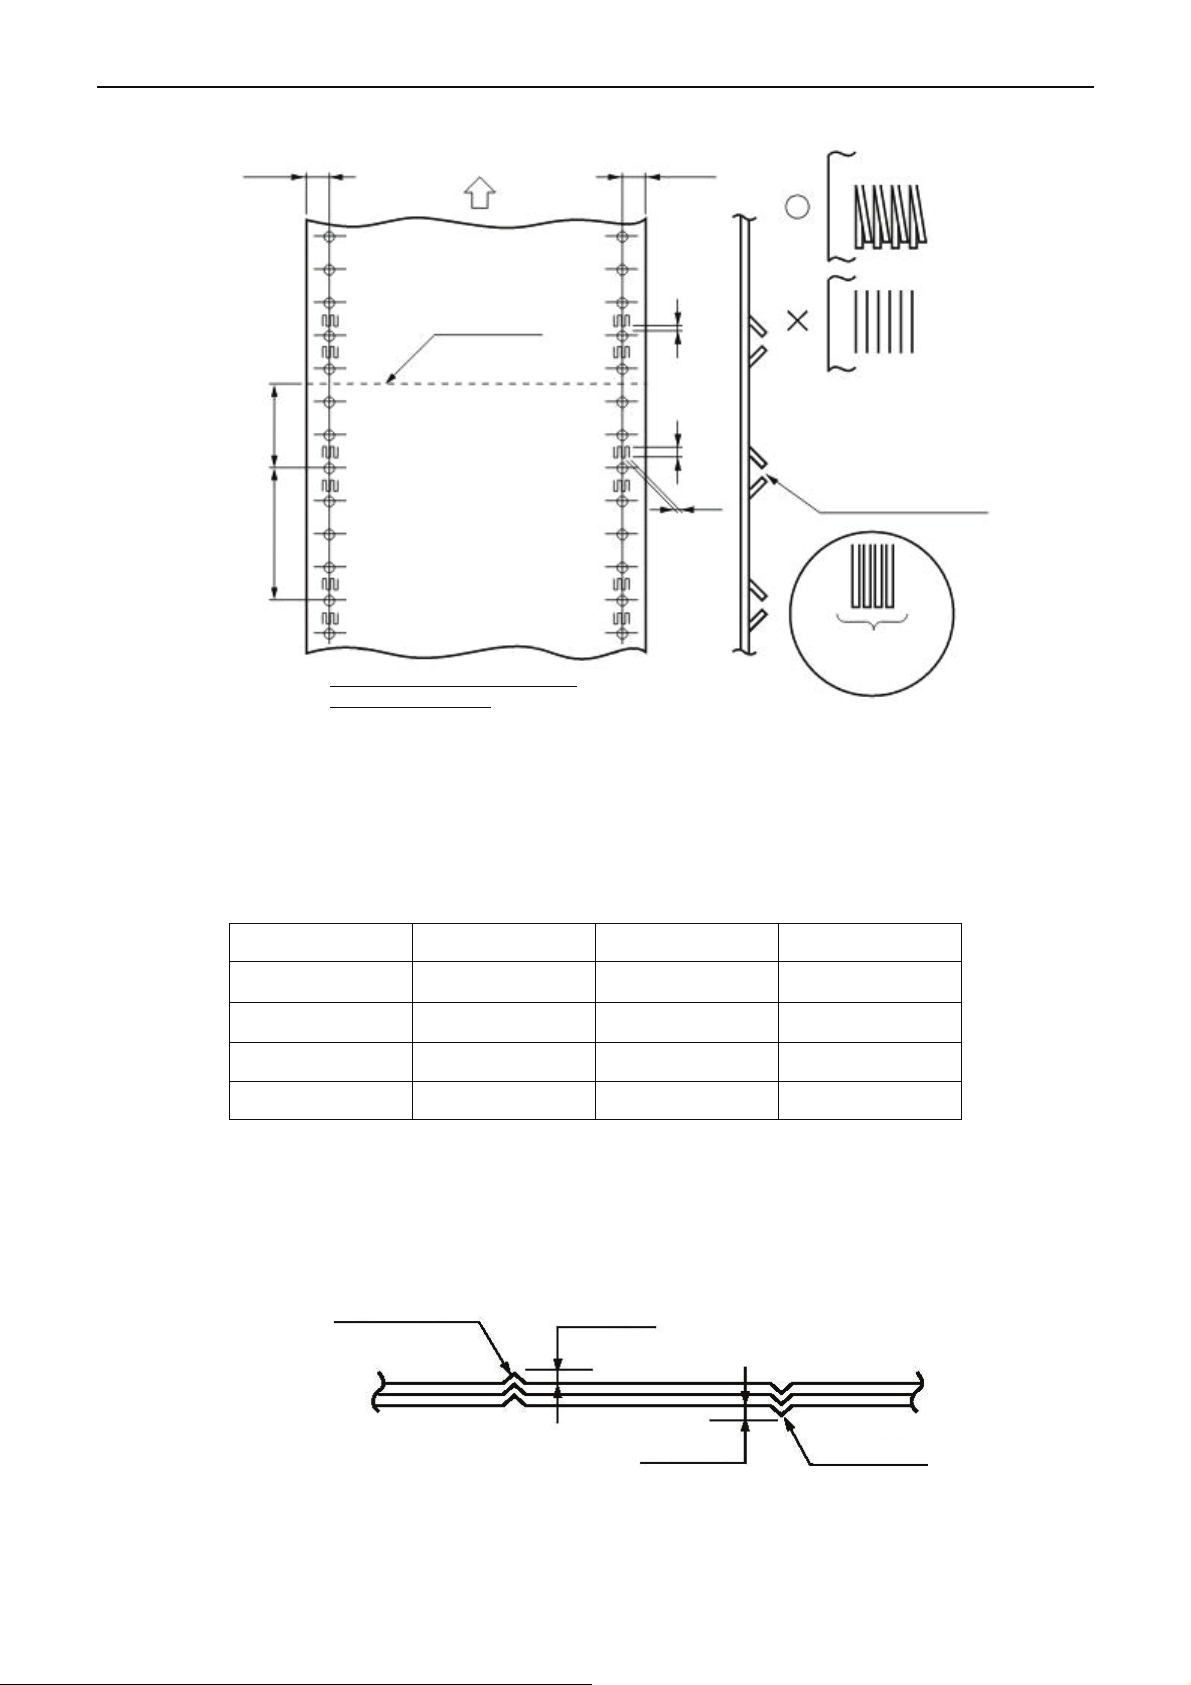
x-Lab Dot Matrix Printer XDP-321 User's Manual
(
)
6.35
Loading direction
Transverse perforation
25.4
50.8 Space
The size and position of paper
binding (Double-ply)
◆ Requirement of Multi-ply paper (NCR paper)
It is recommended to use the multi-ply paper which the quality is in first class or above. Low class
NCR paper would affect the copy effect and printer’s life.
Specification of NCR multi-ply paper is shown below:
Pages 2-ply 3-ply 4-ply
6.35
Above 2
3 ~ 4
About 1
Unit: mm
Fixed tightly
Not fixed tightly
Paper binding space is
over 50.8mm
Press down to
avoid warping
If bind the four
places together
Expanding figure of
the binding part
2inches
Page 1 40 ~ 64 g/m2 40 ~ 50 g/m2 40 g/m2
Page 2 40 ~ 80 g/m2 40 ~ 50 g/m2 40 g/m2
Page 3 ---- 40 ~ 80 g/m2 40 g/m2
Page 4 ---- ---- 40 g/m2
◆The protuberance of transverse perforation
When the fanfold transverse perforation sticks up, it may cause print quality decrease, unstable
paper feed or paper jam etc. Especially when the multi-ply paper is with many pages, it will deeply
affect the stability of paper feed. Please ensure the protuberance height is less than 1 mm.
Transverse perforation
◆ Warp between toothed holes of each ply
Please use the paper which toothed holes warp between each ply (causes by the warp of multi-ply
papers superposition) is less than 0.4 mm.
Less than1 mm
Less than 1 mm
Transverse perforation
- 51 -
Page 59
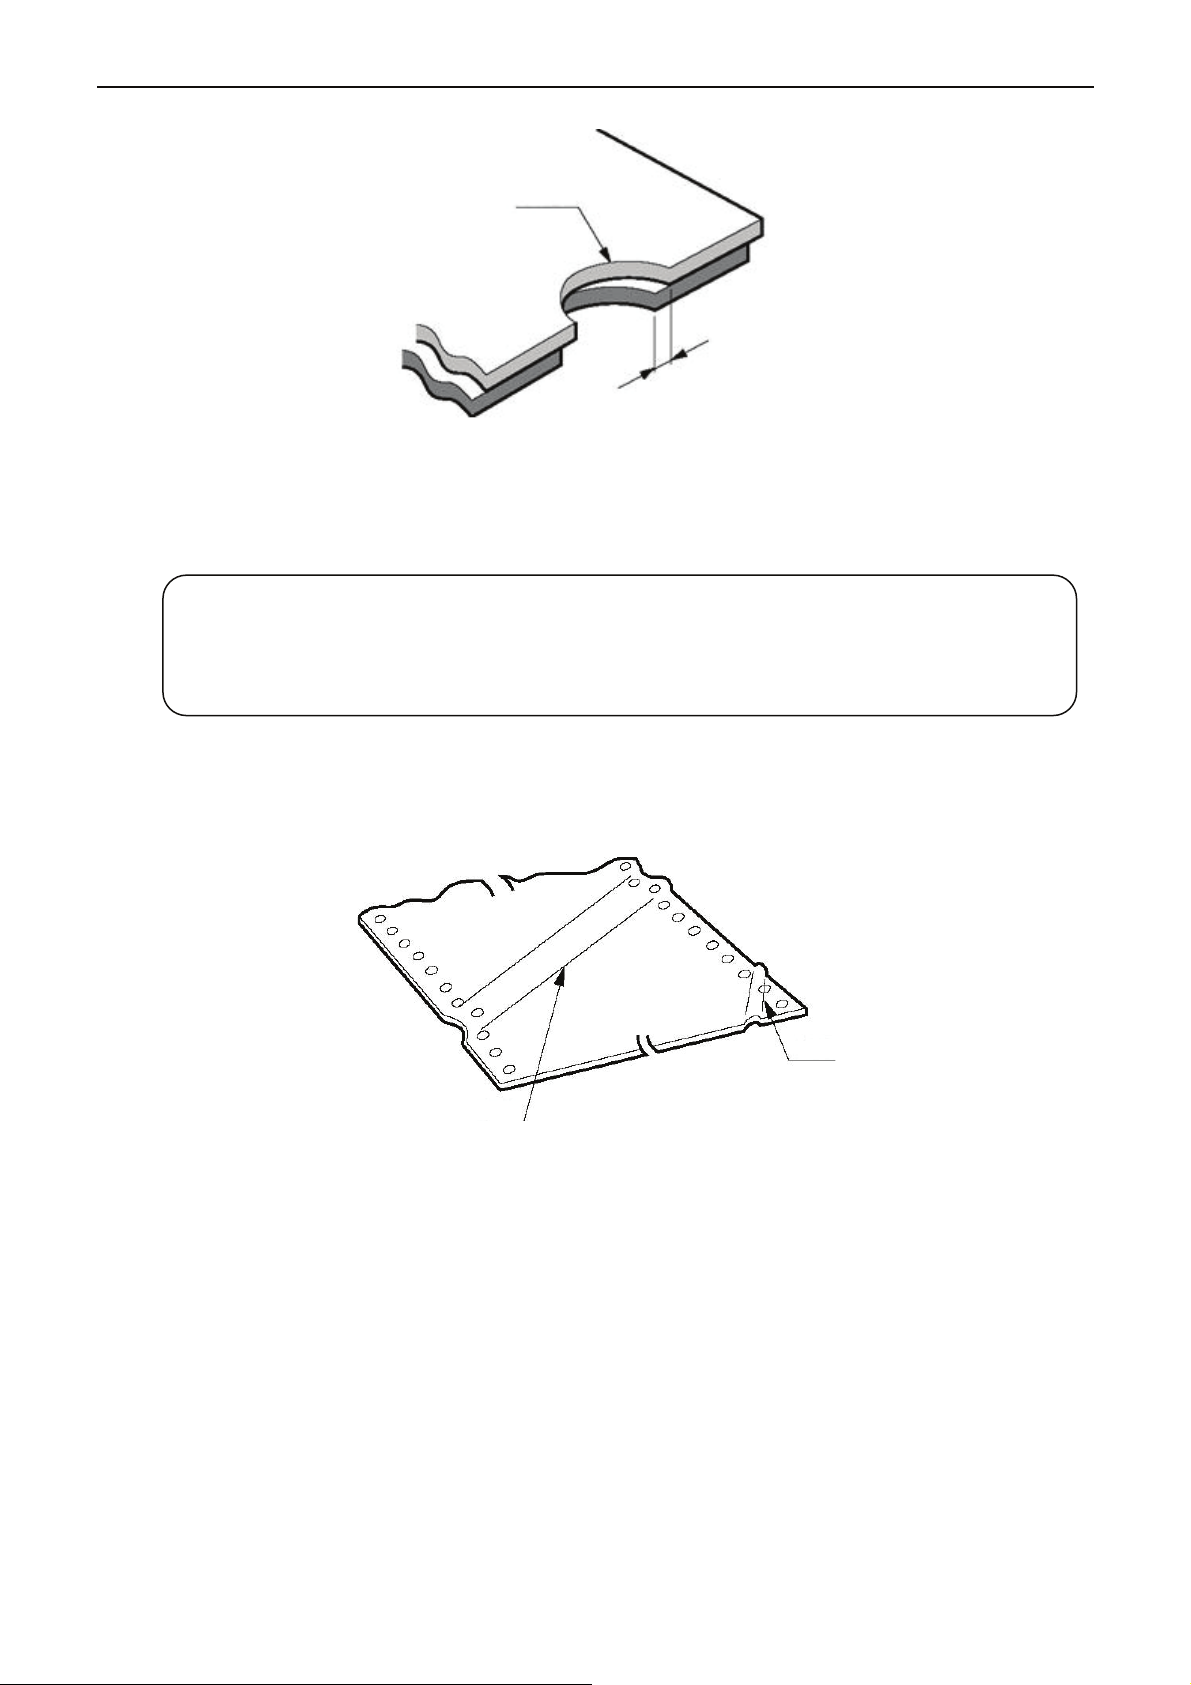
◆Binding hole, Clipped corner
Papers with binding holes and clipped corners are not supported.
Caution: 1. Do not use the paper with clipped corneror binding hole which is not
included in the guarantee list.
x-Lab Dot Matrix Printer XDP-321 User's Manual
Toothed hole
Warp is less than 0.4 mm
Toothed holes section
◆ Rumple, crease
The paper should not have creases or rumples, especially for new paper. The first and last pages
are easy to have creases or rumples, so please do not use them.
The crease, crimp, fold and upturning of the paper top and bottom
◆
Please do not use the paper which is creased, puckered, crimp and upturning in the top and bottom.
Or it may cause cheap printing quality or paper jam. Especially for the new paper, if it creases from
the first few pages, please do not use it.
◆ Paper folding part
Please fold the paper based on the transverse perforation. It will affect paper feeding while the
folding part sticks up as the following figure shown, please do not use it.
2. It can not guarantee device’s capability when using or after using this kind
of paper.
Crease
Rumple
- 52 -
Page 60
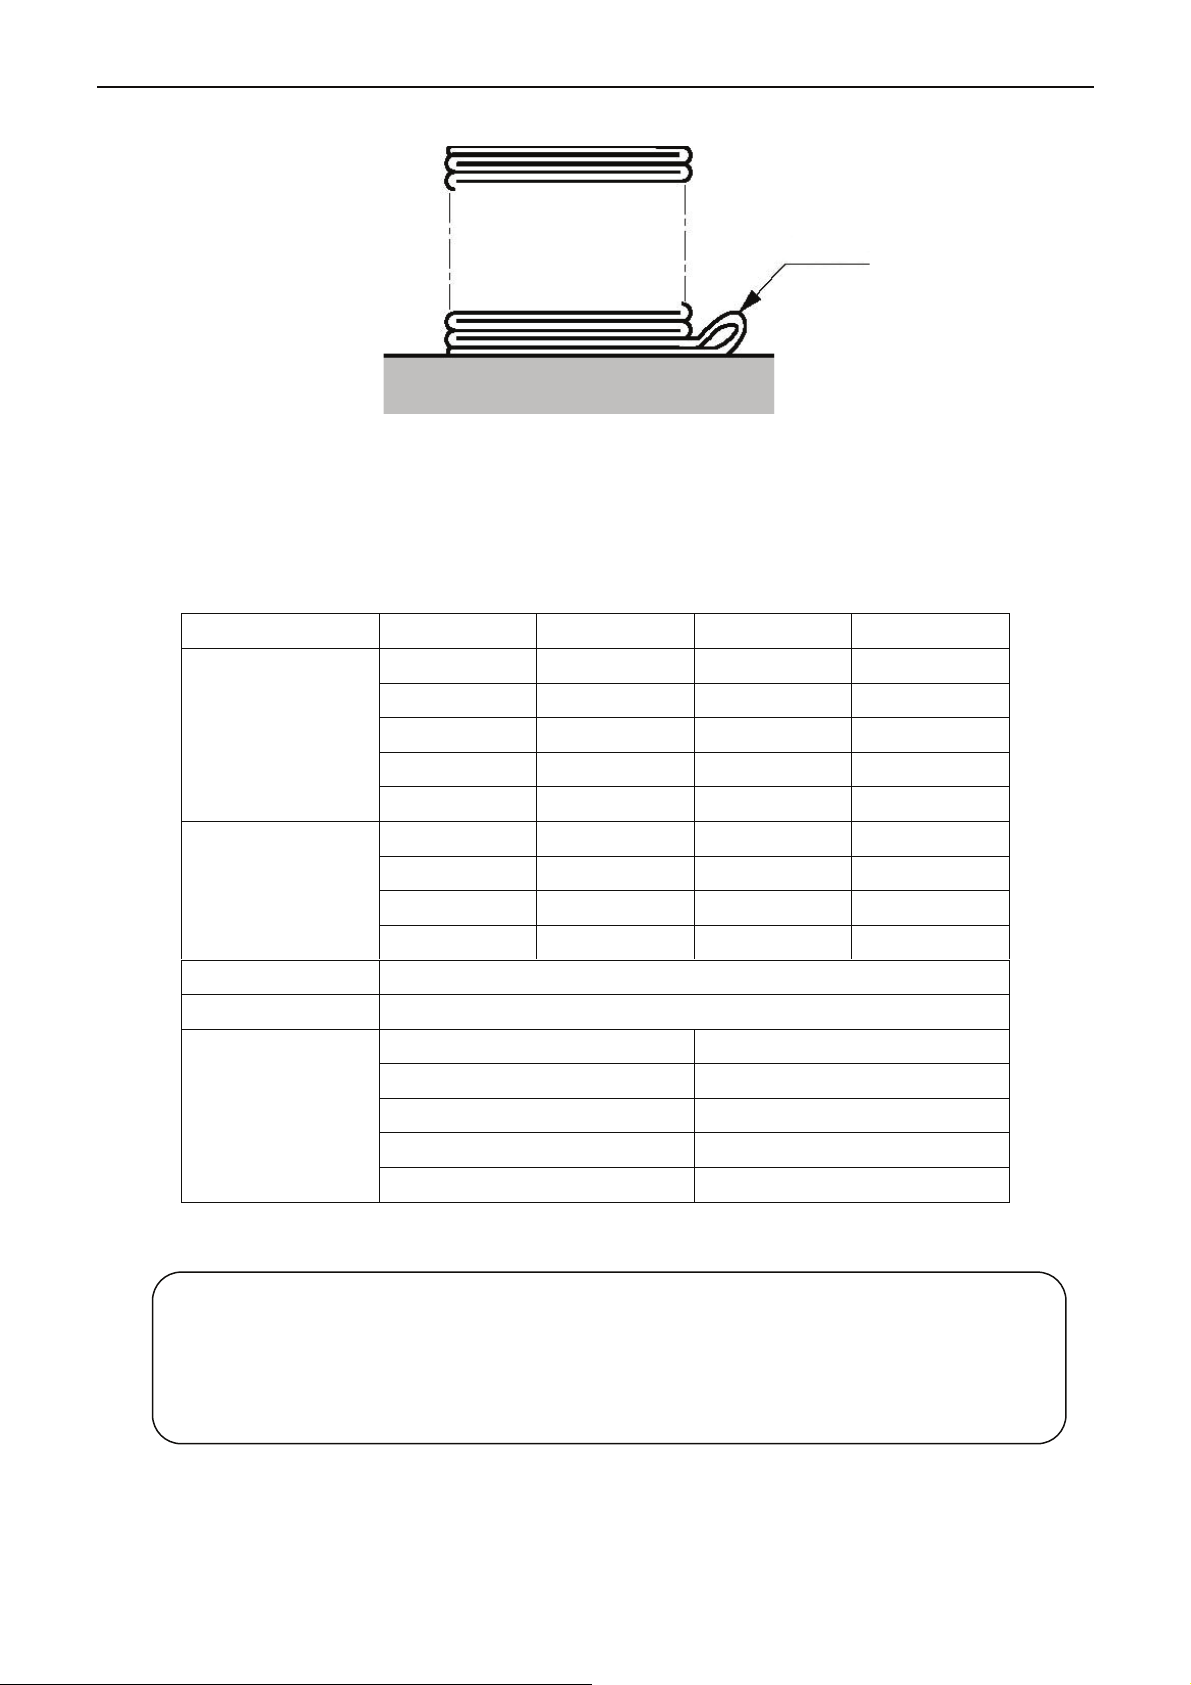
B.1.5 Envelope
Envelope specification should accord with the following table. In this specification, some envelopes
are beyond the supported range because of shape, size and so on.
x-Lab Dot Matrix Printer XDP-321 User's Manual
Protrusive part
◆ Print Size and Printable Area
Envelope type Code name Length (mm) Width (mm) Support
Sample 1
Envelope
Sample 2
Envelope
Material Envelope which is Grade B or above
Weight 80 ~ 120 g/m2
Non-guarantee
Area
B6 176 125 Yes
DL 220 110 Yes
ZL 230 120 Yes
C5 229 162 Yes (Note 1)
C4 324 229 No
C6 162 114 Yes (Note 2)
DL 220 110 Yes
C5 229 162 Yes
C4 324 229 No
Top 6.25 mm
Bottom 6.25 mm
Left 6.25 mm
Right 12 mm (Note 3)
From pulp position 5 mm
Note: 1. Envelope should not have solid edge (the folding part in both sides and the
bottom).
2. Sample 2 Envelope need to be printed vertically.
3. Right margin doesn’t include seal lip, and the distance from printing content to
the bottom sunken line is not less than 5mm.
- 53 -
Page 61
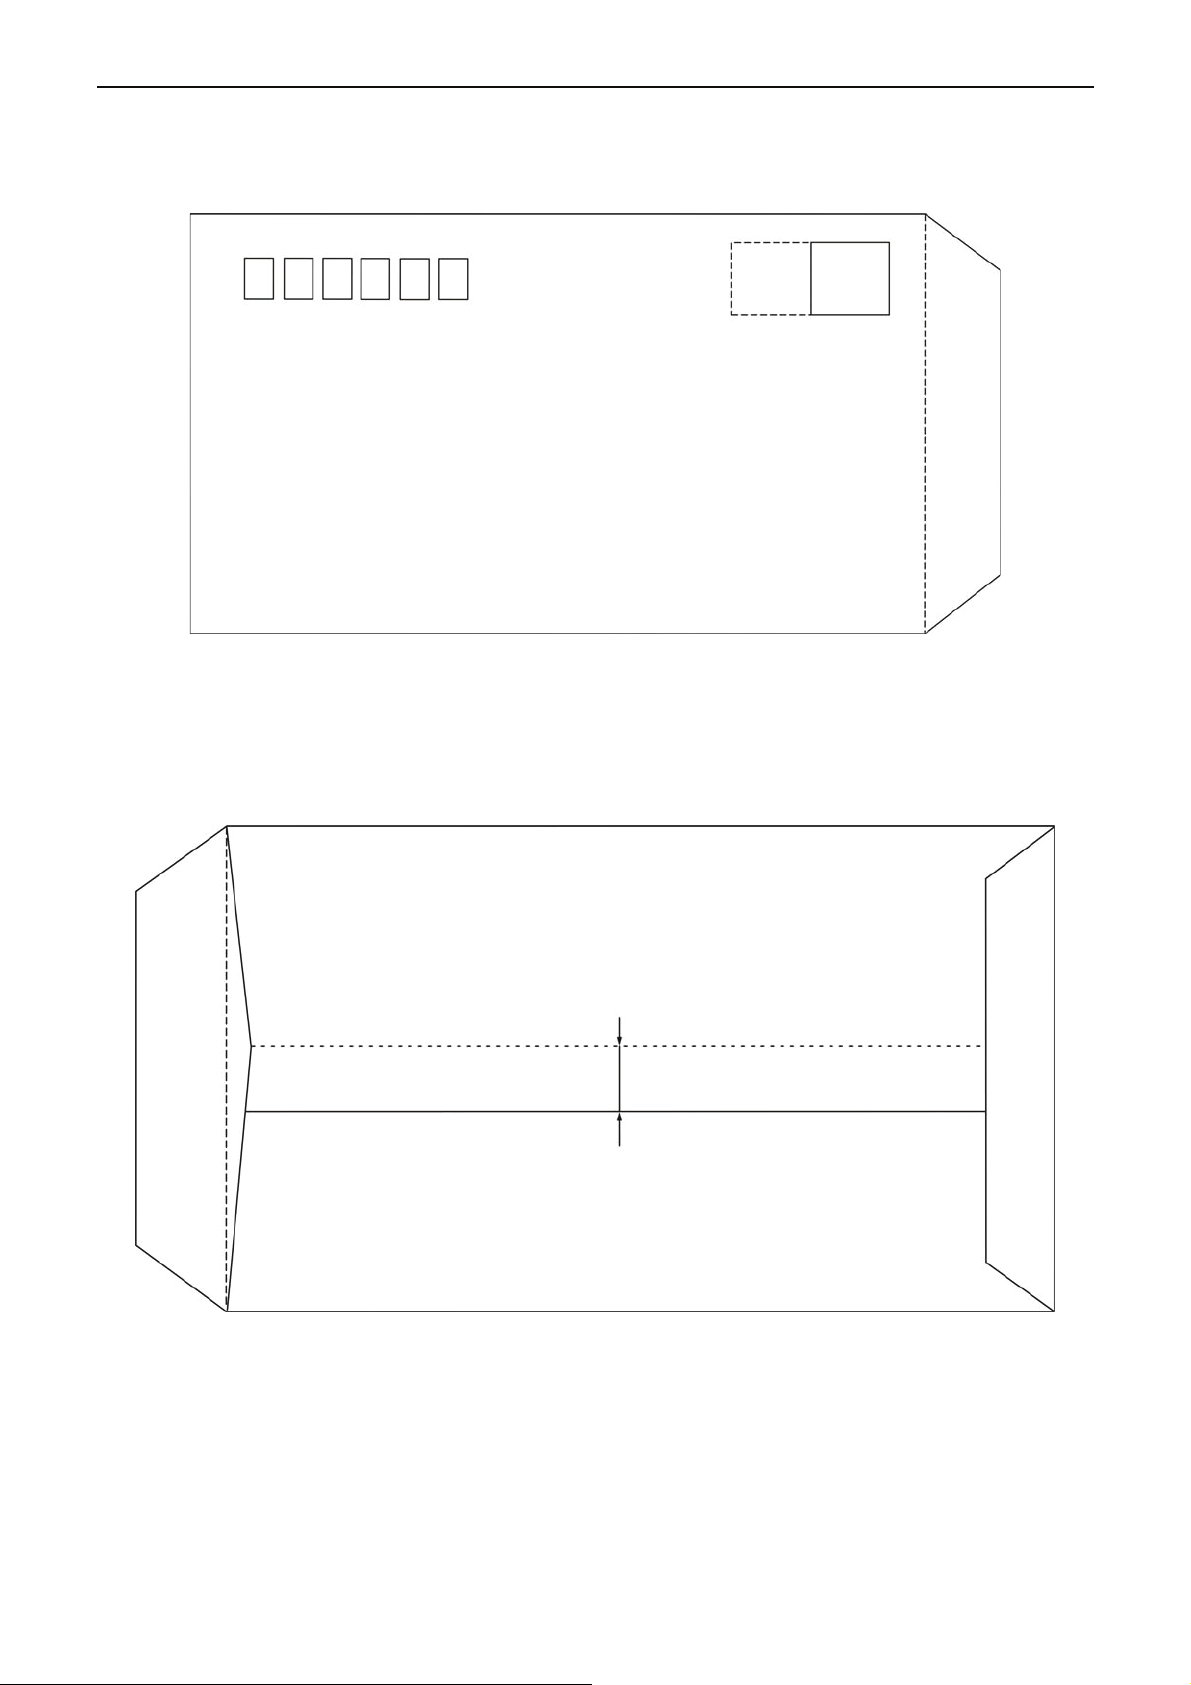
x-Lab Dot Matrix Printer XDP-321 User's Manual
Sample 1 Envelope (Front view)
Stamp
Sample 1 Envelope (Rear view)
15~20 (C5, C4 Envelope)
10~15 (B6, DL, ZL Envelope)
- 54 -
Page 62
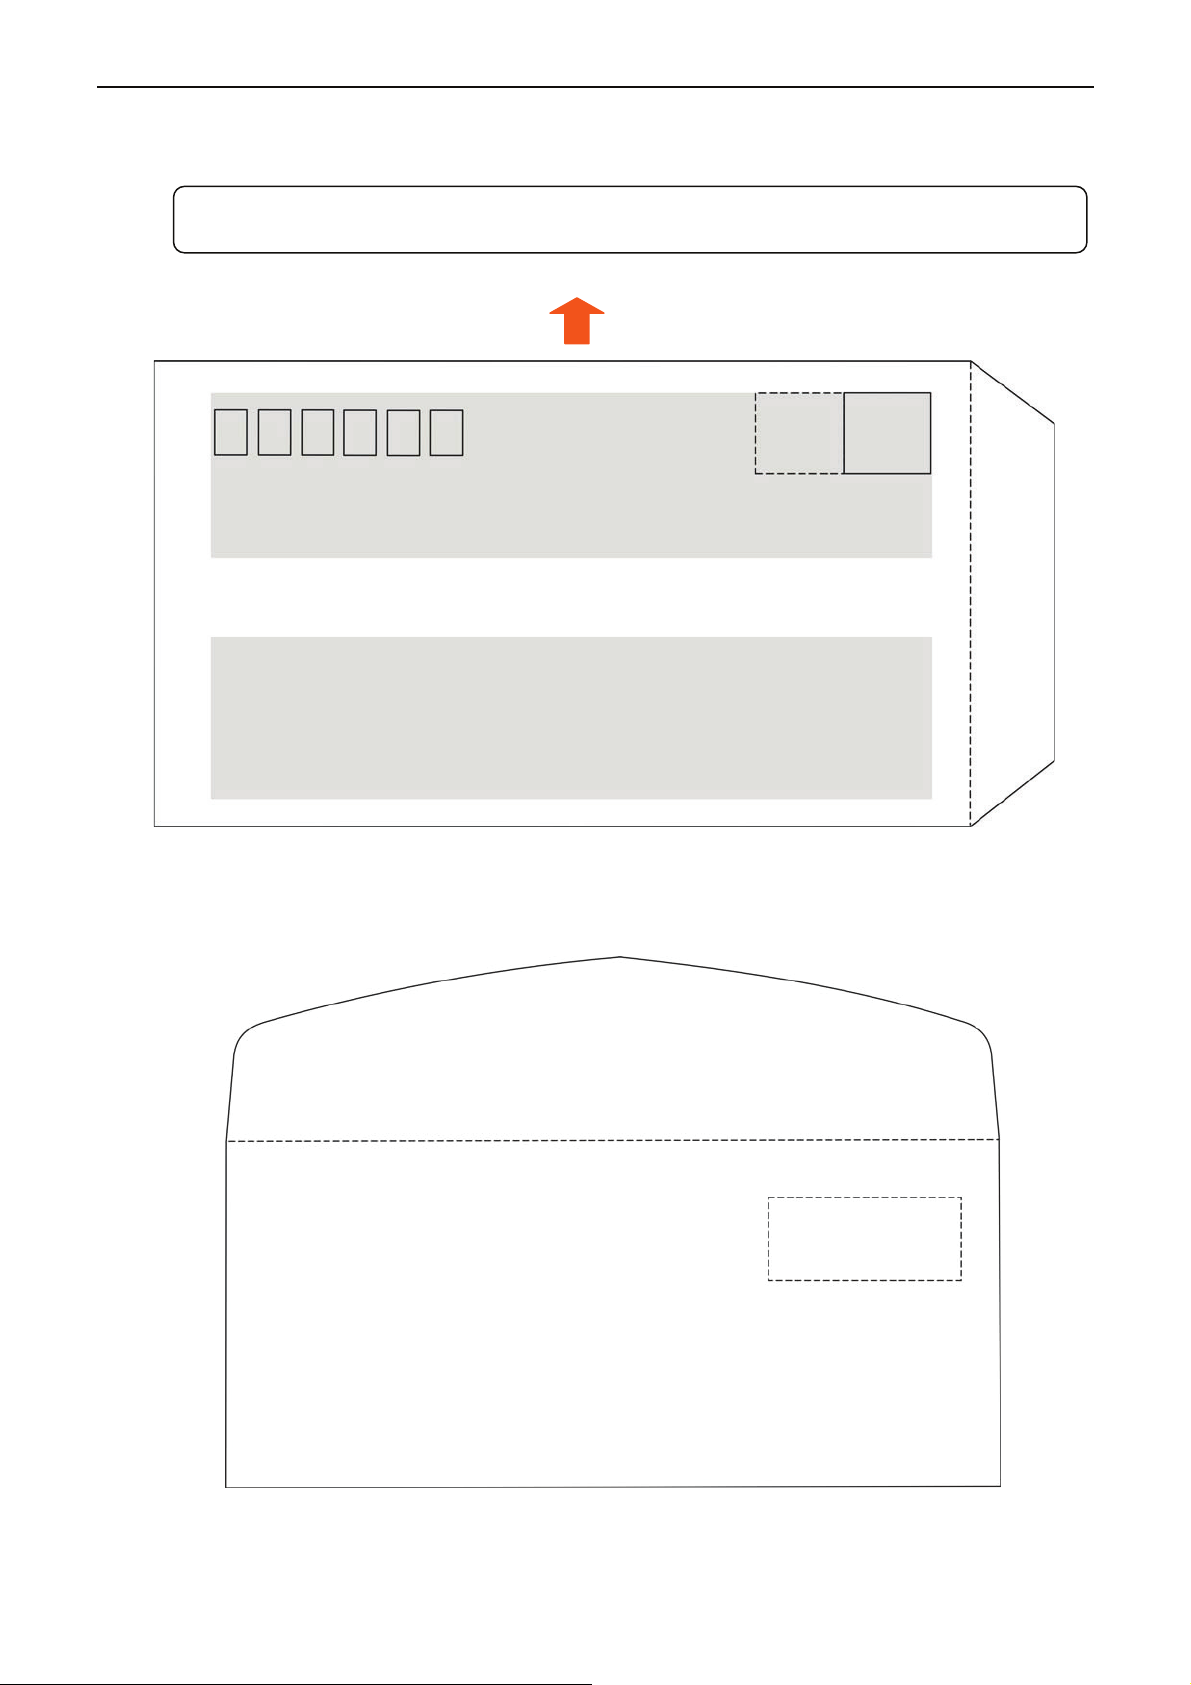
x-Lab Dot Matrix Printer XDP-321 User's Manual
Sample 1 Envelope print direction and printable area
Note: To load envelope, please place it on the paper guide with the front downwards
and the rear upwards.
Stamp
Sample 2 Envelope (Front view)
Stamp
- 55 -
Page 63
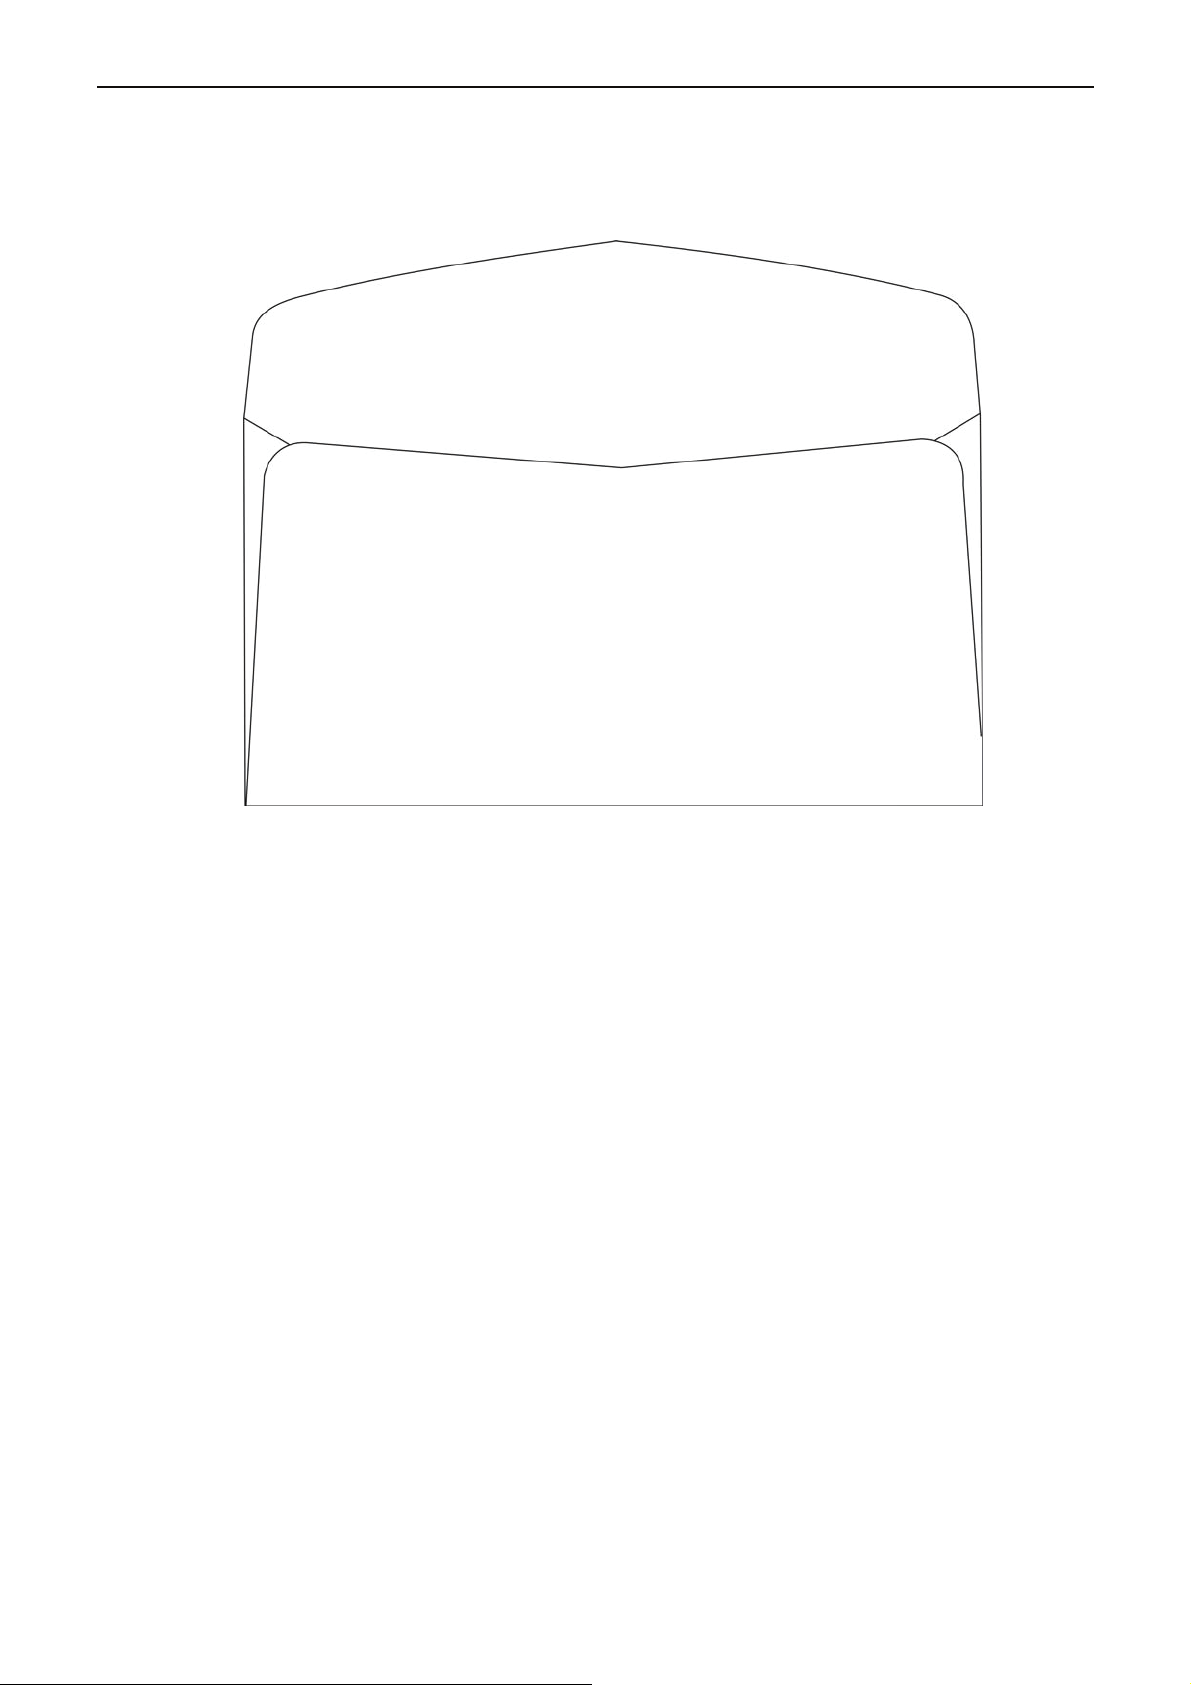
x-Lab Dot Matrix Printer XDP-321 User's Manual
Sample 2 Envelope (Rear view)
- 56 -
Page 64
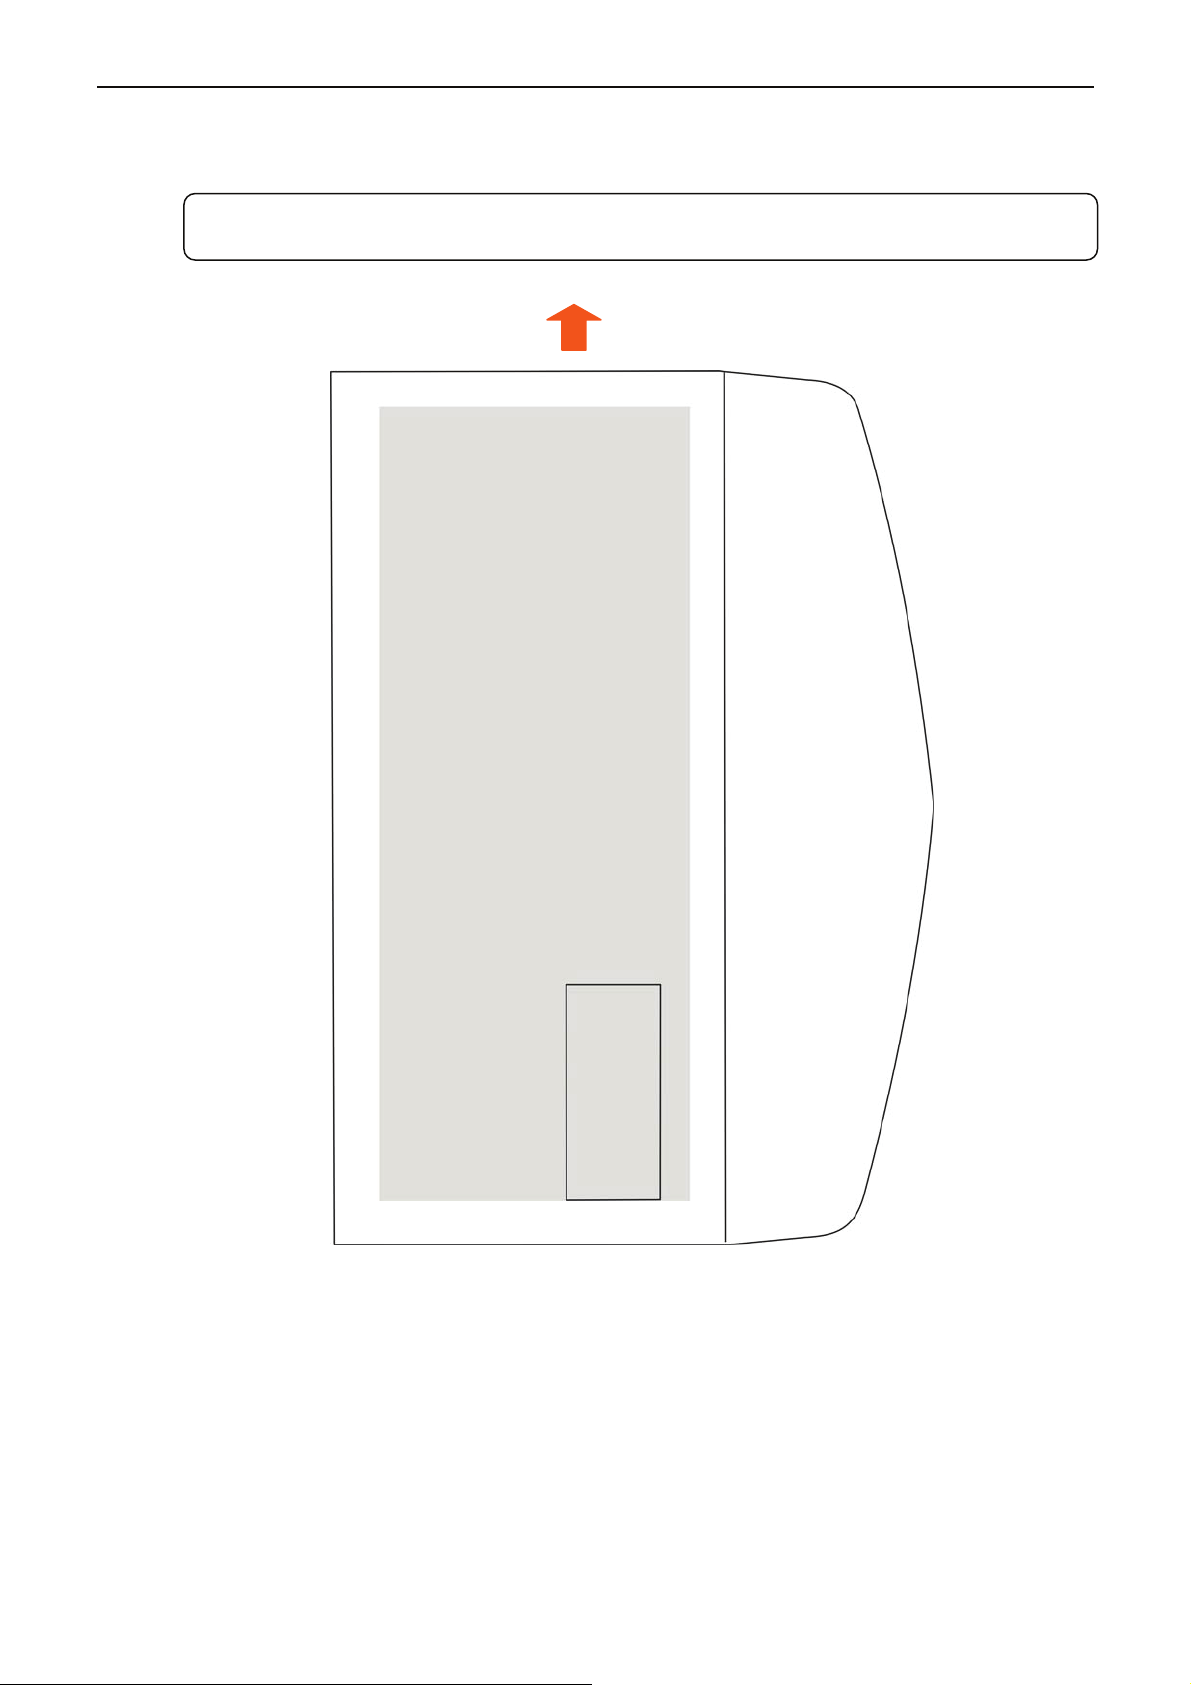
x-Lab Dot Matrix Printer XDP-321 User's Manual
Sample 2 Envelope print direction and printable area
Note: To load envelope, please place it on the paper guide with the front downwards
and the rear upwards.
Stamp
- 57 -
Page 65
Caution: • Envelope refers to single layer envelope. The double layer envelope is not
supported and the envelope should not be with solid edge.
• When the envelope pulp at the top or bottom, please don’t print at that area
within 5mm.
• The sunken place in the bottom of the envelope belongs to the non-printable
area. Please ensure the distance from the bottom sunken line to the printing
area is not less than 5mm.
• Do not use following envelopes:
• Envelopes with contents in it.
• Envelopes with holes and which both sides are coherent in the middle.
• Envelopes which seal lip parts are folded.
• Envelopes which seal lip parts are pulped.
• If you print near the pulped area, even though it belongs to the printable
area, it may also cause paper dirt because of the pulp (especially when the
edge is folded or stuck up).
B.1.6 Delivery Note
x-Lab Dot Matrix Printer XDP-321 User's Manual
Delivery notes here refers to the multi-ply papers (2-ply ~ 7-ply). Its paper size and printable area are
based on the specifications of tractor paper and cut sheet. Moreover, the copy capability and printing
precision are not guaranteed because they are affected by paper thickness and inner paper quality
(such as, thickness). In addition, do not use the paper which is not even to avoid paper dirt or printing
slant.
B.1.7 Postcard
As the specification of standard postcard overruns this printer’s guarantee range, therefore, this
printer does not support standard postcard printing.
B.1.8 Passbook
This printer does not support passbook printing.
B.1.9 Label
This printer does not guarantee the printing with labels.
Note: 1. Label is not included in the guarantee list, please don’t use it.
2. Problem occurs when using labels, we will not guarantee the device and
performance
B.1.10 Recycled Paper
In order to save resource, improve the using rate of resource, we recommend using the recycled paper.
The specification of recycled paper should satisfy the using standard requirement.
- 58 -
Page 66
x-Lab Dot Matrix Printer XDP-321 User's Manual
Appendix C Command Summary
This printer supports x-Lab control commands shown as the follow table:
noitpircseD dnammoC oN yfissalC
1 ESC @ Initialize Printer
2 CAN Cancel Line
Printer
control
commands
3
4
5
6
7
8
9
10
11
12
13
14
15
16
17
18
DEL Delete Character
ESC # Cancel MSB Control Sequence
ESC > Set MSB to 1
ESC = Reset MSB to 0
BEL Beeper
BS Backspace
ESC U Select Print Direction
ESC < Select character Unidirectional Mode (on one line)
ESC s n Select/Cancel Quiet Print Mode
CR Carriage Return
LF Line Feed
FF Form Feed
ESC $ Set Absolute Horizontal print position
ESC \ Set Relative Horizontal print position
ESC ( U Define Unit
ESC ( V Set Absolute Vertical Print Position
Image and
color
handling
19
20
21
22
23
24
25
26
27
28
29
30
31
32
33
34
35
ESC ( v Set Relative Vertical Print Position
ESC J n/180” Line Feed
ESC j n/180” Reverse Line Feed
HT Horizontal Tab
VT Vertical Tab
ESC ? m n Reassign Graphics Mode
ESC * Set Graphics Mode
ESC ( G Select Graphics Mode
ESC . Print Raster Graphics
ESC K 8 dot Single-Density Graphics Mode
ESC L 8 dot Double-Density Graphics Mode
ESC Y 8 dot High-speed, Double-Density Graphics Mode
ESC Z 8 dot Quadruple-Density Graphics Mode
FS & Set Chinese character mode
FS · Cancel Chinese character mode
FS SO Select Double Width Mode (Chinese)
FS DC4 Cancel Double Width Mode
- 59 -
Page 67
x-Lab Dot Matrix Printer XDP-321 User's Manual
Chinese
character
print
command
36
37
38
39
40
41
42
43
44
45
46
47
48
49
50
FS W Select/Cancel quadruple-size mode for Chinese
character
FS J Select lengthways printing
FS K Select transverse printing
FS D Two character lengthways half-size mode paratactically
printing
FS - Select/Cancel Underline Mode for Chinese character
FS S Select full-size mode pitch for Chinese character
FS T Select half-size mode pitch for Chinese character
FS U Select half-size mode pitch adjustment for character
FS V Cancel half-size mode pitch adjustment for character
FS x Select /Cancel high speed printing
FS 2 Chinese character of user-defined
FS SI Select half-size mode for Chinese character
FS DC2 Cancel half-size mode for Chinese character
FS r Select demisemi-size mode for Chinese character
FS ! Select Chinese character print mode
ASCII
Character
51
52
53
54
55
56
57
58
59
60
61
62
63
64
65
66
FS v Select/Cancel form connect line
FS k Select Chinese font
FS Y Select Chinese character dot-matrix and width
FS c Set Chinese character HMI (Horizontal motion space)
FS b Set Chinese character datum line
ESC I Select Chinese CC-DOS print mode
ESC k Select Font Style
ESC X Select ASCII character width and height
ESC P Select 10CPI Mode
ESC M Select 12CPI Mode
ESC g Select 15CPI Mode
ESC p Select/Cancel Proportional Mode
ESC x Select Print Quality
ESC 4 Select Italic Mode
ESC 5 Cancel Italic Mode
ESC E Select Emphasized Mode
67
68
69
70
71
72
73
ESC F Cancel Emphasized Mode
ESC ! n Select Print Mode
ESC q n Select Character Style
ESC t n Select Character Table
ESC ( t Assign Character Table
ESC R Select International Character Set
ESC & Define Downloaded Characters
- 60 -
Page 68
x-Lab Dot Matrix Printer XDP-321 User's Manual
Font
enhancement
74
75
76
77
78
79
80
81
82
83
84
85
86
87
88
89
ESC : Copy ROM Characters Set into RAM
ESC % n Select/Deselect User-Defined Set
ESC 6 Enable Character Set 2
ESC 7 Cancel command ESC 6
SI Select Compressed Mode
DC2 Cancel Compressed Mode
SO Select Double Width Mode
DC4 Cancel Double Width Mode
ESC W n Select/Cancel Double Width Mode
ESC w n Select/Cancel Double height Mode
ESC G Select Double Strike Mode
ESC H Cancel Double Strike Mode
ESC - n Select/Cancel Underline Mode
ESC ( - Define and Apply a Style of Scoring
ESC ( ^ Print Data as Characters
ESC S n Select Superscript/Subscript Mode
Format
control
90
91
92
93
94
95
96
97
98
99
100
101
102
103
104
105
ESC T Cancel Superscript/Subscript Mode
ESC C Set Form Length in Lines
ESC C NUL Set Form Length in Inches
ESC ( C Set Form Length in Defined Unit
ESC ( c Define Form Format
ESC N n Select Page Skip
ESC O Cancel Page Skip
ESC l Set Left Margin
ESC Q Set right Margin
ESC D Set Horizontal Tab Positions
ESC B Set Vertical Tab Positions
ESC / Select a VFU Channel
ESC b Select VFU Positions
ESC 0 Select 1/8-inch Line Spacing
ESC 2 Select 1/6-inch Line Spacing
ESC 3 Select n/180-inch Line Spacing
106
107
108
109
ESC A Select n/60-inch Line Spacing
ESC + Select n/360-inch Line Spacing
ESC SP Set Character Space
ESC a n Select Justification Mode
- 61 -
Page 69

Product of
from Texas, USA
MADE IN CHINA
Warranty Registration
Customer Support
 Loading...