

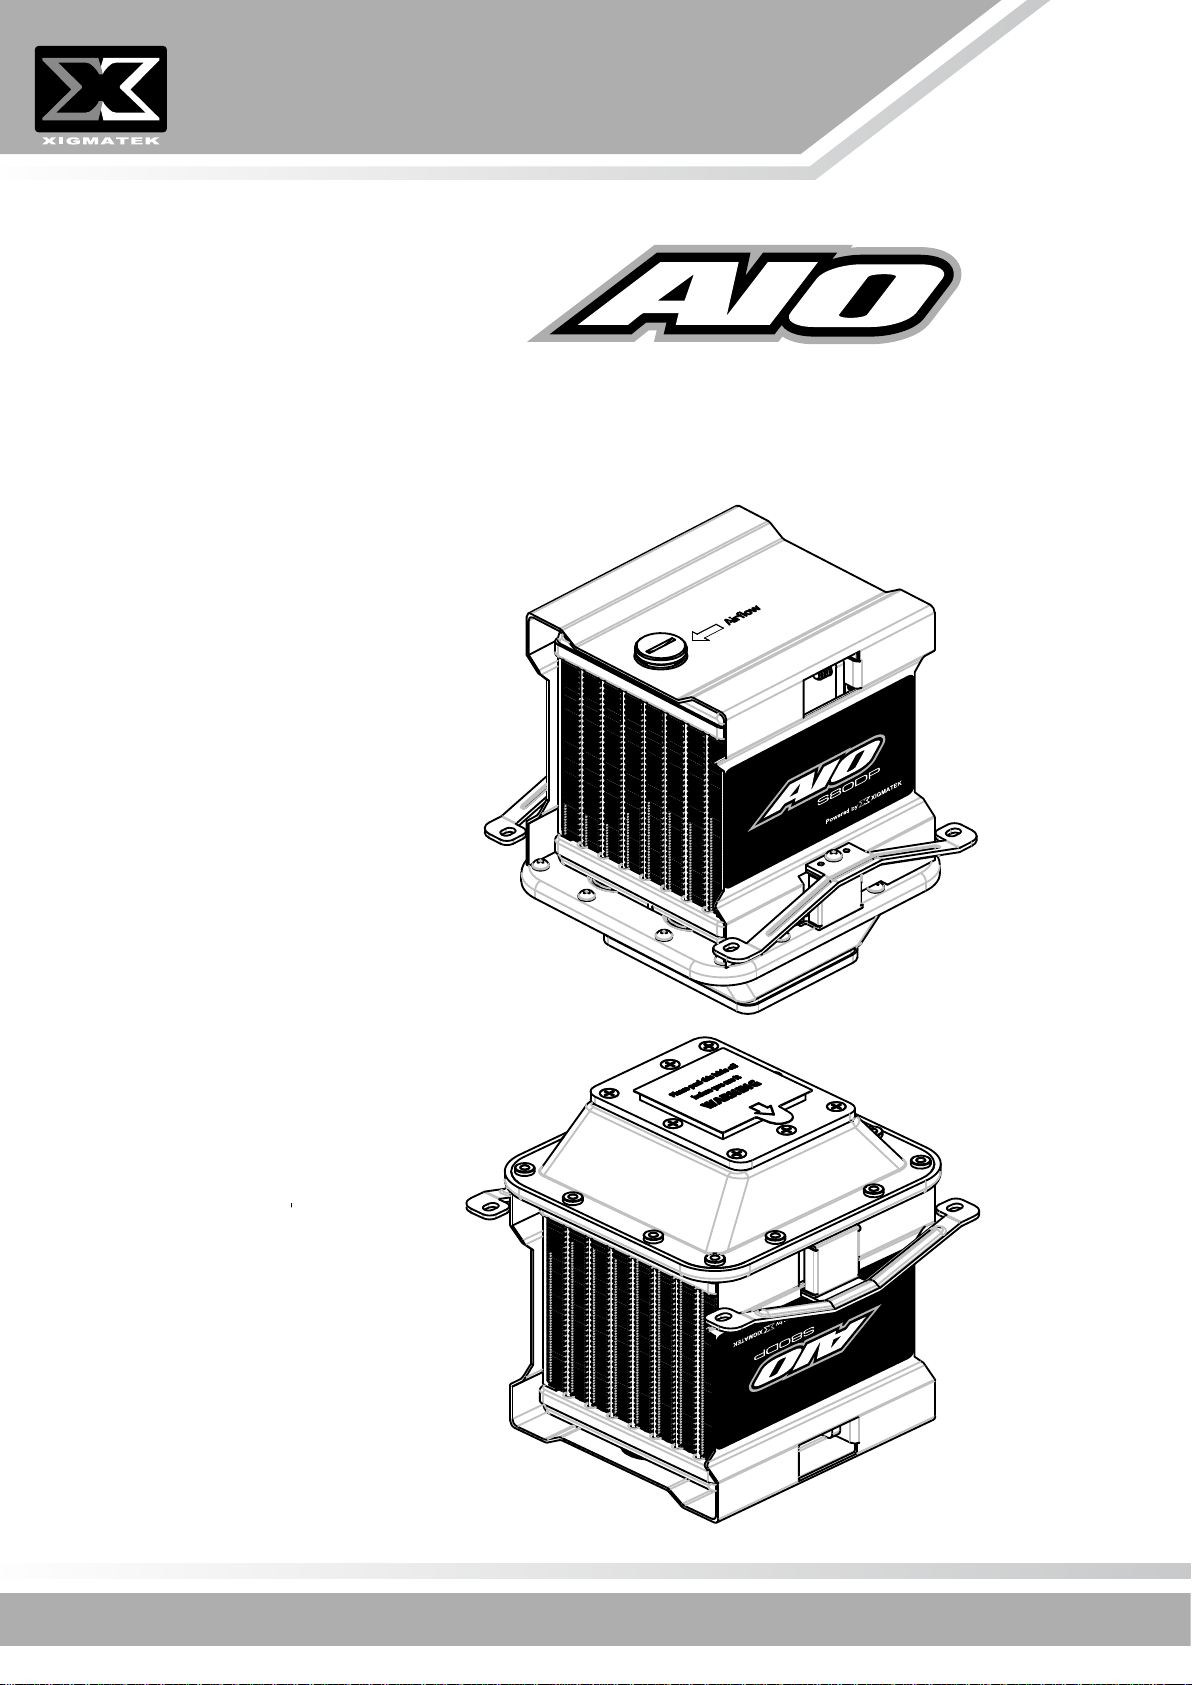
User’s Manual
All-In-One Liquid Cooling System Provider
AIO-S80DP
All-In-One Liquid Cooling System
www.xigmatek.com www.xigmatek.de
Features
Much smaller ─all-in-one liquid cooling system design.
More Silent─silent and powerful mini 12V pump with high
reliability.
More Powerful─dual high performance radiator with a
silent PWM fan provides more cooling performance.
Uses 12V connection from computer power supply.
Coolant pre-filled, 30,000 hours of maintenance free from
liquid refilling.
Universal retention module design achieves maximum cooling
performance at any mounted angle & platform.
Features
Kompakt - All-In-One Flüssigkeitskühlungssystem
Niedriger Geräuschpegel - leise, leistungsstarke und zuverlässige
12V-Pumpe
Mehr Kühlleistung - zwei Hochleistungs-Kühlkörper mit leisem
PWM-Lüfter für bessere Kühlleistung.
Verwendet 12V-Anschluß vom Computer-Netzteil.
Kühlmittel enthalten – 30.000 wartungsfreie Betriebsstunden ohne
Nachfüllen.
Universelles Befestigungsmodul für maximale Kühlleistung bei jedem
Montierwinkel und Plattform.
特徴
より小型 – オールインワン水冷システム設計
より静粛 – 信頼性の高い静かで強力なミニ12Vポンプ
より強力 – 静かなPWMファンを搭載した高性能のデュアルラジエーター
で冷却性能が向上
コンピュータ供給される12V電源を使用
冷却剤充填済み、30,000時間補充不要
ユニバーサルリテンションモジュール設計で、どんな取り付け角およびプ
ラットフォームでも最適な冷却性能を確保
1
Cechy
Mniejszy - uniwersalna konstrukcja systemu chłodzenia cieczą
Bardziej cichy - cicha, dużej mocy miniaturowa pompa 12V o wysokiej
niezawodności
O większej mocy - podwójna wydajność radiatorów z cichym
wentylatorem PWM, zapewnia większą wydajność chłodzenia.
Wykorzystuje 12V połączenie z zasilacza komputera.
Fabryczne napełnienie płynem chłodzącym, 30.000 godzin pracy bez
konieczności dolewania płynu chłodzącego.
Uniwersalna konstrukcja modułu podtrzymującego, zapewnia
maksymalną wydajność chłodzenia przy montażu pod dowolnym kątem
i w dowolnej platformie.
Caractéristiques
Plus petit – conception du système de refroidissement liquide complet
Plus silencieux – Mini pompe silencieuse et puissante de 12V et haute
fiabilité
Plus puissant – Radiateurs doubles de haute performance avec un
ventilateur silencieux commandé en PWM pour davantage de
performances en refroidissement.
Utilise une connexion 12V de l'alimentation électrique de l'ordinateur.
Pré rempli de liquide de refroidissement, 30000 heures sans
maintenance et sans remplissage.
La conception du module de rétention universel permet des
performances maximales en refroidissement quel que soit l'angle de
montage et la plateforme.
特色
整合式水冷散熱系統設計.
內嵌式直流水泵浦設計在長時間運作下,提供高效能低噪音之優勢.
雙水冷散熱排 & 滾珠軸承風扇(PWM)提供更安靜舒適的散熱平台.
電源採用一般直流12伏特(V)電源,方便使用者連接安裝.
預填充水冷散熱液,提供保障運作30,000小時免填充水冷散熱液.
提供普遍性主機板安裝模組設計,方便使用者簡易安裝.
2
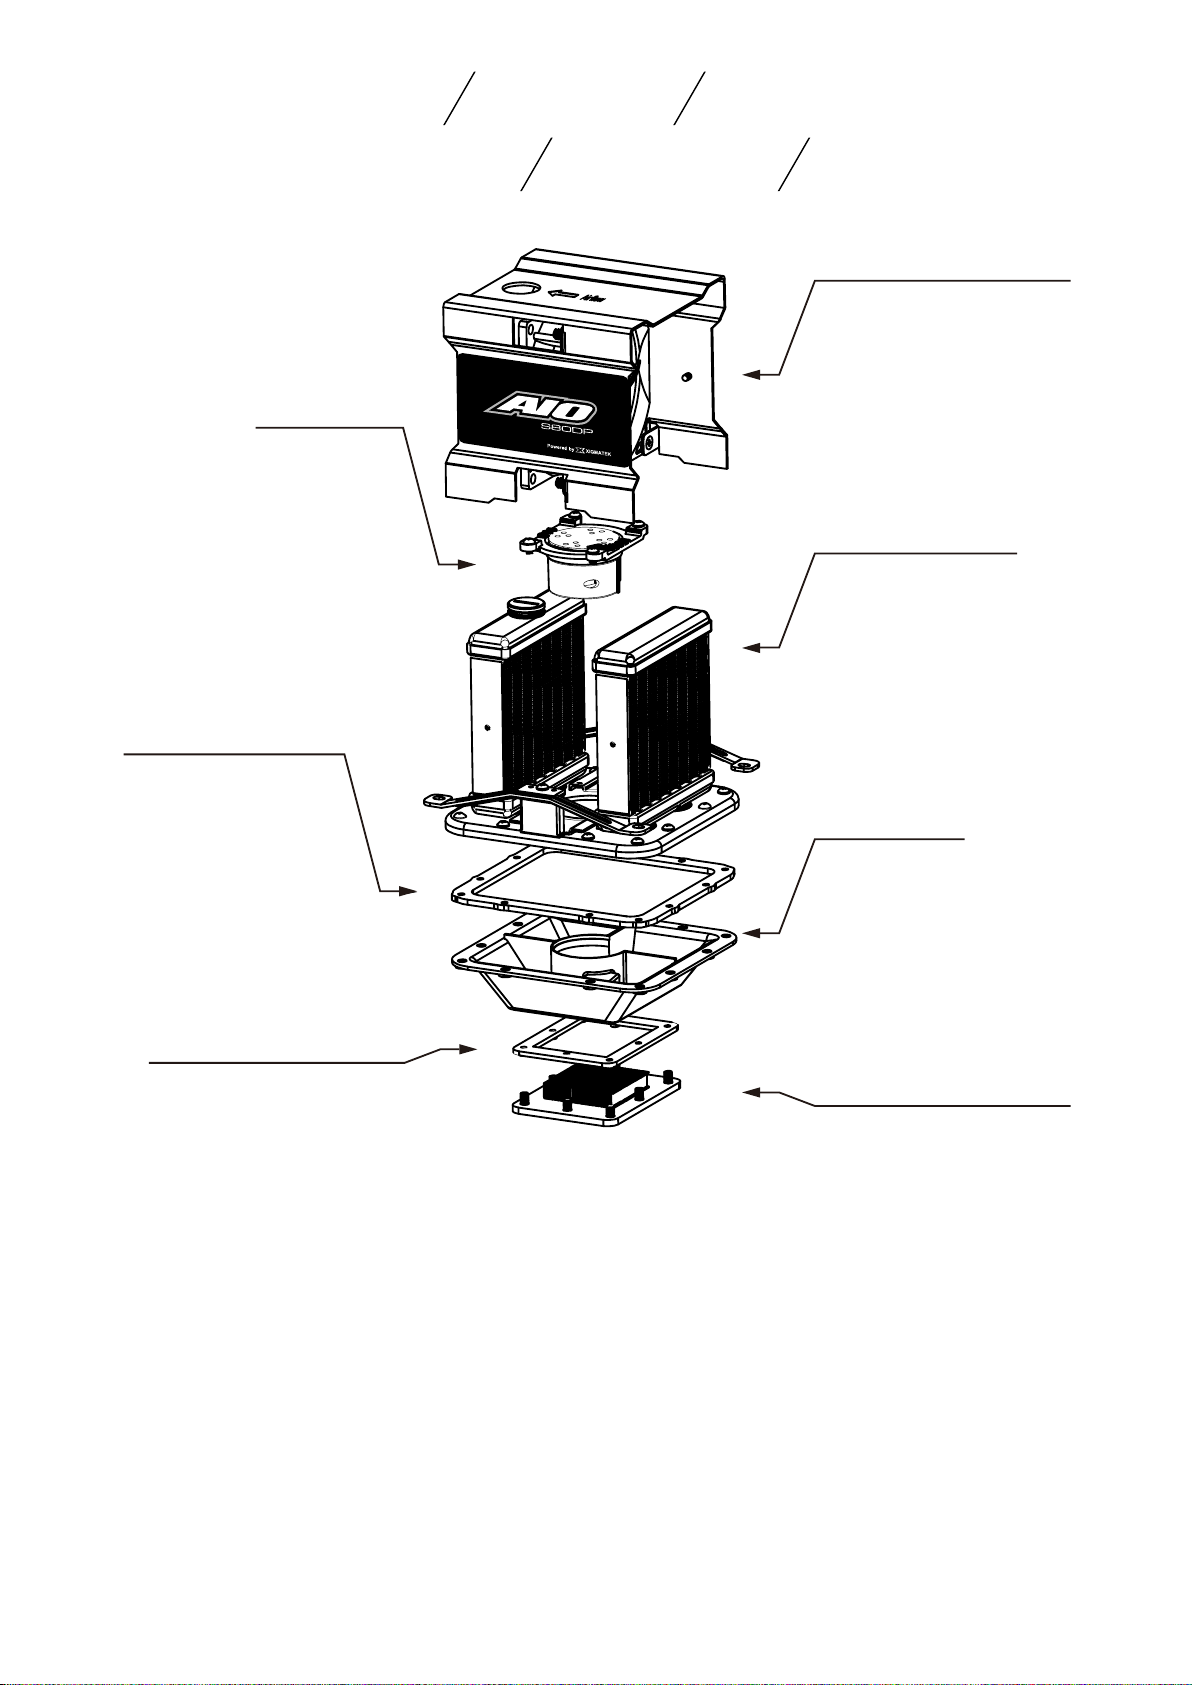
Exploded View
Einzelteile 分解図
Widok rozszerzony Vue éclatée 產品展開圖
Fan & Cover
Lüfter & Abdeckung
ファンおよびカバー
Wentylator i pokrywa
Pump
Pumpe
ポンプ
Pompa
Pompe
水泵
Ventilateur & capot
風扇及外罩
Radiator
Kühlkörper
ラジエーター
Radiator
Tank Packing
Tankabdeckung
タンクパッキング
Uszczelka zbiornika
Emballage réservoir
儲水槽防漏軟墊
Waterblock Packing
Flüssigkeitsheber-Abdeckung
ウォーターブロックパッキング
Uszczelka bloku wodnego
Emballage bloc à eau
水冷頭防漏軟墊
Radiateur
散熱鰭片組
Tank
Tank
タンク
Zbiornik
Réservoir
儲水槽
Waterblock
Flüssigkeitsheber
ウォーターブロック
Blok wodny
Bloc à eau
3
水冷頭
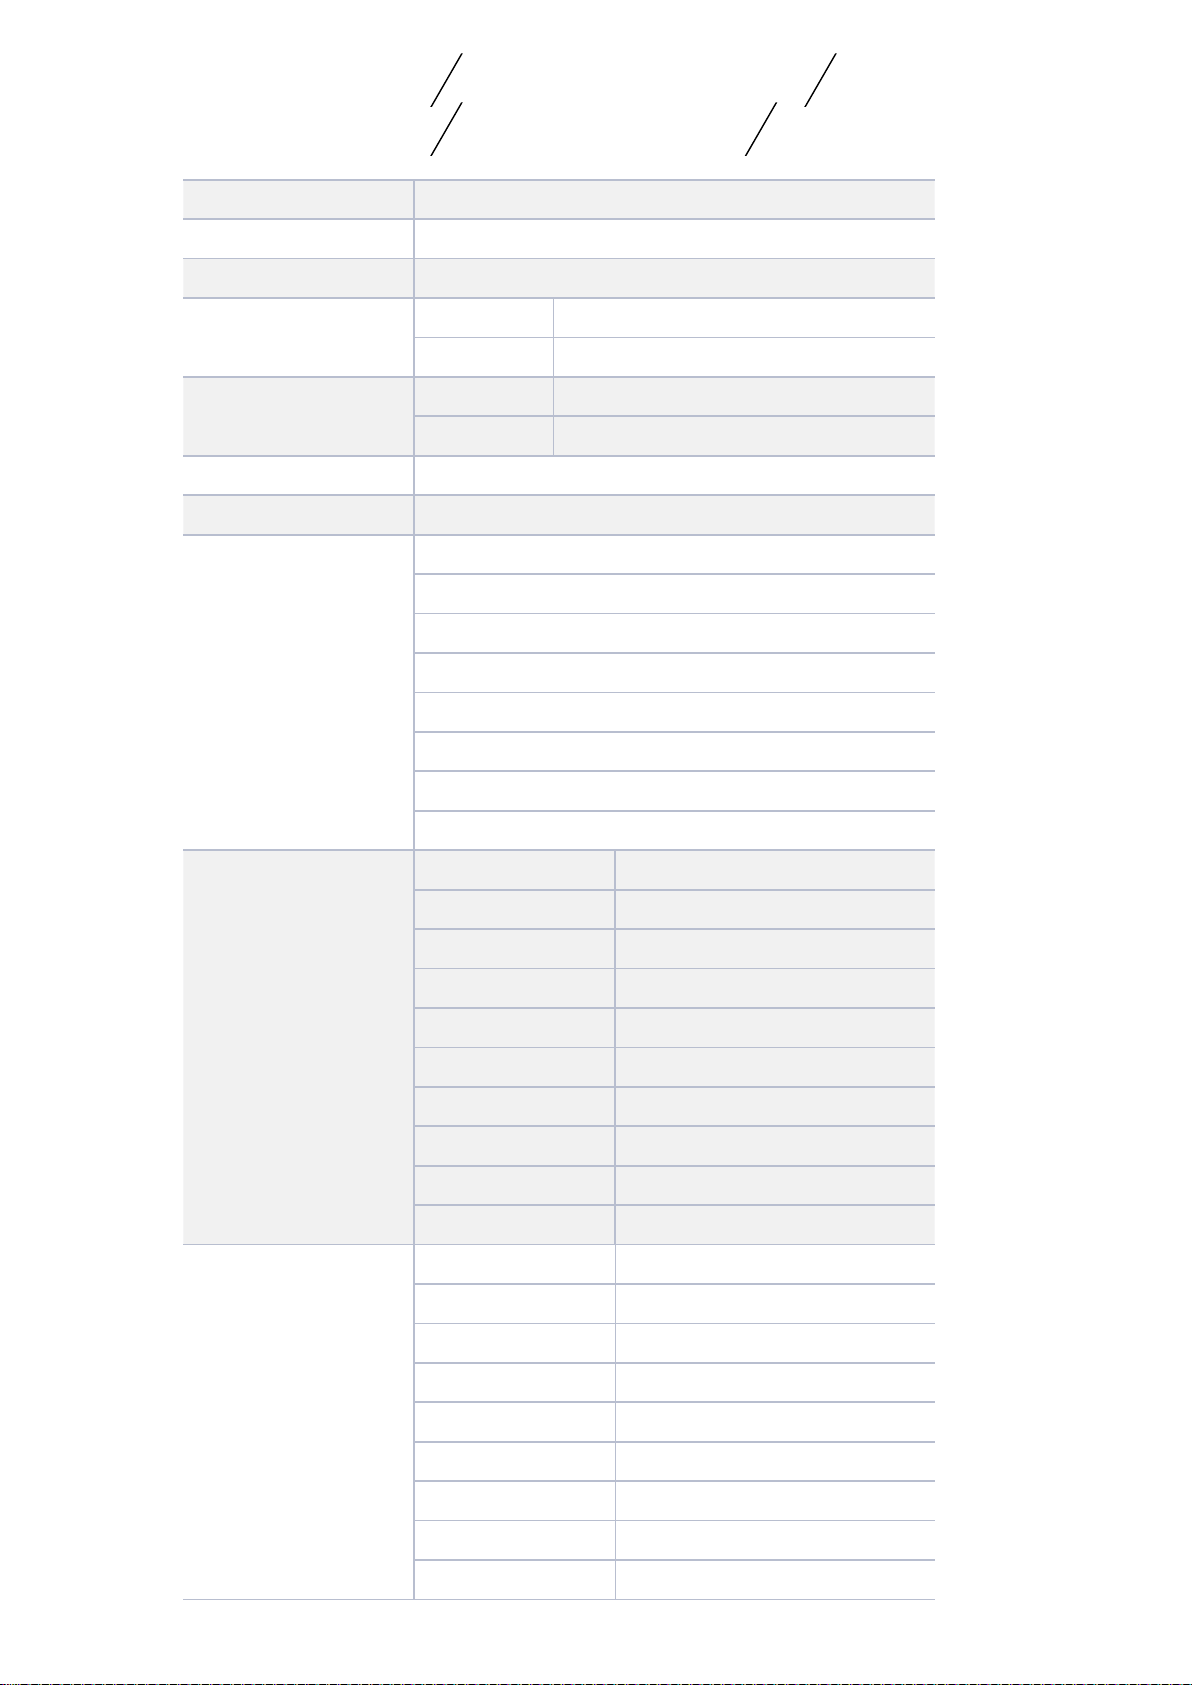
Specification Technische Daten 仕様
Specyfikacje Spécifications 規格
Product Name
Product Number
Outside Dimension
Water Block
Radiator
Net Weight
Thermal Resistance
Application
AIO-S80DP
AIO-S80DP-U1
121(L) x 114(W)x128(H) mm
Material
Dimension
Material
Dimension
840g
0.21~0.38 oC/W
Socket 478/754/939 / 940 / LGA775/AM2
Intel Pentium 4 Processor / Extreme Edition
Intel Pentium D Processor
Intel Celeron / Celeron D Processor
Intel Core Duo
AMD Athlon 64 / 64 FX / 64 X2 Dual-core
Copper
70(L)x54(W)x14(H) mm
Aluminum
80(L)x88.7(W)x22(H) mm
Fan
AMD Sempron
AMD AM2
Dimension
Voltage Rating
Input Current
Speed
Bearing Type
Air Flow
Air Pressure
Life Expectance
Noise Level
Connector
Voltage Rating
Input Current
Speed
80(L) x 80(W)x25(H) mm
12 V
0.12~0.42A
_
1800~3600 R.P.M. (
Ball Bearing
27.68~52.72 CFM
1.84~5.56 mmH2O
50000 hrs
20~32 dBA
4 pin (PWM Ready)
12 V
0.3 A
3100 R.P.M.
+
10%)
Pump
Bearing Type
Water Flow
Water Pressure
Life Expectance
Noise Level
Connector
4
Ceramics Shaft
72 L/hr
1.2 M
50000 hrs
19 dBA
3 pin

Precautions
Vorsichtsmaßnahmen
使用上の注意
Środki ostrożności
Précautions
使用時注意
Keep and store the product away from the reach of
1.
children.
Produkt kindersicher aufbewahren.
製品はお子様の手の届かないところに設置または保管してください。
Produkt należy trzymać i przechowywać poza zasięgiem
dzieci.
Conservez et stockez le produit hors de portée des
enfants.
請將產品放置及儲存於孩童可觸範圍外。
2.
Check the component list and condition of the product before
installation. If there is any problem, contact the shop where you
purchased to get a replacement or refund.
Prüfen Sie vor der Installation die Komponentenliste und den
Zustand des Produktes. Sollte es dabei ein Problem gegen,
wenden Sie sich an Ihren Händler zwecks Austauschs bzw.
Rückerstattung.
取り付ける前に部品リストおよび製品状況を確認してください。問
題がある場合は、販売店に連絡して、交換または返金してもらって
ください。
Przed instalacją należy sprawdzić listę komponentów i stan
produktu. W przypadku napotkania problemów należy
skontaktować się ze sklepem, w którym zakupiono system w
celu wymiany urządzenia lub zwrotu kosztów.
Vérifiez la liste des composants et l'état du produit
avant installation. En cas de problème, contactez le
magasin où vous l'avez acheté pour obtenir un remplacement
ou un remboursement.
安裝前請檢查零件目錄及產品狀況。如有任何問題,請連絡您所購買
的商店以提供換貨或是退貨服務。
5

Xigmatek Co., Ltd. is not responsible for any damages due to
3.
external causes, including but not limited to, improper use,
problems with electrical power, accident, neglect, alteration,
repair, improper installation, and improper testing.
Xigmatek Co., Ltd. haftet nicht für Beschädigungen durch äußere
Einflüsse, einschließlich aber nicht beschränkt auf
unsachgemäßen Gebrauch, Stromversorgungsprobleme, Unfall,
Nachlässigkeit, Modifikationen, Reparaturen, unsachgemäße
Installation und unsachgemäße Überprüfung.
Xigmatek Co., Ltd. は、不正使用、電源に関する問題、事故、粗略な
取扱い、改造、不適切な設置、不正な検査を含む、またはそれらに限
定されない外的要因によるいかなる損傷に対しても責任を負いません
。
Firma Xigmatek Co., Ltd. nie odpowiada za wszelkie szkody
spowodowane przyczynami zewnętrznymi włącznie, ale nie tylko
ze szkodami spowodowanymi nieprawidłowym użytkowaniem,
zasilaniem prądem elektrycznym, przypadkowymi uszkodzeniami,
zaniedbaniem, przeróbkami, naprawami, nieprawidłową instalacją i
nieodpowiednim testowaniem.
Xigmatek Co., Ltd. n'est pas responsable des dégâts dus à des
causes externes, y compris mais non limité à, une mauvaise
utilisation, des problèmes d'alimentation électrique, un accident,
une négligence, une modification, une réparation, une installation
incorrecte ou un mauvais test.
Xigmatek 公司將不負任何因外部因素造成之損失。包括但是不限制於
,不適當之使用、電力問題、意外事件、疏忽、修改、修理、不適當之
安裝和不適當之測試。
CPU and motherboard are subject to damage if the product in
4.
incorrectly installed. Familiarize yourself with the “Installation”
steps before installing the AIO-S80DP.
Bei unsachgemäßer Installation können CPU und Motherboard
beschädigt werden. Machen Sie sich vor der Installation des
AIO-S80DP mit den „Installationsschritten“ vertraut.
製品を正しく取り付ないと、CPUおよびマザーボードが損傷する場合
があります。AIO-S80DPは、「取り付け」手順をよく読んでから取
り付けてください。
6
W przypadku nieprawidłowej instalacji produktu, mogą ulec
uszkodzeniu procesor i płyta główna. Przed instalacją AIO-S80DP
należy poznać czynności “Instalacja”.
Le CPU et le carte mère sont sujets à dégâts si le produit est mal
installé. Familiarisez-vous avec les étapes d'“Installation” avant
d'installer le AIO-S80DP.
中央處理器和主機板在產品於不正確地安裝下,易受損害。 請於安裝
AIO-S80DP 之前熟悉 " 安裝 " 步驟。
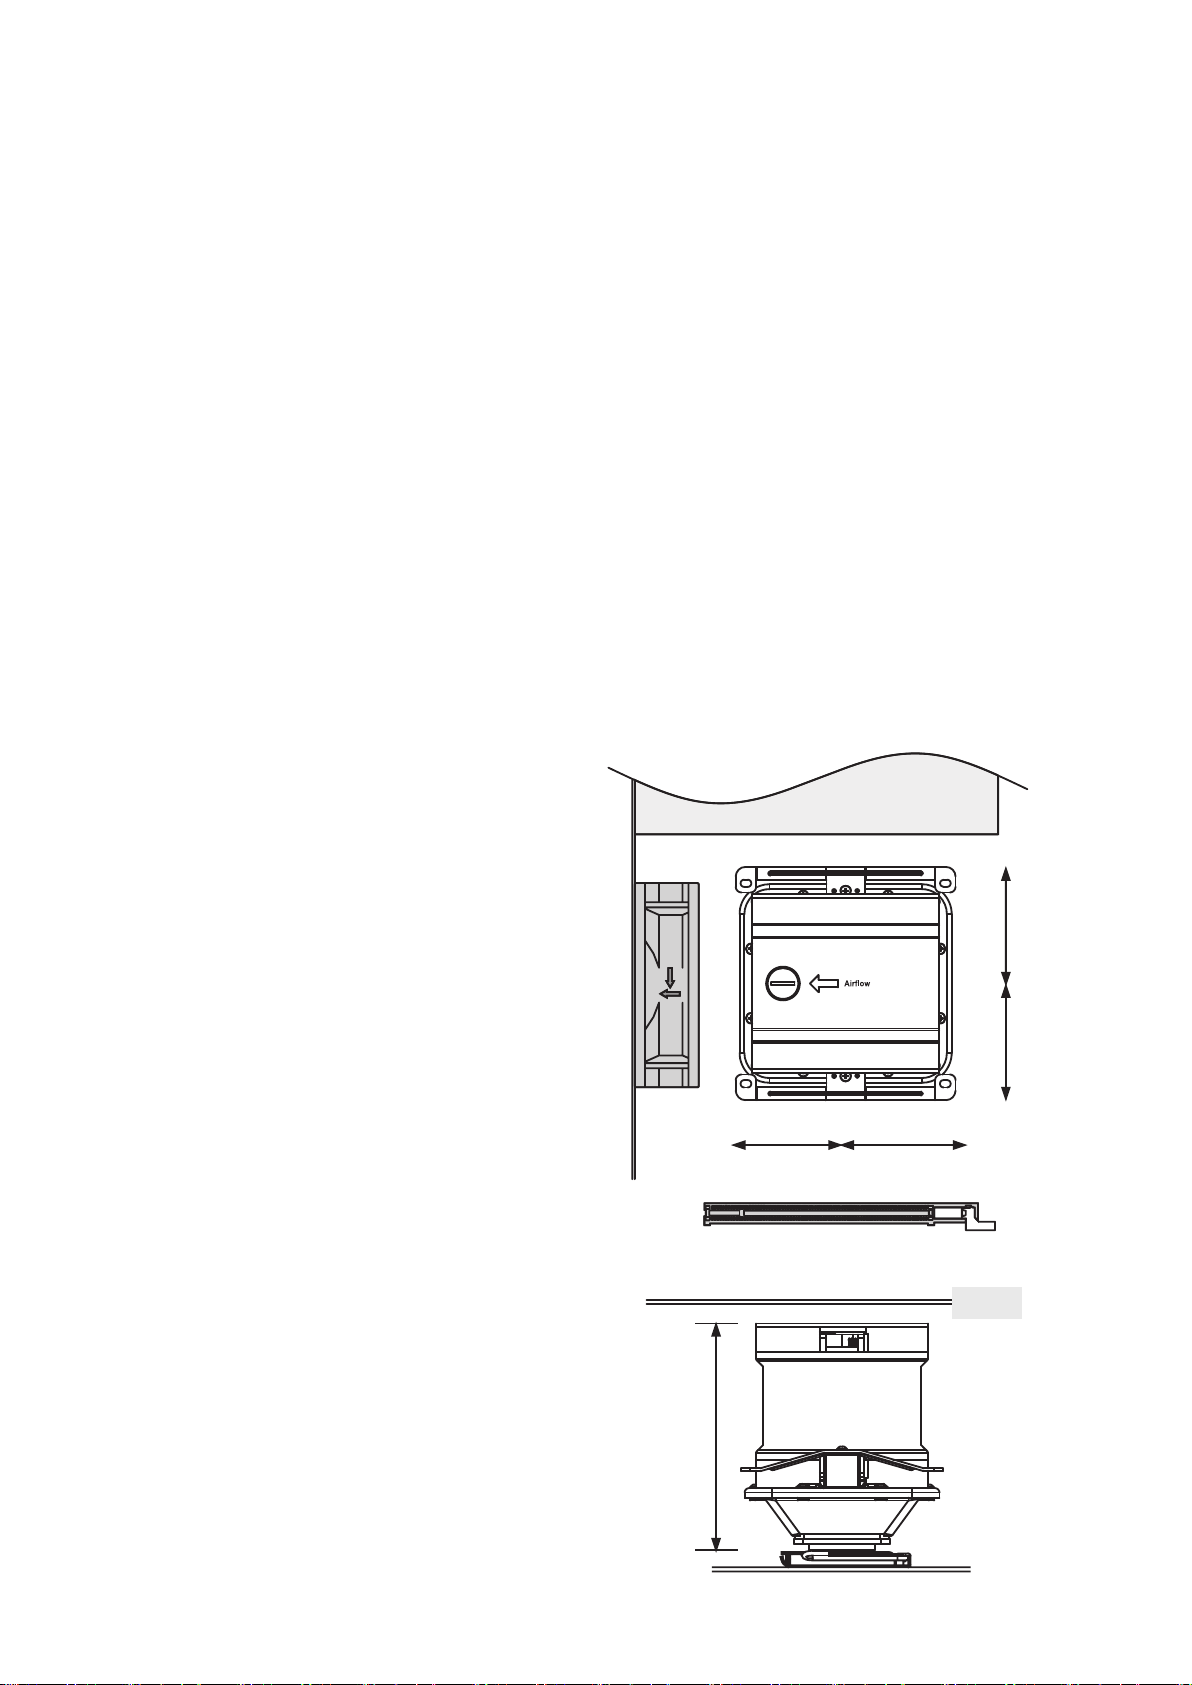
See the picture on the right for product dimensions to check
5.
whether the product interferes with any motherboard components.
Beachten Sie Abb. auf der rechten Seite und prüfen Sie, dass die
Abmessungen des Produktes keine Motherboard-Komponenten
beeinflussen.
右の図を見て、製品がマザーボードの部品にぶつからないかどうか製
品の寸法を確認してください。
Gdy produkt koliduje z
innymi komponentami płyty
głównej należy sprawdzić
ilustrację po prawej w celu
sprawdzenia wymiarów
produktu.
Voyez l'image sur la droite
PSU
System Fan
pour les dimensions du
produit afin de vérifier
que le produit n'interfère
pas avec les composants de
la carte mère.
請見右方照片之產品尺寸並檢查
產品是否與任何主機板零件相牴
57mm 57mm
VGA Card Slot
Case chassis Cover
60.5mm 60.5mm
ODD
觸。
128.05mm
7
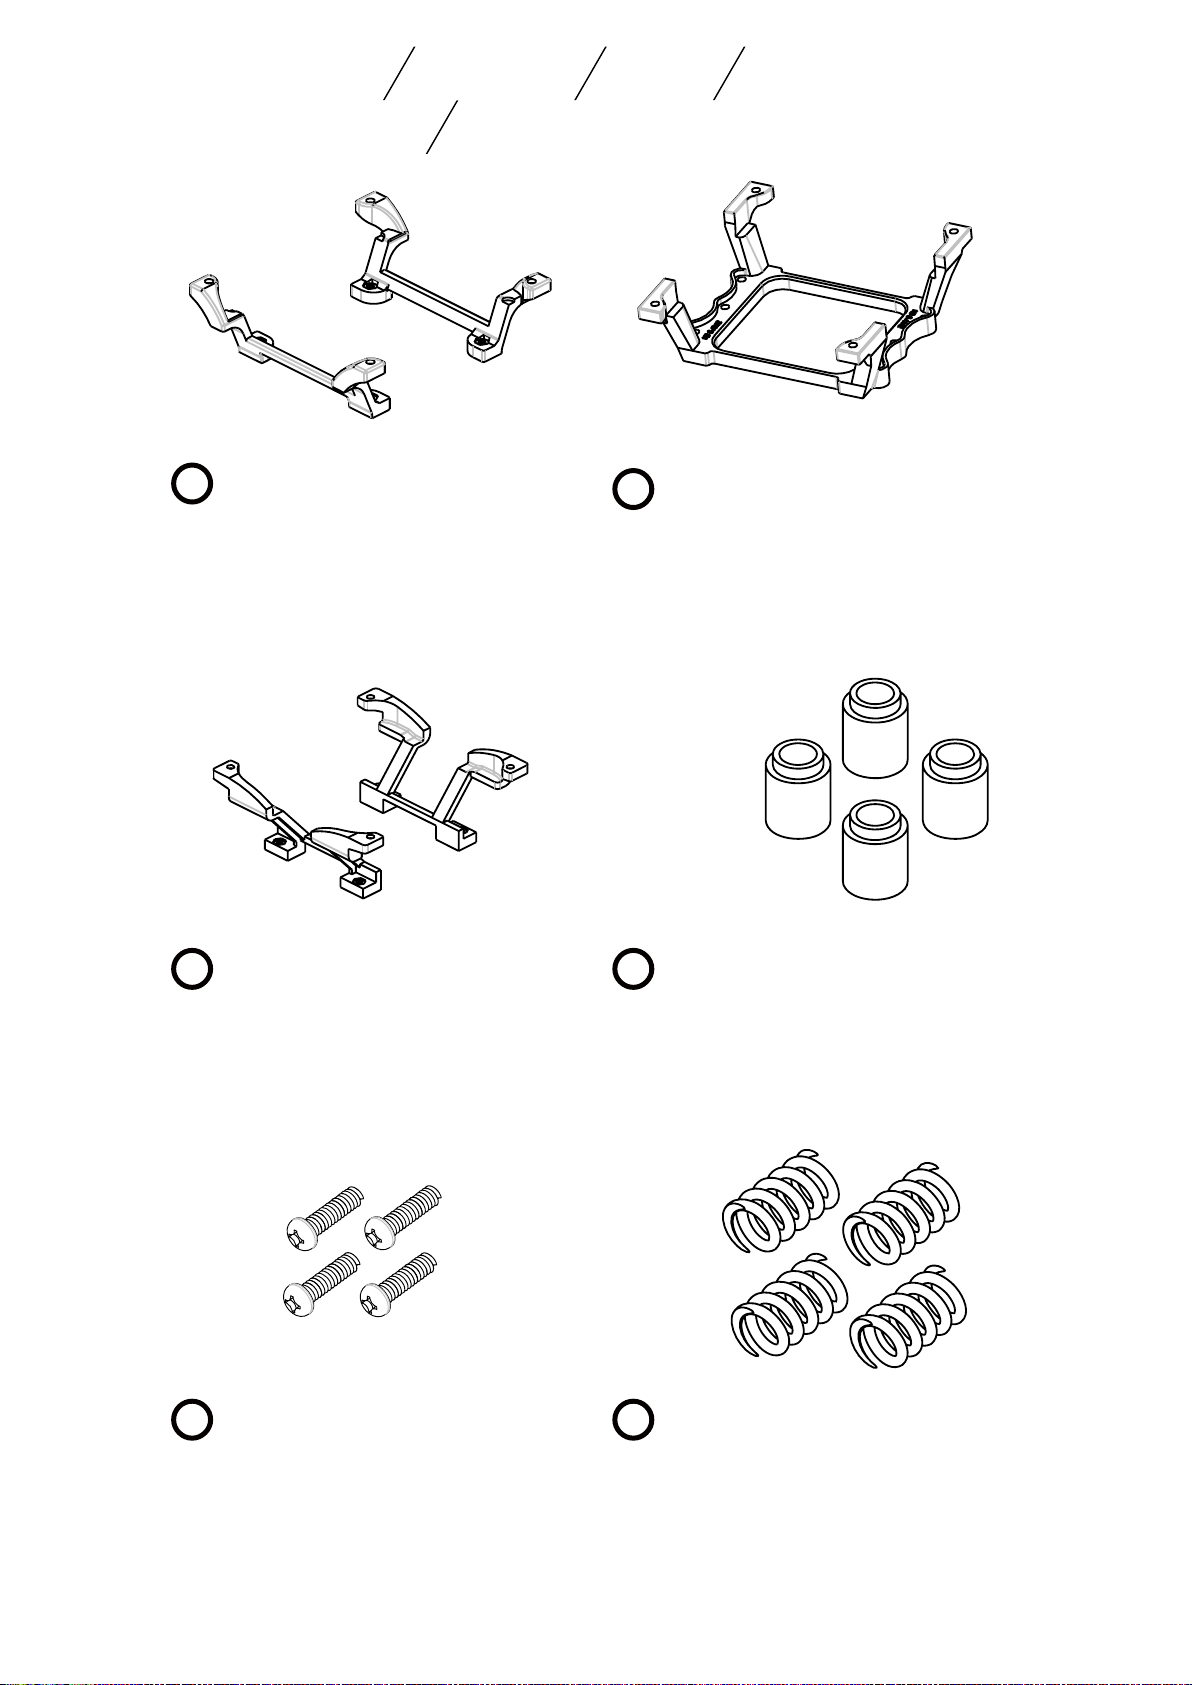
Accessory Akcesoria
Zubehör 付属品
Accessoires 配件
LGA775 Plastic RM x2pcs
1
○
LGA775 Befestigung RM x2 St.
LGA775用プラスチックRM 2本St.
Plastykowy RM LGA775 x 2 szt.
LGA775 RM plastique x2unités
LGA775塑膠固定座 x 2個
P4 Plastic RM x2pcs
3
○
P4 Befestigung RM x2 St.
P4用プラスチックRM 2本
Plastykowy RM P4 x 2 szt.
P4 RM plastique x2unités
P4 塑膠固定座 x 2個
AM2 & K8 Plastic RM x1pcs
2
○
AM2 & K8 Befestigung RM x1 St.
AM2およびK8用プラスチックRM 1本
Plastykowy RM AM2 & K8 x 1 szt.
AM2 & K8 RM plastique x1unité
AM2 & K8 塑膠固定座 x 1個
RM support x4pcs
4
○
RM Abstandshülsen x4 St.
RMサポート 4本
Wspornik RM x 4 szt.
Support RM x4unités
支撐柱 x 4個
10mm Screw x4pcs
5
○
10 mm Schraube x4 St.
10 mmネジ 4本
Śruba 10 mm x 4 szt.
Vis 10 mmx4unités
10mm螺絲 x 4個
6
○
8
Spring x4pcs
Feder x4 St.
バネ 4個
Sprężyna x 4 szt.
Ressort x4unités
彈簧x 4個

Screw washer x4pcs
7
○
Unterlegscheibe x4 St.
ネジワッシャー 4個
Podkładka pod śrubę x 4 szt.
Rondelle vis x4unités
螺絲墊片 x 4個
24mm Screw x4pcs
8
○
24mm Schraube x4 St.
24mmネジ 4本
Śruba 24mm x 4 szt.
Vis 24mm x4unités
24mm螺絲 x 4個
Power adaptor x2pcs
9
○
Anschlussadapter x2 St.
電源アダプタ 2個
Adapter zasilania x 2 szt.
Adaptateur d'alimentation x2unités
電源轉接線 x 2個 導熱膏
20mm Screw x4pcs
11
○
20mm Schraube x4 St.
20mmネジ 4本
Śruba 20mm x 4 szt.
Vis 20mm x4unités
20mm螺絲 x 4個
10
Thermal Grease
○
Wärmeleitpaste
サーマルグリース
Smar termiczny
Pâte thermique
9

Compatible CPUs
Kompatible CPUs
対応CPU Kompatybilne procesory
CPU compatibles 適用CPU
All Intel Socket 775 / 478 CPUs
Alle Intel Sockel 775/478 CPUs
すべてのIntel Socket 775/478 CPU
Wszystkie procesory Intel
Socket 775/478
Tous les CPU Intel Socket 775/478
- Pentium D
- Pentium 4
- Celeron D
All AMD Socket 754/939/940 CPUs
Alle AMD Sockel 754/939/940 CPUs
すべてのAMD Socket 754/939/940 CPU
Wszystkie procesory AMD
Socket 754/939/940
Tous les CPU AMD Socket 754/939/940
- Opteron
- Athlon 64 X2
- Athlon 64 FX
- Athlon 64
- Sempron
- AM2
10

Installation steps Installationsschritte
取り付け手順
Étapes d'installation
Czynności instalacyjne
安裝步驟
Intel Pentium D / Pentium 4 - Socket 775
Install RM support / RM Befestigung installieren / RMサポートの取
1
り付け / Instalacja wspornika RM / Installez le support RM /
安裝支撐柱
4
○
1
○
Install RM support on the plastic RM shown as
above figure
Installieren Sie die RM Abstandshülsen auf der RM
Befestigung , siehe Abb. oben.
上図のようにプラスチックRM に RMサポート を取り
付けます。
Zainstaluj wspornik RM na plastykowym RM ,
pokazanym na rysunku powyżej
Installez le support RM sur le RM plastique comme
indiqué sur la figure ci-dessus.
先將 支撐柱安裝於 塑膠固定座,如上圖
4
○
1
○
4
○
○
1
4
○
4
○
1
○
○
4
○
1
4
○
1
○
1
○
11

Fix the Plastic RM / RM Befestigung montieren / プラスチック
2
RMの固定 / Zamocuj plastykowy RM / Fixez le RM
Plastique / 固定塑膠固定座
8
○
7
○
1
○
Reverse turn the motherboard ,use to fix
on the motherboard
Drehen Sie das Motherboard um, mithilfe von
am Motherboard befestigen.
7
○
7
○
8
○
8
8
○
1
○
マザーボードを裏返し、 を使ってマザーボードに
および を固定します。
Odwróć płytę, użyj do zamocowania na
płycie głównej
Retournez la carte mère, utilisez pour fixer
sur la carte mère
將主機板反轉,使用 將 固定於主機板
4
○
○7○
7
○
7
○
○
7
○
○
4
○
8
○
8
8
1
○
4
○
1
○
4
○
○
1
○
1
○
○
4
1
4
○
○
4
According to the different system, you may select the direction of heat
*
sink’s fan port !
Je nach System können Sie die Richtung des Kühlkörper-Lüfters wählen!
*
システムの違いにより、ヒートシンクのファンポートの方向を変更しなければな
*
らない場合があります!
Zależnie od rodzaju posiadanego systemu, można wybrać kierunek portu
*
wentylatora radiatora!
Selon les différents systèmes, vous pouvez choisir le sens du port ventilateur
*
du radiateur !
可依系統的不同,選擇安裝散熱器風扇進出風口的方向
*
12

3
Thermal grease Application / Wärmeleitpaste auftragen / サーマル
グリースの塗布 / Nakładanie smaru termicznego / Application
de la pâte thermique / 導熱膏應用
10
○
Befor installation, peel the protect label on the bottom of
copper base off. Tear the package of thermal grease off,
apply thermal grease evenly to the bottom of copper base
10
○
Ziehen Sie vor der Installation das Schutzetikett der
Kupferoberfläche ab. Reißen Sie die Packung der
○
10
10
10
○
10
○
Wärmeleitpaste auf und tragen Sie die Paste gleichmäßig
auf die Kupferoberfläche auf.
取り付ける前に、銅ベースの底部の保護ラベルをはがします。サー
マルグリース のパッケージを破って、銅ベースの底部にサー
マルグリースを均等に塗ります。
Przed instalacją, zdejmij etykietę zabezpieczającą na przycisku
miedzianej podstawy. Otwórz opakowanie ze smarem
termicznym , nałóż równo smar termiczny na dolną część
miedzianej podstawy
Avant installation, enlevez l'étiquette de protection sur le
dessous de la base en cuivre. Déchirez le paquet de pâte
thermique , appliquez la pâte thermique de façon régulière
sur le dessous de la base en cuivre
安裝前,請將散熱器底部的保護膜貼紙撕開,將 導熱膏的包裝撕
開,並均勻的將導熱膏塗在散熱器的底座上
○
10
○
13

4
Fix the cooler / Kühler montieren / クーラーの固定 / Zamocuj
radiator / Fixez le refroidisseur / 固定散熱器
11
○
6
○
6
○
6
○
6
○
○
6
○
6
11
○
6
○
Use & to fix the cooler on the plastic RM
Montieren Sie den Kühler mithilfe von & auf der RM
Befestigung.
および を使って、プラスチックRMにクーラーを固定し
○
ます。
Użyj oraz do zamocowania radiatora na plastykowym
RM
Utilisez & pour fixer le refroidisseur sur le RM plastique
使用 將散熱器固定於塑膠固定座上
The screws on the diagonal direction should be locked first.
*
Die Schrauben in diagonaler Richtung müssen zuerst angezogen werden.
*
対角方向のネジをまず固定する必要があります。
*
Śruby diagonalne powinny zostać dokręcone w pierwszej kolejności
*
Les vis en diagonale doivent être serrées en premier.
*
11
11
○
11
○
11
○
11
○
鎖附螺絲時,請對角方向先鎖附
*
14

Intel Pentium 4 - Socket 478
1
Fix the Plastic RM / RM Befestigung montieren / プラスチック
RMの固定 / Zamocuj plastykowy RM / Fixez le RM
Plastique / 固定塑膠固定座
5
○
7
○
3
○
Reverse turn the motherboard the ,use to fix
on the motherboard
Drehen Sie das Motherboard um, mithilfe von
am Motherboard befestigen.
3
○
マザーボードを裏返し、 を使ってマザーボードに
を固定します。
Odwróć płytę, użyj do zamocowania na
płycie głównej
Retournez la carte mère, utilisez pour fixer sur
la carte mère
將主機板反轉,使用 將 固定於主機板
According to the different system, you may select the direction of heat
*
sink’s fan port !
5
○
○
5
○
○
7
5
○
7
○
7
○
3
○
5
○
5
7
○
7
○
○
5
7
○
3
○
3
○
3
○
○
3
Je nach System können Sie die Richtung des Kühlkörper-Lüfters wählen!
*
システムの違いにより、ヒートシンクのファンポートの方向を変更しなければな
*
らない場合があります!
Zależnie od rodzaju posiadanego systemu, można wybrać kierunek portu
*
wentylatora radiatora!
Selon les différents systèmes, vous pouvez choisir le sens du port ventilateur
*
du radiateur !
可依系統的不同,選擇安裝散熱器風扇進出風口的方向
*
15

2
Thermal grease Application / Wärmeleitpaste auftragen / サーマル
グリースの塗布 / Nakładanie smaru termicznego / Application
de la pâte thermique / 導熱膏應用
10
○
Befor installation, peel the protect label on the bottom of
copper base off. Tear the package of thermal grease off,
apply thermal grease evenly to the bottom of copper base
10
○
Ziehen Sie vor der Installation das Schutzetikett der
Kupferoberfläche ab. Reißen Sie die Packung der
○
10
10
10
○
10
○
Wärmeleitpaste auf und tragen Sie die Paste gleichmäßig
auf die Kupferoberfläche auf.
取り付ける前に、銅ベースの底部の保護ラベルをはがします。サー
マルグリース のパッケージを破って、銅ベースの底部にサー
マルグリースを均等に塗ります。
Przed instalacją, zdejmij etykietę zabezpieczającą na przycisku
miedzianej podstawy. Otwórz opakowanie ze smarem
termicznym , nałóż równo smar termiczny na dolną część
miedzianej podstawy
Avant installation, enlevez l'étiquette de protection sur le
dessous de la base en cuivre. Déchirez le paquet de pâte
thermique , appliquez la pâte thermique de façon régulière
sur le dessous de la base en cuivre
安裝前,請將散熱器底部的保護膜貼紙撕開,將 導熱膏的包裝撕
開,並均勻的將導熱膏塗在散熱器的底座上
○
10
○
16

3
Fix the cooler / Kühler montieren / クーラーの固定 / Zamocuj
radiator / Fixez le refroidisseur / 固定散熱器
11
○
6
○
11
○
11
○
11
○
11
○
11
○
Use & to fix the cooler on the plastic RM
Montieren Sie den Kühler mithilfe von & auf der RM
Befestigung.
および を使って、プラスチックRMにクーラーを固定し
ます。
Użyj oraz do zamocowania radiatora na plastykowym
RM
Utilisez & pour fixer le refroidisseur sur le RM plastique
使用 將散熱器固定於塑膠固定座上
The screws on the diagonal direction should be locked first.
*
Die Schrauben in diagonaler Richtung müssen zuerst angezogen werden.
*
対角方向のネジをまず固定する必要があります。
*
Śruby diagonalne powinny zostać dokręcone w pierwszej kolejności
*
Les vis en diagonale doivent être serrées en premier.
*
6
○
6
○
6
○
○
6
○
6
11
○
6
○
鎖附螺絲時,請對角方向先鎖附
*
17

K8
Install RM support / RM Befestigung installieren / RMサポートの取
1
り付け / Instalacja wspornika RM / Installez le support RM /
安裝支撐柱
4
○
2
○
Install RM support on the plastic RM shown as
above figure
Installieren Sie die RM Abstandshülsen auf der RM
Befestigung , siehe Abb. oben.
上図のようにプラスチックRM に RMサポート を取り
付けます。
Zainstaluj wspornik RM na plastykowym RM ,
pokazanym na rysunku powyżej
Installez le support RM sur le RM plastique comme
indiqué sur la figure ci-dessus.
先將 支撐柱安裝於 塑膠固定座,如上圖
2
Dismount the original K8 RM / Originale K8 RM Befestigung
4
○
2
○
4
○
○
2
4
○
4
○
2
○
4
○
2
○
4
○
2
○
2
○
abnehmen / 元のK8用RMの取り外し / Odłącz oryginalny RM
K8 / Démontez le RM K8 d'origine / 拆除K8原廠固定座
18

Original K8 RM
Originale K8 RM
元のK8用RM
Oryginalny RM K8
RM K8 d'origine
K8原廠固定座
Dismount the original K8 RM (leave the back plate)
Nehmen Sie die originale K8 RM ab (Grundplatte zurücklassen)
元のK8用RMを取り外します。 (バックプレートは残します。)
Odłącz oryginalny RM K8 (pozostaw tylną płytkę)
Démontez le RM K8 d'origine (laissez la plaque arrière)
把K8原廠塑膠固定座拆下(保留原廠背板)
Fix the Plastic RM / RM Befestigung montieren / プラスチック
3
RMの固定 / Zamocuj plastykowy RM / Fixez le RM
Plastique / 固定塑膠固定座
8
○
2
○
Use to fix on the motherboard
Befestigen Sie + mithilfe von am Motherboard.
8
○
2
○
2
○
4
○
4
○
8
○
4
○
を使ってマザーボードに と を固定します。
8
○
Użyj do zamocowania + na płycie głównej
Utilisez pour fixer + sur la carte mère
使用 將 固定於主機板
8
○
8
○
8
○
2
○
4
○
○
2
○
2
○
2
4
○
19
○
4
○
4

According to the different system, you may select the direction of heat
*
sink’s fan port !
Je nach System können Sie die Richtung des Kühlkörper-Lüfters wählen!
*
システムの違いにより、ヒートシンクのファンポートの方向を変更しなければな
*
らない場合があります!
Zależnie od rodzaju posiadanego systemu, można wybrać kierunek portu
*
wentylatora radiatora!
Selon les différents systèmes, vous pouvez choisir le sens du port ventilateur
*
du radiateur !
可依系統的不同,選擇安裝散熱器風扇進出風口的方向
*
4
Thermal grease Application / Wärmeleitpaste auftragen / サーマル
グリースの塗布 / Nakładanie smaru termicznego / Application
de la pâte thermique / 導熱膏應用
10
○
Befor installation, peel the protect label on the bottom of
copper base off. Tear the package of thermal grease off,
apply thermal grease evenly to the bottom of copper base
Ziehen Sie vor der Installation das Schutzetikett der
Kupferoberfläche ab. Reißen Sie die Packung der
Wärmeleitpaste auf und tragen Sie die Paste gleichmäßig
auf die Kupferoberfläche auf.
10
○
10
○
取り付ける前に、銅ベースの底部の保護ラベルをはがします。サー
マルグリース のパッケージを破って、銅ベースの底部にサー
マルグリースを均等に塗ります。
Przed instalacją, zdejmij etykietę zabezpieczającą na przycisku
miedzianej podstawy. Otwórz opakowanie ze smarem
termicznym , nałóż równo smar termiczny na dolną część
miedzianej podstawy
○
10
○
10
20

Avant installation, enlevez l'étiquette de protection sur le
dessous de la base en cuivre. Déchirez le paquet de pâte
thermique , appliquez la pâte thermique de façon régulière
sur le dessous de la base en cuivre
10
○
安裝前,請將散熱器底部的保護膜貼紙撕開,將 導熱膏的包裝撕
開,並均勻的將導熱膏塗在散熱器的底座上
5
Fix the cooler / Kühler montieren / クーラーの固定 / Zamocuj
radiator / Fixez le refroidisseur / 固定散熱器
11
○
6
○
10
○
11
11
○
11
○
11
○
11
○
Use & to fix the cooler on the plastic RM
Montieren Sie den Kühler mithilfe von & auf der RM
Befestigung.
および を使って、プラスチックRMにクーラーを固定し
○
ます。
Użyj oraz do zamocowania radiatora na plastykowym
RM
Utilisez & pour fixer le refroidisseur sur le RM plastique
使用 將散熱器固定於塑膠固定座上
The screws on the diagonal direction should be locked first.
*
Die Schrauben in diagonaler Richtung müssen zuerst angezogen werden.
*
対角方向のネジをまず固定する必要があります。
*
Śruby diagonalne powinny zostać dokręcone w pierwszej kolejności
*
Les vis en diagonale doivent être serrées en premier.
*
6
○
6
○
6
○
○
6
○
6
11
○
6
○
鎖附螺絲時,請對角方向先鎖附
*
21

AM2
Install RM support / RM Befestigung installieren / RMサポートの取
1
り付け / Instalacja wspornika RM / Installez le support RM /
安裝支撐柱
4
○
2
○
Install RM support on the plastic RM shown as
above figure
Installieren Sie die RM Abstandshülsen auf der RM
Befestigung , siehe Abb. oben.
上図のようにプラスチックRM に RMサポート を取り
付けます。
Zainstaluj wspornik RM na plastykowym RM ,
pokazanym na rysunku powyżej
Installez le support RM sur le RM plastique comme
indiqué sur la figure ci-dessus.
先將 支撐柱安裝於 塑膠固定座,如上圖
2
Dismount the original AM2 RM / Originale AM2 RM Befestigung
4
○
2
○
4
○
○
2
4
○
4
○
2
○
4
○
2
○
4
○
○
2
○
2
abnehmen / 元のAM2用RMの取り外し / Odłącz oryginalny RM
AM2 / Démontez le RM AM2 d'origine / 拆除AM2原廠固定座
22

Original AM2 RM
Originale AM2 RM
元のAM2用RM
Oryginalny RM AM2
RM AM2 d'origine
AM2原廠固定座
Dismount the original AM2 RM (leave the back plate)
Nehmen Sie die originale AM2 RM ab (Grundplatte zurücklassen)
元のAM2用RMを取り外します。 (バックプレートは残します。)
Odłącz oryginalny RM AM2 (pozostaw tylną płytkę)
Démontez le RM AM2 d'origine (laissez la plaque arrière)
把AM2原廠塑膠固定座拆下(保留原廠背板)
Fix the Plastic RM / RM Befestigung montieren / プラスチック
3
RMの固定 / Zamocuj plastykowy RM / Fixez le RM
Plastique / 固定塑膠固定座
8
○
Use to fix on the motherboard
Befestigen Sie + mithilfe von am Motherboard.
8
○
2
○
2
○
4
○
4
○
8
○
2
○
4
○
を使ってマザーボードに と を固定します。
8
○
Użyj do zamocowania + na płycie głównej
Utilisez pour fixer + sur la carte mère
使用 將 固定於主機板
8
○
8
○
8
○
2
○
4
○
○
2
○
2
○
23
2
4
○
○
4
○
4

According to the different system, you may select the direction of heat
*
sink’s fan port !
Je nach System können Sie die Richtung des Kühlkörper-Lüfters wählen!
*
システムの違いにより、ヒートシンクのファンポートの方向を変更しなければな
*
らない場合があります!
Zależnie od rodzaju posiadanego systemu, można wybrać kierunek portu
*
wentylatora radiatora!
Selon les différents systèmes, vous pouvez choisir le sens du port ventilateur
*
du radiateur !
可依系統的不同,選擇安裝散熱器風扇進出風口的方向
*
4
Thermal grease Application / Wärmeleitpaste auftragen / サーマル
グリースの塗布 / Nakładanie smaru termicznego / Application
de la pâte thermique / 導熱膏應用
10
○
Befor installation, peel the protect label on the bottom of
copper base off. Tear the package of thermal grease off,
apply thermal grease evenly to the bottom of copper base
Ziehen Sie vor der Installation das Schutzetikett der
Kupferoberfläche ab. Reißen Sie die Packung der
Wärmeleitpaste auf und tragen Sie die Paste gleichmäßig
auf die Kupferoberfläche auf.
10
○
10
○
取り付ける前に、銅ベースの底部の保護ラベルをはがします。サー
マルグリース のパッケージを破って、銅ベースの底部にサー
マルグリースを均等に塗ります。
Przed instalacją, zdejmij etykietę zabezpieczającą na przycisku
miedzianej podstawy. Otwórz opakowanie ze smarem
termicznym , nałóż równo smar termiczny na dolną część
miedzianej podstawy
○
10
○
10
24

Avant installation, enlevez l'étiquette de protection sur le
dessous de la base en cuivre. Déchirez le paquet de pâte
thermique , appliquez la pâte thermique de façon régulière
sur le dessous de la base en cuivre
10
○
安裝前,請將散熱器底部的保護膜貼紙撕開,將 導熱膏的包裝撕
開,並均勻的將導熱膏塗在散熱器的底座上
5
Fix the cooler / Kühler montieren / クーラーの固定 / Zamocuj
radiator / Fixez le refroidisseur / 固定散熱器
11
○
6
○
10
○
6
○
6
○
6
○
○
6
○
6
11
○
6
○
11
11
○
11
○
11
○
11
○
Use & to fix the cooler on the plastic RM
Montieren Sie den Kühler mithilfe von & auf der RM
Befestigung.
および を使って、プラスチックRMにクーラーを固定し
○
ます。
Użyj oraz do zamocowania radiatora na plastykowym
RM
Utilisez & pour fixer le refroidisseur sur le RM plastique
使用 將散熱器固定於塑膠固定座上
The screws on the diagonal direction should be locked first.
*
Die Schrauben in diagonaler Richtung müssen zuerst angezogen werden.
*
対角方向のネジをまず固定する必要があります。
*
Śruby diagonalne powinny zostać dokręcone w pierwszej kolejności
*
Les vis en diagonale doivent être serrées en premier.
*
鎖附螺絲時,請對角方向先鎖附
*
25

Plug the power adapter of the fan
Lüfter anschließen ファンの電源アダプタの接続
Podłączenie adaptera zasilania wentylatora
Brancher l'adaptateur d'alimentation du ventilateur
連接風扇電源
9
○
Plug the power adaptor of fan to the PWM 4pin power socket
(CPU Fan)on the motherboard or plug to 12V power supply
through power adaptor
Stecken Sie den Stromanschluss des Lüfters auf den PWN
4-pol. Stromanschluss (CPU Fan) des Motherboards oder,
mithilfe des Stromanschluss-Adapters , am 12V-Netzteil.
ファンの電源アダプタをマザーボード上のPWM 4ピン電源ソケッ
ト (CPUファン) に接続するか、電源アダプタ を使って12V
電源に接続します。
Podłącz adapter zasilania wentylatora do gniazda 4-pinowego
gniazda zasilania PWM (Wentylator procesora) na płycie głównej
lub podłącz do 12V zasilania poprzez adapter zasilania
Branchez l'adaptateur d'alimentation du ventilateur sur la
prise électrique PWM 4pin (Ventilateur CPU) de la carte
mère ou branchez le sur l'alimentation 12V via
l'adaptateur d'alimentation
9
○
9
○
9
○
9
○
9
○
將風扇電源線接至主機板上的PWM4pin供電插座上(CPU Fan)或
經由 電源轉接線接到12V電源供應器
9
○
26

Plug the power adapterof the PUMP
Pumpe anschließen
ポンプの電源アダプタの接続
Podłącz adapter zasilania POMPY
Brancher l'adaptateur d'alimentation de la POMPE
連接PUMP電源
9
○
Plug the power adaptor of PUMP to the 3pin power socket on the
motherboard or plug to 12V power supply through
power adaptor
Stecken Sie den Stromanschluss der Pumpe auf den 3-pol.
Stromanschluss des Motherboards oder, mithilfe des
Stromanschluss-Adapters , am 12V-Netzteil.
ポンプの電源アダプタをマザーボード上の3ピン電源ソケット
に接続するか、電源アダプタ を使って12V電源に接続し
ます。
Podłącz adapter zasilania POMPY do 3-pinowego gniazda
na płycie głównej lub do 12V zasilania poprzez adapter
zasilania
Branchez l'adaptateur d'alimentation de la POMPE sur la
prise électrique 3pin de la carte mère ou branchez le sur
l'alimentation 12V via l'adaptateur d'alimentation
9
○
9
○
9
○
○
9
9
○
將PUMP電源線接至主機板上的3pin供電插座上或經由 電源
轉接線接到12V電源供應器
27
9
○
 Loading...