

Page 1

Robot Vacuum and Mop Cleaner Operation Manual
Read this operation manual carefully before using the product, and store the manual safely.
Scan the QR code for manuals
in multiple languages
Page 2

CONTENTS
Safety instructions
.......................................................................................................................................................................................................................................................................................
Warning
........................................................................................................................................................................................................................................................................................
Caution
Product overview
Main unit
Electric water tank and mopping module
Dust collector (optional)
Charging dock (optional)
Installation
Installing the dust collector (optional)
Installing the charging dock (optional)
Installing the mopping module
Use
APP downloads
Connect to Mijia APP
Turning on/off and cleaning modes
Turning on/off and operating the dust collector (optional)
Dust collector status indicator
.....................................................................................................................................................................................................................................................................................
......................................................................................................................................................................................................
.....................................................................................................................................................................................................................
.........................................................................................................................................................................................................................................................................
Cleaning and maintenance
Disassembling and installing the main brush
Disassembling and installing the side brush
Disassembling and installing the dust box + water tank (2 in 1) and filter
Disassembling and installing the mop
Cleaning the replacement parts
Clean the charging dock (optional)
Clean the dust collector (optional)
Troubleshooting
................................................................................................................................................................................................................
FAQs
Technical data
Disposal
Warrant
.........................................................................................................................................................................................................
y and limitations of liability
Warranty card
Maintenance records
.......................................................................................................................................................................................
..........................................................................................................................................................................................
.......................................................................................................................................................................................................................
.......................................................................................................................................................................................................................................................
......................................................................................................................................................................................................................................................
.............................................................................................................................................................................................................................
............................................................................................................................................................................................................................
...........................................................................................................................................................................................................................................
.............................................................................................................................................................................................................................................................
.................................................................................................................................................................................................................................
......................................................................................................................................................................................
..........................................................................................................................................................................................................................................
.....................................................................................................................................................................
..............................................................................................................................................................................................................
................................................................................................................................................................................................................
.........................................................................................................................................................
...........................................................................................................................................................................................................................
.......................................................................................................................................................................................................................................
.................................................................................................................................................................................................................................
..................................................................................................................................................................................................................................
..........................................................................................................................................................................................
..............................................................................................................................................................................................
......................................................................................................................................................
...............................................................................................................................................................................................
................................................................................................................................................................................
11
15
17
18
19
19
20
20
2
2
3
4
4
4
5
5
6
EN
6
6
7
8
8
8
9
10
10
11
11
12
3
1
13
14
14
1
Page 3

Safety instructions
Read this operation manual before using the product
Warning: To avoid injury to yourself and others, and to avoid unnecessary property damage, read carefully before using the product and observe the
following “Safety instructions”. The safety instructions are divided into two sections, “Warning” and “Caution”. The “Warning” and “Caution” sections
contain important information for safe use of the product and must be followed.
Hereby, [ROIDMI INFORMATION TECHNOLOGY CO., LTD.] declares that the radio equipment type [2.4GHz WLAN Module] is in compliance with Directive
2014/53/EU. The full text of the EU declaration of conformity is available at the following internet address:http://doc.roidmi.com/web/#/27?page_id=0
Warning Instructions against incorrect product use that may lead to death or serious injury
EN
Caution Instructions against incorrect product use that may lead to minor injury or product damage
Warning
1. Do not use this product in wet places such as bathrooms or near water sources.
2. Do not use it to clean up liquids, matches and wet garbage.
3. Do not pull or insert the plug, or touch the adapter socket with wet hands.
4. Do not use damaged power plugs and loose sockets.
5. Do not use the main unit to clean flammable liquids such as kerosene, gasoline, objects with sparks, toner cartridges, toner and other combustible
dust; do not use the device near the above items, or in environments with flammable and explosive gases to avoid fires.
6. Do not disassemble, repair, or modify the product on your own, to avoid fire, injury, or damage, except for the replacement of consumables in
accordance with this manual.
7. When using the adapter, use an AC power supply with a correct rated voltage, and do not use a generator or DC power supply to avoid fire or electric
shock. Do not charge non-rechargeable batteries.
8. Use a dry cloth to clean the dust on the plug regularly to avoid fires due to poor insulation or other reasons.
9. Be sure to insert the plug firmly and completely into the socket to avoid electric shock, short circuiting or fire.
10. In the event of an abnormal fault, cut off the power immediately and stop using the product to avoid smoke, fire or electric shock.
11. When charging or using the product, if the product’s body becomes deformed or is unusually hot, gives off a burning smell, or emits abnormal noises
while operating, immediately cut off the power and unplug the plug. Then place the product in an open area away from any combustible materials to
ensure safety. Have the manufacturer or authorized maintenance personnel replace or maintain the product to avoid danger.
12. Be sure to unplug the plug from the power socket before cleaning and maintenance to avoid electric shock or injury.
13. If you find that the main brush is abnormal during use, turn off the power and immediately check whether the main brush is entangled with hair or
other long fibers, and clean it in a timely manner.
14. Do not spray water on the product body and plug, or immerse them in water.
15. Do not use other adapters to charge the main unit.
16. When unplugging the plug, be sure to hold the insulated part of the adapter body. Do not pull the power cord.
17. The battery is a sealed device, and does not pose a safety hazard under normal circumstances. If liquid leaks out of the battery under extreme
conditions, it may cause irritation or burns. If you accidentally come into contact with the liquid, take the following instructions:
1) In case of skin contact - wash with soap and water;
2) In
case of eye contact - rinse immediately with water for at least 15 minutes and seek medical help.
This appliance can be used by children aged from 8 years and above and persons with reduced physical, sensory or mental capabilities or lack of
18.
experience and knowledge if they have been given supervision or instruction concerning use of the appliance in a safe way and understand the hazards involved
2
Page 4

19. Keep the robot vacuum and mop cleaner away from electromagnetic equipment in hospitals. This product is not a toy. Do not allow children to play
with it. Use this product only with accessories supplied with it.cleaning and user maintenance shall not be made by children without supervision
20. The adapter is for indoor use only, do not expose it to rain.
21. If the exterior is damaged, do not use the adapter to avoid risk of electric shock.
22. This adapter is only intended for use with designated robot vacuum and mop cleaners.
23. Before charging, check whether the adapter specifications conform with the required power supply voltage.
24. Before disposing of the appliance, the battery must be removed from the appliance.
25. This appliance incorporates an earth connection for functional purposes only.
26. The supply connection of dust collector is appliance inlet.The cross-sectional area of supply cord used for the appliance at least 0.75mm².
Caution
1. Do not use this product outdoors, on surfaces other than the ground, or in commercial or industrial environments.
2. Do not use the product in environments without protective fencing (such as duplex floors, open balconies, furniture tops).
3. Do not block the air outlet (so as to avoid deformation, product failure, or fire due to overheating).
4. Do not drag the product body (so as not to scratch the ground).
5. Do not shake or let children play with the product body (so as to avoid injury or damage to the product body).
6. Do not drop the product, bump it against other objects, or apply pressure to the product (so as to avoid fire or electric shock due to product failure).
7. Be sure to install the main brush and filter before use (so as not to cause damage to the motor or product body).
8. Check if the power cable is in good condition before charging the product.
9. Before using the robot vacuum and mop cleaner for the first time or replacing the specified filter, turn off the power on the main unit and make sure
that the filter is properly installed.
10. Used battery packs should be properly disposed off. Do not discard them randomly.
11. Before using the product, arrange
ground to avoid the product being blocked during cleaning.
12. When the machine is running, keep curtains and tablecloths away from the ground, and keep the carpet flat, so as to prevent the product from being
blocked during operation and causing damage to your valuables.
13. Be sure to open the door of each room before the first use, so that the product can build a complete home map.
14. Do not stand in front of the main unit when the appliance is running, to prevent the main unit from being unable to recognize the area to be cleaned.
15. Do
not use and store the main unit under extreme adverse conditions, such as extreme temperatures. It is recommended to use it indoors. Store it in
a cool and dry place.
16. Do not use the adapter and dust collector to recharge non-rechargeable batteries.16.Do not use the adapter and dust collector to recharge
non-rechargeable batteries.16.Do not use the adapter and dust collector to recharge non-rechargeable batteries.
the desks, chairs, household items, floor objects, etc. neatly, and clear power cords and small items laying on the
EN
3
Page 5

Product overview
Main unit
EN
Electric water tank and mopping module
Laser head pressure sensor
Laser sensor
Infrared docking sensor
Bumper
In fra red d ock ing s ens or/ Wall d ete cti on
sensor
TOF wall tracking sensor
Spot button
• Sh or t p re ss to cl ea n a lo ca li ze d a re a. Th e r ob ot
automatically docks after cleaning.
• Short press while operating to pause
Reset button
• Short press to automatically restart
Power button
• Short press to start a cleaning cycle. The robot automatically
docks after cleaning.
• Press and hold to turn the robot on or off
• Short press while operating to pause
Dock button
• Short press to dock
Dust inlet
Filter release button
Dust box + water tank (2 in 1) release button
Dust box + water tank (2 in 1)
Function buttons
Panel
Dust box release button
Dust inlet
Mop holder release button
Charging contact (x2)
Infrared sensor
Universal wheel
Edge sensor (x4)
Charging plates
Side brush (x2)
Driving wheel (x2)
Main brush
Main brush housing release button
Mop
Filter
Dust box + water ta nk (2 in 1 )
cover
4
Page 6

Mop
Mop holder
Mop holder release button
Disposable mop
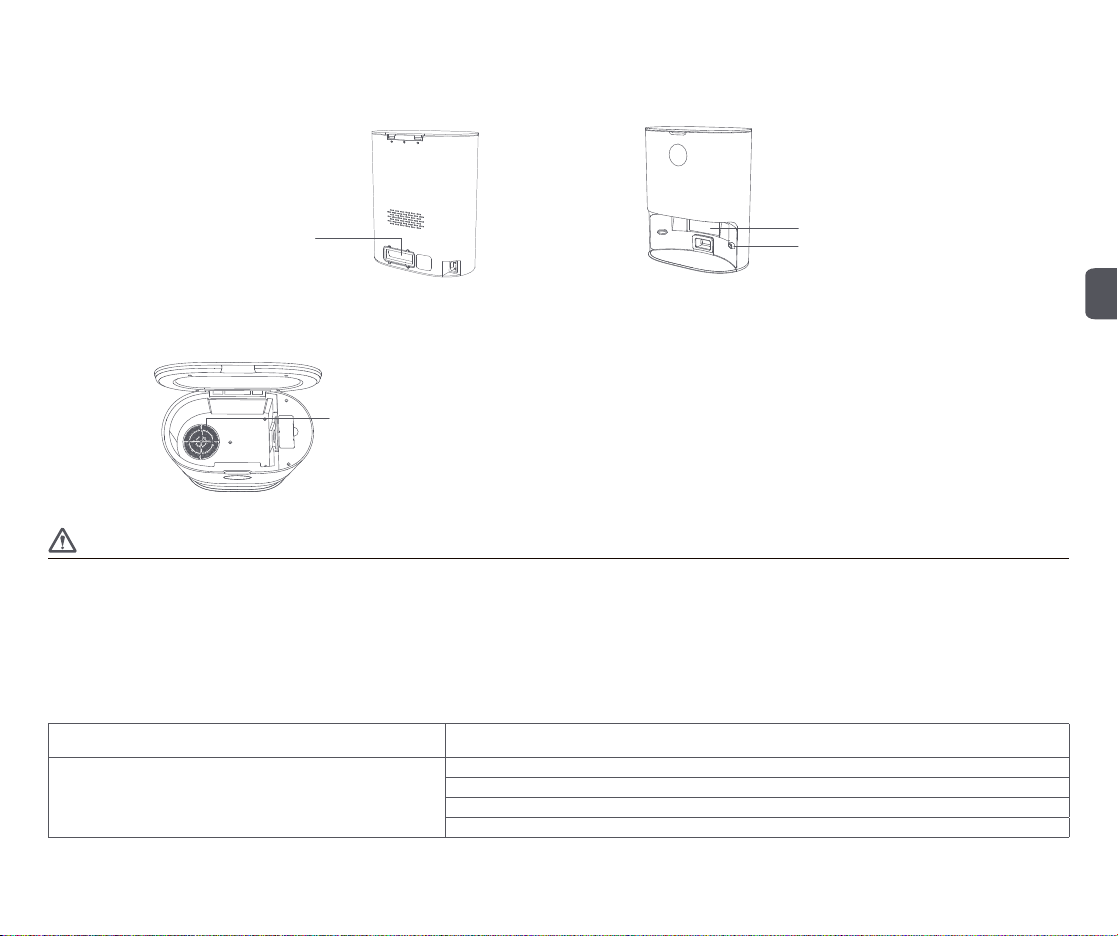
Dust collector (optional)
Flip cover
LED display
Air outlet
Infrared lens
Charging contact
Dust inlet
Working principle of dust collection station:
The dust collection station always emits infrared signals at a certain angle and distance. When the sweeper detects the infrared signal during the recharging process, it will travel to a certain distance directly
in front of the dust collection station, adjust the angle and retreat to the dust collection station. When the dust collection conditions are reached, the dust collection station starts to collect dust. After the dust
is collected, the deodorizing ion generator starts to work to deodorize, and at the same time it starts to charge. If the dust collection condition is not reached, charge directly and the display shows the real-time
power.
Tra ns pa ren t co ver of d us t
channel
Charging port
Charging dock (optional)
EN
Charging dock indicator
Signal emission area
Charging contact
Charging port
Cord storage slot
5
Page 7

Product installation and charging method
1. Installation and use of dust collection station (optional)
Step 1: Place the dust collection station according to the position and distance
shown in the figure, and connect the "pin end" of the power cord to the body
of the dust collection station, and the "metal plug end" to the wall power supply,
as shown in the figure;
Step 2:When the power supply and the dust collection station are normally connected and energized,
long press the power button of the sweeper to turn on and use. When the sweeper robot consumes power,
it can recharge by itself, or manually short press the recharge button to recharge and charge.
EN
>0.5 m
>0.5 m
Caution
1. When charging, do not install the mopping module to prevent water seeping from the wet mop and damaging the floor.
2. Do not use this product in the room of infants and young children, keep it away from infants and young children.
3. When the main unit is docked at the dust collector, do not let children or pets approach it or collide with the main unit to avoid danger.
4. In order to facilitate the smooth return of the main unit to the dust collector after cleaning, it is recommended to start the appliance from the dust collector and that you do not move the dust collector
during the cleaning process.
5. The dust collector has dust collection and charging functions, and a new dust bag is installed before the product leaves the factory.
6. Please make sure that the power supply and the dust collection station are normally energized before the sweeping robot can be charged. The dust collection station that is not connected to the power
supply does not have the charging function.
2. Installation and use of recharger (optional)
Step 1: Place the rechargeable cradle according to the position and distance shown in the figure, connect the round plug of the adapter to the rechargeable cradle body, and connect the "metal plug end" to the
wall power supply, as shown
>1.5 m
Dock button
>0.5 m
>0.5 m
>1.5 m
6
Page 8

Step 2: When the adapter and the recharger are normally connected and powered on, press and hold the power button of the sweeper to turn on and use it. When the sweeper robot consumes power, it can
recharge by itself, or manually short press the recharge button to recharge and charge ;
Dock button
Caution
1. When charging, do not install the mopping module to prevent water seeping from the wet mop and damaging the floor.
2. Do not use this product in the room of infants and young children, keep it away from infants and young children.
3. When the main unit is docked on the charging dock, do not let children or pets approach it or collide with the main unit to avoid danger.
4. In order to facilitate the smooth return of the main unit to the charging dock after cleaning, it is recommended to start the appliance from the charging dock and that you do not move the charging dock
during the cleaning process.
Installing the mopping module
EN
Step 1: Attach the mop
Stick the mop on the designated area on the mop holder
Step 2: Add water to the water tank
Open the lid of the electric dust collecting tank, and close the lid of the electric dust collecting tank after
filling with water
7
Page 9
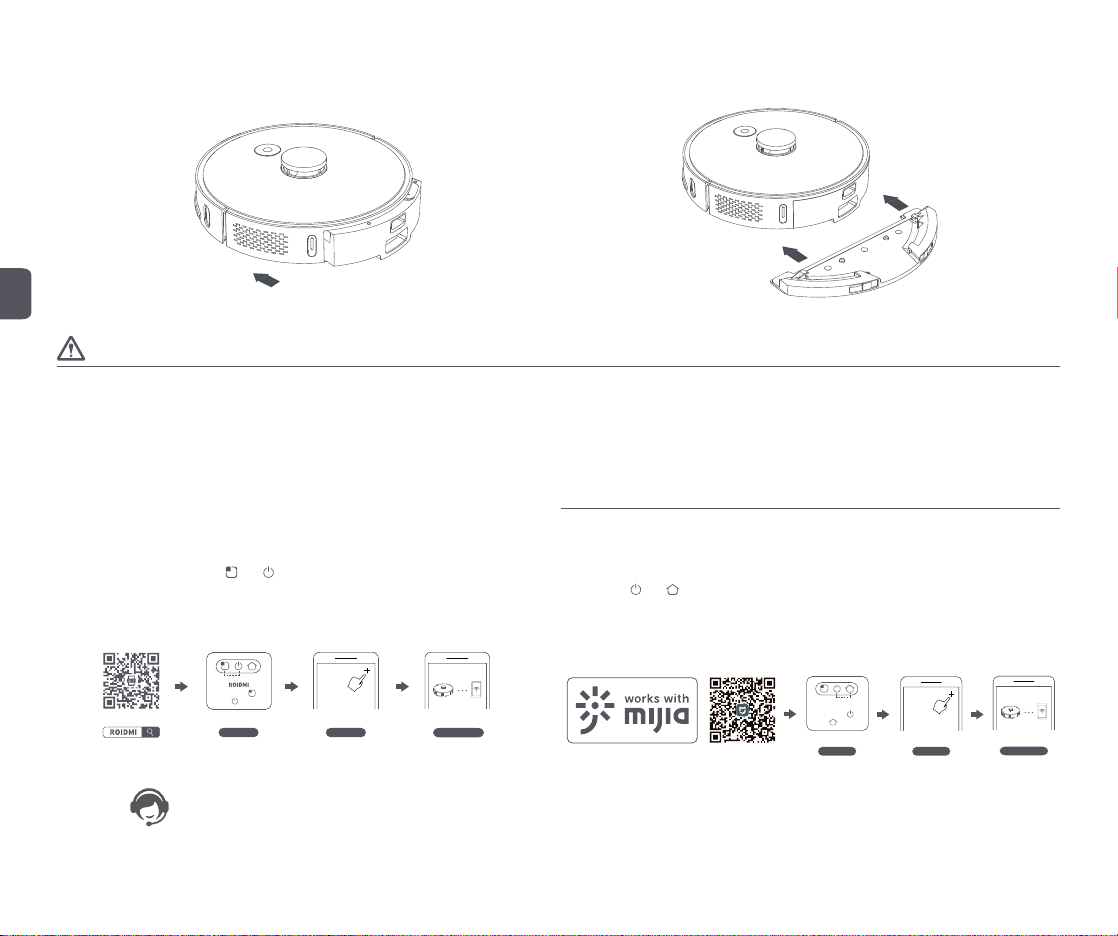
Step 3: Install the water tank
Push the electric water tank and dust box horizontally in the direction of the groove on the main
unit until you hear a "click" sound.
Step 4: Install the mopping module
Push the mopping mod ule buckl e in parallel along the electric water tank until you hear a "click "
sound.
EN
Caution
1. Do not use the mopping function on the carpet.
2. When charging or when the robot is not in use, remove the mopping module, pour out the excess water in the water tank and clean the mop to avoid mold or odor.
3. It is recommended to clean the mop each time to maintain water speed and cleaning effect. Replace with a new mop if necessary.
4. When charging the main unit on wooden floors, remove the mopping module in a timely manner to prevent water seeping from the mop and damaging the floor.
Use
Downloading app
This product is compatible with the ROIDMI vacuum cleaner platform, and can be controlled using
the “ROIDMI” app. It supports Android and iOS systems.
1. Scan the QR code below, or search for “ROIDMI” in the app store to download and install the app.
2. Sign in to the app. Long press
longer than 3 seconds to reset it. Click “+” at the upper right on the app’s homepage to add
device. Select the robot cleaner from the device list and connect it to WiFi according to the
prompts.
and buttons on the robot cleaner at the same time fo r
Mi Home app
This product works with mijia (Mi Home). It can be controlled via Mi Home app and interconnected
with other smart devices.
1. Scan the QR code below, or search for “Mi Home” in the app store to download and install the app.
2. Turn on Mi Home app, register an account or sign in to the app.
3. Long press
reset it. Click “+” at the upper right on the app’s homepage to add device.
4. In the device category list find the “Robot Cleaner” category, then click your ROIDMI robot cleaner
model to enter Network Configuration interface.
5. Perform follow-up operations according to the app’s prompts on network configuration.
and buttons on the robot cleaner at the same time for longer than 3 seconds to
Long press
and
to reset
Reset WiFi Add device
3. If you have any question, please contact our service personnel or visit our official website.
Configure network
* This product only supports 2.4G WiFi
MIHome
Long press
and
to reset
Reset WiFi
Add device
Configure network
Reminder: Actual operations may vary due to upgrade and update of Mi Home app. Please follow the
instructions in the app.
Please note that “works with m ijia” only certifie s the product is c ompatible with Mi Home app.
Xiaomi and Mijia are not liable for any problems related to the product itself and its manufacturer’s
production, executive standards, quality control, etc.
* Some overseas regions do not support connection to Mi Home APP
8
Page 10

Turning on/off and cleaning modes
1. Turning on/off
Press and h old the Power button, the Po wer butt on indi cator is ON a nd the main unit enters
Standby mode. When the main unit is in Idle mode, press and hold the Power button, the indicator
slowly turns off and the cleaning cycle is done.
When the main unit is running, press any button to pause the appliance. Press the Power button
again to resume the cleaning cycle.
Press the Dock button, the main unit automatically docks and the cleaning cycle will end. Press
the Spot button to clean a localized area.
2. Charging
When a c
leaning cycle is complete, the mai n unit automatically docks an d charges itself. I f an
error occurs, resolve the problem and press the Dock button after troubleshooting, the main unit
automatically docks.
When the main unit is charging, the Power button indicator is always ON; when fully charged, the
indicator breathes (breathe = dim and brighten at a certain rate).
If a cleaning cycle does not start from th e charging do ck or dust collector, the robot may fail to
dock. When the cleaning cycle is complete, the main unit automatically returns to where it started.
To return it to the charging dock or the dust collector, press the Dock bu
3. Clean mode
After the main un it is turned on, it scans and i ntelligently maps out a series of areas. Th en it
cleans along the wall and then in small arcs until the area is complete. When the cleaning cycle is
complete, the main unit automatically returns to the charging dock or the dust collector.
Press the Power button to start a cleaning cycle. The cleaning path is as shown in the figure below.
Press any button to pause the cleaning.
tton.
Spot button
• Short pre ss to c lean a lo calized area. The robot automatically docks
after cleaning.
• Short press while operating to pause
Power button
• Short p ress to start a cleaning c ycle. The robot automatica lly docks
after cleaning.
• Press and hold to turn the robot on or off
• Short press while operating to pause
Dock button
• Short press to dock
4. Cleaning a localized area
When the main unit is in Standby mode or paused, press the Spot button to start cleaning a localized
area. The cleaning area is a 1.6 m x 1.6 m square centered on the main unit. After cleaning, the main
unit automati
cally docks.
1.6 m
1.6 m
EN
Area 1 Area 2
Area 4 Area 3
5. Room mode
If a room has been set in map management, select the room and press the Spot button to clean it. If
not set, firstly set the room boundaries on the APP.
6. Adding water or cleaning the mop while operating
In Ope rating mode, to add water or clean the mop, press the Power button to pause the main unit,
remove the dust box + water tank (2 in 1) and the mopping module. When finished, reinstall them back,
and press the Power button to resume the cleaning cycle.
7. Error symptom
When an error occurs while th e main unit is operating, the Power button indicator fl ashes qui ckly
and a voice prompt will
problem.
8. Sleep mode
After 10 minutes of no operatio n, the main unit automatically enters Sleep mode. P ress any key to
wake it up.
9. WiFi reset
When resetting the password or when your phone i s unable to conn ect to the mai n unit for othe r
reasons, reset the WiFi according to the instructions in “APP downloads” section of this manual.
10. Automatic dust collection (only applicable to robot vacuum and mop cleaner supplied with a dust
collector)
When a cleaning cycle is complete, the robot automatically returns to the dust collector for charging
and dust collection.
Reset button
11.
When the button does not respond or cannot be turned on, please try to reset the system; after reset,
the timing cleaning setting and cleaning mode setting of the host will be cleared. Set WiFi.
be heard. Refer to the “Troubleshooting” section in this manual to resolve the
Cleaning a localized area
9
Page 11

Caution
001
1. It is recommended to start cleaning when the main unit is on the charging dock or the dust collector.
2. When power is insuff icient during cleaning, the main unit will automatically dock on the charging dock or the dust collector and charge itself. It will return to where it left off and resume cleaning after
charging is completed.
3. Before using the product, arrange the desks, chairs, hou sehold items, floor object s, etc. neatl y, and clear power cords and sma ll items l aying on th e ground to avoid
cleaning.
4. Do not stand in front of the main unit when the appliance is running, to prevent the main unit from being unable to recognize the area to be cleaned.
5. After the main unit has finished working, it is recommended not to shut it down, and to keep the main unit in the charging state so it can better carry out the next cleaning task.
the product bei ng blocked during
Turning on/off and operating the dust collector (optional)
Touch the LED display to turn on the dust collection function. When the dust collection function of the integrated station is normal, the outer ring indicator light shows the state of the running water light, and
the smell ion generator indicator light is always on for 30 minutes and then goes out. The LED display will also display the remaining power; if the dust bag is not installed, the fault code will be displayed; in
addition, the display There are also functions for reminding the work of the smell ion generator, the communication light of the dust collection station and the host, and the function of reminding that the dust
is full.
EN
LED display
Power level/error code indicator
Dust full reminder
Communication signal indicator
Smell ion generator
Dust collector status indicator
Status Outer ring indicator Power level indicator Deodorant ion indicator
Initializing
Main unit in place/dust collector functions well
Main unit absent/dust collector functions well
Collecting dust
Normal suction during dust collection
Abnormal suction during dust collection
Dust bag full/main unit in place
Dust bag full/main unit absent
Dust bag not installed/main unit in place
Dust bag not installed/main unit absent
Communication is abnormal/host is in place
Powered off/indicators turned off via APP
Remarks: indicates blinking; indicates off; indicates constant on
Reminder: Make sure the dust collector is connected to the power supply and the main unit is in place, so that you can start cleaning and dust collection remotely at any time through the APP.
888
012 001
000
000
004
Communication signal
indicator
10
Dust full reminder
Page 12

Cleaning and maintenance
Always turn off the product before any maintenance!
Disassembling and installing the main brush
Step 1: Disassemble the main brush
Turn the robot vacuum and mop cleaner over, press the main brush cover release button to remove
the main brush cover. Take out the main brush and clean it.
Step 2: Clean the main brush
Use the cleaning brush to pick up and cut away the hair and fibers entangled on the main brush. It
is recommended to replace the main brush every 3-6 months.
Caution
1. Turn off the product before replacing the main brush.
2. The cleaning brush has a sharp blade, which is used to cut away entangled objects that are difficult to clean. Keep the cleaning brush away from children.
Disassembling and installing the side brush
Step 1: Disassemble the side brush
Turn the robot vacuum and mop cleaner over, remove the screw with a screwdriver, and take out
the side brush.
Step 2: Clean the side brush
Use the cleaning brush to pick up and cut away the hair and fibers entangled on the side brush. It
is recommended to replace the side brush every 3-6 months to ensure effective cleaning.
EN
11
Page 13

Caution
1. Only replace with a side brush supplied by ROIDMI, otherwise, it may lead to damage to the main unit.
2. To avoid scratching yourself, be careful when using a screwdriver to replace the side brush.
3. Install the left and right side brushes correctly onto their respective pins.
Disassembling and installing the dust box + water tank (2 in 1) and filter
Step 1: Disassemble the dust box + water tank (2 in 1)
Press the dust box + water tank (2 in 1) release button to remove the dust box + water tank (2 in 1).
EN
Step 3: Empty the dust box + water tank (2 in 1)
Align the dust box with the opening of a trash can and empty the dust. Use the cleaning brush to
clean the dust box corners that are hard to reach.
Step 2: Disassemble the filter
Press the filter release button on the right of the dust box + water tank (2 in 1) to remove the filter.
Step 4: Clean the dust box + water tank (2 in 1)
Rinse the dust box + water tank (2 in 1) with clean water. Air-dry completely for at least 24 hours
before reinstalling to prevent dust from clumping during the next use.
12
Page 14

Disassembling and installing the mop
Step 1: Disassemble the mop
Remove the mopping module from the dust box + water thank (2 in 1), and remove the mop from
the mopping module.
Caution
1. Only replace with a mop supplied by ROIDMI, otherwise, it may lead to ineffective cleaning.
2. Be sure to remove and clean the mop to prevent dirty water flowing back.
3. It is recommended to replace the mop every 3-6 months to ensure effective cleaning.
Cleaning the replacement parts
Step 1: Clean the sensors
Use a soft clean cloth to wipe and clean the charging plates on the back, the laser distance sensor
on the top, the edge sensors, the infrared docking sensors and the TOF wall tracking sensor.
Step 2: Clean the mop
Rinse the mop with clean water. Air-dry com pletely before reins talling to prevent dust from
clumping during the next use.
Step 2: Clean the universal wheel
Turn the robot vacuum and mop cleaner over and pull out the universal wheel, clean out the hair
and dirt from the w heel and axle. Wa sh the universal wheel wi th water, air- dry compl etely and
reinstall it.
EN
13
Page 15

Step 3: Clean the filter
Rinse the dust box filter with clean water. Air-dry completely before reinstalling to prevent dust from clumping during the next use.
Clean the charging dock (optional)
Step 1: Clean the charging contact
Check whether there is dirt on the charging contacts. Wipe and clean the charging contacts with a soft clean cloth to keep it clean and free of debris.
EN
Caution
1. Use a dry cloth to clean the main unit’s sensors, infrared sensors and charging contacts. Do not use a wet cloth to prevent water from entering the appliance and causing damage.
2. To avoid scratching yourself, be careful when using a screwdriver to replace the replacement parts.
Clean the dust collector (optional)
Step 1: Replace the dust bag
When the dust bag is full, the dust full indicator on the LED display of the dust collector becomes constant on, replace the dust bag. It is recommended to replace the dust bag every 4 weeks.
Open the cover of the dust
collector
Pull the dust bag handle up to
remove the dust bag
Dispose of the used dust bag
14
Replace with a new dust bag Close the cover of the dust
collector
Page 16
Step 2: Clean the dust channel
If the dust collector does not work while powered on and the dust bag is not full, firstly disconnect
it fro m the p ower supply and check whether t he dust channel is blocked. I f it is blocked, use a
screwdriver to open its transparent cover and clear out the obstructions.
Step 3: Clean the infrared lens and charging contacts
Wipe and clean the infrared lens and charging contacts with a soft clean cloth to keep it clean and
free of debris.
Transparent cover of dust channel
Step 4: Clean the fan filter bracket
Check whether the fan filter bracket is entangled with any foreign objec ts or debris. Wipe with a
soft clean cloth to keep it clean and free of debris.
Fan filter bracket
Infrared lens
Charging contact
Caution
1. Use a dry cloth to clean. Do not use a wet cloth to prevent water from entering the appliance and causing damage.
2. To avoid scratching yourself, be careful when using a screwdriver to replace the replacement parts.
Troubleshooting
When an error occurs while the robot vacuum and mop cleaner is operating, the Power button indicator flashes quickly and a voice prompt will be heard. Refer to the “ Troubleshooting” table below to fix the
error.
Error message Solution
Error 1:
Check if the radar is obstructed or stuck. If it is, move the main unit to a new
location and start it.
If the radar is obstructed or stuck, remove the obstruction or debris.
Do not use the product outdoors under sunlight or in places with strong light. Use it indoors.
If the solutions above do not work, move the main unit to a new location and start it.
If the alert continues, contact the customer service.
EN
15
Page 17

Error message Solution
If the bumper i s stuck, remove the debris and bri skly tap th e bumper several times to dislodge any debris that may be
Error 2: Check if the bumper is stuck.
Error 3: Wipe the edge sensor, move the main unit away from edge and start
it.
Error 4: Check if the main brush is stuck.
EN
Error 5: Check if the side brushes are stuck.
Error 6: Check if the driving wheel is stuck.
Error 7: Reinstall the dust box + water tank (2 in 1).
Error 8: Battery is too low, please charge. Battery is low, charge it before use.
Error 9: Cannot charge. Check if the main unit is correctly connected to the
dust collector.
Error 10: Battery pack temperature is too high or too low, try it again later. If battery temperature is too high or too low, use the appliance when its temperature returns to normal.
Error 11: Check the wall tracking sensor. If the wall tracking sensor is covered by dust, wipe and clean it.
Error 12: Place the main unit on level ground and start it. If the main unit is detected to be tilted, place it on level ground and start it.
Error 13: Abnormal vacuum fan.
Error 14: Check if the top radar cover is stuck. If the top radar cover is stuck or under pressure, move the appliance to a new location and start it.
Error 15: Move the main unit away from forbidden areas and start it. Move the main unit away from the virtual walls or forbidden areas and start it.
Error 16: Cannot return to the charging dock. Remove any obstacles near the
charging dock.
Error 17: Dust bag is not in place.
Error 18: Dust bag is full.
Error 19: Clean the dust box + water tank (2 in 1) if it has not been cleaned for
a long time.
trapped underneath.
If the product is trapped because of insufficient space, move it to a new location and start it.
If the alert continues, contact the customer service.
If the main unit is suspended in the air, move it to a new location and start it.
If the edge sensor is dirty or obstructed by debris, clean the edge sensor regularly.
If the alert continues, contact the customer service.
If the main brush is entangled with wool, wires and other debris, remove the main brush and clean it.
Clean up wool, wires and other debris on the floor.
Regularly clean the main brush, as it can easily be entangled with debris.
If the alert continues, contact the customer service.
If the side brushes are entangled with wool, wires and other debris, remove the side brushes and clean them.
Clean up wool, wires and other debris on the floor.
Regularly clean the side brushes, as they c
If the alert continues, contact the customer service.
If the driving wheel is stuck, clean it.
If the alert continues, contact the customer service.
Reinstall the dust box + water tank (2 in 1) and filter and make sure they are reinstalled properly.
If the error persists, replace the filter.
If the alert continues, contact the customer service.
Use a dry clean cloth to wipe the charging contacts on the dust collector and the charging plates on the main unit.
If the vacuum fan does not work properly, reset the system.
If the alert continues, contact the customer service.
Remove any obstacles that are closer than 1.5 m from the front of the charging dock.
Check if the dust bag is installed.
If installed, check if it reaches the bottom of the charging dock.
If the alert continues, contact the customer service.
If the dust bag is full, replace with a new one.
If the dust bag is not full, check if the dust collector’s channel is clogged. If clogged, clean the dust channel.
If the alert continues, contact the customer service.
If there is excessive dust in the dust box + water tank (2 in 1), clean it and the filter.
an easily be entangled with debris.
16
Page 18

Error message Solution
Error 20: Clean the filter. Remove the filter and clean it.
Tip: Resetting the system can fix some errors.
FAQs
Question type Solution
Cannot power on
Cannot charge
Slow charging
Cannot dock
Abnormal operation Restart the appliance.
Abnormal noises while cleaning
Decreased cleaning ability or dus
Cannot connect to WiFi
Scheduled cleaning does not start Insufficient power. Scheduled cleaning will only start when the power level is greater than 15%.
Is energy consumption high if the main unit is kept on the charging dock?
Is it necessary to charge for 16 hours during the first three uses? Lithium batteries exhibit no memory effect. You may use the appliance when the batt
Mopping module discharges little or no water
Main unit does not resume cleaning after docking for charging
Main unit does not return to charging dock after cleaning a localized area or
after being moved
Robot vacuum and mop cleaner misses spots If the wall tracking sensor or edge sensor is dirty, clean them with a soft dry cloth.
t falls out of the main unit
If th e battery power is insufficient, dock the main uni t on t he charging dock an d fully c harge it before next use. If the
battery temperature is too low or too high, use the product at temperatures of 0-40 °C.
Make sure both ends of the charging dock’s power cable are firmly plugged in. I f poor contact is detected , clean the
charging contacts on the charging dock and the charging plates on the main unit. Confirm if the charging indicator turns
on.
When the product is used at extreme temperatures, to extend the battery life, the main unit will automatically reduce the
charging speed. If the charging contacts are dirty, clean them with a dry cloth.
If there are many obstacles near the charging dock, place it in a clear, open space. If the main unit is far away from the
charging dock, place it near to the charging dock and try again.
If the main brush, side brush or driving wheel is entangled wit h debris, turn off the appl iance and clean. If the universal
wheel is dusty or jammed while cleaning, it is recommended to use a screwdriver to remove the wheel and rinse it under
water.
If the dust box is full, clean the dust box. If the filter is clogged, clean the filter. If the main brush is entangled with debris,
clean the main brush.
If WiFi function is not activated, reset WiFi and try again.
If WiFi signal is poor, place the main unit within the coverage of WiFi signal.
If WiFi connection is abnormal, reset WiFi, download the latest mobile client and try again.
If the APP does not support the current device model, follow the prompts to check the models supported.
Cannot connect to WiFi suddenly. If the router settings are incorrect, contact the customer service.
Keep ing the mai n un it on t he charg ing dock hel ps t o ke ep the batter y at it s b est perfor mance , an d t he energy
consumption is low.
ery is full.
Check whether there is suff icient water in the water tank. Adjust the water volume to Large via the APP. Make sure the
mop and mop holder are installed correctly according to the instructions.
Make sure the main unit is not in “Do Not Disturb” mode, in which the main unit does not resume cleaning. It also does not
resume cleaning if it is docked by pressing the Dock button or manually returned to the charging dock.
After cleaning a localized area or being moved far away, the robot vacuum and mop cleaner will generate a new map. If the
charging
dock is far away, the main unit may not automatically dock. In this case, manually return the main unit back on
the charging dock to charge.
EN
17
Page 19
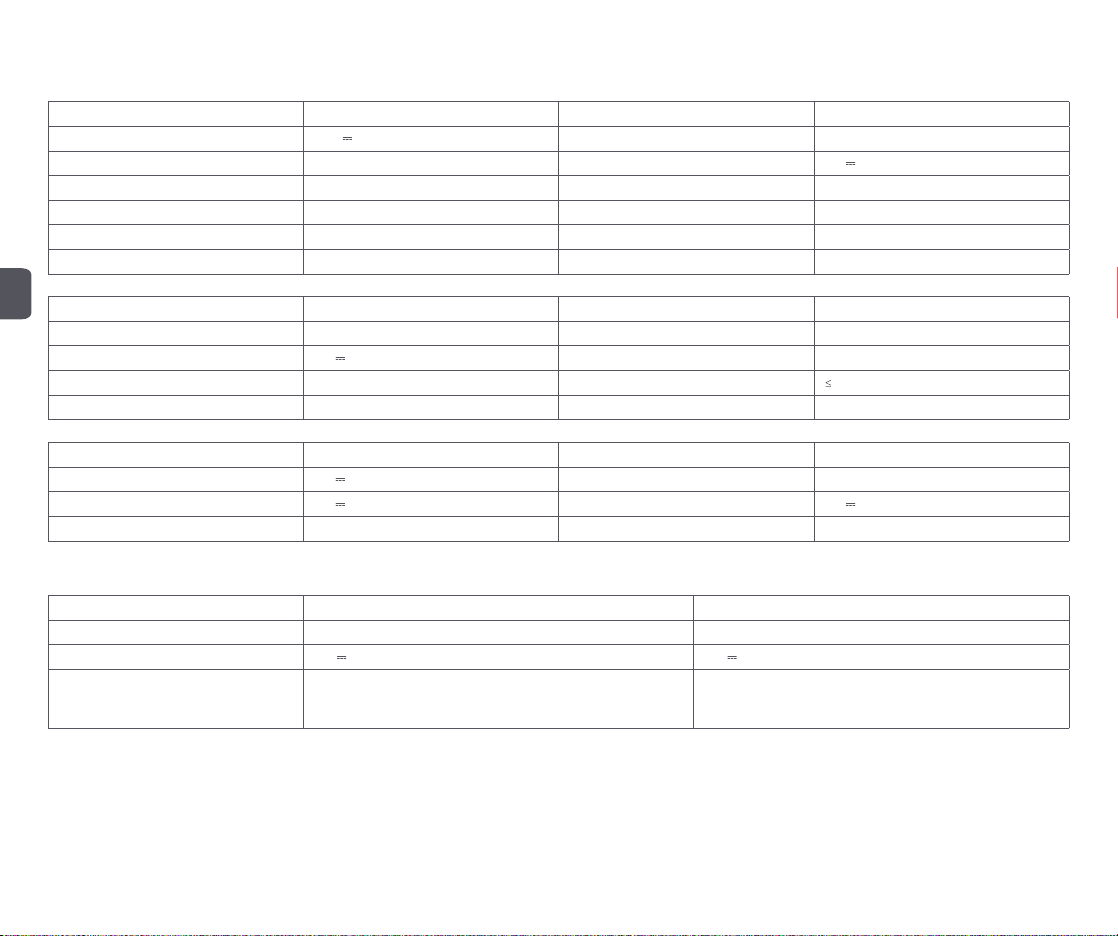
Technical data
Product name Robot vacuum and mop cleaner Product model SDJ01RM / SDJ01RM*
Rated operating voltage 14.4 V
Lithium battery capacity 5200mAh Rated charging voltage 24 V
Net weight ca. 3.5 kg Dimensions 355 x 355 x 100 mm
Charging time ca. 250 minutes Noise level (ECO/STANDARD/BOOST/MAX) <75dB(A)
Dust box capacity 300 ml Cleaning time ca. 250 minutes
Water tank capacity About 220 ml Battery type lithium battery
EN
Product name Dust collector Product model JCZ01RM / JCZ01RM*
Rated power 850 W Rated input 200-240 V~, 50-60 Hz
Rated output 24 V
Net weight ca. 4.3 kg Noise level
Vacuum time ca. 12 seconds Dust bag capacity ca. 3L
Product name Charging dock Product model HCZ01RM / HCZ01RM*
Rated operating voltage 24 V
Rated input 24 V
Net weight ca. 0.4 kg Dimensions 145 x 140 x 99 mm
“*” symbol indicates the product color, e.g. B = black, W = white, G = gray, P = purple.
Product name Power adapter Power adapter
Rated input 100-240V~, 50-60 Hz, 0.9 A 100-240V~, 50-60 Hz, max. 1.0 A
Rated output 24 V
Product model
System requirements: Android 5.0 or later, iOS 10.0 or later (iPhone 5 or later)
This product includes a WiFi module that supports the 802.11b/g/n transmission protocol.
2.4GHz WLAN Module:SDJ01RM;Freqency Range:2400-2483.5MHz;Maximum Transmiting Power:20dBm(EIRP)
, 1.2 A Dimensions 358 x 300 x 174 mm
, 1.2 A Rated output 24 V
1.2 A, 28.8 W 24 V
China: DBS036A-2401200C ; United Kingdom: DBS036A-2401200B ;
Korea: DBS036A-2401200K ; United States: DBS036A-2401200U ;
Japan: DBS036A-2401200J ; European Union: DBS036A-2401200G ;
Rated power 50 W
82 dB(A)
Rated power 30 W
1.2 A, 28.8 W
China: KA3601A-2401200CN ; United Kingdom: KA3601A-2401200BS ;
Korea: KA3601A-2401200KR ; United States: KA3601A-2401200US ;
Japan: KA3601A-2401200JP ; Australia: KA3601A-2401200AU ;
European Union: KA3601A-2401200EU ;
, 1.2 A
18
Page 20

Disposal
This marking indicates that this product should not be disposed with other household wastes throughout the EU. To prevent possible harm to the environment or human health
from uncontrolled waste disposal, recycle it responsibly to promote the sustainable reuse of material resources. To return your used device, please use the return and collection
systems or contact the retailer where the product was purchased. They can take this product for environmental safe recycling.
Warranty and limitations of liability
Correct disposal of this product
This product is guaranteed for a period of 12 months (defined by local law) from the date of purchase against any failure resulting from manufacturing or material defects.
This warranty does not cover damage caused by improper installation, improper use, or normal wear and tear of the product.
More specifically, the warranty does not cover:
• Dust bag, disposable mop, side brush, filter, mop, main brush and main brush co
• Damage or problems caused by improper use, accident, alteration or electrical connection of improper intensity or voltage.
• Modified products, those whose warranty seal or serial number have been damaged, altered, removed or oxidized.
• Failure of the battery due to overcharging or failure to observe the safety instructions explained in the instruction manual.
• Cosmetic damage, including scratches, dents, or any other element.
• Damage caused by any intervention carried out by an unauthorised person.
• Defects caused by normal wear and tear or due to normal ageing of the product.
• Software updates due to a change in network settings.
• Product failures due to the use of third party software to modify, change or adapt the existing software.
• Product failures caused by use without accessories approved by the manufacturer.
• Oxidised products.
Terms and conditions of implementation:
To obtain a warranty service, you are requested to return
with its original packaging.
It is important to have the date of purchase, the model and the serial or IMEI number on hand as information (this information usually appears on the product, the packaging or your proof of purchase).
Failing this, you must return the product with the accessories necessary for its proper operation (power supply, adaptor, etc.).
In the event that your claim is covered by the warranty, the after-sales service may, within the limits of local law, either:
• Repair or replace defective parts.
• Exchange the returned product with a product that has at least the same functionality and that is equivalent in terms of performance.
• Refund the product at the purchase price of the product mentioned on the proof of purchase.
If one of these 3 solutions is used, this does not give rise to the extension or renewal of the warranty period.
your product to the customer service desk of your retail outlet with your proof of purchase (receipt, invoice, …), the product and its supplied accessories,
ver are not covered by the warranty as they are consumable items.
EN
19
Page 21

Warranty card
Customer name Product name and model
Mailing address Main unit serial number
Contact information Purchase date
This warranty card contains customers’ personal information, keep it safe
Maintenance records
EN
№ ЕАЭС RU С-CN.АЯ46.В.18403-21
Manufacturer:
Addre
Executive standards:
PPP 11005F:2018,EN 50564:2011
EN 60335-1:2012/A2:2019,EN 60335-2-2:2010/A1:2013,EN 62233:2008
EN 55014-1:2017,EN 55014-2:2015,EN IEC 61000-3-2:2019,EN 61000-3-3:2013/A1:2019
EN 301 489-1 V2.2.3:2019,EN 301 489-17 V3.2.4:2020
EN 300 328 V2.2.2:2019,EN IEC 62311:2020,EN 50665:2017
2011/65/EU
Service email: wxrm@roidmi.com
Website: www.roidmi.com
No.09.2021
Only applicable to the robot vacuum and mop cleaner model SDJ01RM / SDJ01RM*
Made in China
Servicing center Fault description Replacement parts Servicing engineer Servicing date
Correct disposal
of this product
ROIDMI INFORMATION TECHNOLOGY CO., LTD.
ss:4F,C8 BUILDING,NO.1699 HUISHAN ROAD,LIFE SCIENCE AND TECHNOLOGY PARK,HUISHAN DISTRICT, WUXI,JIANGSU,PRC
functional
earthing
for indoor
use only
20
class Ⅱ
equipment
protection
fuse: T 3.15A
Scan the QR code for manuals
in multiple languages
 Loading...