

Page 1

Printing to Splash v6.0 From
Windows NT
Splash T echnology, Inc.
Sunnyvale, California USA
Page 2

Trademarks and Copyright
Splash and the Splash logo are trademarks of Splash Technology, Inc. Windows is a registered trademark and Windows NT is a trademark of Microsoft Corporation, MajestiK and Regal and DocuColor are trademarks of Xerox,
Incorporated. Acolor is a trademark of Fuji Xerox, Inc. AppleTalk is a registered trademark of Apple Computer , Inc.
Novell NetWare is a trademark of Novell, Inc. Adobe, the Adobe logo, Adobe Illustrator, PostScript, Adobe PStool,
Adobe Type Manager, Adobe PageMaker and Adobe Photoshop are trademarks of Adobe Systems Incorporated,
which may be registered in certain jurisdictions. QuarkXPress is a registered trademark of Quark, Inc. All other
brand or product names are trademarks of their respective holders.
Copyright © 1998 Splash Technology, Inc.
PN: 0014707-0101
tions imposed by the copyright laws as outlined below.
PROPRIETARY RIGHTS NOTICE. The digitally encoded machine readable outline data for producing the typefaces provided as part of your laser printer is copyrighted © 1981 Linotype-Hell AG. Copyright © 1993 Adobe System Incorporated. All Rights Reserved. This data is the property of Linotype-Hell AG and Adobe Systems
Incorporated and may not be reproduced, used, displayed, modified, disclosed or transferred without the express
written approval of Linotype-Hell AG and Adobe Systems Incorporated.
It is against the law to copy, reproduce, or transmit including, without limitation, electronic transmission over any
network any part of the manual or program except as permitted by the Copyright Act of the United States, Title 17,
United States Code. Under the law, cop ying includes translation into another language or format. However, you are
permitted by law to write the contents of the program into the machine memory of your computer so that the program may be executed. You are also permitted by law to make working copies of the program, solely for your own
use, subject to the following restrictions: (1) Working copies must be treated in the same way as the original copy;
(2) If you ever sell, lend, or give away the original copy of the program, all working copies must also be sold, lent,
or given to the same person, or destroyed; (3) No copy (original or working) may be used while any other copy
(original or working) is in use except within the terms of this license. The copyright notice that is on the original
copy of the program must accompany any working copies of the program.
The above is not an inclusive statement of the restrictions imposed on you under the Copyright Act. For a complete
statement of the restrictions imposed on you under the copyright laws of the United States of America, see Title 17,
United States Code.
Last revised: March 2, 1998. Your rights of ownership are subject to the limitations and restric-
Page 2 Printing to Splash v6.0 From Windows NT
Page 3

Table of Contents
Introduction. . . . . . . . . . . . . . . . . . . . . . . . . . . . . . . . . . . . . . . . . . . . . . . . . . . . . . . . . . . . . . 5
System Requirements . . . . . . . . . . . . . . . . . . . . . . . . . . . . . . . . . . . . . . . . . . . . . . . . . . . .5
Chapter 1 — Setting Up for Printing to Splash. . . . . . . . . . . . . . . . . . . . . . . . . . . . . . . .7
Connecting Your Computer to the Splash Printer . . . . . . . . . . . . . . . . . . . . . . . . . . . . . . .7
Set Up for Printing to a Splash Print Spooler . . . . . . . . . . . . . . . . . . . . . . . . . . . . . . . . . .8
Set Up for Printing to Splash Over an AppleTalk Network . . . . . . . . . . . . . . . . . . . . . .11
Enabling the AppleTalk Printer Service . . . . . . . . . . . . . . . . . . . . . . . . . . . . . . . . . .11
Installing the Client Software For Windows NT . . . . . . . . . . . . . . . . . . . . . . . . . . . . . . 15
Chapter 2 — Printing to Splash . . . . . . . . . . . . . . . . . . . . . . . . . . . . . . . . . . . . . . . . . . .25
Setting Splash Print Options . . . . . . . . . . . . . . . . . . . . . . . . . . . . . . . . . . . . . . . . . . . . . . 25
Using the Splash Print Options . . . . . . . . . . . . . . . . . . . . . . . . . . . . . . . . . . . . . . . . . . . .29
Setting Splash Tray Options . . . . . . . . . . . . . . . . . . . . . . . . . . . . . . . . . . . . . . . . . . .29
Setting Splash Color Options . . . . . . . . . . . . . . . . . . . . . . . . . . . . . . . . . . . . . . . . . .33
Setting Other Splash Options . . . . . . . . . . . . . . . . . . . . . . . . . . . . . . . . . . . . . . . . . .36
Creating a PostScript or EPS File . . . . . . . . . . . . . . . . . . . . . . . . . . . . . . . . . . . . . . . . . . 41
Printing an Acrobat PDF File . . . . . . . . . . . . . . . . . . . . . . . . . . . . . . . . . . . . . . . . . . . . .43
Deleting a Print Job . . . . . . . . . . . . . . . . . . . . . . . . . . . . . . . . . . . . . . . . . . . . . . . . . . . .43
Splash Color Correction . . . . . . . . . . . . . . . . . . . . . . . . . . . . . . . . . . . . . . . . . . . . . . . . .43
Splash Color Correction Notes . . . . . . . . . . . . . . . . . . . . . . . . . . . . . . . . . . . . . . . . . 44
Chapter 3 — Using the Splash Web Queue Manager . . . . . . . . . . . . . . . . . . . . . . . . . .45
Contents Page 3
Page 4

Chapter 4 — Application Notes . . . . . . . . . . . . . . . . . . . . . . . . . . . . . . . . . . . . . . . . . . . 53
Supported Windows NT Applications . . . . . . . . . . . . . . . . . . . . . . . . . . . . . . . . . . . . . . 53
General Driver Notes . . . . . . . . . . . . . . . . . . . . . . . . . . . . . . . . . . . . . . . . . . . . . . . . . . . 53
Accidentally Printing EPS Files . . . . . . . . . . . . . . . . . . . . . . . . . . . . . . . . . . . . . . . . 53
Duplicate Cover Pages . . . . . . . . . . . . . . . . . . . . . . . . . . . . . . . . . . . . . . . . . . . . . . . 53
Printing Gradient Fills . . . . . . . . . . . . . . . . . . . . . . . . . . . . . . . . . . . . . . . . . . . . . . . 54
Some Images Print With Limited Color . . . . . . . . . . . . . . . . . . . . . . . . . . . . . . . . . . 54
Windows Jobs with Text or Fill Patterns Over TIFF May Not Print Correctly . . . . 54
Network Notes . . . . . . . . . . . . . . . . . . . . . . . . . . . . . . . . . . . . . . . . . . . . . . . . . . . . . . . . 54
Novell NetWare Notes . . . . . . . . . . . . . . . . . . . . . . . . . . . . . . . . . . . . . . . . . . . . . . . 54
Application Notes . . . . . . . . . . . . . . . . . . . . . . . . . . . . . . . . . . . . . . . . . . . . . . . . . . . . . 55
General Notes . . . . . . . . . . . . . . . . . . . . . . . . . . . . . . . . . . . . . . . . . . . . . . . . . . . . . . 55
Adobe Illustrator Notes . . . . . . . . . . . . . . . . . . . . . . . . . . . . . . . . . . . . . . . . . . . . . . 55
Adobe PageMaker Notes . . . . . . . . . . . . . . . . . . . . . . . . . . . . . . . . . . . . . . . . . . . . . 55
Adobe Photoshop 3.0 Notes . . . . . . . . . . . . . . . . . . . . . . . . . . . . . . . . . . . . . . . . . . . 56
Corel Draw Notes . . . . . . . . . . . . . . . . . . . . . . . . . . . . . . . . . . . . . . . . . . . . . . . . . . . 57
Deneba Canvas Notes . . . . . . . . . . . . . . . . . . . . . . . . . . . . . . . . . . . . . . . . . . . . . . . . 57
MacroMedia FreeHand Notes. . . . . . . . . . . . . . . . . . . . . . . . . . . . . . . . . . . . . . . . . . 58
Microsoft Excel Notes . . . . . . . . . . . . . . . . . . . . . . . . . . . . . . . . . . . . . . . . . . . . . . . 58
Microsoft PowerPoint Notes . . . . . . . . . . . . . . . . . . . . . . . . . . . . . . . . . . . . . . . . . . 58
QuarkXPress Notes . . . . . . . . . . . . . . . . . . . . . . . . . . . . . . . . . . . . . . . . . . . . . . . . . 59
Index . . . . . . . . . . . . . . . . . . . . . . . . . . . . . . . . . . . . . . . . . . . . . . . . . . . . . . . . . . . . . . . . . . 61
Page 4 Printing to Splash v6.0 From Windows NT
Page 5

Introduction
The Splash™ Windows NT Client software allows a PC running Microsoft® Windows NT (version 4.0 or later) to print to a Splash MajestiK™, Acolor™, DocuColor™ 5750, DocuColor 5799, or Regal™ printer/copier. The driver software lets
your Windows™ applications communicate across an appropriate network with a
Splash Server. The Splash Server then processes your print jobs and sends them to
the printer/copier. Thus, you can develop documents with Windows-based applications and then print your work on the Splash printer/copier.
This on-line manual describes how to install and use the Splash Client software
with Windows NT. If you are not already familiar with Windows NT procedures
and conventions, please refer to your Microsoft documentation before you attempt
to print to Splash.
System Requirements
The Splash Windows Client driver requires the following hardware and software:
■
An IBM AT or PS/2 (or 100%-compatible) computer with an 80486 or higher
processor
One 3.5" floppy disk drive, high-density (1.4MB) capacity
■
Hard disk drive
■
At least 16 MB of RAM
■
■
CD-ROM Drive
Microsoft Windows NT version 4.0 or later. And software CD or floppy disks
■
■
Network hardware that works with the built-in Windows NT drivers to connect
your PC to the Splash print queue on the Novell or NT server
Refer to the Windows NT documentation for a description of
compatible hardware.
Introduction Page 5
Page 6

Page 6 Printing to Splash v6.0 From Windows NT
Page 7

Chapter 1
Setting Up for Printing to Splash
This chapter explains how to connect your PC to the Splash printer/copier and how
to install the Splash Windows NT client software.
Connecting Your Computer to the Splash Printer
Before you can install the Splash Windows NT Client software, you must establish
a network connection to the Splash printer. There are several options for setting up
your Windows NT PC for printing to Splash. You can:
Connect to another Windows NT computer on your network that has been set
■
up as a print spooler for Splash.
Connect to a Novell NetWare print spooler that has been configured for print-
■
ing to Splash.
Configure your Windows NT system for direct printing to Splash over an
■
AppleTalk network.
Configure your Windows NT system for direct LPR printing to Splash over a
■
TCP/IP network.
This chapter describes how to set up for printing through a Windows NT or Novell
NetWare print spooler that has been configured for printing to Splash. If no print
spooler is available, this chapter also describes how to set up for printing to Splash
over an AppleTalk network. The instructions provided in this chapter apply to both
Windows NT Server and Windows NT Workstation systems.
If your PC can connect to a Novell NetWare server, the system administrator
responsible for setting up print spoolers should refer to the appropriate Novell NetW are documentation and the Splash NetWare Direct documentation for instructions
on how to set up a Novell print queue for Splash. Refer to the chapter, “Setting Up
TCP/IP and NetWare Direct Printing to Splash,” in the
manual.
Chapter 1: Setting Up For Printing to Splash Page 7
Splash Reference
on-line
Page 8
If your PC is connected to a TCP/IP network, the system administrator should refer
to the chapter “Setting Up TCP/IP and Netware Direct Printing to Splash” in the
Splash Reference
to receive LPR print jobs. This reference manual chapter also includes instructions
on how to set up Windows NT for LPR printing to Splash.
on-line manual for instructions on how to set up the Splash Server
Set Up for Printing to a Splash Print Spooler
This procedure describes how to connect to a W indo ws NT or Nov ell NetWare print
spooler that is set up for printing to Splash. All software needed to print to Splash is
automatically transferred to your computer when you connect to the print spooler
with the Windows NT Add Printer Wizard. You do not need the
procedure.
If a Splash print spooler is not available on your network, go to the section “Set Up
for Printing to Splash Over an AppleTalk Network” on page 11.
Exit any applications that you will use to print to Splash before you begin the set up
procedure.
To set up your Windows NT PC for printing to Splash:
1.
Start Windows NT.
Splash CD
for this
2.
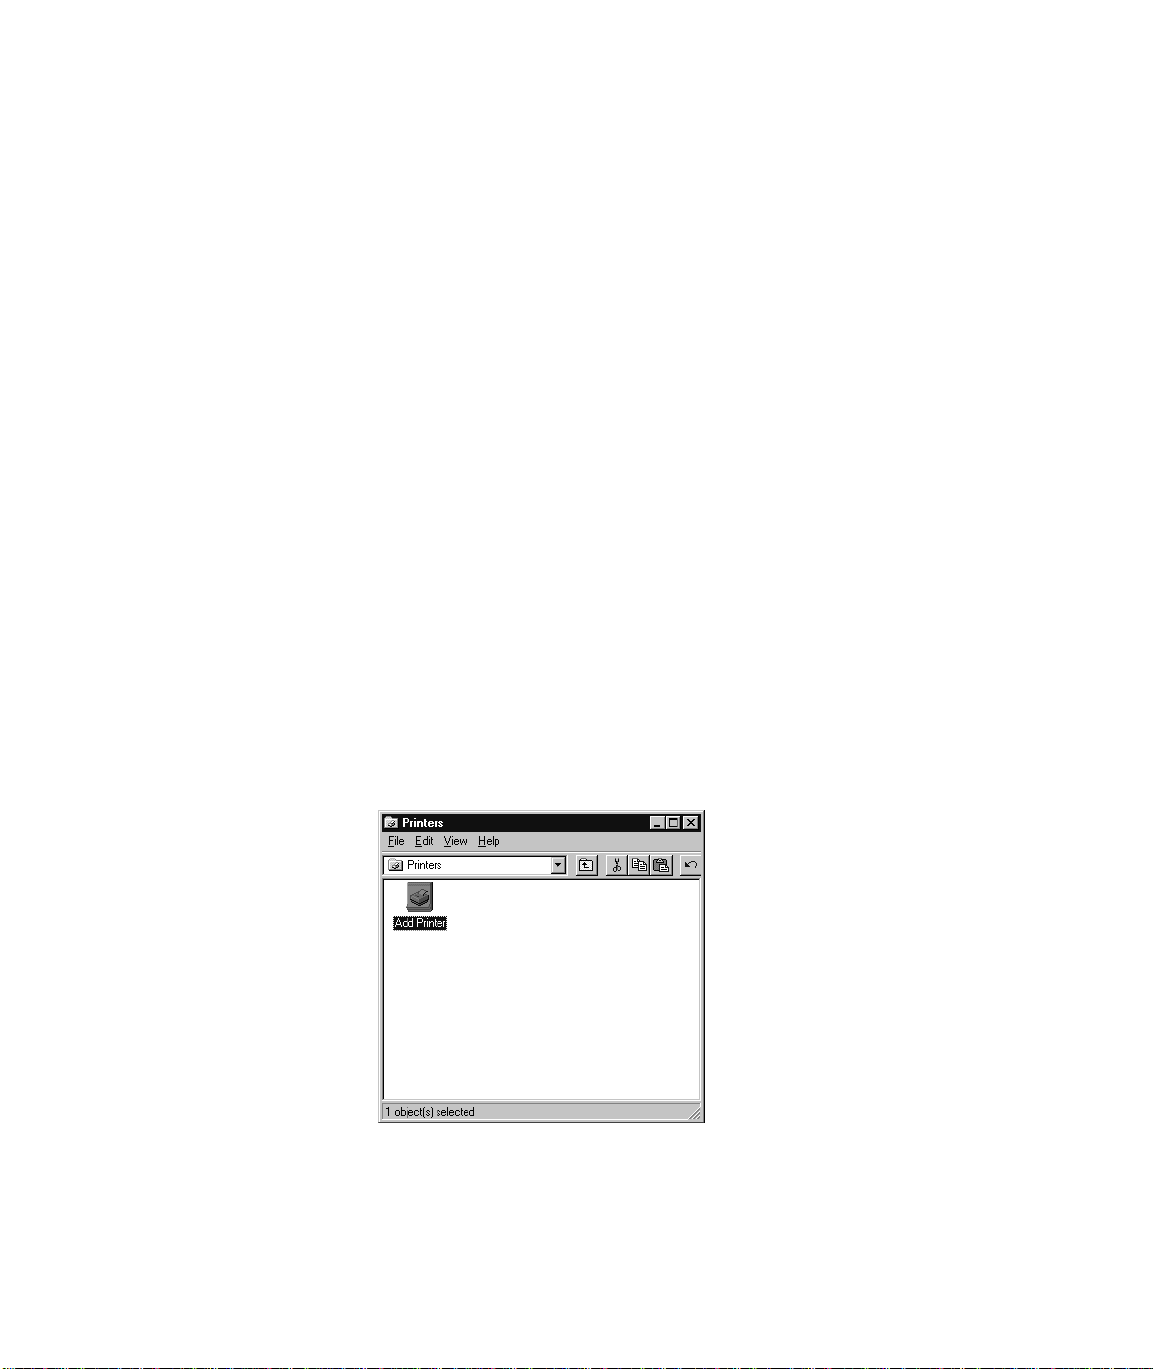
Click the Start button, point to Settings, then choose Printers. The Printers
control panel appears.
3.
Double-click Add Printer.
Page 8 Printing to Splash v6.0 From Windows NT
Page 9
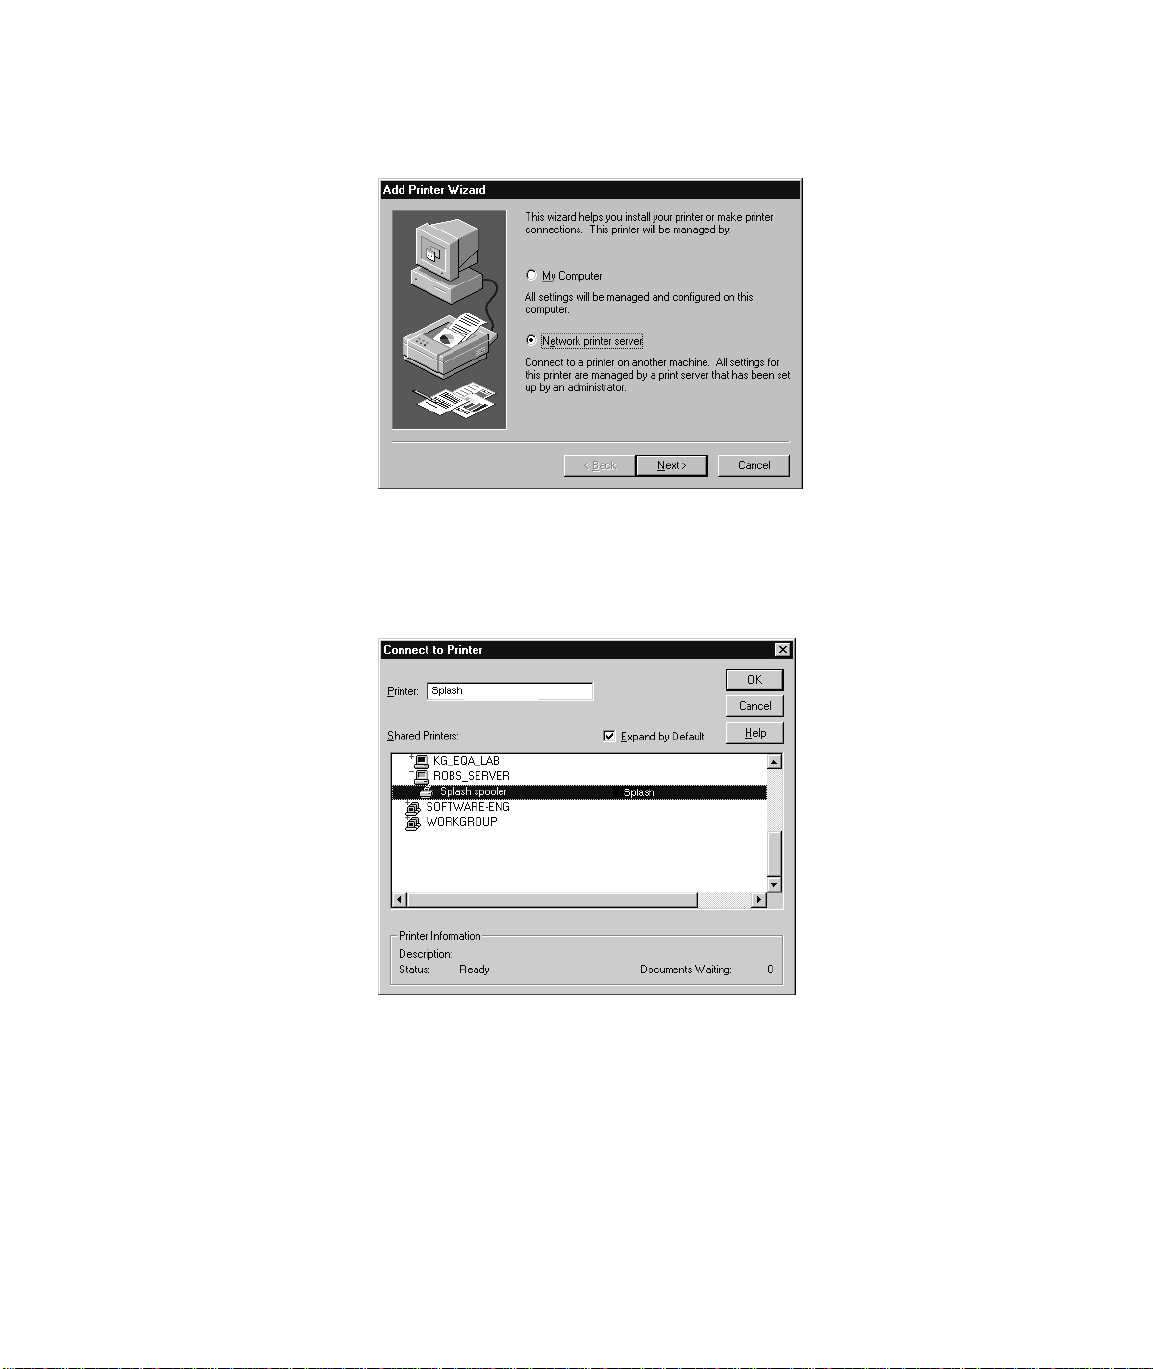
The Windows NT Add Printer Wizard appears.
4.
Select
Network printer server
connected to your computer over a network, then click Next.
Windows NT displays a list of devices on your network.
to tell Windows NT that the Splash printer is
5.
Locate the Splash print spooler and select it in the Shared Printers list.
Chapter 1: Setting Up For Printing to Splash Page 9
Page 10
6.
Click OK to continue.
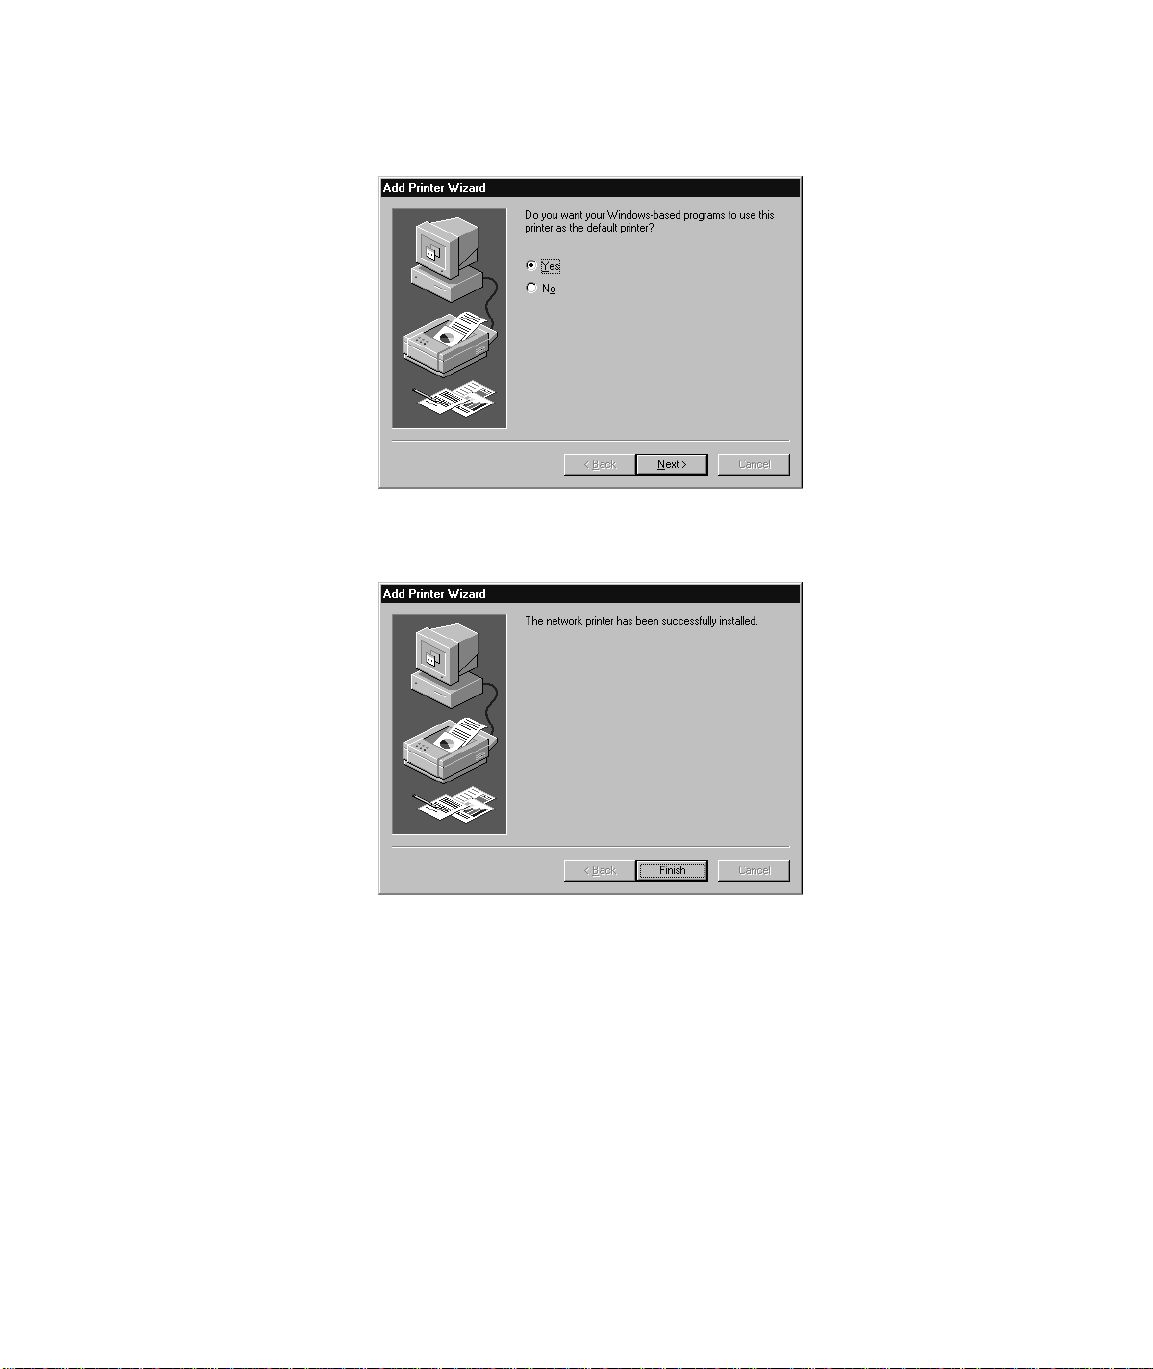
7.
Select “Yes” if you want the Splash printer/copier to be the default printer for
your computer. Click
Next
to continue.
8.
Click
Finish
to complete printer setup. The Splash printer appears in the
Printer control panel.
Setup for the Splash print spooler is complete. The Splash client software was automatically installed on your computer during printer setup. Go to the next chapter of
this manual to learn about the print features available with Splash.
Page 10 Printing to Splash v6.0 From Windows NT
Page 11

Set Up for Printing to Splash Over an AppleTalk Network
If a Splash print spooler is not available on your network, you must install the
Splash W indo ws NT client software on your computer. All software needed to print
to a printer on an AppleTalk network is provided with Windows NT. No AppleTalk
bridge software is needed.
To install the Windows NT Client software, use the
Splash Server. Before you install the Splash Windows NT client software, make a
backup copy of the installation disk. Use the backup disk to perform the installation.
You will need also the Windows NT system CD-ROM to complete the set up procedure.
Splash CD
provided with the
Enabling the AppleTalk Printer Service
If your PC is running W indo ws NT Server, the Microsoft AppleTalk Printer Service
is enabled when you install W indows NT. You can skip this part of the install procedure and go on to the next section, “Installing the Client Software For Windows
NT” on page 15. If your PC is running Windows NT Workstation, you must enable
the Microsoft AppleTalk Printer Service before you can proceed with the Splash
Client software install.
To enable the AppleTalk Printer Service:
1.
Click the Start button, point to Settings, then choose Control Panels.
Chapter 1: Setting Up For Printing to Splash Page 11
Page 12
2.
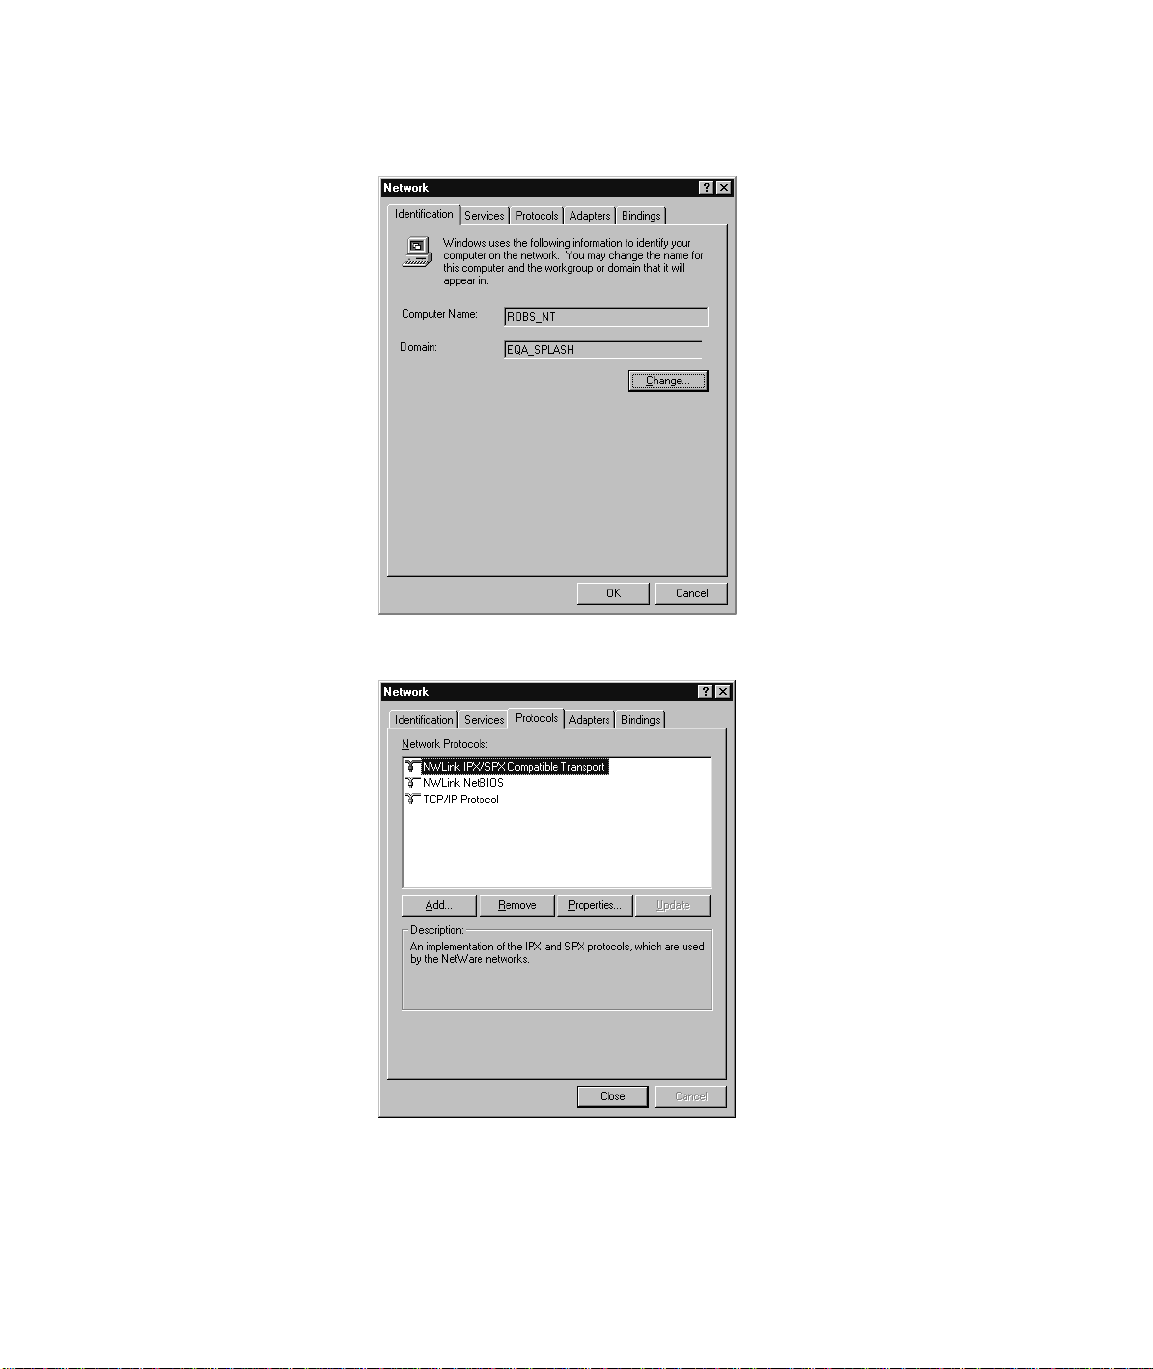
Double-click the Network control panel to open it.
3.
Click the Protocols tab.
Page 12 Printing to Splash v6.0 From Windows NT
Page 13
4.
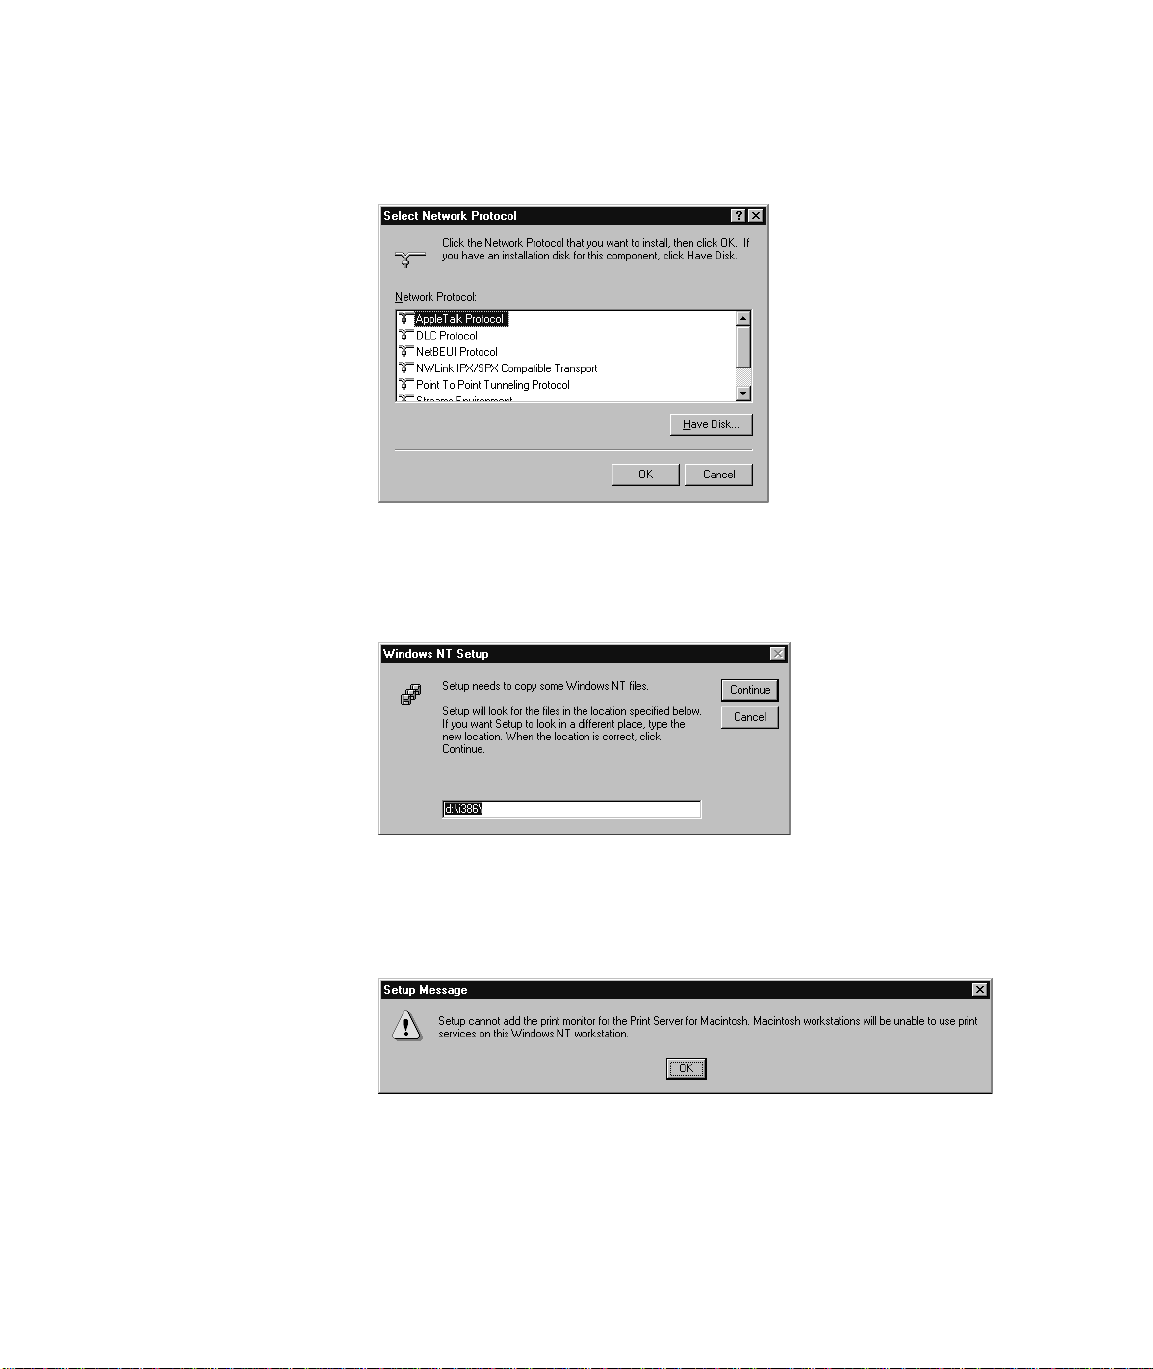
Click Add. Windows NT displays a list of network communications protocols
you can add to your system.
5.
Select “AppleTalk Protocol” in the Network Protocol list, then click OK.
Windows NT asks you to insert the Windows NT system CD-ROM in your
computer’s CD-ROM drive.
6.
Insert the Windows NT system CD-ROM in your computer’s CD-ROM drive,
enter the drive letter and path for the CD-ROM drive, then click Continue.
Another Windows NT message appears.
Chapter 1: Setting Up For Printing to Splash Page 13
Page 14
7.
Click OK.
8.
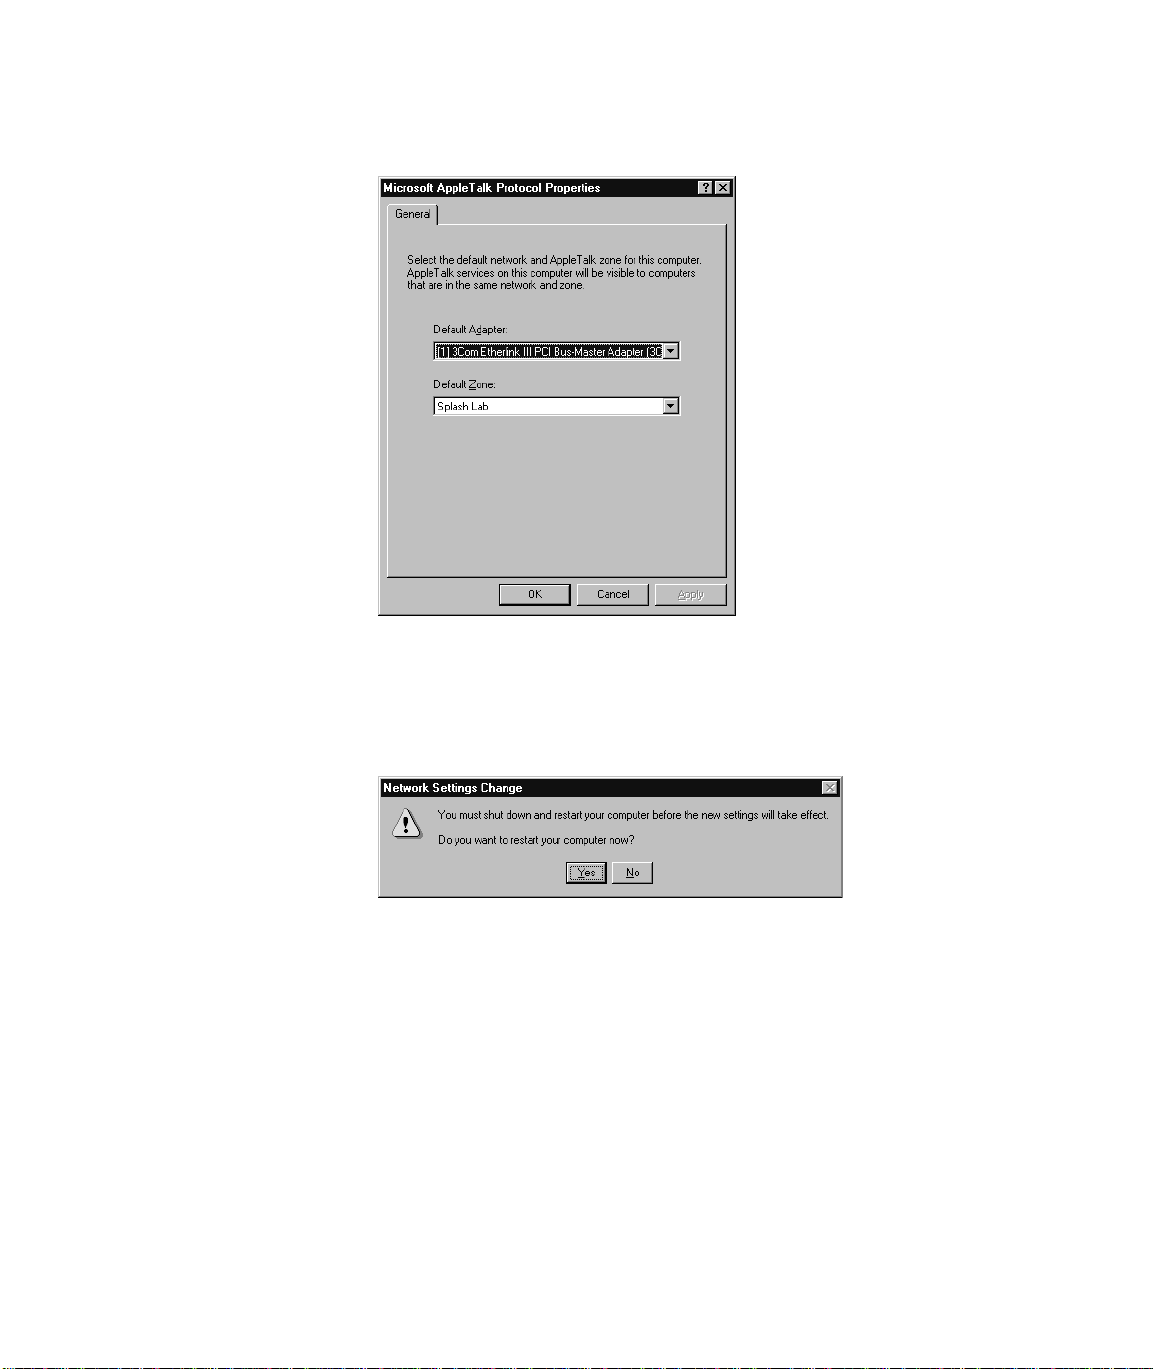
Select the network adapter type used by your computer to connect to the network, select the network zone where your computer and the Splash printer are
located, then click OK.
A message appears.
9.
Click Yes. Windows NT restarts.
When Windows NT restarts, AppleTalk printer service is enabled for your PC. You
can now install the Splash Client software for Windows NT and connect to the
Splash Server.
Page 14 Printing to Splash v6.0 From Windows NT
Page 15
Installing the Client Software For Windows NT
To install the Windows NT Client software, use the
with the Splash Server. Before you install the Splash Windows NT Client driver,
make a backup copy of the installation disk. Use the backup disk to do the installation.
Exit any applications that you will use to print to Splash before you begin the set up
procedure.
To install the Splash Windows NT Client driver on a system running Windows NT:
1.
Locate the
2.
Start Windows NT.
3.
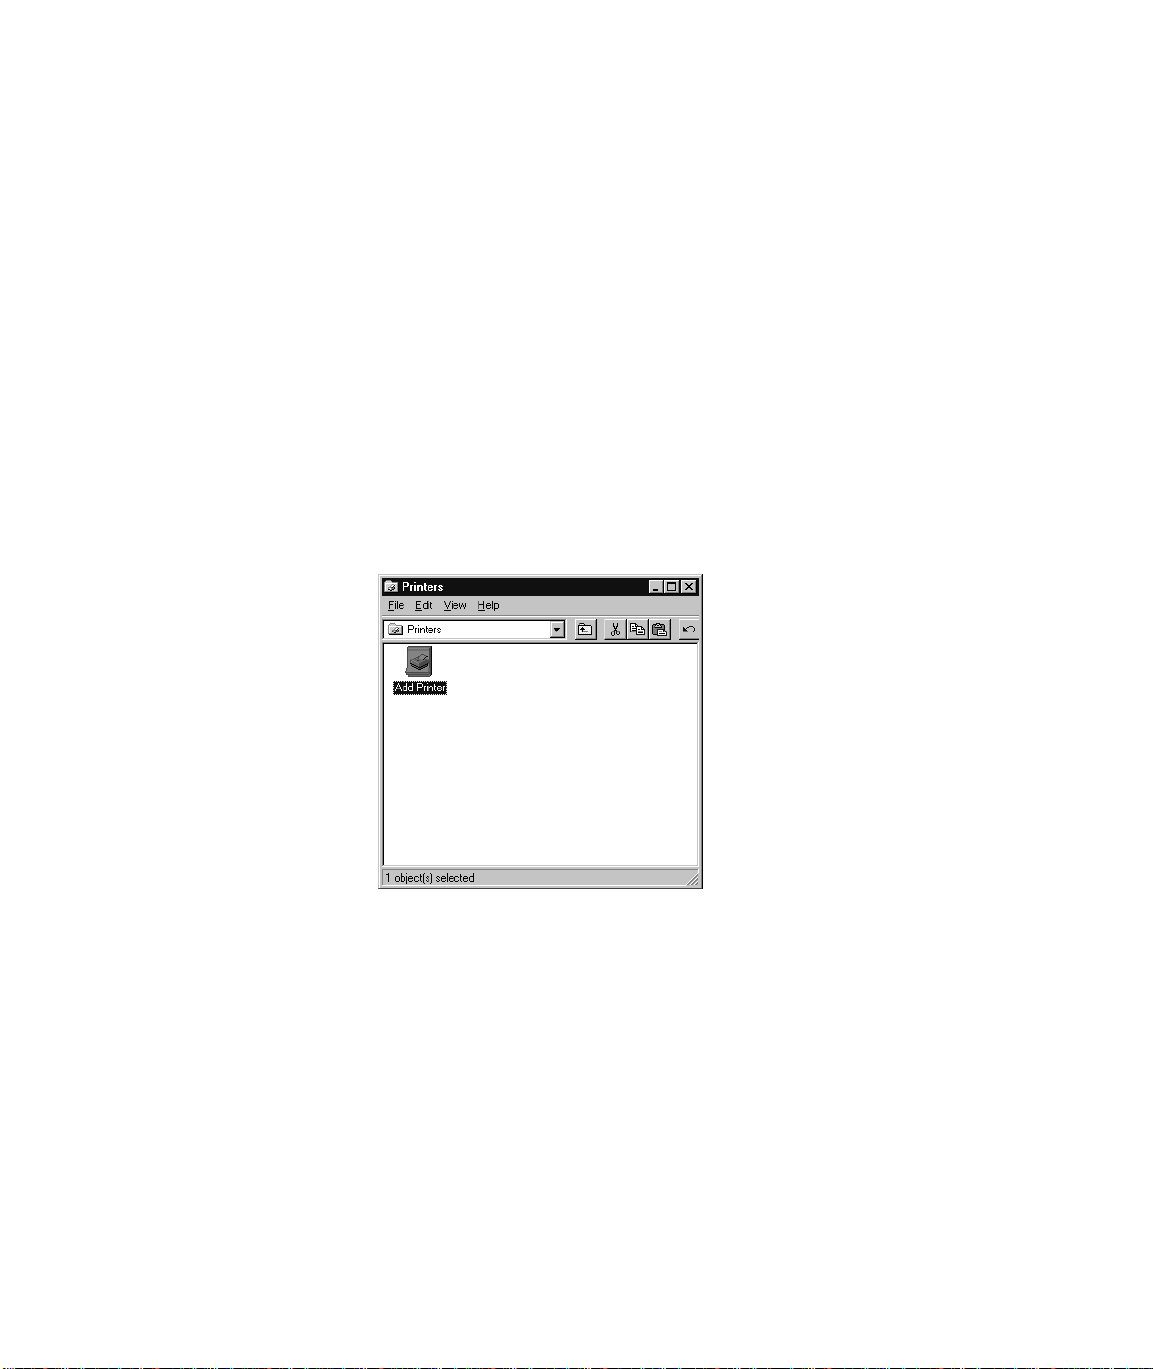
Click the Start button, point to Settings, and then choose Printers. The Printers
setup window appears.
Splash CD
(provided with Splash).
Splash Win NT CD
provided
Chapter 1: Setting Up For Printing to Splash Page 15
Page 16
4.
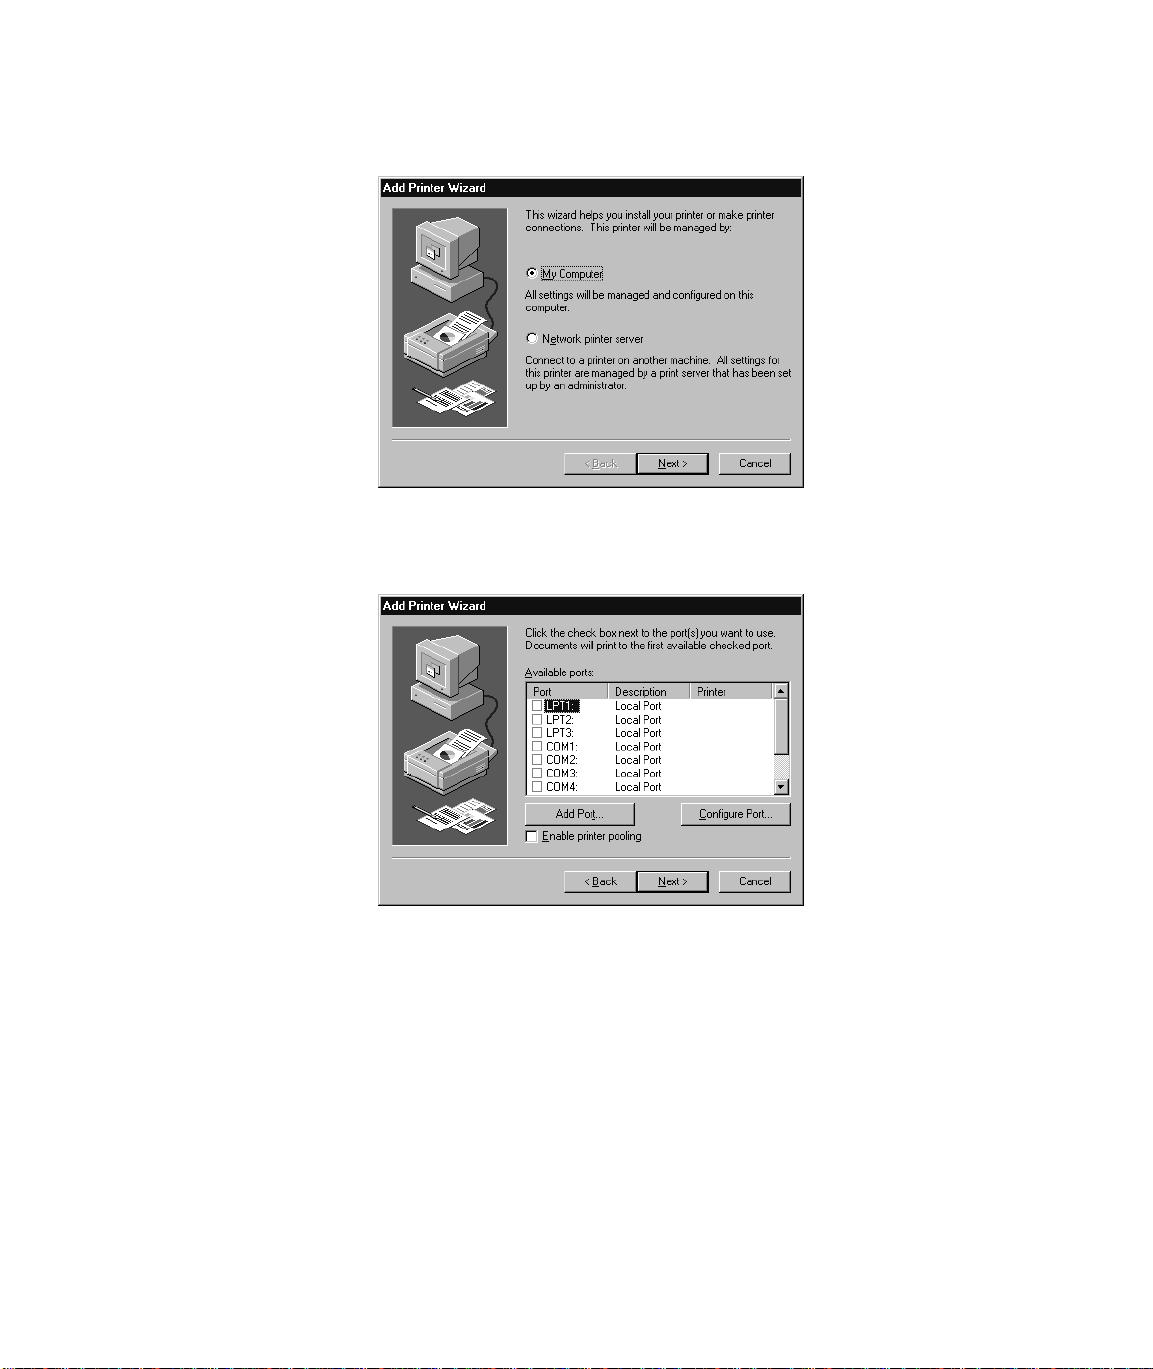
Double-click Add Printer. The Windows NT Add Printer Wizard appears.
5.
Select “My Computer” then click Next to continue the installation process.
The Add Printer Wizard asks you to select the port for your printer.
Page 16 Printing to Splash v6.0 From Windows NT
Page 17
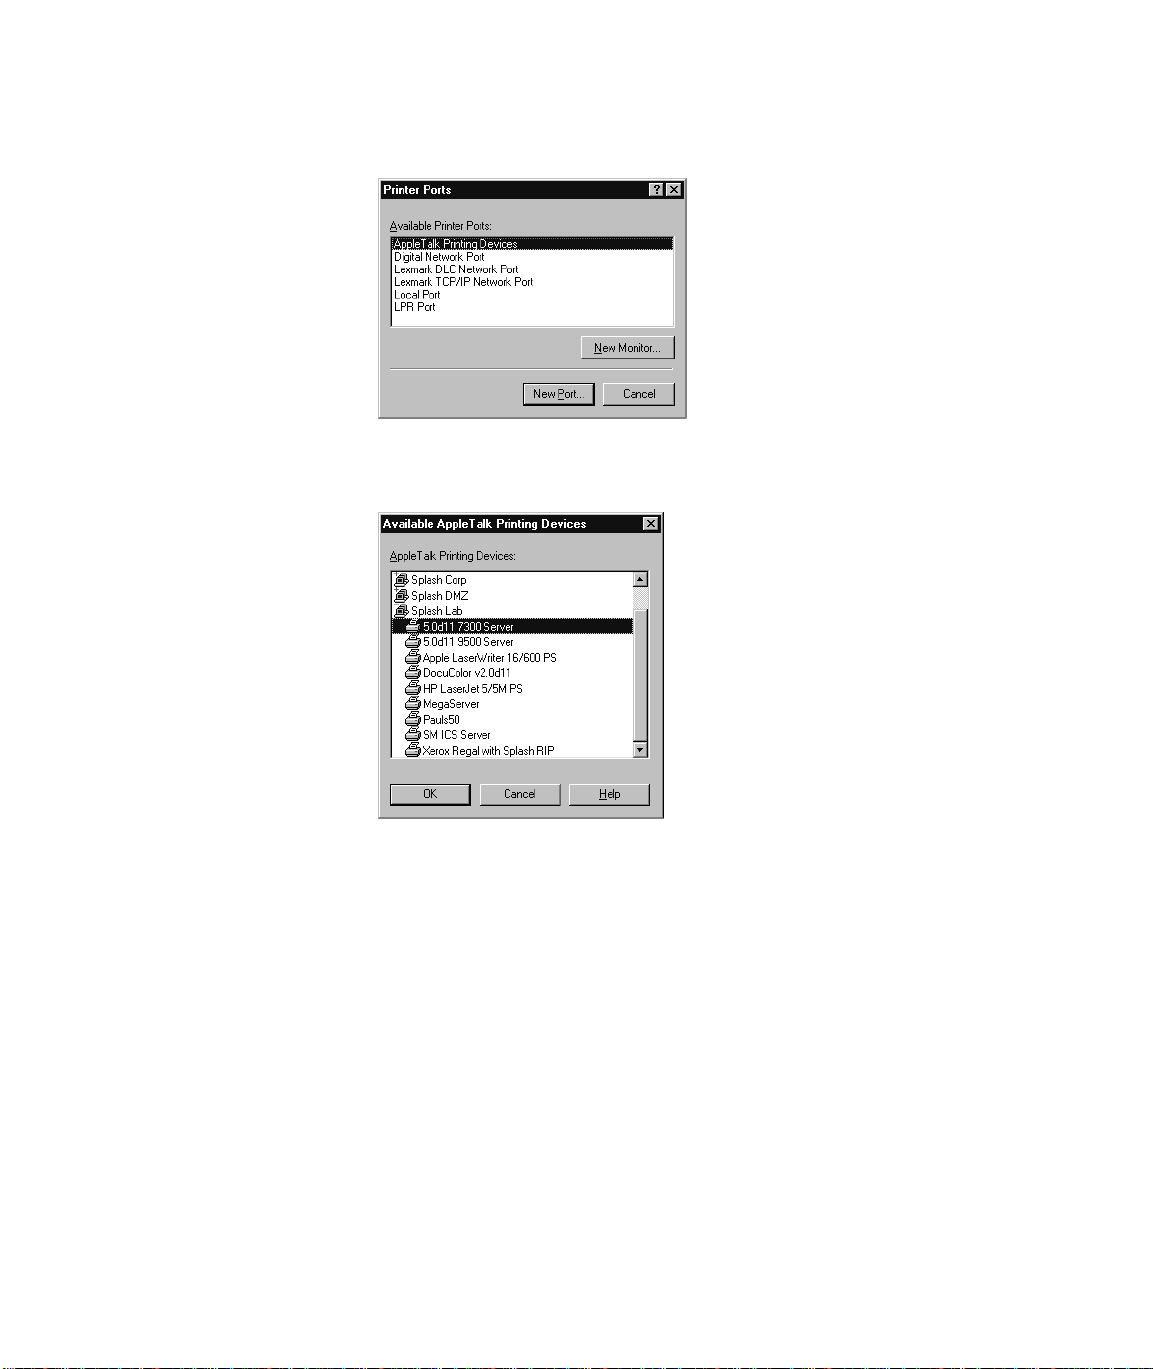
6.
Click Add Port. A list of printer ports you can add appears.
7.
Select AppleTalk Printing Devices from the Available Printer Ports list, then
click New Port.
8.
Locate the Splash Server in the list of AppleTalk Printing Devices, select the
Splash Server, then click OK.
Chapter 1: Setting Up For Printing to Splash Page 17
Page 18
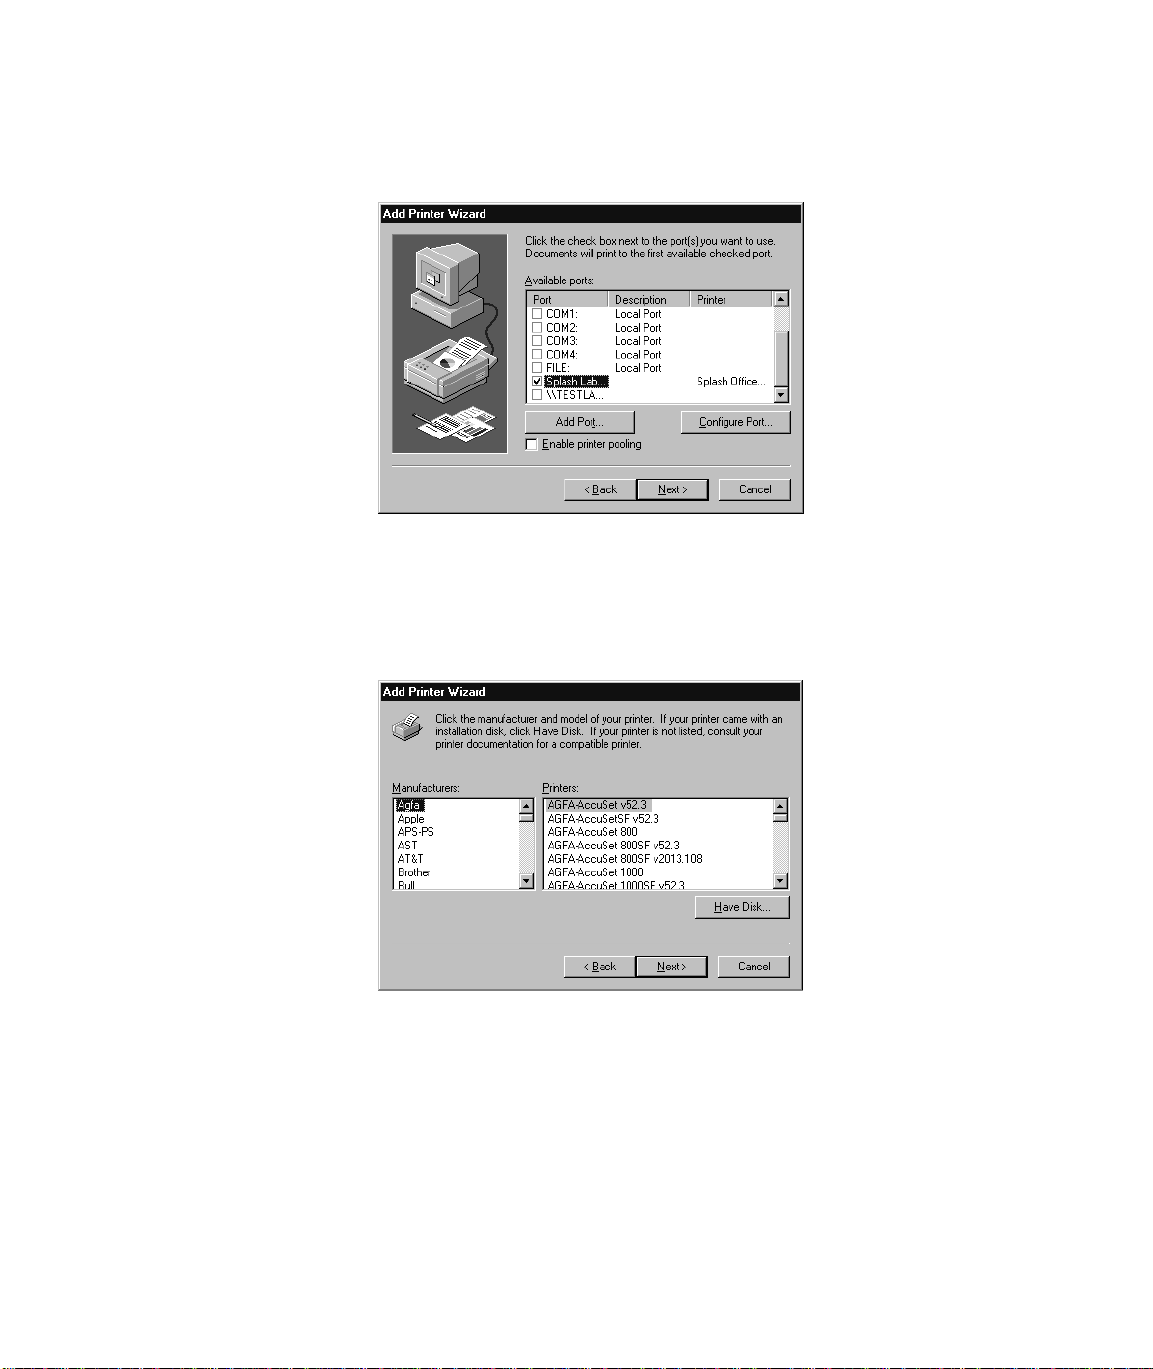
The Splash Server appears in the list of Available ports in the
Add Printer Wizard.
9.
Be sure the Splash Server is selected in the Available ports list, then click Next
to continue.
The Add Printer Wizard asks you to select the manufacturer and model for
your printer.
Page 18 Printing to Splash v6.0 From Windows NT
Page 19
10.
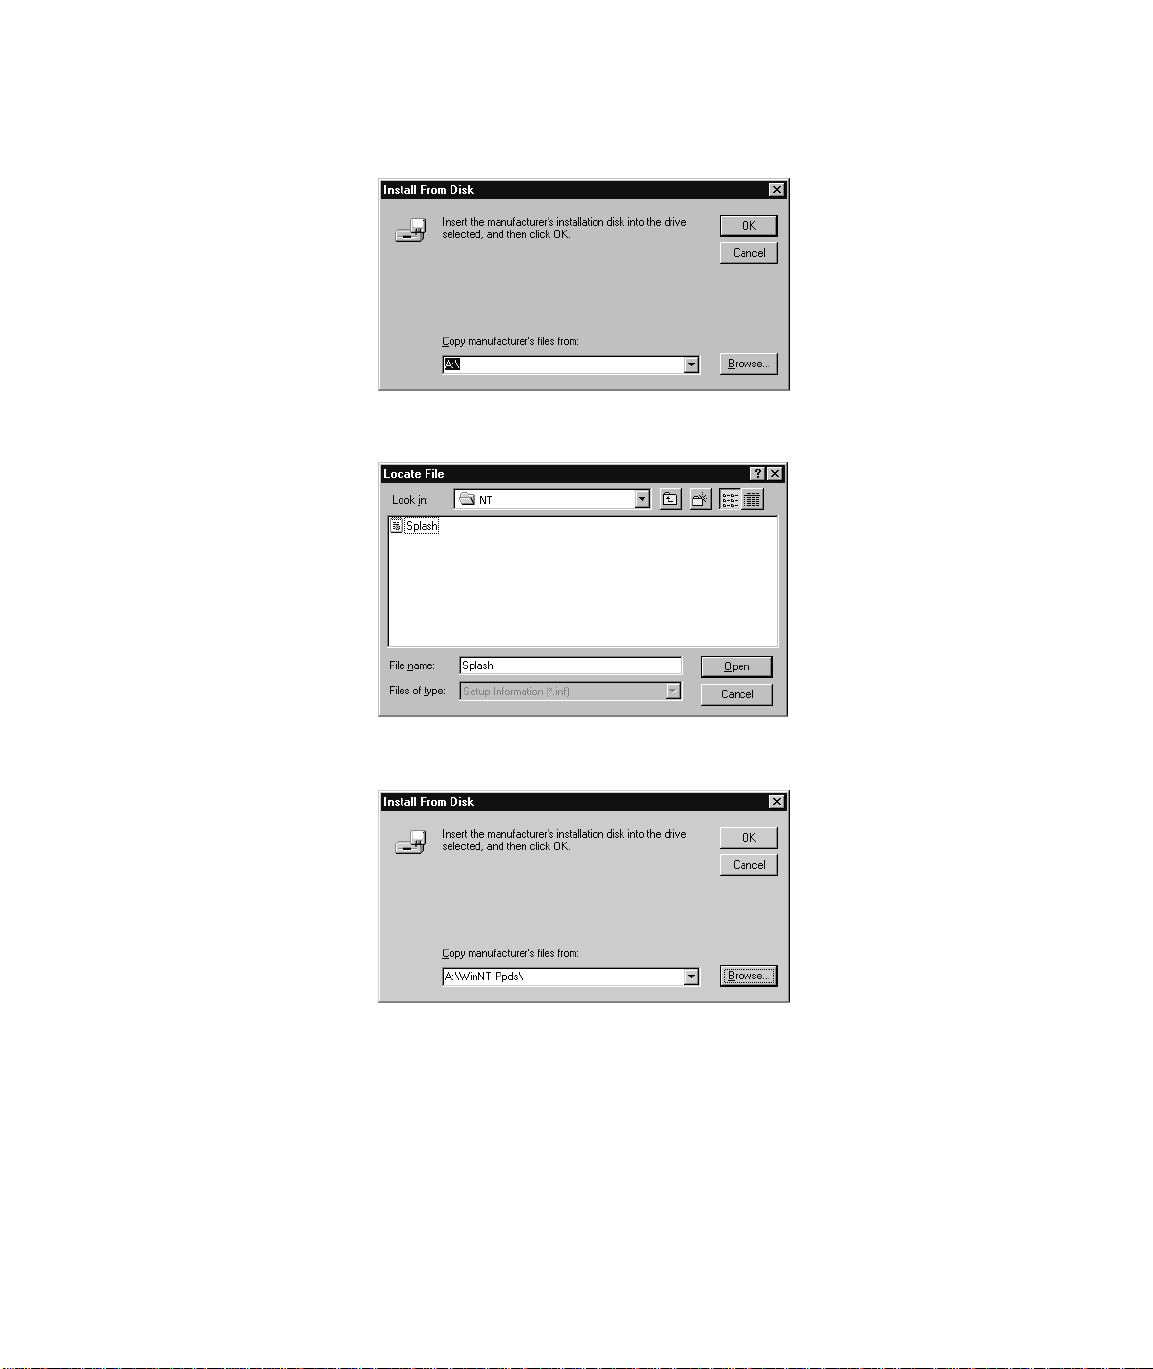
Click Have Disk.
11.
Insert the
Splash CD in your computer, then click Browse.
12.
Open the Windows NT directory, select the file “Splash” then click Open.
Chapter 1: Setting Up For Printing to Splash Page 19
Page 20

13.
Click OK. Windows NT asks you to select the model of your Splash printer.
14.
Select the model of your Xerox or Fuji Xerox printer/copier from the
Printers list. The options are:
■
Splash 5790 v6.0
is for the Regal or Acolor 930 series and MajestiK and
Acolor 630 series printer/copiers
■
Splash 5799 v6.0
■
Splash 5750 v6.0
is for the DocuColor 5799 series printer/copiers
is for the Acolor 620 and DocuColor 5750 series printer/
copiers
15.
Click Next to continue with printer setup.
Windows NT displays more options for setting up the Splash printer.
Page 20 Printing to Splash v6.0 From Windows NT
Page 21

If you want to change the name for the Splash printer/copier, type a new
■
name in the text box. (The name you enter becomes the name of the
printer as it appears in your applications and in the Printer control panel.)
If you want the Splash printer/copier to be the default printer for your
■
computer, choose Yes. Otherwise, choose No.
16.
Click Next to continue.
17.
Choose Shared to allow other Windows NT and Windows 95 clients located in
the same network zone to connect to this print queue for printing to Splash. If
you do not choose Shared, only this computer will be able to print to Splash.
If you choose Shared, select the operating systems for all computers that will
use the print queue from the list.
18.
Click Next.
Chapter 1: Setting Up For Printing to Splash Page 21
Page 22

Windows NT asks you to insert system software disks for the operating systems you selected in the previous step. Insert the floppy disks or CD-ROMs
and click OK as directed by the Add Printer Wizard. When all files are copied,
the Add Printer Wizard asks if you want to print a test page.
19.
Click Yes to print a test page, then click Finish.
20.
Click OK, insert the Windows NT system software CD-ROM in your computer’s CD-ROM drive, then click OK.
Windows NT copies the files needed to set up the print queue. A test page
prints at the printer/copier to confirm that setup was successful.
Page 22 Printing to Splash v6.0 From Windows NT
Page 23

21.
Click Yes. The Splash printer appears in the Printers control panel.
Setup for printing to the Splash Server is complete.
Chapter 1: Setting Up For Printing to Splash Page 23
Page 24

Page 24 Printing to Splash v6.0 From Windows NT
Page 25

Chapter 2
Printing to Splash
After you install the Splash Windows NT software and connect to the Splash
Server, you are ready to print. This chapter describes how to customize print
options for your files, and how to print to the Splash Server. This chapter also
explains how to print your documents as PostScript or EPS (Encapsulated Post-
S
cript) files.
Setting Splash Print Options
Before you print a document to Splash, select print options such as paper size and
orientation, color correction, scaling and number of copies to print. This section
describes how to set Splash print options with the “Print” command provided by
your applications.
Many applications provide a “Printer Setup” or “Page Setup” command that lets
you set Splash print options from your application. See the manual for your application for information.
Note:
The Page Setup and Print dialog boxes in your applications may appear
somewhat different from those that appear in this manual. See the manual for your
application for information about print options that are not described in this chapter.
Chapter 2: Printing to Splash Page 25
Page 26

To set Splash options when you print a file:
1.
When you are ready to print a file, choose Print from the File menu in your
application. The Print options appear.
The Print dialog box for your application may be simple, or it may contain
many extra options for the special features of your application. Adobe Illustrator, for example, has a very simple Print dialog box. The Print dialog box for
QuarkXPress has many print options.
2.
Enter the number of copies to print.
3.
Select “All” to print all pages of your document, or enter a range of pages to
print and select “Pages.”
4. Click Properties.
Page 26 Printing to Splash v6.0 From Windows NT
Page 27

5. In the Properties dialog box, click the Advanced tab. The Splash Document
Properties appear.
Note: This manual describes how to select options that are specific to the
Splash printer/copier. W indo ws NT provides other page setup and print options
that you can use when you print. Refer to the Windows NT On-line Help for
information about how to use other print options that appear.
6. Select a paper size from the Paper Size list. If you select an option other than
“Auto Tray Select,” be sure the correct paper is installed in the tray you select
in Step 8.
IMPORTANT: The Paper Size list for Windows NT applications always
includes some paper sizes that are not supported by the Splash Server. Refer to
the Splash PCI v6.0 Reference manual for a list of supported paper sizes for
printing to Splash.
The paper sizes DocuPac, 12x18, A6, 4x6, B5SEF, and B5LEF print only to
the bypass tray.
When a paper size has an LEF-suffix (Letter LEF, for example), the paper is
loaded with the long edge of the sheet feeding from the tray. When a paper size
has an SEF suffix (such as A4 SEF), the paper is loaded with the short edge of
the sheet feeding from the tray.
Note: Paper sizes that do not have an “SEF” or “LEF” suffix are handled as
short edge feed (SEF) paper by the printer/copier.
The Splash servers print all supported paper sizes and orientations at 400dpi in
both directions.
Chapter 2: Printing to Splash Page 27
Page 28

7. Under Orientation, select Portrait, Landscape, or Rotated.
If you print to a MajestiK (DocuColor 5788), Regal (DocuColor 5790), DocuColor 5799, or Acolor 630 series or 930 series printer/copier, the edge that
feeds into the printer has a margin of 9 mm; the other edges have a 4 mm margin. If you print to an Acolor 620 or DocuColor 5750 printer/copier, the edge
that feeds into the printer has a margin of 6 mm; the other edges have a 4 mm
margin.
Note: Both “LEF” and “SEF” paper sizes can use any paper orientation.
8. Select a default paper tray from the Paper Source list.
If you select Auto Select or Automatically Select, the printer automatically
selects a tray based on the page size of the document. You must choose Bypass
Tray to use the manual feed option on the printer/copier.
Note: Some applications let you print page one of your document from one
paper tray, and all remaining pages from another paper tray. This feature does
not work when you print to the Splash Server. All pages will print from the
paper tray you selected for page one.
Note: For all applications except Adobe PageMaker 6, the paper source menu
contains both an Auto Select and an Automatically Select option. Select either
option to activate the AutoSelect feature.
IMPORTANT: If Tray 4 is selected and the printer/copier does not support a
4th paper tray , the print job is handled by the Automatic tray selection feature.
Tray 4 is an option with the Acolor 620 and DocuColor 5750 printer/copier.
9. Enter the number of copies to print.
10. Scroll down the Advanced options list to select the Splash print options.
See “Using the Splash Print Options” on page 29 for complete descriptions of
the Splash print options that appear in the Advanced tab.
11. When you have made all selections for printing, choose OK.
12. Click OK in the Print dialog box to send the print job to the Splash Server.
Page 28 Printing to Splash v6.0 From Windows NT
Page 29

Using the Splash Print Options
This section describes how to use the special print features of the Splash color print
server. This options are listed under Printer Features in the Properties dialog box.
Setting Splash Tray Options
These options let you specify the type of paper loaded in the bypass tray, and tells
the printer/copier how to sort or collate the printed job.
Bypass T ray Options
To use the bypass tray, you must select “Bypass Tray” in the Paper tab in the
Printers Properties dialog box (see page 28), then specify the type of paper loaded
in the bypass tray in the Device tab.
■ Select Normal to print on recommended paper between 16 to 24 pounds.
■ Select Transparency to print on 60 to 105 gsm Xerox transparencies with a
white leading edge. For information on recommended transparencies, refer to
the manuals supplied with your printer/copier. The only page size you can use
with this bypass tray option is either A4 LEF (A4L) or Letter LEF (LetterL),
depending on the copier configuration.
■ Select Heavy W eight Paper to print on paper that is heavier than 24 pound or
105 gsm. See the manuals supplied with your printer/copier for information on
recommended heavyweight paper.
■ Select Transparency Interleave to have the printer insert blank sheets of
paper between printed transparencies. For transparency interleave, you must
have a paper size that matches the transparency film size installed in a cassette.
If no matching paper size is installed, the transparencies are printed without
separating sheets.
The following Bypass Tray options can be used when the Splash Server is used
with an Acolor 620 or DocuColor 5750 series printer/copier:
■ Special Heavy Paper
■ Coated Paper
■ Single Step Transfer
■ Labels
See the manuals supplied with your printer/copier for information on recommended
paper types for these Bypass Tray options.
Chapter 2: Printing to Splash Page 29
Page 30

The following Bypass T ray option can be used when the Splash Serv er is used with
an Acolor 620, DocuColor 5750, or DocuColor 5799 series printer/copier:
■ Tack Film. The paper sizes supported for this Bypass Tray option are Letter
and A4 only. See the manuals supplied with your printer/copier for information
on recommended paper.
When you insert paper or transparencies into the Bypass tray, the printer/copier
defaults to its Paper Type (Bypass) mode. Push the yellow Clear All button on the
printer/copier after you insert the paper or transparencies to return immediately to
the print mode.
Use Sorter
If the optional sorter is attached to the printer/copier, select “Yes” in the Use Sorter
menu to put all copies of page 1 into bin 1, page 2 into bin 2, and so on. When this
option is disabled, Splash stacks all output pages on top of each other in the bin on
the top of the copier.
Note: If you select Use Sorter with the DocuColor 5750 or Acolor 620 series
copier, Collate is automatically set to On.
Collate
Select “Yes” in the Collate menu to print all pages of copy 1, then all pages of copy
2, and so on. When Use Sorter is enabled also, Splash sends each copy of a job to a
different bin (copy 1 of all pages go into bin 1, copy 2 into bin 2, and so on). When
Use Sorter is disabled, Splash sends all copies on top of each other in the bin on the
top of the copier.
Note the following when you use the sorter for uncollated jobs on the MajestiK
(DocuColor 5788), Regal (DocuColor 5790), or DocuColor 5799:
■ If there are more than 20 pages, Splash prints copies of the first 20 pages in the
20 bins and then an alert dialog appears at the Splash Server to advise you that
the sorter bins are full. If the bins are cleared before the error timeout elapses,
the job continues to print. If the bins are not cleared before the error timeout
elapses, the job moves to the error queue.
■ If there are more than 50 copies in the job, Splash prints 50 copies of each page
into the appropriate bin and then an alert dialog appears at the Splash Server to
advise you that the sorter bins are full. If the bins are cleared before the error
timeout elapses, the job continues to print. If the bins are not cleared before the
error timeout elapses, the job moves to the error queue.
Page 30 Printing to Splash v6.0 From Windows NT
Page 31

Note the following when you use the sorter for collated jobs:
■ For the MajestiK, Regal, or DocuColor 5799, if there are more than 50 pages,
Splash prints the first 50 pages of each copy into the appropriate bin and then
an alert dialog appears at the Splash Server to advise the operator that the
sorter bins are full. If the bins are cleared before the error timeout elapses, the
job continues to print. If the bins are not cleared before the error timeout
elapses, the job moves to the error queue.
■ For the MajestiK, Regal, or DocuColor 5799, if there are more than 20 copies
in the job, Splash prints the first 20 copies into the first 20 bins, and then an
alert dialog appears at the Splash Server to advise you that the sorter bins are
full. If the bins are cleared before the error timeout elapses, the job continues to
print. If the bins are not cleared before the error timeout elapses, the job moves
to the error queue.
■ For the DocuColor 5750 copier, if there are more than 30 pages, Splash prints
the first 30 pages of each copy into the appropriate bin and then an alert dialog
appears at the Splash Server to advise you that the sorter bins are full. You can
clear the bins and click a “Proceed” button to tell the server that the bins have
been cleared. If the “Proceed” button is not selected before the error timeout
elapses, the job will be cancelled. If you select “Proceed” without first clearing
the bins, the sorter will overflow.
■ For the DocuColor 5750 copier, if there are more than 10 copies in the job,
Splash prints the first 10 copies into the first 10 bins, and then an alert dialog
appears at the Splash Server to advise you that the sorter bins are full. You can
clear the bins and click a “Proceed” button to tell the server that the bins have
been cleared. If the “Proceed” button is not selected before the error timeout
elapses, the job will be cancelled. If the you select “Proceed” without first
clearing the bins, the sorter will overflow.
IMPORTANT: Be sure to disable the “collate” option in your applications before
you print to Splash. Some applications provide a collate option that appears in the
Print dialog box. Many applications activate the collate option as a default setting,
so you must be sure to uncheck this option in the Print dialog box before you print.
If the collate option in your application is activated (checked), it usually interferes
with the Splash sorter feature and results in all pages of your document being
placed in a single tray by the printer/copier.
Chapter 2: Printing to Splash Page 31
Page 32

Reverse Page Order
Select “Yes” in the Reverse Page Order menu to print jobs starting with the last
page of the document. Collated documents that are sent to the top bin of the copier
end up face-up with page one on top.
Note the following when you use the Splash Reverse Page Order option:
■ If your application provides reverse order printing (sometimes called “reverse
order” or “back-to-front” printing), select the application’s option instead of
the Splash print driver option.
■ If a sorter is connected to the copier, and you want to print multiple collated
copies, use the sorter.
■ Do not select Reverse Page Order for a separations print job.
■ Print jobs with Reverse Page Order selected do not use the Splash RIP While
Receive feature.
Duplex Printing
Use the Duplex options to set up manual duplex printing. This specifies that the job
will be printed as two-sided output. When this option is selected for a job with the
page range set to “All” or “Selected,” the Splash Server applies the Duplex Alignment offsets to all even pages in the job. The server pauses printing after the first
page has printed and a message appears instructing you to place the page in the
paper or bypass tray in preparation for printing the next page. When ready, click the
“Proceed” button in the dialog box. The back of the first page is printed along with
the third page in the document. Y ou are then prompted to remo v e the page and print
the other side.
Note: For long documents, you can avoid this process by performing the follo wing
steps:
1. Print the job to the Splash Server with the “Print and Hold” spool option
selected.
2. Use the Splash Job Editor to print only the odd pages for the job.
3. Place the printed odd pages in the paper tray in preparation for printing the
even pages. Make sure that the orientation is appropriate for your copier/
printer.
4. Use the Splash Job editor to print the even pages for the job. The Duplex
Alignment offsets set on the Splash Server are applied to the even pages.
Page 32 Printing to Splash v6.0 From Windows NT
Page 33

You can also print manual duplex jobs by printing a job as Send and Hold with
Manual Duplex selected. You can then print all odd pages from the Splash Server,
then remove and turn over the pages and choose to print all even pages at the
Splash.
Setting Splash Color Options
The Splash color options let you set up the printer/copier for four-pass color printing or grayscale printing, with contone or halftone screening. You can also apply
Splash color correction to your print jobs.
Color Model
Select Color (4 pass) or Grayscale (1 pass) printing as a Color Model for your
output. Grayscale images produce similar results with either mode; however,
images process and print significantly faster in Grayscale mode than in Color mode.
Printer Mode
This option switches printer output between Contone (full color) output and
Screened output. When Screened is selected, Splash applies halftone screening to
the color image. In certain circumstances (such as documents composed primarily
of large areas of saturated color), halftone screening produces better results in the
printed output. The screening method used when “Screened” is selected is configured at the Splash Server. The default screening method is stochastic. See the
Splash PCI Series 6.0 Set-Up Manual for more information.
RGB Monitor Color Correction
Splash RGB Monitor Color Correction gives you simple-to-use, accurate, and
consistent results for:
■ Documents with mixed EPS and TIFF file types
■ Documents created with “pre-press” applications (such as QuarkXPress) and
by non-pre-press applications (such as Microsoft Word)
Splash uses advanced, proprietary techniques to accurately color-correct mixed
EPS, TIFF, PICT, and other “problem” page layout files that cannot be accurately
corrected and printed by other CMS and RIP combinations.
T o apply Splash RGB color correction to the print job, select “Enabled” in the RGB
Monitor Color Correction menu, then select the appropriate RGB options from
the Rendering Style, Gamma, and Whitepoint menus.
Chapter 2: Printing to Splash Page 33
Page 34

Rendering Style
Select a Rendering Style that describes how the document was created:
■ Choose Graphics for documents that were created with a computer graphics
application. This option is designed to optimize printing of more saturated colors, such as those used in business presentation documents.
■ Choose Photographic to match the colors of various scanned photographic
images. This is the best option to choose for proofing photographic material.
Note: The default Rendering Style is Photographic.
Gamma
The Gamma options adjust Splash color correction to simulate the monitor used to
view and work with the document. For most purposes, choose Normal (1.8) for
Gamma.
Gamma describes how a device reproduces tonal gradations. This setting applies to
both the input device (such as a scanner) and the output device (such as a computer
monitor or a printer). You can use this option to lighten or darken the RGB content
of a particular document. The Gamma options are:
■ Lightest (1.0)
■ Light (1.4)
■ Normal (1.8)
■ Dark (2.2)
■ Darkest (2.6)
Whitepoint
The Gamma and Whitepoint options adjust Splash color correction to simulate the
monitor used to view and work with the document. For most purposes, choose Nor-
mal (D65) for Whitepoint.
Splash RGB color correction provides three standard whitepoint options. The
options simulate various lighting conditions for proofing color documents. This
option can be used to adjust the RGB content in a particular document relative to
the whitepoint of the monitor. If flesh tones or red tones are too magenta, skies and
other blues too cyan, and grass and greens too dark (almost bluish), change the
Page 34 Printing to Splash v6.0 From Windows NT
Page 35

Whitepoint selection from “Normal” to “More Blue. ” If flesh tones and reds are too
yellow , blues too purple, and greens too yello w, change the Whitepoint setting from
“Normal” to “More Yellow.”
The Whitepoint options are:
■ More Yellow (D50 Proofing)
■ Normal (D65)
■ More Blue (9300)
See page 43 for more information about Splash color correction.
CMYK Press Color Correction
To apply Splash CMYK color correction to the print job, select “Enabled” in the
CMYK Press Color Correction menu, then select the appropriate option from the
Press Profile menu.
■ SWOP simulates SWOP inks.
■ Euroscale simulates Euroscale press inks.
■ Enhanced prints vivid colors on your output. (This profile is not intended for
printing press proofs.)
■ Custom1 through Custom10 are customizable options set at the Splash Server.
Ask your Splash Server administrator about the current settings for these.
See page 43 for more information about Splash color correction.
Composite Spot Colors
Splash can simulate PANTONE, Toyo, HKS, or DIC spot colors when you add
them to your documents. You must print your documents in composite mode to use
this feature.
To print a composite document with simulated spot colors, set the Composite Spot
Color type (PANTONE, Toyo, DIC, HK, HN, HE, or HZ) in the Splash Server Preferences (see the Splash PCI Series v6.0 Set-Up Manual for instructions). Then
select “Enable” in the Composite Spot Colors menu at the printer driver before
you print. Splash produces output that simulates the spot color on a printing press.
Note: This feature supports only 100% (non-tinted) spot colors. For best results, do
not mix regular press CMYK colors in the same document with spot colors when
you use this feature. (Some press CMYK colors may be interpreted as spot colors.)
Chapter 2: Printing to Splash Page 35
Page 36

Text Enhancement
These Splash features, when enabled, improve the printing of text and line drawings. The text enhancement options include:
■ Dynamic Edge Smoothing—enhanced printing of text and drawings that con-
tain fine lines by smoothing lines and avoiding “jaggies.”
■ Black Overprints—100% black overprint, no knockout of underlying colors.
This prevents any “halo” effect when printing black on top of another color.
■ Alternative Black (Un-mixed) —substitutes a pure (C=M=Y=0, K=100)
black for any R=G=B black in the document. This prev ents the buildup of toner
on the page and alleviates any shadows created by misregistered mixed black.
Text enhancement options are set to “On” or “Off” for a print job.
Setting Other Splash Options
This section describes other Splash options you can apply to your print jobs.
Spool Options
Splash provides three options for handling the PostScript spool file that is created
when you print to Splash:
■ Print and Delete automatically deletes the spool file after printing the job.
■ Print and Save saves the spool file after printing. The job is transferred to the
Hold queue with the message “PostScript spool file saved as requested.”
■ Send and Hold sends the spool file directly to the Hold queue after is received
by the Splash Server.
Saving the spool file is useful when small quantities of the same file must be printed
occasionally. You can change print options for the saved spool file before printing
with the Splash Server application. See the Splash PCI Series v6.0 Set-Up Manual
for information.
Note: Saved spool files remain in the Hold queue until you delete them. To delete a
spool file:
■ Select it in the Splash Server Hold queue, then press the Delete key,
■ Choose Delete Job from the Jobs menu.
■ Drag the spool file to the trash.
Page 36 Printing to Splash v6.0 From Windows NT
Page 37

Separations
Some applications, most notably page layout applications such as PageMaker and
QuarkXPress, can produce “separations” as printed output. These are intended to be
imaged on film imagesetters and thus each page is converted to one or more (usually four) output grayscale “pages.” If you print separations to a printer that does
not have a special separations feature, you will get one grayscale page per color in
the original page.
The Splash Server has the ability to re-composite these individual pages back into a
single color page to produce a real proof (equivalent to the proof that would be produced from the films via conventional means). The primary benefit of separations is
to show overprinted objects with proper colors and to make trapping visible.
The Splash Separations print option prints a composite page from applications that
support separations printing.
■ Select Automatic to apply the Splash Separations feature to all your separa-
tions print jobs automatically. This default option supports CMYK plates plus
any number of plates in PANTONE, Toyo, HKS, or DIC (if these press colors
are supported by your separations application). This option supports separations generated by any application. When this option is selected, Splash supports the full range of PANTONE, Toyo, HKS, or DIC colors and tints in your
documents.
Note: The Splash Separations feature does not accurately represent traps or
overprints composed of a PANTONE, Toyo, HKS, or DIC color.
Note: Due to limitations in PageMaker and QuarkXpress, RGB graphics are
converted to CMYK and therefore look similar. RGB images are converted to
grayscale and appear as gray in the output.
■ Select Disabled to disable the Splash Separations feature for a job.
The remaining separation options, QuarkXPress 3.0 Style, QuarkXPress 4.0
Style, PageMaker Style, FreeHand Style, and Canvas Style use a separations
technique from version 4.0 of the Splash PCI Series software. These options require
that the separations job be made up of exactly four process-color plates. These
options do not support additional P ANT ONE plates. If problems occur in the output
when you print separations with “Automatic” selected, convert the colors in your
document to four process plates, then select the v 4.0 separations option that
matches your application.
Chapter 2: Printing to Splash Page 37
Page 38

Separations Notes:
The Splash Separations feature supports printing of high-resolution DCS (Desktop
Color Separation) files. To print a high-resolution proof of a DCS file, activate the
separations feature within your application and in the Splash driver print options
dialog box.
The Separations feature is not compatible with Adobe Separator separation jobs.
To use separations with Adobe Illustrator (typically done with Adobe Separator),
create an EPS and place it into either a QuarkXPress or PageMaker document.
Do not choose the Cover Page option in your application’s print dialog box when
you print a separations job to Splash. The cover page is interpreted as a color plate,
which causes unexpected results in the separations job. (This problem does not
occur when the Print Cover Page option is acti ve for the Splash Server application.)
For best results, do not use the version 4.0 separation options to files with spot colors. Always choose “Automatic”. If your job reports a PostScript error printing a
CMYK-only file (no spot colors) with the “Automatic” separation option, try printing with one of the version 4.0 separation options.
If a separations document contains one or more spot colors, any spot colors that are
not known by the system will be printed as black (or grayscale for tints). The job
will not error. If the spool file “print and sa ve” option is w as selected for the job, the
spool file at the Splash Server will show the message “Document printed, but
unknown spot color: NAME. Run Preflight report for more details.” (NAME is the
name of the unknown spot color.)
If you use a v6.0-style CMYK color correction profile with a separations file, any
black areas (including those created with CMY inks) will print using mainly black
(K) toner. If you want the output to be closer to the original CMYK values for the
purpose of retaining trapping, select a v4.0-style CMYK color correction profile for
the job.
Page 38 Printing to Splash v6.0 From Windows NT
Page 39

Original Type
This print option sets printer/copier screening and filtering to optimize output based
on the image type.
■ Select Photographic for photographic originals to optimize the output, using a
200-line screen at 400 dpi. This is the best option to choose for color images.
■ Select Text/Graphics/Line Art to optimize the output of all other data types,
including text and line art, using a 400-line screen.
Note: When “Text/Graphics/Line Art” (400-line screen) is used, even if color
correction mode is selected, appropriate colors are not always printed. The colors
printed sometimes differ from when “Photographic” is selected. For documents that
emphasize the color image, select “Photographic.” For documents that emphasize
sharp lines (such as a map), select “Text/Graphics/Line Art.”
Document Mode
Select “Enable” in the Document Mode menu to print the document with the
Splash Continuous Print feature. This feature dramatically speeds up printing.
Note: When this feature is selected Splash applies screening to the output to
achieve faster print processing. This feature does not allo w contone printing. Select
this option when speed of printing is the highest priority for your output.
Printing Style
The Printing Style option you select determines how the Splash Server processes
your print job when Document Mode is selected. For some print jobs, Splash must
reduce the quality of images or text to accomplish faster printing at the copier. The
Printing Style option lets you decide which element is more important in your final
output. Select Favor Image (the default setting) to produce the best possible quality for documents with photographic materials and large areas of color. Select
Favor Text to produce the sharpest-possible text and lines in the final output.
Print Control Strip
When you select “Enable” in the Print Control Strip menu, Splash prints a set of
color control patches on the edge of the output. This option can be configured to
print either color patches or an EPS file or both. See the Splash PCI Series v6.0
Set-Up Manual for more information.
Note: The control strip image will overwrite the job image if it occupies the same
part of the page in the output.
Chapter 2: Printing to Splash Page 39
Page 40

Print Progressives
When you select “Enable” in the Print Progressives menu, Splash prints up to four
separate sheets for the print job. This print option is configured at the Splash Serv er
to specify which color passes print on each sheet. This allows you to examine the
result of each color pass for a four-color document. See the Splash PCI Series v6.0
Set-Up Manual for more information.
Note: Do not choose the Cover Page option in your application’s print dialog box
when you print a progressives job to the Splash Server. The cover page is interpreted as one of the progressives pages, which causes unexpected results in the job.
(The problem does not occur when the Print Cover Page option is active for the
Splash Server application.)
Note: If you are using progressives to create press proofs, for best results select one
of the Splash v4.0-style one-dimensional CMYK Press Color Correction profiles
for the print job (see “CMYK Press Color Correction” on page 35). Ask your
Splash system administrator for information about the current CMYK profile settings. See the chapter “Calibrating W ith ColorCal” in the Splash Reference Manual
for more information about CMYK Color Correction profiles.
Sharpness
The Sharpness feature lets you enhance or soften the edges of your image when you
print. (When you apply a Sharpness setting, no additional processing time is
required.) The Sharpness settings are:
■ Softest
■ Soft
■ Normal
■ Sharp
■ Sharpest
The Sharpness feature is not available with the Acolor 620 or DocuColor 5750
printer/copier.
Page 40 Printing to Splash v6.0 From Windows NT
Page 41

Auto Grayscale Detection
Automatic Grayscale Detection (enabled by default in the print driver) checks each
page to see if a page has any color on it before printing. If there is no color detected
on the page, the copier prints in single-pass grayscale mode, which speeds up printing, especially for multi-page documents that contain only some color pages. (This
also reduces the cost of printing, as you are charged for fewer color pages.) Disable
this feature for maximum printing performance when printing documents that have
color on every page. (When activ e, this feature adds approximately one-half second
to the printing of each color page.) This feature is active when the Color Model is
set to “Color” (see page 33). The log file indicates the number of pages within the
document that were printed in grayscale mode on the copier as a result.
Note: For fastest printing of an entirely black and white document, set the Color
Model to Grayscale for the print job (see page 33).
Save as TIFF
Saves a rasterized 72, 200, or 400 dpi TIFF file. The TIFF file is placed in the TIFF
Folder within the Splash Folder on the Splash Server computer. To activate this feature, select a resolution from the Save As TIFF menu.
When Save As TIFF is selected, files are not printed, but are instead sa ved as files in
the TIFF Folder within the Splash Folder on the Splash Server Macintosh. The
TIFF Folder is pre-configured for network access by AppleTalk clients. This setup
allows client PCs with an AppleTalk network connection to the Splash Server to
retrieve TIFF files from the TIFF Folder on the Splash Server, and to delete TIFF
files from the folder once they have been copied to the client PC.
Note: If you select a paper tray for a Save As TIFF job, the print job will error at
the Splash Server. Always select Auto Tray Select for Save As TIFF jobs.
Creating a PostScript or EPS File
As an alternative to printing your document on the Splash printer/copier, you can
save a PostScript language description of your document as a disk file. PostScript
language descriptions of documents can be used to:
■ Create on-disk document archives
■ Print a document from a computer that does not have the application that cre-
ated the document
■ Diagnose printing problems
Chapter 2: Printing to Splash Page 41
Page 42

You also may want to create an Encapsulated PostScript (EPS) file, a description of
your document that can be imported into other documents.
Some Windows applications provide a Print to File check box in the Print dialog
box. If your application does not provide this option, you can use the Windows 95
Printers Properties dialog box to choose a PostScript or EPS file as the print destination.
To print a document to a file:
1. When you are ready to print a file, choose Print from the File menu in your
application. The Print options appear.
2. Select print options for the file (the Splash print options are described in the
previous section in this chapter).
3. When you have finished selecting print options, select the Print to file check-
box.
4. Click OK.
5. Enter a path and filename, then choose OK to create the file.
Refer to the Windows NT On-line Help for more information.
Page 42 Printing to Splash v6.0 From Windows NT
Page 43

Printing an Acrobat PDF File
You can print PDF-format files created for viewing in Adobe Acrobat by downloading them to the Splash Server with the Web Queue Manager. If you have Acrobat
installed on your computer, you can also drop print a PDF file by dragging it to the
Splash spool icon.
Deleting a Print Job
T o delete a print job, you can either choose Cancel in the dialog box that appears as
the job is spooling, or delete the job through the Print Manager if it is enabled. (See
the documentation provided with Windows NT for instructions.)
Splash Color Correction
Splash has built-in color correction capabilities, so you can match your prints to the
colors of the image on your display screen and to process inks used on commercial
printing presses.
Documents that use both RGB and CMYK graphics used to be a special problem
for color proofing. Correcting color for one type of graphic affected the quality of
the other. No w, with Splash mixed RGB/CMYK color correction, you get accurate,
consistent color for both.
CMYK color correction in v6.0 of the Splash PCI Series is optimized for matching
mixed press ink colors. Splash CMYK color correction automatically compensates
for differences between toner and press ink colors to produce an accurate simulation of the selected press ink profile.
Splash color correction eliminates the color variation that occurs when you print a
document as a PostScript file instead of to hard copy, and produces the same RGB
color results for both TIFF and EPS files. And since color correction is applied by
Splash (instead of by the application) any print job can be color corrected, whether
you use a pre-press application such as QuarkXPress, or a less-complex application
such as Microsoft Word.
To ensure the closest possible color correction, use a display calibrator to compensate for the variations of your individual monitor, the lighting conditions in your
office, and the whitepoint of your paper.
Chapter 2: Printing to Splash Page 43
Page 44

T wo “identical” b ut uncalibrated monitors may display an image differently enough
to exceed the ability of a color correction application to closely match them. In
addition, the colors you see on your printed page are affected by the light that is
reflecting off the toner and by the particular shade of white in your paper. If you do
not calibrate your display, you may not be taking advantage of some significant
benefits that your color correction application offers. Display calibrators can standardize the colors on your display and compensate for different lighting conditions
and whitepoints.
If you prefer, you can disable Splash color correction and use a third-party color
management system to accomplish your screen-to-print or process ink-to-print
color correction. (Color correction using a third-party color management system
will increase processing time.)
The Splash ColorCal application can be used to calibrate each of the color correction settings described below. ColorCal gives you consistent printing of colors over
time, and ensures that RGB output matches a calibrated monitor and that CMYK
output matches Press standards.
Splash Color Correction Notes
To achieve the best results with Splash color correction, note the following:
■ When both RGB and CMYK color correction are applied to a print job, any
RGB colors in the document are mapped into the gamut of the CMYK color
profile. RGB colors within the CMYK profile color gamut will match the RGB
monitor settings (gamma and whitepoint), but RGB colors outside the CMYK
profile color gamut may develop desaturation and hue shifts.
■ If your document contains no CMYK data, or if the RGB colors are primarily
out of the CMYK profile color gamut, be sure to turn off Splash CMYK color
correction in the printer driver. If CMYK color correction is applied to these
files, the RGB colors will be restricted to the CMYK profile color gamut and
saturated colors may develop desaturation and hue shifts.
IMPORTANT: MOST BUSINESS APPLICATION DOCUMENTS CONTAIN
ONLY RGB DATA. CMYK COLOR CORRECTION SHOULD NORMALLY BE
TURNED OFF FOR PRINTING THESE DOCUMENTS.
■ For best results with Splash color matching, set the Original Image Type print
option to “Photographic” style. The alternative option, “Text/Graphics/Line
Art” should be used only with grayscale documents or documents that need to
show crisp line detail, such as a map.
Page 44 Printing to Splash v6.0 From Windows NT
Page 45

Chapter 3
Using the Splash Web Queue Manager
If the Splash Server is set up on an Internet or Intranet, and the Splash Web Queue
Manager option is installed and enabled at the Splash Server, you can connect to the
Splash Server and view and control the Server print queues remotely. The Splash
Web Queue Manager lets you view and edit print commands for your jobs in the
queue, temporarily halt your job from printing, or remove your job from the print
queue. In addition, you can send graphics files such as PDF, TIFF, and EPS to the
Splash Server for printing.
Before you can use the Splash Web Queue Manager:
■ The Splash Server computer must be set up and running on a TCP/IP network,
and the Splash web option must be enabled (see the Splash Reference on-line
manual for information about how to do this).
■ Your Windo ws NT PC must be running on a TCP/IP netw ork (contact your net-
work administrator for help with this).
■ Netscape Navigator (v3.0 or later) or Microsoft Explorer (v3.0 or later) must
be installed on your Windows NT PC.
Contact your network administrator for help setting up your computer to use the
local Intranet or Internet service. In addition, your administrator needs to provide
you with the web address (URL) for the Splash Web Queue Manager.
To use the Splash Web Queue Manager:
1. Open the web browser application (Netscape Navigator or Microsoft
Explorer).
2. In the web browser, enter the web address for the Splash Server. (Contact your
Splash administrator for this information.)
Chapter 3: Using the Splash Web Queue Manager Page 45
Page 46

3. The Splash Web Queue Manager appears in the browser application window.
A list of print jobs waiting to print at the Splash Server appears on the left in the
Web Queue Manager. Information about the Xerox or Fuji Xerox printer/copier
appears at the bottom. If an error occurs at the copier, this information displays.
(The chapter “Splash Error Messages” in the Splash Reference on-line manual provides a list of error messages.)
Click Server Preferences to view the default server preferences set for the Splash
Server. If you are logged on as the Administrator, you can also change Preferences
from this screen.
Page 46 Printing to Splash v6.0 From Windows NT
Page 47

To view information for a print job, select the checkbox to the left of the job in the
list, then click the Job Info button below the job list. Information for the selected
print job appears on the right in the Splash Web Queue Manager.
If you select more than one job in the list, Splash provides information for each job
you selected.
If the job has already been RIPped, you can click the Preview button in the Job
Information screen to view a preview image of the first page of the job if your
Splash Server is configured to support this feature.
Managing Print Jobs in the Queue
If the Splash Server is configured to allow client computers to manage print jobs in
the queue, you can use the Splash Web Queue Manager to place jobs on hold, delete
them, or move jobs up and down in the queue.
Use the command buttons that appear under the print job list to manage jobs in the
Splash queues.
Chapter 3: Using the Splash Web Queue Manager Page 47
Page 48

■ To place a hold on a job, select the checkbox to the left of the job, then click
the Hold button below the print job list. To take the job off hold, select it, then
click the Release button.
■ To make a job print sooner, select it, then click the Up button. Each time you
do this, the job moves up one place in the queue.
■ To force a job to print later than other jobs, select it, then click the Down
button. Each time you do this, the job moves down one place in the queue.
■ To cancel a print job, select it, then click the Delete button.
The job list updates to show the revised Splash Server queue information.
If the Splash Server is configured to limit remote print queue management, the
Splash Web Queue Manager asks you to log on when you attempt to make changes
to jobs in the print queue.
Enter your user name and password, then click Register to complete logon. A message appears on the right to confirm your logon. The confirmation message tells
you which jobs you have permission to manage with the Web Queue Manager.
Note: If you did not provide a user name and password when you originally sent
the job, enter the “Owner” name that appears next to your print jobs in the Web
Queue Manager job list.
Page 48 Printing to Splash v6.0 From Windows NT
Page 49

Editing Print Jobs in the Queue
T o view and change the print options for a job listed in the Splash W eb Queue Manager, select the checkbox to the left of the job, click the Job Info button, then click
the Edit button that appears below the job information. The current print options for
the job appear.
Click “Pages,” “Tray,” “Color,” and “Extras” at the top of the editor to view and
select Splash print options for the job. (See Chapter 2 for complete information
about the Splash print options.)
When you have finished selecting print options, click “Submit” at the top of the editor, then click “Save Settings” to confirm your changes.
Chapter 3: Using the Splash Web Queue Manager Page 49
Page 50

Printing Graphics Files
With the Splash Web Queue Manager you can send graphics files such as PDF,
TIFF, EPS, and PostScript files to the printer/copier for printing.
Note: Microsoft Explorer versions 3.0 and earlier do not support sending files to
the Splash Server for printing.
To send a file to Splash:
1. Click “Send Job” in the Splash Web Queue Manager window. The Splash Web
Queue Manager editor appears.
2. Select print options for the job. The Web Queue Manager editor appears.
Click “Pages,” “Tray,” “Color,” and “Extras” at the top of the editor to select
Splash print options for the graphics file. (See Chapter 2 for complete information about the Splash print options.)
Page 50 Printing to Splash v6.0 From Windows NT
Page 51

3. When you have finished selecting print options, click “Submit” at the top of the
editor. Instructions on how to select the file to print appear.
4. Click Browse. A file selection dialog box appears. Select the file to print, then
click OK in the dialog box.
5. Click “Send” to print the graphics file to the Splash Server.
The Splash Web Queue Manager transfers the file to the Drop Folder at the Splash
Server. The Splash Server processes and prints the job.
Splash Web Queue Manager Notes
Job Selection Checkmarks Disappear
If you click to select a job in the Print Queue frame, and do not perform a command
(such as Edit Job or Job Info) the checkmark disappears. This occurs because the
server updates the Print Queue every so often. If no command is sent to the server,
the server cannot tell that the job is selected at the client, so the checkmark is erased
when the frame is refreshed.
Chapter 3: Using the Splash Web Queue Manager Page 51
Page 52

Page 52 Printing to Splash v6.0 From Windows NT
Page 53

Chapter 4
Application Notes
The following notes apply to the 6.0 release of the Splash Windows NT client software. Please read them before you use this software to print to Splash.
Supported Windows NT Applications
The applications listed below have been tested and are known to work with Windows NT.
■ Adobe PageMaker 6.5
■ Adobe Photoshop 4.0
■ Adobe Illustrator 4.1
■ Microsoft Office 97
■ MacroMedia FreeHand 7.0
■ QuarkXPress 4.0
General Driver Notes
Accidentally Printing EPS Files
If a printer driver is configured to print EPS output to a printer rather than a file, a
warning message states that EPS should not be output to a port; the job prints correctly within the application, then the printer stays in a waiting mode until either
another job is sent, or a time-out error occurs. To avoid this error, be sure that EPS
format is printed to a file, rather than to a printer. (See “Creating a PostScript or
EPS File” on page 41 for instructions.)
Duplicate Cover Pages
If “Print Cover Page” is selected in the Splash Server application, and you select the
Cover Page option in your application, Splash prints two cover pages for the job.
Chapter 4: Application Notes Page 53
Page 54

Printing Gradient Fills
Documents that contain radial fills require extra time for Splash to process
and print.
Some Images Print With Limited Color
Images based on RLE-4 and RLE-8 compression print with limited halftoning
effects. Typically , shades of gray or color print as either black or white. There is no
known workaround.
Windows Jobs with Text or Fill P atterns Over TIFF May Not Print Correctly
For jobs printed from a Windows client, text and fill patterns that overlay a TIFF
image may not print. Avoid overlaying a TIFF image with text or fill patterns in
your Windows documents.
Network Notes
Novell NetWare Notes
When you set up a client to print to Splash with Novell NetWare, deselect the Banner Page option with Novell’s User’s Tools on the client computer. If the Banner
Page option is selected, Splash will not receive some Splash Windows driver feature selections (including tray specifications and color correction settings). Novell’ s
Banner Page feature also interferes with proper printing of Letter on Oversize and
A4 on Oversize paper sizes.
When you print to Splash with Novell NetWare, your print job is spooled by both
the Splash Server and by the Novell bridge. This results in slower printing. If you
also enable the W indows Print Manager, the print job is triple spooled—once on the
Windows client, once on the Novell server, and once on Splash.
Uncheck “Print PostScript error information” Checkbox Before Printing to Splash
Be sure to uncheck the “Print PostScript error information” checkbox in the Windows PostScript Printer Properties window before printing to Splash. (Note: The
default setting for this option is On. Be sure to uncheck this option in the Printer
Properties window.)
Page 54 Printing to Splash v6.0 From Windows NT
Page 55

Application Notes
General Notes
If you cancel a print job, the Splash printer generates a blank page with some applications.
Adobe Illustrator Notes
In Adobe Illustrator, if you select an A3 portrait page size and a reduce/enlarge
value of 200% or greater in page setup, you may get multiple copies when only one
is selected.
The top and bottom margins are reversed when you print from Adobe Illustrator
version 3.2.
In some cases, gradients in Adobe Illustrator 5.0 do not print properly with Splash.
If you notice that gradients print with “banding,” move the file
“smt_SpecialStartup001.ps” from the PostScript Items folder within the Splash
Extras folder, to the Splash Folder. This will correct the problem.
Adobe PageMaker Notes
Under certain circumstances, PageMaker print jobs that are sent to a specific paper
tray are moved to the Error queue and do not print. This occurs when no paper trays
at the copier contain Letter or Letter LEF paper. To correct the problem, make sure
at least one paper tray at the copier is loaded with Letter or Letter LEF paper.
If you are using PageMaker 6.0, RGB colors may not be created and printed as
expected. Upgrade to PageMaker 6.5 to ensure RGB color matching between the
monitor and print output.
If an Adobe PageMaker 5 document contains high-resolution TIFF images, the
TIFFs do not print properly to a Color Central Lite queue that is configured for
APR (Automatic Picture Replacement). There are three ways to work around this
problem:
■ Use a low-res sample of the TIFF instead of the high-res TIFF in the document.
■ Use an EPS image instead of a TIFF in the document.
■ Print the PageMaker 5 document to a Color Central Lite queue that is not
configured for APR.
Chapter 4: Application Notes Page 55
Page 56

If you are using PageMaker 6.0, RGB colors may not be created and printed as
expected. Upgrade to PageMaker 6.5 to ensure RGB color matching between the
monitor and print output.
Adobe PageMaker for Windows
Adobe PageMaker 5.0 for Windows jobs with embedded TIFFs are not processed
properly by Color Central and do not print when “Substitute High Resolution
Images” is selected. To resolve this problem, do not select “Substitute High Resolution Images” for these jobs.
Adobe Photoshop 3.0 Notes
When you use the Splash Save as TIFF option with a long-edge feed paper
orientation selected (LetterL, A4L, B5L, and so on), the page appears rotated when
the TIFF is opened in Adobe Photoshop. This does not occur when short-edge feed
paper orientations are used with Save as TIFF.
When you print multiple copies of a document in Adobe Photoshop v3.0 for Windows, the Splash Server RIPs each copy as a separate document. This slows printing of the job (because the job is RIPped multiple times instead of once) and causes
inaccurate information to appear in the print status line in the Server window. You
can avoid slow printing of multiple copies of a document in the following way:
1. In the Splash Server print options, choose “Print and Save” from the Spool
Options list. This saves the spooled print job on the Splash Server after you
print the Adobe Photoshop file. (See the appropriate Printing to Splash... online manual for instructions on how to select Splash print options.)
2. Print the file from Adobe Photoshop.
3. After your file has printed, go to the Splash Server computer and double-click
the saved spool file (created when you printed the job from Adobe Photoshop).
The Splash Server lets you set the number of copies to print, as well as other
Splash printing options.
4. When you finish editing the spool file, click OK then drag it to the Waiting
queue to print.
Corel Draw Notes
If you attempt to save a document as a TIFF with Corel Dra w 5.0, the job returns an
error at the Server with the message, “Can’t save as TIFF.”
Page 56 Printing to Splash v6.0 From Windows NT
Page 57

To use the Splash Separations feature, you must have CorelDraw version 7.0 or
later installed. Earlier versions of CorelDraw will print a black page for each separation plate.
Deneba Canvas Notes
When you print a separations job to Splash from Canvas, select the “Canvas Style”
separations option. The “Automatic” option does not work with Canvas documents.
Certain Canvas separations documents that contain several complex PostScript
operations, such as a combination of trapping, overprinting, and DCS recombination, result in an error at the Splash server. These jobs return the error message
“Error: undefined; OffendingCommand:/” and the separations job does not print.
This problem is caused by faulty PostScript code generation by Canvas.
Multiple-page separations documents printed with the Splash DocuColor driver
print the first page only.
Canvas documents that contain many complex gradients do not print all gradients
correctly when the Splash “Screened” print option is enabled for the job. Some gradients print with a patterned fill and the gradients are heavily stepped. If the document contains multiple pages the problem is more pronounced on later pages.
There are several limitations associated with printing a separations document to
Splash from the Canvas application:
■ When you print a separations job to Splash from Canvas, select the “Canvas
Style” separations option. The “Automatic” option does not work with Canvas
documents.
■ Certain Canvas separations documents that contain several complex PostScript
operations, such as a combination of trapping, overprinting, and DCS recombination, result in an error at the Splash Server. These jobs return the error message “Error: undefined; OffendingCommand:/” and the separations job does
not print. This problem is caused by faulty PostScript code generation by Canvas.
■ With Canvas, a multiple-page separations document printed with the Splash
driver prints the first page only.
Chapter 4: Application Notes Page 57
Page 58

MacroMedia FreeHand Notes
For best results printing your documents to Splash, upgrade to FreeHand version 7.
Earlier versions of this application may produce problems when you print to
Splash.
Before you print a document to Splash from MacroMedia FreeHand, you must
select the Splash PPD in the FreeHand Print dialog box. A Bro wse windo w appears
in the FreeHand Print dialog box. Use the Browse window to select the Splash PPD
from the Windows:System directory. If you experience problems printing from
FreeHand, copy the Splash PPD to the PPDs directory within the FreeHand application directory.
If you select 2-Up or 4-Up printing for a FreeHand document, the job prints the
page borders only. The page contents do not print on the 2-up or 4-up job output.
If the printer/copier runs out of paper while printing an MacroMedia FreeHand document, Splash prompts you to add more paper to the tray, or cancel the print job. If
you click the Cancel button to cancel the print job, FreeHand displays a second add
paper message and then prints an “Error” page once you add paper to the tray. If
your print job specified multiple copies, FreeHand transfers the page count to the
“Error” page. This results in multiple prints of the error message page.
With MacroMedia FreeHand 3.11, if you print an A3 size image with the Fit To
Page option, Splash may print a blank sheet of paper.
The name “Tool Box” appears instead of the correct print job name in the print
queue for FreeHand 3.1. This problem is caused by a design flaw in FreeHand.
Microsoft Excel Notes
Due to a problem caused by Microsoft Excel PostScript generation, an Excel print
job may return to the Splash print queue with an error, although the actual job successfully prints. If this happens, delete the errored job from the Splash queue.
Microsoft PowerPoint Notes
When you use PowerPoint on Windows NT, if you enable Splash RGB Monitor
Color Correction for a file with a pattern fill, print processing is slow.
Page 58 Printing to Splash v6.0 From Windows NT
Page 59

QuarkXPress Notes
With QuarkXPress, if you print with the Force Tray option, but the printer/copier
tray does not contain the correct paper size, the print job errors. Splash does not
report that the tray contains an incorrect paper size. To avoid this problem, use the
Auto Tray Select option instead of Force Tray.
With QuarkXPress, the Force Tray option does not work with all paper sizes. Use
the Auto Tray Select option instead of Force Tray.
Splash Reverse Page Order and QuarkXPress
The Splash Reverse Page Order print option is not supported for QuarkXPress print
jobs. Use the QuarkXPress “Back to Front” print option instead of the Splash
Reverse Page Order print option.
Exception: If the print job has an odd number of pages and the Splash “Duplex”
print option is selected, select both the Splash “Reverse Page Order” option and the
QuarkXPress “Back to Front” option to print the job correctly.
Landscape LEF Jobs Rotated
When you print a job with Landscape orientation and an LEF paper size selected,
the output is rotated 180 degrees. To avoid this, choose Options in the Page Setup
dialog box then select “Flip Horizontal” and “Flip Vertical” under Visual Effects
before you print the job.
Chapter 4: Application Notes Page 59
Page 60

Page 60 Printing to Splash v6.0 From Windows NT
Page 61

Index
A
Acrobat PDF 43
Add Printer Wizard 16
Adobe Illustrator
notes 56
separations 38
Adobe PageMaker
Auto tray select 28
notes 56
separations 37
Adobe Photoshop notes 57
Adobe Separator 38
AppleTalk 11
AppleTalk connection software 7
Applications supported for Splash 53
Auto Tray Select 28
Color printing 33
ColorCal 44
Contone printing option 33
Corel Draw notes 58
Cover page
duplicate cover pages 53
with separations printing 38
Custom color correction 35
D
DCS files, printing 38
Default printer 21
Deleting a print job 43, 48
Deneba Canvas
notes 57
separations 37
Automatic Grayscale Detection 41
C
Canceling a print job 48
Choosing color correction 33
CMYK Press color correction 35
CMYK/RGB mixed color files 43
Color correction, RGB 33
Color options 33
Page 61
DocuPac 27
E
Enable Separations 37
Encapsulated PostScript (EPS) files 42
Enhanced color correction 35
EPS file printing 53
Euroscale color correction 35
Page 62

G
N
Gamma options 34
Graphics rendering style 34
Grayscale printing 33, 41
H
Hold status for a print job 48
I
IPX printing 7
L
Landscape paper orientation 28
LEF vs. SEF paper sizes 27
M
Networking hardware and software 5
Novell NetWare 7, 54
O
Orientation 28
Original Image Type 39
P
Paper orientation 28
Paper size options 27
Paper source option 28
Photographic originals 39
Photographic rendering style 34
Portrait paper orientation 28
PostScript, creating a print file 42
MACLAN Connect 7
MacroMedia FreeHand
notes 58
separations 37
Margins, printer 28
Memory requirement (RAM) 5
Microsoft Excel 58
More Blue whitepoint option 34
More Yellow whitepoint option 34
Page 62 Printing to Splash v6.0 From Windows NT
PowerPoint 58
Print cover page 53
Print job priority 48
Print options 25
Printer margins 28
Printer name 21
Printers setup 15
Page 63

Q
T
QuarkXPress
notes 59
separations 37
R
RAM requirement 5
RGB color correction 33
RGB/CMYK mixed color files 43
RLE-4 and RLE-8 compression note 54
Rotated landscape paper orientation 28
S
Save as TIFF 41
Save Spool File 36
Screened printing option 33
Text Enhancement 36
T ext/Graphics/Line Art originals 39
TIFF, save print job as 41
Transparency 29
Transparency Interleave 29
W
Whitepoint options 34
Windows NT 7
Separations
print option 37
with cover page 38
Special Heavy Paper 29, 30
Splash color options 33
Splash ColorCal 44
Splash IPX Direct 7
Splash Win NT Client floppy disk 11, 15
Supported applications 53
SWOP color correction 35
System requirements 5
Index Page 63
 Loading...