

Spla sh M Seri e sColor Se rver
Getting Started Guide
1.0 I
This Getting Started Guide contains instructions for th e installation and configuration of the
Splash M Se ries Colo r S e rver and th e client wo rk s t ations on yo u r networ k . Follow these
instructions each time you set up the Splash M Series Color Server in a different location,
connect it to a different network, or connect it to a dif ferent color copier.
The Splash M Series Color Server comes standard with a 10/100base T network card, which
you can connect to standard Ethernet (10baseT) or Fast Ethernet networks (100baseT). The
color server automa tically configures the card for Fast Ethernet if Fast Ethernet is detected.
Do not use a cross-over cable to connect your workstation directly to the Splash M Series. If
you need a direct connection, use a mini-hub.
2.0 C
Do not power up the Splash M Series Color Server until instructed.
To connect the Splash M Series Color Server to the copier, follow these steps:
NTRODUCTION
ONNECTING THESPLASH
Turn off the copier.
1.
2. Unpack the Splash M Series Color Server and place it near the copier.
3. Open the accessory box and remove the cables.
4. Connect the Splash M Series Color Server to the copier using the cable provided.
5. Connect the power cable to the Splash M Series Color Server and plug it into an outlet.
Do not use an outlet on the same power circuit as the copier’s outlet.
MS
ERIESCOLORSERVER TO THECOPIER
6. After connecting all the cables,
The copier must be up and at a ready state in order for the Splash color server to set up
proper communications with the copier. Do not turn on the server before the copier is ready.
7. When the copier is in ready state,
Server
Refer to Normal Initialization Process on page 2 for information on the server
initializ ation process. Once the server has completed it’s initialization , a startup test
page prints, indicating that the color server i s p roperly connected to the copier.
Turn off the Splash M Series Color Server.
8.
0015647-0001 February 18, 1999 page-1
.
turn on the copier .
turn on the Splash M Series Color
Getting Started Guide
2.1 Norma l Initialization Process
As the Splash color se rver initializes, the following sequence of events occur:
1. The green LED illumi nates, indicating that power is on.
2. The Splash color server emi ts one long and two short beeps.
3. After about 30 to 45 seconds, the green activity light on the floppy dr ive illuminates
briefly and the Splash color server emits one short beep.
4. After about 45 second s, t he Splash col or se rver emits six bee ps; two shor t, two long , and
two short. This is a signal from the color server indicating that it is ready to accept the
Configuration disk. If the disk is not inserted, th e color server continues to initialize.
The beeps are a normal part of the initialization process.
This time can vary if the Splash color serv er performs a disk check.
5. The status LED alternately flashes between yellow and red several times and then
changes to flashing yellow.
6. The Splash color server prints a startup Test Page.
When powering down the color server, wait for all jobs to complete, tur n o ff the Splash color
server, and then turn off the copier.
2.2 Spla sh M Series Status Lights
LED Description
Green, not flashing Power indicator.
Amber , slowly
flashing
Amber, quickly
flashing
Power LED
(green)
Status LED
(amber
or red)
Red, off No problems.
Red, one flash Add paper.
Red, two flashes Toner or fuser oil problem.
Red, three flashes Paper jam.
Red, four flashes Door open, copier disconnected or other
No amber or red Hardware problem or floppy inserted at the
Splash M Series Color Server is idle. Normal
operation.
Splash M Series Color Server activity, such
as spooling, ripping, or printing.
similar error.
wrong time.
page-2 0015647-0001 February 18, 1999

Getting Started Guide
3.0 S
YSTEMREQUIREMENTS
The minimum system requirements for using the Splash M Series Color Server are:
• One of the following color copiers:
— Xe rox 5750/Acolor 620
— Xe rox 5790/Acolor 935
— Xe rox 5799/Acolor 936
TM
• Supported network printing protocols over EtherNet
TM
—Windows
—EtherTalk
— Novell NetWare
Networks—TCP/IP
TM
Phase II
TM
—IPX
— Unix compatible— LPD over TCP/IP
• Macintosh clients:
— PowerMac
— System 7.5.5 or later
— EtherNet network int e rface
— 8MB free RAM
— 4 MB hard disk space
— 6 40x480 video resolution
— Open Transport 1.1.1 or above
— Las erWriter driver 8.3.4 or above
:
• Minimum system requirements for Windows Network clients:
— Microsoft Windows Network client software installed on the workstation
— PostScript print driver (Microsoft recommended)
— 2 MB hard disk space
— Windows 95, Windows 98 or NT 3.51/4.0
— TCP/IP protocol on workstation
• Additional minimum requirements for Novell NetWare include:
— NetWare client software installed on the workstation
— PostScript print driver (Microsoft recommended)
— 2 MB hard disk space
— NetWare file server running NetWare NOS version 3.11 or later
• Client system must also have application software that can pro duce PostScript output.
• 10baseT (twisted- pair) or 100baseT network cable.
If your network uses BNC/Thinnet media, you must use a hub that includes a BNC po rt to
connect the Splash M Serie s Color Server to the network.
0015647-0001 February 18, 1999 page-3
Getting Started Guide
4.0 C
To physically connect the Splash color server to the network:
ONNECTING THESPLASH
1. Remove any disk from the color server’s flopp y drive and turn off the color server if you
have not already done so.
2. Connect the colo r server to the network.
The Splash M Series Color Server has a 10/1 00baseT network card that supports
twisted pair. Figure 1 illustrates the network connectors.
Link & Status Lights
Figure 1: Splash M Series Color Server Network Connectors
You can connect the color server to standard Ethernet (10baseT) or Fast Ethernet
networks (100baseT). Th e color server automatically configures the card for Fast
Ethernet if Fast Ethernet is detected.
Do not use a cross-over cable to connect your workstation directly to the color server. If
you need a direct connection, use a mini-hub.
MS
ERIESCOLORSERVER TO THENETWORK
Twisted-Pair Port
Do not power up the Splash M Series Color Server.
page-4 0015647-0001 February 18, 1999
Getting Started Guide
4.1 Con figur ing the Server for the Copier and Network
Locate the media package labeled Setup Disks that shipped with the Splash M Series Color
Server. The package contains two sets of Copier Configuration diskettes; one set is labe led
U.S. and the other set is labeled European.
• If your site uses default Imperial page sizes, config ure the server using the U.S. Copier
Configuration diskettes.
• If your site uses default metric page sizes, configure the server using the European
Copier Configuration diskettes.
The Copier Configurat ion disket te co ntains a fi le call ed DP.INI, which has the param eters
for configuring the network, print/hold queue, an d page parameters for the Splash M Series
Color Server.
DP.INI is a text file that can be modified on a user workstat ion with a standard text editor.
There are no protected fields in the file.
Edit only the parameters after the equal signs (=).
Do not de le te any com ment sy mbols.
4.1.1 Special Instruct ions for Printing Through Novell Serve rs
If you are printing through No vell servers, you must creat e a queue a nd color server account
for the Splash M Series Color Server using PCONSOLE. For a complete description of
PCONSOLE, or more information about Novell print servers, refer to your Novell documentation.
If users are printi ng through a Novell print server, complete the following steps.
1. Log into the file server where the Splash M Series Color Server queue will reside.
If you are using NetWare 3.x, log in as Supervisor from an attached workst ation.
If you are using NetWare V4.0 or greater, log into the server administrator account,
adding the /bs switch to the login command.
2. Note the file server’s name. This is the name you will use in the DP.INI file for the
pq0novserver and pq1novserver par ameters.
3. In the PUBLIC subdirectory on SYS: volume, enter the command PCONSOLE.
4. To create a print server account for the Splash M Series Color Server:
a. From the PCONSOLE Main menu, select Print Server Information.
b. Press the Insert key and enter the print server account name. The name cannot
contain more than 12 charact ers and cannot contain special characters or spaces.
Do not enter a password. Leave the password field blank.
c. Press Enter.
5. Make note of the name you enter ed. This is the name you will use in the DP.INI file for
the pq0novpserver and pq1novpserver parameters.
6. Press the Escape key multiple times to return to the main menu.
7. To create a print serv er queue for the Spl ash M Se ri es Color S e rver:
a. From the main menu, select Print Queue Information.
0015647-0001 February 18, 1999 page-5

Getting Started Guide
b. Press the Insert key and enter the queue name. The name cannot contain more
than 12 characters and cannot contain special charact ers or spaces. Since this is
the name users will see from their workstations it should be descriptive of the
device or the device’s location.
c. Make note of the name you enter. This is the name you will use in the DP.INI file
for the pq0novqueue and pq1novqu eue parameters.
d. Highlight the name you entered and press Enter.
e. From the new menu, select Queue Servers.
f. Press the Insert key and select the print server account name you created in
Step 4 and press Enter. This step assigns the account to the queue.
8. Press the Escape key multiple times to return to the main menu.
9. Exit PCONSOLE.
4.2 M odify ing the DP.INI File
To configure and load the DP.INI file onto the Splash M Series Color Server:
1. Make a copy of the Copier Configura tion diskette for the copier model to which the
Splash M Se ries Colo r S e rver is connect e d.
2. Edit the DP.INI file on the copy of the Copier Configuration diskette from a user
workstation. (Refer to the DP.INI description that follows these steps.)
3. Once DP.INI is modified, save the changes onto the copy of the Copier Configuration
diskette.
The DP.INI file contains the following configurable options:
hostname—Specifies the name of the Splash M Series Color Server. Valid values are
alphanumeric characters and underscores. The name cannot include spaces or periods.
The default value is SPLASHM.
Names in the DP.INI file can contain up to 79 characters but the names are truncated,
depending on the maximum number of characters supported by the network type. For
example, on EtherTalk the names are truncated to 32. If the names are truncated, a
warning message is prin ted on the configuration information sheet.
hostname—Specifies the name of the Splash M Series Color Server. Valid values are
alphanumeric characters and underscores. The name cannot include spaces or periods.
The default value is SPLASHM.
domain—Specifies th e na m e of the TCP /IP dom ai n. The de fa u l t va lue is nonet.net.
dhcp_client—Specifies whether or not the color server uses a DHCP server to obtain a
dynamic IP address. Valid values are yes an d no. If dhcp_client is no, the color server
must have a permanent IP address and subnetmask assigned, using the ipaddress and
subnetmask parameters. The default value for dhcp_client is no.
page-6 0015647-0001 February 18, 1999

Getting Started Guide
ipaddress—Specifies the IP address assigned to the color server. This parameter is
required. If dhcp_client is set to yes and no DHCP services are found on the network, the
specified IP address is used. The default value for ipaddress is 19 2.168.0.254.
subnetmask—Specifi es the subnetmask assigned to the color server. This parameter is
required. If dhcp_client is set to yes and no DHCP services are found on the network, the
specified subnet mask is used. The default value for subnetmask is 255.255.255.0.
defaultgateway0—Specifies the permanent IP address assigned to the gateway or router.
This parameter is ignore d if there is no val ue after the equal sign (= ), which is the defa ult.
nameserver0—Specifies the permanent IP address assigned to the gatew ay or router.
This parameter is ignore d if there is no val ue after the equal sign (= ), which is the defa ult.
workgroup—Specifies the Windows domain or Windows Workgroup to which the color
server belongs. The name can be up to 15 characters long. Valid values are alphanumeric
characters and under scores. The name cannot include spaces or periods. If the network
does not use Windows domai ns or Workgroups, leave this parameter blank (default).
nt_domain_controller—Specifies the IP address of the NT domain controller for the color
server. If an NT domain controller does not exist, leave this parameter blank (default).
wins_server—Specifies the IP address of the WINS server for the color server. If a WINS
server does not exists, leave this parameter blank (default).
zone—Specifies the name of the AppleTalk zone that the color server uses for Macintos h
printing. The name can contain up to 32 characters . Valid values are alphanumeric characters, und ersc ore s, s paces , and periods. If Macintos h wor kstat io ns are no t p rin ting to th e
color server, leave this parameter blank (default).
The DP.INI file contains two sections of parameters called Printer 0 and Printer 1: one section
for configuri ng the colo r server pri nt queue and the other fo r conf iguring the colo r serv er hold
queue. Each sect ion contains the following parameters, where # can equal either 0
(parameters in Printer 0 section) or 1 (parameters in Printer 1 section):
pq#—Specifies the color server printer name that is used for lpd queue, Windows printer
sharename, and AppleTalk LaserWriter name. Valid values are alphanumeric characters
and underscores. The name cannot include spaces or periods. The default value for
Printer 0 is Splash_print. The default value for Printer 1 is Splash_hold.
pq#device—Specifies the copier to which the color server is connected. Valid values are
5750 (DocuColor
TM
5750), 5790, and 5799 (DocuColor
TM
5799). Note that the values for
pq0device and pq1device must be identical.
pq#type—Specifies the type of queue: print or hold. Valid values are PRINT (print queue),
and HOLD (hold queue).
pq#wintcp—Enables/disables the color server support for TCP/IP protocol. Valid values
are on (enable support) and off (disable support). The default value is on.
pq#ethertalk—Enables/disables the color server support for AppleTalk protocol. Valid val-
ues are on (enable support) and off (disable support ). The default value is on.
0015647-0001 February 18, 1999 page-7

Getting Started Guide
pq#novell—Enables/disables the color server support for Novell Netware (IPX) protocol.
Valid values are on (enable support) and off (disable support). The default value is off. If
pq#novell is on, values must be specified for pq#novserver, pq#novqueue, and
pq#novpserver parameters.
pq#novserver—Specifies the name of the Novell server that contains the queue for the
color se r ve r.
pq#novqueue—Specifies the name of the print server queue.
pq#novpserver—Specifies the name of the print server account.
To configure a colo r server printer without a hold queue, add a comment symbol in front of all
parameters defined i n Printer 1 or delete them.
The DP.INI file contains the following configurable page options:
SEPARATOR—Specifies whether or not the color server prints a separator page at the
end of each job. Valid values are true (print separator page) and false (do not print separator page). The default value is false.
There are some conditions under which a separator page is not created or printed, even
though SEPARATOR is set to true. These conditions are:
• When the job is sent to a DPI file instead of the copi er.
• When Manual Feed is selected as the paper source .
• When one of the sorter options is selected f or Page Order.
• When the job is printing and it is stopped and cancelled (recall that separator pages
print at th e en d of the job).
Refer to the Splash M Seri es U ser’s Manual for more information.
FORCEPAGE—Causes the color server to conver t certain page sizes from engli sh to metric or vice versa. Valid values are:
• metric—Converts letter to A4 and convert s legal and tabloid to A3.
• english—Converts A4 to letter and converts A3 to tabloid.
• off —Default value; does not convert page sizes.
DEFAULTPAGE—Specifies what paper size to use when the PostScript file does not contain a page size. Valid values are letter (8.5in x 11in) and a4 (21.00cm x 29.70cm). Note
that value’ s case det ermines the orientati on of the p age (e.g . , lowercase v alues spec ify long
edge feed). The default is letter (8.5in x 11in).
4.3 Load ing the Configuration files
1. Power o n the col or serv er and w ait for se rver to emit the configu rati on s igna l, wh ich is a
series of beeps: two short, two long, and two short.
2. Insert the Copier Configuration dis k ette in the color server floppy dri ve. You have
five seconds to insert the modified Copier Configuration disk in the color server
floppy drive.
When the color server fini shes downloading the configur ation, an information sheet and
Startup Test page prints. The color server is now configured and running .
3. Remove and store the Copier Configuration diskette in a safe place.
page-8 0015647-0001 February 18, 1999

Getting Started Guide
If the configuration is in correct or an error occurs while the color server starts up, an information sheet prints infor mi ng you that the configuration was unsuccessful. Check the DP.INI
file, make the necessary corrections, power off the color server, and repeat steps 1 and 2.
5.0 C
The Client so ft wa re for th e S plash M Se rie s Color Se rver inc ludes pr inter fi le s and t he Vi ewer
application (which allows users to view and manage print jobs). Thus, there are two options
for installing the Splash M Series client software on the workstation:
It is not necessary to install the V ie wer to enab le pri nte r support! Inst ruct io ns for the vari ous
installati on options are as follows:
LIENTINSTALLATIO N OVERVIEW
1. You can ins ta l l ju s t th e pr in ter files .
2. You can install the Viewer software, which installs both the Vi ewer application and the
printer files.
• If you are installing printer files only,
—Refer to Section 5.1 on page 10 for Macintosh client instructions
—Refer to Section 5.2 on page 14 for Windows 95/98 client instructions
—Refer to Section 5.3 on page 21 for Windows NT 4.0 client instructions
• If you are installing the Viewer application, which includes the installation of printe r
files,
—Refer to Section 5.4 on page 26 for Maci ntosh client instructions
—Refer to Section 5.5 on page 30 for Windows 95/98 client instructions
—Refer to Section 5.6 on page 38 for Windows NT 4.0 client instructions
0015647-0001 February 18, 1999 page-9
Getting Started Guide
5.1 Installing Printer Support Only: Macintosh Clients
The Splash CD-ROM that shipped with the color server contains a folder na med Mac. This
folder has all files you need to install and setup Splash M Series print er support on the
Macintosh.
If you are installi ng Splash M Series printer file s on a non-U.S. En glish Macintosh, you
must use the installation procedure in Section 5.1.2.
5.1.1 Installing an M Series Printer on a US English Macintosh Client
1. Insert the Splash CD-ROM that shipped with the color server into the workstation’s
CD-ROM drive.
2. On the Splash CD-ROM, locate the Mac:English folder and copy the Splash M210
v1.0, Splash M310 v1.0, and Splash M410 v1.0 files into the System
Folder:Extensions:Printer Descript ions folder.
3. If the workstation has Page Maker, locat e the PageMaker PPD files on the CD-ROM in
Mac:English:PageMaker folder. Also copy the PageMaker PPD files to the System
Folder:Extensions:Printer Descript ions folder.
4. Go to Section 5.1.3, on page 11 to setup the printer.
5.1.2 Installing an M Series Printer on a Non-US English Macintosh Client
In this set of instru ctions, Eng lish names are used when referring to the copy destination
folders. You must substitute the appropriate non- En glish folder names.
1. On a US English Macintosh syst em, t he f older that c ontains the pri nter des cri ption fi les
is the System Folder:Extensions:Printer Descriptions folder. Locate the
corresponding folde r on your syst em in the syste m language. This is the folder wher e the
Splash printer description files will be copied.
2. Insert the Splash CD- R OM that shipped with the color server into the workstation’s
CD-ROM drive.
3. On the Splash CD-ROM, locate the Mac:English folder and copy the Splash M210
v1.0, Splash M310 v1.0, and Splash M410 v1.0 files into the System
Folder:Extensions:Printer Descript ions folder that you located in Step 1.
4. If the workstation has Page Maker, locat e the PageMaker PPD files on the CD-ROM in
Mac:English:PageMaker folder. Also copy the PageMaker PPD files to the System
Folder:Extensions:Printer Descript ions folder that you located in Step 1.
5. Go to Section 5.1.3, on page 11 to setup the printer.
page-10 0015647-0001 February 18, 1999
5.1.3 Printer Setup
To set up the printer on your workstation:
1. Make sure AppleTalk is Active.
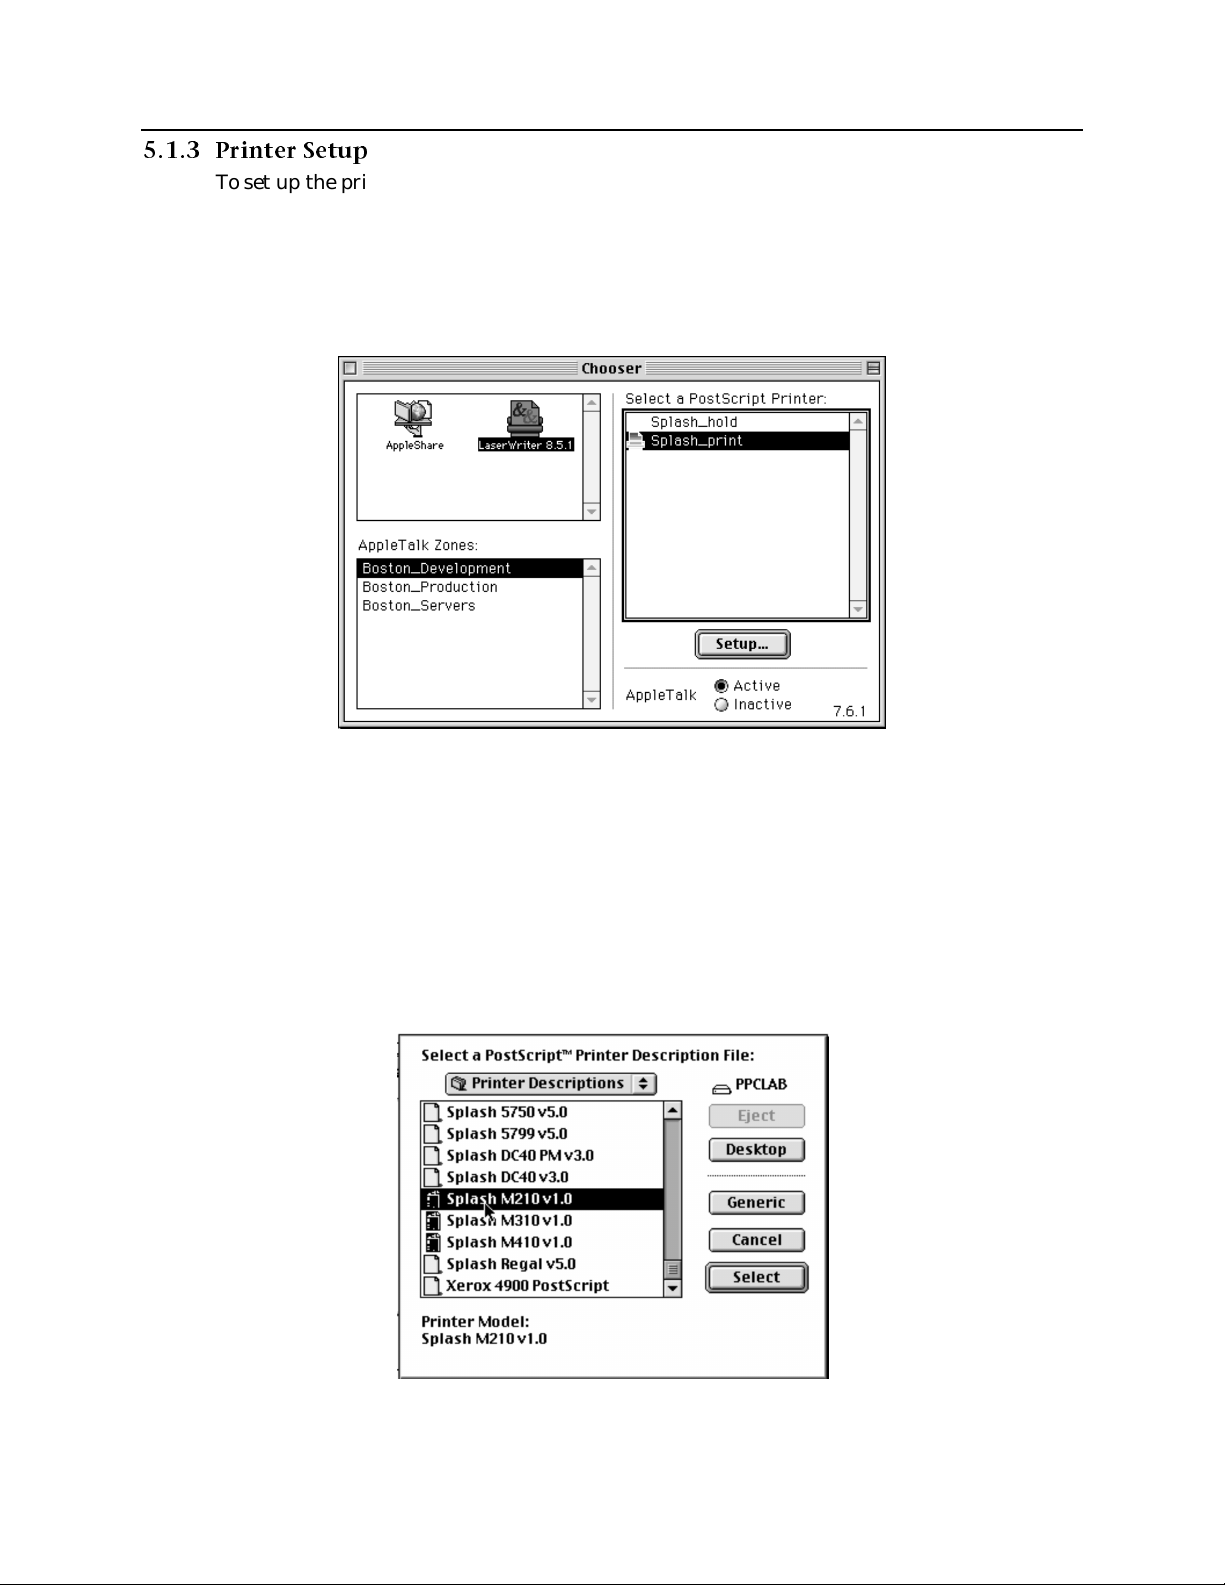
2. From the Apple Menu, select Chooser. The Chooser Control Panel, shown in
Figure 2, appears.
Getting Started Guide
Figure 2: Sample Chooser Control P ane l
3. Select LaserWriter 8.4.3 (or above) and a Zone (if configured).
4. When the printer list appears, click on the appropriate Splash M Series Color Server
(model M210, M310, or M410), and click on Create or Setup, depending on whether
Desktop Printing is enabled.
TM
The Select a PostScript
appears
Printer Description File dialog box, shown in Figure 3,
Figure 3: Select a PostScript Printer Description Fil e Dialog Bo x
0015647-0001 February 18, 1999 page-11
Getting Started Guide
5. Select the printer mode l (Splash M210 v1.0, Splash M310 v1.0, or Splash M410 v1.0)
that matches the server model you selected in Step 4, then click Select.
6. Click on Setup. The Current Printer Description File dialog box (Figure 4) appears
when the workstation has finished setting up the printer.
Figure 4: Curren t Printe r Descri ption File Di alog Box
7. Click on Configure. The Installable Options dialog box, shown in Figure 5, appears.
Figure 5: Installable Options Dialog Box
8. Follow these steps to configure all of the Installable options:
a. Select the Xerox 5750/ Acolor 620 Support option from the Installable options list.
This option enables/disables 12in x 18in, Postcard, and Tray 4 support. This
option also disables/enables Group in Sorter and Group in Sor ter Reverse, which
are not supported by the Xerox 5750/Acolor 620. Xerox 5750/ Acolor 620 Support
is enabled (Yes) by default.
If your color server is connected to a Xerox 5750/Acolor 620 copier, use the
default (Yes).
If your color server is connec ted to a Xerox 5790/ Acolor 935 or Xerox 5799/Acol or
936 copier, set this option to No.
page-12 0015647-0001 February 18, 1999

Getting Started Guide
b. Select the Optional Sorter option from the Installable options list. This option
enables/disables the Splash M Series sorter features. This option is disabled (Not
Installed) by default.
If the copier connected to your color server has a sorter attached, set this option
to Installed.
If the copier does not have a sorter, use the default (Not Installed).
c. Click OK.
9. On the Current Printer Description File dialog box, click OK.
10. Close the Chooser Control Panel.
The installation is now com plete and you can start sending print jobs to the color server. The
printer is insta lled with a set of default options. You can use these defaults, specify new
defaults (which will apply to all your print jobs), or select new options on a job-by-job basis.
For more inform a t ion, refer to the Splash M Series User’s Manual.
0015647-0001 February 18, 1999 page-13
Getting Started Guide
5.2 In stalling Printer Support Only: Windows 95/98 Clients
The Splash CD-ROM that shipped with the color server contains two folders named Wi n95
and Win98. Choose the folder that matches the operating system on your workstation. This
folder has all the files you need to install and setup the print drivers on the workstation.
If you are installing Splash M Series printer files on a non-U.S. English Windows 95/98
workstation , you may op tionally use the installation procedure in Section 5.2. 2. This
procedure contains extra ste ps, but it will minimize the amo unt of US English that appear s
in the Printer Properties dialog box on the work station.
At least one of the network clients lis ted below must be installed on your wo rkstati on to print
to the Splash M Series Color Server:
• Microsoft Client for NetWare Networks
• Novell 32 Client
• Microsoft Client for Microsoft Networks
5.2.1 Installing an M Series Printer on a US English Windows 95/98 Client
To add the printer to your workstation printer folder, start the Add Printer Wizard by
clicking on Start, Settings, Printers and Add Printers, then follow the prompts.
1. When the Add Printer Wizard prompts for a Local Printer or Network Printer , specif y
Network Printer and click Next.
2. When the Add Printer Wizard prompts for a network path or queue name, enter the
Windows network nam e of the Splash M Series Color S erver’s configured print queue. If
the hos t name is splashm and the print queue name is splash_print, the Windows
network name is \\splashm\splash_print.
3. Insert the Splash CD-ROM that shipped with the color server in your workstation
CD-ROM drive.
4. Click on Have D i s k, then Browse.
5. Open the appropriate folder for your operating system on the CD-ROM (win95 or
win98), then open the English language folder.
6. In the English folder, choose the OEMSETUP.INF file, and click OK.
7. When the Add Printer Wizard prompts for the printer model, select one of the
following options, according to the model of the Splash M Series Color Server you
specified in Step 2:
• Splash M210 v1.0
• Spl ash M3 10 v1.0
• Spl ash M4 10 v1.0
8. Click the Next button.
page-14 0015647-0001 February 18, 1999

Getting Started Guide
9. When the Add Printer Wizard prompts for a printer name, type the desired local
logical printer name an d append “_hol d” if you are addi ng a hol d queue or “_print ” if you
are adding a print queue. The reas on for adding “_hold” or “ _print” is because both
queues are represented on the network as identical printer icons (Figure 6).
Adding “_print” or “_hold” to the name identifies the queue type associated with the
icon.
SA
SB
SplashM310
M310_hold
M310_print
S1
S2
S3
SplashM410
M410_hold
M410_print
SC
SD
SE
Figure 6: Color Serve r Queues
10. When t he Add Printer Wizard asks if you want to print the test page, click Yes. After
the test page prints, click Yes again (even if the test page prints incorrectly).
11. Go to Section 5.2.3, on page 17 to setup the printer.
5.2.2 Installing an M Series Printer on a Non-US English Windows 95/98 Client
1. If there are no other PostScript printers installed on the workstation, install a dummy,
local, PostScript printer from your operating system install media:
a. Start the Add Printer Wizard by clicking on Start, Settings, Printers and Add
Printers.
b. When the Add Printer Wizard prompts you to specify either a Local Printer or
Network Printer, select Local Printer and click Next.
c. Follow the prompts. When Add Printer Wizard prompt s you for the
Manufacturer and Model of the printer, choose HP and HP LaserJet III Si
PostScript. This copies the non-U.S. English, printer driver software to your
system.
2. To begin the installation of the M Series printer, restart the Add Printer Wizard.
3. When you are prompted for a Local Pri nte r or Networ k Pri nter, spe cif y Network Printer
and click Next.
4. When you are prompted for a network path or queue name, enter the Windows network
name of the Splash M Series Color Server’s configured print queue. If the hostname is
splashm and the print queue name is splash_print, the Windows network name is
\\splashm\splash_print.
5. Insert Splash CD-ROM in your workstation CD-ROM drive.
0015647-0001 February 18, 1999 page-15

Getting Started Guide
6. Click on Have D i s k, then Browse.
7. Open the appropriate folder for your operating system on the CD-ROM (win95 or
win98), then open the English language folder.
8. In the English folder, choose the OEMSETUP.INF file, and click OK.
9. When the Add Printer Wizard prompts for the printer model, select one of the
following options, according to the model of the Splash M Series Color Server you
specified in Step 4:
• Splash M210 v1.0
• Splash M310 v1.0
• Splash M410 v1.0
10. Click the Next button.
11. If the Add Printer Wizard prompts you to keep or replace the pr inter driver software,
select KEEP THE EXISTING DRIVER and click Next.
If you choose Replace the exi sting driver, the U.S.English print driver will be
installed, overwriting the non-U.S. English print driver.
12. When the Add Printer Wizard prompts for a printer name, type the desired local
logical printer name an d append “_hol d” if you are addi ng a hol d queue or “_print ” if you
are adding a print queue. The reas on for adding “_hold” or “ _print” is because both
queues are represented on the network as identical printer icons (Figure 7).
Adding “_print” or “_hold” to the name identifies the queue type associated with the
icon.
SA
SB
SplashM310
M310_hold
M310_print
S1
S2
S3
SplashM410
M410_hold
M410_print
SC
SD
SE
Figure 7: Col or Server Queues
13. When t he Add Printer Wizard asks if you want to print the test page, click Yes. After
the test page prints, click Yes again (even if the test page prints incorrectly).
14. If the Add Printer Wizard aks you if you want to keep any files that are in the
language of your workstation, keep the files.
15. Go to Section 5.2.3, on page 17 to setup the printer.
page-16 0015647-0001 February 18, 1999

5.2.3 Prin ter Setup
After adding the printer, configure it by following these steps:
1. Open Printer Properties by right-clicking on the printer icon and left-c licking on
Properties. The Printer Properties dialog box, shown in Figure 8, appears.
Getting Started Guide
Figure 8: Printer Properties Dialog Box
2. Click on Details. The Details tab, shown in Figure 9, appears.
Figure 9: De tails Tab
0015647-0001 February 18, 1999 page-17

Getting Started Guide
3. Click on the Spool Settings button. The Spool Settings dialog box, shown in
Figure 10, appears.
4. Click on Print directly to printer then click OK. The Spool Setting dialog box closes,
but the Details tab (Fi gure9) is still displayed.
5. On the Details tab, switch to the PostScript tab by clicking on PostScript. The
PostScript tab, shown in Figure 11, appears.
Figure 10: Spool Settin gs Dial og Bo x
Figure 11: P o stScri pt Tab
6. On the PostScript tab, click Advanced. The Advanced PostScript dialog box, shown
in Figure 12, appears.
page-18 0015647-0001 February 18, 1999

Getting Started Guide
Figure 12: Adv an ced PostScript Dialog Box
7. Set the following options:
• Use PostScript Level 2 features
• Pure binary data
• Compress bitmap images
8. Click OK. The Advanced PostScript dialog box closes, but the PostScript tab is still
displayed.
9. Switch from the PostScript tab to the Device Options tab by clicking on Device
Options. The tab shown in Figure 13 appears.
Installable
options
Change Setting
pull-down list
Figure 13: Device Options Tab
0015647-0001 February 18, 1999 page-19

Getting Started Guide
10. To configure all of the Installable options:
a. Select the Xerox 5750/ Acolor 620 Support opt ion fr om the I nstallable opt ions list.
This option enables/disables 12in x 18in, Postcard, and Tray 4 support. This
option also disables/enables Group in Sorter and Group in Sor ter Reverse, which
are not supported by the Xerox 5750/Acolor 620 copier. Xerox 5750/Acolor 620
Support is enabled (Yes) by defa u lt.
If your color server is connected to a Xerox 5750/Acolor 620 copier, use the
default (Yes).
If your color server is connec ted to a Xerox 5790/ Acolor 935 or Xerox 5799/Acol or
936 copier, use the Change Setting pull-dow n li st to set this option to No.
b. Select the Optional Sorter option from the Installable options list. This option
enables/disables the Splash M Series sorter features. This option is disabled
(Not Installed) by default.
If the copier connected to your color server has a sorter attached, use the
Change Setting pull-down list to set this option to Installed.
If the copier does not have a sorter, use the default (Not Installed.)
c. Click OK.
The installation is now com plete and you can start sending print jobs to the color server. The
printer is insta lled with a set of default options. You can use these defaults, specify new
defaults (which will apply to all your print jobs), or select new options on a job-by-job basis .
For more inform a t ion, refer to the Splash M Series User’s Manual.
page-20 0015647-0001 February 18, 1999

Getting Started Guide
5.3 In stalling Printer Support Only: Windows NT 4.0 Clients
The Splash CD-ROM that shipped with the color server contains a folder na med Winnt4.
This folder has all the files you need to install and setup the print drivers on the workstation.
If you are installi ng M Series printer files on a non-U.S. English Windows NT 4.0
workstation , you may op tionally use the installation procedure in Section 5.3. 2. This
procedure contains extra ste ps, but it will minimize the amo unt of US English that appear s
in the Printer Properties dialog box on the work station.
At least one of the network clients lis ted below must be installed on your wo rkstati on to print
to the Splash M Series Color Server:
• Microsoft Client for NetWare Networks
• Novell Client
• Microsoft Client for Microsoft Networks
• LPR
5.3.1 Installing an M Series Printer on a US English W indows Nt4.0 Client
1. Logon to the workstation as a local administrator.
2. Start the Add Printer Wizard by clicking on Start, Settings, Printers and Add
Printers.
3. When the Add Printer Wizard prompts for My Computer or Network Printer Server,
select Network Printer Server and click Next.
4. When the Connect to Printer dialog box appears, enter the Wi ndows NT network
path for the Splash M Series Color Server’s configured print queue. If the hostname is
splashm and the print queue name is splash_print, the Windows NT network name is
\\splashm\splash_print.
5. Click OK. If the Connect to Printer Warning box appears, click OK.
6. When the Driver Setup window appears, click on Have Disk .
Always click on Have Disk regardl ess of whether or not this is the first ti me you are adding
a printer to your workstation.
7. Insert the Splash CD-ROM that shipped with the color server in your workstation
CD-ROM drive.
8. When the Install from Disk window appears, click Browse.
9. When the Locate File dialog box appears, browse the Splash CD-ROM and locate the
Nt4\English folder.
10. In the Nt4\English folder , open the splashm.inf file.
11. When the Add Printer Wizard prompts for the printer model, select one of the
following options, according to the model of the Splash M Series Color Server:
• Splash M210 v1.0
• Splash M310 v1.0
• Splash M410 v1.0
0015647-0001 February 18, 1999 page-21

Getting Started Guide
12. Click the Next button.
13. When the Installation Successful window appears, cli ck Finish .
14. After successfully installing the printer, the Add Pri nter Wizard may ask you if you
want your system to use this printer as the default printer. Select the desired option
(Yes or No), then go to Section 5.3.3, on page 23 to setup the printer.
5.3.2 Installing an M Series Printer on a Non-US English Windows NT4.0 Client
1. Logon the workstation as a local administrator.
2. If there are no other PostScript printers installed on the workstation, install a dummy,
local, PostScript printer from your operating system install media:
a. Start the Add Printer Wizard by clicking on Start, Settings, Printers and Add
Printers.
b. When the Add Printer Wizard prompts for My Computer or Network Printe r
Server, select My Computer and click Next.
c. Follow the prompts. When Add Printer Wizard prompt s you for the
Manufacturer and Model of the printer, choose HP and HP LaserJet III Si
PostScript. This copies the non-U.S. English, printer driver software to your
system.
3. To begin the installation of the M Series printer, restart the Add Printer Wizard by
clicking on Start, Settings, Printers and Add Printers.
4. When the Add Printer Wizard prompts for My Computer or Network Printer Server,
select Network Printer Server and click Next.
5. When the Connect to Printer dialog box appears, enter the Wi ndows NT network
path for the Splash M Series Color Server’s configured print queue. If the hostname is
splashm and the print queue name is splash_print, the Windows NT network name is
\\splashm\splash_print.
6. Click OK. If the Connect to Printer Warning box appears, click OK.
7. When the Driver Setup window appears, click on Have Disk .
Always click on Have Disk regardl ess of whether or not this is the first ti me you are adding
a printer to your workstation.
8. Insert the Splash CD-ROM that shipped with the color server in your workstation
CD-ROM drive.
9. When the Install from Disk window appears, click Browse.
10. When the Locate File dialo g box appears, browse the Splash CD-ROM and locate the
Nt4\English folder.
11. In the Nt4\English folder , open the splashm.inf file.
page-22 0015647-0001 February 18, 1999

12. When the Add Printer Wizard prompts for the printer model, select one of the
following options, according to the model of the Splash M Series Color Server:
• Splash M210 v1.0
• Splash M310 v1.0
• Splash M410 v1.0
13. Click the Next button.
14. When the Add Printer Wizard prompts you to keep or replace the printer driver
software, select KEEP THE EXISTING DRIVER, and click OK.
If you choose Replace the exi sting driver, the U.S.English print driver will be
installed, overwriting the non-U.S. English print driver.
15. When the Installation Successful window appears, cli ck Finish .
16. After successfully installing the printer, the Add Printer Wizard may ask if you want
your system to use this printer as the default printer. Select the desired option (Yes or
No), then go to Section 5.3.3, on page 23 to setup the printer.
5.3.3 Printer Setup
1. Select the printer by right clicking on its icon in the Printers folder. Choose Prop erties
from the pull-down menu. The Printer Properties dialog box appears.
Getting Started Guide
Figure 14: Printer Properties Bo x
0015647-0001 February 18, 1999 page-23

Getting Started Guide
2. Switch to the Scheduling tab of the Printer Properties dialog box (Figure 15).
Figure 15: Sc heduling Tab
3. Select Print directly to printer and then click OK.
4. Switch to the Device Settings tab (Figure 16).
Figure 16: Device Settings Tab
page-24 0015647-0001 February 18, 1999

Getting Started Guide
5. To configure the installable options, scroll down to Installable Options folder and
double click on the icon:
a. Select the Xerox 5750/Acolor 620 Support option from the list. Th is op tion
enables/disables 12in x 18in, Postcard, and Tray 4 support. This option also
disables/enables Group in Sorter and Group in Sorter Reverse, which are not
supported by t he Xerox 5750/Acolor 620 copier. Xerox 5750/Acolor 620 Support is
enabled (Yes) by def a ult.
If your color server is connected to a Xerox 5750/Acolor 620 copier, use the
default (Yes).
If your color server is connec ted to a Xerox 5790/ Acolor 935 o r Xerox 5799/Acol or
936 copier, set the Change Setting to No.
b. Select the Optional Sorter option from the list. This option enables/disables the
Splash M Series sorter fea tures. This option is disabled
(Not Installed) by default.
If the copier connected to your color server has a sorter attac hed, set the
Change Setting to Installed.
If the copier does not have a sorter, use the default (Not Installed).
c. Click OK.
The installation is now com plete and you can start sending print jobs to the color server. The
printer is insta lled with a set of default options. You can use these defaults, specify new
defaults (which will apply to all your print jobs), or select new options on a job-by-job basis.
For more inform a t ion, refer to the Splash M Series User’s Manual.
0015647-0001 February 18, 1999 page-25

Getting Started Guide
5.4 In stalling the Viewer and Printer Support on Macintosh Clients
The Splash CD-ROM that shipped with the color server contains a folder named Macviewer.
This folder has all the utilities and files you need to install and setup the Viewer and printer
files on the Macintosh.
If you are i nstalling th e M Series printer file on a n on-U.S . English Macintosh workstation,
you must use the installat ion procedure in Section 5.4.2.
5.4.1 Installing an M Series Printer on a US English Macintosh Client
1. Reboot the workstation with all but the basic extensions off.
2. Insert the Splash CD- R OM that shipped with the color server into the workstation’s
CD-ROM drive.
3. Open the Macviewer folder on the CD-ROM.
4. Open the English language folder inside Macviewer.
5. Double click on the Splash M Series Installer and follow the installation prompts to
instal l th e Viewer and printer files.
6. If the workstation has PageMaker, when the Splash M Series Installer comp letes:
a. Locate the PageMaker PPD file in the Splash M Series v1.0 folder.
b. Copy the PageMaker PPD file to the System Folder:Extensions:Printer
Descriptions folder on the Macintosh system drive.
7. Reboot the Macintosh with the desired extensions on.
8. Go to Section 5.4.3, on page 27 to setup the printer.
5.4.2 Installing an M Series Printer on a Non-US English Macintosh Client
1. Reboot the workstation with all but the basic extensions off.
2. Insert the Splash CD- R OM that shipped with the color server into the workstation’s
CD-ROM drive.
3. Open the Macviewer folder on the CD-ROM.
4. Open the English language folder inside Macviewer.
5. Double click on the Splash M Series Installer and follow the installation prompts to
instal l th e Viewer and printer files.
6. When the Splash M Series Installer completes, locate and open the English folder
named System Folder:Extensions:Printer Descriptions on the Macintosh system
drive.
7. Locate and open the corresponding printer description folder whose name is in the
language installed on the Mac intosh.
8. Drag the Splash M Series v1.0 print file from the English System Folder:
Extensions:Printer Descriptions folder to the corresponding printer description
folder in your languag e.
page-26 0015647-0001 February 18, 1999

9. If the workstation has PageMaker, locate the PageMaker PPD file in the Splash M
Series v1.0 folder. C o py the PageMaker PPD file to the printer description folder in
your language on the Macintosh system drive.
10. Rebo ot the Macintosh with the desired extensions on.
11. Go to Section 5.4.3, on page 27 to setup the printer.
5.4.3 Printer Setup
To set up the printer on your workstation:
1. Make sure that AppleTalk is Active.
2. From the Apple Menu, select Chooser. The Chooser Control Panel, shown in
Figure 17, appears.
Getting Started Guide
Figure 17: Sample Chooser Control P an el
3. Select LaserWriter 8.4.3 (or above) and a Zone (if configured). Cl ick Se tup.
4. When the printer list appe ars, click on the Spl ash M Series printer name a nd then click
on Create or Setup, depending on whether Desktop Printing is installed.
If this is th e first time you have s et up a Sp lash M Series Color Server on this workst ation, the
system completes the set up procedure without further intervention from you and an icon
appears next to t he print er na me. When an i con appears nex t to the prin ter nam e, g o to Step 7
If this is not the first time you have set up a S p lash M Series Color Server on this workstatio n,
the Current Printer Description File dialog box, shown in Figure 18, appears.
0015647-0001 February 18, 1999 page-27

Getting Started Guide
Figure 18: Current Print er Des cript ion File Di alog Box
5. Click on Auto Setup. The Current Printer Description File dialog box (Figure 18)
re-appears when the workstation has finished setting up the printer.
6. Click on Configure. Th e Instal labl e Options dialog box, shown in F igure 19, appears.
Figure 19: Insta llable Options Dialog Box
7. Follow these steps to configure all of the Installable options:
a. Select the M Series Featur es option from the Inst allable Opt ion lis t. Choose either
M200, M300, or M400, depending on the model of the color server you specified in
Step 4.
b. Select the Xerox 5750/Acolor 620 Support opt ion fr om the I nstallable opt ions list.
This option enables/disables 12in x 18in, Postcard, and Tray 4 support. This
option also disables/enables Group in Sorter and Group in Sor ter Reverse, which
are not supported by the Xerox 5750/Acolor 620. Xerox 5750/ Acolor 620 Support
is enabled (Yes) by default.
If your color server is connected to a Xerox 5750/Acolor 620 copier, use the
default (Yes).
If your color server is connec ted to a Xerox 5790/ Acolor 935 o r Xerox 5799/Acol or
936 copi er, set this op ti o n to No.
c. Select the Optional Sorter option from the Installable options list. This option
enables/disables the Splash M Series sorter features. This option is disabled (Not
Installed) by default.
If the copier connected to your color server has a sorter attached, set this option
page-28 0015647-0001 February 18, 1999

Getting Started Guide
to Installed.
If the copier does not have a sorter, use the default (Not Installed).
d. Click OK.
8. On the Current Printer Description File dialog box, click OK.
9. Close the Chooser Control Panel.
The installation is now com plete and you can start sending print jobs to the color server. The
printer is insta lled with a set of default options. You can use these defaults, specify new
defaults (which will apply to all your print jobs), or select new options on a job-by-job basis.
For more inform a t ion, refer to the Splash M Series User’s Manual.
If this is the first workstation you have set up for the Splash M Series Color Server, go to
Setting the Administrator Password for the Server on page 44 to set the password for the
server.
0015647-0001 February 18, 1999 page-29

Getting Started Guide
5.5 In stalling the Viewer and Printer Support on Windows 95/98
The Splash CD-ROM that shi pped with the color server contains a folder named Winviewer.
This folder has all the utilities and files you need to install and setup the Viewer and printer
description files on the workstation.
The Microsoft Client for Microsoft networks and TCP/IP protocols must be installed on the
workstation in order to run the Viewer. These protocols also support printing to the Splash M
Series.
If you are installing the Viewer and printer files on a non-U.S. English Windows 95/98
workstation , you may op tionally use the installation procedure in Section 5.5. 2. This
procedure contains extra ste ps, but it will minimize the amo unt of US English that appear s
in the Printer Properties dialog box on the work station.
5.5.1 Installing an M Series Printer on a US English Windows 95/98 Client
1. Insert the Splash CD-ROM that shipped with the color server into your cl ient
workstation’s CD-ROM drive.
2. Open the WINVIEWER folder on the CD-ROM.
3. Double-click on Setup. When Setup starts, a dialog box appears that prompts you to
select a language.
4. Select the English language from the pull-down list and click OK. The Install Shield
Wizard starts.
5. Install the Viewer by following the Install Shield prompts.
6. When the Viewer installa tio n is compl ete, remo ve the CD- ROM fro m the work statio n’s
CD-ROM drive.
7. Start the Add Printer Wizard by clicking on Start, Settings, Printers and Add
Printers.
8. When the Add Printer Wizard prompts for a Local Pri nter or Network Printer, specify
Network Printer and click Next.
9. When the Add Printer Wizard prompts for a network path or queue name, enter the
Windows network nam e of the Splash M Series Color S erver’s configured print queue. If
the hos t name is splashm and the print queue name is splash_print, the Windows
network name is \\splashm\splash_print.
10. When the Add Printer Wizard prompts for the manufacturer and model,
a. Click on Have Disk, then Browse.
b. Go to Program Files\Splash\M Series Viewer v1.0 folder and select either
the win95 or win98 folder.
c. Choose the OEMSETUP.INF file and click OK.
11. When the Add Printer Wizard displays the printer model, Splash M v1.0, click Next.
12. When the Add Printer Wizard prompts for a printer name, type the desired local
logical printer name an d append “_hol d” if you are addi ng a hol d queue or “_print ” if you
are adding a print queue. The reas on for adding “_hold” or “ _print” is because both
queues are represented on the network as identical printer icons (Figure 20).
page-30 0015647-0001 February 18, 1999

Getting Started Guide
Adding “_print” or “_hold” to the name identifies the queue type associated with the
icon.
SA
SB
SplashM310
M310_hold
M310_print
S1
S2
S3
SplashM410
M410_hold
M410_print
SC
SD
SE
Figure 20: Color Serve r Queu es
13. When t he Add Printer Wizard asks if you want to print the test page, click Yes. After
the test page prints, click Yes again (even if the test page prints incorrectly).
14. Go to Section 5.5.3, on page 33 to setup the printer.
5.5.2 Installing an M Series Printer on a Non-US English Windows 95/98 Client
1. If there are no other PostScript printers installed on the workstation, install a dummy,
local, PostScript printer from your operating system install media:
a. Start the Add Printer Wizard by clicking on Start, Settings, Printers and Add
Printers.
b. When the Add Printer Wizard prompt s for a Local Printer or Network Printer,
select Local Printer and click Next.
c. Follow the prompts. When Add Printer Wizard prompt s you for the
Manufacturer and Model of the printer, choose HP and HP LaserJet III Si
PostScript. This co pi es the non - U.S. English, pri n t er driver so ftware to yo u r
system .
2. Insert the Splash CD-ROM that shipped with the color server into your client
workstation’s CD-ROM drive.
3. Open the WINVIEWER folder on the CD-ROM.
4. Double-click on Setup. When Setup starts, a dialog box appears that prompts you to
select a language.
5. Select the English language from the pull-down list and click OK. The Install Shield
Wizard starts.
6. Install the Viewer by following the Install Shield prompts.
7. When the Viewer installa tio n is compl ete, remo ve the CD- ROM fro m the work statio n’s
CD-ROM drive.
0015647-0001 February 18, 1999 page-31

Getting Started Guide
8. Restart the Add Printer Wizard by clicking on Start, Settings, Printers and Add
Printers.
9. When the Add Printer Wizard prompts for a Local Pri nter or Network Printer, specify
Network Printer and click Next.
10. When the Add Printer Wizard prompts for a network path or queue name, enter the
Windows network nam e of the Splash M Series Color S erver’s configured print queue. If
the hos t name is splashm and the print queue name is splash_print, the Windows
network name is \\splashm\splash_print.
11. When the Add Printer Wizard prompts for the manufacturer and model,
a. Click on Have Disk, then Browse.
b. Go to Program Files\Splash\M Series Viewer v1.0 folder and select either
the win95 or win98 folder.
c. Choose the OEMSETUP.INF file and click OK.
12. When the Add Printer Wizard displays the printer model, Splash M v1.0, click Next.
13. If the Add Printer Wizard prompts you to keep or replace the pr inter driver software,
select KEEP THE EXISTING DRIVER and click Next.
If you choose Replace the exi sting driver, the U.S.English print driver will be
installed, overwriting the non-U.S. English print driver.
14. When the Add Printer Wizard prompts for a printer name, type the desired local
logical printer name an d append “_hol d” if you are addi ng a hol d queue or “_print ” if you
are adding a print queue. The reas on for adding “_hold” or “ _print” is because both
queues are represented on the network as identical printer icons (Figure 21).
Adding “_print” or “_hold” to the name identifies the queue type associated with the
icon.
SA
SB
SplashM310
M310_hold
M310_print
S1
S2
S3
SplashM410
M410_hold
M410_print
SC
SD
SE
Figure 21: Color Serve r Queu es
15. When t he Add Printer Wizard asks if you want to print the test page, click Yes. After
the test page prints, click Yes again (even if the test page prints incorrectly).
page-32 0015647-0001 February 18, 1999

16. If the Add Printer Wizard aks you if you want to keep any files that are in the
language of your workstation, keep the files.
17. Go to Section 5.5.3, on page 33 to setup the printer.
5.5.3 Printer Setup
After adding the color server, configure it by following these steps:
1. Open Printer Properties. The Printer Properties dialog box, shown in Figure 22,
appears.
Getting Started Guide
Figure 22: Printer Properties Dialog Box
0015647-0001 February 18, 1999 page-33

Getting Started Guide
2. Click on Details. The Details tab, shown in Figure 23, appears.
\\Splashm\Splash_print
Figure 23: Details Tab
3. Click on the Spool Settings button. The Spool Settings dialog box, shown in
Figure 24, appears.
Figure 24: Spool Sett ings Di alog Box
4. Click on Print directly to printer then click OK. The Spool Setting dialog box closes,
but the Details tab (Figure 23) is still display e d.
5. On the Details tab, switch to the PostScript tab by clicking on PostScript. The
PostScript tab, shown in Figure 25, appears.
page-34 0015647-0001 February 18, 1999

Getting Started Guide
Figure 25: P o stScri pt Tab
6. On the PostScript tab, click Advanced. The Advanced PostScript dialog box, shown
in Figure 26, appears.
Figure 26: Adv an ced PostScript Dialog Box
7. Set the following options:
• Use PostScript Level 2 features
• Pure binary data
• Compress bitmap images
0015647-0001 February 18, 1999 page-35

Getting Started Guide
8. Click OK. The Advanced PostScript dialog box closes, but the PostScript tab is still
displayed.
9. Switch from the PostScript tab to the Device Options tab by clicking on Device
Options. The tab shown in Figure 27 appears.
Print features
Change setting
Installable
options
Change Setting
pull-down list
Figure 27: Device Options Tab
10. Scroll down and select SpotMatch.
a. If the M Series server is a model M210 or M310, set the SpotMatch option to
disabled. This option must be set to disabled because the M210 and M310 do not
support the SpotMatch feature.
b. If the M Series server is a model M4 10, set SpotMatch to the desired option
(disabled or enabled).
11. Configure all of the Installable options:
a. Select the M Series Features option from the Install able Option list. Choose eit her
M200, M300, or M400, depending on the model of the color server.
b. Select the Xerox 5750/Acolor 620 Support opt ion fr om the I nstallable opt ions list.
This option enables/disables 12in x 18in, Postcard, and Tray 4 support. This
option also disables/enables Group in Sorter and Group in Sor ter Reverse, which
are not supported by the Xerox 5750/Acolor 620 copier. Xerox 5750/Acolor 620
Support is enabl ed ( Yes) by default.
If your color server is connected to a Xerox 5750/Acolor 620 copier, use the default
(Yes).
If your color server is connected to a Xerox 5790/Acolor 935 or Xerox 5799/Acolor
936 copier, use the Change Setting pull-down list to set this option to No.
page-36 0015647-0001 February 18, 1999

Getting Started Guide
c. Select the Optional Sorter option from the Installable options list. This option
enables/disables the Splash M Series sorter features. This option is disabled
(Not Installed) by default.
If the copier connected to your color server has a sorter attac hed, use the
Change Setting pull-down list to set this option to Installed.
If the copier does not have a sorter, use the default (Not Installed.)
d. Click OK.
The installation is now com plete and you can start sending print jobs to the color server. The
printer is insta lled with a set of default options. You can use these defaults, specify new
defaults (which will apply to all your print jobs), or select new options on a job-by-job basis.
For more inform a t ion, refer to the Splash M Series User’s Manual.
If this is the first workstation you have set up for the Splash M Series Color Server, go to
Setting the Administrator Password for the Server on page 44 to set the password for the
server.
0015647-0001 February 18, 1999 page-37

Getting Started Guide
5.6 In stalling the Viewer and Printer Support on Windows NT4.0
The Splash CD-ROM that shi pped with the color server contains a folder named Winviewer.
This folder has all the utilities and files you need to install and setup the Viewer and printer
description files on the workstation.
The Microsoft Client for Microsoft networks and TCP/IP protocols must be installed on the
workstation in order to run the Viewer. These protocols also support printing to the Splash M
Series.
If you are installing the Viewer and printer files on a non-US English Windows NT4.0
workstation , you may op tionally use the installation procedure in Section 5.6. 3. This
procedure contains extra ste ps, but it will minimize the amo unt of US English that appear s
in the Printer Properties dialog box on the work station.
5.6.1 Installing an M Series Printer on a US English Windows NT4.0 Client
1. Logon to the workstation as a local administrator.
2. Insert the Splash CD-ROM that shipped with the color server into your client
workstation’s CD-ROM drive.
3. Open the WINVIEWER folder on the CD-ROM.
4. Double-click on Setup. When Setup starts, a dialog box appears that prompts you to
select a language.
5. Select the English language from the pull-down list and click OK. The Install Shield
Wizard starts.
6. Install the Viewer by following the Install Shield prompts.
7. When the Viewer installation is complete, remove the CD-ROM from the workstation
CD-ROM drive.
8. Start the Add Printer Wizard by clicking on Start, Settings, Printers and Add
Printers.
9. When the Add Printer Wizard prompts for My Computer or Network Printer Server,
select Network Printer Server and click Next.
10. When the Connect to Printer dialog box appears, enter the Windows NT network
path for the Splash M Series Color Server’s configured print queue. If the hostname is
splashm and the print queue name is splash_print, the Windows NT network name is
\\splashm\splash_print.
11. Click OK. If the Connect to Printer Warning box appears, click OK.
12. When the Driver Setup window appears, cli ck on Have Disk.
Always click on Have Disk regardl ess of whether or not this is the first ti me you are adding
a printer to your workstation.
13. When the Install from Disk window appears, click Browse.
14. The Locat e File dialog box appears. Select the Winnt4 fol der (the def ault p athname is
c:\Program Files\Splash\M Series Viewer v1.0\Winnt4).
15. Open the Winnt4 folder, select Splashm.inf and click on Open.
page-38 0015647-0001 February 18, 1999

Getting Started Guide
16. When the Confirmation window appears, click OK.
17. When the Add Printer Wizard prompts for the printer model, select SplashM v1.0,
then click Next.
18. When the Installation Successful window appears, cli ck Finish .
19. After successfully installing the printer, the Add Pri nter Wizard may ask if you want
your system to use this printer as the default printer. Select the desired option (Yes or
No), then go to Section 5.6.3, on page 40 to setup the printer.
5.6.2 Installing an M Series Printer on a Non-US English Windows NT4.0 Client
1. Logon to the workstation as a local administrator.
2. If there are no other PostScript printers installed on the workstation, install a dummy,
local, PostScript printer from your operating system install media:
a. Start the Add Printer Wizard by clicking on Start, Settings, Printers and Add
Printers.
b. When the Add Printer Wizard prompt s for My Computer or Network Printer
Server, select My Computer and click Next.
c. Follow the prompts. When Add Printer Wizard prompt s you for the
Manufacturer and Model of the printer, choose HP and HP LaserJet III Si
PostScript. This copies the non-U.S. English, printer driver software to your
system.
3. Insert the Splash CD-ROM that shipped with the color server into your client
workstation’s CD-ROM drive.
4. Open the WINVIEWER folder on the CD-ROM.
5. Double-click on Setup. When Setup starts, a dialog box appears that prompts you to
select a language.
6. Select the English language from the pull-down list and click OK. The Install Shield
Wizard starts.
7. Install the Viewer by following the Install Shield prompts.
8. When the Viewer installation is complete, remove the CD-ROM from the workstation
CD-ROM drive.
9. Start the Add Printer Wizard by clicking on Start, Settings, Printers and Add
Printers.
10. When the Add Printer Wizard prompts for My Computer or Network Printer Server,
select Network Printer Server and click Next.
11. When the Connect to Printer dialog box appears, enter the Windows NT network
path for the Splash M Series Color Server’s configured print queue. If the hostname is
splashm and the print queue name is splash_print, the Windows NT network name is
\\splashm\splash_print.
12. Click OK. If the Connect to Printer Warning box appears, click OK.
13. When the Driver Setup window appears, cli ck on Have Disk.
0015647-0001 February 18, 1999 page-39

Getting Started Guide
Always click on Have Disk regardl ess of whether or not this is the first ti me you are adding
a printer to your workstation.
14. When the Install from Disk window appears, click Browse.
15. The Locat e File dialog box appears. Select the Winnt4 fol der (the def ault p athname is
c:\Program Files\Splash\M Series Viewer v1.0\Winnt4).
16. Open the Winnt4 folder, select Splashm.inf and click on Open.
17. When the Confirmation window appears, click OK.
18. When the Add Printer Wizard prompts for the printer model, select SplashM v1.0,
then click Next.
19. When the Add Printer Wizard prompts you to keep or replace the printer driver
software, select KEEP THE EXISTING DRIVER, and click OK.
If you choose Replace the exi sting driver, the U.S.English print driver will be
installed, overwriting the non-U.S. English print driver.
20. When the Installation Successful window appears, cli ck Finish .
21. After successfully installing the printer, the Add Pri nter Wizard asks if you want your
system to use this prin ter as the default printer. Select the desired option (Yes or No),
then go to Section 5.6.3, on page 40 to setup the printer.
5.6.3 Printer Setup
After adding th e color se r v er, configure it as fo ll o w s:
1. Open the Printers fol d er and right clicking on the M Series printer icon. In the pull-
down menu that appears, choose Properties. The Printer Properties dialog box
appears.
2. Switch to the Scheduling tab (Figure 28).
page-40 0015647-0001 February 18, 1999

Getting Started Guide
Figure 28: Sc heduling Tab
3. Select Print directly to printer and then click OK.
4. Switch to the Device Settings tab (Figure 29).
Figure 29: Device Settings Tab
0015647-0001 February 18, 1999 page-41

Getting Started Guide
5. Configure the installable options by completing these steps:
a. Scroll down to Installable Options fold e r a n d d ouble click on the fo ld er icon.
b. Select the M Series Features option from the Installab le Option l ist. Choose eit her
M200, M300, or M400, depending on the model of the color server.
c. Select the Xerox 5750/Acolor 620 Support option. This option enables/disables
12in x 18in, Postcard, and Tray 4 support. This option also disables/enables
Group in Sorter and Group in Sorter Reverse, which are not supported by the
Xerox 5750/Acolor 620 copier. Xerox 5750/Acolor 620 Support is enabled (Yes) by
default.
If your color server is connected to a Xerox 5750/Acolor 620 copier, use the
default (Yes).
If your color server is connec ted to a Xerox 5790/ Acolor 935 o r Xerox 5799/Acol or
936 copier, set the Change Setting to No.
d. Select the Optional Sorter option from the list. This option enables/disables the
Splash M Series sorter fea tures. This option is disabled
(Not Installed) by default.
If the copier connected to your color server has a sorter attac hed, set the
Change Setting to Installed.
If the copier does not have a sorter, use the default (Not Installed).
e. Click OK.
f. Close the Printer Properties dialog box.
6. Open the Printers folder and right cl icking on the M Series printer icon again. In the
pull-down menu that appears, choos e Document Defaults. The Document Default
Properties window appears.
7. Switch to the Advanced tab (Figure30).
page-42 0015647-0001 February 18, 1999

Getting Started Guide
Figure 30: Adv anc ed Tab for Document Default Properties
8. Scroll down and double click on the Document Options folder, then scroll down and
double click on the Printer Features folder.
9. Scroll down and select SpotMatch.
a. If the M Series server is a model M210 or M310, set the SpotMatch option to
disabled. This option must be set to disabled because the M210 and M310 do not
support the SpotMatch feature.
b. If the M Series server is a model M4 10, set SpotMatch to the desired option
(disabled or enabled).
The installation is now com plete and you can start sending print jobs to the color server. The
color serve r PPD file shi ps wit h a set of d efau lt values. You can use these defaul ts , spec ify new
defaults (which will appl y to al l your print j obs) , or sel ect new val ues on a j ob-by- jo b basis. Fo r
more information, refer to the Splash M Series U ser’s Manual.
If this is the first workstation you have set up for the Splash M Series Color Server, go to
Setting the Administrator Password for the Server on page 44 to set the password for the
server.
0015647-0001 February 18, 1999 page-43

Getting Started Guide
6.0 S
ETTING THEADMINISTRATO RPASSWORD FOR THESERVER
If this is the first ti me you are installing the Viewer on a workstation (Windows or
Macintosh) on your network, complete the procedure in this section to change the
Administrator password on the Splash color server. You only need to change the password
once during the installation process. However, if you have multiple Splash M Seri es Color
Servers on your network, you must perform this procedure once for each color server.
There are three class es of user modes (or privileges) for the Splash M Series Color Server:
ordinary user, operator, administrator. The color server system allows or restr icts user access
to specific color server functions depending on the users’ mode:
Administrator— Unlimited access to all Viewer features and functions, including the
ability to define the features and functions available to ordinary users and operators.
Access to Administrator privileges requires a password.
Operator—Restricted access to Administrator functi ons and other functions as defined
by the Administrator. Access to Operator privileges requires a password.
Ordinary User—Restricted ac cess to Administrator and Operator functions. Access to
Ordinary User privileges does not require a password.
The color server can be configured with two passwords: one password for Administrator
access and one password for Operator access. If your site requires multiple Administrators
and Operators to manage the color server, these users must share passwords.
Since the Splash M Series software ships without passwords it is important to configure an
Administrator pass wo rd after installing the Viewer on the first workstation. Otherw ise, all
users will have unlimi ted access to the color server.
To change the Administrator password:
1. Start the Viewer by clicking on Start and clicking on M Series Viewer under the
Program menu. The Viewer window, shown in Figure 30, appears.
page-44 0015647-0001 February 18, 1999

Pull-down Administration Menu
Getting Started Guide
Figure 30: Sa mple Viewer Window
2. Pull down the Administration menu, and select Log on as shown in Figure 31.
Figure 31: Pull-do wn Logon Menu
The Logon dialog box, shown in Figure 32, appears. The default value for User ID is
Administrator.
Figure 32: Logon Dialog Box
3. If the default does not appear in User ID, pull down the User ID list and select
Administrator.
0015647-0001 February 18, 1999 page-45

Getting Started Guide
4. Do not specify a password in the password field. Click OK. You are now in
Administrator mode.
5. Pull down the Administration menu, and select Configure, then Password, as shown
in Figure 33.
The Change Password dialog box, shown in Figure 34, appears.
Figure 33: Co nfi gure P assword
Figure 34: Change Passwor d Dial og Bo x
6. Since the old password is blank, leave this field empty. Enter the new password in the
New Password field.
7. Re-enter the new password in the Verify field and click OK.
If the passwords enter ed in the New Password and Verify fields do not match, the
error message “The new passwords don’t match” appears. You probably made a typing
mistake. Repeat steps 6 and 7.
If the passwords do match, the message “Password accepted” appears.
8. Click OK and close the Viewer.
page-46 0015647-0001 February 18, 1999
 Loading...