

Page 1

0
Welcome to the family of productive M Series users!
.
r
You will soon have the powe r of M Ser ies print server at your fingertips. The M Series is
very easy to set up and use. This Setup Card guides you through the initial set up process
Follow this process each time you set up the M Series print server in a different location,
connect it to a different network, or connect it to a different color copier.
M Series
Version 1.0
Initial Setup Card
The setup of the M Series Print Server is not complete until you have followed the
Pre-Installation
Step 1:
Prepare the
Copier
Step 2:
Prepare the M
Series
Step 3:
Connect the
cables
Step 4:
Configure the
M Series for
your Copier
Contact your Xerox representative to have a Port Kit installed on your copier.
Ensure that there is at least 25 sheets of lett er size (8 .5"x11") paper in one of the cop ier’ s paper
trays. Make a copy off the glass to ensure that the copier is fu nctioning prope rly. After the copy
is made,
Unpack the M Series and place it near the copier.
Open the accessory box and remove the cables.
Open the disk set labelled Setup Disks.
Connect the M Series to the copier using the cable provided.
Connect the power cable to the M Series and plug it into an outlet. This outlet should not be on
the sam e power ci rcuit as th e copier’s outlet .
After you have connecte d all the cables,
From the Setup Disk package, select the Copier Configuration Disk for your copier model.
When the copier is up and be at a ready state,
As the print server powers up, the following sequence of eve n ts occur:
1. The green led illuminates, indicating that powe r is on.
After you comple te the initial s etup process, refer to the M Series Getting Started Guide fo
instructions for configuring and connecting the M Serie s to you network.
instructions on this card and in the Getting Started Guide!
turn off the copier.
turn on the copier.
turn on the M Series print server.
2. The print server emits one long and two short beeps.
3. After about 30 to 45 seco nds, the green ac ti vity lig ht o n t he flo ppy d rive i ll uminat es bri efl y
and the print server emits one sho rt beep.
4. After about 45 seconds , the print server emits six bee p s; two short, two long, and two
short. This is a signal from the print server indic ating that it is rea dy to accept the Copier
Configuration Disk.
Inserted the Copier Configuration Disk in the print server floppy drive
within 5 seconds after you hear the series of two short, two long, and
two short beeps.
The status indicator alternately flashes between yellow and red several times then changes to
flashing yellow. After a short time, the M Series prints a Start up test page.
Step 5:
Configure the
M Series for
your Network
Initial Setup Card QA 25 Draft: July 31, 1998 920400
Turn off the M Series print server.
To configure the print server for your network, take the Copier Configuration Disk to your
network administrator and have the administrator edit the disk so that it includes the print
server network parameters. Instructions are in the M Serie s Ge tting Started Guide.
Page 2
0
Normal Initialization Process
Before powering up the M Series print server, the copier must be up and be at a ready state, so that the print
server can set up proper communications with the copier.
As the print server initializes, the following sequence of event s occur:
1. The green led illuminates, indicating that power is on.
2. The print server emits one long and two short beeps.
3. After about 30 to 45 seconds, the green activity light on the floppy drive illuminates brie fly and the
print server emits one short beep.
4. After about 45 seconds, the print server emits six beeps; two short, two long, and two short. This is a
signal from the print server indicating that it is ready to ac cept service utility disks. If a disk is not
inserted, the print server will continue to initialize. The beeps are a normal part of the initialization
process.
Note: This time could be longer if the print server has to perform a disk check.
5. The status indicator alternately flashes between yellow and red several times then changes to flashing
yellow.
6. The print server prints its startup test page.
Note that the print server may not shut down or reboot if the power or reset button is pressed during
initialization. It is design this way to prevent system software damage/corruption that could occur if a there
were an interruption of power while the system wa s reading/writing to its hard drive.
When powering down the print se rver, wait for al l jo bs to co mplete, turn off the print server, and then turn off
the cop i er.
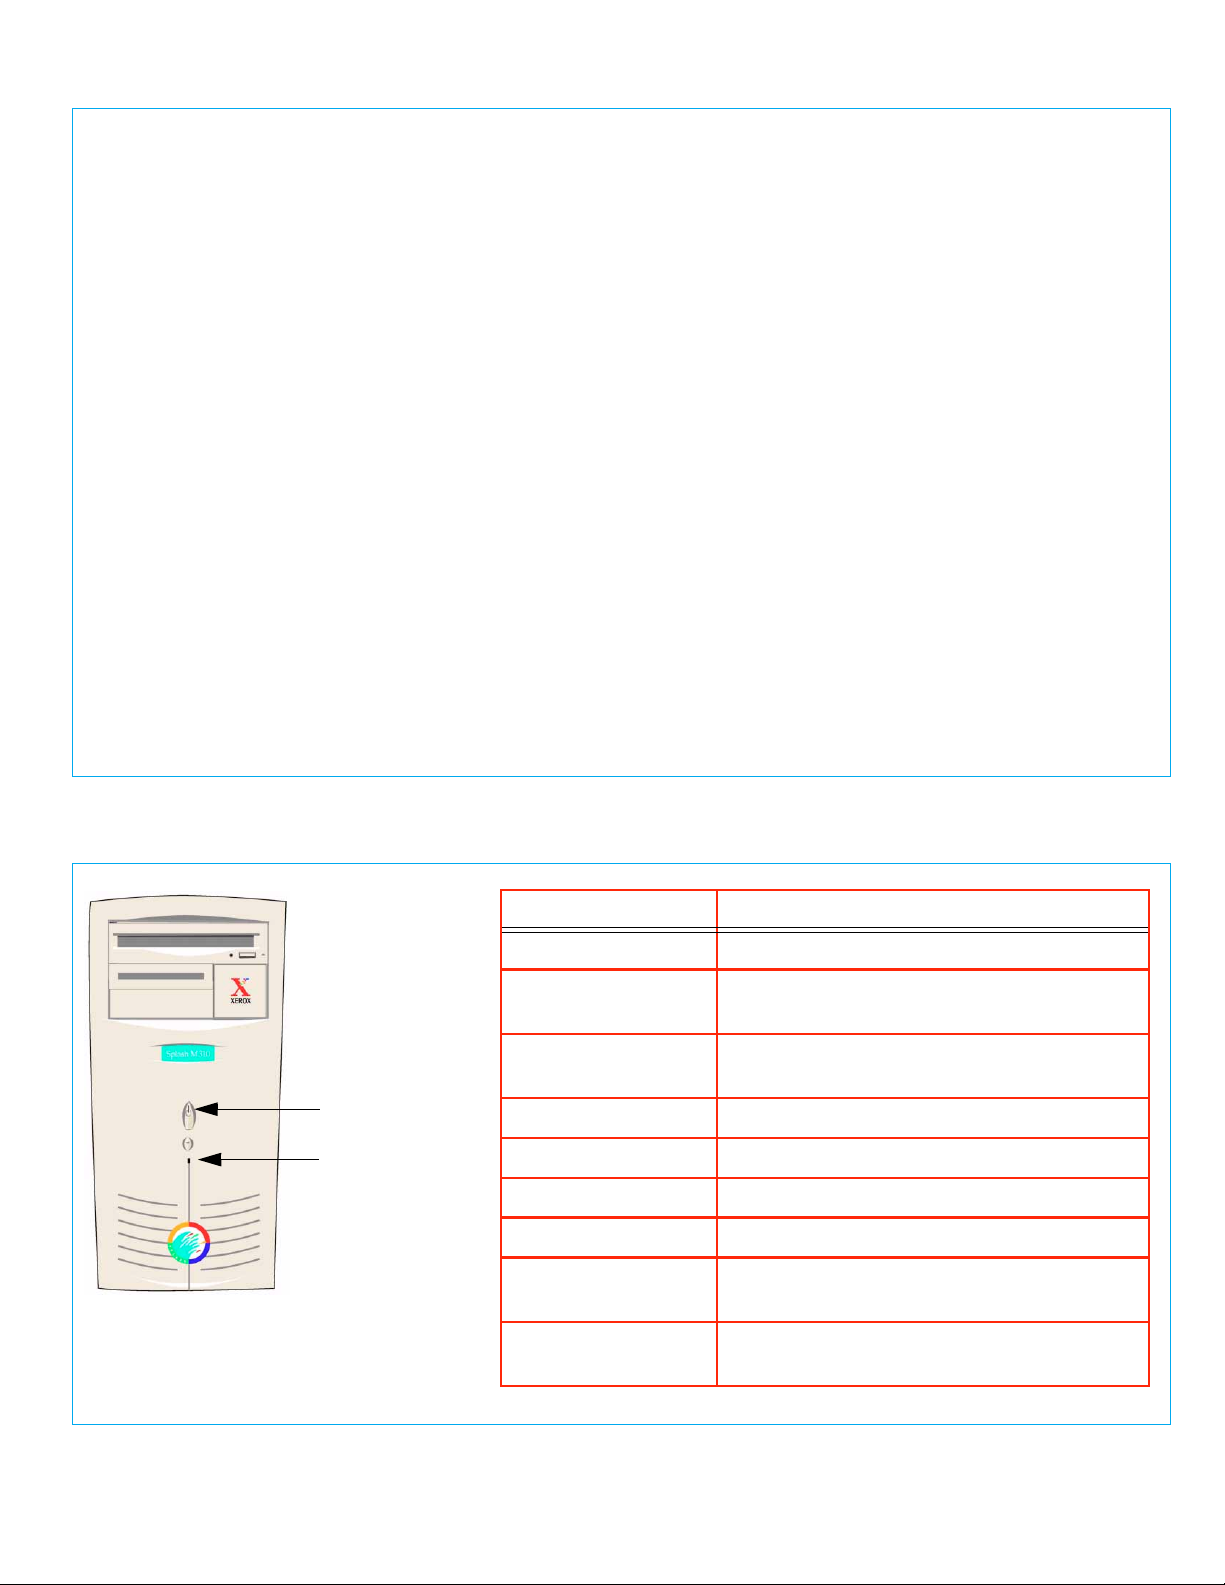
M Series Status Lights
Power indicator
(green)
Status LED
(amber or red)
LED Description
Green, not flashing Power indicator.
Amber, slowly
flashing
Amber, quickly
flashing
Red, off No problems
Red, one flash Add paper.
Red, two flashes Toner or fuser oil problem.
Red, three flashes Paper jam.
Red, four flashes Door open, copier disconnected or other
Panther/Cougar is idl e. Normal operation.
Panther/Cougar activity, such as spooling,
ripping, or print ing.
simila r error.
No amber or red Hardware problem or floppy in serted at the
wrong time.
Initial Setup Card QA 25 Draft: July 31, 1998 920400
 Loading...