


Splash G3535
User Guide


Copyright © 2003 Electronics for Imaging, Inc. All rights reserved.
This publication is protected by copyright, and all rights are reserved. No part of it may be reproduced or transmitted in any form or by any means for any purpose
without express prior written consent from Electronics for Imaging, Inc. Information in this document is subject to change without notice and does not represent
a commitment on the part of Electronics for Imaging, Inc.
This publication is provided in conjunction with an EFI product (the “Product”) which contains EFI software (the “Software”). The Software is furnished under
license and may only be used or copied in accordance with the terms of the Software license set forth below.
The Product may be covered by one or more of the following U.S. Patents: 4,917,488, 4,941,038, 5,109,241, 5,150,454, 5,150,454, 5,170,182, 5,212,546,
5,278,599, 5,335,040, 5,343,311, 5,424,754, 5,467,446, 5,506,946, 5,517,334, 5,537,516, 5,543,940, 5,553,200, 5,565,960, 5,615,314, 5,619,624,
5,625,712, 5,640,228, 5,666,436, 5,760,913, 5,818,645, 5,835,788, 5,866,856, 5,867,179, 5,959,867, 5,970,174, 5,995,724, 6,002,795, 6,025,922,
6,041,200, 6,046,420, 6,065,041, 6,067,080, 6,112,665, 6,116,707, 6,118,205, 6,122,407, 6,134,018, 6,141,120, 6,151,014, 6,166,821, 6,184,873,
6,185,335, 6,201,614, 6,215,562, 6,219,659, 6,222,641, 6,224,048, 6,225,974, 6,226,419, 6,239,895, 6,256,108, 6,265,676, 6,266,051, 6,269,190,
6,289,122, 6,292,177, 6,292,270, 6,300,580, 6,310,697, 6,323,893, 6,326,565, 6,327,047, 6,327,050, 6,327,052, 6,330,071, 6,331,899, 6,335,723,
6,340,975, 6,341,017, 6,341,018, 6,341,307, 6,348,978, 6,356,359, 6,369,895, 6,373,003, 6,381,036, 6,400,443, 6,414,673, 6,424,340, 6,429,949,
6,449,393, 6,456,280, 6,476,927, 6,490,696, 6,501,461, 6,501,565, 6,519,053, D341,131, D406,117, D416,550, D417,864, D419,185, D426,206,
D430,206, D439,851, D444,793, RE33,973, RE36,947
Trademarks
Bestcolor, ColorWise, eBeam, EDOX, EFI, Fiery, the Fiery logo, Fiery Driven, RIP-While-Print, and Spot-On are registered trademarks of Electronics for
Imaging, Inc. in the U.S. Patent and Trademark Office and/or certain other foreign jurisdictions.
The Best logo, the eBeam logo, the Electronics for Imaging logo, the Fiery Driven logo, the Intelligent Device Management logo, the PrintMe logo, the Splash
logo, the Unimobile logo, the Velocity OneFlow logo, Everywhere You Go, Changing the Way the World Prints, AutoCal, AutoGray, Best, ColorCal, Command
WorkStation, Device IQ, DocBuilder, DocBuilder Pro, DocStream, FreeForm, Fiery Link, Fiery Prints, Fiery Spark, NetWise, PrintMe, PrintMe Enterprise,
PrintMe Networks, RIPChips, ScanBuilder, Splash, Unimobile, Velocity, Velocity Balance, Velocity Build, Velocity Estimate, Velocity Exchange, Velocity
OneFlow, Velocity Scan, VisualCal, WebInstaller, WebScan, WebSpooler, WebStatus, and WebTools are trademarks of Electronics for Imaging, Inc.
All other terms and product names may be trademarks or registered trademarks of their respective owners, and are hereby acknowledged.
Legal Notices
APPLE COMPUTER, INC. (“APPLE”) MAKES NO WARRANTIES, EXPRESS OR IMPLIED, INCLUDING WITHOUT LIMITATION THE
IMPLIED WARRANTIES OF MERCHANTABILITY AND FITNESS FOR A PARTICULAR PURPOSE, REGARDING THE APPLE SOFTWARE.
APPLE DOES NOT WARRANT, GUARANTEE, OR MAKE ANY REPRESENTATIONS REGARDING THE USE OR THE RESULTS OF THE USE
OF THE APPLE SOFTWARE IN TERMS OF ITS CORRECTNESS, ACCURACY, RELIABILITY, CURRENTNESS, OR OTHERWISE. THE ENTIRE
RISK AS TO THE RESULTS AND PERFORMANCE OF THE APPLE SOFTWARE IS ASSUMED BY YOU. THE EXCLUSION OF IMPLIED
WARRANTIES IS NOT PERMITTED BY SOME STATES. THE ABOVE EXCLUSION MAY NOT APPLY TO YOU.
IN NO EVENT WILL APPLE, ITS DIRECTORS, OFFICERS, EMPLOYEES OR AGENTS BE LIABLE TO YOU FOR ANY CONSEQUENTIAL,
INCIDENTAL OR INDIRECT DAMAGES (INCLUDING DAMAGES FOR LOSS OF BUSINESS PROFITS, BUSINESS INTERRUPTION, LOSS OF
BUSINESS INFORMATION, AND THE LIKE) ARISING OUT OF THE USE OR INABILITY TO USE THE APPLE SOFTWARE EVEN IF APPLE
HAS BEEN ADVISED OF THE POSSIBILITY OF SUCH DAMAGES. BECAUSE SOME STATES DO NOT ALLOW THE EXCLUSION OR
LIMITATION OF LIABILITY FOR CONSEQUENTIAL OR INCIDENTAL DAMAGES, THE ABOVE LIMITATIONS MAY NOT APPLY TO YOU.
Apple’s liability to you for actual damages from any cause whatsoever, and regardless of the form of the action (whether in contract, tort [including negligence],
product liability or otherwise), will be limited to $50.
PANTONE® Colors displayed in the software application or in the user documentation may not match PANTONE-identified standards. Consult current
PANTONE Color Publications for accurate color. PANTONE® and other Pantone, Inc. trademarks are the property of Pantone, Inc. © Pantone, Inc., 2003.
Pantone, Inc. is the copyright owner of color data and/or software which are licensed to Electronics for Imaging, Inc., to distribute for use only in combination
with the products, or software of Electronics for Imaging, Inc. PANTONE Color Data and/or Software shall not be copied onto another disk or into memory
except as part of the delivery of the Electronics for Imaging, Inc., products or software.
This product includes software developed by the Apache Software Foundation (http://www.apache.org/).
Part Number: 45033928

FCC Information
WARNING: FCC Regulations state that any unauthorized changes or modifications to this equipment not expressly approved by the manufacturer could void
the user’s authority to operate this equipment.
Class A Compliance
This equipment has been tested and found to comply with the limits for a Class A digital device, pursuant to Part 15 of the FCC Rules. These limits are designed
to provide reasonable protection against harmful interference when the equipment is operated in a commercial environment. This equipment generates, and uses,
and can radiate radio frequency energy and, if not installed and used in accordance with the instruction manual, may cause harmful interference to radio
communications. Operation of this equipment in a residential area is likely to cause interference in which case the user will be required to correct the interference
at his own expense.
Industry Canada Class A Notice
This Class A digital apparatus complies with Canadian ICES-003.
Avis de Conformation Classe A de l’Industrie Canada
Cet appareil numérique de la Classe A est conforme à la norme NMB-003 du Canada.
RFI Compliance Notice
This equipment has been tested concerning compliance with the relevant RFI protection requirements both individually and on system level (to simulate normal
operation conditions). However, it is possible that these RFI Requirements are not met under certain unfavorable conditions in other installations. It is the user
who is responsible for compliance of his particular installation.
Dieses Gerät wurde sowohl einzeln als auch in einer Anlage, die einen normalen Anwendungsfall nachbildet, auf die Einhaltung der Funkentstörbestimmungen
geprüft. Es ist jedoch möglich, dass die Funkentstörbestimmungen unter ungünstigen Umständen bei anderen Gerätekombinationen nicht eingehalten werden.
Für die Einhaltung der Funkentstörbestimmungen einer gesamten Anlage, in der dieses Gerät betrieben wird, ist der Betreiber verantwortlich.
Compliance with applicable regulations depends on the use of shielded cables. It is the user who is responsible for procuring the appropriate cables.
Die Einhaltung zutreffender Bestimmungen hängt davon ab, dass geschirmte Ausführungen benützt werden. Für die Beschaffung richtiger Ausführungen ist der
Betreiber verantwortlich.
Software License Agreement
YOU SHOULD CAREFULLY READ THE FOLLOWING TERMS AND CONDITIONS BEFORE USING THIS SOFTWARE. IF YOU DO NOT
AGREE TO THE TERMS AND CONDITIONS OF THIS AGREEMENT, DO NOT USE THE SOFTWARE. INSTALLING OR USING THE
SOFTWARE INDICATES THAT YOU AGREE TO AND ACCEPT THE TERMS OF THIS AGREEMENT. IF YOU DO NOT AGREE TO ACCEPT
THE TERMS OF THIS AGREEMENT YOU MAY RETURN THE UNUSED SOFTWARE FOR A FULL REFUND TO THE PLACE OF PURCHASE.
License
EFI grants you a non-exclusive license to use the Software and accompanying documentation (“Documentation”) included with the Product. The Software is
licensed, not sold. You may use the Software solely for your own customary business or personal purposes. You may not rent, lease, sublicense or lend the Software
or use the Software in any time sharing, service bureau, or similar arrangement.
You may not make or have made, or permit to be made, any copies of the Software or portions thereof, except one (1) copy for backup or archive purposes in
support of your use of the Software as permitted hereunder. You may not copy the Documentation. You may not attempt to localize, translate, disassemble,
decompile, decrypt, reverse engineer, discover the source code of, modify, create derivative works of, or in any way change any part of the Software.
The terms, conditions, and restrictions in the License Agreement apply to all bug fixes, patches, releases, release notes, updates, and upgrades related to the
Software.
Proprietary Rights
You acknowledge and agree that all rights, title and interest, including all intellectual property rights, in and relating to the Software, Documentation and all
modifications and derivative works thereof are solely owned by and shall remain with EFI and its suppliers. Except for the express limited license granted above
to use the Software, no right or license of any kind is granted. You receive no rights or license under any patents, copyrights, trade secrets, or trademarks (whether
registered or unregistered). You agree not to adopt, register, or attempt to register any EFI trademark or trade name (“EFI Mark”) or any confusingly similar mark,
URL, internet domain name, or symbol as your own name or the name of your affiliates or products, and not to take any other action which impairs or reduces
the trademark rights of EFI or its suppliers.
Confidentiality
The Software is confidential, proprietary information of EFI and you may not distribute or disclose the Software. You may, however, permanently transfer all of
your rights under this Agreement to another person or legal entity provided that: (1) such a transfer is authorized under all applicable export laws and regulations,
including the U.S. Export Administration Regulations, (2) you transfer to the person or entity all of the Software and Documentation (including all copies,
updates, upgrades, prior versions, component parts, the media and printed materials, and this Agreement); (3) you retain no copies of the Software and
Documentation, including copies stored on a computer; and (4) the recipient agrees to the terms and conditions of this Agreement.

Remedies and Termination
Unauthorized use, copying, or disclosure of the Software, or any breach of this Agreement will result in automatic termination of this license and will make
available to EFI other legal remedies. In the event of termination, you must destroy all copies of the Software, Documentation, and all component parts thereof.
All provisions of this Agreement relating to disclaimers of warranties, limitation of liability, remedies, damages, governing law, jurisdiction, venue, and EFI’s
proprietary rights shall survive termination.
Limited Warranty and Disclaimer
EFI warrants to the original purchaser (“Customer”) for thirty (30) days from the date of original purchase from EFI or its authorized retailer that the Software
will perform in substantial conformance to the Documentation when the Product is used as authorized by EFI’s specifications. EFI warrants the media containing
the Software against failure during the above warranty period. EFI makes no warranty or representation that the Software will meet your specific requirements,
that the operation of the Software will be uninterrupted, secure, fault-tolerant, or error free, or that all defects in the Software will be corrected. EFI makes no
warranty, implied or otherwise, regarding the performance or reliability of any third party products (software or hardware. THE INSTALLATION OF ANY
THIRD PARTY PRODUCTS OTHER THAN AS AUTHORIZED BY EFI WILL VOID THIS WARRANTY. IN ADDITION, USE, MODIFICATION,
AND/OR REPAIR OF THE PRODUCT OTHER THAN AS AUTHORIZED BY EFI WILL VOID THIS WARRANTY.
EXCEPT FOR THE ABOVE EXPRESS LIMITED WARRANTY AND TO THE MAXIMUM EXTENT PERMITTED BY APPLICABLE LAW, EFI
MAKES AND YOU RECEIVE NO WARRANTIES OR CONDITIONS ON THE SOFTWARE, EXPRESS, IMPLIED, STATUTORY, OR IN ANY
OTHER PROVISION OF THIS AGREEMENT OR COMMUNICATION WITH YOU, AND EFI SPECIFICALLY DISCLAIMS ANY IMPLIED
WARRANTY OR CONDITION OF MERCHANTABILITY OR FITNESS FOR A PARTICULAR PURPOSE OR NONINFRINGEMENT OF THIRD
PARTY RIGHTS.
Limitation of Liability
TO THE MAXIMUM EXTENT PERMITTED BY LAW, EFI AND ITS SUPPLIERS SHALL NOT BE LIABLE FOR ANY DAMAGES, INCLUDING
LOSS OF DATA, LOST PROFITS, COST OF COVER OR OTHER SPECIAL, INCIDENTAL, CONSEQUENTIAL OR INDIRECT DAMAGES
ARISING FROM THE SALE, INSTALLATION, MAINTENANCE, USE, PERFORMANCE OR FAILURE OF THE SOFTWARE, HOWEVER CAUSED
AND ON ANY THEORY OF LIABILITY. THIS LIMITATION WILL APPLY EVEN IF EFI HAS BEEN ADVISED OF THE POSSIBILITY OF SUCH
DAMAGE. YOU ACKNOWLEDGE THAT THE PRICE OF THE PRODUCT REFLECTS THIS ALLOCATION OF RISK. BECAUSE SOME
JURISDICTIONS DO NOT ALLOW THE EXCLUSION OR LIMITATION OF LIABILITY FOR CONSEQUENTIAL OR INCIDENTAL DAMAGES,
THE ABOVE LIMITATION MAY NOT APPLY TO YOU.
You are hereby notified that Adobe Systems Incorporated, a Delaware corporation located at 345 Park Avenue, San Jose, CA 95110-2704 (“Adobe”) is a thirdparty beneficiary to this agreement to the extent that this agreement contains provisions which relate to your use of any software, font programs, typefaces, and/or
trademarks licensed or supplied by Adobe. Such provisions are made expressly for the benefit of Adobe and are enforceable by Adobe in addition to EFI. ADOBE
WILL HAVE NO LIABILITY WHATSOEVER TO YOU FOR ANY ADOBE SOFTWARE OR TECHNOLOGY LICENSED HEREUNDER.
Export Controls
EFI’s Products are subject to U.S. export laws and regulations, including the U.S. Export Administration Regulations, as well as foreign export laws and regulations.
You agree that you will not use, distribute, transfer, export, or re-export any portion of the Product or the Software in any form in violation of any applicable laws
or regulations of the United States or the country in which you obtained them.
U.S. Government Restricted Rights:
Use, duplication, or disclosure of the Software by the United States Government is subject to restrictions as set forth in FAR 12.212 or DFARS 227.7202-3 -
227.7202-4 and, to the extent required under U.S. federal law, the minimum restricted rights as set out in FAR 52.227-14, Restricted Rights Notice (June 1987)
Alternate III(g)(3)(June 1987) or FAR 52.227-19 (June 1987). To the extent any technical data is provided pursuant to the Agreement, such data is protected per
FAR 12.211 and DFARS 227.7102-2 and to the extent explicitly required by the U.S. Government, is subject to limited rights as set out in DFARS 252.227.7015
(November 1995) and DFARS 252.227-7037 (September 1999). In the event that any of the above referenced agency regulations are modified or superceded, the
subsequent or equivalent regulation shall apply. The name of the Contractor is Electronics for Imaging.
General
The rights and obligations of the parties related to this Agreement will be governed in all respects by the laws of the State of California exclusively, as such laws
apply to contracts between California residents performed entirely within California. The United Nations Convention on Contracts for the International Sale of
Goods and any other similar convention does not apply to this Agreement. For all disputes related to this Agreement, you consent to the personal and exclusive
jurisdiction and venue of the state courts in San Mateo County, California and the federal court for the Northern District of California. This Agreement is the
entire agreement held between us and supersedes any other communications or advertising with respect to the Software. If any provision of this Agreement is held
invalid, such provision shall be deemed modified to the extent necessary to be enforceable and the other provisions in this Agreement shall continue in full force
and effect.
If you have any questions, please see EFI’s web site at www.efi.com.
Electronics for Imaging
303 Velocity Way
Foster City, CA 94404


Contents
Introduction
About the documentation
Product features
System requirements
Mac OS xix
Windows xix
Passwords xx
Registration Card
Chapter 1: Network Setup
Network Setup for the Splash G3535
Configuring the Splash G3535 for TCP/IP and LPR printing 1-1
Enabling TCP/IP printing from the Splash G3535 1-4
Setting the Splash TCP/IP Direct options 1-5
Configuring Windows 2000/XP for TCP/IP printing
Configuring Windows NT for TCP/IP Printing
Enabling the Microsoft TCP/IP Print Service for LPR Printing 1-11
Configuring Novell NDPS Printing
Configuring a Novell NetWare print queue
xv
xvi
xix
xx
1-1
1-5
1-11
1-14
1-24
Chapter 2: Installing User Software on a Mac OS Computer
Installing from the Splash G3535 User Software CD
Installing by file sharing to the Splash G3535
Setting up the Mac OS X client
Setting up the Mac OS 9.x computer
Drop-printing files
2-1
2-2
2-8
2-10
2-11

viii Contents
Chapter 3: Installing User Software on a Windows Computer
Setting up printing to the Splash G3535
Chapter 4: Print Options
Accessing the Print options
File Handling
Color Options
Color Model 4-4
Printer Model 4-4
RGB Monitor Color Correction 4-4
CMYK Press Color Correction 4-7
Composite Spot Color Correction 4-8
Rendering Style 4-8
Extras Options 4-9
Prepress Features 4-10
Tray Options
Duplex 4-14
Staple 4-16
Collate 4-18
Rotate Pages 4-18
Imposition 4-18
Printer output tray maintenance 4-21
3-1
4-1
4-2
4-3
4-14
Providing user information
Secure Printing 4-26
Secure Access 4-29
4-25

ix Contents
Chapter 5: Using the Splash G3535 Server
The Splash G3535 interface (full-screen mode)
Main menus 5-2
Print queues 5-2
Preview window 5-5
Start/Stop button 5-5
Toolbar 5-5
Job status indicators 5-6
The Splash G3535 interface (reduced screen mode)
Starting the application
Using the Print Job Queue menu
Selecting jobs 5-8
Moving jobs 5-8
Deleting jobs 5-8
Viewing and editing job options
Setting default job settings
Editing default job settings 5-13
Managing raster files
RIP-While-Print 5-15
RIP-While-Receive 5-15
RIP-Across-Jobs 5-16
Instant Reprint 5-16
5-1
5-6
5-7
5-7
5-9
5-13
5-14
Previewing jobs
Checking job errors (preflight)
Active queue job management
Starting and stopping job processing 5-18
5-16
5-17
5-17

x Contents
Splash G3535 applications and features
ColorCal 5-18
CopyCal 5-18
Profile Loader 5-19
ColorTuner 5-21
Adjusting color in the ColorTuner application 5-24
Setting up server preferences
Viewing and editing job preferences 5-28
Setting Server preferences
Assigning a server name 5-29
Setting the Error Dialog Timeout preference 5-30
Setting File Converter preferences 5-30
Setting additional server preferences 5-32
Drop-printing files
Drop-printing large files 5-33
Drop-printing using Drop folders 5-34
Setting Page preferences
Setting Network preferences
Setting Remote Queue Management preferences 5-38
Setting Services preferences 5-39
5-18
5-27
5-29
5-33
5-36
5-38
Setting Color preferences
Setting Style preferences
Setting and reading a log file 5-44
Using the Configuration Report
Duplex alignment
Duplex alignment features 5-48
Performing color correction
CMYK color correction 5-50
Mixed RGB-CMYK color correction 5-50
TIFF and EPS color correction 5-50
Monitor calibration and RGB color correction 5-50
Spot Color Editor
Print Info
5-42
5-44
5-46
5-48
5-49
5-51
5-54

xi Contents
Hot Folders
Configuring the Splash G3535 for Hot Folders 5-55
Configuring Hot Folders for SMB file sharing 5-57
Set Builder
Printing a document set with Set Builder 5-59
Setting finishing options 5-61
Setting other Set Builder features 5-61
Using Set Builder tips 5-62
Errors in Set Builder document sets 5-62
Secure Access
Secure Access client error messages 5-66
Using Secure Access at client workstations 5-66
Printing with Secure Access 5-67
Splash color correction for Mac OS 5-68
Chapter 6: Using the Web Queue Manager
Preparing the Web Queue Manager
Configuring the Web Queue Manager
Configuring the TCP/IP Control Panel 6-2
Enabling Web Sharing 6-2
Enabling web access 6-3
5-55
5-58
5-63
6-1
6-1
Controlling Remote Queue Management privileges
Using the Web Queue Manager
Managing jobs in the print queue 6-7
Downloading installers and files from the Web Queue Manager
Chapter 7: Calibration
Setting ColorCal Options
Setting the Verify Against Profile 7-2
Calibrating the printer 7-2
Verifying Printer Color Accuracy
AutoGray
6-4
6-5
6-8
7-2
7-7
7-8

xii Contents
Splash Proof
Screened Dmax
Setting Screening Preferences 7-12
Setting the Screen Preferences 7-13
Calibrating with Screened Dmax 7-16
Editing custom color profiles (Expert Mode)
Editing Percentages 7-20
Creating Color Profile Sets
CopyCal
CopyCal Profiles 7-22
CopyCal Calibration 7-22
Chapter 8: Using Acquire
Scanning an image with Acquire
Color options 8-3
RGB color correction 8-3
CMYK color correction 8-3
Gamma 8-3
Cropping a scanned image
Conserving hard disk space 8-6
Choosing an orientation 8-6
Saving a scan 8-6
7-10
7-11
7-18
7-21
7-22
8-1
8-4
Acquire Plug-In for Photoshop
Installing the plug-in 8-6
Preparing the scan 8-7
Checking the required disk space 8-8
Transferring a scanned image to Photoshop 8-8
Acquire without Photoshop
8-6
8-8

xiii Contents
Appendix A: Troubleshooting
General Troubleshooting Tips
Separation
Paper and tray handling
Changing the paper size in a tray A-3
LEF Paper Substitution A-3
Correcting out of paper errors A-3
Secure Access
Correcting Jobs That Error A-4
Printing with the Standard driver A-4
Printing with the PageMaker PPD A-4
Entering an invalid IP address A-4
Splash color correction
Splash G3535 server
Running other applications on the Splash G3535 A-5
Print Job Name A-5
Job Processing A-5
Server Disk Full A-6
Installer A-6
Job Previews A-6
PostScript errors in jobs that print successfully A-7
A-1
A-2
A-3
A-4
A-4
A-5
Web Queue Manager
Job Selection Checkmarks Disappear A-7
Acquire
Improving RGB Scans A-7
A-7
A-7
Index


xv About the documentation
Introduction
This manual describes how to set up, install, and configure the Splash G3535
Color Server™ for Apple Mac OS and Microsoft Windows computers. The Splash
G3535 Color Server is a high-end Color Publishing Print Solution for use on Power
Mac OS G4 platforms. Splash client software enables Mac OS or Windows computers
to send print jobs across an appropriate network to the Splash G3535 Color Server,
which processes the jobs and sends them to the printer. If you are unfamiliar with your
platform’s procedures for printing or integrating printers within the network
environment (Windows NT/2000/XP, AppleTalk, Unix, Novell, and Microsoft TCP/
IP), see the manufacturer’s documentation.
OTE
The term “Splash G3535” is used in this manual to refer to the Splash G3535
N
:
Color Server. The term “Windows 9x” is used in this manual to represent Windows 95
and Windows 98.
About the documentation
This manual is part of the set of Splash G3535 documentation, which includes the
following manuals for users and system administrators:
Getting Started
printer. Specifically, it describes how to install and configure the hardware on the
Splash G3535 workstation. It explains how to install the Splash G3535 software, client
PostScript drivers, and printer description files. It also explains how to configure the
server preferences, print options, calibration, and network settings.
describes how to install the Splash hardware and software to print to the
The
User Guide
explains the basic configuration and administration of the
Splash G3535 supported platforms and network environments. It contains guidelines
for setting up client workstations for AppleTalk, TCP/IP, LPR, Splash G3535,
SAMBA support for Hot Folders, and Mac OS Drop Folder access. It also explains the
server print features, functions, and job management options.
N
:
OTE
Getting Started
User Guide
is online documentation on the Splash G3535 User Software CD.
ships with the Splash G3535 as printed documentation. The

xvi Product features
Product features
The new and commonly used product features of the Splash G3535 are described in
the following list.
•
Color Tuner
—allows you to make color changes to any document (a single page or
the entire document) at the server without having to reopen and edit the original file
in the original application. You can make color changes (RGB or CMYK) globally
by adjusting either the overall intensity of a specific color or the highlights,
midtones, or shadows. Direct color substitution mode changes the selected color to a
new color for a single page of a document or the entire document. Smoothed color
substitution changes all occurrences of a single color to another color, allowing you
to adjust the dominant color in an image. The Splash G3535 enhancements include
selecting Spot Colors for substitutions, limiting the selected area for color effects,
and editing individual colors after global changes have been applied.
Screened Dmax
•
—allows you to obtain dot accurate and color accurate calibrated
output for print jobs that use the Screened job option. In addition, it displays 100%
fills as solids rather than screened areas. This provides an enhanced proofing
capability for screened devices to produce the best screened color output.
Print Info
•
—allows you to print a customizable info strip for your jobs. The Print
Info Strip includes information regarding the user, job, color, and media type.
•
Set Builder
—allows you to select individual jobs and print them as a single set. You
can select from the following options: Copies, Collate, Duplex, Staple, and Rotate.
TIFF-IT P1 and 8.8, PDF-X, CT-LW, and PSD native file formats
•
—allow direct handling
of many pre-press jobs sent to the Drop Folders.
•
ColorCal
—allows you to select from a standard set of RGB and CMYK Color Profiles
or create custom CMYK profiles to calibrate the printer to produce the most
accurate CMYK and RGB color output possible. ColorCal also offers two unique
calibration features: AutoGray and Splash Proof calibration. AutoGray adjusts the
gray balance of the printer. Splash Proof uses a special set of selected print settings to
output a specific proofing style.
• Secure Access—enables the server administrator to limit who is allowed to print to
the server. It requires you to enter a user ID, password, and account number or any
combination of these fields, prior to sending a job to the server.

xvii Product features
• Secure Printing—allows you to password-protect a job from the printer driver, so it
can only be printed at the server print queues when the password is entered. Only
you, as the owner of the job, can reprint the job from these print queues.
• Duplex Alignment—allows the server administrator to enter vertical and horizontal
offsets which are applied to all duplex jobs. These offsets align the print margins for
both sides of the duplexed job. Duplex Alignment also supports separate offset
values for each tray.
• Splash Imposition—creates imposed documents from the print driver, PPD, or Job
Option window at the server.
• Spot Color Editor—allows you to add and delete spot colors, as well as change the
value output, for any particular spot color.
• Hot Folders/Hot Download Folders—allows you to create multiple Drop folders and
Hot Folders. You can then download graphics files directly from a Mac OS or
Windows computer to the Splash G3535 using specified job print options. The
folders are standard Mac OS folders which are shared over the network. Windows
and UNIX client systems are supported via SMB file sharing.
• Composite Spotproof—allows you to simulate PANTONE (including the newer 147
colors in both composite and separations), Toyo, DIC, and HKS spot color
matching systems. You can also print spot tints (less than 100% of a specific spot
color) accurately, since they are calculated from the actual spot color and are not a
CMYK processed color.
• Show Composite CMYK Overprints—allows you to view overprints included in PDF
files or composite files from various publishing applications, improving speed and
workflow.
• Splash Intellicolor—allows you to print jobs that contain mixed RGB format (TIFF,
EPS) and mixed color space (CMYK, RGB, spot) elements without any complex
and time-consuming adjustments.
• Continual Print—automatically processes and prints most files at printer speed.
However, complex jobs with large bitmaps on each page may not print at
printer speed.
• Active Queue—is a management tool that allows you greater flexibility for
scheduling jobs.

xviii Product features
• CopyCal—allows you to create color profiles that enable the printer to simulate the
color output of any other color printer.
• Acquire without Photoshop—allows you to scan images at the Splash G3535
without using third-party applications, such as Adobe Photoshop.
• Drag and Drop from Server Queues—allows you to drag copies of spool files from the
server queues to the Mac OS desktop.
• GCR Preserving Profile—retains the original Gray Component Replacement (GCR)
values of the original file. This creates quality prints that more accurately represent
the output of a press by replacing all neutral color areas with an appropriate amount
of black, using only the minimum amount of cyan, magenta, and yellow. This
option only affects color matching with new style 4D profiles. Old style profiles are
automatically GCR preserving.
Mac OS X Native TCP/IP Printing—the Splash G3535 receives jobs via LPR using a
•
Native Mac OS X application, providing stability and in many cases allowing LPR
networks to avoid running the Classic environment.
• Internet or Intranet Web Queue Manager—enables remote users on any computer
platform to view and control print jobs at the Splash G3535.
NOTE: The Web Queue Manager requires a TCP/IP connection to the Splash server
and Netscape Navigator 4 or later, or Microsoft Internet Explorer 4 or later web
browser.
• Translated server components—in Brazilian Portuguese, French, Italian, German,
and Spanish are included with the Splash G3535. You can auto-switch the server
language without having to restart the system, and separate installation is
not required.
• Import RGB, Output RGB and CMYK Profiles—allows you to import color profiles to
the Splash G3535, providing better and more customizable color management.
• Selectable Printer Screening—takes advantage of the printer’s ability to provide
better proofing capabilities for some special workflows.

xix System requirements
System requirements
To install the Splash G3535 User Software on a Mac OS or Windows computer, the
computer must be equipped with a built-in or external CD-ROM drive.
Mac OS
To print to the Splash G3535, you need:
•Apple Power Mac OS computer or compatible.
•Mac OS 8.6 or later
•Networking software that provides a network connection between the Mac OS
computer and the Splash G3535.
• CD-ROM or connection to the network for Splash G3535 client installers.
•A minimum of 50MB of free hard disk space.
NOTE: The Splash G3535 is incompatible with client software from other versions of
Splash equipment. You must install the Splash client software on all Mac OS
computers that will print to the Splash G3535.
Windows
To print to the Splash G3535, you need:
• An IBM AT or PS/2 or 100% compatible computer with an Intel 80486 or higher
processor, or similar processor.
•A minimum of 50MB of free hard disk space.
•Microsoft Windows 98/Me, or Windows NT v4.0 or later, or Window 2000,
Windows XP and their related software CDs or diskettes.
•At least 8MB of RAM for Windows 98/Me, at least 16MB of RAM for
Windows NT, or at least 32MB RAM for Windows 2000/XP.
•Network hardware that works with the built-in Windows drivers to connect your
Windows computer to the print queue on the Splash G3535.
•A CD-ROM drive or connection to a networked Splash G3535 to download the
Windows installers.

xx Registration Card
Windows Operating System Notes
Windows 98/Me
•Print interface software provided: printer description file (PPD) and Adobe
Custom PS.
•Supports all releases of Windows 98/Me.
•Supports custom page sizes.
Windows NT/2000/XP
•Print interface software provided: printer description file (PPD) and Adobe
Custom PS.
•Supports Windows NT 4.0 or higher and Windows 2000/XP
•Supports custom page sizes.
UNIX
UNIX jobs received via TCP/IP directly use the default options selected.
Passwords
The default Administrator logon for the Mac OS X Splash server computer is Splash
for both User Name and Password. By default, no password is set for Administrator
logon to the Splash G3535 server software.
Registration Card
To receive software upgrade notifications for the Splash G3535, complete the
pre-addressed registration card included with the Splash G3535 and mail it to:
Electronics for Imaging, Inc., 303 Velocity Way; Foster City, CA 94404.

1-1 Network Setup for the Splash G3535
1
Chapter 1: Network Setup
This chapter describes environments that typically include one or more network
configurations. It describes how to set up and configure your network for printing to
the Splash G3535 from Mac OS or Windows computers. The Splash G3535 also
supports printing from Unix OS systems via LPR/LPD printing.
Network Setup for the Splash G3535
The Splash G3535 supports AppleTalk, AppleShare, Microsoft TCP/IP, Novell
NetWare NDPS for TCP/IP or LPR Printing, Legacy support for NetWare Print
Queue setup through PConsole, and third party spoolers for printing from
Windows 9x computers.
Configuring the Splash G3535 for TCP/IP and LPR printing
This section describes how to configure the Splash G3535 to receive print jobs from
Windows computers on a TCP/IP or LPR network.
To configure the Splash G3535 and Windows computers for TCP/IP printing, you
must complete the following procedures:
• Connect the Splash G3535 to the TCP/IP Network.
• Configure the Splash G3535 for the TCP/IP Network.
•Enable TCP/IP printing.
•Set the Splash TCP/IP Direct options.
• Configure Windows computers for TCP/IP printing.
Connecting the Splash G3535 to the TCP/IP network
Connect the server’s Local Area Network (LAN) card or Ethernet port to the network,
if not already connected.
1-2 Network Setup
1
Configuring the Splash G3535 to the TCP/IP network
The following procedure explains how to configure the Splash G3535 to the
TCP/IP network.
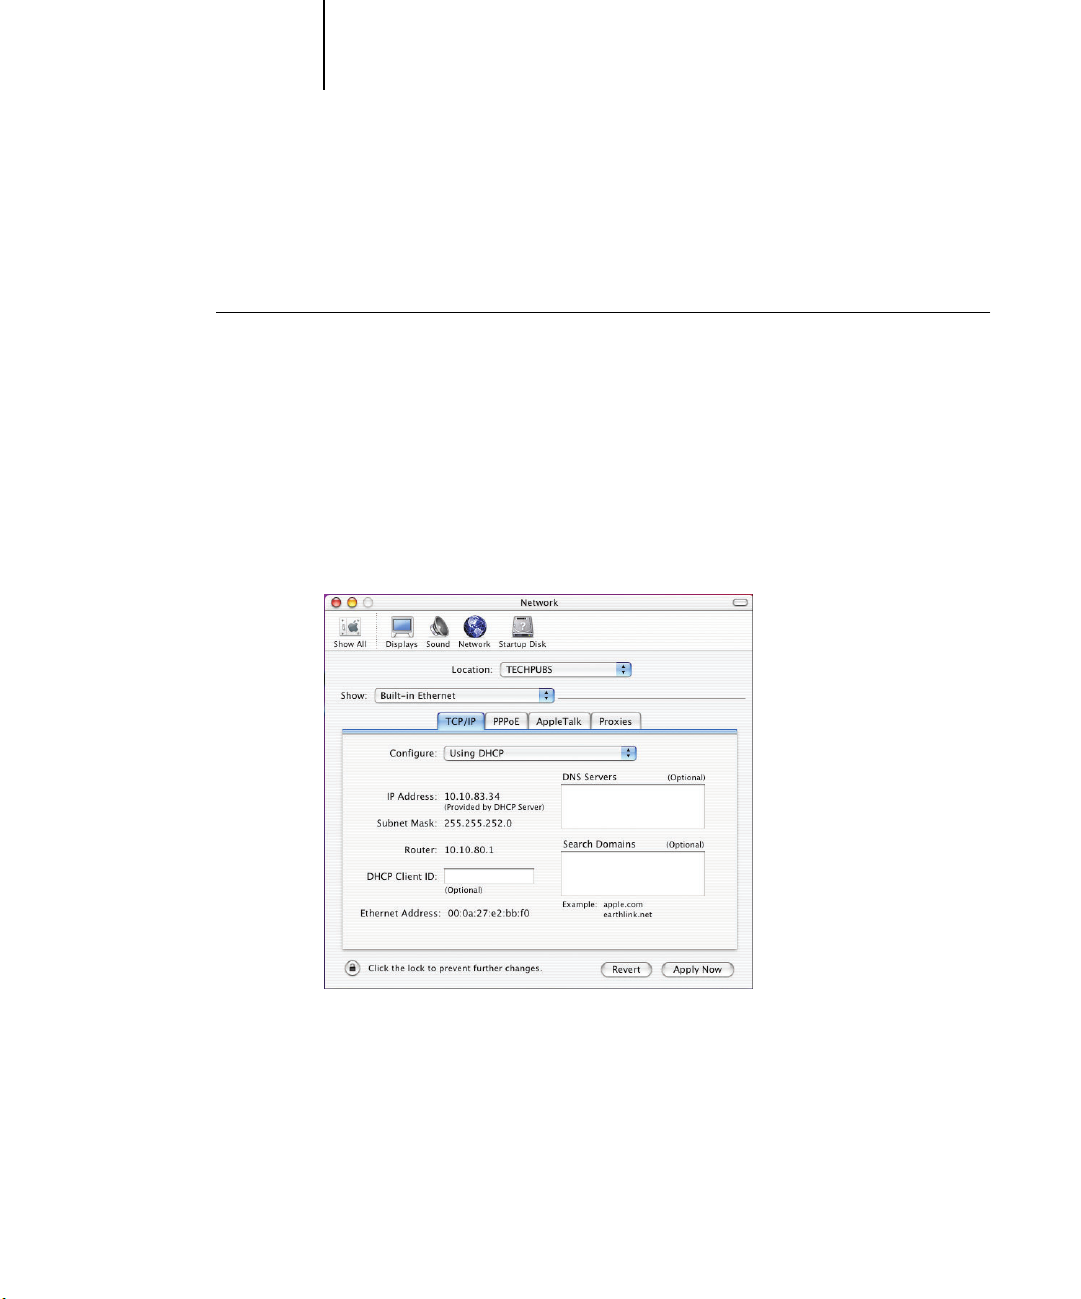
TO CONFIGURE THE SPLASH G3535 TO THE TCP/IP NETWORK
1. Obtain an IP address and subnet mask, and a router address from your network
administrator.
2. Choose Location from the Apple menu on the Splash G3535, and then choose Network
Preferences.
The TCP/IP Control Panel appears.
3. Choose the local area network (LAN) card type or Built-in Ethernet for the Splash
server’s TCP/IP network from the Show menu.

1-3 Network Setup for the Splash G3535
1
4. To configure the TCP/IP address manually, choose Manually from the Configure
5. Enter the IP address for the Splash G3535.
6. Enter a Subnet mask number, if required.
7. Enter the Router address (gateway address), if required.
menu. To have a TCP/IP address automatically assigned from the network, choose
Using DHCP.
Assigning the Splash G3535 a static TCP/IP address allows users to reliably locate the
server on the network. If you want to set up the DHCP server to lock in your TCP/IP
address, contact the network administrator.
N
OTE: If the Subnet mask number is different than the default mask number, you
can change it to match the one used on your network. Contact your network
administrator.
A network router maintains a list of IP addresses for two or more groups of network
devices. The router then uses the list of addresses to direct network data to the
appropriate location on the network. To enter two or more router addresses, press
Return after entering each address.
8. Enter a Name server address for your local DNS server on your network (optional).
9. Enter the search domain name that pertains to your DNS name; for example,
design.corp.com (optional).
10. Close the Network control panel.
11. Click Apply to confirm the new setup.
1-4 Network Setup
1
Enabling TCP/IP printing from the Splash G3535
The following procedure explains how to enable TCP/IP printing from the
Splash G3535.
TO ENABLE TCP/IP DIRECT PRINTING
1. Start the Splash G3535 application.
2. Choose Log In from the Server menu.
3. Enter the Administrator Password and click OK.
N
OTE: The default administrator password for the Splash server is “Splash.”
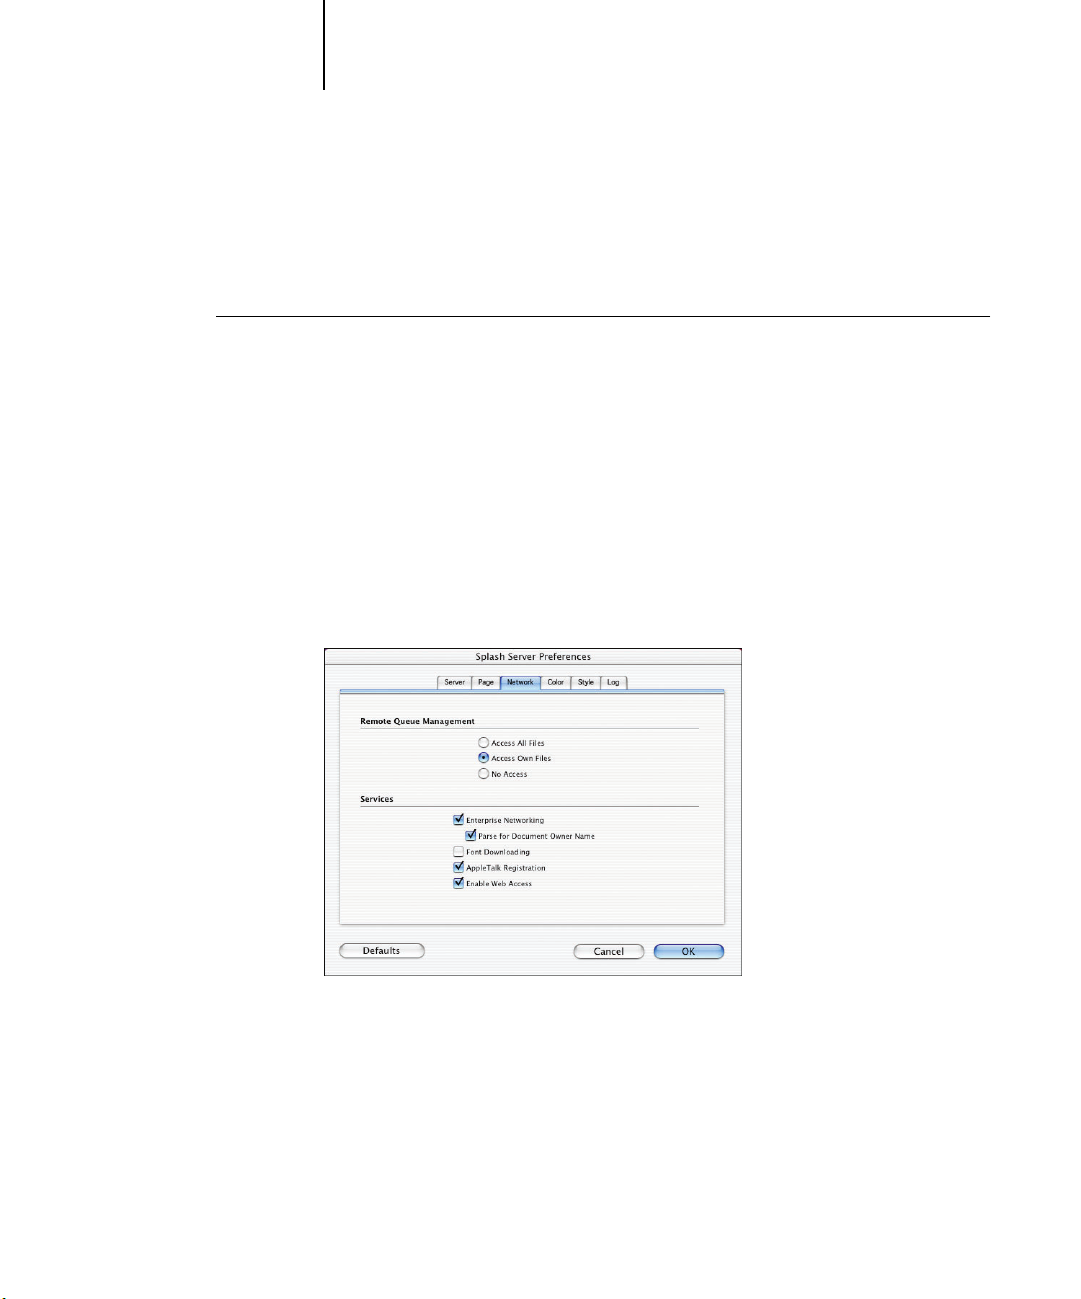
4. Choose Server Preferences from the Server menu.
The Splash Server Preferences dialog box appears.
5. Click the Network tab.
6. Select Enterprise Networking and click OK.
7. Click the Splash G3535 server window to bring the server application to the
foreground.
The Splash G3535 is ready to receive network print jobs from TCP/IP clients.

1-5 Configuring Windows 2000/XP for TCP/IP printing
1
Setting the Splash TCP/IP Direct options
You can configure the Splash G3535 to automatically extract the job owner’s name
from a print job.
You can select the following option in the TCP/IP Direct window:
• Parse For Document Owner Name—Document Owner name is extracted from each
print job as it is received at the Splash G3535. When this option is not selected,
Enterprise Networking determines the owner name from the network connection.
Configuring Windows 2000/XP for TCP/IP printing
You can configure Windows 2000/XP computers to print to the Splash G3535 via
Enterprise Networks TCP/IP Direct Printing.
The Splash G3535 accepts print jobs from the TCP/IP network on Windows 2000/XP
or Novell NetWare NDPS LPR network. In addition, users on a TCP/IP network can
print TIFF, TIFF-IT, EPS, PDF, PDF-X, CTLW, and PostScript files directly to the
Splash G3535 via Drop Folders or Hot Folders.
NOTE: To print over the TCP/IP network, your computer must have Splash software
appropriate for your operating system installed, and must be connected to the
Splash G3535.
Windows 2000/XP computers are pre-configured with the Microsoft TCP/IP software
installed. The following procedure describes how to configure Windows 2000/XP for
TCP/IP printing to the Splash G3535.
NOTE: The following procedure uses Windows XP screenshots.

1-6 Network Setup
1
TO CONFIGURE WINDOWS 2000/XP FOR TCP/IP PRINTING
1. Log on to Windows as Administrator.
2. Click Start, choose Settings, and then choose Printer and Faxes.
3. Double-click the Add a Printer icon.
The Add Printer Wizard dialog box appears.
4. Click Next.
5. Select Local Printer attached to this computer, and deselect Automatically detect and
install my plug and play printer.

1-7 Configuring Windows 2000/XP for TCP/IP printing
1
6. Click Next.
7. Select Create New Port, choose Standard TCP/IP Port from the Type of Port menu, and
then click Next.
The Welcome to the Add Standard TCP/IP Printer Port Wizard dialog box appears.
8. Click Next.
1-8 Network Setup
1
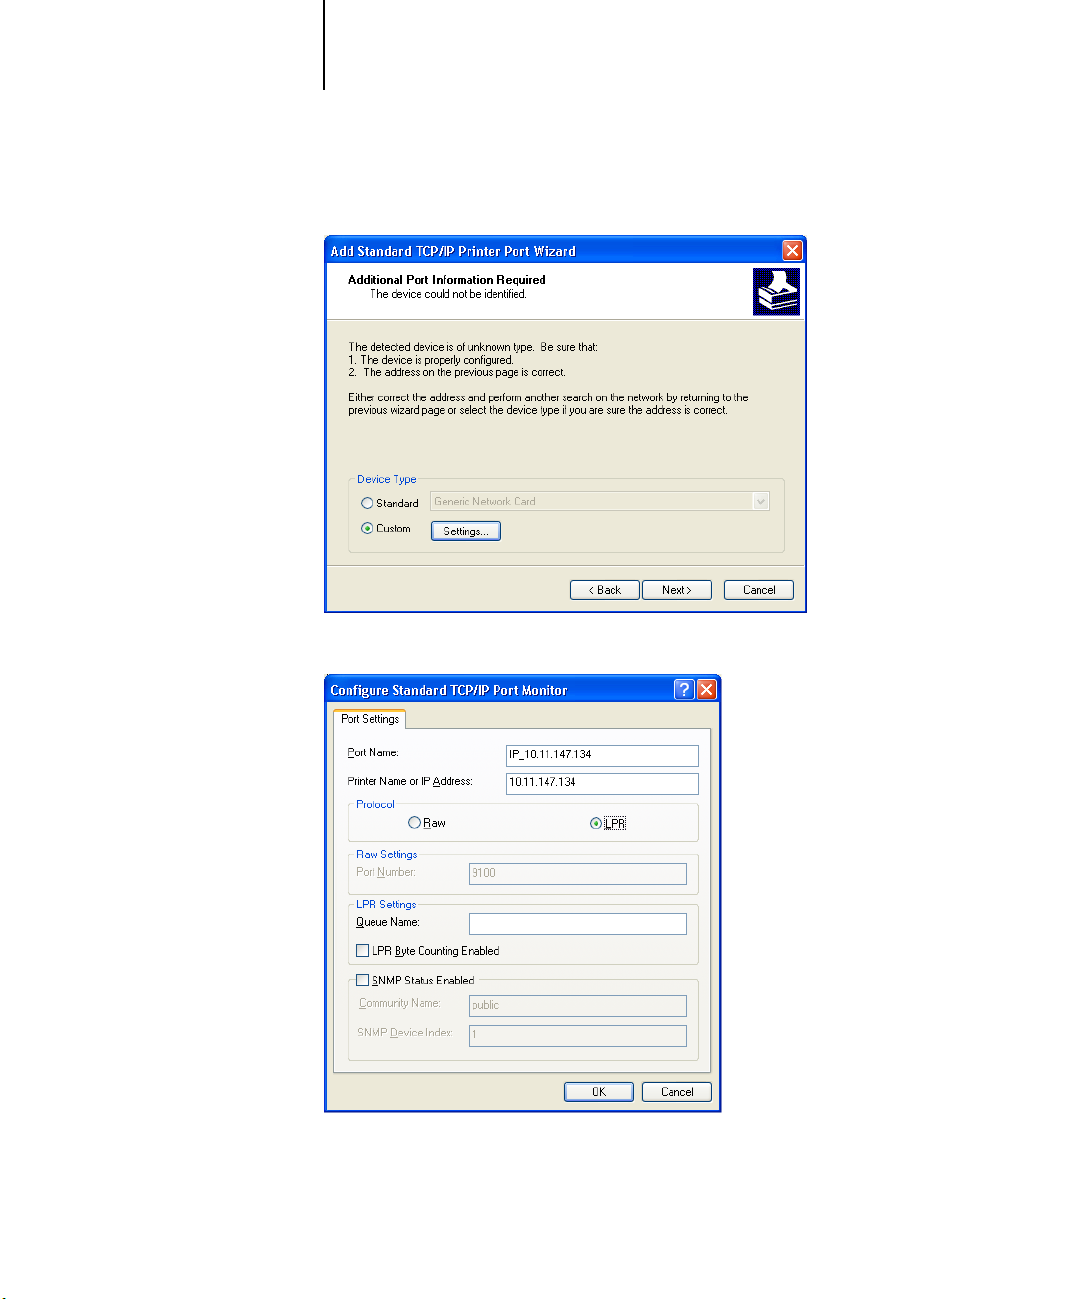
9. Enter the Printer Name or IP address and click Next.
10. Under Device Type, select Custom and click Settings.
11. Under Protocol, click LPR.
1-9 Configuring Windows 2000/XP for TCP/IP printing
1
12. Under LPR Settings, enter the printer name in the Queue Name field and click OK.
13. Click Next.
14. Click Finish.
The Additional Port Information Required dialog box appears.
Completing the Add Standard TCP/IP Printer Port Wizard appears.
15. If the Splash G3535 PPD is listed, click Next.
OTE: If the Splash G3535 PPD is not listed, see the following procedure.
N
16. If a dialog box appears asking if you want to keep the existing driver, select Keep
Existing Driver and click Next.
17. In the Name your Printer dialog box, click Next.
18. In the Printer Sharing dialog box, select whether you want to share the printer.
If you select Share, the Location and Comment dialog box appears. Enter the
appropriate information for your job and click Next.
19. Click Next and then click Finish in the Print Test Page dialog box.
1-10 Network Setup
1
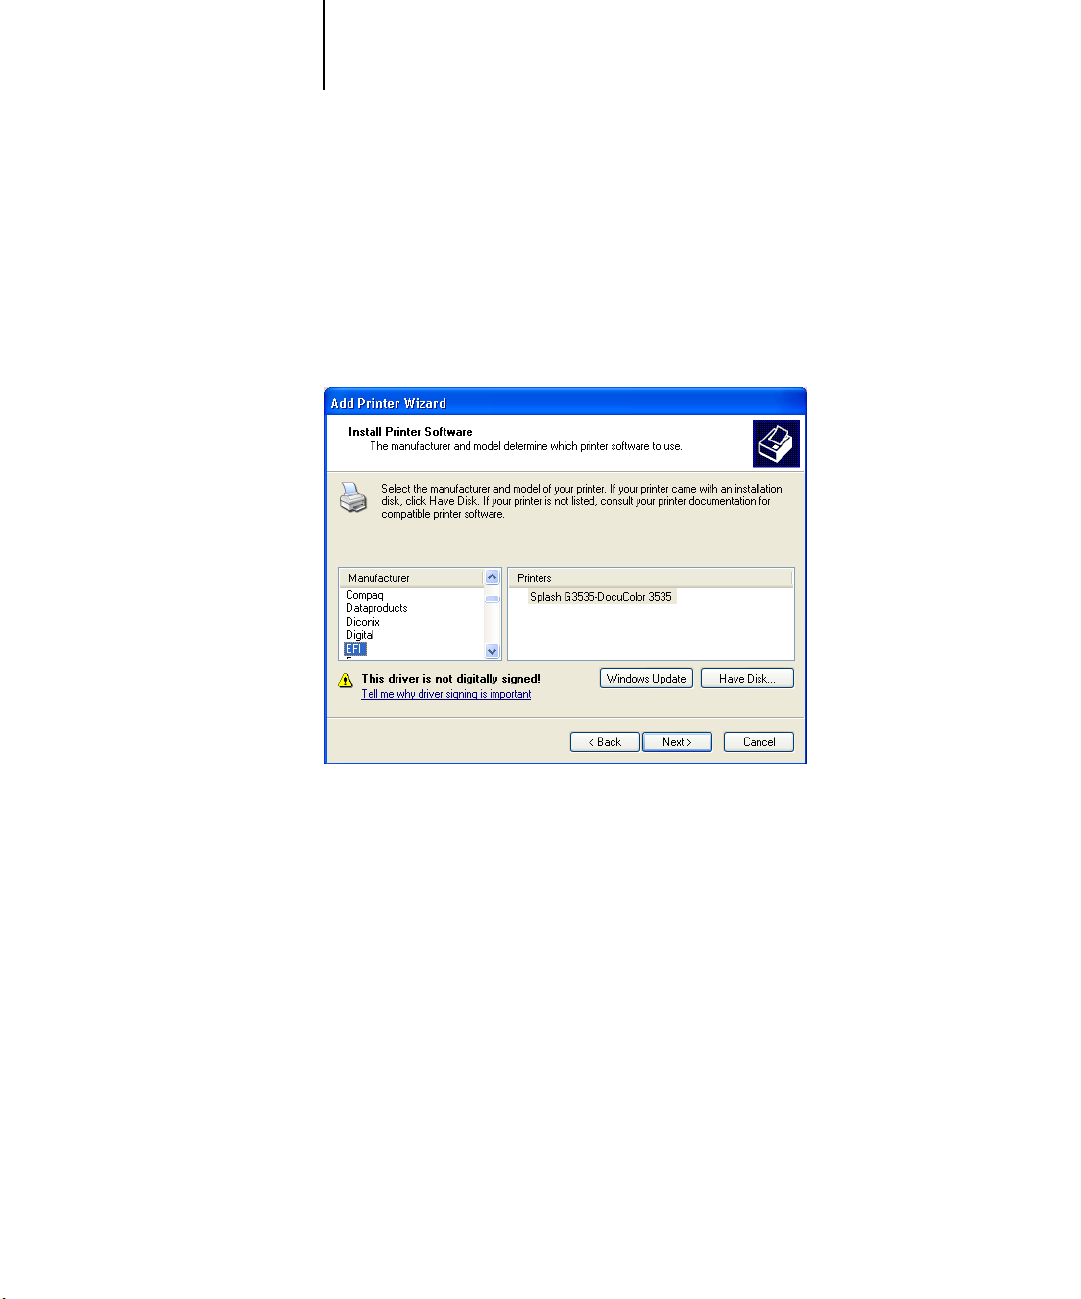
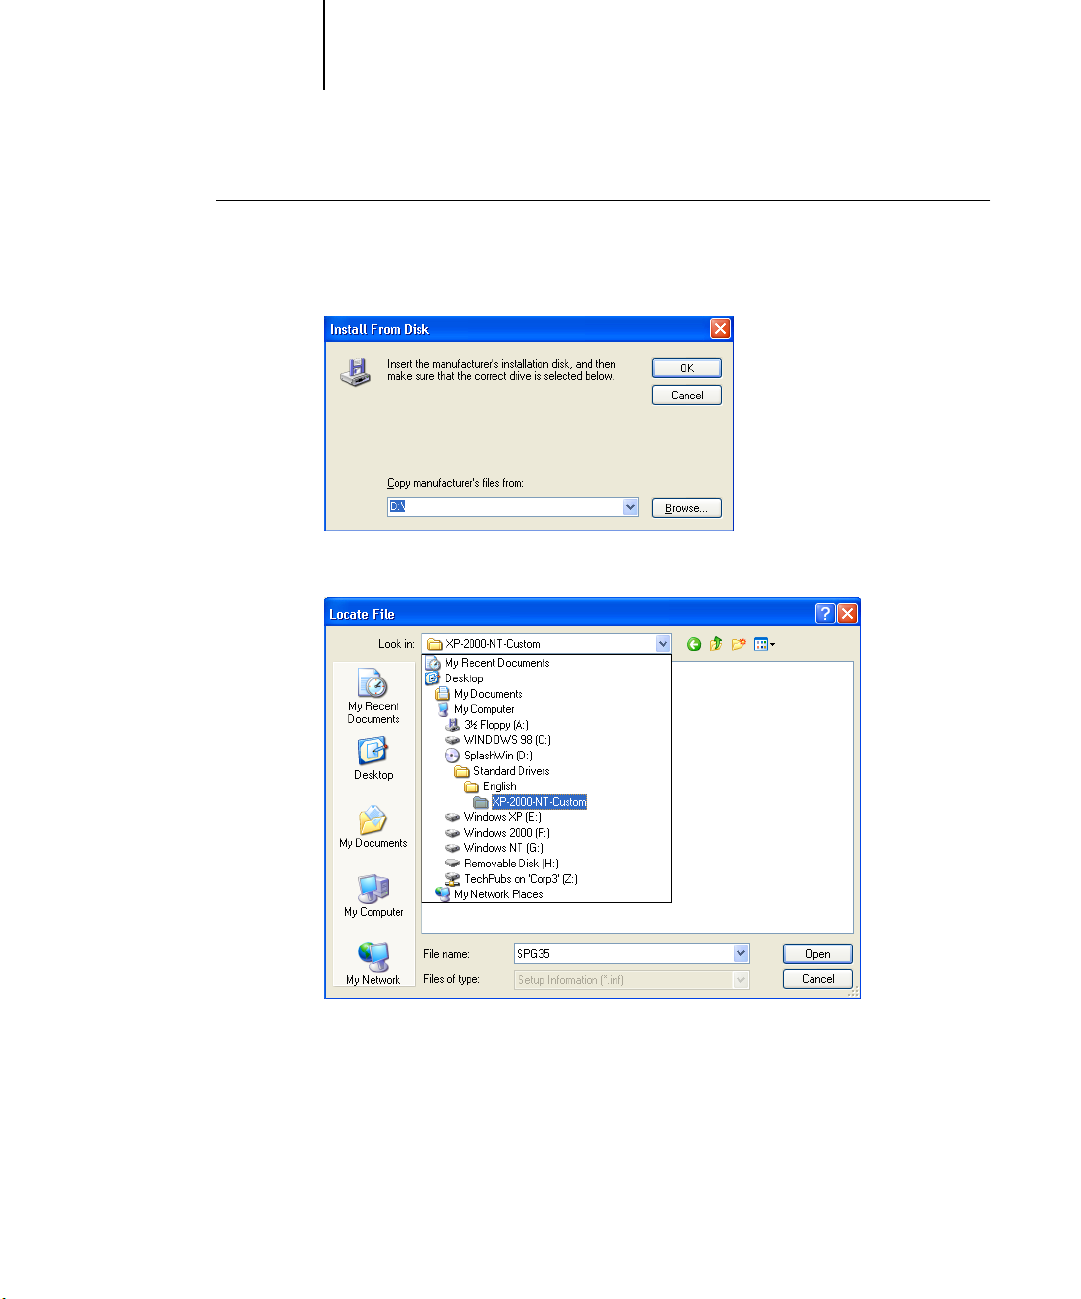
TO BROWSE FOR THE SPLASH G3535 PPD
1. In the Install Printer Software dialog box (see step 15 in the previous procedure),
click Have Disk.
2. Insert the Splash G3535 User Software CD into the CD-ROM drive and click Browse.
3. Choose the appropriate PPD and click Open.
The Install From Disk dialog box appears, listing the PPD directory path.
4. Click OK and continue with the instructions starting with step 16 in the previous
procedure.

1-11 Configuring Windows NT for TCP/IP Printing
1
Configuring Windows NT for TCP/IP Printing
This section describes how to configure a TCP/IP print queue for the Splash G3535
on a computer running Microsoft Windows NT 4.0 or later. You can prepare the print
queue on either a Windows NT server or a Windows NT computer.
Enabling the Microsoft TCP/IP Print Service for LPR Printing
TCP/IP print services must be enabled in the Network control panel before printing to
the Splash G3535 through TCP/IP.
TO ENABLE TCP/IP FOR LPR PRINTING FROM WINDOWS NT
1. Click Start, choose Settings, and then choose Control Panel.
2. Double-click the Network control panel.
3. Click the Services tab.
If TCP/IP is already enabled (Microsoft TCP/IP Printing appears in the Network
Services list), close the Network control panel.
If TCP/IP is not enabled, you must add it to the list of network services from your
Windows NT CD.
4. Insert the Windows NT CD into the CD-ROM drive and click Add.
5. From the Network Service list, select Microsoft TCP/IP Printing and then click OK.
Windows NT displays a message, “Setup needs to copy some Windows NT files.”
6. Enter the drive letter for your CD-ROM drive and click Continue.
7. When the files are copied, close the Network control panel.
8. Restart Windows NT to activate the new network service.
Configuring the Printer setup on the Windows NT for TCP/IP printing
Before connecting to the Splash G3535 and creating a print queue that sends jobs to
the server over the TCP/IP network, you must have the following items:
•TCP/IP address for the Splash G3535
•Splash G3535 User Software CD

1-12 Network Setup
1
TO CONFIGURE THE PRINTER FOR THE TCP/IP PRINTING FROM WINDOWS NT
1. Click Start, choose Settings, and then choose Printers.
2. Double-click the Add Printer icon.
3. Select local or network printer dialog box.
4. Select Add Port, choose LPR Port from the Available Printer Ports menu, then click New
Port.
A list of printer ports appears.
5. Type the TCP/IP address for the Splash server in the field labeled “Name or address of
Server Providing lpd:”.
6. Type the name of the Splash server in the field labeled “Name of printer or printer
queue on that server.”
7. Click OK.
8. Enter the TCP/IP address for the Splash server and click OK.
The Splash G3535 TCP/IP address appears as a new port in the list.
9. Select the Splash G3535 TCP/IP port and click Next.
10. Click Have Disk.
11. Insert the Splash G3535 User Software CD in the CD-ROM drive and click Browse.
12. Select the Splash file and click Open.
13. Click OK.

1-13 Configuring Windows NT for TCP/IP Printing
1
14. Select the Splash printer from the printers list and click Next.
15. Click Next.
16. Choose Shared to allow other users to connect to the print queue to print to the
17. Click Next.
Windows NT displays the following additional set up options for the print queue.
•If you want to change the name of the printer, type a new name in the text box. The
name you enter appears in your applications and the Printer control panel.
•If you want the Splash G3535 to be the default printer for your computer,
choose Yes.
If the printer is going to be shared, go to steps 17-19. Otherwise, go to step 19.
Splash G3535, and select the operating systems for the computers that will use the
print queue from the list that appears.
If you do not choose Shared, this computer only uses the LPR port to print to the
Splash server.
Windows NT prompts you to insert system software disks for the operating systems
selected in the previous step.
18. Insert the diskettes or CDs and click OK.
When all files are copied, the Add Printer Wizard prompts you to print a test page.
19. Select Yes to print a test page, click Finish and then click OK.
20. Click Yes if the test page printed correctly.
The Splash G3535 TCP/IP print queue appears as a shared printer in the Printers
control panel.

1-14 Network Setup
1
Configuring Novell NDPS Printing
The Novell server must be set up and configured prior to installing and configuring the
Novell NetWare Client. The Novell NetWare Client must be installed on the
workstation being used to configure the Novell server for NDPS printing.
NOTE: Use the latest NetWare support pack and Client. For more information, see your
NetWare documentation.
The following procedures assume NDPS has been installed on your NetWare Server
and is properly configured. An NDPS Broker and NDPS Manager are required for
configuring NDPS printing. If these do not exist, contact your Network
Administrator.
TO ADD THE SPLASH G3535 PPD TO THE NOVELL NETWARE NDPS BROKER
1. Log on to the Novell file server as an Administrator.
2. Start NetWare Administrator.
N
OTE: To start NetWare Administrator, go to the Sys:Public\Win32 folder on the
Novell server and click the nwadmin32 icon.
3. Double-click the Broker icon in the NetWare Admin window.

1-15 Configuring Windows NT for TCP/IP Printing
t
1
4. Click Resource Management (RMS).
Click Resource Managemen
(RMS)

Click Add Resources
1-16 Network Setup
1
5. Click Add Resources.
6. From Resource Types, select the Windows operating system you want for the Splash
Driver Installation.

1-17 Configuring Windows NT for TCP/IP Printing
1
7. Insert the Splash G3535 User Software CD into your CD-ROM drive.
NOTE: You can add printer drivers for more than one Windows operating system, but
you must repeat this procedure and the next to install the appropriate printer driver for
each Windows platform.
If the Splash G3535 driver has already been installed, it appears in the installed printer
drivers listed in the Current Resources Section. If the Splash G3535 driver is not listed,
you must install it from the Splash G3535 User Software CD.
8. In the Manage Resources dialog box, click Add.
The Add Resources dialog box appears.

1-18 Network Setup
1
9. Click Browse in the Add Resources dialog box.
10. Browse to the CD-ROM drive, select the appropriate driver from the Standard drivers
folder, and then click OK.
11. Verify the location of the file and click OK.
12. Click Continue.
The printer driver is copied to the Novell NDPS Server.
The next section describes creating a Printer Agent for the NDPS Manager.

1-19 Configuring Windows NT for TCP/IP Printing
1
TO CREATE A PRINTER AGENT
1. Log on to the Novell file server as an Administrator.
2. Start NetWare Administrator.
N
OTE: To start NetWare Administrator, go to the Sys:Public\Win32 folder on the
Novell server and click the nwadmin32 icon.
3. In the NetWare Administrator window, choose Create from the Object menu.
4. In the New Object window, select NDPS Printer and click OK.
5. In the Create NDPS Printer window, type a name in the NDPS Printer name field. Select
Create a New Printer Agent in the Printer Agent Source area and click Create.

1-20 Network Setup
1
6. For the NDPS Manager Name, click the Browse button.
The Create Printer Agent window appears with the NDPS Printer Name you chose
displayed.
7. In the Select Object window, select the NDPS Manager object you want and click OK.

1-21 Configuring Windows NT for TCP/IP Printing
1
8. Make sure that Novell Printer Gateway is selected in the Gateway Types list and
The Create Printer Agent window appears.
click OK.
The Configure Novell for NDPS for Printer Agent dialog box appears.

1-22 Network Setup
1
9. Select (Generic) PS for the printer type and click OK.
10. Select Remote (LPR on IP) and click Next.
A new user interface in the Configure Port Handler dialog box appears.

1-23 Configuring Windows NT for TCP/IP Printing
1
11. Select either Host Address or Host Name. If you select the Host Address field, type the
12. Click Finish.
IP address of the Splash server. If you select the Host Name, type the DNS name.
Printer Name
name.
—Leave this as the default, PASSTHROUGH, or enter any printer
13. Select the appropriate Windows operating system tab, choose the Splash G3535 PPD
and then click Continue.
The NDPS Information dialog box appears. It lists the current Splash G3535 PPDs
selected for the Windows operating systems for this NDPS Printer Agent.
14. Click OK.

1-24 Network Setup
1
Configuring a Novell NetWare print queue
This section describes how to configure a Splash G3535 TCP/IP print queue on a
Novell NetWare server for non-NDPS Novell printing. This uses Novell’s LPR
Gateway and can be used to print via older versions of Novell.
Requirements for setting up this print queue are:
• The Novell server must be configured for TCP/IP.
For more information, see your Novell documentation.
•NetWare Print Services for UNIX must be installed on the NetWare server.
For more information, see the Novell documentation: NetWare Print Services for
UNIX and Installing NetWare Print Services for UNIX.
• The Novell Server must be able to resolve the IP address of the Splash G3535 via
DNS. Add an entry for the Splash G3535 in the Novell server’s HOSTS file, located
in the sys:\ETC folder, or add a DNS entry for the Splash G3535 into your
network’s DNS server.
For more information, see your Network Administrator.
TO SET UP NON-NPDS NOVELL PRINTING
1. Log on to the Novell file server as an Administrator.
2. Start NetWare Administrator.
N
OTE: To start NetWare Administrator, go to the Sys:Public\Win32 folder on the
Novell server and click the nwadmin32 icon.
3. Select the Container where you want the printer configuration to be located.

1-25 Configuring Windows NT for TCP/IP Printing
1
4. From the Tools menu, choose Print Services Quick Setup.
5. From the Type drop-down menu, choose UNIX.
6. In the Unix Communication window that appears, enter the Host name (either DNS
name or IP address) of the Splash server and the Printer name. Click OK.
7. Go to NetWare Server Console. Type “load pserver” and select the print server you just
created.
8. At the NetWare Server Console, type “load unicon”, go to Start/Stop Services, click
Insert, and start NetWare to Unix print services.
9. Browse for the print queue you just created.


2-1 Installing from the Splash G3535 User Software CD
2
Chapter 2: Installing User Software on a Mac OS Computer
TO INSTALL THE MAC OS X SOFTWARE FROM THE SPLASH G3535
USER SOFTWARE CD
This chapter describes installing and configuring a Mac OS computer with the
Splash G3535 Client Drivers. It also describes setting the driver features for printing
from Mac OS 9.x and Mac OS X computers.
NOTE: The installation of the different client drivers are similar for Mac OS 9.x and
Mac OS X. Differences are noted in the following procedures.
Installing from the Splash G3535 User Software CD
The following procedures describe how to install the Mac OS user software from the
Splash G3535 User Software CD. To install the software by file sharing, see “Installing
by file sharing to the Splash G3535” on page 2-2.
1. Insert the Splash G3535 User Software CD in the CD-ROM drive on your computer.
2. Double-click the desired Splash G3535 OS X Standard or Secure Access Client
Installer icon in the Splash Network Install folder.
3. In the Authenticate dialog box, enter the Mac OS password and click OK.
The Administrator name default is the computer name; leave as is.
4. In the Splash OS X Client Driver dialog box, choose Easy Install or Custom Install
from the Installer menu.
N
OTE: The Splash Client Install process is the same for Splash Standard Custom
Driver, Standard PPD, and Secure Access Drivers. However, there are differences when
selecting the PPD options. The Secure Access PPD has an Info Tab option in the
Printer Properties dialog box, which contains a field for the TCP/IP address of the
Splash G3535
5. If there is more than one hard drive on your computer, choose the hard drive
where you want to install the software from the Install Location menu and click
Install.
When installation is complete, you are prompted to Continue or Quit.

2-2 Installing User Software on a Mac OS Computer
2
6. Click Continue to perform more installations.
7. Click Quit to exit the Splash Installer.
For information on how to access and set up the Splash Client SA driver, see “Secure
Access” on page 4-29.
Installing by file sharing to the Splash G3535
The following procedures describe how to configure the Splash G3535 for Mac OS
software installation by file sharing the Splash Network Install folder, and how to
access that folder by connecting to File Sharing.
TO CONFIGURE THE SPLASH G3535 FOR MAC OS SOFTWARE
INSTALLATION BY FILE SHARING
1. From the Apple menu on the Splash G3535, choose System Preferences and
double-click the Sharing folder.
2. In the Services dialog box, select Personal File Sharing and click Start. Select
Windows File Sharing and click Start. Select Personal Web Sharing and click Start.
3. Close the Sharing dialog box.

(Logged in) User
2-3 Installing by file sharing to the Splash G3535
2
4. On the server hard disk, browse to the Users folder and click the (logged in) User
folder.
5. Press Command+ I to Show Info.
The user Info dialog box appears.
6. Choose Ownership & Permissions.

2-4 Installing User Software on a Mac OS Computer
2
7. Set the Owner, Group, and Others privileges to Read & Write, click Apply to
8. Select the Splash Network Install folder and press Command+I to Show Info.
9. Select Ownerships & Permissions.
10. Set the Owner, Group, and Others privileges to Read & Write, click Apply to enclosed
enclosed items, and then close the user Info dialog box.
N
OTE: Keep the (logged in) User folder highlighted and easily accessible.
The Splash Network Install dialog box appears.
items, and then close the Splash Network Install Info dialog box.
Mac OS users can now download and install Splash client installers through the Apple
file sharing network.

2-5 Installing by file sharing to the Splash G3535
2
TO CONNECT TO FILE SHARING FOR ACCESS TO THE SPLASH
NETWORK INSTALL FOLDER (MAC OS X)
1. From the Finder “Go” menu, choose Connect to Server.
2. In the Connect to Server dialog box, choose AppleTalk and then choose the appropriate
AppleTalk Zone and the Splash G3535.
The Splash G3535 Mac OS computer name appears in the list of available shared
systems.
NOTE: If there are no Appletalk Zones in your network configuration, choose only the
Splash G3535.
3. Click Connect.
4. In the File Server Connect dialog box, choose Guest and click OK.
5. Select the (logged in) User folder which contains the Splash Network Install Folder
and click OK.
The Splash server and shared folders appear.
6. Double-click the Splash Network Install folder.
The Splash Network Installers folder opens on the desktop.

2-6 Installing User Software on a Mac OS Computer
2
7. Double-click the desired Splash client installer icon.
8. From the Install Location menu, choose the hard drive where you want to install
9. Click Install.
10. Click Continue to perform more installations.
11. Click Quit to exit the Splash Installer.
The Easy Install dialog box appears.
the software.
If there is more than one hard drive is on your computer, choose the hard drive that
contains Mac OS X.
N
OTE: The Splash G3535 software is installed over the network from the server
computer.
When installation is complete, you are prompted to Continue or Quit.
Repeat this installation procedure for each Mac OS X computer connected to
the network.
TO CONNECT TO FILE SHARING FOR ACCESS TO THE SPLASH NETWORK INSTALL
FOLDER (MAC OS 9.X)
1. Select Chooser From the Apple menu, select Chooser.
2. In the Chooser dialog box, click the AppleShare icon and choose the appropriate
AppleTalk Zone and the Splash G3535.
The Splash G3535 Mac OS computer name appears in the list of available shared
systems.
NOTE: If there are no Appletalk Zones in your network configuration, choose only the
Splash G3535.
3. Click OK.
4. In the File Server Connect dialog box, choose Guest and click Connect.

2-7 Installing by file sharing to the Splash G3535
2
5. Select the (logged in) User folder which contains the Splash Network Install Folder
6. Double-click the Splash Network Install folder.
7. Double-click the desired Splash client installer icon.
8. From the Install Location menu, choose the hard drive where you want to install the
9. Click Install.
and click OK.
The Splash server and shared folders appear.
The Splash Network Installers folder opens on the desktop.
The Easy Install dialog box appears.
software.
If there is more than one hard drive is on your computer, choose the hard drive that
contains Mac OS 9.x.
N
OTE: The Splash G3535 software is installed over the network from the server
computer.
When installation is complete, you are prompted to Continue or Quit.
10. Click Continue to perform more installations.
11. Click Quit or Restart as prompted by the Installer.
Repeat this installation procedure for each Mac OS 9 computer connected to
the network.

2-8 Installing User Software on a Mac OS Computer
2
Setting up the Mac OS X client
Before you can send print jobs to the printer, you must select the Splash G3535 in the
Mac OS Print Center. You can then send print jobs to the printer through the printer
driver provided with Mac OS System software.
TO CHOOSE THE PRINTER DRIVER
1. From the Mac OS X hard drive, select Applications:Utilities:Print Center.
Print Center Application

2-9 Installing by file sharing to the Splash G3535
2
2. Click Add Printer.
3. Choose AppleTalk or IP Printing, as configured in the Mac OS X Network Preferences
4. For AppleTalk, choose the Splash G3535; the Printer Description File is automatically
The Printer List dialog box appears.
Control Panel, from the dialog box that appears.
selected.
You may get a dialog box informing you that Print Center is unable to establish
communications with the printer to set installable options. Click Add in this dialog
box.
For IP Printing, enter the TCP/IP address of the Splash G3535, select the
Splash G3535-DocuColor 3535 PPD.
5. Click Add.
The Splash G3535 appears in the Printer List dialog box.

2-10 Installing User Software on a Mac OS Computer
2
Setting up the Mac OS 9.x computer
Before you can send print jobs to the printer, you must select the Splash G3535 in the
Mac OS Chooser. You can then send print jobs to the printer through the LaserWriter
8 printer driver provided with Mac OS System software or AdobePS 8.8.
The Splash G3535 provides printer description files (PPDs) for applications that use
the Apple LaserWriter 8 or AdobePS 8.8 printer drivers. The Splash PPDs allow
selecting Splash print features when printing to the Splash G3535 from Level 2 and
Level 3 PostScript applications.
TO CHOOSE THE ADOBE PS PRINTER DRIVER
1. From the Apple menu, select Chooser.
Adobe PS printer driver
LaserWriter 8 printer driver
2. In the Chooser dialog box,
Zone for the Splash G3535 (if your network has zones), and then select the
Splash G3535 printer in the list of printers.
3. Click Create.
The Adobe PS driver automatically selects the appropriate PPD file.
click the Adobe PS driver icon, choose the correct AppleTalk

2-11 Drop-printing files
2
TO CHOOSE THE LASERWRITER 8 PRINTER DRIVER
1. Select Chooser from the Apple menu.
The Chooser window appears.
2. In the Chooser dialog box, click the LaserWriter 8 icon, choose the correct AppleTalk
Zone for the Splash G3535 (if your network has zones), and then select the
Splash G3535 printer in the list of printers.
3. Click Create and Select PPD.
4. Choose the Splash G3535-DocuColor 3535 PM from the list of PPDs.
The connection to the Splash G3535 is complete. Your jobs will print to the
Splash G3535 until you select a different printer.
NOTE: To use the Direct TCP/IP Printing feature of Mac OS 9.x or Mac OS 9.1 and
higher, use the LaserWriter 8 printer driver. For information about this feature, see the
Mac OS 9.x or Mac OS 9.1 and higher documentation.
NOTE: Do not use versions of the LaserWriter printer driver older than LaserWriter 8.
Earlier versions of the LaserWriter printer driver will work with the Splash G3535, but
they do not include the correct paper size information and do not allow special Splash
printing features, such as color correction.
Drop-printing files
The Splash G3535 supports PDF, TIFF, EPS, TIFF-IT, PDF-X, CT-LW, PSD and
DCS 2.0 files, and files that are in PostScript format. You can print these files to the
Splash G3535 from any computer with an AppleTalk or TCP/IP network connection
to the server. Use Splash drop-printing, instead of a PostScript file download utility, to
print PostScript files to the Splash G3535.
The TIFF-IT, PDF-X, CT/LW and PSD file formats work in conjunction with a file
converter that automatically converts the file from current format to PostScript format.


3-1 Setting up printing to the Splash G3535
3
Chapter 3: Installing User Software on a Windows Computer
This chapter describes how to install the Microsoft Windows 98/Me and
Windows NT/2000/XP Secure Access and Standard PPDs (PostScript printer
description files) for the Splash G3535 using the Add Printer Wizard included with
your operating system.
NOTE: Before installing the software, close all other applications.
To access the Secure Access and Standard drivers, you can download them from the
internet using TCP/IP LPR or the Web Queue Manager Downloader. For
information, see “Downloading installers and files from the Web Queue Manager” on
page 6-8 and “Configuring the Splash G3535 for TCP/IP and LPR printing” on
page 1-1. Also, you can install the drivers from the Splash G3535 User Software CD.
NOTE: The Splash Client Install process is the same for Splash Custom, PM and Secure
Access Drivers. However, there are differences when selecting the PPD options. The
Secure Access PPD has an Info Tab option in the Printer Properties dialog box, which
contains a field for the TCP/IP address of the Splash G3535
Setting up printing to the Splash G3535
To set up the Splash G3535 as your printer, you must install the printer drivers for the
Windows environments and the corresponding PPDs. This section describes how to
install the Windows Custom, PM and Secure Access drivers. The install instructions
are similar for all Windows environments. Any significant differences are noted in the
following procedure.
NOTE: The following procedure uses Windows 98 illustrations.
TO INSTALL THE SPLASH G3535 PRINTER DRIVERS
1. Insert the Splash G3535 User Software CD into the CD-ROM drive on your computer.
2. Click Start, choose Settings, and then choose Printers to display the Printers window.
3. Double-click the Add Printer icon and click Next.

3-2 Installing User Software on a Windows Computer
3
4. Specify whether you are printer using a Local printer and click Next.
5. In the dialog box displaying lists of manufacturers and printers, click Have Disk.
This procedure describes installing a printer locally. You can modify the connection
later, according to your network type.
6. Type the name of the CD-ROM drive (for example D:\) and click Browse.
7. Browse to either the Standard or Secure Access Drivers folder, select the language you
want, and then select the appropriate Custom or PM Driver folder for your Windows
environment.

3-3 Setting up printing to the Splash G3535
3
8. Click OK.
9. Verify that the path is correct and click OK.
10. In the Printers box, select the Splash G3535 and click Next.
The path is copied to the Install From Disk dialog box
Windows 2000 and XP: If other Splash PPDs are installed, choose Keep or Replace
existing driver.
11. Windows 98/Me and NT: If you want the Splash G3535 to be the default printer, select
Yes; if not, select No.
Windows 2000 and XP: Choose whether you want to share the printer.
12. Click Next.

3-4 Installing User Software on a Windows Computer
3
13. Choose whether you want to print a test page and click Finish.
OTE: Windows 2000 and XP: The Digital Signature Not Found window may appear,
N
indicating that the printer driver does not have a Microsoft digital signature; however,
printing to the Splash G3535 is processed correctly. Click Continue Anyway.
The printer now appears in the Printers control panel. Installation is complete.
NOTE: If you recently installed Windows 98/Me over a Windows 3.1 installation that
had an existing Splash Windows Client driver for Windows 3.1 installed, the older
version may appear in the Printers folder in the Control Panel. Delete the older Splash
Windows Client driver from the Printers folder.

4-1 Accessing the Print options
4
Chapter 4: Print Options
This chapter describes the Splash G3535 print options. These options are available
when printing to the Splash G3535 with the LaserWriter 8 or AdobePS drivers and the
corresponding Splash G3535 printer description file.
Accessing the Print options
Mac OS X: Choose Print from the File menu, and then choose Splash Features from the
Printers menu.
Mac OS 9.x: Using the Adobe PS printer driver, choose Print from the File menu. In the
Print dialog box, choose General and then choose Splash Options and Document Info
to access Splash G3535 specific options.
Using the LaserWriter 8 printer driver, choose Print from the File menu. In the Print
dialog box, choose General and then choose File, Color 1, Color 2, Extras 1, Extras 2,
Extras 3, Tray 1, and Tray 2 to access Splash G3535 specific options.
Windows 98/Me: Click Start> Settings >Printers. Select the Splash G3535 and choose
Properties from the File menu. Click the File, Color, Extras, Tray, and Info tabs to
access the specific Splash G3535 print options.
Windows NT: Click Start >Settings >Printers. Select the Splash G3535 and choose
Document Defaults from the File menu.
Windows 2000/XP: Click Start> Settings >Printers (Windows 2000) or Printers and
Faxes (Windows XP). Select the Splash G3535 and choose Printing Preferences from
the File menu.

4-2 Print Options
4
File Handling
The Splash G3535 provides several options for handling the PostScript spool file and
image files created during printing. These options are available on a user computer,
as well.
• Process and Hold sends the spool file directly to the Hold queue after the Splash
server processes it.
• Process and Print and Save Image File saves the spool and image files after printing
the job. The job is transferred to the Hold queue with the message: PostScript spool
file saved as requested.
• Process and Print and Delete Image File automatically deletes the image file after
printing the job. The spool file is saved.

4-3 Color Options
4
• Process and Print and Delete Job automatically deletes the image and spool files after
printing the job.
• Preflight and Hold processes and screens the job for errors and then sends the job to
the Hold queue.
• Send and Hold sends the job file directly to the Hold queue, without processing.
Saving the image file saves time when the same file must be reprinted, but does not
have to be reRIPped.
Color Options
The Splash G3535 color options allow four-pass color printing or grayscale printing
with contone or halftone screening and Splash color correction.

4-4 Print Options
4
Color Model
Select Grayscale (1 pass) or Color (4 pass), for Color Model. Grayscale images produce
similar results with either model; however, the Grayscale model images print faster
than in Color mode.
Printer Model
This option switches printer output between Contone (full color) output and Screened
output. When Screened is selected, the Splash server applies halftone screening to the
color image. Screened jobs process faster than Contone jobs, but the output quality is
often lower.
The Screened method is configured at the Splash server. The default screening method
is stochastic.
RGB Monitor Color Correction
RGB Monitor Color Correction simulates colors on a monitor. It can accurately color
match mixed RGB file formats independent of the application, platform, or print
driver.
For applications and drivers that color-correct through the PostScript CRD, the
Splash G3535 provides five CRDs: Graphic, Photographic, Presentation, Spot, and
Paper Simulation (selectable from the client printer driver). The server also supports
the accurate color correction of documents that contain both RGB and CMYK
objects.
If RGB Monitor Color Correction is disabled at the printer driver and the application
invokes a CRD for printing, the server applies the default CRD (Photographic).

4-5 Color Options
4
RGB Monitor Color Correction controls
Select the RGB Monitor Color Correction check box to Enable RGB Monitor Color
Correction.
The following options become available:
• Standard—Gamma (default), Dark 2.2, White Point, More Blue 9300
• Profile—Apple RGB (default), Adobe RGB, RGB 9300, RGB D50,
RGB D65, sRGB.
• Press Simulation
Enable RGB Monitor Color Correction
To apply RGB Monitor Color Correction to a print job, enable RGB Monitor Color
Correction, and then select the appropriate RGB options.
NOTE: The default RGB Monitor Color Correction setting is Enabled, using the
Standard Gamma and White Point settings.
Gamma
The Gamma and White Point adjust Splash color correction to simulate the monitor
used to view and work with the document. Use Dark (2.2) for Gamma, and More Blue
for White Point to satisfy most configuration requirements.
Gamma describes how a device reproduces tonal gradations. This setting applies to the
input and output device. This option lightens or darkens the RGB content of a
particular document to provide a more accurate match with the monitor.
The Gamma options are as follows:
• Lightest (1.0)
• Light (1.4)
•Normal (1.8)
•Dark (2.2)–default
•Darkest (2.6)

4-6 Print Options
4
White Point
The White Point simulates various lighting conditions for proofing color documents.
Use to adjust the RGB content in a particular document relative to the White Point of
the monitor. If flesh tones or red tones are too magenta, skies and other blues too cyan,
and grass and greens too dark (almost bluish), change the White Point setting from
Normal to More Blue. If flesh tones and reds are too yellow, blues too purple, and
greens too yellow, change the White Point setting from Normal to More Yellow.
The White Point options are as follows:
•More Yellow (D50 Proofing)
•Normal (D65)
•More Blue (9300)–default
RGB Profiles
You can set RGB Monitor Color Correction using RGB profiles. sRGB is the standard
profile installed at the server, and unless other profiles are installed, this is the only
profile you can select. You can select the profiles listed below at the Splash G3535
server or a client computer. If other RGB profiles are imported beyond the six listed
below, you can only select them at the Splash G3535 server.
The RGB Profiles are as follows:
•Apple RGB (default)
•Adobe RGB
•RGB 9300
•RGB D50
•RGB D65
•sRGB.
NOTE: If a CopyCal profile is selected as the CMYK Press Profile, the RGB color
matching associated with the CopyCal profile is used instead of the RGB color
matching selections.

4-7 Color Options
4
Press Simulation
Press Simulation constrains input RGB colors to the gamut of the selected CMYK
press profile to provide better matching of RGB input to press output. This option
works with either 1D or 4D CMYK press profiles. If CMYK color correction is not
enabled, this option has no effect.
CMYK Press Color Correction
To apply CMYK press color correction to a print job, select the CMYK Press Color
Correction check box, and then select the appropriate CMYK Press Profile from the
following menu options:
• SWOP simulates SWOP inks.
• Euroscale simulates Euroscale press inks.
• Enhanced prints vivid colors on your output. (This profile is not intended for
printing press proofs.)
NOTE: Win98/Me PM users only—To apply CMYK Press color correction to a print
job, select Enabled in the CMYK Press Color Correction menu, and then select the
appropriate CMYK Press Profile
Custom1 through Custom10 are customizable CMYK Press Profile options set at the
Splash G3535. For information about the current settings, contact your server
administrator or see “Profile Loader” on page 5-19.
CMYK Press Profiles
The Splash G3535 provides three standard CMYK press ink color correction profiles
(SWOP, Euroscale and Enhanced) and ten custom CMYK profiles. The CMYK color
correction profiles simulate commercial press inks in your output when you print
CMYK documents to the Splash G3535. The profiles work with CMYK Press Color
Correction to automatically compensate for differences in press ink colors.
To apply color correction to a job, enable CMYK Press Color Correction and select a
color profile as described in the previous section.

4-8 Print Options
4
Preserve Original GCR
Preserve Original GCR causes CMYK press color correction to be applied so the
original GCR settings of the CMYK data are preserved. This option only affects color
matching with new style 4D profiles. Old style profiles are automatically GCR
preserving.
Composite Spot Color Correction
The Splash G3535 can simulate PANTONE, Toyo, HKS, or DIC spot colors and tints
in documents.
To enable this feature, select Composite Spot Color Correction in the Color tab of the
printer driver options. The Splash G3535 produces output that simulates the spot
color on a printing press.
Rendering Style
To choose a Rendering Style option, select the Rendering Style menu in the Color tab
of the printer driver options.
Choose a Rendering Style that describes how the document was created:
• Graphic—For documents that were primarily created with a computer graphics
application. This option optimizes print jobs with highly saturated color and
provides a good screen to print match.
• Photographic—Matches the colors of scanned photographic images. Use this option
for proofing photographic material.
• Presentation—For documents that were created entirely with a computer graphics
application. This option creates bright, close to pure versions of the primary colors,
but provides a less accurate match to the screen and is less accurate for photographic
images than Graphics.
• Paper Simulation—Matches the RGB input to press output, to accommodate
off-white Whitepoint settings or paper.
• Spot—For documents containing spot colors, or to lighten the RGB color output.
NOTE: The default Rendering Style is Photographic.

4-9 Color Options
4
Extras Options
The following Splash G3535 options, when enabled, improve the printing of images,
text, and line drawings.
• Dynamic Image Enhancement enhances low resolution images to create a smoother
appearance.
• Alternate Black (unmixed) substitutes a pure (CMY=0, K=100) black for any
(RGB=0) black in the document. This prevents ink buildup on the page and
alleviates shadows created by misregistered mixed black.
• Dynamic Edge Smoothing smooths fine lines.
• Black Overprints prevents the “halo” effect which occurs when black is printed on
top of another color. Selecting this option tells the server to print with 100% black
overprint with no knockout of underlying colors.

4-10 Print Options
4
• Show Composite CMYK Overprints prints composite documents which specify
overprints for CMYK, with proper color correction applied. RGB and Spot colors
are converted to CMYK values. To see trapping as well as overprinting, you must
print the document as separations from the application.
• Auto Trapping automatically traps text and graphics independently of their
application.
• Splash Proof provides a single step for selecting a combination of print options to
output to specific proofing style options. The default print options that
automatically override the Print Driver and Splash Server Preference options are:
200 Round Dot copier screening, Tray 5, Heavyweight paper and Continuous Tone
Printing.
• Auto Grayscale Detection allows for faster printing of jobs that do not contain
color images.
• Mirror Image flips page about vertical axis.
Prepress Features
The following section describes the options available in the Prepress Features box of
the Extras tab.
Separations
Using Separations, page layout applications, such as PageMaker and QuarkXPress, can
print pages with a single color isolated from the whole image. These pages are then
copied on film image setters so each page is converted to one or more (usually four)
output grayscale pages. Separations printed on a printer that does not have a special
Separation feature will produce one grayscale page per color on the original page.
The Splash G3535 can re-composite these individual pages back into multi-color
pages to produce a proof equivalent to the proof produced from the films by
conventional means. The primary benefit of separation is to show overprinted objects
with proper colors and to make trapping visible.

4-11 Color Options
4
The Separations print option prints a composite page from applications that support
separation printing.
• Automatic applies separation to all of your separation print jobs. This default option
supports CMYK plates plus any number of plates in PANTONE, Toyo, HKS, or
DIC if these press colors are supported by your separation application. This option
supports separation generated by any application. With this option selected, the
Splash server supports the full range of PANTONE, Toyo, HKS, or DIC colors and
tints.
NOTE: Due to limitations in PageMaker and Quark XPress, RGB graphics are
converted to CMYK and, therefore, look similar. RGB images are converted to
grayscale and appear as gray in the output.
• Automatic Single Page processes any separation job as a single page job. All color
plates will be combined together, including spot color. This allows printing spot
color separations from Macromedia Freehand, Deneba Canvas, and Adobe
Illustrator.
NOTE: If a multi-page separation job is sent with this option selected, the pages will
overlay resulting in bad output.
• Disabled disables Separations and prints plates as grayscale pages.
NOTE: The remaining Separations options: QuarkXPress 3.0 Style, QuarkXPress 4.0
Style, PageMaker Style, FreeHand Style, and Canvas Style use a separation technique
from an earlier version of the Splash server software. These options require that the
separation job be made up of exactly four process-color plates. These options do not
support additional spot color plates. If problems occur in the output when printing
separations with Automatic selected, convert the colors in the document to four
process plates, then select the separation option that matches your application.

4-12 Print Options
4
Print Progressives
With Print Progressives selected, the Splash G3535 prints up to four separate sheets for
a print job. You can configure this print option to specify which color passes print on
each sheet. This allows you to examine the result of each color pass for a four-color
document.
NOTE: For best results when creating press proofs using Print Progressives, select one of
the one-dimensional CMYK Press Color Correction profiles for the print job. For
information about the current CMYK profile settings, contact your server
administrator. For more information about CMYK Color Correction profiles, see
“CMYK Press Color Correction” on page 4-7.
Invert Image
Select Invert Image to invert the CMYK data. When using RGB colors, the Invert
Image option inverts the selected color to its opposite. For many of the colors, this will
result in the color black.
Print Control Strip
Select Print Control Strip to print a set of color control patches on the edge of the
output. You can configure this print option to print either color patches or an EPS file
or both.
NOTE: The Control Strip image may overwrite the job image if it occupies the same
part of the page in the output.
Print Info Strip
Print Info Strip provides the ability to print a customizable info strip on jobs. The
default information on the info strip includes user, job, color and media type. The
customizable options become available by selecting Customize Print Info from the
Server menu.
NOTE: The Print Info Strip image may overwrite the job image if it occupies the same
part of the page in the output.

4-13 Color Options
4
Save As TIFF
Save as TIFF saves a rasterized image file or an up to 600 dpi TIFF file. The TIFF file is
placed in the TIFF folder within the Splash folder on the server computer. The TIFF
folder is configured for network access. This setup allows you, at your computer, to
retrieve TIFF files from the server and delete TIFF files from the folder once they have
been copied to the your system.
To activate this feature, choose a resolution of 72, 300, or 600 in the DPI menu at the
client. In Job Edit at the server, you can enter a resolution value between 3 and 600
dpi.
NOTE: Save As TIFF can be enabled or disabled in the Server Job Edit window and in
the Web Queue Manager. For more information about the Web Queue Manager, see
Chapter 6.
The Splash G3535 copies files to the server’s hard disk before printing. For TIFF and
EPS files, the server creates a reference to the file for printing. This allows printing a
large TIFF or EPS file from an external drive without first copying the file to the
Splash G3535 hard disk.
Auto Grayscale Detection
Select Auto Grayscale Detection to check each page for color before printing. If no
color is detected on the page, the printer prints in single-pass grayscale mode, which
speeds printing for multi-page documents that contain few color pages.
NOTE: If you are printing jobs that have color on every page, deselect this option.
When active, Auto Gray Detection adds approximately one-half second to the printing
of each color page.
This option is active when the Color Model is set to Color. The log file indicates the
number of pages within a job that were printed in grayscale mode.
NOTE: For fastest printing of an entirely black and white document, set the Color
Model to Grayscale for the print job.
Mirror Image
Mirror Image inverts the scanned artwork target to match the final transferred piece.
Use Mirror Image for heat transfer paper used for adhering color output to
non-standard media, such as rice paper, rag paper, or T-shirts.

4-14 Print Options
4
Tray Options
The Tray Settings allow you to select various Job Handling options including
Imposition, Staple, and Duplex.
Duplex
The Duplex printing options are as follows:
• No Duplex
• Duplex Short Edge Binding—prints double-sided sheets that are bound on the short
edge of the document. The second side of the sheet is rotated for correct orientation.
Duplex Long Edge Binding—prints double-sided sheets that are bound on a long
•
edge of the document.

4-15 Tray Options
4
Automatic duplex printing
Use the Duplex options to set up automatic duplex printing from Trays 1–4. This
specifies that the job print double-sided output. The Duplex Alignment offsets are
applied to the second side of each page.
Manual duplex printing
Use the Duplex options to set up manual duplex printing from Tray 5 for manual-fed
jobs. This specifies that the job prints as two-sided output.
The following page sizes cannot automatically duplex, so they must be set up for
manual duplex printing from Tray 5:
• SRA3
•12x18
•12x19
•Custom
The following paper types cannot automatically duplex, so they must be also set up for
manual duplex printing:
•Gloss 1A
•Gloss 1C
• Coated 1 Gloss
•Heavyweight 2A
•Heavyweight 2S
• Coated 2
•Transparency
To avoid manual duplex printing to allow faster printing when you print longer jobs,
use the following procedure.

4-16 Print Options
4
TO PRINT USING MANUAL DUPLEX
1. Send the print job to the Splash G3535 with the “Print and Hold” spool option
selected.
2. From the Job Editor, specify to print only the odd-numbered pages.
3. Place the printed odd-numbered pages in Tray 5 in preparation for printing the
even-numbered pages. Verify that the orientation is appropriate for your printer.
4. From the Job editor, specify to print only the even numbered pages.
The Duplex Alignment offsets on the Splash G3535 are applied to the even-numbered
pages.
Staple
If the optional finisher is connected to the printer, you can select one of the Staple
options to staple the final output at the finisher. As with other collated multi-set
(multi-copy) jobs, multi-set stapled jobs offset each set from the other. If the server
Cover Page option is enabled, the cover page prints face down offset from the first
printed set.
The Staple options are as follows:
• None
• One corner, portrait
• One corner, landscape
• Dual portrait
• Dual landscape
With a stapling option selected, jobs must RIP all pages before starting to print. Also,
stapled jobs are automatically collated.

4-17 Tray Options
4
Related job settings for proper output
For proper staple position, jobs of various orientations and page sizes must use the
matching staple position and rotation settings. The Splash G3535 does not auto-detect
the paper orientation and page orientation settings to determine the proper settings to
use for staple position and rotation. For more information, see the following table.
Paper orientation Page orientation Staple position
LEF Portrait One Corner, Portrait
LEF Landscape One Corner, Landscape
SEF Portrait One Corner, Landscape
SEF Landscape One Corner, Portrait
LEF Portrait Dual, Portrait
LEF Landscape Dual, Landscape
SEF Portrait Dual, Portrait
SEF Landscape Dual, Landscape
Stapled output from Microsoft applications on Windows
When printing landscape documents from Microsoft Word, PowerPoint, or Excel from
Windows 9x, Windows NT, or Windows 2000, you must select either the Microsoft
Rotate print option or the Splash G3535 Rotate print option in order to receive
output with the staples in the proper position. The Rotate option is not necessary
when printing from Microsoft applications on a Mac OS computer.
Staple Error Handling
Jobs that exceed the 50-page stapling limit (100 sides duplex) print without stapling.
The job fails after printing with a message stating that the job exceeded the number of
pages that can be stapled. When the printer runs out of staples in the middle of a job,
the server stops processing and a dialog box appears stating that the printer is out of
staples. The Splash G3535 waits for staples to be added and a dialog box displays the
amount of time allowed before the job transfers to the Error queue with an appropriate
error message.

4-18 Print Options
4
Collate
Select the Collate check box to print copies of a complete job, one after another.
Sending collated jobs displays the “Set” message in the server status window. Sending
uncollated copies displays the “Copy” message in the server status window.
NOTE: Selecting the Collate option with the Printer Driver Cover Page option prints
multiple copies of the cover page. Use the Splash Cover Page Server Preferences to
print a single cover page for a collated job.
Rotate Pages
The Rotate Pages option rotates all pages of a job by 180 degrees. Select this option
when stapling landscape jobs that are rotated incorrectly by the creating application,
such as PowerPoint and Quark XPress.
Imposition
Select Imposition to rearrange the printing page order of a job to output booklets. In
some cases, this feature uses paper more efficiently for printing multiple copies of small
documents.
Imposition Type—Saddle Stitch, Perfect Bound and Signature
Saddle Stitch and Perfect Bound both print two pages of a document together on a
single larger sheet, which can then be folded section by section to form booklets.
The two options differ in the number of pages printed in each section. Using Saddle
Stitch, the number of pages in a section is selectable and usually multiple output sheets
are folded together. Perfect Bound prints four original document pages in a single
section, which means that each output sheet is folded separately.
Select Perfect Bound to print jobs that will be folded, cut, and glued along the back
spine into a cover or binding. Most large trade books and larger magazines use this
technique. Select Saddle Stitch to print jobs that will be stapled or stitched with thread
through the center or into the spine.
The Signature imposition type prints two pages of the job, in order, on a single-sided
tabloid sheet. This is always 2-up. Pages 1 and 2 print on the first tabloid sheet and
pages 3 and 4 print on a second tabloid page. If Duplex is selected, pages 3 and 4 print
on the back side of the first sheet. Odd-numbered jobs print the last page with a blank
opposite it.

4-19 Tray Options
4
Scale To Fit
Scale To fit option becomes available when an Imposition Type is selected
(Saddle-Stitch, Perfect Bound, or Signature). This option allows you to scale the
imageable output to fit on the selected page size. Scaling preserves the aspect ratio, so
the output page may not be completely filled.
Paper Use Options—Step and Repeat and 2-Up
Select Step and Repeat or 2-UP Imposition to print multiple copies of a single page on
the same output page. Step and Repeat prints as many copies of the page as will fit on
the selected output page size. It supports duplexing but not collation. 2-Up Imposition
prints two copies of the page on the selected output page size. It is compatible with
duplexing and collation.
Output Paper Size
For proper results with Saddle Stitch, Perfect Bound, and Signature, the output paper
size must be at least twice as large as the original page size defined for printing. For
example, for a Letter page, select Tabloid, 12 x18, or SRA3. For A4, select A3, 12x18,
or SRA3.
Crop Marks
For Step and Repeat, crop marks are always printed and the size of the crop marks is
taken into account when determining how to fit the most possible copies onto the
page.
When other options are selected, crop marks print only if there is room for them on
the page. The imposed pages print centered on the output sheet. If there is additional
room to place full or partial crop marks, the crop marks are added.
If you select Crop Marks, choose a page size that is more than twice as large as the
original page size defined for printing. For a Letter or A4 page, select 12x 18 or SRA3.

4-20 Print Options
4
Determining the Original Page Size
For 2-Up or Signature imposition, the original page size used is always the one selected
in Page Setup (or the equivalent) when printing. Turn off the application registration
marks or crop marks.
For Step and Repeat, Saddle Stitch, Signature, and Perfect Bound imposition, if the
application registration marks or crop marks are not enabled when printing, or if the
application does not support registration marks or crop marks, the original page size is
the one selected in Page Setup. If the application registration marks or crop marks are
enabled, the original page size is the size of the document itself, which in many
applications can be different from the page size selected in Page Setup.
Setting application registration marks
For Step and Repeat, Saddle Stitch, and Perfect Bound, enable registration marks or
crop marks from the application, whenever possible. In general, the imposition
software recognizes the input page size more precisely when the application generates
the registration marks. For Step and Repeat, using the application registration marks or
crop marks increases the number of copies printed on a single sheet.
NOTE: If job errors due to the output not fitting on the paper size selected, enable Crop
Marks in the Tray tab of the Splash G3535 driver options.
Using Saddle Stitch and Perfect Bound with landscape documents
Landscape documents bind along the short edge of the document so two letter-sized
pages cannot fit on a single output page. You can impose landscape documents using
Saddle Stitch and Perfect Bound, but the height of the original must be less than half
the height of the output page size, or the Scale To Fit option must be selected.
Section size
Section size defines the number of pages to print in a Saddle-Stitch layout. This feature
is enabled only when Saddle-Stitch is selected. The Section Size menu includes the
following options: All, 4, 8, 16, 32, 64

4-21 Tray Options
4
Printer output tray maintenance
Though you can configure the Splash G3535 to print up to 9999 copies, the output
tray holds a maximum of 500 pages. If more than 500 copies are specified, empty
the output tray during printing so the total number of copies in the tray never
exceeds 500.
Paper type support from trays
The following table lists the paper types supported for each output tray.
TrayPaper Type Supported Sizes
Tray 1, 2 Plain,
Bond,
Bond S,
Heavyweight 1A,
Trays 3, 4
(3TM)
Tray 3, 4
(TTM))
Tray 5 All
Paper type restrictions
Transparency and transparency interleave print only to the Catch tray, not to the
mailbox bins or Finisher.
The interleave sheet for transparency interleave is pulled from the copier’s default tray.
Heavyweight 1B,
Heavyweight 1C,
Heavyweight 1S,
Coated 1
Gloss 1A
Gloss 1C,
Coated 1 Gloss,
Heavyweight 2A,
Heavyweight 2S,
Coated 2,
Transparency,
Transparency
Interleave
All except 12
x18, SRA3, A5 LEF,
12
Custom
All except 12
x18, SRA3, A5 LEF,
12
Custom
A4 LEF, Letter LEF
x19,
x19,

4-22 Print Options
4
Paper tray selection
The user can configure both media type and copier tray for a print job. The following
table shows the media type defaults by tray selection.
Tray selected Media type default
Automatic As set in the Splash Server Preferences Page
tab (default is Bond paper)
Tray 1, 2, 3, 4 Copier setting (programmed into the copier)
Tray 5 Copier setting (programmed into the copier)
The default paper type for Automatic Tray selection is specified in the Page tab of the
Server Preferences. If the type of paper specified in the Page tab of Server Preferences is
not installed in the copier in any tray when the Automatic tray is selected, jobs will fail.
This prevents jobs being printed unintentionally and wastefully on expensive media.
You must ensure that the type of paper installed in the copier is the default specified in
the Server Preferences.
When Tray 1, 2, 3, 4, or 5 and the Tray Default media type are selected, jobs process
and print using the copier settings. The paper size selected for the job must match the
paper size installed in that tray in the copier.
When the Automatic tray and any media type other than the Tray Default are selected,
the correct paper size of the correct paper type must be installed in the copier.
When Tray 1, 2, 3, 4, or 5 and any media type other than Tray Default are selected,
jobs override the copier settings with the selected paper type, if the paper size matches
the contents of the tray.
NOTE: For Automatic tray selection to work properly, it is important that the paper
types be correctly set in the copier.

4-23 Tray Options
4
Output Profile selection
The following table shows output profile selection by media type:
Output Profile Media Type
DC 3535 (Splash) Plain
Bond
Bond S
Heavyweight 1A
Heavyweight 1B
Heavyweight 1C
Heavyweight 1S
Coated 1
Gloss 1A
Gloss 1C
Coated 1 Gloss
DC 3535 OHP
(Splash)
DC 3535 EHW
(Splash)
Heavyweight 2A
Heavyweight 2C
Coated 2
Transparency
Transparency Interleave

4-24 Print Options
4
Profile Set selection
The following table shows profile set selection by media type:
Output Profile Media Type
Tray 5, Normal Plain
Bond
Bond S
Transparency
Transparency Interleave
Tray 5 Heavyweight Heavyweight 1A
Heavyweight 1B
Heavyweight 1C
Heavyweight 1S
Coated 1
Gloss 1A
Gloss 1C
Coated 1 Gloss
Tray 5 Extra Heavyweight Heavyweight 2A
Heavyweight 2C
Coated 2

4-25 Tray Options
4
Providing user information
The Custom Splash G3535 driver allows adding identification information to print
jobs from the Info tab. This feature is not available when using other print drivers.
NOTE: Owner, Password, Comment, and Account Number are optional text fields.
Owner and Password
Enter the job owner and a password. The text entered here appears in the Job
Information dialog box for the spool file at the Splash G3535. If no name is entered,
the job includes the network identification name of your computer.
Platform Note
Mac OS The maximum number of characters for the Owner field is 24.
The maximum of characters for the Password field is 8.
Windows 9x This feature is available with the Custom driver only. It is not
available when printing to the Splash G3535 with the Windows
printer driver.
If you do not enter your name, the job includes the network
identification name for your computer.
The maximum number of characters for the Owner field is 24.
The maximum of characters for the Password field is 8.
Windows NT/2000/XP This feature is available with the Custom driver only. It is not
available when you print to the Splash G3535 with the
Windows printer driver.
If you do not enter your name, the job includes the network
identification name for your computer from the sharing
control panel.
The maximum number of characters for the Owner field is 24.
The maximum of characters for the Password field is 8.

4-26 Print Options
4
Comment
Enter any additional information about the print job.
Platform Note
Mac OS The maximum number of characters for this field is 255.
Windows 9x The maximum number of characters for this field is 255.
Windows NT/2000/XP The maximum number of characters for this field is 255
Account Number
Enter any account number associated with the print job.
Platform Note
Mac OS The maximum number of characters for this field is 32.
Windows 9x The maximum number of characters for this field is 32.
Windows NT/2000/XP The maximum number of characters for this field is 32.
Secure Printing
You can use Secure Printing to password-protect your jobs. This security feature can
only be implemented from the Mac OS or Windows printer driver, and can only be
printed at the Splash G3535 when a password is entered.
In order for the job to be password-protected, you must provide a password for the job
at the time it is printed. If a job sent to the Splash G3535 is password-protected, the
job will not be RIPped until you enter a password at the server.
NOTE: The following procedure uses Mac OS X illustrations.

4-27 Tray Options
4
TO SET SECURE PRINTING FROM MACOS OR WINDOWS
1. Start the print process for the job.
2. In the Print dialog box, choose Splash Features from the Copies and Pages menu, and
click the Info tab.
The Document Information dialog box appears.

4-28 Print Options
4
3. Click Enable.
4. Enter a Secure Print Password, verify the password, and then click Ok.
The Secure Printing dialog box appears.
The document is now password-protected, and the job will go to the Error queue at
the Splash G3535.
TO ACTIVATE A PASSWORD-PROTECTED JOB AT THE SPLASH G3535
1. Double-click the password-protected job in the Error queue.

4-29 Tray Options
4
2. Click Edit Doc Info.
3. Enter the document password as it was assigned at the Mac OS or Windows computer
and click OK.
If you entered the password correctly, you can now select the job and drag it to the
Active queue.
Secure Printing Notes
The Secure Printing password field can contain a maximum of eight printable
characters.
If a Secure Printing spool file is saved and sent to the Hold queue, the password is not
saved and must be re-entered when you resend the job to the Active queue.
A Secure Printing job cannot be previewed or be part of a document set.
If an incorrect password is entered at the Splash G3535, the job is sent to the Error
queue when you try to print it.
Secure Access
Secure Access enables a system administrator to limit who can print to the
Splash G3535 by defining combinations of user names, passwords, and account
numbers which must be entered and verified before jobs print. Secure Access can also
be used without verification to improve job logging by requiring user names and
account numbers to be entered in order to print.

4-30 Print Options
4
Secure Access accounts are established and managed at the Splash G3535. You are
prompted for the required information at your computer. Validation of the
information, if required, is performed by the Splash G3535 and if the information is
not correct, you are prompted to correct the information before you can print the job.
Using Secure Access
When Secure Access is configured at the Splash G3535, you must install the Secure
Access printer driver on your Mac OS or Windows computer. For information, see
Chapters 2 (Mac OS) or 3 (Windows).
Printing
Printing using the Secure Access driver is exactly the same as printing with the standard
driver, except that the driver prompts you for the Secure Access information. When the
first job is sent to a particular printer, the Secure Access driver prompts you for the
IP address of the Splash G3535. For this information, contact your system
administrator.

4-31 Tray Options
4
With each additional job sent to the printer, the Secure Access driver prompts for the
required information (User ID, Password, Account Number) as set up at the
Splash G3535. If the information entered is incorrect, the driver prompts you to
re-enter the correct information, specifying the first incorrect entry, along with the
error message set up at the server. This continues until you enter the correct
information or click Cancel. Once correct information is entered, the job prints as
with the standard driver.
The user name, password, and account number fields are blanked out at the client
between each print.
For more information on Secure Access, see “Secure Access” on page 5-63.


5-1 The Splash G3535 interface (full-screen mode)
5
Chapter 5:
Using the
Splash G3535
Server
This chapter provides an introduction to the Splash G3535 graphical user interface.
You can view the Splash G3535 main window in two modes: full-screen mode and
reduced screen mode. The window is not resizable in either mode, but can be
repositioned in both. In reduced screen mode, fewer column headers appear in the
print queues, and neither the available hard disk space nor tray capacity is displayed.
The Splash G3535 interface (full-screen mode)
When you start the Splash G3535 application, the main window appears in full-screen
mode. The main window displays information on managing print queues,
administering server functions, and controlling the jobs in the print queues.
1
2
3
4
6
7
8
5
1 Splash G3535 toolbar
2 Start/Stop button
3 Active queue
4 Hold queue
5 Error queue
6 Preview window
7 Trays
8 Device Status
9 Splash Server Status
9

5-2 Using the Splash G3535 Server
5
The following sections describe each component in the Splash G3535 interface.
Main menus
When you initially start the Splash G3535, the following top-level menus appear:
Apple, Splash Server, File, Edit, Server, and Jobs.
Print queues
The print queues in the main window display the Active, Hold, or Error status of all
spooled jobs.
• Active queue—displays the currently processing print job and jobs awaiting
automatic processing.
• Hold queue—lists print jobs that the server has processed and jobs queued to
Process and Hold or Process and Save. To print a job from this queue, press
Command+R or drag the job to the Active queue.
• Error queue—lists print jobs that failed to print, either partially or completely.
To resize a print queue, click the tab that separates it from another queue and drag
up or down.
NOTE: You cannot resize a queue to hide another queue.
Print queue column headings
The column headings in the print queues can be repositioned, resized, added, or
deleted. To resize or reposition a column heading in the Active, Hold, or Error queues,
click the column heading and drag right or left.
To add a column heading, Option-click an existing column heading and choose from
the commands in the menu that appears. To delete a column heading, Option-click
the column heading and choose Empty.

5-3 The Splash G3535 interface (full-screen mode)
5
The column headings in the print queues are:
• Document—lists the title of the job being sent to the server.
• Spool Time—indicates what time the job was spooled/received.
• Completion Time—indicates the last time the server completed a job activity.
•
Owner—lists the computer Name/User ID.
Status—indicates whether the server is receiving, printing, preflighting, or has
•
encountered a job error.
• Copies—lists the number of copies requested.
• Pages—indicates the number of pages in the job.
• Size—lists the full size of the RIPped job.
• Spool Name—assigns a spool number or file name to the job.
• Application—indicates the application in which the document was created.
• Job—assigns a number to the job.
• Comment—displays any relevant comments on the job.
• Account—displays the account from which the job came.
• Error Message—explains why a job was sent to the Error queue.
• Info (Basic)—displays a job status info symbol that indicates if the job has been sent,
is being sent, is being received, has a preflight report, contains saved images, or has
been color tuned.
• Info (Detailed)—displays all job info symbols that apply, with a colored background
that indicates job progress.

5-4 Using the Splash G3535 Server
5
Info field (Basic and Detailed)
When the Splash G3535 main window is in full-screen mode, the leftmost column in
the Hold queue acts as a job information field. The Info field includes two options:
Info (Basic) or Info (Detailed). To toggle from one option to the other, Option-click
the Info column heading, and choose Info (Basic) or Info (Detailed) from the menu
that appears. Info (Basic) displays a symbol that indicates the job’s print status. Info
(Detailed) displays the symbol, but adds a color background to indicate job progress.
If a job is moved to the Active or Error queues, the Info field is no longer displayed,
but is available. In the Active queue, the Rip and Print status of a job is available in the
Status field. When a job moves to the Error queue, the reason the job failed to print
appears in the Error Message field.
The Info (Basic) symbols and descriptions are:
•I = Has Saved Rasters (Image)
•T = Will Apply Color Tuning When Run (Tuning)
•P = Has Preflight Report
•R = RIPped (previously processed)
•S = Receiving From Network (Spooling)
•Blank = Fully Received, Not Processed
The Info (Detailed) displays five columns of color icons that indicate the progress
of a job.
•I = Saved Raster, will print without re-RIPping and is symbol is Red
•T = Applies Color Tuning When Run, symbol is Purple
•P = Preflight Report, symbol is Charcoal Gray
•R = RIPped (previously processed), symbol is Yellow
•S = Spooling (receiving from network), symbol is Blue if received, half-filled blue if
receiving
NOTE: More than one Info field can be displayed at a time.

5-5 The Splash G3535 interface (full-screen mode)
5
For Info Basic jobs for which more than one status condition applies, the field
displayed first is true. For example, for a job with saved rasters and a preflight report,
“I” would be displayed in the Info field.
Preview window
The Preview window displays thumbnails of the job selected in the Active, Hold or
Error queues.
Start/Stop button
Start/Stop allows you to stop and start processing files. These actions are global,
stopping all print jobs currently on the server or allowing the server to
begin processing.
Toolbar
The Splash G3535 toolbar allows you convenient access to frequently used
applications and features.
In full-screen mode, the toolbar includes the following:
• ColorCal—allows you to perform color calibration.
• Profile Loader—allows you to quickly and easily add ICC profiles.
• CopyCal—allows you to create color profiles that simulate the output of any
color printer.
• ColorTuner—allows you to edit the color output of a RIPped job before all the copies
are printed.
• Set Builder—allows you to combine several jobs, printing them as a single,
collated document.
• Acquire—allows you to scan jobs directly from the server, without using Photoshop.
A separate Photoshop plug-in is provided to allow you to scan with Photoshop.
• Open/Save—opens the Open/Save dialog box, where you can open dropped files and
save spooled files.

5-6 Using the Splash G3535 Server
5
Job status indicators
• Device Status—displays the status of the printer.
• Splash Server Status—displays network activity, server status (Idle, Stopped, or
Processing), the date of the last calibration, and available hard disk space.
• Trays—indicates which paper trays are installed and the paper sizes they
accommodate. The type of paper installed in the copier may be viewed by dragging
the cursor over the tray status bar in the full screen view.
The Splash G3535 interface (reduced screen mode)
In reduced screen mode, the Splash G3535 main window displays print queue
management information and print server tools.
NOTE: In reduced screen mode, the Splash G3535 toolbar displays the same
applications and features as in full-screen mode, with the exception of the Open/Save
feature. Open/Save is unavailable in reduced screen mode.
For descriptions of each of the applications and features in the reduced mode toolbar,
see the previous section on the Splash G3535 main window (full-screen mode).
 Loading...