

Page 1
User Guide
Release 2.1
Page 2

June 19, 2006
Xerox Corporation
Global Knowledge and Language Services
800 Phillips Road, Bldg. 0845-17S
Webster, New York 14580
USA
Copyright © 2001–2006 by Xerox Corporation. All rights reserved.
XEROX ®, The Document Company ®, the stylized X ®, CentreWare ®, Document Centre ®, WorkCentre®
Pro, DocuShare
®
, FlowPort ®, PaperWare, SMARTsend, and FreeFlow are trademarks of or licensed to
Xerox Corporation in the United States and other countries.
DataGlyph ® is a trademark of Palo Alto Research Center, Inc.
Adobe and Acrobat are registered trademarks of Adobe Systems, Incorporated.
IBM, Lotus, Domino, and Domino.Doc are registered trademarks of IBM Corporation.
NetWare is a registered trademark of Novell, Inc.
Flash is a trademark of Macromedia, Inc.
Microsoft, Microsoft Windows, Microsoft Word, Microsoft Excel, Microsoft PowerPoint, Microsoft Internet
Explorer, Microsoft Office, Exchange 2000, SharePoint, and Internet Information Services (IIS) are
registered trademarks of Microsoft Corporation.
Netscape Navigator is a registered trademark of Netscape Communications Corporation.
WordPerfect is a registered trademark of Corel Corporation.
WorkSite is a trademark of Interwoven, Inc.
Hummingbird DM is a trademark of Hummingbird, Ltd.
Documentum is a registered trademark of EMC Corporation.
LiveLink is a registered trademark of Open Text Corporation.
Xerox PDF Reader Powered by Foxit Software Company http://www.foxitsoftware.com
ii
Page 3

Table of Contents
Chapter 1 Welcome to SMARTsend . . . . . . . . . . . . . . . . . . . . . . . . . . . . . . . . . . . 1-1
What is Included in This Release? . . . . . . . . . . . . . . . . . . . . . . . . . . . . . . . . . . . . . . . . . . . . . 1-2
What is New in This Release? . . . . . . . . . . . . . . . . . . . . . . . . . . . . . . . . . . . . . . . . . . . . . . . . 1-4
SMARTsend Overview . . . . . . . . . . . . . . . . . . . . . . . . . . . . . . . . . . . . . . . . . . . . . . . . . . . . . 1-5
SMARTsend Documentation . . . . . . . . . . . . . . . . . . . . . . . . . . . . . . . . . . . . . . . . . . . . . . . . . 1-6
SMARTsend Installation and Administration Guide . . . . . . . . . . . . . . . . . . . . . . . . . . . . . . . . . . 1-6
SMARTsend User Guide . . . . . . . . . . . . . . . . . . . . . . . . . . . . . . . . . . . . . . . . . . . . . . . . . . . . . . . .1-6
Help . . . . . . . . . . . . . . . . . . . . . . . . . . . . . . . . . . . . . . . . . . . . . . . . . . . . . . . . . . . . . . . . . . . . . . . .1-6
Quick Reference Cards . . . . . . . . . . . . . . . . . . . . . . . . . . . . . . . . . . . . . . . . . . . . . . . . . . . . . . . . .1-6
Readme.txt . . . . . . . . . . . . . . . . . . . . . . . . . . . . . . . . . . . . . . . . . . . . . . . . . . . . . . . . . . . . . . . . . . . 1-7
Customer Support . . . . . . . . . . . . . . . . . . . . . . . . . . . . . . . . . . . . . . . . . . . . . . . . . . . . . . . . . 1-8
Telephone Support . . . . . . . . . . . . . . . . . . . . . . . . . . . . . . . . . . . . . . . . . . . . . . . . . . . . . . . . . . . . . 1-8
Internet Support . . . . . . . . . . . . . . . . . . . . . . . . . . . . . . . . . . . . . . . . . . . . . . . . . . . . . . . . . . . . . . . 1-8
Chapter 2 Site Overview . . . . . . . . . . . . . . . . . . . . . . . . . . . . . . . . . . . . . . . . . . . . . 2-1
Accessing the User Home Page . . . . . . . . . . . . . . . . . . . . . . . . . . . . . . . . . . . . . . . . . . . . . . . 2-2
About the User Home Page . . . . . . . . . . . . . . . . . . . . . . . . . . . . . . . . . . . . . . . . . . . . . . . . . . . . . . 2-3
Getting Started . . . . . . . . . . . . . . . . . . . . . . . . . . . . . . . . . . . . . . . . . . . . . . . . . . . . . . . . . . . . 2-4
E-mail Address . . . . . . . . . . . . . . . . . . . . . . . . . . . . . . . . . . . . . . . . . . . . . . . . . . . . . . . . . . . . . . . 2-4
Create a Scan To My E-mail PaperWare Cover Sheet . . . . . . . . . . . . . . . . . . . . . . . . . . . . . . . . . 2-4
Workflows . . . . . . . . . . . . . . . . . . . . . . . . . . . . . . . . . . . . . . . . . . . . . . . . . . . . . . . . . . . . . . . . . . .2-5
My Credentials . . . . . . . . . . . . . . . . . . . . . . . . . . . . . . . . . . . . . . . . . . . . . . . . . . . . . . . . . . . . 2-6
Add a New Credential . . . . . . . . . . . . . . . . . . . . . . . . . . . . . . . . . . . . . . . . . . . . . . . . . . . . . . . . . . 2-6
Manage My Credentials . . . . . . . . . . . . . . . . . . . . . . . . . . . . . . . . . . . . . . . . . . . . . . . . . . . . . . . . 2-6
Customization Options . . . . . . . . . . . . . . . . . . . . . . . . . . . . . . . . . . . . . . . . . . . . . . . . . . . . . 2-7
Job Confirmation E-mail Address . . . . . . . . . . . . . . . . . . . . . . . . . . . . . . . . . . . . . . . . . . . . . . . . .2-7
Site Preferences . . . . . . . . . . . . . . . . . . . . . . . . . . . . . . . . . . . . . . . . . . . . . . . . . . . . . . . . . . . . . . . 2-7
Manage My Document Attribute Profiles . . . . . . . . . . . . . . . . . . . . . . . . . . . . . . . . . . . . . . . . . . .2-7
Personalize Your PaperWare Form Scan Settings . . . . . . . . . . . . . . . . . . . . . . . . . . . . . . . . . . . .2-7
Chapter 3 Distribution Workflows . . . . . . . . . . . . . . . . . . . . . . . . . . . . . . . . . . . . . 3-1
Workflow Overview . . . . . . . . . . . . . . . . . . . . . . . . . . . . . . . . . . . . . . . . . . . . . . . . . . . . . . . 3-2
Workflow Explorer . . . . . . . . . . . . . . . . . . . . . . . . . . . . . . . . . . . . . . . . . . . . . . . . . . . . . . . . 3-3
Workflow Tasks . . . . . . . . . . . . . . . . . . . . . . . . . . . . . . . . . . . . . . . . . . . . . . . . . . . . . . . . . . . . . . 3-3
Workflow Views . . . . . . . . . . . . . . . . . . . . . . . . . . . . . . . . . . . . . . . . . . . . . . . . . . . . . . . . . . . . . . 3-3
Workflow Details . . . . . . . . . . . . . . . . . . . . . . . . . . . . . . . . . . . . . . . . . . . . . . . . . . . . . . . . . . . . .3-4
Adding a Distribution Workflow . . . . . . . . . . . . . . . . . . . . . . . . . . . . . . . . . . . . . . . . . . . . . . 3-5
Creating a New Distribution Workflow . . . . . . . . . . . . . . . . . . . . . . . . . . . . . . . . . . . . . . . . . . . . 3-5
Creating a Workflow from an Existing Workflow . . . . . . . . . . . . . . . . . . . . . . . . . . . . . . . . . . . .3-6
Editing a Workflow . . . . . . . . . . . . . . . . . . . . . . . . . . . . . . . . . . . . . . . . . . . . . . . . . . . . . . . . 3-7
Deleting a Workflow . . . . . . . . . . . . . . . . . . . . . . . . . . . . . . . . . . . . . . . . . . . . . . . . . . . . . . . 3-9
Document Destinations . . . . . . . . . . . . . . . . . . . . . . . . . . . . . . . . . . . . . . . . . . . . . . . . . . . . 3-10
Adding/Removing Listed Destinations to/from a Workflow . . . . . . . . . . . . . . . . . . . . . . . . . . . 3-10
Adding New Destinations . . . . . . . . . . . . . . . . . . . . . . . . . . . . . . . . . . . . . . . . . . . . . . . . . . . . . . 3-10
Editing Destinations . . . . . . . . . . . . . . . . . . . . . . . . . . . . . . . . . . . . . . . . . . . . . . . . . . . . . . . . . . 3-12
Deleting Destinations . . . . . . . . . . . . . . . . . . . . . . . . . . . . . . . . . . . . . . . . . . . . . . . . . . . . . . . . . 3-12
Managing Destination Credentials . . . . . . . . . . . . . . . . . . . . . . . . . . . . . . . . . . . . . . . . . . . . . . . 3-13
SMARTsend User Guide iii
Page 4

Destination Properties . . . . . . . . . . . . . . . . . . . . . . . . . . . . . . . . . . . . . . . . . . . . . . . . . . . . . . . . .3-16
Document Name and Type . . . . . . . . . . . . . . . . . . . . . . . . . . . . . . . . . . . . . . . . . . . . . . . . . 3-25
Document Name . . . . . . . . . . . . . . . . . . . . . . . . . . . . . . . . . . . . . . . . . . . . . . . . . . . . . . . . . . . . . 3-25
Document Type . . . . . . . . . . . . . . . . . . . . . . . . . . . . . . . . . . . . . . . . . . . . . . . . . . . . . . . . . . . . . . 3-27
Document Attributes . . . . . . . . . . . . . . . . . . . . . . . . . . . . . . . . . . . . . . . . . . . . . . . . . . . . . . 3-35
Document Attribute Profiles . . . . . . . . . . . . . . . . . . . . . . . . . . . . . . . . . . . . . . . . . . . . . . . . . . . . 3-35
Document Attribute Fields . . . . . . . . . . . . . . . . . . . . . . . . . . . . . . . . . . . . . . . . . . . . . . . . . . . . .3-36
Attribute Properties . . . . . . . . . . . . . . . . . . . . . . . . . . . . . . . . . . . . . . . . . . . . . . . . . . . . . . . . . . .3-36
Attribute Mapping . . . . . . . . . . . . . . . . . . . . . . . . . . . . . . . . . . . . . . . . . . . . . . . . . . . . . . . . . . . . 3-39
Save Workflow . . . . . . . . . . . . . . . . . . . . . . . . . . . . . . . . . . . . . . . . . . . . . . . . . . . . . . . . . 3-41
Job Confirmation . . . . . . . . . . . . . . . . . . . . . . . . . . . . . . . . . . . . . . . . . . . . . . . . . . . . . . . . . . . . .3-41
Workflow Access . . . . . . . . . . . . . . . . . . . . . . . . . . . . . . . . . . . . . . . . . . . . . . . . . . . . . . . . . . . . 3-41
Workflow Summary . . . . . . . . . . . . . . . . . . . . . . . . . . . . . . . . . . . . . . . . . . . . . . . . . . . . . . 3-42
Workflow Name and Description . . . . . . . . . . . . . . . . . . . . . . . . . . . . . . . . . . . . . . . . . . . . . . . . 3-42
Publication Options . . . . . . . . . . . . . . . . . . . . . . . . . . . . . . . . . . . . . . . . . . . . . . . . . . . . . . . . . . . 3-42
Appendix A: Sample Network Folder Workflow Creation . . . . . . . . . . . . . . . . . . . . . . . . . 3-43
Appendix B: Sample E-mail Workflow Creation . . . . . . . . . . . . . . . . . . . . . . . . . . . . . . . . 3-45
Appendix C: Specifying a Custom Object in a SMARTsend Workflow . . . . . . . . . . . . . . 3-47
Appendix D: Specifying a LiveLink Category in a SMARTsend Workflow . . . . . . . . . . . 3-48
Chapter 4 Search Workflows . . . . . . . . . . . . . . . . . . . . . . . . . . . . . . . . . . . . . . . . . 4-1
Search Workflow Overview . . . . . . . . . . . . . . . . . . . . . . . . . . . . . . . . . . . . . . . . . . . . . . . . . 4-2
Adding a Search Workflow . . . . . . . . . . . . . . . . . . . . . . . . . . . . . . . . . . . . . . . . . . . . . . . . . . . . . . 4-2
Creating a New Search Workflow . . . . . . . . . . . . . . . . . . . . . . . . . . . . . . . . . . . . . . . . . . . . . . . . .4-2
Document Search Locations . . . . . . . . . . . . . . . . . . . . . . . . . . . . . . . . . . . . . . . . . . . . . . . . . 4-4
Adding/Removing Listed Search Locations to/from a Workflow . . . . . . . . . . . . . . . . . . . . . . . .4-4
Adding New Search Locations . . . . . . . . . . . . . . . . . . . . . . . . . . . . . . . . . . . . . . . . . . . . . . . . . . .4-4
Editing Search Locations . . . . . . . . . . . . . . . . . . . . . . . . . . . . . . . . . . . . . . . . . . . . . . . . . . . . . . . .4-5
Deleting Search Locations . . . . . . . . . . . . . . . . . . . . . . . . . . . . . . . . . . . . . . . . . . . . . . . . . . . . . . .4-5
Document Search Results . . . . . . . . . . . . . . . . . . . . . . . . . . . . . . . . . . . . . . . . . . . . . . . . . . . 4-6
Search Results Format . . . . . . . . . . . . . . . . . . . . . . . . . . . . . . . . . . . . . . . . . . . . . . . . . . . . . . . . . . 4-6
Job Confirmation . . . . . . . . . . . . . . . . . . . . . . . . . . . . . . . . . . . . . . . . . . . . . . . . . . . . . . . . . . . . . . 4-6
Document Search Summary . . . . . . . . . . . . . . . . . . . . . . . . . . . . . . . . . . . . . . . . . . . . . . . . . 4-8
Workflow Name and Description . . . . . . . . . . . . . . . . . . . . . . . . . . . . . . . . . . . . . . . . . . . . . . . . .4-8
Publication Options . . . . . . . . . . . . . . . . . . . . . . . . . . . . . . . . . . . . . . . . . . . . . . . . . . . . . . . . . . . .4-8
Publishing a Search Workflow . . . . . . . . . . . . . . . . . . . . . . . . . . . . . . . . . . . . . . . . . . . . . . . 4-9
Search Criteria . . . . . . . . . . . . . . . . . . . . . . . . . . . . . . . . . . . . . . . . . . . . . . . . . . . . . . . . . . . . . . . . 4-9
Using a Search Workflow . . . . . . . . . . . . . . . . . . . . . . . . . . . . . . . . . . . . . . . . . . . . . . . . . . 4-10
Chapter 5 Publishing Workflows . . . . . . . . . . . . . . . . . . . . . . . . . . . . . . . . . . . . . . 5-1
Publication Overview . . . . . . . . . . . . . . . . . . . . . . . . . . . . . . . . . . . . . . . . . . . . . . . . . . . . . . 5-2
Device Scan Templates . . . . . . . . . . . . . . . . . . . . . . . . . . . . . . . . . . . . . . . . . . . . . . . . . . . . . . . . . 5-2
PaperWare Cover Sheets . . . . . . . . . . . . . . . . . . . . . . . . . . . . . . . . . . . . . . . . . . . . . . . . . . . . . . . . 5-2
Publishing to a Xerox Multifunction Device . . . . . . . . . . . . . . . . . . . . . . . . . . . . . . . . . . . . . 5-3
Publication Settings . . . . . . . . . . . . . . . . . . . . . . . . . . . . . . . . . . . . . . . . . . . . . . . . . . . . . . . . . . . . 5-3
Document Attributes . . . . . . . . . . . . . . . . . . . . . . . . . . . . . . . . . . . . . . . . . . . . . . . . . . . . . . . . . . .5-4
Scan Profile . . . . . . . . . . . . . . . . . . . . . . . . . . . . . . . . . . . . . . . . . . . . . . . . . . . . . . . . . . . . . . . . . . 5-5
iv SMARTsend User Guide
Page 5

Customizing Scan Profiles . . . . . . . . . . . . . . . . . . . . . . . . . . . . . . . . . . . . . . . . . . . . . . . . . . . . . . 5-6
Publishing to a PaperWare Cover Sheet . . . . . . . . . . . . . . . . . . . . . . . . . . . . . . . . . . . . . . . . 5-8
Using a PaperWare Cover Sheet with Internet Fax . . . . . . . . . . . . . . . . . . . . . . . . . . . . . . . . . . . 5-10
Publication Settings . . . . . . . . . . . . . . . . . . . . . . . . . . . . . . . . . . . . . . . . . . . . . . . . . . . . . . . . . . . 5-11
Destinations . . . . . . . . . . . . . . . . . . . . . . . . . . . . . . . . . . . . . . . . . . . . . . . . . . . . . . . . . . . . . . . . .5-11
Document Attributes . . . . . . . . . . . . . . . . . . . . . . . . . . . . . . . . . . . . . . . . . . . . . . . . . . . . . . . . . .5-11
Scan Settings . . . . . . . . . . . . . . . . . . . . . . . . . . . . . . . . . . . . . . . . . . . . . . . . . . . . . . . . . . . . . . . . 5-12
Viewing Publications . . . . . . . . . . . . . . . . . . . . . . . . . . . . . . . . . . . . . . . . . . . . . . . . . . . . . . 5-14
Publication Details . . . . . . . . . . . . . . . . . . . . . . . . . . . . . . . . . . . . . . . . . . . . . . . . . . . . . . . . . . . . 5-14
Adding or Removing Devices from a Publication . . . . . . . . . . . . . . . . . . . . . . . . . . . . . . . . 5-15
Deleting Workflow Publications . . . . . . . . . . . . . . . . . . . . . . . . . . . . . . . . . . . . . . . . . . . . . 5-16
Deleting Individual Publications of a Workflow . . . . . . . . . . . . . . . . . . . . . . . . . . . . . . . . . . . . . 5-16
Deleting All Publications of a Workflow . . . . . . . . . . . . . . . . . . . . . . . . . . . . . . . . . . . . . . . . . .5-16
Chapter 6 How to Scan . . . . . . . . . . . . . . . . . . . . . . . . . . . . . . . . . . . . . . . . . . . . . 6-1
Before Scanning . . . . . . . . . . . . . . . . . . . . . . . . . . . . . . . . . . . . . . . . . . . . . . . . . . . . . . . . . . . 6-2
How Publication Affects Scanning . . . . . . . . . . . . . . . . . . . . . . . . . . . . . . . . . . . . . . . . . . . . 6-3
Scanning with a Device Scan Template . . . . . . . . . . . . . . . . . . . . . . . . . . . . . . . . . . . . . . . . . 6-4
Scanning with a PaperWare Cover Sheet . . . . . . . . . . . . . . . . . . . . . . . . . . . . . . . . . . . . . . . 6-5
Workflows with Editable Document Attributes . . . . . . . . . . . . . . . . . . . . . . . . . . . . . . . . . . . . . . 6-5
Customized PaperWare Scan Settings . . . . . . . . . . . . . . . . . . . . . . . . . . . . . . . . . . . . . . . . . . . . . . 6-6
Refetching the Cover Sheet . . . . . . . . . . . . . . . . . . . . . . . . . . . . . . . . . . . . . . . . . . . . . . . . . . . . . . 6-7
Common Issues . . . . . . . . . . . . . . . . . . . . . . . . . . . . . . . . . . . . . . . . . . . . . . . . . . . . . . . . . . . 6-8
Index . . . . . . . . . . . . . . . . . . . . . . . . . . . . . . . . . . . . . . . . . . . . . . . . . . . . . . . . . . . INDEX-1
SMARTsend User Guide v
Page 6

vi SMARTsend User Guide
Page 7

1
Welcome to SMARTsend
This chapter describes the features and functions of the Xerox FreeFlowTM SMARTsendTM software and the
support services available through both application documentation and Xerox customer support services.
What is in this chapter:
What is Included in This Release? . . . . . . . . . . . . . . . . . . . . . . . . . . . . . . . . . . . . . . . . . . . . . . . . 1-2
What is New in This Release? . . . . . . . . . . . . . . . . . . . . . . . . . . . . . . . . . . . . . . . . . . . . . . . . . . . 1-4
SMARTsend Overview . . . . . . . . . . . . . . . . . . . . . . . . . . . . . . . . . . . . . . . . . . . . . . . . . . . . . . . . . 1-5
SMARTsend Documentation. . . . . . . . . . . . . . . . . . . . . . . . . . . . . . . . . . . . . . . . . . . . . . . . . . . . . 1-6
Customer Support. . . . . . . . . . . . . . . . . . . . . . . . . . . . . . . . . . . . . . . . . . . . . . . . . . . . . . . . . . . . . 1-8
1-1
Page 8

What is Included in This Release?
SMARTsend is available in Standard and Professional Editions.
Features common to all versions
Workflow creation features that define the conversion and transmission of paper-based documents from
Xerox Multifunction Devices to the following destinations:
DocuShare server
E-Mail address
FTP location
Microsoft SharePoint Portal Server 2003
Network Folder
Remote Printer
External Application Connection
Workflow publication and management features
Backup and Restore Tools—to save SMARTsend workflows, credentials, user preferences, device
configurations, and general settings.
Template Importer—to import CentreWare Network Scanning Services templates into SMARTsend.
Job History Exporter—to create a job history text file for analysis and reporting.
Standard and Professional Edition features
In addition to the destinations common to all versions, support the conversion and transmission of paperbased documents to the following destinations:
URL location
Netware Folder
Microsoft Exchange 2000 Web Folder
Microsoft SharePoint Portal Server 2001
Domino
Domino.Doc
1-2 Welcome to SMARTsend
Page 9

Optional components for Standard or Professional versions
Documentum version 5.2 destination support
Hummingbird version 5.1.0.5 destination support
Interwoven WorkSite version 8 destination support
LiveLink version 9.5.0 destination support
TRIM Context Server 6.0 destination support
Optional components for Professional version
TrueMatch—a patented Xerox technology that enables you to locate electronic documents by scanning
portions of the original paper document.
What is Included in This Release? 1-3
Page 10

What is New in This Release?
SMARTsend can now be installed on Windows XP computers.
New file format and enhanced file compression options.
Support for SNMPv3, HTTP, and HTTPS protocols for enhanced device configuration and security
options.
PaperWare forms forwarding, which enables you to configure SMARTsend computers to process
PaperWare cover sheets that were created on other SMARTsend or Xerox Flowport computers.
The Default scan template on Xerox devices can now be used with PaperWare cover sheets.
Document Attribute (metadata) fields can now be masked and/or designated as required fields.
SMARTsend can now be configured as a secure website.
New optional components, such as Documentum, Interwoven WorkSite, Hummingbird, LiveLink
destinations.
Xerox TrueMatch support (optional), which enables you to create search workflows to locate
documents on your network.
Support for DocuShare 5.0.
Dynamic Filing to a sub-folder.
1-4 Welcome to SMARTsend
Page 11

SMARTsend Overview
SMARTsend combines and enhances many of the powerful features of two Xerox products—FlowPort™
and CentreWare™ Network Scanning Services—to deliver one integrated software application. Built on the
Microsoft .NET platform, SMARTsend software works with new and legacy Xerox advanced multifunction
systems, as well as many types of Internet Fax devices from Xerox and other manufacturers.
Using SMARTsend, paper documents can be scanned in full color and converted into a variety of industry
standard digital formats, including PDF, JFIF/JPEG, TIFF, and Multi-Page TIFF formats. SMARTsend can
also convert scanned documents into editable files such as Excel, Word, PowerPoint or searchable PDF. The
resulting files can then be edited, manipulated, saved and shared. SMARTsend also allows the user to add
descriptive information (also known as metadata) that will accompany the scanned documents. These
versatile features make it simple to categorize, search and retrieve scanned documents.
Web-based application
SMARTsend is a web-based application that requires no additional client software. Users can easily create
workflows that define the type of scanned document, the distribution locations and processes, and the
methods and devices that can be used to submit SMARTsend scan jobs. The workflow is then published to
make it available to users as device scan templates, or as PaperWare cover sheets (Professional Edition).
These publications make it simple for anyone to scan a document and distribute the resulting electronic
file(s) to a wide variety of destinations, including e-mail addresses, network folders, FTP folders, remote
printers, external applications, Web URLs, Domino and Domino.doc repositories, Microsoft SharePoint
Portal Server repositories, and Xerox DocuShare respositories. Additional destinations, such as advanced
document management repositories, can be added as optional components.
Ease of use
SMARTsend is designed for ease of use, versatility, and security. Wizards assist users with complex tasks,
and descriptive instructions, status messages, and help system information accompany all SMARTsend
screens. Users can set up e-mail and printed confirmation reports, and administrators can create job logs to
track usage and obtain audit trails in support of legal and regulatory requirements. Where security is
important, SMARTsend stands above the competition with support for the latest secure protocols and secure
web site configuration options. In addition, the open and flexible .NET architecture permits easy integration
with other programs and provides the flexibility to expand capabilities and features as Xerox makes future
enhancements available.
SMARTsend Overview 1-5
Page 12

SMARTsend Documentation
Several forms of documentation are available with SMARTsend, including printable guides that are
provided as Adobe Acrobat PDF format documents. The documentation components can be accessed from
the links that are provided on the SMARTsend Home Pages, or from the links in the CD autorun program.
SMARTsend administrators can also access the Readme file and the Installation and Administration Guide
from the Start Menu on the SMARTsend computer.
The Adobe Acrobat Reader is required to view and print the guides. Obtain the reader from the Adobe Web
site,
www. adobe.com.
SMARTsend Installation and Administration Guide
The SMARTsend Installation and Administration Guide includes step-by-step instructions for installing and
configuring the SMARTsend computer, clients, and supported scanning devices.
SMARTsend User Guide
The SMARTsend User Guide introduces SMARTsend to new users. It includes overviews of all the main
SMARTsend pages and features, as well as step-by-step instructions for key tasks users perform with
SMARTsend.
Help
SMARTsend contains extensive online Help that covers the use of the application beyond installation and
initial configuration. Help links are included in the upper right corner of any SMARTsend page.
Quick Reference Cards
SMARTsend documentation includes the following Quick Reference Cards:
Administrator Quick Reference—Contains requirements, basic installation procedures, and site
configuration information for SMARTsend administrators.
User Quick Reference—Contains basic overview and getting started information for general
SMARTsend users.
NOTE: The Administrator Quick Reference is not recommended for first-time installations of the product.
Please use the Installation and Administration Guide for detailed planning and installation instructions.
1-6 Welcome to SMARTsend
Page 13

Readme.txt
Readme.txt provides product support information that was not available when the other documentation
components were released for publication. This information is intended primarily for SMARTsend
administrators, and it can be accessed by administrators using the following methods:
After SMARTsend is installed:
On a Windows 2000 server, click Start > Programs > Xerox > SMARTsend > View ReadMe.txt;
- OR -
On a Windows XP Professional computer or server running Windows Server 2003, click Start > All
Programs > Xerox > SMARTsend > View ReadMe.txt.
Insert the SMARTsend CD into your CD drive. Click the README File link from the CD Installer
program.
Click the View Readme file button during installation.
SMARTsend Documentation 1-7
Page 14

Customer Support
You can contact Xerox for support either by telephone or Internet.
Telephone Support
For additional assistance, contact Xerox by telephone to speak with a Customer Support Representative.
Before you call, locate the SMARTsend Serial Number by clicking the About link in the upper right corner
of any SMARTsend page. For future reference, be sure to record the Serial Number in the space provided
below. The Serial Number is required to obtain technical support from Xerox.
Xerox SMARTsend Serial Number:
NOTE: SMARTsend permits the management of a limited number of devices. To identify the number of
supported devices, click the About link on any SMARTsend page and locate the product serial number.
The last set of digits appended to the serial number indicate the number of supported devices. By default,
SMARTsend Standard and Professional Editions support the configuration of up to five devices and
SMARTsend
The Xerox customer support telephone numbers are listed in the following table. If the telephone number for
your country is not listed, please contact your local Xerox representative to obtain the number. If necessary,
please record the telephone number in the space provided below.
Xerox Customer Support Telephone Numbers:
UNITED STATES 800-821-2797
UNITED STATES (TTY)
CANADA 800-939-3769 (800-93-XEROX)
800-855-2880
Internet Support
Additional tips and technical information are available from the Support & Drivers link on the Xerox Web
site,
www.xerox.com. Locate or search for your product and access the product support resources. The
documents in this section cover specific issues that may require special procedures or application notes
regarding the operation and configuration of your Xerox product.
1-8 Welcome to SMARTsend
Page 15

2
Site Overview
This chapter summarizes the basic components of the User Home Page. It is intended to explain the entry
points to the SMARTsend application and to provide a foundation for later chapters.
What is in this chapter:
Accessing the User Home Page . . . . . . . . . . . . . . . . . . . . . . . . . . . . . . . . . . . . . . . . . . . . . . . . . . 2-2
Getting Started . . . . . . . . . . . . . . . . . . . . . . . . . . . . . . . . . . . . . . . . . . . . . . . . . . . . . . . . . . . . . . . 2-4
Workflows . . . . . . . . . . . . . . . . . . . . . . . . . . . . . . . . . . . . . . . . . . . . . . . . . . . . . . . . . . . . . . . . . . . 2-5
My Credentials . . . . . . . . . . . . . . . . . . . . . . . . . . . . . . . . . . . . . . . . . . . . . . . . . . . . . . . . . . . . . . . 2-6
Customization Options . . . . . . . . . . . . . . . . . . . . . . . . . . . . . . . . . . . . . . . . . . . . . . . . . . . . . . . . . 2-7
2-1
Page 16

Accessing the User Home Page
SMARTsend is a web-based application. The User Home Page is the central access point for creating and
accessing workflows and workflow publications, managing credentials, and configuring personal settings.
The following browsers are currently supported:
Microsoft Internet Explorer version 5.5 or higher. (Internet Explorer is recommended for best
performance.)
Netscape version 7.2 or higher.
Mozilla version 1.7 or higher.
Mozilla FireFox version 1.0.6 or higher.
To access the User Home Page:
1 Open a browser window.
2 Enter the following URL or address:
http://[computer name]/SMARTsend
where computer name is the name of the SMARTsend computer. Contact your SMARTsend
administrator if you are unsure of the computer name.
3 Press Enter.
4 You may be asked to enter your user name and password. Enter your SMARTsend user name and
password and click OK.
5 A SMARTsend Welcome screen will be displayed. Select Click here to enter SMARTsend.
6 The User Home Page appears. Keep in mind that some SMARTsend options and buttons that are located
at the bottom of the pages may not be visible on all displays. Use the scroll bar on the right side of the
window to scroll to the bottom of the pages as needed. If you change the settings on the page, you will
need to click the Save or Save As button at the bottom of the page in order to save the changes on
certain pages.
NOTE: If a proxy server is used to connect to the Internet, you may need to bypass the proxy server in
order to connect to SMARTsend. This is done by bypassing the proxy server for all local addresses or by
adding the IP address and fully qualified Host Name of the SMARTsend computer to the proxy server
exceptions list. See your administrator for detailed instructions.
NOTE: Pop-up blockers may interfere with some SMARTsend windows. Pop-up blockers should be
disabled for the SMARTsend URL. See your administrator for instructions on disabling your pop-up
blocker.
2-2 Site Overview
Page 17
About the User Home Page
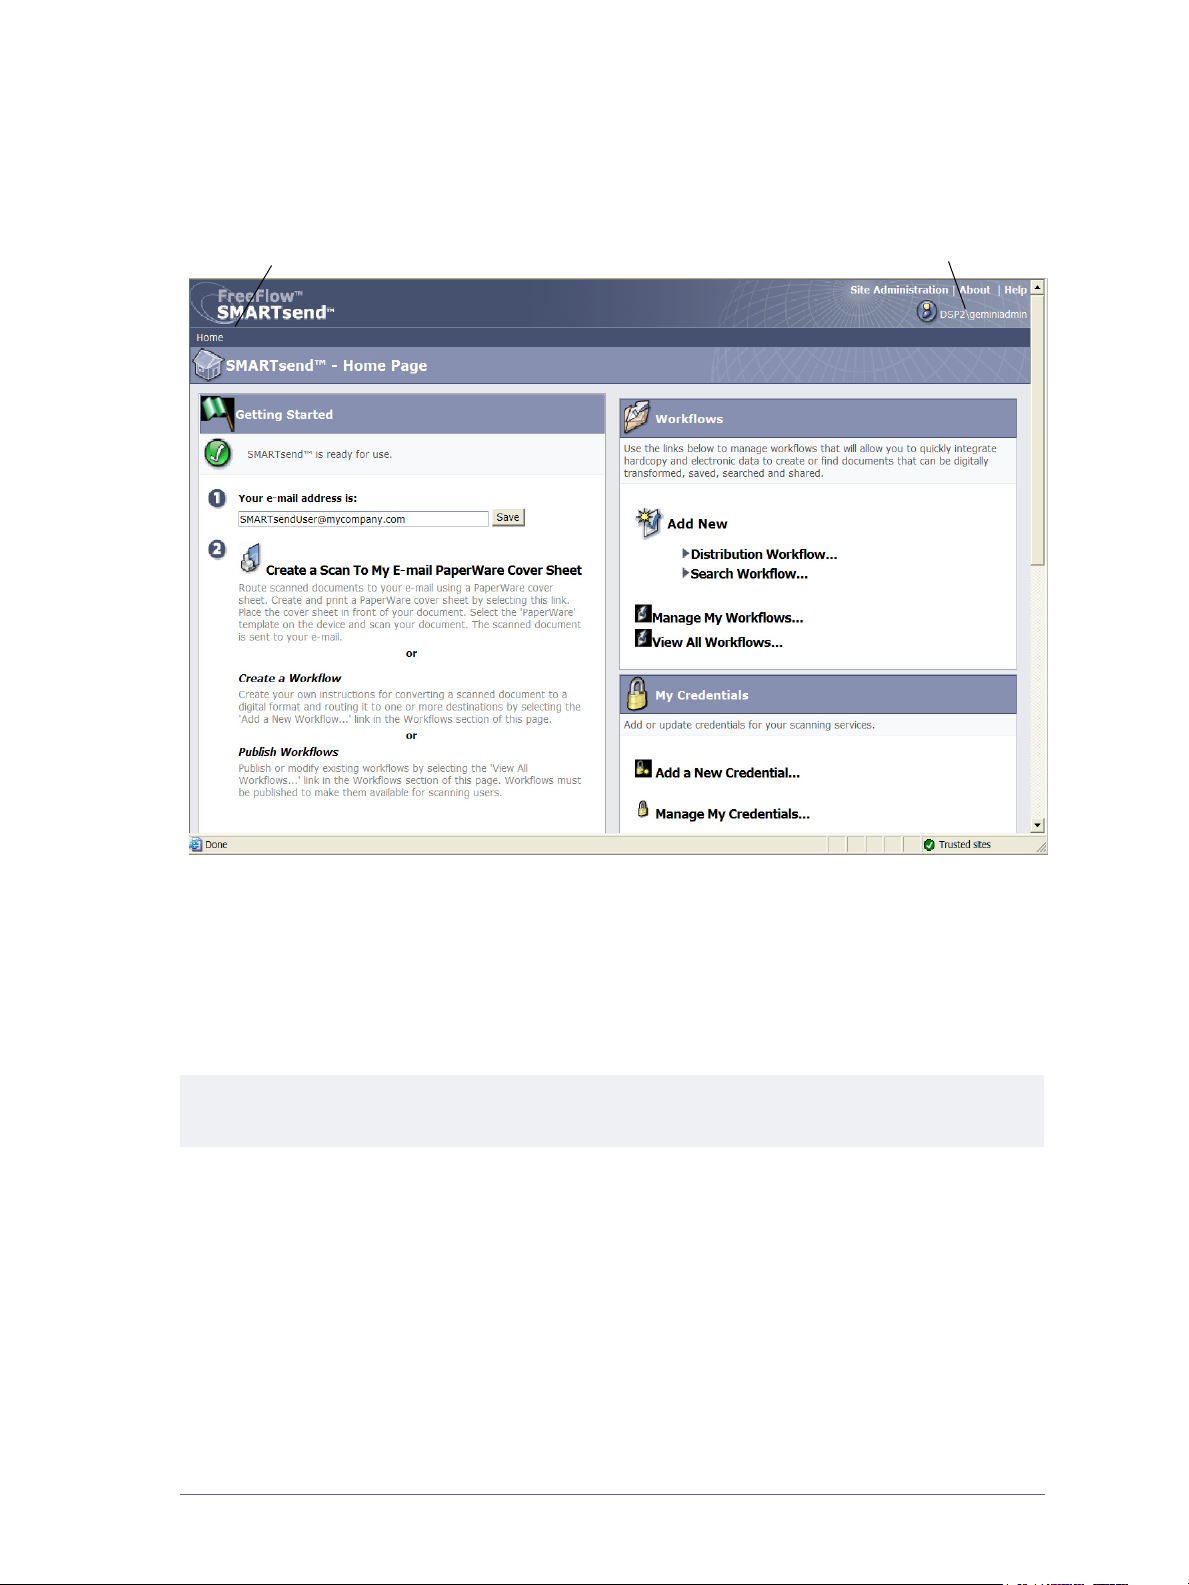
e
The User Home Page contains visual cues to indicate who is logged in, what computer the user is logged
into, and where in the application the user is.
Navigation Path
Computer / User Nam
Figure 2-1: User Home Page (Top Section)
Navigation Path – This area lists the current page and the pages that were used to access the current
page. For example, Home >> Workflow Explorer >> Add New Distribution Workflow is displayed
when adding a new workflow. Keep in mind that the text provides links to each page. Click on the links
to access any of the SMARTsend pages in the path.
Computer / User Name – This area displays the SMARTsend computer name and the user who is
currently logged in.
NOTE: On many of the SMARTsend pages it may be necessary to scroll down to see additional buttons
or to view error messages.
Accessing the User Home Page 2-3
Page 18

Getting Started
The left side or Getting Started section of the User Home Page indicates the status of the application.
The following icons appear to indicate the status of a step or the application:
Indicates that a step is not complete or that the application is not ready for use.
Indicates that a step may not be complete.
Indicates that a step is complete or that the application is ready for use.
E-mail Address
You must enter an e-mail address before managing workflows and credentials. Your e-mail address is used
for e-mail confirmation and as a destination for the My E-mail workflow which comes with the SMARTsend
installation. Type your e-mail address and click Save.
Create a Scan To My E-mail PaperWare Cover Sheet
Professional Edition Feature
Although the My E-mail workflow is part of the SMARTsend installation, the workflow must be published
before it can be used. Creating a PaperWare cover sheet is one method of publishing the workflow. Use this
link to create a cover sheet for the My E-mail workflow. See
publishing workflows.
The My E-mail workflow is used to automatically e-mail a scanned document to the e-mail account of the
scan submitter. The scan submitter is the owner of the PaperWare cover sheet or the person who is logged in
at the Xerox Multifunction Device. If the device requires authentication, however, the scan will always be
sent to the person who is logged in at the device.
Chapter 5, Publishing Workflows, for details on
2-4 Site Overview
Page 19

Workflows
Add New Workflow
Any user can create a new workflow. The Add New links invoke a wizard which leads you through the steps
necessary to define the workflow, including defining the document destinations, specifying the document
attributes, and determining the workflow settings.
information on adding workflows.
Manage My Workflows
This link invokes the Workflow Editor which you can use to manage workflows and publications you have
created. From the Workflow Editor you can view, add, edit, delete, and publish workflows, as well as view
and delete publications. For more information on the Workflow Editor, see
Workflows.
View All Workflows
This link invokes the Workflow Explorer which you can use to view all public workflows, as well as all
private workflows you own. The workflow tasks that are available from the left panel depend upon the
workflow selected from the list of workflows on the right panel. For more information on the Workflow
Explorer, see
Chapter 3, Distribution Workflows.
See Adding a Distribution Workflow on page 3-5 for more
Chapter 3, Distribution
Getting Started 2-5
Page 20

My Credentials
Scanning credentials are needed for all scanning destinations that require credentials for storing and filing
scan documents, e.g., DocuShare, Domino, Microsoft Exchange, FTP, NetWare Folder, Network Folder, or
Microsoft SharePoint. The My Credentials region enables you to add or modify credentials (login user
name/password) for scanning document destinations.
Add a New Credential
You will be prompted to add credentials for new destinations when you add a new workflow. See Adding a
Distribution Workflow on page 3-5. You may also add credentials for new destinations using the Add a New
Credential link on the User Home Page. For more information on adding credentials, see Managing
Destination Credentials on page 3-13.
Manage My Credentials
When credentials on an existing destination have changed, the new credentials must be reflected on the
SMARTsend computer or the workflow scanning job will fail. You can manage credentials for destinations
using the Manage My Credentials link. For more information on changing or deleting credentials, see
Managing Destination Credentials on page 3-13.
2-6 Site Overview
Page 21

Customization Options
Job Confirmation E-mail Address
This option specifies an e-mail address for jobs that are configured for e-mail confirmation.
Select Use my e-mail address for e-mail job confirmation to use your SMARTsend e-mail address.
See E-mail Address on page 2-4.
To use an alternate address, select Use the following e-mail address for e-mail job confirmation,
specify an e-mail address, and click Save.
Site Preferences
User preferences for using SMARTsend are configured here.
Select Show status pages on both failure and success to have status pages appear after successfully
performing tasks such as publishing workflows. If this option is not selected, no status pages will be
displayed when workflows are successfully published.
Select Show Welcome screen next time I access SMARTsend to have the Welcome Page appear when you
access the application.
Manage My Document Attribute Profiles
This link takes you to the Manage Document Profiles page. Document attributes are pieces of additional
information which can be added to each scanned document to describe the document—information such as
document version, document title, or document description. These document attributes can be created when
a workflow is created and will be applied when the workflow is scanned.
The SMARTsend installation comes with pre-packaged sets of document attributes, also called document
profiles. All document attribute profiles are publicly accessible by all SMARTsend users. The document
profiles displayed during workflow creation are filtered by workflow document destinations. For example,
FTP Only is a document profile for an FTP destination and will only be displayed when a workflow has an
FTP destination.
The Manage Document Profiles page will display all document profiles in the system. From this page
document profiles can be deleted by the workflow owner or by an administrator. Custom document attribute
profiles can be created during workflow creation. See
on managing document profiles.
Document Attribute Profiles on page 3-35 for details
Personalize Your PaperWare Form Scan Settings
Professional Edition Feature
This link allows you to publish templates with customized scan settings for PaperWare cover sheets.
During device configuration, a PaperWare template (named PaperWare) is automatically published for each
device configured for the application. This PaperWare template uses a set of default scan settings.
If you often choose alternate settings at the Xerox Multifunction Device when using the PaperWare form,
you may publish a new device template with the desired scan settings. When scanning at the device using a
PaperWare cover sheet, you then select the new template rather than the default PaperWare template. See
Customizing PaperWare Scan Settings on page 5-2 for more information on personalizing PaperWare scan
settings.
Customization Options 2-7
Page 22

2-8 Site Overview
Page 23

3
Distribution Workflows
This chapter covers how to create and edit distribution workflows. Included are detailed instructions for
specifying document destinations, filenames and formats, document attributes, and other settings that affect
the operability of SMARTsend distribution workflows.
NOTE: Search workflows can also be created if the TrueMatch component is installed with SMARTsend
Professional Edition. See Chapter 4, Search Workflows for more information.
What is in this chapter:
Workflow Overview. . . . . . . . . . . . . . . . . . . . . . . . . . . . . . . . . . . . . . . . . . . . . . . . . . . . . . . . . . . . 3-2
Workflow Explorer . . . . . . . . . . . . . . . . . . . . . . . . . . . . . . . . . . . . . . . . . . . . . . . . . . . . . . . . . . . . 3-3
Adding a Distribution Workflow. . . . . . . . . . . . . . . . . . . . . . . . . . . . . . . . . . . . . . . . . . . . . . . . . . 3-5
Editing a Workflow . . . . . . . . . . . . . . . . . . . . . . . . . . . . . . . . . . . . . . . . . . . . . . . . . . . . . . . . . . . . 3-7
Deleting a Workflow . . . . . . . . . . . . . . . . . . . . . . . . . . . . . . . . . . . . . . . . . . . . . . . . . . . . . . . . . . . 3-9
Document Destinations . . . . . . . . . . . . . . . . . . . . . . . . . . . . . . . . . . . . . . . . . . . . . . . . . . . . . . . 3-10
Document Name and Type . . . . . . . . . . . . . . . . . . . . . . . . . . . . . . . . . . . . . . . . . . . . . . . . . . . . . 3-25
Document Attributes. . . . . . . . . . . . . . . . . . . . . . . . . . . . . . . . . . . . . . . . . . . . . . . . . . . . . . . . . . 3-35
Save Workflow . . . . . . . . . . . . . . . . . . . . . . . . . . . . . . . . . . . . . . . . . . . . . . . . . . . . . . . . . . . . . . 3-41
Workflow Summary. . . . . . . . . . . . . . . . . . . . . . . . . . . . . . . . . . . . . . . . . . . . . . . . . . . . . . . . . . . 3-42
Appendix A: Sample Network Folder Workflow Creation . . . . . . . . . . . . . . . . . . . . . . . . . . . . . 3-43
Appendix B: Sample E-mail Workflow Creation . . . . . . . . . . . . . . . . . . . . . . . . . . . . . . . . . . . . 3-45
Appendix C: Specifying a Custom Object in a SMARTsend Workflow. . . . . . . . . . . . . . . . . . . . 3-47
3-1
Page 24

Workflow Overview
SMARTsend uses the concept of workflows to manage how scanned documents are converted to a digital
format and then routed to various destinations. For example, a workflow can be created that will convert
paper documents to PDF files and then route the PDF files to a document repository such as a DocuShare
repository. The workflow can also specify multiple destinations, such as e-mail accounts, network folders, or
any combination of document repositories.
Workflows offer:
Automation of frequently used tasks and settings
Versatile security options
Simple use and maintenance
Workflows are a convenient method of combining scan job settings such as destinations, document name
and type, document attributes, and imaging settings into a single entity that can be used and reused whenever
appropriate. The Document Name and Type are properties that define and describe a scanned document.
Defining the basic attributes for the scanned document, such as the file name and the type of digital format
(for example, PDF, JFIF, Single-Page TIFF, Multi-Page TIFF, etc.), are essential to creating a usable
workflow. SMARTsend also provides a way to add optional document attributes, commonly referred to as
metadata, to scanned documents. These attributes are stored with the digital document and can be used to
automate document storage, retrieval, and management tasks.
Workflows can be designated as either public or private. Public workflows are available for use by all
SMARTsend users to view, use, and edit. Private workflows can be viewed, used, and edited only by the
workflow owner (workflow creator). SMARTsend administrators can list and delete private workflows, but
cannot view or edit them.
Workflows must be published to make them available for use when scanning documents. For information on
publishing workflows, see
Chapter 5, Publishing Workflows.
NOTE: Search workflows can also be created if the optional TrueMatch component is installed with
SMARTsend Professional Edition. See Chapter 4, Search Workflows for more information.
3-2 Distribution Workflows
Page 25

Workflow Explorer
The Workflow Explorer page is used to access and manage workflows and is where the majority of
SMARTsend user operations are performed, including viewing, adding, editing, and publishing workflows.
Access the Workflow Explorer from the Home Page by clicking Manage My Workflows, which displays
only the workflows created by the user who is logged into SMARTsend, or by clicking View All
Workflows, which displays all workflows to which the user who is logged in has access.
The left side of the Workflow Explorer contains the menus for Workflow Tasks and Workflow Views.
Details of the particular workflow selected on the right side of the Workflow Explorer are displayed in the
Details region on the left side.
The right side of the Workflow Explorer displays the workflows in a table. The list of workflows can be
sorted by a particular heading by clicking on that heading. A workflow must be selected when editing or
publishing a workflow.
The following icons appear next to workflow names:
Indicates a workflow created by the user who is logged in.
Indicates a workflow created by a user other than the user who is logged in.
Indicates a private workflow created by the user who is logged in.
Indicates a PaperWare Scan Settings workflow (Professional Edition feature).
Indicates a Search workflow (only available with the TrueMatch optional component and the
Professional Edition).
Workflow Tasks
The Workflow Tasks region lists the tasks that are available to the user for the selected workflow. Except for
adding a new workflow, the task selected will operate on the workflow selected in the right panel.
The tasks available will vary based upon the workflow selected. For example, if a workflow has not yet been
published, the tasks to view or delete the workflow publications will not be available for that workflow.
NOTE: The My_E-mail workflow that comes with the SMARTsend installation cannot be deleted.
Workflow Views
View options allow you to view different listings of workflows and publications.
Show All
Click Show All to view all of the workflows to which you have access. This includes all public workflows
and only the private workflows that you have created.
My Workflows
Click My Workflows to view all the public and private workflows that you have created.
Workflow Explorer 3-3
Page 26

Workflow Details
The Details region displays information about the workflow selected in the right panel. The following
information is displayed:
The name of the workflow
The description of the workflow, if any
The owner of the workflow
Whether the workflow is public or private
When the workflow was last used for scanning
When the workflow was last edited
Number of device publications
Number of PaperWare publications (Professional Edition feature)
Whether the workflow is a Distribution workflow or a Search workflow.
3-4 Distribution Workflows
Page 27

Adding a Distribution Workflow
There are two ways to create a workflow. A new workflow can be created by using a wizard which steps the
user through the process of defining the workflow. Alternatively, a new workflow can be created by basing
the new workflow on an existing workflow.
Creating a New Distribution Workflow
Any user can create a new workflow. A wizard leads the user through the steps necessary to define the
workflow, including defining the document destinations, defining the filename and formats, specifying the
document attributes, and determining the workflow settings.
To create a new distribution workflow:
1 Navigate to the User Home Page and click Add New Distribution Workflow under the Workflows
heading.
2 Select the desired destinations for the scanned output files. For destinations that have already been
configured, checkboxes will be displayed. Select a configured destination by selecting the checkbox for
the destination. If a desired destination is not listed, go to the destination type and click add locations.
See
Document Destinations on page 3-10 for detailed information on adding destinations.
3 Click Next >>.
4 Specify the document name and type. See Document Name and Type on page 3-25 for detailed
information.
5 Click Next >>.
6 Specify the document attributes. See Document Attributes on page 3-35 for detailed information.
7 Click Next >>.
8 Specify the workflow settings. See Save Workflow on page 3-41 for detailed information on specifying
workflow settings.
9 Click Next >>.
10 At the Save Workflow page review the workflow details specified in the previous steps. If something
needs to be changed, click the Change buttons on the page to return to the previous screens. Otherwise,
click Finish to create the workflow.
If you specify that the workflow is to be published later, you will be returned to the User Home Page.
Otherwise, the appropriate Publish Workflow page will be displayed. See
for information on publishing workflows.
Chapter 5, Publishing Workflows
Adding a Distribution Workflow 3-5
Page 28

Creating a Workflow from an Existing Workflow
Sometimes a new workflow may be needed that is similar to an existing workflow, except that a different
document destination or some other property of the workflow needs to be altered. Rather than creating a new
workflow, you can make the needed changes to the existing workflow and save it under a different name.
NOTE: In order to create a new workflow from an existing one, you must edit the existing workflow. See
Editing a Workflow on page 3-7 for information on editing a workflow.
To create a new workflow from one that already exists:
1 Navigate to the User Home Page and click View All Workflows.
2 From the list of workflows in the Workflow Explorer select the workflow that you want to use as the
basis of the new workflow.
3 Click Edit this workflow from the Workflow Tasks list on the left side. The Save Workflow page will
be displayed.
4 Before making any other changes, you should rename the workflow. Change the workflow name and
click Save As. The Workflow Explorer window will be displayed, and the new workflow will now be in
the list of workflows. This workflow is identical to the workflow on which it was based, except that it
now has a different name.
5 To make additional changes, follow the steps in Editing a Workflow on page 3-7.
NOTE: If you are saving the workflow of another user, you will need to add credentials for the
destinations. The workflow always uses the credentials of the owner. If you do not add new credentials at
the time you create the workflow, you will be prompted to add them when the workflow is published. See
Add a New Credential on page 2-6 for information on adding credentials.
3-6 Distribution Workflows
Page 29

Editing a Workflow
Any user can edit a public workflow. Only the workflow owner (i.e., creator) can edit a private workflow.
Workflows are edited with the Workflow Editor.
NOTE: You can only save changes to a workflow if it has not been published. If the workflow has already
been published, you must save the changes as a new workflow by clicking Save As. If you want to edit a
published workflow, you can delete all publications using the Delete this workflow’s publications task and
then edit and save the edited workflow.
To access the Workflow Editor:
1 Navigate to the User Home Page and click View All Workflows. If you are editing your own workflow,
you can also click Manage My Workflows.
2 From the list of workflows in the Workflow Explorer select the workflow you want to edit.
3 Click Edit this workflow from the Workflow Tasks list on the left side. The Save Workflow page will
be displayed.
NOTE: If you are editing the workflow of another user, you will need to add credentials for the
destinations. The workflow always uses the credentials of the owner at scan time. If you do not add
new credentials at the time you edit the workflow, you will be prompted to add them when the
workflow is published. See Add a New Credential on page 2-6 for information on adding credentials.
4 From the Save Workflow page you can modify the Workflow Name and Description, as well as the
Publication Options. You can also modify any of the editable workflow properties using the Change
buttons. There are Change buttons for each of the main workflow components.
a) Workflow Settings—click the Change Settings button to modify the settings on the Workflow
Settings page.
See Save Workflow on page 3-41 for additional information.
b) Document Attributes—click the Change Attributes button to modify the settings on the
Document Attributes page.
See Document Attributes on page 3-35 for additional information.
c) Document Name—click the Change Name button to modify the settings on the Document Name
and Type page.
See Document Name and Type on page 3-25 for additional information.
d) Document Destination and Formats—click the Change Destinations button to modify the
settings on the Document Destinations page, or the Change Formats button to modify the document
format settings on the Document Name and Type page.
and See Document Type on page 3-27 for additional information.
See Document Destinations on page 3-10
5 Click Save to overwrite the current workflow, if desired. If you have change the workflow name, the
name will also be overwritten. This option is only available if the current workflow has not already been
Editing a Workflow 3-7
Page 30

published and if you own the workflow. Otherwise, click Save As to create a new workflow based upon
the current workflow.
NOTE: If you click Save or Save as from this page, you will be returned to the Workflow Explorer (or
to the Publish Workflow page if you selected to have the workflow published), and you will have to
click Edit this workflow to edit the newly named workflow and make additional changes.
6 If you selected to publish the workflow, the Publish Workflow page will be displayed. See Chapter 5,
Publishing Workflows for more information on publishing workflows.
3-8 Distribution Workflows
Page 31

Deleting a Workflow
Only the owner of a workflow or an administrator can delete a workflow from the Workflow Explorer page.
NOTE: When a workflow is deleted, all publications of that workflow are also deleted.
To delete a workflow:
1 Navigate to the User Home Page and click Manage My Workflows.
2 Select the workflow to be deleted from the list of workflows in the Workflow Explorer.
3 Click Delete this workflow from the list of tasks in the left panel. A warning window will be displayed
asking if you are sure you want to delete the workflow.
4 To delete the workflow, click OK. The workflow will be removed from the list of workflows in the
Workflow Explorer. If you do not want to delete the workflow, click Cancel.
NOTE: Workflow publications will also be deleted.
Deleting a Workflow 3-9
Page 32

Document Destinations
The Document Destinations page is used to configure destinations for scanned documents. A destination is
the final location to which a document is scanned. One or more destinations must be specified when a
workflow is created.
To access the Document Destinations page:
1 Navigate to the User Home Page and click View All Workflows.
2 From the list of workflows in the Workflow Explorer select the workflow for which you want to change
document destinations.
3 Click Edit this workflow from the list of workflow tasks in the left panel.
4 From the Workflow Editor click Document Destinations in the left panel.
NOTE: The Document Destinations page is also accessed from the Add New > Distribution
Workflow... link.
The Document Destinations page lists all of the types of destinations that are enabled and can be configured.
Within each type, under the my locations or my addresses sub-heading, are listed the specific destinations
that the user who is logged in has configured. Under the other locations and other addresses sub-headings
are destinations configured by other users. Destinations configured by other users only appear if they are
used in the specific workflow being edited.
Adding/Removing Listed Destinations to/from a Workflow
To add a listed destination to the workflow, select the checkbox for the destination. To remove a destination
from the workflow, clear the checkbox for the destination.
Adding New Destinations
Destinations that are defined and entered into a workflow are kept, regardless of whether the workflow
changes are saved. They are not removed unless manually removed from the Document Destinations page.
This allows the destination to be selected during the definition of other workflows.
To add a new destination:
1 Find the destination type (for example, DocuShare, FTP, etc.) on the Document Destinations page and
click add locations. A window specific to the destination type will be displayed.
2 Enter the destination properties. See Destination Properties on page 3-16.
3 Click OK.
3-10 Distribution Workflows
Page 33

4 If credentials to access the destination are needed, an Account Settings page will be displayed. Add the
user name and password and click OK.
NOTE: When the Accounts Settings page is displayed, you may be prompted to enter your SMARTsend
computer credentials. You must use the same credentials you used to log in to SMARTsend. If you supply
different credentials, you may need to use your browser to delete the Temporary Internet Files on your
workstation before you can proceed. For example, using Internet Explorer you would choose the following
options to delete your Temporary Internet Files: Tools > Internet Options > General > Delete Files > OK.
Document Destinations 3-11
Page 34

Editing Destinations
Destination properties other than the destination name can be changed.
To edit the properties of a destination:
1 From the Document Destinations page click the name of the destination to be changed. The properties
of the destination are displayed.
2 Edit the properties as appropriate. See Destination Properties on page 3-16 for information specific to
the destination. Editing a destination will cause it to be automatically added to the workflow. Uncheck
the checkbox beside the destination if you want to remove it from the workflow.
3 Click OK.
Deleting Destinations
Only destinations added by the user and listed under my locations or my addresses can be deleted.
To remove a single destination:
1 From the Document Destinations page find the destination to be deleted.
2 Without further warning the destination will no longer be available when defining future workflows, so
be sure you want to delete the destination before clicking remove. Click remove to remove the
destination.
NOTE: Workflows that already use the destination will not be affected. For those workflows, the
destination will be displayed beneath the other locations heading the next time destinations are edited.
To remove all destinations of a particular type:
1 From the Document Destinations page find the destination type.
2 Without further warning all destinations will no longer be available when defining new workflows, so
be sure you want to delete the destinations before clicking remove all locations or remove all
addresses. Click remove all locations or remove all addresses to remove the destinations.
NOTE: Workflows that already use the destinations will not be affected. For those workflows, the
destinations will be displayed beneath the other locations heading the next time destinations are edited.
3-12 Distribution Workflows
Page 35

Managing Destination Credentials
Scanning credentials are needed for all scanning destinations that require credentials for storing and filing
scan documents, e.g., DocuShare, Domino, Microsoft Exchange, FTP, NetWare Folder, Network Folder, or
Microsoft SharePoint. You will be prompted to add credentials for new destinations when you add a new
workflow, but you may also add credentials for new destinations before adding a workflow using the Add a
New Credential link on the User Home Page.
TIP: For DocuShare destinations, enter credentials for the DocuShare server rather than an individual
collection whenever possible. This can make it easier to locate collections when browsing, and may eliminate
the need to add credentials for individual collections. When entering credentials for the DocuShare server,
please confirm that you are able to log in to the DocuShare server using the URL that you will enter into
SMARTsend. You can do this by appending "Login" to the URL (for example, http://
www.docushare.companyx.com/dsweb/Login). Please note that "Login" is case sensitive.
To add new credentials:
1 Navigate to the User Home Page and click Add a New Credential. The Account Settings page will be
displayed.
2 Select the destination type from the Account Type drop-down list. The number and names of the other
edit boxes will change based upon the type of destination selected.
3 Complete the other edit boxes for the destination.
4 Click OK.
NOTE: You may be prompted to enter your SMARTsend computer credentials after clicking Add a New
Credential. You must use the same credentials you used to log in to SMARTsend. If you supply different
credentials, you may need to use your browser to delete the Temporary Internet Files on your workstation
before you can proceed. For example, using Internet Explorer you would choose the following options to
delete your Temporary Internet Files: Tools > Internet Options > General > Delete Files > OK.
The credentials you have added will now be a "starting point" when creating a destination for this account.
When credentials on an existing destination have changed, the new credentials must be reflected on the
SMARTsend computer or the workflow scanning job will fail.
NOTE: When adding a destination to a SMARTsend workflow, the user credentials that are entered for
the destination (e.g. DocuShare, SharePoint Portal Server 2003) must have written permission on the
destination server. If the credentials have only read permission, the user will be able to add the destination
to a SMARTsend workflow. However, the workflow publication will fail to execute because the user does
not have permissions to upload a document to the destination server.
To change the credentials for an existing destination:
1 Navigate to the User Home Page and click Manage My Credentials. A list of all destinations with
credentials is displayed.
2 Select the destination credential to be changed.
3 From the Credentials Tasks region on the left, click Edit this credential. The Account Settings page is
displayed.
4 Edit the credential properties as appropriate.
Document Destinations 3-13
Page 36

5 Click OK.
NOTE: You may be prompted to enter your SMARTsend computer credentials after clicking Edit this
credential. You must use the same credentials you used to log in to SMARTsend. If you supply different
credentials, you may need to use your browser to delete the Temporary Internet Files on your workstation
before you can proceed. For example, using Internet Explorer you would choose the following options to
delete your Temporary Internet Files: Tools > Internet Options > General > Delete Files > OK.
3-14 Distribution Workflows
Page 37

To delete an existing credential for a destination:
1 Navigate to the User Home Page and click Manage My Credentials. A list of all destinations with
credentials is displayed.
2 Select the destination credential to be deleted.
3 From the Credentials Tasks region on the left click Delete this credential. A window will be displayed
asking for confirmation.
4 Click OK.
TIP: For DocuShare destinations, enter credentials for the DocuShare server rather than an individual
collection whenever possible. This can make it easier to locate collections when browsing, and may eliminate
the need to add credentials for individual collections.
Document Destinations 3-15
Page 38

Destination Properties
This section identifies the types of document destinations supported and the addressing requirements for
each.
See Adding New Destinations on page 3-10 for additional information.
Destination Naming and Behavior
There is a limit of 64 alphanumeric characters (including underscores and dashes) for destination names.
The name is used to identify destinations at publication time and will appear on PaperWare cover sheets
(Professional Edition feature) and on confirmation pages.
E-mail Recipient
Define e-mail recipient properties by entering the appropriate information for recipients, copy (Cc:), and
blind copy (Bcc:) recipients. Separate the e-mail addresses with a semicolon, for example:
recipient1@comp.com;recipient2@company.com
You may enter partial names and click Check name(s) to search for recipient names. In order for the Check
Name(s) feature to work, your administrator must configure the SMARTsend LDAP Property Mappings for
your integrated address book. A maximum of 50 names will be displayed when names are checked. If more
than 50 names are returned, refine the search by adding more characters.
There is no limit to the number of e-mail addresses you can add. However, mail servers impose size
limitations for file attachments. Scan-to-e-mail jobs that exceed the size limitation will fail.
Select the type of encoding used to send e-mail attachments over the Internet. Both UUEncode and
Base64 are standards for encoding binary data as text. UUEncode uses some characters that are not
compatible with Extended Binary Coded Decimal Interchange Code (EBCDIC), a character set used
mostly in Europe. Internet mail messages use Base64 or MIME (Multipurpose Internet Mail
Extensions) encoding. Select Base64 for greater compatibility with European systems.
Select E-mail to the submitter of this workflow if you want to additionally e-mail the scanned
document to the submitter automatically. The submitter is the person who scans the document. When
device scan templates are used, this option only works on Xerox Multifunction Devices with
authentication enabled.
Select Send URL link to document (no document attached) if you only want to send a link. No file is
attached or sent to recipients. The link will only be sent if other destinations in the workflow are URLaddressable. Sending a link instead of an actual file attachment is useful for e-mail systems that have
memory restrictions for handling large documents. Links to multiple repositories appear in the e-mail if
scanning to all destinations is configured.
NOTE: You must have at least one other destination defined in the workflow that matches the format
that has been selected for your e-mail recipient. If not, you will get an attached document and no
URLs.
Remote Printer
Only Text, Multi-Page TIFF, PDF, Microsoft Word, Excel, and PowerPoint format files can be printed using
this feature.
Select the printer from the drop-down list. These are printers that have drivers set up on the
SMARTsend application computer. If no printers are shown, contact an administrator to configure
printers for the application.
3-16 Distribution Workflows
Page 39

Enter the number of copies to print. The maximum number of copies you can print will vary based on
the selected remote printer.
NOTE: If you experience problems when trying to print a Microsoft Word, Excel or PowerPoint document
to a remote printer, contact your administrator to ensure that Microsoft Office is installed and properly
configured on the SMARTsend computer.
Documentum (Standard or Professional Edition feature)
The Documentum service is an optional component that can be purchased from Xerox and added as a
SMARTsend destination. Documentum version 5.2 is currently supported by SMARTsend.
Enter a Destination Name to identify the workflow.
Select a Starting Point from the drop-down list. The default starting point is defined by your
Documentum credentials. If your credentials provide additional access levels, the drop-down list may
include multiple Starting Points. This selection will automatically populate the Cabinet name and
Folder name fields. Otherwise, you may leave the Starting Point blank and enter the Cabinet name and
Folder name manually.
Enter the name of the Documentum Docbase that will be used as the repository for filing scanned
documents.
The Documentum Cabinet name and Folder name define the filing location that the workflow will use.
A cabinet is the highest level component for organizing objects in Documentum. Folders, documents,
and other objects are created and stored within Documentum cabinets. If you would like to select a
folder that branches off from an existing cabinet, you may click Expand to view and select additional
folders. You may need to add a user name and password for the cabinet, if the required Documentum
credentials have not been configured within SMARTsend. A Cabinet name is required. Adding an
additional Folder name is optional.
File overwriting: Files with the same name are not overwritten.
DocuShare
DocuShare (version 3.1 and 4.0) is a supported document destination.
Enter a Destination Name to identify the workflow.
Select a Starting Point from the drop-down list. The default starting point is defined by your DocuShare
credentials. If your credentials provide additional access levels, the drop-down list may include multiple
Starting Points. This selection will automatically populate the DocuShare Collection URL. Otherwise,
you may leave the Starting Point blank and enter the Collection URL manually.
Enter the DocuShare Collection URL for the destination. If the destination branches off from a starting
point specified above, then you may click Expand to expand the starting point and then select the
branch for the destination.
Example
http://<server>/view/collection-12345
You may need to add a user name and password for the DocuShare collection, if the required DocuShare
credentials have not been configured within SMARTsend.
page 3-13 for more information.
See Managing Destination Credentials on
Document Destinations 3-17
Page 40

Custom Object Name: Custom objects are optional. If needed, enter a name to define a custom object
for a DocuShare (version 3.1 and higher) destination.
See Appendix C: Specifying a Custom Object in a
SMARTsend Workflow on page 3-47 for additional information.
NOTE: The custom object must be created in DocuShare before using the SMARTsend workflow that
references it. Otherwise, workflow execution will fail.
File overwriting: Files with the same name are not overwritten.
Domino (Standard or Professional Edition feature)
Domino (version 5.x or 6.0) is a supported document destination.
Enter a Destination Name to identify the workflow.
Select a Starting Point from the drop-down list. The default starting point is defined by your Domino
credentials. If your credentials provide additional access levels, the drop-down list may include multiple
Starting Points. This selection will automatically populate the Domino server database URL. Otherwise,
you may leave the Starting Point blank and enter the database name manually.
Enter the URL for the Domino server database. A user name and password are required.
Example
http://ff/doclib.nsf
Enter the name of the form.
File overwriting: Files with the same name are not overwritten.
Domino.doc (Standard or Professional Edition feature)
Domino.doc (version 3.1) is a supported document destination.
Enter a Destination Name to identify the workflow.
Select a Starting Point from the drop-down list. The default starting point is defined by your
Domino.doc credentials. If your credentials provide additional access levels, the drop-down list may
include multiple Starting Points. This selection will automatically populate the Domin.doc library URL,
Cabinet title, and Binder title. Otherwise, you may leave the Starting Point blank and enter the
information manually.
Enter the URL of a Domino.Doc library (DDocLIBRARY) for the destination. A user name and
password are required.
Example
http://ff/domdoc/dominodoclib.nsf
Enter a Cabinet (DDocCabinet) title.
Enter a Binder (DDocBinder) title.
Specify a unique identifier (DDocID) in Upload Document Title for the output document.
Enter the Domino.doc Profile name. This is the Interchange Document Profile (IDP) that defines the
content of the document, such as name, author, etc. It is part of Domino's Document Interchange
Architecture.
Add any check-in Comments for the document.
File overwriting: Files with the same name are not overwritten.
3-18 Distribution Workflows
Page 41

Hummingbird (Standard or Professional Edition feature)
The Hummingbird service is an optional component that can be purchased from Xerox and added as a
SMARTsend destination. Hummingbird version 5.1.0.5 is currently supported by SMARTsend.
Enter a Destination Name to identify the workflow.
Select a Starting Point from the drop-down list. The default starting point is defined by your
Hummingbird credentials. If your credentials provide additional access levels, the drop-down list may
include multiple Starting Points. This selection will automatically populate the Library Name and
Folder Name fields. Otherwise, you may leave the Starting Point blank and enter the Library Name and
Folder Name manually.
Enter the Library Name that will be used as the repository for filing scanned documents.
Enter the Folder Name that the workflow will use as the document filing location. If the destination
folder branches off from an existing folder, you may click Expand to expand and select a new folder. A
user name and password are required.
Publish (Yes/No): Choose Yes if you want to publish the document. This option will designate the
resulting scanned document as a published version that has been released to the public. A published
document is typically treated as a read-only document.
File overwriting: Files with the same name are not overwritten.
Interwoven WorkSite (Standard or Professional Edition feature)
The Interwoven service is an optional component that can be purchased from Xerox and added as a
SMARTsend destination. Interwoven WorkSite version 8 is currently supported by SMARTsend.
Enter a Destination Name to identify the workflow.
Select a Starting Point from the drop-down list. The default starting point is defined by your Interwoven
credentials. If your credentials provide additional access levels, the drop-down list may include multiple
Starting Points. This selection will automatically populate the Server Name and Database fields.
Otherwise, you may leave the Starting Point blank and enter the Server Name and Database manually.
Enter the Server name that is hosting the WorkSite database.
Enter the Database name that will be used as the repository for filing scanned documents.
Displays the Folder path that the workflow will use as the document filing location. Click Expand and
select a folder. A user name and password are required.
Publish (Private/Public/View): The Publish options determine whether the scanned document will be
accessible to other users when it is stored in the Interwoven database.
Public—all users have read and write access to the document.
Private—read and write access is restricted to the document/workflow owner.
View—all users have read access to the document. The document/workflow owner has read and
write access.
Checkin Comments: Add any check-in Comments for the document.
Document Type: This option defines the type of document being stored in the database. This selection
determines the metadata schema that is applied to the document, which often varies among applications
and different document types. Keep in mind that the list of available document types can be modified by
the Interwoven WorkSite administrator. Please contact your administrator if your preferred document
type is not available in the list.
Document Destinations 3-19
Page 42

File overwriting: Files with the same name are not overwritten.)
NOTE: Free-form text entry of attributes (metadata) for custom fields is not supported for Interwoven
WorkSite destinations (optional component). Metadata values for custom fields must match the
predefined set of values defined by the WorkSite administrator.
LiveLink (Standard or Professional Edition feature)
The LiveLink service is an optional component that can be purchased from Xerox and added as a
SMARTsend destination. LiveLink version 9.5.0 is currently supported by SMARTsend.
Enter a Destination Name to identify the workflow.
Select a Starting Point from the drop-down list. The default starting point is defined by your LiveLink
credentials. If your credentials provide additional access levels, the drop-down list may include multiple
Starting Points. This selection will automatically populate the Server and Folder fields. Otherwise, you
may leave the Starting Point blank and enter the Server and Folder manually.
Enter the Server that is hosting the LiveLink application.
Click Expand to browse for the Folder that the workflow will use as the document filing location. A
user name and password are required.
Category: Entering a Category is optional. A Category defines custom metadata that will be used when
mapping metadata using document attribute profiles. If needed, click Expand to select a predefined
LiveLink Category to apply to the document.
SMARTsend Workflow on page 3-48 for additional information.
See Appendix D: Specifying a LiveLink Category in a
NOTE: The Category must be created in LiveLink before using the SMARTsend workflow that
references it. Otherwise, workflow execution will fail. Also, if a type mismatch is detected for a custom
LiveLink document attribute field defined in a “Category”, the error will be ignored, the value will be
skipped, and the application will continue the upload. For example, if you define a category field of
type ‘Integer’, yet provide a value of ‘NotAnInt’ at the device, the document will be uploaded but the
category field will be empty. The confirmation report will report that the job was successful as well.
File overwriting: Files with the same name are not overwritten.
3-20 Distribution Workflows
Page 43

Microsoft Exchange 2000 Web Folder (Standard or Professional Edition feature)
Microsoft Exchange 2000 Web Folder is a supported document destination.
Enter a Destination Name to identify the workflow.
Select a Starting Point from the drop-down list. The default starting point is defined by your Exchange
2000 credentials. If your credentials provide additional access levels, the drop-down list may include
multiple Starting Points. This selection will automatically populate the URL field. Otherwise, you may
leave the Starting Point blank and enter the URL manually.
Enter or select the URL of the Microsoft Exchange web folder. If the new destination branches off from
an existing destination, you may click Expand to expand the location chosen as the starting point and
select the new destination. A user name and password are required.
Example
\\organization\publicfolders\testfolder\docs
File overwriting: Files with the same name are overwritten. It is recommended that a suffix be
appended to the file name. See
Document Name and Type on page 3-25.
FTP
FTP is a supported document destination.
Enter a Destination Name to identify the workflow.
Select a Starting Point from the drop-down list. The default starting point is defined by your FTP
credentials. If your credentials provide additional access levels, the drop-down list may include multiple
Starting Points. This selection will automatically populate the FTP Host Name and Folder Path.
Otherwise, you may leave the Starting Point blank and enter the Host Name and Folder Path manually.
Enter the FTP host name for the destination. A fully qualified name (server name and domain name) or
IP (Internet Protocol) address of the destination file server is required.
Example
ftp:companyserver.com or 10.14.121.32
The port defaults to the standard port 21. If port 21 is not available, specify a port to use as part of the
host name, for example, ftp:companyserver.com:99.
Enter the folder path for the Remote FTP directory in which the document is stored. A user name and
password are required. However, anonymous FTP is permitted. The user name must be "anonymous"
and the password should be left blank.
Example
/ftp-public/mydocuments
File overwriting: Files with the same name are overwritten. It is recommended that a suffix be
appended to the file name. See
Advanced Properties: This feature provides the capability to export and customize device job logs. It is
Document Name and Type on page 3-25.
available when Job Log Export Support is enabled for the SMARTsend FTP service, and it is intended
for use by advanced users and system integrators.
See Appendix A - Job Log Export Support on page
4-43 of the SMARTsend Installation and Administration Guide for additional information.
NOTE: When scanning to a secure FTP site, the "Output Documentation" links in job confirmation e-
mails will not work unless the password is also included with the URL, e.g., ftp://user:password@host/
path/file or ftp://anonymous@host/path/file.
Document Destinations 3-21
Page 44

NetWare (Standard or Professional Edition feature)
NetWare is a supported document destination.
Enter a Destination Name to identify the workflow.
Select a Starting Point from the drop-down list. The default starting point is defined by your NetWare
credentials. If your credentials provide additional access levels, the drop-down list may include multiple
Starting Points. This selection will automatically populate the Folder Path field. Otherwise, you may
leave the Starting Point blank and enter the Folder Path manually.
Enter the Folder Path for the destination. If the new destination branches off from an existing
destination, you may click Expand to expand the location chosen as the starting point and select the
new destination.
Example
\\server-1\scan\docs
A user name and password are also required. Common name, context, and tree information are required.
A valid NetWare user name takes the following form:
.cn=[common name].ou=[organizational unit].o=[organization].c=[context].t=[tree]
Example
.cn=myname.ou=dsp.o=mycompany.c=us.t=us123sales
File overwriting: Files with the same name are overwritten. It is recommended that a suffix be
appended to the file name. See
Document Name and Type on page 3-25.
Network Folder
Network folders are supported document destinations.
Enter a Destination Name to identify the workflow.
Select a Starting Point from the drop-down list. The default starting point is defined by your Network
credentials. If your credentials provide additional access levels, the drop-down list may include multiple
Starting Points. This selection will automatically populate the Folder Path field. Otherwise, you may
leave the Starting Point blank and enter the Folder Path manually.
Enter the entire path to the network folder. If the new destination branches off from an existing
destination, you may click Expand to expand the location chosen as the starting point and select the
new destination. A user name and password are required.
Example
\\server-1\scan\docs
File overwriting: Files with the same name are overwritten. It is recommended that a suffix be
appended to the file name. See
Advanced Properties: This feature provides the capability to export and customize SMARTsend job
logs. It is available when Job Log Export Support is enabled for the SMARTsend Network Folder
service, and it is intended for use by advanced users and system integrators.
Export Support on page 4-43 of the SMARTsend Installation and Configuration Guide for additional
information.
Document Name and Type on page 3-25.
See Appendix A - Job Log
3-22 Distribution Workflows
Page 45

Scan to URL Service (Standard or Professional Edition feature)
Scan to URL service is a supported destination.
Enter a Destination Name to identify the workflow.
Select a Starting Point from the drop-down list. The default starting point is defined by your Scan to
URL credentials. If your credentials provide additional access levels, the drop-down list may include
multiple Starting Points. This selection will automatically populate the URL Path field. Otherwise, you
may leave the Starting Point blank and enter the URL Path manually.
Enter the URL Path for the destination. If the new destination branches off from an existing destination,
you may click Expand to expand the location chosen as the starting point and select the new
destination.
File overwriting: Files with the same name are overwritten. It is recommended that a suffix be
appended to the name. See
Document Name and Type on page 3-25.
Microsoft SharePoint Portal Server 2001 (Standard or Professional Edition feature)
Microsoft SharePoint Portal Server 2001 is a supported destination.
Enter a Destination Name to identify the workflow.
Select a Starting Point from the drop-down list. The default starting point is defined by your SharePoint
Portal Server 2001 credentials. If your credentials provide additional access levels, the drop-down list
may include multiple Starting Points. This selection will automatically populate the SharePoint Folder
URL field. Otherwise, you may leave the Starting Point blank and enter the SharePoint Folder URL
manually.
Enter the URL of the SharePoint workspace folder path. If the new destination branches off from an
existing destination, you may click Expand to expand the location chosen as the starting point and
select the new destination.
Example
http://dsp1/workspace/documents/dm
Accept the default or enter a new SharePoint document profile. The SharePoint document profile
contains information associated with a SharePoint Portal folder, for example, Author Name or version
fields. The application queries the SharePoint Portal to determine the Profile fields that are associated
with the destination folder.
The check-in option is available when the destination is a SharePoint Portal. Select Ye s if you want to
publish the document to SharePoint. This makes the document available to others in SharePoint.
Enter any check-in comments.
File overwriting: Files with the same name are not overwritten.
Microsoft SharePoint Portal Server 2003
Microsoft SharePoint Portal Server 2003 is a supported destination.
Enter a Destination Name to identify the workflow.
Select a Starting Point from the drop-down list. The default starting point is defined by your SharePoint
Portal Server 2003 credentials. If your credentials provide additional access levels, the drop-down list
may include multiple Starting Points. This selection will automatically populate the SharePoint Folder
URL field. Otherwise, you may leave the Starting Point blank and enter the SharePoint Folder URL
manually.
Document Destinations 3-23
Page 46

Enter the URL of the SharePoint workspace folder path. If the new destination branches off from an
existing destination, you may click Expand to expand the location chosen as the starting point and
select the new destination.
The check-in option is available when the destination is a SharePoint Portal. Select Yes if you want to
publish the document to SharePoint. This makes the document available to others in SharePoint.
Enter any check-in comments.
File overwriting: Files with the same name are not overwritten.
3-24 Distribution Workflows
Page 47

Document Name and Type
The Document Name and Type page is used to configure the file name, type, and format of the scanned
documents created with SMARTsend.
To access the Document Name and Type page:
1 Navigate to the User Home Page and click View All Workflows.
2 From the list of workflows in the Workflow Explorer select the workflow for which you want to change
the document name or format.
3 Click Edit this workflow from the list of workflow tasks in the left panel.
4 From the Workflow Editor click Document Name and Type from the left panel.
NOTE: The Document Name and Type page is also accessed from the Add New Distribution Workflow
link when a workflow is created.
Document Name
The Document Name options define the output file name of file to be generated. Identification information
is applied after the document is scanned. Determine the constraints (such as the characters allowed and the
file overwrite policy) of your filing destinations before naming the output document.
The ability to change the output file name (Document Name) at scan time is subject to the following
conditions:
When using device scan templates on Xerox WorkCentre Pro 232/238/245/255/265/275 or newer
devices, you will be unable to change the Document Name at scan time unless the Name Provided at
Scan Source option is selected in the workflow. This constraint does not apply to older devices which
will allow you to override the Document Name at scan time, regardless of the naming option specified
in the workflow.
When using PaperWare templates (Professional Edition feature) containing editable Document
Attributes on Xerox WorkCentre Pro 232/238/245/255/265/275 or newer devices, you will always be
permitted to modify the Document Name at the device user interface. However, the document naming
option that will be used to distribute the document will be the one specified in the workflow used to
publish the template.
The My_E-mail scan template will always use a Document Name provided at the scan source and a user
will be able to modify it at scan time at all supported devices.
Name
The Name specifies the name of the output file. The naming options are as follows:
Name: Enter a file name for the output document. The name you enter can contain alphanumeric
characters, dashes, and underscores. Spaces are not allowed. This name will be the base file name of the
output file. If a name suffix is specified, the resulting output file name is the base file name entered in
this edit box, appended by the suffix (either date and time, a unique ID, or nothing at all) and file
extension. That is, the resulting output file name will be in the following form:
Base File Name + Suffix + File Extension
If no suffix is specified, the resulting output file name will be in the following form:
Base File Name + File Extension
Document Name and Type 3-25
Page 48

If the base file name is left blank, the resulting output file name will consist of a unique ID or date and
time identifier, plus the extension. However, if None is selected for the Name Suffix, you must enter a
base file name to identify the document.
Auto Generate a Name (8 characters): Have SMARTsend auto-generate an 8-character name. In this
case, no suffix can be specified.
NOTE: Selecting this option with the Single-Page TIFF or JFIF type (see Document Type on page
3-27) will result in file names longer than 8 characters because page identifiers (beginning with -1 and
incrementing) will be appended to the name to differentiate the pages.
Name Provided at Scan Source (default): Have a file name entered at the scan source. If the scan
source is a Xerox Multifunction Device, the name will be entered at the device; if the scan source is an
Internet Fax device, the name will be the attachment name generated by the device. The name will be
used as the base file name of the output file. If a name suffix is specified, the resulting output file name
is the base file name, appended by the suffix (either date and time, a unique ID, or nothing at all) and the
file extension. That is, the resulting output file name will be in the following form:
Base File Name + Suffix + File Extension
If no suffix is specified, the resulting output file name will be in the following form:
Base File Name + File Extension
If no name is specified at the scan source, a default name as generated by the device will be used.
NOTE: When selecting a name, use one that will work with the destinations to which you are filing. For
example, if your destination will only allow 8 characters, only use 8 characters; otherwise, filing will fail.
Name Suffix
When a base file name is specified or the Name Provided at Scan Source option is selected, a suffix may
be specified to be appended to the end of the base file name. By using suffixes, unique file names can be
assured. This is especially important for document destinations that overwrite files with the same name.
Select one of the following suffixes:
None.
Date and Time (default): The date and time (year, month, day, hour, minute, second) when the file is
processed will be appended to the base file name. For example, if a base file name of myFile and a file
type of PDF are specified and a document is scanned on August 25, 2004, at 12:24:06, the resulting
output file name will be:
myFile20040825122406.pdf
Choose this setting when scan files are created or modified often and each file must be kept.
Unique ID: automatically generates and appends to the base file name a unique identification number
of 32 characters. Choose this setting when simple tracking of scan files can be accomplished by random
ID numbers.
NOTE: A suffix cannot be used when Auto Generate a Name (8 characters) is selected for file naming.
3-26 Distribution Workflows
Page 49

Document Type
The Document Type options specify the type and format of the distribution output files. By default,
SMARTsend will assign a single common document type to be used for destinations in the workflow.
However, you can also specify different document types for each destination in the workflow. Select one of
the following options to configure the Document Type settings for the workflow:
Use the same Document or Print Type for all destinations
Enables you to select and configure a single document type/format and print type (when applicable) for the
workflow destination(s).
Use a different Document or Print Type for each destination
Enables you to select and configure different document types/formats and print types (when applicable) for
each destination type specified in the workflow.
Document Types Supported by Smartsend
PDF, Text Searchable (*.pdf)—Professional Edition feature; available only if optical character
recognition (OCR) is enabled.
PDF, Image Only (*.pdf)
JFIF (*.jpg)
Single-Page TIFF (*.tif)
Multi-Page TIFF (*.tif)
Original Document Type (file format determined by device at scan time)
Other (Professional Edition feature; available only if OCR is enabled). The Other option includes OCR
file formats. See
Table 3-1 on page 3-28 for a complete list of OCR file formats.
Each Document Type has an associated file format. When a type is selected from the drop-down list, the
details for that file type are displayed below the selection. The format and details can be changed for certain
Document Types. When this is the case, simply click the Properties button and select a format from the list.
Print Type
Print Type is only available when a Remote Printer destination is selected in a workflow. Remote Printer
destinations can be configured with the following properties:
Original Image
Prints a scanned image that is visually faithful to the original document image.
Other (Professional Edition Feature)
Enables you to choose and configure a supported OCR format. The format selections available may vary
based on the capabilities of the Remote Printer.
See Other (Professional Edition Feature) on page 3-33 and
OCR Properties (Professional Edition Feature) on page 3-34 for additional information.
NOTE: JFIF and Single-Page TIFF are supported for file distribution to FTP, Network Folder, NetWare
Folder, and E-mail destinations only. These file types will be filtered from the list of available types if other
destinations are selected in combination with the FTP, Network Folder, Netware Folder, and E-mail
destinations.
Document Name and Type 3-27
Page 50

Document Format and Properties
Properties further define the format and certain characteristics of the output file. The format options can be
accessed by clicking the Properties button in the Document Type region of the Document Name and Type
page. The format selections vary based on the type of output file selected. The document types and formats
supported by SMARTsend, along with the considerations for each format, are listed in the following table:
Document Type Output File Formats Considerations
PDF, Image Only PDF, Image Only
PDF, Image Only - Preserve Image from Scan
Source
Supported on all major platforms
Can be filed to all SMARTsend
repositories
Many compression options
Excellent balance of portability,
compatibility, and compression
options
Some imaging tools may not
support PDF
PDF, Text Searchable
(Professional Edition
feature)
PDF with normal text
PDF with image substitutes
PDF with image on text
PDF with image on text - Preserve Page
Orientation
PDF with image on text - Preserve Image
from Scan Source
All of the above, plus support for
OCR
Document can be searched for
text
Text can be copied from
document
Requires extra processing
Information loss possible during
processing
JFIF JPEG Each page stored as single
document
Widely supported image format
Excellent for color images
JPEG is the only supported
compression
May exhibit "ringing" artifacts in
text documents
Some repositories do not support
single-page files
No OCR support
Single-page TIFF Single-page TIFF 6.0
Single-page TIFF 6.0 TTN2
Each page stored as single
document
Widely supported image format
Moderate range of compression
options
Some repositories do not support
this format
No OCR support
Multi-page TIFF Multi-page TIFF 6.0
Multi-page TIFF 6.0 TTN2
Multi-page TIFF - Preserve Image from Scan
Source
Each page stored as single
document
Widely supported image format
Moderate range of compression
options
Can be filed to all SMARTsend
repositories
No OCR support
3-28 Distribution Workflows
Table 3-1: Supported Document Types and Formats
Page 51

Document Type Output File Formats Considerations
Original Document Type File format is determined at scan time. Some
devices will enable you to choose a format at
the device user interface, while other devices
may be constrained to a specific format.
Other - OCR formats
(Professional Edition
feature)
Microsoft Word 97, 2000, 2002, 2003 (*.doc)
Text, standard (*.txt)
Microsoft Excel 97, 2000, 2002, 2003 (.xls)
Microsoft PowerPoint 97 (*.rtf)
Microsoft Publisher 98 (*.rtf)
ASCII Text, formatted (*.txt)
ASCII Text, standard (*.txt)
ASCII Text, standardEx (*.txt)
Rich Text Format (*.rtf)
RTF Word 2000 (*.rtf)
RTF Word 6.0/95 (*.rtf)
RTF Word 97 (*.rtf)
Text, smart (*.txt)
Text, stripped (*.txt)
Text, plain (*.txt)
Text, comma delimited (*.csv)
Text, tab delimited (*.txt)
WordPad (*.rtf)
Table 3-1: Supported Document Types and Formats
PDF Files
Minimal information loss
No OCR support
File format determined at scan
time and may vary by device
Output file formats are created by
SMARTsend after scanned
documents have undergone OCR
processing
Requires extra processing time
Original image data is not
preserved (may include
embedded pictures)
Creates files that are editable in a
variety of popular software
applications.
PDF files preserve the page layouts, text, and images of documents. They are easily reproduced and can be
used in most environments, making PDF a universal format. A PDF file can be quite manageable because of
its small file size.
This section explains the PDF file options available to you.
PDF, Text Searchable (*.pdf) (Professional Edition feature)
The following PDF formats are searchable for text characters.
PDF with normal text contains text and images that match the original source document. Does not
provide control over output image compatibility and compression. Page orientation of output will be
automatically oriented so that text reads normally.
NOTE: High compression formats will not work with many older devices when printing scanned images.
PDF with image substitutes contains text that matches the original source document. The output will
display smaller, substitute images taken from the original source image, if OCR problems are
encountered. Substitute images are used in the following cases: words containing suspect characters in
the text, words not contained in the checking dictionary, words containing rejection symbols, and words
containing missing symbols. This does not provide control over output image compatibility and
compression. The page orientation of the output will be automatically oriented so that text reads
normally.
PDF with image on text contains one image for each page in the document, as well as text characters.
This does not provide control over output image compatibility and compression. The page orientation of
the output will be automatically oriented so that text reads normally. See
Table 3-2 on page 3-30.
Document Name and Type 3-29
Page 52

PDF with image on text - Preserve Page Orientation contains one image for each page in the
document, as well as text characters. This provides control over output image compatibility and
compression. The page orientation of the input documents will be preserved. See
Table 3-2 on page
3-30.
NOTE: If the input documents are not oriented in the standard orientation, or they are skewed
significantly, you may not be able to highlight text in the PDF output document. You will, however, still
be able to search the document.
PDF - Preserve Image from Scan Source preserves the original image data that the device sends to
SMARTsend. This setting provides minimal loss of image acuity, but it does not provide control over
output image compatibility and compression. The page orientation of the input documents will be
preserved.
Document Type Orientation of Input Documents Orientation of Output Documents
PDF with image on text
PDF - Preserve Page
Orientation
Table 3-2: How page orientation is affected by selected PDF option
PDF, Image Only (*.pdf)
The following PDF formats do not contain text characters, making the text unsearchable.
PDF, Image Only contains one image for each page in the document.
PDF - Preserve Image from Scan Source preserves the original image data that the device sends to
SMARTsend. This setting provides minimal loss of image acuity, but it does not provide any
compression options.
NOTE: High compression formats will not work with many older devices when printing scanned images.
PDF Image Optimization Settings
Several PDF image optimization settings can be configured within SMARTsend. These default settings can
be defined by the SMARTsend system administrator, and they can also be adjusted by each SMARTsend
user when workflows are published.
The following Image Optimization Settings are currently supported:
Emphasize Compatibility—use this option when compatibility with older versions of Acrobat Reader is
the most important consideration. This setting may result in larger file sizes. See
below for additional information.
PDF Compatibility Settings
Emphasize Compression—use this option when file size reduction is the most important consideration.
This format may not be supported by older versions of Acrobat Reader.
3-30 Distribution Workflows
Page 53

Custom—use this option to adjust all the Image Optimization settings manually.
NOTE: The compatibility and compression settings in the Document Type Properties dialog can only be
adjusted manually when the Custom option is selected.
PDF Compatibility Settings
The Compatibility Settings are available when the Image Optimization selection is set to Custom. These
settings alter the PDF format based on the following parameters:
Acrobat Reader 4 and older—maintains PDF compatibility with current and older Acrobat Reader
versions dating back to version 4.0. This setting optimizes compatibility but may result in larger file sizes.
Acrobat Reader 5 and newer—maintains PDF compatibility with more recent Acrobat Reader versions
dating back to version 5.0. This setting provides more file compression options.
Document Name and Type 3-31
Page 54

PDF Compression Settings
The Compression Settings are available when the Image Optimization is set to Custom. The settings alter the
PDF format based on the following parameters:
Use Mixed Raster Content—applies different compression techniques to different parts of scanned images.
This setting typically provides the best compression for business documents, including documents with
color line drawings. This setting is not recommended for color photographs.
Monochrome—provides a choice of CCITT Group 4, JBIG2 Huffman Encoded, or JBIG2 Arithmetic
Encoded compression options for monochrome images. Additional information is provided in the following
table:
Compression Type Considerations
CCITT Group 4 Lossless compression
Widely supported
Some document types may not compress significantly
JBIG2 Huffman Encoded Better compression than CCITT Group 4
Support is more limited
JBIG2 Arithmetic Encoded Best compression for monochrome images
Support is more limited compared to other options
Table 3-3: PDF Compression Settings
Contone—displays the compression settings that will be applied to color images. The Contone settings are
defined by the application. JPEG is the default, and JPEG/Flate is used when Mixed Raster Content is
selected.
JFIF/JPEG
JFIF (*.jpg) uses JPEG compression, which is a lossy compression file format (some data is lost or
eliminated). This is often the best format for photographs and graphics. The output will be one file for each
page or image that is scanned.
NOTE: JFIF/JPEG only works when processing color or grayscale images; binary or black and white
images cannot be converted to the JFIF/JPEG format.
TIFF Files
Tagged Image File Format (TIFF) files are highly flexible and platform-independent. They are used and
supported by many image processing applications. TIFF file sizes can be quite large but produce good print
quality for hard-copy documents.
Single-Page Tiff (*.tif)
Single-page TIFF files contain a single image or page. One image or page is contained in a file. Only FTP,
Network Folder, and E-mail destinations support the single-page TIFF format. If other destination types are
in the workflow, this format will not be available.
Multiple-Page Tiff (*.tif)
Multiple-page TIFF files contain more than one image or page. All images or pages are contained in one file.
The following formats are supported for TIFF:
Multi-page TIFF 6.0 (default)
3-32 Distribution Workflows
Page 55

Multi-page TIFF 6.0 (TTN2)
Multi-page TIFF - Preserve Image from Scan Source preserves the original image data that the device
sends to SMARTsend. This setting provides minimal loss of image acuity, but it does not provide any
compression options.
When color and grayscale images are received by SMARTsend, JPEG compression is used. When black and
white images are received, G4 compression (up to 4 gigabytes of raster data) is used.
Original Document Type
When this option is selected, the file format is determined at scan time and may vary based on the type of
device that is being used to scan the document. Some devices will enable you to choose a format at the
device user interface, while other devices may be constrained to a specific format.
Please consult the documentation provided with your Xerox Multifunction Device or Internet Fax device to
determine the supported file formats that are compatible with SMARTsend.
Other (Professional Edition Feature)
Other formats are supported and produced by optical character recognition (OCR). These may be used if you
want to output a file that can be read by a word processor.
Application
These output files are compatible with specific applications. For example, Rich Text Format (.rtf) files can
be read and edited in Microsoft Word, WordPad, and PowerPoint.
Microsoft Word 97, 2000, 2002, 2003 – document output (.doc) or rich text format (.rtf).
Microsoft Excel 97, 2000, 2002, 2003 – output format (.xls).
Microsoft PowerPoint 97 – rich text format (.rtf).
Microsoft Publisher 98 – rich text format (.rtf).
WordPad – rich text format (.rtf).
Text
Text files are usually small in size and can be edited by most text editor and word processing applications,
for example, Microsoft Notepad or Word. These files do not contain complex formatting.
The following file formats are available:
Table 3-4: Text File Format Options
Text, standard text with line breaks after each line. Tabs are used to position table content.
Text, smart text with line breaks after each line. Spaces are used to position margins and table text
content.
Text, stripped text with line breaks after each paragraph. Tabs are used to position table text content.
Text, plain text with line breaks after each line. Spaces and line breaks are used to position the left and
top margins. Tabs are used to position table text content.
Text, comma delimited comma-separated text. Text content is enclosed with quotes.
Text, tab delimited tab character-separated text. Text content is enclosed with quotes.
ASCII
ASCII files contain a special 94-character code that includes letters, digits, and punctuation or mathematical
symbols for English language documents. These files can be converted to text but cannot be edited directly.
Document Name and Type 3-33
Page 56

The following file formats are available:
Table 3-5: ASCII File Format Options
ASCII Text, formatted layout is retained with spaces. Text content is separated by quotes.
ASCII Text, standard quick text conversion and compatibility.
ASCII Text, StandardEx quick text conversion and compatibility. Line breaks after each line and zone.
OCR Properties (Professional Edition Feature)
The Professional Edition of SMARTsend enables documents to be scanned using OCR so that text files are
produced rather than image files. These properties may be set with the PDF, Text Searchable and the Other
output file types. Use the following features to specify the formats that use OCR:
OCR Optimization
Select how to process the scanned input:
Table 3-6: OCR Optimization Options
Optimize for Speed has the fastest processing time with standard OCR accuracy. This is the default
setting.
Balance Speed and Accuracy balances processing time and OCR accuracy.
Optimize for Accuracy takes the longest to process but has the best OCR accuracy.
The following settings help improve the accuracy of the OCR function. The source document is the
document that you are scanning.
Table 3-7: OCR Accuracy Options
Source Document Language Select the language of the source document.
Source Document Printed On Select the type of printer from which the source document was printed.
Source Document Layout Select to have the application auto-detect the source document columns, or select if
the source document is a single column.
3-34 Distribution Workflows
Page 57

Document Attributes
The Document Attributes page is used to add additional information to scan documents for filing and
managing documents in specific destinations. Document attributes, commonly called "metadata," are the
properties that describe the output document. They are stored with the document and help organize filing to
document destinations.
Fields for a particular workflow can be set using the Fields region. Alternatively, a profile can be used as a
shortcut to apply fields to a workflow.
To access the Document Attributes page:
1 Navigate to the User Home Page and click View All Workflows.
2 From the list of workflows in the Workflow Explorer select the workflow for which you want to change
document attributes.
3 Click Edit this workflow from the list of workflow tasks in the left panel.
4 From the Workflow Editor click Document Attributes from the left panel.
The Document Attributes page is also accessed by following the workflow creation wizard when a workflow
is created.
Document Attribute Profiles
Document profiles are sets of document attribute fields configured for reuse. Using a profile eliminates the
need to configure attribute properties for each workflow. Each field in the profile is associated or mapped to
a corresponding field for one or more destinations.
A document profile may include default or custom attribute properties and mappings that are common to a
specific workflow. Typically, document profiles are listed by workflow document destinations. For example,
the profile FTP only is a document profile for an FTP destination. The Basic document profile (containing
Title and Description fields) is installed with SMARTsend. If specific attributes are used often, then a
specialized profile should be customized and saved for these attributes.
For example, if Name and Version attributes are often needed, a profile can be created which groups these
attributes under a profile. A mapping is then made of these attributes to fields for one or more destinations.
For the DocuShare destination, the Name attribute in the profile can be mapped to the Title field on
DocuShare, and the Version attribute can be mapped to the Description field on DocuShare.
Specifying a Profile
To specify a profile for a workflow:
1 Navigate to the Document Attributes page for the workflow.
2 Select an existing document profile from the Use the Following Profile drop-down list.
Profile lists are filtered by destinations in the workflow. You will only see those profiles with mappings to
destinations in the current workflow.
Deleting a Profile
Users can only delete profiles that they own.
To delete a profile:
1 Navigate to the User Home Page.
Document Attributes 3-35
Page 58

2 Under Customization Options click Manage My Document Profiles.
3 Select the profile to be deleted from the list of document profiles.
4 Click Delete from the left panel.
Creating a New Profile
If the set of fields can be used again in another workflow, save them into a new profile.
To create a new profile:
1 Navigate to the Document Attributes page for a workflow.
2 From the Use the Following Profile drop-down list select the profile that most closely matches the
profile to be created.
3 Click Save as New Profile below the fields region.
4 On the Save as New Profile window enter a profile name and description which identify the profile.
5 Click OK.
6 Add and delete fields, and change field properties, as desired.
Editing a Profile
Unless a profile is associated with a workflow that has not yet been published, it is not possible to change the
profile without renaming it using Save as New Profile.
Document Attribute Fields
Document attribute fields are used to provide mappings for data to document destinations. For example, an
e-mail subject document attribute field may be used to map to the subject of an e-mail when a document is
scanned to an e-mail address. The field gives the user the opportunity to specify the e-mail subject.
To view or change the properties of a field, click Properties in the row in which the field is listed. Make
the changes in the Attribute Properties window and click OK.
To add a field, click Add Field at the bottom of the list of fields. Specify the properties in the Attribute
Properties window and click OK.
To delete a field, click Delete in the row in which the field is listed.
Attribute Properties
Field Name
A field name assigns a descriptive or meaningful name to a document attribute field. This field name will
appear at publication time, on cover sheets, and at scan time if Editable at the device is selected at
publication.
Choose a name that is intuitive and will prompt users to enter the desired information into the field,
especially if many users are going to be using publications that contain this field.
3-36 Distribution Workflows
Page 59

Default Values
Table 3-8: Default Value Options
No Default Value indicates that a default value is not provided for the field.
Single Default Value indicates that the value entered in the edit box will be used as the default value. Only one
default is sent to a Xerox Multifunction Device for device publications. This value can be
overwritten at the time the workflow is published if Non-Editable Field Value is not
selected for the field security.
Multiple Default Values enables multiple values when the workflow is published or on the cover sheet from which
the user can select a value. Enter a value and click Add. The value will appear in the list
box. Organize the values using the Move Up and Move Down buttons. Remove values from
the list using Remove or Remove All. The default is always the value at the top of the list.
Multiple defaults for PaperWare publications (Professional Edition feature) enable
corresponding checkboxes for selection on the PaperWare cover sheet.
Required Field
Fields are generally configured as required in order to capture critical information about the scanned
document. The information or attributes may be entered in advance when the workflow is created or
published, or it may be entered at scan time at the Xerox Multifunction Device or on the PaperWare cover
sheet (Professional Edition feature). The entry of attributes at scan time is subject to the following
conditions:
When using the Multiple Default Values option, you can also specify required document attributes at
scan time using the Editable at the Device or Select on PaperWare cover sheet options.
When a workflow with required fields that are Editable at the Device is published to any Xerox
WorkCentre Pro 232/238/245/255/265/275 or newer device, the scan will not initiate until a value has
been entered.
When published to an older Xerox device, workflow execution will fail.
Field Security
Field Security determines how information fields appear when being entered at the device and on the cover
sheet. Select how the value of the field appears:
Show Field Value displays the value in clear text on SMARTsend publish pages, on the PaperWare cover
sheet (Professional Edition feature), and at the Xerox Multifunction Device. Choose this setting when
the field does not contain sensitive information and it does not matter if others see the value.
Example: Arthur_M_Template
Mask User Input (****) will display the value with asterisks (*) on all SMARTsend pages, cover sheets,
and confirmation sheets. Choose this setting if confidential information is contained in the field.
Example: ********* (asterisks used to mask a social security number)
NOTE: Xerox WorkCentre Pro 232/238/245/255/265/275 or newer devices fully support masking
features. Older Xerox devices do not support masking features. In addition, masking is not available when
a workflow is published with Multiple Default Values.
Non-Editable Field Value will not allow the field to be edited outside of the Workflow Editor. The field
will not be shown from the Publication page or when scanning but will map values to the scanned
documents. A default value must be provided when this option is selected.
Document Attributes 3-37
Page 60

Example: Client ID for a client site.
NOTE: The field default value will be shown in the Fields region of the Document Attributes page when
this option is selected. Select this option for field values that will never change or for fields that require
high security.
Field Type
Field Type specifies the kind of field to use for input of field values when the workflow is published. The
field types that are available change as the number of default values changes. Choose a type that reflects the
kind of entry required by the values.
Table 3-9: Field Type Options
Text Box accepts entry of alphanumeric text values of up to 256 characters.
Multi-Line Text Box accepts entry of alphanumeric text values of any length.
E-mail Address accepts entry of an e-mail address format. The format is validated to determine that an e-mail
address was entered.
Drop Down List enables the selection of a value from a drop-down list.
Radio Button List enables the selection of a value from a radio button list.
List Box enables the selection of a value from a list box.
.
NOTE: Free-form text entry of attributes (metadata) for custom fields is not supported for Interwoven
WorkSite destinations (optional component for SMARTsend Standard or Professional Editions). Metadata
values for custom fields are restricted to the predefined set of values defined by the WorkSite
administrator.
Field ID (optional)
Field ID specifies the name of the XML file element when the document attribute fields are added to an
XML file. If a name is not specified, the XML file element will default to Field_0, Field_1, etc. Choose a
Field ID that reflects the kind of entries that will be written to an XML file.
3-38 Distribution Workflows
Page 61

Attribute Mapping
Attributes can be mapped to fields available at document destinations. All available fields supported by the
destinations in the workflow will be shown. Select the attributes you want the field to map to for the
destination. For example, for e-mail, Body and Reply To are available fields; for DocuShare, Title,
Description, Keywords and others are available. During scanning, the data fields that you select here will be
populated using the value(s) of the attributes. You cannot map more than one attribute to the same
destination field, but more than one destination field can be mapped to the same document attribute.
Example
A document attribute field named "Title" can be mapped to a MS SharePoint Folder field called "Title".
Alternatively, arbitrary document attribute fields can be defined in a workflow. Document attribute fields
can be defined in the workflow, without having to map them to a specific service parameter, and a value for
the field can still be entered at workflow creation time, publication time or at scan time.
If document attribute support has been enabled for the service, the fields (both mapped and unmapped) and
their values will be exported in the form of an XML file. Currently, the FTP, Netware Folder (Standard or
Professional Edition feature), Network Folder and Scan to URL (Standard or Professional Edition feature)
services support the export of document attribute fields in the form of an XML file.
Specifying Custom Document Attributes in a SMARTsend Workflow
This procedure illustrates how to create a SMARTsend workflow that stores a scanned document, with
document attribute fields, to an FTP destination:
To specify custom document attributes in a SMARTsend workflow:
1 From the SMARTsend User Home Page, click the Add New Distribution Workflow link.
2 On the Document Destinations page, click the add locations link under the FTP page element.
3 Type the properties for the FTP destination. Click OK.
4 Click Next. The Document Name and Type page opens.
5 Select the desired options for the Document Name and Document Type.
6 Click Next.
7 On the Document Attributes page, select the FTP Only document attribute profile.
8 Click Add Field. The Attribute Properties dialog opens, allowing you to create and define a document
attribute.
9 Choose the options for the document attribute:
a) Type a Field Name (for example, "Plex").
b) If you wish to set a Default Value or multiple values, choose an option and type the value(s) (for
example, "Duplex").
c) Select Required if this is a field the user must complete.
d) Select a Field Security option.
e) Select a Field Type.
10 Under Attribute Mapping, clear the Enabled checkbox.
11 Click OK.
12 To add another field, repeat steps 8 through 11.
Document Attributes 3-39
Page 62

13 On the Document Attributes page, click Save as New Profile to save the fields as a new profile for later
use in other workflows.
14 Continue programming the workflow.
Upon publishing and executing the workflow, values for the document attribute fields will be exported to the
FTP destination specified in the workflow.
NOTE: This requires that document attribute support for the FTP service be enabled by the
SMARTsend System Administrator.
The values for the custom document attribute fields may be used by system integrators for follow-on
processing of the scanned documents. For example, these values can be used to give information to a print
shop on the number of sets that should be made of the documents and the plex mode that should be used
when printing.
3-40 Distribution Workflows
Page 63

Save Workflow
The Save Workflow page is used to select the job confirmation preference for scan jobs and to specify the
access level for the workflow.
To access the Save Workflow page:
1 Navigate to the User Home Page and click View All Workflows.
2 From the list of workflows in the Workflow Explorer select the workflow for which you want to change
settings.
3 Click Edit this workflow from the list of workflow tasks in the left panel.
4 From the Workflow Editor click Work flow Sett ings from the left panel.
Job Confirmation
When a user performs a scan, typically some indication is needed that the job was successful or failed. Select
how the user will receive job confirmation upon completion of a job:
Table 3-10: Job Confirmation Options
No job confirmation provides no confirmation of job completion.
Workflow owner's e-mail enables an e-mail message to be sent to the owner of the workflow.
Workflow user's e-mail enables an e-mail message to be sent to the workflow submitter. This option is only
available when scanning at a device with authentication or when using a PaperWare
cover sheet (Professional Edition feature). If used on a Xerox Multifunction Device with
no authentication and no cover sheet, no job confirmation will be generated.
Printed confirmation enables a page to be printed at the Xerox Multifunction Device used for scanning. The
confirmation prints after the job is successfully sent to the destination or if an error
occurs. If sensitive information is included in the job, you may not want the confirmation
printed at a device where it may be easily viewed.
Workflow Access
Workflow access controls who can view, use, and change the workflow.
Public allows viewing, using, editing, and publishing by any SMARTsend user. Only owners can delete
a public workflow.
Private allows viewing, using, editing, and publishing only by the owner of the workflow. Only the
workflow owner or administrator can delete a private workflow. The content, such as attribute
properties, of a private workflow cannot be viewed by anyone except the owner. Private workflows
published using device scan templates require authentication at the device.
Save Workflow 3-41
Page 64

Workflow Summary
The Workflow Summary page is used to review workflow settings after you have edited or defined a
workflow. Before publishing, you can make modifications to the workflow using the links provided on the
left side of the page.
To access the Workflow Summary page:
1 Navigate to the User Home Page and click View All Workflows.
2 From the list of workflows in the Workflow Explorer select the workflow for which you want to review
settings.
3 Click Edit this workflow from the list of workflow tasks in the left panel.
Workflow Name and Description
Enter a new name and description for the workflow or modify the displayed information. The name should
be unique and something you will remember, as this name will appear in the Workflow Explorer and on
publications. When you are first adding a workflow, the default naming convention begins with Workflow1
and will increment that name for new workflows unless a different name is supplied.
Publication Options
Before you can scan, you must publish a workflow. Select how to publish the workflow:
Table 3-11: Publication Options
Publish workflow later enables you to publish the workflow at another time. Use this
setting if you are just creating a workflow for someone else and
that person will publish the workflow when needed.
Publish PaperWare cover sheet from workflow (Professional Edition feature) generates a PaperWare cover
sheet for the workflow. Use this option if you want to determine
destinations at scan time, if you want to scan using Internet Fax,
or if you have sensitive information that you do not want to be
viewed by other SMARTsend users.
Publish workflow to Xerox Multifunction Device allows you to create a new device scan template for the
workflow.
For more on publishing workflows, see Chapter 5, Publishing Workflows.
3-42 Distribution Workflows
Page 65

Appendix A: Sample Network Folder Workflow Creation
The following procedure covers the steps required to create a sample workflow that files to a network folder
destination.
1 Open a browser window.
2 Enter the following URL or address:
http://[computer name]/SMARTsend
where computer name is the name of the SMARTsend computer. Contact your SMARTsend
administrator if you are unsure of the computer name.
3 Press Enter.
4 You will be asked to enter your user name and password. Enter them and click OK.
5 A SMARTsend welcome screen will be displayed. Select Click here to enter SMARTsend.
6 The User Home Page will be displayed. Click Add a New Distribution Workflow under the
Workflows heading.
7 The destinations that have been used by you and other users for other workflows are listed under
headings designating destination types. Find the Network Folder heading.
8 Select the network folder destinations you want for the workflow.
a) If destinations you want to use are listed, check the checkboxes beside them.
b) If you need to add a network folder destination, click add locations. The Network Folder
Properties window will be displayed.
i Add a name for the destination.
ii Add the folder path, for example: \\myComputer\scans, where myComputer is the name of
the machine on which the folder is located, and scans is the name of a network sharing folder.
iii Click OK.
c) A Security Alert dialog may be displayed. Click Ye s to proceed.
d) You may be prompted to enter your SMARTsend computer credentials. Enter your user name and
password for the SMARTsend computer and click OK.
NOTE: You must use the same credentials you used to log in to SMARTsend. If you supply different
credentials, you may need to use your browser to delete the Temporary Internet Files on your
workstation before you can proceed. For example, using Internet Explorer you would choose the
following options to delete your Temporary Internet Files: Tools > Internet Options > General > Delete
Files > OK.
e) The Account Settings page is displayed. Enter your user name and password for the network folder,
add your password again in the Confirm Password edit box, and click OK.
f) On the Network Properties page click OK again.
g) The new destination should now be displayed on the Document Destinations page, and it should be
checked. If more network folder destinations need to be added, click add locations and repeat the
above steps for adding destinations.
Appendix A: Sample Network Folder Workflow Creation 3-43
Page 66

9 When all destinations have been added on the Document Destinations page, click Next >>.
10 The Document Name and Type page will be displayed. Specify the base name of the output file under
Document Identification. For this example enter a name such as myDocName.
11 Select Date and Time from the Name Suffix drop-down list. This will append the date and time to the
name specified above (myDocName).
12 Select a Document Type. For this example, select PDF, Image Only (*.pdf).
a) To change the format of the file, click the Properties button. For this example, click Properties.
The Document Type Properties page will be displayed. From the Format drop-down list select
PDF, Image Only.
b) Click OK.
13 Click Next >>.
14 The Document Attributes page will be displayed. Specify any document attribute fields that are needed.
For this example we will use the default Basic profile which contains Title and Description fields.
15 Click Next >>.
16 The Workflow Settings page is displayed.
17 Select a job confirmation option. For this example select Printed confirmation from the Job
Confirmation drop-down list.
18 Select the level of access for the workflow. For this example we will use the default Public access level.
19 Click Next >>.
20 The Save Workflow page is displayed. Specify a unique workflow name.
21 Select the type of Publication desired. For this example we will publish the workflow as a device scan
template. Select Publish workflow to Xerox Multifunction Device.
22 Review the workflow settings and change as required.
23 Click Finish.
24 The Publish Workflow to Xerox Multifunction Device page is displayed. Specify a unique publication
name.
25 Select an expiration time.
26 Select the devices to which the template will be published.
27 Enter document attribute values. If the values are to be specified at the device, select Editable at the
device.
28 Select a scan profile. Click Properties to adjust the scan settings as needed.
29 Click OK.
30 The template will be published. Click Return to Home Page at the bottom of the page to return to the
User Home Page.
3-44 Distribution Workflows
Page 67

Appendix B: Sample E-mail Workflow Creation
The following procedure covers the steps required to create a sample workflow that uses an e-mail recipient
as a destination.
1 Open a browser window.
2 Enter the following URL or address:
http://[computer name]/SMARTsend
where computer name is the name of the SMARTsend computer. Contact your SMARTsend
administrator if you are unsure of the computer name.
3 Press Enter.
4 You will be asked to enter your user name and password. Enter them and click OK.
5 A SMARTsend welcome screen will be displayed. Select Click here to enter SMARTsend.
6 The User Home Page will be displayed. Click Add New > Distribution Workflow... under the
Workflows heading.
7 The destinations that have been used by you and other users for other workflows are listed under
headings designating destination types. Find the E-mail Recipient heading.
8 Select the e-mail recipients you want for the workflow.
a) If recipients you want are listed, select the checkboxes beside them.
b) If you need to add a recipient, click add addresses. The E-mail Recipient Properties window will
be displayed.
i Add a name for the destination.
ii Add one or more e-mail addresses for the desired recipients (To:), copy recipients (Cc:), and
blind copy recipients (Bcc:). Separate multiple e-mail addresses with semicolons. If the
address verification feature has been configured by your administrator, you may click Check
name(s) to verify the addresses.
iii Select an attachment encoding format. The default Base64 for MIME encoding should be fine
in most cases.
iv Select Scan to My E-mail if you want the output file to be e-mailed to the scan submitter. This
option requires authentication at the scan device when used with device scan templates and
should only be selected if the device supports authentication.
v Select Send URL link to document (no document attachment) if you only want to send a
link to the document and not the document itself.
vi Click OK.
9 The new recipients should now be displayed on the Document Destinations page, and they should be
checked. When all destinations have been added on the Document Destinations page, click Next >>.
10 The Document Name and Type page will be displayed. Specify the base name of the output file under
Document Identification. For this example enter a name such as myDocName.
11 Select Date and Time from the Name Suffix drop-down list. This will append the date and time to the
name specified above (myDocName).
12 Select a Document Type. For this example, select PDF, Image Only (*.pdf).
Appendix B: Sample E-mail Workflow Creation 3-45
Page 68

a) To change the format of the file, click the Properties button. For this example, click Properties.
The Document Type Properties page will be displayed. From the Format drop-down list select
PDF, Image Only.
b) Click OK.
13 Click Next >>.
14 The Document Attributes page will be displayed. Specify any document attribute fields that are needed.
For this example we will use the default Basic profile which contains Title and Description fields.
15 Click Next >>.
16 The Workflow Settings page is displayed.
17 Select a job confirmation option. For this example select Printed confirmation from the Job
Confirmation drop-down list.
18 Select the level of access for the workflow. For this example we will use the default Public access level.
19 Click Next >>.
20 The Save Workflow page is displayed. Specify a unique workflow name.
21 Select the type of Publication desired. For this example we will publish the workflow as a device scan
template. Select Publish workflow to Xerox Multifunction Device.
22 Review the workflow settings and change as required.
23 Click Finish.
24 The Publish Workflow to Xerox Multifunction Device page is displayed. Specify a unique publication
name.
25 Select an expiration time.
26 Select the devices to which the template will be published.
27 Enter document attribute values. If the values are to be specified at the device, select Editable at the
device.
28 Select a scan profile. Click Properties to adjust the scan settings as needed.
29 Click OK.
30 The template will be published. Click Return to Home Page at the bottom of the page to return to the
User Home Page.
3-46 Distribution Workflows
Page 69

Appendix C: Specifying a Custom Object in a SMARTsend Workflow
The following procedure creates a SMARTsend workflow that stores a scanned document, with document
attribute fields, to a DocuShare collection as a Custom Object.
1 From the SMARTsend User Home Page, click on the Add New Distribution Workflow... link.
2 On the Document Destination page, click on the add locations... link under the DocuShare section.
3 Enter the properties for the DocuShare destination, including the Custom Object Name to use when
storing the document within DocuShare.
4 Click Next >>.
5 On the Document Name and Type page, define the name and format to use for the distributed
document(s).
6 Click Next >>.
7 On the Document Attributes page, select the DocuShare Only document attribute profile.
8 Click on the Add Field... link to add the appropriate fields for use within the DocuShare Custom Object
you have specified for your destination.
9 On the Attribute Properties dialog, add a document attribute field and map it to the appropriate
DocuShare field defined in the Custom Object.
NOTE: The fields defined in the specified Custom Object will be available for attribute mapping. For
example, if a law firm uses a document that stores the matter_id with each document, then a user
may want to add a SMARTsend field named Matter_ID and map it to the DocuShare Custom Object
field.
10 Click OK.
11 On the Document Attributes page, click on the Save as New Profile... link to save the fields as a new
profile for later use in other workflows.
12 Click Next >>. Continue defining the workflow in the remaining screens and publish the workflow as
needed.
Appendix C: Specifying a Custom Object in a SMARTsend Workflow 3-47
Page 70

Appendix D: Specifying a LiveLink Category in a SMARTsend Workflow
The following procedure creates a SMARTsend workflow that stores a scanned document, with document
attribute fields, to a LiveLink folder with a category (Standard or Professional Edition feature).
1 From the SMARTsend User Home Page, click on the Add New Distribution Workflow... link.
2 On the Document Destinations page, click on the add locations... link under the LiveLink section.
3 Enter the properties for the LiveLink destination, selecting a category from the list provided.
4 Click Next >>.
5 On the Document Name and Type page, define the name and format to use for the distributed
document(s).
6 Click Next >>.
7 On the Document Attributes page, select the Basic document attribute profile.
8 Click on the Add Field... link to add the appropriate fields for use with the LiveLink category you have
specified for your destination.
9 On the Attribute Properties dialog, add a document attribute field and map it to the appropriate
LiveLink field defined in the category.
10 Click OK.
11 Optionally, on the Document Attributes page, click on the Save as New Profile... link to save the fields
as a new profile for later use in other workflows.
12 Click Next >>. Continue defining the workflow in the remaining screens and publish the workflow as
needed.
3-48 Distribution Workflows
Page 71

Appendix D: Specifying a LiveLink Category in a SMARTsend Workflow 3-49
Page 72

3-50 Distribution Workflows
Page 73

4
Search Workflows
This chapter covers how to create and use Search Workflows. It provides instructions for specifying search
locations, search options, and other settings that are required to create effective Search Workflows.
Search Workflows have many similarities with SMARTsend Distribution Workflows. Where applicable in
this chapter, information pertaining to common features and functions is included by reference. However, a
basic understanding of Distribution Workflow creation, publishing, and maintenance is recommended as a
prerequisite to this chapter.
NOTE: Search Workflows are only available when the optional TrueMatch component is installed with
the Professional Edition of SMARTsend. When using a TrueMatch Search Workflow to locate a matching
or similar electronic version of a document, the documents must have been authored in English.
What is in this chapter:
Search Workflow Overview. . . . . . . . . . . . . . . . . . . . . . . . . . . . . . . . . . . . . . . . . . . . . . . . . . . . . . 4-2
Adding a Search Workflow . . . . . . . . . . . . . . . . . . . . . . . . . . . . . . . . . . . . . . . . . . . . . . . . . . . . . . 4-2
Document Search Locations. . . . . . . . . . . . . . . . . . . . . . . . . . . . . . . . . . . . . . . . . . . . . . . . . . . . . 4-4
Document Search Results. . . . . . . . . . . . . . . . . . . . . . . . . . . . . . . . . . . . . . . . . . . . . . . . . . . . . . . 4-6
Document Search Summary . . . . . . . . . . . . . . . . . . . . . . . . . . . . . . . . . . . . . . . . . . . . . . . . . . . . . 4-8
Publishing a Search Workflow . . . . . . . . . . . . . . . . . . . . . . . . . . . . . . . . . . . . . . . . . . . . . . . . . . . 4-9
Using a Search Workflow . . . . . . . . . . . . . . . . . . . . . . . . . . . . . . . . . . . . . . . . . . . . . . . . . . . . . . 4-10
4-1
Page 74

Search Workflow Overview
Search Workflows are available when the optional TrueMatch component is installed with SMARTsend
Professional Edition. TrueMatch Search Workflows enable you to scan a small portion of a paper document
and locate a matching or similar electronic version of the document that is stored in a supported destination.
The destinations currently supported include:
DocuShare 3.1, 4.0
SharePoint Portal Server 2001
SharePoint Portal Server 2003
NOTE: When using a TrueMatch Search Workflow to locate a matching or similar electronic version of a
document, the documents must have been authored in English.
Search Workflows are similar to SMARTsend Distribution Workflows. New Search Workflows are created
within SMARTsend using a wizard, and they are managed and maintained using the Workflow Explorer
page.
See Workflow Explorer on page 3-3 for additional information on viewing and managing existing
workflows.
TrueMatch can locate the following file formats:
Word (.doc, .dot)
PowerPoint (.ppt, .pps, .pot)
Excel (.xls)
Text (.txt, .rtf)
PDF (.pdf - text searchable only; not supported by all destinations or may require additional
configuration on the destination computer)
Web Pages (.htm, .html)
Adding a Search Workflow
There are two ways to create a Search Workflow. A new Search Workflow can be created by using a wizard
which steps the user through the process of defining the workflow. Alternatively, a new Search Workflow
can be created by modifying an existing Search Workflow and saving it (Save As) with a different name.
Creating a New Search Workflow
Any user can create a new Search Workflow. A wizard leads the user through the steps necessary to define
the workflow, including defining the document search locations, the search parameters, and the workflow
settings.
To create a new Search Workflow:
1 Navigate to the User Home Page and click Add New > Search Workflow... under the Workflows
heading. The Document Search Locations page will be displayed.
2 Select the desired Search Locations. For locations that have already been configured, checkboxes will
be displayed. Select a configured location by selecting the checkbox for the location. If a desired
location is not listed, go to the location type and click add locations.
on page 4-4 for additional information. Click Next >> to proceed.
See Document Search Locations
4-2 Search Workflows
Page 75

3 If credentials are required for any search locations, a properties window will be displayed. Enter the
credentials needed to gain access to each search location.
page 3-13 for additional information. Click OK to proceed to the Document Search Results page.
See Managing Destination Credentials on
4 Configure the search results and job confirmation options. You can configure the search results format
and e-mail address, as well as the type of job confirmation that will be generated.
Results on page 4-6 for additional information. Click Next >> to proceed to the Document Search
Summary page.
See Document Search
5 Edit the workflow name and description and confirm the workflow settings displayed on the page. If
needed, click << Previous or use the links in the left panel to return to the previous steps and make
changes. Otherwise, click Finish to create the search workflow.
6 If you specify that the workflow is to be published later, you will be returned to the User Home Page.
Otherwise, the appropriate Publish Workflow page will be displayed.
on page 4-9 and Using a Search Workflow on page 4-10 for additional information.
See Publishing a Search Workflow
Search Workflow Overview 4-3
Page 76

Document Search Locations
The Document Search Locations page is used to configure the locations that TrueMatch will search when
attempting to locate a match for a scanned document. This page lists all of the types of locations that are
supported by TrueMatch. Within each type, under the Search Locations sub-heading, are listed the specific
locations that the user who is logged in has configured. Under the other locations sub-headings are locations
configured by other users. Locations configured by other users only appear if they are used in the specific
workflow being edited.
TIP: Select the Search all locations that I have access to option at the top of the Document Search
Locations page to search multiple locations with a single selection.
Adding/Removing Listed Search Locations to/from a Workflow
To add a listed location to the workflow, check the checkbox for the location. To remove a location from the
workflow, uncheck the checkbox for the location.
Adding New Search Locations
Search Locations that are defined and entered into a workflow are kept, regardless of whether the workflow
changes are saved. They are not removed unless manually removed from the Document Search Locations
page. This allows the location to be selected during the definition of other workflows.
To add a new Search Location:
1 Find the location type (for example, DocuShare, SharePoint, etc.) on the Document Search Locations
page and click add locations. A window specific to the location type will be displayed.
2 Enter the location properties.
3 Click OK.
4 If credentials to access the location are needed, an Account Settings page will be displayed. Add the
user name and password and click OK.
NOTE: You may be prompted to enter your SMARTsend computer credentials. You must use the same
credentials you used to log into SMARTsend. If you supply different credentials, you may need to clear
your browser cache before you can proceed.
5 Click Next >> to proceed after the search locations have been configured.
4-4 Search Workflows
Page 77

Editing Search Locations
Location properties other than the location name can be changed.
To edit the properties of a location:
1 From the Document Search Locations page click the name of the location to be changed. The properties
of the location are displayed.
2 Edit the properties as appropriate.
3 Click OK.
NOTE: Editing a location will cause it to be automatically added to the workflow. Uncheck the checkbox
beside the location if you want to remove it from the workflow.
Deleting Search Locations
Only search locations added by the user and listed under my locations or my addresses can be deleted.
To remove search locations:
1 From the Document Search Locations page find the location(s) to be deleted.
2 Without further warning the search location will no longer be available when defining future Search
Workflows, so be sure you want to delete the location before proceeding. Click remove to delete an
individual location. Click remove all locations to delete all the locations that are defined within a
particular category, such as all DocuShare or all SharePoint locations.
NOTE: Workflows that already use the search location will not be affected when a search location is
deleted. For those workflows, the search location will be displayed beneath the other locations heading
the next time locations are edited.
Document Search Locations 4-5
Page 78

Document Search Results
The Document Search Results page contains settings that define how TrueMatch search results are
generated, distributed, and confirmed by SMARTsend.
Search Results Format
The Search Results Format options enable you to configure the method that SMARTsend will use to
generate and distribute TrueMatch search results. The following options are available:
Print document(s) as URL links and best match to originating device—prints a report of the search
results as well as the document that is the best match to the scanned original. The report and matching
document will be printed at the device that was used to submit the search workflow. The printed report will
include URL links to any document(s) found.
NOTE: This option will not function if you publish the search workflow as a PaperWare cover sheet and
use the cover sheet to scan a document at an Internet Fax device.
Please note that printing is subject to the following constraints:
TrueMatch will print the URL links and best match document on the device that is used to scan the
original document.
The device must support PostScript and LPR printing.
The following file formats can be printed:
Word (.doc, .dot)
PowerPoint (.ppt, .pps, .pot)
Excel (.xls)
Text (.txt, .rtf)
PDF (.pdf - text searchable only)
Web Pages (.htm, .html)
Email document(s) found as URL links to—sends a report to the e-mail addresses defined in the
workflow. The report will include URL links to any document(s) found. When this option is selected, one or
more e-mail addresses must be entered in the space provided. You can then use the Check name(s) feature
(see below) to validate the e-mail addresses.
Check name(s)—enables you to search for e-mail addresses using the address book. This option is only
available when an LDAP Address Book has been properly configured within SMARTsend.
Job Confirmation
When a user performs a scan, typically some indication is needed that the job was successful or failed. Select
how the user will receive job confirmation upon completion of a job:
No job confirmation—provides no confirmation of job completion.
Workflow owner's e-mail—enables an e-mail message to be sent to the owner of the workflow.
Workflow user's e-mail—enables an e-mail message to be sent to the workflow submitter. This option
is only available when scanning at a device with authentication or when using a PaperWare cover sheet
(Professional Edition feature). If used on a Xerox Multifunction Device with no authentication and no
cover sheet, no job confirmation will be generated.
4-6 Search Workflows
Page 79

Printed confirmation—enables a page to be printed at the Xerox Multifunction Device used for
scanning. The confirmation prints after the job is successfully sent to the destination or if an error
occurs. If sensitive information is included in the job, you may not want the confirmation printed at a
device where it may be easily viewed.
Document Search Results 4-7
Page 80

Document Search Summary
The Document Search Summary page is used to define the search workflow name and publication options,
and to review workflow settings after you have edited or defined a search workflow. Before publishing, you
can make modifications to the workflow using the links provided on the left side of the page, or by clicking
the << Previous button at the bottom of the page.
Workflow Name and Description
Enter a new name and description for the workflow or modify the displayed information. The name should
be unique and something you will remember, as this name will appear in the Workflow Explorer and on
publications. When you are first adding a workflow, the default naming convention begins with Workflow1
and will increment that name for new workflows unless a different name is supplied.
Publication Options
Before you can scan, you must publish a workflow. Select how to publish the workflow:
Publish workflow later—enables you to publish the workflow at another time. Use this setting if you
are just creating a workflow for someone else and that person will publish the workflow when needed.
Publish PaperWare cover sheet from workflow (Professional Edition feature)—generates a
PaperWare cover sheet for the workflow. Use this option if you want to determine search locations at
scan time, if you want to scan using Internet Fax, or if you have sensitive information that you do not
want to be viewed by other SMARTsend users.
Publish workflow to Xerox Multifunction Device—allows you to create a new scan device template
for the workflow.
When the workflow name, description, and publication options have been properly configured, click the
Finish button at the bottom of the page.
4-8 Search Workflows
Page 81

Publishing a Search Workflow
Search Workflows must be published to make them available for use. Search Workflows can be published as
Device Scan Templates for use with Xerox Multifunction Devices, or as PaperWare cover sheets that can be
used with Xerox Multifunction Devices and Internet Fax devices.
The settings and process for publishing Search Workflows are very similar to SMARTsend Distribution
Workflows. This chapter explains the publication settings that are unique to Search Workflows. To learn
more about the common settings and general publication options that pertain to all SMARTsend workflows,
please refer to
instructions on using Search Workflows after they have been published.
NOTE: The option to Print document(s) as URL links and best match to originating device will not
function if you publish the search workflow as a PaperWare cover sheet and use the cover sheet to scan
a document at an Internet Fax device.
Search Criteria
The Search Criteria settings dictate the results that TrueMatch Search Workflows will generate. When a
search workflow is executed, SMARTsend will OCR and index the scanned pages of the source document.
This information is then used as the basis for locating electronic documents.
The following Search Criteria options can be configured for each workflow:
Select the maximum number of documents to locate—enables you to define a limit for the number of
documents that TrueMatch will return as matches for your search. TrueMatch will terminate a search as soon
as this limit has been reached.
What type of search would you like to perform?—enables you to customize the search parameters that
TrueMatch will use to locate documents. The following search options are available:
Chapter 5, Publishing Workflows. Please consult Using a Search Workflow on page 4-10 for
Retrieve exact matches—matches are listed if TrueMatch locates an electronic document that is
an exact match to the source document pages that were scanned with the Search Workflow.
Retrieve exact matches and revisions—matches are listed if TrueMatch locates electronic
documents that are an exact match to the source document that was scanned with the workflow, as
well as any documents that are revised versions of the source document. TrueMatch considers
revised documents as those that are a close match to the original scanned input pages, but are not an
exact match with the original. Typical matches with this setting may include revised or earlier
versions of the scanned source document.
Retrieve related documents—matches are listed if TrueMatch locates electronic documents that
may be related to the original document that was scanned with the workflow. TrueMatch considers
a document to be a related document if it is based on the same topic(s) as the source document.
Editable at the device—can be selected if you prefer to define the settings at the device when you are ready
to scan the source document. This option provides additional flexibility to customize certain workflow
parameters without republishing the workflow.
Publishing a Search Workflow 4-9
Page 82

Using a Search Workflow
When a Search Workflow is published as a Device Scan Template or PaperWare Cover Sheet, the resulting
publication functions in the same manner as publications that originate from SMARTsend Distribution
Workflows. However, there are a few additional things to consider when you execute a search using a
TrueMatch publication. These considerations include:
You do not need to scan the entire original document when you execute the search workflow. In many
cases, you only need to scan the first 2-5 pages of the original in order to locate matching documents.
However, keep in mind that the criteria for exact matches will only be based on the pages you scan.
The quality and format of the original document may impact the results of the search. If the document
quality is poor or uses formatting and fonts that SMARTsend is unable to OCR effectively, then the
precision of the search may vary accordingly.
The time required to process the scanned original document and locate matching documents will vary
based on SMARTsend computer utilization and performance, the number of pages scanned, and the
number of search locations specified in the workflow. By default, SMARTsend will terminate a search if
it exceeds 2 minutes. However, the SMARTsend administrator has the option to increase or decrease the
timeout limit based on your site requirements. Check with your SMARTsend administrator if you
frequently encounter timeouts.
Some Document Management systems may limit search capabilities to specific document types or
formats, or they may require the installation or configuration of additional components or user accounts
to provide search capabilities. Check with your system admininstrator if TrueMatch is unable to locate
certain types of documents.
Please refer to Chapter 5, Publishing Workflows and Chapter 6, How to Scan for additional information on
viewing, managing, and using Search Workflows that have been published as Device Scan Templates and
PaperWare cover sheets.
4-10 Search Workflows
Page 83

5
Publishing Workflows
After a workflow is created, it must be published to a device as a scan template or as a PaperWare cover
sheet (Professional Edition feature) before it can be used. This chapter describes how to publish a workflow.
What is in this chapter:
Publication Overview . . . . . . . . . . . . . . . . . . . . . . . . . . . . . . . . . . . . . . . . . . . . . . . . . . . . . . . . . . 5-2
Publishing to a Xerox Multifunction Device . . . . . . . . . . . . . . . . . . . . . . . . . . . . . . . . . . . . . . . . 5-3
Publishing to a PaperWare Cover Sheet . . . . . . . . . . . . . . . . . . . . . . . . . . . . . . . . . . . . . . . . . . . 5-8
Viewing Publications . . . . . . . . . . . . . . . . . . . . . . . . . . . . . . . . . . . . . . . . . . . . . . . . . . . . . . . . . 5-14
Adding or Removing Devices from a Publication . . . . . . . . . . . . . . . . . . . . . . . . . . . . . . . . . . . 5-15
Deleting Workflow Publications. . . . . . . . . . . . . . . . . . . . . . . . . . . . . . . . . . . . . . . . . . . . . . . . . 5-16
5-1
Page 84

Publication Overview
Once a workflow has been created, it must be published before it is available for use when scanning
documents. Publishing a public workflow makes it available for use by all users; publishing a private
workflow makes it available only to the owner. Unless the workflow is used within the amount of time
specified at the time of publication, the workflow will be unpublished and no longer available for scanning.
Workflows can be published as device scan templates or as PaperWare cover sheets (Professional Edition
feature).
Device Scan Templates
Device scan templates are used for scanning from Xerox Multifunction Devices. Device scan templates are
said to be distributed templates because they are distributed to particular devices specified at the time of
publication. The workflows can only be used at those devices. Publishing to Xerox Multifunction Devices
using device scan templates provides an extra level of security for devices which support authentication at
the device. When publishing using a device scan template, scanned documents are distributed to all
destinations.
PaperWare Cover Sheets
Professional Edition Feature
A workflow can be published by creating a PaperWare cover sheet. PaperWare cover sheets are printed
cover pages that are scanned at the device as the first page of the job. The cover sheet provides the
information needed to perform the scan—information such as the document attributes and destinations. The
user selects the desired scan destinations from the available options on the cover sheet.
By default, authentication at the device is not required to scan with cover sheets, so they can be used at any
Xerox Multifunction Device unless the default is changed by the administrator or unless the workflow is
created as a private workflow and the device supports authentication. PaperWare cover sheets can also be
used with any Internet Fax device.
Because a PaperWare workflow can only be viewed and used by the owner of the cover sheet, the
PaperWare cover sheet is a good option for those who do not want others to have access to their workflow.
PaperWare Cover Sheets with Editable Document Attributes
When a workflow is published as a PaperWare cover sheet and document attributes are specified as editable
at the device, a device scan template is distributed to specified devices when the PaperWare cover sheet is
created. The user should select the published template at the device rather than the PaperWare template used
for standard PaperWare cover sheets (without editable document attributes).
Cover Sheet on page 5-8 for additional information.
See Publishing to a PaperWare
Customizing PaperWare Scan Settings
If you typically need to use scan settings that differ from those used for the standard PaperWare cover sheet,
you or the administrator can create and publish a customized scan template to meet your personal scanning
needs. You must then select the new template at the device before you scan.
5-2 Publishing Workflows
Page 85

Publishing to a Xerox Multifunction Device
Publishing a workflow to a Xerox Multifunction Device creates a device scan template and assigns it to the
selected Xerox Multifunction Device(s). Below are the steps for publishing to a device, followed by greater
details on each of the publication settings.
To publish a workflow to a Xerox Multifunction Device:
1 Navigate to the User Home Page and click View All Workflows.
2 From the Workflow Name column in the Workflow Explorer, select the name of the workflow to be
published.
3 From the list of Workflow Tasks, click Publish to Xerox Multifunction Device.
4 Specify Publication Settings:
a) Enter a name for the publication. This name will appear in the list of templates and must be unique.
Publication Name on page 5-3.
See
b) Select the time when the publication will expire. See Expires After Not Used For on page 5-4.
c) Select the devices on which the workflow will reside. See Add Workflow Publication to the
Following Device(s) on page 5-4.
NOTE: If the device you need is not listed, contact your SMARTsend administrator to have it added.
5 Specify the Document Attributes. Select Editable at the device if the document attributes will be
editable on the device during scanning. Up to six attributes can be edited at the device. See
Attributes on page 5-4.
Document
6 Specify the Scan Profile. Select the type of document that will be used for scanning with this template.
Click Properties to select custom settings for the document. See
Scan Profile on page 5-5.
7 When you are finished, click OK.
NOTE: The template may not appear in the list of templates at the device until the list is refreshed.
Publication Settings
The Publish Workflow page contains a Publication Settings region where you can set the publication name,
expiration date, and the devices to which the template will be distributed.
Publication Name
The name will appear in the list of templates at the device and must be unique. The name also cannot be the
same name as a workflow (except for the workflow being published). The name must contain between 1 and
20 characters and cannot contain: ", <, >, |, *, ?, /, \, ., :, null, backspace, Unicode characters 16-18 and 2025, or separator characters.
Some devices may not support names with more than 11 characters. If you enter a name containing more
than 11 characters and publish to a device that does not support names with more than 11 characters, an error
message will be displayed when you click OK to publish the template.
Publishing to a Xerox Multifunction Device 5-3
Page 86

Expires After Not Used For
This option automatically unpublishes, and removes from devices, templates that are not used within a
specified time period. However, expired templates may still appear in the list of templates on the device until
the list is refreshed at the device.
The workflows themselves will not be removed or lost, but the published templates will be unavailable for
use and must be republished if needed. If a template is used within the specified time period, then the time
for expiration is reset.
Example: If the published workflow is set to expire in one week and the template is used before the week is
over, the expiration date is reset to expire one week from the day of its last use.
NOTE: You may want to set this option so that the application automatically cleans up publications when
they are not used. Otherwise, administrators will need to manually clean up publications in the application
and on devices.
Add Workflow Publication to the Following Device(s)
Select one or more devices to which to add the workflow. Select consecutive devices by pressing and
holding the <Shift> key while you select the first and last devices. Select non-consecutive devices by
pressing and holding the <Ctrl> key while you click individual devices. If a desired device is not listed,
contact your SMARTsend administrator to have it added.
NOTE: If a workflow requires authentication at the device (by default, any private workflow and the
My_E-mail workflow) but the device does not support authentication, the device will not be displayed.
Document Attributes
Document attributes are created when the workflow is created. Values for the attributes can be specified at
workflow creation or publication time. The values may be changed at the device at scan time by selecting
the Editable at the device option. If this option is selected, you will be prompted by the device to enter the
attribute values at scan time.
NOTE: When security is a concern, the text entry in these fields may be masked with asterisks (*). This
option is defined in the workflow using the Field Security > Mask User Input (****) option.
Attributes on page 3-35 for more information.
See Document
5-4 Publishing Workflows
Page 87

Scan Profile
Scan Profiles contain sets of imaging settings that are optimized for different types of documents. Scan
Profiles can be selected, customized, and applied to a workflow when you publish it to a Xerox
Multifunction Device as a device scan template, or when personalizing your PaperWare form (Professional
Edition feature) scan settings (
See Personalize Your PaperWare Form Scan Settings on page 2-7).
Output Color
Original Type
Contrast/
Darkness/
Sharpness
Edge Erase
Input Media
Size
Resolution
Sides to Scan
Auto Exposure
1-Sided
B/W
Business
Document
Black/White Black/White Gray-scale Full Color Full Color Full Color
Mixed Mixed Photo Mixed Mixed Photo
Normal Normal Normal Normal Normal Normal
3mm or
0.1in
Auto Auto Auto Auto Auto Auto
300x300 300x300 200x200 300x300 300x300 200x200
1 2 1 1 2 1
ON ON ON ON ON ON
2-Sided
B/W
Business
Document
3mm or
0.1in
B/W Photo
3mm or
0.1in
1-Sided
Color
Business
Document
3mm or
0.1in
2-Sided
Color
Business
Document
3mm or
0.1in
Color
Photo
3mm or
0.1in
Table 5-1: Default Scan Profile Settings
Select the profile that best matches the type of document you are scanning, for example, 1-Sided Black/
White Business Document. If a scan profile setting is not supported by a device, the device will use its
default or auto setting. You can also use the following methods to customize the scan settings:
Custom Scan Profile—this method enables you to modify any default scan profile and apply the settings to
the current workflow. When publishing a workflow, simply choose a profile from the Scan Profile selection
list, then click the Properties link located next to the selection list. Change the settings as needed, then click
the OK button to save the settings. The Scan Profile selection will now indicate that a Custom Scan Profile
will be applied to the publication.
See Customizing Scan Profiles on page 5-6 for additional information.
Adjust at Device—this method enables you to adjust or override the scan settings at the device at scan time.
After choosing the scan template at the device, you can modify any of the scan profile settings (
Table ) using
the device user interface. The local scan settings on the device will then override the scan template settings
for the current scan job.
NOTE: You should NOT change settings such as If File Already Exists or File Format at the device.
Changing these settings could have adverse affects on the document output.
Publishing to a Xerox Multifunction Device 5-5
Page 88

Customizing Scan Profiles
The following scan profile settings can be customized:
Output Color
Output color provides the optimal processing settings to produce the highest quality color, grayscale, or
black/white output.
NOTE: If JFIF/JPEG is specified as the document output type (See Document Type on page 3-27) but
the document is scanned on a monochrome device, the job will fail. If JFIF/JPEG is specified as the
document output type and the document is scanned on a color device, the job will fail if the scan profile or
the device has Output Color set to Black and White.
Original Type
Original type determines the kind of output that is produced—either photo, text, mixed (photo and text), or
halftone. Halftone is a pattern of dots used to simulate and print a continuous-tone image.
NOTE: If the Original Type is Photo at the Xerox device, then Auto Exposure will be changed to OFF and
the control will be disabled at the device.
Contrast
Contrast controls the difference between light gray and dark gray regions of the output document. A high
contrast scanned image appears sharp and vivid and is composed of mainly black and white regions. A low
contrast scanned image is softer and is composed of varying shades of gray.
Darkness
Darkness controls the level of darkness of the output document so it appears lighter, darker, or the same as
the original document.
Sharpness
Sharpness makes the edges of a scanned image appear more or less pronounced than those of the original
document. Sharpness is useful in enhancing fine lines or fine details in pictures. Softening can help to mask
fine spots.
Edge Erase Metrics
Edge Erase Metrics removes spots, punch holes, staple marks, or any other dark marks that may appear
around the edge of the original document.
You can erase marks that appear in the outer 0 to 50 mm of the page, or up to 2 inches.
The default is 3 mm or .1 inch.
NOTE: Some devices do not support Edge Erase settings, In this case, the edge erase values must be
manually set at the device when the user scans.
5-6 Publishing Workflows
Page 89

Input Media Size
Input media size is the physical size of the original document.
Resolution
Resolution specifies the desired resolution of the output document. This setting does not need to match the
resolution at which the original document was printed. A 600 dpi image produces a finer, higher quality
image than a 300 dpi setting. However, a 600 dpi resolution will result in a larger file size.
Sides to Scan
Sides to scan specifies the number of sides that are used in the original document, either 1-Sided, 2-Sided, or
Second Side Rotation.
Auto Exposure On/Off
Auto Exposure enhances the output of documents that have color backgrounds.
When Auto Exposure is on, the scanner automatically selects an exposure level that is appropriate for the
original document.
When Auto Exposure is off, the scanner uses the lightness/darkness settings of the template to control the
exposure level of the produced image. This may result in larger output file sizes.
NOTE: If the Original Type is Photo at the Xerox device, then Auto Exposure will be changed to OFF and
the control will be disabled at the device.
Publishing to a Xerox Multifunction Device 5-7
Page 90

Publishing to a PaperWare Cover Sheet
Professional Edition Feature
PaperWare cover sheets can be used to submit scan jobs at a multifunction or Internet Fax device.
The cover sheet has checkboxes that can be used to select destinations. Document attributes will also appear
on the cover sheet. If attributes are specified as editable at the device, a device scan template will also be
published to specified devices when the cover sheet is generated. The cover sheet can only be used at those
specified devices.
When a cover sheet is published, a PDF file of the PaperWare cover sheet is generated. It can be saved to a
location that you choose or it can be printed on a local printer.
NOTE: When using PaperWare cover sheets with Xerox Multifunction Devices, you must use a device
that was configured by the same SMARTsend computer that was used to create the workflow/cover sheet.
However, you may be able to use the cover sheet at devices that have been configured by other
SMARTsend or Xerox Flowport computers if they have been configured to support PaperWare Forms
Forwarding. Please contact your system administrator for a list of devices that support PaperWare Forms
Forwarding.
To publish a workflow as a PaperWare cover sheet:
1 Navigate to the User Home Page and click View All Workflows.
2 From the Workflow Name column in the Workflow Explorer, select the name of the workflow to be
published.
3 From the list of Workflow Tasks, click Publish a cover sheet.
4 Specify Publication Settings.
a) Enter a name for the publication. This name will appear on the cover sheet and must be unique. See
Publication Name on page 5-11.
b) Specify a description for the cover sheet. This will appear on the cover sheet below the name.
c) Select the time when the publication will expire. See Expires After Not Used For on page 5-11.
5 Check only the document destinations that you want to be selected automatically on the cover sheet. If
you do not select a destination now, it still appears on the cover sheet but will need to be manually
selected on the printed form for that destination to receive documents. See
Destinations on page 5-11.
6 Specify the Document Attributes. Select Editable at the device if the document attributes will be
editable on the device during scanning. In this case, the cover sheet can only be used at the devices
where it is published. Up to six attributes can be edited at scan time. If the Create new metadata
template checkbox is selected, you will be prompted to select devices to which a template will be
published. If you deselect this option, a new template will not be published. At scan time, you will then
need to select a previously published PaperWare template that has the same metadata (document
attribute) fields defined as editable at the device. If you select a PaperWare template that does not
contain the correct metadata fields, and the fields in this workflow have been defined as required, your
workflow will fail. See
Document Attributes on page 5-11.
7 Specify the Scan Settings. See Scan Settings on page 5-12.
a) Select where the document will be scanned.
5-8 Publishing Workflows
Page 91

b) Select a resolution. When selecting a resolution, consider whether you are scanning using an
Internet Fax. The settings affect the glyph size, which is determined by the resolution and Internet
Fax setting. See
Resolution on page 5-12 for more information on resolution and DataGlyphs.
8 Click Create Cover Sheet to create the PaperWare cover sheet. A PDF file is created from which the
cover sheet will be printed. PDF files preserve the page layouts, text, and images of documents.
9 If document attributes were specified as editable, you must select the devices to which a template will
be published, as well as a scan profile. See
Scan Profile on page 5-5 for more on scan profiles.
10 A File Download window will be displayed, asking if you would like to open or save the file. You may
save the file so that you can access it later for printing or e-mailing. Click Save to save it. If you click
Open, be sure to print the file before closing the window. If necessary, you can re-create the cover sheet
by clicking Refetch this cover sheet from the View Publications page. See the procedure provided
below, and
Refetching the Cover Sheet on page 6-7 for additional information.
NOTE: You will need Adobe Acrobat Reader® to open and view the PDF file. You can obtain the
Acrobat Reader® from the Adobe web site at www.adobe.com.
11 Open the saved file using Adobe Acrobat Reader®.
12 Print the PDF file. The file should be printed at 100%. That is, the zoom factor on the Print window
should be at or near 100%. In addition, the cover sheet must be printed on 8.5" x 11" or A4 paper.
A cover sheet may also be "refetched" or re-created after the workflow has been published to a cover sheet.
This may be necessary if the PDF file for the cover sheet was generated and printed, but the file was not
saved and the cover sheet printed page is subsequently lost or marked up.
To refetch a PaperWare cover sheet:
1 Navigate to the User Home Page and click View All Workflows.
2 From the Workflow Name column in the Workflow Explorer, select the name of the workflow for which
you want to refetch the cover sheet.
3 From the list of Workflow Tasks, click View publications. A list of publications for the selected
workflow will be displayed. To sort the list by a column, click the column heading. A list of publication
tasks is displayed on the left. The tasks available will change based upon your rights to the publication
selected.
4 From the Name column in the Workflow Explorer, select the cover sheet that you want to refetch.
5 From the list of Publication Tasks, click Refetch this cover sheet.
6 A File Download window will be displayed, asking if you would like to open or save the file. You may
save the file so that you can access it later for printing or e-mailing. Click Save to save it. If you click
Open, be sure to print the file before closing the window.
Cover sheets may also be refetched by clicking the Refetch Form button on the Publication Details page.
See
Viewing Publications on page 5-14.
Publishing to a PaperWare Cover Sheet 5-9
Page 92

Using a PaperWare Cover Sheet with Internet Fax
You can scan from an Internet Fax device using a PaperWare cover sheet which allows the use of any Xerox
or non-Xerox Internet Fax device with SMARTsend.
To use a PaperWare cover sheet with Internet Fax
1 Obtain the e-mail address of an Internet Fax device from your administrator.
2 From Workflow Explorer, click Add New > Distribution Workflow.
3 Define the Document Destinations, Document Name and Type, Document Attributes, and Workflow
Settings as needed. Click Next >> to proceed to each page.
4 On the Save Workflow page, select the option to Publish PaperWare cover sheet from workflow.
Click Finish to proceed.
5 On the Publish PaperWare Cover Sheet page, scroll down to the Scan Settings section, and select one of
the Internet Fax options as the Scan Source. You must also select the Resolution setting that is
appropriate.
6 Click the Create Cover Sheet button.
7 Use the PaperWare cover sheet to perform the scan at the Internet Fax device. The document is sent as
an e-mail attachment.
NOTE: If you have defined attribute properties for the workflow, this functionality will be lost at scan time;
however, you can configure attribute properties as check boxes on your cover sheet. This enables you to
use attribute properties functionality at scan time.
5-10 Publishing Workflows
Page 93

Publication Settings
Publication Name
The name will appear at the top of the cover sheet and must be unique. The name also cannot be the same
name as a workflow (except for the workflow being published). The name must contain between 1 and 20
characters and cannot contain: ", <, >, |, *, ?, /, \, ., :, null, backspace, Unicode characters 16-18 and 20-25, or
separator characters.
Some devices may not support names with more than 11 characters. If you enter a name containing more
than 11 characters and publish to a device that does not support names with more than 11 characters, an error
message will be displayed when you click OK to publish the template.
Cover Sheet Description
The description will appear directly below the publication name on the cover sheet.
Expires After Not Used For
This option automatically renders the cover sheet unusable if not used within a specified time period. The
PaperWare template will not be removed from the list of templates on the device, however. The time period
will be printed on the upper right corner of the cover sheet.
The workflows themselves will not be removed or lost, but the cover sheets will be unavailable for use and
will need to be created again if needed. If a cover sheet is used within the time period, then the time for
expiration is reset.
Example: If the published workflow is set to expire in one week and the cover sheet is used before the
week is over, the expiration date is reset to expire one week from the day of its last use.
NOTE: You may want to set this option so that the application automatically cleans up publications when
they are not used. Otherwise, administrators will need to manually clean up publications in the application.
Destinations
All destinations added to the workflow will appear on the cover sheet. Select only those that you want to
appear pre-checked. To scan to a particular destination using the cover sheet, check the checkbox on the
cover sheet for the destination to which you want to send the output document.
Document Attributes
Document attributes are created when the workflow is created. Values for the attributes can be specified at
publication time. The values may be changed at the device at scan time by selecting the Editable at the
device option. If this option is selected, you will be prompted by the device to enter the attribute values at
scan time.
If there are multiple default values at publish time, there will be checkboxes on the cover sheet for each
value. You will select the desired option by checking the checkbox beside the desired value on the cover
sheet. When no attributes are editable at the device, the cover sheet can be used at any configured Xerox
Multifunction or Internet Fax Device.
When a document attribute is editable at the device, a device scan template will be published when the
PaperWare cover sheet is created. When you click Create Cover Sheet, you will be prompted to specify the
devices which will be used and a Scan Profile. Click Create Cover Sheet again to publish and create the
cover sheet. The cover sheet created when document attributes are specified as editable at the device can
Publishing to a PaperWare Cover Sheet 5-11
Page 94

only be used at the devices specified at the publication step. The cover sheet will indicate the name of the
device scan template to be used with the cover sheet.
Scan Settings
The Scan Settings area is used to describe the device where your document (and Paperware cover sheet) will
be scanned. SMARTsend uses this information to adjust the DataGlyph on the printed PaperWare cover
sheet for the specific scanning device.
Scan Source
Select a Scan Source for your document. PaperWare cover sheets can be used at a Xerox Multifunction
Device or Internet Fax device. Select Internet Fax if you are planning on using the cover sheet at an Internet
Fax device.
NOTE: When you are using document attributes and Internet Fax, you cannot select the option to edit
the attribute properties at the Internet Fax device.
Resolution
The resolution setting determines the size of the PaperWare DataGlyph. Publication creates a PaperWare
cover sheet with the workflow information captured in a DataGlyph in the lower right corner of the cover
sheet.
DataGlyphs are a technology for encoding machine-readable data onto paper documents. They encode
information into thousands of tiny diagonal lines, each representing a single 0 or 1, depending on whether it
slopes to the left or right. Sequences of these can be used to encode numeric, textual, or other information. A
lower resolution produces a larger DataGlyph; conversely, a higher resolution produces a smaller
DataGlyph.
Please consider the following factors when creating PaperWare cover sheets:
The DataGlyph must be a large size for use with the lower resolution scan performed by Internet Fax
devices. The large DataGlyph covers a larger portion of the cover sheet needed for document attribute
checkboxes. In addition, at the lowest resolution the Refetch this form checkbox may be lost.
When using a scanning device with poor image quality (e.g., dirty platen or improper calibration),
selecting a lower resolution may improve results.
Always print your PaperWare cover sheet on a high quality laser or inkjet printer with a minimum
resolution of 300 dpi.
Use the following table as a guideline for selecting the correct resolution setting:
Resolution (dpi) Applications
High (300x300 and higher) Scanning at 300 dpi or higher
Medium (200x200 and higher) Scanning at 200 dpi or higher
Fine resolution Internet Fax
Low (below 200x200) Scanning at 150 dpi or higher
Standard resolution Internet Fax
Table 5-2: PaperWare Cover Sheet Resolution Settings
5-12 Publishing Workflows
Page 95

Personalizing Scan Settings for PaperWare Forms
Scan settings for PaperWare cover sheets can be customized by publishing a device template which specifies
the desired settings. The user must then select the template at the device before scanning. Personalizing scan
settings can be done from the User Home Page.
To publish a customized template:
1 From the User Home Page click Personalize Your PaperWare Form Scan Settings.
1 Specify the desired publication settings.
2 Select the desired Scan Profile or customize the settings by clicking Properties.
3 Click OK to publish.
Publishing to a PaperWare Cover Sheet 5-13
Page 96

Viewing Publications
Any user can view the publications of a particular workflow.
To view the publications of a workflow:
1 Navigate to the User Home Page and click View All Workflows.
2 From the Workflow Name column in the Workflow Explorer, click the name of the workflow whose
publications you want to view.
3 From the list of Workflow Tasks, click View publications. A list of publications will be displayed in the
right panel. To sort the list by a column, click the column heading. A list of Publication Tasks is
displayed on the left. The tasks available will change based upon your rights to the publication selected.
4 To view the details of a particular publication, select the publication from the list and click View
publication details from the list of publication tasks in the left panel. You will only be able to view
publication details for publications that you own.
Publication Details
This option shows the actual publication content and settings for all types of workflow publications.
Administrators cannot view the content of any private publication. Publication owners can only view their
own publication's content.
The types of publications that can be viewed are Device Scan Templates, PaperWare Cover Sheets,
PaperWare Cover Sheets with Document Attribute Templates, and Xerox PaperWare Settings templates.
Using features on this page you can:
update the list of devices for device publication
regenerate a PaperWare Cover Sheet by clicking Refetch Form (Professional Edition feature)
5-14 Publishing Workflows
Page 97

Adding or Removing Devices from a Publication
Since scan device templates are loaded to particular devices when they are published, details of the
publication cannot be changed without re-publishing. However, it is possible to change the devices to which
the template is published.
To add or remove a device to which a template has been published:
1 Follow the steps for navigating to the publication details of the publication for which you want to add or
remove a device. See
2 Do one of the following:
To add a device, select the device from the list of Available Devices and click Add >>.
NOTE: If the device you want to add is not on the list of available devices, see your administrator to
add it.
To remove a device, select the device from the list of Selected Devices and click << Remove.
Viewing Publications on page 5-14.
Adding or Removing Devices from a Publication 5-15
Page 98

Deleting Workflow Publications
Only the owner of a publication can delete the publication. The publication tasks available to a user will
change based upon the rights the user has to the publication.
Deleting Individual Publications of a Workflow
To delete a particular publication:
1 Navigate to the User Home Page and click View All Workflows.
2 From the Workflow Name column in the Workflow Explorer, click the name of the workflow whose
publication you want to delete.
3 From the list of Workflow Tasks, click View publications.
4 Select the publication you want to delete.
5 From the list of Workflow Tasks, click Delete this publication. This task will only be available if you
own the publication.
6 A window asking for confirmation will be displayed. To delete the publication, click OK.
Deleting All Publications of a Workflow
To delete all publications of a workflow:
1 Navigate to the User Home Page and click Manage My Workflows.
2 From the Workflow Name column in the Workflow Explorer, select the name of the workflow whose
publications will be deleted.
3 From the list of Workflow Tasks, click Delete this workflow’s publications. This task will only be
available if you own all publications of the workflow.
4 A window requesting confirmation will be displayed. To delete the publications, click OK.
5-16 Publishing Workflows
Page 99

6
How to Scan
After a workflow has been created and published to a Xerox Multifunction Device or to a PaperWare cover
sheet (Professional Edition feature), it is ready to be used to scan documents. This chapter covers the steps
for using workflows to scan documents at the device.
What is in this chapter:
Before Scanning . . . . . . . . . . . . . . . . . . . . . . . . . . . . . . . . . . . . . . . . . . . . . . . . . . . . . . . . . . . . . . 6-2
How Publication Affects Scanning . . . . . . . . . . . . . . . . . . . . . . . . . . . . . . . . . . . . . . . . . . . . . . . . 6-3
Scanning with a Device Scan Template . . . . . . . . . . . . . . . . . . . . . . . . . . . . . . . . . . . . . . . . . . . . 6-4
Scanning with a PaperWare Cover Sheet. . . . . . . . . . . . . . . . . . . . . . . . . . . . . . . . . . . . . . . . . . . 6-5
Common Issues. . . . . . . . . . . . . . . . . . . . . . . . . . . . . . . . . . . . . . . . . . . . . . . . . . . . . . . . . . . . . . . 6-8
6-1
Page 100

Before Scanning
Before a user can use a workflow to scan a document, the following steps must be performed:
A workflow must be created. See Chapter 3, Distribution Workflows for instructions on creating a
workflow.
A workflow must be published to a Xerox Multifunction Device or to a PaperWare cover sheet
(Professional Edition feature). See
workflow.
If the workflow was published as a PaperWare cover sheet, the cover sheet must be printed on 8.5" x 11"
or A4 paper at 100%.
If the published workflow requires authentication, a cover sheet or device with authentication
configured and enabled is required.
If you have been using a trial version of SMARTsend but it has expired, you must obtain a license or
scanning jobs will fail.
Chapter 5, Publishing Workflows, for instructions on publishing a
6-2 How to Scan
 Loading...