

Page 1

Frequently Asked Questions
Release 2.0
Page 2

March 27, 2006
Xerox Corporation
855 Publisher's Parkway, Bldg. 0855-01D
Webster, NY 14580
USA
Copyright © 2001–2006 by Xerox Corporation. All rights reserved.
XEROX ®, The Document Company ®, the stylized X ®, CentreWare ®, Document Centre ®,
WorkCentre
licensed to Xerox Corporation in the United States and other countries.
DataGlyph
Adobe and Acrobat are registered trademarks of Adobe Systems, Incorporated.
IBM, Lotus, Domino, and Domino.Doc are registered trademarks of IBM Corporation.
NetWare is a registered trademark of Novell, Inc.
Flash is a trademark of Macromedia, Inc.
Microsoft, Microsoft Windows, Microsoft Word, Microsoft Excel, Microsoft PowerPoint, Microsoft
Internet Explorer, Microsoft Office, Exchange 2000, SharePoint , and I nt ernet In f ormation Services (IIS)
are registered trademarks of Microsoft Cor po rat i o n.
Netscape Navigator is a registered trademark of Netscape Communications Corporation.
WordPerfect is a registered trademark of Corel Corporation.
WorkSite is a trademark of Interwoven, Inc.
Hummingbird DM is a trademark of Hummingbird, Ltd.
Documentum is a registered trademark of EMC Corporation.
LiveLink is a registered trademark of Open Text Corporation.
Xerox PDF Reader Powered by Foxit Software Company http://www.foxitsoftware.com
® Pro, DocuShare ®, FlowPort ®, PaperWare, SMARTsend, and FreeFlow are trademarks of or
® is a trademark of Palo Alto Research Center, Inc.
2
Page 3

Table of Contents
Overview...................................................................................................................................................... 5
Troubleshooting a Problem.................................................................................................................... 5
Additional Information ............................................................................................................................. 5
Frequently Asked Questions.................................................................................................................. 6
AFTER MANUALLY CONFIGURING A DEVICE, I AM UNABLE TO REFRESH TEMPLATES? WHY?................ 6
AM I REQUIRED TO INSTALL SMARTSEND FROM THE CD OR ISO IMAGE ON THE SMARTSEND
COMPUTER?............................................................................................................................................... 6
DO NEWER XEROX MULTIFUNCTION DEVICES REQUIRE ADDITIONAL CONFIGURATION STEPS WHEN
THEY ARE BEING MANUALLY CONFIGURED
HOW DO I CONFIGURE SMARTSEND TO USE A SUN JAVA SYSTEM DIRECTORY LDAP SERVER FOR
INTEGRATED ADDRESS BOOK LOOKUP?.................................................................................................. 7
HOW DO I CREATE A SCAN DIRECTORY THAT CAN BE USED BY THE SMARTSEND SCAN TO HOME
UTILITY TO SCAN TO AN FTP HOME LOCATION?....................................................................................... 8
?.............................................................................................. 7
Option 1: Create the scan directory inside the FTP root directory. ..................................... 8
Option 2: Create a Virtual Directory in the Microsoft IIS service........................................ 10
HOW DO I CREATE A SCAN DIRECTORY THAT CAN BE USED BY THE SMARTSEND SCAN TO HOME
UTILITY TO SCAN TO A NETWORK FOLDER HOME LOCATION?............................................................... 12
HOW DO I CREATE AND CONFIGURE A DOMINO DOCUMENT LIBRARY FOR USE WITH SMARTSEND?.14
Verify Domino is ready to accept uploads from SMARTsend.............................................. 14
Create and configure a Domino Library .................................................................................... 15
Creating a Domino Workflow in SMARTsend........................................................................... 17
More information about DIIOP...................................................................................................... 24
Internet Links to Domino Information........................................................................................ 24
HOW DO I POPULATE DOMINO METADATA USING A SMARTSEND WORKFLOW?.................................. 25
Administration Steps...................................................................................................................... 25
User Steps - Create a SMARTsend Workflow to populate the metadata fields............... 25
3
Page 4

I
AM ABL E TO ADD A DES T INAT ION TO A SMARTSEND WORKFLOW. HOWEVER, THE WORKFLOW
PUBLICATION FAILS TO EXECUTE
. WHY? ................................................................................................ 27
I AM UNABLE TO IMPORT A LARGE NUMBER OF USERS INTO THE SMARTSEND SCAN TO HOME USER
DATABASE
? WHY? .................................................................................................................................. 27
I AM UNABLE TO SCAN TO A URL DESTINATION THAT IS AN IIS FOLDER. WHY?................................... 27
WHAT VERSIONS OF NETSCAPE NAVIGATOR ARE SUPPORTED BY SMARTSEND?.............................. 27
WHEN I ATTEMPT TO UNINSTALL SMARTSEND, I RECEIVE AN IIS ERROR AND THE UN-INSTALLATION IS
NOT SUCCESSFUL
. WHY?........................................................................................................................ 27
WHY CAN I ONLY FILE TO ONE HUMMINGBIRD SERVER AT A TIME?........................................................ 28
4
Page 5

Overview
Application, device, and network errors can occur in a variety of situations. This guide includes some of the
common issues and Frequently Asked Questions that pertain to SMARTsend, Xerox Multifunction
Devices, and related networking issues that have been added or updated after the release of SMARTsend
2.0.
This guide should be used in addition to the SMARTsend Installation and Administration Guide and User
Guide that is installed with the application.
Troubleshooting a Problem
When a problem persists, document the error messages and gather information to define the problem. The
following problem-solvin g pr oced u res a re re com mended:
• Accurately define the problem. When, where, and how does the problem occur?
• Reproduce the problem. Can the problem be reproduced consistently or is it an intermittent problem?
• Ask other users if they have encountered the problem, and keep a log to track problem occurrences.
• Examine the data for trends and the common attributes that may be related to the problem. For
example, does the problem occur only with a specific multifunction device or on a specific workstation
or network configuration?
• Review the product documentation, including the README files and problem solving topics, to see if
any similar problems are documented.
If a cause and solution to the problem cannot be identified, call Xerox Customer Support to report the error
information. Provide the support representative with the documentation that you have gathered to define the
problem. Be sure to have your product Serial Number available at the time you place the call. See
Customer Support on page 1-7 of the Installation and Administration Guide for additional information.
Additional Information
Xerox Customer Service welcomes feedback on all documentation - send feedback via e-mail to:
USA.DSSC.Doc.Feedback@mc.usa.xerox.com.
You can reach Xerox Customer Support at 1-800-821-2797 (USA),
TTY 1-800-855-2880, 1-800-939-3769 (CANADA ) or at
Other Tips about Xerox multifunction devices are available at the following URL:
http://www.xerox.com/DocumentCentreFamily/Tips.
http://www.xerox.com.
5
Page 6

Frequently Asked Questions
After manually configuring a device, I am unable to refresh
templates? Why?
When manually configuring a device to use the SMB filing protocol, the SMARTsend user interface
instructions show the short server name instead of the fully qualified domain name. In some networks, this
will not be enough information for the server name to map to an address. This will cause a template refresh
at the device to fail and, potentially, the device may fail to file to its default repository.
This problem is encountered when performing the following procedure:
1. From the Administration Home Page, click on the Add/Update Xerox Devices link.
2. On the Manage Xerox Devices page, enter the name or IP address of the device you wish to configure.
3. Select the Device Properties icon to open the Edit Xerox Device Properties page for the device being
configured.
4. On the Edit Xerox Device Properties page, select the SMB filing protocol, manual configuration
options and click Configure.
5. Click OK on the Manual Device Configuration Status dialog. The Manual Device Configuration
Instructions dialog will be displayed. Note that the server name that is displayed for the default
repository and template pool uses a short name (e.g. myserver instead of myserver.myorg.com).
6. If your network requires a fully qualified domain name, please use the server fully qualified domain
name when entering the server name at the device user interface.
Am I required to install SMARTsend from the CD or ISO Image on the
SMARTsend Computer?
To insure your system is configured correctly, you should copy the SMARTsend ISO image from the CD
to your local computer or run the SMARTsend install from the CD.
Note: If you will be using the SMARTsend ISO image, you will need to mount the ISO image so that
Windows will recognize it as a drive. There are tools available online that will mount the image. After the
ISO image is mounted, the drive should act as if the source CD you obtained the ISO image from is
inserted.
If you attempt to install SMARTsend from a network share (For example: If you are running Microsoft
Virtual Server and create a share to the host computer), you will receive a popup error with the heading
'SetDirAccess.exe - Common Runtime Language Debugging Services'. If you click OK, the installation
will complete successfully. However, the SMARTsend directory tree may not have all of the required
directory permissions. If you have already installed and received this and other errors while running
SMARTsend, please copy the ISO image locally or run the install again, and repair the installation using
the following procedure:
To repair an existing SMARTsend installation:
1. Log in to the SMARTsend computer as an administrator.
2. Open the Windows Control Panel and select Add/Remove Programs.
3. Select SMARTsend, and then select Change.
4. Select Repair on the Application Maintenance Page (Figure 1), and then click Next.
5. Click Next on the Ready to Repair the Application page.
Page 7
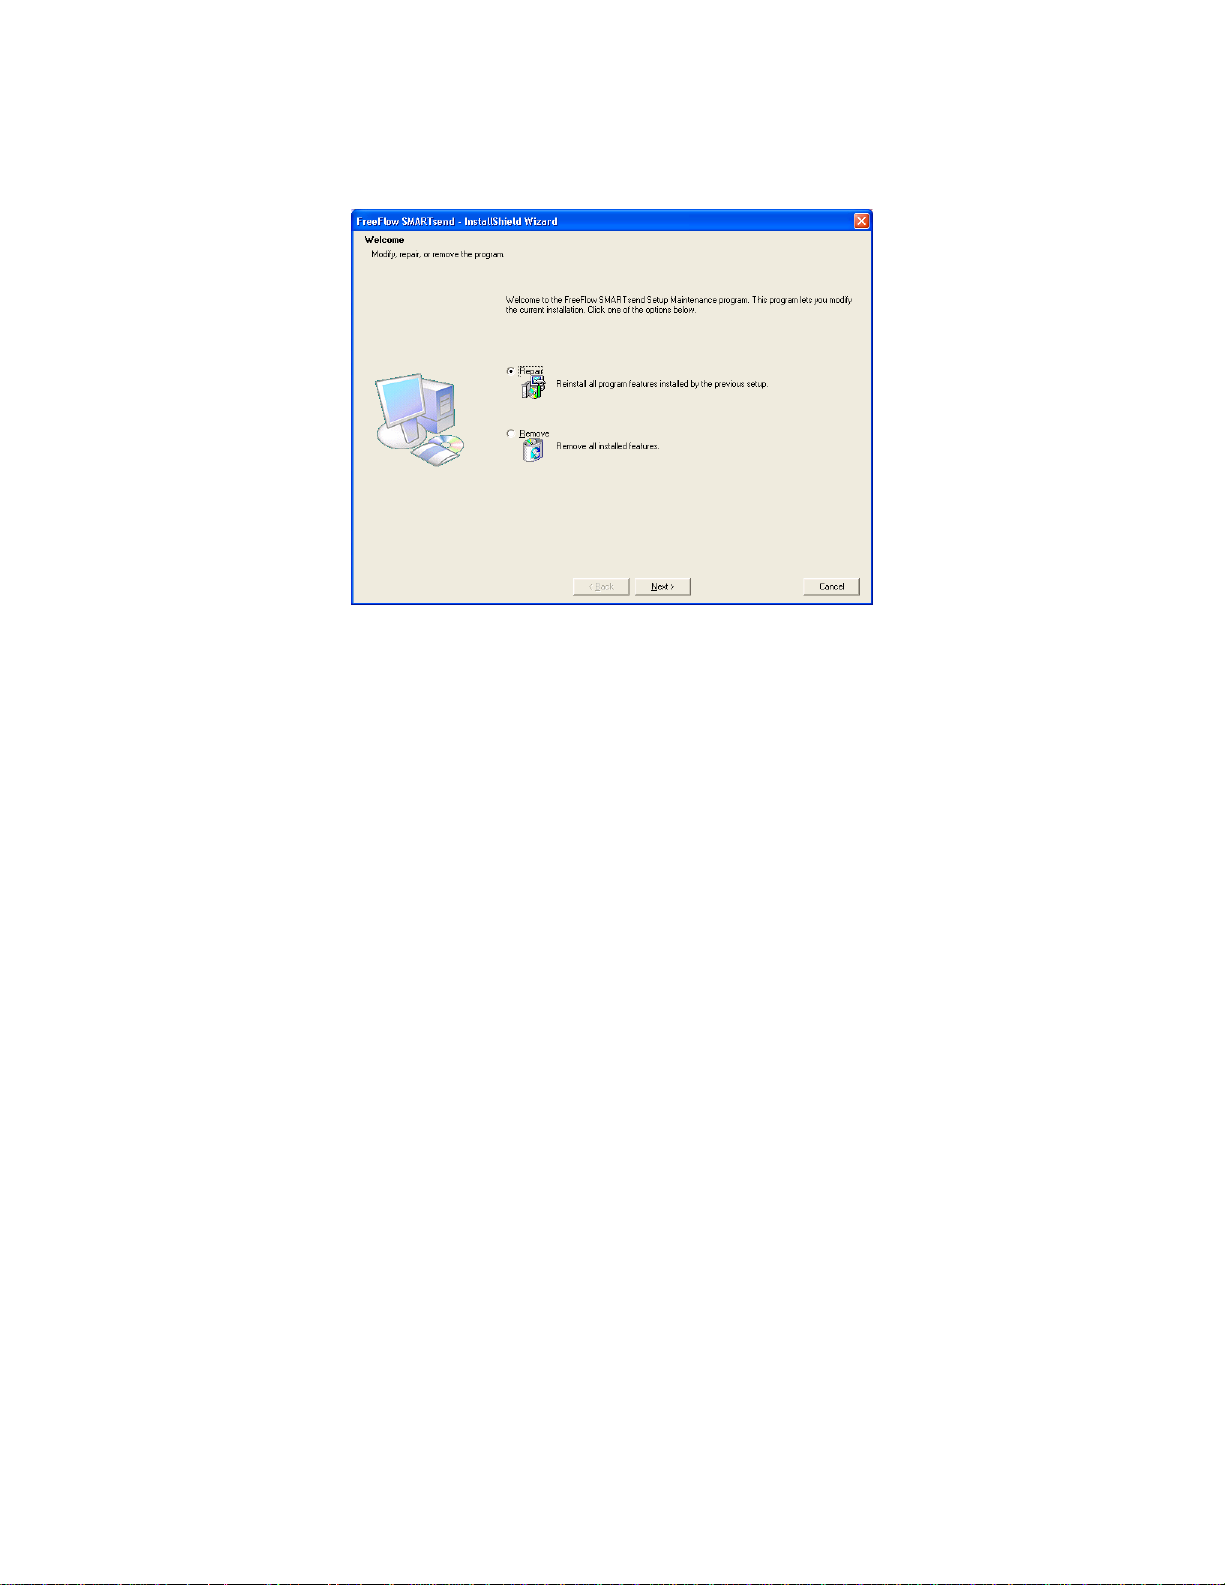
6. Follow the directions provided by the installer to complete the repair.
Figure 1
Do newer Xerox Multifunction Devices require additional
configuration steps when they are being manually configured?
For newer Xerox Multifunction Devices, SMARTsend requires that the Login Credentials Source (labeled
Login Credentials Access to the Destination on the device’s web embedded server’s Fil e Reposit o r y
Setup page) be set to System. When manually configuring a newer Xerox Multifunction Device, please
access the device’s embedded web server and confirm that the value is set to System. If you are not
manually configuring a new Xerox Multifunction Device, SMARTsend will take care of this setting.
How do I configure SMARTsend to use a Sun Java System Directory
LDAP Server for Integrated Address Book Lookup?
The following string entry should be added to the Registry before configuring the SMARTsend LDAP
settings:
[HKEY_LOCAL_MACHINE\SOFTWARE\Xerox\FreeFlowDDS\Settings\Install]
LdapObjectFilter = (objectClass=person)
Note: This value is not required for other types of LDAP servers and may cause them to fail to
return user records. Also, depending on server setup, a different filter string may be required.
When configuring the SMARTsend LDAP settings:
1. At the E-mail and Address Book Setup page (Figure 1), enter a valid LDAP host name (e.g. v-sundir)
7
Page 8

Figure 1
2. Enter colon port number after the host name (e.g. v-sundir:389)
3. Enter a forward slash and base (e.g. v-sundir:389/o=Test_Domain)
4. Enter valid LDAP property mappings.
5. Select Apply button and then select Test to verify success.
Note: Short host names may or may not work so please use the full host name (e.g. v-
sundir.domain.com).
How do I create a scan directory that can be used by the SMARTsend
Scan to Home Utility to scan to an FTP home location?
Option 1: Create the scan directory inside the FTP root directory.
Note: The following sample procedure is based on a Windows 2000 server.
1. Open Windows Explorer on the computer or server that will be the “scan server.”
2. Create a directory inside of the last directory of the FTP root path (the ftp root path in this example is
c:\inetpub\ftproot).
3. Right-click the ftproot directory (or the last directory in the FTP root path that the scan server was just
created in) and select Sharing (Figure 1). The folder Properties dialog will appear.
Figure 1
8
Page 9
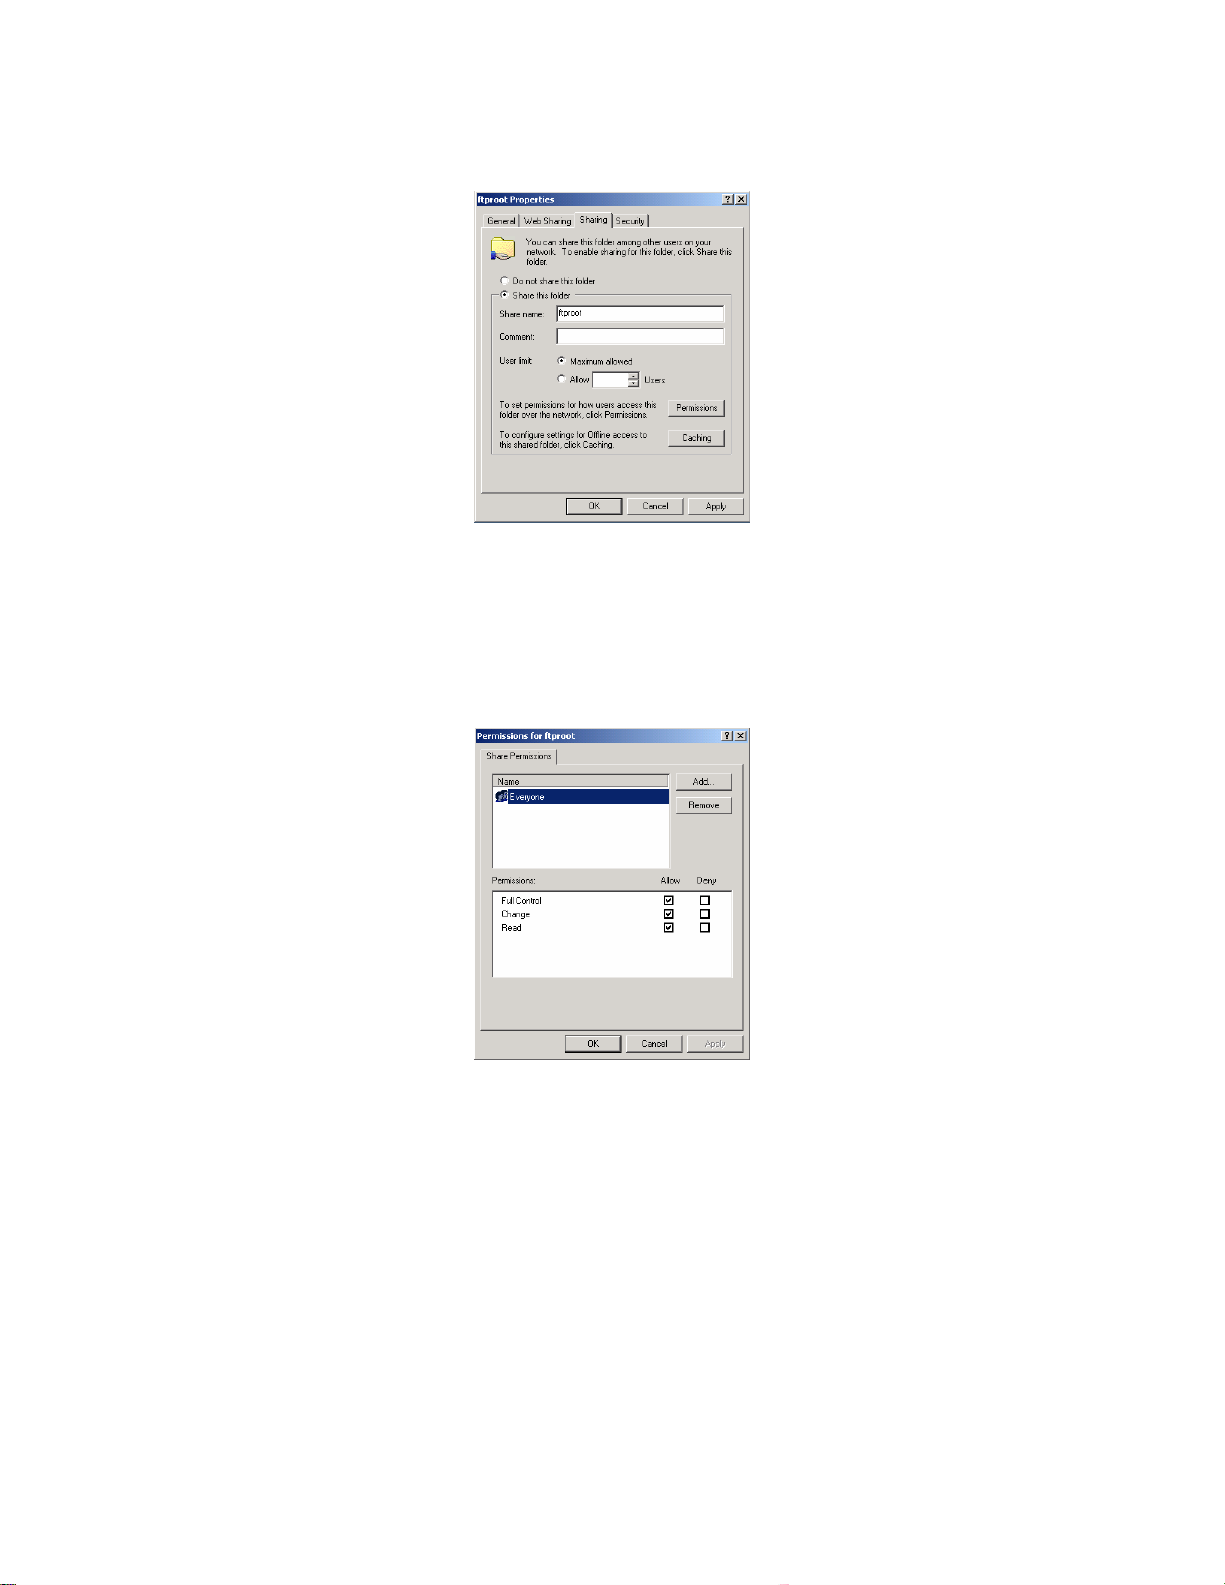
4. Select the radio button for Share this folder then click OK (Figure 2).
Figure 2
5. The Permissions dialog will appear (Figure 3). Make sure that the Everyone group has been granted
Full Control, Change and Read permissions. Click OK.
Note: Although the Everyone group has been granted Full Control, Change and Read permissions to
the share, NTFS permissions for users will override share permissions and can be used to control
access.
Figure 3
6. The last directory in the FTP root path will appear in Windows Explorer with a hand under it to signify
that it is now a shared folder (Figure 4).
9
Page 10

Figure 4
7. Close Windows Explorer.
8. Proceed to creating user folders with the SMARTsend Scan to Home Utility.
Option 2: Create a Virtual Directory in the Microsoft IIS service.
Note: The following sample procedure is based on a Windows 2000 server.
1. First, create a “parent” directory on the computer or server that will be the “scan server” and share this
directory. Then create a subdirectory inside the shared parent directory. The Virtual Director y that will
be created in the next several steps will point to this parent and subdirectory (e.g.
c:\SMARTsend\Scans).
2. Open the Internet Information Services Manager (S tar t > Settings > Control Panel > Administrative
Tools > Internet Services Manager) and expand IIS in the tree view (Figure 1).
Figure 1
3. Right-click Default FTP Site and select New > Virtual Directory. The Microsoft Virtual Di rect ory
Creation Wizard (Figure 2) will appear.
10
Page 11

Figure 2
4. Click Next.
5. Enter the name you would like used when gaining access to this virtual directory (Figure 3).
Figure 3
6. Click Next.
7. Enter the path of the “scan server” created in step 1 (Figure 4).
Figure 4
8. Click Next.
9. Select access permissions (Figure 5). Please note that SMARTsend will require write permissions to
the Virtual Directory.
11
Page 12

Figure 5
10. Click Next.
11. Click Finish to exit.
12. Close the Internet Services Manager.
13. Proceed to creating user folders with the SMARTsend Scan to Home Utility.
How do I create a scan directory that can be used by the SMARTsend
Scan to Home Utility to scan to a Network Folder home location?
Note: The following sample procedure is based on a Windows 2000 server.
1. Open Windows Explorer on the computer or server that will be the “scan server.”
2. Create a directory (e.g. c:\SMARTsend\Network_Folder_Scans).
3. Right-click the directory created in step 2 and select Sharing (Figure 1). The folder Properties dialog
will appear.
Figure 1
4. Select the radio button for Share this folder then click Permissions (Figure 2).
12
Page 13

Figure 2
5. The Permissions dialog will appear (Figure 3). Make sure that the Everyone group has been granted
Full Control, Change and Read permissions. Click OK.
Note: Although the Everyone group has been granted Full Control, Change and Read permissions to
the share, NTFS permissions for users will override share permissions and can be used to control
access.
Figure 3
6. The “scan server” will appear in Windows Explorer with a hand under it to signify that it is now a
shared folder (Figure 4).
13
Page 14

Figure 4
7. Close Windows Explorer.
8. Proceed to creating user folders with the SMARTsend Scan to Home Utility.
How do I create and configure a Domino Document Library for use
with SMARTsend?
Verify Domino is ready to accept uploads from SMARTsend
1. Ensure the DIIOP and HTTP tasks are running on the Domino Server (Figure 1). To run the DIIOP
task, simply type “load DIIOP” at the domino prompt. To make sure this task runs at a server reboot,
add DIIOP to the notes.ini file in the line titled “ServerTasks=”.
Note: For Domino 6.0 and later, HTTP is optional for DIIOP. However, SMARTsend still needs the
HTTP task running in order to file documents.
14
Page 15

Figure 1
2. Set Java/JavaScript/COM Security
a. In order to communicate with the Domino server, the appropriate security setting must be
made for “Restricted Java/JavaScript/COM” code.
b. From the Domino Administrator, cli ck Configuration, and open the Server document.
c. Click the Security tab.
d. In the Programmability Restrictions section, select the Run restricted Java/JavaScript/COM
field and enter names or groups of people who will use SMARTsend to communicate with the
Domino server.
e. Use a “*” to allow access to all users.
3. Enable the Domino Server for File Uploads
a. SMARTsend application uses HTTP POST to upload files to the Domino server. To enable
Domino server to accept HTTP file uploads, open the notes.ini file in Notepad. Ensure that
the line titled DominoDisableFileUploadChecks is set to “1”. If this line does not exist add the
following as a new line at the end of the file:
DominoDisableFileUploadChecks =1
Create and configure a Domino Library
1. Open Domino Administrator and select File > Database > New (Figure 1). The New Database dialog
will be displayed (Figure 2).
15
Page 16

Figure 1
2. Select the Server/Domain of the location where you would like to create the database and enter a Title
of your preference. The File name will be updated for you. However, you may choose a different file
name.
Note: Please record the file name. You will need to know what it is when creating a SMARTsend
workflow.
3. Select the “Doc Library – Notes & Web” Template and click OK to create the Document Library
Figure 2).
Figure 2
4. Set the Access Control List (ACL) for the new database
a. From the Tools pane, select File > Database > Access Control (Figure 1). In the Access
Control dialog box (Figure3), select the user you want to have access to this database. Select
16
Page 17

the User type as Person and Access as Editor. Select the Delete documents and Create
shared folders/views options. Click OK to grant access to the selected user.
Note: ACL decisions are made by the Administrator. Access can be granted based on individual users
or groups. This is not SMARTsend specific, but users that will be filing to this library will need the
appropriate access.
Figure 3
5. Reboot Domino Server to enable configuration changes.
Creating a Domino Workflow in SMARTsend
1. Launch Internet Explorer (or other supported browser) and access the SMARTsend site
(http://hostname/smartsend ).
2. From the SMARTsend User Home Page (Figure 1), select Add New Distribution Workflow.
Figure 1
3. From the Document Destination page, select the link Add Locations under the section called Domino
(Figure 2).
17
Page 18

Figure 2
4. At the Domino Properties dialog, configure the Domino destination (Figure 3).
a. Enter a document Destination Name. This is just the name of the destination. It can be any
text value.
b. Enter (or cut and paste) the URL of your Document Library into the Domino Database URL
field. This is in the format
http://dominohost/libraryfilename.nsf.
c. Form name is op tional.
d. Select OK.
Figure 3
5. The Account Settings pop-up will appear (Figure 4). Enter the User Name and Password of a user
that has been granted access to the Domino Document Library.
Note: Pop-up blockers must be turned off to allow the Account Settings dialog to appear.
18
Page 19

Figure 4
6. Select OK and you will be returned to the Domino Properties dialog. Press OK for the Domino
destination to be added to the SMARTsend workflow.
7. Select Next if this is the last destination you will be using.
8. At the Document Name and Type page (Figure 5), enter the document identification and type
information as required and click Next.
Figure 5
9. At the Document Attributes page (Figure 6), enter document attributes as required and click Next.
19
Page 20

Figure 6
10. At the Workflow Settings page (Figure 7) Job Confirmation method and Workflow Access and click
Next.
Figure 7
11. At the Save Workflow page (Figure 8), enter Workflow Name and Description.
Note: The name that is entered is the name of the overall workflow. This is different from the
Destination Name since one workflow can have many destinations.
12. Select Publication Options. In this example, we will be publishing a PaperWare cover sheet. The
steps for publishing to a Xerox Multifunction device are similar.
20
Page 21

Figure 8
13. At the Publish PaperWare Cover Sheet for Work flow page (Figure 9), click Create Cover sheet (or
select a Xerox multifunction and click OK if you are using the publish to a Xerox Multifunction
Device option).
Figure 9
14. A PaperWare cover sheet (Figure 10) will be created and sent to your client. Some security settings
may prevent this download; make sure the SMARTsend computer is in your list of “trusted ” sites.
15. Print the PaperWare cover sheet.
21
Page 22

Figure 10
16. On the PaperWare cover sheet printed in the previous step, select the Domino location by pu tting an x
in the checkbox.
17. Scan the cover sheet and scan job using the PaperWare template on the multifunction device (Or select
the template on the multifunction device if you published to the device directly).
18. Verify the scan job processed by either opening the Library from Lotus notes or via a web browser at
the URL you used for the workflow (Figure 11 and 12).
22
Page 23

Figure 11
Figure 12
23
Page 24

More information about DIIOP
An HTTP server is necessary for the Lotus Domino remote libraries to make a CORBA connection to the
Domino DIIOP server. On a Lotus Domino 5 server you must use anonymous access to the Domino HTTP
server but the Domino 6 DIIOP server has a simple built-in HTTP server wh ich can be used for this
purpose.
The information returned from this initial HTTP GET request is called the IOR, it contains, amongst other
things, the real DIIOP server host-name/IP-number and the IP-port the SMARTsend application should
connect to.
It is very important that the IOR information is correct; otherwise the SMARTsend application will try to
connect to the wrong machine and/or port.
The DIIOP server generates this information in “.../Lotus/Domino/Data/domino/html/diiop_ior.txt” the first
time it starts, i.e. in the root of the Domino Web server root.
The only way to regenerate this file is to change the DIIOP host or port in Domino Administ rat o r, rest ar t
the Domino DIIOP task (“restart task diiop”), change the host or port back to normal in Domino
Administrator and restart the Domino DIIOP task again.
To load the DIIOP server automatically when the Domino server starts, open the notes.ini file on the
Domino server in Notepad and add “DIIOP” to the list of tasks to run on the server.
To check if the IOR has been generated and is accessible you can point a web browser to
“http://host:port/diiop_ior.txt” where host is the host-name/IP-number of the HTTP server and port is
63148 if you want to use the HTTP server built in to the DIIOP server (and you are using the default DIIOP
port) or 80 if you want to use the Domino built-in HTTP server (and you are using the default HTTP port).
If this test works, you will get back a very long hexadecimal string (>350 characters) and the host and port
can be used by the SMARTsend application to get the IOR, if it does not work SMARTsend application
will not be able to connect.
Internet Links to Domino Information
Running Server Tasks http://www-
12.lotus.com/ldd/doc/domino_notes/6.5/help65_admin.nsf/b3266a3c17f9bb7085256b870069c0a9/7d5c04d
bf086b6c785256d9b004b337c?OpenDocument
Setting up DIIOP
12.lotus.com/ldd/doc/domino_notes/6.5/help65_admin.nsf/89d3962efd85426f85256b870069c0aa/be442e1
584f16beb85256d9b004b03af?OpenDocument
Some information about the DominoDisableFileUploadChecks line in Notes.ini
http://www-1.ibm.com/support/docview.wss?uid=sim28bc635261a61084785256cc30001cdaf
http://www-
24
Page 25

How do I populate Domino metadata using a SMARTsend workflow?
Note: SMARTsend is not able to query the Domino Server for metadata (document attribute) fields.
Therefore, there are some administrative steps that must be performed before a SMARTsend workflow can
be used to populate Domino metadata fields.
Administration Steps
1. Decide which Domino metadata fields you would like to populate using a SMARTsend workflow. To
know which ones are available, see the design tab of a document in your Domino Document Library.
The most common fields to populate are Categories, Body, and Subject. Therefore, these are the fields
that will be covered in this document.
2. Enter the Domino specific XML into the service settings for Domino
a. Launch Internet Explorer (or other supported browser) and access the SMARTsend site
http://hostname/smartsend ).
(
b. On the SMARTsend Administration Hom e Page, select Configure Service Settings.
c. On the Configure Service Settings page, click Edit for the Domino service
d. Scroll to bottom of page and insert the following XML:
<?xml version="1.0" encoding="ISO-8859-1" ?>
<metadataConfig
xmlns="http://www.xerox.com/dsp/2002/services/repositories/domino">
<metadata label="Subject" name="Subject" required="false"/>
<metadata label="Body" name="Body" required="false"/>
<metadata label="WebCategories" name="WebCategories" required="false"/>
</metadataConfig>
Note: This XML can be edited to your own requirements by changing the “metadata” elements of
the xml. The metadata elements consist of the following:
label – This is the text that the user will see when mapping document attributes.
name – This is the name of the field as defined in Domino.
required – This can be set to true or false and specifies whether or not the user has to enter data for
this field in order for the workflow to be successful.
e. Click Apply.
User Steps - Create a SMARTsend Workflow to populate the metadata fields
1. Go to the SMARTsend User Home page and click Add New Distribution Workflow.
2. At the Document Destinations page, add a Domino destination.
3. Click Next.
4. At the Document Name and Type page, enter the document identification and type information as
required and click Next.
5. At the Document Attribute screen, click Add Field.
6. At the Attribute Properties dialog, enter a Field Name for the attribute.
Note: It may be easiest to name these fields the same as they are named in Domino. Users can see the fields
that have been defined for them by scrolling down to the attribute mapping section of the Attribute
Properties dialog screen (Figure 1).
25
Page 26

Figure 1
7. Select Default Values as expected.
8. Select Field Properties as required.
9. In the Attribute Mapping section of the dialog, select the data field in Domino that you want populated
with this information.
10. Click OK.
11. Repeat steps 5-9 for each field required in Domino.
12. If desired, click Save as new Profile (Figure 2) to enable the use of these fields in future workflows.
Figure 2
13. Continue workflow creation and publication as required .
14. Use publication page or the user interface of the Xerox Multifunction Device to enter the metadata
values.
Note: If the Domino Document Library requires you to populate the “Categories” field on th e default form
for a document library, you need to use the Field name of “WebCategories” as seen in the sample XML
above. The use of just “Categories” is not supported.
26
Page 27

I am able to add a destination to a SMARTsend workflow. However,
the workflow publication fails to execute. Why?
When adding a destination to a SMARTsend workflow, the user credentials that are entered for the
destination (e.g. DocuShare, SharePoint Portal Server 2003) must h a ve write permission on the destination
server. If the credentials have only read permission, the user will be able to add the destination to a
SMARTsend workflow. However, the workflow publication will fail to execute because the user does not
have permissions to upload a document to the destination server.
I am unable to import a large number of users into the SMARTsend
Scan to Home user database? Why?
Depending on the amount of memory available to the SMARTsend application, importing more than
25,000 users at a time into the SMARTsend Scan to Home user database may cause application problems.
To remedy this problem, perform the following procedure:
1. Use the SMARTsend Scan to Home Utility to create CSV files that have a maximum of 25,000 users.
2. Use the SMARTsend Scan to Home application features to import each of the CSV files individually
into the SMARTsend user database.
Note: Please ensure that the Append the users above to the users in the database option is selected
when importing multiple CSV files. Please consult Chapter 6 of the Installation and Administration
Guide for additional information on creating CSV files and importing Scan to Home users.
I am unable to scan to a URL destination that is an IIS folder. Why?
In order to scan to a URL destination that is an IIS folder, SMARTsend requires that the IIS folder be
configured to allow write access. When you create a new folder in IIS, the default settings are to allow
anonymous access, but with read only (no write) permissions. Please reconfigure the IIS folder to allow
write access and resubmit your job.
What versions of Netscape Navigator are supported by SMARTsend?
Netscape Navigator version 7.2 or higher is supported for viewing and configuring the SMARTsend 2.0
site, managing devices and managing workflows.
When I attempt to uninstall SMARTsend, I receive an IIS error and the
un-installation is not successful. Why?
In order to successfully uninstall SMARTsend from your computer, you must have IIS installed. If IIS was
uninstalled first, please reinstall IIS and then attempt to uninstall SMARTsend again.
If you attempt to uninstall SMARTsend after IIS has been uninstalled, you will receive the error message
shown in Figure 1.
27
Page 28

Figure 1
Why can I only file to one Hummingbird server at a time?
Once the Hummingbird DM version 5.1.0.5 client is installed on the SMARTsend computer, the client
requires that the desired Hummingbird DM server be specified usi n g t he DM Co n necti o n Wiza r d. Due t o
this requirement, SMARTsend will be able to use only one Hummingbird server at a time.
28
 Loading...