

Page 1

Version 1.6, October 2010
Version 1.6, October 2010
Xerox Secure Access
Xerox Secure Access
®
Unified ID System
Unified ID System
Administration Guide
Administration Guide
®
701P48478 Rev B
© 2010 Xerox Corporation. All rights reserved.
© 2010 Xerox Corporation. All rights reserved.
Page 2

Copyright© 2007-2010 by Xerox Corporation. All rights reserved. XEROX©, Secure Access Unified ID System, SMARTsend, and
FreeFlow are trademarks of or licensed to Xerox Corporation in the United States and other countries.
Page 3

Contents
1Safety Notes
Electrical Supply . . . . . . . . . . . . . . . . . . . . . . . . . . . . . . . . . . . . . . . . . . . . . . . . . . . . . . . . . . . . . . . . . . . . . . . 6
WARNING - Electrical Safety Information. . . . . . . . . . . . . . . . . . . . . . . . . . . . . . . . . . . . . . . . . . . . . . . . . . .7
Disconnect Device . . . . . . . . . . . . . . . . . . . . . . . . . . . . . . . . . . . . . . . . . . . . . . . . . . . . . . . . . . . . . . . . . . . . . 7
Regulatory Information . . . . . . . . . . . . . . . . . . . . . . . . . . . . . . . . . . . . . . . . . . . . . . . . . . . . . . . . . . . . . . . . . . .8
Radio Frequency Emissions. . . . . . . . . . . . . . . . . . . . . . . . . . . . . . . . . . . . . . . . . . . . . . . . . . . . . . . . . . . . .8
Product Recycling and Disposal . . . . . . . . . . . . . . . . . . . . . . . . . . . . . . . . . . . . . . . . . . . . . . . . . . . . . . . . . . 10
European Union . . . . . . . . . . . . . . . . . . . . . . . . . . . . . . . . . . . . . . . . . . . . . . . . . . . . . . . . . . . . . . . . . . . . . 10
EH&S Contact Information. . . . . . . . . . . . . . . . . . . . . . . . . . . . . . . . . . . . . . . . . . . . . . . . . . . . . . . . . . . 11
2 Installation Checklist
3 Secure Access Overview
What is Secure Access? . . . . . . . . . . . . . . . . . . . . . . . . . . . . . . . . . . . . . . . . . . . . . . . . . . . . . . . . . . . . . . . . . . 15
Secure Access Components . . . . . . . . . . . . . . . . . . . . . . . . . . . . . . . . . . . . . . . . . . . . . . . . . . . . . . . . . . . . . . 16
Core Authentication Server (CAS) . . . . . . . . . . . . . . . . . . . . . . . . . . . . . . . . . . . . . . . . . . . . . . . . . . . . . 17
Device Control Engine (DCE) . . . . . . . . . . . . . . . . . . . . . . . . . . . . . . . . . . . . . . . . . . . . . . . . . . . . . . . . . 17
Document Routing Engine (DRE) . . . . . . . . . . . . . . . . . . . . . . . . . . . . . . . . . . . . . . . . . . . . . . . . . . . . . 18
Making Changes to Server Components. . . . . . . . . . . . . . . . . . . . . . . . . . . . . . . . . . . . . . . . . . . . . . . 19
Data Reader Support and User Workflow . . . . . . . . . . . . . . . . . . . . . . . . . . . . . . . . . . . . . . . . . . . . . . . . . 20
Magstripe Device Reader. . . . . . . . . . . . . . . . . . . . . . . . . . . . . . . . . . . . . . . . . . . . . . . . . . . . . . . . . . . . . 20
Contactless Smart Cards and Proximity Cards . . . . . . . . . . . . . . . . . . . . . . . . . . . . . . . . . . . . . . . . . 20
Card Reader Signals and Modes . . . . . . . . . . . . . . . . . . . . . . . . . . . . . . . . . . . . . . . . . . . . . . . . . . . . . . 21
Administering Secure Access . . . . . . . . . . . . . . . . . . . . . . . . . . . . . . . . . . . . . . . . . . . . . . . . . . . . . . . . . . . . . 23
Language Support. . . . . . . . . . . . . . . . . . . . . . . . . . . . . . . . . . . . . . . . . . . . . . . . . . . . . . . . . . . . . . . . . . . . . . . 23
4 Configuration & Management
Configuration Workflow . . . . . . . . . . . . . . . . . . . . . . . . . . . . . . . . . . . . . . . . . . . . . . . . . . . . . . . . . . . . . . . . . 25
Add MFP Devices to the Secure Access Database . . . . . . . . . . . . . . . . . . . . . . . . . . . . . . . . . . . . . . . . . . 26
Enter Device Parameters . . . . . . . . . . . . . . . . . . . . . . . . . . . . . . . . . . . . . . . . . . . . . . . . . . . . . . . . . . . . . 26
Associate the MFP with a Secure Access Authentication Device. . . . . . . . . . . . . . . . . . . . . . . . . 27
Setting Authentication Parameters . . . . . . . . . . . . . . . . . . . . . . . . . . . . . . . . . . . . . . . . . . . . . . . . . . . . . . . 28
HID Decoding . . . . . . . . . . . . . . . . . . . . . . . . . . . . . . . . . . . . . . . . . . . . . . . . . . . . . . . . . . . . . . . . . . . . . . . 29
Swipe Card Self-Registration . . . . . . . . . . . . . . . . . . . . . . . . . . . . . . . . . . . . . . . . . . . . . . . . . . . . . . . . . 30
Configure Follow-You Printing. . . . . . . . . . . . . . . . . . . . . . . . . . . . . . . . . . . . . . . . . . . . . . . . . . . . . . . . . . . . 31
Convert Ports to use the Secure Access Port Monitor . . . . . . . . . . . . . . . . . . . . . . . . . . . . . . . . . . . 31
Creating a Print Queue with a Secure Access Port . . . . . . . . . . . . . . . . . . . . . . . . . . . . . . . . . . . . . . 32
Create Pull Groups . . . . . . . . . . . . . . . . . . . . . . . . . . . . . . . . . . . . . . . . . . . . . . . . . . . . . . . . . . . . . . . . . . . 33
Xerox Secure Access Administration Guide 4
Page 4

Contents
Import and Synchronize User Accounts . . . . . . . . . . . . . . . . . . . . . . . . . . . . . . . . . . . . . . . . . . . . . . . . . . . 34
Use ADS to Import Existing Users. . . . . . . . . . . . . . . . . . . . . . . . . . . . . . . . . . . . . . . . . . . . . . . . . . . . . 34
Adding Users from A Flat File Import . . . . . . . . . . . . . . . . . . . . . . . . . . . . . . . . . . . . . . . . . . . . . . . . . 35
Add. . . . . . . . . . . . . . . . . . . . . . . . . . . . . . . . . . . . . . . . . . . . . . . . . . . . . . . . . . . . . . . . . . . . . . . . . . . . . . . . . 36
Delete . . . . . . . . . . . . . . . . . . . . . . . . . . . . . . . . . . . . . . . . . . . . . . . . . . . . . . . . . . . . . . . . . . . . . . . . . . . . . . 36
Modify. . . . . . . . . . . . . . . . . . . . . . . . . . . . . . . . . . . . . . . . . . . . . . . . . . . . . . . . . . . . . . . . . . . . . . . . . . . . . . 37
Creating Accounts Manually . . . . . . . . . . . . . . . . . . . . . . . . . . . . . . . . . . . . . . . . . . . . . . . . . . . . . . . . . 37
Monitor Authentication Events . . . . . . . . . . . . . . . . . . . . . . . . . . . . . . . . . . . . . . . . . . . . . . . . . . . . . . . . . . . 38
Configure the Release My Documents Custom Service . . . . . . . . . . . . . . . . . . . . . . . . . . . . . . . . . . . . . 39
Adding the Release My Documents Custom Service to the MFP . . . . . . . . . . . . . . . . . . . . . . . . . 40
Release My Documents End-User Workflow . . . . . . . . . . . . . . . . . . . . . . . . . . . . . . . . . . . . . . . . . . . 40
5Appendices
Directory Synchronization Access Permissions . . . . . . . . . . . . . . . . . . . . . . . . . . . . . . . . . . . . . . . . . . . . . 43
Resetting an Authentication Device . . . . . . . . . . . . . . . . . . . . . . . . . . . . . . . . . . . . . . . . . . . . . . . . . . . . . . 44
Port Assignments. . . . . . . . . . . . . . . . . . . . . . . . . . . . . . . . . . . . . . . . . . . . . . . . . . . . . . . . . . . . . . . . . . . . . . . . 44
Troubleshooting. . . . . . . . . . . . . . . . . . . . . . . . . . . . . . . . . . . . . . . . . . . . . . . . . . . . . . . . . . . . . . . . . . . . . . . . . 45
Troubleshooting the Release My Documents Custom Service Installation . . . . . . . . . . . . . . . . . . . 48
Accessing the Release My Documents Screen . . . . . . . . . . . . . . . . . . . . . . . . . . . . . . . . . . . . . . . . . . . . . 49
Setting the Number of Copies for a Print Job . . . . . . . . . . . . . . . . . . . . . . . . . . . . . . . . . . . . . . . . . . 49
Ending a User Session. . . . . . . . . . . . . . . . . . . . . . . . . . . . . . . . . . . . . . . . . . . . . . . . . . . . . . . . . . . . . . . . 50
Xerox Secure Access Administration Guide5
Page 5

Safety Notes
Read these safety notes carefully to ensure you operate the equipment safely and in compliance with
applicable legislation.
The equipment has been designed and tested to meet strict safety requirements. These include safety
agency approval, and compliance to established environmental standards.
Please read the following instructions carefully before operating the equipment and refer to them as
needed to ensure continued safe operation.
WARNING: Any unauthorized alteration, which may include the addition of new functions or
connection of external devices, may impact the product certification. Please contact your
authorized local dealer for more information
Electrical Supply
The power supply provided with the equipment must be operated from the type of electrical supply
indicated on the data plate label. If you are not sure that your electrical supply meets the
requirements, please consult your local power company for advice.
1
Xerox Secure Access Administration Guide 6
Page 6

Safety Notes
WARNING - Electrical Safety Information
• Use only the power supply supplied with this equipment.
• Do not place this equipment where people might step on or trip on the power cord or its associated
power supply.
• Do not place objects on the power supply power cord.
• If any of the following conditions occur, switch off the power to the equipment immediately and
disconnect the power cord from the electrical outlet. Call an authorized local service representative
to correct the problem.
• The equipment emits unusual odors.
• The power cord is damaged or frayed.
• A wall panel circuit breaker, fuse, or other safety device has been tripped.
• The equipment is exposed to water.
• Any part of the equipment is damaged.
Disconnect Device
The power cable to the power supply is the disconnect device for this equipment. To remove all
electrical power from the equipment, disconnect the power cable from the electrical outlet.
Xerox Secure Access Administration Guide7
Page 7

Safety Notes
Regulatory Information
Radio Frequency Emissions
United States, Canada
Note: This equipment has been tested and found to comply with the limits for a Class B digital
device, pursuant to part 15 of the FCC Rules. These limits are designed to provide reasonable
protection against harmful interference in a residential installation. This equipment generates,
uses and can radiate radio frequency energy and, if not installed and used in accordance with the
instructions, may cause harmful interference to radio communications. However, there is no
guarantee that interference will not occur in a particular installation. If this equipment does cause
harmful interference to radio or television reception, which can be determined by turning the
equipment off and on, the user is encouraged to try to correct the interference by one or more of
the following measures:
• Reorient or relocate the receiving antenna.
• Increase the separation between the equipment and receiver.
• Connect the equipment into an outlet on a circuit different from that to which the receiver is
connected.
• Consult the dealer or an experienced radio/TV technician for help.
Shielded interface cables must be used with this equipment to maintain compliance with FCC
regulations in the United States
Canada
This Class "B" digital apparatus complies with Canadian ICES-003.
Cet appareil Numérique de la classe "B" est conforme à la norme NMB-003 du Canada.
Xerox Secure Access Administration Guide 8
Page 8
Safety Notes
Europe
The CE mark applied to this product symbolizes XEROX’s declaration of
conformity with the following applicable Directives of the European Union, as of
the dates indicated:
December 12, 2006: Council Directive 2006/95/EC as amended. Approximation of the laws of the
member states related to low voltage equipment.
December 15, 2004: Council Directive 2004/108/EC as amended. Approximation of the laws of the
member states related to electromagnetic compatibility.
March 9,1999: Council Directive 99/5/EC, on radio equipment and telecommunications terminal
equipment and the mutual recognition of the conformity.
A full declaration of conformity, defining the relevant directives and referenced standards, can be
obtained from your XEROX Limited representative.
WARNINGS:
• In order to allow this equipment to operate in proximity to Industrial Scientific and
Medical (ISM) equipment, the external radiation from the ISM equipment may have to be
limited or special mitigation measures taken.
• Shielded interface cables must be used with this product to maintain compliance with
Council Directive 89/336/EEC.
"Regulatory information for RFID"
Readers provide with this product generates 13.56 MHz using an Inductive Loop System as a Radio
Frequency Identification device (RFID). This RFID device complies with the requirements specified in
FCC Part 15, Industry Canada RSS-210, European Council Directive 99/5/EC, and all applicable local
laws and regulations.
Operation of this device is subject to the following two conditions: (1) this device may not cause
harmful interference, and (2) this device must accept any interference received, including interference
that may cause undesired operation.
Changes or modifications to this equipment not specifically approved by the Xerox Corporation may
void the user’s authority to operate this equipment.
Xerox Secure Access Administration Guide9
Page 9
Safety Notes
Product Recycling and Disposal
If you are managing the disposal of your equipment, please note that the product contains lead,
mercury and other materials whose disposal may be regulated due to environmental considerations in
certain countries or states. The presence of lead and mercury is fully consistent with global regulations
applicable at the time that the product was placed on the market.
European Union
Disposal Information for Commercial Users
Application of this symbol on your equipment is confirmation that you must dispose
of this equipment in compliance with agreed national Procedures.
In accordance with European legislation end of life electrical and electronic
equipment subject to disposal must be managed within agreed procedures.
Prior to disposal please contact your local dealer or Xerox representative for end of
life take back information.
North America (USA, Canada)
Xerox operates a worldwide equipment take back and reuse/recycle program. Contact your Xerox sales
representative (1-800-ASK-XEROX) to determine whether this Xerox product is part of the program. For
more information about Xerox environmental programs, visit http://www.xerox.com/environment
If you are managing the disposal of your Xerox product, please note that the product may contain
lead, mercury, Perchlorate, and other materials whose disposal may be regulated due to environmental
considerations. The presence of these materials is fully consistent with global regulations applicable at
the time that the product was placed on the market. For recycling and disposal information, contact
your local authorities. In the United States, you may also refer to the Electronic Industries Alliance web
site: http://www.eiae.org
Perchlorate Material – This product may contain one or more Perchlorate-containing devices, such as
batteries. Special handling may apply; please see http://www.dtsc.ca.gov/hazardouswaste/perchlorate
Xerox Secure Access Administration Guide 10
Page 10

Safety Notes
Disposal Information for Domestic Users
Application of this symbol on your equipment is confirmation that you should not
dispose of the equipment in the normal household waste stream.
In accordance with European legislation, end of life electrical and electronic
equipment subject to disposal must be segregated from household waste.
Private households within EU Member States may return used electrical and
electronic equipment to designated collection facilities free of charge. Please contact
your local disposal authority for information.
In some Member States when you purchase new equipment your local retailer may
be required to take back your old equipment free of charge. Please ask your retailer
for information.
Other Countries
Please contact your local waste authorities and request disposal guidance.
EH&S Contact Information
Contact Information
For more information on Environment, Health, and Safety in relation to this Xerox product and supplies,
please contact the following customer help lines:
USA: 1-800 828-6571
Canada: 1-800 828-6571
Europe: +44 1707 353 434
http://www.xerox.com/environment safety information US (Product Safety Information for US)
http://www.xerox.com/environment_europe safety information EU (Product Safety information for EU)
Xerox Secure Access Administration Guide11
Page 11
Installation Checklist
The Xerox Secure Access Installation and Administration Guides include step-by-step instructions for
installing and configuring the Secure Access server and MFPs. This chapter provides a table outlining
the order in which the installation should occur based on the type of Secure Access hardware
configuration starting with the Installation Guide.
Xerox Secure
Steps
(*) indicates Required step
Installation Guide
1. Read Chapter 3 Installation Overview * *
Xerox Secure
Access with USB
Card Reader
Access with
Authentication
Device and Card
Reader
2
2. Chapter 4 Installing the Secure Access Server: Section 1.
Preparing the Network and Database
3. Chapter 4 Installing the Secure Access Server: Section 2. Run
the Installation Wizard
4. Chapter 5 Setting Up the Hardware: Step 1. Configure the
Authentication Device IP Address
5. Chapter 5 Setting Up the Hardware: Step 2. Mount the Secure
Access Authentication Device
6. Chapter 5 Setting Up the Hardware: Step 3. Connect the
Hardware
7. Chapter 5 Setting Up the Hardware: Step 4. Mount/Connect
the Secure Access USB Card Reader
Administration Guide
8. Read Chapter 3 Secure Access Overview * *
9. Chapter 4 Configuration Workflow: Step 1 - Configure Xerox
MFP device to accept network authentication through the Xerox
Secure Access mechanism
10. Chapter 4 - Add MFP devices to the Secure Access Database * *
**
**
Skip *
Skip *
Skip *
*Skip
**
11. Chapter 4 - Associate the MFP with a Secure Access
Authentication Device
12. Chapter 4 - Configure Follow-You Printing (optional) * *
13. Chapter 4 - Set authentication parameters * *
Xerox Secure Access Administration Guide 12
Skip *
Page 12

Installation Checklist
Xerox Secure
Steps
(*) indicates Required step
Xerox Secure
Access with USB
Card Reader
Access with
Authentication
Device and Card
Reader
14. Chapter 4 - Import and synchronize user accounts * *
15. Chapter 4 - Configure the Release My Documents Custom
Service
**
Xerox Secure Access Administration Guide13
Page 13

Secure Access Overview
This chapter includes:
• What is Secure Access? on page 15
• Secure Access Components on page 16
• Data Reader Support and User Workflow on page 20
• Administering Secure Access on page 23
• Language Support on page 23
3
After you install the Xerox Secure Access Unified ID System
the Authentication Devices or Secure Access USB Card Reader, use this guide to add MFP (Multifunction Printer) devices to the Secure Access database, enabling communication between the Server
and the Authentication Devices. Use this guide to perform advanced configuration tasks for all
components and features of Secure Access.
This chapter provides information about:
• The hardware and software components that comprise Xerox Secure Access
• Accessing the Secure Access Manager to administer the system
®
Server and perform the physical setup of
Xerox Secure Access Administration Guide 14
Page 14
Secure Access Overview
Secure Access Server
Secure Access Authentication
Device
Card Reader
Xerox MFP
Ethernet Connection
USB Card
Reader
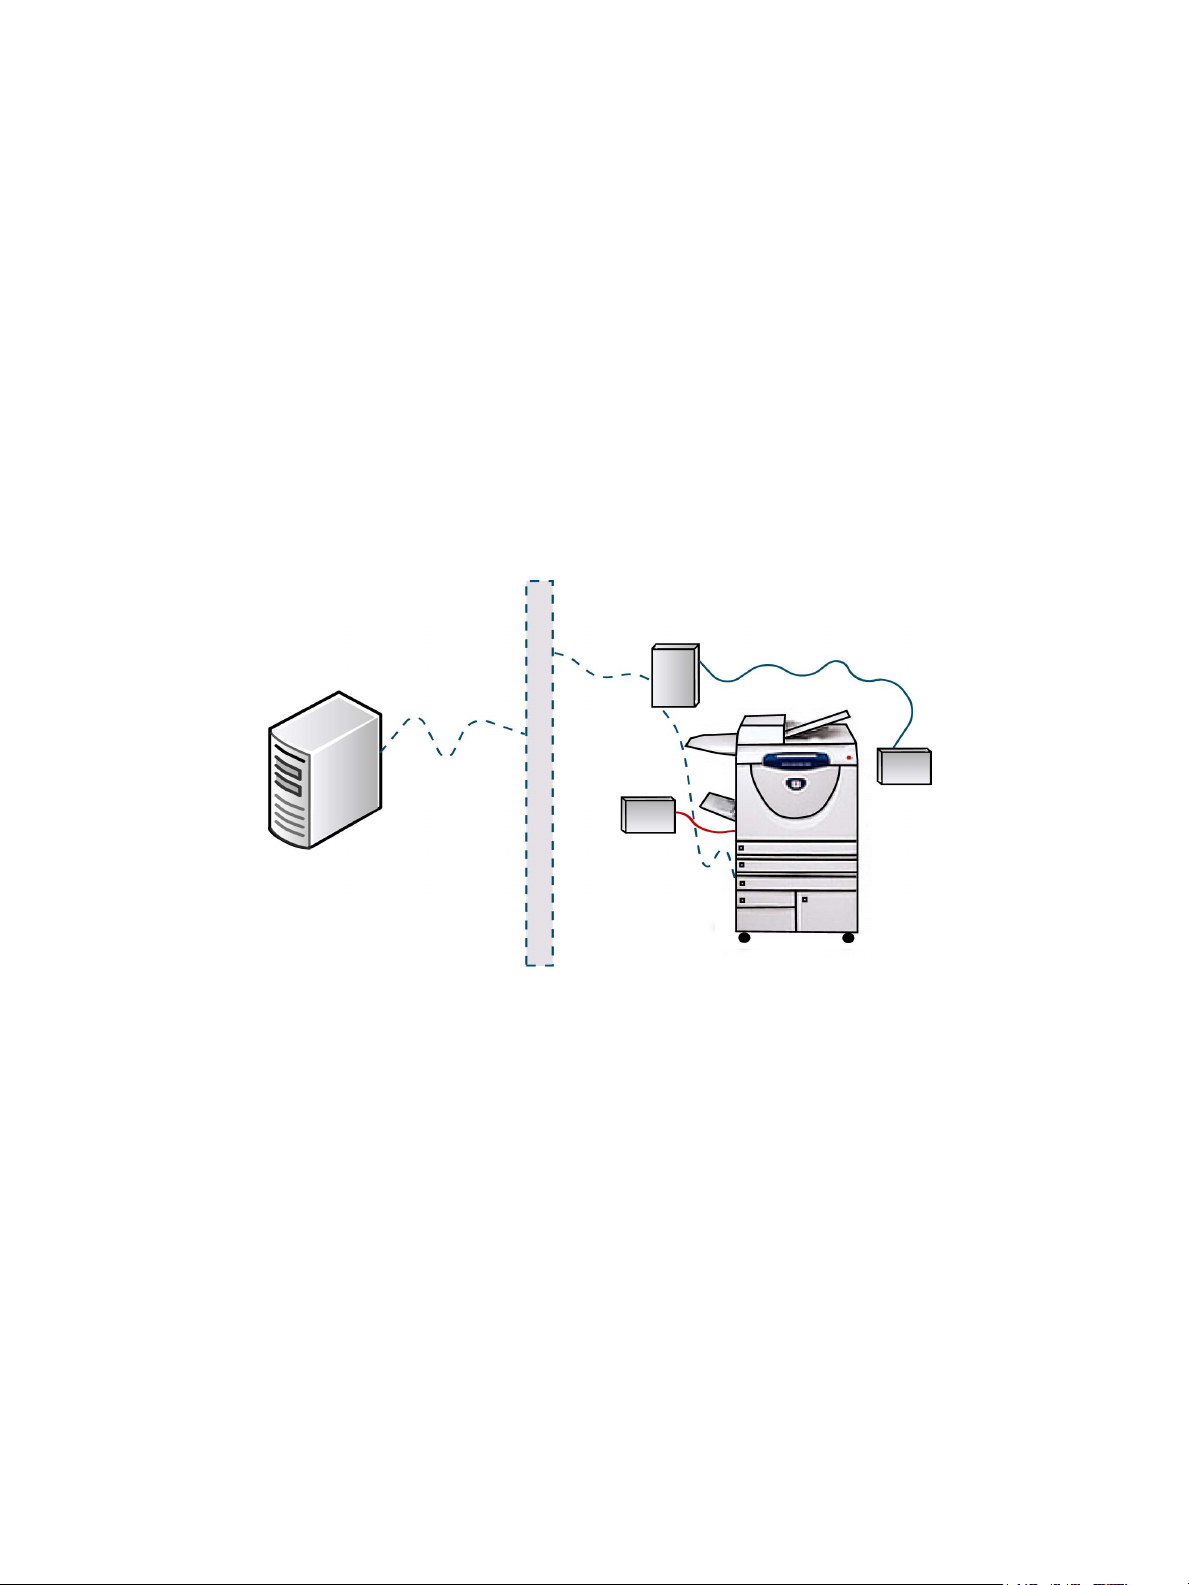
What is Secure Access?
Secure Access Unified ID System® provides the ability to control access to the print, fax, copy and scan
functions of Xerox Multifunction printers (MFP). When a user approaches a device controlled by Secure
Access, they must either swipe their card or pass their card over the proximity card reader. The MFP
front panel is active only when the user’s account information is authenticated by the Secure Access
server.
Using a proprietary protocol (Convenience Authentication Protocol), the Secure Access Authentication
Device contacts the Secure Access Server via an ethernet network connection to verify the user
information gathered from the swipe or proximity card. If using a USB Card Reader the communication
is from the MFP to the Secure Access Server directly. If the Secure Access Server verifies the user, the
MFP device panel unlocks and is ready for use. If the user is not verified, the MFP remains locked and
the user cannot perform any tasks at the device.
Figure 3-1: Secure Access Solution Components
If the user wants to scan documents, the Secure Access server provides the network user ID to the
compatible MFP; the MFP can then use the ID to implement Single Sign-on functionality and
automatically authenticate for scanning.
Xerox Secure Access Administration Guide15
Page 15
Secure Access Overview
Card Reader
Secure Access Authentication
Device
Ethernet Connection
DCE
DRE
CAS
Mgmnt
To ol s
Secure Access Server
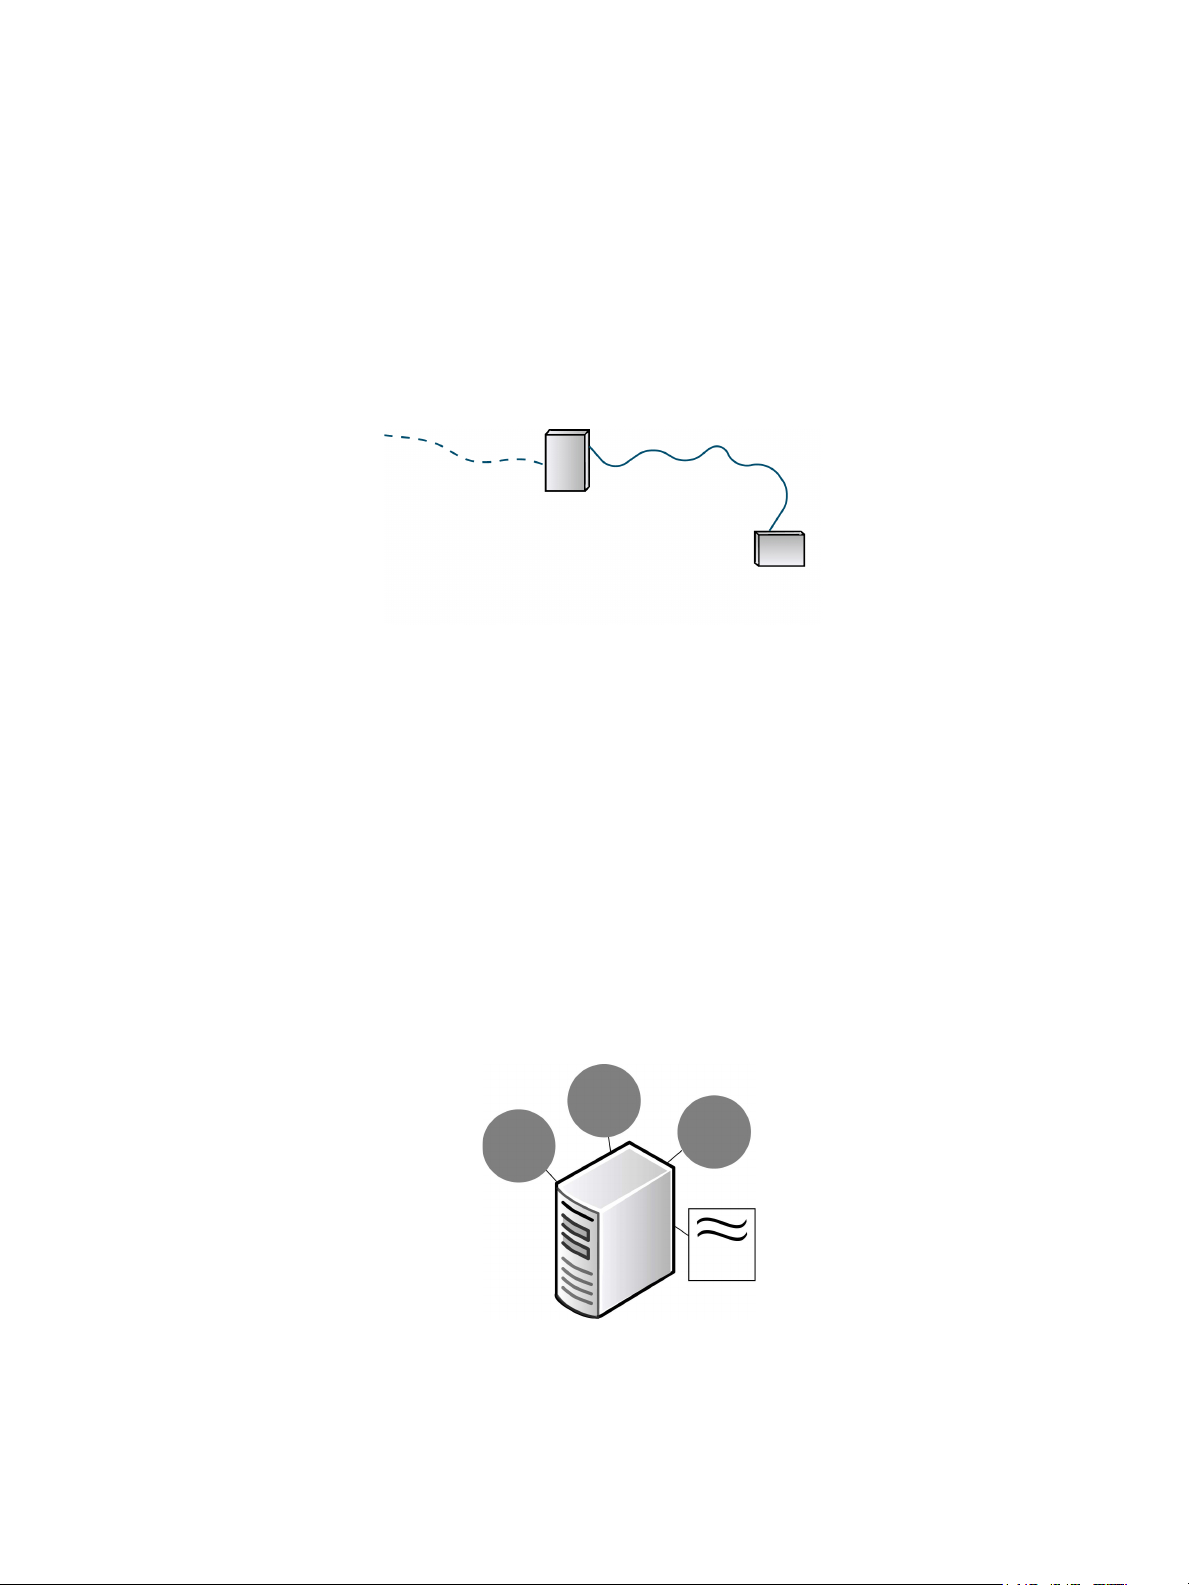
Secure Access Components
The solution requires two main components:
1. Secure Access Authentication Device, which is comprised of an Authentication Terminal and an
external card reader. Users do not access the Authentication Terminal.
The Card Reader is connected to the Authentication device via serial cable only, and is not
attached directly to the MFP. Refer to the Installation Guide for placement and mounting
instructions.
Figure 3-2: Secure Access Authentication Device components
or
1. Secure Access Server USB Card Reader, which is connected to the MFP. Refer to the Installation
Guide for placement and mounting instructions
2. Secure Access Server, which is comprised of the following components:
• Core Authentication Server (CAS)
• Device Control Engine (DCE)
•Document Routing Engine (DRE)
• Secure Access Manager (Administrative Tools)
Note: You can install these components on a single server, or distributed across multiple servers. In
some deployments, you may also require more than one DCE or DRE. See the Installation Guide for
complete details.
Figure 3-3: Secure Access Server Components
Xerox Secure Access Administration Guide 16
Page 16

Secure Access Overview
2. Authentication Request
Generated
3. Forward Request
Authentication
Device
6. Send Unlock
Request to MFP
DCE
CAS
4. Verify User
5. User Verified
1. User triggers card reader
MFP
Ethernet
Serial Cable
Ethernet CAP Protocol
Card
Reader
The core server components communicate on designated ports. Each component “listens” on a specific
port for information or requests from the other components. Refer to Port Assignments on page 44 for
a complete list of port assignments per component.
Core Authentication Server (CAS)
The Core Authentication Server (CAS) houses the database that contains all user and MFP device data.
Every Secure Access installation requires a pre-installed database. The CAS uses the database instance
to create an accounts database that contains all user information, and all device information. See
System Requirements in the Installation Guide for information about supported databases.
Device Control Engine (DCE)
The Device Control Engine (DCE) handles all communication with the MFP devices. When a user wants
to use the copy, scan, or fax functionality on a MFP, they must first trigger the card reader. A swipe or
proximity read initiates an access request.
The Authentication Device forwards the login request to the DCE, which then contacts the CAS to
verify the user account data associated with the card. This process is depicted in Figure 4 and 5.
Xerox Secure Access Administration Guide17
Figure 3-4: User Authentication Workflow
Page 17

Secure Access Overview
2. Authentication Request
Generated
6. Send Unlock
Request to MFP
DCE
CAS
4. Verify User
5. User Verified
1. User triggers card reader
MFP
Ethernet
Serial Cable
Ethernet CAP Protocol
Figure 3-5: User Authentication Workflow with USB Card Reader
Document Routing Engine (DRE)
The Document Routing Engine (DRE) is the print server. It’s primary function is to enable document
flow from user workstations to MFP devices. The following describes a typical DRE workflow:
1. A user generates a print request to an MFP that is registered in the Secure Access Manager
database.
2. If the user prints to a print queue that is using a Secure Access Manager port the DRE holds the job
on the print server.
3. When the user logs in at the MFP the DRE searches the jobs queued for that printer (and/or pull
group) and releases those that were submitted by the logged in user.
Note: If the Release My Documents custom service is installed, users can access the Release My
Documents screen to view the secure print queue and release one or more documents as needed.
See Configure the Release My Documents Custom Service on page 39.
If a Secure Access port is not installed on the device, the print job is printed without validation
If you want print jobs to be held in a secure queue, you can configure Follow-You Printing. To enable
this functionality, you must configure the MFP to use a Secure Access port rather than a standard port.
The Port Monitor integrates with the Windows printing subsystem and functions as part of the spooler
service, allowing the Port Monitor to receive print jobs and then hold the jobs in a secure virtual queue
until a verified user releases them to a particular MFP.
When Follow-You Printing is enabled, the user must first authenticate at the MFP of their choice, as per
Figure 3-4: User Authentication Workflow on page 17. If the authentication is successful, and the
Release My Documents custom service is installed, the user can access the front panel on the MFP to
view the print queue. The user can release one job or all jobs (if configured).
Xerox Secure Access Administration Guide 18
Page 18

Secure Access Overview
Making Changes to Server Components
If you make configuration changes within Secure Access Manager to any of the core Secure Access
server components (CAS, DRE, DCE), such as adding new Secure Access devices, you must wait a
minimum of thirty seconds before these changes take effect.
The delay in updating server components is a function of the CAS polling feature. This means that the
delay may be longer in the event that CAS is unavailable for some reason during that polling period
after the server changes. CAS will send the change data to the relevant components once the
connection is restored.
Xerox Secure Access Administration Guide19
Page 19

Secure Access Overview
Data Reader Support and User Workflow
The MFP functions are locked until a user provides valid authentication data. To do so, the user must
pass their proximity or smart card over the proximity reader or swipe their card through a Magstripe
device reader.
When the user’s data has been validated by the Core Authentication Server (CAS), the MFP is unlocked
and ready for use. When the user is finished, they push either the Clear All or Access button on the
MFP keypad to “log out” and lock the device.
Secure Access supports several types of external readers: magnetic stripe, EM Marin, HID proximity,
Hitag, Indala, Legic, and Mifare. All readers are pre-configured from the manufacturer and require no
further configuration.
Magstripe Device Reader
Secure Access supports external magnetic stripe reader devices. Users can enter validation data by
swiping an encoded magnetic card through the card reader. The magnetic stripe reader reads virtually
any standard magnetic card medium on Track 2 and accepts standard or custom encoded data. Track
1 data is available with the USB mag stripe readers.
Using a Magnetic Stripe Device Reader
Instruct users to follow these steps to enter data using a magnetic card device reader:
1. Insert the card into the guide track with the magnetic stripe facing away from the terminal. Ensure
the card is pressed firmly against the guide.
2. Pull the card down through the guide track and remove the card.
Note: Do not run the card through at an angle or the terminal will not accept the data.
If the terminal cannot read the entry, the LED stays solid red. Reinsert the card into the guide track
and run the card through the reader again.
Contactless Smart Cards and Proximity Cards
Secure Access supports Legic and Mifare contactless smart cards, and EM Marin, HID, Hitag, and
Indala proximity cards. Users can enter validation data by passing the proximity card within one inch
of the external reader.
Xerox Secure Access Administration Guide 20
Page 20

Secure Access Overview
Pass the proximity card over this symbol
on the card reader
The LED light
indicates the status
Using a Proximity or Smart Card
To enter data using a proximity card or smart card, pass the card within 1 inch or 2.5 cm of the
proximity symbol located on the top of the card reader device. To locate the proximity card reader on
the data reader module, look for this symbol:
If the swipe is invalid, the LED flashes red.
Card Reader Signals and Modes
Secure Access displays its messages through an LED on the card reader module.
The LED behavior is the same for both types of Card Readers except where noted. The following signals
may be displayed:
LED Behavior Meaning
Solid Red Authentication Subsystem is in Idle mode; it is ready but there is no active session.
Solid Green Authentication Device is in Ready mode and a session is active. This state will also
occur if using a USB card reader while the MFP is booting and the Network controller
has not yet been initialized.
Slow flashing green Data received from card reader, awaiting authentication for active session or user
input (e.g. card self-registration or at the Release All Jobs prompt).
Slow flashing red Authentication Subsystem has no connection to server.
Fast flashing red Invalid card; access denied.
Xerox Secure Access Administration Guide21
Page 21

Secure Access Overview
The Authentication Subsystem has two functional modes: Idle mode or Ready mode.
An Authentication Subsystem that is ready for use is in Idle mode. When a user swipes a magstripe
card, the device changes to Ready mode. The device returns to Idle mode when a user completes a
transaction or after a configurable period of inactivity, as set on the MFP, in Ready mode.
Note: The Authentication Subsystem returns to Idle mode if the MFP Sleep Mode Timer activates.
When the device is in Idle mode, the LED on the card reader is solid red.
While in Ready mode, the LED on the card reader is solid green and the user can begin using the
controlled device to perform a transaction.
Xerox Secure Access Administration Guide 22
Page 22

Secure Access Overview
Administering Secure Access
All administration takes place in the Secure Access Manager. By default, the installer places the Secure
Access Manager on the Start menu.
Look under Start > All Programs > Xerox Secure Access > Secure Access Manager.
Note: You must have Administrative privileges on the Secure Access server to launch the Secure
Access Manager.
Before you can open the Secure Access Manager, you must select the CAS that you want to work with.
The CAS validates against a single authentication database, so you need to type in the correct
database name, or choose it from the list.
The Secure Access Manager interface is divided into five areas. When you choose a task from the tools,
the contents of the right pane update to show you the available settings.
Language Support
When Secure Access was installed, the installation wizard prompted for the language setting to use for
the components within the deployment. This setting applies to the Secure Access Manager interface
only.
The language displayed on the MFP front panel is determined by the device settings. The Secure
Access Server checks the MFP device language setting each time a user swipes their card. If any
language other than English, French, German, Italian, or Spanish is set on the MFP, the prompts
displayed by Secure Access default to English.
Xerox Secure Access Administration Guide23
Page 23

Configuration &
4
Management
This chapter includes:
• Configuration Workflow on page 25
• Add MFP Devices to the Secure Access Database on page 26
• Setting Authentication Parameters on page 28
• Configure Follow-You Printing on page 31
• Import and Synchronize User Accounts on page 34
• Monitor Authentication Events on page 38
• Configure the Release My Documents Custom Service on page 39
Configuration refers to the software configuration required to establish communication between the
MFPs, the Authentication Devices, and the Secure Access Server. Ensure that you follow the workflow
outlined on page 24 for the best results.
This chapter provides information to:
• Step you through a complete initial configuration
• Add the MFP devices to the Secure Access database
• Associate a Secure Access Authentication Device with an MFP device, if not using a USB Card
Reader
• Enforce authentication and set additional authentication options
• Import and synchronize user accounts with Active Directory Synchronization
• Monitor authentication events
Xerox Secure Access Administration Guide 24
Page 24

Configuration & Management
Configuration Workflow
Follow the steps in the order they are presented below. Failure to do so will result in an incomplete
installation.
Before you start, ensure that you have correctly installed the Secure Access Server. Follow the
®
instructions provided in the Xerox Secure Access Unified ID System
and at least one DCE and DRE.
1. Configure Xerox MFP device to accept network authentication through the Xerox Secure
Access mechanism
This is performed through the CentreWare Internet Services, which you connect to via an internet
browser. Refer to the MFP System Administration CD for information on how to install and
configure Xerox Secure Access on the device.
2. Add MFP devices to the Secure Access Database
Create an entry for each MFP device in the Secure Access Manager. Allocate each MFP to a
particular DRE print server (if required).
3. Configure Follow-You Printing
Installation Guide. Install the CAS
Note: This step is optional and should only be configured if Follow-You Printing is required at the
site.
To configure Follow-You Printing, create Pull Groups that group devices with like characteristics.
When the user sends a document to an MFP within a Pull Group, they can authenticate at any MFP
within the Pull Group and “pull” the job from the queue to be printed on that MFP.
4. Set authentication parameters
Configure the parameters that Secure Access will require to authenticate user access requests,
including enabling secondary prompts and card data setup.
5. Import and synchronize user accounts
Set the Active Directory Synchronization parameters, then import existing User accounts into the
Secure Access database.
6. Install the Release My Documents custom service
To allow users to view release one or more documents from the secure print queue directly from the
MFP front panel, install the Release My Documents custom service.
7. Configure user card self-registration
To enable users to self-register their swipe cards.
Xerox Secure Access Administration Guide25
Page 25

Configuration & Management
Add MFP Devices to the Secure Access Database
Each MFP must be registered in the Secure Access Database. You need to assign a unique name to
each MFP, and you require the network IP address of each device.
This step is divided in two sub-steps for ease of administration: Enter Device Parameters and Associate
the MFP with a Secure Access Authentication Device.
Enter Device Parameters
1. In the Secure Access Manager, click Devices.
2. From the Settings, click Add... in the device listing.
3. In the Physical Device Summary dialog that appears, type the required information, outlined in the
table below.
Note: The Manufacturer and Model are populated automatically the first time the device contacts
the DRE. The next time you open this dialog, this information will be populated.
Setting Description
Name Type a unique name for this MFP. You will use this name to identify the
device in the Secure Access Manager.
Hostname/IP address Type either the IP address or the Hostname. Ensure that you can resolve the
Hostname if you do not know the IP address.
Description Enter a description that will help other Administrators identify the device,
usually by location. For example, “second floor, HR”.
Authentication Device Select the Secure Access Authentication Device (from its MAC address) that
will control access to this MFP.
Note: If you are using a Secure Access USB Card Reader you do not
associate an Authentication Device and you need to leave this as “<USB
Reader>”.
Secure Access compatibility • MFP with Secure Access capability: Select if the MFP if using USB
Card Reader or if you are using a Xerox MFP which supports Secure
Access. Also enter the Admin ID and Password associated with this
MFP.
• Other type of MFP or printer: Select if the Authentication Device is
being used for Follow-You Printing with any MFP or printer which does
not support Secure Access.
Server Enter the servername that has DCE installed and will be controlling this MFP
or printer.
Xerox Secure Access Administration Guide 26
Page 26

Configuration & Management
Setting Description
Initialize Secure Access device The Secure Access device is initialized automatically when it is first
configured. If the MFP is changed, initialize the Secure Access device by
clicking this button. A pop-up window will appear to confirm that the
initialization was successful.
Note: You can click this button to install the Release My Documents custom
service. See Configure the Release My Documents Custom Service on
page 39 for more information.
Behavior If you are using the Secure Access Port Monitor to enable Follow-You
Printing, you can select from one of two release options:
• At assigned control terminal: The user must swipe their card at the
MFP to release documents sent to that device.
• Release documents from pull group: After authentication, the user
can follow the instructions on the front panel to select queued
documents from a specific pull group. For details, see Configure Follow-
You Pr i nt ing on page 31.
If you are using the Windows port monitors, these settings have no effect.
4. Click OK to save the settings.
Note: If Secure Access detects that the device is Custom-services enabled, and you made changes
in the Devices dialog, a popup window will appear:
• If the Release My Documents extension is not currently installed on the device, the prompt “Do
you want to enable Follow-You Printing?” appears.
• If the Release My Documents extension is installed on the device, the prompt asks “Do you
want to keep Follow-You Printing enabled?”
Associate the MFP with a Secure Access Authentication Device
Note: If you are using a Secure Access USB Card reader you can skip this step.
When you initially power on an Authentication Device connected to the network, the DCE registers the
device. The device displays in the Secure Access Manager as an unassigned Secure Access
Authentication Device. You then need to associate each MFP with a specific Secure Access
Authentication Device. Use the Tear Sheet (see the Installation Guide) you filled in during the
hardware setup to map each Authentication Device to the appropriate MFP.
1. In the Secure Access Manager, click Devices, then select the MFP you want to configure.
2. In the Physical Device Summary dialog, drop-down the Hardware Address list.
3. Using your tear sheet as a reference, locate the correct MAC Address of the Authentication Device
that will control access to this particular MFP.
4. Click OK to save the changes.
Xerox Secure Access Administration Guide27
Page 27

Configuration & Management
Setting Authentication Parameters
Before you import user accounts, you need to configure the Core Authentication Server to validate the
accounts against primary and secondary accounts PINs. PIN information connects a Secure Access
user account with the information on a swipe card.
The primary PIN is the numeric sequence that uniquely identifies the user, and is typically the card
number. To enter the primary PIN, the user simply swipes their card.
If you prefer an additional layer of security, you can also enable secondary PINs. When enabled, the
user must first swipe their card, then they need to enter an additional “password” on the front panel of
the MFP. Only when both the data on the swipe card and the secondary PIN password is
authenticated, will the user have access to the MFP.
1. In Secure Access Manager, select Configuration > Authentication device settings.
2. In the Authentication mechanisms section, select one or more authentication mechanisms:
•Leave Secure Access PINs selected only if you want to connect a Secure Access printing
account with logon information.
•Enable External user ID and password only if you are using swipe cards to verify all user
information outside of Secure Access.
•Enable Secure Access PIN with external password if users will swipe their cards for
identification, but must also enter their Secure Access domain user account password. Secure
Access will cross-check the database for the corresponding account name, then verify the
account against the selected external authority for network logon.
Note: If you select an external authentication mechanism, the Enable secondary prompt field is
enabled automatically. External authentication cannot occur if the Secondary PIN information is
empty.
3. In the External authorities section, select one or more external authorities only if you selected a
corresponding authentication method:
• Select Windows to validate accounts against a default Windows domain. Type the domain
name in the Default domain field.
• Select NetWare to validate accounts against a default NetWare context. Enter the name in the
Default context field.
Note: You must install the Novell NetWare client for Windows on the Core Authentication Server if
you plan to validate against a NetWare context.
• Select LDAP to validate accounts against a default LDAP server. Type the LDAP server name,
then choose an LDAP type from the list. Select Force SSL encryption if you want use Secure
Socket Layer encryption.
4. In the Card setup section, do the following:
a. Enter the start and stop data position in the respective fields. The data retrieved from these
positions will be used as the primary PIN.
b. Click <None> beside HID decoding if you are using an HID Proximity card reader. The
Authentication Devices must be configured to return card information in a standard format.
For details on entering the decoding parameters, see HID Decoding on page 29.
Xerox Secure Access Administration Guide 28
Page 28

Configuration & Management
c. Select Auto-register primary PINs to enable users to register an unrecognized swipe card for
future use. See Swipe Card Self-Registration on page 30 for details.
5. In the Secure Access device prompts section, enter the default text that will be displayed on the
MFP front panel:
a. Enter a Title that will be displayed in all prompts.
b. Enter the Login prompt text that will be displayed to prompt the user to login. For example
“Please swipe your card to login”.
c. Select Enable secondary prompt to display a prompt on the Xerox MFP front panel that
requires the user to enter a secondary PIN code (or password).
d. Select Enable release all jobs prompt to display a prompt on the Xerox MFP front panel that
asks the user if they want to release all jobs that are queued for printing.
6. In the SNMP section, enter your Get and Set Community names.
Note: If you change the default names in Secure Access, you must also change them on all of your
physical devices to match, in order for SNMP communication to work. Consult the MFP
documentation for information on changing these settings.
7. Enter the JBA Account ID number if you want to use Secure Access with a third-party JBA
accounting application.
8. Set the Job expiry time (in hours) after which any jobs remaining in the print queue will expire and
be removed from the queue. The default is 1 hour.
9. If you use non-default SNMP community names (“public” for read access and “private” for write
access) on your network, specify those community names in the corresponding fields in the dialog.
Note that all devices must use the same community names.
Note: If you do not enter the community names, the Secure Access server will not be able to
automatically detect device types when you create new ports, but you can still create ports by
manually specifying the connection details.
10. Click OK to save the settings
HID Decoding
To configure the HID encoding, do the following:
1. In Secure Access Manager, select Configuration > Authentication device settings.
2. Click <None> beside HID decoding within the Card Setup section.
3. In the HID decoding dialog, do the following:
• If you know the encoding, enter the following HID card encoding information. If you do not
know the encoding, contact your HID vendor to determine the encoding type used on your
proximity cards.
• In the case where you do not need to extract facility code information, check ID code only. If
you need to extract both Facility code and ID code, check both options.
a. In the Faci l i t y S tart field, enter the position in the raw bitstream (0 based, left to right,
inclusive) where the Facility code begins.
b. In the Faci l i t y E n d field, enter the position in the raw bitstream (0 based, left to right,
inclusive) where the facility code ends.
Xerox Secure Access Administration Guide29
Page 29

Configuration & Management
c. In the Facility Wid t h field, enter the number of decimal digits for the facility portion of the
value that the Authentication Device will output. Numbers will be zero-padded on the left as
needed. If your site or HID card format does not use a facility code, or if you do not require it
to be returned as part of the card value, enter a width of 0 to disable extraction of the facility
number.
d. In the ID Start field, enter the position in the raw bitstream (0 based, left to right, inclusive)
where the ID code begins.
e. In the ID End field, enter the position in the raw bitstream (0 based, left to right, inclusive)
where the ID code ends.
f. In the ID Width field, enter the number of decimal digits for the ID code portion of the value
that the Authentication Device will output. Numbers will be zero-padded on the left as
needed. The Authentication Device will return a single value for each card swipe that is the
decoded facility code followed by the decoded ID.
g. Click OK to save the settings.
Swipe Card Self-Registration
If you want users to self-register their swipe cards, you must enable this option in Secure Access.
1. In Secure Access Manager, select Configuration > Authentication device settings.
2. Select Auto-register primary PINs within the Card Setup section.
3. Click OK to save the changes.
When a user swipes an unregistered card, they are required to login to the MFP with valid user
credentials (user ID and password). The user credentials must already exist in CAS to allow selfregistration.
Once the user registers their card, the next time they swipe the card, their account information is
automatically associated with the card, and they can login without manually entering their user
credentials. If configured, the user may be prompted for Secondary PIN.
Note: If the Secure Access PIN with external password option is selected when configuring card
self-registration, the Secure Access PIN will be overwritten by the swipe card data once the card is
authenticated and registered. The Secure Access PIN will no longer be a valid login credential.
Xerox Secure Access Administration Guide 30
Page 30

Configuration & Management
Print
Server
Destination
Printer
User
Workstation
Document
held in virtual
queue
User authenticates at any MFP
in the Pull Group to print the
document at that device
Secure
Print
Queue
Pull Group
Configure Follow-You Printing
Follow-You Printing allows a user to submit a print job to a specific MFP, but authenticate at another
MFP then view a list of jobs held in a secure queue. The user can then “pull” the print job to the MFP
where they authenticated, even if it is not the original device selected for output.
Figure 4-1: Follow-You Printing User Workflow
To configure Follow-You Printing, you need to perform two steps:
1. Use the Secure Access Port Monitor to enable configuration between the print server and all
controlled MFPs. You can convert existing Windows ports to Secure Access ports. The port monitor
intercepts all document sent to devices within a pull group and holds them in the secure queue
until released by the authenticated user. See Convert Ports to use the Secure Access Port Monitor
on page 31 for instructions.
2. Create the Pull Groups within Secure Access Manager. See Create Pull Groups on page 33.
If you want to allow the user to view their jobs waiting in the secure queue directly on the MFP front
panel, update the MFP to include the Release My Documents custom service. See Configure the
Release My Documents Custom Service on page 39 for instructions.
Convert Ports to use the Secure Access Port Monitor
Secure Access uses specialized ports to enable Follow-You Printing. Each device that will be part of a
Pull Group must use a Secure Access port monitor. If you have existing devices already set up to use
Windows ports, you can easily convert the ports.
1. Ensure the devices you want to convert are powered on, are connected to the network and are
configured to print.
2. Using My Computer, browse to the location where you installed Secure Access.
Xerox Secure Access Administration Guide31
Page 31

Configuration & Management
3. Open the To ol s folder, and double-click SAPrinterConversionWizard.exe.
4. On the Printer Conversion wizard welcome screen, click Next.
5. Select the Print server location.
If the print server (DRE) resides on the local machine, select Local machine, otherwise select
Remote server.
6. Select Convert printers to use the Secure Access Port Monitor, then click Next.
7. Select or clear printers in the Convert Printers list, then click Next.
8. Click Finish to complete the conversion.
Creating a Print Queue with a Secure Access Port
Depending on your printing hardware, you may need more than one port using the Secure Access Port
Monitor on a print server. You can configure a new printer definition that uses the Secure Access Port
Monitor.
1. Using your standard Windows interface, open the Windows Add Printer wizard.
2. Follow the prompts to add a local printer and create a new port.
3. When prompted, select Secure Access Port as the type of port you want to create and click Next.
The Add Secure Access Printer Port wizard displays and you are prompted to ensure that the printer
device is turned on, connected to the network, and properly configured.
4. Click Next and select Physical printer as your Device Type from the drop list.
5. Specify a Printer name or IP address.
6. The wizard supplies a Port name based on the printer name or IP address. Change this name
manually, if desired.
7. Click Next to continue with the port configuration options. The Port Configuration screen displays.
The Detected device information displays automatically if the wizard can collect this data from
the printer.
8. Specify whether to use standard or custom settings for this port.
If you select the Use custom settings option:
a. If you select Raw port communication, identify the TCP Port number, and specify if the Port
Monitor should hold the connection open.
b. If you select LPR, specify the name of the print Queue on the physical device (for example,
PORT1).
c. If you select Specific device, select the appropriate Manufacturer and Model from the drop
lists. The device uses the relevant default communications parameters based on these
selections.
9. Click Next and specify the Physical device name. This is the name of the device as it will display
within Secure Access.
10. Review the details for this new port and device registration, and click Finish to close the Add Secure
Access Printer Port wizard, or Back to change any of the settings. Closing the Add Secure Access
Port wizard returns you to the Windows Add Printer wizard.
Xerox Secure Access Administration Guide 32
Page 32

Configuration & Management
11. Complete the remaining steps in the Add Printer wizard. When prompted, select Yes to print a test
page.
12. Confirm the Windows printer details and click Finish to exit the wizard, or Back to change settings
as necessary.
Create Pull Groups
The Pull Groups you create should reflect the needs of your organization. For example, you can group
compatible devices by physical location, by department, by manufacturer, and so on. You can also
create Pull Groups that include a selection of devices from a single print server.
The device driver selected for the pull group must be compatible with all devices associated with that
group. If you want a print job generated for one MFP to output successfully on another MFP, ensure
that the other printer can understand all of the print commands included in the data stream from the
driver.
1. In Secure Access Manager, click on one or more existing MFP devices that you want to assign to
the same Pull Group.
2. In the Physical Device Summary dialog, select Release documents from pull group. Type in the
name of the Pull group (the name can be any name that makes sense to you), then click OK to
apply the change.
Note: You only have to type in the name of the Pull group the first time you use it. Afterward, it
will appear in the list automatically.
3. Repeat steps 1 and 2 to select devices and create other Pull Groups.
Xerox Secure Access Administration Guide33
Page 33

Configuration & Management
Import and Synchronize User Accounts
To enable authentication, you need to create user accounts that match the attributes used on the card
swipe. When a user swipes their card, the Authentication Device forwards the access request to the
DCE, which then forward the card swipe details to the CAS. If the CAS locates a user account with
attributes matching those found on the card, the MFP is unlocked and the user can proceed with the
fax, scan, copy, or print job release.
There are three methods within Secure Access to import user accounts:
• Use Active Directory to import (and optionally synchronize) accounts
• Import user accounts from a CSV file.
• Create accounts manually within Secure Access Manager.
Use ADS to Import Existing Users
If you have an Active Directory server, you can select the account information you want to import and
synchronize. Synchronization will minimize the administration overhead and allow account updates to
occur automatically.
Performing the steps outlined below causes a task to run in the background. In the Secure Access
Manager, click the Users tool to see the result of the task - the list of users will populate automatically
when the task is complete.
Note: The Secure Access services must be started by a Domain account with access to the contact
Active Directory. Ensure you are logged in as the Domain Administrator. If services are started
under the local administrative account, the Active Directory synchronization will fail.
It’s important to select options in the correct order in the Active Directory Synchronization dialog, so
follow the steps provided below carefully.
1. In Secure Access Manager, click Configuration > Active Directory Synchronization.
2. Under the Domain controllers area, click Add. A Domain controller is a server that provides access
to the Active Directory for member computers. Type the Controller name in the field.
3. Under the Containers area, click Add. A container is a folder in the Active Directory tree structure
containing users, groups, or computers.
CAUTION: Ensure that the OU containers you choose are comprised of user account data only. If
the OUs contain other data (such as system or contact info), you will see unexpected results. You
may need to create specific OU containers to be used only for importing and synchronization
purposes.
4. Adjust the Synchronization interval to change how often Secure Access synchronizes its database
with the specified Active Directory. The synchronization interval value must be at least 15 minutes.
5. Select or clear the Active Directory updates to be applied options—Adds, Deletes, or Changes—
to specify which Active Directory accounts Secure Access receives and applies to the accounts
database during subsequent synchronizations.
Xerox Secure Access Administration Guide 34
Page 34

Configuration & Management
You can choose to import added or changed users, or remove inactive accounts from the Secure
Access database. Leave these settings at the default to ensure the accounts are updated and kept
in sync with the Active Directory server.
6. The Assign Values from Active Directory attributes save you time and effort by assigning
particular attributes to all users within the selected container. Note that you should enter the
Active Directory attribute name, not the field label. Although you can update individual user
accounts later on, choose these attributes before you import to speed up account creation.
The Primary PIN and Secondary PIN attributes map the numeric PIN values found on the Active
Directory server to the Primary PIN and Secondary PIN fields in Secure Access. Check the
Secondary PIN value if you want to import these fields, which the user can enter on the MFP front
panel (a secondary prompt is like a password that adds another layer of security) if the Secondary
prompt is enabled in Configuration > User Authentication Device Settings. Type the attribute
name for both the PIN1 (typically the card number) and the PIN2 fields that is used on the Active
Directory server.
The Primary PIN and Secondary PIN attributes can also map email address.
7. Click Import to immediately begin the import task for the first time. The Import task runs in the
background, and may take a few minutes depending on the size of the Active Directory you are
importing.
8. You can click OK to exit the dialog. The task will continue to run even though the dialog is closed.
9. After a few minutes, refresh Secure Access Manager, then check the list of Users to ensure
successful import of the accounts. Also open the properties for a user account and ensure that the
settings are correct.
Adding Users from A Flat File Import
Use the SACmd.exe utility to add, delete, modify and query user accounts from a flat file.
Note: This method is a one-time import and does not synchronize data beyond the import.
Secure Access installs this utility by default on the authentication server in the directory: Program Files
> Xerox >Secure Access > Too ls .
The command-line utility accepts commands in the following format:
SACmd -s(Server) (Action) (Obj_ID)| [(Options)]
Example: -sTestServer add user1 "John Smith" johns@here.com pin1 pin2
Execute the command with a batch file:
SACmd -s(Server) -f(BatchFile)
SACmd Batch File Process
SACmd has a batch mode and accepts a CSV file as a batch file (one file per server). Batch operation
allows all the command actions except for query command.
Note: Copy the .csv file to the Secure Access > Tools folder.
[Secure Access\Tools file path]\SACmd –s(Server) –f BatchFileName.csv
CVS file format: (Action), (Obj_ID)|All, [(Details)]
Xerox Secure Access Administration Guide35
Page 35

Configuration & Management
Command line parameters enclosed in brackets () are mandatory; parameters within square brackets []
are optional. Use the table below to fill in the parameter.
Parameter Varia bles
Server Specify the name or IP address of CAS.
Action Specify the action to take on the account. Use one of:
• add - Add user
• delete - Delete user
•query - Query database
• modify - Modify an object attribute
Obj_ID Applies (action) only to the specified object ID. Use double quotes around object IDs
that have a space, for example John Doe.
Options for Action
Command
Specify additional values. Use double quotes around detail values that have spaces or
for empty values. Specify amounts with a period for the decimal separator. For the
modify action, place “!” for required fields that you don't wish to change.
(user_ID): User ID
(user_name): User name
(email): User email
Add
Add can add user accounts. It requires values up to and including the final field needed.
Add User:
add(user_ID) [(user_name) (email) (PrimaryPIN) (SecondaryPIN)]
Example:
SACmd -SMyServer add JohnD “John Doe” “johnd@here.com” 123 Password
Delete
Delete can delete user accounts.
Delete a user:
delete (user_ID)
Example:
SACmd -SMyServer delete JohnD
Xerox Secure Access Administration Guide 36
Page 36

Configuration & Management
Modify
Modify will allow user to modify the user database setting. It requires values up to and including final
field needed.
Modify a user:
modify (user_ID) [(user_name) (email) (PrimaryPIN) (SecondaryPIN)]
Example: update e-mail address of user johnd and keep the rest of the information:
SACmd -SMyServer modify johnd! johnd@newplace.com
Creating Accounts Manually
You can use Secure Access Manager to add individual user accounts as needed.
1. Select Users, then right-click in the Settings pane and select Add User from the menu.
2. In the User Properties dialog, enter the required information, outlined in the table below.
Field Description
User ID ID logged to the database to track the account.
Full Name The full name of the user. Enter a full name to easily identify the user within
Accounts Manager or Department Manager. This name also appears in account
statements and reports.
Email address The email address is provided to the MFP, for tasks such as scanning to email.
Primary PIN The primary PIN is typically the card number.
Secondary PIN The secondary PIN is used as a password, and the user must enter this PIN on
the MFP front panel after swiping their card to authenticate.
Confirm Secondary PIN Type the secondary PIN again to confirm the password.
Xerox Secure Access Administration Guide37
Page 37

Configuration & Management
Monitor Authentication Events
Secure Access records each authentication event in the Secure Access database. You can generate an
authentication log for any date, and view the history of events such as:
• Authentication Failure
• Start of Session (successful authentication)
Each event logged contains the following information:
• Source IP Address
• Primary PIN
• Validation Result
•Server type
•Username
• Email Address
•Server Name
To view an authentication log in Secure Access Manager, click Authentication log, and right-click View
log by date. Select the date, and then click OK.
Xerox Secure Access Administration Guide 38
Page 38

Configuration & Management
User releases
document
in a secure printing
environment
Document is held
in a secure print
queue
DRE Print Server
Client Workstation
Secure Access-Controlled MFP
Queue
1. Doc 1
2. Doc 2
User authenticates via
the Secure Access
Authentication Device
1
2
3
Secure Access DCE Service updated for
Custom Services
DCE retrieves the list of queued
documents for the user
4
User accesses the Release My
Documents screen on the MFP to
choose document(s) to release
5
Configure the Release My Documents Custom Service
The Release My Documents custom service updates the MFP to add the Release My Documents option
to the Custom Services screen on the front panel. This screen (shown below) is populated with queued
print jobs for the current user. The user can select one or more jobs and release or delete them directly
from the MFP front panel.
Note: Follow-You Printing must also be configured to enable this functionality. See Configure
Follow-You Printing on page 31 for instructions.
When the Release My Documents custom service is not installed, the Release My Documents screen on
the MFP panel is not available and the user is therefore unable to select individual jobs for release.
Instead, the user is presented with a prompt to release all jobs waiting on the print server immediately
after they authenticate.
When a user authenticates, DCE is notified of the current user and then DCE contacts the DRE Printer
Server(s) to obtain a list of all queued documents for the user. The Release My Documents screen on
the MFP front panel is then populated.
Xerox Secure Access Administration Guide39
Figure 4-2: Release My Documents Architecture
Page 39

Configuration & Management
User prints document
in a secure printing
environment
Document is held in
a secure print queue
Client Workstation
MFP controlled by Authentication Device
Secure Print
Queue
1. Doc 1
2. Doc 2
...
1
2
User authenticates via the
Secure Access
Authentication Device at the
MFP
3
Document
list retrieved
5
User accesses the Release
My Documents screen on
the MFP front panel to view
documents in one or more
secure queues
4
Adding the Release My Documents Custom Service to the MFP
If you are adding new devices to Secure Access Manager, you are prompted to install the Release My
Documents custom service when you click OK after making changes in the Device window. See Enter
Device Parameters on page 26 for details.
Note: Adding the custom service is optional. If it is not added the user will be prompted to release
all documents during the authentication process.
To add the custom service to a device already configured in Secure Access Manager, perform the
following steps:
1. In Secure Access Manager, click Devices.
2. From the list of devices, click the device you want to update.
3. In the Physical Device Summary dialog that appears, click the Initialize Secure Access device
button.
4. When prompted “Do you want to enable Follow-You Printing?”, click Yes.
An executable runs in the background to update the DCE service to include the Release My
Documents screen under Custom Services on the MFP front panel.
To determine if the installation was successful, authenticate at the MFP, then press All Services. You
should see a button labeled Release my documents. Depending on the model of MFP you may need
to press the Custom Services button to see and access this feature.
If the install was not successful, the button is labeled Servicex, where “x” is a number (i.e. Service4 or
Service5). See Troubleshooting the Release My Documents Custom Service Installation on page 48 to
resolve the problem.
Release My Documents End-User Workflow
The diagram below depicts the end-user workflow. After sending the print job, the user walks to a
controlled MFP, authenticates via a Secure Access Authentication Device, then choose Custom
Services > Release My Documents on the front panel to access the secure document release
functions.
Figure 4-3: End-User Workflow with Release My Documents Extension Installed
Xerox Secure Access Administration Guide 40
Page 40

Configuration & Management
Xerox Secure Access Administration Guide41
Page 41

Appendices
This chapter includes:
• Directory Synchronization Access Permissions on page 43
• Resetting an Authentication Device on page 44
• Port Assignments on page 44
• Troubleshooting on page 45
• Troubleshooting the Release My Documents Custom Service Installation on page 48
• Accessing the Release My Documents Screen on page 49
A
Xerox Secure Access Administration Guide 42
Page 42

Appendices
Directory Synchronization Access Permissions
SAModifyDeletedContainerSecurity.exe changes the administrative access permissions on the
deleted objects container in a Windows Active Directory, so that Secure Access can access the objects
during directory synchronizations.
By default, only Active Directory administrators have access permission. The Windows account running
the Secure Access services will need this access if you wish to synchronize deleted accounts between
Active Directory and Secure Access.
The account running this command must be an administrator in the Active Directory domain.
See Use ADS to Import Existing Users on page 34 for more information on configuring Active Directory
Synchronization options.
Secure Access installs this utility by default on the authentication server in the directory: Program Files
> Xerox > Secure Access > Tools.
The command-line utility accepts commands in the following format:
SAModifyDeletedContainerSecurity.exe (-s server) [-p | {-r} -a accountname]
Parameters enclosed in brackets () are mandatory; parameters within square brackets [ ] are optional.
Parameter Description
-s server Server name of the Active Directory domain controller.
-p Display current permissions on the container.
-r Remove access permissions for the specified account name.
- a accountname Account to be granted access to the container. Access permission will be
removed if specified with the -r option.
Xerox Secure Access Administration Guide43
Page 43

Appendices
Resetting an Authentication Device
Use the bypass key to reset the Authentication Device to the default settings. This key was provided
with the device and should be stored in a safe place.
1. Ensure the Authentication Device is powered on.
2. Insert the bypass key into the key slot.
3. Turn the key a quarter turn TOWARD you.
4. Turn the key back to the original position.
5. Remove the key.
Note: The device will beep every 10 seconds if the key is not turned back to its original position
before you remove the key.
Port Assignments
Secure Access communicates on the following ports
Component Port
CAS TCP 2910
DRE TCP 2938
DCE TCP 1824, TCP 2939, UDP 2613
Secure Access Authentication Device TCP 1234
When you install Secure Access, these ports are opened automatically. However, if you need to work
around Windows firewall settings, you can add the ports to the trusted list on each machine where you
deployed a Secure Access Server component.
Xerox Secure Access Administration Guide 44
Page 44

Appendices
Troubleshooting
Before calling for assistance, check these troubleshooting symptoms and instructions on how to correct
the problem.
Symptom Instruction
1 Is the indicator light on
the reader off?
2Does the control unit
have power?
3 Is the reader indicator
light flashing red
slowly?
Authentication device: An unlit indicator light on the card reader
signifies that there is no power to the reader.
Authentication Device: Check that the reader cable is connected and
the connector firmly seated in the mini-DIN connector on the control
unit. If the cable is properly connected and there is still no light,
continue to the next step.
USB Reader: Verify that you have the appropriate level of software
running on the MFP.
Check to make sure the reader is securely plugged into the MFP. If
the LED is still off after the connection is verified and still off after a
power off, power on of the MFP then a replacement reader should be
tried.
Authentication device: Check the back (connector side) of the
control unit. If there is power, the yellow indicator light next to the
jack marked “Ethernet” will be lit.
Check that the power supply cable is firmly seated, and that the
power cord is plugged into the power supply brick and to the wall jack.
Verify that the wall jack has power.
Authentication device: A slow flashing of the reader indicator light
signifies that the reader is correctly connected to the control unit, but
the control unit failed to connect to the server. Check that the
Ethernet cable is plugged into the control unit's jack marked
“Ethernet”, and plugged into the wall Ethernet jack.
USB Reader: The reader module in the MFP can not communicate
with the server. Ensure there is network connectivity to the MFP and
the device was properly initialized in the Secure Access Manager.
4 Is the Ethernet link light
off?
5 Is the Ethernet link light
solid green?
Xerox Secure Access Administration Guide45
Authentication device: If the green indicator light next to the jack
marked “Ethernet” is off, there is no Ethernet connection.
Check that the Ethernet patch cable is good by testing with another
cable, and verify that the Ethernet wall jack is active.
Authentication device: If the green indicator light next to the jack
marked “Ethernet” is solid green, there is an Ethernet connection but
no activity.
Check that the Ethernet wall jack is connected to the correct hub or
switch.
Page 45

Symptom Instruction
Appendices
6 Is the device listed on
the Secure Access
server?
7 Did the device receive
an IP address?
8 Did the device receive a
server address from
DHCP?
9 Was the IP address set
manually?
Authentication device: Check the authentication device drop-down
list on the Secure Access console, and verify that it contains the
problem device's MAC address.
If the device's MAC address (as found on the serial number label on
the control unit) is not listed, it has not been able to contact the
server.
USB Reader: No authentication device is listed if using a USB reader.
Authentication device: If using DHCP to configure the devices, check
the DHCP server to verify that an IP address was assigned to it (use
the MAC address to verify).
If no IP address was assigned, either the device is not able to
communicate with the DHCP server, or it has been configured using
manual IP configuration.
Authentication device: If using DHCP to configure the devices, check
that the DHCP server sets value 230 to the server's IP address. Verify
that the value is the correct IP address for the server. Note that the
Secure Access server itself should not be configured using DHCP.
If value 230 was not set or set incorrectly, the device will not be able
to contact the server.
Authentication device: If the IP address was set manually, check the
records to determine the device's IP address, and connect to the
device using a web browser.
If you are unable to connect to the web page at the device's IP
address, either the device is not correctly connected, is unable to
communicate or the IP address was recorded incorrectly. To eliminate
the first possibility, connect the device directly to the PC using a
crossover cable, and attempt a connection again.
Once you establish the connection, verify that the networking
settings and the server IP address are correct.
10 Is the device
unreachable at its IP
address?
Authentication device: If you are unable to connect to the device at
its IP address using a regular Ethernet cable connected to the
Downlink port, reset the device to its factory settings.
You can do this by disconnecting power from the control unit,
inserting the key and turning it to the “on” position, and reconnecting
the power. After 30 seconds, remove power, remove the key, and
connect power again.
You should now be able to connect to the device at the default IP
address of 192.168.2.1 (Ensure that your PC's networking settings
are correct for being able to reach that address.)
If you can now reach the device's web page, you can then either
configure the networking information manually, or attempt the
DHCP configuration by connecting it to the network again.
If the web page is still unreachable, the control unit may be defective.
Xerox Secure Access Administration Guide 46
Page 46

Appendices
Symptom Instruction
11 Does the reader
indicator light flash red
rapidly when you swipe?
12 Does the reader
indicator light stay red
when you swipe?
13 Does the reader
indicator light change
to green when you
swipe?
Rapid red flashing of the reader indicator light signifies an invalid
swipe at the reader; the Secure Access server has determined that the
card ID does not correspond to a valid user on the network.
Test the reader with another card for a user whose card is known to
work at other readers. If the cards are not being read correctly at any
reader, server configuration may be the cause; contact the technical
support center to verify your server configuration.
Should the reader indicator light not change when you swipe, it
indicates that it did not detect a card. A magnetic card may have
been encoded with a different standard or swiped upside down or
facing the wrong direction; a proximity card or contactless smart card
may not have been placed near enough the reader, or may be of an
incorrect type.
Verify that the swipe was done correctly. If the same card works at
other readers at the same site, the reader module may be at fault. If
the card does not work at other readers, verify the card technology
with the card vendor, and cross-reference it against the reader card
compatibility list.
A red indicator light signifies an active Secure Access session. This
means that the card was read correctly and corresponds to a valid
Secure Access user.
If the light changes to green, but the MFP is still disabled, the Secure
Access device may be associates with an incorrect MFP. Check the
device configuration in the Secure Access console to verify that the
Secure Access device is associated with the correct MFP.
14 Is the MFP front panel
always unlocked?
15 What do the error
messages “Failed to
enable Follow-You
Printing” and “Failed to
enable Follow-You
Printing: no site
specified” mean?
16 Device prompts
(Title/Login prompt) not
displayed at MFP front
panel
17 Is the indicator light on
the reader solid green
after MFP reboot?
The front panel on the MFP can only be locked on devices that
support Xerox Secure Access.
Verify that the model you are attempting to use is supported and has
the correct version of firmware installed.
These messages may appear if the Release My Documents custom
service fails to install correctly. See Troubleshooting the Release My
Documents Custom Service Installation on page 48.
Open the specific device in Secure Access Manager. Click the
Initialize Secure Access device button. The MFP front panel should
now display the correct prompts.
USB Reader: Verify that you have the appropriate level of software
running on the MFP.
Xerox Secure Access Administration Guide47
Page 47

Appendices
saxeroxeipregistration.exe -i 192.168.97.180 -r 192.168.97.137
DCE IP Address
MFP IP Address
Troubleshooting the Release My Documents Custom Service Installation
If the ‘Release my documents’ button does not appear in the Custom Services screen on the MFP, you
may need to run the installation executable with specific parameters. If your DNS does not allow the
MFP to resolve the hostname of the server running DCE, the tool is not capable of registering the
devices correctly. Refer to the table below for specific parameters that you must run instead.
The Release My Documents extension executable is located in the Tools folder on the machine hosting
Core Authentication Server. Ensure that you have Administrator permissions on the server hosting the
CAS and DCE service to install the required files.
1. Open a command prompt, and change the path to the Tools folder. For example:
c:\Program Files\Xerox\SecureAccess\Tools\
2. Run the executable with the parameters outlined in the table below:
saxeroxeipregistration.exe
Note: You can run the command with parameters to overwrite the failed install. You do not need to
unregister the extension first.
Parameter Result
-i Identifies the MFPs IP Address that will receive the Release My Documents extension
-r Registers the specified DCE Server on the specified MFP device
-d Unregisters the Release My Documents extension from the specific MFP device
-v View the registered information. Run this command to confirm the extension installation.
-u Username for authorization to update the device
-p Password for authorization to update the device
-c Enumerates devices from the specified CAS server and registers the extension on all Xerox
MFPs found in the Devices list
/? View a list of parameters for this extension
Example:
Result: Registers the update with the specified DCE server, and installs the Release My Documents
extension on a single MFP.
Xerox Secure Access Administration Guide 48
Page 48

Appendices
Accessing the Release My Documents Screen
If you installed the Release My Documents extension (see the Installation Guide for instructions), users
can access the Release My Documents screen to view their print jobs from one or more secure queues,
and then release or delete the jobs as required.
1. After authenticating, press All Services.
2. Press Custom Services.
3. Press Release My Documents.
4. All documents held for the user on the local print server are shown in the screen. Each button is
described in the table below.
Button Function
Print Touch one or multiple documents in the list, then press Print to print the
document(s) and delete the job(s) from the list. If the number of copies is set to
more than 1, click OK to confirm the request.
Print & Save Touch one or multiple documents in the list, then press Print & Save to print the
document(s), but keep the job(s) in the list. If the number of copies is set to more
than 1, press OK to confirm the request.
Delete Touch one or multiple documents in the list, then press Delete to delete the job(s)
from the queue without printing them.
Select All Selects all jobs in the list.
Refresh Contacts the DCE server to determine if any pending jobs should be added to the
list for the current user. If any documents are found, they are appended to the
bottom of the list.
Details Touch a document in the list, then press Details to view details such as Job name,
date and time submitted, the name of the printer the job was originally sent to, and
the client workstation the job originated from.
Exit Returns to the Custom Services screen.
Setting the Number of Copies for a Print Job
After authenticating, users can use the number pad on the MFP to enter the number of print copies to
produce. If the number of copies is set to more than 1, a confirmation dialog pops up when you press
the Print or Print & Save buttons. To print the current number of copies, press OK, To change the
number, press Cancel, then type in the correct number of copies using the number pad on the MFP
front panel. Press either Print or Print & Save to release your job again.
If the original print job was printed as 2 copies using this feature and selecting 2 will produce 4 copies
of the original document.
Xerox Secure Access Administration Guide49
Page 49

Appendices
Ending a User Session
While in the Release My Documents screen, you must first press Exit to return to the Custom Services
screen. Then, press Close to return to the main screen on the front panel, To fully log out of your active
session, press the Clear All button beside the panel keyboard twice and then choose Log out in the
confirmation dialog.
Xerox Secure Access Administration Guide 50
Page 50

Appendices
Xerox Secure Access Administration Guide51
 Loading...