

Page 1

Xerox DocuPrint NPS/
IPS
Guide to Using Page Description Languages
721P90360
Version 8.0
October 2002
Page 2

Xerox Corporation
701 S. Aviation Boulevard
El Segundo, CA 90245
©2002 by Xerox Corporation. All rights reserved.
Copyright protection claimed includes all forms and matters of copyrightable
material and information now allowed by statutory or judicial law or hereinafter
granted, including without limitation, material generated from the software
programs which are displayed on the screen, such as icons, screen displays,
looks, etc.
Printed in the United States of America.
Publication number: 721P90360
Xerox® and all Xerox products mentioned in this publication are trademarks of
Xerox Corporation. Products and trademarks of other companies are also
acknowledged.
Changes are periodically made to this document. Changes, technical
inaccuracies, and typographic errors will be corrected in subsequent editions.
Page 3

Table of contents
Safety . . . . . . . . . . . . . . . . . . . . . . . . . . . . . . . . . . . . . . . . . . . . . . . . vii
Laser safety . . . . . . . . . . . . . . . . . . . . . . . . . . . . . . . . . . . . . . . . . . . . . . . vii
Ozone information: U. S. only . . . . . . . . . . . . . . . . . . . . . . . . . . . . . . . . . viii
Operation safety: U. S. . . . . . . . . . . . . . . . . . . . . . . . . . . . . . . . . . . . . . . viii
Operation safety: Europe . . . . . . . . . . . . . . . . . . . . . . . . . . . . . . . . . . . . .ix
Warning markings . . . . . . . . . . . . . . . . . . . . . . . . . . . . . . . . . . . . . .ix
Electrical supply . . . . . . . . . . . . . . . . . . . . . . . . . . . . . . . . . . . . . . . x
Ventilation . . . . . . . . . . . . . . . . . . . . . . . . . . . . . . . . . . . . . . . . . . . . x
Operator accessible areas . . . . . . . . . . . . . . . . . . . . . . . . . . . . . . . x
Maintenance . . . . . . . . . . . . . . . . . . . . . . . . . . . . . . . . . . . . . . . . . .xi
Before cleaning your product . . . . . . . . . . . . . . . . . . . . . . . . . . . . .xi
CE mark: Europe only . . . . . . . . . . . . . . . . . . . . . . . . . . . . . . . . . . . . . . . .xi
Radio and telecommunications equipment directive (Europe only) . . . . xii
For further information . . . . . . . . . . . . . . . . . . . . . . . . . . . . . . . . . . . . . . . xiii
Introduction . . . . . . . . . . . . . . . . . . . . . . . . . . . . . . . . . . . . . . . . . . . xv
About this guide . . . . . . . . . . . . . . . . . . . . . . . . . . . . . . . . . . . . . . . . . . . . xv
Contents . . . . . . . . . . . . . . . . . . . . . . . . . . . . . . . . . . . . . . . . . . . . xv
Conventions . . . . . . . . . . . . . . . . . . . . . . . . . . . . . . . . . . . . . . . . .xvi
Related publications . . . . . . . . . . . . . . . . . . . . . . . . . . . . . . . . . . . . . . . xvii
Related information . . . . . . . . . . . . . . . . . . . . . . . . . . . . . . . . . . . . . . . . xviii
PostScript publications . . . . . . . . . . . . . . . . . . . . . . . . . . . . . . . . xviii
HP PCL 5 publications . . . . . . . . . . . . . . . . . . . . . . . . . . . . . . . . .xix
VIPP publications . . . . . . . . . . . . . . . . . . . . . . . . . . . . . . . . . . . . .xix
TIFF publications . . . . . . . . . . . . . . . . . . . . . . . . . . . . . . . . . . . . . xix
1. PostScript . . . . . . . . . . . . . . . . . . . . . . . . . . . . . . . . . . . . . . . . . . . . . 1-1
Implementation-dependent operations . . . . . . . . . . . . . . . . . . . . . . . . . 1-1
Floating-point arithmetic and math operators . . . . . . . . . . . . . . . 1-1
Coordinate system default matrix . . . . . . . . . . . . . . . . . . . . . . . . 1-1
Fonts . . . . . . . . . . . . . . . . . . . . . . . . . . . . . . . . . . . . . . . . . . . . . . . . . . . 1-2
Notes on PostScript fonts . . . . . . . . . . . . . . . . . . . . . . . . . . . . . . 1-3
Loading fonts . . . . . . . . . . . . . . . . . . . . . . . . . . . . . . . . . . . . . . . 1-4
User-defined fonts . . . . . . . . . . . . . . . . . . . . . . . . . . . . . . . . . . . 1-4
Type 1 fonts . . . . . . . . . . . . . . . . . . . . . . . . . . . . . . . . . . . . . . . . 1-4
Using Adobe Type 1 fonts instead of graphics . . . . . . . . 1-5
Producing Type 1 fonts for use with DocuPrint . . . . . . . . 1-6
Using a Type 1 font in a document . . . . . . . . . . . . . . . . . 1-6
Guide to Using Page Description Languages iii
Page 4

Table of contents
PostScript with embedded PJL commands . . . . . . . . . . . . . . . . . . . . . . 1-7
PostScript language extensions . . . . . . . . . . . . . . . . . . . . . . . . . . . . . . 1-7
Appearance consistency . . . . . . . . . . . . . . . . . . . . . . . . . . . . . . . . . . . 1-12
Control-D as binary data and end-of-job . . . . . . . . . . . . . . . . . . . . . . . 1-17
Control-Z and superfluous errors . . . . . . . . . . . . . . . . . . . . . . . . . . . . 1-18
Solution to control-Z and control-D problems . . . . . . . . . . . . . . . . . . . 1-18
DocuPrint NPS/IPS implementation of PostScript Level 2 . . . . . . . . . 1-21
Printer controller operations . . . . . . . . . . . . . . . . . . . . . . . . . . . . . . . . 1-22
Scan conversion details . . . . . . . . . . . . . . . . . . . . . . . . . . . . . . . . . . . 1-23
Image quality . . . . . . . . . . . . . . . . . . . . . . . . . . . . . . . . . . . . . . . . . . . . 1-26
Rendering of color and gray values: transform function . . . . . . . . . . . 1-27
PostScript printer description (PPD) files . . . . . . . . . . . . . . . . . . . . . . 1-28
Implementation limits . . . . . . . . . . . . . . . . . . . . . . . . . . . . . . . . . . . . . . 1-29
Creating the necessary PostScript CCITT Group 3 and 4 . . . . . . . . . 1-34
System Dict . . . . . . . . . . . . . . . . . . . . . . . . . . . . . . . . . . . . . . . . 1-8
User Dict . . . . . . . . . . . . . . . . . . . . . . . . . . . . . . . . . . . . . . . . . . . 1-8
Server Dict . . . . . . . . . . . . . . . . . . . . . . . . . . . . . . . . . . . . . . . . . 1-9
Status Dict . . . . . . . . . . . . . . . . . . . . . . . . . . . . . . . . . . . . . . . . 1-10
Miscellaneous: IdleTime Dict, Printer Dict, and Execution Dict 1-10
IdleTime Dictionary . . . . . . . . . . . . . . . . . . . . . . . . . . . . 1-10
Printer Dictionary . . . . . . . . . . . . . . . . . . . . . . . . . . . . . . 1-10
Execution Dictionary . . . . . . . . . . . . . . . . . . . . . . . . . . . 1-11
Nonstandard definitions . . . . . . . . . . . . . . . . . . . . . . . . . . . . . . 1-11
Examples of nonstandard definitions . . . . . . . . . . . . . . . 1-11
Printer resolution and resolution enhancement . . . . . . . . . . . . 1-12
Printer imaging characteristics . . . . . . . . . . . . . . . . . . . . . . . . . 1-14
Font consistency . . . . . . . . . . . . . . . . . . . . . . . . . . . . . . . . . . . . 1-16
Proprietary PostScript extensions . . . . . . . . . . . . . . . . . . . . . . 1-16
Color differences on full color and highlight color printers . . . . 1-17
Multiple jobs in one input file . . . . . . . . . . . . . . . . . . . . . . . . . . 1-20
Simulated mixed plex . . . . . . . . . . . . . . . . . . . . . . . . . . . . . . . . 1-21
Stroke . . . . . . . . . . . . . . . . . . . . . . . . . . . . . . . . . . . . . . . . . . . . 1-23
Fill . . . . . . . . . . . . . . . . . . . . . . . . . . . . . . . . . . . . . . . . . . . . . . . 1-24
Shapes . . . . . . . . . . . . . . . . . . . . . . . . . . . . . . . . . . . . . . 1-24
Zero-width lines (strokes) . . . . . . . . . . . . . . . . . . . . . . 1-24
Curved shapes . . . . . . . . . . . . . . . . . . . . . . . . . . . . . . . . 1-25
Images . . . . . . . . . . . . . . . . . . . . . . . . . . . . . . . . . . . . . . 1-25
File operators and standard devices . . . . . . . . . . . . . . . . . . . . 1-31
Path limits . . . . . . . . . . . . . . . . . . . . . . . . . . . . . . . . . . . . . . . . . 1-31
PostScript VM limits . . . . . . . . . . . . . . . . . . . . . . . . . . . . . . . . . 1-31
SetCacheDevice . . . . . . . . . . . . . . . . . . . . . . . . . . . . . . . . . . . . 1-32
Device orientation and setscreen operator . . . . . . . . . . . . . . . . 1-32
PostScript storage object size limits . . . . . . . . . . . . . . . . . . . . . 1-33
Obsolete operators—banddevice, framedevice, renderbands . 1-33
Arc to Bezier conversion—pathforall . . . . . . . . . . . . . . . . . . . . 1-33
Print performance related to image printing . . . . . . . . . . . . . . . 1-34
iv Guide to Using Page Description Languages
Page 5

Table of contents
Scan order and rotation . . . . . . . . . . . . . . . . . . . . . . . . . . . . . . 1-35
Purpose . . . . . . . . . . . . . . . . . . . . . . . . . . . . . . . . . . . . . 1-35
Considerations . . . . . . . . . . . . . . . . . . . . . . . . . . . . . . . . 1-38
Summary . . . . . . . . . . . . . . . . . . . . . . . . . . . . . . . . . . . . 1-40
Scan resolution and scaling . . . . . . . . . . . . . . . . . . . . . . . . . . . 1-40
2. PCL 5. . . . . . . . . . . . . . . . . . . . . . . . . . . . . . . . . . . . . . . . . . . . . . . . . 2-1
Maintaining image quality . . . . . . . . . . . . . . . . . . . . . . . . . . . . . . . . . . . 2-2
PCL 5 font support . . . . . . . . . . . . . . . . . . . . . . . . . . . . . . . . . . . . . . . . 2-4
PCL command support . . . . . . . . . . . . . . . . . . . . . . . . . . . . . . . . . . . . . 2-6
PJL commands . . . . . . . . . . . . . . . . . . . . . . . . . . . . . . . . . . . . . . 2-6
PCL Copy command . . . . . . . . . . . . . . . . . . . . . . . . . . . . . . . . . 2-6
PCL Duplex commands . . . . . . . . . . . . . . . . . . . . . . . . . . . . . . . 2-9
PCL Job Separation command . . . . . . . . . . . . . . . . . . . . . . . . . 2-10
PCL media selection . . . . . . . . . . . . . . . . . . . . . . . . . . . . . . . . . 2-12
PCL Paper Source command (tray assignment) . . . . . . . . . . . 2-12
Precedence in selecting media . . . . . . . . . . . . . . . . . . . . . . . . . 2-13
PCL Output Bin command . . . . . . . . . . . . . . . . . . . . . . . . . . . . 2-14
. . . . . . . . . . . . . . . . . . . . . . . . PCL 5 coding recommendations 2-14
PCL 5c support . . . . . . . . . . . . . . . . . . . . . . . . . . . . . . . . . . . . . . . . . . 2-15
PCL 5c coding recommendations . . . . . . . . . . . . . . . . . . . . . . . 2-16
PCL 5c functions not applicable to DocuPrint NPS/IPS . . . . . . 2-16
Driver recommendations for PCL 5c . . . . . . . . . . . . . . . . . . . . 2-17
Limitations for custom PCL 5c drivers . . . . . . . . . . . . . . . . . . . 2-18
3. VIPP . . . . . . . . . . . . . . . . . . . . . . . . . . . . . . . . . . . . . . . . . . . . . . . . . . 3-1
Functionality . . . . . . . . . . . . . . . . . . . . . . . . . . . . . . . . . . . . . . . . . . . . . 3-2
Operating environment . . . . . . . . . . . . . . . . . . . . . . . . . . . . . . . . . . . . . 3-3
VIPP line mode extension (XGFNub) . . . . . . . . . . . . . . . . . . . . . . . . . . 3-3
4. TIFF . . . . . . . . . . . . . . . . . . . . . . . . . . . . . . . . . . . . . . . . . . . . . . . . . . 4-1
Guide to Using Page Description Languages v
Page 6

Table of contents
vi Guide to Using Page Description Languages
Page 7

Laser safety
Safety
WARNING
Adjustments, use of controls, or performance of procedures
other than those specified herein may result in hazardous
light exposure.
The Xerox DocuPrint printers are certified to comply with the
performance standards of the U.S. Department of Health,
Education, and Welfare for Class 1 laser products. Class 1 laser
products do not emit hazardous radiation. The DocuPrint printers
do not emit hazardous radiation because the laser beam is
completely enclosed during all modes of customer operation.
The laser danger labels on the system are for Xerox service
representatives and are on or near panels or shields that must
be removed with a tool.
DO NOT REMOVE LABELED PANELS OR PANELS NEAR
LABELS. ONLY XEROX SERVICE REPRESENTATIVES HAVE
ACCESS TO THESE PANELS.
Guide to Using Page Description Languages vii
Page 8

Safety
Ozone information: U. S. only
This product produces ozone during normal operation. The
amount of ozone produced depends on copy volume. Ozone is
heavier than air. The environmental parameters specified in the
Xerox installation instructions ensure that concentration levels
are within safe limits. If you need additional information
concerning ozone, call 1-800-828-6571 to request the Xerox
publication 600P83222,
Operation safety: U. S.
Your Xerox equipment and supplies have been designed and
tested to meet strict safety requirements. They have been
approved by safety agencies, and they comply with
environmental standards. Please observe the following
precautions to ensure your continued safety.
OZONE
.
WARNING
Improper connection of the equipment grounding conductor
may result in risk of electrical shock.
• Always connect equipment to a properly grounded electrical
outlet. If in doubt, have the outlet checked by a qualified
electrician.
• Never use a ground adapter plug to connect equipment to an
electrical outlet that lacks a ground connection terminal.
• Always place equipment on a solid support surface with
adequate strength for its weight.
• Always use materials and supplies specifically designed for
your Xerox equipment. Use of unsuitable materials may result
in poor performance and may create a hazardous situation.
• Never move either the printer or the printer controller without
first contacting Xerox for approval.
• Never attempt any maintenance that is not specifically
described in this documentation.
• Never remove any covers or guards that are fastened with
screws. There are no operator-serviceable areas within these
covers.
• Never override electrical or mechanical interlocks.
viii Guide to Using Page Description Languages
Page 9

• Never use supplies or cleaning materials for other than their
intended purposes. Keep all materials out of the reach of
children.
• Never operate the equipment if you notice unusual noises or
odors. Disconnect the power cord from the electrical outlet
and call service to correct the problem.
If you need any additional safety information concerning the
equipment or materials Xerox supplies, call Xerox Product Safety
at the following toll-free number in the United States:
1-800-828-6571
For customers outside the United States, contact your local
Xerox representative or operating company.
Operation safety: Europe
Safety
This Xerox product and supplies are manufactured, tested and
certified to strict safety regulations, electromagnetic regulations
and established environmental standards.
Any unauthorised alteration, which may include the addition of
new functions or connection of external devices, may impact the
product certification.
Please contact your Xerox representative for more information.
Warning markings
All warning instructions marked on or supplied with the product
should be followed.
This WARNING alerts users to areas of the product where there
is the possibility of personal damage.
This WARNING alerts users to areas of the product where there
are heated surfaces, which should not be touched.
Guide to Using Page Description Languages ix
Page 10

Safety
Electrical supply
This product shall be operated from the type of electrical supply
indicated on the product’s data plate label. If you are not sure
that your electrical supply meets the requirements, please
consult your local power company for advice.
WARNING
This product must be connected to a protective earth circuit. This
product is supplied with a plug that has a protective earth pin.
This plug will fit only into an earthed electrical outlet. This is a
safety feature. Always connect equipment to a properly grounded
electrical outlet. If in doubt, have the outlet checked by a qualified
electrician.
To disconnect all electrical power to the product, the disconnect
device is the power cord. Remove the plug from the electrical
outlet.
Ventilation
Slots and opening in the enclosure of the product are provided
for ventilation. Do not block or cover the ventilation vents, as this
could result in the product overheating.
This product should not be placed in a built-in installation unless
proper ventilation is provided, please contact your Xerox
representative for advice.
Never push objects of any kind into the ventilation vents of the
product.
Operator accessible areas
This product has been designed to restrict operator access to
safe areas only. Operator access to hazardous areas is restricted
with covers or guards, which would require a tool to remove.
Never remove these covers or guards.
x Guide to Using Page Description Languages
Page 11

Maintenance
Any operator product maintenance procedures will be described
in the user documentation supplied with the product. Do not
carry out any maintenance on the product, which is not
described in the customer documentation.
Before cleaning your product
Before cleaning this product, unplug the product from the
electrical outlet. Always use materials specifically designated for
this product, the use of other materials may result in poor
performance and may create a hazardous situation. Do not use
aerosol cleaners, they may be flammable under certain
circumstances.
Safety
CE mark: Europe only
January 1, 1995: Council Directive 73/23/EEC, amended by
Council Directive 93/68/EEC, approximation of the laws of the
member states related to low voltage equipment.
January 1, 1996: Council Directive 89/336/EEC, approximation
of the laws of the member states related to electromagnetic
compatibility.
March 9, 1999: Council Directive 99/5/EC, on radio equipment
and telecommunications terminal equipment and the mutual
recognition of their conformity.
A full declaration of conformity, defining the relevant directives
and referenced standards, can be obtained from your Xerox
representative.
In order to allow this equipment to operate in proximity to
Industrial, Scientific and Medical (ISM) equipment, the external
radiation for the ISM equipment may have to be limited or special
mitigation measures taken.
This is a Class A product. In a domestic environment this product
may cause radio frequency interference, in which case the user
may be required to take adequate measures.
Shielded interface cables must be used with this product to
maintain compliance with Council Directive 89/36/EEC.
Guide to Using Page Description Languages xi
Page 12

Safety
Radio and telecommunications equipment directive (Europe only)
Certification to 1999/5/EC Radio Equipment and
Telecommunications Terminal Equipment Directive:
This Xerox product has been self-certified by Xerox for panEuropean single terminal connection to the analog public
switched telephone network (PSTN) in accordance with Directive
1999/5/EC.
The product has been designed to work with the national PSTNs
and compatible PBXs of the following countries:
Austria Germany Luxembourg Sweden
Belgium Greece Netherlands Switzerland
Denmark Iceland Norway United Kingdom
Finland Ireland Portugal
France Italy Spain
In the event of problems, contact your local Xerox representative
in the first instance.
This product has been tested to, and is compliant with, TBR21, a
specification for terminal equipment for use on analog switched
telephone networks in the European Economic area.
The product may be configured to be compatible with other
country networks. Please contact your Xerox representative if
your product needs to be reconnected to a network in another
country. This product has no user-adjustable settings.
NOTE: Although this product can use either loop disconnect
(pulse) or DTMF (tone) signaling, it should be set to use DTMF
signaling. DTMF signaling provides reliable and faster call setup.
Modification or connection to external control software, or to
external control apparatus not authorized by Xerox, invalidates
its certification.
xii Guide to Using Page Description Languages
Page 13

For further information
For more information on Environment, Health and Safety in
relation to this Xerox product and supplies, please contact the
following customer help lines:
Europe:+44 1707 353434
USA:1 800 8286571
Canada:1 800 8286571
Safety
Guide to Using Page Description Languages xiii
Page 14

Safety
xiv Guide to Using Page Description Languages
Page 15

Introduction
About this guide
The
Xerox DocuPrint NPS/IPS Guide to Using PDL
how the PostScript and HP PCL 5 page description languages
(PDLs), VIPP (formerly XGF), and the TIFF image format, are
implemented on the Xerox DocuPrint NPS/IPS printers.
This document is for users who will be submitting PostScript, HP
PCL 5, TIFF, and VIPP jobs to the DocuPrint NPS/IPS printers.
These users should be familiar with the applications they are
using to generate print jobs. This document is also for PostScript,
HP PCL 5, and VIPP programmers who will be creating
applications since it defines the features that are not supported.
It is assumed that these programmers have a working knowledge
of the language they are working in. For specific reference
information, refer to the “Related information” section in this
guide.
Before using this guide, become familiar with its contents and
conventions.
describes
Contents
This section lists the contents of this guide:
• Chapter 1, “PostScript,” contains the information you need to
use PostScript with your DocuPrint NPS/IPS printer.
• Chapter 2, “PCL 5,” provides information about how to use
PCL 5 with your DocuPrint NPS/IPS printer.
• Chapter 3, “VIPP,” provides a description of Variable Data
Intelligent PostScript PrintWare (formerly XGF) for use with
your DocuPrint NPS/IPS.
• Chapter 4, “TIFF,” provides information you need to use TIFF
applications with your DocuPrint NPS/IPS printer.
Guide to Using Page Description Languages xv
Page 16

Introduction
Conventions
This guide uses the following conventions:
•
All caps and angle brackets:
of keys are shown in all caps within angle brackets (for
example, press <ENTER>).
•
Angle brackets:
specified argument in the command syntax, appears in angle
brackets (for example, List Fonts <Pattern>).
•
Bold:
shown in bold (for example, enter
•
The word “enter” within procedures:
of keying in data and pressing <ENTER> (for example,
enter y).
•
Italics:
example, the
Print Jobs
•
Quotation marks:
appear in quotes (for example, “USLetter”).
•
Vertical bars:
separated by vertical bars (for example, Set Time <Time |
Remote Host Name | IP Address>).
Within procedures, text and numbers that you enter are
Document and library names are shown in italics (for
).
Variable information, or the position of a
Xerox DocuPrint NPS/IPS Guide to Managing
Keywords you can enter as arguments
Alternatives to specified arguments are
Within procedures, the names
privilege operator
The two-step process
).
xvi Guide to Using Page Description Languages
Page 17

NOTE: Notes are hints that help you perform a task or
understand the text.
Cautions alert you to an action that could damage hardware or
software.
Warnings alert you to conditions that may affect the safety
of people.
Related publications
The Xerox DocuPrint NPS/IPS documentation set includes the
documents listed below.
Introduction
CAUTION
WARNING
NOTE: For a list of IBM reference manuals for IPDS printing,
refer to the Solutions Guide for IPDS Printing.
•
Guide to Configuring and Managing the System
•
Guide to Managing Print Jobs
•
Guide to Performing Routine Maintenance
•
Guide to Submitting Jobs from the Client
•
Guide to Using Page Description Language
•
Installation Planning Guide
•
System Overview Guide
•
Troubleshooting Guide
•
Solutions Guide for IPDS Printing
•
Decomposition Service and Tools Guide
•
Generic MICR Fundamentals Guide
•
Glossary
•
Master Index
s
•
Customer Information Quick Reference Card
•
Printer Controller Commands Quick Reference Card
•
Operator Quick Reference Card
•
Submitting your Jobs from Macintosh Quick Reference Card
Guide to Using Page Description Languages xvii
Page 18

Introduction
Related information
•
Submitting your Jobs from UNIX & DOS Quick Reference
Card
•
Submitting your Jobs from Windows NT 4.0 (QuickPrint)
Quick Reference Card
•
Submitting your Jobs Using Windows NT 4.0 Drivers Quick
Reference Card
The documentation set also includes an electronic version, the
DocuPrint NPS/IPS Interactive Customer Documentation CD.
You can locate additional information related to PostScript, HP
PCL 5, VIPP, or TIFF in the publications listed in this section. For
a complete list and description of available documentation, refer
to the Xerox Documentation Catalog or contact the Xerox
Documentation and Software Services at 1-800-445-5554 or
www.xdss.com for ordering information in the United States. For
customers outside the United States, contact your local Xerox
operating company.
PostScript publications
The following is a list of PostScript publications:
•
PostScript Language Reference Manual
printing, Addison-Wesley, April 1987, Adobe Systems,
Incorporated
•
PostScript Language Reference Manual
Addison-Wesley, January 1991, Adobe Systems,
Incorporated. (This document defines both PostScript Level 1
and Level 2.)
•
Adobe Type 1 Font Format
Incorporated
•
LaserWriter Reference
Apple Computer, Incorporated
•
PostScript Language Program Design
Systems, Incorporated
•
PostScript Language Tutorial and Cookbook
Systems, Incorporated
, first edition, sixth
, second edition,
, 1990, Adobe Systems,
, Addison-Wesley, October 1988,
, 1988, Adobe
, 1986, Adobe
xviii Guide to Using Page Description Languages
Page 19

Introduction
•
PostScript Printer Description File Format Specification
Version 4.2, March 29, 1994, Adobe Systems, Incorporated
•
Real World PostScript
HP PCL 5 publications
The following is a list of HP PCL 5 publications:
•
Hewlett Packard Printer Job Language Technical Reference
Manua
•
Hewlett Packard PCL 5 Printer Language Technical
Reference Manua
•
Hewlett Packard PCL 5 Comparison Guide
•
Hewlett Packard PCL 5 Color Technical Reference Manual
May 1996
VIPP publications
,
, 1988, Addison-Wesley
l, September 1994
l, October 1992
, October 1997
,
The following is a list of VIPP publications:
•
Xerox Variable Data Intelligent PostScript PrintWare (VIPP)
Reference Manual
•
Xerox Variable Data Intelligent PostScript PrintWare (VIPP)
Interactive Development Environment (IDE) 2001 User Guide
•
Xerox Variable Data Intelligent PostScript PrintWare (VIPP)
2001 Quick Reference Card
•
Xerox Variable Data Intelligent PostScript PrintWare (VIPP)
2001Command Librar
vippcommands
TIFF publications
The following is a list of TIFF publications:
• Adobe
•
Draft TIFF Technical Note 2
TIFF/JPEG specification
y. Refer to www.xerox.com/
TIFF specification, Revision 6.0
, March 17, 1995, Replacement
, June 3, 1993
•
Adobe PageMaker 6.0 TIFF Technical Notes
1995
•
TIFF-FX, RFC 2301
Guide to Using Page Description Languages xix
, November 1, 2000
, September 14,
Page 20

Introduction
xx Guide to Using Page Description Languages
Page 21

1. PostScript
This chapter provides an overview of standard PostScript
operations and guidelines for ensuring consistent printer output.
Implementation-dependent operations
The following operations are implementation-dependent.
Floating-point arithmetic and math operators
All PostScript floating-point arithmetic and math operators are
implementation-dependent if you use very large or very small
floating-point numbers. This is rarely a problem with PostScript
masters generated by “real world” creators; that is, commercial
PostScript creators such as Word or Excel. Handwritten test
masters, however, can cause problems.
Some handwritten test masters print out the limits of floating
point numbers and various floating-point operations. Because
these values may vary based on the PostScript implementation,
the test master output also varies, making these tests useless for
testing consistency across different PostScript printers.
Coordinate system default matrix
The PostScript current transformation matrix (CTM) controls the
mapping of user coordinates to device coordinates. You can
describe pages in your own coordinate system and let the
PostScript software transform your requests into the device
space. PostScript masters are device independent only when
they do not use the actual CTM values. When a master needs
CTM values, it becomes device-dependent. The occasional need
for CTM values causes inconsistent output across different
PostScript printers.
Guide to Using Page Description Languages 1-1
Page 22

PostScript
Fonts
Some handwritten test masters print out CTM values. Since
these values vary, depending on the device resolution and
positioning, the test master output also varies, making these
tests useless for consistency testing across different PostScript
printers.
DocuPrint NPS/IPS is capable of processing any legal Type 0,
Type 1, or Type 3 font. Fonts of any of these types may be
included in a document when it is sent to DocuPrint. Type 0, Type
1 and Type 3 fonts may also be installed on the system using the
font installation utility.
NOTE: Only Type 0 OCF fonts are supported. Type 0 CID fonts
are not supported, even when downloaded.
Type 1
DocuPrint NPS/IPS contains 51 PostScript Type 1 fonts listed in
the following table. These fonts are standard Type 1 fonts
licensed through Adobe Systems, Inc. However, because
DocuPrint NPS/IPS may contain different versions of fonts than
other PostScript devices, there could be slight differences in
shapes of characters and the character sets of certain fonts.
Table 1-1. Adobe Type1 PostScript fonts
Font Typeface
Courier Courier, Bold, Oblique, BoldOblique
Helvetica • Helvetica, Bold, Oblique, BoldOblique, Light, LightOblique,
Black, BlackOblique
• Condensed, Condensed Oblique, Condensed Bold,
Condensed BoldOblique
• Narrow, Narrow Bold, Narrow Oblique, Narrow BoldOblique
ITC Avant Garde Gothic Book, BookOblique, Demi, DemiOblique
ITC Bookman Demi, DemiItalic, Light, LightItalic
ITC Garamond Light, LightItalic, Bold, BoldItalic
ITC Korinna Korinna, KursivRegular, Bold, KursivBold
ITC Zapf Chancery MediumItalic
ITC Zapf Dingbats Medium
New Century Schoolbook Roman, Bold, Italic, BoldItalic
Palatino Roman, Bold, Italic, BoldItalic
1-2 Guide to Using Page Description Languages
Page 23

Table 1-1. Adobe Type1 PostScript fonts (Continued)
Font Typeface
Symbol Medium
Times Roman, Bold, Italic, BoldItalic
PostScript
Type 0
Type 3
MICR
A set of Type 0 OCF Chinese fonts is also available from Xerox.
These fonts are composite, “double-byte” fonts.
NOTE: Type 0 fonts that you load on the printer controller must
be either fonts purchased from Xerox, or fonts that meet
specifications provided by Xerox. Each composite font is stored
in its own subdirectory. Loading of Type 0 CID fonts is not
supported.
Type 3 fonts can be installed from a DOS-formatted floppy using
the Install Fonts From Floppy command. Type 3 fonts will install
only if:
• The fonts are in the floppy’s root directory.
• Each font is in a separate file.
• Each font file has a .ps extension.
• Each font file contains a “/FontName” definition with a unique
name.
For MICR systems, MICR PostScript E13B font is provided on
diskette. These fonts are in Type 3 format. For more
information, see the
Generic MICR Fundamentals Guide
“MICR printing”” chapter in the
Managing the System
.
Guide to Configuring and
and the
Notes on PostScript fonts
The DocuPrint PostScript interpreter does not use the “additional
metrics” entry in a font dictionary.
PostScript font substitution error messages appear on the “JOB
MESSAGES AND ERRORS” page only when the requested font
is not present.
DocuPrint NPS/IPS uses Courier when a requested font is not
available.
Guide to Using Page Description Languages 1-3
Page 24

PostScript
Loading fonts
DocuPrint NPS/IPS accepts downloaded legal Type 0, 1 or 3
fonts through the standard means used on other PostScript
devices for downloading fonts. Type 0, Type 1, or Type 3 fonts
may be loaded permanently on the system by the system
administrator using the font installation utility. This method
ensures that the desired fonts are available on the system and
saves time later by avoiding the repeated transfer of fonts
through the network.
NOTE: Only Type 0 OCF fonts are supported. Type 0 CID fonts
are not supported.
CAUTION
Downloading fonts with a PostScript file is discouraged because
printer performance may be degraded significantly. Instead,
install the desired fonts on the controller, then reference them
from within the PostScript file.
User-defined fonts
User-defined fonts can contain bitmaps or define the shape of
characters through PostScript operators (
User-defined bitmap fonts are not portable across different
output devices. You may notice a marked difference in the quality
of rendering for bitmap fonts as printed on different laser printers.
The differences are attributable to device-dependent features
such as resolution, shape of device pixels, and other
characteristics. For further information on these characteristics,
refer to “Scan conversion details” in this chapter.
Type 1 fonts
Type 1 fonts are base fonts with character shapes defined by
using specially encoded PostScript procedures. Because
characters are drawn by PostScript procedures, many visual
elements that are not associated with fonts can be represented
as characters in a Type 1 font.
The multiple master font format is an extension of the Adobe
Type 1 font format and is supported by DocuPrint NPS/IPS.
lineto, curveto, fill
).
1-4 Guide to Using Page Description Languages
Page 25

PostScript
Refer to the
more information, and the Adobe Type 1 Font Format document
for encoding information.
According to the
font program contains the following first line:
%! FontType1 -
•
SpecVersion
to which the font program conforms.
•
FontName
PostScript interpreter.
•
FontVersion
The first line of the Type 1 font, which is available by reading the
header of the Type 1 font program, can aid in determining
differences between fonts on PostScript devices.
Using Adobe Type 1 fonts instead of graphics
One of the factors that can negatively impact performance on
DocuPrint NPS/IPS is the use of small graphic images, logos,
and signatures embedded in PostScript masters. When these
graphic items are used on each page of a document, DocuPrint
performance can be slowed down.
Adobe PostScript Language Reference Manual
Adobe Type 1 Font Format,
SpecVersion. Font Name FontVersion
is the version of the Adobe Type 1 Font format
is the name of the font understood by the
is the version number of the font program.
a conforming Type 1
for
The Type 1 font capabilities of DocuPrint can handle commonly
referenced, small or large graphic elements such as logos and
signatures. You can install and remove any Adobe Type 1 font
from a DocuPrint system using standard administrator
commands in the DocuPrint printer controller. Fonts used only
occasionally for a single job can be included in the PostScript
master for the jobs that require them.
Using fonts for small graphic elements has the following
advantages over using referenced content files:
• You do not need to perform the NFS setup required for
referenced content files. DocuPrint can be used in a standard
configuration.
• Visual elements stored as fonts can be easily rotated and
scaled.
• Font characters are cached so that multiple uses of a visual
element in a document are rendered quicker if the elements
are taken from a font than if they are read from
supplementary files.
Guide to Using Page Description Languages 1-5
Page 26

PostScript
• Including graphic images is easier when creating the
document.
Producing Type 1 fonts for use with DocuPrint
Third-party software for font editing and creation is available for
most popular personal computing systems. With these
programs, you can edit or produce outlines from a bitmap
obtained by scanning existing line art.
Each graphical item that is referenced must be assigned to a
character code in a font. You can incorporate many graphic
elements in a single font by assigning each element to a different
character code, or you can place each item in its own font.
Once created, you must save Type 1 fonts on an MS-DOS
diskette as files with the .pfb extension. You can then load the
fonts from diskette onto a DocuPrint system using the
administrator
Install Fonts From Floppy
command.
Using a Type 1 font in a document
When you create a document using a standard document editor,
you enter the character that refers to the graphic image you
want, assign the appropriate font to it, and size and place it to fit
the document. If you are using Adobe Type Manager, the image
is scaled and displayed.
The PostScript driver of the document editor selects the font
using the PostScript operator
scalefont
operator, any
. Once the font is installed as current by the setfont
show
of a character images the figure associated
findfont
and scales the font using
with that character code.
For example, you can create a font containing a corporate logo,
assigned to the character a. The following PostScript example
shows how the specific size of the logo font is assigned a name
within a master, and how the logo is placed on a page.
/Logo /XYZCorpLogos findfont 20 scalefont def
Logo setfont
50 50 moveto (a) show
1-6 Guide to Using Page Description Languages
Page 27

PostScript with embedded PJL commands
PostScript files created for some Hewlett-Packard printers and
other compatible printers include PJL commands that specify the
use of a PostScript interpreter. DocuPrint NPS/IPS can
recognize a file as PostScript if it starts with code similar to the
following:
^[%-12345X@PJL ENTER LANGUAGE=POSTSCRIPT
Other PJL commands can be included at the start of the job, but
will be ignored.
NOTE: PJL commands in locations other than at the start of the
PostScript job will cause the job to be aborted.
PostScript language extensions
PostScript
DocuPrint NPS/IPS emulates some, but not all, of the
LaserWriter II NTX (containing version 47 of Adobe PostScript)
product-specific functionality as noted in this section.
When unimplemented operators are encountered in the
PostScript master, the standard error message “Undefined”
appears on the job messages page.
This section contains PostScript dictionary entries that are
defined in the LaserWriter II NTX. These PostScript definitions
are not part of the PostScript language.
Guide to Using Page Description Languages 1-7
Page 28

PostScript
System Dict
The following System Dictionary operators are implemented:
•
=print {dup type /stringtype ne {=string cvs}}
•
Run {dup == flush run}
•
error The common error handling routine used by all of
the standard error handlers
The following System Dictionary operators are implemented:
•
ISOLatin1Encoding
This is a 256-entry font encoding array based on the
International Standards Organization Latin1 encoding vector.
•
eexec
This is a decryption operator typically used for decoding Type
1 fonts. For a detailed description, refer to the Adobe Type 1
Font Format, version 1.1.
User Dict
•
cexec
The DocuPrint 1.5
and higher cexec
consumes and ignores the data fed to
implementation simply
cexec
. The
cexec
operator is used to download machine code patches. As
such,
cexec
is Motorola 6800 cpu-dependent and is not
completely implemented. DocuPrint NPS/IPS does not
handle PostScript masters using
cexec
typically hidden by the encryption of
. Usage of
eexec
.
cexec
LaserWriter defines other entries in the System Dictionary
that are specific to its device characteristics, such as extra
operators that deal with the hard disk. Such operators are not
part of the standard as defined in the
Reference Manual
, second edition, and are not implemented
PostScript Language
on DocuPrint NPS/IPS.
User dictionary entries that are implemented include:
cleardictstact {countdictstack 2 sub {end}repeat}
startpage Prints a startup page
start {(Init.ps)run}
is
DocuPrint implements print-level commands provided by the
client print command. PostScript-level print commands are
ignored.
1-8 Guide to Using Page Description Languages
Page 29

PostScript
The following operators, which are specific to the LaserWriter
implementation of PostScript, are defined with null functionality in
DocuPrint NPS/IPS.
a4 legaltray
a4small letter
a4tray lettersmall
b5 lettertray
b5tray note
legal
The DocuPrint NPS/IPS User Dictionary contains the following
definitions of values and procedures that mimic the LaserWriter
II NTX but are not used by DocuPrint:
aa xu
xs xv
xt xw
#copies
Server Dict
NOTE:
#copies
may be used to set the number of copies prior
to the first showpage of a job.
Server Dictionary operators that are implemented include:
dexch exitserver
exchdef fontname
With the exception of
exitserver
(see the “Printer controller”
section of this chapter), these operators allow you to bypass the
save or restore context around each PostScript job. These
changes can be reset only by stopping and restarting job
processing.
Server Dictionary entries that contain defined values and
routines to mimic the LaserWriter, but are not used by DocuPrint,
include:
baud25 parity9
baud9 secretdict
execjob setrealdevice
parity25
No other Server Dictionary operators defined in the LaserWriter
are implemented in DocuPrint 1.5 and higher.
Guide to Using Page Description Languages 1-9
Page 30

PostScript
Status Dict
The following Status Dictionary entries are implemented:
checkpassword product
dostartpage revision
jobname setpassword
jobstate setmargins
jobsource setdostartpage
idlefonts setidlefonts
margins setprintername
printername
The following Status Dictionary entries contain defined values or
routines to mimic the LaserWriter but are not used by DocuPrint:
defaulttimeouts printererror
eerom sccbatch
eescratch sccinteractive
jobtimeout setdefaulttimeouts
manualfeed seteescratch
manualfeedtimeout setjobtimeout
pagecount setpagetype
pagestacktorder setsccbatch
pagetype setsccinteractive
prefeed waittimeout
Miscellaneous: IdleTime Dict, Printer Dict, and Execution Dict
IdleTime Dictionary
IdleTime Dictionary ($idleTimeDict) entries that are implemented
include:
dfltkIdleArry
needflush
The following $idleTimeDict entries contain defined values or
routines to mimic the LaserWriter II NTX, but are not used by
DocuPrint:
bmpl ReadIdleFonts
boundsCheck stopPred
exitWhenDone ROMnames
idleA
Printer Dictionary
Printer Dictionary ($printerdict) entries that are implemented
include:
framelimit width
height xoffset
mtx yoffset
1-10 Guide to Using Page Description Languages
Page 31

PostScript
The following $printerdict print command operators are defined
with null functionality. DocuPrint implements print-level
commands as provided by the DocuPrint Client print commands.
PostScript-level print commands are ignored.
019
124
225
3 dopage
8proc
9 setpage
18
Execution Dictionary
Execution Dictionary (execdict) entries that are implemented
include:
checkquit print
execdepth quitflag
idleproc stmtfile
Nonstandard definitions
Commercial PostScript creators commonly use nonstandard
(product-specific) definitions without encapsulating the
definitions with an existence check. This check searches for the
existence of a nonstandard definition and bypasses the definition
if it is undefined.
Examples of nonstandard definitions
The following two dictionaries and their operators are examples
of nonstandard (product-specific) definitions.
Statusdict Userdict
a4tray a4
b5tray a4small
checkpassword b5
defaulttimeouts legal
jobtimeout letter
legaltray lettersmall
lettertray note
margins
manualfeedtimeout
pagecount
printername
product
revision
sccbatch
sccinteractive
setdefaulttimeouts
setjobtimeout
Guide to Using Page Description Languages 1-11
Page 32

PostScript
Appearance consistency
To control the consistency of output between more than one
printer, you must consider the following:
• Printer resolution and resolution enhancement
• Printer imaging characteristics
• Font consistency
Statusdict Userdict
setmargins
setpassword
setprintername
setsccbatch
setsccinteractive
waittimeout
• Proprietary Postscript extensions
• Color differences for full color and highlight color printers
The following sections provide guidelines for ensuring
consistency between printers.
Printer resolution and resolution enhancement
The most obvious reason for inconsistent output between two
printing devices is that they have different resolutions. For
example, a 600 by 600 dpi printer has much smoother looking
fonts and curves than a 300 by 300 dpi device. For the same
physical size (constant frequency) of halftone, you get four times
the number of gray levels on a 600 by 600 dpi printer as on a 300
by 300 dpi device. If your document contains scalable fonts or
simple line art generated at 600 dpi, the differences between
printing it at 300 and 600 dpi are subtle.
However, if your document contains bitmaps with a resolution of
600 dpi, printing it at 300 dpi causes a degradation in image
quality. Figure 2-1 provides an example of a 300 dpi image and a
600 dpi image output on a 300 dpi printer. The 600 dpi image
appears larger and in a different position on the page.
1-12 Guide to Using Page Description Languages
Page 33

PostScript
300 dpi image
printed on a 300 dpi printer
Figure 1-1. 300 and 600 dpi image output
In the following figure, the 600 dpi halftone is distorted and only a
portion of the image appears.
Figure 1-2. 300 dpi image output
600 dpi image
printed on a 300 dpi printer
Guide to Using Page Description Languages 1-13
Page 34

PostScript
Figure 1-3. 600 dpi image output
To preserve image quality when printing on 300 dpi printers,
regenerate the bitmaps at 300 dpi. The 600 dpi printers can
accept jobs with resources in either 300 or 600 dpi. See
“Maintaining image quality” in the “PCL5e” chapter for
information about the recommended attribute settings to use
when generating a document on your system.
Some manufacturers have added hardware imaging
enhancements to 300 by 300 dpi printers that effectively boost
the apparent dpi by micro-controlling the laser beam. The
function is called post-enhancement because it is performed by
the hardware after the PostScript interpreter has imaged into the
frame buffer. The frame buffer is still only 300 by 300 dpi, but the
hardware is controlling the laser beam to produce smoother
edges.
Other manufacturers have added pre-enhancements that involve
the PostScript interpreter. In these printers, the frame buffer is
actually larger because the PostScript interpreter is effectively
rendering at a higher resolution. The hardware performs some of
the halftoning function to provide finer halftoning, resulting in
picture output that looks smoother.
You can only accurately compare two different printers if both are
using the same enhancement techniques or if all enhancement
techniques are turned off.
Printer imaging characteristics
Most xerographic printers do not image perfect circular dots with
even dry ink distribution. The dry ink “spread” is typically
Gaussian, with dry ink density being the greatest at the center of
the dot and fading off toward the edges.
1-14 Guide to Using Page Description Languages
Page 35

PostScript
The terms “write-white” and “write-black” are broad
generalizations. The specific print imaging characteristics of
some products may not represent other products with the same
write-white or write-black classification. For example, the
HewlettPackard (HP) LaserJet and the LaserWriter II NTX use a
write-black laser printer engine that uses the laser beam to
“write” where dry ink should go. Therefore, single pixel dry ink
dots are approximately round and are visible on an HP LaserJet.
In contrast, write-white laser printer engines “write” the dry ink
free areas, which can create single dots that have four concave
sides.
It is important to distinguish the fast scan direction, which is the
direction the laser beam moves across the page before jumping
back to do the next line. Remember that a laser printer scans a
page in a raster method, just like a television set. Fast scan
directions are not the same for a LaserWriter and the Xerox
engine.
In general, when turning on the same pixels, the write-white
engine produces output that appears lighter than output
produced by a write-black engine. Xerox device-parameterized
PostScript interpreters are able to partially compensate for this
by rendering thicker strokes and fonts. Device-dependent
PostScript cannot be compensated for because it is sending
user-created bit images instead of mathematical descriptions of
the desired output.
• User-defined PostScript fonts—Some user-defined fonts use
bitmaps that are tuned to write-black engines. These fonts
appear light on certain write-white printers.
• Image data at output device resolution—PostScript image
data that has a resolution matching the output device is
typically transferred directly to the frame buffer with no
modification. These images appear light on certain writewhite printers.
Black lines on a color background print white—PostScript (or
PCL) jobs that have black lines on a color background will
print the lines with white borders. This is a characteristic of
write-white printing.
• Single-pixel fills—Single isolated dots are visible on a
LaserWriter but not on some write-white printers; therefore,
single-pixel isolated fills in PostScript may not be visible on
your product.
Guide to Using Page Description Languages 1-15
Page 36

PostScript
You may be able to correct the above situation by means of
the Change Imager Parameters command. Set the
FatScanConversion option to Yes. This should only be used if
needed, because it may degrade performance.
NOTE: When the
together either via the Thicken attribute or a Change Imager
Parameters command, the data printed on every page generated
by copypage becomes progressively darker.
In addition to these PostScript issues, your output may not meet
your expectations if your printer is not set within the Xerox print
quality specification range. Please make sure your printer has
been adjusted by a qualified technician.
Font consistency
If you do not use exactly the same fonts on both printers, you
cannot expect the output to look the same. The actual shape of
the characters in any given font varies among different font
manufacturers. In fact, different versions of a font from the same
manufacturer may have different shapes and character sets.
Because some PostScript printers have fonts permanently
installed, it is likely that newer models may have newer versions
of the same fonts. The font rasterizer software may vary between
printer models, also resulting in output differences.
copypage
operator and darkening are used
Proprietary PostScript extensions
Some PostScript printers contain proprietary PostScript
extensions. In general, PostScript masters that use proprietary
printer features may cause appearance inconsistencies between
different PostScript printers.
1-16 Guide to Using Page Description Languages
Page 37

Color differences on full color and highlight color printers
The output of a job printed on a highlight color printer is likely to
appear different from the output of the same job printed on a full
color printer, even if the job uses only one color. This occurs
because the color on the highlight printer is limited to the color
toner used, plus black, whereas the full color printer toners can
mix to produce millions of different colors. To adjust the output
color in the job when printing on a different type of printer, you
must change the application.
Control-D as binary data and end-of-job
The fact that control-D can be a valid PostScript end-of-file
(EOF) delimiter in one communications protocol and invalid in
another creates a paradox for PostScript printers that must
accept jobs created for either communications mode without any
indication of which communications mode was used. The
recommended solution is described in “Solution to control-Z and
control-D problems.“
PostScript
How PostScript jobs are delimited—separated from each other in
a continuous stream of jobs—is not simple. Remember that the
actual PostScript interpreter has no concept of a job. There is no
PostScript job end operator. The job server, which is external to
the interpreter, must make the job begin and job end
determination and act accordingly. It does this by considering a
PostScript job to be a simple byte stream input file. When end-offile (EOF) is reached, the job server restores the PostScript state
for the next input file (job).
The way input files—or jobs—are sent to a PostScript printer
depends on the communications protocol used to transfer the
PostScript document to a PostScript printer. For example, when
a LaserWriter is connected to an Apple Macintosh over the
AppleTalk serial communications channel, AppleTalk protocol
encapsulates PostScript jobs as files. The LaserWriter AppleTalk
software delimits PostScript jobs based on the AppleTalk file
protocol. AppleTalk encapsulates files in its own high-level
protocol. This allows AppleTalk to support transparent data
transmission; that is, there are no byte codes reserved for
AppleTalk communication functions. This means that all byte
values are valid in a PostScript master.
Guide to Using Page Description Languages 1-17
Page 38

PostScript
This is not true when you are connecting an IBM PC to a
LaserWriter over the LaserWriter asynchronous serial
communications (RS232 or RS422). There is no high-level
protocol, such as AppleTalk has, that delimits files, so the
control-D character code (octal 004) was chosen to delimit input
files. The LaserWriter asynchronous software handler strips out
the control-Ds and sends an EOF to the PostScript job server.
This prevents sending binary PostScript jobs (jobs where all byte
codes are valid PostScript data) through the asynchronous serial
communications port. In contrast, the LaserWriter can accept
binary PostScript jobs over AppleTalk since it is data transparent.
Control-Z and superfluous errors
Control-Z is not used by the LaserWriter RS232 asynchronous
serial communications software; yet it often appears at the end
of many PostScript masters and can pose problems.
Control-Zs appear at the end of many PostScript files created
under the Microsoft Disk Operating System (MS-DOS). They
cause errors on a LaserWriter, but this is usually unnoticed
because the control-Z undefined command error occurs after the
last page is printed. In addition, because the default error
handling mode of the LaserWriter is to send the error back to the
creator through the communications port, most users never see
the error. This is not the case for PostScript products that have
been configured to print a break page on every error.
Because the majority of the error messages caused by control-Z
are superfluous, it is recommended that control-Zs used as endof-files be ignored.
Solution to control-Z and control-D problems
The recommended solution for the problems induced by controlD and control-Z is to include the following PostScript definitions.
They can be loaded permanently, or prepended to jobs that have
these problems. These definitions catch illegal uses of these
control characters and also allow the legal uses (binary data) to
pass through untouched.
1-18 Guide to Using Page Description Languages
Page 39

PostScript
(\004) cvn {} def %ignore single ^D character
(\032) cvn {} def %ignore single ^Z character
(\004\004) cvn {} def %ignore ^D^D pattern
(\004\032) cvn {} def %ignore ^D^Z pattern
(\032\004) cvn {} def %ignore ^Z^D pattern
(\032\032) cvn {} def %ignore ^Z^Z pattern
(\004\004\004) cvn {} def %ignore ^D^D^D pattern
(\004\004\032) cvn {} def %ignore ^D^D^Z pattern
(\004\032\004) cvn {} def %ignore ^D^Z^D pattern
(\004\032\032) cvn {} def %ignore ^D^Z^Z pattern
(\032\004\004) cvn {} def %ignore ^Z^D^D pattern
(\004\032\004) cvn {} def %ignore ^D^Z^D pattern
(\032\032\004) cvn {} def %ignore ^Z^Z^D pattern
(\032\032\032) cvn {} def %ignore ^Z^Z^Z pattern
%
% The following code redefines PS operators and names
containing control
% characters. Jobs containing the redefined commands will
run without
% the undefined error. Additional lines may be added here as
needed.
%
(\004initgraphics) cvn {initgraphics} def %remove ^D
(initgraphics\004) cvn {initgraphics} def %remove ^D
(showpage\004) cvn {showpage} def %remove ^D
% Examples of case sensitivity.
(sp\004) cvn {sp} def %remove ^D
(Sp\004) cvn {Sp} def %remove ^D
(SP\004) cvn {SP} def %remove ^D
The preceding definitions use the following rules:
•
Isolated illegal characters.
alone or only with some combination of other illegal
characters, then the resulting token may be redefined as an
empty PostScript procedure, as shown in this example:
(\004) cvn {} def
NOTE: It is not desirable to redefine the token as null
because this would leave a null object on the operand stack.
•
Illegal characters adjacent to legal characters
no white space character (as defined in the
Language Reference Manual
illegal character or characters and legal PostScript
characters, then that combination can be redefined to be the
legal PostScript substring only, as shown in these examples:
Guide to Using Page Description Languages 1-19
If the illegal characters occur
. If there is
PostScript
, second edition) between the
Page 40

PostScript
(showpage\004) cvn {showpage} def
(sp\004) cvn {sp} def
NOTE: It is not desirable to redefine a legal substring ABC
as some other legal substring XYZ in the illegal token
initialization file. For instance, although
is redefined by PostScript code to be sp for brevity, it may
seem to make sense to redefine
showpage. However, if the client application creating the
PostScript defines sp to mean show rather than
then to have
an error.
Also, due to case sensitivity, some patterns may have to
appear with the same case variety as in the PostScript jobs to
be processed.
Because there may be an infinite number of character
combinations, the system administrator is encouraged to
redefine only known or suspect problem tokens.
sp <control D>
sp <control D>
initialized to mean
showpage
frequently
as
showpage
showpage
,
is
Multiple jobs in one input file
Note that the above control-D handling does not perform true
PostScript job encapsulation. Therefore, the following PostScript
job situations may cause problems. All of these problems are
due to having multiple PostScript jobs in one input file. If
problems occur, break the concatenated masters into separate
input files.
• Because control-Ds are not interpreted as end-of-job (EOJ),
PostScript virtual memory (VM) is not restored before the
next job. This means that the next job environment is not
“clean,” which may or may not cause problems. PostScript
VM may also run out since VM is not restored by control-D.
Note that all Xerox PostScript products do restore VM at the
end of their input file, so single PostScript jobs per input file
are always handled correctly.
• Some of the PostScript jobs execute exitserver, which stays
in effect until EOJ. Because the control-Ds are not interpreted
as EOJ, subsequent non-exitserver job definitions become
permanent, which could consume all of the PostScript VM or
cause other PostScript problems.
1-20 Guide to Using Page Description Languages
Page 41

• A job executes code that flushes the input data up to EOJ.
Because the control-D is not interpreted as EOJ, it does not
stop the flushing. Therefore, the rest of the PostScript jobs in
the input file are ignored.
DocuPrint NPS/IPS implementation of PostScript Level 2
DocuPrint NPS/IPS implements the PostScript Level 2 operators;
it conforms to the PostScript Language as defined in the
PostScript Language reference manuals.
DocuPrint does not support the following device-specific
operators:
setup and output operators). These operators are devicespecific.
• In PostScript Level 2, the LZWEncode, CCITTFaxEncode,
and DCTEncode filter names are not supported with the
operator.
banddevice, framedevice
, and
renderbands
PostScript
(device
filter
NOTE: The DCTDecode filter does not work correctly for all
full color images.
• Unlike the Adobe implementation of PS Level 2, the
setfileposition
standard input comes from a file.
•The
Due to support of mixed paper sizes, PostScript files that use the
clippath pathbbox
of the page will not image shift correctly. Image shifting will not
occur by using the AdjustX and AdjustY system options nor the
image shift document attributes: HorizontalImageShift,
HorizontalImageShiftforBack, VerticalImageShift,
VerticalImageShiftforBack, and the ExceptionPage image shift.
Simulated mixed plex
For releases prior to 7.x, simulated mixed plex is supported using
the standard PostScript Level 2 /Duplex pagedevice key. The /
Duplex key is supported only with the PostScript Level 2
interpreter when the plex attribute value is “duplex.” The /Tumble
key is not supported.
charpath
Level 1 interpreter when used on type 3 fonts, However, this
operator is supported with PostScript Level 2.
operator is permitted on %stdin when the
operator is not supported with the PostScript
operators to determine the imageable area
Guide to Using Page Description Languages 1-21
Page 42

PostScript
The /Duplex key is not supported when used in a job with the
MultiSet-specific pagedevice keys: /EndOfSet, /EndOfRun, and
/Staple, which are also capable of simulating mixed plex.
For more information on mixed plex jobs, see the chapter “Mixed
plex applications” in the
Printer controller operations
The DocuPrint NPS/IPS printer controller operates as follows:
• PostScript stdout messages are printed on the “JOB
MESSAGES AND ERRORS” page. DocuPrint PostScript
prints error messages directed to %stderr on the “JOB
MESSAGES AND ERRORS” page as well.
• PostScript font substitution error messages appear on the
“JOB MESSAGES AND ERRORS” page only when the
requested font is not present and is not one of the DocuPrint
base 51 font set.
Guide to Managing Print Jobs
.
• DocuPrint does not emulate the serial communications
handling aspects of the LaserWriter. Notably, DocuPrint
syntactically treats control-D and control-Z as literal
characters in ASCII strings and binary data, not as end-of-file
delimiters. Also, DocuPrint does not strip high bits from
character string data. Instead DocuPrint treats all input bytes
as valid PostScript.
• DocuPrint handles ASCII or binary input transparently and
does not require two input modes.
• DocuPrint wraps each PostScript document with a save and
restore to ensure that documents are independent. DocuPrint
NPS/IPS implements the exitserver operator to permit
modifying PostScript virtual memory within a document, but
not across documents.
• DocuPrint performs standard PostScript error handling when
it encounters LaserWriter-specific operators that DocuPrint
NPS/IPS does not implement. The error handling process
produces a standard PostScript “undefined command”
message and flushes the master to end-of-file.
1-22 Guide to Using Page Description Languages
Page 43
Scan conversion details
DocuPrint NPS/IPS uses the scan conversion rules to control the
PostScript painting operators
The scan conversion process and rules are not defined as part of
the PostScript language. They are subject to variations
depending on algorithms used in different PostScript printing
devices to achieve the most accurate rendition possible. The
sections below describe the stroke and fill operators.
Stroke
Stroke refers to painting a line that follows the current path, is
centered on the path, and has sides parallel to the path segment.
“Path” includes a thickness set by the operator
DocuPrint NPS/IPS turns on any device pixels whose centers lie
within the width of the path to be stroked. The pixels whose
centers lie outside of the width of the path are turned off.
stroke, fill, clip
PostScript
, and
image
setlinewidth
.
.
Figure 1-4. Stroke function
The top illustration above shows four columns of three pixels on
the printing device. The dashed lines intersect at the center
points of the device pixels or dots. The columns from left to right
are designated as columns 1, 2, 3, and 4.
Guide to Using Page Description Languages 1-23
Page 44

PostScript
The lower illustration builds on the top illustration by adding two
vertical line segments that will be stroked. The sides of the line to
be stroked are indicated with solid bold lines. The line to right
has its left side to the left of the center point of the third column of
pixels and has its right side to the right of the center point of the
fourth column. Because the center points of the third and fourth
columns of pixels are within the thickness of this line, all six
pixels are turned on (indicated in this picture by cross-hatching
the pixels). Contrast this with the line on the first and second
columns of pixels. Because the center point of the second
column falls outside its boundaries, only the first column is
turned on.
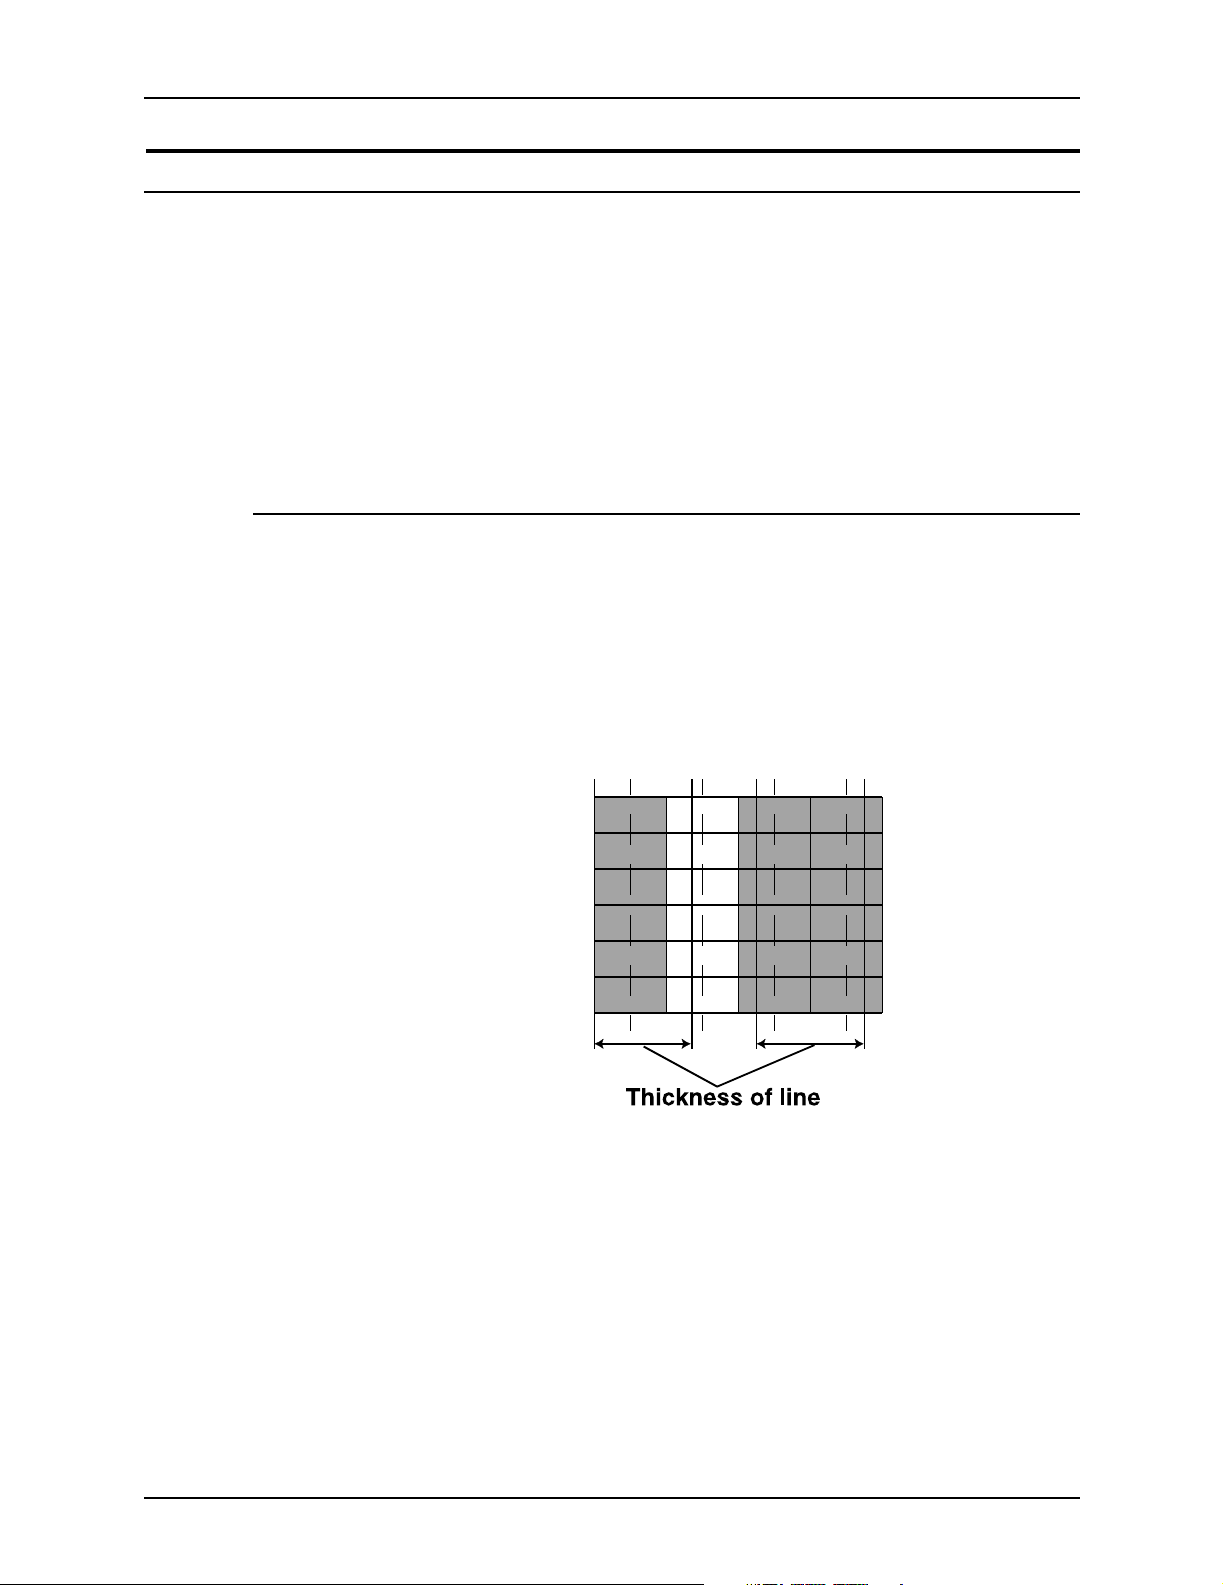
Fill
The Fill function controls the shapes, zero-width lines, curved
shapes, and image operators.
Shapes
A shape is a path to be painted with the current color or with a
pattern. To paint shapes, “insideness” computations need to be
performed. These determine which pixels fall inside and outside
the shape. During fill, the pixels whose centers lie within the
inside boundaries of the shape are turned on. Those whose
centers lie outside the shape are turned off.
Some PostScript creators describe long, very thin, rectangular fill
regions in the masters (for example, boundaries of boxes or
rules). DocuPrint selects some of those shapes and treats them
as thin paths that are “stroked” to ensure that they are imaged
(painted).
Zero-width lines (strokes)
Zero-width lines are lines that have a line width set to zero by the
PostScript master. These lines may not image. The best method
is to specify the sizes of the hairline you want, such as .24
setlinewidth
instead of 0
setlinewidth
.
1-24 Guide to Using Page Description Languages
Page 45

Center
Points of
Pixels
Figure 1-5. Example illustrating fill function
PostScript
Thickness
of Line
This illustration shows four rows of five pixels on the output
device. The center points of the device pixels are at the cross
sections of the dashed lines. The horizontal lines to be filled are
indicated by two solid, bold line segments per horizontal line.
The horizontal line at the top contains the center points of the
second row of pixels; therefore, the pixels are turned on by the
imager. This is shown by cross hatching the pixels that are
turned on. The horizontal line at the bottom of the picture does
not contain the center points of the fourth row of pixels; therefore,
no pixels are turned on, and the line is not visible.
Curved shapes
The flatness parameter is used to set the accuracy with which
curves are rendered on the output device. Because DocuPrint
does not use curve flattening (conversion of curves to line
segments) in graphic rendering, the parameter for the operator
setflat has no effect on the smoothness of curves.
Images
In DocuPrint, the region of the device space to be painted is
determined according to the following rules:
• Scan Conversion paints only those pixels whose centers lie
within the shape if:
Guide to Using Page Description Languages 1-25
Page 46

PostScript
Image quality
– The resolution of the source image (sampled image) is
higher than the device resolution. Scan Conversion paints
those pixels whose centers lie within the shape.
– The resolution of the source image (sample image) is
lower than the device space, and the scaling of sourceimage-to-device space is an integer multiple and rotation
is in multiples of 90 degrees.
• Scan Conversion paints any pixel whose square region
intersects the shape if the resolution of the source image is
lower than that of device space, and the scaling between
source image and device space is not an integer multiple.
This effect is noticeable when you are printing a sampled image
with a resolution of less than 600 dpi on the printer at 600 dpi.
The output of DocuPrint NPS/IPS printers that use write-white
technology can be superior to the output of many printers that
use “write-black” technology; the difference appears in the
following areas:
• Black regions are darker.
• Fonts of small point sizes are more readable.
• Single-pixel-wide white lines on a black background are
visible.
NOTE: The DocuPrint 92C NPS/IPS can produce a single-pixel
line. However, because of the many variables involved, such as
print density settings and line placement on the page, Xerox
cannot guarantee the quality of these single-pixel lines. Specific
questions regarding single-pixel line printing for your application
should be directed to your Xerox service engineer.
Some user-defined fonts use either outlines or bitmaps that are
tuned to write-black printers. As a result, these fonts appear light
on the Xerox DocuPrint printers. Character rasterization for fonts
that use PostScript painting operators is subject to the scan
conversion rules described earlier in this chapter.
1-26 Guide to Using Page Description Languages
Page 47

PostScript
It is often difficult to determine if a PostScript master uses userdefined fonts. To do so requires studying the master in detail,
unless the creator has followed the standards suggested in the
PostScript reference manual and specified the fonts used by the
document in a PostScript comment format. An example of this
format is:
%%DocumentFonts: { <
%%DocumentSuppliedFonts:{ <
However, if the character shapes seem poorly rasterized, userdefined fonts probably are contained in the master. When
possible, use Type 1 fonts, which are rasterized through special
techniques, for best output quality.
Note that the DocuPrint PostScript interpreter applies thickening
to certain graphics-rendering operations. For example, outline
fonts in the Type 1 format are subject to rasterization techniques
that use thickening for best quality of text rendering on Xerox
devices.
fontname
> ...}
fontname
> ...}
Rendering of color and gray values: transform function
PostScript devices approximate source color values by a
sampling and halftoning technique. These values can be
modified by changing the output transfer function. The transfer
function permits the correction of color (including gray) values to
compensate for nonlinear color (and gray) level response in both
an output device and the human eye.
The color levels presented to the
setrgbcolor
data are not used directly, but are mapped through the current
transfer functions. The resulting output consists of combinations
of black and white on the DocuPrint monochrome printer, and
black, white, and highlight color on the DocuPrint highlight color
printers.
NOTE: The internal default transfer function in DocuPrint cannot
be bypassed. Currently, there is an internal table that is used for
converting input requests for a color value to a different number
that is used to set the output device color level.
On the DocuPrint monochrome printers, PostScript masters that
rely on the null transfer function (null transfer function is {}
settransfer
Guide to Using Page Description Languages 1-27
, and
setgray
) do not overwrite the internal transfer function.
operators and appearing as sampled
setcmykcolor, sethsbcolor
,
Page 48

PostScript
Furthermore, the operator
to be a null transfer function, that is, {}. However, the internal
transfer function is not null. This achieves compatibility, because
the xerography differs between DocuPrint and LaserWriter.
NOTE: For DocuPrint monochrome printers only, provision is
made for compatibility with pattern generation, as long as the
spot function returns values of 0 or 1.
When a gray value is presented to the
DocuPrint NPS/IPS performs the following processes:
1. Computes the index by multiplying the gray value by 255.0
and rounding the result:
index = Round (gray x 255.0 + 0.5)
2. Sets the device gray value to the value in the transfer array at
the which the index was calculated:
device color = transferarray[index]
NOTE:
four color components (red, green, blue, and gray) to the same
value. The
individually.
Settransfer
setcolortransfer
actually sets the transfer functions for all
currenttransfer
operator sets the transfer functions
returns what appears
setgray
operator,
PostScript printer description (PPD) files
PostScript printer description files (PPD files) are readable text
files that provide information about the special features of your
printing device to the application program running on your host
system. PPD files include information about page sizes, finishing
features, and fonts, among other items.
PPD files are stored on a client workstation or PC where they
can be parsed by applications. Some application programs
supply PPD files for a variety of printers, rather than have you
contact printer manufacturers to obtain one.
The DocuPrint PPD files provided with DocuPrint software
conform to version 4.2 of Adobe PPD specifications. If your
application software supports version 4.2 PPD files, the
DocuPrint PPD files should be used when generating print
documents from your application.
1-28 Guide to Using Page Description Languages
Page 49

If your application does not support version 4.2 of the PPD
specification, the Generic PPD file can be used. In the cases
where using the LaserWriter PPD file results in PostScript code
that contains operations not supported on DocuPrint, use the
“NULL” PPD file that is available with some applications.
Implementation limits
PostScript
Features that are known to be device dependent (see the
PostScript Language Reference Manual
may differ from other implementations. These include
performance, VM usage, certain kinds of shading and line
thickness, some kinds of halftoning, resolution dependencies,
and certain implementation limits.
, 2nd edition, for a list)
Adobe
Guide to Using Page Description Languages 1-29
Page 50

PostScript
The following table lists the implementation limits that are not
defined in the PostScript standard, but are inherently different on
PostScript devices.
Table 1-2. Implementation limits
Quantity Limit Description
16
16
31
38
31
-1
38
_
Actual values are slightly less than 1038
38
and slightly more than -10
.
Maximum length of an array
Maximum capacity of a dictionary (key
integer
real
array
dict
Largest: 2
Smallest: -2
Largest: 10
Smallest: -10
65536 or 2
65536 or 2
value pairs)
string
262144 or 2
18
Maximum number of characters in a
name
file See “File operators and standard
_
devices”
userdict 2000 Capacity of UserDict
operand stack 5000 Maximum depth of the operand stack
dict stack 50 Maximum depth of the dictionary stack
exec stack 250 Maximum depth of the execution stack
interpreter level Variable Maximum number of recursive
invocation of the interpreter
save level 31 Maximum number of active saves
gsave level 31 Maximum number of active gsaves
path 1500
_
See
”Path limits”
dash 65536 Maximum elements in dash pattern
VM Approximately 4 megabytes Maximum size of the virtual memory in
bytes
systemdict 256 Maximum capacity of System Dict
errordict 28 Maximum capacity of Error Dict
1-30 Guide to Using Page Description Languages
Page 51

File operators and standard devices
PostScript
Path limits
When “%stdin” is the filename for the
NPS/IPS does not create a new file object. For example, the
following PostScript segment uses %stdin to open a file from the
stdin device:
(%stdin) (r) file %
DocuPrint NPS/IPS returns the file object for %stdin created at
initialization time, which is used for reading the PostScript
master. Therefore, PostScript masters should avoid doing a
closefile
is used by the PostScript interpreter to read the PostScript
master.
Although the use of the operator
PostScript operators such as
standard devices. Likewise, miscellaneous file operators such as
status
compared among different implementations of PostScript, due to
differences in the implementation of file I/O.
on %stdin because this action closes the file object that
file
closefile
and
bytesavail
return different results when output is
operator, DocuPrint
file
on %stdin is common, other
are rarely used with the
The LaserWriter has a limit of 1500 path segments that can be
defined in the current path. Any master that exceeds this limit
generates a limitcheck error.
DocuPrint NPS/IPS uses a different scheme for representing
paths in its internal memory than that used by the LaserWriter.
Although the maximum number of path segments is larger than
the LaserWriter’s (in other words, masters that print on the
LaserWriter also print on DocuPrint NPS/IPS without limitcheck
error), it is difficult to state the exact limit, due to the different
algorithm for storing rendered shapes in DocuPrint NPS/IPS.
PostScript VM limits
DocuPrint simulates PostScript virtual memory (VM) limits
(default=4 MBytes). When the PostScript VM limit is reached, it
sends the PostScript error message “VMe=Error” to the “JOB
AND ERROR MESSAGES” page. In rare cases when real VM
runs out, the printer controller sequencer is automatically
restarted and the job is held for either restart or cancellation by
the operator.
Guide to Using Page Description Languages 1-31
Page 52

PostScript
SetCacheDevice
DocuPrint does not pad the bounding box of user-defined fonts.
Emitters that depend on the PostScript interpreter for padding of
the bounding box create PostScript masters that can result in
blank pixels.
Device orientation and setscreen operator
Due to differences between the device coordinate systems in
DocuPrint NPS/IPS and those in the LaserWriter or a typical
desktop printer, the use of the
different results between printers.
setscreen
operator produces
Figure 1-6. DocuPrint device coordinate
Figure 1-7. Typical desktop printer device coordinate
1-32 Guide to Using Page Description Languages
Page 53

PostScript storage object size limits
The two main PostScript storage objects are the font cache and
virtual memory (VM), which stores composite PostScript data
structures such as the user and system dictionaries. The font
cache, VM, and data structures in VM do not have standard
sizes. Therefore, test masters that print out these object sizes
are useless for testing consistency across different PostScript
printers.
A small font cache size does not normally cause a PostScript
master to fail; it should affect only performance.
PostScript
Refer to the
memory limits for PostScript products. These limits should be
considered minimum values.
Obsolete operators—banddevice, framedevice, renderbands
The
banddevice, framedevice
obsolete and should not be used. These operators were not
meant to be included in page descriptions and were used only in
certain implementations for device setup.
Arc to Bezier conversion—pathforall
The
pathforall
path. Path components
sequences of
define the arc to Bezier (
Therefore, different PostScript implementations may return
different
PostScript Language Reference Manual
, and
renderbands
operator returns the components of the current
, and
arcto
) conversion algorithm.
curveto
pathforall
arc, arcn
components. The standard does not
curveto
results.
are converted to
for typical
operators are
NOTE: All PostScript implementations should return the same
equivalent path, but the path may be composed of a different
number of
on a particular arc to Bezier conversion algorithm may not be
consistent across different PostScript printers.
Guide to Using Page Description Languages 1-33
curveto
components. PostScript masters that depend
Page 54

PostScript
Creating the necessary PostScript CCITT Group 3 and 4
You can embed an image that is compressed to CCITT group 4
specifications in the PostScript. You need to add several
standard PostScript statements before the embedded image to
provide the image parameters, and to properly use the
FaxDecode filter.
Images use the PostScript
(CCITTFaxDecode filter) operators. Refer to the
PostScript Language Reference Manual
specifically the sections on the
operators, the FaxDecode filter, and transformation matrixes.
The source parameter of the CCITTFaxDecode
should be set to
image
method of submission uses an embedded CCITT compressed
image. Either form of the
be used; however, DocuPrint does not support any functionality
in the dictionary form that exceeds the functionality available
through the non-dictionary form of the operators.
Print performance related to image printing
Printing speed for CCITT G3/G4 documents is determined
largely by the decompression and imaging time. The
decompression time is correlated with the compression ratio
(better compression means less time). The imaging time is
correlated with the kind of scaling and rotation performed.
Consequently, printing speed is dependent on the document
characteristics.
operator should be 1 (for a binary image) because this
currentfile
image, imagemask
image
, and the bit/sample parameter of the
image
and
and
imagemask
, and
Adobe
for the proper syntax,
imagemask
filter
operators can
filter
operator
Optimal performance for CCITT G3/G4 printing is obtained with a
1-to-1 scaling (for example, 300 dpi input resolution) and 0
degree rotation. DocuPrint software is optimized to provide good
performance for the most frequently employed resolutions and
rotations. For example: resolutions of 200 dpi [fax]; 240 dpi
[IBM,etc.]; 400 dpi [extended fine fax]; and rotations of 0, 90,
180, or 270 degrees. Arbitrary scaling and/or rotation may impact
performance.
1-34 Guide to Using Page Description Languages
Page 55

Typical CCITT G3/G4 images have the fast scan direction along
the short edge of the paper and DocuPrint images along the long
edge of the paper. Therefore, in most cases, it is necessary to
perform an image rotation of 90 degrees on the CCITT G3/G4
data.
It is beneficial to create and to store CCITT G3/G4 images with
optimal scaling and rotation values for the target printer. These
CCITT G3/G4 images, of reasonable compression ratios,
typically print at or near rated printer speed.
Scan order and rotation
A scanned or sampled image is defined as a rectangular array of
sample values, each representing some color. In a PostScript
program, such an image is represented by a sequence of sample
values obtained by scanning the image rectangle in row or
column order.
PostScript
For any image, there are eight such sequences (four scan origin
possibilities, with either a row or a column order choice for each).
Any of these sequences may be used in a PostScript program as
long as the image-to-user coordinate transformation matrix is
prepared correctly.
Purpose
There is one sequence in each case that enables the fastest
processing on DocuPrint NPS/IPS. You should know why there is
a difference in speed depending on the order chosen, and how to
choose the optimum order.
The laser scans the image area in a specific order relative to the
paper to produce the output image. For DocuPrint, the fast laser
scan direction is parallel to the long edge of the paper, and the
slow laser scan direction is parallel to the short edge of the
paper. The fast scan direction is in the direction of increasing y
coordinates and the slow scan direction is in the direction of
increasing x coordinates in the PostScript default user space,
with the y axis corresponding to the long edge of the paper.
Refer to the Adobe
more information.
PostScript Language Reference Manual
for
Guide to Using Page Description Languages 1-35
Page 56

PostScript
When an image is used in a document, it is placed in a specific
orientation on a page. The orientation of fast and slow scan
directions for the image relative to those for the entire output
page is important. If the directions for the image do not match
the directions for the page, extra processing must be done at the
printer to reorder the image data.
The most time-consuming processing is rotation, shown in the
figures below using US Letter paper size.
Printer's paper
orientation
Image
Output
A
A
Fast
Fast
Rotated
A
Slow
Output
without rotation
Figure 1-8. Image orientation mismatch A
with rotation
A
Output
1-36 Guide to Using Page Description Languages
Page 57

Printer's paper
orientation
Slow
PostScript
Output
Image
A
Slow
Rotated
A
Output
without rotation
A
Fast
Output
with rotation
Figure 1-9. Image orientation mismatch B
The scan order of an image relative to the content of the image is
not important. It is important that the scan order of the image in
the desired orientation is relative to the scan order of the page.
There are circumstances during which a transformation cannot
be avoided by any ordering of image data (such as when the
image sides are not parallel to the sides of the paper, or when
the image is skewed), but for many cases, you can avoid a
rotation by ensuring that the data in the image is in the correct
order.
Ensuring optimum image data order is complicated by the fact
that the rotations are not tied to the use of the
rotate
operator in
a PostScript program, or to implied rotations in the image-to-user
space transformation. The transformations in the figures above
are automatically performed on data by DocuPrint NPS/IPS
when required as part of rendering. The transformations
specified in PostScript are part of a specification of the desired
position of an image in terms of the default user coordinate
system.
Guide to Using Page Description Languages 1-37
Page 58

PostScript
The following example shows the choice of row or column to
describe an arbitrary one-dimensional slice of an image that
depends on the viewpoint.
Table 1. Image pixel sequence example
Image:
00000000
00011000
00111100
01111110
00011000
00000000
Sequence A (origin top left, row scan order):
0 0 0 0 0 0 0 0 0 0 0 1 1 0 0 0 0 0 1 1 1 1 0 0 0 1 1 1 1 1 1 0 0 0 0 1 1 0 0 0 0 0
0 0 0 0 0 0
Sequence B (origin bottom right, column scan order):
0 0 0 0 0 0 0 0 1 0 0 0 0 0 1 1 0 0 0 1 1 1 1 0 0 1 1 1 1 0 0 0 1 1 0 0 0 0 1 0 0 0
0 0 0 0 0 0
Regardless of which scan order is chosen, the scan proceeds in
one direction (called the fast scan direction) through each
parallel slice in turn, progressing through the slices in a direction
called the slow scan direction.
In sequence A, the fast scan direction is left to right and the slow
scan direction is top to bottom. For sequence B, the fast scan
direction is bottom to top, and the slow scan direction is right to
left. The terms left, right, bottom, and top only have meaning
based on the orientation of the image on the page.
When DocuPrint NPS/IPS executes a PostScript program, the
principal product for each page is an image just like the images
that can be incorporated into PostScript programs. The image
data is transferred to the imaging hardware as a sequence of
values in laser scan order.
Considerations
The scan order of an image relative to the content of the image is
not important. It is important that the scan order of the image in
the desired orientation is relative to the scan order of the page.
1-38 Guide to Using Page Description Languages
Page 59

PostScript
There are circumstances when a transformation cannot be
avoided by any ordering of image data (such as when the image
sides are not parallel to the sides of the paper, or when the
image is skewed), but for many cases a rotation can be avoided
by ensuring that the data in the image is in the correct order.
Ensuring optimum image data order is complicated by the fact
that the rotations are not tied to the use of the
a PostScript program, or to implied rotations in the image-to-user
space transformation. The transformations specified in
PostScript are part of a specification of the desired position of an
image in terms of the default user coordinate system.
DocuPrint NPS/IPS only performs an image rotation when one is
required. Rotations of multiples of 90 degrees are optimized so
that the impact is not too great.
Because the data is already aligned with the printing orientation,
DocuPrint NPS/IPS does not perform any rotation of the image.
In the default user coordinate system, a rotate operation is
required.
rotate
operator in
Without the rotate operation, the PostScript specifies that the
image be placed on the page with its left edge (fast scan
dimension) parallel to the short edge of the paper. A 90 degree
counterclockwise rotation of the coordinate system is needed to
correctly specify the image orientation on the page.
It may be possible to arrange an appropriate order for the data by
correctly arranging the original when a scan is performed. It is
assumed that scanners produce data from a portrait scan in leftto-right (fast scan), top-to-bottom (slow scan) order.
By rotating the original 90 degrees clockwise, you can obtain
data from the scanner with the fast scan direction bottom-to-top
(relative to the original), and the slow scan direction left-to-right,
matching the page scan directions for the correct output
orientation. Alternatively, you can have the data reordered by a
program before the PostScript master is created.
After determining that a certain scan orientation produces data
in the optimum order for printing, you can scan an image and
import it into an emitter. Some rotation may be necessary to
place the image correctly.
If the emitter performs a rotation by manipulating the data, then
the resulting PostScript master may have the data in the
incorrect order. It is also possible that the emitter may not alter
the data and change the transformations specified in PostScript
so that the initial ordering is preserved.
Guide to Using Page Description Languages 1-39
Page 60

PostScript
Summary
To minimize imaging time, make sure that no data
transformations need to be performed at the printer. Order the
image data so that the fast and slow scan directions match the
output fast and slow scan directions when the image is in the
correct orientation on the page. With the image data correctly
ordered, arrange the PostScript transformations so that they
specify the position and orientation of the image relative to the
PostScript default image and user coordinate systems.
Scan resolution and scaling
Just as rotation of an image is often required to produce correct
output, scaling is also often required. To reduce imaging time,
present the data so that scaling is not required; supply data for
300 dots per inch of output size in both dimensions.
Part of the image-to-user space transformation for any image is
the scaling that takes image coordinates to physical coordinates
in user space. DocuPrint splits the transformation into two parts.
The
scale
operator is needed as part of the transformation from
the unit square in user space (1 unit equals 1 point, which equals
1/72 inches) to the destination rectangle or parallelogram.
In the following example, the number of samples in each
dimension is divided by the input resolution, giving the size of the
image in inches, which is multiplied by 72 to obtain the size in
points. The two computed values are used as scale factors to
take the unit square to the size of the original image.
Table 1-3.
/lines 3296 def % lines in the image
/bpl 2528 def % bits per line
/res 300.0 def % spots per inch of image resolution
.
.
.
bpl res div 72 mul lines res div 72 mul scale
Scaling and resolution example
As with rotation, the image-to-user space transformation
specifies the output size of the image, and internal scaling may
or may not be required, depending on the data available. In the
scaling and resolution example above, 300 samples per inch of
output size were provided, and output scaling is not required.
1-40 Guide to Using Page Description Languages
Page 61

PostScript
Common cases of scaling are optimized to minimize the
performance penalty. Refer to “Performance measurement” in
the Troubleshooting Guide. Recognition of optimized cases is
dependent upon precise scale values. For this reason, you
should always have the scale values calculated by the PostScript
code as shown in the examples. Optimized scaling works well
with optimized rotations.
The following example illustrates the requirements for
embedding and printing an image in a normal scan.This example
uses the default PostScript user coordinate system. The image
data is already in the correct order for that coordinate system, so
the use of the rotate operator is not required. DocuPrint NPS/IPS
performs an internal rotation of the image data in order to align it
properly with the print scan ordering. Three hundred samples
per square inch of output size is provided and scaling is not
required.
Table 1-4.
%!PS - Adobe - 3.0
% G4.example.ps
% Example using embedded CCITT group 4 (G4) data.
% Example using data in "normal" scan order, which has the fast scan
% direction left-to-right, and the slow scan direction top-to-bottom.
% Page size is roughly 8.5x11 (slightly clipped).
% Data has resolution of 300 spots per inch.
% Fast scan direction for the image is left-to-right across the page.
% Slow scan direction for the image is top-to-bottom down the page.
% This scan direction requires 90 degree internal rotation for DocuPrint.
% printers, although the PostScript code has no explicit rotation given.
/lines 3296 def % lines in the image
/bpl 2528 def % bits per line
/res 300.0 def % spots per inch of image resolution
/useMask true def % true => use imagemask, false => use image
save
PostScript with embedded image: normal scan order
Guide to Using Page Description Languages 1-41
Page 62

PostScript
Table 1-4.
bpl res div 72 mul lines res div 72 mul scale
bpl lines useMask {false} {1} ifelse
[bpl 0 0 lines neg 0 lines]
currentfile
<<
/Uncompressed false
/K -1
/EndOfLine false
/EncodedByteAlign false
/Columns bpl
/Rows lines
/EndOfBlock false
/BlackIs1 true
>>
/CCITTFaxDecode filter useMask {imagemask} {image} ifelse
!!!! binary G4 data goes here !!!!
%%%%%%%% end of G4 data
restore
showpage
%%End of Example
PostScript with embedded image: normal scan order
1-42 Guide to Using Page Description Languages
Page 63

PostScript
The following example illustrates the requirements for
embedding and printing an image in an enhanced scan. If a large
number of images are to be printed, it is best to avoid the internal
rotation. To do this, you must include the data in the order in
which it is required, which means that the fast scan direction for
the image is bottom-to-top, and the slow scan direction is left-toright.
Guide to Using Page Description Languages 1-43
Page 64

PostScript
Table 1-5.
%! PS-Adobe-3.0
% G4.example.ps
% Example using embedded CCITT group 4 (G4) data.
% For optimal printing speeds, the scan data should be aligned with
% the printing orientation, which scans the long edge of the page.
% Fast scan direction for the image is bottom-to-top across the page.
% Slow scan direction for the image is left-to-right down the page.
% To get this data for a normal portrait oriented image, scan it as
% landscape with the original rotated 90 degrees clockwise. This can
% also be done as a post pass on the scan data.
% This scan direction requires no internal rotation for DocuPrint
% printers, although the PostScript code has a 90 degree rotation
% (counterclockwise) to compensate for the rotation performed in the
% scan step.
save
% Rotate to the printer orientation
clippath pathbbox % => 11x 11y urx ury
/maxY exch def
/maxX exch def
/minY exch def
/minX exch def
/centerX maxX minX add 0.5 mul def
/centerY maxY minY add 0.5 mul def
centerX centerY translate
90 rotate
centerY neg centerX neg translate
PostScript with embedded image: reordered data
bpl res div 72 mul lines res div 72 mul scale
bpl lines useMask {false} {1} ifelse
[bpl 0 0 lines neg 0 lines]
currentfile
<<
/Uncompressed false
/K -1
/EndOfLine false
/EncodedByteAlign false
/Columns bpl
/Rows lines
/EndOfBlock false
/BlackIs1 true
>>
/CCITTFaxDecode filter useMask {imagemask} {image} ifelse
!!!! binary G4 data goes here !!!!
%%%%%%%% end of G4 data
restore
showpage
%%End of Example
1-44 Guide to Using Page Description Languages
Page 65

PostScript
Table 1-6.
%!PS-Adobe-3.0
%%Emulation: ccitt
%%LanguageLevel: 2
%%Requirements: duplex (off)
%%Requirements: numcopies (1)
%%Requirements: staples(none)
%%DocumentMedia: letter 612 792 75 white ()
%%DocumentMedia: white 612 792 75 white ()
%%EndComments
%%BeginSetup
<< /Duplex false /NumCopies 1
/PageSize [612.00 792.00]
>> setpagedevice
%%EndSetup
%%Page: 1 1
save
0.0000 792.0000 translate
612.4800 -792.0000 scale
/do_image { currentfile 80 string readline pop pop image { currentfile read { 37 eq { exit} if } { exit
} ifelse } loop } def
2552 3300 1
[2552 0 0 3300 0 0]
currentfile << /K -1 /Columns 2552 /Rows 3300 /BlackIs1 false >> /CCITTFaxDecode filter
do_image
%CCITT G3/G4 Data
Actual PostScript print
=======================================
CCITT G3/G4 Data
=======================================
%%%%%%%%%%
restore
%%PageTrailer
showpage
Guide to Using Page Description Languages 1-45
Page 66

PostScript
1-46 Guide to Using Page Description Languages
Page 67

2. PCL 5
The DocuPrint NPS/IPS system supports the following functions
for source documents:
• On monochrome systems, printing of PCL 5e masters
containing PCL commands, HP-GL/2 commands, fonts, and
data to be printed.
• On highlight color models, printing of PCL 5e monochrome or
PCL 5c color masters containing PCL commands, HP-GL/2
commands, fonts, and data to be printed.
The DocuColor 2060 NPS/IPS supports only PCL5e
monochrome printing. It does not support PCL 5c color printing.
Jobs can be submitted using the HP LaserJet 4 or LaserJet 4Si
print drivers for monochrome printing with PCL 5e, or the HP
Color LaserJet for highlight color printing with PCL 5c.
DocuPrint NPS/IPS supports most HP PCL commands, features,
and fonts, including those for PCL (the printer control language)
and HP-GL/2 (the vector graphics language). The
implementation of PCL 5e on DocuPrint NPS/IPS emulates the
HP LaserJet 4. The implementation of PCL 5c on DocuPrint
NPS/IPS emulates the HP Color LaserJet. This chapter provides
specific information about the support available.
Refer to your Hewlett Packard PCL 5 printer language
publications for more information on PCL.
There is a DocuPrint NPS/IPS
command that allows you to configure your PCL printing
environment. Refer to the
the System
NOTE: In PCL commands referenced in this chapter, the sign #
is replaced by a number.
, “Utility commands” for more information.
Change PCL Parameters
Guide to Configuring and Managing
Guide to Using Page Description Languages 2-1
Page 68

PCL 5
Maintaining image quality
DocuPrint 4050, 4090, 4850, and 4890 NPS/IPS provide a
resolution of 300 dots per inch (dpi), and DocuPrint 92C, 96,
4635, 2060, and 180 NPS/IPS provide resolution of 600 dots per
inch. If your PDL contains scalable fonts or simple vector
graphics and line art generated at 600 dpi, the differences in
printing at 300 or 600 dpi are subtle. However, if your PDL
contains bitmaps with a resolution of 600 dpi, printing at 300 dpi
causes a degradation in image quality. To preserve image quality,
regenerate the bitmaps at the printer resolution of 300 dpi or
regenerate them as simple line art. The 600 dpi printers can
accept jobs with resources in either 300 or 600 dpi.
NOTE: Though you can print documents containing 300 dpi
bitmaps on a 600 dpi printer, there can be an impact on
performance as the printer processes the image for 600 dpi
printing.
NOTE: For PCL jobs, DocuPrint NPS/IPS supports 300 and 600
dpi printing only.
To obtain the best image quality on the DocuPrint NPS/IPS,
choose the correct printer setup attributes when generating a
document on your personal computer.
Refer to the “Appearance Consistency” section in the
“PostScript” chapter for more information on resolution.
The following table shows the recommended printer settings in
order of preference:
• The recommended choice is listed in the 300 dpi vector
graphics settings column. The print quality of an object that is
created in HP-GL/2 mode is very consistent. Because the
image is not a bitmap, the data is not skewed.
• The second choice is listed in the 600 dpi vector graphics
settings column. Because you are using an image that is not
a bitmap, the data will not be skewed and the differences
would be difficult to detect.
2-2 Guide to Using Page Description Languages
Page 69

PCL 5
• The last choice is listed in the 300 dpi raster graphics settings
column. The print quality deteriorates if the image is a
rasterized bitmap, which leaves some white space where the
bits are not formulated.
Table 2-1. PCL settings
300 dpi
Setting
Resolution 300 600 300
Page protection OFF OFF OFF
Orientation Portrait Portrait Portrait
Memory222
Option…
Graphics mode
Option…
Graphics quality
Option…
Halftoning
Option…
Print quality
vector graphics
HP-GL/2 HP-GL/2 RASTER
HIGH HIGH HIGH
Photographic images Photographic images Photographic images
Printer default Printer default Printer default
600 dpi
vector graphics
300 dpi
raster graphics
Keep the following points in mind when preparing your images
and setting print attributes:
• Page protection, orientation, and memory are not values that
affect the image quality.
• Setting the graphics quality to HIGH allows for the best
possible output.
• Setting print quality to printer default allows the printer to
determine the best match for the job.
• The DocuPrint 92C NPS/IPS can produce a single-pixel line.
However, because of the many variables involved, such as
print density settings and line placement on the page, Xerox
cannot guarantee the quality of these single-pixel lines.
Specific questions regarding single-pixel line printing for your
application should be directed to your Xerox service
engineer.
Guide to Using Page Description Languages 2-3
Page 70

PCL 5
PCL 5 font support
DocuPrint supports most PCL 5 fonts. Table 1-2 lists the
internal, HP LaserJet compatible fonts installed with the system:
• One bitmap font
• 45 scalable fonts:
– 35 Intellifont FAIS typefaces
– 1 0 Tr u e Typ e t yp e fa c e s
PCL fonts may be downloaded within a PCL job.
NOTE: The DocuPrint NPS/IPS PCL 5e and 5c interpreters
support use of downloaded PCL fonts or macros by setting the
proper parameter using the
command. Refer to the Guide to Configuring and Managing the
System chapter “Setting system defaults.”
Change PCL Parameters
PCL Intellifont FAIS typefaces and PCL bitmap fonts may be
permanently installed using the font installation utility.
PCL bitmap fonts must be in the PCL soft font format for HP
LaserJet printers. A PCL bitmap font contains a font header and
a set of character definitions. The PCL format 0 (zero) and
format 20 font headers are supported for PCL bitmap fonts. Refer
to your Hewlett Packard PCL 5 printer language publications for
details on the font header and character descriptions.
Installation of other font types is not supported.
For MICR systems, a special DocuPrint NPS/IPS MICR font
floppy is available. It contains the PCL bitmap font named E13B
required for MICR applications. See the
and Managing the System
information. Refer also to the
Guide
NOTE: Fonts installed using the “Install PCL Fonts from Floppy”
command cannot be selected by font ID. They must be selected
by characteristics.
Only fonts installed using this command can be deleted using the
Delete Fonts command. PCL fonts installed with the system
software cannot be deleted.
.
chapter on “MICR Printing” for more
Generic MICR Fundamentals
Guide to Configuring
Refer to the
information on loading fonts from floppy and from CD-ROM.
2-4 Guide to Using Page Description Languages
Guide to Configuring and Managing the System
for
Page 71

Table 2-2. PCL 5 fonts installed with NPS/IPS software
Intellifont Typeface
CG Times Medium, Italic, Bold, Bold Italic
Univers Medium, Italic, Bold, Bold Italic
Univers Condensed Medium, Italic, Bold, Bold Italic
Courier Medium, Italic, Bold, Bold Italic
Letter Gothic Medium, Italic, Bold
Albertus Medium (semi-bold), Extra Bold
Antique Olive Medium, Italic, Bold
PCL 5
Clarendon
Condensed
Coronet Medium Italic
Garamond Antiqua (Medium), Kursiv (Italic), Halbfett (Bold), Kursiv Halbfett (Bold
Marigold Medium
CG Omega Medium, Italic, Bold, Bold Italic
TrueType Typeface
Arial Medium, Italic, Bold, Bold Italic
Times New Roman Medium, Italic, Bold, Bold Italic
Symbol Medium
Wingdings Medium
Bitmap Typeface
Line Printer 16.67 pitch/8.5 point medium
Bold
Italic)
Guide to Using Page Description Languages 2-5
Page 72

PCL 5
PCL command support
The following sections explain the differences in processing and
how DocuPrint NPS/IPS interprets various PCL commands.
PJL commands
DocuPrint NPS/IPS does not support Printer Job Language
(PJL) commands embedded within a job. When PJL commands
are embedded within a PCL job, the
job prints but the PJL commands are ignored.
NOTE: PJL commands specifying the resolution of the job are
ignored. This can cause a PCL job to be printed at an incorrect
resolution. Use the DefaultResolution option or the virtual printer
to specify the correct resolution.
NOTE: PCL files that contain PJL commands or Xerox Job
Tickets in the middle of the files due to concatenation will not
print. Such PCL files can also be created by use of certain
applications such as Microsoft Access or Binder.
PCL Copy command
DocuPrint behavior with the PCL Copy command (<ESX>&|#X)
differs slightly from the behavior of the HP LaserJet 4si or Color
LaserJet. This section describes these differences.
If a document is printed as simplex, the behavior of the HP
LaserJet 4si or Color LaserJet and the DocuPrint NPS/IPS is
nearly identical, except that DocuPrint collates the copy output
when one copy command is used to print copies of multiple
output pages.
The following is an example for a 9 page document with a “3
copies” command on page 2, a “2 copies” command on pages 6
and 7, and a “1 copy” command on page 8:
Table 2-3. PCL Copy command example
DocuPrint NPS/IPS collated output simplex HP LaserJet output - simplex
Sheet 1 PAGE 1, simplex command Sheet 1 PAGE 1, simplex command
Sheet 2 PAGE 2, <ESC>&l3X (3 copies) Sheet 2 PAGE 2, <ESC>&l3X (3 copies)
2-6 Guide to Using Page Description Languages
Page 73

PCL 5
Table 2-3. PCL Copy command example (Continued)
DocuPrint NPS/IPS collated output simplex HP LaserJet output - simplex
Sheet 3 PAGE 3, no copy command Sheet 3 PAGE 2, <ESC>&l3X (3 copies)
Sheet 4 PAGE 4, no copy command Sheet 4 PAGE 2, <ESC>&l3X (3 copies)
Sheet 5 PAGE 5, no copy command Sheet 5 PAGE 3, no copy command
Sheet 6 PAGE 2, <ESC>&l3X (3 copies) Sheet 6 PAGE 3, no copy command
Sheet 7 PAGE 3, no copy command Sheet 7 PAGE 3, no copy command
Sheet 8 PAGE 4, no copy command Sheet 8 PAGE 4, no copy command
Sheet 9 PAGE 5, no copy command Sheet 9 PAGE 4, no copy command
Sheet 10 PAGE 2, <ESC>&l3X (3 copies) Sheet 10 PAGE 4, no copy command
Sheet 11 PAGE 3, no copy command Sheet 11 PAGE 5, no copy command
Sheet 12 PAGE 4, no copy command Sheet 12 PAGE 5, no copy command
Sheet 13 PAGE 5, no copy command Sheet 13 PAGE 5, no copy command
Sheet 14 PAGE 6, <ESC>&l2X (2 copies) Sheet 14 PAGE 6, <ESC>&l2X (2 copies)
Sheet 15 PAGE 6, <ESC>&l2X (2 copies) Sheet 15 PAGE 6, <ESC>&l2X (2 copies)
Sheet 14 PAGE 7, <ESC>&l2X (2 copies) Sheet 14 PAGE 7, <ESC>&l2X (2 copies)
Sheet 15 PAGE 7, <ESC>&l2X (2 copies) Sheet 15 PAGE 7, <ESC>&l2X (2 copies)
Sheet 16 PAGE 8, <ESC>&l1X (1 copy) Sheet 16 PAGE 8, <ESC>&l1X (1 copy)
Sheet 17 PAGE 9, no copy command Sheet 17 PAGE 9, no copy command
In addition, if the stapling attribute is set for the document on a
DocuPrint equipped with a High-Capacity Stitcher/Stacker,
pages 2, 3, 4, and 5 will be stapled together on all copies but
pages 6 and 7 will not be stapled together because the copy
command is given explicitly on each of pages 6 and 7. When the
PCL Copy command is used on the DocuPrint, all of the pages
cannot be stapled together automatically.
Guide to Using Page Description Languages 2-7
Page 74

PCL 5
If the document is printed as duplex (refer to the “PCL Duplex
command” section), the behavior differences between the HP
LaserJet 4si and the DocuPrint are greater. The simplex issue in
which DocuPrint copies are collated and HP LaserJet 4si copies
are uncollated also applies to duplex printing. Additionally, the
DocuPrint will blank the back side of the sheet and pull a new
sheet if the copy command occurs on what is normally the back
side of a sheet. However, the HP LaserJet 4si does not pull a
new sheet of paper when the copy command appears on the
back side of a sheet. Instead, the HP LaserJet 4si will place
multiple copies of both the front and back sides of that sheet into
the output, even though multiple copies are not requested for the
front side.
The following is an example of the same job as shown above,
printed as duplex:
Table 2-4. Duplex PCL Copy command example
DocuPrint NPS/IPS collated output duplex HP LaserJet 4si output - duplex
Sheet 1 PAGE 1, duplex command Sheet 1 PAGE 1, duplex command
Sheet 2 PAGE 2, <ESC>&l3X (3 copies) PAGE 2, <ESC>&l3X (3 copies)
PAGE 3, no copy command Sheet 2 PAGE 1, duplex command
Sheet 3 PAGE 4, no copy command PAGE 2, <ESC>&l3X (3 copies)
PAGE 5, no copy command Sheet 3 PAGE 1, duplex command
Sheet 4 PAGE 2, <ESC>&l3X (3 copies) PAGE 2, <ESC>&l3X (3 copies)
PAGE 3, no copy command Sheet 4 PAGE 3, no copy command
Sheet 5 PAGE 4, no copy command PAGE 4, no copy command
PAGE 5, no copy command Sheet 5 PAGE 3, no copy command
Sheet 6 PAGE 2, <ESC>&l3X (3 copies) PAGE 4, no copy command
PAGE 3, no copy command Sheet 6 PAGE 3, no copy command
Sheet 7 PAGE 4, no copy command PAGE 4, no copy command
PAGE 5, no copy command Sheet 7 PAGE 5, no copy command
Sheet 8 PAGE 6, <ESC>&l2X (2 copies) PAGE 6, <ESC>&l2X (2 copies)
Sheet 9 PAGE 6, <ESC>&l2X (2 copies) Sheet 7 PAGE 5, no copy command
Sheet 10 PAGE 7, <ESC>&l2X (2 copies) PAGE 6, <ESC>&l2X (2 copies)
Sheet 11 PAGE 7, <ESC>&l2X (2 copies) Sheet 8 PAGE 7, <ESC>&l2X (2 copies)
Sheet 12 PAGE 8, <ESC>&l1X (1 copy) PAGE 8, <ESC>&l1X (1 copy)
2-8 Guide to Using Page Description Languages
Page 75

Table 2-4. Duplex PCL Copy command example (Continued)
DocuPrint NPS/IPS collated output duplex HP LaserJet 4si output - duplex
PAGE 9, no copy command Sheet 9 PAGE 9, no copy command
As with simplex, if the stapling attribute is set for the document
on a DocuPrint equipped with a High-Capacity Stitcher/Stacker,
pages 2, 3, 4 and 5 are stapled together on all copies, but pages
6 and 7 are not stapled together because the copy command is
given explicitly on each of pages 6 and 7.
PCL Duplex commands
The following table summarizes the behavior of a selection of
PCL Duplex commands (<ESC>&|#S and <ESC>&a#G) with
respect to blanking the back-sides of sheets.
PCL 5
NOTE: These commands force new sheets to be pulled
regardless of the value of the PlexChangesDynamic attribute.
Table 2-5. PCL Duplex commands
DocuPrint NPS/IPS
(collated) HP LaserJet 4si
Next-side command (<ESC>&a0G) no new sheet no new sheet
Front-side command (<ESC>&a1G) forces new sheet forces new sheet
Back-side command (<ESC>&a2G) no new sheet no new sheet
Simplex command (<ESC>&l0S) forces new sheet forces new sheet
Duplex command (<ESC>&l1S) forces new sheet forces new sheet
*Feed from upper tray (<ESC>&l1H) forces new sheet forces new sheet
*Feed from manual feeder (<ESC>&l2H) forces new sheet forces new sheet
*Feed from lower tray (<ESC>&l4H) forces new sheet forces new sheet
Number of copies command (<ESC>&l#X) forces new sheet no new sheet
Page Size command (<ESC>&I#A) forces new sheet forces new sheet
Guide to Using Page Description Languages 2-9
Page 76

PCL 5
*DocuPrint implements the Paper Source command by
corresponding the number specified in the command to the
correlating media in the media list of the Media document
attribute. Therefore, the "Feed from upper tray" command
specifies the first media in a media list in the document attribute
and the "Feed from lower tray" command specifies the fourth
media in a media list in the document attribute. Refer to the “PCL
Paper Source command” section for more information.
For information on
applications” in the
PCL Job Separation command
PCL uses the Job Separation command (<ESC>&l1T) to
separate distinct portions of the output by offsetting a set of
sheets in the output from a succeeding set of sheets.
There is a short description of the PCL Job Separation command
in the HP documentation. This command is only supported on
the HP LaserJet IIISi. HP recommends that the Job Separation
command be included at the end of each job. There is no
mention of possible side effects when this practice is not
followed.
This PCL Job Separation command description is based on the
printing behavior observed on the HP LaserJet IIISi. Job
Separation toggles the output tray offset. It is primarily a printer
hardware function. There were no observed page processing
effects.
mixed plex jobs
Guide to Managing Print Jobs
, see the chapter “Mixed plex
.
The PCL Job Separation command has these major features:
• The Job Separation command operates independent of all
other PCL commands. This command is the only PCL
command that changes the output tray offset.
• The Job Separation command toggles the output tray offset.
The output tray offset is switched between two positions. This
command does not set the output tray offset to a specific
position.
• The Job Separation command sends a hardware command
to toggle the output tray offset that is executed immediately.
• The Job Separation command takes effect on the current
page that is being processed. It will be observed when this
page is ejected.
2-10 Guide to Using Page Description Languages
Page 77

PCL 5
• The output tray offset is retained between print jobs. This
offset consistency cannot be guaranteed since there are
ways to change the output tray offset between print jobs.
When a PCL Job Separation command is encountered on a
page, DocuPrint NPS/IPS will offset that page from the previous
page. If the job is printed duplex and the command is
encountered on the backside of the page, DocuPrint NPS/IPS
will not offset the current page. In this case, the next page will be
offset. There are other conditions that result in different sets of
paper being offset in the output tray.
The DocuPrint NPS/IPS currently provides consistent support of
the PCL Job Separation command when it appears at the
beginning of the print job section that should be offset. There are
several recommendations to consider for the use of the PCL Job
Separation command in DocuPrint NPS/IPS printing
environments:
• Use DocuPrint NPS/IPS facilities for offsetting at the print job
level.
Do not rely on the use of the Job Separation command at the
end of every PCL job. Although this is the HP
recommendation, a consistent offsetting of print jobs cannot
be guaranteed. For example, actions such as resetting the
HP LaserJet IIISi at the printer change the output tray offset.
The printer does not keep track of the offset tray position
under all conditions.
• The Job Separation command can be used within a print job
to offset sections of the print job. (This feature is sometimes
referred to as creating report offsets within a print job.) The
recommended job structure is to insert PCL commands
before the section that should be offset.
The sequence of PCL commands is a Printer Reset
command, other PCL setup commands, and the Job
Separation command. This PCL setup produces consistent
results on the HP LaserJet IIISi and the Xerox DocuPrint
NPS/IPS.
• Do not place the Job Separation command at the end of a
page that starts a section with a new output tray offset. There
are significantly different results when printing the same print
job on the HP LaserJet IIISi and the Xerox DocuPrint NPS/
IPS.
• Use a PCL copy count of 1 (one).
Guide to Using Page Description Languages 2-11
Page 78

PCL 5
Inconsistent offsetting takes place when multiple copies are
specified. Sheets in the printer output are not stacked with
the desired offset.
PCL media selection
There are three ways to specify media for a given page. You can
use the PCL Page Size command (<Esc>&l#A), the PCL Paper
Source command, or you can use the DocuPrint NPS/IPS
ExceptionPages attribute.
PCL Paper Source command (tray assignment)
PCL uses the Paper Source command (<Esc>&l#H) to specify
the tray definition (# is a number from 0-6).
0=don’t change paper source
1=feed paper from printer specific tray
2=feed paper from manual input
3=feed envelope from manual input
4=feed paper from lower tray
5=feed paper from optional paper source
6=feed paper from optional envelope
NOTE: These are the documented values of HP printers.
However, the DocuPrint NPS/IPS changes paper by media
definition and not by tray definition.
These numbers map directly to the media list set for the Media
document attribute on the virtual printer or in the job submission
so that if:
Media List: A4::blue,A4::white,A4::green,A4::yellow
then:
Esc&l1H selects A4:: blue
Esc&l2H selects A4:: white
Esc&l3H selects A4:: green
Esc&l4H selects A4:: yellow
“Media list” is the list of media assigned to the Media document
attribute.
2-12 Guide to Using Page Description Languages
Page 79

PCL 5
NOTE: Refer to the Xerox DocuPrint NPS/IPS Guide to
Managing Print Jobs for information on using virtual printers to
create media lists.
Tray assignments are independent so that if the trays are set as:
Tray 1: A4::white
Tray 2: A4::yellow
Tray 3: A4::blue
Tray 4: A4::green
then:
Esc &|1H selecting A4::blue will use Tray 3
Esc &|2H selecting A4::white will use Tray 1
Esc &|3H selecting A4::green will use Tray 4
Esc &|4H selecting A4::yellow will use Tray 2
When Esc&l0H is used at the start of the job, then media 1 is
used, otherwise it uses the media previously selected.
NOTE: If an HP LaserJet driver is used that does not support
certain media (for example, manual or envelope feeders), it may
be difficult to specify that media in the media list.
Precedence in selecting media
When more than one method of specifying media is used for the
same page, the order of precedence used by the system to
select the medium is:
1. ExceptionPages attribute
2. PCL Paper Source command
3. PCL Page Size command
If a given page has a media exception (that is, the
ExceptionPages attribute) associated with it, the attribute
determines the medium that the page uses, regardless of
whether there is a Paper Source (tray selection) or Page Size
specification.
If a given page does not have a media exception, but has both
the Page Size and Paper Source specified, then the medium
specified by the Paper Source command is checked against the
media list. If the medium is of the appropriate size, it is used. If it
is not of the appropriate size, then the Paper Source command
specification is ignored.
Guide to Using Page Description Languages 2-13
Page 80

PCL 5
If a given page has only a Page Size specification, it is used to
identify the required medium in the media list. If no exact match
is available, the medium closest in size is used. If there is more
than one medium of the chosen size (differing in color or weight),
the one appearing first in the media list is used.
If a given page contains only a Paper Source specification, this
determines the medium for the page. The medium used is the
th medium in the media list, where n is the tray that has been
n
specified in the Paper Source command. If the number of the tray
specified in the Paper Source command is greater than the
number of media in the media list, then the paper source
command is ignored.
If none of three methods of specifying media is available for a
given page, then the medium specified for the previous page is
used, with two exceptions: an ExceptionPages specification is
not used, and if the page is a first page, then the first medium in
the media list is used.
For duplex jobs, the medium for the front side of a given sheet is
the medium used for the sheet, regardless of the medium
selected for the back side.
PCL Output Bin command
PCL uses the Output Bin command (<Esc>&l#G) to select an
output bin (where # is replaced by a number):
• When # = 1, then the Stacker Group will be 1.
• When # = 2, then the Stacker Group will be 2.
NOTE: The NPS/IPS OutputBin attribute, if specified, overrides
the PCL Output Bin command.
PCL 5 coding recommendations
When creating PCL 5 jobs, there are some general
recommendations for optimal performance:
• Use PCL Fill Rectangle Area for horizontal and vertical lines
and rectangles.
• Use HPGL for other synthetic graphics (curves, diagonal
lines).
2-14 Guide to Using Page Description Languages
Page 81

PCL 5c support
PCL 5
• Minimize raster usage (avoid translating fonts or lines into
raster data); on fast (100Mbit) networks, send uncompressed
data.
• Maximize use of internal scalable fonts.
• Define logos as fonts rather than raster graphics.
• Rotate rasters to align with printer edge feed, using the
Raster Graphics Presentation Mode, if possible.
• Minimize switching between HPGL and PCL modes.
• Download resources outside of macros.
This section provides specific information related to the
DocuPrint NPS/IPS implementation of PCL 5c on the 4850,
4890, 92C. For more information on PCL 5c, see the
Color Technical Reference Manual
.
HP PCL 5
The DocuPrint NPS/IPS implementation of PCL 5c is tuned for
optimal print quality on the 4850, 4890, 92C highlight color
printers.
NOTE: If the same document is printed with PostScript and with
PCL 5c, the highlight color may not match exactly.
When the DocuPrint NPS/IPS PCL 5c interpreter is installed on
the highlight color printers, the decomposer can switch between
highlight color and monochrome modes dynamically on a per-job
basis. You can specify monochrome printing (that is, Executive
Black mode) by setting the highlight color attribute to black. The
PCL 5e interpreter is used for monochrome mode.
In general, PCL 5c jobs can be expected to have much larger file
sizes than PCL 5e jobs because of the nature of the PCL 5c
driver. This is not a function of DocuPrint NPS/IPS.
The default highlight color rendering algorithm, Automatic, is not
recommended for use with PCL 5c jobs. Presentation and
Pictorial rendering algorithms produce the best appearance.
The ColorToHighlight algorithm is also supported for PCL 5c.
For PCL 5c jobs, the Thicken attribute has no effect.
User-defined dither patterns are ignored. The default highlight
color dither pattern is used instead.
Guide to Using Page Description Languages 2-15
Page 82

PCL 5
For highlight color printers, the NPS/IPS implementation of
PCL5c is designed for a two-color (highlight color) context,
whereas PCL logical operators are designed to work in a fourcolor CMYK/RGB context. As a result, a complex mapping model
is employed to translate four colors into two-color output. In
certain cases with logical operators, the correct mapping may be
mathematically impossible, resulting in unexpected output.
PCL 5c coding recommendations
When creating PCL 5c jobs, there are some color-related
commands you should be aware of for optimal performance and
print quality.
• Use the Simple Color command whenever possible; when
greater color palette control is required, use Configure Image
Data (short form) with either Device RGB or Device CMY
color space.
• For defining gray shade fills:
– Use RGB color values which provide a wider range of gray
shades.
– Alternatively, use the Built-in shade fills (Fill Rectangle
Area with shade fill command or HPGL FT10); this is less
than optimal.
• When using Configure Image Data (short form), use the
Direct by Plane pixel encoding mode for optimal performance.
The Direct by Pixel and Indexed by Pixel are the second and
third recommended choices, respectively.
• Avoid using the following commands:
– Logical Operation and HPGL MC
– Fill Rectangle Area with user-defined pattern fill and
HPGL FT11
PCL 5c functions not applicable to DocuPrint NPS/IPS
The following PCL 5c functions are not applicable to NPS/IPS
printers and, therefore, it is recommended that they not be
included in PCL 5c jobs:
• Halftone Render Algorithms
• Download Dither Matrix
2-16 Guide to Using Page Description Languages
Page 83

• Gamma Correction
• Color Lookup Tables
• Viewing Illuminant
• Driver Configuration
The following PCL 5c functions are not fully functional on the
NPS/IPS printers and their usage is discouraged.
• Logical Operation – The highlight color print model is not fully
compatible with the complete set of 256 logical operations.
Use of logical operators, which either negate (NOT) or
exclusive-or (XOR) the Destination or Texture, such as 90,
will result in incorrect color output.
• HPGL Merge Control - This is the HPGL equivalent of the
Logical Operation command.
Driver recommendations for PCL 5c
PCL 5
This section identifies drivers that are recommended for the
Windows 95 and the Windows NT 4.0 environments.
For Windows 95, the HP Color LaserJet 5/5M PCL 5C driver,
version vF2.2 is recommended for the 4850 and 4890. For the
driver Color Setup option, select Manual mode with the No
Adjustment option to allow using device RGB Color Space in the
document. An alternative driver for this environment is the Xerox
DocuPrint C55 driver.
For Windows NT 4.0, the HP Color LaserJet 5/5M PCL 5C driver
is recommended for the 4850 and 4890. For the driver Color
Setup option, select Manual mode with the No Adjustment option
to allow using device RGB Color Space in the document. For
Graphic Mode, select HP-GL/2 mode for all the graphics in the
document.
For the 92C printer, the recommended driver is the HP Color
Laser Jet 4500. It is available from www.hp.com.
Guide to Using Page Description Languages 2-17
Page 84

PCL 5
Limitations for custom PCL 5c drivers
If you write your own PCL 5c drivers, the following are
recommended restrictions:
• Do not use Logical Operations that negate (NOT) either the
Texture or Destination.
• Do not use Logical Operations that involve using XOR for
Destination or Texture.
• Avoid using Logical Operation 136 in standalone mode. PCL
5C highlight color has been tailored to accommodate a
special way of using the Logical Operator sequence (136, 90)
generated by some applications. Therefore, using Logical
Operation 136 may cause the output to print incorrectly.
2-18 Guide to Using Page Description Languages
Page 85

3. VIPP
Variable Data Intelligent PostScript PrintWare, or VIPP, (formerly
XGF) provides a facility for the easy integration of data, forms,
and images from host applications to the PostScript
environment.
VIPP offers the following benefits:
• Allows imaging and data processing applications to produce
an easy-to-implement data stream that is PostScriptcompliant.
• Provides access to optimal performance.
• Keeps applications independent of PostScript and printer
evolution.
• Brings all the power of PostScript to production printing
without requiring a heavy investment in PostScript training.
• Provides a cost effective solution for continuing to print host-
based applications.
VIPP software is installed with the standard DocuPrint NPS/IPS
system and provides PostScript macro definitions (XGF
commands) to the PostScript interpreter. Normal PostScript jobs
print as always, while jobs that include VIPP commands can take
advantage of the power offered by VIPP.
The VIPP package provides the following two modes of
operation:
• Native mode—Provides a set of easy-to-use operators
bundled as a PostScript program that enables the quick
development of host-based production printing applications.
Guide to Using Page Description Languages 3-1
Page 86

VIPP
Functionality
• Line mode—Enables formatting and extensive print job
control of host-supplied ASCII or EBCDIC data with minimal
change for host applications. Line mode commands are
modeled after Xerox LCDS commands, coupled with a
growing list of third party tools available on the market today,
enables the simple migration of LCDS print jobs to the
PostScript environment. This capability is often needed when
you are downsizing from a centralized IM shop to a client/
server architecture. An adaptation to Line mode also allows
formatting and job control of field delimited database files
supplied from multiple hosts.
In native mode, an application program uses the following
operators to control how data is placed on a page:
• Orientation (P, L, I, J)
• Font selection (scaling, color/gray level, and outline)
• Absolute placement coordinates
• Text alignment (left, right, and center)
• Rotation to any angle
• Linespacing
• PostScript forms merge (several per page; may be produced
by virtually any PostScript emitter)
• Image merge (including TIFF header interpretation, scaling,
rotation, and CCITT Group 3 and 4).
• Decomposition Service forms merge.
In line mode, you must place a job description ticket (JDT) call at
the start of the data to initiate VIPP in line mode. The JDT
describes the layout of the printed job and includes the following
operators:
• Orientation
• Margins
• Characters per line (CPI) and lines per page (LPI)
• Font selection (including automatic scaling to required CPI/
LPI)
• Font indexing
3-2 Guide to Using Page Description Languages
Page 87

• Automatic frame and zebra generation
• Form merge
• Page numbering
• Cycle form (printing of data multiple times with different
forms)
• Cycle feed (printing of data multiple times on different paper).
Operating environment
VIPP is not a converter that takes source or other PDLs and
translates them to PostScript. It is contained in the PostScript
decomposer as a set of subroutines callable from within the
PostScript language. VIPP is independent of the printer and level
of PostScript being used, and supports the entire DocuPrint
NPS/IPS family of products.
VIPP
VIPP is supplied as a PostScript prologue that is loaded into the
interpreter as part of startup. Each copy of the dictionary is
licensed to a particular printer and functions only on that printer.
DocuPrint NPS/IPS supplies a demonstration license that allows
printing of VIPP documents up to 200 pages in length, without a
specific printer license. A license is required for longer
documents.
VIPP line mode extension (XGFNub)
The VIPP line mode extension (formerly called XGFNub) is a
DocuPrint NPS/IPS (Version 1.4 and higher) extension that
enables users to execute VIPP commands at the start of any
VIPP document.
Multiple sets of commands may be enabled by the
DocumentFormat attribute. To invoke a command set named
xxx, just set the DocumentFormat attribute to “XGF/xxx.”
The following is an example of the extension used to execute the
VIPP command (job1.jdt) STARTLM (command set named
“job1”) at the front of the main data file:
Guide to Using Page Description Languages 3-3
Page 88

VIPP
1. Enter the following in the job 1 file/usr/xgfc/mislib/job1.ini:
%!
% custom.ini
(job1.jdt) STARTLM
2. Send the main data file to DocuPrint NPS/IPS to set the
DocumentFormat attribute to “XGF/job1.” Refer to your
DocuPrint NPS/IPS documentation for other methods to set
the DocumentFormat attribute, (such as by using a virtual
printer or by the lpr -C switch).
NOTE: New sets of commands can be installed at any time by
creating new files called /usr/xgfc/mislib/xxx.ini, where xxx is the
name of the command set. The extension .ini is mandatory. Use
all lower-case characters in place of xxx.
3-4 Guide to Using Page Description Languages
Page 89

4. TIFF
The DocuPrint NPS/IPS implementation of TIFF (Tagged Image
File Format) is based on the Adobe TIFF specification. It
supports the most commonly used TIFF features. For
information, refer to the following publications.
Job submission
Orientation
• Adobe
•
Draft TIFF Technical Note 2
TIFF/JPEG specification
•
Adobe PageMaker 6.0 TIFF Technical Notes
1995
•
TIFF-FX, RFC 2301
• If you need information about support for specific TIFF
features, contact your Xerox representative.
If the job submission method does not explicitly support TIFF as
a document format, submit the files to a virtual printer with the
DocumenFormat attribute set to TIFF.
The order in which the media dimensions are specified in the
TIFF file has no impact on the resulting orientation. Use the
Orientation attribute to control whether the logical top of the TIFF
image is oriented along the long edge (landscape) or short edge
(portrait).
TIFF specification, Revision 6.0
, March 17, 1995, Replacement
, November 1, 2000
, June 3, 1993
, September 14,
Guide to Using Page Description Languages 4-1
Page 90

TIFF
4-2 Guide to Using Page Description Languages
Page 91

Index
Symbols
#copies operator 1-9
%stdin 1-31
.pfb extension 1-6
A
additional metrics entry 1-3
Adobe
Type Manager 1-6
AppleTalk 1-17
arc-to-bezier conversion 1-33
ASCII input 1-22
asynchronous communications 1-18
B
bezier 1-33
binary input 1-22
bitmaps 1-4, 1-14
bounding box padding 1-32
break page 1-18
C
CCITT
printing speed 1-34–1-35
specifications 1-34
CE mark xi
character
codes 1-6
illegal 1-18–1-20
characteristics, image 1-15
charpath operator 1-21
Chinese fonts 1-3
collating, PCL Copy command 2-6
commands
control-D 1-17–1-22
control-Z 1-18–1-22
Duplex, PCL 2-9
LCDS 3-2
PCL Copy 2-8–2-9
PCL Paper Source 2-12
PJL 2-6
sets, installing 3-4
communications, asynchronous 1-18
components, curveto 1-33
compression
quality 1-34
consistency
font 1-16
control-D command 1-17–1-22
control-Z command 1-18–1-22
conventions xvi
conversion
arc-to-bezier 1-33
LCDS commands 3-2
coordinates
device 1-1–1-2, 1-32
user 1-1–1-2, 1-39–1-41
copypage 1-16
current transformation matrix (CTM) 1-1
curves 1-25, 1-33
curveto components 1-33
D
data
flushing 1-21
placement operators 3-2–3-3
data base mode 3-2
See also line mode
default
font 1-3
user coordinate system 1-39–1-41
definitions, nonstandard 1-11–1-12
delimiters, EOF 1-18–1-20
delimiting PostScript jobs 1-17–1-18
demo mode, VIPP 3-3
devices
coordinates 1-1–1-2, 1-32
dependent features 1-29–1-33
dictionary operators
Execution 1-11
IdleTime 1-10
Printer 1-10–1-11
Server 1-9
Status 1-10
Guide to Using Page Description Languages
INDEX-1
Page 92

INDEX
System 1-8
User 1-8–1-9
documentation xvii
double byte fonts 1-3
drivers, PCL 5c 2-17
dry ink distribution 1-14
Duplex commands, PCL 2-9
duplex printing 2-8
E
EBCDIC 3-2
eexec operator 1-8
embedding images 1-34, 1-43
engine
write-black 1-15–1-16, 1-26
write-white 1-15–1-16
enhancement, resolution 1-12–1-16
EOF delimiters 1-17–1-20
error
limitcheck 1-31
undefined command 1-18
Execution Dictionary operators 1-11
exitserver operator 1-20, 1-22
extensions, proprietary PostScript 1-16
F
fast scan direction 1-35, 1-38
fax resolution 1-34
features, device dependent 1-29–1-33
file
PPD 1-28–1-29
file operator 1-31
fill operator 1-24–1-26
filter operator 1-21, 1-34
floating-point operators 1-1
flushing input data 1-21
fonts
cache size 1-33
Chinese 1-3
consistency 1-16
creating 1-6
default 1-3
double byte 1-3
error messages 1-22
HP PCL 5 2-5
Intellifont 2-4
loading 1-4, 1-6
MICR 1-3, 2-4
selecting 2-4
Type 0 1-3
installing 1-3
Type 1
installing 1-2
using 1-5–1-8
Type 3 1-3
installing 1-3
user-defined 1-4
fonts, MICR 2-4
full color vs. highlight color 1-17
G
graphics
bitmap 1-5, 1-14
raster 2-3
vector 2-2
gray values, rendering 1-27
H
halftoning 1-12, 1-27
handwritten test masters 1-1–1-2
highlight color vs. full color 1-17
HP PCL 5 fonts 2-5
I
IdleTime Dictionary operators 1-10
illegal characters, ignoring 1-18–1-20
image
characteristics 1-15
coordinates, transforming 1-40
data
order, optimizing 1-35–1-40
embedding 1-34, 1-43
orientation 1-36
post-enhancement 1-14
pre-enhancement 1-14
quality, maintaining 1-12–1-16, 2-2–2-3
rendering 1-37
rotating 1-36–1-37
scaling 1-40–1-43
scanning 1-35–1-40
implementation limits 1-30
installing
command sets 3-4
Type 0 fonts 1-3
Type 1 fonts 1-2
Type 3 fonts 1-3
Intellifont fonts 2-4
ISOLatin1Encoding operator 1-8
INDEX-2
Guide to Using Page Description Languages
Page 93

INDEX
J
job description ticket (JDT) 3-2
L
laser safety vii
LaserWriter 1-22
LCDS commands, converting 3-2
Level 2 operators 1-21
license, VIPP 3-3
limit
path 1-31
storage object size 1-33
virtual memory 1-31
limitcheck error 1-31
line mode 3-2
line mode extension 3-3–3-4
lines, zero-width 1-24
loading fonts 1-4, 1-6
logos 1-5
M
mapping user coordinates 1-1–1-2
master, PostScript 1-27
math operators 1-1
media selection precedence, PCL 2-13
memory, virtual 1-20
messages
font substitution error 1-22
stdout 1-22
MICR font floppy 1-3, 2-4
mixed plex, simulated PostScript 1-21
multiple master font 1-4
N
native mode 3-1, 3-2
nonstandard definitions 1-11–1-12
O
operation safety, Europe ix, xi
operation safety, U. S. viii, ix
operators
#copies 1-9
charpath 1-21
data placement 3-2–3-3
dictionary
Execution 1-11
IdleTime 1-10
Printer 1-10–1-11
Server 1-9
Status 1-10
System 1-8
User 1-8–1-9
eexec 1-8
exitserver 1-20, 1-22
file 1-31
fill 1-24–1-26
filter 1-21, 1-34
floating-point 1-1
ISOLatin1Encoding 1-8
obsolete 1-33
pathforall 1-33
PostScript Level 2 1-21
rotate 1-37, 1-41
scale 1-40
SetCacheDevice 1-32
setfileposition 1-21
setflat 1-25
setgray 1-28
setlinewidth 1-23, 1-24
setscreen 1-32
stroke 1-23–1-24
optimized scaling 1-41
orientation 1-32, 1-36
ozone production information viii
P
padding, bounding box 1-32
Page Size command, PCL 2-12
Paper Source command, implementing 2-10
Paper Source command, PCL 2-12
path limits 1-31
pathforall operator 1-33
PCL
drivers for 5c 2-17
PCL 5
coding recommendations 2-14
documentation xix
resolution 2-2–2-3
PCL 5c
coding recommendations 2-16
PCL 5c support 2-15
PCL commands, supported 2-6
PCL Copy command 2-8–2-9
PCL Paper Source command 2-12
PCL support
full color 2-1
highlight color 2-1
monochrome 2-1
Guide to Using Page Description Languages
INDEX-3
Page 94

INDEX
PCL tray assignment 2-12
pixels, painting 1-23–1-26
PJL, commands 2-6
plex, PostScript simulated mixed 1-21
ports 1-18
post-enhancement 1-14
PostScript
comment format 1-27
documentation xviii
EOF delimiters 1-18–1-20
extensions, proprietary 1-16
fonts
listing 1-2
Type 1 1-2–1-6
jobs, delimiting 1-17–1-18
Level 2 operators 1-21
master 1-27
Printer Controller operations 1-22
printer description, see PPD
virtual memory 1-20, 1-31
PPD
files 1-28–1-29
specifications 1-28
pre-enhancement 1-14
print
engine
write-black 1-15–1-16, 1-26
write-white 1-15–1-16
resolution, recommended 2-2–2-3
speed 1-34–1-35
Printer Control Language, see PCL
Printer Controller operations 1-22
Printer Dictionary operators 1-10–1-11
Printer Job Language, see PJL
printing
duplex 2-8
publications xvii
R
raster graphics 2-3
rendering
gray 1-27
image 1-37
resolution 1-26
enhancement 1-12–1-16
fax 1-34
PCL 5 2-2–2-3
restore context, bypassing 1-9
rotate operator 1-37, 1-41
rotation, image 1-36–1-37
RS232 port 1-18
S
safety
hotline numbers ix
laser vii
operation viii–xi
save context, bypassing 1-9
scale operator 1-40
scaling 1-26, 1-34, 1-40–1-43
scanning
conversion 1-23, 1-25
order 1-35–1-40
rotation 1-35–1-40
serial port, asynchronous 1-18
Server Dictionary operators 1-9
SetCacheDevice operator 1-32
setfileposition operator 1-21
setflat operator 1-25
setgray operator 1-28
setlinewidth operator 1-23, 1-24
setscreen operator 1-32
simplex output 2-6
slow scan direction 1-35, 1-38
specifications
CCITT 1-34
PPD 1-28
speed, printing 1-34–1-35
stapling 2-7, 2-9
Status Dictionary operators 1-10
stdout message 1-22
storage object size limits 1-33
stroke operator 1-23–1-24
System Dictionary operators 1-8
T
test masters, handwritten 1-1–1-2
tokens, defining 1-19–1-20
transforming user coordinates 1-40
tray assignment, PCL 2-12
tray assignments 2-13
Tray definition, PCL 2-12
Type 0 fonts 1-3
installing 1-3
Type 1 fonts
creating 1-6
installing 1-2
loading 1-4, 1-6
INDEX-4
Guide to Using Page Description Languages
Page 95

using 1-5–1-8
Type 3 fonts 1-3
installing 1-3
typefaces,
U
undefined command error 1-18
user coordinate system
default 1-39–1-41
mapping 1-1–1-2
User Dictionary operators 1-8–1-9
user-defined fonts 1-4
V
vector graphics 2-2
VIPP
benefits 3-1
demo mode 3-3
license 3-3
modes 3-1, 3-2
virtual memory 1-20, 1-31
see
fonts
INDEX
W
write-black engine 1-15–1-16, 1-26
write-white engine 1-15–1-16
X
x axis 1-35
XGFNub. See line mode extension
Y
y axis 1-35
Z
zero-width lines, imaging 1-24
Guide to Using Page Description Languages
INDEX-5
Page 96

INDEX
INDEX-6
Guide to Using Page Description Languages
 Loading...