

Page 1
Version 7.1
Page 2

Scan to PC Desktop v7.1
Network Installation Guide
Document version 2.0
This document provides instructions for installing the software associated with
Scan to PC Desktop in a network environment.
Xerox Corporation
800 Phillips Rd.
Webster, NY 14580-9791
ScanSoft, Inc.
One Wayside Road
Burlington, MA 01803
© 2005 Xerox Corporation and ScanSoft Inc. All rights reserved.
XEROX®, The Document Company®, the stylized X®, and the identifying product names and numbers herein are
trademarks of XEROX CORPORATION.
ScanSoft and the Scansoft logo are trademarks or registered trademarks of ScanSoft, Inc. in the United States and
other countries.
Other product names and images used in this guide may be trademarks or registered trademarks of their respective
companies and are hereby acknowledged.
2 of 17
Page 3

Scan to PC Desktop v7.1
Network Installation Guide
Table of contents
Scan to PC Desktop v7.1 Network Installation Guide............................................................. 3
Table of contents.......................................................................................................................3
Introduction .............................................................................................................................. 4
Scan to PC Desktop software components...............................................................................5
Windows 2000/2003 Server with Active Directory Support....................................................6
Systems Management Server Support .....................................................................................7
Creating administrative images................................................................................................8
Creating administrative images of the components.................................................................. 8
Deployment - Active Directory...............................................................................................10
Prerequisites..........................................................................................................................10
Installation order...................................................................................................................10
Deployment steps..................................................................................................................11
Deployment - SMS server.......................................................................................................14
Prerequisites..........................................................................................................................14
Installation order...................................................................................................................14
Deployment steps..................................................................................................................15
Examples ..............................................................................................................................16
3 of 17
Page 4

Introduction
This guide provides instructions for installing the software associated with Scan to PC Desktop
in a network environment.
Targeted users are administrators, Information Technology specialists or programmers who set
up or perform network installations. It assumes the reader is familiar with Microsoft Windows
2000/2003 Server with Active Directory or with Microsoft Systems Management Server (SMS),
in addition to program package setup, advertising and distribution.
Network installation enables a network administrator to manage and distribute software
applications without the need to visit each client system.
First administrative images of the applications (the components of Scan to PC Desktop) should
be created on the server. Then the server should be configured to automatically "push" the
applications onto the client machines.
4 of 17
Page 5

Scan to PC Desktop software components
Scan to PC Desktop is delivered in two CD-ROM variants: Special Edition and Professional
Edition.
These two editions of Scan to PC Desktop comprise different software products from ScanSoft.
All the installers of these software components support MSI (Windows Installer-based)
distribution.
Software components for Special Edition CD-ROM:
Software component
1 PaperPort 10.0 SE
2 OmniPage SE 3.0
3 Image Retriever 5.2 SE
Software components for Professional Edition CD-ROM:
Software component
1 PaperPort Professional 10.0
2 OmniPage Pro 14.0 Office
3 Image Retriever 5.2 Pro
4 PDF Create! 2.0
5 PDF Converter 1.3
Any combination of the products on the CD-ROMs can be installed under the following
limitations:
1.) To install Image Retriever, you must install PaperPort first.
2.) To ensure full functionality of PaperPort Pro, PDF Create! 2.0 must also be installed.
You can create as many administrative images on a network location as many software
components Scan to PC Desktop includes.
5 of 17
Page 6
Windows 2000/2003 Server with Active Directory Support
Active Directory is a feature of Windows 2000 Advanced Server and Windows 2003 Server.
Group Policy, a component of Active Directory, includes a Software Installation snap-in that
enables an administrator to create a network installation. The administrator can use this feature
to install software to Windows 2000 and Windows XP clients only. The snap-in cannot be used
to install software to clients with older versions of the Windows operating system.
In general, Active Directory supports three main installation scenarios: Publish to Users, Assign
to Users, and Assign to Computers. The software components of Scan to PC Desktop support the
Assign to Computers scenario only. This will successfully install the software on next system
reboot.
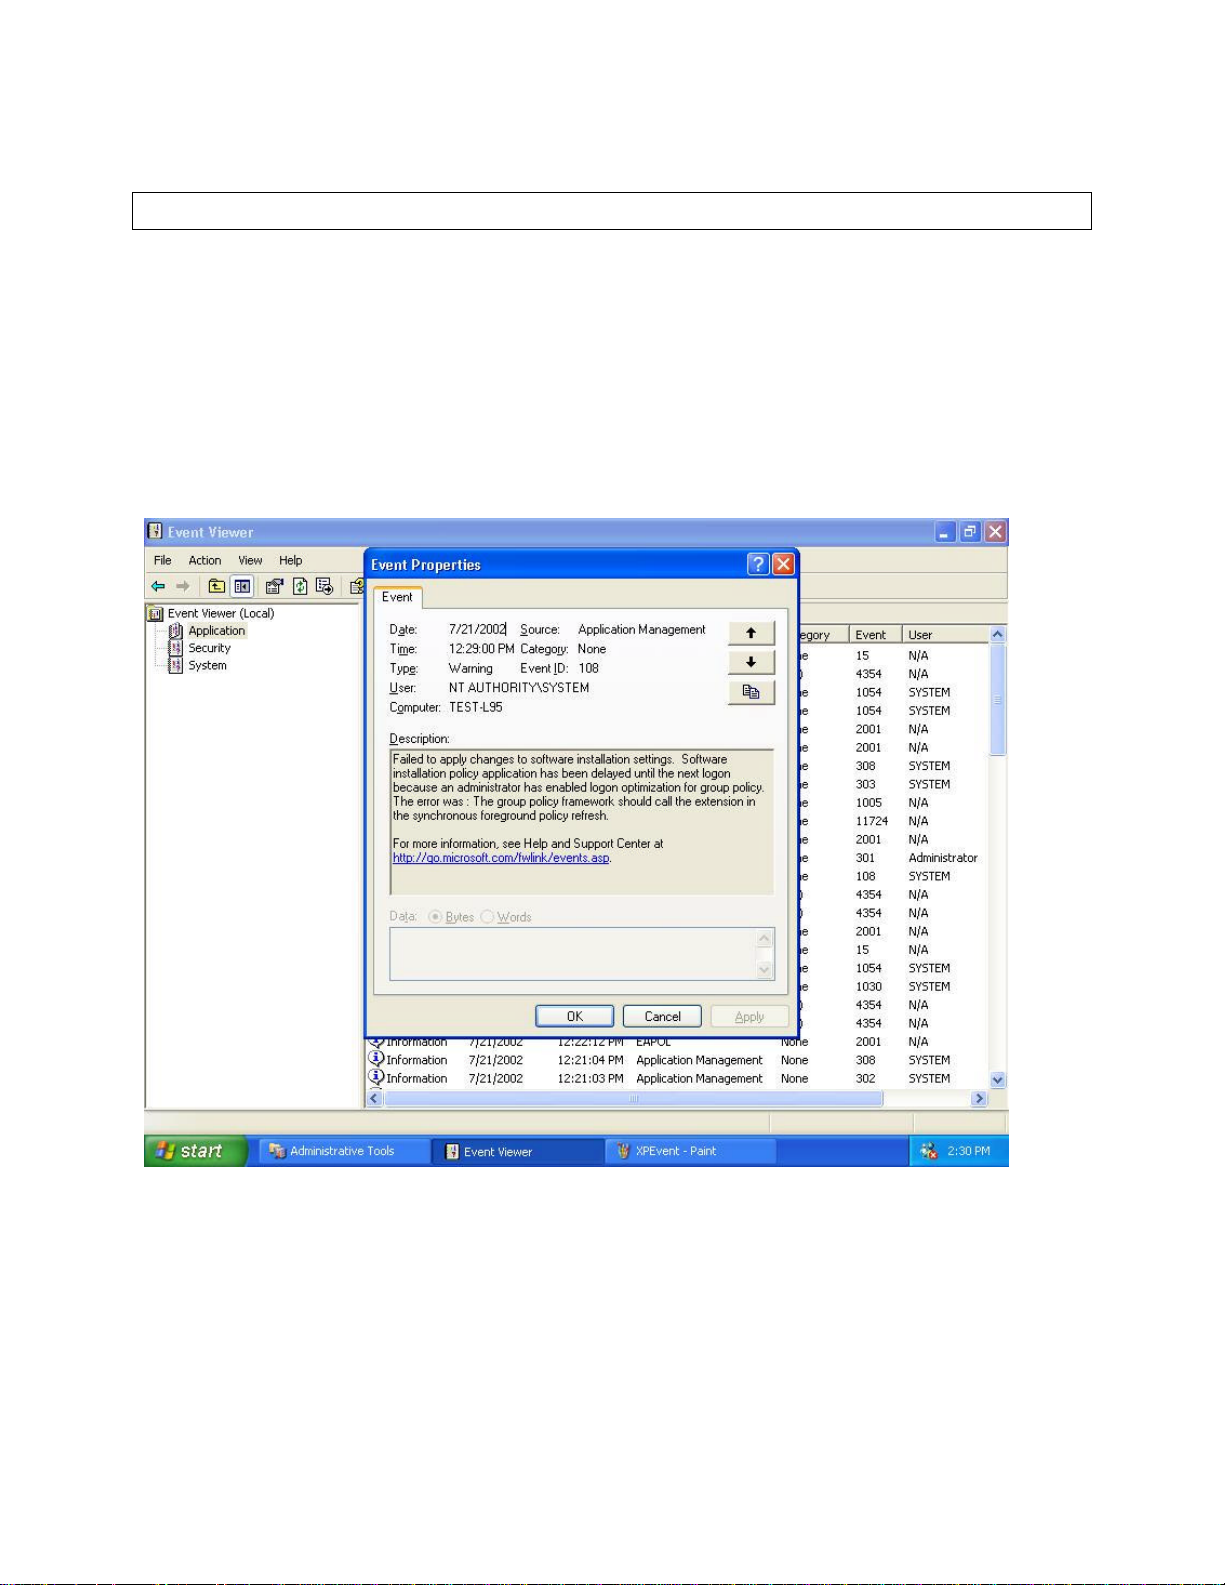
Installation can be delayed on Windows XP clients when the administrator enables logon
optimization for group policy: for this type of installation, an entry can be viewed in the event
log after the first reboot. The installation takes place silently, and the software is installed for all
users of the given computer.
The screenshot above illustrates this case.
6 of 17
Page 7

Systems Management Server Support
Systems Management Server (SMS) provides a mechanism for pushing application installations
out from the server to client systems. SMS supports the following versions of Windows:
Windows 95, 98, Me, NT 4.0, 2000, and XP when installing products that use Windows Installer
(MSI) technology. SMS requires a client application to be installed on all client machines. The
software components of Scan to PC Desktop were tested using SMS version 2.0 with Service
Pack 4.
SMS enables you to deploy a setup package per User or per System. The software components
have been verified to work in the per System configuration only. The per System installation of
the components can be configured to run either unattended or attended. Instructions for
controlling this process are provided below.
All the software components of Scan to PC Desktop use Windows Installer Technology. The
official Microsoft document describing the usage of Windows Installer-based applications with
SMS (entitled "Deploying Windows Installer Setup Packages with Systems Management Server
2.0"). The document, is available at
http://www.microsoft.com/smserver/techinfo/deployment/20/
7 of 17
Page 8

Creating administrative images
This section describes how to create administrative images of the software components of Scan
to PC Desktop onto the network.
Such an administrative installation will extract the necessary files into a network location
specified during the installation. This location is also known as a Software Distribution Point.
An administrative installation will not install any program files.
Administrators can run an administrative installation from the command line by using the /a
command line option. Users in a workgroup who have access to this administrative image can
then install the product from this source.
SETUP /a
or
MSIEXEC /a <MSI-filename>
The following options can be used together with the SETUP executable:
Setup option Description
/a
Administrative installation option. This instructs SETUP.exe to perform
an administrative installation instead of a normal installation.
/v
/L
(followed by the Windows
Language Code)
Precedes the list of arguments or properties that are passed to the Windows
Installer.
If applicable, specifies the setup language to use for installation.
The following language codes are supported:
• 1031=German
• 1033=English
• 1034=Spanish
• 1036=French
• 1040=Italian
• 1043=Dutch
Creating administrative images of the components
To create an administrative image on the network for any application
1. Use the below tables to locate the installer of the application on the CD-ROM.
2. Launch SETUP.exe or MSIEXEC with appropriate command line options including the
administrative installation option:
SETUP /a
or
MSIEXEC /a "ScanSoft PaperPort 10.msi"
or e.g. for German setup language:
SETUP /a /L1031
8 of 17
Page 9

3. If applicable, select a language for the administrative installation (not necessary if setup language
was specified in the command line).
4. During installation, specify a target network location for the administrative image to be
created.
5. Share this location (Software Distribution Point).
Software components and their installer locations for the Special Edition:
Software component Installer location on the CD-ROM Command
1 PaperPort 10.0 SE
2 OmniPage SE 3.0
3 Image Retriever 5.2 SE
PP10SE\PaperPort SETUP /A
OPSE3\OmniPage SETUP /A
IR52SE SETUP /A
Software components and their installer locations for the Professional Edition:
Software component Installer location on the CD-ROM Command
1 PaperPort Professional 10.0
2 OmniPage Pro 14.0 Office
3 Image Retriever 5.2 Pro
4 PDF Create! 2.0
5 PDF Converter 1.3
PP10PRO\PaperPort SETUP /A
OP14OFFC SETUP /A
IR52PRO SETUP /A
PP10PRO\PaperPort\PDFCreate COPY
OP14OFFC\OmniPage\PDFConv MSIEXEC /A
Note
Do not perform an administrative installation for PDF Create! 2.0. Instead, simply copy its
installer onto the target network location.
9 of 17
Page 10

Deployment - Active Directory
This section describes how to install the software components of Scan to PC Desktop onto
clients’ systems using Active Directory.
Prerequisites
• A working Active Directory environment.
• A Software Distribution Point (with administrative images of the software components)
• A deployment target computer that is a member of a domain, site, or organizational unit.
• MSI 2.0 installed on the target computer.
Installation order
Before starting to install any component of Scan to PC Desktop, please ensure that
InstallShield's Installscript engine be installed on the target computer.
You can find the Installscript engine installer (ISSCRIPT8.msi) in the folder of each component
(e.g. in PP10PRO\PaperPort) on the CD-ROM.
Once the Installscript engine is installed, the different components can be installed in any
combination. Note that the installation of PaperPort must precede that of Image Retriever. Please
note also that during the installation of PaperPort Pro, PDF Create! 2.0 must also be installed.
The preferred order of the installations of the different components is the following:
Software components and their installers for the Special Edition:
Software component Installer
1 Installscript engine
2 PaperPort 10.0 SE
3 OmniPage SE 3.0
4 Image Retriever 5.2 SE
Software components and their installers for the Professional Edition:
Software component Installer
1 Installscript engine
2 PaperPort Professional 10.0
3 PDF Create! 2.0
4 OmniPage Pro 14.0 Office
5 PDF Converter 1.3
6 Image Retriever 5.2 Pro
Note: To install PDF Create! 2.0 properly, two installations must be completed.
ISSCRIPT8.msi
ScanSoft PaperPort 10.msi
ScanSoft OmniPage SE 3.0.msi
Image Retriever 5.2.msi
ISSCRIPT8.msi
ScanSoft PaperPort 10.msi
ScanSoft PDF Create 2.0.msi
and
ScanSoft PDF Create 2.0-<lang>.msi
ScanSoft OmniPage Pro 14.0.msi
ScanSoft PDF Converter.msi
Image Retriever 5.2.msi
10 of 17
Page 11

Deployment steps
This procedure describes how to install a given component of Scan to PC Desktop.
You must repeat the steps below, as many times as many software component installations are
needed.
1. Open Administrative Tools\Active Directory Users and Computers, select the object, then
a domain, site, or organization unit. Create a Group Policy Object as follows:
a. Right-click the domain or the selected container.
b. Select Properties, click the Group Policy tab, select New, and then name the new
policy.
c. Close the Active Directory Users and Computers dialog box.
2. Use Microsoft Management Console (MMC) to open the new Group Policy Object:
a. In the Run command dialog box, type mmc to open Console1.
b. Navigate to Console\Add\Remove Snap-in, click the Add button, and then select
Group Policy from the menu list.
c. Select the Group Policy Object that you have just created.
3. Configure the new Group Policy Object to install the software component as follows:
a. Under the console root\Group Policy <name>, select Computer Configuration,
Software Settings, right-click Software Installation, select New, and then Package.
Note: InstallShield's Installscript engine must be installed before installing any component of Scan to
PC Desktop. That is, the Installscript engine installer (ISSCRIPT8.msi) must be the very first software
installation package.
b. Browse to the shared network folder (administrative image) that contains the
component's installation package and select its installer for the package. (e.g.
ScanSoft PaperPort 10.msi)
The component properties dialog box opens. In the General tab, the name of the
software component (e.g. PaperPort Professional 10) will be listed under Name.
Note: The installer names for the components are listed below in the Professional and Standard tables.
c. In the Deployment tab, under Deployment Type, select Assigned, and make sure that
Basic is selected under Installation User Interface Option.
d. To specify the installation language, go to the Modification tab, click the Add button
and choose the appropriate language transform file.
Note: If the installer of the software component supports more then one UI languages, and you need a
non-English installation, one of the language transform files must also be specified.
(For example, to specify a German installation, add the file 1031.mst.)
To read more about Windows Language Codes for the language transform files, see the chapter
"Creating administrative images".
e. Add further installer transform file(s), if necessary.
11 of 17
Page 12

Note: When installing PDF Converter 1.3, the addition of the transform file "ScanSoft PDF
Converter.mst" is also required.
f. Close the dialog box, and then select Software Installation.
The settings for the installation package will be displayed on the right side of the
screen, and the component will be installed to the targeted client systems upon their
restart.
The installation is a "silent install" and is installed for all users on the specified computer.
Software components and their installers for the Special Edition:
Software component Installer
InstallShield Installscript engine
PaperPort 10.0 SE
OmniPage SE 3.0
Image Retriever 5.2 SE
ISSCRIPT8.msi
ScanSoft PaperPort 10.msi
ScanSoft OmniPage SE 3.0.msi
Image Retriever 5.2.msi
Software components and their installers for the Professional Edition:
Software component Installer
InstallShield Installscript engine
PaperPort Professional 10.0
PDF Create! 2.0
OmniPage Pro 14.0 Office
PDF Converter 1.3
Image Retriever 5.2 Pro
ISSCRIPT8.msi
ScanSoft PaperPort 10.msi
ScanSoft PDF Create 2.0.msi
ScanSoft OmniPage Pro 14.0.msi
ScanSoft PDF Converter.msi
Image Retriever 5.2.msi
12 of 17
Page 13

Microsoft introduced a new feature in Windows XP called Fast Logon Optimization. This feature will
typically log the user in quickly even off the network.
This causes software installation via group policy to sometimes take many reboots to actually install
managed software (you must reboot at least once after the group policy change just to refresh the policy
on the local machine plus once to install the software.
For more details see the following Microsoft website:
http://www.microsoft.com/technet/prodtechnol/windowsserver2003/library/Operations/ae11795f-6d3c44b4-a231-7670dc6c05e1.mspx
13 of 17
Page 14

Deployment - SMS server
This section describes how to install software components of Scan to PC Desktop onto a client's
system using SMS Server.
Prerequisites
• A Software Distribution Point (with administrative images of the software components)
• A deployment target computer that is a member of a domain, site, or organizational unit.
• MSI 2.0 installed on the target computer.
Installation order
Before starting to install any component of Scan to PC Desktop, please ensure that
InstallShield's Installscript engine be installed on the target computer.
You can find the Installscript engine installer (ISSCRIPT8.msi) in the folder of each component
(e.g. in PP10PRO\PaperPort) on the CD-ROM.
Once the Installscript engine is installed, the different components can be installed in any
combination.
Note that successful installation of Image Retriever requires a preceding PaperPort installation.
Please also note that PDF Create! 2.0 installation is required for that of PaperPort Pro.
The preferred order of the installations of individual components is the following:
Software components and their installers for the Special Edition:
Software component Installer
1 Installscript engine
2 PaperPort 10.0 SE
3 OmniPage SE 3.0
4 Image Retriever 5.2 SE
Software components and their installers for the Professional Edition:
Software component Installer
1 Installscript engine
2 PaperPort Professional 10.0
3 PDF Create! 2.0
4 OmniPage Pro 14.0 Office
5 PDF Converter 1.3
6 Image Retriever 5.2 Pro
ISSCRIPT8.msi
ScanSoft PaperPort 10.msi
ScanSoft OmniPage SE 3.0.msi
Image Retriever 5.2.msi
ISSCRIPT8.msi
ScanSoft PaperPort 10.msi
ScanSoft PDF Create 2.0.msi
ScanSoft OmniPage Pro 14.0.msi
ScanSoft PDF Converter.msi
Image Retriever 5.2.msi
14 of 17
Page 15

Deployment steps
Please follow the instructions below to install the components of Scan to PC Desktop
appropriately.
If the installer of any software component supports more than one UI languages, and a nonEnglish installation is needed, one of the language transform files must also be specified in the
command-line (Presented as <LANG-TRFILE.mst> below). For example, to specify a German
installation, use the following transforms tag:
TRANSFORMS="1031.mst"
Note: To read more about Windows Language Codes for the language transform files see the chapter "Creating
administrative images".
1. To install the Installscript engine, use the following command -line:
MSIEXEC /i ISSCRIPT8.msi /q
2. To install PaperPort Professional 10, use the following command -line:
MSIEXEC /i "ScanSoft PaperPort 10.msi" ALLUSERS=2
TRANSFORMS=<LANG-TRFILE.mst> /qb+
3. To install PDF Create! 2.0, you must use both command-lines below:
MSIEXEC /i "ScanSoft PDF Create 2.0.msi"
TRANSFORMS=<LANG-TRFILE.mst> /qb+
MSIEXEC /i "ScanSoft PDF Create 2.0-<LANG>.msi" /qb+
where <LANG> is one of language abbreviation code for the supported languages:
Por (for Brazilian-Portuguese), Eng (for English), Fre (for French), Ita (for
Italian), Ger (for German), Spa (for Spanish).
4. To install OmniPage Pro 14 Office, use the following command -line:
MSIEXEC /i "ScanSoft OmniPage Pro 14.0.msi" ALLUSERS=2
TRANSFORMS=<LANG-TRFILE.mst> /qb+
5. To install PDF Converter 1.3, use the following command- line:
MSIEXEC /i "ScanSoft PDF Converter.msi" TRANSFORMS=
"ScanSoft PDF Converter.mst;<LANG-TRFILE.mst>" /qb+
6. To install Image Retriever 5.2 Pro or Image Retriever 5.2 SE use the following
command-line:
MSIEXEC /i "Image Retriever 5.2.msi" ALLUSERS=2
TRANSFORMS=<LANG-TRFILE.mst> [<wfolder>] /qb+
where the optional <wfolder> parameter can be used to specify a base folder in
the network for the Image Retriever's folder watching feature. For the current user
of Image Retriever, it will watch a subfolder of this base folder. The name of this
subfolder will be the user's login name. This way Image Retriever can be
configured during installation.
The <wfolder> parameter has the following syntax:
WATCHFOLDER=<path>
7. To install PaperPort 10 SE, use the following command -line:
15 of 17
Page 16

MSIEXEC /i "ScanSoft PaperPort 10.msi" ALLUSERS=2
TRANSFORMS=<LANG-TRFILE.mst> /qb+
8. To install the OmniPage SE 3.0, use the following command- line:
MSIEXEC /i "ScanSoft OmniPage SE 3.0.msi" ALLUSERS=2
TRANSFORMS=<LANG-TRFILE.mst> /qb+
You can now advertise the packages to your SMS clients.
Examples
1. To install the PaperPort Professional 10 with English user interface, use the following
command-line:
MSIEXEC /i "ScanSoft PaperPort 10.msi" ALLUSERS=2
TRANSFORMS=1033.mst /qb+
2. To install the PaperPort Professional 10 with German user interface, use the following
command-line:
MSIEXEC /i "ScanSoft PaperPort 10.msi" ALLUSERS=2
TRANSFORMS=1031.mst /qb+
3. To install the PDF Create! 2.0 with German user interface, use both command-lines
below:
MSIEXEC /i "ScanSoft PDF Create 2.0.msi"
TRANSFORMS=1031.mst /qb+
MSIEXEC /i "ScanSoft PDF Create 2.0-Ger.msi" /qb+
4. To install the OmniPage Pro 14 Office with English user interface, use the following
command-line:
MSIEXEC /i "ScanSoft OmniPage Pro 14.0.msi" ALLUSERS=2
TRANSFORMS=1033.mst /qb+
5. To install the OmniPage Pro 14 Office with German user interface, use the following
command-line:
MSIEXEC /i "ScanSoft OmniPage Pro 14.0.msi" ALLUSERS=2
TRANSFORMS=1031.mst /qb+
6. To install the PDF Converter 1.3 with English user interface, use the following
command-line:
MSIEXEC /i "ScanSoft PDF Converter.msi"
TRANSFORMS="ScanSoft PDF Converter.mst;1033.mst" /qb+
7. To install the PDF Converter 1.3 with German user interface, use the following
command-line:
MSIEXEC /i "ScanSoft PDF Converter.msi"
TRANSFORMS="ScanSoft PDF Converter.mst;1031.mst" /qb+
8. To install the Image Retriever 5.2 Pro or Image Retriever 5.2 SE with German user
interface, use the following command-line:
MSIEXEC /i "Image Retriever 5.2.msi" ALLUSERS=2
TRANSFORMS=<LANG-TRFILE.mst> [<wfolder>] /qb+
9. To install Image Retriever 5.2 Pro or Image Retriever 5.2 SE with English user
interface and to specify the folder to watch, use the following command-line:
MSIEXEC /i "Image Retriever 5.2.msi" ALLUSERS=2
TRANSFORMS=<LANG-TRFILE.mst> [<wfolder>] /qb+
WATCHFOLDER="\\OMEGA\SCANS" /qb+
16 of 17
Page 17

10. To install the PaperPort 10 SE with German user interface, use the following
command-line:
MSIEXEC /i "ScanSoft PaperPort 10.msi" ALLUSERS=2
TRANSFORMS=1031.mst /qb+
11. To install the OmniPage SE 3.0 with English user interface, use the following
command-line:
MSIEXEC /i "ScanSoft OmniPage SE 3.0.msi" ALLUSERS=2
TRANSFORMS=1033.mst /qb+
17 of 17
 Loading...