

Page 1

Scan to PC Desktop Professional 10
Scan to PC Desktop Professional 10
Install Instructions
Install Instructions
Personalize your Xerox network
scanning and your PDF workflow
Xerox Corporation – Scan to PC Desktop Professional 10 – Install Instructions
1
Page 2

General information
General information
How to use this document
This document can be used in several ways:
• Xerox customers can use it to learn how to install their Scan to PC
Desktop software
• By members of the Xerox sales teams to facilitate installing Scan to
PC Desktop Professional 10 onto their own laptops for use during
customer demonstrations.
• By Xerox Analysts to install the Scan to PC Desktop Professional 10
software onto the PCs in Xerox demo rooms.
Information about installing Scan to PC Desktop
This document provides instructions for installing the software associated
with the desktop PC Client components of Scan to PC Desktop Professional
10. These software components include:
• PaperPort Professional 11
• OmniPage Professional 16
• PDF Converter Professional 5 Enterprise
• Image Retriever Professional 9
Notes:
• Nuance has created a Server Administrator’s Guide that contains
information about how to install and configure the PSP Server 2.0 server
component. This Guide is available for download at
http://www.nuance.com/scan2pc and http://www.xerox.com/scan2pc
• Scan to PC Desktop products, including OmniPage, PaperPort, PDF
Converter Professional, Image Retriever, and PSP Server are translated into
English, French, Italian, German, Spanish, and Brazilian Portuguese. These
products are designed to work with an operating system that is properly
configured with the corresponding language. Use of these products with
operating systems that are configured with non-supported languages is not
recommended or supported.
• On Windows 2000, XP, or Vista systems, you should have Administrator
privileges to install or later to change, repair or uninstall the product.
Xerox Corporation – Scan to PC Desktop Professional 10 – Install Instructions
2
Page 3

Minimum system requirements for Scan to PC Desktop 10
Minimum system requirements for Scan to PC Desktop 10
PaperPort Professional 11:
• Microsoft® Windows 2000 SP4 or above, Windows XP SP2 32-bit, Windows Vista 32-bit, Windows Vista 64bit
• Intel® Pentium® processor or equivalent
• 128 MB RAM, 256 MB RAM or higher recommended
• 300 MB free hard disk space
• Microsoft® Internet Explorer 5.5 or higher (free download available at www.microsoft.com)
• CD-ROM drive (required for installation)
• SVGA monitor with 256 colors, but preferably 16-bit color (called High Color in Windows 2000 and Medium
Color in XP and Vista) and 800 x 600 pixel resolution
• A Web connection is required for registration
OmniPage Professional 15:
• Intel® Pentium® III or higher processor or its equivalent. Intel Core Duo, Intel Core 2 Duo or AMD X2 Dual
Core 3600+ recommended for advanced performance.
• Windows 2000 (from Service Pack 2), Windows XP 32 bit (from Service Pack 2), Windows XP 64-bit,
Windows Vista 32-bit, Windows Vista 64-bit
• Microsoft Internet Explorer 5.5 or higher
• 256 MB of memory (RAM), 1GB recommended for advanced performance.
• 150 MB of free hard disk space for the application files and sample images, plus 70 MB working space during
installation. An additional 245 MB for RealSpeakTM Solo speech modules (nine languages)
• 20 MB for ScanSoft PDF Create! and 250 MB for PaperPort
• 1024x768 pixel color monitor with 16-bit color or greater video card
• CD-ROM drive for installation
• A sound card and speaker for reading text aloud
• To save DOCX, XLSX and PPTX files (Microsoft Office 2007 Word, Excel and PowerPoint file formats) or to
load and save XPS files (XML Paper Specification files), you should install Microsoft .NET Framework 3.0 if
you are not already running Windows Vista or have Office 2007 installed.
PDF Converter Professional 5 Enterprise:
• Intel® Pentium® or higher processor or equivalent.
• Microsoft® Windows® : Windows 2000 (SP 4), Windows XP (SP 2), Windows XP 64-bit Edition, Windows
Vista 32-bit or 64-bit Editions, Windows 2003 Server.
• Microsoft Internet Explorer 5.5 or above.
• 256MB RAM (512 MB recommended).
• 200MB of free hard disk space for application files plus 50MB working space during installation.
• SVGA monitor with 256 colors, but preferably 16-bit color (called High Color in Windows 2000 and Medium
Color in XP) and 800 x 600 pixel resolution.
• Windows-compatible pointing device.
• CD-ROM drive for installation.
• If Windows Vista is not installed; Microsoft .NET Framework 3.0 is required in order to save to DOCX, XLSX,
and PPTX file formats (Microsoft Office 2007 formats) The Microsoft .NET Framework 3.0 can be installed on
Windows XP but cannot be installed on Windows 2000.
• Sound card is optionally required for using the functionality of the supplied Text-To-Speech Engine.
• Microsoft® Office 2007 (SP 1) is required to leverage the complete functionality included for XPS files.
Note: Performance and speed will be enhanced if your computer's processor, memory and available disk space
exceed minimum requirements. This is especially true when converting very large color PDF files. Hyperthread enabled or multi-processor systems can deliver better performance.
Xerox Corporation – Scan to PC Desktop Professional 10 – Install Instructions
3
Page 4

Preparing to install
Preparing to install
If a previous version of Scan to PC Desktop is
installed:
• During the installation of Scan to PC Desktop Professional 10 the following
software will automatically be uninstalled as part of the installation process:
Scan to PC Desktop v6, v7, v8, v9, and v9.1 components (PaperPort,
OmniPage, PDF Converter, PDF Create, and Image Retriever).
• If a reboot is required during a component uninstall, the Scan to PC Desktop
10 installer will manage the reboot.
• The installation of Scan to PC Desktop Professional 10 will continue after
reboot.
Please note:
• The above process will only be implemented for Scan to PC Desktop v6, v7,
v8, v9, and v9.1 known components (PaperPort, OmniPage, PDF Converter,
PDF Create!, and Image Retriever).
• Any other PaperPort, OmniPage, PDF Converter, or PDF Create! component
installed as retail products or non Xerox OEM products must be uninstalled
manually through Add/Remove Programs. In these situations, the Scan to PC
Desktop 10 installer will notify the user to uninstall components and reinstall
Scan to PC Desktop 10.
Xerox Corporation – Scan to PC Desktop Professional 10 – Install Instructions
4
Page 5
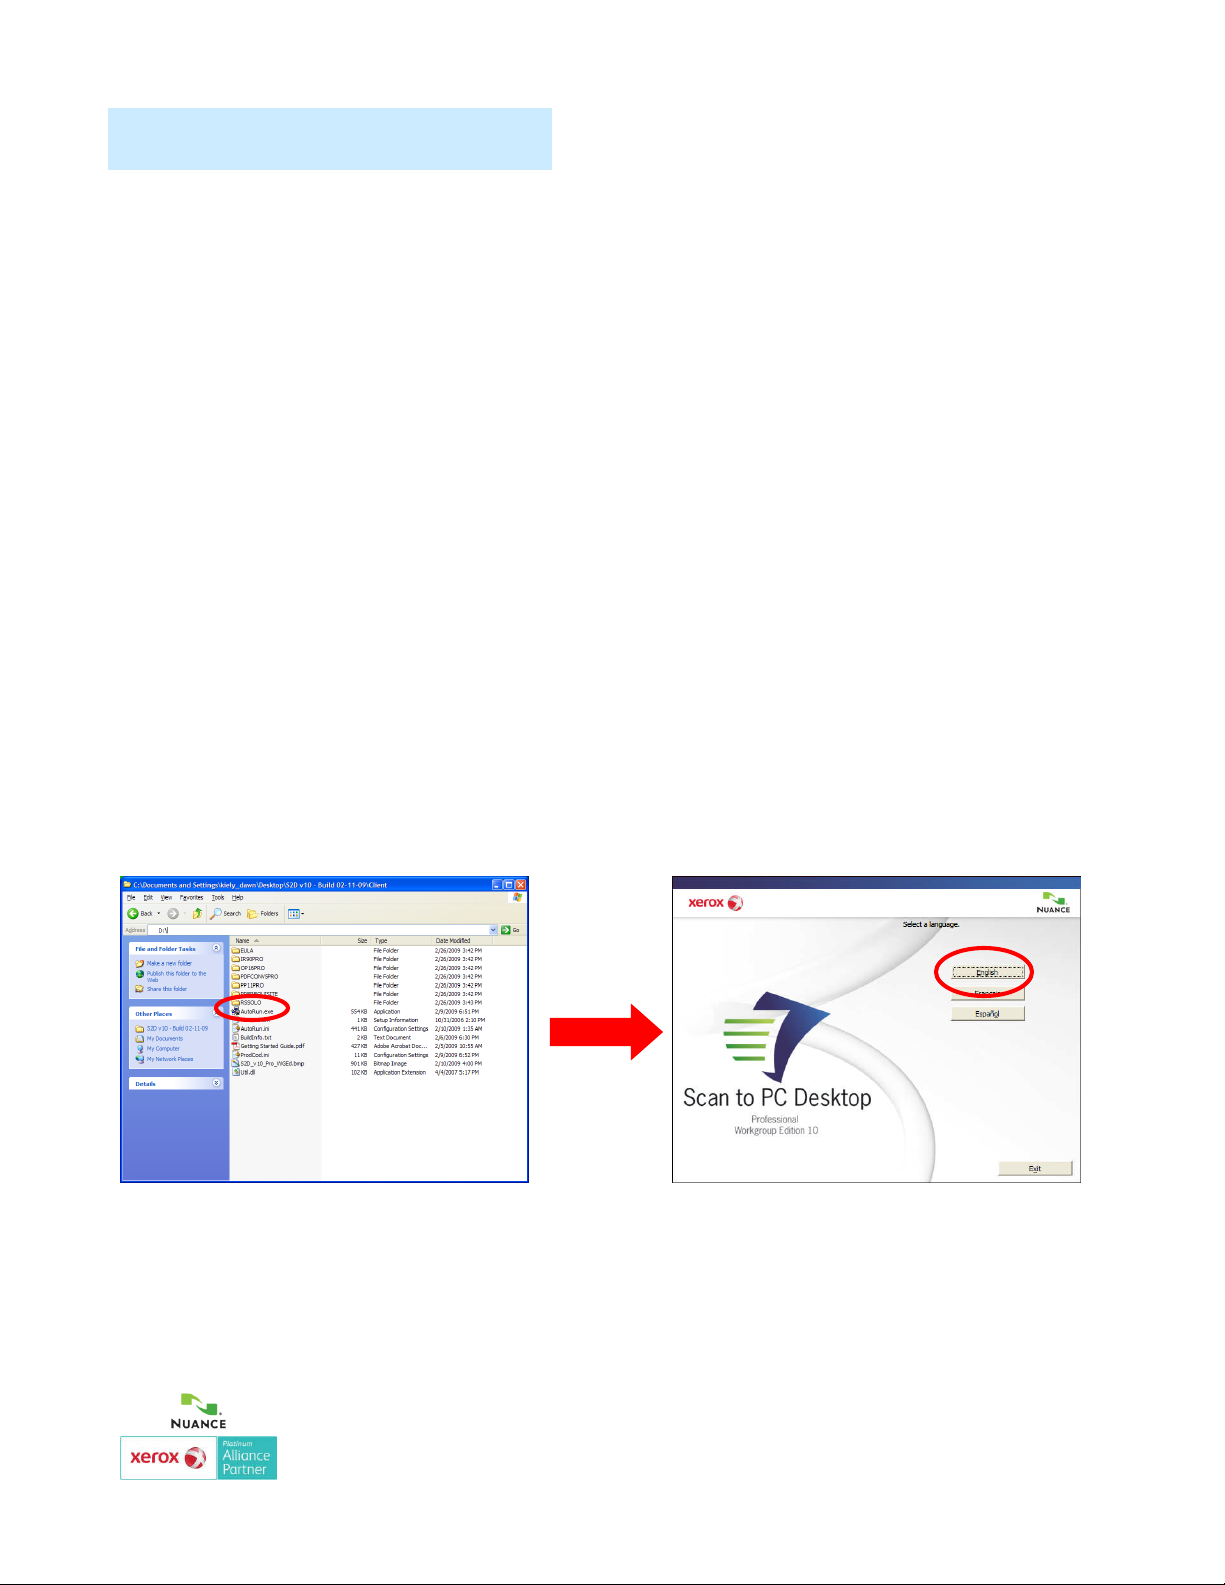
Begin the installation
On most PCs, simply inserting the installation CD-ROM
into the CD-ROM drive launches the Scan to PC
Desktop installer. However, if the installer does not
automatically run on your PC after you insert the CDROM, please follow these steps:
1. Use Windows Explorer to browse the CD-ROM.
2. Double-click on the autorun.exe program on the CDROM.
3. Either way, the language chooser screen is the first
screen displayed by the installer.
4. The installation CD-ROM contains multiple localized
versions of the associated software. To begin, select
the language appropriate for your installation.
Xerox Corporation – Scan to PC Desktop Professional 10 – Install Instructions
5
Page 6
Installing over a previous version
Note: If you are not installing over a previous version of Scan to PC Desktop, proceed to Page 7 of this
Guide.
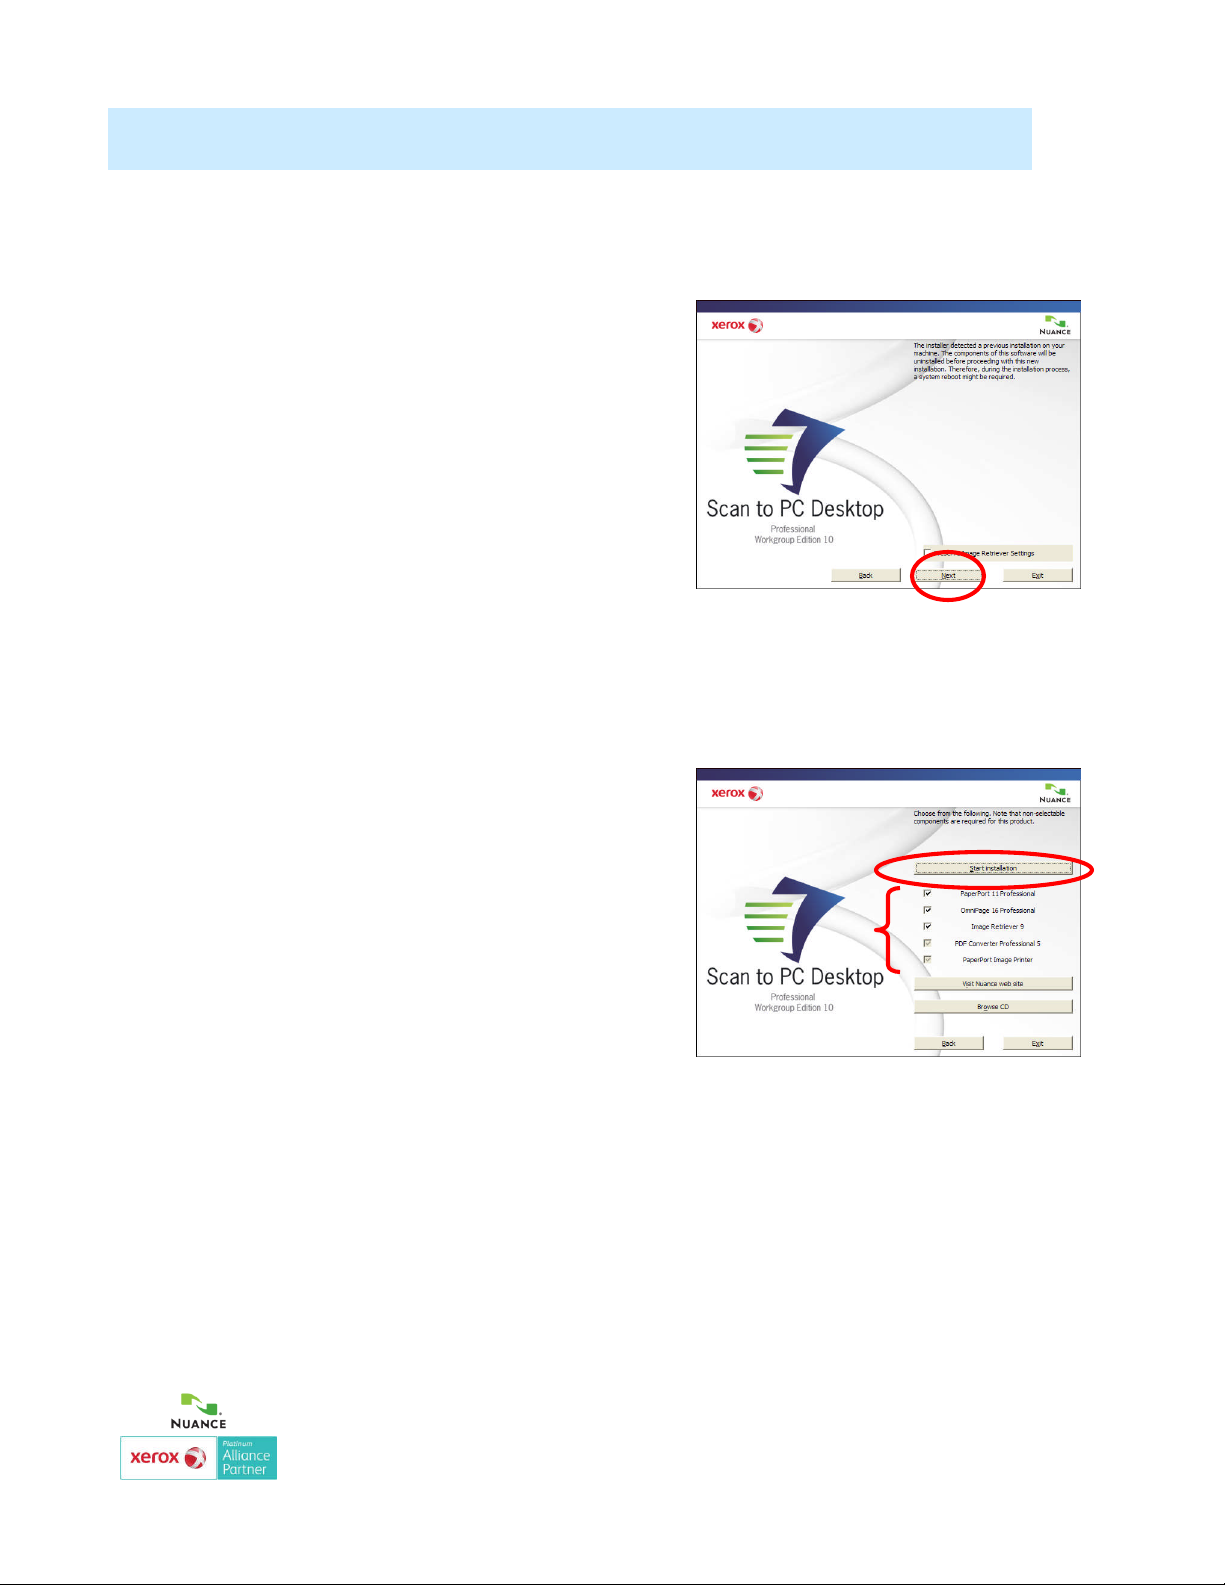
If you are installing over Scan to
PC Desktop v6, v7, v8, v9, or v9.1,
the installer will detect that you
have a previous version of Scan to
PC Desktop installed. Click on
“Next”.
Specify which components you want
to install. Click the checkboxes ON
for each item to be installed. To gain
the full functionality of Scan to PC
Desktop, leave all item checkboxes
ON (the default). Note that if
PaperPort or OmniPage are
selected installed, PDF Converter
Professional will be installed. You
can select to start the installation ,
browse the CD, or visit Nuance’s
Web Site. Choose Start
Installation.
Proceed to Page 8 to
continue the installation.
Xerox Corporation – Scan to PC Desktop Professional 10 – Install Instructions
6
Page 7

New installation
Note: If you are installing over a previous version of Scan to PC Desktop, proceed to Page 6 of this
Guide.
Specify which components you want to install.
Click the checkboxes ON for each item to be
installed. To gain the full functionality of Scan to
PC Desktop, leave all item checkboxes ON (the
default). Note that if PaperPort or OmniPage
are selected installed, PDF Converter
Professional will be installed.
Click on “Start installation”.
Proceed to Page 8 to continue the installation.
Xerox Corporation – Scan to PC Desktop Professional 10 – Install Instructions
7
Page 8
Installation
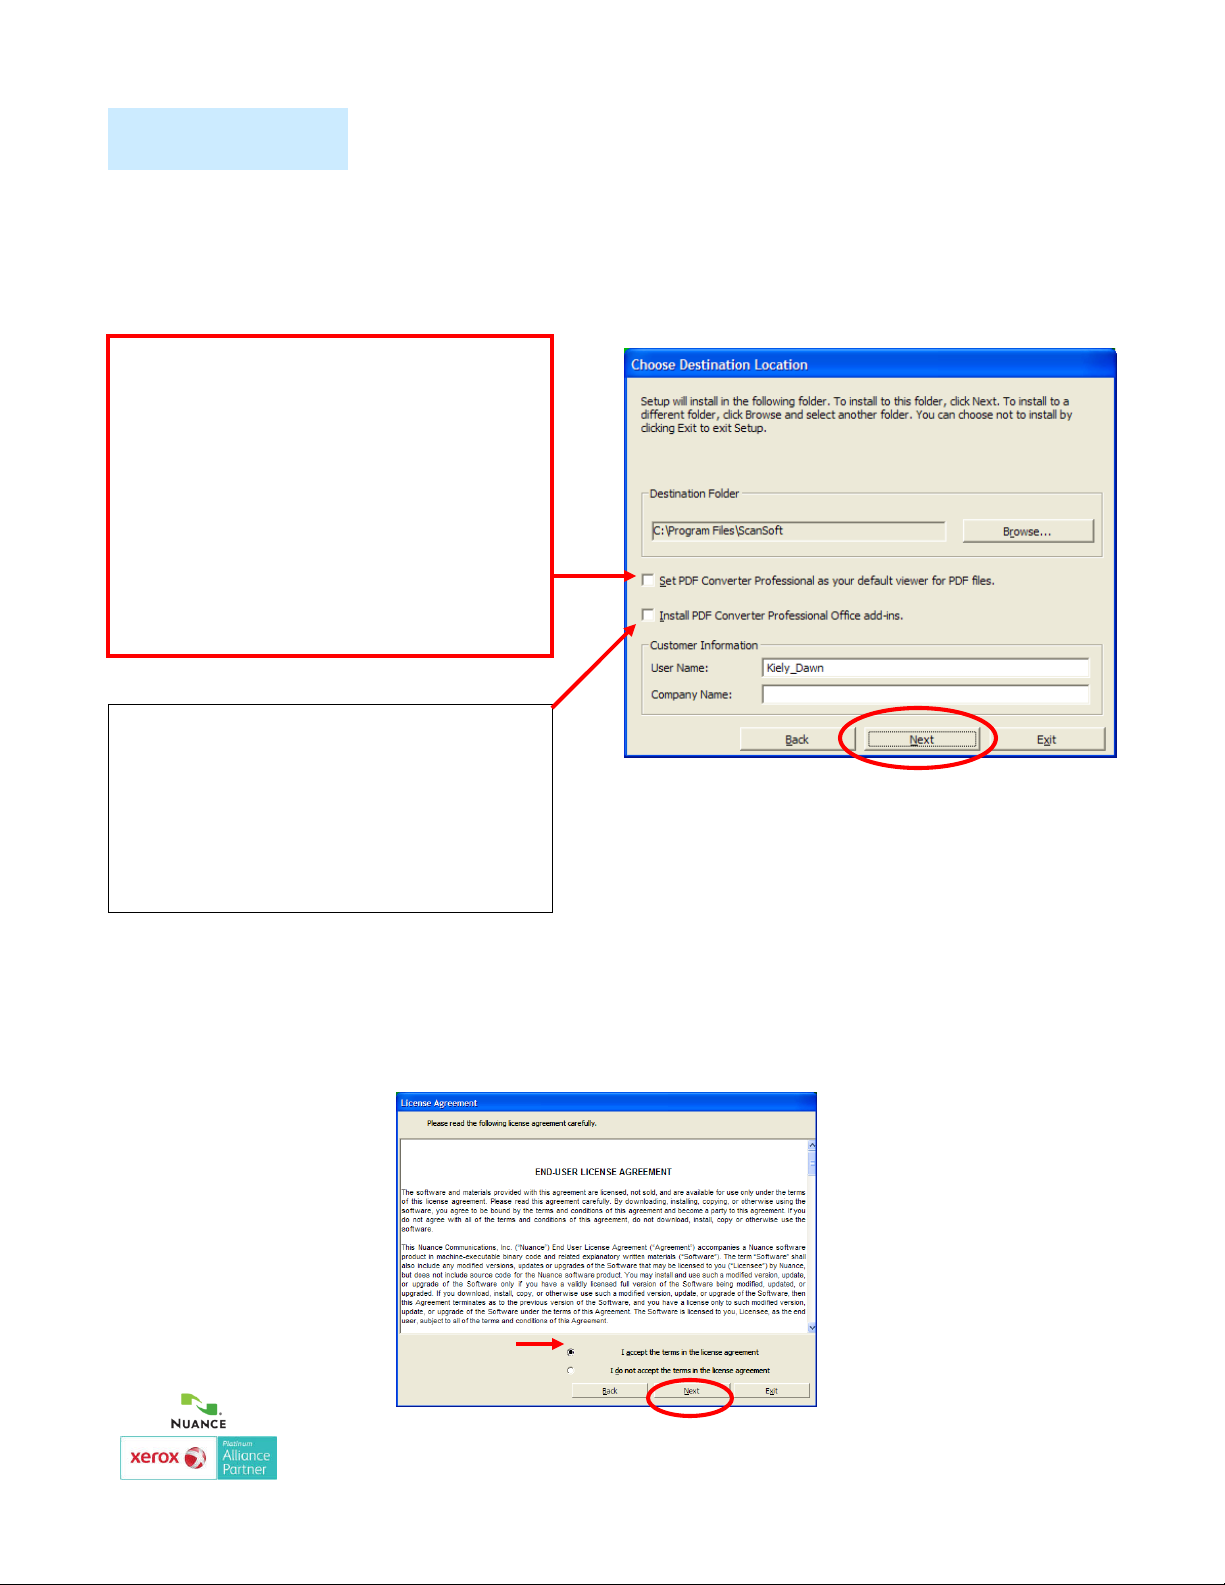
Chose Destination Location and PDF Settings
You will be asked where you want Scan to PC Desktop 10 to be
installed. You will be asked to select your preferred PDF settings.
You can select whether or not
you want PDF Converter
Professional to be your default
PDF viewer. If you currently
have Adobe Reader installed
and you would prefer to have
Adobe Reader be your default
PDF viewer, leave this box
unchecked.
If you would prefer to not
have PDF shortcut buttons
add into your Microsoft
Office applications, leave this
box unchecked.
Accept license agreement
You must click I accept to accept the License Agreement and proceed
with the installation. Click on Next.
Xerox Corporation – Scan to PC Desktop Professional 10 – Install Instructions
8
Page 9

Installation Begins
The installer will automatically install each component of Scan to PC
Desktop including the ODMA link, SharePoint link, ScanSoft
PaperPort 11, ScanSoft OmniPage 16, Image Retriever 9, Nuance
PDF Professional 5, and PaperPort Image Printer.
Xerox Corporation – Scan to PC Desktop Professional 10 – Install Instructions
9
Page 10

Xerox Corporation – Scan to PC Desktop Professional 10 – Install Instructions
10
Page 11

You may be prompted if you want to install or upgrade RSSolo. If
so, click on “Yes”.
Xerox Corporation – Scan to PC Desktop Professional 10 – Install Instructions
11
Page 12

Xerox Corporation – Scan to PC Desktop Professional 10 – Install Instructions
12
Page 13

Register and reboot
When the specified components are installed, complete
the electronic registration by following the screen
instructions. Select OK.
Another dialog box appears asking if you want to restart your
computer.
You must restart your computer before you can successfully
use the Scan to PC Desktop components. Click Yes.
Xerox Corporation – Scan to PC Desktop Professional 10 – Install Instructions
13
Page 14

Image Retriever setup
After your computer restarts, open the Image Retriever Settings
dialog box by double clicking on the Image Retriever icon the in
the Systray in the lower right corner of your Windows Desktop.
Folder watching status E-mail polling status
Depending on which program edition you use, the icon may have
one or three light indicators in the bottom. They represent the
status of e-mail polling, folder watching and Personalized MFP
Scanning by means of different colors. Since e-mail polling and
Personalized MFP Scanning are only available in the
Professional Edition of Image Retriever, the corresponding (right)
LEDs will not be displayed in the Special Edition of the program.
Personalized MFP
Scanning status
Please note that the “Image Retriever Settings“ dialog may
automatically display on the startup of Image Retriever until you
configure the program.
Xerox Corporation – Scan to PC Desktop Professional 10 – Install Instructions
14
Page 15

Image Retriever setup – Email polling
This feature of Image Retriever lets
you monitor your Microsoft Outlook
or Lotus Notes inbox for new
messages with attached PDF,
TIFF, or XPS files generated by a
Xerox device. Disable the feature if
you do not want to monitor your email. Use the following controls to
configure e-mail polling of Image
Retriever.
Click Watch for scanned files in
your e-mail inbox checkbox to
enable e-mail polling.
Click the Options button to change
your current e-mail polling
configuration. If you have both
Microsoft Outlook and Lotus Notes
installed on your system, the
following dialog box will display
enabling you to make your
selection between the two mail
clients. Click OK to confirm your
choice.
Image Retriever Professional supports the following email
applications:
• Outlook 98
• Outlook 2000
• Outlook 2002
• Lotus Notes 5.x
• Lotus Notes 6.x
• Lotus Notes 7.x
• Outlook 2003
• Outlook 2007
Xerox Corporation – Scan to PC Desktop Professional 10 – Install Instructions
15
Page 16
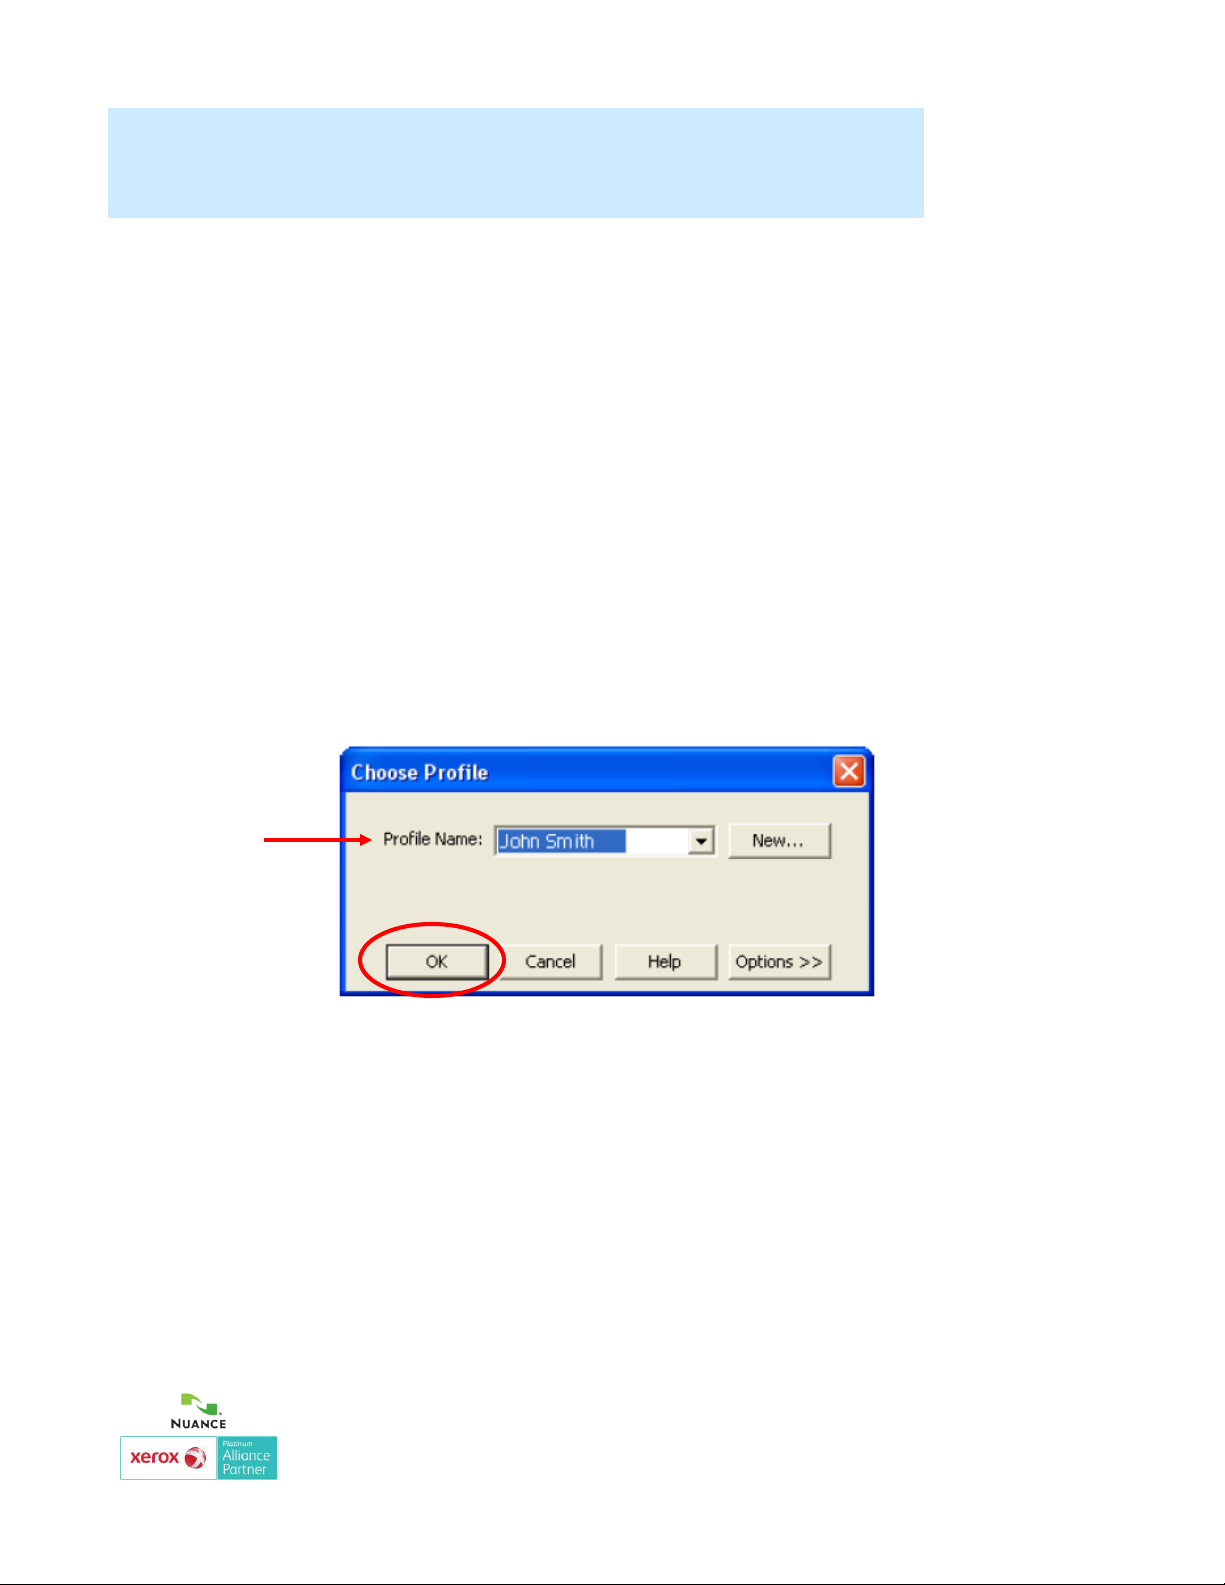
Image Retriever setup – Email polling –
Microsoft Outlook
In the case of Microsoft Outlook the “Choose Profile” dialog box
displays enabling you to choose the Microsoft Outlook profile whose
inbox you want Image Retriever to monitor. Select your Microsoft
Outlook profile and click OK. In the “Image Retriever Settings”
dialog, you will see your Microsoft Outlook profile name displayed in
the relevant field.
Xerox Corporation – Scan to PC Desktop Professional 10 – Install Instructions
16
Page 17
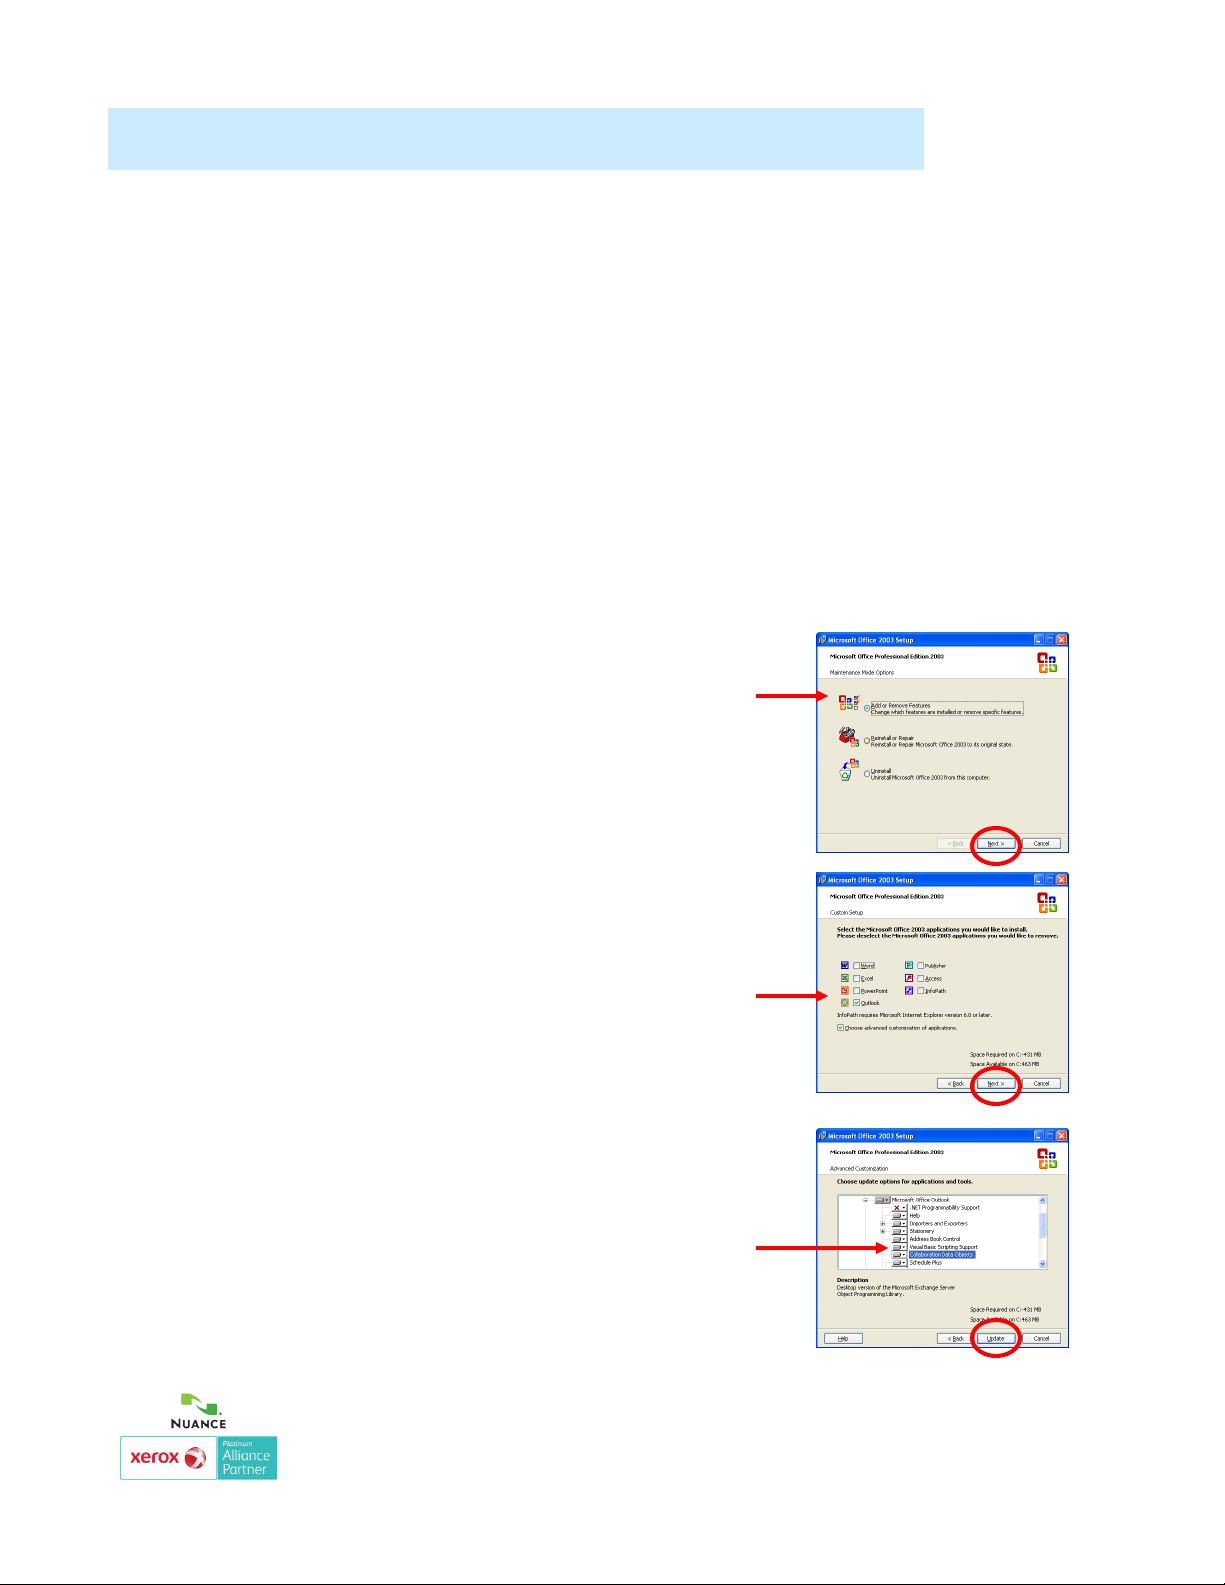
Microsoft Collaboration Data Objects
Microsoft Outlook users cannot enable e-mail monitoring or choose a Microsoft
Outlook profile unless Collaboration Data Objects is installed and enabled for
Microsoft Outlook. Image Retriever will display an error message if they attempt
to do so.
To install Collaboration Data Objects with Microsoft Outlook 2000, 2002 or 2003
• choose custom installation
• then detailed installation options for each application
• finally select and enable the installation of the Collaboration Data Objects.
Microsoft Outlook 98 users should pick the Full Installation option.
Microsoft Outlook 2007 users should download and install Collaboration Data Objects from
Microsoft’s Download Center.
For more information about Collaboration Data Objects please see your Microsoft Outlook
documentation.
Microsoft Outlook users cannot enable e-mail monitoring
or choose a Microsoft Outlook profile unless Collaboration
Data Objects (CDO) is installed and enabled for Microsoft
Outlook.
Image Retriever supports email polling with the following
Microsoft Outlook versions:
•Outlook 98
•Outlook 2000
•Outlook 2002
•Outlook 2003
•Outlook 2007
To install Microsoft Collaboration Data Objects after
Microsoft Outlook has been installed, please follow
these steps:
1. Go to Start > Control Panel > Add/Remove
Programs.
2. Click on Microsoft Office and click on the Change
button.
3. Select Add or Remove Features and click on Next.
4. Check the option for Outlook.
5. Check the option for Choose advanced
customization of applications and click on Next.
6. Click on Collaboration Data Objects and select
Update.
Xerox Corporation – Scan to PC Desktop Professional 10 – Install Instructions
17
Page 18

Image Retriever setup – Email polling –
Lotus Notes
If you set Lotus Notes as the mail client for Image
Retriever to watch, you have to specify your password. If
you leave the checkbox “Save password“ empty you will
have to give it again every time Image Retriever starts. If
you click the checkbox, your password will be stored in an
encrypted format and will not be prompted for again.
Please note that if Lotus Notes is installed, but is not
configured properly, or not set for any users, e-mail polling
will not work, and Image Retriever will display an error
message (during configuring the program) or the left-hand
side light indicator in the program icon will turn red (during
monitoring).
Xerox Corporation – Scan to PC Desktop Professional 10 – Install Instructions
18
Page 19

Image Retriever setup – Supported devices
E-mail Polling Supported Xerox Devices
Image Retriever can poll for e-mail attachments generated by the Xerox devices listed
below.
Document Centre 490/480/470/460 ST
Document Centre 440/432/425/420 ST
Document Centre 426/430
Document Centre 555/545/535
WorkCentre Pro 55/45/35
WorkCentre M55/M45/M35
WorkCentre Pro 90/75/65
WorkCentre Pro 40 Color/32 Color
WorkCentre Pro 165/175
WorkCentre M165/M175
WorkCentre Pro C2128/C2636/C3545
WorkCentre C2128/C2636/C3545
WorkCentre Pro 232/238/245/255/265/275
WorkCentre 232/238/245/255/265/275
WorkCentre C7132
WorkCentre 7655/7665/7675
WorkCentre 5030/5050
WorkCentre 7328/7335/7345
WorkCentre 4150
WorkCentre 7328/7335/7346
WorkCentre 123/128/133
WorkCentre 5222/5225/5230
WorkCentre 7232/42
Phaser 3200 MFP
Phaser 8560 MFP/X
Phaser 6110 MFP
WorkCentre 5632/5638/5645/5655/5665/5675/5687
Phaser 3300 MFP
Phaser 3635 MFP
Phaser 6180 MFP
WorkCentre 4260
WorkCentre M20i
For list updates, see: http://www.xerox.com/scan2pc
NOTE: Scan to Email with JPEG attachments will not be polled by the
Image Retriever e-mail feature.
Xerox Corporation – Scan to PC Desktop Professional 10 – Install Instructions
19
Page 20

Notes on Using Image Retriever with a Xerox
Phaser 8560 MFP Device
To ensure proper functioning between Image Retriever and this device, follow the steps
below:
First, install your device driver.
Launch the Xerox Scan Utility application.
Use this to create one or more user templates. Each will contain a folder that you can set
as the watched one for Image Retriever.
Then install Image Retriever.
Finally, set the Image Retriever watch folder to the one specified by the user template you
wish to use.
Image Retriever can watch only one user template-specified folder at a time. To change
this, select a folder specified by another user template.
Xerox Corporation – Scan to PC Desktop Professional 10 – Install Instructions
20
Page 21
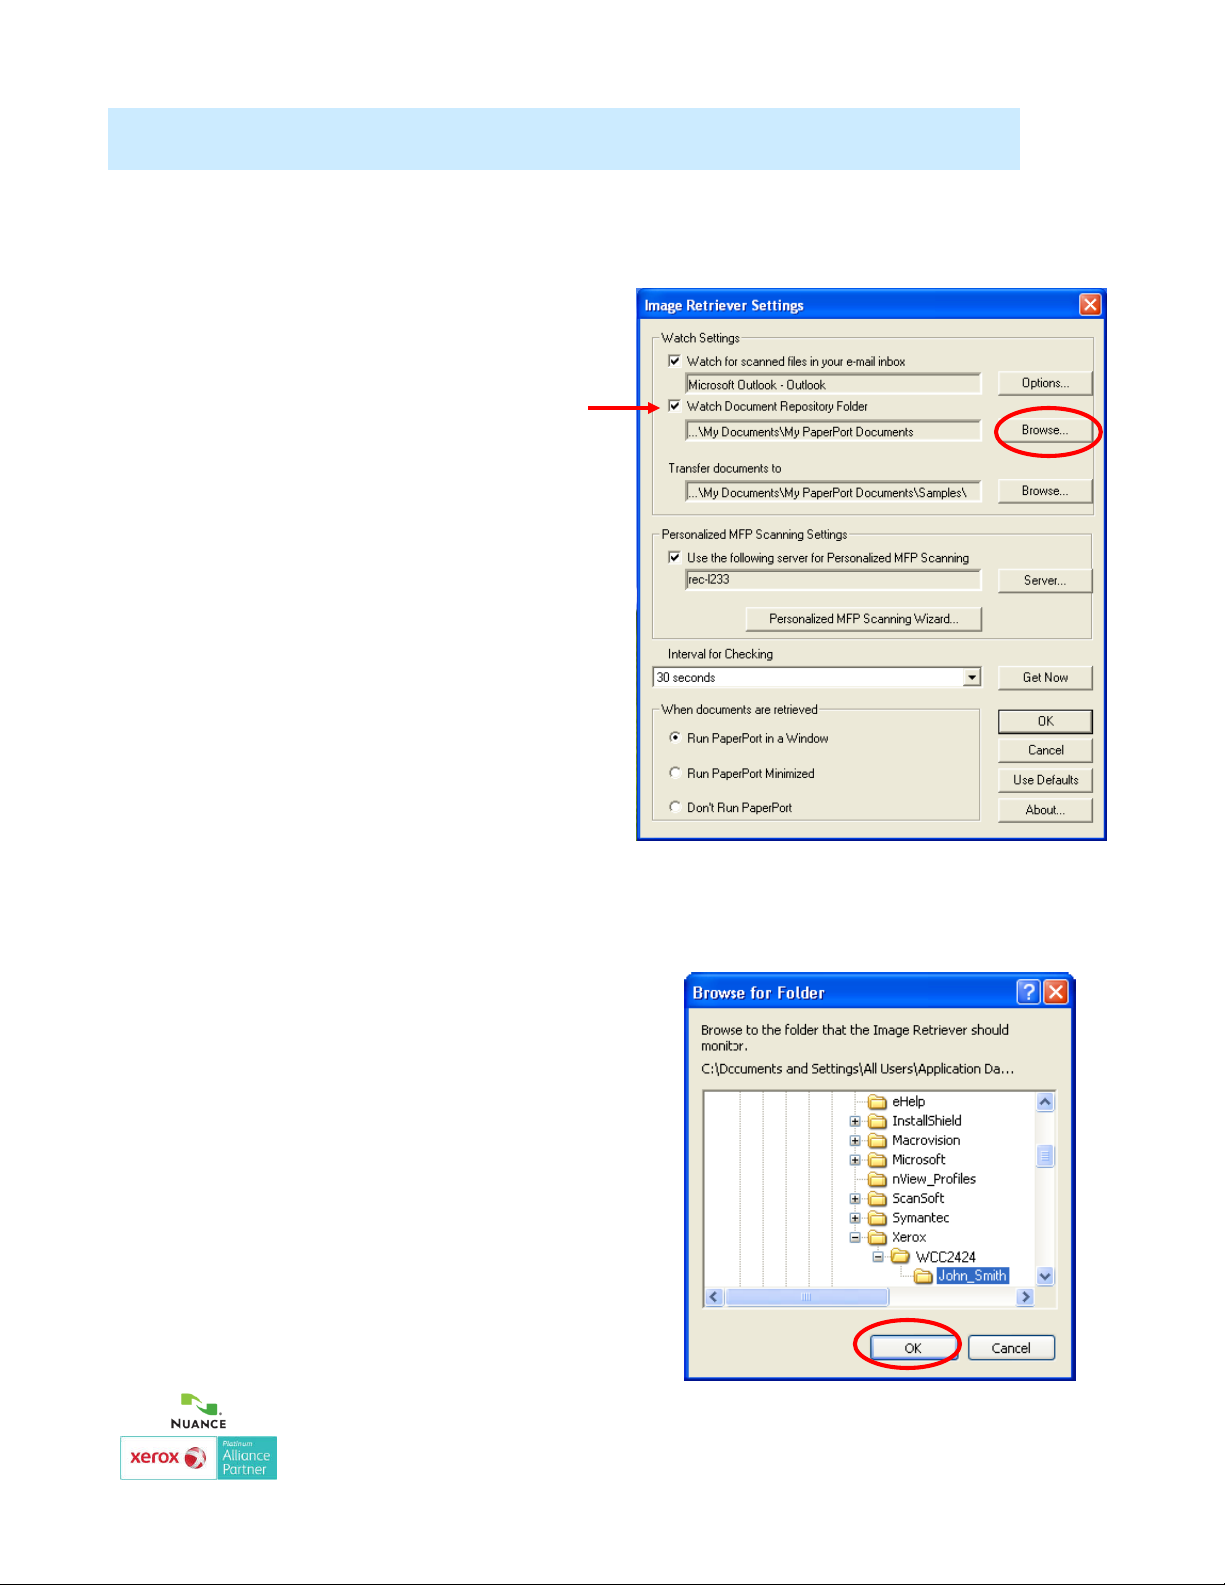
Image Retriever setup – Folder polling
Enable this setting to monitor a
specified folder on a networked
file server or local drive for
incoming scanned images
generated by a Xerox device.
Click this checkbox in the “Image
Retriever Settings” dialog to
enable Image Retriever to monitor
the folder of your choice.
Click the Browse... button to
display the “Browse for Folder”
dialog box. This dialog box lets
you locate and select the folder
you want Image Retriever to
monitor:
After you identify the directory to
be monitored and click OK, the
“Browse for Folder” dialog box
closes. Image Retriever can
periodically monitor this folder to
see if any scanned images are
placed there by the Xerox system.
Xerox Corporation – Scan to PC Desktop Professional 10 – Install Instructions
21
Page 22

Image Retriever setup – Folder polling
To set how often the watched
folder or monitored inbox will be
checked, select a setting from the
“Interval for checking” list box.
The following choices are
available from the list box:
1, 2, 5, 10, or 30 seconds
1, 2, 3, 5, 10, 30, or 60 minutes
In addition to the above values,
you could also select Never. In
this case Image Retriever will
continue running but watching is
suspended. One option is to
select Never for the interval and
only press the Get Now button
when you know that there are
scanned images to be retrieved
from your network folder. For
additional info, see the Image
Retriever setup – Get Now
button section of this document.
One suggestion is to set the watch interval at about half the time it
takes you to walk from the device’s location in your company to
your office. If it takes you 60 seconds to walk this distance, set the
interval to 30 seconds. This way the document that you scanned can
be ready and waiting for you on your PaperPort desktop!
Xerox Corporation – Scan to PC Desktop Professional 10 – Install Instructions
22
Page 23

Image Retriever setup – Get Now button
Click the Get Now button if you wish to scan the folder or inbox of
your choice immediately. Image Retriever does the monitoring on
whichever component is checked. That is, if “Watch Document
Repository Folder” is checked, Image Retriever will immediately
scan the selected folder; whereas if “Watch for scanned files in
your e-mail inbox” is checked, your Microsoft Outlook or Lotus
Notes inbox will be polled for new PDF, TIFF, or XPS e-mail
attachments generated by a Xerox device.
In either case, the relevant signal of the Image Retriever icon on
the system tray will change to “Processing” state (light green).
Image Retriever will place the new items appearing in the watched
folder or inbox on the PaperPort desktop and will launch the
PaperPort application - unless you have specified “Don’t run
PaperPort“ in the “Image Retriever Settings” dialog.
Xerox Corporation – Scan to PC Desktop Professional 10 – Install Instructions
23
Page 24
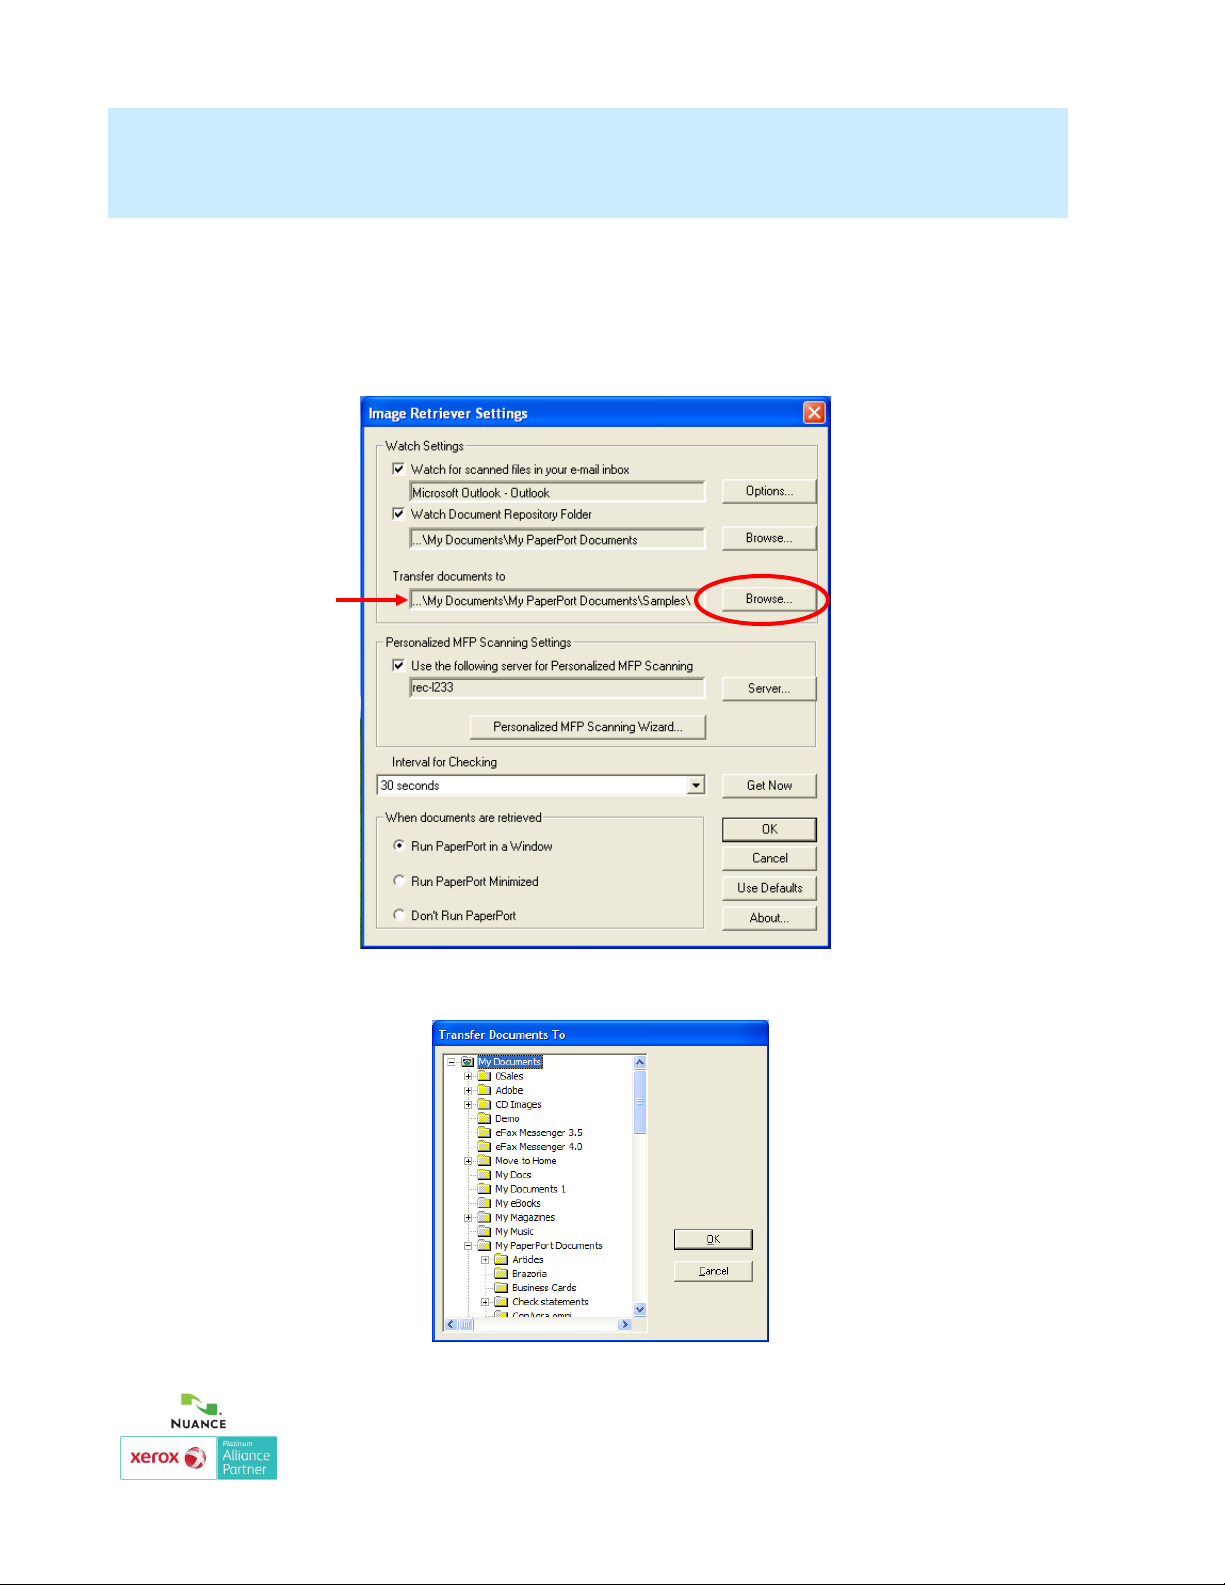
Image Retriever setup – Transfer documents
setting
To specify where Image Retriever is to place the retrieved files,
click Browse and choose a PaperPort folder.
Xerox Corporation – Scan to PC Desktop Professional 10 – Install Instructions
24
Page 25
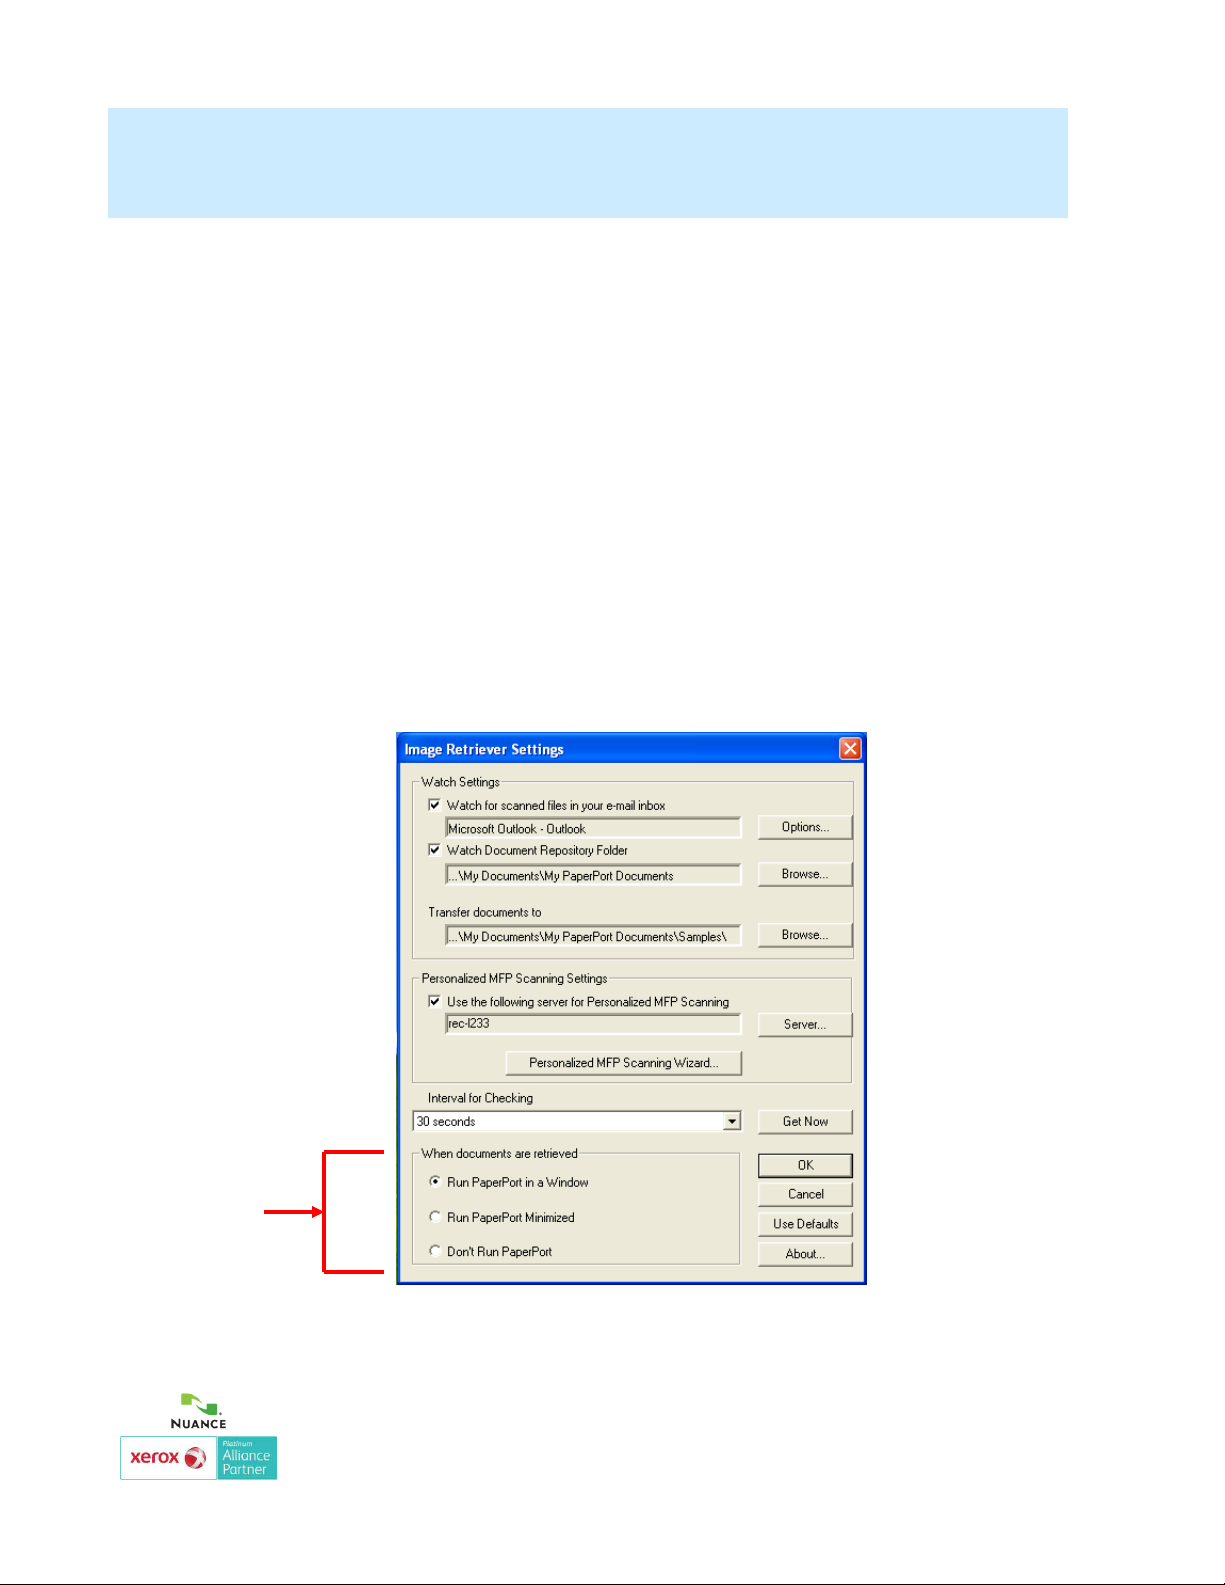
Image Retriever setup – When documents are
retrieved setting
Specify the behavior you prefer for document retrieval. The
When documents are retrieved setting offers three
choices :
•Run PaperPort in a window
•Run PaperPort minimized
•Don’t run PaperPort
Click OK in the Image Retriever Settings dialog box to
confirm Image Retriever settings.
Xerox Corporation – Scan to PC Desktop Professional 10 – Install Instructions
25
Page 26

Personalized MFP Scanning
Personalized MFP Scanning is the ability to change the control
panel on supported Multifunction Printers/Copiers so that it
becomes customized with your own destination folders and
scanning preferences. Image Retriever displays PaperPort
folders and scanning profiles as well as the document
conversion workflows of OmniPage stored on your local
computer and allows you to "push" these settings to the control
panel of the Multifunction Printer/Copier through the PaperPort
PSP Server. When you identify yourself to the MFP through a
log-in screen it will automatically change the control panel to
reflect your personal folder destinations and scanning
preferences. The PaperPort PSP Server requires Image
Retriever on your local machine and the ability to control the
MFP through a specially designed software interface. On select
Xerox machines this ability is referred to as the Xerox
Extensible Interface Platform (EIP) Advanced Development
Software for Xerox Multifunction Printers. The following devices
currently support the Xerox Extensible Interface Platform (EIP)
and PaperPort PSP Personalized MFP Scanning:
WorkCentre™ 56xx
WorkCentre™ 76xx
WorkCentre™ Pro 2xx
WorkCentre™ 73xx
WorkCentre™ 52xx
WorkCentre™ 72xx
WorkCentre™ 74xx
Xerox Corporation – Scan to PC Desktop Professional 10 – Install Instructions
26
Page 27

Personalized MFP Scanning
Use the following
server for Personalized
MFP Scanning
Turn on this option to enable
the Personalized MFP
Scanning functionality.
Server Button
Click the Server button to
change the PaperPort
PSP Server used for the
Personalized MFP
Scanning functionality.
For information on
available servers contact
your system
administrator.
Personalized MFP
Scanning Wizard
Button
Detailed information about using the Personalized Scanning Wizard is
located in the Scan to PC Desktop 10 Customer Orientation Guide available
at http://www.nuance.com/scan2pc
Xerox Corporation – Scan to PC Desktop Professional 10 – Install Instructions
27
 Loading...