


SERVER ADMINISTRATOR’S GUIDE
© Nuance Communications, Inc. All rights reserved. Subject to change without prior notice.
1

System Requirements.......................................................................................................... 4
Installing Prerequisites........................................................................................................ 5
Pre-Installation Device Configuration ................................................................................ 6
HTTPS Support............................................................................................................... 6
EIP Support..................................................................................................................... 6
Simple Network Management Protocol (SNMP) Support.............................................. 7
Scan Template Management Support ............................................................................. 8
Setting up the Network Environment ................................................................................. 8
IP Addresses and Host Names ........................................................................................ 9
Configuring IIS on Windows 2008 Server ..................................................................... 9
Checking your IIS settings.............................................................................................. 9
Creating temporary storage for scanned media files..................................................... 10
Providing SMB access to Temporary Storage.............................................................. 10
Checking SMB access................................................................................................... 13
Creating an FTP folder.................................................................................................. 14
Checking FTP access .................................................................................................... 16
Installation alternatives ..................................................................................................... 17
Interactive Installation ...................................................................................................... 18
PaperPort PSP Server.................................................................................................... 19
Service setup with the Administration application ....................................................... 19
Steps to launch the Administration Tool ...................................................................... 20
Using the Administration Tool ..................................................................................... 20
Example Scenario ..................................................................................................... 20
Administration Steps................................................................................................. 21
Server side configuration ...................................................................................... 21
Device configuration............................................................................................. 22
Adding new devices.............................................................................................. 24
Removing devices................................................................................................. 24
Removing this service from a device.................................................................... 24
Managing multiple devices................................................................................... 25
Setting the device working folder......................................................................... 27
Repository Changes .............................................................................................. 28
User management.................................................................................................. 29
Displaying a customized message to unregistered users ...................................... 32
Defaults................................................................................................................. 34
Customized installation (advanced).................................................................................. 37
Extract product files to a specific folder ....................................................................... 37
Installer command-line parameters........................................................................... 37
Set-up Web Services in IIS web site............................................................................. 38
Check the correct setup of Web Services in IIS ........................................................... 45
Troubleshooting tips ......................................................................................................... 49
Appendix........................................................................................................................... 52
Enabling SSL ................................................................................................................ 52
2xx devices................................................................................................................ 52
76xx devices.............................................................................................................. 52
2

73xx devices.............................................................................................................. 53
56xx devices.............................................................................................................. 53
52xx devices.............................................................................................................. 54
72xx devices.............................................................................................................. 54
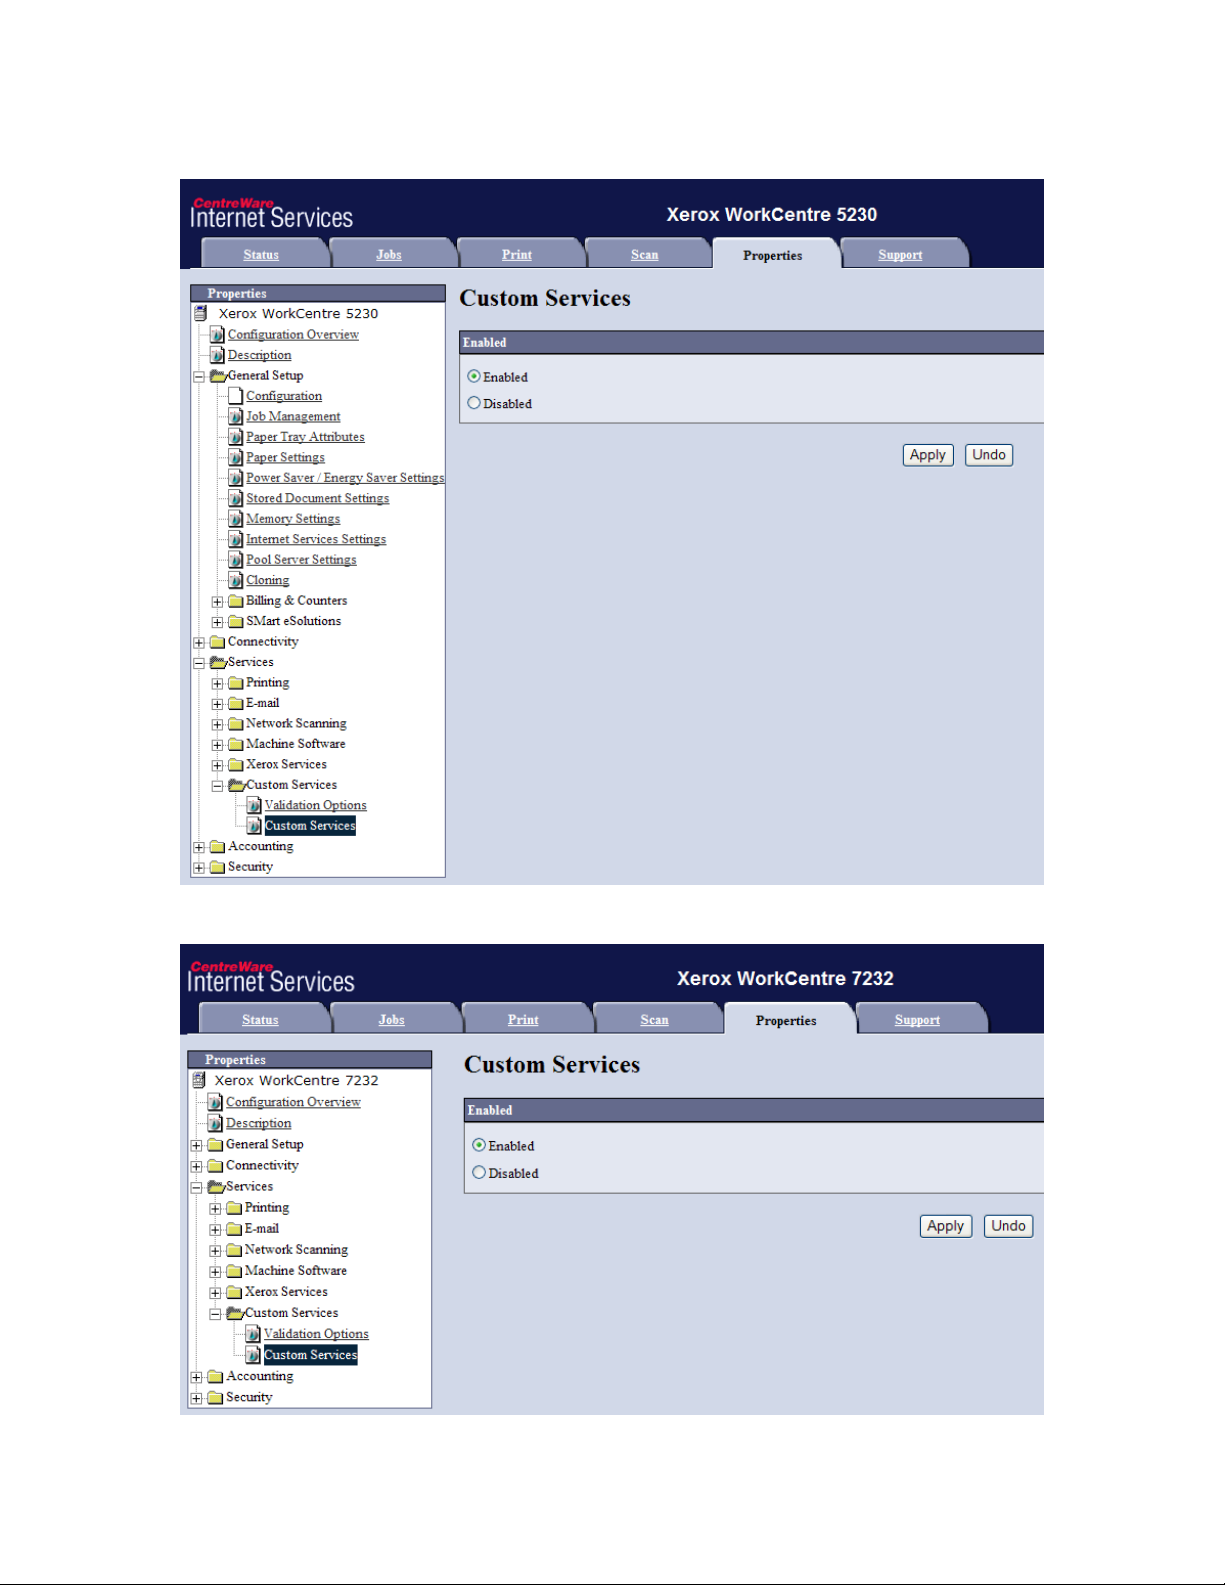
Enabling EIP ................................................................................................................. 55
2xx devices................................................................................................................ 55
76xx devices.............................................................................................................. 55
73xx devices.............................................................................................................. 56
56xx devices.............................................................................................................. 56
52xx devices.............................................................................................................. 57
72xx devices.............................................................................................................. 57
Enabling SNMP v1/v2c protocols ................................................................................ 58
2xx devices................................................................................................................ 58
76xx devices.............................................................................................................. 58
73xx devices.............................................................................................................. 59
56xx devices.............................................................................................................. 59
52xx devices.............................................................................................................. 60
72xx devices.............................................................................................................. 60
Enabling Scan Template Management ......................................................................... 61
76xx devices.............................................................................................................. 61
73xx devices.............................................................................................................. 61
52xx devices.............................................................................................................. 62
72xx devices.............................................................................................................. 62
3

Welcome and thank you for choosing our software. This document will give you
guidance on how to install the product. It covers the following areas:
- System Requirements
- Setting up Network Environment
- Interactive Installation
- Setting up PaperPort PSP service with the Administration application
- Customized installation (advanced)
- Installer command-line parameters
- Trouble shooting tips
This Guide shows screen pictures made with Windows® XP. The appearance may vary
under other Operating Systems.
System Requirements
To install the software, your system has to meet the following requirements:
- Operating system: Microsoft®Windows®XP Professional SP3, Microsoft
Windows 2003 Server SP2 or Microsoft Windows 2008 Server SP1
- Microsoft Internet Information Services (IIS) 5.0, 5.1, 6.0 or 7.0 only on
Windows 2008 Server, installed with "World Wide Web Services" and "FTP
services"
- Microsoft Internet Explorer 6.0 or above
The following prerequisites are offered during installation:
- Microsoft .NET Framework version 2.0
- Web Services Enhancements 2.0 SP3 Runtime for Microsoft .NET
4

Installing Prerequisites
Availability of system prerequisites:
Microsoft Internet Information Services (IIS) 5.0, 5.1, or 6.0 is available from the
Windows installation CD
Microsoft Internet Explorer 6.0 or above; Microsoft .NET Framework version 2.0 is
available from the Server CD or from Windows Update
Web Services Enhancements 2.0 is available from the product installation CD under the
folder [PREREQ\Microsoft WSE 2.0 SP3 Runtime.msi]
Install prerequisites as instructed in the documentation of the individual components.
Notes:
- Windows XP Home Edition is not supported, because Internet Information
Services is not a part of this operating system.
5
Pre-Installation Device Configuration
We recommend that you use a static IP address for the device. Descriptions in this
guide are based on such a scenario.
To achieve proper functionality of the application, HTTPS, EIP and Simple Network
Management Protocol (SNMP) must be enabled on the device.
The examples below use WorkCentre 7665 specific terms and illustrations. The device
you are using may be different from this. For screenshots made with other devices see the
Appendix at the end of this guide.
To check HTTPS, EIP and SNMP enablement, open your MFP device’s Web
Administration Application (enter your device IP address into a browser) then click the
“Properties” tab.
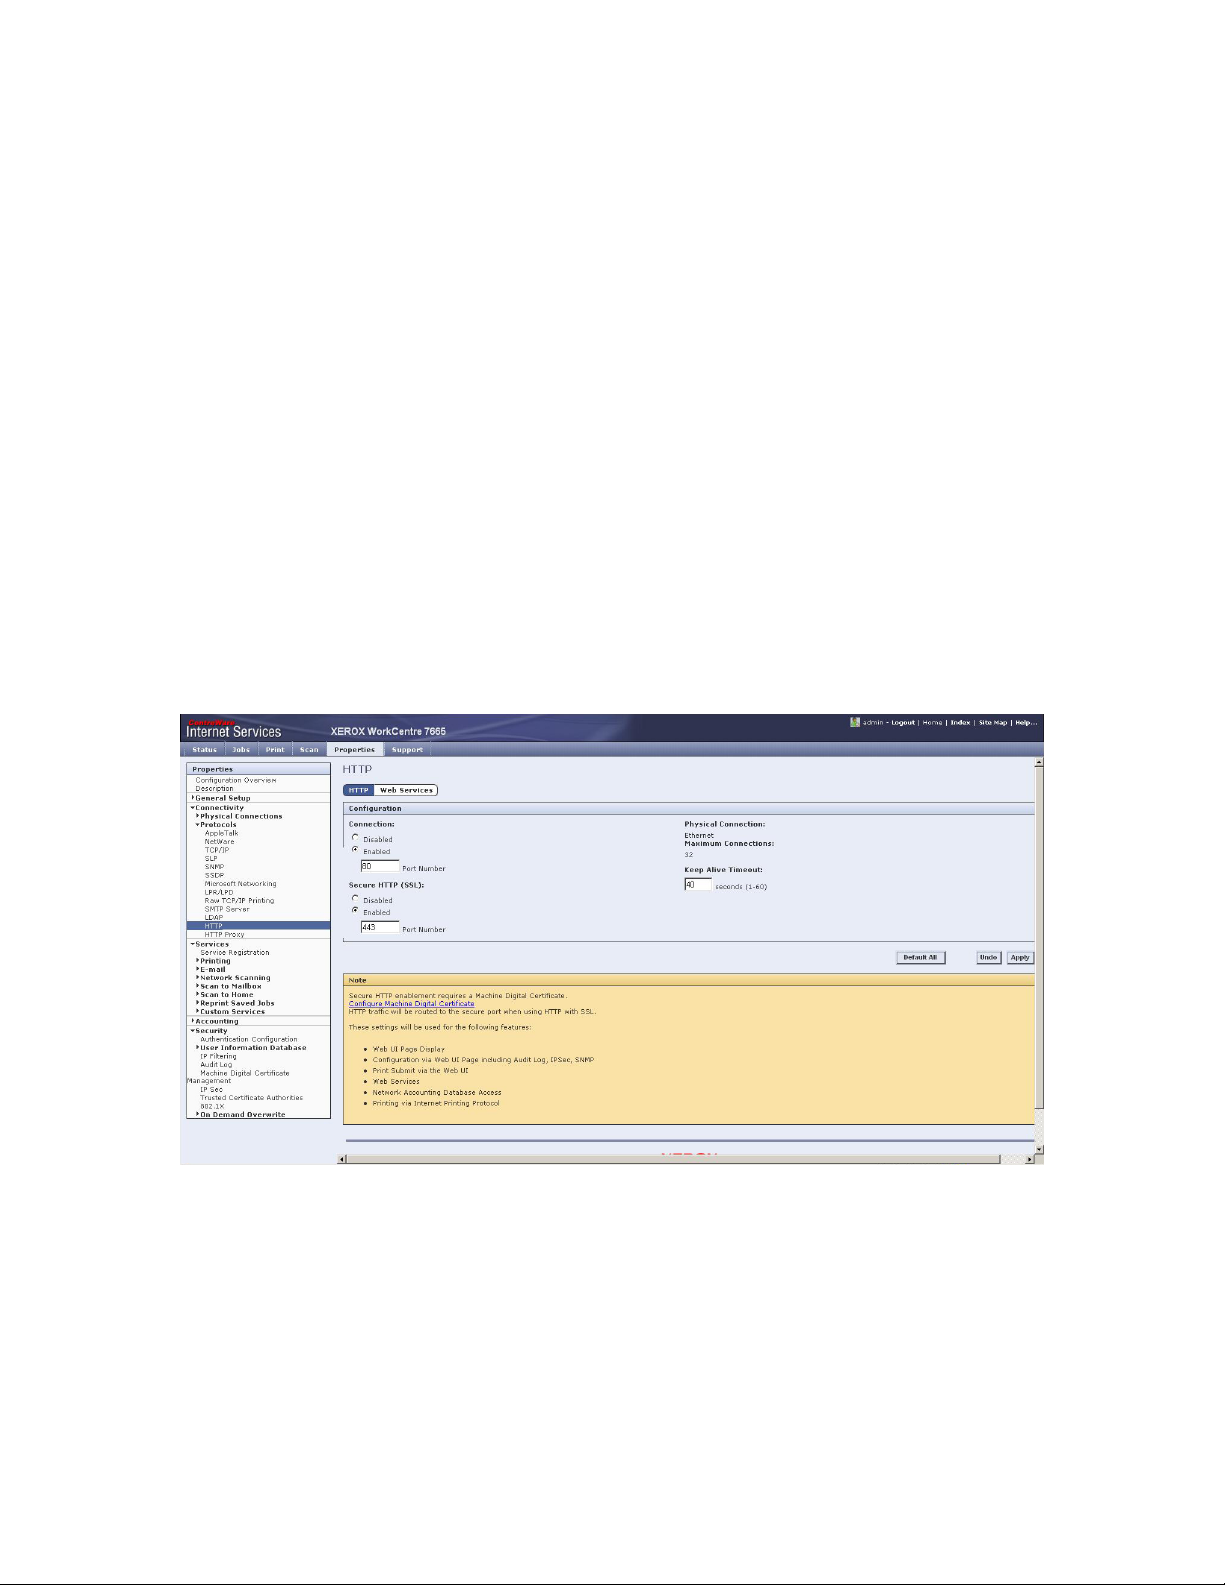
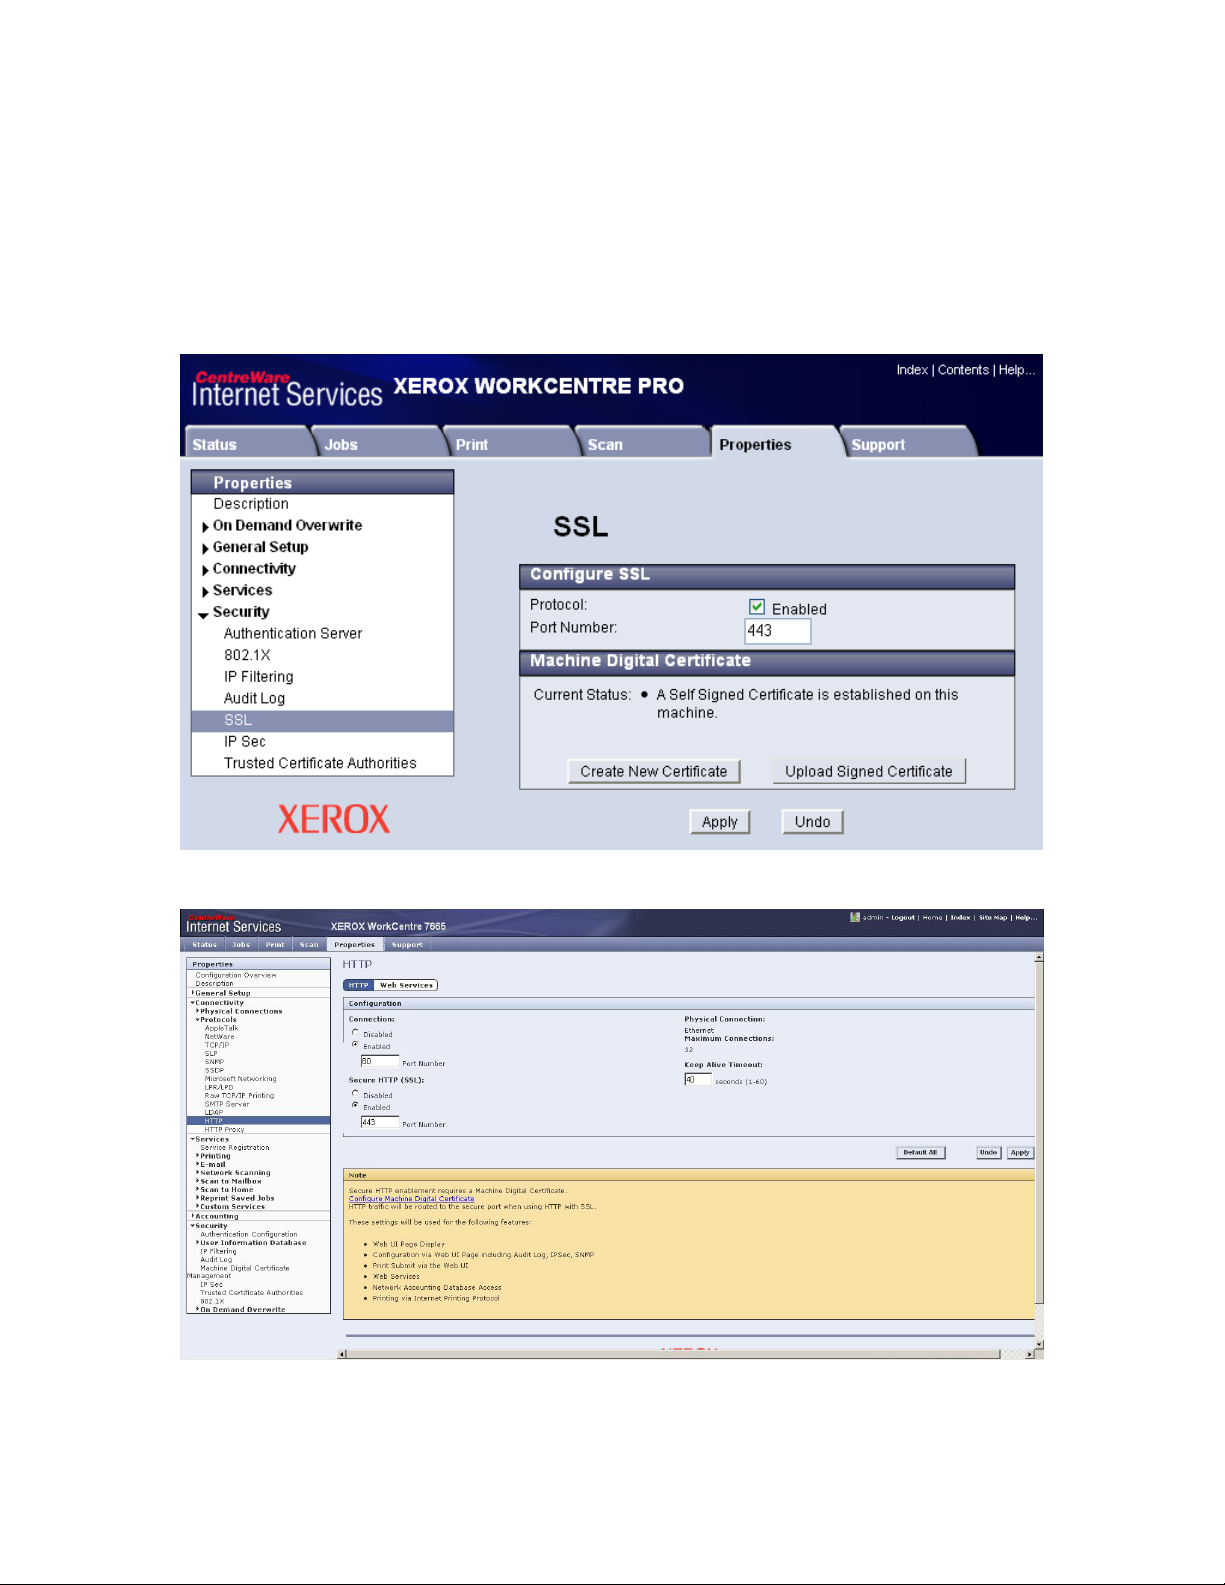
HTTPS Support
Check if HTTPS is enabled. To do this, navigate to the proper page of the device’s Web
Administration Application. (The below screenshot shows 76xx devices. For other
devices, see the Appendix at the end of this guide.) If HTTPS is not enabled, create a new
certificate or upload an existing one.
EIP Support
By default, EIP is usually turned off. To turn it on, navigate to the proper page of the
device’s Web Administration Application. (The below screenshot shows 76xx devices.
For other devices, see the Appendix at the end of this guide.)
6
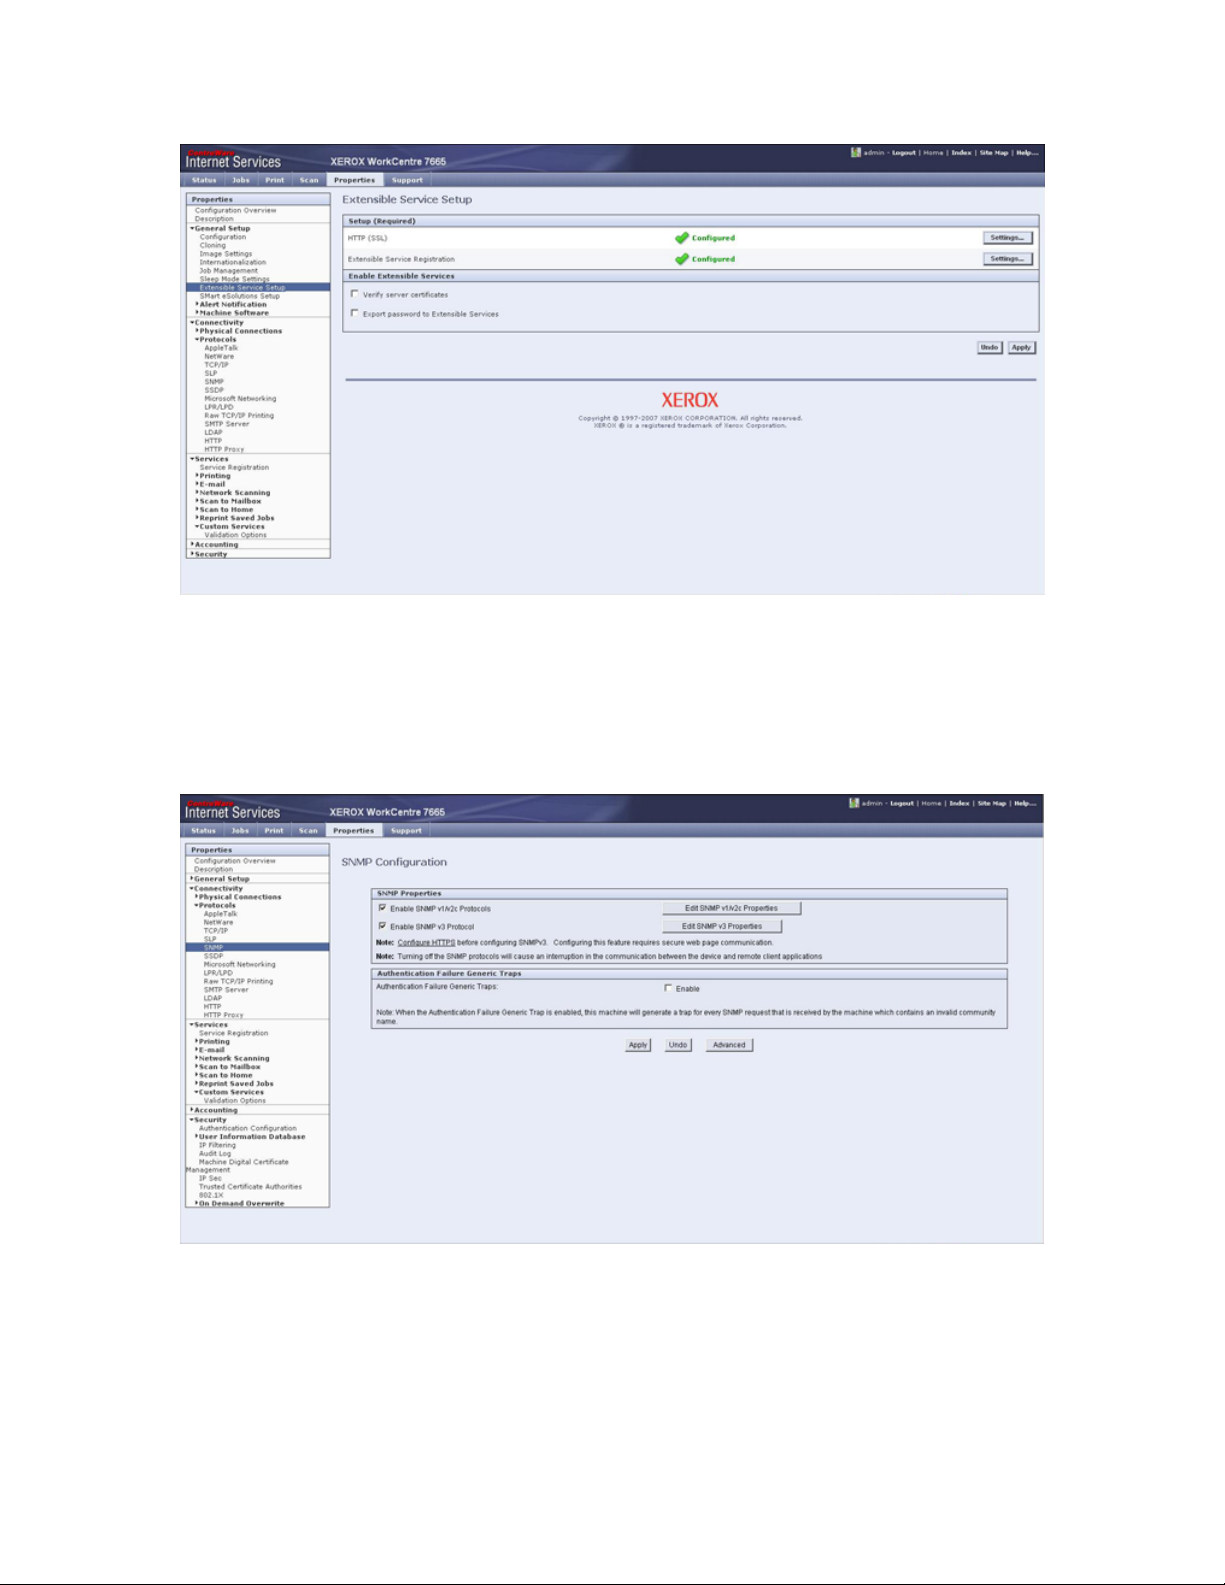
Simple Network Management Protocol (SNMP) Support
By default, SNMP is usually turned on. To check this, navigate to the proper page of the
device’s Web Administration Application. (The below screenshot shows 76xx devices.
For other devices, see the Appendix at the end of this guide.) For the PaperPort PSP
service SNMP v1/v2c protocols are sufficient.
7
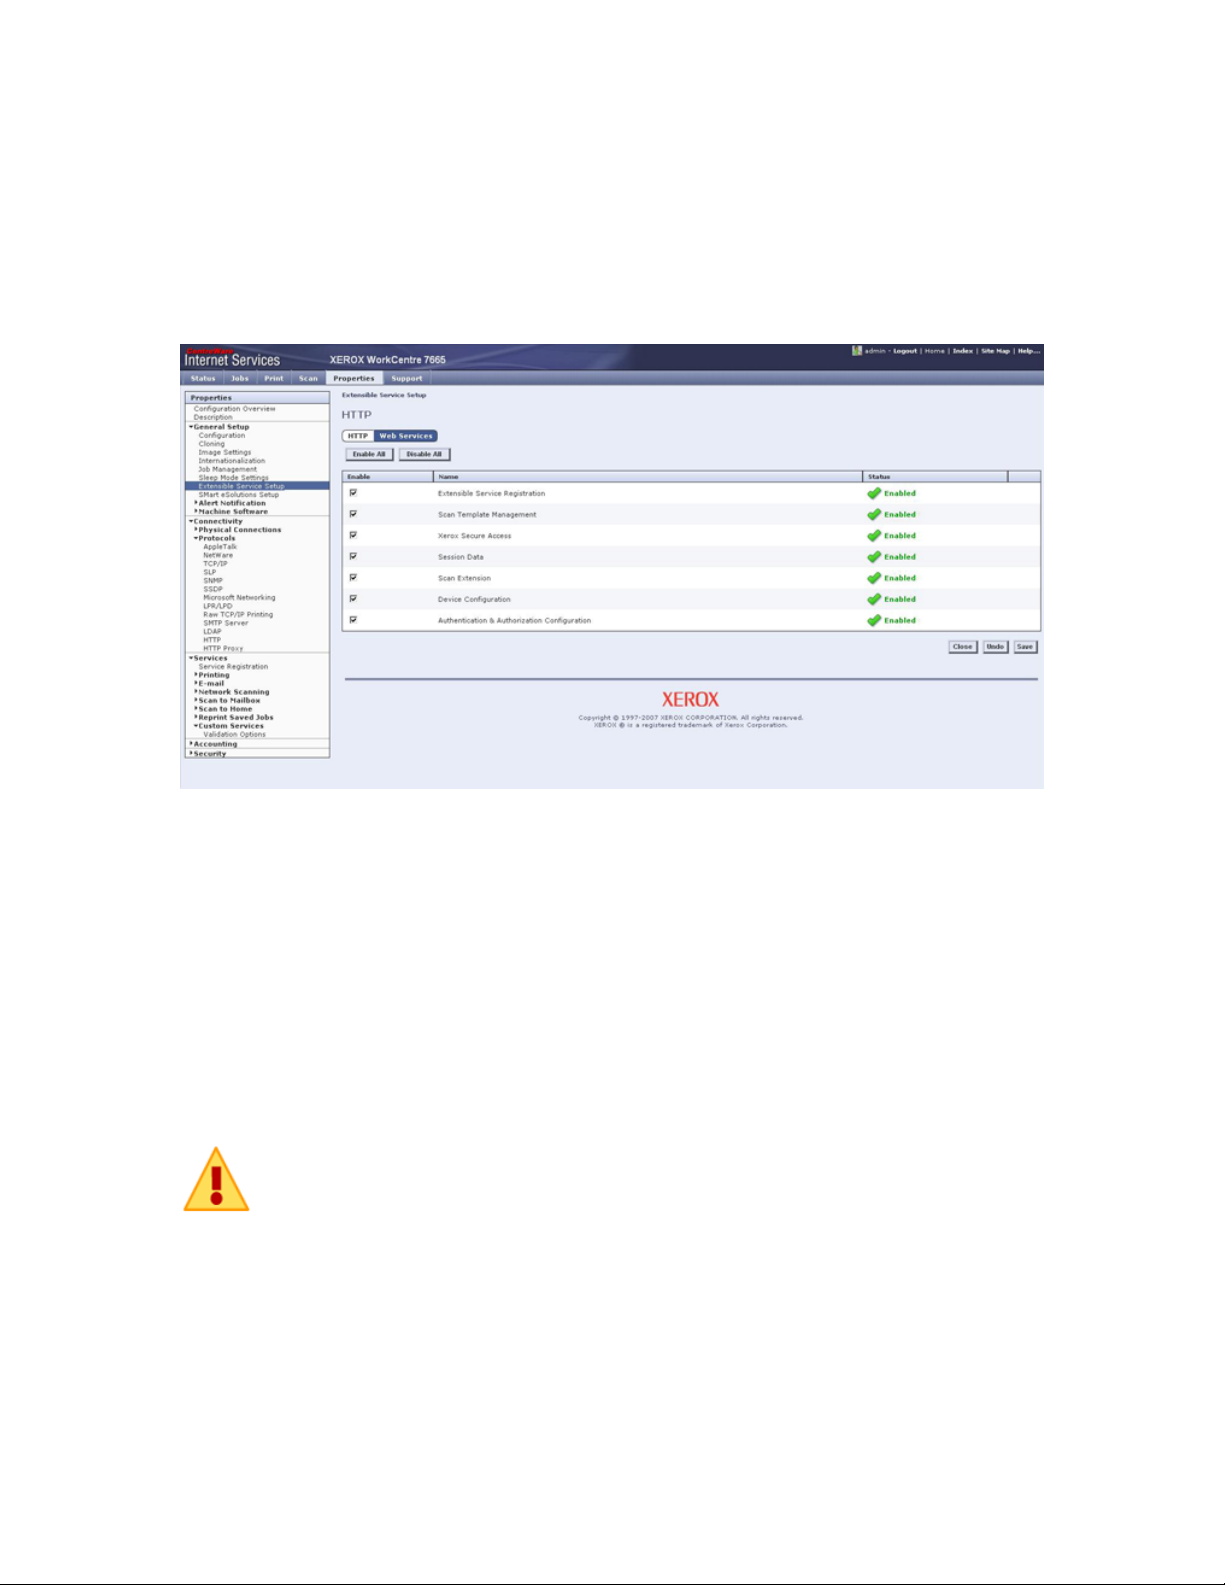
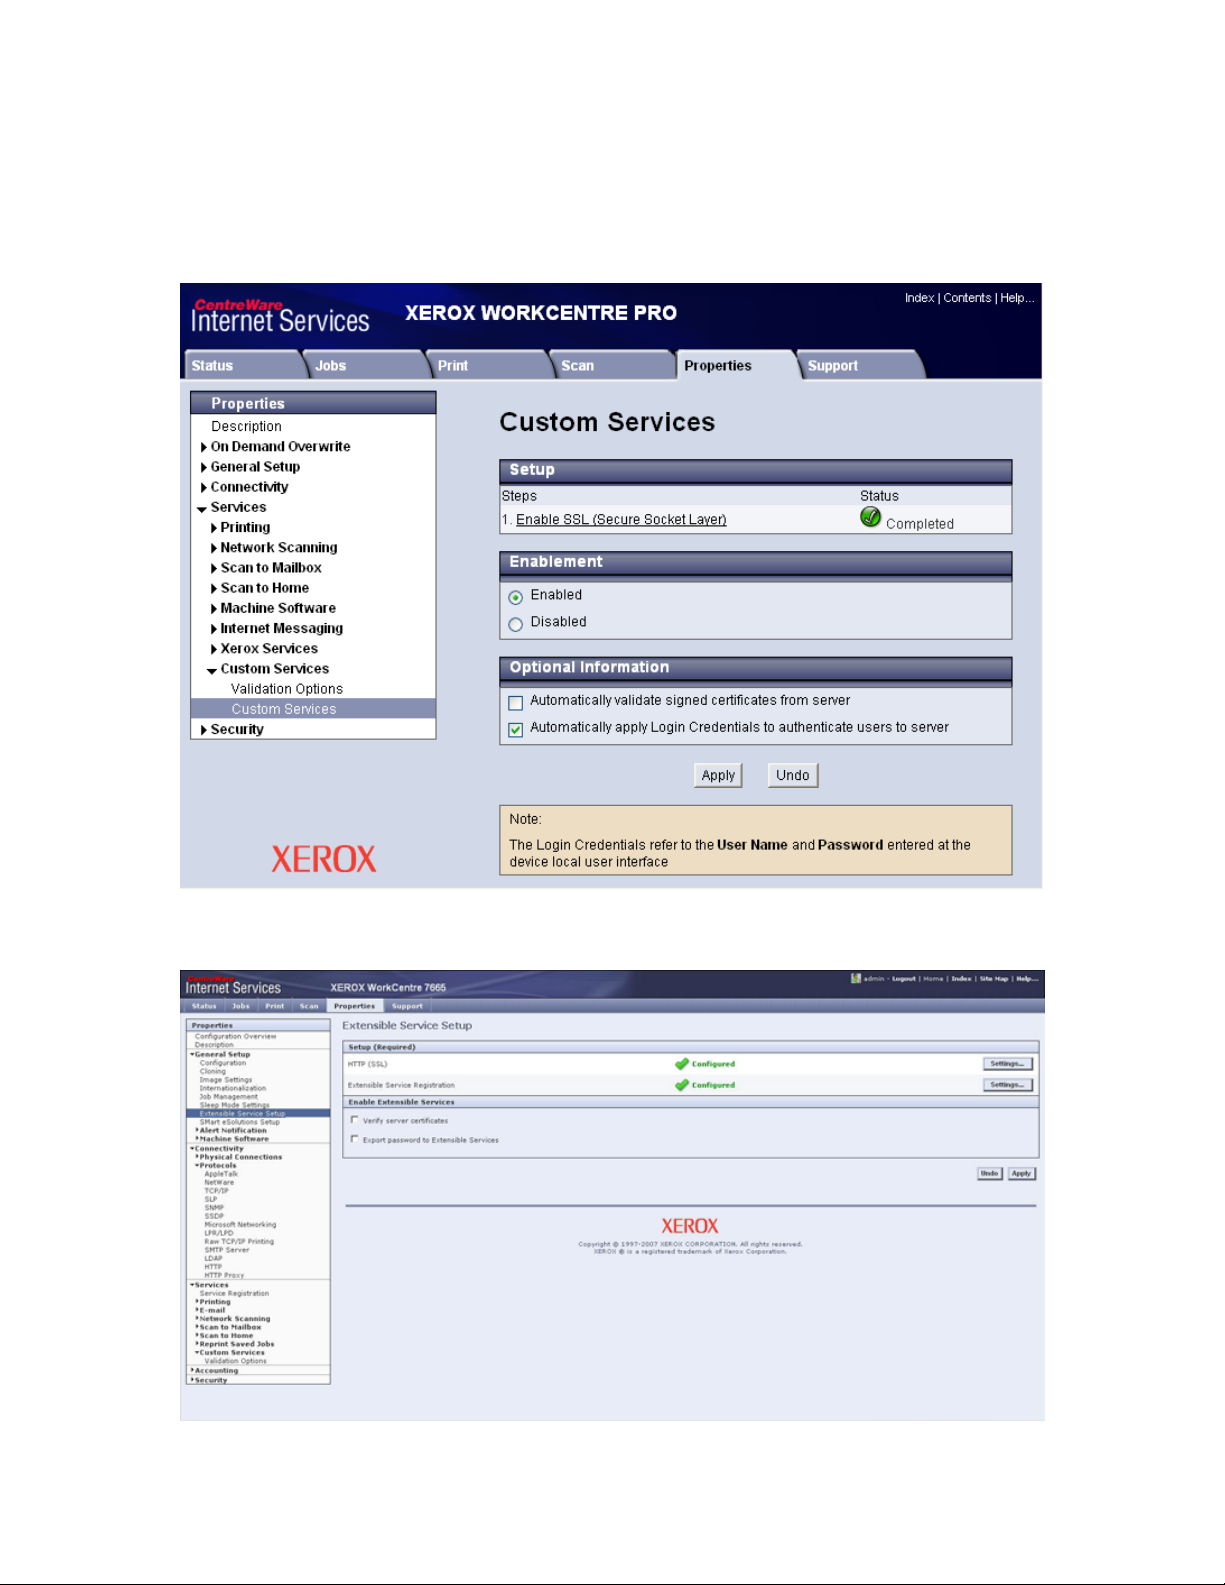
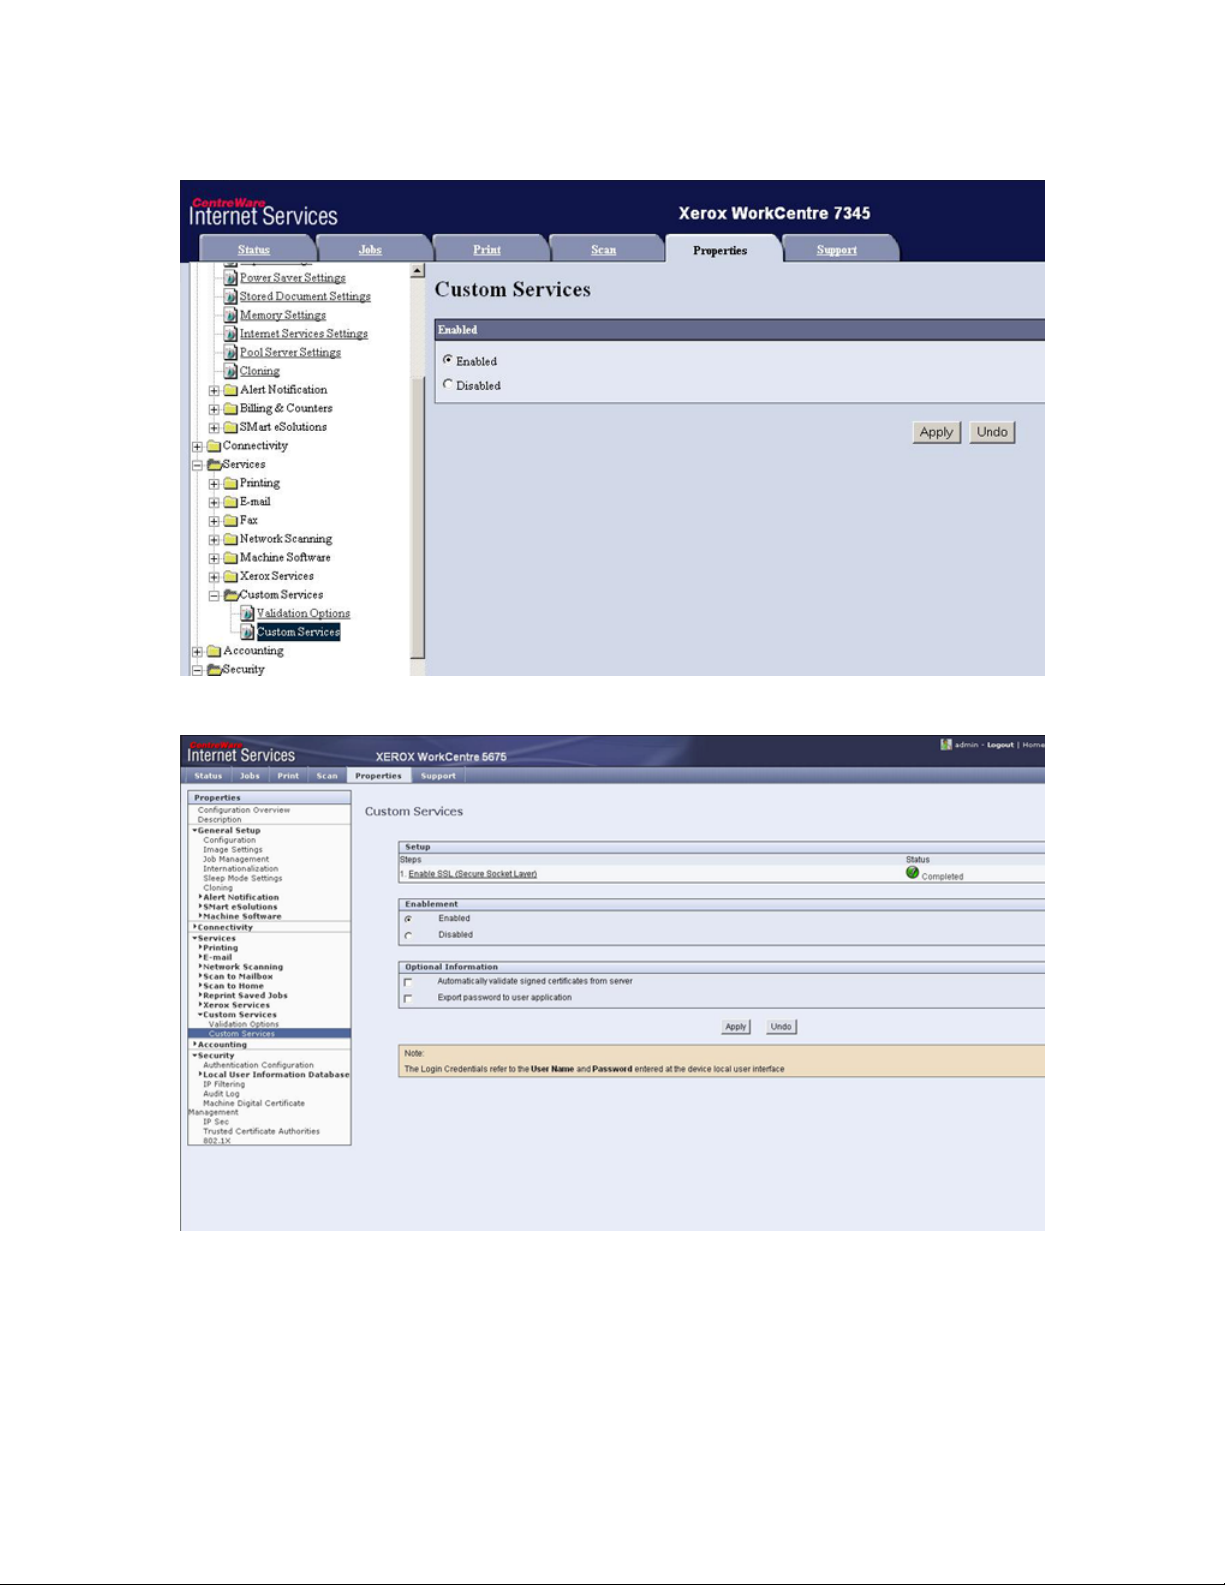
Scan Template Management Support
Usually, Scan Template Management is enabled by default. On 52xx, 72xx, 76xx and
73xx devices, you also have the option to disable it. When you use such devices, go to the
proper page of the device’s Web Administration Application to check that it is enabled.
(The below screenshot shows 76xx devices. For other devices, see the Appendix at the
end of this guide.)
You need to enable Scan Template Management for the PaperPort PSP service to work
properly.
Setting up the Network Environment
To utilize the full functionality of the product, you have to identify a file server in your
network that is accessible via SMB or FTP. (This file server can also be used as a
PaperPort PSP server.)
We recommend that you install the product to a server with a static IP address. The
following description is based on such a scenario.
FTP access is not necessary in all cases: whether you need it or not depends on
your Administration Tool settings.
The configuration steps presented here describe only Windows and IIS based SMB and
FTP process. If you are using the product on a different system, consult your product
distributor.
8

IP Addresses and Host Names
PaperPort PSP supports IP addresses as well as host names. In general, you are free to use
either for identifying the device, server, etc. However, there are cases when host names
cannot be properly resolved (e.g. clients, the server, the device(s) are in different
workgroups, etc). In such scenarios, only use IP addresses when
- installing the server
- accessing the Administration Tool
- setting the repository parameters in the Administration Tool, or
- specifying the PSP Server in Image Retriever.
Configuring IIS on Windows 2008 Server
The following steps describe the necessary steps to install and configure IIS on Windows
2008 Server.
1. Click Start > Server Manager
2. Under the Server Manager root node click Roles
3. Under Roles Summary click Add Role
4. In the Add Roles Wizard choose the Select Server Roles page
5. Click Web Server (IIS) and accept all required features
6. Click Next twice
7. On the Select Role Services page click ASP.NET under Application Development
and accept all required role services
8. On the same page select Windows Authentication under Security
9. On the same page select IIS 6 Metabase Compatibility under IIS 6 Management
Compatibility
10. Click Next
11. Click Install
12. When the installation completes click Close to close the wizard
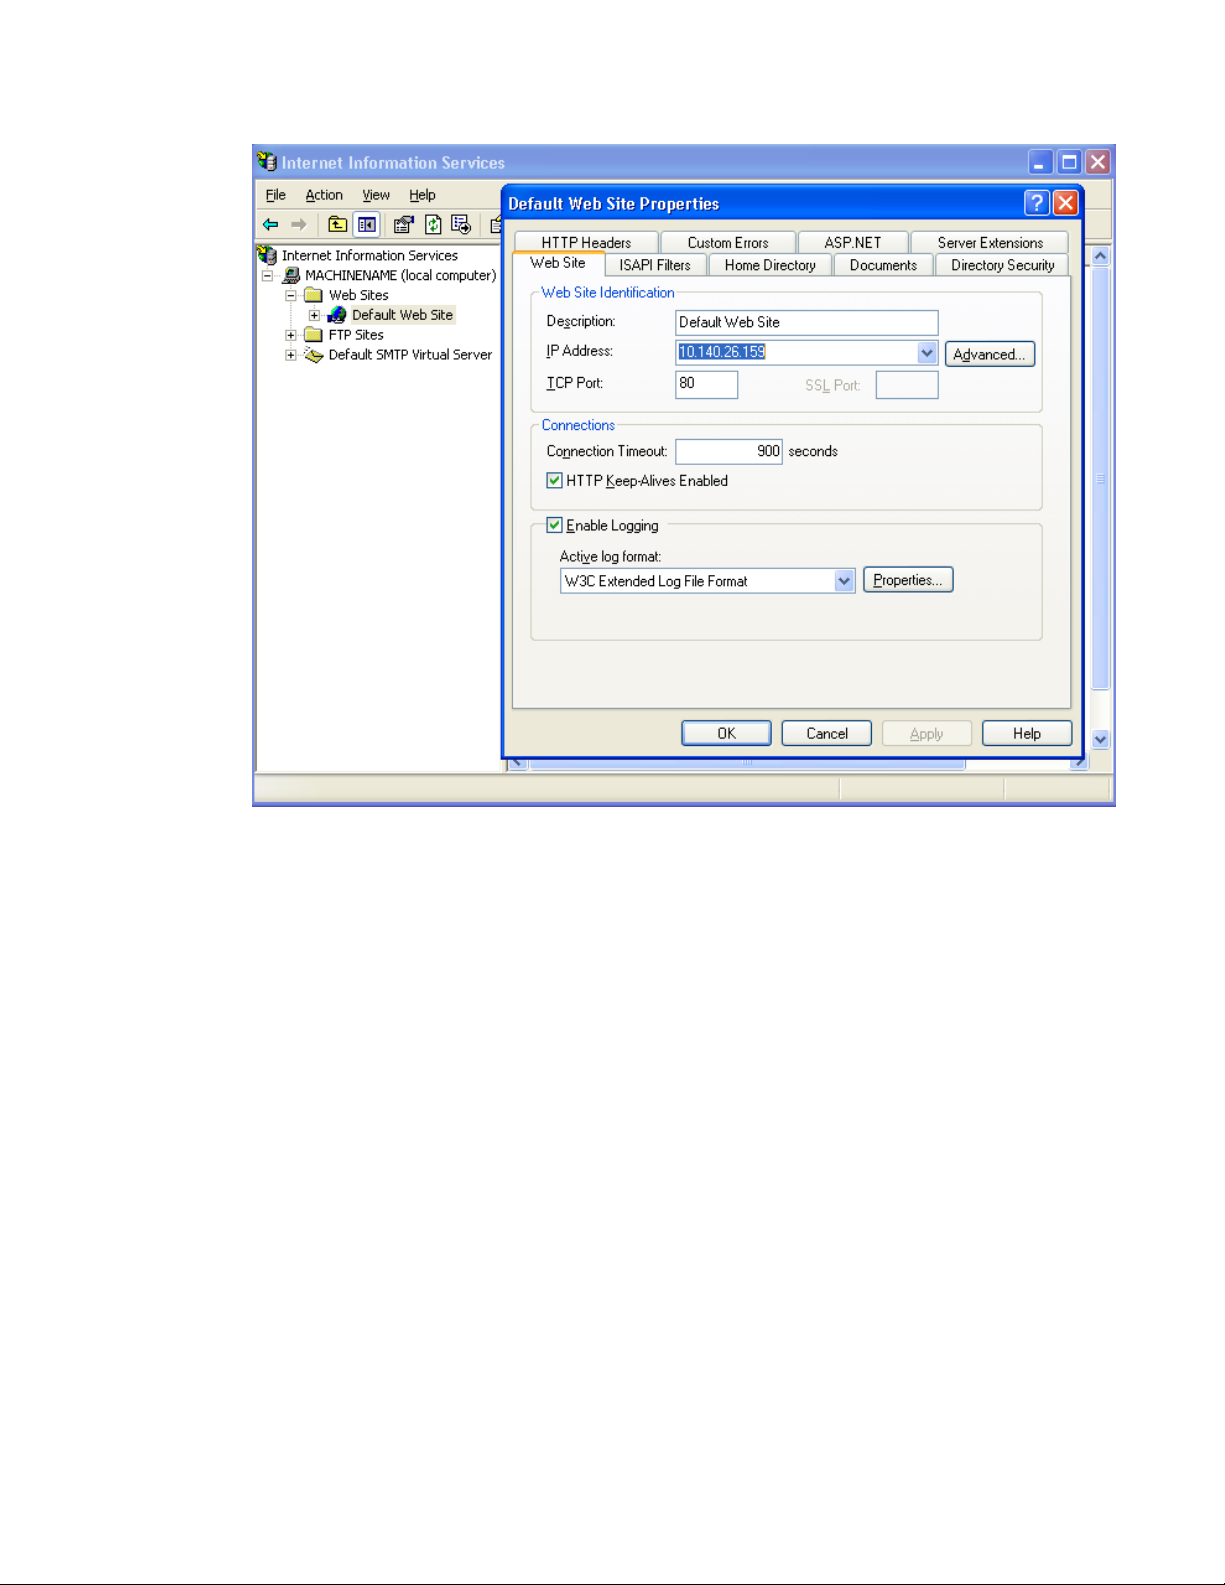
Checking your IIS settings
1. Open the IIS Administrator console: Click the Windows Start menu then choose
Control Panel > Administrative Tools > Internet Information Services
2. In the IIS administrator console select <<computer name>>(local computer)/Web
Sites/Default Web Site.
3. Click the Action menu item and select Properties. The “Default Web Site
Properties” dialog window appears.
4. Make sure that in the “Web Site” tab the “IP Address” is set to that of the product
installation target server. (i.e. It is the same as the one in the Server Information
dialog (“Host address” field) of the product installer.)
9
Creating temporary storage for scanned media files
Scanned media files are stored in a temporary storage until ImageRetriever starts
processing them. This temporary storage can be either an SMB share or an FTP folder.
The device and the ImageRetriever clients will use a dedicated user account to access the
temporary storage.
Note: The folder, share and account names in next sections are illustrations only. You are
free to make your own destination and account choices when setting up your system.
The account “PSPUser” is used in these examples as an illustration. You can use any
account that you want to grant access to the file share.
Providing SMB access to Temporary Storage
Make sure you first disable the folder option “Simple file sharing (recommended)” in
“Folder settings” on Windows XP. (To learn more about advanced folder settings refer to
your operating system manual.) Without enabling advanced file sharing you will not see
some dialog boxes referenced in the following section.
10
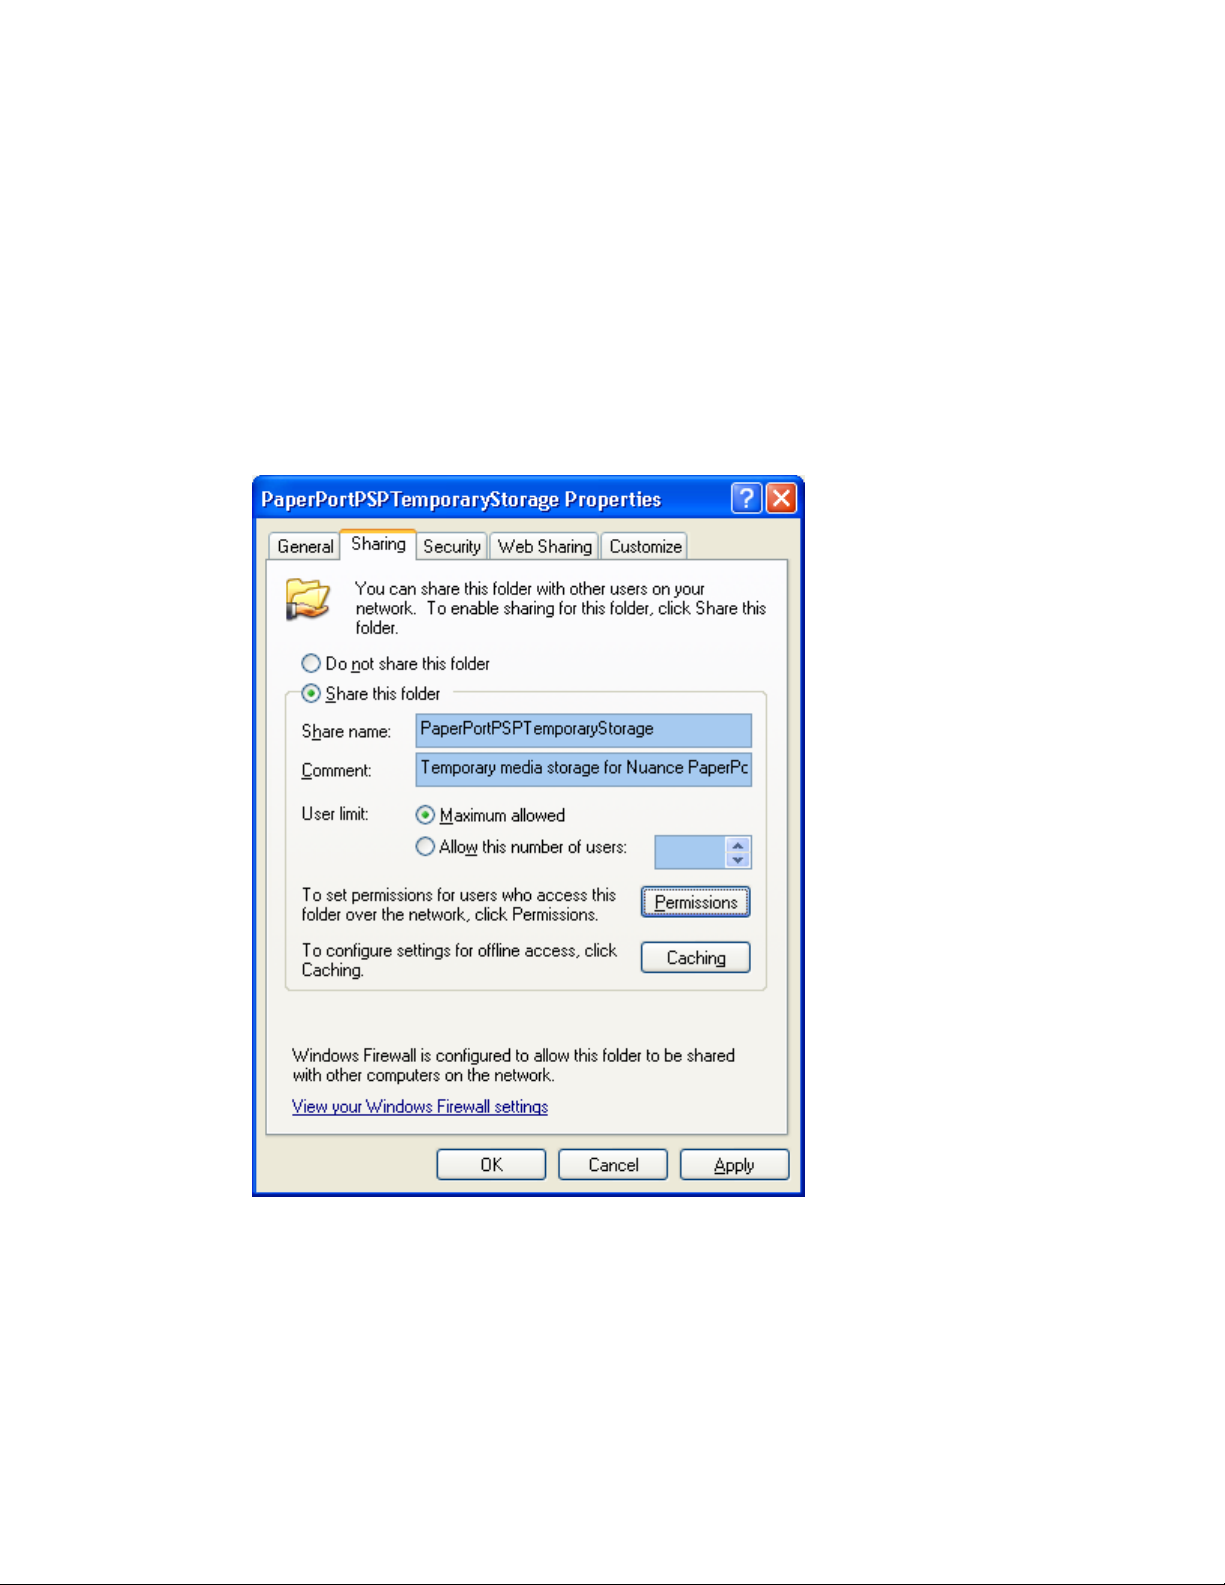
Note: the server file system must be NTFS.
To provide SMB access to Temporary Storage:
1. Open Windows Explorer and browse to the folder you want to use as the
temporary storage. We will use the c:\temp\PaperPortPSPTemporaryStorage
folder in our example.
2. Click: File > “Sharing and Security...”
3. Turn on the “Share this folder” option on the Sharing pane
4. Enter the following parameters:
5. Share name: PaperPortPSPTemporaryStorage
Comment: Temporary media storage for Nuance PaperPort PSP Solution
6. Click the “Permissions...” button.
7. Click the "Add…" button.
8. Turn on Full Control for the PSPUser account. In our example PSPUser is a
dedicated account that will be used by the device and the ImageRetriever clients
to access the PaperPortPSPTemporaryStorage.
11
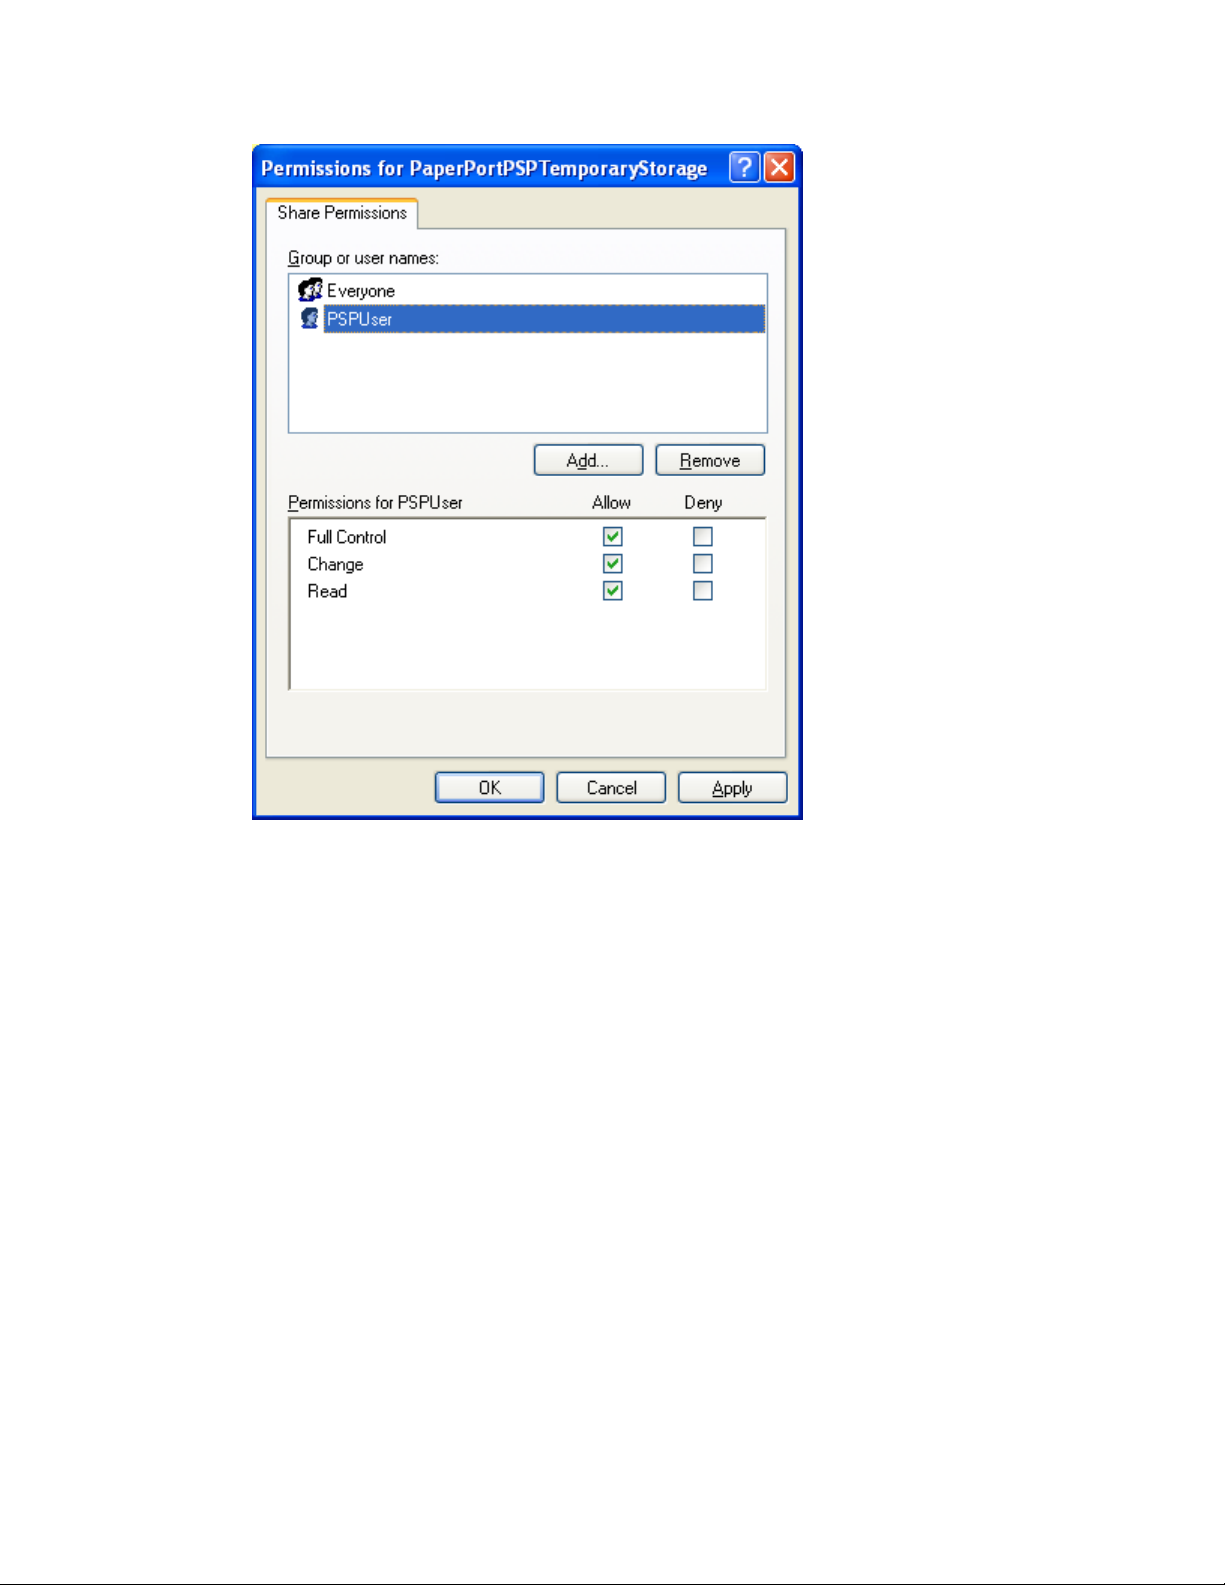
9. Click OK to close this dialog.
10. Select the “Security” pane.
11. Click the “Add...” button.
12. Enter PSPUser and click OK to close add wizard.
13. Select the PSPUser item in “Group or user names” list box.
14. Turn on Full Control for the PSPUser account.
12
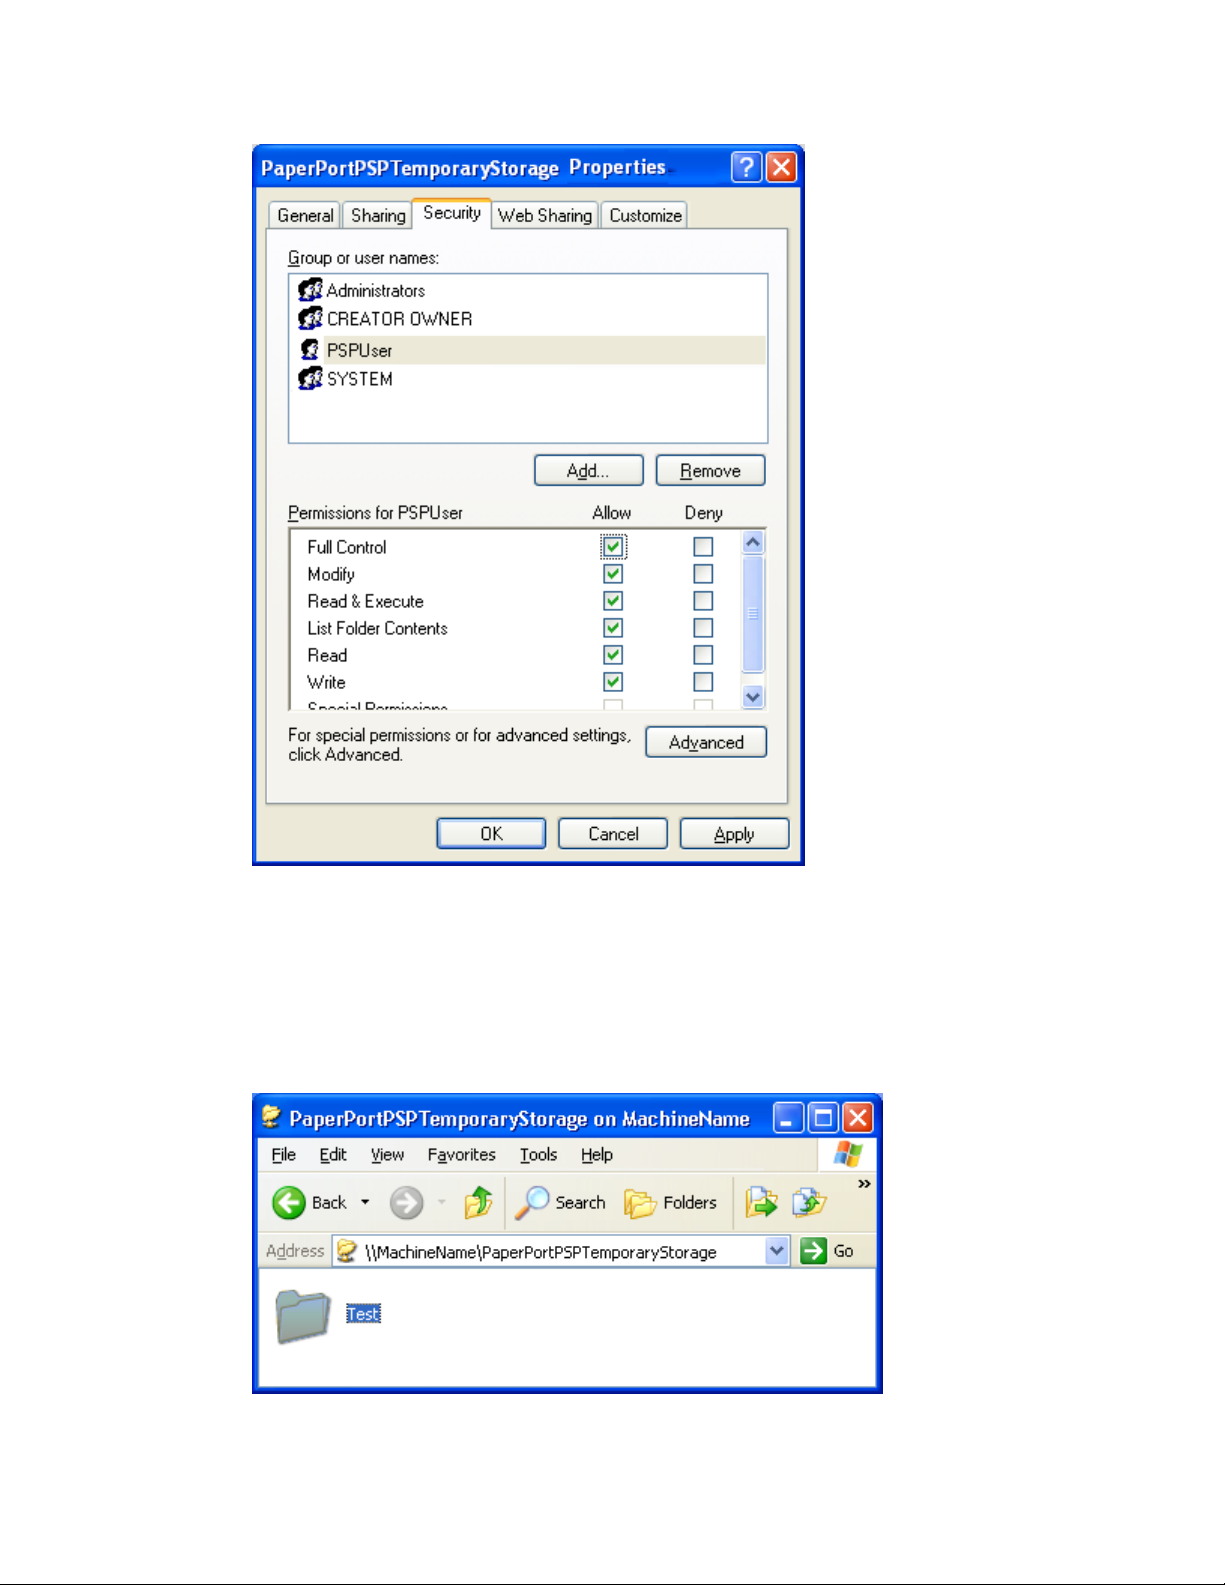
15. Click OK. You have finished setting up SMB access to the folder
PaperPortPSPTemporaryStorage.
Checking SMB access
1. Open Windows Explorer and navigate to \\<<your computer
name>>\PaperPortPSPTemporaryStorage.
2. Create a new folder (call it “Test”).
3. Copy a file into this directory.
13

4. Make sure you do not get any error messages.
5. Delete the “Test” folder.
6. Choose another computer in your network and navigate to \\<<your computer
name>>\PaperPortPSPTemporaryStorage
7. Provide the PSPUser account details – user name and password – if prompted.
8. Create a new folder (call it “Test”).
9. Copy a file into this directory.
10. Make sure you do not get any error messages.
11. Delete the “Test” folder.
Your SMB configuration is now complete.
To set up FTP access as well, proceed as follows:
Creating an FTP folder
The following steps describe how to provide FTP access on the Windows XP Operating
System. For other operating systems or FTP servers, consult their product documentation.
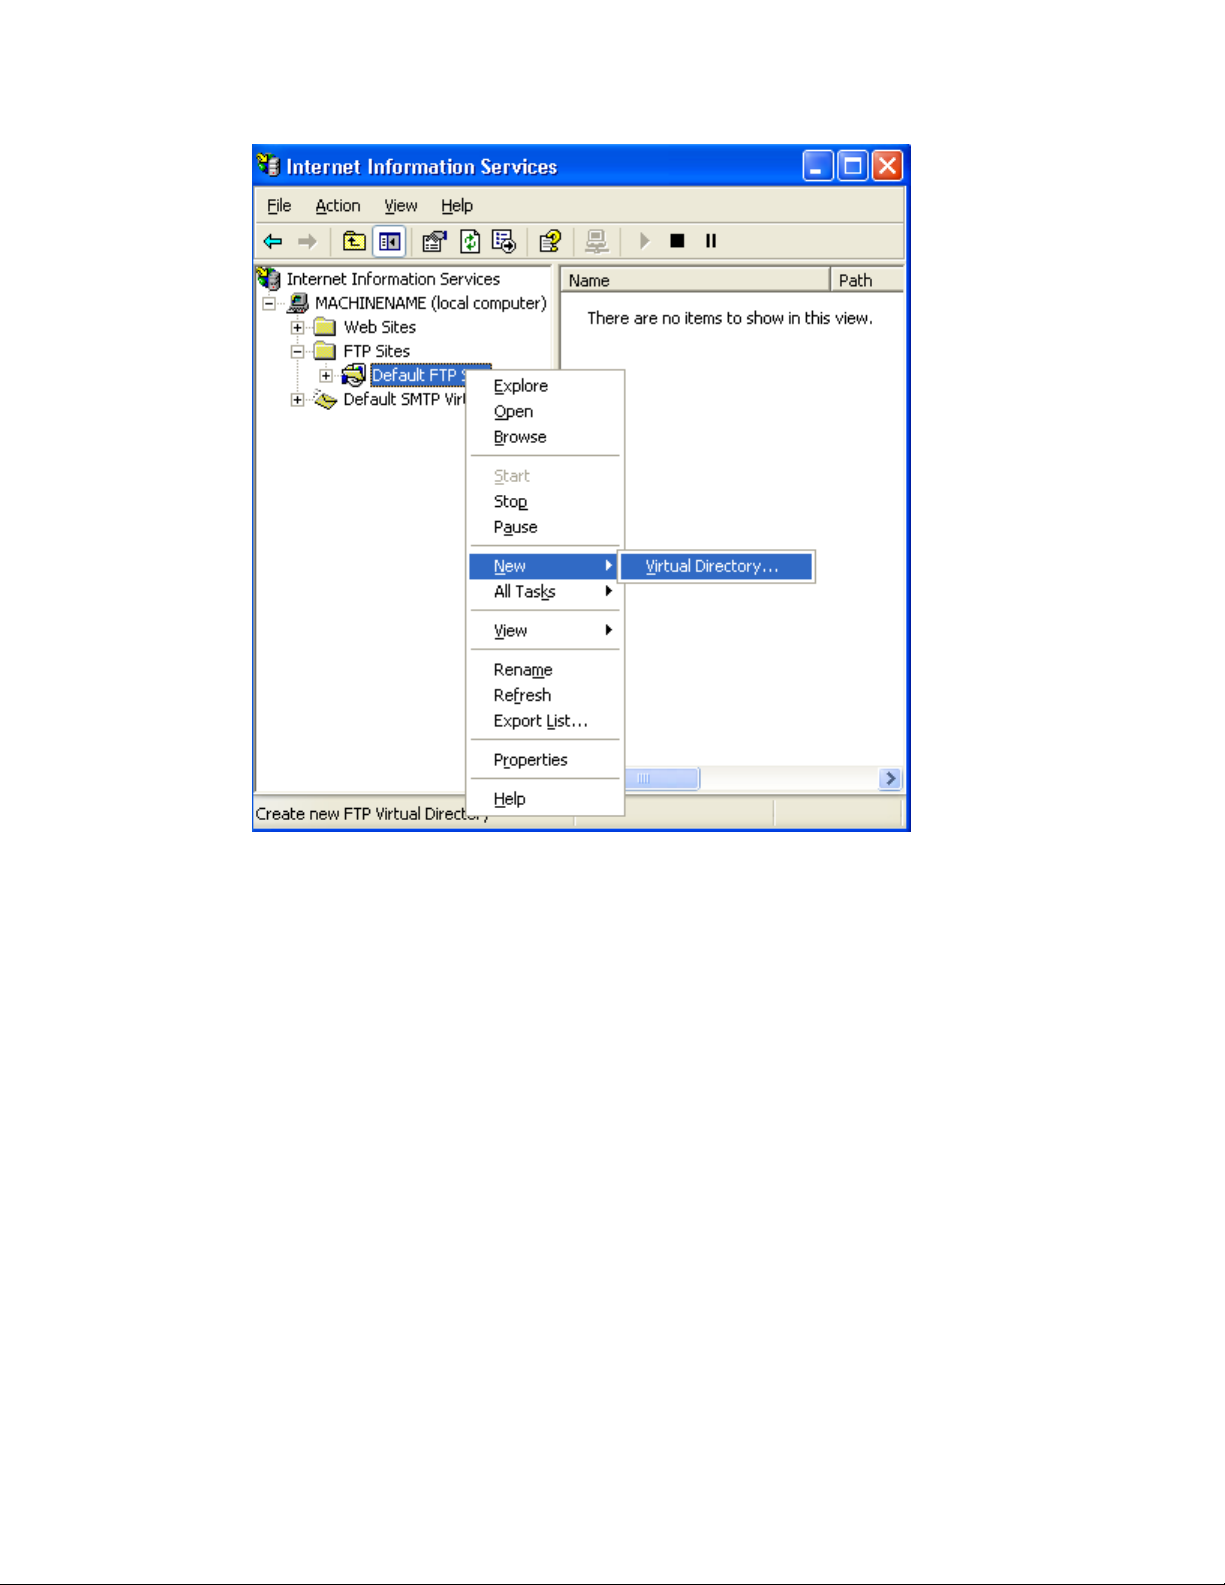
1. Open the IIS Administrator console: Click the Windows Start menu then choose
Control Panel > Administrative Tools > Internet Information Services
2. In the Administrator console, select <COMPUTER> and choose FTP Sites.
3. Select: "Default FTP site". (At this point you may choose to create a new FTP site
for Nuance product services or to use an already existing one.)
4. Click Action > New > Virtual Directory...
14
5. The Virtual Directory Wizard appears. Set up your virtual directory with the
following parameters:
- alias: PaperPortPSPTemporaryStorage
- directory: C:\temp\PaperPortPSPTemporaryStorage
- permissions for this directory: read and write checked.
6. Click Finish to complete the wizard.
15
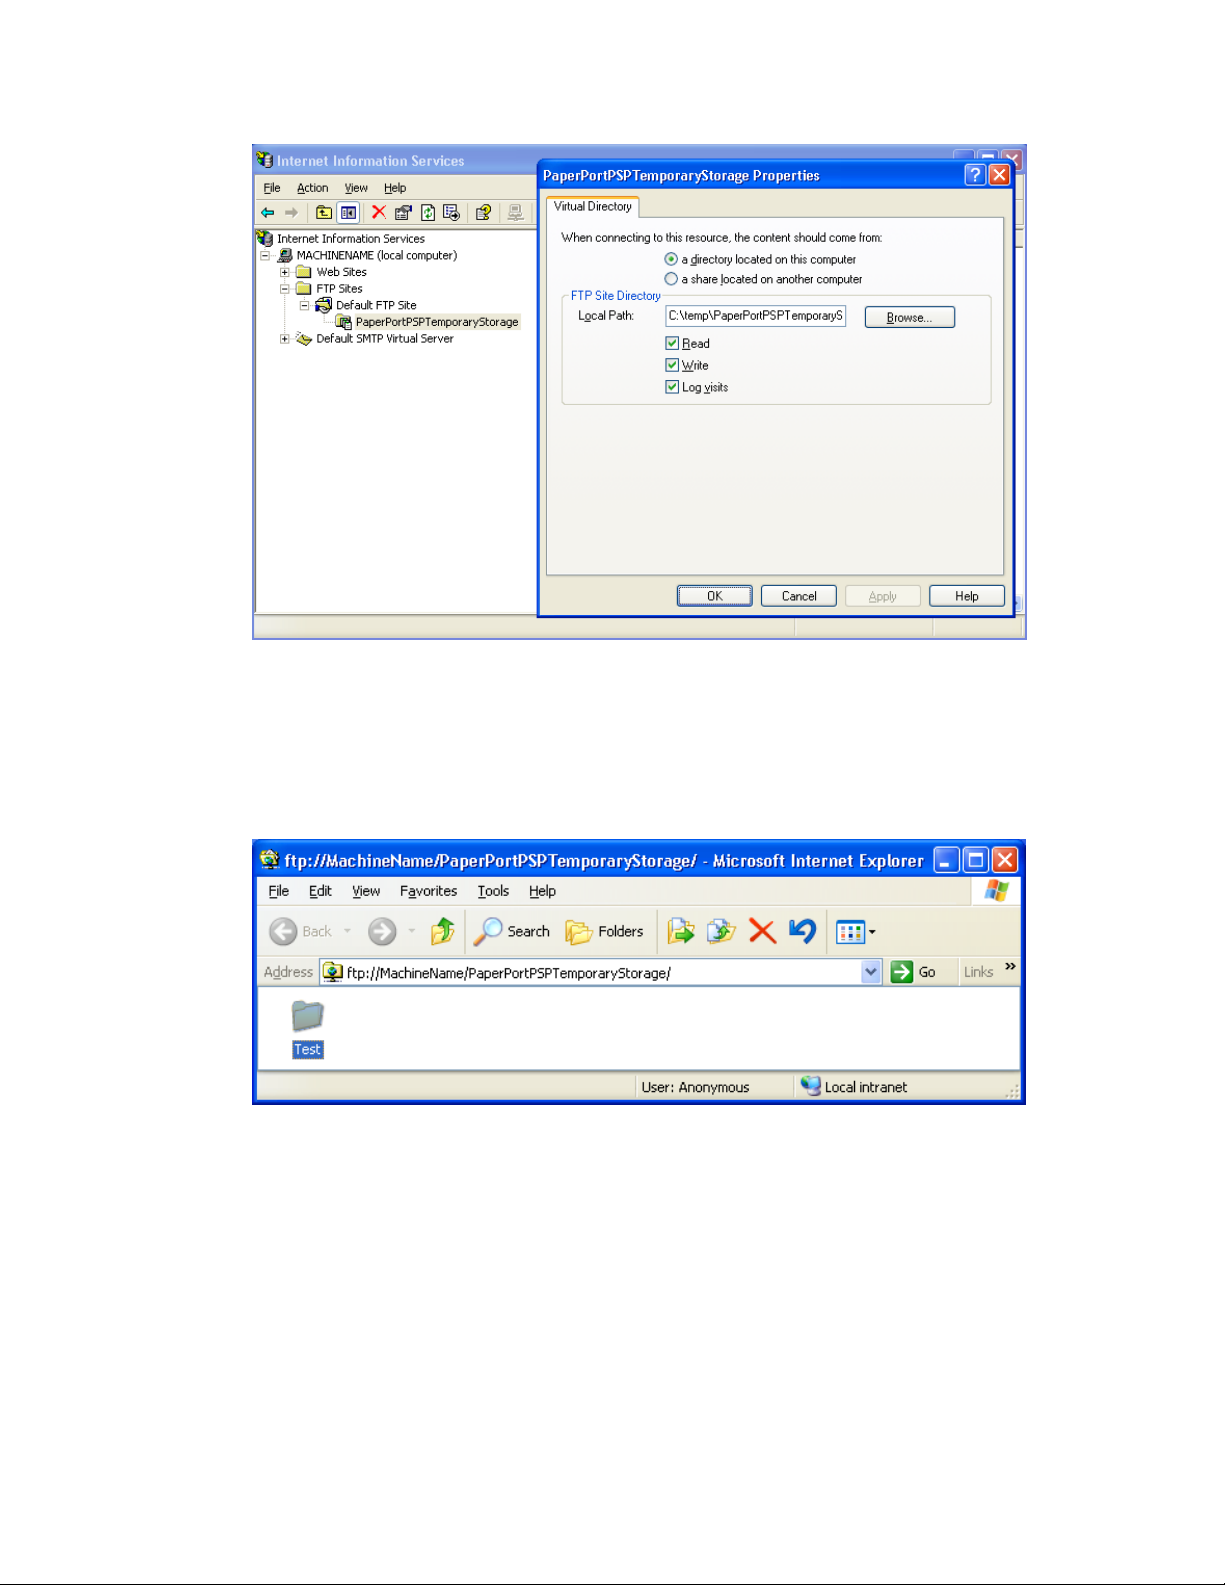
Checking FTP access
1. Open Explorer and type: ftp://<<your site IP>>:<<your site
port>>/PaperPortPSPTemporaryStorage/ Your file server is accessed via FTP in
your browser.
2. Create a new folder (name it “Test”).
3. Copy a file into this directory.
4. Make sure you do not get any error messages.
5. Delete the “Test” folder.
6. Close your browser.
7. Choose another computer in your network and browse to
ftp://<<your site IP>>:<<your site port>>\PaperPortPSPTemporaryStorage
8. Create a new folder (name it “Test”).
9. Copy a file into this directory.
10. Make sure you do not get any error messages.
11. Delete the “Test” folder.
16
Installation alternatives
There are two alternatives to install the product: interactive and customized. Interactive
presents you with a wizard-like interface, whereas customized is recommended for
advanced users. You can use either one to install the product.
To install the product use:
either Interactive installation… or Customized Installation.
The installer of the server components is located in the root of the Server CD.
After successful installation, two shortcuts will be added to Start Menu > “(All)
Programs” > “Nuance” > “PaperPort PSP”:
- “Administration Tool”
- “PaperPort PSP Server” linking to a device simulation page.
17
Interactive Installation
Tips before starting:
- It is recommended to take notes about each installation step to make it easier to
restore your system or to roll back installation in case of a failure.
- Interactive product installation will create a virtual directory called
"PaperPortPSP" overwriting any existing ones with the same name.
On most PCs, simply insert the installation CD-ROM into the CD-ROM drive to launch
the Server installer. However, if the installer does not automatically start on your PC
1. Use Windows Explorer to browse the CD-ROM.
2. Double-click on the autorun.exe program
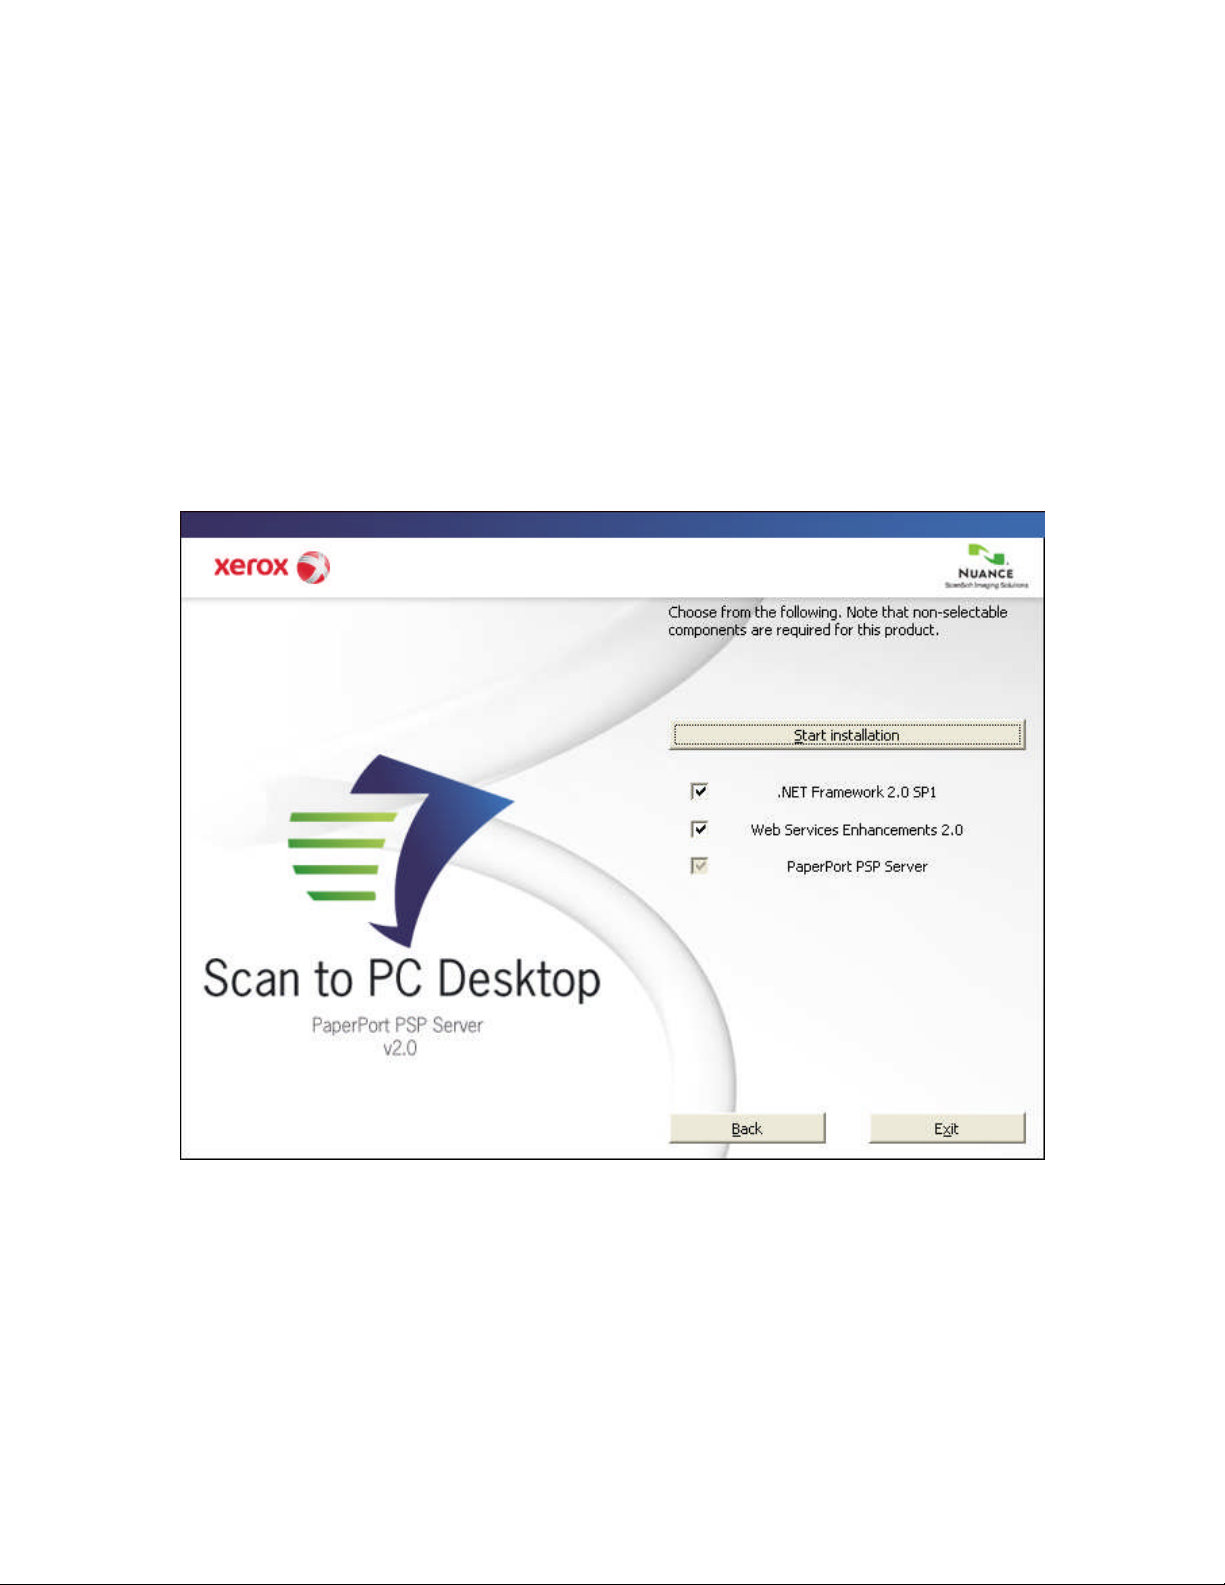
Before starting the installation, you can specify which components you want to install.
Click the check boxes ON for each item to be installed. Microsoft .NET Framework
version 2.0 and Web Services Enhancements 2.0 SP3 Runtime for Microsoft .NET are
required for proper functioning. Turn off the installation of these components only if they
are already installed on your machine (e.g. through Windows update)
A separate installer program for each component launches. Follow the installation
instructions for each component.
18
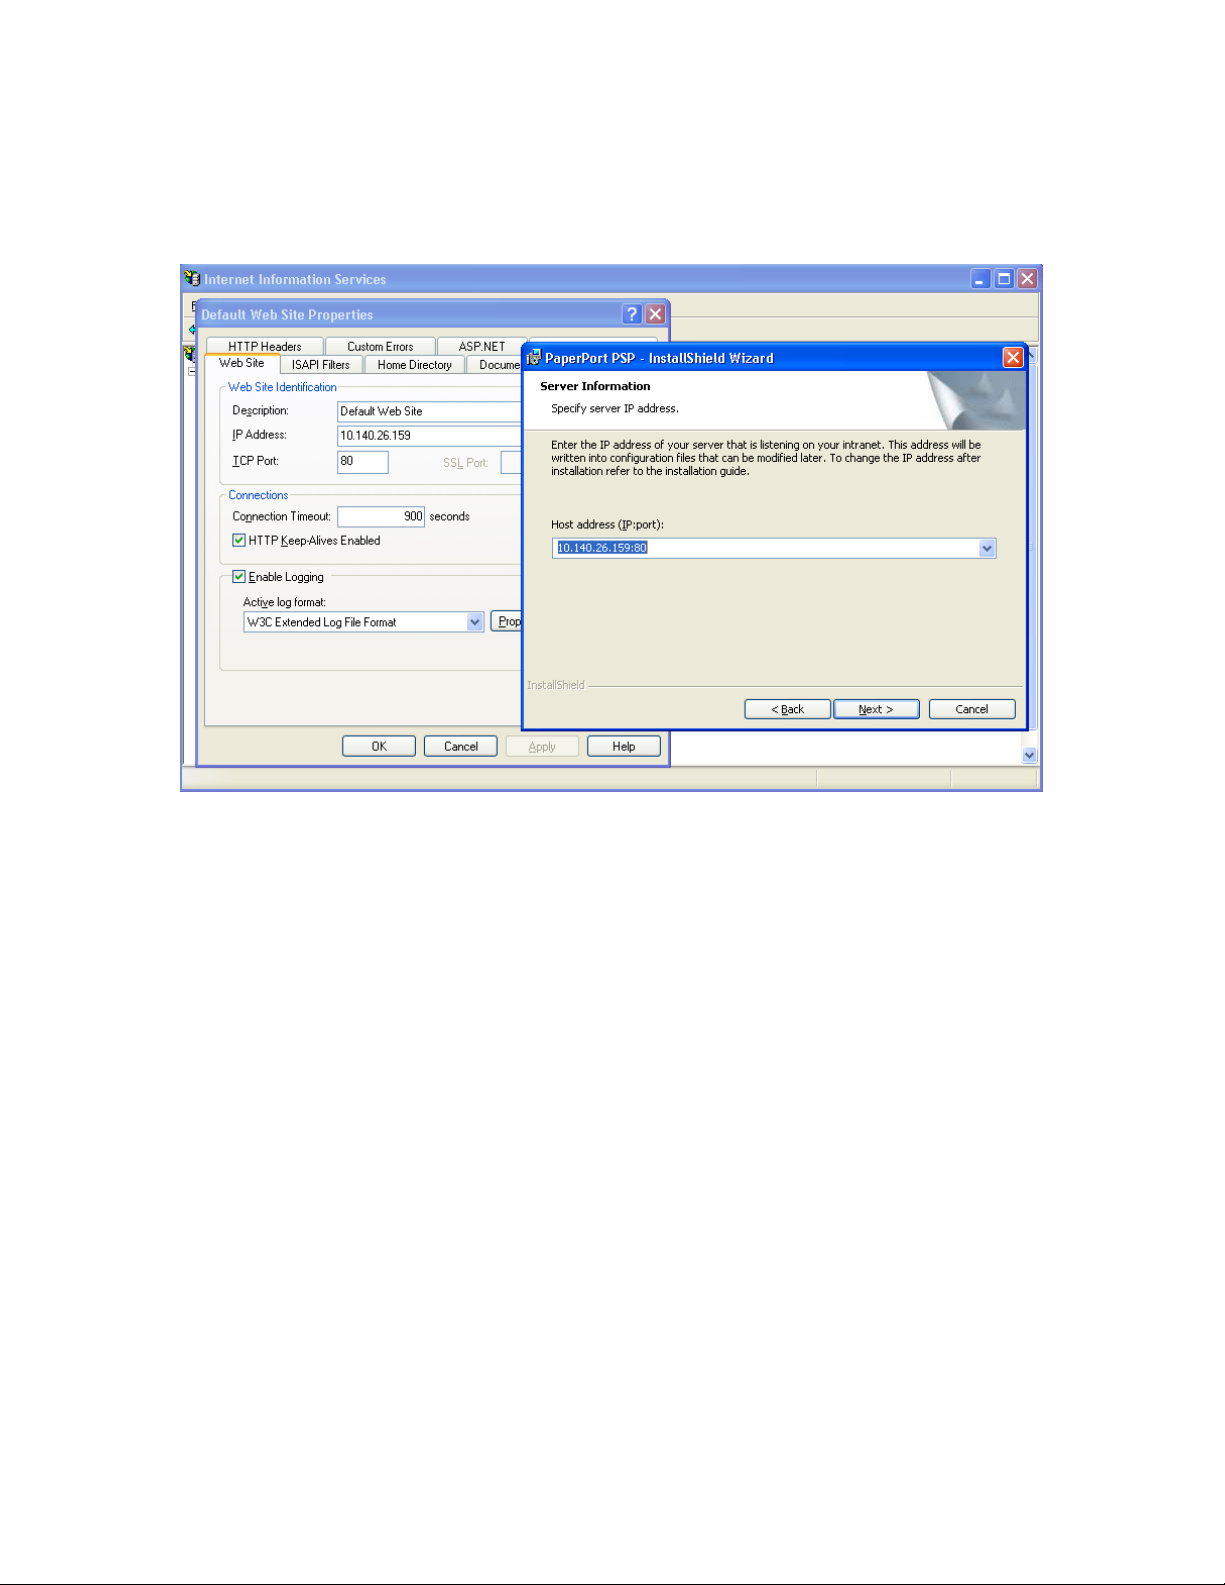
PaperPort PSP Server
During the installation make sure that the “Host address” is the same as the “IP Address”
on the “Web Site” tab in the IIS Management Console.
Service setup with the Administration application
Your Application Server and FTP folder/SMB shared folder are now ready to be
registered to Xerox EIP-capable Multi Functional devices. First collect some information
about your network and your device to proceed:
Device properties:
Type: ............................... (e.g.: Xerox Workcentre Pro 232)
IP address: ......................... (e.g.: 10.140.24.30)
Administrator’s User Name
Administrator’s Password
Application server properties:
IP address (or name): ............... (e.g.: 10.140.1.1, or rocket)
Administration Tool URL: ......... (e.g.: http://10.140.1.1/PaperPortPSP/admin)
EIP user interface URL: ............. (e.g.: http://10.140.1.1/PaperPortPSP/UI)
File server properties:
IP address (or name): ............... (e.g.: 10.140.1.1, or rocket)
SMB share path: ..................... (e.g.: \\rocket\PaperPortPSPTemporaryStorage)
FTP access path: .................... (e.g.: ftp://rocket/PaperPortPSPTemporaryStorage)
19

All examples are illustrations only and have to be replaced with your own environment
settings.
Steps to launch the Administration Tool
To launch the Administration tool
1. Choose Start Menu > (All) Programs > Nuance > PaperPort PSP > Administration
Tool or type the Administration Tool URL
(http://10.140.1.1/PaperPortPSP/admin) into a browser.
If IIS is not permitted to serve dynamic content, you may get “HTTP Error 404 File or Directory not found” on Windows 2003 Servers. For guidelines on how to
resolve this problem, see http://support.microsoft.com/kb/315122.
2. Depending on your network security settings, an authentication dialog may
display. Log in as an administrator (the administration task involves modification
of local files).
3. Select your interface language from the following: English, French, Italian,
German, Portuguese or Spanish.
Using the Administration Tool
In the following section, we present a typical use case of this tool for system
administrators.
This is only a working example to walk you through the most commonly used steps.
Your actual administration activity is likely to differ from the one you find here.
Example Scenario
Suppose that your company purchases or rents one or more devices. A single device is
usually enough for small and medium size businesses, while larger organizations might
need several more devices.
The device(s) are delivered and set up by an external expert with the help of the
company’s IT expert. This way, the IT professional will know the IP address and
administrator login information.
Optional software components – for instance, the current package – are installed and the
network infrastructure is created. The PaperPort PSP administrator role is assigned to a
person with sufficient knowledge and experience (can be the same IT professional).
20
Administration Steps
1.1
1.2
1.3
1.4
1.5
Server side configuration
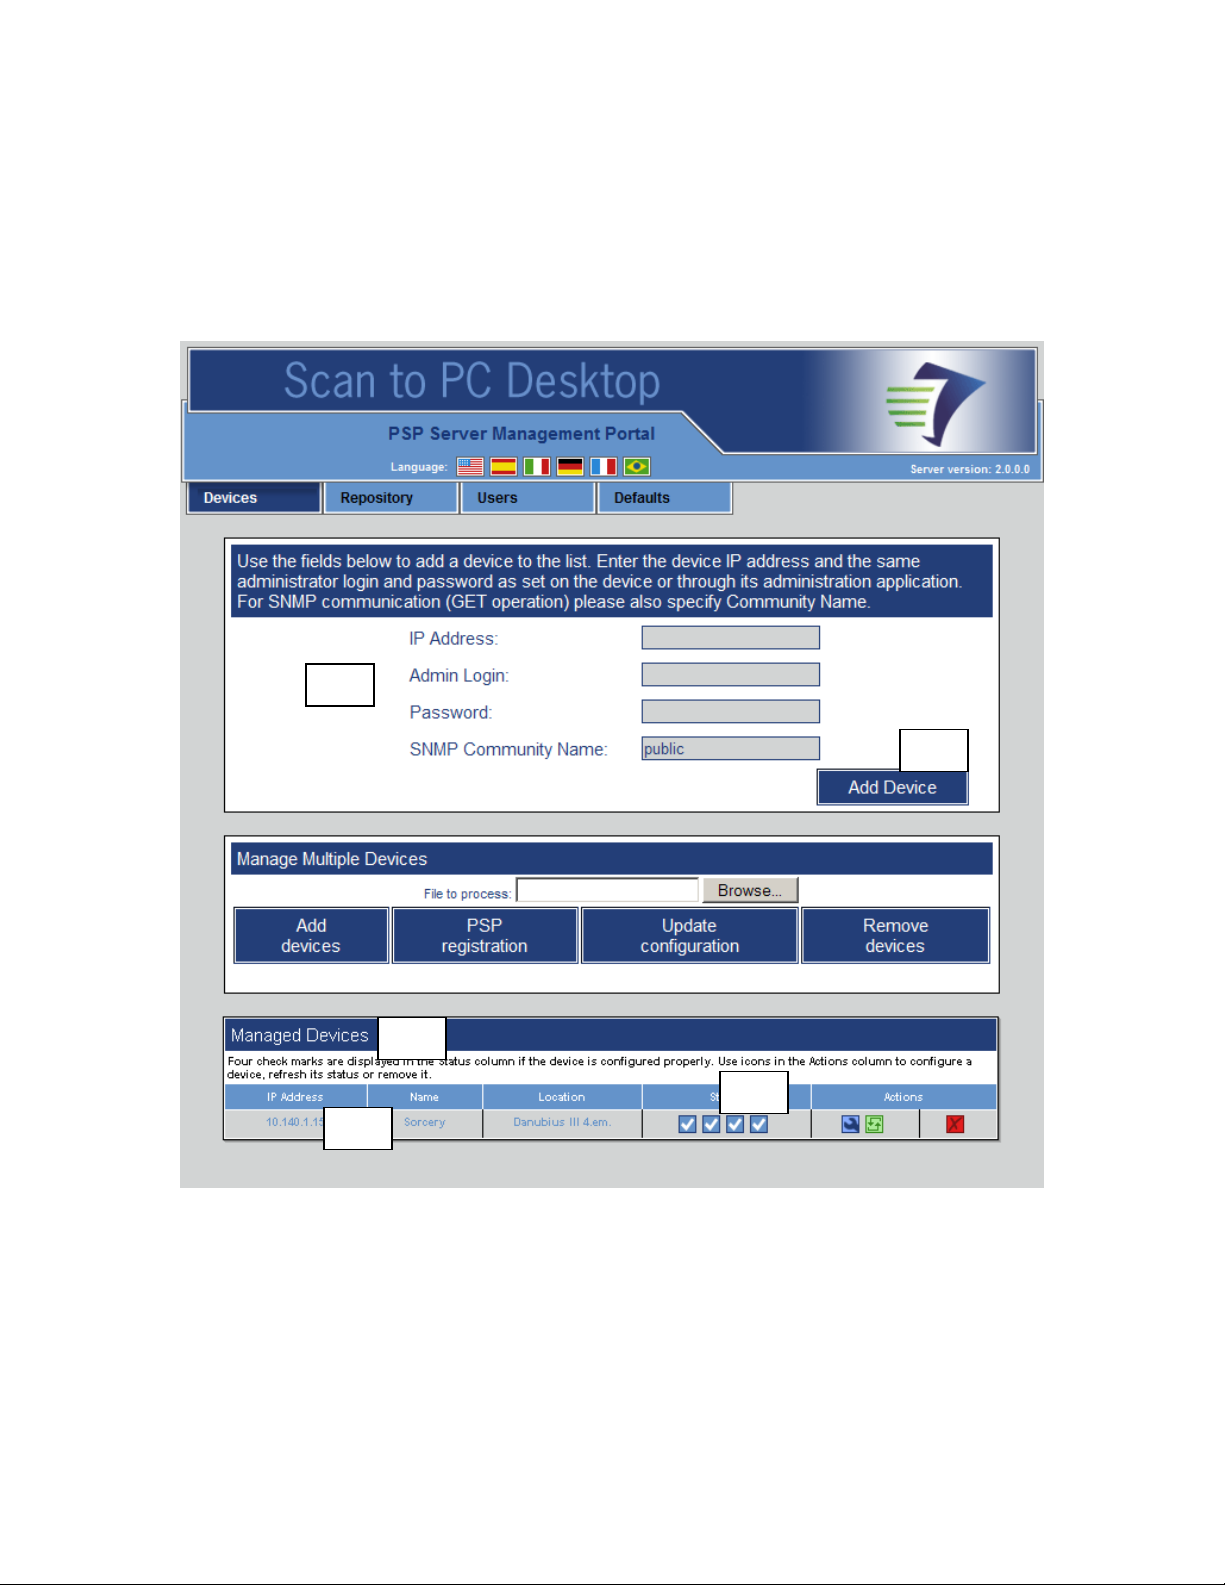
1. The first task of the administrator is to configure the server side of the PaperPort
PSP system. To do so, launch the Administration Tool.
1.1. The “Managed Devices” table at the bottom is empty, indicating that the server
does not manage any devices yet.
1.2. Enter the device’s IP Address, the device administrator’s logon information and
the SNMP Community Name. You can find the SNMP Community Name in the
device’s Web Administration Application on the “Edit SNMP v1/v2c Properties”
page.
1.3. Click the “Add Device” button
1.4. A new row is added to the table containing the device information and the
PaperPort PSP service is automatically registered on the device.
21

1.5. Check the four icons in the “Status” column to see if the device is up and running
correctly.
The first status indicator displays a check mark if the device is reachable at the specified
IP Address. If the device does not appear to be reachable, check the IP Address and make
sure the device is turned on.
The second status indicator displays a check mark if the device is EIP capable. If the
device is not EIP capable, PaperPort PSP can not be used on the device.
The third status indicator displays a check mark if EIP is enabled on the device. If EIP is
not enabled, consult your device documentation on how to enable it.
The last status indicator displays a check mark if the PaperPort PSP service has been
installed on the device.
Device configuration
Normally, when you add a device, you should see four check mark indicators in the table.
If the 3rdand the 4thstatus indicators signal problems, you have to resolve them first – as
described in the "Pre-Installation Device Configuration" section in this guide – and then
perform this step.
2. Configuring the device.
2.1. Click the blue Configure icon in the “Actions” column
2.2. The Device Configuration page is displayed.
22
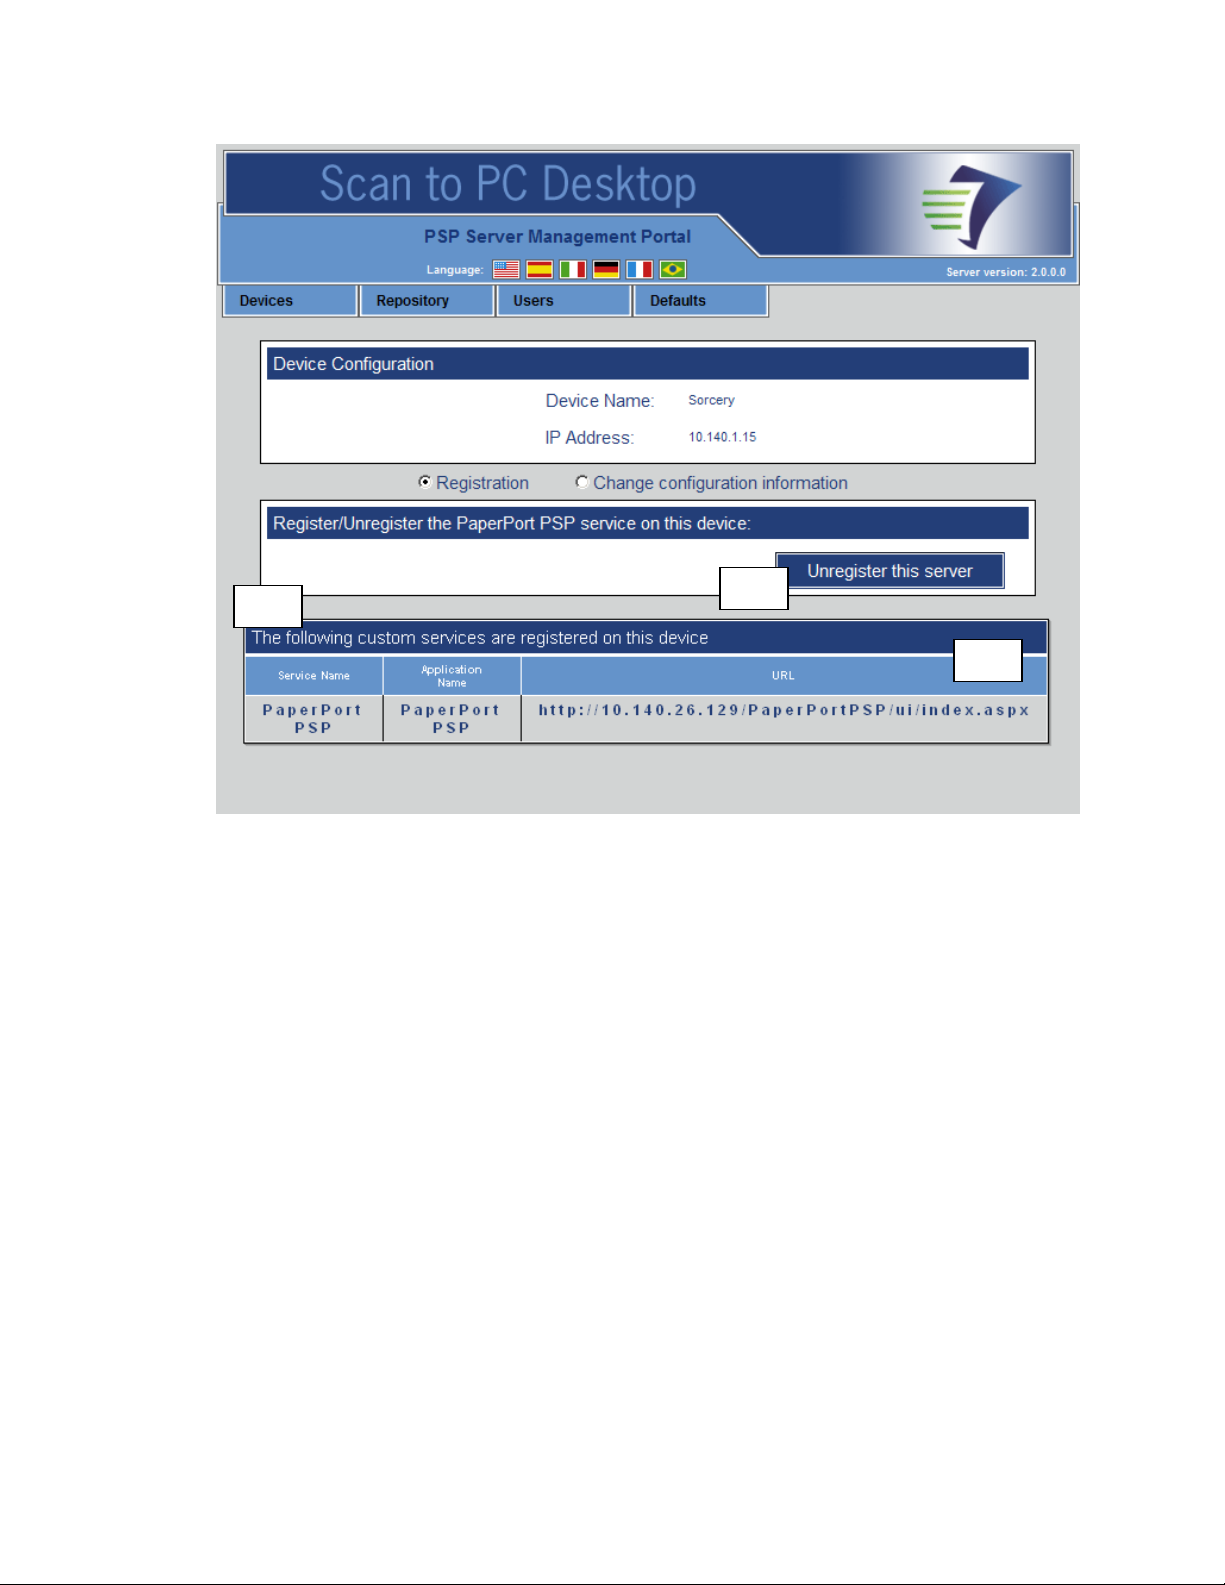
2.3. The table at the bottom is empty, indicating that our service is not yet registered
2.3
2.4
2.5
on the device.
2.4. Click the “Register this server” button.
2.5. A new row is added to the table and the “Register this Server” button changes to
“Unregister this Server”.
Registration is now finished.
Note: in some cases (while this page is loading) a Security Warning displays. If you
choose “No”, individual Service Names might not be available.
This dialog is displayed, because the machines running services to be listed in this table
are not in the trusted zone. To avoid this warning, you have two options:
Add the above computers to the trusted zone, or
Change security settings. Using Internet Explorer under Windows XP, it implies the
following steps:
1. Launch Internet Explorer.
2. Choose “Internet Options…” in the “Tools” menu
3. Go to the “Security” tab
4. Select “Local intranet”
5. Click the “Custom Level…” button
6. Choose “Miscellaneous” > “Access data sources across domains” and select the
radio button “Enable”.
23

Administrators might also want to add or remove a device. In the most common cases a
few devices are purchased or rented simultaneously and the necessary administration
tasks are performed after installation.
Adding new devices
To set up additional devices manually, the administrator has to go through the following
steps again:
1. Click the “Devices” tab (at the top).
2. Enter the device IP Address, the device administrator’s logon information and
the SNMP Community Name.
3. Click the “Add Device” button.
4. A new row is added to the table with the device information and the PaperPort
PSP service is automatically registered on the device.
5. Check the four icons in the “Status” column to see if the device is up and
running correctly.
If automatic registration was not successful, or if you want to unregister the application
from the device, proceed as follows:
6. Click the Configure icon (the blue wrench in the “Actions” column) associated
with the new device.
7. The Device Configuration page is displayed with the IP Address and name of
the new device.
8. Click the “Register this server” button.
9. A new row is added to the table and the “Register this Server” button changes
to “Unregister this Server”.
Removing devices
To remove a device
1. Go to the Devices page (choose the “Devices” tab at the top) and click the Delete icon
in the “Actions” column.
2. The device is removed from the system and the PaperPort PSP service is
automatically unregistered from the device.
3. The table at the bottom is updated to reflect this change.
Removing this service from a device
To remove this service from a device, do this:
1. Go to the Devices page (choose the “Devices” tab at the top) and click the Configure
icon in the “Actions” column.
24

2. The Device configuration page is displayed with this service highlighted in the table
at the bottom.
3. Click the “Unregister this server” button.
4. The service is revoked from the device.
The table at the bottom is updated to reflect this change.
Managing multiple devices
When handling several devices, it is more convenient to utilize comma-separated text
files – filled with device parameters – to carry out the following device management
tasks:
• Adding several devices
• Removing several devices
• Registering PSP on several devices
• Updating the configuration parameters of several devices
A comma-separated text file for such purposes has to have the following structure:
Field name IP Admin Password SNMP Register
Accepted
value(s)
Example 100.255.23.45 Admin 1111 Public 1
String, valid IP
address of a device
String, Admin
login
information,
valid for the
device on the
corresponding IP
address
String, Admin
password, valid for the
device on the
corresponding IP
address
String, SNMP Get
Community Name,
valid for the device
on the
corresponding IP
address
1, 0 (representing
"Register" and
"Unregister"
respectively)
Device management task details
Adding devices: all fields are required and used for this task. Devices are added one-by-
one and - depending on the value of the Register fields - PSP server registration is also
done. Processing continues with the next row in the file in case of errors (e.g. invalid IP
address, wrong password…)
Sample CSV file content:
10.140.1.15,admin,1111,public,1
10.140.24.34,admin,1111,public,0
10.140.24.32,11111,x-admin,public,1
Explanation:
1. The device at 10.140.1.15 is registered using the user name admin, the password
1111, and the SNMP Get community name public. PSP server registration is
performed.
2. The device at 10.140.24.34 is registered using the user name admin, the
password 1111, and the SNMP Get community name public. PSP server
registration is not performed.
25

3. The device at 10.140.24.32 is registered using the user name 11111, the
password x-admin and the SNMP Get community name public. PSP server
registration is performed.
Removing devices: Required and used fields: IP Address, Admin, Password and SNMP
(the Register field is ignored). Currently managed devices are enumerated and matched
against the IP Addresses in the file. If a match is found, the PSP server is unregistered
automatically and the device is removed.
Sample CSV file content:
10.140.1.15,admin,1111,public,
10.140.24.34,admin,1111,public,
10.140.24.32,11111,x-admin,public,
Explanation:
1. The device at 10.140.1.15 is removed (using admin as the user name, 1111 as
the password and public as the SNMP Get community name.)
2. The device at 10.140.24.34 is removed (using admin as the user name, 1111 as
the password and public as the SNMP Get community name.)
3. The device at 10.140.24.32 is removed (using admin as the user name, 1111 as
the password and public as the SNMP Get community name.)
PSP Registration: Required and used fields: IP Address and Register (other fields are
ignored). Currently managed devices are enumerated and matched against the IP
Addresses in the file. If a match is found, the PSP server is registered or unregistered,
depending on the content of the Register field. If the PSP server is already registered and
the content of the Register field is 1, no action is taken. Similarly, if the PSP server is not
registered and the content of the Register field is 0, no action is taken.
Sample CSV file content:
10.140.1.15,,,,1
10.140.24.34,,,,0
Explanation:
1. PSP Server gets registered on the device at 10.140.1.15
2. PSP Server gets unregistered on the device at 10.140.24.34
Updating the configuration: Required and used fields: IP Address, Admin, Password
and SNMP (the Register field is ignored). Currently managed devices are enumerated and
matched against the IP Addresses in the file. If a match is found, the content of the
Admin, Password and SNMP fields overwrite the currently stored values.
Sample CSV file content:
10.140.1.15,newadmin,1111,public,
10.140.24.34,admin,12345,public,
26

Explanation:
1. PSP Server stores newadmin as the new user name, 1111 as the new password
and public as the new SNMP Get community name for the device at 10.140.1.15
2. PSP Server stores admin as the new user name, 12345 as the new password and
public as the new SNMP Get community name for the device at 10.140.24.34
The result of each batch operation is a log file that is accessible from the Administration
Tool.
Setting the device working folder
3. The next step is to set the working folder of the device. This is where images will
temporarily be stored.
3.1. Click the “Repository” tab (at the top).
3.2. The Repository page is displayed
27

3.3. In most cases, the SMB protocol is used: pick this option.
3.1
3.3
3.43.5
3.4. Enter the information of a shared folder along with an account that the device
and the ImageRetriever clients will use to reach this location.
3.5. Click the “Store Settings” button.
Initial server administration is done and the system is ready to work.
For full functionality, client side installation is also required.
Repository Changes
Protocol and file transfer location changes are not quite frequent (c.f. email system
changes within an organization). However, the Administration Tool gives you the option
to do this.
To change the file transfer location and protocol
1. Click the “Repository” tab (at the top).
2. Change the protocol and other information.
28

3. Click the “Store Settings” button.
1
3.1
User management
Administrators are usually not required to manage user lists, because clients are able to
automatically register themselves and use the system without any administrator
interaction.
On the other hand, we provide an administration tool to add/remove users and user
groups to/from the system.
Adding users
1. Click the “Users” tab (at the top)
2. The User Management page is displayed with the list of already registered (manually
by the administrator or automatically by the clients themselves) users.
3. To add a single user manually
3.1. Pick the “Add users manually” option
3.2. The page changes to this
29

3.3. Enter user information.
3.3
3.4
3.4. Click the “Add User” button.
3.5. The page reverts to the user list.
4. To add several users
4.1. Pick the “Add users from LDAP” option
4.2. The page changes to this
30

4.1
4.3
4.4
4.5
4.6
4.3. Provide the LDAP server and its access parameters. Leave the Filter field blank
to get access to each user and group available within LDAP.
4.4. Click the “List” button.
4.5. The list at the bottom of the screen is populated with the entries matching the
filter. Individual users and user groups are also displayed in the list.
4.6. Select several users and click “Add Selected”,
or
Press the “Add All” button
4.7. The page reverts back to the user list.
31
Removing users
5.1
5.3
5.4
5.5
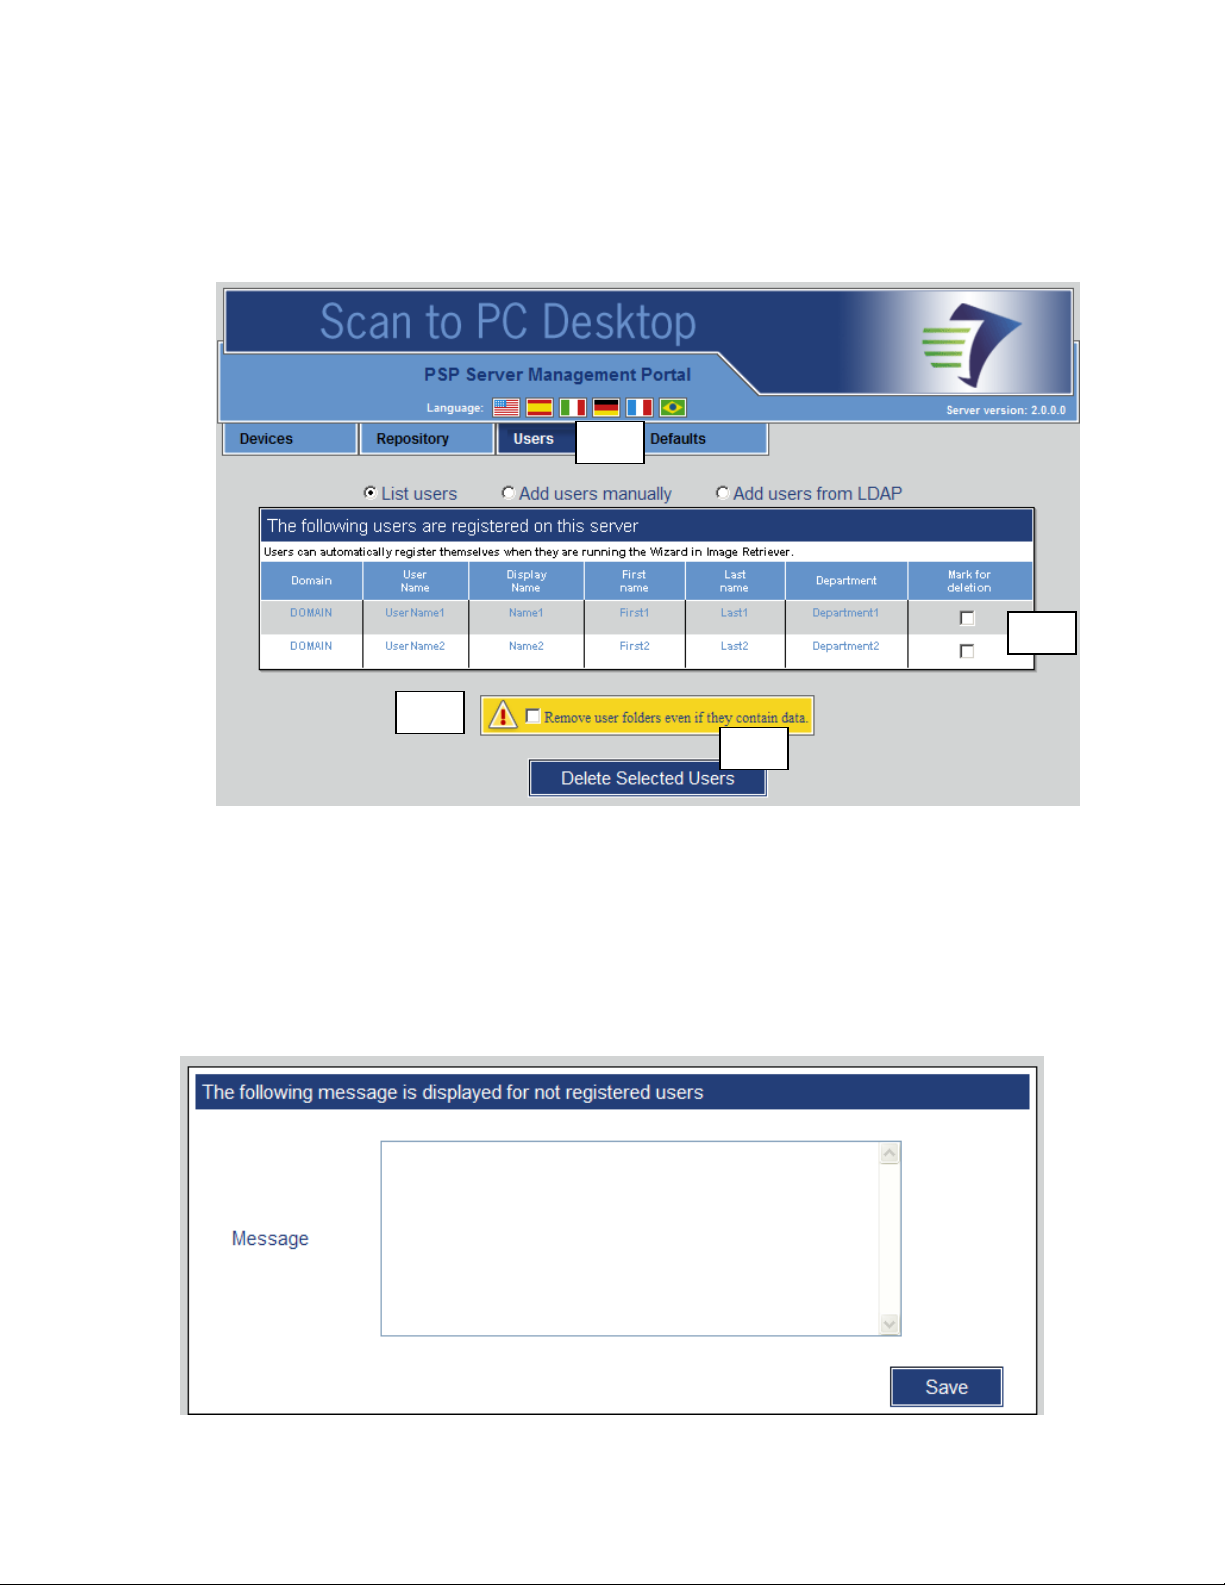
5.1. Click the “Users” tab (at the top)
5.2. The User Management page is displayed with the list of already registered
(manually by the administrator or automatically by the clients themselves) users.
5.3. Mark the appropriate boxes in the “Mark for deletion” column.
5.4. Decide if user data should be deleted (mark the checkbox in the yellow field
below the table).
5.5. Click the “Delete Selected Users” button.
5.6. The table updates to reflect the changes.
Displaying a customized message to unregistered users
32
1. Click the “Users” tab (at the top)
2. Enter your customized text in the Message area. You might want to include
details, such as how to get the PSP client, whom users should contact in case they
need access to PaperPort PSP, etc.
3. Click the Save button.
Your customized message is going to be displayed on the device panel for users who are
not registered on the PaperPort PSP Server.
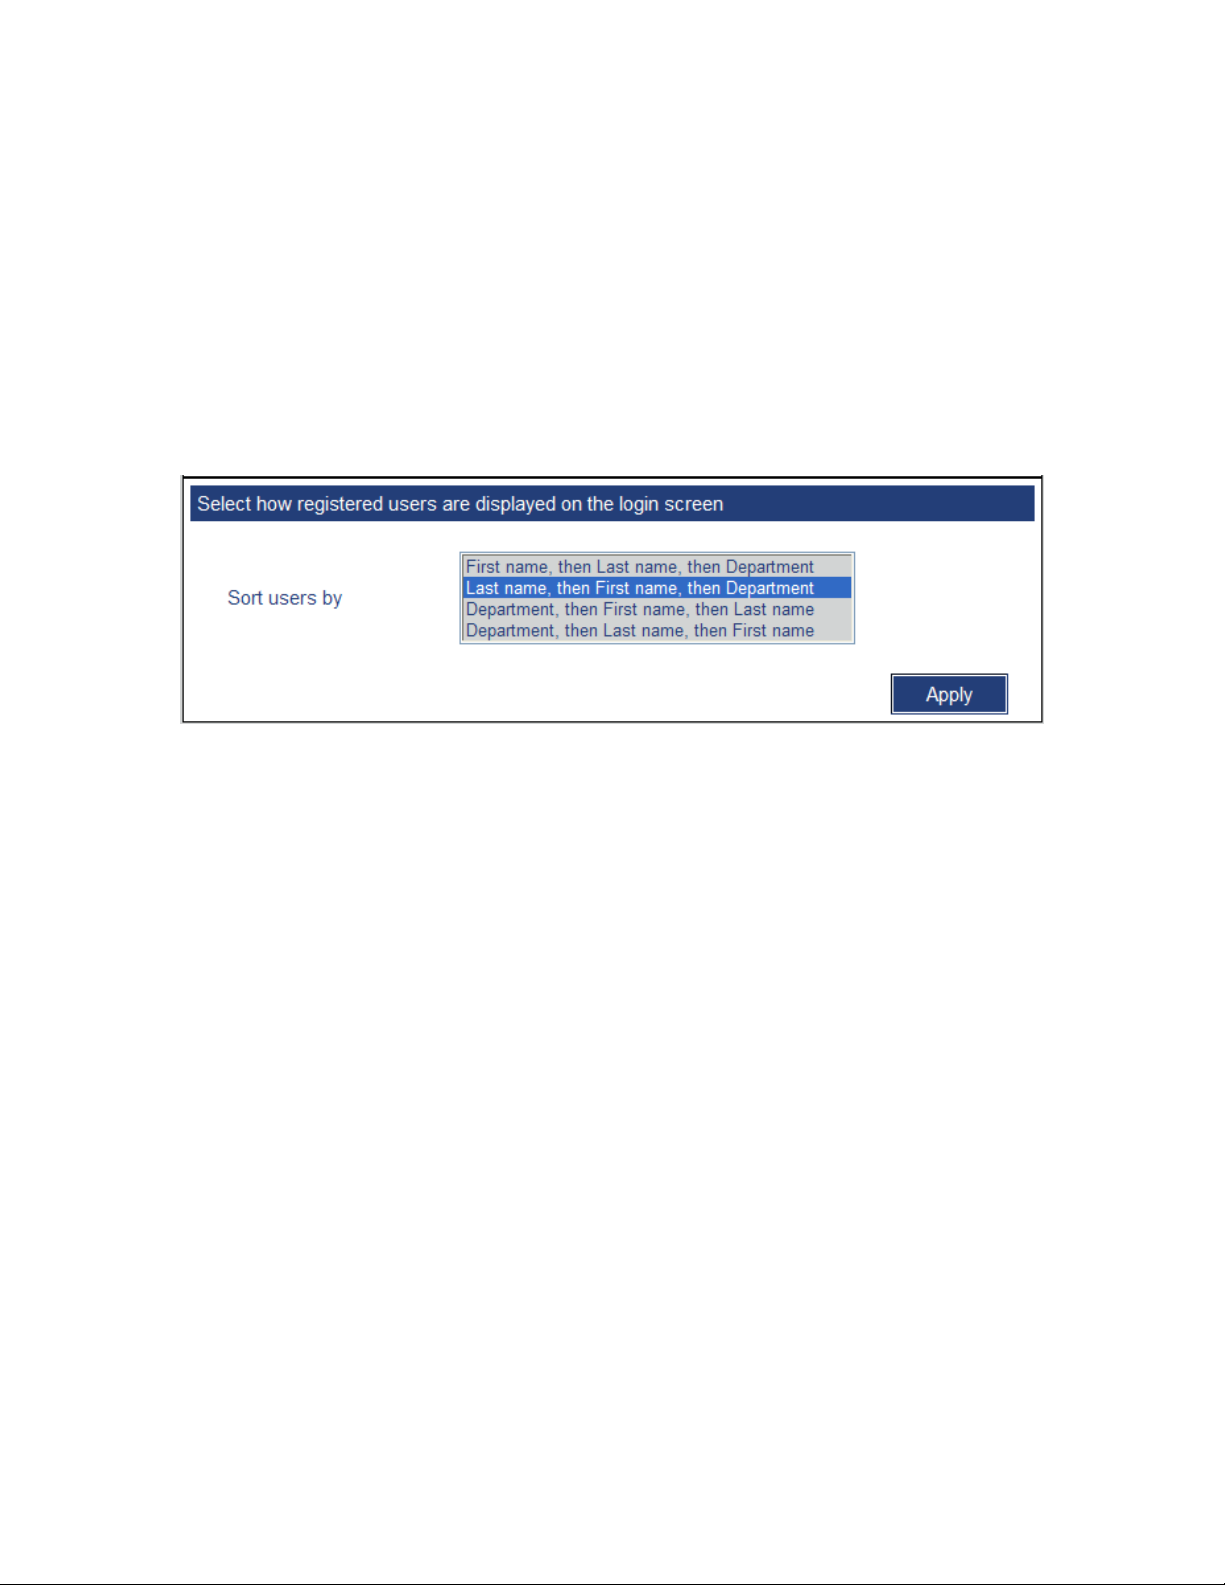
Sorting login names on the device panel
1. Click the “Users” tab (at the top)
2. Set the order for displaying user names on the device panel.
3. Click the Apply button.
33
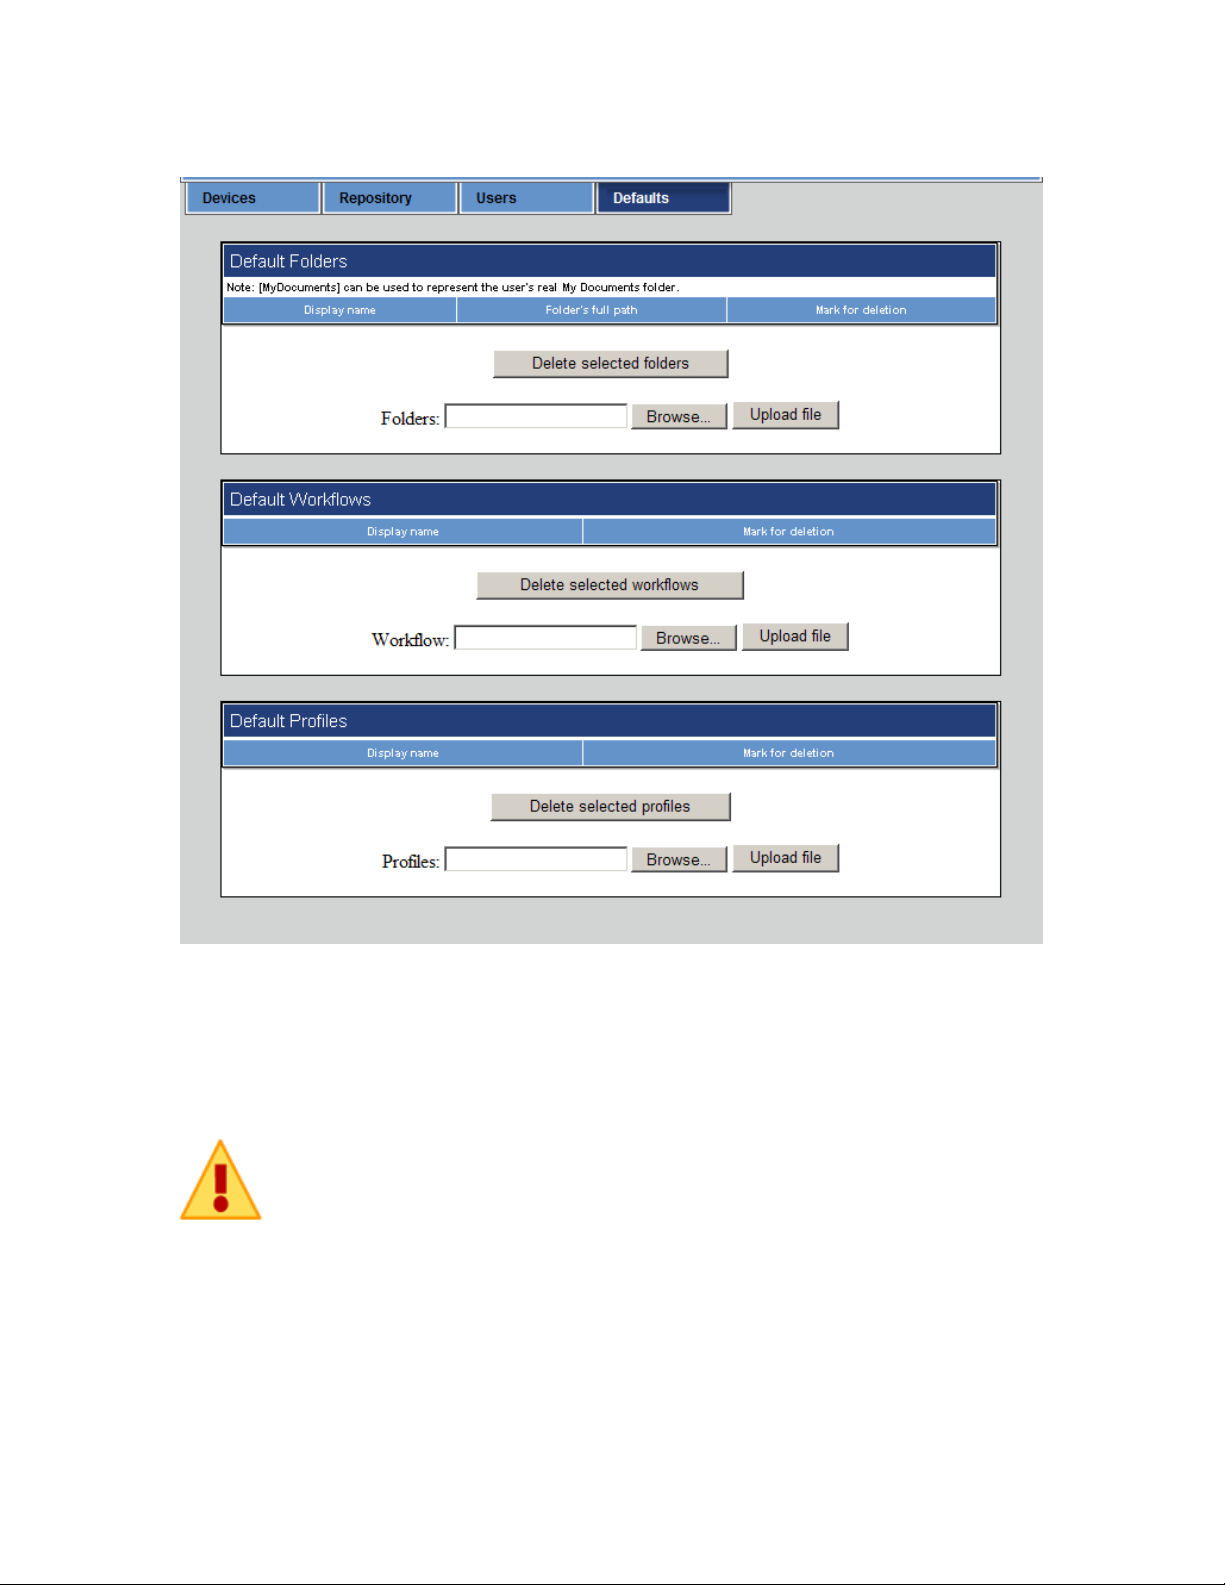
Defaults
Administrators are usually not required to manage user settings, because users are able to
customize the device screen using their own destination folders and scanning preferences
through the Personalized MFP Scanning Wizard. On the other hand, we provide an
administration tool to add/remove default folders, workflows and profiles.
These defaults will appear on the device screen - below the users' own
items – if the user
• Restarts Image Retriever
• Updates his/her own preferences through the Wizard
• Selects the Refresh defaults item from the context menu of the
Image Retriever system tray icon.
34

Default folders
Use comma-separated text files – filled with folder information – to specify destination
folders for all users. These comma-separated text files have to have the following
structure
Field name Path Display name
Accepted
value(s)
Example Q:\Year2009\Common\Accounting Accounting
String, full path of a folder String, short display name of the path as it will appear on the
device's main screen
How to create default destination folders (administrator’s tasks):
1. Create the comma-separated text file, containing the full path and the display
name of the destination folders.
2. Click the "Defaults" tab (at the top)
3. Click the Browse button in the "Default Folders" section, next to "Folders file".
4. Select the comma-separated text file in the File Open dialog and click OK.
5. Click the "Upload File" button in the "Default Folders" section
6. The file is uploaded, processed and the default folders are displayed.
Sample CSV file content:
C:\temp,MyTemp
Q:\Year2009\Common\Accounting,Accounting
[MyDocuments]\ScannedFiles,Scanned files
Explanation
1. The user will see the MyTemp item on the device screen. If this item is selected,
the scanned document is delivered into the C:\temp folder on the user's machine.
2. The user will see the Accounting item on the device screen. If this item is
selected, the scanned document is delivered into the
Q:\Year2009\Common\Accounting folder on the user's computer.
3. The user will see the Scanned files item on the device screen. If this item is
selected, the scanned document is delivered into the C:\Documents and
Settings\<User>\My Documents\ Scanned files folder on the user's PC. The
[MyDocuments] meta tag should be used when the administrator wants to use a
path within the user's own My Documents folder. (This meta tag is resolved on
the user's machine locally).
Default workflows
Use OmniPage to create workflows available for all users on their machines.
As an administrator, do the following to create default workflows:
1. Create one or more workflows in OmniPage and export them to a location
accessible through the Administration tool.
35

2. Click the "Defaults" tab (at the top)
3. Click the Browse button in the "Default Workflows" section, next to "Workflow
file".
4. Select the workflow file in the File Open dialog and click OK.
5. Click the "Upload File" button in the "Default Workflows" section
6. The file is uploaded, processed and the default workflow is displayed.
7. Workflow files can be uploaded one-by-one. If you have more workflows to
upload, repeat the above steps.
Sample:
The administrator uses the Workflow Assistant in OmniPage (Tools menu/Workflow
Assistant item) to create a workflow, with steps necessary to handle an invoice. The
workflow is exported from OmniPage (Tools menu/Workflows item) as Invoice, and
then uploaded to the PSP Server through the Administration Tool. The user will see the
Invoice item on the device screen. If this item is selected, the scanned document is
loaded into OmniPage on the user's machine and processed using the Invoice workflow.
Default profiles
As an administrator, use PaperPort to create profiles available for all users on their own
machines.
To create profiles, do the following:
1. Create one or more profiles in PaperPort.
2. Right click the profile list in PaperPort and export them to a location accessible
through the Administration tool.
3. Click the "Defaults" tab (at the top)
4. Click the Browse button in the "Default Profiles" section, next to "Profiles file".
5. Select Profiles.xml in the File Open dialog and click OK.
6. Click the "Upload File" button in the "Default Profiles" section
7. The file is uploaded, processed and the default profiles are displayed.
Sample:
The administrator uses PaperPort to create profiles (e.g. ColorScan, LowResBW…),
containing the scanning parameters, image processing and destination format options.
The profiles are uploaded to the PSP Server through the Administration Tool. The user
will see the ColorScan, LowResBW… items on the device screen. If an item is selected,
the document is scanned and processed, as described in the profile.
36
Customized installation (advanced)
Customized installation is recommended for advanced administrators. To install the
product this way, follow the steps below:
IMPORTANT: It is an imperative that all prerequisites are already installed before you
perform the following steps.
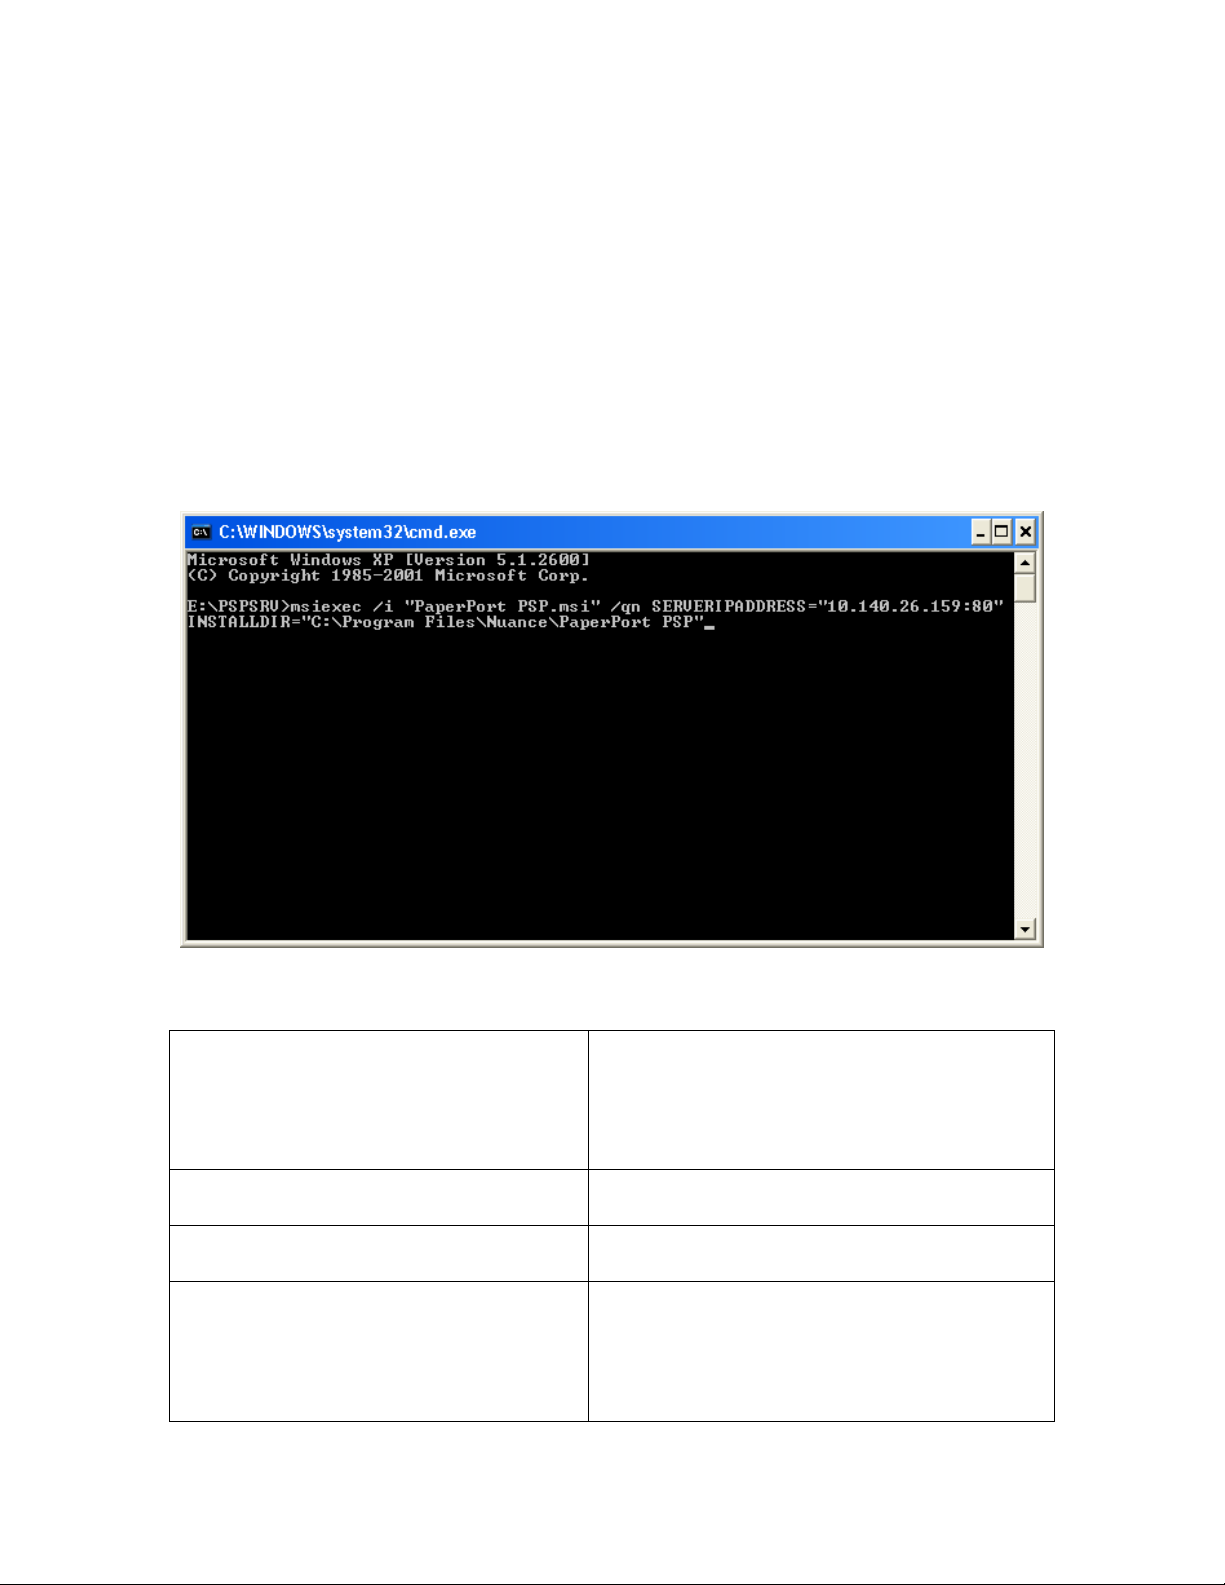
Extract product files to a specific folder
Use the following command line to extract application files to a dedicated folder:
msiexec.exe /i "PaperPort PSP.msi" /IIS=0
SERVERIPADDRESS="???.???.???.???:??" INSTALLDIR="?:\????"
Installer command-line parameters
IIS Interaction with IIS.
IIS=0: Extract into a specific folder and do
not interact with IIS.
IIS=1: Extract into a specific folder and
interact with IIS to register the virtual folders.
SERVERIPADDRESS You need to specify the IP address of the
computer and a port number.
INSTALLDIR C:\Program Files\Nuance\PaperPort PSP
(Destination folder for product files)
PREREQ_IIS_INSTALLEDONPORT80 Interactive installation may fail with the
following error “Check if your IIS is
configured to listen at port 80. To install the
application without this check refer to the
Server Administrator's Guide. Installation will
37

now abort.” Use this command line parameter
to disable the check.
If SERVERIPADDRESS is specified, the appropriate files will be replaced with the ones
containing the specified IP address. Otherwise, you have to modify some files manually
after installation: these are listed in the next section. If you do not specify a server IP
address and port number, the name of your computer will be used by default.
When PREREQ_IIS_INSTALLEDONPORT80=“2” is specified, the IIS settings are not
examined and the “Check if your IIS is configured to listen at port 80. To install the
application without this check refer to the Server Administrator's Guide. Installation will
now abort.” error message is suppressed.
It is also a good practice to turn on installer logging and to check the log file after
installation. We suggest consulting the Windows Installer documentation on the lvx*
<log file> command line parameter and its usage.
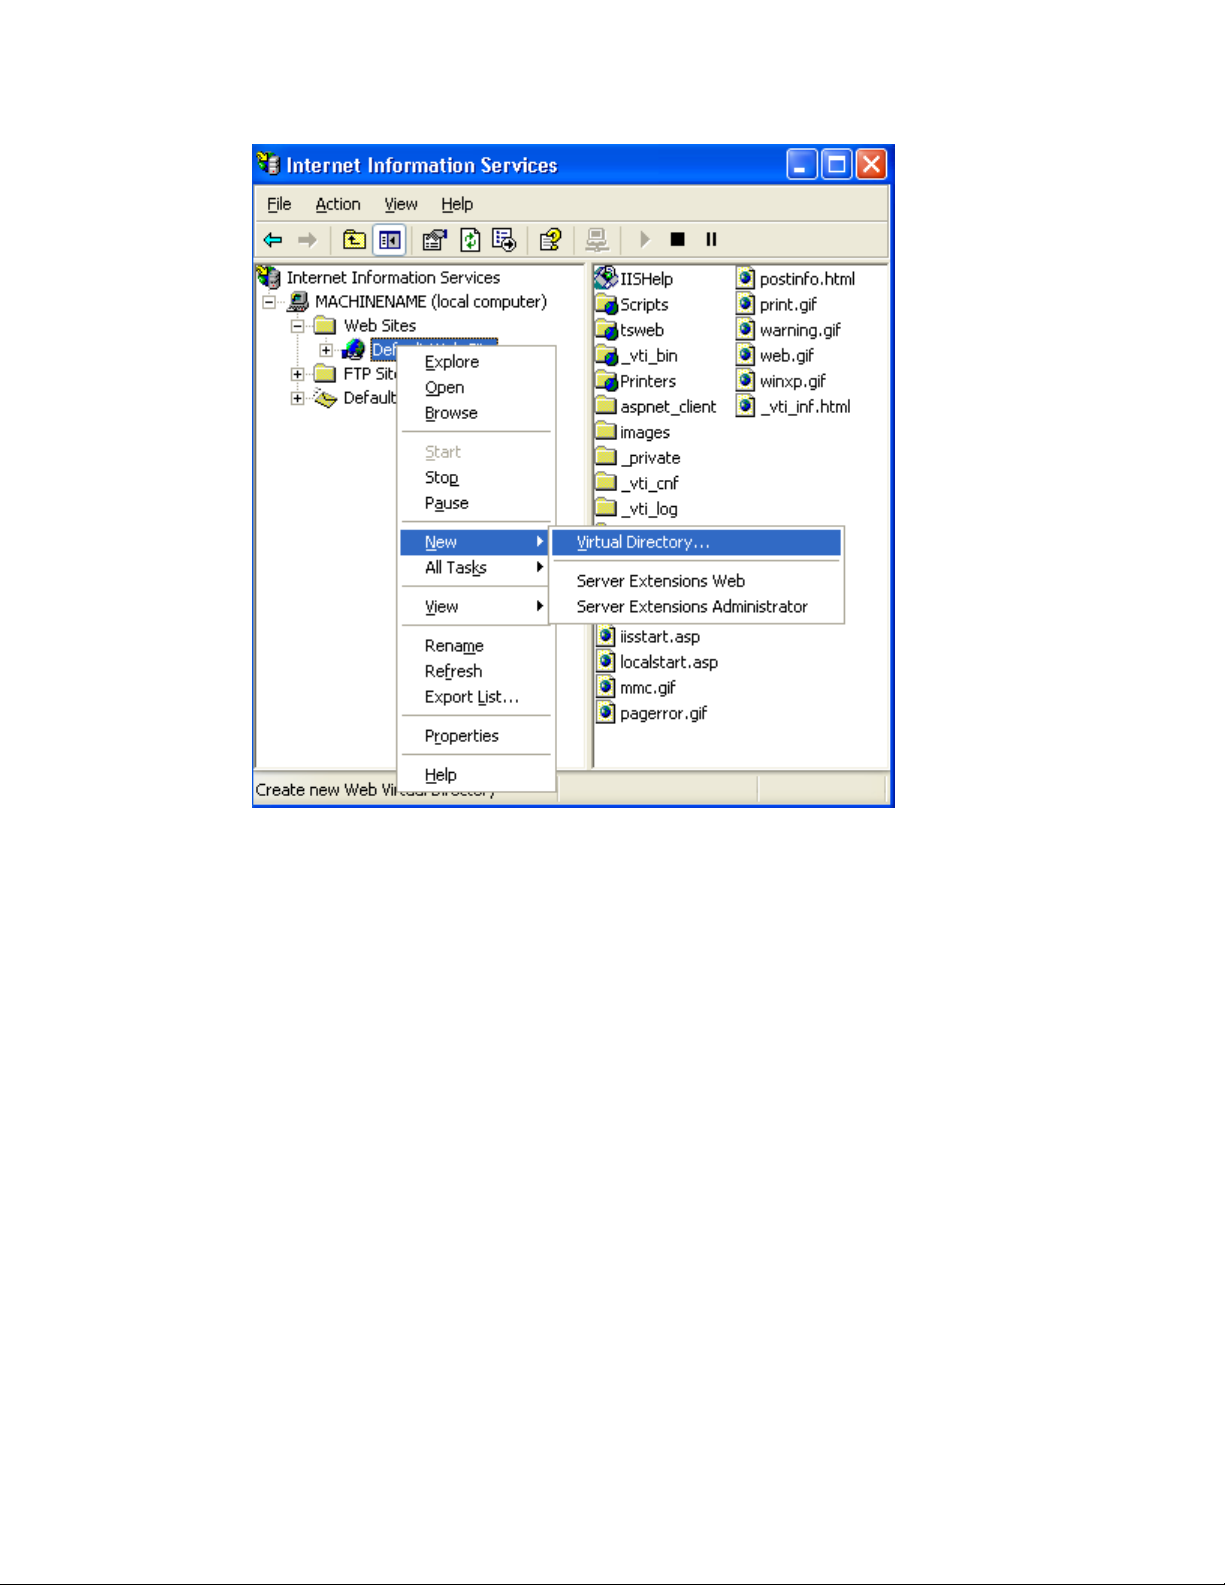
Set-up Web Services in IIS web site
1. Create a base virtual directory
1. Click the Windows Start menu then choose Control Panel > Administrative
Tools > Internet Information Services
2. Select <COMPUTER>/Web Sites/Default Web Site
3. Click: Action > New > Virtual Directory...
38
4. The Virtual Directory Wizard appears. Set up your virtual directory with the
following parameters:
o alias: PaperPortPSP
o directory: C:\Program Files\Nuance\PaperPortPSP (or the directory you
have specified in the INSTALLDIR property)
o permissions for this directory:
read, run scripts (such as ASP) and browse checked
write, execute (such as ISAPI applications or CGI) unchecked
5. Click Finish to complete the wizard.
On Windows XP perform the following additional steps
6. Select the new virtual directory.
7. Click Actions > Properties. The Virtual directory properties dialog appears.
8. Select the "Low (IIS Process)" Application protection option.
9. Click OK
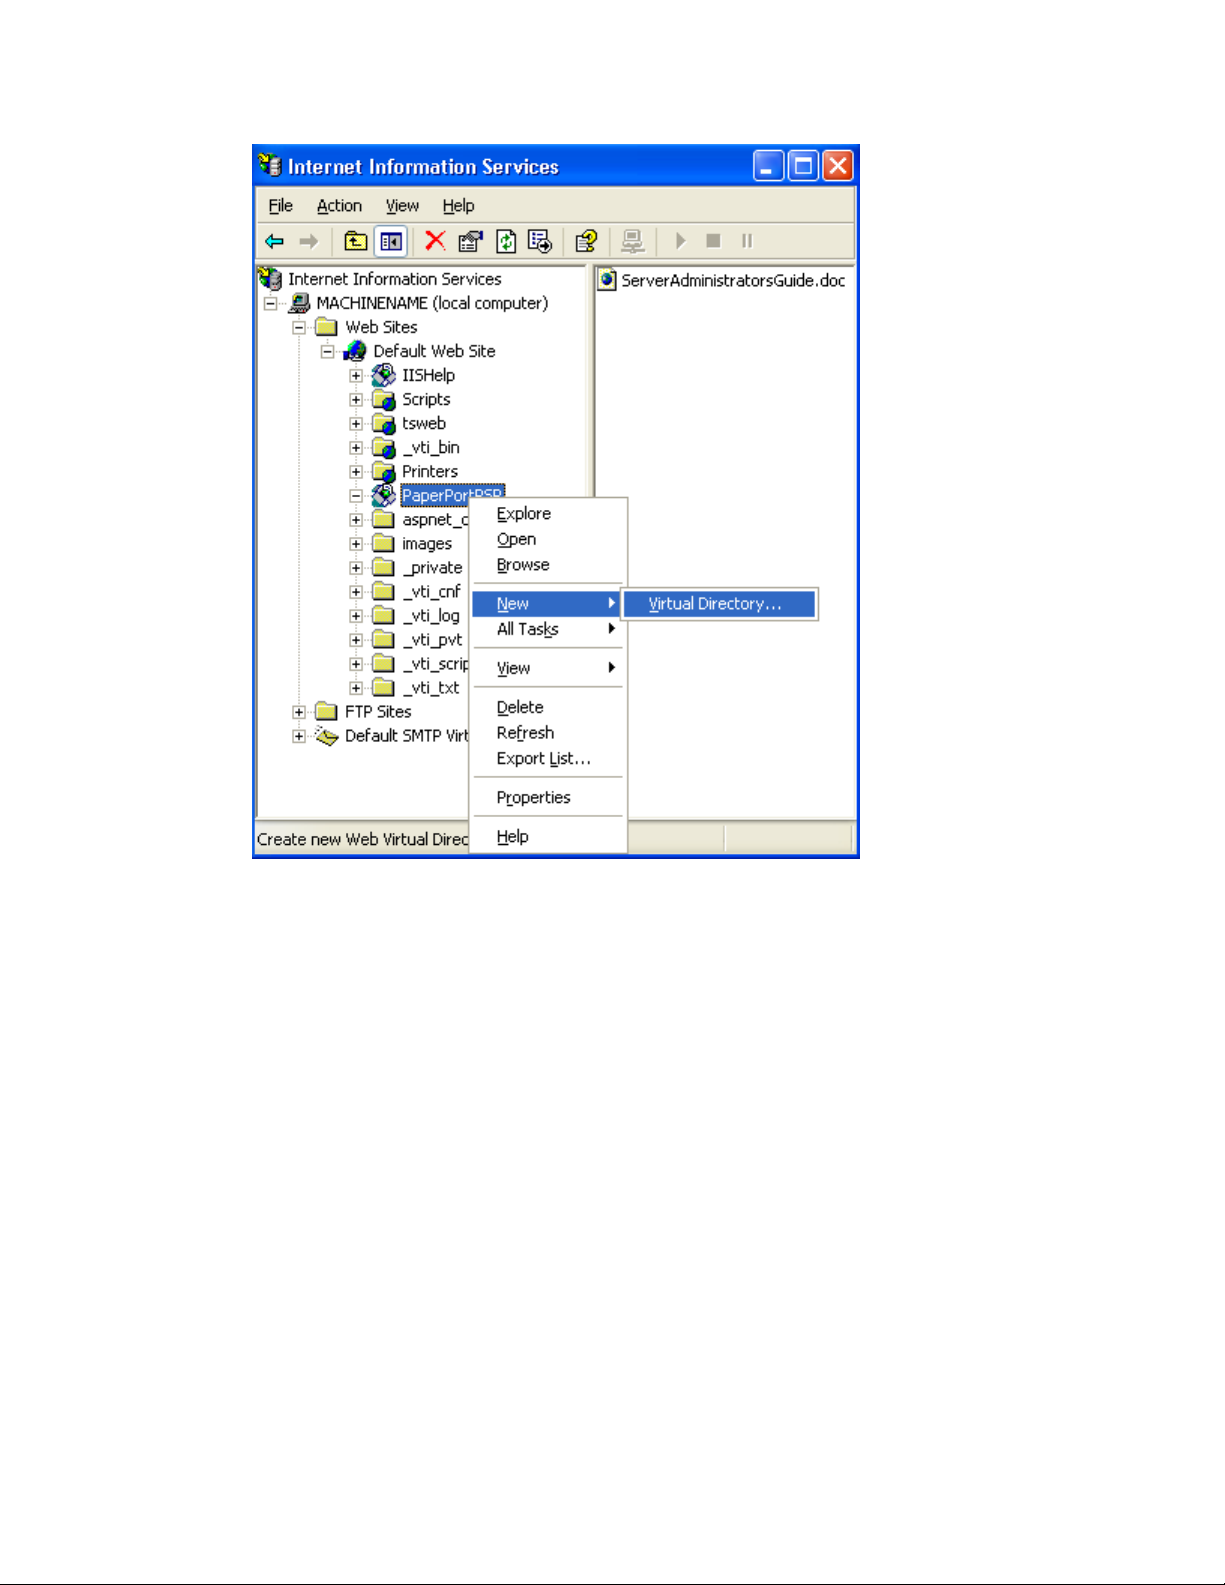
2. Create a virtual directory for product administration
1. Select the “PaperPortPSP” virtual directory.
2. Click Action > New > Virtual Directory...
39
The Virtual Directory Wizard appears. Set up your virtual directory with the
following parameters:
o alias: admin
o directory: C:\Program Files\Nuance\PaperPortPSP\admin (or the directory
you have specified in the INSTALLDIR property)
o permissions for this directory:
read, run scripts (such as ASP), execute (such as ISAPI
applications or CGI) and write checked
browse unchecked
3. Click Finish to complete the wizard.
4. Select this new “PaperPortPSP\admin” virtual directory.
5. Click Actions > Properties. The Virtual directory properties dialog appears.
6. Select the Directory Security pane.
7. Click the Edit button under the “Anonymous access and authentication
control” section. The “Authentication Methods” dialog displays.
8. Uncheck the “Anonymous access” checkbox.
9. Check the “Integrated Windows authentication” checkbox.
40
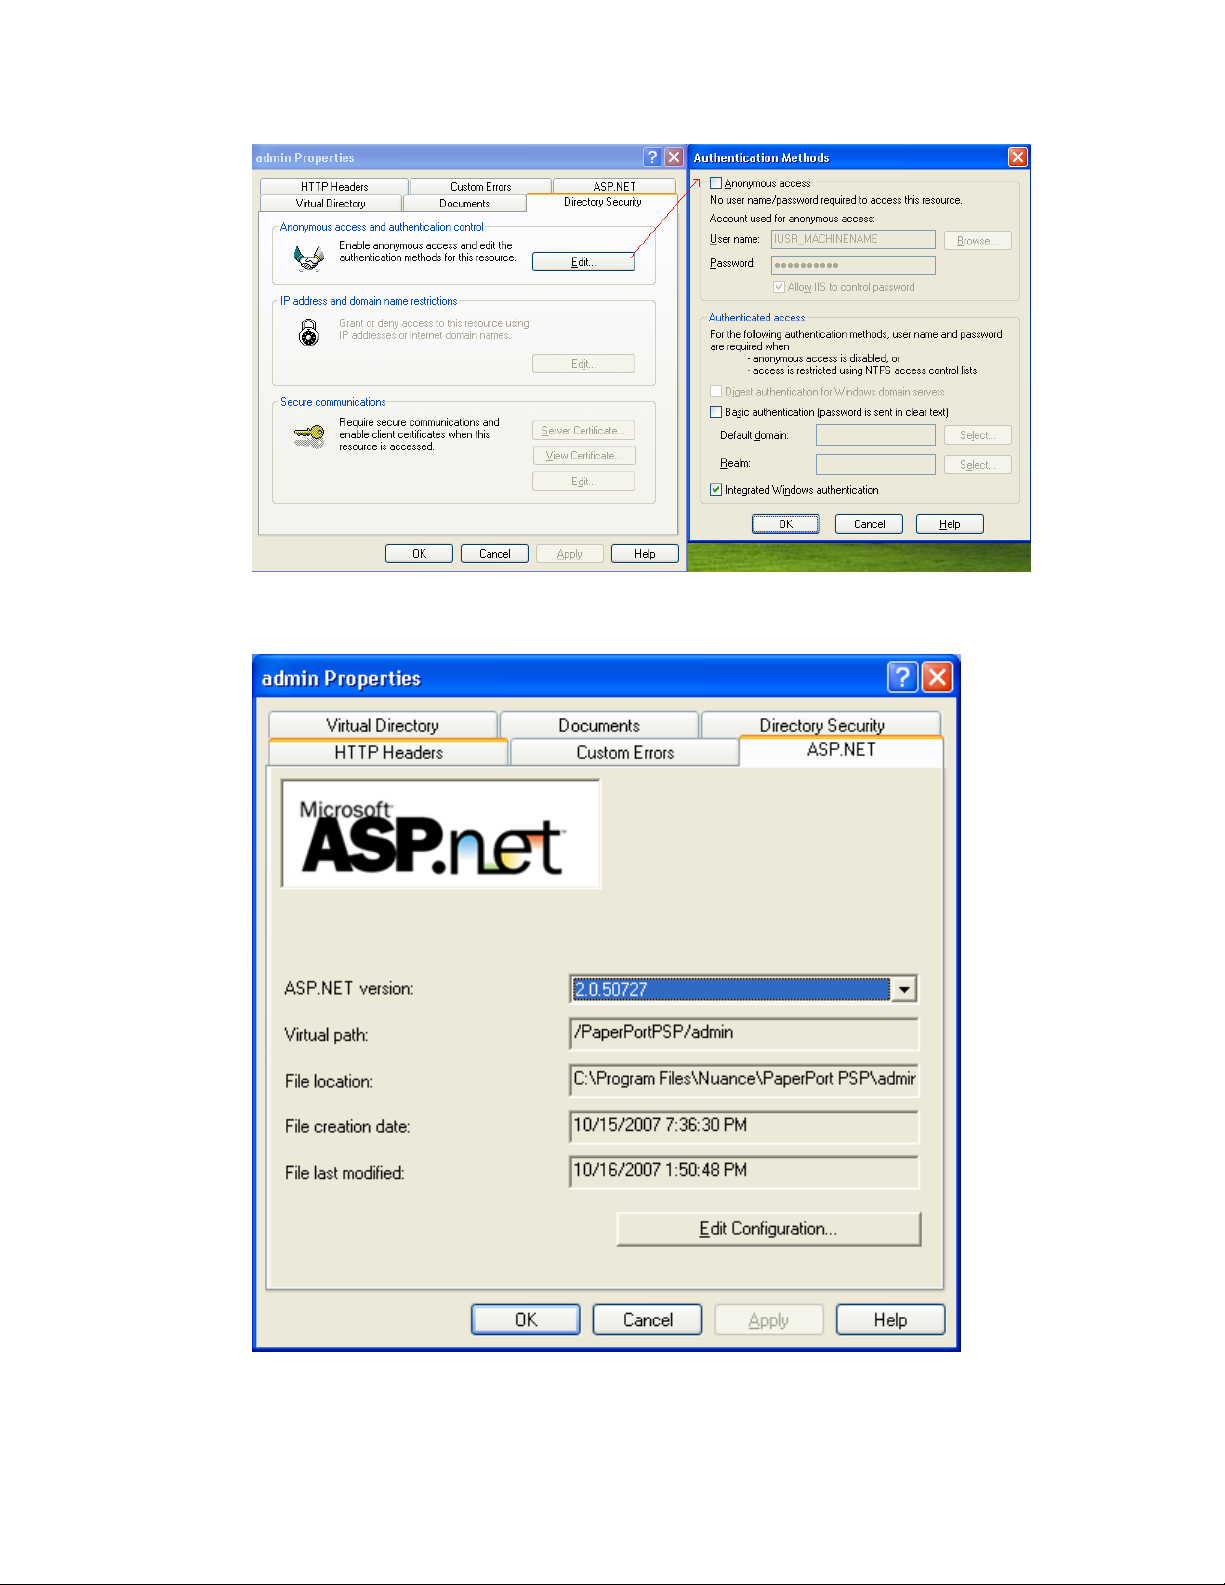
10. Click OK to close the “Authentication Methods” dialog.
11. Select the ASP.NET pane.
12. Choose “2.0.50727” in the ASP.NET version combo box.
13. Click OK to finish setup.
On Windows XP perform the following additional steps
41

14. Select the new virtual directory.
15. Click Actions > Properties. The Virtual directory properties dialog appears.
16. Select the "Low (IIS Process)" Application protection option.
17. Click OK
4. Create the Product EIP service virtual directory
1. Select the “PaperPortPSP” virtual directory.
2. Click Action > New > Virtual Directory...
The Virtual directory wizard displays. Set up your virtual directory with the
following parameters:
o alias: UI
o directory: C:\Program Files\Nuance\PaperPortPSP\UI (or the directory
you have specified in the INSTALLDIR property)
o permissions for this directory:
read, run scripts (such as ASP) execute (such as ISAPI applications or
CGI) and write checked
browse unchecked
3. Click Finish to complete the wizard.
4. Select the “PaperPortPSP\UI” virtual directory.
42

5. Click Action > Properties. The “UI Properties” dialog appears.
6. Select the Directory Security pane.
7. Click the Edit button under the “Anonymous access and authentication
control” section. The “Authentication Methods” dialog displays.
8. Mark the “Anonymous access” checkbox.
9. Mark the “Integrated Windows authentication” checkbox.
10. Click OK to close the “Authentication Methods” dialog
11. Select the Documents pane
12. Click the Add button
43

13. Enter "Index.aspx" and click OK
14. Select the ASP.NET pane.
15. Choose “2.0.50727” in the “ASP.NET version” combo box.
44

16. Click OK to complete setup.
On Windows XP perform the following additional steps
17. Select the new virtual directory.
18. Click Actions > Properties. The Virtual directory properties dialog appears.
19. Select the "Low (IIS Process)" Application protection option.
20. Click OK
The product will create run-time application data files in the “C:\Documents and
Settings\All Users\Application Data\Nuance\PaperPortPSP” folder. Make sure that
the application has access to this folder and can create directories and files in it
run-time.
Check the correct setup of Web Services in IIS
1. Open a browser and enter the following address: http://<<your site
IP>>:<<your site port>>/PaperPortPSP/admin/
If IIS is not permitted to serve dynamic content, you may get “HTTP Error
45

404 - File or Directory not found” on Windows 2003 Servers. For guidelines
on how to resolve this problem, see http://support.microsoft.com/kb/315122.
2. An authentication window displays. Authenticate yourself and the “PaperPort
PSP Server Management Portal” application will launch. UI language can be
changed to the following: English, French, Italian, German, Portuguese or
Spanish.
3. Make sure you receive no error messages and close your browser.
4. Open a browser and enter the following address: http://<<your site
IP>>:<<your site port>>/PaperPortPSP/UI/
5. The Xerox EIP platform simulation displays.
46

6. Make sure you see the above screen and close your browser.
4. Setting up PaperPort PSP service with Administration Application
Proceed as described in the Setting up PaperPort PSP service with the
Administration Application section under Interactive Installation.
47

Changing server IP address or port after setup
If you did not specify the server IP address and/or port during installation you have to
make additional modifications to regain the services of PaperPort PSP.
The following list of files reference a URL. The obsolete URL has to be replaced with the
correct one in each of them.
The files to be modified are:
<installdir>/admin/Web.Config
<installdir>/UI/App_Data/ServerProperties.xml
Note: Although it is possible to change server IP addresses and/or ports this way, it is not
recommended. Consider reinstalling PaperPort PSP service instead.
48

Troubleshooting tips
The following section presents typical error scenarios with suggestions on how to solve
them.
Error: Installation Order Conflict (.NET Framework 2.0 and IIS)
Server Error in '/PaperPortPSP' Application.
The current identity (REC-L233\ASPNET) does not have write access to
'C:\WINDOWS\Microsoft.NET\Framework\v2.0.50727\Temporary ASP.NET Files'
or
Failed to access IIS metabase.
Description:
If IIS is installed after the .NET 2.0 Framework installation, the framework registration
into IIS is not performed correctly. In this case an additional manual registration step is
needed to avoid the error message.
Solution:
C:\WINDOWS\Microsoft.NET\Framework\v2.0.50727>aspnet_regiis -i -enable
Error: Web Services prerequisite is not installed
Description:
Server Error in '/PaperPortPSP' Application.
Administrator has not installed the Web Service prerequisite.
Solution:
Install the prerequisite: <CD-DRIVE>\PREREQ\Microsoft WSE 2.0 SP3 Runtime.msi
Error: installer error message
Description:
The installer displays error messages if one of the installation prerequisites is missing, or
if a virtual folder named PaperPortPSP already exists in Microsoft Internet Information
Service setup. List of errors:
49

Condition Error message Solution
AdminUser
Not Version9X
PREREQ_DOTNET20_INSTALLED = 1
PREREQ_IIS_INSTALLEDONPORT80 =
1 or
PREREQ_IIS_INSTALLEDONPORT80 =
2
PREREQ_WSE_INSTALLED = 1
VersionNT <> 500 or
ServicePackLevel>=4
VersionNT <> 501 or
ServicePackLevel>=2
VersionNT <> 502 or
ServicePackLevel>=2
PREREQ_IIS_INSTALLED=1
PREREQ_IIS_PATH_OCCUPIED=0
Product installation
requires administrator
privileges.
The application does not
support Windows 9.x and
Windows 2000 OS
versions.
Microsoft .NET
Framework Version 2.0
Redistributable Package
is not installed.
Installation checks if IIS is
configured to listen at
port 80.
Web Services
Enhancements (WSE)
2.0 SP3 is not installed
for the Microsoft .NET
Redistributable Runtime
MSI prerequisite
Service Pack 4 is not
installed on Windows
2000.
Service Pack 2 is not
installed on Windows XP.
Service Pack 2 is not
installed on Windows
2003 Server.
Microsoft Internet
Information Service is not
installed.
A virtual folder named
PaperPortPSP exists in
Microsoft Internet
Information Service
setup.
Log in as an administrator to install the
application.
Install the application on a Windows
XP or 2003 Server operating system
with the latest service pack (see
below).
Install this prerequisite.
To disable the check, use this
command-line parameter:
PREREQ_IIS_INSTALLEDONPORT80
Install WSE 2.0 SP3.
Install Service Pack 4 for Windows
2000.
Install Service Pack 2 for Windows XP.
Install Service Pack 2 for Windows
2003 Server.
Install IIS.
Remove this folder.
Error: The Administration Tool does not display on Windows 2003 Server
Description:
On launch, the following error message is displayed: “HTTP Error 404 - File or Directory
not found”.
Solution:
You need to permit IIS to serve dynamic content. For guidelines on how to resolve this
problem, see http://support.microsoft.com/kb/315122.
In addition to Active Server Pages, you also need to set ASP.NET to “Allow”.
Error: Administration Tool action buttons do not work
Description:
Such a situation may occur if Active Scripting is disabled in your internet settings. On
Windows 2003 Server, the default setting is “Disable”.
50

Solution:
Add the Administration Tool to the trusted zone or
Enable Active Scripting.
Using Internet Explorer under Windows 2003 Server, it implies the following steps:
1. Launch Internet Explorer.
2. Choose “Internet Options…” in the “Tools” menu
3. Go to the “Security” tab
4. Select “Zones” > “Internet”
5. Click the “Custom Level…” button
6. Choose “Scripting” > “Active scripting” and select the radio button “Enable”.
Error: Status warnings in the Managed Devices table (Devices panel of the
Administration Tool)
If the application is unable to communicate with the device properly, the Status column
displays question marks and/or error signals.
Solutions in possible scenarios:
The second, third and fourth icons are question marks: check and correct the device
administration logon information.
The second and third icons are question marks, and the fourth one is in yes/no status:
check and correct SNMP Community Name.
Error: Unregistration problem on a 73xx device
Description:
When trying to unregister the service from a 73xx device (via Administration Tool /
Configure device) you may get the following error message:
Unable to un-register the service.
Error: Server was unable to process request. --> Invalid State
The device cannot complete your request at the current time.
This means that a process is probably in use.
Solution:
1. Use the device screen to launch the registered service you see at the “All
Services” page.
2. Close the service.
3. Open the Device Configuration tab in the Administration Tool at your machine.
4. Click the “Unregister this Server” button.
Error: The server is configured to use FTP protocol, the device scans properly, but
documents are not delivered.
Solution:
Check if FTP protocol is enabled on the device.
51
Appendix
Enabling SSL
2xx devices
76xx devices
52

73xx devices
56xx devices
53

52xx devices
72xx devices
54
Enabling EIP
2xx devices
76xx devices
55
73xx devices
56xx devices
56
52xx devices
72xx devices
57

Enabling SNMP v1/v2c protocols
2xx devices
76xx devices
58

73xx devices
56xx devices
59

52xx devices
72xx devices
60

Enabling Scan Template Management
76xx devices
73xx devices
61

52xx devices
72xx devices
62

Third Party Licenses and Notices
This product was developed using SNMP. Copyright (c) 2003-2004 Military
Communication Institute, Zegrze, Poland
63
 Loading...