

Page 1

Contents
Tektronix Supplies and Accessories 9
Print Quality Modes 16
TekColor™ Color Corrections 17
Paper Tips 18
Letterhead 19
Supported page sizes and image area 20
Paper and Transparency Trays 21
Paper Tray 21
Transparency Tray 22
Loading Paper or Transparency Tray 23
Multi-Purpose Tray 25
Overview 25
Loading the Multi-Purpose Tray 27
Loading Special Media 31
Tektronix Transparencies 31
Printing #10 Envelopes 33
Printing on Tektronix Color Laser Labels 36
Automatic 2-Sided Printing 39
Manual 2-Sided Printing From the Multi-Purpose Tray
43
Troubleshooting Print Quality 46
Symptom: Problem in one color only 48
Symptom: Problem in all four colors 50
Symptom: All four colors are solid black 52
Symptom: All four colors are extremely faded 52
Symptom: Pieces of print image missing all four
colors 54
Media Jams 55
Preventing media jams 55
Jam-Wrong Media 55
Jam at A 56
Jam at B (Lower Tray Assembly Only) 57
Combined User and Troubleshooting Manuals
1
Page 2

Jam at C 58
Jam at D 60
Jam at E 62
Jam at Multi-Purpose Tray 63
Jam at Duplex Unit 64
Getting Help 66
The front panel Help button: 66
Printer CD-ROM 66
Tektronix web site 67
TekSMART™ Knowledge Base 67
PhaserLink™ Software 67
Color Connection 68
Other online services 68
Controlling Color Density 69
Print and use the Color Reference Page 69
Fonts 71
Resident typefaces (PostScript) 71
Resident typefaces (PCL5C) 71
Downloading fonts 72
Downloading fonts from a Macintosh 73
Printing a list of resident fonts 74
From a Macintosh 74
From a PC or workstation 74
Image Smoothing 75
Quick Collate 76
Requirements 76
Separation Pages 77
PANTONE Colors 78
Methods of printing PANTONE Colors 78
PANTONE Colors from color selection books 78
2
Phaser 850 Color Printer
Page 3

Printer-specific PANTONE Colors 78
Installing the PANTONE Color files 79
From the Web 79
Printing the PANTONE Color Chart 80
Macintosh 80
PC 81
PhaserPrint Plug-in for Photoshop 82
Installing the plug-in: Macintosh 82
Installing the plug-in: Windows 83
Using the plug-in 84
Selecting options in the PhaserPrint dialog box 85
Number of copies 85
Print using (Macintosh) 85
Print using (Windows) 86
Printer model 86
Media size (selection) 86
Color Correction 86
Media 87
Quality 87
Rendering Intent 87
Compress Image Data 87
Fast preview 87
1st Page Preview 88
Image Smoothing 88
Stylized representation of the page 88
Scaling an image 89
Landscape orientation 89
Center images 89
Replicate images 89
Image size 89
Image separation 90
Number of images 90
Image layout 90
Media size (display) 90
Combined User and Troubleshooting Manuals
3
Page 4

Show color preview of image 90
Printer Utilities 91
Locating the files on the printer’s CD-ROM 92
Installing the utility files for Macintosh 92
Installing the files for PC 92
Locating files on the Tektronix World Wide Web site
93
Locating files on the Tektronix FTP server 94
Downloading files to the printer from a Macintosh 95
Using the Apple Printer Utility to download files
95
Using the Apple Printer Utility to perform other
tasks 96
Downloading files to the printer from a PC 97
Downloading files from Windows 3.1 97
Downloading files from Windows 95 / Windows
98 97
Downloading files from Windows NT 97
Downloading files if your printer is connected to a
Novell Netware network 98
Downloading files if your printer is connected
through PhaserPort 99
Downloading files if your printer is connected to
Windows NT 99
Advanced Printing Features for Phaser 750 Printers 100
Previewing with 1st Page Preview 100
Requirements 100
Use 1st Page Preview 100
Reset the timeout 101
Automatic tray switching 101
Output Order 101
Output Order: Face Up 102
Output Order: Face Down 102
4
Phaser 850 Color Printer
Page 5

Output Order hints 102
Intelligent Ready mode 102
Adjusting margins 103
Adjusting margins for a single-sided print 103
Adjusting margins for a duplex print 104
Adjusting Color Density 106
Calibrating Colors 106
Print and use the Color Reference Page 106
Adjust the colors 106
Calibrate for Paper 108
Color Sampler Charts for Phaser 750 Printers 109
Overview 109
Color charts 110
Printing a color sampler chart from the Phaser 750
printer’s front panel 111
Selecting a color correction and a print quality
mode 111
Printing a color sampler chart 111
Printing the desired colors from an application 111
Printing the color sampler charts with utility files 112
From a Macintosh 112
From a PC or workstation 112
Troubleshooting Phaser 750 Printers 113
Useful tools 113
Diagnostic Test Print 113
Color Density Samples and Color Reference Page
113
Printer CD-ROM 113
Windows driver help system 114
Color Connection 114
PhaserLink™ Software 114
Tektronix web site 114
Combined User and Troubleshooting Manuals
5
Page 6

TekSMART™ Knowledge Base 115
Other online services 115
Internal Printer Pages 115
Front panel messages 117
Indicators 117
Messages 117
Maintaining print quality 119
Basic rules for troubleshooting 119
Print quality problems 120
Printing problems 131
Print quality hints 136
Media hints 137
Media handling 137
Double-sided printing 137
If your printer has an Automatic Duplex/Lower
Tray Assembly installed 137
Specialty media 137
Improving print speed 138
Printed colors are not what you expect 140
Printing PANTONE Colors 143
Using the Tektronix halftone screens 143
Selecting page sizes in Windows applications 144
Fonts printing incorrectly from Windows 145
Sharing the printer on a network 145
Driver, utility files, and front panel interactions
145
If the Apple Printer Utility does not work
(AppleTalk) 145
Startup Page prints even though it is disabled 146
PostScript printing errors 146
Enabling the PostScript error report 147
Error codes 148
Enabling and disabling the Startup Page 150
Enabling and disabling the Intelligent Ready feature
6
Phaser 850 Color Printer
Page 7

151
Protected mode for the front panel menu 152
Macintosh utility files: 152
PC utility files: 152
Enabling and disabling SysStart Job execution 153
Macintosh users 153
PC and workstation users 154
Problems printing on labels 155
Labels are printed on the wrong side 155
Printing labels from Microsoft Word 155
Cleaning Phaser 750 Printers 156
Paper-pick rollers (a) 156
Paper-feed rollers (b) on the Lower Tray Assembly
156
Duplex Unit 156
Sensor 156
Cleaning the sensor 157
Cleaning other rollers 157
Supplies for Phaser 750 Printers 158
Coverage Examples 158
Toner Cartridges 159
Imaging Unit 160
Fuser 160
Fuser Roll and Cleaning Pad 161
Transfer Kit 161
Main Charge Grid 162
Supplies life information 162
Using the information on the Supplies Page 163
Regulatory Information for Phaser 750 Printers 164
Canadian EMC (Electromagnetic Compatibility)
regulatory standards 164
Declaration of conformity 165
Combined User and Troubleshooting Manuals
7
Page 8

for 220-230 VAC equipment 165
FCC Class B device 167
for 100-120 VAC equipment 167
Material Safety Data Sheets for Phaser 750 Printers 168
MSDS for Toner 169
Environmental Specifications
(Temperature/Humidity/Power) 171
Index 173
8
Phaser 850 Color Printer
Page 9

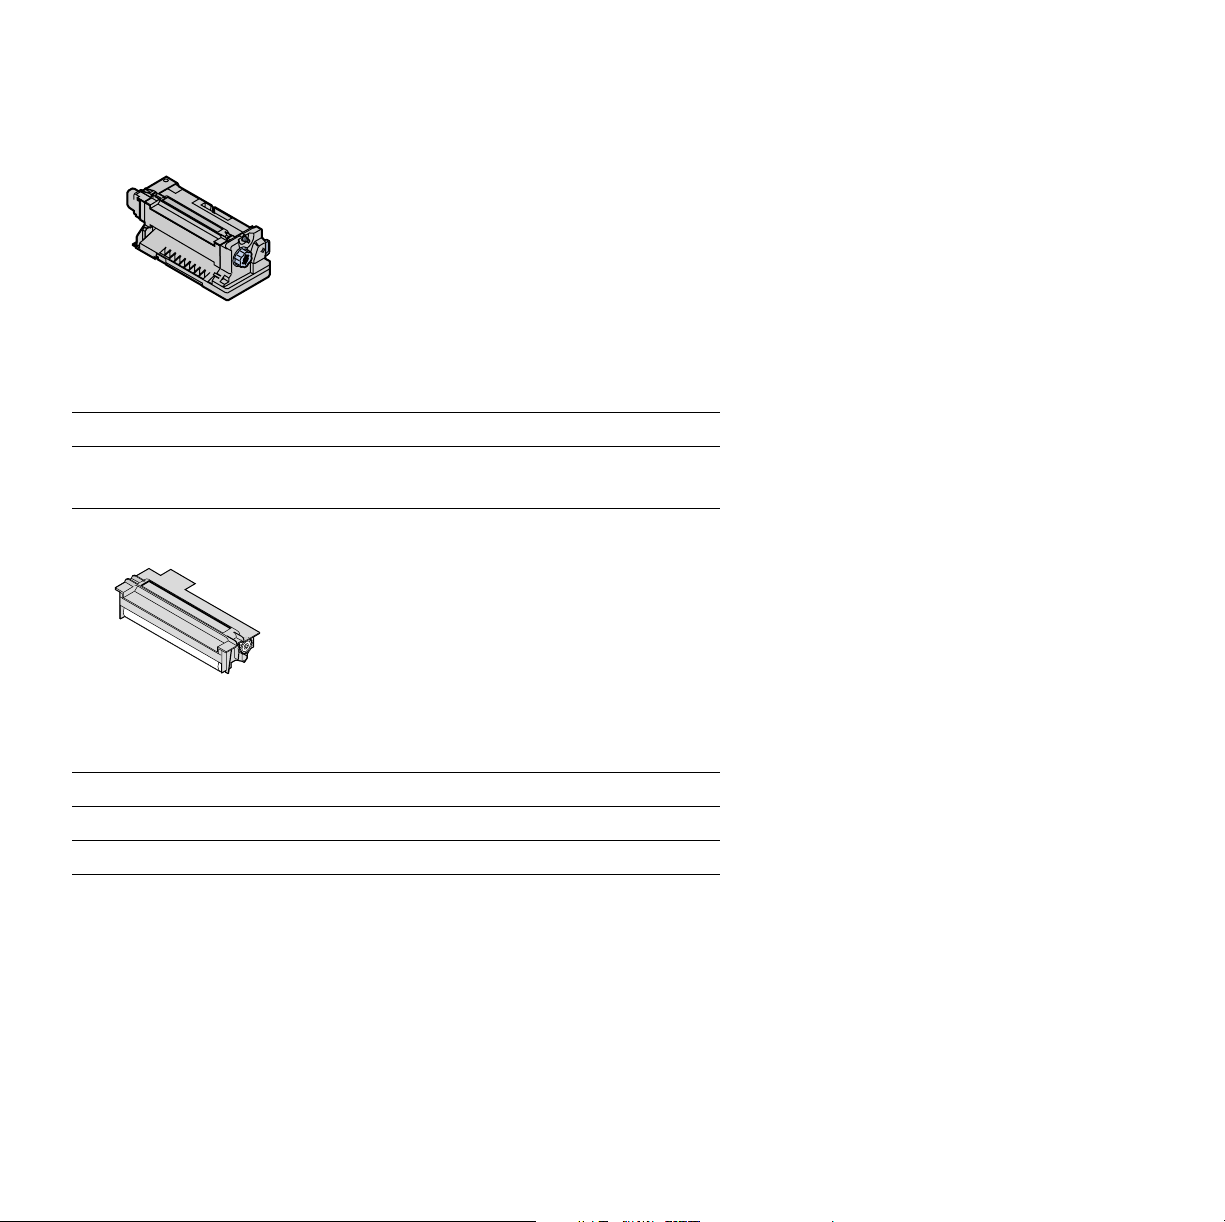
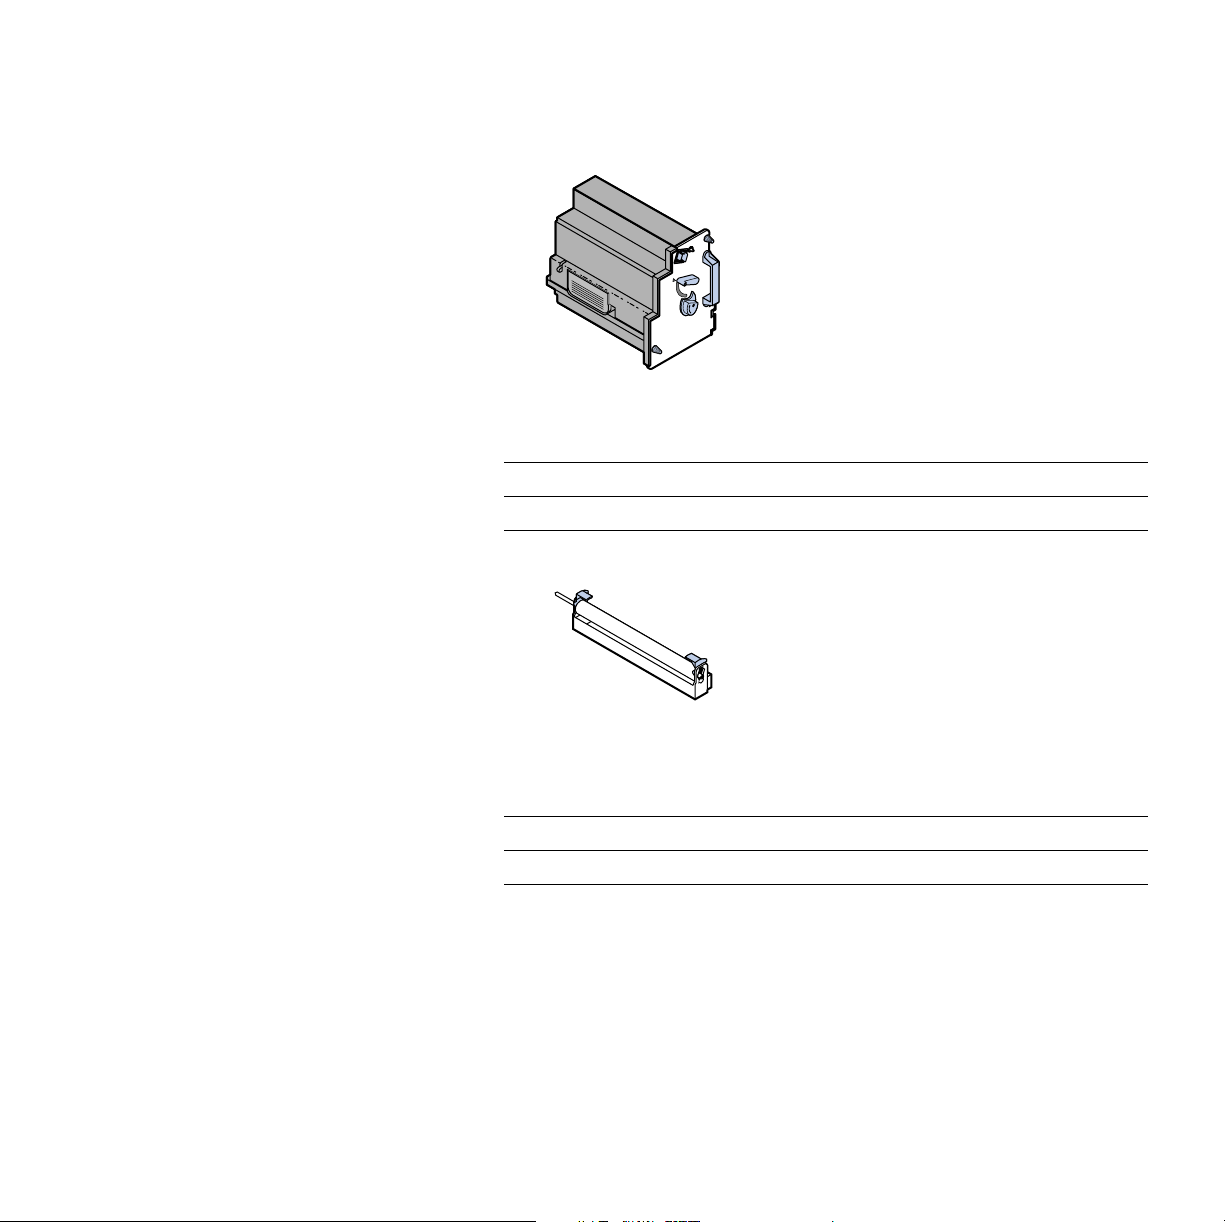
Tektronix Supplies and Accessories
Note
Imaging Unit
& Main Charge
Grid
Front
Door
Fuser
& Fuser
Roll
Inside the printer, all handles, knobs, and other features that
the user interacts with are blue.
Front Panel
Display
Toner
Cartridges
Toner
Door
0632-61
Supplies
When the front panel prompts you that a supply is low or needs to be
replaced, make sure that you have replacements on hand. To order
supplies and accessories, contact your local dealer or visit the
Tektronix web site:
www.tek.com/Color_Printers/supplies/
User Guide
9
Page 10

33100-33
Supplies
High Capacity Toner Cartridges
Item Part Number
Cyan
Magenta
Yellow
Black
Standard Toner Cartridges
Item Part Number
Cyan
Magenta
Yellow
Black
016-1800-00
016-1801-00
016-1802-00
016-1803-00
016-1804-00
016-1805-00
016-1806-00
016-1807-00
0236-44
Main Change Grid
Item Part Number
Main Charge Grid 016-1665-00
10
Phaser 750 Color Printer
Page 11
33100-35
Fuser
Item Part Number
110 volt
220 volt
33100-36
016-1839-00
016-1840-00
Fuser Roll and Cleaning Pad
Item Part Number
Fuser Roll (with Cleaning Pad) 016-1843-00
Fuser Cleaning Pad 116-0329-00
User Guide
11
Page 12
0236-41
Imaging Unit
Item Part Number
Imaging Unit (Color Imaging Kit) 016-1841-00
0236-43
Transfer Kit
Item Part Number
Transfer Kit 016-1842-00
12
Phaser 750 Color Printer
Page 13

Tektronix Professional Printing Paper
Item Size Description Part Number
Premium Color Printing
Paper
A/Letter (U. S.)
8.5 x 11 in.
500 sheets 016-1368-00
Premium Color Printing
Paper
Glossy Coated Paper A/Letter (U. S.)
Glossy Coated Paper A4 (Metric Letter)
Premium Cover Paper A/Letter (U. S.)
Premium Cover Paper A4 (Metric Letter)
A4 (Metric Letter)
210 x 297 mm
8.5 x 11 in.
210 x 297 mm
8.5 x 11 in.
210 x 297 mm
500 sheets 016-1369-00
100 sheets 016-1704-00
100 sheets 016-1705-00
100 sheets 016-1823-00
100 sheets 016-1824-00
Tektronix Transparency Film
Item Size Description Part Number
Premium A/Letter (U. S.)
8.5 x 11 in.
Premium A4 (Metric Letter)
210 x 297 mm
Standard A/Letter (U. S.)
8.5 x 11 in.
Standard A4 (Metric Letter)
210 x 297 mm
50 sheets 016-1427-00
50 sheets 016-1428-00
50 sheets 016-1431-00
50 sheets 016-1432-00
Tektronix Color Laser Labels
Size Description Part Number
A/Letter (U. S.)
8.5 x 11 in.
A/Letter (U. S.)
8.5 x 11 in.
100 sheets / 30 labels per sheet
1.0 x 2.625 in. labels
100 sheets / 6 labels per sheet
3.33 x 4.0 in. labels
016-1695-00
016-1696-00
User Guide
13
Page 14

Tektronix Color Laser Labels
Size Description Part Number
A4 (Metric Letter)
210 x 297 mm
A4 (Metric Letter)
210 x 297 mm
100 sheets / 14 labels per sheet
38.1 x 99.1 mm labels
100 sheets / 8 labels per sheet
67.7 x 99.1 mm labels
016-1688-00
016-1689-00
Paper Trays
Item Paper Capacity Part Number
A/Letter (U. S.) 250 sheets 436-0282-02
A4 (Metric Letter) 250 sheets 436-0283-02
U. S. Legal 250 sheets 436-0314-02
Transparency Trays
Item Part Number
A/Letter (U. S.) 436-0284-02
A4 (Metric Letter) 436-0285-02
Printer Station
Features Part Number
Ergonomic surface height
■
■
Provides storage for supplies
ZCARTA
Internal Hard Drive
Feature Part Numbers
■
Adds collation
■
User documentation on disk
Enhanced Job Accounting
■
■
Enhanced PhaserLink features
14
Z750HD
Phaser 750 Color Printer
Page 15

Automatic Duplex/Lower Tray Assembly
Features Part Number
Automatic duplex with the Duplex Unit
■
■
Lower Tray Assembly with:
■
1 Paper Tray
■
1 Transparency Tray
■
Increased paper-printing capacity
Increased printing versatility and convenience.
■
U.S./Standard:
ZDPLX Option 00
Metric: ZDPLX
Option 01
PhaserShare® Token Ring Network Card
Features Part Number
■
Easy to install
■
Token Ring connectivity
ZNBTR
Additional memory
Feature Part Numbers
Improved performance
64 Mbytes
■
■
128 Mbytes
ZMC64
ZMC128
User Guide
15
Page 16

1.
2.
Print Quality Modes
You can select the Print Quality mode in the follow ways:
From the software driver. (This always overrides the front panel
setting.)
From the printer’s front panel. Press Menu, scroll to Print Quality,
press Menu, and select a Print Quality Mode.
Black and White
Fast Color
Standard
Enhanced
Premium
Converts all colors to black, white, and shades of
gray. Prints at 1200 x 600 dpi.
Fastest color print mode. Prints at 600 x 600 dpi
using only the cyan, magenta, and yellow toners;
black is a composite color. Not recommended for
black text.
General-purpose mode for color printing. Prints at
600 x 600 dpi using all four color toners.
Transparencies are always printed in Standard mode
even if another mode is selected.
Produces superior text resolution and smooth colors.
Prints at 1200 x 600 dpi.
Produces the highest-quality color prints at 1200 x
1200 dpi. Available only on 750P, 750DP, and the
750DX configurations.
16
Phaser 750 Color Printer
Page 17

1.
2.
TekColor
Color Corrections
™
You can select the TekColor™ Color Correction mode in the following
ways:
From the software driver. (This always overrides the front panel
setting.)
From the printer’s front panel. Press Menu, scroll to Print Quality,
press Menu, and select a TekColor™ Color Correction.
Automatic
None
Vivid Color Produces the brightest possible colors. Makes blue colors
sRGB Display Closest match to computer screen colors.
SWOP Press Specification for Web Offset Publications. Use to match U. S.
Euroscale
Press
Commercial
Press
Optimizes colors for each element (text and graphics) on the
page. Best all-purpose selection.
No color correction applied. Use with printer specific (i.e.,
using the printer’s PANTONE® Color chart) PANTONE®
Colors or when no correction is desired.
appear less purple. Use when printing transparencies.
press standards.
Use to match equivalent Imation Matchprint® proofs.
Use to match commercial Imation Matchprint® proofs. Best
choice for comps.
Features
DIC Use to match Dai Nippon printing inks on coated paper.
Toyo Use to match commercial Toyo printing inks on coated
Use Printer
Setting
paper.
Uses the selection made at the printer's front panel.
To set a printer default TekColor correction:
■ At the READY menu, press Menu.
■ Scroll to Print Quality, press Menu.
■ Scroll to TekColor Correction, press Menu.
■ Scroll to the correction, press OK.
User Guide
17
Page 18
Paper Tips
Caution
Do not use any media designed for inkjet printers, especially
inkjet coated paper and inkjet transparencies. Inkjet media is
coated with a substance that will damage the fuser. Tektronix
does not furnish warranty service for damage or malfunction
caused by the use of non-Tektronix supplies or consumables.
Always use Tektronix media that has been specially designed
for use with Tektronix Laser Printers.
■ To prevent Jam-Wrong Media errors, load only paper in the PAPER
tray and Tektronix transparencies in the TRANSPARENCY tray or
Multi-Purpose tray.
■ If you have the Automatic Duplex/Lower Tray Assembly:
■ Insert the Duplex Unit only in the upper (a) slot.
■ Insert the TRANSPARENCY tray only into the middle (b) tray
slot.
Paper Tips
■ Insert the PAPER tray into the middle (b) or lower (c) slot.
■ Always use the Multi-Purpose Tray (d) for specialty media.
d
a
x
e
l
p
u
D
A
b
r
e
t
t
e
r
L
/
e
p
a
P
c
l
a
g
e
r
e
L
p
a
P
0236-06
■ When loading the Multi-Purpose Tray, the front panel
automatically prompts you to select the media type and media
size.
18 Phaser 750 Color Printer
Page 19

■ When you select a media tray by location (Upper, Middle, Lower,
Multi-Purpose Tray), the printer picks from that tray, regardless
of the tray’s media type or size.
■ Always keep media in a sealed package to avoid the effects of
humidity, which can affect print quality.
Letterhead
■ For printing letterhead:
■ In the PAPER tray put this material face-down.
■ In the Multi-Purpose Tray put this material face-up.
User Guide 19
Page 20

Supported page sizes and image area
23451
0632-57
The printer supports five media sizes, which you select in the Print
screen (using a supported printer driver).
Margins
Media Page size Print area Top /
1 Letter
2A4
3 Legal
4 Executive
5 #10
Envelope
8.5 x 11 in. 8.21 x 10.56 in. .22 in. .14 in.
210 x 297 mm 200 x 287 mm 5 mm 4.8 mm
8.5 x 14 in. 8.2 x 13.5 in. .23 in. .14 in.
7.25 x 10.5 in. 6.93 x 10.31 in. .22 in. .15 in.
4.13 x 9.5 in.
(104.8 x
3.8 x 9.2 in.
(96.5 x 233.7 mm)
Bottom
.16 in.
(4.1 mm)
241.3 mm)
Sides
.14 in.
(3.6 mm)
20 Phaser 750 Color Printer
Page 21
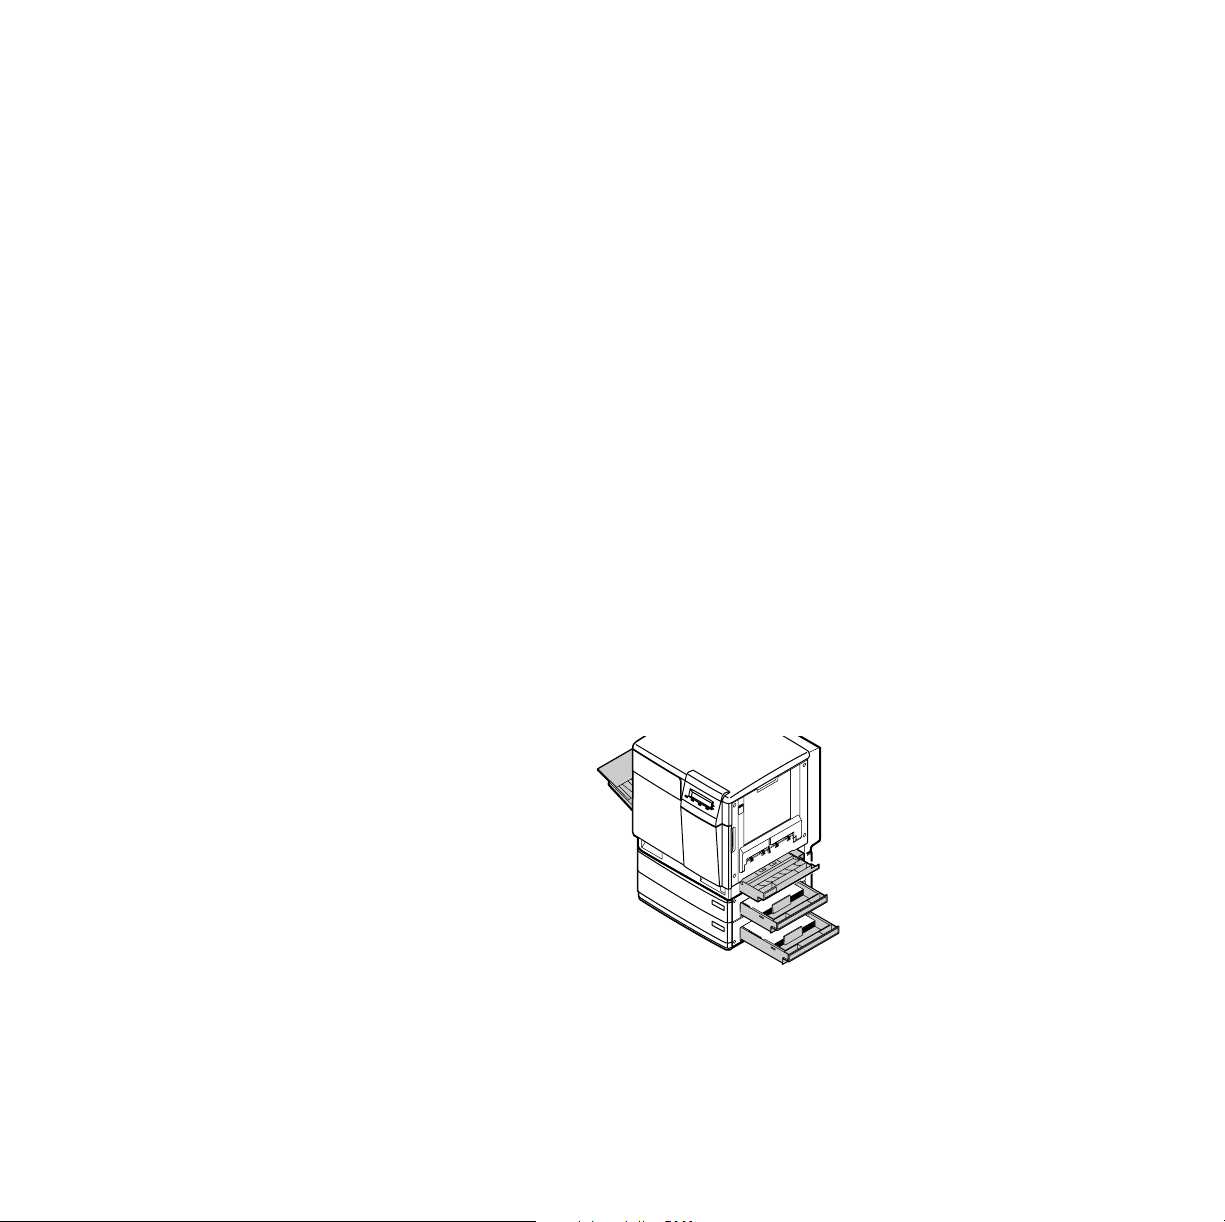
Paper and Transparency Trays
PAPER
A/Letter
PAPER
A4
PAPER
Legal
Paper Tray
PAPER
4
A
0632-01
■ 250-sheet capacity
■ 60 - 90 g/m
■ Use Tektronix Premium Color Printing Paper or Premium Laser
Bond Paper for best results.
2
(16 - 24 lb.)
■ Paper only. Do not load transparencies.
Note
Load only laser paper in the paper trays. Specialty papers
such as Tektronix Glossy Coated Paper, Tektronix Premium
Cover Paper, envelopes, and Tektronix Laser Labels must be
loaded in the Multi-Purpose Tray.
Do not use transparency in the P
APER tray. This will result in
a Jam-Wrong Media error.
User Guide 21
Trays
Page 22
TRANSPARENCY
A/Letter
TRANSPARENCY
A4
Transparency Tray
Y
C
N
E
R
A
P
S
N
4
A
A
R
T
0632-02
■ Use only Tektronix transparencies. See page 9 for supplies
ordering information. For information on Tektronix
transparencies, visit the Tektronix web site:
www.tek.com/Color_Printers/products/supplies/trans/index.html
■ Install the transparency tray only in the printer’s upper or middle
tray slots. If this tray is installed in the lower tray slot, a front
panel error occurs that stops the print job. The transparency tray
must then be moved to the upper or middle tray slot.
Caution
Use of non-Tektronix transparencies can damage printer
components or produce poor image quality.
Do not load paper in the Transparency tray, this will result in
Trays
■ Tektronix transparencies
a Jam-Wrong Media error.
■ Use only Premium or Standard Tektronix transparencies (see
page 9 for supplies ordering information)
■ 100-sheet capacity
22 Phaser 750 Color Printer
Page 23

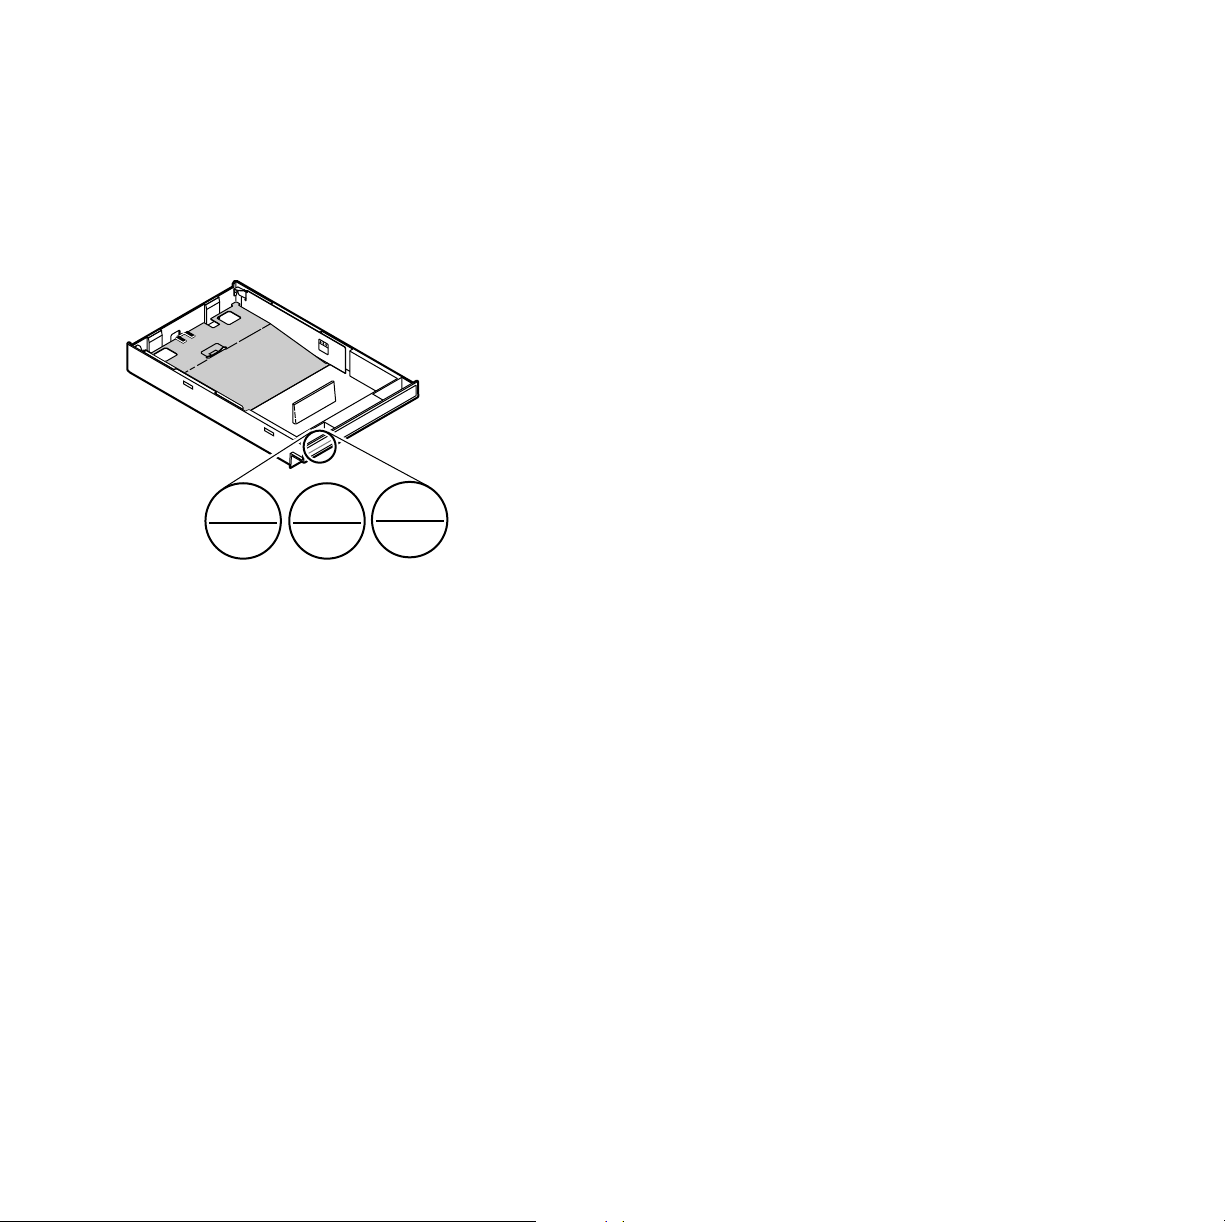
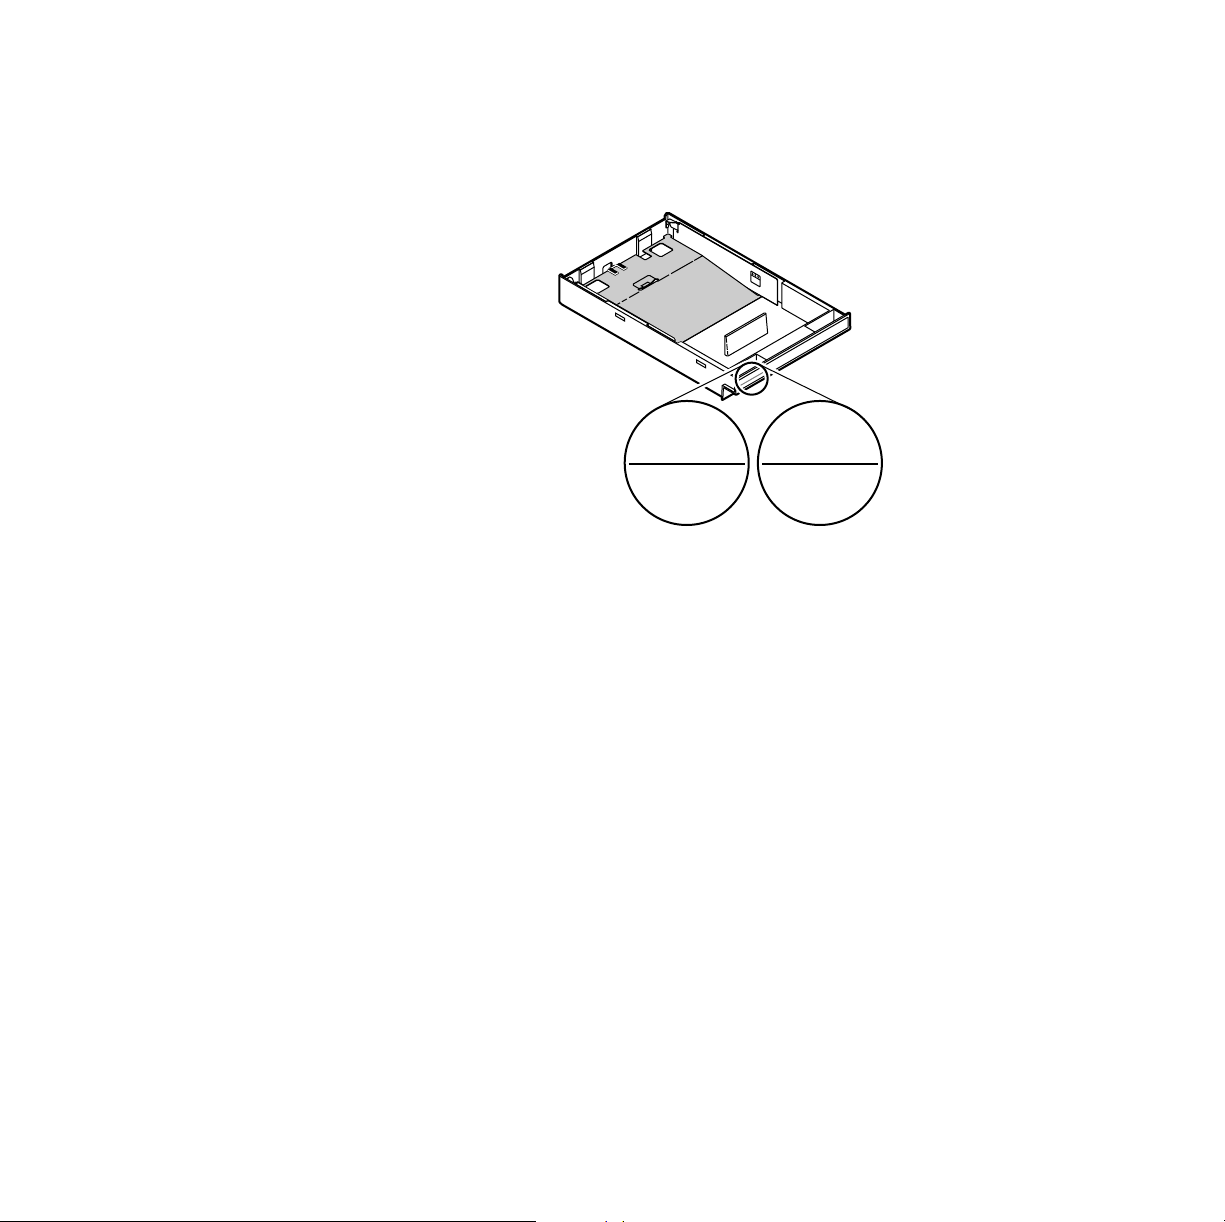
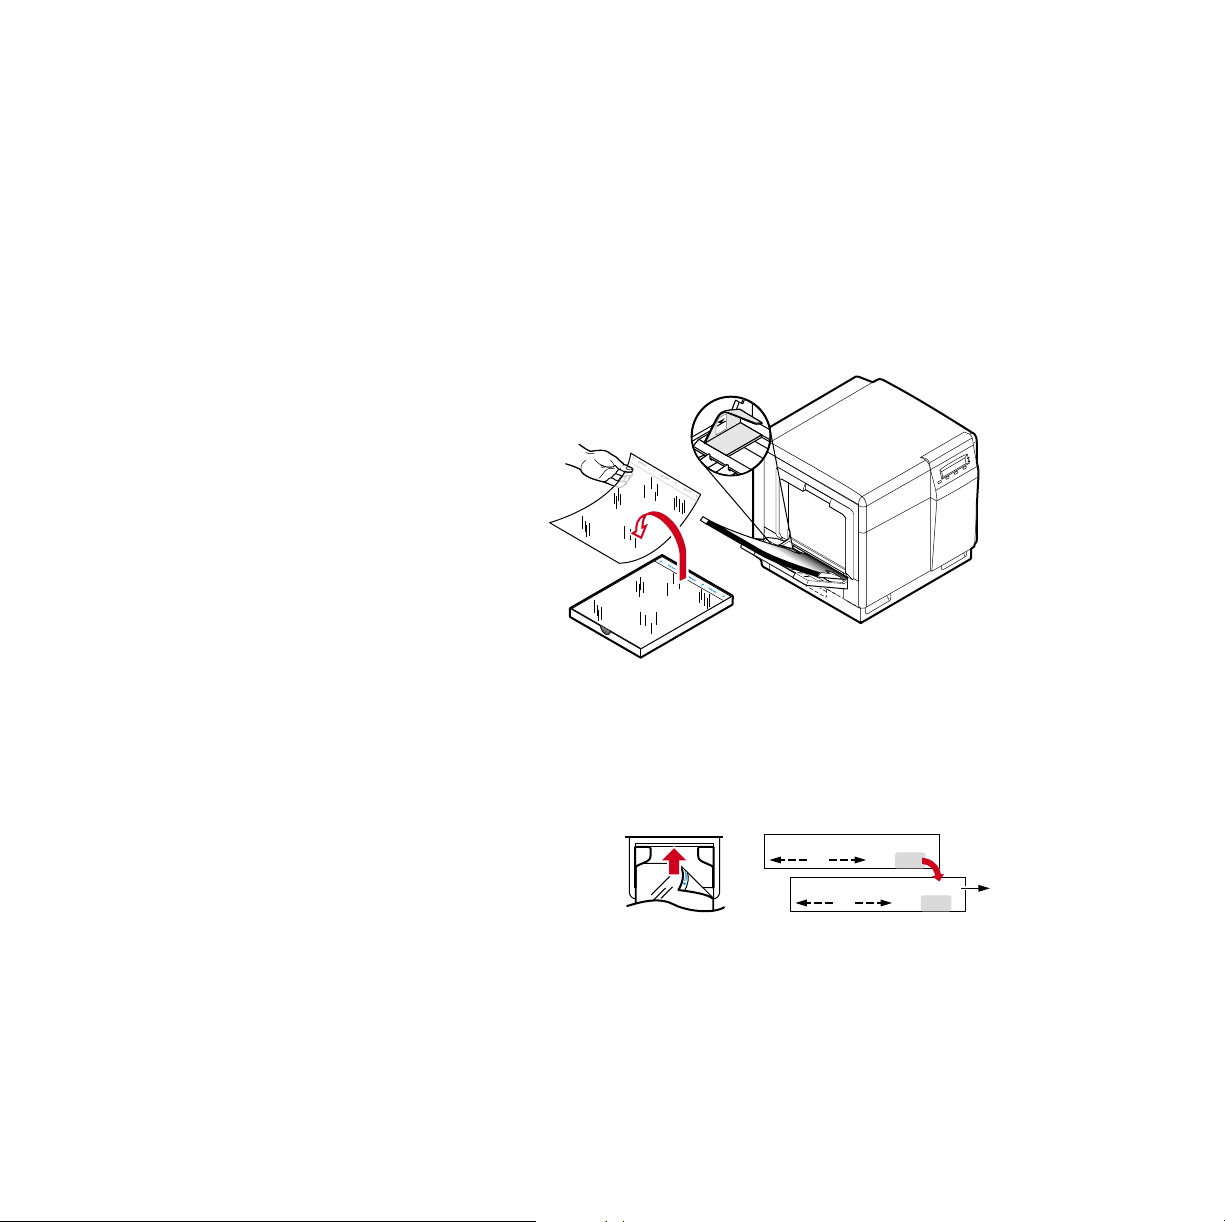
Loading Paper or Transparency Tray
Note
Place the side to be printed (for example, letterhead paper)
face-down under the hooks.
1. Push down on the tray’s metal plate until it clicks, locking it in
place.
R
E
P
A
P
4
A
0632-08
2. Fan the media to release sheets that are stuck together.
0632-09
User Guide 23
Page 24
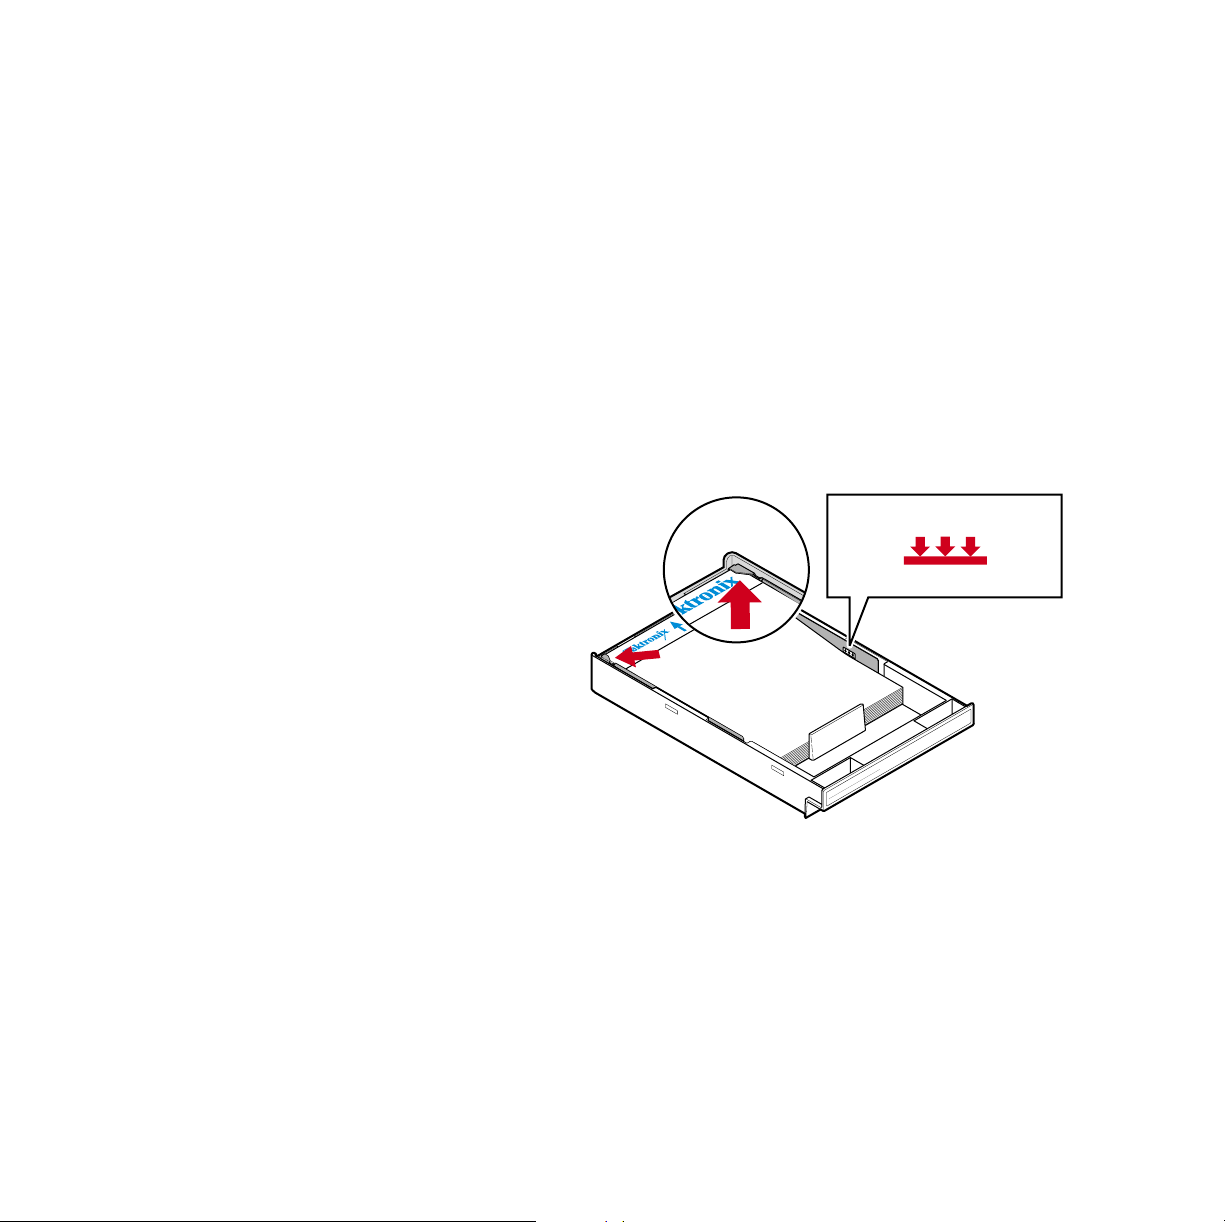
3. Place the media in the tray under the hooks.
Caution
Keep the media level below the indicator on the tray’s
label; otherwise, the printer may jam or be damaged.
■ Letterhead: Load this material face-down under the tray
hooks.
■ Transparencies: Place the Tektronix logo strip face-up under
the transparency tray hooks. Use Tektronix transparencies
only.
MAXIMUM TRAY LEVEL
A4
TRANSPARENCY
0632-10
4. Tray capacity:
a. Paper tray 250 sheets
b. Transparency tray 100 sheets
5. Insert the tray.
■ For tray placement guidelines, see page 18.
24 Phaser 750 Color Printer
Page 25

Multi-Purpose Tray
Overview
Always use the Multi-Purpose Tray for speciality media; it supports
the following media types:
Supported Media Tray capacity Media thickness
Paper and Paper 2nd Side
75-105 g/m
2
, (20-28 lb.)
100 sheets Thin
Tektronix Transparency Film 50 sheets Normal
Tektronix Glossy Coated Paper 30 sheets Normal
Heavy paper:
■ Cover Stock
■ 120-163 g/m
■ Index Stock
■ 120-163 g/m
■ Card Stock
■ 120-163 g/m
2
), (40- 60 lb.)
2
, (60- 90 lb.)
2
, (32- 40 lb.)
30 sheets Thick
Tektronix Color Laser Labels 30 sheets Thick
#10 Envelopes 10 envelopes Thick
switch
Multi-Purpose Tray
User Guide 25
Page 26
Note
For the best coverage when using laser paper heavier than
105 g/m2 (28 lb.) in the Multi-Purpose Tray, select Heavy
Paper as the media type.
If the printer experiences frequent media jams at the
Multi-Purpose Tray, move the Media Thickness Switch to a
thicker setting. If the printer experiences frequent
double-feed errors at the Multi-Purpose Tray, move the
Multi-Purpose Tray
Media Thickness Switch to a thinner setting.
Thin Thick
Normal
33100-68
Note
The printer prompts you for the paper type and size. If the
wrong media is selected, the printer’s front panel displays a
Jam-Wrong Media message.
26 Phaser 750 Color Printer
Page 27
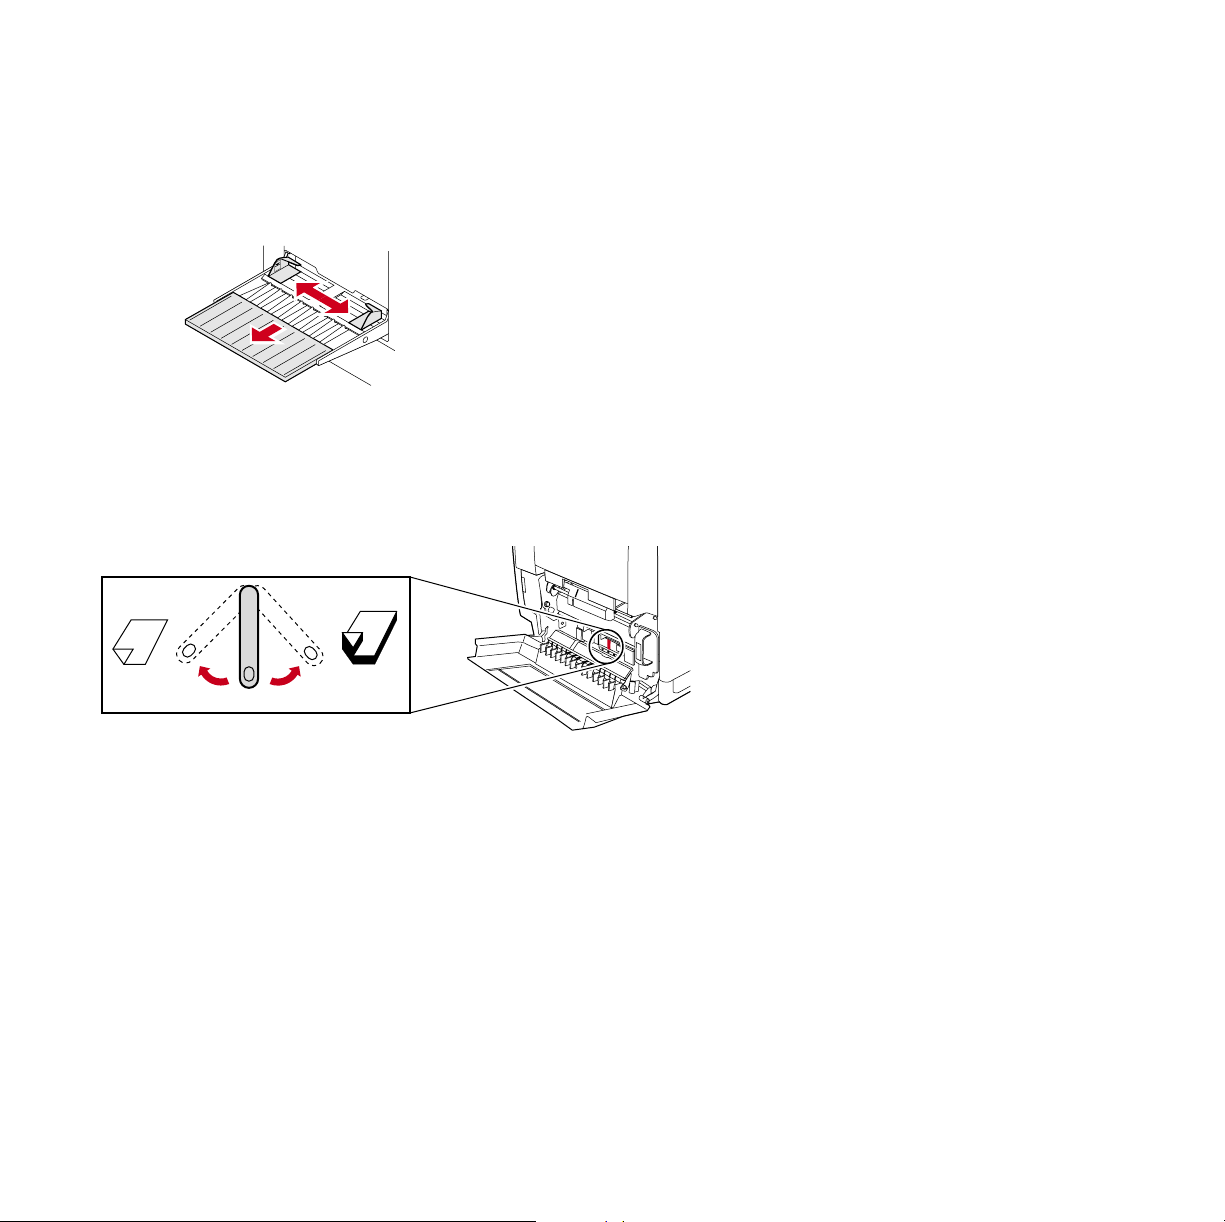
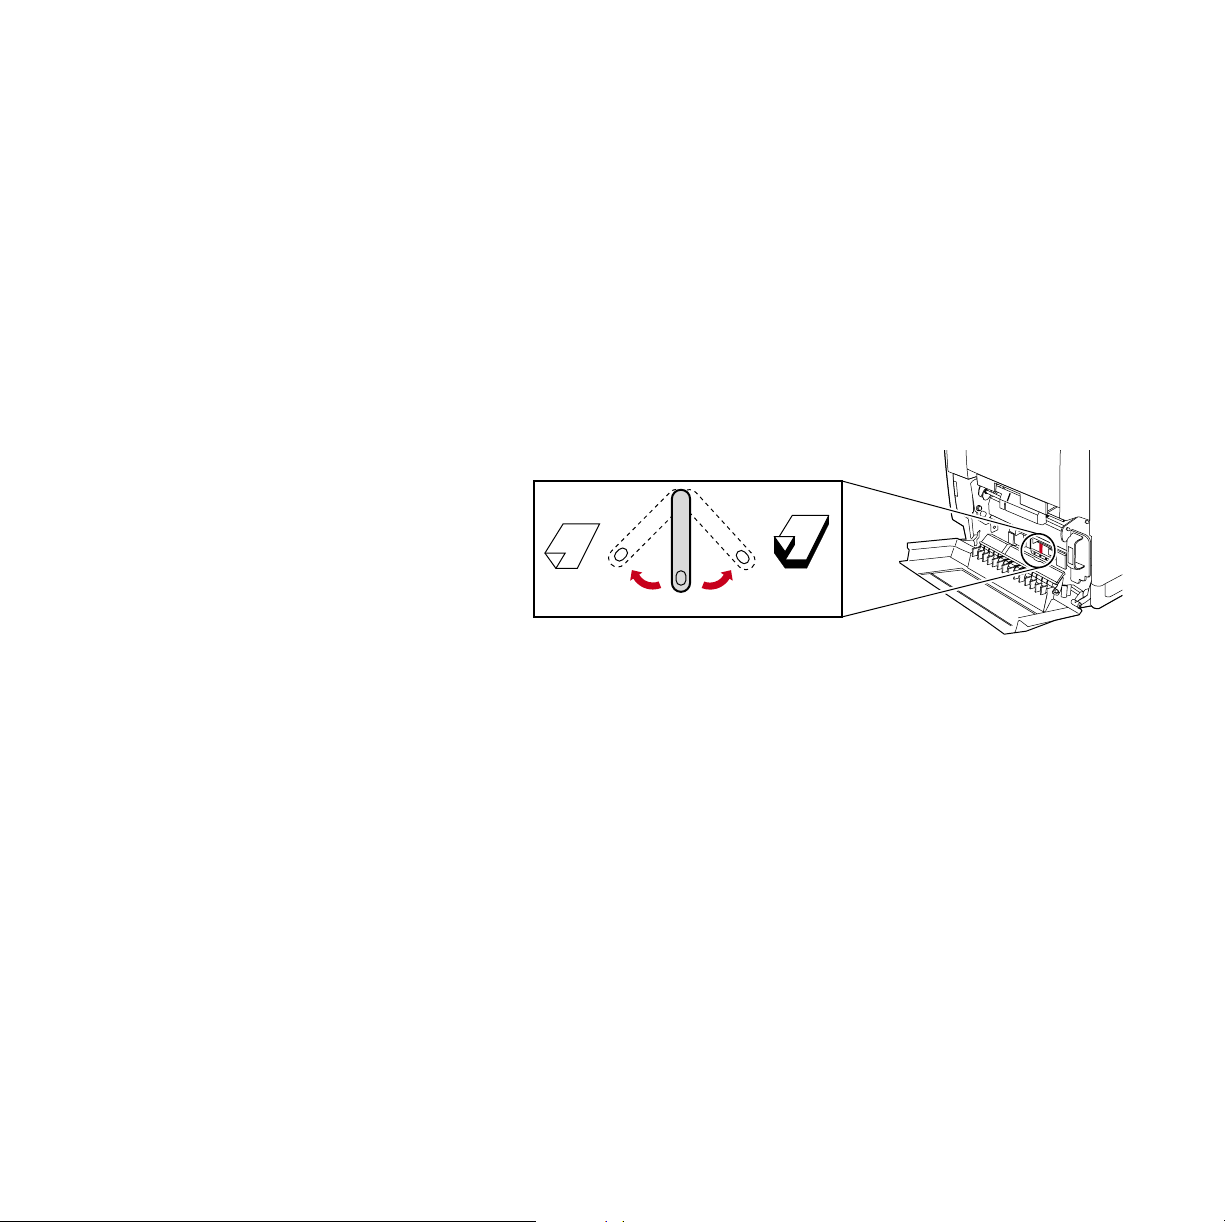
Loading the Multi-Purpose Tray
1. Pull out the slide and adjust the guides for the width of the media.
0632-11
2. Adjust the Media Thickness switch for the media you are using
(see page 25).
Thin Thick
Normal
33100-68
User Guide 27
Page 28
3. Insert the media:
■ For Tektronix Transparencies place the Tektronix strip
facing down and refer to page 31.
■ For Tektronix Color Laser Labels, place face-up and refer to
page 36.
■ For envelopes, place face-up and refer to page 33.
■ For letterhead, place face-up and refer to page 19.
0632-63
4. The front panel prompts you to select the media type and then the
media size:
Tektronix Transparency
Tek Transparency
Letter or A4
OK
OK
0632-44
28 Phaser 750 Color Printer
Page 29
Tektronix Glossy Coated Paper
Tek Glossy Coated Paper
OK
Letter
OK
Tektronix Premium Cover Paper
Heavy Paper
OK
Letter
OK
Tektronix Color Laser Label
Tek Labels
OK
Letter
OK
Paper
■ Letterhead
■ Office Laser Paper
■ Standard paper and letterhead 75 - 105 g/m
or A4
0632-45
or A4
0632-64
or A4
0632-47
2
(20 - 28 lb.)
Paper
Letter
OK
OK
Legal, A4,
or Executive
0632-48
User Guide 29
Page 30
Paper 2nd Side
■ Standard paper and letterhead 75 - 105 g/m
2
(20 - 28 lb.)
Paper-2nd Side
Letter
Heavy Paper
■ Cover Stock 120-163 g/m
■ Index Stock 120-163 g/m
■ Card Stock 120-163 g/m
Heavy Paper
Letter
Envelope #10
Envelope
# 10
2
(60 lb.)
2
(90 lb.)
2
(40 lb.)
OK
OK
0632-51
OK
OK
OK
OK
Legal, A4,
or Executive
0632-49
Legal, A4,
or Executive
0632-50
5. In the Print screen (using a supported driver), select
Multi-Purpose Tray. Send the job to the printer.
30 Phaser 750 Color Printer
Page 31

Loading Special Media
Tektronix Transparencies
1. Set the Media Thickness Switch to Normal.
Thin Thick
2. Adjust the tray’s guides for the width of your Tektronix
Transparencies.
3. Insert the transparency with the logo strip face-down, entering
the printer first.
Normal
33100-68
0632-16
Special Media
User Guide 31
Page 32

4. Fill the Multi-Purpose Tray to the level indicator on the guide
(maximum capacity is 50 sheets).
4
3
0236-13
5. At the front panel’s media type prompt, scroll to Tek
Transparency and press OK. Scroll to the media size Letter or A4.
Special Media
Tek Transparency
Letter or A4
OK
OK
0632-44
6. In the application’s Print screen under Tray Selection or Paper
Source, depending on the driver, select the Multi-Purpose Tray
and send the job to the printer.
32 Phaser 750 Color Printer
Page 33

Printing #10 Envelopes
1. Prepare each envelope: tuck in the envelope flap.
0632-22
2. Adjust the printer’s media thickness switch to Thick.
Thin Thick
Normal
33100-69
3. Adjust the printer’s media guides for the width of your envelopes.
e
c
p
a
l
m
P
a
e
t
r
S
e
H
e
c
p
a
l
m
P
a
e
t
r
S
e
H
0632-24
4. Insert the envelopes (maximum capacity is 10):
a. Short end enters first.
User Guide 33
Envelopes
Page 34

b. Side to be printed is face-up.
c. The edge where you place the stamp enters the printer first
in some applications; make a test print before proceeding.
5. At the front panel prompt, scroll to Envelope then scroll to #10
and press OK.
Envelope
# 10
OK
OK
0632-51
6. In your application create a document with these measurements:
■ Width: (104.1 mm), 4.13 in.
■ Length: (241.3 mm), 9.5 in.
■ Margins: (5 mm), 0.2 in.
7. Access the Page Setup menu and make these selections:
■ Paper Size: #10 Envelope
■ Orientation: Landscape
8. In the Print screen, use the supported printer driver, and make
this selection:
■ Paper Source: Multi-Purpose Tray
9. Send the job to the printer.
Envelopes
34 Phaser 750 Color Printer
Page 35

Guidelines for envelope printing:
Caution
Never use envelopes with windows or metal clasps; they will
damage the printer. Use envelopes that are at least #10-size.
(4.13 x 9.5 in. /104.8 x 241.3 mm)
■ Do not print on the envelope’s back side.
■ Keep unused envelopes in their packaging to avoid the
effects of moisture and dryness, which can affect print
quality and cause wrinkling.
■ Many applications include a tool for creating an envelope
document. For example, Microsoft Word includes an
Envelopes and Labels feature under the Tools menu. Make
sure that you select Face Up; select the feed method icon
showing the stamp end entering the printer first, with the
image centered; and unselect Clockwise Rotation.
■ Print a maximum of ten envelopes at a time.
■ Use envelopes that are at least #10-size
(4.13 x 9.5 in. / 104.1 x 241.3 mm).
■ No plastic windows or metal clips.
■ No exposed gummed surfaces.
■ Single-sided printing only.
■ Keep unused envelopes in their original packaging.
Note
This printer is not made to handle high-capacity production
envelope printing. Envelopes may wrinkle depending on
weight and stiffness of the envelope.
User Guide 35
Page 36

Printing on Tektronix Color Laser Labels
At the printer:
1. Adjust the printer’s media thickness switch to Thick.
Thin Thick
Normal
2. Insert the label sheets (maximum capacity is 30 sheets):
a. Side to be printed is face-up.
b. The top of the sheet enters the printer first.
0632-26
33100-69
36 Phaser 750 Color Printer
Page 37

3. At the front panel prompt, scroll to Tek Labels and press OK, then
scroll to the media size Letter or A4.
Tek Labels
Letter
OK
or A4
OK
0632-47
In the application:
Note
For printing Tektronix Color Laser Labels, you can use
common software settings.
4. If your application has a setting for Avery® labels, use it as a
template. Otherwise, refer to the instructions included with the
labels for margin settings. Use the Avery template for the
Tektronix labels.
Labels
Template Tektronix Labels
Letter:
5160 016-1695-00 (30 per sheet)
5164 016-1696-00 (6 per sheet)
Labels
A4:
L7163 016-1688-00 (14 per sheet)
L7165 016-1689-00 (8 per sheet)
5. In the Print screen, use the supported print driver, and select:
■ Paper Source: Multi-Purpose Tray and send the job to the
printer.
User Guide 37
Page 38

Guidelines for printing on labels:
■ Use Tektronix Color Laser Labels.
■ If any of the labels on a sheet are missing, do not use that
sheet; it may damage printer components.
■ When selecting Tek Label as the media type, the printer
requires that room temperature be cooler than 27 degrees C
Labels
(81 degrees F). If the temperature is above this, the printer
reports an error and stops printing.
38 Phaser 750 Color Printer
Page 39

Automatic 2-Sided Printing
Caution
Never put media in the Duplex Unit; the printer reports a
media jam.
Use only laser bond paper for automatic two-sided printing
in the paper tray. Do not use any special media (glossy coated
paper) to print automatic two-sided printing. Two-sided
printing can be done manually; refer to Manual 2-Sided
Printing From the Multi-Purpose Tray on page 43.
Automatic two-sided printing requires that the Lower Tray Assembly
be installed.
1. Make sure that the Duplex Unit is inserted in the printer’s upper
(a) slot.
a
x
le
p
r
u
e
p
D
a
P
A
b
r
e
tt
e
r
/L
e
p
a
P
c
l
a
g
e
r
e
L
p
a
P
0632-27
2. Load 75 - 90 g/m2 (20 - 24 lb.) paper in the paper tray.
If you are using pre-printed paper, such as letterhead:
a. Place the first side to be printed face-down.
2-Sided Prints
User Guide 39
Page 40

b. Place the top of the page under the paper tray’s hooks.
This example shows letterhead paper.
b
7
a
PAPER
4
A
6
5
4
3
2
1
0632-28
3. Insert the paper tray in the printer’s middle (b) or lower (c) tray
slots.
Note
For best results with two-sided printing, use 90 g/m2 (24 lb.)
laser paper.
2-sided Prints
4. Decide on a binding preference (how the page turns) for Step 5:
a. Long-Edge binding or uncheck Bind on top edge.
0632-29
40 Phaser 750 Color Printer
Page 41

b. Short-Edge binding or check Bind on top edge.
0632-30
5. In the Print screen, select the 2-Sided Printing option and a
binding preference:
PC Drivers:
Windows 95/ Windows 98
a. From the File menu, select Print.
b. Click Properties.
c. Click the Setup tab.
d. Click Print on 2-Sides option.
e. Check or uncheck Bind on top edge.
Windows NT4
a. Start/Settings/Printers.
b. Right-mouse-button-click on your printer’s icon.
c. From the pop-up menu, select Document Defaults.
d. Click the Advanced tab.
e. Under Paper/Output, select Print on Both Sides.
f. Select Long Side or Short Side.
User Guide 41
Page 42

Macintosh Drivers:
LaserWriter 8.6
a. From the File menu, select Print.
b. From the pull-down menu, choose Layout.
c. Select Print on Both Sides.
d. Select a binding preference.
LaserWriter 8.3.4
a. From the File menu, select Print.
b. Click the Options button.
c. Select 2-Sided Printing.
d. Select Short-Edge Binding or Long-Edge Binding.
6. Send the job to the printer.
42 Phaser 750 Color Printer
Page 43

Manual 2-Sided Printing From the Multi-Purpose Tray
Side 1
Caution
Use only laser bond paper for the automatic two-sided
printing in the paper trays. The Multi-Purpose tray should be
used for manual two-sided printing on Tektronix Premium
Color Printing Paper, Tektronix Glossy Coated Paper, or
Heavy Paper. Two-sided printing on specialty media can
shorten component life. For opacity and feed reliability, use
laser paper that is 90 g/m2 (24 lb. bond). For best results, do
not use heavy toner coverage on Side 1 of a manual 2-Sided
Print; also, increase the top margin on Side 1 to at least
12mm (or .5 in.).
■ For a multi-page document, print odd-numbered pages for Side 1.
(This selection is application-specific).
1. Set the media thickness switch; refer to page 25 for the correct
setting.
User Guide 43
Page 44

2. Insert paper with the side to be printed face-up.
This example shows letterhead paper.
1234567
32564-06
3. In the printer’s front panel, select the media type and size at the
prompt.
Front Panel Media Type
Paper
■ Standard laser paper, 75-105 g/m
(20-28 lb.)
2
Tektronix Glossy Coated
■ Tektronix Glossy Coated Paper
Paper
Heavy Paper ■ Card stock, 120 - 150 g/m2 (32 - 40 lb.)
■ Cover stock, 120 - 150 g/m
■ Index stock, 120 - 150 g/m
■ Heavy laser paper, 120 - 150 g/m
2
(40 - 54 lb.)
2
(60 - 80 lb.)
2
(32 - 40 lb.)
4. In the Print screen (using a supported driver), select
Multi-Purpose Tray as the Paper Source or Tray Selection. Send
the job to the printer.
5. Remove the printed paper from the output tray.
44 Phaser 750 Color Printer
Page 45

Side 2
Note
For a multi-page document, print even-numbered pages for
Side 2. (This selection is application-specific).
1. Insert the paper with the blank side face-up.
1234567
32564-07
2. In the printer’s front panel, select the media type and size at the
prompt.
3. In the Print screen (using a supported driver), select
Multi-Purpose Tray as the Paper Source or Tray Selection. Send
the job to the printer.
4. Remove the printed paper from the output tray.
User Guide 45
Page 46

Troubleshooting Print Quality
For detailed troubleshooting information, refer to the printer’s
CD-ROM or the Tektronix Color Printer Knowledge Base web site:
www2.tek.com/TekSMART/
If you notice a problem with the quality of your prints, the probable
solution is replacing one of the supplies. Keep in mind this basic
guideline:
■ If the symptom appears in a single color:
Replace the Toner Cartridge.
■ If the symptom appears in all colors:
Replace the Imaging Unit, or Fuser, or Fuser Roll, or
Main Charge Grid, or Transfer Kit.
To diagnose the problem, check these items:
1. Check the front panel for messages on replacing supplies.
46 Phaser 750 Color Printer
Page 47

2. From the Help menu, scroll to Supplies Information, press OK
ack
Pages Remaining: >500 @ 5% coverage
Standard Reorder: 0
Hi-Capacity Reorder: 0
agenta
Pages Remaining: >500 @ 5% coverage
Standard Reorder: 0
Hi-Capacity Reorder: 0
0% 50% 100%
32
%
Life Remaining
Serial #:
Avg. Coverage/Image: 5.8%
Date Installed: Sep 1, 1999
0% 50% 100%
72%
Life Remaining
Serial #:
Avg. Toner Coverage/Page: 13.3%
Date Installed: Sep 1, 1999
and print the Supplies Page. Use it to diagnose and correct
problems. The Supplies Page contains useful information, such as
the remaining life for supplies.
Pages Remaining: >500 @ 5% coverage
Hi-Capacity Reorder: 016-1803-00
Standard Reorder: 016-1807-00
Pages Remaining: >500 @ 5% coverage
Hi-Capacity Reorder: 016-1801-00
Standard Reorder: 016-1805-00
32
%
HEX XXX
%
HEX XXX
64%
HEX XXX
Phaser® 750 COLOR PRINTER
Cyan
Pages Remaining: >500 @ 5% coverage
Hi-Capacity Reorder: 016-1800-00
Standard Reorder: 016-1804-00
Yellow
Pages Remaining: >500 @ 5% coverage
Hi-Capacity Reorder: 016-1802-00
Standard Reorder: 016-1806-00
Main Charge Grid
Life Remaining
0% 50% 100%
Date Installed:
Reorder: 016-1665-00
Fuser Roll
Life Remaining
0% 50% 100%
Date Installed:
Reorder: 016-1663-00
Front Panel Display
Imaging Unit
& Main Charge Grid
Front Door
Fuser
& Fuser Roll
%
HEX XXX
%
HEX XXX
Toner Cartridges
Toner Door
}
Supplies Usage
Toner
Imaging Unit
Reorder: 016-1662-00
Fuser
110V Reorder: 016-1660-00
220V Reorder: 016-1661-00
(located in paper feeder)
Transfer Kit
Reorder: 016-1664-00
tektronix.com/Color_Printers/
Black
Magenta
Life Remaining
0% 50% 100%
Serial #:
Avg. Coverage/Image: 5.8%
Date Installed: Sep 1, 1999
Life Remaining
0% 50% 100%
Serial #:
Avg. Toner Coverage/Page: 13.3%
Date Installed: Sep 1, 1999
Life Remaining
0% 50% 100%
0632-56
3. From the front panel Help menu, scroll to Print Quality, press
Menu, scroll to Help Pages, press Menu, and print Diagnostic Test
Pages. (This includes five color pages and one instruction page.)
Examine the prints for symptoms.
Test Print
Black
Cyan
Magenta
Yellow
Print Quality
User Guide 47
0632-60
Page 48

Symptom: Problem in one color only
■ 1 color has many vertical streaks.
■ 1 color has a light vertical streak.
■ 1 color is light or faded.
33100-61
33100-59
Print Quality
48 Phaser 750 Color Printer
33100-58
Page 49

Solution:
1. Adjust the color density.
a. Press Help, and scroll to Print Quality, press Menu, scroll to
Calibrate Colors. Press Menu, scroll to Adjust Each Color.
Press Menu.
b. Adjust the density of the color that has problems.
2. Replace the Toner Cartridge of the color that has problems.
User Guide 49
Page 50
Symptom: Problem in all four colors
■ Streak through all 4 colors.
■ Spot in the same place on the page in all 4 colors.
■ Random spots appear on every page.
33100-57
33100-56
33100-55
50 Phaser 750 Color Printer
Page 51

Solution:
1. The choice of media; check the following:
a. Use Tektronix media.
b. Use the correct media tray for the media you are using.
c. When using the Multi-Purpose Tray, select the correct media
in the front panel.
2. Run Clean for Smudges. Press Help, scroll to Print Quality. Press
Menu, scroll to Clean for Smudges. Press Ok and press Confirm.
3. Print about 25 blank pages until the problem disappears.
4. Replace Imaging Unit, or Fuser, or Fuser Roll.
User Guide 51
Page 52

Symptom: All four colors are solid black
Prints are black (edge to edge).
Solution:
Remove then re-insert the Main Charge Grid. If problem persists,
replace the Main Charge Grid.
Symptom: All four colors are extremely faded
33100-54
33100-53
52 Phaser 750 Color Printer
Page 53

Solution:
1. Choice of media; check the following:
■ Use Tektronix media.
■ Use the correct media tray for the media you are using.
■ When using the Multi-Purpose Tray, select the correct media
in the front panel.
2. Relative humidity may be too low (below 30 percent relative
humidity).
■ Refer to Calibrate for Paper in the printer’s front panel and run
this mode:
■ Press Help, scroll to Print Quality, press Menu, scroll to
Calibrate for Paper, press Menu, print the references pages.
Follow the instructions on these pages and adjust the transfer
setting.
3. Replace imaging unit or transfer kit.
User Guide 53
Page 54

Symptom: Pieces of print image missing all four colors
1. Pieces of the printed image are missing and reappear out of place,
approximately 129 mm (5 in.) down the page.
33100-67
2. Media frequently wraps around the Fuser (Jam at C).
Solution:
1. Choice of media; check the following:
■ Use appropriate media in the correct tray location; refer to
page 21 through page 36.
■ Print 10-20 blank pages of plain paper.
■ To avoid jams with Tektronix Transparencies, make sure
that the logo strip is loaded face-down for the Multi-Purpose
Tray and face-up for the Transparency tray.
2. If Jam at C, clear the media jam and run the front panel’s Clean for
Smudges cleaning routine (5 blank pages will print to clean the
roller). Press OK and then press Confirm.
3. Replace Fuser.
54 Phaser 750 Color Printer
Page 55

Media Jams
Preventing media jams
■ To reduce the frequency of paper and transparency jams,
use Tektronix media and occasionally clean the rollers. From the
Help Menu, scroll to Print Quality and press OK. Scroll to the
Help Pages and press OK. Scroll to the Paper Tips and print and
read the tips to avoid media jams.
■ When using the Multi-Purpose Tray, always set the media
thickness switch for the media you are using. See page 25.
■ If the printer frequently reports Jam at Multi-Purpose, move the
media thickness switch to a thicker setting.
Jam-Wrong Media
1. Check the trays to make sure that they contain the proper media.
a. Check all PAPER trays and remove all transparencies.
b. Check all TRANSPARENCY trays and remove all paper.
c. If printing from the Multi-Purpose Tray, make sure that the
correct media type is selected from the front panel.
2. Open the left side door, remove the jammed media. See Jam at A
illustrations.
Jams
User Guide 55
Page 56

Jam at A
33100-09
Solution 1
Open the left side door; remove the jammed media.
Jams
33100-08
Solution 2
Remove the media tray; remove the jammed media from inside the
printer.
56 Phaser 750 Color Printer
Page 57

Jam at B (Lower Tray Assembly Only)
Solution 1
Open the lower left side door and remove the jammed media.
33100-10
Solution 2
Remove the selected media tray (middle or lower tray) and remove the
jammed media from inside the printer.
r
tte
e
r
/L
e
p
A
a
P
r
tte
e
r
/L
e
p
A
a
P
33100-11
User Guide 57
Page 58

Jam at C
Caution
The Fuser is hot. To avoid personal injury, use caution or
wait for the Fuser to cool before touching it.
1. Remove the Fuser:
a. Open the printer’s front door.
b. To unlock the Fuser, turn the small blue thumbscrew
counterclockwise.
c. At the lower left side of the Fuser, press the safety catch and
slide the Fuser out of the printer.
a
b
c
2. Remove the Fuser Roll:
a. To unlock the Fuser Roll, press out on the two tabs.
b. Lift the Fuser Roll out of the Fuser and set the roll aside.
a
b
0632-32
0632-31
58 Phaser 750 Color Printer
Page 59

3. To release the jammed media, turn the Fuser’s large blue knob
clockwise or counterclockwise.
0632-33
4. Remove the jammed media from the Fuser.
0632-34
5. Re-insert the Fuser Roll into the Fuser; re-install the Fuser.
6. The printer automatically prints five blank pages which cleans the
fuser and then resumes the current print job.
User Guide 59
Page 60

Jam at D
Caution
The Fuser is hot. To avoid personal injury, use caution or
wait for it to cool before touching it.
Solution 1
1. Open the front door.
2. Pull open the access door; the media is visible.
3. Turn the Fuser’s large blue knob counterclockwise.
4. Remove the media.
Caution
.
3
2
4
r
e
t
t
e
r
L
/
e
p
A
a
P
0632-53
If the Fuser knob does not turn, do not force it or you may
damage the Fuser. Instead, remove the Fuser and Fuser Roll;
then turn the Fuser knob to release the jammed media.
60 Phaser 750 Color Printer
Page 61

Solution 2
1. Open the front door and the right side door.
0632-35
2. Turn the Fuser’s large blue knob counterclockwise.
3. Remove the jammed media.
3
2
0632-36
User Guide 61
Page 62

Jam at E
Solution 1
Remove the jammed media from the output tray.
r
e
t
t
e
r
L
/
e
p
A
a
P
33100-15
Solution 2
Pull open the access door (above the plastic output tray) and remove
the media.
r
e
t
t
e
r
L
/
e
p
A
a
P
33100-16
Note
Open and close the printer’s front door to clear the error
message.
62 Phaser 750 Color Printer
Page 63

Jam at Multi-Purpose Tray
33100-17
1. Remove all media in the Multi-Purpose Tray.
2. Remove the jammed media from the Multi-Purpose Tray.
3. Set the Media Thickness switch for the media you are using
(page 25).
4. Re-insert the media in the Multi-Purpose Tray.
Note
To clear the error message, open and close the printer’s front
door.
User Guide 63
Page 64

Jam at Duplex Unit
1. Remove the Duplex Unit (it is in the printer’s upper slot).
0632-37
2. Open the Duplex Unit.
0632-38
Note
If paper is not in the Duplex Unit, open the right side door;
paper may be jammed there.
64 Phaser 750 Color Printer
Page 65

3. Remove the jammed media.
0632-39
4. Close the Duplex Unit; press down to make sure that it snaps shut
on both sides.
0632-40
5. Re-insert the Duplex Unit into the printer’s upper slot.
0632-41
User Guide 65
Page 66

Getting Help
Getting Help gives you a comprehensive set of instructions to solve
printer problems. The printer's auto-running CD-ROM guides you to
the various resources available for installing and learning more about
your Tektronix color printer. Use the CD-ROM to install your printer
driver software, view and print user documentation, and watch how-to
videos. Live Internet links on the CD-ROM let you access the Tektronix
Color Connection web site, your single source for color education,
interactive tutorials, free templates and support information.
The front panel Help button:
■ Offers you a suite of tools along with information pages to
help solve printing quality, media feed, supplies, and printer
administration problems.
■ To print the two-page Help Guide: at the printer’s front
panel, press Help, then press Print.
Printer CD-ROM
■ Advanced Features and Troubleshooting Manual
■ Supplies instructions
■ Setup Guide poster
■ Video help
■ Networking manuals
■ Repacking instructions
■ Printer drivers
■ Material Safety Data Sheets (MSDS)
66 Phaser 750 Color Printer
Page 67

Tektronix web site
www.tek.com/Color_Printers/
■ Product and supplies information
■ Downloading printer drivers
■ Finding your local reseller
■ Online documentation
TekSMART™ Knowledge Base
www2.tek.com/TekSMART/
■ Is the same troubleshooting knowledge base used by
Tektronix Customer Support staff
■ Application issues
■ Networking issues
■ Printer errors
■ Print-quality issues
■ Troubleshooting
Getting Help
PhaserLink™ Software
www.tek.com/Color_Printers/products/phaserlink.html
■ View printer status using any web browser
■ Control printer settings
■ Link to online documentation via the World Wide Web
■ Requires network connection via TCP/IP
User Guide 67
Page 68

Color Connection
www.colorconnection.tektronix.com
Color resource for tools and information to help you get the most out of
your color printer:
■ Interactive tutorials and helpful tips for using your printer
and favorite software applications
■ Easy access to online technical support.
■ Customized features to meet your individual needs
Other online services
Anonymous ftp server: ftp.tek.com/Color_Printers/
Subscribe to email update notices: www.colorconnection.tektronix.com
U. S.
1-800-835-6100
Getting Help
Canada
1-800-563-1289
Outside U.S. and Canada
Contact your local
Tektronix office for a list of
local resellers
Customer Support Centers
U. S. and Canada
1-800-835-6100
Australia
1800 811 177
Austria
0 660 5804
Belgium
0800 1 5059
Denmark
80 01 81 76
Eastern Europe and
the Middle East
+44 1908 681707
Finland
0800 1 14494
France
05 90 85 41
Germany
0130 82 10 68
Italy
1678 77261
Luxembourg
0800 2853
Norway
800 11782
Spain
900 97 4499
Sweden
020 795 177
Switzerland
155 9493
The Netherlands
06 0221647
UK
0800 558668
68 Phaser 750 Color Printer
Page 69

Controlling Color Density
When colors look faded, adjust the toner color density to extend the
life of the components.
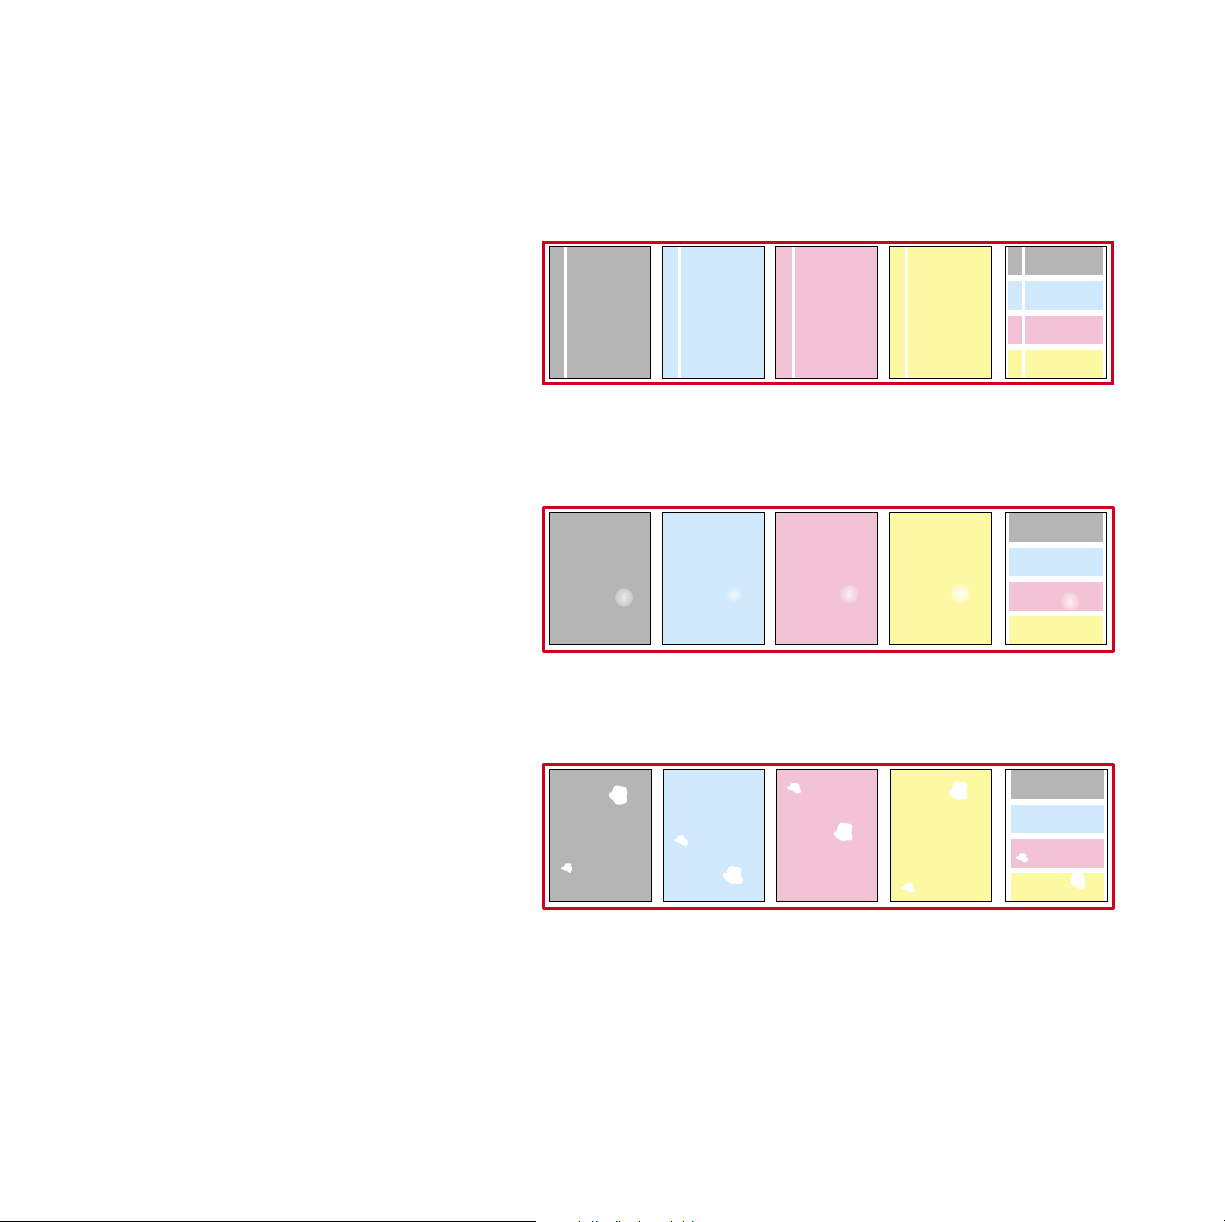
Print and use the Color Reference Page
1. In the printer’s front panel, press Help scroll to Print Quality.
Press Menu, scroll to Calibrate Colors. Press Menu, scroll to
Adjust Each Color. Press Menu, and print the Color Reference
Page.
2. Compare the Color Reference Page to the Color Density Samples.
Make a note of the value (–10 to +10) for each color that most
closely matches the samples.
3. Adjust the density for each color: Enter the value noted in Step 2
in the Calibrate Colors menu, under Adjust Each Color.
■ Decrease color density: Press <---.
■ Increase color density: Press --->.
4. Reprint the Color Reference Page; check your adjustments.
1
Color Reference Page
Cyan Magenta Yellow Black
-10
-8
-6
-4
-2
+2
+4
+6
+8
+10
-10
-10
-8
-8
-6
-6
-4
-4
-2
-2
0
0
0
+2
+2
+4
+4
+6
+6
+8
+8
+10
+10
-10
-8
-6
-4
-2
0
+2
+4
+6
+8
+10
+
2
+
4
+
6
+
+
4
8
+
+
1
6
0
+
8
+
1
0
+
8
+
1
0
-
4
2
0
0
+
2
+
4
+
6
+
8
+
1
0
2
Color Density Samples
Color Reference Page
-
1
C
0
y
a
n
-
8
-
1
0
-
6
-
8
-
6
-
4
-
6
2
-
4
2
0
-
+
2
2
0
+
2
+
4
+
6
M
a
g
e
n
t
a
-
Y
1
0
e
l
l
o
w
-
8
-
1
B
0
l
a
c
k
-
8
-
6
-
4
Calibrate Colors
3
Exit
Menu
Adjust Light/Dark Adjust Each Color
33100-30
User Guide 69
Color Density
Page 70

Color Density
70 Phaser 750 Color Printer
Page 71

Fonts
Fonts
Resident typefaces (PostScript)
The printer accepts Adobe Type 1 and Type 3 downloadable fonts, TrueType fonts, PCL5,
and a variety of user-defined fonts.
To extend font capability, the printer supports an optional internal IDE hard drive for
storage of additional fonts. Refer to the printer’s user guide, or the Tektronix web site, for
ordering information.
ATM (Adobe Type Manager) software (provided on the printer’s CD-ROM) helps your
computer to display these fonts on screen as they will appear in your prints.
All printer configurations are shipped with 136 resident fonts. To print a sample of the
printer’s fonts, see page 74.
Resident typefaces (PCL5C)
For PCL5C (Printer Command Language) printing, the printer supports Courier, Times,
and Universe typefaces in medium, bold, italic medium, and italic bold. In addition,
there are 46 PCL fonts. The printer port must be set to AutoSelect (which is the default)
for the printer to accept PCL data.
Advanced Features and Troubleshooting Manual 71
Page 72

Fonts
Downloading fonts
Printer-resident fonts are always available for printing. Additional downloadable fonts
can be sent from your computer and stored in the printer’s memory or on a hard disk.
Adding more printer memory expands the number of fonts that can be stored on your
printer.
Downloading fonts saves print time when printing large, or several documents, that use
those fonts.
The printer accepts these (and other) downloadable fonts:
■ Type 1
■ Type 3
■ Adobe
■ Agfa
■ Bitstream
■ Microsoft
■ Apple
■ TrueType (scalable to any point size; look the same on-screen and printed).
Before printing, make sure that the fonts specified in your document are installed in the
printer or are set up correctly. If you request a font in an application that is not resident in
the printer, or is not correctly installed, the text is printed in Courier typeface.
Refer to the printer’s user guide, or the Tektronix web site, for information on ordering a
hard drive for font storage.
72 Phaser 750 Color Printer
Page 73

Fonts
Downloading fonts from a Macintosh
1. Refer to Downloading files to the printer from a Macintosh on page 95 to locate the
Apple Printer Utility on the printer’s CD-ROM.
2. Within the Apple Printer Utility, click Open Printer; a dialog box appears.
3. Click the arrow next to Printer Preferences.
4. For a list of installed fonts and locations, click the arrow next to Fonts.
5. Click Add.
6. Select your font folder, then select the font you want to download.
7. Under Destination, select the download location: either the printer’s memory or an
internal hard disk.
8. Click Add for one font or click Add All for all fonts in the folder.
9. Click Send; the font(s) appear in the list.
Note
To remove downloaded fonts, click Remove.
Advanced Features and Troubleshooting Manual 73
Page 74

Fonts
Printing a list of resident fonts
From a Macintosh
1. Refer to Downloading files to the printer from a Macintosh on page 95 to install and
use the Apple Printer Utility.
2. Within the Apple Printer Utility, from the File menu, select Print Font Samples.
From a PC or workstation
1. Insert the printer’s CD-ROM into the CD-ROM drive.
■ If the Windows autorun feature is enabled, the CD-ROM launches automatically.
■ If the Windows autorun feature is disabled, double-click My Computer, then
double-click the CD icon to launch the CD-ROM.
2. For Setup Type, select Custom.
3. Click Next until the Choose Components and Sub-components dialog box appears.
Make the following selections:
■ Components: Graphics Arts Files
■ Sub-components: Samplers
4. Follow the on-screen instructions to complete the installation.
5. Locate the files in the folder you selected during the installation; the default is:
C:Program Files\Tektronix\Phaser xxx, where xxx is your printer’s name.
6. Refer to Downloading files to the printer from a PC on page 97 for file downloading
instructions.
74 Phaser 750 Color Printer
Page 75

Image Smoothing
Image Smoothing
Image Smoothing blends adjacent colors in low-resolution images for smoother color
transitions. For example, use Image Smoothing to improve the appearance of a 72-dpi
image downloaded from the World Wide Web. Image Smoothing is not recommended for
300-dpi or higher images.
There are four ways of selecting Image Smoothing (driver selections override all other
settings):
1. In a supported driver, locate the Image Smoothing option:
■ LaserWriter 8.3.4 driver:
In the Print dialog box, click Options.
■ LaserWriter 8.6 driver:
In the Print dialog box, from the pull-down menu (General) select Printer
Specific Options.
■ Windows 95 / Windows 98 PostScript driver:
Start/Settings/Printers, then select Properties for your printer. In the Setup tab,
select Expert Options.
■ Windows 2000 driver:
From the Layout tab or Paper/Quality tab, click Advanced.
■ Windows NT driver:
From the Properties tab, select the Advanced tab. From the Document Options
tab, select Printer Features.
■ Adobe PS3 driver for Windows 3.1:
Select the Features tab options.
2. Through the printer’s front panel; see the Menu Map for location.
3. Through PhaserLink Printer Management software.
4. Through one of the following PostScript utility files (see Printer Utilities on page 91
for instructions):
Macintosh
■ Image Smoothing On
■ Image Smoothing Off
PC
■ SMOOTHON.PS
■ SMOOTHOFF.PS
Advanced Features and Troubleshooting Manual 75
Page 76

Quick Collate
Quick Collate
Requirements
■ DP or DX Feature Set
■ Hard drive (internal)
Quick Collate speeds the collation and printing of large print jobs and multiple sets of
documents. The collate function in some software applications repeatedly sends each page
in sequence to the printer until the requested number of copies is printed. With the Quick
Collate option, the job is sent only once and then multiple collated sets are produced by
the printer, allowing much faster processing time.
The number of pages that can be collated at one time depends on the size of the hard disk
installed in the printer.
Note
Make sure that you turn off the collate function in your application, because the
printer’s Quick Collate option is faster than the collate function in software
applications.
In a supported driver, locate the Quick Collate option:
■ LaserWriter 8.3.4 driver:
In the Print dialog box, click Options.
■ LaserWriter 8.6 driver:
In the Print dialog box, from the pull-down menu (General) select Printer
Specific Options.
■ Windows 95 / Windows 98 PostScript driver:
Start/Settings/Printers, then select Properties for your printer. In the Setup tab,
select Advanced Paper Options.
■ Windows 2000 driver:
From the Layout tab or Paper/Quality tab, click Advanced.
■ Windows NT driver:
From the Properties tab, select the Advanced tab. From the Document Options
tab, select Printer Features.
■ Adobe PS3 driver for Windows 3.1:
Select the Features tab options.
Quick Collate and 1st Page Preview
When you use the printer’s Quick Collate option with 1st Page Preview, only the first page
of the first set is printed before pausing for your review.
76 Phaser 750 Color Printer
Page 77

Separation Pages
Separation Pages
You can have the printer insert a separation page, or divider page, to separate print jobs,
multiple copies of a single print job, or individual pages of a print job.
There are two selections to make in your printer driver.
1. In a supported driver, locate the Separation Page options:
■ LaserWriter 8.3.4 driver:
In the Print dialog box, click Options.
■ LaserWriter 8.6 driver:
In the Print dialog box, from the pull-down menu (General) select Printer
Specific Options.
■ Windows 95 / Windows 98 PostScript driver:
Start/Settings/Printers, then select Properties for your printer. In the Setup tab,
select Advanced Paper Options.
■ Windows 2000 driver:
From the Layout tab or Paper/Quality tab, click Advanced.
■ Windows NT driver:
From the Properties tab, select the Advanced tab. From the Document Options
tab, select Printer Features.
■ Adobe PS3 driver for Windows 3.1:
Select the Features tab options.
2. Select one of the following for Separation Page:
■ Off: Turns off the Separation Page feature.
■ End of Job: Inserts a separation page between individual print jobs.
■ End of Set: Inserts a separation page between copies, or sets, of a multi-copy
print job.
■ End of Page: Inserts a separation page between every page of a print job.
3. Select one of the following for Separation Page Source:
■ Upper Tray: Takes paper for the separation page from the upper media tray.
■ Middle Tray: Takes paper for the separation page from the middle media tray, if
you have optional paper trays installed.
■ Lower Tray: Takes paper for the separation page from the lower media tray, if
you have optional paper trays installed.
Advanced Features and Troubleshooting Manual 77
Page 78

PANTONE Colors
PANTONE Colors
For the latest information on color libraries, visit the Tektronix web site at:
www.tektronix.com/Color_Printers/
or contact your local Tektronix reseller.
PANTONE Color files for your printer include printer-specific color library files for some
specific applications and a file to print the PANTONE Color sampler chart.
Methods of printing PANTONE Colors
PANTONE Colors from color selection books
In some applications, you can select colors from PANTONE Color selection books. These
colors can be proofed on your Phaser printer before final output on a printing press. For
this method, the printer-specific PANTONE Color files are not required.
1. From an application, select and apply PANTONE Colors; use individual color values
from a PANTONE Colors selection book.
2. Print your document; from a supported driver, select the Commercial Press color
correction. (Proof colors may not be completely accurate, but PANTONE Colors will
be printed correctly on a printing press.)
3. When you are satisfied with the proof, the file can be separated for printing press
plates without adjustment to the file.
Printer-specific PANTONE Colors
Your printer can produce process color simulations of PANTONE Spot Colors.
1. Print a copy of the PANTONE Color chart. Refer to Printing the PANTONE Color
Chart on page 80.
2. Within an application, define the desired color in your document by using the
individual CMYK values which appear on the sampler chart.
3. Print your document. For best results, use the same printer settings for color
correction and print quality, and the same type of paper that you used to print the
PANTONE Color chart.
For final output on a color printing press
For colors to be printed as a process color (no spot colors), follow these steps:
1. Open the application.
2. Before separating the file for printing press plates, replace the printer’s PANTONE
process Colors with standard PANTONE Colors.
78 Phaser 750 Color Printer
Page 79

PANTONE Colors
Installing the PANTONE Color files
From the Web
1. Download the appropriate PANTONE Color file for your printer from the Tektronix
web site:
www.tektronix.com/Color_Printers/
2. Choose a directory location, and extract the file.
Advanced Features and Troubleshooting Manual 79
Page 80

PANTONE Colors
Printing the PANTONE Color Chart
Macintosh
Printing individual pages from Acrobat Reader
1. You will need to install Acrobat Reader if you want to print individual pages from the
PANTONE Color chart. Insert the printer’s CD-ROM in your computer’s drive, go to
the Utilities folder, and install Acrobat Reader onto your computer’s hard disk; follow
on-screen instructions.
2. After Acrobat Reader is installed, locate the Pantone files you downloaded from the
web site. Double-click the desired PDF file.
3. View and print pages from the PDF file. For best results, print on paper.
Note
Print only with the None Color Correction setting; other settings cause
PANTONE Colors to print differently than expected.
Printing the entire chart
■ Use the Apple Printer Utility to download to the printer the desired PANTONE Color
PostScript file, refer to page 91 for instructions. This PostScript file contains
necessary color correction and print quality settings.
■ For best results and truest color:
■ Print the chart on paper that is similar to the paper that will be used on the
printing press.
■ Turn off two-sided printing when printing the color chart in order to reduce the
effects of color show-through.
80 Phaser 750 Color Printer
Page 81

PANTONE Colors
PC
Printing individual pages from Acrobat Reader
1. You will need to install Acrobat Reader if you want to print individual pages from the
PANTONE Color chart. Insert the printer’s CD-ROM in your computer’s drive, go to
the Utility directory, and install Acrobat Reader onto your computer’s hard disk;
follow on-screen instructions.
2. Click Start, then Programs, then the program folder you selected; the default is the
printer’s name.
3. Select the PDF file.
4. View and print pages from the PDF file. For best results, print on paper.
Note
Print only with the None Color Correction setting; other settings cause
PANTONE Colors to print differently than expected.
Printing the entire chart
Print the PANTONE Color chart by sending the PANTONE PostScript file to the printer.
Refer to page 91 for downloading instructions.
■ For best results and truest color:
■ Print the chart on paper that is similar to the paper that will be used on the
printing press.
■ Turn off two-sided printing when printing the color chart in order to reduce the
effects of color show-through.
Advanced Features and Troubleshooting Manual 81
Page 82

PhaserPrint Plug-in for Photoshop
PhaserPrint Plug-in for Photoshop
The PhaserPrint™ plug-in, included on the printer’s CD-ROM, operates within the
Photoshop application. With PhaserPrint, you can improve image transfer time and gain
easy access to Tektronix printer features and other media features.
PhaserPrint software produces correct output only on supported Tektronix printers.
Note
If you use this plug-in with a printer not listed in the PhaserPrint dialog box, the
image may be placed incorrectly on the page, or colors may look incorrect, or
your file may not print.
Installing the plug-in: Macintosh
Note
The PhaserPrint Plug-in is automatically installed with the software installation
option Easy Install.
Compatibility requirements
■ Photoshop 2.5.1 and higher
■ System 7.0 and higher
Installing the plug-in
1. From the printer’s CD-ROM, run the Installer application. Select Custom Install.
2. Select PhaserPrint plug-in for Photoshop. Click Install; the file is installed in the
Photoshop application’s Plug-ins folder on your computer’s hard disk.
82 Phaser 750 Color Printer
Page 83

PhaserPrint Plug-in for Photoshop
Installing the plug-in: Windows
Compatibility requirements
■ Photoshop 4.0 and higher
■ Windows 95/Windows 98 or Windows NT
■ (optional) TCP/IP support requires proper installation of IP networking software and
cards
Installing the plug-in
1. Insert the printer’s CD-ROM into the CD-ROM drive.
■ If the Windows autorun feature is enabled, the CD-ROM launches automatically.
■ If the Windows autorun feature is disabled, double-click My Computer, then
double-click the CD icon to launch the CD-ROM.
2. For Setup Type, select Custom.
3. Click Next until the Choose Components and Sub-components dialog box appears.
Make the following selections:
■ Components: Printer Driver
■ Sub-components: Photoshop plug-in
4. Follow the on-screen instructions to complete the installation.
Advanced Features and Troubleshooting Manual 83
Page 84

PhaserPrint Plug-in for Photoshop
Using the plug-in
1. If you don’t already have a default printer selected, do the following:
■ Macintosh:
a. Open the Chooser.
b. Select a PostScript driver (such as the Apple LaserWriter 8); select your printer.
PhaserPrint software works like a printer driver, and prints to the printer you
selected in the Chooser.
■ Windows:
a. Click Start, then Settings, then Printers.
b. Right-mouse-button-click on your printer’s icon.
c. In the pop-up menu, select Set as Default.
d. Within the PhaserPrint software, select your printer and port, as described in
Print using (Windows) on page 86.
2. Open Photoshop. Open an image file.
3. From the File menu, select Export. Select PhaserPrint; the PhaserPrint dialog box
appears.
4. In the Printer Model field, select your printer.
5. PhaserPrint software supports the following image modes selected from Photoshop’s
Mode menu. If you select a mode not listed here, an error message appears and your
image is not printed.
■ Bitmap
■ Grayscale
■ Indexed Color
■ RGB Color
■ CMYK Color
■ Lab Color
84 Phaser 750 Color Printer
Page 85

PhaserPrint Plug-in for Photoshop
Selecting options in the PhaserPrint dialog box
Settings you make in the PhaserPrint plug-in remain in effect until you change them. The
exception is Number of Copies, which defaults to 1 each time you start the plug-in.
Note
You can get information on any of the plug-in’s features or printer-specific
options with the online Help function.
Number of copies
Enter the number of copies to print, from 1 to 1000.
Print using (Macintosh)
The Print using pop-up menu lets you choose between printing an image or saving the
image to disk.
■ AppleTalk: Prints the image to the printer currently selected in the Chooser; the
currently selected printer name is displayed in the Printer model field. If the selected
printer is not a PostScript printer, this option is unavailable (grayed-out).
■ PostScript file: Saves an image to disk as a PostScript file. Click Save; a dialog box
lets you choose a new or existing file for saving the PostScript code.
When selected, the File format pop-up menu becomes available. This pop-up menu
has two options: ASCII base-85 and Binary.
■ ASCII base-85: Image data is encoded using an ASCII base-85 filter during file
output, making the resulting PostScript file portable, and downloadable through
interface ports that don’t support binary data. Note that the file may be up to
25% larger.
■ Binary: Image data is output in binary format.
Advanced Features and Troubleshooting Manual 85
Page 86

PhaserPrint Plug-in for Photoshop
Print using (Windows)
The Print using pop-up menu lets you choose between printing an image or saving the
image to disk. It has two to four options, depending on your system configuration:
■ TCP/IP: Available if a TCP/IP stack is installed and running. From Printer model,
choose a printer. Add and delete printers in the list, and edit the printer
configurations. TCP/IP is the fastest printing method; it prints jobs in much less time
than the Local Port or Printer Driver methods, and is the recommended method if it is
available for the printer you are using.
■ Local Port: Available if you have local ports installed in your PC. From the Port
Name, choose the desired printer port.
■ Printer Driver: Prints the image through the selected printer driver. From Driver
Name, choose a printer.
■ PostScript file: Saves an image to disk as a PostScript file. Click Save; a dialog box
lets you choose a new or existing file for saving the PostScript code.
When selected, the File format pop-up menu becomes available. This pop-up menu
has two options: ASCII base-85 and Binary.
■ ASCII base-85: Image data is encoded using an ASCII base-85 filter during file
output, making the resulting PostScript file portable so that it can be downloaded
through interface ports that don’t support binary data. Note that the file may be
up to 25% larger.
■ Binary: Image data is output in binary format. Recommended for network
printing only (not for the parallel port).
Printer model
■ Displays the currently selected printer.
■ Lists all printers supported by PhaserPrint software.
■ When you select your printer model, PhaserPrint displays the correct options for your
printer.
Media size (selection)
■ Paper sizes are printer-specific; refer to the online Help for your printer’s options.
Before selecting a paper size, select your printer in the Printer model field.
Color Correction
■ Color Corrections are not available if Lab is the selected Mode in Photoshop.
■ If RGB is the selected Mode in Photoshop, the Calibrated RGB option is also
available.
86 Phaser 750 Color Printer
Page 87

PhaserPrint Plug-in for Photoshop
Media
■ The setting remains in effect until you change it.
Quality
■ The setting remains in effect until you change it.
Rendering Intent
■ Available in the following cases:
■ If the Mode in Photoshop is RGB, and you select Calibrated RGB as the Color
Correction in PhaserPrint.
■ If the Mode in Photoshop is Lab.
■ Calibrated RGB and Lab modes take longer to print than other modes because the
printer must convert CIE colors to RGB or CMYK colors before printing.
Compress Image Data
■ Compresses image data so that less data is sent to the printer or stored in a file.
■ Useful if your network connection is slow, for example, if you are connected to a busy
network or if you are using a parallel port. For fast networks, printing may be faster
without using this option.
■ The setting remains in effect until you change it.
■ Default is On.
Fast preview
■ Quick print of your image with slightly reduced image quality.
■ Reflects the printer color correction you selected.
■ For the fastest printing, use the None color correction option.
■ Default is Off.
Advanced Features and Troubleshooting Manual 87
Page 88

PhaserPrint Plug-in for Photoshop
1st Page Preview
■ Available only with the printer’s DP or P, and DX Feature Set options.
■ When sending a multiple-copy print job to the printer through the driver, you can
select 1st Page Preview to preview the first page of the job, and determine if the job is
printing as expected before proceeding with the remainder of the job. This option is
especially useful when printing many copies.
a. Click the 1st Page Preview check box.
b. Check your first print. At the 1st Page Preview message on the printer’s front
panel, select one of the following:
■ Reprint: Reprints the first page, the printer pauses again for the duration of the
selected timeout, or until you press one of the buttons.
■ Cancel: Cancels the print job.
■ Continue: Continues printing the entire job.
■ At the printer’s front panel, set the 1st Page Preview timeout.
■ Default is Off.
Image Smoothing
■ Blends adjacent colors so that color transitions are less noticeable.
■ Use this option when the image being printed was scanned at a lower resolution than
the printer’s output resolution. For example, printing an image scanned at 72 dpi
using the printer’s Standard print quality mode.
■ Images printed using Image Smoothing appear with less sharp detail but with
smoother color transitions.
■ Default is Off.
Stylized representation of the page
■ The lower left area of the dialog box displays a stylized representation of the page as it
would look when printed using the current selections in the Scale, Scale to fit,
Printer model, Media size (selection), Landscape orientation, Replicate images,
Center images, and Image separation options. When you change any of these
selections, the representation of the page is redrawn to reflect the new selection.
■ If Show color preview of image is On, an approximate color image is displayed.
88 Phaser 750 Color Printer
Page 89

PhaserPrint Plug-in for Photoshop
Scaling an image
■ Scale to fit
■ Scales an image to the largest size that fits the image area of the currently
selected page size or orientation.
■ Automatically updates the Scale field value.
■ Scale
■ Type the percentage the image should be scaled, from 10 percent to
2000 percent.
■ Use with the Replicate images option to produce multiple copies of an image on
a single page.
■ Alert message: Image clipping will occur.
This message appears in the PhaserPrint dialog box whenever a scaled image will not
fit within the image area of the currently selected page size or orientation option.
Landscape orientation
■ Prints the image horizontally (landscape) on the page. Leave this box unchecked to
print the image vertically (portrait) on the page.
■ Refer to the Stylized representation of the page, in the lower left corner of the dialog
box, to see how your selection will look when printed.
Center images
■ Centers the image in the page’s image area.
■ If this box is not checked, the lower left corner of the image is aligned with the lower
left corner of the printable area of the page.
■ If the Center images box is checked and the Replicate images box is checked, the set
of replicated images are centered in the image area of the page.
Replicate images
■ Fills the page’s image area with as many copies of the image as will fit.
■ The size of each replicated image is determined by the setting in the Scale text box.
■ If the size of each replicated image (shown as black rectangles in the stylized
representation of the page) is too small to display, the total image area of the printed
page is shown as a single gray rectangle.
Image size
■ Reflects the dimensions, in inches or millimeters, of the image.
■ If the value in the Scale box is out-of-range, the image dimensions are displayed with
question marks.
Advanced Features and Troubleshooting Manual 89
Page 90

PhaserPrint Plug-in for Photoshop
Image separation
■ Only available if the Replicate images box is checked.
■ Type an amount, in inches or millimeters (depending on your measurement
standard), to specify the amount of separation between each replicated image.
■ A larger amount reduces the number of images that can be printed at one time.
■ Minimum allowed separation value is 0.
■ Maximum separation value is 100 mm (4 inches).
■ Default separation value is 3.175 mm (0.125/one-eighth inch).
■ Valid characters for this field are 0 to 9 and a period (or decimal point).
■ As you type a value, the stylized representation of the page, and Number of
images and Image layout values are dynamically updated. If the value entered in
the Image separation field is out-of-range, the values in these other fields are
replaced by question marks, and no images are shown in the stylized
representation of the page. If the value is out-of-range, and you click Print or
Save, the following alert is displayed:
The value for Image separation is out of range. It will be replaced with the
closest allowed value.
Number of images
■ Displays the number of scaled images that will fit in the image area of the currently
selected Media size (selection) and Landscape orientation options.
■ Number of images reflects the current Image separation value.
■ If the Replicate images box is not checked, this number is set to 1.
■ If either Scale or Image separation values are out-of-range, a question mark is
displayed.
Image layout
■ Shows how the scaled images will fit horizontally and vertically in the image area of
the currently selected Media and Landscape orientation options.
■ Image layout reflects the current Image separation value.
■ If the Replicate images box is not checked, this number is set
to 1 x 1.
■ If either Scale or Image separation values are out-of-range, question marks
are displayed.
Media size (display)
Reflects the dimensions, in inches or millimeters, of the selected media size.
Show color preview of image
Displays an approximate color image, rather than a black box, in the Stylized
representation of the page field.
90 Phaser 750 Color Printer
Page 91

Printer Utilities
Printer Utilities
In addition to using the printer’s front panel or the options in a supported driver, the
printer’s utility files offer another method for changing the way the printer operates.
In some cases, a selection can only be made with a utility file.
Utility files control print features such as color correction and enabling or disabling the
Startup Page. However, printer features that are selected from a driver override utility file
settings and front panel settings.
There are three places to locate utility files:
■ The printer’s CD-ROM
■ Tektronix’ ftp site
■ Tektronix’ World Wide Web site
■ Phaser Hard Drive (if internal IDE Hard Disk is installed)
Files can be downloaded to the printer:
■ From a Macintosh
■ From a PC
Advanced Features and Troubleshooting Manual 91
Page 92

Printer Utilities
Locating the files on the printer’s CD-ROM
Installing the utility files for Macintosh
To install the Apple Printer Utility and the Samplers (color charts):
1. From the printer’s CD-ROM, run the Installer application. Select Easy Install.
2. In the PhaserTools folder on your computer’s hard disk, locate the Samplers (color
charts) and the Apple Printer Utility.
To install the printer’s utility files:
1. On the printer’s CD-ROM, locate the PhaserTools folder, then the Printer Utilities
folder.
2. Copy the Printer Utilities folder, or individual files, to your computer’s hard disk, or
use the files from the CD-ROM.
Installing the files for PC
Locating the printer’s utility files:
1. Insert the printer’s CD-ROM into the CD-ROM drive.
■ If the Windows autorun feature is enabled, the CD-ROM launches automatically.
At the opening screen, click Exit.
2. In the taskbar on your screen, click Start, then Programs, then Windows Explorer.
Select the CD-ROM.
3. Locate the utility files on the CD-ROM in the phsrxxx folder inside the utility folder
(where phsrxxx is your printer’s name). Use the files on the CD-ROM or copy the files
to your computer’s hard disk.
Installing the Sampler (color charts and font sampler) files:
1. Insert the printer’s CD-ROM into the CD-ROM drive.
■ If the Windows autorun feature is enabled, the CD-ROM launches automatically.
■ If the Windows autorun feature is disabled, double-click My Computer, then
double-click the CD icon to launch the CD-ROM.
2. For Setup Type, select Custom.
3. Click Next until the Choose Components and Sub-components dialog box appears.
Make the following selections:
■ Components: Graphics Arts Files
■ Sub-components: Samplers
4. Follow the on-screen instructions to complete the installation.
5. Locate the files in the folder you selected during the installation; the default is:
C:Program Files\Tektronix\Phaser xxx, where xxx is your printer’s name.
92 Phaser 750 Color Printer
Page 93

Printer Utilities
Locating files on the Tektronix World Wide Web site
Tektronix has a site on the World Wide Web that you can reach from a web browser, at the
following address:
www.tek.com/Color_Printers/
At the Tektronix Color Printer home page, explore options such as customer support
documents and new product information. New and updated information is always being
added, so check the web site frequently.
Use a web browser such as Netscape Navigator, and follow these steps.
1. Start your web browser and enter the following address:
www.tek.com/Color_Printers/support/software.html
2. From the pull-down menus, select your printer, computer, and type of file.
3. Select the files you need; they are downloaded to your computer.
Advanced Features and Troubleshooting Manual 93
Page 94

Printer Utilities
Locating files on the Tektronix FTP server
Utility files included on the printer’s CD-ROM let you set up the printer from UNIX and
VMS workstations to select between media trays, print quality modes, color correction
modes and other features. If you don’t have the means to transfer these files from the
CD-ROM, you can request files from the Tektronix anonymous ftp server.
If you can exchange electronic mail with other Internet sites, you can access the Tektronix
ftp server. From this server you can retrieve driver and utility files and color printer
information either with a web browser or command prompt.
From a web browser:
1. Start your web browser application.
2. Type this address:
ftp://ftp.tek.com/
3. From the pull-down menus, select your printer, computer, and type of file.
4. Select the files you need; they are downloaded to your computer.
From the command line:
1. At the system prompt, type the following: ftp ftp.tek.com
The system responds: Name (ftp.tek.com:<login name>):
2. Type: anonymous. Press Return.
The system responds: Guest login ok, send your complete e-mail address as
password.
3. Enter your e-mail address. Press Return.
4. Change directories to your printer-specific directory:
cd Color_Printers/UNIX/Phaser_850/utilities
5. Download the utility files; type: mget *
The system prompts you for each file in the directory, to which you respond y (yes)
or n (no).
6. Exit the ftp session: type quit or bye; press Return.
94 Phaser 750 Color Printer
Page 95

Printer Utilities
Downloading files to the printer from a Macintosh
Using the Apple Printer Utility to download files
All PostScript utility files on the printer’s CD-ROM can be downloaded to the printer with
the Apple Printer Utility.
To download PostScript utility files, follow this procedure:
1. From the PhaserTools folder on your computer’s hard disk, double-click Apple
Printer Utility.
2. In the Printer Selector dialog box, make the following selections:
■ Under AppleTalk Zones, select your printer’s zone.
■ Under Printers, select your Phaser printer.
■ Click Open Printer.
3. From the File menu, select Send PostScript File; the Select the PostScript files to
download dialog box appears.
4. Select the folder location of the PostScript file(s) that you want to download. The
printer’s PostScript utility files are located on the CD-ROM in the Printer Utilities
folder inside the Phaser Tools folder.
5. Select a utility file. Click Add.
6. Click Send.
7. At the prompt Save PostScript output as, you are asked for a file name for saving
printer output. Use the default name given in the edit box or type a new name.
(Printer output includes status messages generated by the printer reporting such
conditions as out of paper.)
8. Click Save.
9. If no output is returned by the printer, the Apple Printer Utility displays a dialog box;
click Continue. If output is returned by the printer, you won't see this dialog box.
Check your computer’s hard disk for the message file created by the utility.
To download fonts, see page 72 for additional information.
To print a font sampler, see page 74 for additional information.
To download color sampler charts, see page 110 for additional information.
Advanced Features and Troubleshooting Manual 95
Page 96

Printer Utilities
Using the Apple Printer Utility to perform other tasks
In addition to downloading PostScript files and fonts, you can use the
Apple Printer Utility to perform the following specialized tasks.
Note
If your printer is connected through a print server, you can only use the Apple
Printer Utility to download PostScript utility files.
Turning on/off the Startup Page
1. Double-click Apple Printer Utility.
2. In the Printer Selector dialog box, make the following selections:
■ Under AppleTalk Zones, select your printer’s zone.
■ Under Printers, select your Phaser printer.
■ Click Open Printer.
3. Click the arrow next to Printer Preferences; a list of options appears.
4. Click the arrow next to Startup Page.
5. Click one of the following:
■ On: Prints a Startup Page each time the printer is turned on or reset.
■ Off: Stops the Startup Page from automatically printing.
6. Click Send.
Changing the printer’s AppleTalk name
1. Double-click Apple Printer Utility.
2. In the Printer Selector dialog box, make the following selections:
■ Under AppleTalk Zones, select your printer’s zone.
■ Under Printers, select your Phaser printer.
■ Click Open Printer.
3. Click the arrow next to Printer Preferences; a list of options appears.
4. Click the arrow next to Name.
5. In the text box, type the new printer name.
6. Click Send.
96 Phaser 750 Color Printer
Page 97

Printer Utilities
Downloading files to the printer from a PC
Downloading files from Windows 3.1
1. Select the utility file you want to send to the printer, for example RESET.PS.
2. From the File menu, select Copy; the Copy dialog box appears with the utility file you
selected listed in the From field.
3. In the To field, type the port your printer is connected to. For example, type LPT1:
for a parallel port connection. Click OK.
4. If the Confirm File Replace dialog box appears, click Yes to continue; the file is
downloaded to the printer.
Downloading files from Windows 95 / Windows 98
1. Select the utility file you want to send to the printer, for example RESET.PS.
2. In the taskbar on your screen, click Start, then Programs, then MS-DOS Prompt.
■ Change directory to the location of the utility files.
■ If your printer is connected to the parallel (LPT) port, type the following
command (where x is 1, 2, or 3): COPY RESET.PS LPTx:
Downloading files from Windows NT
1. Select the utility file you want to send to the printer, for example RESET.PS.
2. In the taskbar on your screen, click Start, then Programs, then MS-DOS Prompt.
■ Change directory to the location of the utility files.
■ If your printer is connected to a network, type the following command:
lpr -S <IP Address> -P PS RESET.PS
Advanced Features and Troubleshooting Manual 97
Page 98

Printer Utilities
Downloading files if your printer is connected to a Novell Netware network
This procedure lets you redirect (capture) LPT ports in Novell NetWare. NetWare queues
can be captured from the DOS Prompt or captured directly from Windows. To find out if
an LPT port is already captured, type the following command from the DOS Prompt:
capture show
This will list the current capture data for each virtual port.
Note
If an ad command or file name error occurs, run the command from the file
servers Public directory.
■ For NetWare 3.xx and Netware 4.xx bindery queues:
capture q=[queue_name] l=[port] nb nff nt
where queue_name is the name of the queue to be captured, and port is the virtual
port to capture to, such as LPT3.
Also, nb is no banners, nff is no form feeds, and nt is no tabs.
For example: capture q=phaser_350 l=3 nb nff nt
Note
For NetWare 4.xx NDS queues, the queue name needs to start with a period. For
example: capture q=.phaser_350_q.nds.printers.support l=2 nb nff nt.
■ For Windows 95 / 98 environments follow these guidelines:
1. From the Details tab of your printer’s driver, select the Capture Printer Port button.
2. Select the appropriate virtual port under the Device field.
■ For bindery queues, enter the path as \\server_name\queue_name and select
OK. For example: \\nw_server\Phaser_350
■ For NDS queues, enter the path as \\Tree\queue_name.context and select OK.
For example: \\Tek\.Phaser_350_Q.nds.printers
■ For Windows 3.1x environments follow these guidelines:
1. From the Windows Control Panel, select Printers.
2. Select the Connect button, then select the Network button.
3. Choose a Port to capture, then locate the appropriate queue.
Note
If the appropriate file server is not listed, click the Attach button and select the
desired file server. Login and click OK. Within the Operation section, check the
box next to the word Permanent, then click Connect. The port should then be
captured.
98 Phaser 750 Color Printer
Page 99

Printer Utilities
Downloading files if your printer is connected through PhaserPort
This procedure lets you create the printer and then redirect the port, turning client #1 into
a print server.
1. On Client #1, create a printer using the LPT1 port.
2. Share the printer to the network.
3. Install Phaserport and switch the LPT1 port to the Phaserport port.
4. On client #2, browse the network and install the shared printer.
5. Open the printer's Properties.
a. Click Start, select Settings, and then select Printers.
b. Right-mouse-click on the printer's icon.
c. In the pop-up dialog box, select Properties.
d. In the Details tab, click Capture Port and enter the path.
Downloading files if your printer is connected to Windows NT
This procedure lets you redirect (capture) LPT Ports
Under Windows NT print spooler, you create Ports based on their physical location:
■ Local ports = Lpt1 / Lpt2, etc.
■ IPX Port = \\NW_SERVER\Phaser
■ Appletalk Ports = WV Net 36:Phaser
■ TCP/IP Ports = 162.36.62.151:PS or [AUTO]
However, if you’re at a command prompt (DOS Prompt) and want to print, or copy, a
PostScript file to a port that is a network port, you can do the following:
■ TCP/IP Ports:
lpr -S [printers IP Address] -P [print queue] filename
For xxample: lpr -S 134.62.36.70 -P PS test.ps
■ IPX and Appletalk ports require the redefinition of the LPTX port to the network path
through the use of the NET USE command.
NET USE LPT1 \\Server_Name\Queue_Name
For example: NET USE LPT1 \\NW_SERVER\Phaser
or: NET USE LPT2 \\NT_SERVER_NT\Phaser
After redirecting the port using the NET USE command you can use the COPY
command to print the postscript file.
eg. C:\> COPY TEST.PS LPT1:
When finished, end the redirect with the command:
NET USE LPT1 /delete
Advanced Features and Troubleshooting Manual 99
Page 100

Advanced Printing Features for Phaser 750 Printers
Advanced Printing Features for
Phaser 750 Printers
Previewing with 1st Page Preview
When printing multiple pages through the driver (either multiple copies of a single page or
a multiple-page file), select 1st Page Preview to preview the first page of the job before
proceeding with the remainder of the job; this feature is useful when printing a large job.
You can set the timeout in the printer’s front panel (timeout is the amount of time the
printer waits after sending the first page of a file before it continues with the remainder of
the job). The default timeout is 5 minutes.
Requirements
■ P, DP or DX Feature Set
■ Turn on the feature in the printer driver
Use 1st Page Preview
1. In a supported driver, select 1st Page Preview:
■ LaserWriter 8.3.4 driver:
In the Print dialog box, click Options.
■ LaserWriter 8.6 driver:
In the Print dialog box, from the pull-down menu (General) select Printer
Specific Options.
■ Windows 95 / Windows 98 PostScript driver:
Start/Settings/Printers, then select Properties for your printer. In the Setup tab,
select Expert Options.
■ Windows 2000 driver:
From the Layout tab or Paper/Quality tab, click Advanced.
■ Windows NT driver:
Under the Properties tab, select the Advanced tab. In the Document Options tab,
select Printer features.
■ Adobe PS3 driver for Windows 3.1:
Select the Features tab options.
2. Check your first print. At the printer’s front panel 1st Page Preview message, choose
one of these options:
■ Reprint: Reprints the first page, pauses for the duration of timeout or until you
press a button.
■ Cancel: Cancels the print job.
■ Continue: Prints the rest of the print job.
3. Press Select.
100 Phaser 750 Color Printer
 Loading...