

Page 1

Phaser® 6300/6350
c o l o r l a s e r p r i n t e r
Advanced Features Guide
Guide des fonctions avancées
Guida alle funzioni avanzate
Handbuch zu erweiterten Funktionen
Guía de características avanzadas
Guia de recursos avançados
Handleiding voor geavanceerde functies
Avancerade Funktionsguiden
www.xerox.com/office/support
Page 2

Copyright © 2005 Xerox Corporation. All Rights Reserved. Unpublished rights reserved under the copyright laws of the United
States. Contents of this publication may not be reproduced in any form without permission of Xerox Corporation.
Copyright protection claimed includes all forms of matters of copyrightable materials and information now allowed by statutory
or judicial law or hereinafter granted, including without limitation, material generated from the software programs which are
displayed on the screen such as styles, templates, icons, screen displays, looks, etc.
®
XEROX
Wal k- Up
Acrobat
Brilliant
, The Document Company®, the digital X®, CentreWare®, Made For Each Other®, Phaser®, PhaserSMART®, and
™
are trademarks of Xerox Corporation in the United States and/or other countries.
®
, Adobe® Reader®, Adobe Type Manager®, ATM™, Illustrator®, PageMaker®, Photoshop®, PostScript®, Adobe
®
Screens, Adobe Garamond®, Adobe Jenson™, Birch®, Carta®, IntelliSelect®, Mythos®, Quake®, and Tekton® are
trademarks of Adobe Systems Incorporated in the United States and/or other countries.
®
, AppleTalk®, Bonjour™, EtherTalk®, LaserWriter®, LocalTalk®, Macintosh®, Mac OS®, TrueType®, Apple Chancery®,
Apple
®
Chicago
, Geneva®, Monaco®, New York® , and QuickDraw® are trademarks of Apple Computer, Inc. in the United States and/
or other countries.
™
Marigold
Ave ry
HP-GL
and Oxford™ are trademarks of Alpha Omega Typography.
™
is a trademark of Avery Dennison Corporation.
®
, HP-UX®, and PCL®are trademarks of Hewlett-Packard Corporation in the United States and/or other countries.
Hoefler Text was designed by the Hoefler Type Foundry.
®
and AIX® are trademarks of International Business Machines Corporation in the United States and/or other countries.
IBM
®
ITC Avant Guard Gothic
ITC Zapf Dingbats
Bernhard Modern
™
Garamond
Macromedia
Windows
, Times™, and Univers™ are trademarks of Linotype-Hell AG and/or its subsidiaries.
®
and Flash® are trademarks of Macromedia, Inc.
®
, Windows NT®, Windows Server™, and Wingdings® are trademarks of Microsoft Corporation in the United States
, ITC Bookman®, ITC Lubalin Graph®, ITC Mona Lisa®, ITC Symbol®, ITC Zapf Chancery®, and
®
are trademarks of International Typeface Corporation.
™
, Clarendon™, Coronet™, Helvetica™, New Century Schoolbook™, Optima™, Palatino™, Stempel
and/or other countries.
™
Albertus
Antique Olive
Eurostile
Novell
, Arial™, Gill Sans™, Joanna™, and Times New Roman™ are trademarks of Monotype Imaging Inc.
®
is a trademark of M. Olive.
™
is a trademark of Nebiolo.
®
, NetWare®, NDPS®, NDS®, Novell Directory Services® , IPX™, and Novell Distributed Print Services™are trademarks
of Novell, Incorporated in the United States and/or other countries.
SM
, Sun Microsystems™, and Solaris® are trademarks of Sun Microsystems, Incorporated in the United States and/or other
Sun
countries.
®
is a trademark of SWOP, Inc.
SWOP
®
is a trademark in the United States and other countries, licensed exclusively through X/Open Company Limited.
UNIX
NERGY STAR
As an E
efficiency. The E
®
partner, Xerox Corporation has determined that this product meets the ENERGY STAR guidelines for energy
NERGY STAR name and logo are registered U.S. marks.
PANTONE
®
Colors generated may not match PANTONE-identified standards. Consult current PANTONE Publications for
accurate color. PANTONE
®
and other Pantone, Inc. trademarks are the property of Pantone, Inc. © Pantone, Inc., 2000.
Page 3

Contents
1 Using Printer Driver Options
Printer Driver Features . . . . . . . . . . . . . . . . . . . . . . . . . . . . . . . . . . . . . . . . . . . . . . . . . . . . . 1-2
Printing in Black and White . . . . . . . . . . . . . . . . . . . . . . . . . . . . . . . . . . . . . . . . . . . . . . . . . 1-3
Printing Multiple Pages to a Single Sheet (N-Up) . . . . . . . . . . . . . . . . . . . . . . . . . . . . . . . . 1-4
Printing Booklets . . . . . . . . . . . . . . . . . . . . . . . . . . . . . . . . . . . . . . . . . . . . . . . . . . . . . . . . . . 1-5
Printing Separation Pages . . . . . . . . . . . . . . . . . . . . . . . . . . . . . . . . . . . . . . . . . . . . . . . . . . . 1-7
Printing Cover Pages . . . . . . . . . . . . . . . . . . . . . . . . . . . . . . . . . . . . . . . . . . . . . . . . . . . . . . . 1-8
Scaling . . . . . . . . . . . . . . . . . . . . . . . . . . . . . . . . . . . . . . . . . . . . . . . . . . . . . . . . . . . . . . . . . 1-10
Printing Watermarks . . . . . . . . . . . . . . . . . . . . . . . . . . . . . . . . . . . . . . . . . . . . . . . . . . . . . . 1-11
Printing Negative and Mirror Images . . . . . . . . . . . . . . . . . . . . . . . . . . . . . . . . . . . . . . . . . 1-13
Smoothing Images . . . . . . . . . . . . . . . . . . . . . . . . . . . . . . . . . . . . . . . . . . . . . . . . . . . . . . . . 1-14
Printing Secure, Personal, Proof, and Saved Print Jobs . . . . . . . . . . . . . . . . . . . . . . . . . . . 1-15
Specifying Secure, Personal, Proof, and Saved Print Jobs . . . . . . . . . . . . . . . . . . . . 1-16
Printing or Deleting Secure Print Jobs . . . . . . . . . . . . . . . . . . . . . . . . . . . . . . . . . . . 1-17
Printing or Deleting Personal Print Jobs . . . . . . . . . . . . . . . . . . . . . . . . . . . . . . . . . . 1-17
Printing or Deleting Proof and Saved Print Jobs . . . . . . . . . . . . . . . . . . . . . . . . . . . 1-17
2 Using Fonts
Types of Fonts . . . . . . . . . . . . . . . . . . . . . . . . . . . . . . . . . . . . . . . . . . . . . . . . . . . . . . . . . . . . 2-2
Viewing a List of Resident Fonts . . . . . . . . . . . . . . . . . . . . . . . . . . . . . . . . . . . . . . . . . . . . . 2-3
Printing Font Samples . . . . . . . . . . . . . . . . . . . . . . . . . . . . . . . . . . . . . . . . . . . . . . . . . . . . . . 2-4
Using the Control Panel . . . . . . . . . . . . . . . . . . . . . . . . . . . . . . . . . . . . . . . . . . . . . . . 2-4
Using CentreWare IS . . . . . . . . . . . . . . . . . . . . . . . . . . . . . . . . . . . . . . . . . . . . . . . . . 2-4
Using a Windows Printer Driver. . . . . . . . . . . . . . . . . . . . . . . . . . . . . . . . . . . . . . . . . 2-5
Downloading Fonts . . . . . . . . . . . . . . . . . . . . . . . . . . . . . . . . . . . . . . . . . . . . . . . . . . . . . . . . 2-6
3 Printing on Other Specialty Media
Determining Which Tray to Use . . . . . . . . . . . . . . . . . . . . . . . . . . . . . . . . . . . . . . . . . . . . . . 3-2
Printing Specialty Media from Tray 1 (MPT). . . . . . . . . . . . . . . . . . . . . . . . . . . . . . . . . . . . 3-3
Printing Specialty Media from Trays 2–5 . . . . . . . . . . . . . . . . . . . . . . . . . . . . . . . . . . . . . . . 3-4
Phaser® 6300/6350 Color Laser Printer
i
Page 4

Contents
4Networking
Printer Management Software. . . . . . . . . . . . . . . . . . . . . . . . . . . . . . . . . . . . . . . . . . . . . . . . 4-2
CentreWare Internet Services (IS) . . . . . . . . . . . . . . . . . . . . . . . . . . . . . . . . . . . . . . . 4-2
CentreWare Web. . . . . . . . . . . . . . . . . . . . . . . . . . . . . . . . . . . . . . . . . . . . . . . . . . . . . 4-3
Windows 2000, Windows XP, and Windows Server 2003. . . . . . . . . . . . . . . . . . . . . . . . . . 4-4
Preliminary Steps . . . . . . . . . . . . . . . . . . . . . . . . . . . . . . . . . . . . . . . . . . . . . . . . . . . . 4-4
Quick CD-ROM Install Steps . . . . . . . . . . . . . . . . . . . . . . . . . . . . . . . . . . . . . . . . . . . 4-4
Other Methods of Installation . . . . . . . . . . . . . . . . . . . . . . . . . . . . . . . . . . . . . . . . . . . 4-5
Windows 2000, Windows XP, and Windows Server 2003 Troubleshooting. . . . . . . 4-9
Windows NT 4.x . . . . . . . . . . . . . . . . . . . . . . . . . . . . . . . . . . . . . . . . . . . . . . . . . . . . . . . . . 4-11
Preliminary Steps . . . . . . . . . . . . . . . . . . . . . . . . . . . . . . . . . . . . . . . . . . . . . . . . . . . 4-11
Quick CD-ROM Install Steps . . . . . . . . . . . . . . . . . . . . . . . . . . . . . . . . . . . . . . . . . . 4-11
Other Methods of Installation . . . . . . . . . . . . . . . . . . . . . . . . . . . . . . . . . . . . . . . . . . 4-12
Windows NT 4.x Troubleshooting . . . . . . . . . . . . . . . . . . . . . . . . . . . . . . . . . . . . . . 4-14
Windows 98 SE and Windows Me . . . . . . . . . . . . . . . . . . . . . . . . . . . . . . . . . . . . . . . . . . . 4-16
Preliminary Steps . . . . . . . . . . . . . . . . . . . . . . . . . . . . . . . . . . . . . . . . . . . . . . . . . . . 4-16
Quick CD-ROM Install Steps . . . . . . . . . . . . . . . . . . . . . . . . . . . . . . . . . . . . . . . . . . 4-17
Other Methods of Installation . . . . . . . . . . . . . . . . . . . . . . . . . . . . . . . . . . . . . . . . . . 4-17
Windows 98 SE and Windows Me Troubleshooting . . . . . . . . . . . . . . . . . . . . . . . . 4-19
Macintosh . . . . . . . . . . . . . . . . . . . . . . . . . . . . . . . . . . . . . . . . . . . . . . . . . . . . . . . . . . . . . . 4-20
Requirements . . . . . . . . . . . . . . . . . . . . . . . . . . . . . . . . . . . . . . . . . . . . . . . . . . . . . . 4-20
Quick CD-ROM Install Steps . . . . . . . . . . . . . . . . . . . . . . . . . . . . . . . . . . . . . . . . . . 4-20
Enabling and Using EtherTalk for Mac OS 9.x . . . . . . . . . . . . . . . . . . . . . . . . . . . . 4-20
Enabling and Using TCP/IP for Mac OS 9.x . . . . . . . . . . . . . . . . . . . . . . . . . . . . . . 4-21
Enabling or Using TCP/IP or AppleTalk for Mac OS X, Version 10.2 and Higher. 4-23
Macintosh Troubleshooting (Mac OS 9.x, Mac OS X, Version 10.2 and Higher). . 4-25
Novell . . . . . . . . . . . . . . . . . . . . . . . . . . . . . . . . . . . . . . . . . . . . . . . . . . . . . . . . . . . . . . . . . 4-27
Novell Distributed Print Services (NDPS) . . . . . . . . . . . . . . . . . . . . . . . . . . . . . . . . 4-27
Xerox NDPS Gateway Software. . . . . . . . . . . . . . . . . . . . . . . . . . . . . . . . . . . . . . . . 4-27
UNIX (Linux) . . . . . . . . . . . . . . . . . . . . . . . . . . . . . . . . . . . . . . . . . . . . . . . . . . . . . . . . . . . 4-28
Quick Install Steps . . . . . . . . . . . . . . . . . . . . . . . . . . . . . . . . . . . . . . . . . . . . . . . . . . 4-28
Additional Resources . . . . . . . . . . . . . . . . . . . . . . . . . . . . . . . . . . . . . . . . . . . . . . . . 4-29
Phaser® 6300/6350 Color Laser Printer
ii
Page 5

Contents
5 Managing Your Printer
Printer Settings . . . . . . . . . . . . . . . . . . . . . . . . . . . . . . . . . . . . . . . . . . . . . . . . . . . . . . . . . . . 5-2
Controlling Startup Page Printing . . . . . . . . . . . . . . . . . . . . . . . . . . . . . . . . . . . . . . . . 5-2
Selecting Tray 1 (MPT) Behavior. . . . . . . . . . . . . . . . . . . . . . . . . . . . . . . . . . . . . . . . 5-3
Setting the Duration for Tray 1 (MPT) Prompts. . . . . . . . . . . . . . . . . . . . . . . . . . . . . 5-4
Setting the Duration for Tray 2 - 5 Prompts . . . . . . . . . . . . . . . . . . . . . . . . . . . . . . . . 5-5
Changing the Power Saver Timeout . . . . . . . . . . . . . . . . . . . . . . . . . . . . . . . . . . . . . . 5-6
Changing Intelligent Ready Mode . . . . . . . . . . . . . . . . . . . . . . . . . . . . . . . . . . . . . . . 5-7
Changing the Load Paper Timeout . . . . . . . . . . . . . . . . . . . . . . . . . . . . . . . . . . . . . . 5-8
Setting the Control Panel Language . . . . . . . . . . . . . . . . . . . . . . . . . . . . . . . . . . . . . . 5-9
Setting the Printer Date and Time. . . . . . . . . . . . . . . . . . . . . . . . . . . . . . . . . . . . . . . . 5-9
Setting the Timing for the Low Toner Warning Message . . . . . . . . . . . . . . . . . . . . 5-10
Printer Security . . . . . . . . . . . . . . . . . . . . . . . . . . . . . . . . . . . . . . . . . . . . . . . . . . . . . . . . . . 5-12
Selecting Administrative Settings. . . . . . . . . . . . . . . . . . . . . . . . . . . . . . . . . . . . . . . 5-12
Selecting Printing Security Settings . . . . . . . . . . . . . . . . . . . . . . . . . . . . . . . . . . . . . 5-13
Selecting the Secure Socket Layer (SSL) Settings . . . . . . . . . . . . . . . . . . . . . . . . . . 5-13
Locking the Control Panel Menus . . . . . . . . . . . . . . . . . . . . . . . . . . . . . . . . . . . . . . 5-13
Analyzing Printer Usage . . . . . . . . . . . . . . . . . . . . . . . . . . . . . . . . . . . . . . . . . . . . . . . . . . . 5-14
Job Accounting . . . . . . . . . . . . . . . . . . . . . . . . . . . . . . . . . . . . . . . . . . . . . . . . . . . . . 5-14
Usage Profile Reports . . . . . . . . . . . . . . . . . . . . . . . . . . . . . . . . . . . . . . . . . . . . . . . . 5-15
MaiLinX Alerts . . . . . . . . . . . . . . . . . . . . . . . . . . . . . . . . . . . . . . . . . . . . . . . . . . . . . 5-16
Xerox Usage Analysis Tool . . . . . . . . . . . . . . . . . . . . . . . . . . . . . . . . . . . . . . . . . . . 5-17
A Printer Specifications
B Regulatory Information
C Material Safety Data Sheet
D Product Recycling and Disposal
E Acknowledgements
Index
Phaser® 6300/6350 Color Laser Printer
iii
Page 6

Using Printer Driver Options
This chapter includes:
■ Printer Driver Features on page 1-2
■ Printing in Black and White on page 1-3
■ Printing Multiple Pages to a Single Sheet (N-Up) on page 1-4
■ Printing Booklets on page 1-5
■ Printing Separation Pages on page 1-7
■ Printing Cover Pages on page 1-8
■ Scaling on page 1-10
■ Printing Watermarks on page 1-11
■ Printing Negative and Mirror Images on page 1-13
■ Smoothing Images on page 1-14
■ Printing Secure, Personal, Proof, and Saved Print Jobs on page 1-15
See also:
Quick start tutorial at www.xerox.com/office/6300_6350support
Phaser® 6300/6350 Color Laser Printer
1-1
Page 7

Printer Driver Features
Printer Driver Features
The following table displays many of the Xerox printer driver features that are available with
specific operating systems. This section includes more information about these features and
information about how to select the feature in the driver.
Macintosh
Feature
Windows
98 SE, Me
Windows
NT 4.x
Windows,
2000, XP,
Server
2003
Macintosh
OS 9.x
OS X,
Version
10.2 and
higher
Black & White printing
(page 1-3)
Pages per sheet (page 1-4) ●●●●●
Booklet (page 1-5) ● - ● --
Separation Pages (page 1-7) ●●●●●
Cover Pages (page 1-8) ●●●●●
Scaling (page 1-10) ●●●●●
Watermarks (page 1-11) ● - ● --
Negative Images (page 1-13) ● --● -
Mirror Images (page 1-13) ●●●● -
Image Smoothing
(page 1-14)
Job Completion Notification
Secure Print (page 1-15) ■■■■■
Personal Print (page 1-15) - ■■■■
Proof Print (page 1-15) ■■■■■
Saved Print (page 1-15) ■■■■■
●●●●●
●●●●●
❍ -
❍
--
● = Supported.
■ = Only available when your printer has a hard drive.
❍ = Only available when your printer is connected to your computer over a network.
Phaser® 6300/6350 Color Laser Printer
1-2
Page 8

Printing in Black and White
Printing in Black and White
If you want your output in black, white, and shades of gray, you can select Black & White in
a supported printer driver:
Operating System Steps
Windows98SE,
Windows Me,
Windows 2000,
Windows XP,
Windows Server 2003,
Windows NT 4.x
PostScript driver
Mac OS 9 driver 1. In the Print dialog box, select Print Quality/Color 1.
Mac OS X (version 10.2
and higher) driver
1. Select the TekColor tab.
2. Select Black & White.
2. Select Black & White from the Color Correction drop-down list.
1. In the Print dialog box, select Image Quality from the drop-down
list.
2. Select Black and White from the Color Correction drop-down list.
Phaser® 6300/6350 Color Laser Printer
1-3
Page 9
Printing Multiple Pages to a Single Sheet (N-Up)
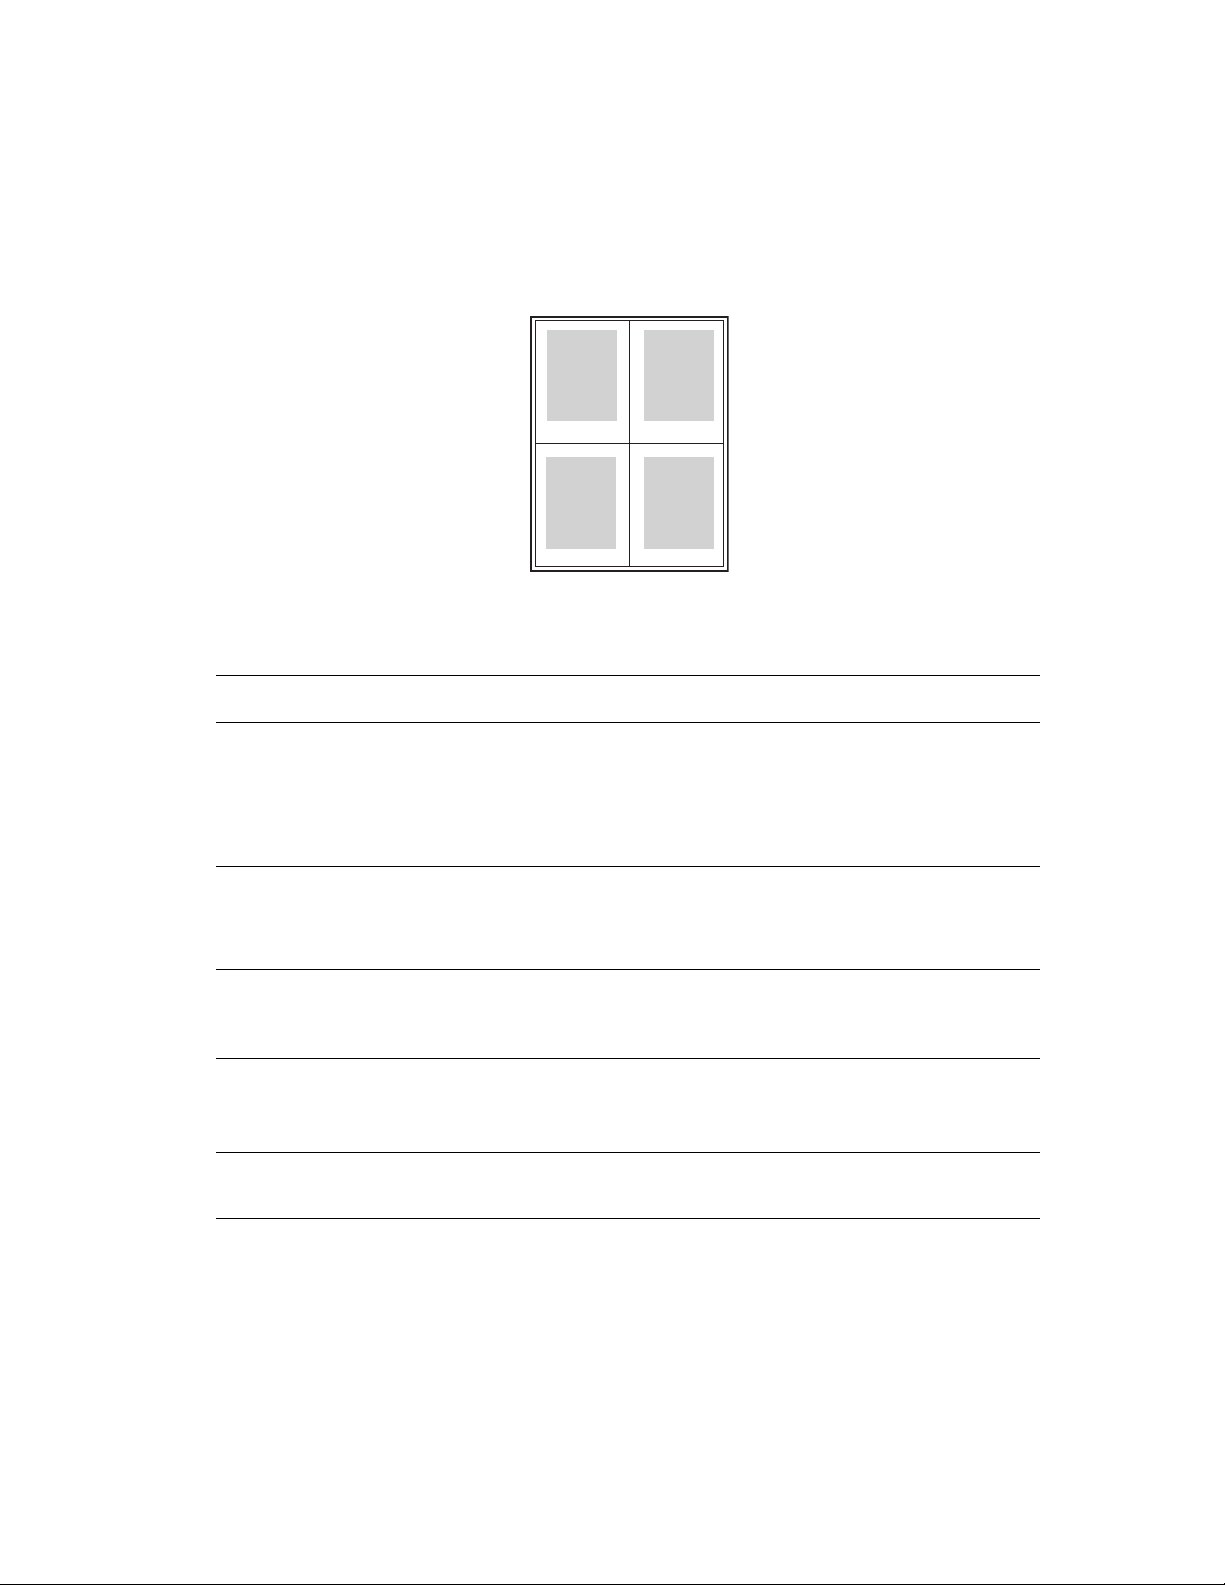
Printing Multiple Pages to a Single Sheet (N-Up)
When printing a multiple-page document, you can print more than one page on a single sheet
of paper. Print one, two, four, six, nine, or 16 pages per side.
1 2
43
To print multiple pages on a single sheet of paper in a supported driver:
Operating System Steps
Windows98SE,
Windows Me PostScript
driver
Windows 2000,
Windows XP,
Windows Server 2003
PostScript driver
Windows NT 4.x
PostScript driver
Mac OS 9 driver 1. In the Print dialog box, select General.
Mac OS X (version 10.2
and higher) driver
1. Select the Setup tab.
2. Click the More Layout Options button.
3. Select the number of pages per side from the drop-down list.
When you print more than one page on a side, you can also print a
border around each page.
1. Select the Layout tab.
2. Select the number of pages per side from the drop-down list.
1. Select the Advanced tab.
2. Under Document Options, select the number of pages per side for
Page Layout (N-up) Option.
2. Select Layout from the drop-down list.
3. Select the number of Pages per sheet and Layout direction.
1. In the Print dialog box, select Layout.
2. Select the number of Pages per Sheet and Layout Direction.
Phaser® 6300/6350 Color Laser Printer
1-4
Page 10
Printing Booklets
Printing Booklets
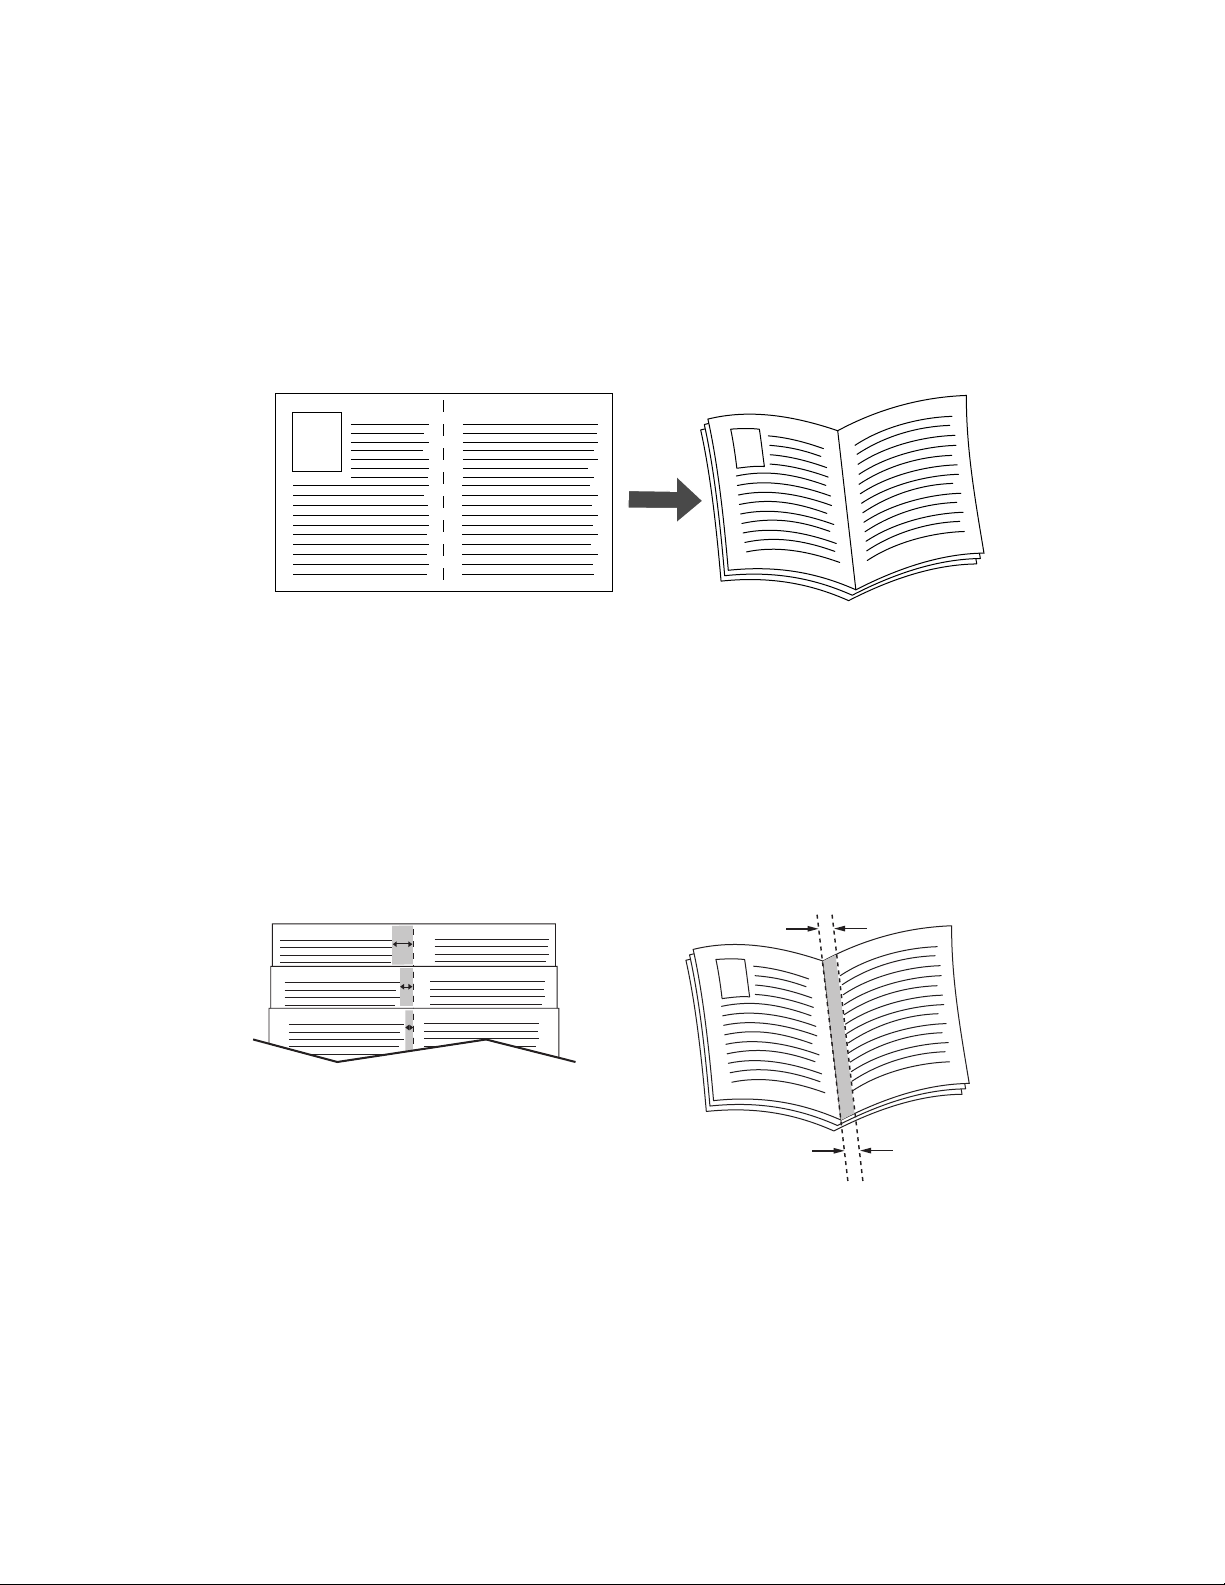
With 2-sided printing, you can print a document in the form of a small book. Create booklets
for any paper size that is supported for 2-sided (duplex) printing. The driver automatically
reduces each page image and prints four pages per sheet of paper (two on each side). The
pages are printed in the correct order so that you can fold and staple the pages to create a
booklet.
When you print booklets, you can also specify the creep and gutter in both Windows 98 and
Windows Me drivers. The gutter is the horizontal distance from the fold to the page image (in
points). The creep is the distance that page images are shifted inward (in 10ths of a point); this
compensates for the thickness of the folded paper, which otherwise would cause the inner page
images to shift slightly outward.
Creep Gutter
Phaser® 6300/6350 Color Laser Printer
1-5
Page 11

To select booklet printing in a supported Windows driver:
Operating System Steps
Printing Booklets
Windows98SE,
Windows Me PostScript
driver
Windows 2000,
Windows XP,
Windows Server 2003
PostScript driver
1. Select the Setup tab.
2. Click the More Layout Options button.
3. Select Print Booklet Style.
4. If desired, specify the creep and gutter.
1. Select the Layout tab.
2. Click the Advanced button.
3. Under Document Options and Printer Features, select On for
Booket Layout.
Phaser® 6300/6350 Color Laser Printer
1-6
Page 12

Printing Separation Pages
Printing Separation Pages
A separation page (a divider page or slipsheet) can be inserted after a print job, between
copies of a print job, or between individual pages of a print job. Specify the tray to use as the
source for the separation pages.
To specify separation pages in a supported driver:
Operating System Steps
Windows98SE,
Windows Me,
Windows 2000,
Windows XP,
Windows Server 2003,
Windows NT 4.x
PostScript driver
Mac OS 9 driver 1. In the Print dialog box, select Advanced Options from the
Mac OS X (version 10.2
and higher) driver
1. Select the Output Options tab.
2. Under Separation Pages, select the location of the separation
pages.
3. Select the tray to use for the separation pages from the Source
drop-down list.
drop-down list.
2. Select the tray to use for the separation pages from the Separation
Page Source drop-down list.
3. Select the Separation Page from the drop-down list.
1. In the Print dialog box, select Printer Features from the drop-down
list.
2. Under Feature Sets, select Advanced Options 1 from the
drop-down list.
3. Select the tray to use for the separation pages from the Separation
Pages Source drop-down list.
Phaser® 6300/6350 Color Laser Printer
1-7
Page 13

Printing Cover Pages
Printing Cover Pages
A cover page is the first or last page of a document. The printer enables you to choose a
different paper source for the cover page than for the body of a document. For instance, use
your company letterhead for the first page of a document, or use card stock for the first and last
pages of a report.
■ Use any applicable paper tray as the source for printing cover pages.
■ Verify that the cover page is the same size as the paper used for the rest of your document.
If you specify a different size in the driver than the tray you select as a cover pages source,
your cover(s) print on the same paper as the rest of your document.
You have several choices for cover pages:
■ None: Prints the first and last pages of your document from the same tray as the rest of
your document.
■ First: Prints the first page on paper from the specified tray.
■ First and Last: Prints the first and last pages on paper from the specified tray.
Cover Page Print Option Pages Printed on Cover
First 1-sided printing Page 1
2-sided printing Pages 1 and 2
Last 1-sided printing Last page
2-sided printing
(odd-numbered pages)
2-sided printing
(even-numbered pages)
Last page
Last two pages
For the back of your front cover to remain blank when 2-sided printing, page two of your
document must be blank. For the back cover of your document to remain blank, see the
following table for inserting blank pages.
Print Option Last Page of Text Blank Pages
1-sided printing Add one blank page at the end of the
document.
2-sided printing Odd-numbered Add two blank pages at the end of the
document.
Even-numbered Add one blank page at the end of the
document.
Phaser® 6300/6350 Color Laser Printer
1-8
Page 14

To select cover pages in a supported driver:
Operating System Steps
Printing Cover Pages
Windows98SE,
Windows Me PostScript
driver
Windows 2000,
Windows XP,
Windows Server 2003,
Windows NT 4.x
PostScript driver
Mac OS 9 driver 1. In the Print dialog box, select Cover Page.
Mac OS X (version 10.2
and higher) driver
1. Select the Output Options tab.
2. Under Cover Pages, select First Page Only or First and Last
Pages.
3. Select the tray to use for the covers from the Source drop-down list.
1. Select the Paper/Quality tab.
2. Under Cover Pages, select First Page Only or First & Last Pages.
3. Select the tray to use for the covers from the Source drop-down list.
2. Under Print Cover Pages, select Before Document or After
Document.
3. Under Cover Page Paper Source select the tray to use for the
covers from the drop-down list.
1. In the Print dialog box, select Paper Feed.
2. Select First page from, and then select the tray to use for the
covers.
3. Select Printer Features.
4. Under Feature Sets, select Advanced Options 2.
5. Select the tray to use for the cover pages from the Last Page Paper
Source drop-down list.
Phaser® 6300/6350 Color Laser Printer
1-9
Page 15
Scaling
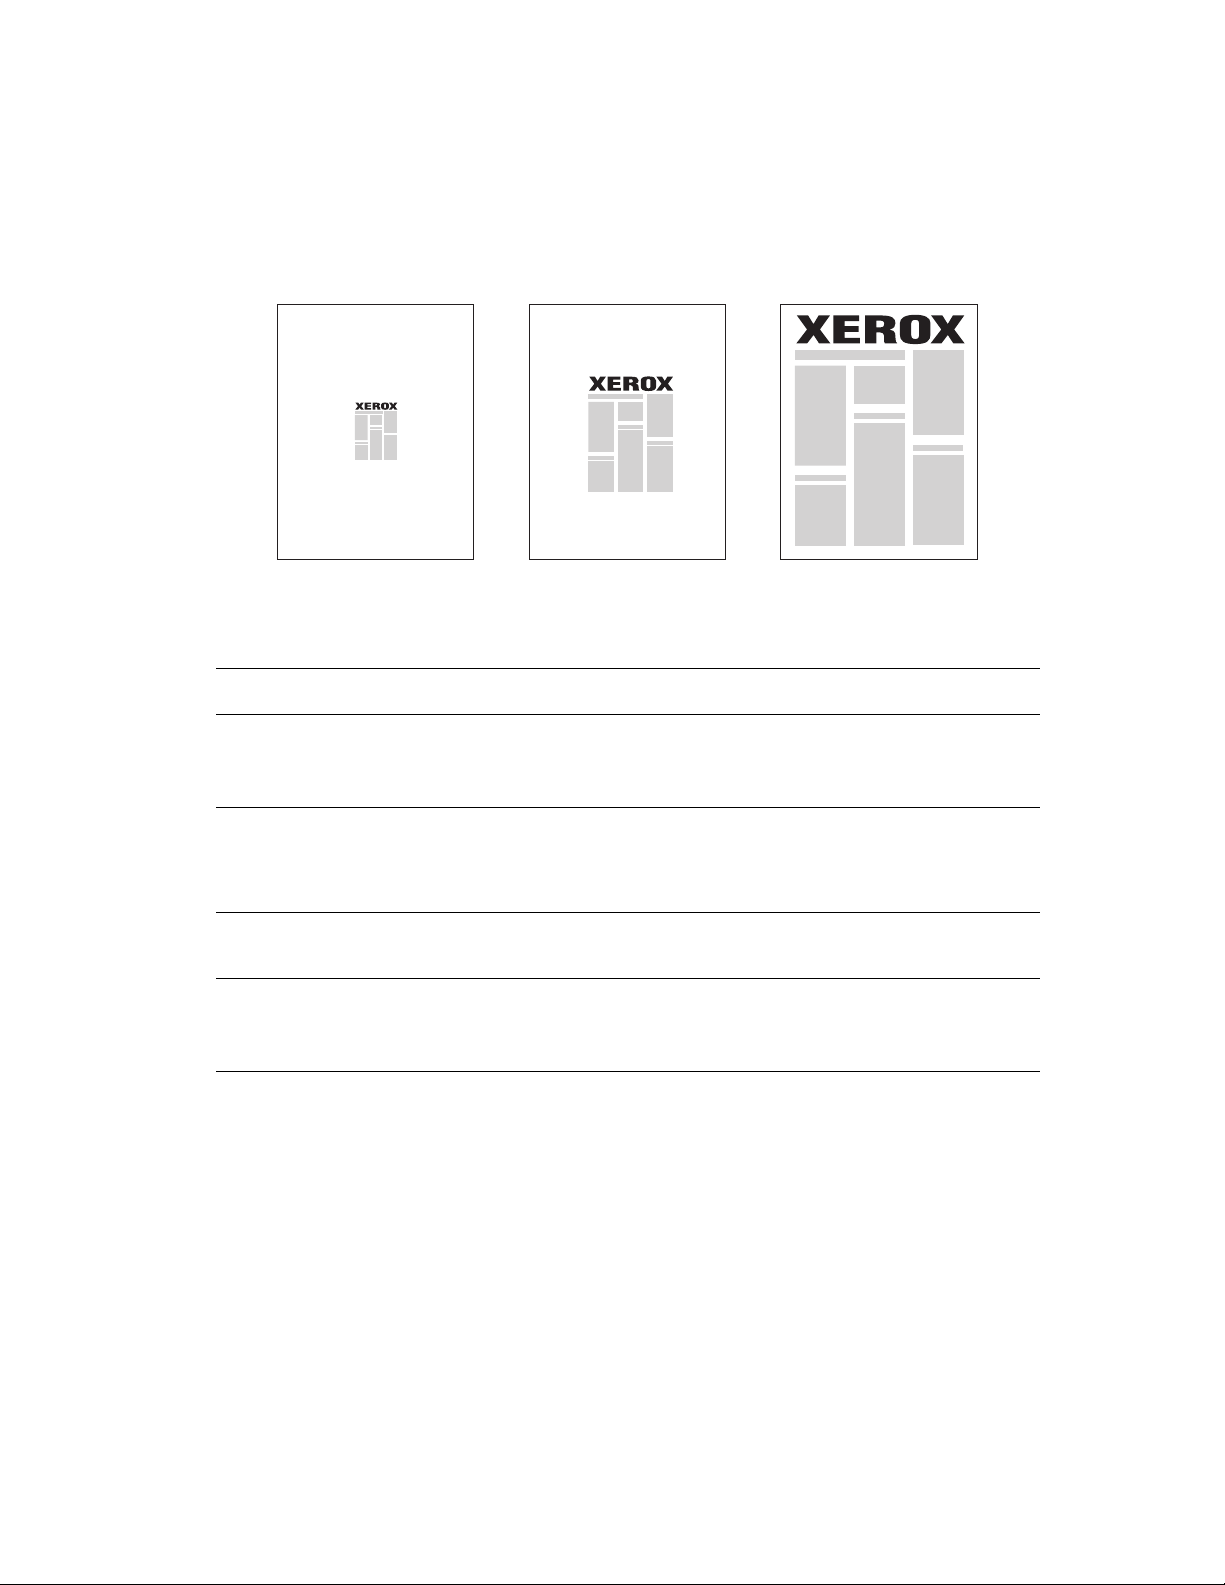
Scaling
You can reduce or enlarge your page images when they are printed by selecting a scaling value
between 25 and 400 percent. The default is 100 percent.
50% 100% 200%
To select scaling in a supported driver:
Operating System Steps
Windows98SE,
Windows Me PostScript
driver
Windows 2000,
Windows XP,
Windows Server 2003
PostScript driver
Windows NT 4.x
PostScript driver
Mac OS 9, Mac OS X
(version 10.2 and
higher) driver
1. Select the Setup tab.
2. Click the More Layout Options button.
3. Specify the percentage to scale in the Percentage box.
1. Select the Layout tab.
2. Click the Advanced button.
3. Under Graphic, select the desired percentage for Scaling.
1. Select the Advanced tab.
2. Under Graphic, select the desired percentage for Scaling.
1. Select File.
2. Select Page Setup.
3. Specify the percentage in the box for Scale.
Phaser® 6300/6350 Color Laser Printer
1-10
Page 16

Printing Watermarks
Printing Watermarks
A watermark is additional text that can be printed across one or more pages. For example,
terms like Draft and Confidential, which you might stamp on a page before distribution, can be
inserted with a watermark.
In some Windows drivers you can:
■ Create a watermark
■ Edit an existing watermark’s text, color, location, and angle
■ Place a watermark on either the first page or every page in a document
■ Print a watermark in the foreground or background or blend with the the print job
■ Use a graphic for the watermark
Note: Not all applications support watermark printing.
Phaser® 6300/6350 Color Laser Printer
1-11
Page 17

To select, create, and edit watermarks using a supported Windows driver:
Operating System Steps
Printing Watermarks
Windows98SE,
Windows Me PostScript
driver
Windows 2000,
Windows XP,
Windows Server 2003
PostScript driver
1. Select the Setup tab.
2. Click the More Layout Options button.
3. Click the Watermark button to display the Watermarks dialog box.
1. Select the Layout tab.
2. Click the Advanced button.
3. Select one of the following options in the Watermark s section under
Document Options and Printer Features:
■ To use an existing watermark, select it from the Watermarks
drop-down list. To modify the watermark, click the Edit button to
display the Watermark Editor dialog box.
■ To create a new watermark, select New, and then click the
Properties button to display the Watermark Editor dialog box.
4. To print the watermark in the foreground or background or to blend it
with the job, select the option from the Watermark Options
drop-down list.
5. To print the watermark on the first page only, select On from the
First Page Only drop-down list.
Phaser® 6300/6350 Color Laser Printer
1-12
Page 18
Printing Negative and Mirror Images
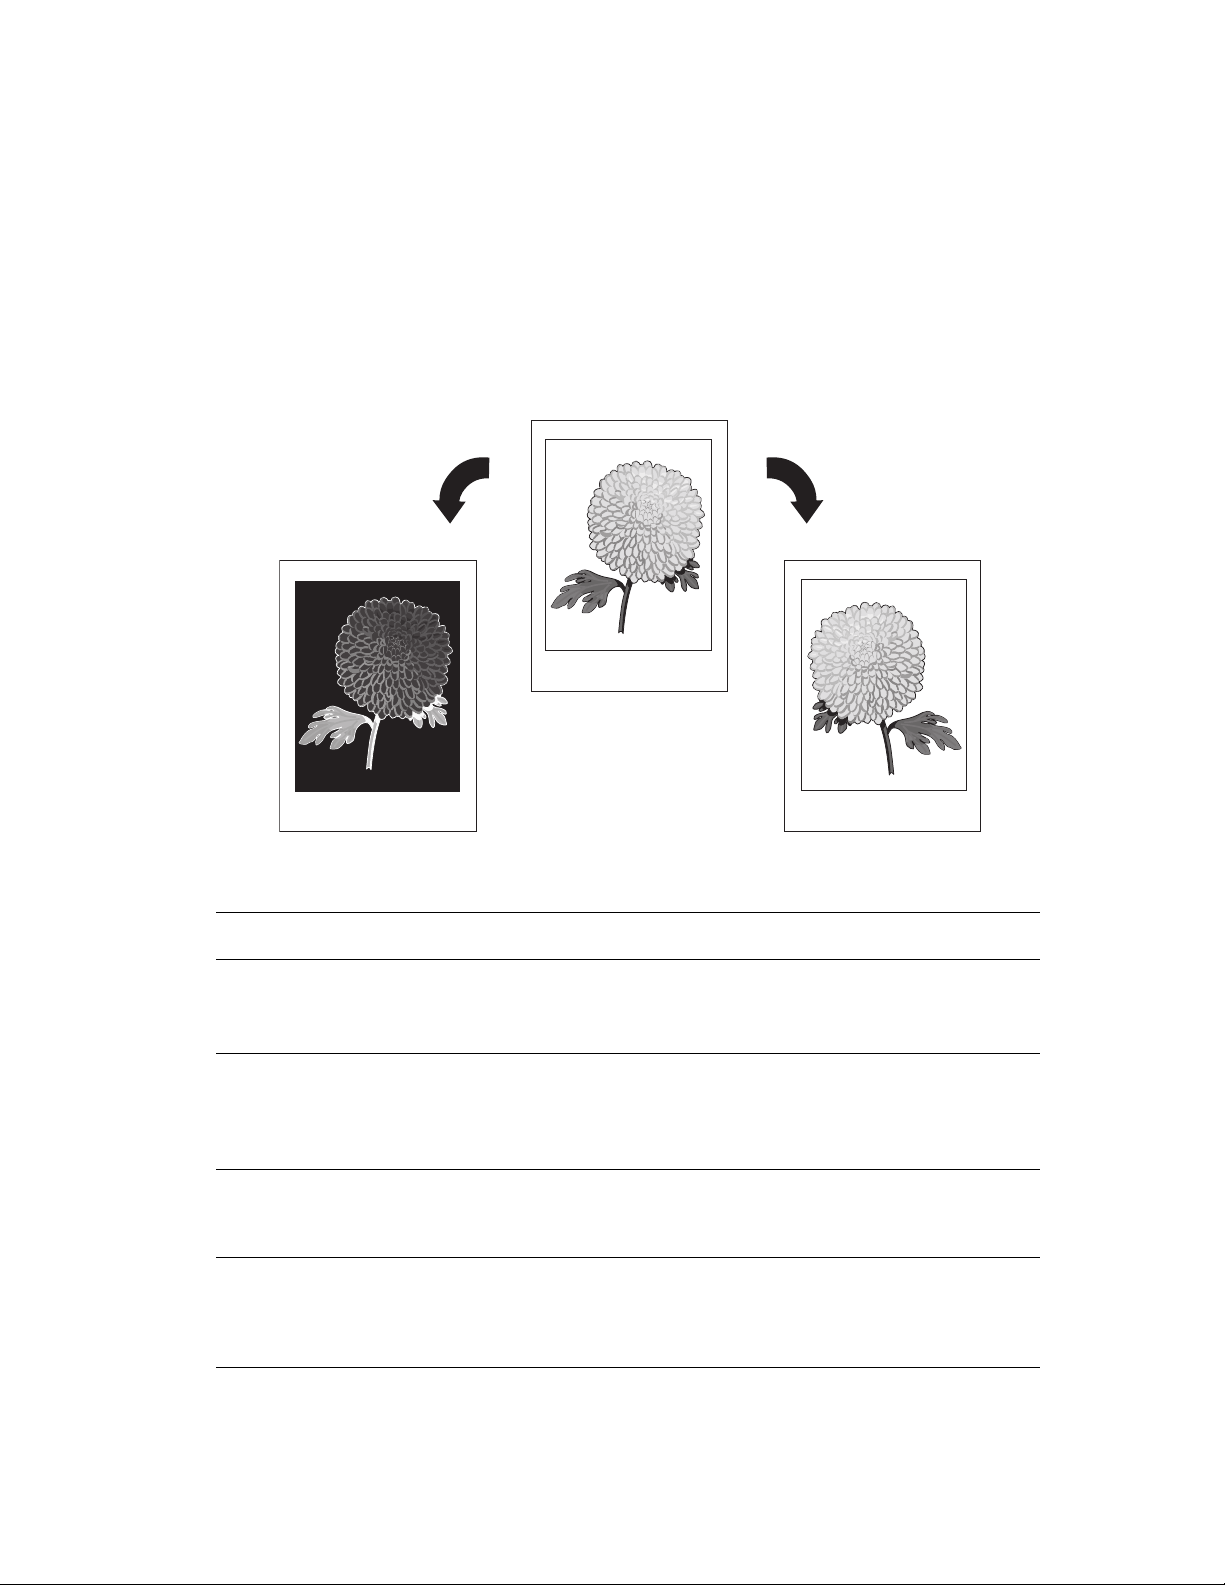
Printing Negative and Mirror Images
You can print pages as a negative image (reverses the light and dark areas in your printed
image) or mirror image (flips images horizontally on pages when printed).
Note: Negative images are not supported in Windows 2000, Windows XP, and Windows
Server 2003.
To select negative or mirror images in a supported driver:
Operating System Steps
Windows 98 SE,
Windows Me PostScript
driver
Windows 2000,
Windows XP, Windows
Server 2003 PostScript
driver
Windows NT 4.x
PostScript driver
Mac OS 9 driver 1. Select File, select Page Setup, and then select PostScript Options
1. Select the Setup tab.
2. Click the More Layout Options button.
3. Select Print as a Negative Image or Print as a Mirror Image.
1. Select the Layout tab.
2. Click the Advanced button.
3. Under Document Options and PostScript Options, select Ye s for
Mirrored Output.
1. Select the Advanced tab.
2. Under Document Options and PostScript Options, select Ye s for
Mirrored Output.
from the drop-down list.
2. Select Invert Image (to print a negative image) or Flip Horizontal
(to print a mirror image).
Phaser® 6300/6350 Color Laser Printer
1-13
Page 19

Smoothing Images
Smoothing Images
Image smoothing blends adjacent colors in low-resolution images for smoother color
transitions. For example, use image smoothing to improve the appearance of a 72 dpi image
downloaded from the web. Image smoothing is not recommended for images with resolutions
of 300 dpi or higher.
Note: Print processing is slower when this option is selected.
To select image smoothing in a supported driver:
Operating System Steps
Windows 98 SE,
Windows Me PostScript
driver
Windows 2000,
Windows XP,
Windows Server 2003
PostScript driver
Windows NT 4.x
PostScript driver
Mac OS 9 driver 1. In the Print dialog box, select Advanced Options from the
Mac OS X (version 10.2
and higher) driver
1. Select the Setup tab.
2. Click the More Layout Options button.
3. Select Image Smoothing.
1. Select the Layout tab.
2. Click the Advanced button.
3. Under Document Options and Printer Features, select On for
Image Smoothing.
1. Select the Advanced tab.
2. Under Printer Features, select On for Image Smoothing.
drop-down list.
2. Select On for Image Smoothing.
1. In the Print dialog box, select Image Quality from the drop-down
list.
2. Select Image Smoothing.
Phaser® 6300/6350 Color Laser Printer
1-14
Page 20

Printing Secure, Personal, Proof, and Saved Print Jobs
Printing Secure, Personal, Proof, and Saved Print
Jobs
These features are available if your printer has an internal hard drive. These jobs are stored on
the hard drive and remain in the printer even when it is turned off.
Select one of the following special job types:
■ Secure Print: Prints the job only after you enter the four-digit numeric password on the
control panel.
■ Personal Print: Prints the job when you select your user name on the printer’s control
panel or in CentreWare IS.
■ Proof Print: Prints only one copy of the job so that you can proof the copy. If you want to
print the remaining copies, select the job name on the printer’s control panel.
■ Saved Print: Stores the job on the hard drive so you can print it on demand from the
control panel. The job is not deleted after printing. This is useful for any document you
frequently print, such as tax forms, personnel forms, or requisition forms.
Note: Protected Jobs are another special job type. These are jobs that have been copied or
moved from the Public Jobs group in CentreWare IS. For more information, click the
Help button in CentreWare IS to view the online help.
Phaser® 6300/6350 Color Laser Printer
1-15
Page 21

Printing Secure, Personal, Proof, and Saved Print Jobs
Specifying Secure, Personal, Proof, and Saved Print Jobs
Use a supported driver to specify a job as a secure print, personal print, proof print, or saved
print job:
Operating System Steps
Windows98SE,
Windows Me,
Windows 2000,
Windows XP,
Windows Server 2003,
Windows NT 4.x
PostScript driver
Mac OS 9 driver In the Print dialog box, select the job type from the Job Type drop-down
Mac OS X (version
10.2 and higher) driver
1. Select the Output Options tab.
2. Select the job type under Walk-Up Features.
■ For a secure print job, enter a four-digit password to assign to this
job.
■ For a proof print or saved print job, enter the name you want to give
this job.
list.
■ For a secure print job, enter a four-digit password to assign to this
job.
■ For a proof print or saved print job, enter the name you want to give
this job in the Job Name field.
In the Print dialog box, select the job type from the Job Types drop-
down list.
■ For a secure print job, enter a four digit number, ranging from 0000
through 9999, in the Job Password field.
■ For a proof print or saved print job, enter a document name (up to 20
alpha characters) in the Document Name field.
Note: Personal print jobs are not supported in Windows 98 SE and Windows Me.
Phaser® 6300/6350 Color Laser Printer
1-16
Page 22

Printing Secure, Personal, Proof, and Saved Print Jobs
Printing or Deleting Secure Print Jobs
To print or delete a secure print job, specify the four-digit password on the control panel:
1. Select Walk-Up Printing, and then press the OK button.
2. Select Secure Print Jobs, and then press the OK button.
3. Scroll to your User Name, and then press the OK button.
4. Scroll to the correct number for the first digit of the numeric password, and then press the
OK button to accept that digit.
5. Repeat Step 4 for the second, third, and fourth digits.
Note: If you enter less than four digits in the driver’s Password field, enter zeros before
your password so that there are four digits displayed on the control panel. For example, if
you entered 222 in the driver, enter 0222 on the control panel. Use the Back button to
return to a previous digit.
6. If you submitted more than one secure print job with that password, select the desired job
or select All of Them, and then press the OK button.
7. Select Print and Delete or Delete, and then press the OK button to print or delete the
job.
Printing or Deleting Personal Print Jobs
To print or delete a personal print job, select your user name on the control panel:
1. Select Walk-Up Printing, and then press the OK button.
2. Select Personal Print Jobs, and then press the OK button.
3. Select your User Name, and then press the OK button.
4. Select Print and Delete or Delete, and then press the OK button to print or delete all of
your personal print jobs.
Printing or Deleting Proof and Saved Print Jobs
To print a saved print job, print the remaining copies of a proof print job, or delete a saved or
proof print job, select the job name on the control panel:
1. Select Walk-Up Printing, and then press the OK button.
2. Select Proof Print Jobs or Saved Print Jobs, and then press the OK button.
3. Select your job name, and then press the OK button. (If you use the Windows NT printer
driver, select NT4User as the job name.)
4. Select Print and Delete (for proof prints), Print and Save (for saved prints), or
Delete, and then press the OK button.
5. If you are printing, scroll to the desired number of copies, and then press the OK button to
print the job.
Phaser® 6300/6350 Color Laser Printer
1-17
Page 23

Using Fonts
This chapter includes:
■ Types of Fonts on page 2-2
■ Viewing a List of Resident Fonts on page 2-3
■ Printing Font Samples on page 2-4
■ Downloading Fonts on page 2-6
Phaser® 6300/6350 Color Laser Printer
2-1
Page 24

Types of Fonts
Types of Fonts
Your printer uses the following types of fonts:
■ Resident fonts
■ Fonts downloaded into printer memory
■ Fonts downloaded with your print job from the application
Adobe Type Manager (ATM) software enables your computer to display these fonts on your
computer screen as they will appear in your prints.
If you do not have ATM on your computer:
1. Install it from the Software and Documentation CD-ROM.
2. Install the printer’s screen fonts for your computer from the ATM folder.
Phaser® 6300/6350 Color Laser Printer
2-2
Page 25

Viewing a List of Resident Fonts
Viewing a List of Resident Fonts
To view a list of resident PCL or PostScript fonts, use CentreWare IS:
1. Launch your web browser.
2. Enter your printer’s IP address in the browser’s Address field (http://xxx.xxx.xxx.xxx).
3. Click Properties.
4. Select the Emulations folder on the left sidebar.
5. Select Font Files.
6. Select either PostScript or PCL.
Phaser® 6300/6350 Color Laser Printer
2-3
Page 26

Printing Font Samples
Printing Font Samples
This section includes:
■ Using the Control Panel on page 2-4
■ Using CentreWare IS on page 2-4
■ Using a Windows Printer Driver on page 2-5
Use one of the following options to print a list of available PostScript or PCL fonts:
■ The printer’s control panel
■ CentreWare IS
■ The printer driver
Using the Control Panel
To print either a PostScript or PCL font list on the control panel:
1. Select Information, and then press the OK button.
2. Select Information Pages, and then press the OK button.
3. Select either PCL Font List or PostScript Font List, and then press the OK button to
print.
Using CentreWare IS
To print either a PostScript or PCL font list from CentreWare IS:
1. Launch your web browser.
2. Enter your printer’s IP address in the browser’s Address field (http://xxx.xxx.xxx.xxx).
3. Click Properties.
4. Select the Emulations folder on the left sidebar.
5. Select Font Files.
6. Select either PostScript or PCL.
7. Print the list of fonts from your browser.
Phaser® 6300/6350 Color Laser Printer
2-4
Page 27

Printing Font Samples
Using a Windows Printer Driver
To print either a PostScript or PCL font list from your printer driver:
1. Select Start, select Settings, and then select Printers.
2. Right-click the Phaser 6300/6350 printer, and then select Properties.
3. Select the Troubleshooting tab.
4. In the Printer Information Pages drop-down list, select PostScript Font List or PCL
Font List.
5. Click the Print button.
Phaser® 6300/6350 Color Laser Printer
2-5
Page 28

Downloading Fonts
Downloading Fonts
To supplement the resident fonts (which are always available for printing), you can download
fonts from your computer to the printer’s memory or to the printer’s hard drive. Downloading
fonts to a printer can improve printing performance and reduce network traffic.
You can list, print, and download PostScript, PCL, and TrueType fonts to your printer using
the CentreWare Font Management Utility. This Windows and Macintosh utility helps you
manage fonts, macros, and forms on a printer’s hard drive.
To download and install the Font Management Utility:
1. Go to www.xerox.com/office/pmtools
2. Select your printer from the Select Product drop-down list.
3. Click Additional Utilities in the Printer Utilities table.
4. Locate the CentreWare Font Management Utility option, and save the .exe file to your
desktop.
5. Install the font manager.
Note: If you turn off the printer, the fonts you download to memory are deleted. You must
download them again when you turn on the printer. Fonts downloaded to the hard drive are not
deleted when you turn off the printer.
.
Phaser® 6300/6350 Color Laser Printer
2-6
Page 29

Printing on Other Specialty Media
This chapter includes:
■ Determining Which Tray to Use on page 3-2
■ Printing Specialty Media from Tray 1 (MPT) on page 3-3
■ Printing Specialty Media from Trays 2–5 on page 3-4
Other specialty media can include business cards, postcards, trifold brochures, and
weatherproof paper. To verify the media you can print, go to the Recommended Media List at
www.xerox.com/office/6300_6350support.
See also:
Printing Basics in the User Guide at www.xerox.com/office/6300_6350support
To order paper, transparencies, or other specialty media, contact your local reseller or go to
www.xerox.com/office/supplies
Caution: Damage caused by using unsupported paper, transparencies, and other specialty
media is not covered by the Xerox warranty, service agreement, or Total Satisfaction
Guarantee. The Total Satisfaction Guarantee is available in the United States and Canada.
Coverage may vary outside these areas; please contact your local representative for details.
.
Phaser® 6300/6350 Color Laser Printer
3-1
Page 30

Determining Which Tray to Use
Determining Which Tray to Use
To determine which tray to use and the control panel settings for printing the specialty media:
1. Find the media weight and size on the packaging label.
2. Print the Paper Tips page:
a. On the control panel, select Information, and then press the OK button.
b. Select Information Pages, and then press the OK button.
c. Select Paper Tips, and then press the OK button.
3. Find the media type, weight, and size on the Paper Tips page, and then find the
corresponding trays.
For example, if you are using letter-size Thin Card Stock within a weight range of
100-163 g/m
a. Select Thin Card Stock if prompted for the paper type.
b. Select Letter (8.5 x 11 in.) if prompted for the paper size.
See also:
Printing Specialty Media from Tray 1 (MPT) on page 3-3
Printing Specialty Media from Trays 2–5 on page 3-4
2
(36-60 lb. Cover), load the media in any tray. On the control panel:
Phaser® 6300/6350 Color Laser Printer
3-2
Page 31
Printing Specialty Media from Tray 1 (MPT)
Printing Specialty Media from Tray 1 (MPT)
To verify the specialty media you can print from Tray 1 (MPT):
■ See the Recommended Media List at www.xerox.com/office/6300_6350support.
■ Print the Paper Tips page. See Determining Which Tray to Use on page 3-2.
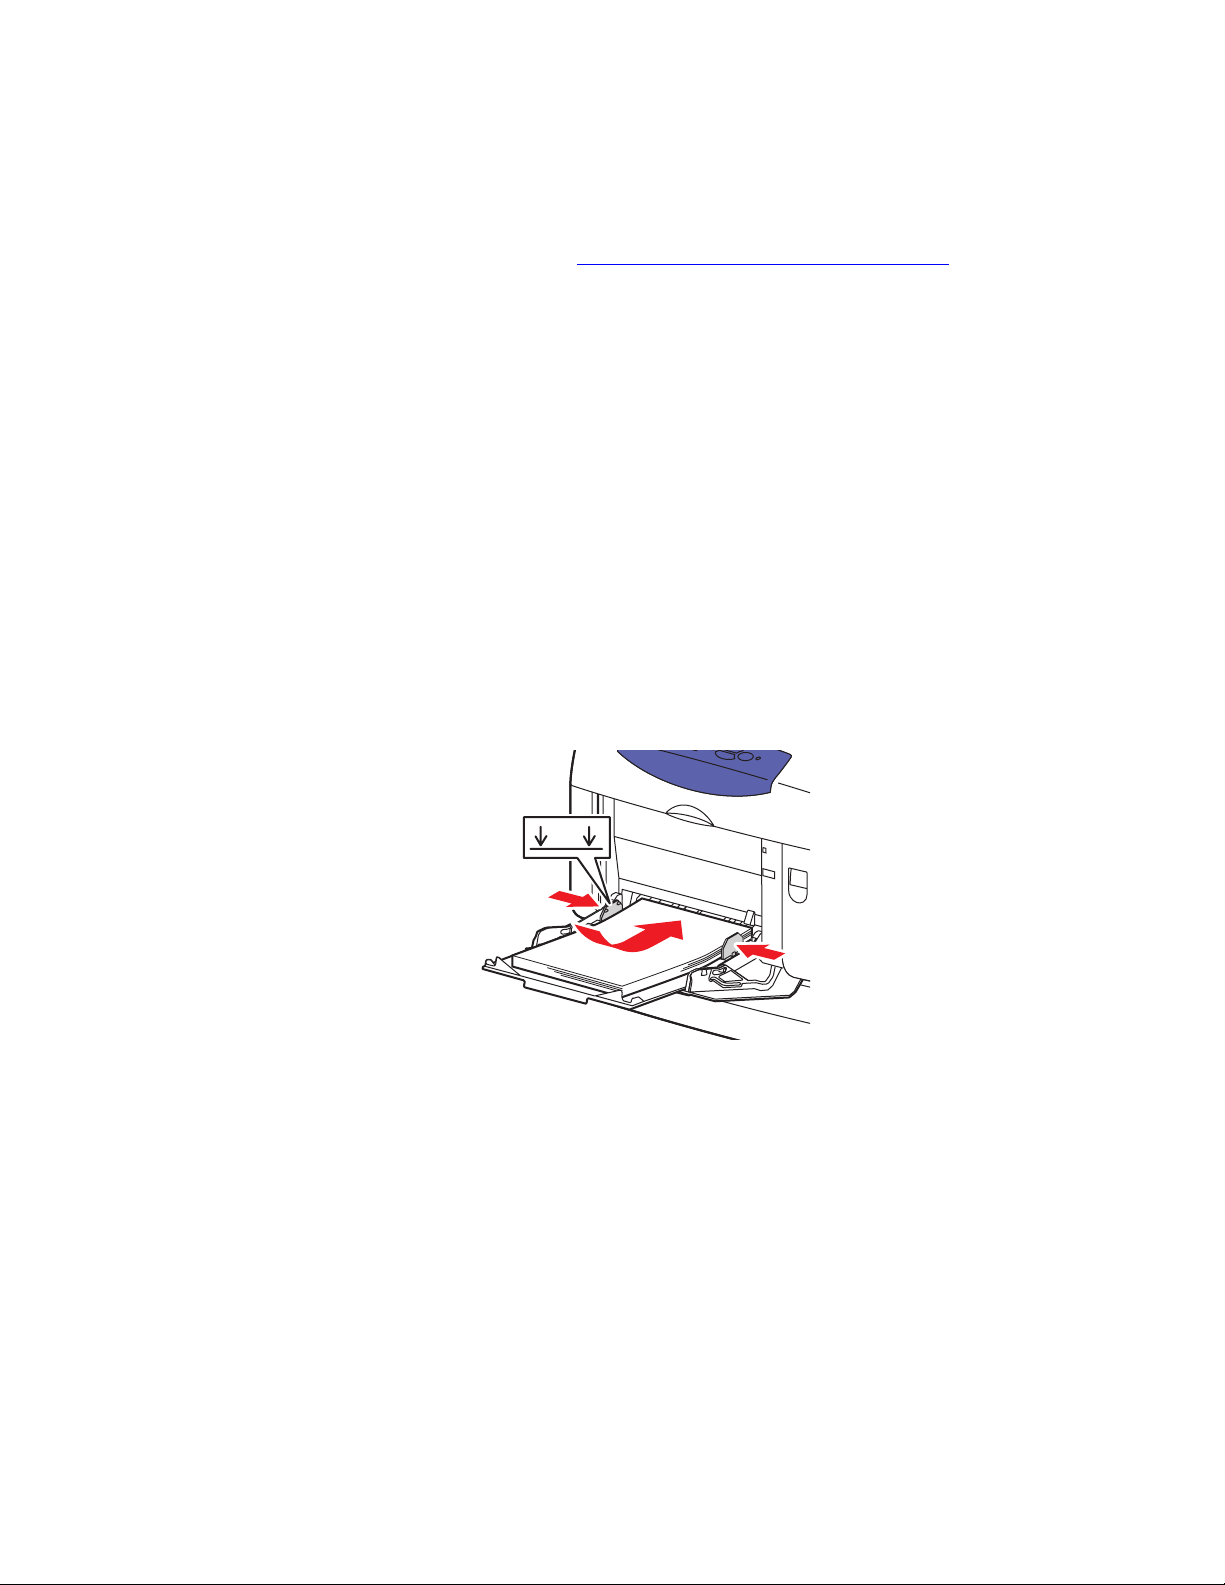
To print specialty media in Tray 1 (MPT):
1. Open Tray 1 (MPT) by pulling out on the handle.
2. Pull out the tray extension, and open the paper guides.
3. Insert the paper into Tray 1 (MPT). If you are using preprinted or prepunched paper,
follow these guidelines:
■ For single-sided printing, place the side to be printed facedown with the top of the
page entering the printer first.
■ For 2-sided printing, place the first side to be printed faceup with the bottom of the
page entering the printer first.
■ For prepunched paper, place the paper with the holes toward the right side of the
tray.
Note: Do not load the paper above the fill line inside the tray.
MAX
6300-008
4. Adjust the paper guides to fit the paper.
5. On the control panel, select the paper type and size:
a. Select Change setup, and then press the OK button.
b. Select the paper type, and then press the OK button.
c. Select the paper size, and then press the OK button.
6. In the printer driver, select either the paper type or Tray 1 (MPT) as the paper source.
7. Submit your print job.
Phaser® 6300/6350 Color Laser Printer
3-3
Page 32
Printing Specialty Media from Trays 2–5
Printing Specialty Media from Trays 2–5
To verify the specialty media you can print from Trays 2–5:
■ See the Recommended Media List at www.xerox.com/office/6300_6350support.
■ Print the Paper Tips page. See Determining Which Tray to Use on page 3-2.
To print specialty media in Trays 2–5:
1. Pull out the tray.
2. If necessary, open the tray guides.
■ Squeeze the green tab on the length guide, and then slide it back. The guide clicks into
place.
■ Slide the green side guides outward.
3. Fan the paper to release sheets that are stuck together.
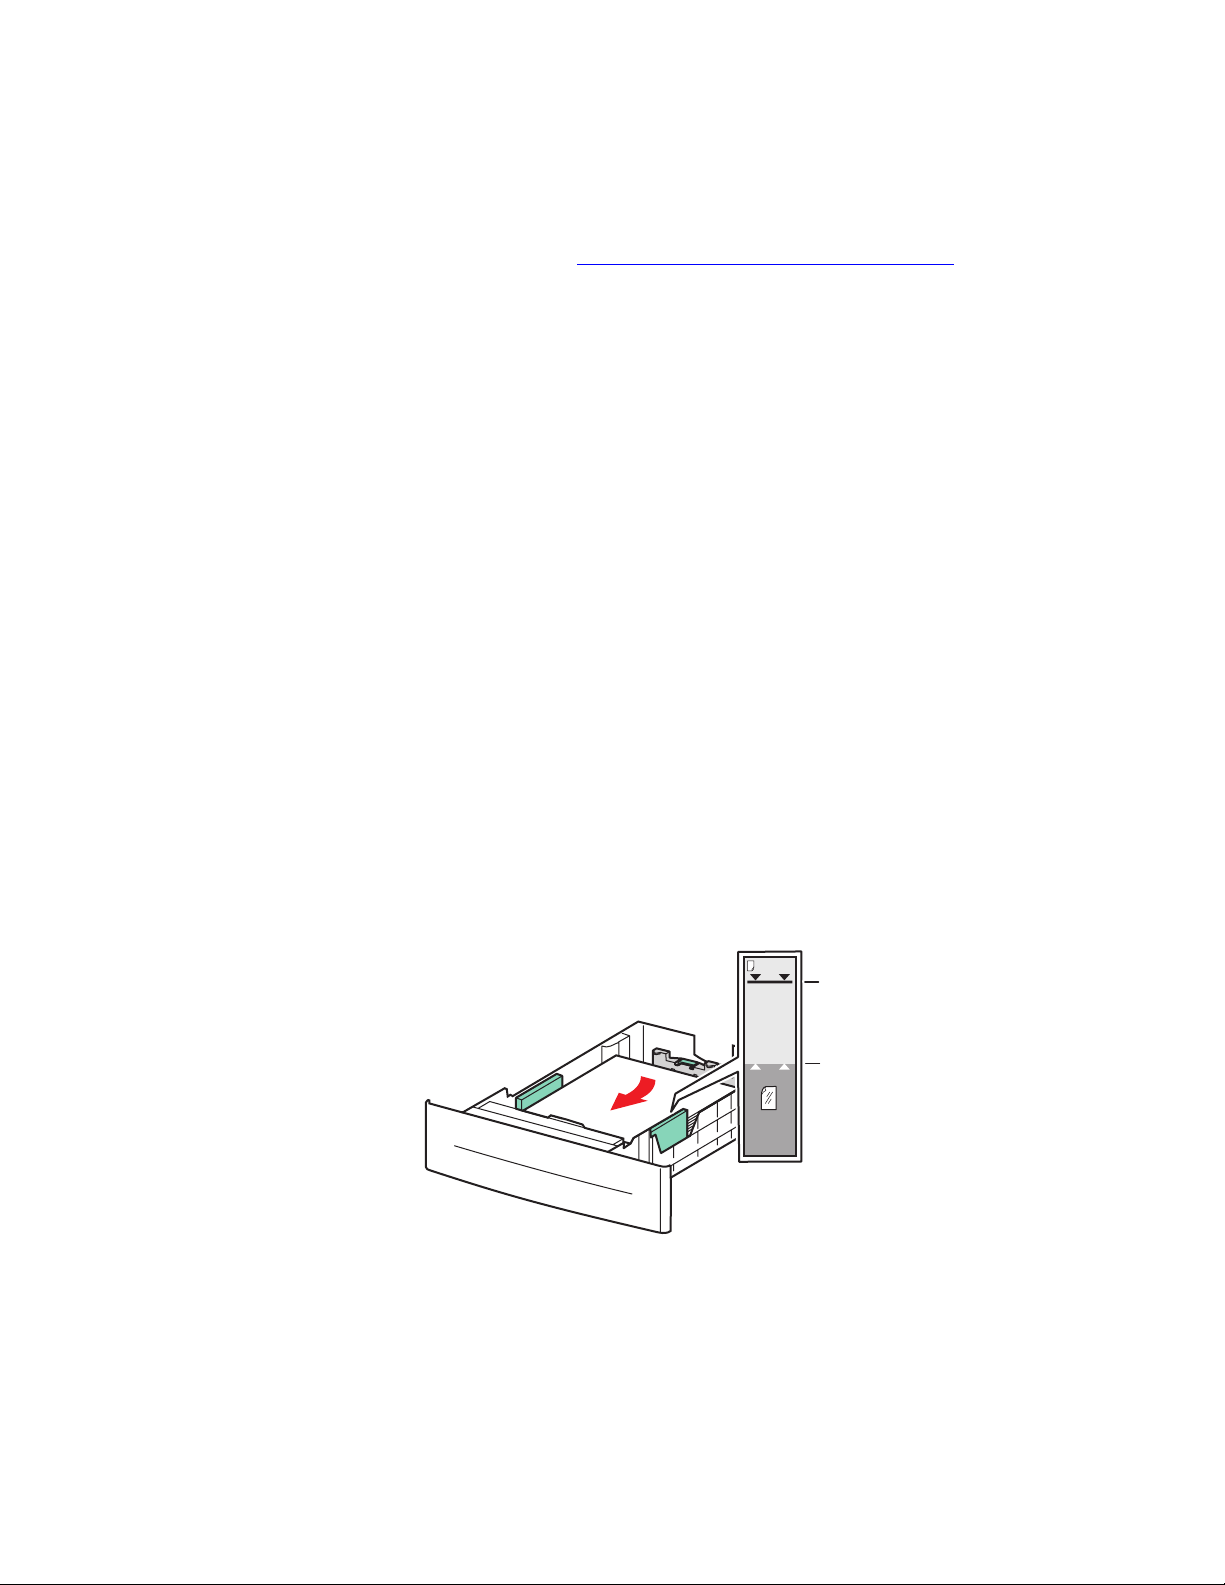
4. Insert the paper into the tray. If you are using preprinted or prepunched paper, follow these
guidelines:
■ For single-sided printing, place the side to be printed faceup with the top of the page
toward the front of the tray.
■ For 2-sided printing, place the side to be printed with the odd-numbered pages
facedown and the top of the page toward the back of the tray.
■ For prepunched paper, place the paper with the holes toward the right side of the
tray.
Note: Do not load the paper above the fill line indicated on the tray. Overloading the tray
may cause jams. In the following illustration, 1 indicates the maximum fill line for paper
and 2 indicates the maximum fill line for transparencies, labels, glossy paper, and thin card
stock.
MAX
1
MAX
2
6300-003
Phaser® 6300/6350 Color Laser Printer
3-4
Page 33

Printing Specialty Media from Trays 2–5
5. If necesssary, press the paper guides inward to fit the paper.
6300-105
6. Insert the tray into the tray slot, and push the tray completely into the printer.
7. On the control panel, select the paper type:
a. Select Change setup, and then press the OK button.
b. Select the paper type, and then press the OK button.
8. In the printer driver, select either the paper type or the appropriate tray as the paper source.
9. Submit your print job.
Phaser® 6300/6350 Color Laser Printer
3-5
Page 34

Networking
This chapter includes:
■ Printer Management Software on page 4-2
■ Windows 2000, Windows XP, and Windows Server 2003 on page 4-4
■ Windows NT 4.x on page 4-11
■ Windows 98 SE and Windows Me on page 4-16
■ Macintosh on page 4-20
■ Novell on page 4-27
■ UNIX (Linux) on page 4-28
This chapter provides detailed information for the system administrator. Additional
information about print quality, maintenance, and troubleshooting issues is located in the
User Guide.
See also:
User Guide at www.xerox.com/office/6300_6350support
Phaser® 6300/6350 Color Laser Printer
4-1
Page 35

Printer Management Software
Printer Management Software
This section includes:
■ CentreWare Internet Services (IS) on page 4-2
■ CentreWare Web on page 4-3
CentreWare Internet Services (IS)
CentreWare IS provides a simple interface that enables you to manage, configure, and monitor
networked printers from your desktop using an embedded web server. CentreWare IS gives
administrators easy access to printer status, configuration, and diagnostic functions. It also
provides users with access to printer status and special printing functions such as printing
saved jobs. With CentreWare IS software, you can access and manage your printers over a
TCP/IP network using a web browser.
CentreWare IS enables you to:
■ Check supplies status from your desktop, saving a trip to the printer. Access job
accounting records to allocate printing costs and plan supplies purchases.
■ Define a network printer search and view a list of printers using Printer Neighborhood.
The list provides current status information and allows you to manage printers
independent of network servers and operating systems.
■ Configure printers from your desktop. CentreWare IS makes it easy to copy settings from
one printer to another.
■ Set up and use a simple web-browser-based printing system. Marketing collateral, sales
materials, business forms, or other standardized, frequently used documents can be saved
as a group with their original driver settings then reprinted on demand at high speed from
any user's browser. A printer with a hard drive is required to support these functions. In
some printer models, a DX configuration is required to support these functions.
■ Troubleshoot print-quality problems using built-in diagnostics.
■ Define a link to your local web server’s support page.
■ Access online manuals and technical support information located on the Xerox website.
Note: CentreWare IS requires a web browser and a TCP/IP connection between the printer
and the network (in Windows, Macintosh, or UNIX environments). TCP/IP and HTTP must be
enabled in the printer. JavaScript is required to access the pages in Printer Neighborhood. If
JavaScript is disabled, a warning message appears and the pages do not function properly.
For complete informaton about CentreWare IS, click the Help button in CentreWare IS to go
to the CentreWare IS Online Help.
Note:
Quick start tutorial at www.xerox.com/office/6300_6350support
Phaser® 6300/6350 Color Laser Printer
4-2
Page 36

Printer Management Software
CentreWare Web
CentreWare Web is a multi-vendor printer management, installation, and troubleshooting
application. Use CentreWare Web to remotely manage, install, and troubleshoot printers on
your network using a web browser. Printers are found through network or print server
discovery and managed over TCP/IP networks using RFC-1759 SNMP (Simple Network
Management Protocol).
With CentreWare Web you can:
■ Remotely add ports, queues, and drivers to Windows 2000, Windows XP,
Windows Server 2003, and NT 4.x SP6 print servers.
■ Install, troubleshoot, upgrade, and clone wizards to aid all users in performing
administrative tasks.
■ Install CentreWare Web on a server for availability to all clients on the network with
Internet access.
■ Support multiple users and provide different levels of user access privileges for
administrators or guests.
■ Discover printers on local and remote subnets.
■ Automatically discover printers as scheduled.
■ Generate reports.
■ Connect to printer web servers for additional printer-specific features, including help.
For more information, go to www.xerox.com/office/pmtools
model to view the CentreWare Web User Guide.
, and select your specific printer
Phaser® 6300/6350 Color Laser Printer
4-3
Page 37

Windows 2000, Windows XP, and Windows Server 2003
Windows 2000, Windows XP, and Windows Server
2003
This section includes:
■ Preliminary Steps on page 4-4
■ Quick CD-ROM Install Steps on page 4-4
■ Other Methods of Installation on page 4-5
■ Windows 2000, Windows XP, and Windows Server 2003 Troubleshooting on page 4-9
Preliminary Steps
These preliminary steps must be performed for all printers:
1. Verify that the printer is plugged in, turned On, and connected to an active network.
2. Verify that the printer is receiving network information by monitoring the LEDs on the
back of the printer or on the CentreDirect External Print Server. When the printer is
connected to a functioning network and receiving traffic, its link LED is green, and its
amber traffic LED is flashing rapidly.
3. Proceed to Quick CD-ROM Install Steps or Other Methods of Installation for the
installation method desired.
4. Print the Configuration page and keep it for reference.
Quick CD-ROM Install Steps
To install the printer driver:
1. Insert the Software and Documentation CD-ROM into the computer’s CD-ROM drive. If
the installer does not launch, do the following:
a. Click Start, and then click Run.
b. In the Run window, type: <CD drive>:\INSTALL.EXE.
2. Select your desired language from the list.
3. Select Install Printer Driver.
4. Click I Agree to accept the Xerox Software License Agreement.
5. In the Select Printer dialog box, the default Use Walk-Up Technology (recommended
for network printers) is selected. Click Next.
6. Follow the Use Walk-Up Technology instructions displayed.
7. Click Exit Program.
Note: If the Walk-Up Technology dialog box remains onscreen after you have completed
Steps 1–6, click the Cancel button, and then click Select from the following discovered
printers. Follow the onscreen prompts to complete the installation procedure.
Phaser® 6300/6350 Color Laser Printer
4-4
Page 38

Windows 2000, Windows XP, and Windows Server 2003
Other Methods of Installation
Your printer can also be installed on a Windows 2000, Windows XP, or Windows Server 2003
network using one of these methods:
■ Microsoft TCP/IP Protocol
■ Microsoft IPP Port
To monitor or configure your printer, use CentreWare IS with a web browser if your printer is
connected to a Windows 2000, Windows XP, or a Windows Server 2003 network with the
TCP/IP protocol enabled.
Note: The CentreWare methods are not discussed in this section.
See also:
Printer Management Software on page 4-2 (CentreWare IS)
Microsoft TCP/IP Protocol
Note: For Windows XP, select Classic Look or the Windows XP procedures will not match
the steps below. To select Classic Look, click Start, click Settings, and then click Taskbar
and Start Menu. Select the Start Menu tab, and then select the Classic Start menu. Click
OK.
To verify that TCP/IP is installed:
1. Right-click the My Network Places icon on the desktop, and then click Properties.
2. Right-click Local Area Connection, and then click Properties.
3. Click the General tab to verify that Internet Protocol (TCP/IP) is installed.
■ If the Internet Protocol (TCP/IP) box is checked, the software is installed.
■ If the Internet Protocol (TCP/IP) box is not checked, the software is not installed.
Install TCP/IP software using the documentation provided by Microsoft, and then
return to this document.
Phaser® 6300/6350 Color Laser Printer
4-5
Page 39

Windows 2000, Windows XP, and Windows Server 2003
Adding the Printer
To add the printer:
1. On the desktop click Start, and then click Settings.
2. Select one of these options:
■ Windows 2000: Click Printers, double-click Add Printer to launch the Add Printer
Wizard, and then click Next.
■ Windows XP or Windows Server 2003: Click Printers and Faxes. Double-click
Add Printer to launch the Add Printer Wizard, and then click Next.
3. Click the Local Printer button, and then click Next.
4. Click the Create a New Port button.
5. Select Standard TCP/IP Port from the New Port Type drop-down menu, and then click
Next.
6. Click Next.
7. Enter the IP Address of the printer you want to use in the Printer Name or IP Address
edit box. Click Next.
8. Select one of these options:
■ Click Finish in the Confirmation window if the data is correct.
■ Click the Back button to correct the data if it is incorrect, and then click Finish in the
Confirmation window.
Configuring the Printer
To configure the printer:
1. Insert the Software and Documentation CD-ROM into the computer’s CD-ROM drive and
click Have Disk.
2. Click the Browse button, and then select the directory which contains the Windows 2000
or Windows XP drivers.
3. Select the *.INF file, and then click Open.
4. Verify that the path and filename are correct, and then click OK.
5. Enter a name for the printer and select whether you want that printer to be the default.
Click Next.
6. Select one of these options:
■ If the printer is not shared, click Next.
■ If the printer is shared, enter a Share Name, check the Share box, and then click
Next.
Phaser® 6300/6350 Color Laser Printer
4-6
Page 40

Windows 2000, Windows XP, and Windows Server 2003
Printing a Test Page
You are prompted to print a test page.
1. Select one of these options:
■ Click Ye s to print a test page, and then click Next.
■ Click No if you do not want to print a test page, and then click Next.
2. Select one of these options in the Completing the Add Printer Wizard screen:
■ Click the Finish button if the data presented is correct. Proceed to Step 3.
■ Click the Back button to correct the data if incorrect, and then click Finish in the Add
Printer Wizard when the data is correct. Proceed to Step 3.
3. If you printed a test page, you are prompted to confirm that the test page printed:
■ Click Ye s if the test page printed successfully.
■ Click No if the test page did not print or printed incorrectly.
See also:
Windows 2000, Windows XP, and Windows Server 2003 Troubleshooting on page 4-9
Microsoft IPP Port
Follow these steps to obtain the printer’s URL and create an Internet Printing Protocol (IPP)
printer.
Obtaining the Printer’s URL (Network Path)
To obtain the printer’s URL:
1. Launch your web browser.
2. Enter your printer's IP address in the browser’s Address field (http://xxx.xxx.xxx.xxx).
3. Select Properties.
4. Select the Protocols folder on the left sidebar.
5. Select IPP. The Network Path field on the IPP Settings page displays the printer’s URL.
Phaser® 6300/6350 Color Laser Printer
4-7
Page 41

Windows 2000, Windows XP, and Windows Server 2003
Creating an IPP Printer
To create an IPP printer:
1. On the desktop, click Start, click Settings, and then click Printers.
2. Double-click Add Printer to launch the Microsoft Add Printer Wizard.
3. Select Network Printer, and then click Next.
4. When prompted for Network Path (Windows 9x) or URL (Windows NT, Windows 2000,
Windows XP), enter the printer’s URL in the following format:
http://printer-ip-address/ipp
Note: Substitute your printer’s IP address or DNS name for printer-ip-address.
5. Click Next.
Configuring the Printer
To configure the printer:
1. Insert the Software and Documentation CD-ROM into the computer’s CD-ROM drive and
click Have Disk.
2. Click the Browse button, and then select the directory which contains the Windows 2000
or Windows XP drivers.
3. Select the *.INF file, and then click Open.
4. Verify that the path and filename are correct, and then click OK.
5. Enter a name for the printer and select whether you want that printer to be the default.
Click Next.
6. Select one of these options:
■ If the printer is not shared, click Next.
■ If the printer is shared, enter a Share Name, check the Share box, and then click
Next.
Phaser® 6300/6350 Color Laser Printer
4-8
Page 42

Windows 2000, Windows XP, and Windows Server 2003
Windows 2000, Windows XP, and Windows Server 2003 Troubleshooting
Note: For Windows XP, select Classic Look or the Windows XP procedures will not match
the steps below. To select Classic Look, click Start, click Settings, and then Taskbar and
Start Menu. Select the Start Menu tab, and then select Classic Start menu. Click OK.
This Troubleshooting section assumes you have completed the following tasks:
■ Loaded a Phaser printer PCL or PostScript printer driver.
■ Printed and kept a current copy of the Configuration page.
Verifying Settings
To verify settings:
1. Verify the settings on the Configuration page.
■ IP Address Source is set to: DHCP, Control Panel, BOOTP, or Auto IP (depending
on your network configuration).
■ Current IP Address is set correctly. (Note this address if it is assigned by Auto IP,
DHCP, or BOOTP.)
■ Subnet Mask is set correctly (if used).
■ Default Gateway is set correctly (if used).
■ LPR is enabled. Verify that the LPR and AppSocket settings are set as desired.
■ Interpreters: Auto, PCL, or PostScript (depending on your driver).
2. Verify that the client is logged into the network and printing to the correct print queue. The
user should also have access to the Phaser printer queue.
Phaser® 6300/6350 Color Laser Printer
4-9
Page 43

Windows 2000, Windows XP, and Windows Server 2003
Verifying Driver Installation
To verify driver installation:
1. Right-click My Network Places on the desktop, and then click Properties.
2. Right-click Local Area Connection, and then click Properties.
3. Select the General tab. View the list of installed network protocols to verify that TCP/IP is
installed. (For more information, contact your network administrator.)
4. Click Install to install any components not listed, and then restart your computer.
5. Click Start, click Settings, and then click Printers.
6. Right-click the printer icon, and then click Properties.
7. Select the Advanced tab. Verify that the correct printer driver is installed.
8. Select the Ports tab. Verify that the IP Address in the Print to the Following Ports list is
identical to the one on the Configuration page. You may need to click the
Configure Port button to see the IP address. If necessary, re-select the TCP/IP number
used for the printer.
Printing a Test Page
To print a test page:
1. Select the General tab.
2. Click Print Test Page. If the printer does not print, select PhaserSMART Technical
Support on the Troubleshooting tab of your Windows printer driver to access
PhaserSMART Technical Support.
See also:
www.xerox.com/office/6300_6350support
Phaser® 6300/6350 Color Laser Printer
4-10
Page 44

Windows NT 4.x
Windows NT 4.x
This section includes:
■ Preliminary Steps on page 4-11
■ Quick CD-ROM Install Steps on page 4-11
■ Other Methods of Installation on page 4-12
■ Windows NT 4.x Troubleshooting on page 4-14
Preliminary Steps
These preliminary steps must be performed for all printers:
1. Verify that the printer is plugged in, turned On, and connected to an active network.
2. Verify that the printer is receiving network information by monitoring the LEDs on the
back of the device or on the CentreDirect External Print Server. When the printer is
connected to a functioning network and receiving traffic, its link LED is green, and its
amber traffic LED is flashing rapidly.
3. Proceed to Quick CD-ROM Install Steps or Other Methods of Installation for the
installation method desired.
4. Print a Configuration page and keep it for reference.
Quick CD-ROM Install Steps
To use the quick CD-ROM install option:
1. Insert the Software and Documentation CD-ROM into the computer’s CD-ROM drive. If
the installer does not launch, do the following:
a. Click Start, and then click Run.
b. In the Run window, type: <CD drive>:\INSTALL.EXE.
2. Select your desired language from the list.
3. Select Install Printer Driver.
4. Click I Agree to accept the Xerox Software License Agreement.
5. In the Select Printer dialog box, the default Use Walk-Up Technology (recommended
for network printers) is selected. Click Next.
6. Follow the Use Walk-Up Technology instructions displayed.
7. Click Exit Program.
Note: If the Walk-Up Technology dialog box remains onscreen after you have completed
Steps 1–6, click the Cancel button, and then click Select from the following discovered
printers. Follow the onscreen prompts to complete the installation procedure.
Phaser® 6300/6350 Color Laser Printer
4-11
Page 45

Windows NT 4.x
Other Methods of Installation
Install your printer on a Windows NT 4.x network using Microsoft TCP/IP Protocol.
To monitor or configure your printer, use CentreWare IS with a web browser if your printer is
connected to a Windows NT 4.x network with TCP/IP protocol enabled.
Note: The CentreWare methods are not discussed in this section.
See also:
Printer Management Software on page 4-2 (CentreWare IS)
Quick Install Steps (Microsoft TCP/IP Protocol)
Note: This procedure is only performed by the system administrator.
To install the Microsoft TCP/IP Printing software:
1. Right-click the My Network Places icon on the desktop, and then click Properties.
2. Select the Protocols tab to verify that the TCP/IP protocol has been installed.
3. Select the Services tab and verify that Microsoft TCP/IP Printing software is installed. If it
is not installed, install it, and then return to this document.
Adding the Printer
To add the printer:
1. Open the Control Panel, and then double-click the Printers icon.
2. Double-click Add Printer to launch the Add Printer Wizard, and then click Next.
3. Verify that My Computer is selected, and then click Next.
4. Click Add Port, and then select the LPR Port from the list displayed.
5. Click New Port.
6. Enter the IP address for your printer and a printer name of 31 characters or less (no
spaces).
7. Select OK.
8. Verify that the new IP address you entered is listed correctly. If the check box next to the
IP address is not checked, select the check box, and then click Next.
Phaser® 6300/6350 Color Laser Printer
4-12
Page 46

Windows NT 4.x
Configuring the Printer
To configure the printer:
1. Insert the Software and Documentation CD-ROM into the computer’s CD-ROM drive, and
then click Have Disk.
2. Click the Browse button and select the directory containing the Windows NT drivers.
3. Select the *.INF file, and then click Open. Verify that the path and filename are correct,
and then click OK.
4. Select the correct printer, and then click OK.
5. Enter a name for the printer, select whether you want that printer to be the default, and
then click OK.
6. Select one of these options:
■ If the printer is not shared, click Next.
■ If the printer is shared, enter a Share Name, check the Share box, and then click Next.
Printing a Test Page
You are prompted to print a test page.
1. Select one of these options:
■ Click Ye s to print a test page, and then click Next.
■ Click No if you do not want to print a test page, and then click Next.
2. Select one of these options:
■ Click the Finish button if the data presented is correct. Proceed to Step 3.
■ Click the Back button to correct the data if incorrect, and then click Finish when the
data is correct. Proceed to Step 3.
3. If you printed a test page, you are prompted to confirm that the test page printed:
■ Click Ye s if the test page printed successfully.
■ Click No if the test page did not print or printed incorrectly.
See also:
Windows NT 4.x Troubleshooting on page 4-14
Phaser® 6300/6350 Color Laser Printer
4-13
Page 47

Windows NT 4.x
Windows NT 4.x Troubleshooting
This troubleshooting section assumes you have completed the following tasks:
■ Loaded a PostScript printer driver.
■ Printed and kept a current copy of the Configuration page.
Verifying Settings
To verify settings:
1. Verify the settings in the Configuration page.
■ IP Address Source is set to: DHCP, Control Panel, BOOTP, or Auto IP (depending
on your network configuration).
■ Current IP Address is set correctly. (Note this address if it is assigned by Auto IP,
DHCP, or BOOTP.)
■ Subnet Mask is set correctly (if used).
■ Default Gateway is set correctly (if used).
■ LPR is enabled. Verify that the LPR and AppSocket settings are set as desired.
■ Interpreters: Auto, PCL, or PostScript (depending on your driver).
2. Verify that the client is logged into the network and printing to the correct print queue. The
user should also have access to the Phaser print queue.
Verifying Installation
To verify printer installation:
1. Right-click the My Network Places icon on the desktop and select Properties.
2. Click the Protocols tab to verify that the TCP/IP protocol has been installed.
3. Click Add to install any components not listed, and then restart your computer.
4. Click Start, click Settings, and then click Control Panel.
5. Double-click Services.
6. Locate TCP/IP Print Server, and then verify these column entries:
■ Status column: Started
■ Startup column: Automatic
7. Click Start, click Settings, and then click Printers.
8. Right-click the printer icon, and then select Properties. Verify that you have installed the
correct driver for your printer.
9. Select the Ports tab. Verify that the IP Address in the Print to the Following Port list is
identical to the one on the Configuration page. You may need to click the
Configure Port button to view the IP address. If necessary, re-select the TCP/IP number
used for your printer.
Phaser® 6300/6350 Color Laser Printer
4-14
Page 48

Windows NT 4.x
Printing a Test Page
To print a test page:
1. Select the General tab.
2. Click Print Test Page. If the printer does not print, select PhaserSMART Technical
Support on the Troubleshooting tab of your Windows printer driver to access
PhaserSMART Technical Support.
See also:
www.xerox.com/office/6300_6350support
Phaser® 6300/6350 Color Laser Printer
4-15
Page 49

Windows 98 SE and Windows Me
Windows 98 SE and Windows Me
This section includes:
■ Preliminary Steps on page 4-16
■ Quick CD-ROM Install Steps on page 4-17
■ Other Methods of Installation on page 4-17
■ Windows 98 SE and Windows Me Troubleshooting on page 4-19
Preliminary Steps
Follow these preliminary steps:
1. Verify that the printer is plugged in, turned on, and connected to an active network.
2. Verify that the printer is receiving network information by monitoring the LEDs on the
back of the device or on the CentreDirect External Print Server. When the printer is
connected to a functioning network and receiving traffic, its link LED is green, and its
amber traffic LED is flashing rapidly.
3. Print a Configuration page and verify that the desired protocol is enabled, and then follow
one of these options:
■ Proceed to Step 4 if you do not have a TCP/IP address configured for your printer.
■ Proceed to Step 5 if you do have a TCP/IP address configured for your printer.
4. Do one of the following if you do not have a TCP/IP address configured for your
computer:
■ Contact your system administrator to ensure that configuration is made according to
your company guidelines.
■ Configure your PC with a unique address such as 192.1.1.1.
5. If you have a TCP/IP address, and then follow these steps to verify the IP address for your
PC:
a. Click Start, and then click Run.
b. Enter winipcfg in the Open field. (If the file is not found, TCP/IP may not be
installed.)
c. Click OK.
d. Select your network adapter from the list. The IP address is listed in the IP Address
field.
Note: For more information about installing and configuring TCP/IP in Windows
environments, go to your Microsoft Windows documentation.
6. Proceed to Quick CD-ROM Install Steps or Other Methods of Installation for the
installation method desired.
Phaser® 6300/6350 Color Laser Printer
4-16
Page 50

Windows 98 SE and Windows Me
See also:
Quick CD-ROM Install Steps on page 4-17
Other Methods of Installation on page 4-17
Quick CD-ROM Install Steps
To use quick CD-ROM installation:
1. Insert the Software and Documentation CD-ROM into the computer’s CD-ROM drive. If
the installer does not launch, do the following:
a. Click Start, and then click Run.
b. In the Run window, type: <CD drive>:\INSTALL.EXE.
2. Select your desired language from the list.
3. Select Install Printer Driver.
4. Click I Agree to accept the Xerox Software License Agreement.
5. In the Select Printer dialog box, the default Use Walk-Up Technology (recommended
for network printers) is selected. Click Next.
6. Follow the Use Walk-Up Technology instructions displayed.
7. Click Exit Program.
Note: If the Walk-Up Technology dialog box remains onscreen after you have completed
Steps 1–6, click the Cancel button, and then click Select from the following discovered
printers. Follow the onscreen prompts to complete the installation procedure.
Other Methods of Installation
Install your printer on a Windows 98 SE or Windows Me network using PhaserPort software.
PhaserPort Software
The Windows installer installs PhaserPort for Windows (for those installations using
PostScript drivers). PhaserPort for Windows is a Xerox print monitor for printing over
Windows 98 SE or Windows Me TCP/IP peer-to-peer networks. PhaserPort can be used to add
or remove TCP/IP ports.
Note: PhaserPort is the preferred utility for PostScript installations.
Adding a Port
To add a printer port:
1. Open Printer Properties for the printer you would like to attach to the new TCP/IP port.
2. Click Start, click Settings, and then click Printers.
3. Right-click the printer to be attached to the new TCP/IP port, and then click Properties.
Phaser® 6300/6350 Color Laser Printer
4-17
Page 51

Windows 98 SE and Windows Me
4. Click the Details tab, and then click the Add Port button.
5. Select Other.
6. From the list of available printer-port monitors, select PhaserPort, and then click OK.
Configuring a Port
PhaserPort enables you to:
■ Choose a name for the new port.
■ Identify a printer by its DNS Name or IP Address.
To install a port using PhaserPort:
1. In the Add PhaserPort window:
■ Enter a unique name for the port being added in the Description section.
■ Enter the printer host name or IP Address in the DNS/Address section.
2. Click OK.
Changing a PhaserPort IP Address
If the printer’s IP address is changed, you must change the IP address for the device’s
corresponding port:
1. Click Start, click Settings, and then click Printers.
2. Right-click the printer to be changed to a new PhaserPort IP address, and then click
Properties.
3. Select the Details tab.
4. Verify that PhaserPort appears in the Print to the Following Port field.
5. Click Port Settings. The Configure PhaserPort dialog box appears.
6. Do one of the following:
a. If you know the correct IP address or DNS name for the printer, enter that information.
b. If you don’t know the printer’s IP address or DNS name, click Browse to display a list
of printers on the network.
c. Double-click the appropriate printer. PhaserPort automatically enters the information
into the Configure PhaserPort dialog box.
Note: To search the network again, click Refresh. To expand the search to other subnets,
click Advanced.
7. Click OK.
8. Click OK again to apply the changes.
Phaser® 6300/6350 Color Laser Printer
4-18
Page 52

Windows 98 SE and Windows Me
Windows 98 SE and Windows Me Troubleshooting
This Troubleshooting section assumes you have completed the following tasks:
■ Verified that the printer is plugged in, turned on, and connected to an active network.
■ Installed a PostScript print driver.
■ Verified that the printer is receiving network information by monitoring the LEDs on the
back of the device or on the CentreDirect External Print Server. When the printer is
connected to a functioning network and receiving traffic, its link LED is green, and its
amber traffic LED is flashing rapidly.
■ Printed and kept a current copy of the Configuration page.
Verifying Settings
To verify settings:
1. Right-click Network Neighborhood on the desktop, and then click Properties.
2. Click the Configuration tab. A list of installed network components appears for the Client
for Microsoft networks.
3. If any of the necessary components are not installed, install them, and then restart the
system. When the system is restarted, return to this document.
4. Click Start, click Settings, and then click Printers. The Printers window appears.
5. Right-click the printer icon, and then click Properties.
6. Select the Details tab.
7. Verify the following:
a. The printer driver name in the Print Using the Following Driver list. If necessary, re-
select or install a new printer driver.
b. The Port name in the Print to the Following Port list. If necessary, re-select the
correct name.
Note: Send a print job to the printer. If the printer does not print, select PhaserSMART
Technical Support on the Troubleshooting tab of your Windows printer driver to access
PhaserSMART Technical Support.
See also:
www.xerox.com/office/6300_6350support
Phaser® 6300/6350 Color Laser Printer
4-19
Page 53

Macintosh
Macintosh
This section includes:
■ Requirements on page 4-20
■ Quick CD-ROM Install Steps on page 4-20
■ Enabling and Using EtherTalk for Mac OS 9.x on page 4-20
■ Enabling and Using TCP/IP for Mac OS 9.x on page 4-21
■ Enabling or Using TCP/IP or AppleTalk for Mac OS X, Version 10.2 and Higher on
page 4-23
■ Macintosh Troubleshooting (Mac OS 9.x, Mac OS X, Version 10.2 and Higher) on
page 4-25
Requirements
■ A workstation with the appropriate printer driver installed.
■ A working knowledge of the operating system (Mac OS 9.x or Mac OS X, version 10.2 or
higher) being used on the workstation.
■ Proper cabling to connect the printer to the network.
Quick CD-ROM Install Steps
To use the quick CD-ROM installation option:
1. Insert the Software and Documentation CD-ROM into the computer’s CD-ROM drive.
2. Double-click the installer on the Software and Documentation CD-ROM to install the
printer driver.
Enabling and Using EtherTalk for Mac OS 9.x
If you use EtherTalk, Macintosh computers do not require IP addresses.
To create a desktop printer:
1. Open the AppleTalk Control Panel. Verify that the Ethernet port is the selected network
port.
2. Open the Chooser, and then click the LaserWriter printer driver.
3. Select the printer.
4. Click Create to create the desktop printer.
Phaser® 6300/6350 Color Laser Printer
4-20
Page 54

Macintosh
Enabling and Using TCP/IP for Mac OS 9.x
This section provides installation and troubleshooting steps for Macintosh OS 9.x.
Setting Up the Macintosh Ethernet Port for TCP/IP
To set up your Macintosh for TCP/IP:
1. On the control panel, select TCP/IP, and then select Ethernet.
2. Specify how you will obtain the IP address from the TCP/IP tab:
■ Manually: Specify the IP address, Subnet Mask, Router Address, and Name Server
Address in the dialog box.
■ Using DHCP Server: Automatically finds the IP address.
3. Close the dialog box.
Creating an LPR Printer with LaserWriter 8.5.1 or Higher
To create an LPR printer:
1. Open the Desktop Printer Utility. (This utility, or an alias to it, can be found in the
PhaserTools folder.)
2. Click Printer (LPR) in Create Desktop, and then click OK.
3. Click Change in the PostScript Printer Description (PPD) file.
4. Select the appropriate PPD from the list, and then click Select. If your printer PPD is not
listed, install it from the Software and Documentation CD-ROM.
5. Click Change in LPR Printer Selection.
6. Enter information in the following fields:
■ Printer Address: Enter the printer's IP address or domain name.
■ Queue: Enter PS (use uppercase), and then click OK.
7. Close the dialog box. When prompted, click Save.
8. Enter a name for the desktop printer in Save Desktop Printer As field, and then click
Save.
9. Two methods are available for printing through LPR:
■ Use the new Desktop Printer (LPR).
■ Use the LaserWriter 8.5.1 printer driver (any printer can be selected). Click File, and
then click Print to select the appropriate LPR printer in the Printer drop-down list.
Phaser® 6300/6350 Color Laser Printer
4-21
Page 55

Macintosh
Creating an AppSocket Printer with LaserWriter 8.6
Xerox provides Macintosh AppSocket printing with PhaserPort for Mac OS on the Software
and Documentation CD-ROM. PhaserPort for Mac OS provides a bi-directional, high-speed
communications channel using the new plug-in communication architecture of Apple
LaserWriter version 8.6.
AppSocket provides feedback about print job status which is not available through LPR.
PhaserPort for Mac OS System Requirements
Note: PhaserPort is not supported by Mac OS X.
System requirements include:
■ A printer installed on a TCP/IP network
■ PowerPC-based Macintosh
■ Apple's LaserWriter version 8.6 or later, with Desktop Printing enabled
■ Open Transport version 1.1 or later networking. TCP/IP networking provided by MacTCP
software is not supported. The Macintosh must be properly configured to communicate
with the printer.
Creating a Desktop Printer with PhaserPort for Mac OS
To create a desktop printer using PhaserPort for Mac OS:
1. Launch the PhaserPort Printer Tool.
2. Enter the printer’s IP address or DNS name in the Printer Internet Address field.
3. Enter a name for the desktop printer in the Desktop Printer Name field.
4. Click Ve ri f y to contact the printer over the TCP/IP network, and then verify its network
configuration.
5. Click Create to create the desktop printer.
6. Click Quit to exit the PhaserPort Printer Tool.
7. In the Finder, click the newly created desktop printer icon.
8. Click Change Setup in the Finder’s Printing menu.
9. Select the PostScript Printer Description file and provide configuration information.
You can also select the Auto Setup button, and then Macintosh automatically attempts to
determine the correct settings for the printer.
Note: Certain utilities, such as Adobe Font Downloader, are not compatible with PhaserPort
for Mac OS software because they attempt to directly communicate with the printer using the
AppleTalk protocol. If you use Mac OS software, create an AppleTalk desktop printer, and
then delete this printer after running and exiting the non-compatible software.
Phaser® 6300/6350 Color Laser Printer
4-22
Page 56

Macintosh
Enabling or Using TCP/IP or AppleTalk for Mac OS X, Version
10.2 and Higher
Verify that you are running Mac OS X, version 10.2 or higher. The previous versions of
Mac OS X do not fully support PostScript printing and printer features.
Setting Up the Macintosh Ethernet Port for TCP/IP
To set up your Macintosh for TCP/IP:
1. Select Network from the System Preferences application.
2. Select Built-In Ethernet from the Show menu.
3. Specify how you will obtain the IP address from the TCP/IP tab:
■ Manually: Specify the IP address, Subnet Mask, Router Address, and Name Server
Address in the dialog box.
■ Using DHCP: Automatically finds the IP address.
4. Click Apply, and then close the dialog box.
Setting Up the Macintosh Ethernet Port for AppleTalk
To set up your Macintosh for AppleTalk:
1. Select Network from the System Preferences application.
2. Select Built-In Ethernet from the Show menu.
3. Select Make AppleTalk Active in the AppleTalk tab.
4. Click Apply, and then close the dialog box.
Phaser® 6300/6350 Color Laser Printer
4-23
Page 57

Macintosh
Creating an LPR Printer with Mac OS X, Version 10.2 and Higher
To create an LPR printer:
1. Open the Print Center utility. In Mac OS X, version 10.3 or higher, open the Printer
Setup Utility. The utility is located in a directory called Utilities in the Applications
directory.
2. Select Add, then select one of the following options:
■ Version 10.2: Select IP Printing from the pull-down menu.
■ Version 10.3 and higher: Select LPD/LPR in the Printer Type field.
3. Enter the printer’s IP address in the Printer Address field.
4. Select the appropriate PPD from the list in the Printer Model pull-down list. If your
printer PPD is not listed, install it from the Software and Documentation CD-ROM.
5. Click Add to complete the configuration.
Creating an AppleTalk Printer with Mac OS X, Version 10.2 and Higher
To create an AppleTalk printer:
1. Verify that AppleTalk is enabled in System Preferences.
2. Open the Print Center utility. In Mac OS X, version 10.3 or higher, open the Printer
Setup Utility. The utility is located in a directory called Utilities in the Applications
directory.
3. Select Add Printer, and then select AppleTalk from the pull-down list.
4. Select the appropriate zone.
5. Select your printer from the list provided.
6. Select the appropriate PPD from the list in the Printer Model drop-down list. If your
printer PPD is not listed, install it from the Software and Documentation CD-ROM.
7. Click Add to complete the configuration.
Creating a Bonjour Printer with Mac OS X, Version 10.2 and Higher
To create a Bonjour printer:
1. Open the Print Center utility. In Mac OS X, version 10.3 or higher, open the Printer
Setup utility. The utility is located in Utilities in the Applications directory.
2. Select one of the following options:
■ Version 10.2: Click Add.
■ Version 10.3 and higher: From the top pull-down menu, select Bonjour.
A list appears displaying name of your printer, followed by a series of numbers. For
example, Your Printer’s Name xx:xx:xx. Each numbered segment represents the last
section of your printer’s hardware address. Your PPD is automatically selected.
3. Click Add to complete the installation.
Phaser® 6300/6350 Color Laser Printer
4-24
Page 58

Macintosh
Macintosh Troubleshooting (Mac OS 9.x, Mac OS X, Version
10.2 and Higher)
The following procedure eliminates cabling, communication, and connection problems. Once
you complete these steps, print a test page from your software application.
Note: If the job prints, no further system troubleshooting is necessary. If there are
print-quality problems, see the User Guide at www.xerox.com/office/6300_6350support
Macintosh Troubleshooting OS 9.x Step-By-Step
Perform these steps only for Mac OS 9:
1. Open the Chooser, and then click the LaserWriter driver.
2. Do one of the following:
■ If the printer’s name appears, your device is communicating through the network. You
do not need to perform any additional steps.
■ If the printer’s name does not appear, proceed to Step 3.
3. Verify that the printer is plugged in, turned On, and connected to an active network.
4. Verify the cable connection from the network to the printer.
5. Follow these steps:
a. From the printer’s control panel, verify that EtherTalk is enabled. If it is not, enable it
in the control panel, and then reset the printer.
b. Print the Configuration page and verify that EtherTalk is enabled.
c. From the Configuration page, verify the Zone. If you have multiple zones on your
network, verify that your printer appears in the desired zone.
6. If you are still unable to print, access PhaserSMART Technical Support through
CentreWare IS:
a. Launch your web browser.
b. Enter the printer’s IP address in the browser’s Address field (http://xxx.xxx.xxx.xxx).
c. Select Support.
d. Click the PhaserSMART Diagnostic Tool link to access PhaserSMART.
.
See also:
www.xerox.com/office/6300_6350support
Phaser® 6300/6350 Color Laser Printer
4-25
Page 59

Macintosh
Macintosh Troubleshooting OS X, Versions 10.2 and Higher
Perform these steps only for Mac OS X, versions 10.2 and higher:
1. Open the Network Utility, and then click the Ping tab.
2. Enter the printer’s IP address.
3. Click Ping. If you do not get a response, confirm that your TCP/IP settings are correct for
your printer and computer.
4. For AppleTalk, follow the steps below. For TCP/IP proceed to Step 5.
a. From the printer’s control panel, verify that EtherTalk is enabled. If it is not, enable it
in the control panel, and then reset the printer.
b. Print the Configuration page and verify that EtherTalk is enabled.
c. From the Configuration page, verify the Zone. If you have multiple zones on your
network, verify that your printer appears in the desired zone.
5. If you are still unable to print, access PhaserSMART Technical Support through
CentreWare IS:
a. Launch your web browser.
b. Enter the printer’s IP address in the browser’s Address field (http://xxx.xxx.xxx.xxx).
c. Select Support.
d. Click the PhaserSMART Diagnostic Tool link to access PhaserSMART.
See also:
www.xerox.com/office/6300_6350support
Phaser® 6300/6350 Color Laser Printer
4-26
Page 60

Novell
Novell
This section includes:
■ Novell Distributed Print Services (NDPS) on page 4-27
■ Xerox NDPS Gateway Software on page 4-27
■ Quick Install Steps on page 4-28
■ Additional Resources on page 4-29
Novell Distributed Print Services (NDPS)
Novell Distributed Print Services (NDPS) are products built on Novell’s printing architecture
that enables administrators to take advantage of built-in printer intelligence to manage network
printing resources from anywhere on the network, improve network printing performance, and
reduce network printing issues for end-users.
The Xerox NDPS Solution enables you to use Novell NDPS with many of the latest Xerox
printers. It includes administrative tools that work with NetWare Administrator so that users
can easily configure and manage their network printer services.
To access Xerox printers in this environment, Xerox NDPS Gateway software must be
installed on an Novell server.
Xerox NDPS Gateway Software
The current release of the Xerox NDPS Solution for Novell NDPS supports IP protocol. It
enables the user to manage Xerox printers in Novell NetWare NDPS environments.
The Xerox NDPS Solution software contains these features:
■ Support for IP networking
■ Simplified installation, driver download, and configuration of the Xerox printers in a
Novell NetWare NDPS network
■ Automatic installation, when users connect to a printer, to eliminate individual driver
installation
■ Status retrieval and remote management of NDPS-supported networked printers using
NetWare Administrator
■ CentreWare IS access for printer management of networked printers.
For more information, see the Xerox NDPS User Guide and download the latest version of the
Xerox NDPS Gateway software at www.xerox.com/office/pmtools
.
Phaser® 6300/6350 Color Laser Printer
4-27
Page 61

UNIX (Linux)
UNIX (Linux)
This section includes:
■ Quick Install Steps on page 4-28
■ Additional Resources on page 4-29
Your printer supports connection to a variety of UNIX platforms through the network
interface. The workstations currently supported by CentreWare for UNIX/Linux to a networkconnected printer are:
■ Sun Solaris
■ IBM AIX
■ Hewlett-Packard HP-UX
■ DEC UNIX
■ Linux (i386)
■ Linux (PPC)
■ SGI IRIX
The following procedures enable you to connect your printer using any of the supported
versions of UNIX or Linux listed above.
Quick Install Steps
Perform the following procedures to set up the printer and install the appropriate drivers.
From the Printer
To set up the printer:
1. Verify that both TCP/IP protocol and the proper connector are enabled.
2. On the control panel, select one of these IP address options:
■ Allow the printer to set up a DHCP address.
■ Enter the IP address manually.
3. Print the Configuration page and keep it for reference.
From Your Computer
To install the printer:
1. Go to www.xerox.com/office/drivers
2. Select your printer, the platform you are running (UNIX), and file type (Drivers).
3. Click Go to Downloads.
4. From the list of files provided, download the PrinterPackageXPXX and the file that
matches your operating system.
5. Print a test page and verify the print quality of the printed page.
.
Phaser® 6300/6350 Color Laser Printer
4-28
Page 62

UNIX (Linux)
6. Launch your web browser.
7. Enter the printer’s IP address in the browser’s Address field (http://xxx.xxx.xxx.xxx).
8. Select Support.
9. Click the PhaserSMART Diagnostic Tool link to access PhaserSMART.
Note: If print-quality problems exist, or your job did not print, see the User Guide at
www.xerox.com/office/6300_6350support
through CentreWare IS.
or access PhaserSMART Technical Support
Additional Resources
Access the Xerox website for the latest CentreWare for UNIX drivers at www.xerox.com/
office/drivers. To download printer drivers:
1. Select your printer, the platform you are running (UNIX), and the files you would like to
download (Drivers).
2. Click Go to Downloads.
3. Select the appropriate CentreWare printer driver for your platform.
4. Download the PrinterPackageXPXX. It provides the printer-specific features of
CentreWare for UNIX driver.
Phaser® 6300/6350 Color Laser Printer
4-29
Page 63

.
Managing Your Printer
This chapter includes:
■ Printer Settings on page 5-2
■ Printer Security on page 5-12
■ Analyzing Printer Usage on page 5-14
Phaser® 6300/6350 Color Laser Printer
5-1
Page 64

Printer Settings
This section includes:
■ Controlling Startup Page Printing on page 5-2
■ Selecting Tray 1 (MPT) Behavior on page 5-3
■ Setting the Duration for Tray 1 (MPT) Prompts on page 5-4
■ Setting the Duration for Tray 2 - 5 Prompts on page 5-5
■ Changing the Power Saver Timeout on page 5-6
■ Changing the Power Saver Timeout on page 5-6
■ Changing Intelligent Ready Mode on page 5-7
■ Changing the Load Paper Timeout on page 5-8
■ Setting the Control Panel Language on page 5-9
■ Setting the Printer Date and Time on page 5-9
■ Setting the Timing for the Low Toner Warning Message on page 5-10
Note: Print the Menu Map to view the path to select other menu options.
Printer Settings
Controlling Startup Page Printing
The printer can produce a Startup page each time the printer is turned on or reset. The factory
default is On. You can print the Startup page at any time from the Information Pages menu.
To turn on/off automatic printing of the Startup page, use one of the following options:
■ The printer’s control panel
■ CentreWare IS
Using the Control Panel
To turn on/off automatic printing of the Startup page on the control panel:
1. Select Printer Setup, and then press the OK button.
2. Select Printer Controls, and then press the OK button.
The Startup Page is highlighted. The end of the line displays the setting (On or Off).
3. Press the OK button to change the setting.
Phaser® 6300/6350 Color Laser Printer
5-2
Page 65

Printer Settings
Using CentreWare IS
To turn on/off the automatic printing of the Startup page using CentreWare IS:
1. Launch your web browser.
2. Enter your printer’s IP address in the browser’s Address field (http://xxx.xxx.xxx.xxx).
3. Click Properties.
4. Select the General folder on the left sidebar.
5. Select Printer Defaults.
6. Select Off or On from the Startup Page drop-down list to change the setting.
7. Click the Save Changes button at the bottom of the page.
Printing the Startup Page from the Control Panel
To print the Startup page on the control panel:
1. Select Information, and then press the OK button.
2. Select Information Pages, and then press the OK button.
3. Select Startup Page, and then press the OK button to print.
Note: You can also print the Startup page from the Troubleshooting tab of the Windows
printer driver.
Selecting Tray 1 (MPT) Behavior
The Tray 1 (MPT) behavior setting specifies how Tray 1 (MPT) paper size and type are
determined when you load paper in the tray, but do not set the paper size and type on the
control panel.
Setting Behavior
Adaptive
(Default)
Previous The next print job uses the most recently set paper size and type.
Bypass The next print job uses the paper in Tray 1 (MPT) and determines its paper size and
To set the Tray 1 (MPT) behavior settings, use one of the following options:
■ The printer’s control panel
■ CentreWare IS
The next print job that requests a paper size and type not in any other tray uses the
paper in Tray 1 (MPT) and determines its paper size and type.
type.
Phaser® 6300/6350 Color Laser Printer
5-3
Page 66

Printer Settings
Using the Control Panel
To select a Tray 1 (MPT) behavior setting on the control panel:
1. Select Paper Tray Setup, and then press the OK button.
2. Select Paper Handling Setup, and then press the OK button.
3. Select Tray 1 (MPT) Behavior, and then press the OK button.
4. Select the appropriate behavior setting, and then press the OK button.
Using CentreWare IS
To select a Tray 1 (MPT) behavior setting using CentreWare IS:
1. Launch your web browser.
2. Enter the printer’s IP address in the browser’s Address field (http://xxx.xxx.xxx.xxx).
3. Click Properties.
4. Select the General folder on the left sidebar, and then select Printer Defaults.
5. Select the appropriate behavior setting in the Tray 1 (MPT) Behavior drop-down list.
6. Click the Save Changes button at the bottom of the page.
Setting the Duration for Tray 1 (MPT) Prompts
The Tray 1 (MPT) prompt setting specifies the amount of time the prompt displays on the
control panel after paper is loaded in Tray 1 (MPT). The Tray 1 (MPT) prompt asks the person
that loaded the paper to confirm the current tray setup or to specify the paper type and size.
Setting Behavior
None Turns the tray setup prompt off.
30 seconds
(Default)
Infinite Displays the tray setup prompt after paper is loaded in Tray 1 (MPT) until a control panel
To select a Tray 1 prompt timeout, use either:
■ The printer’s control panel
■ CentreWare IS
Using the Control Panel
To change the Tray 1 (MPT) Prompt Timeout on the control panel:
1. Select Paper Tray Setup, and then press the OK button.
2. Select Paper Handling Setup, and then press the OK button.
3. Select Tray 1 (MPT) Prompt, and then press the OK button.
4. Select the appropriate prompt setting, and then press the OK button.
Displays the tray setup prompt for 30 seconds after paper is loaded in Tray 1 (MPT).
selection is made.
Phaser® 6300/6350 Color Laser Printer
5-4
Page 67

Printer Settings
Using CentreWare IS
To select the Tray 1 (MPT) prompt timeout using CentreWare IS:
1. Launch your web browser.
2. Enter the printer’s IP address in the browser’s Address field (http://xxx.xxx.xxx.xxx).
3. Click Properties.
4. Select the General folder on the left sidebar, and then select Printer Defaults.
5. Select the appropriate prompt setting in the Tray 1 (MPT) Prompt drop-dowm list.
6. Click the Save Changes button at the bottom of the page.
Setting the Duration for Tray 2 - 5 Prompts
The Tray 2 - 5 prompt setting specifies the amount of time the prompt displays on the control
panel after paper is loaded in Trays 2 - 5. The Tray 2 - 5 Prompt asks the person that loaded the
paper to confirm the current tray setup or to specify the paper type.
Setting Behavior
None
(Default)
30 seconds Displays the tray setup prompt for 30 seconds after loading paper in Trays 2 - 5.
Infinite Displays the tray setup prompt after paper is loaded in Trays 2 - 5 until a control panel
Turns the tray setup prompt off.
selection is made.
To select a Tray 2 - 5 prompt timeout, use either:
■ The printer’s control panel
■ CentreWare IS
Using the Control Panel
To change the Tray 2 - 5 prompt timeout on the control panel:
1. Select Paper Tray Setup, and then press the OK button.
2. Select Paper Handling Setup, and then press the OK button.
3. Select Tray 2 - 5 Prompt, and then press the OK button.
4. Select the appropriate prompt setting, and then press the OK button.
Using CentreWare IS
To select the Tray 2 - 5 prompt timeout using CentreWare IS:
1. Launch your web browser.
2. Enter the printer’s IP address in the browser’s Address field (http://xxx.xxx.xxx.xxx).
3. Click Properties.
4. Select General on the left sidebar, and then select Printer Defaults.
5. Select the appropriate prompt setting in the Tray 2 - 5 Prompt drop-dowm list.
6. Click the Save Changes button at the bottom of the page.
Phaser® 6300/6350 Color Laser Printer
5-5
Page 68

Printer Settings
Changing the Power Saver Timeout
To save energy, the printer enters a Power Saver, low-energy consumption mode after a predefined period of time since its last activity. In this mode, most printer electrical systems are
shut down. When a print job is sent to the printer, the printer enters Warmup mode. You can
also warm up the printer by pressing the OK button on the control panel.
If you find that the printer is going into Power Saver mode too often and you do not want to
wait while the printer warms up, increase the length of time before the printer goes into Power
Saver mode.
To change the Power Saver Timeout value, use one of the following options:
■ The printer’s control panel
■ CentreWare IS
Using the Control Panel
To change the Power Saver Timeout value on the control panel:
1. Select Printer Setup, and then press the OK button.
2. Select Printer Controls, and then press the OK button.
3. Select Power Saver, and then press the OK button.
4. Press the Up Arrow or Down Arrow button to scroll to a selected Power Saver Timeout
value. Select a larger value if you want to extend the length of time before the printer goes
into Power Saver mode.
5. Press the OK button.
Using CentreWare IS
To change the Power Saver Timeout value using CentreWare IS:
1. Launch your web browser.
2. Enter your printer’s IP address in the browser’s Address field (http://xxx.xxx.xxx.xxx).
3. Click Properties.
4. Select the General folder on the left sidebar, and then click Warmup .
5. Select a value from the Power Saver Timeout drop-down list.
6. Click the Save Changes button at the bottom of the page.
Phaser® 6300/6350 Color Laser Printer
5-6
Page 69

Printer Settings
Changing Intelligent Ready Mode
Intelligent Ready mode is an automated system that:
■ Monitors the printer’s usage.
■ Warms up the printer when you are most likely to need it based on past usage patterns.
■ Activates the Power Saver mode when the printer times out.
To turn on/off the Intelligent Ready mode, use one of the following options:
■ The printer’s control panel
■ CentreWare IS
Using the Control Panel
To turn Intelligent Ready mode on/off on the control panel:
1. Select Printer Setup, and then press the OK button.
2. Select Printer Controls, and then press the OK button.
3. Select Intelligent Ready.
4. Press the OK button to turn on/off Intelligent Ready.
5. Select Exit, and then press the OK button to return to the main menu.
Using CentreWare IS
To select Intelligent Ready mode or to schedule warmup/standby settings using
CentreWare IS:
1. Launch your web browser.
2. Enter your printer’s IP address in the browser’s Address field (http://xxx.xxx.xxx.xxx).
3. Click Properties.
4. Select the General folder on the left sidebar, and then select War m u p .
5. Select Intelligent Ready, Scheduled, or Job Activated from the Warmup Mode
drop-down list to change the setting.
6. If you selected Scheduled in Step 5, make selections for each day’s warmup setting and
standby setting.
7. Click the Save Changes button at the bottom of the screen.
Note: Although the control panel selections only enable you to turn Intelligent Ready mode
on or off, CentreWare IS enables you to specify particular printer Warmup modes and settings.
Phaser® 6300/6350 Color Laser Printer
5-7
Page 70

Printer Settings
Changing the Load Paper Timeout
When your print job is formatted for a type or size of paper that is not loaded in the printer, the
printer’s control panel displays a message requesting you to load the appropriate paper. The
Load Paper Timeout value controls the amount of time the printer waits before printing on
another type or size of paper.
To change the Load Paper Timeout value, use one of the following options:
■ The printer’s control panel
■ CentreWare IS
Using the Control Panel
To change the Load Paper Timeout value on the control panel:
1. Select Paper Tray Setup, and then press the OK button.
2. Select Paper Handling Setup, and then press the OK button.
3. Select Load Paper Timeout, and then press the OK button.
4. Scroll to the desired timeout value. The values (None, 1, 3, 5, or 10 minutes, 1 hour or
24 hours) indicate the length of time you want the printer to wait for you to load paper
before printing. If you select a value of None, the printer does not wait for paper to be
inserted and immediately picks paper from the default tray.
5. Press the OK button to save the change.
Using CentreWare IS
To change the Load Paper Timeout value using CentreWare IS:
1. Launch your web browser.
2. Enter your printer’s IP address in the browser’s Address field (http://xxx.xxx.xxx.xxx).
3. Click Properties.
4. Select the General folder on the left sidebar, and then select Printer Defaults.
5. Scroll to the desired Load Paper Timeout value in Timeout Settings. The values (None,
1, 3, 5, or 10 minutes, 1 or 24 hours) indicate the length of time you want the printer to
wait for you to load paper before printing. If you select a value of None, the printer does
not wait for paper to be inserted and immediately picks paper from the default tray.
6. Click the Save Changes button at the bottom of the screen.
Phaser® 6300/6350 Color Laser Printer
5-8
Page 71

Setting the Control Panel Language
To select the default control panel language, use one of the following options:
■ The printer’s control panel
■ CentreWare IS
Using the Control Panel
To select the default language on the control panel:
1. Select Printer Setup, and then press the OK button.
2. Select Control Panel Setup, and then press the OK button.
3. Select Language, and then press the OK button.
4. Select the desired language, and then press the OK button.
Using CentreWare IS
To change the default control panel language using CentreWare IS:
Printer Settings
1. Launch your web browser.
2. Enter your printer’s IP address in the browser’s Address field (http://xxx.xxx.xxx.xxx).
3. Click Properties.
4. Select the General folder on the left sidebar, and then select Printer Defaults.
5. In the User Preferences area, select the language from the Set Control Panel Language
drop-down list.
6. Click the Save Changes button at the bottom of the screen.
Setting the Printer Date and Time
Some printer features, like Scheduled Warmup mode and Job Accounting, rely on the printer
date and time settings to initiate functions and report usage information. To change the printer
date and time, use one of the following options:
■ The printer’s control panel
■ CentreWare IS
Phaser® 6300/6350 Color Laser Printer
5-9
Page 72

Printer Settings
Using the Control Panel
To change the printer’s date and time setting on the control panel:
1. Select Printer Setup, and then press the OK button.
2. Select Printer Controls, and then press the OK button.
3. Select Date and Time, and then press the OK button. The printer displays the current
settings for the Year, Month, Day, Hour, Minute, and Second.
4. To change one of the date/time settings:
a. Select the appropriate setting, and then press the OK button.
b. Press the Up Arrow or Down Arrow button to select a value, and then press the
OK button.
Using CentreWare IS
To change the printer’s date and time setting using CentreWare IS:
1. Launch your web browser.
2. Enter your printer’s IP address in the browser’s Address field (http://xxx.xxx.xxx.xxx).
3. Click Properties.
4. Select the General folder on the left sidebar, and then select Date and Time. The window
displays the printer’s current date and time setting.
5. To change the date or time, select the new values from the drop-down lists.
6. Click the Save Changes button at the bottom of the screen.
Setting the Timing for the Low Toner Warning Message
The printer detects when the toner is running low and displays a warning message on the
control panel. You can set the supply level at which this warning message first appears.
To set the timing for the low toner warning message, use either:
■ The printer’s control panel
■ CentreWare IS
Using the Control Panel
To change the timing for the low toner warning message on the control panel:
1. Select Printer Setup, and then press the OK button.
2. Select Printer Controls, and then press the OK button.
3. Select Low Toner Warning Level, and then press the OK button.
4. Select the remaining number of pages that can be printed after the Low Toner message
appears. Use the Up Arrow and Down Arrow buttons to select the approximate number
of pages remaining (0 to 4500).
Phaser® 6300/6350 Color Laser Printer
5-10
Page 73

Printer Settings
Using CentreWare IS
To change the timing for the low toner warning message using CentreWare IS:
1. Launch your web browser.
2. Enter your printer’s IP address in the browser’s Address field (http://xxx.xxx.xxx.xxx).
3. Click Properties.
4. Select the General folder on the left sidebar, and then select Printer Defaults.
5. Select a value from the Low Toner Warning Level drop-down list to change the setting.
6. Click the Save Changes button at the bottom of the screen.
Phaser® 6300/6350 Color Laser Printer
5-11
Page 74

Printer Security
Printer Security
This section includes:
■ Selecting Administrative Settings on page 5-12
■ Selecting Printing Security Settings on page 5-13
■ Selecting the Secure Socket Layer (SSL) Settings on page 5-13
■ Locking the Control Panel Menus on page 5-13
CentreWare IS enables you to configure varying levels of user access, printer feature
authorization, and control panel selections in the following settings:
■ Administrative Security Settings
■ Printing Security Settings
■ Secure Socket Layer (SSL) Setting
■ Control Panel Lockout Setting
For more information about these settings, click the Help (?) button in CentreWare IS.
Selecting Administrative Settings
Administrative settings in CentreWare IS enable you to select settings based on three levels of
user security:
■ Any user: Includes the majority of people who will be sending print jobs to the printer.
■ Key user: A person who has some administrative responsibilities and who manages some
or all of the printer functions.
■ Administrator: The person with the ultimate management responsibility and authority for
controlling all functions of the printer.
To prevent unauthorized changes to printer settings, select appropriate user rights in
CentreWare IS:
1. Launch your web browser.
2. Enter your printer’s IP address in the browser’s Address field (http://xxx.xxx.xxx.xxx).
3. Click Properties.
4. Select the Security folder on the left sidebar, and then select Administrative Security
Settings.
5. Enter the appropriate Administrator and Key User information.
6. Select the appropriate feature authorization settings for each user category in the Feature
Authorization table.
7. Click the Save Changes button at the bottom of the screen.
Phaser® 6300/6350 Color Laser Printer
5-12
Page 75

Printer Security
Selecting Printing Security Settings
Printing security settings enable you to:
■ Remove unprinted secure, personal, and proof jobs.
■ Overwrite hard drive security options.
■ Select jam recovery options.
To set printing security settings:
1. Launch your web browser.
2. Enter your printer’s IP address in the browser’s Address field (http://xxx.xxx.xxx.xxx).
3. Click Properties.
4. Select the Security folder on the left sidebar, and then select Printing Security Settings.
5. Select the appropriate options.
6. Click the Save Changes button at the bottom of the screen.
Selecting the Secure Socket Layer (SSL) Settings
To configure a secure connection between the printer and the server:
1. Launch your web browser.
2. Enter your printer’s IP address in the browser’s Address field (http://xxx.xxx.xxx.xxx).
3. Click Properties.
4. Select the Security folder on the left sidebar, and then select SSL.
5. Select the appropriate options.
6. Click the Save Changes button at the bottom of the screen.
Locking the Control Panel Menus
Lock the control panel menus to prevent others from changing settings in the printer setup
menus. To lock or unlock the printer’s control panel menus:
1. Launch your web browser.
2. Enter your printer’s IP address in the browser’s Address field (http://xxx.xxx.xxx.xxx).
3. Click Properties.
4. Select the Security folder on the left sidebar, and then select Control Panel Lockout.
5. Click the checkbox for each control panel menu item you want to lock.
6. Click the Save Changes button at the bottom of the page.
Phaser® 6300/6350 Color Laser Printer
5-13
Page 76

Analyzing Printer Usage
Analyzing Printer Usage
This section includes:
■ Job Accounting on page 5-14
■ Usage Profile Reports on page 5-15
■ MaiLinX Alerts on page 5-16
■ Xerox Usage Analysis Tool on page 5-17
Job Accounting
Job accounting is available through CentreWare IS and CentreWare Web.
The printer stores information about print jobs in a log file. The log file is stored either in the
printer’s memory or on an optional hard drive if one is installed in the printer. If the log file is
stored in the printer’s memory, it is lost when the printer is reset. It is recommended that a hard
drive be used for job accounting.
The log file lists job records. Each record contains fields such as user name, job name, pages
printed, job times, and toner or ink used. Not all fields are supported by all printers. For more
information, go to the CentreWare IS Online Help or CentreWare Web Online Help.
The job accounting values reported vary depending on the protocol and print command used
when each job was printed. For example, using NPRINT over NetWare provides the printer
with the most information about the job being printed. When using Windows and NetWare, the
job name is often LST: or LST:BANNER. Other jobs from other ports may provide less
information about the job.
Using CentreWare IS
To access job accounting information using CentreWare IS:
1. Launch your web browser.
2. Enter the printer’s IP address in the browser’s Address field (http://xxx.xxx.xxx.xxx).
3. On the right side of the main CentreWare IS page, click Jobs.
The Job Accounting Links page provides links that enable you to browse, download, and clear
job accounting records.
For complete information on CentreWare IS job accounting, including clearing job
information, downloading job information to a file, and job accounting file formats, click the
Help button in CentreWare IS to go to the CentreWare IS Online Help.
Phaser® 6300/6350 Color Laser Printer
5-14
Page 77

Analyzing Printer Usage
Usage Profile Reports
The printer generates reports accessible through CentreWare IS that detail device usage. Usage
profile reports track multiple items, including:
■ Printer information, such as printer name, date installed, total pages printed, options
installed, and network ID.
■ Supplies usage data, such as toner or ink. By tracking supplies usage, you can order
supplies before they reach their end of life.
■ Media and tray information, such as how often prints are made on paper compared to
transparencies, and how often each tray is used.
■ Job characteristics, such as size and timing of jobs.
Setting Up Usage Profile Reporting
To set up usage profile reporting:
1. Launch your web browser.
2. Enter the printer’s IP address in the browser’s Address field (http://xxx.xxx.xxx.xxx).
3. Select Jobs.
4. Select Usage Profile Reports on the left sidebar.
5. Click the Usage Profile Properties link. Follow the instructions on the page to set up
reports.
6. Click the Save Changes button at the bottom of the screen.
For complete information about usage profile reporting, including descriptions of each field in
the report, click the Help button in CentreWare IS to go to CentreWare IS Online Help.
Using CentreWare IS
To send a usage profile report using CentreWare IS:
1. Enter the printer’s IP address in your browser’s Address field (http://xxx.xxx.xxx.xxx).
2. Click Jobs.
3. Select Usage Profile Reports on the left sidebar.
4. Enter the desired email address in the Send to Specific Address field.
5. Click the Send Usage Profile Report button.
Note: To send usage profile reports using email, MaiLinX must be properly set up. See
MaiLinX Alerts on page 5-16.
Phaser® 6300/6350 Color Laser Printer
5-15
Page 78

Analyzing Printer Usage
MaiLinX Alerts
MaiLinX alerts enable the printer to automatically send email to the system administrator and
others under the following conditions:
■ When printer errors, warnings, and alerts occur.
■ When the printer requires attention (for example, when service is required or supplies need
to be replenished).
■ When a reply to a CentreWare IS Remote Internet Printing message is desired. For more
information about CentreWare IS Remote Internet printing, click the Help button in
CentreWare IS to go to CentreWare IS Online Help.
Three designated users can receive messages:
■ SysAdmin
■ Service
■ Key
Printer messages reporting errors, alerts, and warnings can be individually assigned to any of
these users. You can customize the message text and the subject line in the Status Notification
messages. Status Notification is supplied by the printer’s Simple Mail Transport Protocol
(SMTP) client.
Setting Up CentreWare IS Status Notification
To set up status notification using CentreWare IS:
1. Launch your web browser.
2. Enter the printer’s IP address in the browser’s Address field (http://xxx.xxx.xxx.xxx).
3. Click Properties.
4. Select Mail Alerts on the left sidebar. Follow the instructions on the page to select mail
alert options.
5. Click the Save Changes button at the bottom of the screen.
For complete information about CentreWare IS Status Notification, click the Help button in
CentreWare IS to go to CentreWare IS Online Help.
Phaser® 6300/6350 Color Laser Printer
5-16
Page 79

Analyzing Printer Usage
Xerox Usage Analysis Tool
The Xerox Usage Analysis Tool is a Windows client/server application that enables system
administrators to automatically track Xerox printer usage and obtain job accounting records.
The tool supports large networks with many users and printers. Job accounting and printer
usage data is stored in a database. The application can be run on multiple clients using a single
server. The data can be exported to a spreadsheet for viewing, analysis, and billing.
Go to www.xerox.com/office/uat
Analysis Tool provided by the application’s online help system.
for complete information about using the Xerox Usage
Phaser® 6300/6350 Color Laser Printer
5-17
Page 80

Printer Specifications
Physical Specifications
Printer
■ Width: 429 mm (17.2 in.)
■ Depth: 580 mm (23.2)
■ Height: 457 mm (18.3 in.)
■ Weight: 35 kg (77 lb.)
Optional 550-Sheet Feeder
■ Width: 429 mm (17.2 in.)
■ Depth: 509 mm (20.4 in.)
■ Height: 130 mm (5.2 in.)
■ Weight: 6.8 kg (15 lb.)
Optional 1100-Sheet High-Capacity Feeder
■ Width: 429 mm (17.2 in.)
■ Depth: 509 mm (20.4 in.)
■ Height: 341 mm (13.42 in.)
■ Weight: 21 kg (46 lb.)
Environmental Specifications
Temperature
■ Storage: 0–35 degrees C /32–95 degrees F
■ Operating: 5–32 degrees C / 41–90 degrees F
■ Optimal Print Quality Range: 15–28 degrees C
Relative Humidity
■ Storage: 15% – 85%
■ Operating: 15% – 85%
■ Optimal Print Quality Range: 20% – 70%
Phaser® 6300/6350 Color Laser Printer
A-1
Page 81

Electrical Specifications
Available in five (5) configurations: Phaser 6300N, 6300DN, 6350DP, 6350DT, 6350DX
■ 110–127 VAC, 50/60 Hz
■ 220–240 VAC, 50/60 Hz
■ ENERGY STAR qualified printer
Performance Specifications
Resolution
■ 2400 dpi
Print Speed
■ Phaser 6350 printer: Up to 36 pages per minute (ppm) color, black and white
■ Phaser 6300 printer: Up to 26 ppm color and 36 ppm black and white
Controller Specifications
■ 800 MHz processor
Memory
■ 256 MB PC333 DRAM standard on Phaser 6300N, 6300DN, and 6350DP configurations
■ 512 MB PC333 DRAM standard on Phaser 6350DT and 6350DX configurations
■ Upgradeable to a total of 1 GB
Page Description Languages (PDL)
■ PCL
■ Adobe PostScript 3
Fonts
■ PostScript
■ PCL
Interfaces
■ Ethernet 10BaseT and 100BaseTx
■ USB
Phaser® 6300/6350 Color Laser Printer
A-2
Page 82

Regulatory Information
Xerox has tested this product to electromagnetic emission and immunity standards. These
standards are designed to mitigate interference caused or received by this product in a typical
office environment.
United States (FCC Regulations)
This equipment has been tested and found to comply with the limits for a Class B digital
device, pursuant to Part 15 of the FCC Rules. These limits are designed to provide reasonable
protection against harmful interference in a residential installation. This equipment generates,
uses, and can radiate radio frequency energy. If it is not installed and used in accordance with
these instructions, it may cause harmful interference to radio communications. However, there
is no guarantee that interference will not occur in a particular installation. If this equipment
does cause harmful interference to radio or television reception, which can be determined by
turning the equipment off and on, the user is encouraged to try to correct the interference by
one or more of the following measures:
■ Reorient or relocate the receiver.
■ Increase the separation between the equipment and receiver.
■ Connect the equipment into an outlet on a circuit different from that to which the receiver
is connected.
■ Consult the dealer or an experienced radio/television technician for help.
Any changes or modifications not expressly approved by Xerox could void the user's authority
to operate the equipment. To ensure compliance with Part 15 of the FCC rules, use shielded
interface cables.
Canada (Regulations)
This Class B digital apparatus complies with Canadian ICES-003.
Cet appareil numérique de la classe B est conforme à la norme NMB-003 du Canada.
Phaser® 6300/6350 Color Laser Printer
B-1
Page 83

European Union (Declaration of Conformity)
Xerox Corporation declares, under our sole responsibility, that the product to which this
declaration relates is in conformity with the following standards and other normative
documents:
Low Voltage Directive 73/23/EEC as amended
EN 60950:2000
Electromagnetic Compatibility Directive 89/336/EEC as amended
EN 55022:1998+A1:2000 +A2:2003
EN 55024:1998+A1:2000 +A2:2003
EN 61000-3-2:2000
EN 61000-3-3:1995+A1:2000
Radio & Telecommunications Terminal Equipment Directive 1999/5/EC as amended
EN 300 330-2 V1.1.1
EN 300 440-2 V1.1.1
EN 301 489-3 V1.3.1
This product, if used properly in accordance with the user's instructions, is neither dangerous
for the consumer nor for the environment.
A signed copy of the Declaration of Conformity for this product can be obtained from Xerox.
Phaser® 6300/6350 Color Laser Printer
B-2
Page 84

Material Safety Data Sheet
For Material Safety Data information regarding your Phaser 6300/6350 printer, go to
www.xerox.com/office/msds
information sheet that shipped with your printer or go to www.xerox.com/office/contacts
. For the Customer Support Center phone numbers, see the
.
Phaser® 6300/6350 Color Laser Printer
C-1
Page 85

Product Recycling and Disposal
All Countries
If you are managing the disposal of your Xerox product, please note that the product contains
lead, mercury, and other materials whose disposal may be regulated due to environmental
considerations in certain countries or states. The presence of lead and mercury is fully
consistent with global regulations applicable at the time that the product was placed on the
market.
European Union
Some equipment may be used in both a domestic/household and a professional/business
application.
Domestic/Household Environment
Application of this symbol on your equipment is confirmation that you
should not dispose of the equipment in the normal household waste stream.
In accordance with European legislation, end of life electrical and electronic equipment
subject to disposal must be segregated from household waste.
Private households within EU member states may return used electrical and electronic
equipment to designated collection facilities free of charge. Please contact your local disposal
authority for information.
In some member states, when you purchase new equipment, your local retailer may be
required to take back your old equipment free of charge. Please ask you retailer for
information.
Phaser® 6300/6350 Color Laser Printer
D-1
Page 86

Professional/Business Environment
Application of this symbol on your equipment is confirmation that you must
dispose of this equipment in compliance with agreed national procedures.
In accordance with European legislation, end of life electrical and electronic equipment
subject to disposal must be managed within agreed procedures.
Prior to disposal, please contact your local dealer or Xerox representative for end of life
takeback information.
North America
Xerox operates an equipment takeback and reuse/recycle program. Contact your Xerox sales
representative (1-800-ASK-XEROX) to determine whether this Xerox product is part of the
program. For more information about Xerox environmental programs, visit www.xerox.com/
environment.html or for recycling and disposal information, contact your local authorities.
In the United States, you may also refer to the Electronic Industries Alliance website at
www.eiae.org
.
Other Countries
Please contact your local waste authorities and request disposal guidance.
Phaser® 6300/6350 Color Laser Printer
D-2
Page 87

Acknowledgements
Original SSLeay License
Copyright © 1995-1998 Eric Young (eay@cryptsoft.com). All rights reserved.
This package is an SSL implementation written by Eric Young (eay@cryptsoft.com). The
implementation was written so as to conform with Netscape’s SSL.
This library is free for commercial and non-commercial use as long as the following
conditions are adhered to. The following conditions apply to all code found in this distribution,
be it the RC4, RSA, lhash, DES, etc., code; not just the SSL code. The SSL documentation
included with this distribution is covered by the same copyright terms except that the holder is
Tim Hudson (tjh@cryptsoft.com).
Copyright remains Eric Young’s, and as such any Copyright notices in the code are not to be
removed.
If this package is used in a product, Eric Young should be given attribution as the author of the
parts of the library used.
This can be in the form of a textual message at program startup or in documentation (online or
textual) provided with the package.
Redistribution and use in source and binary forms, with or without modification, are permitted
provided that the following conditions are met:
■ Redistributions of source code must retain the copyright notice, this list of conditions and
the following disclaimer.
■ Redistributions in binary form must reproduce the above copyright notice, this list of
conditions and the following disclaimer in the documentation and/or other materials
provided with the distribution.
■ All advertising materials mentioning features or use of this software must display the
following acknowledgement:
■ “This product includes cryptographic software written by Eric Young
(eay@cryptsoft.com).”
■ The word ‘cryptographic’ can be left out if the routines from the library being used are not
cryptographic related.
■ If you include any Windows specific code (or a derivative thereof) from the apps directory
(application code) you must include an acknowledgement:
“This product includes software written by Tim Hudson (tjh@cryptsoft.com).”
Phaser® 6300/6350 Color Laser Printer
E-1
Page 88

THIS SOFTWARE IS PROVIDED BY ERIC YOUNG “AS IS” AND ANY EXPRESS OR
IMPLIED WARRANTIES, INCLUDING, BUT NOT LIMITED TO, THE IMPLIED
WARRANTIES OF MERCHANTABILITY AND FITNESS FOR A PARTICULAR
PURPOSE ARE DISCLAIMED. IN NO EVENT SHALL THE AUTHOR OR
CONTRIBUTORS BE LIABLE FOR ANY DIRECT, INDIRECT, INCIDENTAL, SPECIAL,
EXEMPLARY, OR CONSEQUENTIAL DAMAGES (INCLUDING, BUT NOT LIMITED
TO, PROCUREMENT OF SUBSTITUTE GOODS OR SERVICES; LOSS OF USE, DATA,
OR PROFITS; OR BUSINESS INTERRUPTION) HOWEVER CAUSED AND ON ANY
THEORY OF LIABILITY, WHETHER IN CONTRACT, STRICT LIABILITY, OR TORT
(INCLUDING NEGLIGENCE OR OTHERWISE) ARISING IN ANY WAY OUT OF THE
USE OF THIS SOFTWARE, EVEN IF ADVISED OF THE POSSIBILITY OF SUCH
DAMAGE.
The license and distribution terms for any publicly available version or derivative of this code
cannot be changed, i.e., this code cannot simply be copied and put under another distribution
license [including the GNU Public License.]
Net-SNMP License
Part 1: CMU/UCD copyright notice: (BSD like) -----
Copyright © 1989, 1991, 1992 by Carnegie Mellon University
Derivative Work - 1996, 1998-2000
Copyright ©
1996, 1998-2000 The Regents of the University of California
All rights reserved.
Permission to use, copy, modify and distribute this software and its documentation for any
purpose and without fee is hereby granted, provided that the above copyright notice appears in
all copies and that both that copyright notice and this permission notice appear in supporting
documentation, and that the name of CMU and The Regents of the University of California not
be used in advertising or publicity pertaining to distribution of the software without specific
written permission.
CMU AND THE REGENTS OF THE UNIVERSITY OF CALIFORNIA DISCLAIM ALL
WARRANTIES WITH REGARD TO THIS SOFTWARE, INCLUDING ALL IMPLIED
WARRANTIES OF MERCHANTABILITY AND FITNESS. IN NO EVENT SHALL CMU
OR THE REGENTS OF THE UNIVERSITY OF CALIFORNIA BE LIABLE FOR ANY
SPECIAL, INDIRECT OR CONSEQUENTIAL DAMAGES OR ANY DAMAGES
WHATSOEVER RESULTING FROM THE LOSS OF USE, DATA OR PROFITS,
WHETHER IN AN ACTION OF CONTRACT, NEGLIGENCE OR OTHER TORTIOUS
ACTION, ARISING OUT OF OR IN CONNECTION WITH THE USE OR
PERFORMANCE OF THIS SOFTWARE.
Phaser® 6300/6350 Color Laser Printer
E-2
Page 89

Part 2: Networks Associates Technology, Inc copyright notice (BSD) -----
Copyright © 2001-2003, Networks Associates Technology, Inc.
All rights reserved.
Redistribution and use in source and binary forms, with or without modification, are permitted
provided that the following conditions are met:
■ Redistributions of source code must retain the above copyright notice, this list of
conditions and the following disclaimer.
■ Redistributions in binary form must reproduce the above copyright notice, this list of
conditions and the following disclaimer in the documentation and/or other materials
provided with the distribution.
■ Neither the name of the Networks Associates Technology, Inc nor the names of its
contributors may be used to endorse or promote products derived from this software
without specific prior written permission.
THIS SOFTWARE IS PROVIDED BY THE COPYRIGHT HOLDERS AND
CONTRIBUTORS “AS IS” AND ANY EXPRESS OR IMPLIED WARRANTIES,
INCLUDING, BUT NOT LIMITED TO, THE IMPLIED WARRANTIES OF
MERCHANTABILITY AND FITNESS FOR A PARTICULAR PURPOSE ARE
DISCLAIMED. IN NO EVENT SHALL THE COPYRIGHT HOLDERS OR
CONTRIBUTORS BE LIABLE FOR ANY DIRECT, INDIRECT, INCIDENTAL, SPECIAL,
EXEMPLARY, OR CONSEQUENTIAL DAMAGES (INCLUDING, BUT NOT LIMITED
TO, PROCUREMENT OF SUBSTITUTE GOODS OR SERVICES; LOSS OF USE, DATA,
OR PROFITS; OR BUSINESS INTERRUPTION) HOWEVER CAUSED AND ON ANY
THEORY OF LIABILITY, WHETHER IN CONTRACT, STRICT LIABILITY, OR TORT
(INCLUDING NEGLIGENCE OR OTHERWISE) ARISING IN ANY WAY OUT OF THE
USE OF THIS SOFTWARE, EVEN IF ADVISED OF THE POSSIBILITY OF SUCH
DAMAGE.
Phaser® 6300/6350 Color Laser Printer
E-3
Page 90

Part 3: Cambridge Broadband Ltd. copyright notice (BSD) -----
Copyright © 2001-2003, Cambridge Broadband Ltd.
All rights reserved.
Redistribution and use in source and binary forms, with or without modification, are permitted
provided that the following conditions are met:
■ Redistributions of source code must retain the above copyright notice, this list of
conditions and the following disclaimer.
■ Redistributions in binary form must reproduce the above copyright notice, this list of
conditions and the following disclaimer in the documentation and/or other materials
provided with the distribution.
■ The name of Cambridge Broadband Ltd. may not be used to endorse or promote products
derived from this software without specific prior written permission.
THIS SOFTWARE IS PROVIDED BY THE COPYRIGHT HOLDER “AS IS”' AND
ANYEXPRESS OR IMPLIED WARRANTIES, INCLUDING, BUT NOT LIMITED TO,
THE IMPLIED WARRANTIES OF MERCHANTABILITY AND FITNESS FOR A
PARTICULAR PURPOSE ARE DISCLAIMED. IN NO EVENT SHALL THE
COPYRIGHT HOLDER BE LIABLE FOR ANY DIRECT, INDIRECT, INCIDENTAL,
SPECIAL, EXEMPLARY, OR CONSEQUENTIAL DAMAGES (INCLUDING, BUT NOT
LIMITED TO, PROCUREMENT OF SUBSTITUTE GOODS OR SERVICES; LOSS OF
USE, DATA, OR PROFITS; OR BUSINESS INTERRUPTION) HOWEVER CAUSED AND
ON ANY THEORY OF LIABILITY, WHETHER IN CONTRACT, STRICT LIABILITY, OR
TORT (INCLUDING NEGLIGENCE OR OTHERWISE) ARISING IN ANY WAY OUT OF
THE USE OF THIS SOFTWARE, EVEN IF ADVISED OF THE POSSIBILITY OF SUCH
DAMAGE.
Part 4: Sun Microsystems, Inc. copyright notice (BSD) -----
Copyright © 2003 Sun Microsystems, Inc., 4150 Network Circle, Santa Clara, California
95054, U.S.A. All rights reserved.
Use is subject to license terms below.
This distribution may include materials developed by third parties. Sun, Sun Microsystems,
the Sun logo and Solaris are trademarks or registered trademarks of Sun Microsystems, Inc. in
the U.S. and other countries. Redistribution and use in source and binary forms, with or
without modification, are permitted provided that the following conditions are met:
■ Redistributions of source code must retain the above copyright notice, this list of
conditions and the following disclaimer.
■ Redistributions in binary form must reproduce the above copyright notice, this list of
conditions and the following disclaimer in the documentation and/or other materials
provided with the distribution.
■ Neither the name of the Sun Microsystems, Inc. nor the names of its contributors may be
used to endorse or promote products derived from this software without specific prior
written permission.
Phaser® 6300/6350 Color Laser Printer
E-4
Page 91

THIS SOFTWARE IS PROVIDED BY THE COPYRIGHT HOLDERS AND
CONTRIBUTORS “AS IS”AND ANY EXPRESS OR IMPLIED WARRANTIES,
INCLUDING, BUT NOT LIMITED TO, THE IMPLIED WARRANTIES OF
MERCHANTABILITY AND FITNESS FOR A PARTICULAR PURPOSE ARE
DISCLAIMED. IN NO EVENT SHALL THE COPYRIGHT HOLDERS OR
CONTRIBUTORS BE LIABLE FOR ANY DIRECT, INDIRECT, INCIDENTAL, SPECIAL,
EXEMPLARY, OR CONSEQUENTIAL DAMAGES (INCLUDING, BUT NOT LIMITED
TO, PROCUREMENT OF SUBSTITUTE GOODS OR SERVICES; LOSS OF USE, DATA,
OR PROFITS; OR BUSINESS INTERRUPTION) HOWEVER CAUSED AND ON ANY
THEORY OF LIABILITY, WHETHER IN CONTRACT, STRICT LIABILITY, OR TORT
(INCLUDING NEGLIGENCE OR OTHERWISE) ARISING IN ANY WAY OUT OF THE
USE OF THIS SOFTWARE, EVEN IF ADVISED OF THE POSSIBILITY OF SUCH
DAMAGE.
Part 5: Sparta, Inc copyright notice (BSD) -----
Copyright © 2003-2004, Sparta, Inc.
All rights reserved.
Redistribution and use in source and binary forms, with or without modification, are permitted
provided that the following conditions are met:
■ Redistributions of source code must retain the above copyright notice, this list of
conditions and the following disclaimer.
■ Redistributions in binary form must reproduce the above copyright notice, this list of
conditions and the following disclaimer in the documentation and/or other materials
provided with the distribution.
■ Neither the name of the Networks Associates Technology, Inc nor the names of its
contributors may be used to endorse or promote products derived from this software
without specific prior written permission.
THIS SOFTWARE IS PROVIDED BY THE COPYRIGHT HOLDERS AND
CONTRIBUTORS “AS IS”' AND ANY EXPRESS OR IMPLIED WARRANTIES,
INCLUDING, BUT NOT LIMITED TO, THE IMPLIED WARRANTIES OF
MERCHANTABILITY AND FITNESS FOR A PARTICULAR PURPOSE ARE
DISCLAIMED. IN NO EVENT SHALL THE COPYRIGHT HOLDERS OR
CONTRIBUTORS BE LIABLE FOR ANY DIRECT, INDIRECT, INCIDENTAL, SPECIAL,
EXEMPLARY, OR CONSEQUENTIAL DAMAGES (INCLUDING, BUT NOT LIMITED
TO, PROCUREMENT OF SUBSTITUTE GOODS OR SERVICES; LOSS OF USE, DATA,
OR PROFITS; OR BUSINESS INTERRUPTION) HOWEVER CAUSED AND ON ANY
THEORY OF LIABILITY, WHETHER IN CONTRACT, STRICT LIABILITY, OR TORT
(INCLUDING NEGLIGENCE OR OTHERWISE) ARISING IN ANY WAY OUT OF THE
USE OF THIS SOFTWARE, EVEN IF ADVISED OF THE POSSIBILITY OF SUCH
DAMAGE.
Phaser® 6300/6350 Color Laser Printer
E-5
Page 92

Index
Numerics
2-sided printing
booklets, 1-5
A
accessing online manuals
using CentreWare IS, 4-2
adaptive
Tray 1 (MPT) behavior setting, 5-3
adding a printer port
Windows 98 SE, Windows Me, 4-17
adding the printer
Windows, 4-6
Windows NT 4.x, 4-12
administrative security settings
selecting, 5-12
analyzing printer usage, 5-14
AppleTalk
creating a printer
Mac OS X, version 10.2 and higher,
4-24
enabling and using TCP/IP
Mac OS X, version 10.2 and higher,
4-23
setting up the Macintosh Ethernet port,
4-23
AppSocket
creating a Macintosh printer
LaserWriter 8.6 (Macintosh), 4-22
B
black and white printing, 1-3
Bonjour
creating a printer
Mac OS X, version 10.2 and higher,
4-24
booklet printing, 1-2, 1-5
creep and gutter, 1-5
bypass
Tray 1 (MPT) behavior setting, 5-3
C
CentreWare IS, 4-2
accessing online manuals, 4-2
changing
Load Paper Timeout, 5-8
Power Saver Timeout, 5-6
checking supplies status, 4-2
copying settings from one printer to
another, 4-2
defining a network printer, 4-2
locking the control panel, 5-13
printer management software, 4-2
printing
list of fonts, 2-4
Startup page, 5-3
selecting
administrative security settings, 5-12
Intelligent Ready mode, 5-7
MaiLinX alerts, 5-16
Secure Socket Layer (SSL) settings,
5-13
Tray 1 (MPT) behavior, 5-4
setting
CentreWare IS status notification,
5-16
control panel language, 5-9
duration for tray prompts, 5-5
printer’s date and time, 5-10, 5-11
setting up a web-browser-based printing
system, 4-2
troubleshooting print-quality problems,
4-2
usage profile reports
sending, 5-15
viewing list of networked printers, 4-2
CentreWare Web, 4-3
colors
blending adjacent colors in images, 1-14
configuring the printer
Windows, 4-6
Windows NT 4.x, 4-13
Phaser® 6300/6350 Color Laser Printer
Index-1
Page 93

Index
control panel
changing
Intelligent Ready mode, 5-7
Load Paper Timeout mode, 5-8
Power Saver Timeout setting, 5-6
locking menus, 5-13
printing a font list, 2-4
selecting
Tray 1 (MPT) behavior settings, 5-4
setting
control panel language, 5-9
duration for tray prompts, 5-4, 5-5
printer’s date and time, 5-10
controller specifications, A-2
copy printer settings
using CentreWare IS, 4-2
cover pages
letterhead, 1-8
printing, 1-8
selecting a different paper source, 1-8
selecting printing options, 1-8
creating an IPP printer
Windows, 4-8
creep
booklet printing, 1-5
D
date
setting, 5-9
deleting
personal print jobs, 1-17
proof print jobs, 1-17
saved print jobs, 1-17
secure print jobs, 1-17
divider page, 1-7
downloading fonts, 2-6
driver
features, 1-2
other installation methods
Windows 2000, Windows XP,
Windows Server 2003, 4-5
Windows 98 SE, Windows Me, 4-17
Windows NT 4.x, 4-12
printing a list of fonts, 2-5
quick CD-ROM installation
Macintosh, 4-20
Windows 2000, Windows XP,
Windows Server 2003, 4-4
Windows 98 SE , Windows Me, 4-17
Windows NT 4.x, 4-11
verifying installation
Windows 2000, Windows XP,
Windows Server 2003, 4-10
Windows NT 4.x, 4-14
driver features
listed by operating system, 1-2
E
electrical specifications, A-2
email
MaiLinX alerts, 5-16
energy saving
changing Power Saver Timeout setting,
5-6
enlarge images, 1-10
environmental specifications, A-1
Ethernet port
setting up
AppleTalk, 4-23
TCP/IP, 4-23
TCP/IP (Macintosh), 4-21
EtherTalk
enabling and using
Mac OS 9.x, 4-20
F
first or last page of a document, 1-8
Font Management Utility, 2-6
fonts
downloading, 2-6
printing a list from CentreWare IS, 2-4
printing a list from the control panel, 2-4
printing a list from the printer driver, 2-5
printing font samples, 2-4
types, 2-2
viewing a list of resident PCL or
PostScript fonts, 2-3
Phaser® 6300/6350 Color Laser Printer
Index-2
Page 94

Index
G
gutter
booklet printing, 1-5
I
image smoothing, 1-2
images
flip horizontally on the page (mirror
image), 1-13
improving appearance of low resolution
images, 1-14
printing negative or mirror images, 1-13
reducing or enlarging, 1-10
reversing the light and dark areas, 1-13
smoothing, 1-14
Intelligent Ready mode, 5-7
J
job
accounting, 5-14
CentreWare IS job accounting, 5-14
log file, 5-14
records, 5-14
usage profile reports, 5-15
job completion notification, 1-2
jobs
secure, personal, proof, and saved print
jobs, 1-15
L
language
setting on the control panel, 5-9
LaserWriter
creating an Appsocket printer
Macintosh, 4-22
creating an LPR printer
Macintosh, 4-21
letterhead
cover pages, 1-8
Load Paper Timeout mode, 5-8
low toner warning message, 5-10
LPR printer
creating
Mac OS X, version 10.3 and higher,
4-24
creating with LaserWriter 8.5.1
Macintosh, 4-21
M
Macintosh networking
creating a Bonjour printer
Mac OS X, version 10.2 and higher,
4-24
creating a desktop printer
PhaserPort software, 4-22
creating an AppleTalk printer
Mac OS X, version 10.2 and higher,
4-24
creating an AppSocket printer
LaserWriter 8.6, 4-22
creating an LPR printer
LaserWriter 8.5.1, 4-21
Mac OS X, version 10.3 and higher,
4-24
enabling and using EtherTalk
Mac OS 9.x, 4-20
enabling and using TCP/IP
Mac OS 9.x, 4-21
enabling and using TCP/IP or AppleTalk
Mac OS X version 10.2 and higher,
4-23
PhaserPort software, 4-22
quick CD-ROM install steps, 4-20
requirements, 4-20
setting up the Ethernet port
AppleTalk, 4-23
TCP/IP, 4-21, 4-23
troubleshooting
Mac OS 9.x, 4-25
Mac OS X, version 10.2 and higher,
4-26
MaiLinX alerts, 5-16
manage networked printers remotely
using CentreWare Web, 4-3
Material Safety Data Sheet, C-1
Phaser® 6300/6350 Color Laser Printer
Index-3
Page 95

Index
messages
low toner warning, 5-10
mirror images, 1-2, 1-13
multiple-page printing on a single sheet of
paper, 1-4
N
negative images, 1-2, 1-13
Net-SNMP License, E-2
network path
obtaining printer’s URL
Windows 2000, Windows XP,
Windows Server 2003, 4-7
networking
Macintosh requirements, 4-20
Windows 2000, Windows XP,
Windows Server 2003, 4-4
Windows 98 SE, Windows Me, 4-16
Windows NT 4.x, 4-11
Novell Distributed/Enterprise Print Services
(NDPS/NEPS), 4-27
Novell networking
Distributed/Enterprise Print Services
(NDPS/NEPS), 4-27
N-Up
printing multiple pages on a single sheet
of paper, 1-4
O
obtaining the printer’s network path
Windows 2000, Windows XP,
Windows Server 2003, 4-7
operating systems
printer driver features, 1-2
supported features, 1-2
Original SSLeay License, E-1
P
paper
inserting blank sheets between print jobs,
1-7
selecting a different paper source for
cover sheets, 1-8
separation pages, 1-7
size and type
Tray 1 (MPT) behavior setting, 5-3
PCL fonts, 2-3
performance specifications, A-2
personal print jobs, 1-2, 1-15
deleting, 1-17
printing, 1-17
specifying, 1-16
PhaserPort software
changing an IP address
Windows 98 SE, Windows Me, 4-18
creating a desktop printer
Macintosh, 4-22
Macintosh system requirements, 4-22
Windows 98 SE, Windows Me, 4-17
physical specifications, A-1
PostScript fonts, 2-3
Power Saver
changing the timeout setting, 5-6
timeout setting, 5-6
Power Saver Timeout
changing with CentreWare IS, 5-6
preliminary steps
Windows 98 SE, Windows Me, 4-16
previous
Tray 1 (MPT) behavior setting, 5-3
printer
adding
Windows, 4-6
Windows NT 4.x, 4-12
adding a printer port
Windows 98 SE, Windows Me, 4-17
analyzing usage, 5-14
configuring
Windows, 4-6
Windows NT 4.x, 4-13
configuring a printer port
Windows 98 SE, Windows Me, 4-18
creating an IPP printer
Windows, 4-8
driver features, 1-2
features supported by operating systems,
1-2
fonts, A-2
Load Paper Timeout mode, 5-8
management software, 4-2
Phaser® 6300/6350 Color Laser Printer
Index-4
Page 96

Index
obtaining network path
Windows 2000, Windows XP,
Windows Server 2003, 4-7
physical specifications, A-1
security, 5-12
selecting printing security settings, 5-13
setting date and time, 5-9
verifying settings
Windows 2000, Windows XP,
Windows Server 2003, 4-9
printer driver
features, 1-2
operating system features, 1-2
other installation methods
Windows 2000, Windows XP,
Windows Server 2003, 4-5
Windows 98 SE, Windows Me, 4-17
Windows NT 4.x, 4-12
printing a list of fonts, 2-5
quick CD-ROM installation
Windows 2000, Windows XP,
Windows Server 2003, 4-4
Windows 98 SE, Windows Me, 4-17
Windows NT 4.x, 4-11
verify installation
Windows 2000, Windows XP,
Windows Server 2003, 4-10
Windows NT 4.x, 4-14
printer driver features
listed by operating system, 1-2
printer management software, 4-2
CentreWare IS, 4-2
CentreWare Web, 4-3
printer settings, 5-2
copying from one printer to another
(CentreWare IS), 4-2
printer usage
job accounting, 5-14
printing
black and white, 1-3
booklets, 1-5
cover pages, 1-8
font samples, 2-4
mirror images, 1-13
multiple pages per sheet, 1-4
negative images, 1-13
N-Up, 1-4
personal print jobs, 1-17
proof print jobs, 1-17
saved print jobs, 1-17
secure print jobs, 1-17
secure, personal, proof and saved jobs,
1-15
selecting cover page printing options, 1-8
separation pages, 1-7
shades of gray, 1-3
specialty media, 3-3, 3-4
Startup page
using CentreWare IS, 5-3
test page
Windows 2000, Windows XP,
Windows Server 2003, 4-7, 4-10
Windows NT 4.x, 4-13
watermarks, 1-11
printing a test page
Windows NT 4.x, 4-15
proof print jobs, 1-2, 1-15
deleting, 1-17
printing, 1-17
specifying, 1-16
R
recycling and disposal
product, D-1
reduce images, 1-10
regulatory information
Canada, B-1
Europe, B-2
United States, B-1
reports
usage profile, 5-15
resident fonts
viewing, 2-3
Phaser® 6300/6350 Color Laser Printer
Index-5
Page 97

Index
S
saved print jobs, 1-2, 1-15
deleting, 1-17
printing, 1-17
specifying, 1-16
saving energy
Power Saver Timeout, 5-6
scaling, 1-10
secure print jobs, 1-2, 1-15
deleting, 1-17
printing, 1-17
specifying, 1-16
Secure Socket Layer (SSL) settings, 5-13
security
locking the control panel menus, 5-13
selecting printer settings, 5-12
selecting printing security settings, 5-13
selecting the Secure Socket Layer (SSL),
5-13
selecting
administrative security settings, 5-12
duration for tray prompts, 5-4, 5-5
printing security settings, 5-13
separation pages, 1-2
printing, 1-7
setting
control panel language, 5-9
date and time, 5-9
duration for tray prompts, 5-4, 5-5
setting up usage profile reports, 5-15
slipsheet
using a separation page, 1-7
smoothing images, 1-14
software
PhaserPort
Windows 98 SE, Windows Me, 4-17
printer management, 4-2
specialty media
determining which tray to use, 3-2
printing from Tray 1 (MPT), 3-3
printing from Trays 2-5, 3-4
specifications, A-1
Startup page
factory default setting, 5-2
setting automatic printing option, 5-2
supplies
setting supply life message options, 5-10
setting timing for the low toner warning
message, 5-10
supply life messages
setting options, 5-10
T
TCP/IP
enabling and using
Mac OS 9.x, 4-21
Mac OS X, version 10.2 and higher,
4-23
setting up the Macintosh Ethernet port,
4-23
TCP/IP Protocol
Microsoft Windows, 4-5
text
printing across one or more pages
(watermarks), 1-11
time
setting, 5-9
Timeouts
Load Paper Timeout, 5-8
Power Saver Timeout, 5-6
Tray 1 (MPT) Prompt Timeout, 5-4
Tray 2 - 5 Prompt Timeout, 5-5
Tray 1 (MPT)
behavior settings, 5-3
printing specialty media, 3-3
selecting behavior, 5-3
setting the duration for prompts, 5-4
Trays 2-5
printing specialty media, 3-4
troubleshooting
Mac OS 9.x, 4-25
Macintosh networking, 4-25
Mac OS X, version 10.2 and higher,
4-26
print-quality problems using CentreWare
IS, 4-2
using CentreWare Web, 4-3
Windows 2000, Windows XP, Windows
Server 2003, 4-9
Windows NT 4.x, 4-14
two-sided printing
booklets, 1-5
Phaser® 6300/6350 Color Laser Printer
Index-6
Page 98

Index
U
Unix networking
additional resources, 4-29
quick install, 4-28
Usage Analysis Tool, 5-17
usage profile reports, 5-15
setting up, 5-15
using the printer
analyzing printer usage, 5-14
W
Warmup mode
Power Saver Timeout, 5-6
watermarks, 1-2
inserting, 1-11
Windows networking
adding a printer port
Windows 98 SE, Windows Me, 4-17
adding the printer
Windows NT 4.x, 4-12
changing a PhaserPort IP address
Windows 98 SE, Windows Me, 4-18
configuring a port
Windows 98 SE, Windows Me, 4-18
configuring the printer
Windows NT 4.x, 4-13
creating an IPP printer
Windows 2000, Windows XP,
Windows Server 2003, 4-8
Microsoft IPP Port, 4-7
Microsoft TCP/IP protocol, 4-5
Windows NT 4.x, 4-12
obtaining the printer’s network path
Windows 2000, Windows XP,
Windows Server 2003, 4-7
other driver installation methods
Windows 98 SE, Windows 2000,
Windows XP, Windows
Server 2003, 4-5
Windows 98 SE, Windows Me, 4-17
Windows NT 4.x, 4-12
PhaserPort software
Windows 98 SE, Windows Me, 4-17
preliminary steps
Windows 2000, Windows XP,
Windows Server 2003, 4-4
Windows 98 SE, Windows Me, 4-16
Windows NT 4.x, 4-11
printing a test page
Windows 2000, Windows XP,
Windows Server 2003, 4-10
Windows 2000, Windows XP,
Windows Server 2003, 4-7
Windows NT 4.x, 4-13, 4-15
quick CD-ROM installation
Windows 98 SE, Windows Me, 4-17
Windows NT 4.x, 4-11
troubleshooting
Windows 2000, Windows XP,
Windows Server 2003, 4-9
Windows NT 4.x, 4-14
verifying driver installation
Windows 2000, Windows XP,
Windows Server 2003, 4-10
Windows NT 4.x, 4-14
verifying settings
Windows 2000, Windows XP,
Windows Server 2003, 4-9
X
Xerox Usage Analysis Tool, 5-17
Phaser® 6300/6350 Color Laser Printer
Index-7
 Loading...