

QUICK GUIDE
for Windows Vista
CONTENTS
Chapter 1:
Chapter 2:
Chapter 3:
SYSTEM REQUIREMENTS
INSTALLING PRINTER SOFTWARE IN WINDOWS
Installing Software for Local Printing ................................................................................. 2
Installing Software for Network Printing ............................................................................. 5
CANNING USING THE
S
.........................................................................................................................1
WIA D
RIVER
.......................................................................................8
..........................................................2
See the User Guide for detailed infomation and instructions not covered in
this guide.
Click here to access the User Guide.
1 System Requirements
Before you begin, ensure that your system meets the following
requirements:
Windows
Item Vista Home Basic
CPU
Memory
Hard
Disk
Graphics
Card
Optical
Disk
Drive
Others
N
OTE
right can install the software.
1 GHz 32-bit (x86) or
64-bit (x64)
processor
512 MB of system
memory
20 GB hard drive
with at least 15 GB of
available space
Support for DirectX 9
graphics and 32 MB
of graphics memory
DVD-ROM drive DVD-ROM drive
Audio Output Audio Output
Internet access
(fees may apply)
:
For Windows Vista, users who have an administrator
Vista Home Premium/
Business/Ultimate
1 GHz 32-bit (x86) or
64-bit (x64) processor
1 GB of system memory
40 GB hard drive with at
least 15 GB of available
space
Support for DirectX 9
graphics with:WDDM Driver
128 MB of graphics memory
(minimum) Pixel Shader
2.0 in hardware 32 bits per
pixel
Internet access
(fees may apply)
• XEROX
®
in the United States and/or other countries.
• Adobe Reader
of Adobe Systems Incorporated in the United States and/or
other cuntries.
• Microsoft
Corporation in the United States and/or other countries.
and Phaser® are trademarks of Xerox Corporation
®
, Acrobat®, and PostScript® are trademarks
®
, Vista™,Windows® are trademarks of Microsoft
1
2 Installing Printer
Software in Windows
Installing Printer Software
You can install the printer software for local printing or network
printing. To install the printer software on the computer,
perform the appropriate installation procedure depending on
the printer in use.
A printer driver is software that lets your computer
communicate with your printer. The procedure to install drivers
may differ depending on the operating system you are using.
All applications should be closed on your PC before beginning
installation.
Installing Software for Local Printing
A local printer is a printer directly attached to your computer
using the printer cable supplied with your printer, such as a USB
or parallel cable. If your printer is attached to a network, skip
this step and go to “Installing Software for Network Printing” on
page 5.
You can install the printer software using the typical or custom
Method.
NOTE
: If the “New Hardware Wizard” window appears during
the installation procedure, click in the upper right corner of
the box to close the window, or click
Cancel
Typical Installation
This is recommended for most users. All components necessary
for printer operations will be installed.
1
Make sure that the printer is connected to your computer
and powered on.
2
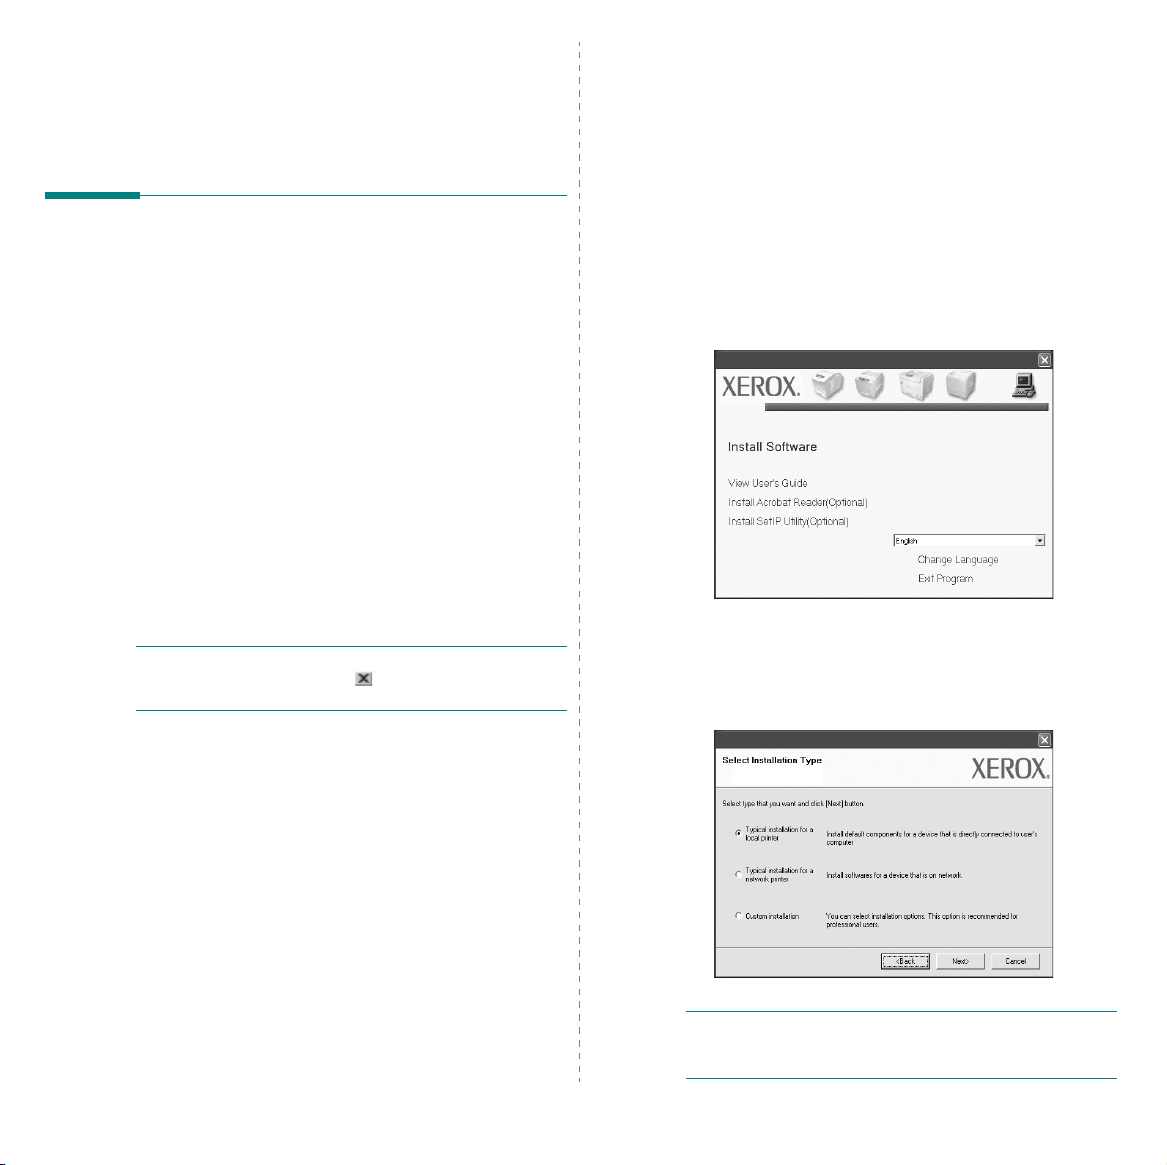
Insert the supplied CD-ROM into your CD-ROM drive.
The CD-ROM should automatically run, and an installation
window appears.
If you use Windows Vista, click
Accessories → Run
If the
AutoPlay
Run Setup.exe
Continue
click
3
Click
Next
.
• If necessary, select a language from the drop-down list.
4
Select
.
Typical installation for a local printer
Next
.
, and type
window appears in Windows Vista, click
in
Install or run program
in the
User Account Control
Start → All programs →
X:\Setup.exe
.
field, and
window.
. Click
NOTE
“
Typical installation for a local printer
on the screen.
2
Installing Printer Software in Windows
: If your product does not have the network feature
” will not appear

NOTE
: If your printer is not already connected to the
computer, the following window will appear.
Custom Installation
You can choose individual components to install.
1
Make sure that the printer is connected to your computer
and powered on.
2
Insert the supplied CD-ROM into your CD-ROM drive.
The CD-ROM should automatically run, and an installation
window appears.
If you use Windows Vista, click
Accessories → Run
AutoPlay
If the
Run Setup.exe
Continue
in the
, and type
window appears in Windows Vista, click
in
Install or run program
User Account Control
Start → All programs →
X:\Setup.exe
.
field, and click
window.
• After connecting the printer, click
• If you don’t want to connect the printer at this time, click
Next
, and No on the following screen. Then the installation
will start and a test page will not be printed at the end of the
installation.
• The installation window that appears in this User
Guide may differ depending on the printer and
interface in use.
5
After the installation is finished, a window asking you to
print a test page appears. If you choose to print a test
page, select the check box and click
Otherwise, just click
6
If the test page prints out correctly, click
If not, click
7
To register yourself as a user of Xerox Printers in order to
receive information from Xerox, select the check box and
click
Otherwise, just click
No
Finish
. You are now sent to the Xerox web site.
Next
to reprint it.
Finish
Next
.
Next
.
and skip to step 7.
Yes
.
.
3
Click
Next
.
• If necessary, select a language from the drop-down list.
View User Guide
•
your computer doesn’t have Adobe Reader, click on this
option and it will automatically install Adobe Reader for
you.
4
Select
Custom installation
: Allows you to view the User Guide. If
. Click
Next
.
3
Installing Printer Software in Windows

5
The list of printers available on the local appears. Select
the printer you want to install from the list, and then click
Next
.
6
Select your printer and click
NOTE
: If your printer is not already connected to the
computer, the following window will appear.
Next
.
7
Select the components to install and click
NOTE
: You can change the desired installation folder by
clicking [
8
9
10
Browse
].
After the installation is finished, a window asking you to
print a test page appears. If you choose to print a test
page, select the check box and click
Next
Otherwise, just click
If the test page prints out correctly, click
If not, click No to reprint it.
Click
Finish
.
and skip to step 10.
Next
Next
.
Yes
.
.
Next
• After connecting the printer, click
• If you don’t want to connect the printer at this time, click
Next
, and No on the following screen. Then the installation
will start and a test page will not be printed at the end of the
installation.
• The installation window that appears in this User
Guide may differ depending on the printer and
interface in use.
.
Installing Printer Software in Windows
4

Installing Software for Network
Printing
When you connect your printer to a network, you must first
configure the TCP/IP settings for the printer. After you have
assigned and verified the TCP/IP settings, you are ready to
install the software on each computer on the network.
You can install the printer software using the typical or custom
method.
Typical Installation
This is recommended for most users. All components necessary
for printer operations will be installed.
1
Make sure that the printer is connected to your network
and powered on. For details about connecting to the
network, see the supplied printer’s User Guide.
2
Insert the supplied CD-ROM into your CD-ROM drive.
The CD-ROM should automatically run, and an installation
window appears.
If you use Windows Vista, click
Accessories → Run
AutoPlay
If the
Run Setup.exe
Continue
click
, and type
window appears in Windows Vista, click
in
Install or run program
in the
User Account Control
Start → All programs →
X:\Setup.exe
.
field, and
window.
4
Select
Typical installation for a network printer
Next
.
5
The list of printers available on the network appears.
Select the printer you want to install from the list, and
then click
Next
.
. Click
3
Click
Next
.
• If necessary, select a language from the drop-down list.
View User Guide
•
your computer doesn’t have Adobe Reader, click on this
option and it will automatically install Adobe Reader for
you.
: Allows you to view the User Guide. If
Installing Printer Software in Windows
Update
• If you do not see your printer on the list, click
refresh the list, or select
printer to the network. To add the printer to the
network, enter the port name and the IP address for the
printer.
To verify your printer’s IP address or the MAC address,
print a Configuration page.
NOTE
: If you cannot find your machine on the network,
please turn off the firewall and click
6
After the installation is finished, a window appears asking
you to print a test page. If you so desire, select the
corresponding check box and click
Otherwise, just click
Add TCP/IP Port
Finish
.
Update
Finish
to add your
.
.
to
5

Custom Installation
You can choose individual components to install and set a
specific IP address.
1
Make sure that the printer is connected to your network
and powered on. For details about connecting to the
network, see the supplied printer’s User Guide.
2
Insert the supplied CD-ROM into your CD-ROM drive.
The CD-ROM should automatically run, and an installation
window appears.
If you use Windows Vista, click
Accessories → Run
AutoPlay
If the
Run Setup.exe
Continue
click
, and type
window appears in Windows Vista, click
in
Install or run program
in the
User Account Control
Start → All programs →
X:\Setup.exe
.
field, and
window.
5
The list of printers available on the network appears. Select
the printer you want to install from the list, and then click
Next
.
3
Click
Next
.
• If necessary, select a language from the drop-down list.
View User Guide
•
your computer doesn’t have Adobe Reader, click on this
option and it will automatically install Adobe Reader for
you.
4
Select
Custom installation
: Allows you to view the User Guide. If
. Click
Next
.
• If you do not see your printer on the list, click
refresh the list, or select
printer to the network. To add the printer to the network,
enter the port name and the IP address for the printer.
To verify your printer’s IP address or the MAC address,
print a Network Configuration page.
NOTE
: If you cannot find your machine on the network, please
turn off the firewall and click
TIP
: To set a specific IP address on a specific network printer,
click the
appears. Do as follows:
a. Select a printer to set with a specific IP address from the list.
b. Configure an IP address, subnet mask, and gateway for the
c. Click
Set IP Address
printer manually and click
address for the network printer.
Next
.
Add TCP/IP Port
Update
.
button. The Set IP Address window
Configure
to set the specific IP
Update
to add your
to
6
Installing Printer Software in Windows

6
Select the components to install. After selecting the
components, the following window appears. You can also
change the printer name, set the printer to share on the
network, set the printer as the default printer, and change
the port name of each printer. Click
Next
.
To install this software on a server, select the
this printer on a server
7
After the installation is finished, a window appears asking
you to print a test page. If you so desire, select the
corresponding check box and click
Otherwise, just click
Finish
checkbox.
Finish
.
Setting up
.
7
Installing Printer Software in Windows

3 Scanning Using the WIA
Driver
Your machine also supports the Windows Image Acquisition
(WIA) driver for scanning images. WIA is one of the standard
components provided by Microsoft Windows Vista and
works with digital cameras and scanners. Unlike the TWAIN
driver, the WIA driver allows you to scan and easily manipulate
images without using additional software.
Your device may not have this feature
N
OTE
: The WIA driver works on Windows Vista with a USB
port.
1
Load the document(s) face up into the DADF (or ADF).
OR
Place a single document face down on the scanner glass
and close the scanner lid.
2
Click
Start
->
->
Scanners and Cameras
3
Click on
Fax and Scan
N
OTE
: To view scanners, user can click on
and cameras
4
Click
New Scan
5
Choose your scanning preferences, and click
see how your preferences affect the picture.
6
Click
Scan
N
OTE
: If you want to cancel the scan job, press the
button on the Scanner and Camera Wizard.
Control Panel
.
Scan a document or picture
application is opened automatically.
.
, and the scan driver is opened
.
.
->
Hardware and Sound
. Then
Windows
View scanners
Preview
.
Cancel
to
8
Scanning Using the WIA Driver
 Loading...