

Page 1

Xerox® Phaser® 6020
Color Printer
Imprimante couleur
User Guide
Guide d'utilisation
Italiano Guida per l’utente
Deutsch Benutzerhandbuch
Español Guía del usuario
Português Guia do usuário
Nederlands Gebruikershandleiding
Svenska Användarhandbok
Dansk Betjeningsvejledning
Suomi Käyttöopas
Norsk Brukerhåndbok
Русский Руководство пользователя
Čeština Uživatelská příručka
Polski Przewodnik użytkownika
Magyar
Felhasználói útmutató
Türkçe
Kullanıcı Kılavuzu
Ελληνικά Εγχειρίδιο χρήστη
Page 2

© 2015 Xerox Corporation. All rights reserved. Unpublished rights reserved under the copyright laws of the United States. Contents of
this publication may not be reproduced in any form without permission of Xerox Corporation.
Copyright protection claimed includes all forms of matters of copyrightable materials and information now allowed by statutory or
judicial law or hereinafter granted, including without limitation, material generated from the software programs which are displayed on
the screen such as styles, templates, icons, screen displays, looks, and so on.
®
Xerox
and Xerox and Design®, Phaser®, PhaserSMART®, PhaserMatch®, PhaserCal®, PhaserMeter™, CentreWare®, PagePack®, eClick®,
PrintingScout
Secure Access Unified ID System
®
, Walk-Up®, WorkCentre®, FreeFlow®, SMARTsend®, Scan to PC Desktop®, MeterAssistant®, SuppliesAssistant®, Xerox
®
, Xerox Extensible Interface Platform®, ColorQube®, Global Print Driver®, and Mobile Express Driver®
are trademarks of Xerox Corporation in the United States and/or other countries.
®
Reader®, Adobe® Type Manager®, ATM™, Flash®, Macromedia®, Photoshop®, and PostScript® are trademarks of
Adobe
Adobe Systems Incorporated in the United States and/or other countries.
Apple, Bonjour, EtherTalk, TrueType, iPad, iPhone, iPod, iPod touch, Mac and Mac OS are trademarks of Apple Inc., registered in the U.S.
and other countries. AirPrint and the AirPrint logo are trademarks of Apple Inc.
®
, HP-UX®, and PCL® are trademarks of Hewlett-Packard Corporation in the United States and/or other countries.
HP-GL
®
IBM
and AIX® are trademarks of International Business Machines Corporation in the United States and/or other countries.
Microsoft
®
, Windows Vista®, Windows®, and Windows Server® are trademarks of Microsoft Corporation in the United States and other
countries.
®
Novell
, NetWare®, NDPS®, NDS®, IPX™, and Novell Distributed Print Services™ are trademarks of Novell, Inc. in the United States and
other countries.
®
SGI
and IRIX® are trademarks of Silicon Graphics International Corp. or its subsidiaries in the United States and/or other countries.
Sun, Sun Microsystems, and Solaris are trademarks or registered trademarks of Oracle and/or its affiliates in the United States and
other countries.
®
McAfee
, ePolicy Orchestrator®, and McAfee ePO™ are trademarks or registered trademarks of McAfee, Inc. in the United States and
other countries.
®
UNIX
is a trademark in the United States and other countries, licensed exclusively through X/ Open Company Limited.
®
PANTONE
and other Pantone, Inc. trademarks are the property of Pantone, Inc.
Document version 1.1: February 2015
BR9749_en-us
Page 3

Contents
1 Safety 9
Notices and Safety ........................................................................................................................................................... 10
Electrical Safety ................................................................................................................................................................. 11
General Guidelines ................................................................................................................................................... 11
Power Cord .................................................................................................................................................................. 12
Emergency Turn Off ................................................................................................................................................ 12
Operational Safety ........................................................................................................................................................... 13
Operational Guidelines ........................................................................................................................................... 13
Ozone Release ............................................................................................................................................................ 13
Printer Location ......................................................................................................................................................... 14
Printer Supplies .......................................................................................................................................................... 14
Maintenance Safety ........................................................................................................................................................ 15
Printer Symbols .................................................................................................................................................................. 16
Environmental, Health, and Safety Contact Information ............................................................................... 17
2 Features 19
Parts of the Printer ........................................................................................................................................................... 20
Front View .................................................................................................................................................................... 20
Rear View ..................................................................................................................................................................... 20
Control Panel .............................................................................................................................................................. 21
Information Pages ........................................................................................................................................................... 22
Printing the Printer Information Pages from the Control Panel ........................................................... 22
Printing the Printer Information Pages from Your Computer ............................................................... 22
Power Saver Mode ............................................................................................................................................................ 23
Changing Power Saver Mode Settings Using Windows ........................................................................... 23
Exiting Power Saver Mode ....................................................................................................................................
Administrative Features ................................................................................................................................................. 24
Finding the IP Address of Your Printer ............................................................................................................ 24
CentreWare Internet Services ............................................................................................................................. 24
More Information ............................................................................................................................................................. 25
23
3 Installation and Setup 27
Installation and Setup Overview ................................................................................................................................ 28
Selecting a Location for the Printer .......................................................................................................................... 29
Connecting the Printer.................................................................................................................................................... 30
Selecting a Connection Method ......................................................................................................................... 30
Connecting to a Computer Using USB ............................................................................................................ 31
Connecting to a Wireless Network .................................................................................................................... 31
Connecting to Wi-Fi Direct ................................................................................................................................... 33
Installing the Software ................................................................................................................................................... 34
®
Xerox
User Guide
Phaser® 6020 Printer 3
Page 4

Contents
Operating System Requirements ....................................................................................................................... 34
Installing the Print Drivers for a Windows Network Printer .................................................................... 35
Installing the Print Drivers for a Windows USB Printer ............................................................................ 35
Installing the Drivers and Utilities for Macintosh OS X Version 10.5 and Later ............................ 36
Configuring Network Settings ..................................................................................................................................... 38
About TCP/IP and IP Addresses ......................................................................................................................... 38
Assigning the IP Address of the Printer ........................................................................................................... 38
Configuring General Settings Using CentreWare Internet Services ........................................................... 40
Viewing Printer Information ................................................................................................................................ 40
Configuring Printer Defaults ................................................................................................................................ 40
Resetting the Printer ................................................................................................................................................ 41
Configuring Security Settings Using CentreWare Internet Services ........................................................... 42
Opening the Security Menu .................................................................................................................................. 42
Configuring Administrative Security Settings .............................................................................................. 42
Configuring the Host Access List ........................................................................................................................ 43
Managing Certificates ............................................................................................................................................ 45
Configuring AirPrint ......................................................................................................................................................... 47
Installing the Printer as a Web Services Device ................................................................................................... 48
4 Paper and Media 49
Supported Paper ............................................................................................................................................................... 50
Ordering Paper ........................................................................................................................................................... 50
General Paper Loading Guidelines .................................................................................................................... 50
Paper That Can Damage Your Printer ............................................................................................................. 51
Paper Storage Guidelines ...................................................................................................................................... 51
Supported Paper Types and Weights ............................................................................................................... 52
Supported Standard Paper Sizes ........................................................................................................................
52
Supported Custom Paper Sizes ........................................................................................................................... 52
Loading Paper .................................................................................................................................................................... 53
Printing on Special Paper ............................................................................................................................................... 56
Envelopes ..................................................................................................................................................................... 56
Printing Labels ............................................................................................................................................................ 59
Printing on Glossy Cardstock ............................................................................................................................... 59
5 Printing 61
Printing Overview .............................................................................................................................................................. 62
Selecting Printing Options ............................................................................................................................................. 63
Windows Printing Options .................................................................................................................................... 63
Macintosh Printing Options .................................................................................................................................. 65
Printing from Mobile Devices ...................................................................................................................................... 66
Printing with Wi-Fi Direct ...................................................................................................................................... 66
Printing with AirPrint ............................................................................................................................................... 66
Printing with Xerox
Using Custom Paper Sizes ............................................................................................................................................. 68
Defining Custom Paper Sizes ............................................................................................................................... 68
®
PrintBack ........................................................................................................................... 67
4 Xerox
User Guide
®
Phaser® 6020 Printer
Page 5

Contents
Printing on Custom Paper Sizes .......................................................................................................................... 69
Printing on Both Sides of the Paper .......................................................................................................................... 71
Setting Up 2-Sided Printing .................................................................................................................................. 71
Loading Paper for Manual 2-Sided Printing .................................................................................................. 72
6 Maintenance 73
Cleaning the Printer ......................................................................................................................................................... 74
General Precautions ................................................................................................................................................. 74
Cleaning the Exterior ............................................................................................................................................... 75
Cleaning the Interior ............................................................................................................................................... 75
Ordering Supplies .............................................................................................................................................................. 80
Consumables .............................................................................................................................................................. 80
When to Order Supplies ......................................................................................................................................... 80
Recycling Supplies .................................................................................................................................................... 80
Toner Cartridges ................................................................................................................................................................ 81
General Precautions ................................................................................................................................................. 81
Replacing a Toner Cartridge ................................................................................................................................ 81
Refreshing the Toner ............................................................................................................................................... 82
Cleaning the Developer .......................................................................................................................................... 82
Adjustments and Maintenance Procedures .......................................................................................................... 83
Color Registration ..................................................................................................................................................... 83
Adjusting the Paper Type ...................................................................................................................................... 83
Adjusting the Bias Transfer Roller ..................................................................................................................... 84
Adjusting the Fuser .................................................................................................................................................. 84
Refreshing the Bias Transfer Roller ................................................................................................................... 84
Adjusting the Altitude............................................................................................................................................. 84
Checking Page Counts .................................................................................................................................................... 85
Moving the Printer ............................................................................................................................................................ 86
7 Troubleshooting 89
General Troubleshooting ............................................................................................................................................... 90
Printer Does Not Turn On ...................................................................................................................................... 90
Printer Resets or Turns Off Frequently ............................................................................................................. 90
Printer Does Not Print ............................................................................................................................................. 91
Printing Takes Too Long ........................................................................................................................................ 92
Printer is Making Unusual Noises ...................................................................................................................... 92
Condensation has Formed Inside the Printer ............................................................................................... 92
Paper Jams .......................................................................................................................................................................... 93
Minimizing Paper Jams .......................................................................................................................................... 93
Locating Paper Jams ............................................................................................................................................... 95
Clearing Paper Jams ................................................................................................................................................ 96
Troubleshooting Paper Jams ............................................................................................................................... 99
Print-Quality Problems .................................................................................................................................................. 101
Controlling Print Quality ...................................................................................................................................... 101
Solving Print-Quality Problems .......................................................................................................................... 102
Xerox
User Guide
®
Phaser® 6020 Printer 5
Page 6

Contents
Getting Help ...................................................................................................................................................................... 107
Printer Error Indicators ......................................................................................................................................... 107
PrintingScout Alerts ............................................................................................................................................... 108
Online Support Assistant ..................................................................................................................................... 108
A Specifications 109
Standard Features .......................................................................................................................................................... 110
Physical Specifications.................................................................................................................................................. 111
Dimensions and Weight ...................................................................................................................................... 111
Total Space Requirements .................................................................................................................................. 111
Clearance Requirements ...................................................................................................................................... 111
Environmental Specifications .................................................................................................................................... 112
Temperature ............................................................................................................................................................. 112
Relative Humidity ................................................................................................................................................... 112
Elevation ..................................................................................................................................................................... 112
Electrical Specifications ................................................................................................................................................ 113
Power Supply Voltage and Frequency ........................................................................................................... 113
Power Consumption .............................................................................................................................................. 113
ENERGY STAR Qualified Product ..................................................................................................................... 113
Performance Specifications ........................................................................................................................................ 114
Controller Specifications .............................................................................................................................................. 115
Processor ..................................................................................................................................................................... 115
Memory ....................................................................................................................................................................... 115
Interfaces ................................................................................................................................................................... 115
B Regulatory Information 117
Basic Regulations ............................................................................................................................................................ 118
United States FCC Regulations ......................................................................................................................... 118
Canada ........................................................................................................................................................................ 118
European Union ...................................................................................................................................................... 119
European Union Lot 4 Imaging Equipment Agreement Environmental Information .............. 119
Germany ..................................................................................................................................................................... 121
Turkey RoHS Regulation ...................................................................................................................................... 121
Regulatory Information for 2.4 GHz Wireless Network Adapter ........................................................ 122
Material Safety Data Sheets...................................................................................................................................... 123
C Recycling and Disposal 125
All Countries ...................................................................................................................................................................... 126
North America .................................................................................................................................................................. 127
European Union ............................................................................................................................................................... 128
Domestic/Household Environment ................................................................................................................. 128
Professional/Business Environment ................................................................................................................ 128
Collection and Disposal of Equipment and Batteries .............................................................................. 129
Battery Symbol Note ............................................................................................................................................. 129
Battery Removal ...................................................................................................................................................... 129
6 Xerox
User Guide
®
Phaser® 6020 Printer
Page 7

Other Countries................................................................................................................................................................ 130
Contents
Xerox
®
Phaser® 6020 Printer 7
User Guide
Page 8

Page 9

1
Safety
This chapter includes:
• Notices and Safety .............................................................................................................................................................. 10
• Electrical Safety .................................................................................................................................................................... 11
• Operational Safety .............................................................................................................................................................. 13
• Maintenance Safety ........................................................................................................................................................... 15
• Printer Symbols ..................................................................................................................................................................... 16
• Environmental, Health, and Safety Contact Information .................................................................................. 17
Your printer and the recommended supplies have been designed and tested to meet strict safety
requirements. Attention to the following information ensures the continued safe operation of your Xerox
printer.
Xerox
User Guide
®
Phaser® 6020 Printer 9
Page 10

Safety
Notices and Safety
Please read the following instructions carefully before operating your printer. Refer to these instructions
to ensure the continued safe operation of your printer.
®
Your Xerox
include safety agency evaluation and certification, and compliance with electromagnetic regulations
and established environmental standards.
The safety and environment testing and performance of this product have been verified using Xerox
materials only.
Note: Unauthorized alterations, which can include the addition of new functions or connection of
external devices, can affect the product certification. Please contact your Xerox representative for
more information.
printer and supplies are designed and tested to meet strict safety requirements. These
®
10 Xerox
User Guide
®
Phaser® 6020 Printer
Page 11

Safety
• Emergency Turn Off ............................................................................................................................................................ 12
Electrical Safety
This section includes:
• General Guidelines .............................................................................................................................................................. 11
• Power Cord .............................................................................................................................................................................. 12
General Guidelines
WARNINGS:
• Do not push objects into slots or openings on the printer. Touching a voltage point or shorting
out a part could result in fire or electric shock.
• Do not remove the covers or guards that are fastened with screws unless you are installing
optional equipment and are instructed to do so. Turn off the printer when performing these
installations. Disconnect the power cord when removing covers and guards for installing optional
equipment. Except for user-installable options, there are no parts that you can maintain or
service behind these covers.
The following are hazards to your safety:
• The power cord is damaged or frayed.
• Liquid is spilled into the printer.
• The printer is exposed to water.
• The printer emits smoke, or the surface is unusually hot.
• The printer emits unusual noise or odors.
• The printer causes a circuit breaker, fuse, or other safety device to activate.
If any of these conditions occur, do the following:
1. Turn off the printer immediately.
2. Disconnect the power cord from the electrical outlet.
3. Call an authorized service representative.
Xerox
User Guide
®
Phaser® 6020 Printer 11
Page 12

Safety
Power Cord
Use the power cord supplied with your printer.
• Plug the power cord directly into a properly grounded electrical outlet. Ensure that each end of the
cord is connected securely. If you do not know if an outlet is grounded, ask an electrician to check
the outlet.
WARNING: To avoid risk of fire or electrical shock, do not use extension cords, power strips, or power
plugs for more than 90 days. When a permanent outlet receptacle cannot be installed, use only one
factory-assembled extension cord of the appropriate gauge per printer or multifunction printer.
Always adhere to national and local building, fire, and electrical codes regarding length of cord,
conductor size, grounding, and protection.
• Do not use a ground adapter plug to connect the printer to an electrical outlet that does not have a
ground connection terminal.
• Verify that the printer is plugged into an outlet that is providing the correct voltage and power.
Review the electrical specification of the printer with an electrician if necessary.
• Do not place the printer in an area where people can step on the power cord.
• Do not place objects on the power cord.
• Do not plug or unplug the power cord while the power switch is in the On position.
• If the power cord becomes frayed or worn, replace it.
• To avoid electrical shock and damage to the cord, grasp the plug when unplugging the power cord.
The power cord is attached to the printer as a plug-in device on the back of the printer. If it is necessary
to disconnect all electrical power from the printer, disconnect the power cord from the electrical outlet.
Emergency Turn Off
If any of the following conditions occur, turn off the printer immediately and disconnect the power cord
from the electrical outlet. Contact an authorized Xerox service representative to correct the problem if:
• The equipment emits unusual odors or makes unusual noises.
• The power cable is damaged or frayed.
• A wall panel circuit breaker, fuse, or other safety device has been tripped.
• Liquid is spilled into the printer.
• The printer is exposed to water.
• Any part of the printer is damaged.
12 Xerox
User Guide
®
Phaser® 6020 Printer
Page 13

Safety
Operational Safety
Your printer and supplies were designed and tested to meet strict safety requirements. These include
safety agency examination, approval, and compliance with established environmental standards.
Your attention to the following safety guidelines helps to ensure the continued, safe operation of your
printer.
Operational Guidelines
• Do not remove any trays while the printer is printing.
• Do not open the doors when the printer is printing.
• Do not move the printer while is printing.
• Keep hands, hair, neckties, and so on away from the exit and feed rollers.
• Covers, which require tools for removal, protect the hazard areas within the printer. Do not remove
the protective covers.
• Do not override any electrical or mechanical interlock devices.
• Do not attempt to remove paper that is jammed deeply inside the product. Switch off the product
promptly and contact your local Xerox representative.
WARNING: The metallic surfaces in the fuser area are hot. Always use caution when removing paper
jams from this area and avoid touching any metallic surfaces.
Ozone Release
This printer produces ozone during normal operation. The amount of ozone produced is dependent on
copy volume. Ozone is heavier than air and is not produced in amounts large enough to harm anyone.
Install the printer in a well-ventilated room.
For more information in the United States and Canada, go to www.xerox.com/environment. In other
markets, please contact your local Xerox representative or go to www.xerox.com/environment_europe.
Xerox
User Guide
®
Phaser® 6020 Printer 13
Page 14

Safety
Printer Location
• Place the printer on a level, solid, non-vibrating surface with adequate strength to hold its weight.
To find the weight for your printer configuration, see Physical Specifications on page 111.
• Do not block or cover the slots or openings on the printer. These openings are provided for
ventilation and to prevent overheating of the printer.
• Place the printer in an area where there is adequate space for operation and servicing.
• Place the printer in a dust-free area.
• Do not store or operate the printer in an extremely hot, cold, or humid environment.
• Do not place the printer near a heat source.
• Do not place the printer in direct sunlight to avoid exposure to light-sensitive components.
• Do not place the printer where it is directly exposed to the cold air flow from an air conditioning
system.
• Do not place the printer in locations susceptible to vibrations.
• For optimum performance, use the printer at the elevations specified in Elevation on page 112.
Printer Supplies
• Use the supplies designed for your printer. The use of unsuitable materials can cause poor
performance and a possible safety hazard.
• Follow all warnings and instructions marked on, or supplied with, the product, options, and supplies.
• Store all consumables in accordance with the instructions given on the package or container.
• Keep all consumables away from the reach of children.
• Never throw toner, print/drum cartridges, or toner containers into an open flame.
• When handling cartridges, for example toner and such, avoid skin or eye contact. Eye contact can
cause irritation and inflammation. Do not attempt to disassemble the cartridge, which can increase
the risk of skin or eye contact.
CAUTION: Use of non-Xerox supplies is not recommended. The Xerox Warranty, Service Agreement,
and Total Satisfaction Guarantee do not cover damage, malfunction, or degradation of performance
caused by use of non-Xerox supplies, or the use of Xerox supplies not specified for this printer. The
Total Satisfaction Guarantee is available in the United States and Canada. Coverage could vary
outside these areas. Please contact your Xerox representative for details.
14 Xerox
User Guide
®
Phaser® 6020 Printer
Page 15

Safety
Maintenance Safety
• Do not attempt any maintenance procedure that is not specifically described in the documentation
supplied with your printer.
• Clean with a dry lint-free cloth only.
®
• Do not burn any consumables or routine maintenance items. For information on Xerox
recycling programs, go to www.xerox.com/gwa.
WARNING:
Do not use aerosol cleaners. Aerosol cleaners can cause explosions or fires when used on
electromechanical equipment.
supplies
Xerox
User Guide
®
Phaser® 6020 Printer 15
Page 16
Safety
Printer Symbols
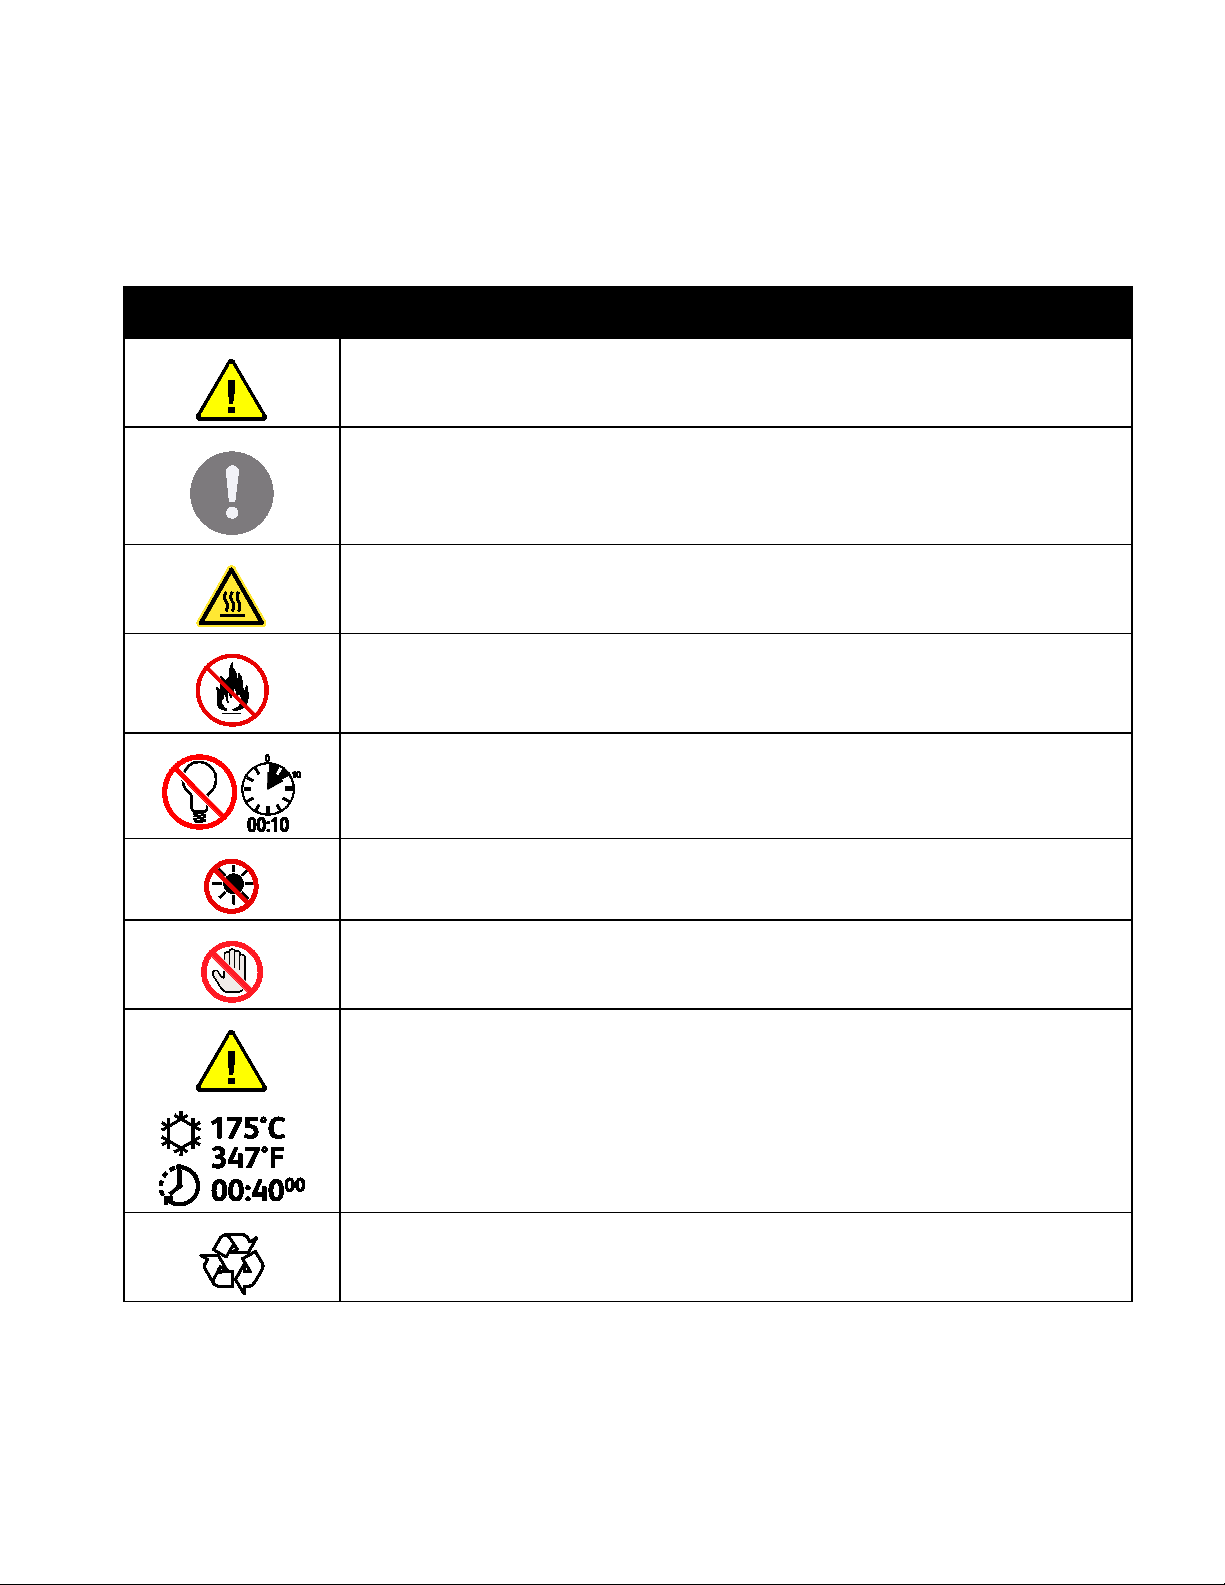
Symbol Description
Warning:
Indicates a hazard which, if not avoided, could result in death or serious injury.
Caution:
Indicates a mandatory action to take in order to avoid damage to the property.
Hot surface on or in the printer. Use caution to avoid personal injury.
Do not burn the item.
Do not expose the imaging unit to light for more than 10 minutes.
Do not expose the imaging unit to direct sunlight.
Do not touch the part or area of the printer.
Warning:
Wait for the printer to cool for the specified time before touching the fuser.
This item can be recycled. For details, see Recycling and Disposal on page 125.
16 Xerox
User Guide
®
Phaser® 6020 Printer
Page 17

Safety
Europe:
+44 1707 353 434
Environmental, Health, and Safety Contact
Information
For more information on Environment, Health, and Safety in relation to this Xerox product and supplies,
contact the following customer help lines:
United States and Canada: 1-800-ASK-XEROX (1-800-275-9376)
For product safety information in the United States and Canada, go to www.xerox.com/environment.
For product safety information in Europe, go to www.xerox.com/environment_europe.
Xerox
User Guide
®
Phaser® 6020 Printer 17
Page 18

Page 19

• More Information ................................................................................................................................................................ 25
2
Features
This chapter includes:
• Parts of the Printer............................................................................................................................................................... 20
• Information Pages .............................................................................................................................................................. 22
• Power Saver Mode ............................................................................................................................................................... 23
• Administrative Features .................................................................................................................................................... 24
®
Xerox
User Guide
Phaser® 6020 Printer 19
Page 20
Features
• Control Panel.......................................................................................................................................................................... 21
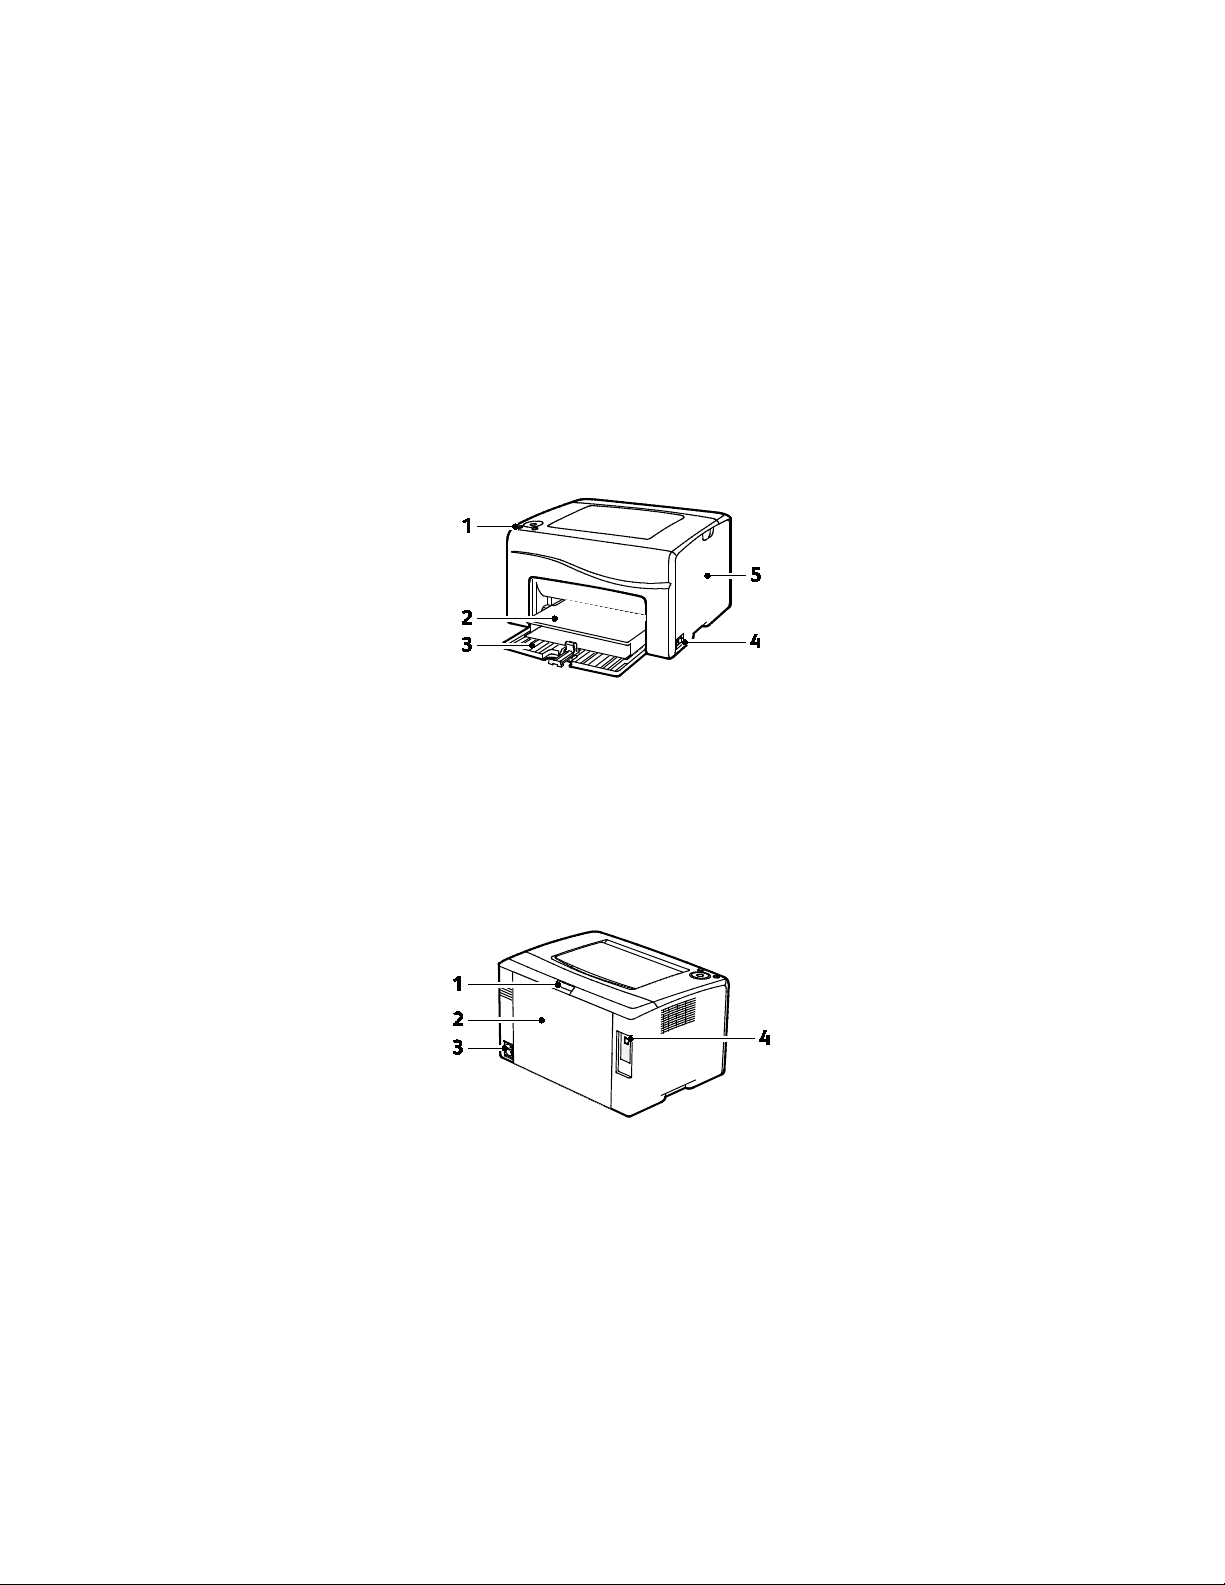
Parts of the Printer
This section includes:
• Front View ............................................................................................................................................................................... 20
• Rear View ................................................................................................................................................................................. 20
Front View
1. Control Panel
2. Dust Cover
3. Paper Tray
4. Power Switch
5. Side Door
Rear View
1. Rear Door Release Button
2. Rear Door
3. Power Connector
4. USB Port
20 Xerox
®
Phaser® 6020 Printer
User Guide
Page 21
Control Panel
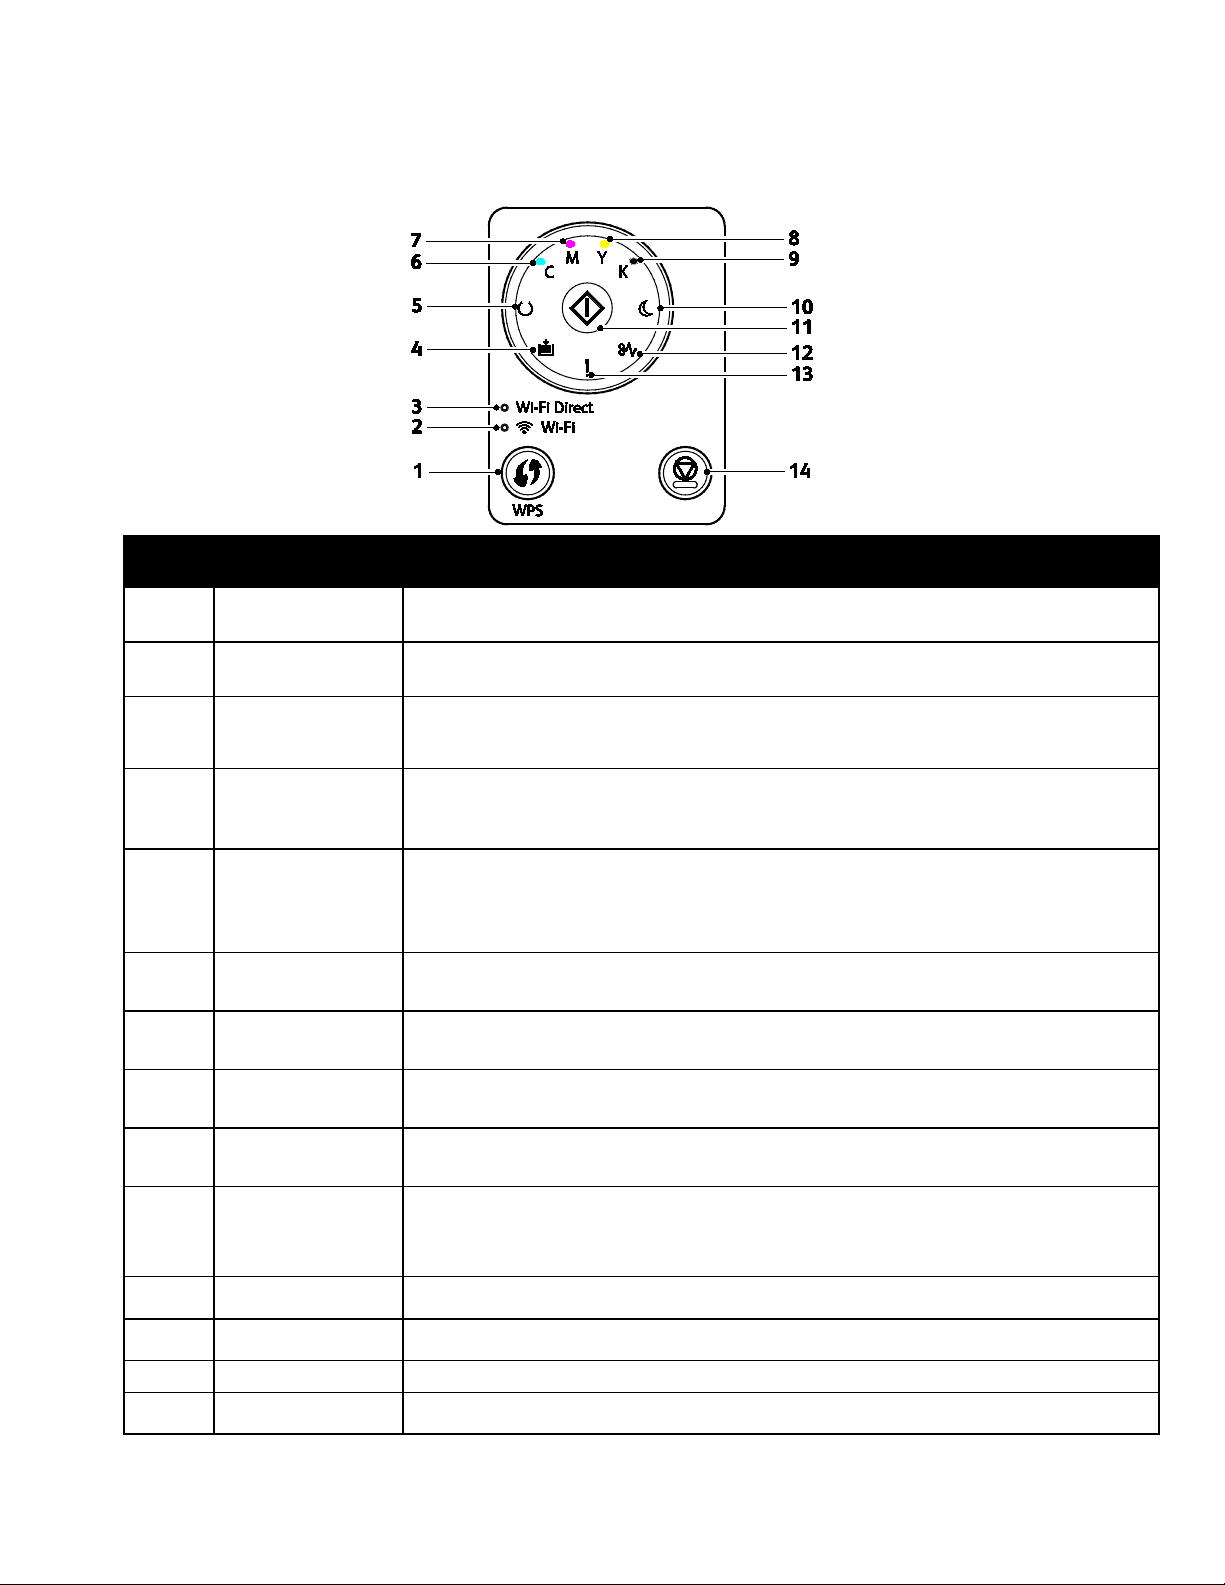
Features
Item Name Description
1
2
3
4
5
6
7
8
9
10
WPS Button To establish a wireless connection, first, press the button on the printer, then press the
button on your wireless router.
Wi-Fi Light This light indicates that a wireless connection is established between the printer and the
wireless router.
Wi-Fi Direct® Light This light flashes to indicate that there is a connection between the printer and a
wireless device, such as a smart phone or tablet.
Load Paper Light This light flashes if there is a jam in the paper tray, the printer is out of paper, or there is
a paper size mismatch.
If the light is on but not flashing, see Troubleshooting on page 89.
Ready/Data Light The light appears green when the printer is ready to receive data, and blinks when the
printer is busy receiving data.
If the Ready/Data and the Power Saver lights are both flashing, the printer is canceling a
print job.
Cyan Toner Light This light indicates that the Cyan toner is low.
Flashing indicates that the toner is empty or non-Xerox
Magenta Toner
Light
This light indicates that the Magenta toner is low.
Flashing indicates that the toner is empty or non-Xerox
Yellow Toner Light This light indicates that the Yellow toner is low.
Flashing indicates that the toner is empty or non-Xerox
Black Toner Light This light indicates that the Black toner is low.
Flashing indicates that the toner is empty or non-Xerox
Power Saver Light This light indicates that the printer is in Low Power or Sleep mode.
If the Ready/Data and the Power Saver lights are both flashing, the printer is canceling a
print job.
®
toner is installed.
®
toner is installed.
®
toner is installed.
®
toner is installed.
11
12
OK
Jam Light This light indicates that there is a paper jam in the printer.
To resume the print job, press OK.
13 Error Light This light indicates an error condition or warning that requires your attention.
14
Xerox
Cancel Button To end printing jobs, press this button.
®
Phaser® 6020 Printer 21
User Guide
Page 22

Features
Information Pages
Your printer has a printable set of information pages. These pages include configuration, panel settings,
error history, and more.
Printing the Printer Information Pages from the Control Panel
To print the information pages, at the control panel, press and hold the OK button for approximately
four seconds until the printer activates.
Printing the Printer Information Pages from Your Computer
You can use the Xerox® Office Printing utility included on your installation CD to print the following:
• Configuration Page
• Panel Settings
• Job History
• Error History
• Demonstration Page
To print information pages:
Note: The following procedure is for Windows 7.
1. Click Start > All Programs > Xerox Office Printing > Phaser 6020 > Printer Settings Utility.
2. Click the Printer Settings Report tab.
3. Click Information Pages.
4. Select the page that you want to print.
22 Xerox
User Guide
®
Phaser® 6020 Printer
Page 23

Features
Power Saver Mode
You can set the time the printer spends idle in ready mode before the printer transitions to a lower
power level.
There are two levels of Power Saver mode.
• Mode 1 (Low Power): The printer shifts from Ready mode to Low Power mode to reduce standby
power consumption.
• Mode 2 (Sleep): The printer shifts from Low Power mode to Sleep mode for a greater reduction in
power consumption.
Changing Power Saver Mode Settings Using Windows
To change the Power Saver mode settings:
1. Launch the Printer Setting Utility, then select the Printer Maintenance tab.
2. For Mode 1 and Mode 2, select the number of minutes.
Exiting Power Saver Mode
The printer exits Power Saver mode automatically when it receives data from a connected device.
To exit Power Saver mode manually, on the control panel, press the Power Saver button.
Xerox
User Guide
®
Phaser® 6020 Printer 23
Page 24

Features
Administrative Features
Finding the IP Address of Your Printer
You can view the IP address of your printer on the Configuration Page.
CentreWare Internet Services
CentreWare Internet Services is the administration and configuration software installed on the
embedded Web server in the printer. It allows you to configure and administer the printer from a Web
browser.
CentreWare Internet Services requires:
• A TCP/IP connection between the printer and the network in Windows, Macintosh, UNIX, or Linux
environments.
• TCP/IP and HTTP enabled on the printer.
• A network-connected computer with a Web browser.
Accessing CentreWare Internet Services
At your computer, open a Web browser, in the address field, type the IP address of the printer, then press
Enter or Return.
Logging In to CentreWare Internet Services
When Administrator Mode is enabled, the Jobs, Address Book, Properties, and Support tabs are locked
until you enter the administrator user name and password.
To log in to CentreWare Internet Services as the administrator:
1. At your computer, open a Web browser, in the address field, type the IP address of the printer, then
press Enter or Return.
Note: If you do not know the IP address of your printer, see Finding the IP Address of Your Printer on
page 24.
2. Click the Jobs, Address Book, Properties, or Support tab.
3. Type the administrator user name.
4. Type your password, then click Login.
24 Xerox
®
Phaser® 6020 Printer
User Guide
Page 25

More Information
You can obtain more information about your printer from these sources:
Resource Location
Features
Installation Guide
Quick Use Guide
Other documentation for your printer www.xerox.com/office/6020docs
Technical support information for your printer;
including online technical support, Online Support
Assistant, and driver downloads.
Information Pages Print from the control panel, or from CentreWare
CentreWare Internet Services documentation
Order supplies for your printer www.xerox.com/office/6020supplies
A resource for tools and information, including
interactive tutorials, printing templates, helpful tips,
and customized features to meet your individual
needs.
Local sales and support center www.xerox.com/office/worldcontacts
Printer registration www.xerox.com/office/register
Xerox® Direct online store www.direct.xerox.com/
Packaged with the printer.
Packaged with the printer.
www.xerox.com/office/6020support
Internet Services, click Status > Information Pages.
In CentreWare Internet Services, click Help.
www.xerox.com/office/businessresourcecenter
Xerox
User Guide
®
Phaser® 6020 Printer 25
Page 26

Page 27

• Installing the Printer as a Web Services Device ...................................................................................................... 48
Online Support Assistant at www.xerox.com/office/6020support
3
Installation and Setup
This chapter includes:
• Installation and Setup Overview ................................................................................................................................... 28
• Selecting a Location for the Printer .............................................................................................................................. 29
• Connecting the Printer ....................................................................................................................................................... 30
• Installing the Software ...................................................................................................................................................... 34
• Configuring Network Settings ........................................................................................................................................ 38
• Configuring General Settings Using CentreWare Internet Services .............................................................. 40
• Configuring Security Settings Using CentreWare Internet Services .............................................................. 42
• Configuring AirPrint ............................................................................................................................................................ 47
See also:
Installation Guide packaged with your printer.
®
Xerox
User Guide
Phaser® 6020 Printer 27
Page 28

Installation and Setup
Installing the Software on page 34
Installation and Setup Overview
Before printing, your computer and the printer must be plugged in, turned on, and connected. Configure
the initial settings of the printer, then install the print driver software and utilities on your computer.
You can connect to your printer directly from your computer using a USB cable or a wireless network
connection.
Note: If the Software and Documentation disc is not available, you can download the latest drivers
from www.xerox.com/office/6020drivers.
See also:
Selecting a Location for the Printer on page 29
Choosing a Connection Method on page 30
Connecting the Printer on page 30
Configuring Network Settings on page 38
28 Xerox
User Guide
®
Phaser® 6020 Printer
Page 29

Installation and Setup
Clearance Requirements on page 111
Selecting a Location for the Printer
1. Select a dust-free area with temperatures from 10–32°C (50–90°F), and relative humidity 15–85%.
Note: Sudden temperature fluctuations can affect print quality. Rapid heating of a cold room can
cause condensation inside the printer, directly interfering with image transfer.
2. Place the printer on a level, solid, non-vibrating surface with adequate strength for the weight of the
printer. The printer must be horizontal with all four feet in solid contact with the surface. To find the
weight for your printer configuration, see Physical Specifications on page 111.
After positioning the printer, you are ready to connect it to the power source and computer or network.
See also:
Total Space Requirements on page 111
Xerox
User Guide
®
Phaser® 6020 Printer 29
Page 30

Installation and Setup
• Connecting to Wi-Fi Direct ............................................................................................................................................... 33
Connecting the Printer
This section includes:
• Selecting a Connection Method .................................................................................................................................... 30
• Connecting to a Computer Using USB ....................................................................................................................... 31
• Connecting to a Wireless Network................................................................................................................................ 31
Selecting a Connection Method
You can connect to your printer directly from your computer using a USB cable or Wi-Fi Direct, or over a
wireless network using WPS. A USB connection is a direct connection and is the easiest to set up. A
wireless connection is used for networking. If you are using a network connection, it is important to
understand how your computer is connected to the network. For details, see About TCP/IP and IP
Addresses on page 38.
Note: Hardware and cabling requirements vary for the different connection methods. Routers, network
hubs, network switches, and modems are not included with your printer and must be purchased
separately.
• Wireless Network: If your computer includes a wireless router or wireless access point, you can
connect the printer to the network with a wireless connection. A wireless network connection
provides the same access and services as a wired connection provides. A wireless network
connection is typically faster than USB and allows direct access to the setting of the printer using
CentreWare Internet Services.
• USB: If you connect the printer to one computer and do not have a network, you can use a USB
connection.
Note: A USB connection does not provide access to CentreWare Internet Services.
• Wi-Fi Direct: You can connect to the printer with a Wi-Fi mobile device using Wi-Fi Direct. Xerox
recommends that only one user at a time accesses the printer using Wi-Fi Direct.
30 Xerox
User Guide
®
Phaser® 6020 Printer
Page 31

Installation and Setup
Connecting to a Computer Using USB
To use USB, you must have Windows XP SP1 and later, Windows Server 2003 and later, or Macintosh OS
X version 10.5 and later.
Note: A USB cable is provided with your printer.
To connect the printer to the computer using a USB cable:
1. Ensure that the printer is turned off.
2. Connect the B end of a standard A/B USB 2.0 cable to the USB Port on the printer.
3. Attach the power cord to the printer, plug the cord into an electrical outlet, then turn on the printer.
4. Connect the A end of the USB cable to the USB port on the computer.
5. If the Windows Found New Hardware Wizard appears, cancel it.
6. Insert the Software and Documentation disc into the appropriate drive on your computer.
If the installer does not start automatically, navigate to the drive, and double-click the Setup.exe
installer file.
7. Click Setup Printer and Install Software.
8. At the License Agreement, select I Agree, then click Next.
9. Click USB.
10. To connect your printer and install the print driver and software, select Personal Installation, then
click Next.
Connecting to a Wireless Network
To connect to a wireless network, use the installer disk included with your printer.
Notes:
• You can connect using the 3-click connection method one time on the first installation attempt
only.
• WPA2 Enterprise networks are not supported.
• The 3-click connection method is supported for Windows 7 and later only.
Connecting with 3-Click Connection
1. Insert the Software and Documentation disc into the appropriate drive on your computer.
If the installer does not start automatically, navigate to the drive, and double-click the Setup.exe
installer file.
2. Click Setup Printer and Install Software.
3. At the License Agreement, select I Agree, then click Next.
4. On the Select a Connection Method screen, click Wireless. If a wireless connection is established, the
Xerox Printer Found screen appears.
5. To connect to the wireless network, click Next, or click Connect to a different wireless network.
6. To complete the installation, click Finish.
Note: If a connection is not established, select Search for Networks or WPS. For details, see Searching
for Networks on page 32 or Connecting Using WPS on page 32.
Xerox
User Guide
®
Phaser® 6020 Printer 31
Page 32

Installation and Setup
Connecting Using Wi-Fi Protected Setup (WPS)
1. Insert the Software and Documentation disc into the appropriate drive on your computer.
If the installer does not start automatically, navigate to the drive, and double-click the Setup.exe
installer file.
2. Click Setup Printer and Install Software.
3. At the License Agreement, select I Agree, then click Next.
4. On the Select a Connection Method screen, click Wireless.
5. Click WPS.
6. At the prompt, press and hold the WPS button on the printer for two seconds.
7. After you press the WPS button on the printer, within two minutes, press and hold the WPS button
on your wireless router for two seconds.
8. After you press both buttons, click Next.
9. In the printer list, select your printer.
Note: You can name your printer and choose to share it on the network or set it as your default
printer.
10. In the Software and Documentation window, clear the check box for any undesired options.
11. Click Next.
12. To complete the installation, click Finish.
Connecting Using Searching for Networks
1. Insert the Software and Documentation disc into the appropriate drive on your computer. If the
installer does not start automatically, navigate to the drive, and double-click the Setup.exe installer
file.
2. Click Setup Printer and Install Software.
3. At the License Agreement, select I Agree, then click Next.
4. On the Select a Connection Method screen, click Wireless.
5. On the Select a Wireless Setup Method screen, click Search for Networks.
6. Ensure that the USB cable is connected properly.
7. Select a network, then click Next.
8. Enter the passphrase for your wireless network, then click Next.
9. On the Configure Printer screen, click Next, or to configure IP settings manually, click Advanced.
10. At the prompt, remove the USB cable from the printer, then click Next.
11. In the printer list, select your printer.
Note: You can name your printer and choose to share it on the network or set it as your default
printer.
12. Select Install printer driver, then click Next.
13. In the Software and Documentation window, clear the check box for any undesired options.
14. Click Next.
15. To complete the installation, click Finish.
32 Xerox
User Guide
®
Phaser® 6020 Printer
Page 33

Installation and Setup
Connecting to Wi-Fi Direct
You can connect to your printer from a Wi-Fi mobile device, such as a tablet, computer, or smart phone,
using Wi-Fi Direct.
Note: Wi-Fi Direct is disabled by default.
Connecting with Wi-Fi Direct from Your Computer
Before you can use Wi-Fi Direct, ensure that the printer is connected to a computer using USB or a
wireless network. See Connecting the Printer on page 30.
To connect your printer with Wi-Fi Direct from your computer:
1. Launch the Printer Setting Utility, then select the Printer Maintenance tab.
2. Click Wireless Setup.
3. For Wi-Fi Direct Setup, click Enable.
4. Select your mobile device to connect.
5. On your mobile device, accept the invitation to connect.
Connecting with Wi-Fi Direct from Your Mobile Device
To connect with Wi-Fi Direct, follow the directions provided with your mobile device.
Xerox
User Guide
®
Phaser® 6020 Printer 33
Page 34

Installation and Setup
• Installing the Drivers and Utilities for Macintosh OS X Version 10.5 and Later ....................................... 36
Installing the Software
This section includes:
• Operating System Requirements .................................................................................................................................. 34
• Installing the Print Drivers for a Windows Network Printer ............................................................................... 35
• Installing the Print Drivers for a Windows USB Printer ........................................................................................ 35
Before installing driver software, verify that the printer is plugged in, turned on, connected correctly, and
has a valid IP address. The IP address usually appears in the upper right corner of the control panel. If
you cannot find the IP address, see Finding the IP Address of Your Printer on page 24.
If the Software and Documentation disc is not available, download the latest drivers from
www.xerox.com/office/6020drivers.
Operating System Requirements
• Windows XP SP1 and later, or Windows Server 2003 and later
• Macintosh OS X version 10.4 or later
34 Xerox
User Guide
®
Phaser® 6020 Printer
Page 35

Installation and Setup
Installing the Print Drivers for a Windows Network Printer
1. Insert the Software and Documentation disc into the appropriate drive on your computer. If the
installer does not start automatically, navigate to the drive, and double-click the Setup.exe installer
file.
2. Click Install Software.
3. At the License Agreement, select I Agree, then click Next.
4. Select Network Installation, then click Next.
5. From the list of discovered printers, select your printer, then click Next.
Notes:
• When installing drivers for a network printer, if you do not see your printer in the list, click the
IP Address or DNS Name button. In the IP Address or DNS Name field, type the IP address of
your printer, then click Search to locate your printer. If you do not know the IP address of the
printer, see Finding the IP Address of Your Printer on page 24.
• To enable continued use of the printer even if the IP Address assigned by the DHCP server
changes, you can use the installer or CentreWare Internet Services.
6. In the printer list, select your printer.
Note: You can name your printer and choose to share it on the network or set it as your default
printer.
7. Click Next.
8. In the Software and Documentation window, clear the check box for any undesired options.
9. Click Next.
10. To complete the installation, click Finish.
Installing the Print Drivers for a Windows USB Printer
1. Insert the Software and Documentation disc into the appropriate drive on your computer.
If the installer does not start automatically, navigate to the drive, and double-click the Setup.exe
installer file.
2. Click Install Software.
3. At the License Agreement, select I Agree, then click Next.
4. To install the printer support software, select Software, then click Next.
5. In the Software and Documentation window, clear the check box for any undesired options.
6. Click Next.
7. To complete the installation, click Finish.
Xerox
User Guide
®
Phaser® 6020 Printer 35
Page 36

Installation and Setup
• Adding the Printer ................................................................................................................................................................ 37
Installing the Drivers and Utilities for Macintosh OS X Version 10.5 and Later
This section includes:
• Installing the Print Driver .................................................................................................................................................. 36
To access all features of the printer, you must:
1. Install the print driver.
2. Add the printer.
Note: Before you install the print driver, verify that the printer is plugged in, turned on, and
connected to an active network or by USB.
Installing the Print Driver
1. Insert the Software and Documentation disc into the appropriate drive on your computer.
Note: If the Software and Documentation disc is not available, you can download the latest drivers
from www.xerox.com/office/6020drivers.
2. Double-click Phaser 6020 Installer.
3. At the Introduction installer window, click Continue.
4. At the License Agreement, select I Agree, then click Next.
5. Select the destination disk, then click Continue.
6. To change the location of the driver installation, click Change Install Location.
7. Click Install.
8. If prompted, enter your password, then click OK.
9. Click Continue Installation.
10. To complete the installation and restart your computer, when the print driver finishes installing, click
Restart.
36 Xerox
User Guide
®
Phaser® 6020 Printer
Page 37

Installation and Setup
Adding the Printer
For networking, set up your printer using Bonjour (Rendezvous), or connect using the IP address of your
printer for an LPD/LPR connection. For a non-network printer, create a desktop USB connection.
To add the printer using Bonjour:
1. From the computer Applications folder or from the dock, open System Preferences.
2. Click Print & Fax.
The list of printers appears on the left of the window.
3. Click the plus button (+) under the list of printers.
4. Click the Default icon at the top of the window.
5. Select your printer from the list and click Add.
Note: If your printer was not detected, verify that the printer is on and that the Ethernet or USB
cable is connected properly.
To add the printer by specifying the IP address:
1. From the computer Applications folder or from the dock, open System Preferences.
2. Click Print & Fax.
The list of printers appears on the left of the window.
3. Click the plus button (+) under the list of printers.
4. Click IP.
5. From the Protocol drop-down menu, select the protocol.
6. In the Address field, enter the IP address of the printer.
7. In the Name field, enter a name for the printer.
8. From the Print Using drop-down list, choose Select a driver to use.
9. Select the print driver for your printer model from the list.
10. Click Add.
See also:
Online Support Assistant at: www.xerox.com/office/6020support
Xerox
User Guide
®
Phaser® 6020 Printer 37
Page 38

Installation and Setup
• Assigning the IP Address of the Printer ...................................................................................................................... 38
Configuring Network Settings
This section includes:
• About TCP/IP and IP Addresses ..................................................................................................................................... 38
About TCP/IP and IP Addresses
Computers and printers use TCP/IP protocols to communicate over a network. Macintosh computers use
either TCP/IP or the Bonjour protocol to communicate with a network printer. For Macintosh OS X
systems, TCP/IP is preferred.
With TCP/IP protocols, each printer and computer must have a unique IP address. Many networks as well
as cable and DSL routers have a DHCP server A DHCP server assigns an IP address to every computer and
printer on the network that is configured to use DHCP, automatically.
If you are connected to the Internet using cable or DSL, check with your carrier for information on IP
addressing.
Assigning the IP Address of the Printer
By default, the printer receives an IP address from a DHCP server over a TCP/IP network. Network
addresses assigned by DHCP are temporary. Once the addresses expire, the network can assign a new
one.
To assign a static IP address for your printer, you can use the wireless connection method on the installer
disk. Once an IP address is assigned, you can change it using CentreWare Internet Services or the Printer
Setting Utility.
Notes:
• You can view the IP address of your printer on the Configuration Page.
• To enable continued use of the printer even if the IP Address assigned by the DHCP server
changes, you can use the installer or CentreWare Internet Services.
38 Xerox
User Guide
®
Phaser® 6020 Printer
Page 39

Installation and Setup
Changing the IP Address Using CentreWare Internet Services
To change the IP address of the printer using CentreWare Internet Services:
1. At your computer, open a Web browser, in the address field, type the IP address of the printer, then
press Enter or Return.
Note: If you do not know the IP address of your printer, see Finding the IP Address of Your Printer on
page 24.
2. Click the Properties link.
If the Protocols link is not expanded under Properties, scroll to the Protocols link and expand it.
3. Click TCP/IP.
4. In the IPv4 section of the page, make the desired changes. For example, to change the way the
printer acquires the IP address, in the Get IP Address field, select a method from the drop-down list.
5. After changing the address information, scroll to the bottom of the page and click Save Changes.
Changing the IP Address Using the Installer with USB
1. From your installer disk, click Setup Printer and Install Software.
2. At the License Agreement, select I Agree, then click Next.
3. On the Select a Connection Method screen, click Wireless.
4. On the Select a Wireless Setup Method screen, click Search for Networks.
5. Ensure that the USB cable is connected properly.
6. Select a network, then click Next.
7. Enter the passphrase for your wireless network, then click Next.
8. For the Configure Printer screen, click Advanced.
9. For the IP Address Settings screen, modify the settings as needed then, click Next.
10. At the prompt, remove the USB cable from the printer, then click Next.
11. In the printer list, select your printer.
12. In the Software and Documentation window, clear the check box for any undesired options.
13. Click Next.
14. To complete the installation, click Finish.
Xerox
User Guide
®
Phaser® 6020 Printer 39
Page 40

Installation and Setup
• Resetting the Printer ........................................................................................................................................................... 41
Configuring General Settings Using CentreWare
Internet Services
This section includes:
• Viewing Printer Information ........................................................................................................................................... 40
• Configuring Printer Defaults ........................................................................................................................................... 40
You can configure general printer settings from your computer using your Web browser and CentreWare
Internet Services.
Note: A USB connection does not provide access to CentreWare Internet Services.
Viewing Printer Information
1. At your computer, open a Web browser, in the address field, type the IP address of the printer, then
press Enter or Return.
2. In CentreWare Internet Services, click Properties.
3. To expand the menu, in the Properties pane, for the General folder, click the plus symbol (+).
4. Under Version Information, find the printer model number, serial number, and the firmware version
number for the operating systems.
5. Under Page Description Language, find the version numbers for each of the page description
languages installed on the printer.
Configuring Printer Defaults
The Printer Defaults page displays the printer model information and product code or serial number. It
also provides a place to enter the name and location of the printer and the name and email address of
the contact.
1. At your computer, open a Web browser, in the address field, type the IP address of the printer, then
press Enter or Return.
2. In CentreWare Internet Services, click Properties.
3. To expand the menu, in the Properties pane, for the General folder, click the plus symbol (+).
4. Click Printer Defaults.
5. In the fields, type descriptive information as needed.
6. Click Save Changes.
40 Xerox
User Guide
®
Phaser® 6020 Printer
Page 41

Installation and Setup
Resetting the Printer
Using Software Resets to restart the printer is faster and wastes fewer consumables than powering the
printer on and off. Restarting the printer can take up to five minutes during which time CentreWare
Internet Services is not available.
1. At your computer, open a Web browser, in the address field, type the IP address of the printer, then
press Enter or Return.
2. In CentreWare Internet Services, click Properties.
3. To expand the menu, in the Properties pane, for the General folder, click the plus symbol (+).
4. From the General menu, click Resets.
5. To reset the network memory and restart the printer, for Reset network memory and restart the
printer, click Start Printer.
6. To restart the printer without resetting any of the default settings, for Restart the printer, click Start
Printer.
Xerox
User Guide
®
Phaser® 6020 Printer 41
Page 42

Installation and Setup
• Managing Certificates ....................................................................................................................................................... 45
Configuring Security Settings Using
CentreWare Internet Services
This section includes:
• Opening the Security Menu ............................................................................................................................................. 42
• Configuring Administrative Security Settings .......................................................................................................... 42
• Configuring the Host Access List ................................................................................................................................... 43
Use security settings to configure administrative settings, authentication, user access and privileges, and
service access.
Note: For details, see the Help in CentreWare Internet Services.
Opening the Security Menu
1. At your computer, open a Web browser, in the address field, type the IP address of the printer, then
press Enter or Return.
2. In CentreWare Internet Services, click Properties.
3. In the Properties pane, to expand the menu, click the plus (+) symbol next to the Security folder.
Configuring Administrative Security Settings
1. At your computer, open a Web browser, in the address field, type the IP address of the printer, then
press Enter or Return.
2. In CentreWare Internet Services, click Properties.
3. In the Properties pane, to expand the menu, click the plus (+) symbol next to the Security folder.
4. Click Administrator Security Settings.
5. To turn on administrator privileges, select Enable Administrator Mode.
6. Enter the user name and password, then reenter the password.
7. To enter the default user name and password, leave the fields blank, then click OK.
8. For Access denial by the authentication failure of the Administrator, enter the number of login
attempts allowed before the user is locked out.
9. Click Save Changes.
42 Xerox
User Guide
®
Phaser® 6020 Printer
Page 43

Installation and Setup
1
192.168.200.10
255.255.255.255
Accept
2
192.168.200.0
255.255.255.0
Reject
3
192.168.0.0
255.255.0.0
Accept
Configuring the Host Access List
The host access list controls access to the printer over LPR or Port 9100. You can enter up to five IP
address/mask combinations, and then select to reject, accept, or turn off the filtering for each IP address.
You can enter a specific IP address and address mask, or you can enter a range of IP addresses and
address masks. If you leave IP address and Address Mask blank, anyone can access the printer.
You can choose to allow printing from one specific IP address only. The following table shows an
example.
Access List IP Address Address Mask Active Mode
1 192.168.200.10 255.255.255.255 Accept
You can reject one specific IP address but allow printing from any other address. The following table
shows an example.
Access List IP Address Address Mask Active Mode
1 192.168.200.10 255.255.255.255 Reject
2 0.0.0.0 0.0.0.0 Accept
The first row of the access list is the highest priority. When configuring a list with multiple rows, enter the
smallest range first. Make the first row the most specific and the last row the most general.
You can set up the host access list to accept or reject printing from a specific network or network mask.
You can also accept printing from one IP address within a rejected network mask. The following table
shows an example.
Access List IP Address Address Mask Active Mode
To configure the Host Access List:
1. At your computer, open a Web browser, in the address field, type the IP address of the printer, then
press Enter or Return.
2. In CentreWare Internet Services, click Properties.
3. In the Properties pane, to expand the menu, click the plus (+) symbol next to the Security folder.
4. Click Host Access List.
5. In the IP Address field, enter the IP address of the host as X.X. X.X, where X is a number from 0
through 255. For example, 192.168.200.10.
6. In the Address Mask field, enter the network mask for the host as X.X. X.X, where X is a number from
0 through 255. For example, 255.255.255.255.
Xerox
User Guide
®
Phaser® 6020 Printer 43
Page 44

Installation and Setup
7. For the action the host takes with the IP address, for Active mode, select an option.
− Off: You can use this setting to make a row of the access list inactive. Use this setting to enter a
specific IP address or range of addresses before you apply Accept or Reject mode.
− Accept: You can use this setting to allow the specified IP address or range of addresses access
to the printer.
− Reject: You can use this setting to deny the specified IP address or range of addresses access
to the printer.
8. Click Save Changes.
44 Xerox
User Guide
®
Phaser® 6020 Printer
Page 45

Installation and Setup
• Deleting a Digital Certificate .......................................................................................................................................... 46
Managing Certificates
This section includes:
• About Security Certificates .............................................................................................................................................. 45
• Enabling HTTPS Communication .................................................................................................................................. 46
About Security Certificates
A digital certificate is a file that contains data used to verify the identity of the client or server in a
network transaction. A certificate also contains a public key used to create and verify digital signatures.
One device proves its identity to another by presenting a certificate trusted by the other device. Or, the
device can present a certificate signed by a trusted third party and a digital signature proving its
ownership of the certificate.
A digital certificate includes the following data:
• Information about the owner of the certificate
• The certificate serial number and expiration date
• A public key
• A purpose defining how the certificate and public key can be used
This printer supports two types of certificates.
• Device Certificate: This certificate contains a private key and a stated purpose that allows the
printer to use it to prove identity.
• Trusted Certificate: A self-signed certificate is a certificate from a device that verifies its identity to
any devices that connect to it.
Note: This printer does not support Certificate Authority (CA) certificates.
To ensure that the printer can communicate with other devices over a secure trusted connection, both
devices must have specific certificates installed.
Xerox
User Guide
®
Phaser® 6020 Printer 45
Page 46

Installation and Setup
Enabling HTTPS Communication
1. At your computer, open a Web browser, in the address field, type the IP address of the printer, then
press Enter or Return.
2. Click Properties.
3. Select Security > SSL/TSL Communication.
4. To configure the printer to create a digitally signed certificate, click Create New Certificate.
5. To select the DKIM signature type, for Public Key Method, select RSA/SHA-256 or RSA/SHA-1.
6. To select the size of the key, for Public Key Size, select the number of bits.
7. For Issuer, type the name of the organization that issues the certificate.
8. To set the number of days that the certificate is effective, for Validity, enter a number.
9. Adjust the parameters of the new digital certificate as needed, then click Generate Certificate.
10. For the new settings to take effect, restart your printer.
Note: After you generate a signed certificate, Certificate Management appears in the Security
menu.
11. In the address bar, type the IP address of the printer, then press Enter or Return.
12. To display the SSL page, select Properties > Security > SSL/TSL Communication.
13. Ensure that Enabled SSL is selected.
Deleting a Digital Certificate
1. At your computer, open a Web browser, in the address field, type the IP address of the printer, then
press Enter or Return.
2. Click Properties.
3. In the navigation panel, click Security > SSL/TLS Server Communication, then click Delete All
Certificates.
4. To confirm, click Delete.
46 Xerox
User Guide
®
Phaser® 6020 Printer
Page 47

Installation and Setup
Configuring AirPrint
Use AirPrint to print directly from a wired or wireless device without using a print driver. AirPrint is a
software feature that allows for driverless printing from Apple iOS-based mobile devices and Mac
OS-based devices. AirPrint-enabled printers let you print directly from a Mac or from an iPhone, iPad, or
iPod touch.
Notes:
• Not all applications support AirPrint.
• Wireless devices must join the same wireless network as the printer.
• For AirPrint to function, both IPP and Bonjour (mDNS) protocols must be enabled.
• The device that submits the AirPrint job must be on the same subnet as the printer. To allow
devices to print from different subnets, configure your network to pass multicast DNS traffic
across subnets.
• The Mac OS device must be Mac OS 10.7 or later.
• AirPrint-enabled printers work with iPad (all models), iPhone (3GS or later), and iPod touch (3rd
generation or later), running the latest version of iOS.
1. At your computer, open a Web browser, in the address field, type the IP address of the printer, then
press Enter or Return.
Note: If you do not know the IP address of your printer, see Finding the IP Address of Your Printer
on page 24.
2. Click Properties.
3. If the Protocols link is not expanded under Properties, scroll to the Protocols link and expand it.
4. Under Protocols, click AirPrint.
5. To enable AirPrint, next to Enable AirPrint, click Turn On AirPrint.
Note: AirPrint is enabled by default when IPP and Bonjour (mDNS) are both enabled. When AirPrint
is enabled, Turn On AirPrint is not selectable. To disable AirPrint, disable either IPP or Bonjour
(mDNS) protocols.
− To change the printer name, in the Name field, enter a new name.
− To enter a location for the printer, in the Location field, enter the location of the printer.
− To enter a physical location or address for the printer, in the Geo-Location field, enter the
geographic latitude and longitude coordinates in decimal form. For example, use coordinates
like 45.325026, -122.766831 for a location.
6. Click Save Changes.
7. At the prompt, click Restart, or click Back to cancel.
If you click Restart, the printer takes several minutes to restart and apply the new settings.
Xerox
User Guide
®
Phaser® 6020 Printer 47
Page 48

Installation and Setup
Installing the Printer as a Web Services Device
Web Services on Devices (WSD) allow a client to discover and access a remote device and its associated
services across a network. WSD supports device discovery, control, and use.
To install a WSD printer using the Add Printer Wizard:
1. At your computer, access the Add Printer Wizard.
− For Windows Vista, click Start > Control Panel > Hardware and Sound > Printers.
− For Windows Server 2003 and later, click Start > Settings > Printers.
− For Windows 7, click Start > Devices and Printers.
− For Windows 8, click Control Panel > Devices and Printers.
2. To launch the Add Printer Wizard, click Add a Printer.
3. In the list of available devices, select the one you want to use, then click Next.
4. If the printer that you want does not appear in the list, click The printer that I want is not listed.
a. Select Add a printer using a TCP/IP address or hostname, then click Next.
b. For the Device type field, select Web Services Device.
c. Enter the printer IP address in the Hostname or IP address field, then click Next.
5. Complete the steps in the wizard, then click Finish.
48 Xerox
User Guide
®
Phaser® 6020 Printer
Page 49

• Printing on Special Paper .................................................................................................................................................. 56
4
Paper and Media
This chapter includes:
• Supported Paper ................................................................................................................................................................... 50
• Loading Paper ........................................................................................................................................................................ 53
®
Xerox
User Guide
Phaser® 6020 Printer 49
Page 50

Paper and Media
• Supported Custom Paper Sizes ...................................................................................................................................... 52
Supported Paper
This section includes:
• Ordering Paper ...................................................................................................................................................................... 50
• General Paper Loading Guidelines................................................................................................................................ 50
• Paper That Can Damage Your Printer ........................................................................................................................ 51
• Paper Storage Guidelines ................................................................................................................................................. 51
• Supported Paper Types and Weights .......................................................................................................................... 52
• Supported Standard Paper Sizes ................................................................................................................................... 52
Your printer is designed to use various paper and other media types. To ensure the best print quality and
to avoid jams, follow the guidelines in this section.
For best results, use Xerox paper and media recommended for your printer.
Ordering Paper
To order paper or other media, contact your local reseller or visit www.xerox.com/office/6020supplies.
General Paper Loading Guidelines
• Do not overfill the paper trays. Do not load paper above the maximum fill line in the tray.
• Adjust the paper guides to fit the paper size.
• Fan paper before loading it in the paper tray.
• If excessive jams occur, use paper or other approved media from a new package.
• Do not print on label media once a label has been removed from a sheet.
• Use only paper envelopes. Print envelopes 1-sided only.
50 Xerox
User Guide
®
Phaser® 6020 Printer
Page 51

Paper and Media
Paper That Can Damage Your Printer
Some paper and other media types can cause poor output quality, increased paper jams, or damage
your printer. Do not use the following:
• Rough or porous paper
• Inkjet paper
• Non-laser glossy or coated paper
• Paper that has been photocopied
• Paper that has been folded or wrinkled
• Paper with cutouts or perforations
• Stapled paper
• Envelopes with windows, metal clasps, side seams, or adhesives with release strips
• Padded envelopes
• Plastic media
CAUTION: The Xerox Warranty, Service Agreement, or Xerox Total Satisfaction Guarantee does not
cover damage caused by using unsupported paper or specialty media. The Xerox Total Satisfaction
Guarantee is available in the United States and Canada. Coverage could vary outside these areas.
Please contact your local representative for details.
Paper Storage Guidelines
Storing your paper and other media properly contributes to optimum print quality.
• Store paper in dark, cool, relatively dry locations. Most paper is susceptible to damage from
ultraviolet and visible light. Ultraviolet light, from the sun and fluorescent bulbs, is particularly
damaging to paper.
• Reduce the exposure of paper to strong lights for long periods of time.
• Maintain constant temperatures and relative humidity.
• Avoid storing paper in attics, kitchens, garages, or basements. These spaces are more likely to collect
moisture.
• Store paper flat, either on pallets, cartons, shelves, or in cabinets.
• Avoid food or drinks in the area where paper is stored or handled.
• Do not open sealed packages of paper until you are ready to load them into the printer. Leave
stored paper in the original packaging. The paper wrapper protects the paper from moisture loss or
gain.
• Some special media is packaged inside resealable plastic bags. Store the media inside the bag until
you are ready to use it. Keep unused media in the bag and reseal it for protection.
Xerox
User Guide
®
Phaser® 6020 Printer 51
Page 52
Paper and Media
x
x
Supported Paper Types and Weights
Paper Type Weight
Plain
Plain Reloaded
Letterhead
Hole Punched
Colored
Heavyweight 60–90 g/m²
Lightweight 60–80 g/m²
Note: The default setting is Heavyweight. For
details on how to change the paper type
setting, see Adjusting Paper Type on page 83.
Recycled 60–105 g/m²
Bond, Heavy Plain 91–105 g/m²
Lightweight Cardstock
106–163 g/m²
Lightweight Cardstock Reloaded
Lightweight Glossy Cardstock
Lightweight Glossy Cardstock Reloaded
Labels
Envelopes
Supported Standard Paper Sizes
European Standard Sizes North American Standard Sizes
A4 (210 x 297 mm, 8.3 x 11.7 in.)
B5 (176 x 250 mm, 6.9 x 9.8 in.)
A5 (148 x 210 mm, 5.8 x 8.3 in.)
C5 envelope (162 x 229 mm,
6.4 x 9 in.)
DL envelope (110 x 220 mm,
4.33
8.66 in.)
Legal (216 x 356 mm, 8.5 x 14 in.)
Folio (216 x 330 mm, 8.5 x 13 in.)
Letter (216 x 279 mm, 8.5 x 11 in.)
Executive (184 x 267 mm, 7.25 x 10.5 in.)
Monarch envelope (98 x 190 mm,
3.9 x 7.5 in.)
No. 10 envelope (241 x 105 mm,
9.5 in.)
4.1
Supported Custom Paper Sizes
You can use custom-sized paper within the following dimensions in your printer:
• Width: 76.2–215.9 mm (3–8.5 in.)
• Length: 127–355.6 mm (5–14 in.)
52 Xerox
User Guide
®
Phaser® 6020 Printer
Page 53

Loading Paper
The main tray holds up to 150 sheets of paper.
Notes:
• To avoid paper jams, do not remove the dust cover while printing is in progress.
• Use only laser print media.
1. Open the front door.
Paper and Media
2. Pull the slide bar forward until it stops.
3. Pull the length guide forward until it stops.
Xerox
User Guide
®
Phaser® 6020 Printer 53
Page 54

Paper and Media
4. Move the width guides to the edges of the tray.
5. Flex the sheets back and forth and fan them, then align the edges of the stack on a level surface.
This procedure separates any sheets that are stuck together and reduces the possibility of jams.
6. Load the paper into the tray with the top edge going into the printer and the print side up.
7. Adjust the width guides until they touch the edges of the paper.
54 Xerox
User Guide
®
Phaser® 6020 Printer
Page 55

Paper and Media
8. Push in the length guides and slide bar until they stop.
Note: Depending on the size of the paper, first push the slide bar toward the printer until it stops.
Pinch the length guide and slide it in until it touches the paper edge.
9. Place the dust cover on the main tray, then align the tabs with the marks.
10. If the paper that you loaded is not plain, set the correct paper type and size in your print driver. For
details, see Using Custom Paper Sizes on page 68.
Note: If you are printing on custom size paper, define the custom size in the printer properties before
printing.
Xerox
User Guide
®
Phaser® 6020 Printer 55
Page 56

Paper and Media
• Printing on Glossy Cardstock ........................................................................................................................................... 59
Printing on Special Paper
This section includes:
• Envelopes ................................................................................................................................................................................. 56
• Printing Labels ....................................................................................................................................................................... 59
To order paper or other media, contact your local reseller or visit www.xerox.com/office/6020supplies.
Envelopes
You can print envelopes using the main tray.
Guidelines for Printing Envelopes
• Print quality depends on the quality and construction of the envelopes. Try another envelope brand
if you do not get desired results.
• Maintain constant temperatures and relative humidity.
• Store unused envelopes in their packaging to avoid excess moisture and dryness which can affect
print quality and cause wrinkling. Excessive moisture can cause the envelopes to seal before or
during printing.
• Remove air bubbles from the envelopes before loading them into the tray by setting a heavy book
on top of them.
• In the print driver software, select Envelope as the paper type.
• Do not use padded envelopes. Use envelopes that lie flat on a surface.
• Do not use envelopes with heat activated glue.
• Do not use envelopes with press and seal flaps.
• Use only paper envelopes.
• Do not use envelopes with windows or metal clasps.
56 Xerox
User Guide
®
Phaser® 6020 Printer
Page 57
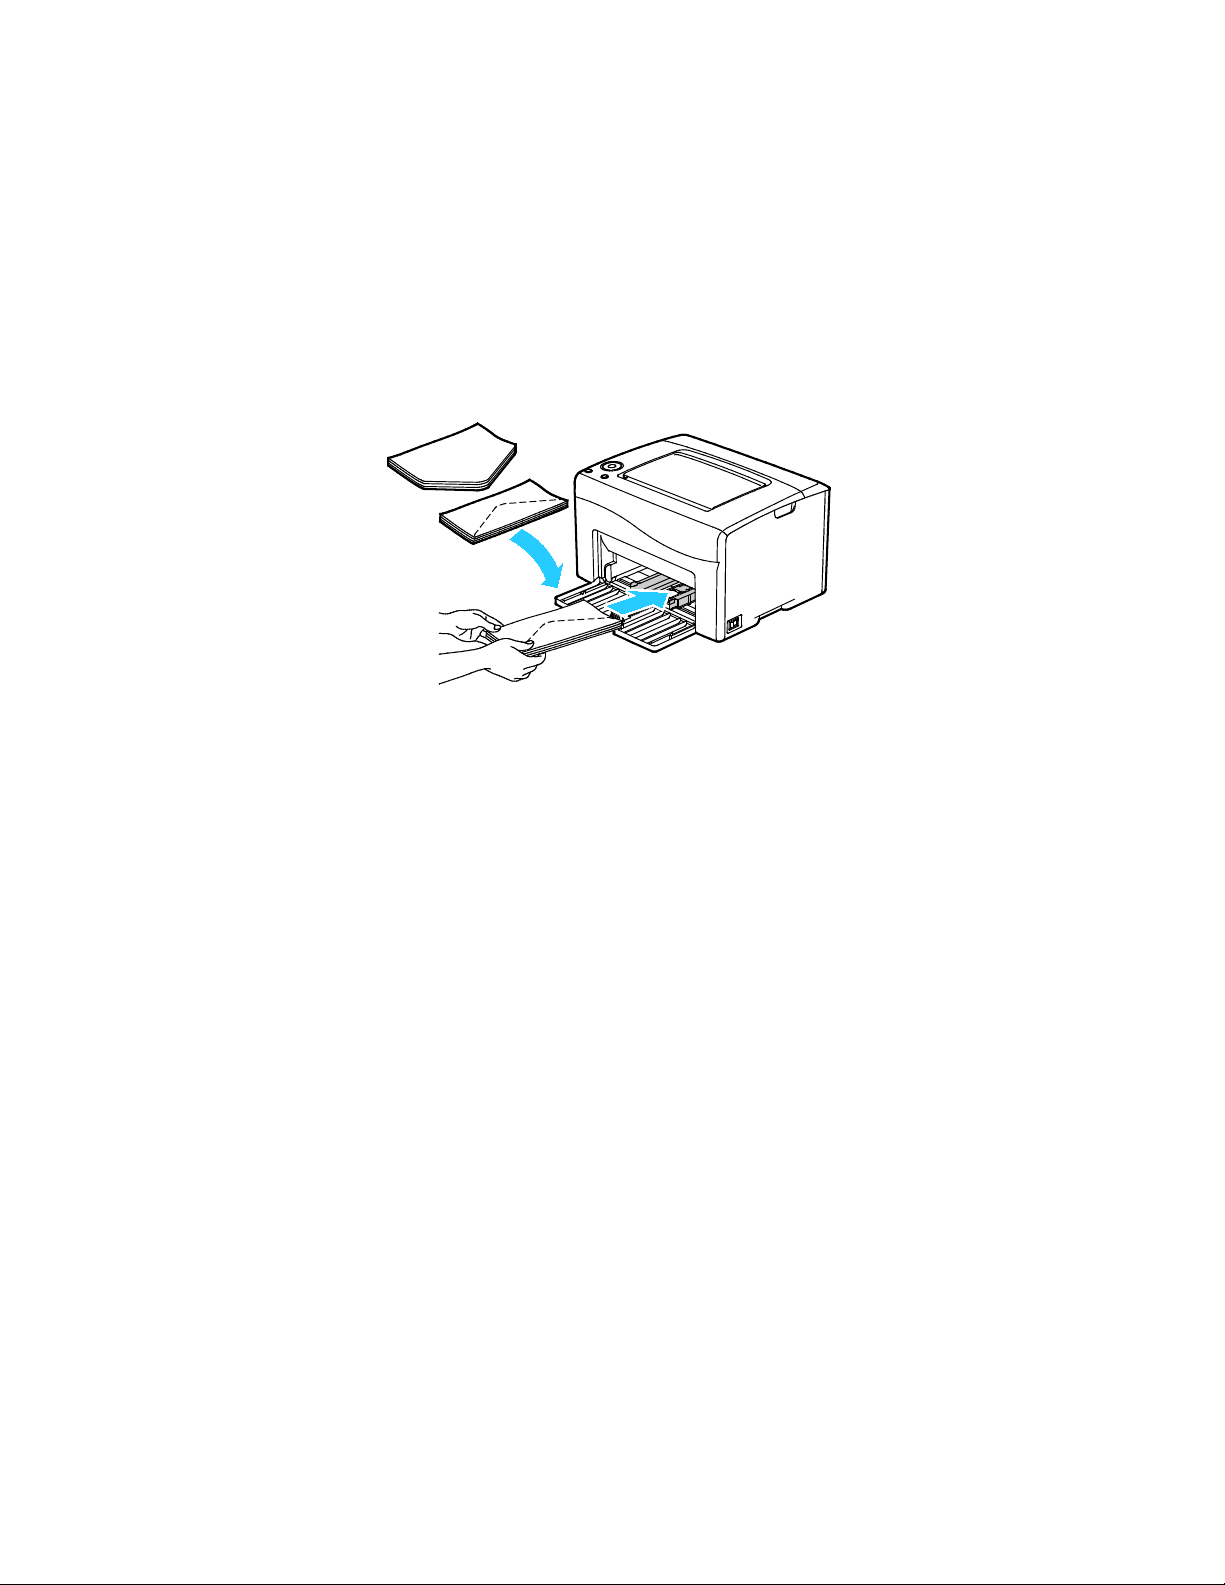
Paper and Media
Loading Envelopes
You can load up to five envelopes at a time in the main tray.
To load envelopes:
1. Slide open the width guides.
2. Place envelopes in the main tray using one of the following methods:
− Insert No. 10, DL, or Monarch envelopes with the print side up, flaps closed and facing down,
and the flap side to the right.
Xerox
User Guide
®
Phaser® 6020 Printer 57
Page 58

Paper and Media
− Insert C5 envelopes with the print side up, flaps open and facing away from the printer.
Notes:
• To prevent wrinkling on No. 10, DL, C5, or Monarch envelopes, load them print side up, flaps
open and facing away from the printer.
• When you load envelopes long-edge feed, ensure that you specify landscape orientation in the
print driver.
3. Adjust the paper guides so they rest lightly against the edges of the envelopes.
58 Xerox
User Guide
®
Phaser® 6020 Printer
Page 59

Paper and Media
Printing Labels
Ensure that label media is placed face-up in the main tray.
Guidelines for Printing Labels
• Use labels designed for laser printing.
• Do not use vinyl labels.
• Do not feed a sheet of labels through the printer more than once.
• Do not use dry gum labels.
• Print only on one side of the sheet of labels. Use full sheet labels only.
• Store unused labels flat in their original packaging. Leave the sheets of labels inside the original
packaging until ready to use. Return any unused sheets of labels to the original packaging and
reseal it.
• Do not store labels in extremely dry or humid conditions or extremely hot or cold conditions. Storing
them in extreme conditions can cause print-quality problems or cause them to jam in the printer.
• Rotate stock frequently. Long periods of storage in extreme conditions can cause labels to curl and
jam in the printer.
• In the print driver software, select Label as the paper type.
• Before loading labels, remove all other paper from the tray.
CAUTION: Do not use any sheet where labels are missing, curled, or pulled away from the backing
sheet. It could damage the printer.
Printing on Glossy Cardstock
You can print on Lightweight Glossy Cardstock that is 163 g/m² or less.
• Do not open sealed packages of glossy cardstock until you are ready to load them into the printer.
• Leave glossy cardstock in the original wrapper, and leave the packages in the shipping carton until
ready to use.
• Remove all other paper from the tray before loading glossy cardstock.
• Load only the amount of glossy cardstock you are planning to use. Do not leave glossy cardstock in
the tray when you are finished printing. Replace unused cardstock in the original wrapper and seal.
• Rotate stock frequently. Long periods of storage in extreme conditions can cause glossy cardstock to
curl and jam in the printer.
• In the print driver software, select the desired glossy cardstock type or select the tray loaded with
the desired paper.
To optimize printing on glossy cardstock, do one or more of the following:
• Adjust the paper type setting. For details, see Adjusting Paper Type on page 83.
• Adjust the bias transfer roller. For details, see Adjusting the Bias Transfer Roller on page 84.
• Adjust the fuser. For details, see Adjusting the Fuser on page 84.
Xerox
User Guide
®
Phaser® 6020 Printer 59
Page 60

Page 61

• Printing on Both Sides of the Paper ............................................................................................................................. 71
5
Printing
This chapter includes:
• Printing Overview ................................................................................................................................................................. 62
• Selecting Printing Options ................................................................................................................................................ 63
• Printing from Mobile Devices .......................................................................................................................................... 66
• Using Custom Paper Sizes ................................................................................................................................................ 68
®
Xerox
User Guide
Phaser® 6020 Printer 61
Page 62

Printing
Printing Overview
Before printing, your computer and the printer must be plugged in, turned on, and connected. Ensure
that you have the correct print driver software installed on your computer. For details, see Installing the
Software on page 34.
1. Select the appropriate paper.
2. Load paper in the main tray.
3. In your software application, access the print settings. For most software applications, press CTRL+P
for Windows or CMD+P for Macintosh.
4. Select your printer.
5. In the print settings, specify the paper size and type.
− To access the print driver settings for Windows, select Properties or Preferences.
®
− For Macintosh, select Xerox
Note: Depending on your application, the title of the button varies.
Features.
6. Modify the print driver settings as needed, then click OK.
7. Click Print to send the job to the printer.
62 Xerox
User Guide
®
Phaser® 6020 Printer
Page 63

Printing
• Macintosh Printing Options ............................................................................................................................................. 65
Selecting Printing Options
This section includes:
• Windows Printing Options ................................................................................................................................................ 63
Windows Printing Options
Setting Default Printing Options for Windows
When you print from any software application, the printer uses the print job settings specified in the
Printing Preferences window. You can specify your most common printing options and save them so that
you do not have to change them every time you print.
For example, if you want to print on both sides of the paper for most jobs, specify 2-sided printing in
Printing Preferences.
To select default printing options:
1. Navigate to the list of printers on your computer:
− For Windows Vista, click Start > Control Panel > Hardware and Sound > Printers.
− For Windows Server 2003 and later, click Start > Settings > Printers.
− For Windows 7, click Start > Devices and Printers.
− For Windows 8, click Control Panel > Devices and Printers.
Note: If the Control Panel icon does not appear on the desktop, right-click on the desktop, then
select Personalize > Control Panel Home > Devices and Printers.
2. In the list, right-click the icon for your printer and click Printing Preferences.
3. In the Printing Preferences window, click a tab, select the options, then click OK to save.
Note: For more information about Windows print driver options, click the Help button (?) in the
Printing Preferences window.
Xerox
User Guide
®
Phaser® 6020 Printer 63
Page 64

Printing
Selecting Printing Options for an Individual Job in Windows
To use special printing options for a particular job, change the print driver settings in the application
before sending the job to the printer.
Note: The print driver includes online help with more information on selecting printing options. To
access help from any print driver dialog box, click Help.
To select printing options:
1. With the desired document or graphic open in your application, open the Print dialog box. For most
software applications, click File > Print or press CTRL+P.
2. Select your printer, then click Properties to open the print driver dialog box.
3. Make selections from the driver tabs as desired, beginning with settings in the Paper/Output tab.
4. Click OK in the Properties window, then click OK in the Print window.
Selecting Printing Defaults in Windows for a Shared Network Printer
1. Navigate to the list of printers on your computer:
− For Windows XP SP3, click Start > Settings > Printers and Faxes.
− For Windows Vista, click Start > Control Panel > Hardware and Sound > Printers.
− For Windows Server 2003 and later, click Start > Settings > Printers.
− For Windows 7, click Start > Devices and Printers.
− For Windows 8, click Control Panel > Devices and Printers.
Note: If the Control Panel icon does not appear on the desktop, right-click on the desktop, then
select Personalize > Control Panel Home > Devices and Printers.
2. In the Printers folder, right-click the name of your print driver and select Properties.
3. In the printer Properties dialog box, click the Advanced tab.
4. On the Advanced tab, click Printing Defaults.
5. Make your selections on the driver tabs as needed, then click Apply.
6. Click OK to save your selections.
Saving a Set of Commonly Used Printing Options for Windows
You can define and save a set of options, so that you can apply them to future print jobs.
To save a set of printing options:
1. With the document open in your application, click File > Print.
2. To open the Printing Preferences window, select your printer, then click Properties or Preferences.
3. In the Printing Properties window, click the tabs, then select the desired settings
4. At the bottom of the Printing Properties window, click Saved Settings, then click Save As.
5. To save the set of options in the Saved Settings list, type a name for the set of printing options, then
click OK.
6. To print using these options, select the name from the list.
64 Xerox
®
Phaser® 6020 Printer
User Guide
Page 65

Printing
Macintosh Printing Options
Selecting Printing Options for Macintosh
To use specific printing options, change the settings before sending the job to the printer.
1. With the document open in your application, click File > Print.
2. Select your printer.
®
3. Select Xerox
4. Select the desired printing options from the drop-down lists.
5. Click Print to send the job to the printer.
Saving a Set of Commonly Used Printing Options for Windows
You can define and save a set of options, so that you can apply them to future print jobs.
To save a set of printing options:
1. With the document open in your application, click File > Print.
2. To open the Printing Preferences window, select your printer, then click Properties or Preferences.
3. In the Printing Properties window, click the tabs, then select the desired settings.
4. Click Save.
5. Type a name for the set of printing options, then click OK.
6. To print using these options, select the name from the list.
Features from the Copies & Pages menu.
Xerox
User Guide
®
Phaser® 6020 Printer 65
Page 66

Printing
• Printing with Xerox® PrintBack ....................................................................................................................................... 67
Printing from Mobile Devices
This section includes:
• Printing with Wi-Fi Direct .................................................................................................................................................. 66
• Printing with AirPrint .......................................................................................................................................................... 66
Depending on the type of device, you can print from your mobile device using Wi-Fi Direct, AirPrint, or
®
Xerox
Printing with Wi-Fi Direct
You can connect to your printer from a Wi-Fi mobile device, such as a tablet, computer, or smart phone,
using Wi-Fi Direct.
PrintBack.
For details, see Connecting with Wi-Fi Direct on page 33.
For details on using Wi-Fi Direct, refer to the documentation provided with your mobile device.
Note: Depending on which mobile device you are using, the printing procedure varies.
Printing with AirPrint
You can print directly from your iPhone, iPad, iPod touch, or Mac using AirPrint. To enable AirPrint for
your printer, see Configuring AirPrint on page 47. To use AirPrint, ensure that your mobile device is
connected to the wireless network.
To print with AirPrint:
1. Open the email, photograph, website page, or document that you want to print.
2. Tap the Action icon.
3. Tap Print.
4. Select your printer, then set the printer options.
5. Tap Print.
66 Xerox
User Guide
®
Phaser® 6020 Printer
Page 67

Printing
Printing with Xerox® PrintBack
This printer supports printing from Android or iOS mobile devices using Xerox® PrintBack. PrintBack
consists of three components.
• Xerox
• Online service: A Web-based service, such as Dropbox or an email provider, transmits jobs from your
• Xerox
To print, the computer and the default printer must be turned on and ready to print. If documents are
sent while the computer or printer are not ready or not connected, the online service stores the
documents. When the computer is turned on and connected to the network again, the documents are
retrieved and printed.
For more information about PrintBack installation and setup, and for PrintBack printing instructions, see
www.xerox.com/downloadprintback.
®
PrintBack app: Installed on your mobile device, the app sends print jobs to your selected
online service.
mobile device to your computer.
®
PrintBack agent: Installed on your computer, the agent retrieves print jobs from the online
service and prints them to your default printer.
Xerox
User Guide
®
Phaser® 6020 Printer 67
Page 68

Printing
• Printing on Custom Paper Sizes ..................................................................................................................................... 69
Using Custom Paper Sizes
This section includes:
• Defining Custom Paper Sizes .......................................................................................................................................... 68
The Xerox® Phaser® 6020 Printer prints on custom paper sizes that are within the minimum and
maximum size range supported by the printer.
Defining Custom Paper Sizes
To print custom paper sizes, define the custom width and length of the paper in the print driver software.
Note: When you set the paper size, ensure that you specify the same size as the paper in the tray.
Setting the wrong size can cause a printer error.
Defining a Custom Paper Size for Windows
You can save up to 20 custom paper sizes in the Windows print driver. Save each custom size with a
unique name and the dimensions are retained until you change them.
1. Navigate to the list of printers on your computer:
− For Windows Vista, click Start > Control Panel > Hardware and Sound > Printers.
− For Windows Server 2003 and later, click Start > Settings > Printers.
− For Windows 7, click Start > Devices and Printers.
− For Windows 8, click Control Panel > Devices and Printers.
Note: If the Control Panel icon does not appear on the desktop, right-click on the desktop, then
select Personalize > Control Panel Home > Devices and Printers.
2. From the Printers and Faxes window, select a printer, right-click the printer, and select Properties.
Notes:
• For Windows 7, in the Devices and Printers window, right click the printer, and select Printer
Properties from the middle of the drop-down list.
• For Windows 7, you must have an Administrator Account to select Custom Settings in the print
driver.
3. In the Properties dialog box, click the Configuration tab, then click Custom Paper Size.
4. In the Custom Paper Size Settings dialog box, select the units of measurement to use.
68 Xerox
User Guide
®
Phaser® 6020 Printer
Page 69

Printing
5. In the Custom Size Settings section, specify the size for the short edge and the long edge of the
paper.
6. Select the Name the Paper Size check box, type a name in the Paper Name dialog box, then click
OK.
7. In the Properties dialog box, click OK.
The custom size appears in the Paper Size list in the print driver Properties window.
Defining a Custom Paper Size for Macintosh
1. In the application you are printing from, select File > Page Setup.
2. From the Format For drop-down list, select the printer.
3. From the Paper Size drop-down list, select Manage Custom Sizes.
4. In the Custom Paper Sizes window, click plus (+) to add the new custom size.
5. For the custom paper size, enter the width and height.
6. In the Non-Printable Area drop-down list, select the printer.
7. Double-click untitled, then type a name for the new custom size.
8. Click OK to close the Custom Paper Sizes window.
9. Click OK to close the Page Setup window.
The new custom size is available in the Paper Size drop-down list of the print driver and in Page
Setup.
Note: To use the custom paper size, select Page Setup, and select the custom size that you created
from the Paper Size drop-down list.
Printing on Custom Paper Sizes
Note: Before printing on a custom paper size, use the Custom Paper Sizes feature in printer
properties to define the custom size. For details, see Defining Custom Paper Sizes on page 68.
Printing on Custom Paper Size Using Windows
1. Load the custom-size paper in the tray.
2. In the application, click File > Print and select your printer.
3. In the Print dialog box, click Properties.
4. On the Paper/Output tab, use the Paper Size drop-down list to select the desired custom size.
Note: If you are printing on custom size paper, define the custom size in the printer properties
before printing.
5. From the Paper Type drop-down list, select the paper type.
6. Select any other desired options, then click OK.
7. In the Print dialog box, click OK to start printing.
Xerox
User Guide
®
Phaser® 6020 Printer 69
Page 70

Printing
Printing on Custom Paper Size Using Macintosh
1. Load the custom-size paper. For details, see Loading Paper on page 53.
2. In the application, click Page Setup.
3. From the Paper Size drop-down list, select the custom paper size.
4. Click OK.
5. In the application, click Print.
6. Click OK.
70 Xerox
User Guide
®
Phaser® 6020 Printer
Page 71

Printing
• Loading Paper for Manual 2-Sided Printing ............................................................................................................. 72
sided printing. Once the window is closed, it cannot
Printing on Both Sides of the Paper
This section includes:
• Setting Up 2-Sided Printing ............................................................................................................................................. 71
The Xerox® Phaser® 6020 Printer supports manual 2-sided printing. You can set printing preferences to
print your jobs on both sides of the paper.
Use 2-Sided Printing to specify the page orientation for the printed output.
You can specify the page layout for 2-sided printing, which determines how the printed pages turn.
These settings override the application page orientation settings.
Portrait Landscape
Portrait
2-Sided Print
Portrait
2-Sided Print, Flip on Short
Edge
Landscape
2-Sided Print
Landscape
2-Sided Print, Flip on Short
Edge
Setting Up 2-Sided Printing
To set up manual 2-sided printing:
1. From the File menu, select Print.
2. Select the printer from the Select Printer list, then click Properties.
3. From the Duplex window on the Paper/Output tab, select Flip on Long Edge or Flip on Short Edge.
4. Select the Paper Size and Paper Type to match the paper you are using.
5. To close the Printing Preferences dialog box, click OK.
6. To start printing, click Print.
Note: When you start manual 2-sided printing, the Manual Duplex Setup window appears. Do not
close the window until you have completed the 2be reopened.
Xerox
®
Phaser® 6020 Printer 71
User Guide
Page 72

Printing
Loading Paper for Manual 2-Sided Printing
For manual 2-sided printing, the back sides of the pages are printed first in reverse order. For a six-page
document, the pages are printed page 6, page 4, and then page 2. Once the even pages are printed, the
paper is reloaded. The odd pages are printed page 1, page 3, and then page 5.
1. Load the paper to print the even pages.
Note: Load letterhead into the main tray with the printed side down and the top going into the
printer.
After the even pages print, the OK button flashes.
2. Remove the printed pages from the output tray and reload them into the main tray without
rotating or flipping the pages. The unprinted sides of the pages are facing up.
3. Press OK.
The odd pages are printed, page 1, page 3, then page 5.
72 Xerox
User Guide
®
Phaser® 6020 Printer
Page 73

6
Maintenance
This chapter includes:
• Cleaning the Printer ............................................................................................................................................................ 74
• Ordering Supplies ................................................................................................................................................................. 80
• Toner Cartridges ................................................................................................................................................................... 81
• Adjustments and Maintenance Procedures .............................................................................................................. 83
• Checking Page Counts ....................................................................................................................................................... 85
• Moving the Printer ............................................................................................................................................................... 86
Xerox
User Guide
®
Phaser® 6020 Printer 73
Page 74

Maintenance
• Cleaning the Interior .......................................................................................................................................................... 75
Cleaning the Printer
This section includes:
• General Precautions ............................................................................................................................................................ 74
• Cleaning the Exterior .......................................................................................................................................................... 75
General Precautions
CAUTION: When cleaning your printer do not use organic or strong chemical solvents or aerosol
cleaners. Do not pour fluids directly into any area. Use supplies and cleaning materials only as
directed in this documentation.
WARNING: Keep all cleaning materials out of the reach of children.
WARNING: Do not use pressurized spray cleaning aids on or in the printer. Some pressurized sprays
contain explosive mixtures and are not suitable for use in electrical applications. Use of pressurized
spray cleaners increases the risk of fire and explosion.
WARNING: Do not remove the covers or guards that are fastened with screws. You cannot maintain
or service any parts that are behind these covers and guards. Do not attempt any maintenance
procedure that is not described in the documentation supplied with your printer.
WARNING: Internal parts of the printer can be hot. Use caution when doors and covers are open.
• Do not place anything on top of the printer.
• Do not leave the covers and doors open for any length of time, especially in well-lit places. Light
exposure can damage the imaging units.
• Do not open covers and doors during printing.
• Do not tilt the printer while it is in use.
• Do not touch the electrical contacts or gears. Doing so could damage the printer and cause the print
quality to deteriorate.
• Ensure any parts removed during cleaning are replaced before you plug in the printer.
74 Xerox
®
Phaser® 6020 Printer
User Guide
Page 75

Maintenance
Cleaning the Exterior
Clean the exterior of the printer once a month.
• Wipe the paper tray, output tray, control panel, and other parts with a damp, soft cloth.
• After cleaning, wipe with a dry, soft cloth.
• For stubborn stains, apply a small amount of mild detergent to the cloth and gently wipe the stain
off.
CAUTION: Do not spray detergent directly on the printer. Liquid detergent could enter the printer
through a gap and cause problems. Never use cleaning agents other than water or mild detergent.
Cleaning the Interior
After clearing paper jams or replacing a toner cartridge, inspect the inside of the printer before closing
the printer covers and doors.
• Remove any remaining pieces of paper or debris. For details, see Clearing Paper Jams on page 96.
• Remove any dust or stains with a dry, clean cloth.
WARNING: Never touch a labeled area on or near the heat roller in the fuser. You can get burned. If
a sheet of paper is wrapped around the heat roller, do not try to remove it immediately. Switch off
the printer immediately and wait 20 minutes for the fuser to cool. Try to remove the jam after the
printer has cooled.
Cleaning the LED Lenses
1. Turn off the printer.
2. Open the side door.
Xerox
®
Phaser® 6020 Printer 75
User Guide
Page 76

Maintenance
3. Pinch the release tab on the toner cartridge as shown.
4. Pull out the toner cartridge.
To avoid spilling toner, pull out the toner cartridge slowly.
5. Remove the remaining toner cartridges in the same manner.
6. Pull out the cleaning rod.
76 Xerox
User Guide
®
Phaser® 6020 Printer
Page 77

Maintenance
7. To remove toner and debris from the top of the cleaning rod, wipe it with a clean lint-free cloth.
8. Insert the cleaning rod into the hole indicated by the arrow in the middle of the toner cartridge slot.
Push in the cleaning rod until it stops, then pull it out.
9. Repeat the procedure for the holes in the other three slots.
10. Return the cleaning rod to its original location.
11. Align the black toner cartridge with the rear toner slot. Press firmly near the center of the cartridge
until it clicks into place.
Xerox
User Guide
®
Phaser® 6020 Printer 77
Page 78

Maintenance
12. Replace the remaining three toner cartridges in the same manner.
13. Close the side door.
78 Xerox
®
Phaser® 6020 Printer
User Guide
Page 79

Maintenance
Cleaning the Toner Density Sensor
Clean the color toner density (CTD) sensor when an alert for the CTD sensor appears on the control
panel or in the PrintingScout Printer Status window.
To clean the toner density sensor:
1. Turn off the printer.
2. Push down on the rear door release and pull open the door.
3. Use a dry cotton swab to clean the color toner density sensor.
4. Close the rear door.
Xerox
User Guide
®
Phaser® 6020 Printer 79
Page 80

Maintenance
• Recycling Supplies ................................................................................................................................................................ 80
predetermined point.
Ordering Supplies
This section includes:
• Consumables .......................................................................................................................................................................... 80
• When to Order Supplies ..................................................................................................................................................... 80
Consumables
Consumables are printer supplies that get depleted during the operation of the printer. Consumable
supplies for this printer are the Genuine Xerox
®
Toner Cartridges in Cyan, Magenta, Yellow, and Black.
Notes:
• Each consumable includes installation instructions.
• Install only new cartridges in your printer. If a used toner cartridge is installed, then the toner
remaining amount displayed could be inaccurate.
• To ensure print quality, the toner cartridge has been designed to cease functioning at a
®
CAUTION: Use of toner other than genuine Xerox
reliability. Xerox
®
Toner is the only toner designed and manufactured under strict quality controls by
Toner can affect print quality and printer
Xerox for specific use with this printer.
When to Order Supplies
A warning appears on the control panel when supplies near their replacement time. Verify that you have
replacements on hand. It is important to order these items when the messages first appear to avoid
interruptions to your printing. An error message appears on the control panel when supplies must be
replaced.
Order supplies from your local reseller or go to www.xerox.com/office/6020supplies.
CAUTION: Use of non-Xerox supplies is not recommended. The Xerox Warranty, Service Agreement,
and Total Satisfaction Guarantee do not cover damage, malfunction, or degradation of performance
caused by use of non-Xerox supplies, or the use of Xerox supplies not specified for this printer. The
Total Satisfaction Guarantee is available in the United States and Canada. Coverage could vary
outside these areas. Please contact your Xerox representative for details.
Recycling Supplies
For more information on the Xerox® supplies recycling program, go to: www.xerox.com/gwa.
80 Xerox
User Guide
®
Phaser® 6020 Printer
Page 81

Maintenance
• Cleaning the Developer ..................................................................................................................................................... 82
Toner Cartridges
This section includes:
• General Precautions ............................................................................................................................................................ 81
• Replacing a Toner Cartridge............................................................................................................................................ 81
• Refreshing the Toner .......................................................................................................................................................... 82
General Precautions
WARNINGS:
• When replacing a toner cartridge, be careful not to spill the toner. If any toner spills, avoid
contact with clothes, skin, eyes, and mouth. Do not inhale the toner dust.
• Keep toner cartridges out of the reach of children. If a child accidentally swallows toner, have the
child spit out the toner, and rinse out their mouth with water. Consult a physician immediately.
WARNING: Use a damp cloth to wipe off spilled toner. Never use a vacuum cleaner to remove spills.
Electric sparks inside the vacuum cleaner can cause a fire or explosion. If you spill a large volume of
toner, contact your local Xerox representative.
WARNING: Never throw a toner cartridge into an open flame. Remaining toner in the cartridge can
catch fire and cause burn injuries or an explosion.
Replacing a Toner Cartridge
When a toner light on the control panel lights up or blinks, it is time to replace the toner cartridge. A
steady light indicates that the toner is low. A blinking light indicates that the toner is empty. You can use
PrintingScout to view the toner status in the Printer Status window.
Install only new cartridges in your printer. If a used toner cartridge is installed, then the toner remaining
amount displayed could be inaccurate.
Note: Each toner cartridge includes installation instructions.
Xerox
User Guide
®
Phaser® 6020 Printer 81
Page 82

Maintenance
Refreshing the Toner
Toner Refresh recalibrates toner concentration and developer voltages. If you print documents with high
or low ink coverage, Toner Refresh can optimize print quality.
To refresh the toner:
1. Launch the Printer Setting Utility, then select the Diagnosis tab.
2. Click Refresh Mode.
3. Click a toner cartridge.
Cleaning the Developer
The Clean Developer feature runs the developer motor and mixes the toner in the developer. Use the
Clean Developer feature to refresh the toner after replacing a toner cartridge or if dark streaks are
appearing in your prints.
To clean the developer:
1. Launch the Printer Setting Utility and select the Diagnosis tab.
2. Click Clean Developer.
3. Click Start.
82 Xerox
User Guide
®
Phaser® 6020 Printer
Page 83

Maintenance
• Adjusting the Altitude ........................................................................................................................................................ 84
Adjustments and Maintenance Procedures
This section includes:
• Color Registration ................................................................................................................................................................ 83
• Adjusting the Paper Type ................................................................................................................................................. 83
• Adjusting the Bias Transfer Roller ................................................................................................................................. 84
• Adjusting the Fuser ............................................................................................................................................................. 84
• Refreshing the Bias Transfer Roller .............................................................................................................................. 84
Color Registration
The printer automatically adjusts the color registration when automatic adjustment is turned on. You
can also adjust color registration manually any time the printer is idle. You must adjust the color
registration any time the printer is moved. If you are having printing problems, adjust the color
registration.
To perform a color registration adjustment:
1. Launch the Printer Setting Utility, then select the Printer Maintenance tab.
2. Select Color Registration Adjustment.
3. For On, clear the check box.
For Auto Correct, click Start.
Adjusting the Paper Type
Use Adjust Paper Type to compensate for paper thickness within a paper type. If the printed image is
too light, use a heavier setting for the paper you are using. If the printed image is mottled or
blotchy-looking, decrease the setting for the paper you are using.
To adjust the paper type:
1. Launch the Printer Setting Utility, then select the Printer Maintenance tab.
2. Click Adjust Paper Type.
3. For Plain Paper or Labels, change the paper type.
4. Click Apply New Settings.
Xerox
User Guide
®
Phaser® 6020 Printer 83
Page 84

Maintenance
Adjusting the Bias Transfer Roller
Use Adjust BTR to specify the bias transfer roller (BTR) voltage for printing on the selected paper type. If
the printed image is too light, increase the offset for the paper you are using. If the printed image is
mottled or blotchy-looking, decrease the offset for the paper you are using.
To adjust the bias transfer roller:
1. Launch the Printer Setting Utility and select the Printer Maintenance tab.
2. Click Adjust BTR.
3. Change the offset value for the paper that you are using.
4. Click Apply New Settings.
Adjusting the Fuser
Use Adjust Fuser for optimum print quality across a wide range of paper types. If the toner on a print is
smearing or can be rubbed off the paper, increase the offset for the paper you are using. If the toner is
blistered or mottled, decrease the offset for the paper you are using.
To adjust the fuser:
1. Launch the Printer Setting Utility, then select the Printer Maintenance tab.
2. Click Adjusting Fusing Unit.
3. Select the offset value for the desired paper type.
4. Click Apply New Settings.
Refreshing the Bias Transfer Roller
Use the BTR Refresh procedure to reduce paper curling and improve paper discharge.
To refresh the bias transfer roller:
1. Launch the Printer Setting Utility, then select the Printer Maintenance tab.
2. Click BRT Refresh Mode.
3. For On, select the check box.
4. Click Apply New Settings.
Adjusting the Altitude
Use Adjust Altitude to adjust the altitude to match that of the location where the printer is installed. If
the altitude setting is incorrect, it can cause print-quality problems.
To adjust the altitude:
1. Launch the Printer Setting Utility and select the Printer Maintenance tab.
2. Click Adjust Altitude.
3. Select the altitude range to match that of the location where the printer is installed.
4. Click Apply New Settings.
84 Xerox
User Guide
®
Phaser® 6020 Printer
Page 85

Maintenance
Checking Page Counts
You can check the total number of printed pages on the Configuration Page. The Print Volume section
lists the total number of pages printed on each paper size.
To print the Configuration Page:
1. Launch the Printer Setting Utility.
2. Click the Printer Settings Report tab.
3. Click Information Pages.
4. Click Configuration Page.
Xerox
User Guide
®
Phaser® 6020 Printer 85
Page 86
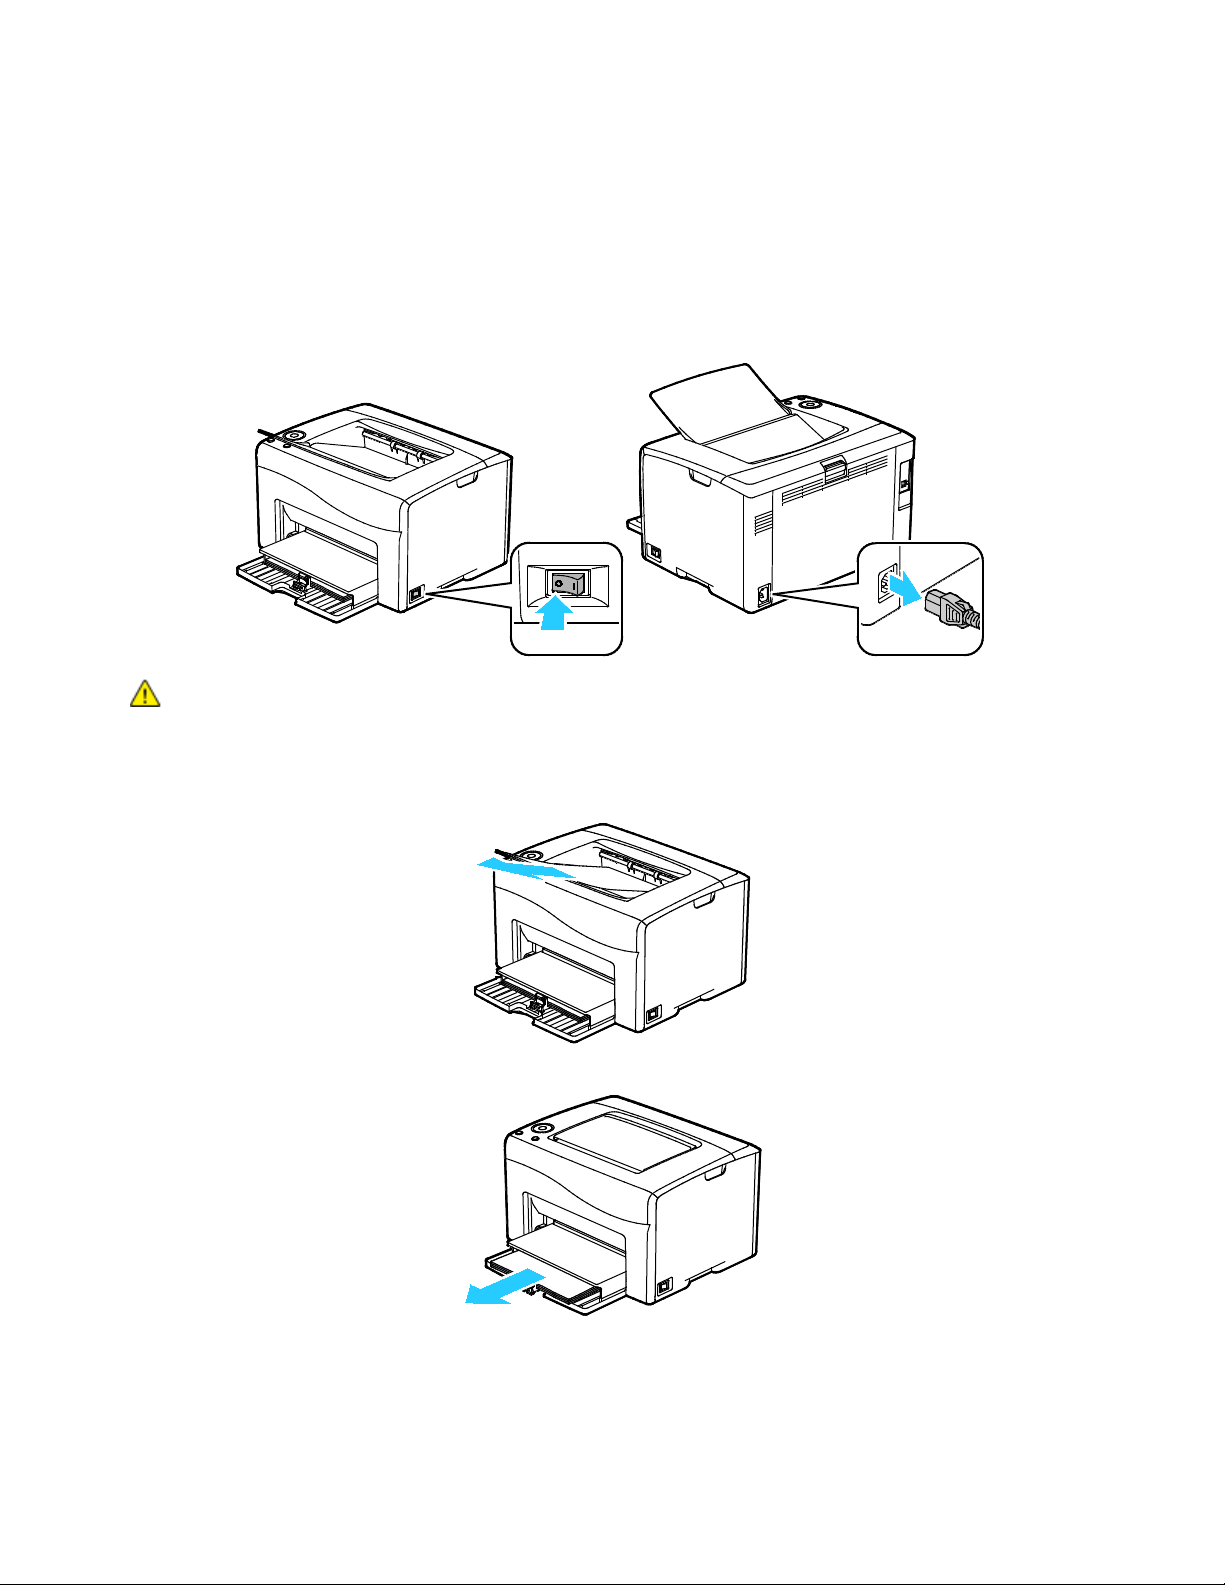
Maintenance
Moving the Printer
Follow these instructions when moving the printer:
1. Turn off the printer and disconnect the power cord and other cables from the back of the printer.
WARNING: To prevent electric shock, never touch the power plug with wet hands. When removing
the power cord, ensure that you pull the plug and not the cord. Pulling the cord can damage it, which
can lead to fire or electric shock.
2. Remove any paper or other media from the output tray.
3. Remove the paper from the paper tray. Keep the paper wrapped and away from humidity and dirt.
86 Xerox
User Guide
®
Phaser® 6020 Printer
Page 87

4. Lift the dust cover and push it into the printer.
5. Push in the length guides and slide bar until they stop.
Maintenance
6. Close the front door.
Xerox
User Guide
®
Phaser® 6020 Printer 87
Page 88
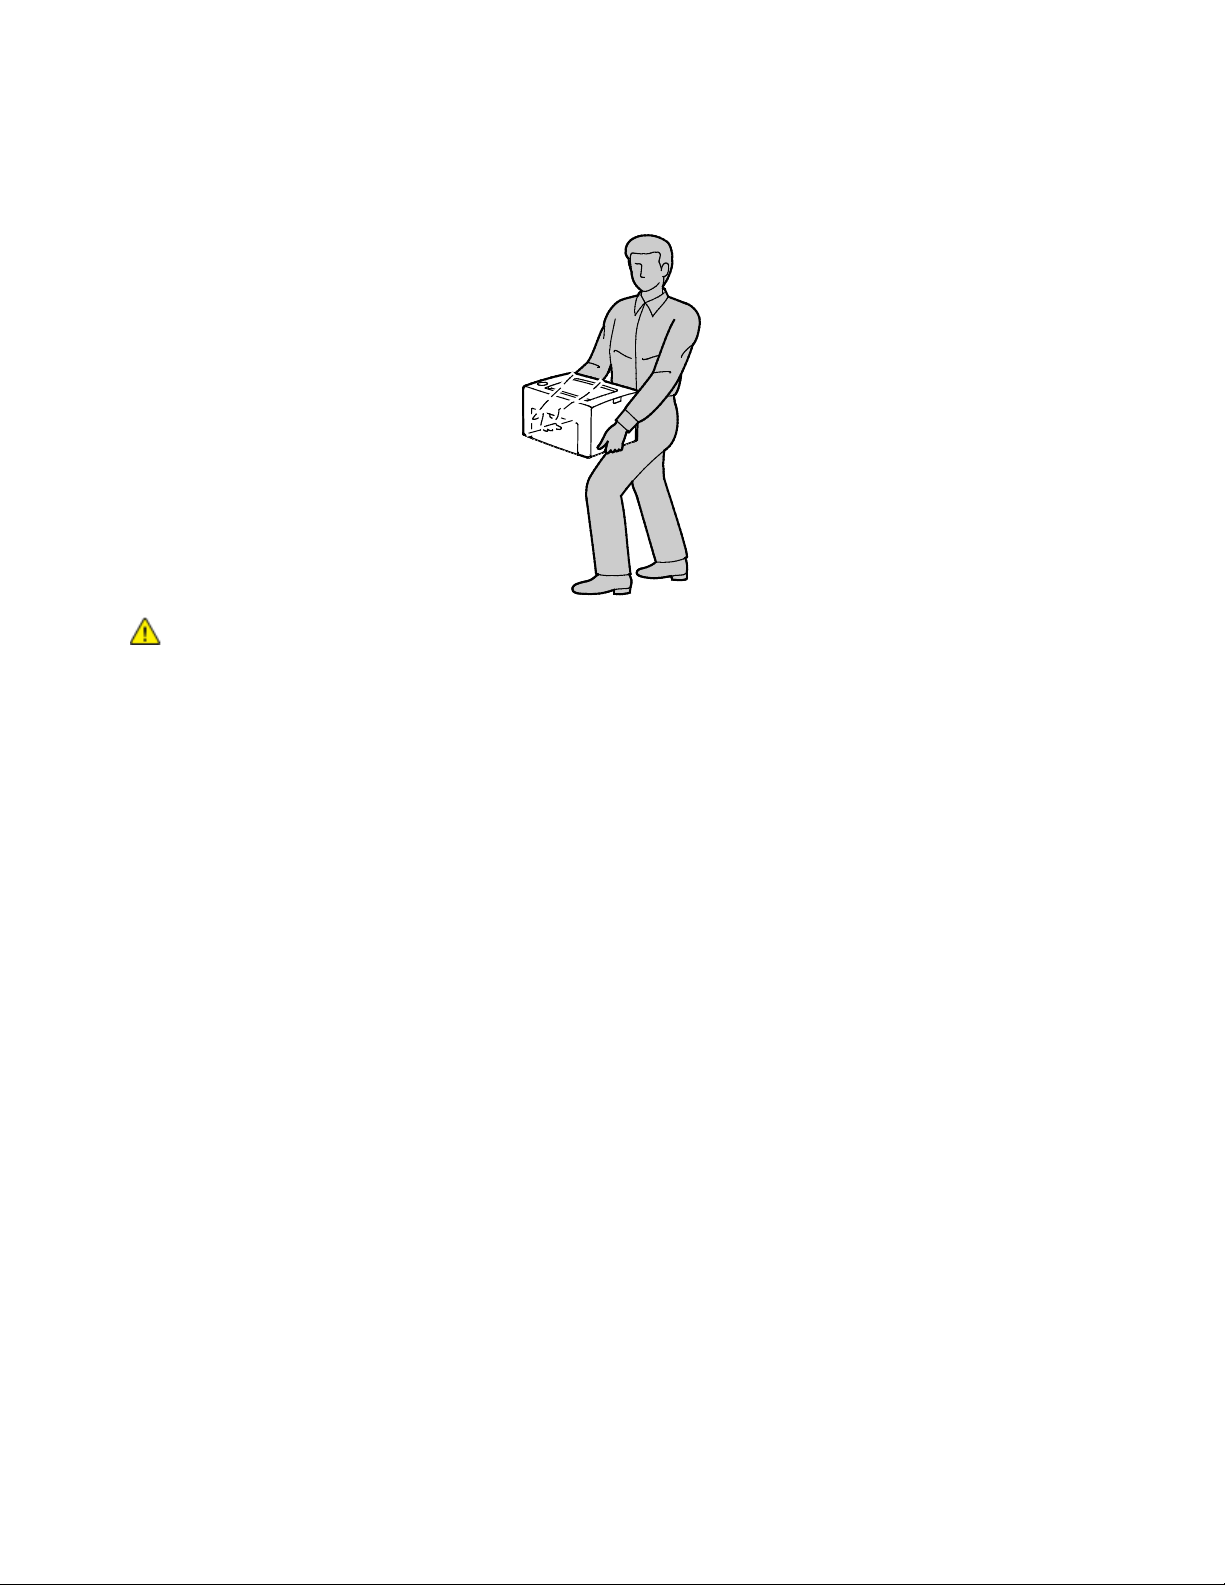
Maintenance
7. Lift and carry the printer as shown in the illustration.
Note: To find the weight for your printer configuration, see Physical Specifications on page 111.
CAUTIONS:
• Failure to repackage the printer properly for shipment can result in damage not
covered by the Xerox
®
The Xerox
Warranty, Service Agreement, or Total Satisfaction Guarantee do not cover
®
Warranty, Service Agreement, or Total Satisfaction Guarantee.
damage to the printer caused by improper moving.
• When moving the printer, do not tilt it more than 10 degrees to the front, back, left, or
right. Tilting the printer more than 10 degrees can cause toner spillage.
After moving the printer:
1. Reinstall any parts you removed.
2. Reconnect the printer to the cables and power cord.
3. Plug in and turn on the printer.
88 Xerox
User Guide
®
Phaser® 6020 Printer
Page 89

• Getting Help ......................................................................................................................................................................... 107
7
Troubleshooting
This chapter includes:
• General Troubleshooting .................................................................................................................................................. 90
• Paper Jams .............................................................................................................................................................................. 93
• Print-Quality Problems ..................................................................................................................................................... 101
®
Xerox
User Guide
Phaser® 6020 Printer 89
Page 90

Troubleshooting
• Condensation has Formed Inside the Printer .......................................................................................................... 92
General Troubleshooting
This section includes:
• Printer Does Not Turn On ................................................................................................................................................. 90
• Printer Resets or Turns Off Frequently ........................................................................................................................ 90
• Printer Does Not Print ........................................................................................................................................................ 91
• Printing Takes Too Long.................................................................................................................................................... 92
• Printer is Making Unusual Noises .................................................................................................................................. 92
This section contains procedures to help you locate and resolve problems. Resolve some problems by
simply restarting the printer.
Printer Does Not Turn On
Probable Causes Solutions
The power switch is not turned on. Turn on the switch.
The power cord is not correctly plugged into
the outlet.
Something is wrong with the outlet
connected to the printer.
Turn off the printer power switch, and plug the power cord securely
into the outlet.
• Plug another electrical appliance into the outlet and see if it
operates properly.
• Try a different outlet.
The printer is connected to an outlet with a
voltage or frequency that does not match the
printer specifications.
CAUTION: Plug the three-wire cord with grounding prong directly into a grounded AC outlet.
Use a power source with the specifications listed in the Electrical
Specifications on page 113.
Printer Resets or Turns Off Frequently
Probable Causes Solutions
The power cord is not plugged into the outlet
correctly.
A system error occurred. Turn off the printer, then turn it on again. Print the Error History
The printer is connected to an uninterruptible
power supply.
The printer is connected to a power strip
shared with other high-power devices.
Turn off the printer, confirm that the power cord is plugged in
correctly to the printer and the outlet, then turn on the printer.
from the Information Pages of the Printer Setting Utility. If the error
persists, contact your Xerox representative.
Turn off the printer, then connect the power cord to a suitable
outlet.
Plug the printer directly into the outlet or into a power strip that is
not shared with other high-power devices.
90 Xerox
®
Phaser® 6020 Printer
User Guide
Page 91
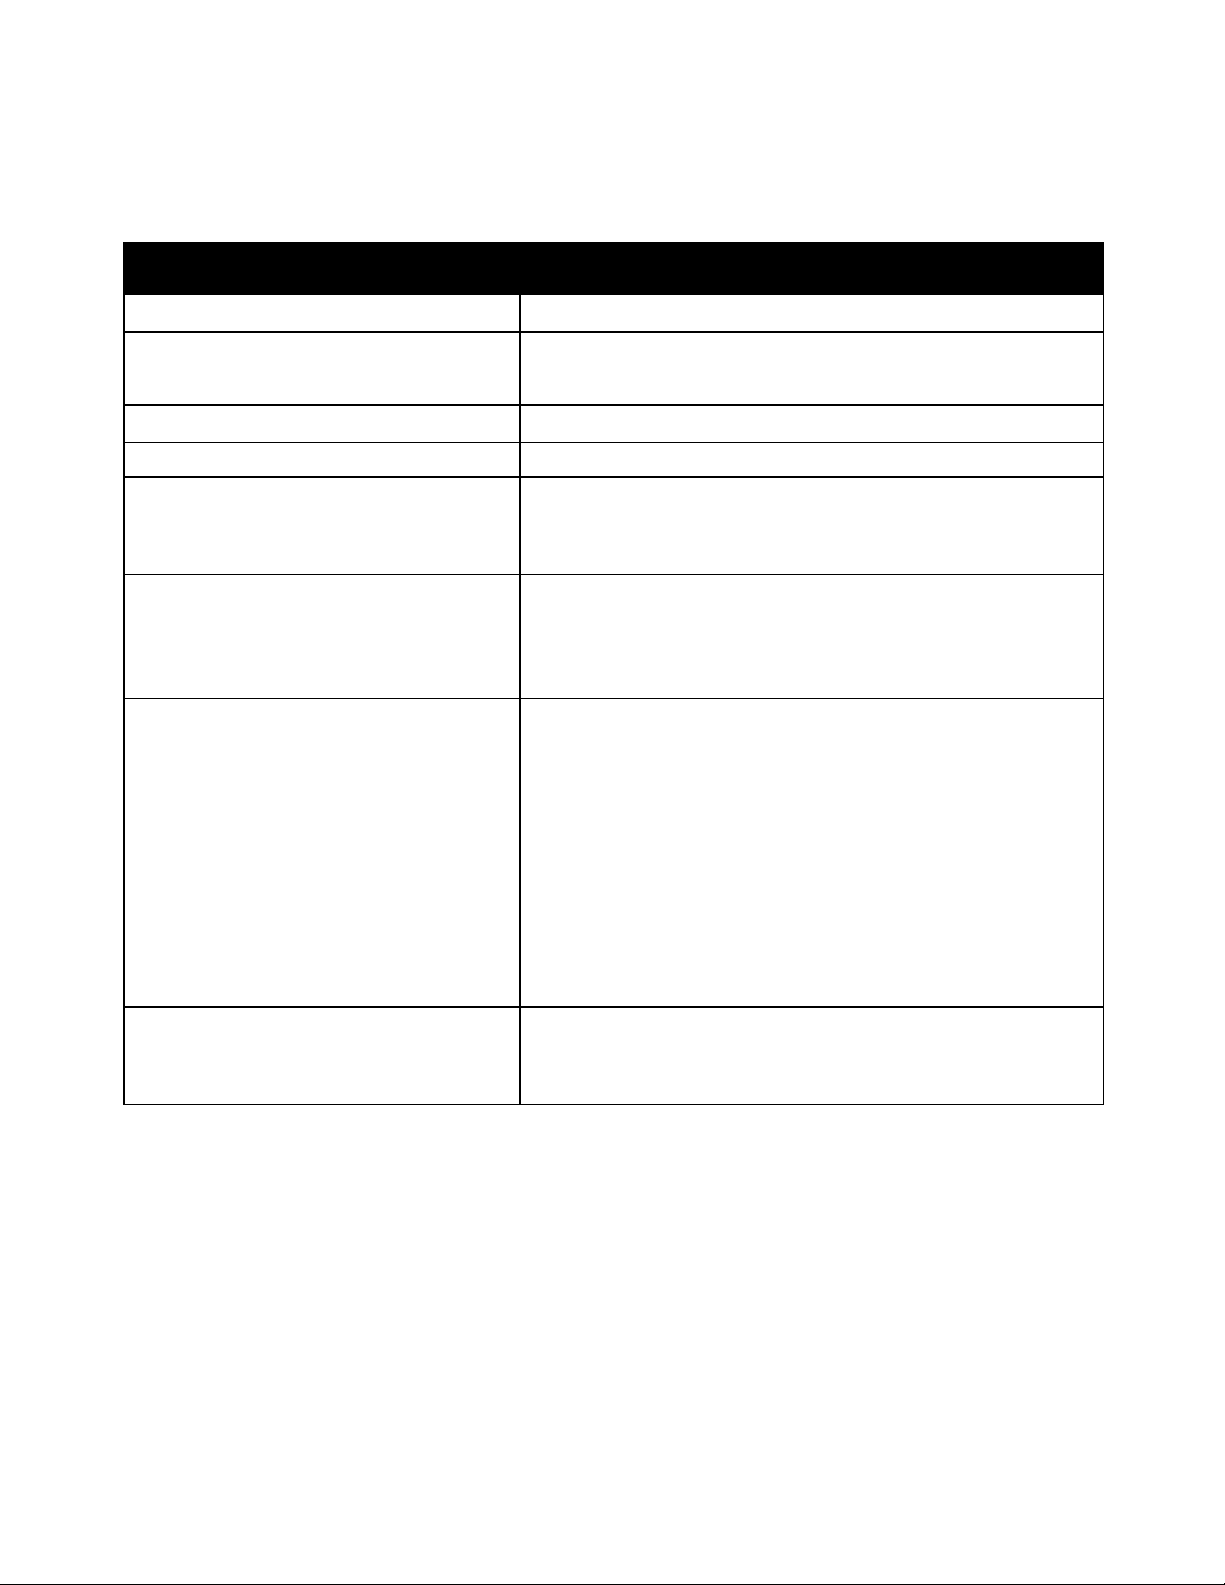
Troubleshooting
Printer Does Not Print
Probable Causes Solutions
The printer is in Power Saver mode. Push the control panel button.
The printer has an error. Follow the instructions on the control panel display or in the Printer
Status window of PrintingScout.
The printer is out of paper. Load paper into the tray.
A toner cartridge is empty. Replace the empty toner cartridge.
The Error Indicator is blinking. If the Ready Indicator is off, the printer has stopped working. Turn
off the printer, then turn it on again. If the error persists, contact
your Xerox representative.
Both control panel indicators are off. Turn off the printer, confirm that the power cord is plugged in
correctly to the printer and the outlet, then turn on the printer. If
the error persists, contact your Xerox representative.
The printer is busy.
The printer cable is disconnected.
• If the Ready Indicator is flashing, it is normal. A previous print
job could be the problem. Use the printer properties to delete all
print jobs in the print queue.
• Load the paper in the tray.
• If the Ready Indicator is not flashing after you send a print job,
check the USB connection between the printer and the
computer. Turn off the printer, then turn it on again.
• If the Ready Indicator is not flashing after you send a print job,
check the wireless connection between the printer and the
computer. Turn off the printer, then turn it on again.
• If the Ready Indicator is not flashing after you send a print job,
check the USB connection between the printer and the
computer.
Xerox
®
Phaser® 6020 Printer 91
User Guide
Page 92

Troubleshooting
The way the printer was installed on the
Determine if a print spooler or a computer sharing the printer is
Printing Takes Too Long
Probable Causes Solutions
The printer is set to a slower printing mode.
For example, the printer could be set to print
on Heavyweight paper.
It takes more time to print on certain types of special paper. Ensure
that the paper type is set properly in the driver and at the printer
control panel.
The printer is in Power Saver mode. It takes time for printing to start when the printer is coming out of
Power Saver mode.
network could be an issue.
buffering all print jobs and then spooling them to the printer.
Spooling can slow print speeds. To test the speed of the printer,
print an information page from the control panel. If the page does
not print at the rated speed of the printer, there could be a network
or printer installation issue. Contact the system administrator.
The job is complex. Wait. No action needed.
Printer is Making Unusual Noises
Probable Causes Solutions
There is an obstruction or debris inside the
printer.
Turn off the printer and remove the obstruction or debris. If you
cannot remove it, contact your Xerox representative.
Condensation has Formed Inside the Printer
Moisture can condense inside a printer where the humidity is above 85% or when a cold printer is
located in a warm room. Condensation can form in a printer after it has been sitting in a cold room that
is heated quickly.
Probable Causes Solutions
The printer has been sitting in a cold room. Allow the printer to operate for several hours at room temperature.
The relative humidity of the room is too high.
• Reduce the humidity in the room.
• Move the printer to a location where the temperature and
relative humidity are within the operating specifications.
92 Xerox
®
Phaser® 6020 Printer
User Guide
Page 93

Troubleshooting
• Troubleshooting Paper Jams ........................................................................................................................................... 99
Paper Jams
This section includes:
• Minimizing Paper Jams ...................................................................................................................................................... 93
• Locating Paper Jams ........................................................................................................................................................... 95
• Clearing Paper Jams ........................................................................................................................................................... 96
Minimizing Paper Jams
The printer is designed to function with minimal paper jams using Xerox supported paper. Other paper
types can cause jams. If supported paper is jamming frequently in one area, clean that area of the paper
path.
The following can cause paper jams:
• Selecting the incorrect paper type in the print driver.
• Using damaged paper.
• Using unsupported paper.
• Loading paper incorrectly.
• Overfilling the tray.
• Adjusting the paper guides improperly.
Most jams can be prevented by following a simple set of rules:
• Use only supported paper. For details, see Supported Paper on page 50.
• Follow proper paper handling and loading techniques.
• Always use clean, undamaged paper.
• Avoid paper that is curled, torn, moist, creased, or folded.
• To separate the sheets before loading into the tray, fan the paper.
• Observe the paper tray fill line; never overfill the tray.
• Adjust the paper guides in all trays after inserting the paper. A guide that is not properly adjusted
can cause poor print quality, misfeeds, skewed prints, and printer damage.
• After loading the trays, select the correct paper type and size on the control panel.
• When printing, select the correct type and size in the print driver.
• Store paper in a dry location.
• Use only Xerox paper and transparencies designed for the printer.
Xerox
User Guide
®
Phaser® 6020 Printer 93
Page 94

Troubleshooting
Avoid the following:
• Polyester coated paper that is specially designed for inkjet printers.
• Paper that is folded, wrinkled, or excessively curled.
• Loading more than one type, size, or weight of paper in a tray at the same time.
• Overfilling the trays.
• Allowing the output tray to overfill.
For a detailed list of supported paper, go to www.xerox.com/paper.
94 Xerox
®
Phaser® 6020 Printer
User Guide
Page 95

Troubleshooting
Locating Paper Jams
WARNING: Never touch a labeled area on or near the heat roller in the fuser. You can get burned. If
a sheet of paper is wrapped around the heat roller, do not try to remove it immediately. Switch off
the printer immediately and wait 20 minutes for the fuser to cool. Try to remove the jam after the
printer has cooled. If the error persists, contact your Xerox representative.
CAUTION: Do not attempt to clear any paper jams using tools or instruments. This can permanently
damage the printer.
The following illustration shows where paper jams occur along the paper path and the printer parts used
for clearing paper jams.
1. Output Tray
2. Transfer Belt
3. Release Levers
4. Rear Door
5. Front Door
6. Main Tray
7. Dust Cover
Xerox
User Guide
®
Phaser® 6020 Printer 95
Page 96

Troubleshooting
• Clearing Paper Jams From the Back of the Printer ................................................................................................ 97
Clearing Paper Jams
This section includes:
• Clearing Paper Jams from the Front of the Printer ............................................................................................... 96
To facilitate clearing paper jams, you can activate Jam Recovery Mode. Jam Recovery Mode runs the
printer for a brief period of time to move the paper further into the exit tray.
To run Jam Recovery Mode:
1. Press and hold the Cancel button for three seconds.
2. After the printer engine stops running, turn the power off, then remove the jammed paper.
Clearing Paper Jams from the Front of the Printer
1. Remove the dust cover.
2. Remove any paper jammed at the front of the printer.
3. Place the bypass tray on the main tray, then align the tabs with the marks.
96 Xerox
User Guide
®
Phaser® 6020 Printer
Page 97

Troubleshooting
4. Follow the instructions in the Printer Status window of PrintingScout.
5. Press OK.
6. To resolve the error displayed on the control panel you must clear all paper from the paper path.
Clearing Paper Jams From the Back of the Printer
1. Push down on the rear door release and pull open the door.
2. Lift the levers as shown.
3. Remove any jammed paper from the back of the printer.
Xerox
User Guide
®
Phaser® 6020 Printer 97
Page 98

Troubleshooting
4. Lower the levers to their original position.
5. Close the rear door.
6. Follow the instructions in the Printer Status window of PrintingScout.
7. Press OK.
8. To resolve the error displayed on the control panel you must clear all paper from the paper path.
98 Xerox
User Guide
®
Phaser® 6020 Printer
Page 99

Troubleshooting
• Paper Jam Message Stays On ....................................................................................................................................... 100
Use only Xerox approved paper. For details, see Supported Paper on
Troubleshooting Paper Jams
This section includes:
• Multiple Sheets Pulled Together .................................................................................................................................... 99
• Paper Misfeeds ...................................................................................................................................................................... 99
• Label and Envelope Misfeeds ....................................................................................................................................... 100
Multiple Sheets Pulled Together
Probable Causes Solutions
The paper tray is too full. Remove some of the paper. Do not load paper past fill line.
The edges of the paper are not even. Remove the paper, align the edges, and then reload it.
The paper is moist from humidity. Remove the paper from the tray, and replace it with new dry paper.
Too much static electricity is present.
• Try a new ream of paper.
• Do not fan transparencies before loading in tray.
Using unsupported paper.
page 50.
Humidity is too high for coated paper. Feed paper one sheet at a time.
Paper Misfeeds
Probable Causes Solutions
The paper is not correctly positioned in the
tray.
The paper tray is too full. Remove some of the paper. Do not load paper past the fill line.
The paper guides are not correctly adjusted
to the paper size.
The tray contains warped or wrinkled paper. Remove the paper, smooth it out, and reload it. If it still misfeeds,
The paper is moist from humidity. Remove the moist paper and replace it with new, dry paper.
Using paper of the wrong size, thickness, or
type.
• Remove the misfed paper and reposition it properly in the tray.
• Adjust the paper guides in the tray to match the size of the
paper.
Adjust the paper guides in the tray to match the size of the paper.
do not use that paper.
Use only Xerox approved paper. For details, see Supported Paper on
page 50.
Xerox
®
Phaser® 6020 Printer 99
User Guide
Page 100

Troubleshooting
Label and Envelope Misfeeds
Probable Causes Solutions
The label sheet is facing the wrong way in the
tray.
Envelopes are loaded incorrectly.
• Load label sheets according to the instructions from the
manufacturer. Load labels face up in either tray.
• Load No. 10, DL, and Monarch envelopes in the trays with the
print side up, flaps closed, flap-side down, and the short edge
leading into the printer.
• Load C5 envelopes with the print side up, flaps open and facing
away from the printer.
No. 10, DL, and Monarch envelopes are
wrinkling.
To prevent wrinkling on No. 10, DL, C5, or Monarch envelopes, load
them print side up, flaps open and facing away from the printer.
Note: When you load envelopes long-edge feed, ensure that you
specify landscape orientation in the print driver.
Paper Jam Message Stays On
Probable Causes Solutions
Some paper remains jammed in the printer. Recheck the media path and ensure that you have removed all of
the jammed paper.
Check for, and remove, torn pieces of paper in the paper path.
One of the printer doors is open. Check the doors on the printer and close any door that is open.
The rear door interlock switch is not reset. To reset the interlock switch and clear the paper jam message, open
and close the back door.
100 Xerox
®
Phaser® 6020 Printer
User Guide
 Loading...