

Page 1
Apple
Color OneScanner
User’s Manual for the Color OneScanner 600/27 and 1200/30
Page 2

K Apple Computer, Inc.
©1996 Apple Computer, Inc. All rights reserved.
Under the copyright laws, this manual may not be copied, in whole or in part, without the
written consent of Apple. Your rights to the software are governed by the accompanying
software license agreement.
The Apple logo is a trademark of Apple Computer, Inc., registered in the U.S. and other
countries. Use of the “keyboard” Apple logo (Option-Shift-K) for commercial purposes without
the prior written consent of Apple may constitute trademark infringement and unfair
competition in violation of federal and state laws.
Every effort has been made to ensure that the information in this manual is accurate. Apple is
not responsible for printing or clerical errors.
Apple Computer, Inc.
1 Infinite Loop
Cupertino, CA 95014-2084
408-996-1010
http://www.apple.com
Apple, the Apple logo, AppleScript, ColorSync, LaserWriter, Macintosh, and PowerBook are
trademarks of Apple Computer, Inc., registered in the U.S. and other countries.
Apple Desktop Bus, AudioVision, and Finder are trademarks of Apple Computer, Inc.
Adobe, Adobe Photoshop, and PostScript are trademarks of Adobe Systems Incorporated or its
subsidiaries and may be registered in certain jurisdictions.
Helvetica and Times are registered trademarks of Linotype-Hell AG and/or its subsidiaries.
MacDraw is a registered trademark of Claris Corporation.
Convolver is a trademark of MetaTools, Inc.
Kai’s Power Tools is a trademark of MetaTools, Inc.
TextBridge is a trademark of Xerox Imaging Systems, Inc.
Simultaneously published in the United States and Canada.
Mention of third-party products is for informational purposes only and constitutes neither an
endorsement nor a recommendation. Apple assumes no responsibility with regard to the
performance or use of these products.
Page 3

Con tents
Communications Regulation Information vii
1 Welcome 1
System requirements 2
What you need to know 2
In this manual 3
In the appendixes 4
2 Setting Up the Scanner 5
Unpacking the scanner and accessory kit 6
Choosing a SCSI cable 6
Choosing the right location 8
Carrying the scanner 9
Apple Color OneScanner at a glance 10
Locking and unlocking th e scanner 11
Setting the SCSI ID number and termination 12
Connecting the scanner to your Macintosh 13
Switching the power on 16
Important safety information 17
Where to go from here 17
iii
Page 4

3 Installing the Scanner Software 19
About the disks 19
Installing the scanner software 20
Installing the plug-in module for use by other applications 22
Assigning the Xerox TextBridge 3.0H application to the Dispatcher 23
Setting up ColorSync 25
Installing Kai’s Power Tools and Convolver 26
Where to go from here 26
4 Scanning Images 27
What you ca n scan 28
Preparing originals 28
Removing and replacing the scanner cover 31
Opening the OneScanner Dispatcher application 32
How the OneSca nner Dispatcher application is organized 33
Scanning with automatic settings 35
Saving a sca nn ed image 40
Assigning a fax application to the Dispatcher 42
Faxing or printing directly from the scanner 42
Opening a saved image from an archive 43
Renaming a saved image in an archive 45
Printing or faxing a saved image from an archive 45
Adding your own drag-and-drop applications 47
Scanning directly into a graphics application 49
Scanning with custom settings 51
Changing image size and ruler units 57
Copyright regulations (USA) 59
iv
Contents
Page 5

5 Editing Scanned Images 61
Opening a saved image 62
Image-editing overview 6 4
Showing and hiding the palettes 65
Selecting images 66
Using the tools to edit an image 68
Copying, cutting, or deleting a selection 75
Undoing an action 76
Zooming in and out 76
Inverting an image from positive to negative 77
Adjusting the brightness a nd contrast 78
Changing the color balance 79
Sharpening an image 80
Resizing an image 82
Cropping a n image 83
Flipping an image 84
Rotating an image 85
Setting the image depth 86
Setting ColorSync preferences 87
Changing the way you view an archive 88
6 Scanning Text 89
Scanning a text document into the TextBridge application 90
Moving a text image to the TextBridge application 92
Converting a text image into an HTML document 94
7 Dispatcher Commands 95
File menu 96
Edit menu 102
Image menu 103
Window menu 107
Image-editing tools 108
Contents
v
Page 6

8 Scanner Maintenance 111
Cleaning the scanner 111
9 Using the Automatic Document Feeder 113
Setting up the Automatic Document Feeder 113
Automatic Document Feeder at a glance 116
Choosing originals to scan 117
Scanning with the document feeder 118
Bypassing the document feeder 121
Clearing paper jams 122
Maintenance 129
10 Using the Transparent Media Adapter 137
Setting up the Transparent Media Adapter 137
Handling film 141
Inserting film into a film guide for scanni ng 142
Scanning with the Transparent Media Adapter 145
Bypassing the adapter 148
Maintenance 149
Troubleshooti ng 150
Appendix A Technical Specifications 153
Appendix B Troubleshooting 155
Appendix C Assembling a SCSI Chain 159
Index 167
vi
Contents
Page 7

Communic ations re gu lation information
FCC statement
This equipment has been tested and found to comply with the limits for a Class B digital device
in accordance with the specifications in Part 15 of FCC rules. See instructions if interference to
radio or television reception is suspected.
Radio and television interference
The equipment described in this manual generates, uses, and can radiate radio-frequency
energy. If it is not installed and used properly—that is, in strict accordance with Apple’s
instructions—it may cause interference with radio and television reception.
This equipment has been tested and found to comply with the limits for a Class B digital device
in accordance with the specifications in Part 15 of FCC rules. These specifications are designed
to provide reasonable protection against such interference in a residential installation. However,
there is no guarantee that interference will not occur in a particular installation.
You can determine whether your computer system is causing interference by turning it off. If
the interference stops, it was probably caused by the computer or one of the peripheral devices.
If your computer system does cause interference to radio or television reception, try to correct
the interference by using one or more of the following measures:
m Turn the television or radio antenna until the interference stops.
m Move the computer to one side or the other of the television or radio.
m Move the computer farther away from the television or radio.
m Plug the computer into an outlet that is on a different circuit from the television or radio.
(That is, make certain the computer and the television or radio are on circuits controlled by
different circuit breakers or fuses.)
If necessary, consult an Apple-authorized service provider or Apple. See the service and support
information that came with your Apple product. Or, consult an experienced radio/television
technician for additional suggestions.
IMPORTANT
could void the FCC Certification and negate your authority to operate the product.
This product was tested for FCC compliance under conditions that included the use of Apple
peripheral devices and Apple shielded cables and connectors between system components. It is
important that you use Apple peripheral devices and shielded cables and connectors between
system components to reduce the possibility of causing interference to radios, television sets,
and other electronic devices. You can obtain Apple peripheral devices and the proper shielded
cables and connectors through an Apple-authorized dealer. For non-Apple peripheral devices,
contact the manufacturer or dealer for assistance.
Changes or modifications to this product not authorized by Apple Computer, Inc.,
Communications Regulation Information
vii
Page 8
DOC statement
DOC Class B Compliance This digital apparatus does not exceed the Class B limits for radio
noise emissions from digital apparatus as set out in the interference-causing equipment standard
entitled “Digital Apparatus,” ICES-003 of the Department of Communications.
Observation des normes—Classe B Cet appareil numérique respecte les limites de bruits
radioélectriques applicables aux appareils numériques de Classe B prescrites dans la norme
sur le matériel brouilleur : “Appareils Numériques”, NMB-003 édictée par le ministre des
Communications.
VCCI statement
viii
Communications Regulation Information
Page 9

1
W elcome
Welcome to the Apple Color OneScanner. With the Color On eScanner and
the Apple OneScann er Dispatcher application program, you can
m scan an image or document and save it in a format you can use with
compatible graphics and page-layout applications
m print or fax saved images using convenient drag-and-drop icons
m retrieve saved images using thumbnail-view archives
m use the Apple Color OneScanner plug-in module to scan directly i nto
applications compatible with Adobe
™
Photoshop plug-ins
1
Page 10

System r equirements
The Apple Color OneScanner works with Macintosh computers with the
following configurations:
m System software version 7.5 or later
m 68030 or later processor
Scanning and sca nned images require significa nt space on your computer and
significant free space on a hard disk.
m You need at least 12 megabytes (MB) of random-access memory (RAM).
The OneScanner Dispatcher software requires at least 3 MB of free RAM.
The TextBridge OCR software requires at least 4 MB of RAM. If you
use the two applications at the same time, th ese RAM requirements are
additive (you need at least 7 MB of available RAM, plus the RAM
required by your system). Scanning operations improve with more RAM.
m Your hard disk n eeds to have at least 20 MB of disk space available.
What you need to know
If you’re new to the Macintosh—or to computi ng in general—you need to
2
m read the information that came with your computer
m explore the interactive learning products you received
These materials will explain the basic Macintosh skills you need to have
before you set up and use your scanner.
Chapter 1
Page 11

In this m anu al
This manual provides step-by-step instructions and reference information for
the Apple Color OneScanner and the OneScanner Dispatcher application.
Chapter Title Provides information about. . .
1 Welcome This manual and system requirements
2 Setting Up the Scanner Assembling and connecting the scanner
to your Macintosh computer
3 Installing the Scanner Installing the OneScanner Dispatcher
Software
4 Scanning Images Using the scanner and the OneScanner
5 Editing Scanned Images Using the OneScanner Dispatcher application
6 Scanning Text Using the OneScanner Dispatcher application
7 Dispatcher Commands The software, organized by menus and tools
8 Scanner Maintenance Basic maintenance procedures
application and related software
Dispatcher application to scan, save, print,
and fax; using drag-and-drop icons
to change your scanned images
to scan text
9 Using the Automatic Installation and use
Document Feeder
10 Using the Transparent Installation and use, including a section
Media Adapter on troubleshooting
Welcome
3
Page 12

In the appendixes
The appendixes provide supplementary i nformation about the Apple Color
OneScanner.
Appendix Title Provides information about. . .
A Technical Specifications Technical features of the Apple Color
B Troubleshooting Diagnosing and correcting problems
C Assembling a SCSI Chain Connecting the scanner and other
OneScanner
SCSI devices
4
Chapter 1
Page 13

2
Setting Up the Scanner
This chapter shows you how to set up the Apple Color On eScanner. You’ll
find instructions for
m unpacking, carrying, and placing the scanner
m connecting the scanner to a Macintosh computer
m plugging in the scanner and switching it on
m safely using your scanner
5
Page 14
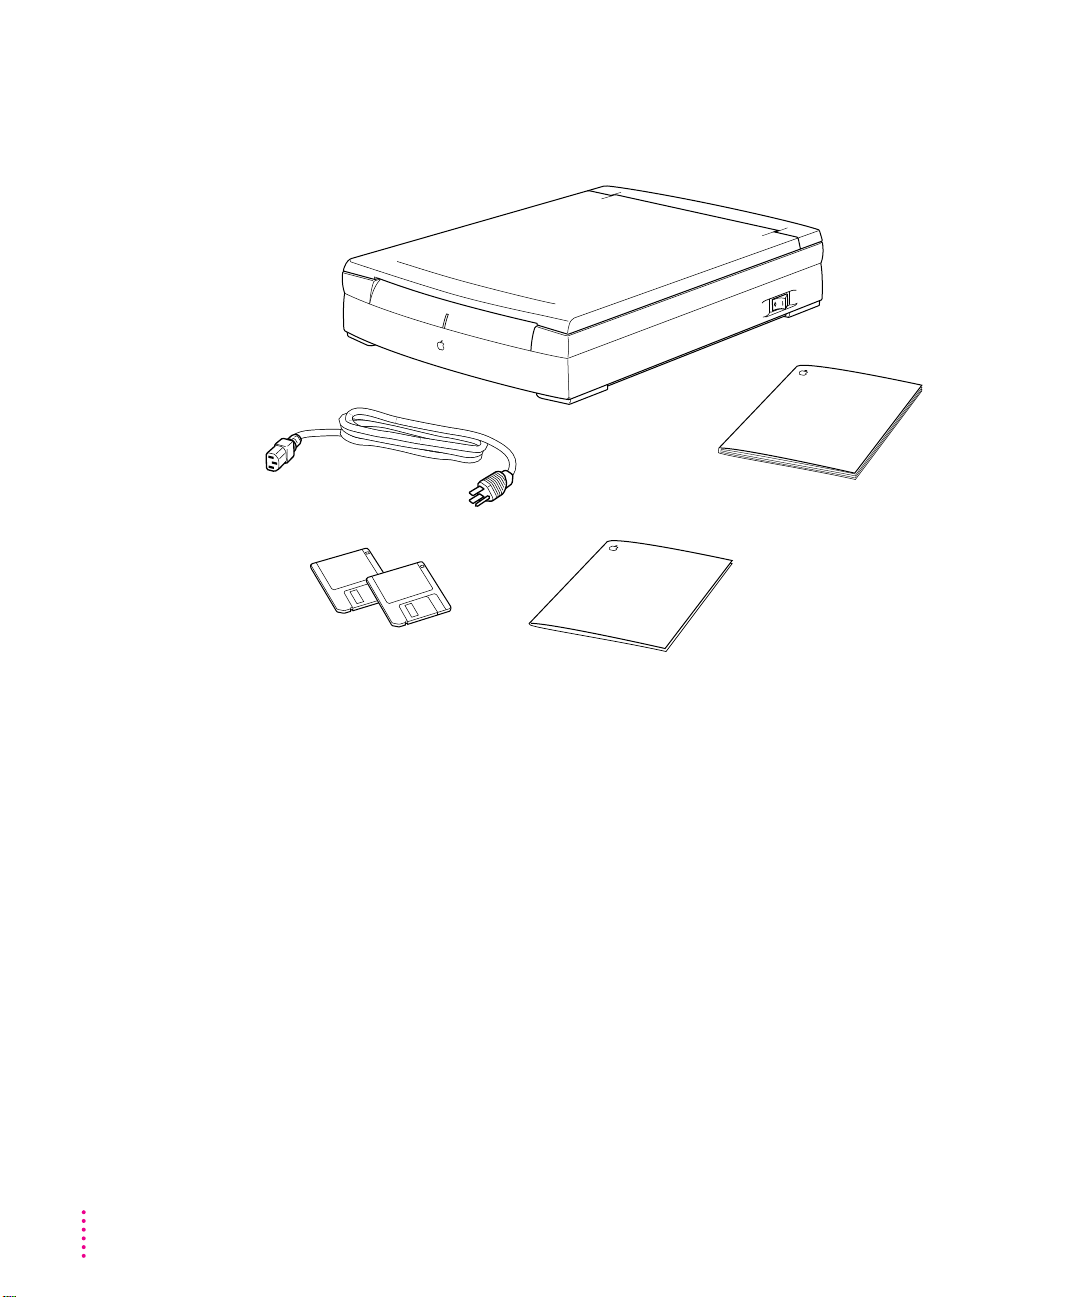
Unpacking the scanner and accessory kit
Make sure you have the items shown here.
Power cord
Color OneScanner
Color OneScanner
User’s Manual
Color OneScanner software
You may have received additional third-party software with your scanner.
Choosing a SCSI cable
The Apple Color OneScanner connects to your Macintosh through a Small
Computer System Interface (SCSI) cable (pronounced “SKUH-zee”). This
cable provides for high-speed communication between the computer and a
SCSI device, or devices, connected to the computer.
You will need to purchase a SCSI cable to connect your Apple Color
OneScanner to the Macintosh. If you have a Macintosh IIfx, you also need a
special terminator. For more information about connecting the scanner to a
Macintosh IIfx or PowerBook computer, see Appendix C.
Apple recommends that you purchase only Apple-brand SCSI cables, which
are properly shielded for trouble-free operation. You can purchase SCSI
terminators and cables from your authorized Apple reseller.
Quick Start
Dispatcher software
card for OneScanner
6
Chapter 2
Page 15
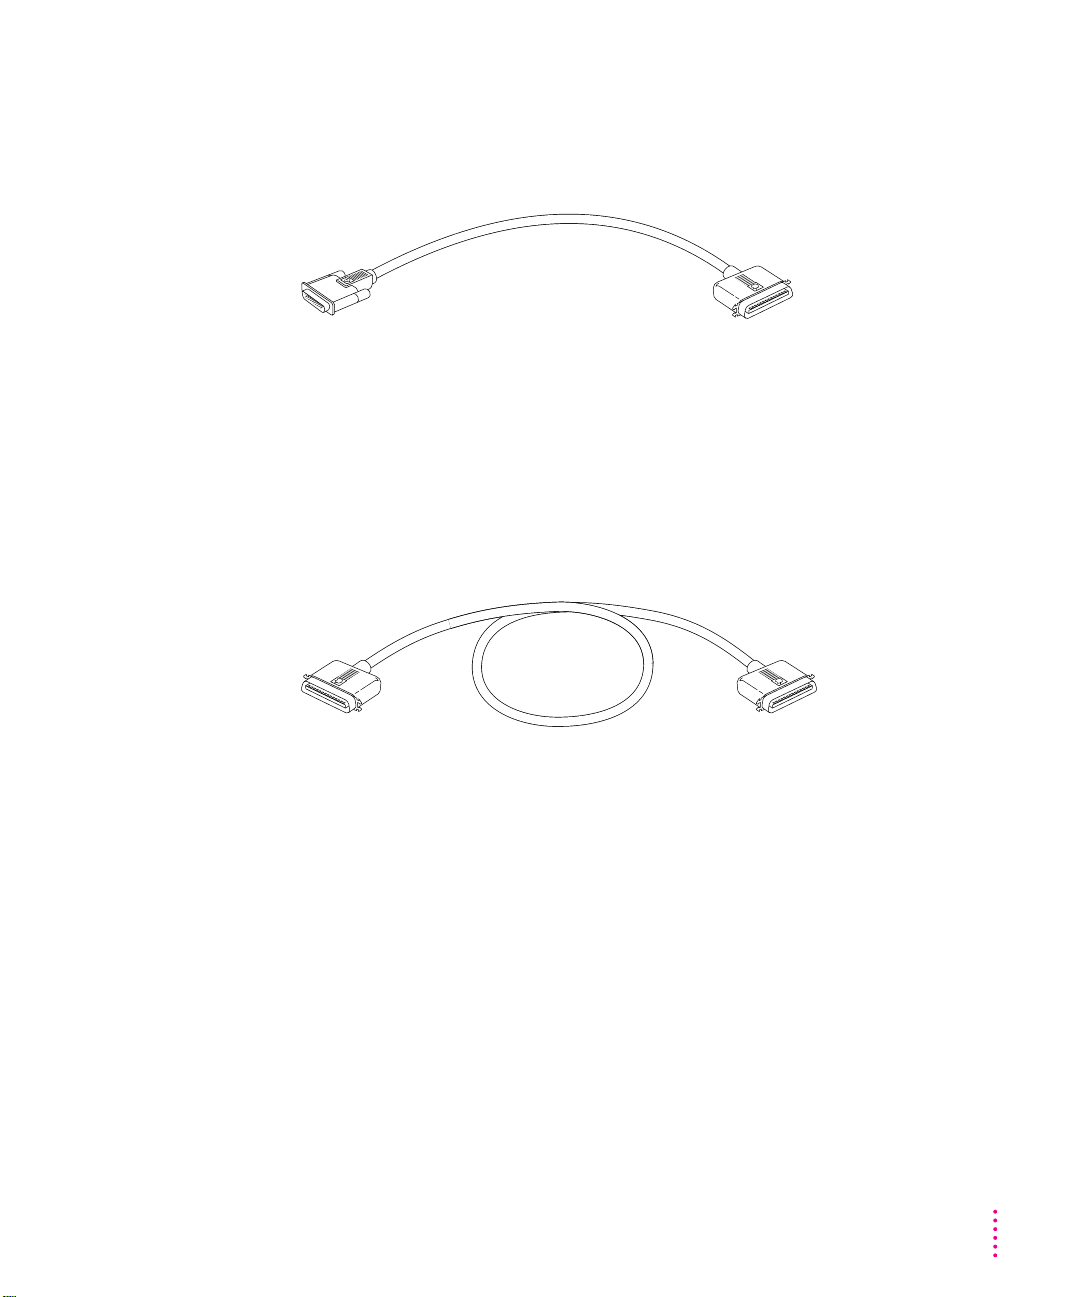
To connect the scanner directly to the Macintosh
To connect the scanner directly to your Macintosh computer, you need a SCSI
system cable.
SCSI system cable (one end
is smaller than the other)
To connect the scanner at the end of a SCSI chain
If you already have an external SCSI device (such as a SCSI hard disk drive)
attached to your Macintosh computer, Apple recommends that you connect
the scanner at the end of the SCSI chain.
To make this connection, you n eed a SCSI peripheral cable.
SCSI peripheral cable
To use a different arrangement (configuration)
For information about connecting the scanner in the middle of a SCSI chain,
see Appendix C, “Assembling a SCSI Chain.”
Setting Up the Scanner
7
Page 16
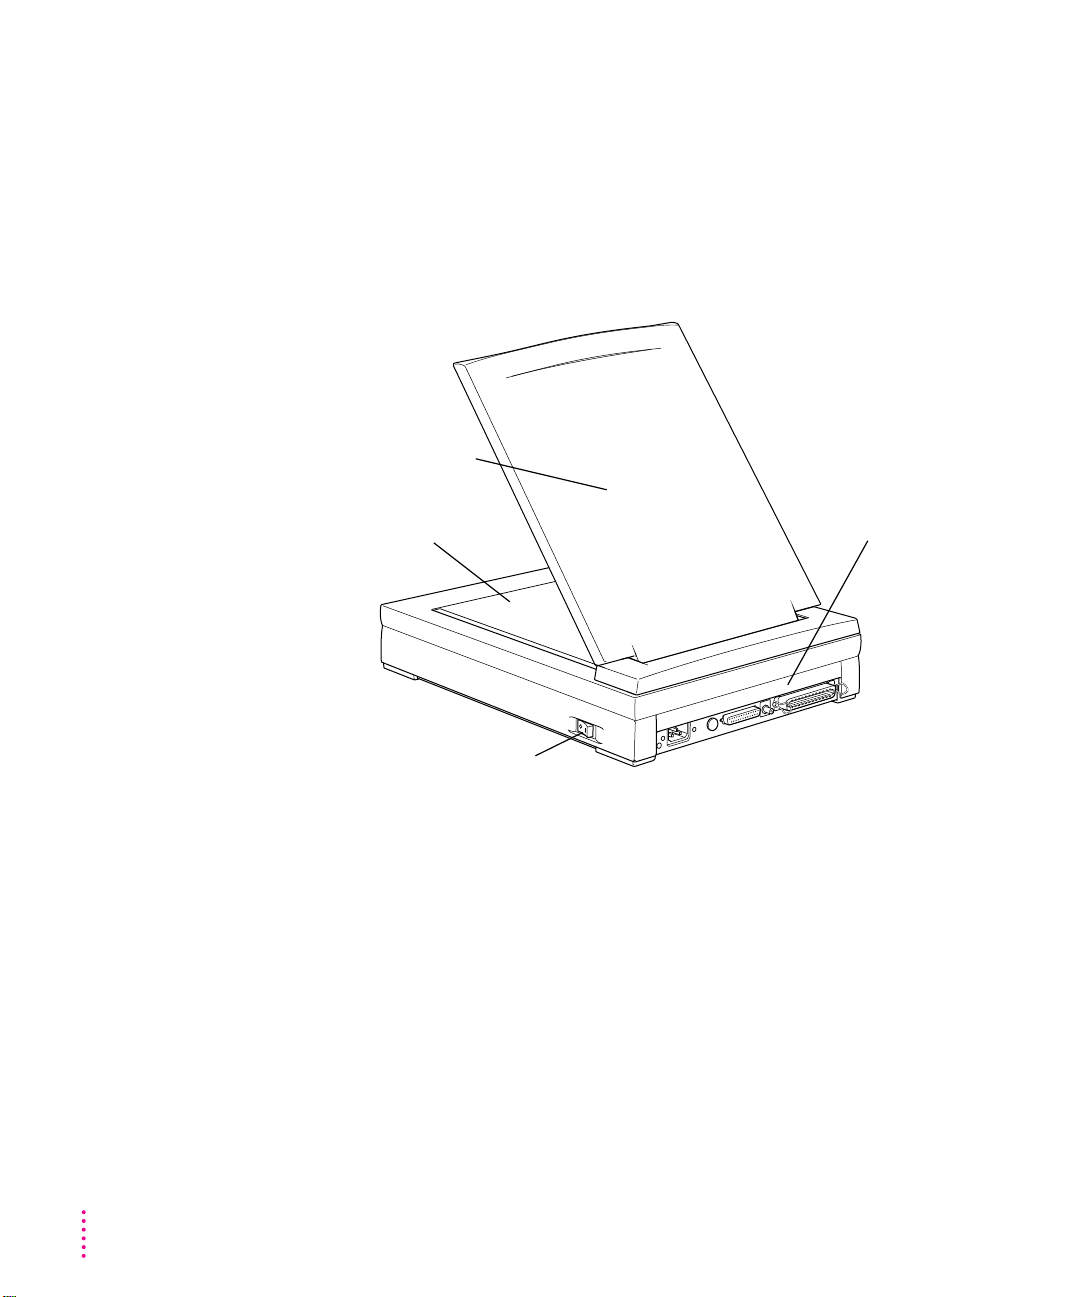
Choosing the right location
Before you set up the scanner, choose a work area that’s convenient for you
and that meets the physical requi rements of the scanner:
m a level, stable surface, such as a desk or table
m a grounded three-pin power outlet
m space around the scanner for easy access to the on/off switch
Allow clearance
above the scanner so
the top cover opens easily.
Leave enough room to place
large originals on the
scanner glass.
Allow enough space
at the back of the
scanner for the
power cord and
SCSI connectors.
8
On/off switch
Environmental c onsiderations
m Make sure you allow space for adequate ventilation so the scanner does not
overh eat.
m If relative humidity is low, use a humidifier or an antistatic mat to avoid
electrostatic buildup. Avoid dusty areas, places wh ere the scanner will b e
exposed to salty air or corrosive gases, and locations where temperature
and humidity levels vary significa ntly.
m Avoid placing the scanner in direct sunlight or exposing it to open flames.
m Place the scanner on a surface that is free from vibrations.
Chapter 2
Page 17
Safety precautions
m Don’t place the scanner where anyone can walk on the power cord, and do
not allow anythi ng to rest on the cord. If you must use an extension cord,
be sure the total length of the power cord plus the extension cord is not
greater than 16.5 feet (5 meters).
m Keep th e scanner away from equipment that might cause electromagnetic
or radio frequency interference, such as radio transmitters, cordless
telephone base units, television sets, copy machines, and heating and
air-conditioning equipment.
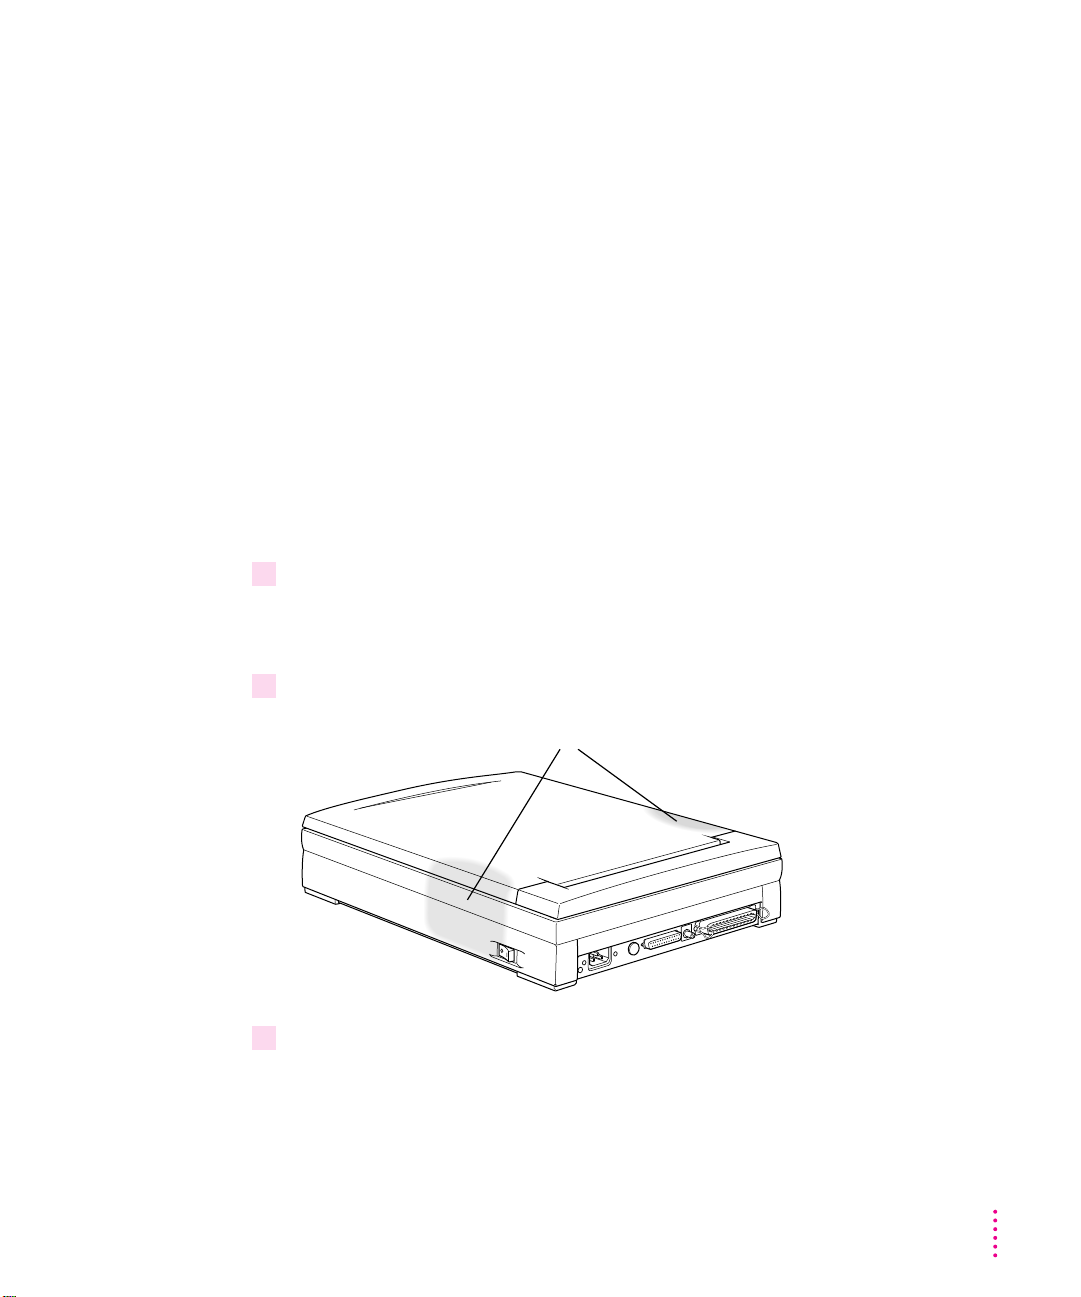
Carr ying the scanner
The Apple Color OneScanner is a complex electronic device. Handle the
scanner carefully as you set it up.
To carry the scanner:
1 Make sure the scanner carriage is locked.
For information, refer to “Locking and Unlocking the Sca nner,” later in
this chapter.
2 Grasp the scanner by its side edges, toward the back:
Grasp scanner here.
3 Carry the scanner flat, without tipping it on its ends or sides, and keep it stable.
Setting Up the Scanner
9
Page 18
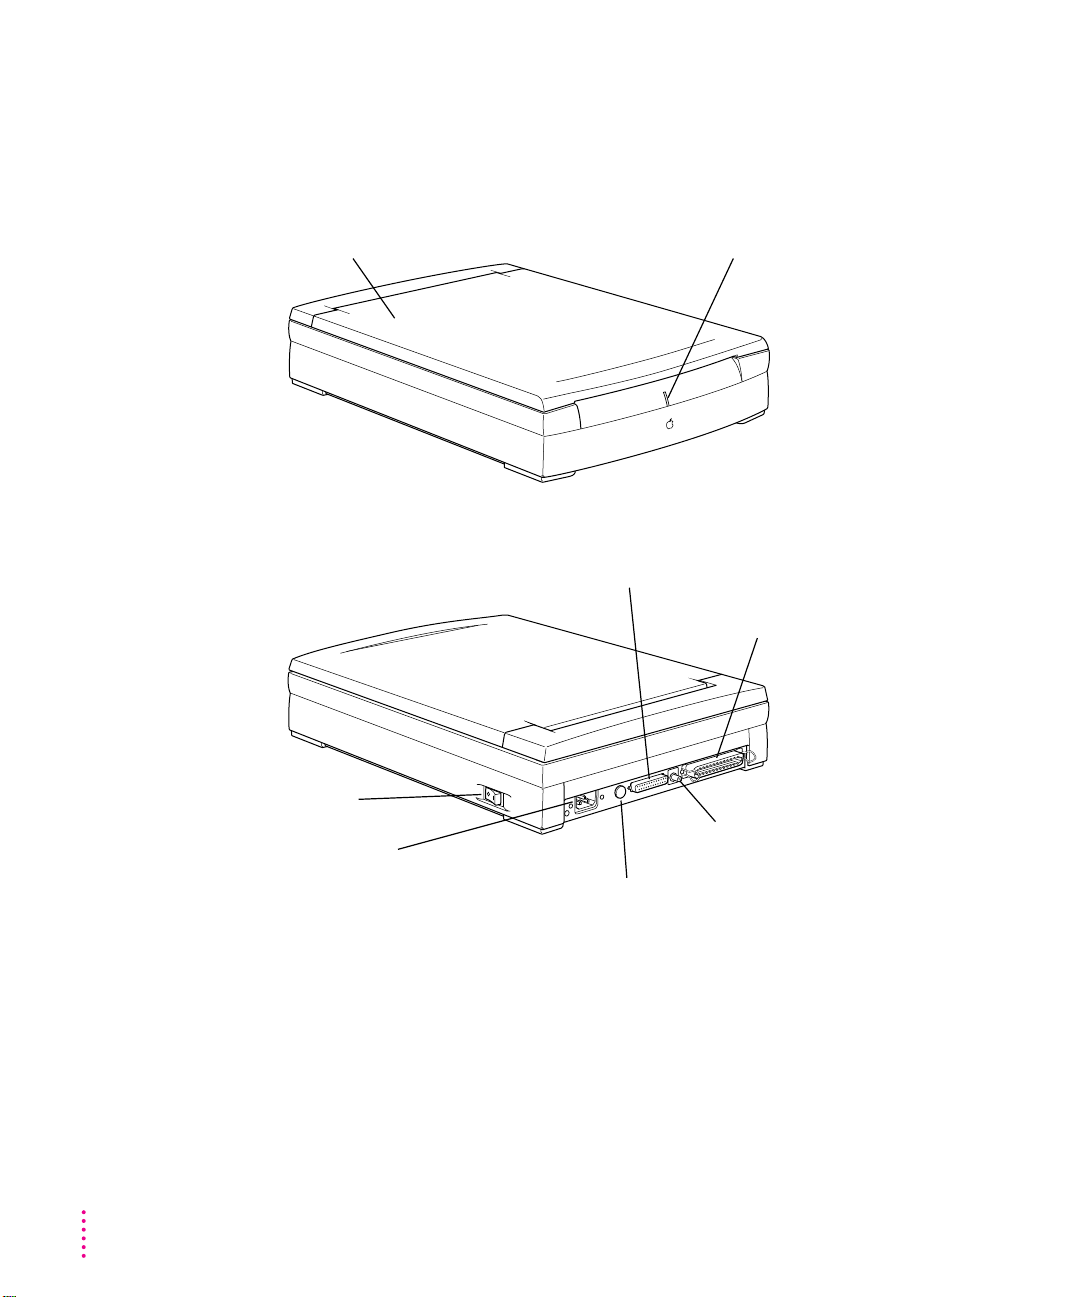
Apple Color OneScanner at a glance
Now that you’ve unpacked the scanner and accessory kit and found a good
location, take a moment to identify the most important parts of your new
Apple Color OneScanner.
Scanner cover
On/off switch
Power cord socket
Power on light
SCSI connector (small)
SCSI connector (large)
SCSI ID and
termination selector
10
Capped connector for Automatic Document
Feeder or Transparent Media Adapter
Chapter 2
Page 19
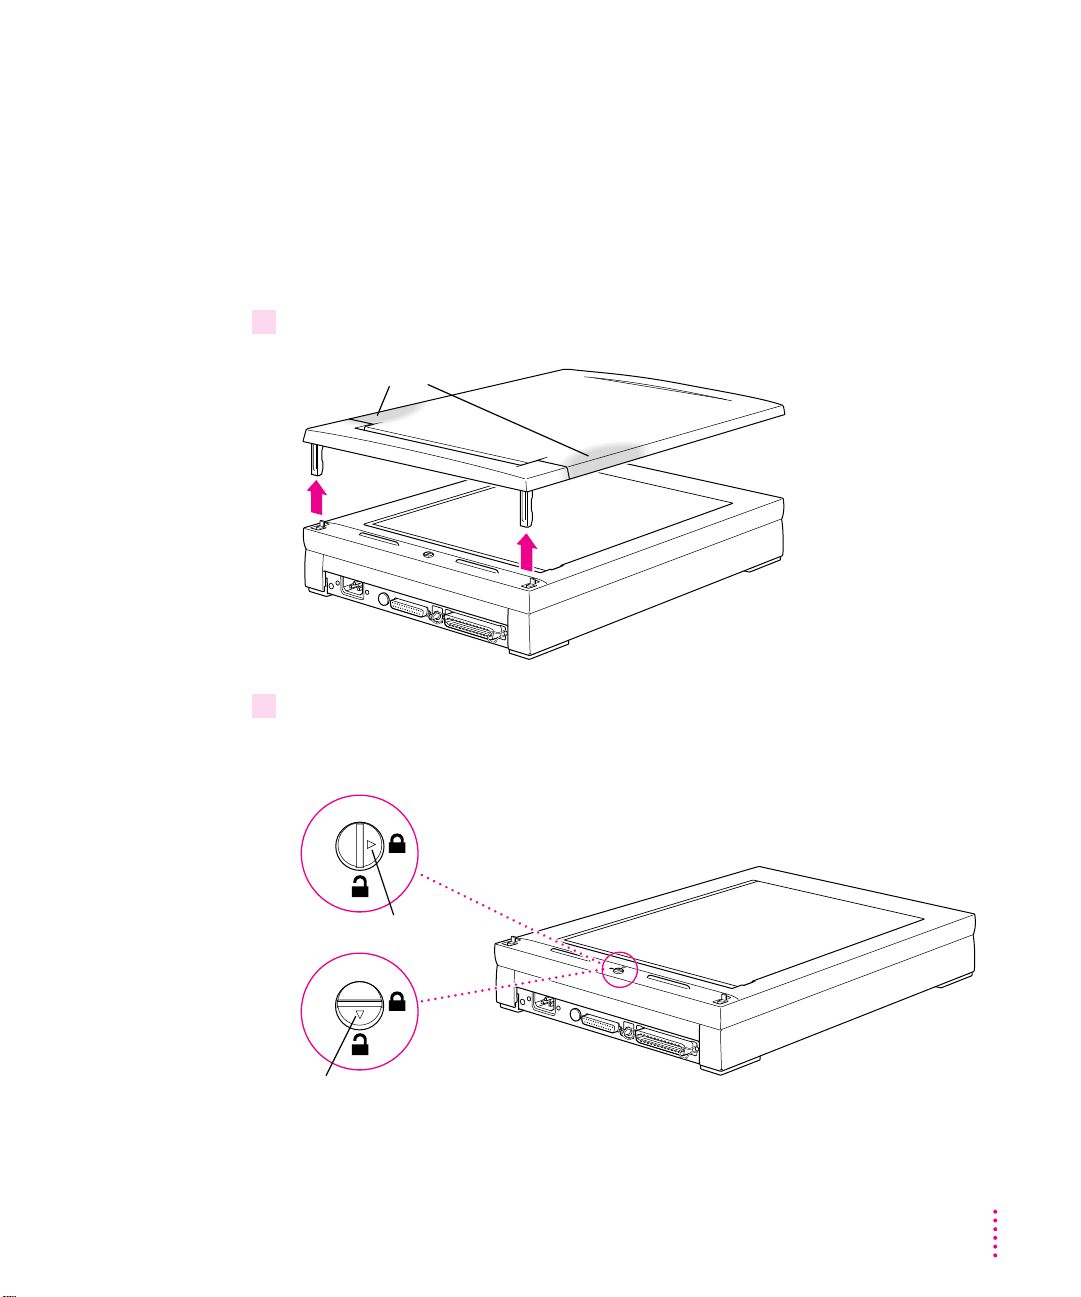
Locking and unlocking the scanner
The Apple Color OneScanner carriage is locked during shipment. Make sure
the carriage is unlocked. The scanner will not work if the carriage is locked.
If in the future you need to ship the sca nner for service or move it to a
different place, be sure to relock the scanning unit.
To lock or unlo ck the scanning unit:
1 Grip the scanner top cover on both sides and lift it off.
Grasp cover here.
2 Use a coin to turn the lock to the locked or unlocked position.
Take care not to scratch the scanner glass.
Locked position
Unlocked position
Setting Up the Scanner
11
Page 20
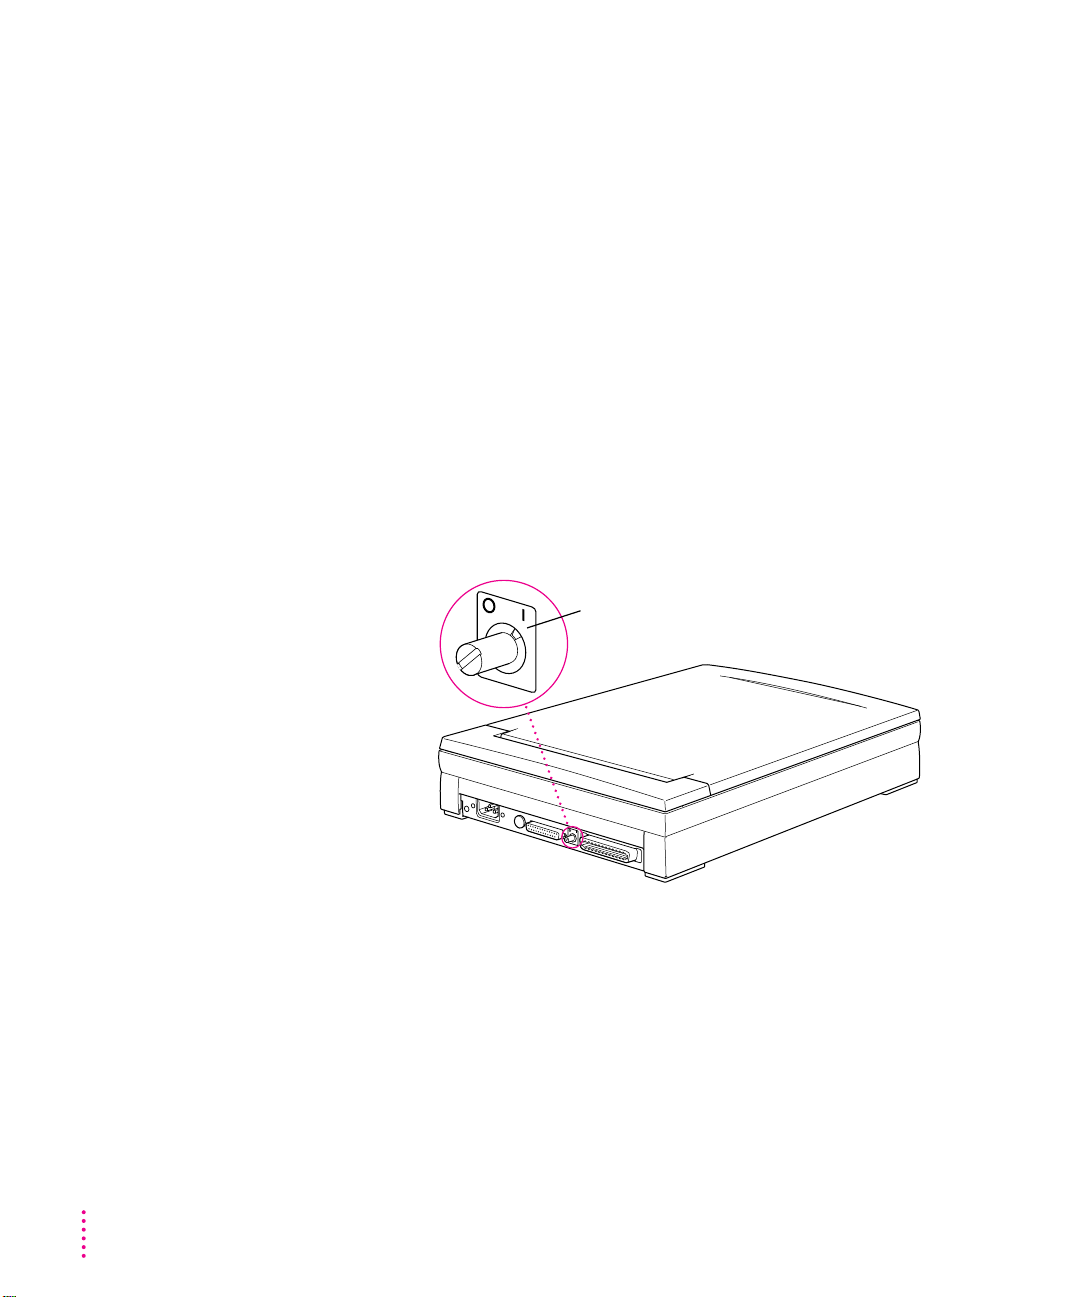
Setting the SCSI ID number and termination
You may not need this step. You can skip this topic if
m the scanner is the only external SCSI device to be connected to your
Macintosh
or
m you’re setting the scanner up as the last device in a SCSI chain
If you need to change the SCSI ID numb er or termination setti ng, do so after
you review this topic and before you connect any cables.
About the SCSI ID number
A SCSI ID selector on the back of the scanner identifies the Macintosh port
through which scanner information travels. T he SCSI ID number is preset to
2. This factory setting is valid if you have no other SCSI device occupying
SCSI ID number 2.
To choose a SCSI ID with
termination on, use the
“I” side of the dial. To
choose a SCSI ID with
termination off, use the
0
1
7
6
2
2
5
4
3
2
6
1
7
0
SCSI ID selector
switch set to 2 “on”
(default setting)
3
4
5
“O” side. The ID numbers
are the same on
both sides.
0
1
7
6
2
5
3
4
4
3
5
2
6
1
7
0
You can change the SCSI ID number if your configuration requires a different
number.
Numbers to avoid: Don’t assign numbers 0, 3, or 7 to the scanner. Th e default
setting for the Macintosh computer is 7. The default setting for an i nternal
CD-ROM player is 3. The default setting for the internal hard disk drive
inside your Macintosh is 0. Make sure you use a number that is not assigned
to any other SCSI device. Each ID number must be unique.
12
Chapter 2
Page 21

About SC S I termination
The SCSI selector on the Apple Color OneScanner also works as a selector
for internal SCSI ter mination. Termination is set to “on” at the factory.
If the scanner is the only SCSI device connected to your Macintosh or if you
place the scanner as the last device in a SCSI chain, the “on” setti ng is correct
and doesn’t n eed to be changed.
If the scanner is one device in a SCSI chain, but not the last device, you must
turn off termination. See Appendix C for details.
Connecting the scanner to your Macintosh
You’re now ready to connect th e scanner to your Macintosh computer.
If you’re connecti ng the scanner to a Macintosh PowerBook, see the manual
that came with your computer for instructions on connecting SCSI devices.
WARNING
Before you begin, make sure that the power to the scanner,
your computer, and any connected devices is switched off. If the power
is on while you connect or disconnect SCSI cables, you can damage the
system.
If you need to conn ect more than one SCSI device to your computer,
follow the instructions above or those in Appendix C, “Assembling a
SCSI Chain.” Correct placement of the devices and the cable termi nator
(if one is required) is important. You can damage your equipment if you
connect the devices the wrong way.
Setting Up the Scanner
13
Page 22
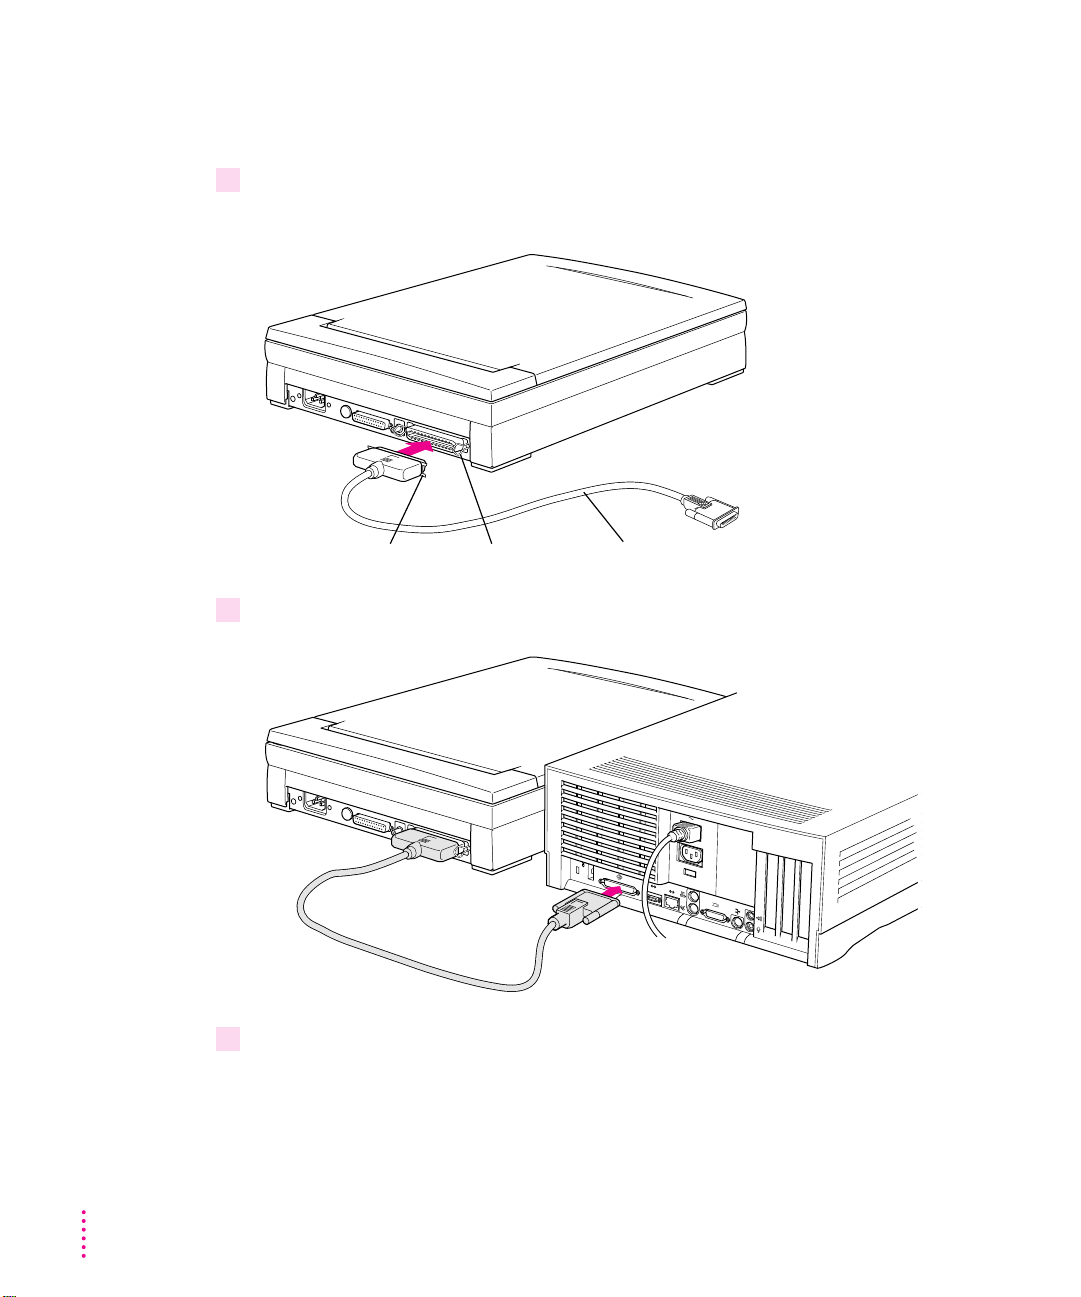
Connecting the SCSI cable
Follow these steps to connect th e scanner directly to your computer.
1 Plug the large end of the SCSI cable into the back of the scanner, and push the retaining
clips into the tabs.
Retaining clipRetaining tab
2 Plug the small end of the SCSI connector into the back of the Macintosh, as shown.
3 Gently tighten the thumbscrews on the cable.
SCSI cable
You’re now ready to attach th e power cord.
14
Chapter 2
Page 23
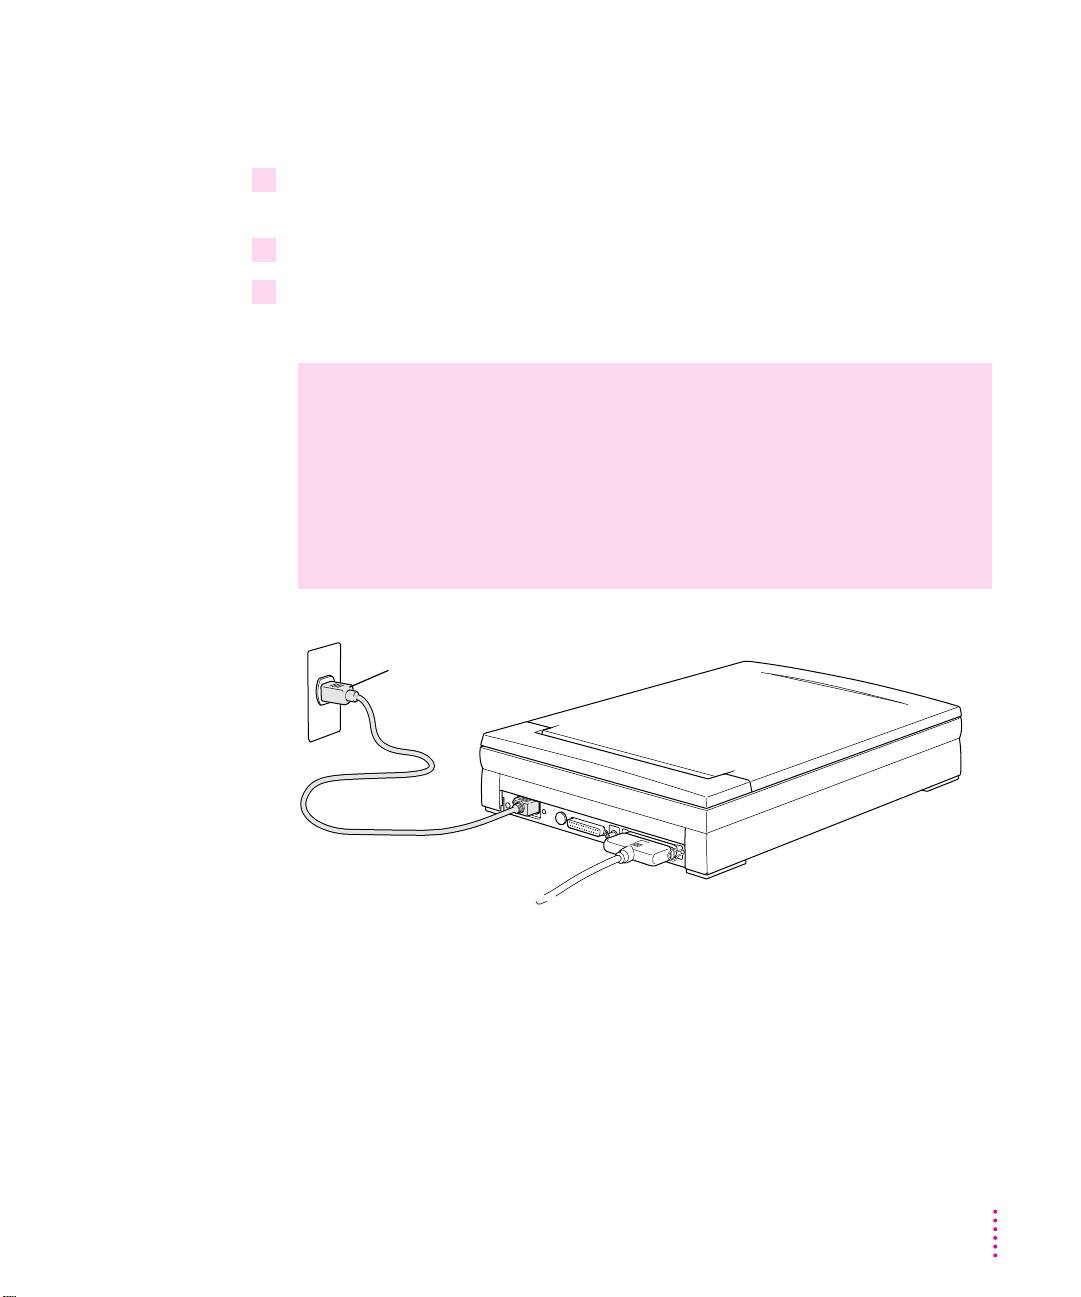
Connecting the power cord
Follow these steps to connect th e power cord to the scanner:
1 Align the holes in the socket end of the power cord with the pins of the power cord
socket on the back of the scanner.
2 Plug the socket end of the power cord into the pins on the scanner.
3 Plug the other end of the power cord into a standard electrical outlet that accepts a
three-pronged plug.
WARNING
This equipment is intended to be electrically grounded. Your
Apple Color OneScanner is equipped with a three-wire grounding
plug—a plug that has a third (grounding) pin. This plug will fit only a
grounded AC outlet. This is a safety feature. If you are unable to insert
the plug into the outlet, contact a licensed electrician to replace the
outlet with a properly grounded outlet. Do not defeat the pur pose of the
grounding plug!
Power cord plug
You’re now ready to switch the scanner on and install the scanner software.
Setting Up the Scanner
15
Page 24
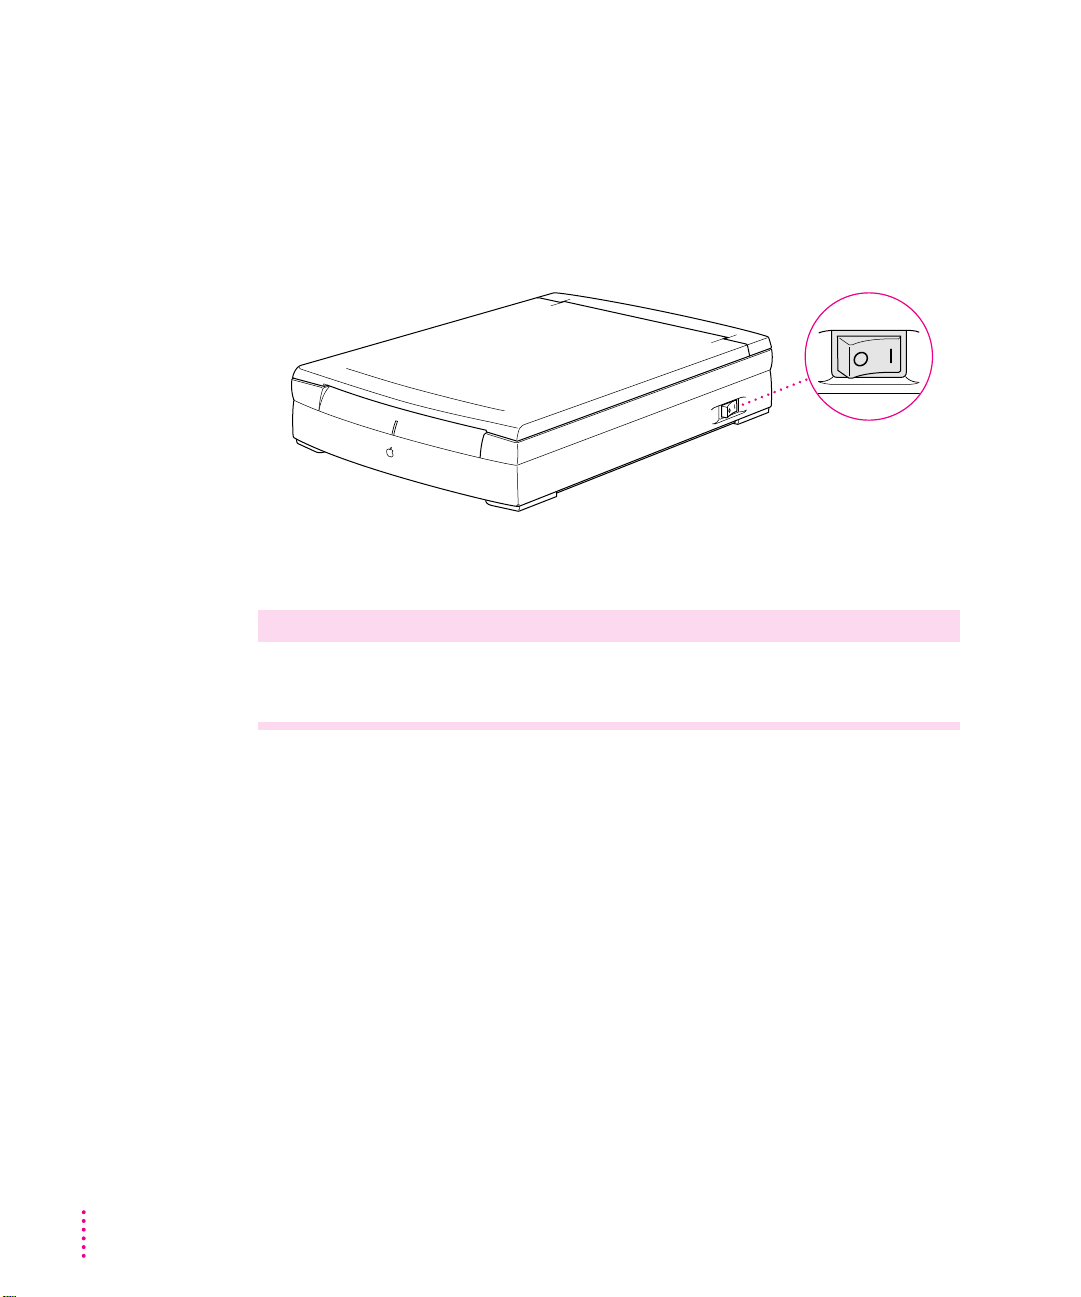
Switching the power on
The scanner and other SCSI devices require that you switch th e power on in a
certain sequence.
To switch the scanner on:
m
Press the on/off switch.
Switching the power on
Equipment attached to computer Switch on in this order
Scanner only Scanner > computer
“O” is for off,
and “I” is for on.
16
Scanner plus other devices Scanner > other devices > computer
If you start the computer before you turn on the scanner, the computer won’t
be able to find the scanner.
Chapter 2
Page 25

Important safety information
Any electrical device, when operated improperly, can be hazardous. Before
you use your scanner, become familiar with these important safety
precautions:
m Don’t use the scanner near water.
m Use the power cord that is appropriate for use in the country in which you
use the scanner.
m Never drop or insert objects of any kind into the scanner.
m Never spill liquid of any kind on or into the scanner. Should an object or
liquid come i nto contact with high-voltage points inside the scanner, a fire
could occur, or you could b e exposed to electrical shock.
m If liquid of a ny kind is accidentally spilled on or into the scanner,
immediately switch th e power off and disconnect the power cord.
m Don’t allow young children to handle power cords or cables.
m Be careful not to drop the scanner or allow it to collide with other objects.
Where to go from here
You’ve now completed the hardware part of scann er setup. The next step is to
install the scanner software. See Chapter 3, “Installing the Scanner Software,”
for instructions.
Setting Up the Scanner
17
Page 26

Page 27

3
About the disks
Installing the Scanner Software
This chapter tells you how to install the software you need to use the Apple
Color On eScanner. You’ll find i nstructions for
m installing the Apple OneSca nner Dispatcher application and related
software
m installi ng the Apple Color OneScanner plug-in module for use with a
compatible graphics application
m assigning the Xerox TextBridge application for use with the scanner
software
m installi ng Kai’s Power Tools and Convolver plug-ins from MetaTools
(plug-in filters which come with the Color OneScanner 1200/30)
To install the scanner software, you need the disks that came with your
scanner (in the accessory kit). You should have two disks: OneScanner
Dispatcher Disk 1 and Disk 2. These disks contain
m the Installer, a system program you use to install everything you need to
use the scanner
m the scanner driver
m a Read Me file, which provides information available too late to be
included in this manual, and the SimpleText application program for
viewing the Read Me file
19
Page 28

m ColorSync, a system program that records color information about scanned
images so the colors stay consistent in different applications and on
different devices, such as pri nters a nd monitors
Most of the files on these disks are compressed. To install them, you must use
the Installer.
Your scanner package may include additional software. If you want to install
and use the software, see the on-disk documentation that comes with the
software for installation and user instructions.
IMPORTANT
Apple recommends that you make backup copies of th e disks and
store the originals in a safe place. If you need instructions for copying disks,
see your Maci ntosh user’s manual.
Installing the scanner software
To install the scanner software and start scanning, remember that you
need at least 20 MB of space available on your hard disk. You must have
system software version 7.5 or a later version to use the scanner with your
Macintosh computer.
Note: If you’re using a system with 8 MB of RAM, Apple recommends that
you turn on Virtual Memory.
To install the software:
1 Turn off any automatic virus-detection programs and restart your Macintosh computer.
If you leave these programs on, problems may o ccur. You can turn the virusdetection programs back on after i nstallation is complete.
2 Insert
OneScanner Dispatcher Disk 1
If necessary, open the icon for OneScanner Dispatcher Disk 1. A wi ndow
appears, showing th e contents of the disk.
into a floppy disk drive.
20
Chapter 3
Page 29
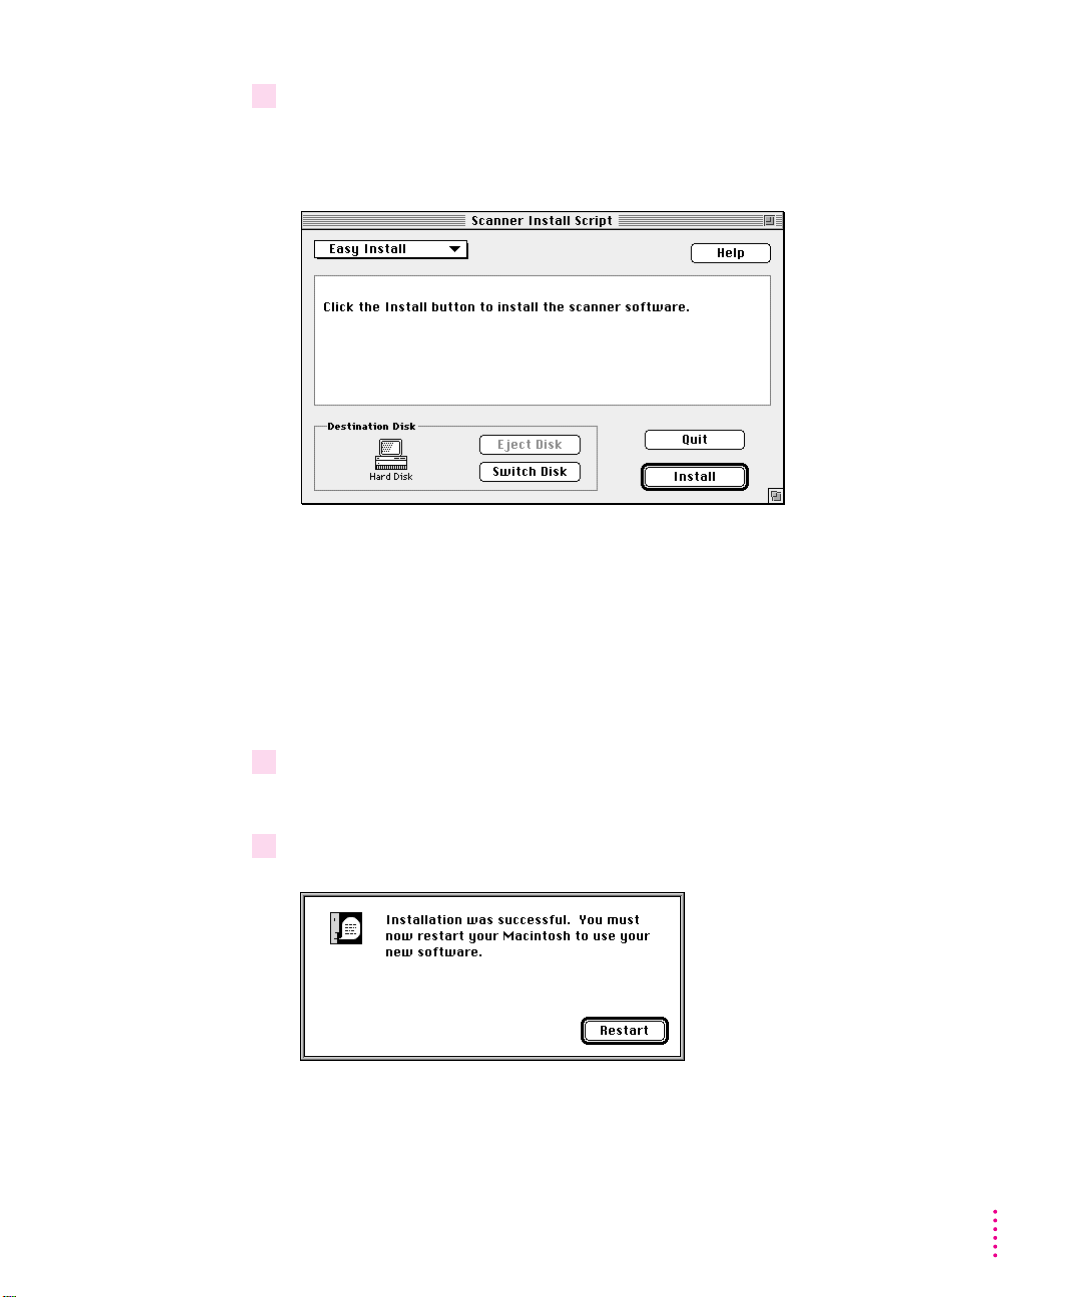
3 Double-click the Installer icon.
After a welcome screen appears (click Continue), an installation dialog
box opens.
Easy Install: Apple recommends that you use the Easy Install process for
your sca nn er software. Easy Install places all necessary files on your hard disk
and updates any existing files as needed.
Custom installations: The I nstaller has a custom feature that allows you to
choose specific items from a list and have them installed. To use this feature,
click Easy Install in the I nstall dialog box to open a pop-up menu, and choose
Custom Install. Then follow the instr uctions on the screen.
4 Click Install and follow the instructions on the screen.
A status box keeps you informed of progress during installation.
5 When the process is complete, a message tells you that installation was successful.
Installing the Scanner Software
21
Page 30
6 If the scanner is not on, switch it on.
7 Click Restart.
Installing the plug-in module for use by other applications
The Apple Color OneScanner plug-in module allows you to scan images
directly into applications compatible with Adobe Photoshop plug-ins. The
user’s manual for your application will tell you where the application requires
you to place the plug-in module.
Before you install the plug-in modules, you must install the Apple Color
OneScanner software, as described earlier in this chapter.
To install the plug-in module for use by another application:
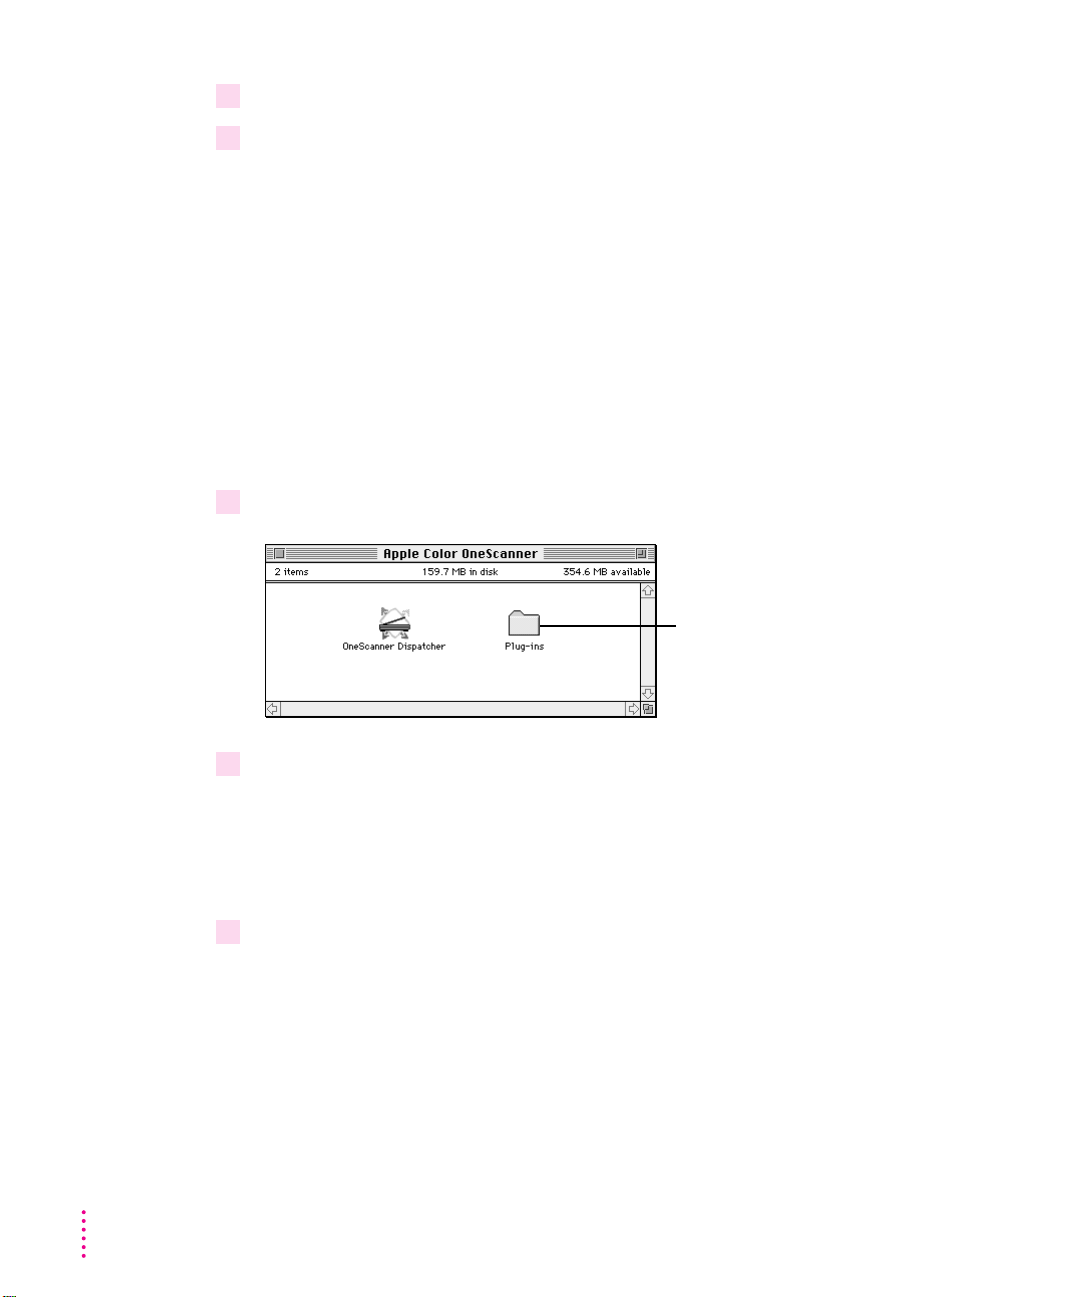
1 Open the Apple Color OneScanner folder (the one you just installed on your hard disk).
Plug-ins folder
22
2 Open the Plug-ins folder, select the plug-in icon, and choose Duplicate or Make Alias
from the File menu (Finder).
A copy or an alias of the plug-in module is created. (An alias takes up no
space on your disk, a big advantage. For information about usi ng aliases, see
your Macintosh user’s manual or Apple Guide, Apple’s online help.)
3 Move the copy or the alias to the location you want.
The original plug-in must remain in the Plug-in folder in the Apple Color
OneScanner folder or you will not be able to create new scans with the
OneScanner Dispatcher application.
Chapter 3
Page 31

4 Drag the copy of the Apple Color OneScanner plug-in icon to the folder suggested by the
user’s manual for your graphics application.
5 When the plug-in icon is where you want it, delete the word “copy” and the space before
the word.
6 If the user’s manual for your application suggests a restart, restart your computer.
You can now scan images directly i nto the graphics application.
Assigning the Xerox TextBridge 3.0H application to the Dispatcher
The TextBridge application, from Xerox Imaging Systems, Inc., analyzes an
image of scanned text and conver ts each character into a form of text a
computer can recognize. This process of text conversion is called optical
character recognition (OCR).
The TextBridge OCR application comes with the Apple Color OneScanner.
You may have other OCR software that you prefer to use. The instructions
that follow work for any compatible OCR application.
To assign the TextBridge application for use with the Apple Color
OneScanner:
1 First, install the TextBridge application on your Macintosh computer.
Follow the instr uctions in the TextBridge user’s ma nual.
2 Open the Apple Color OneScanner folder and double-click the OneScanner
Dispatcher icon.
Installing the Scanner Software
23
Page 32

Drag-and-drop icons
3 In the Dispatcher window, double-click the icon labeled Unassigned OCR.
4 Move through folders (and disks, if necessary) to find the TextBridge application.
The Dispatcher window opens on the Macintosh desktop.
You’ll find complete information about using the Dispatcher window in
Chapter 4, “Scanning Images.” For now, continue following these steps to
assign TextBridge to the Dispatcher.
A dialog box opens.
24
Chapter 3
Page 33

5 Double-click the TextBridge application name, or select the name and click Select.
The dialog box closes. TextBridge appears as the OCR icon.
Drag-and-drop icons
Like the other icons in this area of the Dispatcher window, the OCR icon is a
drag-and-drop icon. To move text images into your OCR application, drag
them to the OCR icon. For more information, see Chapter 6, “Scanni ng Text.”
Setting up ColorSync
ColorSync is a system extension that helps maintain color consistency among
different devices, such as scanners, monitors, and printers.
ColorSync is not turned on when you install the scanner software. If you want
to use ColorSync as you work, you must turn it on and set preferences. For
information, see “Setting ColorSync Preferences” in Chapter 5.
Installing the Scanner Software
25
Page 34

Installing Kai’s Power Tools and Convolver
Kai’s Power Tools and Convolver are plug-in modules that provide filters
compatible with Adobe PhotoShop and similar applications. To install
these applications, follow the instructions in the user’s ma nuals that came
with them.
During installation, a dialog box appears that lets you select the Plug-Ins
folder (i nside the Apple Color OneScanner folder) as the correct destination
for the new plug-in modules.
If you also need to place these plug-in modules in a special folder for an
application you are usi ng, make copies or aliases of the modules. Then drag
the copies or aliases to the application’s folder. (For details, see the user’s
manual for that application.) It is impor tant to leave th e original plug-in
modules in the Plug-I ns folder inside the Apple Color OneScann er folder.
Where to go from here
You’ve now completed the i nstallation of the sca nn er hardware and software.
Will you be using the scanner only for images?
26
m For a quick overview of the scanner software, see the Quick Start card for
the OneScanner Dispatcher application.
m For details on scanni ng and customizing scanner settings, see Chapter 4,
“Scanning Images.”
Will you be using the scanner for optical character recognition (OCR) text scanning?
m For a quick introduction to text scanning, see Chapter 6, “Sca nning Text.”
m For complete i nstructions for using the TextBridge application or another
compatible OCR application, see th e documentation that came with
your software.
Chapter 3
Page 35

4
Scanning Images
This chapter provides complete instructions for using the OneScanner
Dispatcher application program with the Apple Color On eScanner. The
chapter shows how to
m choose originals and align them on the scanner
m use the OneScanner Dispatcher application to scan, print, fax, save, and
retrieve saved images
m use the drag-and-drop feature to print or fax saved images
m add drag-and-drop icons for compatible graphics applications
m scan an image directly into a compatible graphics application with the
Apple Color OneScanner plug-in module
27
Page 36

What you can scan
You can scan almost anything you can put on the scanner glass:
m photographs and flat art
m drawings and calligraphy
m line ar t
m bound documents such as magazines and books
You should be aware of a few limitations:
m You cannot completely scan an item that is larger than 8.5 by 11.7 inches.
m You cannot scan items that weigh more than 4.4 lb. (2 kg). Heavier items
m It is illegal to scan certain official and copyrighted do cuments. Please see
Text and optical character recognition: You can scan printed text and conver t
the image to text that can be read by a computer. To do this, you n eed special
optical character recognition (OCR) software. Xerox TextBridge 3.0H OCR
software comes with the Apple Color OneScanner. For an introduction to
TextBridge, see Chapter 6, “Scanning Text,” in this manual. For i nformation
about using TextBridge, see the TextBridge user’s manual.
The optional Automatic Document Feeder extends the scanning area to 8.5
by 14 inches.
may damage the scanner glass.
“Copyright Regulations (USA)” at the end of this chapter for a summary of
restrictions in the United States.
Preparing originals
28
Chapter 4
Follow these guideli nes to prepare originals for scanni ng.
m Flatten out curled or wrinkled originals before you place th em on the
scanner glass.
m When you scan large, bound do cuments, you may find it helpful to remove
the scanner top cover. For information, see “Removi ng and Replaci ng the
Scanner Cover,” later in this chapter.
Page 37

Aligning a single origin al
To ensure that the alignment of the scanned image matches the alignment of
the original, you can use the alignment mark.
To align an origi nal page on the document glass:
1 Lift the scanner cover, as shown.
2 Place the original
face down
on the document glass.
Position the origi nal so the top edge is toward the rear of the document glass
and the top-right corner points to the align ment mark, as shown.
Original face down
Alignment mark
3 See “Opening the OneScanner Dispatcher Application,” later in this chapter, for
complete scanning instructions.
Scanning Images
29
Page 38

Aligning bound originals
You can scan pictures or text in bound books with the Apple Color
OneScanner. To simplify the placement of large bound originals, you may
wish to remove the scanner cover. For instr uctions, see the next topic,
“Removing and Replacing the Scann er Cover.”
To align bound originals:
1 Open the bound document and place the page you want to scan face down on the
document glass.
2 Position the page to cover as much of the glass as possible.
Alignment mark
30
3 See “Opening the OneScanner Dispatcher Application,” later in this chapter, for
complete scanning instructions.
Chapter 4
Page 39

Removing and replacing the scanner cover
When you work with a bound do cument, you may wish to remove the
scanner cover. Removing the cover makes it much easier to align the pages of
bound items and makes the align ment more accurate.
To remove the scanner cover:
1 Position the scanner so the front is facing you.
2 Grip the cover as shown and lift it straight up off the scanner.
Grasp cover here.
To replace the scanner cover:
1 Insert the metal posts into the scanner.
2 Gently push the cover down.
Grasp cover here.
Scanning Images
31
Page 40

Opening the OneScanner Dispatcher application
To start scanning, you need to open the OneScanner Dispatcher application.
1 Double-click the OneScanner Dispatcher icon.
The Dispatcher window opens.
Arrow
2 To hide (or show) the bottom half of the window, click the arrow.
Title bar
32
You’ll find information about using the Dispatcher window throughout
this chapter.
3 To move the Dispatcher window anywhere on the desktop, drag it by its title bar.
You can leave the window in a convenient spot for handy access when you’re
ready to scan or edit images.
Chapter 4
Page 41

How the OneScanner Dispatcher application is organized
The Dispatcher window is the control center for your scanning activities.
Buttons
You use the buttons on the top half of the Dispatch er window to scan
new images, send new images to your pri nter or a fax application, open
and edit images you’ve already sca nn ed and saved, and view images i n
thumbnail form.
Example: If you have a letter on the scanner glass and want to fax the letter,
you use th e Scan Router button to send the scanned image of the letter to your
fax application.
Buttons
Scanning Images
33
Page 42

Drag-and-drop icons
Drag-and-drop icons
You use the icons on the bottom half of the Dispatcher window to drag a nd
drop saved images you want to send to a printer, a fax application, an optical
character recognition (OCR) application, or an application you add, such as a
graphics application.
Example: You may have an archive full of images you’ve scanned. If you want
to fax one of the images, you simply drag the image’s thumbnail from an
image archive and drop the thumbnail onto the Fax icon. Your fax application
opens, allowing you to address a nd tra nsmit the fax without going through a
separate operation.
34
Chapter 4
Page 43

Scanning with automatic settings
The OneScanner Dispatcher application comes preset to scan most color and
black-a nd-white originals. For your first scanned images, you may wish to
work with the automatic settings. Later, when you’re ready for fine-tuning,
you ca n customize the settings.
To scan a document and create a new image:
1 Put the original document on the scanner glass and close the scanner cover.
For more information, see “Prepari ng Originals,” earlier in this chapter.
Original face down
Alignment mark
2 If necessary, open the OneScanner Dispatcher application by double-clicking its icon.
The Dispatcher window opens:
Scanning Images
35
Page 44

3 Click Scan.
The Apple Color OneScanner dialog box opens.
IMPORTANT
If you have a PowerBook and cannot see the controls at the
bottom of th e dialog box, you must change the setting in your Monitors
control panel. Open the control panel, click Options, and choose 640 x 400.
Pop-up
menus
36
Chapter 4
4 To make sure the correct options are selected, check the Set Up pop-up menus.
Source
If you’ve attached an Automatic Document Feeder or Transparent
Media Adapter, you need to specify it as the source of the scan. Choose
Feeder or Transparency from the Source pop-up menu.
Image
Choose the type of image you’re scanning from the Image pop-up
menu. The options are Color, Grayscale, Black and White, and Halftone.
Choosing Halftone opens a dialog box where you can choose a pattern for the
halftone screen. The patterns determin e the shape and number of the dots
when the screen is created. Try different patter ns to find the one that looks
best on your monitor or in a document you print.
Page 45

Destination
Choose a destination for the image. The destination you specify is
used to determine the resolution at which the scanner will scan the image. For
example, if you select Monitor as the destination, the Resolution pop-up menu
automatically chooses the resolution that is correct for most monitors. You
can, however, change the resolution setting if you wish. You can also specify a
custom resolution.
Resolution
Choose the resolution you want to use. T he resolution is
automatically set for the output device (destination) you’ve chosen, but you
can choose a different resolution if you wish. For more information on
resolution settings, see “Scanning With Custom Setti ngs,” later in this chapter.
5 Click Preview.
The scanner creates a preliminary image in the preview area of the
dialog box.
Tip: When the preview shows as much of the image as you want, you can
stop the scanner by pressing x-. (Comma nd-period).
Preview of the scan
Preview area
Scanning Images
37
Page 46

6 Drag to select the area you want.
7 If you want to zoom in, click the zoom button (optional).
Zoom button
A marquee (dashed line) surrounds the selected area. The Image Info area
changes to reflect the size of the selection. Image height, width, and size
change depending on the selection you make.
Selection marquee
The area in the zoom view is th e area that will be scanned. To retur n to the
original view, you must click Preview and start over.
38
Chapter 4
8 Choose any automatic adjustments you may want the scanner to make.
Note: These adjustments take extra time a nd won’t work with all images.
Suggest Crop
The scanner analyzes the picture for domina nt shapes and crops
the image appropriately when the scan occurs.
Adjust Tone
The scanner checks image brightness and contrast and adjusts for
them.
Straighten
The scanner looks for the top and side edges of the image and
adjusts th e orientation of the image when the scan occurs.
Page 47

9 Click Scan.
The image may be
larger than the new
window. You can
scroll to view the
rest of the image.
The scanner scans the original.
When the scan is complete, the image appears in a new document. The
document is named Image1. Subsequent scans in the same session are named
Image2, Image3, and so on.
Scroll bar
Scroll bar
Each dot on the scanned image corresponds to a pixel on the computer
screen. The higher the resolution (the greater the number of dots per inch),
the larger the image appears on the screen. So an image scanned at 75 dpi
appears smaller than one scanned at 300 dpi. To change the size of th e image,
choose Zoom In or Zoom Out from the Image menu.
Scanning Images
39
Page 48

Saving a scanned image
As soon as the scanner has completed a scan, the new image, with the name
Image1, appears in a window on the Macintosh desktop, as shown at the end
of the previous topic. You can save the image with a more useful name, and in
a different folder, if you wish.
To save and rename a new image:
1 Make sure the image window is active.
To activate the document, click anywhere i n the image window.
2 Choose Save from the File menu.
The Save dialog box opens.
Folder in which the image is being saved
Type a name for the
new image here.
40
Chapter 4
Choose a format for the
image from the pop-up menu.
3 Type a name in the Save Document box.
4 Choose a folder or disk drive for the file.
For more information on switching folders, see your Macintosh manual.
Page 49

5 Choose an image format from the File Format pop-up menu.
PICT
(default setting): A widely used format that is compatible with most
Macintosh applications (uses ColorSync).
JPEG
Joint Photographic Experts Group, a format that compresses files and
lets you choose compression versus quality.
Photoshop
A format that supports all available Adobe Photoshop image
modes.
TIFF
Tagged-Image File Format, a format used to exchange do cuments
between different computer systems (for example, between Macintosh and
Windows computers). This format is recommended when you scan text.
EPS
Encapsulated PostScript™, a format supported by most illustration and
page-layout applications.
Windows BMP
A format commonly used on MS-DOS and MS-Windows
computers.
GIF
A format used on the Internet, GIF supports only 256 colors or grays.
6 Click Save.
The Macintosh stores the image in the folder you chose.
When you next view the folder as an archive, this image and others in the
folder will app ear as thumbnails—small representations of full-size images.
The thumbnails make it easy for you to identify the images you’ve scanned.
An image archive.
Scanned images
appear as thumbnails.
Scanning Images
41
Page 50

Assigning a fax application to the Dispatcher
Before you can use the sca nn er for faxing, you must assign th e driver for your
fax application to the Dispatcher. (If you have a fax modem or fax machine
connected to your computer, use the driver that came with it.)
1 In the Dispatcher window, click the Fax drag-and-drop icon.
2 In the dialog box that appears, find the driver for your fax application.
The Dispatcher takes you to the Extensions folder where your fax driver
should be.
Faxing or printing directly from the scanner
You can place a document on the sca nn er glass and send its image di rectly to
your fax application where you can then address and transmit the new image.
(If you have a fax modem or fax machine connected to your computer, use the
application that came with it.) Or, you can send the image to your pri nter.
Example: Sign or mark up an incoming fax that you’ve printed, scan the
marked-up original, and transmit the revised image to your fax application.
1 Put the original document on the scanner glass and close the scanner cover.
42
2 If necessary, start the OneScanner Dispatcher application by double-clicking its icon.
The Dispatcher window opens.
3 Click Scan Router.
4 In the Scan Router dialog box that appears, click an Image option to specify the type
of image.
For text and simple line drawings, choose Text/Line Art.
For photographs, full-color art, or grayscale art, choose
Photograph.
Chapter 4
Page 51

5 Click Fax or Copy.
Printing (Copy): The Print dialog box opens. Specify the number of copies
you want, set any other options, and click Print.
The original is scanned and sent to your fax application or currently
chosen printer.
No image document created: When you fax or print an image using the Scan
Router, an image document (file) is not created. The scanner simply sends
the new image to the fax application or printer. To fax or print the image
again, you must rescan it.
Opening a saved image from an archive
Images you scan into the Macintosh using the Color OneScanner and
Dispatcher are stored in folders called archives. Archives contain images and
Hypertext Markup Language (HTML) files shown as thumbnails—little
sketches that represent full-size images.
Thumbnails in an archive
This thumbnail is an HTML document.
You can drag-and-drop this thumbnail
on assigned applications that read
and support HTML.
Scanning Images
43
Page 52

1 If necessary, start the OneScanner Dispatcher application to open the Dispatcher
2 Click Archive.
3 Select the name of the folder you want.
Selected folder
4 Click Select “folder name” (the large button at the bottom of the window).
To open a saved image:
window.
A dialog box opens.
An archive opens, showing thumbnail representations of your images.
44
5 To open an image, double-click it.
You can use the image-editing tools and commands to modify the image or
select and copy parts of it. For information, see Chapter 5, “Editing Scann ed
Images.”
Note: To open an HTML thumbnail from the archive, you must drag the
thumbnail to the drag-and-drop icon of an application that reads and supports
HTML files. Double-clicking the HTML thumbnail will not open it.
Chapter 4
Page 53

Renaming a saved image in an archive
To rename an image that is open:
1 Choose Save As from the File menu.
2 In the dialog box that appears, give the image a new name.
To rename an image in the Finder desktop
1 Click the icon to select the image and its name.
2 Type a new name.
Printing or faxing a saved image from an archive
You can use the drag-and-drop icons to send a saved image directly to your
printer or fax application.
To print or fax a stored image:
1 If necessary, open the Dispatcher window.
2 Click Archive and open the archive that contains the image you want to fax.
For instructions on opening archives, see “Opening a Saved Image From an
Archive,” earlier in this chapter.
Scanning Images
45
Page 54

3 Drag the thumbnail from the archive onto the Print or Fax icon.
Drag the thumbnail
onto the icon.
Faxing
If this is your first fax, a dialog box asks you to find your fax driver.
(For instructions, see “Assigning a Fax Application to the Dispatcher,” earlier
in this chapter.) If this is not your first fax, your fax application opens, ready
for you to address and transmit the scanned image.
Printing
The Print dialog box opens. Set the options you want to use, and click
Print. (Make sure you have selected a printer in the Chooser before you try
to print.)
The image is sent to the pri nter or fax application.
46
Chapter 4
Page 55

Adding your own drag-and-drop applications
To speed up your work, you can add an application you frequently use to th e
unassigned drag-and-drop icons. You can then send an image to th e
application by dragging a saved image onto the icon and dropping it there.
Example: You may routinely rework scanned images in the MacDraw
application. Ordinarily, you must scan an image, copy it, and paste it into a
MacDraw Pro document. With a MacDraw Pro drag-and-drop icon, you can
simply scan and save a series of images and then drag the thumbnails, one by
one, onto the icon. MacDraw Pro automatically opens the image in a new
document.
To add your own drag-and-drop application:
1 If necessary, open the Dispatcher window.
®
Unassigned
drag-and-drop icon
Pro
2 Click one of the icons labeled Unassigned.
A dialog box opens.
Scanning Images
47
Page 56

3 Move through folders (and hard disks, if necessary) to find the application you want
Application you
want to add
4 Double-click the application name, or select the name and click Select.
to add.
The application you select must support drag-and-drop b ehavior and must be
able to open documents in formats supported by th e Dispatcher (such as
PICT and TIFF).
The dialog box closes. The application’s icon appears in the previously
unassigned icon.
48
You can now use the icon to drag and drop scanned images.
Chapter 4
Page 57

Scanning directly into a graphics application
The OneScanner Dispatcher application comes with the Apple Color
OneScanner plug-i n mod ule. A plug-in is a software module that extends an
application for a specific purpose, such as importing sca nned images.
IMPORTANT
If you haven’t already installed the Apple Color OneScanner plugin module, see “Installing the Plug-In Module for Use by Other Applications”
in Chapter 3.
With the plug-in module and a compatible graphics application, you can scan
directly into a document without creating and saving an image with the
OneScanner Dispatcher application.
Example: You can use the Adobe Photoshop Acqui re command to scan an
image directly into an Adobe Photoshop document.
For information about i nstalling and using the scanner plug-in module with
your graphics applications, see Chapter 3, “Installing the Scanner Software,”
and the manual for your graphics application.
Note: The following steps are intended as a general example. Your
application may work differently.
1 Open the application you want to use.
2 Choose the application’s Acquire command.
Scanning Images
49
Page 58

3 Choose Apple Color OneScanner (the plug-in module) as the source of the acquisition.
The Apple Color OneScanner dialog box opens.
Choose the options you
want from the pop-up menus.
50
Chapter 4
Click to preview
the image.
Select a portion of the
preview image and then
click Scan.
4 Click Preview, and change scanner options if necessary.
For information, see “Scanning with Automatic Settings,” earlier in
this chapter.
5 Click Scan.
The image is scanned and inserted in a new document for the application.
Page 59

Scanning with custom settings
After you’ve scanned a number of images, you may want to customize the
settings in the Apple Color OneSca nn er dialog box. This section provides
detailed information about settings for resolution, tone, and threshold.
Setting the resolution
The level of detail in a scanned image is determined by the number of dots
per inch (dpi) the scanner uses to reproduce an image. T h e number of dots
per inch defines the resolution.
Higher resolutions provide more detail. Accordingly, the quality of a scanned
image increases with high er resolution—but not always.
Things to think about when you set the resolution
Consider these factors when you choose a resolution:
m Each dot on the scanned image corresponds to a pixel on the computer
screen. The higher the resolution (the greater the number of dots per inch),
the larger the image appears on the screen.
m As resolution increases, you need more memory and disk space to scan and
store the image on your hard disk drive. Sometimes the extra resolution
may not be worth the extra memory or disk space.
m When you choose a resolution, check the I mage Info area for image size
before you scan.
m Scanning at a higher resolution may not necessarily produce better results
because the printer or other output device (such as a monitor) may not
reproduce the higher resolution. For example, a monitor may display an
image at 72 dpi, even though the image is at 60 0 dpi. In general, choose
the lowest dpi setting that will meet your needs.
m Large images take longer to print, a nd the quality of the printed version is
still limited by the capabilities of the printer.
m Large images take longer to scan, save, view, and manipulate.
Scanning Images
51
Page 60

Recommended resolutions for maximum efficiency
The chart below shows the settings that Apple recommends for the output
devices listed. Keep in mi nd that an image scanned at a higher resolution will
require more memory and take longer to scan and print.
Recommended scanning resolutions
For this output device Set the scanning resolution at
Computer screen 75 dpi
Laser printer, 300 dpi 100 dpi
Color laser printer, 600 dpi 150 dpi
Laser printer, 600 dpi 150 dpi
Linotronic imagesetter 200 to 300 dpi
Fax output device 75 dpi
Inkjet printer 100 dpi
52
Chapter 4
Page 61

Changing the tone (brightness and contrast)
You can improve the appeara nce of a scanned image by adjusting the tone
before you scan the image. Tone is a measure of brightness and contrast—the
intensity of blacks and whites, or colors, in a sca nn ed image.
The way your monitor is set up affects the way an image appears on the
screen. For infor mation, see your monitor manual.
Brightness
Brightn ess determines the overall lightness of a scanned image.
m With increased brightness, the scanned image generated by the scanner
will be lighter.
m With decreased brightness, the scanned image will b e darker.
Contrast
Contrast is a measure of differences between light a nd dark tones.
m With increased contrast, all light tones become increasi ngly lighter, and all
dark tones become increasingly darker at th e same rate.
m With decreased contrast, all light tones become increasingly darker, and all
dark tones become increasingly lighter at the same rate.
To change the tone of a scanned image:
1 In the Dispatcher window, click Scan to open the Apple Color OneScanner dialog box.
2 Click Preview.
3 Drag to select the portion of the image you want to scan.
Scanning Images
53
Page 62

4 Click Tone.
The image as it
will be scanned
5 Drag to select the portion of the preview you want to use as a sample for brightness
The Tone dialog box appears.
How the image will
Tone variations
and contrast.
look with your changes
A solid outlin e appears around th e selection. You can drag the outline to a
different part of th e preview if you want to sample different areas. When you
release the mouse button, the selected area becomes the central point for
tone variations.
54
Chapter 4
6 Select a sample from the Select a Range options.
Brightness
From left to right, the tone variations show brightness from darker
to lighter.
Contrast
From top to bottom, the variations show contrast from less to more.
Wh en you click one of the variatio ns, the p revi ew changes a nd the variations
themselves are readjusted, using your recent selection as a new starting point.
The Fine Tune view changes to reflect your choice in the center panel,
outlined in red.
7 To fine-tune the tone, drag the Brightness and Contrast sliders to change the settings.
The Fine Tune view shows t he effect s of any changes you make.
Page 63

8 To return to the Apple Color OneScanner dialog box, click Apply.
If you want to return the image to its original state, click Revert.
9 When the settings are the way you want them, click Scan.
The image is scanned using the settings you chose.
Changing the thre shold
You can customize scann ed images by resetting the threshold. Thr eshold is
a measure of the darkest dark colors and the brightest light colors. In a
black-a nd-white image, threshold is the point at which a dark color b ecomes
black a nd a light color becomes white.
To change the threshold:
1 In the Dispatcher window, click Scan to open the Apple Color OneScanner dialog box.
2 Click Preview.
3 Drag to select the portion of the image you want to scan.
4 Click Threshold.
The Threshold dialog box opens.
Zoom
Grabber
Shadow dropper
Highlight dropper
Scanning Images
55
Page 64

5 In the Threshold dialog box, make the changes and selections you want.
m If you want the Dispatcher to recommend the appropriate threshold
settings, click Suggest.
m If you want to customize the threshold settings yourself, you can.
To set the lightest value, click th e highlight dropper and then click the spot
in the original that you want to use as highlight threshold. The slider
adjusts to show the point you set, a nd the result adjusts to the change. The
point you set becomes the lightest color i n the image. Colors lighter than
this point are reset to this level.
To set the darkest value, click the shadow dropper and then click the spot
in the original that you want to use as shadow threshold. The slider adjusts
to show the point you set, a nd the result adjusts to the change. The point
you set becomes the darkest point in the image. Colors darker than this
point are reset to this level.
56
Zoom
Grabber
Shadow dropper
Chapter 4
Highlight dropper
Tip: To work with a specific area of the image, click the zoom tool and then
click the area you want. Use the grabber to move the original image around if
necessary.
Page 65

6 To return to the Apple Color OneScanner dialog box, click Apply.
To return to the original settings, click Revert.
7 Click Scan.
The image is scanned with th e settings you chose.
Changing image size and ruler units
The Apple Color OneScanner dialog box provides information about the size
of a scanned image and the size of the document (file) the image will o ccupy.
Viewing and changing image size (dimensions)
The Height and Width boxes show the size of the preview image or of the
selected area within the preview image.
Image Info portion of the Apple Color
OneScanner dialog box
Dimensions are determined by
m the size of th e image area to be scanned
m the resolution setting
The minimum area you can scan is 48 by 32 pixels.
To specify the size of the scan:
m
Type a value in the Height and Width boxes.
A marquee appears in the upper-left corner of the preview, scaled to the
size you typed. To select a different part of th e image, move the pointer
inside the box formed by the marquee and drag the box where you want it.
Scanning Images
57
Page 66

Viewing image file size
Image File Size shows how much memory, in kilobytes, the image file will
occupy. File size is determined by
m the image type and resolution
m the size of th e image area to be scanned
Changing the ruler units
You can set the ruler to use a different unit of measure for the height and
width of an image. You can set the ruler for inches, centimeters, pixels, points,
and picas.
To change ruler units:
Choose the units you want from the Ruler Units pop-up menu.
m
Ruler units pop-up menu
58
Chapter 4
Page 67

Copyright regulations (USA)
It is illegal to reproduce certain official or copyrighted do cuments, and doing
so may be punishable by criminal or civil law. Th e following documents may
not be copied:
m currency
m govern ment-issue securities and passports
m publicly or privately issued licenses or permits
m official documents
m private documents
In addition, it is unlawful to make copies of the following copyrighted works,
except for personal or household use or for other uses permitted under the
terms of the copyright:
m copyrighted publications
m music scores
m paintings
m prints
m maps
m drawings
m movies or photographs
m other copyrighted works
Scanning Images
59
Page 68

Page 69

5
Editing Scanned Images
You can use the OneScanner Dispatch er application to edit and improve the
appearance of scanned images. You can add and adjust colors, change the
size, crop an image, or copy selected areas to other documents.
This chapter tells you how to
m open a saved image and show th e editing tools
m use the tools to edit your images
m change your view of a scanned image
61
Page 70

Opening a saved image
To open and edit a saved image, you first open the OneScanner Dispatcher
window and then open the image you want to edit.
To open the Dispatcher window:
1 Double-click the OneScanner Dispatcher icon.
The Dispatcher window opens.
2 Click Image Edit.
A dialog box opens.
62
Chapter 5
Page 71

3 Open the folder that contains your saved images.
The first image is automatically selected. A preview appears on the left to
help you identify the image. Selecting another image name changes the
preview.
4 To open the image document, double-click an image name.
The document op ens, and the tool, color, and brush palettes become
available. If you don’t see the tools, choose Show Tools, Show Brushes, or
Show Colors from the Window menu.
Close box
Scroll bar
Resize tool
Editing Scanned Images
63
Page 72

Image-editing overview
When you save a scanned image, the application stores it as an image
document. The image within the document is made up of pixels—the dots
that form any image on the computer screen. When you use the tools,
brushes, and color palette, you change the arrangement or appearance of
the pi xels.
Tool palette
Use the tools in the tool palette to select portions of the image, add text or
color, erase portions of the image, and do other tasks.
Selection rectangle
Grabber
Paint bucket
Eraser
Spray can
Clone
Background color
Lasso
Zoom
Text
Pencil
Paintbrush
Smudge
Foreground color
Note: To open the Macintosh Color Picker, click the
foreground color (or Option-click the background color).
You can use the Color Picker to design the colors you want.
Brush palette
Use the brushes to set the shap e for the painting tools. The brush shape you
choose affects the selected tool (spray can, paintbrush, clone, and smudge).
Brush shapes
64
Chapter 5
Page 73

Color palette
Use the color palette to change the color that you apply with the pencil,
brush, bucket, or spray can in the foreground, or to select the color that
appears when you use the eraser in the background.
To change the color you apply in the
foreground, click the color you want.
To change the color in the background when
you erase, Option-click the color you want.
To create custom colors, double-click a swatch.
In the Color Picker that appears, select the color you want.
To choose a paint color from an image:
1 Select the pencil, brush, bucket, or spray can, press Option, and then click in the image.
The foreground indicator shows th e color you clicked. You can drag the
eyedropper a nywhere in the image, changing the foreground color as you go.
2 When you find the color you want, release the Option key.
You can now use the pencil, brush, bucket, or spray can to apply the newly
chosen color.
Showing and hiding the palettes
You can hide the palettes without quitting the application.
m
To hide the palette, click the close box.
Close box
m
To show a palette, choose Show Tools, Show Brushes, or Show Colors from the
Window menu.
Editing Scanned Images
65
Page 74

Selecting images
1 Click the selection rectangle.
2 Drag the tool over an area to select that area.
When you select a portion of an image, you can move, cut, copy, or
manipulate the selection.
Regular shape
To select a recta ngular part of an image:
66
Marquee
The area you dragged over is surrounded by a marquee (a dashed line), which
indicates selection.
Chapter 5
Page 75

1 Click the lasso.
2 Drag the lasso to trace an area around the shape you want to select.
Irregular marquee
Irregular shape
To select an irregular shape:
When you release th e mouse button, the marquee takes th e irregular shape
you made.
Whole image
To select th e whole image:
m
Choose Select All from the Edit menu (or press
A marquee surrounds the whole image.
To deselect the whole image:
m
Choose Deselect from the Edit menu.
x
–A).
Editing Scanned Images
67
Page 76

Using the tools to edit an image
Each tool on the tool palette has a special purpose: making a selection,
adding text, painting, and so on.
Using a tool
To use a tool:
m
Click the tool to make it active.
Moving a selection
To move a selection around within the image:
m
To drag the selection, use the tool you used to make it (the lasso or the selection
rectangle).
68
The building was moved
to cover the sheds.
Chapter 5
Page 77

Zooming in
To zoom in close:
m
Click the magnifying glass and then click a spot in the image.
The image is enlarged.
To zoom back out:
m
With the magnifying glass still selected, press Option and click the image.
You can also choose Zoom I n or Zoom Out from the Image menu.
Filling a space with color
To fill a space with color:
1 Click the paint bucket.
2 Click a color on the color palette.
The foreground color changes to the color you clicked.
3 Click the space you want to fill.
The space fills with the foreground color.
Space filled
Editing Scanned Images
69
Page 78

Adding text
To type some text in the image:
1 Click the text tool.
2 Click the part of the image where you want to add text.
3 In the dialog box that appears, type the text you want.
You can also use the dialog box to choose the font you want, its size, style,
and color.
4 When you’ve got the text the way you want it, click OK.
The text appears in the image.
Erasing a selection
To erase parts of the image:
1 Click the eraser.
2 Drag the eraser over the areas you want to erase.
The area you drag over fills with the background color.
70
Note: On 68000 series Macintosh computers, the eraser takes longer to work.
The eraser tool was used to
create a black border.
Chapter 5
Page 79

Drawing lines
To draw fine lines or shapes in the image:
1 Select the pencil.
2 Drag the pencil through the image to add the shapes or lines.
You can also zoom in and click individual pixels.
Tip: To create a horizontal or vertical lin e, press Shift as you drag. To change
the size of th e pencil line, use the brush palette.
Spray painting
To spray pai nt:
1 Select the spray can.
2 Drag the spray can across the image.
The paint leaves a stroke in the foreground color.
Tip: To change the size of the spray can stroke, use the brush palette.
The spray can was
used to add
definition to the edges
of the petals.
Note: On 68000 series Macintosh computers, the spray ca n takes longer
to work.
Editing Scanned Images
71
Page 80

Painting with brushes
To paint with strokes of various sizes:
1 Select the brush.
2 Click one of the brush sizes on the brush palette.
3 Drag the brush to paint in the foreground color.
Cloning
A clone is a duplicate of a small part of an image. You can use the clone to
edit flaws in an image, pai nting it into an image at a different location.
When you paint the clon e back in, the painting starts at a reference point that
you defi n e. This is easier to do than to explain, but here is an example.
Example: Suppose you’ve sca nn ed a picture of a building and you want to
cover a certain feature, such as a fountain, with another portion of the image,
such as a group of shrubs. You wa nt to repeat the shrub portion of the image
without the sharp cut-out image of a copied-and-pasted selection.
To clone an image and repeat it:
1 Click the clone tool.
72
Chapter 5
Page 81

2 Press the Option key and then click the spot you want to serve as a reference point for
the clone.
In the example, you’d click a point in the shrubbery.
Option-click here (for example),
so you can clone the shrubbery
and cover up the fountain spray.
3 Move the clone tool over the point at which you want the image to begin repeating, then
start dragging.
In the example, you’d start dragging (painting) at a poi nt somewhere near the
fountain. As you drag, the image begins to appear, starting with the reference
point.
The clone appears
as you paint.
The reference point
that is duplicated
Editing Scanned Images
73
Page 82

As you extend the painting, the rest of the cloned image appears—or as much
of it as you want to paint.
Tip: For a more natural appearance, reposition the reference point from time
to time. To do this, press the O ption key and click the new spot you want to
clone.
Smudgi ng
To smudge colors and lines into other colors a nd lines:
1 Select the smudge tool.
2 Drag through colors and lines.
The tool takes colors with it as you drag, much the same way your fingers
smear wet paint when you paint with your fingers.
74
Colors smear
as you drag.
Chapter 5
Page 83

Copying, cutting, or deleting a selection
You may want to copy part or all of an image a nd paste it into a wordprocessing or desktop publishing document.
Copying within an image document
To copy and paste a selection within an image do cument:
1 Select the area you want to copy.
2 Choose Copy from the Edit menu (or press
3 Click anywhere in the image area and choose Paste from the Edit menu (or press
x
–C).
x
–V).
The copy is pasted where you clicked.
Copying and pasting into another application
To copy and paste a selection into a document in another application:
1 Select and copy a portion of an image as described in the previous steps.
2 If the other application is running and the document is open, click the document to
activate it.
You can open another application and create a new do cument without losing
the contents of the Clipboard. T h e copy you made remains on the Macintosh
Clipboard until you copy somethi ng else.
3 Set the insertion point in the document and choose Paste from the Edit menu
(or press x–V).
The copy is pasted into the document.
Note: Some publishing applications do not allow you to paste the selection.
Editing Scanned Images
75
Page 84

Cutting
To cut a selection from an image:
1 Select the area you want to cut.
2 To store a temporary copy of what you cut on the Clipboard, choose Cut from the Edit
menu (or press x–X).
3 To remove the selection without storing a temporary copy of it, press the Delete key.
This completely erases the selection. You cannot paste a copy elsewhere.
Undoing an action
You can reverse an action if you do so before you take another action. For
example, if you press the Delete key to delete a selection, you can restore
what you cut if the cut was the most recent editing action you took.
To undo an action:
m
Zooming in and out
Sometimes you may need to work closely with an image or back away from it
to get an overview. A closer view makes it easier to work with details. A more
distant view makes it easier to work with an image as a whole.
To zoom into and out of an image:
1 Choose Zoom In or Zoom Out from the Image menu.
Zoom In
Zoom Out
appear smaller.
2 To return to a 100-percent view, choose Actual Size from the Image menu.
Changes you make with t hese commands don’t affect the size of the actual
image.
Immediately choose Undo from the Edit menu (or press
x
–Z).
Takes you closer to the image; elements of the image appear larger.
Takes you farther away from the image; elements of the image
76
Chapter 5
Page 85

Inverting an image from positive to negative
You can change a positive image to a negative image, or a negative image to a
positive image.
To invert an image:
m
Open the image and choose Invert from the Image menu.
Editing Scanned Images
77
Page 86

Adjusting the brightness and contrast
You can adjust th e brightness and contrast of images. You may want to do this
when an image is too dark or does not show sharp enough differences
between dark and light colors.
To adjust brightness and contrast:
1 Choose Brightness/Contrast from the Image menu.
The Brightness/Contrast dialog box opens.
2 Drag the sliders to the settings you want.
You can see the effects of the changes on t he image.
3 Click Reset to return the settings to zero and leave the dialog box open.
78
4 Click OK to save the changes and close the dialog box.
Chapter 5
Page 87

Changing the color balance
You can change the color balance in a n image by adjusting color values for
shadows (darker areas), midtones, and highlights (brighter areas).
To adjust color bala nce:
1 Open the image you want to adjust.
2 Choose Color Balance from the Image menu.
The Color Balance dialog box op ens.
3 Click Shadows, Midtones, or Highlights to specify the level of color you want to modify.
4 Drag a slider to adjust a color value.
The numeric values i n the Red, Green, and Blue boxes change as you drag the
sliders for Cyan, Magenta, and Yellow.
Click a color to change the
foreground color.
Option-click to change the
background color.
Example: When you drag the Cyan slider toward the right, you increase Red
to a value between 1 and 100, and you decrease th e Cyan value. Wh en you
drag the Cyan slider toward the left, you reduce the Red value to a negative
number (from –1 to –100) and i ncrease the Cyan value.
As soon as you adjust a color, the image is updated to show the change.
5 To change your mind and return the image to its original color balance, click Reset.
The image reverts to the original color balance, but the dialog box remains
open.
6 Click OK to confirm your changes, or click Cancel to close the dialog box without
applying your changes.
Editing Scanned Images
79
Page 88

Sharpening an image
You may notice that the edges of an image are softer than you want them to
be. Or, you may want to soften edges that look too sharp.
To sharpen an image:
m
Choose a command from the Sharpen submenu in the Image menu.
Commands in the Sharpen submenu add definition to an image. If an image
looks softer than you want it to look, the Sharpen commands may help. You
may not notice much difference on the screen.
A Little
A Lot
Unsharp Masking
Has an almost imperceptible effect.
Has a significant effect.
Opens the Unsharp Masking dialog box:
Options in the Unsharp Masking dialog box adjust the contrast of image
details to create the illusion of a sharper image.
80
Chapter 5
Page 89

Amount
The amount determi n es what percentage of change will occur. The
default setting is 50 percent. Increase up to 100; decrease down to 1. A higher
percentage makes the effect stronger.
Radius
The radius determin es the depth of pixels that are affected at the edge
you’re changing. The default setti ng is 25 pixels. Increase up to 100; decrease
down to 0.1. A larger radius causes more of th e pixels surrounding the edge
pixels to be shar pened.
Threshold
Threshold determines the level of brightness to be used for
differentiation. The default setting is 0 levels. Increase up to 25. A lower value
produces a more pronounced effect.
Amount 50
Radius 25
Threshold 0
Amount 75
Radius 75
Threshold 0
Amount 100
Radius 50
Threshold 1
Amount 100
Radius 100
Threshold 25
Editing Scanned Images
81
Page 90

Resizing an image
You can set a specific size for an image.
To resize:
1 Open the image and choose Resize from the Image menu.
The Resize dialog box opens.
To maintain the
image’s proportions
(aspect ratio), make
sure there’s an X in
this check box.
Pop-up menu
82
2 Choose the units you want to use from the Units pop-up menu.
3 Type the new size and click OK.
The image is resized to fit your settings.
Chapter 5
Page 91

Cropping an image
You can select an area of an image and then eliminate the surrounding area.
To crop an image:
1 Select the area you want to remain in the image.
2 Choose Crop from the Image menu.
The area around the selection is deleted.
Editing Scanned Images
83
Page 92

Flip ping an image
1 Open the image.
2 From the Image menu, choose an option from the Flip pop-up menu.
Sometimes you may inadvertently scan an image upside down or on its side.
You can correct this situation by flipping the image.
To rotate a selection:
Vertical
Original Flip vertical
Horizontal
Flips the image vertically (upside down)
Flips the image horizontally (from right to left)
84
Original Flip horizontal
Chapter 5
Page 93

Rot ating an ima ge
1 From the Image menu, choose an option from the Rotate pop-up menu.
You can rotate the image 9 0 degrees left, 90 degrees right, or 180 degrees. You
can also choose Arbitrary rotation and set the number of degrees.
90˚ left rotation
2 If you want to specify the degree of rotation, choose Arbitrary to open a dialog box.
3 Type the number of degrees you want and click OK.
Original 45˚ right rotation
90˚ right rotation 180˚ rotation
Editing Scanned Images
85
Page 94

Setting the image depth
You can change the number of colors used in an image or switch a color
image to black and white. You do this by cha nging the image depth.
To change depth:
m
From the Image menu, choose an option from the Image Depth submenu:
86
If you change the depth of an image to fewer colors or grays, you cannot
recover the original image depth. You must rescan the original to get back the
higher number of colors.
Chapter 5
Page 95

Setting ColorSync preferences
Different devices—scanners, printers, and monitors, for example—reproduce
different ra nges of colors. Color Sync is a color management system that
allows applications a nd device drivers to prod uce consistent color across
different devices.
ColorSync stores information about various devices in profiles. P r ofiles are
dictionaries that contain color infor mation about a specific device. ColorSync
is an Apple system extension. You can switch ColorSync on and off and select
the appropriate ColorSync profile for your scanner when necessary.
To set ColorSync preferences:
1 With the OneScanner Dispatcher application open, choose ColorSync Preferences from
the Image menu.
The ColorSync Preferences dialog box opens.
An X in the checkbox
means ColorSync
is on.
Choose your model of the Color
OneScanner from this pop-up menu.
2 To switch ColorSync on, click to place an X in the Use ColorSync box.
3 Choose the scanner model you want to use from the Use Scanner Profile pop-up menu.
If you are using the optional Tra nsparent Media Adapter with the Color
OneScanner 1200/30, choose the ColorSync profile for the medium you are
scanning:
m Color On eScanner Flatbed for magazines, paper, other opaque originals
m Color On eScanner Positive for positive tra nsparencies
m Color On eScanner Negative for negatives
Without the correct profile, you may not b e satisfied with the resulting image
quality. If you change media, be sure to change the ColorSync profile.
4 Click OK to close the dialog box, or click Cancel to leave preferences the way they were.
Editing Scanned Images
87
Page 96

Changing the way you view an archive
Occasionally you may wa nt to view thumbnails in order by type, date, or size
rather than by name.
To change the view:
1 Open the archive you want to look at.
2 From the Image menu, choose an option from the View By submenu: Name, Date, Type,
or Size.
The order of thumbnails in the archive changes to the optio n you chose.
88
Chapter 5
Page 97

6
Scanning Text
An optical character recognition (OCR) program such as Xerox TextBridge
analyzes scanned text and converts each character into a form of text a
computer can recognize.
This chapter is a brief introduction to text scanning. You’ll learn
m how to scan a text document for use with the TextBridge application
m how to use the OneScanner Dispatcher application to send a saved text
image to the TextBridge application
Be sure you use the version of TextBridge that comes with your scann er. This
version has an OCR-to-HTM L converter so you can save files in HTML
format.
Xerox TextBridge application
in a drag-and-drop icon
89
Page 98

Scanning a text document into the TextBridge application
You’ll find OCR scanning especially useful if you have many documents that
need to be moved onto the computer for storage or information-retrieval
(search) purposes.
After the text is converted, you can copy and paste—or import—the text into
a word-processing or desktop publishing document. There you can edit and
revise the text without retypi ng.
To use TextBridge, you must complete two procedures:
m First install the TextBridge software, following instructions in the user’s
manual for TextBridge.
m Then you must assign TextBridge to the Dispatcher. For instructions, see
“Assigning the Xerox TextBridge 3.0H Application to the Dispatcher” in
Chapter 3 of this manual.
Optional Automatic Document Feeder: An optional Automatic Document
Feeder is available from your authorized Apple dealer. This device increases
productivity by automatically feeding up to 20 pages into the scanner. If you
already have an Automatic Document Feeder, see Chapter 9, “Using the
Automatic Document Feeder,” for information on setup, use, a nd
maintenance.
90
To scan for OCR:
1 Put the text original on the scanner glass and close the scanner cover, or place the
originals in the document feeder.
2 If necessary, start the OneScanner Dispatcher application by double-clicking its icon.
The Dispatcher window opens:
Chapter 6
Page 99

3 Click Scan to open the Apple Color OneScanner dialog box.
4 Choose Flatbed from the Source pop-up menu; if you’re using the document feeder,
choose Feeder.
5 Choose Black and White from the Image pop-up menu, and choose 300 dpi from the
Resolution pop-up menu.
6 Click Scan.
The original document is scanned.
7 Choose Save from the File menu.
The Save dialog box opens.
8 Choose TIFF from the File Format pop-up menu.
TIFF is the recommended format for text images.
For information on saving an image and choosing a file format, see “Saving a
Scanned Image” in Chapter 4.
9 Click Save.
10 In the TIFF Options dialog box that appears, click Compressed.
When you’ve scanned a few pages, you can use the drag-and-drop OCR icon,
as described in the next topic, to send the text to TextBridge.
Scanning Text
91
Page 100

Moving a text image to the TextBridge application
After a text image is scanned, you can rename it or accept the automatically
numbered image. When you’ve sca nn ed and saved an image, you can send the
image to the TextBridge application.
Note: You can use TextBridge as a stand-alone application. It is not required
to use it through the Color On eScanner Dispatcher.
To send a saved text image to TextBridge:
1 If necessary, open the Dispatcher window.
2 Click Archive and open the archive that contains the image you want to send to the
TextBridge application.
92
Archive with
scanned text
documents
Chapter 6
 Loading...