

Page 1
Quick
Guide
Start
Page 2

CONTENTS
Step 1:
Step 2:
Step 3:
Changing the Size of the Paper in the Paper Tray .. 1.9
Step 4:
Step 5:
For Local Printing .............................................1.12
For Network Printing
Step 6:
Step 7:
Step 8:
System Requirements ......................................1.17
Installing Xerox Driver CD .................................1.18
Unpacking ................................................ 1.3
Installing the Toner Cartridge .................. 1.5
Loading Paper .......................................... 1.7
Connecting Telephone Line .................... 1.11
Connecting a Printer Cable ..................... 1.12
(WorkCentre PE120i only) .......1.14
Turning the Machine On ......................... 1.15
Changing the Display Language ............. 1.16
Installing Xerox Software in Windows ... 1.17
1.2
Step 9:
S
ETTING UP YOUR PRINTER
Viewing the User’s Guide ....................... 1.19
Page 3
Step 1: Unpacking
1
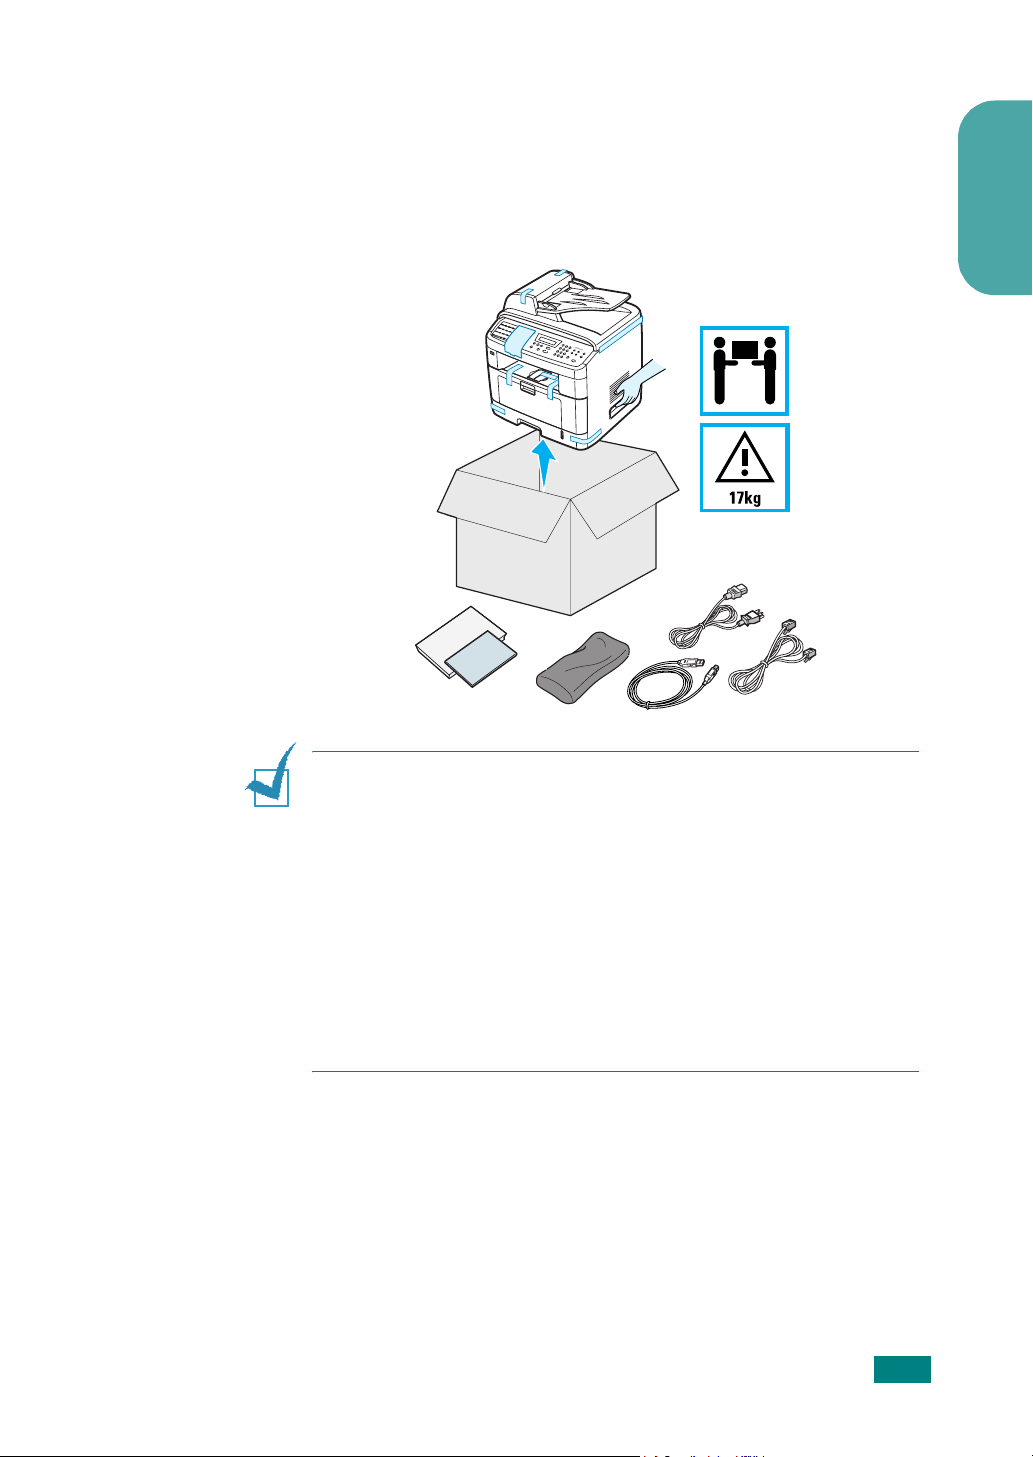
Remove the machine and all accessories from the packing
carton. Make sure that the machine has been packed with
the following items:
English
N
OTES
:
• The appearance of the power cord and the telephone line cord
may differ depending on your country’s specifications.
• The CD-ROMs contains the Xerox printer driver, Scan drivers,
ControlCentre, the User’s Guide, and the Adobe Acrobat Reader
program.
• For the WorkCentre PE120i, the PS Driver CD-ROM is supplied
with your machine.
• You should use the telephone line cord which is supplied with
your machine. If you are replacing it with another vendor’s, it
should be AWG #26 or lower gauge.
• Power cord must be plugged into a grounded power socket.
S
ETTING UP YOUR PRINTER
1.3
Page 4
2
Remove the packing tape from the front, back, and sides of
the machine.
Ta p e
3
Gently pull the scan lock label until it comes away from the
machine. This will pull the scanner locking switch into the
FORWARD (Unlocked) position automatically.
Scan Lock Label
1.4
N
OTE
machine or do not intend to use it for a
long period of time, move the scanner
locking switch BACKWARD to the lock
position, as shown. To scan or copy a
document, the switch must be unlocked.
S
ETTING UP YOUR PRINTER
: When you are moving the
Page 5
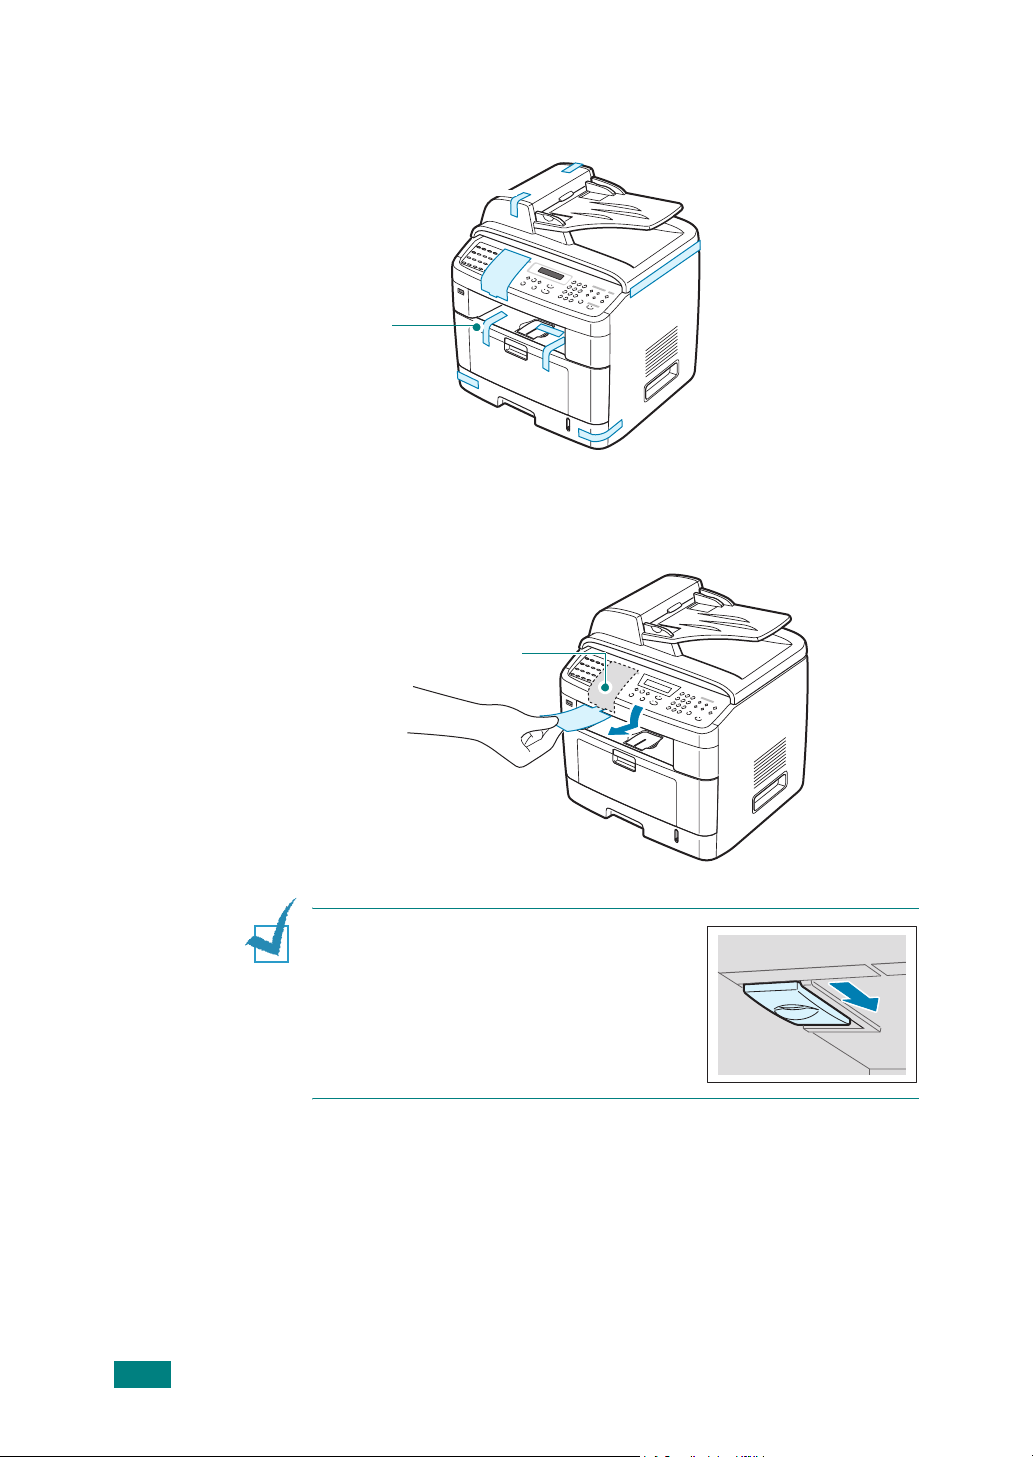
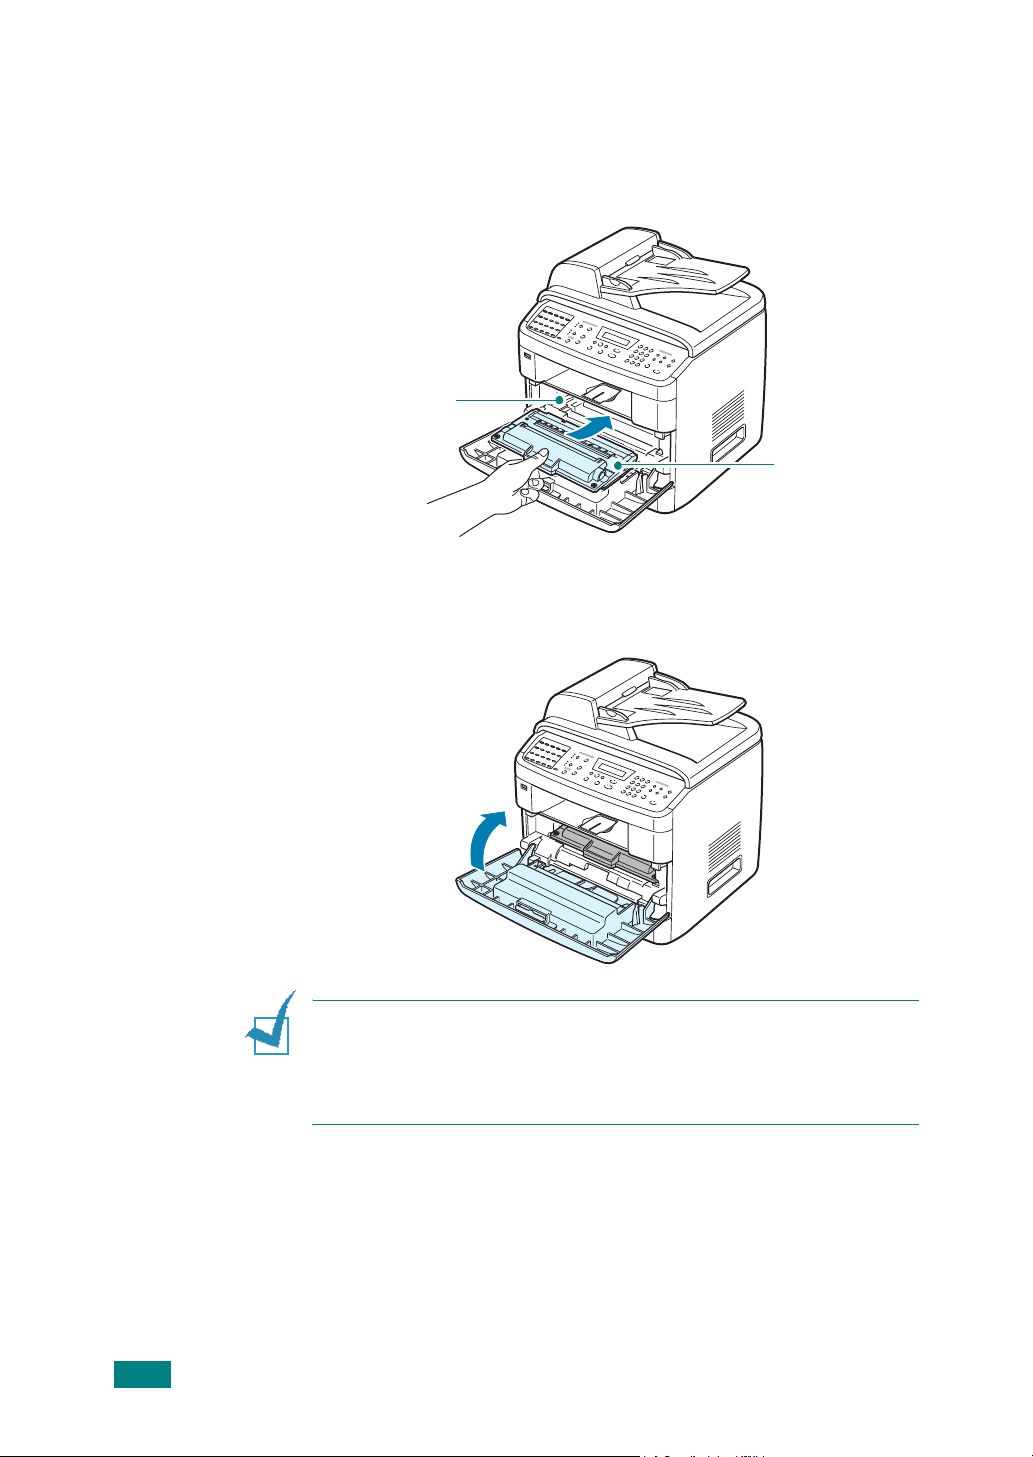
Step 2: Installing the Toner Cartridge
1
Open the front door.
2
Remove the starter toner cartridge from its bag. Gently
shake the cartridge 5 or 6 times to distribute the toner.
English
Thoroughly shaking the cartridge will assure maximum
copies per cartridge.
N
OTE
: If toner gets on your clothing, wipe it off with a dry cloth
and wash clothing in cold water. Hot water sets toner into fabric.
C
AUTIONS
• To prevent damage, do not expose the toner cartridge to light for
more than a few minutes. Cover it with a piece of paper, if left
exposed for more than a few minutes.
• Do not touch the green underside of the toner cartridge. Use the
handle on the cartridge to avoid touching this area.
:
S
ETTING UP YOUR PRINTER
1.5
Page 6
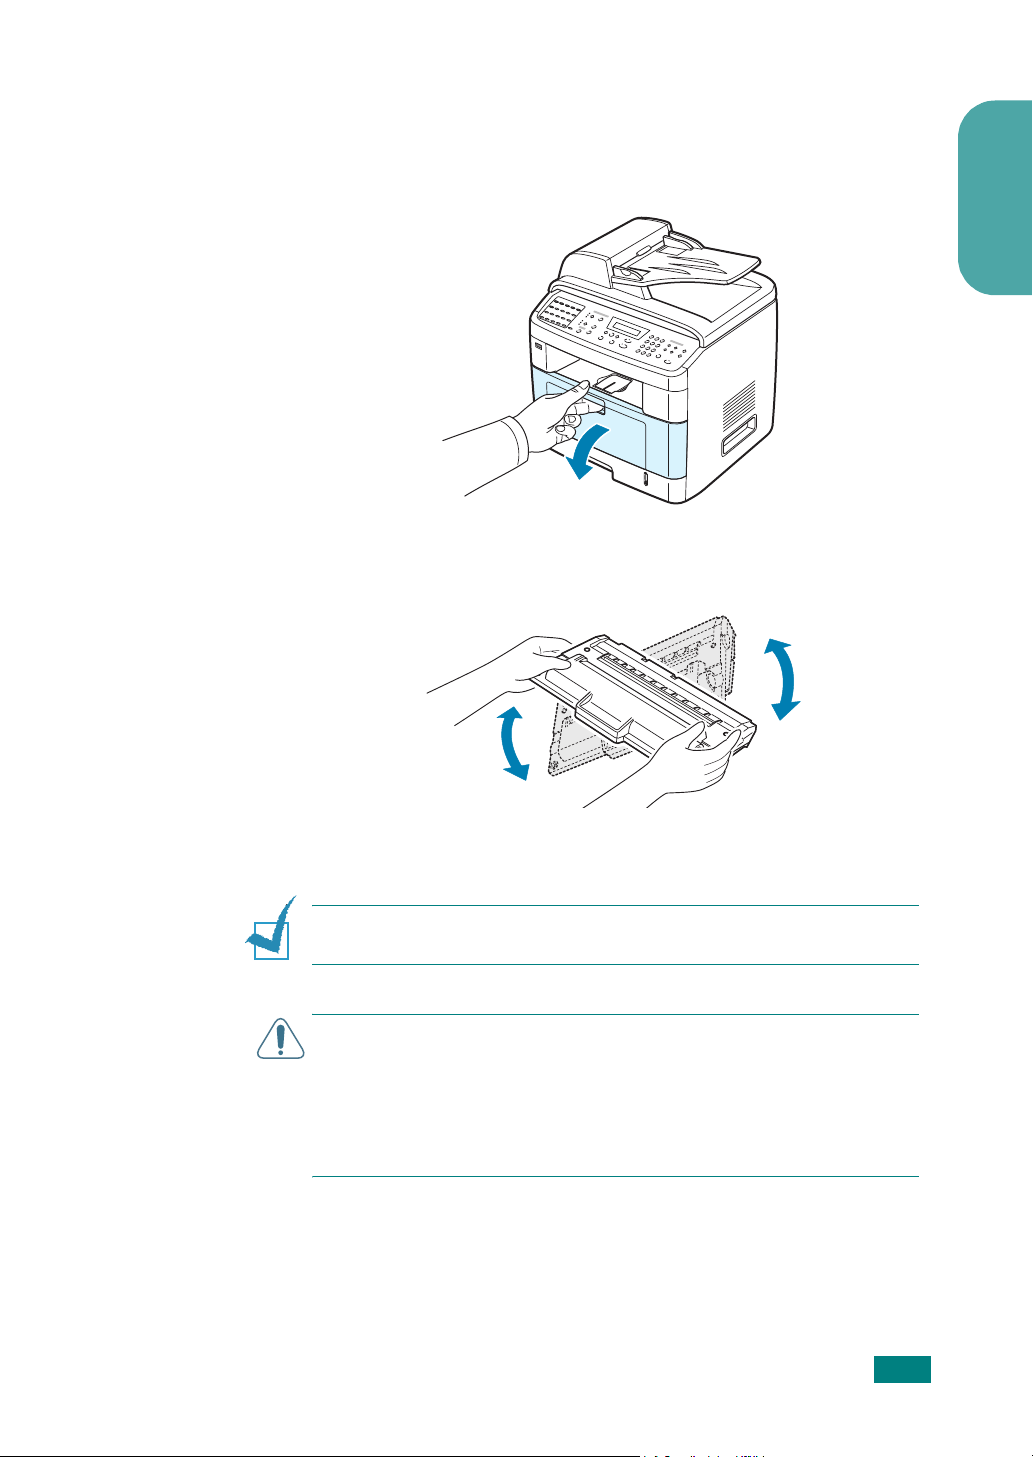
3
Hold the toner cartridge by the handle. Slowly insert the
cartridge into the opening in the machine. Tabs on the sides
of the cartridge and corresponding grooves within the
machine will guide the cartridge into the correct position
until it locks into place completely.
Groove
Tab
4
Close the front door. Make sure that the door is securely
closed.
1.6
N
OTE
cartridge life of approximately 3,500 for the Standard-Capacity
Print Cartridge and 5,000 for the High-Capacity print Cartridge.
(3,500 pages for the toner cartridge that is shipped with the
machine.)
S
ETTING UP YOUR PRINTER
: When printing text at 5% coverage, you can expect a toner
Page 7

Step 3: Loading Paper
The paper tray can hold a maximum of 250 sheets of 20 lb (75
2
g/m
) plain paper.
To load a stack of Letter-sized paper:
1
Pull open the paper tray and remove it from the machine.
English
2
Fan the edges of the paper stack to separate the pages.
Then tap the stack on a flat surface to even it up.
3
Insert the paper stack into the paper tray
be printed on facing down
N
OTE
: If you want to load a different sized paper, you need to
adjust the paper guides. For details, see page 1.9.
.
with the side to
S
ETTING UP YOUR PRINTER
1.7
Page 8

4
Pay attention to the paper limit mark on both inside walls of
the tray. Paper overloading may cause paper jams.
5
Insert and slide the paper tray back into the machine.
1.8
S
ETTING UP YOUR PRINTER
Page 9

Changing the Size of the Paper in the Paper Tray
To load longer sizes of paper, such as Legal-sized paper, you
need to adjust the paper guides to extend the paper tray.
1
After pressing and unlatching the guide lock, slide the paper
length guide out completely to extend the paper tray to its
full length.
English
2
After inserting paper into the tray, squeeze the length guide
and slide it until it lightly touches the end of the paper
stack.
S
ETTING UP YOUR PRINTER
1.9
Page 10

For paper smaller than Letter size, adjust the front paper
length guide so that it lightly touches the paper stack.
3
Squeeze the width guide, as shown and slide it to the stack
of paper until it lightly touches the side of the stack.
1.10
N
OTES
• Do not push the paper width guide far enough to cause the
materials to warp.
• If you do not adjust the paper width guide, it may cause paper
jams.
S
ETTING UP YOUR PRINTER
:
Page 11

Step 4: Connecting Telephone Line
English
Plug one end of the supplied telephone line cord into the
jack on the machine and the other end into the wall jack.
To the wall jack
If you want to use your machine to receive both faxes and voice
calls, you will need to connect a telephone and/or answering
machine to your machine.
Plug your phone or answering machine cord into the
as shown below.
EXT
LINE
jack,
To a phone or answering
machine
S
ETTING UP YOUR PRINTER
1.11
Page 12

Step 5: Connecting a Printer Cable
For Local Printing
To print from your computer in a local environment, you need to
connect your machine to a computer with either a Universal
Serial Bus (USB) cable or a parallel cable.
N
OTE
: You only need to connect one of the cables mentioned
above. Do not use the parallel and the USB cables at the same
time.
Using a USB Cable
N
OTE
: If you are using a USB cable, you must be running
Windows 98/Me/2000/XP.
1
Make sure that both the machine and the computer are
turned off.
2
Connect a USB cable to the USB connector on your
machine.
3
Connect the other end of the cable to the USB port on your
computer.
1.12
S
ETTING UP YOUR PRINTER
Page 13

Using a Parallel Cable
N
OTE
: Connecting the machine to the parallel port of the
computer requires a certified parallel cable. You need to buy an
IEEE-1284 compliant parallel cable that is 3 m or less in length.
1
Make sure that both the machine and the computer are
turned off.
2
Connect the parallel cable to the parallel connector on your
machine.
Push the metal clips down to fit inside the notches on the
cable plug.
English
3
Connect the other end of the cable to the parallel interface
port on your computer, and tighten the screws.
S
ETTING UP YOUR PRINTER
1.13
Page 14

For Network Printing
You can attach your machine to a network using an Ethernet
cable (UTP cable with RJ.45 connector).
The WorkCentre PE120i has a built-in network interface card.
1
Make sure that both the machine and the computer are
turned off.
2
Plug one end of the Ethernet cable into the Ethernet
network port on your machine.
(WorkCentre PE120i only)
3
Plug the other end of the cable into a network LAN
connection.
N
OTE
: After connecting the machine, you need to configure the
network parameters on the control panel. See your machine’s
System Administration Guide.
1.14
S
ETTING UP YOUR PRINTER
Page 15

Step 6: Turning the Machine On
1
Plug one end of the supplied three-pronged electrical cord
into the AC socket on the machine and the other end into a
properly grounded AC outlet.
2
Press the power switch to turn the machine on. “Warming
Up Please Wait” appears on the display indicating that the
machine is now on.
To the AC wall jack
English
To view your display text in another language, see
page 1.16.
C
AUTIONS
• The fuser area inside the rear door of your machine becomes
very hot when in use. Take care not to burn your fingers when
you access this area.
• Do not disassemble the machine with power on. If you do, you
may receive an electric shock.
:
S
ETTING UP YOUR PRINTER
1.15
Page 16

Step 7: Changing the Display Language
To change the language that displays on the control panel,
follow these steps:
1
Press
Menu
until “Machine Setup” appears on the top line
of the display.
2
When “Language” appears on the bottom line of the display,
press
Enter
.
The current setting appears on the bottom line of the
display.
3
Press the scroll button (W or X) until the language you want
appears on the display.
4
Press
Enter
to save the selection.
5
To return to Standby mode, press
Stop/Clear
.
1.16
S
ETTING UP YOUR PRINTER
Page 17

Step 8: Installing Xerox Software in
Windows
System Requirements
Before you begin, ensure that your system meets the minimum
requirements.
Item Requirements Recommended
English
Operating
system
CPU
RAM
Free disk
space
Internet
Explorer
Windows 98/Me/NT 4.0/2000/XP
Windows 98/
Me/NT 4.0/
2000
Windows XP
Windows 98/
Me/NT 4.0/
2000
Windows XP
Windows 98/
Me/NT 4.0/
2000
Windows XP 1 GB or higher 5 GB
5.0 or higher 5.5
Pentium II 400
MHz or higher
Pentium III 933
MHz or higher
64 MB or higher 128 MB
128 MB or
higher
300 MB or
higher
Pentium III 933
MHz
Pentium IV 1
GHz
256 MB
1 GB
N
OTE
: For Windows NT 4.0/2000/XP, the system administrator
should install the software.
S
ETTING UP YOUR PRINTER
1.17
Page 18

Installing Xerox Driver CD
For Windows 2000 or XP connecting via USB port:
1
Mark sure that your machine is turned on and connected to
your computer’s USB port
2
The “New Hardware Found” window will appear when your
computer boots up.
3
Insert the supplied Drivers CD into your computers CD
drive.
4
Follow the on screen instructions to complete the software
installation. For more detailed instructions, see User Guide.
N
OTES
:
• For Windows NT 4.0/98/Me, see instructions in User Guide.
• For connectiong via Parallel Port, see instructions in User Guide.
• For Postscript Driver install, see instructions in User Guide.
• For Macintosh and Linux, see instructions in User Guide.
before inserting Drivers CD
.
1.18
S
ETTING UP YOUR PRINTER
Page 19

Step 9: Viewing the User’s Guide
The User’s Guide, which is in Adobe Acrobat PDF format, comes
with your machine in the supplied EUG CD-ROM. The manual will
provide you flexibility and convenience in accessing information.
You can view the manual on-screen in different formats (viewing
a single page, continuous single page or continuous facing page,
zooming in up to 1600% or out up to 12.5%, scrolling two-up
page or article flow). You can also print the manual, if necessary.
To view the User’s Guide in Windows:
1
Place the EUG CD-ROM in the CD-ROM drive.
2
When the language selection window appears, select the
appropriate language.
Adobe Acrobat automatically runs and then the User’s Guide
opens.
Note:
To open the User’s Guide, you must have the Adobe Acrobat
Reader program installed on your computer. If your computer
doesn’t have Adobe Acrobat, the EUG CD-ROM automatically
installs Adobe Acrobat Reader for you. After installation is
complete, repeat step 1 and 2.
English
S
ETTING UP YOUR PRINTER
1.19
Page 20

M
EMO
1.20
S
ETTING UP YOUR PRINTER
 Loading...