

Page 1

User's Guide
IndexContents
About This Guide
Page 2

Contents Index
COPYRIGHT INFORMATION Copyright © 1997–1998 by ScanSoft, Inc., a Xerox Company. All rights
reserved. No part of this publication may be transmitted, transcribed,
reproduced, stored in any retrieval system or translated into any
language or computer language in any form or by any means,
mechanical, electronic, magnetic, optical, chemical, manual, or
otherwise, without the prior written consent of ScanSoft, Inc., 9
Centennial Drive, Peabody, Massachusetts 01960. Printed in the United
States of America.
The software described in this book is furnished under license and may
be used or copied only in accordance with the terms of such license.
IMPORTANT NOTICE ScanSoft, Inc. provides this publication “as is” without warranty of any
kind, either express or implied, including but not limited to the implied
warranties of merchantability or fitness for a particular purpose. Some
states or jurisdictions do not allow disclaimer of express or implied
warranties in certain transactions; therefore, this statement may not
apply to you. ScanSoft reserves the right to revise this publication and to
make changes from time to time in the content hereof without obligation
of ScanSoft to notify any person of such revision or changes.
TRADEMARKS AND CREDITS TextBridge is a registered trademark, and Pagis is a trademark, of
ScanSoft, Inc., a Xerox Company. Xerox, The Document Company, and
the Stylized X are trademarks of Xerox Corp.
Excel, Word, and Windows are trademarks of Microsoft Corp.
WordPerfect is a registered trademark of WordPerfect Corp.
MGI PhotoSuite, MGI PC Photography Kit, MGI VideoWave, MGI and
the MGI logo are trademarks or registered trademarks of MGI Software
Corp.
Other terms used in this manual are the trademarks of their respective
holders.
Portions of this product copyright © 1990–1998, Pixel Translations, Inc.
Portions of this product copyright © 1994–1998, Mastersoft Corp.
Portions of this product copyright © 1998, MGI Software Corp.
Verity Topic® Search Technology copyrighted by Verity, Inc.
AccuSoft Redlining® Toolkit copyrighted by AccuSoft Corp.
Authors: Jim Cahill and Sadie DeSimone
© SCANSOFT, INC.
9 Centennial Drive
Peabody, Massachusetts 01960
Pagis Pro 2.0 User’s Guide
Part Number 00–09407–00
May 1998
Page 3
Using this Electronic User's Guide
This document is the electronic version of the Pagis Pro User's Guide. It is in Adobe
Acrobat™ Portable Document Format (PDF), and contains links that let you navigate
quickly to specific sections of the user's guide.
To be viewing this document, you must have already installed the Acrobat Reader provided with Pagis Pro. The Acrobat Reader provides these navigation tools:
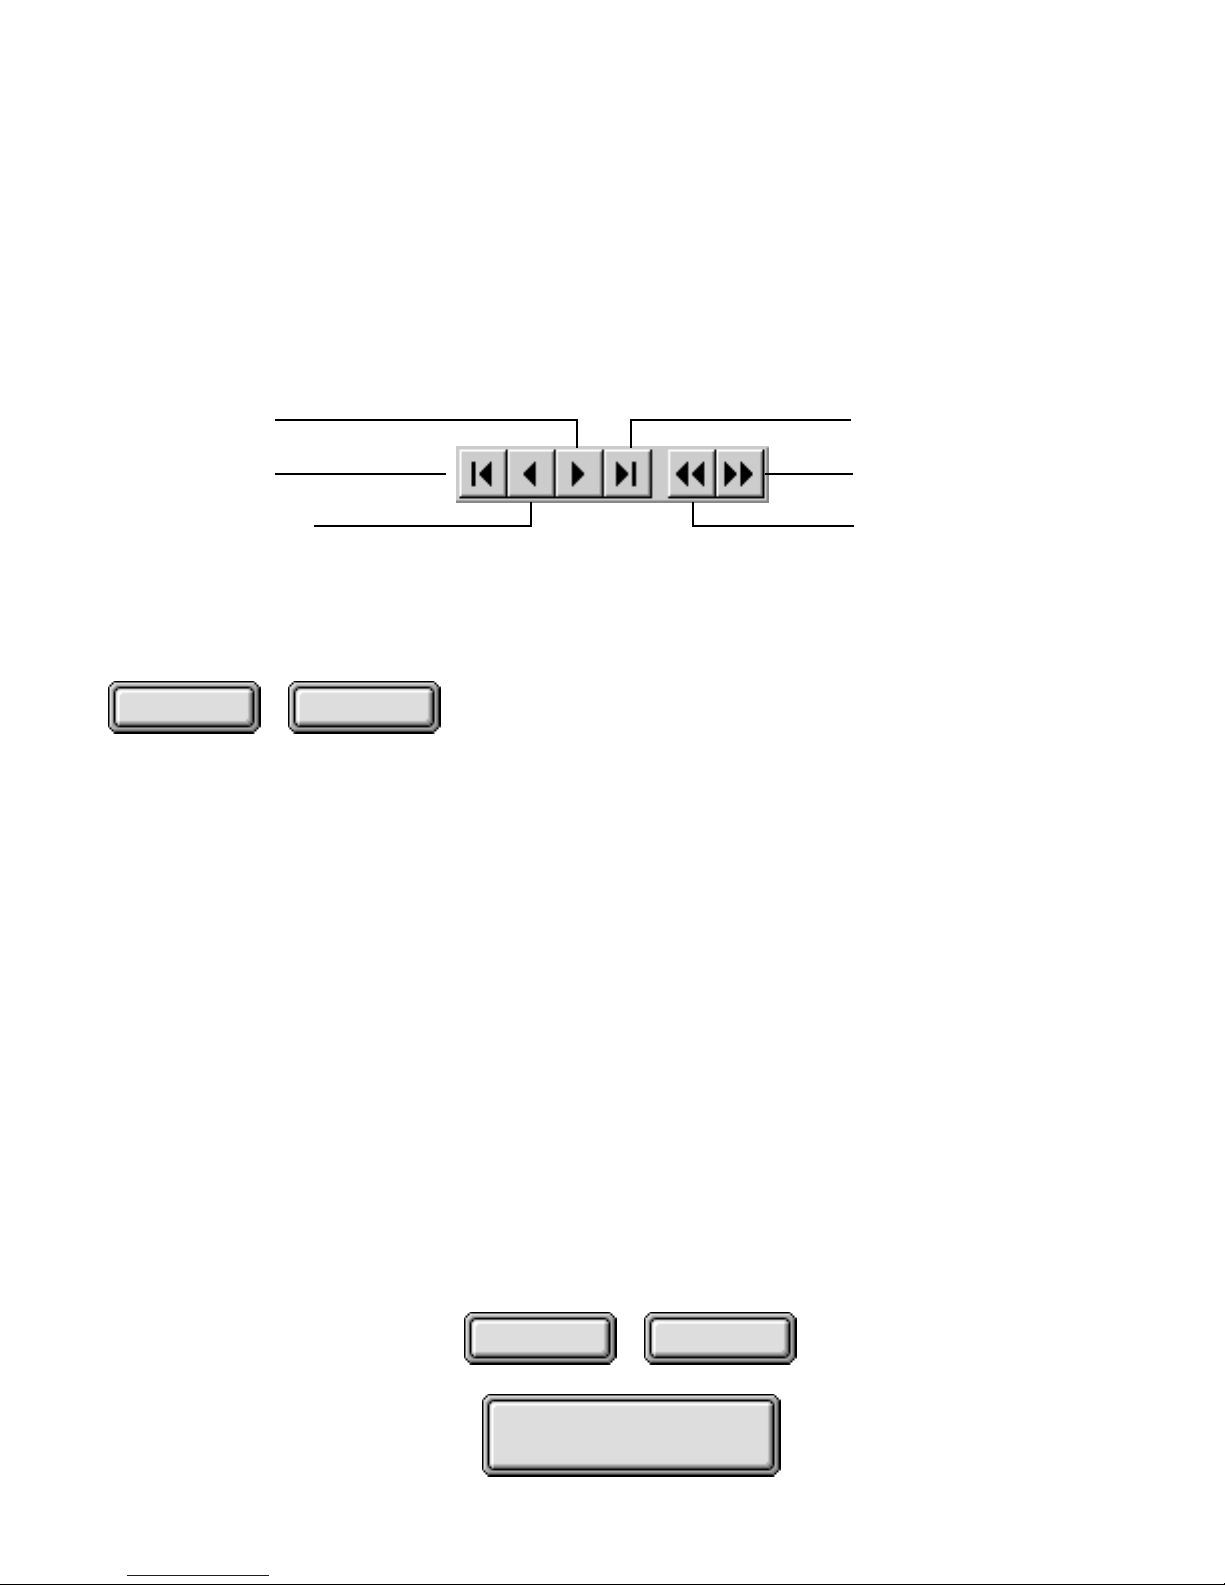
Go to last pageGo to next page
Go to first page Go to next page viewed
Go to previous page
This document also contains some custom navigation tools:
IndexContents Bold Text
Click on the Contents button from any page to navigate to the Table of Contents. In the
Table of Contents, click on any entry to navigate to that section of the user's guide.
Click on the Index button from any page to navigate to the Index. In the Index, click on
any page number in bold to navigate to the page that contains that topic.
Throughout the user's guide, click on any technical term in bold to navigate to the
definition of the term.
Go to previous page
viewed
IndexContents
More About this
User's Guide
Page 4

CONTENTS
PREFACE
About this User’s Guide..............................xiii
Organization of this manual.......................xiii
Typographic conventions used in this manual..........xv
Related Documents.................................xvi
How To Contact Customer Support....................xvii
Internet and electronic mail addresses..............xvii
Telephone and fax numbers.......................xviii
1 INTRODUCTION
What is Pagis Pro?.................................1–1
What Comes with Pagis Pro.........................1–2
Pagis Pro Features................................1–3
Where to Go From Here.............................1–8
2 INSTALLING PAGIS PRO
System Requirements..............................2–1
Installing and Testing Your Scanner...................2–2
Installing Pagis Pro Software........................2–3
If you already have TextBridge Pro 98...............2–3
Upgrading from an earlier Pagis version.............2–3
Uninstalling the old Pagis software..............2–4
Upgrading your old Pagis search index...........2–4
Running the Pagis Pro setup program...............2–6
Where to Go From Here............................2–13
Uninstalling Pagis Pro............................2–13
Pagis Pro User’s Guide iii
Page 5

3 LEARNING PAGIS PRO
Tools that Pagis Pro Adds to Windows.................. 3–1
Pagis Inbox ................................... 3–2
Pagis ToolBar ................................. 3–3
Pagis SendTo Bar .............................. 3–4
Scanning a Document .............................. 3–6
Copying a Document ............................... 3–9
Faxing a Document ............................... 3–12
Refining and Annotating a Document ................. 3–15
Scanning and Typing Into a Form .................... 3–18
Editing a Scanned Picture .......................... 3–21
Searching for a Document .......................... 3–25
Running OCR on a Document ....................... 3–29
Where to Go From Here............................ 3–31
4 USING PAGIS PRO
Pagis Inbox ...................................... 4–1
Pagis Inbox menus and commands ................. 4–2
Pagis commands in the File menu ............... 4–3
Pagis commands added to the View menu ......... 4–3
Pagis menu ................................ 4–4
Document thumbnails ........................... 4–5
Pagis ToolBar ................................. 4–7
Modifying the Pagis ToolBar in the Pagis Inbox..... 4–7
Launching the Pagis ToolBar on the Windows
desktop and changing its view ............ 4–8
Pagis SendTo Bar .............................. 4–9
Launching the SendTo Bar on the Windows desktop . 4–9
Changing SendTo Bar options .................. 4–9
Adding a program to the SendTo Bar............ 4–10
Removing a program from the SendTo Bar ....... 4–12
Changing the Pagis Inbox location in your file system .. 4–13
iv Pagis Pro User’s Guide
Page 6

Pagis Folders.................................... 4–14
Creating a Pagis Folder...................... 4–14
Removing Pagis Folder attributes .............. 4–15
Working with Pagis Files in Windows™ ............... 4–15
About Pagis (XIF) files.......................... 4–15
Enhanced context menu ........................ 4–17
Thumbnail command........................ 4–18
Stacking documents......................... 4–19
Unstacking documents ...................... 4–20
Converting to other image formats ............. 4–20
XIF property sheets............................ 4–23
Defining keywords and other index properties
for a file............................ 4–23
Getting details about a XIF file ................ 4–25
Scan Tool (Scanner, Copier, Fax)..................... 4–26
Setting up your scanner or digital camera to work
with Pagis Pro.......................... 4–27
About scanners and scanner drivers ............ 4–27
Selecting the scanner or digital camera driver..... 4–28
Displaying the TWAIN dialog box .............. 4–30
Changing default properties for scanned documents ... 4–32
Specifying scanner properties ................. 4–32
Specifying page refinements .................. 4–36
Specifying auto save properties ................ 4–38
Specifying keyword properties................. 4–40
Scanning documents ........................... 4–41
Scanning a single-sided document to a XIF file .... 4–41
Scanning a double-sided document to a XIF file.... 4–45
Scanning directly to an application ............. 4–47
Acquiring an image from a digital camera........ 4–49
Using Prescan to scan part of a document ........ 4–51
Table of Contents v
Page 7

4 USING PAGIS PRO (CONT.)
Copying documents ............................ 4–54
Select a printer ............................ 4–54
Set up the copy job.......................... 4–56
Make copies............................... 4–57
Faxing documents ............................. 4–59
Select a fax printer ......................... 4–60
Set up the fax job........................... 4–61
Fax a document............................ 4–62
Pagis Editor .................................... 4–64
File menu ................................... 4–65
New command............................. 4–65
New Window command ...................... 4–65
Open command ............................ 4–65
Save command ............................ 4–66
Save As command .......................... 4–66
Export command........................... 4–66
Send To command.......................... 4–68
Properties command ........................ 4–68
Page Setup command ....................... 4–69
Print Preview command ..................... 4–69
Print command ............................ 4–70
Scan command ............................ 4–70
Exit command............................. 4–70
Edit menu................................... 4–70
Undo command ............................ 4–71
Cut command ............................. 4–71
Copy command ............................ 4–71
Copy as Text command ...................... 4–71
Paste command............................ 4–71
vi Pagis Pro User’s Guide
Page 8

Paste as New Page command.................. 4–71
Clear command ............................ 4–72
Select Page command ....................... 4–72
Select All Pages command.................... 4–72
Deselect All command ....................... 4–72
Move Page command........................ 4–72
Reverse Page Order command................. 4–73
View menu .................................. 4–73
Zoom command ............................ 4–74
Fit in Window command ..................... 4–74
Fit to Width command....................... 4–74
Fit to Height command ...................... 4–74
Toolbars command.......................... 4–75
Status Bar command........................ 4–75
Page Thumbnails command................... 4–75
Enhance Text Display command ............... 4–76
Show Annotations command .................. 4–76
Show Background Tint command .............. 4–76
Show Colored Text command.................. 4–76
Go to Page command........................ 4–76
Insert menu.................................. 4–77
Blank Page command ....................... 4–77
File command ............................. 4–77
Tools menu .................................. 4–78
OCR command ............................ 4–78
Picture Edit command....................... 4–80
Select command............................ 4–81
Pan command ............................. 4–81
Zoom command ............................ 4–81
Options command .......................... 4–82
Table of Contents vii
Page 9

4 USING PAGIS PRO (CONT.)
Page menu................................... 4–84
Auto Refine command ....................... 4–84
Refine command ........................... 4–84
Manual Straighten command ................. 4–86
Rotate command ........................... 4–87
Crop to Region command..................... 4–87
Brightness & Contrast command............... 4–88
Invert Colors command ...................... 4–89
Sharpen command.......................... 4–89
Blur command............................. 4–89
Resize command ........................... 4–89
Change Resolution command.................. 4–90
Convert Color Depth command ................ 4–90
Remove Background Tint command............. 4–91
Convert Text to Black command ............... 4–91
Image Properties command................... 4–91
Annotate menu ............................... 4–92
Highlighter command ....................... 4–92
Margin Note command ...................... 4–92
Sticky Note command ....................... 4–93
Arrow command ........................... 4–93
Line command............................. 4–93
Circle command............................ 4–93
Rectangle command......................... 4–93
Freehand command......................... 4–93
Stamp command ........................... 4–94
Edit Text command......................... 4–94
Options command .......................... 4–94
viii Pagis Pro User’s Guide
Page 10

Forms menu ................................. 4–96
Detect Fields command ...................... 4–96
Add Field command......................... 4–97
Remove All Fields command .................. 4–97
Edit Field command ........................ 4–98
Clear All Text command ..................... 4–98
Options command .......................... 4–98
Toolbars in the Pagis Editor ..................... 4–99
Standard toolbar ........................... 4–99
Annotation toolbar......................... 4–100
Image toolbar ............................ 4–100
Pagis Index Manager and Update Tool ............... 4–101
About search indexes.......................... 4–103
Exploring the Pagis Index Manager............... 4–104
Create Index command ..................... 4–105
Configure Index command................... 4–106
Delete Index command ..................... 4–106
Change Schedule command.................. 4–106
Update Index command..................... 4–107
Attach to Index command ................... 4–107
Detach from Index command................. 4–108
Properties command ....................... 4–108
Exit command............................ 4–108
Index toolbar............................. 4–109
Creating and defining an index .................. 4–109
Indexing removable media...................... 4–112
Sharing indexes in a networked environment ....... 4–115
Table of Contents ix
Page 11

4 USING PAGIS PRO (CONT.)
Search Tool .................................... 4–116
Basic search steps ............................ 4–116
Defining a search string ....................... 4–118
Simple searches........................... 4–118
Concept (Boolean) searches .................. 4–119
Proximity searches ........................ 4–121
Natural language searches .................. 4–121
Search by example......................... 4–122
Other search properties........................ 4–122
Search Options tab ........................ 4–122
Date Modified tab ......................... 4–123
Keywords tab ............................ 4–124
Name & Type tab ......................... 4–124
File menu .................................. 4–125
Open Selected command .................... 4–125
Properties command ....................... 4–125
Open Containing Folder command............. 4–126
Save Search command...................... 4–126
Exit command............................ 4–126
Edit menu.................................. 4–126
Copy command ........................... 4–126
Select All command........................ 4–127
Invert Selection command................... 4–127
View menu ................................. 4–127
Toolbar command ......................... 4–127
Status Bar command....................... 4–127
Large Icons command ...................... 4–128
Small Icons command ...................... 4–128
List command ............................ 4–128
Details command.......................... 4–128
Arrange Items command .................... 4–128
x Pagis Pro User’s Guide
Page 12

Options menu ............................... 4–129
Configure Search Results command............ 4–129
Index menu................................. 4–130
Update Indexes command ................... 4–130
Manage Indexes command................... 4–130
Search toolbar............................... 4–131
Working with found documents.................. 4–131
Where to Go From Here........................... 4–132
5 EXAMPLES AND TIPS
Sample Uses of Pagis Pro ........................... 5–1
Scan manuscripts and photographs for a newsletter .... 5–2
Create a library of company documents.............. 5–3
Use annotations to comment on scanned design
drawings ............................... 5–4
Scan invoices and e-mail them to customers .......... 5–5
Scan pictures for art projects or to create posters....... 5–6
Scan and fax reports to clients..................... 5–6
Scan, organize, and retrieve articles and
research information...................... 5–7
Scan client records for archival to CD-ROM........... 5–8
Eliminate office clutter .......................... 5–8
Scan receipts and other financial documents
for tax purposes......................... 5–10
Scan and retrieve your favorite recipes ............. 5–11
Scan photos of possessions for insurance purposes..... 5–12
Tips and Techniques .............................. 5–12
Using the Pagis Print Driver to create XIF documents.. 5–13
Downloading the Pagis Viewer ................... 5–17
Table of Contents xi
Page 13

5 EXAMPLES AND TIPS (CONT.)
Sending XIF files as e-mail attachments ............ 5–18
America Online ............................ 5–19
Eudora Pro and Eudora Lite .................. 5–20
Lotus cc:Mail and Lotus Notes................. 5–20
MS Outlook Express and MS Outlook ........... 5–21
Netscape Mail ............................. 5–21
Registering Netscape and Netscape Mail......... 5–22
Dragging XIF files to open applications............. 5–23
Using TextBridge Pro as a standalone application..... 5–24
Using MGI PhotoSuite as a standalone application .... 5–25
Where to Go From Here............................ 5–26
A SUPPORTED PROGRAMS AND FILE FORMATS
Supported Drag-and-Drop Programs ................... A–1
Image Formats that Pagis Pro Supports ................ A–6
GLOSSARY OF TERMS
INDEX
xii Pagis Pro User’s Guide
Page 14

Contents Index
PREFACE
Welcome to Pagis Pro from ScanSoft, Inc., a Xerox Company.
Pagis Pro is your all-in-one scanning suite running in Microsoft®
Windows™ 95, Windows 98 or Windows NT 4.0.
Please read this preface before going on to install and use Pagis
Pro, as it discusses the following important topics:
◆ About this user’s guide
◆ Related documents
◆ How to contact customer support
ABOUT THIS USER’S GUIDE
This user’s guide provides all the information you need to install,
learn and use Pagis Pro successfully.
Please note that this user’s guide does not teach you about your
Windows operating system. It assumes that you know how to
operate and manage your computer and its operating system
software.
Organization of this manual
Whether you need learning exercises, reference information, or
examples and tips, this manual is designed to work for you.
To make best use of this manual, take a minute to see how it is
organized:
Pagis Pro User’s Guide xiii
Page 15

Contents Index
◆ Chapter 1, “Introduction,” provides an overview of Pagis Pro
features and benefits, describes what is included with Pagis, and
tells you how to get started with installing and using the
software.
◆ Chapter 2, “Installing Pagis Pro,” discusses system requirements,
and provides complete installation instructions. It also describes
how to uninstall Pagis Pro.
◆ Chapter 3, “Learning Pagis Pro,” provides step-by-step practice
sessions to help you learn and use the primary tools of Pagis Pro.
◆ Chapter 4, “Using Pagis Pro,” is the primary reference to Pagis
Pro. It provides in-depth, detailed information and step-by-step
procedures to explore, set up, use, and master Pagis Pro.
◆ Chapter 5, “Examples and Tips,” describes many sample uses for
Pagis Pro and some additional tips and techniques. For example,
it describes how to attach and e-mail a Pagis document using
many popular e-mail applications. It also describes the Pagis
Print Driver that enables you to “print” a document from another
application to convert it to the Pagis eXtended Image File (XIF)
format.
◆ Appendix A, “Supported Programs and File Formats”, lists the
programs that Pagis Pro supports for drag-and-drop operations.
It also lists the file formats it can import and export.
◆ The “Glossary of Terms” provides definitions of all of the
technical terms used in this manual.
◆ The “Index” provides page numbers for all of the topics described
in this manual.
Note This manual is provided both in print and electronic form. The
electronic version is in Adobe® Portable Document Format (PDF),
and is designed as a complete hyperlinked reference tool.
xiv Pagis Pro User’s Guide
Page 16

Contents Index
Typographic conventions used in this manual
This manual uses bold, italic, and other typographic styles to
highlight different types of information in the text (Table P–1).
Table P–1. Documentation Conventions
bold Introduces a new term, or the first use of an
important term in a chapter; also sometimes
used to denote strong in-line emphasis.
italic Denotes titles of other manuals or books. Also
used to denote generic representations of file
name entries, for example,
filename
monospace Denotes examples, menu text, actual file names
or messages that appear on the computer
screen.
“ ” (quotes) Denotes titles of chapters and sections in this
manual.
☞
Note
Preface xv
Introduces tips that provide useful information
about a procedural step or system function.
Introduces information of special note about the
current topic. There are borders above and
below the noted text.
Page 17

RELATED DOCUMENTS
◆ Release Notes—Read the on-line Release Notes (Readme.rtf)
◆ On-line version of the Pagis Pro User’s Guide—This user’s
Contents Index
In addition to the printed Pagis Pro User’s Guide, refer to the
following documents for more information related to Pagis Pro:
first. This document provides late-breaking information about
Pagis Pro. You can access the Release Notes at installation time,
and after installation in the Pagis Pro 2.0 Program Group.
guide is also provided in Adobe® Acrobat™ 3.0 Portable
Document Format (PDF). You can access the User’s Guide
(PagisUG.pdf) at installation time, and, after installation, from
the Pagis Pro 2.0 CD-ROM.
☞ The PDF version of the user’s guide provides hyperlinks in
the table of contents and index that let you navigate quickly
to specific information in the manual.
◆ On-line Help—From Pagis Pro software, you can access context
sensitive help, including topics about the menus, commands, and
tools. Using the standard Windows winhelp utility, you can also
access Pagis help via Contents, Index, and Search screens.
◆ TextBridge Pro User’s Guide—Provided in both printed and
PDF formats, the TextBridge Pro User’s Guide covers all aspects
of the optical character recognition (OCR) technology built into
Pagis Pro software. TextBridge Pro software also contains its own
extensive on-line help system.
◆ MGI PhotoSuite documentation—You can access the
PhotoSuite Idea Guide and Reference Manual in Adobe Acrobat
PDF files on the Pagis Pro CD-ROM. To order hard copies of
these manuals, contact MGI Software Corp. directly:
Phone: 1-888–644–7638 (North America only)
(905) 764–7358 (Outside North America)
Fax: (905) 707–3694
Email: custserv@mgisoft.com
xvi Pagis Pro User’s Guide
Page 18

Contents Index
HOW TO CONTACT CUSTOMER SUPPORT
Registered users of Pagis Pro are entitled to free customer
support from ScanSoft, Inc.
If you should experience problems with Pagis Pro that you cannot
resolve, contact Pagis Technical Support.
You can contact Pagis Technical Support by the Internet,
telephone, or fax, as described below.
This information will assist Technical Support in solving the
problem:
◆ Your software version number
(This is in the Control menu of the Pagis ToolBar under the
About Pagis command.)
◆ Your software serial number
(This is the serial number on the back of the Pagis CD-ROM
case.)
◆ Your scanner make and model
◆ A description of the steps that led up to the problem
◆ If Pagis Pro generated an error message, a verbatim description
of the error message or its number
Internet and electronic mail addresses
You can contact Technical Support and get information about
Pagis Pro on the Internet at the addresses in the following list:
◆ Pagis site: www.pagis.com
The Pagis website provides a link to Technical Support with
Frequently Asked Questions, technical information bulletins, and
a problem report form.
Preface xvii
Page 19

Contents Index
E-mail in the United States, Canada, or the Pacific Rim:
◆ Technical Support: pagis_support@xis.xerox.com
◆ Sales information: pagis_sales@xis.xerox.com
E-mail from European countries and the Middle East:
◆ Technical Support: uksupport@xis.xerox.com
◆ Sales information: xisuk@xis.xerox.com
Telephone and fax numbers
Call one of the following telephone numbers or send a fax
describing the problem to one of the fax numbers.
In the United States, Canada, or the Pacific Rim:
☎ Telephone: 978–977–6304 (Monday–Friday, 8:30 a.m.–5:30 p.m.
Eastern Time)
Fax: 978–977–2434
From European countries and the Middle East:
Xerox ScanSoft Ltd. in England:
☎ Telephone: +44 (0) 1923 209140
Fax: +44 (0) 1923 208446
xviii Pagis Pro User’s Guide
Page 20
Contents Index
1
◆ What is Pagis Pro?
◆ What comes with Pagis Pro
◆ Pagis Pro features
☞ To get started quickly, go directly to Chapter 2, “Installing Pagis
WHAT IS PAGIS PRO?
INTRODUCTION
Welcome to Pagis™ Pro, your all-in-one scanning suite from
ScanSoft, Inc., a Xerox Company. Read this chapter for
information about the following topics:
Pro,” for installation instructions.
Pagis Pro is the premier color scanning suite available for
Microsoft Windows™ 95, Windows 98, and Windows NT 4.0.
Pagis Pro enables you to scan, copy, fax, view and edit, index,
search and otherwise manage electronic documents (articles,
photos, forms, and so on) on your Windows desktop.
In addition to documents on your personal computer, Pagis Pro
enables you to manage documents on removable media, such as
Jaz™ and Zip™ drives and CD-ROMs.
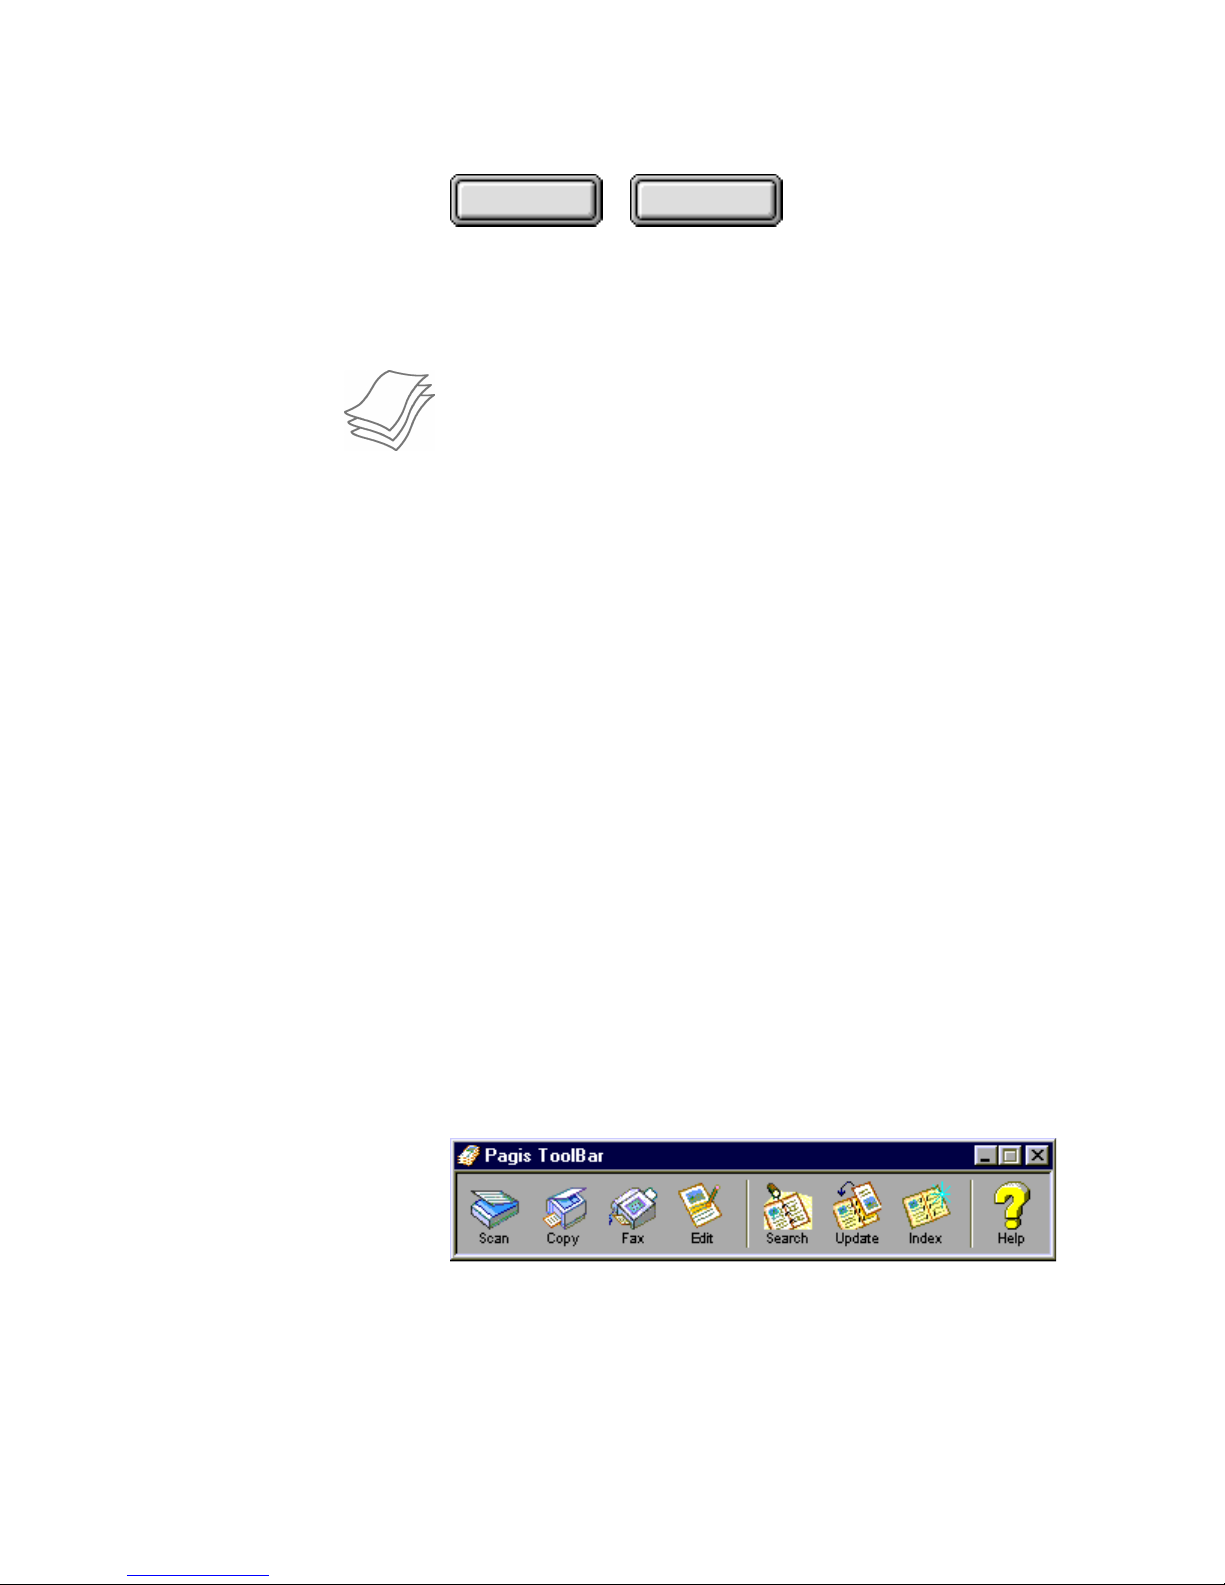
Figure 1–1 shows the Pagis ToolBar, which provides access to
all the major features of the product.
Figure 1–1. Pagis ToolBar
Pagis Pro User’s Guide 1–1
Page 21

Contents Index
WHAT COMES WITH PAGIS PRO
The Pagis Pro package includes a software CD-ROM, printed
user’s guides for both Pagis Pro and TextBridge Pro, and a
printed postage-paid customer registration form.
If any of these items are missing, please contact ScanSoft
Customer Support as described in the Preface.
The Pagis Pro CD-ROM contains the following:
◆ Pagis Pro installation program and application software
◆ TextBridge® Pro OCR software
◆ MGI® PhotoSuite™ image editing software
◆ Pagis Pro multimedia product tour
◆ On-line documentation for Pagis Pro, TextBridge Pro, and MGI
PhotoSuite in Adobe® Portable Document Format (PDF)
◆ Adobe Acrobat™ Reader
◆ Sample XIF (eXtended Image Format) image files
Note Be sure to register your copy of Pagis Pro software. As a
registered user, you will be entitled to free technical support, and
kept up to date on new software releases and other important
product information.
1–2 Pagis Pro User’s Guide
Page 22
PAGIS PRO FEATURES
◆ The Pagis Inbox
Standard menus and tools
(Pagis menu is added)
Pagis Toolbar
Contents Index
Pagis Pro tools are designed to improve your work flow,
productivity, and organization. Please read this section for
highlights of the many features and benefits Pagis Pro provides.
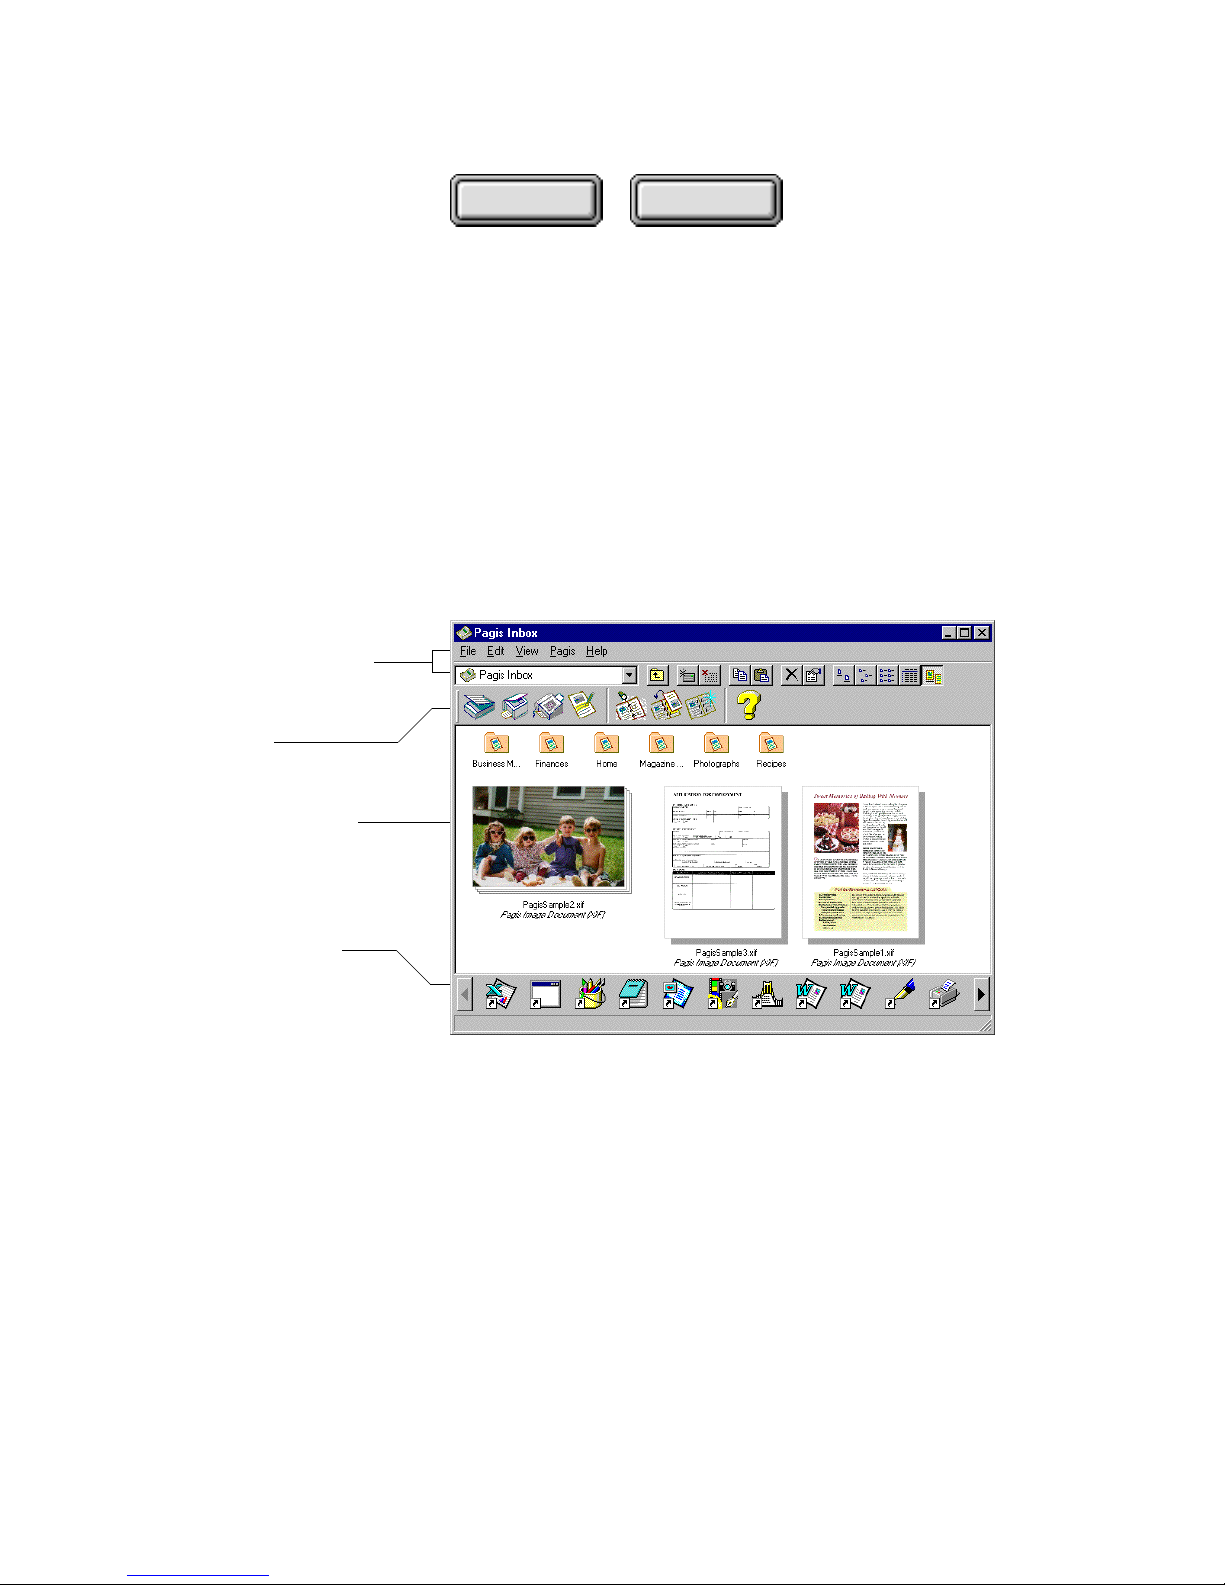
The Pagis Inbox (Figure 1–2) is a special folder installed on your
Windows desktop. It is Pagis Pro’s default location for scanned
documents and the main control center for Pagis Pro operation.
Enhanced Explorer view
('thumbnail' pictures of
scanned documents can
be shown)
Pagis SendTo Bar with
shortcuts to other
programs on your PC
Figure 1–2. Pagis Inbox with document thumbnails
Think of the Pagis Inbox as a supercharged Windows folder. It
includes all the menu items of a Windows Explorer view plus an
added Pagis menu, an integrated Pagis ToolBar, and an
integrated SendTo Bar for drag-and-drop operations.
From the Pagis Inbox, you can arrange and organize your
scanned documents, launch Pagis tools, and drag documents to
any application for word processing, e-mailing, image editing, and
other purposes.
Introduction 1–3
Page 23

Contents Index
◆ Pagis Folders
There is only one Pagis Inbox. However, Pagis Pro enables you to
change any standard Windows folder into a Pagis Folder, which
has all the same enhancements as the Pagis Inbox. For
organizing your scanned documents, the Pagis Inbox provides
several sample Pagis Folders—Business Materials, Finances,
Home, Magazine Articles, Photographs, and Recipes.
◆ SendTo Bar
During installation, Pagis Pro finds all the applications on your
system and lets you select which ones are added as shortcuts to
the SendTo Bar (refer to Figure 1–2).
You can drag and drop any scanned document onto any shortcut
on the SendTo Bar to convert, if necessary, and open the
document in that application.
For example, when you drag and drop a scanned document onto
the MS Word shortcut on the SendTo Bar, Pagis Pro performs
OCR (optical character recognition) on the document, launches
Microsoft Word™, and places the recognized text (and graphics, if
there are any) in an open Word document.
The SendTo Bar is integrated into the Pagis Inbox and all Pagis
Folders, and can hold an unlimited number of applications.
◆ SendTo Bar drag and drop to registration wizard
You can add applications to the SendTo Bar anytime. Simply
drag and drop the application icon onto the SendTo bar. This
opens the Drag and Drop Registration Wizard so you can
register the application with Pagis Pro.
1–4 Pagis Pro User’s Guide
Page 24

Contents Index
◆ Scan and capture high quality color images in extremely
compact file sizes
Only Pagis Pro offers the XIF (eXtended Image File) format,
which enables you to store high quality color scans in extremely
compact file sizes.
A typical color magazine page, for example, can take up less than
100 kilobytes when scanned to XIF. By contrast, a JPEG version
of the same file could be as much as five times the size. JPEG is a
very popular image compression format.
Pagis Pro achieves its high compression levels by segmenting the
scanned image into four layers in the XIF file: the binary (black
and white) text and graphics layer; the color text layer; the
background tint layer; and the color image layer. Each layer is
then appropriately compressed.
◆ Scan to and read many popular image formats
In addition to XIF, Pagis Pro can read and write many popular
image formats, including BMP, FlashPix, GIF, JPEG, and TIFF.
For a complete list of supported image formats, see Appendix A,
“Supported Programs and File Formats.”
◆ Direct scanning to many popular applications
Pagis Pro allows you to scan documents directly into many
applications. A partial list includes Microsoft Office Suite
applications (such as Word, Excel, and Power Point); Adobe
applications (such as PageMaker, PhotoDeluxe, and PhotoShop);
Corel WordPerfect Suite applications (such as WordPerfect,
Draw, and Quattro Pro); Lotus Smart Suite applications (such as
AmiPro, Freelance, and 1–2–3). For a complete list, see Appendix
A, “Supported Programs and File Formats.”
◆ Color copying
With Pagis Pro and your color scanner, you can scan paper
documents into your computer as high-quality color images, then
send them to your color printer to make color copies.
Introduction 1–5
Page 25

Contents Index
◆ Fax your scanned documents
With Pagis Pro, a modem and fax software, you can quickly and
conveniently fax text documents, forms, photos and so on. To
achieve the best quality image, Pagis Pro enhances the scanned
document before it is faxed. Some of the fax applications
supported by Pagis Pro are Delrina WinFax and Eclipse Fax. For
a complete list of supported fax applications, see Appendix A,
“Supported Programs and File Formats.”
◆ View and clean up scanned documents
Using the Pagis Editor, you can view and perform a number of
operations on scanned XIF documents. You can zoom, rotate,
enhance colors, remove specks and lines, straighten, crop, and
reorder scanned pages.
◆ Add annotations to scanned documents
The Pagis Editor enables you to add comments and draw
emphasis to key parts of your scanned documents before
distributing them. Some of the annotation tools include margin
note, sticky note, highlighter, arrow, line, circle, rectangle, and
stamp.
◆ Image edit scanned documents
The Pagis Editor includes integrated MGI PhotoSuite image
editing tools. PhotoSuite enables you to edit scanned images with
all the familiar image editing tools such as eraser, pencil,
airbrush, brush, line, and curve. Using PhotoSuite you can
manipulate photos, add effects, create post cards, calendars,
posters, signs, and so on.
Scan a form and fill in the fields
The Pagis Editor enables you to scan forms, fill them in, then
print them out. A forms detection tool in the Editor places text
annotations in each form field and lets you easily navigate to, and
type in, each field.
1–6 Pagis Pro User’s Guide
Page 26

Contents Index
◆ Search and retrieve all documents on your system
The Pagis Search Tool enables you to perform a full text search
of the scanned documents and electronic (for example, Word)
documents on your system. You can also add keywords to scanned
documents so you can easily find them.
◆ Search on text in annotations
If you have added text annotations (such as margin notes and
sticky notes) to a scanned document in the Editor, you can use
the Search Tool to search for documents based on these
annotations.
◆ Index and search network drives and removable media
You can search and retrieve information not only on your local
system, but on network drives, Jaz™ drives, Zip™ drives, floppy
disks, and CD-ROMs.
◆ Create and manage multiple search indexes
The Pagis Index Manager allows you to create and configure
Pagis indexes on your system and removable media. The Index
Manager shows the date and time each index was last updated,
the update schedule, which directories and file types are
included, and which are excluded. You can set up an automatic
index update schedule or update your indexes manually.
◆ OCR documents with pinpoint accuracy
Pagis Pro includes TextBridge Pro 98, ScanSoft’s awardwinning OCR (optical character recognition) software.
TextBridge Pro is a full-featured, highly accurate and easy to use
application. The advantage of pro level OCR is that it maintains
the original formatting of scanned documents (text columns,
pictures, and tables).
You can access TextBridge Pro from Pagis Pro, or directly as a
standalone application.
Introduction 1–7
Page 27

Contents Index
WHERE TO GO FROM HERE
Proceed to Chapter 2 of this manual for detailed instructions to
install and register Pagis Pro software, and to select your
scanner.
Chapter 2 also describes how to uninstall Pagis Pro.
1–8 Pagis Pro User’s Guide
Page 28
Contents Index
2
◆ System requirements
◆ Installing and testing your scanner
◆ Installing Pagis Pro software
◆ Uninstalling Pagis Pro software
SYSTEM REQUIREMENTS
◆ an Intel Pentium™ (or compatible) microprocessor
INSTALLING PAGIS PRO
This chapter describes the Pagis Pro software installation and
setup procedures. Specifically, it covers these topics:
It is recommended that you read through the first three sections
before proceeding with software installation. However, if you are
ready to begin software installation, please turn to Page 2–3.
To install and run Pagis Pro, your PC must be set up to run
Microsoft Windows™ 95, Windows 98, or Windows NT
(version 4.0). Your PC must also be equipped with the following:
◆ VGA, SVGA, or Multi-sync color monitor
◆ 24 megabytes (Mb) of random access memory (RAM) minimum
(32 megabytes recommended)
☞ The more RAM you have, the more efficiently Pagis Pro runs,
particularly when you are scanning and editing large documents.
If you are running with only 24Mb of RAM, make sure you have
plenty of hard disk space to accommodate Windows virtual
memory (swapping to disk). Consult Windows documentation for
more information about virtual memory.
◆ 55Mb of free space in which to install all Pagis Pro components
Pagis Pro User’s Guide 2–1
Page 29

Contents Index
INSTALLING AND TESTING YOUR SCANNER
Using built-in ISIS drivers, Pagis Pro works with many popular
desktop scanners. In addition, with its support of the TWAIN
standard, Pagis Pro can work with scanners and other devices,
such as digital cameras, that provide their own TWAIN source
drivers.
Note Check the Pagis Pro home page on the World Wide Web for the
latest list of supported scanners and digital cameras:
http://www.pagis.com
Scanners usually require a system-level driver or a TWAIN source
driver, which is provided by the scanner or interface card manufacturer. Consult the scanner documentation for details
about installing your scanner, interface card, and driver.
The basic steps for installing a scanner are to:
1. Install the correct scanner interface card (if one is necessary) in
the PC bus. Note that many scanners simply plug into the PC’s
standard serial or parallel port.
2. Hook up the scanner to the interface card or standard port with
the correct cable, and power up the scanner and the PC.
3. Install the system-level scanner driver (.SYS) file, or TWAIN
source driver on your PC hard disk, as directed by the scanner
documentation.
4. Test the scanner using software tools provided by the manufacturer. After the scanner is functioning, go on to install, and
link your scanner to, Pagis Pro software.
☞ If your scanner runs independently of Pagis Pro, you can be sure
that it is functioning correctly. Setting it up to run with Pagis Pro
should then be a simple matter.
2–2 Pagis Pro User’s Guide
Page 30

Contents Index
INSTALLING PAGIS PRO SOFTWARE
After you have installed and tested your scanner, you are ready
to install Pagis Pro software. This section covers these topics:
◆ If you already have TextBridge Pro 98
◆ Upgrading from an earlier Pagis version
◆ Running the Pagis Pro setup program
If you are a new Pagis user, go directly to “Running the Pagis Pro
setup program” on page 2–6.
If you already have TextBridge Pro 98
If you have a version of TextBridge Pro 98 installed, you should
uninstall it before installing Pagis Pro software. Pagis Pro
includes its own full-featured version of TextBridge Pro 98.
Refer to the TextBridge Pro 98 User’s Guide for uninstall
instructions.
Note that if you have saved any training files or recognized text
files in the TextBridge Pro 98 folder, they will not be uninstalled.
Upgrading from an earlier Pagis version
If you are upgrading from an earlier version of Pagis, there are a
few items you should take into account.
First, you must uninstall the old version of Pagis software before
installing this new version. See the next subsection, “Uninstalling
the old Pagis software,” for instructions.
Second, however, you can maintain your old Pagis search index
and use it with this new version of Pagis Pro. For this purpose,
an Upgrader program is provided. See the subsection,
“Upgrading your old Pagis search index,” for information.
Installing Pagis Pro 2–3
Page 31

Contents Index
Uninstalling the old Pagis software
If you have Pagis Pro 97 or Pagis SE, you must uninstall it before
installing the new version of Pagis Pro.
To uninstall the old version of Pagis software:
1. Close all active applications, including the Pagis Tool Bar
and Send To Bar.
2. On the Windows task bar, click:
Start ➧ Programs ➧ Pagis ➧ Uninstall Pagis
3. Follow the screen messages to proceed with the Uninstall
process.
Toward the end of the install process, a message box asks if you
want to delete the Xerox Search Tool Database.
Click No if you want to keep your search database and update it
for use with the new version of Pagis Pro. See the next
subsection, “Upgrading your old Pagis search index” for details.
Click Yes if you want to discard the old search database.
In a few moments, a Setup Complete dialog appears.
4. Click OK to finish the installation and automatically
restart your computer.
With the above steps completed, Pagis Pro or Pagis SE is
completely uninstalled from your PC.
Upgrading your old Pagis search index
If you saved your old Xerox Search Tool Database from an earlier
version of Pagis, you can update it for use with this new version
of Pagis Pro. To do so:
1. Uninstall your Pagis software, and maintain your old
index, as described in the previous subsection.
2–4 Pagis Pro User’s Guide
Page 32

Contents Index
2. Fully install Pagis Pro 2.0 using the procedure that starts
on page 2–6.
3. Locate the Upgrader program.
The program name is Upgrader.exe. It is located in the
installation directory that you specified for Pagis Pro 2.0,
typically:
C:\Program Files\Xerox\Pagis
4. Double-click on the Upgrader.exe program to run it.
A message box informs you that Pagis Pro 2.0 has detected an old
Pagis index, and asks if you want to upgrade it.
5. Click Yes in the message box.
Another dialog box informs you that:
Pagis is converting your Pagis Pro 97 index to a Pagis Pro
2.0 index. The contents of the files, and the Author, Title,
and Keyword information are being merged into the new index.
Note that this process can take awhile. When the index is
completely upgraded, another message informs you that:
The conversion of your Pagis Pro 97 index was successful. The
index is now available with all of Pagis Pro 2.0’s indexing
and retrieval tools.
6. Click OK to complete the operation.
You can now go on to use the upgraded index with Pagis Pro 2.0.
The index name is:
Pagis Pro 97
Please refer to “Pagis Index Manager and Update Tool” and
“Search Tool” in Chapter 4 for complete information.
Installing Pagis Pro 2–5
Page 33

Contents Index
Running the Pagis Pro setup program
To install this new version of Pagis Pro software for Windows 95,
Windows 98, or Windows NT 4.0:
1. Insert the Pagis Pro CD into your CD-ROM drive.
An autorun program on the CD-ROM launches the Pagis setup
program automatically. An initial screen provides several options.
☞ If your system is set up to ignore autorun commands, use
Windows Explorer to navigate to the Pagis CD-ROM. At the
top-level of the CD-ROM, double-click the Autorun.exe
program and display the initial setup screen.
2. On the initial master setup screen, click the “Install the
Software” option.
The Pagis Pro Welcome dialog appears (Figure 2–1).
Read the instructions
Click Next to proceed
Figure 2–1. Welcome dialog
3. In the Welcome dialog, click Next.
The Pagis Pro Software License Agreement is displayed in a
scrolling window.
2–6 Pagis Pro User’s Guide
Page 34

Browse to specify a
different installation
drive or folder
Contents Index
4. Read the license agreement, then:
Click No if you do not accept the license agreement. Pagis Pro
setup will close.
Click Yes to proceed with installation. A screen to specify the
installation drive and folder now appears (Figure 2–2).
Click Next to proceed
Figure 2–2. Choose Destination Location dialog box
5. Specify a different installation drive and directory if
necessary, then click Next.
The next screen lets you specify the Setup Type—Typical or
Custom.
6. Specify the Setup Type—Typical or Custom—then click
Next.
• Select Typical to install all Pagis Pro components. This is
recommended. After you click Next, go directly to Step 8.
• If you have limited space on your hard drive, you can choose
Custom. After you click Next, the Select Components dialog
box is displayed (Figure 2–3). Proceed to Step 7.
Installing Pagis Pro 2–7
Page 35

Remove the checkmark
for items not to be
installed
Click Next to proceed
Contents Index
Click to
change an
item
Figure 2–3. Select Components dialog box
7. Select the components to be installed, then click Next. Go
to Step 8.
☞ Before you click Next, you can click the Change button to further
define sub-components to be installed. For example, if you click
the Pagis Program item, then click Change, you can opt not to
install TextBridge Pro or MGI PhotoSuite. If you do this,
however, you will not have access to some of Pagis Pro’s features.
8. The Select Program Folder appears. Specify the name of
the folder in which Pagis Pro is installed.
• You can accept the default name—Pagis—or type a different
name.
• When you are done, click Next. The setup program now
begins installing Pagis Pro program files on your system.
When all program files are installed, a dialog box appears so you
can specify which of your other programs to place on the Pagis
SendTo Bar (Figure 2–4).
2–8 Pagis Pro User’s Guide
Page 36

Specify the programs to
appear on the SendTo
Bar, then click OK
Contents Index
☞ The Pagis SendTo Bar is a convenient way to import scanned
documents to your programs. You simply drag a scanned
document to a program shortcut on the SendTo Bar, and the
scanned document is converted and imported automatically. This
feature is described in more detail in Chapters 3 and 4.
Figure 2–4. Add Shortcuts dialog box
9. Specify the program shortcuts to be placed on the SendTo
Bar. When you are done, click OK.
In general, select the programs into which you are likely to be
importing scanned documents—for example, word processing
programs, imaging programs, web editors, and so on.
All programs are selected by default. Depending on how many
programs you have on your PC, it may be easier to click the
Select None button, then manually select just the programs you
want.
When you click OK, a message box informs you that Pagis Pro
software has been successfully installed, and asks you if you want
to select a scanner driver.
10. Click Yes to select a scanner driver.
In a few moments, the Select Scanner dialog is displayed
(Figure 2–5).
Installing Pagis Pro 2–9
Page 37

Find and select your
scanner
Click ISIS only or TWAIN
only to narrow the list
Contents Index
Click when
done
Click to
configure
the driver
Figure 2–5. Select Scanner dialog box
11. Find and select your scanner in the list, and if necessary
configure it to use the correct scanner settings. When you
are done, click OK in the Select Scanner dialog box.
Most new scanners and digital cameras have TWAIN drivers,
which are provided by the manufacturer. Pagis Pro also provides
a number of ISIS drivers, mainly for older scanners.
If you have at least one TWAIN scanner driver installed on your
system, this dialog box defaults to displaying only TWAIN
scanner drivers.
If no TWAIN scanner drivers are found, this dialog box loads the
built-in ISIS scanner drivers.
Select a driver for your scanner, either TWAIN or ISIS, as
appropriate. Click the Configure button to specify additional
settings.
For TWAIN, you can click the Configure button to specify
whether the TWAIN scanner interface or the Pagis scanner
interface is to be used with your scanner.
2–10 Pagis Pro User’s Guide
Page 38

Contents Index
The default selection is to use the Pagis scanner interface, which
provide access to all of Pagis Pro’s scanner settings.
It is recommended that you start with the default here,
particularly if your scanner is one that is listed in the release
notes as having been certified with Pagis Pro.
However, not all TWAIN scanner drivers are designed to be used
with the TWAIN user interface hidden. In this case, you must
configure your scanner to work with its own scanner settings.
If your scanner’s TWAIN driver is not designed to be hidden, you
may see any one of the following results when running this way
with Pagis Pro:
• The message “An internal error has occurred” appears when
you attempt to scan.
• One of the error messages, “Bad value” or “Invalid
parameter” appears during scanning.
• Other error messages appear during scanning, or the scanned
image itself is poor.
• Scan resolution, page size or brightness settings are not
available or functioning in the Scan Tool Properties menu.
If your scanner's TWAIN interface does not work with the
interface suppressed, do not use the setting “Use the Pagis
Settings – Scanner dialog box” in the Configure TWAIN driver
dialog box. Instead, select the setting to “Use scanner’s TWAIN
dialog box”.
See “Setting up your scanner or digital camera to work with
Pagis Pro” in Chapter 4 for complete information about changing
your scanner setup after Pagis Pro has already been installed.
After you select and configure your scanner, and click OK in the
Select Scanner dialog box, Pagis electronic registration
appears.
Installing Pagis Pro 2–11
Page 39

Contents Index
11. Complete the electronic registration.
Follow the instructions in the electronic registration screens. If
you do not have a modem or fax machine, you can click a Print
Mail Form button from the electronic registration program and
mail it to ScanSoft, Inc.
Note It is highly recommended that you register your copy of Pagis
Pro. This entitles you to free customer support, and assures that
you are kept up to date on software updates and upgrades.
After you complete and exit the electronic registration program, a
dialog box asks if you would like to load the Pagis ToolBar and
SendTo Bar on your Windows desktop.
12. Click Yes to load the Pagis ToolBar and SendTo Bar. Click
No if you would prefer not to have these on your desktop.
The Pagis ToolBar and SendTo Bar are integrated into the Pagis
Inbox, the main control center for Pagis Pro operation. It is
therefore more a convenience than a requirement to have these
tools on your desktop.
Normally, after completing Step 12, you are finished installing
Pagis Pro.
However, a dialog box may appear recommending that you
restart your system (Figure 2–6, next page). This appears only if
some other program was active during Pagis Pro setup.
13. In the dialog box, specify when you want to restart your
PC, then click OK.
☞ Restarting in this case is necessary to complete Pagis Pro setup.
It is recommended that you restart immediately if you get this
message box. However, if you want to perform other activities
before restarting, you can click the No option.
After you restart, Pagis Pro setup is complete.
2–12 Pagis Pro User’s Guide
Page 40

Contents Index
Specify whether to
reboot at this stage
Figure 2–6. Restarting Windows dialog box
WHERE TO GO FROM HERE
With Pagis Pro fully installed, you are ready to begin using the
product.
Click to end Setup
Please refer to Chapter 3 of this guide. It is designed to help you
learn the primary features of Pagis Pro.
UNINSTALLING PAGIS PRO
To restore your PC to the state it was in before you installed
Pagis Pro, use the following procedure.
Note Any Pagis documents that you created after installation are not
removed by uninstalling Pagis Pro. If any of these documents
were stored in the Pagis Inbox folder, the folder is not removed
either.
Installing Pagis Pro 2–13
Page 41

Contents Index
1. Close all active applications, including the Pagis Pro Tool
Bar, Send To Bar, and Pagis Index Manager Scheduler.
The Pagis Index Manager Scheduler runs as a background
process. It places a small icon in the right-hand or lower corner of
the Windows task bar:
Left-click on the icon to display a context menu. Click the Close
Index Manager Scheduler command. A dialog box to confirm the
closing appears. Click Yes in the dialog box.
2. With no other programs running, click:
Start ➧ Programs ➧ Pagis Pro 2.0 ➧ Add & Remove Program
This launches the Pagis Install Utility (Figure 2–7).
Click to start the
uninstall process
2–14 Pagis Pro User’s Guide
Figure 2-7. Pagis Install Utility
3. Click the Uninstall button.
In a few moments, a Confirm File Deletion message box appears.
Page 42

Contents Index
4. Click Yes to continue the uninstall process.
A progress dialog box appears indicating the items that are being
removed from your system.
The first item is “Shared program files.” These are system-level
files that Pagis Pro installs. Because these are system-level files,
the Uninstall Utility displays another dialog box to confirm the
removal of these shared files.
5. In the Remove Shared File dialog, click Yes To All. Click
Yes again to confirm.
The uninstall process continues. When the process is completed,
an “Uninstall completed” message is displayed.
6. Click OK.
This displays a message recommending that you restart your
computer.
Specify whether to
reboot at this stage
7. Click OK again.
This displays a Restarting Windows dialog box (Figure 2–8).
Click to end Uninstall
Figure 2–8. Restarting Windows dialog box
Note that the dialog box message indicates that you must reboot
your system to clean up all files that were in use during the
uninstall process.
Installing Pagis Pro 2–15
Page 43

Contents Index
8. Click OK to finish the Uninstall process.
If you selected the Yes option, your system is rebooted
automatically at this stage (Recommended).
If you selected the No option, make sure to reboot your system as
soon as possible to finish the Pagis Pro uninstall process.
After you reboot, a Pagis cleanup utility program runs
automatically.
2–16 Pagis Pro User’s Guide
Page 44

Contents Index
3
LEARNING PAGIS PRO
Assuming that you successfully completed the setup steps in
Chapter 2, you are now ready to learn more about Pagis Pro
operation. This chapter provides step-by-step instructions to get
you started, presenting the following topics:
◆ Tools that Pagis Pro adds to Windows
◆ Scanning a Document
◆ Copying a document
◆ Faxing a document
◆ Refining and annotating a document
◆ Scanning and typing into a form
◆ Editing a picture
◆ Searching for documents
◆ Running OCR on a document
TOOLS THAT PAGIS PRO ADDS TO WINDOWS
Pagis Pro is designed to work smoothly in the Windows™ file
system. The Pagis Inbox, for example, is a Windows folder with
some added features.
Similarly, you can store Pagis scanned documents in any
Windows folder and access them like any other Windows file.
This section highlights the tools that Pagis Pro adds to your
Windows environment. For complete information, please refer to
Chapter 4.
Pagis Pro User's Guide 3–1
Page 45

Contents Index
Pagis Inbox When you install Pagis Pro, the Setup program places the Pagis
Inbox icon on your Windows desktop. The icon serves as a
shortcut to the Pagis Inbox folder.
By default, the Pagis Inbox folder has the following location:
C:\My Documents\Pagis Inbox (Windows 95/98)
C:\Pagis Inbox (Windows NT 4.0)
Double-click on the desktop icon to open the Pagis Inbox. The
Pagis Inbox, an enhanced Windows folder, is the control center for
Pagis Pro operations (Figure 3–1).
Standard menus and tools
(Pagis menu is added)
Pagis Toolbar
Enhanced Explorer view
('thumbnail' pictures of
scanned documents can
be shown)
Pagis SendTo Bar with
shortcuts to other
programs on your PC
Figure 3–1. Pagis Inbox in Thumbnail view
In the Pagis Inbox, you can view thumbnails (miniature
versions) of scanned documents that show you their contents
without your having to open them. In addition, an Inbox setting
enables you to increase (or decrease) the size of thumbnails.
3–2 Pagis Pro User's Guide
Page 46

Contents Index
Click any icon to launch the
related Pagis tool
Like all Windows folders, the Pagis Inbox offers standard menus
and commands, toolbar, and views (Large Icon, Small Icon, List,
and Details).
In addition, the Pagis Inbox includes:
◆ the Pagis menu with commands that parallel the Pagis ToolBar
◆ a Thumbnail view command and toolbar button
◆ an embedded, detachable Pagis ToolBar
◆ an embedded Pagis SendTo Bar
Pagis ToolBar During installation, you can specify that the Pagis ToolBar
(Figure 3–2) will start up on your Windows desktop. The Pagis
ToolBar is also integrated into the Pagis Inbox as a docking
toolbar.
Figure 3-2. Pagis ToolBar
The Pagis ToolBar provides the most convenient way to launch
Pagis Pro tools, which are described in Table 3–1.
Table 3–1. Pagis ToolBar Tools
Click To Launch The
Scan Tool, which has Scanner, Copier,
and Fax control panels (tabs) to perform
any of these tasks.
Learning Pagis Pro 3–3
Page 47

Contents Index
Table 3–1. Pagis ToolBar Tools (cont.)
Click To Launch The
Editor to open a scanned document,
view it, clean it up, enter text and other
annotations in it, image edit it, and
more.
Search Tool to locate files by content or
keyword on any hard drive, removable
drive, or CD-ROM.
Update Index tool, which lists, and lets
you update, any or all of the file indexes
that you have created.
Index Manager, which lets you create
indexes to your local hard drive(s),
network drives, removable drive(s), and
CD-ROMs.
Pagis SendTo Bar During installation, you can specify that the Pagis SendTo Bar
(Figure 3–3) will start up on your Windows desktop. The Pagis
SendTo Bar is integrated into the Pagis Inbox, as well.
Also during installation, you can specify which of the programs on
your computer should be added to the SendTo Bar.
Drag a scanned document to
any shortcut on the SendTo Bar
Figure 3–3. SendTo Bar
3–4 Pagis Pro User's Guide
Page 48

Contents Index
The SendTo Bar provides a powerful, fast and convenient way to
import scanned documents to the other applications on your
system. To do this, you simply click and hold on a document, and
drag it to the target program’s shortcut on the SendTo Bar.
Following are several examples of the results when you drag and
drop a scanned document to a program on the SendTo Bar:
◆ TextBridge Pro—Pagis Pro sends the document to TextBridge
Pro, which opens and provides tools to achieve excellent OCR
results. In TextBridge Pro, after OCR is complete, you can save
the results to a file in one of many supported text formats.
◆ Microsoft Word—Pagis Pro first sends the document to
TextBridge Pro, which performs document recognition and
converts it to Word format in the background. Then TextBridge
launches Word and pastes the recognized elements (text, tables
and graphics) into the open Word document, ready for editing.
☞ By right-clicking on a document and dragging it to Word (or any
other text program), you can access a dialog box of OCR settings
to control the TextBridge OCR process. Otherwise, the default
OCR settings are used.
◆ Netscape Navigator—Pagis Pro sends the document to
TextBridge Pro, which performs document recognition and
converts it to HTML format. Then Navigator opens automatically
and displays the converted document.
◆ Adobe Photoshop—Pagis Pro converts the document to TIFF
format, launches Photoshop and places the converted image into
the open Photoshop document.
Pagis Pro’s SendTo Bar works similarly with a large number of
Windows applications. See Appendix A, “Supported Programs
and File Formats,” for a list of supported applications.
☞ It is very easy to add applications to the SendTo Bar. Simply click
and hold on the application’s icon in Windows, then drag it to the
SendTo Bar. The Create New Shortcut wizard appears.
Simply follow the wizard’s directions to add the application’s
shortcut to the SendTo Bar.
Learning Pagis Pro 3–5
Page 49

Contents Index
SCANNING A DOCUMENT
To scan a hard copy document into Pagis Pro, use the Scan button
on the Pagis ToolBar, as follows.
Note This procedure assumes that you have properly connected your
scanner and it is working with Pagis Pro. Also, this basic procedure uses the scanning defaults built into Pagis Pro. For more
details about the Scan Tool settings, please refer to Chapter 4.
1. Place the page(s) to be processed into the scanner.
If you have a scanner with an automatic document feeder, you
can load a stack of pages. If you have a flatbed scanner, place the
first page of the document on the platen.
2. Click the Scan icon on the Pagis ToolBar to display the
Scanner tab (Figure 3–4).
Specify the document type
Scan to a XIF file, or select
from a list of applications to
which to scan directly
Figure 3–4. Scanner tab in the Scan Tool
3–6 Pagis Pro User's Guide
Click to start scanning
Click to specify scanner
settings, refinements,
and file attributes
Page 50

Contents Index
3. Select the page type of the document to be scanned.
☞ The Any Document page type is the default and works well for
most documents.
4. Click the Scan button on the Scanner dialog box.
☞ With most flatbed scanners, Pagis Pro can perform a two-pass
scan. This optimizes binary (black and white) scanning for the
text layer and color scanning for the graphics layer. If you select
Letter as the page type, or Photograph, Pagis Pro will only
perform a one-pass scan. This is because Pagis Pro does not
need to segment the resulting file into multiple layers. For more
information about layers in scanned Pagis documents, see “About
Pagis (XIF) files” in Chapter 4.
As the page is being scanned, a Scanner Progress dialog tracks
scanning status. After the page is completely scanned, additional
buttons appear on the dialog box, allowing you to scan more
pages or end the job and save the scanned image (Figure 3–5).
Scanned page is
shown here
When all pages are scanned,
click to save the document
Click to scan the next
page of the document
Figure 3–5. Scanner Progress dialog box
Learning Pagis Pro 3–7
Page 51

Select a different page
type if necessary
Contents Index
5. To continue scanning go to Step 6. To end scanning and
save your document, go to Step 8.
6. Insert the next page into the scanner, and click the More
Pages button.
A More Pages dialog box appears allowing you to select a
different page type for this next page (Figure 3–6).
Click to scan the next
page of the document
Figure 3–6. More Pages dialog box
7. Specify the page type for the next page, and click the Scan
button.
Continue from Step 5 to scan additional pages. When you are
done scanning, go to Step 8.
8. On the Scanner Progress dialog box (refer to Figure 3–5),
click the Save button.
By default, the document is saved as a XIF file in the Pagis Inbox
with the name:
pagetype.xif
Where pagetype is derived from the actual page type name. In the
case of the Any Document page type, the file name would be:
3–8 Pagis Pro User's Guide
Page 52

COPYING A DOCUMENT
Contents Index
Pagis Document.xif
Also, after the file is stored in the Pagis Inbox (or other
destination folder), Pagis automatically opens the folder on your
desktop, and selects the file for you.
Finally, the Scan Tool closes automatically, as controlled by the
Close when done checkbox (which is turned on by default).
When you direct Pagis Pro to copy a document, it automatically
does so in two stages: scanning the original document; then
printing it to the specified printer.
Pagis Pro can make very good quality copies using practically any
supported scanner/printer combo. However, if you have both a
color scanner and a color printer, Pagis Pro can make excellent
color copies of any document.
To make a copy, use the following steps:
Note This procedure assumes that you have properly connected the
scanner and printer to your PC.
1. Place the document to be copied in the scanner.
2. Click the Copy tool on the Pagis ToolBar.
This starts up the Pagis Scan Tool with the Copier tab in front
(Figure 3–7, next page).
3. On the Copier tab, specify the copy job.
• Number of copies: Click in the large number display area, and
type the number of copies. Alternatively, click the ▲ button
next to the number display to increment the number.
Learning Pagis Pro 3–9
Page 53

Contents Index
• Reduce/Enlarge: Leave on Reduce To Fit unless you have a
specific size in mind. With this setting, the page is slightly
reduced to accommodate the built-in margins in printers.
• Enhance Text and Pictures: Click this on only if you are
copying a document with photographs. With text-only
documents, leave this off.
• Collate Copies: Click this on if you are scanning more than a
one-page document.
☞ For more details about the settings you can adjust for copying,
please refer to Chapter 4.
Click here and type the
number of copies
Specify size, enhancement,
and collation as needed
Click to start the copy
process
Figure 3–7. Copier tab on the Scan Tool
4. Click the Copy button to start the copy process.
As the first page of the document is scanned, a Copier Progress
dialog displays the status of the job. When the page is completely
scanned, it is sent to the printer automatically, and you are done.
However, if you specified collation, the page appears as Page 1 in
the Copier Progress window (Figure 3–8).
3–10 Pagis Pro User's Guide
Page 54

Scanned pages to be copied
are stored here temporarily
When all pages are
scanned, click to print
Contents Index
Click to scan more
pages to be copied
Figure 3–8. Copier Progress dialog box
5. Insert the next page of the document in the scanner. In the
Copier Progress dialog box, click More Pages.
The next page is scanned and added to the Copier Progress page
area. Repeat this step for each additional page. When all pages
have been scanned, go to Step 6.
6. Click the Print Copy button.
All scanned pages in the Copier Progress window are printed the
specified number of times and collated. When printing is
completed, the scanned pages are discarded.
☞ If you would prefer to save the document, then copy (print) it
later, use the Scan Tab to scan the document to a XIF document
on your system. When you are ready to print it, open the
document in the Pagis Editor, and select the Print command from
the File menu.
Learning Pagis Pro 3–11
Page 55

FAXING A DOCUMENT
Note This procedure assumes that your scanner and fax modem are
Contents Index
In Pagis Pro, faxing a document involves three separate
operations—scanning the original document; optimizing the
image quality; and sending the image(s) to your fax software (for
example WinFax™ Pro).
After Pagis Pro sends the image to your fax software, you specify
the fax phone number and send the fax as you ordinarily would.
Refer to the documentation that came with your fax software for
additional instructions.
To fax a document from Pagis Pro, use the following procedure:
properly connected, and that the necessary fax software is
installed and working.
1. Place the document to be faxed in your scanner.
2. Click the Fax icon on the Pagis ToolBar.
This starts up the Pagis Scan Tool with the Fax tab in front
(Figure 3–9, next page).
3. On the Fax tab, specify the fax job.
• Quality: The Fine setting (200 dpi) is appropriate for typical
office documents. Superfine scans at a higher resolution (300
dpi), but is only useful if the receiving fax can print the
higher resolution. Select Halftone if you are faxing a photo or
a page made up primarily of graphics.
• Enhance Text and Pictures: Click this on only if you are
faxing a document with photographs. With text-only
documents, leave this off.
☞ For more details about the settings you can adjust for faxing,
please refer to Chapter 4.
3–12 Pagis Pro User's Guide
Page 56

Contents Index
Specify the fax
quality setting
Click to start the Fax
process
Figure 3–9. Fax tab on the Scan Tool
4. Click the Fax button to start the fax process.
The first page of the document is scanned. A Fax Progress dialog
displays the status of the job. When the page is completely
scanned, it appears as Page 1 in the Fax Progress window
(Figure 3–10, next page).
5. If you are faxing a multiple-page document, go to Step 6 to
scan the next page. If you are ready to fax the document,
proceed directly to Step 7.
6. Insert the next page of the multiple-page document in the
scanner. In the Fax Progress dialog, click More Pages.
The next page is scanned and added to the Fax Progress page
area. Repeat this step for each additional page.
Learning Pagis Pro 3–13
Page 57

Scanned pages to be faxed
are stored here temporarily
When all pages are
scanned, click to send
to your fax software
Contents Index
Click to scan more
pages to be faxed
Figure 3–10. Fax Progress dialog
7. Click the Send Fax button.
All scanned pages are saved to a temporary file, then your fax
software takes over.
8. When the fax process is completed, the temporary
document is automatically discarded.
☞ If you would prefer to save the document, then fax it later, use
the Scan Tab to scan the document to a XIF document on your
system. When you are ready to print it, open the document in the
Pagis Editor, and select the Print command from the File menu.
Select your fax software as the ‘printer’.
3–14 Pagis Pro User's Guide
Page 58

Contents Index
REFINING AND ANNOTATING A DOCUMENT
With the Pagis Editor, you can color correct, straighten, crop, and
reorder pages in a scanned XIF document. You can also add
annotations and draw emphasis to key parts of the document.
To perform those editing task on a XIF document, use the
following procedure:
1. In the Pagis Inbox or other folder, double-click the XIF
document that you want to edit.
Pagis Pro displays the document in the Pagis Editor window
(Figure 3–11).
☞ You can also select the Edit button from the Tool Bar to display
the Pagis Pro Editor window. Then use the Open command from
the File menu to open a XIF document or other image file.
Menu bar
Toolbars
Thumbnail view
Full-page view
Status bar with buttons to
change the current page
Figure 3–11. Pagis Editor main window
Learning Pagis Pro 3–15
Page 59

Contents Index
2.Adjust the document view.
You can use the tools on the Standard toolbar (Figure 3–12) or
commands in the View menu to change the way you see your
document in the Editor window.
Zoom out
Zoom in
Selection tool
Pan tool
Zoom tool
Percent of size
Fit page width
Fit page height
Fit page in window
Figure 3–12. Tools to change the view of the image
☞ The Standard toolbar also includes the familiar Windows New,
Open, Save, Print, Undo and Redo buttons.
3.Refine the document image.
Another toolbar in the Editor, the Image toolbar includes a
number of tools to rotate and refine the image. One of the tools,
the Auto Refine tool, does many of these tasks automatically:
With a page selected in the Editor window, click this button to
display the Auto Refine dialog (Figure 3–13). Here you can
perform image enhancement on the current page.
3–16 Pagis Pro User's Guide
Page 60

Select enchancement
options
Contents Index
Click to apply options
to the selected page
Figure 3–13. Auto Refine dialog box
Line tool
Arrow tool
Highlighter tool
Margin note tool
Sticky note tool
Refer to the on-line help and to Chapter 4 for more information
about the Image Toolbar and Auto Refine options.
4. Add annotations to the document.
The Pagis Editor provides the annotation tools shown in Figure
3–14 to allow you to make notes or draw attention to various part
of the document.
Circle
Rectangle
Tool options
Stamp
Freehand
Figure 3–14. Annotation toolbar
Learning Pagis Pro 3–17
Page 61

Contents Index
For example, you can use the circle tool to draw attention to an
illustration in your document (Figure 3–15).
Select the
1
circle tool
Click the upper left corner
2
of the area to be circled
Drag the cursor to
3
the lower right corner
Figure 3–15. Draw a circle
Refer to Chapter 4 for more information about the annotation
tools available in the Pagis Pro Editor.
SCANNING AND TYPING INTO A FORM
The Pagis Editor also provides tools to scan a form, detect the form
fields, and enter text into these fields.
For example, you might want to scan and fill out a purchase
requisition, invoice, loan application, or tax return. After you fill
out the form, it is ready to be printed, faxed, e-mailed, or saved to
disk for future reference.
Release the mouse.
4
Circle is selected.
3–18 Pagis Pro User's Guide
To scan and type into a form, use the following procedure:
1. Place the form to be scanned into the scanner.
2. Click the Edit icon on the Pagis ToolBar.
This displays the Pagis Editor window (refer to Figure 3–11) with
no document in it as yet.
Page 62

Contents Index
3. Pull down the File menu, and select the Scan command.
In a few moments, the Scan Tool (refer to Figure 3–4) appears on
top of the Editor window.
4. Select the Form page type.
5. Click the Scan button.
After the page is completely scanned, it appears in the Scanner
Progress dialog’s view window (refer to Figure 3–5).
6. On the Scanner Progress dialog box, click the Save button.
The scanned form is now placed in the Editor window
(Figure 3–16).
Figure 3–16. Pagis Editor with a scanned form
Learning Pagis Pro 3–19
Page 63

Contents Index
7. Pull down the Forms menu in the Pagis Editor and choose
Detect Fields.
The Editor looks for horizontal lines on the scanned image. The
detected fields are placed in a layer above the image file in cyan
(light blue) for higher visibility.
8. Prepare to type into the fields.
• You can edit the size of any field. Click it to display corner
handles. Click and hold on a handle and move it until the
field is the desired height and width.
• If an incorrect field is added, simply click on it, and press the
Delete key to remove it.
• If no field is added where there should be one, you can add
one. Pull down the Forms menu, and click the Add Field
command. The mouse pointer now appears as a Text tool, and
you can point to the desired area, click and drag to create a
new field.
• Before entering text in the fields, you can pull down the
Forms menu and select the Options command. This displays
the Forms Options dialog box, which lets you specify the
font attributes (Figure 3–17).
Specify font attributes
Click to apply attributes
to all fields
Figure 3–17. Forms Options dialog box
3–20 Pagis Pro User's Guide
Click to close the dialog box
and confirm the new options
Page 64

Contents Index
9. Type into the fields.
• Position the cursor on a field, then double-click on it. A typing
cursor appears.
• Type text into the field.
• Press the Tab key to move to the next field.
10. Repeat Step 9 until you have filled in all the fields.
☞ To edit the information you have typed into a field, double-click
on the field. The typing cursor appears at the beginning of the
field, and you can move it around to add text, delete it, backspace
over it, type over it, and so on.
EDITING A SCANNED PICTURE
In the Pagis Editor, you can open a scanned photograph or a
document containing graphics and modify them with the fully
integrated MGI PhotoSuite program.
PhotoSuite is image editing software with tools for performing
such tasks as pixel editing, erasing, cropping, rotating, air
brushing,
To edit a scanned photograph or other graphic with PhotoSuite,
follow these steps:
1. Click the Edit tool on the Pagis ToolBar.
This opens the Pagis Editor and displays its main window (refer
to Figure 3–11).
Learning Pagis Pro 3–21
Page 65

Contents Index
2. From the Pagis Editor, select the file to be edited.
• Select the Open command from the File menu to display the
Open dialog. By default, the Open dialog displays the Pagis
Inbox.
• Select the XIF (or other image) file to open in the Editor.
☞ With the Editor and embedded PhotoSuite tools, you can
open and edit many different image file types, such as
Windows Bitmap (BMP), TIFF, JPEG, and many more.
The full list is shown in the Files of Type list box in the
Open dialog.
• Click the Open button to display the image in the Editor.
☞ For the purposes of this learning session, the sample
document, PagisSample2.xif is used (Figure 3–18).
Double-click the picture to
access the PhotoSuite
picture editing tools
3–22 Pagis Pro User's Guide
Figure 3–18. Pagis Editor with PagisSample2
Page 66

Movable Tool Panel provides
selection tools, shapes,
brushes and more
Contents Index
3. Access PhotoSuite tools to edit the image.
There are two ways to access the PhotoSuite tools in the Editor:
• From the Tools menu, select the Picture Edit command.
• In segmented documents with both text and pictures, double-
click directly on a picture in the displayed document.
Either way, PhotoSuite takes over the Editor window and
displays its menus and tools (Figure 3–19).
Movable Color Palette
provides 256 colors for
shapes and brushes
Click here to close
PhotoSuite
Figure 3–19. PhotoSuite tools in the Editor window
4. Use PhotoSuite tools to edit the picture.
For example, in Figure 3–20, the photograph is cropped and
framed, and text has been added.
☞ For details about using the picture editing tools, refer to the
PhotoSuite documentation included on the Pagis Pro CD-ROM.
Learning Pagis Pro 3–23
Page 67

Scanned photo with
PhotoSuite effects
Contents Index
Figure 3–20. Picture edited with PhotoSuite tools
5. When you have finished picture editing, click:
PhotoSuite closes, and the Pagis Editor menus and tools return to
the window. The edited picture remains in the Editor window.
6. Save the newly edited image to a different file name.
• Pull down the File menu and select the Save As command to
display the Save As dialog box.
• Enter a new file name, and click the Save button to save the
edited image.
3–24 Pagis Pro User's Guide
Page 68

Contents Index
SEARCHING FOR A DOCUMENT
The Pagis Pro Search Tool provides a powerful means to find and
access scanned and electronic documents on your hard drives,
Jaz™ (and other removable) drives, and CD-ROMs.
Using the Search Tool, you can define simple or complex searches
to find any electronic text file, any scanned image file that
contains text, or any file to which you assigned keywords.
In Pagis Pro, three tools are related to the search process:
◆ Index Manager, which enables you to create, configure,
schedule, and otherwise maintain your search indexes.
◆ Update, which runs the actual indexing function to create or
update an index.
◆ Search Tool, which searches at your direction through the
indexes for the specified file(s).
☞ For more information about these tools, see Chapter 4.
The following procedure describes how to perform a simple search
on the default index, Pagis Index.
1. Update the Pagis Index.
• Click the Update button on the Pagis ToolBar:
This displays the Update Index dialog box (Figure 3–21).
Learning Pagis Pro 3–25
Page 69

Contents Index
Select the default index,
Pagis Index
Progress information
Click to index
the Pagis Inbox
Figure 3–21. Update Index dialog box
• Click on Pagis Index to select it.
• Click the Update button to create the default index, which is
an index of all the files in the Pagis Inbox. A status dialog
informs you of the operation’s progress (Figure 3–22).
Click to stop indexing
Click to minimize the
screen and index in
the background
File being indexed
3–26 Pagis Pro User's Guide
Figure 3–22. Update Progress dialog box
• When the update is complete, a message box informs you.
Click OK, then proceed to Step 2.
2. On the Pagis Pro Tool Bar, click the Search button:
This displays the Search Tool main window (Figure 3–23).
Page 70

Enter search string here
Specify the index to be
searched
Click to start the search
Contents Index
Figure 3–23. Search Tool main window
3. Define the search.
Enter “Erica” in the Containing field. “Erica” is in one of the
sample files provided with Pagis Pro. In the Look In list box,
specify Pagis Index.
Before you begin a search, you can also specify a number of
search parameters—for example, search options such as Match
Case, date and time conditions, keywords that you had previously
assigned, and so on. These options are described in more detail in
Chapter 4.
3. Click the Find Now button (or press the Enter key).
The search begins, and in a few moments, the Search Tool
windows displays the files that were found (Figure 3–24).
Learning Pagis Pro 3–27
Page 71

Files found during the
search are displayed here
Contents Index
Figure 3–24. Search results in Search Tool window
The Search Tool displays all the indexed documents on your
system—both text and image—that match the information you
have supplied.
☞ By default, the Search Tool shows you the found documents by
name, rank, relevance, the words found, location, size, and the
date the document was last modified. This is called Details view.
You can also display other standard Windows views (for example,
Large Icons, Small Icons, and so on).
4. View the document(s).
You can view or open the listed document(s) just as if they were
shown in a standard Windows Explorer view.
Simply double-click the file to open it in its native application—
for example, XIF documents are opened in the Pagis Editor.
3–28 Pagis Pro User's Guide
Page 72

Contents Index
RUNNING OCR ON A DOCUMENT
Built into Pagis Pro is ScanSoft’s award-winning TextBridge Pro
OCR (optical character recognition) program.
TextBridge Pro provides a range of features that no other OCR
program can match. In addition, TextBridge Pro is designed to be
very easy to use—either as a standalone program or from within
Pagis Pro.
There are several ways to use TextBridge Pro:
◆ Standalone—TextBridge Pro is available from the Windows
Start menu in the Pagis Pro program group.
◆ Instant Access OCR™—TextBridge Pro can be run from within
a word processing or other text program.
◆ From the Pagis Editor—With a document displayed, click the
OCR tool on the Image toolbar. You can run OCR on a selection,
on the current page, or on the entire document.
◆ SendTo from the Scan Tool—After scanning a document, you
can use a SendTo button to send it directly to a program.
◆ Drag and Drop—Perhaps the easiest way to use TextBridge
OCR is to simply drag and drop a scanned XIF document to your
word processor shortcut on the Pagis SendTo Bar.
The following procedure describes the drag-and-drop method of
using TextBridge OCR. For more information, see Chapter 4.
1. In the Pagis Inbox or other Explorer view, select the XIF
document.
For the purposes of this session, select PagisSample1.xif from
the Pagis Inbox, and drag it to Microsoft Word, WordPerfect,
Lotus WordPro, or Internet Explorer.
(You can OCR other image types—for example, TIFF, PCX,
BMP—however, they must be black and white. TextBridge can
only process color documents if they are XIF documents.)
Learning Pagis Pro 3–29
Page 73

Page being recognized
is shown here
Contents Index
2. Point to the document, and holding down the left mouse
button, drag it to your word processor icon on the Pagis
Send To Bar.
☞ You can also right-click the document and use the Send To
command to send it to your word processor.
TextBridge Pro reads the XIF file and automatically performs
OCR on it, displaying a progress window that tracks the process
(Figure 3–25).
Process stages are
indicated here
Figure 3–25. TextBridge OCR progress dialog box
When OCR is complete, TextBridge Pro converts the recognized
text to the target program’s format, and opens a document in the
target program.
3–30 Pagis Pro User's Guide
Click to cancel and
discard OCR data
Page 74

Contents Index
3. You can now go on to edit or otherwise use the recognized
data in the target application.
Compare the recognized document in your application with the
original XIF document in the Pagis Editor.
With a word processor such as Word or WordPerfect, the
recognized document should look virtually identical to the image.
The difference is now you have formatted, fully editable text.
☞ Do not use TextBridge Pro to scan forms for the purpose of filling
them in. TextBridge Pro is not designed to recognize and retain
the layout of forms. Use the Pagis Editor instead.
WHERE TO GO FROM HERE
The procedures in this chapter were designed to give you a solid
basis on which to use Pagis Pro for your own documents.
For more information about Pagis Pro, please refer to Chapter 4.
Learning Pagis Pro 3–31
Page 75

Contents Index
PAGIS INBOX
4
USING PAGIS PRO
In Chapter 3, you are introduced to the basic operation of Pagis
Pro’s key features.
This chapter provides a closer look at Pagis Pro tools, settings,
and operation. Specifically, in this chapter, you can find more
information about:
◆ Pagis Inbox and Pagis Folders
◆ Working with Pagis Files in Windows™
◆ Scan Tool (Scanner, Copier, Fax)
◆ Pagis Editor
◆ Pagis Index Manager and the Update Tool
◆ Search Tool
The Pagis Inbox is a special icon that sits on your Windows
desktop. It points to an enhanced Windows folder that serves as
the main control center for Pagis Pro operation.
In most respects, the Pagis Inbox behaves like a standard
Windows folder. However, it is equipped with additional menus
and commands, as well as the Pagis ToolBar and the Pagis
SendTo Bar (Figure 4–1, next page).
This section describes the Pagis Inbox in detail, covering the
following topics:
◆ Menus and commands
◆ Document thumbnails
◆ Pagis ToolBar and SendTo Bar
◆ Changing the Pagis Inbox location
Pagis Pro User’s Guide 4–1
Page 76

Standard menus and tools
(Pagis menu is added)
Pagis Toolbar
Enhanced Explorer
view with document
thumbnails
Pagis SendTo Bar
with shortcuts to
other programs
Contents Index
Figure 4–1. Pagis Inbox
Pagis Inbox menus and commands
The menu bar on the Pagis Inbox, and the menus and commands
it contains, closely follow those of a standard Windows folder.
The differences are described in this section, specifically:
◆ Pagis commands in the File menu
◆ Pagis commands added to the View menu
◆ Pagis menu
4–2 Pagis Pro User’s Guide
Page 77

Contents Index
Pagis commands in the File menu
In the Pagis Inbox folder, the File menu includes the standard
Windows commands—New, Create Shortcut, Delete, Rename,
Properties, Close and, when a file is selected, Open and SendTo.
When you select a Pagis (XIF) document specifically, additional
commands appear in the File menu (Figure 4–2). These
commands enable you to stack and unstack, convert, and index
Pagis documents.
Commands to stack
(combine) and unstack
Pagis documents
Pagis-related properties
are added to the dialog
Convert a XIF document
to another image format
Add the selected file to
the Pagis Index
Figure 4–2. Pagis commands in the Inbox File menu
For information about using these commands, please refer to
“Working with Pagis Files in Windows™” later in this chapter.
Pagis commands added to the View menu
In the Pagis Inbox View menu, the standard commands for
changing the window view are present—ToolBar, Status Bar,
Large Icon, Small Icon, List, Details, Arrange Icons, Line up
icons, Refresh, and Options.
Using Pagis Pro 4–3
Page 78

Commands to access
Pagis ToolBar tools
Contents Index
In addition, the Pagis ToolBar, Pagis SendTo Bar, and
Thumbnails commands are provided to control the display of
these Pagis-related options in the Pagis Inbox view (refer to
Figure 4–1).
Refer to “Document thumbnails” later in this chapter for more
information about the Thumbnails feature.
Pagis menu
The Pagis menu (Figure 4–3) provides access to all the same tools
that are on the Pagis ToolBar (Scan, Copy, Fax, and so on). It also
lets you launch the Pagis ToolBar as a standalone application.
Command to prepare the
TextBridge OCR process
Figure 4–3. Pagis menu in the Pagis Inbox
In addition, the Pagis menu provides access to the Pagis Drag
and Drop Registration Wizard. The wizard helps you define
(or change) the conversion process that happens when you drag
and drop a Pagis document to another program.
For more information about Drag and Drop Registration, see
“Adding applications to the SendTo Bar” later in this chapter.
Finally, the OCR Settings... command lets you change the
TextBridge OCR defaults when you drag and drop a document.
For related information, see “Running OCR on a document” in
Chapter 3.
4–4 Pagis Pro User’s Guide
Run the Pagis ToolBar as
a standalone program
Register a program for
drag-and-drop purposes
Page 79

Contents Index
Document thumbnails A simple yet powerful Pagis Inbox feature is the Thumbnails
view, which you get by selecting the Thumbnails command in the
View menu.
When you do, scanned XIF documents, and many other electronic
documents, are shown as miniature versions (“thumbnails”) of
the actual document (Figure 4–4).
Click the arrow to page
through multi-page
documentsThumbnail view enables
you to identify a document
at a glance
Drop shadow
Figure 4–4. Thumbnail view
In addition to XIF, file formats that can be viewed as thumbnails
in the Pagis Inbox or any Pagis Folder include JPEG, GIF, BMP,
Word, Excel, PowerPoint, WordPerfect, HTML, and many more.
Pagis Pro also provides a number of ways to affect the
appearance of thumbnails in the Pagis Inbox (or any Pagis
Folder), as follows:
◆ Thumbnail size—To change the size of thumbnails:
• In the View menu, click the Options command.
• In the Pagis Folder tab, type in a new Thumbnail Size, or
click on the ▲ or ▼ buttons to increase or decrease the size.
◆ Thumbnail popups—In a default Explorer view (for example,
Large Icons, Small Icons, List, Details, when you point to a file,
its thumbnail “pops up” if you have this feature turned on.
Using Pagis Pro 4–5
Page 80

Contents Index
To show thumbnail popups in default views:
• In the View menu, click the Options command.
• In the Pagis Folder tab, click the Show thumbnail popups
in default views checkbox.
◆ Thumbnail appearance—When the Pagis Inbox is in
Thumbnail view, there are a number of settings that let you
define thumbnail appearance:
• In the View menu, click the Options command.
• In the Thumbnails tab, click the checkbox labeled:
Show the document’s
name
Show the document’s
type
Show the document’s
size
Show the document’s
last modified date
and time
Show the document’s
attributes
Show drop shadows To show a shadow behind the
Show multiple pages To show multiple pages if the
To show the document’s name
beneath the thumbnail
To show the file type (for example,
XIF, JPEG, and so on) beneath the
thumbnail
To show the document’s size in
kilobytes (KB).
To show the date and time the file
was last changed, for example:
4/21/98 7:29 PM
To show a letter indicating the
document’s attributes (A=Archive,
R=Read Only, H=Hidden)
thumbnail to give it depth
document has more than one page
4–6 Pagis Pro User’s Guide
Page 81

Contents Index
Pagis ToolBar
Modifying the Pagis ToolBar in the Pagis Inbox
The Pagis ToolBar provides a convenient way to launch the
different programs in Pagis Pro—Scan Tool, Editor, Search Tool,
Update Tool, Index Manager, and Help.
The ToolBar is available in the Pagis Inbox as a docking toolbar.
You can also launch it, and keep it, on your Windows desktop, if
you prefer. Read the following subsections for more information.
As shown in Figure 4–1 (page 4–2), the Pagis ToolBar appears as
a set of large icons above the view area of the Pagis Inbox.
To change to small icons:
• With the mouse, right-click anywhere on the toolbar.
• Click the Use Small Icons button.
To detach it and make it a floating toolbar:
• With the mouse, click and hold on the toolbar area below a
tool (not on a tool).
Click and hold on the title
bar to move the toolbar
• Drag the mouse downward. Notice as you are moving it that
the toolbar appears as a rectangular shape.
• Release the mouse. The toolbar is now a floating toolbar
(Figure 4–5).
Figure 4–5. Floating Pagis ToolBar
Using Pagis Pro 4–7
Page 82

Contents Index
To reattach the Pagis ToolBar in the Inbox:
• With the mouse, point to the toolbar area below a tool (not on
a tool).
• Double-click the mouse.
Launching the Pagis ToolBar on the Windows desktop
and changing its view
The Pagis ToolBar runs as a standalone program on the Windows
desktop. To launch the Pagis ToolBar program, click:
Start ➧ Programs ➧ Pagis Pro 2.0 ➧ Pagis ToolBar
To change the Pagis ToolBar view:
Title bar
• Display the Pagis ToolBar control menu (Figure 4–6) by
right-clicking anywhere in the title bar.
• Click Show Text off to hide the tool labels on the toolbar.
• Click Show Small Icons to show smaller toolbar icons.
• Click Background Bitmap on or off to show or hide the
textured background appearance of the toolbar.
Commands to change
the Pagis ToolBar
appearance
Figure 4–6. Pagis ToolBar control menu
4–8 Pagis Pro User’s Guide
Page 83

Contents Index
Pagis SendTo Bar The Pagis SendTo Bar holds shortcuts to other programs (for
example, a word processor) on your system. It provides a quick
and simple way to import scanned Pagis documents to programs
that support Windows drag-and-drop capabilities.
As shown in Figure 4–1, the SendTo Bar is integrated with the
Pagis Inbox. To place it on your Windows desktop, you can also
launch the SendTo Bar, like the Pagis ToolBar, as a standalone
program.
Read the following subsections for more information about the
Pagis SendTo Bar.
Launching the SendTo Bar on the Windows desktop
To launch the SendTo Bar on your Windows desktop, click:
Start ➧ Programs ➧ Pagis Pro 2.0 ➧ Pagis SendTo Bar
Changing SendTo Bar options
Built into the SendTo Bar is a Properties dialog that enables you
to modify its look and feel.
To access the SendTo Bar Properties dialog box:
• Position the mouse pointer on the SendTo Bar, and right-click
the mouse.
• On the context menu that now appears, select the SendBar
Properties command. The SendTo Bar Properties dialog is
displayed (Figure 4–7).
To specify various options:
• Click the Always On Top checkbox on to make sure that no
other program will obscure the SendTo Bar. (This is useful
when the SendTo Bar is active on the Windows desktop.)
Using Pagis Pro 4–9
Page 84

Click these checkboxes
on or off to control
SendTo Bar options
Contents Index
Figure 4–7. SendTo Bar options
• Click the Autohide checkbox on to hide the SendTo Bar when
it is not in use. (This is available for the desktop version
only.)
• Click the Small Icon checkbox to display smaller versions of
the program icons on the SendTo Bar.
• Click the Show Label checkbox to display the shortcut label
for the program icons on the SendTo Bar.
Adding a program to the SendTo Bar
During Pagis Pro installation (see Chapter 2), you can specify
programs to add to the SendTo Bar. The Pagis Setup program
searches your system for all installed programs, and presents
them in a list that you can accept or modify.
To add a program to the SendTo Bar after Pagis Pro is already
installed:
4–10 Pagis Pro User’s Guide
Page 85

Verify that the correct
program path is here
Contents Index
1. Use Windows Explorer to browse to the folder that
contains the program to add to the Send To Bar.
For example, to add Windows Notepad, you would browse to the
Windows folder and look for:
notepad.exe
2. Click and hold on the program icon, and drag it onto the
SendTo Bar.
This displays the Create New Shortcut dialog box with the
pathname of the program already entered (Figure 4–8).
Click to continue the process
Figure 4–8. Create New Shortcut dialog box
3. Click Next.
This displays the New Item Title dialog box to define the name of
the shortcut.
4. Enter a new name if desired for the shortcut. Click Next to
continue.
This displays a Drag and Drop Registration dialog that informs
you whether the program is already registered with Pagis Pro.
Using Pagis Pro 4–11
Page 86

Contents Index
5. Click Finish.
If the program was already registered, you are finished. The
shortcut is now added to the SendTo Bar.
If the program was not registered, the Pagis Drag and Drop
Registration Wizard now appears. Proceed from Step 6.
6. Complete Drag and Drop registration.
• Click Next in the Pagis Drag and Drop Registration Wizard.
• Follow the directions to register the application and have it
appear on the SendTo Bar.
Removing a program from the SendTo Bar
To remove a program from the SendTo Bar:
1. Right-click on the SendTo Bar.
This displays a context menu.
2. Click the SendBar Properties command.
This displays the SendTo Bar Properties dialog (refer to
Figure 4–7).
3. On the SendTo Bar Properties dialog, click the SendTo
Programs tab.
4. On the SendTo Programs tab, click the Remove button.
This displays the Remove Item From Pagis SendTo dialog box
with a list of program shortcuts on the SendTo Bar.
4–12 Pagis Pro User’s Guide
Page 87

Contents Index
5. Remove the desired program shortcut(s).
• Select the program shortcut to be removed, and click the
Remove button.
• Repeat until all shortcuts that you want to remove are
removed.
• Click OK to close the Remove Item From Pagis SendTo dialog
box.
6. Click OK again to close the SendTo Bar Properties
dialog box.
Note that the shortcut(s) are no longer on the SendTo Bar.
Changing the Pagis Inbox location in your file system
The Pagis Inbox folder, by default, has the following location:
Windows 95/98: C:\My Documents\Pagis Inbox
Windows NT: C:\Pagis Inbox
If you wanted all future scanned documents to be stored on your
D: drive, however, you could create a folder with the following
pathname, for example, and make this the new Pagis Inbox:
D:\My Scanned Documents
To specify a different folder as the Pagis Inbox location, use the
following procedure:
1. Make sure the Pagis Inbox folder is closed on your
Windows desktop.
2. Right-click the Pagis Inbox icon on the Windows desktop.
A context menu appears.
Using Pagis Pro 4–13
Page 88

Contents Index
3. Click the Properties command.
This displays the Pagis Inbox Properties dialog box.
4. In the Pagis Inbox category, enter the pathname of the
new location.
5. Click OK.
6. Open the Pagis Inbox and note the new location.
PAGIS FOLDERS
To extend the availability of Pagis Pro tools in your Windows file
system, you can convert any standard folder to a Pagis Folder.
A Pagis Folder has all the same features as the Pagis Inbox—
Pagis ToolBar, SendTo Bar, Thumbnails, and so on. However,
there can only ever be one Pagis Inbox.
Read the following subsections for more information about Pagis
Folders.
Creating a Pagis Folder
To convert a standard Windows folder into a Pagis Folder:
1. Using the My Computer icon, or a Windows Explorer view,
locate the Windows folder to be converted.
2. Right-click the folder to display a context menu.
3. In the context menu, select the Convert to a Pagis Folder
command.
The folder icon is updated with the Pagis Folder symbol. When
you open the folder, note that it now has all the same capabilities
as the Pagis Inbox.
4–14 Pagis Pro User’s Guide
Page 89

Contents Index
Removing Pagis Folder attributes
To remove the Pagis Folder attributes from a folder:
1. Navigate to the Pagis Folder via My Computer or a
Windows Explorer view.
2. Right-click the Pagis Folder.
3. In the context menu, select the Remove Pagis Attributes
from Folder command.
The folder icon is updated without the Pagis Folder symbol, and
when you open the folder, all Pagis enhancements are removed.
WORKING WITH PAGIS FILES IN WINDOWS™
◆ About Pagis (XIF) files
◆ Enhanced context menu
◆ XIF property sheets
About Pagis (XIF) files
Pagis Pro brings to the Windows environment a number of added
features related to Pagis (XIF) files. This section describes these
features, focusing on the following topics:
To use Pagis Pro effectively, it is helpful to understand the
eXtended Image File (XIF) format. This format is central to the
many features that Pagis Pro provides.
XIF is an image file format developed by Xerox scientists to
provide the following key features:
Using Pagis Pro 4–15
Page 90

Contents Index
◆ high fidelity image quality
◆ small file size
◆ document analysis
When you scan a magazine page, for example, you want to scan it
at a high resolution, in color, so that it will look as good as the
original. XIF lets you do this.
However, you do not want the scanned image to take up a lot of
space on your computer. XIF’s built-in file compression
technology produces very compact files.
Later, you may want to search on the data contained in this
magazine page. Or you may want to extract a block of text, or a
picture, from this image. XIF’s document analysis technologies
enable you to do this, as well.
XIF achieves these goals by storing a scanned image in multiple
layers (Figure 4–9).
Text color layer
Text layer (for OCR)
Color image segments
(shown as one layer)
Background tint layer
Figure 4–9. XIF file layers
4–16 Pagis Pro User’s Guide
Page 91

Contents Index
Each layer is stored in an optimal resolution and bit-depth,
enabling you to process the document through any of the Pagis
functions.
For example, the text layer is stored at 300 or 400 dots per inch
resolution in one-bit binary (black and white) color depth. This
enables you to index the document for full search and retrieval. It
also enables you to OCR the document so you can use the actual
text in your word processor or other application.
The photographs and other pictures in the document are stored
as 24-bit color segments typically in 75–200 dots per inch
resolution. This enables you, for example, to copy and edit a
photograph from a scanned document in your graphics editing
software. It also enables an OCR’d document in your word
processor to include the color pictures from the original
document.
The background tint and text color layers are present so that
if you print or OCR a document, the output remains true to the
original.
Enhanced context menu
To maintain the small file size, Pagis Pro provides optimal data
compression to each layer in the XIF file.
What this means is that you can scan a full-color magazine
article and save it in a file smaller than 100,000 bytes on your
hard drive. With conventional scanning software, and no file
compres-sion, the same file would be upwards of 10 million bytes
in size.
When you right-click on any file in Windows, a context menu
appears with commands such as Open, Print, Copy, Create
Shortcut, and so on.
For XIF files, Pagis Pro adds a number of commands to this context
menu—Thumbnail, Stack Documents, Unstack Documents,
Unstack Current Page, and Convert Format (Figure 4–10).
See the following subsections for information about using these
commands.
Using Pagis Pro 4–17
Page 92

Commands to stack and
unstack Pagis documents
Contents Index
Display a dialog box with a
thumbnail view
Convert Pagis documents
to other image formats
Figure 4–10. Enhanced context menu
Thumbnail command
You can use the Thumbnail view to identify XIF (and other)
documents located in the Pagis Inbox or another Pagis Folder.
However, if a XIF document is on the desktop or in a standard
Windows folder, Thumbnail view is not available. In such cases,
use the Thumbnail command to view a XIF thumbnail:
1. In a folder or Explorer view, right-click on a XIF file.
2. In the context menu, select the Thumbnail command.
The Thumbnail dialog box is displayed.
3. If the XIF file is a multiple-page document, use the Arrow
keys to page through the document.
4. When you are done viewing the thumbnail, click the Close
button.
4–18 Pagis Pro User’s Guide
Page 93

Contents Index
Stacking documents
When you select one or more XIF documents in a Windows view,
Pagis Pro loads additional commands in the context menu. One
command, Stack Documents, lets you combine two or more XIF
files into one. To stack two or more XIF files into one file:
1. In an Explorer view (for example, the Pagis Inbox), select
the XIF files to be stacked.
2. Point to one of the files in the selected group and hold
down the right mouse button.
This displays the context menu (refer to Figure 4–10).
3. From the context menu, select Stack Documents.
This displays the Stack Files dialog. A message on the dialog identifies which of the selected files will receive the stacked pages.
☞ The target file is always the one that is listed first in the view.
4. Optionally, click the checkbox to delete the original files
after stacking.
5. Click Continue to stack the documents.
The pages from the original files are appended to the first file in
the group. For example:
Originals: File_1.xif 3 pages
File_2.xif 4 pages
File_3.xif 2 pages
Stacked Document: File_1.xif 3 pages (followed by)
4 pages (from File_2)
2 pages (from File_3)
9 total pages
☞ You can also stack XIF documents by simply dragging one on top
of another. Pagis Pro also enables you to stack other image
formats onto a XIF document. For example, you can drag a JPEG
document onto a XIF document.
Using Pagis Pro 4–19
Page 94

Contents Index
Unstacking documents
When you select one or more XIF documents in the Explorer,
Pagis Pro loads additional commands in the File menu. One
command, Unstack Document, lets you create a new XIF file for
each page in the original XIF file.
To unstack a document:
1. In an Explorer view (for example, the Pagis Inbox), select
the XIF file to be unstacked.
2. Point to the selected file and hold down the right mouse
button to display the context menu (refer to Figure 4–10).
3. Select the Unstack Document command.
This displays the Unstack Files dialog box, which indicates the
number of pages in the source document and the new files that
will be created from the unstack process.
4. Optionally, click the checkbox to delete the original file
after unstacking.
5. Click Continue to unstack the pages of the source
document into separate files.
Notice that the new files, each containing an individual page, are
created in the same folder.
Converting to other image formats
For most of your document scanning and file management
operations in Pagis Pro, XIF is the preferred file format.
However, if for some reason, you require another file format,
Pagis Pro enables you to convert a XIF document (or most any
image file) to a number of other image file formats.
4–20 Pagis Pro User’s Guide
Page 95

Contents Index
To convert an image file to a different image format:
1. In an Explorer view on the desktop, select the image file
that you want to convert.
☞ In addition to XIF, Pagis Pro can both input and output over 40
popular image file formats including TIFF, BMP, PCX, DCX,
GIF, FlashPix, JPEG, PICT, and many more.
2. With the mouse pointer on the selected image file, click
and hold the right mouse button.
This displays the context menu (refer to Figure 4–10).
3. Select the Convert Format command.
This displays the Select Output Format dialog box (Figure 4–11).
Select the output format
from the list box
Read here for additional
information
If available, click
to specify output
options
Figure 4–11. Select Output Format dialog box
4. In the Save as type list box, select the output image
format.
5. If available for the selected output format, specify
conversion options.
☞ Conversion options are available for any of the image formats
that support both binary (black and white) and color.
When you click the Options button, the Export Options dialog box
is displayed (Figure 4–12).
Using Pagis Pro 4–21
Page 96

Specify color depth and
resolution
Contents Index
Click OK to close the
dialog box
Figure 4–12. Export Options dialog box
• Specify the appropriate color depth and resolution
combination for the output file:
Black and White;
High Resolution
Color or Gray;
Lower Resolution
Use this for line-art graphics, or for
images destined for OCR. Output is a
one-bit, or binary, image at the
original highest scanning resolution
(typically 200 to 400 dpi).
Use this for images destined for a
graphics application (for example,
PhotoSuite). Output is at the highest
color depth and resolution (typically
75 or 100 dpi) of any image in the
document.
• Click OK.
6. Click OK in the Select Output Format dialog (Figure 4–11)
to start the conversion process.
A progress box indicates conversion progress as well as the input
and output file names. The converted file is stored in the same
folder as the original file.
4–22 Pagis Pro User’s Guide
Page 97

Contents Index
XIF property sheets In Windows, when you point to and select a file on the desktop or
in any Explorer view, you can display a context menu by clicking
the right mouse button.
One of the commands in this menu is the Properties command.
When you select this command, it displays the General properties
of the selected file in the Properties dialog box.
For XIF files, Pagis Pro adds up to two additional property sheets
to the Properties dialog box—Pagis Index and XIF Details. For
any other file type that Pagis Pro includes in a search index, it
adds the Pagis Index tab to the file’s properties.
Please read the following subsections for more information.
Defining keywords and other index properties for a file
Pagis Pro enables you to index and search for virtually any text
or image file on your system. One way to organize files for later
searching is to define Pagis Index properties for them.
The Pagis Index properties include Author, Title, and Keywords.
You can define these properties in the Scan Tool when you scan a
document, or at anytime later using the following procedure.
Note To add Pagis Index properties, the file(s) must already be
referenced in a Pagis index, or must at least be located in a folder
that is included in a Pagis index. For more information about
defining Pagis indexes, refer to “Pagis Index Manager and
Update Tool” later in this chapter.
1. Right-click on the file or files for which you want to define
Keyword properties.
The context menu appears (refer to Figure 4–10).
2. Select the Properties command.
The Properties tabbed dialog box for the selected file or files now
appears. One of tab labels is Pagis Index (Figure 4–13).
Using Pagis Pro 4–23
Page 98

Click tab to bring Pagis
Index dialog in front
Enter information in
some or all of the
fields
Contents Index
Click OK when
you are done
Figure 4–13. Pagis Index Properties
3. Click the Pagis Index tab to bring it to the front.
Fields for Title, Author, and Keywords are shown.
☞ If you have selected multiple files, the Title and Author fields are
blank (unless they are identical for all files). The Keywords field
contains only those keywords that are common to all files.
4. Enter text for Title, Author, and Keywords, as desired.
You can leave any of these blank if you choose. Keywords should
be separated by a space.
5. Click OK to store the properties and close the dialog box.
A progress box appears indicating that the file is being added or
updated in the specific Pagis index.
Later, you can search for this file based on the Title, Author, and
Keywords you assigned to it.
4–24 Pagis Pro User’s Guide
Page 99

XIF details are
shown here
Contents Index
Getting details about a XIF file
For XIF files, another property sheet added to the Properties
dialog box is XIF Details (Figure 4–14).
Click OK when you are done
Click to advance
the displayed page
Figure 4–14. XIF Details property sheet
This property sheet provides information such as the number of
pages in the document, number of annotations, whether it is segmented, and whether it is searchable (included in a Pagis index).
In this property sheet, you can also view the different pages of
the document in a thumbnail view. Use the Arrow buttons to
cycle through thumbnail views of the other pages of the
document. The thumbnail page that is showing is the current
page for this document.
Click the OK button to close the dialog and accept the change.
Click Cancel to close the dialog without changing the current
page. Click Apply to accept the new current page, but leave the
dialog open.
Using Pagis Pro 4–25
Page 100

Contents Index
SCAN TOOL (SCANNER, COPIER, FAX)
Containing the scanner, copier, and fax tools, the Scan Tool
(Figure 4–15) is the central document capture and communication
program in Pagis Pro.
Click one of the tabs to
bring a tool forward
Figure 4–15. Scan Tool with Scanner tab in front
Depending on scanner setup options you specify, the Scan Tool
directly controls your scanner (or digital camera), or connects to
the device’s TWAIN interface.
Either way, with the Scan Tool, you can capture paper documents,
and save them as XIF files, or send them to a printer or fax
program. Read this section for details about the following topics:
◆ Setting up your scanner or digital camera to work with Pagis Pro
◆ Changing default properties for scanned documents
◆ Scanning documents
◆ Copying documents
◆ Faxing documents
4–26 Pagis Pro User’s Guide
 Loading...