

Page 1
DOCUCOLOR 12
PRINTER
USER GUIDE
Page 2

©
1999, 2000, 2001 Xerox Corporation. All rights reserved.
Copyright protection claimed includes all forms and matters of
copyrightable material and information now allowed by statutory or
judicial law or hereinafter granted, including without limitation,
material generated from the software programs that are displayed
on the screen such as styles, templates, icons, screen displays,
looks, etc.
®
Xerox
, The Document Company®, the stylized X, and all Xerox
product names and product numbers mentioned in this publication
are registered trademarks of Xerox Corporation. Xerox Canada is a
licensee of all the trademarks. Other company brands and product
names may be trademarks or registered trademarks of their
respective companies and are also acknowledged.
PANTONE
®
Colors generated by the DocuColor 12 are four and/or
three-color process simulations and may not match PANTONEidentified solid color standards. Use current PANTONE Color
Reference Manuals for accurate color.
PANTONE
®
Color simulations are only obtainable on this product
when driven by qualified Pantone-licensed software packages.
Contact Pantone, Inc. for a current list of qualified licensees.
PANTONE
Pantone, Inc.
®
and other Pantone, Inc. trademarks are the property of
©
Pantone, Inc., 1988.
Changes are periodically made to this document. Technical updates
will be included in subsequent editions.
Printed in the United States of America.
Page 3

Contents
SafetyNotes............................................VII
Electricalsafety ...........................................VII
Lasersafety.............................................. IX
Maintenancesafety .........................................X
Operationalsafety ......................................... XI
Ozonesafety .............................................XII
Notices ...............................................XIII
RadioFrequencyEmissions ................................ XIII
FCC ....................................XIII
InCanada ...............................XIV
SafetyExtraLowVoltageApproval............................XV
Certifications...inEurope .................................XVI
It’s Illegal...in the USA . . . . . ............................... XVII
It’s Illegal...in Canada . . . . . . ................................XIX
EnvironmentalNotices...intheUSA .........................XX
EnvironmentalNotices...inCanada .........................XXI
1
2
3
4
DOCUCOLOR 12 PRINTER USER GUIDE III CONTENTS
5
6
7
Page 4

IVC
1. Aboutthismanual ...................................1-1
Manual contents . . . . . . . . . ................................ 1-2
1.AbouttheManual........................ 1-2
2.GettingtoknowyourDocuColor12.......... 1-2
3.Paper ................................. 1-2
4.Accessories ............................ 1-3
5.ProblemSolving......................... 1-3
6.TechnicalInformation .................... 1-3
7.Index ................................. 1-4
Formoreinformation ....................... 1-4
Conventionsusedinthismanual............................. 1-5
2. GettingtoknowyourDocuColor12.....................2-1
Introduction ............................................. 2-1
Poweronandoff ......................................... 2-2
Switchingthepoweroff...................... 2-2
Switchingthepoweron...................... 2-2
ControlPanel............................................ 2-3
ControlPanelButtons ..................................... 2-4
TouchScreen ........................................... 2-6
Messagearea ............................ 2-6
Audiotones ............................................. 2-6
PaperTraysandPaperPath................................ 2-7
PaperTrays.............................. 2-7
PaperPathAreas ......................... 2-8
Outputdelivery............................ 2-8
Dryink(Toner)........................................... 2-9
Whiteborderedgesonprints .............................. 2-10
Groundfaultprotection ................................... 2-11
Connectivity............................................ 2-12
MovingthePrinter ....................................... 2-12
Optionsandaccessories .................................. 2-13
1
2
3
4
5
6
7
DOCUCOLOR 12 PRINTER USER GUIDE
ONTENTS
Page 5

V
C
3. Paper..............................................3-1
Overview ............................................... 3-1
PaperTrays1,2,3,and4 ................... 3-2
PaperTray5 ............................. 3-3
Loadingpaper ........................................... 3-4
Usingpaper .............................. 3-4
Usingtransparencies....................... 3-6
Loadingpaperintotrays1,2,3,and4 ......... 3-7
LoadingpaperintoPaperTray5 .............. 3-9
Using12x18inchorSRA3paper ........... 3-12
PaperUsage ........................................... 3-13
Tray5Setupscreen...................................... 3-16
Preservingyourcoloroutput................................ 3-17
Adhesive tapes and adhesives. . . . . . . . . . ..... 3-17
PVCandcoloroutput...................... 3-17
1
2
4. Accessories ........................................4-1
Mailbox ................................................ 4-1
Overview ................................ 4-1
UsingtheMailbox ......................... 4-3
Clearingapaperjam ....................... 4-4
HighCapacityFeeder...................................... 4-7
Introduction .............................. 4-7
Acceptablemedia ......................... 4-7
Loadingpaper ............................ 4-8
Clearing an HCF paper jam . . . . . . . . . . . . ...... 4-9
Accessing the HCF from the client workstation . . 4-11
ConvenienceStapler ..................................... 4-14
Overview ............................... 4-14
Indicatorlights............................ 4-15
Acceptablemedia......................... 4-16
Orderingstaplecartridges .................. 4-16
Usingthestapler ......................... 4-17
Addingstaples........................... 4-18
Clearingastaplerjam ..................... 4-19
Troubleshooting.......................... 4-20
3
4
5
6
7
DOCUCOLOR 12 PRINTER USER GUIDE
ONTENTS
Page 6

VIC
5. ProblemSolving.....................................5-1
Overview ............................................... 5-1
PaperJamClearance ..................................... 5-3
Preventingpaperjams...................... 5-4
PaperjambehindtheLeftDoor............... 5-5
PaperjambehindtheRightDoor ............. 5-6
PaperjambehindtheFrontDoor ............. 5-7
Paperjaminsideapapertray ............... 5-10
PaperjaminsidePaperTray5 .............. 5-11
Resolvinghardwareproblems.............................. 5-12
Resolvingprogrammingproblems........................... 5-13
ResolvingProcessorproblems ............................. 5-14
Resolvingoutputqualityproblems........................... 5-17
6. TechnicalInformation ................................6-1
Overview ............................................... 6-1
Specifications ........................................... 6-2
Electrical Power Requirements
(115VAC-60Hz) ......................... 6-2
Electrical Power Requirements
(220-240VAC-50Hz) ..................... 6-3
EnvironmentalRequirements ................ 6-4
HealthandSafetyInformation ................ 6-4
Capabilities .............................. 6-5
PhysicalDimensions ....................... 6-6
SystemModesofOperation ................. 6-7
Print rates for Paper Trays 1, 2, 3, and 4:
NormalPaper............................. 6-8
Print rates for Paper Trays 2, 3, and 4:
LimitedHeavyweightPaper.................. 6-9
PrintratesforTray5 ...................... 6-10
MailboxSpecifications.................................... 6-11
MetricConversionChart .................................. 6-12
1
2
3
4
7. Index ..............................................7-1
5
6
7
DOCUCOLOR 12 PRINTER USER GUIDE
ONTENTS
Page 7

Safety Notes
The Xerox DocuColor 12 Printer and the
recommended maintenance supplies have been
designed and tested to meet strict safety
requirements. Attention to the following notes will
ensure the continued safe operation of your
printer.
Electrical safety
• Use only the power cord supplied with this
equipment.
• Plug the power cord directly into a correctly
grounded electrical outlet. Do not use an
extension cord. If you do not know whether or
not an outlet is grounded, consult a qualified
electrician
1
2
3
4
• Do not use a ground adapter plug to connect
this equipment to an electrical outlet that lacks
a ground connection terminal.
WARNING: You may get a severe electrical
shock if the outlet is not correctly grounded.
• Do not place the printer where people may
step on or trip on the power cord. Do not place
objects on the power cord.
• Do not override or disable electrical or
mechanicalinterlocks.
• Do not obstruct the ventilation openings.
These openings are provided to prevent
overheating of the machine.
5
6
7
DOCUCOLOR 12 PRINTER USER GUIDE VII SAFETY NOTES
Page 8

WARNING: Never push objects of any kind into
slots or openings on this equipment. Making a
1
contact with a voltage point or shorting out a part
could result in fire or electrical shock.
• If any of the following conditions occur, switch
off the power to the machine immediately and
disconnect the power cord from the electrical
outlet. Call an authorizedXerox service
representative to correct the problem.
2
3
– The machine emits unusual noises or
odors.
– The power cord is damaged or frayed.
– Awall panel circuit breaker, fuse, or other
safety device has been tripped.
– Liquid is spilled into the printer.
– The machine is exposed to water.
– A ny part of the machine is damaged.
Disconnect Device
The power cable is the disconnect device for this
equipment. It is attached to the back of the
machine as a plug-in device. To remove all
electrical power from the machine, disconnect the
4
power cable from the electrical outlet.
5
6
7
SAFETY N OTES VIII DOCUCOLOR 12 PRINTER USER GUIDE
Page 9

Laser safety
CAUTION: Use of controls, adjustments, or
procedures other than those specified in this
documentation may result in a hazardous
exposure to laser radiation.
This equipment complies with international safety
standards. With specific regard to laser safety, the
equipment complies with performance standards
for laser products set by government, national,
and international agencies as a Class 1 laser
product. It does not emit hazardous light, as the
beam is totally enclosed during all phases of
customer operation and maintenance.
1
2
3
4
5
6
DOCUCOLOR 12 PRINTER USER GUIDE IX SAFETY NOTES
7
Page 10

Maintenance safety
1
• Do not attempt any maintenance procedure
that is not specifically described in the
documentation that is supplied with your
printer.
• Do not use aerosol cleaners. The use of
supplies that are not approved may cause
2
3
poor performance of the printer, and could
create a dangerous condition.
• Use the supplies and cleaning materials only
as directed in this manual. Keep all of these
materials out of the reach of children.
• Do not remove the covers or guards that are
fastened with screws. There are no parts
behind these covers that you can maintain or
service.
Do not perform any maintenance procedures
unless you have been trained to do them by a
Xerox representative or unless a procedure is
specifically described in one of the printer
manuals.
4
5
6
7
SAFETY N OTES X DOCUCOLOR 12 PRINTER USER GUIDE
Page 11

Operational safety
Your Xerox equipment and supplies were
designed and tested to meet strict safety
requirements. These include safety agency
examination, approval, and compliance with
established environmental standards.
Your attention to the following safety guidelines
will help ensure the continued safe operation of
your printer:
• Use the materials and supplies specifically
designed for your printer. The use of
unsuitable materials may result in poor
performance of the machine and possibly a
hazardous situation.
• Follow all warnings and instructions that are
marked on or supplied with the machine.
• Place the machine in a room that provides
adequate space for ventilation and servicing.
• Place the machine on a level, solid surface
(not on a thick pile carpet) that has adequate
strength to support the weight of the machine.
• Do not attempt to move the machine. A
leveling device that was lowered when your
machine was installed may damage the
carpet or floor.
1
2
3
4
• Do not locate the machine near a heat source.
• Do not locate the machine in direct sunlight.
5
6
7
DOCUCOLOR 12 PRINTER USER GUIDE XI SAFETY NOTES
Page 12

Do not locate the machine in line with the cold
•
air flow from an air conditioning system.
1
• Do not place containers of coffee or other
liquid on the machine.
• Do not block or cover the slots and openings
on the machine. Without adequate ventilation,
the machine may overheat.
2
mechanical interlock devices.
WARNING:Be careful when working in areas
identified with this warning symbol. These areas
may be very hot and could cause personalinjury.
If you need any additional safety information
concerning the machine or materials, contact your
Xerox representative.
3
Ozone safety
This product produces ozone during normal
operation. The ozone is heavier than air, and the
quantity is dependent on print volume. Providing
the correct environmental parameters, as
• Do not attempt to override any electrical or
4
5
specified in the Xerox installation procedures,
ensures that concentration levels meet safe limits.
If you need additional information about ozone,
request the Xerox publication, Facts About
Ozone, 601P64653, by calling 1-800-828-6571 in
the USA, or you can go to the following web
address: http://www2.xerox.com/go/xrx/
about_xerox/T_ehs.jsp to download the brochure
or view it online.
6
7
SAFETY N OTES XII DOCUCOLOR 12 PRINTER USER GUIDE
Page 13

Notices
Radio Frequency Emissions
This equipment has been tested and found to comply with
the limits for a Class B digital device, pursuant to Part 15 of
the FCC Rules. These limits are designed to provide
reasonable protection against harmful interference in a
residential installation. This equipment generates, uses,
and can radiate radio frequency energy and, if not installed
and used in accordance with the instructions, may cause
harmful interference to radio communications. However,
there is no guarantee that interference will not occur in a
particular installation. If this equipment does cause harmful
interference to radio or television reception, which can be
determined by turning the equipment off and on, the user
is encouraged to try to correct the interference by one or
more of the following measures:
• Reorient or relocate the receiving antenna.
1
2
3
FCC
4
5
• Increase the separation between the
equipment and receiver.
• Connect the equipment into an outlet on a
circuit different from that to which the receiver
is connected.
• Consult the dealer or an experienced radio/TV
technician for help.
Changes or modifications to this equipment not
specifically approved by the Xerox Corporation may void
the authority granted by the FCC to operate this
equipment.
DOCUCOLOR 12 PRINTER USER GUIDE XIII NOTICES
6
7
Page 14

Shielded cables must be used with this equipment to
maintain compliance with FCC regulations.
1
In Canada
This digital apparatus does not exceed the Class
B limits for radio noise emissions from digital
apparatus as defined in the Radio interference
regulations of Industry Canada.
2
3
4
5
6
7
NOTICES XIV DOCUCOLOR 12 PRINTER USER GUIDE
Page 15

Safety Extra Low Voltage Approval
The Xerox DocuColor 12 Printer is in compliance
with various governmental agencies and national
safety regulations. All system ports meet the
Safety Extra Low Voltage (SELV) circuits for
connection to customer-owned devices and
networks. Additions of customer-owned or thirdparty accessories that are attached to the printer
must meet or exceed the requirements listed
above. All modules that require external
connection must be installed per the DocuColor
12 Printer installation procedure.
1
2
3
4
5
6
DOCUCOLOR 12 PRINTER USER GUIDE XV NOTICES
7
Page 16

Certifications . . . in Europe
1
The CE marking that is applied to this product
symbolizes Xerox Europe’s Declaration of
Conformity with the following applicable Directives
of the European Union as of the dates indicated:
January 1, 1995: - Council Directive 73/23/EEC
amended by Council Directive 93/68/EEC,
2
3
approximation of the laws of the member states
related to low voltage equipment.
January 1, 1996: - Council Directive 89/336/EEC,
approximation of the laws of the member states
related to electromagnetic compatibility.
Changes or modifications to this equipment not
specifically approved by Xerox Europe may void
the user’s authority to operate the equipment.
Shielded cables must be used with this equipment
to maintain compliance with the EMC Directive 89/
336/EEC.
This equipment is not primarily intended for use in
a domestic environment.
4
A full declaration, defining the relevant Directives
and referenced standards, can be obtained from
your Xerox Europe representative.
WARNING: In order to allow this equipment to
operate in proximity to Industrial, Scientific and
Medical (ISM) equipment, the external radiation
from ISM equipment may have to be limited or
5
special mitigation measures taken.
6
7
NOTICES XVI DOCUCOLOR 12 PRINTER USER GUIDE
Page 17

It’s Illegal... in the USA
Congress, by statute, has forbidden the
reproduction of the following subjects under
certain circumstances. Penalties of fine or
imprisonment may be imposed on those guilty of
making such copies.
1. Obligations or Securities of the United States Government, such as:
Certificates of Indebtedness National Bank Currency
Coupons from Bonds Federal Reserve Bank Notes
Silver Certificates Gold Certificates
United States Bonds Treasury Notes
Federal Reserve Notes Fractional Notes
Certificates of Deposit Paper Money
Bonds and Obligations of certain agencies of the
government, such as FHA, etc.
1
2
3
Bonds. (U.S. Savings Bonds may be photographed only for publicity purposes in connection with the campaign for the sale of such
bonds.)
Internal Revenue Stamps. (If necessary to
copy a legal document on which there is a
canceled revenue stamp, this may be done,
provided the reproduction of the document is
performed for legal purposes.)
Postage Stamps, canceled or uncanceled.
(Forphilatelicpurposes, PostageStamps may
be photographed, provided the reproduction is
in black and white and is less than 75% or
more than 150% of the linear dimensions of
the original.)
Postal Money Orders.
Bills, Checks, or Drafts of money drawn by or
upon authorized officers of the United States.
Stamps and other representatives of value, of
whatever denomination, which have been or
may be issued under any Act of Congress.
4
5
6
DOCUCOLOR 12 PRINTER USER GUIDE XVII NOTICES
7
Page 18

2. Adjusted Compensation Certificates for Veterans of the World Wars.
1
2
3
3. Obligations or Securities of any Foreign Government, Bank, or Corporation.
4. Copyrighted material, unless permission of
the copyright owner has been obtained or the
copying falls within the “fair use” or library
reproduction rights provisions of the copyright
law. Further information of these provisions
may be obtained from the Copyright Office,
Library of Congress, Washington, D.C. 20559.
Ask for Circular R21.
5. Certificates of Citizenship or Naturalization.
(ForeignNaturalization Certificates may be
photographed.)
6. Passports. (Foreign Passports may be photographed.)
7. Immigration Papers.
8. Draft Registration Cards.
9. Selective Service Induction Papers that bear
any of the following Registrant’s information:
Earnings or Income Dependency Status
Court Record Previous military service
4
5
6
Physical or mental condition
Exception: U.S. Army and Navy discharge
certificates may be photographed.
10. Badges, Identification Cards, Passes, or
Insigniacarriedby Militaryor Naval personnel,
or by members of the various Federal Departments, such as FBI, Treasury, etc. (unless
photograph is ordered by the head of such
department or bureau.)
Copying the following is also prohibited in
certain states:
Automobile Licenses - Drivers’ Licenses Automobile Certificates of Title.
The above list is not all inclusive, and no
liability is assumed for its completeness or
accuracy. In case of doubt, consult your
attorney.
7
NOTICES XVIII DOCUCOLOR 12 PRINTER USER GUIDE
Page 19

It’s Illegal... in Canada
Parliament, by statute, has forbidden the
reproduction of the following subjects under
certain circumstances. Penalties of fines or
imprisonment may be imposed on those guilty of
making such copies.
1. Current bank notes or current paper money.
1
2. Obligations or securities of a government or bank.
3. Exchequer bill paper or revenue paper.
4. The public seal of Canada or of a province, or the seal
of a public body or authority in Canada, or of a court of
law.
5. Proclamations, orders, regulations or appointments, or
notices thereof (with intent to falsely cause same to
purport to have been printed by the Queen’s Printer
for Canada, or the equivalent printer for a province).
6. Marks, brands, seals, wrappers or designs used by or
on behalf of the Government of Canada or of a province, the government of a state other than Canada or
a department, board, Commission or agency established by the Government of Canada or of a province
or of a government of a state other than Canada.
7. Impressed or adhesive stamps used for the purpose
of revenue by the Government of Canada or of a province or by the government of a state other than Canada.
2
3
4
8. Documents, registers or records kept by public officials charged with the duty of making or issuing certified copies thereof, where the copy falsely purports to
be a certified copy thereof.
9. Copyrighted material or trademarks of any manner or
kind without the consent of the copyright or trademark
owner.
10. The above list is provided for your convenience and
assistance, but it is not all inclusive, and no liability is
assumed for its completeness or accuracy . In case of
doubt, consult your solicitor.
DOCUCOLOR 12 PRINTER USER GUIDE XIX NOTICES
5
6
7
Page 20

Environmental Notices . . . in the USA
1
As an ENERGY STAR®partner, Xerox
Corporation has determined that this printer model
®
meets the ENERGY STAR
efficiency.
guidelines for energy
ENERGY STAR
2
3
The ENERGY STAR program is a team effort
between the Environment Protection Agency and
the office equipment industry to promote energyefficient personal computers, monitors, printers,
fax machines and copiers. Reducing the energy
consumption of this equipment will help combat
smog, acid rain and long-term changes to the
climate by decreasing the emissions that result
from generating electricity.
®
is a US registered trademark.
4
5
6
7
NOTICES XX DOCUCOLOR 12 PRINTER USER GUIDE
Page 21

Environmental Notices . . . in Canada
As a participant in the Environmental Choice
program, Xerox Corporation has determined that
this printer model meets the Environmental
Choice guidelines for energy efficiency.
Environment Canada established the
Environmental Choice program in 1988 to help
consumers identify environmentally responsible
products and services. Copier, printer and fax
products must meet energy efficiency and
emissions criteria, and exhibit compatibility with
recycled supplies. Currently, Environmental
Choice has more than 1600 approved products
and 140 licensees. Xerox has been a leader in
offering EcoLogo approved products. In 1996,
Xerox became the first company licensed to use
the Environmental Choice EcoLogo for its copiers
printers, and fax machines.
1
2
3
4
5
6
DOCUCOLOR 12 PRINTER USER GUIDE XXI NOTICES
7
Page 22

1
2
3
4
5
6
7
NOTICES XXII DOCUCOLOR 12 PRINTER USER GUIDE
Page 23
1
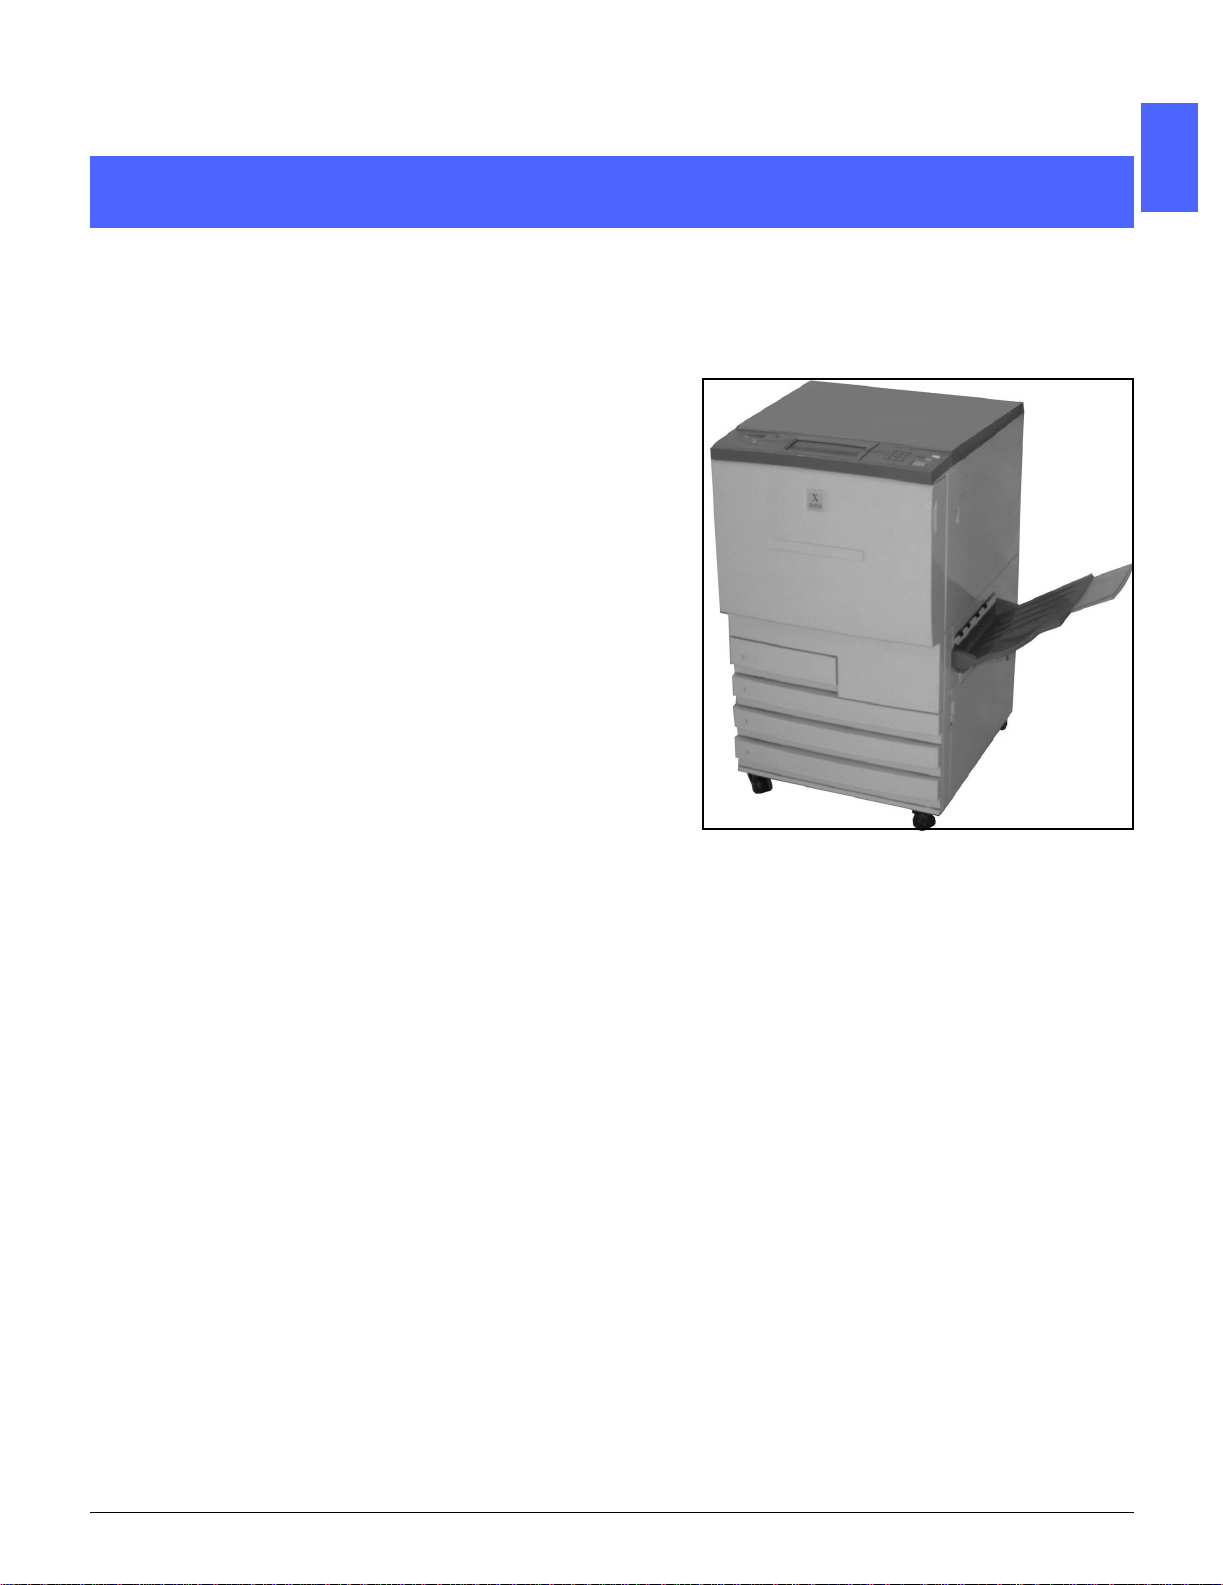
1. About this manual
The DocuColor 12 Printer, as illustrated in Figure
1, is a standalone printer that can produce up to
12 color prints or 50 black and white prints per
minute.
For more information on using the DocuColor 12
Printer from your workstation, refer to your Digital
Front End (DFE) documentation.
This chapter introduces the organization,
contents, and conventions of this manual.
2
3
4
Figure 1: The DocuColor 12 Printer
5
6
7
DOCUCOLOR 12 PRINTER USER GUIDE 1–1 ABOUT THIS MANUAL
Page 24

Manual contents
1
This manual is divided into the following chapters:
KEY POINT: Features and options discussed in
each chapter reflect the factory default settings.
You may see different settings, depending on the
options your System Administrator has selected in
Tools mode.
2
1. About the Manual
Chapter 1 provides basic information about the
User Guide, the information contained within each
chapter and the conventions used in the manual.
3
4
2. Getting to know your DocuColor 12 Printer
Chapter 2 provides basic information about the
DocuColor 12 Printer.It includes an introduction to
the Control Panel, Touch Screen, Paper Trays and
Paper Path.
It also reviews such topics as powering the printer
on and off, audio tones, dry ink, white border
edges, ground fault protection, connectivity and
options and accessories.
3. Paper
Chapter 3 provides information about paper trays
and auto tray switching. It also includes the
5
correct procedures for loading stock into the paper
trays and specific information regarding the paper
touseintheDocuColor12.
For more general information about paper, refer to
the Color Materials Usage Guide.Forspecific
information about papers tested for use with the
DocuColor 12, refer to the Recommended
Materials List.
6
7
ABOUT THIS MANUAL 1–2 DOCUCOLOR 12 PRINTER USER GUIDE
Page 25

1
4. Accessories
Chapter 4 provides information on the optional
accessories, such as the Mailbox, the High
Capacity Feeder and the Convenience Stapler.
5. Problem Solving
Chapter 5 provides instructions for clearing paper
jams, and analyzing and solving hardware,
programming, and processor problems. It also
provides a number of solutions for improving
output quality.
6. Technical Information
Chapter 6 provides the specifications,
requirements, capabilities, physical
characteristics, estimated print rates, and health
and safety information for the printer.
Specifications for the Mailbox, as well as a metric
conversion chart, are also included.
2
3
4
DOCUCOLOR 12 PRINTER USER GUIDE 1–3 ABOUT THIS MANUAL
5
6
7
Page 26

7. Index
1
Chapter 7 provides an index of key words and
pointers to information about them.
For more information
This guide should be used in conjunction with
the DocuColor 1 2 Printer System Administration
2
3
Guide, the Recommended Materials List, and the
Color Materials Usage Guide.
For more information about the DocuColor 12
Printer with a Digital Front End (DFE) refer to your
DFE user documentation.
For site planning information, refer to the
DocuColor 12 Customer Site Planning Guide.
The Xerox Web site is:
www.xerox.com
4
5
6
7
ABOUT THIS MANUAL 1–4 DOCUCOLOR 12 PRINTER USER GUIDE
Page 27
1
Conventions used in this manual
Descriptions of features and options generally
precede procedure steps. You may need to
combine several procedures to achieve your
desired results.
This manual uses a number of symbols to help
you identify various kinds of information. These
symbols are described below.
The 1, 2, 3 symbol indicates the beginning of a
procedure. Be sure to follow steps carefully in the
order given.
2
NOTE: Notes provide extra information that may
be helpful to your understanding or performance
of procedures.
KEY POINT: The key symbol draws your
attention to important additional information, hints,
or tips.
WARNING:This symbol alerts you to an operating
or maintenance procedure, practice, or condition
that, if not strictly observed, could result in injury
or loss of life.
WARNING:This hot surface symbol warns you of
an area that may be very hot and would cause
personal injury if touched.
CAUTION:This symbol alerts you to an operating
or maintenance procedure, practice, or condition
that, if not strictly observed, could result in
damage to or destruction of equipment or loss of
data.
3
4
5
6
7
DOCUCOLOR 12 PRINTER USER GUIDE 1–5 ABOUT THIS MANUAL
Page 28

1
2
3
4
5
6
7
ABOUT THIS MANUAL 1–6 DOCUCOLOR 12 PRINTER USER GUIDE
Page 29
1
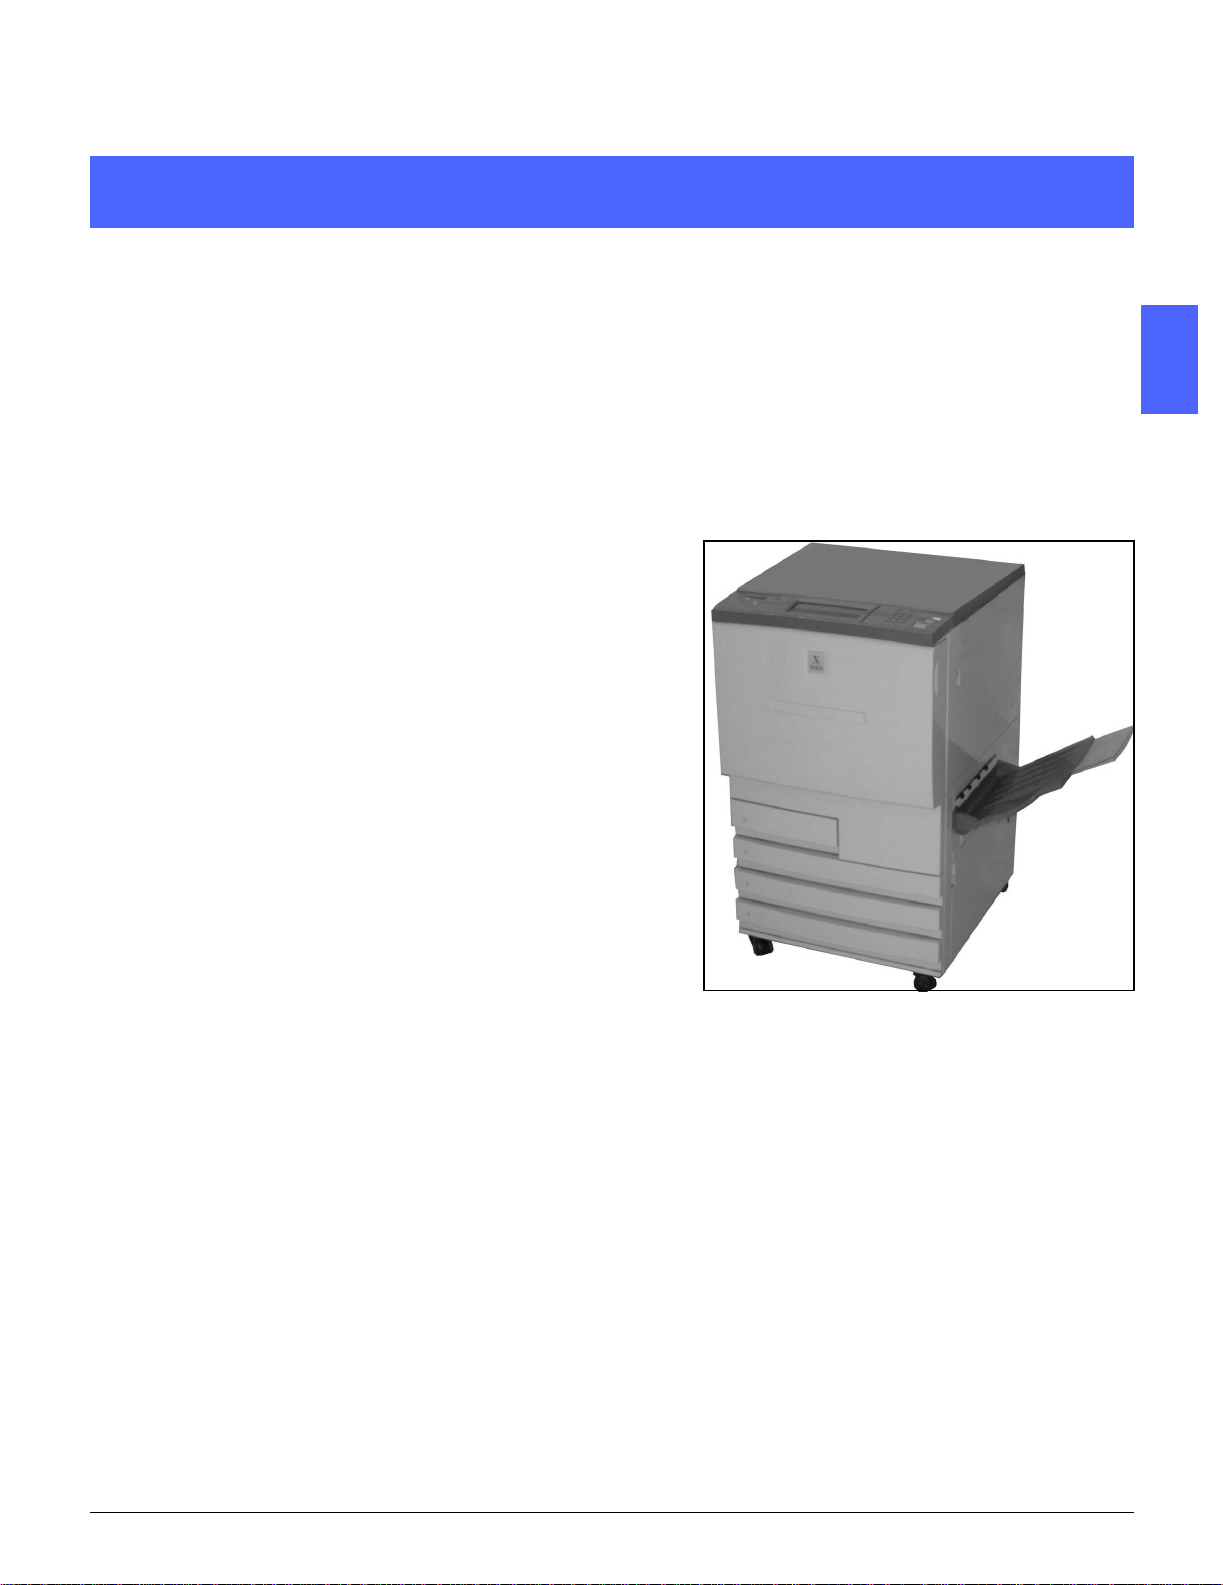
2. Getting to know the DocuColor 12 Printer
Introduction
2
The DocuColor 12 Printer provides full-color,
digital imaging at approximately 12 prints per
minute using full-color mode, and 50 prints per
minute in the black and white mode. The rate
varies depending upon the paper size, paper
weight, and the orientation. It includes an anticounterfeit function as standard equipment.
3
4
5
Figure 1: The DocuColor 12 Printer
6
7
DOCUCOLOR 12 PRINTER USER GUIDE 2–1 GETTING TO KNOW THE DOCUCOLOR 12 PRINTER
Page 30
Power on and off
2
2
Switching the power off
Press the Power Switch to the Off position to
switch the printer off. The Touch Screen will
appear dark.
Allow the printer to remain off for approximately 5
seconds before switching it on again.
3
Switching the power on
Press the Power Switch to the On position to
switch the printer on. A message will display
asking you to wait.
4
After the Power Switch is pressed to the On
position, the printer takes approximately eight
minutes to come to a Ready to Print condition.
CAUTION: The Fuser Roll remains in a cammedup position if power to the printer is interrupted
while the printer is in use. If the Fuser Roll
5
6
remains in the cammed-up position for a
prolonged period of time, the Fuser Roll can be
damaged and print quality defects can occur. To
prevent any damage, the printer should be
powered on and a print made as soon as the
power is restored. The Fuser Roll will not be
released from the cammed-up position until the
power is restored, the Power Switch is in the On
position, and a print is made.
Figure 2: Power switch - off position
7
GETTING TO KNOW THE DOCUCOLOR 12 PRINTER 2–2 DOCUCOLOR 12 PRINTER USER GUIDE
Page 31

1
Control Panel
Illustrated below is the User Interface and the
Control Panel.
A
Figure 3: Control Panel
As illustrated in Figure 3, the Control Panel
includes the following areas:
A.) Contrast Dial - Is used to adjust the
brightness or darkness of the Touch screen.
BC
2
3
B.) User Interface Touch Screen - Displays the
printer Feature menus.
C.) Control Panel buttons - Are used with the
Touch screen by the System Administrator to
enter information and access Tools Mode.
4
5
6
7
DOCUCOLOR 12 PRINTER USER GUIDE 2–3 GETTING TO KNOW THE DOCUCOLOR 12 PRINTER
Page 32

Control Panel Buttons
The function of the Control Panel hard buttons is
described below. The numbers before the
descriptions correspond to the numbered call-outs
in Figure 4.
2
3
1
2
2
1 Numeric Keypad -Buttons0to9areused.
These buttons are used to enter an access
number.
4
3
Figure 4: Control Panel buttons
Administration -Thisbuttonisusedbythe
System Administrator. The System Administrator
uses this feature to make changes in the machine
2
feature default settings.
4
Figure 5: Administration button
5
6
7
GETTING TO KNOW THE DOCUCOLOR 12 PRINTER 2–4 DOCUCOLOR 12 PRINTER USER GUIDE
Page 33

1
3 Power Saver button - Press this button to restore
the printer from Power Saver mode to full power.
The Power Saver mode enables the DocuColor 12
Printer to use less power than when it is in Ready
mode.
The DocuColor 12 Printer will go into Power Saver
mode automatically if it is not used for a length of
time specified by the System Administrator in the
Tools Mode. The DocuColor 12 Printer will enter a
warm-up cycle to return to full power when you
press the Power Saver button or when you send
a job to the printer.
4Clear(C) - Press the Clear (C)buttontodeleteall
values displayed in a selected field. Re-enter the
desired new values using the Control Panel
buttons.
NOTE: The Clear button can not be used when a
jobisincompleteortoclearafaultorjam.
NOTE: The Control Panel buttons that are not
described in this section are not functional on the
DocuColor 12 Printer.
Figure 6: Power Saver button
C
Figure 7: Clear button
2
3
4
DOCUCOLOR 12 PRINTER USER GUIDE 2–5 GETTING TO KNOW THE DOCUCOLOR 12 PRINTER
5
6
7
Page 34

Touch Screen
The Touch Screen can be used to select paper
sizes and weights for tray 5 operation.
The Touch Screen displays messages that
indicate the printer status and fault conditions.
2
2
Message area
The Message area at the top of the screen
instructs the Operator about:
• Printer Status
• Programming Instructions/Status
3
• Fault Messages
Audio tones
The Audio tones alert the user about:
4
• A change in printer operation (e.g. warm-up
cycle is complete)
• Fault condition
5
6
7
GETTING TO KNOW THE DOCUCOLOR 12 PRINTER 2–6 DOCUCOLOR 12 PRINTER USER GUIDE
Page 35

1
Paper Trays and Paper Path
Paper Trays
PaperTrays1,2,3,and4arelocatedatthelower
front of the printer, as illustrated in Figure 8. Paper
Tray 5 is on the left side of the printer, as
illustrated in Figure 9.
Paper Tray 1 can accommodate 8.5 x 11inch, A4,
A5, or B5 paper. Paper Tray 1 cannot be manually
adjusted by the customer. If you are interested in
changing the paper size in this tray,please contact
your Xerox service representative.
2
Paper Trays 2, 3, and 4 can accommodate an
assortment of standard paper sizes, from 8 x 10
inch through 11 x 17 inch, and B5 through A3.
NOTE: Paper Trays 2, 3, and 4 can also
accommodate 12 x 18 inch paper through a
special, optional tray setup procedure performed
by a Xerox service representative. If you are
interested in this option, contact your Xerox
service representative.
Paper Tray 5 (sometimes called the Bypass Tray)
can accommodate non-standard paper sizes up to
12 x 18 inches. Tray 5 can also accommodate
special materials such as transparencies and
heavy weight paper.
NOTE: Also shown in Figure 8 is the optional
High Capacity Feeder - Tray 6, which can
accommodate 8.5 x 11 inch or A4 paper.
Tray 1
Tray 6
Trays 2, 3, 4
Figure 8: Paper Trays
3
4
5
5
Figure 9: Paper Tray 5
6
7
DOCUCOLOR 12 PRINTER USER GUIDE 2–7 GETTING TO KNOW THE DOCUCOLOR 12 PRINTER
Page 36

Paper Path Areas
1 Paper Tray 1
2 Paper Tray 2
3 Paper Tray 3
4 Paper Tray 4
2
2
3
4
5
5 Paper Tray 5
6 Preregistration Area
7 Transfer Belt
8 Fuser
9 Output Tray, Mailbox, or Finisher
10 Duplex path (10a, 10b, 10c)
As illustrated in Figure 10, the paper is fed from
the selected paper tray (1-5) to the Paper
Transport rollers.
The Paper Transport rollers deliver the paper to
the Preregistration Area (6) in the Paper Path
Module.
From the Preregistration Area, the paper is
registered onto the Transfer Belt (7), and the
image is transferred.
The paper proceeds to the Post Transfer Area and
into the Fuser (8), where the image is fixed to the
paper permanently.
Figure 10: Paper Path
From the Fuser, the paper passes either through
the Post Fuser Area and into the Mailbox, the
Finisher (9) or into the duplex path (10a, 10b,
10c).
6
Output delivery
Refer to your Digital Front End (DFE) user
documentation for more information on output
delivery.
7
GETTING TO KNOW THE DOCUCOLOR 12 PRINTER 2–8 DOCUCOLOR 12 PRINTER USER GUIDE
Page 37

1
Dry ink (Toner)
The DocuColor 12 Printer has a four-color
development system that uses a combination of
dry inks (toners) to produce the output colors. The
dry ink colors are magenta, cyan, yellow, and
black.
Each dry ink is contained in a dry ink cartridge.
When dry ink is running low in a particular
cartridge, the Touch Screen displays a message
indicating that it is low. When a cartridge is empty,
the Touch Screen displays a message indicating
that the cartridge needs to be replaced. The
DocuColor 12 Printer will not make prints using
that color until the cartridge has been replaced.
Refer to the DocuColor 12 Printer System
Administration Guide for information about
replacing the dry ink cartridges.
2
3
4
DOCUCOLOR 12 PRINTER USER GUIDE 2–9 GETTING TO KNOW THE DOCUCOLOR 12 PRINTER
5
6
7
Page 38

White border edges on prints
All prints made on the DocuColor 12 Printer have
white border edges on four sides of the print.
There is a factory setting which removes a 2 mm
wide area from the left, right, top and bottom
edges of the print. This factory setting cannot be
altered.
2
2
Figure 11: Print with white border edges
3
4
5
6
7
GETTING TO KNOW THE DOCUCOLOR 12 PRINTER 2–10 DOCUCOLOR 12 PRINTER USER GUIDE
Page 39

1
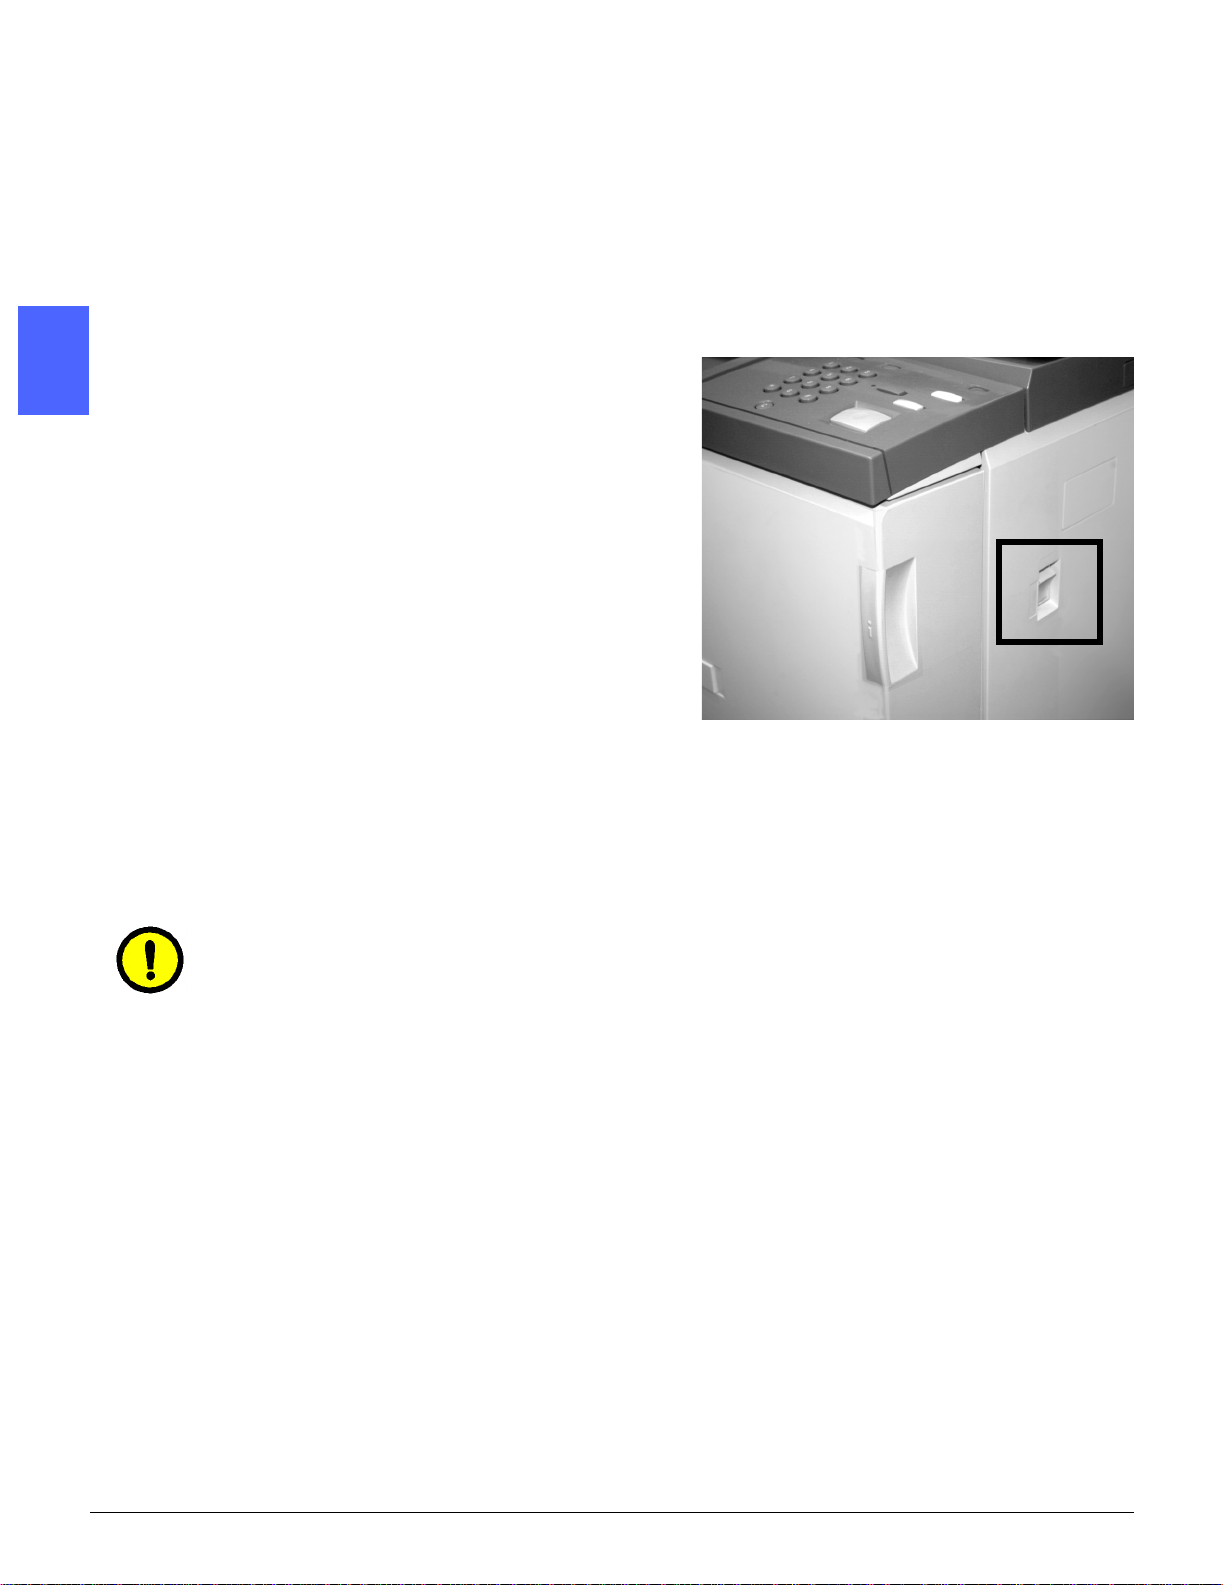
Ground fault protection
The DocuColor 12 Printer is equipped with a
safety feature called a Ground Fault Protector.
This device removes all electrical power to the
printer if a fault is detected in the power supply to
the printer.
If power is interrupted to the printer, perform the
following:
2
1
2
Locate the Ground Fault Protector on the back of
the printer in the lower left corner.
Flip the switch up if the device has been tripped
and the switch is in the Off (down) position.
If the device interrupts power to the printer again,
or if power has not been restored by the above
procedure, disconnect the power cord and call
your Xerox service representative.
CAUTION: The Fuser Roll remains in a cammedup position if power to the printer is interrupted
while the printer is in use. If the Fuser Roll
remains in the cammed-up position for a
prolonged period of time, the Fuser Roll can be
damaged and print quality defects can occur. To
prevent any damage, the printer should be
powered on and a print made as soon as the
power is restored. The Fuser Roll will not be
released from the cammed-up position until the
power is restored, the Power Switch is in the On
position, and a print job is sent.
3
Figure 12: Ground Fault Protector
4
5
6
7
DOCUCOLOR 12 PRINTER USER GUIDE 2–11 GETTING TO KNOW THE DOCUCOLOR 12 PRINTER
Page 40

Connectivity
If your DocuColor 12 Printer is already connected
to a Digital Front End (DFE), refer to the
documentation that was supplied with the DFE for
installation instructions, setup procedures, and
feature descriptions for your DocuColor 12 Printer.
2
2
3
Moving the Printer
The DocuColor 12 Printer should not be moved
after it has been installed. Improperly moving the
printer may damage the equipment, carpet or
floor.
lf you must move the printer, please ask your
Xerox representative to assist you.
4
5
6
7
GETTING TO KNOW THE DOCUCOLOR 12 PRINTER 2–12 DOCUCOLOR 12 PRINTER USER GUIDE
Page 41

1
Options and accessories
Table 1 lists the optional equipment that is
available for the DocuColor 12 Printer.
Option Comment
Mailbox The Mailbox can be used to separate print jobs from different users
into individual mailboxes.
Finisher The Finisher provides stapling capability for print jobs. It can staple
from 2 to 50 sheets of a single paper size or selected mixed paper
sizes. It offers both single and dual stapling choices.
Work Surface Extension A Work Surface Extension can be added to the DocuColor 12 if it does
not have a Mailbox.
Convenience Stapler The Convenience Stapler attaches to the printer and is used for sta-
pling your printouts.
High Capacity Feeder (HCF) The High Capacity Feeder (HCF) is attached to the printer and is iden-
tified as Tray 6. The HCF can hold a maximum of 2,000 sheets of 20
lb. (75 gsm) paper, 8.5 x 11 inch or A4 size only.
Mobility Plate The Mobility Plate provides a surface whereby the machine can be
moved when service is needed. This is useful in tight spaces or on
carpet when the machine can be difficult to move.
Table 1: DocuColor 12 Printer Options and Acc essories
For more information about any one of the above
accessories and/or for ordering one of the
accessories, contact your Xerox representative.
2
3
4
DOCUCOLOR 12 PRINTER USER GUIDE 2–13 GETTING TO KNOW THE DOCUCOLOR 12 PRINTER
5
6
7
Page 42

2
2
3
4
5
6
7
GETTING TO KNOW THE DOCUCOLOR 12 PRINTER 2–14 DOCUCOLOR 12 PRINTER USER GUIDE
Page 43

1
3 Paper
Overview
This chapter contains basic information about
loading paper or transparencies and about using
paper trays. It also includes some paper usage
guidelines for the DocuColor 12 Printer.
Good quality, 24 lb (90 gsm), bright, white paper
with a smooth finish is the standard for color
output, as it reduces show-through on 2-sided
output and provides the best quality output. Good
quality, 20 lb (75 gsm) paper is the standard for
black and white output.
3
3
4
NOTE: For additional information on materials,
see the Recommended Materials List and the
Color Materials Usage Guide.
5
6
7
DOCUCOLOR 12 PRINTER USER GUIDE 3–1
Page 44

Paper Trays 1, 2, 3, and 4
Paper Trays 1, 2, 3, and 4 hold the paper supply
fortheDocuColor12Printer.
Paper Tray 1, illustrated in Figure 1, can
accommodate 8.5 x 11 inch, A4, B5, or A5 paper.
Paper Trays 2, 3, and 4 can accommodate an
assortment of standard paper sizes, from 8 x 10
3
2
3
inch through 17 x 11 inch, and A3 through B5.
KEY POINT: Paper Trays 2, 3, and 4 can handle
normal weight papers from 16 lb. - 28 lb. (64 - 105
gsm) and also limited heavyweight papers from
105 - 128 gsm. The heaviest standard paper that
can be run in Trays 2, 3, and 4 is 32 lb bond (128
gsm). To run papers heavier than 105 gsm (28 lb
bond) one of the trays must be specifically set to
“Heavyweight” in Tools mode. Refer to the Tray
Management section of the DocuColor 12 Printer
System Administration Guide.
Trays 2, 3, and 4 have width and length
adjustment guides that should be adjusted if the
paper size in the tray needs to be changed.
Tray 1
Trays 2, 3, 4
Figure 1: Paper Trays
4
5
NOTE: Paper Trays 2, 3, and 4 can also
accommodate 12 x 18 inch paper through a
special, optional tray setup procedure performed
by a Xerox service representative. If you are
interested in this capability, contact your Xerox
service representative.
Refer to the Recommended Materials List and the
Color Materials Usage Guide for more information
about the materials you can use in Paper Trays 1,
2, 3, and 4.
6
7
3–2 DOCUCOLOR 12 PRINTER USER GUIDE
Page 45

1
Paper Tray 5
Paper Tray 5 (sometimes called the Bypass Tray)
is located on the left side of the printer. Paper Tray
5 can accommodate transparencies and other
specified paper stocks, and various paper sizes
up to 12 x 18 inches or SRA3 (320 x 450 mm).
Refer to the Recommended Materials List and the
Color Materials Usage Guide for more information
about the materials you can use in Paper Tray 5.
CAUTION:Do not, at any time, place any objects
or materials other than the appropriate stock on
Paper Tray 5. Printer damage may occur.
PaperTray6(Optional)
Paper Tray 6 is located on the left side of the
printer. Paper Tray 6 (sometimes called the High
Capacity Feeder - HCF) has a 2000 sheet
capacity of (20 lb. / 75 gsm) 8.5 x 11 inch or A4
paper.
3
Figure 2: Paper Tray 5
3
Refer to Section 4, Accessories, of this Guide for
more information about the HCF.
4
5
6
7
DOCUCOLOR 12 PRINTER USER GUIDE 3–3
Page 46

Loading paper
Using paper
The front and back surfaces of a piece of paper
differ slightly. Therefore, one side is preferred as
the side to print on for one-sided printouts and the
first side to print on for two-sided printouts.
3
2
3
4
Some ream wrappers mark this preferred printing
side(alsocalledthewireside)withanarrow.Ifthe
arrow is not present, turn the ream over so that
the package seam is facing up.
Load the paper into Paper Trays 1, 2, 3, and 4 with
the preferred printing side down. With the wrapper
seam facing up, remove the paper from the
wrapper, turn it over, and load. (See above
paragraph).
Load the paper into Paper Tray 5 with the
preferred printing side up. With the seam facing
up, remove the paper from the wrapper and load it
without turning it.
The sheet capacity of the tray varies with the
paper weight that is loaded in the tray.Refer to the
Paper Usage section in this chapter for the
recommended paper stock selections, or refer to
the Recommended Materials List and the Color
Materials Usage Guide.
Figure 3: Opening a ream of paper with seam
side up
5
6
7
3–4 DOCUCOLOR 12 PRINTER USER GUIDE
Page 47

1
KEY POINT:
• For the best results, use only the
recommended paper sizes, paper weights, or
paper types. If you do not use recommended
papers, you may experience print quality
problems, paper jams, or possible component
failures.
Refer to the Recommended Materials List and
the Color Materials Usage Guide for more
information.
• If you are loading pre-drilled paper, load it into
Paper Tray 5 with the undrilled long edge as
the leading edge (holes to the left).
• Do not load the paper above the fill line of the
paper tray edge guides.
• Straighten the paper stack each time the
paper tray is opened. Close the paper tray
slowly to avoid shifting the paper stack. This
ensures that the paper is in the correct
position when the paper tray is in the
operating position.
3
3
• If paper feeding or curl problems occur,flip the
paper over in the tray and send the prints
again. If the performance improves, continue
to load the paper in this manner. Testing has
shown that paper handling and print
performance vary with room temperature,
humidity, paper quality, image area on prints,
etc. All of these variables interact and, in
some cases, you must decide which paper
loading method works best.
4
5
6
7
DOCUCOLOR 12 PRINTER USER GUIDE 3–5
Page 48

Using transparencies
Transparencies can be run ONLY from Tray 5.
Transparencies with removable lead edge paper
stripes are recommended.
KEY POINT: Use only the transparencies
recommended in the Recommended Materials
List and the Color Materials Usage Guide.
3
2
Before you load transparencies, you must
determine which side has the white stripe. Use a
soft lead pencil to make a small mark on the stripe
on each side of the transparency. The side with
the darker mark is the stripe side.
Load transparencies with the white stripe side
3
facing down and as the leading edge. (The
leading edge is the edge that feeds into the printer
first.)
KEY POINT: Follow these guidelines to prevent
static build up when using transparencies:
White stripe down and as leading edge
• Placenomorethantwenty-five8.5x11-inch
or A4 transparencies in Paper Tray 5 at one
4
time.
• Place only one 11 x 17 or A3 transparency in
Paper Tray 5 at a time.
Figure 4: Loading transparencies
in Paper Tray 5
• Remove the transparencies from the Output
or Offset Catch Tray before running additional
sets.
5
NOTE: If the printer has a Mailbox, the
transparency prints are delivered to the Offset
Catch Tray. Transparencies cannot be delivered to
separate Mailbox bins.
6
7
3–6 DOCUCOLOR 12 PRINTER USER GUIDE
Page 49

1
Loading paper into trays 1, 2, 3, and 4
Use the following procedure to load paper into
paper trays 1, 2, 3, and 4:
1
2
Pull out the paper tray.
Place the appropriate paper into the tray. Adjust
the paper guides.
The paper level must not be above the MAX fill
line, as indicated in the tray.
NOTE: You can not adjust the guides for Tray 1.
Contact a Xerox Service Representative to adjust
the paper guides for Tray 1.
3
3
Figure 5: A fully opened Paper Tray
Fill line
4
DOCUCOLOR 12 PRINTER USER GUIDE 3–7
5
Figure 6: Loading a Paper Tray
6
7
Page 50

3
3
2
In Paper Trays 2, 3, and 4, straighten the paper
stack and adjust the paper guides until they lightly
touch the paper.
Figure 7: Adjusting the Rear Paper Guide
3
4
Close the paper tray slowly to avoid shifting the
paper stack. This ensures that the paper is in the
correct position when the paper tray is in the
operating position.
KEY POINT:
• For the best results, use only the paper sizes
and paper weights indicated in the Paper
4
Usage Table in this section.
• Adjusting the paper guides indicates the
paper size to the printer. If the guides are not
adjusted to the paper size, incorrect
placement of the image may occur.
Figure 8: Adjusting the Right Paper Guide
• It is important that you straighten the paper
stack each time the Paper Tray is opened.
5
Close the Paper Tray slowly to avoid having to
reposition the paper stack. This ensures that
the paper is in the correct position when the
paper tray is in the operating position.
6
7
3–8 DOCUCOLOR 12 PRINTER USER GUIDE
Page 51

1
Loading paper into Paper Tray 5
Paper Tray 5 is located on the left side of the
printer. Paper Tray 5 is used for transparencies,
heavy weight papers, and non-standard size
paper.A maximum of 100 sheets of 20 lb (75 gsm)
paper may be loaded into Paper Tray 5. For more
information about paper weight and requirements,
refer to the Recommended Materials List and the
Color Materials Usage Guide.
Do not load materials above the fill line located on
the paper guide.
KEY POINT: Because of the paper path design of
Paper Tray 5, paper stocks that cause difficulties
being fed from Paper Tray 1, 2, 3, or 4 may be fed
more reliably from Paper Tray 5.
Follow these guidelines to prevent static build up
when using transparencies:
• Placenomorethantwenty-five8.5x11-inch
or A4 transparencies in Paper Tray 5 at one
time.
3
Figure 9: Paper Tray 5
3
• Place only one 11 x 17 or A3 transparency in
Paper Tray 5 at a time.
• Remove the transparencies from the Output
or Offset Catch Tray before running additional
sets.
4
5
6
7
DOCUCOLOR 12 PRINTER USER GUIDE 3–9
Page 52

1
3
2
Open Paper Tray 5 by grasping the Tray 5 cover
at the top on the right and gently pushing it away
from the printer and down.
Figure 10: Opening Paper Tray 5
3
For long paper, extend the tray by grasping the
long plastic tab at the left edge and pulling it to the
left as far as possible.
If you do not extend the tray fully, paper jams or
print misregistration may occur.
4
CAUTION:Do not place any objects or materials
other than the appropriate stock on Paper Tray 5.
Printer damage may occur.
Figure 11: Grasping the Paper Tray 5 tab
5
6
Figure 12: Extending Paper Tray 5
7
3–10 DOCUCOLOR 12 PRINTER USER GUIDE
Page 53

1
2
Place the stack of materials onto Paper Tray 5
between the edge guides. Slide the stack into the
tray until it stops.
Edge guides
3
4
Move the back edge guide until it lightly touches
the side of the stack of materials. Readjust the
back edge guide each time you load materials into
Paper Tray 5.
3
Figure 13: Loading paper into Paper Tray 5
Select the appropriate size and type for the stock
you have loaded. Refer to the Tray 5 Setup screen
for more information.
3
NOTE: Adjust the front edge guide only for 12” x
18” paper. Refer to Using12x18inchorSRA3
Paper in this manual for additional information.
NOTE: Remove all stock from Paper Tray 5
when the job is complete. Dust and moisture can
affect stock, causing print quality defects.
4
DOCUCOLOR 12 PRINTER USER GUIDE 3–11
5
6
7
Page 54

Using 12 x 18 inch or SRA3 paper
UsePaperTray5for12x18inch(305x457mm)
or SRA3 (320 x 450 mm) paper.
Refer to the Recommended Materials List and the
Color Materials Usage Guide for more information
about the paper you are loading.
3
2
1
3
2
Open Paper Tray 5 and fully extend the tray to
place it in the operating position. Refer to the
instructions in the previous section, if necessary.
Adjust the front Paper Guide of Paper Tray 5:
• Unscrew the registration thumb screw,
illustrated in Figure 14, on the front side of
Paper Tray 5.
• Lift and reposition the Paper Guide in the slot
appropriate for the paper size you are using.
4
3
4
5
5
• Tighten the registration thumb screw.
Load up to 100 sheets of 12 x 18 inch (305 x 457
mm) or SRA3 (320 x 450 mm) 20 lb. paper into
Paper Tray 5.
Adjust the back edge guide until it lightly touches
the paper.
Select the appropriate size and type for the stock
you have loaded. Refer to “Programming the
Paper Supply for Tray 5” for more information.
Figure 14: Front Paper Guide
andregistrationthumbscrew
6
When the job is complete, return the paper guides
for Paper Tray 5 to their normal position.
6
7
3–12 DOCUCOLOR 12 PRINTER USER GUIDE
Page 55

1
Paper Usage
This section provides a quick summary of useful
information about paper for the DocuColor 12
Printer.
For additional general information, refer to the
Color Materials Usage Guide.
For additional specific information regarding
materials that have been tested and approved for
use in the DocuColor 12 Printer, refer to the
Recommended Materials List and the Color
Materials Usage Guide. Thislist is availableoff the
main Xerox web site (www.xerox.com) and will be
updated periodically. Contact your Xerox
representative for additional details.
Stock is classified according to the following
categories:
• Excellent – Provides reliable feeds and
optimum print quality
• Good – Provides less reliable feeds and may
result in print quality degradation
• Not Recommended – Does not feed reliably
and/or may cause severe print quality
degradation
3
3
4
DOCUCOLOR 12 PRINTER USER GUIDE 3–13
5
6
7
Page 56

PAPER Excellent Good Not Recommended
Size • 7.2 x 7.2 to 11 x 17 inches
• A4toA3
3
2
Capacity Using Xerox 20 lb (75gsm) or
equivalent or Xerox Europe
(80gsm):
• Paper Tray 1: 500 sheets
• Paper Trays 2, 3, 4: 550
sheets
• 12 x 18 inches
• 4 x 6 inch postcard
•SRA3
•A6
• Smaller than 7.2 x 7.2 inches
• Larger than 12 x 18 inches or SRA3
(320 x 450 mm)
• Any sizes between 11 x 17 inches
and12x18inchesorbetweenA3and
SRA3
3
Weight • Paper Tray 1:
16 lb to 28 lb Bond
(64gsmto105gsm)
• Paper Trays 2, 3, 4:
16 lb to 32 lb Bond
(64gsmto128gsm)
• Paper Tray 5:
4
16 lb Bond to 140 lb Index
(64gsmto250gsm)
• Paper Tray 1:
greater than 28 lb (105 gsm)
• Paper Trays 2, 3, 4:
greater than 32 lb Bond (128 gsm)
• Paper Trays 1, 2, 3, 4, 5:
less than 16 lb (64 gsm)
• Paper Tray 5:
greater than 140 lb Index (250 gsm)
Paper
Condition
5
Undamaged • Damaged or wrinkled paper
• Papers w ith excessive curl
• Papers exposed to extreme environmental conditions, such as high
humidity or high temperature, for an
extended period of time
6
7
3–14 DOCUCOLOR 12 PRINTER USER GUIDE
Page 57

1
PAPER Excellent Good Not Recommended
Paper Type • Xerox Color Xpressions or
Xerox Europe Colotech +
paper
• Xerox 4024 DP or Xerox
Europe Premier for black
only
• Xerox or Xerox Europe recommended transparencies long edge feed (White stripe:
load the white stripe edge
face down and as the leading
edge from Paper Tray 5 only)
• Paper equivalent to recommended papers:white/bright,
smooth surface, uncoated,
uniform formation (uniform
distribution of paper fibers)
• Predrilled stock -Theprinted
image MUST NOT extend
into the hole area, or printer
damage may result. (Load
this paper into Tray 5 for best
results with holes on the left.)
• Laserprint paper
• Xerographic copy
paper
• Colored paper
• Coated papers
• Paper with poor formation (nonuniform distribution of paper fibers)
• Carbonless papers
• Clear transparencies (no stripe)
• Rough paper
• Short edge feed transparencies
• Stiff paper - greater than 140 lb. (250
gsm)
3
3
4
5
6
7
DOCUCOLOR 12 PRINTER USER GUIDE 3–15
Page 58

Tray 5 Setup screen
The Tray 5 setup screen will be displayed if there
is media in Tray 5 when you power on your
DocuColor 12 Printer, or anytime that you load
media into the tray.
Tray media should be setup on your client
workstation when you send a print job, because
the settings revert to defaults automatically after a
3
2
given time. To exit this screen press either the
Save button or the Cancel button.
Figure 15: Tray 5 International Sizes screen
Figure 16: Tray 5 Inch Sizes screen
3
4
Figure 17: Tray 5 Non Standard Size screen
5
6
7
3–16 DOCUCOLOR 12 PRINTER USER GUIDE
Page 59

1
Preserving your color output
Color output, like black and white output, should
be handled and stored carefully to preserve its
appearance and usability.Yourcolor output, which
is made from color dry inks (toners), requires a
little special attention. To help preserve the fidelity
of your color output, Xerox recommends that you
consider the following:
Adhesive tapes and adhesives
Some adhesive tapes and adhesives (glues)
contain solvents that may soften or dissolve the
color dry inks. Adhesive tapes and adhesives
should be tested on sample output before being
applied to your valuable prints. Adhesive tape may
also pull off the dry inks when the tape is removed.
PVC and color output
If your output comes in contact with PVC and
PVC-type (vinyl) plastics, the dry inks may soften
and transfer to the plastic. Use polypropylene and
polyethylene plastics for any covers or binders
that come in contact with the color output
3
3
4
DOCUCOLOR 12 PRINTER USER GUIDE 3–17
5
6
7
Page 60

3
2
3
4
5
6
7
3–18 DOCUCOLOR 12 PRINTER USER GUIDE
Page 61

1
4. Accessories
Mailbox
Overview
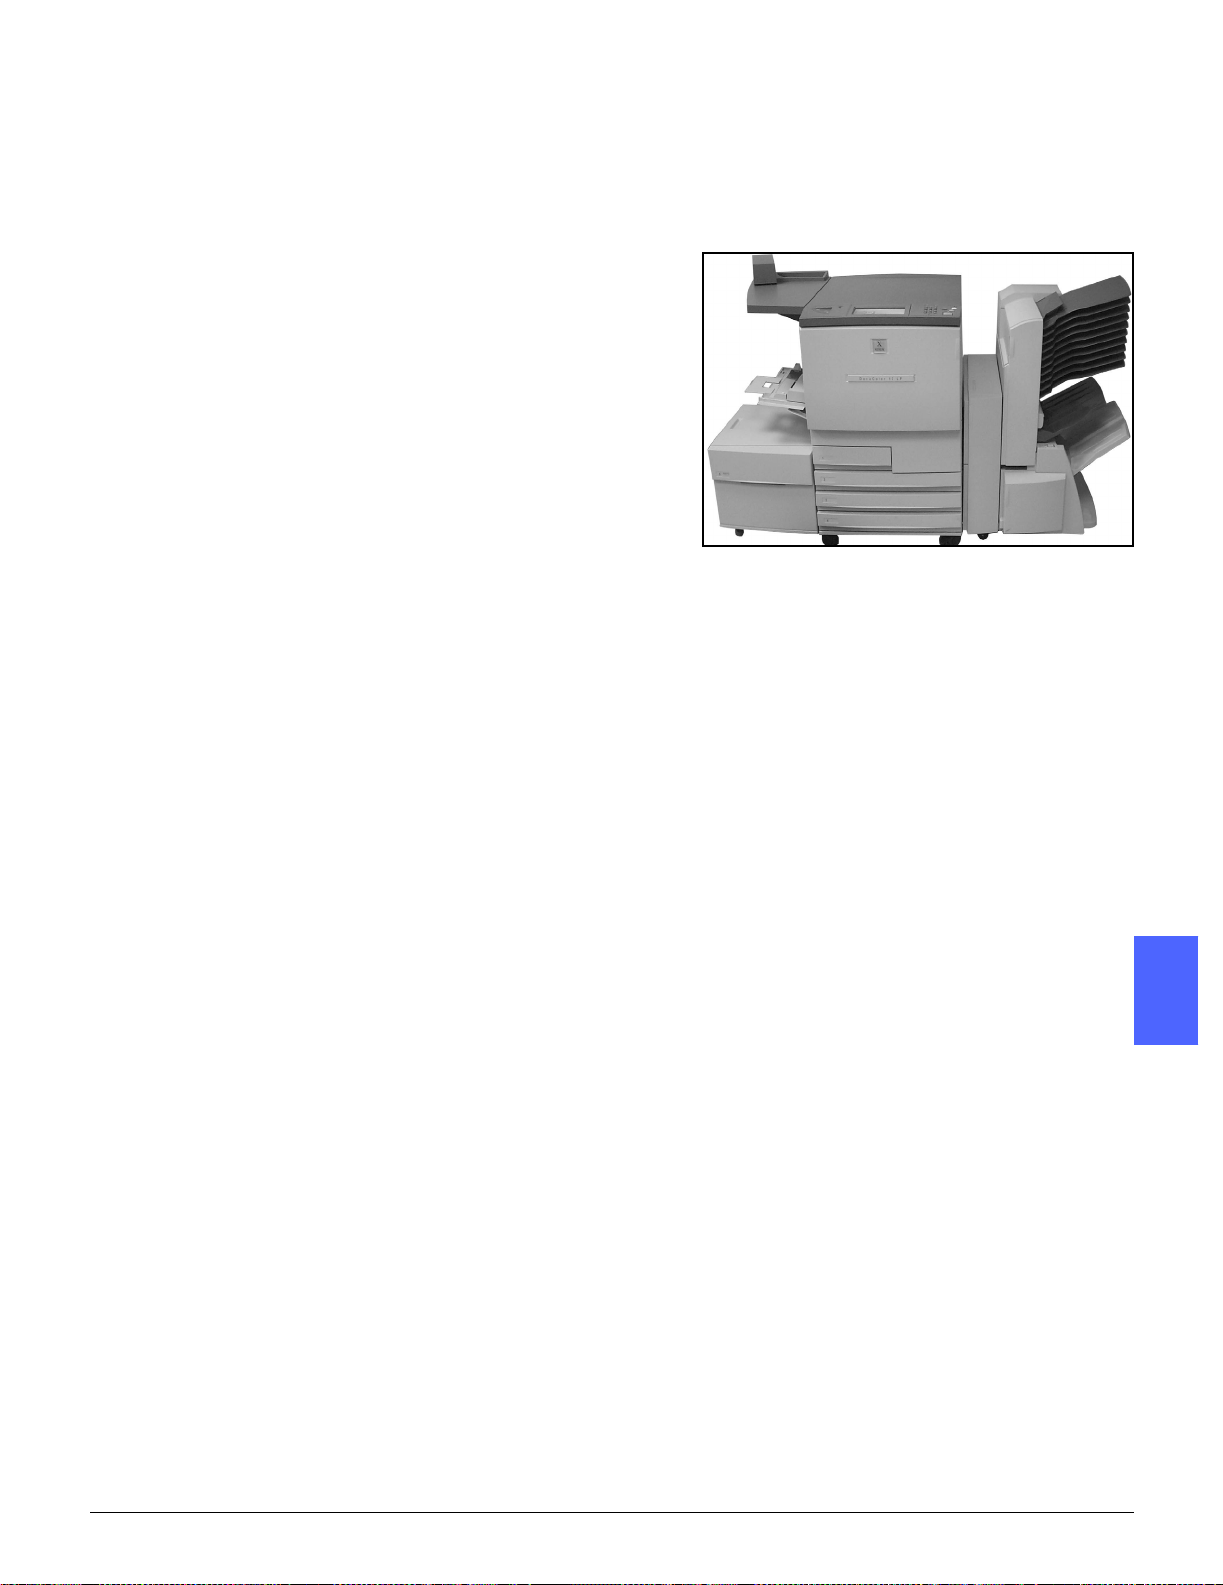
The DocuColor 12 Printer may be equipped with
an optional Mailbox with Finisher Station or
Mailbox with Offset Catch Tray (OCT). The
Mailbox contains the following components:
1 Mailbox Release Lever
2 Mailbox Bins: Prints are delivered here for
designated bin (name) settings.
3 Offset Catch Tray (OCT): Output is delivered here
when you select the Offset Catch Tray.
4 Right and Left Front Doors: Open these doors to
clear paper jams.
NOTE: For more information about the DocuColor
12 Finisher, an optional accessory, refer to the
Xerox DocuColor 12/Document Centre Color
Series 50 In-line Stapler Finisher User Guide.
1
2
3
4
Figure 1: DocuColor 12 Printer with Mailbox
4
4
5
6
7
DOCUCOLOR 12 PRINTER USER GUIDE 4–1 ACCESSORIES
Page 62

WARNING:Do not place your fingers between the
Bins while the Mailbox is in operation.
WARNING:Never cheat the safety interlock
switch. Injury or a document jam may occur.
This switch shuts off the Mailbox power when you
open the front doors or when you move the
Mailbox to the right to clear a paper jam.
2
3
4
4
5
6
7
ACCESSORIES 4–2 DOCUCOLOR 12 PRINTER USER GUIDE
Page 63

1
Using the Mailbox
When you use the optional Mailbox, prints are
delivered to the Mailbox Bins or the Finisher
Output Tray in one of the following ways:
• Each Mailbox bin can hold up to 100 prints of
20 lb (75 gsm) paper.
• The Finisher Output Tray can hold up to 1,000
sheets of 8.5 x 11” or A4 paper.
• The Mailbox can accept paper sizes from 8.5
x 11 inches (A4) to 11 x 17 inches (A3).
• If you print onto transparencies using Paper
Tray 5, the prints are delivered to the Offset
Catch Tray.
NOTE: Any job that uses Paper Tray 5 is always
delivered to the Offset Catch Tray.
3
4
5
4
6
7
DOCUCOLOR 12 PRINTER USER GUIDE 4–3 ACCESSORIES
Page 64

Clearing a paper jam
When a paper jam occurs, a paper jam message
and instructions for clearing the paper jam display
on the screen.
KEY POINT: Remove the jammed paper
carefully and gradually so you do not tear it. If the
jammed paper tears, be sure to remove all the
torn pieces.
2
1
Pushthe Mailboxrelease levertowardthe Mailbox
and pull the unit to the right, away from the printer.
3
4
Figure 2: Mailbox Release Lever
2
4
5
Remove any paper that is caught in the interface
between the printer Right Door and Mailbox.
6
Figure 3: Removing paper from the
interface area
7
ACCESSORIES 4–4 DOCUCOLOR 12 PRINTER USER GUIDE
Page 65

1
3
If the jam is behind the Left Front Door of the
Mailbox:
1. Open the Left Front Door.
2. Push the green handle (5) down, to release
the baffle and rotate the knob (6) to release
any jammed paper.
3. Remove the jammed paper gently.
4. Lift the handle to secure the baffle.
5. Close the Left Front Door.
Figure 4: Behind the Left Front Door
3
4
5
4
6
7
DOCUCOLOR 12 PRINTER USER GUIDE 4–5 ACCESSORIES
Page 66

4
If the jam is behind the Right Front Door of the
Mailbox:
1. Open the Right Front Door.
2. Push the green handle down to release the
baffle and remove any jammed paper.
3. Lift the handle to secure the baffle.
2
3
5
4. Push the upper handle to the left to open the
transport area. Remove any jammed paper
gently.
5. Push the handle to the right and secure in
place.
6. Close the Right Front Door.
Remove any jammed paper that may be exiting
the machine and push the Mailbox back into
place.
If the Paper jam message reappears, repeat the
preceding steps to clear a remaining paper jam.
Figure 5: Behind the Right Front Door (lower
portion)
4
Figure 6: Behind the Right Front Door
4
5
6
7
ACCESSORIES 4–6 DOCUCOLOR 12 PRINTER USER GUIDE
Page 67
1
High Capacity Feeder
Introduction
A High Capacity Feeder (HCF) may be attached to
and used with your DocuColor 12 Printer.
Although labeled Tray 6, the High Capacity
Feeder is referred to as the HCF.
The HCF is an optional accessory for the
DocuColor 12 Printer. The HCF is connected to
the left side of the printer, as shown in Figure 1.
Acceptable media
The HCF can feed paper from 16 lb. (64 gsm) –
28 lb. (105 gsm). It can hold a maximum of 2000
sheets of 20 lb. (75 gsm) paper.
The paper may be either 8.5 in. x 11 in. or A4 long
edge feed (LEF). Adjust the Paper Guide in the
back of the paper tray to the required size. Refer
to the Recommended Materials List and the Color
Materials Usage Guide for more detailed
information.
3
Figure 7: DocuColor 12 Printer with an HCF
attached
4
DOCUCOLOR 12 PRINTER USER GUIDE 4–7 ACCESSORIES
5
4
6
7
Page 68

Loading paper
You can add paper to the HCF while printing from
any other tray. (Check the Touch Screen to see
what tray is in use to determine if the HCF is
available for loading.) When you close the HCF
paper drawer, the tray does not elevate
immediately, but waits for the printer to finish the
current job.
2
1
3
Grasp the handle on the front of the HCF and pull
the paper tray open.
The elevator in the HCF lowers to the bottom of
the tray.
Figure 8: Opening the HCF tray
4
2
4
5
If you are changing paper sizes, perform the
following:
1. Remove all paper in the tray.
CAUTION: Handle the paper and the Paper
Guide carefully so you do not break the black
plastic sensor actuators on the guide.
2. Remove the metal Paper Guide by pulling it
straight up.
3. Align the tabs on the bottom and top of the
guide with the slots on the bottom and top of
the tray for the new size. Push the guide
firmly into the slots until it is secure.
6
Figure 9: The HCF Paper G uide
7
ACCESSORIES 4–8 DOCUCOLOR 12 PRINTER USER GUIDE
Page 69

1
3
Load the paper. Ensure that the paper is aligned
evenly and tightly against the right side of the tray.
4
1
2
Close the HCF paper tray.
When you close the HCF, the elevator rises and
positions the paper for use; also, the screen briefly
displays the type and size of the paper currently
programmed for the HCF.
NOTE: Toset the HCF as your default paper tray,
change the necessary printer drivers options at
the client workstation.
Clearing an HCF paper jam
Follow the Touch Screen messages in order to
clear the jam.
Slide the HCF away from the printer.
3
4
Figure 10: Moving the HCF from the printer
DOCUCOLOR 12 PRINTER USER GUIDE 4–9 ACCESSORIES
5
4
6
7
Page 70

3
Remove any partially fed paper from the exit area
on the HCF and the entry to the printer.
It is important to remove jammed paper from the
exit area of the HCF before opening the HCF
paper tray. Partially fed paper may tear when you
open the HCF and be difficult to remove.
4
2
5
After you have cleared the jam, grasp the handle
on the front of the HCF paper tray and pull to
open. Remove any wrinkled or damaged paper
from the paper stack.
Close the paper tray and slide the HCF to the
right, into position against the printer.
3
Figure 11: Opening the tray to remove
jammed paper
4
4
5
6
7
ACCESSORIES 4–10 DOCUCOLOR 12 PRINTER USER GUIDE
Page 71

1
Accessing the HCF from the client workstation
From the client workstation, you should add the
HCF to the available device options.
This procedure must be repeated at each client
workstation.
Even when the HCF is installed, you should use
AutoSelectTray as the default tray. The printer
will automatically select the HCF for a job if it
contains the requested paper.
You can also check the Status of the HCF from the
web client, and for any other paper tray.
Windows 98/95
3
1
2
3
4
5
6
From the Start menu, select Settings, then
Printers, and the desired printer.
From the File menu, select Properties.
Select the Device Options tab.
From the Installable options scroll menu, select
Tray 6 (High Capacity Feeder).
From the “Change setting for Tray 6 (High
Capacity Feeder)” menu, select Installed.
Click OK and close the Printers window.
4
5
4
6
7
DOCUCOLOR 12 PRINTER USER GUIDE 4–11 ACCESSORIES
Page 72

Windows NT
NOTE: You may need System Administrator
privileges to perform the following procedure.
2
1
2
3
3
4
5
6
From the Start menu, select Settings, then
Printers, and the desired printer.
From the File menu, select Properties.
Select the Device Settings tab.
Scroll through the list and highlight Tray 6 (High
Capacity Feeder).
From the “Change Tray 6 (High Capacity Feeder)
setting” menu, select Installed.
Click OK and close the Printers window.
4
4
5
6
7
ACCESSORIES 4–12 DOCUCOLOR 12 PRINTER USER GUIDE
Page 73

1
Mac OS
1
2
3
4
5
From the Apple menu, select Chooser.
In the Chooser, select Adobe PS.
In the Select PS Printer dialog box, highlight the
name of the desired printer and select Setup.
NOTE: If a .ppd file has already been associated
with the printer, go to step 7.
Browse for one of the following files:
• Splash G610-DocuColor 12
• Splash G610-DocuColor 12PM
• Fiery XP12 Color Server PS
• Fiery X12 Color Server PS
Highlight the desired file and click Select.
3
4
6
7
8
9
In the Chooser, select Setup.
A list of options displays.
Select Configure.
At the High Capacity Feeder option, select
Installed, and then select OK.
Click OK and close the Chooser.
5
4
6
7
DOCUCOLOR 12 PRINTER USER GUIDE 4–13 ACCESSORIES
Page 74

Convenience Stapler
Overview
2
The Convenience Stapler may be attached to and
used with your DocuColor 12 Printer.
The Convenience Stapler attaches to the back left
corner of your DocuColor 12 Printer work surface.
3
Figure 12: DocuColor 12 with a Convenience
Stapler attached
4
4
5
6
7
ACCESSORIES 4–14 DOCUCOLOR 12 PRINTER USER GUIDE
Page 75

1
The Stapler plugs in at the lower right side toward
the rear of the printer. The convenience stapler
unit includes the stapler as well as a holder for
used staples and stationary supplies.
Use the stapler as an off-line stapler.
Indicator lights
Indicator lights signify the status of the stapler:
• When the green “ready” light is lit, the staple
cartridge has more than 20 staples available
and is ready to staple.
• When the red light is on, the staple cartridge
has fewer than 20 staples available and
should be replaced.
• When the green and red lights are off, a jam
has occurred or the stapler is unplugged.
Figure 13: The Stapler power cord
Figure 14: Indicator Lights
3
4
5
4
6
7
DOCUCOLOR 12 PRINTER USER GUIDE 4–15 ACCESSORIES
Page 76

Acceptable media
The following table shows the maximum number
of sheets that can be stapled using paper of the
specified type and weight.
Paper Type Weight Maximum sheets
2
For equivalent paper types and weights, refer to
the Recommended Materials List for this product.
Color Xpressions 24 lb. (90 gsm) 50
ColoTech + 24 lb. (90 gsm) 50
T able 2: Acceptable media
3
Ordering staple cartridges
The stapler contains a cartridge,108R00053,that
holds 5000 staples and is easily replaceable.
Call the numbers listed below for consumable
supplies:
US: 1-800-822-2200
4
Canada: 1-800-668-0199
Canada (French):1-800-668-0133
Europe: _______________
Latin America: _______________
4
5
6
7
ACCESSORIES 4–16 DOCUCOLOR 12 PRINTER USER GUIDE
Page 77

1
Using the stapler
1
2
Ensure that you have no more than 50 sheets of
24 lb. paper. Align all sheets to the edge you want
to staple.
Slide the set under the staple head using the
diagonal or straight marks on the stapler base as
a guide. These diagonal or straight marks are the
paper guides.
• When the set is inserted into the stapler, a
switch activates the stapling action
automatically.
3
• Remove and reinsert the set if another staple
is required.
Figure 15: Paper guides
4
DOCUCOLOR 12 PRINTER USER GUIDE 4–17 ACCESSORIES
5
4
6
7
Page 78

Adding staples
1
Open the stapler by grasping the cover at the two
indentations on the upper right and left side and
pulling it straight up and back.
2
3
2
3
4
4
Pull the empty cartridge out by holding the gold
handle at the top tabs and pulling the cartridge
straightout. Dispose of the cartridge according to
local regulations.
Align the new cartridge so that the bottom white
tabs are on the bottom edge of the metal bracket
and below the black plastic side arms.
Push the cartridge firmly to the back until the
cartridge clicks into place.
Figure 16 : Opening the stapler
5
4
5
Close the cover by moving it down until it clicks
close.
Figure 17: Removing the cartridge
6
7
ACCESSORIES 4–18 DOCUCOLOR 12 PRINTER USER GUIDE
Page 79

1
Clearing a stapler jam
1
2
For a simple jam, remove the set with the jammed
staples from the stapler. Insert a sheet under the
staple head to cause the stapler to eject the
jammed staple.
If the set itself is jammed, remove the staple
cartridge, as described in “Adding Staples,” then
pull out the jammed set.
Clear the jammed staple and reinsert the cartridge
or insert a new cartridge.
3
4
DOCUCOLOR 12 PRINTER USER GUIDE 4–19 ACCESSORIES
5
4
6
7
Page 80

Troubleshooting
If you suspect a problem with the Convenience
Stapler,perform the following steps in the order
listed.
2
1
2
3
Ensure that the stapler cover is completely closed.
Check the power cord and power switch on the
printer to ensure that it is plugged in and powered
on.
Check the power cord for the stapler to ensure
that it is plugged in.
3
4
5
Perform the procedure for “Clearing a stapler
jam.”
If the stapler is still not operating correctly, call for
assistance.
Figure 18: The Stapler power cord
4
4
5
6
7
ACCESSORIES 4–20 DOCUCOLOR 12 PRINTER USER GUIDE
Page 81

1
5. Problem Solving
Overview
The DocuColor 12 Printer is designed to help you
find and solve problems as they happen. The
printer can detect problems and display the
corrective action on the screen. If the instructions
for solving a particular problem are not displayed
on the screen, refer to the tables on the following
pages to help you resolve the problem.
This section describes the printer faults and how
to perform the appropriate recovery procedure.
Figure 1: A typical fault screen
4
Sometimes, you may not succeed in your efforts
to clear a fault. When this happens, you should
call the Xerox Customer Support Center. Before
calling for assistance, perform the steps provided
on the following pages.
5
5
6
7
DOCUCOLOR 12 PRINTER USER GUIDE 5–1 PROBLEM SOLVING
Page 82

1
With the power on and the printer in a fault
condition, record the Fault Codes displayed in the
lower left corner of the touch screen.
2
2
Record the Machine Serial Number from the label
on the inside lower left cover of the printer.
3
3
If the problems are print quality problems, save
the defective prints for the Xerox service
representative to examine.
For DocuColor 12 Printer applications support,
user help, and service support, call the Xerox
Customer Support Center.
4
Figure 2: Machine Serial Number location
5
5
6
7
PROBLEM SOLVING 5–2 DOCUCOLOR 12 PRINTER USER GUIDE
Page 83

1
Paper Jam Clearance
Paper may jam in several areas inside the printer:
• Behind the Left Door
• Behind the Right Door
• Behind the Front Door
• In the Duplex Path
• In the output area, that is, near the Output
Tray (or the Mailbox)
• Near the paper exit for Paper Tray 5
When a paper jam occurs, a message displays
in the message area of the Touch Screen with
the corrective actions to take, as illustrated in
Figure 3.
Occasionally, multiple paper jams occur or
multiple sheets of paper jam during an extended
print job. A paper jam message displays until all
paper jams in the printer have been cleared. The
Touch Screen displays the appropriate message
screen for the area of the printer which needs to
be checked until all jams are cleared.
3
Figure 3: A typical fault screen
4
5
5
6
7
DOCUCOLOR 12 PRINTER USER GUIDE 5–3 PROBLEM SOLVING
Page 84

KEY POINT: Gradually remove the jammed
paper so you do not rip it. If the jammed paper
rips,besuretoremoveallofthepieces.
The action required to clear a paper jam varies
with the location of the jam. Clearance procedures
for each of these areas are provided in the
sections that follow.
Occasionally, you may have to follow more than
2
one clearance procedure to clear the paper path
completely. If so, begin at the sides of the printer
and then clear the jam from the front.
Read the instructions and carefully follow the
steps in the order given. If you do not follow the
instructions sequentially, the printer may be
subject to more complex paper jams.
3
When the jam is cleared successfully and all
doors are closed, a message telling you to
continue or change the job displays on the Touch
Screen.
Preventing paper jams
4
To prevent paper jams:
• Ensure that the paper you use is not
damaged. Dispose of any damaged paper.
• Ensure that you position the paper guides
lightly against the paper.
If jams persist:
5
• Invert the paper stack in the appropriate paper
tray. Excessive curl of the paper sometimes
causes paper jams.
• Load freshly opened paper into the
appropriate paper tray. If the paper jams
cease, dispose of the paper that caused the
5
6
jams.
7
PROBLEM SOLVING 5–4 DOCUCOLOR 12 PRINTER USER GUIDE
Page 85

1
Paper jam behind the Left Door
NOTE: Paper that is partially out of the printer
may become more severely jammed if it is not
removed before you open the Paper Path Module.
Ensure that all paper is cleared from this area,
especially paper that is positioned between the
paper trays and t he Paper Path Module
Registration area.
1
2
Note the area of the jam behind the Left Door
displayed on the Touch Screen.
Perform one of the following:
• If a paper jam occurs from Paper Trays 1, 2, 3,
or 4, open the side panel in the Left Door and
carefully remove the jammed paper.
• If a paper jam occurs near Paper Tray 5, lift
the release lever on Paper Tray 5 and open
the panel.
3
4
Figure 4: Clearing a jam from the left side
5
3
Close all open panels.
Figure 5: Opening the Paper Tray 5 Panel
5
6
7
DOCUCOLOR 12 PRINTER USER GUIDE 5–5 PROBLEM SOLVING
Page 86

Paper jam behind the Right Door
1
2
2
Note the area of the jam behind the Right Door
displayed on the Touch Screen.
If there is a Mailbox, push down on the release
lever, and push the Mailbox away from the printer.
3
Figure 6: The printer Mailbox release lever
3
Open the Right Door.
4
5
4
5
5
6
6
Remove all paper that is visible in the area.
Close the Right Door.
If there is a Mailbox, push the Mailbox back into
place.
Figure 7: Opening the Right Door
7
PROBLEM SOLVING 5–6 DOCUCOLOR 12 PRINTER USER GUIDE
Page 87
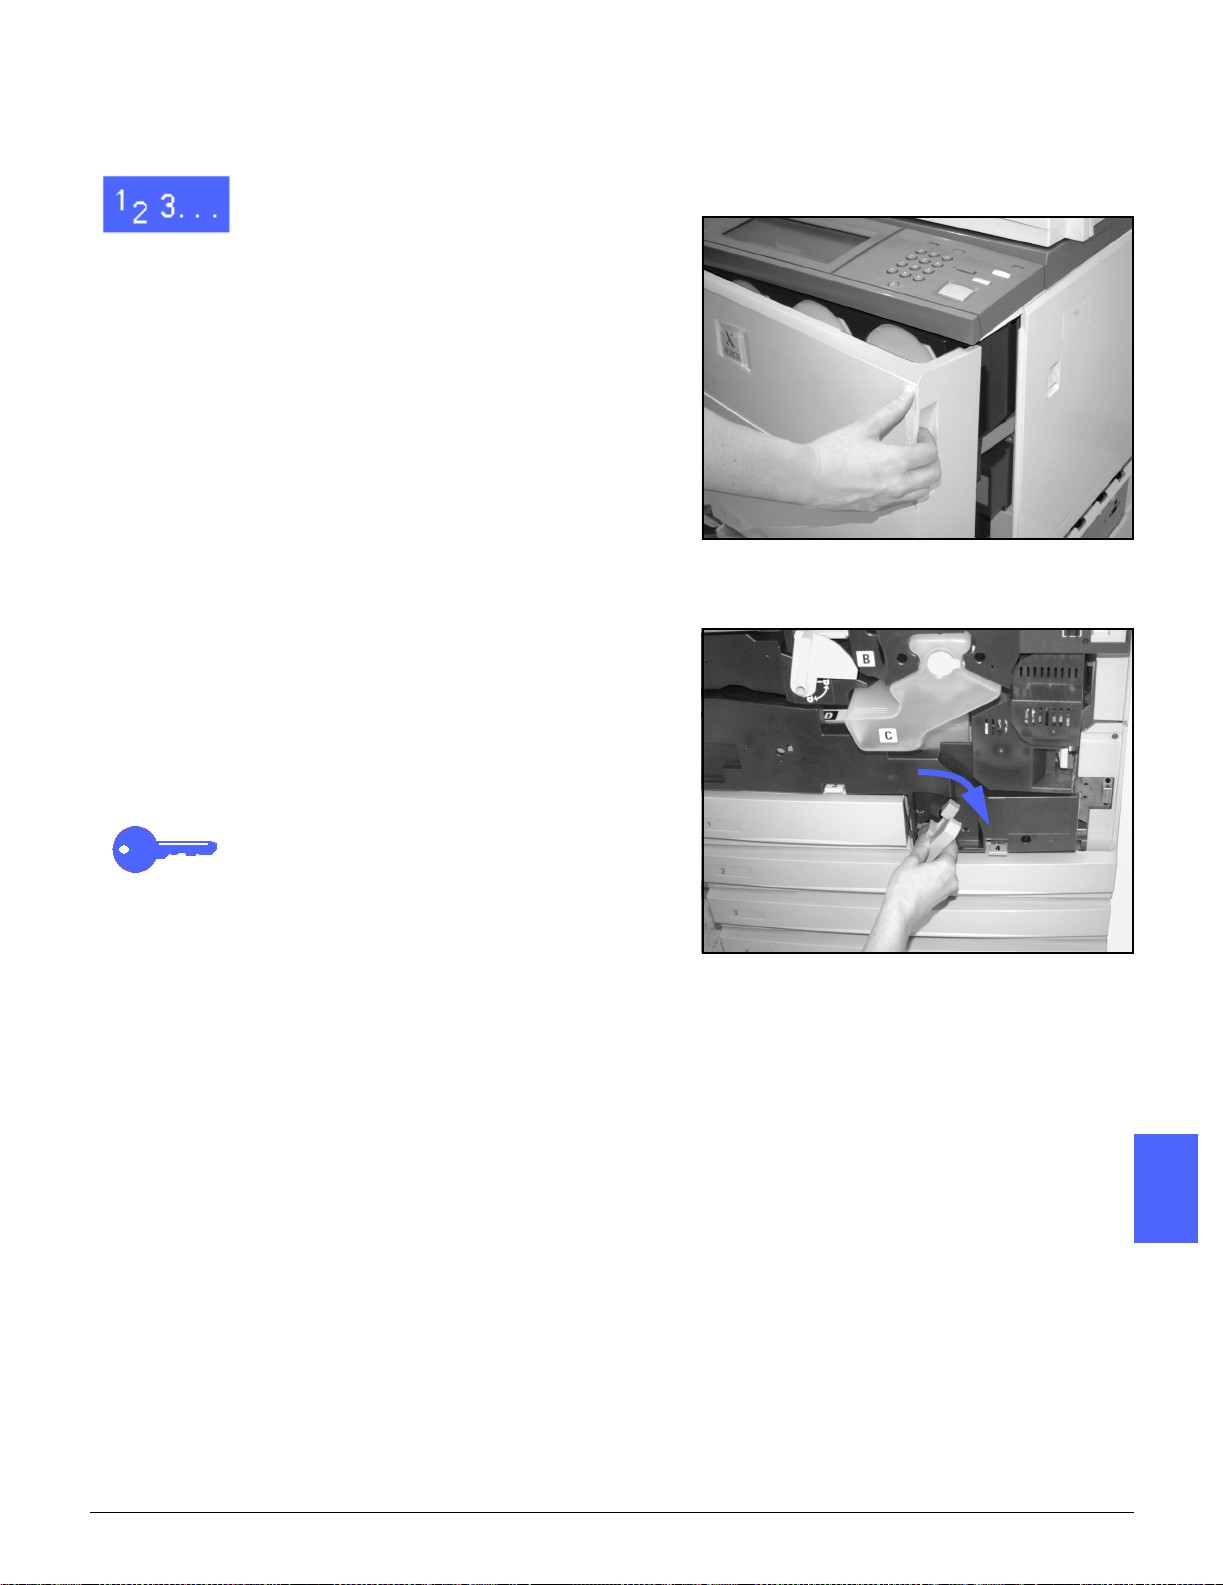
1
Paper jam behind the Front Door
1
2
3
When the Touch Screen displays a message
indicating a jam behind the Front Door, open the
Front Door.
Rotate the green handle clockwise, and pull out
the Paper Path Module until it is fully open.
Check the Touch Screen for a new message
indicating the area of the jam.
KEY POINT: Check and clear all jams in the
Paper Path Module before closing the module.
Figure 8: Opening the Front Door
3
4
Figure 9: Rotating the green handle
clockwise
DOCUCOLOR 12 PRINTER USER GUIDE 5–7 PROBLEM SOLVING
5
5
6
7
Page 88

4
In the Registration area, lift the baffle marked 1
and carefully remove the jammed paper. Press the
baffle gently back into place.
NOTE: If transparency jams occur in this area,
check Paper Tray 5 to ensure that the
transparencies are loaded with the white stripe
down, and as the leading edge.
2
Figure 10: Area 1 in the Registration area
3
4
5
WARNING:The Fuser Area is very hot. Be careful
when clearing a jam in this area.
WARNING:Fuser oil can irritate your eyes. Wash
your hands thoroughly with soap and water and
avoid touching your eyes if your fingers are contaminated with fuser oil.
In the Fuser Area, 2, carefully pull any paper in the
entry area to the left to free it.
5
Figure 11: Fuser Area 2
5
6
7
PROBLEM SOLVING 5–8 DOCUCOLOR 12 PRINTER USER GUIDE
Page 89

1
6
If the paper jam is in the Fuser Exit Area, locate
the Fuser Exit Area handle at the right of the
Paper Path Module. Move the handle to the right
and carefully remove the jammed paper. Gently
secure the handle back into place.
Figure 12: Fuser Exit area
7
8
9
In the Duplex Path, areas 3 and 4, press the
handles down gently to release the Aligner Baffle
(left handle) and Duplex In baffle (right handle).
Remove the jammed paper and secure the
handles back in place.
Firmly push in the Paper Path Module until it is in
place. Turn the green handle counterclockwise to
lock the module.
Area 3
3
4
Area 4
Figure 13: Duplex Path Areas
5
5
6
Figure 14: Rotating the green handle
counterclockwise
7
DOCUCOLOR 12 PRINTER USER GUIDE 5–9 PROBLEM SOLVING
Page 90

Paper jam inside a paper tray
Paper that is partially out of the paper tray when
the paper tray is opened can cause more complex
jams by tearing. The torn pieces may become
jammed in areas that you cannot reach.
2
1
2
3
3
4
4
5
5
Use the message that displays on the Touch
Screen to locate the paper jam.
Use the previous procedures to clear any paper
that is behind the Left or Right Door of the printer.
Slowly open the appropriate paper tray.
If you hear the sound of tearing or crumpling
paper, stop opening the paper tray.
Attempt to grasp and remove the paper that is
being damaged without opening the paper tray
farther.
If you cannot grasp the paper, carefully open the
paper tray farther and attempt to grasp the
damaged paper again.
Remove all of the damaged paper.
Readjust the paper stack in the paper tray to the
proper position. Ensure that the paper stack
height does not cover the MAX fill line on the
paper tray.
6
5
6
7
Adjust the edge guides so they are lightly touching
the paper.
Close the paper tray slowly to avoid shifting the
paper stack.
Figure 15: Clearing a Paper Jam
inside a Paper Tray
7
PROBLEM SOLVING 5–10 DOCUCOLOR 12 PRINTER USER GUIDE
Page 91

1
Paper jam inside Paper Tray 5
1
2
3
Use the message that displays on the Touch
Screen to locate the paper jam.
If necessary, grasp the center top handle and
raise the top of Paper Tray 5 toward the printer to
access the jam.
Remove all of the visible jammed paper, including
any partially fed sheets.
If you cannot grasp all of the jammed paper at the
entrance of Paper Tray 5, open the Front Door
and follow the procedure, “Paper jam behind the
Front Door.”
After you have cleared all of the paper jams, grasp
the center top handle and lower the top of Paper
Tray 5. Readjust the paper stack and the paper
guide in Paper Tray 5.
Center top handle
3
Figure 16: Grasping the top of Paper Tray 5
4
KEY POINT:
• Move the edge guide so it lightly touches the
paper stack. Adjust the edge guide each time
you load paper into Paper Tray 5.
• If Paper Tray 5 is not fully extended, paper
jams or misregistration may occur.
Figure 17: Lifting the top of Paper Tray 5
5
5
6
7
DOCUCOLOR 12 PRINTER USER GUIDE 5–11 PROBLEM SOLVING
Page 92
Resolving hardware problems
WARNING: When clearing the paper path in the
Fuser area (located in the Paper Path Module),
remember that the surfaces are hot. To avoid
injury, proceed with caution when clearing the
path.
2
Dry Ink Cartridge:
• Operator cannot reinsert a partially full dry
ink cartridge after it has been removed.
3
• Operator mistakenly removed the wrong dry
ink cartridge and wishes to reinsert it.
4
Problem Suggested Solution
Reinstall the dry ink cartridge using the following procedure:
NOTE: The following procedure may result
in dry ink spillage on the floor. To protect the
floor, put a disposable covering or drop cloth
beneath and in front of the printer.
• Reinstall the used and partially full dry ink
cartridge by pushing in the cartridge until it is
fully seated against the rear stop. Rotate the
cartridge in the direction indicated on the label
located on the printer. For more information,
refer to the System Administration Guide,
Replacing the Dry Ink (Toner) Cartridge.
• Inform the Xerox service representative at
the next service call about the above action
since he or she may need to clean up the dry
ink on internal printer components.
Electrical power to the printer appears to be
5
5
6
off even though the Main Power Switch is
on, and the power outlet to the printer is
operational.
The printer is equipped with an additional
safety feature to provide protection in the
event of an incorrectly wired electrical supply
to the printer. This device, a Ground Fault
Protector (GFP), cuts off all power to the
printer if an electrical fault is detected. If
there appears to be no power to the printer,
determine if the switch on the GFP has been
tripped. The GFP is located on the lower rear
panel of the printer. If the switch is in the off
position (down), the GFP has been activated. Flip the switch up and determine if
electrical power has been restored. If power
is restored, continue to operate the printer
normally. If the GFP reactivates, call your
representative. Refer to section 2, “Getting
to know your DocuColor 12 Printer,” for additional Power on/off information.
7
PROBLEM SOLVING 5–12 DOCUCOLOR 12 PRINTER USER GUIDE
Page 93

1
Resolving programming problems
Problem Suggested Solution
The Control Panel Touch Screen does not
respond to a touch command.
Printer features are not selectable. Certain features cannot be selected because
Press Clear All on the Control panel.
Touch a selectable button on the T ouch
Screen with one finger. A slight pressure is
required to cause the printer to react.
If the problem persists, open the Front Door
of the printer. Close the Front Door and
make a selection on the Touch Screen. If the
Touch Screen does not respond to any touch
commands, switch off the power. Wait 5 seconds. Then switch on the power.
of the previous selections. Generally, features or buttons you can select appear
selectable to indicate you can use them with
the previous selections. See your System
Administrator for more information about
buttons.
3
4
DOCUCOLOR 12 PRINTER USER GUIDE 5–13 PROBLEM SOLVING
5
5
6
7
Page 94

Resolving Processor problems
Problem Suggested Solution
Transparencies Use transparencies with a painted or removable white stripe. Load them with
stripe down, as the lead edge of the sheet in Paper Tray 5.
2
Transparencies are too
oily
11x17inch(A3)transparencies jam when exiting the printer to the
3
Output Tray
Multiple sheets feed from
the paper trays
4
Multiple sheets feed from
Paper Tray 5
Load the transparencies by following the instructions in Chapter 3.
Refer to the Recommended Materials List and the Color Materials Usage
Guide for more information about transparencies.
Remove each copy of 11 x 17 inch (A3) transparencies from the Output Tray
before subsequent prints exit the printer.
Do not fill the paper trays above the MAX fill line indicator. Tray 1 holds
approximately 500 sheets of 20 lb. (75 gsm) paper. Trays 2, 3, and 4 hold
approximately 550 sheets of 20 lb (75 gsm) paper.
Remove the paper from the tray and fan the sheets to separate the joined
sheets.
Predrilled sheets may stick together at the holes. Remove the paper from the
tray and fan the sheets to separate the joined sheets.
Paper and transparencies may stick together if environmental conditions are
too dry and cause excessive static. Increase the humidity level in the printer
room to minimize static.
Do not overload Paper Tray 5.
5
Gently fan transparencies to separate the sheets before you load them into
Paper Tray 5. If multiple sheet feeding continues, feed the transparencies one
at a time from Paper Tray 5.
Sheets will not feed from
the Paper Tray 5
5
6
Ensure that the height of the stack does not exceed the MAX fill line.
Check that the paper guide is not too tight. The paper guide should be
adjusted to be just snug against the paper stack.
7
PROBLEM SOLVING 5–14 DOCUCOLOR 12 PRINTER USER GUIDE
Page 95

1
Problem Suggested Solution
Paper jams when exiting
the Paper Trays
Outputjams when exiting
the printer to the Output
Catch Tray
Outputjams when exiting
the printer to the Offset
Catch Tray
Ensure that the edge guides of the paper tray fit snugly against the paper
stack.
Do not fill the paper trays above the MAX fill line indicator. Tray 1 holds
approximately 500 sheets of 20 lb. (75 gsm) paper. Trays 2, 3, and 4 hold
approximately 550 sheets of 20 lb. (75 gsm) paper.
Close the tray slowly to avoid shifting the paper stack.
Ensure the paper matches the type defined for the Paper Tray.
When no Mailbox is present, the Output Catch Tray can hold up to 250 sheets
of 20 lb (75 gsm) paper. Empty the catch tray when output approaches this
limit to ensure continuous production.
Ensure the first sheet is not blocking the paper exit, particularly for 1 1x 17
inch output.
Ensure the paper matches the type defined for the Paper Tray.
The Mailbox Offset Catch Tray has a capacity of 500 sheets of 20 lb (75 gsm)
paper. Remove the output when it approached this limit to ensure continuous
production.
3
4
11 x 17 inch output blocks
exit
Prints originating from
Paper Tray 5 are skewed.
Jams may be occurring.
Ensure the first sheet is not blocking the paper exit, particularly for 1 1x 17
inch output.
Ensure the first sheet of 11 x 17 inch output exits completely.
The paper guide on Paper Tray 5 may not be set correctly or may be too tight
against the paper stack. Ensure that the paper guide snugly touches the
paper stack.
5
5
6
7
DOCUCOLOR 12 PRINTER USER GUIDE 5–15 PROBLEM SOLVING
Page 96

Problem Suggested Solution
Excessive paper curl Paper curl may be a result of:
• The mass of dry ink (toner) coverageon the copy - the greater the toner
mass, the greater the paper curl.
• The paper weight.
2
• The humidityconditions at the printer.
You can sometimes minimize curl problems by flipping the paper over in the
tray and sending the prints again. If excessive curl is still present, use a
heavier paper.
Ensure the paper matches the type defined for the Paper Tray.
3
When no Mailbox is present, the Offset Catch Tray can hold up to 250 sheets
of 20 lb (75 gsm) paper. Empty the catch tray when output approaches this
limit to ensure continuous production.
The Mailbox Offset Catch Tray has a capacity of 500 sheets of 20 lb (75 gsm)
paper. Remove the output when it approached this limit to ensure continuous
production.
4
Printing high density background areas or documents with alternating high
and low density areas results in more curl. Attempt to reduce the amount of
curl by adjusting the image in the DFE quality controls to reduce the amount
of dry ink on the prints.
Place the printer and paper in a room with air conditioning and low humidity to
minimize the moisture in the environment.
5
Attempt to print on thicker paper or on paper stock that is less sensitive to
moisture.
Load Paper in Tray 6
message is displayed.
5
6
Check that paper is loaded correctly and the paper size guide is properly set.
Ensure that paper is not loaded over the maximum fill line.
7
PROBLEM SOLVING 5–16 DOCUCOLOR 12 PRINTER USER GUIDE
Page 97

1
Resolving output quality problems
Problem Suggested Solution
Deletions on the print edges. Edge deletion on all sides of the print is nor-
mal, and is greatest on the lead edge of the
print.
Moisture may be present in the paper. Load
a fresh supply of paper into the trays.
Some deletions may be caused by small
pieces of paper remaining in the printer components after a paper jam has been cleared.
When clearing a paper jam, be sure to look
for and remove any paper fragments.
3
The image quality and the color have
degraded over a period of time.
It is difficult to perform secondary operations
on the prints, such as writing on them or
using adhesives.
The dry ink cartridge may need attention.
Contact your System Administrator for assistance.
This problem is caused by the oil used in the
fusing process. The problem can be reduced
or eliminated by setting the prints aside for
one or two hours before performing a secondary operation on them. Rubbing the print
surface with a soft, clean cloth or eraser may
also help.
4
5
5
6
7
DOCUCOLOR 12 PRINTER USER GUIDE 5–17 PROBLEM SOLVING
Page 98

2
3
4
5
5
6
7
PROBLEM SOLVING 5–18 DOCUCOLOR 12 PRINTER USER GUIDE
Page 99

1
6. Technical Information
Overview
The information in this section is provided for your
convenience and can be supplemented with
information provided by your Xerox sales or
service representative.
4
5
6
7
6
DOCUCOLOR 12 PRINTER USER GUIDE 6–1 TECHNICAL INFORMATION
Page 100

Specifications
Electrical Power Requirements (115 VAC - 60 Hz)
Specifications Single phase Two wire plus earth ground
2
3
Max. Power Consumption 1.584 kVA
Current Loads @ 115V Warm-up 11 Amps (1.265 kVA) (approx.)
Current service 15 Amps (Dedicated line recom-
mended but not required)
Line-to-Neutral 115 Volts (+
Frequency 60 Hz
Contact your Xerox Service
Representative for more information.
Stand-by Average 5.3 Amps (0.6 kV A) (approx.)
Average Run
Mode
(4-Color)
7.5 Amps (0.9 kVA ) (approx.)
10%)
4
5
6
6
7
TECHNICAL INFORMATION 6–2 DOCUCOLOR 12 PRINTER USER GUIDE
 Loading...