

Xerox D110, D136 with built-in controller, D136 with EFI Fiery Controller, D136 with FreeFlow Print Server, D125 User Manual
...Page 1

Version 3.0
September 2013
701P33220
Xerox® D110/D125/D136 Printer
User Guide
Page 2

©2013 Xerox Corporation. All rights reserved. Xerox® and Xerox and Design® are
trademarks of Xerox Corporation in the United States and/or other countries.
FreeFlow®, SquareFold®, and CentreWare® are trademarks of Xerox Corporation in the
United States and/or other countries. Product status, build status, and/or specifications
are subject to change without notice.
Microsoft, Windows, Windows XP, Windows Vista, Internet Explorer, and Word are
registered trademarks of Microsoft Corporation in the United States and/or other
countries.
PANTONE® is a registered trademark of Pantone, Inc. ScanFlowStore® is a registered
trademark of Nuance Communications, Inc.
Apple®, Macintosh®, Mac OS®, and EtherTalk™ are trademarks or registered trademarks
of Apple Computer, Inc., registered in the U.S. and other countries. Elements of Apple's
Technical User Documentation used by permission from Apple Computer, Inc.
Adobe, the Adobe logo, Acrobat, the Acrobat logo, Acrobat Reader, Distiller, Adobe PDF
logo, Adobe PDF JobReady, Illustrator, InDesign, and Photoshop are registered trademarks
of Adobe Systems, Inc. PostScript is an Adobe registered trademark used with the Adobe
PostScript Interpreter, the Adobe page description language, and other Adobe products.
This product is not endorsed or sponsored by Adobe Systems, publisher of Adobe
Photoshop.
Fiery® and PrintMe® are registered trademarks of Electronics For Imaging, Inc. GBC® and
AdvancedPunch™ are trademarks or registered trademarks of General Binding Corporation.
HP, HPGL, HPGL/2, and HP-UX are registered trademarks of Hewlett-Packard Corporation.
Netscape® is a registered trademark of Netscape Communications. UNIX® is a registered
trademark of the Open Group. Mozilla Firefox™ is a trademark of Mozilla Foundation.
BR780
Page 3

Table of Contents
1 Product Overview.......................................................................................1-1
Machine components.........................................................................................................1-1
User Interface (UI)..............................................................................................................1-2
Power Source..........................................................................................................................1-4
Power On....................................................................................................................1-4
Power Off...................................................................................................................1-5
Energy Saver..........................................................................................................................1-5
Exiting the Energy Saver Mode.........................................................................1-6
Print server overview...........................................................................................................1-6
Feeding and finishing devices.........................................................................................1-6
High Capacity Feeder (HCF/Trays 6 and 7), 8.5 x 11 in./A4..................1-7
Oversized High Capacity Feeder (OHCF), 1 or 2 trays (Trays
6/7).........................................................................................................................1-7
Interface Module (D110/D125 configurations).........................................1-8
Interface (Cooling) Module (D136 configuration)....................................1-8
GBC® AdvancedPunch™......................................................................................1-9
High Capacity Stacker........................................................................................1-10
Standard Finisher.................................................................................................1-10
Booklet Maker Finisher......................................................................................1-11
SquareFold Trimmer Module...........................................................................1-11
Standard Finisher Plus........................................................................................1-12
Third-Party Finishing Devices (D110/D125/D136
configurations)...............................................................................................1-12
2 Where to find help....................................................................................2-1
Customer documentation CD/DVD..............................................................................2-1
Print server customer documentation.........................................................................2-1
Help on the World Wide Web..........................................................................................2-1
3 Paper and other media...........................................................................3-1
Loading media in trays 1, 2, 3, and 4...........................................................................3-1
Loading paper in trays 1 and 2.........................................................................3-2
Loading paper in trays 3 and 4.........................................................................3-3
Loading tab stock in trays 3 and 4..................................................................3-4
Loading pre-drilled stock in trays 1, 2, 3, and 4..........................................3-4
Loading transparencies in trays 1-4................................................................3-5
Loading media in optional feeding devices..............................................................3-6
Loading post-process media in optional finishing devices..................................3-6
Loading tab stock with the GBC AdvancedPunch.....................................3-6
User Guide
iXerox® D110/D125/D136 Printer
Page 4

Table of Contents
4 Media Print - Text......................................................................................4-1
Overview..................................................................................................................................4-1
Supported file formats..........................................................................................4-1
Notes and Restrictions..........................................................................................4-2
Selecting media files...........................................................................................................4-2
Inserting USB Memory Device.......................................................................................4-3
Setting the Printing Options............................................................................................4-3
Media Print - Text printing options..................................................................4-3
Index Print.................................................................................................................4-4
5 Web Applications.......................................................................................5-1
Web Application Overview...............................................................................................5-1
Accessing Using Buttons Registered on the Services Home window..............5-1
6 Computer operations...............................................................................6-1
Network Printing...................................................................................................................6-1
Printing with the PS print drivers......................................................................6-1
Printing with the PCL print drivers....................................................................6-1
Network tab printing..........................................................................................................6-2
Network printing on tabs using the PS print drivers.................................6-2
Network printing on tabs using the PCL print drivers...............................6-3
7 Job Status.....................................................................................................7-1
Job Status overview.............................................................................................................7-1
Active Jobs..............................................................................................................................7-1
Completed Jobs....................................................................................................................7-2
Secure Print Jobs & More tab..........................................................................................7-2
Secure Print...............................................................................................................7-2
Sample Set................................................................................................................7-3
Delayed Print............................................................................................................7-3
Charge Print..............................................................................................................7-4
8 Machine Status..........................................................................................8-1
Machine Status.....................................................................................................................8-1
Machine Information tab.................................................................................................8-1
Faults tab.................................................................................................................................8-3
Supplies tab............................................................................................................................8-3
Billing Information tab......................................................................................................8-4
Accessing Billing Information............................................................................8-4
Billing meters/usage counters...........................................................................8-4
Usage Counters..........................................................................................8-4
User Account Billing Information.......................................................8-5
User Guideii
Page 5

Table of Contents
Tools tab..................................................................................................................................8-6
Changing the paper tray attributes................................................................8-6
9 Maintenance...............................................................................................9-1
Cleaning the machine .......................................................................................................9-1
Cleaning the exterior.............................................................................................9-2
Cleaning the document cover and glass.......................................................9-2
Cleaning the document feeder rollers............................................................9-5
Cleaning the Fuser Stripper Fingers................................................................9-6
Replacing consumable supplies......................................................................................9-8
Ordering supplies....................................................................................................9-8
Checking the status of CRUs..............................................................................9-9
Replacing the toner cartridge............................................................................9-9
Replacing the toner waste container...........................................................9-12
10 Problem solving.....................................................................................10-1
Paper jams............................................................................................................................10-1
Information about paper jams......................................................................10-1
Lower left cover jams..........................................................................................10-2
Paper jams in the Bypass (Tray 5).................................................................10-3
Envelope jams in the Bypass tray.....................................................10-4
Paper jams in Trays 1-4.....................................................................................10-5
Paper jams in transport unit 4........................................................................10-6
Paper jams in duplex module 3......................................................................10-7
Paper jams inside the main unit....................................................................10-9
Fault codes........................................................................................................................10-12
Machine troubleshooting............................................................................................10-24
Basic troubleshooting......................................................................................10-24
Image quality problems.................................................................................10-28
Image is not what was expected..................................................10-32
Print troubleshooting.......................................................................................10-33
Unable to print......................................................................................10-34
The printed result is not what was expected............................10-36
11 Specifications........................................................................................11-1
Print specifications............................................................................................................11-1
12 High Capacity Feeder (HCF/Trays 6 and 7), 8.5 x 11
in./A4..........................................................................................................12-1
Loading media into the HCF (Trays 6 and 7).........................................................12-2
Problem solving..................................................................................................................12-3
Paper jams in Trays 6/7 (HCF)........................................................................12-3
User Guide
iiiXerox® D110/D125/D136 Printer
Page 6

Table of Contents
Paper jams inside the HCF unit......................................................................12-4
Paper jams inside lower left cover...................................................12-5
Paper jams at lever 1a and knob 1c................................................12-6
Paper jams at lever 1b and knob 1c................................................12-8
Paper jams at lever 1d and knob 1c................................................12-9
Fault codes...........................................................................................................12-10
Trays 6/7 (HCF) specifications...................................................................................12-11
13 Oversized High Capacity Feeder (OHCF), 1 or 2 trays
(Trays 6/7)................................................................................................13-1
Postcard bracket.................................................................................................................13-2
Using the Postcard bracket..............................................................................13-2
Loading media in the 1 or 2-Tray OHCF..................................................................13-4
Loading paper in the OHCF (1 or 2 Trays).................................................13-4
Loading tabs in the OHCF (1 or 2 Trays)....................................................13-4
Loading transparencies in the OHCF (1 or 2 Trays)...............................13-5
Loading pre-drilled stock into the OHCF (1 or 2 Trays) for 1-sided
print jobs...........................................................................................................13-6
Loading pre-drilled stock into the OHCF (1 or 2 Trays) for 2-sided
print jobs...........................................................................................................13-7
Skew adjustment levers..................................................................................................13-8
OHCF problem solving.....................................................................................................13-9
Clearing OHCF jams............................................................................................13-9
Paper jams inside the OHCF trays.................................................13-10
OHCF paper jams at lever 1a and knob 1c................................13-10
OHCF paper jams at lever 1b and knob 1c................................13-11
OHCF paper jams at lever 1d and knob 1c................................13-12
OHCF fault codes...............................................................................................13-14
OHCF specifications.......................................................................................................13-22
14 Interface Module/Interface Cooling Module............................14-1
Module overview................................................................................................................14-3
Control panel.........................................................................................................14-3
Paper path..............................................................................................................14-4
Paper curl settings on the module..............................................................................14-4
Preset decurler settings.....................................................................................14-4
Manual decurler buttons...................................................................................14-4
Problem solving..................................................................................................................14-5
Clearing jams.........................................................................................................14-5
Paper jams at lever 1a..........................................................................14-5
Paper jams at lever 2a..........................................................................14-6
Paper jams at lever 2b..........................................................................14-8
User Guideiv
Page 7

Table of Contents
Fault codes..............................................................................................................14-9
15 High Capacity Stacker (HCS)...........................................................15-1
Overview................................................................................................................................15-1
Identifying the components...........................................................................15-2
Control panel.........................................................................................................15-3
HCS top tray...........................................................................................................15-3
Unloading the Stacker Tray...........................................................................................15-4
Problem solving..................................................................................................................15-5
General problems.................................................................................................15-5
Jam clearance........................................................................................................15-5
HCS entrance jams (E1, E2, and E3)...............................................15-5
HCS transport jams (E4, E5, and E6)...............................................15-6
HCS top tray jam (E7)...........................................................................15-7
HCS exit jam (E8)....................................................................................15-8
Hints and tips for using the HCS....................................................................15-9
Loss of power......................................................................................................15-10
Fault codes...........................................................................................................15-10
Specifications...................................................................................................................15-25
16 Standard/Booklet Maker Finisher..................................................16-1
Manual decurling feature on the finisher................................................................16-3
Folding feature...................................................................................................................16-4
Fold types................................................................................................................16-4
Loading paper/tabs in Tray 8/T1 (Post-Process Inserter)..................................16-6
Maintenance.......................................................................................................................16-7
Standard/Booklet Maker consumable supplies........................................16-7
Replace the standard staple cartridge........................................................16-7
Replace the booklet staple cartridge............................................................16-9
Replacing the Staple Waste Container on the finisher......................16-10
Empty the Punch Waste Container............................................................16-12
Finisher problem solving..............................................................................................16-13
Paper jams in Tray 8/T1 (Post-Process Inserter)...................................16-14
Paper jams at lever 1a and knob 1c..........................................................16-15
Paper jams at lever 1d.....................................................................................16-16
Paper jams at lever 1b.....................................................................................16-17
Paper jams at lever 3b and 3d.....................................................................16-18
Paper jams at lever 3e and knob 3c...........................................................16-19
Paper jams at lever 3g and knob 3f...........................................................16-20
Paper jams at lever 4b and knob 3a..........................................................16-21
Paper jams at lever 2a and knob 3a..........................................................16-22
User Guide
vXerox® D110/D125/D136 Printer
Page 8

Table of Contents
Paper jams at lever 2b and knob 2c..........................................................16-23
Paper jams at 2c, 2e, 2f, and 2d..................................................................16-24
Paper jams at 2d and lever 2g.....................................................................16-25
Paper jams at unit 4 and knob 4a..............................................................16-26
Paper jams at finisher top tray....................................................................16-27
Paper jams at finisher stacker tray.............................................................16-28
Paper jams at the optional booklet maker tray....................................16-29
Stapler faults.......................................................................................................16-30
Staple jams in the standard staple cartridge...........................16-30
Staple jams in the booklet maker cartridge..............................16-32
Reinserting the standard staple cartridge...............................................16-34
Fault codes...........................................................................................................16-36
Specifications...................................................................................................................16-47
Standard/Booklet Maker Finisher...............................................................16-47
Optional C/Z Folder..........................................................................................16-50
17 SquareFold Trimmer Module...........................................................17-1
Overview................................................................................................................................17-1
Identifying the components.........................................................................................17-2
Main components................................................................................................17-2
Paper path..............................................................................................................17-3
Control panel.........................................................................................................17-4
Square Fold feature..........................................................................................................17-4
Square fold options.............................................................................................17-5
Accessing the Square Fold options...............................................................17-6
Accessing the Square Fold options for network print
jobs.........................................................................................................17-6
Accessing the Square Fold options for copy jobs.......................17-7
Trimmer feature.................................................................................................................17-7
Trimmer options...................................................................................................17-7
Trim guidelines......................................................................................................17-9
Accessing the Trimmer options...................................................................17-10
Accessing the Trimmer options for network print
jobs......................................................................................................17-10
Accessing the Trimmer options for copy jobs...........................17-10
Hints and tips...................................................................................................................17-11
Printing full-page images on booklets......................................................17-11
Follow these tips................................................................................................17-12
Problem solving...............................................................................................................17-12
Jam clearance.....................................................................................................17-12
Clearing jams.........................................................................................17-13
User Guidevi
Page 9

Table of Contents
Clearing E1/E2 jams............................................................................17-13
Clearing E3 jams..................................................................................17-15
Fault codes...........................................................................................................17-16
Technical data..................................................................................................................17-26
Specifications......................................................................................................17-26
18 Standard Finisher Plus........................................................................18-1
Overview................................................................................................................................18-1
Finisher Module..................................................................................................................18-2
Finisher Module main components..............................................................18-2
Folding feature......................................................................................................18-3
Fold types...................................................................................................18-4
Loading paper/tabs in Tray 8/T1 (Post-Process Inserter).....................18-5
Finishing Transport...........................................................................................................18-6
Finishing Transport main components........................................................18-6
Finishing Transport status indicators...........................................................18-7
Standard Finisher Plus maintenance.........................................................................18-8
Standard Finisher Plus consumable supplies............................................18-8
Replace the standard staple cartridge........................................................18-8
Replacing the Staple Waste Container on the finisher......................18-10
Empty the Punch Waste Container............................................................18-12
Problem solving...............................................................................................................18-13
Paper jams in the Finisher Module.............................................................18-13
Paper jams in Tray 8/T1 (Post-Process Inserter)......................18-13
Paper jams inside the finisher left cover.....................................18-14
Paper jams inside the finisher right cover..................................18-17
Paper jams at the optional C/Z Folder.........................................18-22
Paper jams at the finisher output area.......................................18-29
Paper jams in the Finishing Transport......................................................18-30
Paper jams in area 1...........................................................................18-30
Paper jams in area 2...........................................................................18-32
Paper jams in area 3...........................................................................18-33
Paper jams in area 4...........................................................................18-34
Stapler faults.......................................................................................................18-35
Staple jams in the standard staple cartridge...........................18-35
Standard Finisher Plus fault codes.............................................................18-37
Finisher Module fault codes.............................................................18-37
Finishing Transport fault codes......................................................18-38
Third-party DFA fault codes.............................................................18-42
Specifications...................................................................................................................18-44
Finisher Module specifications....................................................................18-44
User Guide
viiXerox® D110/D125/D136 Printer
Page 10

Table of Contents
Optional C/Z Folder.............................................................................18-47
Finishing Transport specifications..............................................................18-47
User Guideviii
Page 11

Product Overview
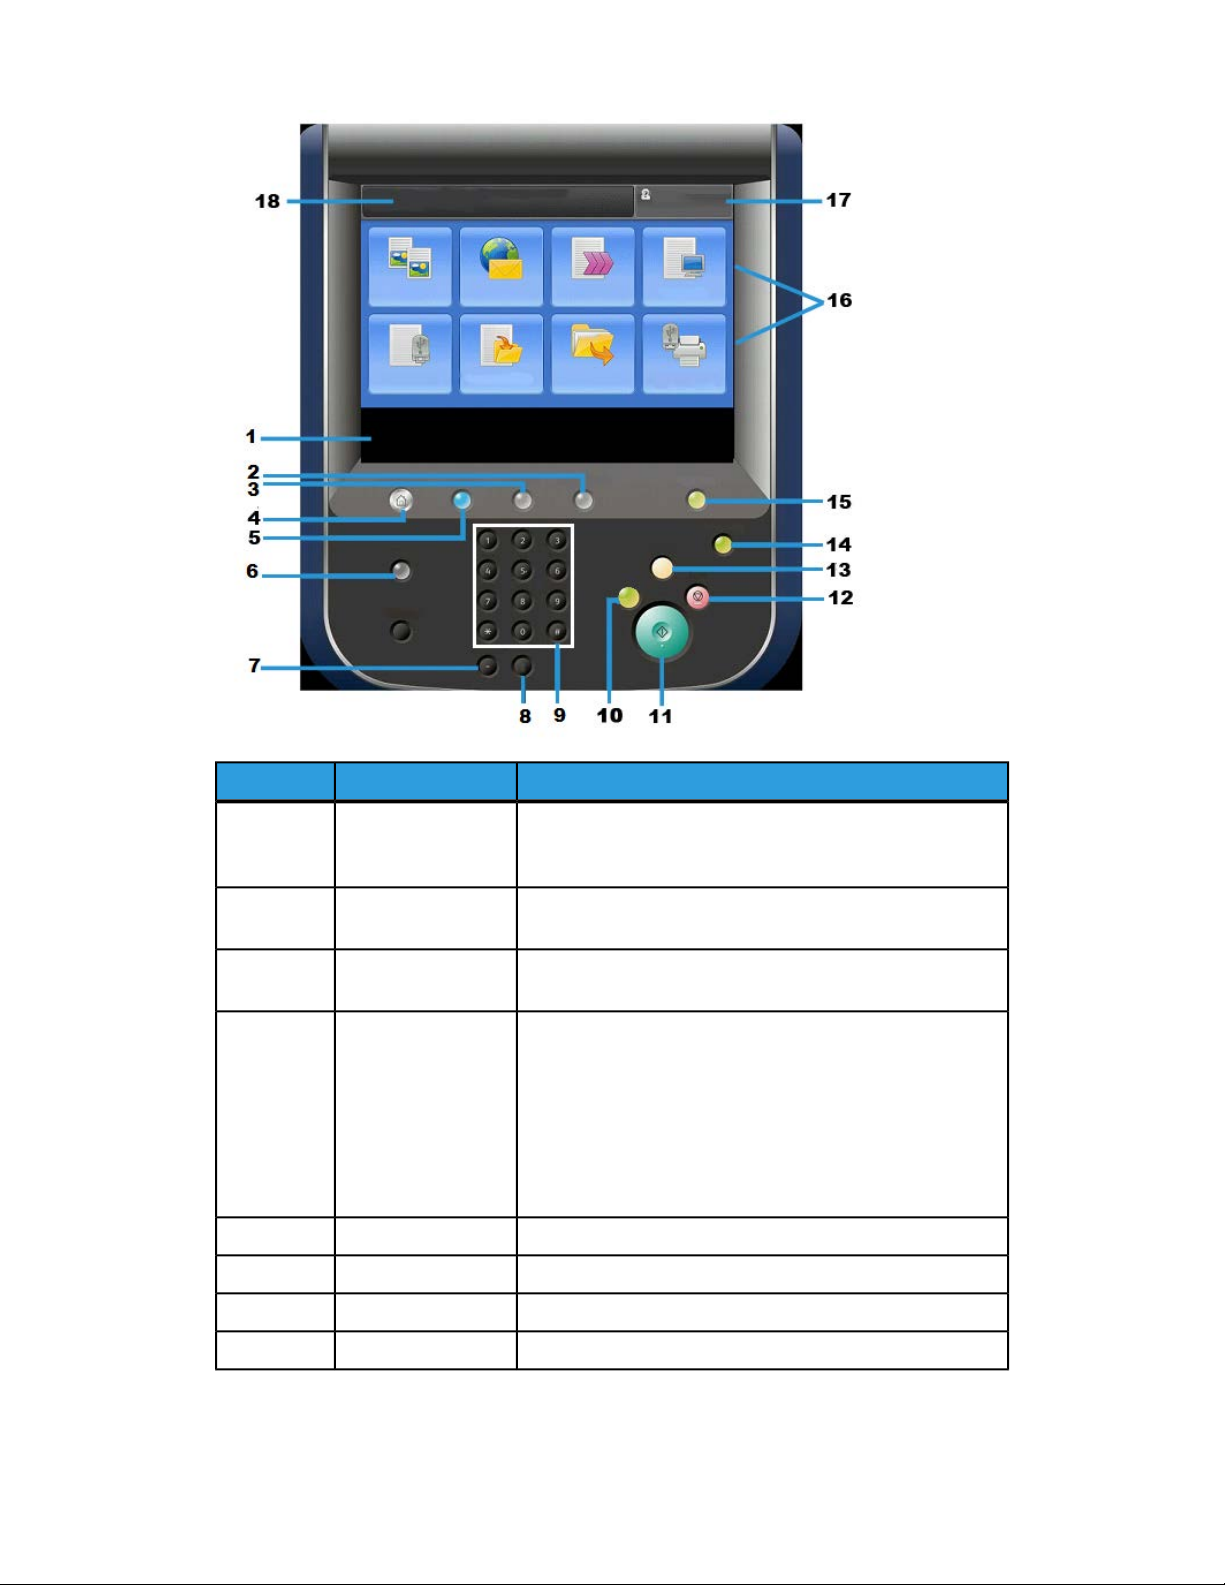
Machine components
1
1 Optional High Capacity Feeder (HCF/Trays 6 and 7)
This optional feeding device adds an additional 2,000 sheet capacity of letter-size (8.5
x 11 in.)/A4 media.
User Guide
1-1Xerox® D110/D125/D136 Printer
Page 12

Product Overview
2 Bypass tray (Tray 5)
The Bypass tray, also called Tray 5, accommodates all types of stock in various size
and weight ranges. The tray holds a maximum of 250 sheets of 20 lb./75 gsm bond
paper. This tray is often used to load nonstandard paper, such as heavy stock or other
special media, that cannot be loaded in trays 1-4.
3 User Interface (UI)
The User Interface (UI) consists of the control panel and the touch screen.
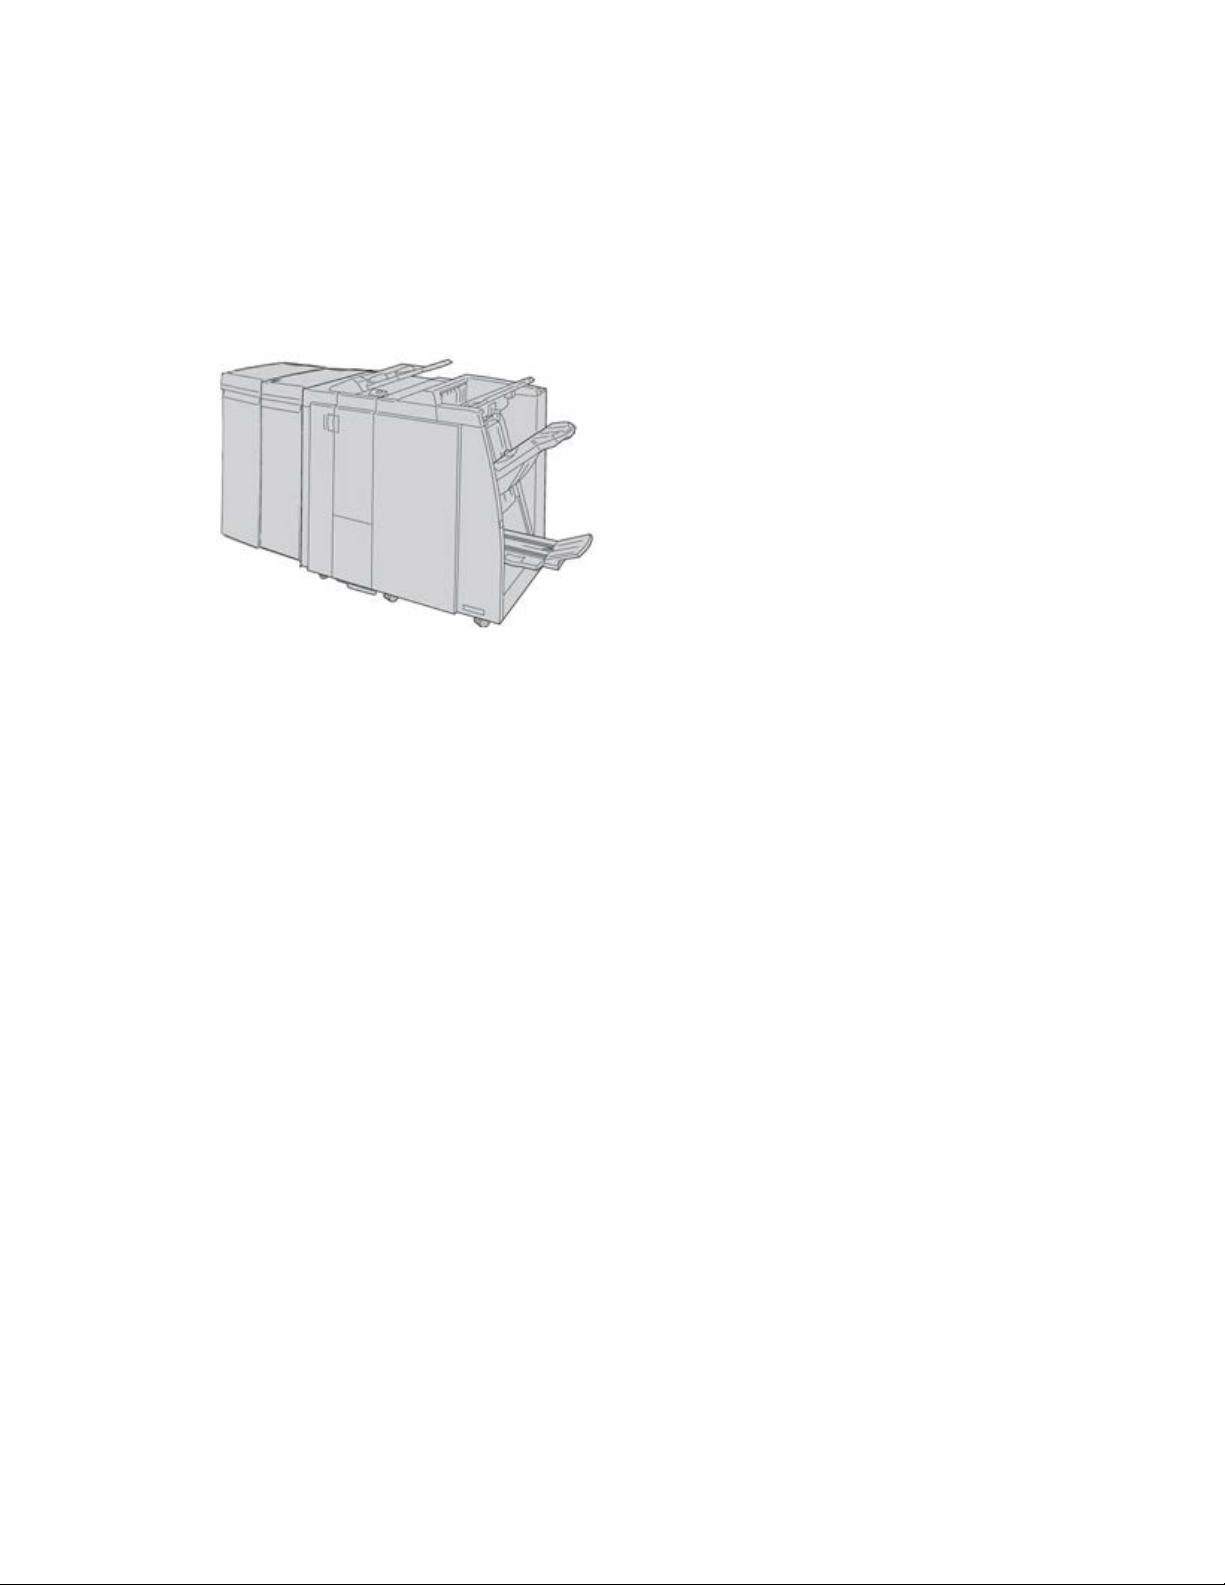
4 Optional Standard Finisher
This optional finishing device provides a wide range of finishing options including
stapling and folding.
5 Front cover
Open this cover to clear paper jams and to replace the toner waste container.
6 Left cover
Open this cover to replace the toner cartridge.
7 Trays 1-4
Contains the media used for copy or print output.
8 Lower left cover
Open this cover to access the inside of the machine to remove jammed paper.
9 Front cover on optional HCF
Open this cover to access the bottom left cover of the machine to remove jammed
paper.
User Interface (UI)
The User Interface is the main area where options are selected, procedures are completed,
and printer information can be viewed.
User Guide1-2
Page 13
Product Overview
FunctionComponentNumber
Touch Screen1
Displays messages required for operation and buttons for
features. You can directly touch the screen to instruct
operations and to set features.
Machine Status2
Use this button to check the machine status, meters, the
status of the consumables, and to print reports.
Job Status3
Use this button to check or cancel the current job, to check
or print stored jobs, or to check completed jobs.
Services Home4
Press this button to display the main window, which is called
Services Home. The Services Home window, by default, is
where the UI displays the available service buttons such
as Copy, E-Mail, Network Scanning, Store to Folder, and
Send from Folder. The system administrator can change
the Services Home window to display a specific feature
(such as Copy); refer to the System Administration Guide
for more information.
This button lights when the main power is on.Services5
Displays the Help SystemHelp6
Not usedDial Pause7
Clear the last entryC8
User Guide
1-3Xerox® D110/D125/D136 Printer
Page 14
Product Overview
FunctionComponentNumber
Used to enter alpha/numeric dataKey Pad9
Interrupt button10
Start11
Clear All13
Energy Saver button14
Log In/Log Out15
Use this button to suspend a copy or print job in progress
and have the machine stop to process another job. During
the Interrupt mode, the Interrupt button lights. Pressing
the Interrupt button again exits the Interrupt mode and
resumes the suspended job.
Use this button to perform certain functions, such as
scanning a document.
Use this button to pause the current job or communication.Stop12
Select this button to return all selections to the default
values. The machine returns to the same state as when it
is powered on.
When the machine is not being used for a while, it enters
the Energy Saver mode to reduce power consumption.
When the Energy Saver mode is active, the Energy Saver
button lights. Press this button to exit the Energy Saver
mode.
This button lights when a user is logged in through the
System Administration mode, the Authentication mode,
or the Accounting mode. Press this button to display the
User ID entry screen for entering the System Administration
mode, the Authentication mode, or the Accounting mode.
Also press this button to exit these modes.
Services buttons16
Login field17
Use these options to enter the various service windows to
make feature selections. This is where you will find the
Copy, Network Scanning, and Store to USB options among
others.
This area displays the currently logged in user. Select this
option to login as the System Administration,
Authentication, or Accounting modes.
This area displays messages to the user.Message field18
Power Source
The machine is provided with the power switch and the main power switch.
Power On
After turning the power on, the machine takes approximately 3 minutes to warm up
before you can start making copies.
User Guide1-4
Page 15
Product Overview
1. Open the cover.
2. Press the power switch to the On position.
The Please wait... message indicates that the machine is warming up. The machine
cannot be used while it is warming up.
Power Off
Before switching the power off, ensure all job processing, copy and printing is completed
and ensure that the Data indicator is not lit up.
1. Press the power switch on top of the printer to the upright position (I). This will power
off the printer.
2. To continue to power off the Main Power, ensure that the touch screen is blank and
the Energy Saver button is not lit up.
3. Open the front cover.
4. Press the main power switch to the zero [0] position to switch the main power off.
The Main Power indicator on the control panel will turn off.
5. Close the front cover.
Energy Saver
Note
The terms Power Saver and Energy Saver are used synonymously.
The Energy Saver feature has two modes:
• Low Power: After remaining inactive for a preset time period, the machine enters the
Low Power mode.
• Sleep Mode: After entering Low Power and remaining inactive for another preset
time period, the machine enters the Sleep mode.
1-5Xerox® D110/D125/D136 Printer
User Guide
Page 16

Product Overview
Here are two examples:
• If the Low Power Mode is set to 15 minutes and the Sleep Mode is set to 60 minutes,
the Sleep Mode activates after 60 minutes of total inactivity and not 60 minutes
after the Low Power Mode begins.
• If the Low Power Mode is set to 15 minutes and the Sleep mode is set to 20 minutes,
the Sleep Mode activates 5 minutes after the Low Power Mode begins.
When logged on as administrator, the time periods for both Low Power and Sleep Mode
may be set from Tools > System Settings > Common Service Settings > Energy
Saver Settings.
Exiting the Energy Saver Mode
1. Press Energy Saver, or
2. Send a print job to the machine.
Print server overview
One of the following print servers may be available and used with your machine:
• Xerox®FreeFlow® Print Server
• Xerox® EX Print Server, Powered by Fiery
Note
For detailed information on your specific print server, refer to the customer
documentation that was delivered with it.
®
Feeding and finishing devices
Available with your machine is a variety of optional feeding and finishing devices. These
devices are briefly discussed on the following pages along with where to find specific
information on each device.
User Guide1-6
Page 17
Product Overview
High Capacity Feeder (HCF/Trays 6 and 7), 8.5 x 11 in./A4
The two-tray High Capacity Feeder (HCF/Trays 6 and 7) provides an extra 4,000 sheet
capacity of either 8.5 x 11 in. or A4 paper. Each tray holds 2000 sheets (from 16 lb. Bond
to 80 lb. Cover/52 gsm to 216 gsm).
Oversized High Capacity Feeder (OHCF), 1 or 2 trays (Trays 6/7)
The Oversized High Capacity Feeder (OHCF) is available in a 1-tray or 2-tray option. The
OHCF feeds a variety of stock sizes, including standard and oversized stock up to 13 x
19.2 in./330.2 x 488 mm. Each tray holds 2,000 sheets.
User Guide
1-7Xerox® D110/D125/D136 Printer
Page 18

Product Overview
Note
The 1-Tray OHCF is not available with D136 configurations.
Interface Module (D110/D125 configurations)
The Interface Module is required with many finishing devices. It enables communication
and provides a paper path between the print engine and any attached finishing device
or devices.
Note
The Interface Module is not available with the D95 Copier/Printer configuration.
Interface (Cooling) Module (D136 configuration)
The Interface Cooling Module is required for all D136 configurations. It is similar in
function to the Interface Module (for D110/D125 configurations), but it also aids in
cooling the outgoing printed media through the use of additional fans and associated
duct work.
User Guide1-8
Page 19
Product Overview
GBC® AdvancedPunch™
The GBC AdvancedPunch may be attached to a variety of optional finishing accessories.
The GBC AdvancedPunch provides another level of finishing options to your output by
allowing you to punch holes in 8.5 x 11 in./A4 documents, which support a variety of
binding styles. Punch types include 19-hole to a maximum of 32-hole for 8.5 x 11 in.
media. A4 media supports punch types 21-hole to a maximum of 47-hole.
Note
The GBC AdvancedPunch is shown here with either the required Interface Module or
the Interface Cooling Module (depends on your machine configuration); it is also shown
with the optional Booklet Maker Finisher and the optional C/Z Folder.
Important
The D110/D125 configurations require the Interface Module, while the D136
configuration requires the Interface Cooling Module.The Interface Module is not available
with the D95 Copier/Printer configuration.
Information on this device can be found on the customer documentation CD that came
with the accessory, or documentation can be downloaded from www.xerox.com. From
the website, enter the machine product name in the Search field and select the User
Documentation link.
User Guide
1-9Xerox® D110/D125/D136 Printer
Page 20
Product Overview
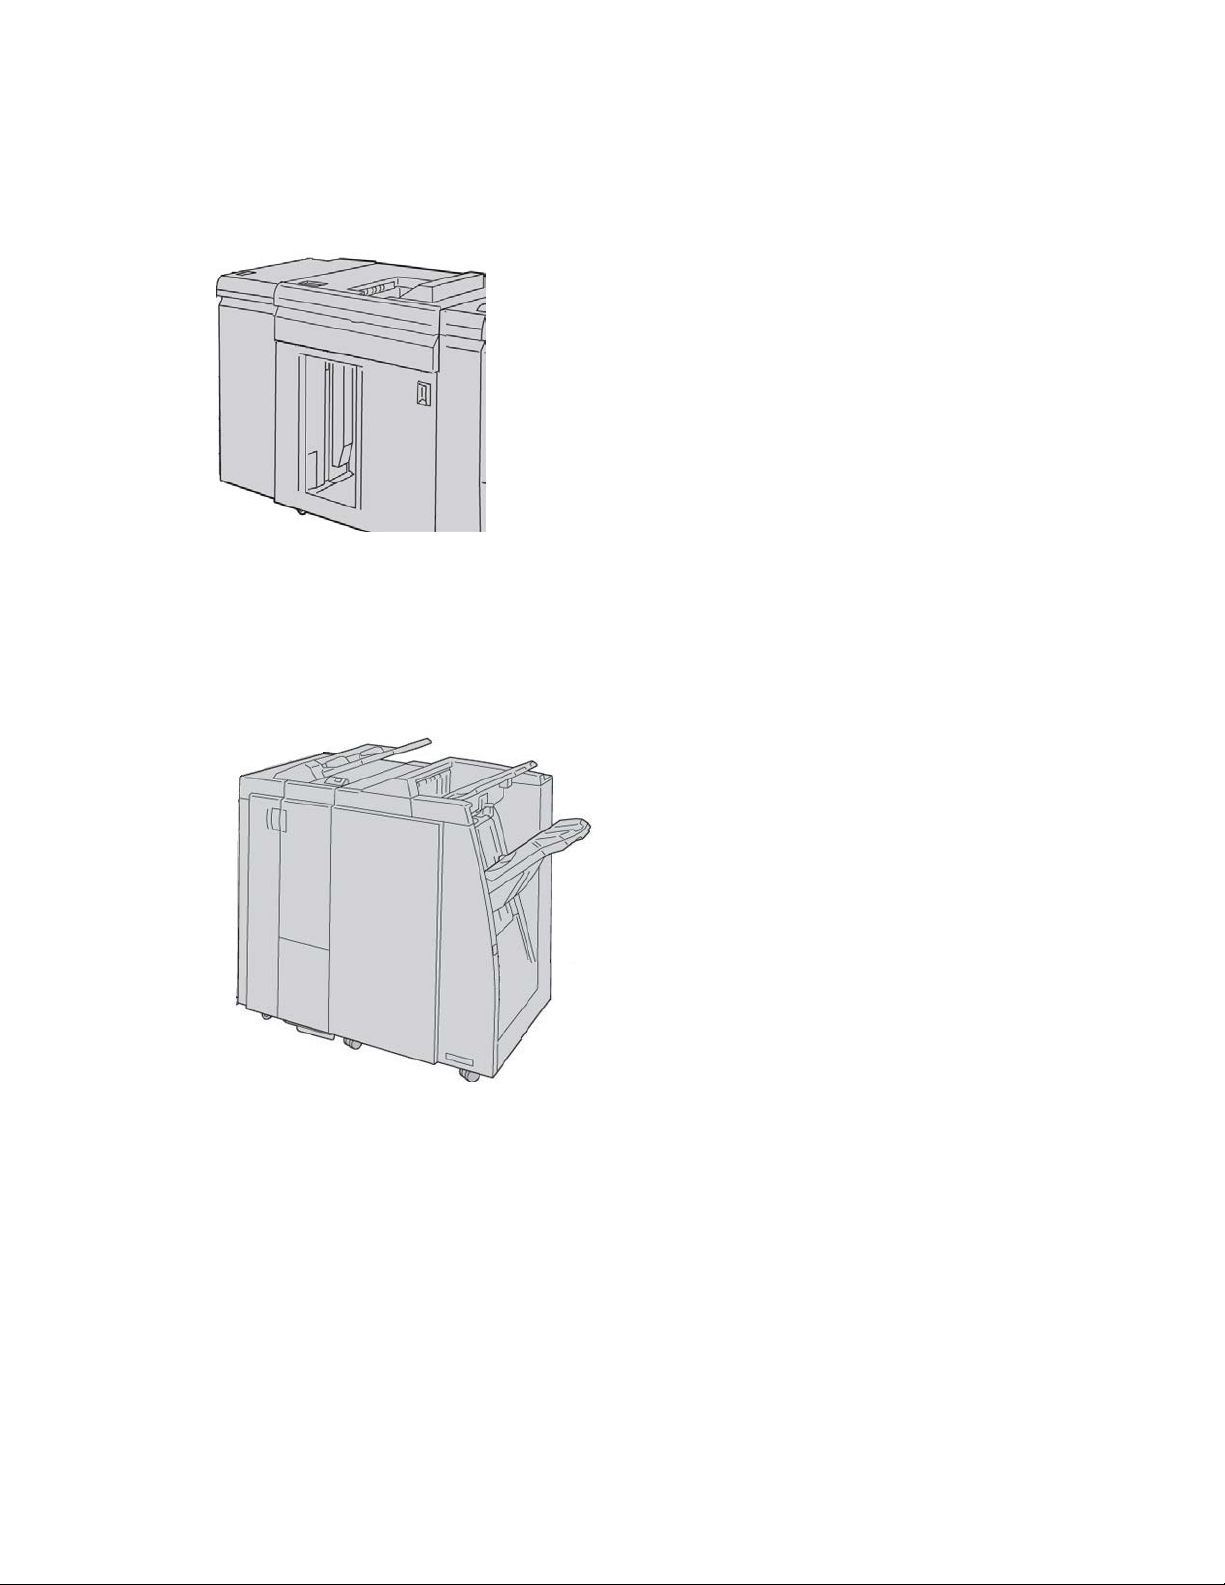
High Capacity Stacker
The High Capacity Stacker (HCS) is an optional finishing device that provides stacking
and offsetting capabilities for output to a Stacker Tray.
Note
The Interface Module is not available with the D95 Copier/Printer configuration.
Standard Finisher
This finisher provides a wide range of finishing/folding options.
Note
If attached to a D136 configuration, the Standard Finisher requires the Interface Cooling
Module.
User Guide1-10
Page 21
Product Overview
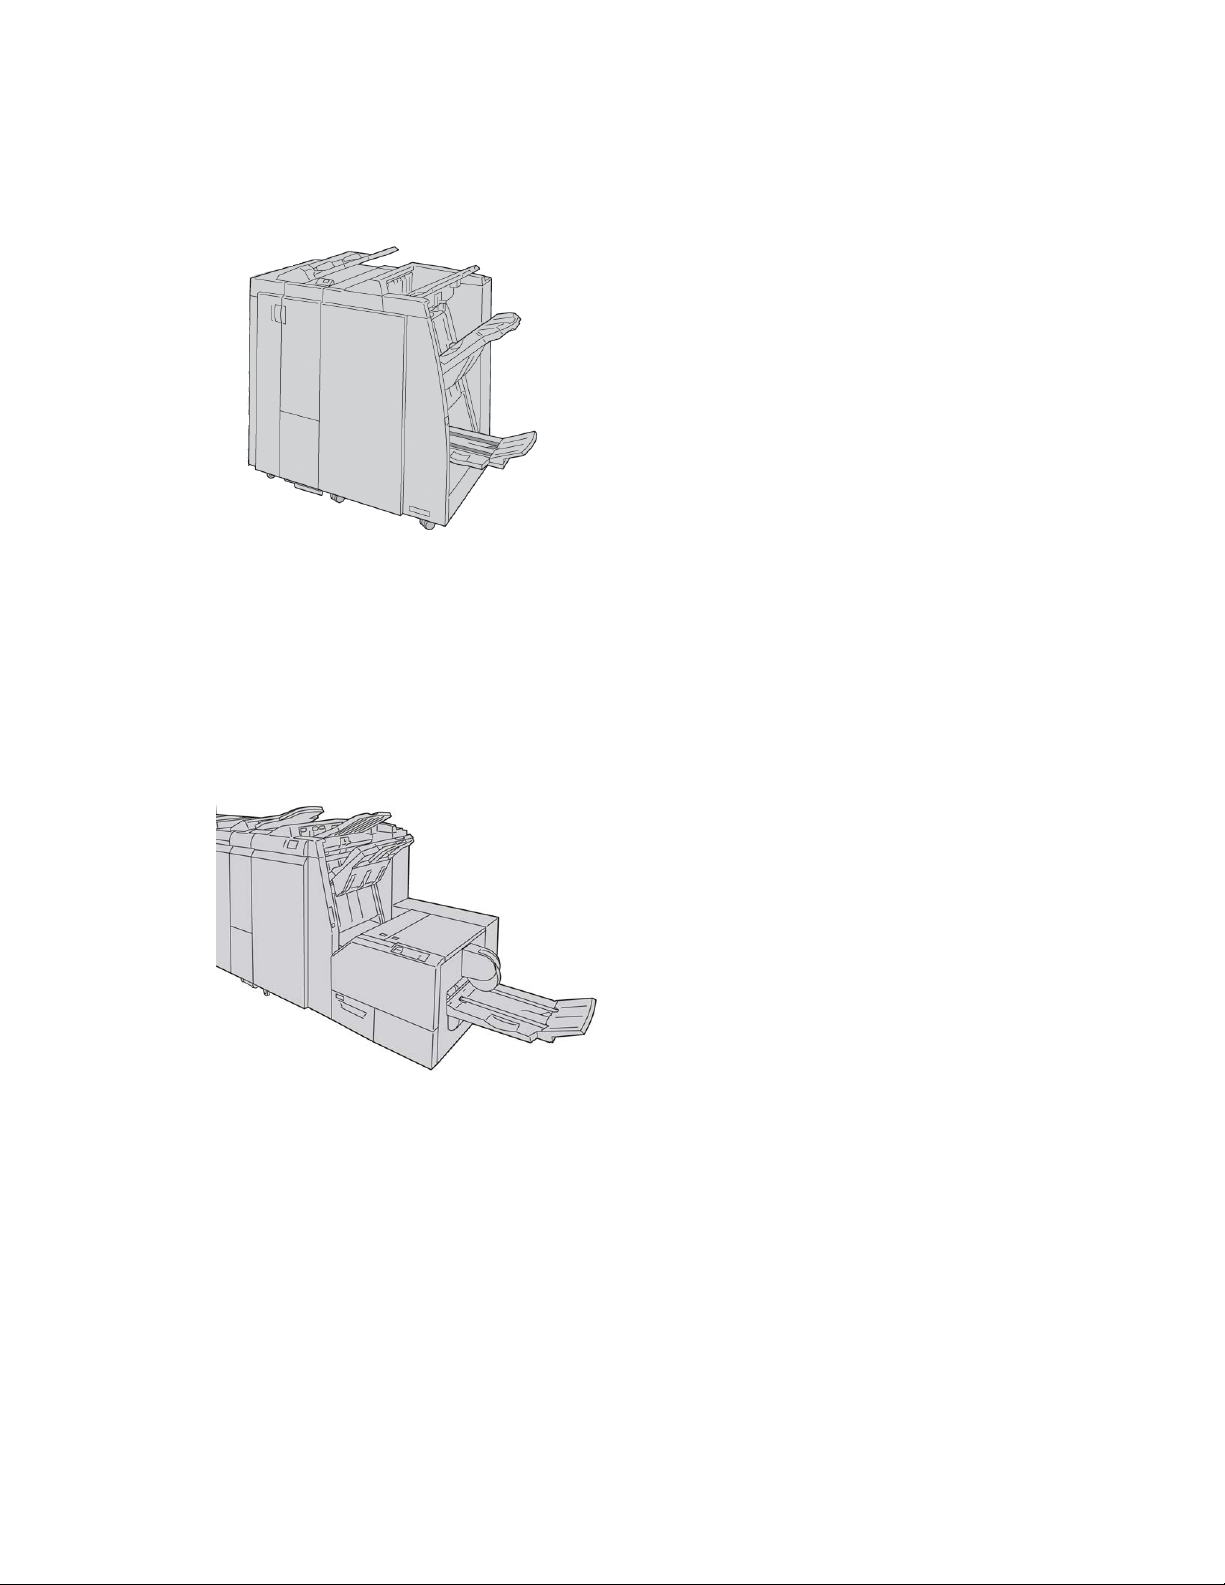
Booklet Maker Finisher
This finisher provides a wide range of finishing/folding options.
Note
If attached to a D136 configuration, the Booklet Maker Finisher requires the Interface
Cooling Module.
SquareFold Trimmer Module
The SquareFold Trimmer Module is an optional finishing device that is used in conjunction
with a finishing device that contains a booklet maker.
User Guide
1-11Xerox® D110/D125/D136 Printer
Page 22
Product Overview
Standard Finisher Plus
The Standard Finisher Plus serves as an interface to transfer paper between the print
engine and any third-party, Document Finishing Architecture (DFA) device attached to
the machine.
Note
The Standard Finisher Plus requires the either the Interface Module (for D110/D125
configurations) or the Interface Cooling Module (for D136 configurations). The Standard
Finisher Plus is not available with the D95 Copier/Printer configuration.
Third-Party Finishing Devices (D110/D125/D136 configurations)
Additional third-party, Document Finishing Architecture (DFA) devices are also available
for your machine. Information on these DFA devices can be obtained by contacting your
Xerox sales representative.
Note
All third-party, DFA devices require the Interface Module (for D110/D125 configurations)
or the Interface Cooling Module (for D136 configurations), and they also require the
Standard Finisher Plus. DFA devices are not available with the D95 Copier/Printer
configuration.
User Guide1-12
Page 23

2
Where to find help
Customer documentation CD/DVD
We recommend that you print all customer documentation and keep it close to the
machine.
You can locate the customer documentation on your Customer Documentation CD/DVD.
Your customer documentation CD/DVD was shipped with the machine.
Print server customer documentation
Supporting customer documentation for your print server is on a CD/DVD and is shipped
with the print server. You or your System Administrator should print these documents,
after the installation is complete.
Help on the World Wide Web
Xerox on the World Wide Web: For system support, user help, customer documentation,
and service support, go to www.xerox.com and click the Contact Us link for specific
contact information/telephone numbers in your area.
Note
You can get the latest customer documentation updates for your product by going to
www.xerox.com. Be sure to periodically check this website for the latest information on
your product.
User Guide
2-1Xerox® D110/D125/D136 Printer
Page 24

Where to find help
It may be helpful to know your machine serial number before calling for support. The
machine serial number is shown on the Machine Information tab: Machine Status >
Machine Information.
User Guide2-2
Page 25

3
Paper and other media
Loading media in trays 1, 2, 3, and 4
The following information is applicable for Trays 1-4:
Trays 1 and 2
• Trays 1 and 2 are identical
• Only 8.5 x 11 in./A4 media may be loaded into Trays 1 and 2
• Both trays accommodate media weights from 16 lb bond to 80 lb cover (52 gsm to
216 gsm)
• Tray 1 has a capacity of 1,100 sheets
• Tray 2 has a capacity of 1,600 sheets
• Media must be loaded into the trays in the long edge feed (LEF) direction
Trays 3 and 4
• Trays 3 and 4 are size-adjustable
• Both trays accommodate media sizes starting at 5.5 x 7.2 in./140 mm x 182 mm
(A5) to a maximum of 13.0 x 19.2 in./330 mm x 488 mm (SRA3)
• Both trays accommodate media weights from 16 lb bond to 80 lb cover (52 gsm to
216 gsm)
• Each tray has a capacity of 550 sheets
• Media may be loaded in either the long edge feed (LEF)/portrait or short edge feed
(SEF)/landscape direction
3-1Xerox® D110/D125/D136 Printer
User Guide
Page 26
Paper and other media
Loading paper in trays 1 and 2
Note
A paper jam may occur if a tray is opened while it is being used to feed stock.
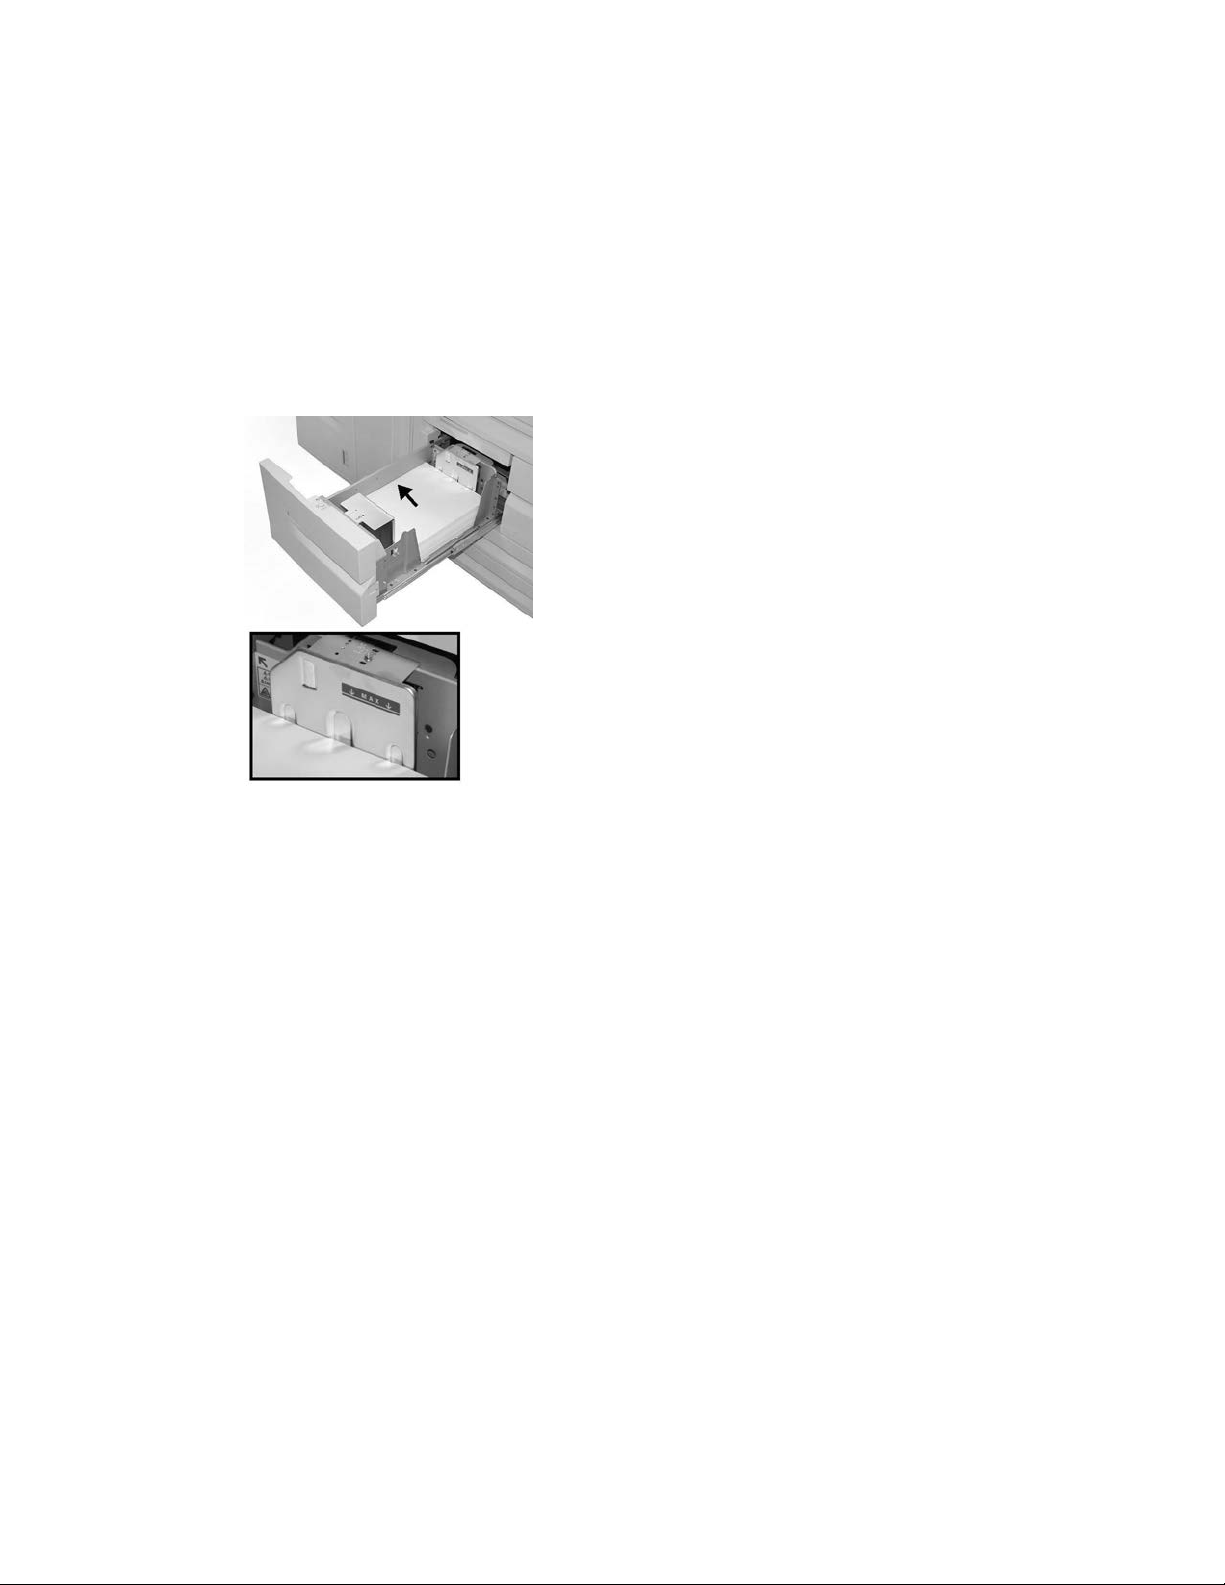
1. Select the appropriate paper stock for your print job.
2. Pull out the tray slowly until it stops.
3. Open the ream of paper with the seam side facing up.
4. Fan the sheets before loading them into the tray.
5. Load and align the edge of the paper against the LEFT edge of the tray.
Paper must be loaded in the Long Edge Feed (LEF)/portrait direction.
6. Gently push in the tray until it comes to a stop.
If enabled by your System Administrator, the Paper Tray settings screen may be
displayed on the UI.
7. If changes have been made to the paper tray, select the Change Settings button;
otherwise, proceed to the next step.
a) Make the desired selections for Paper Type/Paper Weight, Paper Size, and Paper
Color.
b) If necessary, make the desired changes to paper curl and alignment adjustment.
Note
Refer to the System Administration Guide for detailed information on the paper
curl and alignment adjustment options.
c) Select Save until you are returned to the tray settings window.
8. Select Confirm to close the window.
User Guide3-2
Page 27
Paper and other media
Loading paper in trays 3 and 4
Note
A paper jam may occur if a tray is opened while it is being used to feed stock.
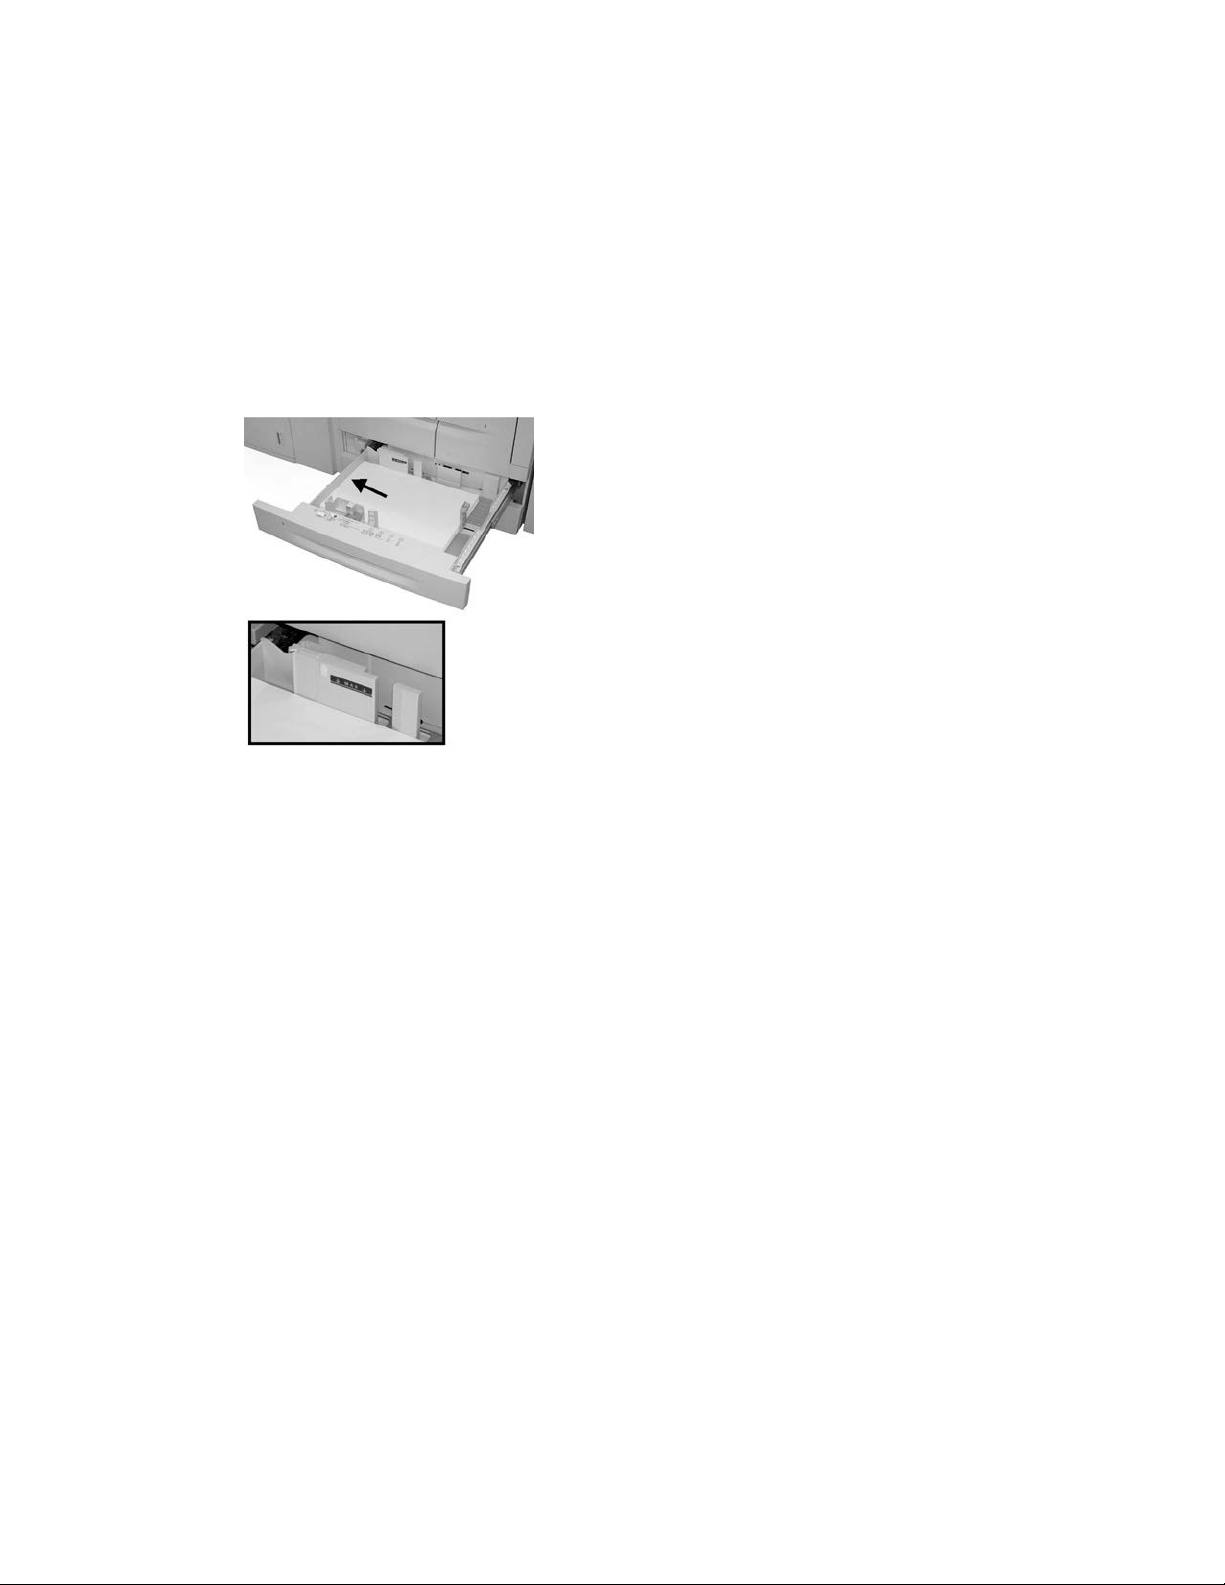
1. Select the appropriate paper stock for your print job.
2. Pull out the tray slowly until it stops.
3. Open the ream of paper with the seam side facing up.
4. Fan the sheets before loading them into the tray.
5. Load and align the edge of the paper against the LEFT edge of the tray.
Paper can be loaded either in the Long Edge Feed (LEF)/portrait or Short Edge Feed
(SEF)/landscape direction.
6. Adjust the paper guides by pressing in the guide release and carefully moving the
Edge Guide until it lightly touches the edge of the material in the tray.
Do not load materials above the MAX line located on the rear Edge Guide.
7. Gently push in the tray until it comes to a stop.
If enabled by your System Administrator, the Paper Tray settings screen may be
displayed on the UI.
8. If changes have been made to the paper tray, select the Change Settings button;
otherwise, proceed to the next step.
a) Make the desired selections for Paper Type/Paper Weight, Paper Size, and Paper
Color.
b) If necessary, make the desired changes to paper curl and alignment adjustment.
Note
Refer to the System Administration Guide for detailed information on the paper
curl and alignment adjustment options.
c) Select Save until you are returned to the tray settings window.
9. Select Confirm to close the window.
User Guide
3-3Xerox® D110/D125/D136 Printer
Page 28
Paper and other media
Loading tab stock in trays 3 and 4
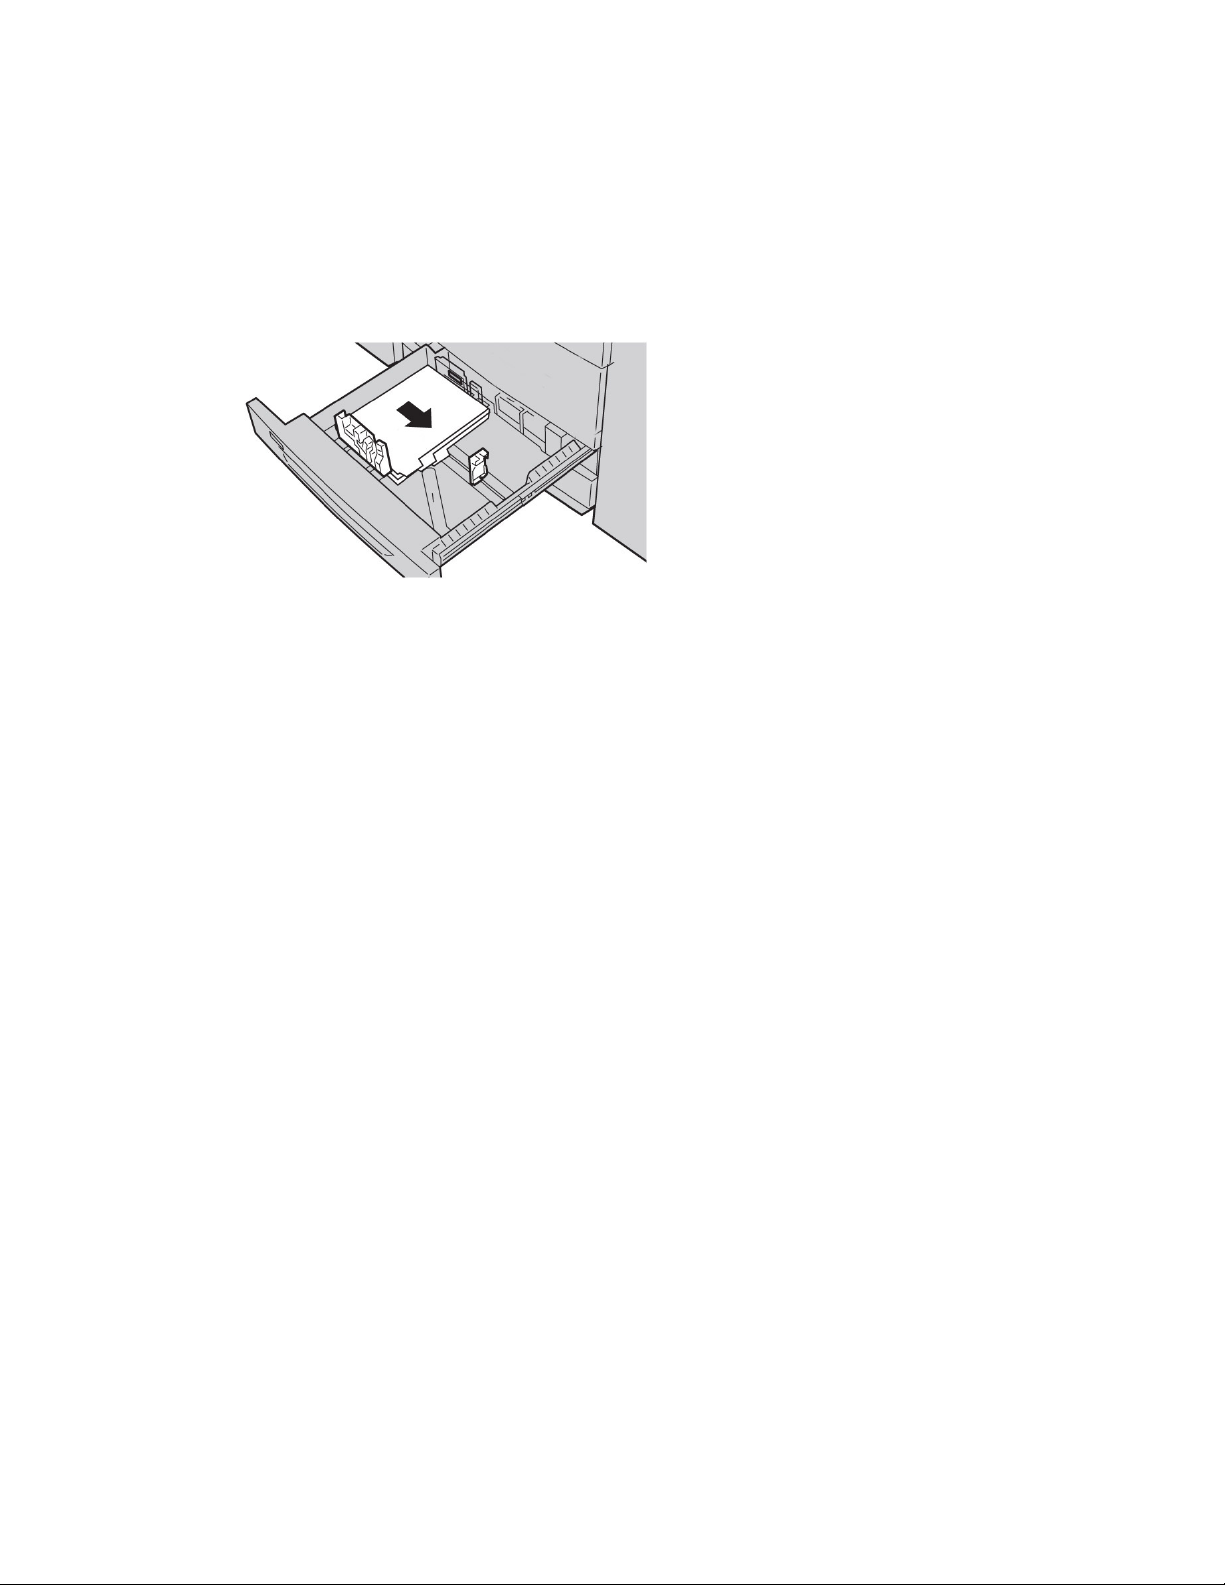
1. Select the appropriate paper stock for your print job.
2. Pull out the tray slowly until it stops.
3. Fan the tab paper before loading into the tray.
4. Load and align the edge of the tab paper against the RIGHT edge of the tray with
the side to be copied or printed on facing down.
Note
Tab stock can be loaded either long edge or short edge feed (portrait or landscape).
5. Adjust the paper guides by pressing in the guide release and carefully moving the
Edge Guide until it lightly touches the edge of the material in the tray.
Do not load materials above the MAX line located on the rear Edge Guide.
6. Gently push in the tray until it comes to a stop.
If enabled by your System Administrator, the Paper Tray settings screen may be
displayed on the UI.
7. If changes have been made to the paper tray, select the Change Settings button;
otherwise, proceed to the next step.
a) Make the desired selections for Paper Type/Paper Weight, Paper Size, and Paper
Color.
b) If necessary, make the desired changes to paper curl and alignment adjustment.
Note
Refer to the System Administration Guide for detailed information on the paper
curl and alignment adjustment options.
c) Select Save until you are returned to the tray settings window.
8. Select Confirm to close the window.
Loading pre-drilled stock in trays 1, 2, 3, and 4
1. Select the appropriate paper stock for your print job.
2. Pull out the tray slowly until it stops.
3. Open the ream of paper with the seam side facing up.
4. Fan the sheets before loading them into the tray.
User Guide3-4
Page 29

Paper and other media
5. Load and align the edge of the pre-drilled paper against the LEFT edge of the tray.
Align the paper so that the holes are against the left edge of the tray, and ensure
that the paper is loaded in the LEF direction.
6. Adjust the paper guides by pressing in the guide release and carefully moving the
Edge Guide until it lightly touches the edge of the material in the tray.
Do not load materials above the MAX line located on the rear Edge Guide.
7. Gently push in the tray until it comes to a stop.
If enabled by your System Administrator, the Paper Tray settings screen may be
displayed on the UI.
8. If changes have been made to the paper tray, select the Change Settings button;
otherwise, proceed to the next step.
a) Make the desired selections for Paper Type/Paper Weight, Paper Size, and Paper
Color.
b) If necessary, make the desired changes to paper curl and alignment adjustment.
Note
Refer to the System Administration Guide for detailed information on the paper
curl and alignment adjustment options.
c) Select Save until you are returned to the tray settings window.
9. Select Confirm to close the window.
Loading transparencies in trays 1-4
1. Select the appropriate paper stock for your print job.
2. Pull out the tray slowly until it stops.
3. Fan the transparencies to stop them from sticking together before loading into the
tray.
4. Load transparencies on top of a small stack of same-size paper, and align the edge
of the transparencies with the removable stripe against the LEFT edge of the tray
with the side to be copied or printed on facing down.
Note
• Do not load more than 100 transparencies in a paper tray at one time.
• Transparencies can be loaded either long edge or short edge feed (portrait or
landscape).
• Do not load transparencies above the MAX line as indicated on the tray.
5. When loading transparencies into either Tray 3 or 4, adjust the paper guides until
they lightly touch the edges of the material in the tray.
6. Gently push in the tray until it comes to a stop.
If enabled by your System Administrator, the Paper Tray settings screen may be
displayed on the UI.
7. If changes have been made to the paper tray, select the Change Settings button;
otherwise, proceed to the next step.
User Guide
3-5Xerox® D110/D125/D136 Printer
Page 30

Paper and other media
a) Make the desired selections for Paper Type/Paper Weight, Paper Size, and Paper
Color.
b) If necessary, make the desired changes to paper curl and alignment adjustment.
Note
Refer to the System Administration Guide for detailed information on the paper
curl and alignment adjustment options.
c) Select Save until you are returned to the tray settings window.
8. Select Confirm to close the window.
Loading media in optional feeding devices
Refer to the specific chapter for information and instructions on loading media in the
optional feeding devices.
Loading post-process media in optional finishing devices
Refer to the specific chapter for information on loading post-process media in the optional
finishing devices.
Loading tab stock with the GBC AdvancedPunch
When the optional GBC AdvancedPunch is attached to your machine, tab stock is loaded
differently into paper trays. For information on how to load media into the paper trays
when a GBC AdvancedPunch is attached, refer to the GBC AdvancedPunch customer
documentation.
User Guide3-6
Page 31

4
Media Print - Text
This chapter describes the basic procedures and features of Media Print - Text when the
optional USB Enablement Kit is installed.
Overview
The installation of the USB Enablement Kit allows the machine to retrieve and print PDF,
TIFF, and XPS document files. This feature is called the Media Print feature. When a
USB memory device is connected to the machine, the machine can print the data stored
in the USB memory device. The Media Print feature includes the Media Print - Text
mode that prints data stored in text format. It also includes index printing that prints a
list of files retrieved in the mode.
Make sure to back up data on media. Data stored on media may be lost or damaged
for the following reasons.
• When switching the machine off/on or disconnecting/connecting the USB memory
device
• When receiving the effect of electrical noise or an electrical discharge
• When a failure or repair occurs
• When damage results from a natural calamity
Supported file formats
The following file formats can be used:
• PDF - PDF 1.3 or later
Extension: pdf
• TIFF - Grayscale 4 bit/8 bit uncompressed, 8 bit/24 bit JPEG compressed, MH/MMR
compressed
User Guide
4-1Xerox® D110/D125/D136 Printer
Page 32

Media Print - Text
Extension: tif
• XPS files
Extension: xps
- If the medium contains more than 900 folders, the machine may not be able to
recognize them correctly.
- PDF files or TIFF files cannot be printed if they are stored in folders.
- PDF files saved on a MAC OS cannot be displayed on the screen and cannot be
printed.
- If a file name contains characters that are not supported by the machine, the
file name will not be displayed on the screen.
- Up to 255 characters can be recognized as a file name.
Notes and Restrictions
The following notes and restrictions apply to the use of the Media Print - Text feature:
• Printing speed depends on the size and number of files on the USB memory device.
• Before storing document files, format the media with a computer. In Media Print -
Text mode, files are printed only from the directory located directly in the USB memory
device. A file or folder name can be recognized even if it exceeds 8 characters.
• Do not connect multiple USB memory devices to the machine simultaneously.
• The machine does not support some types of USB memory devices, such as those
with an encryption function or with multiple partitions.
• Do not connect or disconnect the USB memory device while the machine is retrieving
or printing the data, or accessing the USB memory device.
Selecting media files
1. Insert the USB memory device into the USB memory slot on the control panel of the
printer.
2. Press the Services Home button.
3. Select Media Print - Text.
Do not disconnect the USB memory device while the machine is retrieving the files.
Index numbers 001 to 900 are automatically assigned to the retrieved files.
4. When the files are retrieved, select files using Select All, Select From List, Select
Range, or Index Print.
User Guide4-2
Page 33

Media Print - Text
The Index Print option prints a list of the selected files from the USB drive with the
index numbers automatically assigned. The Index Print checkbox is enabled when
certain paper supplies are selected.
5. Once the files are selected, set the printing options on the Media Print - Text tab
and Advanced Settings tab.
Depending on the types of files stored in the USB memory device or the directory
configuration, all files selected may not print.
Inserting USB Memory Device
1. Insert the USB memory device into the USB memory slot on the control panel.
2. The USB Device detected screen appears. Select one of the following:
• Store to USB
3. One of the following will occur:
• The USB Device Detected screen appears.
• The Store to USB screen appears.
• The Media Print - Text screen appears.
• The screen display does not change.
4. Select Media Print - Text on the Services Home screen.
Setting the Printing Options
You can set the printing options on the Media Print - Text tab.
Media Print - Text printing options
Setting ValueItemTab
Quantity
Specify the print quantity within the range of 1
- 999, using the numeric keypad.
User Guide
4-3Xerox® D110/D125/D136 Printer
Page 34

Media Print - Text
Setting ValueItemTab
Paper SupplyMedia Print - Text
Auto Paper Select, Trays 1 - 5
Select Auto or a tray that holds any of the
following sizes of paper: A3, B4, A4, A4 short edge
feed (SEF), B5, B5 SEF, A5, A5 SEF, 8.5 x 11", 8.5
x 11" SEF, 8.5 x 14", 11 x 17"
When selecting Auto, a paper tray of the size of
the document is selected automatically, and the
document is printed at its original size.
When the tray to be used is not displayed, select
More. On the screen displayed, select the desired
tray.
If you select More and then Tray, Paper Size and
Paper Type are selectable.
Paper Size
A3, B4, A4, A4 SEF, B5, B5 SEF, A5, A5 SEF, 8.5 x
11", 8.5 x 11" SEF, 8 x 14", 11 x 17"
Paper Type
Select the paper type to be used from the list.
Off, Long Edge Flip, Short Edge Flip2 Sided Printing
Off, 2 Pages Up, 4 Pages UpPages per side
Off, OnBitmap SmoothingAdvanced Settings
Index Print
In Media Print - Text mode, the file names (maximum of 2 lines and 100 characters),
the dates the documents were stored on the USB memory device, and the total file
quantity are printed.
For Index Print, only the print quantity can be set with the numeric pad, within the range
of 1 - 999 sets.
When selecting Index Print, the following items are restricted:
ValueSetting Item
Paper Supply
Trays 1 - 5
Any of the following sizes of paper must be
loaded in the selected tray: A3, A4, A4 SEF, 8.5
x 11”, or 8.5 x 11” SEF
Off2 Sided Printing
Not availablePages per side
User Guide4-4
Page 35

5
Web Applications
Web Application Overview
Web Applications is a service that allows you to access to web applications via a network
using the browser on the machine in order to display and store data.
1. Select Services Home.
2. Select Web Application
3. Select an access destination.
4. Select Open from the pop-up menu displayed.
Accessing Using Buttons Registered on the Services Home window
You can register frequently used web applications on the Services Home screen as
buttons. The following describes how to access the applications by simply selecting the
buttons.
1. Press the Services Home button.
2. Select Head Office registered on the Services Home window.
User Guide
5-1Xerox® D110/D125/D136 Printer
Page 36

Web Applications
User Guide5-2
Page 37

6
Computer operations
Network Printing
Print procedures vary depending on the application software you are using. For more
information, refer to the documentation provided with each application.
To learn about print features, click Help in the print driver screen and refer to the online
help.
Printing with the PS print drivers
1. Load the paper in the paper tray. See the Paper and other Media chapter in the User
Guide.
2. From your computer, open the document you want to print.
3. Select File > Print.
4. Select the desired printer.
5. Select Properties.
6. Select the Paper/Output tab.
7. Select the appropriate Paper Tray, Paper Size, and Paper Type.
8. Select the Advanced tab and select any Advanced Features.
9. Select OK to save and close the Properties window.
10. Select the desired copies/quantity and OK to print the job.
Note
For additional information, review your print driver documentation.
Printing with the PCL print drivers
1. Load the paper in the tray. See the Paper and other Media chapter in the User Guide.
2. From your computer, open the document you want to print.
3. Select File > Print.
6-1Xerox® D110/D125/D136 Printer
User Guide
Page 38

Computer operations
4. Select the desired printer.
5. Ensure that Auto-Rotate and Center and Choose Paper Source by PDF page size
check boxes are clear.
Note
These options may not be available with your version of Adobe Acrobat or Adobe
Reader.
6. Select Properties and select the Paper/Output tab.
7. Click the Paper Select button.
8. If Tray 3 or Tray 4 is being used, then select Paper Settings for Auto Tray and choose
the appropriate paper type.
9. Select OK twice to return to the Properties screen.
10. Select the Advanced tab and select any Advanced Features.
11. Select OK to save and close the Properties window.
12. Select the desired copies/quantity and OK to print the job.
Note
For additional information, review your print driver documentation.
Network tab printing
Network printing on tabs using the PS print drivers
1. Load the tab stock in Tray 3, Tray 4, or Tray 5 (Bypass). Refer to Loading Tab Paper
in Trays in the Paper and Other Media chapter.
2. From your computer, open the document you want to print.
3. Select File > Print.
4. Select the desired printer.
5. Select Properties.
6. Select the Paper/Output tab.
7. Select the appropriate Paper Tray, Paper Size, and Paper Type (Select Tab Stock if
using the Tray 5 manual tray, otherwise select Printer Default Type).
8. Select the Advanced tab and select Advanced Features.
9. Select Shift tab from the Tab Margin Shift feature.
10. Set the desired shift margin.
11. Select OK to save and close the Tab Margin Shift window.
12. Select OK to save and close the Properties window.
13. Select the desired copies/quantity and OK to print the job.
Note
For additional information, review your print driver documentation.
User Guide6-2
Page 39

Computer operations
Network printing on tabs using the PCL print drivers
1. Load the tab stock in Tray 3, Tray 4, or Tray 5 (Bypass). Refer to Loading Tab Paper
in Trays in the Paper and Other Media chapter.
2. From your computer, open the document you want to print.
3. Select File > Print.
4. Select the desired printer.
5. Ensure that Auto-Rotate and Center and Choose Paper Source by PDF page size
are unchecked.
Note
These options may not be available with your version of Adobe Acrobat or Adobe
Reader.
6. Select Properties and select the Paper/Output tab.
7. Click the Paper Select button.
8. If Tray 3 or Tray 4 is being used for the tab stock, then select Paper Settings for Auto
Tray and choose Tab Stock for the paper type.
9. If Tray 5 (Bypass) is being used for the tab stock, then select Tray 5 (Bypass) Settings
and choose Tab Stock for the paper type.
10. Select OK twice to return to the Properties screen.
11. Select the Advanced tab and select the Tab Margin Shift item.
12. From the Tab Margin Shift pull-down menu, select the Shift Tab option.
13. Set the desired Tab margin Shift.
14. Select OK to save and close the Tab Margin Shift window.
15. Select OK to save and close the Properties window.
16. Select the desired copies/quantity and OK to print the job.
Note
For additional information, review your print driver documentation.
User Guide
6-3Xerox® D110/D125/D136 Printer
Page 40

Computer operations
User Guide6-4
Page 41

7
Job Status
Job Status overview
The Job Status feature allows the user to check active, pending, and completed jobs.
The ability to cancel printing or print pending-print jobs is also available from Job Status.
Active Jobs
The Active Jobs tab allows you to check or cancel current or pending jobs.
1. Select Job Status from the Control Panel.
2. Select Active Jobs.
3. From the View pull-down menu, select the desired jobs to be viewed. You can select:
• All Jobs
• Printer and Print from Folder Jobs
• Scan and Internet Fax Jobs
• Job Flow and File Transfer Jobs
4. From the displayed list, select the applicable job to view.
5. Use the up and down buttons to navigate the list.
6. If required, select Display Time to show the time required to process the selected
job.
7. To delete a job or change the execution order, select a job from the list.
8. Select Delete or Promote from the pop-up menu.
User Guide
7-1Xerox® D110/D125/D136 Printer
Page 42

Job Status
Completed Jobs
The Completed Jobs tab allows you to check that a print job has been completed
successfully.
1. Select Job Status from the Control Panel.
2. Select Active Jobs.
3. From the View pull-down menu, select the desired jobs to be viewed. You can select:
• All Jobs
• Printer and Print from Folder Jobs
• Scan and Internet Fax Jobs
• Job Flow and File Transfer Jobs
4. From the displayed list, select the applicable job to view.
5. Use the up and down buttons to navigate the list.
6. Select a job and the Print Job details will display.
7. Select Print this Job History Report or Print this Report if a report is desired.
Secure Print Jobs & More tab
This tab allows you to print confidential documents.
1. Press the Job Status button.
2. Select the Secure Print Jobs & More tab.
3. Select the applicable feature:
• Secure Print
• Sample Set
• Delayed Print
• Charge Print
4. Continue to the applicable procedure for instructions on that feature.
Secure Print
Use this feature to print secure documents with a pass code.
1. Press the Job Status button.
2. Select the Secure Print Jobs & More tab.
3. Select the Secure Print. The Secure Print screen is displayed.
4. Select Refresh to display the latest updated information. Use the up or down buttons
to navigate the list.
5. From the displayed list, select the applicable user.
User Guide7-2
Page 43

Job Status
6. Select Job List.
7. Use the keypad on the control panel to enter the passcode.
8. Select Confirm.
If no password code is set, the Passcode screen does not appear.
9. Use the up or down buttons to navigate the document list.
10. Select the document to print or delete.
11. If deleting a document, select Delete. Select Yes to confirm the deletion. The
document is deleted.
12. If printing a document, perform the following:
a) Using the numeric keypad, enter the number of copies to print.
b) Select Print.
c) Select what to do with the document after printing:
• Print and Delete: Starts printing the document. After printing, the document
is removed.
• Cancel: Cancels the printing of the document.
Sample Set
This feature allows you to print one set for review before printing the entire job set.
1. Press the Job Status button.
2. Select the Secure Print Jobs & More tab.
3. Select Sample Set.
The Sample Set screen is displayed.
4. Select Refresh to display the latest updated information.
Use the up or down buttons to navigate the list.
5. From the displayed list, select the applicable user.
6. Select Job List.
7. Select the document to print or delete.
8. If deleting a document, select Delete.
Select Yes to confirm the deletion. The document is deleted.
9. If printing a document, perform the following:
a) Using the numeric keypad, enter the number of copies to print.
b) Select Print.
A screen is displayed stating that the job will be deleted after printing and asking
if you still want to print the job.
c) Select Yes or No to continue printing the job.
Delayed Print
This feature allows you to print a job at a specified time and then delete the job.
1. Press the Job Status button.
User Guide
7-3Xerox® D110/D125/D136 Printer
Page 44

Job Status
2. Select Secure Print Jobs & More tab.
3. Select the Delayed Print. The Delayed Print screen is displayed.
4. Select Refresh to display the latest updated information. Use the up or down buttons
to navigate the list.
5. From the displayed list, select the document to print at a specified time or the delayed
print job to delete.
6. If deleting a document, select Delete. Select Yes to confirm the deletion. The
document is deleted.
7. If printing a document, perform the following:
a) Select Print.
A screen is displayed stating that the job will be deleted after printing and asking
if you still want to print the job.
b) Select Yes or No to continue printing the job.
Charge Print
The Charge Print feature allows you to print or delete documents stored for each billing
user ID.
1. Press the Job Staus button on the Control Panel.
2. From the Secure Print Jobs & More tab, select Charge Print...
3. Select Refresh to display the latest updated information.
4. Use the up or down button to navigate the list. If you know the exact number of the
document in the list, you can specify it directly with the numeric keypad, from the
Go to box.
5. Select the needed billing user ID.
6. Select Job List. The Password screen is displayed.
7. Enter the passcode and select Confirm.
8. Select a document to print or delete from the displayed list.
9. Select the required option.
10. When finished, select Close.
User Guide7-4
Page 45

8
Machine Status
Machine Status
Press the Machine Status button on the UI control panel to access the Machine Status
information and features.
The Machine Status button is used to access machine status information and features:
• Machine information
• Faults
• Supplies
• Billing information
• Tools
Machine Information tab
Machine Information provides general information about the copier/printer and has
buttons that allow the user to view details that apply to the machine and to access other
machine information features.
Paper Tray Status
Select the Paper Tray Status button to view the current status information for each
paper tray.
8-1Xerox® D110/D125/D136 Printer
User Guide
Page 46

Machine Status
Machine Configuration
Select the Machine Configuration button to display a list of the various hardware
components and options that are available on the machine. The list also displays the
status of each of these components and options. Hardware components and options
include the document feeder, paper trays, and any optional feeding and finishing
devices attached to the machine.
Machine Serial Number
The Machine Serial Number is displayed in the General Information area on the Machine
Information tab. Use this number when calling Xerox for technical information or
assistance.
Current System Software
The version of the system software that is currently installed on the machine is displayed
under the Current System Software title.
Software Version
Select the Software Version button to display a list of the software versions for the
various machine components, such as the print engine, the Controller ROM (Read Only
Memory), and any optional feeding and finishing devices.
Print Reports
The Print Reports button must be enabled by the system administrator before reports
can be printed. Some features on the Print Reports screen are only available in the
system administrator mode.
To print a report, select the Various Report button to identify the desired report criteria
and then press Start.
Note
The type of reports available varies depending on machine configuration.
Maintenance Assistant
Select Maintenance Assistant to send the diagnostic information of the machine.
Overwrite Hard Disk
The Overwrite Hard Disk feature prevents the document image and registered data
that is recorded on the machine hard disk from being illegally retrieved. The number
of overwrites is set by the system administrator.
Overwriting the machine hard disk is performed after every copy job that includes more
than one set, and after each scan job is transferred to the print server. The Standby
status indicates the completion of the overwriting process.
User Guide8-2
Page 47

Machine Status
Print Mode
Select Print Mode to identify the current printing mode of the printer. Select Off-Line
or On-Line. Select one of the following:
PCL Emulation: Select Item Number and enter the number using the numeric keypad.
Select the current value and select Confirm.
PDF Select Programming: Select Item Number and enter the number using the numeric
keypad. Select the current value and select Confirm. Select a Password to save. Enter
the password and select Save.
HP-GL/2 Emulation: Select this to retrieve programming. Select Factory Defaults or
Custom Settings and select a job. Select Programming and select the item number.
Select Store/Delete Programming and select a job. Either Store the Current Selections
or Delete. Select Default Programming and select either Factory Defaults or Custom
Settings.
Faults tab
The Faults tab provides access to fault information and error messages. Access to this
tab is by pressing the Machine Status button on the control panel and selecting the
Fault tab on the UI.
Current Faults
If there are any current faults affecting the machine, select the Current Faults button
to view a list those faults. From the Current Faults screen, select a fault to view
instructions on how to fix the error.
Current Messages
Select the Current Messages button on the Faults tab to view a list of current machine
messages. These messages indicate actions that need to be taken to continue or resume
the proper operation of the machine.
Fault History
Select the Fault History button to display a list of past fault codes. This information
can be used to diagnose and solve machine problems.
Supplies tab
The Supplies tab provides status information about the customer replaceable units
(CRUs) that are used in the machine.
User Guide
8-3Xerox® D110/D125/D136 Printer
Page 48

Machine Status
To access supplies information, press the Machine Status button on the control panel
and then select the Supplies tab from the Machine Status screen.
Each Customer Replaceable Unit and status is displayed.
Billing Information tab
Accessing Billing Information
1. Press the Machine Status button on the control panel.
2. Select the Billing Information tab.
Billing meters/usage counters
The Billing Information feature displays the total number of prints/copies made by the
machine and also allows the user to view specific billing meter/usage counter information.
The main Billing Information screen displays:
• The Machine Serial Number
• Total Impressions: This is the total number of prints/copies made on the machine.
• The Usage Counters button
Usage Counters
Select the Usage Counters button to view individual counters and their current count
status.
From the drop-down list you can select the desired counter to view:
• Impression Counters
• Sheet Counters
• Image Sent Counters
• All Usage Counters
User Guide8-4
Page 49

Machine Status
Impression Counters
This view displays the total impression amount. In other words, impression is the image
on one side of one sheet of media. This counter shows the total impression amount
for copied and printed impressions and for large impressions.
• Black Copied Impressions: This number represents the total number of impressions
for all black/white copied/scanned jobs.
• Black Print Impressions: This number represents the total number of impressions for
all black/white network print jobs (sent from the user’s computer to the printer).
• Large Impressions: These impressions are one side of one sheet of a large document
(such as 11 x17 in./A3). Large Impressions are any documents/originals/prints that
are larger than 8.5 x14 in./B4.
Sheet Counters
This view provides information on the total number of sheets the machine feeds to
the output area. Each sheet counts as one click on the counter (regardless of whether
it is a one-sided or two-sided copy/print job).
Images Sent Counters
This view provides information on the total amounts for internet fax images, email
images, and network scanned images.
All Usage Counters
This view provides a complete total of all the counters, including the totals from the
Impression Counters, Sheet Counters, and Images Sent Counters.
User Account Billing Information
Note
This feature is available only if the Accounting feature is enabled. For more information
on the Accounting feature, refer to the System Administration Guide.
When the Accounting feature is enabled by the system administrator, the User Account
Billing Information button is displayed on the Billing Information screen. By selecting
the User Account Billing Information button, the following information then is displayed:
• The billing information of the currently logged-in user, including copy and scan jobs
• By selecting either Meter (Copy Jobs) or Meter (Scan Jobs), the following information
then is displayed:
- Usage amount for this session
- Total usage
- Account Limit (set by the system administrator)
- Available Balance (remaining unused amount for the account)
User Guide
8-5Xerox® D110/D125/D136 Printer
Page 50

Machine Status
Tools tab
Regular users have limited access to some of the features on the Tools tab.
Stored Programming
When available to the user, this feature enhances productivity by saving a series of
programming steps and assigning them to a specified Stored Programming option.
Stored programs save frequently used features and job settings which can be accessed
using a shortcut button. Stored Programming not only remembers feature settings,
but it can record a series of operations. This enables the user to record the hierarchy
of displayed screens for each step. For example, Stored Programming can record the
following actions: press the Machine Status button, and display the Print Reports
screen to print reports.
Note
This feature is available only if the system administrator has created and saved stored
programs.
Add Address Book Entry
Select to add Address and Recipient Information. To add, select an available entry and
enter the information. To view an entry, select the entry and the information will
automatically display.
Paper Tray Attributes
The Paper Tray Attributes feature allows the user to change the attributes of a paper
tray, including size, type, and weight.
Note
The Paper Tray Attributes feature appears on the Tools tab only if the system
administrator has made it available to users.
Changing the paper tray attributes
1. Press the Machine Status button on the control panel.
2. Access the Tools tab on the UI.
3. Select Paper Tray Attributes on the Tools tab.
4. Select a tray.
5. Select Change Settings.
6. If the settings are correct, select Confirm or select Change Settings.
7. If necessary, make the required changes to the tray settings (such as weight, type,
and size).
8. Select Save.
The previous screen is displayed.
User Guide8-6
Page 51

Machine Status
9. Select Confirm.
The Paper Tray Attributes screen is displayed.
10. Select Close.
The main Tools screen is displayed.
11. Press the Services button on the control panel to return to the main Copy screen.
User Guide
8-7Xerox® D110/D125/D136 Printer
Page 52

Machine Status
User Guide8-8
Page 53

9
Maintenance
Cleaning the machine
Read and adhere to the following information when cleaning the machine:
• Before you start to clean the machine, be sure to switch off the power and unplug
the machine. Cleaning the machine without switching off the power may cause an
electric shock.
• Do not use benzene, paint thinner, other volatile liquids, or spray insect repellent on
the machine as doing so may discolor, deform, or crack covers.
• Cleaning the machine with an excessive amount of water may cause the machine
to malfunction and/or damage documents during copying.
• Document feeder, cover, and glass information:
- The document cover is the flat, white surface on the underside of the DADF that
holds the document in place on the document glass.
- It is recommended that you clean all components of the document cover and
document glass at the same time. These components consist of the document
cover, the document (platen) glass, and the second-side scanning lens assembly.
- Cleaning the document cover and glass on a regular basis is important to
providing the best image quality possible on your printed or copy output. If the
document cover and document glass are dirty, spots may appear on copies and
the machine may not properly detect document sizes.
- Perform the cleaning procedure for the document cover and document glass if
you receive this message, The Scanner may be dirty; see User Guide or label
instructions on the Document Feeder to wipe the scanning glass.
- The document (or platen) glass consists of two parts: the document glass itself
and the glass strip. The document glass is the glass on which you place your
document in order to copy it. The glass strip is an approximately one-inch wide
strip of glass located to the left the document glass.
User Guide
9-1Xerox® D110/D125/D136 Printer
Page 54

Maintenance
Cleaning the exterior
1. Wipe the exterior with a soft cloth moistened with water. If dirt is difficult to remove,
try gently wiping with a soft cloth moistened with a small amount of neutral detergent.
2. Wipe off any excess water from the exterior with a soft cloth.
Cleaning the document cover and glass
1. Cleaning the document cover
a) Raise the document feeder.
b) To remove dirt, wipe the document cover with a soft cloth moistened with water
and then wipe it dry with a soft cloth. If dirt is difficult to remove, try gently wiping
with a soft cloth moistened with a small amount of neutral detergent.
2. Cleaning the document (platen) glass
User Guide9-2
Page 55

Maintenance
a) To remove dirt, wipe the document glass with a soft cloth moistened with water
and then wipe it dry with a soft cloth. If dirt is difficult to remove, try gently wiping
with a soft cloth moistened with a small amount of neutral detergent.
Caution
Do not press heavily on the document glass to avoid damaging the glass surface.
3. Cleaning the second-side scanning lens assembly
a) The second-side scanning lens assembly is located along the left side of the
document cover. The assembly consists of the mirrored-glass strip, a metal strip,
a white-plastic strip, and rollers. All parts of the assembly must be cleaned to
ensure the best image quality when making copies.
b) With the document feeder open, pull the lever that is located at the top of the
document cover.
User Guide
9-3Xerox® D110/D125/D136 Printer
Page 56

Maintenance
Part of the document cover pulls away from the assembly, which allows better
access to the second-side scanning lens assembly.
c) To remove dirt, wipe the mirrored glass, metal strip, both sides of the white-plastic
strip, and the rollers with a soft cloth moistened with water, and then wipe it dry
with a soft cloth.
Caution
Do not press heavily on the mirrored glass as this will result in damage to the film
around the glass surface.
Note
If dirt is difficult to remove, try gently wiping with a soft cloth moistened with a
small amount of neutral detergent.
User Guide9-4
Page 57

Maintenance
4. Once the second-side scanning assembly is clean, return the document cover to its
original position and ensure that the lever is locked in place.
If you touch the document cover with your bare hands, wipe it clean before closing
the document feeder.
5. Gently close the document feeder.
Cleaning the document feeder rollers
1. Gently lift the latch of the document feeder top cover until it is open completely in
a fixed position.
2. While turning the rollers, gently clean them with a soft cloth moistened with water.
Caution
Use a cloth that has been thoroughly wrung to prevent drops of water falling into
the machine. Drops of water on internal components may cause a malfunction.
User Guide
9-5Xerox® D110/D125/D136 Printer
Page 58

Maintenance
If dirt is difficult to remove, try gently wiping with a soft cloth moistened with a small
amount of neutral detergent.
3. Close the top cover of the document feeder until you hear it click into place.
4. Close the left cover of the document feeder until you hear it click into place.
Cleaning the Fuser Stripper Fingers
Note
It is recommended to read through all of the installation instructions before performing
this procedure.
Note
It is recommended to perform this operation prior to powering up the machine for the
day. However, if it is necessary to perform it during the day, to avoid injury, wait
approximately 50 minutes from the time the machine is powered off to allow the machine
to cool down.
Fuser oil can cause irritation upon contact with the eye. Make sure to wash your hands
thoroughly with soap and water after completing this procedure. Be careful not to touch
other areas of the machine after servicing the Fuser area.
1. Make sure that the machine has stopped copying / printing, and then power the
machine off.
2. Allow the machine to cool for approximately 50 minutes.
3. Open the front door.
4. Move handle 2 to the right and down to the unlocked position.
5. Pull the drawer out until it stops.
6. Lift the 2c handle.
7. Carefully clean the six yellow stripper fingers with a clean, dry, lint free cloth by using
a pinching grip between your finger and thumb to wipe the underside of the stripper
fingers.
User Guide9-6
Page 59

8. Return the 2c handle to its original position.
9. Clean the input baffles to the Transfer and Fuser.
Maintenance
10. Wipe the Fuser input baffle.
11. Wipe the Transfer input baffle.
User Guide
9-7Xerox® D110/D125/D136 Printer
Page 60

Maintenance
12. Grasp handle 2, push in on the drawer, and then move the handle to the left and
up to the locked position.
13. Close the front door.
Replacing consumable supplies
Ordering supplies
Xerox supplies, paper, and throughput material can be ordered from Xerox by going to
www.xerox.com and clicking on either the Contact Us link for specific contact
information/telephone numbers in your area or by clicking on the Supplies and
entering/selecting your specific machine information (product family and model type).
Store supply items and Xerox parts in their original packages in a convenient location.
Note
Always refer to www.xerox.com for the latest Customer Replaceable Units (CRUs) part
numbers.
The following items are consumables for this machine. It is recommended that you have
a supply of these items available to eliminate downtime when they need to be replaced.
Customer Replaceable Units (CRUs)
• Black Toner Cartridge; reorder quantity: 1/box
• Toner Waste Bottle; reorder quantity: 1/box
User Guide9-8
Page 61

Maintenance
Checking the status of CRUs
Check the status of consumables by using the Supplies tab.
• The status of consumables is indicated by Ready, Order New, Replace Now, or other
indications.
• An indication from 0 to 100% displays the remaining amount of toner.
The machine UI will indicate when it is time to order and/or install a Customer
Replaceable Unit (CRU). With some CRUs, the UI indicates that the machine may
continue to run copy or print jobs without immediately replacing the CRU. When it is
time to replace it, a message appears on the UI, and the machine stops running.
Always recycle/dispose the used CRU according to the disposal instructions supplied
with the new CRU.
Note
If image quality (IQ) issues are on the output, refer to the problem solving chapter of
the user guide for specific IQ problems and their related corrective actions.
Replacing the toner cartridge
Warning
Replace a toner cartridge while the machine is ON. Before replacing a cartridge, ensure
that the machine is given time to cool down. Failure to do so may result in burns to the
skin if certain parts of the machine are touched.
1. Open the left cover of the machine.
2. Lay paper on the floor before removing the cartridge. This will allow any excess toner
to fall on the paper.
User Guide
9-9Xerox® D110/D125/D136 Printer
Page 62

Maintenance
3. Grash the handle of the toner cartridge.
4. Pull out the toner cartridge slowly (1), while holding the bottom of the cartridge with
one hand (2).
5. Dispose the old toner cartridge as normal office waste or recycle the cartridge.
6. Remove the new cartridge from the box and shake if from side to side to even out
the toner inside.
User Guide9-10
Page 63

7. Hold the cartridge with the arrow mark facing up.
8. Push the cartridge in slowly until it stops.
Maintenance
9. Close the toner cover. If the cover does not close completely, make sure the cartridge
is in the lock position and is installed into the appropriate toner location.
Caution
Never use a vacuum cleaner when cleaning up spilled toner. It can cause a small
explosion as the toner fills the vacuum cleaner and creates sparks. Use a broom,
brush, or a cloth moistened with a neutral detergent.
User Guide
9-11Xerox® D110/D125/D136 Printer
Page 64

Maintenance
Replacing the toner waste container
A message displays on the UI when the toner waste container is full. If you continue
copying or printing without replacing it, the machine stops after copying or printing
(approximately 18,000 sheets).
1. Make sure that the machine has stopped copying/printing, then open the front cover
on the machine.
2. Open the toner waste container cover and push the lever down.
3. Grasp the handle of the toner waste container with one hand, and pull it out of the
machine about half way.
User Guide9-12
Page 65

Maintenance
4. With the other hand, grasp the top, middle part of the bottle, and then using both
hands, pull the entire container out of the machine.
5. Hold the used container firmly with both hands and put it into the plastic bag, which
is provided with the new container. Close the bag and dispose of the container
according to your local regulations.
6. Remove the new container from its packaging.
7. Do not grip the container handle. Grasp the top, middle part of the new container
and slide it into the machine until it snaps into position.
8. Close the toner waste container cover.
9. Close the front cover.
User Guide
9-13Xerox® D110/D125/D136 Printer
Page 66

Maintenance
A message displays and the machine will not operate if the front cover is open even
slightly.
User Guide9-14
Page 67

10
Problem solving
Paper jams
If a paper jam occurs, a fault screen displays a message on the UI indicating in which
area the jam is situated. Follow the instructions provided for clearing the jam and
resuming machine operation.
Information about paper jams
Review the following list to address paper jams:
• When paper jams inside the machine, the machine stops and an alarm sounds.
• Follow the instructions displayed on the controller to remove the jammed paper.
• Gently remove the paper taking care not to tear it. If paper is torn, be sure to remove
all torn pieces.
• If a piece of jammed paper remains inside the machine, the paper jam message will
remain on the display.
• Paper jams can be removed with the machine still powered on. When the power is
turned off, all information stored to the machine's memory will be erased.
• Do not touch components inside the machine. This can cause print defects.
• After clearing a paper jam, printing is automatically resumed from the state before
the paper jam occurred.
• If a paper jam occurred during copying, press the Start button. Copying is resumed
from the state before the paper jam occurred.
Warning
When removing jammed paper, make sure that no pieces of jammed paper are left in
the machine. A piece of paper remaining in the machine can cause fire. If a piece of
paper is stuck in a hidden area or paper is wrapped around the fuser unit or rollers, do
not remove it forcefully. You can get injured or burned. Switch off the machine
immediately and contact the Customer Support Center.
10-1Xerox® D110/D125/D136 Printer
User Guide
Page 68

Problem solving
Lower left cover jams
Note
This procedure shows how to clear a jam without either the optional HCF (Trays 6/7) or
optional OHCF (Trays 6/7) being present. If you have either an HCF or an OHCF, open
the front cover to optional Trays 6/7 to access this area.
1. Open the lower left cover
2. Remove the jammed paper.
3. Close the lower left cover.
User Guide10-2
Page 69

Problem solving
Paper jams in the Bypass (Tray 5)
Tip
Always ensure that all paper jams, including any small, ripped pieces of paper, are cleared
before proceeding with any copy/print jobs.
1. Remove the jammed paper and any paper that is loaded from the Bypass tray.
Note
If paper is torn, check inside the machine and remove it.
2. Open the tray cover and remove jammed paper.
User Guide
10-3Xerox® D110/D125/D136 Printer
Page 70

Problem solving
3. Close the tray cover.
4. Reload paper into the tray and resume copying/printing.
Envelope jams in the Bypass tray
Note
Envelopes can be fed only from the Bypass tray. Check that the envelopes are within
specification.
Carefully read and adhere to the following guidelines when using envelopes in the Bypass
Tray:
• Always ensure that the Bypass tray guides are against the edges of the envelopes.
• Check that the attributes of the paper tray are set correctly.
• Some wrinkle is expected on the back of the fed envelope.
User Guide10-4
Page 71

Problem solving
Paper jams in Trays 1-4
Tip
Always ensure that all paper jams, including any small ripped pieces of paper, are cleared
before proceeding with your copy/print jobs.
1. Pull out the tray where the paper jam occurred.
Note
To avoid tearing paper, review where the paper jam occurred before pulling out a
tray. Torn paper remaining inside the machine can cause machine malfunction.
2. Remove the jammed paper and any torn pieces.
3. Push the tray in gently until it comes to a stop.
User Guide
10-5Xerox® D110/D125/D136 Printer
Page 72

Problem solving
Paper jams in transport unit 4
Tip
Always ensure that all paper jams, including any small ripped pieces of paper, are cleared
before proceeding with your copy/print jobs.
1. Make sure that the machine has stopped printing before opening the front cover.
2. Pull out Tray 1.
3. Pull out Transport Unit 4. Tray 2 will come out as you pull out transport unit 4.
4. Lift up lever 4a and then remove the jammed paper.
User Guide10-6
Page 73

Problem solving
Note
If paper is torn, check inside the machine and remove it.
5. Return lever 4a to the original position.
6. Push Tray 2 in gently until it comes to a stop. Transport unit 4 will be inserted
simultaneously.
7. Push Tray 1 in gently until it comes to a stop.
8. Close the front cover completely. The machine will not operate if the front cover is
open even slightly.
Paper jams in duplex module 3
Tip
Always ensure that all paper jams, including any small ripped pieces of paper, are cleared
before proceeding with your copy/print jobs.
1. Make sure that the machine has stopped printing before opening the front cover.
User Guide
10-7Xerox® D110/D125/D136 Printer
Page 74

Problem solving
2. Pull out duplex module 3.
3. Move the release lever 3a to remove the jammed paper.
Note
If paper is torn, check inside the machine and remove it.
4. Move lever 3b to the right and then remove the jammed paper.
Note
If paper is torn, check inside the machine and remove it.
5. Push the duplex module in gently until it comes to a stop.
6. Return all levers to their starting positions.
User Guide10-8
Page 75

Problem solving
7. Close the front cover completely. The machine will not operate if the front cover is
open even slightly.
Paper jams inside the main unit
Tip
Always ensure that all paper jams, including any small ripped pieces of paper, are cleared
before proceeding with your copy/print jobs.
Warning
Never touch a labeled area (found on the fuser unit or nearby) indicating High
Temperature and Caution. Contact can lead to burns.
1. Make sure that the machine has stopped printing before opening the front cover.
2. Turn the green lever at the center of the transfer module to the right until it is in the
horizontal position and then pull the transfer module out to the end.
User Guide
10-9Xerox® D110/D125/D136 Printer
Page 76

Problem solving
3. Lift up lever 2b to remove jammed paper. Then turn knob 2a to remove jammed
paper.
4. If paper is jammed at the top of the transfer module or inside the fuser unit, remove
the paper by pulling it out toward the left. If the paper cannot be removed, lift up
the lever 2c and then try removing it
5. Lift up the lever 2c as necessary, shift the lever 2d, and then remove the jammed
paper.
User Guide10-10
Page 77

Problem solving
6. Turn the knob 2f as necessary and then remove the jammed paper.
7. Shift lever 3b on the right of the fuser unit as necessary and then remove the jammed
paper.
If the jammed paper remains inside and it is difficult to remove, pull out the duplex
module after returning the transfer module to the original position. Then try again.
8. Insert the transfer module completely and turn the green lever 2 to the left.
Note
If the lever cannot be turned, pull the transfer module to the middle and insert it
again.
User Guide
10-11Xerox® D110/D125/D136 Printer
Page 78

Problem solving
9. Close the front cover completely. The machine will not operate if the front cover is
open even slightly.
Fault codes
Cause and RemedyFault code
002-770
003-750
003-751
003-753
003-754
003-755
003-760
003-761
Cause: Unable to process job template due to insufficient hard disk space.
Remedy: Remove unnecessary data from the hard disk to increase free disk space.
Cause: Unable to store any documents with 2 Sided Book Copy feature.
Remedy: Check the 2 Sided Book Copy settings.
Cause: The machine is unable to process size, because the specified document
area is too small.
Remedy: Increase resolution or scan area size.
Cause: The selected resolution was too large for scanning mixed size originals
using document feeder.
Remedy: Decrease Scan Resolution to 200dpi or less, and rescan.
Cause: An error occurred in the document scanner.
Remedy: Reprocess the job.
Cause: An error occurred in the document scanner.
Remedy: Reprocess the job.
Cause: An incompatible combination of features is specified in the document scan
conditions.
Remedy: Check the selected options.
Cause: The paper size of the tray selected for auto tray is different from the paper
size of the tray selected for Auto Repeat.
Remedy: Change the paper size for the tray, or change the Paper Type Priority
settings.
003-764
003-795
005-275
005-280
005-281
005-282
005-283
005-284
Cause: No document is scanned by Form Overlay.
Remedy: Prepare 2 documents or more.
Cause: When enlarging/reducing a scanned document to the specified paper size,
the reduction/enlargement ratio value exceeds the allowed range.
Remedy: Take one of the following actions:
Manually enter a reduction/enlargement ratio.
Change the paper size.
Cause: An error occurred in the document feeder.
Remedy: Power-cycle the machine. Contact the Customer Support Center.
User Guide10-12
Page 79

Problem solving
Cause and RemedyFault code
016-210
016-211
016-212
016-213
016-214
016-215
016-216
016-217
016-218
016-219
016-220
016-221
016-222
016-223
016-224
016-225
016-226
016-227
016-228
016-229
016-230
016-231
016-232
016-233
016-234
016-235
016-236
016-237
016-238
016-239
016-240
016-242
016-300
016-336
Cause: An error occurred in the software settings.
Remedy: Power-cycle the printer. Contact the Customer Support Center.
Cause: An error occurred in the document scanner.
Remedy: Power-cycle the machine. If the document scanner error is not corrected,
contact the Customer Support Center.
016-415
016-416
016-450
016-453
016-454
016-503
User Guide
Cause: An error occurred in the machine.
Remedy: Power off/power on the machine. If the document scanner error is not
corrected, contact the Customer Support Center.
Cause: The SMB host name already exists.
Remedy: Change the host name.
For information about network settings, refer to the System Administration Guide.
Cause: Unable to retrieve IP address from DNS.
Remedy: Check the DNS configurations and IP address retrieve method.
For information about network settings, refer to the System Administration Guide.
Cause: Unable to resolve SMTP server name during E-mail send.
Remedy: Check that the SMTP server settings from CWIS are correct. Also, check
the DNS server settings.
10-13Xerox® D110/D125/D136 Printer
Page 80

Problem solving
Cause and RemedyFault code
016-504
016-505
016-506
016-701
016-702
Cause: Unable to resolve POP3 server name during E-mail send.
Remedy: Check that the POP3 server settings from CWIS are correct. Check the
DNS server settings.
Cause: Unable to login to POP3 server during mail send.
Remedy: Check that the user name and password used in the POP3 server from
CWIS are correct.
Cause: An error occurred while running a job.
Remedy: Cancel the job and re-run it. If error continues, contact the Customer
Support Center.
Cause: PCL print data could not be processed due to insufficient memory.
Remedy: Reduce resolution, cancel 2 Sided printing or N up, and try to print again.
Refer to the online help for the print driver.
Cause: PCL print data could not be processed due to insufficient print page buffer.
Remedy: Take one of the following actions:
Set Print Mode to Speed Priority.
Use Ensure Print.
Increase the size of the print page buffer.
Add additional memory.
For information about print modes and print guarantees, refer to the online help
for the print driver.
For information about memory, refer to Allocate Memory in the System
Administration Guide.
016-703
016-704
016-705
016-706
016-707
016-708
016-709
Cause: Mail specifying a non-registered or invalid mailbox number was received.
Remedy: Take one of the following actions:
Request the sender to register the mailbox with the specified number.
Request the sender to send to a valid mailbox.
Cause: Documents stored in the mailbox have reached the hard disk capacity limit.
Remedy: Remove unnecessary documents from the mailbox, and save the
document.
Cause: Secure print documents cannot be registered because of hard disk
malfunction.
Remedy: Contact the Customer Support Center.
Cause: The maximum number of Secure Print users has been exceeded and no
space is available on the hard disk.
Remedy: Remove unnecessary documents stored on the printer, and delete
unnecessary Secure Print users.
Cause: Unable to sample print because the feature expansion kit is not installed
or has malfunctioned.
Remedy: A feature expansion kit is needed to use the Sample Print feature. If the
kit is malfunctioning, contact the Customer Support Center.
Cause: Annotation is not possible due to insufficient hard disk space.
Remedy: Remove unnecessary data from the hard disk to increase free disk space.
Cause: An error occurred during PCL processing.
Remedy: Retry printing.
User Guide10-14
Page 81

Problem solving
Cause and RemedyFault code
016-710
016-711
016-713
016-714
016-716
016-718
Cause: Delayed Print documents cannot be registered because of hard disk
malfunction.
Remedy: Contact the Customer Support Center.
Cause: The configured maximum e-mail size has been exceeded.
Remedy: Take one of the following actions and resend the e-mail:
• Decrease document pages
• Reduce the Scan Resolution
• Reduce the Scan Magnification
• Have the system administrator increase your Maximum Send E-mail Data Size
Refer to 003-751.016-712
Cause: The password set to the mailbox and the inputted password were not in
agreement.
Remedy: Enter the correct password.
Cause: Specified mailbox does not exist.
Remedy: Create a mailbox or specify the existing mailbox.
Cause: Unable to spool TIFF file because of insufficient disk space.
Remedy: Remove unnecessary documents and users stored on the printer and
then attach the hard disk. When attaching a hard disk, contact the Customer
Support Center.
Cause: PCL print data could not be processed as there was insufficient memory.
Remedy: Reduce resolution, cancel 2 Sided printing or N up, and retry printing.
016-719
016-720
016-721
016-722
016-723
016-728
Cause: PCL print data could not be processed as there was insufficient memory.
Remedy: Increase the size of the print page buffer.
Cause: The PCL print data included a command which cannot be processed.
Remedy: Confirm the print data and try to print again.
Cause: An error occurred during print processing. Probable causes are as follows:
1. Printing was instructed by Automatic Tray Selection when Paper Type Priority
is set to Automatic Tray switching Off for all paper in the Common Settings.
2. ESC/P command error
Remedy: For 1, when printing by Automatic Tray Selection, set one of the paper
types to a setting other than Automatic Tray Switching Off in Paper Type Priority.
For 2, check print data.
Refer to “Paper Type Priority” in the System Administration Guide.
Cause: Unsupported staple position is specified.
Remedy: Confirm the position, and specify the print data again.
Cause: Unsupported punch position is specified.
Remedy: Confirm the position, and specify the print data again.
Cause: An unsupported tag was included in the TIFF file.
Remedy: Check the print data.
User Guide
10-15Xerox® D110/D125/D136 Printer
Page 82

Problem solving
Cause and RemedyFault code
016-729
016-730
016-731
016-732
016-733
016-735
Cause: Unable to print because the number of colors/resolution of the TIFF file
exceeds the allowed range.
Remedy: Change the number of colors/resolution for the TIFF file, and specify the
print data again.
Cause: Detected a command not supported by ARTIV.
Remedy: Check the print data, remove the offending command, and try to print
again.
Cause: Unable to print TIFF data because it was interrupted.
Remedy: Retry printing.
Cause: Unable to use registered form specified by Emulation with host.
Remedy: Resend the form data.
Cause:
1. Unable to retrieve IP address from text on the right side of @ of an
address during E-mail send.
2. Unable to resolve Internet address on the right side of @ by DNS.
Remedy:
1. Check the mail address.
2. Check the DNS address.
Cause: Attempted to print Job Template List while updating the job template.
Remedy: Retry printing after waiting for a period.
016-738
016-739
016-740
016-746
016-748
016-749
016-755
016-756
016-757
Cause: Booklet Creation is not applied to the specified paper.
Remedy: Specify the printable paper size for booklet creation.
Cause: The specified document and paper size are an unauthorized combination.
Remedy: Specify the combination of the printable document and paper size for
booklet creation.
Cause: Booklet Creation is not applied to the specified paper tray.
Remedy: Specify the printable paper tray for booklet creation.
Cause: An unsupported feature is included in received PDF.
Remedy: Print using printer driver.
Cause: Printing is not possible due to insufficient hard disk space.
Remedy: Reduce the number of pages of print data, for example, by dividing up
the print data or printing one copy at a time when making multiple copies.
Cause: A PJL command syntax error occurred.
Remedy: Either confirm the print settings, or correct the PJL command.
Cause: Attempted to process PDF file which was specified to printing prohibited.
Remedy: Cancel the printing prohibited specification using Adobe Reader and try
to print again.
Cause: No permissions to use the service.
Remedy: Check with your System Administrator.
Cause: Password is incorrect.
Remedy: Enter the correct password.
User Guide10-16
Page 83

Problem solving
Cause and RemedyFault code
016-758
016-759
016-760
016-761
016-762
016-764
016-765
016-766
Cause: No Permissions to use service.
Remedy: Check with your Auditron Administrator.
Cause: Maximum number of pages for this service has been reached.
Remedy: Check with your Auditron Administrator.
Cause: An error occurred during PostScript processing.
Remedy: Take one of the following actions:
Set Print Mode to Speed Priority.
Increase PostScript memory.
For information about Print Modes, refer to the print driver's online help.
For information about memory, refer to “Allocate Memory” in the System
Administration Guide.
Cause: An error occurred during image processing.
Remedy: Set the Print Mode to Speed Priority and start printing again. If this does
not remedy the error, print in the Ensure Print mode.
Cause: A print language not installed on the machine was specified.
Remedy: In Specify Print Mode under Port Settings, specify a print language.
Cause: Could not connect to the SMTP server.
Remedy: Contact the SMTP Server Administrator.
Cause: Could not send mail as the hard disk on the SMTP server was full.
Remedy: Contact the SMTP Server Administrator.
Cause: An error occurred on the SMTP server.
Remedy: Contact the SMTP Server Administrator.
016-767
016-768
016-769
016-772
016-774
016-775
016-776
Cause: Could not send mail as the mail address was wrong.
Remedy: Check the mail address and transmit again.
Cause: Could not connect to the SMTP server as the mail address of the machine
was incorrect.
Remedy: Check the mail address of the machine.
Cause: The SMTP server does not support confirmation of mail distribution (DSN).
Remedy: Send mail without setting confirmation of mail distribution (DSN).
Cause: Unable to retrieve scan data repository address from the CentreWare scan
service.
Remedy: Check the DNS address or define the scan data repository address by its
IP address.
Cause: Compression conversion is not possible due to insufficient hard disk space.
Remedy: Remove unnecessary data from the hard disk to increase free disk space.
Cause: Image conversion is not possible due to insufficient hard disk space.
Remedy: Remove unnecessary data from the hard disk to increase free disk space.
Cause: An error occurred during image conversion processing.
Remedy: A portion of the data might have finished image conversion processing.
Check the data via CentreWare Internet Services.
Refer to “CentreWare Internet Services” in the System Administration Guide.
User Guide
10-17Xerox® D110/D125/D136 Printer
Page 84

Problem solving
Cause and RemedyFault code
016-777
016-778
016-779
016-780
016-786
016-788
016-792
Cause: A hard disk error occurred during image processing.
Remedy: The hard disk might be defective. When replacing a hard disk, contact
the Customer Support Center.
Cause: Conversion processing of scanned image was interrupted because of
insufficient disk space.
Remedy: Remove unnecessary data from the hard disk to increase free disk space.
Cause: An error occurred during scanned image conversion processing.
Remedy: Retry scanning.
Cause: A hard disk error occurred during scanned image conversion processing.
Remedy: The hard disk might be defective. When replacing a hard disk, contact
the Customer Support Center.
Cause: When using the scan feature, hard disk capacity is insufficient for writing
to a file.
Remedy: Either remove unnecessary data from the hard disk to increase free disk
space or initialize the hard disk.
Cause: Failed to load a file from the Web browser.
Remedy: Perform the following actions, and try again.
Reload the browser page
Restart the browser
Power-cycle the machine
Cause: Specified job history could not be acquired when printing Job Counter
Report
Remedy: Specified job history does not exist.
016-799
021-750
021-751
021-770
021-771
021-772
Cause: An illegal print parameter is included.
Remedy: Confirm the print data and option and specify the print data again.
Cause: During an inspection or maintenance request a transmission error occurred
and our Customer Support Center could not be contacted.
Remedy: Check that the phone lines are connected and try sending an inspection
or maintenance request again after a short time. If the error persists, contact the
Customer Support Center.
User Guide10-18
Page 85

Problem solving
Cause and RemedyFault code
024-340
024-341
024-342
024-343
024-344
024-345
024-346
024-347
024-348
024-349
024-350
024-351
024-352
024-353
024-354
024-355
024-356
024-357
024-358
024-359
024-360
024-361
024-362
024-363
024-364
024-365
024-366
024-367
024-368
024-367
024-370
024-371
024-372
024-373
024-374
024-375
Cause: A communication or initialization failure occurred.
Remedy: Power off/power on the machine. If the error is not corrected, contact
the Customer Support Center.
024-746
024-747
027-452
027-500
User Guide
Cause: A feature (one of paper size, tray, output tray, or 2 sided printing) that is
incompatible with the specified paper quality has been specified.
Remedy: Check the print data.
Cause: An illegal print parameter combination was set. For example, a non-standard
size was specified and Tray Selection was set to Auto.
Remedy: Check the print data. In the above case, select Tray 5 (Bypass).
Cause: IP address already exists.
Remedy: Change the IP address.
For information about network settings, refer to the System Administration Guide.
Cause: Unable to resolve SMTP server name during answer E-mail send.
Remedy: Check that the SMTP server settings from CWIS are correct.
10-19Xerox® D110/D125/D136 Printer
Page 86

Problem solving
Cause and RemedyFault code
027-501
027-502
027-720
027-721
027-722
027-724
027-725
027-726
Cause: Unable to resolve POP3 server name when using POP3 protocol.
Remedy: Check that the POP3 server settings from CWIS are correct.
Cause: Unable to login to POP3 server when using POP3 protocol.
Remedy: Check that the user name and password used in the POP3 server from
CWIS are correct.
Cause: Unable to find the server of an application interface destination.
Remedy: Check DNS server application or check whether an application interface
installed on the computer is registered by DNS server or not.
Cause: An application interface destination does not exist.
Remedy: Check whether an interfaced application operates correctly.
Cause: The job was timed out during connection with an application interface
destination. An application linkage destination does not exist.
Remedy: Try to process the job flow.
Cause: An application interface destination could not be accessed.
Remedy: Check whether an interfaced application operates correctly. When it is
operating, check the log. When it is not operating, check the network environments.
Cause: A job operation failed using an application interface.
Remedy: Check whether an application linked operates correctly. When it is
operating, check the log. When it is not operating, check the network environments.
Cause: The job status is unclear during an application interface.
Remedy: Check whether an application linked operates correctly. When it is
operating, check the log. When it is not operating, check the network environments.
027-727
027-737
027-739
027-740
027-741
027-742
027-743
027-744
Cause: A parameter is illegal during an application interface.
Remedy: Try to process the job flow.
Cause: An error occurred while reading data from the job template pool server.
Remedy: Check to see whether you have privileges for the directory storing the
job template.
Cause: Unable to find the specified job template server.
Remedy: Check the path name for the job template server.
Cause: Unable to login to job template server.
Remedy: Check the login user name and password.
Cause: Unable to connect to job template server.
Remedy: Have the network administrator check the network and server
environments.
Cause: Unable to store job template due to insufficient hard disk space.
Remedy: Remove unnecessary data from the hard disk to increase free disk space.
Cause: The specified job template server is incorrect.
Remedy: Check the settings for the job template server.
Cause: There is a problem in the domain name of the job template server.
Remedy: Make sure that the DNS server connection and the domain name are
registered to the DNS server.
User Guide10-20
Page 87

Problem solving
Cause and RemedyFault code
027-745
027-746
027-750
027-751
027-752
027-753
027-770
027-771
Cause: The address of the DNS server is not registered on the machine.
Remedy: Either register the address of the DNS server on the machine or set the
address of the job template server by an IP address.
Cause: The specified job template pool server protocol settings are incorrect.
Remedy: Set up the correct port.
Cause: Attempted to command a print job to a scanned document.
Remedy: Scanned document cannot be printed. Configure the job flow correctly.
Cause: When following the job flow, an error occurred.
Remedy: Check the settings for the job flow.
Cause: In a job flow, a job start was specified before a required item was input.
Remedy: Configure a default to input the required item in the job flow or change
the job flow to have the required item link to the mailbox.
Cause: The necessary port for the job flow is either not enabled or is unavailable.
Remedy: Have your System Administrator check the port status.
Cause: PDL (Printer Description Language) error detected by the controller while
processing a network print job.
Remedy: Cancel and resend the print job. If problem continues, reboot both the
controller and the printer and resend job. If the problem persists, call the Customer
Support Centre for further help/instructions.
Cause: Disk full error message on the controller.
Remedy: Cancel job. Delete unwanted files from the controller. Resend the network
print job.
027-796
027-797
062-277
062-790
065-210
071-210
072-210
Cause: When the machine is configured to only print attached documents when
received by mail, a message with no attachments is discarded upon receipt.
Remedy: To print the mail body or header information as well, change settings in
the CentreWare Internet Services Properties screen.
Refer to “E-mail Print” in the System Administration Guide.
Cause: Invalid received mail output destination.
Remedy: Specify a correct output destination and send the mail again.
Cause: A communications error occurred between the document scan unit and
the document feeder.
Remedy: Contact the Customer Support Center.
Cause: The scanned document is copy-protected.
Remedy: Refer to the Safety Guide, and check to see if the document can be
copied.
Cause: An error occurred with the machine.
Remedy: Contact the Customer Support Center.
Cause: Paper Tray 1 malfunctioned.
Remedy: Contact the Customer Support Center. Trays other than Paper Tray 1
can be used.
Cause: Paper Tray 2 malfunctioned.
Remedy: Contact the Customer Support Center. Trays other than Paper Tray 2
can be used.
User Guide
10-21Xerox® D110/D125/D136 Printer
Page 88

Problem solving
Cause and RemedyFault code
073-210
074-210
075-210
075-211
077-142
078-213
078-214
078-282
078-283
091-311
Cause: Paper Tray 3 malfunctioned.
Remedy: Contact the Customer Support Center. Trays other than Paper Tray 3
can be used.
Cause: Paper Tray 4 malfunctioned.
Remedy: Contact the Customer Support Center. Trays other than Paper Tray 4
can be used.
Cause: Paper Tray 5 (bypass) malfunctioned.
Remedy: Power-cycle the machine. If the tray error is not fixed by performing the
relevant remedy, contact the Customer Support Center.
Cause: A “Pretransfer sensor ON” indicates a jam; this jam may be caused by any
of the following conditions: An error by the Pretransfer sensor, a worn fuser roll,
foreign material (such as paper) in the machine, or using media stock that is not
supported by the machine.
Remedy: Clear jammed paper.
Cause: Paper Tray 5 (Bypass) malfunctioned.
Remedy: Power-cycle the machine. If the tray errors are not fixed by performing
the relevant remedy, contact the Customer Support Center.
Check the paper loaded in Tray 5 and then power off/on the printer.078-281
Power off/on the printer.078-282
Cause: Charge Corotron cleaner failure.
Remedy: Power-cycle the machine. If the error is not fixed by performing the
relevant remedy, contact the Customer Support Center.
091-320
116-701
116-702
116-703
116-710
116-713
116-714
116-720
Cause: Charge Corotron fault.
Remedy: Power off/on the machine.
Cause: 2 sided print could not be made.
Remedy: Print each side separately.
Cause: Printing was performed using a substitute font.
Remedy: Check the print data.
Cause: An error occurred during PostScript processing.
Remedy: Either confirm the print data or click Spool Settings on the Details tab in
the print driver to set bi-directional communications to off.
Cause: A probable cause is that the correct document size could not be judged as
the receive data exceeded the HP-GL/2 spool size.
Remedy: Increase the size assigned to HP-GL/2 auto-layout memory.
Cause: Job was divided and printed due to insufficient disk space.
Remedy: Remove unnecessary data from the hard disk to increase free disk space.
Cause: An HP-GL/2 command error occurred.
Remedy: Check the print data.
Cause: An error occurred during printing as there was insufficient memory.
Remedy: Stop unnecessary ports and remove unnecessary data from the hard disk
to increase free disk space.
User Guide10-22
Page 89

Problem solving
Cause and RemedyFault code
116-740
116-747
116-748
116-749
116-771
116-772
116-773
116-774
116-775
116-776
116-777
116-778
116-790
116-780
Cause: Numerical value operation error occurred as a value exceeding the value
limit of the printer was used in the print data.
Remedy: Check the print data.
Cause: There are too many paper margin values for the HP-GL/2 effective
coordinate area.
Remedy: Reduce the paper margin values, and instruct it to print again.
Cause: There is no plot data in the HP-GL/2 print data.
Remedy: Check the print data.
Cause: Job cancelled because the specified font was unavailable.
Remedy: Install the font or set up a font replacement on the print driver side.
Cause: There was a problem with parameters in the JBIG data. They were
automatically edited.
Remedy: If any problem occurs in job result, try to process the job again.
Cause: There is a problem with the document attached to the received mail.
Remedy: Check the attached document.
124-345
124-346
124-347
124-348
124-349
127-210
127-211
127-212
127-213
Cause: A malfunction occurred in the machine.
Remedy: Power-cycle the machine. If the machine error is not fixed by performing
the relevant remedy, contact the Customer Support Center.
Cause: Communication error between the printer and the controller. Error detected
by the printer.
Remedy: Remove and reinsert the cable connection between the printer and the
controller. Power off and on both the printer and the controller. If the problem
persists, call the Customer Support Center.
Cause: Detected a communication error between the printer and the controller.
Remedy: Remove and reinsert the cable connection between the printer and the
controller. Power off and on both the printer and the controller. If the problem
persists, call the Customer Support Center.
Cause: Detected an internal print check error by the controller.
Remedy: Remove and reinsert the command/video cable between the controller
and the printer. Power off and on both the printer and the controller. If the problem
persists, call the Customer Support Center.
Cause: Detected a mismatch with the software version of the controller.
Remedy: Contact the Customer Support Center for information and/or instructions
to remedy the problem.
User Guide
10-23Xerox® D110/D125/D136 Printer
Page 90

Problem solving
Cause and RemedyFault code
127-220
127-221
127-311
Cause: Detected a communication error of the video system by the controller.
Remedy: Remove and reinsert the cable connection between the printer and the
controller. Power off and on both the printer and the controller. If the problem
persists, call the Customer Support Center.
Cause: Detected a communication error by the controller.
Remedy: Remove and reinsert the cable connection between the printer and the
controller. Power off and on both the printer and the controller. If the problem
persists, call the Customer Support Center.
Cause: Detected a fatal error by the controller.
Remedy: Power on/off both the controller and the printer. If the problem persists,
contact the Customer Support Center.
Remedies are described in this section for situations in which the following messages
are displayed.
Cause and RemedyFault Code
Message
A malfunction occurred.
Power-cycle the machine.
(xxx-yyy)
Cause: An error occurred.
Remedy: Turn off the power, wait until the Control Panel display
goes dark and then turn on power again. If the message persists,
record the displayed contents for (xxx-yyy). Switch off the machine
immediately, wait for the Control Panel display to go dark and
contact the Customer Support Center.
Completed with an error.
(xxx-yyy)
A fault has occurred. The
machine has rebooted.
Select Close. When in
doubt, report the
malfunction to our Call
Center.
(xxx-yyy)
Cause: An error occurred and the job completed.
Remedy: Retry operation after waiting for a period.
Cause: An auto-recoverable internal error occurred and the machine
restarted automatically.
Remedy: Select the Close button. The machine is operating normally
now. If the error persists, call or contact the Customer Support Center.
Machine troubleshooting
Basic troubleshooting
Check the machine status for machine troubleshooting.
User Guide10-24
Page 91

Problem solving
Warning
Precision components and high-voltage power supplies are used on the machine. Never
open or remove machine covers that are screwed shut unless specifically instructed in
the User Guide. A high-voltage component can cause electric shocks. When opening the
panels and covers that are screwed shut to install or detach optional accessories, be sure
to follow instructions in the User Guide. Do not try to alter the machine configuration
or modify any parts. Doing so might cause machine malfunction or fire.
RemedyCheckSymptoms
Power is not
switched ON.
Display is dark.
Unable to print,
or
unable to copy.
machine turned off?
Is the power cord plugged
into the power outlet?
Is the power cord
disconnected from the
machine or the rear of the
rack?
Is power of the correct
voltage being supplied?
Is the Power Saver button
on?
Is the brightness dial set too
low?
the Control Panel?
Is the printer mode Offline?
Turn the power switch on.Is the power switch on the
Turn the power switch off and then firmly plug
in the power cord. Then turn the power switch
on.
Make sure that the power supply is 200 -240 V
(volts), 15 A (amperes).
Make sure that power of capacity compatible
with the specified maximum power
consumption of the machine (2.8 - 3.1 KVA) is
being supplied.
The machine is in the Power Saver mode. Press
the Power Saver button on the Control Panel
to cancel the Power Saver mode.
Adjust display brightness using the Brightness
dial.
Follow the instructions displayed.Is a message displayed on
Press the Machine Status button and from the
Printer Mode, select Online.
User Guide
Is the power cord
disconnected from the
machine or the rear of the
rack?
Turn the power switch off and then firmly plug
in the power cord. Then turn the power switch
on.
10-25Xerox® D110/D125/D136 Printer
Page 92

Problem solving
RemedyCheckSymptoms
Online indicator
does not light
even though you
instructed it to
print.
Tray 5 (Bypass)
printing failed.
print quality.
Text prints
incorrectly (text
is corrupted).
Online indicator
lights, but copies
are not delivered
with Online still
lit.
Is the interface cable
disconnected?
Is the environment correctly
set on the personal
computer?
Is the required interface set?
Is correct paper loaded on
the tray?
Image defect.Unsatisfactory
for printing.
memory.
Turn the power switch off, unplug the power
cord from the power outlet, and check the
interface cable connection.
For information about network settings, refer
to the System Administration Guide.
Check the print driver and other environment
settings on the personal computer.
Check the status of the interface port in use.
For information about network settings, refer
to the System Administration Guide.
Follow the instructions displayed to load paper
of the correct size and instruct it to print again.
Refer to the image quality troubleshooting
section for more information.
Check the application or print driver settings.Non-standard fonts are used
Cancel printing, or purge remaining data.Data remains in machine
Cannot open or
close trays.
Did you open a cover or turn
power off during printing?
Turn the power off without closing or opening
a paper tray. Wait several seconds and then
turn the power switch on. Make sure that the
machine is online (ready to receive data) and
then close or open the paper tray.
User Guide10-26
Page 93

Problem solving
RemedyCheckSymptoms
Copies are not
made at the
desired size.
Paper is often
jammed or
wrinkled.
Is the document scanning
glass or the document cover
dirty?
Is the document made of
highly transparent material
like a transparency?
correct position?
Is the document loaded
correctly?
the correct position?
bent?
standard size?
the paper tray?
Is the paper tray set
properly?
Clean the document feeder glass or the
document cover.
Place the document on the document glass,
and place a white sheet of paper on top of the
document before making a copy.
Load the document correctly.Is the document at the
Properly set the document guides.Are the document guides at
Straighten and properly reset the document.Is the document folded or
Enter the document size.Is the document a non-
Load paper correctly.Is paper loaded properly in
To ensure tray closure, Firmly push it in as far
as possible.
Is the paper curled?
Are the paper and paper tray
settings correct?
Are there any torn pieces of
paper still remaining inside
the machine or is there a
foreign object in the
machine?
Is out-of-spec paper loaded
in the tray?
Is the paper tray loaded past
its maximum fill line?
Is the paper guide set
correctly?
Replace with paper from a new ream.Is the paper damp?
Either turn the paper so that the curl is facing
down in the paper tray, or replace with paper
from a new ream.
Make sure the paper and paper tray selected
match the paper size settings.
Refer to “Paper Tray Settings” in the System
Administration Guide.
Open the door of the machine or slide out the
paper tray to remove the torn paper or the
foreign object.
Replace with paper that meets machine
specifications.
Load paper in the paper tray so that it does not
exceed the maximum fill line.
Load the paper correctly, and apply the paper
guides lightly.
User Guide
10-27Xerox® D110/D125/D136 Printer
Page 94

Problem solving
RemedyCheckSymptoms
Documents are
not fed into the
document
feeder.
An error
message is
displayed after
paper is loaded
in paper Tray 5
(Bypass) and the
Start button is
pressed.
Documents jam
often.
Are the documents too
small?
paper guides at the front
side of paper Tray 5
(Bypass).
Is the right type of
paper/media being used?
Are you trying to copy
irregular shaped documents,
business cards,
transparencies, or thin
documents?
Are you trying to copy
documents affixed with
sticky labels, paper clips or
adhesive tape?
The minimum size of the document that can
be loaded on the document feeder is A5 and
5.5 X 8.5.in.
Set the paper guides to the correct positions.Check the position of the
Make sure the document feeder is loaded
properly with acceptable media.
Remove sticky labels, paper clips or adhesive
tape from the document before copying.
the correct position?
Is part of the document
ripped, and a piece of paper
remaining in the document
feeder?
different sizes, is the Mixed
Size Originals setting set to
ON?
loaded horizontally () on the
document feeder when the
Mixed Size Originals feature
is in use?
Is the document curled?A corner of the
document is
folded.
Image quality problems
Properly set the document guides.Are the document guides at
Open the document feeder cover and check for
pieces of paper.
Set Mixed Size Originals to ON.When importing originals of
Load the A5-size document vertically.Is an A5-size document
Flatten out the curl and load the document
again.
When output image quality is poor, review the following table for solutions.
User Guide10-28
Page 95

Problem solving
If image quality is not improved after performing the relevant remedy, contact the
Customer Support Center.
RemedyCheckSymptoms
The copy is dirty.
The copy has
black lines.
The copy is too
dark.
The copy is too
light.
The copy shifts
slightly.
Is the document glass or
the document cover dirty?
Is the document made of
highly transparent material
like a transparency?
Is the document colored, of
a rough texture or a
blueprint?
Are you making copies of
glossy printing paper?
feeder dirty?
Dark?
Is the copy density set to
Light?
Is the paper shifting or is
the leading edge of the
paper not loaded flush with
the tray corners?
Clean the document glass or the document
cover.
If the document is highly transparent, marks
on the document cover will be copied. Place a
white sheet of paper on the document and
make a copy.
Either adjust the copy density or image quality
and then retry copying.
Glossy printing paper sticks easily to the
document glass and shadows are sometimes
copied and reproduced as dirt. Place a
transparency or highly transparent film under
the document and retry copying.
Clean the document glass.Is the scanning glass on the
Adjust the copy density.Is the copy density set to
Load the paper so it is flush against the paper
tray corners.
Images on the
copy are skewed.
User Guide
correctly?
the tray?
Tray 5 (Bypass) set so that
the tray touches the paper?
Are the document guides at
the correct position?
properly?
Load the document correctly.Is the document loaded
Load paper correctly.Is paper loaded properly in
Load paper correctly.Is the paper guide for paper
Load the document correctly, and align the
document guides with the edge of the
document.
Firmly push in the tray as far as possible.Is the paper tray set
10-29Xerox® D110/D125/D136 Printer
Page 96

Problem solving
is missing on the
copy.
RemedyCheckSymptoms
Replace with paper from a new ream.Is the paper damp?Part of the image
Is the loaded paper folded
or wrinkled?
A stripe pattern
appears in copies.
(smudged,
unclear).
Black dots are
printed.
Black lines are
printed.
Dirt appears at
equal intervals.
Is the document pasted
together or folded in?
Is the document
enlargement ratio set too
large?
depleted or damaged.
depleted or damaged.
depleted or damaged.
document feeder is dirty.
path.
The pasted or folded in section may be curling
back, and risen up from the surface of the
document glass. Place a stack of white sheets
on the document to hold the document down
flat against the document glass.
Some enlargement ratios can cause stripes.
Adjust the copy enlargement ratio.
RemedyCheckSymptoms
Replace with paper from a new ream.Is the paper damp?Printing is faint
Contact the Customer Support Center.The drum cartridge is
Contact the Customer Support Center.The drum cartridge is
Contact the Customer Support Center.The drum cartridge is
Clean the document feeder glass.The scanning glass on the
Print a few pages.Dirt on the paper feed
White dots appear
in black filled
areas.
smudges when
rubbed with your
finger.
- Toner is not fused
to the paper.
- The paper is
dirtied with toner.
The entire paper
area is printed
black.
Contact the Customer Support Center.The drum cartridge is
depleted or damaged.
Load suitable paper.The paper in use is
unsuitable.
Contact the Customer Support Center.The drum cartridge is
depleted or damaged.
Replace with paper from a new ream.Is the paper damp?- Printed toner
Load suitable paper.The paper in use is
unsuitable.
Contact the Customer Support Center.The drum cartridge is
depleted or damaged.
Contact the Customer Support Center.High-voltage power supply
malfunction.
User Guide10-30
Page 97

Problem solving
RemedyCheckSymptoms
Nothing is printed.
stripes appear.
The entire page is
printed faint.
Paper becomes
wrinkled.
Text is blurred.
paper are being fed
simultaneously (doublefeed).
malfunction.
unsuitable.
If the print was made
using Tray 5 (Bypass), the
size and type of the loaded
paper differed from the
setting on the print driver.
be feeding at once.
unsuitable.
Paper is being added while
it is being fed.
Fan the paper and reset.Two or more sheets of
Contact the Customer Support Center.High-voltage power supply
Replace with paper from a new ream.Is the paper damp?White areas or
Load suitable paper.The paper in use is
Load paper of the correct size and type into
Tray 5 (Bypass).
Fan the paper thoroughly before loading it.
Fan the paper thoroughly and reset.Two or more sheets may
Replace with paper from a new ream.The paper in use is
Outline characters
on a colored
background
longwise.
Text or images are
printed at an
angle.
Is the paper damp?
depleted or damaged.
The paper guide in the
paper tray is not set at the
correct position.
Contact the Customer Support Center.The drum cartridge is
Set the horizontal and vertical paper guides to
the correct positions.
User Guide
10-31Xerox® D110/D125/D136 Printer
Page 98

Problem solving
Image is not what was expected
If No, go to next symptom.
Cause and Remedy (Action)Symptoms
The document glass or the document cover is dirty.CauseYesThe image is dirty
Clean the document glass or the document cover.Action
If problem is not solved, go to next Cause/Action.
light
If No, go to next symptom.
Cause
Action
Cause
Action
Action
The document is made of highly transparent
material like a transparency.
If the document is highly transparent, marks on
the document cover will appear on the image. Place
a white sheet of paper on the document and scan.
If problem is not solved, go to next Cause/Action.
The document is colored, of a rough texture or a
blueprint, for example.
Either adjust the copy density or image quality and
then retry scanning.
If problem is not solved, go to next Cause/Action.
Glossy printing paper is being scanned.Cause
Glossy printing paper easily sticks to the document
glass and shadows are sometimes scanned and
reproduced as dirt. Place a transparency or highly
transparent film under the document and retry
scanning.
Scan density is set to Dark, or to Light.CauseYesImage is too dark, or too
Adjust the scan density.Action
If problem is not solved, go to next Cause/Action.
missing
If No, go to next symptom.
Action
Action
The Original Type is inappropriate.Cause
Select an image quality appropriate for the
document.
The document is pasted together or folded in.CauseYesPart of the image is
It is possible that the folded in or pasted part of
the document is not touching the document glass.
Place a stack of white sheets on the document to
hold the document down flat against the document
glass.
User Guide10-32
Page 99

desired size
If No, go to next symptom.
Problem solving
Cause and Remedy (Action)Symptoms
The document glass or the document cover is dirty.CauseYesThe image is not the
Clean the document glass or the document cover.Action
If problem is not solved, go to next Cause/Action.
Cause
Action
Action
The document is made of highly transparent
material like a transparency.
Place a white sheet of paper on the document and
scan.
If problem is not solved, go to next Cause/Action.
The document is misaligned.Cause
Load the document correctly.Action
If problem is not solved, go to next Cause/Action.
The document guides are in an incorrect position.Cause
Load the document correctly, and align the
document guides with the edges of the document.
If problem is not solved, go to next Cause/Action.
The document is a non-standard size.Cause
Enter the document size and then scan.Action
If problem is not solved, go to next Cause/Action.
The document is folded or bent.Cause
Straighten and properly reset the document.Action
Resolution is too low.CauseYesThe image is coarse
Set a higher resolution.Action
Print troubleshooting
This section describes solutions for problems encountered during printing.
1. Unable to print
2. The print result was not what was expected
User Guide
10-33Xerox® D110/D125/D136 Printer
Page 100

Problem solving
Unable to print
printer icon
If No, go to next
symptom.
Causes and ActionsYes/NoSymptoms
The printer is not powered on.CauseYesData remains in the
Turn the power on.Action
If problem is not solved, go to next
Cause/Action.
Cause
Cause
Action
Action
The network cable is disconnected from the
computer.
Connect the network cable to the computer.Action
If problem is not solved, go to next
Cause/Action.
The network cable is disconnected from the
machine.
Connect the network cable to the machine.
For information about network settings, refer
to the System Administration Guide.
If problem is not solved, go to next
Cause/Action.
Printer mode is set to Offline.Cause
Press the Machine Status button and confirm
the Printer Mode in the Machine Status screen.
If Printer Mode is Offline, select Online in the
Printer Mode screen.
If problem is not solved, go to next
Cause/Action.
User Guide10-34
 Loading...