

Page 1

Version 1.4
October 2019
702P05613
Xerox
®
VersaLink
User Guide
®
C7000 Color Printer
Page 2

© 2019 Xerox Corporation. All rights reserved. Xerox®, Xerox and Design®, VersaLink®, FreeFlow®, SMARTsend®,
Scan to PC Desktop
Extensible Interface Platform
®
, MeterAssistant®, SuppliesAssistant®, Xerox Secure Access Unified ID System®, Xerox
®
, Global Print Driver®, and Mobile Express Driver®are trademarks of Xerox Corporation
in the United States and / or other countries.
®
Adobe
PostScript
Apple
Mac OS
Google Cloud Print
, Adobe PDF logo, Adobe®Reader®, Adobe®Type Manager®, ATM™, Flash®, Macromedia®, Photoshop®, and
®
are trademarks or registered trademarks of Adobe Systems, Inc.
®
, Bonjour®, EtherTalk™, TrueType®, iPad®, iPhone®, iPod®, iPod touch®, AirPrint®and the AirPrint Logo®, Mac®,
®
, and Macintosh®are trademarks or registered trademarks of Apple Inc. in the U.S. and other countries.
™
web printing service, Gmail™webmail service, and Android™mobile technology platform are
trademarks of Google, Inc.
®
HP-GL
, HP-UX®, and PCL®are registered trademarks of Hewlett-Packard Corporation in the United States and/or
other countries.
®
IBM
and AIX®are registered trademarks of International Business Machines Corporation in the United States and/or
other countries.
McAfee
®
, ePolicy Orchestrator®, and McAfee ePO™are trademarks or registered trademarks of McAfee, Inc. in the
United States and other countries.
Microsoft
®
, Windows Vista®, Windows®, Windows Server®, and OneDrive®are registered trademarks of Microsoft
Corporation in the United States and other countries.
Mopria is a trademark of the Mopria Alliance.
®
Novell
, NetWare®, NDPS®, NDS®, IPX™, and Novell Distributed Print Services™ are trademarks or registered
trademarks of Novell, Inc. in the United States and other countries.
PANTONE
SGI
®
and other Pantone, Inc. trademarks are the property of Pantone, Inc.
®
and IRIX®are registered trademarks of Silicon Graphics International Corp. or its subsidiaries in the United
States and/or other countries.
Sun, Sun Microsystems, and Solaris are trademarks or registered trademarks of Oracle and/or its affiliates in the
United States and other countries.
®
UNIX
is a trademark in the United States and other countries, licensed exclusively through X/ Open Company Limited.
Wi-Fi CERTIFIED Wi-Fi Direct
®
is a trademark of the Wi-Fi Alliance.
Page 3

Table of Contents
1 Safety ..........................................................................................................................................9
Notices and Safety............... . . . ........................ . . . ........................ . . . . . ....................... . . . ............. 10
Electrical Safety ........ . . ........................ . . . . . ....................... . . . . ........................ . . ........................ . 11
General Guidelines.................... . . . . . ....................... . . . . ........................ . . . ....................... . . . . . 11
Power Cord .................... . . . ........................ . . . ........................ . . . . . ....................... . . . ............. 11
Emergency Power Off......... . . . ........................ . . . ....................... . . . . . ........................ . . .......... 12
Operational Safety............... . . . ........................ . . . ........................ . . . . ........................ . . .............. 13
Operational Guidelines................. . . . . . ........................ . . ........................ . . . . ........................ . 13
Ozone Release ........... . . ........................ . . . . . ....................... . . . . ........................ . . .................. 13
Printer Location ............. . . . . ........................ . . ........................ . . . . . ....................... . . . ............. 13
Printer Supplies . . . . . ....................... . . . ........................ . . . . ....................... . . . . ......................... . 14
Maintenance Safety...... . . . . . ........................ . . ........................ . . . . ....................... . . . . . .................. 15
Printer Symbols................ . . ........................ . . . . . ....................... . . . ........................ . . . .................. 16
Environmental, Health and Safety Contact Information ............... . . . ....................... . . . . . ........... 18
2 Getting Started........................................................................................................................19
Parts of the Printer . . ........................ . . . . . ....................... . . ........................ . . . . . ....................... . . . . . 20
Front View .............. . . . ......................... . . ........................ . . . . . ....................... . . . .................... 20
Internal Parts... . . . . . ....................... . . . ........................ . . . . ....................... . . . . . ........................ . 21
Rear View .. . . . . ....................... . . ......................... . . . ........................ . . . . ........................ . . ....... 22
Configurations............... . . . . . ........................ . ........................ . . . . . ....................... . . . . ............ 23
Control Panel .... . . . . ....................... . . . . . ........................ . . ....................... . . . . . ........................ . 24
Power Options....... . . ........................ . . . . . ....................... . . . ........................ . . . . ....................... . . . . . 26
Powering On the Printer ............... . . . . . ........................ . . ....................... . . . . . ........................ . 26
Powering Off the Printer.............. . . . ....................... . . . . . . ....................... . . ......................... . . . 27
Entering and Exiting Sleep Mode and Low-Power Mode.................... . . . . ....................... . . . . . 27
Power Saver ..................... . . . ........................ . . . . . ....................... . . ......................... . . . ........... 27
Accessing the Printer................ . . ........................ . . . . ....................... . . . . . ........................ . . .......... 29
Logging In ....... . . ........................ . . . . ....................... . . . . . ........................ . . ........................ . . . . 29
Convenience Authentication ............ . . . . . ........................ . . ........................ . . . . ..................... 29
Smart Card . . ........................ . . . ....................... . . . . . ........................ . . ........................ . . . . ....... 29
Introduction to Apps................ . . . ........................ . . . ....................... . . . . . ........................ . . .......... 30
Information Pages ............... . . . ........................ . . . ........................ . . . . . ....................... . . . ............. 31
Printing Information Pages . . . . . ....................... . . . . ........................ . . ........................ . . . . . ....... 31
Configuration Report .................... . . . . . ....................... . . . . ........................ . . ........................ . 32
The Embedded Web Server ...... . . ........................ . . . . ....................... . . . . . ........................ . ........... 33
Accessing the Embedded Web Server ................. . . . . . ....................... . . . . ........................ . . . ... 33
Finding the IP Address of Your Printer ....................... . . . ........................ . . . ........................ . 33
Certificates for the Embedded Web Server .. . ........................ . ........................ . . . . . .............. 34
Downloading the Configuration Report from the Embedded Web Server . ........................ . 34
Xerox®VersaLink®C7000 Color Printer
User Guide
3
Page 4

Table of Contents
Using the Remote Control Panel Feature .. ........................ . . ........................ . . . . .................. 35
Installation and Setup . ........................ . . . . ....................... . . . . . ........................ . . ........................ 36
Installation and Setup Overview .. . . . . ........................ . . . ....................... . . . . . ........................ . 36
Selecting a Location for the Printer ........................ . . . . . ....................... . . . . ........................ . . 36
Connecting the Printer ................ . . . . . ........................ . . . ........................ . . . ....................... . . . . . . ... 37
Selecting a Connection Method . ........................ . . ........................ . . . . ....................... . . . . . .... 37
Connecting to a Computer Using USB. . . ........................ . . . . . ....................... . . . .................... 37
Connecting to a Wired Network .............. . . . . . ........................ . . ........................ . . . . .............. 38
Connecting to a Wireless Network...................... . ........................ . . . . . ....................... . . . . ..... 38
Initial Printer Setup............ . ......................... . . . . ....................... . . . . ........................ . . ........... 44
Configuring AirPrint ......................... . . ....................... . . . . . ........................ . . . ....................... 44
Configuring Google Cloud Print .... . . ........................ . . . . . ....................... . . . . ........................ . . 45
Installing the Software .. . ....................... . . . . . ........................ . . ........................ . . . . ..................... 47
Operating System Requirements ... . . . . . ....................... . . . . ........................ . . ........................ . 47
Installing the Print Drivers for a Windows Network Printer..................... . . ........................ . 47
Installing the Print Drivers for a Windows USB Printer .... . . . . ....................... . . . . . .................. 48
Installing the Drivers and Utilities for Macintosh OS X............. . . . . ........................ . . ........... 48
Installing Drivers and Utilities for UNIX and Linux. ......................... . . ....................... . . . . . . ... 48
Installing the Printer as a Web Service on Devices ........ . . ........................ . . . . . ..................... 49
More Information .. . ........................ . . . . ........................ . . ....................... . . . . . . ....................... . . . .. 50
3 Customize and Personalize...................................................................................................51
Customize and Personalize Overview ... . . . . . ....................... . . . . ........................ . . ........................ . 52
Customizing or Personalizing the Home Screen ..... . . . . ........................ . . . . ........................ . . ....... 53
Hiding or Showing an App on the Home Screen .... . . . . . ........................ . . ....................... . . . . . 53
Rearranging Apps on the Home Screen ... . . . . . ........................ . ......................... . . . . .............. 53
Customizing or Personalizing the Apps .......... . . ......................... . . . ........................ . . . . ............... 54
Customizing or Personalizing the Feature List .. . ....................... . . . . . ........................ . . . ......... 54
Saving Presets.................... . . . . . ....................... . . . . ........................ . . ........................ . . . . . ....... 54
Removing App Customization using the Control Panel...... . . . . . ........................ . . . ................ 55
4 Xerox®Apps.............................................................................................................................57
Xerox®App Gallery . ........................ . . . ......................... . . ....................... . . . . . . ....................... . . . .. 58
®
Xerox
Setting up the Xerox
Accessing the Xerox
Installing or Updating an App from the Xerox
Logging out of your App Gallery Account .............. . . ........................ . . . . . ....................... . . . . . 61
Device ................... . . . . ........................ . . ........................ . . . . . ....................... . . . . ........................ . . 62
Device Overview............. . . . . . ........................ . . ........................ . . . . ....................... . . . . ............ 62
About . . ........................ . . . . ....................... . . . . . ........................ . ......................... . . . . .............. 63
Supply Status. . . . ........................ . . . ........................ . . . ....................... . . . . . . ....................... . . . .. 63
Billing and Usage Counters .. ........................ . . . . ....................... . . . . ......................... . ........... 64
Reset to Factory Defaults .......... . . . . . ....................... . . . ........................ . . . . ....................... . . . . . 65
Remote Services.................. . . . . ....................... . . . . . ........................ . . ........................ . . . . ....... 65
Jobs....................... . . ........................ . . . . ....................... . . . . ........................ . . . ....................... . . . . . 66
App Gallery Overview ........... . . . . . ........................ . . . ........................ . . . ..................... 58
®
App Gallery .............. . . . . ........................ . . ........................ . . . . ........... 58
®
App Gallery ............ . . . . ........................ . . . . ........................ . . .............. 59
®
App Gallery ............... . . . . . ........................ . 60
4
Xerox®VersaLink®C7000 Color Printer
User Guide
Page 5

Table of Contents
Jobs Overview .. . ........................ . . . . . ....................... . . . ........................ . . . . ....................... . . . . . 66
Managing Jobs ........................ . . ........................ . . . . . ....................... . . . ........................ . . . . ... 66
Managing Special Job Types . . . ....................... . . . ........................ . . . ........................ . . . . . ....... 67
Managing Jobs Using the Embedded Web Server.......... . . . . ........................ . . ..................... 70
USB ................. . . . . ....................... . . . . . ........................ . ........................ . . . . . ....................... . . . . ..... 72
USB Overview .. . . . . . ....................... . . . ........................ . . . . ....................... . . . . . ........................ . 72
Printing from a USB Flash Drive ....................... . . . ........................ . . . . . ....................... . . ....... 72
Printing from a USB Flash Drive Already Inserted in the Printer .... . . . . ....................... . . . . . .... 73
@PrintByXerox . ........................ . . ........................ . . . . ....................... . . . . . ........................ . ........... 74
@PrintByXerox Overview .... . . . ........................ . . . ....................... . . . . . ........................ . . .......... 74
Printing with the @PrintByXerox App................... . . . . ....................... . . . . . ........................ . . ... 74
5 Printing......................................................................................................................................75
Printing Overview.............. . . . ........................ . . . ....................... . . . . . ........................ . . . ................ 76
Selecting Printing Options .. . . . ........................ . . ........................ . . . . ........................ . . . ................ 77
Print Driver Help........................ . . ......................... . . . ....................... . . . . . ........................ . . ... 77
Windows Printing Options ....................... . . . . . ........................ . . . ........................ . . . .............. 78
Macintosh Printing Options................... . . . . ....................... . . . . . ........................ . .................. 80
UNIX and Linux Printing . . . . ........................ . . ........................ . . . . . ....................... . . . ............. 81
Mobile Printing Options . ........................ . . . ....................... . . . . . ........................ . . ................. 83
Print Jobs..................... . . . ....................... . . . . . ........................ . . ........................ . . . . ..................... 85
Managing Jobs ........................ . . ........................ . . . . . ....................... . . . ........................ . . . . ... 85
Printing Special Job Types................. . . . . ........................ . . . . ........................ . . ..................... 86
Printing Features............... . ........................ . . . . . ....................... . . . . ........................ . . .................. 90
Selecting Paper Options for Printing ........ . . . . ........................ . . ........................ . . . . . .............. 90
Printing on Both Sides of the Paper ........................ . . . . . ....................... . . . . ........................ . . 90
Xerox Black and White ..................... . . ........................ . . . . ........................ . . . ....................... 91
Print Quality........... . . . ....................... . . . . . ........................ . . ........................ . . . . ..................... 91
Image Options........................ . . . ........................ . . . . . ....................... . . . ........................ . . . . ... 91
Printing Multiple Pages to a Single Sheet .... . . ........................ . . . . ....................... . . . . . ........... 92
Printing Booklets................ . . ......................... . . . ....................... . . . . . ........................ . . .......... 93
Using Special Pages .............. . . . . ........................ . . ........................ . . . . . ....................... . . . ...... 93
Printing Watermarks for Windows ........................ . . . ....................... . . . . . . ....................... . . . .. 95
Orientation .. . . ....................... . . . . ........................ . . ........................ . . . . . ....................... . . . ...... 96
Advanced Tab ................ . . . . . ........................ . ........................ . . . . . ....................... . . . . ............ 97
Using Custom Paper Sizes . . ........................ . . ........................ . . . . ....................... . . . . . .................. 98
Printing on Custom Paper Sizes . . ........................ . . . . ........................ . . ........................ . . . . . ... 98
Defining Custom Paper Sizes........... . . . ....................... . . . . . ........................ . . . ....................... 98
6 Paper and Media ................................................................................................................. 101
Paper and Media Overview................. . . . . ........................ . . . ....................... . . . . . ....................... 102
Supported Paper .... . . . . . ....................... . . . ........................ . . . . ....................... . . . . . ....................... 103
Ordering Paper............... . . . ........................ . . . ........................ . . . . ........................ . . ............ 103
General Paper Loading Guidelines .. ....................... . . . . . ........................ . . ....................... . . . 103
Paper That Can Damage Your Printer............. . . . ........................ . . . ........................ . . . . . ..... 103
Paper Storage Guidelines ................. . . ........................ . . . . ........................ . . . . .................... 104
Xerox®VersaLink®C7000 Color Printer
User Guide
5
Page 6

Table of Contents
Supported Paper Types and Weights .................. . . ........................ . . . . ....................... . . . . ... 104
Supported Standard Paper Sizes... . . . ........................ . . . . ....................... . . . . . ....................... 106
Supported Standard Paper Sizes for Automatic 2-Sided Printing . . ........................ . . ......... 107
Supported Paper Types and Weights for Automatic 2-Sided Printing........................ . . ..... 108
Supported Custom Paper Sizes ...... . . . . . ....................... . . . . ........................ . . ....................... 108
Configuring Tray Settings.. . ........................ . . . . . ....................... . . . . ........................ . . ................ 109
Loading Paper................... . . . . . ....................... . . . ........................ . . . ........................ . . . . . ............ 110
Loading Paper in Trays 1–4 .. . . . ....................... . . . ........................ . . . ........................ . . . . . ..... 110
Loading Paper in the Bypass Tray..................... . . . ........................ . . . . . ....................... . . . .... 114
Printing on Special Paper . ........................ . . . ........................ . . . . . ....................... . . . .................. 118
Envelopes .... . . . . . ........................ . ........................ . . . . . ....................... . . . . ........................ . . . . 118
Labels ........................ . . ........................ . . . . . ....................... . . . ........................ . . . ................ 122
7 Maintenance ........................................................................................................................ 127
General Precautions ....................... . . ........................ . . . . . ....................... . . . ........................ . . . . . 128
Cleaning the Printer .................... . . . . ........................ . . ........................ . . . . . ....................... . . . .... 129
Cleaning the Exterior . . . ........................ . . . ........................ . . . ....................... . . . . . ................ 129
Cleaning the Interior...... . . . . . ........................ . . ........................ . . . . ....................... . . . . . ......... 129
Supplies ........................ . . . . . ........................ . ......................... . . . . ....................... . . . . ................. 134
Consumables ............. . . ........................ . . . . . ....................... . . . . ........................ . . ................ 134
Routine Maintenance Items............ . . . ....................... . . . . . ........................ . . ...................... 134
Ordering Supplies. . . . . . ....................... . . . ........................ . . . ........................ . . . . . ................... 137
Toner Cartridges . . . . ........................ . . . . ....................... . . . . . ........................ . . ...................... 137
Recycling Supplies . ....................... . . . . ........................ . . . ....................... . . . . . ....................... 138
Adjustments and Maintenance Procedures.. ........................ . . . . . ....................... . . . .................. 139
Color Registration ............... . . . . ....................... . . . . . ........................ . . ........................ . . . . ..... 139
Color Calibration............ . . . . . ........................ . . ......................... . . . ....................... . . . . . ......... 139
Adjusting Paper Registration.................. . . . ....................... . . . . . ........................ . . . .............. 139
Adjusting the Altitude .. . . . . ....................... . . . ........................ . . . ........................ . . . . . ............ 142
Managing the Printer . . . . . . ....................... . . ........................ . . . . ........................ . . . . .................... 143
Viewing the Meter Reading..................... . . . ........................ . . . ........................ . . . . ............. 143
Printing the Billing Summary Report..... . . . . ........................ . . ........................ . . . . ................ 143
Moving the Printer ........................ . . . ........................ . . . . . ....................... . . . ........................ . . . . . 144
8 Troubleshooting ................................................................................................................... 145
General Troubleshooting...... . . . . . ........................ . . . ........................ . . . ....................... . . . . . ......... 146
Printer Does Not Power On................... . ........................ . . . . . ....................... . . . . ................. 146
Printer Resets or Powers Off Frequently ......... . . . ....................... . . . . . ........................ . . . ....... 146
Printer Does Not Print ........ . . . . . ....................... . . . ........................ . . . ........................ . . . . . ..... 147
Printing Takes Too Long . . . . . . ........................ . . ........................ . . . . ....................... . . . . . ......... 148
Document Prints from Wrong Tray . ....................... . . . . . ........................ . . ........................ . . 149
Automatic 2-Sided Printing Problems ........ . . . ........................ . . . . . ....................... . . . ........... 149
Printer is Making Unusual Noises ..... . . . . ........................ . . ........................ . . . . . ................... 149
Paper Tray Will Not Close......... . . ........................ . . . . . ....................... . . . ........................ . . . . . 150
Condensation has Formed Inside the Printer ................. . . ........................ . . . . ................... 150
Paper Jams ............... . . . ........................ . . . . ....................... . . . . . ........................ . ....................... 151
6
Xerox®VersaLink®C7000 Color Printer
User Guide
Page 7

Table of Contents
Locating Paper Jams .. ........................ . . . ........................ . . . . . ....................... . . . .................. 151
Minimizing Paper Jams .. . . . . . ........................ . . ........................ . . . . ....................... . . . . . ......... 151
Clearing Paper Jams ....................... . . . ....................... . . . . . ........................ . . ...................... 153
Troubleshooting Paper Jams ................ . . . . . ....................... . . . . ........................ . . ................ 160
Clearing Paper Jams in the Integrated Office Finisher ................... . . . ....................... . . . . . . . 162
Print-Quality Problems... . . . ........................ . . . ........................ . . . . . ....................... . . ................... 165
Controlling Print Quality.......... . . . ........................ . . . . . ....................... . . ......................... . . . . . 165
Paper and Media.. . ....................... . . . . ........................ . . . ....................... . . . . . ....................... 165
Solving Print-Quality Problems ...................... . . . ....................... . . . . . ........................ . . . ....... 166
Getting Help ................... . . . ........................ . . . . ........................ . . ........................ . . . . ................ 171
Viewing Warning Messages on the Control Panel .. . . . . . ........................ . . ........................ . . 171
Viewing Current Errors on the Control Panel .. . . . ....................... . . . . . ........................ . . ........ 171
Using the Integrated Troubleshooting Tools....... . . ........................ . . . . ....................... . . . . . .. 171
Online Support Assistant .. ....................... . . . . ........................ . . ........................ . . . . . ............ 171
More Information about Your Printer .......... . . . . . ....................... . . ........................ . . . . ......... 172
A Specifications........................................................................................................................ 173
Printer Configurations and Options ...................... . . . . . ........................ . . ........................ . . . . ..... 174
Available Configurations..................... . . ........................ . . . . . ....................... . . . . ................. 174
Configurations............... . . . . . ........................ . ........................ . . . . . ....................... . . . . .......... 174
Features...................... . . ........................ . . . . ....................... . . . . . ........................ . ................ 175
Options and Upgrades ..................... . . . ........................ . . . ........................ . . . . . ................... 176
Physical Specifications ................ . . . ........................ . . . ........................ . . . . . ....................... . . ..... 177
Weights and Dimensions...... . . . ....................... . . . . . ........................ . . . ........................ . . . ..... 177
Total Space Requirements.. . . . . . ....................... . . . . ........................ . . ........................ . . . . . ..... 179
Environmental Specifications ........... . . . . ....................... . . . . . ........................ . . ........................ . . 181
Temperature ............... . . . . ........................ . . ........................ . . . . ........................ . . . . ............. 181
Relative Humidity .. . . . ....................... . . . . ........................ . . ........................ . . . . . ................... 181
Elevation ................ . . . . . ........................ . . . ........................ . . . ....................... . . . . . ................ 181
Electrical Specifications..... . . . ........................ . . . ....................... . . . . . ........................ . . . .............. 182
Power Consumption ........... . . . . . ....................... . . . . ........................ . . ........................ . . . . . ..... 182
Power Supply Voltage and Frequency.................... . . ........................ . . . . . ....................... . . . 182
ENERGY STAR Qualified Product. . . . . ....................... . . . ........................ . . . . ....................... . . . 182
Recycling Supplies . ....................... . . . . ........................ . . . ....................... . . . . . ....................... 183
Performance Specifications .. ........................ . . . ....................... . . . . . ........................ . . . .............. 184
Print Speed ................. . ........................ . . . . . ....................... . . . . ........................ . . ................ 184
B Regulatory Information...................................................................................................... 185
Basic Regulations.............. . ........................ . . . . . ....................... . . . . ........................ . . ................ 186
ENERGY STAR ................. . . . . ........................ . . . . ........................ . . ........................ . . . . ......... 186
Power Consumption and Activation Time . ........................ . . ........................ . . . . ................ 186
Default Power Saver Settings ..................... . . ........................ . . . . . ....................... . . . . .......... 187
Environmental Benefits of Duplex Printing ..... . . . ........................ . . . ........................ . . . . . ..... 187
Paper Types .................... . . . . ........................ . . . . ........................ . . ........................ . . . . ......... 187
Regulatory Information for 2.4-GHz and 5-GHz Wireless Network Adapters ................. . . . 187
United States FCC Regulations......... . . . ......................... . . ........................ . . . . . ................... 188
Xerox®VersaLink®C7000 Color Printer
User Guide
7
Page 8

Table of Contents
Canada.................... . . . . ........................ . . . . ........................ . . ........................ . . . . ................ 188
Certifications in Europe.................... . . . . . ........................ . . ........................ . . . . ................... 189
European Union Lot 4 Imaging Equipment Agreement Environmental
Information............. . . . . ........................ . . . . ........................ . . ........................ . . . . ................ 189
Eurasian Economic Community Certification ........................ . . . . . ....................... . . . ........... 189
Germany...... . . . . ........................ . . ........................ . . . . . ....................... . . . ........................ . . . . . 190
Turkey RoHS Regulation ....................... . . . . . ....................... . . . ........................ . . . ................ 190
Safety Certification .. . ......................... . . ....................... . . . . . . ....................... . . . ........................ . 191
Material Safety Data Sheets ....... . . ........................ . . . . ........................ . . . . ........................ . . ..... 192
C Recycling and Disposal ....................................................................................................... 193
All Countries ................ . . . ....................... . . . . . ........................ . . . ........................ . . . ................... 194
North America . ........................ . . . . ........................ . . ........................ . . . . ........................ . . . . ...... 195
European Union............... . . ........................ . . . . . ....................... . . . . ........................ . . ................ 196
Domestic/Household Environment . . . . ........................ . . ........................ . . . . ....................... 196
Professional/Business Environment. . . . . ....................... . . . . . ........................ . ....................... 196
Collection and Disposal of Equipment and Batteries......... . . . . . ........................ . . ............... 197
Battery Symbol Note............... . . . ........................ . . . . ........................ . . ........................ . . . . . . 197
Battery Removal ............ . . . . . ........................ . . ......................... . . . ....................... . . . . . ......... 197
Other Countries.......... . . . . . ....................... . . . ........................ . . . ........................ . . . . . ................... 198
8
Xerox®VersaLink®C7000 Color Printer
User Guide
Page 9

1
Safety
This chapter contains:
• Notices and Safety. ........................ . . . ....................... . . . . . ........................ . . . ........................ . . . ....... 10
• Electrical Safety .................. . . . ........................ . . . . ........................ . . ........................ . . . . .................. 11
• Operational Safety. ........................ . . . ....................... . . . . . ........................ . . ........................ . . . . ....... 13
• Maintenance Safety................. . . . ........................ . . . ........................ . . . . . ....................... . . . ............. 15
• Printer Symbols . ........................ . . . . ........................ . . . . ........................ . . ....................... . . . . . ........... 16
• Environmental, Health and Safety Contact Information ........................ . . . . . ....................... . . . ...... 18
Your printer and the recommended supplies have been designed and tested to meet strict safety
requirements. Attention to the following information ensures the continued safe operation of your
Xerox printer.
Xerox®VersaLink®C7000 Color Printer
User Guide
9
Page 10

Safety
Notices and Safety
Read the following instructions carefully before operating your printer. Refer to these instructions to
ensure the continued safe operation of your printer.
Your Xerox
include safety agency evaluation and certification, and compliance with electromagnetic regulations
and established environmental standards.
The safety and environment testing and performance of this product have been verified using Xerox
materials only.
®
printer and supplies are designed and tested to meet strict safety requirements. These
Note: Unauthorized alterations, which can include the addition of new functions or connection
of external devices, can affect the product certification. For more information, contact your
Xerox representative.
®
10
Xerox®VersaLink®C7000 Color Printer
User Guide
Page 11

Electrical Safety
GGeenneerraall GGuuiiddeelliinneess
WARNING:
• Do not push objects into slots or openings on the printer. Touching a voltage point or
shorting out a part could result in fire or electric shock.
• Do not remove the covers or guards that are fastened with screws unless you are installing
optional equipment and are instructed to do so. Power off the printer when performing
these installations. Disconnect the power cord when removing covers and guards for
installing optional equipment. Except for user-installable options, there are no parts that
you can maintain or service behind these covers.
The following are hazards to your safety:
• The power cord is damaged or frayed.
• Liquid is spilled into the printer.
• The printer is exposed to water.
Safety
• The printer emits smoke, or the surface is unusually hot.
• The printer emits unusual noise or odors.
• The printer causes a circuit breaker, fuse, or other safety device to activate.
If any of these conditions occur, do the following:
1. Power off the printer immediately.
2. Disconnect the power cord from the electrical outlet.
3. Call an authorized service representative.
PPoowweerr CCoorrdd
Use the power cord supplied with your printer.
• Plug the power cord directly into a properly grounded electrical outlet. Ensure that each end of the
cord is connected securely. If you do not know if an outlet is grounded, ask an electrician to check
the outlet.
WARNING: To avoid risk of fire or electrical shock, do not use extension cords, power
strips, or power plugs for more than 90 days. When a permanent outlet receptacle
cannot be installed, use only one factory-assembled extension cord of the appropriate
gauge for each printer or multifunction printer. Always adhere to national and local
building, fire, and electrical codes regarding length of cord, conductor size, grounding,
and protection.
• Do not use a ground adapter plug to connect the printer to an electrical outlet that does not have
a ground connection terminal.
• Verify that the printer is plugged into an outlet that is providing the correct voltage and power.
Review the electrical specification of the printer with an electrician if necessary.
• Do not place the printer in an area where people can step on the power cord.
Xerox
®
VersaLink®C7000 Color Printer
User Guide
11
Page 12

Safety
• Do not place objects on the power cord.
• Do not plug or unplug the power cord while the power switch is in the On position.
• If the power cord becomes frayed or worn, replace it.
• To avoid electrical shock and damage to the cord, grasp the plug when unplugging the power
cord.
The power cord is attached to the printer as a plug-in device on the back of the printer. If it is
necessary to disconnect all electrical power from the printer, disconnect the power cord from the
electrical outlet.
EEmmeerrggeennccyy PPoowweerr OOffff
If any of the following conditions occur, power off the printer immediately and disconnect the power
cord from the electrical outlet. Contact an authorized Xerox service representative to correct the
problem if:
• The equipment emits unusual odors or makes unusual noises.
• The power cable is damaged or frayed.
• A wall panel circuit breaker, fuse, or other safety device has been tripped.
• Liquid is spilled into the printer.
• The printer is exposed to water.
• Any part of the printer is damaged.
12
Xerox®VersaLink®C7000 Color Printer
User Guide
Page 13

Safety
Operational Safety
Your printer and supplies were designed and tested to meet strict safety requirements. These include
safety agency examination, approval, and compliance with established environmental standards.
Your attention to the following safety guidelines helps to ensure the continued, safe operation of your
printer.
OOppeerraattiioonnaall GGuuiiddeelliinneess
• Do not remove any trays when the printer is printing.
• Do not open the doors when the printer is printing.
• Do not move the printer when it is printing.
• Keep hands, hair, neckties, and so on, away from the exit and feed rollers.
• Covers, which require tools for removal, protect the hazard areas within the printer. Do not remove
the protective covers.
• Do not override any electrical or mechanical interlock devices.
• Do not attempt to remove paper that is jammed deeply inside the printer. Switch off the printer
promptly and contact your local Xerox representative.
WARNING:
• The metallic surfaces in the fuser area are hot. Always use caution when removing paper
jams from this area and avoid touching any metallic surfaces.
• To avoid a tip hazard, do not push or move the device with all the paper trays extended.
OOzzoonnee RReelleeaassee
This printer produces ozone during normal operation. The amount of ozone produced is dependent on
copy volume. Ozone is heavier than air and is not produced in amounts large enough to harm anyone.
Install the printer in a well-ventilated room.
For more information in the United States and Canada, go to www.xerox.com/environment. In other
markets, please contact your local Xerox representative or go to www.xerox.com/environment_europe.
PPrriinntteerr LLooccaattiioonn
• Place the printer on a level, solid, non-vibrating surface with adequate strength to hold its weight.
To find the weight for your printer configuration, refer to Physical Specifications.
• Do not block or cover the slots or openings on the printer. These openings are provided for
ventilation and to prevent overheating of the printer.
• Place the printer in an area where there is adequate space for operation and servicing.
• Place the printer in a dust-free area.
• Do not store or operate the printer in an extremely hot, cold, or humid environment.
• Do not place the printer near a heat source.
• Do not place the printer in direct sunlight to avoid exposure to light-sensitive components.
®
Xerox
VersaLink®C7000 Color Printer
User Guide
13
Page 14

Safety
• Do not place the printer where it is directly exposed to the cold air flow from an air conditioning
system.
• Do not place the printer in locations susceptible to vibrations.
• For optimum performance, use the printer at the elevations specified in Elevation.
PPrriinntteerr SSuupppplliieess
• Use the supplies designed for your printer. The use of unsuitable materials can cause poor
performance and a possible safety hazard.
• Follow all warnings and instructions marked on, or supplied with, the product, options, and
supplies.
• Store all consumables in accordance with the instructions given on the package or container.
• Keep all consumables away from the reach of children.
• Never throw toner, toner cartridges, drum cartridges, or waste cartridges into an open flame.
• When handling cartridges, for example toner and such, avoid skin or eye contact. Eye contact can
cause irritation and inflammation. Do not attempt to disassemble the cartridge, which can
increase the risk of skin or eye contact.
Caution: Use of non-Xerox supplies is not recommended. The Xerox Warranty, Service
Agreement, and Total Satisfaction Guarantee do not cover damage, malfunction, or
degradation of performance caused by use of non-Xerox supplies, or the use of Xerox supplies
not specified for this printer. The Total Satisfaction Guarantee is available in the United States
and Canada. Coverage could vary outside these areas. Please contact your Xerox representative
for details.
14
Xerox®VersaLink®C7000 Color Printer
User Guide
Page 15

Safety
Maintenance Safety
• Do not attempt any maintenance procedure that is not specifically described in the
documentation supplied with your printer.
• Clean with a dry lint-free cloth only.
• Do not burn any consumables or routine maintenance items. For information on Xerox
recycling programs, go to www.xerox.com/gwa.
WARNING: Do not use aerosol cleaners. Aerosol cleaners can cause explosions or fires when
used on electromechanical equipment.
When installing the device in a hallway or similar restricted area, additional space requirements can
apply. Ensure that you comply with all workspace safety regulations, building codes, and fire codes for
your area.
®
supplies
Xerox
®
VersaLink®C7000 Color Printer
User Guide
15
Page 16
Safety
Printer Symbols
Symbol Description
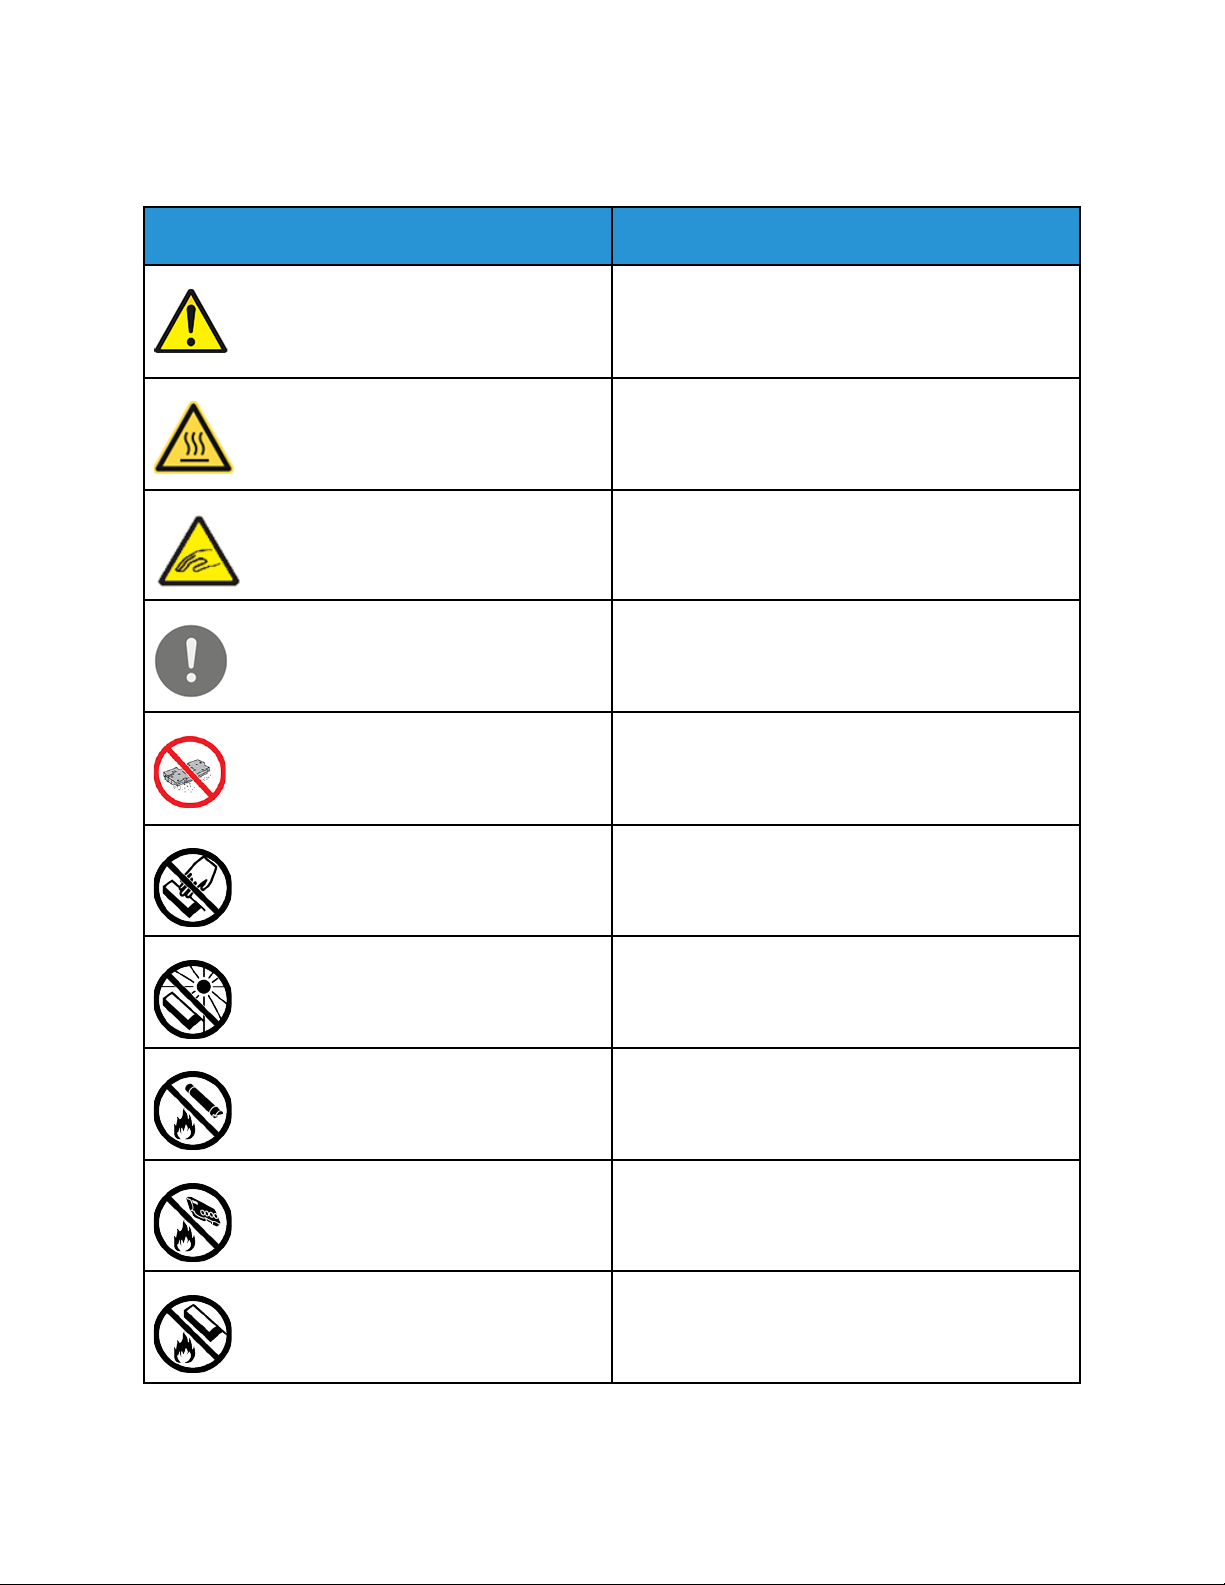
Warning:
Indicates a serious hazard that can result in death or
serious injury if not avoided.
Hot Warning:
Hot surface on or in the printer. Use caution to avoid
personal injury.
Warning: Moving parts. To avoid personal injury, use
caution.
Caution:
Indicates a mandatory action to take in order to
avoid damage to the property.
Caution:
To avoid damage to the property, be careful not to
spill toner when handling the waste cartridge.
Do not touch the part or area of the printer.
Do not expose the drum cartridges to direct sunlight.
Do not burn the toner cartridges.
Do not burn the waste cartridge.
16
Do not burn the drum cartridges.
Xerox®VersaLink®C7000 Color Printer
User Guide
Page 17
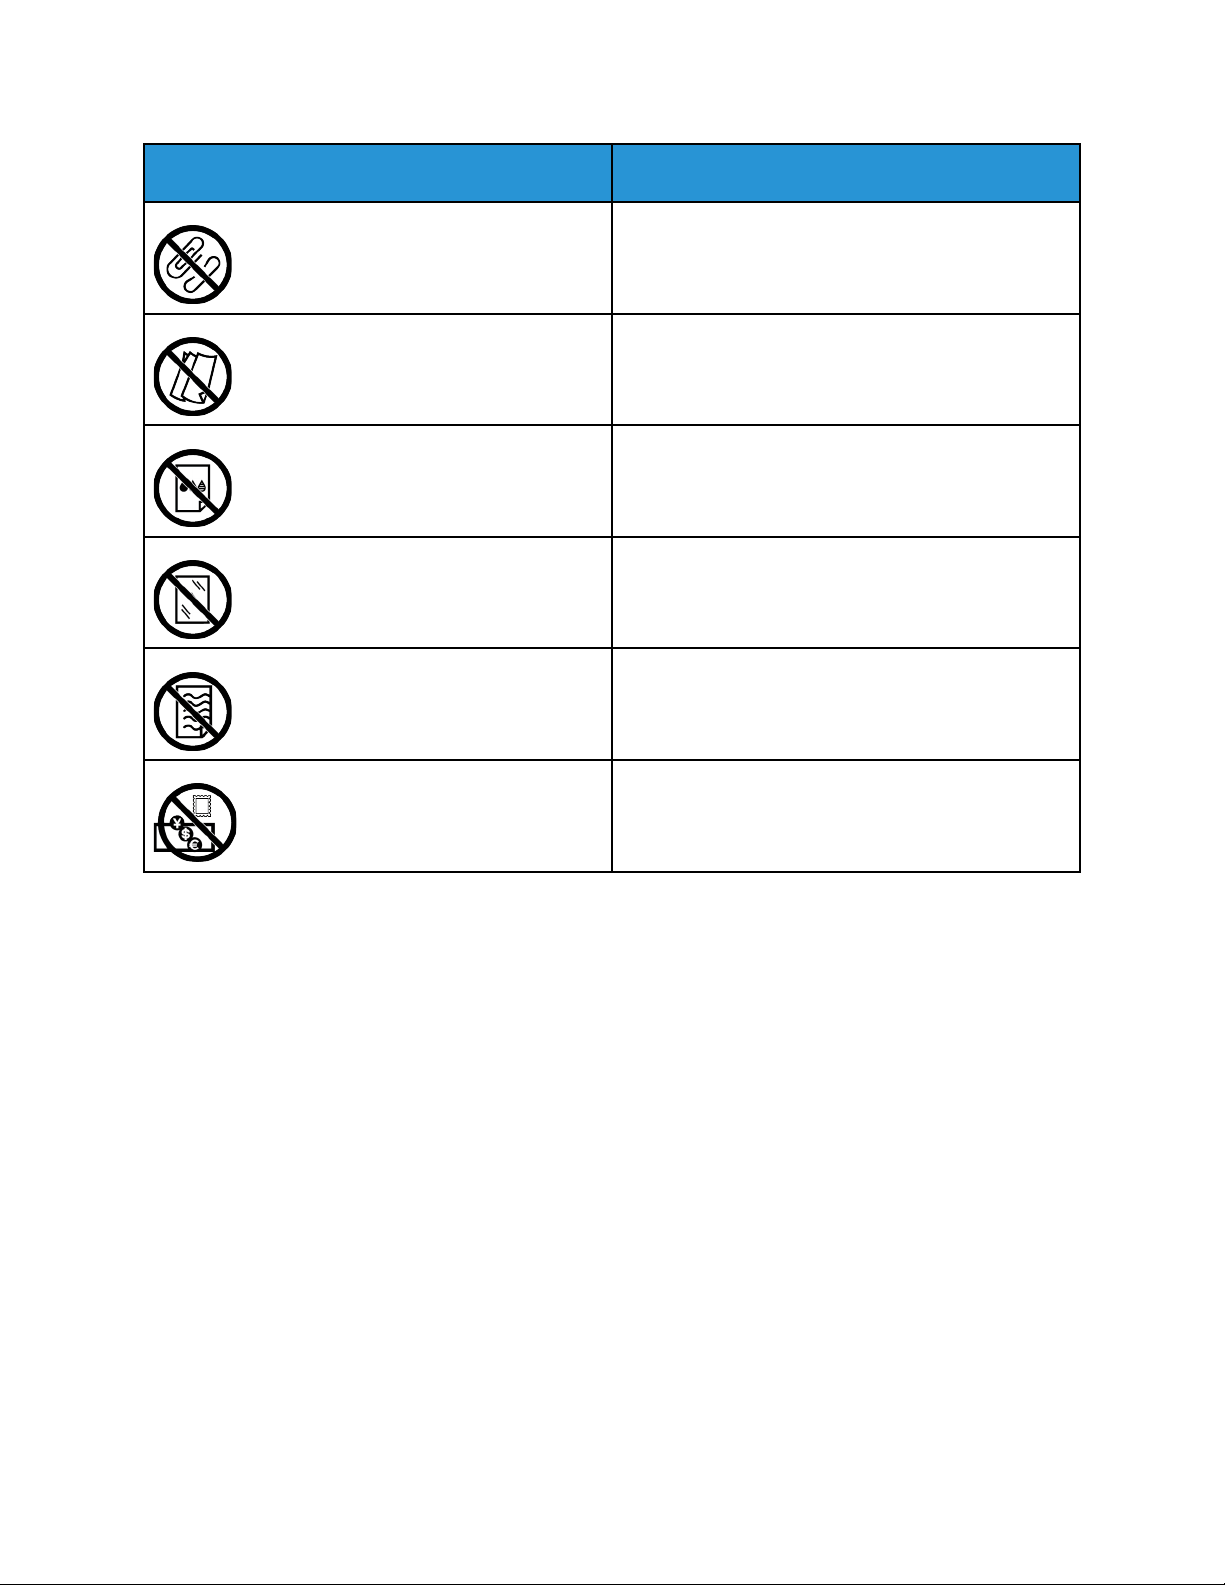
Symbol Description
Do not use paper attached with staples or any form
of binding clip.
Do not use folded, creased, curled, or wrinkled paper.
Do not use inkjet paper.
Do not use transparencies or overhead projector
sheets.
Safety
Do not reload paper previously printed on or used.
Do not copy money, revenue stamps, or postage
stamps.
For details about all the printer symbols that appear on your printer, refer to the Printer Symbols
guide at www.xerox.com/office/VLC7000docs.
Xerox
®
VersaLink®C7000 Color Printer
User Guide
17
Page 18

Safety
Environmental, Health and Safety Contact Information
For more information on Environment, Health, and Safety in relation to this Xerox product and
supplies, contact:
• United States and Canada: 1-800-ASK-XEROX (1-800-275-9376)
• Europe: EHS-Europe@xerox.com
For product safety information in the United States and Canada, go to www.xerox.com/environment.
For product safety information in Europe, go to www.xerox.com/environment_europe.
18
Xerox®VersaLink®C7000 Color Printer
User Guide
Page 19

2
Getting Started
This chapter contains:
• Parts of the Printer ... . . . ........................ . . . . . ....................... . . ......................... . . . . ....................... . . . . . 20
• Power Options................ . . . . . ....................... . . . ......................... . . ........................ . . . . . ..................... 26
• Accessing the Printer . ........................ . . . ........................ . . . . . ....................... . . . ........................ . . . . ... 29
• Introduction to Apps . . ........................ . . ........................ . . . . . ....................... . . . . ........................ . . . ... 30
• Information Pages . ........................ . . . ....................... . . . . . ........................ . . . ........................ . . . ....... 31
• The Embedded Web Server ............... . . . ........................ . . . . . ....................... . . . ........................ . . . . ... 33
• Installation and Setup .. . . ....................... . . . . . ........................ . . ........................ . . . . ........................ . 36
• Connecting the Printer . . . . ....................... . . . . ......................... . . ....................... . . . . . ........................ . 37
• Installing the Software. . . . ....................... . . . . ........................ . . . ....................... . . . . . ........................ . 47
• More Information ......... . . . . . ........................ . . ........................ . . . . ........................ . . . ....................... 50
Xerox®VersaLink®C7000 Color Printer
User Guide
19
Page 20
Getting Started
Parts of the Printer
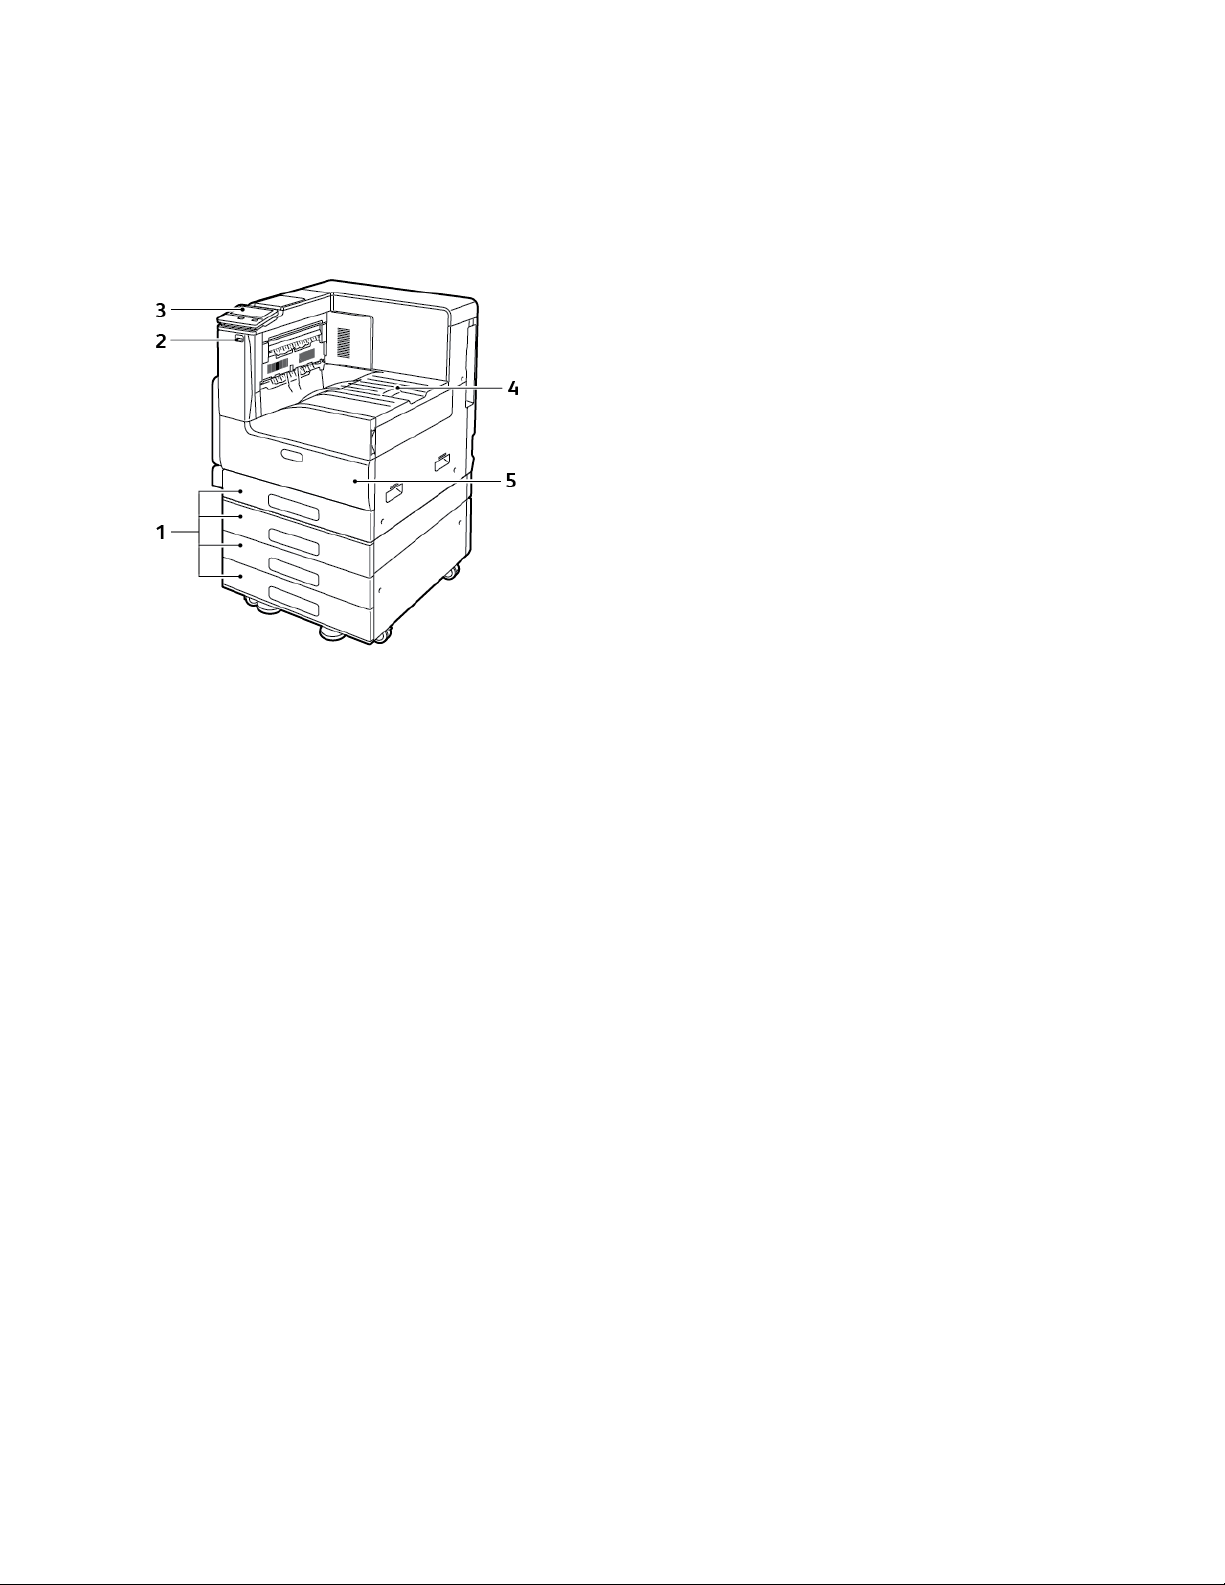
FFrroonntt VViieeww
1. Paper Trays. Configurations vary from 1 to
4 trays
2. USB Port
3. Control Panel
4. Paper Output
5. Front Door
20
Xerox®VersaLink®C7000 Color Printer
User Guide
Page 21
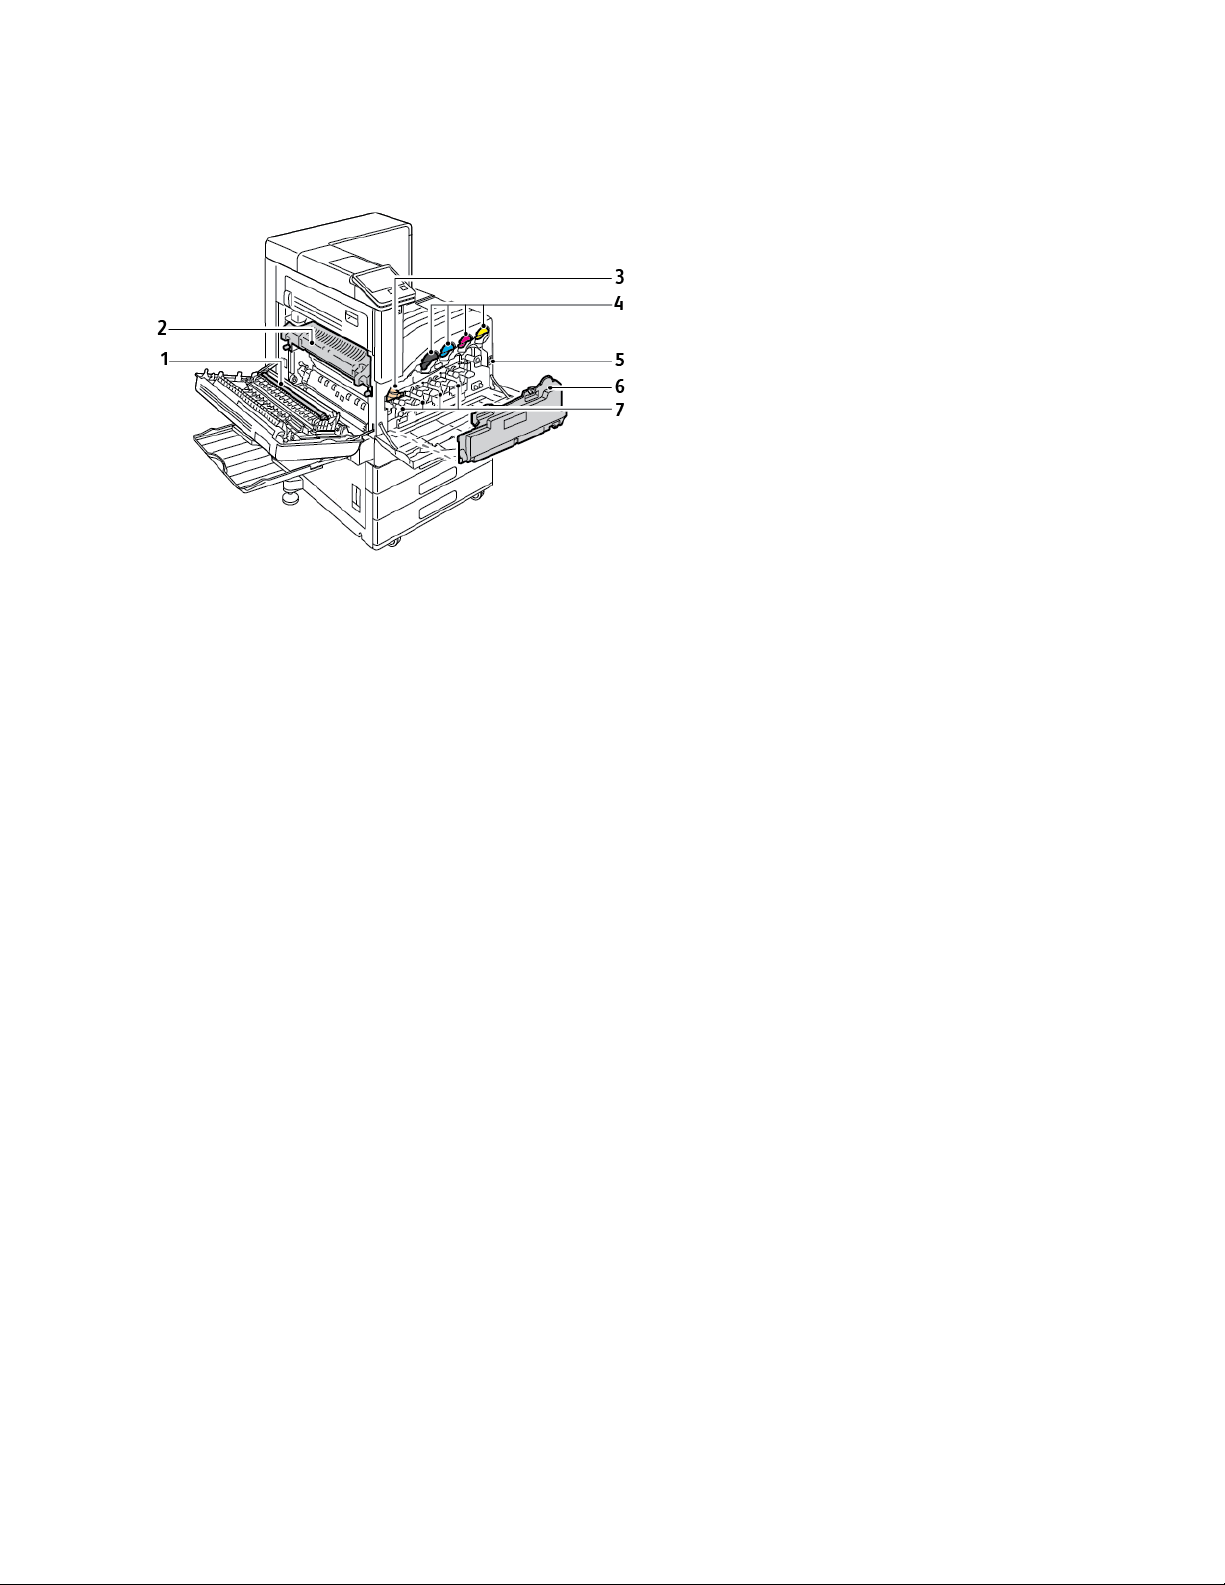
IInntteerrnnaall PPaarrttss
Getting Started
1. Transfer Roll
2. Fuser
3. IBT Belt Release
4. Toner Cartridges
5. Power Switch
6. Waste Cartridge
7. Drum Cartridges
Xerox
®
VersaLink®C7000 Color Printer
User Guide
21
Page 22
Getting Started
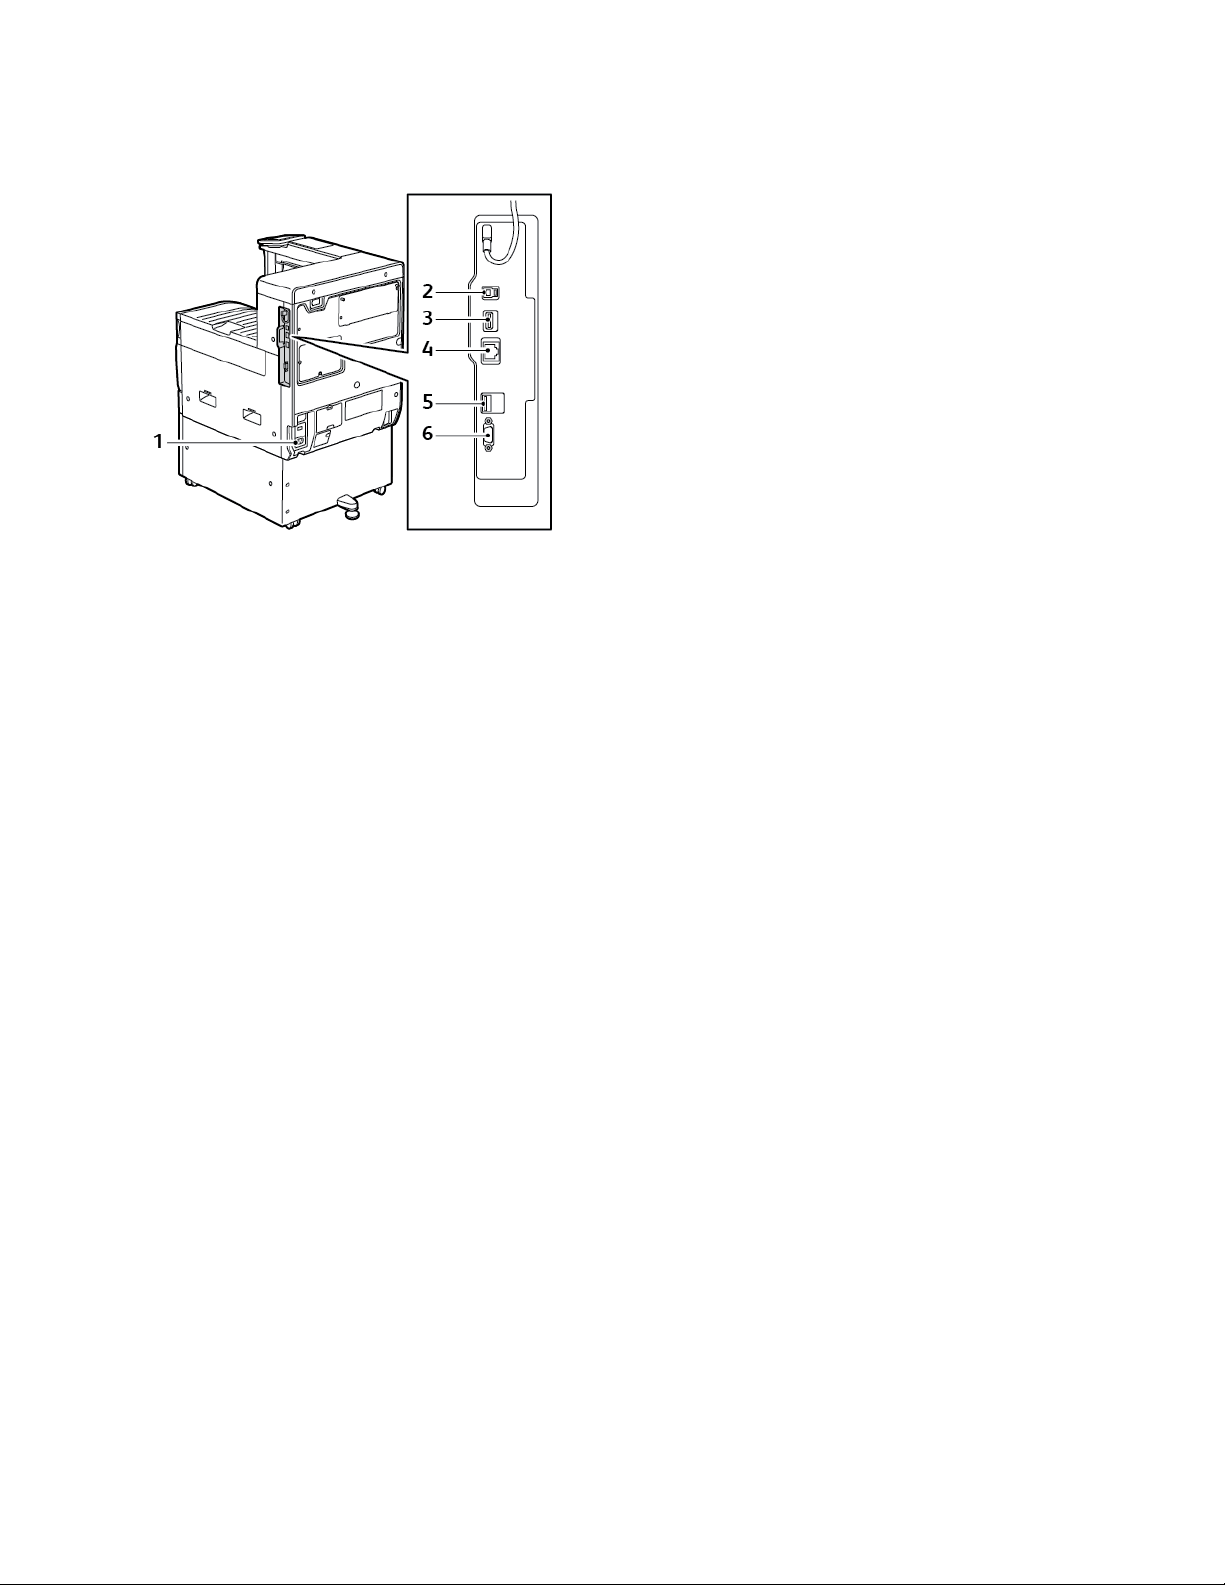
RReeaarr VViieeww
1. Power Connection
2. USB Host Port
3. USB Device Port
4. Wi-Fi Connectivity Port
5. Ethernet Port
6. Foreign Device Interface
22
Xerox®VersaLink®C7000 Color Printer
User Guide
Page 23

CCoonnffiigguurraattiioonnss
Getting Started
1. Base Model; second tray without stand,
optionally available
2. Base Model with Optional Single Tray
Module
3. Base Model, Optional Single Tray Module,
with Stand
4. Base Model, 3-Tray Module, and
Integrated Office Finisher
Xerox
®
VersaLink®C7000 Color Printer
User Guide
23
Page 24
Getting Started
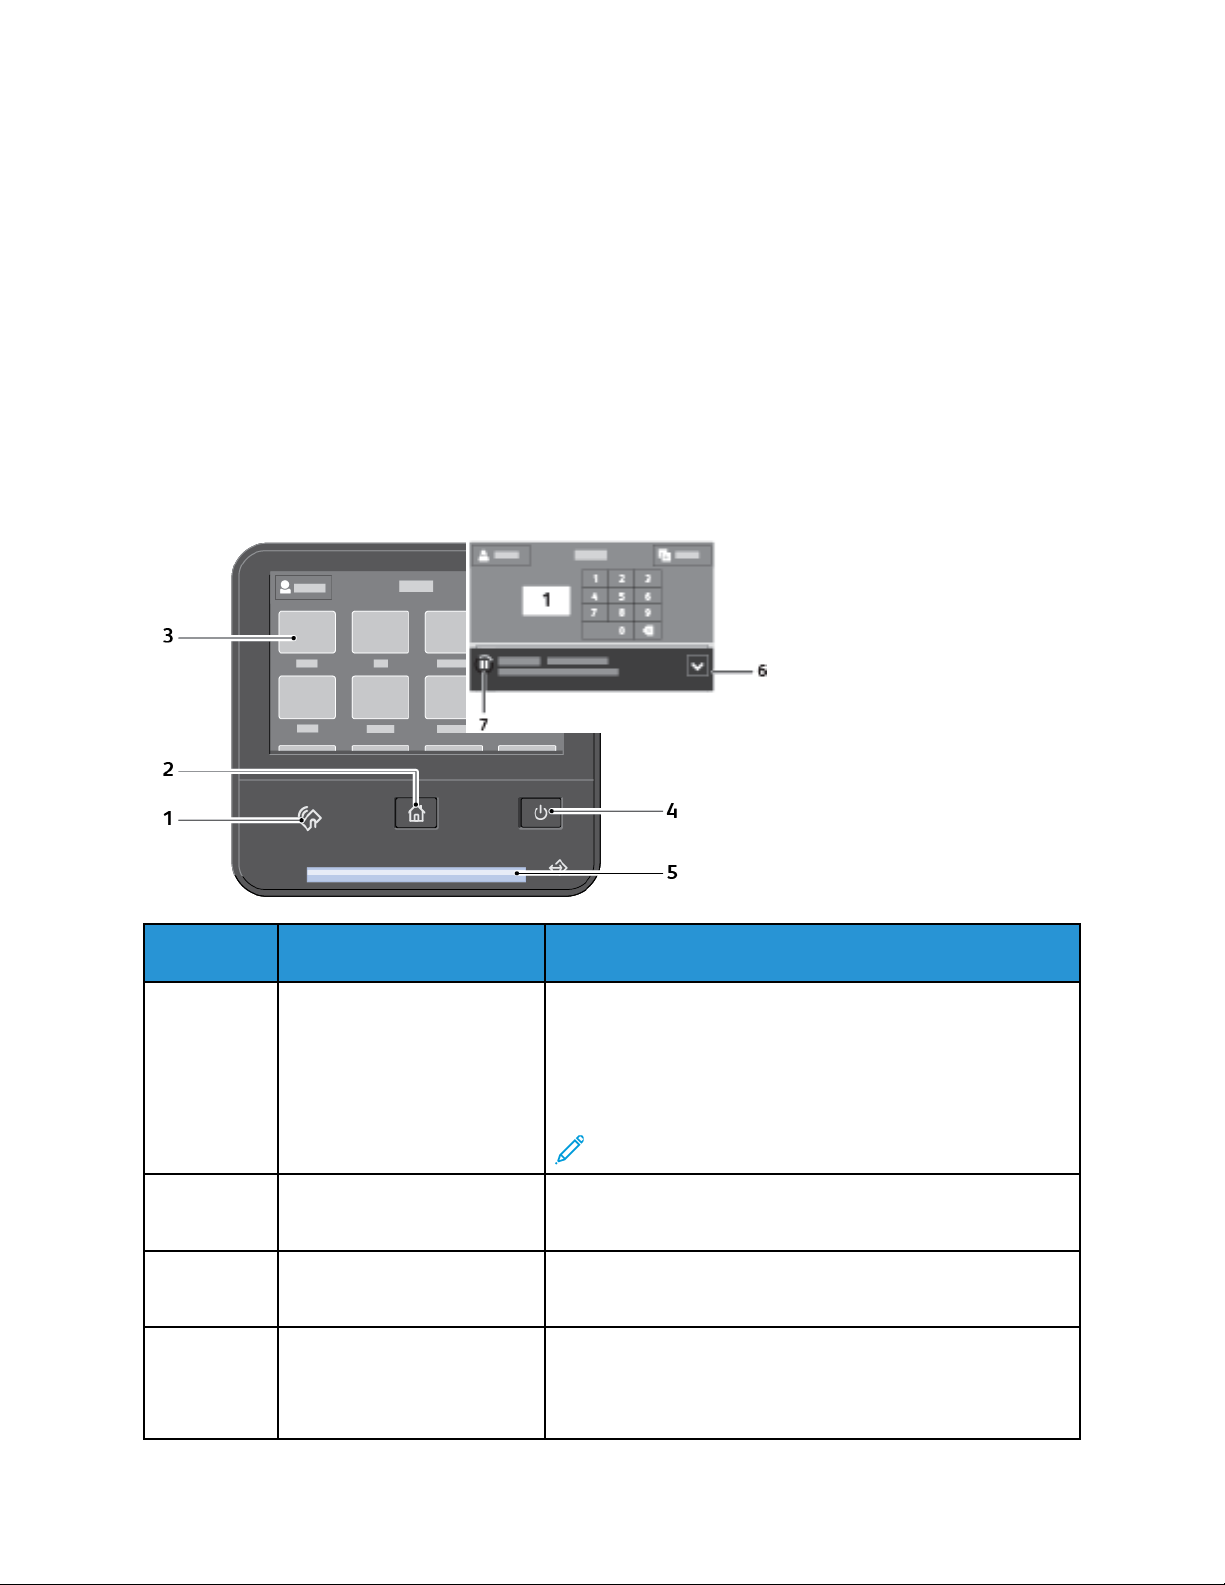
CCoonnttrrooll PPaanneell
The control panel consists of a touch screen and buttons you press to control the functions available
on the printer. The control panel:
• Displays the current operating status of the printer.
• Provides access to printing features.
• Provides access to reference materials.
• Provides access to Tools and Setup menus.
• Prompts you to load paper, replace supplies, and clear jams.
• Displays errors and warnings.
• Provides the Power/Wake button used for powering on or off the printer. This button also supports
the power-saver modes, and blinks to indicate the power status of the printer.
Item Name
1 NFC Area
(Optional)
Description
Near Field Communication (NFC), is a technology that
enables devices to communicate when they are within 10 cm
(4 in.) of each other. Use the NFC area to obtain a network
interface or to establish a TCP/IP connection between your
device and the printer.
Note: The indicator is visible when NFC is activated.
2 Home Button This button provides access to the Home menu for access to
printer features.
3 Touch Screen Display The screen displays information and provides access to
printer functions.
4 Power/Wake Button This button serves several power-related functions.
When the printer is powered off, this button powers on the
printer.
24
Xerox®VersaLink®C7000 Color Printer
User Guide
Page 25

Getting Started
Item Name
5 Status LED This light blinks blue or amber to indicate printer status.
Description
When the printer is powered on, pressing this button displays
a menu on the control panel. From this menu, you can
choose to enter Sleep mode, restart, or power off the printer.
When the printer is powered on, but in a low-power mode or
Sleep mode, pressing this button wakes the printer.
When the printer is powered on, holding this button for 10seconds turns off the printer.
This button blinks to indicate the power status of the printer.
When the light blinks slowly, the printer is in low-power mode
or Sleep mode.
When the light blinks rapidly, the printer is powering down, or
exiting a low-power mode.
Blue
Blinks blue once to acknowledge a successful Authentication
request.
Blinks blue once slowly for a print job initiated at the control
panel.
Blinks blue twice slowly for a print job received from the
network.
Blinks blue rapidly while the printer is powering up, or to
signal detection of a Wi-Fi Direct connection request.
Amber
Blinks amber to indicate an error condition or warning that
requires your attention. For example, an out of toner
condition, a paper jam, or out of paper for the current job.
It also blinks amber to indicate a system error, which typically
is associated with an error code.
6 Notification Banner Notifications and messages are displayed in a pop-up banner
below the apps area. To view the full notification, touch the
center of the banner. After you have reviewed the
information, touch X to close.
7 Pause Icon When a job is being processed, a Pause icon appears in the
notification banner area. To pause the current job, touch the
Pause icon. The job pauses with the option to resume or
delete the job.
Xerox®VersaLink®C7000 Color Printer
User Guide
25
Page 26
Getting Started
Power Options
The Power/Wake button is a single multifunction button on the control panel.
• When used in conjunction with the main power switch, the Power/Wake button powers on the
printer.
• If the printer is already powered on, the Power/Wake button can be used to:
– Restart the printer
– Enter or exit sleep mode
– Enter or exit low-power mode
• The Power/Wake button also flashes when the printer is in low-power mode.
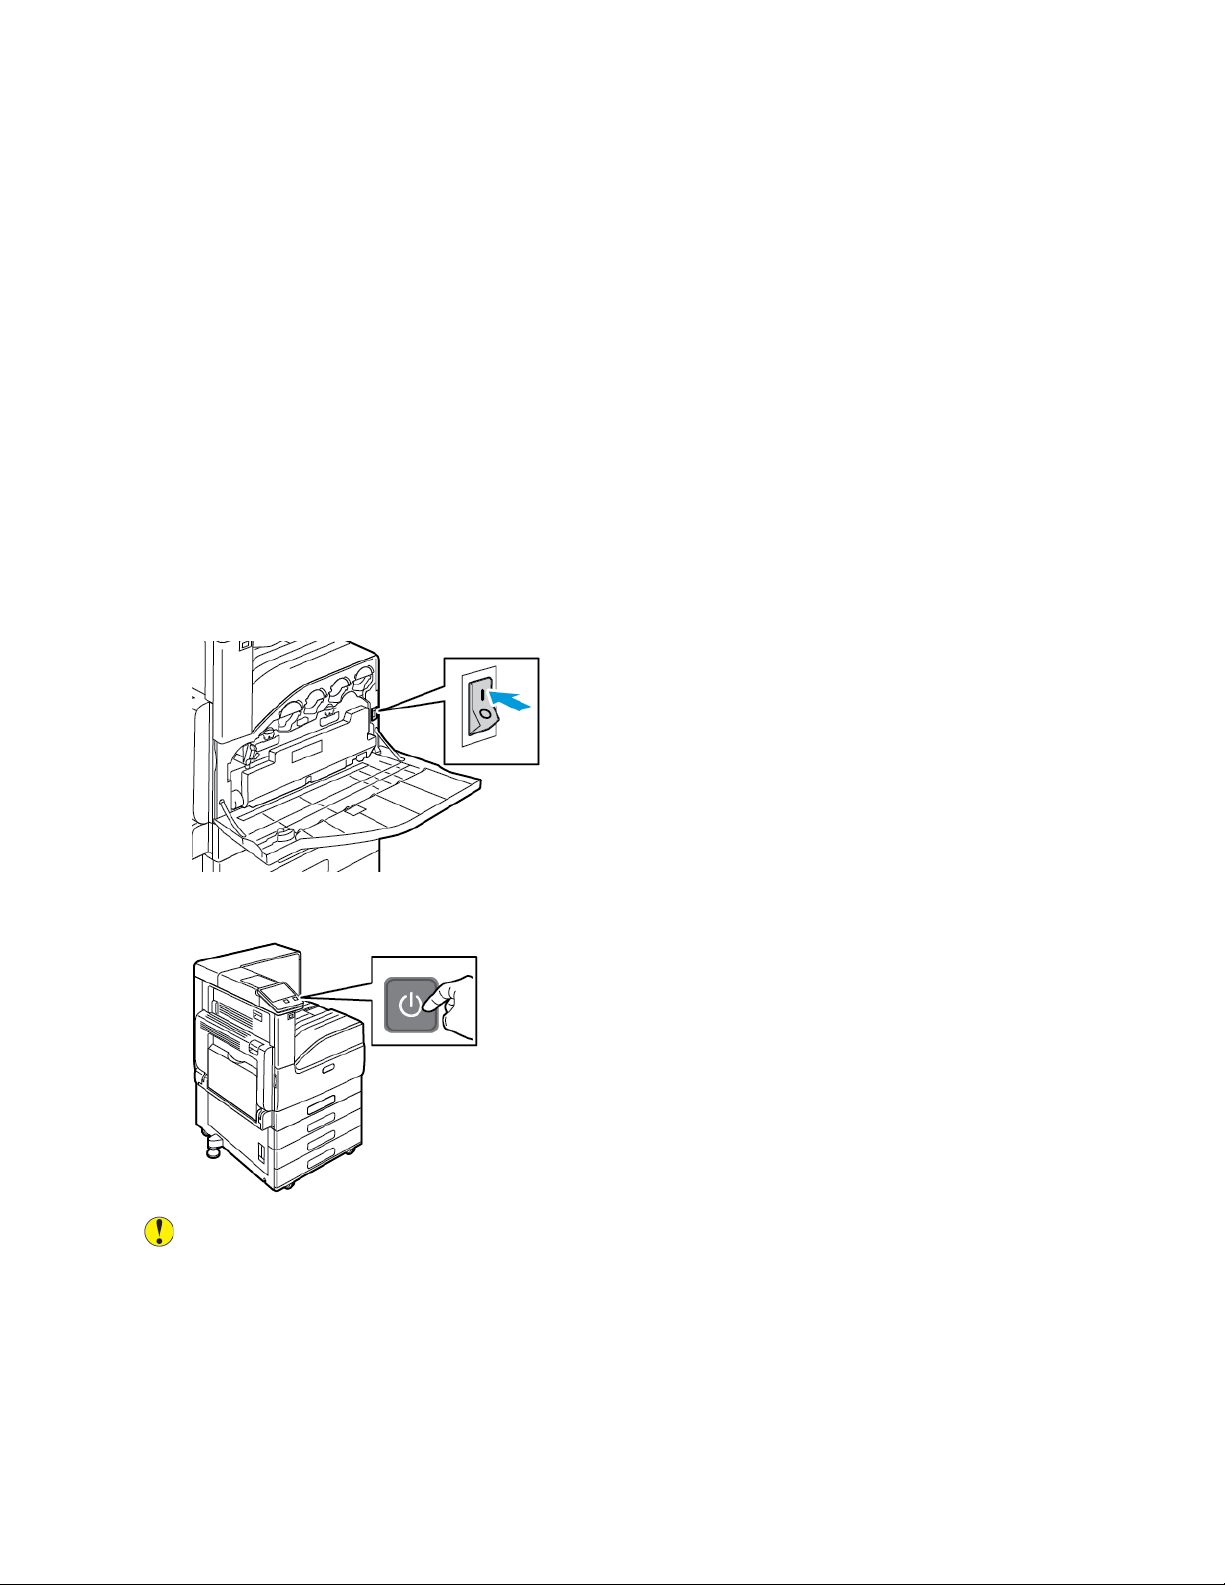
PPoowweerriinngg OOnn tthhee PPrriinntteerr
To power on the printer:
1. To power on the printer, open the front door, and press the power switch to the On position.
2. At the printer control panel, press the Power/Wake button.
Caution: Do not unplug the power cord while the printer powers up.
26
Xerox®VersaLink®C7000 Color Printer
User Guide
Page 27
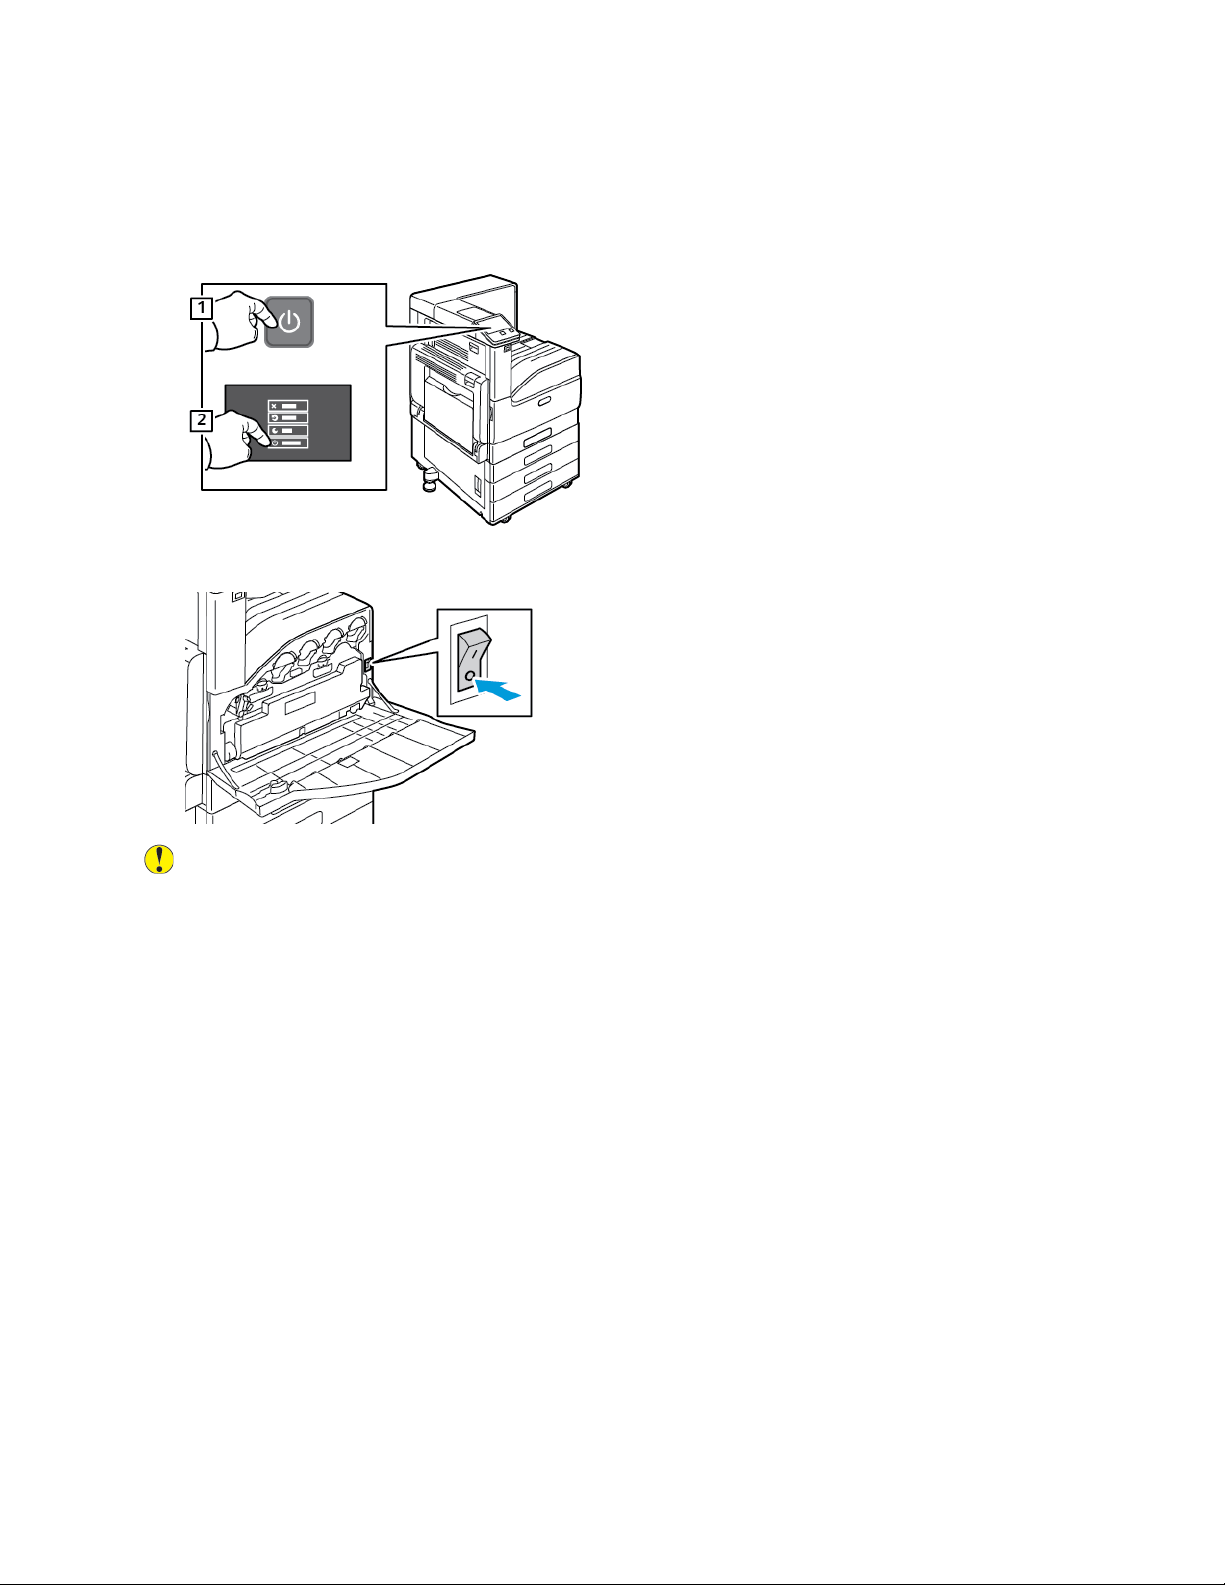
PPoowweerriinngg OOffff tthhee PPrriinntteerr
To power off the printer:
1. At the printer control panel, press the Power/Wake button, then touch Power Off.
2. Open the front door, then press the power switch off.
Getting Started
Caution: Do not unplug the power cord while the printer powers down.
EEnntteerriinngg aanndd EExxiittiinngg SSlleeeepp MMooddee aanndd LLooww--PPoowweerr
MMooddee
After the printer is powered on but is in Sleep Mode or Low-Power Mode:
• The touch screen appears blank and unresponsive.
• The printer exits Low-Power mode or Sleep mode automatically when it receives data from a
connected device.
To wake the printer manually, press the Power/Wake button.
PPoowweerr SSaavveerr
You can set the time the printer spends idle in ready mode before the printer transitions to a lower
power level.
There are two levels of power-saver mode.
Xerox
®
VersaLink®C7000 Color Printer
User Guide
27
Page 28

Getting Started
• Low-Power Timeout: The printer shifts from Ready mode to Low-Power mode to reduce standby
power consumption.
• Sleep Timeout: The printer shifts from Low-Power mode to Sleep mode for a greater reduction in
power consumption.
28
Xerox®VersaLink®C7000 Color Printer
User Guide
Page 29

Getting Started
Accessing the Printer
LLooggggiinngg IInn
Logging in is the process by which you identify yourself to the printer for authentication. If
authentication is set, to access printer features, you log in with your user credentials.
LLooggggiinngg IInn aatt tthhee CCoonnttrrooll PPaanneell
1. At the printer control panel, press the Home button.
2. Touch Log In.
3. Type the User Name using the keypad, then touch Enter.
4. If prompted, enter the password, then touch Enter.
Note: For more information on logging in as system administrator, refer to the System
Administrator Guide at www.xerox.com/office/VLC7000docs.
5. Touch OK.
Note: To access each password-protected service, enter the User Name and password.
CCoonnvveenniieennccee AAuutthheennttiiccaattiioonn
When Convenience Authorization is enabled, users swipe a pre-programmed identification card
through a Proximity Card Reader at the control panel. To use this method, purchase and install a USB
card reader and an authentication server that supports the Xerox
®
Convenience Authentication API.
SSmmaarrtt CCaarrdd
When a Common Access Card system is installed on your Xerox device, access to the printer requires
the use of a Smart Card. There are several models of card readers that are compatible with your
device. To access the printer, insert the pre-programmed identification card into the reader, or place
your card on the reader. If extra security credentials are required, enter the login information at the
control panel.
For more information about configuring a Common Access Card system on your device, refer to the
®
Xerox
VLC7000docs.
VersaLink®Common Access Card System Configuration Guide at www.xerox.com/office/
Xerox
®
VersaLink®C7000 Color Printer
User Guide
29
Page 30

Getting Started
Introduction to Apps
Xerox Apps are a gateway to the features and functions of your device. Standard Apps are already
installed on the device and appear on the Home screen. Some Apps are installed as standard, but
hidden the first time you use the device.
When you log in, the Apps configured for your personal account appear on the control panel.
You can download more Apps for your device from the Xerox
refer to Xerox
®
App Gallery.
®
App Gallery. For more information,
30
Xerox®VersaLink®C7000 Color Printer
User Guide
Page 31

Getting Started
Information Pages
Your printer has a set of information pages that you can print. These pages include configuration and
font information, demonstration pages, and more.
The following Information Pages are available:
Name
Description
Configuration Report The Configuration Report provides printer information
including installed options, network settings, port
setup, tray information, and more.
Billing Summary Report The Billing Summary Report provides information
about the device and a detailed listing of the billing
meters and sheet counts.
Supplies Usage Report The Supplies Usage Report provides coverage
information and part numbers for reordering supplies.
PostScript Font List
The PostScript Font List provides a printout of all
PostScript fonts that are available on the printer.
Note: PostScript
Fonts are optional.
PCL Font List The PCL Font List provides a printout of all PCL fonts
that are available on the printer.
Demonstration Print Demonstration Print provides a demonstration of the
current print quality.
Startup Page The Startup Page provides basic printer configuration
and network information.
Job History Report The printer retains information on previous print jobs,
including the date, time, job type, document name,
output color, paper size, number of pages, and results.
The status of a maximum of 200 jobs prints on the Job
History Report.
PPrriinnttiinngg IInnffoorrmmaattiioonn PPaaggeess
1. At the printer control panel, press the Home button.
2. Touch Device→About→Information Pages.
3. To print an information page, touch the needed page.
4. To return to the Home screen, press the Home button.
Xerox
®
VersaLink®C7000 Color Printer
User Guide
31
Page 32

Getting Started
CCoonnffiigguurraattiioonn RReeppoorrtt
The Configuration Report provides product information including installed options, network settings,
port setup, tray information, and more.
PPrriinnttiinngg tthhee CCoonnffiigguurraattiioonn RReeppoorrtt
1. At the printer control panel, press the Home button.
2. Touch Device→About→Information Pages.
3. Touch Configuration Report.
4. To return to the Home screen, press the Home button.
32
Xerox®VersaLink®C7000 Color Printer
User Guide
Page 33

Getting Started
The Embedded Web Server
The Embedded Web Server is the administration and configuration software that is installed in the
printer. It allows you to configure and administer the printer from a Web browser.
The Embedded Web Server requires:
• A TCP/IP connection between the printer and the network in Windows, Macintosh, UNIX, or Linux
environments.
• TCP/IP and HTTP enabled in the printer.
• A network-connected computer with a Web browser that supports JavaScript.
AAcccceessssiinngg tthhee EEmmbbeeddddeedd WWeebb SSeerrvveerr
At your computer, open a Web browser. In the address field, type the IP address of the printer, then
press Enter or Return.
FFiinnddiinngg tthhee IIPP AAddddrreessss ooff YYoouurr PPrriinntteerr
To install the print driver for a network-connected printer, you need the IP address of your printer. You
also need the IP address to access the settings of your printer through the Embedded Web Server. You
can view the IP address of your printer on the control panel or on the Configuration Report.
Note: To view the TCP/IP address on the control panel, wait until the printer has been on for 2
minutes. If the TCP/IP address is 0.0.0.0, or begins with 169, it indicates a network connectivity
issue. However, note that if Wi-Fi is set as the primary Ethernet connection, 0.0.0.0 is shown for
the printer’s IP address.
VViieewwiinngg tthhee IIPP PPrriinntteerr AAddddrreessss oonn tthhee CCoonnttrrooll PPaanneell
To view the IP address of the printer on the control panel:
1. At the printer control panel, press the Home button.
2. Touch Device→About.
3. Record the IP address from the display.
4. To return to the Home screen, press the Home button.
OObbttaaiinniinngg tthhee PPrriinntteerr IIPP AAddddrreessss ffrroomm tthhee CCoonnffiigguurraattiioonn RReeppoorrtt
To obtain the printer IP address from the Configuration Report:
1. At the printer control panel, press the Home button.
2. Touch Device→About→Information Pages.
3. Touch Configuration Report.
The IP address appears in the Connectivity section of the Configuration Report for IPv4 or IPv6.
4. To return to the Home screen, press the Home button.
®
Xerox
VersaLink®C7000 Color Printer
User Guide
33
Page 34

Getting Started
CCeerrttiiffiiccaatteess ffoorr tthhee EEmmbbeeddddeedd WWeebb SSeerrvveerr
Your device includes a self-signed HTTPS certificate. The device generates the certificate
automatically during device installation. The HTTPS certificate is used to encrypt communications
between your computer and the Xerox device.
Note:
• The Embedded Web Server page for your Xerox device can display an error message that
the security certificate is not trusted. This configuration does not lessen the security of the
communications between your computer and the Xerox device.
• To eliminate the connection warning in your Web browser, you can replace the self-signed
certificate with a signed certificate from a Certificate Authority. For information on
obtaining a certificate from a Certificate Authority, contact your Internet Service Provider.
For information on obtaining, installing, and enabling certificates, refer to the System Administrator
Guide at www.xerox.com/office/VLC7000docs.
DDoowwnnllooaaddiinngg tthhee CCoonnffiigguurraattiioonn RReeppoorrtt ffrroomm tthhee
EEmmbbeeddddeedd WWeebb SSeerrvveerr
From the Embedded Web Server, you can download and save a copy of the Configuration Report to
your computer hard drive. Use Configuration Reports from multiple devices to compare software
versions, configurations, and compliance information.
To download a copy of the Configuration Report from the Embedded Web Server:
1. At your computer, open a Web browser. In the address field, type the IP address of the printer,
then press Enter or Return.
Note: For details about obtaining the IP address of your printer, refer to Finding the IP
Address of Your Printer.
2. To download the Configuration Report scroll to the bottom of the page, then, in the Quick Links
section, click Download Configuration Report.
Note: If this feature does not appear, log in as a system administrator.
The document is saved automatically as an XML file in the default download location on your
computer hard drive. To open the Configuration Report, use an XML viewer.
34
Xerox®VersaLink®C7000 Color Printer
User Guide
Page 35

Getting Started
UUssiinngg tthhee RReemmoottee CCoonnttrrooll PPaanneell FFeeaattuurree
The Remote Control Panel feature in the Embedded Web Server allows you to access the printer
control panel remotely from a Web browser.
Note: To access the Remote Control Panel, first enable the feature. For details, contact your
system administrator or refer to the System Administrator Guide at www.xerox.com/office/
VLC7000docs.
To access the Remote Control Panel feature:
1. At your computer, open a Web browser. In the address field, type the IP address of the printer,
then press Enter or Return.
Note: For details about obtaining the IP address of your printer, refer to Finding the IP
Address of Your Printer.
2. In the Quick Links area, click Remote Control Panel.
Note: If the Remote Control Panel option is not displayed or fails to load, contact your
system administrator.
3. To restrict other users from accessing the device control panel when you are connected remotely
to the device, click the Lock Device Control Panel option.
Note: If a local user attempts to access the control panel while the device control panel is
locked, the control panel does not respond. A message appears on the control panel,
confirming that the control panel is locked and the device is being controlled remotely.
4. To enable remote access to the device control panel, click Request Session. The remote control
panel sends a request to the local control panel.
• If the local control panel is inactive, the remote control panel session is activated
automatically.
• If a local user is active on the device, a Remote Session Request message appears on the local
control panel. The local user chooses to accept or deny the request. If the request is accepted,
the remote control panel session is activated. If the request is denied, a Request Denied
message appears in the Embedded Web Server.
Note: If the system administrator requests a remote session, if the request is denied, an
option to override the local session is displayed.
Xerox
®
VersaLink®C7000 Color Printer
User Guide
35
Page 36

Getting Started
Installation and Setup
For reference:
• Installation Guide packaged with your printer
• Online Support Assistant at www.xerox.com/office/VLC7000docs
IInnssttaallllaattiioonn aanndd SSeettuupp OOvveerrvviieeww
Before you print, ensure that your computer and the printer are plugged in, powered on, and
connected. Configure the initial settings of the printer, then install the print driver software and
utilities on your computer.
You can connect to your printer directly from your computer using USB, or connect to a network using
an Ethernet cable or wireless connection. Hardware and cabling requirements vary for the different
connection methods. Routers, network hubs and switches, modems, Ethernet cables, and USB cables
are not included with your printer and must be purchased separately. Xerox recommends an Ethernet
connection because it is typically faster than a USB connection, and it provides access to the
Embedded Web Server.
For more information, refer to the System Administrator Guide at www.xerox.com/office/
VLC7000docs.
SSeelleeccttiinngg aa LLooccaattiioonn ffoorr tthhee PPrriinntteerr
1. Select a dust-free area with temperatures from 10-32°C (50-90°F), and relative humidity 10-85%.
Note: Sudden temperature fluctuations can affect print quality. Rapid heating of a cold
room can cause condensation inside the printer, directly interfering with image transfer.
2. Place the printer on a level, solid, non-vibrating surface with adequate strength to hold the weight
of the printer. The printer must be horizontal with all four feet in solid contact with the surface. To
find the weight for your printer configuration, refer to Weights and Dimensions. Select a location
with adequate clearance to access supplies and to provide proper ventilation. To find the
clearance requirements for your printer, refer to Total Space Requirements.
3. After positioning the printer, connect it to the power source and computer or network.
36
Xerox®VersaLink®C7000 Color Printer
User Guide
Page 37

Getting Started
Connecting the Printer
SSeelleeccttiinngg aa CCoonnnneeccttiioonn MMeetthhoodd
You can connect the printer to your computer using a USB cable, Ethernet cable, or wireless
connection. The method that you select depends on how your computer is connected to the network.
A USB connection is a direct connection and is the easiest to set up. An Ethernet connection is used
to connect to a network. If you are using a network connection, it is important to understand how
your computer is connected to the network.
Note: Hardware and cabling requirements vary for the different connection methods. Routers,
network hubs, network switches, modems, Ethernet cables, and USB cables are not included
with your printer and must be purchased separately.
USB
If you connect the printer to one computer and do not have a network, use a USB connection. A
USB connection offers fast data speeds, but typically not as fast as a network connection.
Note: To access the Embedded Web Server, a network connection is required.
Network
If your computer is connected to an office network or home network, use an Ethernet cable to
connect the printer to the network. You cannot connect the printer directly to the computer. A
connection through a router or network switch is required. An Ethernet network can be used for
one or more computers and supports many printers and systems simultaneously. An Ethernet
connection is typically faster than USB and allows you direct access to the settings of the printer
using the Embedded Web Server.
Wireless Network
If your environment includes a wireless router or wireless access point, you can connect the printer
to the network with a wireless connection. A wireless network connection provides the same access
and services as a wired connection. A wireless network connection is typically faster than USB and
allows direct access to the settings of the printer using the Embedded Web Server.
CCoonnnneeccttiinngg ttoo aa CCoommppuutteerr UUssiinngg UUSSBB
• Windows 7, Windows 8.1, Windows Server 2008, Windows 10, Windows Server 2008 R2, and
Windows Server 2012.
• Macintosh OS X version 10.10 and later.
• UNIX and Linux: Your printer supports connection to various UNIX platforms through the network
interface.
To connect the printer to the computer using a USB cable:
1. Connect the B end of a standard A/B USB 2.0 or USB 3.0 cable to the USB Port on the back of the
printer.
2. Connect the A end of the USB cable to the USB port on the computer.
3. If the Windows Found New Hardware Wizard appears, cancel it.
4. Install the print driver.
Xerox
®
VersaLink®C7000 Color Printer
User Guide
37
Page 38

Getting Started
For more information, refer to Installing the Software.
CCoonnnneeccttiinngg ttoo aa WWiirreedd NNeettwwoorrkk
1. Ensure that the printer is powered off.
2. Attach a Category 5 or better Ethernet cable from the printer to the network or router socket. Use
an Ethernet switch or router, and two or more Ethernet cables. Connect the computer to the
switch or router with one cable, then connect the printer to the switch or router with the second
cable. Connect to any port on the switch or router except the uplink port.
3. Attach the power cord, then plug in the printer and power it on.
4. Set the network IP printer address, or set up the printer for automatic printer IP detection. For
more information, refer to the System Administrator Guide at www.xerox.com/office/
VLC7000support.
CCoonnnneeccttiinngg ttoo aa WWiirreelleessss NNeettwwoorrkk
A wireless local area network (WLAN) provides the means to connect 2 or more devices in a LAN
without a physical connection. The printer can connect to a wireless LAN that includes a wireless
router or wireless access point. Before connecting the printer to a wireless network, the wireless router
must be configured with a service set identifier (SSID) and any necessary credentials.
Note: Wireless networking is available only on printers with the optional Wireless Network
Adapter installed.
CCoonnffiigguurriinngg tthhee PPrriinntteerr ffoorr aa WWiirreelleessss NNeettwwoorrkk
Note: Before you configure wireless network settings, install the Xerox®Wireless Network
Adapter Kit.
If you purchased and installed a Wireless Network Adapter Kit, you can connect the device to a
wireless network. If the device is connected to a wired network, you can configure wireless networking
at the device, or use the Embedded Web Server. For details on configuring wireless network settings,
refer to the System Administrator Guide at www.xerox.com/office/VLC7000docs.
Note: After the Wireless Network Adapter is installed, remove it only as necessary. For
information on removing the adapter, refer to Removing the Wireless Network Adapter.
IInnssttaalllliinngg tthhee WWiirreelleessss NNeettwwoorrkk AAddaapptteerr
The optional wireless network adapter plugs in to the back of the control board. After the adapter is
installed, and wireless networking is enabled and configured, the adapter is able to connect to a
wireless network.
To install the Wireless Network Adapter:
1. Power off the printer.
38
Xerox®VersaLink®C7000 Color Printer
User Guide
Page 39

a. At the control panel, press the Power/Wake button, then touch Power Off.
b. Open the front door, then press the power switch off.
Getting Started
Caution: Do not unplug the power cord while the printer powers down.
2. Remove the packaging from the Wireless Network Adapter.
3. To install the Wireless Network Adapter, follow the instructions provided with the Wireless
Network Adapter.
Caution: Pulling on the adapter can cause damage. Once the adapter is installed, remove it
only as needed, and as directed in the Wireless Network Adapter removal instructions. For
details, refer to Removing the Wireless Network Adapter.
4. Configure the Wi-Fi settings. For details about configuring the Wi-Fi settings, refer to the System
Administrator Guide at www.xerox.com/office/VLC7000docs.
®
Xerox
VersaLink®C7000 Color Printer
User Guide
39
Page 40

Getting Started
RReemmoovviinngg tthhee WWiirreelleessss NNeettwwoorrkk AAddaapptteerr
To remove the Wireless Network Adapter:
1. Power off the printer:
a. At the printer control panel, press the Power/Wake button, then touch Power Off.
b. Open the front door, then press the power switch to the Off position.
Caution: Do not unplug the power cord while the printer powers down.
2. To release the Wireless Network Adapter from the connection panel on the side of the printer,
gently grasp the adapter and push the release lever to the side. Carefully pull the adapter away
from the printer.
Caution: Do not use force to pull on the Wireless Network Adapter. If the latch is released
properly, the adapter pulls out easily. Pulling on the adapter can damage it.
40
Xerox®VersaLink®C7000 Color Printer
User Guide
Page 41

Getting Started
3. Connect the printer to your computer with a USB cable or to the network with an Ethernet cable.
4. Power on the printer:
a. Open the front door, then press the power switch to the On position.
b. At the printer control panel, press the Power/Wake button.
Note: If the printer was installed previously in a wireless network environment, it could retain
setup and configuration information from that environment. To prevent the printer from
attempting to connect to the previous network, reset the wireless settings. For more
information, refer to the System Administrator Guide at www.xerox.com/office/VLC7000docs.
®
Xerox
VersaLink®C7000 Color Printer
User Guide
41
Page 42

Getting Started
CCoonnnneeccttiinngg ttoo aa WWii--FFii NNeettwwoorrkk aatt tthhee CCoonnttrrooll PPaanneell
To connect to a Wi-Fi network at the control panel:
1. At the printer control panel, press the Home button.
2. Log in as administrator. For details, refer to the System Administrator Guide at www.xerox.com/
office/VLC7000docs.
3. Touch Device→Connectivity→Wi-Fi.
4. To enable the Wi-Fi feature, touch the enable toggle button.
5. To connect automatically to an existing Wi-Fi network:
a. In the list of available Wi-Fi networks, touch the required network.
Note: If the required Wi-Fi network is not listed, or if the required network uses WPS,
configure the connection manually. For details, refer to step 6.
b. If needed, to log in to the network, type the password.
c. To select a Wi-Fi frequency band, touch Wi-Fi Band, then select an option.
Note: The Wi-Fi frequency band is set to AUTO by default.
d. Touch OK.
6. To connect manually to a Wi-Fi Network:
a. Touch Manual Setup.
b. In the first field, type a name for the Wi-Fi network, then touch Enter.
c. Touch Network Type, then select an option.
d. Touch Security, then select an option.
e. Touch Wi-Fi Protected Setup (WPS), then select an option.
Note: For a WPS setup with a Push Button Connection (PBC), select PBC.
f. Touch OK.
42
Xerox®VersaLink®C7000 Color Printer
User Guide
Page 43

CCoonnffiigguurriinngg tthhee PPrriimmaarryy NNeettwwoorrkk aatt tthhee CCoonnttrrooll PPaanneell
You can set the primary network connection type at the device control panel.
Note:
• A Primary Network setup is required only if the optional Wi-Fi network connection kit is
installed and enabled.
• By default, without a Wi-Fi network connection, the primary network is set to Ethernet.
When the kit is installed and enabled, the device acquires two network connections. One
network connection is primary, and the other network connection is secondary.
• The following features are available only over the primary network connection:
– IPsec
– SMTP
– SNTP
– WSD scan
– Scan to SFTP, Scan to SMB, Scan to Email
– LDAP
Getting Started
– UPnP discovery
– ThinPrint
– EIP Web Service
• If you remove the Wi-Fi network connection module, the primary network connection is set
to Ethernet.
To configure the primary network at the control panel:
1. At the printer control panel, press the Home button.
2. Log in as administrator. For details, refer to the System Administrator Guide at www.xerox.com/
office/VLC7000docs.
3. Touch Device→Connectivity→Primary Network.
4. Select the appropriate network connection type for the device.
5. To apply the changes and restart the device, at the prompt, touch Restart Now.
CCoonnnneeccttiinngg ttoo WWii--FFii DDiirreecctt
You can connect to your printer from a Wi-Fi mobile device, such as a tablet, computer, or
smartphone, using Wi-Fi Direct. Wi-Fi Direct is disabled by default.
Note: Wireless networking is available only on printers with the optional Wireless Network
Adapter installed.
To connect with Wi-Fi Direct, follow the directions provided with your mobile device.
®
Xerox
VersaLink®C7000 Color Printer
43
User Guide
Page 44

Getting Started
IInniittiiaall PPrriinntteerr SSeettuupp
Before installing the printer software, verify that the printer is set up correctly. Setup includes
enabling the optional features and assigning an IP address for the Ethernet network connection. The
installation wizard starts automatically the first time the printer is powered on. The installation wizard
prompts the system administrator to configure the following settings:
• Language
• Network Connection
• Proxy Server Setup
• Date and Time
• Measurements
• LDAP Settings
• Apps Setup
• Security Settings
For more information on configuring the printer settings, refer to the System Administrator Guide at
www.xerox.com/office/VLC7000docs.
CCoonnffiigguurriinngg AAiirrPPrriinntt
AirPrint®is a software feature that allows you to print from wired or wireless Apple iOS-based mobile
devices and Mac OS-based devices without the need to install a print driver. AirPrint-enabled printers
allow you to print directly from a Mac, an iPhone, iPad, or iPod touch. You can use AirPrint to print
from a wired device or a wireless device without using a print driver.
Note:
®
• Not all applications support AirPrint
• Wireless devices must join the same wireless network as the printer.
• For AirPrint to function, both IPP and Bonjour
• The device that submits the AirPrint job must be on the same subnet as the printer. To allow
devices to print from different subnets, configure your network to pass multicast DNS traffic
across subnets.
• The Mac OS device must be Mac OS 10.10 or later.
.
®
(mDNS) protocols must be enabled.
44
Xerox®VersaLink®C7000 Color Printer
User Guide
Page 45

Getting Started
• AirPrint-enabled printers work with all models of iPad, iPhone (3GS or later), and iPod touch
(third generation or later), running the latest version of iOS.
1. At your computer, open a Web browser. In the address field, type the IP address of the printer,
then press Enter or Return.
Note: If you do not know the IP address for your printer, refer to Finding the IP Address of
Your Printer.
2. In the Embedded Web Server, click Home→Connectivity.
Note: If this feature does not appear, log in as a system administrator.
3. For Mobile Printing, click AirPrint.
4. To enable AirPrint, click the Enable toggle button.
Note: AirPrint is enabled by default when IPP and Bonjour®(mDNS) are both enabled.
• To change the printer name, in the Name field, enter a new name.
• To enter a location for the printer, in the Location field, enter the location of the printer.
• To enter a physical location or address for the printer, in the Geo-Location field, enter the
geographic latitude and longitude coordinates in decimal form. For example, use coordinates
such as 45.325026, -122.766831 for a location.
5. Click OK.
6. To activate your changes, at the prompt, click Restart Now.
CCoonnffiigguurriinngg GGooooggllee CClloouudd PPrriinntt
Google Cloud Print allows you to print documents that are stored in the cloud without using a print
driver.
Before you begin:
• Set up a Google email account.
• Configure the printer to use IPv4.
• Configure Proxy Server settings as needed.
To configure Google Cloud Print:
1. At your computer, open a Web browser. In the address field, type the IP address of the printer,
then press Enter or Return.
Note: If you do not know the IP address for your printer, refer to Finding the IP Address of
Your Printer.
2. In the Embedded Web Server, click Home→Connectivity.
3. For Mobile Printing, click Google Cloud Print.
4. To enable Google Cloud Print, click the Enable toggle button.
5. Click OK.
6. Restart the printer, then wait 2 minutes for the printer to connect.
7. Refresh your Web browser, then for Mobile Printing, click Google Cloud Print.
8. Click Printer Registration.
®
Xerox
VersaLink®C7000 Color Printer
45
User Guide
Page 46

Getting Started
9. Click Register.
A printer registration page prints.
10. To register the printer, in your Web browser, type the URL provided, or use your mobile phone to
scan the barcode.
After the printer is registered, a confirmation status window appears.
11. To access the Google Cloud Print feature, in your Google account, click Manage Your Printer.
Note: The default printer name appears in this format: Model name (MAC address).
46
Xerox®VersaLink®C7000 Color Printer
User Guide
Page 47

Getting Started
Installing the Software
Before installing driver software, verify that the printer is plugged in, powered on, connected correctly,
and has a valid IP address. The IP address usually appears in the upper, right corner of the control
panel. If you cannot find the IP address, see Finding the IP Address of Your Printer.
Note:
If the Software and Documentation disc is not available, download the latest drivers from www.
xerox.com/office/VLC7000drivers.
OOppeerraattiinngg SSyysstteemm RReeqquuiirreemmeennttss
• Windows 7, Windows 8.1, Windows Server 2008, Windows 10, Windows Server 2008 R2, and
Windows Server 2012.
• Macintosh OS X version 10.10 and later.
• UNIX and Linux: Your printer supports connection to various UNIX platforms through the network
interface.
IInnssttaalllliinngg tthhee PPrriinntt DDrriivveerrss ffoorr aa WWiinnddoowwss NNeettwwoorrkk
PPrriinntteerr
1. Insert the Software and Documentation disc into the appropriate drive on your computer. If the
installer does not start automatically, navigate to the drive, and double-click the Setup.exe
installer file.
2. Select your printer model.
3. Click Install Drivers.
4. Select Install Print Driver.
5. At the License Agreement, click I Agree.
6. From the list of discovered printers, select your printer.
Note: When installing drivers for a network printer, if your printer does not appear in the
list, click the IP Address or DNS Namebutton. In the IP Address or DNS Name field, type
the IP address of your printer, then click Search to locate and select your printer. If you do
not know the IP address of the printer, refer to Finding the IP Address of Your Printer.
7. Click Next.
8. If needed, you can name your printer by typing a name in the Queue Name field.
9. Select a Print Driver.
10. Click Install.
11. If needed, set the printer as the default printer.
Note: Before selecting Share Printer, contact your system administrator.
12. To complete the installation, click Finish, then click Close.
Xerox
®
VersaLink®C7000 Color Printer
User Guide
47
Page 48

Getting Started
IInnssttaalllliinngg tthhee PPrriinntt DDrriivveerrss ffoorr aa WWiinnddoowwss UUSSBB PPrriinntteerr
1. Insert the Software and Documentation disc into the appropriate drive on your computer. If the
installer does not start automatically, navigate to the drive, and double-click the Setup.exe
installer file.
2. Click Install Software.
3. At the License Agreement, select I Agree, then click Next.
4. To install the printer support software, select Software, then click Next.
5. In the Software and Documentation window, clear the check box for any unnecessary options.
6. Click Next.
7. To complete the installation, click Finish.
IInnssttaalllliinngg tthhee DDrriivveerrss aanndd UUttiilliittiieess ffoorr MMaacciinnttoosshh OOSS XX
1. Insert theSoftware and Documentation disc into the appropriate drive on your computer.
Note: The latest print drivers are also available for download from www.xerox.com/office/
VLC70XXdrivers.
2. Open Xerox
3. To run Xerox
®
Print Drivers 3.xx.x.dmg/.pkg as needed for your printer.
®
Print Drivers 3.xx.x.dmg/.pkg, double-click the appropriate file name.
4. When prompted, click Continue.
5. To accept the license agreement, click I Agree.
6. To accept the current installation location, click Install, or select another location for the
installation files, then click Install.
7. If prompted, enter your password, then click OK.
8. From the list of discovered printers, select your printer, then click Next.
9. If your printer does not appear in the list of discovered printers:
a. Click the Network Printer Icon.
b. Type the IP address of your printer, then click Continue.
c. Select your printer in the list of discovered printers, then click Continue.
10. If your printer was not detected, verify that the printer is powered on and that the Ethernet or
USB cable is connected properly.
11. To accept the print queue message, click OK.
12. Select or clear the Set Printer as Default and Print a Test Page check boxes.
13. Click Continue, then click Close.
IInnssttaalllliinngg DDrriivveerrss aanndd UUttiilliittiieess ffoorr UUNNIIXX aanndd LLiinnuuxx
For more information on installing print drivers and utilities for UNIX and Linux, refer to UNIX and
Linux Printing.
48
Xerox®VersaLink®C7000 Color Printer
User Guide
Page 49

Getting Started
IInnssttaalllliinngg tthhee PPrriinntteerr aass aa WWeebb SSeerrvviiccee oonn DDeevviicceess
Web Services on Devices (WSD) allows a client to discover and access a remote device and its
associated services across a network. WSD supports device discovery, control, and use.
IInnssttaalllliinngg aa WWSSDD pprriinntteerr uussiinngg tthhee AAdddd DDeevviiccee WWiizzaarrdd
1. At your computer, click Start, then select Devices and Printers.
2. To launch the Add Device Wizard, click Add a Device.
3. In the list of available devices, select the one you want to use, then click Next.
Note: If the printer you want to use does not appear in the list, click the Cancel button.
Add the WSD printer manually using the Add Printer Wizard.
4. Click Close.
IInnssttaalllliinngg aa WWSSDD pprriinntteerr uussiinngg tthhee AAdddd PPrriinntteerr WWiizzaarrdd
1. At your computer, click Start, then select Devices and Printers.
2. To launch the Add Printer Wizard, click Add a Printer.
3. Click Add a network, wireless, or Bluetooth printer.
4. In the list of available devices, select the one you want to use, then click Next.
5. If the printer you want to use does not appear in the list, click The printer that I want is not
listed.
6. Select Add a printer using a TCP/IP address or hostname, then click Next.
7. From the Device type field, select Web Services Device.
8. Enter the printer IP address in the Hostname or IP address field, then click Next.
9. Click Close.
Xerox
®
VersaLink®C7000 Color Printer
User Guide
49
Page 50

Getting Started
More Information
You can obtain more information about your printer from these sources:
Resource Location
Installation Guide Packaged with the printer.
Other documentation for your printer www.xerox.com/office/VLC7000docs
Recommended Media List United States: www.xerox.com/rmlna
European Union: www.xerox.com/rmleu
Technical support information for your printer;
including online technical support, Online Support
Assistant, and print driver downloads.
Information Pages Print from the control panel. For details, refer to
Order supplies for your printer www.xerox.com/office/VLC7000supplies
Local sales and Technical Customer Support www.xerox.com/office/worldcontacts
Printer registration www.xerox.com/office/register
®
Xerox
Direct online store www.direct.xerox.com/
www.xerox.com/office/VLC7000support
Printing Information Pages.
50
Xerox®VersaLink®C7000 Color Printer
User Guide
Page 51

3
Customize and Personalize
This chapter contains:
• Customize and Personalize Overview .............. . . . . ........................ . . ........................ . . . . .................. 52
• Customizing or Personalizing the Home Screen.. ........................ . . . ....................... . . . . . .................. 53
• Customizing or Personalizing the Apps .................... . . . ....................... . . . . . ........................ . . .......... 54
Xerox®VersaLink®C7000 Color Printer
User Guide
51
Page 52

Customize and Personalize
Customize and Personalize Overview
This chapter provides information on how to customize and personalize your device to meet the
specific demands of your workflows.
You can customize your apps, hide, or show apps on the Home screen, and rearrange
the order to suit your job priorities. For each app, you can hide or show individual
features and configure default settings to meet the needs of your workgroup. You
can save job settings for repeated use.
Customization enables users to work more productively.
When individual user accounts are configured on the device, you can personalize the
device to meet specific user needs. You can configure your personal Home page to
hide or show only the apps you use. Each of the feature lists can be tailored to your
job requirements. Default settings for each app can be specified, and settings for
regular jobs can be saved for your use.
Personalization options ensure that the features and functions displayed meet individual user
needs, improving efficiency.
52
Xerox®VersaLink®C7000 Color Printer
User Guide
Page 53

Customize and Personalize
Customizing or Personalizing the Home Screen
HHiiddiinngg oorr SShhoowwiinngg aann AApppp oonn tthhee HHoommee SSccrreeeenn
1. At the printer control panel, press the Home button.
2. Touch Customize.
3. To display an installed app that is hidden initially:
a. Touch the Plus (+) icon.
b. Touch the app that you want to appear on the control panel.
c. Touch Done.
4. To hide an installed app:
a. For the app, touch X.
b. Touch Done.
5. Verify that only the selected apps appear on the Home screen.
RReeaarrrraannggiinngg AAppppss oonn tthhee HHoommee SSccrreeeenn
1. At the printer control panel, press the Home button.
2. Touch Customize.
3. Touch and hold the required app.
4. Drag the app to the new location.
5. Release the app.
6. Touch Done.
7. Verify that the apps appear in the correct location on the Home screen.
Xerox
®
VersaLink®C7000 Color Printer
User Guide
53
Page 54

Customize and Personalize
Customizing or Personalizing the Apps
Customization enables you to modify the features available, delete a saved preset, or remove
customized settings applied to an app.
CCuussttoommiizziinngg oorr PPeerrssoonnaalliizziinngg tthhee FFeeaattuurree LLiisstt
To customize the Features list for an app:
1. At the printer control panel, press the Home button.
2. Touch the app required.
3. Scroll to the bottom, then touch Customize.
4. Touch Feature List.
Note: For logged-in administrators, a window appears that asks you to confirm if the
changes are for a Guest or for you.
5. Touch the particular option.
• To hide a feature, for the required feature, touch the Eye icon. To signify that the feature is
hidden, the Eye icon appears with a line across it.
• To show a feature, for the required feature, touch the Eye icon. To signify a feature is visible,
the Eye icon appears with no line across it.
6. To reorder the menu features, touch and drag the features into the appropriate order.
7. To save the current configuration, touch Done.
SSaavviinngg PPrreesseettss
You can use this feature to save a particular combination of app settings for future jobs. You can save
the settings with a name and retrieve them for later use.
To save the current app settings:
1. At the printer control panel, press the Home button.
2. Touch the app required.
3. Select the job settings.
4. Scroll to the bottom, then touch Save.
5. Touch Save as New Preset.
6. Touch Enter Preset Name, then to enter a preset name, use the keypad.
7. Touch Next.
8. Select an icon that best suits the preset that you are creating.
9. Touch Done.
Note: The preset is stored within the Preset feature.
54
Xerox®VersaLink®C7000 Color Printer
User Guide
Page 55

Customize and Personalize
DDeelleettiinngg aa SSaavveedd PPrreesseett
To delete a saved preset:
1. At the printer control panel, press the Home button.
2. Touch the app required.
3. Scroll to the bottom, then touch Customize.
4. Touch Presets.
5. Touch the Trash icon that corresponds with the preset that you want to delete.
6. At the prompt, touch Delete.
7. Touch Done.
RReemmoovviinngg AApppp CCuussttoommiizzaattiioonn uussiinngg tthhee CCoonnttrrooll PPaanneell
To remove the current app customization settings:
1. At the printer control panel, press the Home button.
2. Touch the app required.
3. Scroll to the bottom, then touch Customize.
4. Touch Remove App Customization.
5. At the prompt, touch OK.
Xerox
®
VersaLink®C7000 Color Printer
User Guide
55
Page 56

Customize and Personalize
56
Xerox®VersaLink®C7000 Color Printer
User Guide
Page 57

4
Xerox
This chapter contains:
• Xerox
• Device............. . . ....................... . . . . . ........................ . . . ........................ . . . ....................... . . . . . ........... 62
• Jobs .. . ........................ . . ........................ . . . . ....................... . . . . . ........................ . . ....................... . . . . . 66
• USB . . . ........................ . . . . . ....................... . . . ........................ . . . . ....................... . . . . ........................ . . 72
• @PrintByXerox . . . . . ........................ . . ........................ . . . . ....................... . . . . . ........................ . . .......... 74
®
Xerox
already installed and displayed on the Homescreen. There are also apps that are installed as standard
but are hidden when your device is used for the first time.
For more information about customizing the Home screen and the apps features, refer to Customize
and Personalize.
A range of apps is available for download and installation from the Xerox
®
Xerox
compatible printers.
®
Apps
®
App Gallery ........... . . . ........................ . . . ........................ . . . . ........................ . . ..................... 58
Apps are a gateway to the features and functions of your device. There are standard apps
®
App Gallery. These include
Extensible Interface Platform (EIP) Apps. EIP Apps enable you to install secure, signed apps on
Xerox®VersaLink®C7000 Color Printer
User Guide
57
Page 58

®
Xerox
Apps
Xerox®App Gallery
XXeerrooxx®®AApppp GGaalllleerryy OOvveerrvviieeww
Use the Xerox®App Gallery to find apps that provide new features or
capabilities for your device. The Xerox
apps that can improve your productivity, simplify workflows, and enhance your
user experience.
The Xerox
app library without logging in. The moving banner provides an active display of apps, or you can
scroll the full list of apps. To get more details on an app, touch the app name in the list.
To use the Xerox
network connection.
For more information and instructions on using the Xerox
Gallery User Guide available at www.xerox.com/XeroxAppGallery.
®
App Gallery enables you to browse and update apps easily. You can browse through the
®
App Gallery App, ensure that your device uses either the wireless or the wired
Note: If a local server inside a firewall hosts your device and a proxy is enabled, set a proxy
exception at the device.
®
App Gallery provides direct access to
®
App Gallery, refer to the Xerox®App
SSeettttiinngg uupp tthhee XXeerrooxx®®AApppp GGaalllleerryy
The first time that any App Gallery user logs in to the Xerox®App Gallery from the control panel, the
®
Xerox
• If you already have a Xerox
• If you do not yet have a Xerox
App Gallery software updates.
®
App Gallery Account, to log in to the software and initiate the
software update, refer to Logging in to the App Gallery for the First Time.
®
App Gallery Account, to request an account, refer to Creating an
App Gallery Account for the First Login.
CCrreeaattiinngg aann AApppp GGaalllleerryy AAccccoouunntt ffoorr tthhee FFiirrsstt LLooggiinn
1. At the printer control panel, press the Home button.
2. Touch Xerox App Gallery.
3. On the Login page, touch Request an Account.
Note: The keypad covers the Request an Account link. Minimize the keypad or, to close the
keypad and access the link, touch outside the text box.
4. Enter a valid email address using the touch screen keypad, then touch Enter.
A message appears stating that completion instructions have been sent to the email address that
you entered. Touch Close.
5. Access the email account for the email address that you provided to the Xerox
6. Open the account request email, then click the URL link provided to access the create account
page. Click Agree.
7. Review and accept the Terms of Use. To continue creating an account, click Agree.
58
Xerox®VersaLink®C7000 Color Printer
User Guide
®
App Gallery.
Page 59

8. Enter the information required into the appropriate fields:
• User ID
• Password
• Confirm Password
• First and Last Name
• Company Name
• Country
9. Click OK.
After the account is created, a confirmation message appears.
10. At the printer control panel, log in to your App Gallery Account.
LLooggggiinngg iinn ttoo tthhee AApppp GGaalllleerryy ffoorr tthhee FFiirrsstt TTiimmee
To log in to the App Gallery Account for the first time from the control panel:
1. At the printer control panel, press the Home button.
2. Touch Xerox App Gallery.
®
3. On the Xerox
App Gallery Login page:
Xerox®Apps
a. Enter your User Name using the touch screen keypad, then touch Enter.
b. Enter your Password using the touch screen keypad, then touch Enter.
4. Touch Log In. The Xerox
The App Gallery software updates.
®
App Gallery opens.
AAcccceessssiinngg tthhee XXeerrooxx®®AApppp GGaalllleerryy
When you are logged in to the App Gallery, you can browse available apps, and install and update
apps.
CCrreeaattiinngg aa XXeerrooxx®®AApppp GGaalllleerryy AAccccoouunntt
With an App Gallery account, you have direct access to all the available apps for your device. An App
Gallery account allows you to view and acquire apps, install apps on your device, and manage your
apps and licenses.
You can set up an App Gallery account using the control panel or the Embedded Web Server. For
information about accessing the Embedded Web Server, refer to Getting Started.
Note: If you have an existing Xerox App Gallery Account, refer to Logging into your Xerox®App
Gallery Account.
To create an App Gallery account using the control panel:
1. At the printer control panel, press the Home button.
2. Touch Xerox App Gallery.
Xerox
®
VersaLink®C7000 Color Printer
User Guide
59
Page 60

®
Xerox
3. Do one of the following:
4. Enter a valid email address using the touch screen keypad, then touch Enter.
5. Access the email account for the email address that you provided to the Xerox
6. Open the account request email, then click the URL link provided to access the create account
7. Review and accept the Terms of Use. To continue creating an account, click Agree.
8. Enter the information required into the appropriate fields:
Apps
• On the blue scrolling panel, touch Create an App Gallery Account Now.
• To log in, touch the Person icon. Touch the top of the Login page, then touch Request an
Account.
Note: The keypad covers the Request an Account link. To reveal the Request an Account
link, touch the top of the Login page, or minimize the keypad.
A message appears stating that completion instructions have been sent to the email address that
you entered. Touch Close.
®
App Gallery.
page. Click Agree.
• User ID
• Password
• Confirm Password
• First and Last Name
• Company Name
• Country
9. Click OK.
After the account is created, a confirmation message appears.
10. At the printer control panel, log in to your App Gallery Account.
LLooggggiinngg iinnttoo yyoouurr XXeerrooxx®®AApppp GGaalllleerryy AAccccoouunntt
When you are logged in to the App Gallery, you can browse available apps, and install and update
apps.
To log in to your App Gallery Account:
1. At the printer control panel, press the Home button.
2. Touch Xerox
3. Enter your User Name using the touch screen keypad, then touch Enter.
4. Enter your Password using the touch screen keypad, then touch Enter.
5. Touch Log In. The Xerox
®
App Gallery.
®
App Gallery appears.
IInnssttaalllliinngg oorr UUppddaattiinngg aann AApppp ffrroomm tthhee XXeerrooxx®®AApppp
GGaalllleerryy
Xerox®Apps add, extend, or customize the functionality of your device. You can use the Xerox®App
Gallery App to browse and install Apps at your device control panel.
60
Xerox®VersaLink®C7000 Color Printer
User Guide
Page 61

IInnssttaalllliinngg aann AApppp ffrroomm tthhee AApppp GGaalllleerryy
To install an app from the App Gallery:
1. At the printer control panel, press the Home button.
2. Touch Xerox App Gallery. The App Gallery opens.
Note: You can browse the App Gallery and view app descriptions without being logged in.
To download or update apps, you must be logged in to the App Gallery.
3. Touch the Person icon.
a. Enter your User Name using the touch screen keypad, then touch Enter.
b. Enter your Password using the touch screen keypad, then touch Enter.
4. Touch the desired app, then touch Install. The License Agreement appears.
5. Touch Agree. The installation process begins.
If the app does not install successfully, to attempt the installation process again, touch Install.
6. To exit the app, touch X.
Xerox®Apps
UUppddaattiinngg aann AApppp ffrroomm tthhee AApppp GGaalllleerryy
To update an app from the Xerox®App Gallery:
1. At the printer control panel, press the Home button.
2. Touch Xerox App Gallery. The App Gallery opens.
Note: You can browse the App Gallery and view app descriptions without being logged in.
To download or update apps, you must be logged in to the App Gallery.
3. Touch the Person icon.
a. Enter your User Name using the touch screen keypad, then touch Enter.
b. Enter your Password using the touch screen keypad, then touch Enter.
4. Touch Installed. The list shows all installed apps, and any apps eligible for update. You can
update apps individually or all apps at once. Touch the desired app, then touch Update or
Update All. The License Agreement appears for each app.
5. To accept the license agreements, touch Agree for each app.
6. When the update completes, the apps are shown in the list of Installed Apps.
7. To exit the app, touch X.
LLooggggiinngg oouutt ooff yyoouurr AApppp GGaalllleerryy AAccccoouunntt
To log out of your Xerox®App Gallery account:
1. Touch the Person icon.
2. Touch Logout.
Xerox
®
VersaLink®C7000 Color Printer
User Guide
61
Page 62

®
Xerox
Apps
Device
DDeevviiccee OOvveerrvviieeww
The Device App gives you access to information about your printer, including
the serial number and model. You can view the status of the paper trays,
billing and supplies information, and print Information Pages.
You can configure many Device options to meet your individual needs. For details about configuring
all Device settings, refer to the System Administrator Guide at www.xerox.com/office/
VLC7000support.
DDeevviiccee OOppttiioonnss
The following Device options are available:
Option Description
Language Language allows you to set the language that appears on the control
panel.
About The About option provides an overview of your device and its current
settings and status. You can access Printing Information Pages and
reports using this option.
Software Update Use this option to check for software updates and configure update
settings.
Notifications Use the Notifications option to see details of current alerts or faults on
the device. A History button displays fault codes and the date that the
fault occurred on the device.
Paper Trays Use the Paper Trays option to see the paper size, type, and color set for
each paper tray and the tray-capacity status.
Supplies Use the Supplies option to monitor the status of the components you can
replace. The supply level and estimated number of impressions or days
left for each unit is displayed.
Billing/Usage Use the Billing/Usage option to view the serial number and the total
number of impressions made by your device.
62
General Use the General option to customize settings such as the power-saver
modes, date and time, and control panel brightness. You can configure
the General settings using the device control panel, or by using the
Embedded Web Server.
Xerox®VersaLink®C7000 Color Printer
User Guide
Page 63

Xerox®Apps
Option Description
Apps Use Apps to select settings for the apps installed on your device.
Connectivity Use the Connectivity option to configure network settings at the control
panel, or join another wireless network.
Support Use this option to access and print the Support Pages to assist with
troubleshooting errors.
Resets Use the Resets option to reset device settings and font, forms, and macros
to the factory-default settings.
For details on configuring the printer settings, refer to the System Administrator Guide at www.xerox.
com/office/VLC7000docs.
AAbboouutt
The About option provides an overview of your device and current settings and status. You can access
Printing Information Pages and reports using this option.
SSuuppppllyy SSttaattuuss
You can check the status and percentage of life remaining for your printer supplies at the control
panel or from the Embedded Web Server. When printer supplies near their replacement time, warning
alerts appear on the control panel. You can customize the alerts that appear on the control panel and
configure email alert notifications.
To check the supplies status and set up alerts using the Embedded Web Server, refer to the System
Administrator Guide at www.xerox.com/office/VLC7000docs.
CChheecckkiinngg tthhee SSuupppplliieess SSttaattuuss aatt tthhee CCoonnttrrooll PPaanneell
1. To view status information for the printer supplies, touch Device→Supplies.
2. To view details about a specific item, including part numbers for reordering, touch the specific
item.
3. To return to the Supplies screen, touch X.
4. To return to the Device screen, touch the back arrow.
CCuussttoommiizziinngg SSuupppplliieess AAlleerrtt SSeettttiinnggss
1. To customize the alerts that appear for printer supplies, touch Device→Supplies→Alerts Setup.
2. To enable supplies alerts that appear on the control panel, touch the Enable Alerts toggle button.
3. To configure the printer to display an alert when an item reaches a specific usage percentage
level, touch the item, then select the percentage.
Xerox
®
VersaLink®C7000 Color Printer
User Guide
63
Page 64

®
Xerox
4. To customize the alerts for each supply item, or to enable or disable an alert, touch the toggle
5. To return to the Supplies screen, touch X.
6. To return to the Device screen, touch the back arrow.
Apps
button.
SSeettttiinngg UUpp EEmmaaiill AAlleerrttss
To check the supplies status and set up alerts using the Embedded Web Server, refer to the System
Administrator Guide at www.xerox.com/office/VLC7000docs.
1. To set up alerts to send to an email address, touch Device→Supplies→Email Alerts.
2. To enter an email address, touch Add Email, then touch Enter Email Address.
3. Use the touch screen keyboard to enter an email address, or select an entry from the Address
Book, then touch OK.
4. Add more email addresses if necessary.
5. To customize the alerts for each supply item, or to enable or disable an alert, touch the toggle
button.
6. To exit the menu, touch OK.
7. To return to the Device screen, touch the back arrow.
BBiilllliinngg aanndd UUssaaggee CCoouunntteerrss
The Billing/Usage menu displays the total number of impressions that the printer generated or
printed during its lifetime. You cannot reset the counters. A page is counted as one side of a sheet of
paper. For example, a sheet of paper that is printed on two sides counts as two impressions.
To view the Billing and Usage Counters:
1. At the printer control panel, press the Home button.
2. Touch Device→Billing/Usage.
3. To view more details, touch Usage Counters, then select an option.
• Impression Counters: This option provides the number of impressions made by the printer.
The number of impressions cannot equal the number of sheets counted, depending on the
printer setup. If your printer counts large sheets as large impressions or as multiple smaller
impressions, the number of impressions can differ.
• Sheet Counters: This option provides the number of impressions made by the printer.
Impressions for 2-sided sheets are listed on a separate line from 1-sided sheets.
• All Usage Counters: This option provides all printer usage information.
4. To return to the Billing/Usage screen, touch the back arrow.
5. To return to the Device screen, touch the back arrow.
64
Xerox®VersaLink®C7000 Color Printer
User Guide
Page 65

Xerox®Apps
RReesseett ttoo FFaaccttoorryy DDeeffaauullttss
The non-volatile memory (NVRAM) stores printer settings, even after the power is turned off. The
Reset to Factory Defaults feature erases all settings and returns the printer to original factory state.
All jobs, presets, Apps, and device settings are reset. If the printer includes a hard disk, the disk is
reinitialized. When complete, the printer restarts, then displays the Install Wizard.
To reset the printer to factory defaults:
1. At the printer control panel, press the Home button.
2. Touch Device→Resets→Reset to Factory Defaults.
3. At the prompt, touch Reset.
4. When the process is complete, the printer restarts automatically.
RReemmoottee SSeerrvviicceess
You can use the Remote Services option in the Embedded Web Server to send error and usage
information to the Xerox support team to help them resolve problems quickly.
For information about enabling Remote Services and uploading information to Xerox, refer to the
System Administrator Guide at www.xerox.com/office/VLC7000docs.
Xerox
®
VersaLink®C7000 Color Printer
User Guide
65
Page 66

®
Xerox
Apps
Jobs
JJoobbss OOvveerrvviieeww
Use Jobs to view current jobs, print saved, personal, and secure jobs, and view
details of completed jobs. You can pause, delete, print, or view job progress or
job details for a selected job.
MMaannaaggiinngg JJoobbss
From the control panel Jobs menu, you can view lists of active jobs, secure jobs, or completed jobs.
You can pause, delete, print, or view job progress or job details for a selected job. From the Jobs
window in the Embedded Web Server, you can view a list of active and completed print jobs. For more
information, refer to Managing Jobs Using the Embedded Web Server.
A print job can be held by the printer when it is unable to complete a print job. For example, when the
printer needs attention, paper, or supplies. When the condition is resolved, the printer automatically
resumes printing. When you send a Secure Print job, the job is held until you release it by typing a
passcode at the control panel. For more information, refer to Printing Special Job Types.
PPaauussiinngg tthhee PPrriinntt JJoobb wwiitthh tthhee OOppttiioonn ttoo DDeelleettee IItt
1. At the printer control panel, press the Home button.
2. Touch Jobs, then touch the name of the print job.
3. Do one of the following:
• To pause the print job, touch Pause. To resume the print job, touch Resume.
• To delete the print job, touch Delete. At the prompt, touch Delete.
Note: If you do not make a selection within 60 seconds, the job resumes automatically.
4. To return to the Home screen, press the Home button.
VViieewwiinngg,, PPrriinnttiinngg,, oorr DDeelleettiinngg SSaavveedd aanndd SSeeccuurree JJoobbss
Note:
• The system administrator can restrict users from deleting jobs. If a system administrator
has restricted job deletion, you can view the jobs, but not delete them.
• Only the user that sent the job or the system administrator can delete a Secure Print job.
1. At the printer control panel, press the Home button.
2. To view a list of active and completed jobs, touch Jobs.
66
Xerox®VersaLink®C7000 Color Printer
User Guide
Page 67

Xerox®Apps
3. To view a list of specific job types, touch an option.
• To view Saved Jobs, touch Saved Jobs. To print the job, touch the job, enter the quantity, then touch OK. To delete the job, touch the Trash icon, then touch Delete.
• To view Personal jobs, touch Personal & Secure Jobs. To print the jobs, touch the folder, then
touch Print All, or Delete All.
• For Secure Jobs, touch Personal & Secure Jobs. Touch the folder, enter the passcode number,
then touch OK. To print a Secure Job, touch the job. To print or delete all the jobs in the folder,
touch Print All, or Delete All.
4. To view details about a job, touch the job.
5. To return to the Home screen, press the Home button.
PPrriinnttiinngg aa JJoobb HHeelldd ffoorr RReessoouurrcceess
1. At the printer control panel, press the Home button.
2. Touch Jobs.
3. From the jobs list, touch the held job name. The resources required for the job appear on the
control panel.
4. Do one of the following:
• To print the job, replenish the resources required. The job resumes automatically when the
required resources are available. If the job does not print automatically, touch Resume.
• To delete the print job, touch Delete. At the prompt, touch Delete.
5. To return to the Home screen, press the Home button.
MMaannaaggiinngg SSppeecciiaall JJoobb TTyyppeess
Special job types allow you to send a print job from your computer, then print it from the printer
control panel. Select special job types in the print driver, Printing Options tab, under Job Type.
SSaavveedd JJoobbss
Saved Jobs are documents sent to the printer and, unless deleted, are stored there for future use. Any
user can print or delete a Saved Job.
To print a Saved Job, refer to Printing a Saved Job.
Printing a Saved Job
1. In your software application, access the print settings. For most software applications, press CTRL
+P for Windows or CMD+P for Macintosh.
2. Select your printer, then open the print driver.
• For Windows, click Printer Properties. Depending on your application, the title of the button
can vary.
• For Macintosh, in the Print window, click Print Options, then select Xerox Features.
3. For Job Type, select Saved Job.
4. Type a job name or select a name from the list, then click OK.
5. Select any other required printing options.
• For Windows, click OK, then click Print.
• For Macintosh, click Print.
®
Xerox
VersaLink®C7000 Color Printer
User Guide
67
Page 68

®
Xerox
Apps
Releasing a Saved Job
1. At the printer control panel, press the Home button.
2. Touch Jobs.
3. To view Saved Jobs, touch Saved Jobs.
4. To print a Saved Job, touch the job name, enter the quantity, then touch OK.
5. To delete the document after printing, for that job, touch the Trash icon, then at the prompt,
touch Delete.
6. To return to the Home screen, press the Home button.
SSeeccuurree PPrriinntt
Use Secure Print to print sensitive or confidential information. After you send the job, it is held at the
printer until you enter your passcode at the printer control panel.
To print a Secure Print job, refer to Printing a Secure Print Job.
Printing a Secure Print Job
1. In your software application, access the print settings. For most software applications, press CTRL
+P for Windows or CMD+P for Macintosh.
2. Select your printer, then open the print driver.
• For Windows, click Printer Properties. Depending on your application, the title of the button
varies.
• For Macintosh, in the Print window, click Preview, then select Xerox Features.
3. For Job Type, select Secure Print.
4. Type the passcode, confirm the passcode, then click OK.
5. Select any other required printing options.
• For Windows, click OK, then click Print.
• For Macintosh, click Print.
Releasing a Secure Print job
1. At the printer control panel, press the Home button.
2. Touch Jobs.
3. To view Secure Print jobs, touch Personal & Secure Jobs.
4. Touch your folder.
5. Enter the passcode number, then touch OK.
6. Select an option:
• To print a Secure Print job, touch the job.
• To print all the jobs in the folder, touch Print All.
• To delete a Secure Print job, touch the Trash icon. At the prompt, touch Delete.
• To delete all the jobs in the folder, touch Delete All.
Note: After a Secure Print job is printed, it is deleted automatically.
7. To return to the Home screen, press the Home button.
68
Xerox®VersaLink®C7000 Color Printer
User Guide
Page 69

Xerox®Apps
PPeerrssoonnaall PPrriinntt
Personal Print allows you to store a document in the printer, then print it from the control panel.
Note: The Personal Print feature is only available on a Windows computer printing to a network
printer.
Personal Print is a type of saved job with these features:
• A Personal Print job appears in a folder named after the user ID associated with the print job.
• A Personal Print job does not use a passcode.
• Any user can print or delete a Personal Print job.
• You can print all jobs in the list at once, delete an individual job, or delete all jobs in the list.
• After a Personal Print job is printed, it is deleted automatically.
To print a Personal Print job, refer to Printing a Personal Print Job.
Printing a Personal Print Job
1. In your software application, access the print settings. For most software applications, click
File→Print or for Windows, press CTRL+P.
2. Select your printer, then click Printer Properties. Depending on your application, the title of the
button varies.
3. For Job Type, select Personal Print.
4. Select any other required printing options, then click OK.
5. To send the job to the printer, click Print.
Releasing a Personal Print Job
1. At the printer control panel, press the Home button.
2. Touch Jobs.
3. To view Personal Print jobs, touch Personal & Secure Jobs.
4. Touch your folder.
5. If prompted for a passcode, touch Skip.
Note: When your folder contains Secure Print jobs and Personal Print jobs, the passcode
prompt appears.
6. Select an option.
• To print a Personal Print job, touch the job.
• To print all the jobs in the folder, touch Print All.
• To delete all the jobs in the folder, touch Delete All.
7. To return to the Home screen, press the Home button.
SSaammppllee SSeett
The Sample Set job type prints one copy of a multiple-copy print job before printing the remaining
copies. After reviewing the sample set, you can either print the remaining copies or delete them at
the printer control panel.
®
Xerox
VersaLink®C7000 Color Printer
User Guide
69
Page 70

®
Xerox
Sample Set is a type of saved job with these features:
• A Sample Set job appears in a folder named after the user ID associated with the print job.
• A Sample Set job does not use a passcode.
• Any user can print or delete a Sample Set job.
• A Sample Set prints one copy of a job to allow you to proofread the job before printing any
After a Sample Set job is printed, it is deleted automatically.
To print a Sample Set, refer to Printing a Sample Set.
Apps
remaining copies.
Printing a Sample Set
1. In your software application, access the print settings. For most software applications, press CTRL
+P for Windows or CMD+P for Macintosh.
2. Select your printer, then open the print driver.
• For Windows, click Printer Properties. Depending on your application, the title of the button
varies.
• For Macintosh, in the Print window, click Preview, then select Xerox Features.
3. For Job Type, select Sample Set.
4. Select any other required printing options.
• For Windows, click OK, then click Print.
• For Macintosh, click Print.
Releasing a Sample Set
1. At the printer control panel, press the Home button.
2. To view available jobs, touch Jobs.
3. Touch the Sample Set job.
Note: The Sample Set file description shows the job as Held for Future Printing, and shows
the number of remaining copies of the job.
4. Select an option.
• To print the remaining copies of the job, touch Release.
• To delete the remaining copies of the job, touch Delete.
5. To return to the Home screen, press the Home button.
MMaannaaggiinngg JJoobbss UUssiinngg tthhee EEmmbbeeddddeedd WWeebb SSeerrvveerr
You can view a list of active jobs and delete print jobs from the Active Jobs list in the Embedded Web
Server. You can use the Embedded Web Server to submit jobs for printing at the device. You can print .
pdf, .ps, .pcl, .prn, .xps, .jpg, .tif and .txt files directly from the Embedded Web Server without opening
another application or the print driver. The files can be stored on a local computer hard drive, mass
storage device, or network drive.
1. At your computer, open a Web browser. In the address field, type the IP address of the printer,
then press Enter or Return.
2. In the Embedded Web Server, click Jobs.
3. Click the job name.
70
Xerox®VersaLink®C7000 Color Printer
User Guide
Page 71

Xerox®Apps
4. Do one of the following:
• To pause the print job, click Pause. To resume the print job, click Resume.
• To delete the print job, click Delete. At the prompt, click Delete.
5. To return to the Home screen, click Home.
SSuubbmmiittttiinngg JJoobbss ffoorr PPrriinnttiinngg UUssiinngg tthhee EEmmbbeeddddeedd WWeebb SSeerrvveerr
1. At your computer, open a Web browser. In the address field, type the IP address of the printer,
then press Enter or Return.
2. In the Embedded Web Server, click Home.
3. In the Quick Links area, click Submit File.
4. Click the Submit field.
5. In the selection window, select a file to print, then click Open.
6. To print the document, click Submit.
Xerox
®
VersaLink®C7000 Color Printer
User Guide
71
Page 72

®
Xerox
Apps
USB
UUSSBB OOvveerrvviieeww
Use the Print from USB feature to print jobs already stored on a USB drive. Jobs
in a print-ready format, such as PDF, TIFF, or JPEG, can be printed.
To create a print-ready file, select the Print to File option when you print your documents from
programs such as Microsoft Word. From advanced publishing programs, there may be several
methods to create print-ready files.
PPrriinnttiinngg ffrroomm aa UUSSBB FFllaasshh DDrriivvee
You can print a file stored on a USB Flash drive. The USB port is on the front of the printer.
Note:
• If the device is in Power Saver mode, before proceeding with the Print job, to wake the
device, press the Power/Wake button.
• Only USB Flash drives formatted to the typical FAT32 file system are supported.
1. Insert the USB Flash drive into the USB memory port on the printer.
2. At the USB Drive has been detected screen, touch Print from USB.
Note: If this feature does not appear, enable the feature or contact the system
administrator. For more information, see the System Administrator Guide at www.xerox.
com/office/VLC7000docs.
3. Add files using the Browse USB screen.
• To print a group of print-ready files, for the USB drive or folder, touch the Select All icon.
Verify that your files are selected.
• To print a specific file, browse to that file, then touch the file name or icon.
4. Touch OK.
5. Confirm that the required files are listed.
• To select more files, touch Add Documents, then touch OK.
• To remove a file name from the list, touch the file name, then touch Remove.
6. Select the paper supply, quantity, output color, and 2-sided printing options.
7. Touch Print.
8. When you are finished, remove the USB Flash drive.
72
Xerox®VersaLink®C7000 Color Printer
User Guide
Page 73

Xerox®Apps
PPrriinnttiinngg ffrroomm aa UUSSBB FFllaasshh DDrriivvee AAllrreeaaddyy IInnsseerrtteedd iinn
tthhee PPrriinntteerr
1. If the USB Flash drive is already in the USB memory port, press the Home button.
2. Touch Print from USB.
Note: If this feature does not appear, enable the feature or contact the system
administrator. For more information, see the System Administrator Guide at www.xerox.
com/office/VLC7000docs.
3. Add files using the Browse USB screen.
• To print a group of print-ready files, for the USB drive or folder, touch the Select All icon.
Verify that your files are selected.
• To print a specific file, browse to that file, then touch the file name or icon.
4. Touch OK.
5. Confirm that the desired documents appear. If the documents do not appear, touch Add
Documents, select additional documents, then touch OK.
6. Select the paper supply, quantity, output color, and 2-sided printing options.
7. Touch Print.
Xerox
®
VersaLink®C7000 Color Printer
User Guide
73
Page 74

®
Xerox
Apps
@PrintByXerox
@@PPrriinnttBByyXXeerrooxx OOvveerrvviieeww
You can use the Xerox®@PrintByXerox App to print email attachments and
documents sent to your printer from mobile devices.
When your Xerox device is connected to the Internet, the @PrintByXerox App works with
the Xerox
Note: The @PrintByXerox App and Xerox®Workplace Cloud software require specific licenses,
configuration settings, and minimum system specifications. For details, refer to the Xerox
@PrintByXerox App Quick Start Guide available at www.xerox.com/XeroxAppGallery.
®
Workplace Cloud for simple email-based printing.
®
PPrriinnttiinngg wwiitthh tthhee @@PPrriinnttBByyXXeerrooxx AApppp
1. Send an email with an attachment containing a supported file type to Print@printbyxerox.com.
First-time users receive a response email with a user ID and password.
2. At the Xerox device control panel, press the Home button.
3. Touch @PrintByXerox.
4. Enter your email address, then touch Save.
5. On the Enter password screen, use the onscreen keyboard to enter your password, then touch
Save.
6. Select the documents that you want to print.
7. Touch Print Settings, then touch OK.
8. Touch Print.
• The Submitting Jobs to Print message and conversion state appears.
• When the documents begin to print, a green check mark appears.
74
Xerox®VersaLink®C7000 Color Printer
User Guide
Page 75

5
Printing
This chapter contains:
• Printing Overview ......................... . ........................ . . . . . ....................... . . . . ........................ . . ........... 76
• Selecting Printing Options ............ . . ........................ . . . . ....................... . . . . . ........................ . ........... 77
• Print Jobs ......................... . . . ....................... . . . . . ........................ . . ......................... . . . ..................... 85
• Printing Features........................ . . . ........................ . . . . . ....................... . . ........................ . . . . ........... 90
• Using Custom Paper Sizes ........ . . . . . ........................ . . ........................ . . . . ....................... . . . . . ........... 98
Xerox®VersaLink®C7000 Color Printer
User Guide
75
Page 76

Printing
Printing Overview
Before you print, ensure that your computer and the printer are plugged in, powered on, and
connected to an active network. Ensure that you have the correct print driver software installed on
your computer. For details, refer to Installing the Software.
This printer has PCL enabled by default. To use PostScript, purchase and install the feature. For details,
contact your local Xerox representative.
Note:
• Not all options described are supported on all printers. Some options apply only to a specific
printer model, configuration, operating system, print driver type.
• The Windows PostScript print driver and the Macintosh print driver provide the widest range
of features.
To send a job to the printer:
1. Select the appropriate paper.
2. Load paper in the appropriate tray. At the printer control panel, specify the paper size, color, and
type.
3. Access the print settings in your software application. For most software applications, press CTRL
+P for Windows, or CMD+P for Macintosh.
4. Select your printer.
5. To access the print driver settings, for Windows, select Printer Properties, Print Options, or
Preferences. For Macintosh, select Xerox Features. The title of the button can vary depending on
your application.
6. Modify the print driver settings as necessary, then click OK.
7. To send the job to the printer, click Print.
To print a file stored on a USB Flash drive, refer to Printing from a USB Flash Drive.
76
Xerox®VersaLink®C7000 Color Printer
User Guide
Page 77
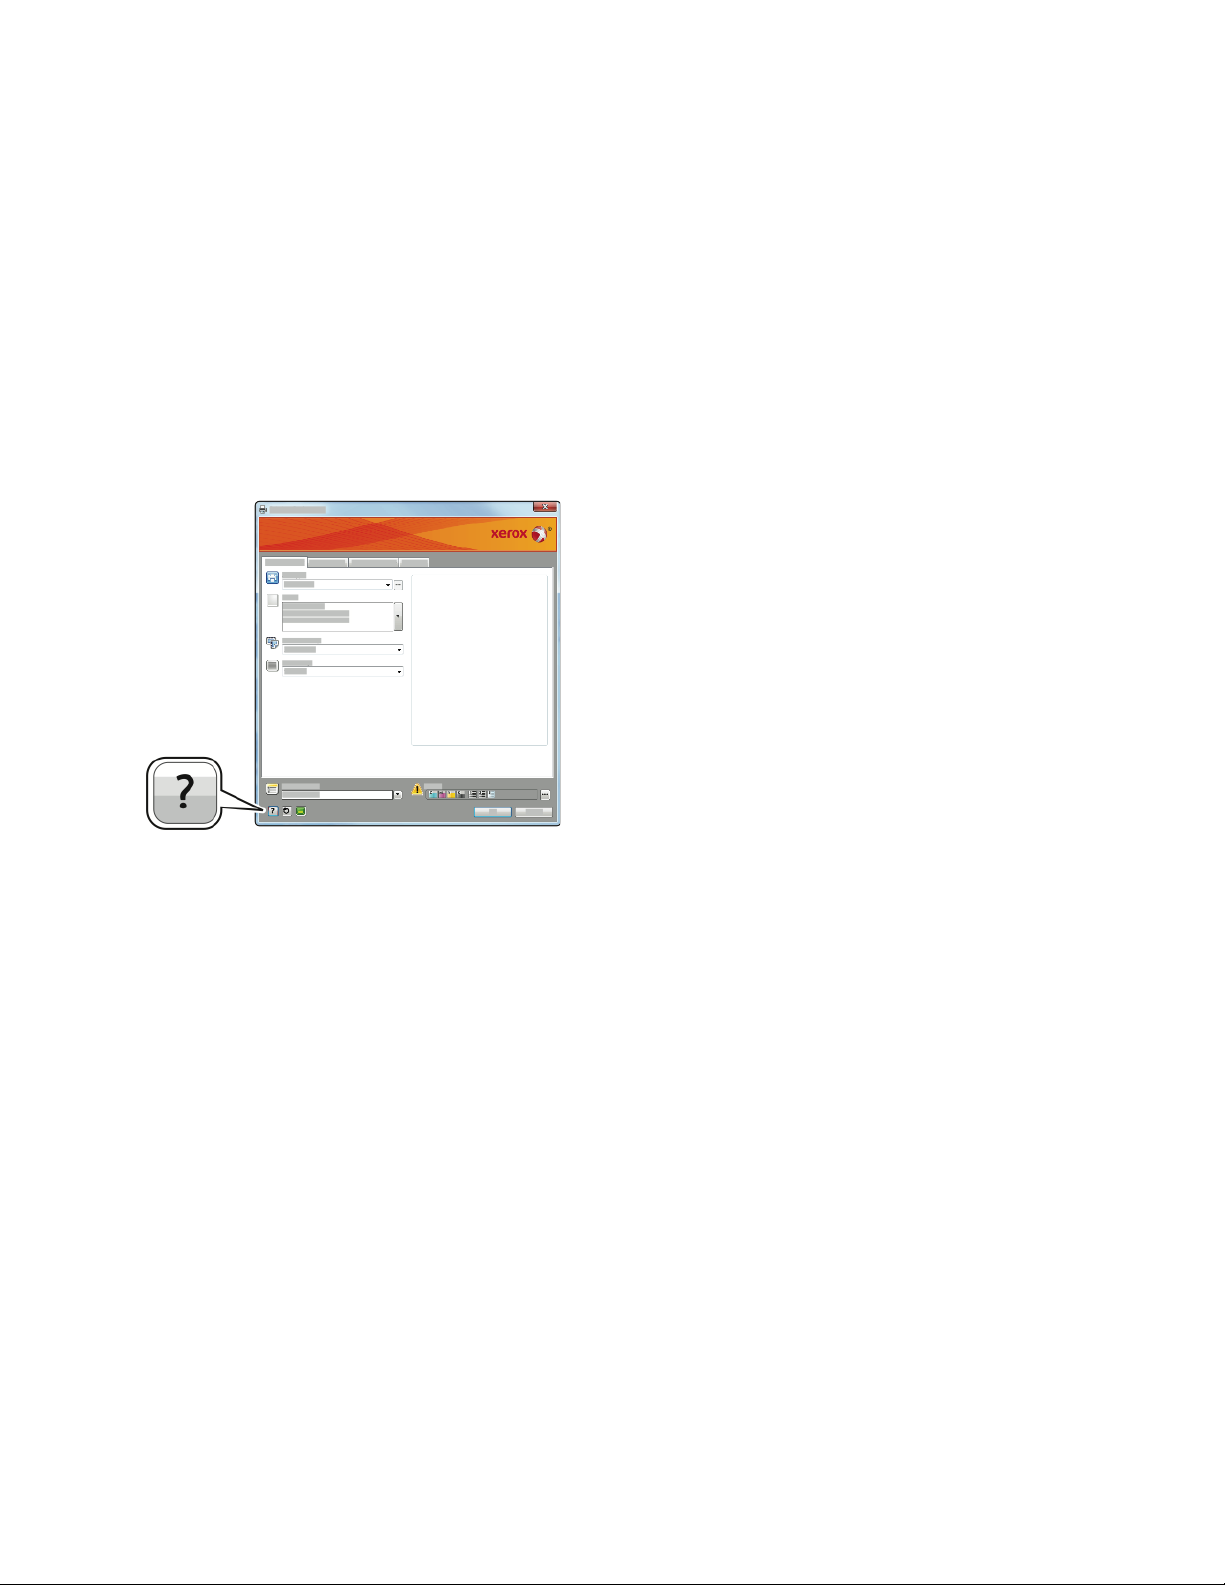
Selecting Printing Options
Printing
Printing options, also called print driver software options, are specified as Printing preferences in
Windows and Xerox
page layout, and print quality. Printing options that are set from Printing preferences within the
Devices and Printers window become the default setting. Printing options that are set from within the
software application are temporary. The application and the computer do not save the settings after
the application is closed.
®
Features in Macintosh. Printing options include settings for 2-sided printing,
PPrriinntt DDrriivveerr HHeellpp
Xerox®print driver software Help information is available from the Printing Preferences window. Click
the Help button (?) in the bottom, left corner of the Printing Preferences window to see the Help.
Information about Printing Preferences appears in the Help window. From there, you can select by
topic or use the search field to enter the topic or function for which you need information.
Xerox
®
VersaLink®C7000 Color Printer
User Guide
77
Page 78

Printing
WWiinnddoowwss PPrriinnttiinngg OOppttiioonnss
SSeettttiinngg DDeeffaauulltt PPrriinnttiinngg OOppttiioonnss ffoorr WWiinnddoowwss
When you print from any software application, the printer uses the print job settings specified in the
Printing Preferences window. You can specify your most common printing options and save them so
that you do not have to change them every time you print.
For example, if you want to print on both sides of the paper for most jobs, specify 2-sided printing in
Printing Preferences.
1. Navigate to the list of printers on your computer:
• For Windows Server 2008 and later, click Start→Settings→Printers.
• For Windows 7, click Start→Devices and Printers.
• For Windows 8, click Start→Control Panel→Devices and Printers.
• For Windows 10, click Start→Settings→Devices→Printers & scanners. Scroll down in the
window, then under Related settings, click Devices and printers.
Note: If you are using a custom Start Menu application, it can change the navigation path
to your list of printers.
2. In the list of printers, right-click the icon for your printer, then click Printing preferences.
3. In the Printing Preferences window, click a tab, then select the options. To save the settings, click
OK.
Note: For more information about Windows print driver options, click the Help button (?) in the
Printing Preferences window.
SSeelleeccttiinngg PPrriinnttiinngg OOppttiioonnss ffoorr aann IInnddiivviidduuaall JJoobb ffoorr WWiinnddoowwss
To use special printing options for a particular job, you can change the Printing Preferences before
sending the job to the printer.
1. With the document open in your software application, access the print settings. For most
software applications, click File→Print or press CTRL+P.
2. Select your printer and click the Properties or Preferences button to open the Printing
Preferences window. The title of the button can vary depending on your application.
3. Click a tab in the Printing Preferences window, then make selections.
4. To save and close the Printing Preferences window, click OK.
5. To send the job to the printer, click Print.
78
Xerox®VersaLink®C7000 Color Printer
User Guide
Page 79

Printing
SSeelleeccttiinngg FFiinniisshhiinngg OOppttiioonnss ffoorr WWiinnddoowwss
If your printer has a finisher installed, you can select finishing options in the Properties window of the
print driver. Finishing options allow you to select how your document is delivered. For example, you
can select hole-punching, stapling, folding, or printing in a booklet format.
Note: Not all options listed are supported on all printers. Some options apply only to a specific
printer model, configuration, operating system, or print driver type.
To select finishing options in the PostScript and PCL print drivers:
1. In the print driver, click the Printing Options tab.
2. To select a finishing option, for Finishing, click the arrow.
Note: The print driver displays stapling positions for paper fed on the long edge. If paper
feeds on the short edge instead of the long edge, the finisher can insert the staple in the
wrong location.
3. To select the output tray, for Output Destination, click the arrow, then select an option:
• Automatic: Use this option to have the printer determine the output destination based on
the number of sets and the stapling option selected. The printer sends multiple sets or stapled
sets to the finisher output tray.
• Center Tray: Use this option to select the output tray in the center of the printer.
• Center Top Tray: Use this option to select the upper output tray in the center of the printer.
• Center Bottom Tray: Use this option to select the lower output tray in the center of the
printer.
• Finisher Tray: Use this option to select the output tray on the right side of the Office Finisher,
or the Office Finisher with Booklet Maker.
4. To send the job to the printer, click OK, then click Print.
SSeelleeccttiinngg PPrriinnttiinngg DDeeffaauullttss iinn WWiinnddoowwss ffoorr aa SShhaarreedd NNeettwwoorrkk
PPrriinntteerr
1. Navigate to the list of printers on your computer:
• For Windows Server 2008 and later, click Start→Settings→Printers.
• For Windows 7, click Start→Devices and Printers.
• For Windows 8, click Start→Control Panel→Devices and Printers.
• For Windows 10, click Start→Settings→Devices→Printers & scanners. Scroll down in the
window. For Related settings, click Devices and printers.
Note: If the Control Panel icon does not appear on the desktop, right-click the desktop,
then select Personalize→Control Panel Home→Devices and Printers.
2. In the list of printers, right-click the icon for your printer, then select Printer properties.
3. In the printer Properties dialog box, click the Advanced tab.
4. On the Advanced tab, click Printing Defaults.
5. Make your selections on the print driver tabs as needed, then click Apply.
6. To save the settings, click OK.
Xerox
®
VersaLink®C7000 Color Printer
User Guide
79
Page 80

Printing
SSaavviinngg aa SSeett ooff CCoommmmoonnllyy UUsseedd PPrriinnttiinngg OOppttiioonnss ffoorr WWiinnddoowwss
You can define and save a set of options, so that you can apply them to future print jobs. In Xerox
App Gallery, you can save an app as default, so you can have app-by-app default settings for printing.
To save a set of printing options:
1. With the document open in your application, click File→Print.
2. To open the Printing Preferences window, select your printer, then click Properties or Preferences.
3. In the Printing Properties window, click the tabs, then select the required settings.
4. In the Printing Properties window, click Saved Settings, then click Save As.
5. To save the set of options in the Saved Settings list, type a name for the set of printing options,
then click OK.
®
MMaacciinnttoosshh PPrriinnttiinngg OOppttiioonnss
SSeelleeccttiinngg PPrriinnttiinngg OOppttiioonnss ffoorr MMaacciinnttoosshh
To use specific printing options, change the settings before sending the job to the printer.
1. With the document open in your application, click File→Print.
2. Select your printer.
3. In the Print Options menu, select Xerox Features.
Note: To see all printing options, click Show Details.
4. Select any other required printing options from the lists.
5. To send the job to the printer, click Print.
SSeelleeccttiinngg FFiinniisshhiinngg OOppttiioonnss ffoorr MMaacciinnttoosshh
If your printer has a finisher installed, select finishing options in the Xerox®Features of the print
driver.
To select finishing options in the Macintosh print driver:
1. Open the Print dialog box, then click Show Details. Click the application menu for your current
application, then select Xerox Features.
2. To select stapling options, for Finishing, click the arrow, then select an option.
3. To select the output tray, for Output Destination, click the arrow, then select an option.
• Automatic: Use this option to have the printer determine the output destination based on
the number of sets and the stapling option selected. The printer sends multiple sets or stapled
sets to the finisher output tray.
• Center Tray: Use this option to select the output tray in the center of the printer.
• Center Top Tray: Use this option to select the upper output tray in the center of the printer.
• Center Bottom Tray: Use this option to select the lower output tray in the center of the
printer.
80
Xerox®VersaLink®C7000 Color Printer
User Guide
Page 81

Printing
• Finisher Tray: Use this option to select the output tray on the right side of the Office Finisher,
or the Office Finisher with Booklet Maker.
4. To send the job to the printer, click Print.
SSaavviinngg aa SSeett ooff CCoommmmoonnllyy UUsseedd PPrriinnttiinngg OOppttiioonnss ffoorr MMaacciinnttoosshh
You can define and save a set of options, so that you can apply them to future print jobs.
To save a set of printing options:
1. With the document open in your application, click File→Print.
2. Select your printer from the Printers list.
3. Select the required printing options from the lists in the Print dialog box.
Note: To see all printing options, click Show Details.
4. Click Presets→Save Current Settings as Preset.
5. Type a name for the printing options. To save the set of options in the Presets list, click OK.
6. To print using these options, select the name from the Presets list.
UUNNIIXX aanndd LLiinnuuxx PPrriinnttiinngg
The Xerox®Print Driver package provides tools for you to manage printers connected in UNIX and
Linux environments.
The Xerox
feature selections. You can select print drivers based on your operating system.
XXeerrooxx®®PPrriinntteerr MMaannaaggeerr
Xerox®Printer Manager is an application that allows you to manage and print to multiple printers in
UNIX and Linux environments.
Xerox
• Configure and check the status of network connected printers.
• Set up a printer on your network and monitor the operation of the printer once installed.
• Perform maintenance checks and view supplies status at any time.
• Provide a common look and feel across the many different suppliers of UNIX and Linux operating
systems.
Installing Xerox®Printer Manager
Before you begin, ensure that you have root or superuser privileges to install Xerox®Printer Manager.
To install Xerox
®
print drivers provide a GUI-based (Graphical User Interface) driver dialog for printer
®
Printer Manager allows you to:
®
Printer Manager:
1. Download the appropriate package for your operating system. To locate print drivers for your
printer, go to www.xerox.com/office/VLC7000drivers.
2. On the print driver website, navigate to your printer model.
3. For your printer model, click Drivers & Downloads.
®
Xerox
VersaLink®C7000 Color Printer
User Guide
81
Page 82

Printing
4. From the Operating System menu, select your operating system.
5. To identify the print driver for your printer model, review the list of available print drivers.
Note: For additional information on each driver, click Description.
6. To select the print driver for your printer model and operating system, click the print driver name.
7. To begin the download, read the End User License Agreement, then click Accept.
The file automatically downloads to the default location for your computer file downloads.
8. To install the Xerox
a. Open the package with your OS package manager.
b. To install using a command-line utility, change to the directory where you downloaded the
file. To run the installer, type the appropriate command-line utility for your operating system.
For example:
• Red Hat: rpm -U <filename>.rpm
• Debian-based Linux: dpkg -i <filename>.deb
• AIX: rpm -U <filename>.rpm
• HPUX: <filename>.depot.gz
®
Print Driver package:
• Solaris: pkgadd -d <filename>.pkg
Note: Most installations create a Xerox directory in /opt/Xerox/prtsys. For additional
information about utilities included in the OS package manager, refer to the manual
included with the package. For example, man xeroxprtmgr.
Launching Xerox®Printer Manager
To launch Xerox®Printer Manager, do one of the following tasks.
• For UNIX, log in as root. From a terminal window, type xosdprtmgr, then press Enter or Return.
• For Linux, type sudo xeroxprtmgr, then press Enter or Return.
PPrriinnttiinngg wwiitthh xxeerrooxxpprriinntt
Xerox has its own print command. You can use the following command:
xeroxprint -d<Some_Queue→ -o[Options] <Somefile
PPrriinnttiinngg ffrroomm aa LLiinnuuxx WWoorrkkssttaattiioonn
To print from a Linux workstation, install either a Xerox®print driver for Linux or a CUPS (Common
UNIX Printing System) print driver. You do not need both drivers.
Xerox recommends that you install one of the full-featured custom print drivers for Linux. To locate
drivers for your printer, go to www.xerox.com/office/drivers.
If you use CUPS, ensure that CUPS is installed and running on your workstation. The instructions for
installing and building CUPS are contained in the CUPS Software Administrators Manual, written and
copyrighted by Easy Software Products. For complete information on CUPS printing capabilities, refer
to the CUPS Software Users Manual available from www.cups.org/documentation.php.
82
Xerox®VersaLink®C7000 Color Printer
User Guide
Page 83

Printing
Installing the PPD File on the Workstation
1. If available, download the Xerox®PPD for CUPS (Common UNIX Printing System) from the
Drivers and Downloads page on the Xerox Support website.
2. Copy the PPD file into the CUPS ppd/Xerox folder on your workstation. If you are unsure of the
location of the folder, use the Find command to locate the PPD files.
3. Follow the instructions that are included with the PPD file.
Adding the Printer
1. Verify that the CUPS (Common UNIX Printing System) daemon is running.
2. Open a Web browser and type http://localhost:631/admin, then click Enter or Return.
3. For User ID, type root. For password, type the root password.
4. Click Add Printer, then follow the onscreen prompts to add the printer to the CUPS printer list.
Printing with CUPS (Common UNIX Printing System)
CUPS supports the use of both the System V (lp) and Berkeley (lpr) printing commands.
1. To print to a specific printer in System V, type lp -dprinter filename, then click Enter.
2. To print to a specific printer in Berkeley, type lpr -Pprinter filename, then click Enter.
MMoobbiillee PPrriinnttiinngg OOppttiioonnss
This printer can print from iOS and Android mobile devices. For more information, refer to Configuring
Google Cloud Print.
PPrriinnttiinngg wwiitthh WWii--FFii DDiirreecctt
You can connect to your printer from a Wi-Fi mobile device, such as a tablet, computer, or
smartphone, using Wi-Fi Direct.
For details, refer to Connecting to Wi-Fi Direct.
For details on using Wi-Fi Direct, refer to the documentation provided with your mobile device.
Note: Depending on which mobile device you are using, the printing procedure varies.
PPrriinnttiinngg wwiitthh AAiirrPPrriinntt
You can print directly from your iPhone, iPad, iPod touch, or Mac using AirPrint®. To enable AirPrint
for your printer, refer to Configuring AirPrint. To use AirPrint®, ensure that your mobile device is
connected to the same wireless network as the printer.
To print with AirPrint
®
:
®
1. Open the email, photograph, website page, or document that you want to print.
2. Tap the Action icon.
3. Tap Print.
®
Xerox
VersaLink®C7000 Color Printer
83
User Guide
Page 84

Printing
4. Select your printer, then set the printer options.
5. Tap Print.
PPrriinnttiinngg ffrroomm aa MMOOPPRRIIAA--EEnnaabblleedd MMoobbiillee DDeevviiccee
MOPRIA™is a software feature that enables users to print from mobile devices without requiring a
print driver. You can use MOPRIA
™
to print from your mobile device to MOPRIA™-enabled printers.
Note:
• MOPRIA
• Ensure that you have the latest version of the MOPRIA
™
and all of its required protocols are enabled by default.
™
Print Service installed on your
mobile device. You can obtain a free download from the Google Play Store.
• Wireless devices must join the same wireless network as the printer.
• The name and location of your printer appears in a list of MOPRIA
™
-enabled printers on
connected devices.
To print using MOPRIA
™
, follow the directions provided with your mobile device.
84
Xerox®VersaLink®C7000 Color Printer
User Guide
Page 85

Printing
Print Jobs
MMaannaaggiinngg JJoobbss
From the control panel Jobs menu, you can view lists of active jobs, secure jobs, or completed jobs.
You can pause, delete, print, or view job progress or job details for a selected job. From the Jobs
window in the Embedded Web Server, you can view a list of active and completed print jobs. For more
information, refer to Managing Jobs Using the Embedded Web Server.
A print job can be held by the printer when it is unable to complete a print job. For example, when the
printer needs attention, paper, or supplies. When the condition is resolved, the printer automatically
resumes printing. When you send a Secure Print job, the job is held until you release it by typing a
passcode at the control panel. For more information, refer to Printing Special Job Types.
PPaauussiinngg tthhee PPrriinntt JJoobb wwiitthh tthhee OOppttiioonn ttoo DDeelleettee IItt
1. At the printer control panel, press the Home button.
2. Touch Jobs, then touch the name of the print job.
3. Do one of the following:
• To pause the print job, touch Pause. To resume the print job, touch Resume.
• To delete the print job, touch Delete. At the prompt, touch Delete.
Note: If you do not make a selection within 60 seconds, the job resumes automatically.
4. To return to the Home screen, press the Home button.
VViieewwiinngg,, PPrriinnttiinngg,, oorr DDeelleettiinngg SSaavveedd aanndd SSeeccuurree JJoobbss
Note:
• The system administrator can restrict users from deleting jobs. If a system administrator
has restricted job deletion, you can view the jobs, but not delete them.
• Only the user that sent the job or the system administrator can delete a Secure Print job.
1. At the printer control panel, press the Home button.
2. To view a list of active and completed jobs, touch Jobs.
3. To view a list of specific job types, touch an option.
• To view Saved Jobs, touch Saved Jobs. To print the job, touch the job, enter the quantity, then
touch OK. To delete the job, touch the Trash icon, then touch Delete.
• To view Personal jobs, touch Personal & Secure Jobs. To print the jobs, touch the folder, then
touch Print All, or Delete All.
• For Secure Jobs, touch Personal & Secure Jobs. Touch the folder, enter the passcode number,
then touch OK. To print a Secure Job, touch the job. To print or delete all the jobs in the folder,
touch Print All, or Delete All.
4. To view details about a job, touch the job.
5. To return to the Home screen, press the Home button.
Xerox
®
VersaLink®C7000 Color Printer
User Guide
85
Page 86

Printing
PPrriinnttiinngg SSppeecciiaall JJoobb TTyyppeess
Special job types allow you to send a print job from your computer, then print it from the printer
control panel. To select special job types from the print driver, select Printing Options→Job Type.
SSaavveedd JJoobbss
Saved Jobs are documents sent to the printer and, unless deleted, are stored there for future use. Any
user can print or delete a Saved Job.
To print a Saved Job, refer to Printing a Saved Job.
Printing a Saved Job
1. In your software application, access the print settings. For most software applications, press CTRL
+P for Windows or CMD+P for Macintosh.
2. Select your printer, then open the print driver.
• For Windows, click Printer Properties. Depending on your application, the title of the button
can vary.
• For Macintosh, in the Print window, click Print Options, then select Xerox Features.
3. For Job Type, select Saved Job.
4. Type a job name or select a name from the list, then click OK.
5. Select any other required printing options.
• For Windows, click OK, then click Print.
• For Macintosh, click Print.
Releasing a Saved Job
1. At the printer control panel, press the Home button.
2. Touch Jobs.
3. To view Saved Jobs, touch Saved Jobs.
4. To print a Saved Job, touch the job name, enter the quantity, then touch OK.
5. To delete the document after printing, for that job, touch the Trash icon, then at the prompt,
touch Delete.
6. To return to the Home screen, press the Home button.
SSeeccuurree PPrriinntt
Use Secure Print to print sensitive or confidential information. After you send the job, it is held at the
printer until you enter your passcode at the printer control panel.
To print a Secure Print job, refer to Printing a Secure Print Job.
86
Xerox®VersaLink®C7000 Color Printer
User Guide
Page 87

Printing
Printing a Secure Print Job
1. In your software application, access the print settings. For most software applications, press CTRL
+P for Windows or CMD+P for Macintosh.
2. Select your printer, then open the print driver.
• For Windows, click Printer Properties. Depending on your application, the title of the button
varies.
• For Macintosh, in the Print window, click Preview, then select Xerox Features.
3. For Job Type, select Secure Print.
4. Type the passcode, confirm the passcode, then click OK.
5. Select any other required printing options.
• For Windows, click OK, then click Print.
• For Macintosh, click Print.
Releasing a Secure Print job
1. At the printer control panel, press the Home button.
2. Touch Jobs.
3. To view Secure Print jobs, touch Personal & Secure Jobs.
4. Touch your folder.
5. Enter the passcode number, then touch OK.
6. Select an option:
• To print a Secure Print job, touch the job.
• To print all the jobs in the folder, touch Print All.
• To delete a Secure Print job, touch the Trash icon. At the prompt, touch Delete.
• To delete all the jobs in the folder, touch Delete All.
Note: After a Secure Print job is printed, it is deleted automatically.
7. To return to the Home screen, press the Home button.
PPrriinnttiinngg aa PPeerrssoonnaall PPrriinntt JJoobb
1. In your software application, access the print settings. For most software applications, click
File→Print or for Windows, press CTRL+P.
2. Select your printer, then click Printer Properties. Depending on your application, the title of the
button varies.
3. For Job Type, select Personal Print.
4. Select any other required printing options, then click OK.
5. To send the job to the printer, click Print.
Printing Using Personal Print
1. In your software application, access the print settings. For most software applications, click File or
for Windows, press CTRL+P.
2. Select your printer, then click Printer Properties. Depending on your application, the title of the
button varies.
Xerox
®
VersaLink®C7000 Color Printer
User Guide
87
Page 88

Printing
3. For Job Type, select Personal Print.
4. Select any other required printing options, then click OK.
5. To send the job to the printer, click Print.
Releasing a Personal Print Job
1. At the printer control panel, press the Home button.
2. Touch Jobs.
3. To view Personal Print jobs, touch Personal & Secure Jobs.
4. Touch your folder.
5. If prompted for a passcode, touch Skip.
Note: When your folder contains Secure Print jobs and Personal Print jobs, the passcode
prompt appears.
6. Select an option.
• To print a Personal Print job, touch the job.
• To print all the jobs in the folder, touch Print All.
• To delete all the jobs in the folder, touch Delete All.
7. To return to the Home screen, press the Home button.
SSaammppllee SSeett
The Sample Set job type prints one copy of a multiple-copy print job before printing the remaining
copies. After reviewing the sample set, you can either print the remaining copies or delete them at
the printer control panel.
Sample Set is a type of saved job with these features:
• A Sample Set job appears in a folder named after the user ID associated with the print job.
• A Sample Set job does not use a passcode.
• Any user can print or delete a Sample Set job.
• A Sample Set prints one copy of a job to allow you to proofread the job before printing any
remaining copies.
After a Sample Set job is printed, it is deleted automatically.
To print a Sample Set, refer to Printing a Sample Set.
Printing a Sample Set
1. In your software application, access the print settings. For most software applications, press CTRL
+P for Windows or CMD+P for Macintosh.
2. Select your printer, then open the print driver.
• For Windows, click Printer Properties. Depending on your application, the title of the button
varies.
• For Macintosh, in the Print window, click Preview, then select Xerox Features.
88
Xerox®VersaLink®C7000 Color Printer
User Guide
Page 89

3. For Job Type, select Sample Set.
4. Select any other required printing options.
• For Windows, click OK, then click Print.
• For Macintosh, click Print.
Releasing a Sample Set
1. At the printer control panel, press the Home button.
2. To view available jobs, touch Jobs.
3. Touch the Sample Set job.
Note: The Sample Set file description shows the job as Held for Future Printing, and shows
the number of remaining copies of the job.
4. Select an option.
• To print the remaining copies of the job, touch Release.
• To delete the remaining copies of the job, touch Delete.
5. To return to the Home screen, press the Home button.
Printing
Xerox
®
VersaLink®C7000 Color Printer
User Guide
89
Page 90

Printing
Printing Features
SSeelleeccttiinngg PPaappeerr OOppttiioonnss ffoorr PPrriinnttiinngg
There are two ways to select the paper for your print job. You can let the printer select which paper to
use based on the document size, paper type, and paper color you specify. You can also select a
specific tray loaded with the desired paper.
SSccaalliinngg
Scaling reduces or enlarges the original document to match the selected output paper size.
• For Windows, the scale options are on the Printing Options tab, in the Paper field.
• For Macintosh, the scale options are in the Print window. To view more printing options, click Show
Details.
The following scaling options are available:
• Automatically Scale scales the document to fit the selected Output Paper Size. The scaling
amount appears in the percentage box below the sample image.
• No Scaling does not change the size of the page image printed on the output paper, and 100%
appears in the percentage box. If the original size is larger than the output size, the page image is
cropped. If the original size is smaller than the output size, extra space appears around the page
image.
• Manually Scale scales the document by the amount entered in the percentage box below the
preview image.
PPrriinnttiinngg oonn BBootthh SSiiddeess ooff tthhee PPaappeerr
PPrriinnttiinngg aa 22--SSiiddeedd DDooccuummeenntt
If your printer supports Automatic 2-Sided Printing, the options are specified in the print driver. The
print driver uses the settings for portrait or landscape orientation from the application for printing the
document.
Note: Ensure that the paper size and weight are supported. For more information, refer to
Supported Paper Types and Weights for Automatic 2-Sided Printing.
22--SSiiddeedd PPaaggee LLaayyoouutt OOppttiioonnss
You can specify the page layout for 2-sided printing, which determines how the printed pages turn.
These settings override the application page orientation settings.
• 1-Sided Print: This option prints on one side of the media. Use this option when printing on
envelopes, labels, or other media that cannot be printed on both sides.
• 2-Sided Print: This option prints the job on both sides of the paper to allow binding on the long
edge of the paper. The following illustrations show the result for documents with portrait and
landscape orientations, respectively:
90
Xerox®VersaLink®C7000 Color Printer
User Guide
Page 91

Printing
• 2-Sided Print, Flip on Short Edge: This option prints on both sides of the paper. The images print
to allow binding on the short edge of the paper. The following illustrations show the result for
documents with portrait and landscape orientations, respectively:
Note: 2-Sided Printing is part of the Earth Smart settings.
To change your default print driver settings, see Setting Default Printing Options for Windows.
XXeerrooxx BBllaacckk aanndd WWhhiittee
You can select printing in color or black and white.
• Off (use Document Color): Use this option to print in color.
• On: Use this option to print in black and white.
PPrriinntt QQuuaalliittyy
PostScript print-quality modes:
• Standard print-quality mode: 1200 x 2400 dpi
• Enhanced print-quality mode: 1200 x 2400 dpi
• Photo Mode: 1200 x 2400 dpi
PCL print-quality mode:
• Standard print-quality mode: 600 x 600 dpi
Note: Enhanced and Photo Mode are not available with the PCL driver.
IImmaaggee OOppttiioonnss
Image Options controls how the printer uses color to produce your document. The Windows
PostScript print driver and the Macintosh print drivers provide the widest range of color controls and
corrections on the Image Options tab.
IImmaaggee SShhiifftt
Image Shift allows you to modify the location of the image on the page. You can shift the printed
image along the X and Y axes of each sheet of paper.
®
Xerox
VersaLink®C7000 Color Printer
User Guide
91
Page 92

Printing
CCoolloorr CCoorrrreeccttiioonn
Color Correction matches printer colors on PostScript jobs to colors on other devices, such as your
computer screen or a printing press.
Color Correction options:
• Xerox Black and White: This option converts all color in the document to black and white, or
shades of gray.
• Xerox Automatic Color: This option applies the best color correction to text, graphics, and images.
Xerox recommends this setting.
There are more Color Correction options, including Vivid RGB and Commercial.
CCoolloorr AAddjjuussttmmeennttss
Use Color Adjustments to adjust particular characteristics of the printed color. Characteristics include
lightness, contrast, saturation, and color cast.
Note: Not all options listed are supported on all printers. Some options apply only to a specific
printer model, configuration, operating system, or driver type.
Lightness
The Lightness feature allows you to adjust the overall lightness or darkness of the text and images in
your printed job.
Contrast
You can use the Contrast feature to adjust the variation between light and dark areas of the print job.
Saturation
Saturation allows you to adjust the color strength and the amount of gray in the color.
Color Cast
Use Color Cast settings to adjust the amount of a selected color in the print job while preserving
lightness.
The following options are available:
• The Cyan to Red option allows you to adjust the color balance between cyan and red. For
example, when you increase the cyan levels, the red levels decrease.
• The Magenta to Green option allows you to adjust the color balance between magenta and
green. For example, when you increase the magenta levels, the green levels decrease.
• The Yellow to Blue option allows you to adjust the color balance between yellow and blue. For
example, when you increase the yellow levels, the blue levels decrease.
PPrriinnttiinngg MMuullttiippllee PPaaggeess ttoo aa SSiinnggllee SShheeeett
When printing a multiple-page document, you can print more than one page on a single sheet of
paper.
To print 1, 2, 4, 6, 9, or 16 pages per side, select Pages Per Sheet on the Pages Per Sheet Page Layout
tab.
92
Xerox®VersaLink®C7000 Color Printer
User Guide
Page 93

Printing
• For Windows, Page Layout is on the Document Options tab.
• For Macintosh, in the Print window, Layout is on the Preview list.
To print a border around each page, select Page Borders.
PPrriinnttiinngg BBooookklleettss
With 2-sided printing, you can print a document in the form of a small booklet. You can create
booklets from any paper size that is supported for 2-sided printing.
The print driver automatically reduces each page image and prints four page images per sheet of
paper, two page images on each side. The pages are printed in the correct order so that you can fold
and staple the pages to create the booklet.
• For Windows, Booklet Layout is on the Page Layout tab. Page Layout is on the Document Options
tab.
• For Macintosh, in the Print window, in Xerox Features, Booklet Layout is on the Paper/Output list.
When you print booklets using the Windows PostScript or Macintosh driver, you can specify the gutter
and creep.
• Gutter: Specifies the horizontal distance in points between the page images. A point is 0.35 mm
(1/72 in.).
• Creep: Specifies how much the page images shift outward in tenths of a point. Shifting
compensates for the thickness of the folded paper, which can cause the page images to shift
outward slightly when folded. You can select a value from zero to 1 point.
Gutter
Creep
UUssiinngg SSppeecciiaall PPaaggeess
The Special Pages options control how covers, inserts, and exception pages are added to your printed
document.
®
Xerox
VersaLink®C7000 Color Printer
User Guide
93
Page 94

Printing
• For Windows, the Special Pages tab is on the Document Options tab.
• For Macintosh, in the Print window, in Xerox Features, Special Pages is in the Paper field for Paper/
Output.
PPrriinnttiinngg CCoovveerr PPaaggeess
A cover page is the first or last page of a document. You can select paper sources for the cover pages
that are different from the source used for the body of a document. For example, you can use your
company letterhead for the first page of a document. You can also use heavyweight paper for the
first and last pages of a report. You can use any applicable paper tray as the source for printing cover
pages.
Select one of these options for printing cover pages:
• No Covers: This option does not print cover pages. No cover pages are added to the document.
• Front Only: This option prints the first page on paper from the specified tray.
• Back Only: This option prints the back page on paper from the specified tray.
• Front and Back: Same prints the front and back cover pages from the same tray.
• Front and Back: Different prints the front and back cover pages from different trays.
After making a selection for printing the cover pages, you can select the paper for the front and back
covers by size, color, or type. You can also use blank or pre-printed paper, and you can print side one,
side two, or both sides of the cover pages.
PPrriinnttiinngg IInnsseerrtt PPaaggeess
You can add blank or pre-printed insert pages before page one of each document or after designated
pages within a document. Adding an insert after designated pages within a document separates
sections, or acts as a marker or placeholder. Ensure that you specify the paper to use for the insert
pages.
• Insert Options provides the options to place an insert After Page X, where X is the specified page,
or Before Page 1.
• Insert Quantity specifies the number of pages to insert at each location.
• Pages: Specifies the page or range of pages that use the exception page characteristics. Separate
individual pages or page ranges with commas. Specify pages within a range with a hyphen. For
example, to specify pages 1, 6, 9, 10, and 11, type 1,6,9-11.
• Paper: Displays the default size, color, and type of paper selected in Use Job Settings.
• Job Setting: Displays the attributes of the paper for the remainder of the job.
PPrriinnttiinngg EExxcceeppttiioonn PPaaggeess
Exception pages have different settings from the rest of the pages in the job. You can specify
differences such as page size, page type, and page color. You can also change the side of the paper
on which to print as your job requires. A print job can contain multiple exceptions.
For example, your print job contains 30 pages. You want five pages to print on only one side of a
special paper, and the remainder of the pages printed 2-sided on regular paper. You can use
exception pages to print the job.
94
Xerox®VersaLink®C7000 Color Printer
User Guide
Page 95

Printing
In the Add Exceptions window, you can set the characteristics of the exception pages and select the
alternate paper source:
• Pages: Specifies the page or range of pages that use the exception page characteristics. Separate
individual pages or page ranges with commas. Specify pages within a range with a hyphen. For
example, to specify pages 1, 6, 9, 10, and 11, type 1,6,9-11.
• Paper: Displays the default size, color, and type of paper selected in Use Job Settings.
• 2-Sided Printing allows you to select 2-sided printing options. Click the Down arrow to select an
option:
– 1-Sided Print prints the exception pages on one side only.
– 2-Sided Print prints the exception pages on both sides of the paper and flips the pages on
the long edge. The job then can be bound on the long edge of the pages.
– 2-Sided Print, Flip on Short Edge prints the exception pages on both sides of the paper and
flips the pages on the short edge. The job then can be bound on the short edge of the pages.
– Use Job Setting prints the job using the attributes shown in the Job Settings box.
• Job Setting: Displays the attributes of the paper for the remainder of the job.
Note: Some combinations of 2-sided printing with certain paper types and sizes can produce
unexpected results.
PPrriinnttiinngg WWaatteerrmmaarrkkss ffoorr WWiinnddoowwss
A watermark is special-purpose text that can be printed across one or more pages. For example, you
can add a word like Copy, Draft, or Confidential as a watermark instead of stamping it on a document
before distribution.
Note:
• This feature is available only on a Windows computer printing to a network printer.
• Not all options listed are supported on all printers. Some options apply only to a specific
printer model, configuration, operating system, or print driver type.
• Watermarks are not supported for some print drivers when booklet is selected or when more
than one page is printed on a sheet of paper.
To print a watermark:
1. In the print driver, click the Document Options tab.
2. Click the Watermark tab.
3. From the Watermark menu, select the watermark. You can choose from preset watermarks, or
create a customized watermark. You can also manage watermarks from this menu.
4. Under Text, select an option:
• Text: Enter the text in the field, then specify the font.
• Time Stamp: Specify the date and time options, then specify the font.
• Picture: To locate the picture, click the Browse icon.
Xerox
®
VersaLink®C7000 Color Printer
User Guide
95
Page 96

Printing
5. Specify the scaling angle and position of the watermark:
• Select the scaling option that specifies the size of the picture in relation to the original image.
Use the arrows to scale the image in increments of 1%.
• To define the angle of the image on the page, specify the position option or to rotate the
image left or right by increments of 1, use the arrows.
• To define the location of the image on the page, specify the position option, or to move the
image in each direction in increments of 1, use the arrows.
6. Under Layering, select how to print the watermark:
• Print in Background: This option prints the watermark behind the text and graphics in the
document.
• Blend: This option combines the watermark with the text and graphics in the document. A
blended watermark is translucent, so you can see both the watermark and the document
content.
• Print in Foreground: This option prints the watermark over the text and graphics in the
document.
7. Click Pages, then select the pages to print the watermark:
• Print on All Pages: This option prints the watermark on all pages of your document.
• Print on Page 1 Only: This option prints the watermark only on the first page of the
document.
8. If you select a picture as a watermark, specify the lightness settings for the image.
9. Click OK.
OOrriieennttaattiioonn
Orientation allows you to select the direction that the page prints.
• For Windows, the Orientation tab is on the Document Options tab.
Note: The orientation setting in your application print dialog box may override the orientation
options in the print driver.
• For Macintosh, Orientation options are in the Print window.
The following options are available:
• Portrait: Orients the paper so that the text and images print across the short dimension of the
paper.
• Landscape: Orients the paper so that the text and images print across the long dimension of the
paper.
• Rotated Landscape: Orients the paper so that the content is rotated 180 degrees and with the
long bottom side up.
96
Xerox®VersaLink®C7000 Color Printer
User Guide
Page 97

Printing
Note: For Macintosh, to print portrait text and images in landscape orientation, clear
the Auto Rotate check box.
AAddvvaanncceedd TTaabb
You can use the Advanced tab to set advanced printing options. Selections on this tab apply to all
jobs that you print with the print driver.
Note: Not all options listed are supported on all printers. Some options apply only to a specific
printer model, configuration, operating system, or print driver type.
JJoobb IIddeennttiiffiiccaattiioonn
You can use the Job ID feature to change the job identification setting for your print job. You can
print the job identification on a separate banner page or on the pages of your document.
The following options are available:
• Disable Job ID: This option directs the printer not to print a banner page.
• Print ID on a Banner Page: This option prints the job identification on a banner page.
• Print ID in Margins - First Page Only: This option prints the job identification on the first page of
the document in the top-left margin.
• Print ID in Margins - All Pages: This option prints the job identification in the top-left margin on
every page of the document.
PPrriinnttiinngg MMiirrrroorr IImmaaggeess
If the PostScript driver is installed, you can print pages as a mirror image. Images mirror left to right
when printed.
SSeelleeccttiinngg JJoobb CCoommpplleettiioonn NNoottiiffiiccaattiioonn ffoorr WWiinnddoowwss
You can select to be notified when your job finishes printing. A message appears on your computer
screen with the name of the job and the name of the printer where it was printed.
Note: This feature is only available on a Windows computer printing to a network printer.
To select job completion notification from the Advanced tab:
1. Click Notifications.
2. Click Notify for Completed Jobs, then select an option.
• Enabled: This option turns on notifications.
• Disabled: This option turns off the Notification feature.
3. Click OK.
Xerox
®
VersaLink®C7000 Color Printer
User Guide
97
Page 98

Printing
Using Custom Paper Sizes
You can print on custom paper sizes that are within the minimum and maximum size range supported
by the printer. For more information, refer to Supported Custom Paper Sizes.
PPrriinnttiinngg oonn CCuussttoomm PPaappeerr SSiizzeess
Note: Before printing on a custom paper size, use the Custom Paper Sizesfeature in Printer
Properties to define the custom size. For more information, refer to Defining Custom Paper
Sizes.
PPrriinnttiinngg oonn CCuussttoomm PPaappeerr SSiizzee ffrroomm WWiinnddoowwss
Note: Before printing on custom-size paper, define the custom size in the Printer Properties.
1. Load the custom-size paper in the tray.
2. In the application, click File→Print, then select your printer.
3. In the Print dialog box, click Printer Properties.
4. On the Printing Options tab, from the Paper list, select the required custom paper size and type.
5. Select any other required options, then click OK.
6. In the Print dialog box, click Print.
PPrriinnttiinngg oonn CCuussttoomm--SSiizzee PPaappeerr ffrroomm aa MMaacciinnttoosshh CCoommppuutteerr
1. Load the custom-size paper.
2. In the application, click File→Print.
3. From the Paper Size list, select the custom paper size.
4. Click Print.
DDeeffiinniinngg CCuussttoomm PPaappeerr SSiizzeess
To print custom paper sizes, define the custom width and length of the paper in the print driver
software and on the printer control panel. When setting the paper size, ensure that you specify the
same size as the paper in the tray. Setting the wrong size paper can cause a printer error. Print driver
settings override control panel settings when you print using the print driver software on your
computer.
CCrreeaattiinngg aanndd SSaavviinngg CCuussttoomm PPaappeerr SSiizzeess iinn tthhee PPrriinntt DDrriivveerr
You can print custom-size paper from any paper tray. Custom-size paper settings are saved in the
print driver and are available for you to select in all your applications.
For more information on supported paper sizes for each tray, refer to Supported Custom Paper Sizes.
98
Xerox®VersaLink®C7000 Color Printer
User Guide
Page 99

Printing
Creating and Saving Custom Sizes for Windows
1. In the print driver, click the Printing Options tab.
2. For Paper, click the arrow, then select Other Size→Advanced Paper Size→Output Paper
Size→New.
3. In the New Custom Paper Size window, enter the height and width of the new paper size.
4. To specify the units of measurement, at the bottom of the window, click the Measurements
button, then select Inches or Millimeters.
5. To save, in the Name field, type a title for the new size, then click OK.
Creating and Saving Custom Sizes for Macintosh
1. In the application, click File→Print.
2. Click Paper Size, then select Manage Custom Sizes.
3. To add a new size, in the Manage Paper Sizes window, click the Plus icon (+).
4. Double-click Untitled, then type a name for the new custom paper size.
5. Enter the height and width of the new custom paper size.
6. Click the arrow for the Non-Printable Area field, then select the printer from the list. Or, for User
Defined margins, set the top, bottom, right, and left margins.
7. To save the settings, click OK.
DDeeffiinniinngg aa CCuussttoomm PPaappeerr SSiizzee aatt tthhee CCoonnttrrooll PPaanneell
You can print custom-size paper from any paper tray. Custom-size paper settings are saved in the
print driver and are available for you to select in all your applications.
1. At the printer control panel, press the Home button.
2. Touch Device→Paper Trays.
3. Touch the desired tray for your custom-size paper.
4. Touch the current paper size setting, then from the list, touch Custom.
5. In the Custom Paper Size screen, enter the height and width of the new paper size.
6. To save the setting, touch OK.
7. To return to the Home screen, press the Home button.
Xerox
®
VersaLink®C7000 Color Printer
User Guide
99
Page 100

Printing
100
Xerox®VersaLink®C7000 Color Printer
User Guide
 Loading...