

Page 1
CopyCentre
WorkCentre Pro
CopyCentre/
WorkCentre Pro
at a
The system offers some distinct advantages
that will help you get your job done.
Glance
C65/C75/C90
65/75/90
Page 2
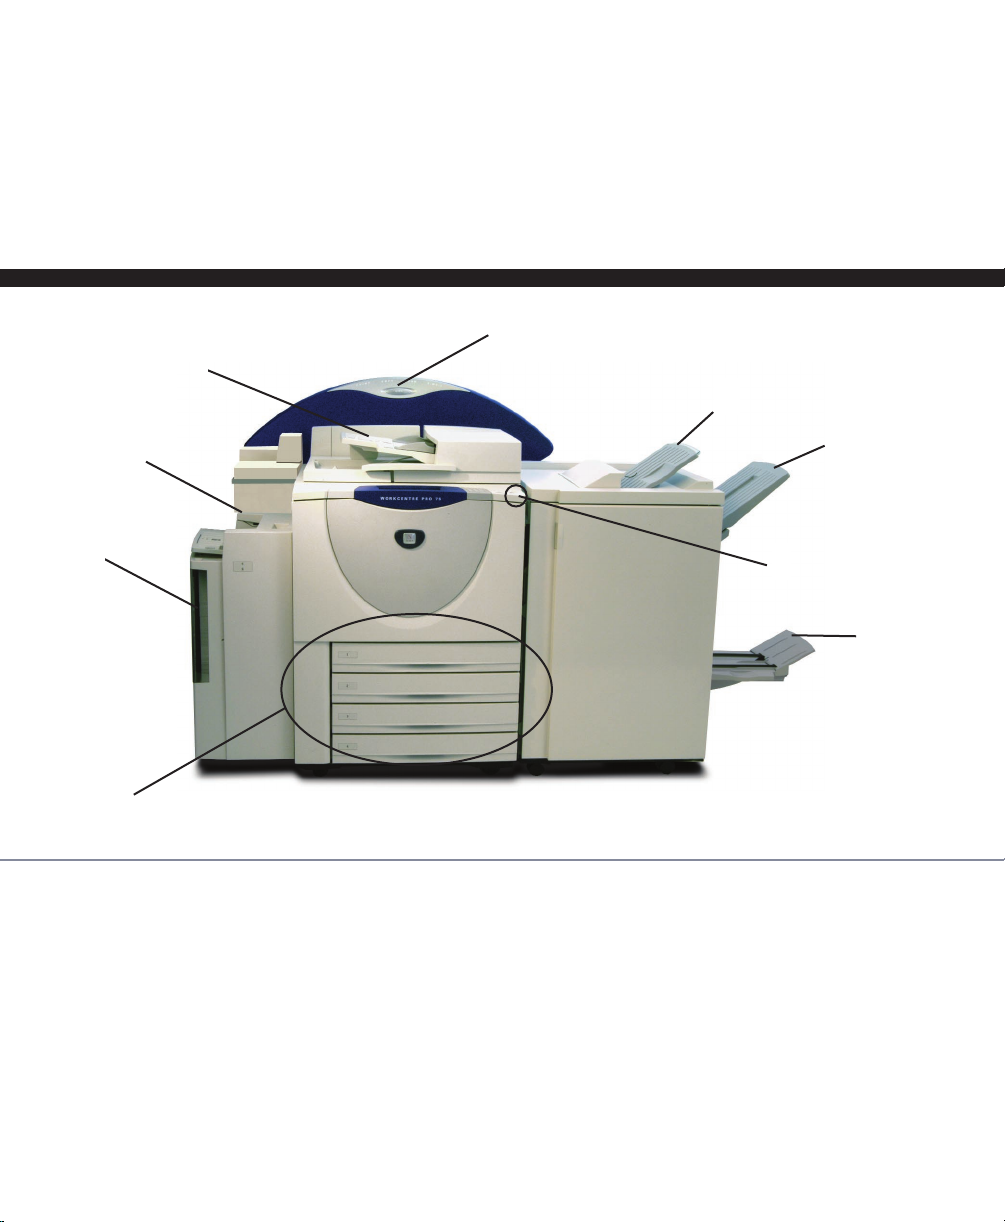
Table of Contents
Making Copies . . . . . . . . . . . . . . . . . . . . . . . . . . . . . . 1
Advanced Copy Job Options . . . . . . . . . . . . . . . . . . 2
Print Driver . . . . . . . . . . . . . . . . . . . . . . . . . . . . . . . . . 3
Embedded Web Browser . . . . . . . . . . . . . . . . . . . . . 4
Finisher . . . . . . . . . . . . . . . . . . . . . . . . . . . . . . . . . . . . 5
Tri-Fold Option . . . . . . . . . . . . . . . . . . . . . . . . . . . . . . 6
Booklet Maker . . . . . . . . . . . . . . . . . . . . . . . . . . . . . . 7
1
8
7
Using Network Scanning . . . . . . . . . . . . . . . . . . . . . 8
Scanning Your Originals . . . . . . . . . . . . . . . . . . . . . . 9
Sending E-mail . . . . . . . . . . . . . . . . . . . . . . . . . . . . . 10
Sending a Fax . . . . . . . . . . . . . . . . . . . . . . . . . . . . . . 11
Internal Auditron . . . . . . . . . . . . . . . . . . . . . . . . . . . 12
Network Accounting . . . . . . . . . . . . . . . . . . . . . . . . 13
Hints and Tips . . . . . . . . . . . . . . . . . . . . . . back cover
9
2
3
4
5
6
1 . . . Use the Document Feeder to rapidly scan
originals or lift the cover to use the glass.
2 . . . The Top Tray receives single sheets and
unstapled output.
3 . . . The Main Tray receives collated and
stapled output.
4 . . . Power On/Off button.
5 . . . The Bottom Tray receives output from the
Booklet Maker.
6 . . . Paper Trays hold different sizes and types
of stock.
7 . . . Use Tray 6 for large jobs.
8 . . . Use Tray 5 to feed special stock.
9 . . . Identifies installed optional features.
Page 3
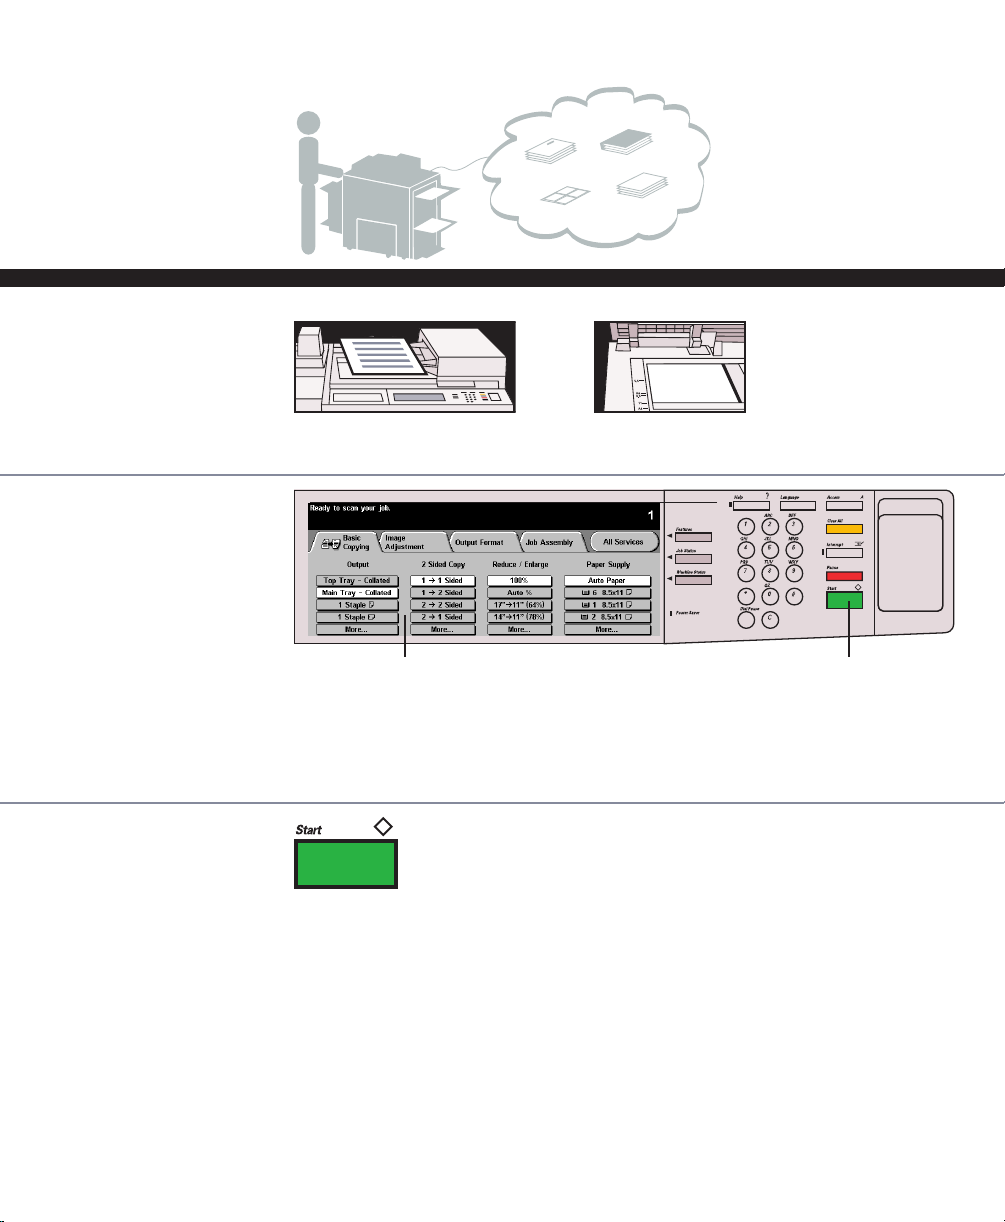
Making Copies
No waiting. You can
program and scan
your job while
another is processing.
1Load 1- or
2-sided
originals
2Make your
selections
3Press Start
or
The Touch screen display will change to the Features screen.
Features screen
Start
• The Basic Copying tab will be displayed.
• Touch the screen to make selections.
• Press other tabs for more advanced copy options.
1
Page 4
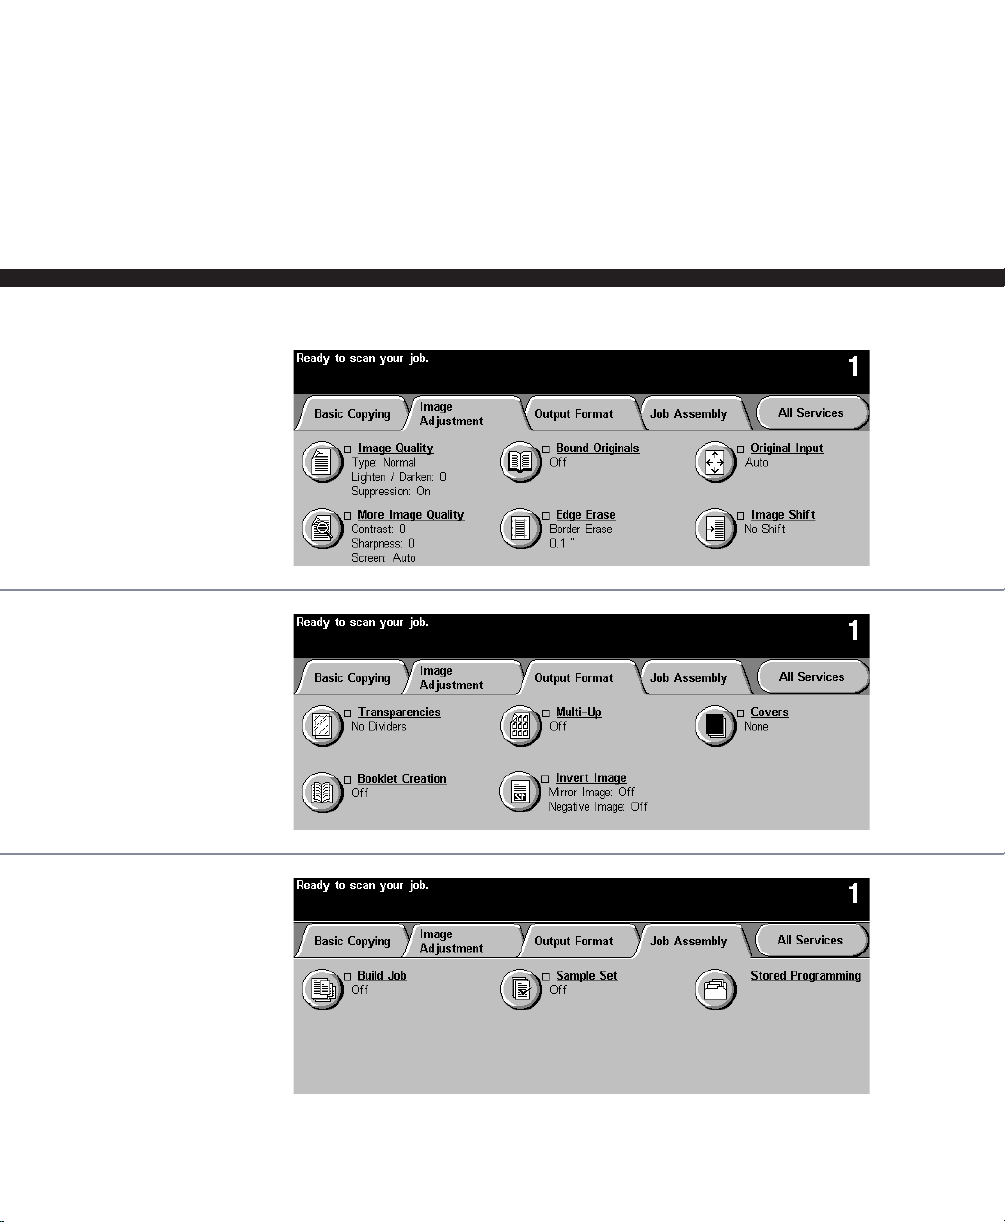
Advanced Copy Job Options
• Copy pages from books. • Erase edges and borders.
• Make brochures and booklets. • Insert dividers into transparencies.
• Add covers. • Create sample sets.
• Use Build Job to apply different • Copy mixed size originals.
programming within a stack of originals.
Use these tabs to access the advanced copy feature:
These features refine
the appearance of the
finished output.
These features
produce different
options for the
finished output.
These features
produce different
options to allow you
to program, proof,
and store jobs.
2
Page 5
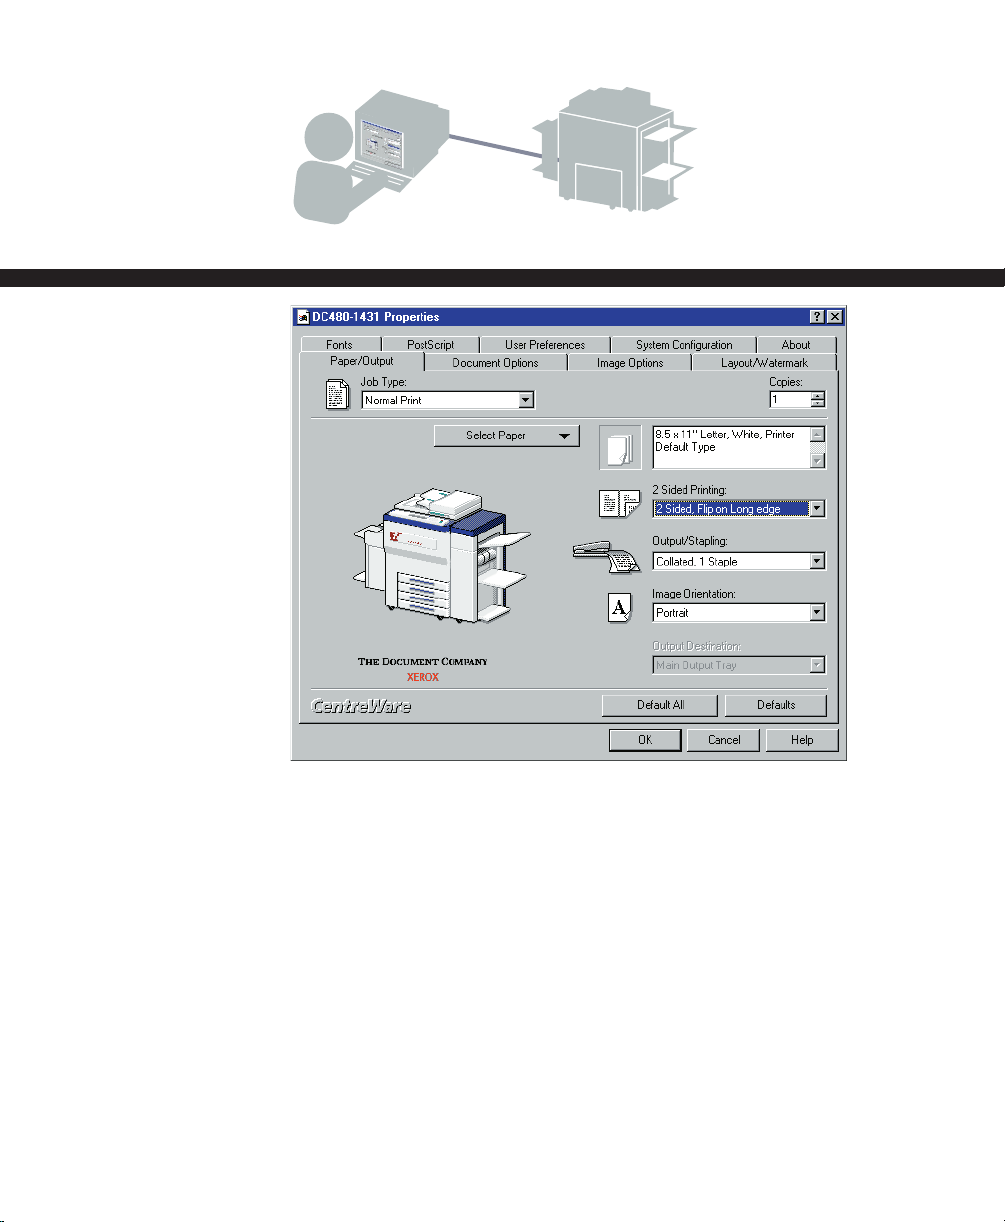
Print Driver
You can print to your
system after you are
connected through a
computer network and
have the correct
CentreWare®Print
Driver loaded.
1Select Print in
your application
2Select your
printer
3Select
Properties to
bring up the
Print Driver.
Make your
selections
4Click OK
CentreWare®screen Printer Properties
Most of what you need is on this tab. Explore the features on the
other tabs.
Print Job options:
• Print 1-sided or 2-sided.
• Print stapled sets if you
have a Finisher.
• Print resolutions up to
1800 x 1800 dpi.
• Add watermarks.
• Print your confidential
document after you get to
the printer with Secure
Printing.
• Create a proof set to review
with Sample Print before you
print multiple sets.
• Add covers.
• Print multiple images on
a page.
• Make a booklet.
• Simultaneously print
transparencies and
transparency separators.
3
Page 6

Embedded Web Browser
You can print a
document when
your print driver is
not available or if
working in a remote
office location.
1Type the
machine’s
Internet
Protocol
address in
your browser
2Select the
Services button
to submit printready jobs
~
~
3Make your Job
Submission
Selections
4Browse to
select your file
5Select
Submit Job
4
CentreWare Internet Services screen®.
• Internet Services supports print-ready file formats only. All files
must be submitted in formats such as PDF and PostScript.
• If you don’t know the IP address, ask your Administrator.
Page 7

Finisher
The Finisher is available in 3 different
configurations as illustrated below.
All finishing options are selectable from
the local user interface on the device, from
the network using print drivers, and from
the embedded web server when submitting
print ready files.
Professional Finisher
Features
• Booklet Making
• 2 Letter size Tri-Fold options: C and Z shapes
• 100 Sheet Staple capacity, sizes 8.5 x14" or
215 x 330mm and smaller
• 50 Sheet Staple capacity sizes over 8.5 x 14"
or 215 x 330mm
Advanced Office Finisher
Features
• 100 Sheet Staple capacity, sizes 8.5 x14" or
215 x 330mm and smaller
• 50 Sheet Staple capacity sizes over 8.5 x 14"
or 215 x 330mm
Office Finisher
Features
• 100 Sheet Staple capacity, sizes 8.5 x14"
or 215 x 330mm and smaller
• 50 Sheet Stapling capacity
5
Page 8

Tri-Fold Option Available on the Professional Finisher only.
• You must load the originals in
the Document Feeder in Short
Edge Feed (SEF) orientation.
• You must select SEF
Paper Supply.
1Load originals
2On the Basic
Copying tab
select SEF Paper
Supply then select
More under the
Output column
3Select Folding
Options
4Select Tri-Fold >
Z-Configuration >
Save
• Tri-Fold option
produces single sheet
letter size output only
(8.5 x 11" or A4).
Z-Fold
C-Fold
5Select Save to
confirm fold
settings
6Enter the copy
count on the
keypad
7Press the Start
button
You can also make
2 Sided Copy and
Reduce/Enlarge
selections as required.
6
Page 9

Booklet Maker Available on the Professional Finisher only.
Folded and
Stapled Booklet
2–15 sheets
Booklet Overview
• Load the originals into the Document
Feeder in Long Edge Feed orientation.
• Use an even number of orginals to avoid
blank sheets in your booklet.
• You must select SEF Paper Supply.
The table illustrates sample booklet
sheet count.
Example:
4 original pages scanned will produce
1 finished booklet sheet.
1Place the orginals
face up in the
Document Feeder,
Long Edge Feed
orientation
2Select a Paper Tray
loaded with Short
Edge Feed stock
4Select On > 1 or 2
Sided Originals > Save
5On the Basic Copying
tab Output column,
select More… >
Booklet Maker
6Select Folded and
Stapled > Save
3On the Output
Format tab, select
Booklet Creation
7Select Save to confirm
your Booklet Maker
selections
Folded Only
Booklet
1–5 sheets
Number of Number of
Originals = Sheets in the
Scanned Booklet
4–20 = 1–5
24–40 = 6–10
44–60 = 11–15
8Enter the copy
quantity on the
keypad
9Press the
Start button
7
Page 10

Using Network Scanning
Ever want to…
• Fax a newspaper article to someone
without making a copy first?
• Send a paper document to both Fax and
e-mail addresses at the same time?
Scanning Overview
Authentication Access Control is a
scanning feature. The Administrator can
configure the system to limit access until
a login sequence is completed.
The system creates a TIFF or PDF file from
a hard copy original. The file is sent to
locations specified in the selected
Distribution Template. Once your file is
digital, with the correct software you can
do almost anything.
Transfer it, E-mail it, OCR it, Edit it.
What you need is a system with network
scanning enabled, and basic knowledge of
a template. Start with your Administrator to
get connected.
• Convert a hard copy original into an
editable electronic format without retyping
the document?
• Share handwritten meeting notes quickly?
With network scanning you can do all these
and more.
PC
E-mail
DISTRIBUTION
TEMPLATES
File
Server
Work Flow
Distribution Template Basics
Templates are files stored at the machine
that tell it how to create your scan file and
where to send it after it is created. Your
organization may provide you with a standard template or you can create your own.
For detailed information, see the
CentreWare Network Scanning Services
Guide or your Administrator.
8
Page 11

Scanning Your Originals Optional Feature
1Load originals
and press the
Network
Scanning button
2 Select a
Distribution
Template
Templates
3 Press Start
Network
Scanning
Modify the template Feature settings if necessary.
• Sides Scanned
• Image Quality
• Resolution (On the Image Adjustment tab)
The file is on its way to wherever you sent it. If you sent the
file back to your workstation, go back and retrieve the file you
just created.
9
Page 12

Sending E-mail Optional Feature
You can send an
e-mail message much
the way that you
can at your personal
computer.
E-mail Overview
If enabled, Network Scan to E-mail allows
you to scan a document and distribute it via
Simple Mail Transfer Protocol (SMTP). What
you need is a network enabled system with
Network Scanning and Network E-mail
options installed.
This optional feature allows you to send
electronic mail without the use of a template.
1Load originals
and press the
E-mail button
2 Press the To,
Cc, or Bcc
button. Use
the keyboard
to type a
recipient name
When sending to
multiple recipients
enter name then
press Add to Address
List – repeat until all
names are entered.
E-mail
The system creates an electronic file such
as TIFF or PDF from a hard copy original
document. You can create an Address List
of recipients using an Address Book configured by your Administrator.
For detailed information see your
Administrator.
3Select any
additional
features
4 Press Start
10
Additional features you can change
• Resolution
• Sides Scanned
• Anything under the More… button
Page 13

Sending a Fax Optional Feature
Fax a copy of your
original, anytime
anywhere.
Telephone
network
1Load originals
and press the
Fax button
Fax
2Enter a
number
3Select any
additional
features
4Press Start
Use the keypad to enter a Fax number. To access stored numbers,
press the Phone List button.
If sending to multiple numbers, use the keypad to enter a Fax
number, then press Add to Send List – repeat until all numbers
are entered.
Change:
• Resolution
• Sides Scanned
• Anything else under the More Fax Features tab
11
Page 14

Internal Auditron Optional Feature
If your organization is using a tracking feature, you will
have to log in to the system before using it.
See your administrator for more information.
The Auditron feature is used to keep track of copier use
by User ID and expense account number. User ID is not
needed for print jobs.
Logging In at the Machine:
1Enter a valid Password.
2Press Enter.
Internal Auditron Login screen
3Depending on your configuration,
press the User Pathway button
and start your job.
Logging Out:
Don’t forget to log out.
1Press the Access or Clear All
button above the keypad.
Accessing General Accounts
Your administrator may also provide access
to a second level of tracking known as
General Accounts.
1Enter the User Number.
Then press Enter.
2Press the General
Accounts button.
12
2Press the Logout button.
3Enter a General Account number
and press Enter. Quantity of
copies made will be recorded in
the General Account.
Page 15

Network Accounting Optional Feature
If your organization is using a tracking feature, you will have to
log in to the system before using it.
See your administrator for more information.
This option requires a user to enter a valid User ID and Account
ID to access all the machine functions, including printing.
Logging In at the Machine:
1Press User ID, enter your
User ID, and press Save.
2Press Account ID, enter your
Account ID, and press Save.
Machine Login screen
3Press Enter.
4Start your job.
Logging In from Your PC:
1When you send a print job,
the Print Login screen appears
before the job is sent to the printer.
2Enter your User ID and Account ID
and click OK.
Logging Out:
Don’t forget to log out.
1Press the Access or Clear All
button above the keypad.
Print Login screen
2Press the Logout button.
13
Page 16

Hints and Tips
To access the Job Queue:
1Press Job Status to see a
list of jobs the machine is
currently processing.
2Touch a job for access
to more options.
3You can promote, delete,
release or view additional
details about a job.
If there is a problem…
Messages, screen instructions
and animated graphics provide
additional information.
Job Status
Messages
If streaks or spots appear on
your copies...
Clean the Document Glass. See the
Reference Guide for additional information.
©2003 XEROX CORPORATION. Xerox®, The Document Company®, the digital X, WorkCentre Pro® and CopyCentre™, are trademarks
of XEROX CORPORATION, or Xerox (Europe) Limited. All rights reserved. Product names used may be trademarks or registered
trademarks of their respective companies and are hereby acknowledged. 701P39799 05/03
Animated Graphics
Instructions
Clean this area if
streaks appear
Clean the glass if spots appear
 Loading...