

Page 1

WorkCentre XE Series
XE60/62/80/82
701P98848
9/98
Page 2

FCC Compliance in the USA
WARNING: This equipment has been tested and found to comply with the
limits for a Class B digital device pursuant to Part 15 of the FCC Rules.
These limits are designed to provide reasonable protection against harmful
interference in a residential installation. This equipment generates, uses
and can radiate radio frequency energy and, if not installed and used in
accordance with the instructions, may cause harmful communications.
However, there is no guarantee that interference will not occur in a particular
installation. If this equipment does cause harmful interference to radio or
television reception, which can be determined by turning the equipment off
and on, the user is encouraged to try to correct the interference by one or
more of the following measures:
• Reorient or relocate the receiving antenna.
• Increase the separation between the equipment and the receiver.
• Connect the equipment into an outlet on a different circuit than the
receiver.
• Consult the dealer or an experienced radio/TV technician for help.
Changes or modifications to this equipment not specifically approved by the
Xerox Corporation may void the authority granted by the FCC to operate this
equipment.
Shielded cables must be used with this equipment to maintain compliance
with FCC regulations.
Use of controls or adjustments of performance of procedures
other than those specified herein may result in hazardous radiation
exposure.
EME Compliance in Canada
This Class B digital apparatus meets all requirements of the Canadian
Interference-Causing Equipment regulations.
ENERGY STAR (XE80 series)
As an ENERGY STAR® Partner, Xerox Corporation has
determined that this product meets the ENERGY
STAR® guidelines for energy efficiency.
Page 3

It's Illegal
In the USA
It is against US law to copy copyrighted material without permission of the
copyright owner unless the copying falls within the "Fair Use" or library
reproduction rights of the copyright law. Further information on these U.S.
provisions may be obtained from the Copyright Office, Library of Congress,
Washington, D.C. 20550, or telephone the Copyright Office at (202) 7079100 and ask for circular 21. Copying of other items may be prohibited. If
you have any questions, seek legal advice.
In Canada
In Canada it is against the law to copy copyrighted material without
permission of the copyright owner, unless the copying falls within the private
study, research or criticism provision of the copyright law. Copying of other
items may be prohibited. If you have any questions, seek legal advice.
©1998 Xerox Corporation. Xerox®, The Document Company®, the stylized
X, and the identifying product names and numbers herein are registered
trademarks of Xerox Corporation. Xerox Canada Ltd. is the licensee of all
the trademarks.
Copyright protection claimed includes all forms and matters of copyrighted
material and information now allowed by statutory of judicial law or
hereinafter granted, including without limitation material generated from the
software programs which are displayed on the screen such as icons, screen
display tools, etc.
Product names used in this guide may be trademarks or registered
trademarks of their respective companies and are hereby acknowledged.
All non-Xerox brands and product names are trademarks or registered
trademarks of their respective companies.
Page 4

Table of Contents
Introduction-------------------------------------------------------------------------------- i
Supplies -------------------------------------------------------------------------------- i
Information----------------------------------------------------------------------------- i
Service---------------------------------------------------------------------------------- i
Manual Conventions------------------------------------------------------------------- ii
Safety Notes ------------------------------------------------------------------------------ ii
Setting Up the WorkCentre ---------------------------------------------------------- 1
Introduction --------------------------------------------------------------------------- 1
WorkCentre Features--------------------------------------------------------- 1
Unpacking the WorkCentre-------------------------------------------------- 4
Removing the Cardboard ---------------------------------------------------- 4
Removing the Shipping Tape ----------------------------------------------- 4
Removing the Shipping Screw---------------------------------------------- 5
Installing the Paper Tray ----------------------------------------------------- 6
The Paper Output Support--------------------------------------------------- 6
Removing the Protective Paper from the Drum Cartridge------------ 7
Installing the Toner Cartridge ----------------------------------------------- 8
Getting To Know Your WorkCentre---------------------------------------- 8
Installation----------------------------------------------------------------------------- 9
Requirements------------------------------------------------------------------- 9
Connecting the Parallel Cable (XE80, XE82) --------------------------10
Connecting the Power Cord ------------------------------------------------10
Copying/Printing -----------------------------------------------------------------------11
Selecting Media---------------------------------------------------------------------11
Paper Specifications ---------------------------------------------------------11
Paper Tips ----------------------------------------------------------------------12
Loading Media ----------------------------------------------------------------------12
Copy/Print Features----------------------------------------------------------------14
Control Panel-------------------------------------------------------------------14
Customizing Your WorkCentre --------------------------------------------17
Copying a Page---------------------------------------------------------------------20
Copying Oversized Documents -------------------------------------------------20
Two-Sided Copying ----------------------------------------------------------------20
Copying While Printing------------------------------------------------------------21
On-line/Off-line Button ------------------------------------------------------------21
Power Saving------------------------------------------------------------------------21
Auto Clear----------------------------------------------------------------------------22
Troubleshooting------------------------------------------------------------------------23
Clearing Paper Jams------------------------------------------------------23
Page 5

At the Paper Tray -------------------------------------------------------------23
Inside the WorkCentre-------------------------------------------------------24
Paper Exit Area----------------------------------------------------------------24
WorkCentre Fault Codes---------------------------------------------------------25
Problem Solving --------------------------------------------------------------------26
Printer Driver Software Installation (XE80, XE82)................................. 29
Xerox Printer Services Program (Status Monitor)
(Windows 95, Windows 98 and Windows NT)....................................... 31
Xerox Printer Services Program (Status Monitor)
(Windows 3.1x)......................................................................................... 32
WorkCentre XE Properties (Printer Driver)............................................ 33
Displaying the Driver Properties dialog from an application................ 33
Displaying the Properties dialog from the Start Menu ......................... 34
Displaying the Properties dialog from the Xerox Printer Services
Program (Status Monitor).................................................................... 34
Properties Tabs................................................................................... 35
On-Line Help ....................................................................................... 35
?
Printer Driver Help (Windows 95, 98 and NT)............................... 35
Creating WorkCentre XE Floppy Disk Installation Diskettes............... 36
Cleaning and Maintenance----------------------------------------------------------37
Cleaning the WorkCentre --------------------------------------------------------37
Cleaning the Outside---------------------------------------------------------37
Cleaning the Document Glass and Cover-------------------------------37
Cleaning the Drum Cartridge-----------------------------------------------38
Repacking the WorkCentre------------------------------------------------------39
Storage/Transportation ------------------------------------------------------39
Service---------------------------------------------------------------------------39
Consumables------------------------------------------------------------------------40
Copy Count---------------------------------------------------------------------40
Toner Cartridge Yield ------------------------------------------------41
Storage --------------------------------------------------------------------------42
Replacing the Toner Cartridge---------------------------------------------42
Drum Cartridge Life-----------------------------------------------------43
Replacing the Drum Cartridge ---------------------------------------------43
Appendix----------------------------------------------------------------------------------46
Warranty ----------------------------------------------------------------------------------47
Page 6

Introduction
Congratulations on acquiring your new Document WorkCentre XE Series
Digital WorkCentre. The features, ease of operation, and reliability of the
WorkCentre allow you to concentrate on your business and leave the
copying/printing to your WorkCentre and Team Xerox experts.
Supplies
To order supplies for your WorkCentre, call or visit your local retailer. If your
store does not stock these items, you may call the following number.
In the United States and Canada:
Xerox SupplyNet toll free at: 1 – 800 – 822 – 2200
Toner Cartridge: 6R916
Copy Cartridge: 13R553
Information
To get answers for any other questions you might have regarding your
WorkCentre, to register your warranty by phone, or for assistance with the
installation of your WorkCentre you may call:
1 – 800 – TEAM – XRX (1 – 800 – 832 – 6979)
Service
A Customer Service Support Representative will assist you in keeping your
WorkCentre operational and, if required, will arrange for service.
Visit the Xerox Web site at: http://www.teamxrx.com
or call our experts at:1 – 800 – TEAM – XRX (1 – 800 – 832 – 6979)
The following information will be needed when you call Xerox:
• Machine Type: XE __________________
• Machine serial number:_______________
(Located on the back cover of the WorkCentre.)
Xerox Corporation
XEROX
PRODUCT CODE: W7P
RATING:
VOLTAGE: 120~
FREQUENCY: 60hZ
CURRENT: 6A 600w
Rochester, New York
Manufactured in China
0001095
Serial Number
• The purchase date from your receipt (required for warranty service).
• A description of the problem.
Status Code (if any) displayed on the control panel.
•
i
Page 7

Manual Conventions
The following conventions are used throughout this manual:
Provides information required to successfully complete an operation or
procedure.
Caution. You are not to overlook the mentioned points.
Safety Notes
Your Document WorkCentre XE Series Digital WorkCentre and supplies
have been designed and tested to meet strict safety requirements. These
include safety agency examination and approval, and compliance to
established environmental standards. Please read the following instructions
carefully before operating the WorkCentre and refer to them as needed to
ensure the continued safe operation of your WorkCentre.
Follow all warnings and instructions marked on or supplied with the
product.
Symbology:
= Laser Caution. Use of controls or adjustments or performance of
procedures other than those specified herein may result in hazardous
radiation exposure.
Unplug this WorkCentre from the wall outlet before cleaning.
Do not use aerosol cleaners. Follow the instructions in this User Guide for
proper cleaning methods.
ii
= High Voltage, = Heated Surface,
!
= Warning.
Page 8

Safety Notes (continued)
This product is equipped with a 3-wire grounding type plug (e.g., a plug
having a third grounding pin). This plug will fit only into a grounding-type
power outlet. This is a safety feature. To avoid risk of electric shock,
contact your electrician to replace the receptacle if you are unable to insert
the plug into the outlet. Never use a grounding adapter plug to connect the
copier to a power source receptacle that lacks a ground connection
terminal.
This WorkCentre should be operated from the type of power source
indicated on the marking label. If you are not sure of the type of power
available, consult your local power company.
Do not allow anything to rest on the power cord. Do not locate the copier
where persons will step on the cord.
Slots and Openings in the cabinet and in the back and sides of the copier
are provided for ventilation. To ensure reliable operation of the copier and
to protect it from overheating, these openings must not be blocked or
covered. The copier should never be located near or over a radiator or heat
register. This copier should not be placed in a built-in installation unless
proper ventilation is provided.
Never push objects of any kind into the slots of the copier as they may
touch dangerous voltage points or short out parts which could result in a fire
or electric shock.
iii
Page 9

Safety Notes (continued)
Never spill liquid of any kind on the copier.
Never remove covers or guards that require a tool for removal. There are
no casual operator serviceable areas within these covers.
Never defeat interlock switches. Machines are designed to restrict operator
access to unsafe areas. Covers, guards, and interlock switches are
provided to ensure that the machine will not operate with covers opened.
Do not put your hands into the fuser area, located just inside the
exit tray area, as you may be burned.
iv
Page 10

Setting Up the WorkCentre
Introduction
The Document WorkCentre XE Series Digital Copier (XE60, XE62) and
WorkCentre XE Series Digital Copier/Printer (XE80, XE82) are compact and
easy to use. They have been specially designed to provide you with high
quality and high performance copying/printing.
This manual tells you how to set up, operate, maintain, and get the best
performance from your WorkCentre.
WorkCentre Features
The maximum copy speed for the Document WorkCentre XE Series Digital
WorkCentre XE60/XE62 is 6 copies per minute. The maximum print speed
for the Document WorkCentre XE80/XE82 Series Digital WorkCentre is 8
prints per minute. The WorkCentre features a high-capacity paper tray for
easy loading of paper, envelopes, label sheets and transparency film.
Some of the other advanced features which can be selected from the
control panel of this WorkCentre include:
• Copy ratio: two reduction values, two enlargement values, one
customer-programmable value
• Zoom R/E ratio range: 50 to 200%
• Copy Quality modes: Automatic, Text, Photo, Toner Saver
• Programmable defaults (refer to Customizing Your Copier)
• Fault indicators and error message display
1
Page 11

Unpacking the WorkCentre
3
Your box contains the items shown below. If you are missing any of the
items shown, call 1 – 800 – TEAM – XRX (1 – 800 – 832 – 6979).
2
1 CD-ROM (XE80/XE82
1
8
4
7
5
only)
2 User Guide
Quick Reference Card
Warranty/Registration
Card
3 Power cord
4 Parallel Cable (XE80 and
XE82 only. IEEE-1284
only)
5 WorkCentre
6 Packing Material
7 Paper tray
6
8 Starter-Toner cartridge
• Do not remove the toner cartridge from the foil bag until you are
ready to install it in the WorkCentre.
• Keep the WorkCentre box, packing materials and shipping screw
in case you need to store or transport the WorkCentre at a later
date.
• Do not remove the drum cartridge from the WorkCentre.
Removing the Cardboard
Remove the piece of cardboard from the fr ont of
the WorkCentre as shown.
Removing the Shipping Tape
Remove the protective shipping tape from the WorkCentre.
2
Page 12
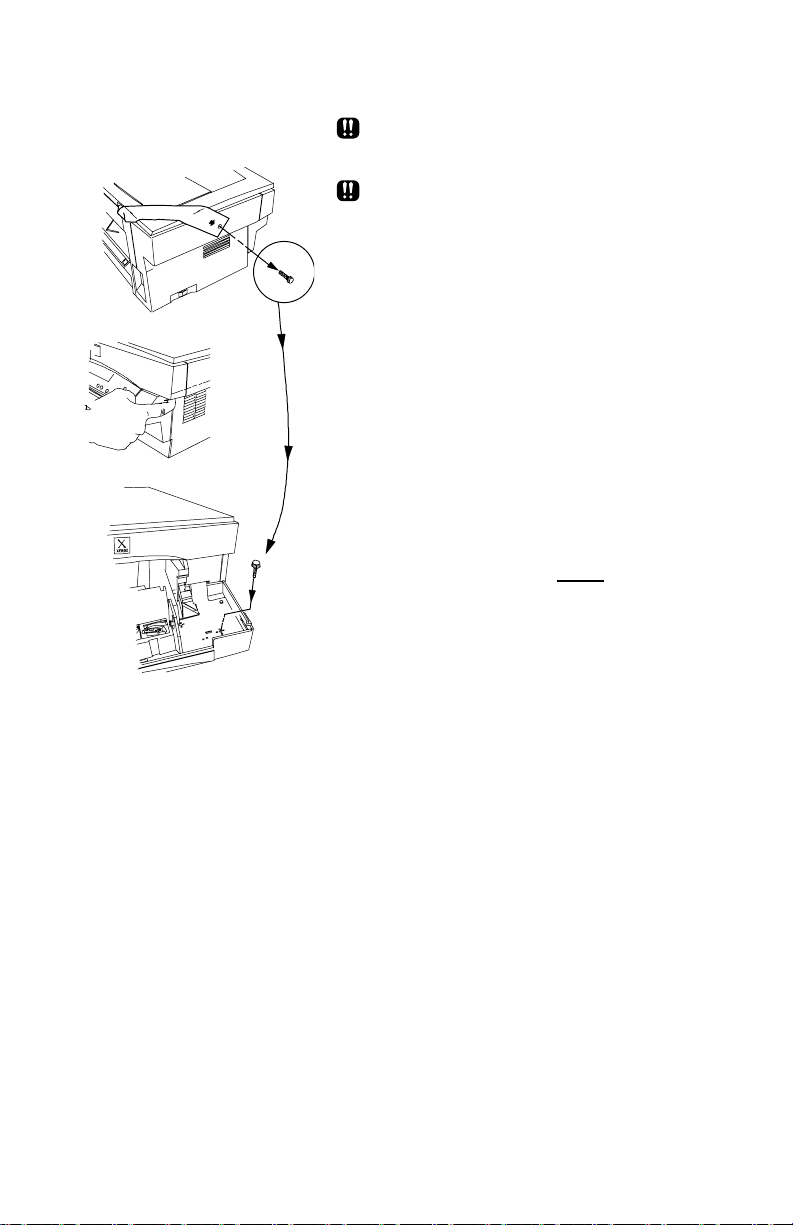
Removing the Shipping Screw
1. Remove the shipping screw.
2. Lift the document cover so that the left
hinge separates. Remove the
restraining strip and reconnect the
document cover to the WorkCentre.
3. Open the front door by pushing in on
the front door latches on each side of
the front door.
4. Place the shipping screw in a hole
of the plastic shield in the right side
of the front door. It must be
reinserted when repacking or moving
the WorkCentre.
DO NOT FORCE THE
DOCUMENT COVER.
THE WORKCENTRE WILL
MALFUNCTION IF THE
SHIPPING SCREW IS NOT
REMOVED.
3
Page 13
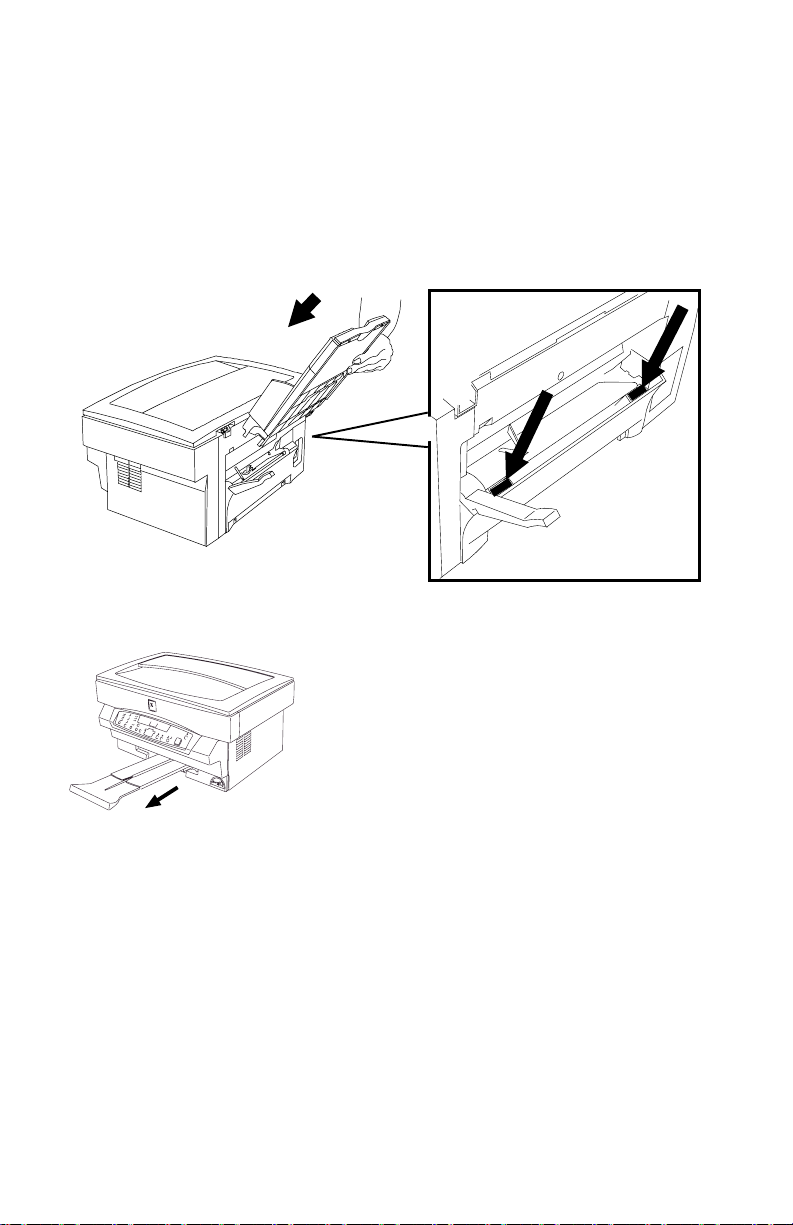
Installing the Paper Tray
1. Using two hands (one on each side of the tray), hold the paper tray so
that the paper tray guide is facing front.
2. Insert the paper tray into the paper tray slots at the rear of the
WorkCentre.
3. Ensure that the Paper Tray snaps into place.
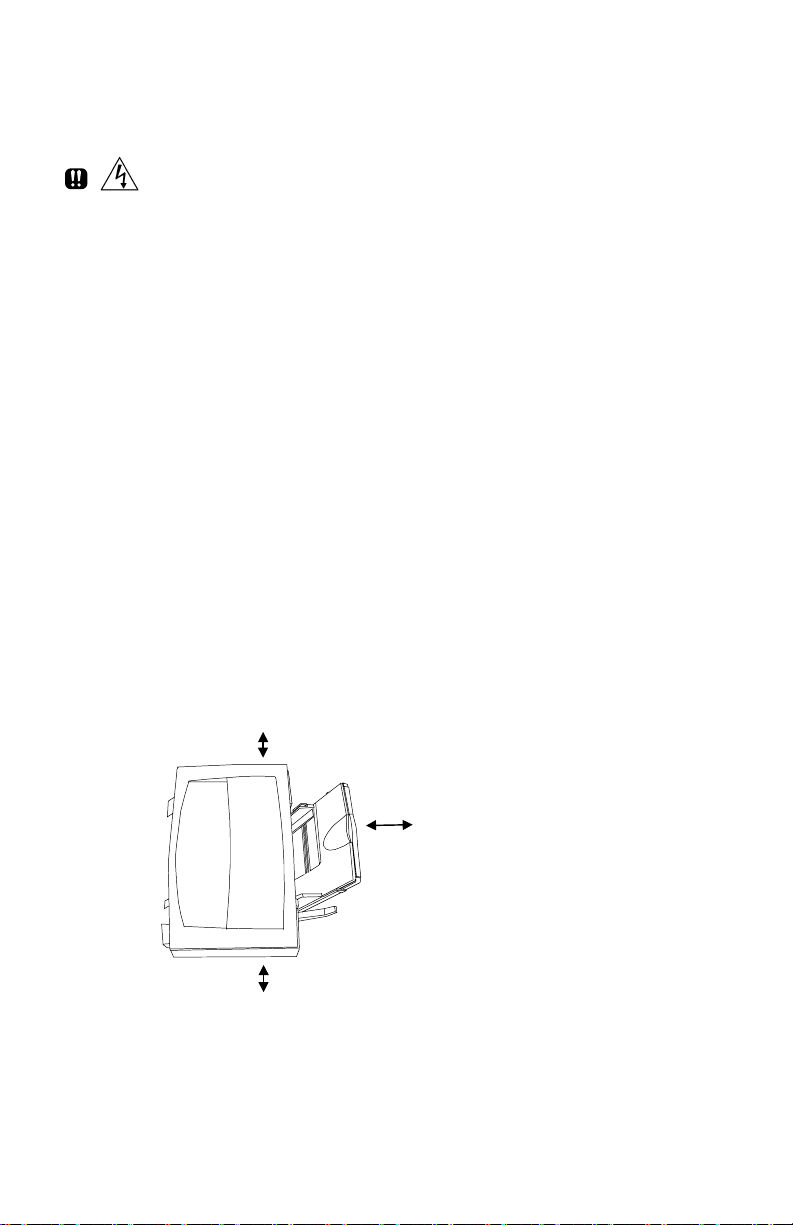
The Paper Output Support
The paper output support pulls straight out from
the bottom front of the WorkCentre.
4
Page 14
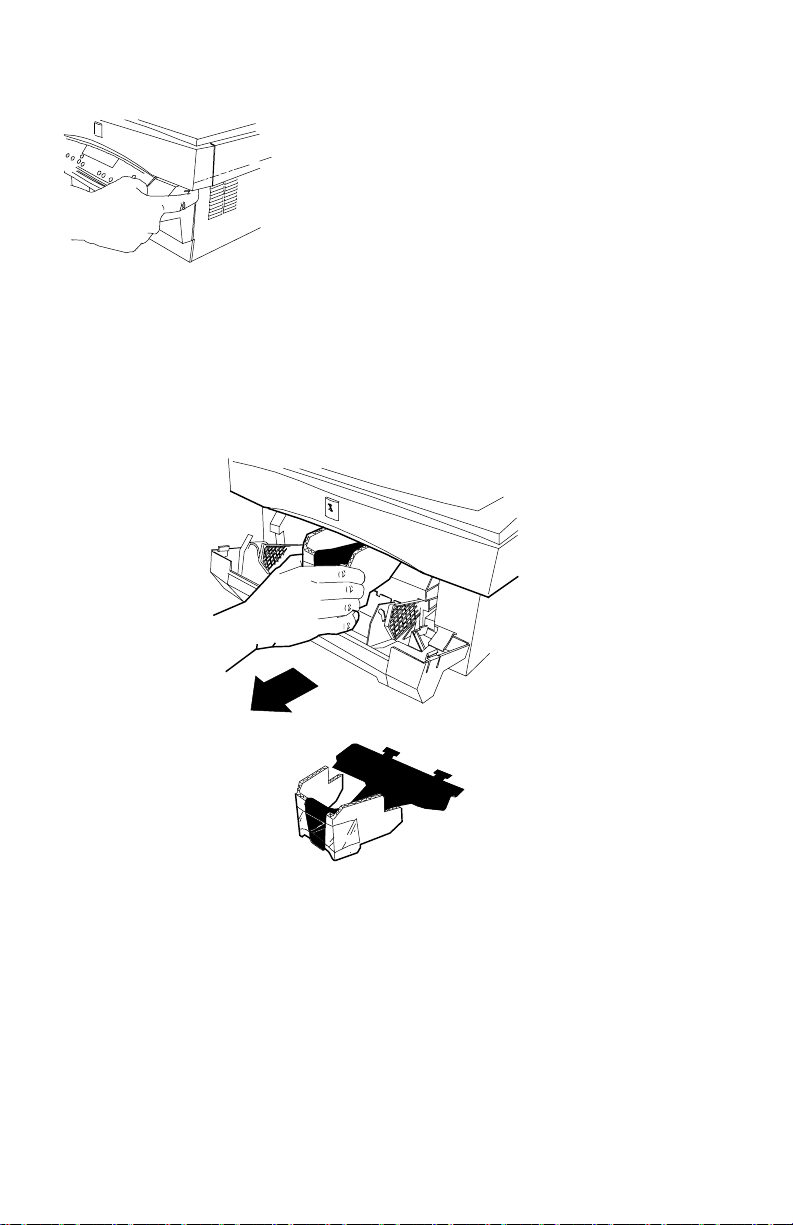
Removing the Protective Paper from the Drum Cartridge
1. Open the front door by pushing in on the front
door latches on each side of the front door.
2. With the sheet of black protective paper
attached, carefully remove the cardboard from the drum cartridge.
Make sure not to leave any torn pieces of paper in the WorkCentre.
5
Page 15
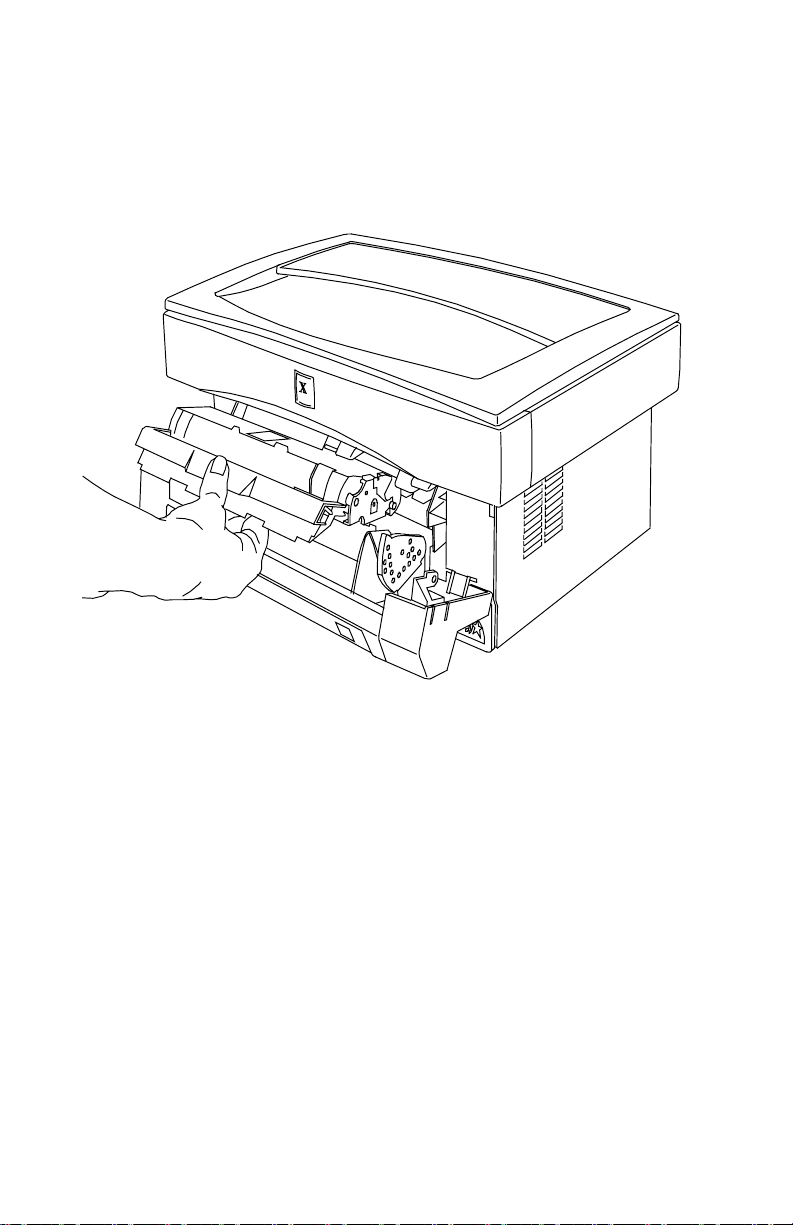
Installing the Toner Cartridge
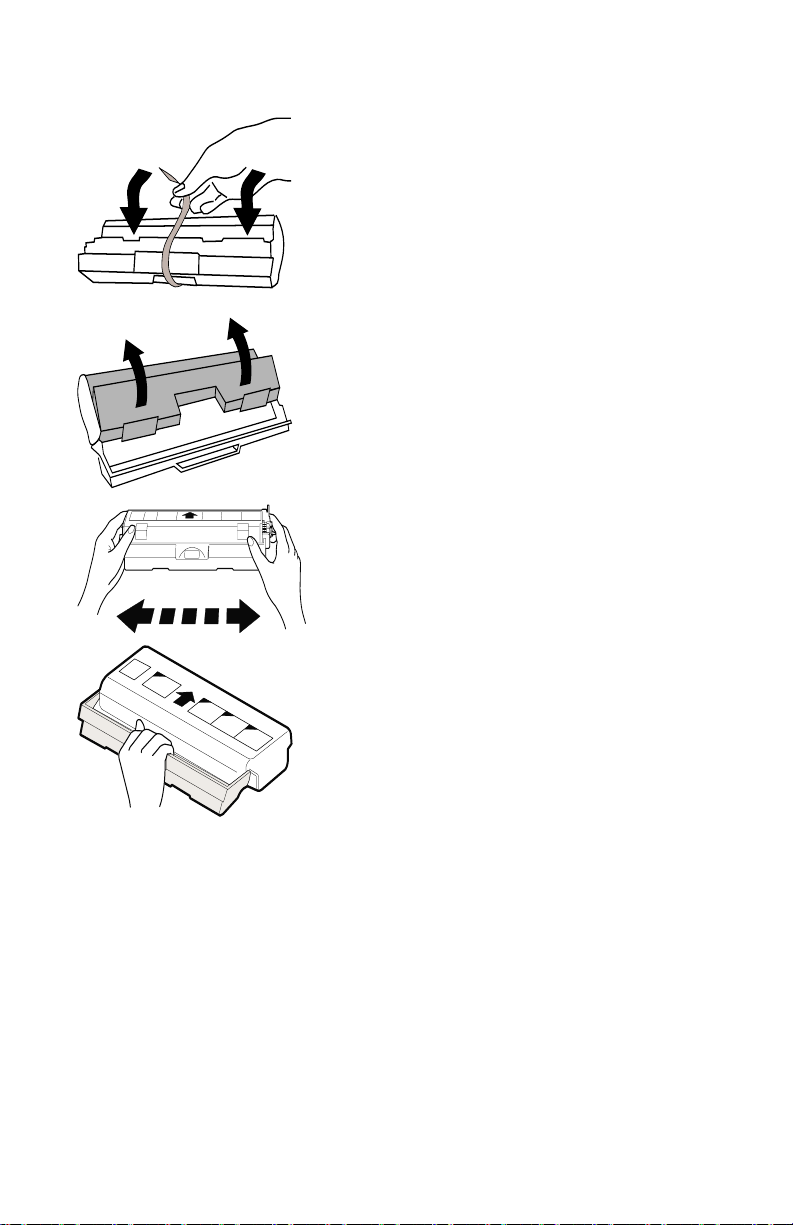
1. Remove the toner cartridge from its
bag, unwrap the tape and remove the
protective cover.
2. Shake the toner cartridge four to five
PUSH
times to distribute the toner evenly
inside the reservoir.
3. Hold the handle of the toner cartridge
(which locks in place) so that the
stamped markings are facing upward.
In the future, when the toner cartridge
has to be removed from the
WorkCentre, lay it on a paper with the
stamped markings down. The
cartridge may leave a line of toner on
the surface if laid with the stamped
markings up.
6
Page 16
4. Gently insert the toner cartridge inside the WorkCentre.
5. Push firmly until the toner cartridge is fully seated and the handle
springs slightly back.
6. Close the front door.
7
Page 17
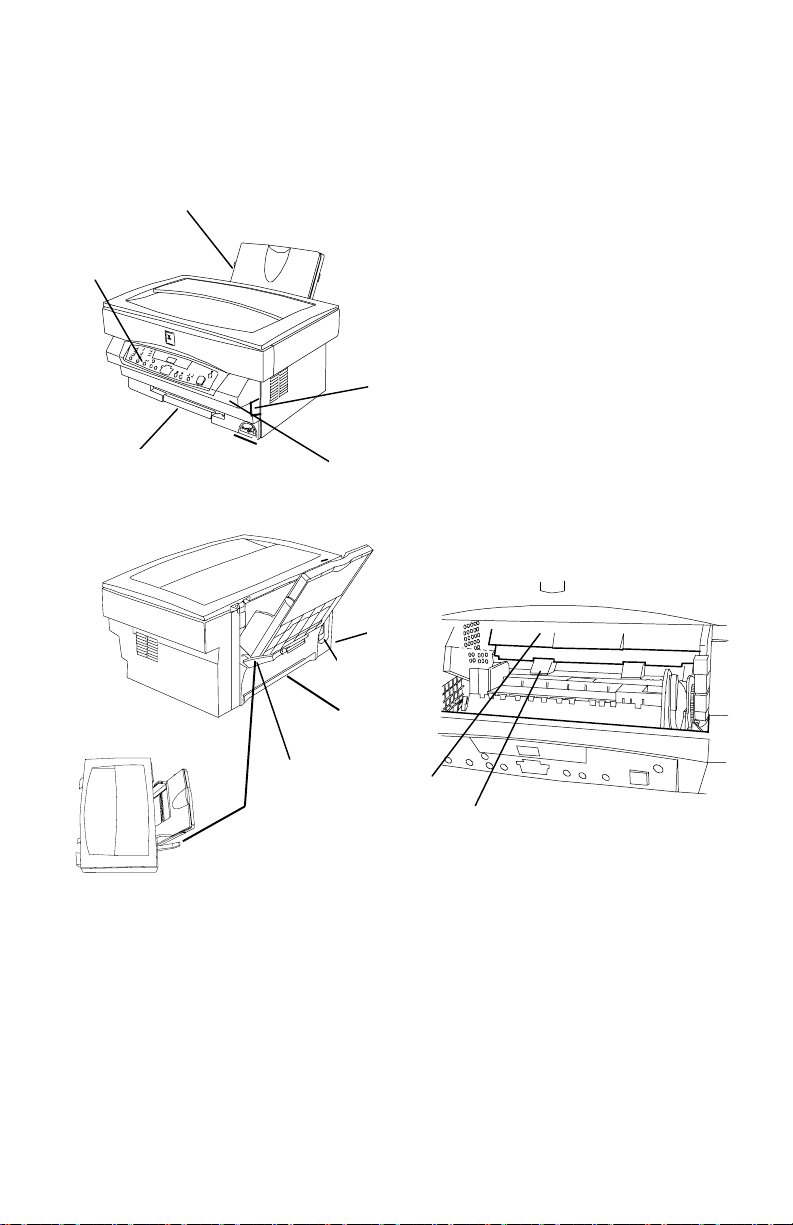
Getting To Know Your WorkCentre
1 Paper tray with extension
1
2
5
3
4
9
8
7
2 Control panel
3 Paper output support
4 Front door
5 Front door latch (2)
6 Paper release lever
7 Parallel Cable Port (XE80
and XE82 only. Use only
cables labeled IEEE-1284)
8 Power cord socket
9 Power switch (on side)
10 Starter-Toner cartridge
11 Drum cartridge
6
8
10
11
Page 18
Installation
Requirements
All electrical equipment is potentially dangerous if not installed and
operated correctly. Make sure that you meet the following requirements
when you set up or move the WorkCentre.
1. Use only the rated voltage from a properly-grounded wall socket.
2. Keep the WorkCentre away from areas that are:
• Dusty or smoky
• Damp or humid
• Poorly ventilated
• In direct sunlight
• Subject to other extreme conditions
3. Place the WorkCentre on a stable, level surface.
4. Leave enough space around the ventilation outlets for heat from the fan
to dissipate properly. Blocking these outlets could cause the
WorkCentre to overheat, which can cause serious damage to the
WorkCentre.
5. Leave some space at the front of the WorkCentre to make operation
easier. Make sure that there is enough space at the front of the
WorkCentre for the output paper to be stacked.
1
1 4 inches (100 mm)
2 4 inches (100 mm)
3
3 8 inches (200 mm)
2
9
Page 19

Connecting the Parallel Cable (XE80, XE82 only)
1. Connect the IEEE-1284 parallel cable to the parallel port on the back of
the WorkCentre.
2. Connect the IEEE-1284 parallel cable to the parallel port on the back of
the PC.
Turn to the Printer Driver Software Installation section in this User
Guide to set up the WorkCentre XE for printing.
Connecting the Power Cord
As electricity is always dangerous if not used properly, please
take all necessary precautions to prevent electric shocks when
connecting and disconnecting the WorkCentre.
If you use the WorkCentre in a country other than the country
where the WorkCentre was purchased, you will need to make sure
that your local power supply is compatible with your model. If you
plug the WorkCentre into an incompatible power supply,
irreparable damage to the WorkCentre will result.
1. Check that the power switch for the WorkCentre is in the OFF position.
The switch is located on the lower left hand side of the WorkCentre and
labeled “O” for OFF and “I” for ON.
2. Connect the power cord to the power cord socket in the rear left hand
corner of the WorkCentre, and then plug the other end into a properlygrounded power outlet.
The WorkCentre should only be plugged into a pr operly-grounded
wall socket. Do not plug the WorkCentre into a power strip.
3. Load paper (refer to Loading Media).
4. Turn on the power switch ON.
10
Page 20

Copying/Printing
Selecting Media
Paper Specifications
Paper Storage
For reliable WorkCentre operation and good copy/print quality, Xerox
recommends that paper be stored:
• on a flat surface.
• in a closed container.
• in a low humidity area.
• tightly wrapped, if the ream is partially used.
NOTE: Paper affected by humidity, and curled paper can cause jams and
copy/print quality problems.
The Specifications Chart below gives you information about the types of
paper that can be used at the paper input area.
Paper Input Paper Tray
Paper Sizes 3 7/8 x 5 7/8 to 8 ½ x 14” (98 to 216 x
315/330 mm)
Paper Weights
Optimum
Range
Paper Capacities
Copy, letterhead, and
predrilled
Labels and
Transparencies *
Envelope COM-10 (4.1 x 9.5” / 216 x 279mm)
* Use labels and transparencies specifically designed for copiers (high
temperatures).
20 lb / 80 g/m²
14 – 34 lb
52 – 130 g/m²
20 lb / 80 g/m² - 250 sheets
Yes (1 at a time)
Monarch (3.87 x 7.5” / 98.5 x 191 mm)
C5 (6.4 x 9.16” / 162 x 229mm)
DL (4.4 x 8.8” / 110 x 220mm)
11
Page 21

Paper Tips
will flash in the copy quantity display and the indicator in the WorkCentre
diagram will flash when a paper tray is empty.
• Do not reuse the misfed paper.
• Close the paper tray. Press Start to make the remaining copies.
• Do not use envelopes that:
- have been fed into the printer before
- are composed with glues, inks and adhesive that could discolor,
scorch, or melt when heat is applied
- have discontinuous seams and uneven glue line
- have thick or uneven edges
- have clasps, strings, snaps, cellophane windows, peel-off adhesive
strips
- are heavily textured, coated or embossed
- are cotton paper composed of more than 25% of recycled paper.
• Do not insert paper with metallic attachments such as staples or paper
clips, as these will get stuck in the paper feeding mechanism and will
scratch the drum and damage other parts of the WorkCentre
mechanism.
Loading Media
12
1. Pull the paper release lever at
the right of the paper tray
toward you.
If the paper is inserted
without doing this, paper jams
will occur.
2. If you are using extra-long
paper (such as legal size),
raise the paper support to
support the paper once it has
been inserted.
Page 22

3. Place the paper into the paper tray
with the side to be printed facing
toward you. Adjust the position of the
paper so that its right edge is up
against the right paper guide. Then
move the left paper guide until it is
resting gently against the left edge of
the paper. The paper tray can be
filled to the MAX line with standard
weight paper (16 to 24 lbs. or about
60 to 90 g/m
2
).
If copying onto an envelope:
Insert the side to be copied on is
facing upwards (as shown by the
imprint on the paper tray) and the flap
on the reverse side is closed and at
the right when looking from the front
of the printer. Leave a gap of
approximately
the paper guide and the left edge of
the envelope.
When copying envelopes, labels
and transparencies, it is
recommended that you load and
copy one envelope or sheet at a
time.
1
/32” (1 mm) between
4. Push the paper release lever back. The paper will be clamped by the
paper feed roller inside the printer.
The handle may position itself. Do not force the handle or
breakage could occur.
Paper jams may occur if:
− The paper tray is overstacked.
− If the space between the paper guide and the left edge of the
paper is greater than 1 mm, or if the paper guide is pushing the
paper so hard that the paper buckles.
− The paper is not stored properly and absorbs moisture from
the air (replace the paper).
13
Page 23

Copy/Print Features
Control Panel
50% 200%
Copy Quality:
Select Auto Exposure, Text, Photo or Toner
Saver.
T
N
E
M
U
C
O
D
C
k
e
r
n
o
t
W
r
e
X
E
8
0
C
Auto
Use Auto when copying from originals with a
colored background.
NOTE: When Auto is selected, the copier
automatically varies the contrast of your copies.
Lighter/Darker settings are not available.
Use Text to copy documents containing mostly
text.
Use Photo when the originals are photographs.
Toner Saver mode lowers the cost of copying by
decreasing overall copy density on each page.
This feature can be used when making draft
copies.
Copy Contrast:
Adjust the exposure from lighter to darker for
Text, Photo and Toner Saver. The indicators
light up one or two at a time to represent the
selected setting. There are 5 variations
represented by 3 lights.
NOTE: When Auto is selected the copy contrast
settings are not available.
14
Page 24

Control Panel (Continued)
200%
129%
78%
100 %
Paper Tray
Jam Drum Toner
Reduction/Enlargement:
is preset at 50% and is customer
programmable (refer to Customizing Your
WorkCentre). 78%,129% and 200% are
standard reduction/enlargement options.
Reduction/Enlargement:
The down and up arrows reduce and enlarge in
1% increments. The % button indicates the
present percent chosen when pressed.
Indicators for:
Paper tray, jams, toner and drum cartridge
replacement.
The paper tray indicator blinks when the paper
tray is out of paper or a misfeed is located at the
paper tray. The indicator light is green.
The jam indicator blinks when a jam occurs and
a fault code will appear (refer to WorkCentre
Fault Codes). The indicator light is red.
The drum indicator is on when the drum is near
end of life (1,000 pages remaining) and blinks
when the drum is at end of life (refer to Drum
Cartridge Life). The indicator light is red.
The toner indicator comes on when the toner is
low (refer to Toner Cartridge Yield). The
indicator light is red.
10
1
Unit buttons:
The maximum number of copies that can be
made at one time is 50. The 10 button is set in
increments of 10 and the 1 button is set in
increments of 1.
15
Page 25

Control Panel (Continued)
On-line/Off-line Button (XE80, XE82 only):
Alternates between the On-line and Off-line
status.
The On-line/Off-line button can be pressed to
interrupt a print job to run a copy job. When the
copy job is complete, touch the On-line/Off-line
button to take it back to print mode or it will revert
to print mode automatically after 1 minute.
When the light is on printing is in progress.
When the light is off there is no communication to
or from the PC. When the light is blinking data is
being received from the PC.
Ready Indicator light
Start:
Press to start copying.
16
C
O
D
o
W
50% 200%
Clear:
Stops a copy job in progress after completing the
copy being made, changes the copy quantity to
one after whole job is complete, and displays
copy count information (refer to Copy Count).
T
N
E
M
U
C
r
e
t
n
e
C
k
r
Message display:
Indictors light up when there is a fault. The fault
code will appear in the Message Display.
Page 26

Customizing Your WorkCentre
Programmable Feature Settings 0 – 7, and 14
To change the programmable features (refer to the Control Panel), find the
Program Number and the desired Option Number in the Programmable
features chart on the following pages. Follow the instructions below.
1. Select the Toner Saver in Copy Quality.
2. Press again and hold the Copy Quality button for approximately 4 to 6
seconds.
• The light next to Auto will light.
• The lights within the WorkCentre Diagram will flash.
3. From the table on the following page, select the Program Number of the
feature to be changed. Enter the selection using the 10 button.
4. Press Start.
• The current setting for that program will flash.
5. Press the 1 button until the option number you want is displayed.
6. Press Start to store the selection.
NOTE: To continue making other changes press the Clear button and
repeat steps 3 - 7. Press the Copy Quality button to return to the copy
mode.
Programmable Feature Se tting 10
Use the following procedure to change the preset Reduction/Enlargement
default setting. This feature allows you to set a specific preset reduction or
enlargement between 50-200%.
1. Select the Toner Saver.
2. Press again and hold the Copy Quality button for approximately 4 to 6
seconds.
• The light next to Auto will light.
• The lights within the WorkCentre Diagram will flash.
3. Press the 10 button until the number 10 is displayed.
4. Press Start.
• The current reduction/enlargement setting will flash.
5. Press the Variable Percentage buttons until the desired percentage is
displayed.
17
Page 27

6. Press Start to store the selection.
7. Press the Clear button to continue making other changes. Press the
Copy Quality button to return to the copy.
Programmable Features Chart
Program
Number
1 Auto Clear time-out
2
3
4
5
Program Option Number and Option
Time-out to Power Save
(Part of Power Saver )
Time-out to Power Shut-off
(Part of Power Saver )
Default Magnification
feature allows you to make
copies slightly larger or
smaller than the original, or
the same size.
Default Copy Quality: This
feature allows you to select
the default Copy Quality
mode.
: This
(default is in bold)
0 — Off
1 — 30 seconds
2 — 60 seconds
3 — 90 seconds
4 — 120 seconds
0 — Off
1 — 45 seconds
2 — 90 seconds
3 — 2 minutes
4 —5 minutes
0 — 2 minutes
1 — 5 minutes
2 — 15 minutes
3 — 30 minutes
4 — 60 minutes
5 — 120 minutes
6 — Off
0 — 100%
1 — 99%
2 — 101%
0 — Auto
1 — Text
2 — Photo
3 — Toner Saver
18
Page 28

Programmable Features Cha rt (continued)
Program
Number
6
7
10
14 Return to Print Mode time-
15
Program Option Number and Option
Copy Contrast Adjustment:
The copy contrast range
may be adjusted when the
copy image is consistently
too light or too dark.
Paper Trail Edge Void (4
mm)
: The trail edge deletion
can be turned off to
accommodate originals that
have print to the very bottom
edge. When Off, another 4
mm will copy, however the
image quality may
deteriorate as it gets closer
to the bottom edge.
Zoom R/E Preset
out (XE80, XE82 only)
During long runs with narrow
paper (5.5 inches wide and
narrower), toner may
accumulate on the machine
rollers. Use this function to
maintain clean transfer rolls.
Turning this option on will
delete all printing between
5.5 and 8.5 inches wide. A4
and letter size width papers
will be unaffected.
(default is in bold)
0 — Lightest:-4
1 — -3
2 — -2
3 — -1
4 — Nominal
5— +1
6— +2
7— +3
8— Darkest:+4
0 - On
1 - Off
50-200% in 1% increments
(default: 50%)
0 —1 minute
1 — 1.5 minutes
2 — 2 minutes
3 — 2.5 minutes
4 — 3 minutes
5 — Off, infinite time out
0 –Off
1 - On
19
Page 29

Copying a Page
The basic procedure for copying is described below.
1. Turn on the copier.
2. Raise the Document Cover.
3. Place the original face down on the document glass.
4. Select the number of copies desired using the unit buttons.
5. Press Start.
6. The copy will exit to the paper output support tray.
Copying Oversized Documents
The document cover may be removed in order to position an oversized
document on the document glass.
1. Lift the document cover straight up.
2. Reattach the document cover by reversing the above step.
Two-Sided Copying
1. Place side 1 original face down on the Document Glass, with the TOP
toward the LEFT. Lower the document cover.
NOTE: 16 lb / 60 g/m² copy paper is not recommended for two-sided
copying.
2. Select the quantity of 1. To maintain copy quality run one copy at a time.
3. Press Start to make side 1 copy.
4. Remove the first original and place the second original face down on the
Document Glass with the TOP toward the RIGHT, and lower the
document cover.
5. Remove side 1 copy from the output tray and insert it face down, TOP
toward the BOTTOM OF THE PAPER TRAY.
6. Press Start.
NOTE: If jams occur, let the copy cool before reinserting it to copy side 2.
20
Page 30

Copying While Printing
In order to perform a copy job while the machine is printing:
1. Set up the copy job while the machine is printing.
2. Press Start. The current page will finish printing, then the copy job will
start.
3. When you complete the copy job, the factory preset is 1 minute before it
reverts to print mode or touch the On-line/Off-line button to take it back
to print mode. The machine will resume printing if pages are pending.
On-line/Off-line Button
Alternates between the On-line and Off-line status
The On-line/Off-line button can be pressed to interrupt a print job to run a
copy job. When the copy job is complete, touch the On-line/Off-line button
to take it back to print mode or it will revert to print mode automatically after
1 minute.
When the light is on printing is in progress. When the light is off there is no
communication to or from the PC. When the light is blinking data is being
received from the PC.
Power Saving
For assistance in changing the preset values refer to Programmable
Features.
Power Reductions automatically reduce power consumed by the
WorkCentre when the WorkCentre has not been used for a set period of
time. There are two modes of power reduction; Power Save, and Power
Shut-off.
Power Save – In this mode, the fuser is maintained at a lower heat level,
thereby saving power. The Ready Indicator will flash and the other
indicators will remain on. To copy from Power Save select the desired
features and press Start. The copies will be made automatically.
Power Shut-Off – This mode saves more power than the Power Save
Mode, but requires more time before copying can begin. When the copier
enters the power shut-off the Ready Indicator will flash and the other
indicators will turn off. To copy from the power shut-off , press the Start
button, then, select the desired features and press Start again. The copies
will be made automatically.
21
Page 31

Auto Clear
This copier is enabled at the factory to return to the Normal Copy mode
approximately one minute after a job is completed. Unless otherwise
programmed, the Normal Copy settings are as follows:
• Copy Quality – Auto
• Copy lighter/darker – Normal
• Priority Magnification – 100%
• Quantity Selected – 1
NOTE: Time periods for the Power Shut-Off, Power Save, and Auto Clear
can be modified to meet your specific copying needs. Refer to Customizing
Your WorkCentre section of this User Guide for information about changing
these settings.
22
Page 32

Troubleshooting
Clearing Paper Jams
At the Paper Tray
E1 Jam
1. Pull the paper release lever at
the right of the paper tray
toward the front of the
WorkCentre.
2. Remove all the paper,
including the jammed paper,
from the paper tray.
If the jammed paper will not
come out easily, do not pull too
hard, as you may tear or
damage the copying/printing
mechanism. In such cases, go
to the Inside the Copier
procedure to remove the paper.
3. Straighten the edges of the stack of paper and then reinsert it into the
paper tray.
4. Push the paper release lever back again to secure the paper.
23
Page 33

Inside the WorkCentre
E2 Jam
1. Open the front door by pushing in on
the front door latches on each side of
the front door.
2. Lift the toner cartridge handle.
3. Remove the toner cartridge.
4. Remove any paper that may be inside the WorkCentre.
5. Install the toner cartridge.
6. Close the front door.
Paper Exit Area
E3 Jam
24
1. To reduce the pressure on the paper,
open the front door by pushing in on
the front door latches.
2. With the front door partially open,
remove any paper that may be in the
paper exit area.
Page 34

WorkCentre Fault Codes
Fault codes are listed below. If multiple faults exist, only the highest-priority
fault code appears in the message display. Press and hold the Start button
to display the other codes. The original fault code is redisplayed by
releasing the Start button.
Fault Code Customer Action
E7
H2 - H4
L1 - L6
U2
C1 The front door of the machine is open. Close the
CH The toner cartridge is not installed in the machine.
Toner indicator
light
Drum indicator
light
J2 Replace the drum cartridge.
Jam indicator
light
Switch the main power off, wait 5 seconds and switch
the power on. Repeat two or three times. If the error
persists, call 1-800-832-6979.
front door.
Install the toner cartridge.
When the toner cartridge replacement indicator
appears, the toner cartridge will need to be replaced
soon. Be sure to have a replacement cartridge in
stock. You may extend the life of the toner cartridge
by removing it from the machine and shaking it from
side to side to loosen additional toner.
The drum indicator is on when the drum is near
end of life (1,000 pages remaining) and blinks
when the drum is at end of life (refer to Drum
Cartridge Life).
E1 Paper jam in the paper feed tray.
E2 Paper jam inside of the machine.
E3 Paper jam in the paper exit area.
P The paper feed tray is empty. Load paper.
NOTE: All the status codes will be displayed as a fixed 2 character code on
the message display.
25
Page 35

Problem Solving
If you have any problems with the operation of your WorkCentre, refer to the
table below and on the following pages as well as the WorkCentre Fault
Codes.
If the problem cannot be solved by carrying out the instructions given
below, refer to this User Guide Introduction.
Problem Suggested Solution
Copier does not come
on, Ready indicator
does not light.
Copies are too light or
too dark.
Smears, lines, marks,
or spots on copies.
Copy image is skewed. Ensure that original is positioned correctly on
Image rubs off the copy
easily.
Check that the copier is plugged into an
electrical receptacle.
Ensure that there is power to the receptacle and
that the copier power is switch ON.
If the original is light, select the lower copy
contrast position to darken the background of
the copies.
If the original is dark, select the upper copy
contrast position to lighten the background of
the copies.
If defects are on the original, press the copy
contrast button to lighten the background of your
copies.
If the defects are in the same place on every
page, clean the document glass and inside the
document cover. (Refer to Cleaning the
WorkCentre.)
If the defects occur two or three times on each
copy, you may have a substance stuck to the
drum cartridge. (Refer to Cleaning the Drum
Cartridge.)
document glass.
Check that copy paper is loaded correctly.
Replace the paper in the tray with paper from a
new package.
There are blank lines or
sections on the page.
26
In high humidity areas do not leave paper in the
WorkCentre for extended periods of time.
The toner cartridge may be empty. This is
indicated by the toner indicator light. Try
removing the toner cartridge from the machine
and shaking it from side to side to redistribute
the toner.
Page 36

Problem Suggested Solution
Auto
The three trouble
indicators are flashing
The machine is in the program mode. Press the
Copy Quality mode button to exit.
in the copier diagram.
Jam Drum Toner
Frequent copy paper
jams.
All of the page is blank.
Part of the page is
blank.
Back of the copy/print is
dirty.
Fan the stack of paper, then turn it over in the
tray.
Replace paper in paper tray with a fresh supply.
Check/adjust paper guides.
Ensure that the paper is the proper paper
weight. 20 lb / 80 gsm bond paper is
recommended.
Check for copy paper or pieces of copy paper
remaining in the copier after a paper jam has
been cleared.
If copying onto envelopes, insert the envelopes
so that the flap is closed and there is a small
1/32” (1mm) gap between the left edge of the
envelope and the paper guide.
The toner cartridge may be empty. This is
indicated by the toner indicator light. Try
removing the toner cartridge from the machine
and shaking it from side to side to redistribute
the toner.
Make sure that the originals are face down on
the document glass.
The reduce/enlarge setting may not be set
correctly.
The paper may be damp, try putting in fresh
paper.
Copy a few blank pages to clean the pressure
roller.
27
Page 37

The following is for the XE80 and XE82 machines only.
Problem Suggested Solution
The WorkCentre
does not print.
Half of the page is
blank.
Printing is too slow. Try closing other applications before printing.
Incorrect fonts Use the fonts dialog box in the Control Panel to
Use the IEEE-1284 parallel port cable supplied
with the machine.
Check the IEEE-1284 parallel cable connection
at the WorkCentre and the PC.
Check the IEEE-1284 cable with a computer and
printer that work. If printing is still not possible,
replace the cable.
Check that the On-line/Off-line indicator light is
on. If the machine is currently copying, the
machine will print when the current copy job is
finished.
Check the printer settings in the Windows
Control Panel to make sure that the print job is
being sent to the correct port. (For Example:
LPT1.)
Uninstall, then reinstall the WorkCentre printing
software.
Reduce the resolution setting from 600 dpi to 300
dpi. Install more RAM into the computer.
Change the page orientation in the printer setup
dialog.
Check that the computer meets the minimum
specifications listed in this manual
Reduce the resolution setting from 600 dpi to 300
dpi.
(Windows 3.1x only.) In the options menu of
print manager, remove the check from
background printing.
enable True Type fonts.
28
Page 38

Printer Driver Software Installation (XE80, XE82)
The printer driver software is the program which runs the printer. It converts
the data in the file you want to print into information that the printer can
understand. It also controls communication between the printer and
computer as the data is printed.
You will need the following PC hardware and software in order to use the
printer driver:
WorkCentre XE Series
Computer type IBM PC/AT or Compatible Computer
Operating system Windows 3.1x, Windows 95, Windows 98,
Windows NT 4.0
CPU 486DX 66 MHz or better
RAM 8 MB or more
IEEE-1284 parallel
cable
If your PC does not have a CD-ROM Drive:
If you have access to a computer with a CD-ROM drive and a floppy disk
drive, the WorkCentre XE CD-ROM has a program to create a set of
installation diskettes.
NOTE: Refer to Creating WorkCentre XE Floppy Disk Installation
Diskettes section in this User Guide for instructions on making your own
floppy diskettes.
To ensure reliability use the IEEE-1284
compliant parallel cable that is supplied with
the machine. Only cables labeled “IEEE-1284”
can be used with your WorkCentre.
There are two other options available to you. Refer to the order sheet that is
packaged with the WorkCentre XE. This sheet explains how you can:
• download the necessary software from the WEB site at:
http://www.teamxrx.com
• order floppy diskettes from Xerox.
29
Page 39

Installation for Windows 3.1x and Windows NT 4.0. 95 or
98
The Printer Driver Installation software cannot be installed using the Control
Panel/Printers for Win 3.1x or the Add Printer Wizard for Win
95/98/NT4.0. Please use one of the following methods depending on your
operating system.
1. Ensure that the computer and the
WorkCentre are turned off.
2. Plug the IEEE-1284 cable into the
parallel port on the WorkCentre.
3. Plug the other end of the IEEE-1284
cable into the computer.
4. Turn on the PC.
NOTE: Be sure to close all applications before installing the printer driver.
5. Start Windows on your computer.
6. Insert the WorkCentre XE CD-ROM into the CD-ROM Drive.
7. For Installation of 3.1x:
Manager, and then choose the Run… command.
For Installation for Windows NT 4.0, 95 or 98
button and then choose the Run menu option.
8. Type D:\SETUP (or the appropriate drive letter depending on your CDROM Drive) in the command line box. Click on the OK button to
proceed.
9. Follow the on-screen instructions.
10. For Installation of Windows 3.1x:
ensure that the power cord is plugged into the WorkCentre and then
into a grounded outlet. Restart Windows and turn on the WorkCentre.
For Installation for NT 4.0, 95 or 98
complete, ensure that the power cord is plugged into the WorkCentre
and then into a grounded outlet. You will be asked whether or not to
print a test page. If you wish to do so, load paper, turn on the
WorkCentre and then click the Yes button.
30
Choose File from the menu bar in Program
: Click on the Start
When the install is complete,
: When the installation is
Page 40

Xerox Printer Services Program (Status Monitor)
(Windows 95, Windows 98 and Windows NT)
The Printer Services Program (Status Monitor) displays a window containing
printer status information. A Dialog Box shows the current status of the
printer. Job Status fields provide details about the currently active print job.
The window also contains command buttons you use to control the print
queue, to gain access to the Printer Driver Properties, Printer Services
Program Options, and the on-line Help system.
To use the Status Monitor:
1. Click on Start
2. Select Programs
3. Select Xerox WorkCentre XE
4. Click on Status Monitor
To use Status Monitor Help:
For more information on the Xerox Printer Services Program (Status
Monitor), refer to the on-line Help.
1. Click on Start
2. Select Programs
3. Select Xerox WorkCentre XE
4. Click on Status Monitor HELP
NOTE: On-line help can also be accessed by selecting the Help button on
the Status Monitor screen.
31
Page 41

Xerox Printer Services Program (Status Monitor)
(Windows 3.1x)
The Printer Services Program (Status Monitor) displays a window containing
printer status information. An Dialog Box shows the current status of the
printer. The dialog window also contains command buttons you use to gain
access to the Printer Driver Properties, Printer Services Program Options
and the on-line Help system.
To use the Status Monitor:
1. Open Program Manager
2. Double click Xerox WorkCentre XE program group
3. Double click Status Monitor
To use Status Monitor Help:
For more information on the Xerox Printer Services Program (Status
Monitor) refer to the on-line Help.
1. Open Program Manager
2. Double click Xerox WorkCentre XE program group
3. Double click Status Monitor Help
NOTE: On-line help can also be accessed by selecting the Help button on
the Status Monitor screen.
32
Page 42

To use Status Monitor Options:
Click Options. Choose one of the three choices of event notification.
1. Disabled - If selected, the printer driver will NOT start the status
monitor at the start of the print job.
2. Display status monitor when printing - This setting will configure
printer driver to start the status monitor when a print job begins.
3. Always display the status monitor - The status monitor will always
display the current state of the machine.
WorkCentre XE Properties (Printer Driver)
The purpose of this section is to provide information about how to access
and use the options in the Xerox WorkCentre XE Printer Driver Properties
dialog. Use the Xerox WorkCentre XE Properties dialog to change the
settings used for printing.
There are several ways to display the Printer Driver dialog, including:
• Displaying the Driver Properties dialog from an application
• Displaying the Properties dialog from the Start Menu
• Displaying the Properties dialog from the Xerox Printer Services
Program (Status Monitor)
Displaying the Driver Properties dialog from an application
Control of the driver settings is provided from the Xerox WorkCentre XE
Properties (Printer Driver) dialog box. The new driver settings will be
active while the application is open. The driver settings will return to the
prior values when the application is exited.
Access to the Properties dialog will vary depending upon the application
that is in use.
NOTE: The application may override any options that are selected
using the Properties Dialog.
Windows 95, 98 and NT:
1. Click Print on the application’s File menu
2. If not selected, select the Xerox Document WorkCentre XE printer
3. Click the Properties button
4. Change the print options and click OK
33
Page 43

Windows 3.1x:
1. Click Print on the application’s File menu
2. Click the Printer Setup button
3. If not selected, select the Xerox Document WorkCentre XE printer
4. Click the Options button
5. Change the print options and click OK
Displaying the Properties dialog from the Start Menu
Windows 95, 98 and NT
1. On the Start Menu, click Settings. On the Settings submenu, click
Printers.
2. Right click on the XEROX Document WorkCentre XE printer icon
and click Properties, or click Properties from the File menu.
Windows 3.1
1. Double click Main Program Group
2. Double click Control Panel Program Group
3. Double click Printers Program
4. Select Xerox Document WorkCentre XE
5. Press Setup
Displaying the Properties dialog from the Xerox Printer Services Program (Status Monitor)
Windows 95, 98 and NT
1. Click on the Properties button in the Xerox Printer Services window
Windows 3.1
1. Click on the Properties button in the Xerox Printer Services window
2. This will display the Windows Printer Program
3. Select Xerox Document WorkCentre XE
4. Press Setup
34
Page 44

Properties Tabs
The WorkCentre XE Printer Driver Properties dialog contains four tabs from
which you can make selections that best suits your printing requirements.
Below is a brief description of each tab.
NOTE: Refer to On-line Help for detailed information.
Paper/Output — to select desired paper source (tray), number of copies,
paper size, document orientation (portrait or landscape), image shift, and
output collation.
Image Quality — to change the output type (Normal, Photograph, Text,
Advanced), Lighten/Darken, contrast and resolution.
DOS Emulation — to configure the host-based DOS emulation control
parameters. This is used to support printing for DOS applications running in
a Windows environment.
About — to display the driver version and copyright information.
On-Line Help
The WorkCentre XE Series Printer Driver includes a comprehensive on-line
help system, designed to answer all your questions about using the Xerox
WorkCentre XE Properties dialog.
The help system is your on-line user guide, providing complete introductory
and reference information. It also provides troubleshooting information, in
case you should run into any problems.
When you have a question simply click on the Help button on the Xerox
WorkCentre XE Properties dialog.
The main Help Topics window will be displayed.
?
Printer Driver Help (Windows 95, 98 and NT)
To view an explanation of any field or button in the dialog window:
?
1. Click the
and release the mouse button.
• The cursor will change to a question mark.
2. Place the question mark on the field or button that you want defined, and
release the mouse button.
• The on-line Help file will display information on the selected subject.
icon located in the upper right corner of the dialog window,
35
Page 45

Creating WorkCentre XE Floppy Disk Installation Diskettes
If floppy diskettes are required to install the WorkCentre Printer Driver
Software, the user can order floppy diskettes or create a set of diskettes
from CD-ROM.
To create a set of WorkCentre XE Printer Driver floppy Diskettes, find a PC
that has a floppy diskette drive with a CD-ROM drive and follow the
procedure below. Four or five blank high density diskettes will be required.
Windows 3.1x:
1. Insert the WorkCentre CD-ROM into the CD-ROM Drive.
2. Choose File from the menu bar in Program Manager, and then
choose the Run… command.
3. Type D:\MAKEDISK\MAKEDISK.EXE (or the appropriate drive letter
depending on your CD-ROM Drive) in the command line box. Click
on the OK button to proceed.
4. Follow the on-screen instructions.
Windows 95, Windows 98 and Windows NT 4.0:
1. Insert the WorkCentre CD into the CD-ROM Drive.
2. Click on the Start button and then choose the Run menu option.
3. Type D:\MAKEDISK\MAKEDISK.EXE (or the appropriate drive letter
depending on your CD-ROM Drive) in the command line box. Click
on the OK button to proceed.
4. Follow the on-screen instructions.
To use the Floppy Disk Installation Disks created, follow the same
procedure for your operating system but refer to the floppy disk drive (A: B:)
rather than the CD-ROM drive (D:).
36
Page 46

Cleaning and Maintenance
Cleaning the WorkCentre
Do not use ammonia-based sprays or volatile solvents such as thinner to
clean the WorkCentre, as these can damage the WorkCentre surface.
Always unplug the power cord before cleaning any part of the
WorkCentre.
Cleaning the Outside
Clean the outside surfaces of the WorkCentre by wiping them with a soft,
clean, lint-free cloth.
• Keep the front door closed when cleaning the outside of the
WorkCentre.
• You can dampen the cloth slightly with water, but be careful not to let
any water drip onto the WorkCentre or inside it.
Cleaning the Document Glass and Cover
Keeping the document glass clean helps ensure the best possible copies.
Xerox suggests that you clean the document glass at the start of each day
and during the day as needed.
Do not pour or spray water directly onto any part of the
WorkCentre.
1. Slightly dampen a soft lint-free cloth or paper towel with water.
2. Lift the
3. Wipe the surface of the document glass until it is clean and dry.
4. Wipe the underside of the white document cover until it is clean and dry.
5. Close the document cover.
document cover.
37
Page 47

Cleaning the Drum Cartridge
If some of the print is missing, you may need to clean the surface of the
drum. Because the drum surface is very sensitive, you must take extreme
care when cleaning it. Otherwise, it may become damaged and will have a
serious effect on the print quality.
• Replacement of drum cartridges, toner cartridges, and other
supplies are customer maintenance responsibilities and are not
covered by this warranty. See the Warranty. Refer to
Consumables.
• Put the drum cartridge down on a clean, uncluttered and level
surface. The drum can easily become damaged if it is not handled
with care.
• Do not let the drum surface come into contact with fingerprints,
water, alcohol or other solvents that will damage the drum surface.
• Do not touch the drum surface with the edges of the rolled-up
paper.
Follow the procedure below to clean the drum surface.
1. Unplug the power cord.
2. Remove the toner cartridge. (Refer to Replacing the Toner Cartridge).
3. Remove the drum cartridge. (Refer to Replacing the Drum Cartridge).
38
4. Take a sheet of clean paper and roll it into a tube.
Roll it tightly so that the diameters of the holes at
each end are less than the thickness of your little
finger.
5. Holding the drum cartridge as shown, gently rub the
surface of the drum with the rolled-up paper to
remove any particles of toner caking on the drum
into a wastebasket or onto a prepared surface.
6. Replace the drum cartridge. (Refer to Replacing the
Drum Cartridge).
7. Replace the toner cartridge. (Refer to Replacing the
Toner Cartridge).
Page 48

Repacking the WorkCentre
Storage/Transportation
When you pack the WorkCentre away for storage or transportation, follow
the instructions given below to ensure that the WorkCentre will not get
damaged. Use the original box and packing materials.
1. Turn off the power switch and disconnect the power cord.
2. Open the front door.
Be careful not to let any toner spill out of the toner cartridge
during removal.
3. Remove the toner cartridge. (Refer to Replacing the Toner Cartridge.)
4. Close the front door.
5. Insert the shipping screw stored in the plastic insert in the right hand
side of the front door.
6. Push in the paper tray extension (if in use), remove any paper from the
tray and remove the tray.
7. Store the IEEE-1284 parallel cable and the power cord.
Service
It is important that you speak with a service representative to resolve any
persistent problem. The service representative will direct you as to what
action must be taken.
The WorkCentre cannot be shipped for service without the authorization of
a service representative.
Visit the Xerox Web site at: http://www.teamxrx.com
or call our experts at:1 – 800 – TEAM – XRX (1 – 800 – 832 – 6979)
39
Page 49

Consumables
Replacement of drum cartridges, toner cartridges, and other
supplies are customer maintenance responsibilities and are not
covered by the warranty. See the warranty.
The toner cartridge and the drum cartridge in your WorkCentre are
"consumable" parts. This means that after a certain period of use, these
parts will need to be replaced. The part numbers for these parts are as
follows.
Toner cartridge Drum cartridge
Part Number: 6R916 Part Number: 13R553
Copy/Print Count
For Copy/Print Count, press and hold the Clear button. The display will
flash numbers three at a time and will repeat until letting go of the Clear
button. (Example: If the machine flashes 002 123 this equates to 2,123
copies/prints or if the machine flashes 014 356 this equates to 14,356
copies/prints.).
40
Page 50

Toner Cartridge Yield
Low printed Medium High printed V ery high printed
area area area area
The main factor affecting toner cartridge yield is the printed area of a
document. The graph is a sample representation of how the number of
copies/prints per cartridge decreases as the printed area increases.
Other factors which can affect the toner cartridge yield are:
• The size of the document being copied/printed.
• Dark backgrounds.
• Leaving the platen cover open.
• The number of times the WorkCentre is switched on and off.
• Double sided copying will use more toner per ream of paper.
• High humidity.
To get the most from your toner cartridge:
• Always copy with the document cover closed.
• Leave the WorkCentre on during the day. Switch off the WorkCentre
at the end of the working day.
• Copy with the exposure control set to Auto exposure unless you need
to adjust for the background of your original.
• Operate the WorkCentre in a dry environment whenever possible.
• Use Toner Saver Mode.
41
Page 51

Storage
The toner cartridge and drum cartridge should always be stored in sealed
opaque bags to protect them from direct sunlight. Furthermore, the toner
cartridge and the drum cartridge should be stored at temperatures of not
lower than approximately 0°C (32°F) and not higher than approximately
40°C (104°F).
Do not store the toner cartridge and drum cartridge in the
following places.
• In direct sunlight
• In dusty places
• Places which experience extreme changes in humidity
• Places where corrosive gases are present
• Places where the air is particularly salty
Replacing the Toner Cartridge
If you notice that the print quality is becoming more and more faint,
remove the toner cartridge and shake it gently from side to side to distribute
the toner evenly through the cartridge. If the problem persists, it is probably
time to replace the toner cartridge. The order number for the toner cartridge
is 6R916.
1. Open the front door by pushing in on
the front door latches on each side of
the front door.
2. Gently pull out the toner cartridge as
shown below. The toner cartridge will
slide out along the runners. Do not
pull it all the way out of the
WorkCentre.
3. When the toner cartridge is near the end of the runners, hold the handle
to support the toner cartridge, and then pull it clear of the WorkCentre.
4. Recycle the toner cartridge.
42
Page 52

NOTE: Help the environment by recycling your used toner cartridge. Use
the recycle sticker packed with the toner cartridge for instructions on
returning the used toner cartridge to Xerox.
5. Refer to Installing the Toner Cartridge.
Drum Cartridge Life
The rated life for the drum cartridge is approximately 18,000 pages, but
this can vary depending on how the drum cartridge is handled. If the surface
of the drum cartridge is exposed to direct light, it will damage the surface of
the drum and adversely affect the print quality. When the drum light comes
on, there are 1,000 more pages able to be copied/printed until drum end of
life. The order number for the drum cartridge is 13R553.
Replacing the Drum Cartridge
Ensure that you follow steps 1 through 14 (it is essential that you
complete all 14 steps in order for the WorkCentre to operate). If you
have a J2 fault code and the drum indicator is blinking, the drum cartridge
has reached end of life. The order number for the drum cartridge is 13R553.
Let the WorkCentre cool before performing the procedure.
Handle the drum cartridge very gently during installation to avoid
any possible damage to the drum surface.
1. Open the front door by pulling it forward.
2. Place some scrap paper on a nearby level surface.
3. Gently pull out the toner
cartridge. Do not pull it all the
way out of the WorkCentre.
4. Hold the handle to support the
toner cartridge, and then pull it
clear of the WorkCentre.
43
Page 53

5. Place the toner cartridge on the scrap paper prepared in step 2.
The fusing unit beneath the drum cartridge becomes very hot
when the WorkCentre is in use. Be careful not to touch the fusing
unit when removing the drum cartridge.
6. Hold the tabs on the drum cartridge handle
between your thumbs and index fingers,
and gently pull the drum cartridge up and
out in a circular motion to lift it clear of the
WorkCentre.
7. Remove the new drum cartridge from the
plastic bag and set it down on a clean,
uncluttered and level surface.
The new drum cartridge is sealed with a sheet of black protective
paper to shield the drum from light. To prevent damage to the
drum surface, do not remove the protective paper until you have
inserted the cartridge into the WorkCentre.
8. Place the used cartridge into the empty bag, seal the bag.
NOTE: Help the environment by recycling your used drum cartridge. Use
the recycle sticker packed with the drum cartridge for instructions on
returning the used drum cartridge to Xerox.
9. Hold the tabs on the new drum cartridge
handle between your thumbs and index
fingers. Slide the drum cartridge along the
runners into the WorkCentre.
44
Page 54

10. Carefully remove the sheet of black
protective paper from the drum
cartridge, making sure not to leave any
torn pieces of paper in the WorkCentre.
11. Replace the toner cartridge. Hold the
handle of the toner cartridge so that the
stamped markings on top of the
cartridge are facing upward.
12. Gently insert the toner cartridge inside
the WorkCentre.
13. Push where indicated (in the illustration)
until the toner cartridge is fully inside the
WorkCentre and the handle springs
back.
14. Ensure that the WorkCentre power is on. You must hold in the button
indicated and close the door at the same time. Continue to hold the
button for 3 seconds then release the button. The 3 Copy Contrast
LEDs will flash and return to ready state. If the J2 code is still present,
repeat the process.
T
N
E
M
U
C
O
D
50% 200%
C
k
e
r
n
o
t
W
r
e
X
E
8
0
C
45
Page 55

Appendix
Technical Data
Type Desktop
Recording system Electro-reprographic with semiconductor
laser diode
Paper feeding method Choice of automatic or manual feed
Paper output 50 sheets
User Interface 10 buttons
Dimensions W x D x H:
18.2 x 16.8 x 9.02 inches (460 x 425 x 229
mm)
Weight 23 lbs (10 kg) with toner/drum cartridge
Power source 120V: 110 - 127V
230V: 220 - 240V
Nominal line frequency 50 or 60Hz
Power consumption Max power: .6 kW
Resolution 600 dpi
Copy speed
6 copies per minute
Print Speed
Noise Level Less than 66 dBA (during operation)
Operating temperature 50°F to 95°F (10°C to 35°C)
Operating humidity 20% to 85% RH (non-condensing during
Usable media sizes Short Edge Feed: 3 7/8 x 5 7/8 to 8 ½ x 14”
Paper weight 15 to 24 lb. (60 - 90 g/m²) (standard)
Paper capacity 250 sheets 20 lb. (80 g/m²)
46
8 prints per minute
operation)
(98 to 216 x 315/330 mm)
Envelopes: COM-10, Monarch, Int’l DL,
Int’l C5
Label: 8 ½ x 11” (A4)
Transparency: 8 ½ x 11” (A4)
14 to 34 lb. (52.6 - 129.7 g/m²) (special
media)
200 sheets 24 lb. (90 g/m²)
Page 56

Warranty
Hardware Warranty and Product Support for y our
Xerox WorkCentre Copier
Three Year Limited Hardware Warranty
If you are not satisfied with the performance of the Xerox WorkCentre covered by
this warranty, Xerox warrants that, upon your request, it will be repaired or replaced,
at your option, during the first two years of the warranty period and that it will be
repaired during the third year of the warranty period.
This warranty applies only to the first end-user purchaser of a Xerox Document
WorkCentre unit that is purchased and used in the United States or Canada. It is not
valid for subsequent purchasers. The warranty period for your Xerox Document
WorkCentre commences on the date you purchased it and expires three years
thereafter.
IMPORTANT: THIS WARRA NTY APPLIES ONLY TO XEROX UNITS
PURCHASED A ND USED IN THE UNITED STATES OR CANADA . THIS
WARRANTY GIVES YOU SPECIFIC LEGAL RIGHTS, AND YOU MAY ALSO
HAVE OTHER RIGHTS THAT VARY FROM STATE TO STATE OR PROVINCE
TO PROVINCE.
Proof of Purchase
Within 10 days of purchase, complete and mail the enclosed registration card to
Xerox Corporation, Attn.: TEAM XRX, PO Box 431, East Rochester, NY 14445-
0431. You can also fax your registration card to 1-800-594-5023 or register your
warranty via the Internet at the following web site: www.teamxrx.com. When you
make a warranty claim, you must present your original receipt or bill of sale to
establish your date of purchase.
If you have a problem with your unit
The answers to many problems may be found in the documentation provided with
your unit (check the trouble shooting sections). Other sources for help include the "fax
back" service for answers to commonly asked questions which is available via 1-800TEAM-XRX (1-800-832-6979) or via the Internet at www.teamxrx.com. Before you
call, please be ready to provide the model number of your unit, machine serial
number, date of purchase, problem description and a valid credit card number,
should it be required (Master Card, Visa or American Express).
47
Page 57

How is a replacement obtained?
Our replacement program is the easiest and quickest way to provide y ou with a fully
operational unit. Upon your authorization to accept a replacement unit and with
appropriate security (credit card authorization), we will, at no cost to you, promptly ship
a replacement unit. The replacement unit we ship to you may be reconditioned by
Xerox. The unit that needs service must be packed and returned to us. Upon its
receipt, we will release your credit card security. Replacement service is only available
during the first two years of the warranty period; during the third year, your unit is
shipped free of charge to Xerox for repair and then returned to you (see below).
How is warranty repair service obtained?
If you prefer that we repair your unit instead of replacing it with another unit, our
Customer Service Representative will explain how to obtain repair service under this
warranty. Please save the original packaging materials to facilitate shipment. Repair
service is available during all three years of the warranty period.
What must you do?
Your unit is designed to perform with a minimum amount of user maintenance. You
are, however, responsible for the required user maintenance described in the User
Guide provided with your unit. This required user maintenance includes replacement
of the toner cartridge, clearing paper misfeeds, cleaning the unit and other routine and
preventive maintenance.
What the warranty does not cover
This warranty covers only defects in materials and workmanship provided by Xerox
and does not cover equipment damage or malfunction from misuse, abuse, accident,
act of God, defect in non-Xerox supplies, use with incompatible hardware or software,
or non-Xerox alteration, modification or upgrade. Improper return shipping, packaging
or shipping damage is not covered, unless the unit is packaged and shipped in
accordance with Xerox replacement procedures or via an authorized Xerox Service
Access Center. Replacement of the toner cartridge and other supplies are customer
maintenance responsibilities and are not covered by this warranty.
48
Page 58

Replacement and repair are your only remedies
YOUR ONLY REMEDY UNDER THIS WARRANTY IS THE REPLACEMENT OR
REPAIR OF YOUR ELIGIBLE UNIT AS DESCRIBED ABOVE. NEITHER THIS
WARRANTY NOR ANY OTHER WARRANTY, EXPRESS OR IMPLIED,
INCLUDING, BUT NOT LIMITED TO, THE IMPLIED WARRANTIES OF
MERCHANTABILITY AND FITNESS FOR A PARTICULAR PURPOSE, SHALL
EXTEND BEYOND THE THREE YEAR WARRANTY PERIODS. UNDER
NO CIRCUMSTANCES SHALL XEROX BE LIABLE FOR ANY SPECIAL
INCIDENTAL, INDIRECT OR PUNITIVE DAMAGES OR FOR ANY
CONSEQUENTIAL DAMAGES, EVEN IF XEROX KNOWS OR IS INFORMED
THAT SUCH DAMAGES ARE POSSIBLE.
IMPORTANT: SOME STATES DO NOT ALLOW THE EXCLUSION OR
LIMITATION OF INCIDENTAL OR CONSEQUENTIAL DAMAGES, SO THE
ABOVE EXCLUSION OR LIMITATION MAY NOT APPLY TO YOU.
No reseller is authorized to modify the terms of this warranty. Any additional warranty
offered by a reseller is the sole responsibility of that reseller.
Service after your three year warranty expires
When your three year warranty expires, you can obtain Xerox post warranty
coverage maintenance agreem ents by calling 1-800-TEAM-X RX (1-800-832-6979).
We recom mend you call 90 days prior to warranty expiration to ensure continuous
service coverage.
49
 Loading...